Embed Size (px)
Citation preview
BFSv9 PO Change Order Manual Created on Wednesday, March 30, 2011
© 2011 Regents of the University of California All rights reserved. Published 2011. Restricted Rights Printed in the United States of America. No part of this document may be reproduced or transmitted in any form or by any means, electronic or mechanical, including photocopying and recording, for any purpose without the express written permission of Enterprise Systems Solutions - User Support, University of California, and Berkeley.
Enterprise Systems Solutions User Support
Training Guide
Page iii
Table of Contents
BFS PO Change Order ....................................................................................... 1 PO Change Order ..................................................................................................... 1
PO Change Order Overview ................................................................................. 1 Look Up Existing Vouchers for a PO .................................................................. 2 Print or Email PO Change Order........................................................................ 7 Create PO Change Orders ...............................................................................14
Change PO Amount without Vouchers ..........................................................17 Change PO Amount with Vouchers ...............................................................27 Change PO Quantity without Vouchers .........................................................40 Change PO Quantity with Vouchers ..............................................................51 Change PO Chartstring/Distribution without Vouchers ...................................65 Change PO Chartstring/Distribution with Vouchers .......................................80 Change PO Lines to Amount Only without Vouchers ................................... 123 Change PO lines to Amount Only with Vouchers ......................................... 133 Correct PO Sales/Use Tax .......................................................................... 168 Change PO Vendor Address ....................................................................... 184 Cancel PO ................................................................................................... 200 Add a Line to a PO ...................................................................................... 213 Cancel a Line from a PO ............................................................................. 221 Approve PO Change Orders ........................................................................ 225 Deny PO Change Orders ............................................................................ 234 Eliminate Resourced Requisition Pre-encumbrance .................................... 247

Enterprise Systems Solutions User Support
Training Guide
Page 1
BFS PO Change Order
PO Change Order
The definition of a PO Change Order is a revision made to a Purchase Order by a department processor or a Buyer
Changes made to POs’ are tracked within the BFS system PO Change Orders are routed through workflow and approved via the worklist A change to a PO should only be made when the PO is in a status of
“Dispatched” or "Pending Approval"
PO Change Order Overview The following Purchase Order types do not require Buyer involvement and can be made by the departments
Direct to Vendor The PO is sent directly to the vendor for goods or services under $5,000
Subaward Research agreement between UCB and other entities to conduct research on behalf of UCB
After the fact When the department creates a requisition after goods and services have been ordered
DEPT_POCNV Converted POs that were created by the Departments in 8.8. This new type allows the departments to create change orders if needed
Departments cannot change Purchase Orders for the following types:
POCNV – conversion purchase orders Buyer ID – campus or departmental Buyer Special Handling - campus or department Buyer
Change Orders for Catalog shopping ePro require the following:
A new order is required If the change needed affects the vendor, e.g. -quantity changes -amount changes
If the change does not affect the vendor it can be performed e.g.. -chartfield changes -comments
Training Guide
Enterprise Systems Solutions User Support
Page 2
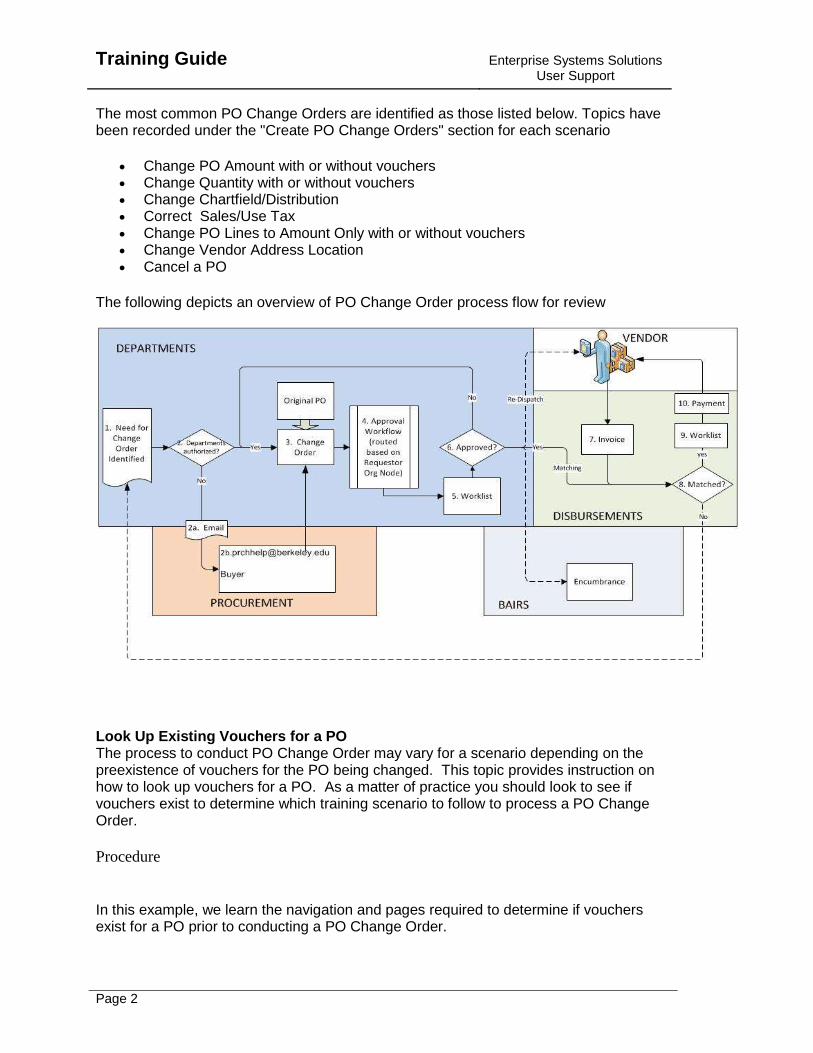
The most common PO Change Orders are identified as those listed below. Topics have been recorded under the "Create PO Change Orders" section for each scenario
Change PO Amount with or without vouchers Change Quantity with or without vouchers Change Chartfield/Distribution Correct Sales/Use Tax Change PO Lines to Amount Only with or without vouchers Change Vendor Address Location Cancel a PO
The following depicts an overview of PO Change Order process flow for review
Look Up Existing Vouchers for a PO The process to conduct PO Change Order may vary for a scenario depending on the preexistence of vouchers for the PO being changed. This topic provides instruction on how to look up vouchers for a PO. As a matter of practice you should look to see if vouchers exist to determine which training scenario to follow to process a PO Change Order.
Procedure
In this example, we learn the navigation and pages required to determine if vouchers exist for a PO prior to conducting a PO Change Order.
Enterprise Systems Solutions User Support
Training Guide
Page 3
Step Action
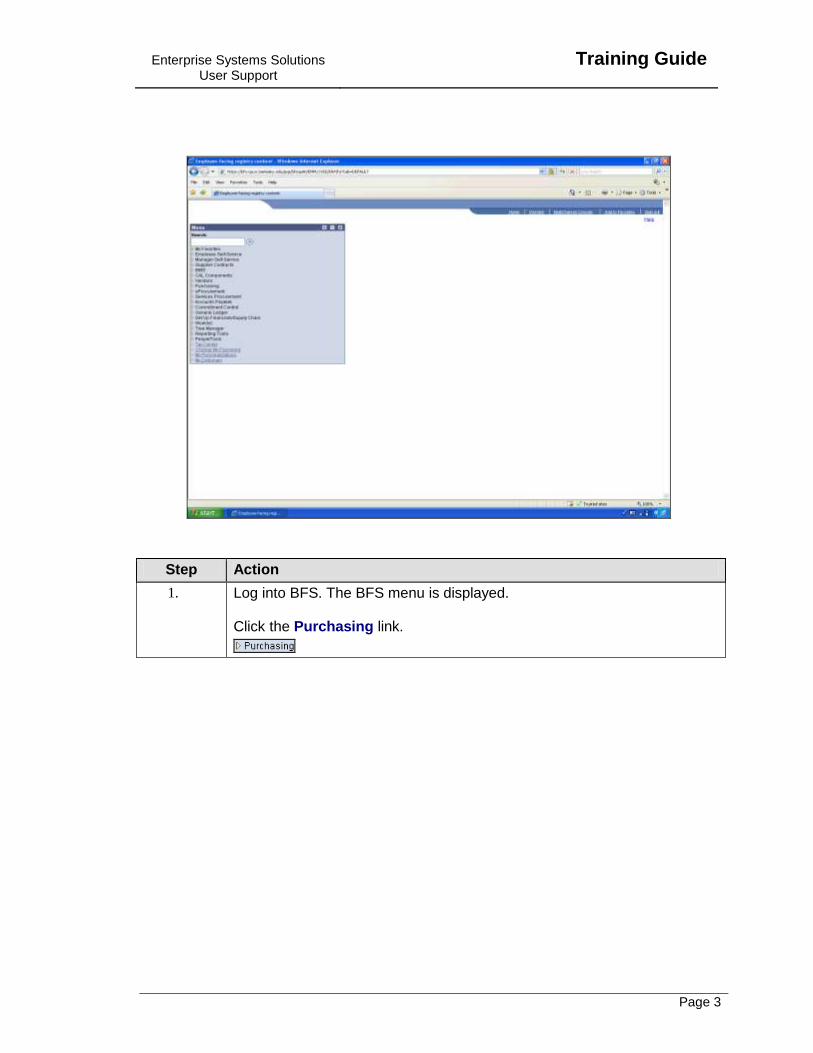
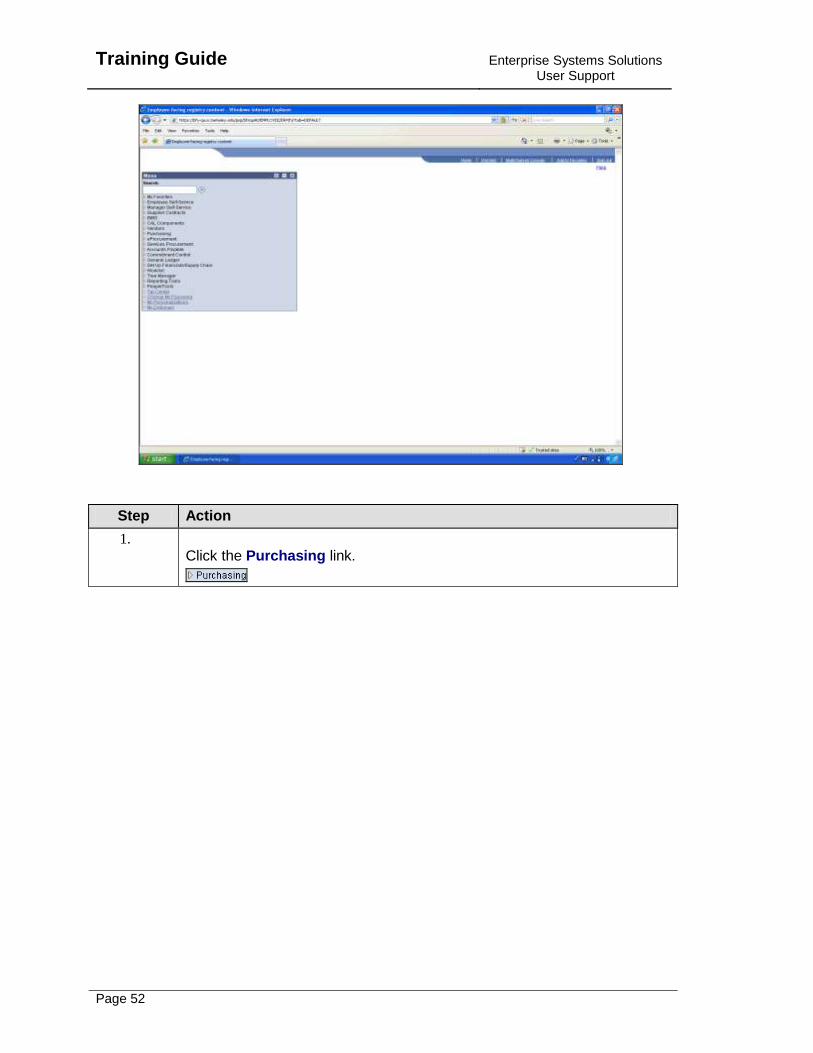
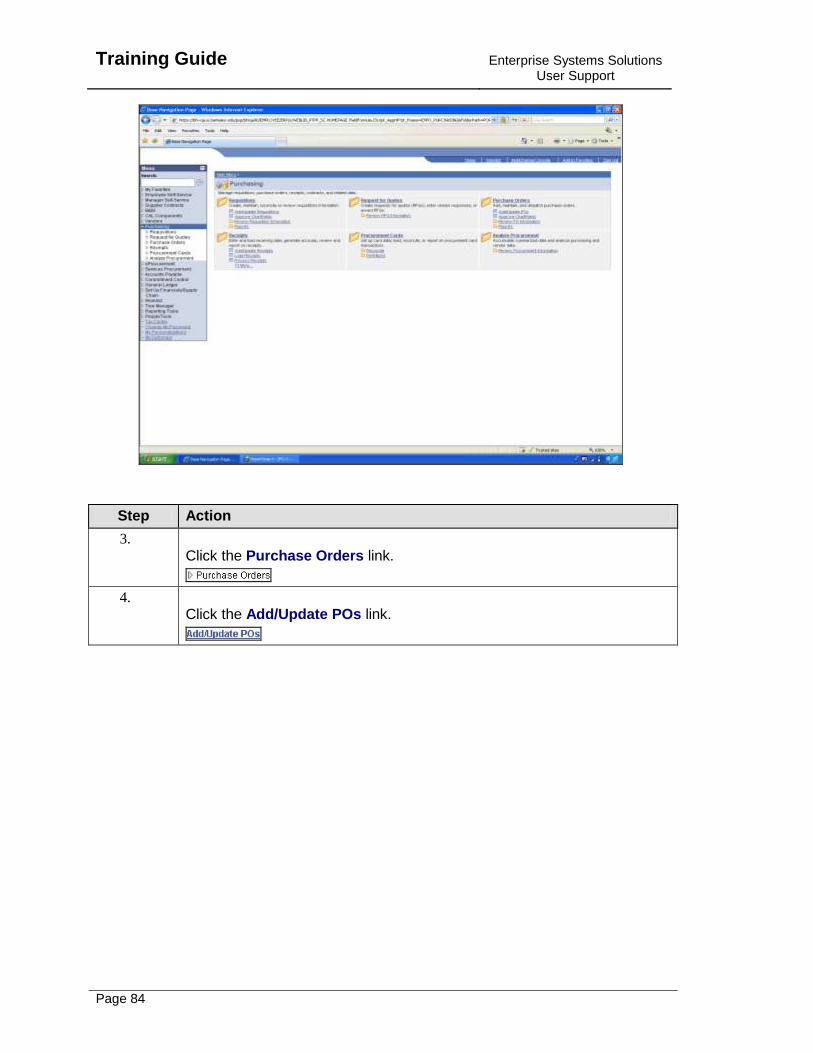
1. Log into BFS. The BFS menu is displayed. Click the Purchasing link.
Training Guide
Enterprise Systems Solutions User Support
Page 4
Step Action
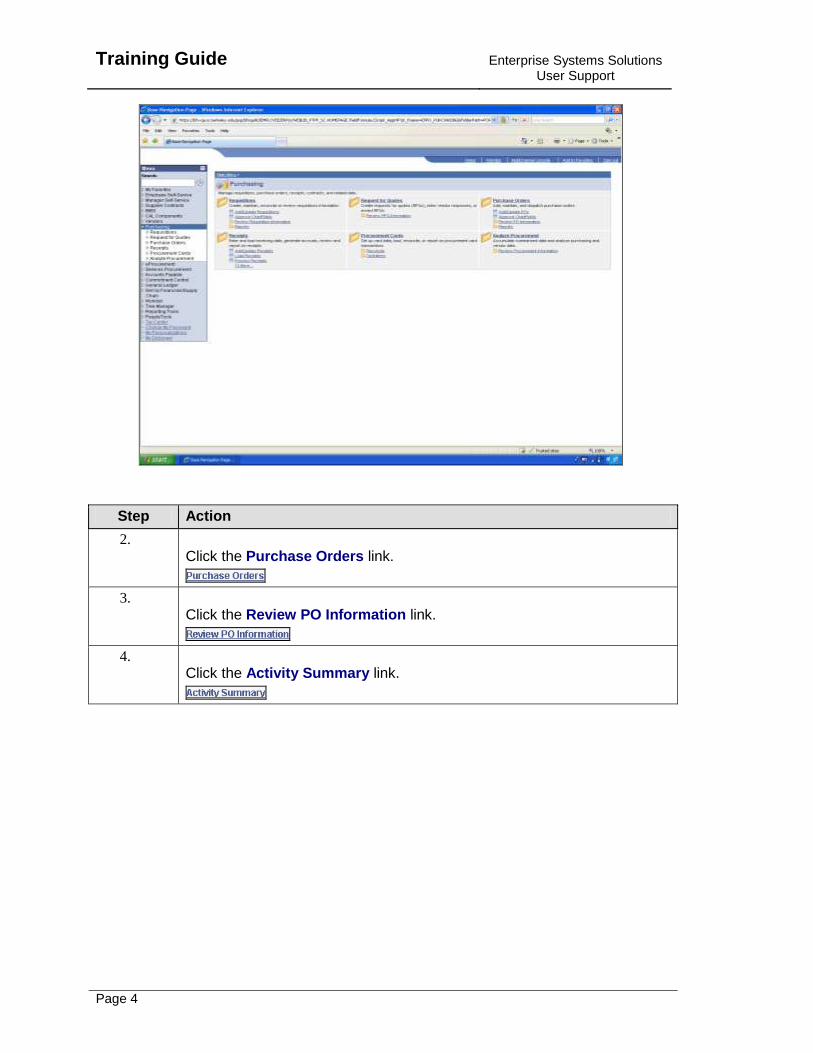
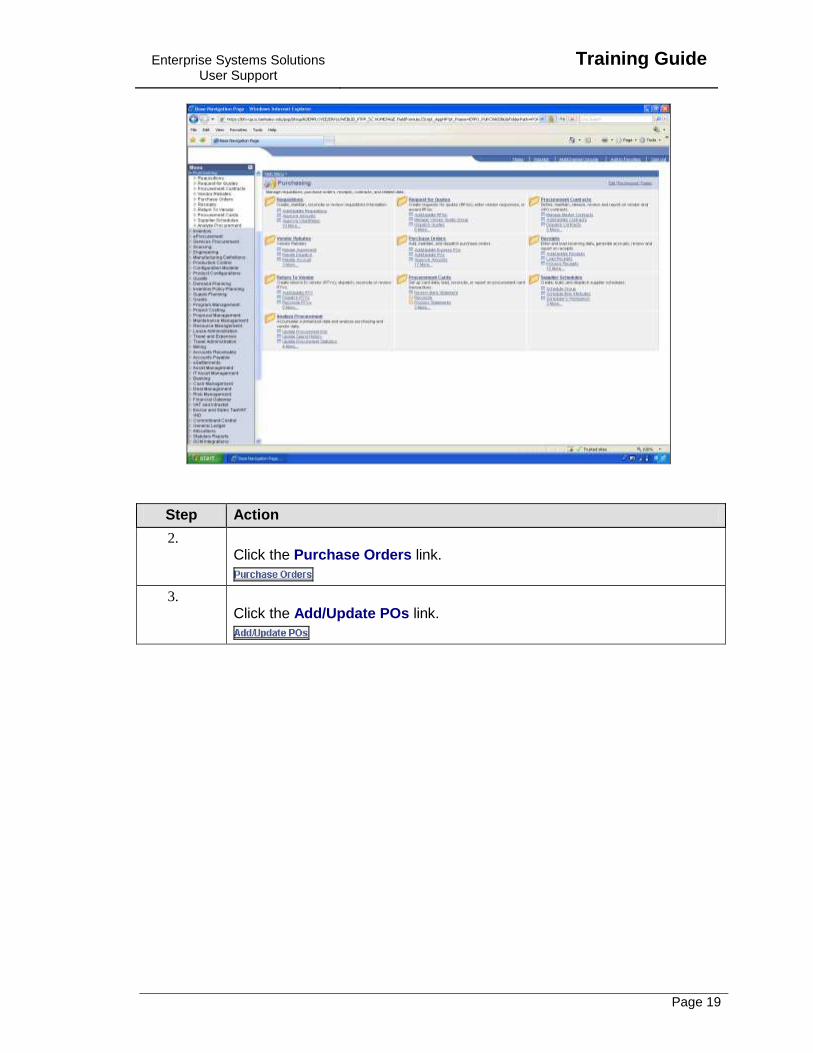
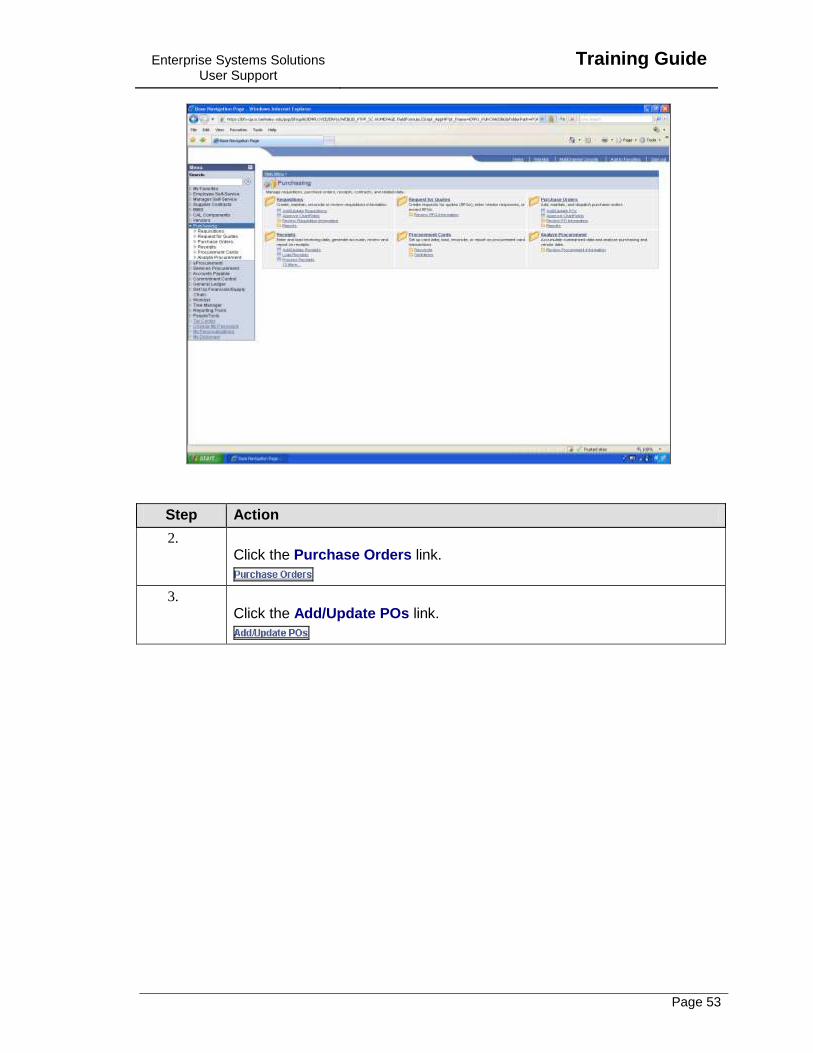
2. Click the Purchase Orders link.
3. Click the Review PO Information link.
4. Click the Activity Summary link.
Enterprise Systems Solutions User Support
Training Guide
Page 5
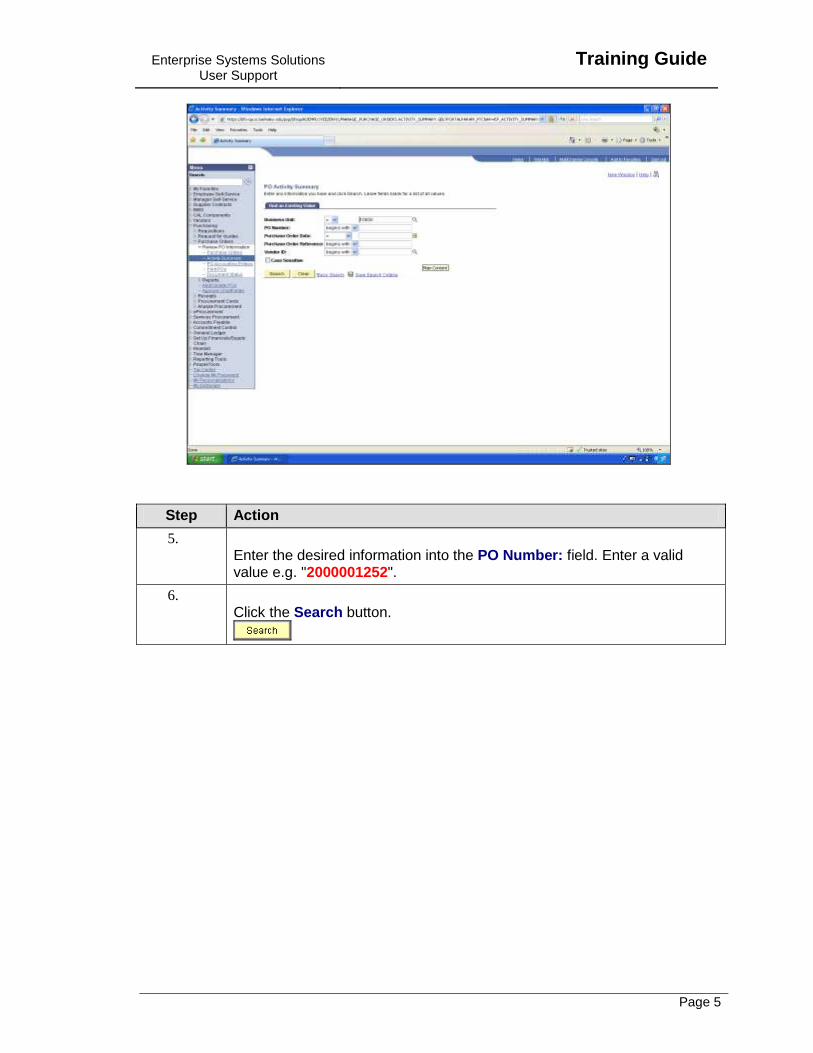
Step Action
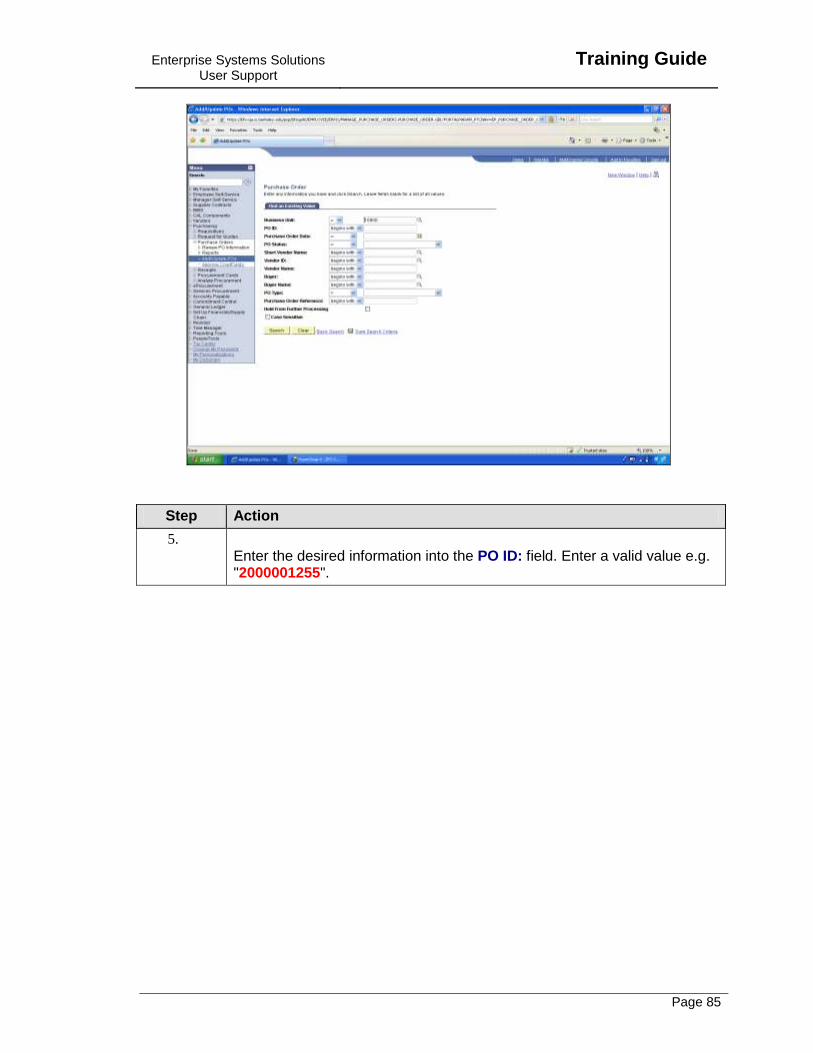
5. Enter the desired information into the PO Number: field. Enter a valid value e.g. "2000001252".
6. Click the Search button.
Training Guide
Enterprise Systems Solutions User Support
Page 6
Step Action
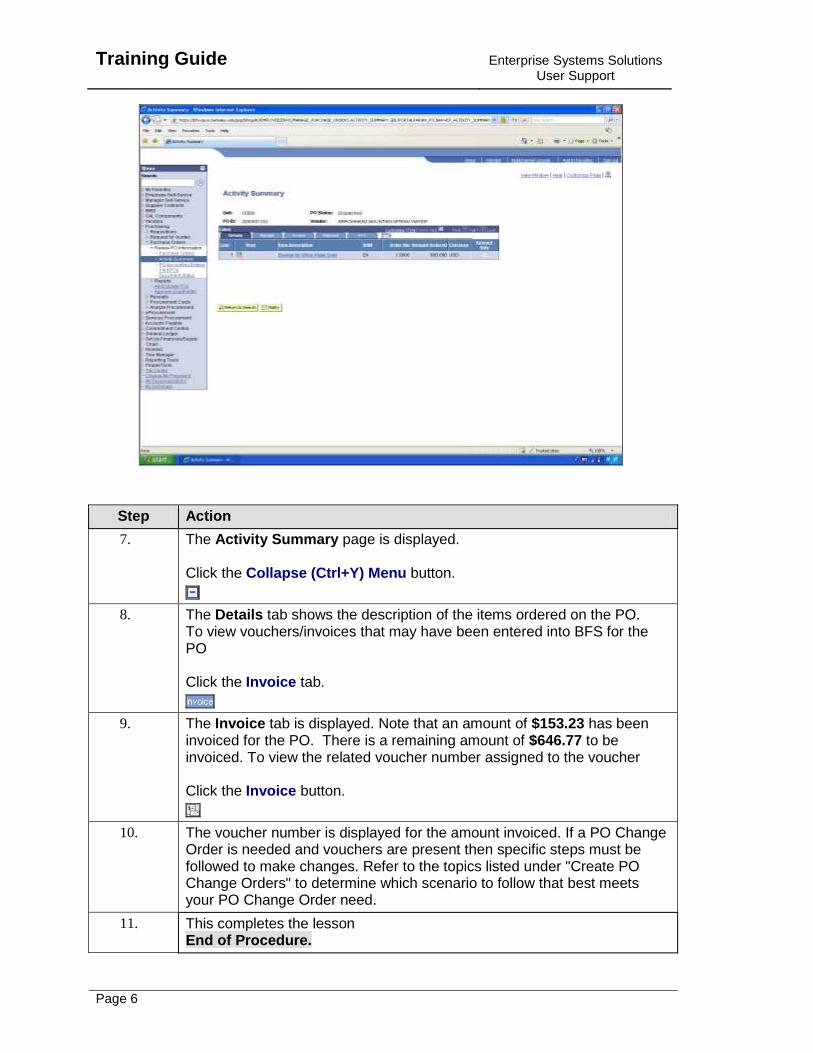
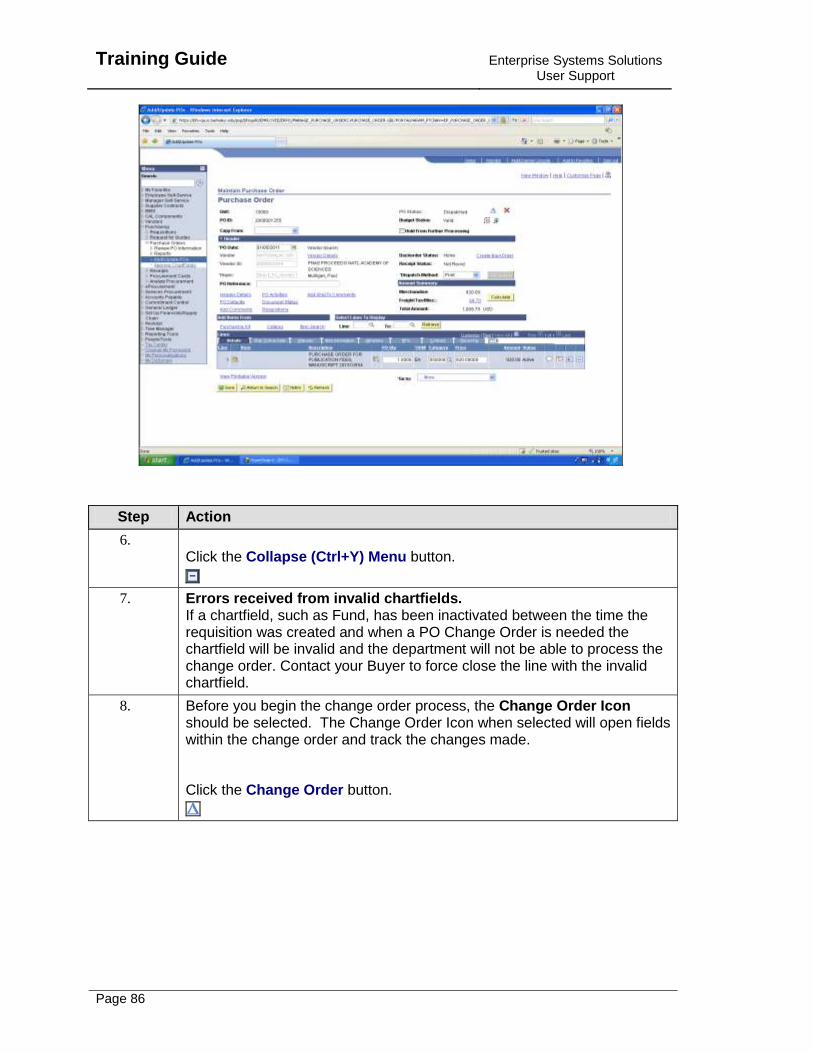
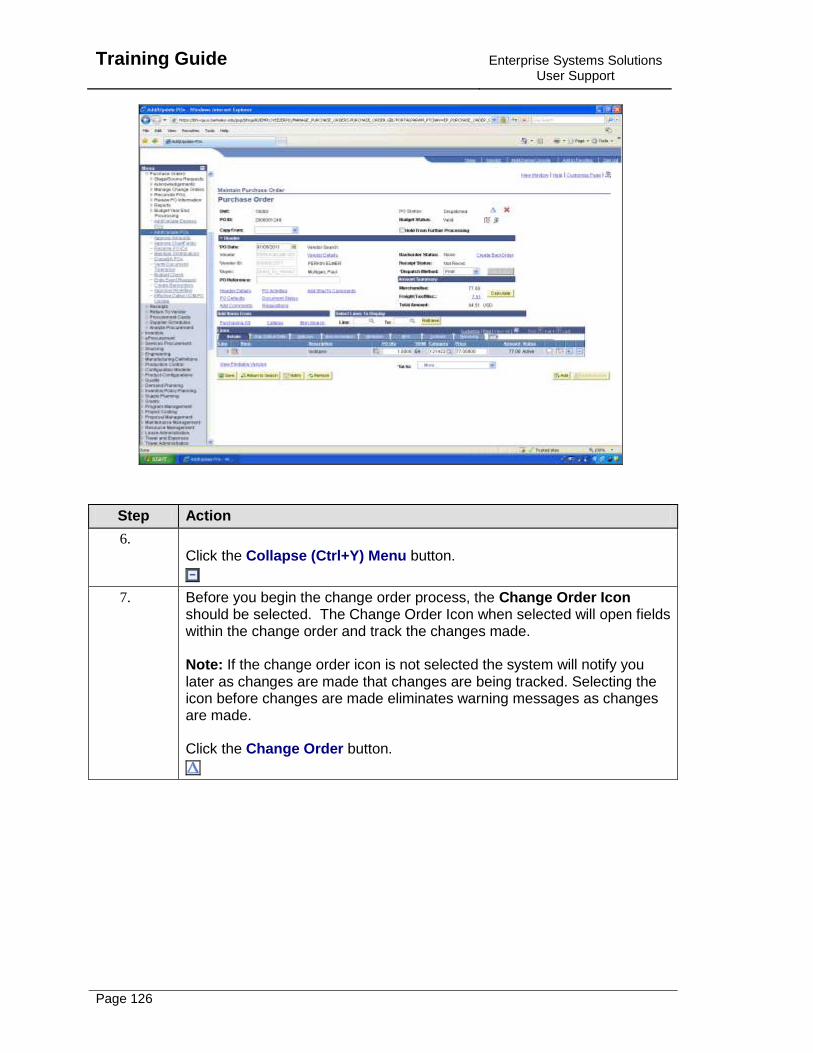
7. The Activity Summary page is displayed. Click the Collapse (Ctrl+Y) Menu button.
8. The Details tab shows the description of the items ordered on the PO. To view vouchers/invoices that may have been entered into BFS for the PO Click the Invoice tab.
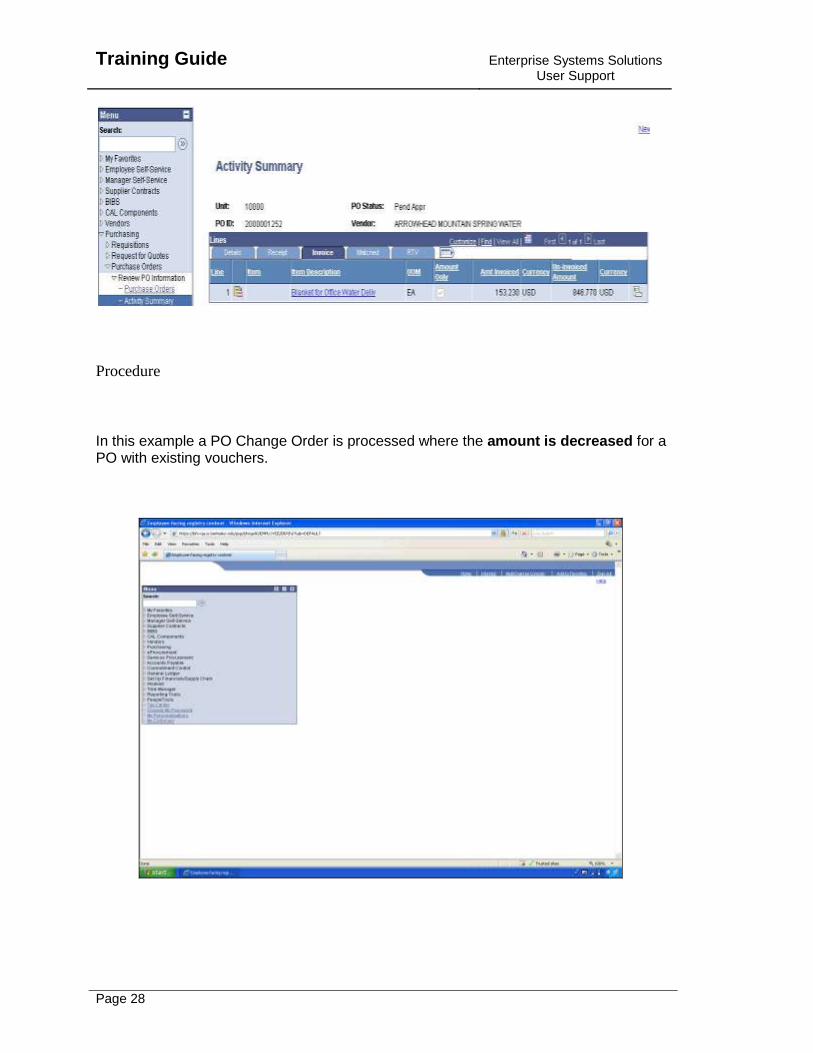
9. The Invoice tab is displayed. Note that an amount of $153.23 has been invoiced for the PO. There is a remaining amount of $646.77 to be invoiced. To view the related voucher number assigned to the voucher Click the Invoice button.
10. The voucher number is displayed for the amount invoiced. If a PO Change Order is needed and vouchers are present then specific steps must be followed to make changes. Refer to the topics listed under "Create PO Change Orders" to determine which scenario to follow that best meets your PO Change Order need.
11. This completes the lesson End of Procedure.
Enterprise Systems Solutions User Support
Training Guide
Page 7
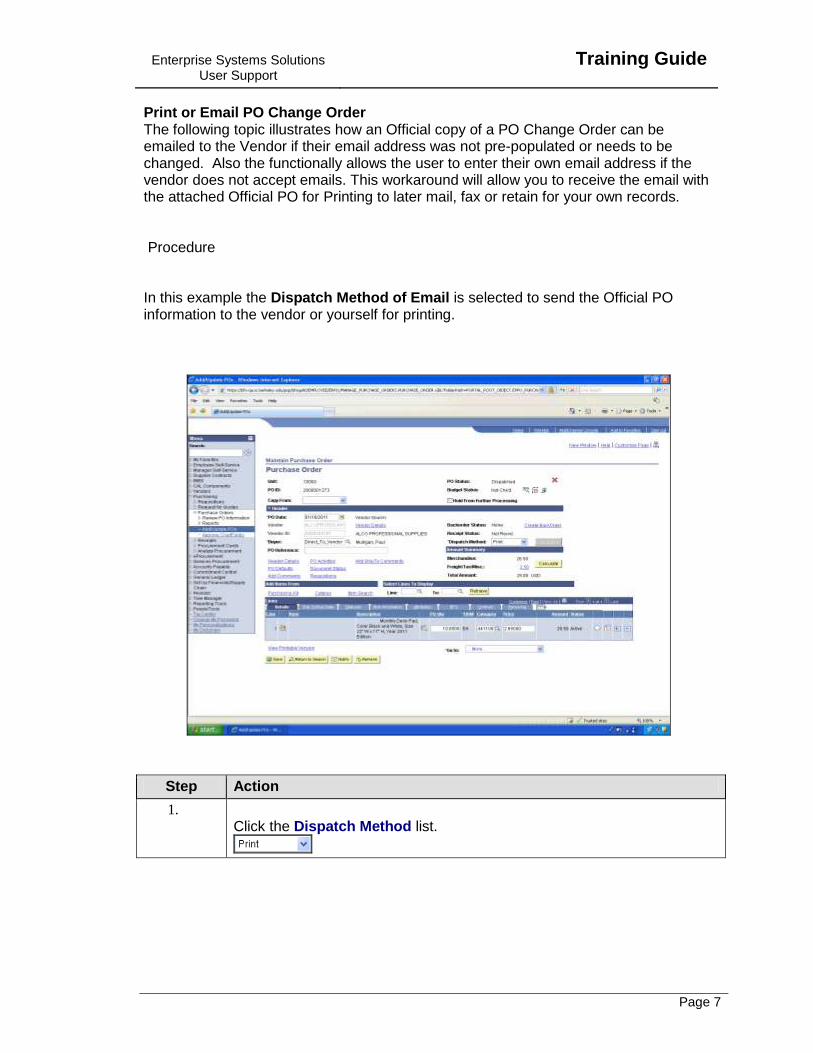
Print or Email PO Change Order The following topic illustrates how an Official copy of a PO Change Order can be emailed to the Vendor if their email address was not pre-populated or needs to be changed. Also the functionally allows the user to enter their own email address if the vendor does not accept emails. This workaround will allow you to receive the email with the attached Official PO for Printing to later mail, fax or retain for your own records. Procedure In this example the Dispatch Method of Email is selected to send the Official PO information to the vendor or yourself for printing.
Step Action
1. Click the Dispatch Method list.
Training Guide
Enterprise Systems Solutions User Support
Page 8
Step Action
2. ****As a Reminder: The information displayed below was given in other PO Change Order topics related to selection of the Dispatch Method: In this Topic we will be covering the Dispatch Method Email Option. The value displayed for the Dispatch Method on the PO is defaulted from vendor set-up. The method may need to be changed depending on the need to send PO information to the vendor. 1) If the vendor does not require PO information to be sent, then select: Print - the print option for PO Change Orders will not print the PO. 2) If the vendor does require that PO information is sent, then select: Email - the email option will send a copy of the official PO to the vendor via email. The email dispatch method is NOT available for After the Fact or Subaward POs. Note: If the vendor does not accept email or an Official PO copy is needed for printing please refer to the Topic - "Print or Email PO Change Order" in the UPK under Purchasing or the Quick Reference Guide" for detailed instruction. Do no not use the following values: EDX - not used for PO Change Orders Fax - not used for PO Change Orders Phone - not used for PO Change Orders

Enterprise Systems Solutions User Support
Training Guide
Page 9
Step Action
3. The Email option is selected if you would like a copy of the official PO for your records or to send to the vendor. Point to the Email list item.
4. Click the Email list item.

Training Guide
Enterprise Systems Solutions User Support
Page 10
Step Action
5. To set up the email address to send the official PO the Header Defaults link is accessed. Click the Header Details link.
Enterprise Systems Solutions User Support
Training Guide
Page 11
Step Action
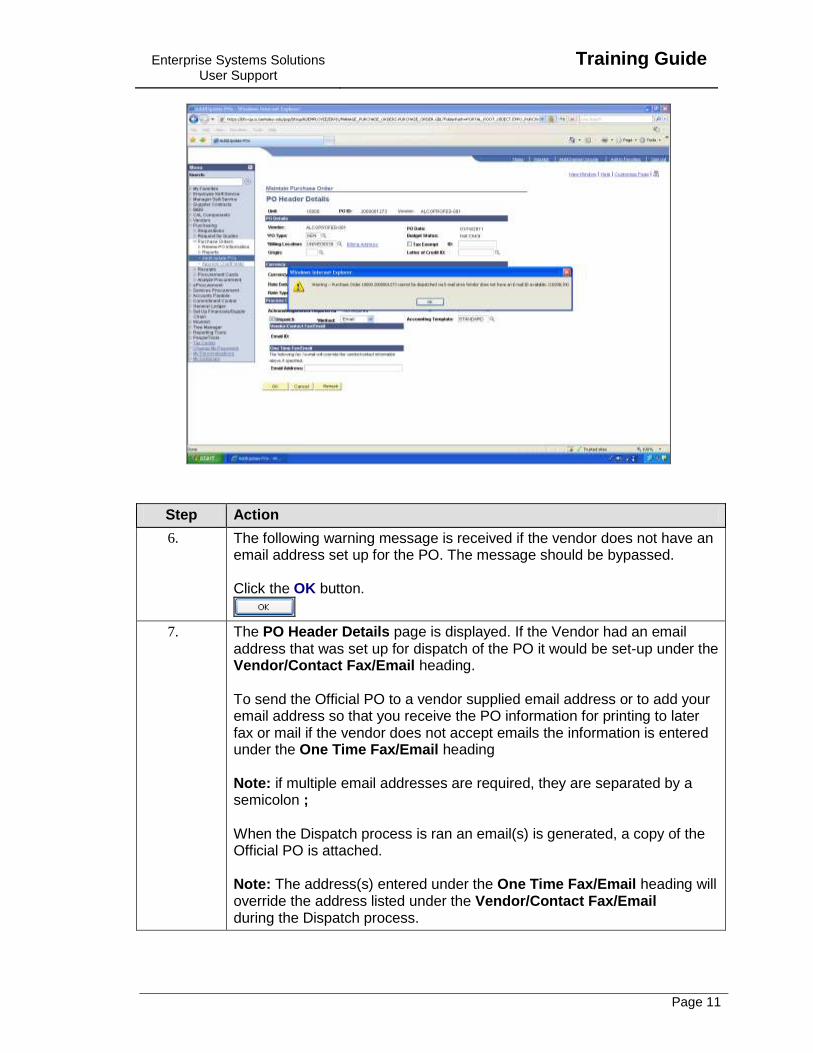
6. The following warning message is received if the vendor does not have an email address set up for the PO. The message should be bypassed. Click the OK button.
7. The PO Header Details page is displayed. If the Vendor had an email address that was set up for dispatch of the PO it would be set-up under the Vendor/Contact Fax/Email heading. To send the Official PO to a vendor supplied email address or to add your email address so that you receive the PO information for printing to later fax or mail if the vendor does not accept emails the information is entered under the One Time Fax/Email heading Note: if multiple email addresses are required, they are separated by a semicolon ; When the Dispatch process is ran an email(s) is generated, a copy of the Official PO is attached. Note: The address(s) entered under the One Time Fax/Email heading will override the address listed under the Vendor/Contact Fax/Email during the Dispatch process.
Training Guide
Enterprise Systems Solutions User Support
Page 12
Step Action
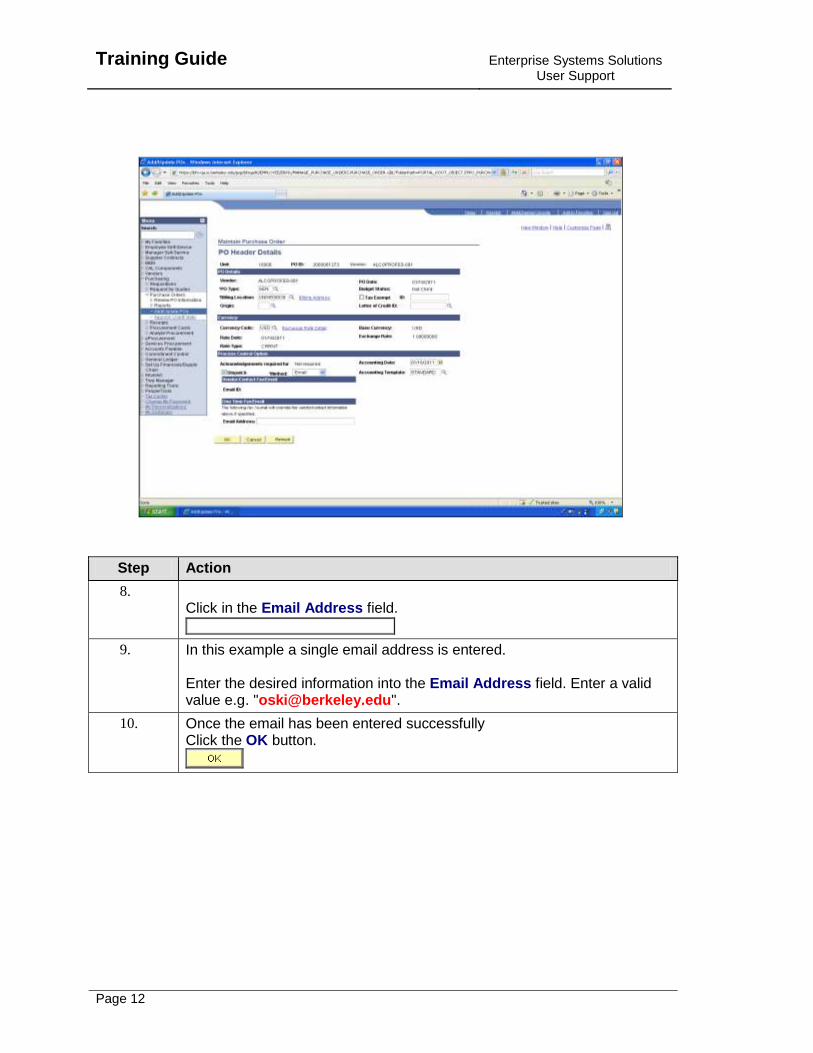
8. Click in the Email Address field.
9. In this example a single email address is entered. Enter the desired information into the Email Address field. Enter a valid value e.g. "[email protected]".
10. Once the email has been entered successfully Click the OK button.
Enterprise Systems Solutions User Support
Training Guide
Page 13
Step Action
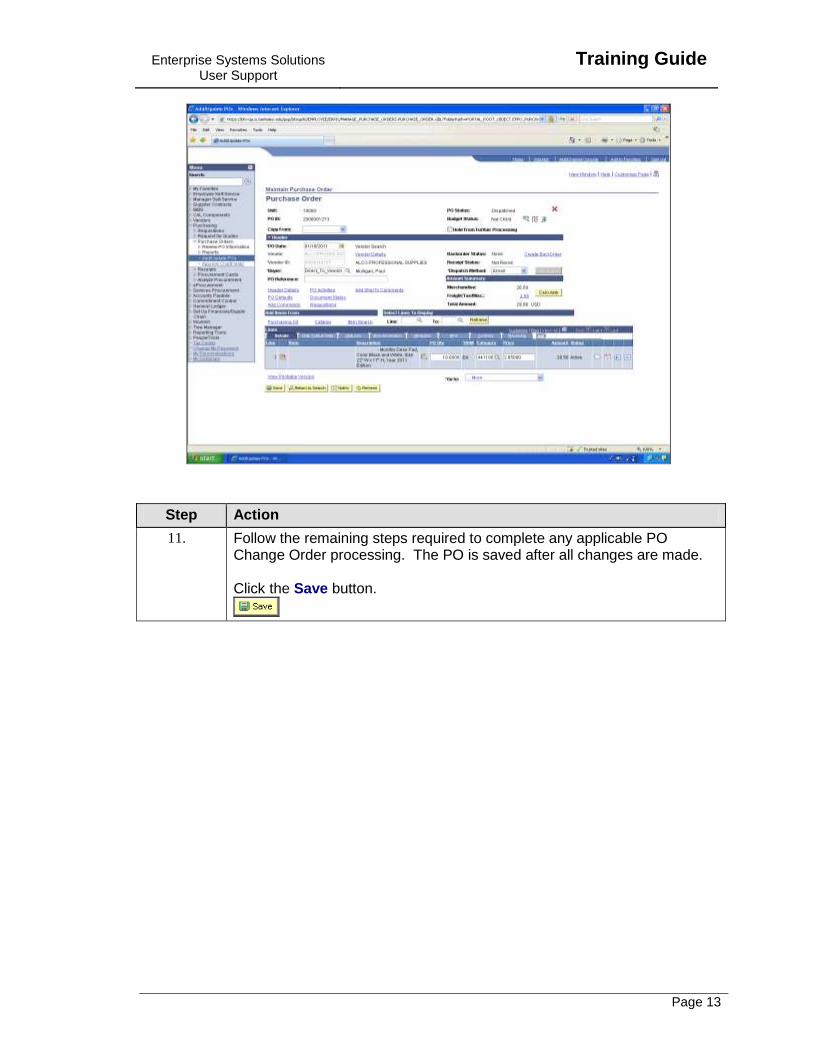
11. Follow the remaining steps required to complete any applicable PO Change Order processing. The PO is saved after all changes are made. Click the Save button.
Training Guide
Enterprise Systems Solutions User Support
Page 14
Step Action
12. Purchase Orders are dispatched every 30 min. An email will be generated with the attached PO when the email option is selected. Below is an example of the email received. Subject Heading line of the email: Dispatched Purchase Order Body of email: Purchase Order, 10000 / 2000000947, has been Dispatched. Please detach and print the attached Purchase Order in PDF format. Links that can be used to open inquiry pages in BFS: Click on the link below to enter an acknowledgment for this PO online: https://bfs-qa.is.berkeley.edu/psp/bfsqa90/SUPPLIE R/ERP/c/ROLE_VENDOR.PO_SS_ POA.GBL?Action=A&BUSINESS_UNIT=10000&PO_ID=2000000 947 Click on the link below to view recently dispatched purchase orders: https://bfs-qa.is.berkeley.edu/psp/bfsqa90/SUPPLIE R/ERP/?cmd=login
13. This completes the exercise End of Procedure.
Create PO Change Orders The pages in BFS used to create PO Change Orders have not been customized. There are numerous areas accessible that do not require data entry. It is important to follow the training developed to prevent needless data entry or errors. The following BFS page shots and descriptions give an overview of the PO Change Order pages. The Purchase Order main page is divided into three sections that are explained in detail.
1. Section above the Header 2. Header 3. Lines
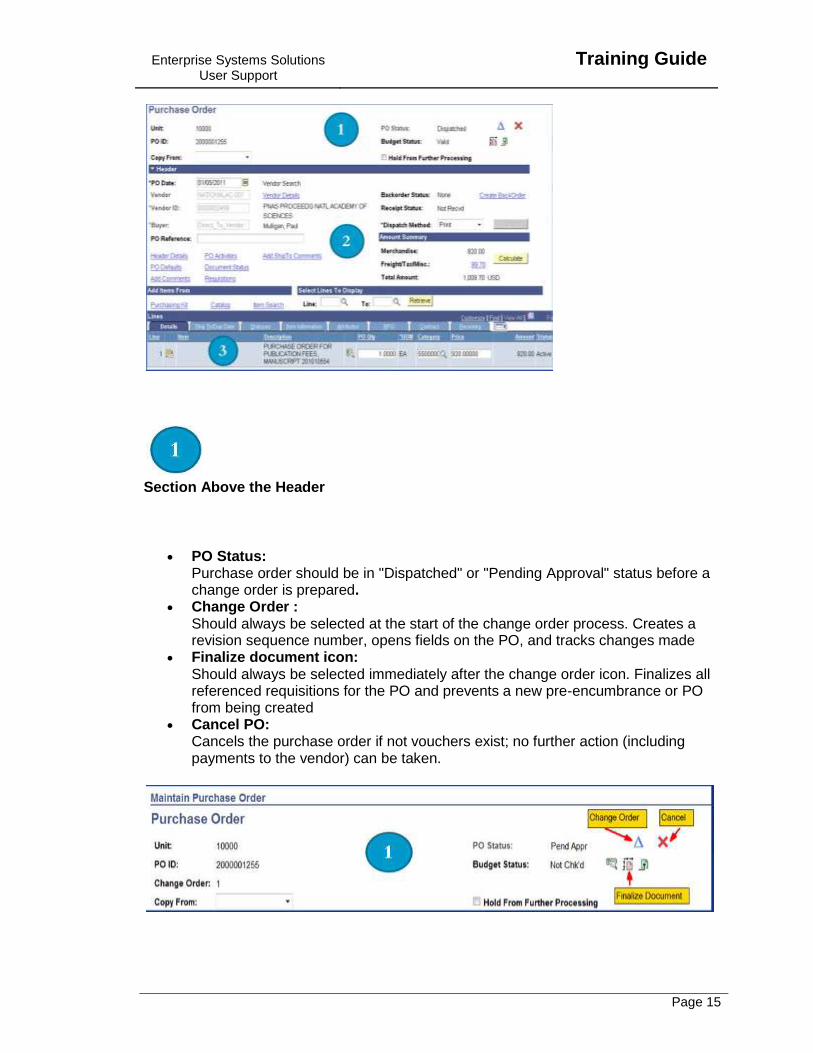
Enterprise Systems Solutions User Support
Training Guide
Page 15
Section Above the Header
PO Status: Purchase order should be in "Dispatched" or "Pending Approval" status before a change order is prepared.
Change Order : Should always be selected at the start of the change order process. Creates a revision sequence number, opens fields on the PO, and tracks changes made
Finalize document icon: Should always be selected immediately after the change order icon. Finalizes all referenced requisitions for the PO and prevents a new pre-encumbrance or PO from being created
Cancel PO: Cancels the purchase order if not vouchers exist; no further action (including payments to the vendor) can be taken.
Training Guide
Enterprise Systems Solutions User Support
Page 16
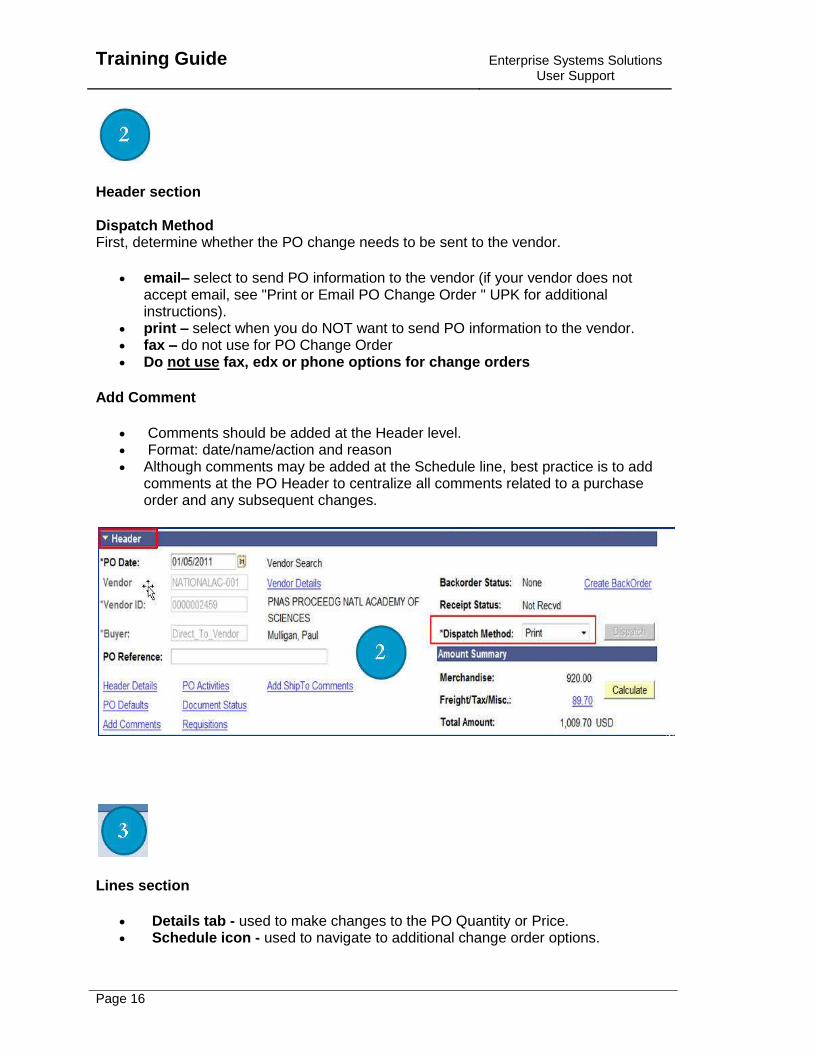
Header section Dispatch Method First, determine whether the PO change needs to be sent to the vendor.
email– select to send PO information to the vendor (if your vendor does not accept email, see "Print or Email PO Change Order " UPK for additional instructions).
print – select when you do NOT want to send PO information to the vendor. fax – do not use for PO Change Order Do not use fax, edx or phone options for change orders
Add Comment
Comments should be added at the Header level. Format: date/name/action and reason Although comments may be added at the Schedule line, best practice is to add
comments at the PO Header to centralize all comments related to a purchase order and any subsequent changes.
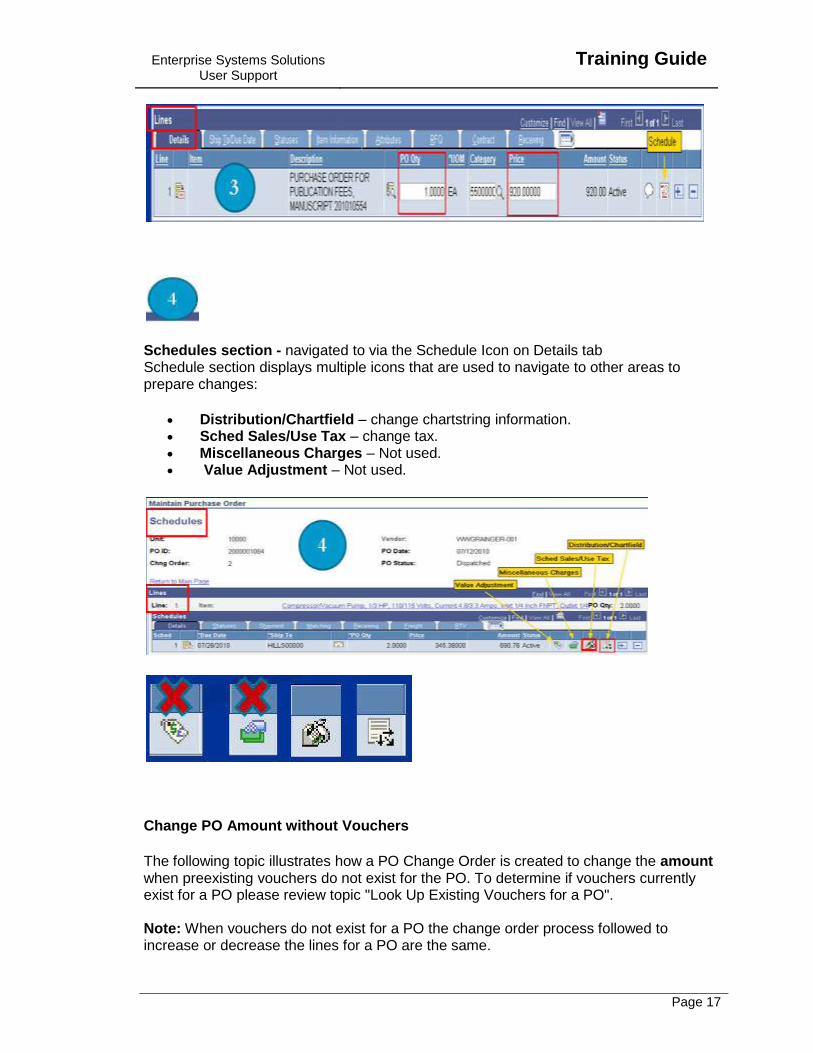
Lines section
Details tab - used to make changes to the PO Quantity or Price. Schedule icon - used to navigate to additional change order options.
Enterprise Systems Solutions User Support
Training Guide
Page 17
Schedules section - navigated to via the Schedule Icon on Details tab Schedule section displays multiple icons that are used to navigate to other areas to prepare changes:
Distribution/Chartfield – change chartstring information. Sched Sales/Use Tax – change tax. Miscellaneous Charges – Not used. Value Adjustment – Not used.
Change PO Amount without Vouchers
The following topic illustrates how a PO Change Order is created to change the amount when preexisting vouchers do not exist for the PO. To determine if vouchers currently exist for a PO please review topic "Look Up Existing Vouchers for a PO". Note: When vouchers do not exist for a PO the change order process followed to increase or decrease the lines for a PO are the same.
Training Guide
Enterprise Systems Solutions User Support
Page 18
Procedure
In this example a PO Change Order is processed where the amount is decreased for the PO.
Step Action
1. Click the Purchasing link.
Enterprise Systems Solutions User Support
Training Guide
Page 19
Step Action
2. Click the Purchase Orders link.
3. Click the Add/Update POs link.
Training Guide
Enterprise Systems Solutions User Support
Page 20
Step Action
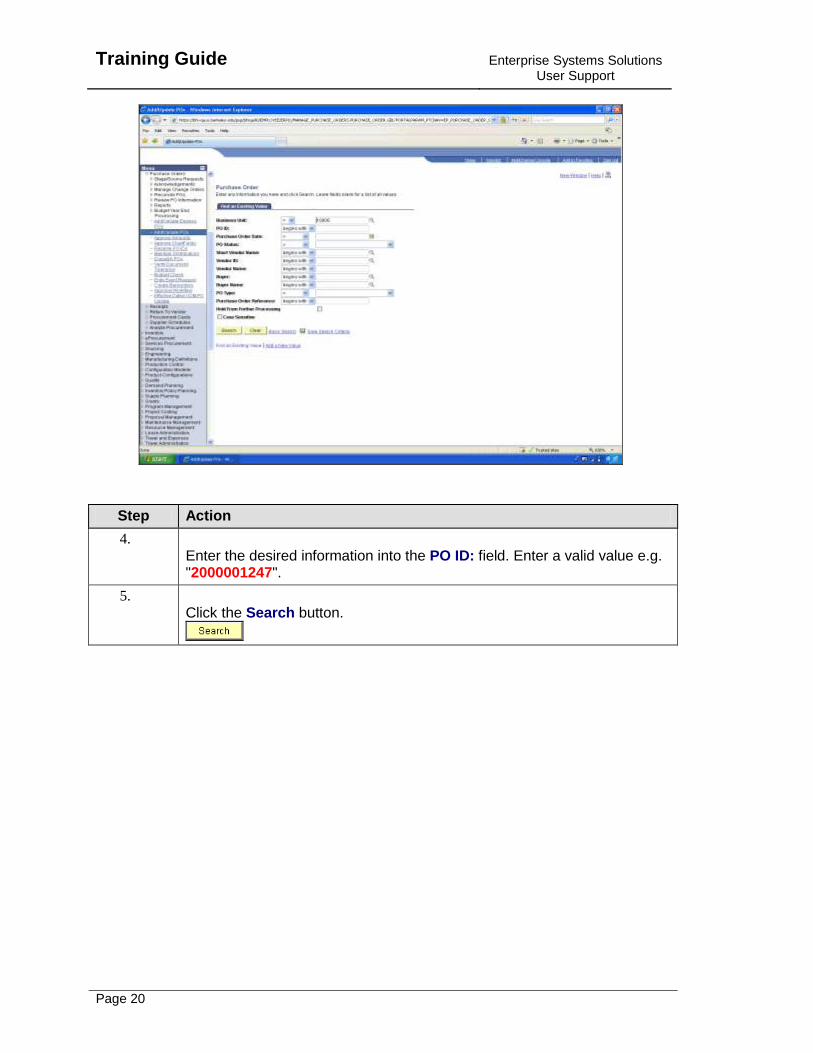
4. Enter the desired information into the PO ID: field. Enter a valid value e.g. "2000001247".
5. Click the Search button.
Enterprise Systems Solutions User Support
Training Guide
Page 21
Step Action
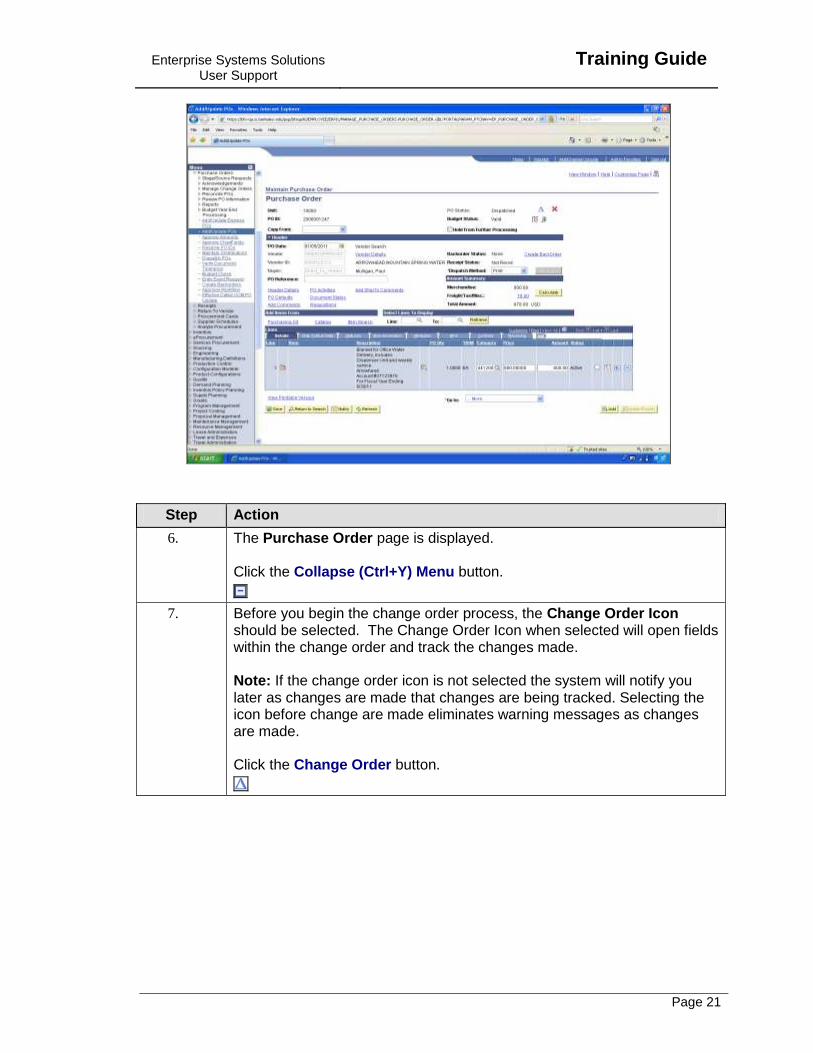
6. The Purchase Order page is displayed. Click the Collapse (Ctrl+Y) Menu button.
7. Before you begin the change order process, the Change Order Icon should be selected. The Change Order Icon when selected will open fields within the change order and track the changes made. Note: If the change order icon is not selected the system will notify you later as changes are made that changes are being tracked. Selecting the icon before change are made eliminates warning messages as changes are made. Click the Change Order button.
Training Guide
Enterprise Systems Solutions User Support
Page 22
Step Action
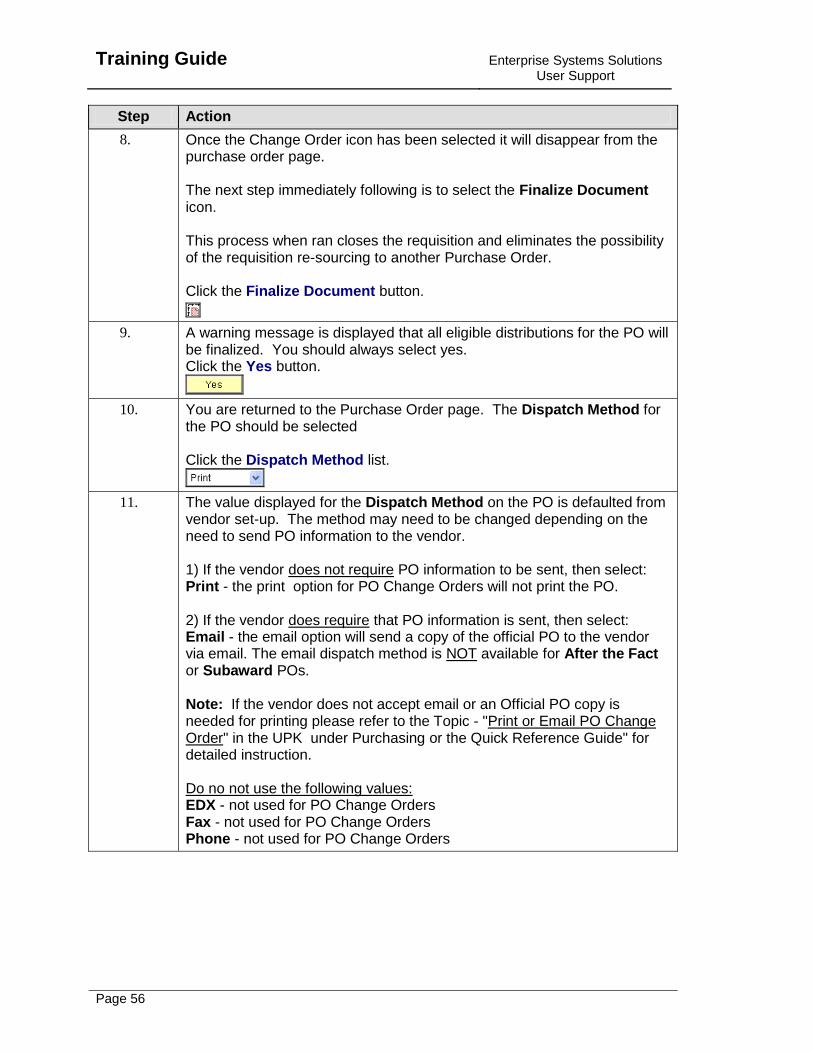
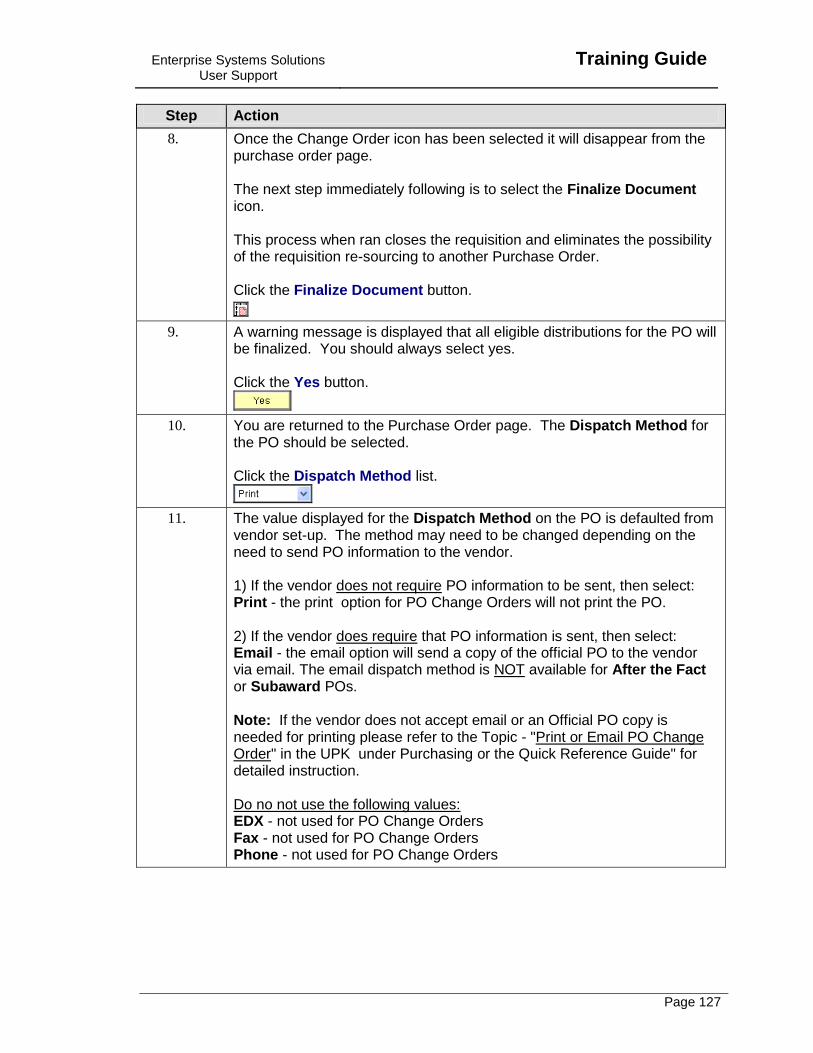
8. Once the Change Order icon has been selected it will disappear from the purchase order page. The next step immediately following is to select the Finalize Document icon. This process when ran closes the requisition and eliminates the possibility of the requisition re-sourcing to another Purchase Order. Click the Finalize Document button.
9. A warning message is displayed that all eligible distributions for the PO will be finalized. You should always select yes. Click the Yes button.
10. You are returned to the Purchase Order page. The Dispatch Method for the PO should be selected. Click the Dispatch Method list.
11. The value displayed for the Dispatch Method on the PO is defaulted from vendor set-up. The method may need to be changed depending on the need to send PO information to the vendor. 1) If the vendor does not require PO information to be sent, then select: Print - the print option for PO Change Orders will not print the PO. 2) If the vendor does require that PO information is sent, then select: Email - the email option will send a copy of the official PO to the vendor via email. The email dispatch method is NOT available for After the Fact or Subaward POs. Note: If the vendor does not accept email or an Official PO copy is needed for printing please refer to the Topic - "Print or Email PO Change Order" in the UPK under Purchasing or the Quick Reference Guide" for detailed instruction. Do no not use the following values: EDX - not used for PO Change Orders Fax - not used for PO Change Orders Phone - not used for PO Change Orders
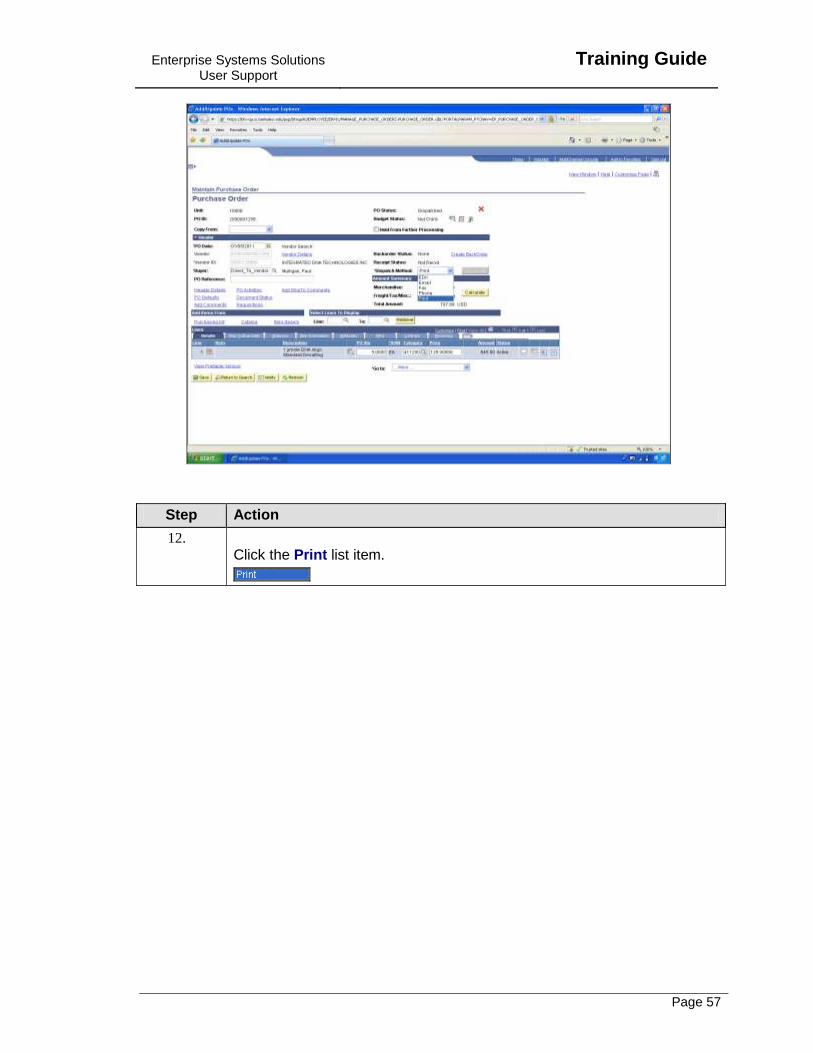
12. Click the Print list item.
Enterprise Systems Solutions User Support
Training Guide
Page 23
Step Action
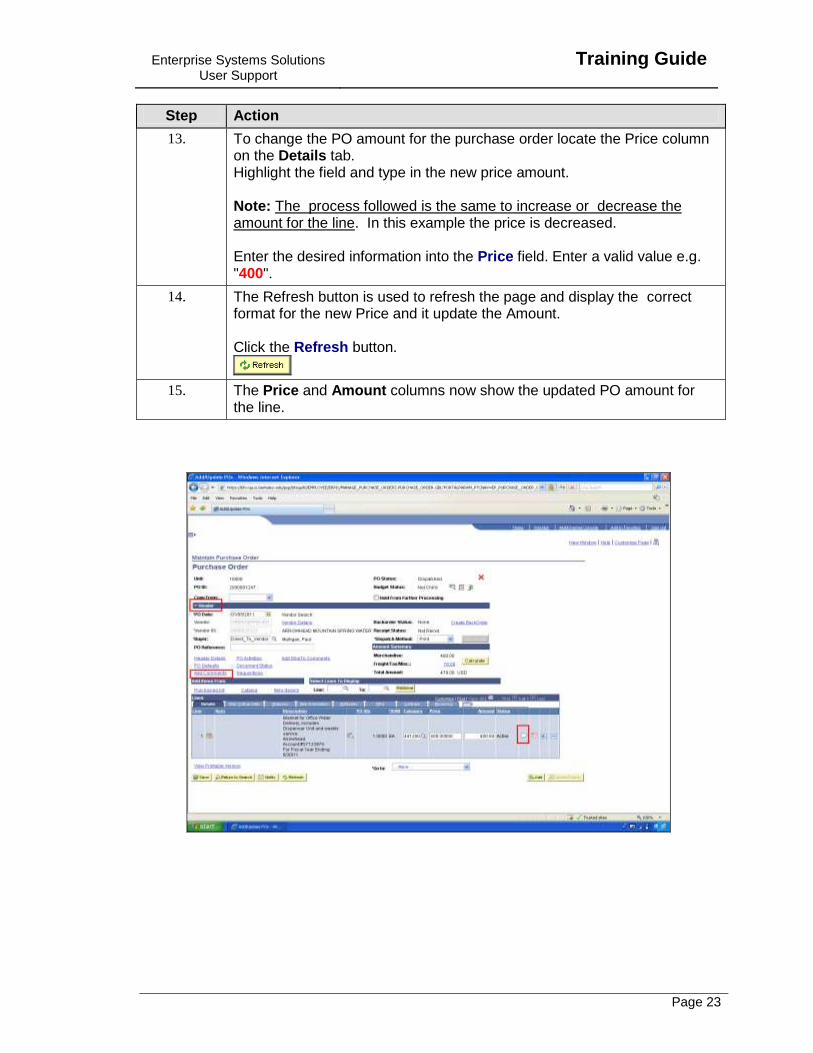
13. To change the PO amount for the purchase order locate the Price column on the Details tab. Highlight the field and type in the new price amount. Note: The process followed is the same to increase or decrease the amount for the line. In this example the price is decreased. Enter the desired information into the Price field. Enter a valid value e.g. "400".
14. The Refresh button is used to refresh the page and display the correct format for the new Price and it update the Amount. Click the Refresh button.
15. The Price and Amount columns now show the updated PO amount for the line.
Training Guide
Enterprise Systems Solutions User Support
Page 24
Step Action
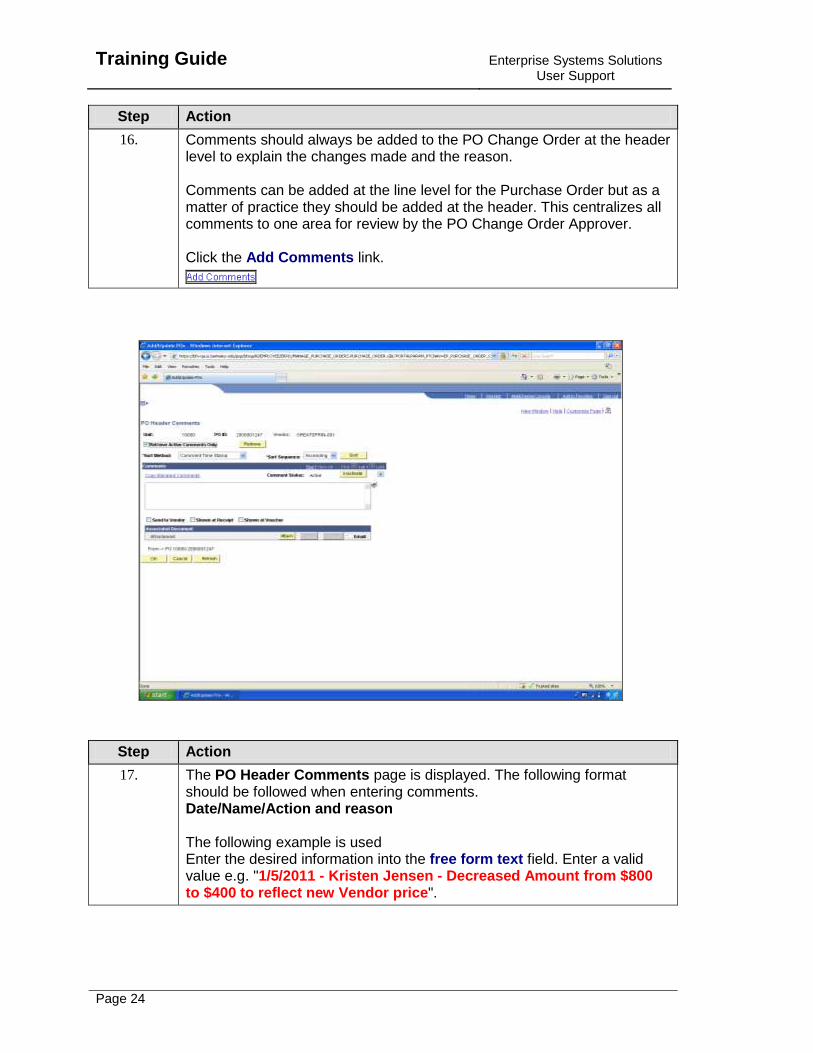
16. Comments should always be added to the PO Change Order at the header level to explain the changes made and the reason. Comments can be added at the line level for the Purchase Order but as a matter of practice they should be added at the header. This centralizes all comments to one area for review by the PO Change Order Approver. Click the Add Comments link.
Step Action
17. The PO Header Comments page is displayed. The following format should be followed when entering comments. Date/Name/Action and reason The following example is used Enter the desired information into the free form text field. Enter a valid value e.g. "1/5/2011 - Kristen Jensen - Decreased Amount from $800 to $400 to reflect new Vendor price".
Enterprise Systems Solutions User Support
Training Guide
Page 25
Step Action
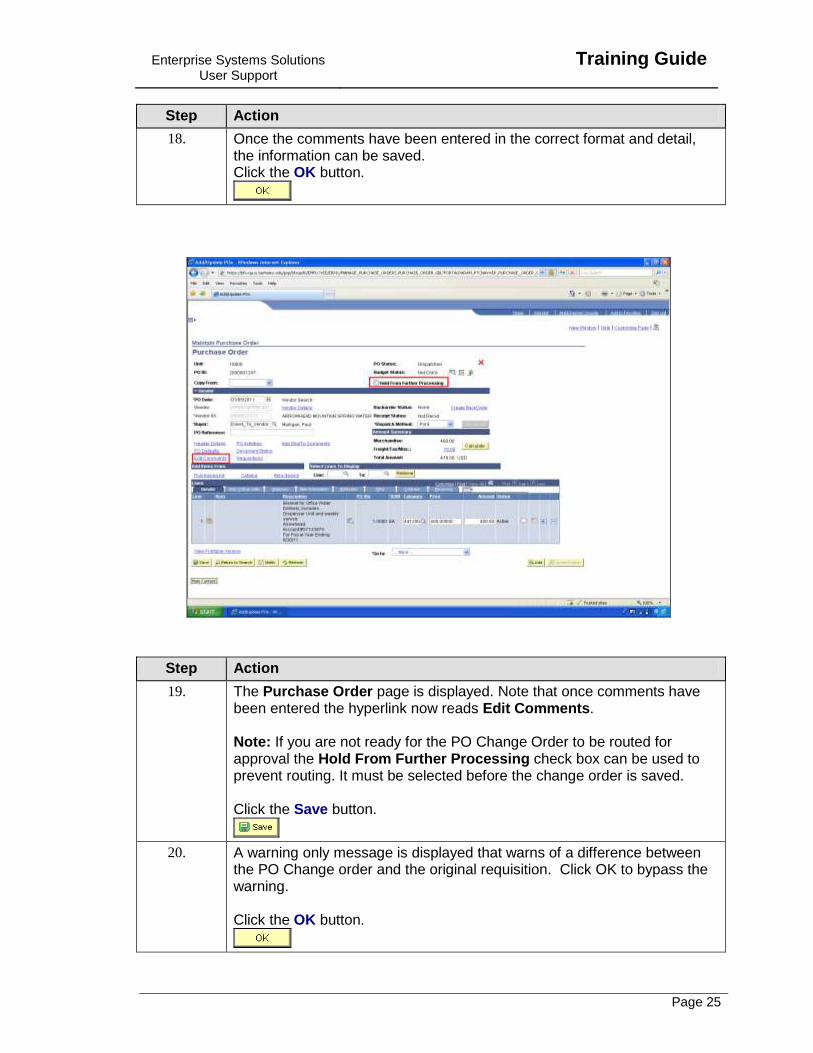
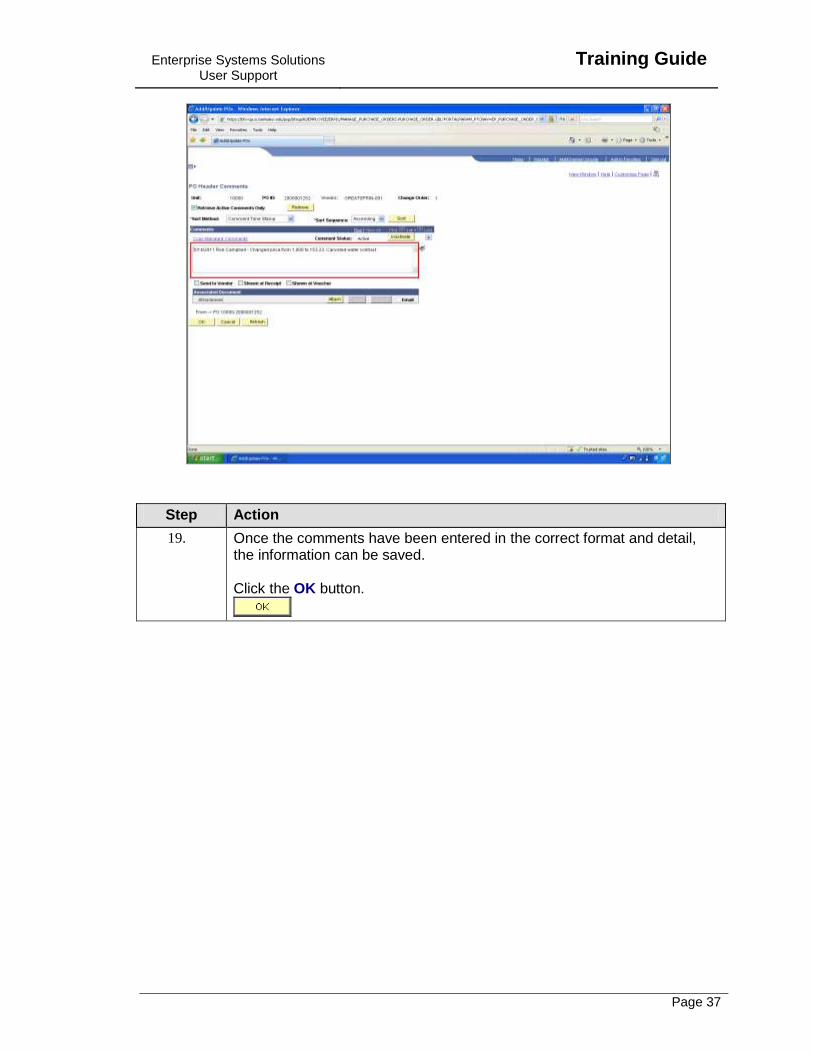
18. Once the comments have been entered in the correct format and detail, the information can be saved. Click the OK button.
Step Action
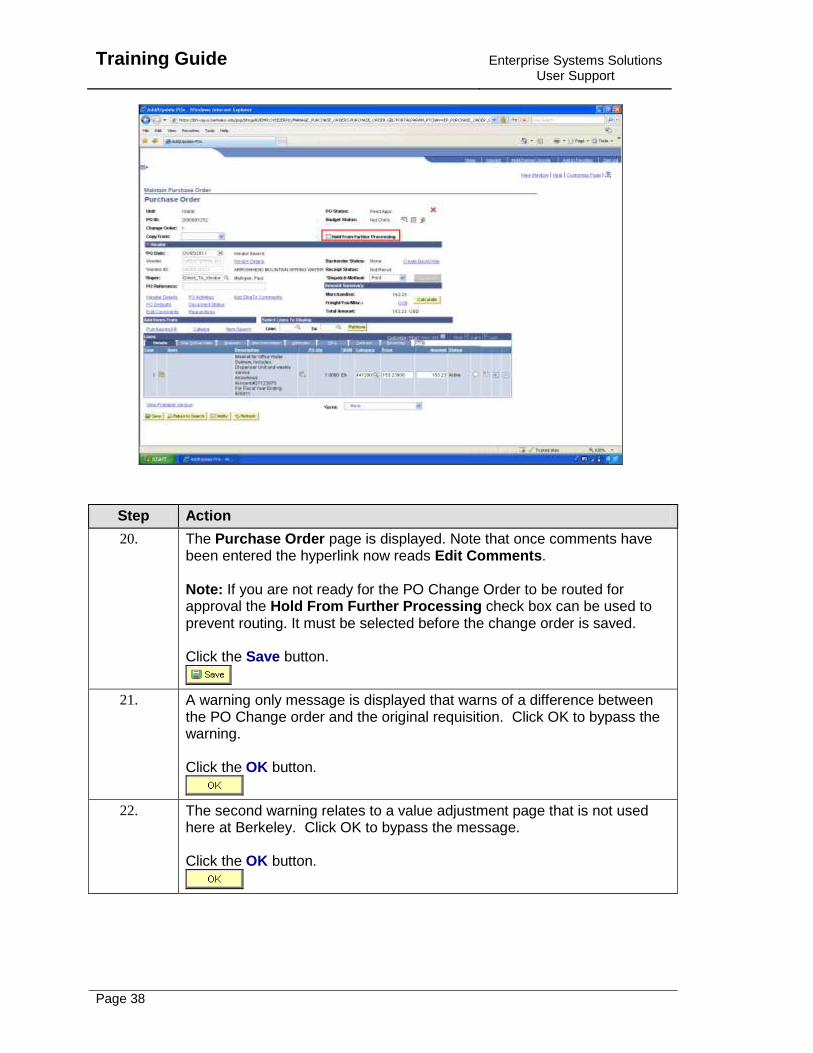
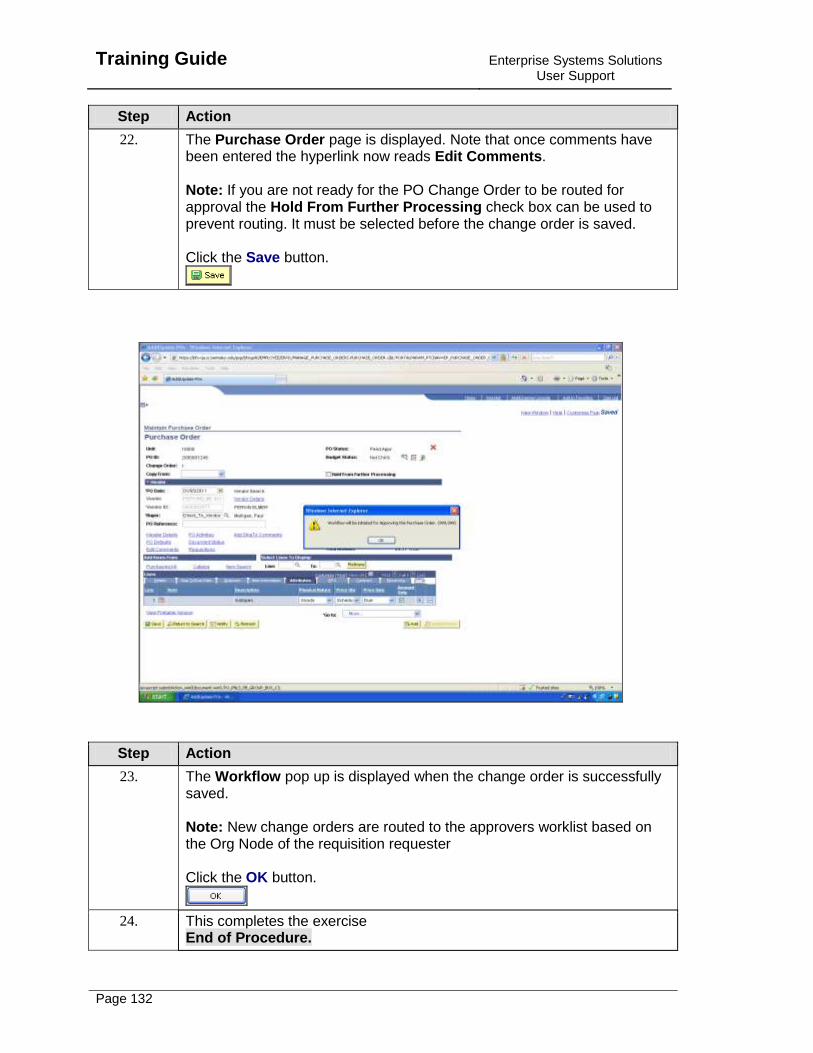
19. The Purchase Order page is displayed. Note that once comments have been entered the hyperlink now reads Edit Comments. Note: If you are not ready for the PO Change Order to be routed for approval the Hold From Further Processing check box can be used to prevent routing. It must be selected before the change order is saved. Click the Save button.
20. A warning only message is displayed that warns of a difference between the PO Change order and the original requisition. Click OK to bypass the warning. Click the OK button.

Training Guide
Enterprise Systems Solutions User Support
Page 26
Step Action
21. The second warning relates to a value adjustment page that is not used here at Berkeley. Click OK to bypass the message. Click the OK button.
Step Action
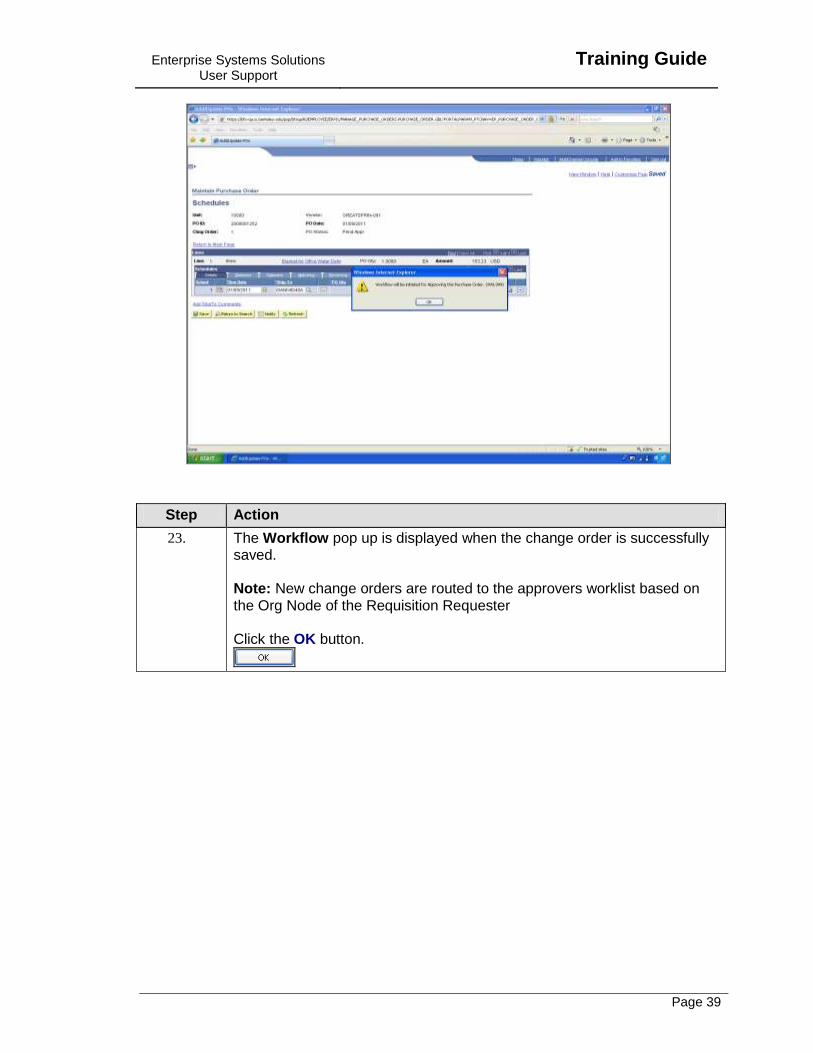
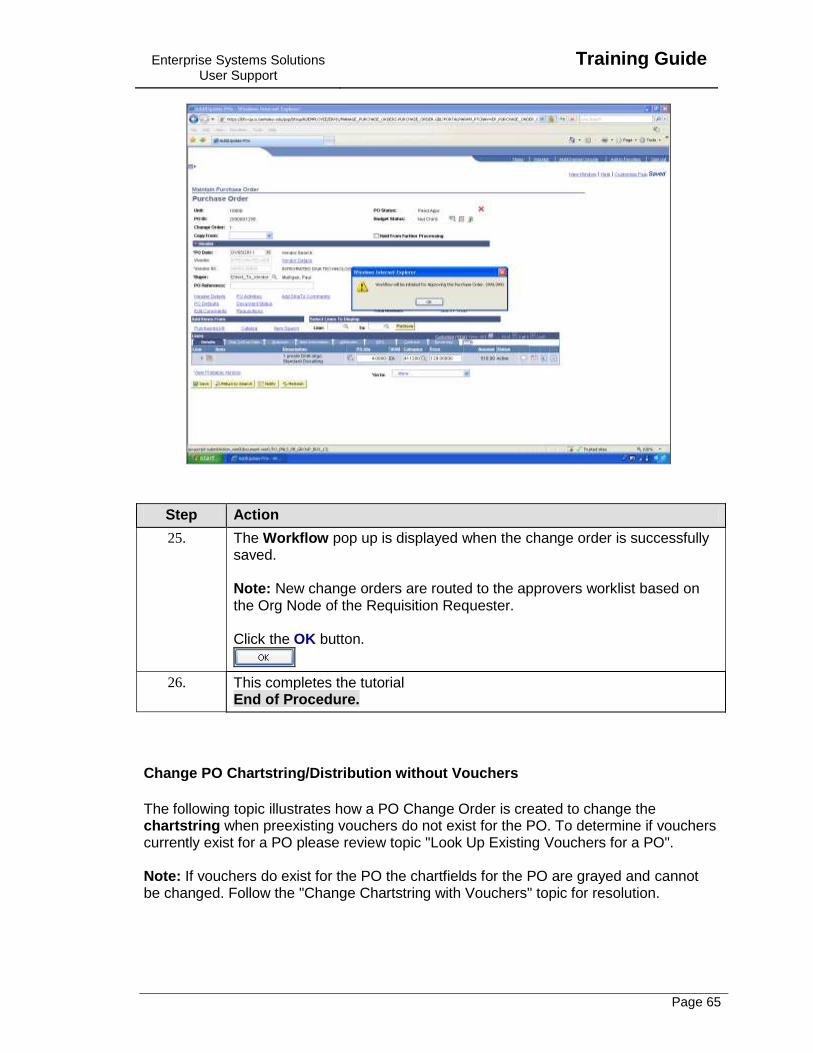
22. The Workflow pop up is displayed when the change order is successfully saved. Note: New change orders are routed to the approvers worklist based on the Org Node of the requisition requester Click the OK button.
Enterprise Systems Solutions User Support
Training Guide
Page 27
Step Action
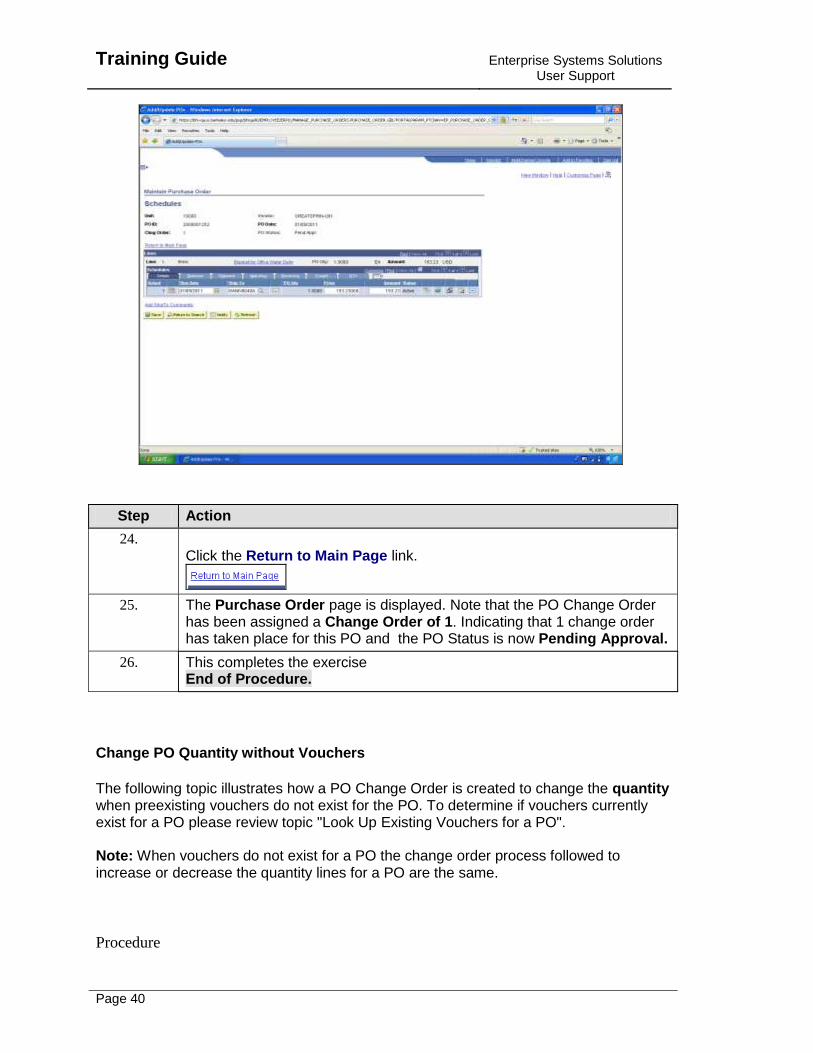
23. Click the Return to Main Page link.
24. The Purchase Order page is displayed. Note that the PO Change Order has been assigned a Change Order of 1. Indicating that 1 change order has taken place for this PO and the PO Status is now Pending Approval.
25. This completes the tutorial End of Procedure.
Change PO Amount with Vouchers
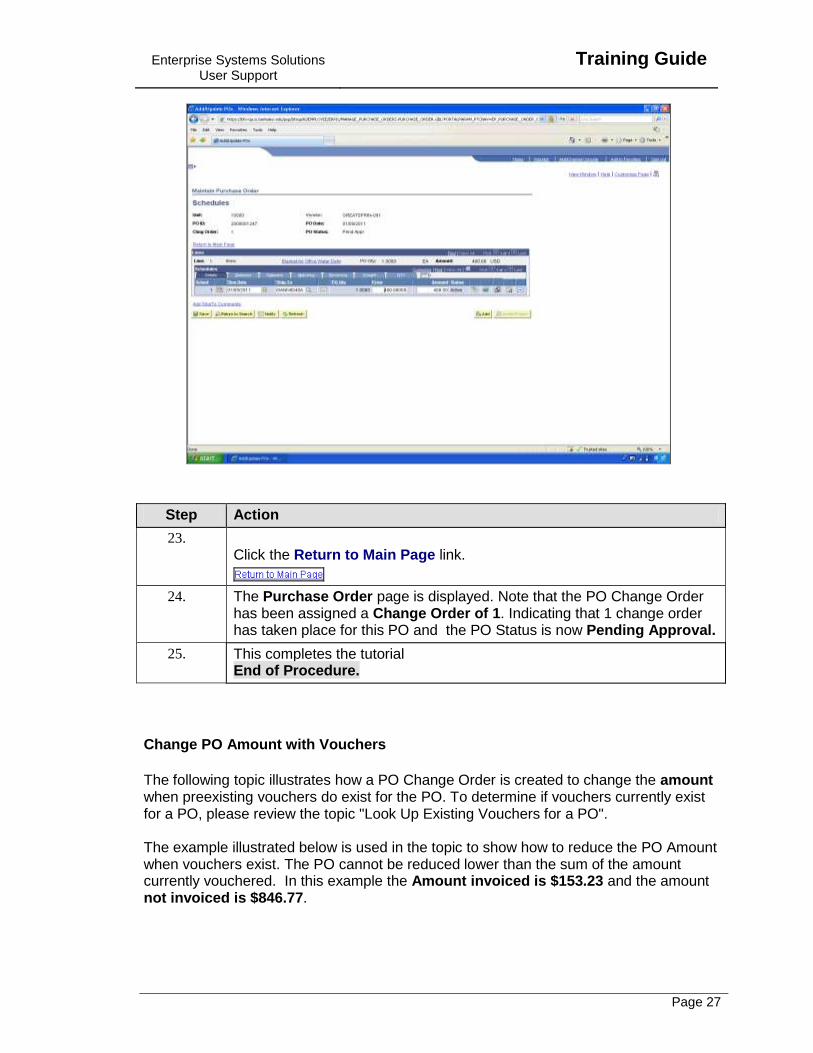
The following topic illustrates how a PO Change Order is created to change the amount when preexisting vouchers do exist for the PO. To determine if vouchers currently exist for a PO, please review the topic "Look Up Existing Vouchers for a PO". The example illustrated below is used in the topic to show how to reduce the PO Amount when vouchers exist. The PO cannot be reduced lower than the sum of the amount currently vouchered. In this example the Amount invoiced is $153.23 and the amount not invoiced is $846.77.
Training Guide
Enterprise Systems Solutions User Support
Page 28
Procedure
In this example a PO Change Order is processed where the amount is decreased for a PO with existing vouchers.
Enterprise Systems Solutions User Support
Training Guide
Page 29
Step Action
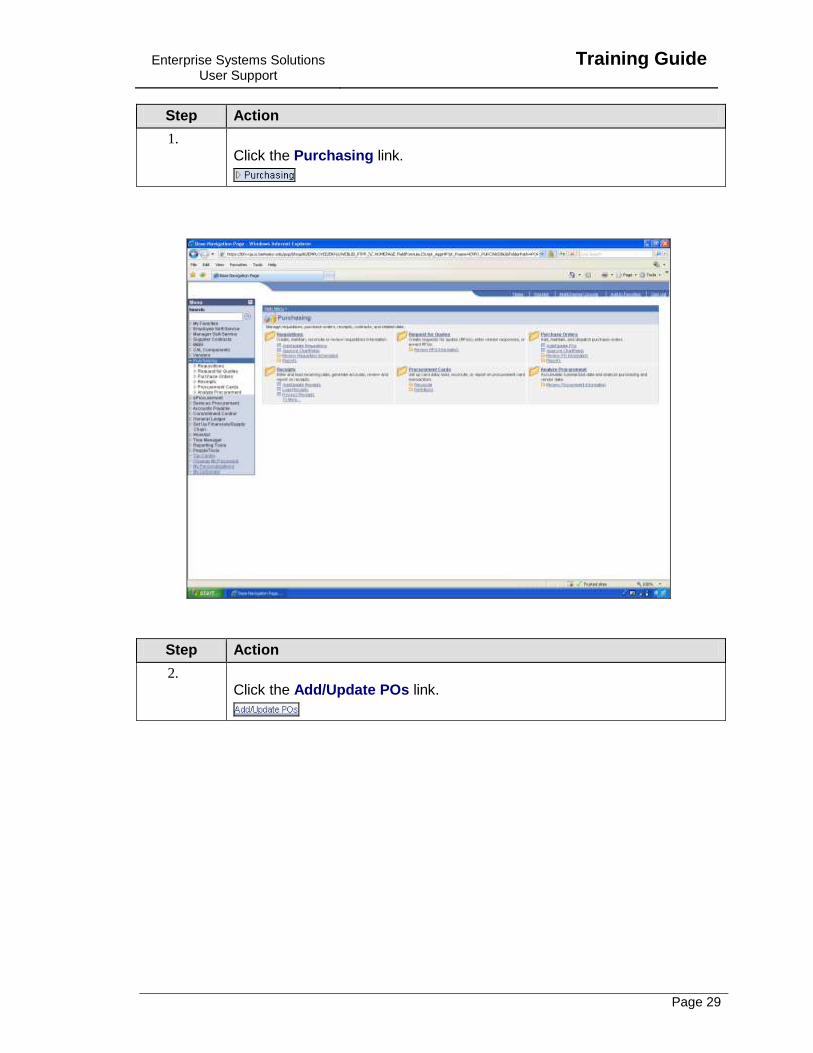
1. Click the Purchasing link.
Step Action
2. Click the Add/Update POs link.

Training Guide
Enterprise Systems Solutions User Support
Page 30
Step Action
3. Enter the desired information into the PO ID: field. Enter a valid value e.g. "2000001252".
4. Click the Search button.
Enterprise Systems Solutions User Support
Training Guide
Page 31
Step Action
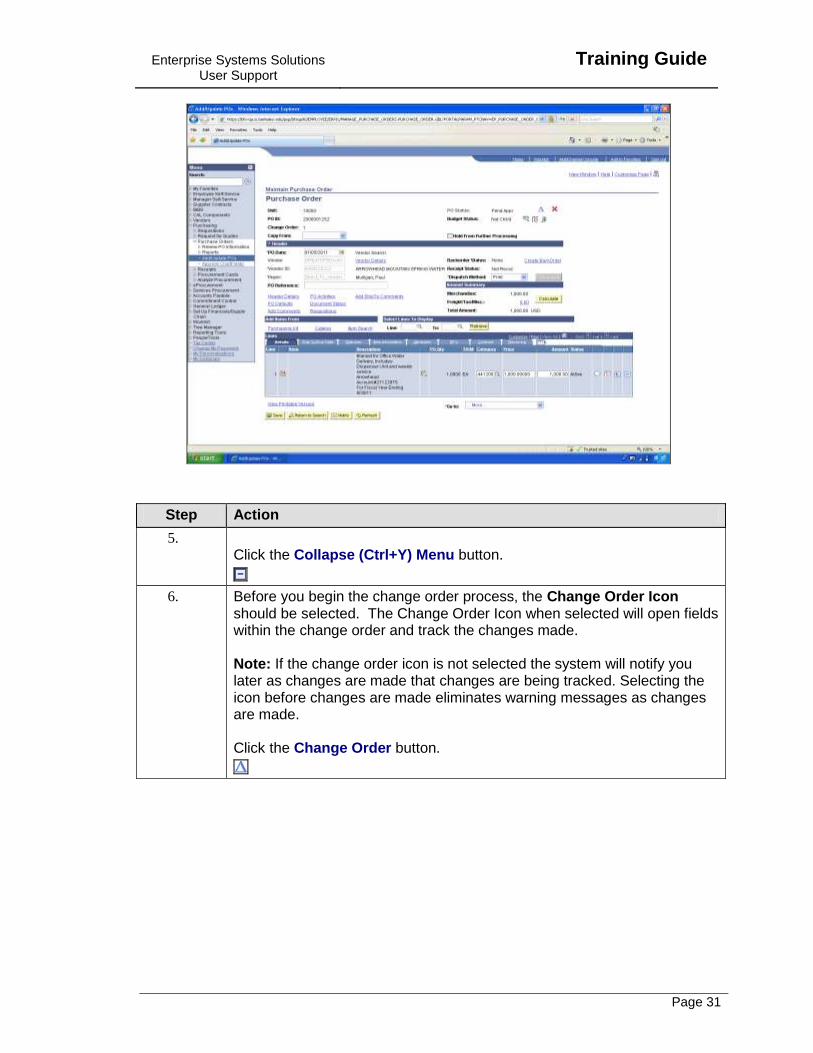
5. Click the Collapse (Ctrl+Y) Menu button.
6. Before you begin the change order process, the Change Order Icon should be selected. The Change Order Icon when selected will open fields within the change order and track the changes made. Note: If the change order icon is not selected the system will notify you later as changes are made that changes are being tracked. Selecting the icon before changes are made eliminates warning messages as changes are made. Click the Change Order button.
Training Guide
Enterprise Systems Solutions User Support
Page 32
Step Action
7. Once the Change Order icon has been selected it will disappear from the purchase order page. The next step immediately following is to select the Finalize Document icon. This process when ran closes the requisition and eliminates the possibility of the requisition re-sourcing to another Purchase Order. Click the Finalize Document button.
8. A warning message is displayed that all eligible distributions for the PO will be finalized. You should always select yes. Click the Yes button.
9. You are returned to the Purchase Order page. The Dispatch Method for the PO should be selected . Click the Dispatch Method list.
10. The value displayed for the Dispatch Method on the PO is defaulted from vendor set-up. The method may need to be changed depending on the need to send PO information to the vendor. 1) If the vendor does not require PO information to be sent, then select: Print - the print option for PO Change Orders will not print the PO. 2) If the vendor does require that PO information is sent, then select: Email - the email option will send a copy of the official PO to the vendor via email. The email dispatch method is NOT available for After the Fact or Subaward POs. Note: If the vendor does not accept email or an Official PO copy is needed for printing please refer to the Topic - "Print or Email PO Change Order" in the UPK under Purchasing or the Quick Reference Guide" for detailed instruction. Do no not use the following values: EDX - not used for PO Change Orders Fax - not used for PO Change Orders Phone - not used for PO Change Orders
Enterprise Systems Solutions User Support
Training Guide
Page 33
Step Action
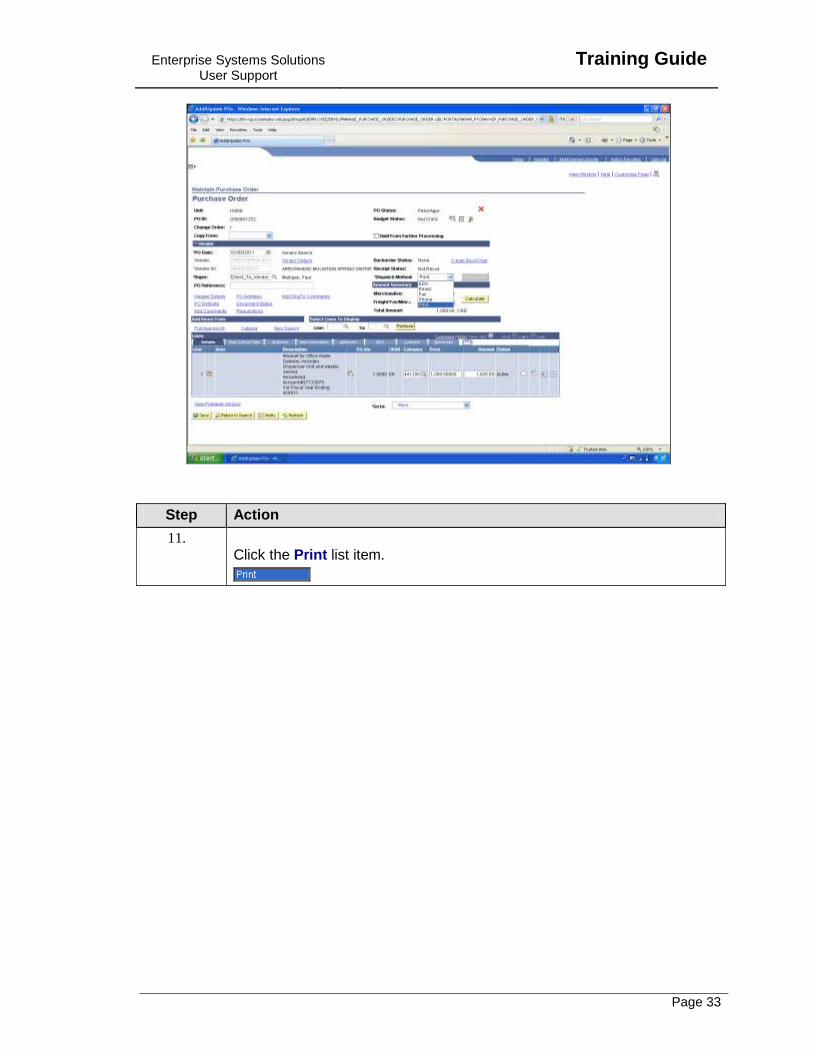
11. Click the Print list item.
Training Guide
Enterprise Systems Solutions User Support
Page 34
Step Action
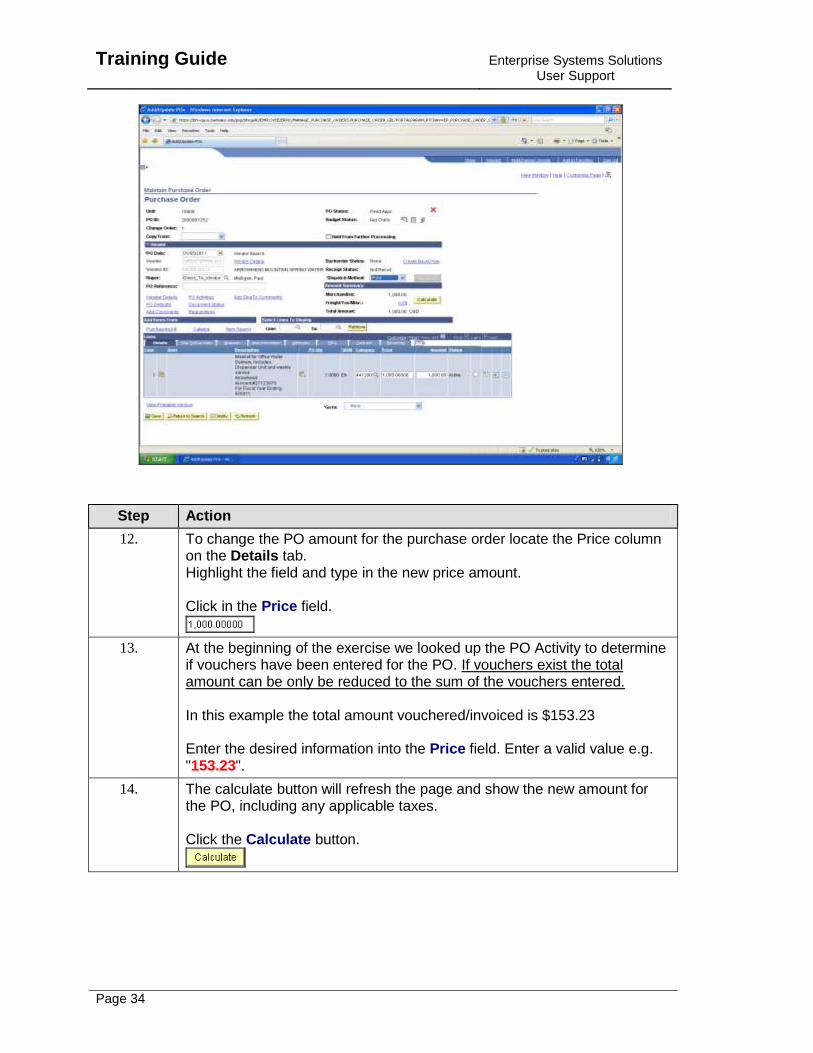
12. To change the PO amount for the purchase order locate the Price column on the Details tab. Highlight the field and type in the new price amount. Click in the Price field.
13. At the beginning of the exercise we looked up the PO Activity to determine if vouchers have been entered for the PO. If vouchers exist the total amount can be only be reduced to the sum of the vouchers entered. In this example the total amount vouchered/invoiced is $153.23 Enter the desired information into the Price field. Enter a valid value e.g. "153.23".
14. The calculate button will refresh the page and show the new amount for the PO, including any applicable taxes. Click the Calculate button.
Enterprise Systems Solutions User Support
Training Guide
Page 35
Step Action
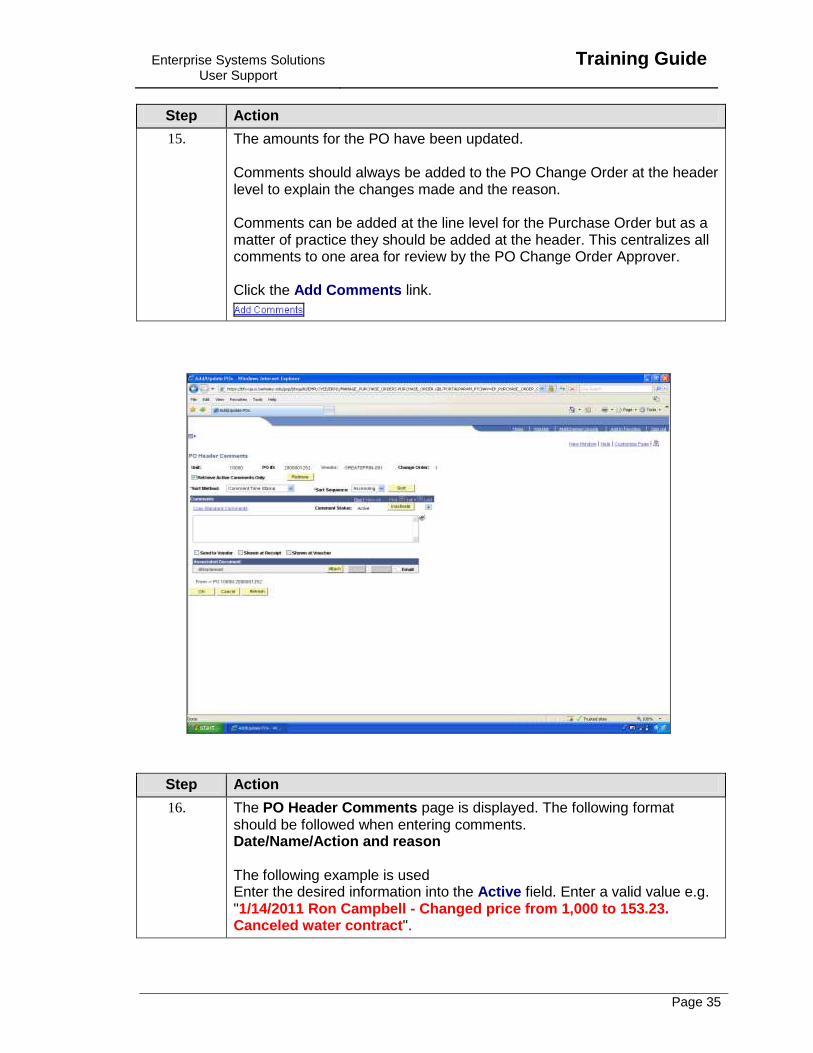
15. The amounts for the PO have been updated. Comments should always be added to the PO Change Order at the header level to explain the changes made and the reason. Comments can be added at the line level for the Purchase Order but as a matter of practice they should be added at the header. This centralizes all comments to one area for review by the PO Change Order Approver. Click the Add Comments link.
Step Action
16. The PO Header Comments page is displayed. The following format should be followed when entering comments. Date/Name/Action and reason The following example is used Enter the desired information into the Active field. Enter a valid value e.g. "1/14/2011 Ron Campbell - Changed price from 1,000 to 153.23. Canceled water contract".
Training Guide
Enterprise Systems Solutions User Support
Page 36
Step Action
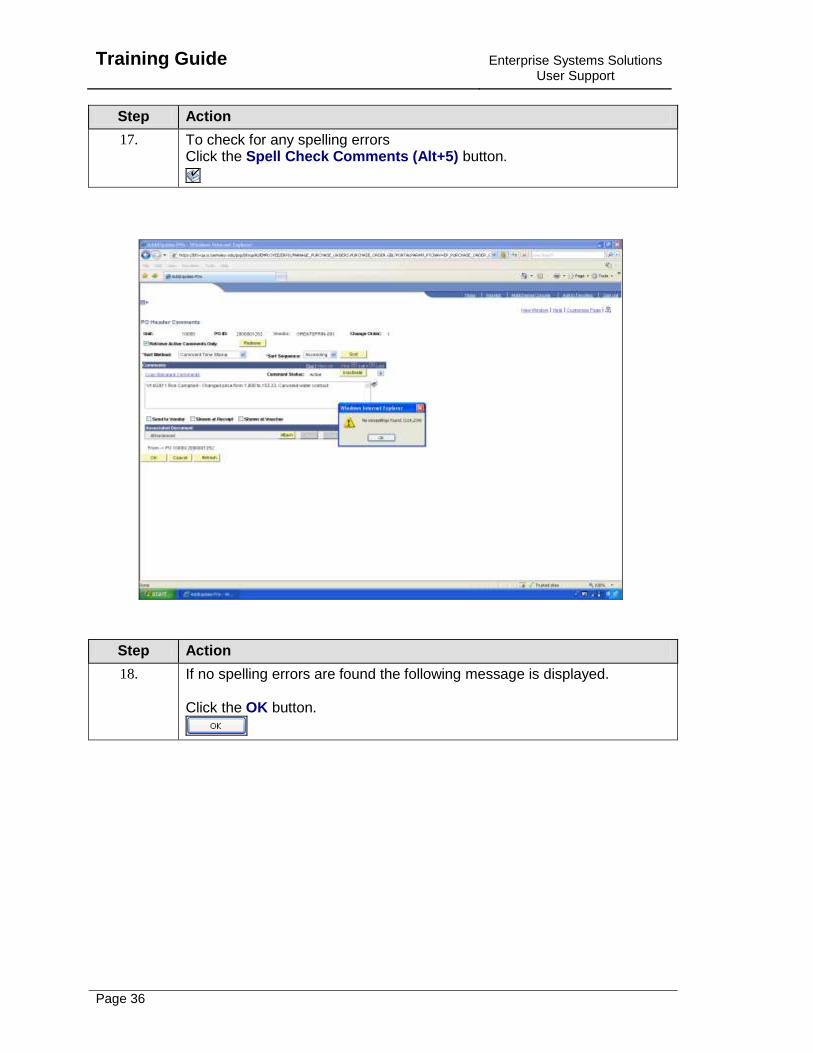
17. To check for any spelling errors Click the Spell Check Comments (Alt+5) button.
Step Action
18. If no spelling errors are found the following message is displayed. Click the OK button.
Enterprise Systems Solutions User Support
Training Guide
Page 37
Step Action
19. Once the comments have been entered in the correct format and detail, the information can be saved. Click the OK button.
Training Guide
Enterprise Systems Solutions User Support
Page 38
Step Action
20. The Purchase Order page is displayed. Note that once comments have been entered the hyperlink now reads Edit Comments. Note: If you are not ready for the PO Change Order to be routed for approval the Hold From Further Processing check box can be used to prevent routing. It must be selected before the change order is saved. Click the Save button.
21. A warning only message is displayed that warns of a difference between the PO Change order and the original requisition. Click OK to bypass the warning. Click the OK button.
22. The second warning relates to a value adjustment page that is not used here at Berkeley. Click OK to bypass the message. Click the OK button.
Enterprise Systems Solutions User Support
Training Guide
Page 39
Step Action
23. The Workflow pop up is displayed when the change order is successfully saved. Note: New change orders are routed to the approvers worklist based on the Org Node of the Requisition Requester Click the OK button.
Training Guide
Enterprise Systems Solutions User Support
Page 40
Step Action
24. Click the Return to Main Page link.
25. The Purchase Order page is displayed. Note that the PO Change Order has been assigned a Change Order of 1. Indicating that 1 change order has taken place for this PO and the PO Status is now Pending Approval.
26. This completes the exercise End of Procedure.
Change PO Quantity without Vouchers
The following topic illustrates how a PO Change Order is created to change the quantity when preexisting vouchers do not exist for the PO. To determine if vouchers currently exist for a PO please review topic "Look Up Existing Vouchers for a PO". Note: When vouchers do not exist for a PO the change order process followed to increase or decrease the quantity lines for a PO are the same.
Procedure
Enterprise Systems Solutions User Support
Training Guide
Page 41
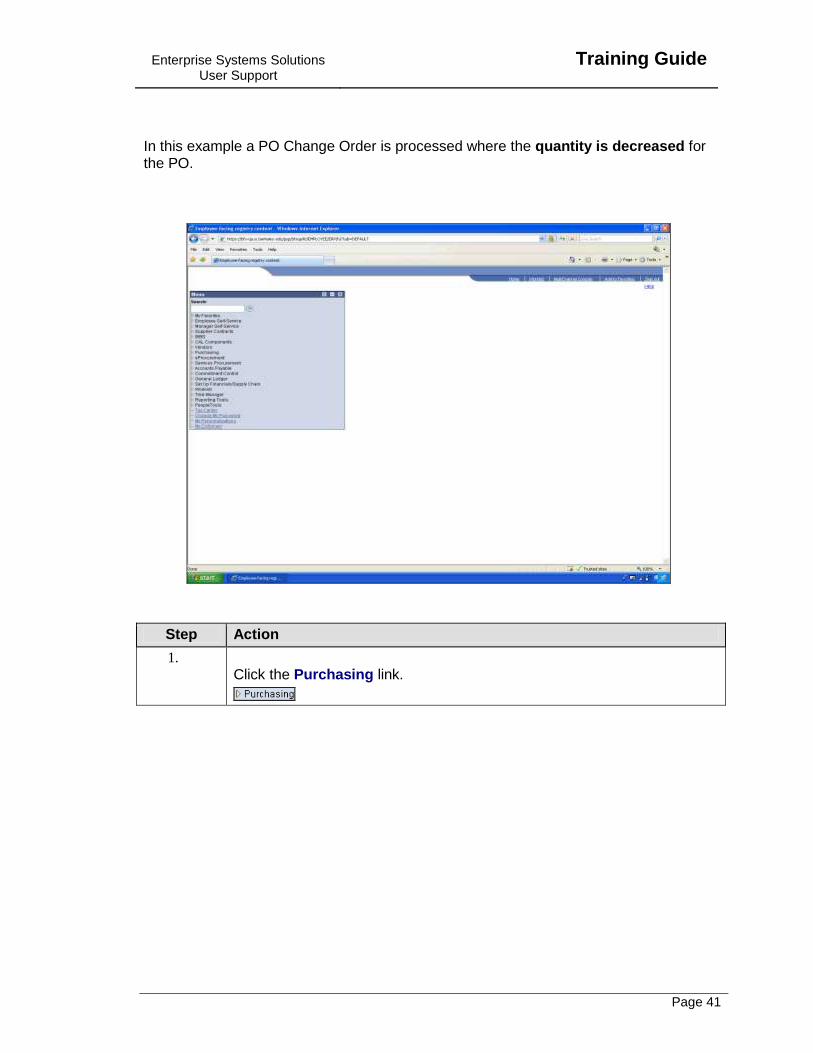
In this example a PO Change Order is processed where the quantity is decreased for the PO.
Step Action
1. Click the Purchasing link.

Training Guide
Enterprise Systems Solutions User Support
Page 42
Step Action
2. Click the Purchase Orders link.
3. Click the Add/Update POs link.

Enterprise Systems Solutions User Support
Training Guide
Page 43
Step Action
4. Enter the desired information into the PO ID: field. Enter a valid value e.g. "2000001245".
5. Click the Search button.
Training Guide
Enterprise Systems Solutions User Support
Page 44
Step Action
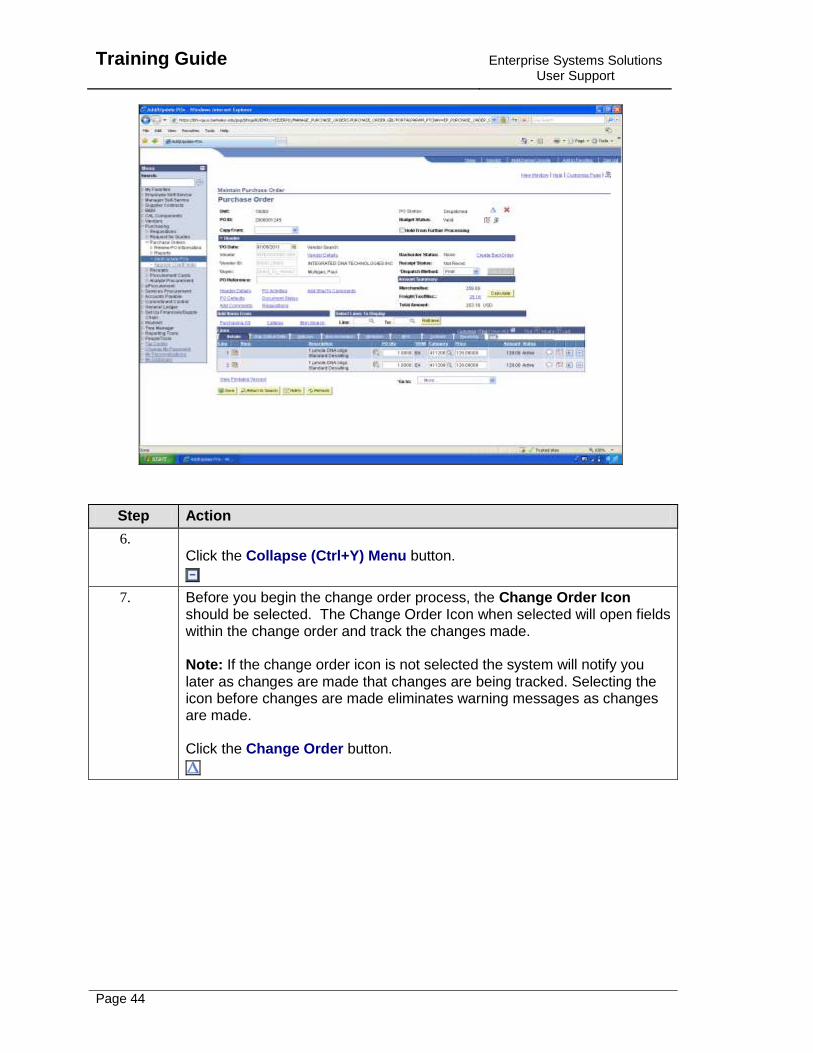
6. Click the Collapse (Ctrl+Y) Menu button.
7. Before you begin the change order process, the Change Order Icon should be selected. The Change Order Icon when selected will open fields within the change order and track the changes made. Note: If the change order icon is not selected the system will notify you later as changes are made that changes are being tracked. Selecting the icon before changes are made eliminates warning messages as changes are made. Click the Change Order button.

Enterprise Systems Solutions User Support
Training Guide
Page 45
Step Action
8. Once the Change Order icon has been selected it will disappear from the purchase order page. The next step immediately following is to select the Finalize Document icon. This process when ran closes the requisition and eliminates the possibility of the requisition re-sourcing to another Purchase Order. Click the Finalize Document button.
9. A warning message is displayed that all eligible distributions for the PO will be finalized. You should always select yes. Click the Yes button.
10. You are returned to the Purchase Order page. The Dispatch Method for the PO should be selected Click the Dispatch Method list.
11. The value displayed for the Dispatch Method on the PO is defaulted from vendor set-up. The method may need to be changed depending on the need to send PO information to the vendor. 1) If the vendor does not require PO information to be sent, then select: Print - the print option for PO Change Orders will not print the PO. 2) If the vendor does require that PO information is sent, then select: Email - the email option will send a copy of the official PO to the vendor via email. The email dispatch method is NOT available for After the Fact or Subaward POs. Note: If the vendor does not accept email or an Official PO copy is needed for printing please refer to the Topic - "Print or Email PO Change Order" in the UPK under Purchasing or the Quick Reference Guide" for detailed instruction. Do no not use the following values: EDX - not used for PO Change Orders Fax - not used for PO Change Orders Phone - not used for PO Change Orders
Training Guide
Enterprise Systems Solutions User Support
Page 46
Step Action
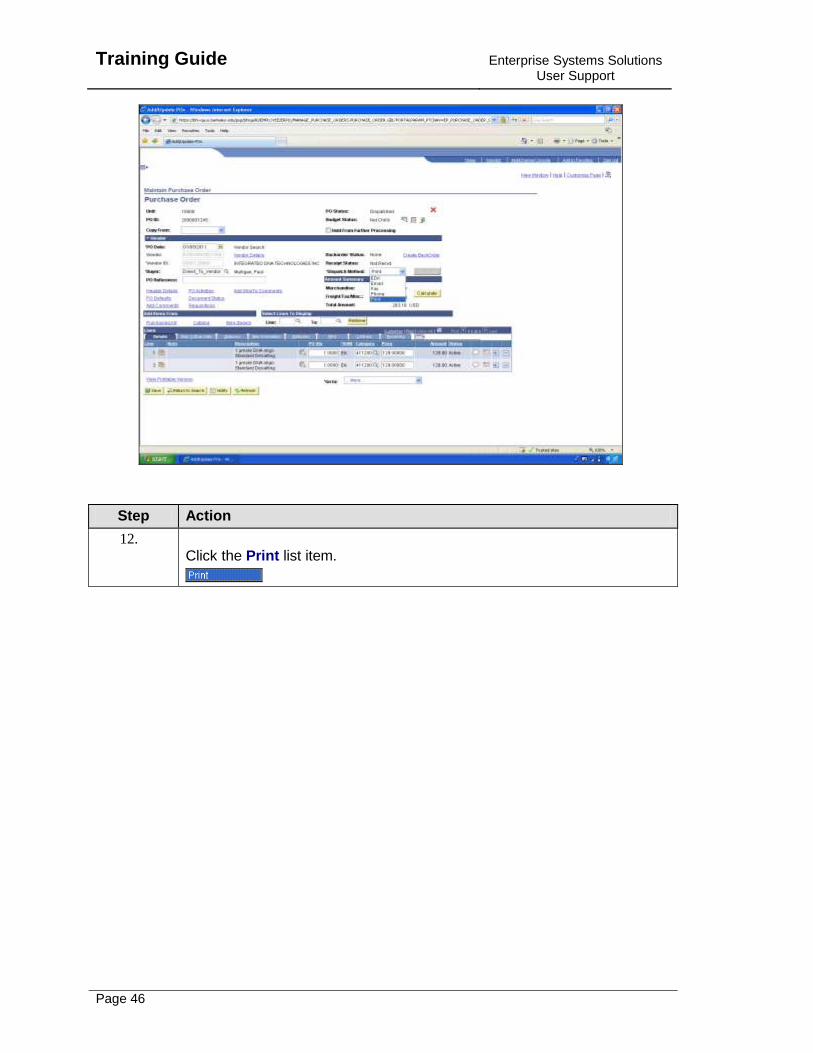
12. Click the Print list item.
Enterprise Systems Solutions User Support
Training Guide
Page 47
Step Action
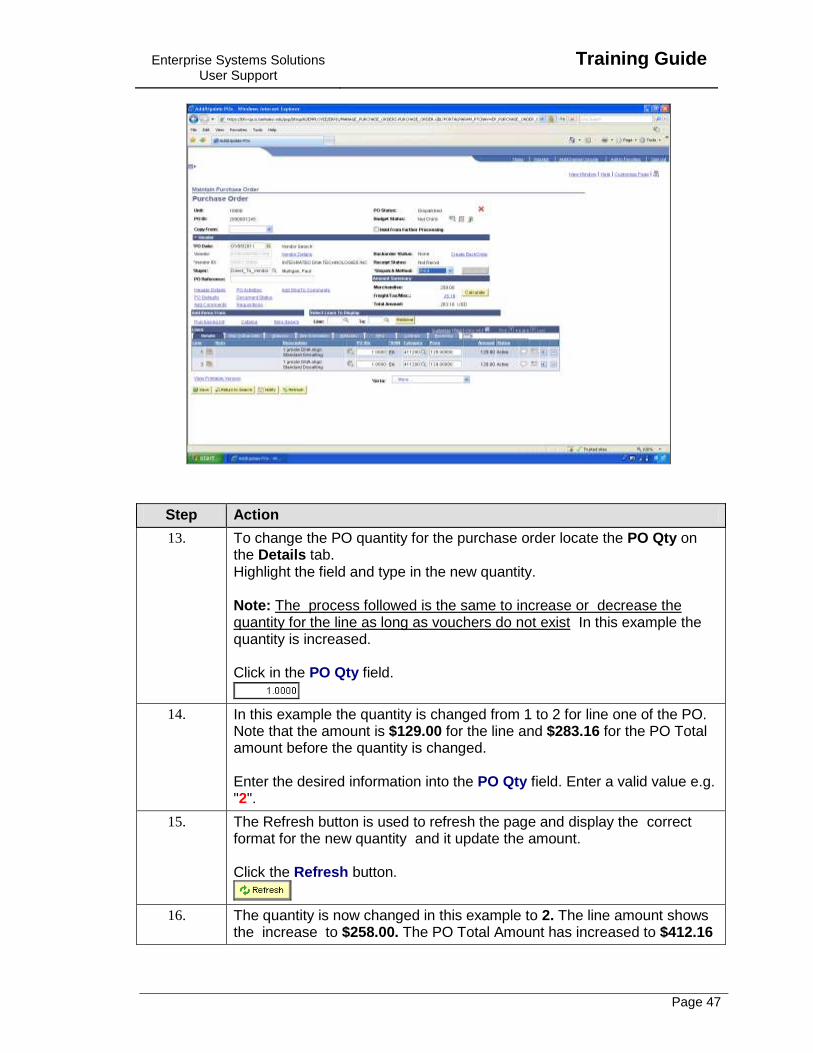
13. To change the PO quantity for the purchase order locate the PO Qty on the Details tab. Highlight the field and type in the new quantity. Note: The process followed is the same to increase or decrease the quantity for the line as long as vouchers do not exist In this example the quantity is increased. Click in the PO Qty field.
14. In this example the quantity is changed from 1 to 2 for line one of the PO. Note that the amount is $129.00 for the line and $283.16 for the PO Total amount before the quantity is changed. Enter the desired information into the PO Qty field. Enter a valid value e.g. "2".
15. The Refresh button is used to refresh the page and display the correct format for the new quantity and it update the amount. Click the Refresh button.
16. The quantity is now changed in this example to 2. The line amount shows the increase to $258.00. The PO Total Amount has increased to $412.16
Training Guide
Enterprise Systems Solutions User Support
Page 48
Step Action
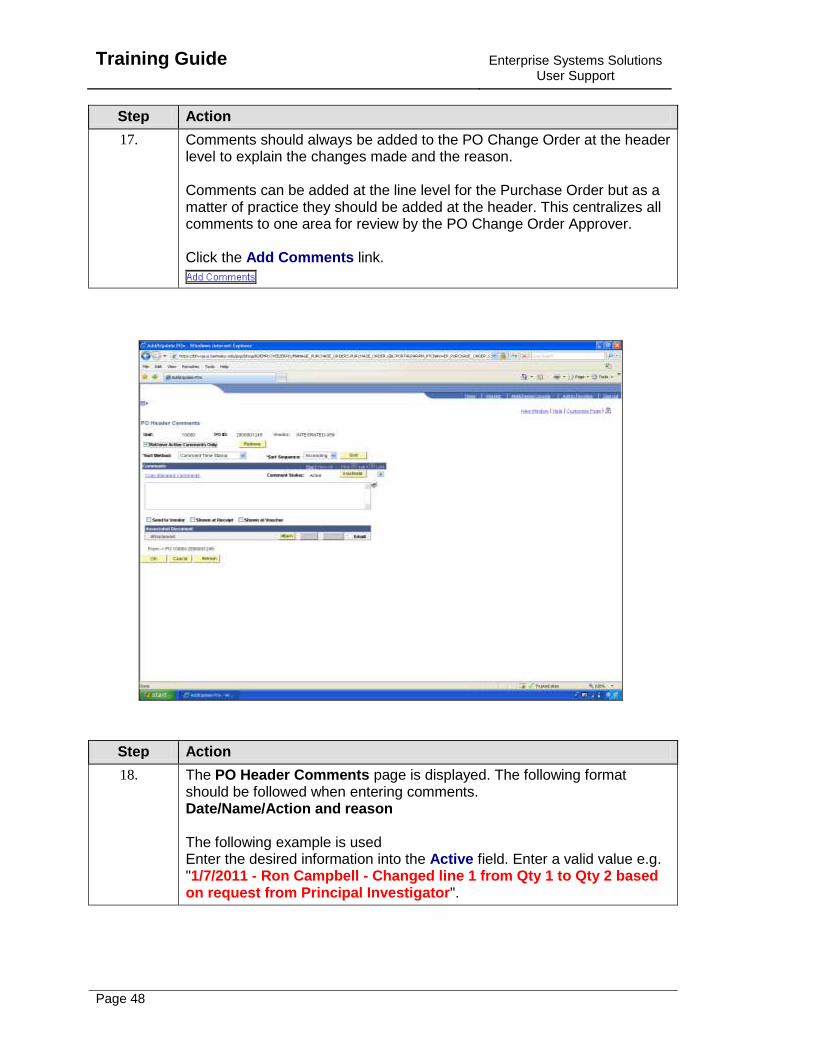
17. Comments should always be added to the PO Change Order at the header level to explain the changes made and the reason. Comments can be added at the line level for the Purchase Order but as a matter of practice they should be added at the header. This centralizes all comments to one area for review by the PO Change Order Approver. Click the Add Comments link.
Step Action
18. The PO Header Comments page is displayed. The following format should be followed when entering comments. Date/Name/Action and reason The following example is used Enter the desired information into the Active field. Enter a valid value e.g. "1/7/2011 - Ron Campbell - Changed line 1 from Qty 1 to Qty 2 based on request from Principal Investigator".
Enterprise Systems Solutions User Support
Training Guide
Page 49
Step Action
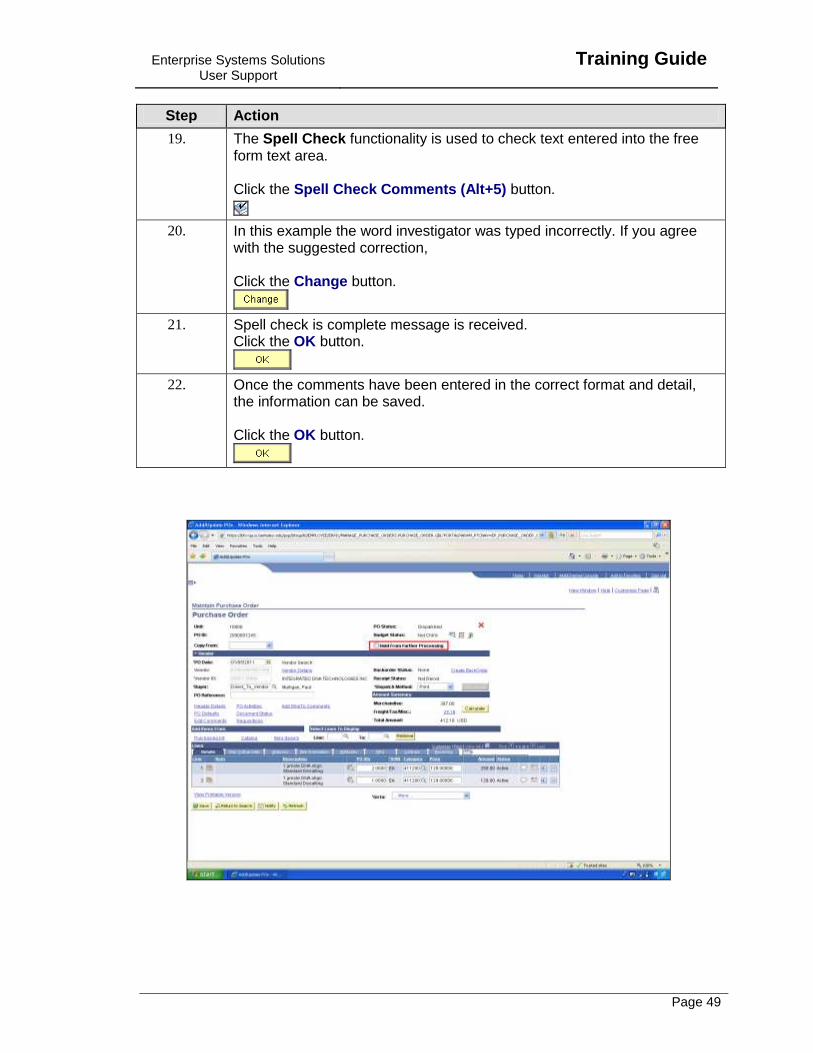
19. The Spell Check functionality is used to check text entered into the free form text area. Click the Spell Check Comments (Alt+5) button.
20. In this example the word investigator was typed incorrectly. If you agree with the suggested correction, Click the Change button.
21. Spell check is complete message is received. Click the OK button.
22. Once the comments have been entered in the correct format and detail, the information can be saved. Click the OK button.
Training Guide
Enterprise Systems Solutions User Support
Page 50
Step Action
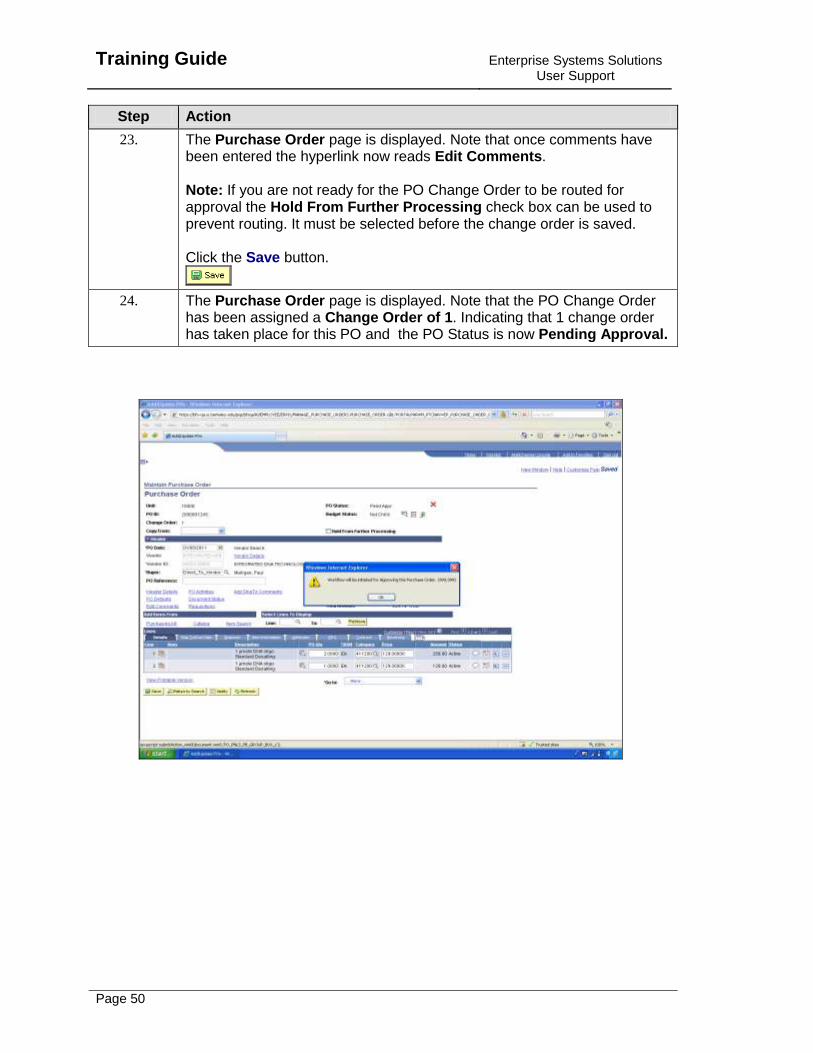
23. The Purchase Order page is displayed. Note that once comments have been entered the hyperlink now reads Edit Comments. Note: If you are not ready for the PO Change Order to be routed for approval the Hold From Further Processing check box can be used to prevent routing. It must be selected before the change order is saved. Click the Save button.
24. The Purchase Order page is displayed. Note that the PO Change Order has been assigned a Change Order of 1. Indicating that 1 change order has taken place for this PO and the PO Status is now Pending Approval.
Enterprise Systems Solutions User Support
Training Guide
Page 51
Step Action
25. The Workflow pop up is displayed when the change order is successfully saved. Note: New change orders are routed to the approvers worklist based on the Org Node of the Requisition Requester. Click the OK button.
26. This completes the exercise End of Procedure.
Change PO Quantity with Vouchers
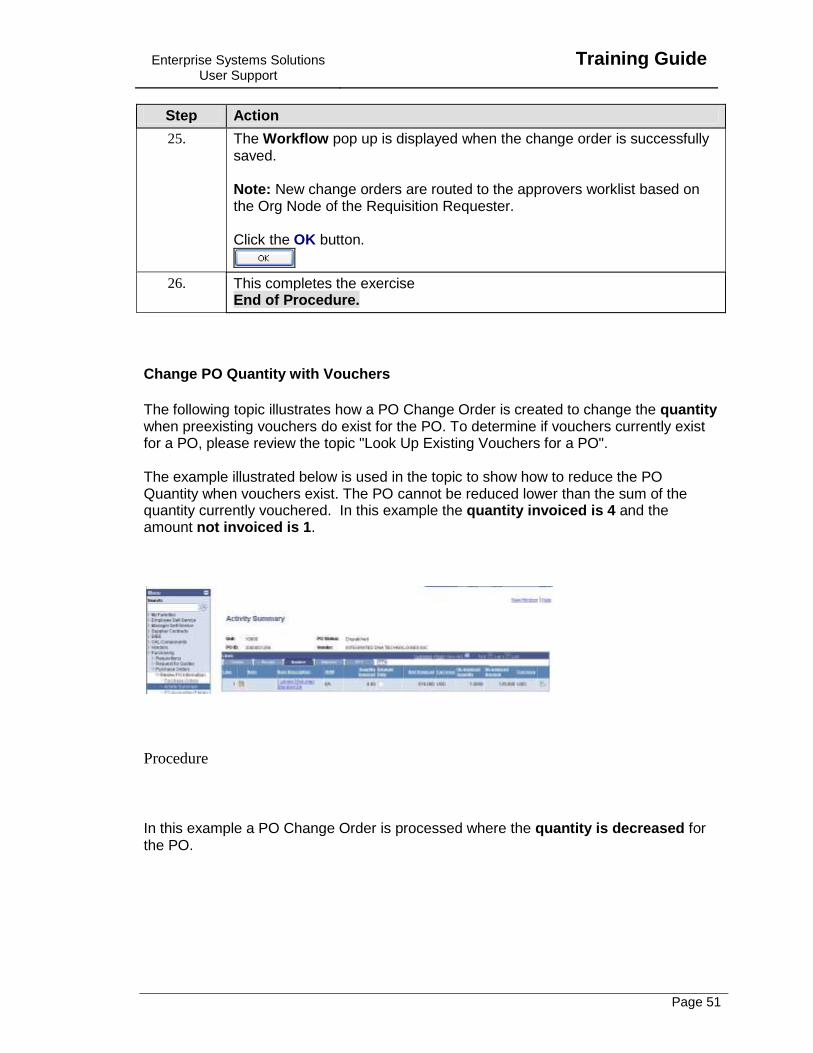
The following topic illustrates how a PO Change Order is created to change the quantity when preexisting vouchers do exist for the PO. To determine if vouchers currently exist for a PO, please review the topic "Look Up Existing Vouchers for a PO". The example illustrated below is used in the topic to show how to reduce the PO Quantity when vouchers exist. The PO cannot be reduced lower than the sum of the quantity currently vouchered. In this example the quantity invoiced is 4 and the amount not invoiced is 1.
Procedure
In this example a PO Change Order is processed where the quantity is decreased for the PO.
Training Guide
Enterprise Systems Solutions User Support
Page 52
Step Action
1. Click the Purchasing link.
Enterprise Systems Solutions User Support
Training Guide
Page 53
Step Action
2. Click the Purchase Orders link.
3. Click the Add/Update POs link.
Training Guide
Enterprise Systems Solutions User Support
Page 54
Step Action
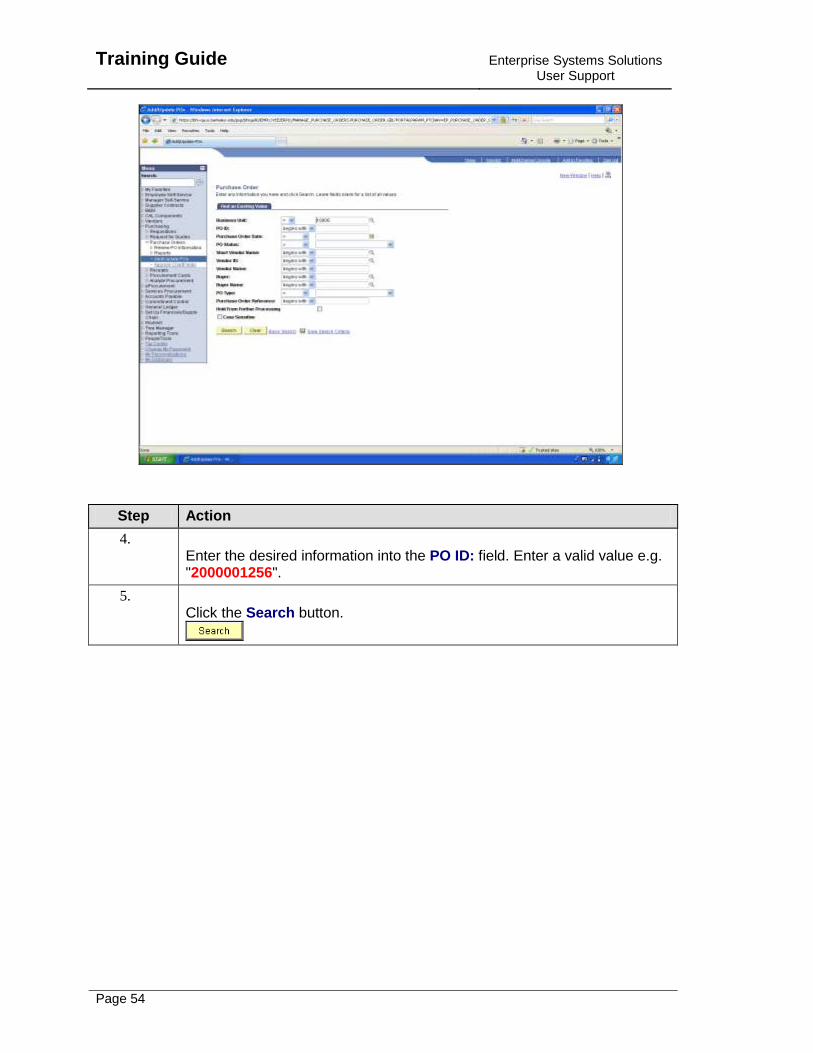
4. Enter the desired information into the PO ID: field. Enter a valid value e.g. "2000001256".
5. Click the Search button.
Enterprise Systems Solutions User Support
Training Guide
Page 55
Step Action
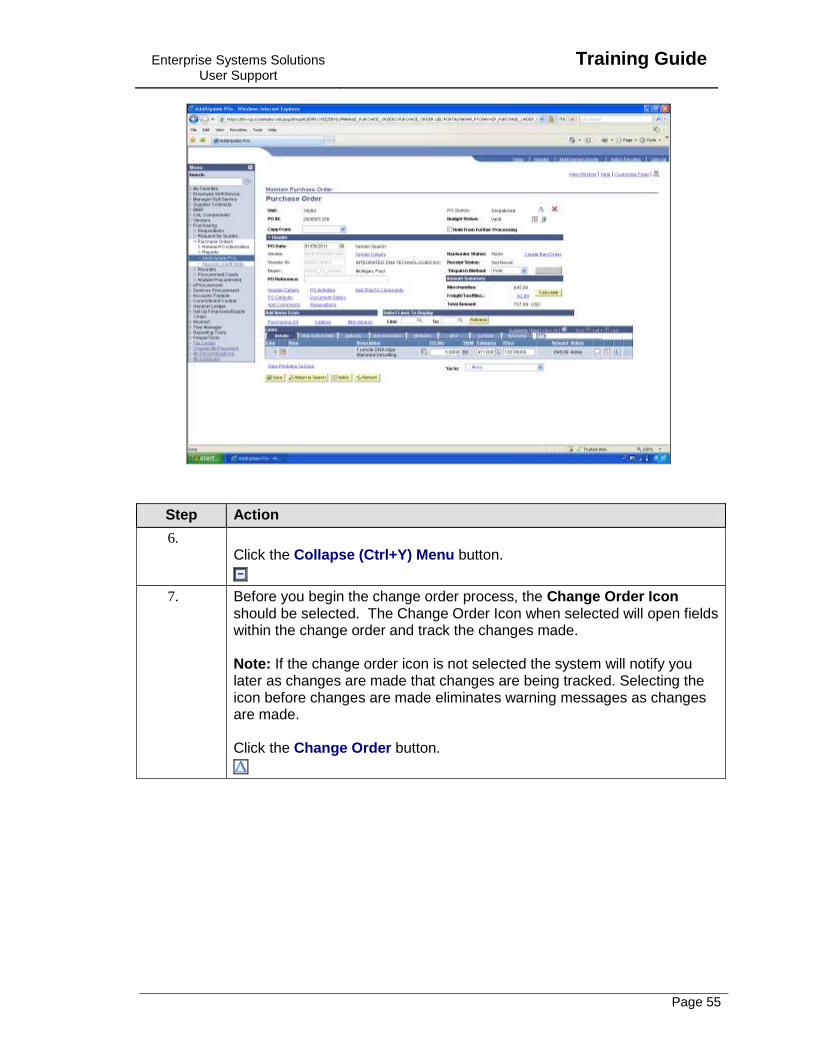
6. Click the Collapse (Ctrl+Y) Menu button.
7. Before you begin the change order process, the Change Order Icon should be selected. The Change Order Icon when selected will open fields within the change order and track the changes made. Note: If the change order icon is not selected the system will notify you later as changes are made that changes are being tracked. Selecting the icon before changes are made eliminates warning messages as changes are made. Click the Change Order button.
Training Guide
Enterprise Systems Solutions User Support
Page 56
Step Action
8. Once the Change Order icon has been selected it will disappear from the purchase order page. The next step immediately following is to select the Finalize Document icon. This process when ran closes the requisition and eliminates the possibility of the requisition re-sourcing to another Purchase Order. Click the Finalize Document button.
9. A warning message is displayed that all eligible distributions for the PO will be finalized. You should always select yes. Click the Yes button.
10. You are returned to the Purchase Order page. The Dispatch Method for the PO should be selected Click the Dispatch Method list.
11. The value displayed for the Dispatch Method on the PO is defaulted from vendor set-up. The method may need to be changed depending on the need to send PO information to the vendor. 1) If the vendor does not require PO information to be sent, then select: Print - the print option for PO Change Orders will not print the PO. 2) If the vendor does require that PO information is sent, then select: Email - the email option will send a copy of the official PO to the vendor via email. The email dispatch method is NOT available for After the Fact or Subaward POs. Note: If the vendor does not accept email or an Official PO copy is needed for printing please refer to the Topic - "Print or Email PO Change Order" in the UPK under Purchasing or the Quick Reference Guide" for detailed instruction. Do no not use the following values: EDX - not used for PO Change Orders Fax - not used for PO Change Orders Phone - not used for PO Change Orders
Enterprise Systems Solutions User Support
Training Guide
Page 57
Step Action
12. Click the Print list item.
Training Guide
Enterprise Systems Solutions User Support
Page 58
Step Action
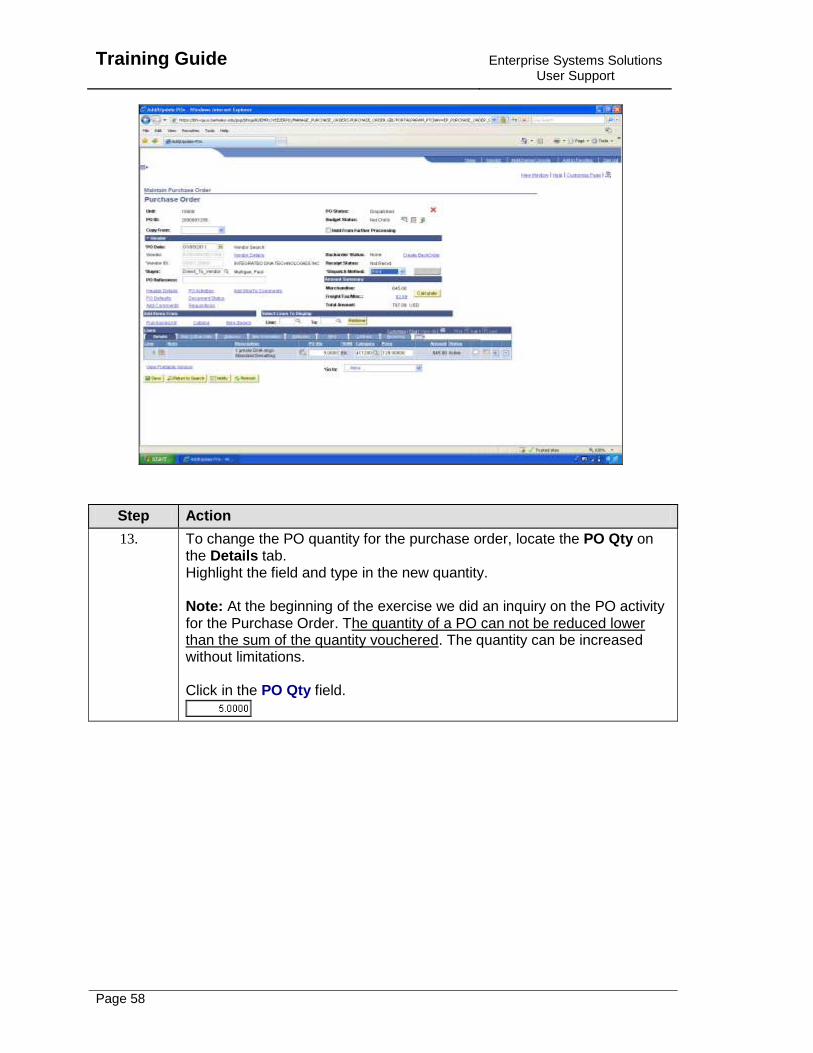
13. To change the PO quantity for the purchase order, locate the PO Qty on the Details tab. Highlight the field and type in the new quantity. Note: At the beginning of the exercise we did an inquiry on the PO activity for the Purchase Order. The quantity of a PO can not be reduced lower than the sum of the quantity vouchered. The quantity can be increased without limitations. Click in the PO Qty field.
Enterprise Systems Solutions User Support
Training Guide
Page 59
Step Action
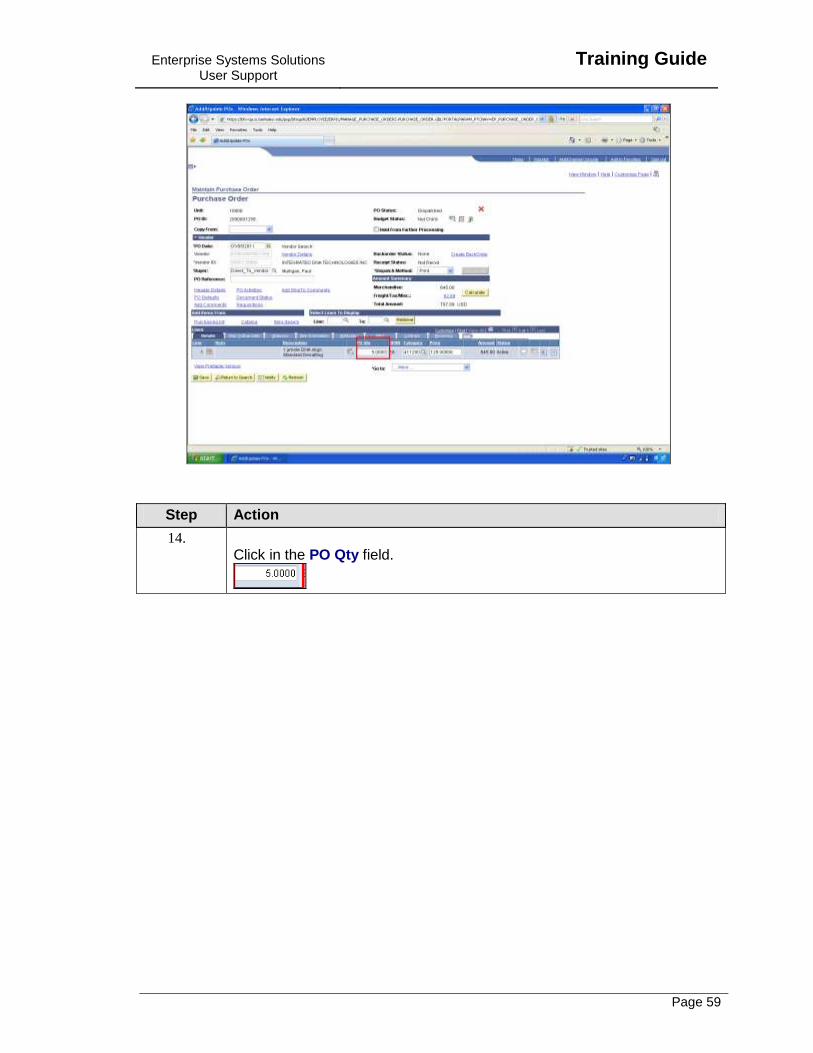
14. Click in the PO Qty field.
Training Guide
Enterprise Systems Solutions User Support
Page 60
Step Action
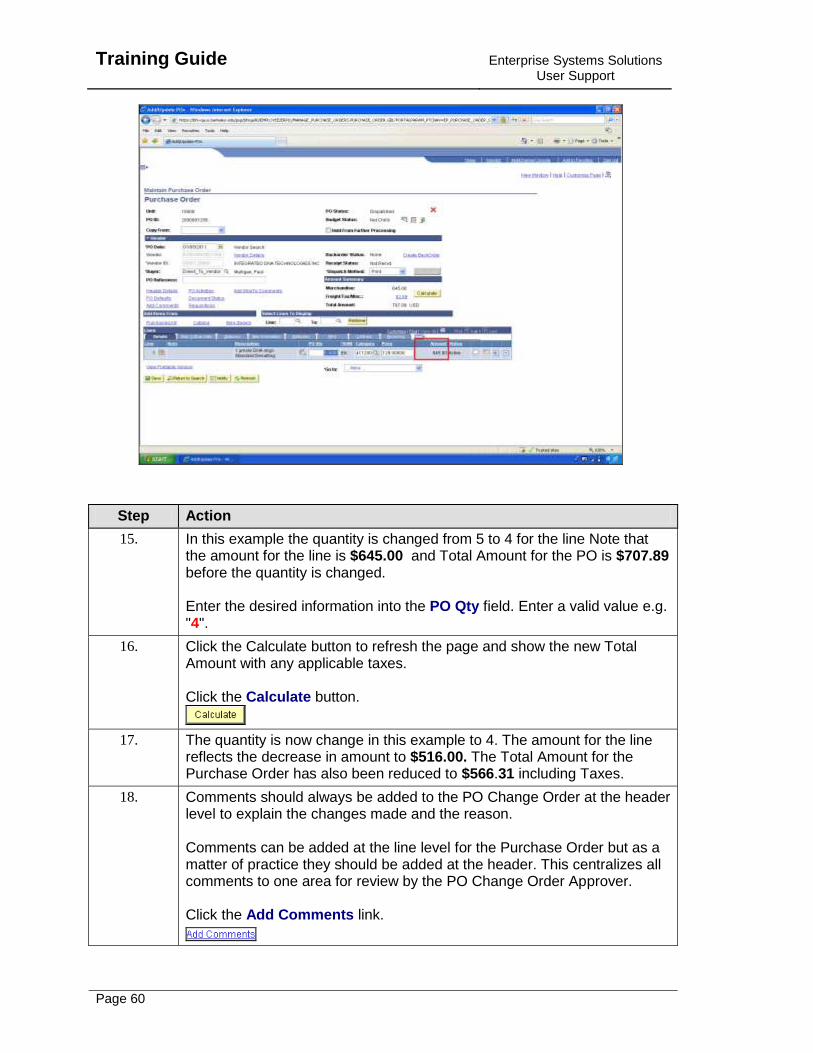
15. In this example the quantity is changed from 5 to 4 for the line Note that the amount for the line is $645.00 and Total Amount for the PO is $707.89 before the quantity is changed. Enter the desired information into the PO Qty field. Enter a valid value e.g. "4".
16. Click the Calculate button to refresh the page and show the new Total Amount with any applicable taxes. Click the Calculate button.
17. The quantity is now change in this example to 4. The amount for the line reflects the decrease in amount to $516.00. The Total Amount for the Purchase Order has also been reduced to $566.31 including Taxes.
18. Comments should always be added to the PO Change Order at the header level to explain the changes made and the reason. Comments can be added at the line level for the Purchase Order but as a matter of practice they should be added at the header. This centralizes all comments to one area for review by the PO Change Order Approver. Click the Add Comments link.
Enterprise Systems Solutions User Support
Training Guide
Page 61
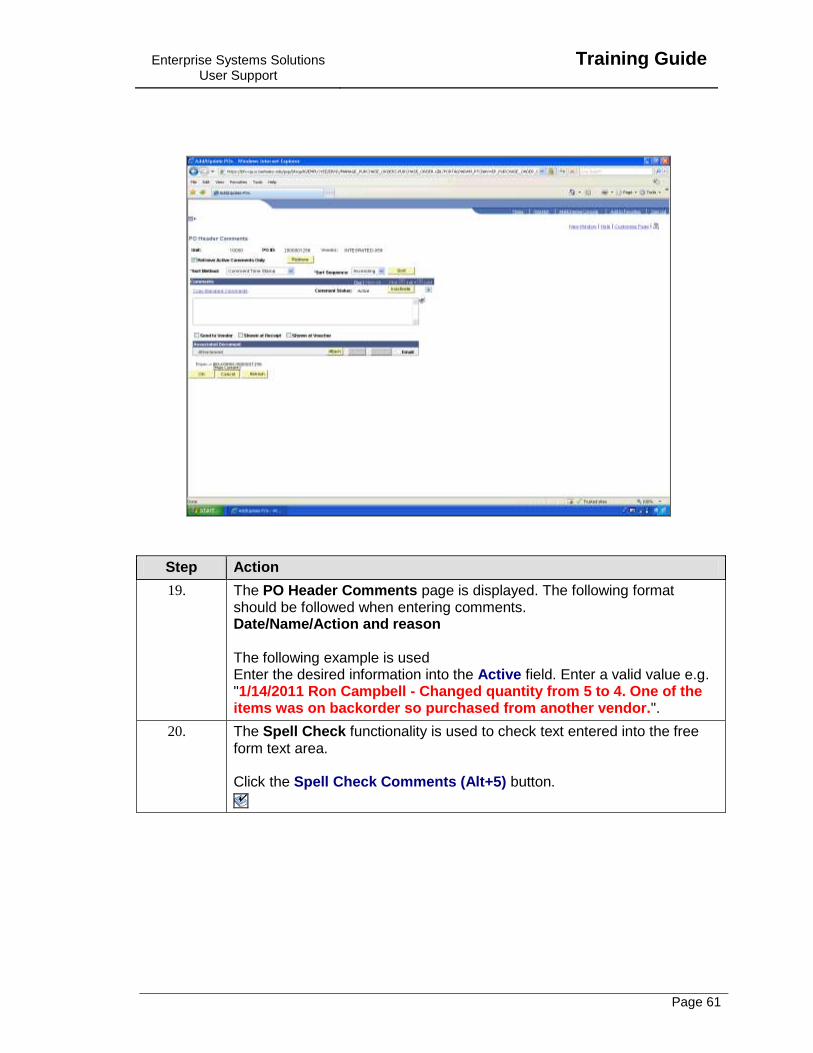
Step Action
19. The PO Header Comments page is displayed. The following format should be followed when entering comments. Date/Name/Action and reason The following example is used Enter the desired information into the Active field. Enter a valid value e.g. "1/14/2011 Ron Campbell - Changed quantity from 5 to 4. One of the items was on backorder so purchased from another vendor.".
20. The Spell Check functionality is used to check text entered into the free form text area. Click the Spell Check Comments (Alt+5) button.

Training Guide
Enterprise Systems Solutions User Support
Page 62
Step Action
21. if no errors are found the No misspellings pop up is generated. Click the OK button.
Enterprise Systems Solutions User Support
Training Guide
Page 63
Step Action
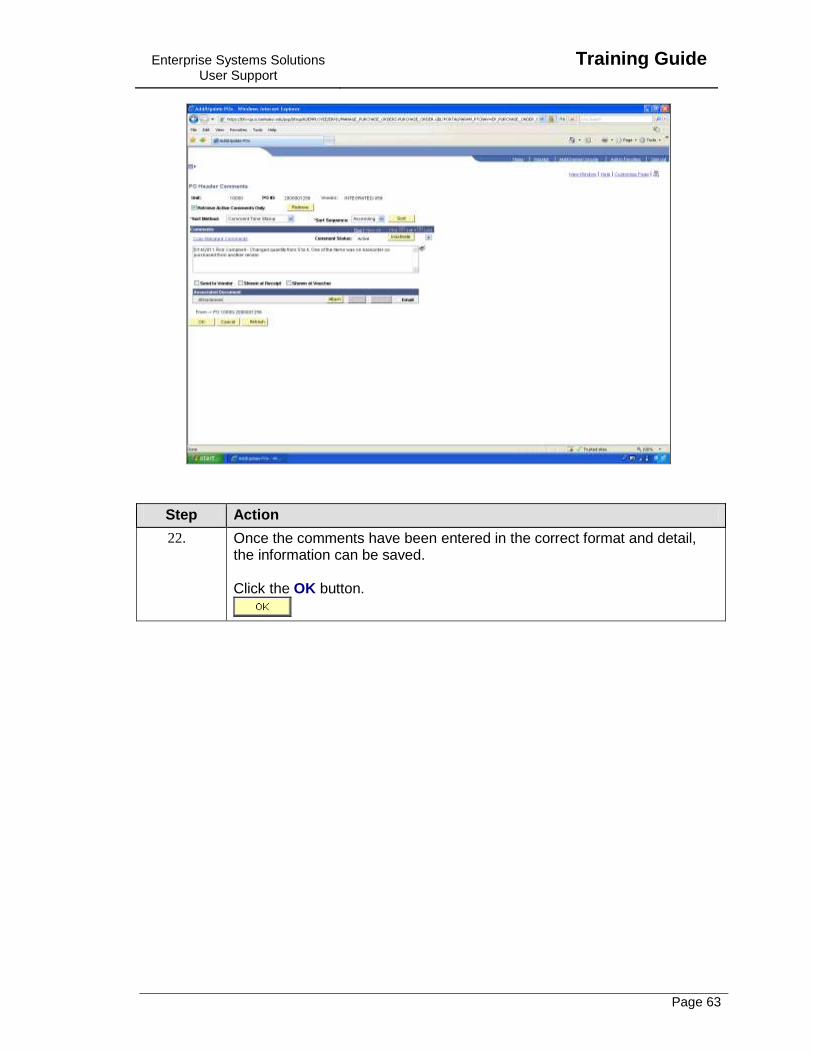
22. Once the comments have been entered in the correct format and detail, the information can be saved. Click the OK button.
Training Guide
Enterprise Systems Solutions User Support
Page 64
Step Action
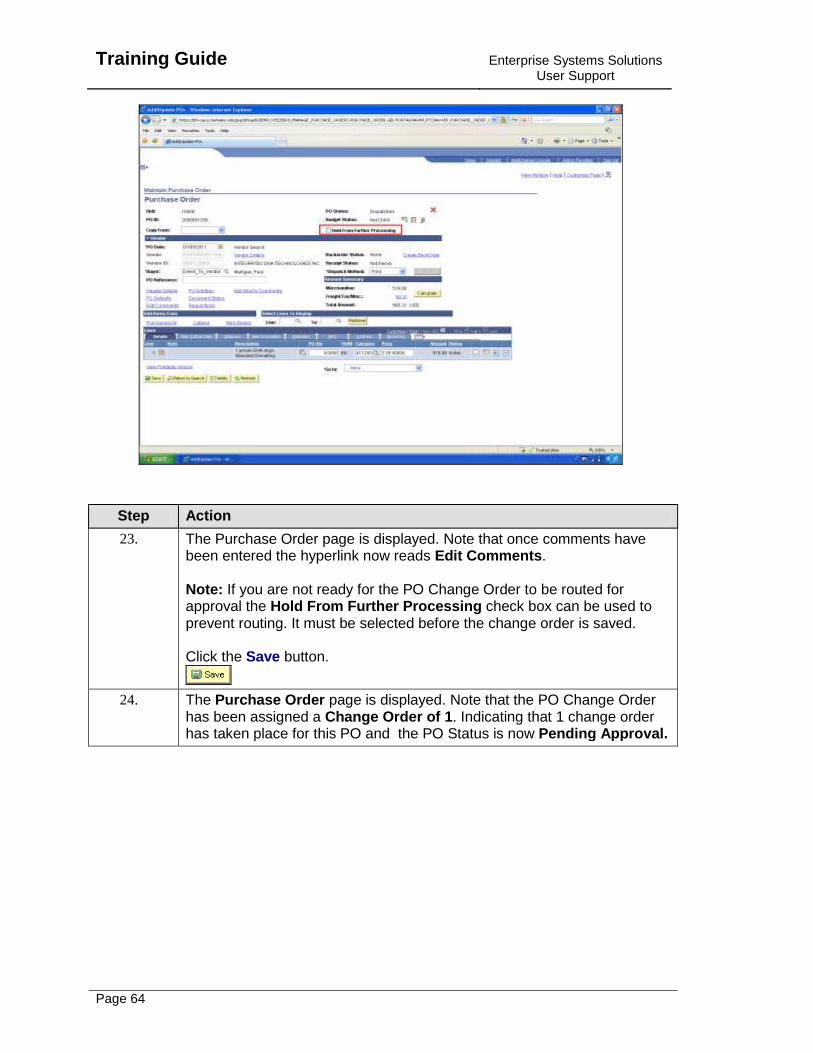
23. The Purchase Order page is displayed. Note that once comments have been entered the hyperlink now reads Edit Comments. Note: If you are not ready for the PO Change Order to be routed for approval the Hold From Further Processing check box can be used to prevent routing. It must be selected before the change order is saved. Click the Save button.
24. The Purchase Order page is displayed. Note that the PO Change Order has been assigned a Change Order of 1. Indicating that 1 change order has taken place for this PO and the PO Status is now Pending Approval.
Enterprise Systems Solutions User Support
Training Guide
Page 65
Step Action
25. The Workflow pop up is displayed when the change order is successfully saved. Note: New change orders are routed to the approvers worklist based on the Org Node of the Requisition Requester. Click the OK button.
26. This completes the tutorial End of Procedure.
Change PO Chartstring/Distribution without Vouchers
The following topic illustrates how a PO Change Order is created to change the chartstring when preexisting vouchers do not exist for the PO. To determine if vouchers currently exist for a PO please review topic "Look Up Existing Vouchers for a PO". Note: If vouchers do exist for the PO the chartfields for the PO are grayed and cannot be changed. Follow the "Change Chartstring with Vouchers" topic for resolution.
Training Guide
Enterprise Systems Solutions User Support
Page 66
Procedure
In this example a PO Change Order is processed where the chartstring is changed for the PO.
Step Action
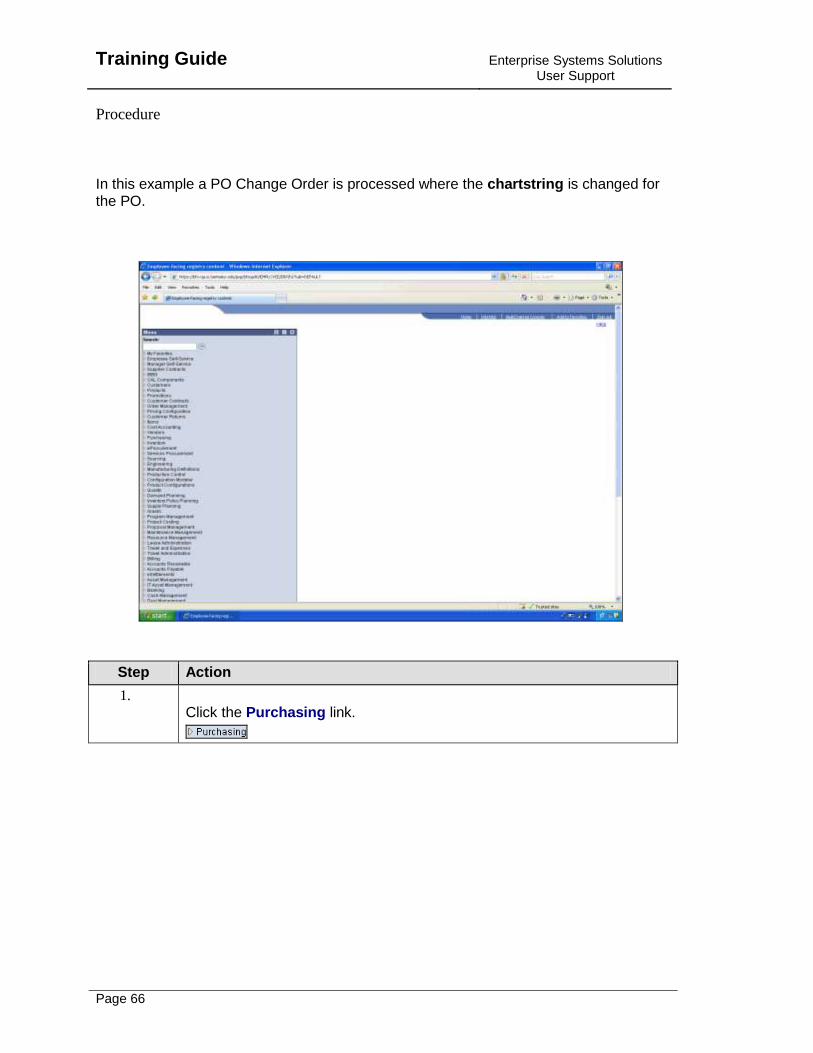
1. Click the Purchasing link.

Enterprise Systems Solutions User Support
Training Guide
Page 67
Step Action
2. Click the Purchase Orders link.
3. Click the Add/Update POs link.
Training Guide
Enterprise Systems Solutions User Support
Page 68
Step Action
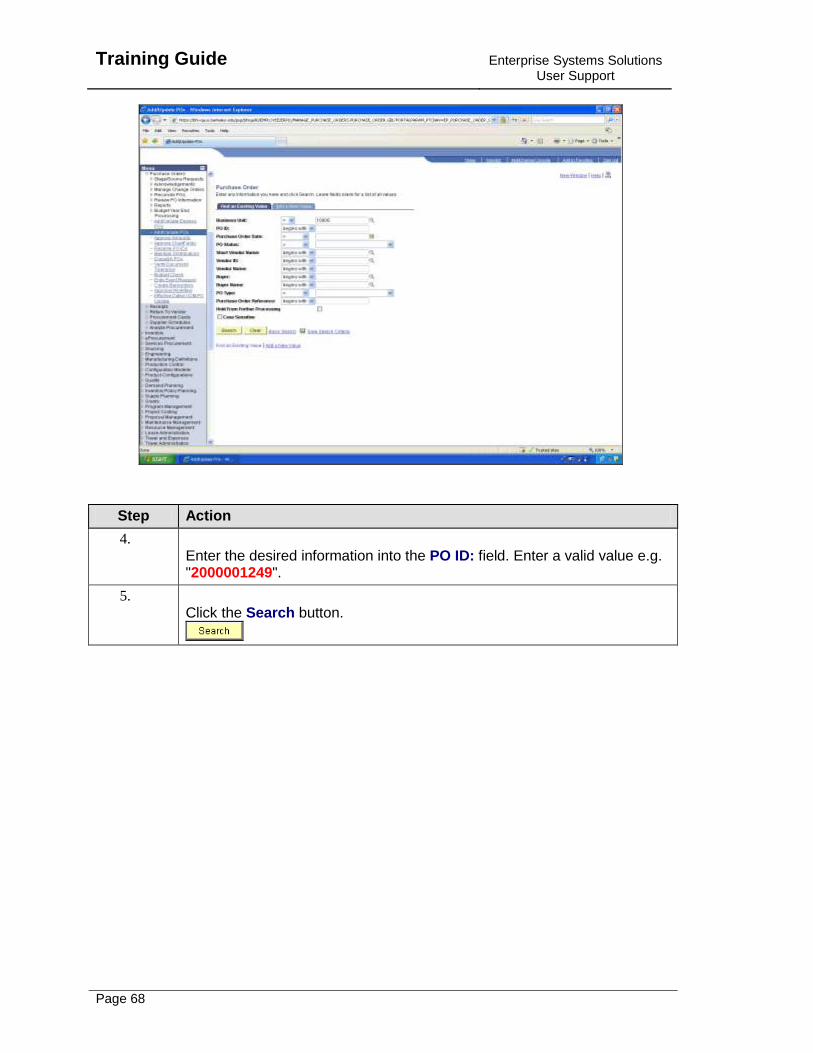
4. Enter the desired information into the PO ID: field. Enter a valid value e.g. "2000001249".
5. Click the Search button.

Enterprise Systems Solutions User Support
Training Guide
Page 69
Step Action
6. Click the Collapse (Ctrl+Y) Menu button.
7. Before you begin the change order process, the Change Order Icon should be selected. The Change Order Icon when selected will open fields within the change order and track the changes made. Note: If the change order icon is not selected the system will notify you later as changes are made that changes are being tracked. Selecting the icon before changes are made eliminates warning messages as changes are made. Click the Change Order button.

Training Guide
Enterprise Systems Solutions User Support
Page 70
Step Action
8. Once the Change Order icon has been selected it will disappear from the purchase order page. The next step immediately following is to select the Finalize Document icon. This process when ran closes the requisition and eliminates the possibility of the requisition re-sourcing to another Purchase Order. Click the Finalize Document button.
9. A warning message is displayed that all eligible distributions for the PO will be finalized. You should always select yes. Click the Yes button.
10. You are returned to the Purchase Order page. The Dispatch Method for the PO should be selected. Click the Dispatch Method list.
11. The value displayed for the Dispatch Method on the PO is defaulted from vendor set-up. The method may need to be changed depending on the need to send PO information to the vendor. 1) If the vendor does not require PO information to be sent, then select: Print - the print option for PO Change Orders will not print the PO. 2) If the vendor does require that PO information is sent, then select: Email - the email option will send a copy of the official PO to the vendor via email. The email dispatch method is NOT available for After the Fact or Subaward POs. Note: If the vendor does not accept email or an Official PO copy is needed for printing please refer to the Topic - "Print or Email PO Change Order" in the UPK under Purchasing or the Quick Reference Guide" for detailed instruction. Do no not use the following values: EDX - not used for PO Change Orders Fax - not used for PO Change Orders Phone - not used for PO Change Orders

Enterprise Systems Solutions User Support
Training Guide
Page 71
Step Action
12. Click the Print list item.

Training Guide
Enterprise Systems Solutions User Support
Page 72
Step Action
13. The Schedule Icon is used to navigate to schedule page for the line where additional change order options are available. Click the Schedule button.
Enterprise Systems Solutions User Support
Training Guide
Page 73
Step Action
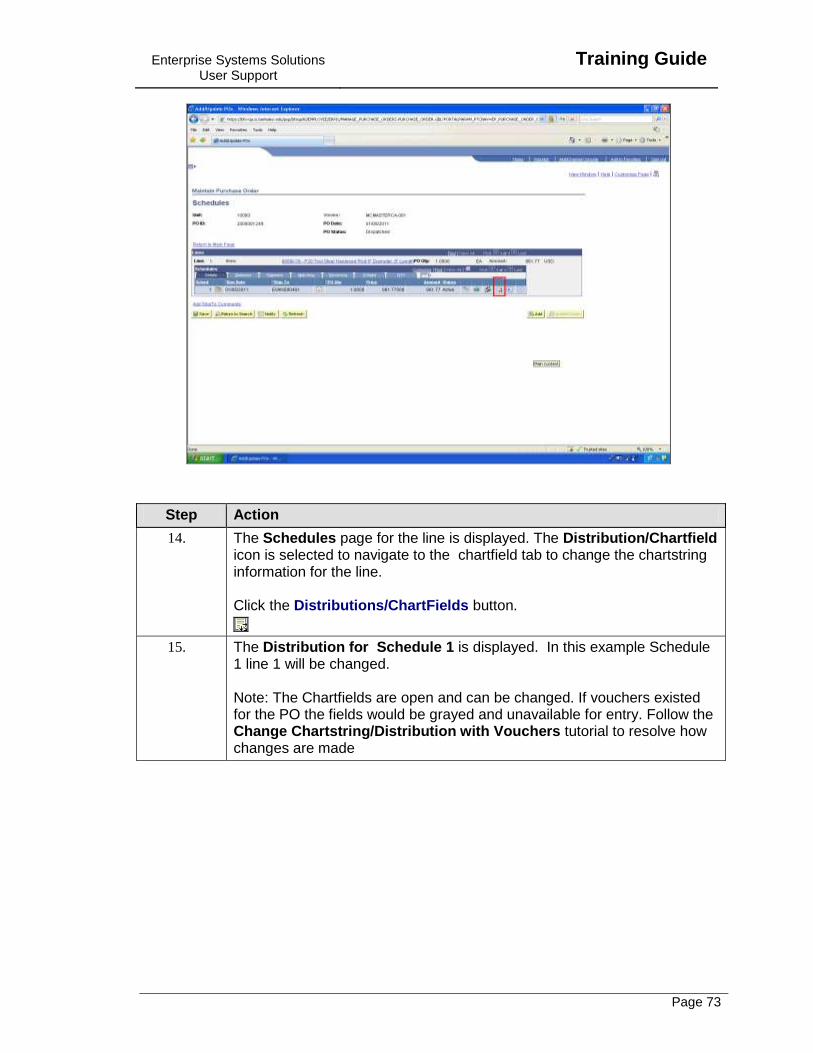
14. The Schedules page for the line is displayed. The Distribution/Chartfield icon is selected to navigate to the chartfield tab to change the chartstring information for the line. Click the Distributions/ChartFields button.
15. The Distribution for Schedule 1 is displayed. In this example Schedule 1 line 1 will be changed. Note: The Chartfields are open and can be changed. If vouchers existed for the PO the fields would be grayed and unavailable for entry. Follow the Change Chartstring/Distribution with Vouchers tutorial to resolve how changes are made
Training Guide
Enterprise Systems Solutions User Support
Page 74
Step Action
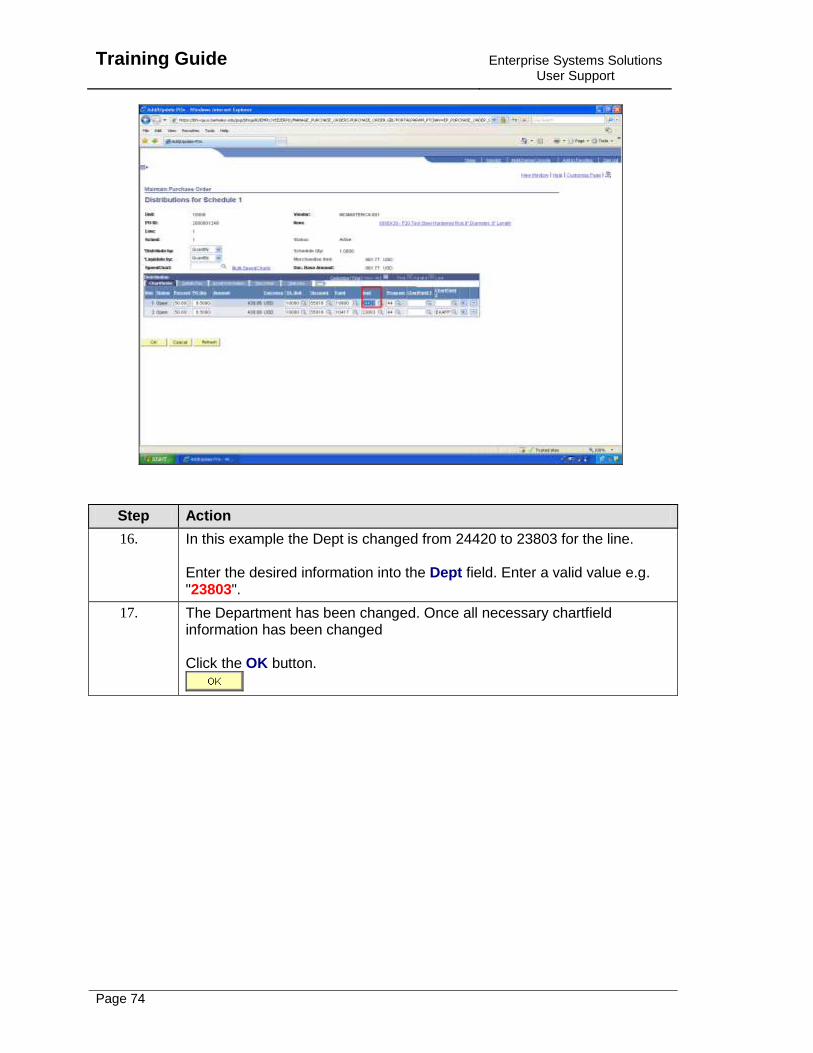
16. In this example the Dept is changed from 24420 to 23803 for the line. Enter the desired information into the Dept field. Enter a valid value e.g. "23803".
17. The Department has been changed. Once all necessary chartfield information has been changed Click the OK button.

Enterprise Systems Solutions User Support
Training Guide
Page 75
Step Action
18. Navigate back to the PO Home page to enter comments related to the change made a on the PO header. Click the Return to Main Page link.
Training Guide
Enterprise Systems Solutions User Support
Page 76
Step Action
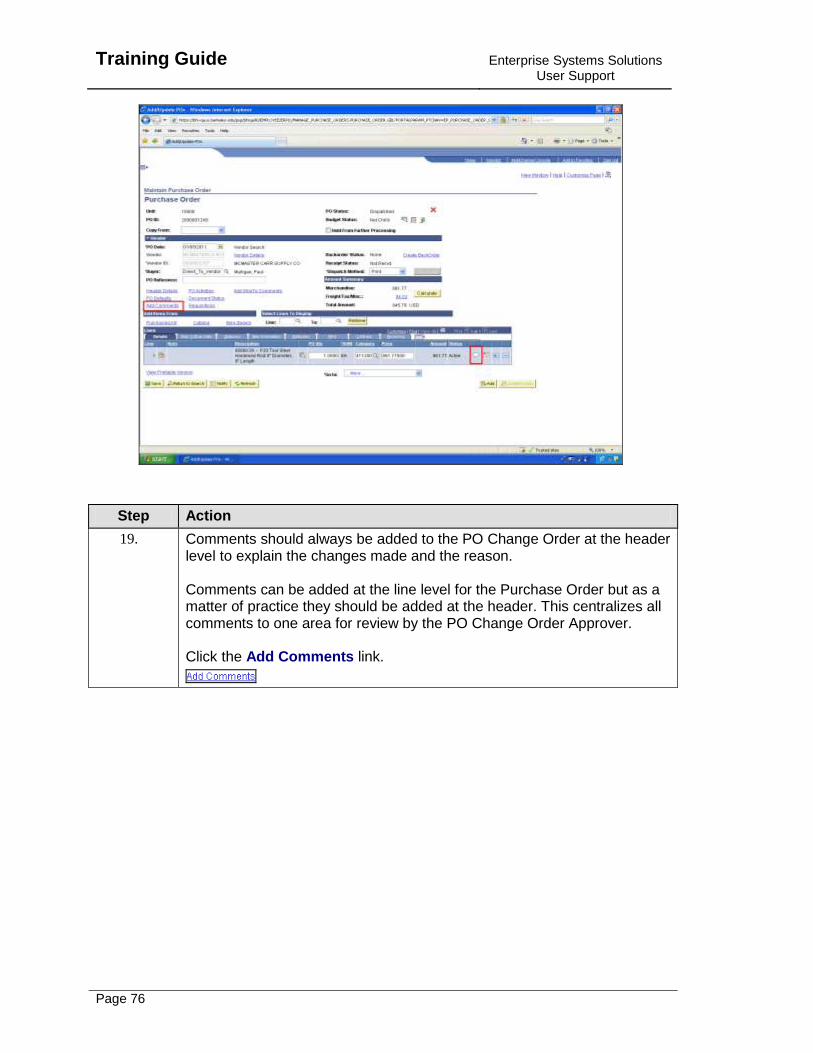
19. Comments should always be added to the PO Change Order at the header level to explain the changes made and the reason. Comments can be added at the line level for the Purchase Order but as a matter of practice they should be added at the header. This centralizes all comments to one area for review by the PO Change Order Approver. Click the Add Comments link.
Enterprise Systems Solutions User Support
Training Guide
Page 77
Step Action
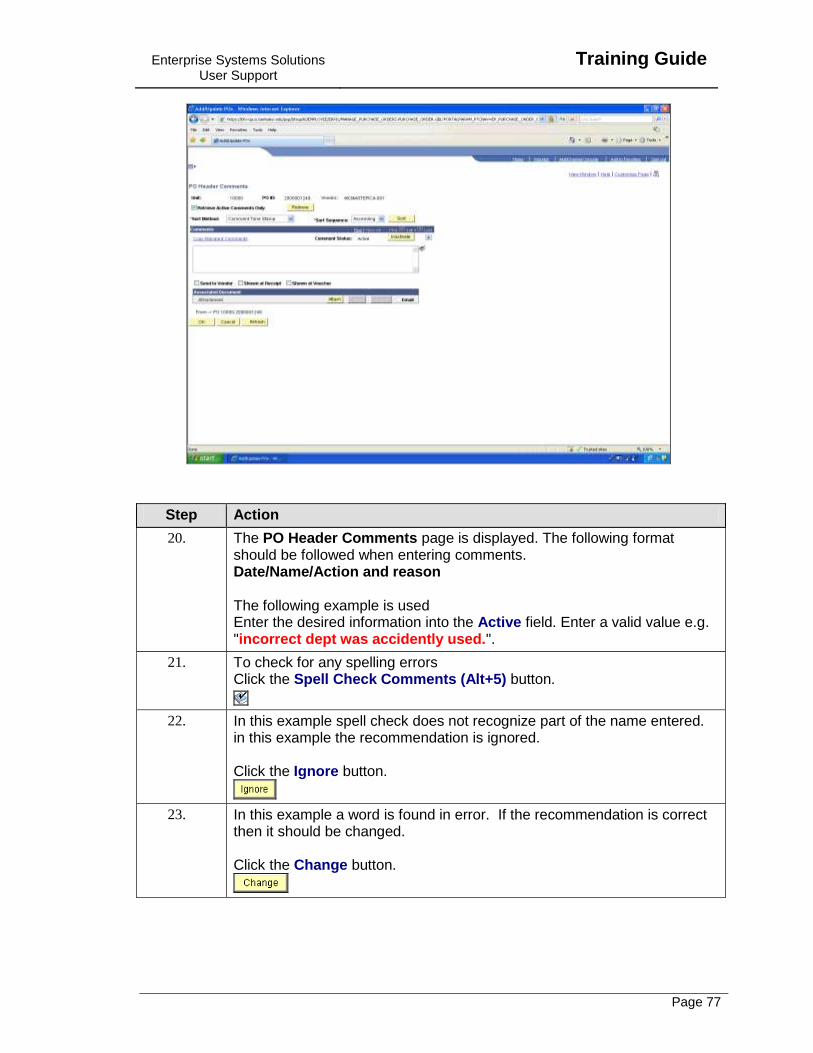
20. The PO Header Comments page is displayed. The following format should be followed when entering comments. Date/Name/Action and reason The following example is used Enter the desired information into the Active field. Enter a valid value e.g. "incorrect dept was accidently used.".
21. To check for any spelling errors Click the Spell Check Comments (Alt+5) button.
22. In this example spell check does not recognize part of the name entered. in this example the recommendation is ignored. Click the Ignore button.
23. In this example a word is found in error. If the recommendation is correct then it should be changed. Click the Change button.

Training Guide
Enterprise Systems Solutions User Support
Page 78
Step Action
24. If no additional errors are found click OK. Click the OK button.
25. Once the comments have been entered in the correct format and detail, the information can be saved. Click the OK button.
Step Action
26. The Purchase Order page is displayed. Note that once comments have been entered the hyperlink now reads Edit Comments. Note: If you are not ready for the PO Change Order to be routed for approval the Hold From Further Processing check box can be used to prevent routing. It must be selected before the change order is saved. Click the Save button.
Enterprise Systems Solutions User Support
Training Guide
Page 79
Step Action
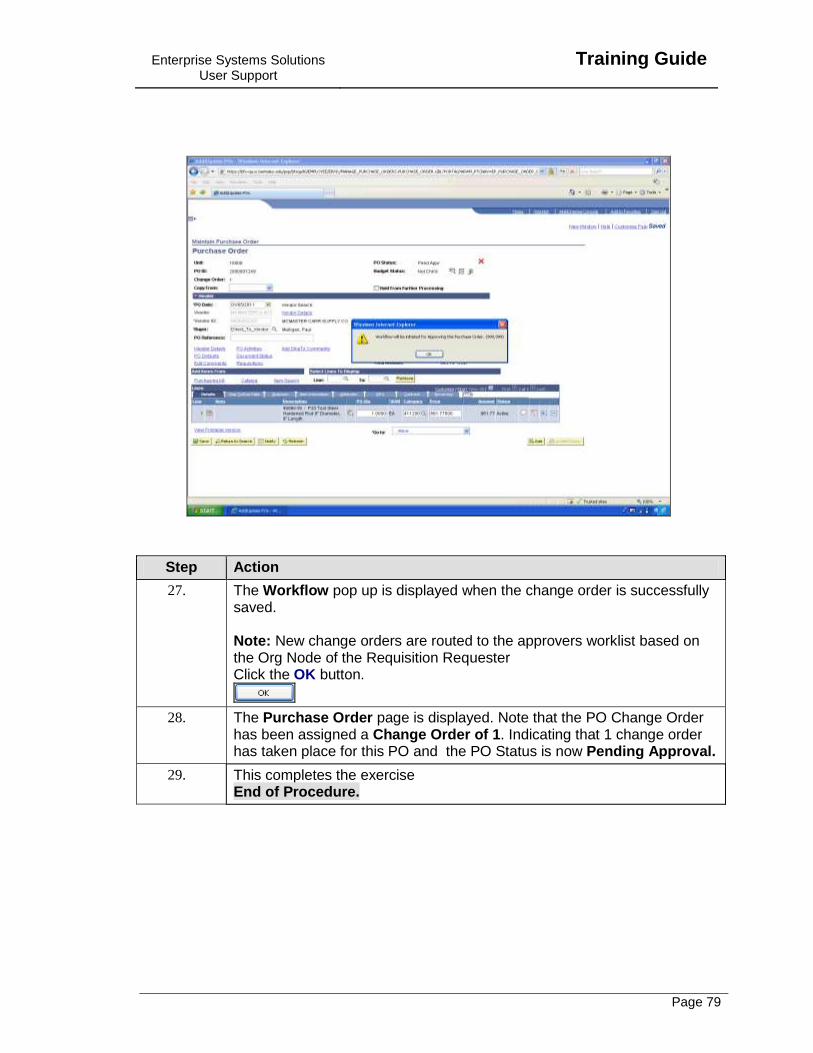
27. The Workflow pop up is displayed when the change order is successfully saved. Note: New change orders are routed to the approvers worklist based on the Org Node of the Requisition Requester Click the OK button.
28. The Purchase Order page is displayed. Note that the PO Change Order has been assigned a Change Order of 1. Indicating that 1 change order has taken place for this PO and the PO Status is now Pending Approval.
29. This completes the exercise End of Procedure.
Training Guide
Enterprise Systems Solutions User Support
Page 80
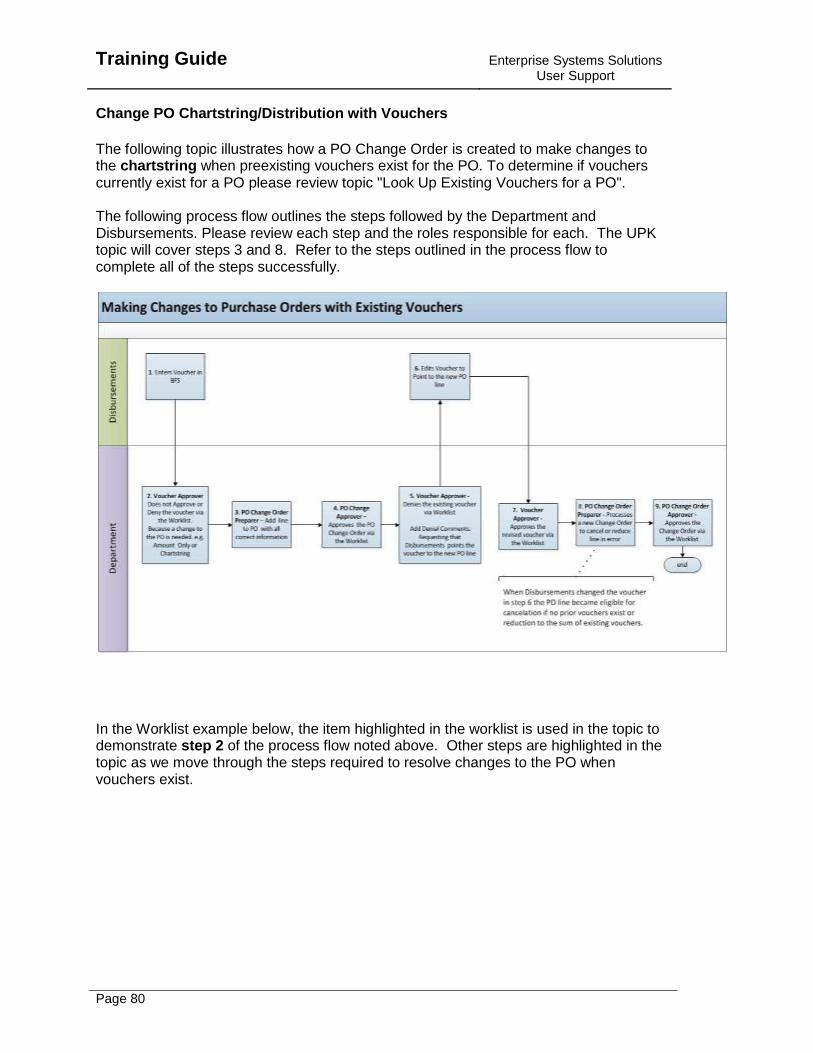
Change PO Chartstring/Distribution with Vouchers
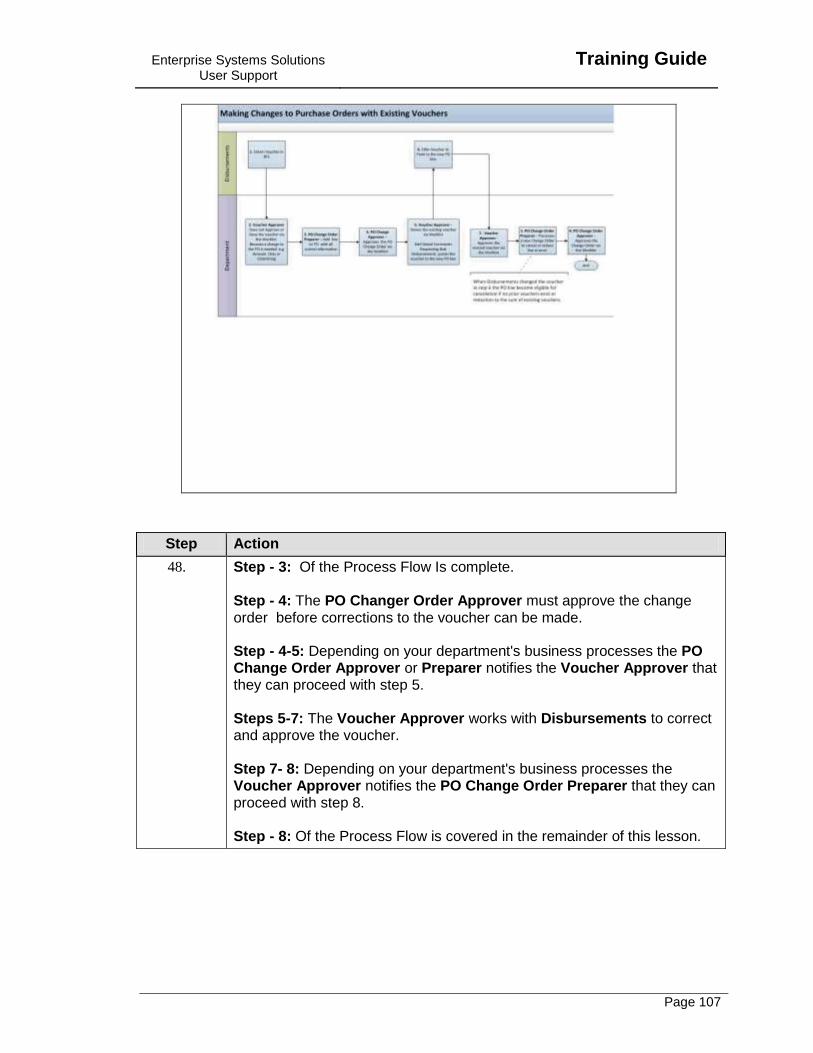
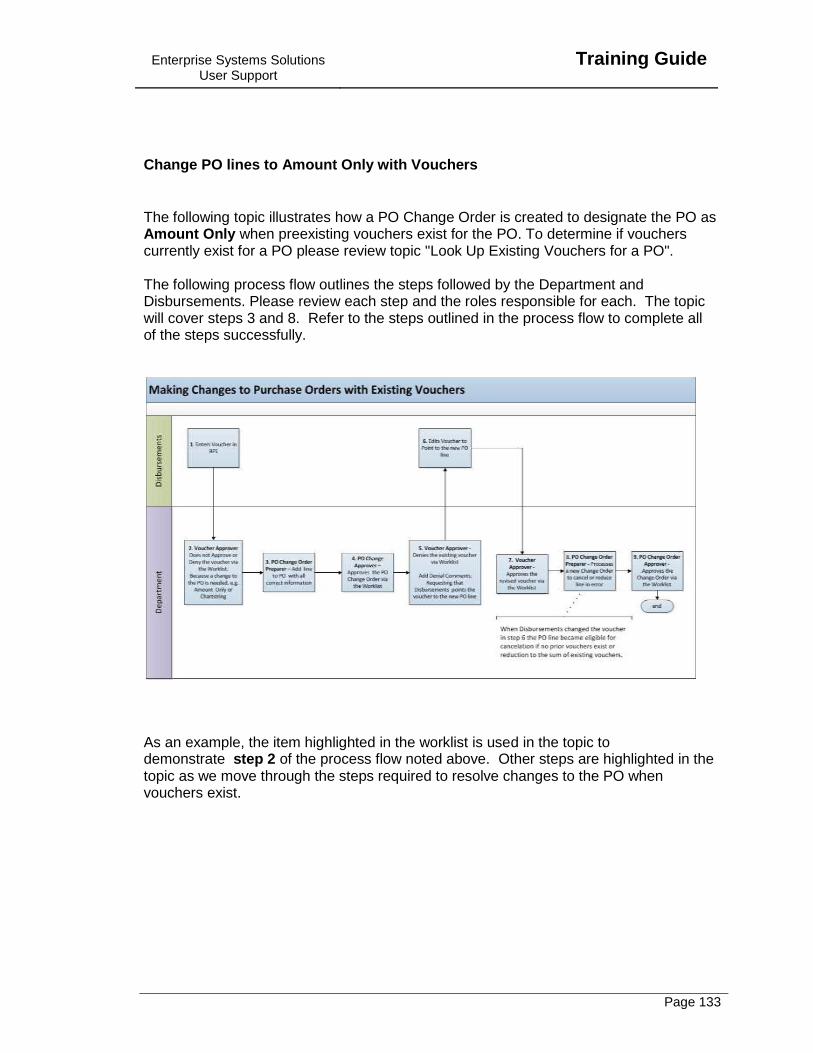
The following topic illustrates how a PO Change Order is created to make changes to the chartstring when preexisting vouchers exist for the PO. To determine if vouchers currently exist for a PO please review topic "Look Up Existing Vouchers for a PO". The following process flow outlines the steps followed by the Department and Disbursements. Please review each step and the roles responsible for each. The UPK topic will cover steps 3 and 8. Refer to the steps outlined in the process flow to complete all of the steps successfully.
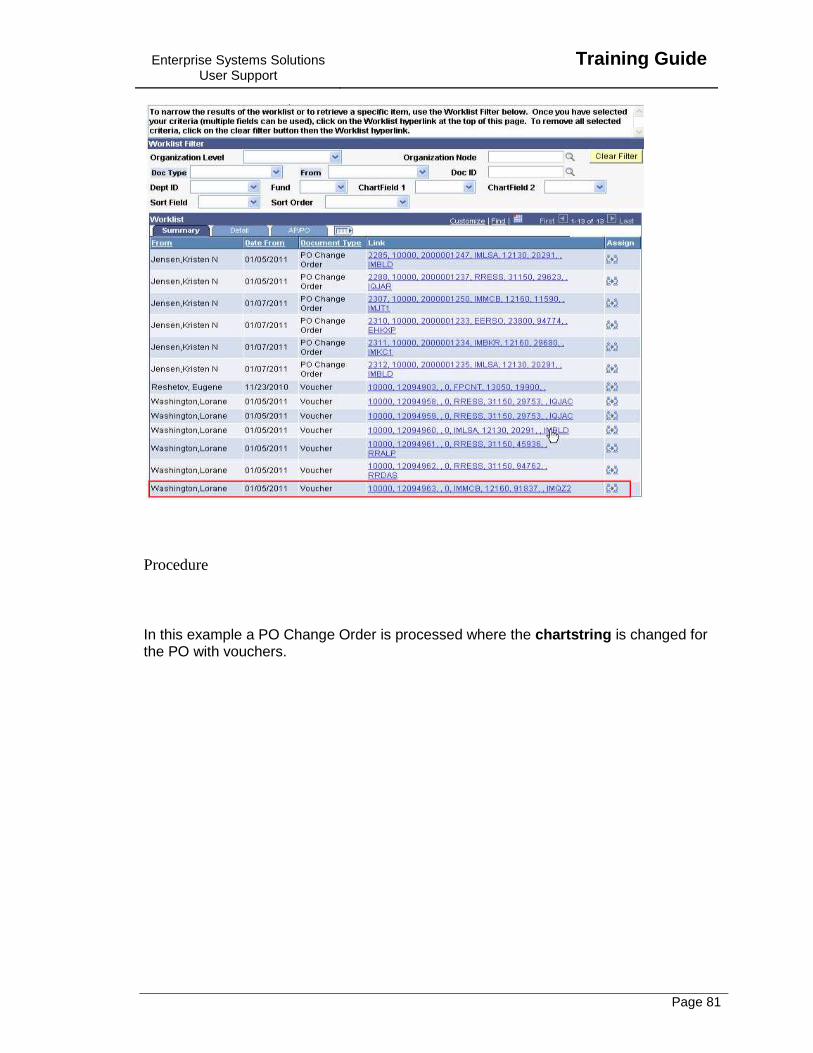
In the Worklist example below, the item highlighted in the worklist is used in the topic to demonstrate step 2 of the process flow noted above. Other steps are highlighted in the topic as we move through the steps required to resolve changes to the PO when vouchers exist.
Enterprise Systems Solutions User Support
Training Guide
Page 81
Procedure
In this example a PO Change Order is processed where the chartstring is changed for the PO with vouchers.
Training Guide
Enterprise Systems Solutions User Support
Page 82
Step Action
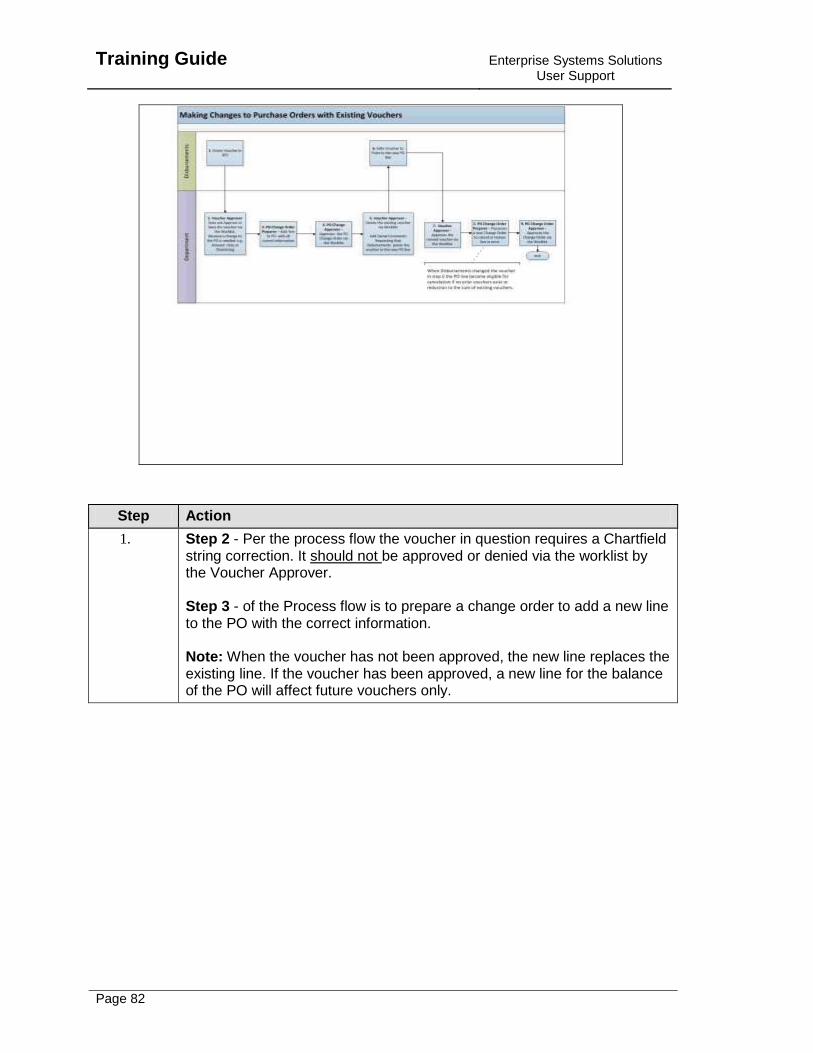
1. Step 2 - Per the process flow the voucher in question requires a Chartfield string correction. It should not be approved or denied via the worklist by the Voucher Approver. Step 3 - of the Process flow is to prepare a change order to add a new line to the PO with the correct information. Note: When the voucher has not been approved, the new line replaces the existing line. If the voucher has been approved, a new line for the balance of the PO will affect future vouchers only.
Enterprise Systems Solutions User Support
Training Guide
Page 83
Step Action
2. Click the Purchasing link.
Training Guide
Enterprise Systems Solutions User Support
Page 84
Step Action
3. Click the Purchase Orders link.
4. Click the Add/Update POs link.
Enterprise Systems Solutions User Support
Training Guide
Page 85
Step Action
5. Enter the desired information into the PO ID: field. Enter a valid value e.g. "2000001255".
Training Guide
Enterprise Systems Solutions User Support
Page 86
Step Action
6. Click the Collapse (Ctrl+Y) Menu button.
7. Errors received from invalid chartfields. If a chartfield, such as Fund, has been inactivated between the time the requisition was created and when a PO Change Order is needed the chartfield will be invalid and the department will not be able to process the change order. Contact your Buyer to force close the line with the invalid chartfield.
8. Before you begin the change order process, the Change Order Icon should be selected. The Change Order Icon when selected will open fields within the change order and track the changes made. Click the Change Order button.
Enterprise Systems Solutions User Support
Training Guide
Page 87
Step Action
9. Once the Change Order icon has been selected it will disappear from the purchase order page. The next step immediately following is to select the Finalize Document icon. This process when ran closes the requisition and eliminates the possibility of the requisition re-sourcing to another Purchase Order. Click the Finalize Document button.
10. A warning message is displayed that all eligible distributions for the PO will be finalized. You should always select yes. Click the Yes button.
11. Click the Dispatch Method list.
12. The value displayed for the Dispatch Method on the PO is defaulted from vendor set-up. The method may need to be changed depending on the need to send PO information to the vendor. 1) If the vendor does not require PO information to be sent, then select: Print - the print option for PO Change Orders will not print the PO. 2) If the vendor does require that PO information is sent, then select: Email - the email option will send a copy of the official PO to the vendor via email. The email dispatch method is NOT available for After the Fact or Subaward POs. Note: If the vendor does not accept email or an Official PO copy is needed for printing please refer to the Topic - "Print or Email PO Change Order" in the UPK under Purchasing or the Quick Reference Guide" for detailed instruction. Do no not use the following values: EDX - not used for PO Change Orders Fax - not used for PO Change Orders Phone - not used for PO Change Orders

Training Guide
Enterprise Systems Solutions User Support
Page 88
Step Action
13. Click the Print list item.
Enterprise Systems Solutions User Support
Training Guide
Page 89
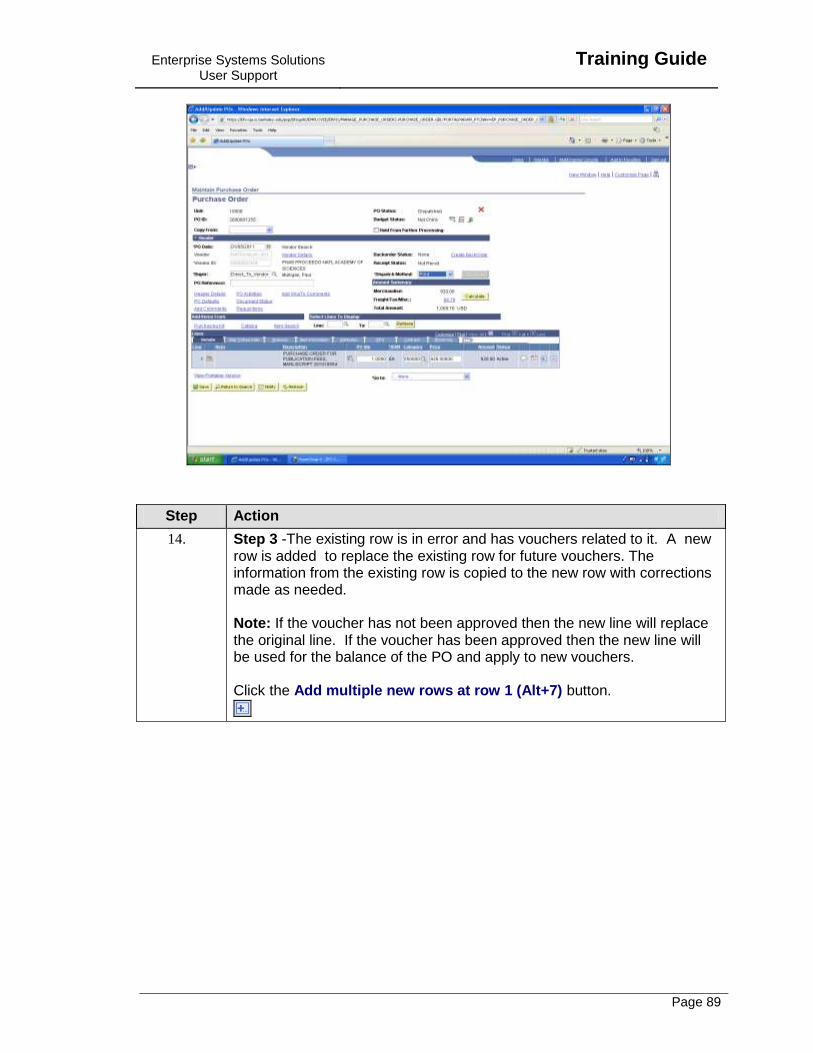
Step Action
14. Step 3 -The existing row is in error and has vouchers related to it. A new row is added to replace the existing row for future vouchers. The information from the existing row is copied to the new row with corrections made as needed. Note: If the voucher has not been approved then the new line will replace the original line. If the voucher has been approved then the new line will be used for the balance of the PO and apply to new vouchers. Click the Add multiple new rows at row 1 (Alt+7) button.
Training Guide
Enterprise Systems Solutions User Support
Page 90
Step Action
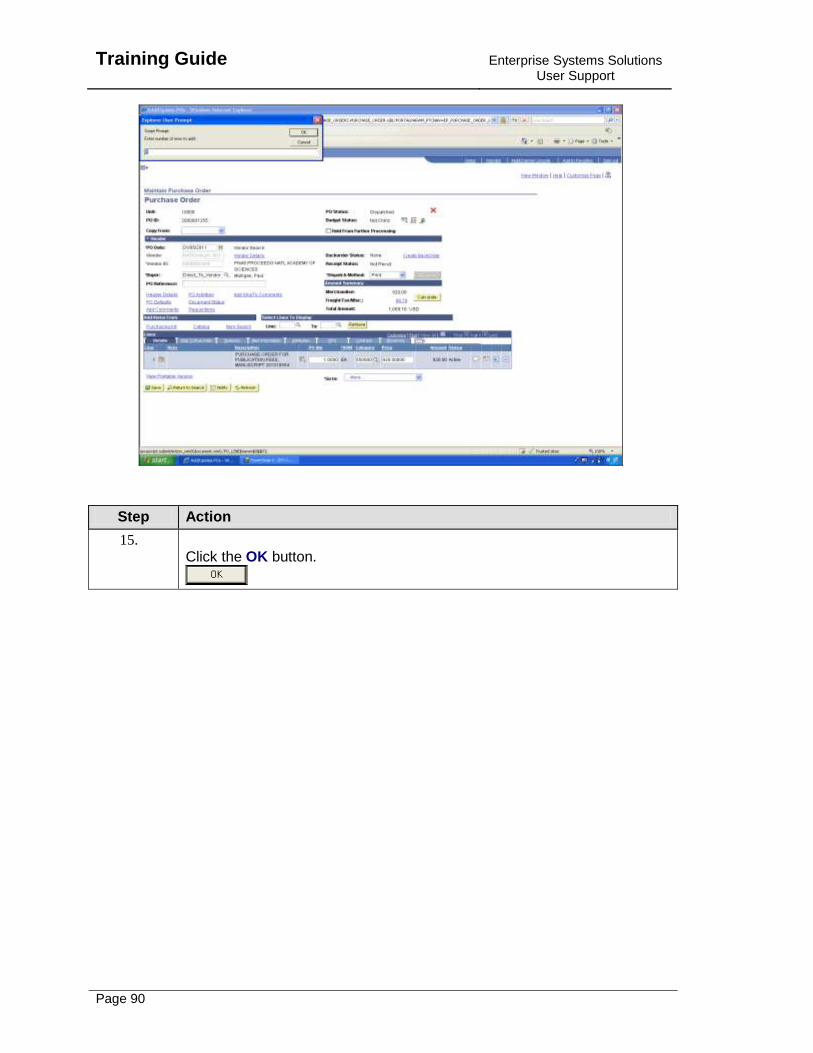
15. Click the OK button.
Enterprise Systems Solutions User Support
Training Guide
Page 91
Step Action
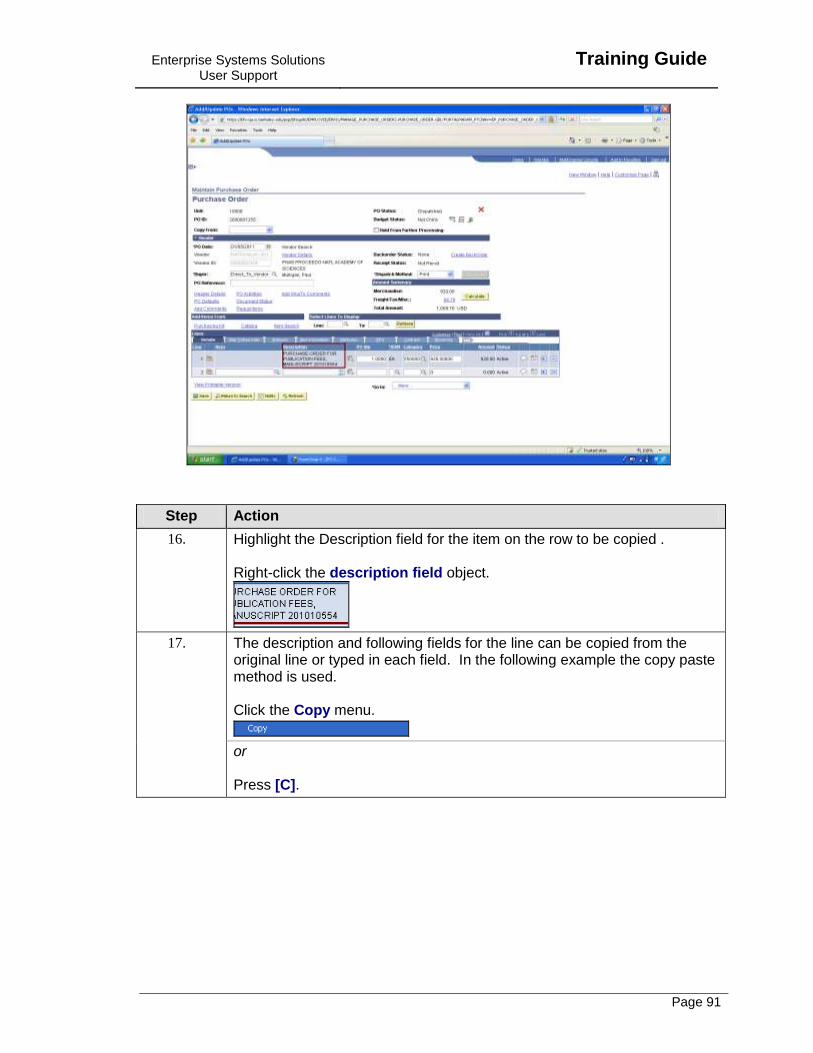
16. Highlight the Description field for the item on the row to be copied . Right-click the description field object.
17. The description and following fields for the line can be copied from the original line or typed in each field. In the following example the copy paste method is used. Click the Copy menu.
or Press [C].
Training Guide
Enterprise Systems Solutions User Support
Page 92
Step Action
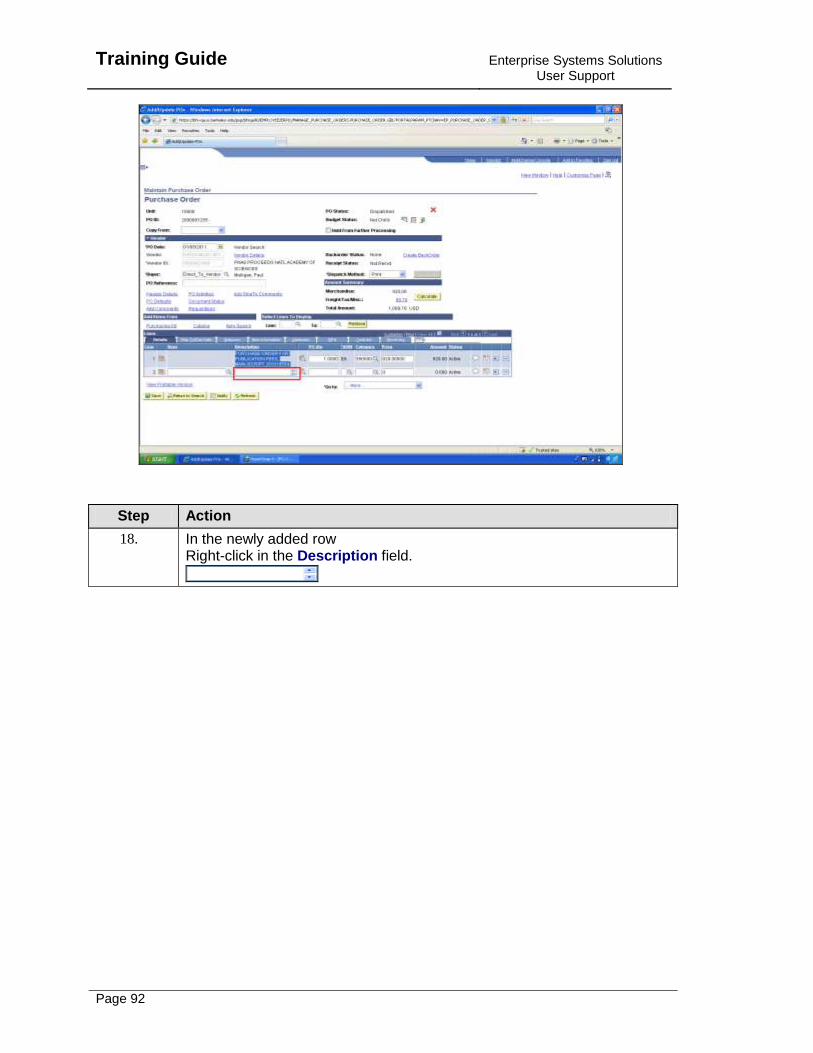
18. In the newly added row Right-click in the Description field.
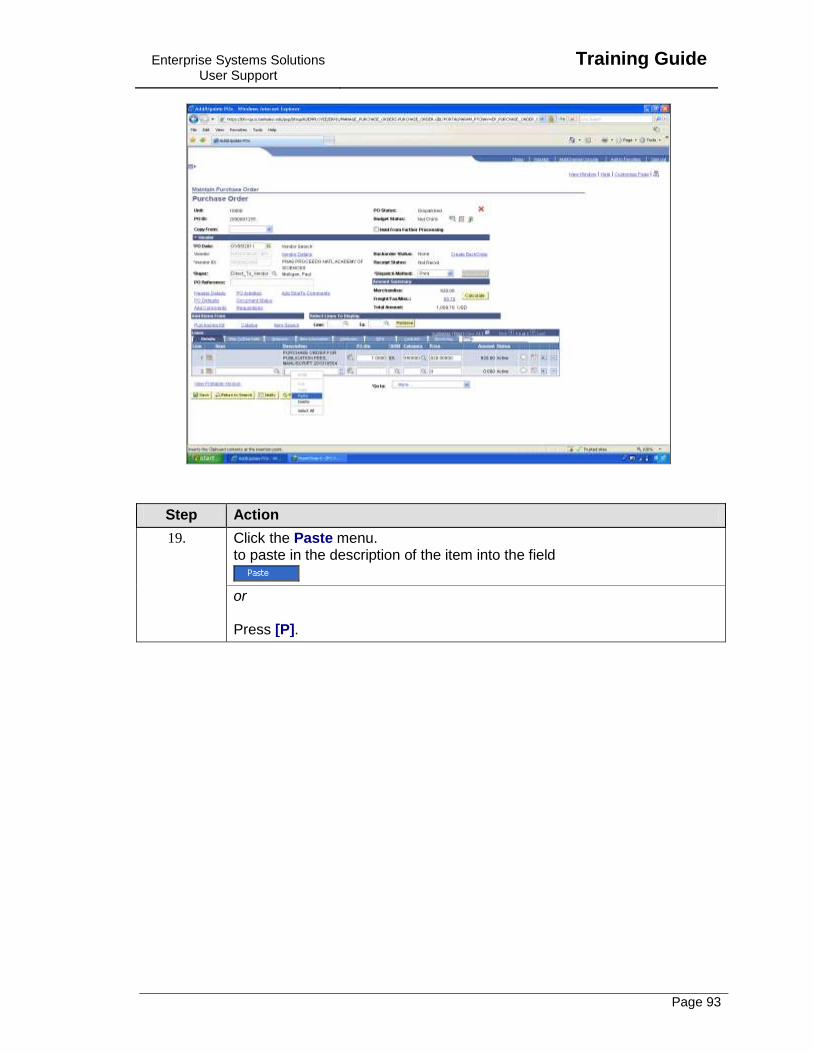
Enterprise Systems Solutions User Support
Training Guide
Page 93
Step Action
19. Click the Paste menu. to paste in the description of the item into the field
or Press [P].

Training Guide
Enterprise Systems Solutions User Support
Page 94
Step Action
20. Continue to copy the information from the line in error to the new line. Enter the desired information into the PO Qty field. Enter a valid value e.g. "1".
21. Press [Tab].
22. Enter the desired information into the UOM field. Enter a valid value e.g. "ea".
23. Press [Tab].
24. Right-click in the Category field.
25. Right-click in the Category field.
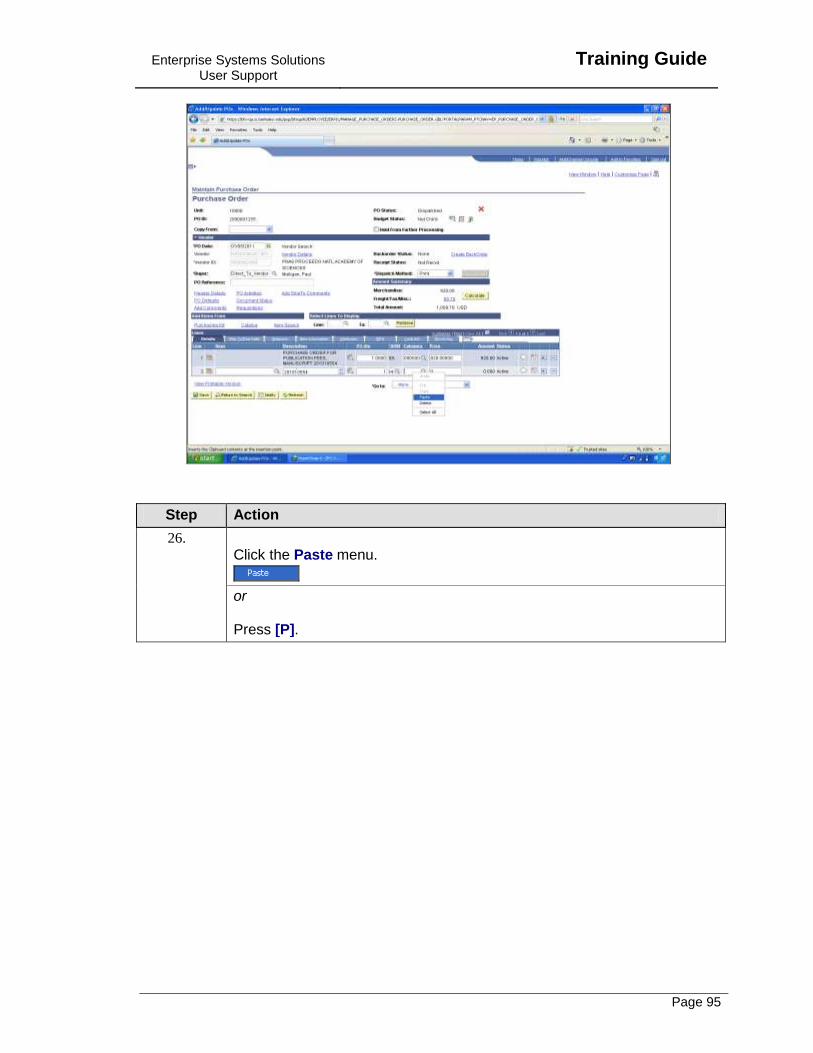
Enterprise Systems Solutions User Support
Training Guide
Page 95
Step Action
26. Click the Paste menu.
or Press [P].
Training Guide
Enterprise Systems Solutions User Support
Page 96
Step Action
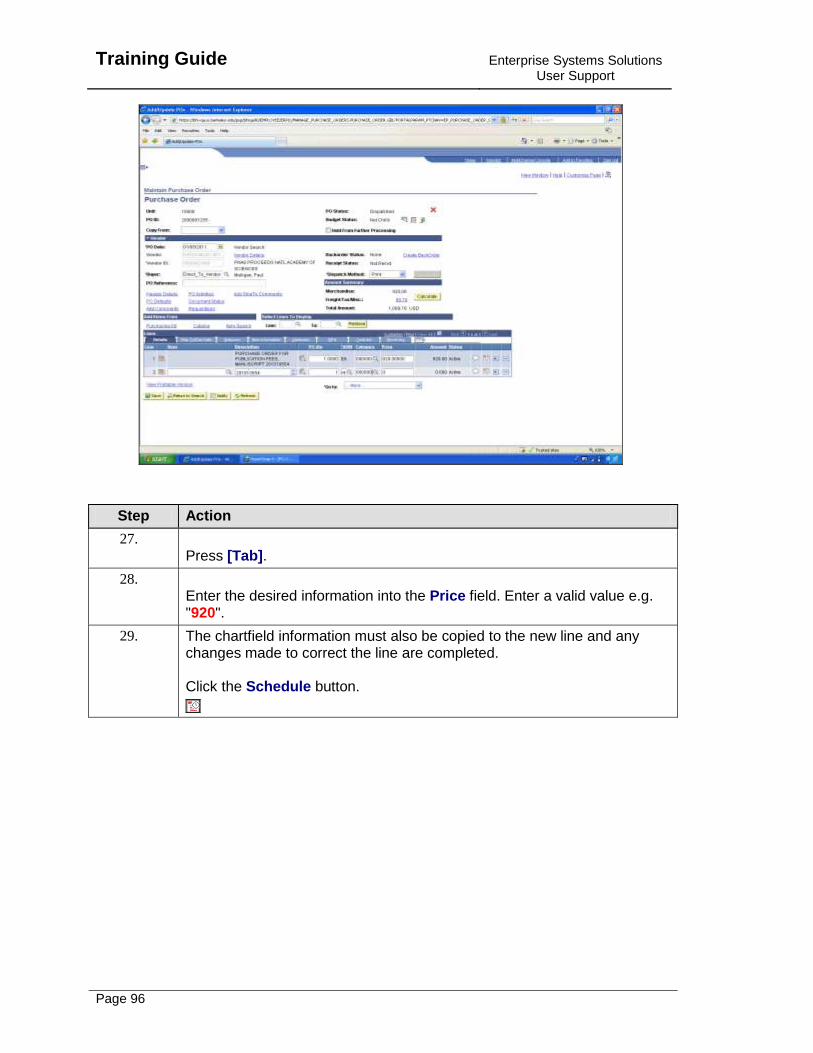
27. Press [Tab].
28. Enter the desired information into the Price field. Enter a valid value e.g. "920".
29. The chartfield information must also be copied to the new line and any changes made to correct the line are completed. Click the Schedule button.
Enterprise Systems Solutions User Support
Training Guide
Page 97
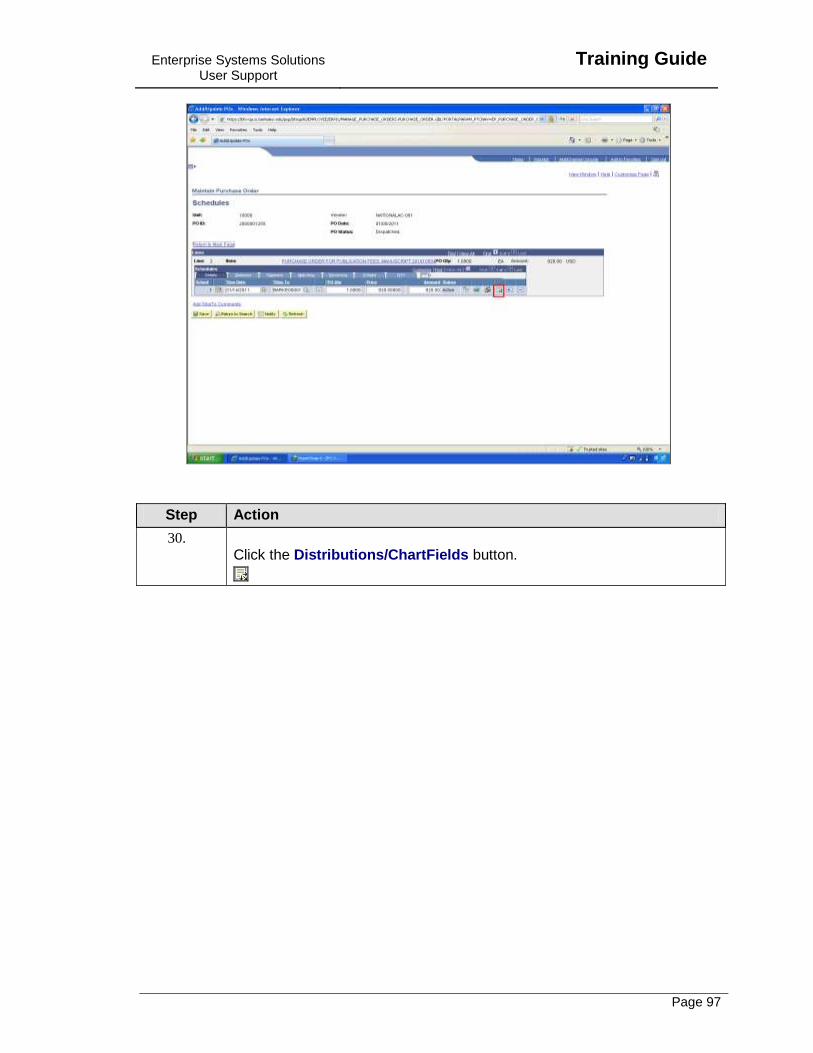
Step Action
30. Click the Distributions/ChartFields button.
Training Guide
Enterprise Systems Solutions User Support
Page 98
Step Action
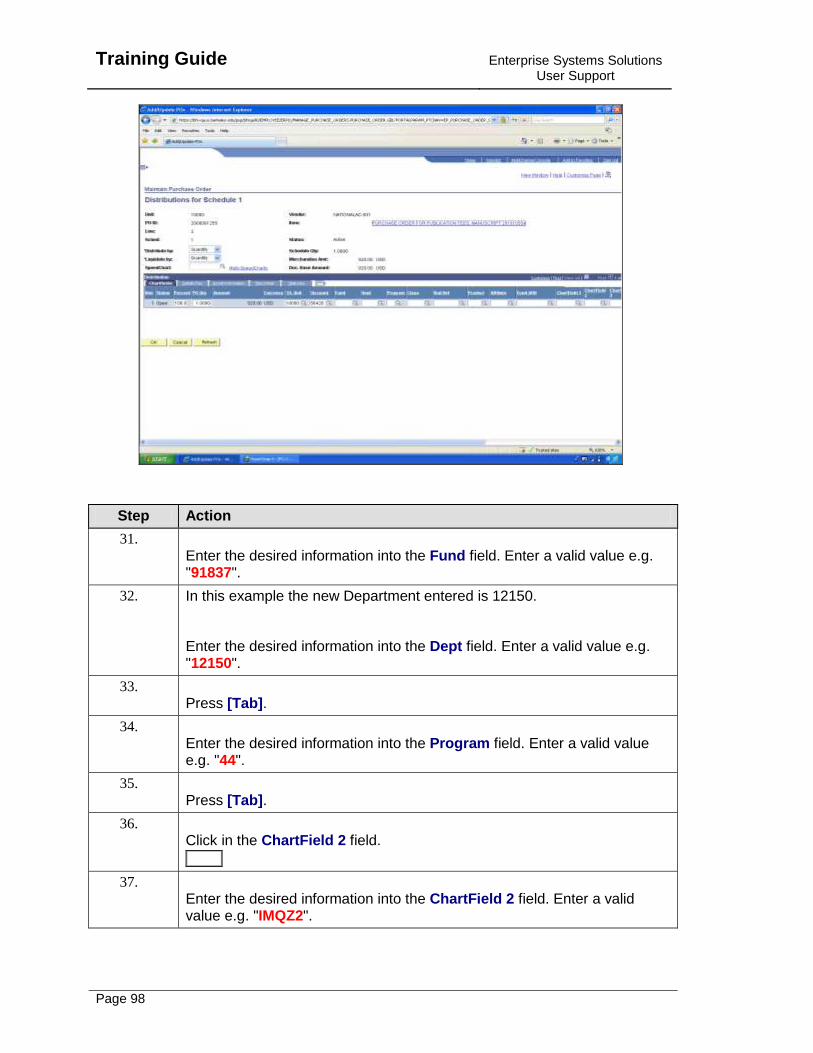
31. Enter the desired information into the Fund field. Enter a valid value e.g. "91837".
32. In this example the new Department entered is 12150. Enter the desired information into the Dept field. Enter a valid value e.g. "12150".
33. Press [Tab].
34. Enter the desired information into the Program field. Enter a valid value e.g. "44".
35. Press [Tab].
36. Click in the ChartField 2 field.
37. Enter the desired information into the ChartField 2 field. Enter a valid value e.g. "IMQZ2".

Enterprise Systems Solutions User Support
Training Guide
Page 99
Step Action
38. Once the chartfield information for the row has been updated Click the OK button.
Step Action
39. The Schedule page is displayed . Click the Return to Main Page link.
Training Guide
Enterprise Systems Solutions User Support
Page 100
Step Action
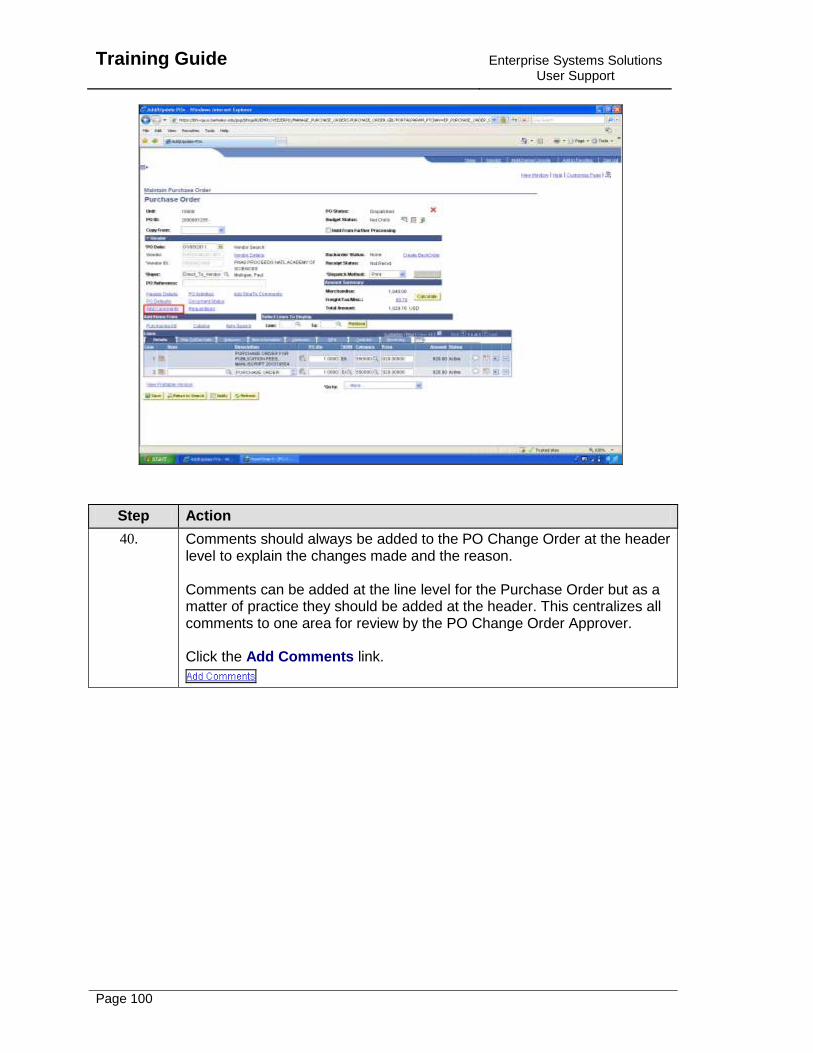
40. Comments should always be added to the PO Change Order at the header level to explain the changes made and the reason. Comments can be added at the line level for the Purchase Order but as a matter of practice they should be added at the header. This centralizes all comments to one area for review by the PO Change Order Approver. Click the Add Comments link.
Enterprise Systems Solutions User Support
Training Guide
Page 101
Step Action
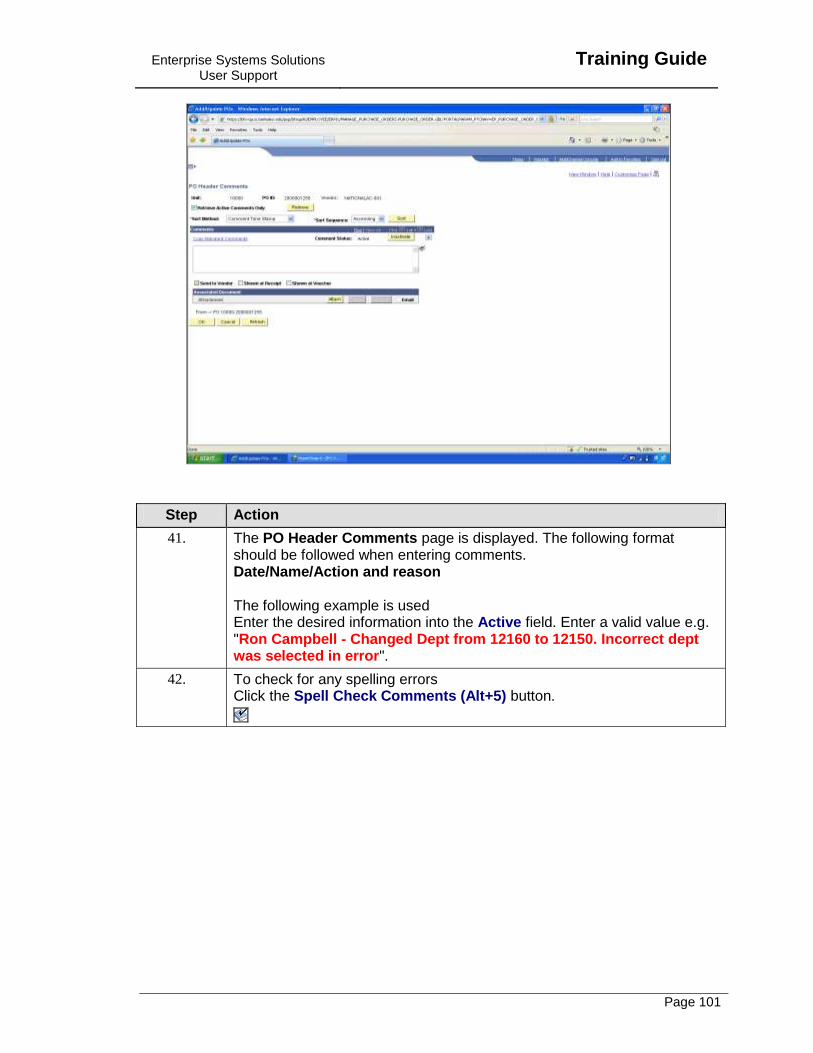
41. The PO Header Comments page is displayed. The following format should be followed when entering comments. Date/Name/Action and reason The following example is used Enter the desired information into the Active field. Enter a valid value e.g. "Ron Campbell - Changed Dept from 12160 to 12150. Incorrect dept was selected in error".
42. To check for any spelling errors Click the Spell Check Comments (Alt+5) button.
Training Guide
Enterprise Systems Solutions User Support
Page 102
Step Action
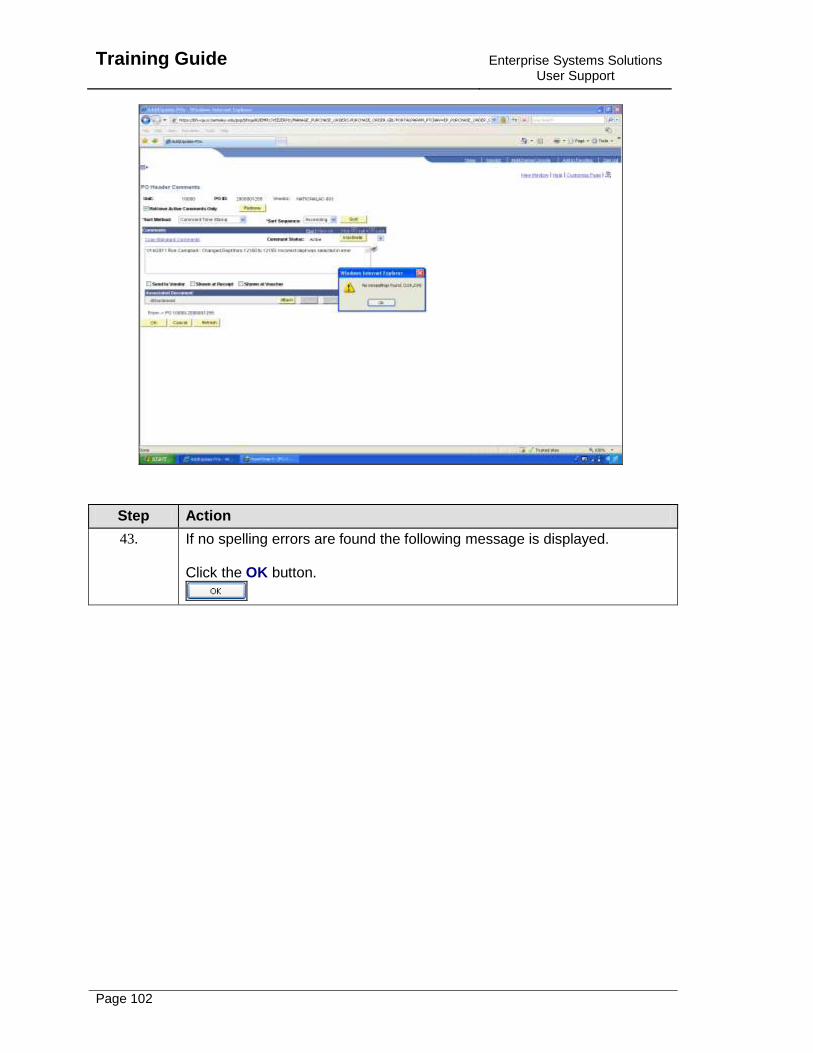
43. If no spelling errors are found the following message is displayed. Click the OK button.
Enterprise Systems Solutions User Support
Training Guide
Page 103
Step Action
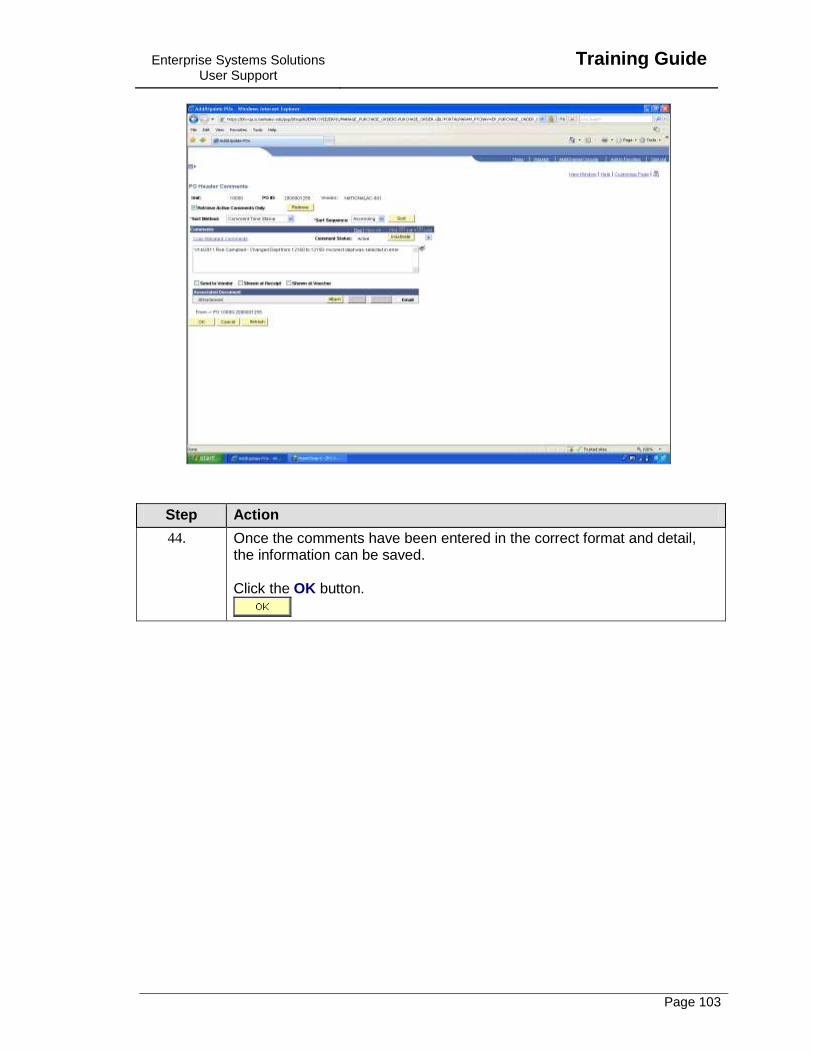
44. Once the comments have been entered in the correct format and detail, the information can be saved. Click the OK button.
Training Guide
Enterprise Systems Solutions User Support
Page 104
Step Action
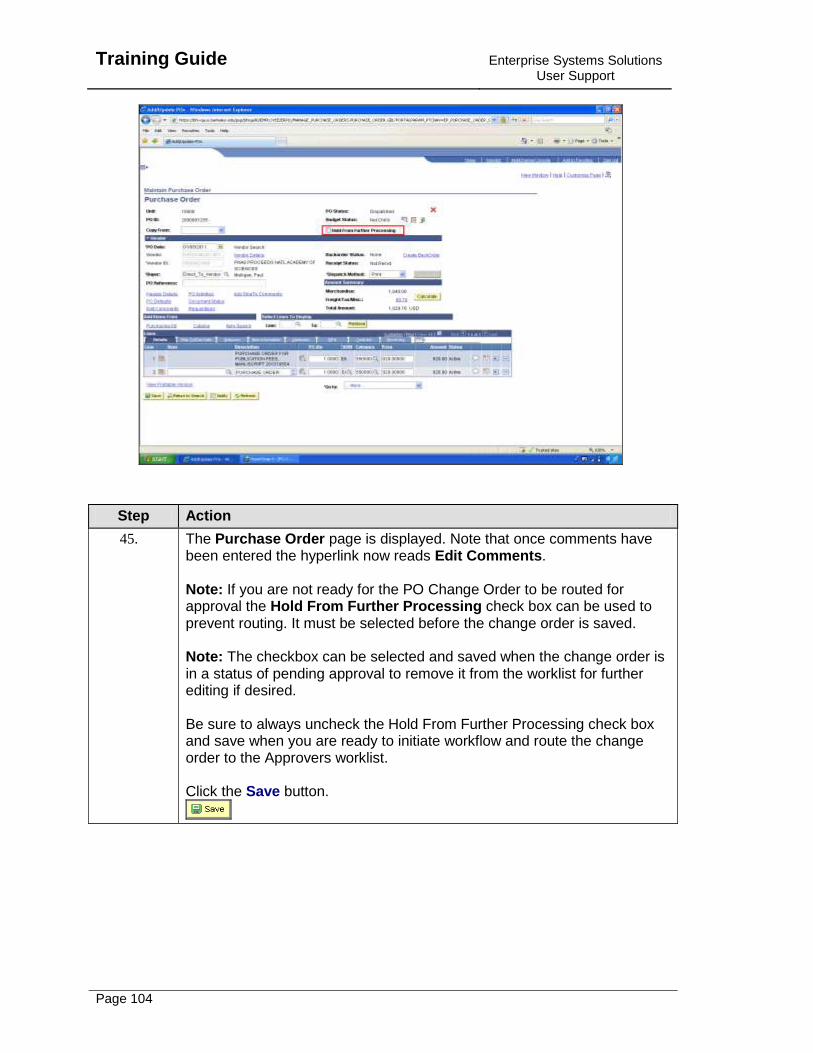
45. The Purchase Order page is displayed. Note that once comments have been entered the hyperlink now reads Edit Comments. Note: If you are not ready for the PO Change Order to be routed for approval the Hold From Further Processing check box can be used to prevent routing. It must be selected before the change order is saved. Note: The checkbox can be selected and saved when the change order is in a status of pending approval to remove it from the worklist for further editing if desired. Be sure to always uncheck the Hold From Further Processing check box and save when you are ready to initiate workflow and route the change order to the Approvers worklist. Click the Save button.
Enterprise Systems Solutions User Support
Training Guide
Page 105
Step Action
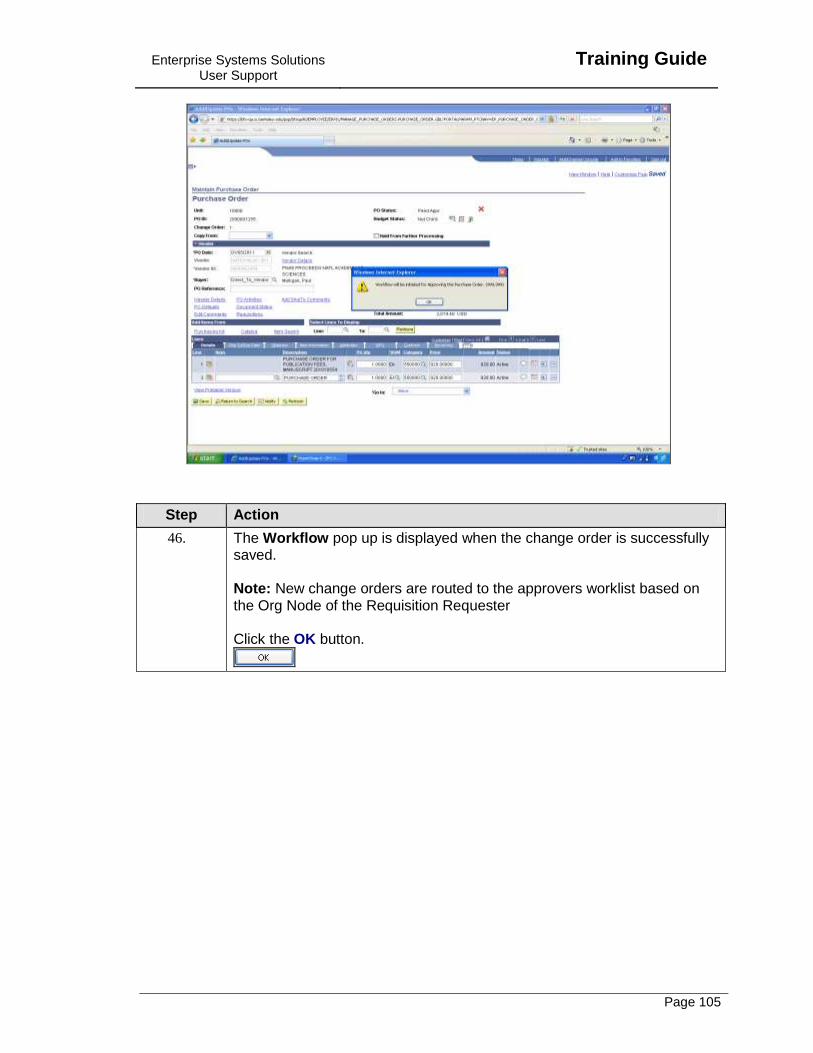
46. The Workflow pop up is displayed when the change order is successfully saved. Note: New change orders are routed to the approvers worklist based on the Org Node of the Requisition Requester Click the OK button.
Training Guide
Enterprise Systems Solutions User Support
Page 106
Step Action
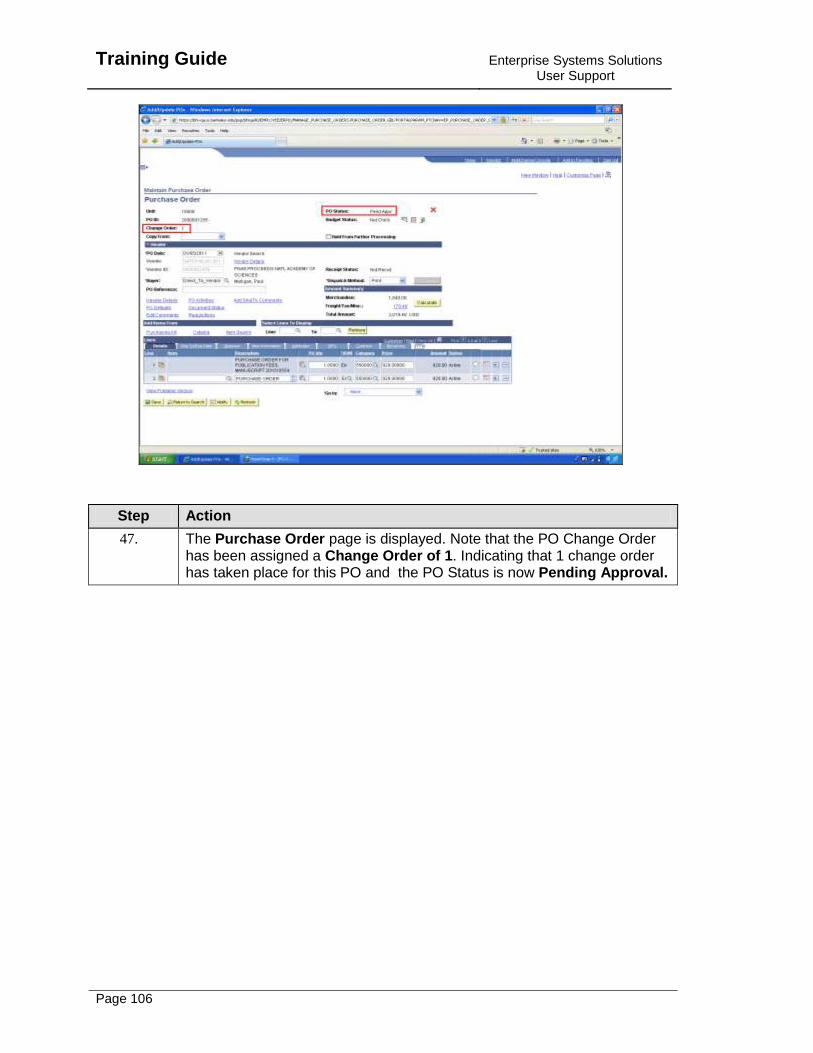
47. The Purchase Order page is displayed. Note that the PO Change Order has been assigned a Change Order of 1. Indicating that 1 change order has taken place for this PO and the PO Status is now Pending Approval.
Enterprise Systems Solutions User Support
Training Guide
Page 107
Step Action
48. Step - 3: Of the Process Flow Is complete. Step - 4: The PO Changer Order Approver must approve the change order before corrections to the voucher can be made. Step - 4-5: Depending on your department's business processes the PO Change Order Approver or Preparer notifies the Voucher Approver that they can proceed with step 5. Steps 5-7: The Voucher Approver works with Disbursements to correct and approve the voucher. Step 7- 8: Depending on your department's business processes the Voucher Approver notifies the PO Change Order Preparer that they can proceed with step 8. Step - 8: Of the Process Flow is covered in the remainder of this lesson.
Training Guide
Enterprise Systems Solutions User Support
Page 108
Step Action
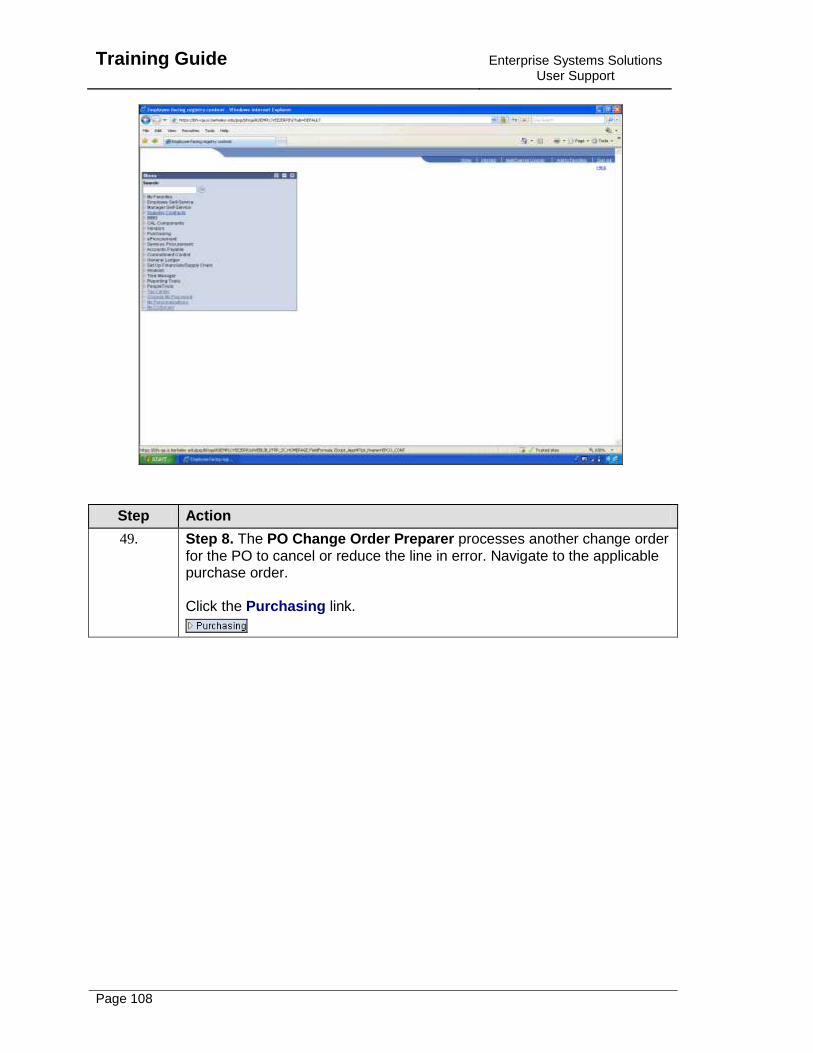
49. Step 8. The PO Change Order Preparer processes another change order for the PO to cancel or reduce the line in error. Navigate to the applicable purchase order. Click the Purchasing link.

Enterprise Systems Solutions User Support
Training Guide
Page 109
Step Action
50. Click the Purchase Orders link.
51. Click the Add/Update POs link.

Training Guide
Enterprise Systems Solutions User Support
Page 110
Step Action
52. Enter the desired information into the PO ID: field. Enter a valid value e.g. "20000012990".
53. Click the Search button.

Enterprise Systems Solutions User Support
Training Guide
Page 111
Step Action
54. The Purchase Order page is displayed. Click the Collapse (Ctrl+Y) Menu button.
55. Before you begin the change order process, the Change Order Icon should be selected. The Change Order Icon when selected will open fields within the change order and track the changes made. Click the Change Order button.
56. Once the Change Order icon has been selected it will disappear from the purchase order page. The next step immediately following is to select the Finalize Document icon. This process when ran closes the requisition and eliminates the possibility of the requisition re-sourcing to another Purchase Order. Click the Finalize Document button.
Training Guide
Enterprise Systems Solutions User Support
Page 112
Step Action
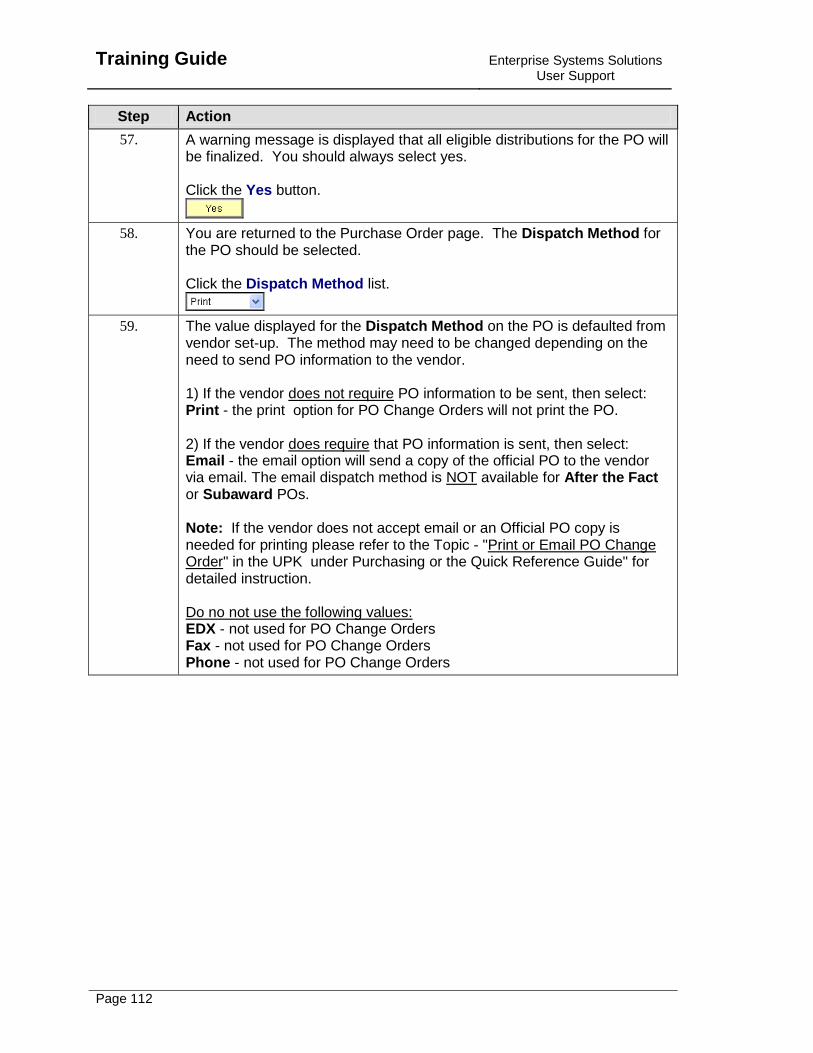
57. A warning message is displayed that all eligible distributions for the PO will be finalized. You should always select yes. Click the Yes button.
58. You are returned to the Purchase Order page. The Dispatch Method for the PO should be selected. Click the Dispatch Method list.
59. The value displayed for the Dispatch Method on the PO is defaulted from vendor set-up. The method may need to be changed depending on the need to send PO information to the vendor. 1) If the vendor does not require PO information to be sent, then select: Print - the print option for PO Change Orders will not print the PO. 2) If the vendor does require that PO information is sent, then select: Email - the email option will send a copy of the official PO to the vendor via email. The email dispatch method is NOT available for After the Fact or Subaward POs. Note: If the vendor does not accept email or an Official PO copy is needed for printing please refer to the Topic - "Print or Email PO Change Order" in the UPK under Purchasing or the Quick Reference Guide" for detailed instruction. Do no not use the following values: EDX - not used for PO Change Orders Fax - not used for PO Change Orders Phone - not used for PO Change Orders
Enterprise Systems Solutions User Support
Training Guide
Page 113
Step Action
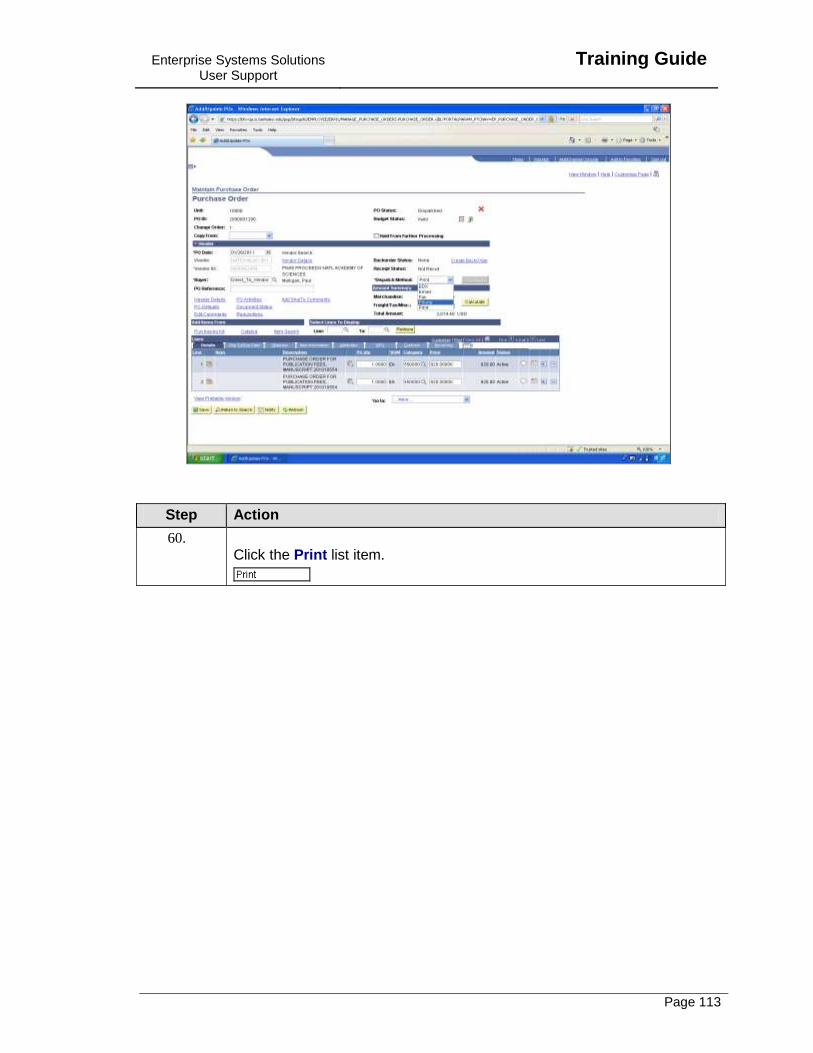
60. Click the Print list item.
Training Guide
Enterprise Systems Solutions User Support
Page 114
Step Action
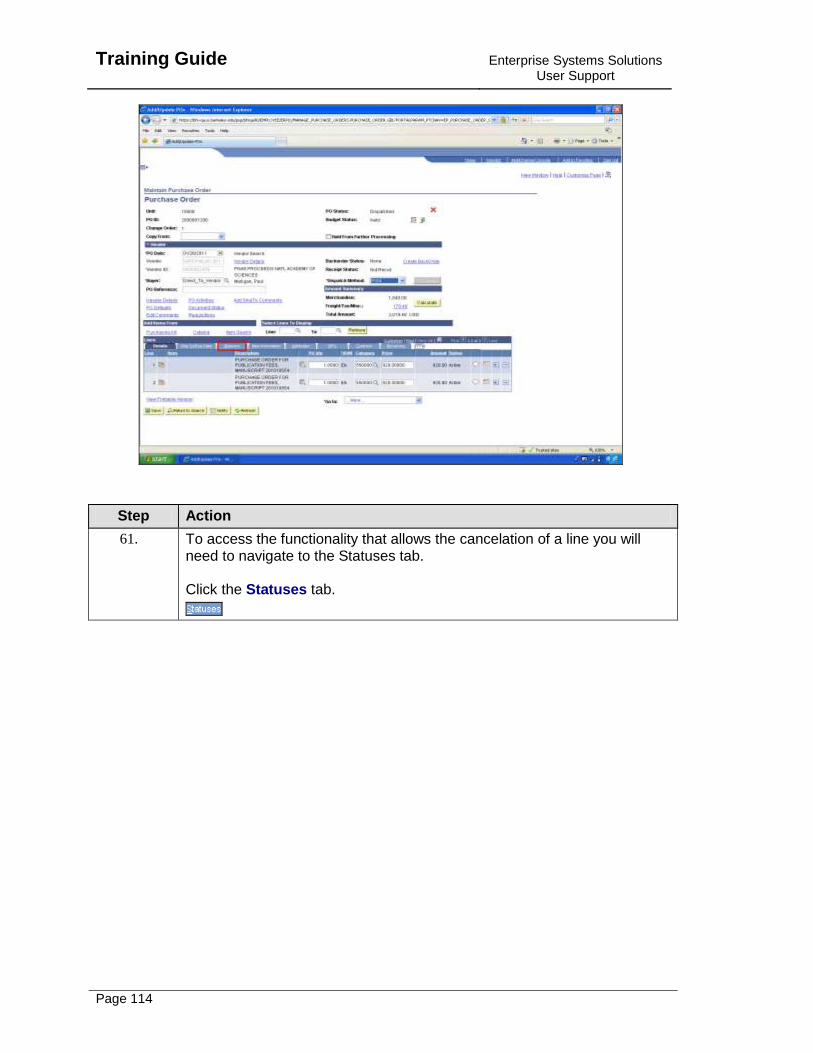
61. To access the functionality that allows the cancelation of a line you will need to navigate to the Statuses tab. Click the Statuses tab.
Enterprise Systems Solutions User Support
Training Guide
Page 115
Step Action
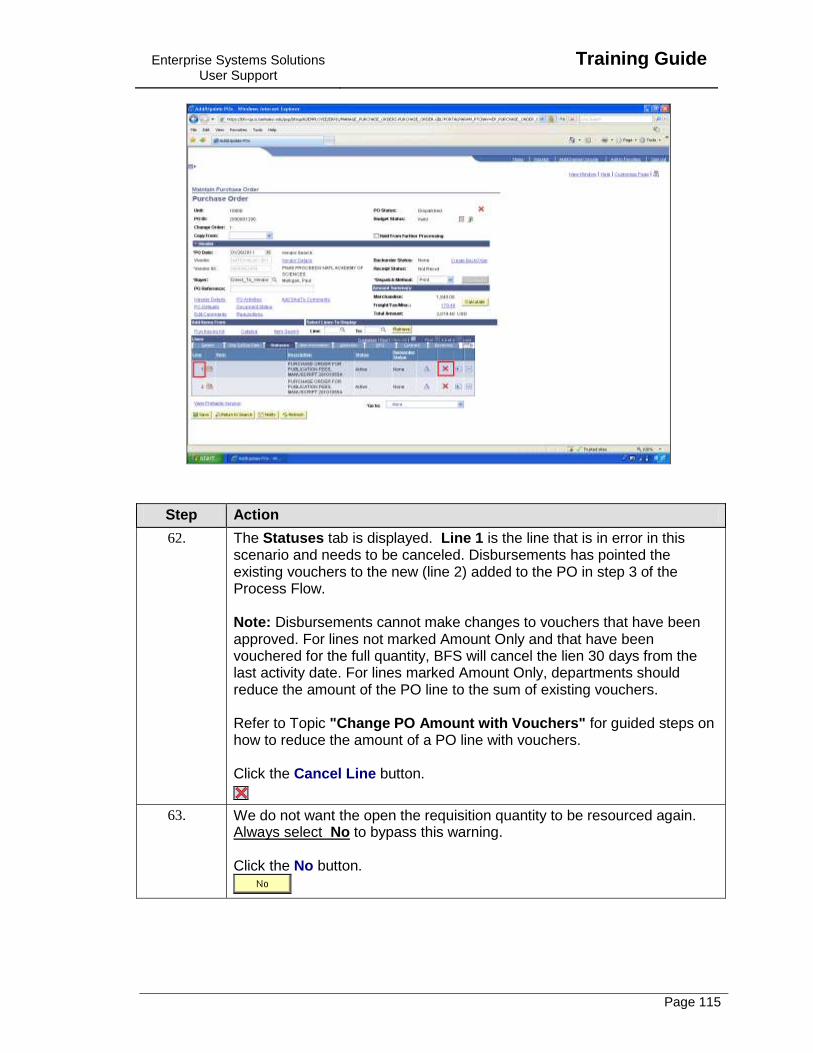
62. The Statuses tab is displayed. Line 1 is the line that is in error in this scenario and needs to be canceled. Disbursements has pointed the existing vouchers to the new (line 2) added to the PO in step 3 of the Process Flow. Note: Disbursements cannot make changes to vouchers that have been approved. For lines not marked Amount Only and that have been vouchered for the full quantity, BFS will cancel the lien 30 days from the last activity date. For lines marked Amount Only, departments should reduce the amount of the PO line to the sum of existing vouchers. Refer to Topic "Change PO Amount with Vouchers" for guided steps on how to reduce the amount of a PO line with vouchers. Click the Cancel Line button.
63. We do not want the open the requisition quantity to be resourced again. Always select No to bypass this warning. Click the No button.
Training Guide
Enterprise Systems Solutions User Support
Page 116
Step Action
64. A warning is received that the action taken will cancel the line for the PO. Select Yes to bypass the warning message. Click the Yes button.
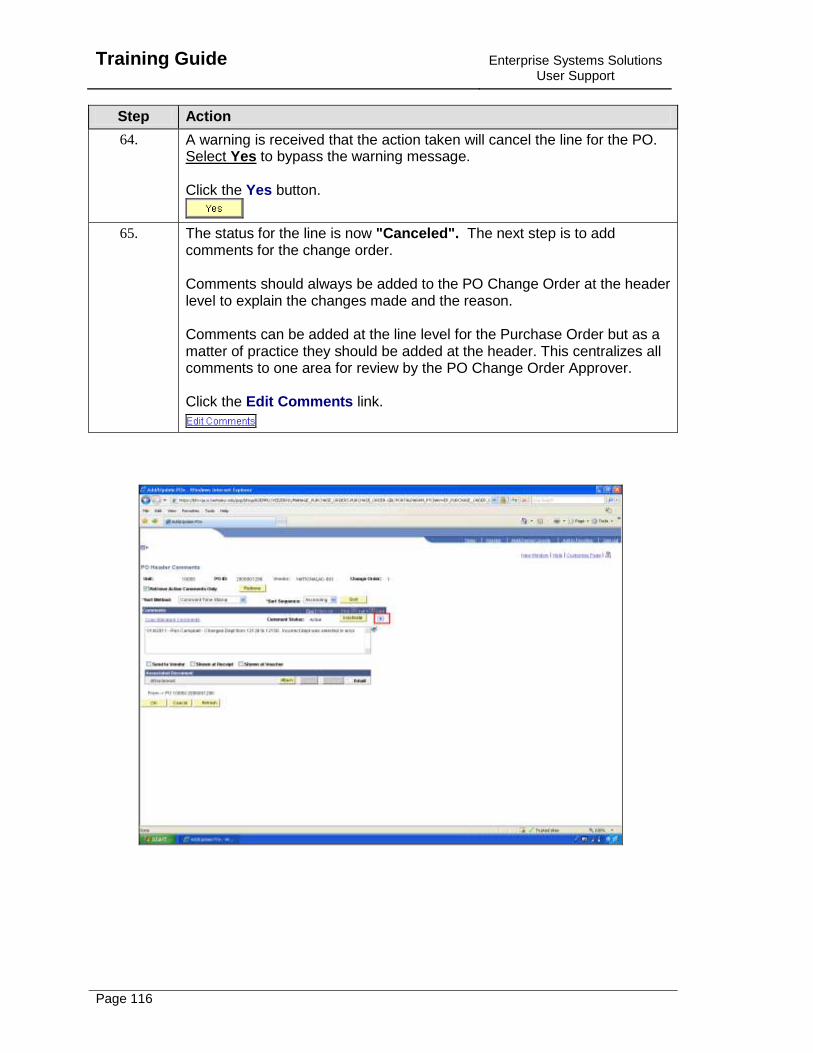
65. The status for the line is now "Canceled". The next step is to add comments for the change order. Comments should always be added to the PO Change Order at the header level to explain the changes made and the reason. Comments can be added at the line level for the Purchase Order but as a matter of practice they should be added at the header. This centralizes all comments to one area for review by the PO Change Order Approver. Click the Edit Comments link.
Enterprise Systems Solutions User Support
Training Guide
Page 117
Step Action
66. The PO Header Comments page is displayed. The comments added during Step 3 of the business process is visible. To add comments related to this change order select the add a new row button. Click the Add a new row at row 1 (Alt+7) button.
67. Enter the desired information into the Active field. Enter a valid value e.g. "1/14/2011 - Ron Campbell - Changed Dept from 12130 to 12150. Incorrect dept was used".
68. To check for any spelling errors Click the Spell Check Comments (Alt+5) button.
69. In this example spell check does not recognize a common word "chartstring". You can click Ignore to bypass the warning or add to add the word to the spell check dictionary. in this example the warning is ignored. Click the Ignore button.
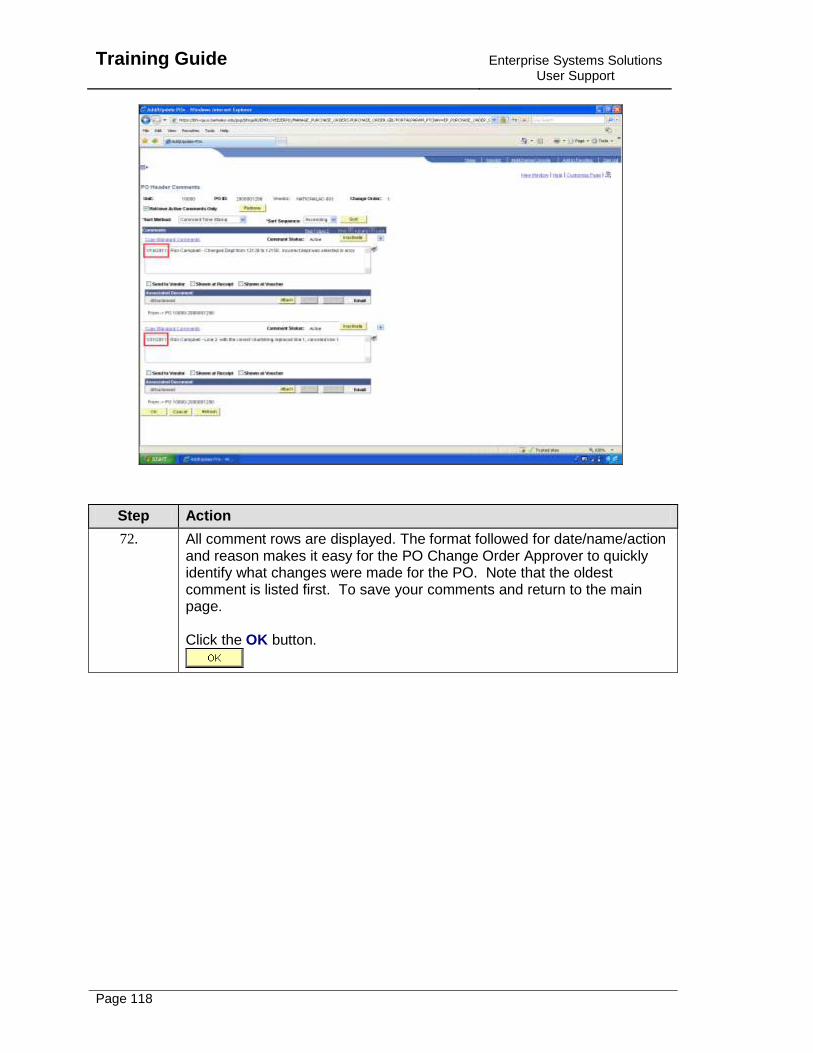
70. If no additional errors are found click OK. Click the OK button.
71. The PO Header Comments page is again displayed. Note that there are now 2 rows of comments available for viewing related to the change order. All of the comments can be viewed at one time. Click the View All link.
Training Guide
Enterprise Systems Solutions User Support
Page 118
Step Action
72. All comment rows are displayed. The format followed for date/name/action and reason makes it easy for the PO Change Order Approver to quickly identify what changes were made for the PO. Note that the oldest comment is listed first. To save your comments and return to the main page. Click the OK button.
Enterprise Systems Solutions User Support
Training Guide
Page 119
Step Action
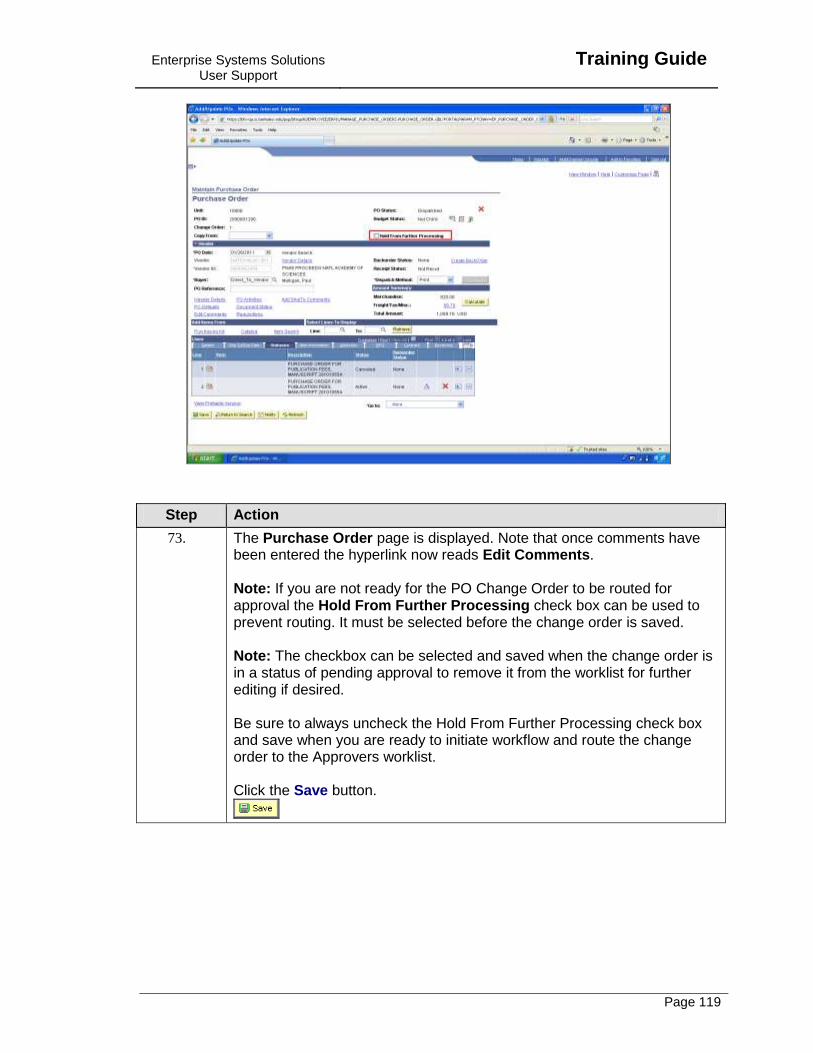
73. The Purchase Order page is displayed. Note that once comments have been entered the hyperlink now reads Edit Comments. Note: If you are not ready for the PO Change Order to be routed for approval the Hold From Further Processing check box can be used to prevent routing. It must be selected before the change order is saved. Note: The checkbox can be selected and saved when the change order is in a status of pending approval to remove it from the worklist for further editing if desired. Be sure to always uncheck the Hold From Further Processing check box and save when you are ready to initiate workflow and route the change order to the Approvers worklist. Click the Save button.
Training Guide
Enterprise Systems Solutions User Support
Page 120
Step Action
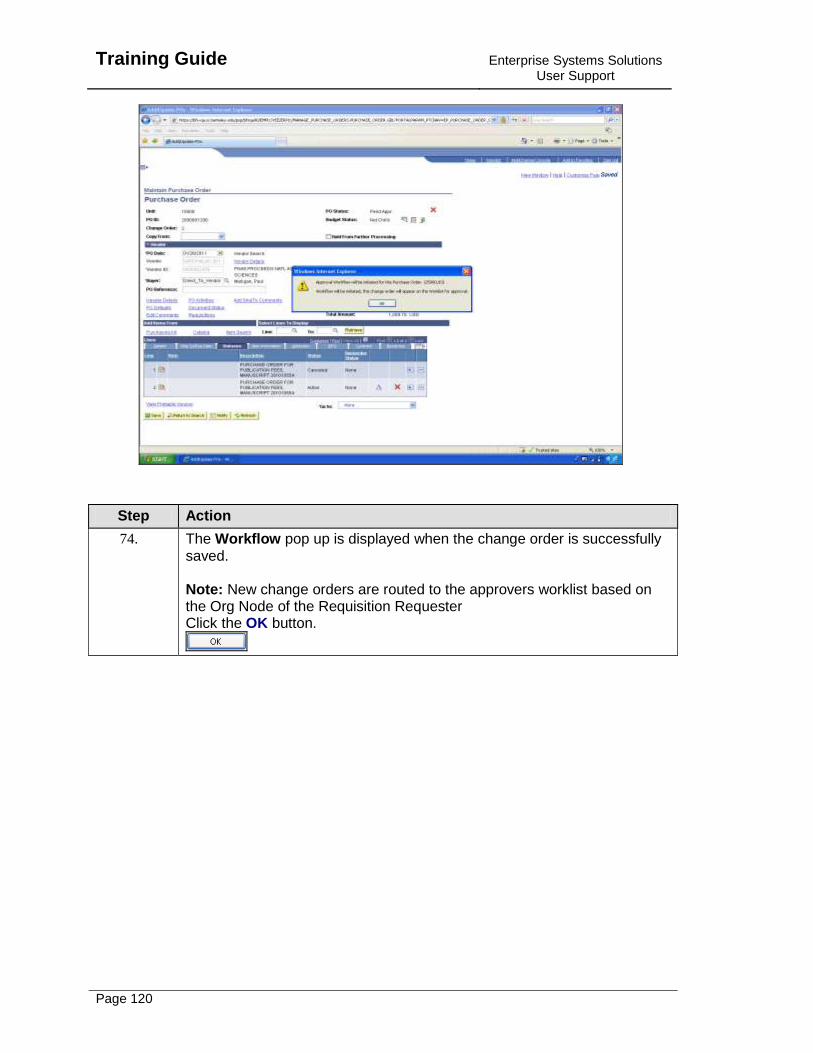
74. The Workflow pop up is displayed when the change order is successfully saved. Note: New change orders are routed to the approvers worklist based on the Org Node of the Requisition Requester Click the OK button.
Enterprise Systems Solutions User Support
Training Guide
Page 121
Step Action
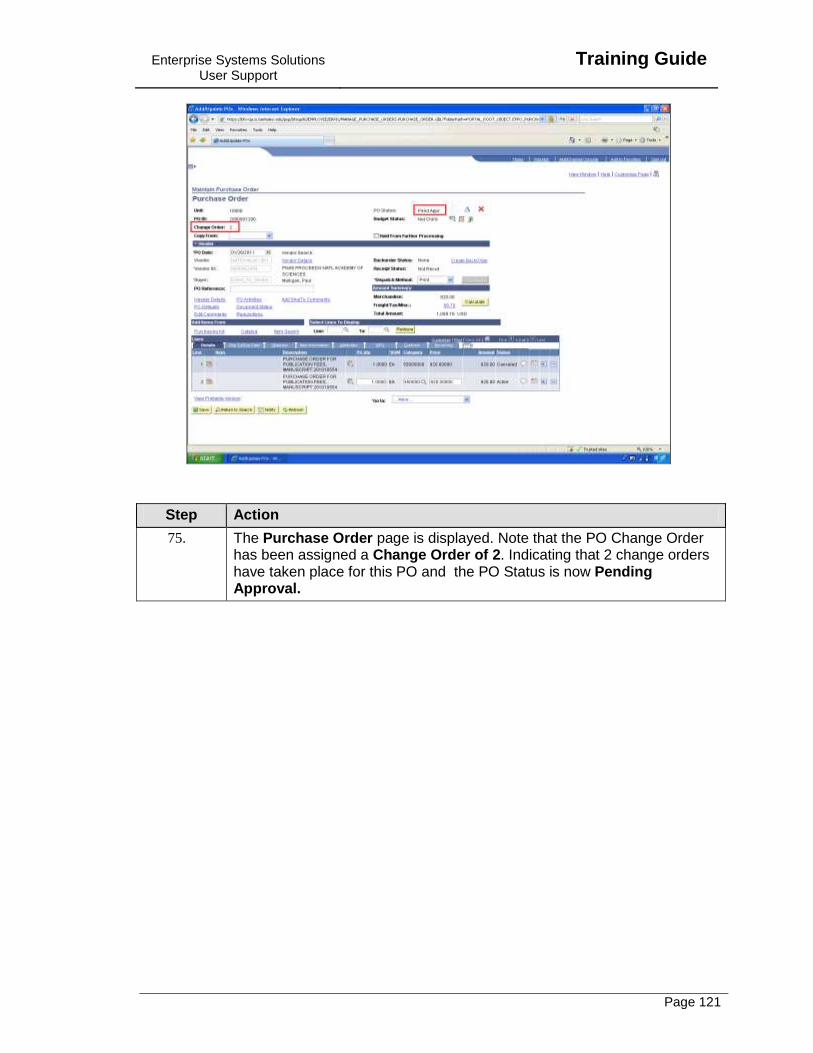
75. The Purchase Order page is displayed. Note that the PO Change Order has been assigned a Change Order of 2. Indicating that 2 change orders have taken place for this PO and the PO Status is now Pending Approval.
Training Guide
Enterprise Systems Solutions User Support
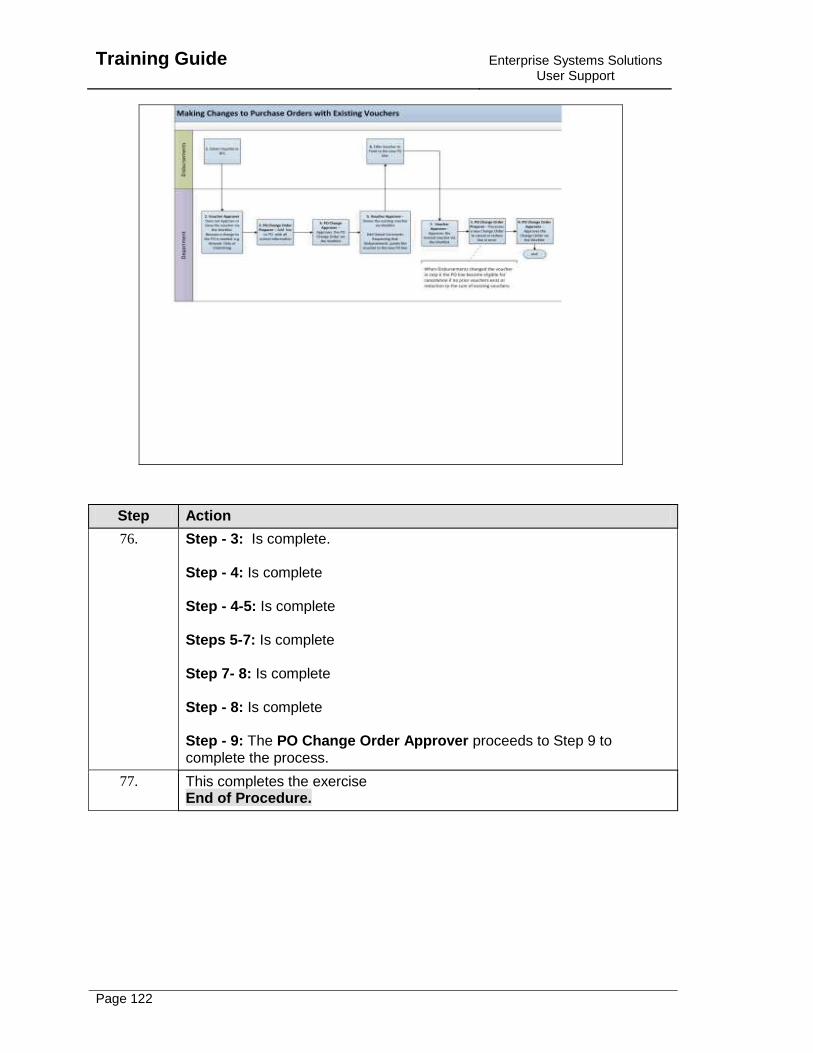
Page 122
Step Action
76. Step - 3: Is complete. Step - 4: Is complete Step - 4-5: Is complete Steps 5-7: Is complete Step 7- 8: Is complete Step - 8: Is complete Step - 9: The PO Change Order Approver proceeds to Step 9 to complete the process.
77. This completes the exercise End of Procedure.
Enterprise Systems Solutions User Support
Training Guide
Page 123
Change PO Lines to Amount Only without Vouchers
The following topic illustrates how a PO Change Order is created to change a line(s) to Amount Only when preexisting vouchers do not exist for the PO. To determine if vouchers currently exist for a PO please review topic "Look Up Existing Vouchers for a PO".
Procedure
In this example a PO Change Order is processed where the line is changed to Amount Only for the PO.
Step Action
1. Click the Purchasing link.
Training Guide
Enterprise Systems Solutions User Support
Page 124
Step Action
2. Click the Purchase Orders link.
Enterprise Systems Solutions User Support
Training Guide
Page 125
Step Action
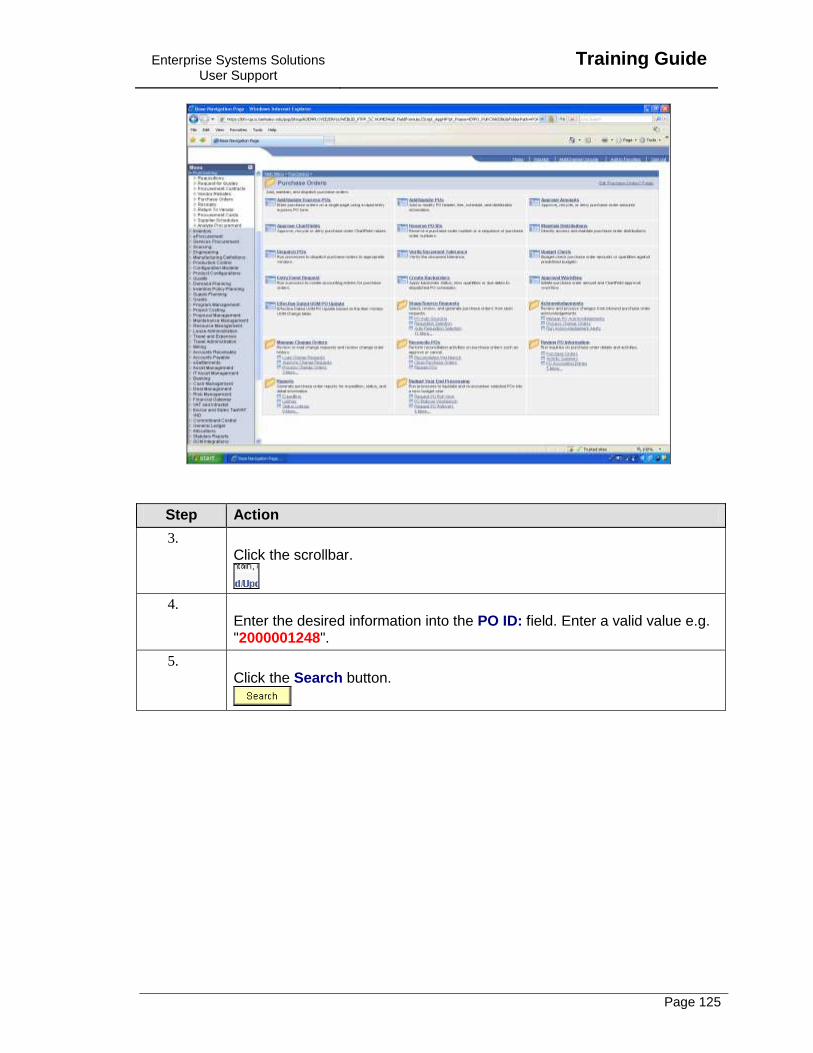
3. Click the scrollbar.
4. Enter the desired information into the PO ID: field. Enter a valid value e.g. "2000001248".
5. Click the Search button.
Training Guide
Enterprise Systems Solutions User Support
Page 126
Step Action
6. Click the Collapse (Ctrl+Y) Menu button.
7. Before you begin the change order process, the Change Order Icon should be selected. The Change Order Icon when selected will open fields within the change order and track the changes made. Note: If the change order icon is not selected the system will notify you later as changes are made that changes are being tracked. Selecting the icon before changes are made eliminates warning messages as changes are made. Click the Change Order button.
Enterprise Systems Solutions User Support
Training Guide
Page 127
Step Action
8. Once the Change Order icon has been selected it will disappear from the purchase order page. The next step immediately following is to select the Finalize Document icon. This process when ran closes the requisition and eliminates the possibility of the requisition re-sourcing to another Purchase Order. Click the Finalize Document button.
9. A warning message is displayed that all eligible distributions for the PO will be finalized. You should always select yes. Click the Yes button.
10. You are returned to the Purchase Order page. The Dispatch Method for the PO should be selected. Click the Dispatch Method list.
11. The value displayed for the Dispatch Method on the PO is defaulted from vendor set-up. The method may need to be changed depending on the need to send PO information to the vendor. 1) If the vendor does not require PO information to be sent, then select: Print - the print option for PO Change Orders will not print the PO. 2) If the vendor does require that PO information is sent, then select: Email - the email option will send a copy of the official PO to the vendor via email. The email dispatch method is NOT available for After the Fact or Subaward POs. Note: If the vendor does not accept email or an Official PO copy is needed for printing please refer to the Topic - "Print or Email PO Change Order" in the UPK under Purchasing or the Quick Reference Guide" for detailed instruction. Do no not use the following values: EDX - not used for PO Change Orders Fax - not used for PO Change Orders Phone - not used for PO Change Orders

Training Guide
Enterprise Systems Solutions User Support
Page 128
Step Action
12. Click the Print list item.
Enterprise Systems Solutions User Support
Training Guide
Page 129
Step Action
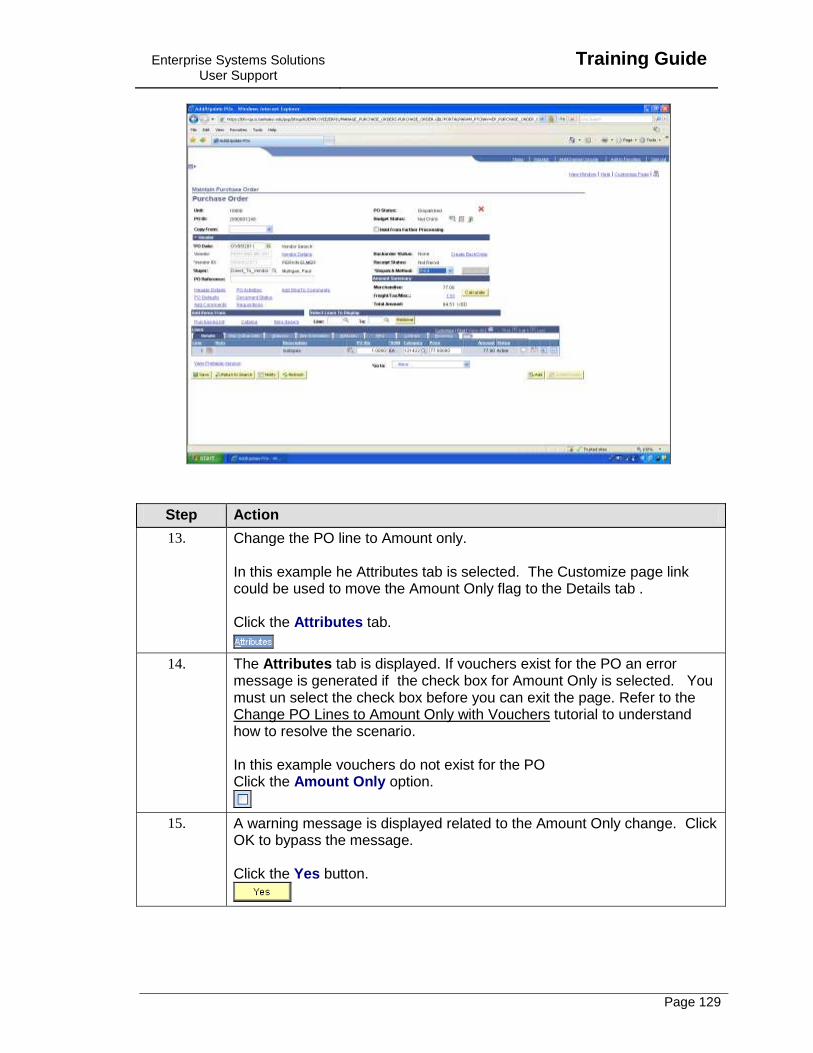
13. Change the PO line to Amount only. In this example he Attributes tab is selected. The Customize page link could be used to move the Amount Only flag to the Details tab . Click the Attributes tab.
14. The Attributes tab is displayed. If vouchers exist for the PO an error message is generated if the check box for Amount Only is selected. You must un select the check box before you can exit the page. Refer to the Change PO Lines to Amount Only with Vouchers tutorial to understand how to resolve the scenario. In this example vouchers do not exist for the PO Click the Amount Only option.
15. A warning message is displayed related to the Amount Only change. Click OK to bypass the message. Click the Yes button.
Training Guide
Enterprise Systems Solutions User Support
Page 130
Step Action
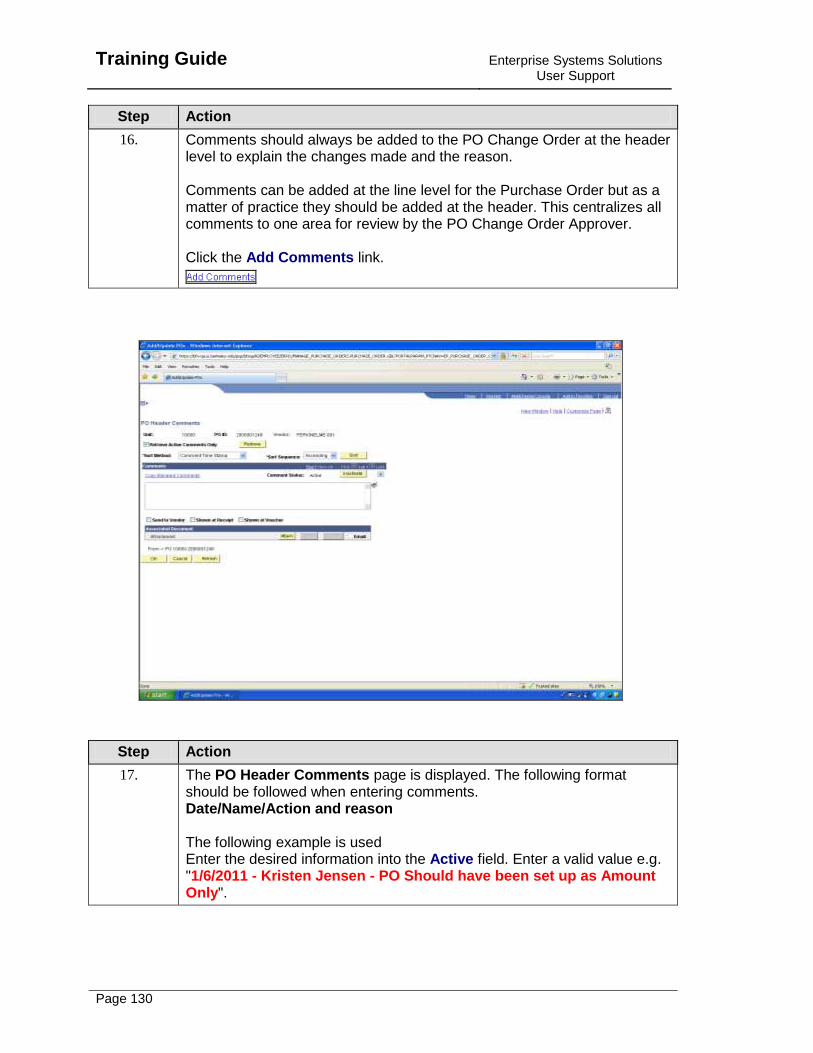
16. Comments should always be added to the PO Change Order at the header level to explain the changes made and the reason. Comments can be added at the line level for the Purchase Order but as a matter of practice they should be added at the header. This centralizes all comments to one area for review by the PO Change Order Approver. Click the Add Comments link.
Step Action
17. The PO Header Comments page is displayed. The following format should be followed when entering comments. Date/Name/Action and reason The following example is used Enter the desired information into the Active field. Enter a valid value e.g. "1/6/2011 - Kristen Jensen - PO Should have been set up as Amount Only".

Enterprise Systems Solutions User Support
Training Guide
Page 131
Step Action
18. To check for possible spelling errors Click the Spell Check Comments (Alt+5) button.
19. In this example the system does not recognize a name. Click ignore to bypass the recommendation. Click the Ignore button.
20. Click the OK button.
21. Once the comments have been entered in the correct format and detail, the information can be saved. Click the OK button.
Training Guide
Enterprise Systems Solutions User Support
Page 132
Step Action
22. The Purchase Order page is displayed. Note that once comments have been entered the hyperlink now reads Edit Comments. Note: If you are not ready for the PO Change Order to be routed for approval the Hold From Further Processing check box can be used to prevent routing. It must be selected before the change order is saved. Click the Save button.
Step Action
23. The Workflow pop up is displayed when the change order is successfully saved. Note: New change orders are routed to the approvers worklist based on the Org Node of the requisition requester Click the OK button.
24. This completes the exercise End of Procedure.
Enterprise Systems Solutions User Support
Training Guide
Page 133
Change PO lines to Amount Only with Vouchers
The following topic illustrates how a PO Change Order is created to designate the PO as Amount Only when preexisting vouchers exist for the PO. To determine if vouchers currently exist for a PO please review topic "Look Up Existing Vouchers for a PO". The following process flow outlines the steps followed by the Department and Disbursements. Please review each step and the roles responsible for each. The topic will cover steps 3 and 8. Refer to the steps outlined in the process flow to complete all of the steps successfully.
As an example, the item highlighted in the worklist is used in the topic to demonstrate step 2 of the process flow noted above. Other steps are highlighted in the topic as we move through the steps required to resolve changes to the PO when vouchers exist.
Training Guide
Enterprise Systems Solutions User Support
Page 134
Procedure In this example a PO Change Order is processed where the PO is changed to amount only and vouchers exist .
Step Action
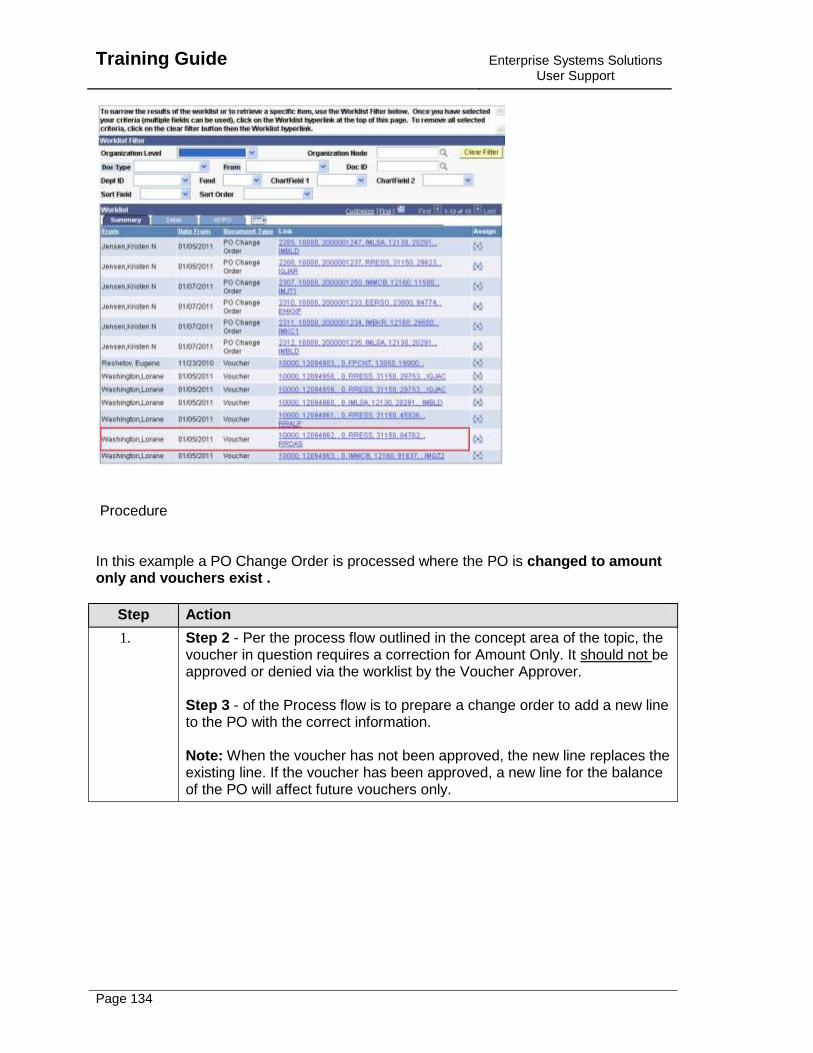
1. Step 2 - Per the process flow outlined in the concept area of the topic, the voucher in question requires a correction for Amount Only. It should not be approved or denied via the worklist by the Voucher Approver. Step 3 - of the Process flow is to prepare a change order to add a new line to the PO with the correct information. Note: When the voucher has not been approved, the new line replaces the existing line. If the voucher has been approved, a new line for the balance of the PO will affect future vouchers only.

Enterprise Systems Solutions User Support
Training Guide
Page 135
Step Action
2. Click the Purchasing link.
Training Guide
Enterprise Systems Solutions User Support
Page 136
Step Action
3. Click the Add/Update POs link.
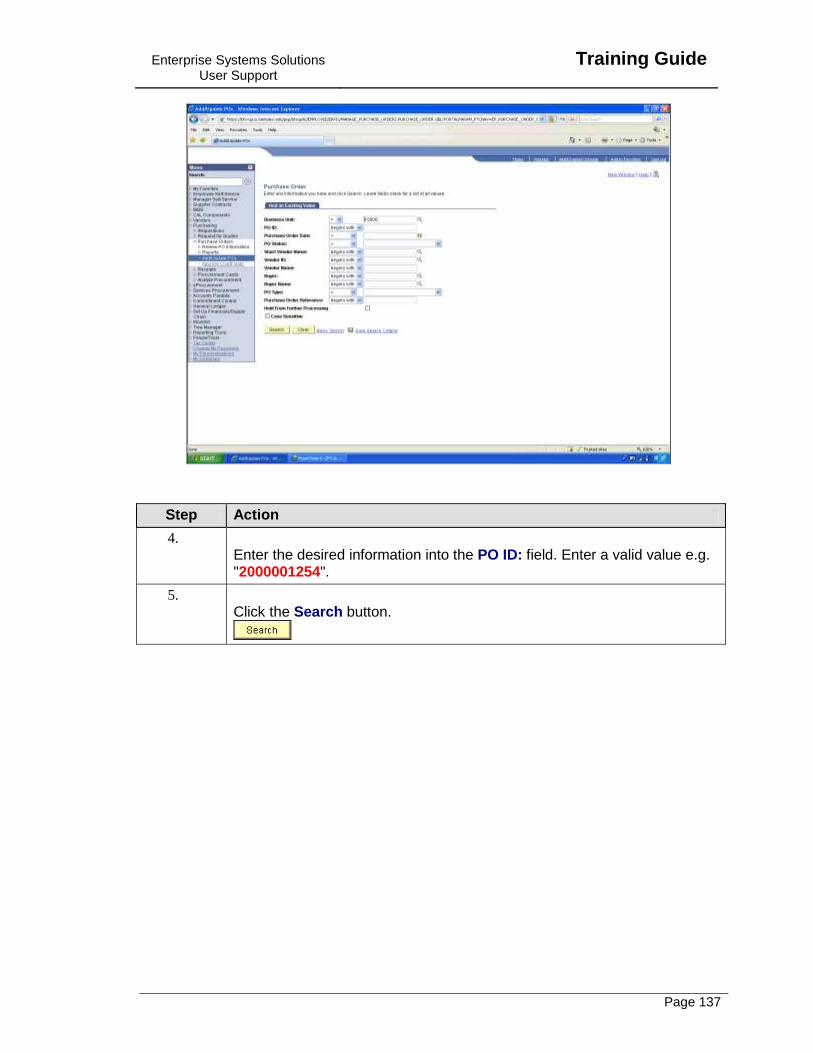
Enterprise Systems Solutions User Support
Training Guide
Page 137
Step Action
4. Enter the desired information into the PO ID: field. Enter a valid value e.g. "2000001254".
5. Click the Search button.
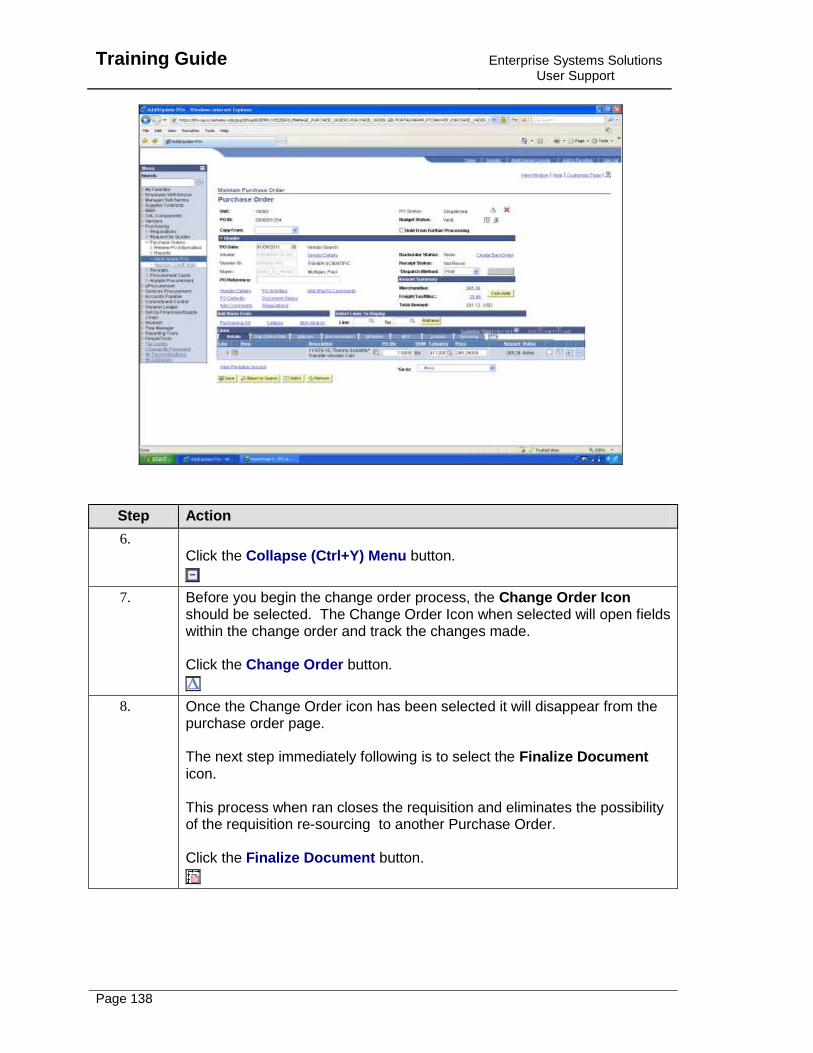
Training Guide
Enterprise Systems Solutions User Support
Page 138
Step Action
6. Click the Collapse (Ctrl+Y) Menu button.
7. Before you begin the change order process, the Change Order Icon should be selected. The Change Order Icon when selected will open fields within the change order and track the changes made. Click the Change Order button.
8. Once the Change Order icon has been selected it will disappear from the purchase order page. The next step immediately following is to select the Finalize Document icon. This process when ran closes the requisition and eliminates the possibility of the requisition re-sourcing to another Purchase Order. Click the Finalize Document button.
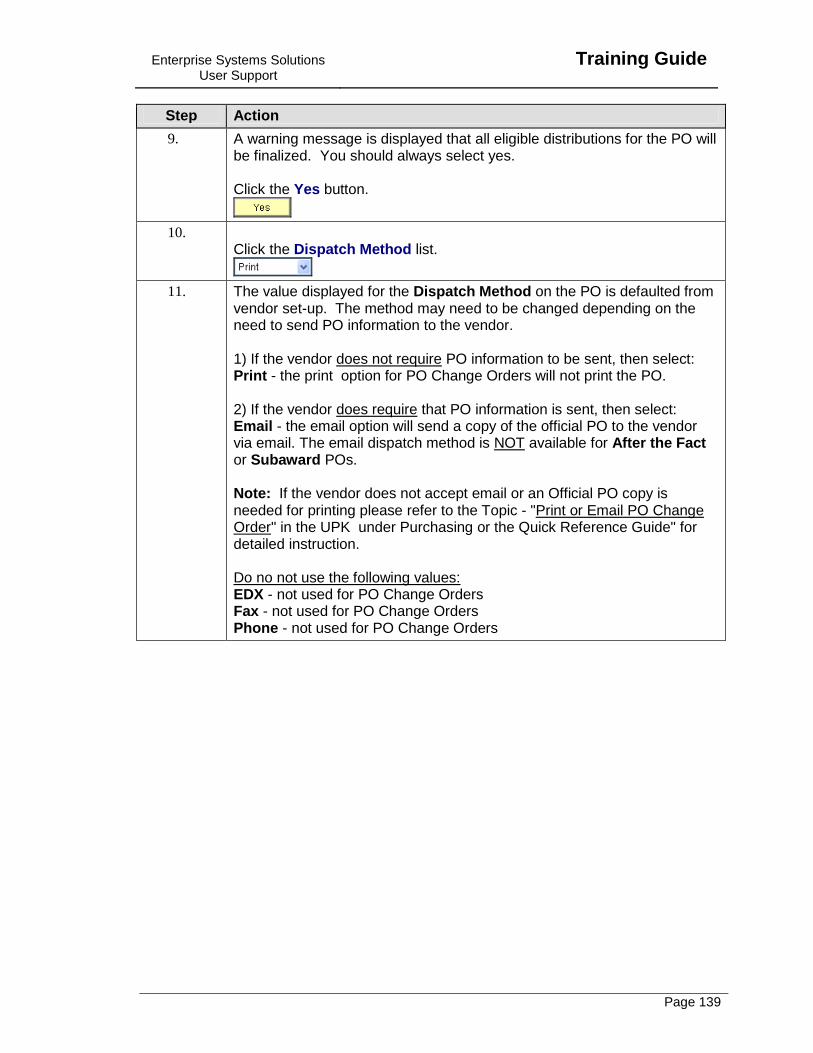
Enterprise Systems Solutions User Support
Training Guide
Page 139
Step Action
9. A warning message is displayed that all eligible distributions for the PO will be finalized. You should always select yes. Click the Yes button.
10. Click the Dispatch Method list.
11. The value displayed for the Dispatch Method on the PO is defaulted from vendor set-up. The method may need to be changed depending on the need to send PO information to the vendor. 1) If the vendor does not require PO information to be sent, then select: Print - the print option for PO Change Orders will not print the PO. 2) If the vendor does require that PO information is sent, then select: Email - the email option will send a copy of the official PO to the vendor via email. The email dispatch method is NOT available for After the Fact or Subaward POs. Note: If the vendor does not accept email or an Official PO copy is needed for printing please refer to the Topic - "Print or Email PO Change Order" in the UPK under Purchasing or the Quick Reference Guide" for detailed instruction. Do no not use the following values: EDX - not used for PO Change Orders Fax - not used for PO Change Orders Phone - not used for PO Change Orders
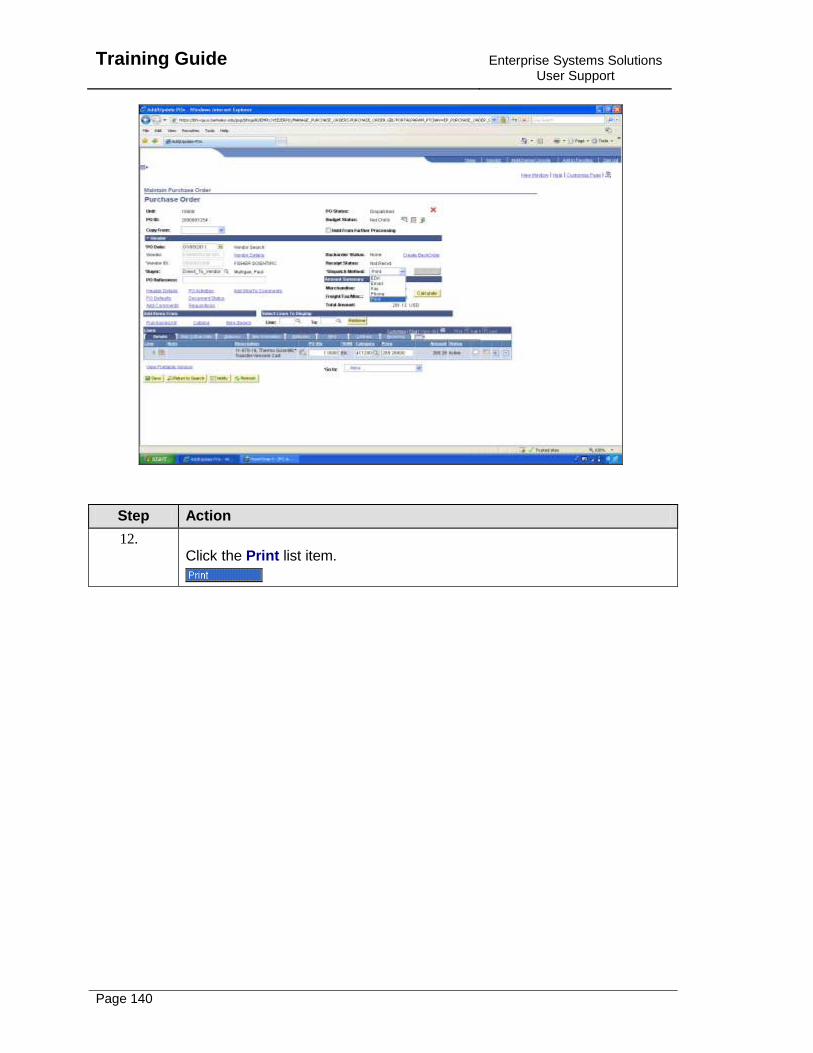
Training Guide
Enterprise Systems Solutions User Support
Page 140
Step Action
12. Click the Print list item.
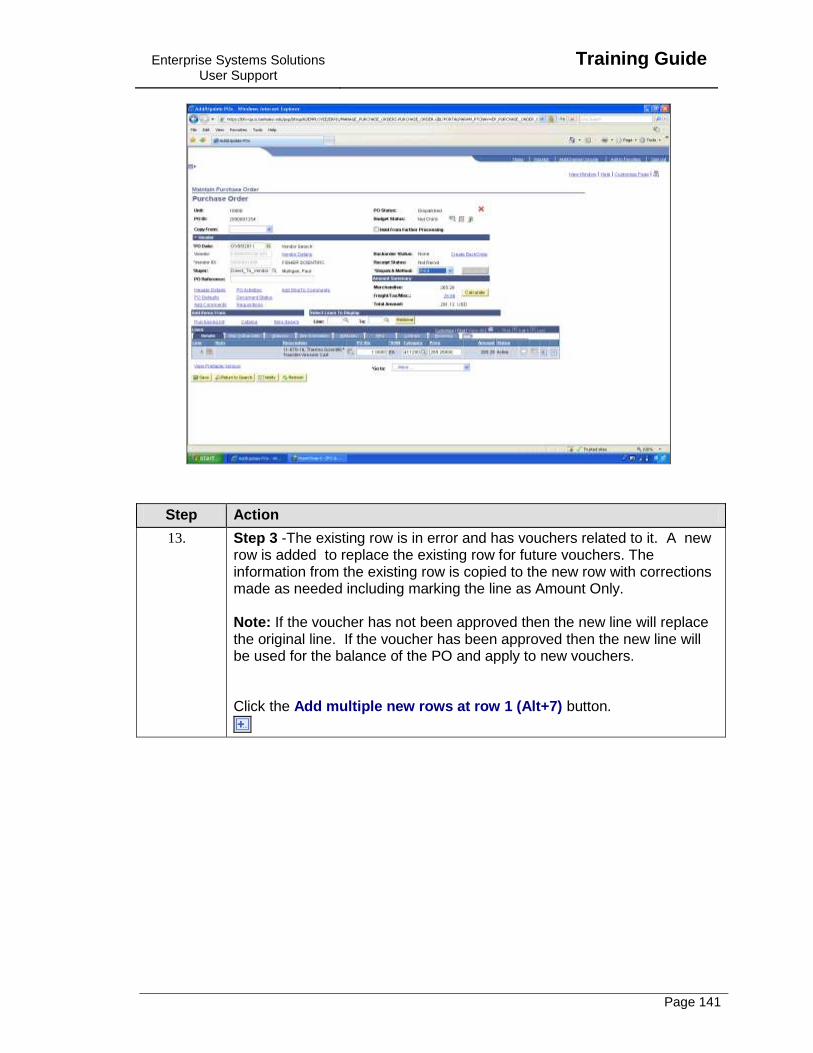
Enterprise Systems Solutions User Support
Training Guide
Page 141
Step Action
13. Step 3 -The existing row is in error and has vouchers related to it. A new row is added to replace the existing row for future vouchers. The information from the existing row is copied to the new row with corrections made as needed including marking the line as Amount Only. Note: If the voucher has not been approved then the new line will replace the original line. If the voucher has been approved then the new line will be used for the balance of the PO and apply to new vouchers. Click the Add multiple new rows at row 1 (Alt+7) button.
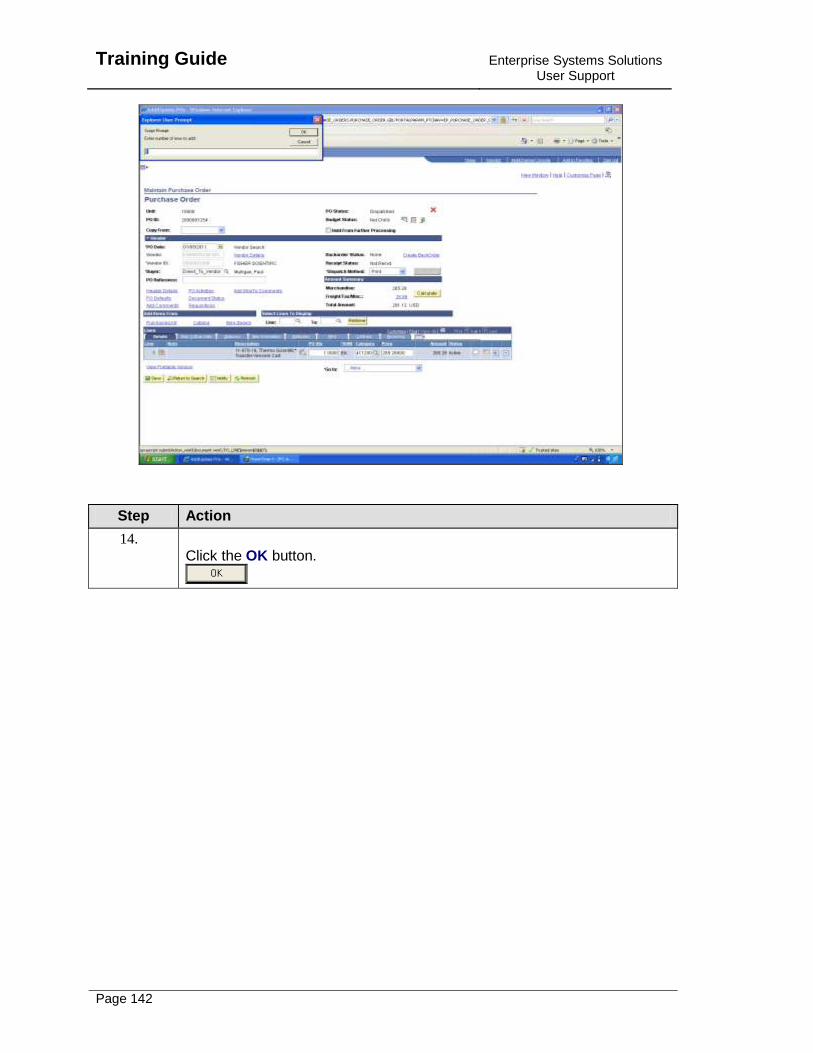
Training Guide
Enterprise Systems Solutions User Support
Page 142
Step Action
14. Click the OK button.
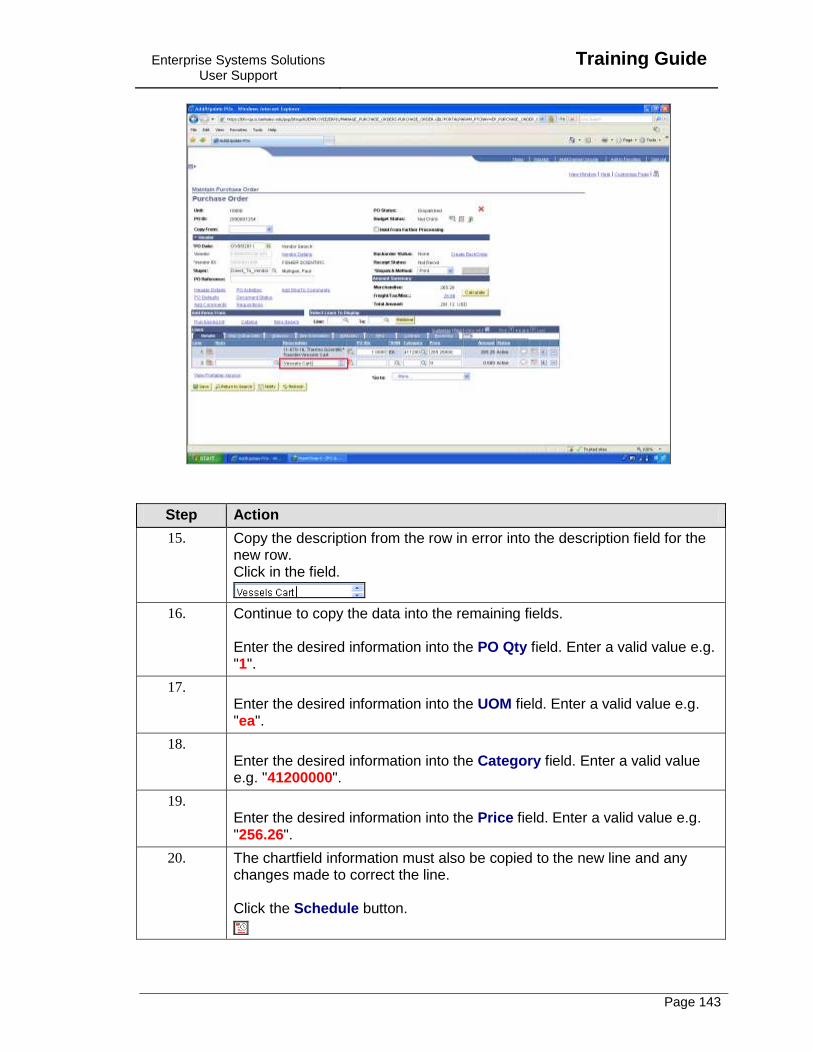
Enterprise Systems Solutions User Support
Training Guide
Page 143
Step Action
15. Copy the description from the row in error into the description field for the new row. Click in the field.
16. Continue to copy the data into the remaining fields. Enter the desired information into the PO Qty field. Enter a valid value e.g. "1".
17. Enter the desired information into the UOM field. Enter a valid value e.g. "ea".
18. Enter the desired information into the Category field. Enter a valid value e.g. "41200000".
19. Enter the desired information into the Price field. Enter a valid value e.g. "256.26".
20. The chartfield information must also be copied to the new line and any changes made to correct the line. Click the Schedule button.
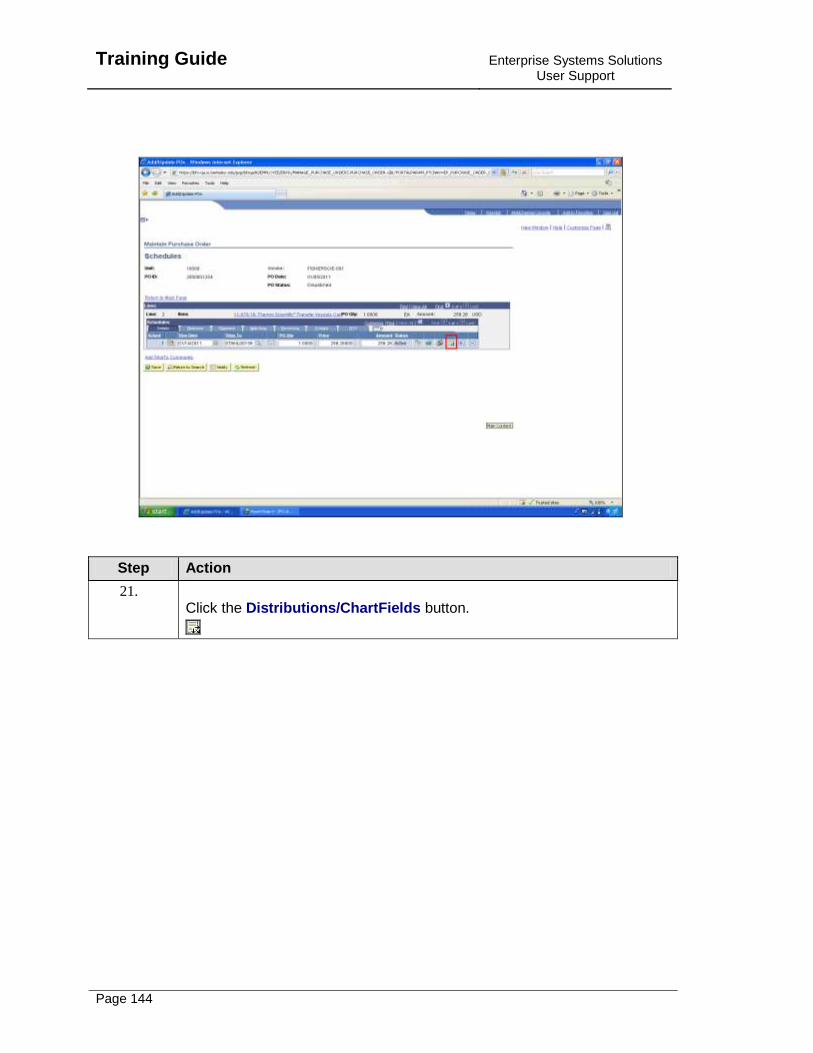
Training Guide
Enterprise Systems Solutions User Support
Page 144
Step Action
21. Click the Distributions/ChartFields button.
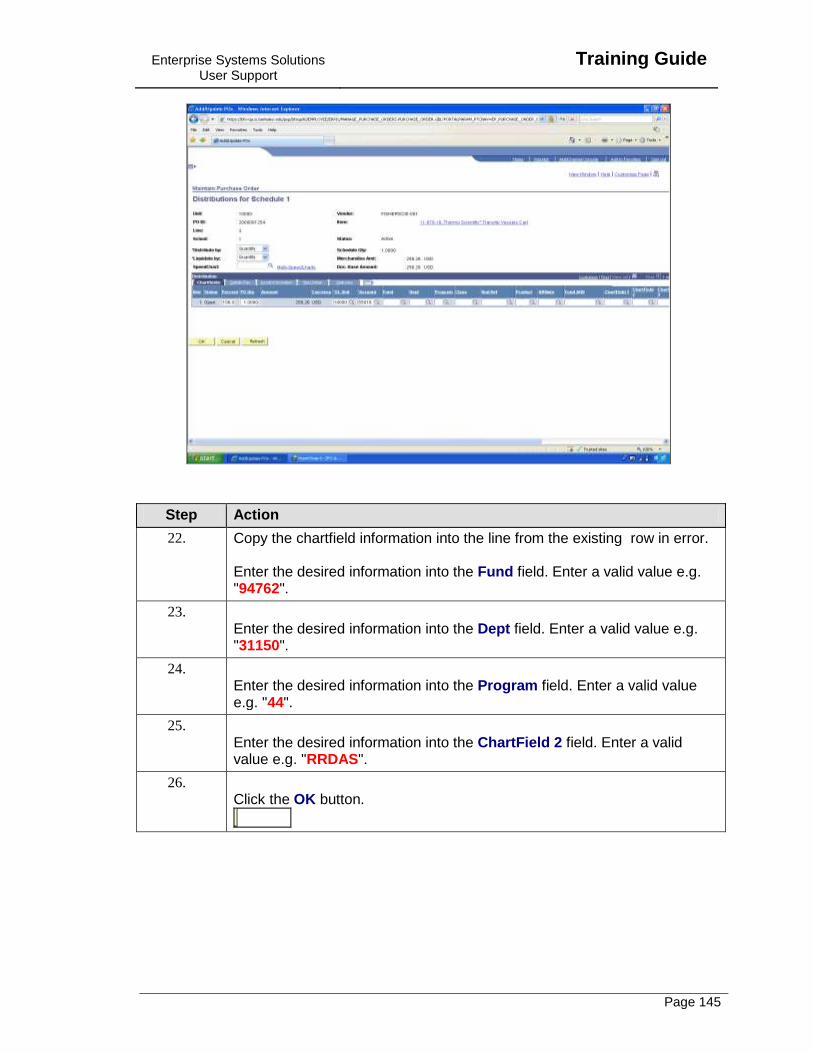
Enterprise Systems Solutions User Support
Training Guide
Page 145
Step Action
22. Copy the chartfield information into the line from the existing row in error. Enter the desired information into the Fund field. Enter a valid value e.g. "94762".
23. Enter the desired information into the Dept field. Enter a valid value e.g. "31150".
24. Enter the desired information into the Program field. Enter a valid value e.g. "44".
25. Enter the desired information into the ChartField 2 field. Enter a valid value e.g. "RRDAS".
26. Click the OK button.

Training Guide
Enterprise Systems Solutions User Support
Page 146
Step Action
27. The Schedules page is displayed. Click the Return to Main Page link.
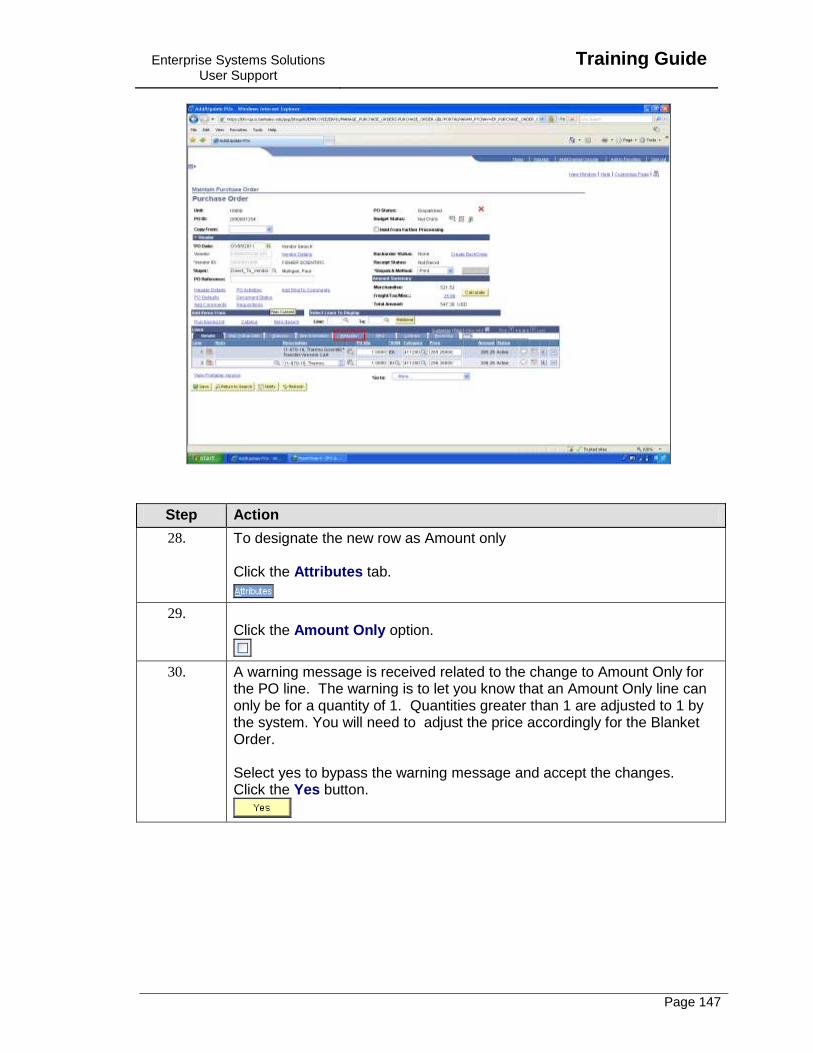
Enterprise Systems Solutions User Support
Training Guide
Page 147
Step Action
28. To designate the new row as Amount only Click the Attributes tab.
29. Click the Amount Only option.
30. A warning message is received related to the change to Amount Only for the PO line. The warning is to let you know that an Amount Only line can only be for a quantity of 1. Quantities greater than 1 are adjusted to 1 by the system. You will need to adjust the price accordingly for the Blanket Order. Select yes to bypass the warning message and accept the changes. Click the Yes button.
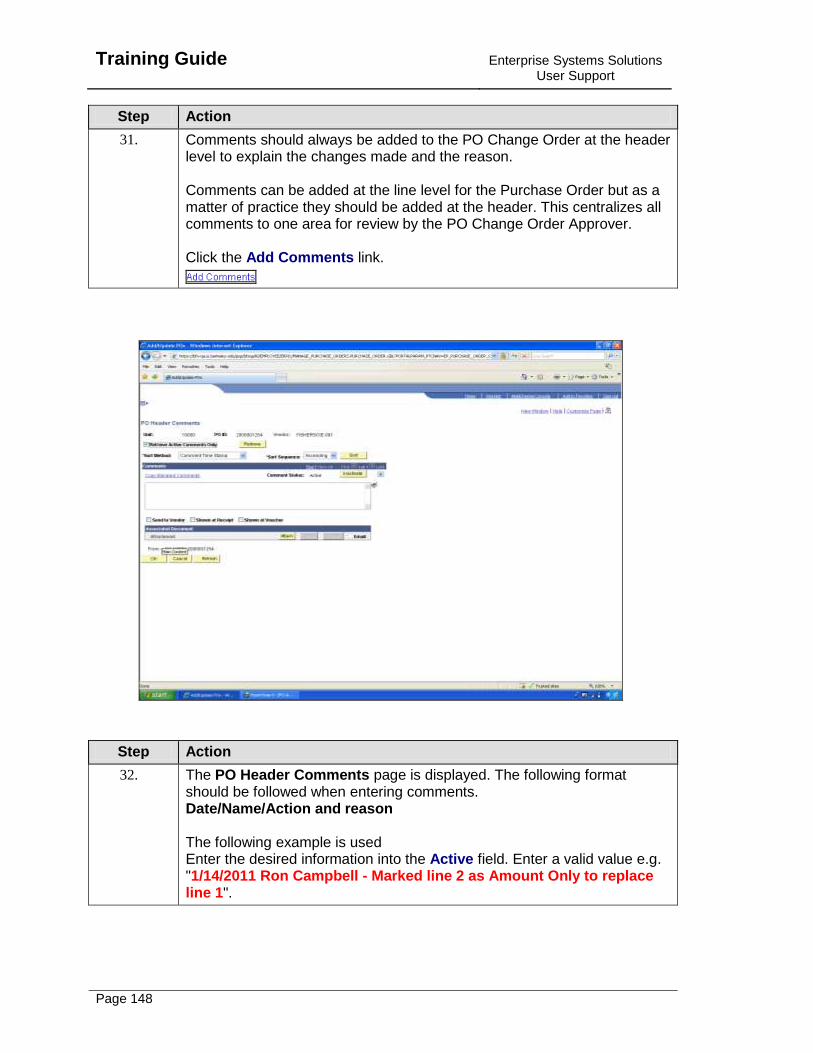
Training Guide
Enterprise Systems Solutions User Support
Page 148
Step Action
31. Comments should always be added to the PO Change Order at the header level to explain the changes made and the reason. Comments can be added at the line level for the Purchase Order but as a matter of practice they should be added at the header. This centralizes all comments to one area for review by the PO Change Order Approver. Click the Add Comments link.
Step Action
32. The PO Header Comments page is displayed. The following format should be followed when entering comments. Date/Name/Action and reason The following example is used Enter the desired information into the Active field. Enter a valid value e.g. "1/14/2011 Ron Campbell - Marked line 2 as Amount Only to replace line 1".
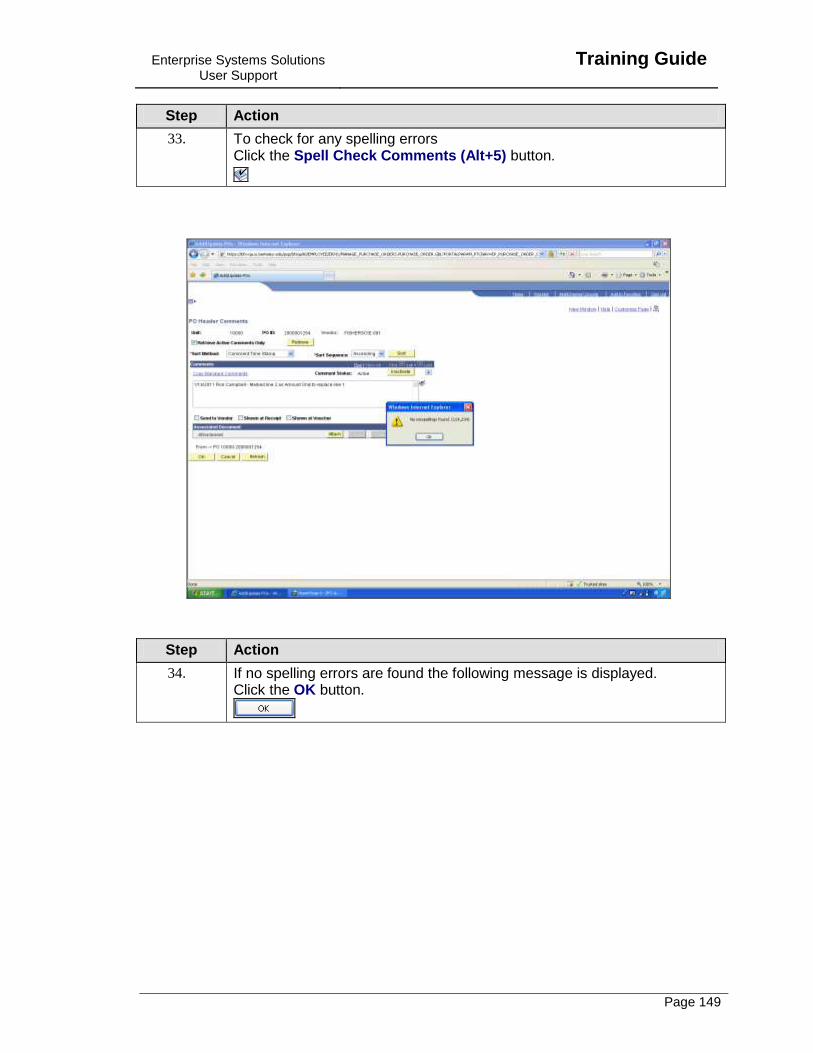
Enterprise Systems Solutions User Support
Training Guide
Page 149
Step Action
33. To check for any spelling errors Click the Spell Check Comments (Alt+5) button.
Step Action
34. If no spelling errors are found the following message is displayed. Click the OK button.
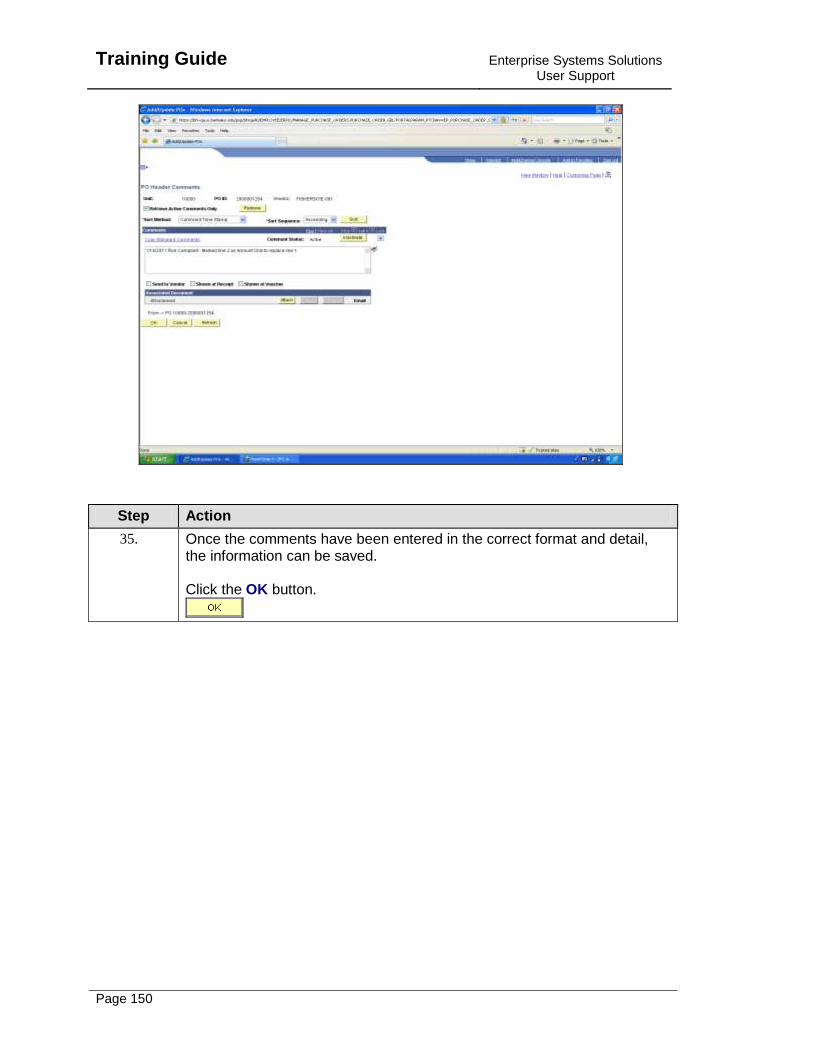
Training Guide
Enterprise Systems Solutions User Support
Page 150
Step Action
35. Once the comments have been entered in the correct format and detail, the information can be saved. Click the OK button.
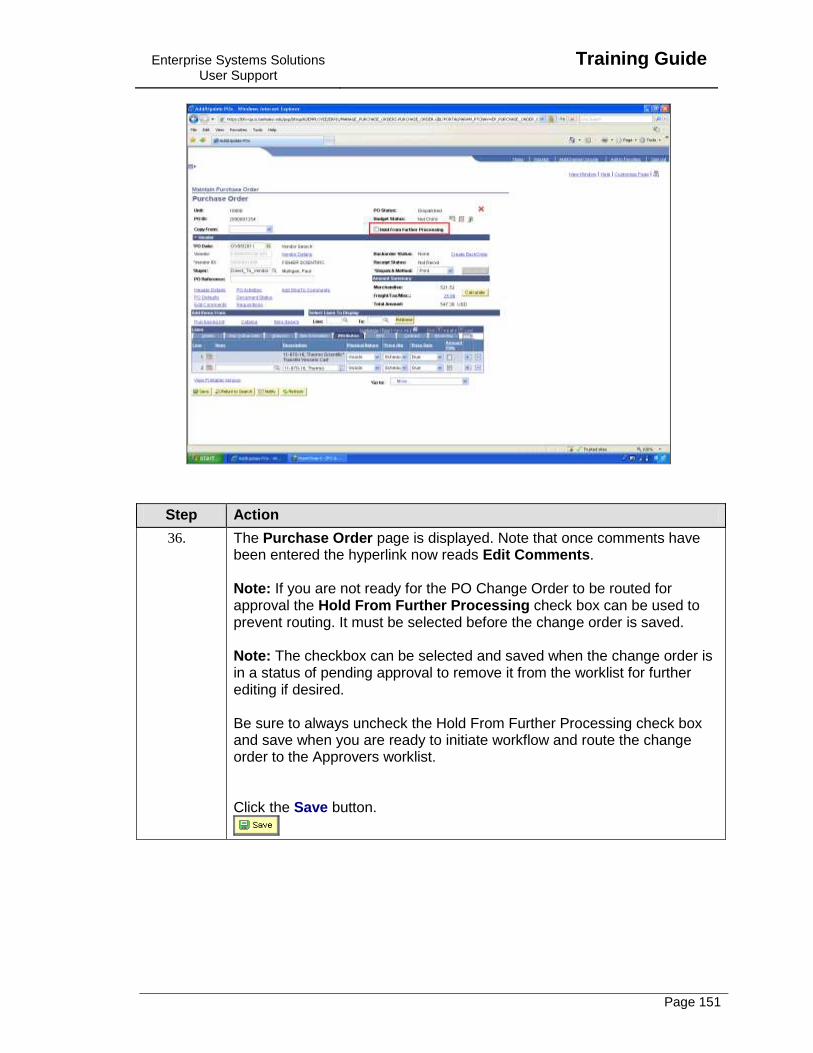
Enterprise Systems Solutions User Support
Training Guide
Page 151
Step Action
36. The Purchase Order page is displayed. Note that once comments have been entered the hyperlink now reads Edit Comments. Note: If you are not ready for the PO Change Order to be routed for approval the Hold From Further Processing check box can be used to prevent routing. It must be selected before the change order is saved. Note: The checkbox can be selected and saved when the change order is in a status of pending approval to remove it from the worklist for further editing if desired. Be sure to always uncheck the Hold From Further Processing check box and save when you are ready to initiate workflow and route the change order to the Approvers worklist. Click the Save button.
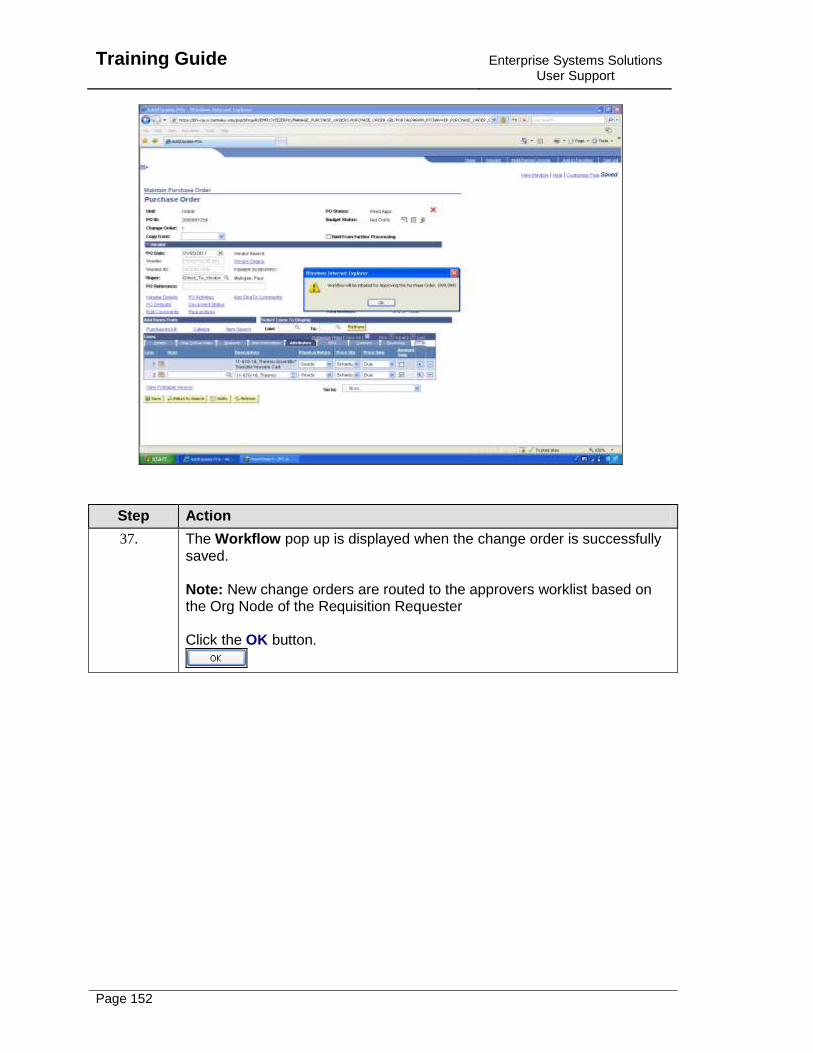
Training Guide
Enterprise Systems Solutions User Support
Page 152
Step Action
37. The Workflow pop up is displayed when the change order is successfully saved. Note: New change orders are routed to the approvers worklist based on the Org Node of the Requisition Requester Click the OK button.
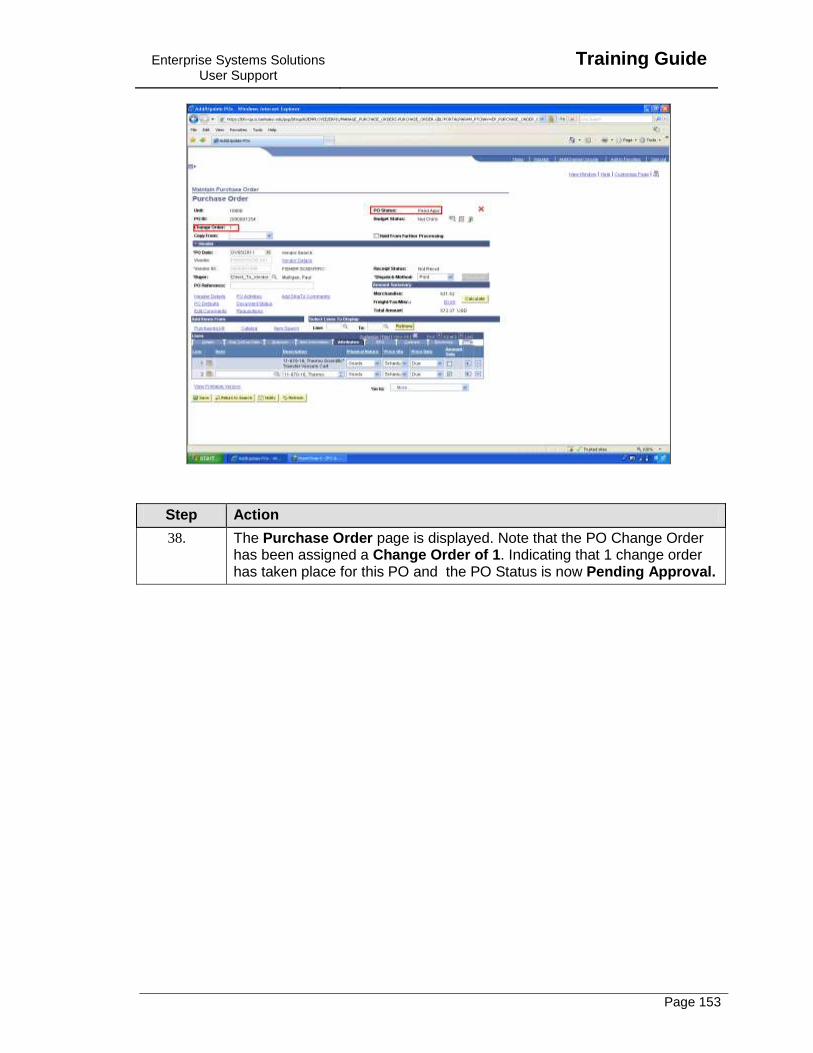
Enterprise Systems Solutions User Support
Training Guide
Page 153
Step Action
38. The Purchase Order page is displayed. Note that the PO Change Order has been assigned a Change Order of 1. Indicating that 1 change order has taken place for this PO and the PO Status is now Pending Approval.
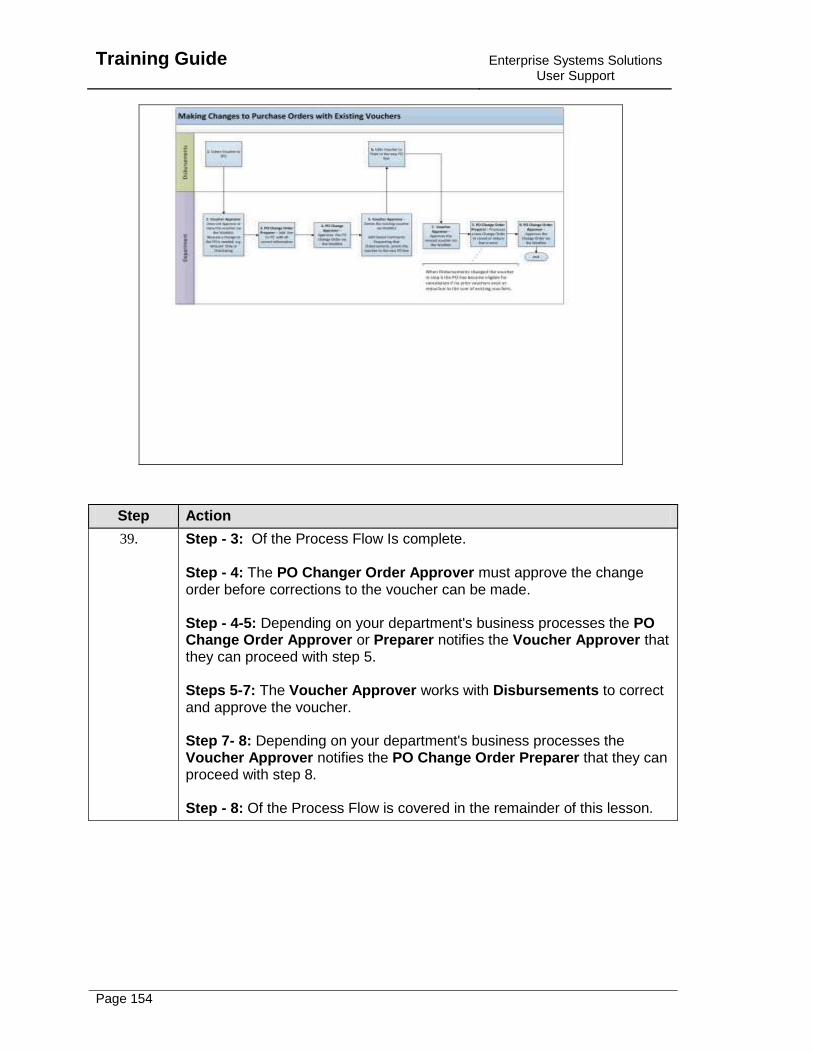
Training Guide
Enterprise Systems Solutions User Support
Page 154
Step Action
39. Step - 3: Of the Process Flow Is complete. Step - 4: The PO Changer Order Approver must approve the change order before corrections to the voucher can be made. Step - 4-5: Depending on your department's business processes the PO Change Order Approver or Preparer notifies the Voucher Approver that they can proceed with step 5. Steps 5-7: The Voucher Approver works with Disbursements to correct and approve the voucher. Step 7- 8: Depending on your department's business processes the Voucher Approver notifies the PO Change Order Preparer that they can proceed with step 8. Step - 8: Of the Process Flow is covered in the remainder of this lesson.
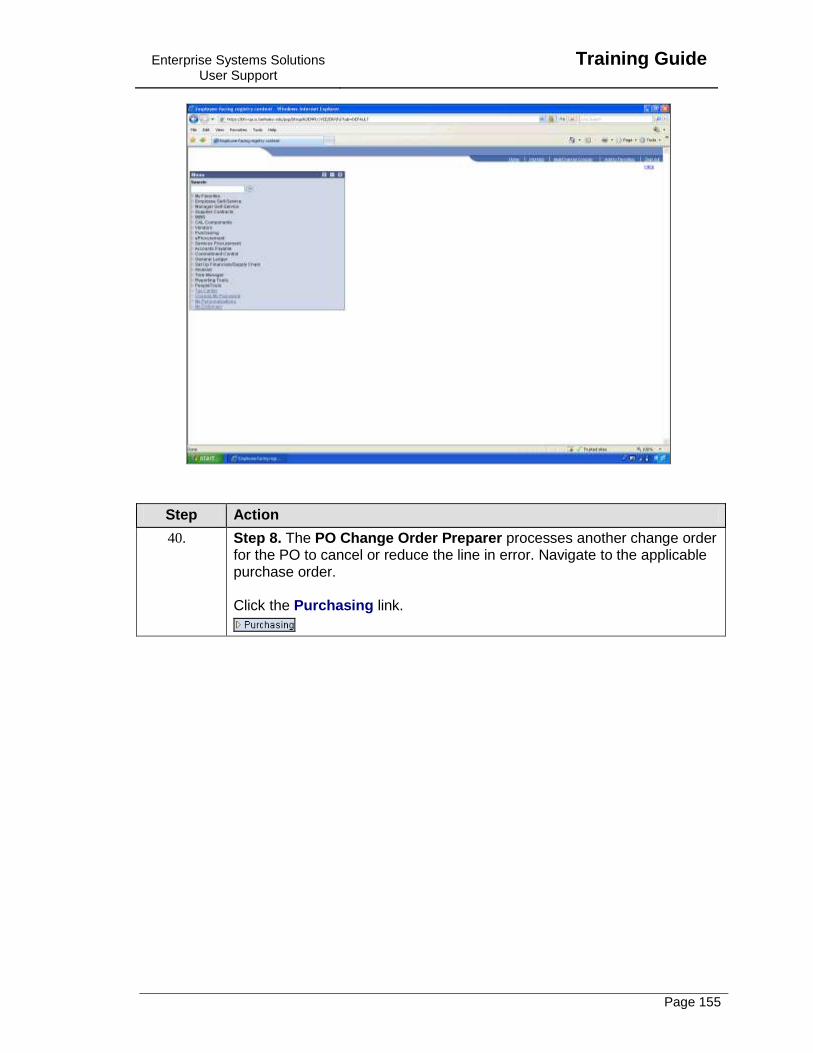
Enterprise Systems Solutions User Support
Training Guide
Page 155
Step Action
40. Step 8. The PO Change Order Preparer processes another change order for the PO to cancel or reduce the line in error. Navigate to the applicable purchase order. Click the Purchasing link.

Training Guide
Enterprise Systems Solutions User Support
Page 156
Step Action
41. Click the Purchase Orders link.
42. Click the Add/Update POs link.

Enterprise Systems Solutions User Support
Training Guide
Page 157
Step Action
43. Enter the desired information into the PO ID: field. Enter a valid value e.g. "2000001291".
44. Click the Search button.
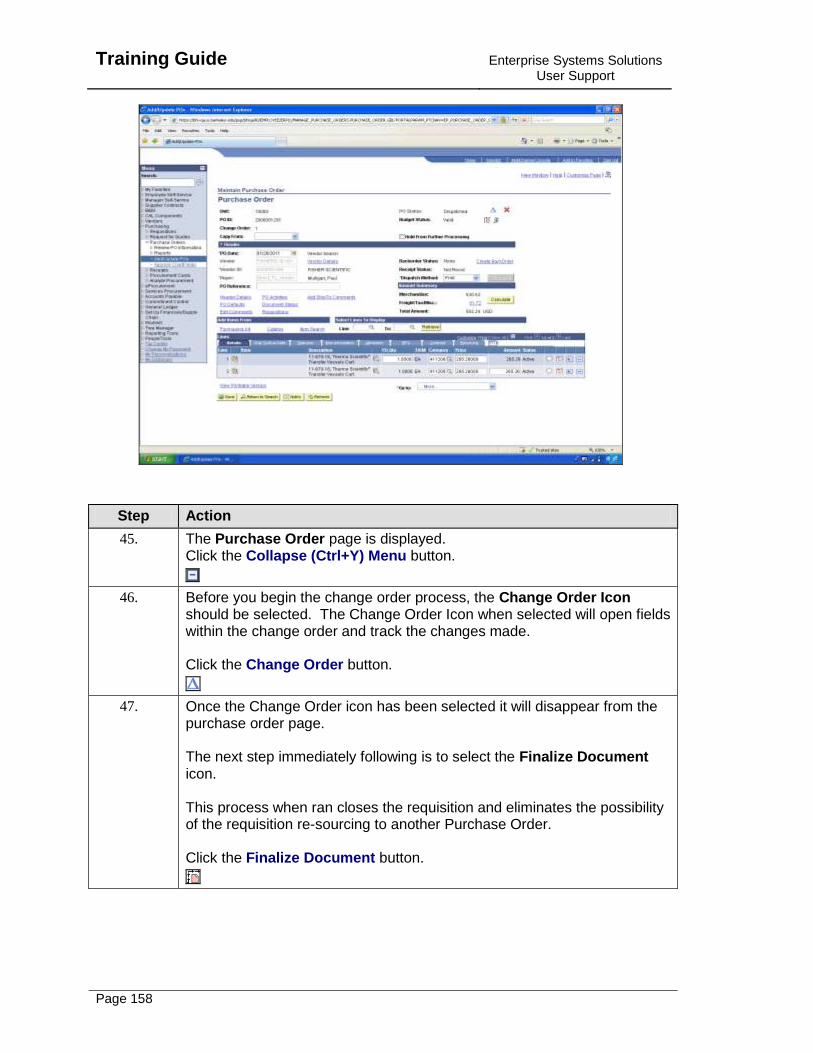
Training Guide
Enterprise Systems Solutions User Support
Page 158
Step Action
45. The Purchase Order page is displayed. Click the Collapse (Ctrl+Y) Menu button.
46. Before you begin the change order process, the Change Order Icon should be selected. The Change Order Icon when selected will open fields within the change order and track the changes made. Click the Change Order button.
47. Once the Change Order icon has been selected it will disappear from the purchase order page. The next step immediately following is to select the Finalize Document icon. This process when ran closes the requisition and eliminates the possibility of the requisition re-sourcing to another Purchase Order. Click the Finalize Document button.
Enterprise Systems Solutions User Support
Training Guide
Page 159
Step Action
48. A warning message is displayed that all eligible distributions for the PO will be finalized. You should always select yes. Click the Yes button.
49. You are returned to the Purchase Order page. The Dispatch Method for the PO should be selected. Click the Dispatch Method list.
50. The value displayed for the Dispatch Method on the PO is defaulted from vendor set-up. The method may need to be changed depending on the need to send PO information to the vendor. 1) If the vendor does not require PO information to be sent, then select: Print - the print option for PO Change Orders will not print the PO. 2) If the vendor does require that PO information is sent, then select: Email - the email option will send a copy of the official PO to the vendor via email. The email dispatch method is NOT available for After the Fact or Subaward POs. Note: If the vendor does not accept email or an Official PO copy is needed for printing please refer to the Topic - "Print or Email PO Change Order" in the UPK under Purchasing or the Quick Reference Guide" for detailed instruction. Do no not use the following values: EDX - not used for PO Change Orders Fax - not used for PO Change Orders Phone - not used for PO Change Orders
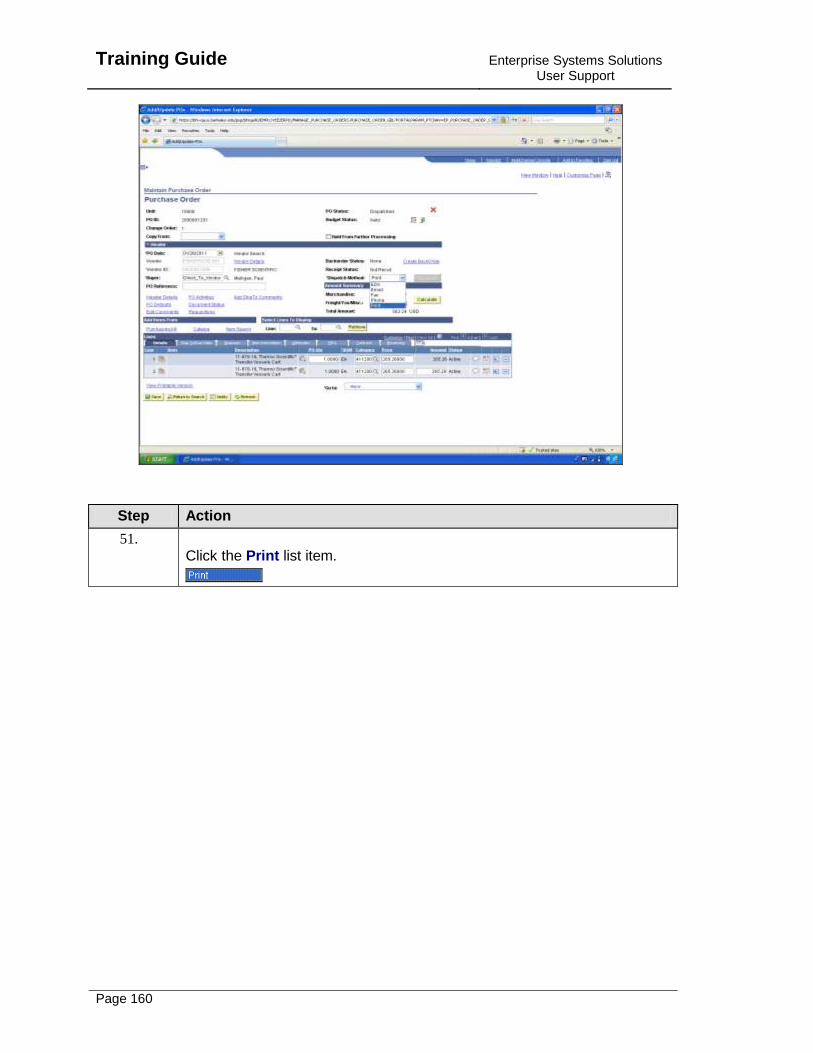
Training Guide
Enterprise Systems Solutions User Support
Page 160
Step Action
51. Click the Print list item.
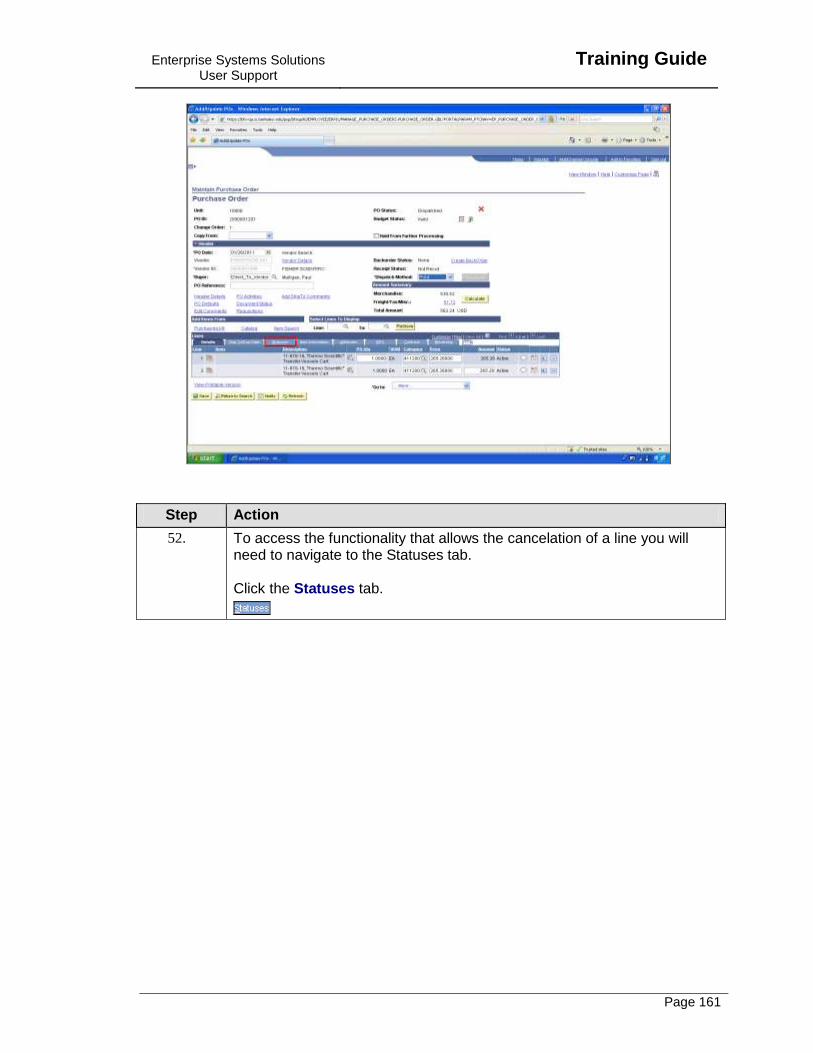
Enterprise Systems Solutions User Support
Training Guide
Page 161
Step Action
52. To access the functionality that allows the cancelation of a line you will need to navigate to the Statuses tab. Click the Statuses tab.
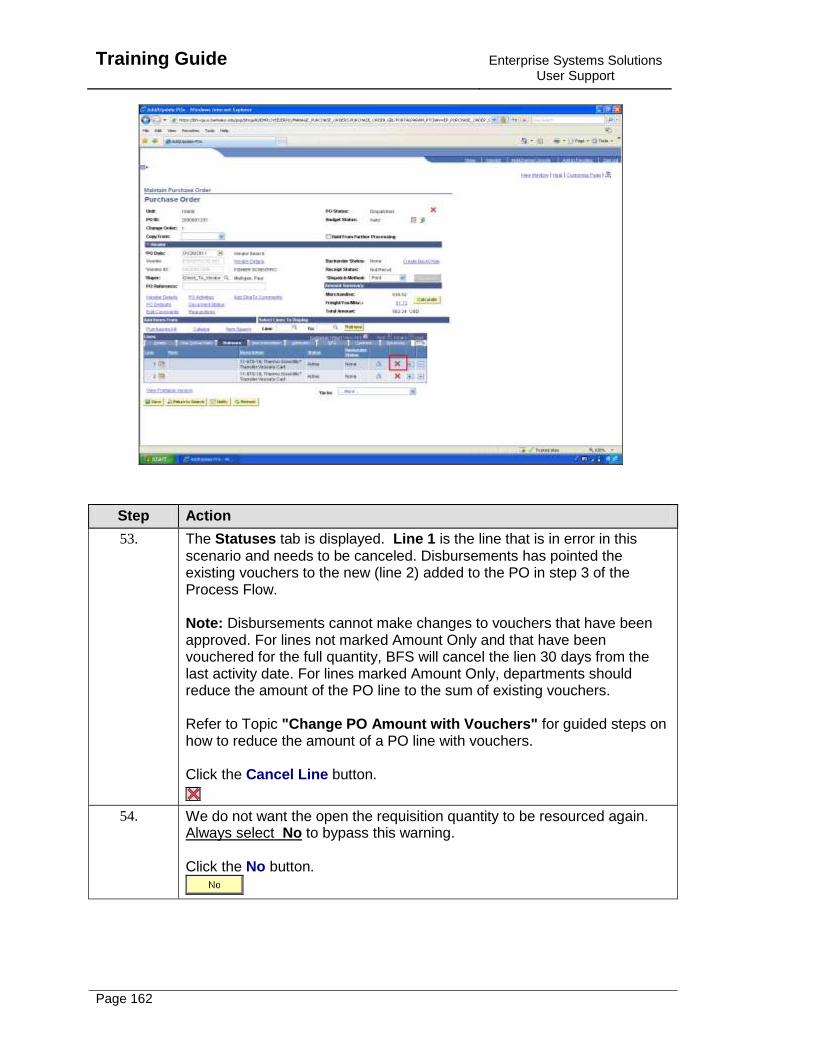
Training Guide
Enterprise Systems Solutions User Support
Page 162
Step Action
53. The Statuses tab is displayed. Line 1 is the line that is in error in this scenario and needs to be canceled. Disbursements has pointed the existing vouchers to the new (line 2) added to the PO in step 3 of the Process Flow. Note: Disbursements cannot make changes to vouchers that have been approved. For lines not marked Amount Only and that have been vouchered for the full quantity, BFS will cancel the lien 30 days from the last activity date. For lines marked Amount Only, departments should reduce the amount of the PO line to the sum of existing vouchers. Refer to Topic "Change PO Amount with Vouchers" for guided steps on how to reduce the amount of a PO line with vouchers. Click the Cancel Line button.
54. We do not want the open the requisition quantity to be resourced again. Always select No to bypass this warning. Click the No button.
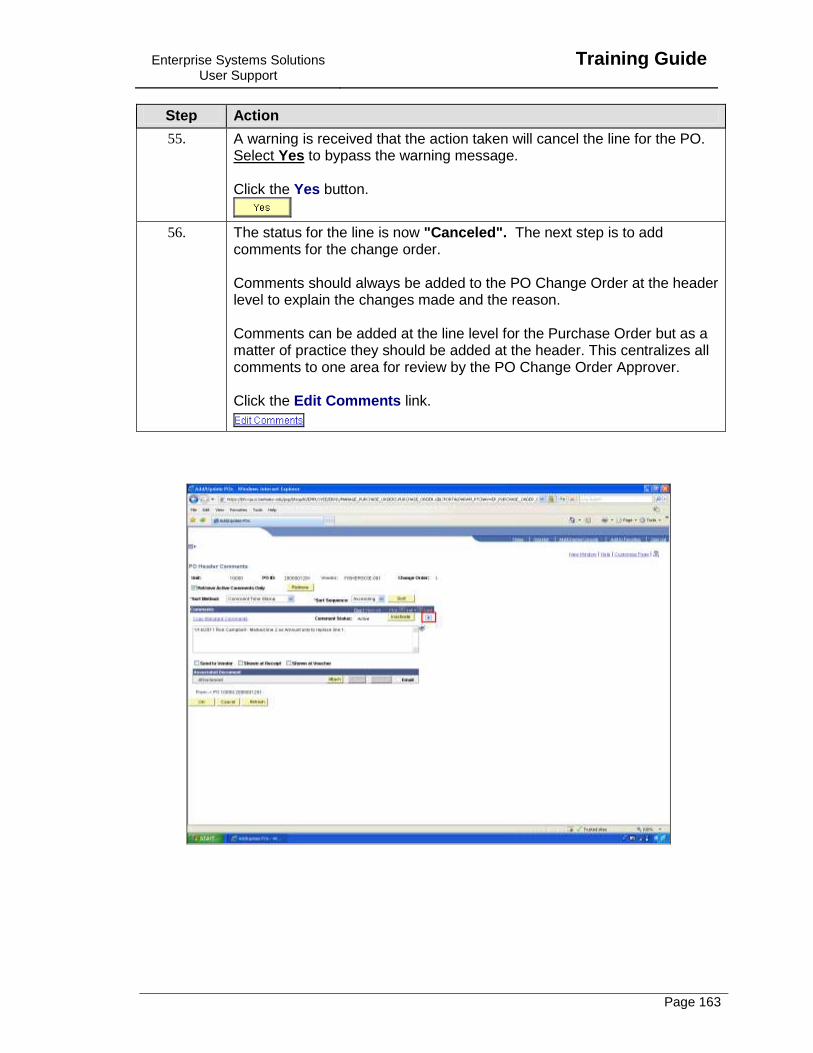
Enterprise Systems Solutions User Support
Training Guide
Page 163
Step Action
55. A warning is received that the action taken will cancel the line for the PO. Select Yes to bypass the warning message. Click the Yes button.
56. The status for the line is now "Canceled". The next step is to add comments for the change order. Comments should always be added to the PO Change Order at the header level to explain the changes made and the reason. Comments can be added at the line level for the Purchase Order but as a matter of practice they should be added at the header. This centralizes all comments to one area for review by the PO Change Order Approver. Click the Edit Comments link.
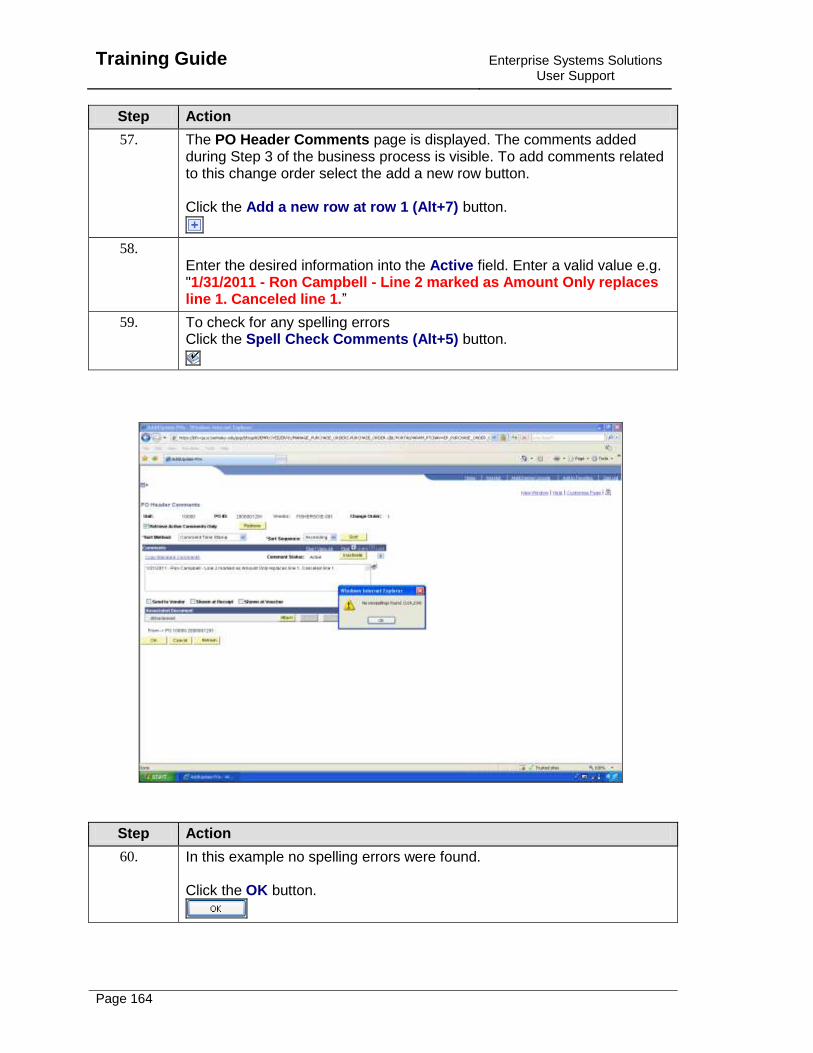
Training Guide
Enterprise Systems Solutions User Support
Page 164
Step Action
57. The PO Header Comments page is displayed. The comments added during Step 3 of the business process is visible. To add comments related to this change order select the add a new row button. Click the Add a new row at row 1 (Alt+7) button.
58. Enter the desired information into the Active field. Enter a valid value e.g. "1/31/2011 - Ron Campbell - Line 2 marked as Amount Only replaces line 1. Canceled line 1.”
59. To check for any spelling errors Click the Spell Check Comments (Alt+5) button.
Step Action
60. In this example no spelling errors were found. Click the OK button.
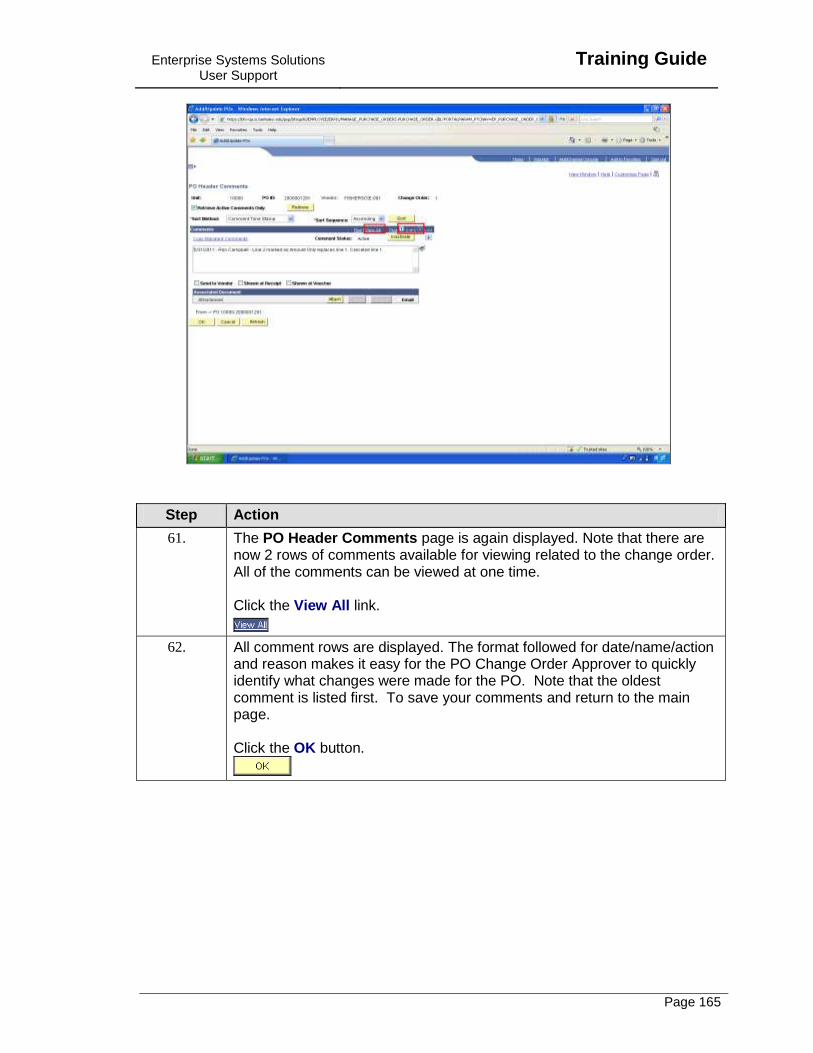
Enterprise Systems Solutions User Support
Training Guide
Page 165
Step Action
61. The PO Header Comments page is again displayed. Note that there are now 2 rows of comments available for viewing related to the change order. All of the comments can be viewed at one time. Click the View All link.
62. All comment rows are displayed. The format followed for date/name/action and reason makes it easy for the PO Change Order Approver to quickly identify what changes were made for the PO. Note that the oldest comment is listed first. To save your comments and return to the main page. Click the OK button.
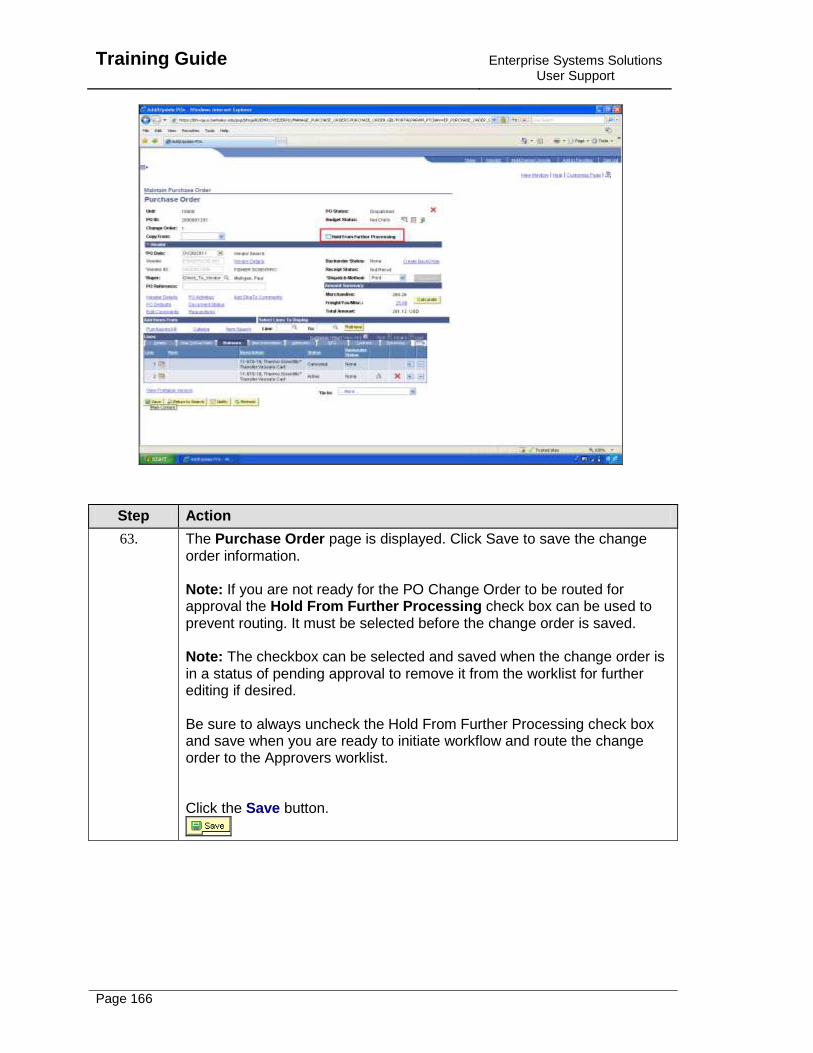
Training Guide
Enterprise Systems Solutions User Support
Page 166
Step Action
63. The Purchase Order page is displayed. Click Save to save the change order information. Note: If you are not ready for the PO Change Order to be routed for approval the Hold From Further Processing check box can be used to prevent routing. It must be selected before the change order is saved. Note: The checkbox can be selected and saved when the change order is in a status of pending approval to remove it from the worklist for further editing if desired. Be sure to always uncheck the Hold From Further Processing check box and save when you are ready to initiate workflow and route the change order to the Approvers worklist. Click the Save button.
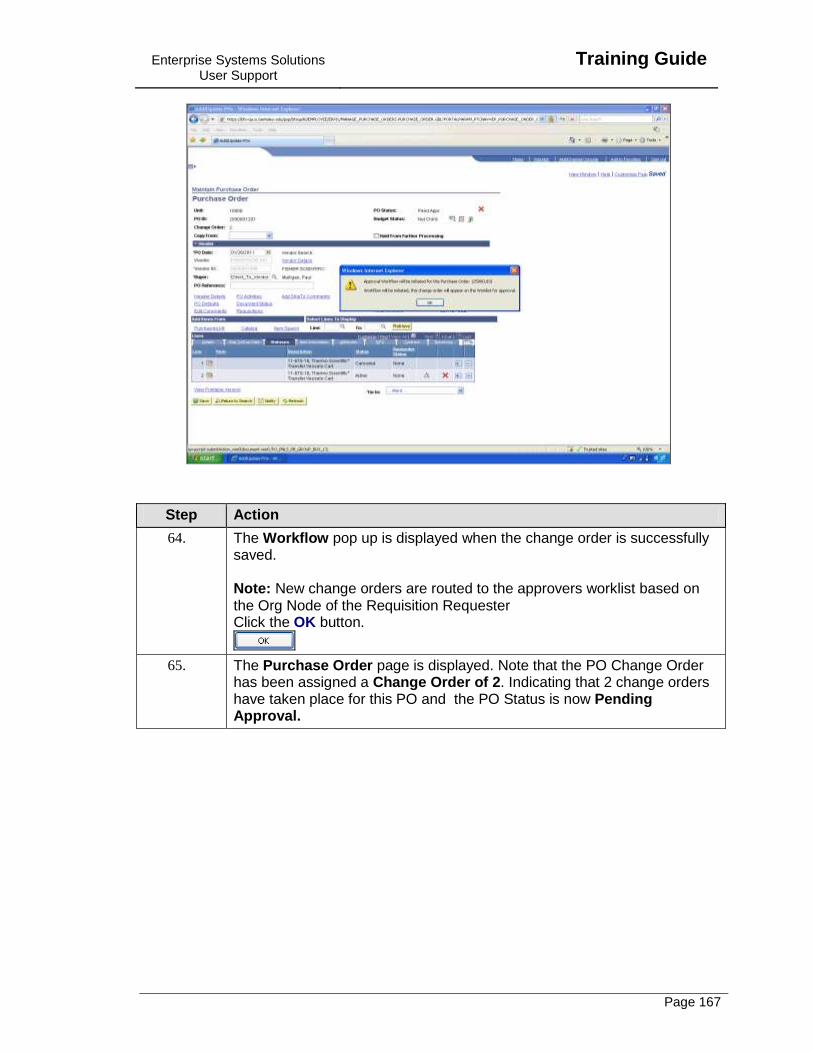
Enterprise Systems Solutions User Support
Training Guide
Page 167
Step Action
64. The Workflow pop up is displayed when the change order is successfully saved. Note: New change orders are routed to the approvers worklist based on the Org Node of the Requisition Requester Click the OK button.
65. The Purchase Order page is displayed. Note that the PO Change Order has been assigned a Change Order of 2. Indicating that 2 change orders have taken place for this PO and the PO Status is now Pending Approval.
Training Guide
Enterprise Systems Solutions User Support
Page 168
Step Action
66. Step - 3: Is complete. Step - 4: Is complete Step - 4-5: Is complete Steps 5-7: Is complete Step 7- 8: Is complete Step - 8: Is complete Step - 9: The PO Change Order Approver proceeds to Step 9 to complete the process.
67. This completes the exercise End of Procedure.
Correct PO Sales/Use Tax
The following topic illustrates how a PO Change Order is created to change the tax for the PO. The process can be followed if vouchers do or do not exist for the PO.
Procedure
In this example a PO Change Order is processed where the tax is changed to exempt an item for the PO.
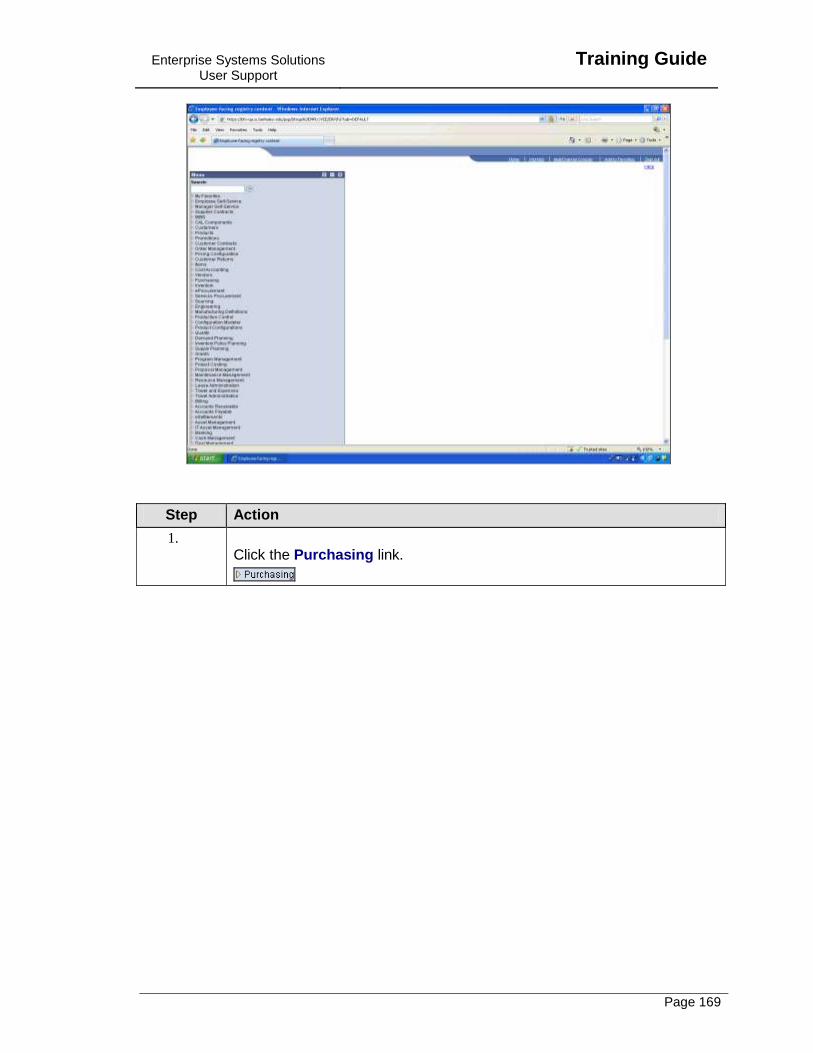
Enterprise Systems Solutions User Support
Training Guide
Page 169
Step Action
1. Click the Purchasing link.
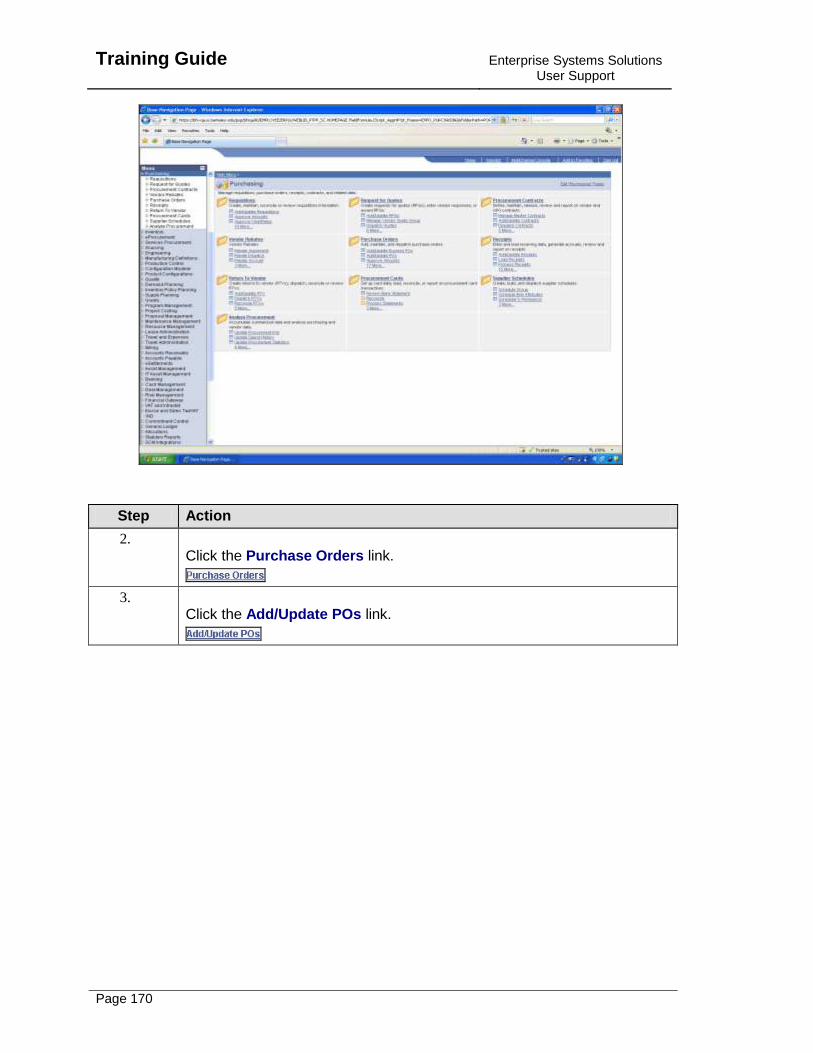
Training Guide
Enterprise Systems Solutions User Support
Page 170
Step Action
2. Click the Purchase Orders link.
3. Click the Add/Update POs link.
Enterprise Systems Solutions User Support
Training Guide
Page 171
Step Action
4. Enter the desired information into the PO ID: field. Enter a valid value e.g. "2000001250".
5. Click the Search button.

Training Guide
Enterprise Systems Solutions User Support
Page 172
Step Action
6. The Purchase Order page is displayed Click the Collapse (Ctrl+Y) Menu button.
7. Before you begin the change order process, the Change Order Icon should be selected. The Change Order Icon when selected will open fields within the change order and track the changes made. Note: If the change order icon is not selected the system will notify you later as changes are made that changes are being tracked. Selecting the icon before changes are made eliminates warning messages as changes are made. Click the Change Order button.
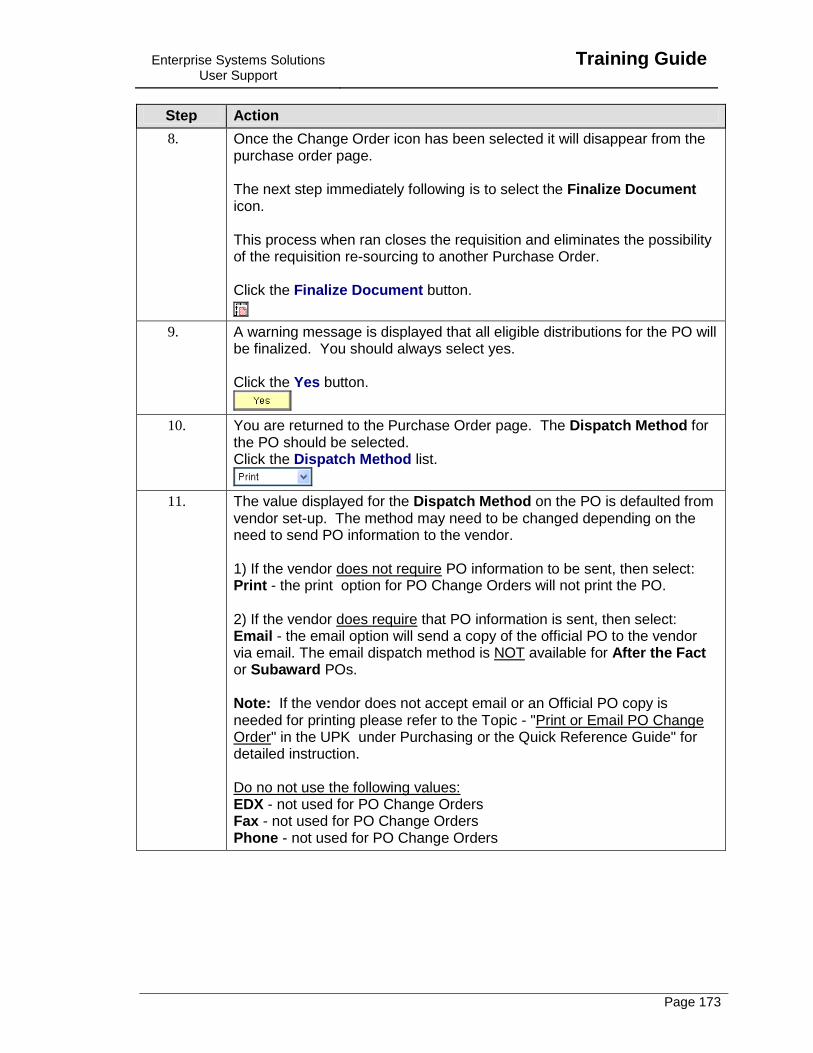
Enterprise Systems Solutions User Support
Training Guide
Page 173
Step Action
8. Once the Change Order icon has been selected it will disappear from the purchase order page. The next step immediately following is to select the Finalize Document icon. This process when ran closes the requisition and eliminates the possibility of the requisition re-sourcing to another Purchase Order. Click the Finalize Document button.
9. A warning message is displayed that all eligible distributions for the PO will be finalized. You should always select yes. Click the Yes button.
10. You are returned to the Purchase Order page. The Dispatch Method for the PO should be selected. Click the Dispatch Method list.
11. The value displayed for the Dispatch Method on the PO is defaulted from vendor set-up. The method may need to be changed depending on the need to send PO information to the vendor. 1) If the vendor does not require PO information to be sent, then select: Print - the print option for PO Change Orders will not print the PO. 2) If the vendor does require that PO information is sent, then select: Email - the email option will send a copy of the official PO to the vendor via email. The email dispatch method is NOT available for After the Fact or Subaward POs. Note: If the vendor does not accept email or an Official PO copy is needed for printing please refer to the Topic - "Print or Email PO Change Order" in the UPK under Purchasing or the Quick Reference Guide" for detailed instruction. Do no not use the following values: EDX - not used for PO Change Orders Fax - not used for PO Change Orders Phone - not used for PO Change Orders

Training Guide
Enterprise Systems Solutions User Support
Page 174
Step Action
12. Click the Print list item.

Enterprise Systems Solutions User Support
Training Guide
Page 175
Step Action
13. The Schedule Icon is used to navigate to schedule page for the line where additional change order options are available. Click the Schedule button.
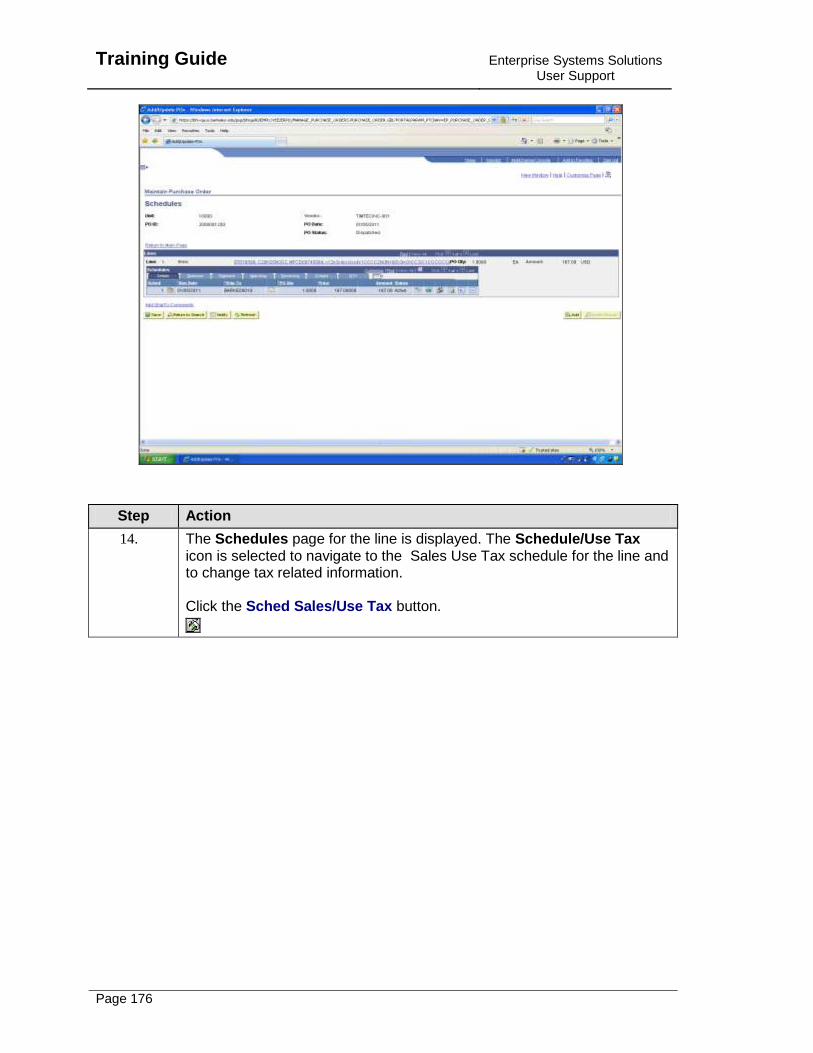
Training Guide
Enterprise Systems Solutions User Support
Page 176
Step Action
14. The Schedules page for the line is displayed. The Schedule/Use Tax icon is selected to navigate to the Sales Use Tax schedule for the line and to change tax related information. Click the Sched Sales/Use Tax button.
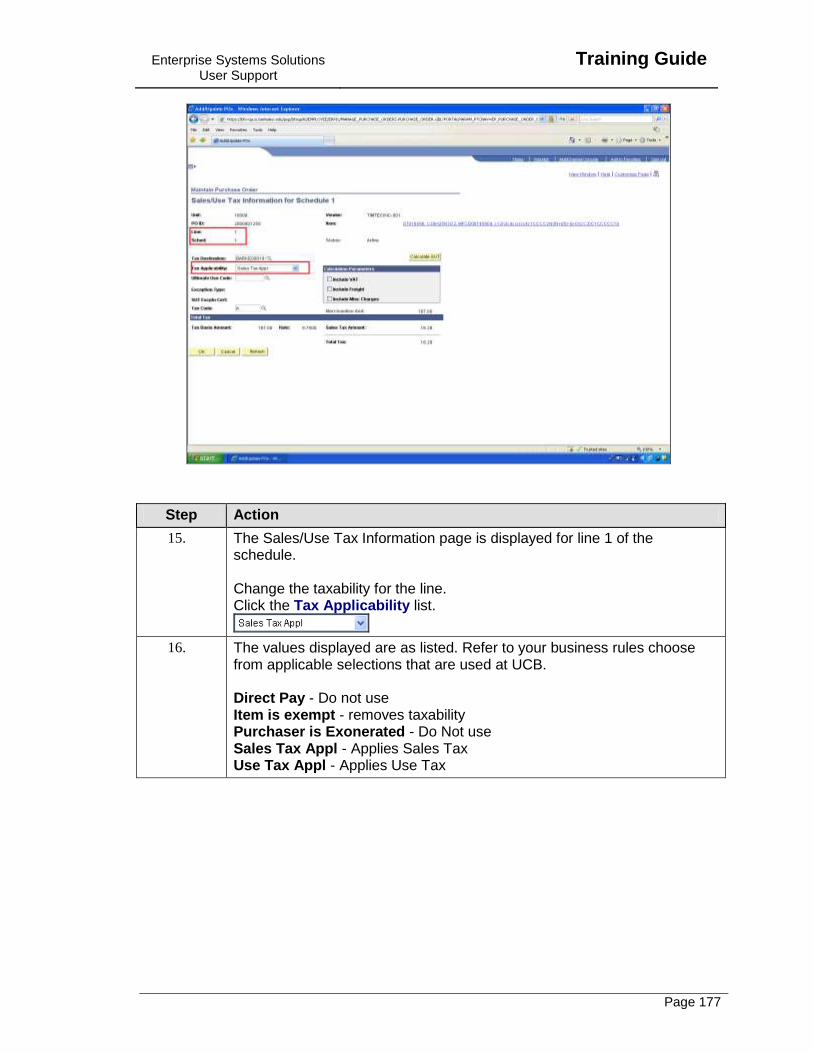
Enterprise Systems Solutions User Support
Training Guide
Page 177
Step Action
15. The Sales/Use Tax Information page is displayed for line 1 of the schedule. Change the taxability for the line. Click the Tax Applicability list.
16. The values displayed are as listed. Refer to your business rules choose from applicable selections that are used at UCB. Direct Pay - Do not use Item is exempt - removes taxability Purchaser is Exonerated - Do Not use Sales Tax Appl - Applies Sales Tax Use Tax Appl - Applies Use Tax

Training Guide
Enterprise Systems Solutions User Support
Page 178
Step Action
17. In this example the selection is made to exempt the item from taxability. Click the Item is Exempt list item.
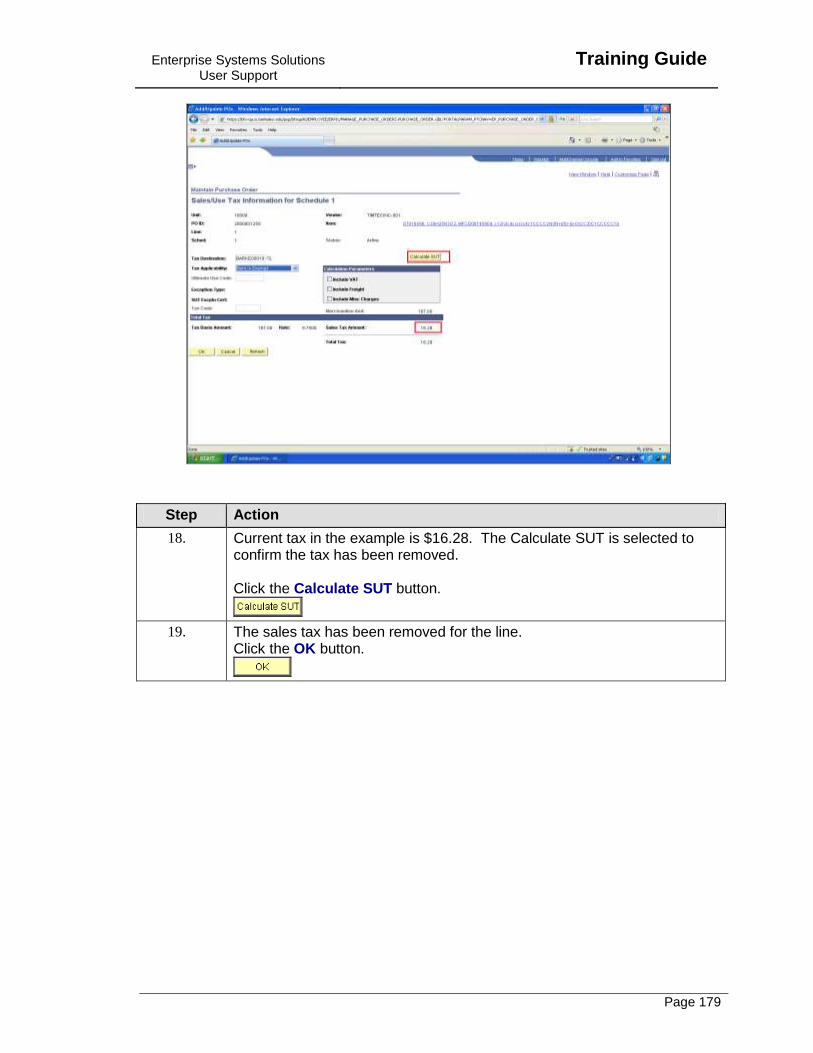
Enterprise Systems Solutions User Support
Training Guide
Page 179
Step Action
18. Current tax in the example is $16.28. The Calculate SUT is selected to confirm the tax has been removed. Click the Calculate SUT button.
19. The sales tax has been removed for the line. Click the OK button.
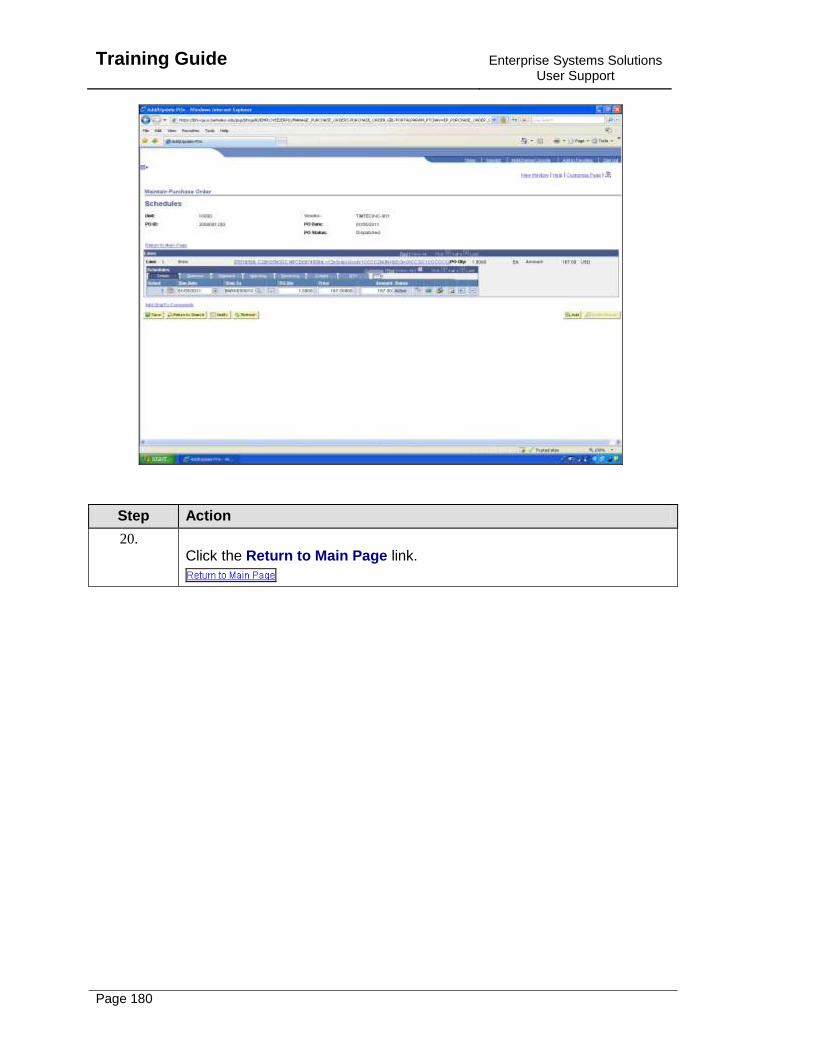
Training Guide
Enterprise Systems Solutions User Support
Page 180
Step Action
20. Click the Return to Main Page link.
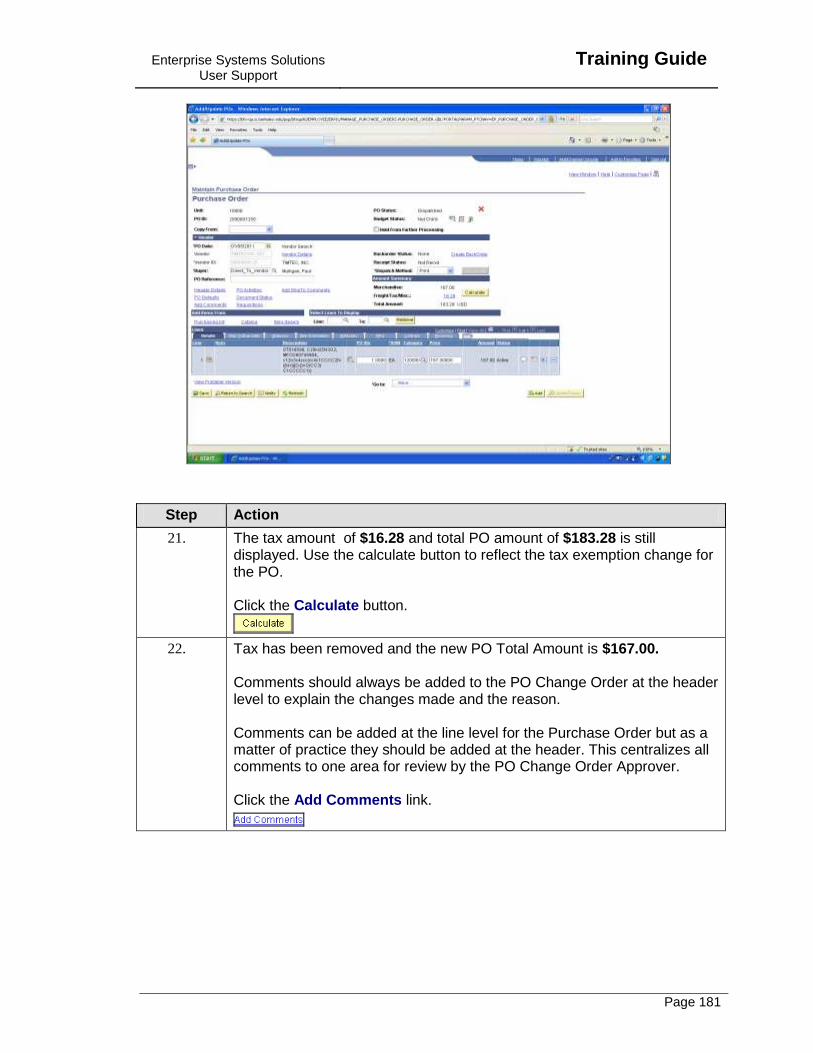
Enterprise Systems Solutions User Support
Training Guide
Page 181
Step Action
21. The tax amount of $16.28 and total PO amount of $183.28 is still displayed. Use the calculate button to reflect the tax exemption change for the PO. Click the Calculate button.
22. Tax has been removed and the new PO Total Amount is $167.00. Comments should always be added to the PO Change Order at the header level to explain the changes made and the reason. Comments can be added at the line level for the Purchase Order but as a matter of practice they should be added at the header. This centralizes all comments to one area for review by the PO Change Order Approver. Click the Add Comments link.
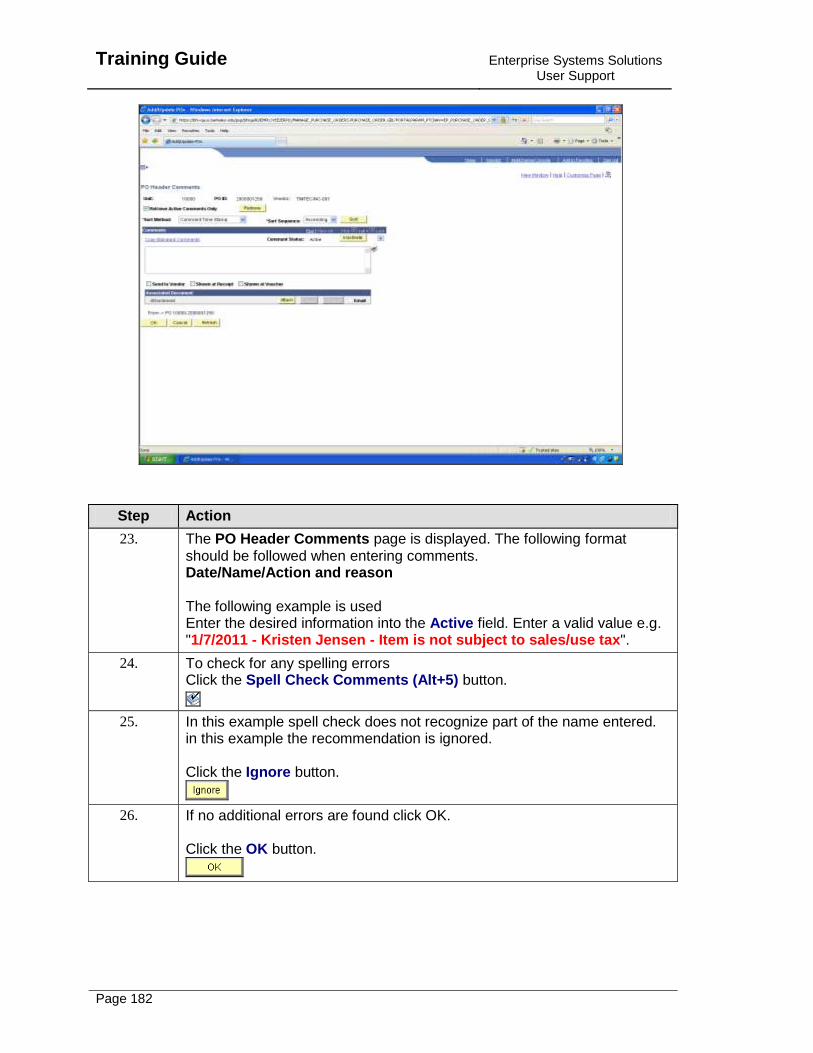
Training Guide
Enterprise Systems Solutions User Support
Page 182
Step Action
23. The PO Header Comments page is displayed. The following format should be followed when entering comments. Date/Name/Action and reason The following example is used Enter the desired information into the Active field. Enter a valid value e.g. "1/7/2011 - Kristen Jensen - Item is not subject to sales/use tax".
24. To check for any spelling errors Click the Spell Check Comments (Alt+5) button.
25. In this example spell check does not recognize part of the name entered. in this example the recommendation is ignored. Click the Ignore button.
26. If no additional errors are found click OK. Click the OK button.
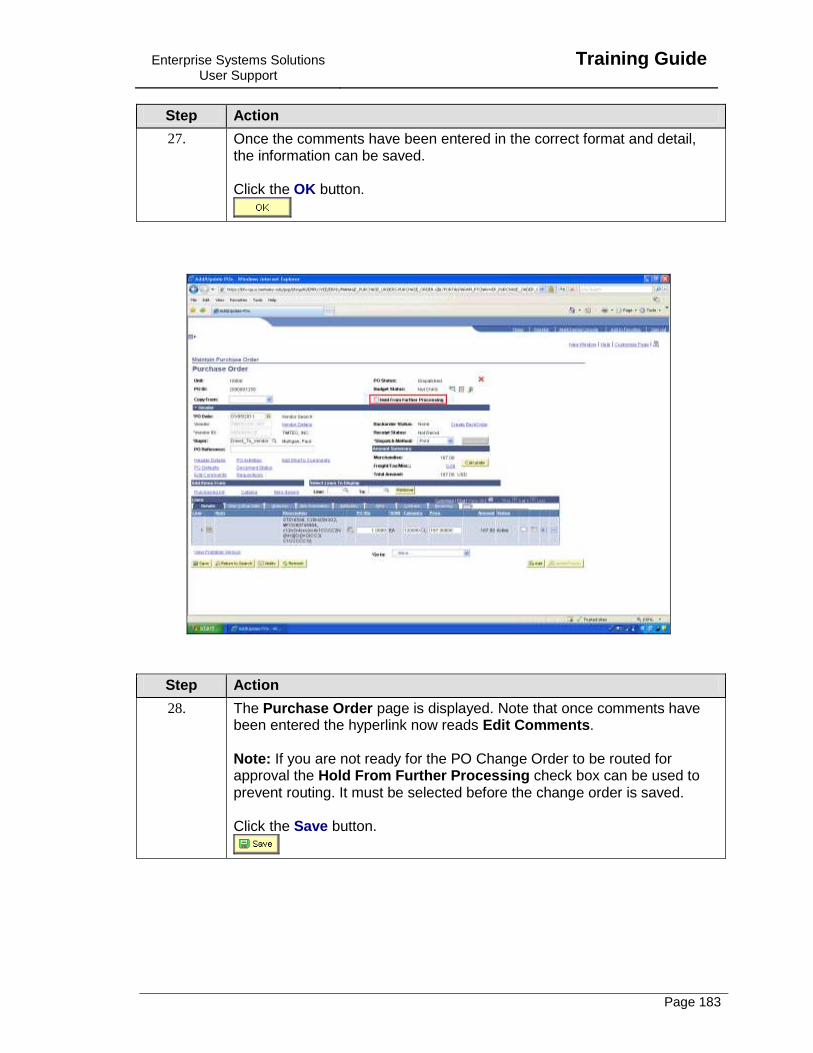
Enterprise Systems Solutions User Support
Training Guide
Page 183
Step Action
27. Once the comments have been entered in the correct format and detail, the information can be saved. Click the OK button.
Step Action
28. The Purchase Order page is displayed. Note that once comments have been entered the hyperlink now reads Edit Comments. Note: If you are not ready for the PO Change Order to be routed for approval the Hold From Further Processing check box can be used to prevent routing. It must be selected before the change order is saved. Click the Save button.
Training Guide
Enterprise Systems Solutions User Support
Page 184
Step Action
29. The Workflow pop up is displayed when the change order is successfully saved. Note: New change orders are routed to the approvers worklist based on the Org Node of the Requisition Requester Click the OK button.
30. The Purchase Order page is displayed. Note that the PO Change Order has been assigned a Change Order of 1. Indicating that 1 change order has taken place for this PO and the PO Status is now Pending Approval.
31. This completes the exercise End of Procedure.
Change PO Vendor Address
Enterprise Systems Solutions User Support
Training Guide
Page 185
The following topic illustrates how a PO Change Order is created to change the address for a Vendor location. The default address for a location is address 1. All of the existing addresses for a location are selectable via the PO Change Order pages. The process can be followed if vouchers do or do not exist for the PO. Procedure In this example a PO Change Order is processed to change the address for a Vendor location
Step Action
1. Click the Purchasing link.

Training Guide
Enterprise Systems Solutions User Support
Page 186
Step Action
2. Click the Purchase Orders link.
3. Click the Add/Update POs link.

Enterprise Systems Solutions User Support
Training Guide
Page 187
Step Action
4. Enter the desired information into the PO ID: field. Enter a valid value e.g. "2000001251".
5. Click the Search button.
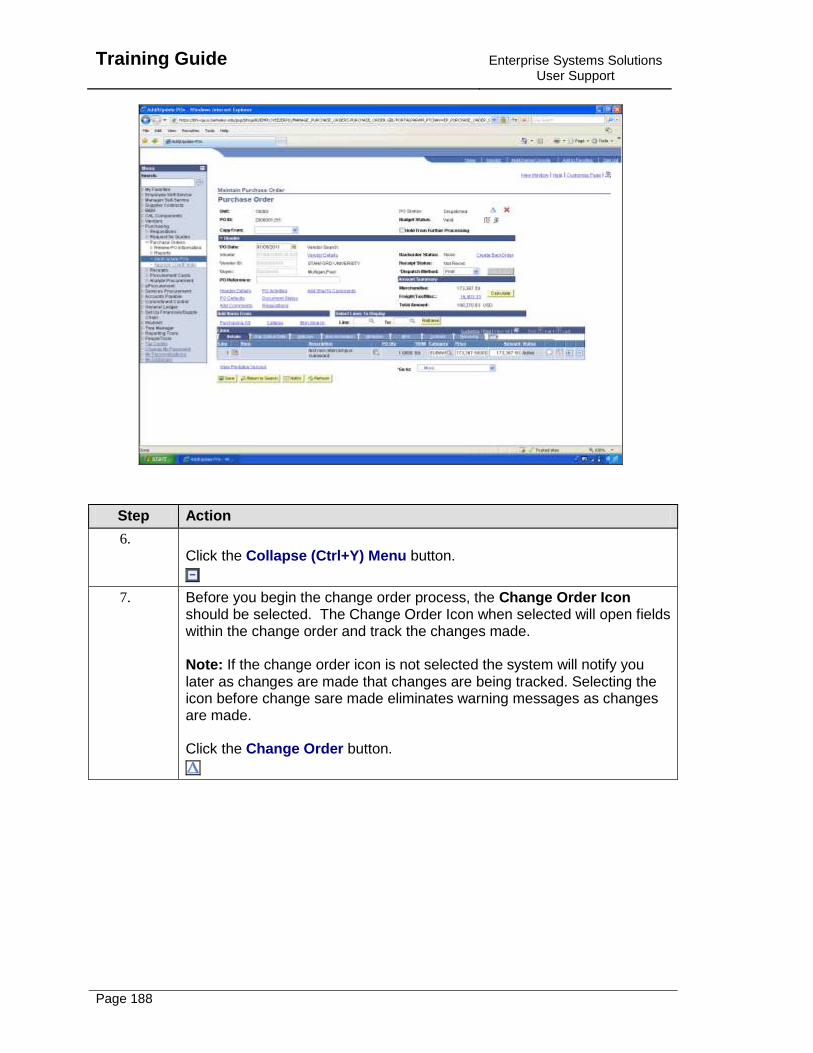
Training Guide
Enterprise Systems Solutions User Support
Page 188
Step Action
6. Click the Collapse (Ctrl+Y) Menu button.
7. Before you begin the change order process, the Change Order Icon should be selected. The Change Order Icon when selected will open fields within the change order and track the changes made. Note: If the change order icon is not selected the system will notify you later as changes are made that changes are being tracked. Selecting the icon before change sare made eliminates warning messages as changes are made. Click the Change Order button.
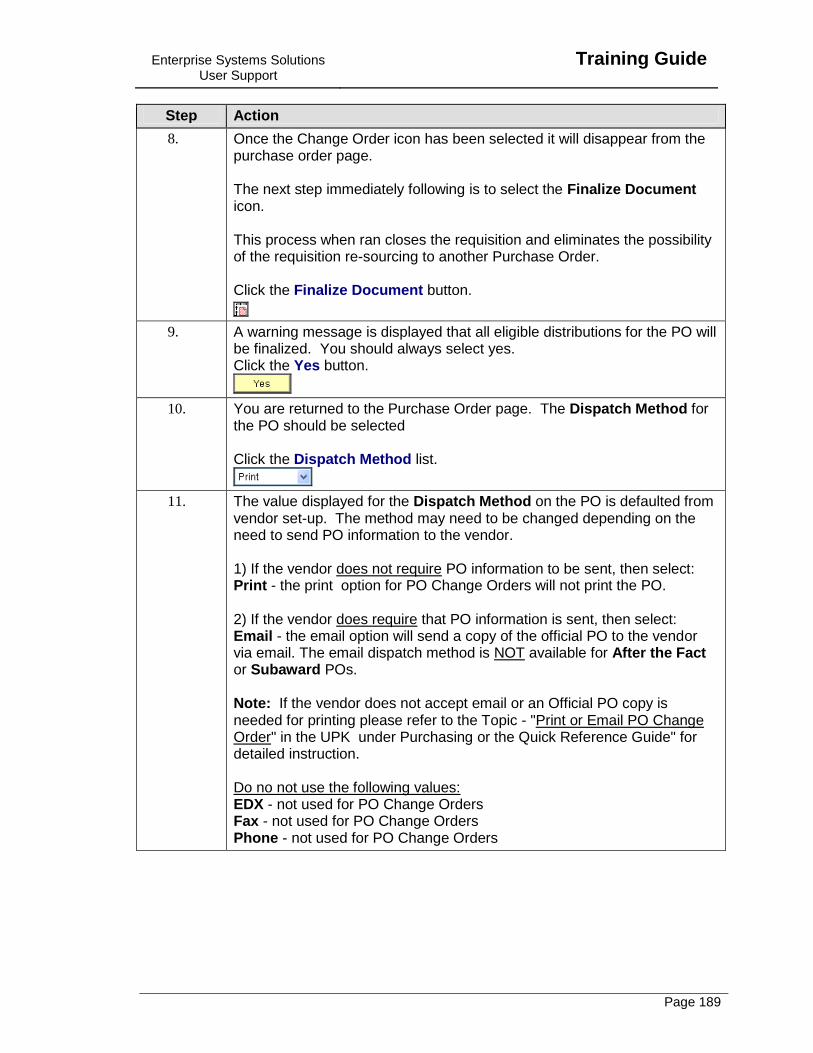
Enterprise Systems Solutions User Support
Training Guide
Page 189
Step Action
8. Once the Change Order icon has been selected it will disappear from the purchase order page. The next step immediately following is to select the Finalize Document icon. This process when ran closes the requisition and eliminates the possibility of the requisition re-sourcing to another Purchase Order. Click the Finalize Document button.
9. A warning message is displayed that all eligible distributions for the PO will be finalized. You should always select yes. Click the Yes button.
10. You are returned to the Purchase Order page. The Dispatch Method for the PO should be selected Click the Dispatch Method list.
11. The value displayed for the Dispatch Method on the PO is defaulted from vendor set-up. The method may need to be changed depending on the need to send PO information to the vendor. 1) If the vendor does not require PO information to be sent, then select: Print - the print option for PO Change Orders will not print the PO. 2) If the vendor does require that PO information is sent, then select: Email - the email option will send a copy of the official PO to the vendor via email. The email dispatch method is NOT available for After the Fact or Subaward POs. Note: If the vendor does not accept email or an Official PO copy is needed for printing please refer to the Topic - "Print or Email PO Change Order" in the UPK under Purchasing or the Quick Reference Guide" for detailed instruction. Do no not use the following values: EDX - not used for PO Change Orders Fax - not used for PO Change Orders Phone - not used for PO Change Orders
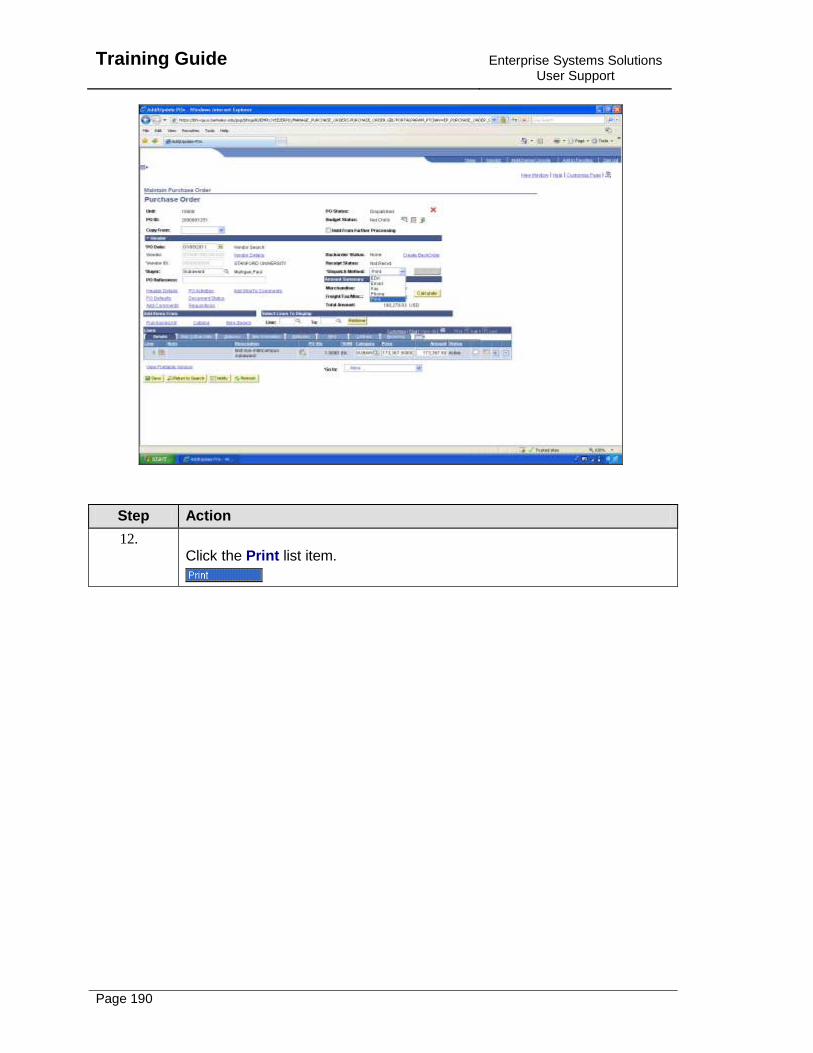
Training Guide
Enterprise Systems Solutions User Support
Page 190
Step Action
12. Click the Print list item.
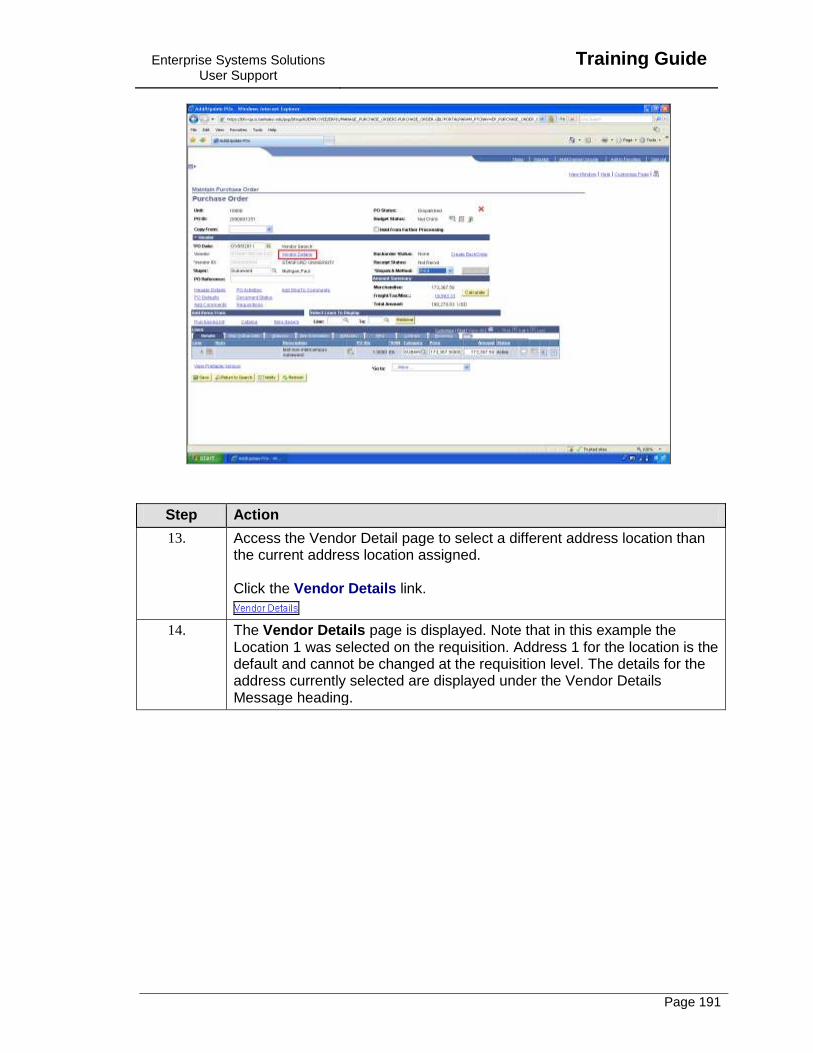
Enterprise Systems Solutions User Support
Training Guide
Page 191
Step Action
13. Access the Vendor Detail page to select a different address location than the current address location assigned. Click the Vendor Details link.
14. The Vendor Details page is displayed. Note that in this example the Location 1 was selected on the requisition. Address 1 for the location is the default and cannot be changed at the requisition level. The details for the address currently selected are displayed under the Vendor Details Message heading.
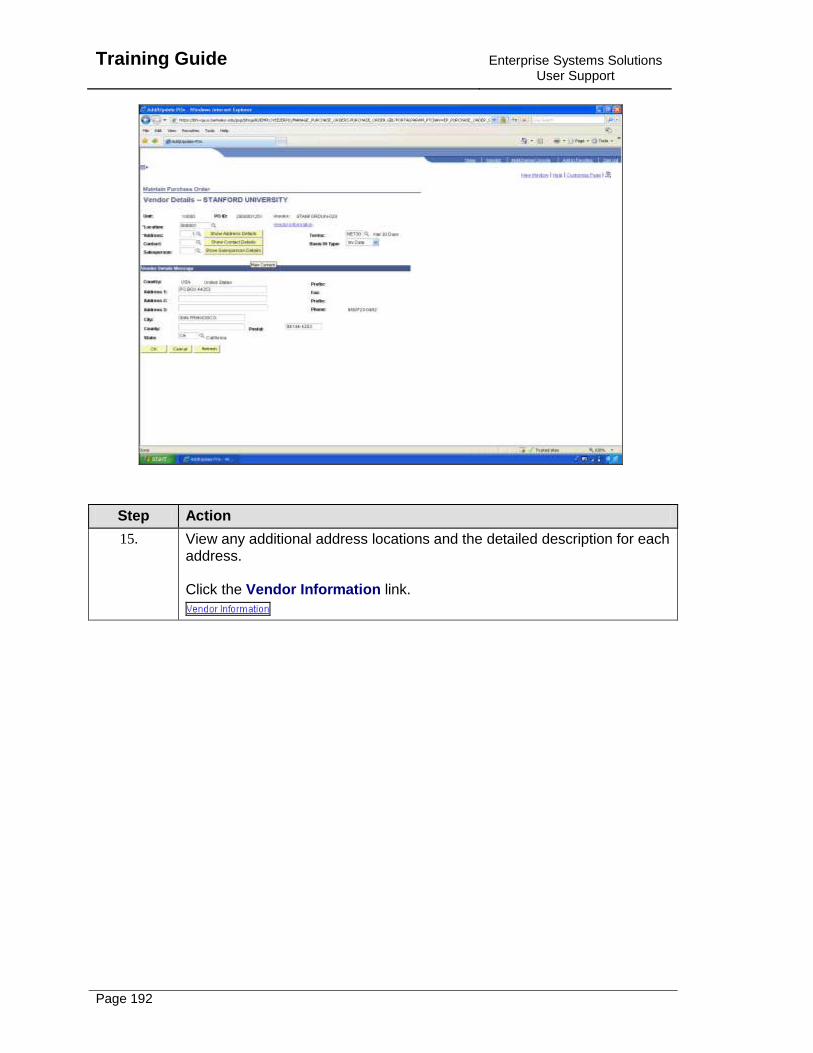
Training Guide
Enterprise Systems Solutions User Support
Page 192
Step Action
15. View any additional address locations and the detailed description for each address. Click the Vendor Information link.

Enterprise Systems Solutions User Support
Training Guide
Page 193
Step Action
16. A new window is opened and the Vendor Information Address tab is displayed. Note that there are seven Address IDs available for the vendor. Click the View All link to see all address detailed information for each location. Click the View All link.
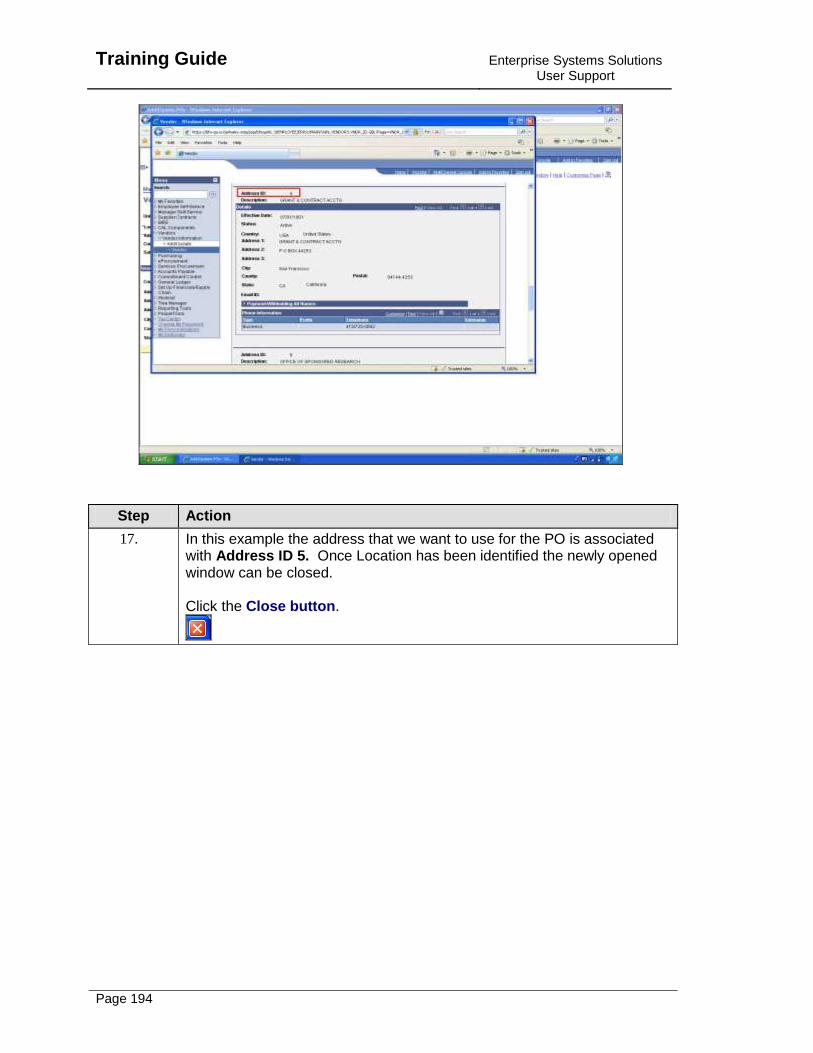
Training Guide
Enterprise Systems Solutions User Support
Page 194
Step Action
17. In this example the address that we want to use for the PO is associated with Address ID 5. Once Location has been identified the newly opened window can be closed. Click the Close button.
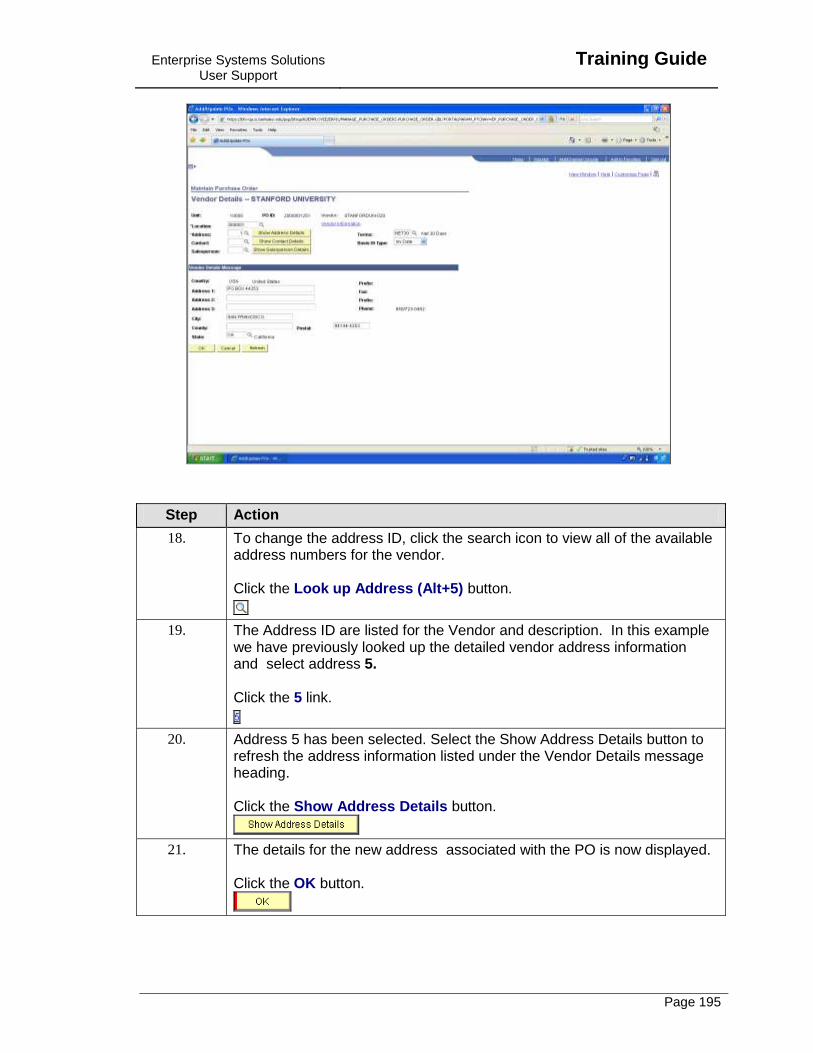
Enterprise Systems Solutions User Support
Training Guide
Page 195
Step Action
18. To change the address ID, click the search icon to view all of the available address numbers for the vendor. Click the Look up Address (Alt+5) button.
19. The Address ID are listed for the Vendor and description. In this example we have previously looked up the detailed vendor address information and select address 5. Click the 5 link.
20. Address 5 has been selected. Select the Show Address Details button to refresh the address information listed under the Vendor Details message heading. Click the Show Address Details button.
21. The details for the new address associated with the PO is now displayed. Click the OK button.
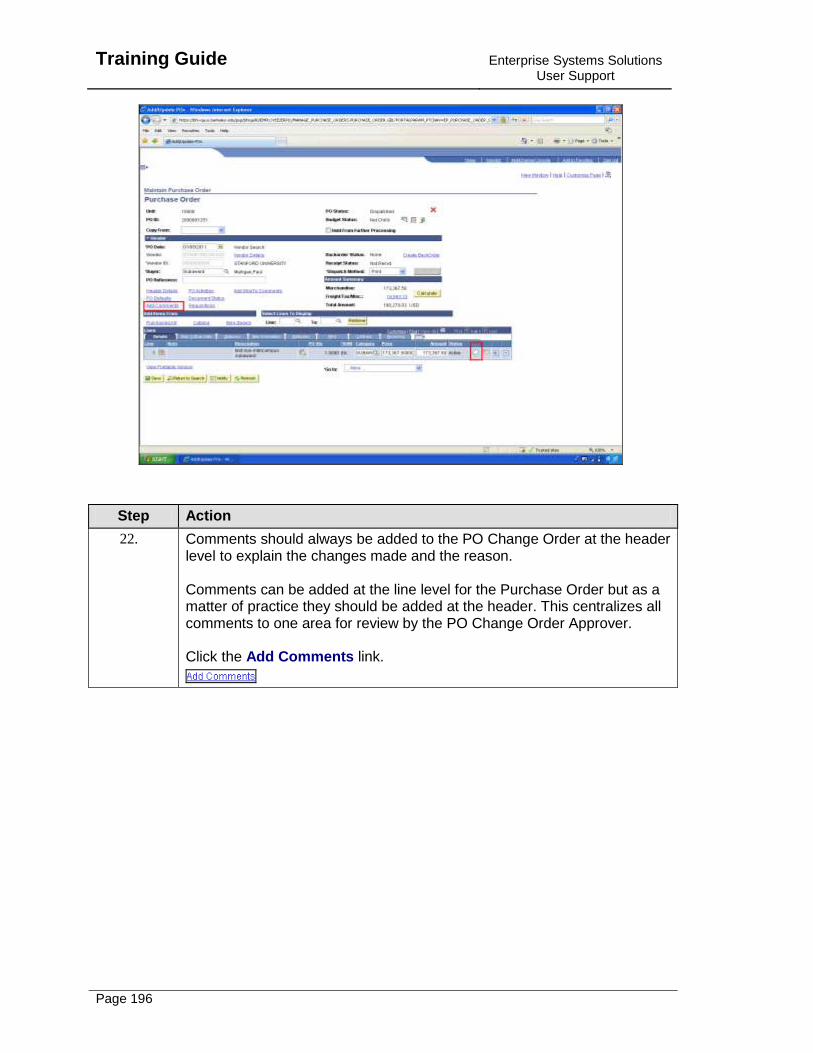
Training Guide
Enterprise Systems Solutions User Support
Page 196
Step Action
22. Comments should always be added to the PO Change Order at the header level to explain the changes made and the reason. Comments can be added at the line level for the Purchase Order but as a matter of practice they should be added at the header. This centralizes all comments to one area for review by the PO Change Order Approver. Click the Add Comments link.
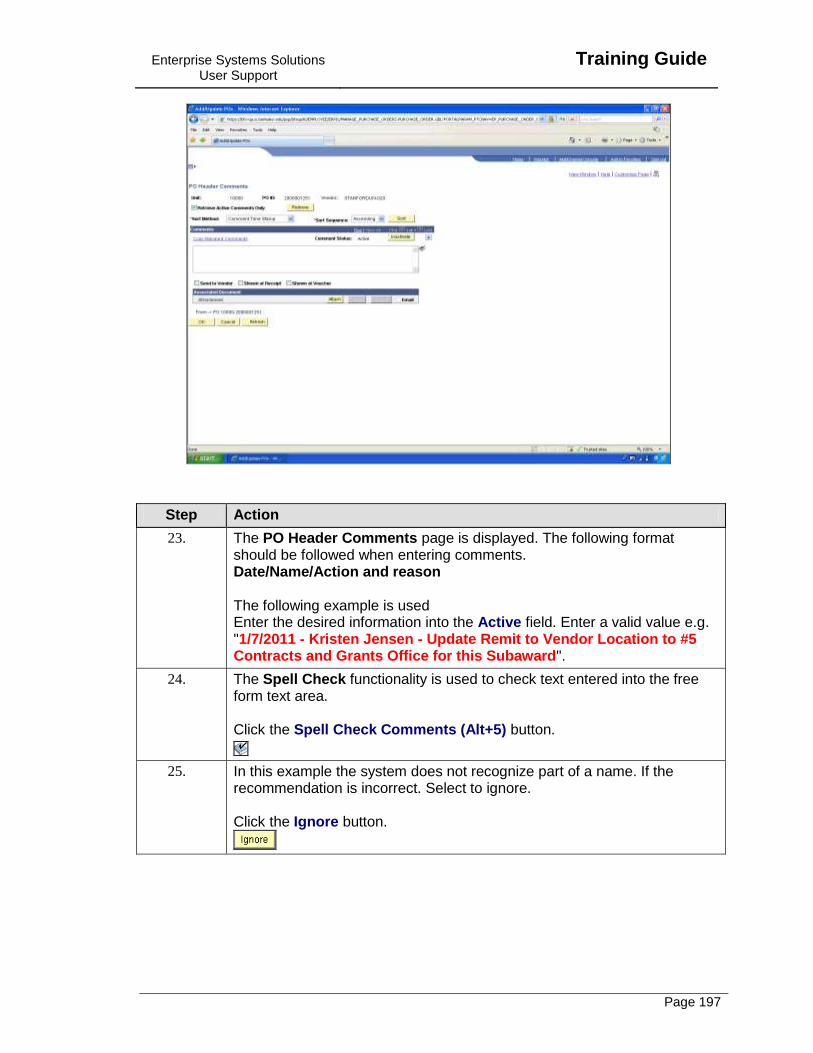
Enterprise Systems Solutions User Support
Training Guide
Page 197
Step Action
23. The PO Header Comments page is displayed. The following format should be followed when entering comments. Date/Name/Action and reason The following example is used Enter the desired information into the Active field. Enter a valid value e.g. "1/7/2011 - Kristen Jensen - Update Remit to Vendor Location to #5 Contracts and Grants Office for this Subaward".
24. The Spell Check functionality is used to check text entered into the free form text area. Click the Spell Check Comments (Alt+5) button.
25. In this example the system does not recognize part of a name. If the recommendation is incorrect. Select to ignore. Click the Ignore button.
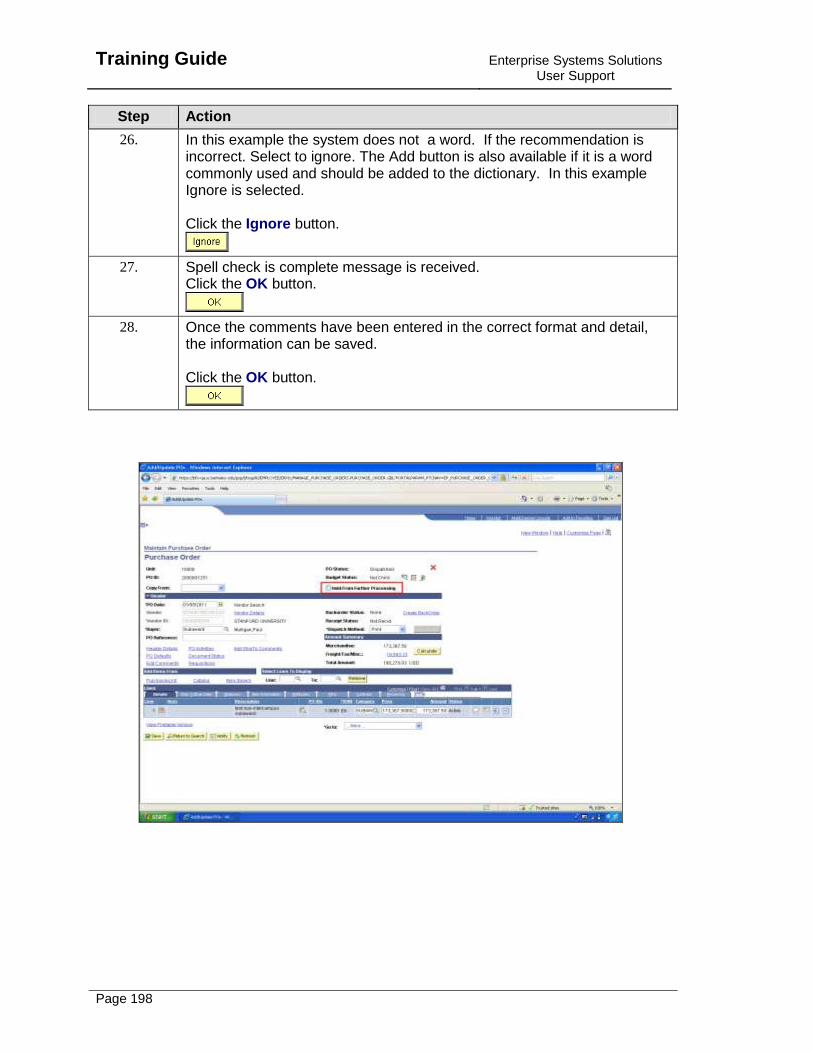
Training Guide
Enterprise Systems Solutions User Support
Page 198
Step Action
26. In this example the system does not a word. If the recommendation is incorrect. Select to ignore. The Add button is also available if it is a word commonly used and should be added to the dictionary. In this example Ignore is selected. Click the Ignore button.
27. Spell check is complete message is received. Click the OK button.
28. Once the comments have been entered in the correct format and detail, the information can be saved. Click the OK button.
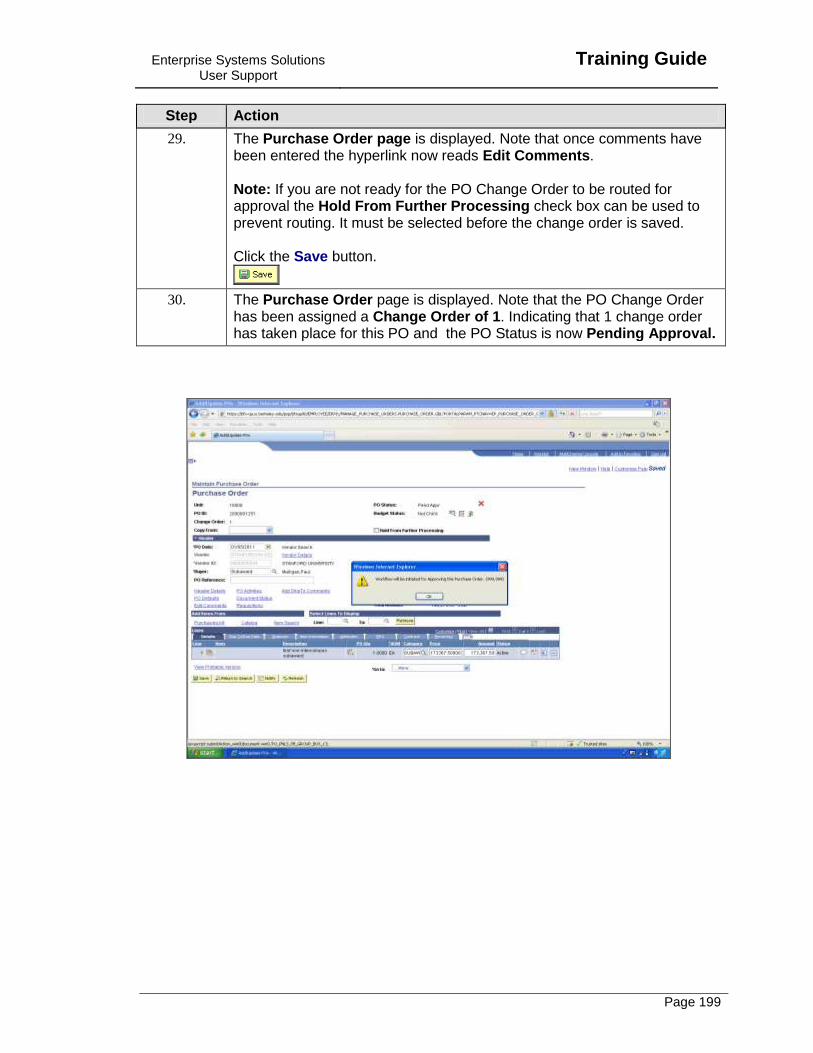
Enterprise Systems Solutions User Support
Training Guide
Page 199
Step Action
29. The Purchase Order page is displayed. Note that once comments have been entered the hyperlink now reads Edit Comments. Note: If you are not ready for the PO Change Order to be routed for approval the Hold From Further Processing check box can be used to prevent routing. It must be selected before the change order is saved. Click the Save button.
30. The Purchase Order page is displayed. Note that the PO Change Order has been assigned a Change Order of 1. Indicating that 1 change order has taken place for this PO and the PO Status is now Pending Approval.
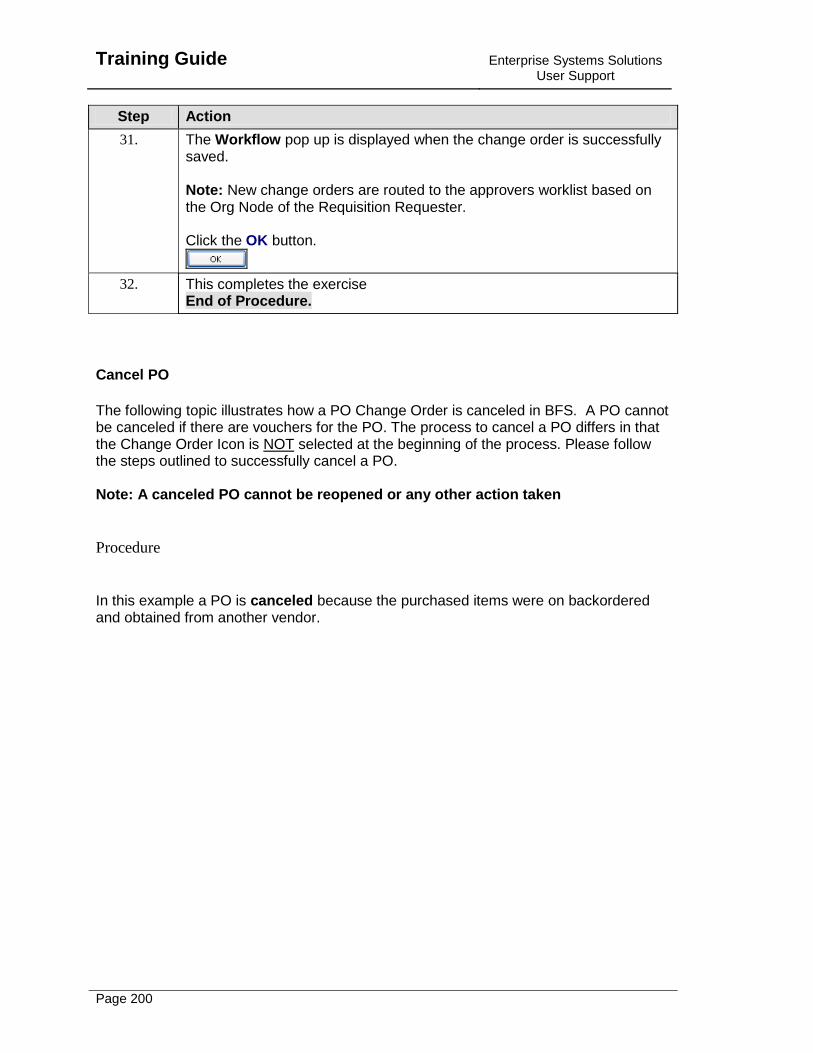
Training Guide
Enterprise Systems Solutions User Support
Page 200
Step Action
31. The Workflow pop up is displayed when the change order is successfully saved. Note: New change orders are routed to the approvers worklist based on the Org Node of the Requisition Requester. Click the OK button.
32. This completes the exercise End of Procedure.
Cancel PO
The following topic illustrates how a PO Change Order is canceled in BFS. A PO cannot be canceled if there are vouchers for the PO. The process to cancel a PO differs in that the Change Order Icon is NOT selected at the beginning of the process. Please follow the steps outlined to successfully cancel a PO. Note: A canceled PO cannot be reopened or any other action taken
Procedure
In this example a PO is canceled because the purchased items were on backordered and obtained from another vendor.

Enterprise Systems Solutions User Support
Training Guide
Page 201
Step Action
1. Click the Purchasing link.

Training Guide
Enterprise Systems Solutions User Support
Page 202
Step Action
2. Click the Purchase Orders link.
3. Click the Add/Update POs link.
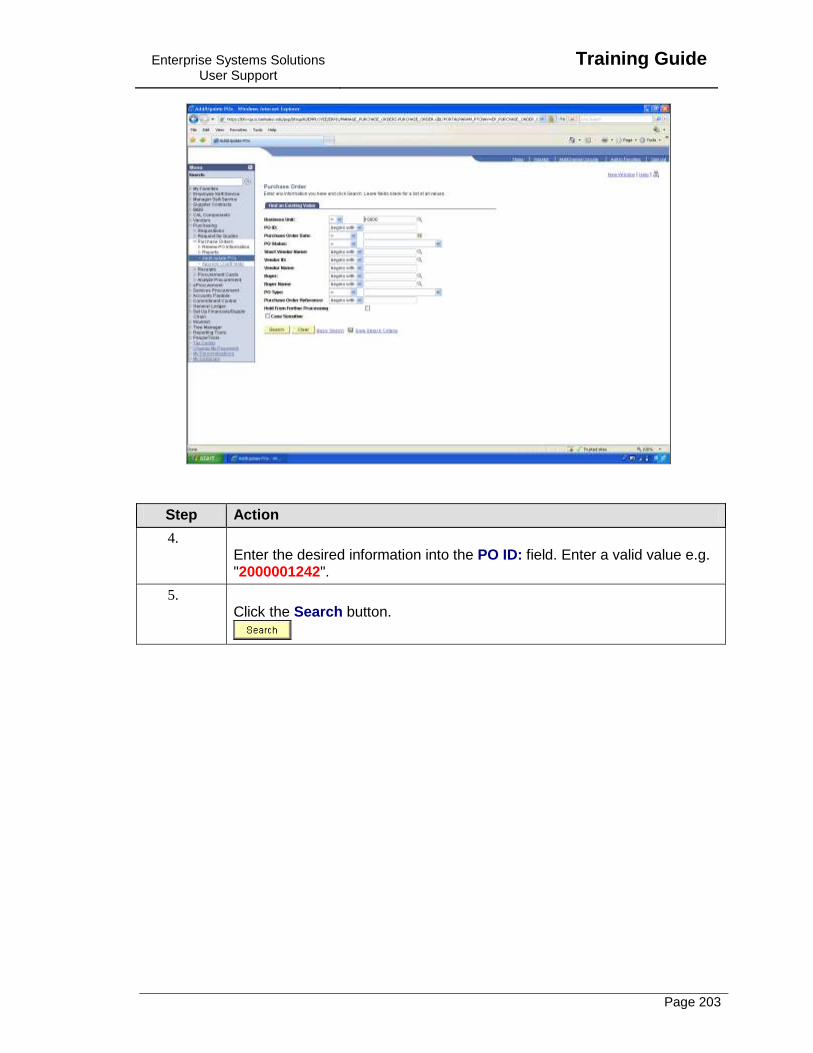
Enterprise Systems Solutions User Support
Training Guide
Page 203
Step Action
4. Enter the desired information into the PO ID: field. Enter a valid value e.g. "2000001242".
5. Click the Search button.
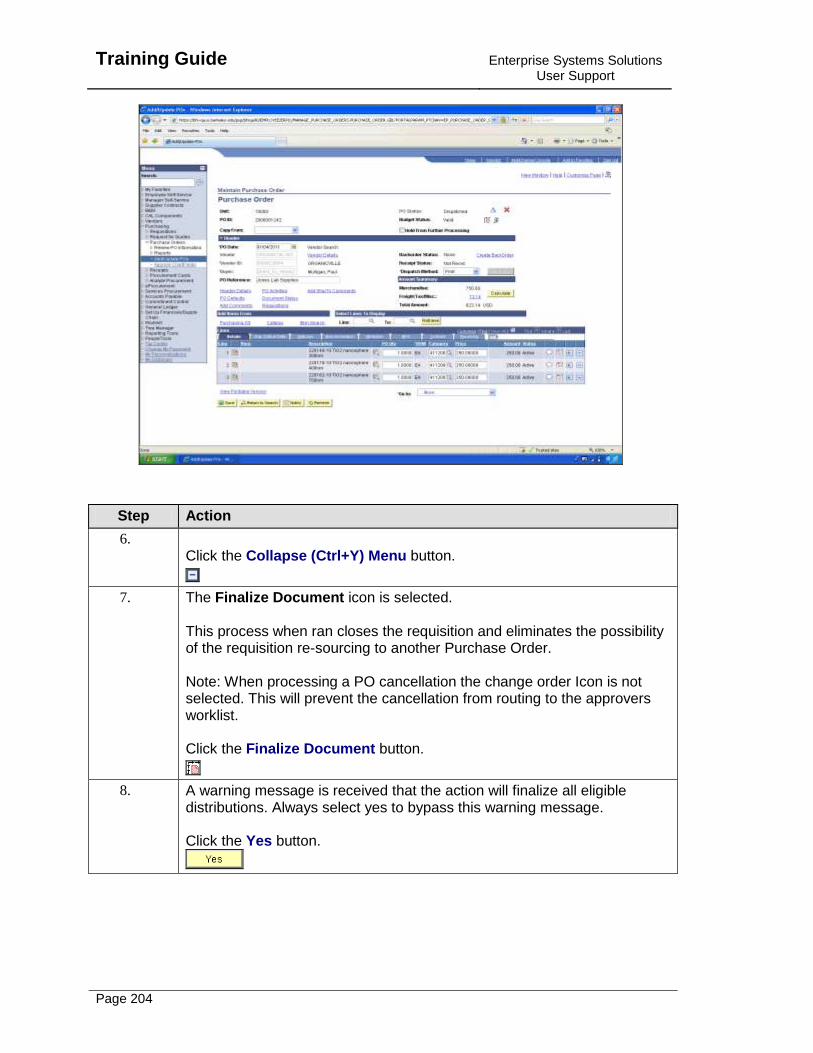
Training Guide
Enterprise Systems Solutions User Support
Page 204
Step Action
6. Click the Collapse (Ctrl+Y) Menu button.
7. The Finalize Document icon is selected. This process when ran closes the requisition and eliminates the possibility of the requisition re-sourcing to another Purchase Order. Note: When processing a PO cancellation the change order Icon is not selected. This will prevent the cancellation from routing to the approvers worklist. Click the Finalize Document button.
8. A warning message is received that the action will finalize all eligible distributions. Always select yes to bypass this warning message. Click the Yes button.
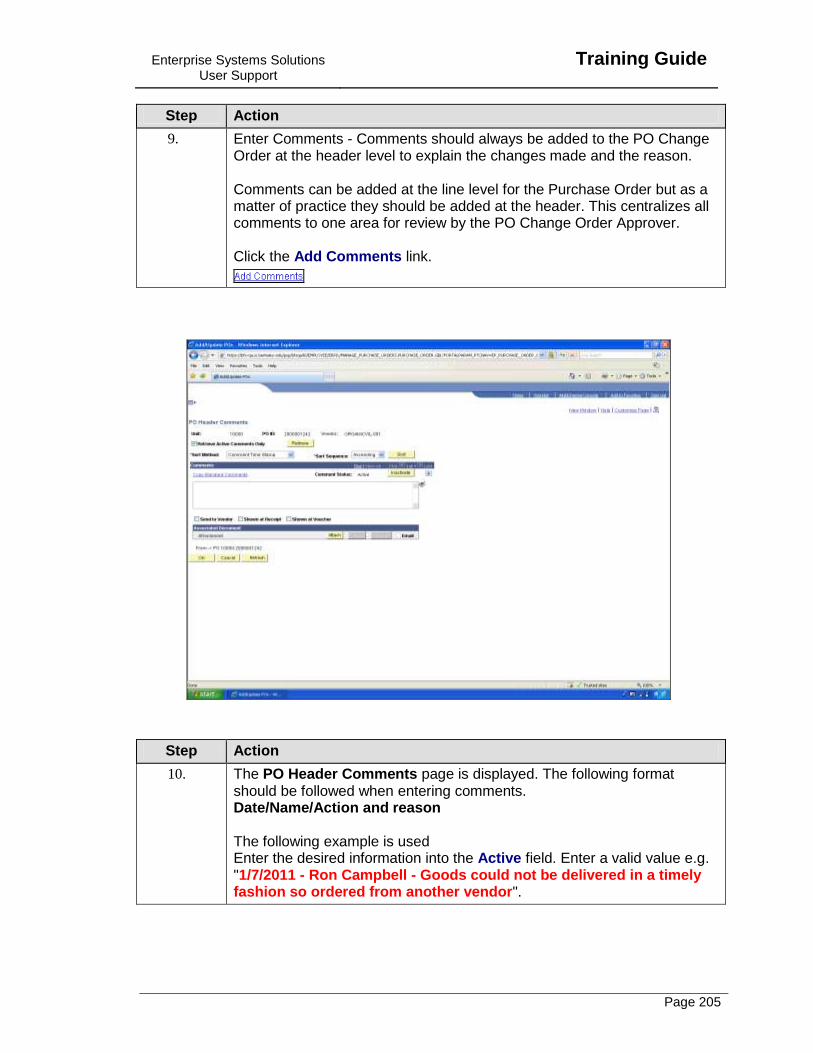
Enterprise Systems Solutions User Support
Training Guide
Page 205
Step Action
9. Enter Comments - Comments should always be added to the PO Change Order at the header level to explain the changes made and the reason. Comments can be added at the line level for the Purchase Order but as a matter of practice they should be added at the header. This centralizes all comments to one area for review by the PO Change Order Approver. Click the Add Comments link.
Step Action
10. The PO Header Comments page is displayed. The following format should be followed when entering comments. Date/Name/Action and reason The following example is used Enter the desired information into the Active field. Enter a valid value e.g. "1/7/2011 - Ron Campbell - Goods could not be delivered in a timely fashion so ordered from another vendor".
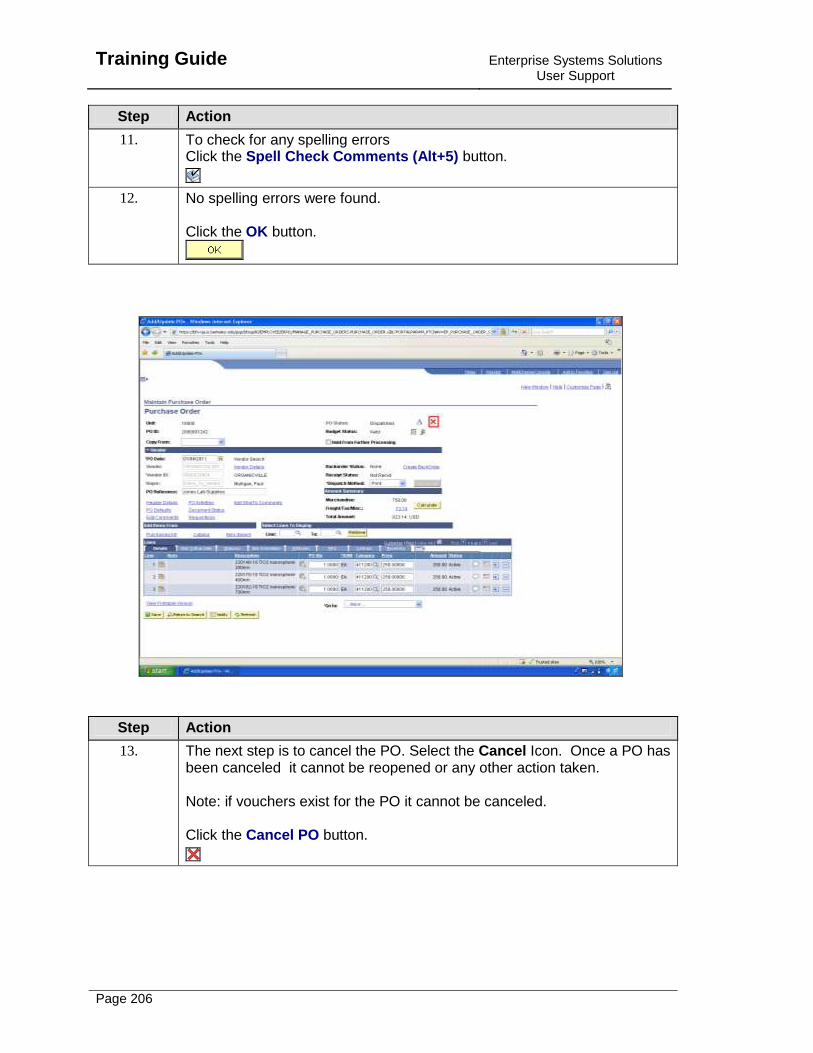
Training Guide
Enterprise Systems Solutions User Support
Page 206
Step Action
11. To check for any spelling errors Click the Spell Check Comments (Alt+5) button.
12. No spelling errors were found. Click the OK button.
Step Action
13. The next step is to cancel the PO. Select the Cancel Icon. Once a PO has been canceled it cannot be reopened or any other action taken. Note: if vouchers exist for the PO it cannot be canceled. Click the Cancel PO button.
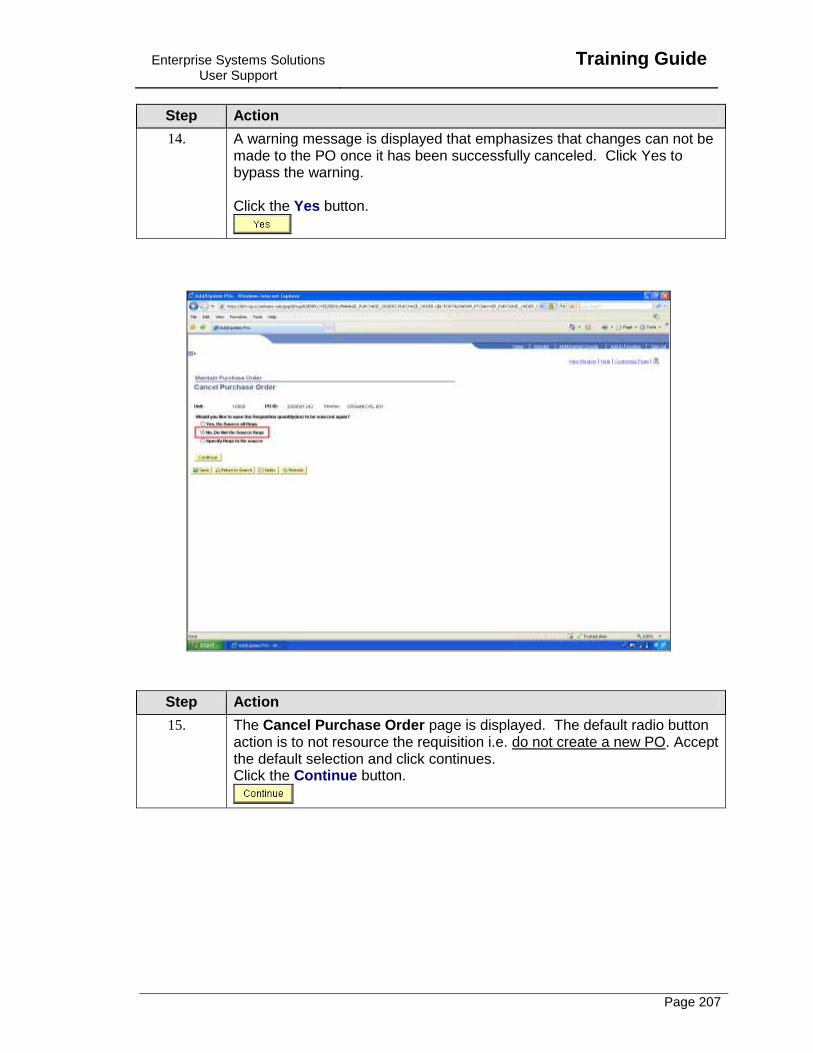
Enterprise Systems Solutions User Support
Training Guide
Page 207
Step Action
14. A warning message is displayed that emphasizes that changes can not be made to the PO once it has been successfully canceled. Click Yes to bypass the warning. Click the Yes button.
Step Action
15. The Cancel Purchase Order page is displayed. The default radio button action is to not resource the requisition i.e. do not create a new PO. Accept the default selection and click continues. Click the Continue button.
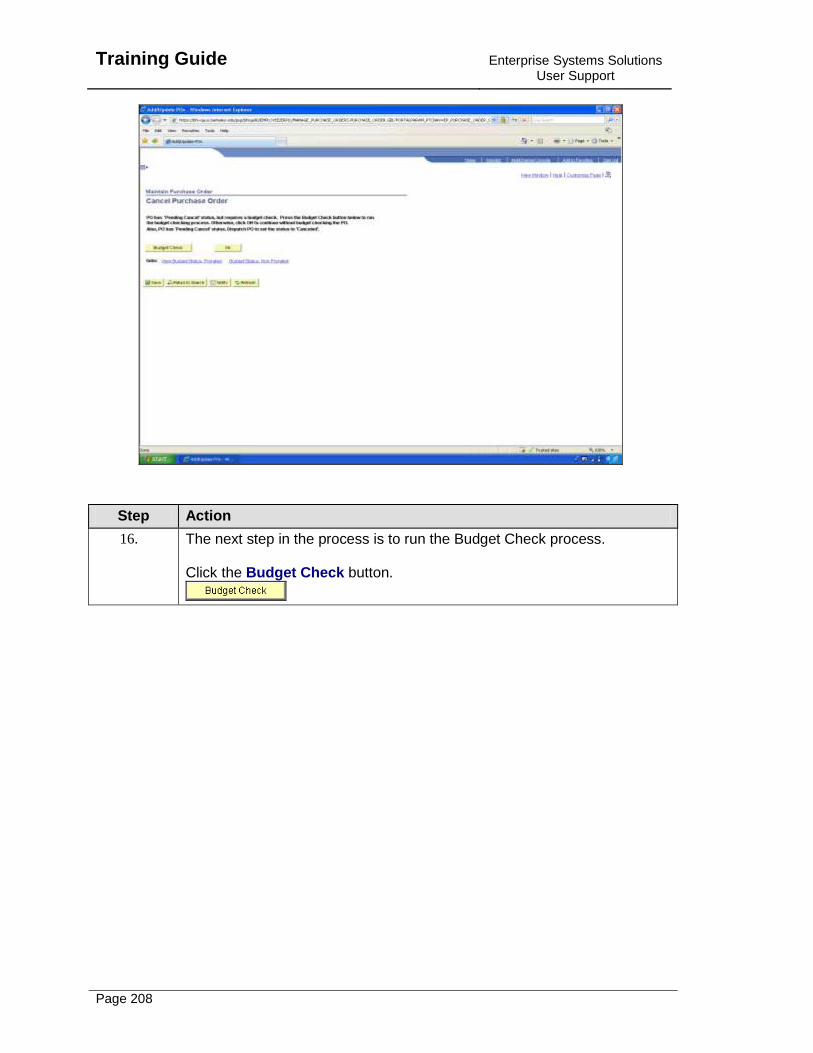
Training Guide
Enterprise Systems Solutions User Support
Page 208
Step Action
16. The next step in the process is to run the Budget Check process. Click the Budget Check button.
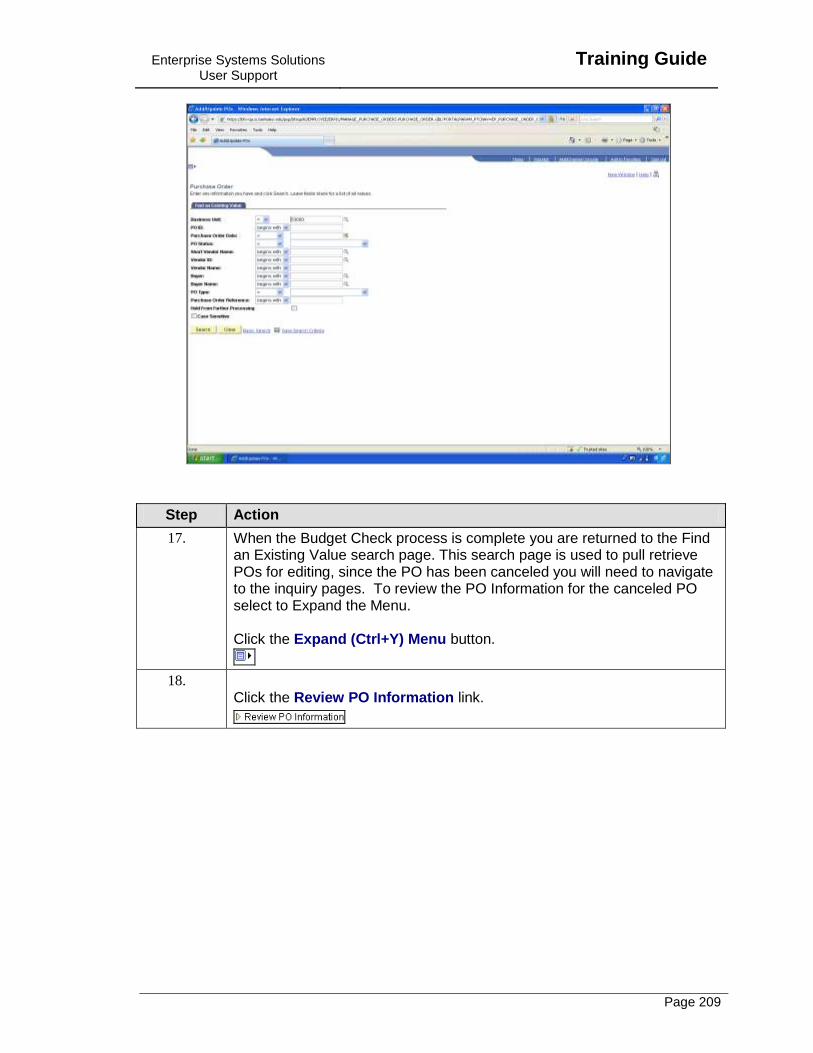
Enterprise Systems Solutions User Support
Training Guide
Page 209
Step Action
17. When the Budget Check process is complete you are returned to the Find an Existing Value search page. This search page is used to pull retrieve POs for editing, since the PO has been canceled you will need to navigate to the inquiry pages. To review the PO Information for the canceled PO select to Expand the Menu. Click the Expand (Ctrl+Y) Menu button.
18. Click the Review PO Information link.
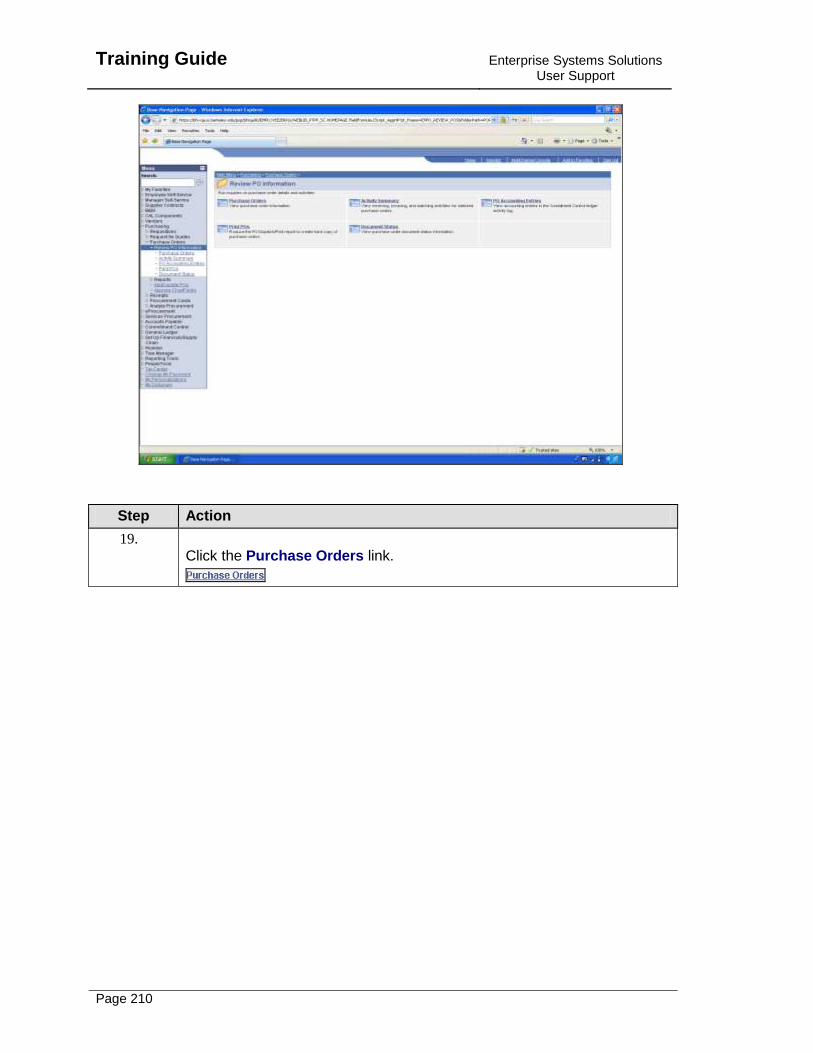
Training Guide
Enterprise Systems Solutions User Support
Page 210
Step Action
19. Click the Purchase Orders link.

Enterprise Systems Solutions User Support
Training Guide
Page 211
Step Action
20. Enter the desired information into the PO ID: field. Enter a valid value e.g. "2000001242".
21. Click the Search button.
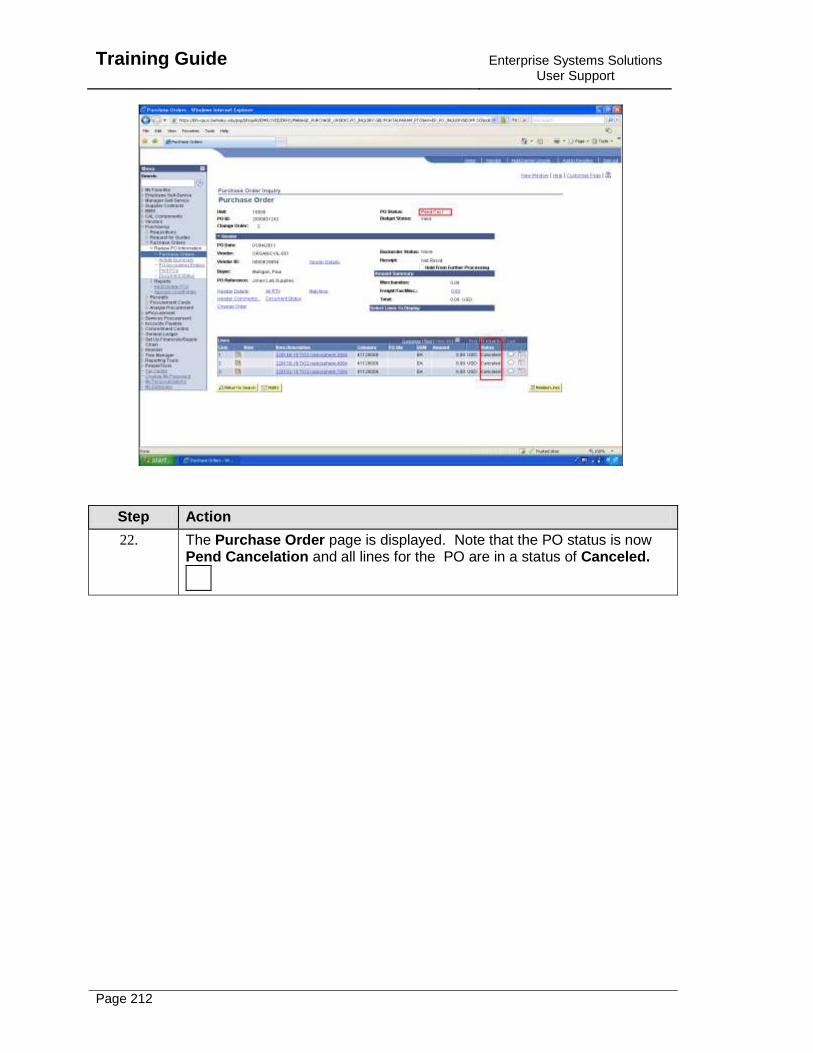
Training Guide
Enterprise Systems Solutions User Support
Page 212
Step Action
22. The Purchase Order page is displayed. Note that the PO status is now Pend Cancelation and all lines for the PO are in a status of Canceled.
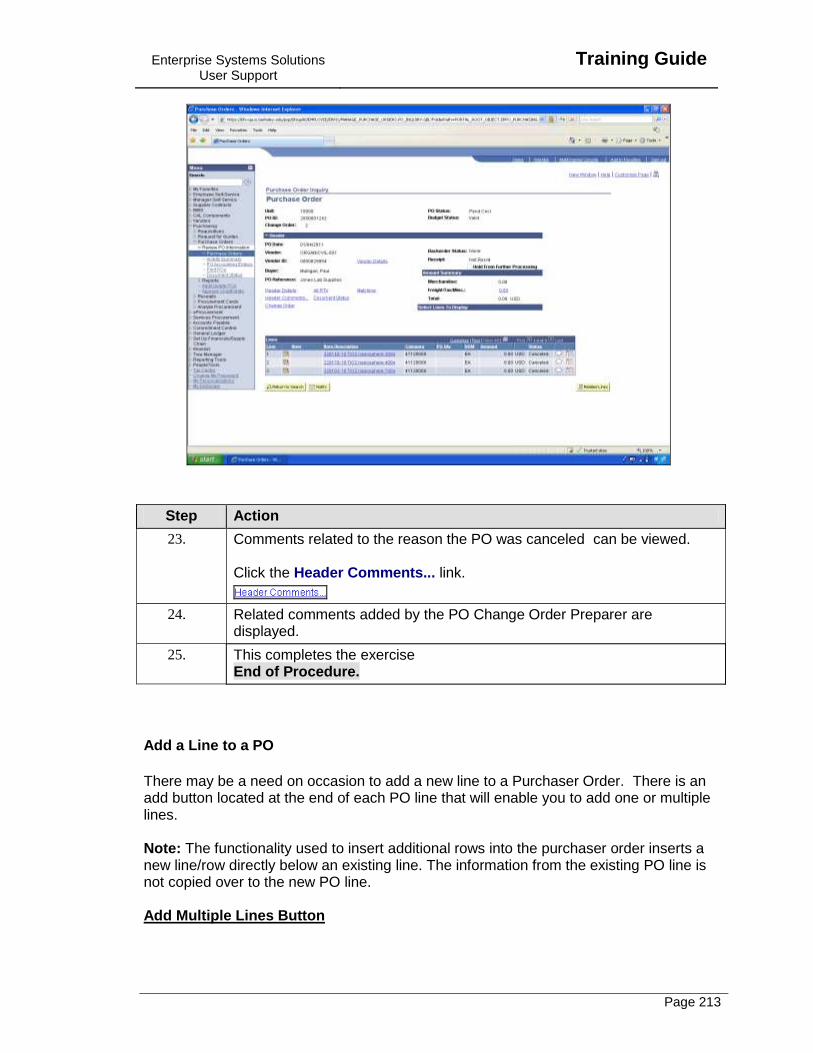
Enterprise Systems Solutions User Support
Training Guide
Page 213
Step Action
23. Comments related to the reason the PO was canceled can be viewed. Click the Header Comments... link.
24. Related comments added by the PO Change Order Preparer are displayed.
25. This completes the exercise End of Procedure.
Add a Line to a PO
There may be a need on occasion to add a new line to a Purchaser Order. There is an add button located at the end of each PO line that will enable you to add one or multiple lines. Note: The functionality used to insert additional rows into the purchaser order inserts a new line/row directly below an existing line. The information from the existing PO line is not copied over to the new PO line. Add Multiple Lines Button
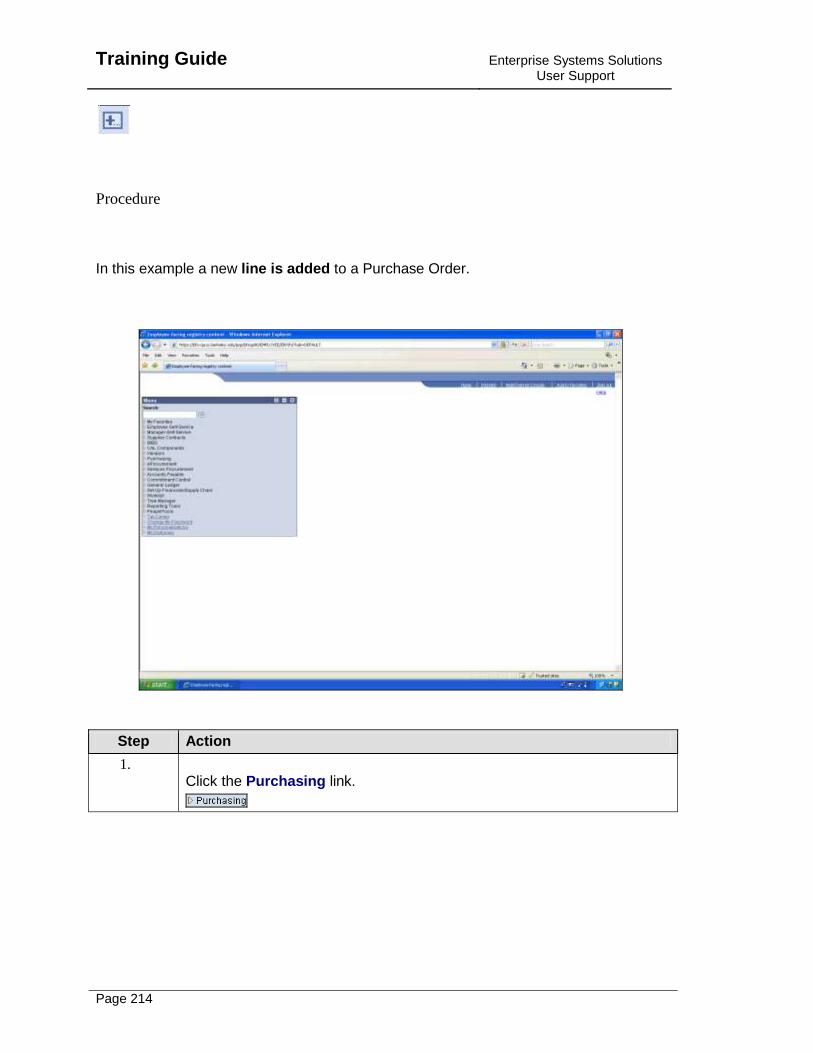
Training Guide
Enterprise Systems Solutions User Support
Page 214
Procedure
In this example a new line is added to a Purchase Order.
Step Action
1. Click the Purchasing link.
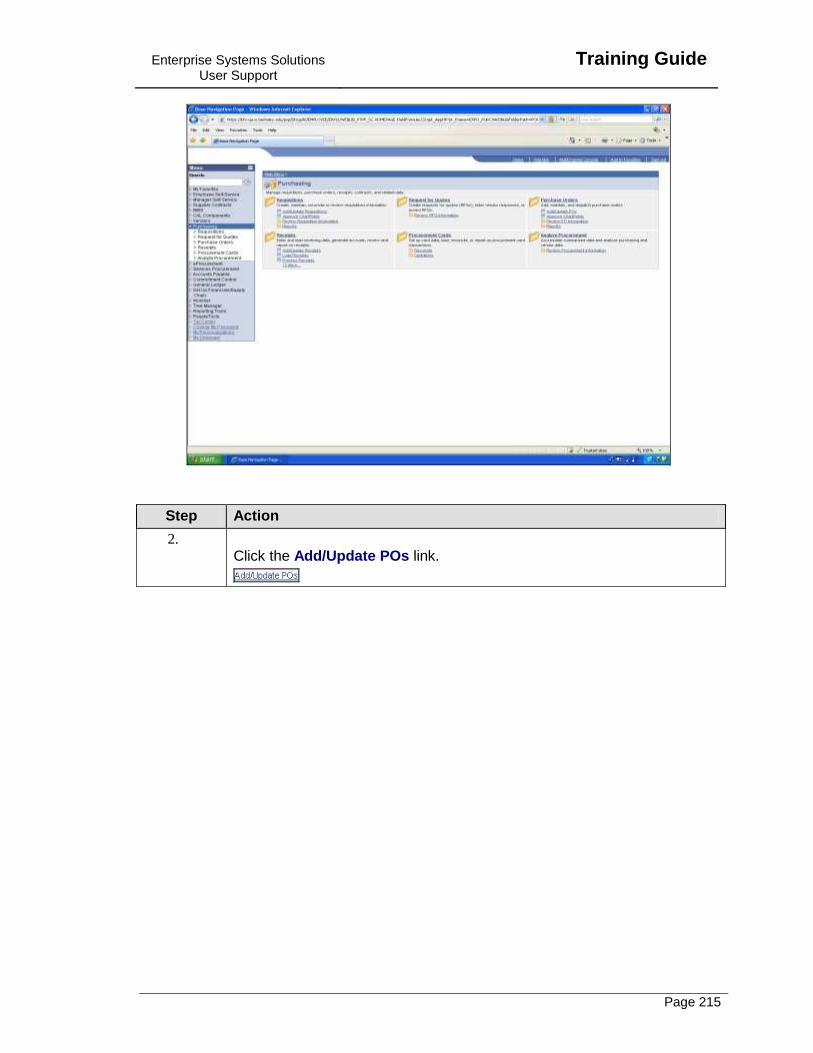
Enterprise Systems Solutions User Support
Training Guide
Page 215
Step Action
2. Click the Add/Update POs link.
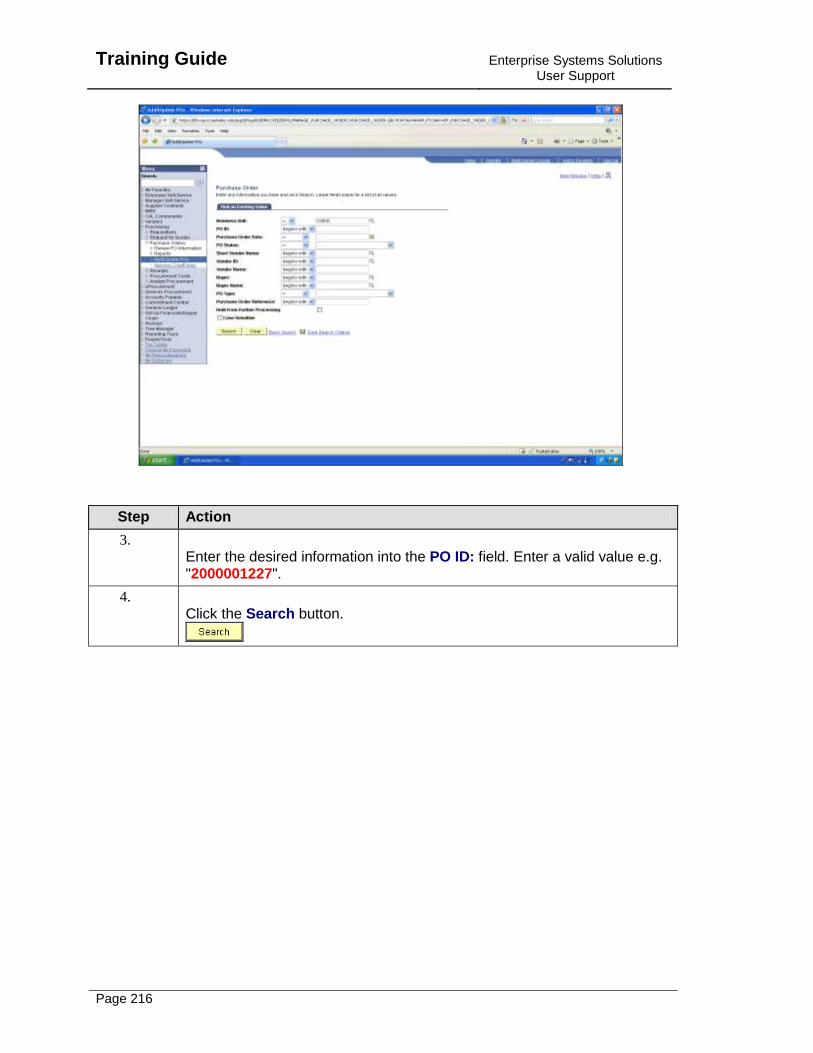
Training Guide
Enterprise Systems Solutions User Support
Page 216
Step Action
3. Enter the desired information into the PO ID: field. Enter a valid value e.g. "2000001227".
4. Click the Search button.
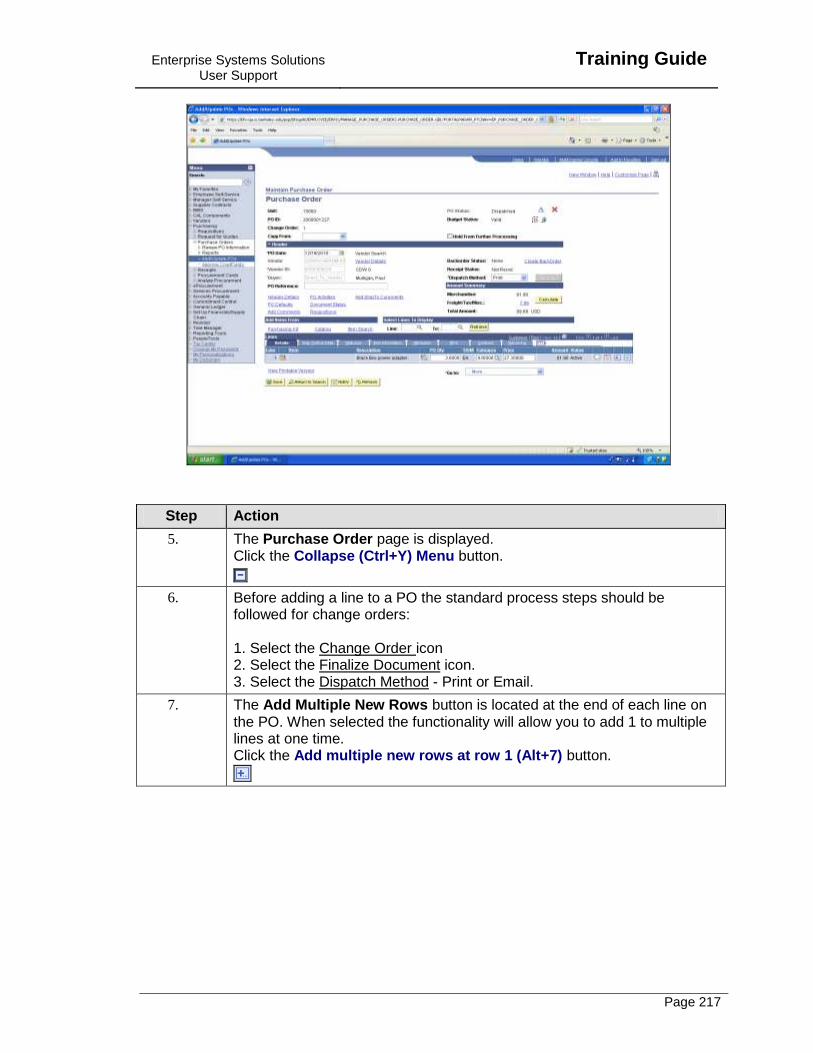
Enterprise Systems Solutions User Support
Training Guide
Page 217
Step Action
5. The Purchase Order page is displayed. Click the Collapse (Ctrl+Y) Menu button.
6. Before adding a line to a PO the standard process steps should be followed for change orders: 1. Select the Change Order icon 2. Select the Finalize Document icon. 3. Select the Dispatch Method - Print or Email.
7. The Add Multiple New Rows button is located at the end of each line on the PO. When selected the functionality will allow you to add 1 to multiple lines at one time. Click the Add multiple new rows at row 1 (Alt+7) button.
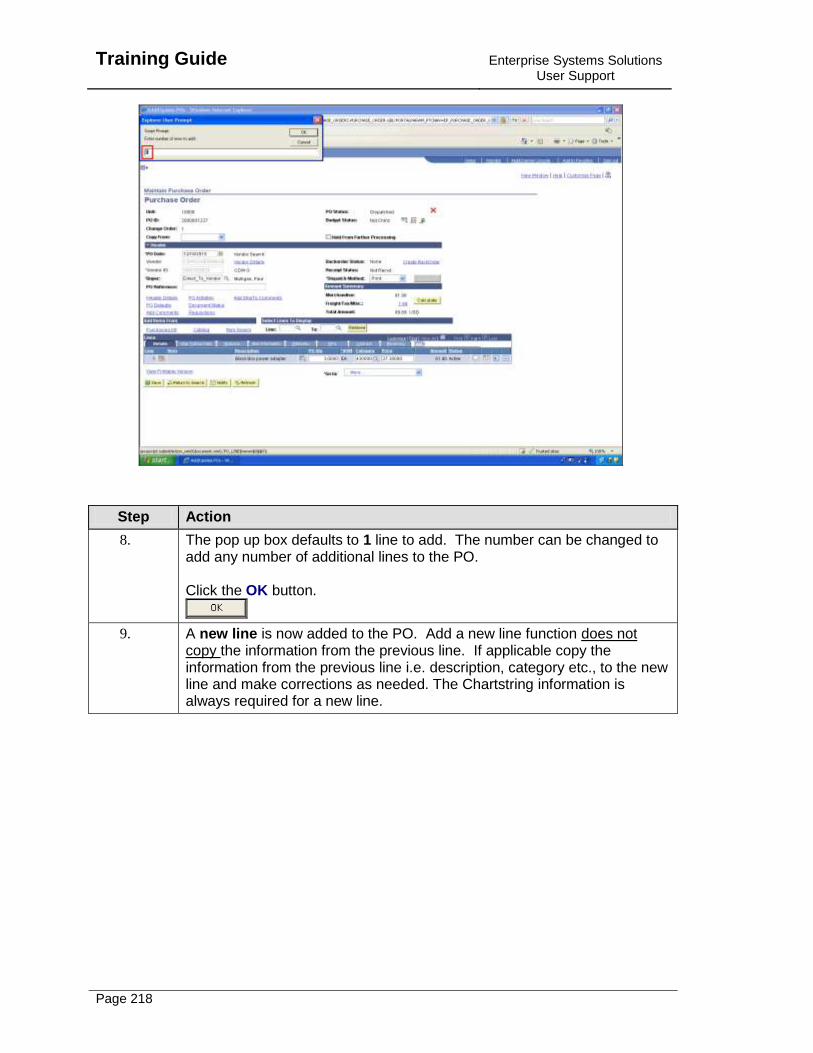
Training Guide
Enterprise Systems Solutions User Support
Page 218
Step Action
8. The pop up box defaults to 1 line to add. The number can be changed to add any number of additional lines to the PO. Click the OK button.
9. A new line is now added to the PO. Add a new line function does not copy the information from the previous line. If applicable copy the information from the previous line i.e. description, category etc., to the new line and make corrections as needed. The Chartstring information is always required for a new line.
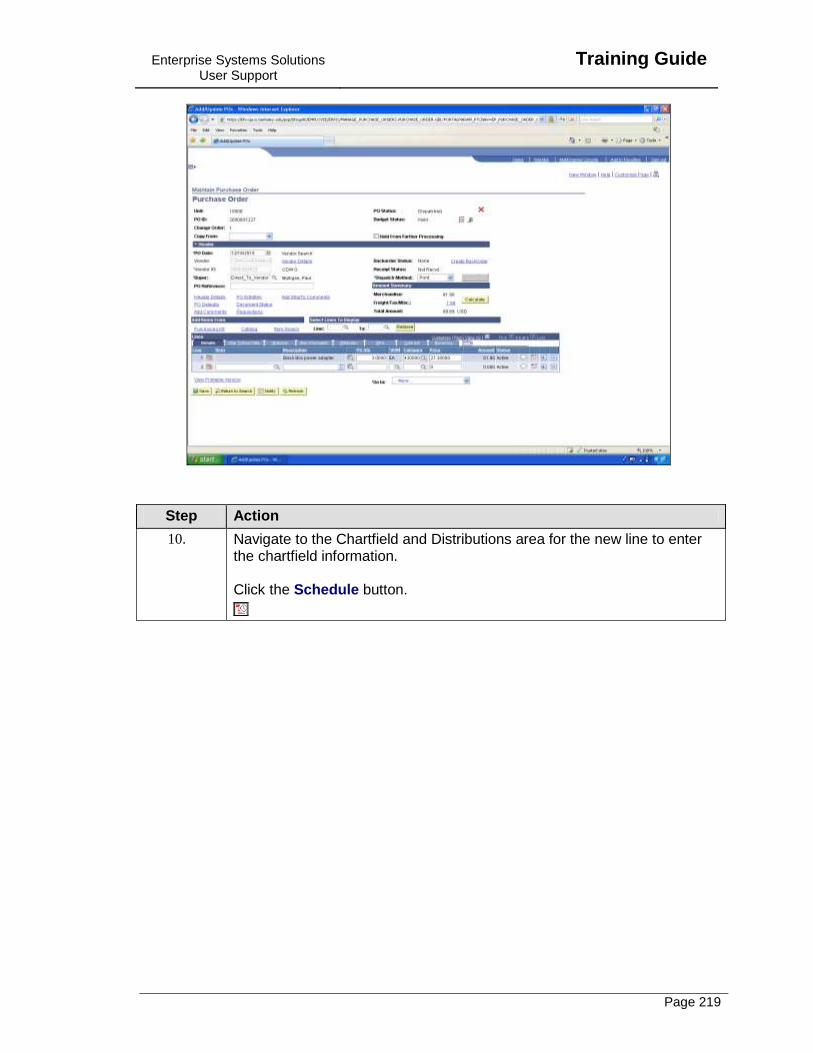
Enterprise Systems Solutions User Support
Training Guide
Page 219
Step Action
10. Navigate to the Chartfield and Distributions area for the new line to enter the chartfield information. Click the Schedule button.
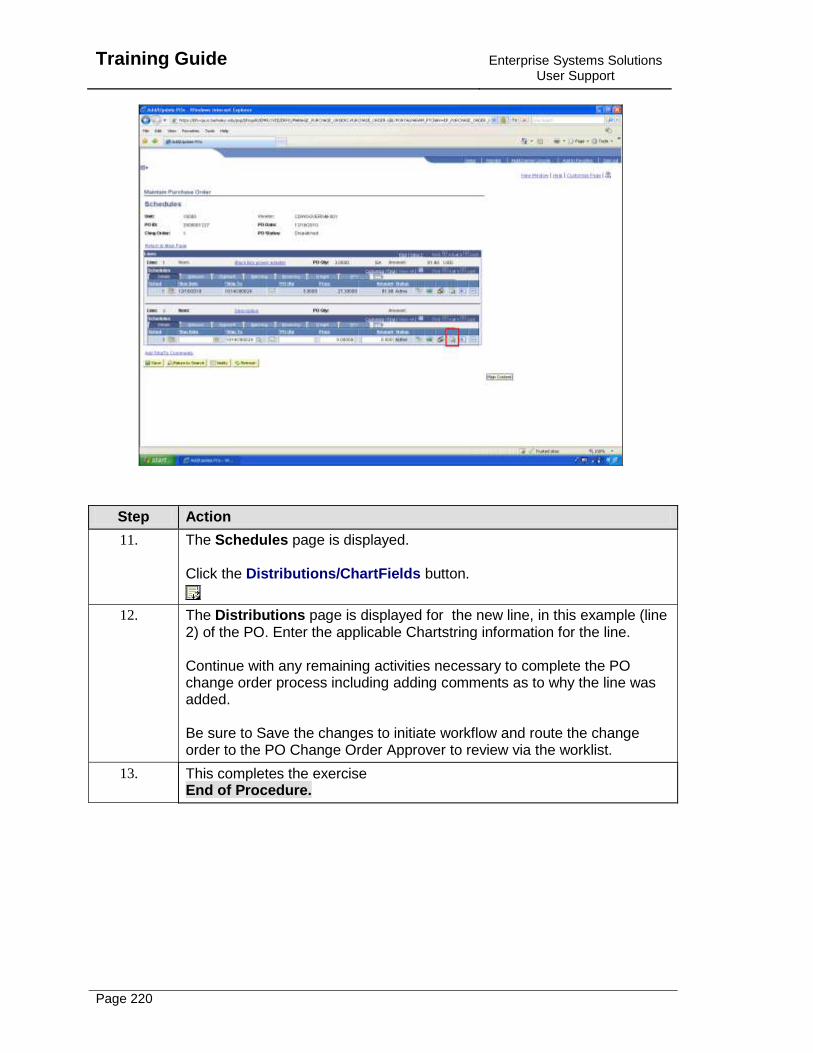
Training Guide
Enterprise Systems Solutions User Support
Page 220
Step Action
11. The Schedules page is displayed. Click the Distributions/ChartFields button.
12. The Distributions page is displayed for the new line, in this example (line 2) of the PO. Enter the applicable Chartstring information for the line. Continue with any remaining activities necessary to complete the PO change order process including adding comments as to why the line was added. Be sure to Save the changes to initiate workflow and route the change order to the PO Change Order Approver to review via the worklist.
13. This completes the exercise End of Procedure.
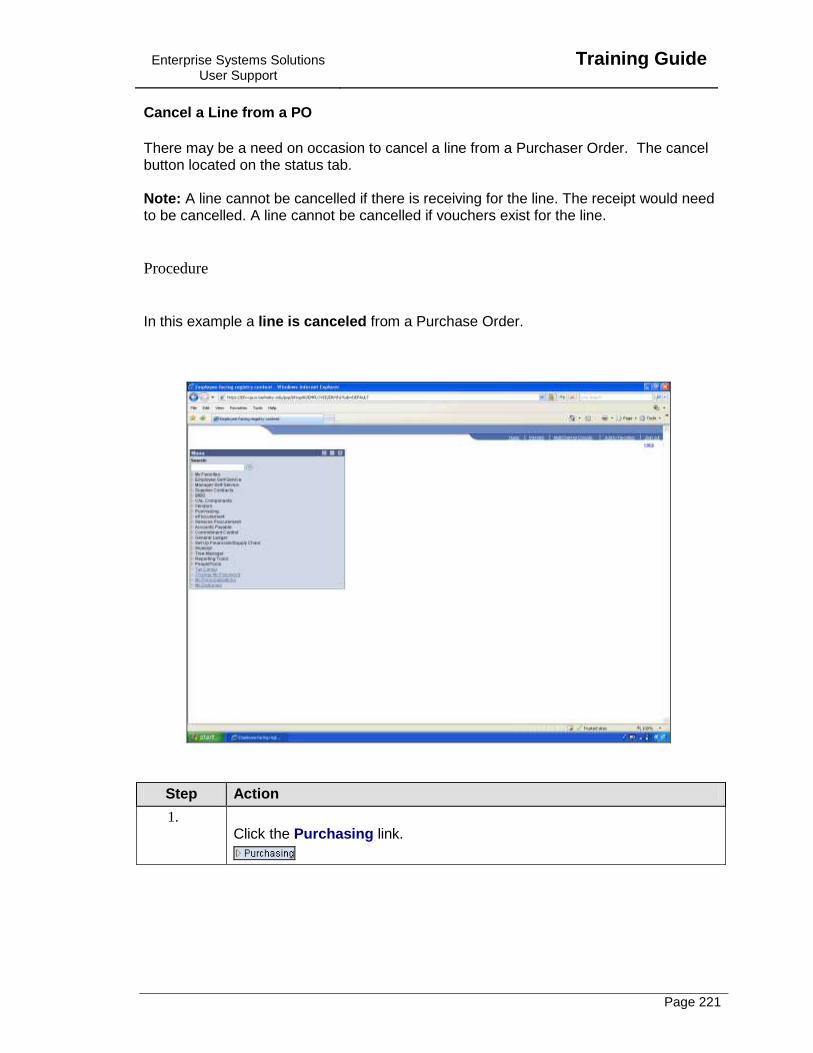
Enterprise Systems Solutions User Support
Training Guide
Page 221
Cancel a Line from a PO
There may be a need on occasion to cancel a line from a Purchaser Order. The cancel button located on the status tab. Note: A line cannot be cancelled if there is receiving for the line. The receipt would need to be cancelled. A line cannot be cancelled if vouchers exist for the line.
Procedure
In this example a line is canceled from a Purchase Order.
Step Action
1. Click the Purchasing link.

Training Guide
Enterprise Systems Solutions User Support
Page 222
Step Action
2. Click the Purchase Orders link.
3. Click the Add/Update POs link.
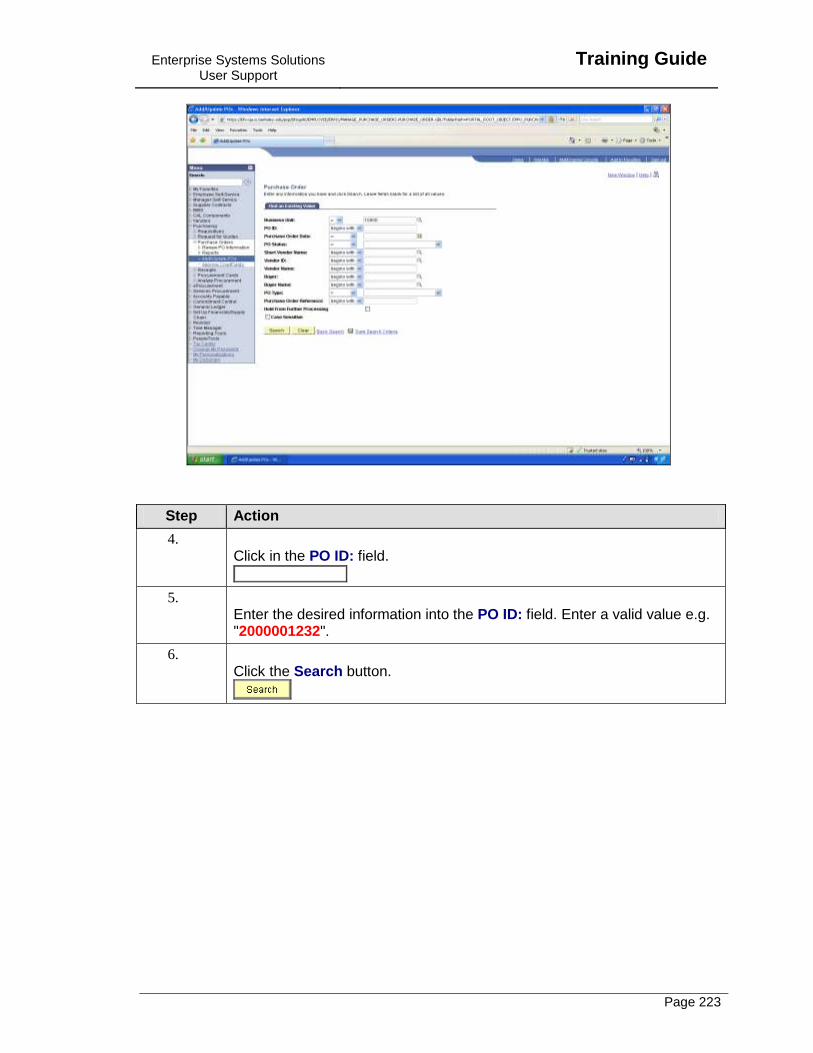
Enterprise Systems Solutions User Support
Training Guide
Page 223
Step Action
4. Click in the PO ID: field.
5. Enter the desired information into the PO ID: field. Enter a valid value e.g. "2000001232".
6. Click the Search button.
Training Guide
Enterprise Systems Solutions User Support
Page 224
Step Action
7. The Purchase Order page is displayed. Click the Collapse (Ctrl+Y) Menu button.
8. Before a line is canceled for a PO the standard process steps should be followed for change orders: 1. Select the Change Order icon 2. Select the Finalize Document icon. 3. Select the Dispatch Method - Print or Email.
9. Select the Statuses tab to navigate to the functionality that enables cancellation of a line. Click the Statuses tab.
10. The Statuses tab is displayed. Select the Cancel Icon to cancel the line. A line cannot be canceled if it has vouchers associated with it. Once a line has been canceled it cannot be reopened or any other action taken against it. Click the Cancel Line button.
Enterprise Systems Solutions User Support
Training Guide
Page 225
Step Action
11. A warning message is displayed that the line will be cancelled for the PO. Click Yes to bypass this message and cancel the line. Click the Yes button.
12. A warning message is displayed that there are associated requisitions available for re-sourcing. Always select Yes to close the associated requisition line. Click the Yes button.
13. The line is now in a status of Canceled. Continue with any remaining activities necessary to complete the PO change order process including adding comments as to why the line was cancelled. Be sure to Save the changes to initiate workflow and route the change order to the PO Change Order Approver to review via the worklist.
14. This completes the exercise End of Procedure.
Approve PO Change Orders
The following topic illustrates the process followed when approving a PO Change Order via the worklist. The PO Change Order Approver should always add a comment as to why the PO Change Order is being denied for approval. The following occurs when the denial is saved. PO Change Order is Approved:
goes through two way matching (Voucher and PO) voucher is paid based on vendor terms
Procedure
In this example the PO Change Order Approver, Approves a PO Change Order via the worklist .
Training Guide
Enterprise Systems Solutions User Support
Page 226
Step Action
1. To review PO Change Orders for Approval or Denial Click the Worklist link.
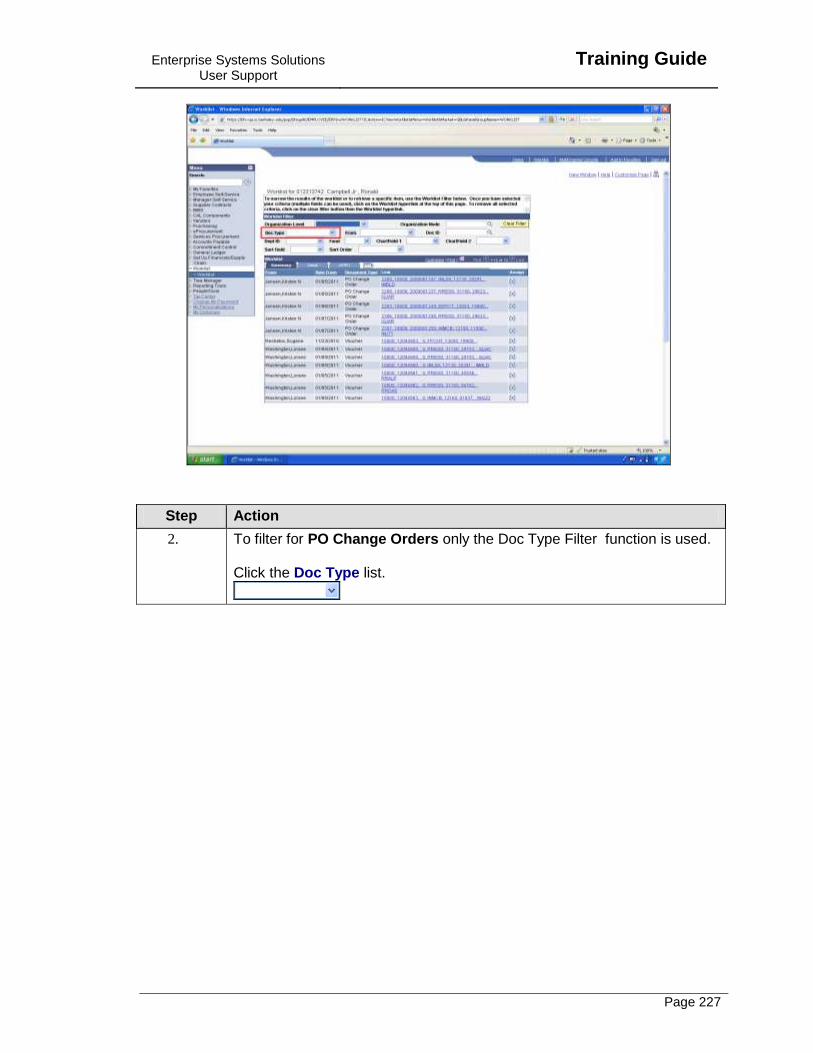
Enterprise Systems Solutions User Support
Training Guide
Page 227
Step Action
2. To filter for PO Change Orders only the Doc Type Filter function is used. Click the Doc Type list.
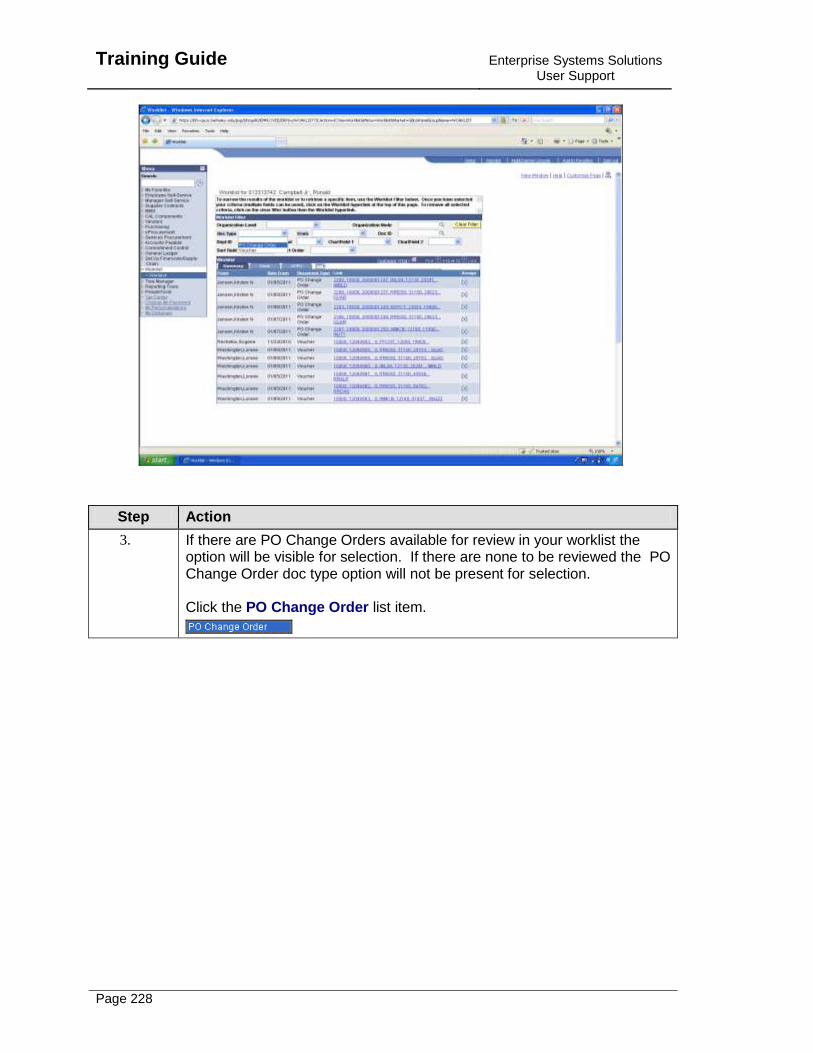
Training Guide
Enterprise Systems Solutions User Support
Page 228
Step Action
3. If there are PO Change Orders available for review in your worklist the option will be visible for selection. If there are none to be reviewed the PO Change Order doc type option will not be present for selection. Click the PO Change Order list item.
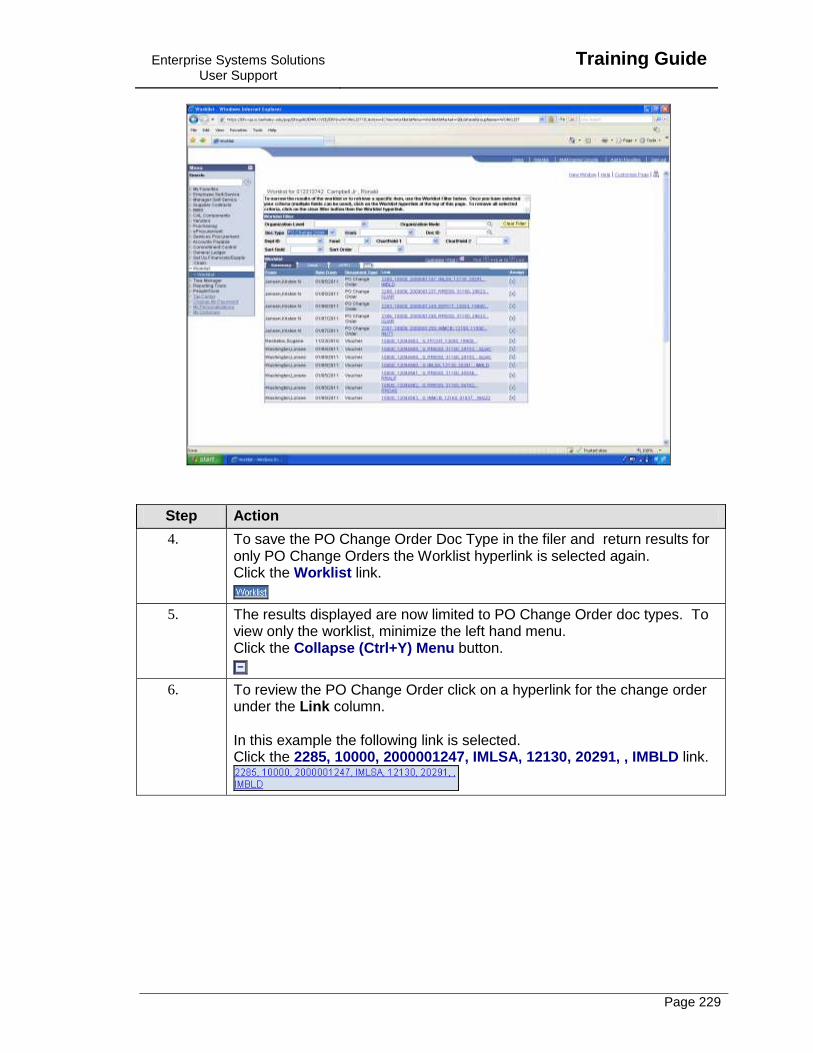
Enterprise Systems Solutions User Support
Training Guide
Page 229
Step Action
4. To save the PO Change Order Doc Type in the filer and return results for only PO Change Orders the Worklist hyperlink is selected again. Click the Worklist link.
5. The results displayed are now limited to PO Change Order doc types. To view only the worklist, minimize the left hand menu. Click the Collapse (Ctrl+Y) Menu button.
6. To review the PO Change Order click on a hyperlink for the change order under the Link column. In this example the following link is selected. Click the 2285, 10000, 2000001247, IMLSA, 12130, 20291, , IMBLD link.
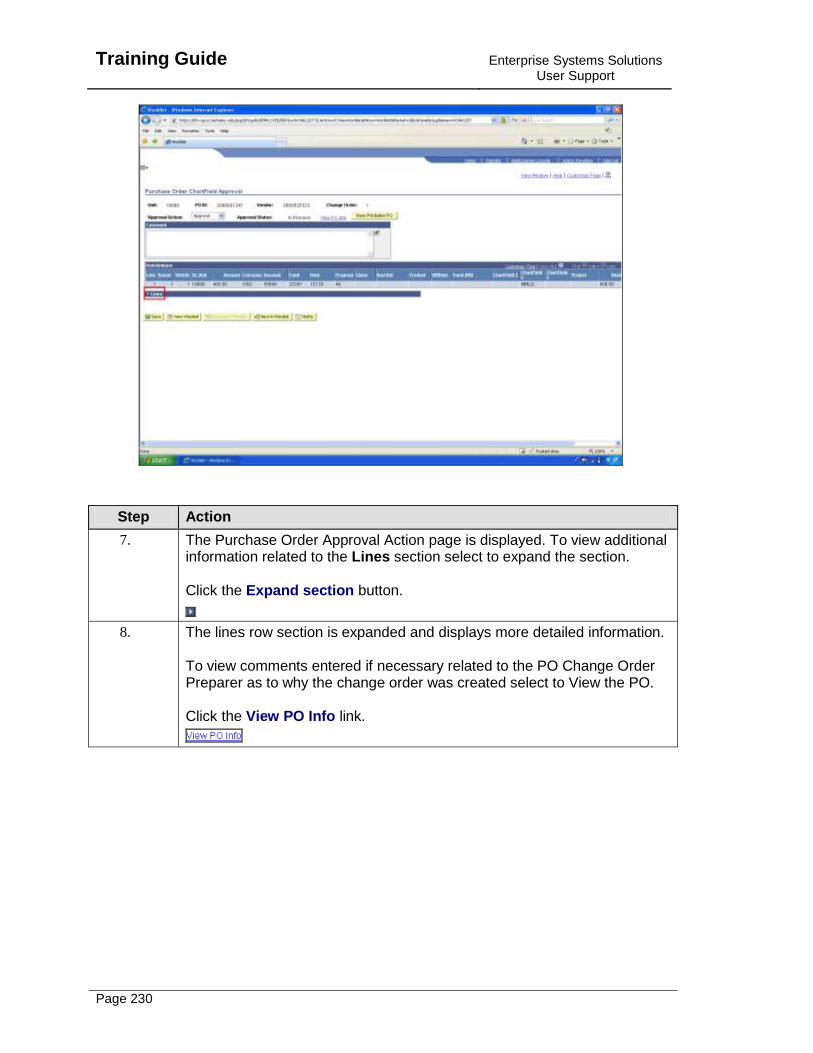
Training Guide
Enterprise Systems Solutions User Support
Page 230
Step Action
7. The Purchase Order Approval Action page is displayed. To view additional information related to the Lines section select to expand the section. Click the Expand section button.
8. The lines row section is expanded and displays more detailed information. To view comments entered if necessary related to the PO Change Order Preparer as to why the change order was created select to View the PO. Click the View PO Info link.
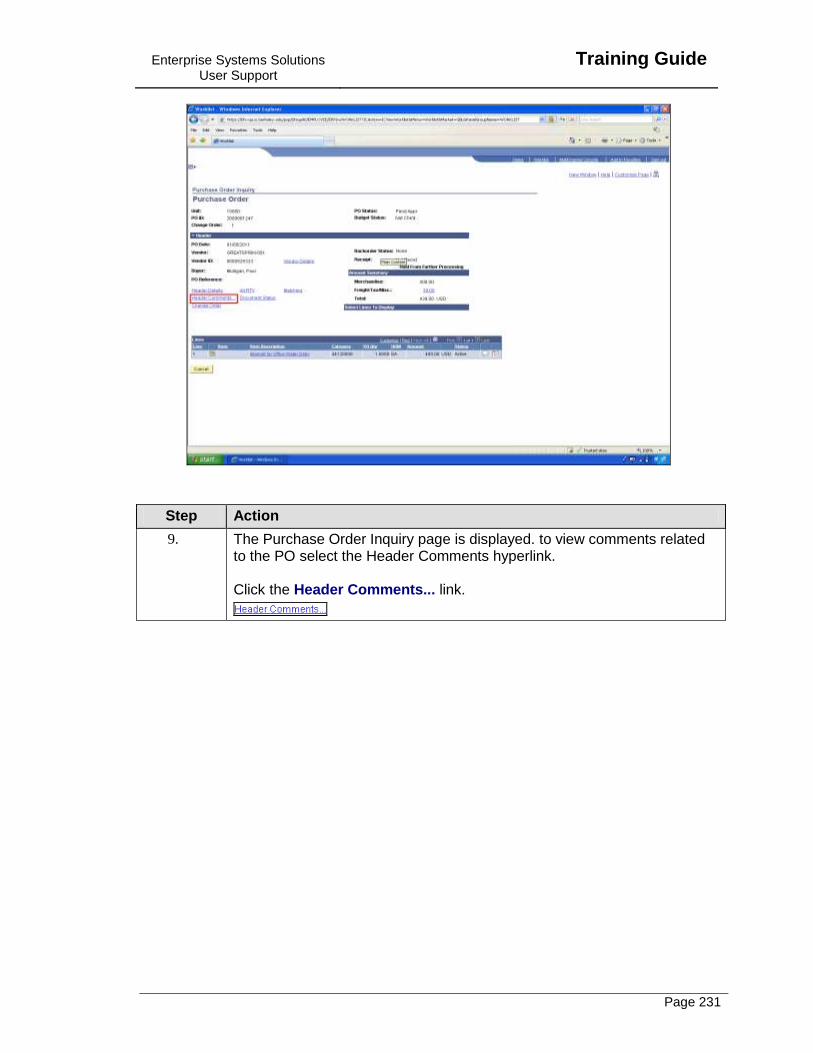
Enterprise Systems Solutions User Support
Training Guide
Page 231
Step Action
9. The Purchase Order Inquiry page is displayed. to view comments related to the PO select the Header Comments hyperlink. Click the Header Comments... link.
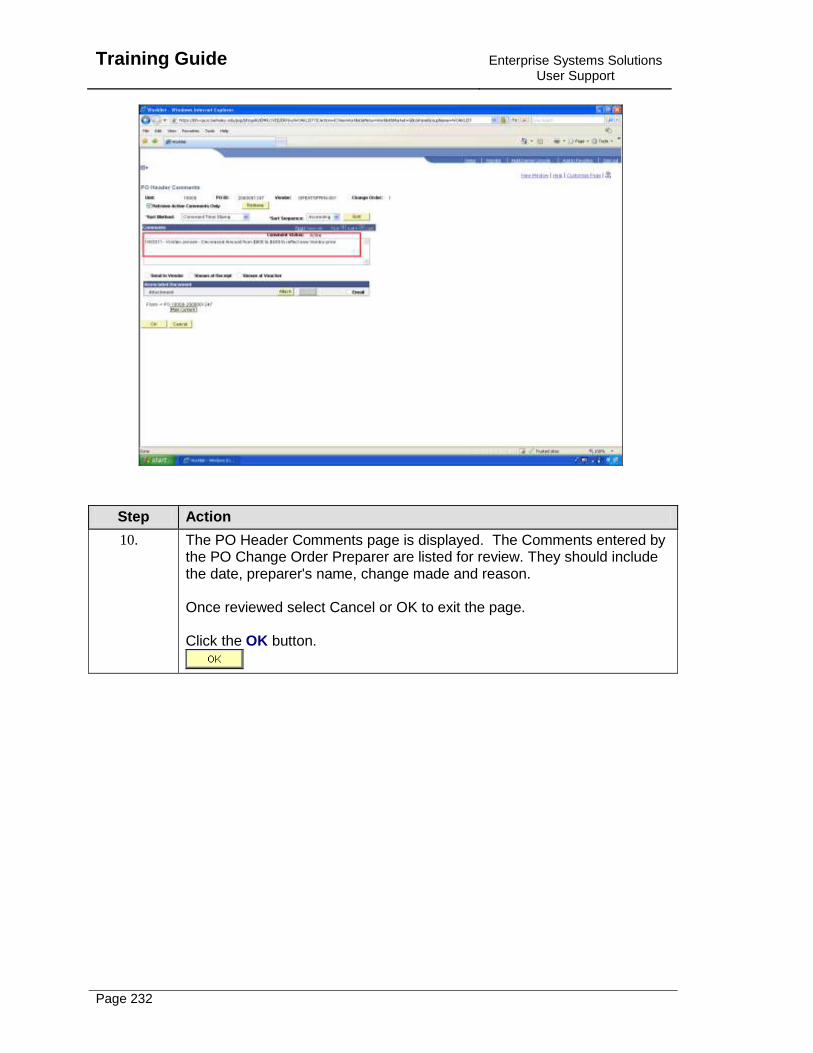
Training Guide
Enterprise Systems Solutions User Support
Page 232
Step Action
10. The PO Header Comments page is displayed. The Comments entered by the PO Change Order Preparer are listed for review. They should include the date, preparer's name, change made and reason. Once reviewed select Cancel or OK to exit the page. Click the OK button.
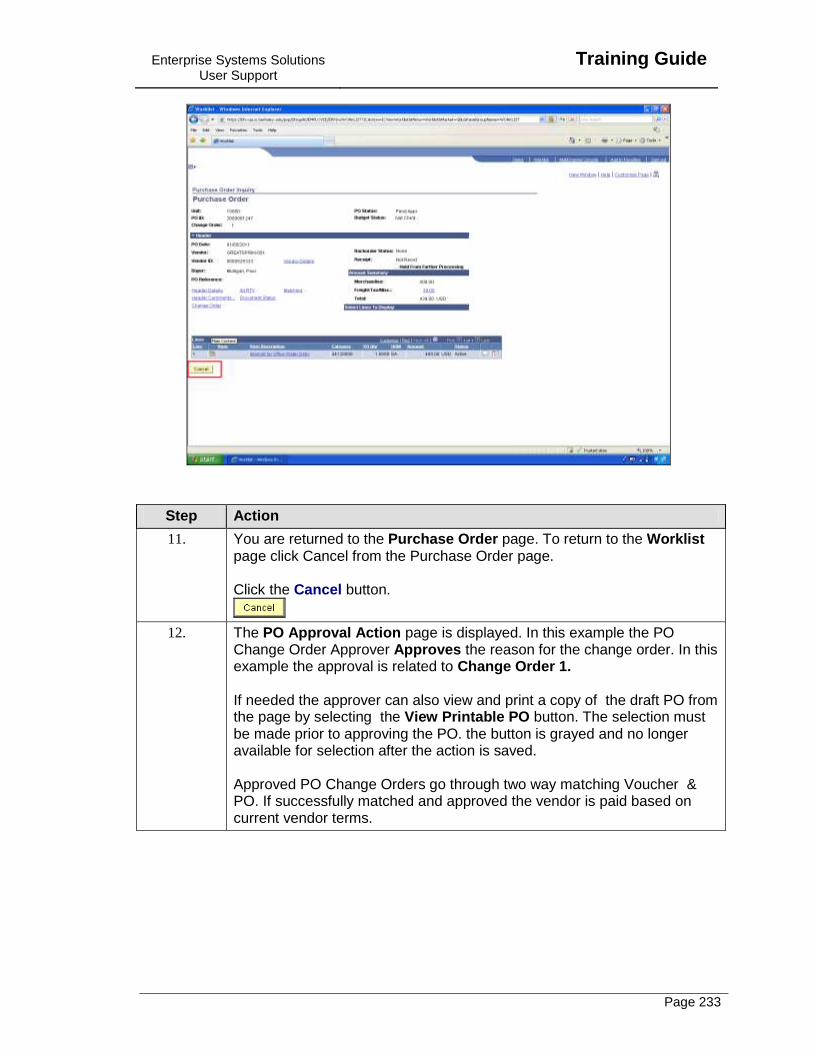
Enterprise Systems Solutions User Support
Training Guide
Page 233
Step Action
11. You are returned to the Purchase Order page. To return to the Worklist page click Cancel from the Purchase Order page. Click the Cancel button.
12. The PO Approval Action page is displayed. In this example the PO Change Order Approver Approves the reason for the change order. In this example the approval is related to Change Order 1. If needed the approver can also view and print a copy of the draft PO from the page by selecting the View Printable PO button. The selection must be made prior to approving the PO. the button is grayed and no longer available for selection after the action is saved. Approved PO Change Orders go through two way matching Voucher & PO. If successfully matched and approved the vendor is paid based on current vendor terms.
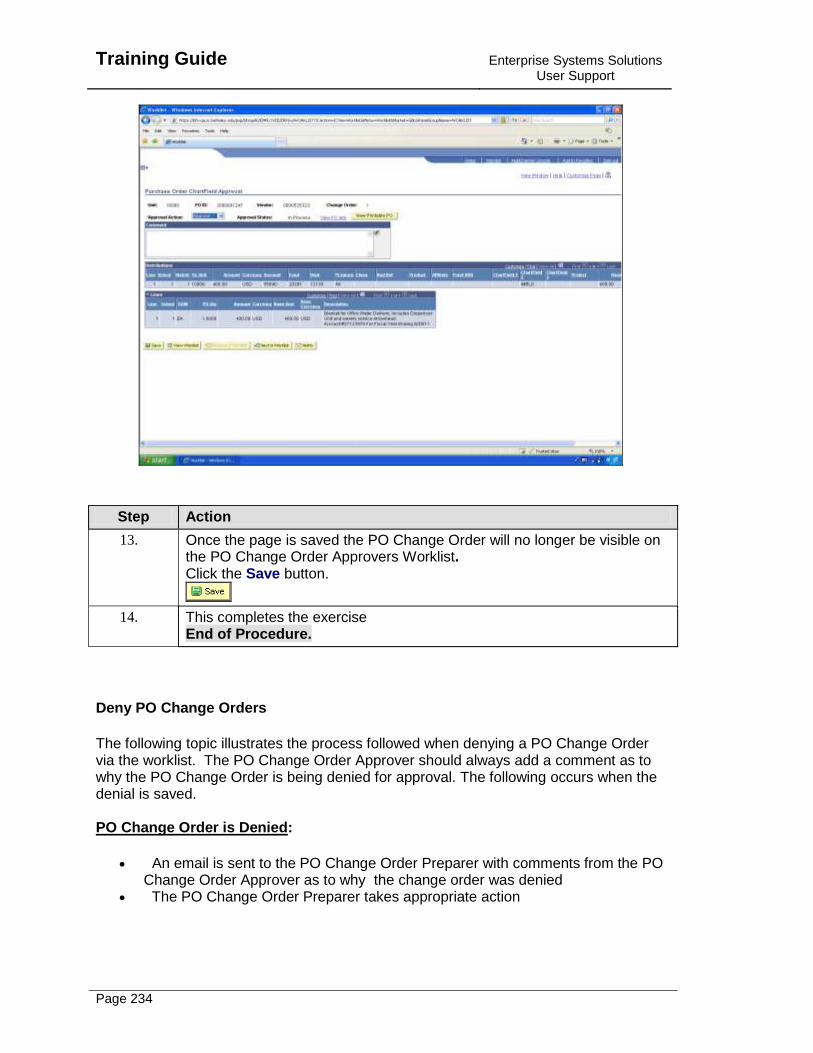
Training Guide
Enterprise Systems Solutions User Support
Page 234
Step Action
13. Once the page is saved the PO Change Order will no longer be visible on the PO Change Order Approvers Worklist. Click the Save button.
14. This completes the exercise End of Procedure.
Deny PO Change Orders
The following topic illustrates the process followed when denying a PO Change Order via the worklist. The PO Change Order Approver should always add a comment as to why the PO Change Order is being denied for approval. The following occurs when the denial is saved. PO Change Order is Denied:
An email is sent to the PO Change Order Preparer with comments from the PO Change Order Approver as to why the change order was denied
The PO Change Order Preparer takes appropriate action
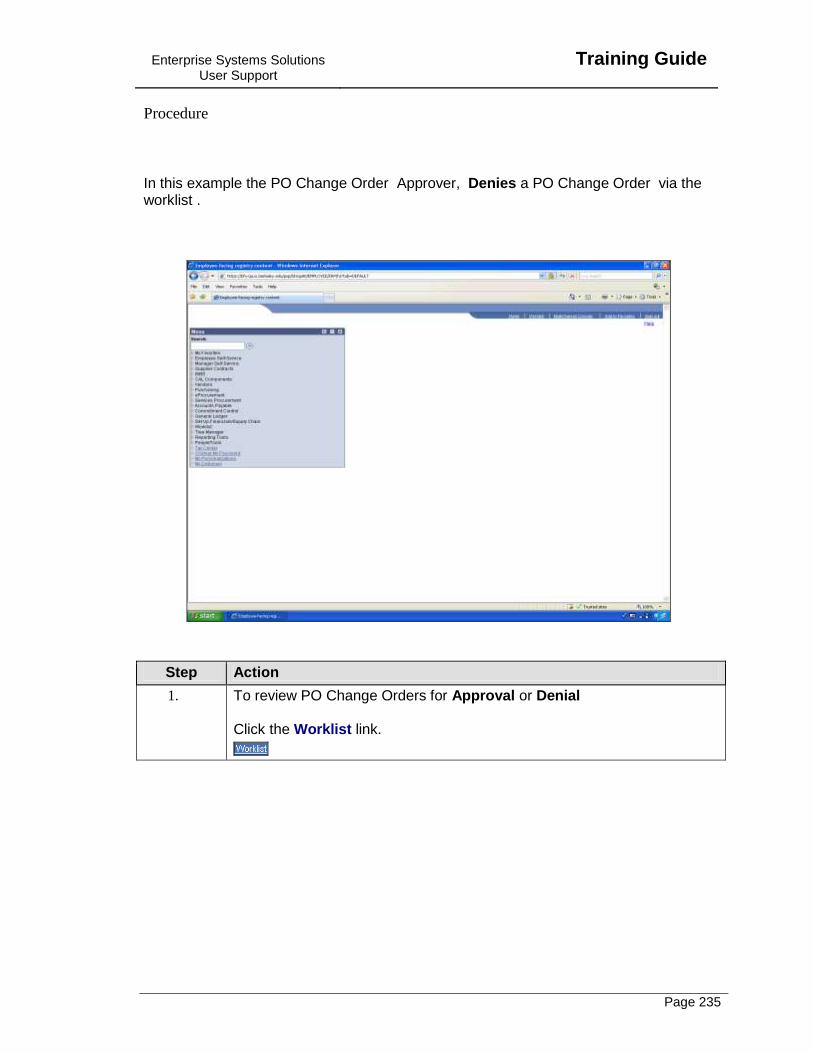
Enterprise Systems Solutions User Support
Training Guide
Page 235
Procedure
In this example the PO Change Order Approver, Denies a PO Change Order via the worklist .
Step Action
1. To review PO Change Orders for Approval or Denial Click the Worklist link.

Training Guide
Enterprise Systems Solutions User Support
Page 236
Step Action
2. To filter for PO Change Orders only the Doc Type Filter function is used. Click the Doc Type list.
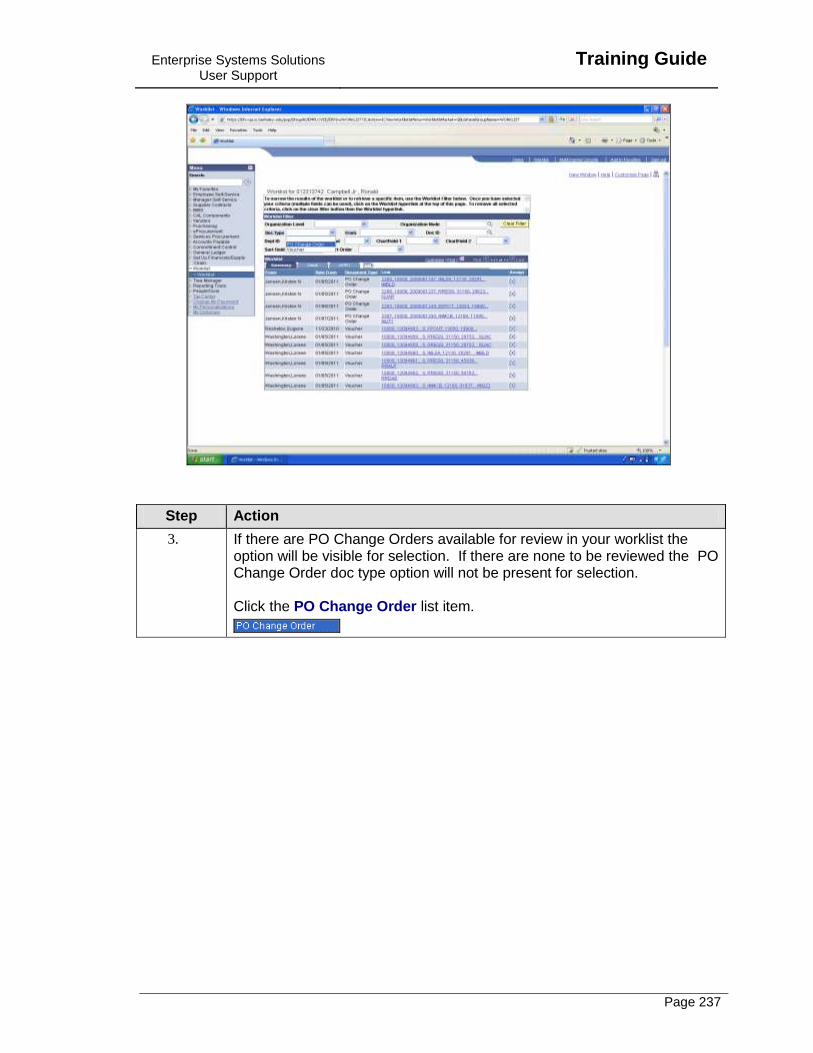
Enterprise Systems Solutions User Support
Training Guide
Page 237
Step Action
3. If there are PO Change Orders available for review in your worklist the option will be visible for selection. If there are none to be reviewed the PO Change Order doc type option will not be present for selection. Click the PO Change Order list item.
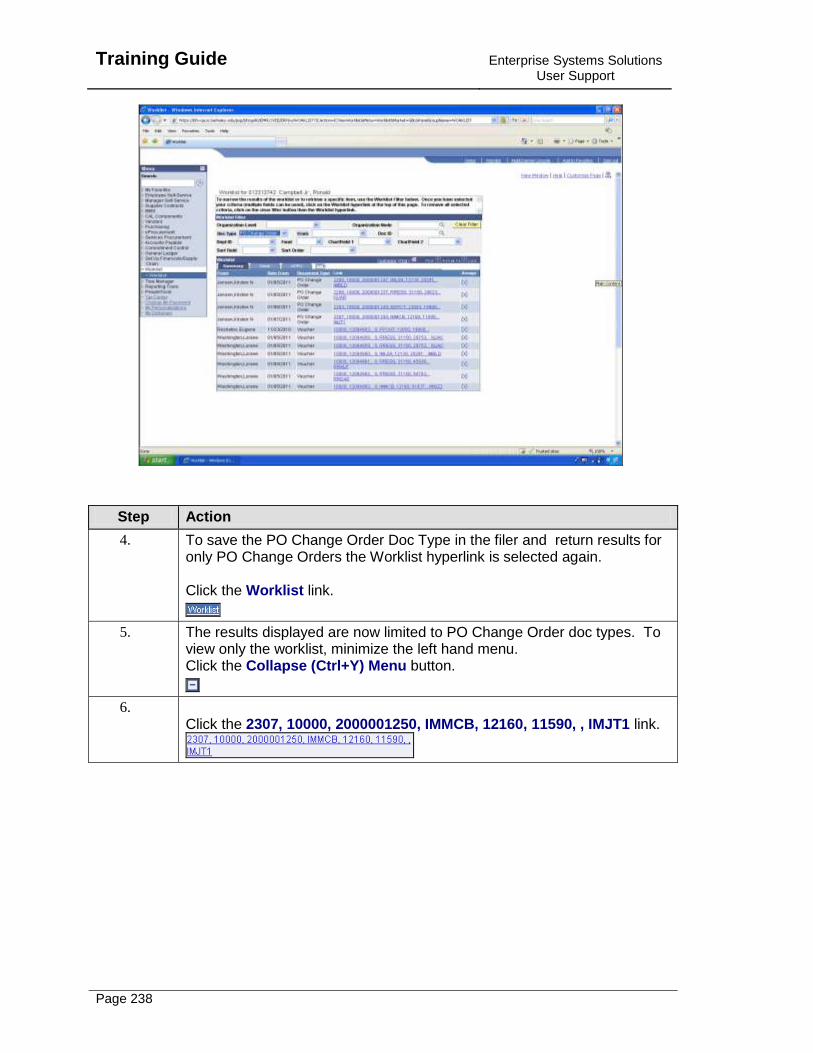
Training Guide
Enterprise Systems Solutions User Support
Page 238
Step Action
4. To save the PO Change Order Doc Type in the filer and return results for only PO Change Orders the Worklist hyperlink is selected again. Click the Worklist link.
5. The results displayed are now limited to PO Change Order doc types. To view only the worklist, minimize the left hand menu. Click the Collapse (Ctrl+Y) Menu button.
6. Click the 2307, 10000, 2000001250, IMMCB, 12160, 11590, , IMJT1 link.

Enterprise Systems Solutions User Support
Training Guide
Page 239
Step Action
7. Click the Expand section button.
8. Click the View PO Info link.
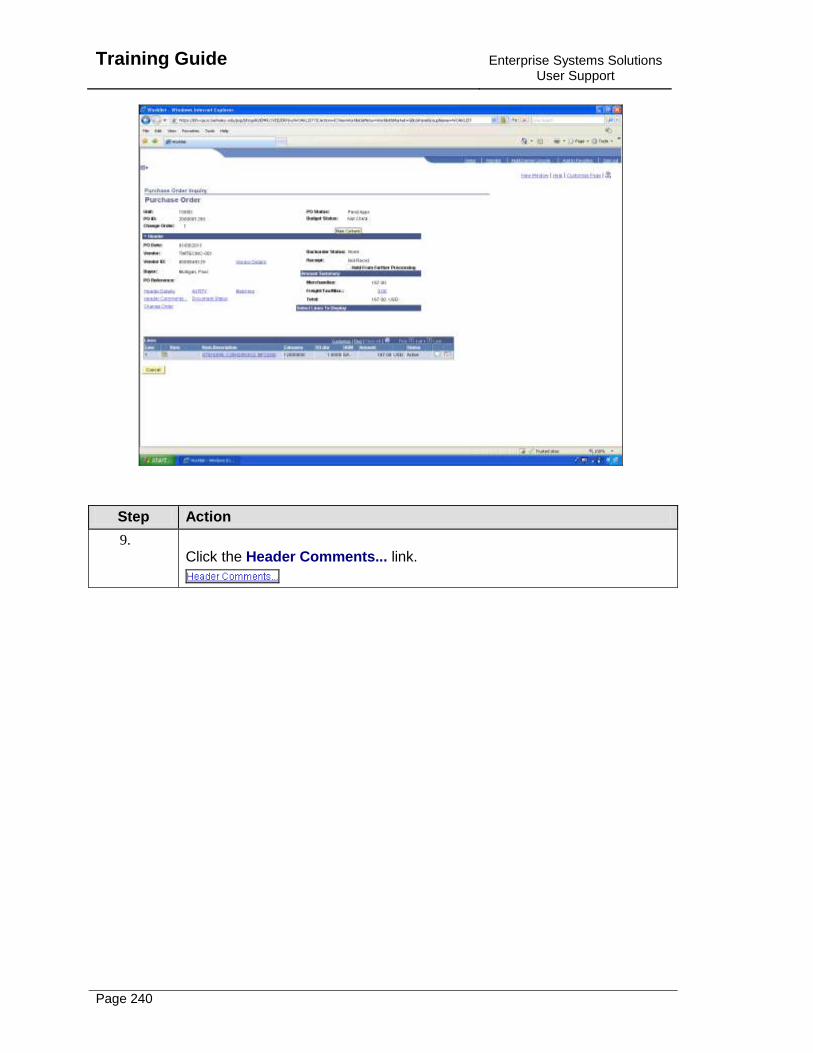
Training Guide
Enterprise Systems Solutions User Support
Page 240
Step Action
9. Click the Header Comments... link.
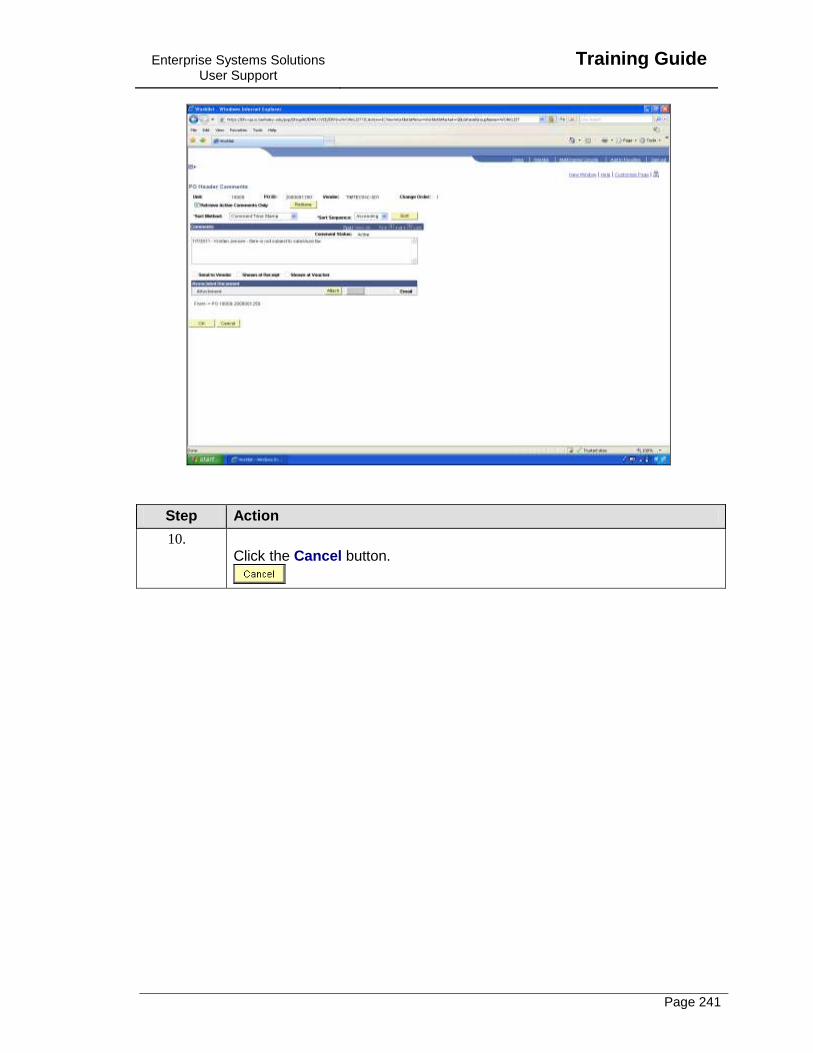
Enterprise Systems Solutions User Support
Training Guide
Page 241
Step Action
10. Click the Cancel button.

Training Guide
Enterprise Systems Solutions User Support
Page 242
Step Action
11. Click the Cancel button.

Enterprise Systems Solutions User Support
Training Guide
Page 243
Step Action
12. Click the Approval Action list.

Training Guide
Enterprise Systems Solutions User Support
Page 244
Step Action
13. Click the Deny list item.
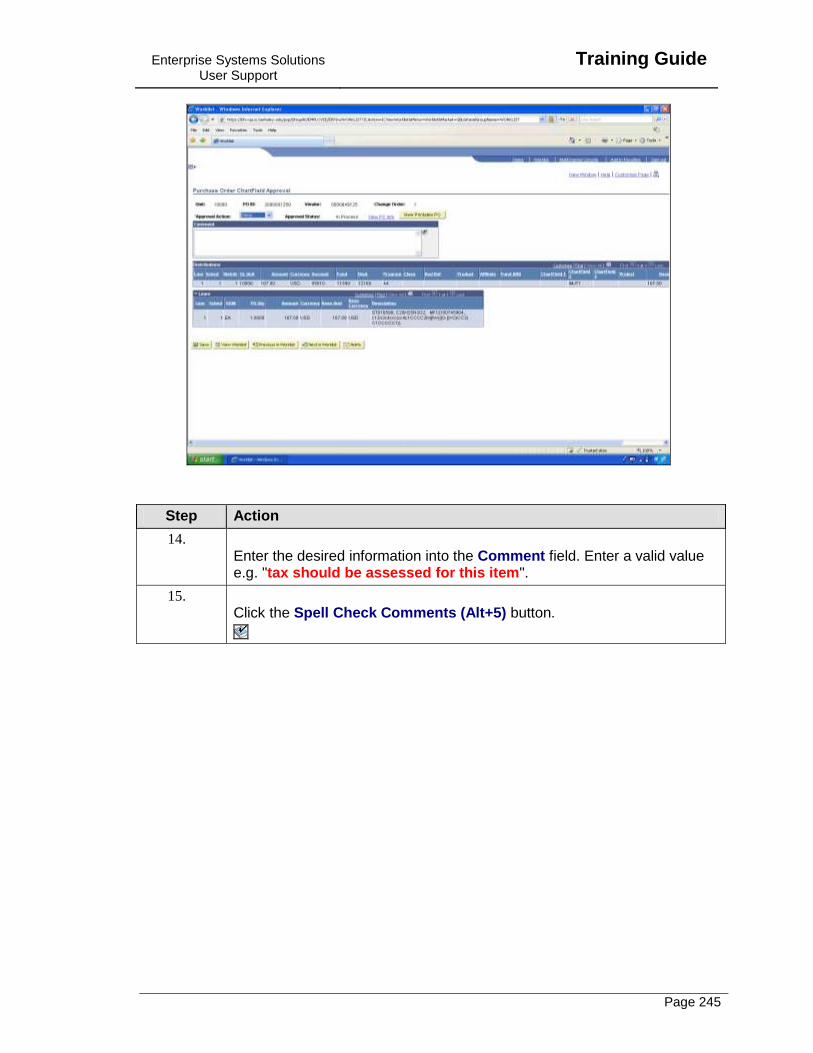
Enterprise Systems Solutions User Support
Training Guide
Page 245
Step Action
14. Enter the desired information into the Comment field. Enter a valid value e.g. "tax should be assessed for this item".
15. Click the Spell Check Comments (Alt+5) button.
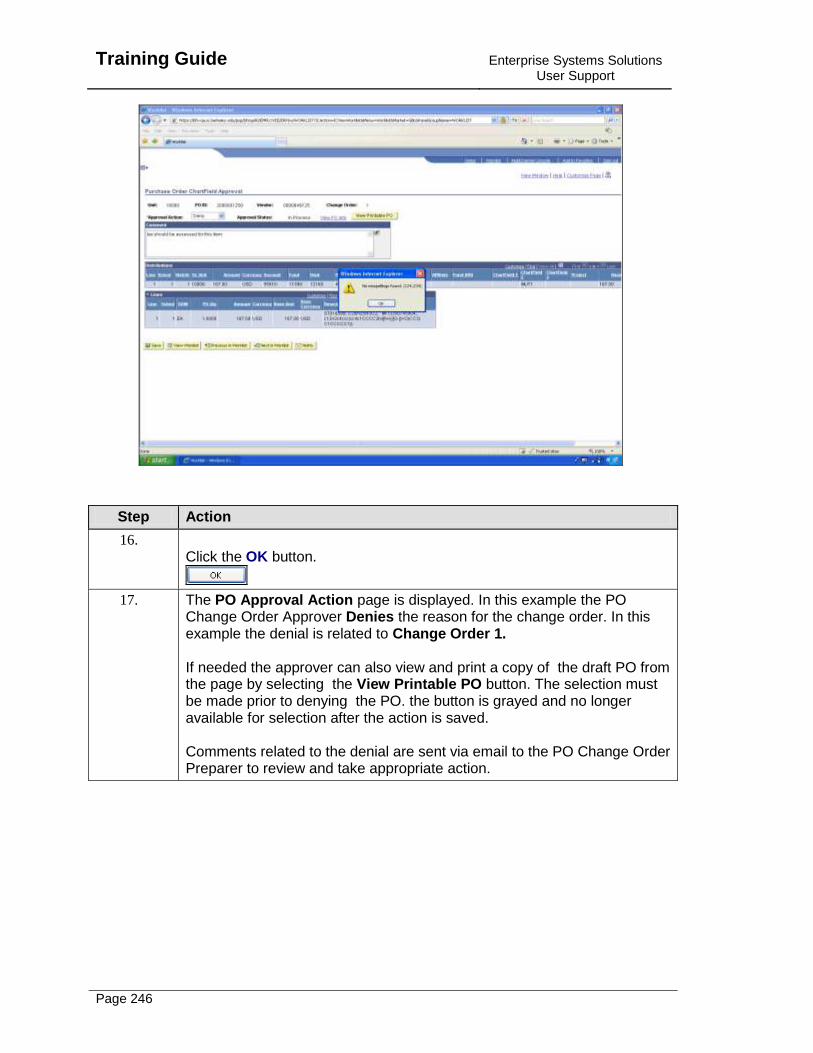
Training Guide
Enterprise Systems Solutions User Support
Page 246
Step Action
16. Click the OK button.
17. The PO Approval Action page is displayed. In this example the PO Change Order Approver Denies the reason for the change order. In this example the denial is related to Change Order 1. If needed the approver can also view and print a copy of the draft PO from the page by selecting the View Printable PO button. The selection must be made prior to denying the PO. the button is grayed and no longer available for selection after the action is saved. Comments related to the denial are sent via email to the PO Change Order Preparer to review and take appropriate action.
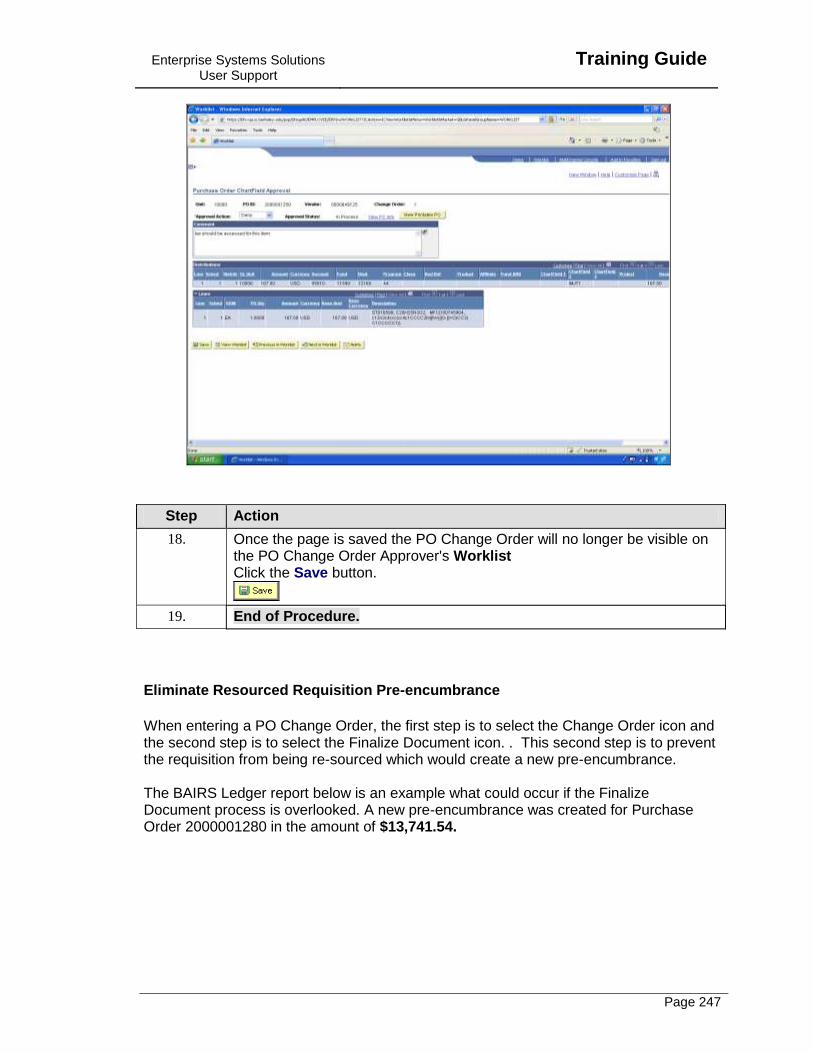
Enterprise Systems Solutions User Support
Training Guide
Page 247
Step Action
18. Once the page is saved the PO Change Order will no longer be visible on the PO Change Order Approver's Worklist Click the Save button.
19. End of Procedure.
Eliminate Resourced Requisition Pre-encumbrance
When entering a PO Change Order, the first step is to select the Change Order icon and the second step is to select the Finalize Document icon. . This second step is to prevent the requisition from being re-sourced which would create a new pre-encumbrance. The BAIRS Ledger report below is an example what could occur if the Finalize Document process is overlooked. A new pre-encumbrance was created for Purchase Order 2000001280 in the amount of $13,741.54.
Training Guide
Enterprise Systems Solutions User Support
Page 248
Procedure
In this example the Finalize Document process is run to remove a pre-encumbrance that appears on the department’s ledger.
Enterprise Systems Solutions User Support
Training Guide
Page 249
Step Action
1. When entering a PO Change Order, the first step is to select the Change Order icon and the second step is to select the Finalize Document icon. . This second step is to prevent the requisition from being re-sourced which would create a new pre-encumbrance. The BAIRS Ledger report displayed is an example of what could occur if the Finalize Document process is overlooked. A new pre-encumbrance was created for Purchase Order 2000001280 in the amount of $13,741.54.
Training Guide
Enterprise Systems Solutions User Support
Page 250
Step Action
2. Click the Purchasing link.
Enterprise Systems Solutions User Support
Training Guide
Page 251
Step Action
3. Click the Purchase Orders link.
4. Click the Add/Update POs link.
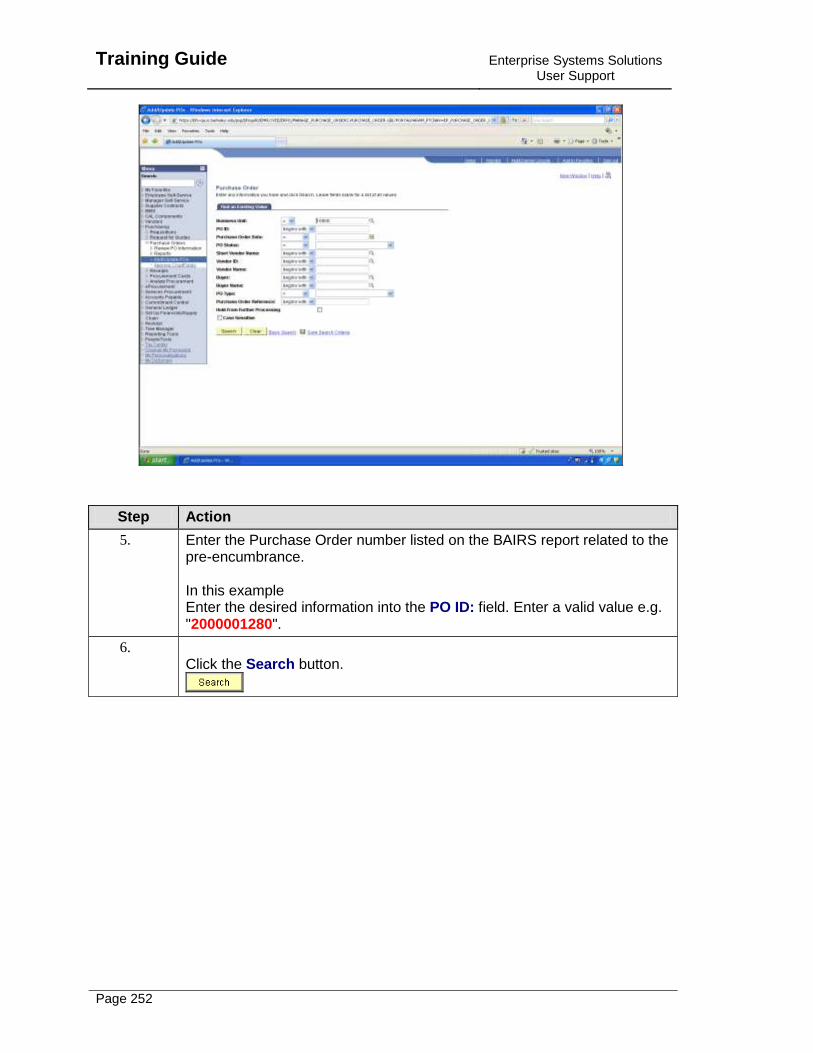
Training Guide
Enterprise Systems Solutions User Support
Page 252
Step Action
5. Enter the Purchase Order number listed on the BAIRS report related to the pre-encumbrance. In this example Enter the desired information into the PO ID: field. Enter a valid value e.g. "2000001280".
6. Click the Search button.
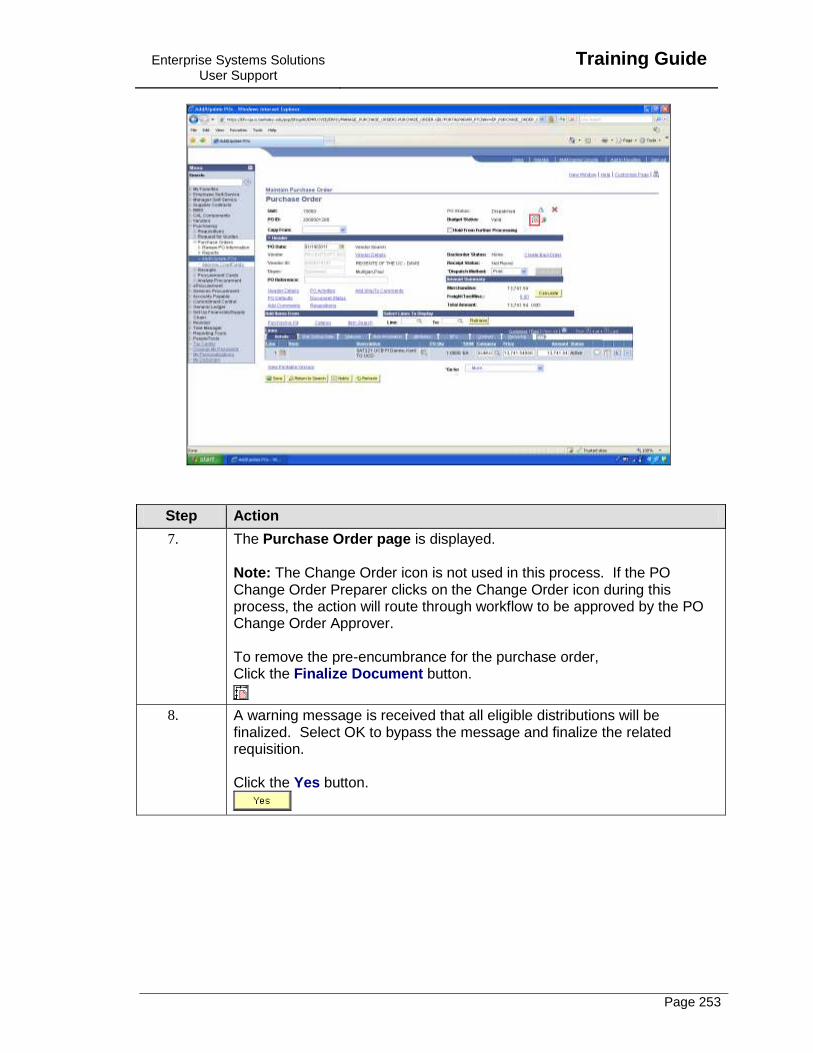
Enterprise Systems Solutions User Support
Training Guide
Page 253
Step Action
7. The Purchase Order page is displayed. Note: The Change Order icon is not used in this process. If the PO Change Order Preparer clicks on the Change Order icon during this process, the action will route through workflow to be approved by the PO Change Order Approver. To remove the pre-encumbrance for the purchase order, Click the Finalize Document button.
8. A warning message is received that all eligible distributions will be finalized. Select OK to bypass the message and finalize the related requisition. Click the Yes button.

Training Guide
Enterprise Systems Solutions User Support
Page 254
Step Action
9. You are returned to the Purchase Order page. To save your changes Click Save. Click the Save button.
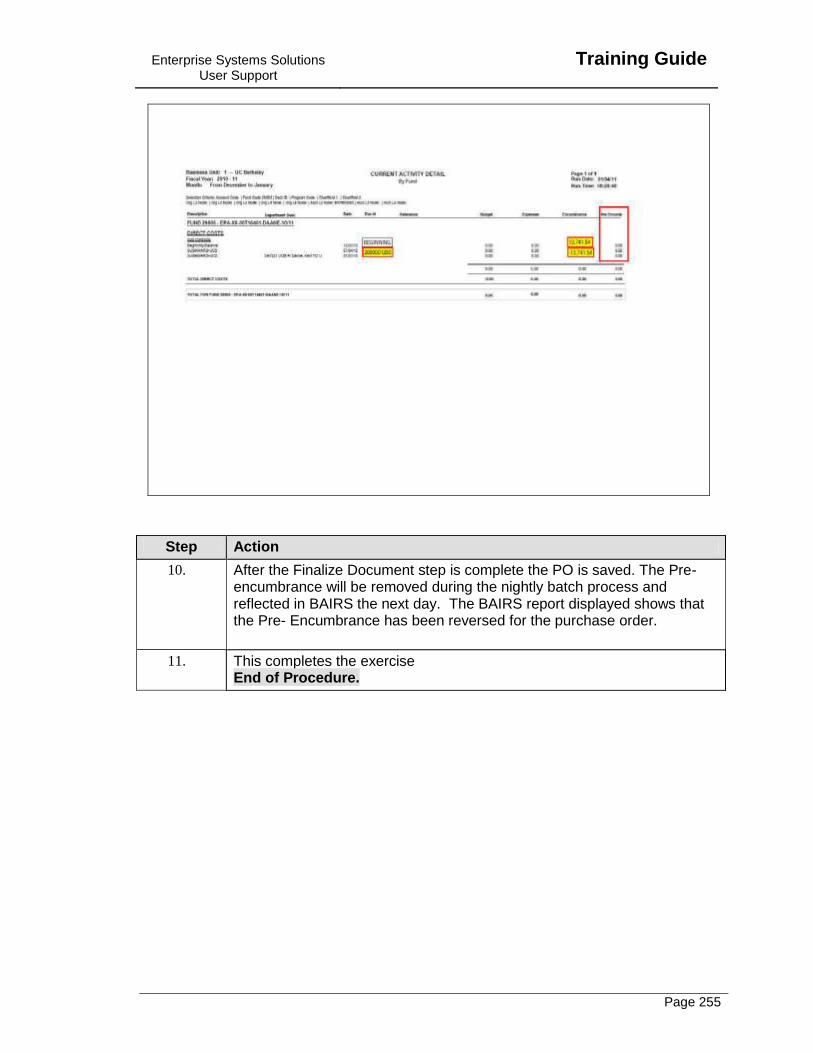
Enterprise Systems Solutions User Support
Training Guide
Page 255
Step Action
10. After the Finalize Document step is complete the PO is saved. The Pre-encumbrance will be removed during the nightly batch process and reflected in BAIRS the next day. The BAIRS report displayed shows that the Pre- Encumbrance has been reversed for the purchase order.
11. This completes the exercise End of Procedure.