Embed Size (px)
Citation preview

BGV-D8* Chain Hoist
User�s Guide
* Previously known as BVG-8
North American Exclusive Distributor 2366-A Galvani ● Ste-Foy ● Quebec ● Canada ● G1N 4G4 Telephone: (418) 686-0543 ● Fax: (418) 686-3836 ● [email protected] www.showdistribution.com

Contents 1 Safety advice ................................................................................................................................................................................3
1.1 Advice for the use of electric chain hoists ............................................................................................................................3 1.2 European regulations ...........................................................................................................................................................3 1.3 Spare parts ...........................................................................................................................................................................3
2 2 Technical overview....................................................................................................................................................................4 2.1 Assembly possibilities ..........................................................................................................................................................4 2.2 Explanation of type designation............................................................................................................................................4 2.3 Sectional view ......................................................................................................................................................................5 2.4 Schematic sketch of the load chain configuration ................................................................................................................6
3 Assembly ......................................................................................................................................................................................6 3.1 Mechanical assembly ...........................................................................................................................................................6
3.1.1 Hook tackle...................................................................................................................................................................6 3.1.2 Hook block....................................................................................................................................................................7 3.1.3 Stationary suspended hoists ........................................................................................................................................7
3.1.3.1 Suspension with suspension eye .........................................................................................................................7 3.1.3.2 Special version �Suspension with single-hole eye- .............................................................................................8 3.1.3.3 Special version � Suspension with hook suspension �........................................................................................8
3.1.4 Gear ventilation ............................................................................................................................................................9 3.1.5 Mounting the chain box ................................................................................................................................................9
3.1.5.1 Outside chain bags ..............................................................................................................................................9 3.1.6 Fitting the load chain (except version 6.1, 8.1 and 9.1)..............................................................................................10 3.1.7 Fitting the load chain (for version 6.1, 8.1 and 9.1) ....................................................................................................11 3.1.8 Assembling the load chain .........................................................................................................................................11 3.1.9 Replacing the load chain and hold-down ...................................................................................................................12 3.1.10 Electric chain hoists in upside down mode ............................................................................................................12
3.2 Electric connections ...........................................................................................................................................................12 3.2.1 Mains connection .......................................................................................................................................................12 3.2.2 230 V 1-phase current 50 Hz .....................................................................................................................................14 3.2.3 Electric limit switch for lift limitation ............................................................................................................................14 3.2.4 Changing the operating voltage from 400 V to 230 V (3-phase current)....................................................................14
4 Electric chain hoist with trolley....................................................................................................................................................15 4.1 Mechanical assembly .........................................................................................................................................................15
4.1.1 Positioning the hoist underneath the trolley ...............................................................................................................15 4.1.2 Assembly of a trolley with two connecting bolts .........................................................................................................16 4.1.3 Assembly of a trolley with one connecting bolt...........................................................................................................16
4.2 Electric trolleys with reaction wheels instead of counterweight ..........................................................................................16 4.3 Electric connection of electric trolleys ................................................................................................................................16 4.4 Technical data for trolleys with two suspension bolts.........................................................................................................17 4.5 Technical data for trolleys with one suspension bolt ..........................................................................................................18
5 Tests...........................................................................................................................................................................................19 5.1 Test when used according to VBG 8, section 23 ...............................................................................................................19 5.2 Test when used according to VBG 9, section 25 ...............................................................................................................19 5.3 Regular tests ......................................................................................................................................................................19
6 Operation....................................................................................................................................................................................19 6.1 Prohibitions on use.............................................................................................................................................................19
7 Maintenance ...............................................................................................................................................................................20 7.1 Maintenance and checks in accordance with maintenance table ......................................................................................20 7.2 Maintenance and adjustment of the D.C. disk brake..........................................................................................................21
7.2.1 Construction of the brake ...........................................................................................................................................21 7.2.2 Adjusting the brake.....................................................................................................................................................21 7.2.3 Electric control of brake..............................................................................................................................................21 7.2.4 Checking brake functioning ........................................................................................................................................21
7.3 Sliding clutch ......................................................................................................................................................................21 7.3.1 Construction of the sliding clutch................................................................................................................................22 7.3.2 Construction of the sliding clutch of the version 9.1 slow speed motor......................................................................22 7.3.3 Adjusting the clutch ....................................................................................................................................................22 7.3.4 Adjusting the clutch on the slow speed motor of the version 9.1 ...............................................................................23
7.4 Load chain..........................................................................................................................................................................23 7.4.1 Lubricating the load chain before starting and during operation ................................................................................23 7.4.2 Testing wear in the load chain....................................................................................................................................23 7.4.3 Measuring wear and replacing chain..........................................................................................................................23
7.5 Maintenance work on trolley...............................................................................................................................................24 7.5.1 Construction of the brake of a trolley with a single travelling speed...........................................................................24 7.5.2 Adjustment of air gap for trolleys with double travelling speeds.................................................................................24
8 Duty rate of an electric chain hoist .............................................................................................................................................25 8.1 Short- time duty ..................................................................................................................................................................25 8.2 Intermittent duty..................................................................................................................................................................25 8.3 Example..............................................................................................................................................................................25
9 Duty rate of a motorized trolley...................................................................................................................................................26 10 Strainer clamp for the control cable........................................................................................................................................26 11 Lubrication ..............................................................................................................................................................................26
11.1 Lubrication of the gear....................................................................................................................................................26 11.2 Lubrication of the hook block and hook tackle ...............................................................................................................26 11.3 Lubrication of the trolleys ...............................................................................................................................................26
12 Disposal.................................................................................................................................................................................. 26
3
1 Safety advice
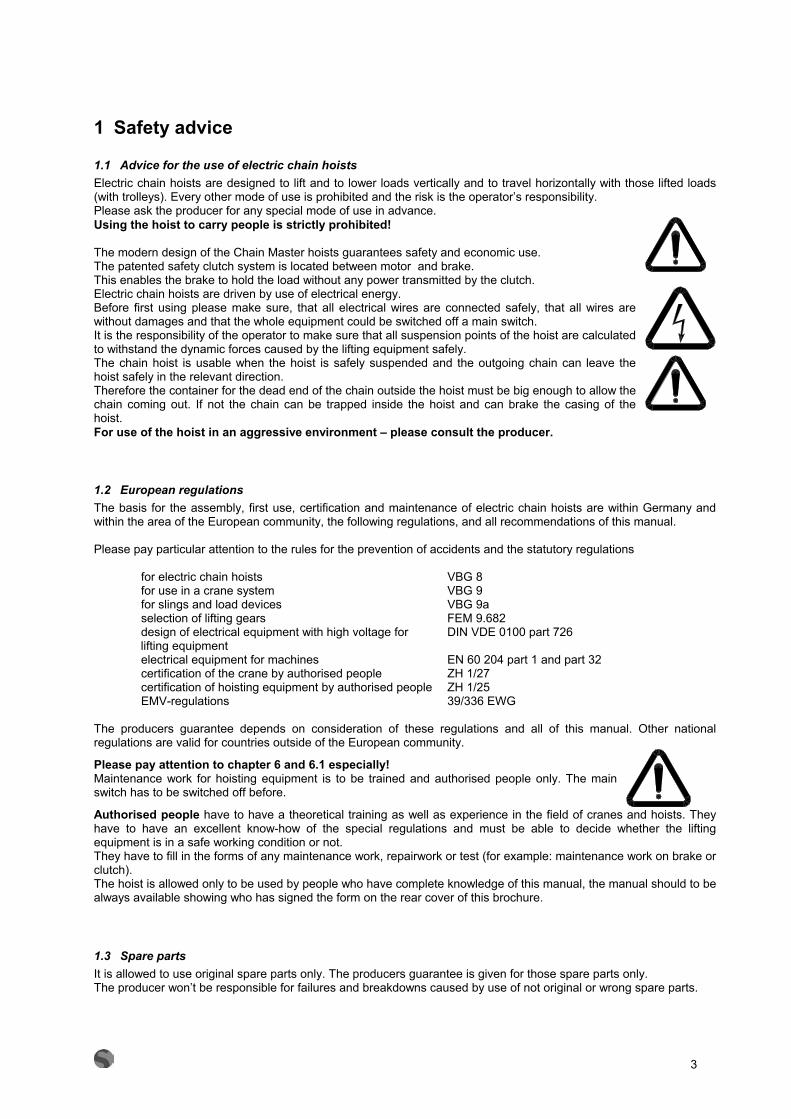
1.1 Advice for the use of electric chain hoists Electric chain hoists are designed to lift and to lower loads vertically and to travel horizontally with those lifted loads (with trolleys). Every other mode of use is prohibited and the risk is the operator�s responsibility. Please ask the producer for any special mode of use in advance. Using the hoist to carry people is strictly prohibited! The modern design of the Chain Master hoists guarantees safety and economic use. The patented safety clutch system is located between motor and brake. This enables the brake to hold the load without any power transmitted by the clutch. Electric chain hoists are driven by use of electrical energy. Before first using please make sure, that all electrical wires are connected safely, that all wires are without damages and that the whole equipment could be switched off a main switch. It is the responsibility of the operator to make sure that all suspension points of the hoist are calculated to withstand the dynamic forces caused by the lifting equipment safely. The chain hoist is usable when the hoist is safely suspended and the outgoing chain can leave the hoist safely in the relevant direction. Therefore the container for the dead end of the chain outside the hoist must be big enough to allow the chain coming out. If not the chain can be trapped inside the hoist and can brake the casing of the hoist.
For use of the hoist in an aggressive environment � please consult the producer.
1.2 European regulations The basis for the assembly, first use, certification and maintenance of electric chain hoists are within Germany and within the area of the European community, the following regulations, and all recommendations of this manual. Please pay particular attention to the rules for the prevention of accidents and the statutory regulations for electric chain hoists VBG 8 for use in a crane system VBG 9 for slings and load devices VBG 9a selection of lifting gears FEM 9.682 design of electrical equipment with high voltage for lifting equipment
DIN VDE 0100 part 726
electrical equipment for machines EN 60 204 part 1 and part 32 certification of the crane by authorised people ZH 1/27 certification of hoisting equipment by authorised people ZH 1/25 EMV-regulations 39/336 EWG The producers guarantee depends on consideration of these regulations and all of this manual. Other national regulations are valid for countries outside of the European community.
Please pay attention to chapter 6 and 6.1 especially! Maintenance work for hoisting equipment is to be trained and authorised people only. The main switch has to be switched off before.
Authorised people have to have a theoretical training as well as experience in the field of cranes and hoists. They have to have an excellent know-how of the special regulations and must be able to decide whether the lifting equipment is in a safe working condition or not. They have to fill in the forms of any maintenance work, repairwork or test (for example: maintenance work on brake or clutch). The hoist is allowed only to be used by people who have complete knowledge of this manual, the manual should to be always available showing who has signed the form on the rear cover of this brochure.
1.3 Spare parts It is allowed to use original spare parts only. The producers guarantee is given for those spare parts only. The producer won�t be responsible for failures and breakdowns caused by use of not original or wrong spare parts.

4
2 Technical overview
2.1 Assembly possibilities The simple building block system makes it easy to convert the electric chain hoists. This allows the choice of single or double � fall versions, stationary or mobile with manual or electric travelling trolleys, and the installation of greater hoisting and operating heights. specially shaped shackle single hole suspension eye suspension eye hoisting gear hook tackle with elastic washers operating buttons with emergency stop
trolley
hook suspension
lift limiterwith elastic
washers
chain box
hook block with elastic
washers
figure 1: possibilities for completion
2.2 Explanation of type designation Example: version 7.1 type 3200 / 2 � 3 / 0,75 slow lifting speed [m/min] main lifting speed [m/min] number of falls capacity [kg]

5
2.3 Sectional view picture No.
designation reference to picture No.
designation reference to
1 brake cover 13 clutch hollow shaft 7.3 2 casing 14 stator 3.2.4 3 gear cover 15 wheel IV 4 gear cap 16 pinion shaft V 5 magnet for d. c. brake 7.2 17 wheel VI 6 motor pinion shaft 18 drive shaft 7 clutch compression spring 7.3 19 load chain 2.4 / 7.4 8 pressure nut 7.3 20 hold- down 3.1.9 9 retaining plate 7.2 21 hook tackle complete 3.1.2 10 brake disk 7.2 22 chain box 3.1.5 11 clutch disk 7.3 23 control cable 12 rotor 3.2.4 24 terminal strip for mains
cable 3.2
figure 2: sectional view

6
2.4 Schematic sketch of the load chain configuration Only use manufacturer�s original parts as these meet the high stress and service life standards required.
figure 3: 3.1 single- fall version 3.2 double- fall version
3 Assembly Assembly work should only be carried out by trained specialists in accordance with VBG 8, section 24.
3.1 Mechanical assembly
3.1.1 Hook tackle The hook tackle used to attach loads for hoists in single- fall version.
hook tackle for
chain 4x12 hook tackle for
chain 5x15 hook tackle for
chain 7x22 hook tackle for
chain 9x27 hook tackle for
chain 11x31
figure 4: details of the hook tackle
During maintenance work the condition of the load hook has to be checked (wear and centre punch spacing, on page hook certificate). For the 4 mm and 5 mm hook tackle the plastic cover has to be checked additionally and changed if worn. Furthermore the condition of the pin which secures the hook nut, the pressure bearing and the safety latch have to be checked.
plastic cover
special rubber- metal washer
casing
hook tackle complete (incl. pressure
hook tackle complete (incl. pressure bearing)
hook tackle complete (incl. pressure bearing)
elastic washer
2 screws
casing
elastic washer
4 screws
casingpressure disk
pressure disk
mark 4 for chain diameter in the casing
mark 4 for chain diameter in the casing
2 screwsthreated bolt
threated bolt

7
3.1.2 Hook block The hook block used to attach the load in double fall version.
hook block
for chain
4x12, 5x15, 7x22, 9x27 and 11x31
figure 5: details off the hook block
At all maintenance work the condition of all the parts has be checked (according to 3.1.1). Caution! The sprocket wheel for the hook block of versions 6, 7 and 7.2 (capacity 2000 kg) has 4
plain surfaces and the sprocket wheel of versions 6.1 and 7.1 (capacity 3200 kg) 5 pockets.
Caution! The hook nut for the hook block of versions 8.1 and 9.1 (capacity 5000 kg) is secured by a safety pin 90 ° degrees to the hook axis.
3.1.3 Stationary suspended hoists - basic version �
3.1.3.1 Suspension with suspension eye Assembly: The suspension eye section, which forms part of the standard delivery, must be inserted into the specially provided suspension holes on the electric chain hoist and pinned into place with the two bolts. Use washers with the lock bolts and secure position with split pins.
figure 6: suspension with suspension eye
rubber block
2 screw
casing with sprocket wheel and bearings
load hook complete (incl. pressure bearing)
safety pin for hook nut
1 screw
suspension eye blue arrow

8
3.1.3.2 Special version �Suspension with single-hole eye- Assembly: The suspension with single- hole
eye section, which forms part of the standard delivery, must be inserted into the specially provided suspension holes on the electric chain hoist and pinned into place with the two bolts. Use washers with the lock bolts and secure position with split pins.
symbols for single and double fall versions
figure 7: Suspension with single hole eye
Caution! The marking arrow on the single-hole eye must be on the same side as the marking arrow on the hoist casing.
3.1.3.3 Special version � Suspension with hook suspension � Assembly:
The hook suspension must be inserted into the specially provided suspension holes on the electric chain hoist and pinned into place with the two bolts. Use washers with the lock bolts and secure position with split pins.
single- fall
double- fall blue arrow
figure 8: Suspension with hook suspension
Caution! The marking arrow on the single-hole eye must be on the same side as the marking arrow on the hoist casing.
When converting the hoist with hook suspension from one fall number to the other, the hook must be fixed into the hole on the cross member provided with the respective symbol (see figure 8). To do this, pull the hook grooved pin, loosen the notch pin from the nut, put the hook into the other hole and screw in the nut again. The grooved pin must then driven into the hole to secure the bolt. Please take care that the pin is put in safely, that it cannot fall out and that the body of the hoist prevents the pin from falling out after the hook suspension has been assembled. If the pin could become loose please use a new one.
interchangeable between single fall
and double fall blue arrow
notch pin for hook

9
Caution! For changing the hook suspension of version 1-1.3 for the different numbers of falls the traverse of the suspension has to be turned additionally by 180 ° degrees that the arrows at the same side again.
figure 9: suspension with hook suspension
symbol hook block blue arrow symbol hook tackle blue arrow blue arrow load centre for single fall load centre for double fall
3.1.4 Gear ventilation Having completed assembly, the split washer is placed under the oil-filler plug (top side of casing).
3.1.5 Mounting the chain box Figure 10 shows how the chain box is mounted. Fitting the chain box is to be done in accordance with figure 10 with a bolt and a nylock nut. This nut has to be tightened up fully. The nylock nut has to be used once only. Caution! Check if the size of the chain box at hand is sufficient to accommodate the respective
chain length of the chain hoist (chain dimensions and holding capacity can be read on the bottom of the chain box). Insert the chain end with lift limiter and rubber washer loosely into the chain box. After running in the Chain box check again if the chain bag is not filled more than the capacity level mark shows. Don�t use chain bags which are filled more than this level mark indicates.
split washerattached with self adhesive tape
when the hoist delivered
figure 10: oil- filling plug and chain box mounting
3.1.5.1 Outside chain bags
If the chain weight is more than 20 kg the strain of the chain bag has to be relieved with a special textile strap. When fitting the chain bag to the suspension the customer must correctly adjust it´s position using the ratchet strap with a load of appr. 10 kg inside the bag. The suspension point of this strap for a stationary suspended hoist has to be provided by the buyer (see picture 11). If the hoist is fitted to a trolley the producer provides a dual trolley to fit the chain bag strainer strap (see picture 12). Please take care that the strainer strap has to be tighten in accordance with this manual and inspected in regular intervals. Please use the edge protectors at the suspension points (see pictures 11 and 12).
maximal Kette / chain
9/18 11/12 chain 9x27 max. 18m chain 11x31 max. 12m

10
suspension point
edge protector ratchet canvas strainer strap
figure 11: Stationary suspended hoist. The suspension point for
the strainer strap has to be provided by the user.
figure 12: Electric chain hoist with chain bag suspended at the tandem trolley (If running around bends please ask the producer first).
The end of the strainer strap has to be fixed and tightened as shown in figure 13.
strainer strap with ratchet
figure 13: Scheme of the fixed strainer strap
3.1.6 Fitting the load chain (except version 6.1, 8.1 and 9.1) - single-fall version � 1. Push the pull-in wire (special tool) into and through the chain guide cross plate shown in figure 14.1 until the wire
hook is pushed out on the opposite side. 2. Starting with the flat chain link (see figure 14.1), hang chain end into the wire hook (always lead in from the chain
box side) and pull chain with wire hook into the chain pocket. 3. Allow chain to be fed in using inching control on push button (figure 14.2). 4. Attach rubber limit stop and load hook onto the other chain end (figure 14.3). 5. Lower load hook to the lowest position. 6. Press the rubber washers, included in delivery, onto the chain. 7. Fix lift limiter* onto the 3rd link after the chain end (see figure 14.4). 8. Mount chain box as described in 3.1.5 and 3.1.5.1. 9. Lubricate chain well and let it run into the chain bag. Let the dead end of chain run into the chain bag by pressing the up button and using the hoist motor to prevent knots inside the chain collector.
*Lift limiter The lift limiter is deigned to prevent the dead end of chain running out of the hoist. It is used in emergency and cannot be used regularly as a lower limit switch. For safe operation the rubber washer under the dead end stop can�t possibly do that worn or lost.
not suitable for single bolt trolleys
free end of the strainer strap
11
figure 14: Fitting the load chain in single-fall version (except version 6.1, 8.1 and 9.1)
3.1.7 Fitting the load chain (for version 6.1, 8.1 and 9.1) - single-fall version �
A short piece of chain is already fitted in these models by the manufacturer. 1. Always hang the connecting piece, included in the delivery, into the inserted chain fitted by the manufacturer on
the chain box side and then attach the load chain to be drawn in. Continue as described in 3.1.6. Caution! When changing the load chain and converting to other numbers of falls in versions 6.1, 8.1
and 9.1, never allow the chain to come out of the casing completely, always pull in new chain or a short piece of chain with the connecting piece. (pay attention to section 3.1.9). After having mounted the new load chain remove the short piece of chain and connecting piece (see section 3.1.9 ).
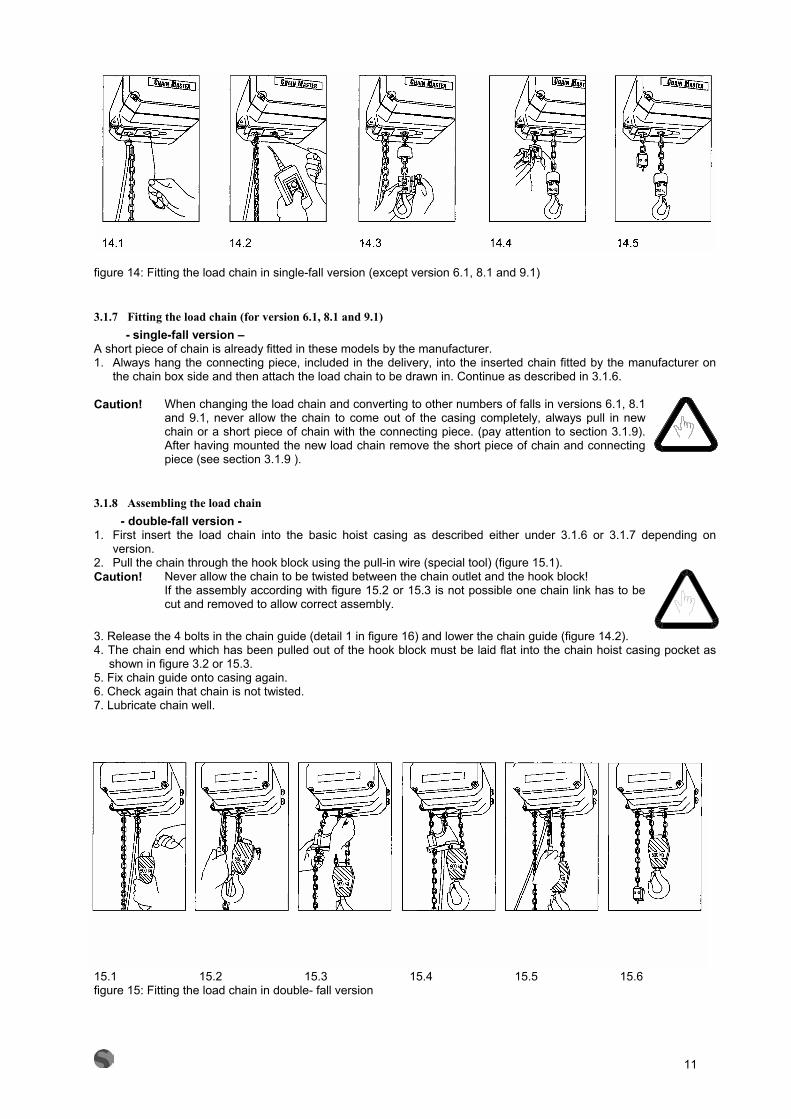
3.1.8 Assembling the load chain - double-fall version - 1. First insert the load chain into the basic hoist casing as described either under 3.1.6 or 3.1.7 depending on
version. 2. Pull the chain through the hook block using the pull-in wire (special tool) (figure 15.1). Caution! Never allow the chain to be twisted between the chain outlet and the hook block!
If the assembly according with figure 15.2 or 15.3 is not possible one chain link has to be cut and removed to allow correct assembly.
3. Release the 4 bolts in the chain guide (detail 1 in figure 16) and lower the chain guide (figure 14.2). 4. The chain end which has been pulled out of the hook block must be laid flat into the chain hoist casing pocket as
shown in figure 3.2 or 15.3. 5. Fix chain guide onto casing again. 6. Check again that chain is not twisted. 7. Lubricate chain well.
15.1 15.2 15.3 15.4 15.5 15.6 figure 15: Fitting the load chain in double- fall version

12
3.1.9 Replacing the load chain and hold-down The chain guide and the hold-down must also be changed when load chain is being replaced.
1. Let worn chain move out 2. Loosen 4 bolts (1) 3. Take out chain guide (2) 4. Press hold down (3), using the screwdriver (arrow in picture
16) 5. When inserting the new hold down (3) ,take care that the
chamfered end shows in the direction of the chain box 6. Push in chain guide and screw tight 7. Fit new chain in single- fall designs as described in the
preceding section figure 16: Replacing the load chain, the chain guide and the
hold-down
Caution! In the case of designs 6.1and 8.1 the clutch must be relieved of stress by loosening the pressure nut 8 shown in figure 2 before carrying out this work. This must be set in position again as in figure 8.3 after replacing the hold-down. For version 9.1 the clutch of the slow speed motor must be relieved of stress only (figure 28 part 9. The chain has to be assembled by using the slow speed only.
3.1.10 Electric chain hoists in upside down mode Electric chain hoists except versions 1-1.3 can be delivered for upside down use. It is possible to convert the hoist to this mode of use after having bought it. The necessary parts can be supplied by the producer. If the hoist is used in upside down mode in open air prevent rain water from going in the chain outlet. The producer can prepare the hoist specially to prevent this.
figure 17: Electric chain hoist in upside down mode
special part to reverse the dead end of chain
Caution! User information in accordance with 292-2 section 5 If the hoist is used upside down the load fall and the dead end of chain is showing to the top. For safe use both chain falls have to be kept tighten at all times. If not taken care of this advise, the hoist and the chain can be destroyed which can produce dangerous situations.
3.2 Electric connections After having completed the installation check in accordance with the European Regulations EN 60 204�1(20.2 and 20.3) or your national regulations. Details on this control can be seen in the wiring diagram. The electric installation complies with the currently valid DIN VDE 0100, section 726.
3.2.1 Mains connection The mains current supply (main incoming line conductor) must be disconnected at all poles by means of a mains switch (in accordance with EN 60 204-1 section 5.3). Work on the electric installation may only be carried out by trained specialists and equipment must first be disconnected from the current supply.

13
Fuses (sluggish) at 400 V (3 phase) in front of mains switch:
Check if the mains voltage agrees with that specified on the rating plate. Connect mains current supply lines and control line in accordance with wiring diagram. The L1, L2, L3 and PE terminals for the mains connection are located under the gear cap. Line 3 + PE (minimum cross section 1,5 mm2) are necessary for the connection.
After connecting, press button for lift. If the load moves downwards, interchange the L1 and L3 supply cores. (disconnect mains supply before!). Fuses (sluggish) at 230 V (single phase) in front of mains switch:
Check if the mains voltage agrees with that specified on the rating plate. Connect mains current supply lines and control line in accordance with wiring diagram. The L1, N and PE terminals for the mains connection are located under the gear cap. Lines 2 + PE (minimum cross section 2,5 mm2) are necessary for the connection.
After connecting, press button for lift. If the load moves downwards, interchange the L and N supply cores. (disconnect mains supply before!).
If the control unit is equiped with an emergency stop (DIN VDE 100, part 726, point 8.2) you will find this button on your control pendant.
In accordance with European Regulations the mains switch has to be installed in addition to the emergency stop, has to be turned off after daily operation.
Control occurs in the control circuit which receives 24 Volts through a safety transformer. This safety transformer can also be used for other primary voltages (reserve the terminal connections). Other secondary voltages are possible. If the control is fitted out with an �emergency stop� in accordance with DIN VDE 0100 section 726 point 8.2, a main contactor is also located in the switching area and the �emergency stop� button is on the control pendant.
Fuse (sluggish) Motor output for example for version 4A max. 0,5 kW 1 / 1.1 / 1.3 6A max. 1,0 kW 2 / 3 / 4 / 4.1
10A max. 4,0 kW 4.2 / 5 / 5.1 / 6 / 6.1 / 7 / 7.1 / 7.2 / 8.1 / 9.1
Fuses (sluggish) Motor output for example for version 6A max. 0,5 kW 1AK / 1.1AK / 1.1AK1 10A max. 1,0 kW 2AK / 2AK1 / 3AK 16A max. 2,0 kW 5AK
table 1:
table 2

14
3.2.2 230 V 1-phase current 50 Hz The 230 V single phase 50 Hz version is provided with a single- phase asynchronous motor with starting capacitor. The starting capacitor is switched off by a relay. Details of control can be found in the wiring diagram.
3.2.3 Electric limit switch for lift limitation On request the electric chain hoists with low voltage control can be fitted out with electric limit switches to limit the highest and lowest load positions. These switches may not be used as operation limit switches. Please make sure during first operation that the lifting direction shown on the pendant control agrees to the real hoist movements as this is absolutely necessary for the safe operation of the limit switches. (see 3.2.1).
3.2.4 Changing the operating voltage from 400 V to 230 V (3-phase current) Multi-voltage motors have been connected to 400 V by the manufacturer unless a different voltage was ordered specifically. The following work is required for changing the operating voltage: Direct and contactor control Contactor control version Motor D.C. brake Transformer for
control current 1/1.1/2/4/ 4.1/4.2/6/ 6.1/8.1 1 lifting speed
U V W XYZ
from 400 V Y
U Z V X W Y
to 230 V ∆
in the 380 � 415 Volts version the magnetic coil is supplied with D.C. voltage from a half wave rectifier circuit. In the 230 Volts version the connection at the rectifier unit is to change from 2-4 to 3-4 (bridge connected rectifier)
if there are 6 motor lines, changing voltage is impossible
1.3/3/5/5.1/ 7/7.1/7.2/9.1 2 lifting speeds if there 12 motor lines, changing
according to wiring diagram For hoists in direct control the brake contactor K8 (230 Volts) has to be changed.
Primary from 400 Volts to 230 Volts
table 3 The electric chain hoists with one lifting speed are suitable for operation with a voltage of 380 - 415 Volt (3 phases).
15
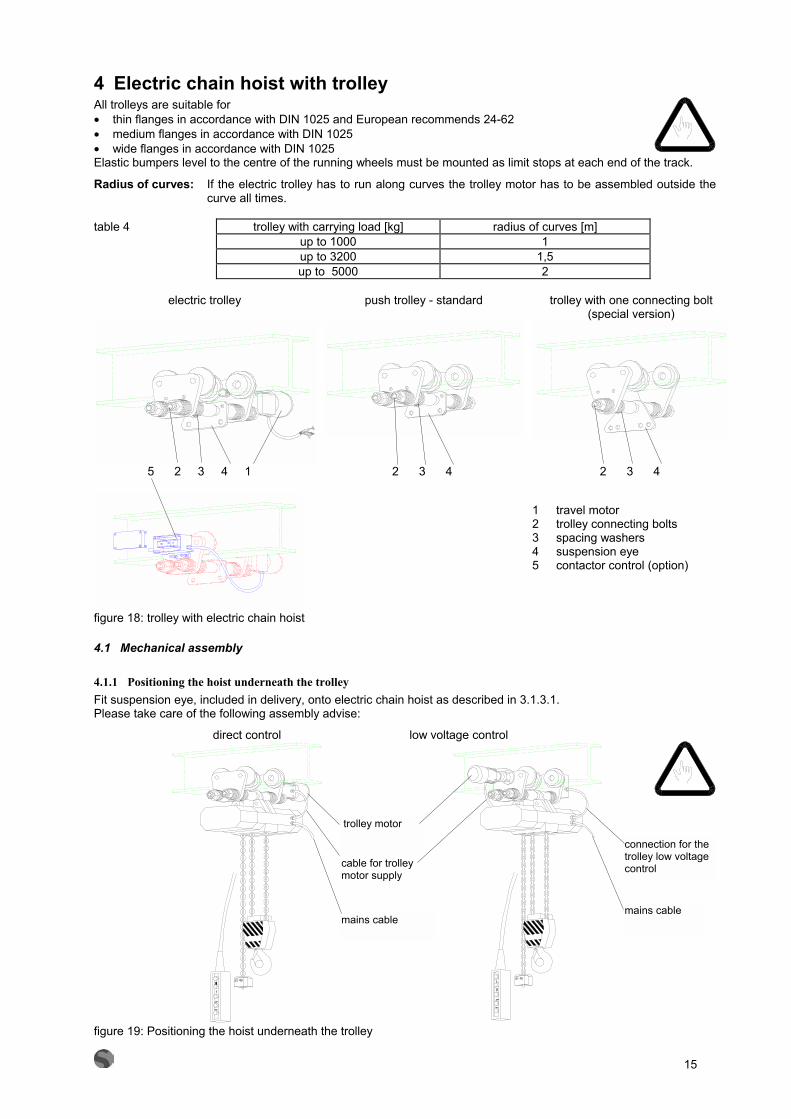
4 Electric chain hoist with trolley All trolleys are suitable for • thin flanges in accordance with DIN 1025 and European recommends 24-62 • medium flanges in accordance with DIN 1025 • wide flanges in accordance with DIN 1025 Elastic bumpers level to the centre of the running wheels must be mounted as limit stops at each end of the track.
Radius of curves: If the electric trolley has to run along curves the trolley motor has to be assembled outside the curve all times.
table 4 trolley with carrying load [kg] radius of curves [m] up to 1000 1 up to 3200 1,5 up to 5000 2
electric trolley push trolley - standard trolley with one connecting bolt (special version)
5 2 3 4 1 2 3 4 2 3 4
1 travel motor 2 trolley connecting bolts 3 spacing washers 4 suspension eye 5 contactor control (option)
figure 18: trolley with electric chain hoist
4.1 Mechanical assembly
4.1.1 Positioning the hoist underneath the trolley Fit suspension eye, included in delivery, onto electric chain hoist as described in 3.1.3.1. Please take care of the following assembly advise:
direct control low voltage control
figure 19: Positioning the hoist underneath the trolley
cable for trolley motor supply
mains cablemains cable
connection for the trolley low voltage control
trolley motor

16
4.1.2 Assembly of a trolley with two connecting bolts The two trolley connecting bolts are to be fixed to the lateral boards so as to allow a clearance of one to two millimetres between the running wheel flange and the girder flange. The width is adjusted by inserting spacing washers symmetrically. The suspension eye is mounted between the spacing bushes on the trolley connecting bolts.
Tighten the nylock nuts with a torque wrench.
Table 5 nylock nut in accordance to DIN 985 torque M16x1,5 75 Nm M22x1,5 150 Nm M36x1,5 560 Nm
Movement in the directions shown by the arrows in figure 23 must still be possible between the hoist and the trolley when assembly is complete.
figure 20: Flexibility between chain hoist and trolley
Caution! The type of suspension eye employed depends on the respective chain hoist type and trolley type (girder flange width). When retrofitting a trolley to an electric chain hoist, the suspension eye must be selected in accordance with table 6 or table 8.
4.1.3 Assembly of a trolley with one connecting bolt The one trolley connecting bolt is to be fixed to the lateral boards so as to allow a clearance of one to two millimetres between the running wheel flange and the girder flange. The width is adjusted by inserting spacing washers symmetrically. Tighten the nylock nuts with a torque wrench. It is to heed, that the spacing bushes might not be braced! Tighten the nylock nuts with a torque wrench (see table 5).
4.2 Electric trolleys with reaction wheels instead of counterweight If electric trolleys, especially with double speed, are used on girders with a very small width it may be necessary to provide a device which prevents tipping up of the trolley. This unit can be retrofitted to each trolley. This kit doesn�t influence any features of a standard trolley but cannot be used if the beam is equipped with connection plates welded under the beam. It is possible to travel through similar curves as was possible before mounting the reaction wheels.
figure 21: Counterwheel for electric
trolley Assembly guide: • The unit has to be fitted in threaded holes at all the side-plates with screws M8x20. • The counter-wheel has to be adjusted that it touches the bottom of the girder. • The screws which adjust the counter-wheel to be tightened to a torque of 4 kpm. • To check the behaviour the trolley it should be travelled along the whole beam once. • The low voltage control box (if required) has to be assembled to the other side of the trolley as usual with two
screws M8x20
4.3 Electric connection of electric trolleys Direct control An electric cable which is approx. 0.5 m long is located on the travel motor of the electric trolley for connecting to the electric chain hoist. The terminals are in the electric chain hoist casing. Connection should be carried out as shown in wiring diagram. The control pendant has push buttons for controlling the travel motion. The motorized trolley for fast and precision travelling speed rates has push buttons with step switching.
Low voltage control 24 V The contactors for switching the trolley motor are located in a special
figure 22: Hoisting gear with motorized trolley
contactor box. Mount the contactor box on the two trolley bolts at the motor free end of the trolley using castle nuts. The contactor box must be assembled with two screws M8x16 DIN 912 on the side-plate without motor. Connect the two leads protruding from the contactor box to the terminal section and to the trolley motor as shown in wiring diagram. After electric connection, check that the electric chain hoist and trolley function correctly.

17
4.4 Technical data for trolleys with two suspension bolts Push trolley type Motorized trolley type Load Girder width/ Suspension eye / for
version / for
version / travelling
speed [m/min] capacity
[kg] Setting range
[mm] type
EFN / B1-3 / 16 HFN / B 1-3 EFN / B1-3 / 25 50-106 EFN / B1-3 / 5+20 500 500 EFS1 / B1-3 / 16 N,S1 N,S1 HFS1 / B 1-3 EFS1 / B1-3 / 25 500 110-200 B 1,1.1,1.3 B 2,3 EFS1 / B1-3 / 5+20 EFS2 / B1-3 / 16 500 500 HFS2 / B 1-3 EFS2 / B1-3 / 25 210-300 S2 S2 EFS2 / B1-3 / 5+20 B 1,1.1,1.3 B 2,3 EFN / B4+5 / 16 1000 HFN / B 4+5 EFN / B4+5 / 25 66-135 N EFN / B4+5 / 5+20 B 4,5 EFS1 / B4+5 / 16 1000 HFS1 / B 4+5 EFS1 / B4+5 / 25 1000 137-215 S1 EFS1 / B4+5 / 5+20 B 4,5 EFS2 / B4+5 / 16 1000 HFS2 / B 4+5 EFS2 / B4+5 / 25 220-300 S2 EFS2 / B4.1-5.1 / 5+20 B 4,5 EFN / B4.1-5.1 / 16 2000 HFN / B 4.1-5.1 EFN / B4.1-5.1 / 25 66-135 N EFN / B4.1-5.1 / 5+20 B 4.1,4.2,5.1 EFS1 / B4.1-5.1 / 16 2000 HFS1 / B 4.1-5.1 EFS1 / B4.1-5.1 / 25 2000 137-215 S1 EFS1 / B4.1-5.1 / 5+20 B 4.1,4.2,5.1 EFS2 / B4.1-5.1 / 16 2000 HFS2 / B 4.1-5.1 EFS2 / B4.1-5.1 / 25 220-300 S2 EFS2 / B4.1-5.1 / 5+20 B 4.1,4.2,5.1 EFN / B6+7 / 8 2000 EFN / B6+7 / 12 82-155 N HFN / B 6+7 EFN / B6+7 / 5+20 B 6,7,7.2 EFS1 / B6+7 / 8 2000 EFS1 / B6+7 / 12 137-215 S1 HFS1 / B 6+7 EFS1 / B6+7 / 5+20
2000
B 6,7,7.2 HFS2
/
B 6+7
EFS2
/
B6+7
/
5+20
220-300
2000 S2 B 6,7,7.2
EFN / B6.1+7.1 / 8 3200 EFN / B6.1+7.1 / 12 82-155 N HFN / B 6.1+7.1 EFN / B6.1+7.1 / 5+20 B 6.1,7.1 EFS1 / B6.1+7.1 / 8 3200 3200 EFS1 / B6.1+7.1 / 12 137-215 S1 HFS1 / B 6.1+7.1 EFS1 / B6.1+7.1 / 5+20 B 6.1,7.1 HFS2
/
B 6.1+7.1
EFS2
/
B6.1+7.1
/
5+20
220-300
3200 S2 B 6.1,7.1
HAN / B 8.1-9.1 EFN / B8.1-9.1 / 3,5+16 90-155 5000
HAS1 / B 8.1-9.1 EFS1 / B8.1-9.1 / 3,5+16 160-226 N,S1 B 8.1,9.1
HAS2
/
B 8.1-9.1
EFS2
/
B8.1-9.1
/
3,5+16
5000 240-310
5000 S2 B 8.1,9.1
table 6: Technical data for selecting trolleys for electric chain hoists
Explanation of trolley type designation Trolleys with two suspension bolts: HFN / B1-3 EFS1 / B1-3 / 16 EFS2 / B6+7 / 5+20 HF- push trolley girder can be travelling speed EF- motorized trolley width used for for motorized HA- winding trolley N,S1,S2 version trolley

18
4.5 Technical data for trolleys with one suspension bolt
Push trolley type
Motorized trolley travelling speed
[m/min]
load capacity
[kg]
Girder width
[mm] EEFN 1000 / 16 EEFN 1000 / 25 EEFN 1000 / 5+20 EHFN 1000
EEFN 1000 / 7,5+30
66-135
EEFS1 1000 / 16 EEFS1 1000 / 25 EEFS1 1000 / 5+20 EHFS1 1000
EEFS1 1000 / 7,5+30
137-215
EEFS2 1000 / 16 EEFS2 1000 / 25 EEFS2 1000 / 5+20 EHFS2 1000
EEFS2 1000 / 7,5+30
1000
220-300
EEFN 2000 / 16 EEFN 2000 / 25 EEFN 2000 / 5+20 EHFN 2000
EEFN 2000 / 7,5+30
66-135
EEFS1 2000 / 16 EEFS1 2000 / 25 EEFS1 2000 / 5+20 EHFS1 2000
EEFS1 2000 / 7,5+30
137-215
EEFS2 2000 / 16 EEFS2 2000 / 25 EEFS2 2000 / 5+20 EHFS2 2000
EEFS2 2000 / 7,5+30
2000
220-300
EEFN 3200 / 5+20 EHFN 3200 EEFN 3200 / 7,5+30 82-155
EEFS1 3200 / 5+20 EHFS1 3200 EEFS1 3200 / 7,5+30 137-215
EEFS2 3200 / 5+20 EHFS2 3200 EEFS2 3200 / 7,5+30
3200
220-300
EHFN 5000 EEFN 5000 / 3,5+16 82-155 EHFS1 5000 EEFS1 5000 / 5+20 5000 137-215 EHFS2 5000 EEFS2 5000 / 5+20 220-300 table 7: Technical data for selecting trolleys Explanation of trolley type designation trolleys with one suspension bolt: EHFN / 1000 EEFS1 / 3200 / 7,5+30 EHF- push trolley girder load travelling speed with one suspension bolt width capacity for motorized EEF- motorized trolley N,S1,S2 [kg] trolley with one suspension bolt
19
5 Tests Use of the electric chain hoist is possible in accordance with: accident prevention regulations for • Windlasses, lifting and pulling equipment VBG 8 • Cranes VBG 9
5.1 Test when used according to VBG 8, section 23 The equipment must be tested by a trained specialist before starting operation for the first time and after extensive alterations.
5.2 Test when used according to VBG 9, section 25 The cranes must be tested by an expert before starting operation for the first time and after extensive alterations. The electric chain hoists are type tested.
5.3 Regular tests • The equipment, cranes and supporting structures must be tested by a trained specialist once a year. It may be
necessary to carry out tests more often if the operating conditions are very demanding, that means for example high percentage of use with full load, dusty or aggressive environment, high duty rate, high number of operation cycles.
• Only experts appointed by the trade associations and experts from the Technical Control Association are considered qualified to test cranes.
• Trained specialists are highly-qualified specialist personnel or the manufacturer�s after-sales assemblers.
6 Operation • The load may only then be moved if it is slung securely and no person is standing near enough to be
at risk and when the operator has received an all clear signal from the person slinging the load (VBG 8, section 29.1, paragraph 1).
• The load must be placed vertically under the electric hoist before lifting. • The motion directions are indicated with symbols on the control buttons. • Do not turn the chain over edges. • Only the load, the hook block or hook tackle may be pulled to move an electric chain hoist with
manual travelling gear. • Consult the manufacturer or supplier, if the hoist is to be used in aggressive environment (for
instance acid or alkaline or dusty environment or to transport inflammable or other dangerous loads). • Don�t lower the double fall hook if the chain gets slack. • Repairwork has to be done only if mains supply is switched off and no load is suspended on the
hook. • After switching off the emergency stop the reason for this failure has to be found out by trained
people and the hoist can only be used if all possible failures are removed. • Lifting the load from the ground has to be done with the lowest possible speed. Before doing this
slack sling chains or ropes have to be tightened carefully.
6.1 Prohibitions on use • Inching mode • Permanent run against the rubber washers of the lowest and highest hook position or lifting
loads with bigger weight as marked on the specification plate • Transporting people • Using the hoist with people being underneath the load • Starting initial operation before an expert or a trained specialist has inspected the equipment. • Moving loads heavier than the nominal load • Pulling loads which are tilted or dragging loads • Tearing off loads • Removing the cover of vessels under vacuum • Moving trolley by pulling control pendant or control cable, even if these are relieved of strain • Carrying out repairs without disconnecting the current supply and without special knowledge • Use of hoists with worn rubber elements or without rubber washer on hook tackle, hook block or lift
limiter • Using the lifting chain to sling the loads • Using the lifting chain longer than that stated under the chain bag (see 3.1.3 and 3.1.3.1) • Using the hoist with higher duty rate as marked on the specification plate • Using the hoist without having done the regular inspection

20
7 Maintenance • All maintenance work must be carried out by trained specialists • The maintenance table 9 lists the parts and functions to be tested and the necessary maintenance
work. Defects must be rectified immediately by a trained specialist • Maintenance work may only be carried out if the electric chain hoist is not loaded and the mains is
switched off so that the current supply is disconnected • Shorten the periods between maintenance work in very demanding operating conditions, e.g. multi-
shift operation, high number of switching actuation, poor environmental conditions
Checking for wear • Check suspension hook and load hook for deformation (measure grain spacing) and cracks • The chain sprocket in the hook block must be replaced if the running surface is worn by about 1 mm • Replace rubber bumper if worn!
7.1 Maintenance and checks in accordance with maintenance table note point 1.2 too! If the hoist is working hard (two or three shifts, high percentage of work with nominal load, dusty or high temperature environment) this maintenance work has to be done more frequently.
check daily 3 month yearly visual check of the whole equipment !
function check of the brake !
of the lift limiter !
maintenance or adjustment of the brake ! of the clutch ! wear of the load chain (point 8.4) !
lubrication of the load chain !
wear of the rubber elements (eye check) !
lubrication of single and double fall hooks, pressure bearing and wheel bearings check condition of safety latch and of the pin which prevent the hook nut from loosening
!
universal checks of all screws ! hold down, chain guide ! safety devices ! check of the condition and safe positioning of the chain bag and condition of the canvas material as well
!
check of the electrical cable, power cable and pendant control ! check of the trolleys and wheels ! table 8
The electric chain hoist is designed in accordance with FEM 9.511. If the hoist is used under the conditions of FEM 9.511, including the described frequency of maintenance work, the electric chain hoist must be overhauled after 10 years.
21
7.2 Maintenance and adjustment of the D.C. disk brake The D.C. disk brake needs very little maintenance.
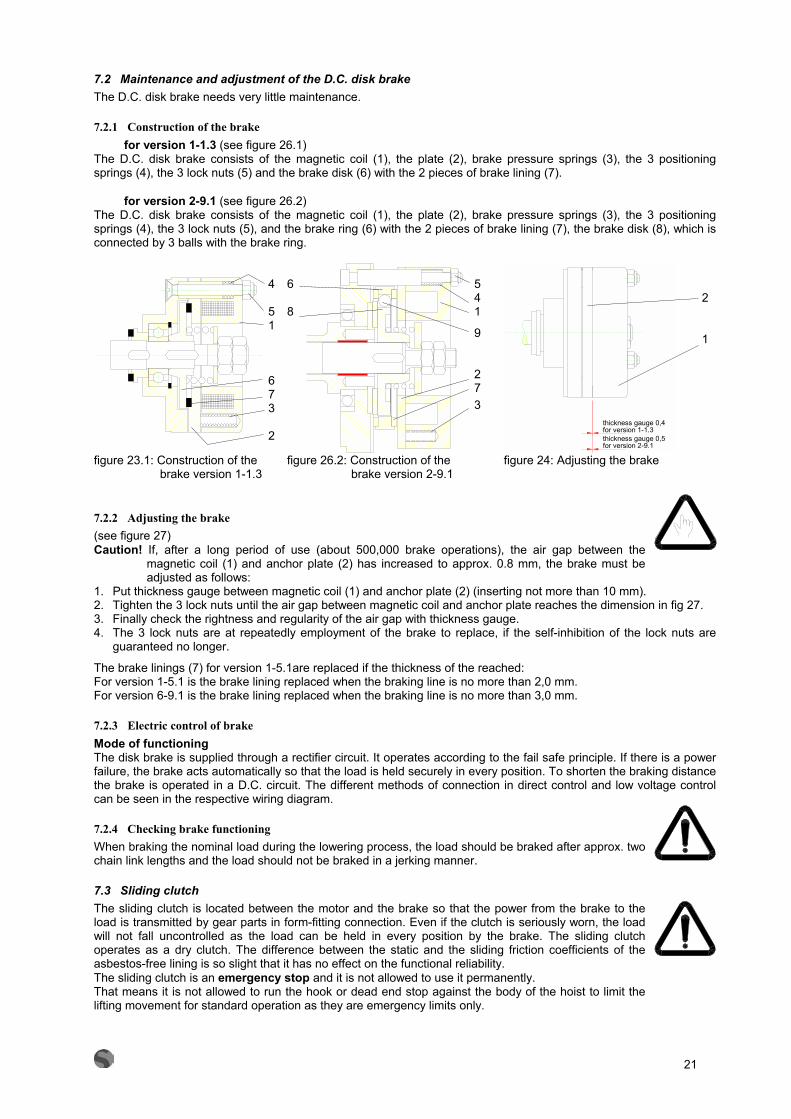
7.2.1 Construction of the brake for version 1-1.3 (see figure 26.1) The D.C. disk brake consists of the magnetic coil (1), the plate (2), brake pressure springs (3), the 3 positioning springs (4), the 3 lock nuts (5) and the brake disk (6) with the 2 pieces of brake lining (7). for version 2-9.1 (see figure 26.2) The D.C. disk brake consists of the magnetic coil (1), the plate (2), brake pressure springs (3), the 3 positioning springs (4), the 3 lock nuts (5), and the brake ring (6) with the 2 pieces of brake lining (7), the brake disk (8), which is connected by 3 balls with the brake ring.
4 5 1 6 7 3 2
6 8
5 4 1
9
2 7
3 for version 1-1.3
for version 2-9.1
thickness gauge 0,4
thickness gauge 0,5
2 1
figure 23.1: Construction of the brake version 1-1.3
figure 26.2: Construction of the brake version 2-9.1
figure 24: Adjusting the brake
7.2.2 Adjusting the brake (see figure 27) Caution! If, after a long period of use (about 500,000 brake operations), the air gap between the
magnetic coil (1) and anchor plate (2) has increased to approx. 0.8 mm, the brake must be adjusted as follows:
1. Put thickness gauge between magnetic coil (1) and anchor plate (2) (inserting not more than 10 mm). 2. Tighten the 3 lock nuts until the air gap between magnetic coil and anchor plate reaches the dimension in fig 27. 3. Finally check the rightness and regularity of the air gap with thickness gauge. 4. The 3 lock nuts are at repeatedly employment of the brake to replace, if the self-inhibition of the lock nuts are
guaranteed no longer.
The brake linings (7) for version 1-5.1are replaced if the thickness of the reached: For version 1-5.1 is the brake lining replaced when the braking line is no more than 2,0 mm. For version 6-9.1 is the brake lining replaced when the braking line is no more than 3,0 mm.
7.2.3 Electric control of brake Mode of functioning The disk brake is supplied through a rectifier circuit. It operates according to the fail safe principle. If there is a power failure, the brake acts automatically so that the load is held securely in every position. To shorten the braking distance the brake is operated in a D.C. circuit. The different methods of connection in direct control and low voltage control can be seen in the respective wiring diagram.
7.2.4 Checking brake functioning When braking the nominal load during the lowering process, the load should be braked after approx. two chain link lengths and the load should not be braked in a jerking manner.
7.3 Sliding clutch The sliding clutch is located between the motor and the brake so that the power from the brake to the load is transmitted by gear parts in form-fitting connection. Even if the clutch is seriously worn, the load will not fall uncontrolled as the load can be held in every position by the brake. The sliding clutch operates as a dry clutch. The difference between the static and the sliding friction coefficients of the asbestos-free lining is so slight that it has no effect on the functional reliability. The sliding clutch is an emergency stop and it is not allowed to use it permanently. That means it is not allowed to run the hook or dead end stop against the body of the hoist to limit the lifting movement for standard operation as they are emergency limits only.

22
7.3.1 Construction of the sliding clutch The rotor (17) is tightly connected with the hollow shaft (11). The hollow shaft (11) is mounted with the bearing bushes, which do not require lubrication or maintenance, on the motor pinion shaft (10). The motor power is transmitted through the hollow shaft (11) with the coupling flange (12), through the asbestos- free clutch lining (13) to the brake hub (8). The brake hub (8) is rigidly connected with the motor pinion shaft (10) by means of a feather key (18) so that the driving force is conducted into the gear. The clutch torque for transmitting the force is set externally with the adjusting nut (16) on the spring collar (14) through the compression spring (15).
figure 25: Mode of functioning of the sliding clutch for
version 2-9.1 Caution! The sliding clutch of the versions 1-1.3 and the slow speed motor of the version 9.1 are
located at each side of the rotor. Note: Test load = nominal load (in regular testing) If the load is measured with a compression spring tool, the load value reading for setting the sliding clutch is 10 to 25 % higher.
7.3.2 Construction of the sliding clutch of the version 9.1 slow speed motor The rotor (1) is mounted with two bearing bushes (4), which do not require lubrication or maintenance on the motor pinion shaft (2). The torque of the motor is transmitted through the two clutch linings (5) on the clutch hub (6) which is rigidly connected with the pinion shaft (2) by means of feather keys (7). The clutch torque can be set externally with the adjusting nut on the spring collar (8) through the compression spring (10). 9 10 11 7 1
12 8 6 5 4 2 3
figure 26: Construction of the sliding clutch of the version 9.1 slow speed motor
7.3.3 Adjusting the clutch 1. Turn the pressure nut with the welded-on spring collar (14) until the
lock washer groove is in line with the magnet groove (1). 2. Insert a bar (screwdriver) into the magnet groove (1) and hold the
spring collar (14) in place with the pressure nut. Then loosen the lock nut (16).
3. Tighten the compression spring (15) with the pressure nut (14) sensitively to exactly the point where the test load is raised.
4. Secure the pressure nut (14) again with the lock nut (16). 5. Test the clutch setting once more by raising the nominal load to the
uppermost load position and letting clutch slip. The clutch should not slip for longer than 2 - 3 seconds.
figure 27: Adjusting nut for clutch power
1 14 16

23
7.3.4 Adjusting the clutch on the slow speed motor of the version 9.1 (details relate to figure 30) 1. Remove the screws (11) and the cap (12) and the spring plate of the limit switch for lifting movement underneath
the hoist body. 2. Loosen the lock nut (9). 3. Tighten or loosen the compression nut (8) sensitively to exactly that point where the test load is just raised. 4. Secure the pressure nut (8) with the lock nut (9). 5. Test the setting once again by raising the nominal load to the uppermost position and letting clutch slip. The clutch
should not slip for longer than two to three seconds. 6. Mount the cap (12) and the limit switch spring plate again. 7.4 Load chain Hoist chains are means of carrying which require official approval. It is, therefore, important to observe the guidelines issued by the trade association�s centre for accident prevention with regard to round steel chains in hoisting operation, the guidelines for general inspection and test specifications in accordance with DIN 685, section 5, Nov 1981, the accident prevention regulations in VBG 8 of April 1980/1990 and in VBG 9 of December 1979 / April 1983 or equivalent regulations in the country in question.
7.4.1 Lubricating the load chain before starting and during operation The links along the entire length of the load chain must be lubricated with a penetrating gear lubricant oil before starting operation for the first time and during unloaded operation. Subsequent lubrication, whereby the links must be cleaned first, depends on the degree of use and the operating conditions. A dry-film lubricant, e.g. lubricating varnish, graphite powder, should be used when ambient influences are conducive to wear (sand, emery).
7.4.2 Testing wear in the load chain The continuous monitoring of the load chain is compulsory according to DIN 685 section 5 and the accident prevention regulations in VBG 8 section 27. The load chain must be tested before starting operation and after approx. 200 operating hours or 10,000 load cycles under normal conditions or more often under demanding and severe conditions.
Testing must cover checking links, particularly at their points of contact, for wear, cracks, deformation and other damages.
The chain must be replaced: • if the nominal thickness at the points of contact is reduced by 10%, • if the chain or a link is elongated by 5 %, or an eleven links piece of chain is elongated by 2% • if the links are rigid
The chain guide and hold-down must also be replaced with the chain. Caution! Replacement of chain can only be filled if obtained from the manufacturer or his approved
service agent.
7.4.3 Measuring wear and replacing chain
See the points 3.1.6 and following for how to change the chain

24
7.5 Maintenance work on trolley The checks and maintenance work on the motorized trolley and push trolley have to be done in accordance with table 8 of point 7.1.
7.5.1 Construction of the brake of a trolley with a single travelling speed
3 pieces screws M3x8 DIN 912 at a circle diameter of 58 mm motor pinion shaft
Figure 28: Construction of the brake BFK 04 for trolleys with a single travelling speed The BFK 04 brake operates absolute maintenance free.
7.5.2 Adjustment of air gap for trolleys with double travelling speeds If the brake linings are worn such that the air gap is about 0,9 mm it is necessary to adjust them. 1. Dismantle cover (1). 2. Loosen fan screws (2). 3. Remove rubber gasket (3) and put a thickness gauge 0,25 mm
between plate (4) and anti- sticking plate (5). 4. Tighten screw (6) so far that you can remove the thickness gauge
easily. 5. Tighten fan screws (2) symmetrically. Tighten first the screws opposite
the key (torque 4-5,5 Nm). 6. Tighten screws (6) again. 7. Remove thickness gauge. 8. Assemble fan cover (1). 9. Watch the test run of the trolley.
3 1 2 6 4 5
figure 29: Construction of the brake of a double speed trolley

25
8 Duty rate of an electric chain hoist The duty rate and the number of operating cycles in one hour must not be higher than as shown on the specification plate of the hoist or in a technical data table. (European regulation FEM 9.682). The duty rate, expressed as the cyclic duration factor (c.d.f.) is the ratio of running time to running time + period of rest formula: c.d.f. running time x 100%
running time + period of rest=
1 lifting cycle lifting break time lowering break time time [min]
The duty rate is limited by the permissible degree of heat in the lifting motor. The running time is dependent on the necessary lifting height, lifting speed of the electric chain hoist and the number of lifting motions required for a particular transport procedure (unloading trucks, feeding machines). It is difficult in practice to take note of the duty rate during the lifting operation. We, therefore, give the following practical guidelines:
8.1 Short- time duty table 9: Permissible operating period without cooling interval when operation starts and with a motor temperature of approx. 20° C.
8.2 Intermittent duty table 10: Operation must be interrupted whenever the highest permissible operating time is reached. The following breaks are necessary depending on the c.d.f. of the hoist:
c.d.f. driving gear group
DIN 5684 part 3
operating period [min]
c.d.f. [duty rate %]
breake [min]
25 % 1 Bm 20 15 % 5times running time 40 % 2m 40 20 % 4times running time
25 % 3times running time 30 % 2,5times running time 40 % 1,5times running time 50 % 1times running time
This duty type is not permissible for the slower speed of precision hoisting motors. After having reached the maximum running time a break is required and the hoist can be continued to be used in intermittent duty mode. 60 % 0,66times running time
8.3 Example The electric chain hoist type 500/1-10 is to lift loads of 500 kg to a height of 5 m. Performance data: Carrying load 500 kg Lifting speed 10 m/min Uninterrupted duty 40 % On starting the work of unloading the vehicle, the electric chain hoist has a cold temperature of approx. 20 °C.
c.d.f. 5 m lifting + 5 m lowering10 m / min lifting speed
= = 1 min
Approx. 40 minutes operation without break is possible. This covers 40 lifting cycles x 500 kg carrying load = 20.000 kg goods can be transported. After 40 minutes of running time, 1.5 minutes break for each minute of operating time must be taken (i.e. 1.5 times the operating time). This break is usually necessary for slinging and taking off loads. Caution! Cooling periods are imperative for extreme lifting heights (from 10 metres on). Precision lifting should only be used for precise lowering and lifting. It is not suitable when greater lifting heights are involved. Option! To protect the lifting motor a thermal overload device is offered as an option (24 Volts low
voltage control is required!).
liftin
g he
ight
[m]
26
9 Duty rate of a motorized trolley If the hoist is equipped with an electric trolley the operators have to take care of the duty rating of the trolley as well. motorized trolley type
duty rate running time [min]
trolleys with a single speed
40 % 40
trolley with a double speeds
40/20% 40*
*The ratings are relevant for the fast travelling speed
table 11: duty rate for electric trolley 10 Strainer clamp for the control cable
The strainer clamp must be fixed in such a way as to prevent any tensile forces affecting the control cable. Pulling the chain hoist at the control pendant by means of the strainer clamp is not permitted. figure 30: Assembly of the strainer clamp
11 Lubrication
11.1 Lubrication of the gear The gear is filled with oil already by the manufacturer. The oil must be changed if the hoist is going to be overhauled. The oil has to be disposed in accordance of the law of environment protection. Use oil for an operative range from - 10° to + 50° C and 220 mm2/s at 40° C. amount of oil:
version (basic type) Amount [litre] 1 / 1.1 / 1.3 0,2
2 / 3 / 4 / 4.1 / 4.2 / 5 / 5.1 0,25 6 / 6.1 / 7 / 7.1 / 7.2 / 8.1 / 9.1 0,5 table 12
Alternative oils are: Supplier oil type Castrol Alpha Zn 100 ESSO EP 100 Mobil Mobilgard 627 Shell Melina Oel 30
Gadinia 40 ELF Reduktelf SP 100 BP XP 100
BP Energol GR table 13
11.2 Lubrication of the hook block and hook tackle Lubricate the anti-friction bearings on the hook and the chain sprocket after approx. 20,000 lifting cycles or a year, if in heavy use shorten the interval, use a special anti- friction bearing grease.
11.3 Lubrication of the trolleys The geared wheels of the electric trolley have to be lubricated by grease once a year or after 10,000 driving cycles, if in heavy use the interval has to be shortened.
12 Disposal After the hoist or its components are taken finally out of operation the parts have to be disposed in accordance to the laws of environment protection. Metals, rubber, plastics have to be disposed or recycled separately.
27
The advice contained within this
manual should only be implemented by the appropriate skilled and qualified operators of industrial hoists. Further information for other fields of operation are not considered herewith. If changes to the normal operations are discovered (such as unusual noise, vibrations, higher input current or frequently blowing fuses) the hoist has to should be taken out of operation and the load area has to be isolated because a fault is possible which can result in danger to people or goods. The operator or owner of the hoist has to call a trained specialist to repair the hoist.
Visit www.chainmaster.de and www.showdistribution.com


![[XLS] · Web viewHOIST HOIST EQUIPMENT ACTUATOR, MLG HOIST HOIST EQUIPMENT - ACTUATOR, MLG HOIST HOIST - CARDAN PIN HOIST HOIST-CARDAN PIN HOIST HOIST-DEVICE,FLAP TRACK 2-5 HOIST](https://img.pdfslide.net/doc/110x75/5b1fa5177f8b9aa64c8b4800/xls-web-viewhoist-hoist-equipment-actuator-mlg-hoist-hoist-equipment-actuator.jpg)