Embed Size (px)
Citation preview
1
Bidirectional Interface
Training Manual (eClinicalWorks v. 9.0)
eClinicalWorks 112 Turnpike Road Westborough, MA 01581
Interfaces Division
2
Contents
Adding a New Test in the Test Dictionary ......................................................................... 3
Adding Attributes in the Test Dictionary............................................................................ 5
Associating CPT ................................................................................................................. 8
Inactivating Tests .............................................................................................................. 10
LOINC Codes ................................................................................................................... 12
Associating ABNs (Advanced Beneficiary Notice) to Tests ............................................ 14
Associating AOEs (Ask-at-Order-Entry) questions to Tests ............................................ 16
Configuring Labs Alias ..................................................................................................... 18
Configuring Labs, DI and Procedure Favorites ................................................................ 19
Adding a New Insurance Code in Insurances ................................................................... 23
Insurance/Lab Associations .............................................................................................. 24
Adding a Provider Code for a New Provider .................................................................... 26
Lab, DI & Procedure Order screen Modern View ............................................................ 27
Ordering a Test in Modern View ...................................................................................... 30
Order Transmission Based on Specimen Collection ........................................................ 40
Configuring the Specimen Collection Status for Labs ..................................................... 41
Transmitting Future Orders............................................................................................... 42
Dymo Label Printing......................................................................................................... 44
Reason Status .................................................................................................................... 46
Receiving and Reviewing Results .................................................................................... 50
Viewing past results on current Progress Note ................................................................. 55
Default Lab Assistant ........................................................................................................ 57
Reconciliation ................................................................................................................... 59
Interface Dashboard .......................................................................................................... 64
Additional Features ........................................................................................................... 68
Practice Defaults Settings ................................................................................................. 69

3
Adding a New Test in the Test Dictionary
1. While ordering a lab, we need to make sure that the test has a code. To check for code you can go to EMR->Labs, DI & Procedures -> Labs.
2. Select the lab company from the drop down and type in the test you are looking for. Then, click on View Lab Codes.
4
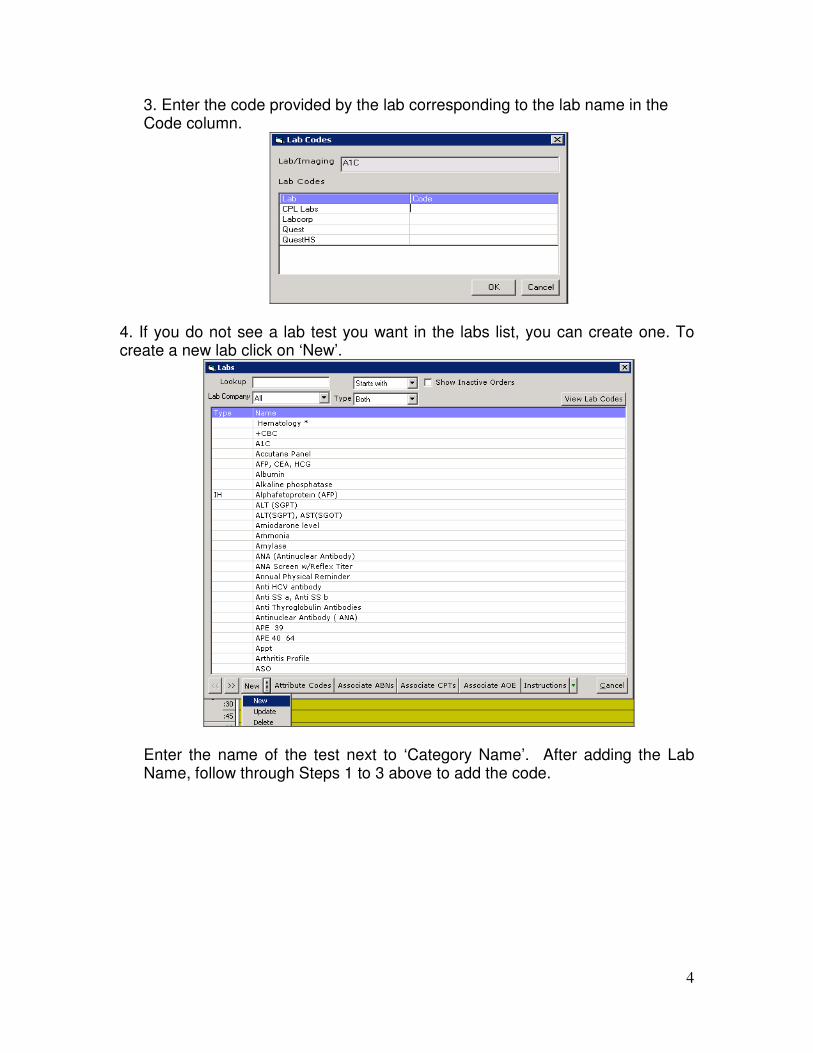
3. Enter the code provided by the lab corresponding to the lab name in the Code column.
4. If you do not see a lab test you want in the labs list, you can create one. To create a new lab click on ‘New’.
Enter the name of the test next to ‘Category Name’. After adding the Lab Name, follow through Steps 1 to 3 above to add the code.
5
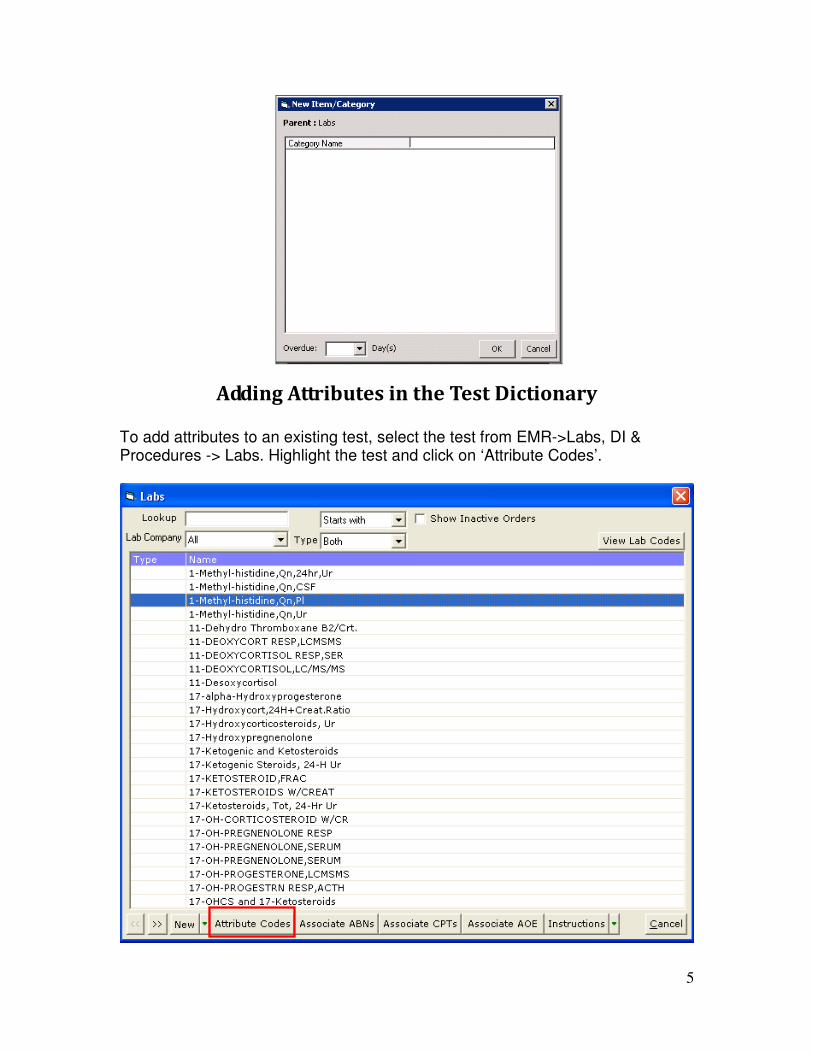
Adding Attributes in the Test Dictionary To add attributes to an existing test, select the test from EMR->Labs, DI & Procedures -> Labs. Highlight the test and click on ‘Attribute Codes’.
6
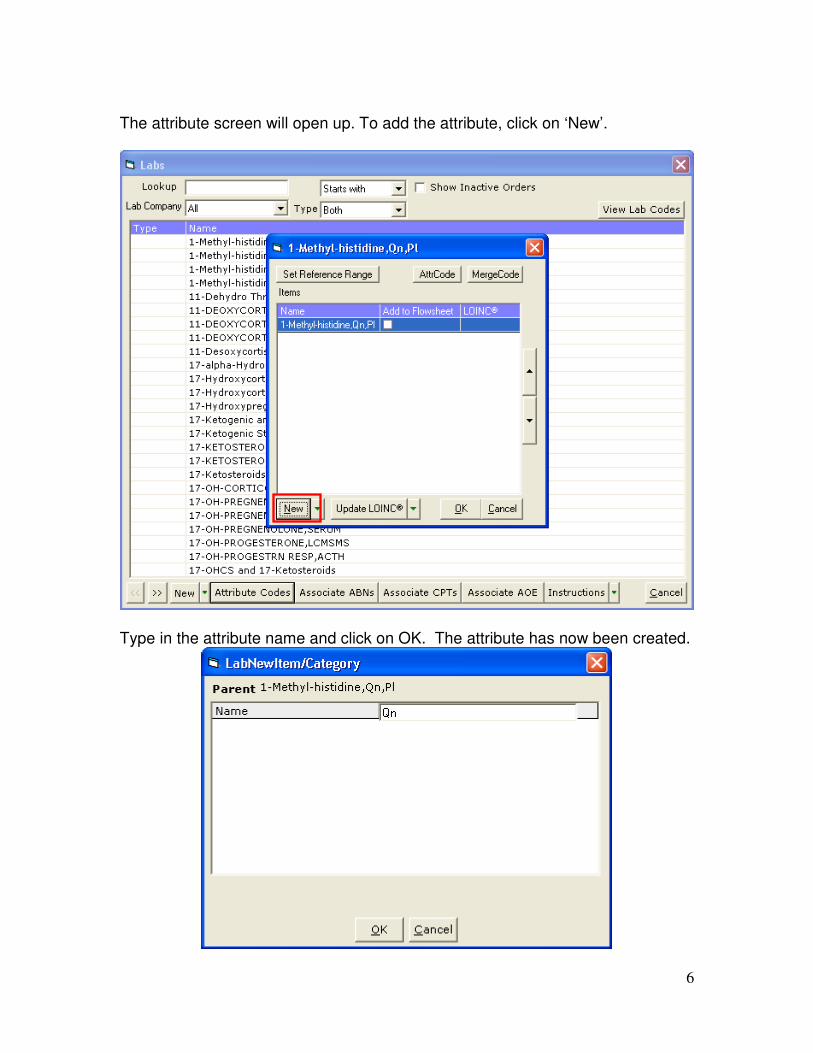
The attribute screen will open up. To add the attribute, click on ‘New’.
Type in the attribute name and click on OK. The attribute has now been created.
7
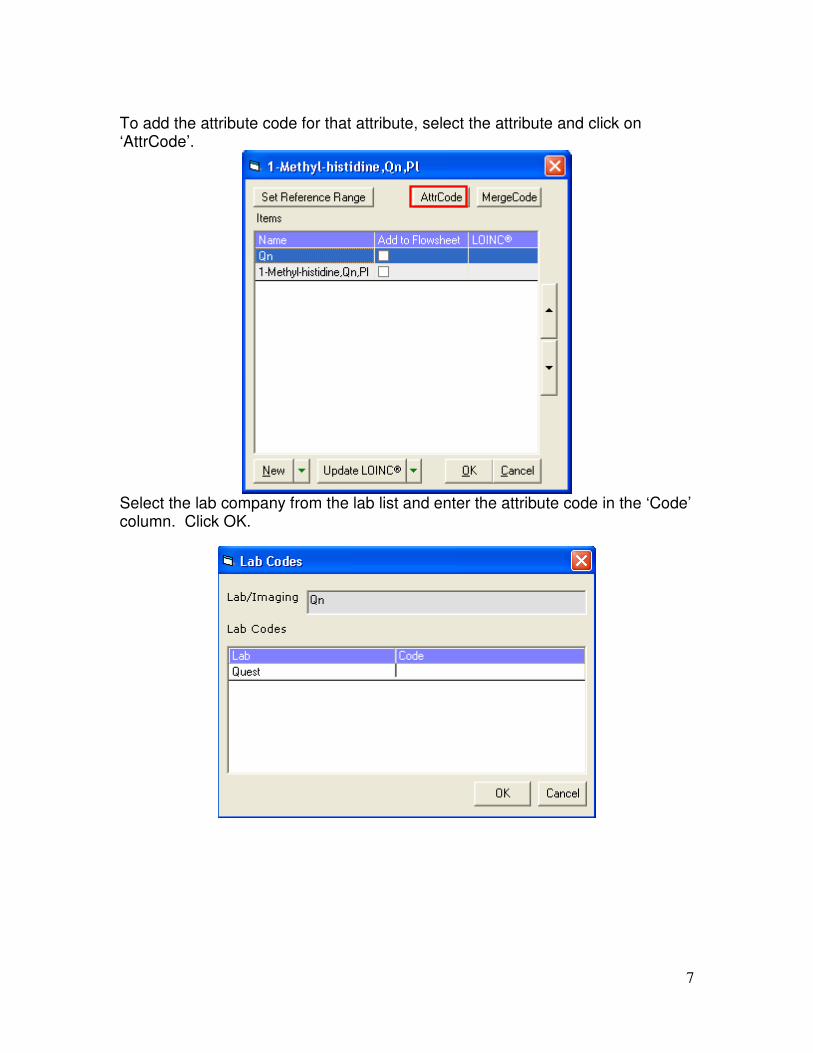
To add the attribute code for that attribute, select the attribute and click on ‘AttrCode’.
Select the lab company from the lab list and enter the attribute code in the ‘Code’ column. Click OK.
8
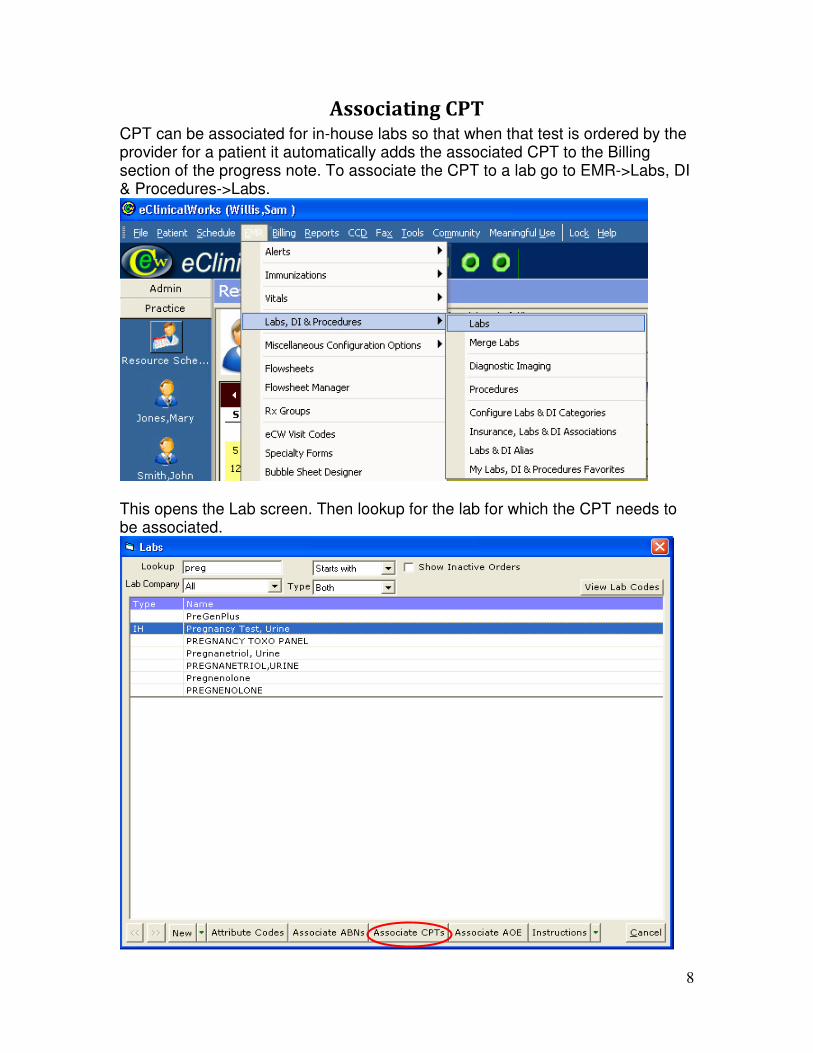
Associating CPT CPT can be associated for in-house labs so that when that test is ordered by the provider for a patient it automatically adds the associated CPT to the Billing section of the progress note. To associate the CPT to a lab go to EMR->Labs, DI & Procedures->Labs.
This opens the Lab screen. Then lookup for the lab for which the CPT needs to be associated.
9
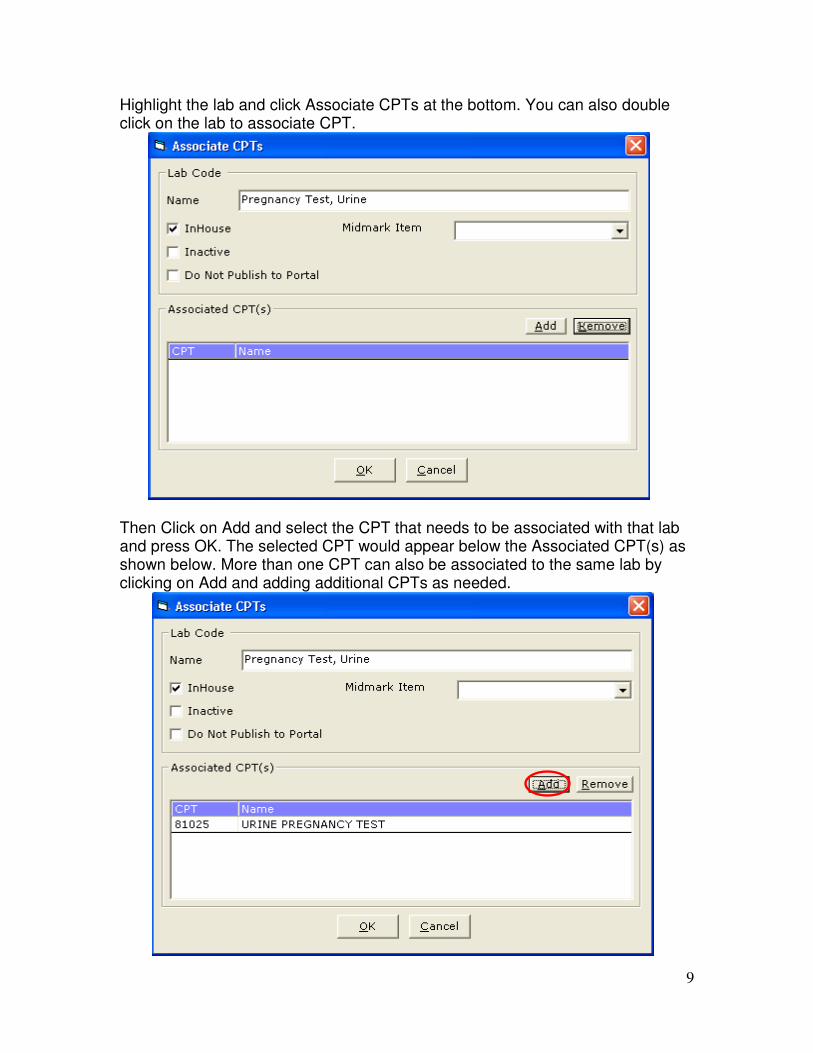
Highlight the lab and click Associate CPTs at the bottom. You can also double click on the lab to associate CPT.
Then Click on Add and select the CPT that needs to be associated with that lab and press OK. The selected CPT would appear below the Associated CPT(s) as shown below. More than one CPT can also be associated to the same lab by clicking on Add and adding additional CPTs as needed.

10
Once the necessary CPT codes are associated, press OK to close the ‘Associate CPTs’ window.
Inactivating Tests
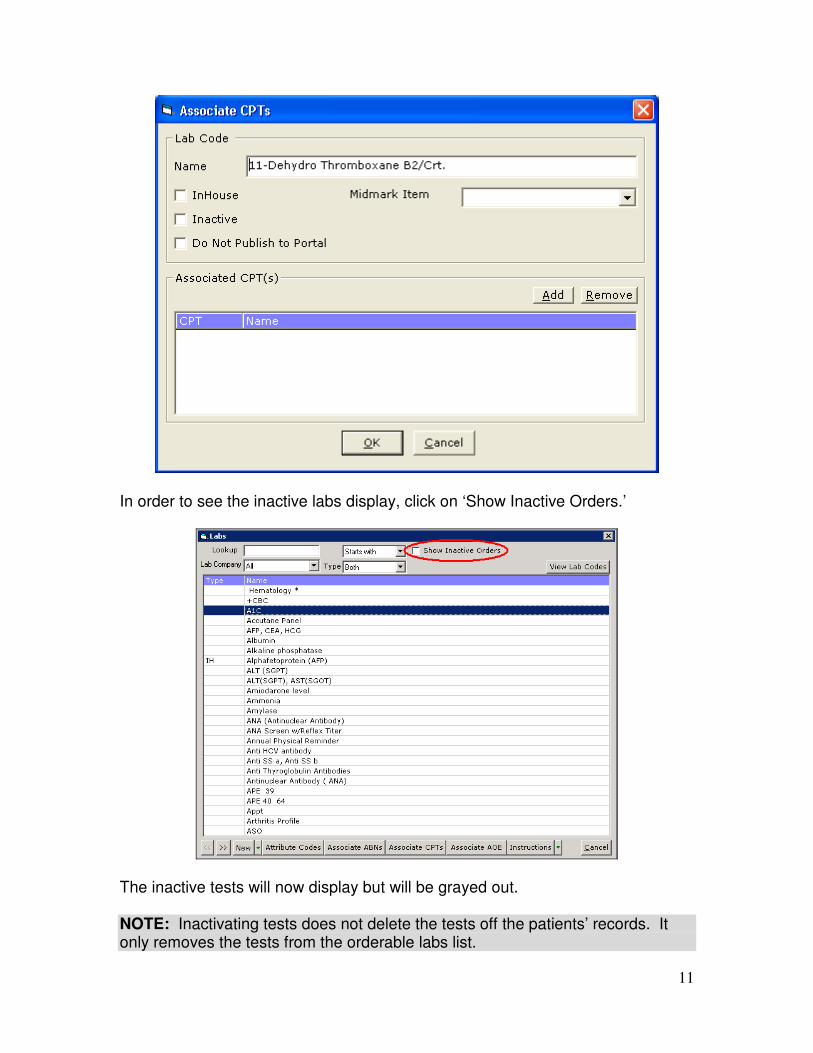
In order to inactive tests so that they do not appear in the test dictionary as an orderable test, go to EMR->Labs, DI & Procedures->Labs and double click on the test you want to inactive or highlight the test and click on ‘Associate CPTs.’
The following screen will pop up. Check the ‘Inactive’ box and hit OK. The test will no longer appear in the test dictionary.
11
In order to see the inactive labs display, click on ‘Show Inactive Orders.’
The inactive tests will now display but will be grayed out. NOTE: Inactivating tests does not delete the tests off the patients’ records. It only removes the tests from the orderable labs list.
12
LOINC Codes
In eClinicalWorks version 8.0, LOINC codes can be entered. LOINC stands for Logical Observations Identifiers, Names, Codes. The LOINC laboratory terms set provides a standard set of universal names and codes for identifying individual laboratory and clinical results. LOINC codes allow users to merge clinical results from many sources into one database for patient care, clinical research, or management.
In eClinicalWorks, LOINC codes are NOT used in any interface transactions. They are loaded as a mapping in the compendium to uniquely identify the result components from many different sources. These mappings are then used to run Clinical Decision Support System (CDSS) and various different reports in eClinicalWorks.
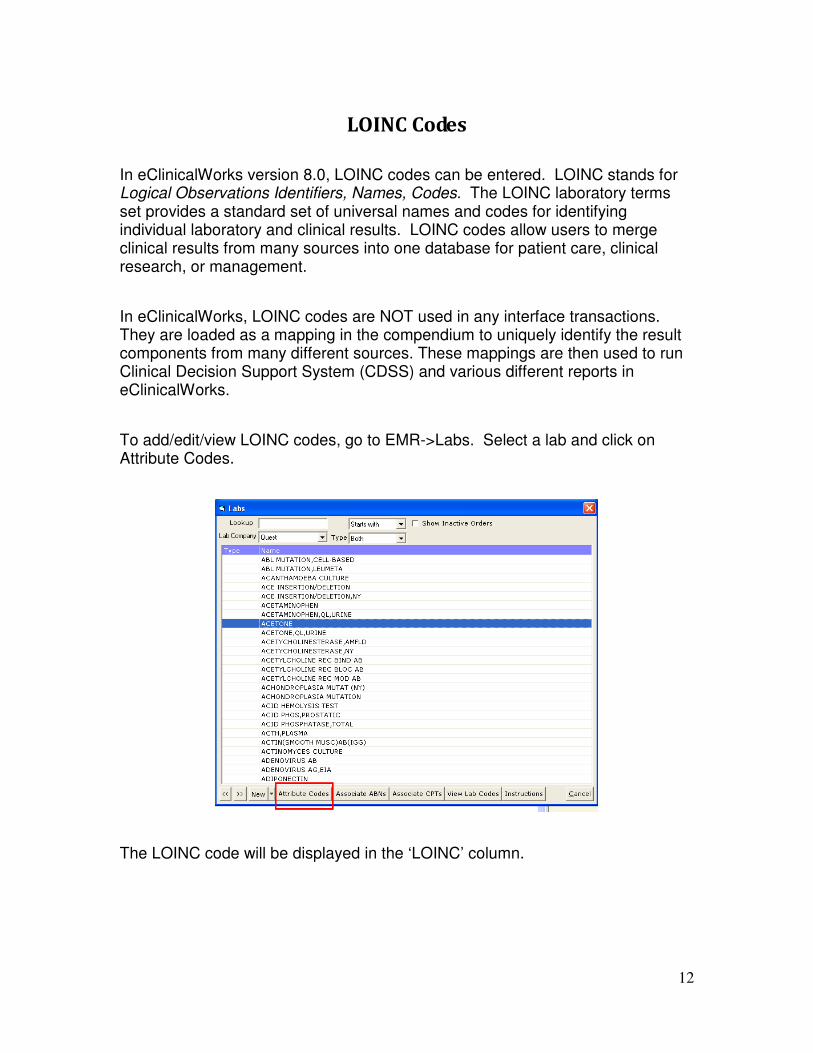
To add/edit/view LOINC codes, go to EMR->Labs. Select a lab and click on Attribute Codes.
The LOINC code will be displayed in the ‘LOINC’ column.
13
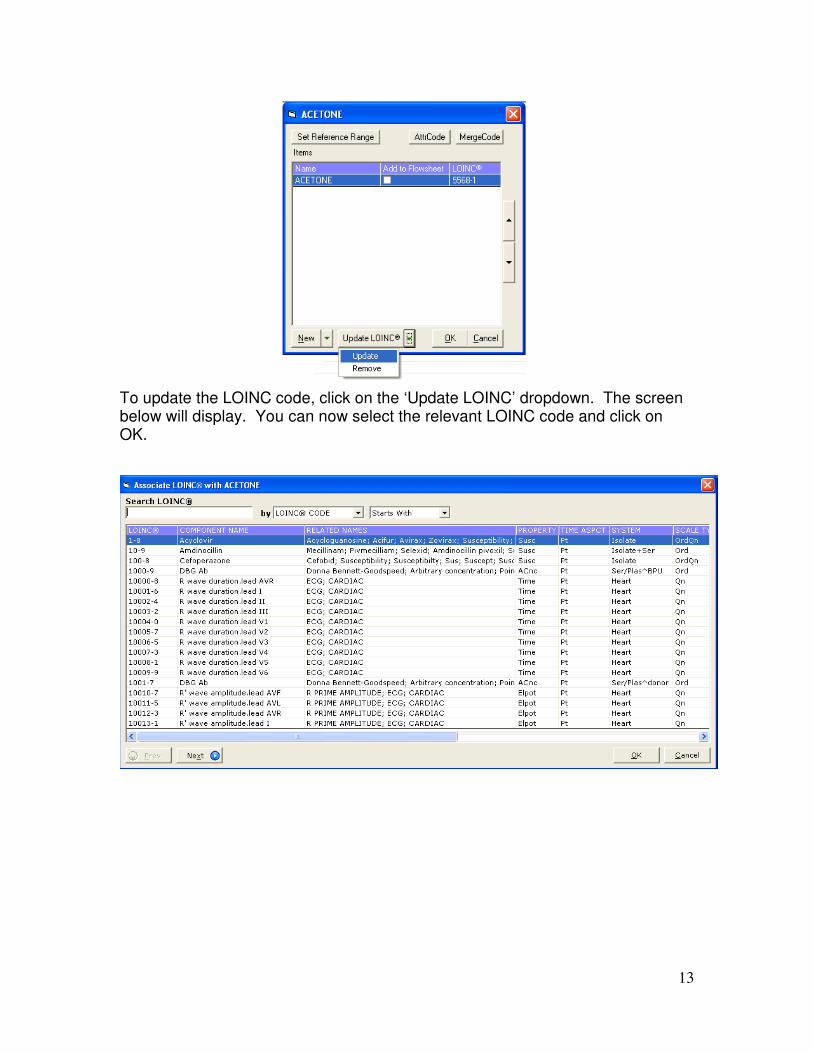
To update the LOINC code, click on the ‘Update LOINC’ dropdown. The screen below will display. You can now select the relevant LOINC code and click on OK.

14
Associating ABNs (Advanced Beneficiary Notice) to Tests
The Advanced Beneficiary Notice associates the type of coverage for a particular test for Medicare patients with payment source type C, MB, or MA, if Medicare is the primary insurance for a patient. The ABN prompts a notice if a particular test may not be covered by Medicare. To associate a coverage type to a test: 1. From the EMR menu, select Labs from the ‘Labs, DI, & Procedures’ option. The Labs window opens.
2. Select the lab name and click Associate ABNs. The Lab Codes window opens.
3. Use the ABN Type drop-down list to select the type of coverage:
15
• Limited: An ABN will be prompted if the mapping of the selected diagnosis codes for this visit and the CPT code for this test are not in the cpticdcodes table. If a valid mapping exists in this table, the ABN will not be prompted. (NOTE: ABN does not work with the CPT-ICD mappings from the application menu).
• Frequency: Some frequent tests may not be covered by Medicare, and an ABN appears each time this type of test is ordered.
• Experimental: A test might be considered experimental by Medicare, and an ABN appears each time this type of test is ordered.
• Both: (Limited/Frequency): An ABN appears each time both of these types of test is ordered.
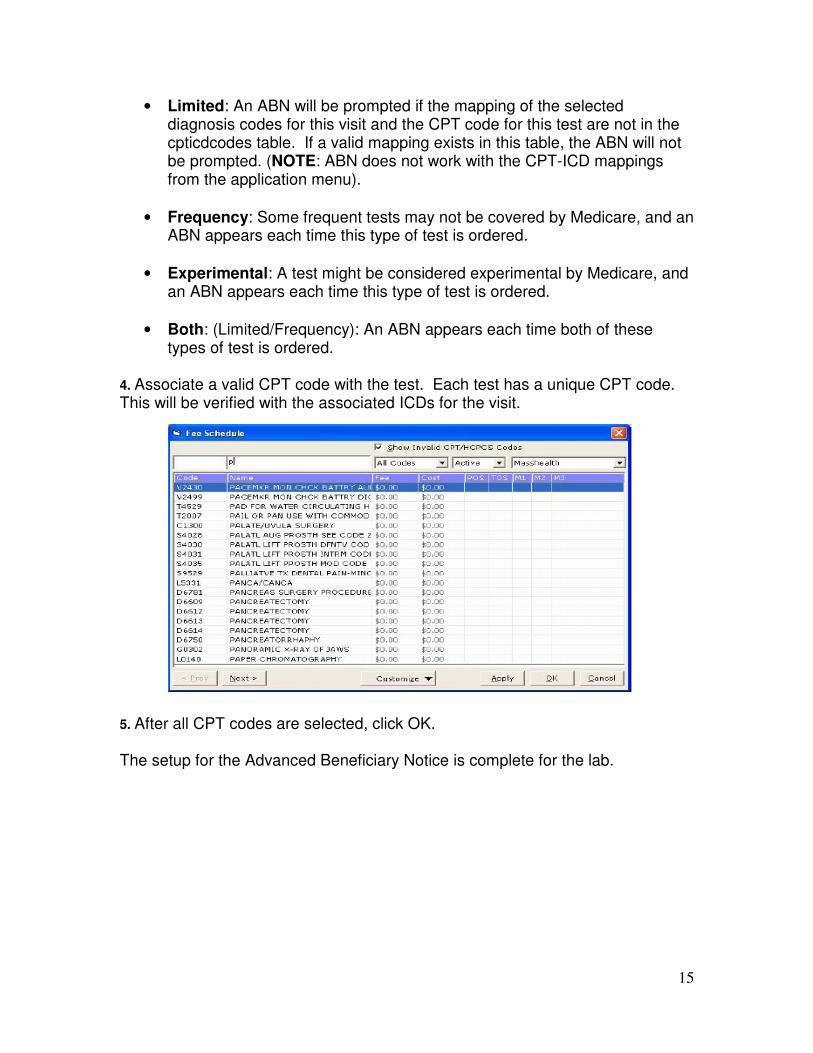
4. Associate a valid CPT code with the test. Each test has a unique CPT code. This will be verified with the associated ICDs for the visit.
5. After all CPT codes are selected, click OK. The setup for the Advanced Beneficiary Notice is complete for the lab.
16
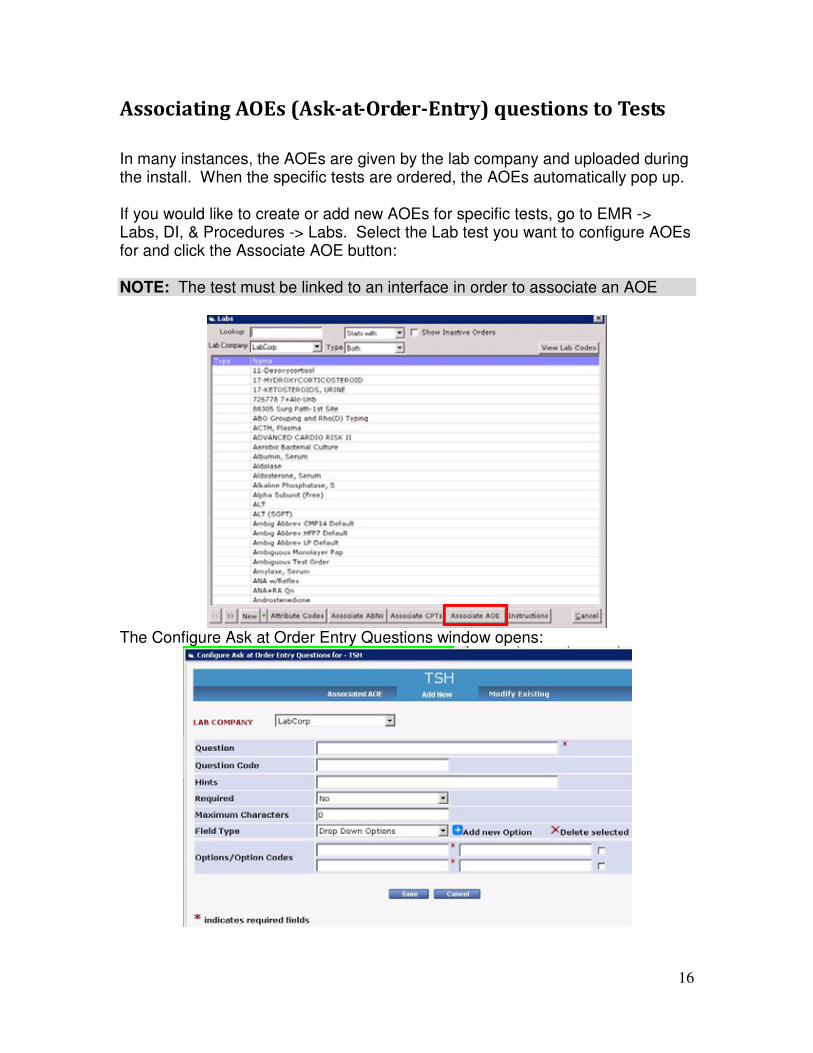
Associating AOEs (Ask-at-Order-Entry) questions to Tests
In many instances, the AOEs are given by the lab company and uploaded during the install. When the specific tests are ordered, the AOEs automatically pop up. If you would like to create or add new AOEs for specific tests, go to EMR -> Labs, DI, & Procedures -> Labs. Select the Lab test you want to configure AOEs for and click the Associate AOE button: NOTE: The test must be linked to an interface in order to associate an AOE
The Configure Ask at Order Entry Questions window opens:
17
Select the lab company used for this test from the Lab Company drop-down list and follow these steps:
1. Click the ‘Add New’ tab to add a new question, or click the ‘Modify’ button next to an existing question to modify it. Options to configure a new questions display.
2. Enter the desired question in the Question field. 3. If applicable, enter a question code in the Question Code field. 4. If desired, enter any hints in the Hints field. 5. Select whether answering this question is mandatory or not from the
Required drop-down list. 6. Enter the number of maximum characters in an acceptable answer in the
Maximum Characters field. 7. Select one of the following types of options from the Field Type drop-down
list: • Free Text - Select this option if you want providers to answer this question with any manually-typed text. •Standard Text with Validation - Select this option if you want providers to answer this question with a specific type of text. If you select this option, a Details drop-down list displays with the following options:
• Alphabets Only - select this option if the expected answer contains only letters. • Alpha-numeric - select this option if the expected answer contains both letters and numbers. • Date - select this option if the expected answer is a date. • Numbers Only - select this option if the expected answer contains only numbers.
• Drop-Down Options - Select this option if you want to provide specific options for providers to choose from. If you select this option, an Options/Option Codes field displays, allowing you to enter the text and a code for each of the desired options. Click the Add New Option button to add more options, and check the boxes next to all options you want to include for this question.
• Radio-Button Options - Select this option if you want to display radio buttons for providers to choose from.
Click the Save button. An Ask at Order Entry Question is now configured.
18
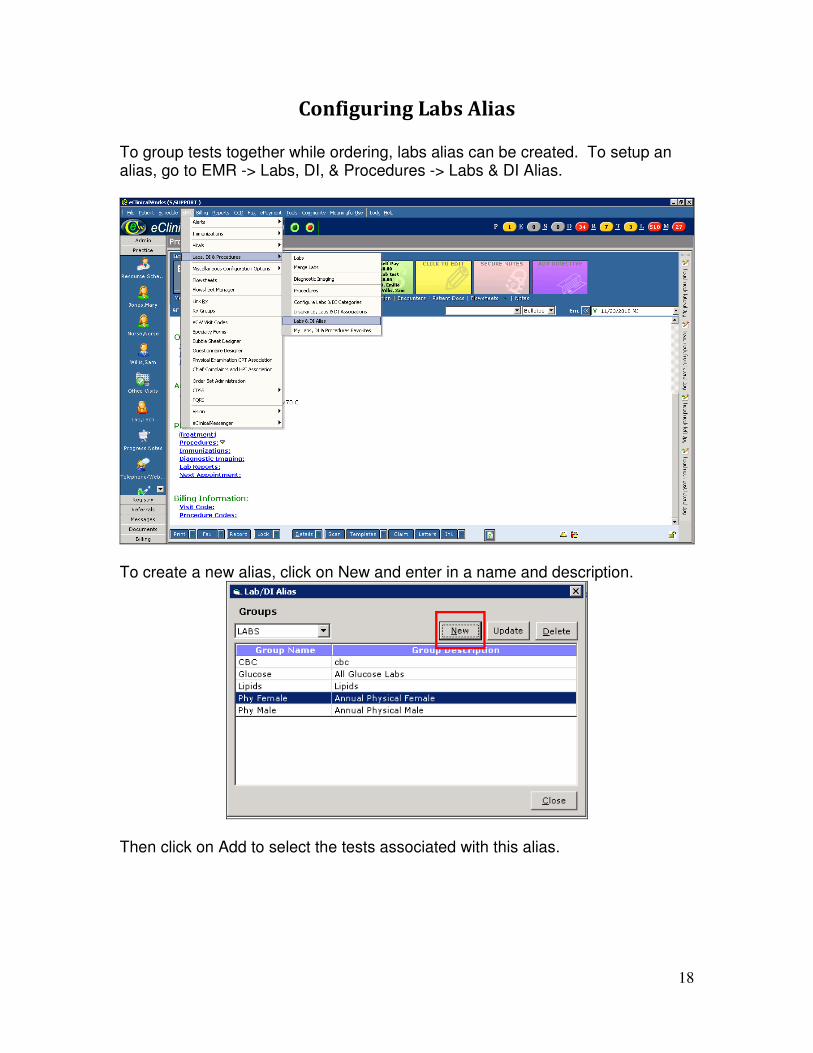
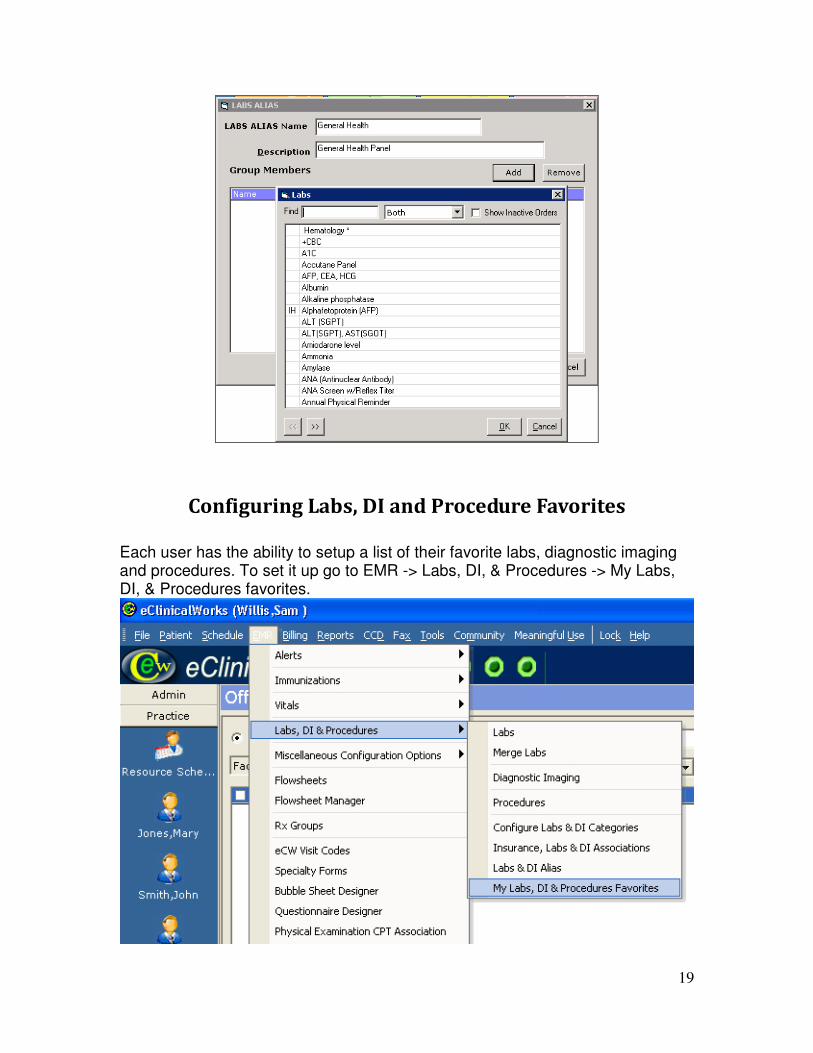
Configuring Labs Alias To group tests together while ordering, labs alias can be created. To setup an alias, go to EMR -> Labs, DI, & Procedures -> Labs & DI Alias.
To create a new alias, click on New and enter in a name and description.
Then click on Add to select the tests associated with this alias.
19
Configuring Labs, DI and Procedure Favorites
Each user has the ability to setup a list of their favorite labs, diagnostic imaging and procedures. To set it up go to EMR -> Labs, DI, & Procedures -> My Labs, DI, & Procedures favorites.
20
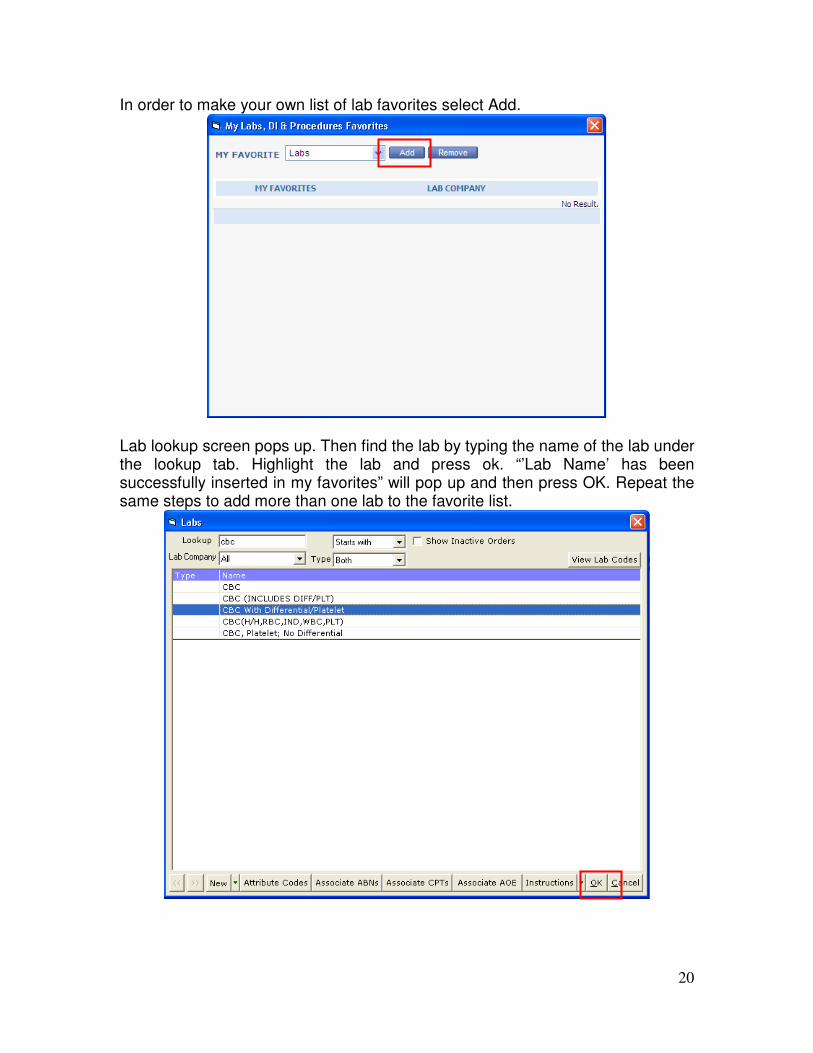
In order to make your own list of lab favorites select Add.
Lab lookup screen pops up. Then find the lab by typing the name of the lab under the lookup tab. Highlight the lab and press ok. “’Lab Name’ has been successfully inserted in my favorites” will pop up and then press OK. Repeat the same steps to add more than one lab to the favorite list.
21
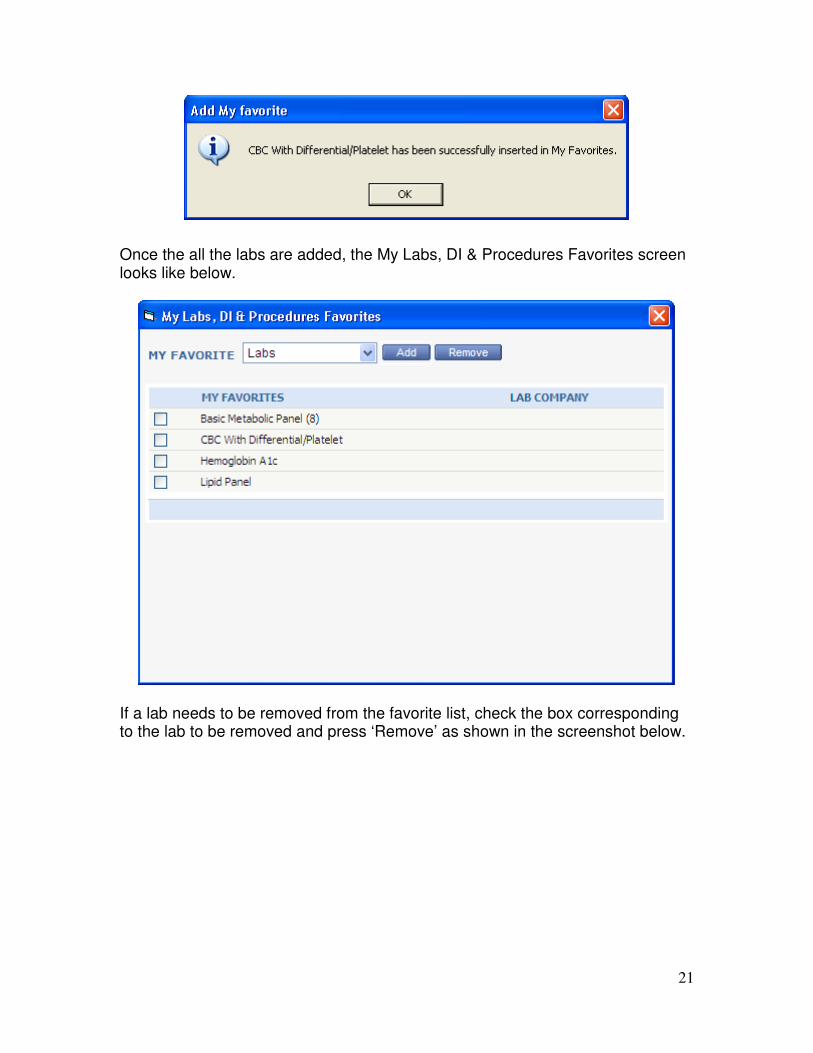
Once the all the labs are added, the My Labs, DI & Procedures Favorites screen looks like below.
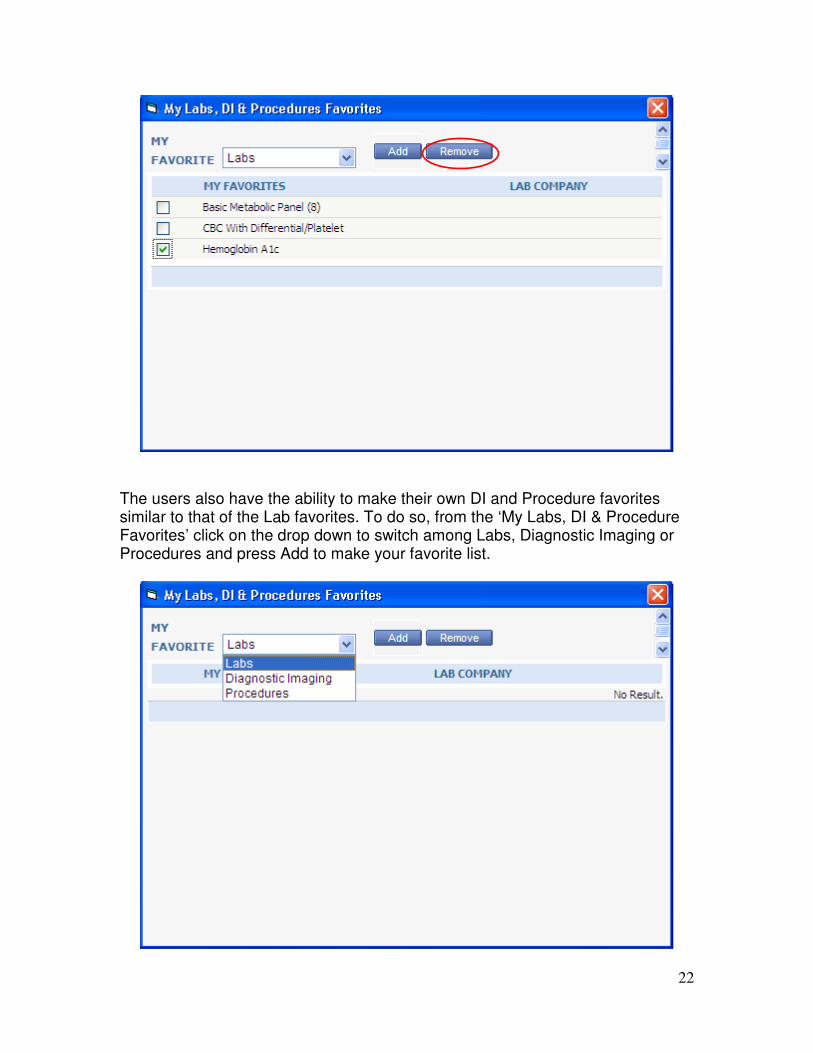
If a lab needs to be removed from the favorite list, check the box corresponding to the lab to be removed and press ‘Remove’ as shown in the screenshot below.
22
The users also have the ability to make their own DI and Procedure favorites similar to that of the Lab favorites. To do so, from the ‘My Labs, DI & Procedure Favorites’ click on the drop down to switch among Labs, Diagnostic Imaging or Procedures and press Add to make your favorite list.

23
Adding a New Insurance Code in Insurances
If a new insurance is added, its corresponding carrier code must be added as well. The lab company can provide this code. To enter this code, go to File -> Insurances.
Select the new insurance and click on ‘View Lab Ins. Codes’
Enter the code provided by the lab corresponding to the lab name by double clicking in the Code column.
24
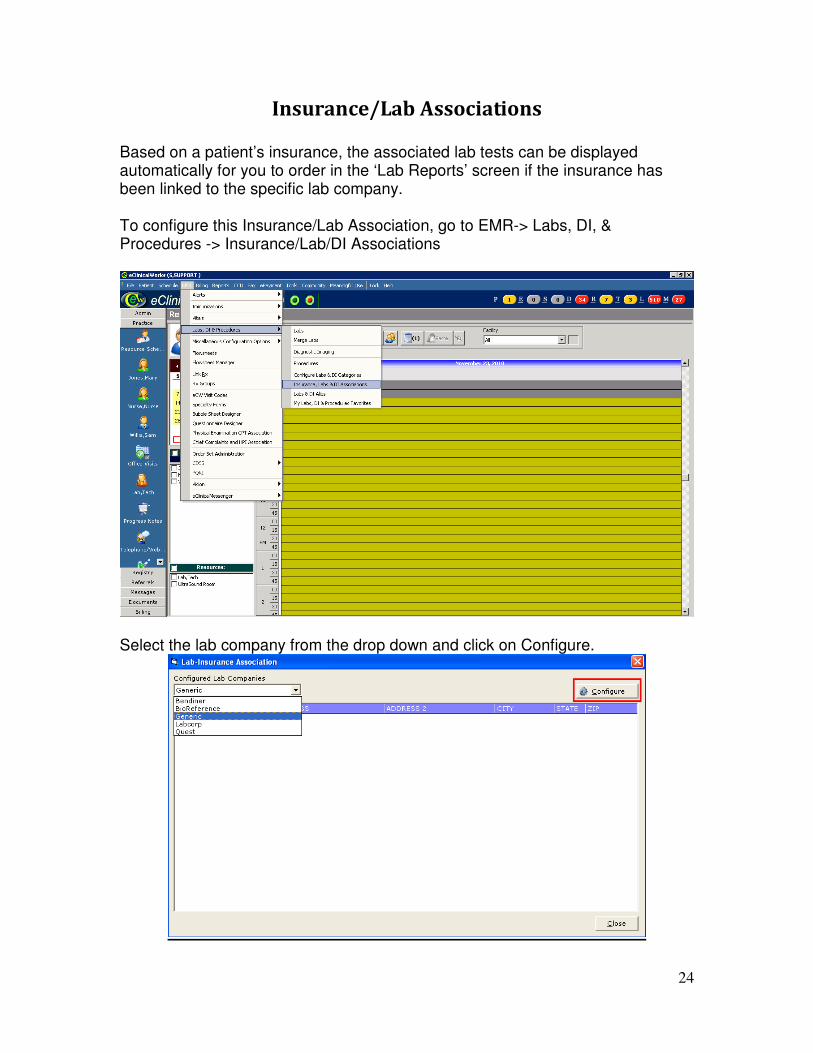
Insurance/Lab Associations Based on a patient’s insurance, the associated lab tests can be displayed automatically for you to order in the ‘Lab Reports’ screen if the insurance has been linked to the specific lab company. To configure this Insurance/Lab Association, go to EMR-> Labs, DI, & Procedures -> Insurance/Lab/DI Associations
Select the lab company from the drop down and click on Configure.
25
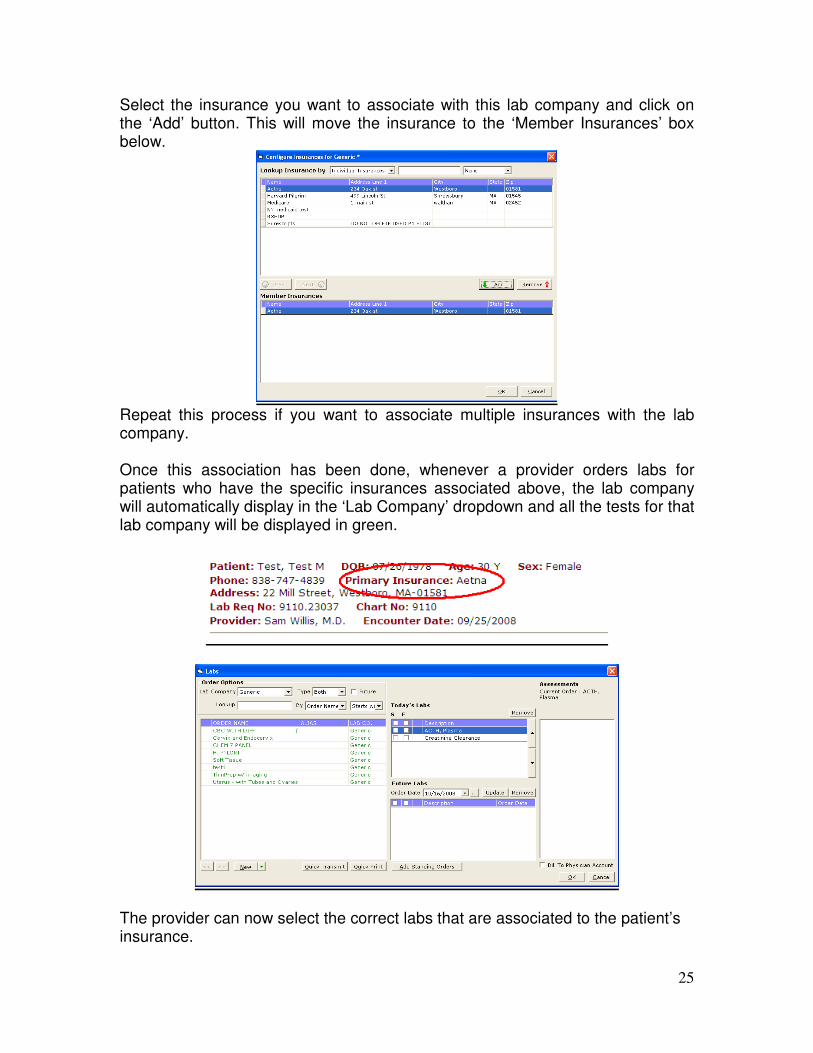
Select the insurance you want to associate with this lab company and click on the ‘Add’ button. This will move the insurance to the ‘Member Insurances’ box below.
Repeat this process if you want to associate multiple insurances with the lab company. Once this association has been done, whenever a provider orders labs for patients who have the specific insurances associated above, the lab company will automatically display in the ‘Lab Company’ dropdown and all the tests for that lab company will be displayed in green.
The provider can now select the correct labs that are associated to the patient’s insurance.
26
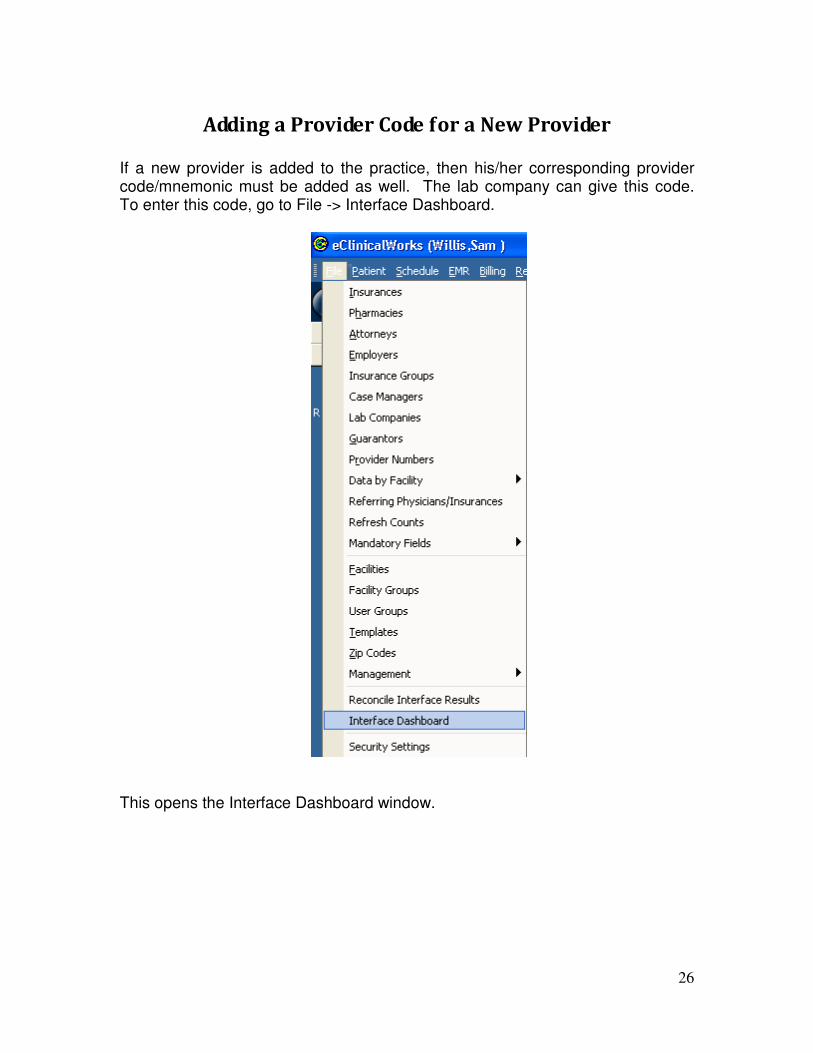
Adding a Provider Code for a New Provider If a new provider is added to the practice, then his/her corresponding provider code/mnemonic must be added as well. The lab company can give this code. To enter this code, go to File -> Interface Dashboard.
This opens the Interface Dashboard window.
27
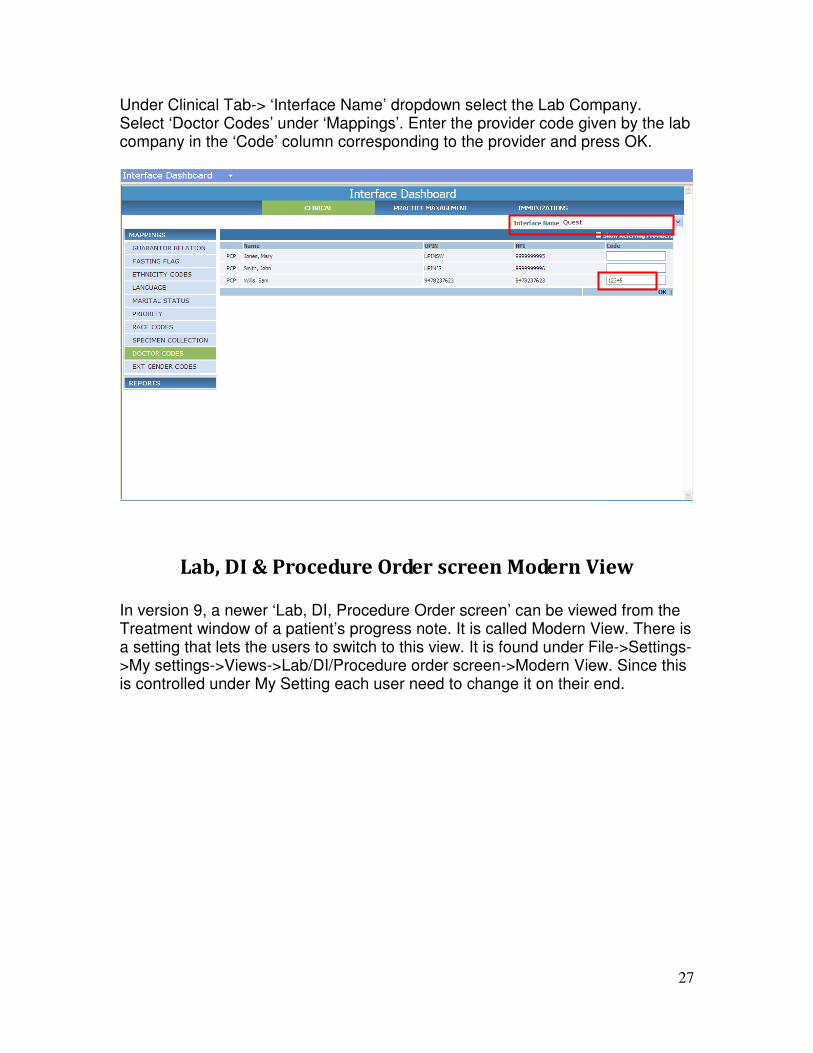
Under Clinical Tab-> ‘Interface Name’ dropdown select the Lab Company. Select ‘Doctor Codes’ under ‘Mappings’. Enter the provider code given by the lab company in the ‘Code’ column corresponding to the provider and press OK.
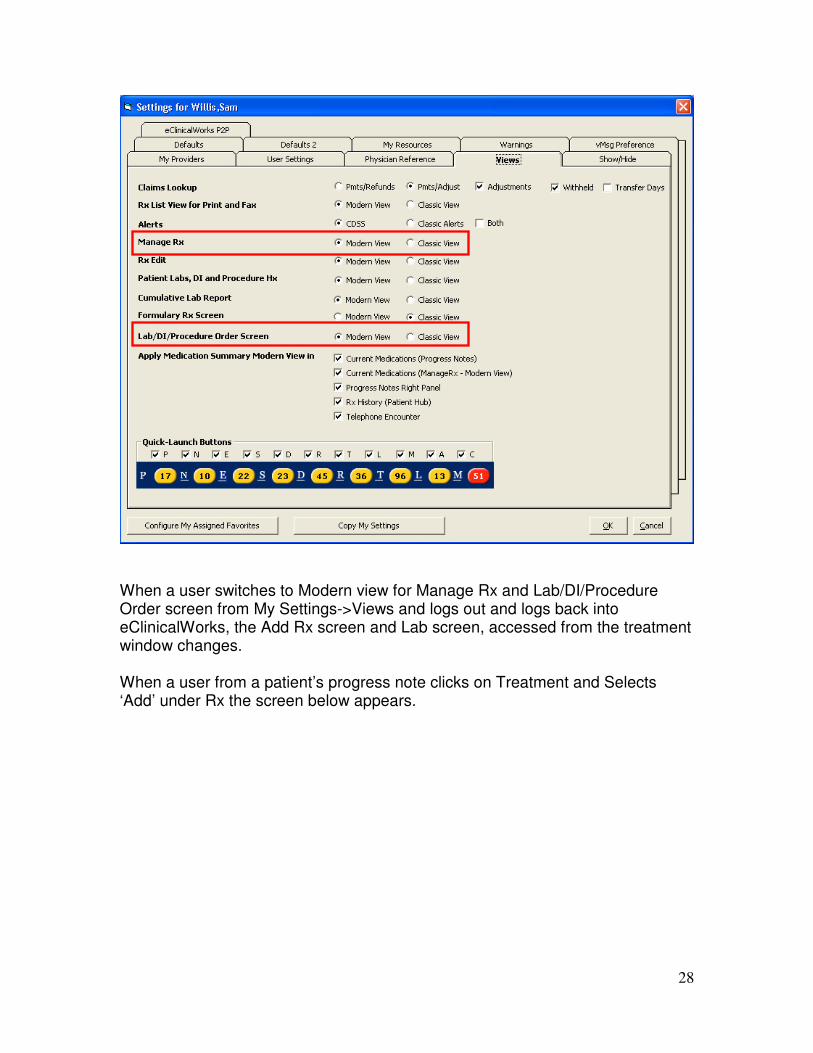
Lab, DI & Procedure Order screen Modern View
In version 9, a newer ‘Lab, DI, Procedure Order screen’ can be viewed from the Treatment window of a patient’s progress note. It is called Modern View. There is a setting that lets the users to switch to this view. It is found under File->Settings->My settings->Views->Lab/DI/Procedure order screen->Modern View. Since this is controlled under My Setting each user need to change it on their end.
28
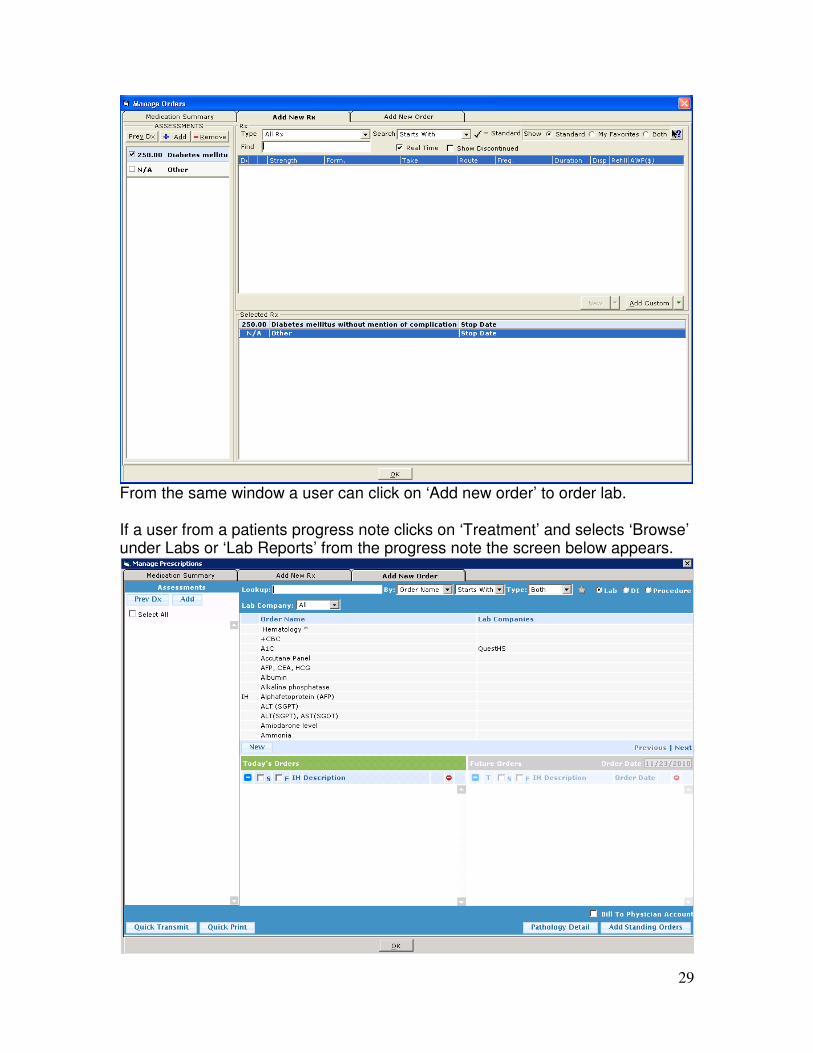
When a user switches to Modern view for Manage Rx and Lab/DI/Procedure Order screen from My Settings->Views and logs out and logs back into eClinicalWorks, the Add Rx screen and Lab screen, accessed from the treatment window changes. When a user from a patient’s progress note clicks on Treatment and Selects ‘Add’ under Rx the screen below appears.
29
From the same window a user can click on ‘Add new order’ to order lab. If a user from a patients progress note clicks on ‘Treatment’ and selects ‘Browse’ under Labs or ‘Lab Reports’ from the progress note the screen below appears.
30
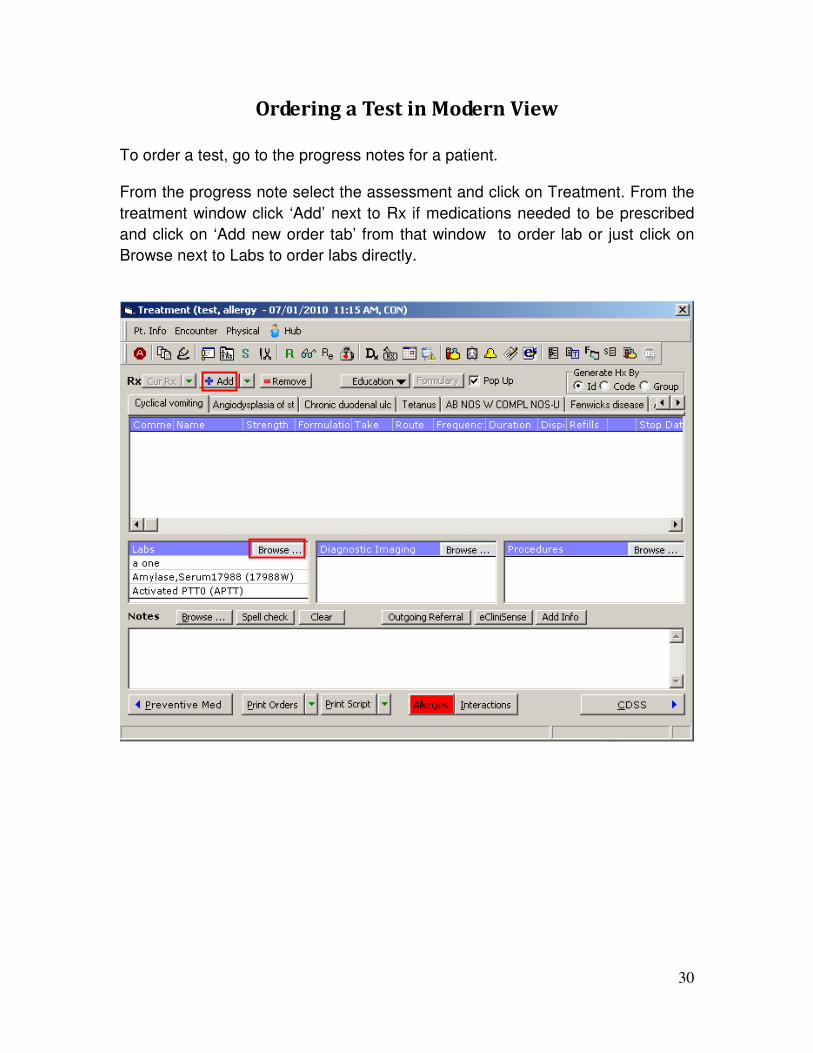
Ordering a Test in Modern View
To order a test, go to the progress notes for a patient. From the progress note select the assessment and click on Treatment. From the
treatment window click ‘Add’ next to Rx if medications needed to be prescribed
and click on ‘Add new order tab’ from that window to order lab or just click on
Browse next to Labs to order labs directly.
31
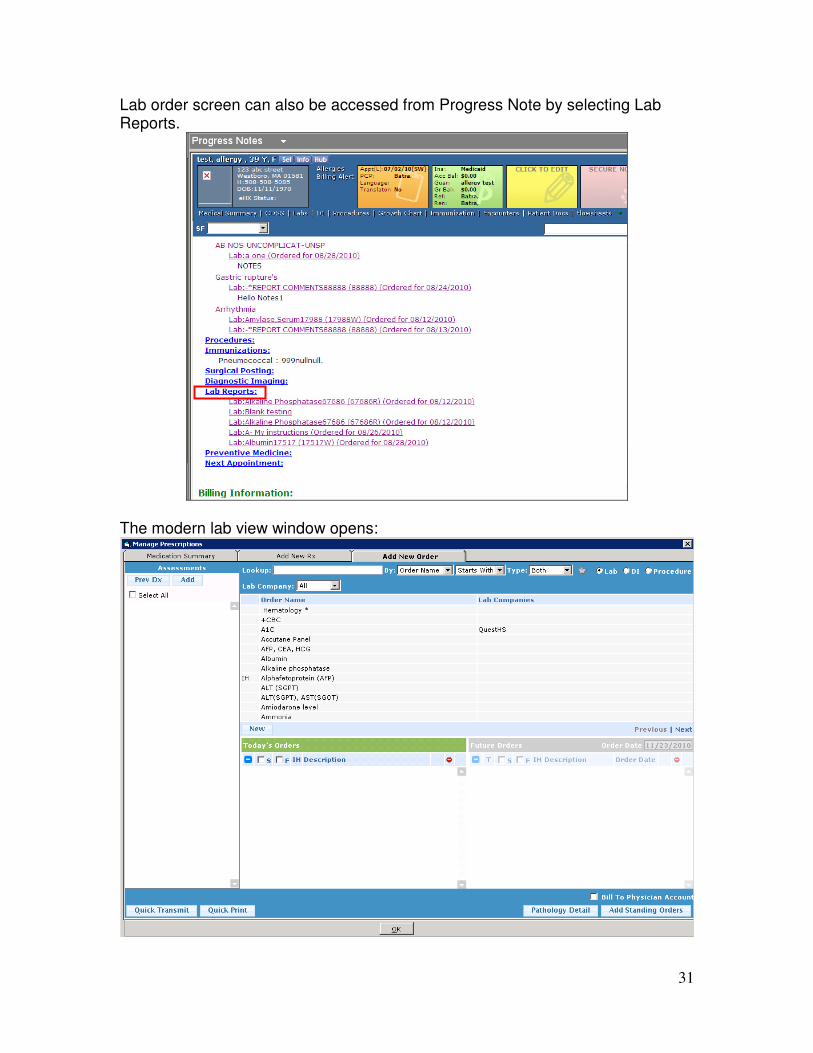
Lab order screen can also be accessed from Progress Note by selecting Lab Reports.
The modern lab view window opens:
32
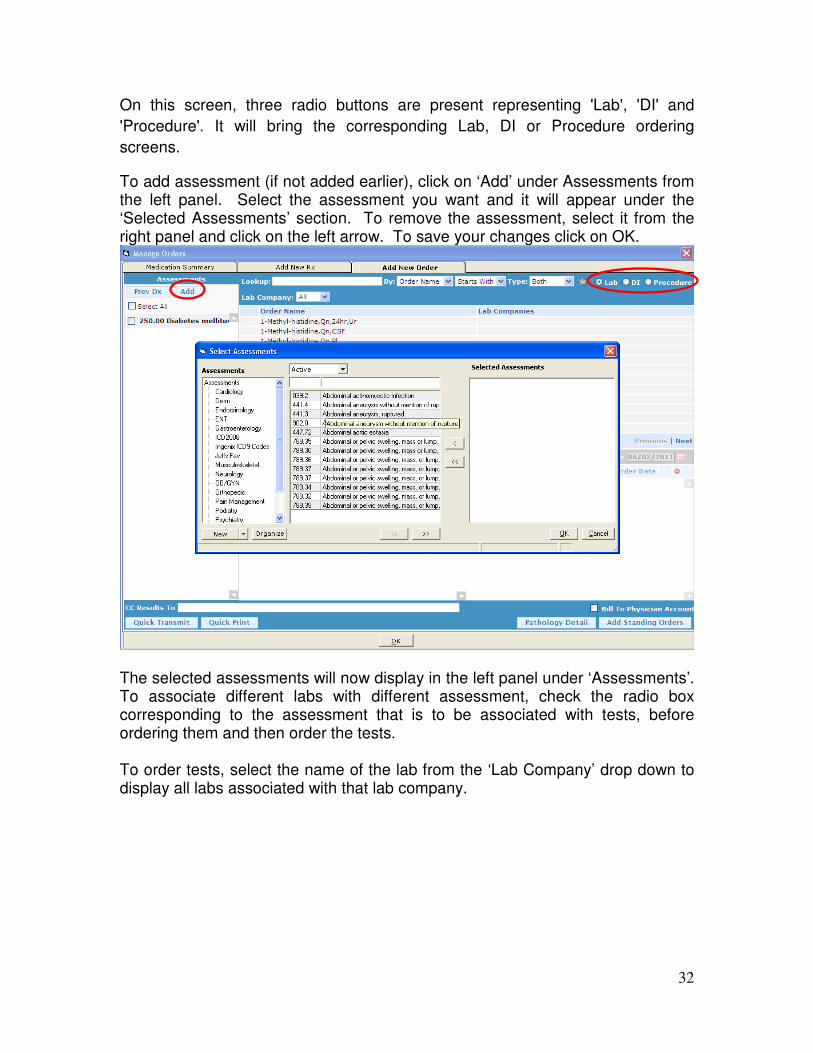
On this screen, three radio buttons are present representing 'Lab', 'DI' and
'Procedure'. It will bring the corresponding Lab, DI or Procedure ordering
screens.
To add assessment (if not added earlier), click on ‘Add’ under Assessments from the left panel. Select the assessment you want and it will appear under the ‘Selected Assessments’ section. To remove the assessment, select it from the right panel and click on the left arrow. To save your changes click on OK.
The selected assessments will now display in the left panel under ‘Assessments’. To associate different labs with different assessment, check the radio box corresponding to the assessment that is to be associated with tests, before ordering them and then order the tests. To order tests, select the name of the lab from the ‘Lab Company’ drop down to display all labs associated with that lab company.
33
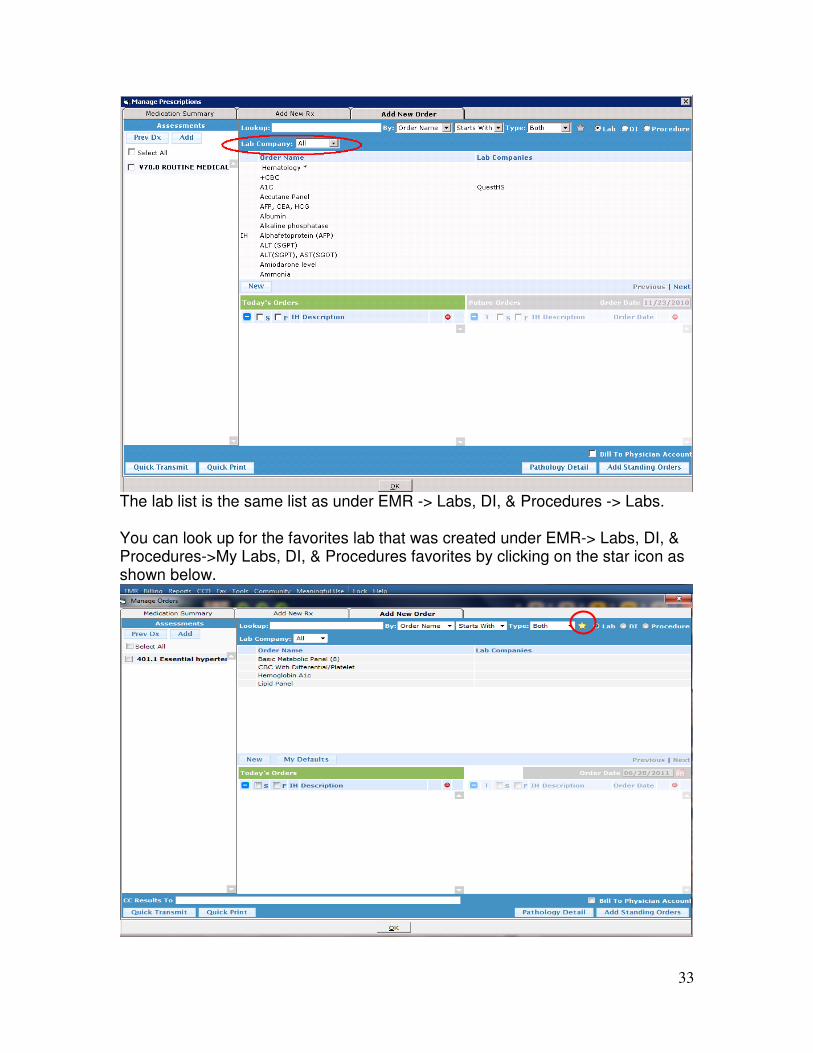
The lab list is the same list as under EMR -> Labs, DI, & Procedures -> Labs. You can look up for the favorites lab that was created under EMR-> Labs, DI, & Procedures->My Labs, DI, & Procedures favorites by clicking on the star icon as shown below.
34
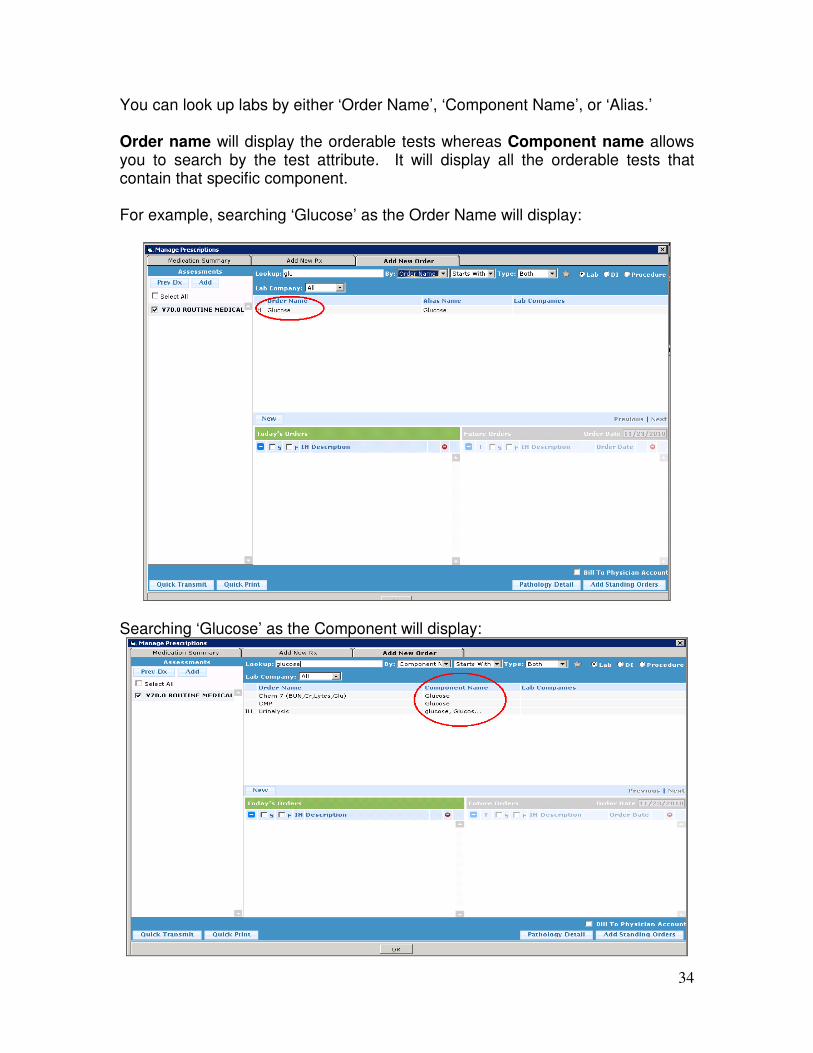
You can look up labs by either ‘Order Name’, ‘Component Name’, or ‘Alias.’ Order name will display the orderable tests whereas Component name allows you to search by the test attribute. It will display all the orderable tests that contain that specific component. For example, searching ‘Glucose’ as the Order Name will display:
Searching ‘Glucose’ as the Component will display:
35
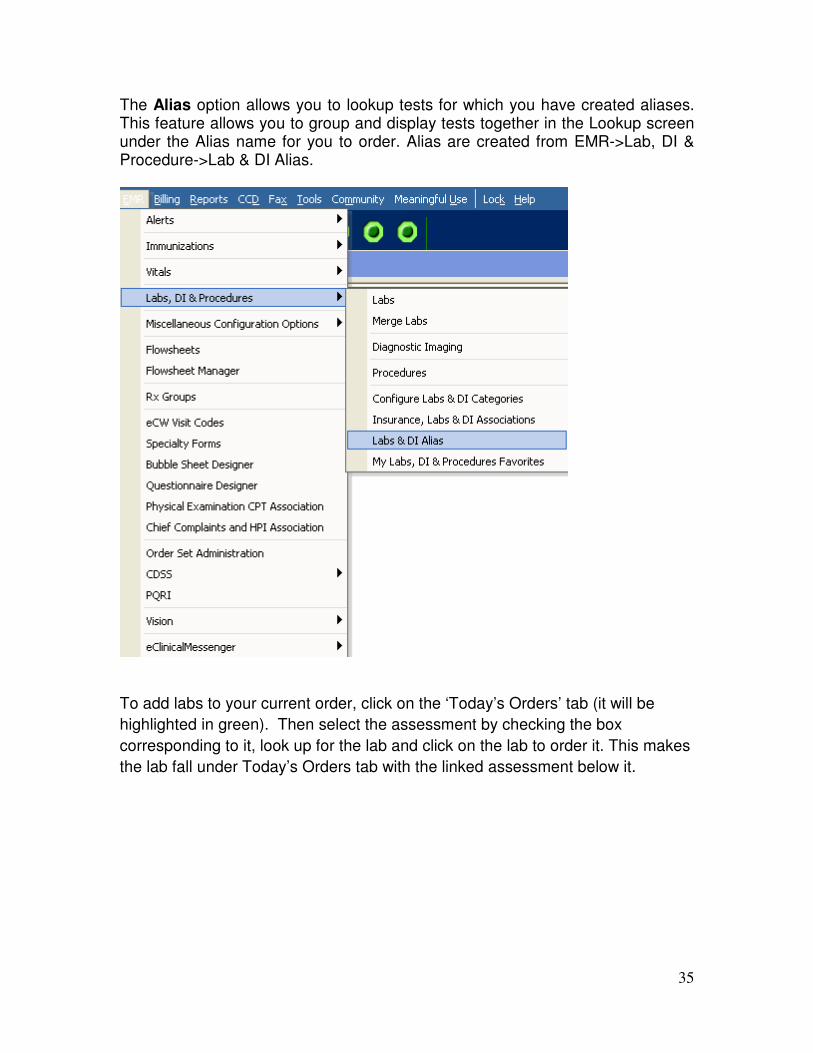
The Alias option allows you to lookup tests for which you have created aliases. This feature allows you to group and display tests together in the Lookup screen under the Alias name for you to order. Alias are created from EMR->Lab, DI & Procedure->Lab & DI Alias.
To add labs to your current order, click on the ‘Today’s Orders’ tab (it will be
highlighted in green). Then select the assessment by checking the box
corresponding to it, look up for the lab and click on the lab to order it. This makes
the lab fall under Today’s Orders tab with the linked assessment below it.
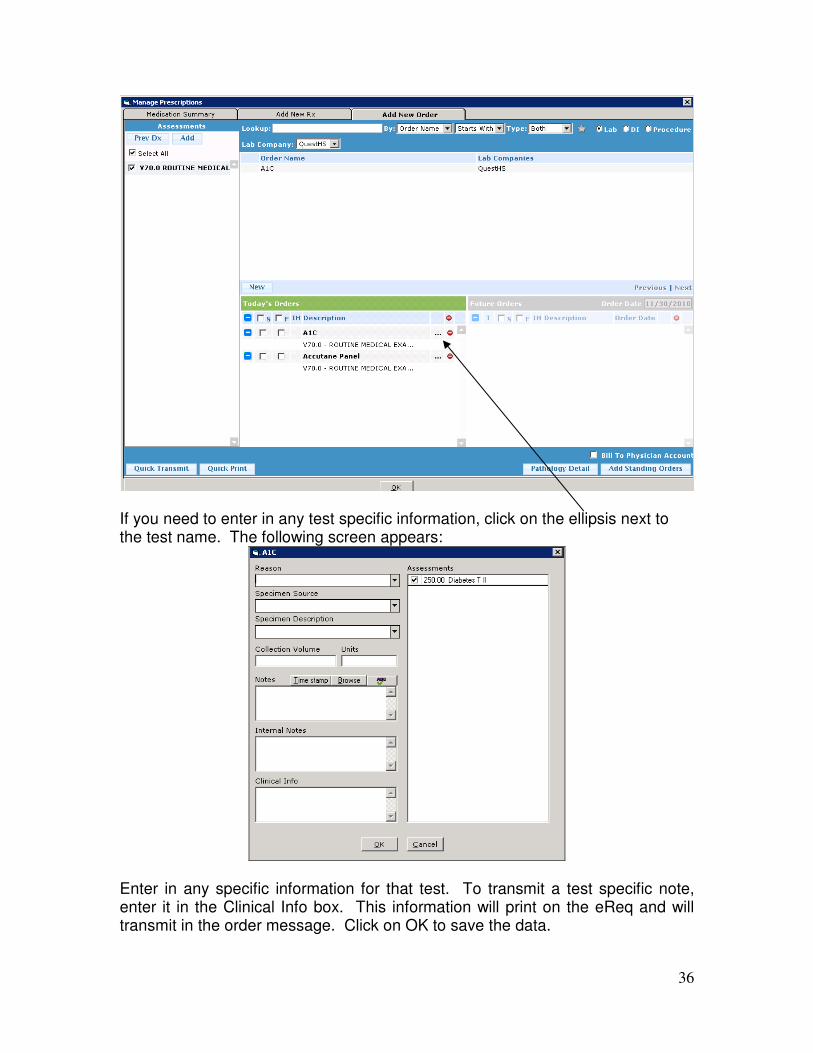
36
If you need to enter in any test specific information, click on the ellipsis next to the test name. The following screen appears:
Enter in any specific information for that test. To transmit a test specific note, enter it in the Clinical Info box. This information will print on the eReq and will transmit in the order message. Click on OK to save the data.
37
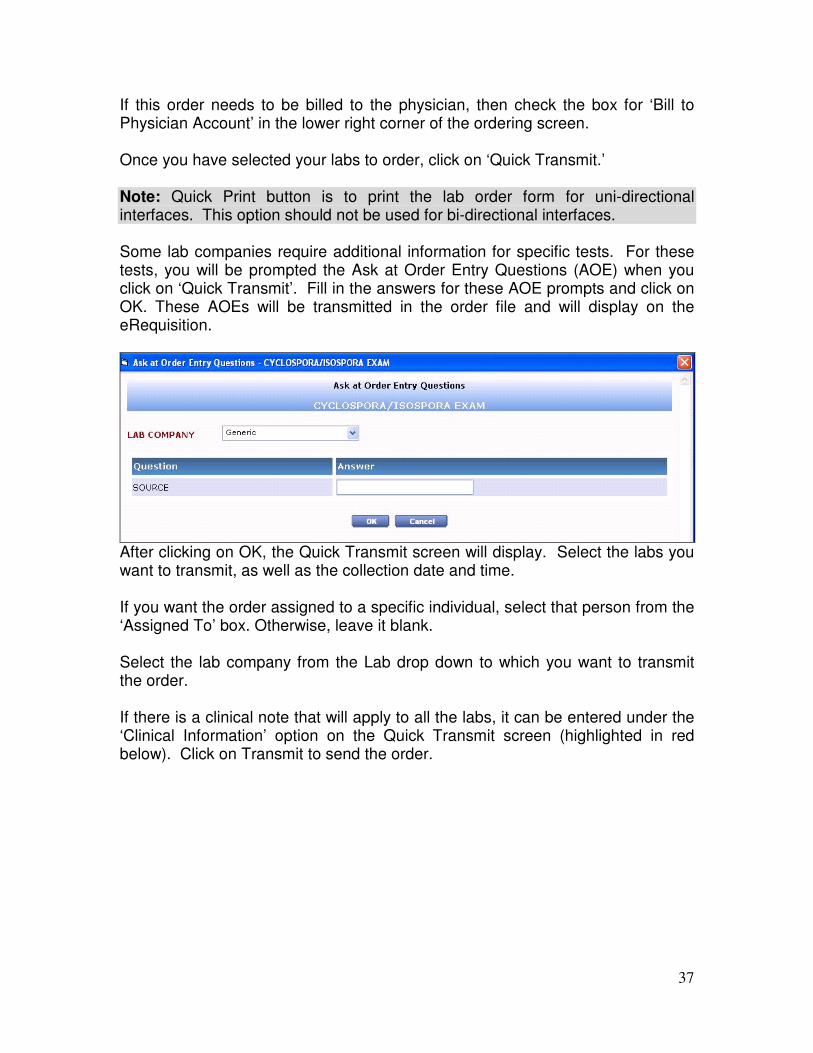
If this order needs to be billed to the physician, then check the box for ‘Bill to Physician Account’ in the lower right corner of the ordering screen. Once you have selected your labs to order, click on ‘Quick Transmit.’ Note: Quick Print button is to print the lab order form for uni-directional interfaces. This option should not be used for bi-directional interfaces. Some lab companies require additional information for specific tests. For these tests, you will be prompted the Ask at Order Entry Questions (AOE) when you click on ‘Quick Transmit’. Fill in the answers for these AOE prompts and click on OK. These AOEs will be transmitted in the order file and will display on the eRequisition.
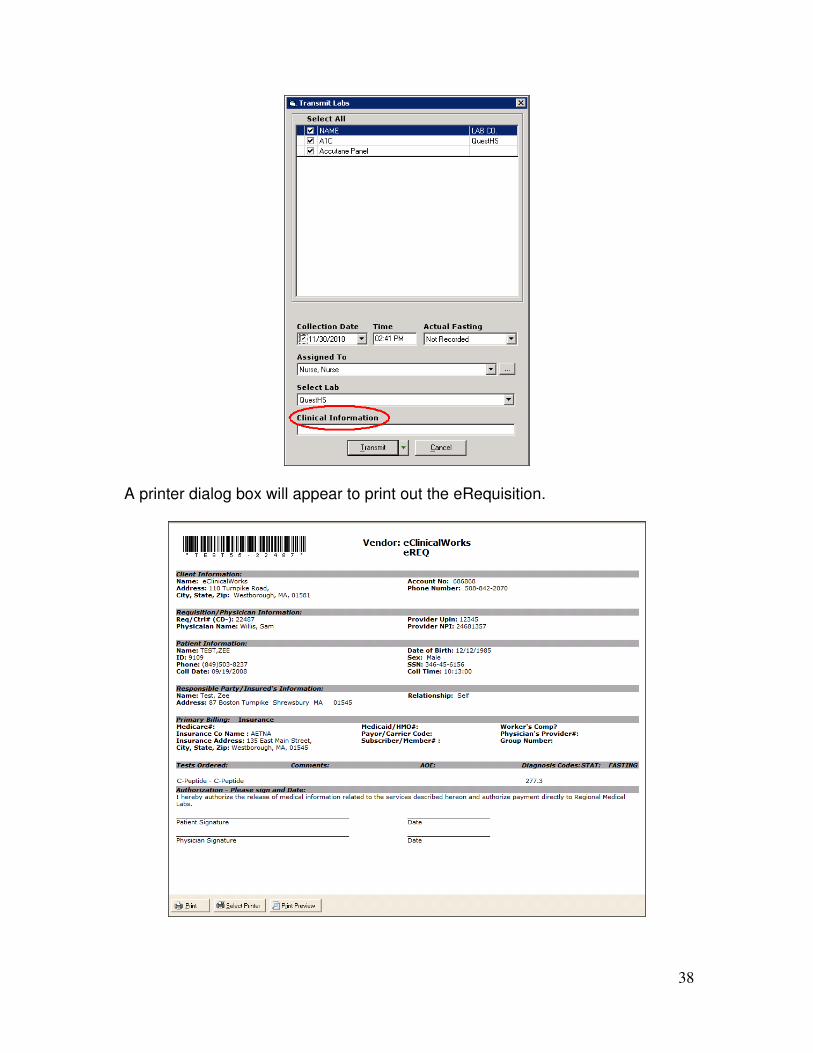
After clicking on OK, the Quick Transmit screen will display. Select the labs you want to transmit, as well as the collection date and time. If you want the order assigned to a specific individual, select that person from the ‘Assigned To’ box. Otherwise, leave it blank. Select the lab company from the Lab drop down to which you want to transmit the order. If there is a clinical note that will apply to all the labs, it can be entered under the ‘Clinical Information’ option on the Quick Transmit screen (highlighted in red below). Click on Transmit to send the order.
38
A printer dialog box will appear to print out the eRequisition.
39
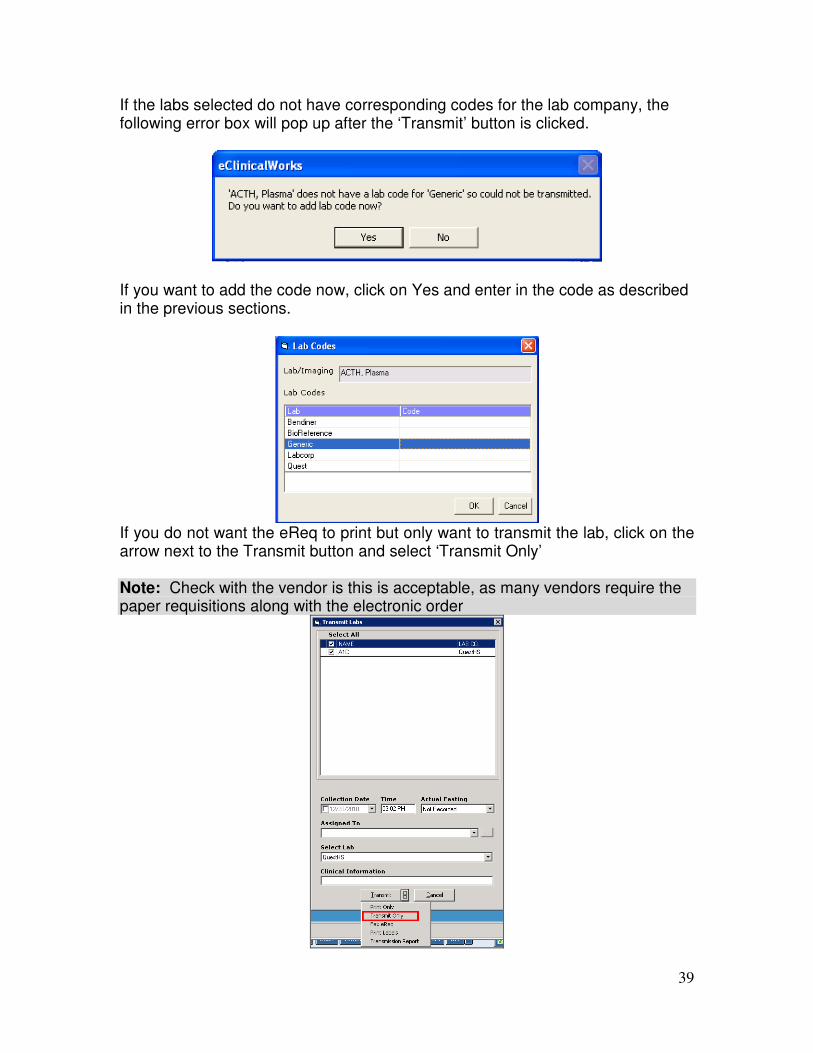
If the labs selected do not have corresponding codes for the lab company, the following error box will pop up after the ‘Transmit’ button is clicked.
If you want to add the code now, click on Yes and enter in the code as described in the previous sections.
If you do not want the eReq to print but only want to transmit the lab, click on the arrow next to the Transmit button and select ‘Transmit Only’ Note: Check with the vendor is this is acceptable, as many vendors require the paper requisitions along with the electronic order
40
If you do not want to transmit the lab at this time and would just like to print or fax the eRequisition, then click on the arrow next to the Transmit button and select either ‘Print Only’ or ‘Fax eReq’. This will just print or fax the requisition but will not transmit the order.
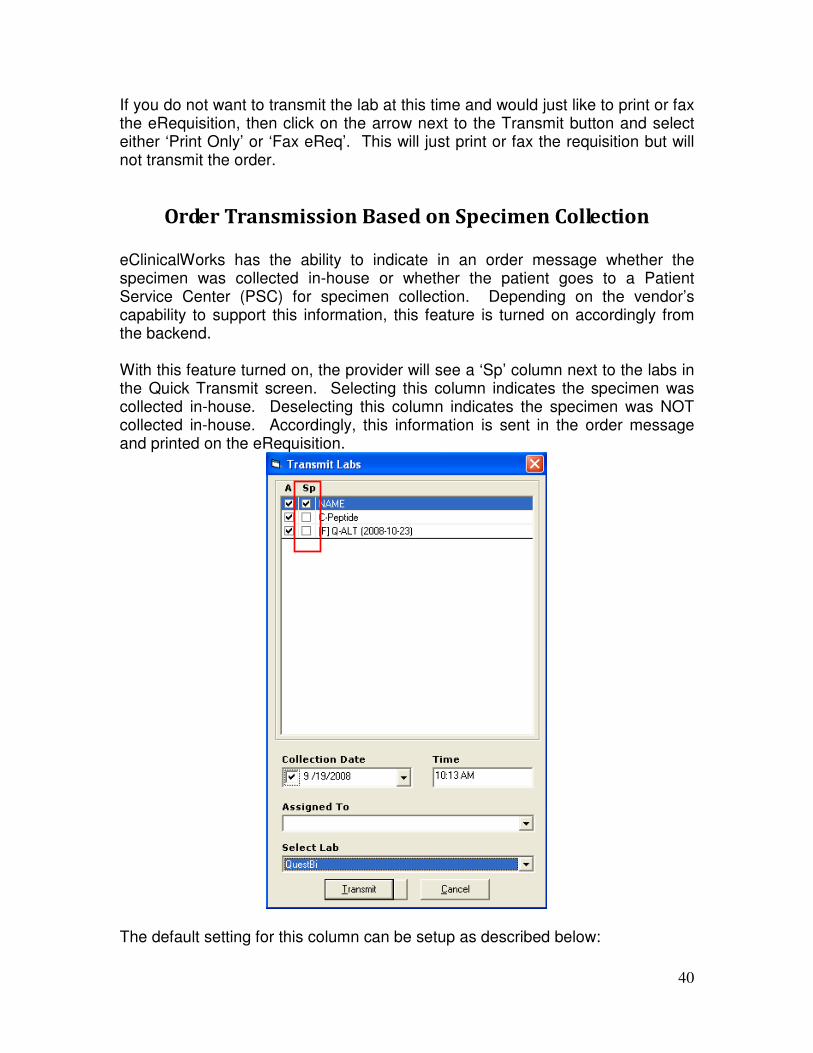
Order Transmission Based on Specimen Collection
eClinicalWorks has the ability to indicate in an order message whether the specimen was collected in-house or whether the patient goes to a Patient Service Center (PSC) for specimen collection. Depending on the vendor’s capability to support this information, this feature is turned on accordingly from the backend. With this feature turned on, the provider will see a ‘Sp’ column next to the labs in the Quick Transmit screen. Selecting this column indicates the specimen was collected in-house. Deselecting this column indicates the specimen was NOT collected in-house. Accordingly, this information is sent in the order message and printed on the eRequisition.
The default setting for this column can be setup as described below:
41
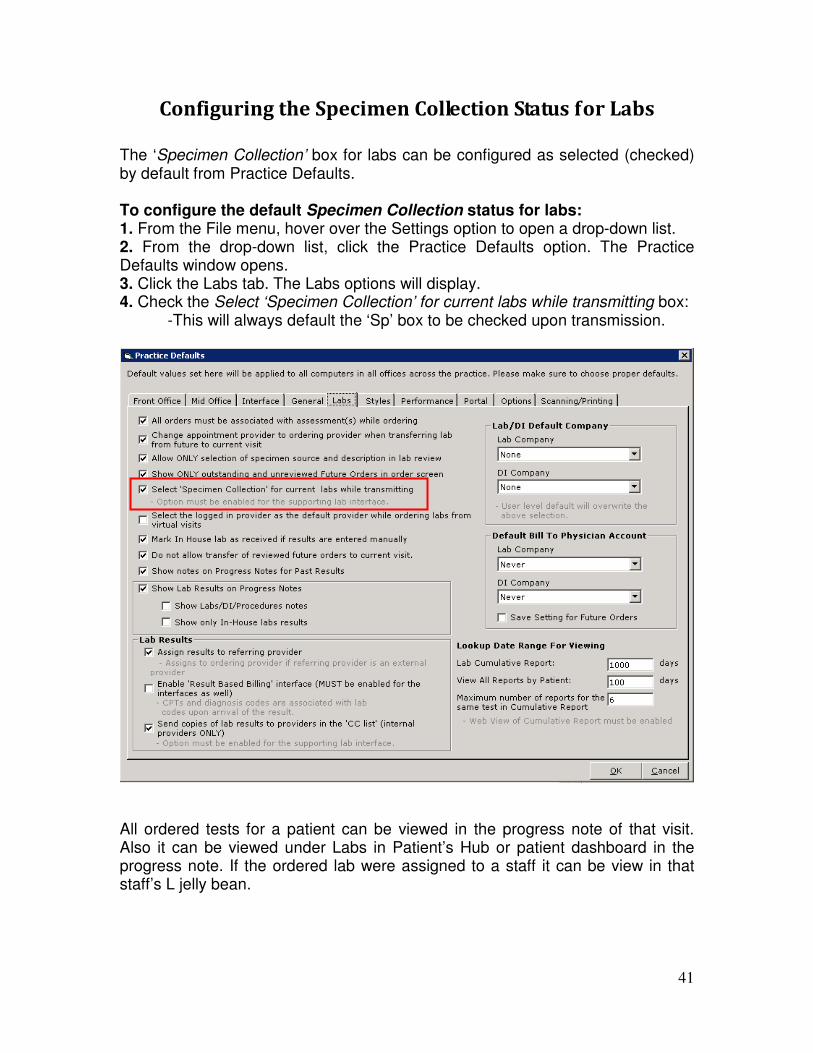
Configuring the Specimen Collection Status for Labs
The ‘Specimen Collection’ box for labs can be configured as selected (checked) by default from Practice Defaults. To configure the default Specimen Collection status for labs: 1. From the File menu, hover over the Settings option to open a drop-down list. 2. From the drop-down list, click the Practice Defaults option. The Practice Defaults window opens. 3. Click the Labs tab. The Labs options will display. 4. Check the Select ‘Specimen Collection’ for current labs while transmitting box: -This will always default the ‘Sp’ box to be checked upon transmission.
All ordered tests for a patient can be viewed in the progress note of that visit. Also it can be viewed under Labs in Patient’s Hub or patient dashboard in the progress note. If the ordered lab were assigned to a staff it can be view in that staff’s L jelly bean.
42
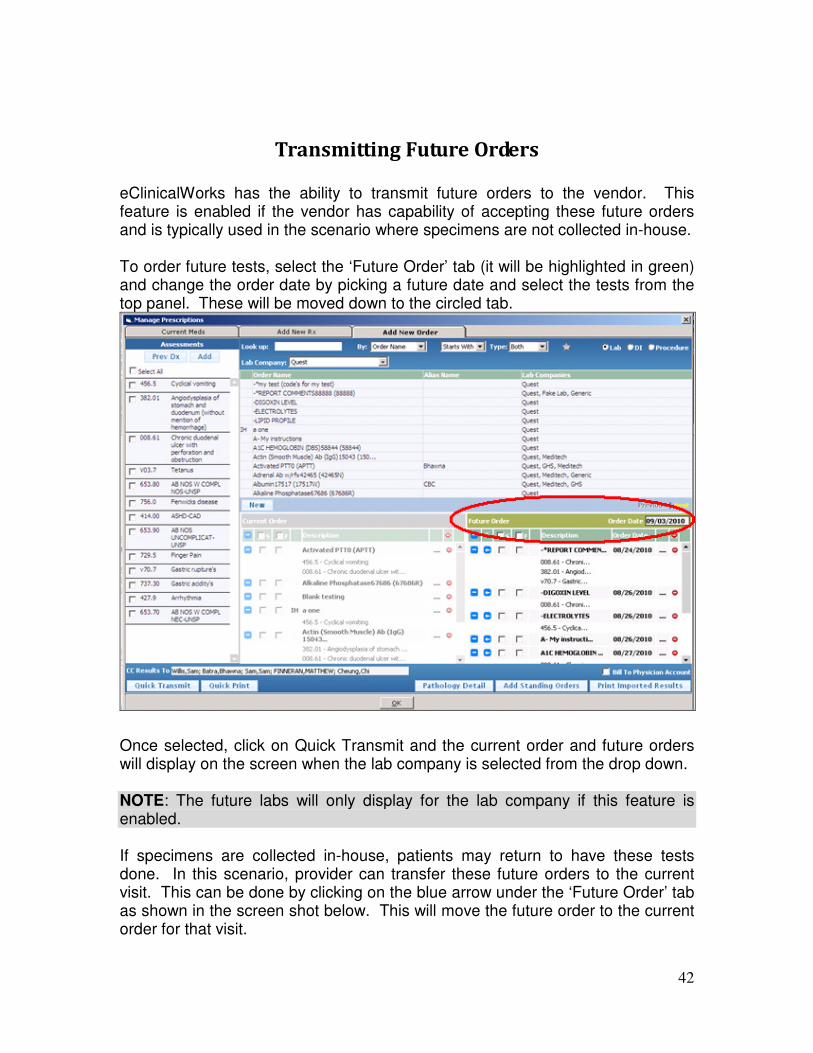
Transmitting Future Orders
eClinicalWorks has the ability to transmit future orders to the vendor. This feature is enabled if the vendor has capability of accepting these future orders and is typically used in the scenario where specimens are not collected in-house. To order future tests, select the ‘Future Order’ tab (it will be highlighted in green) and change the order date by picking a future date and select the tests from the top panel. These will be moved down to the circled tab.
Once selected, click on Quick Transmit and the current order and future orders will display on the screen when the lab company is selected from the drop down. NOTE: The future labs will only display for the lab company if this feature is enabled.
If specimens are collected in-house, patients may return to have these tests done. In this scenario, provider can transfer these future orders to the current visit. This can be done by clicking on the blue arrow under the ‘Future Order’ tab as shown in the screen shot below. This will move the future order to the current order for that visit.
43
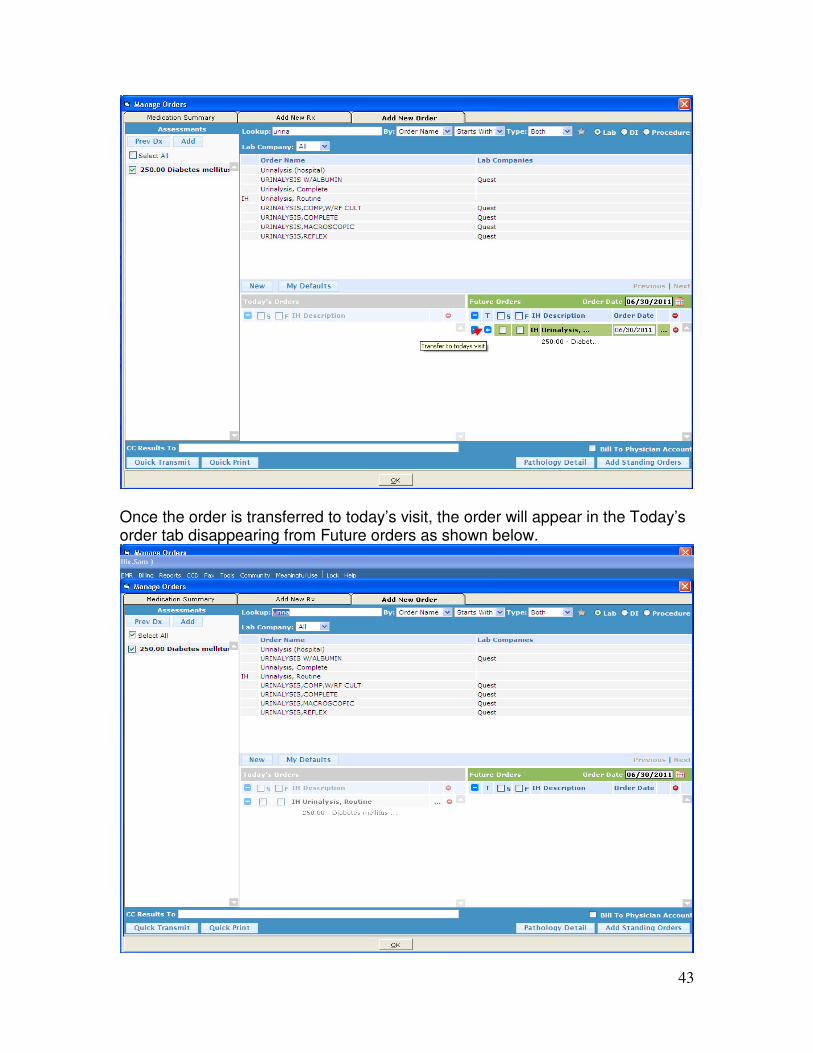
Once the order is transferred to today’s visit, the order will appear in the Today’s order tab disappearing from Future orders as shown below.
44
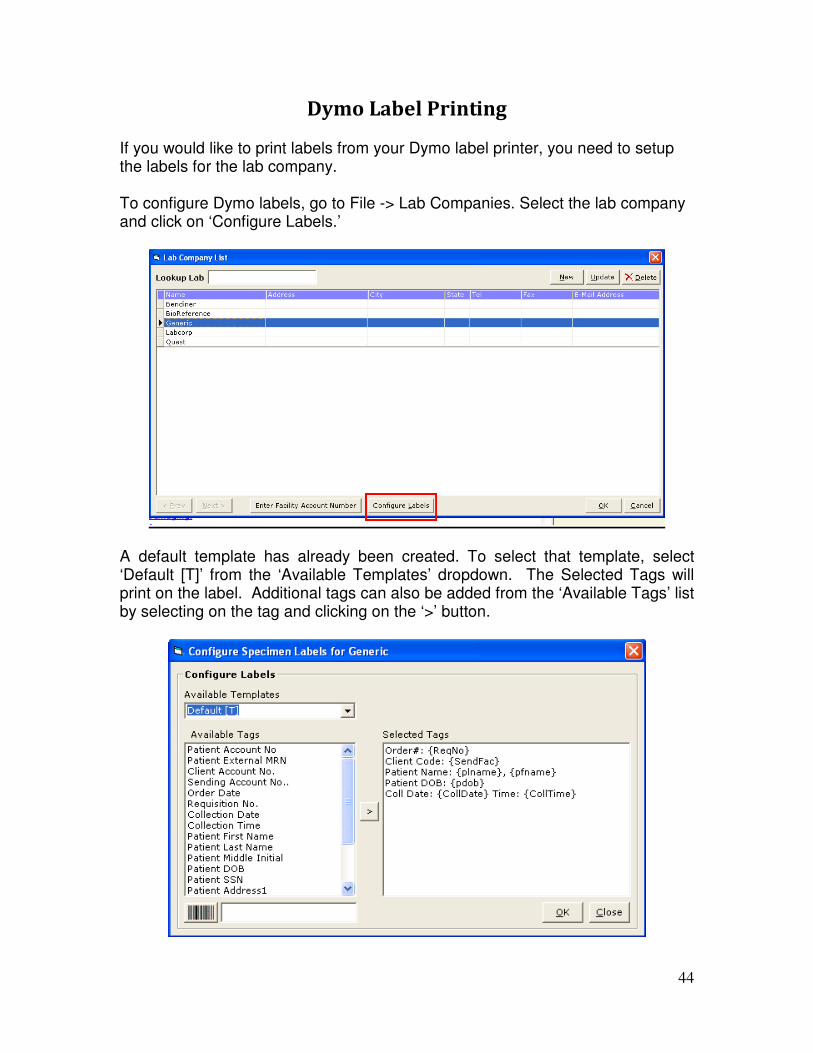
Dymo Label Printing If you would like to print labels from your Dymo label printer, you need to setup the labels for the lab company. To configure Dymo labels, go to File -> Lab Companies. Select the lab company and click on ‘Configure Labels.’
A default template has already been created. To select that template, select ‘Default [T]’ from the ‘Available Templates’ dropdown. The Selected Tags will print on the label. Additional tags can also be added from the ‘Available Tags’ list by selecting on the tag and clicking on the ‘>’ button.
45
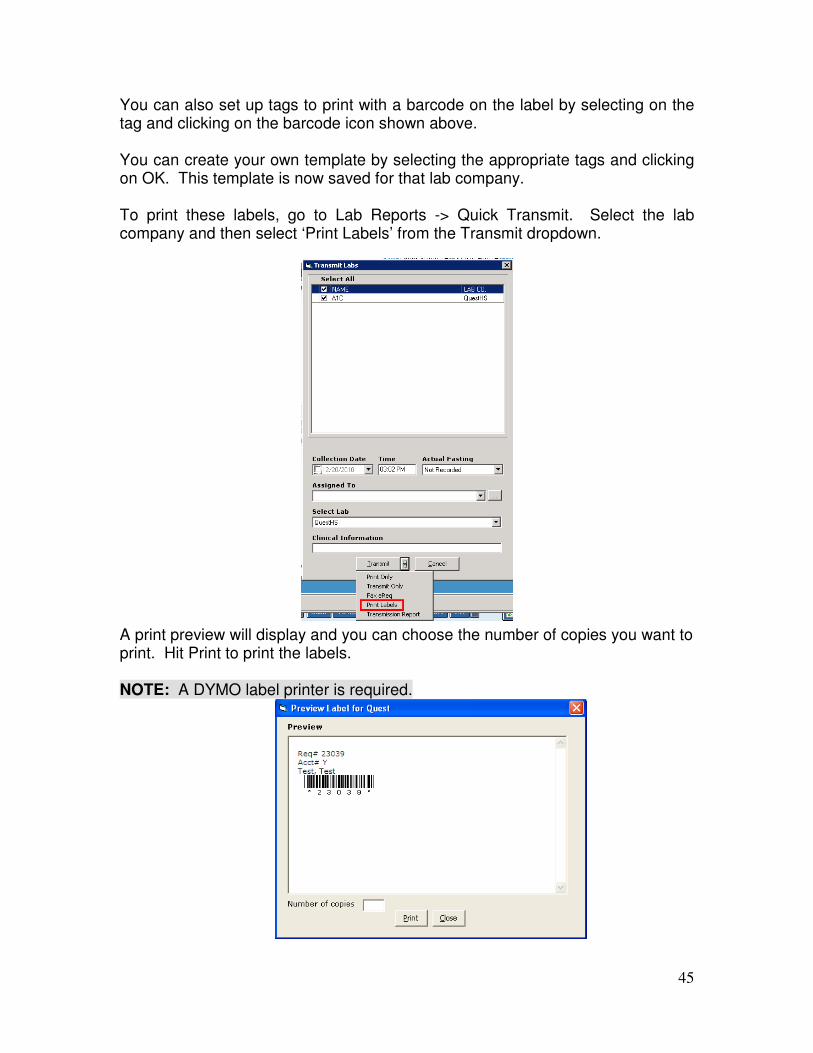
You can also set up tags to print with a barcode on the label by selecting on the tag and clicking on the barcode icon shown above. You can create your own template by selecting the appropriate tags and clicking on OK. This template is now saved for that lab company. To print these labels, go to Lab Reports -> Quick Transmit. Select the lab company and then select ‘Print Labels’ from the Transmit dropdown.
A print preview will display and you can choose the number of copies you want to print. Hit Print to print the labels. NOTE: A DYMO label printer is required.

46
Reason Status
There are different interface reason statuses that are found in the reason column for Labs under Lab result screen.
1. Transmitted to ‘Lab Company’- After the order has been successfully transmitted, the ‘Reason’ column under Labs Results screen will be updated to display ‘Transmitted to ‘Lab Company’ as shown below.
2. Ready to transmit – After the order is transmitted, if the order is in pending state to be transmitted from eCW the ‘Reason’ column under Labs Results screen will be updated to display ‘Ready to Transmit’ as shown below.
47
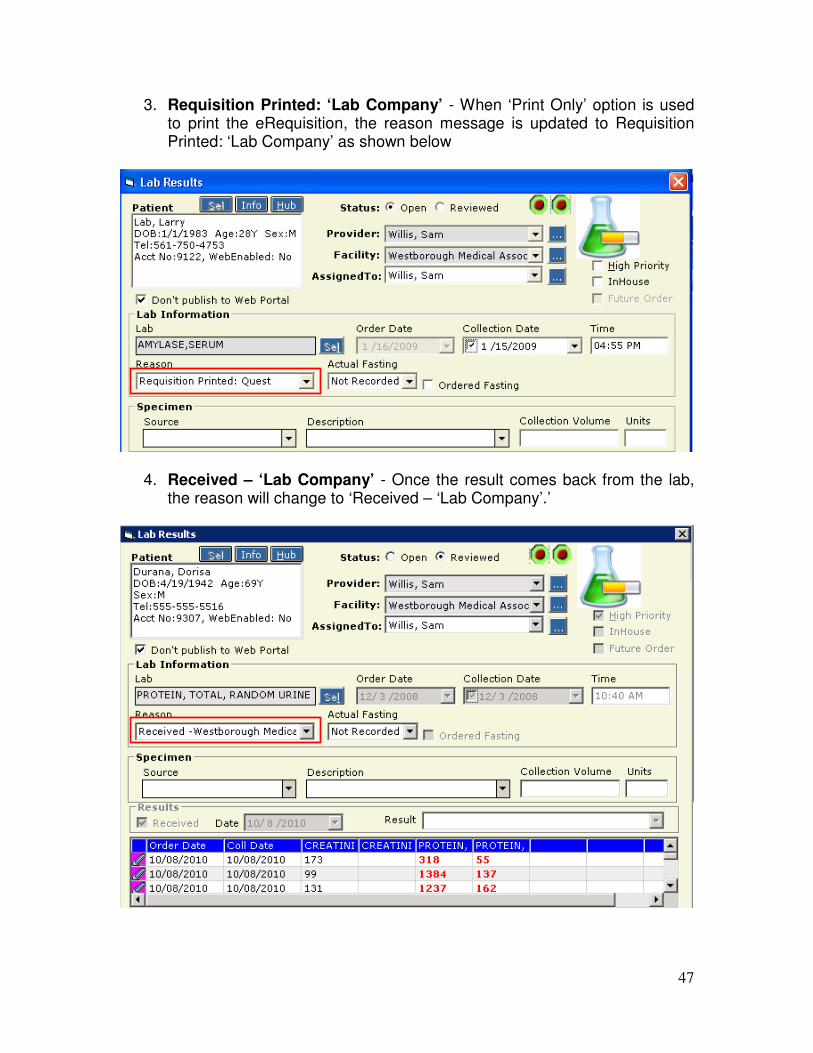
3. Requisition Printed: ‘Lab Company’ - When ‘Print Only’ option is used to print the eRequisition, the reason message is updated to Requisition Printed: ‘Lab Company’ as shown below
4. Received – ‘Lab Company’ - Once the result comes back from the lab, the reason will change to ‘Received – ‘Lab Company’.’
48
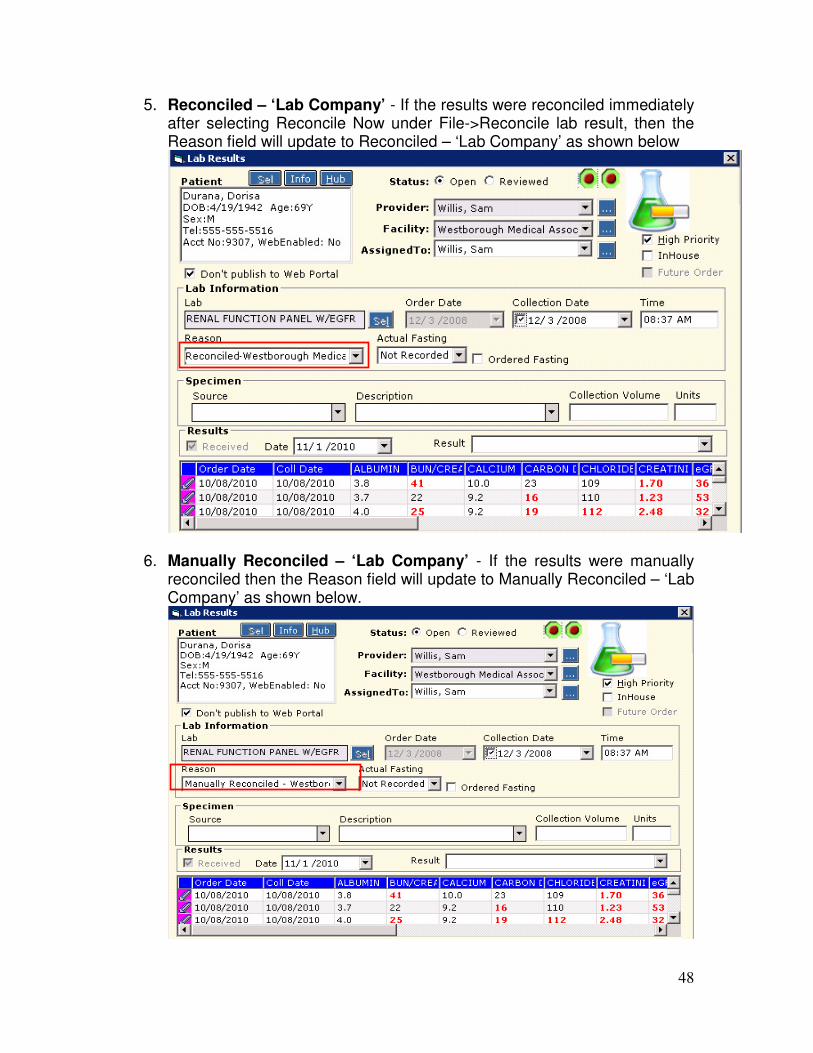
5. Reconciled – ‘Lab Company’ - If the results were reconciled immediately after selecting Reconcile Now under File->Reconcile lab result, then the Reason field will update to Reconciled – ‘Lab Company’ as shown below
6. Manually Reconciled – ‘Lab Company’ - If the results were manually reconciled then the Reason field will update to Manually Reconciled – ‘Lab Company’ as shown below.
49
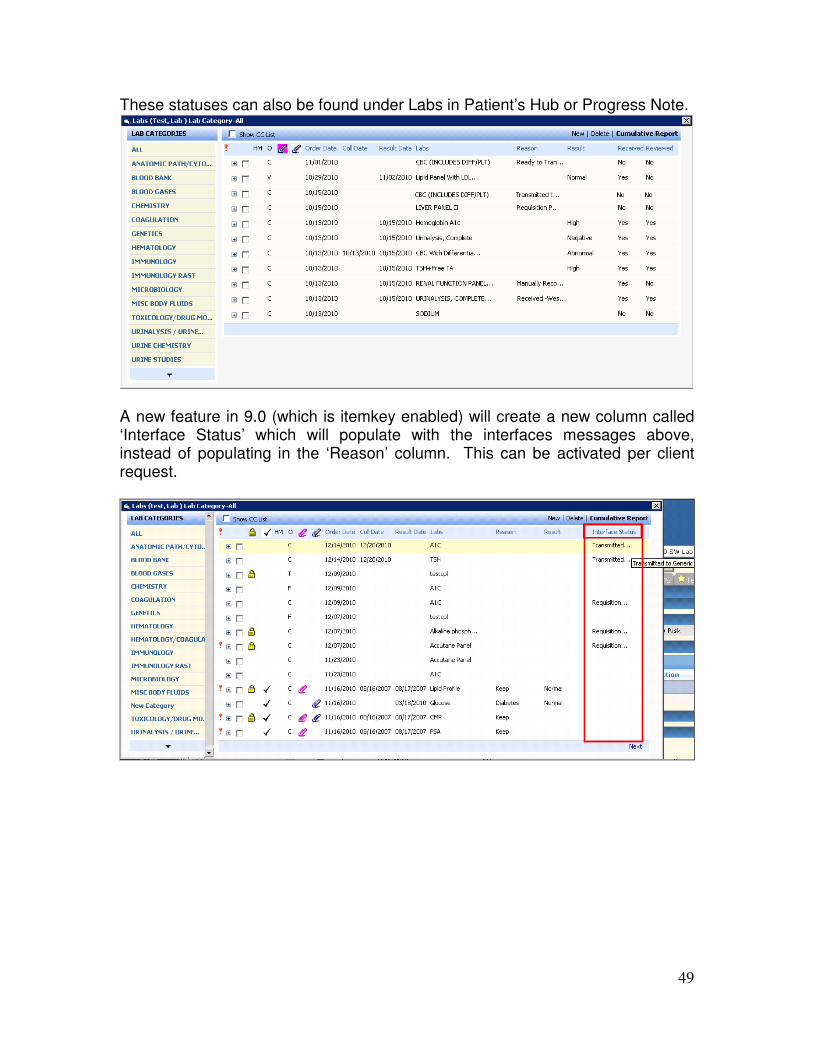
These statuses can also be found under Labs in Patient’s Hub or Progress Note.
A new feature in 9.0 (which is itemkey enabled) will create a new column called ‘Interface Status’ which will populate with the interfaces messages above, instead of populating in the ‘Reason’ column. This can be activated per client request.
50
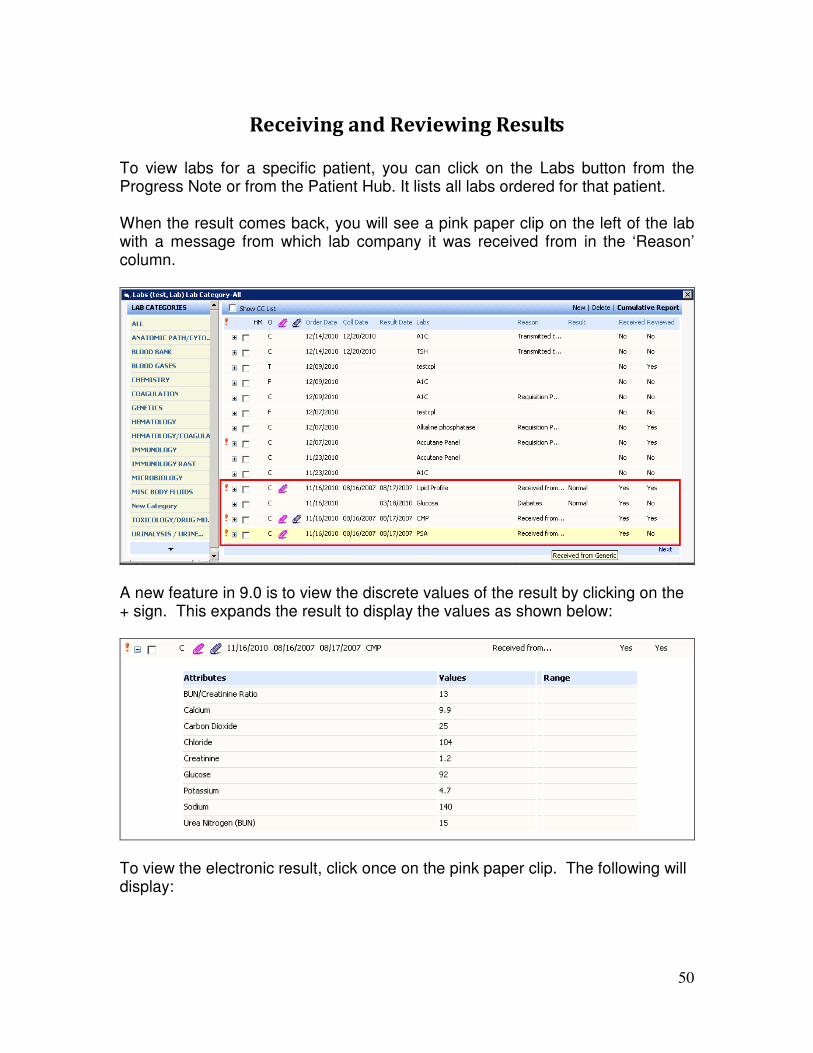
Receiving and Reviewing Results
To view labs for a specific patient, you can click on the Labs button from the Progress Note or from the Patient Hub. It lists all labs ordered for that patient. When the result comes back, you will see a pink paper clip on the left of the lab with a message from which lab company it was received from in the ‘Reason’ column.
A new feature in 9.0 is to view the discrete values of the result by clicking on the + sign. This expands the result to display the values as shown below:
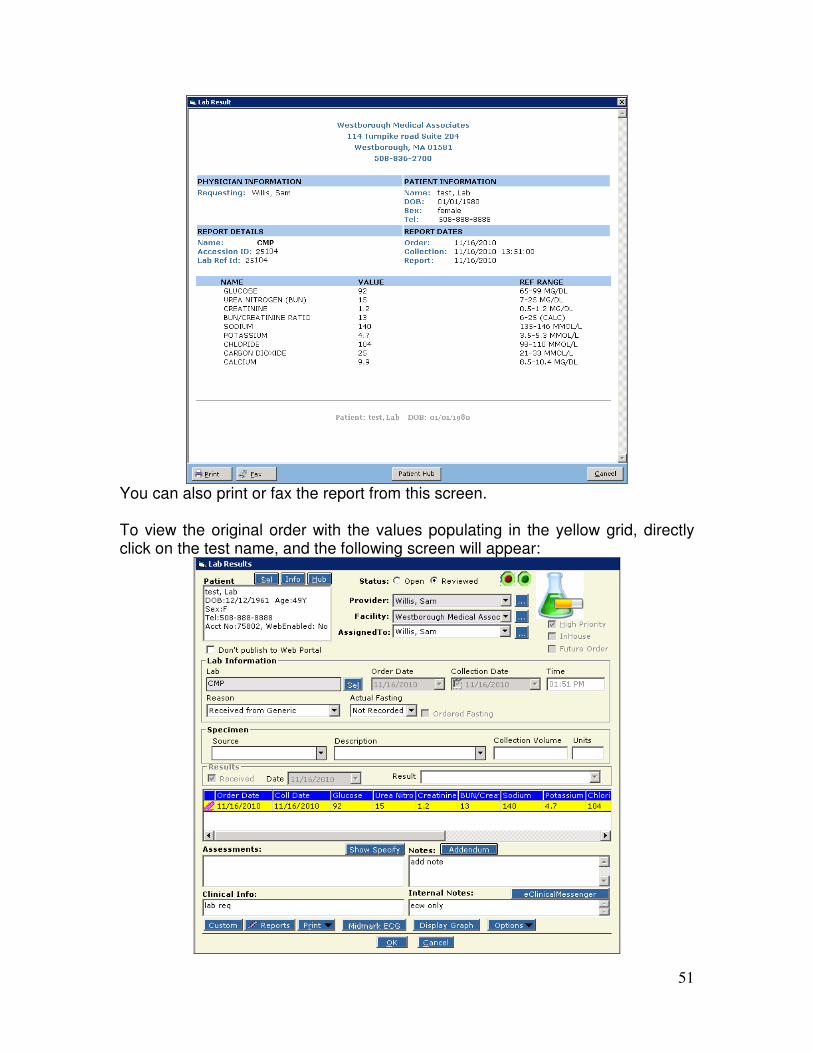
To view the electronic result, click once on the pink paper clip. The following will display:
51
You can also print or fax the report from this screen. To view the original order with the values populating in the yellow grid, directly click on the test name, and the following screen will appear:
52
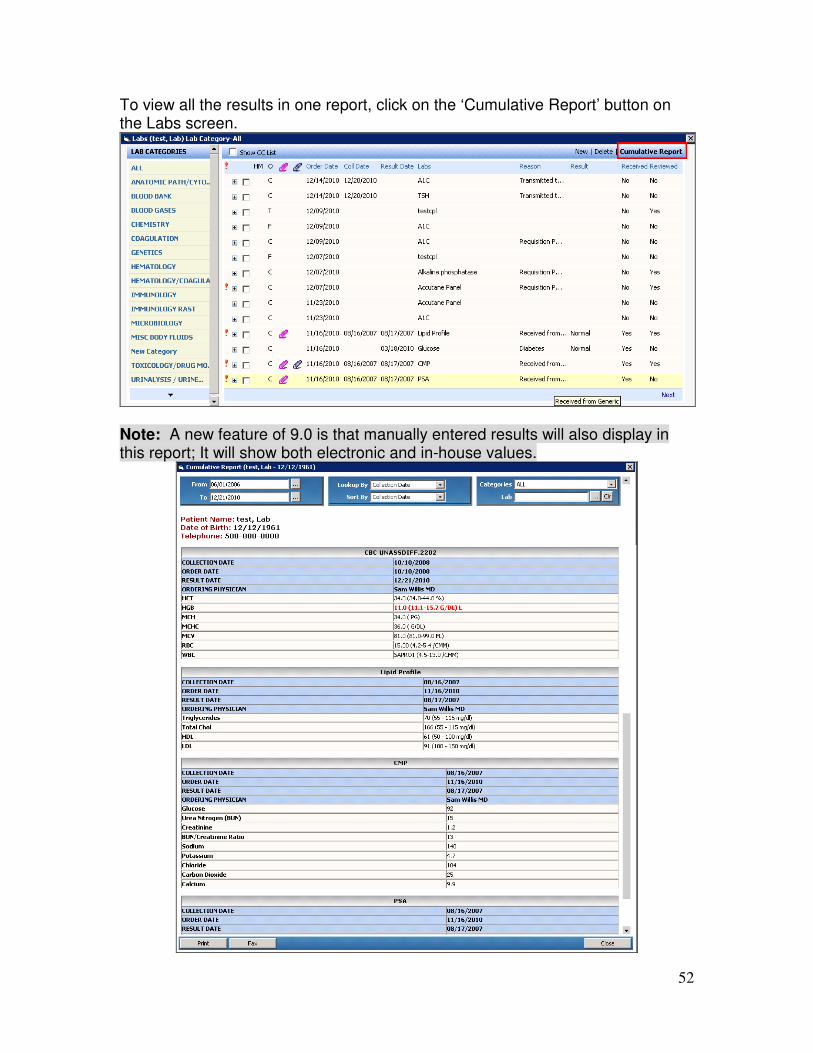
To view all the results in one report, click on the ‘Cumulative Report’ button on the Labs screen.
Note: A new feature of 9.0 is that manually entered results will also display in this report; It will show both electronic and in-house values.
53
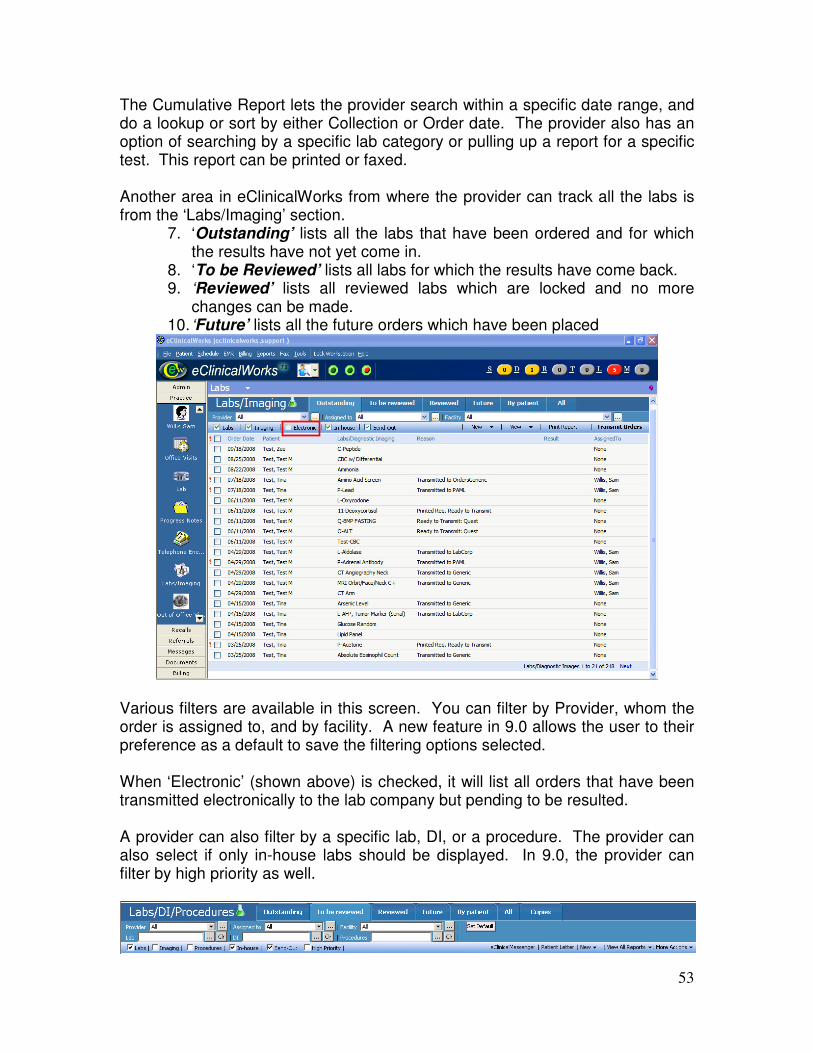
The Cumulative Report lets the provider search within a specific date range, and do a lookup or sort by either Collection or Order date. The provider also has an option of searching by a specific lab category or pulling up a report for a specific test. This report can be printed or faxed. Another area in eClinicalWorks from where the provider can track all the labs is from the ‘Labs/Imaging’ section.
7. ‘Outstanding’ lists all the labs that have been ordered and for which the results have not yet come in.
8. ‘To be Reviewed’ lists all labs for which the results have come back. 9. ‘Reviewed’ lists all reviewed labs which are locked and no more
changes can be made. 10. ‘Future’ lists all the future orders which have been placed
Various filters are available in this screen. You can filter by Provider, whom the order is assigned to, and by facility. A new feature in 9.0 allows the user to their preference as a default to save the filtering options selected. When ‘Electronic’ (shown above) is checked, it will list all orders that have been transmitted electronically to the lab company but pending to be resulted. A provider can also filter by a specific lab, DI, or a procedure. The provider can also select if only in-house labs should be displayed. In 9.0, the provider can filter by high priority as well.
54
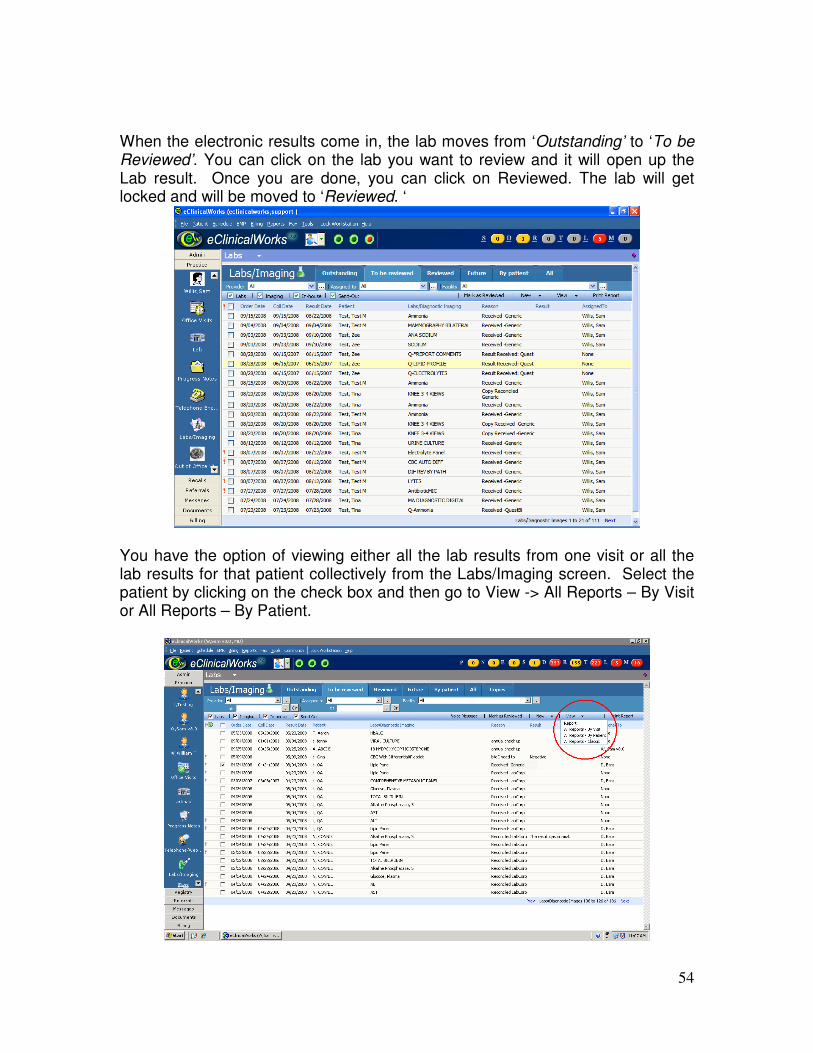
When the electronic results come in, the lab moves from ‘Outstanding’ to ‘To be Reviewed’. You can click on the lab you want to review and it will open up the Lab result. Once you are done, you can click on Reviewed. The lab will get locked and will be moved to ‘Reviewed. ‘
You have the option of viewing either all the lab results from one visit or all the lab results for that patient collectively from the Labs/Imaging screen. Select the patient by clicking on the check box and then go to View -> All Reports – By Visit or All Reports – By Patient.

55
This will display all the lab results that came back on one visit for this patient.
From this screen, you can view all the results, assign them to one individual, and can review them simultaneously. You also have the ability to view and add individual notes for each of the labs.
Viewing past results on current Progress Note In order to view past reviewed lab results on a current progress note, they must be transferred over. On the current progress note, select the Labs/DI tab from the right panel. Select ‘All’ from the drop down and all labs done for this patient will display.
Clicking on the lab name (e.g. ACTH, Plasma) will open up the lab result screen
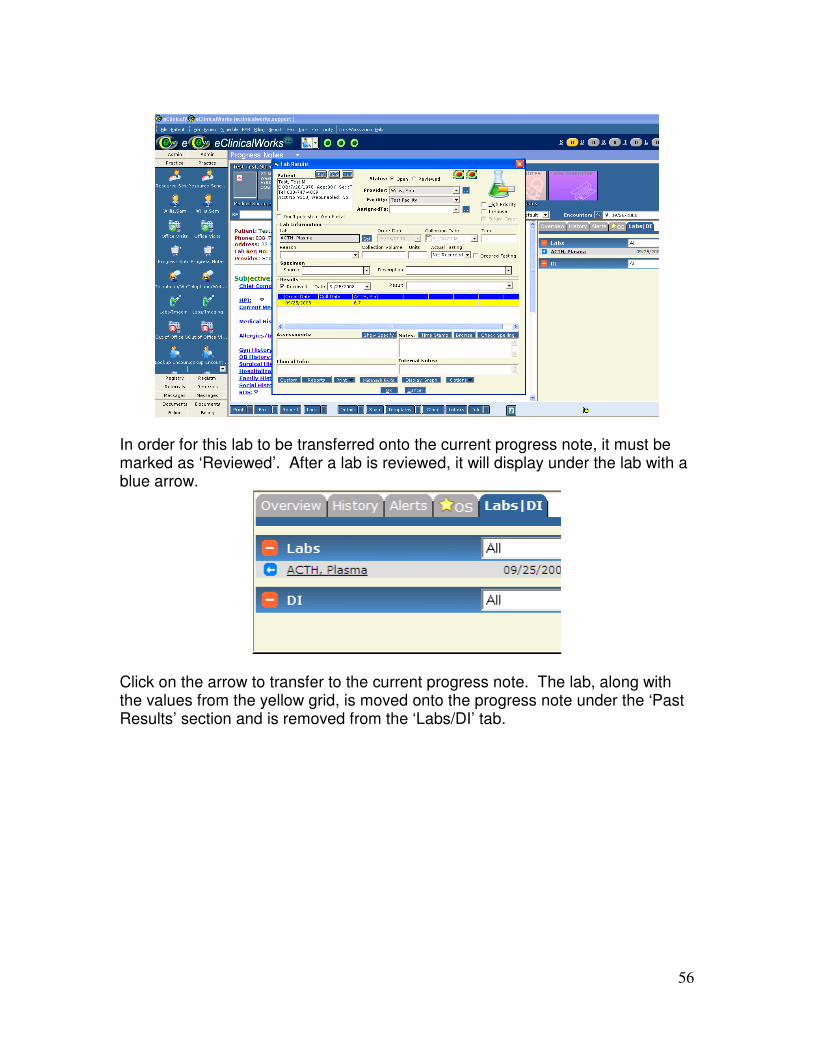
56
In order for this lab to be transferred onto the current progress note, it must be marked as ‘Reviewed’. After a lab is reviewed, it will display under the lab with a blue arrow.
Click on the arrow to transfer to the current progress note. The lab, along with the values from the yellow grid, is moved onto the progress note under the ‘Past Results’ section and is removed from the ‘Labs/DI’ tab.
57
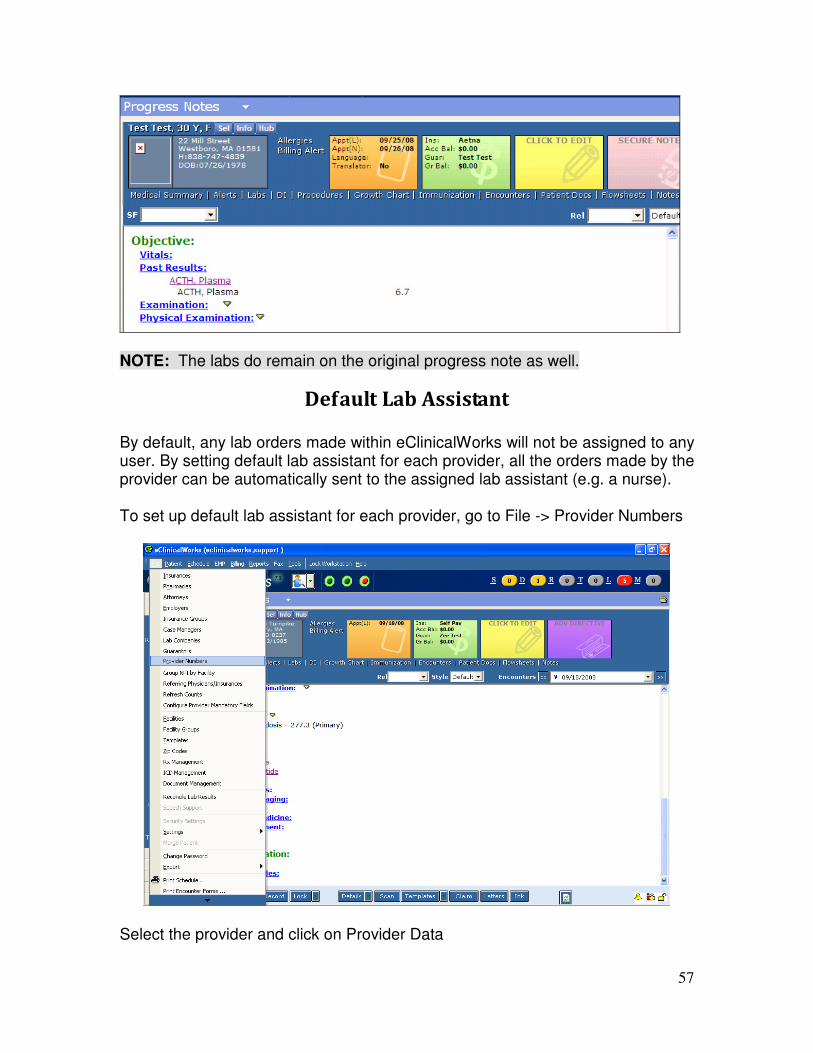
NOTE: The labs do remain on the original progress note as well.
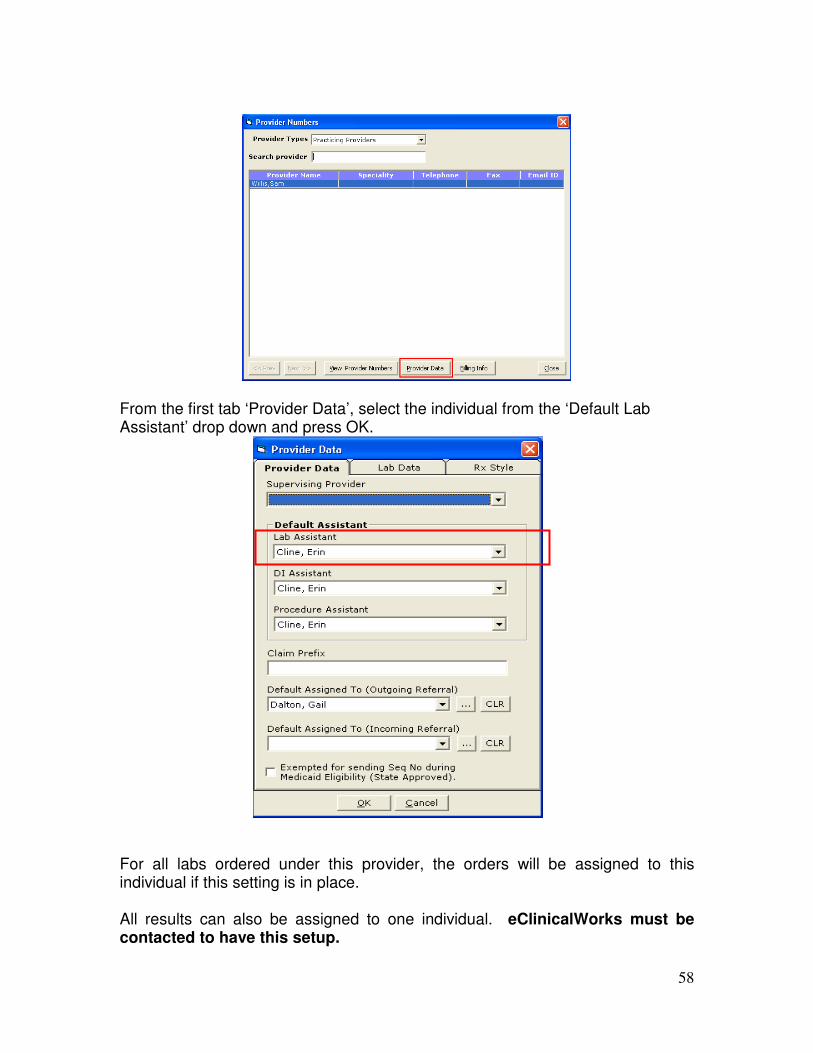
Default Lab Assistant By default, any lab orders made within eClinicalWorks will not be assigned to any user. By setting default lab assistant for each provider, all the orders made by the provider can be automatically sent to the assigned lab assistant (e.g. a nurse).
To set up default lab assistant for each provider, go to File -> Provider Numbers
Select the provider and click on Provider Data
58
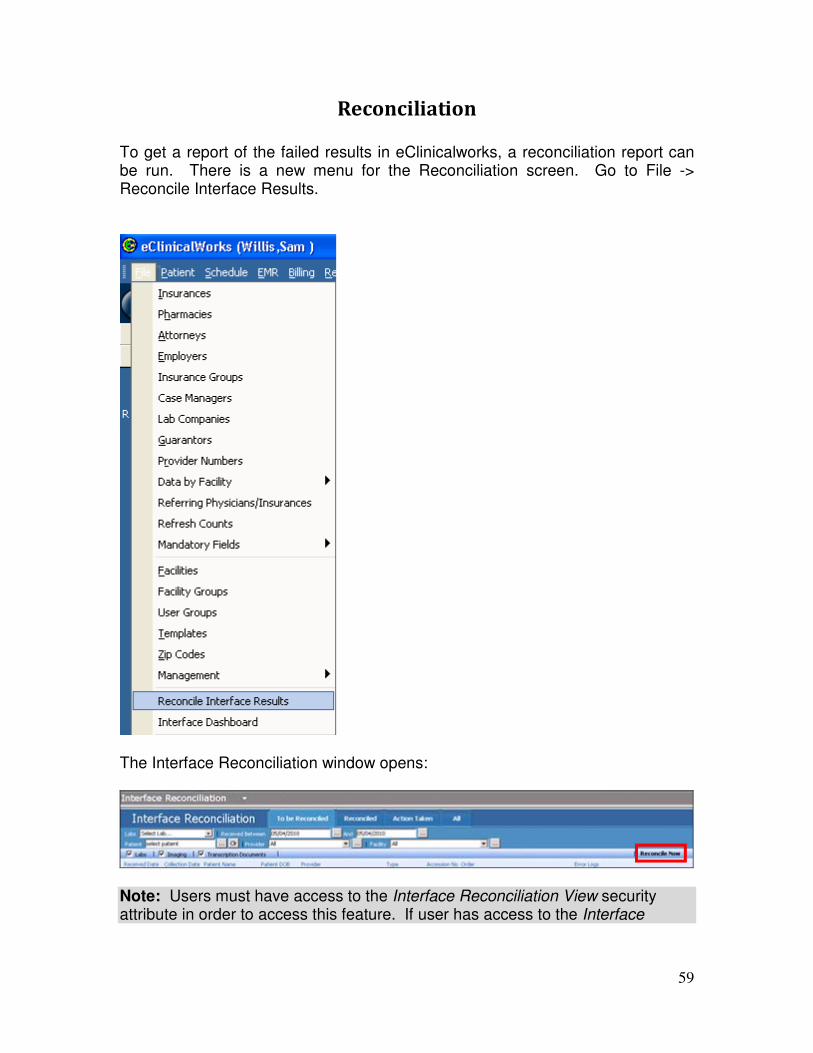
From the first tab ‘Provider Data’, select the individual from the ‘Default Lab Assistant’ drop down and press OK.
For all labs ordered under this provider, the orders will be assigned to this individual if this setting is in place. All results can also be assigned to one individual. eClinicalWorks must be contacted to have this setup.
59
Reconciliation To get a report of the failed results in eClinicalworks, a reconciliation report can be run. There is a new menu for the Reconciliation screen. Go to File -> Reconcile Interface Results.
The Interface Reconciliation window opens:
Note: Users must have access to the Interface Reconciliation View security attribute in order to access this feature. If user has access to the Interface

60
Reconciliation-Electronic security attribute, then they will have access to the ‘Reconcile Now’ button in the upper right corner. In the interface reconciliation window the following tables display:
• To be Reconciled – Displays electronic results that have not been reconciled
• Reconciled – Displays electronic results that have already been reconciled
• Action Taken – Displays electronic results that have had actions taken on them
• All – Displays all lab results.
Select the Lab Company from the drop-down list and select the date range for which you want to reconcile from the filters provided. If you want to reconcile for a specific patient, then select the patient from the ellipsis. The user also has the option of viewing failed results for a specific provider and for a specific facility. To exclude specific types of orders from your results, uncheck any of the following boxes: labs, imaging, transcription documents. Once all the options have been set, the results that match the selected criteria will display:
On the ‘To be Reconciled’ table, results can be reconciled automatically in batches by clicking on the ‘Reconcile Now’ button. All current results are reconciled. Note: Failed messages that have not been reconciled for a certain number of days on the ‘To be Reconciled’ tab are marked with a red exclamation mark. This indicates that the provider has not reconciled the results and needs to open the message and reconcile it. This feature is enabled by request and provider can indicate after how many days the result should be marked. In the ‘To be Reconciled’ table, the following errors can be found:
• Patient Match Not Found
• Provider Match Not Found
• Patient and Provider match not found
61
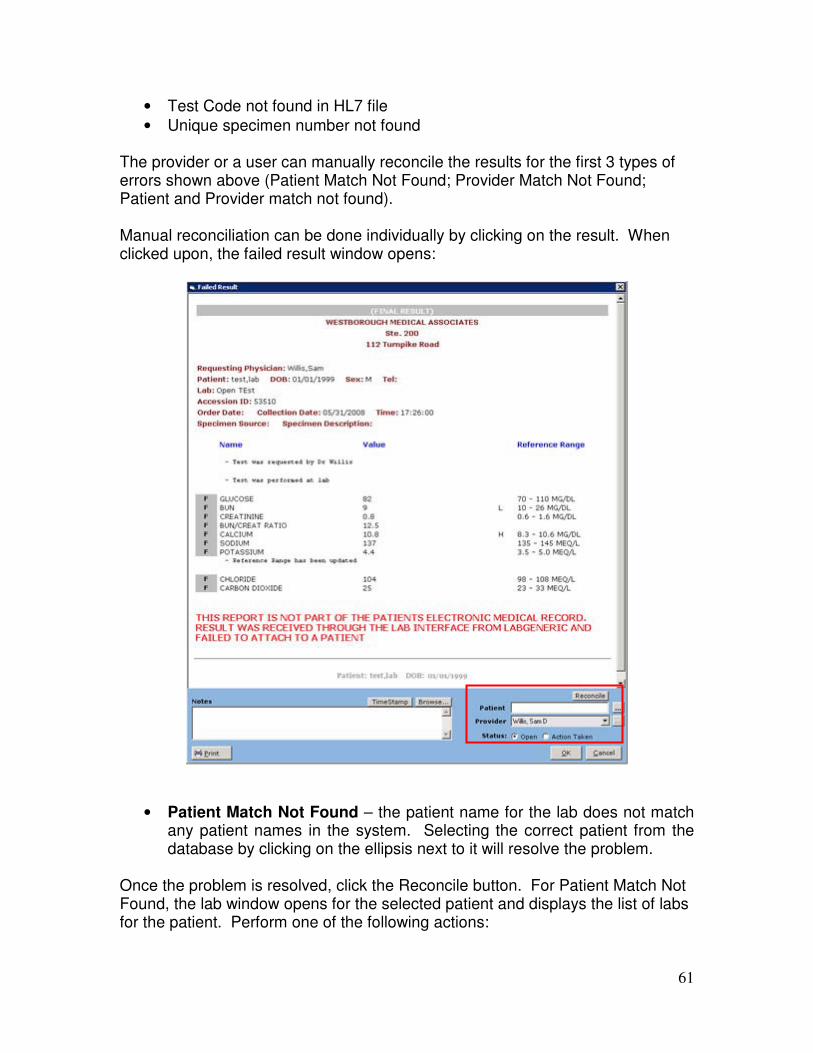
• Test Code not found in HL7 file
• Unique specimen number not found The provider or a user can manually reconcile the results for the first 3 types of errors shown above (Patient Match Not Found; Provider Match Not Found; Patient and Provider match not found). Manual reconciliation can be done individually by clicking on the result. When clicked upon, the failed result window opens:
• Patient Match Not Found – the patient name for the lab does not match any patient names in the system. Selecting the correct patient from the database by clicking on the ellipsis next to it will resolve the problem.
Once the problem is resolved, click the Reconcile button. For Patient Match Not Found, the lab window opens for the selected patient and displays the list of labs for the patient. Perform one of the following actions:
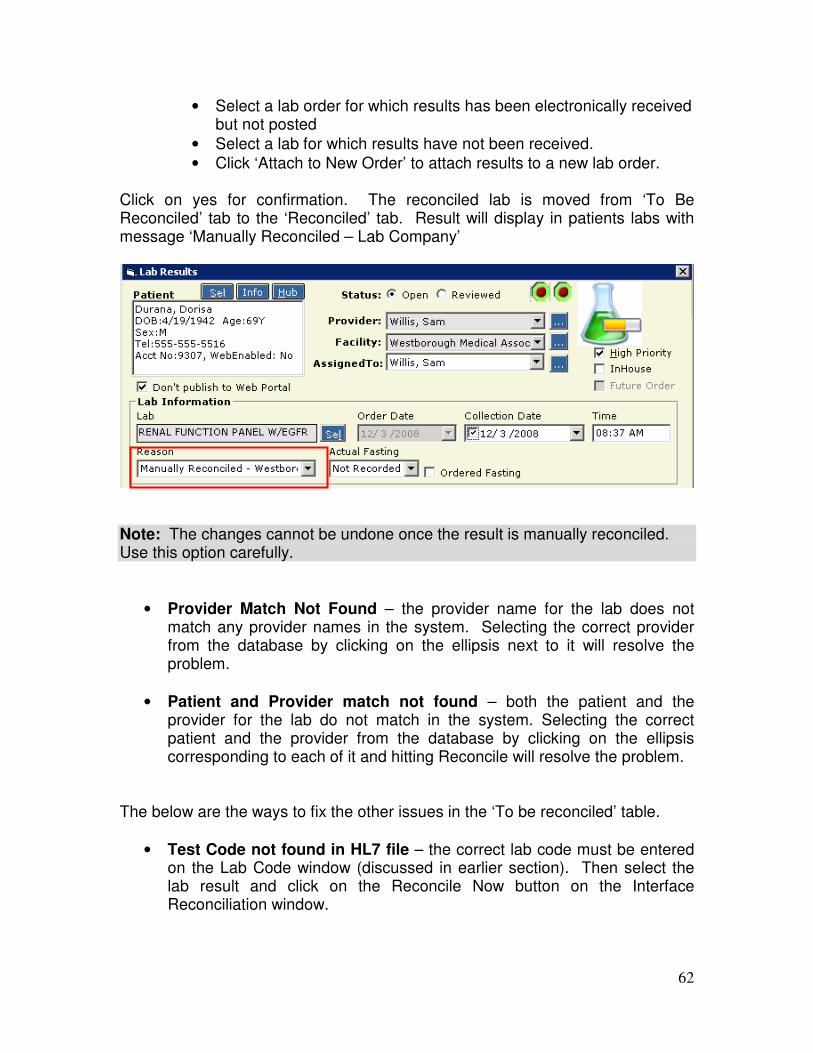
62
• Select a lab order for which results has been electronically received but not posted
• Select a lab for which results have not been received.
• Click ‘Attach to New Order’ to attach results to a new lab order. Click on yes for confirmation. The reconciled lab is moved from ‘To Be Reconciled’ tab to the ‘Reconciled’ tab. Result will display in patients labs with message ‘Manually Reconciled – Lab Company’
Note: The changes cannot be undone once the result is manually reconciled. Use this option carefully.
• Provider Match Not Found – the provider name for the lab does not match any provider names in the system. Selecting the correct provider from the database by clicking on the ellipsis next to it will resolve the problem.
• Patient and Provider match not found – both the patient and the provider for the lab do not match in the system. Selecting the correct patient and the provider from the database by clicking on the ellipsis corresponding to each of it and hitting Reconcile will resolve the problem.
The below are the ways to fix the other issues in the ‘To be reconciled’ table.
• Test Code not found in HL7 file – the correct lab code must be entered on the Lab Code window (discussed in earlier section). Then select the lab result and click on the Reconcile Now button on the Interface Reconciliation window.
63
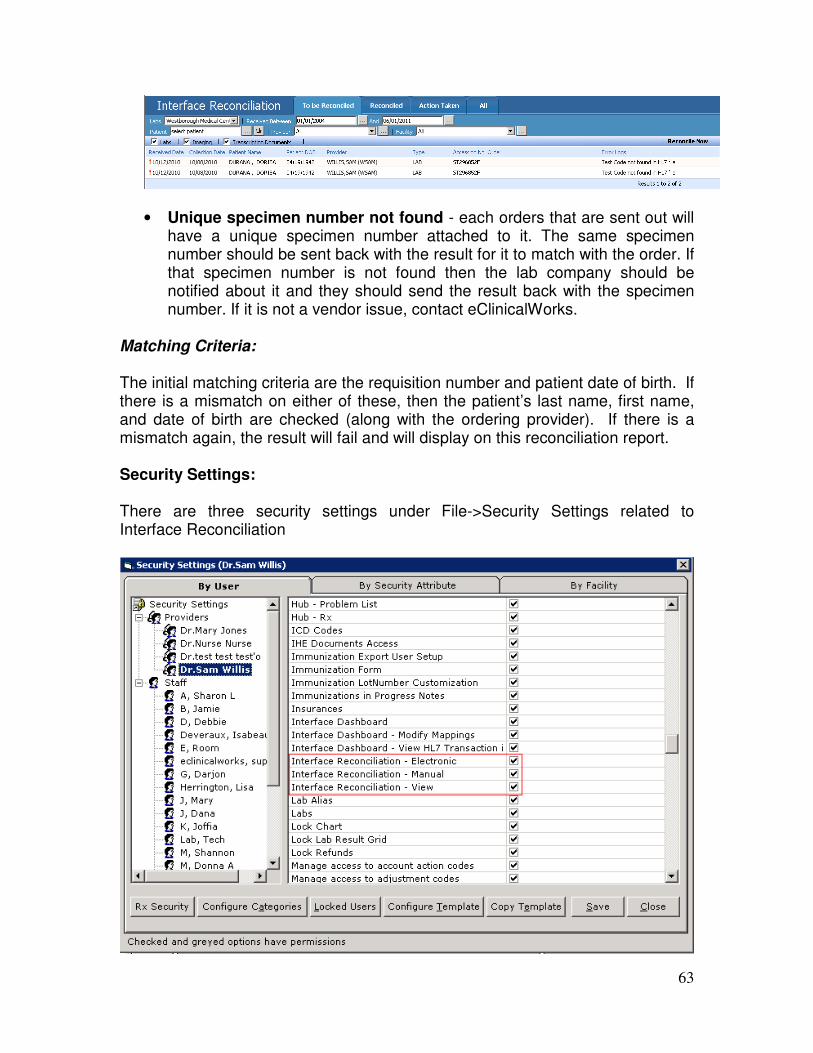
• Unique specimen number not found - each orders that are sent out will have a unique specimen number attached to it. The same specimen number should be sent back with the result for it to match with the order. If that specimen number is not found then the lab company should be notified about it and they should send the result back with the specimen number. If it is not a vendor issue, contact eClinicalWorks.
Matching Criteria: The initial matching criteria are the requisition number and patient date of birth. If there is a mismatch on either of these, then the patient’s last name, first name, and date of birth are checked (along with the ordering provider). If there is a mismatch again, the result will fail and will display on this reconciliation report. Security Settings:
There are three security settings under File->Security Settings related to Interface Reconciliation

64
Interface Reconciliation – Electronic: Grants or denies users permission to reconcile failed electronic results using the Reconcile Now button (File menu > Reconcile Lab Results > Reconcile Now button).
Interface Reconciliation – Manual: Grants or denies users permission to manually reconcile failed electronic results (File menu > Reconcile Lab Results).
Interface Reconciliation – View: Grants or denies users permission to access the Interface Reconciliation window in Web view (File menu > Reconcile Lab Results).
Interface Dashboard
The Interface Dashboard provides a place to configure mappings and view reports for various lab, practice management, and immunization interface elements. The lab elements will be discussed below. To get to the Interface Dashboard, go to File -> Interface Dashboard option. The Interface Dashboard window opens with the ‘Clinical’ tab selected by default. This tab refers to the lab elements. Select an interface from the Interface Name drop-down list:
Configuring Clinical Mappings: eClinicalWorks items can be mapped to external codes provided by the interface vendor. These mappings are done during install time and should not be changed unless indicated by the provider. The following items can be mapped:
• Guarantor Relations
65
• Fasting
• Ethnicity Codes
• Language
• Marital Status
• Priority
• Race Codes
• Specimen Collection
• Doctor Codes
• External Gender codes Confirm with vendor before making any changes. Click on OK to save the changes. Running Clinical Reports: Reports on lab orders and results can be run from the Clinical Tab.
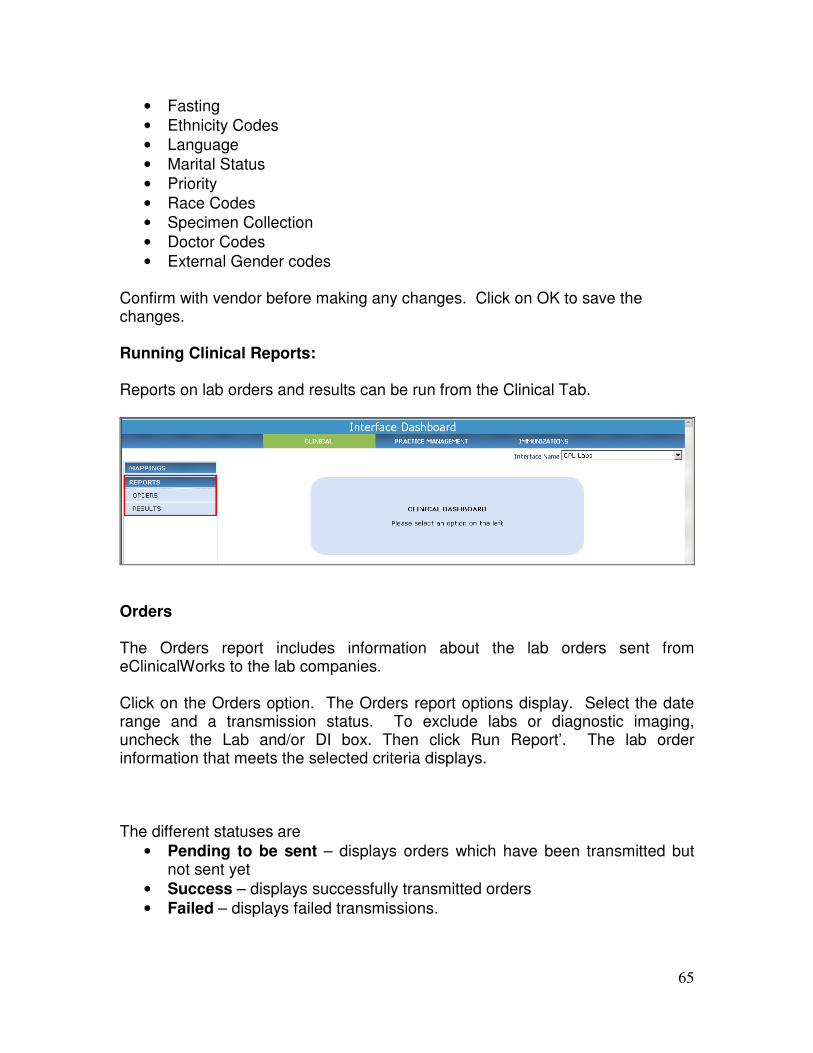
Orders The Orders report includes information about the lab orders sent from eClinicalWorks to the lab companies. Click on the Orders option. The Orders report options display. Select the date range and a transmission status. To exclude labs or diagnostic imaging, uncheck the Lab and/or DI box. Then click Run Report’. The lab order information that meets the selected criteria displays. The different statuses are
• Pending to be sent – displays orders which have been transmitted but not sent yet
• Success – displays successfully transmitted orders
• Failed – displays failed transmissions.
66
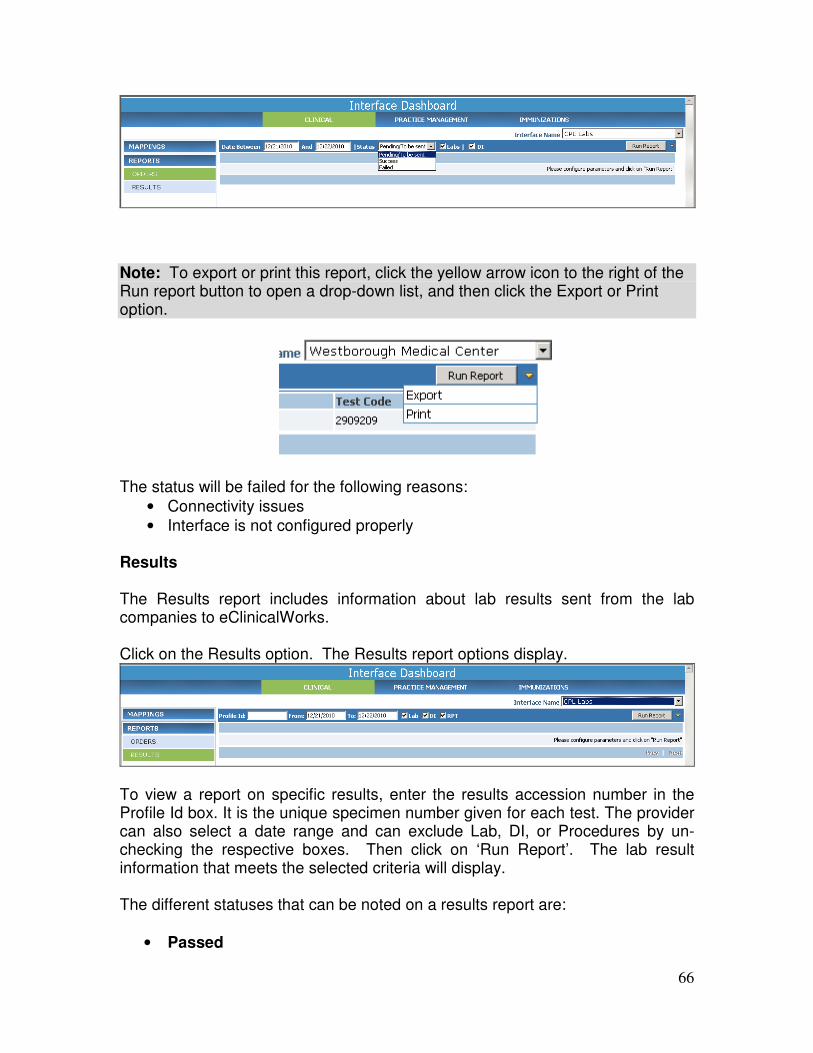
Note: To export or print this report, click the yellow arrow icon to the right of the Run report button to open a drop-down list, and then click the Export or Print option.
The status will be failed for the following reasons:
• Connectivity issues
• Interface is not configured properly Results
The Results report includes information about lab results sent from the lab companies to eClinicalWorks. Click on the Results option. The Results report options display.
To view a report on specific results, enter the results accession number in the Profile Id box. It is the unique specimen number given for each test. The provider can also select a date range and can exclude Lab, DI, or Procedures by un-checking the respective boxes. Then click on ‘Run Report’. The lab result information that meets the selected criteria will display. The different statuses that can be noted on a results report are:
• Passed
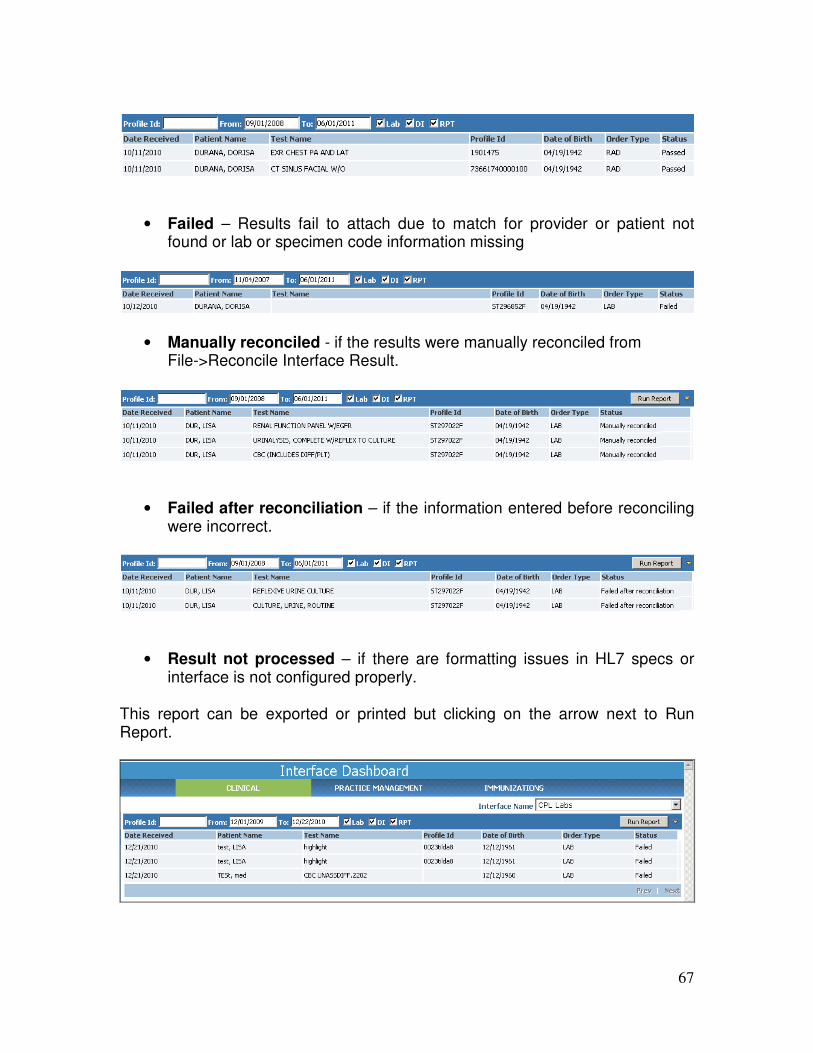
67
• Failed – Results fail to attach due to match for provider or patient not found or lab or specimen code information missing
• Manually reconciled - if the results were manually reconciled from File->Reconcile Interface Result.
• Failed after reconciliation – if the information entered before reconciling were incorrect.
• Result not processed – if there are formatting issues in HL7 specs or interface is not configured properly.
This report can be exported or printed but clicking on the arrow next to Run Report.

68
If the security attribute ‘Interface Dashboard – View HL7 Transaction in reports’ is enabled, then provider can view the HL7 message received from the vendor by clicking on the result.
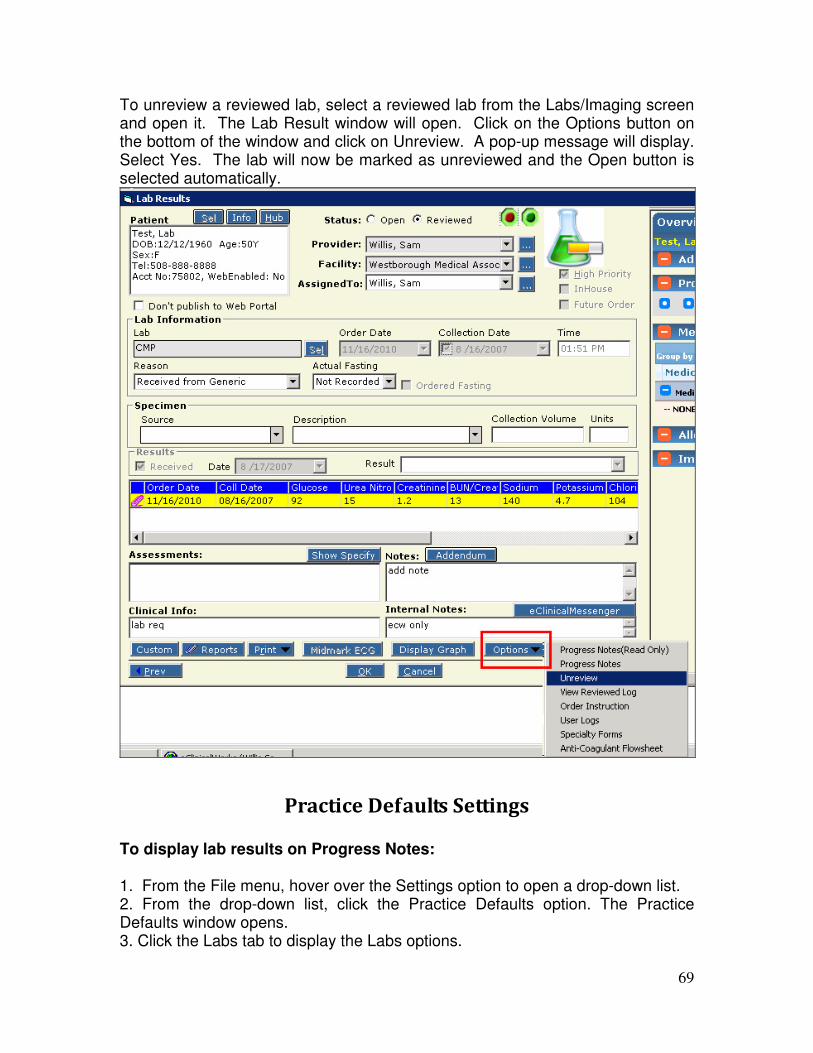
Additional Features
Unreviewing a Reviewed Lab: The security attribute, ‘Unreview Labs/DI/Procedure’ has been added to the Security Settings window to enable the user to open and mark a previously reviewed lab as unreviewed. To mark reviewed labs as not reviewed, go to File -> Security Settings. Select ‘Unreview Labs/DI/Procedure’ security key. Assign the security setting to a user who can access the feature:
69
To unreview a reviewed lab, select a reviewed lab from the Labs/Imaging screen and open it. The Lab Result window will open. Click on the Options button on the bottom of the window and click on Unreview. A pop-up message will display. Select Yes. The lab will now be marked as unreviewed and the Open button is selected automatically.
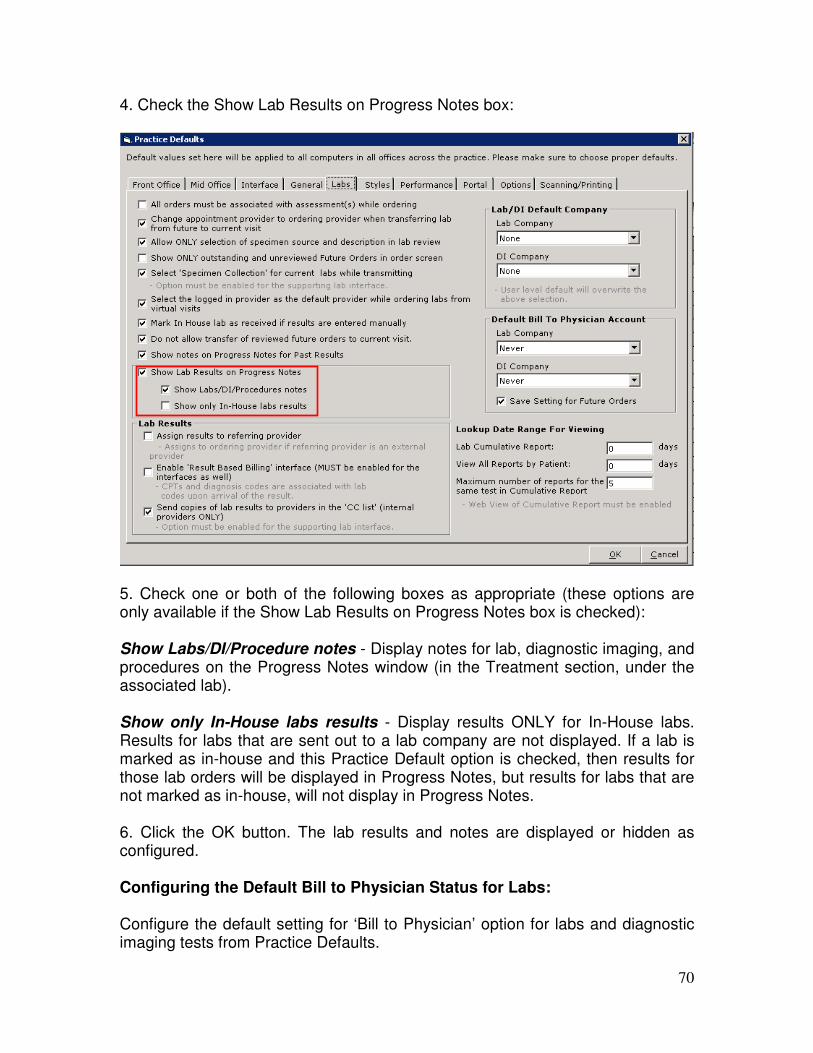
Practice Defaults Settings To display lab results on Progress Notes: 1. From the File menu, hover over the Settings option to open a drop-down list. 2. From the drop-down list, click the Practice Defaults option. The Practice Defaults window opens. 3. Click the Labs tab to display the Labs options.
70
4. Check the Show Lab Results on Progress Notes box:
5. Check one or both of the following boxes as appropriate (these options are only available if the Show Lab Results on Progress Notes box is checked): Show Labs/DI/Procedure notes - Display notes for lab, diagnostic imaging, and procedures on the Progress Notes window (in the Treatment section, under the associated lab). Show only In-House labs results - Display results ONLY for In-House labs. Results for labs that are sent out to a lab company are not displayed. If a lab is marked as in-house and this Practice Default option is checked, then results for those lab orders will be displayed in Progress Notes, but results for labs that are not marked as in-house, will not display in Progress Notes. 6. Click the OK button. The lab results and notes are displayed or hidden as configured. Configuring the Default Bill to Physician Status for Labs: Configure the default setting for ‘Bill to Physician’ option for labs and diagnostic imaging tests from Practice Defaults.
71
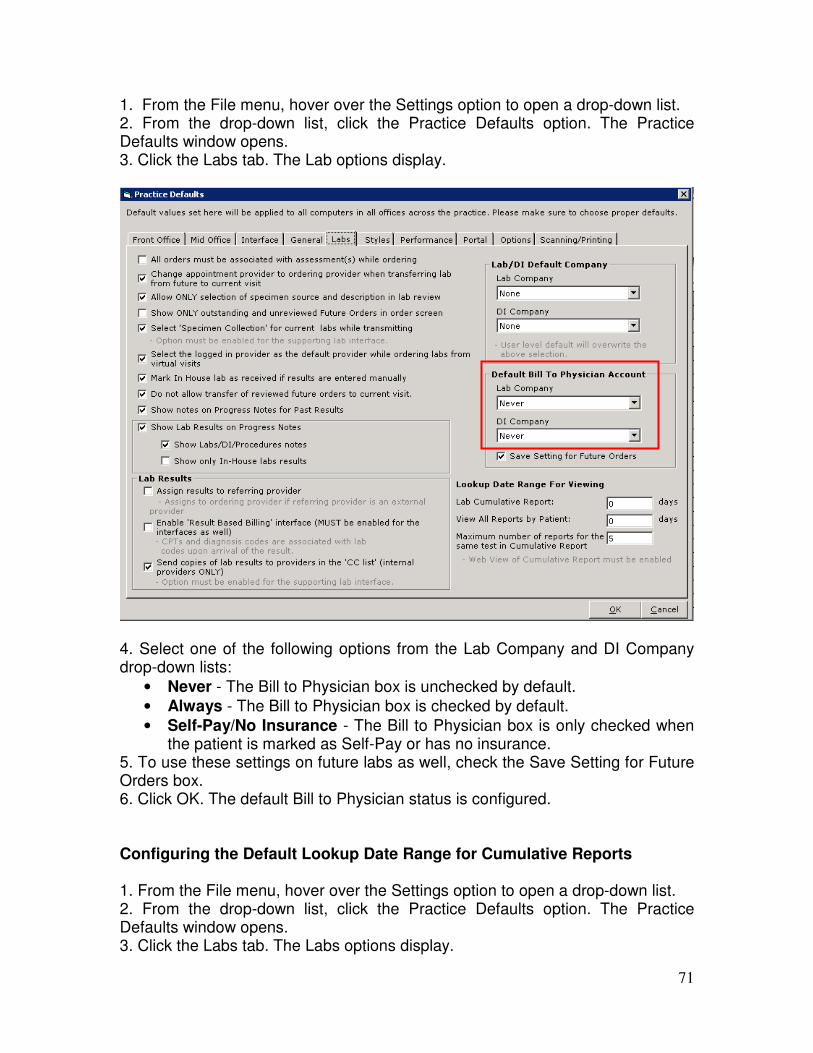
1. From the File menu, hover over the Settings option to open a drop-down list. 2. From the drop-down list, click the Practice Defaults option. The Practice Defaults window opens. 3. Click the Labs tab. The Lab options display.
4. Select one of the following options from the Lab Company and DI Company drop-down lists:
• Never - The Bill to Physician box is unchecked by default.
• Always - The Bill to Physician box is checked by default.
• Self-Pay/No Insurance - The Bill to Physician box is only checked when the patient is marked as Self-Pay or has no insurance.
5. To use these settings on future labs as well, check the Save Setting for Future Orders box. 6. Click OK. The default Bill to Physician status is configured.
Configuring the Default Lookup Date Range for Cumulative Reports 1. From the File menu, hover over the Settings option to open a drop-down list. 2. From the drop-down list, click the Practice Defaults option. The Practice Defaults window opens. 3. Click the Labs tab. The Labs options display.
72
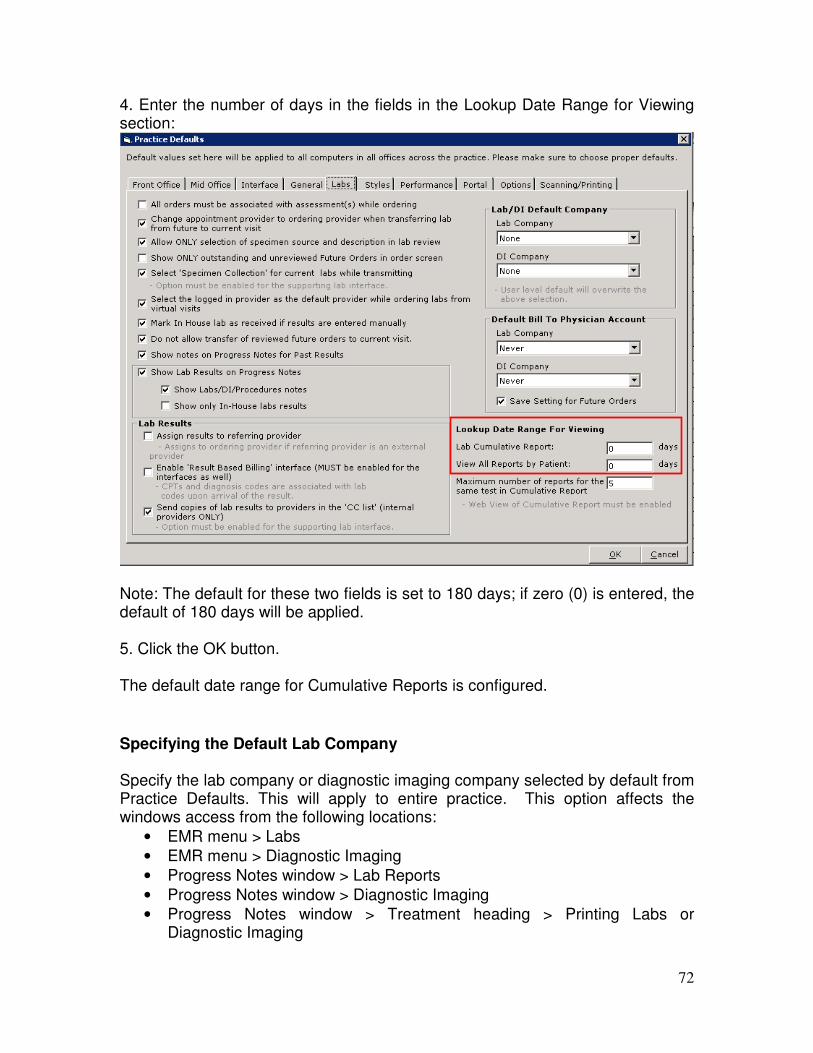
4. Enter the number of days in the fields in the Lookup Date Range for Viewing section:
Note: The default for these two fields is set to 180 days; if zero (0) is entered, the default of 180 days will be applied. 5. Click the OK button. The default date range for Cumulative Reports is configured.
Specifying the Default Lab Company Specify the lab company or diagnostic imaging company selected by default from Practice Defaults. This will apply to entire practice. This option affects the windows access from the following locations:
• EMR menu > Labs
• EMR menu > Diagnostic Imaging
• Progress Notes window > Lab Reports
• Progress Notes window > Diagnostic Imaging
• Progress Notes window > Treatment heading > Printing Labs or Diagnostic Imaging
73
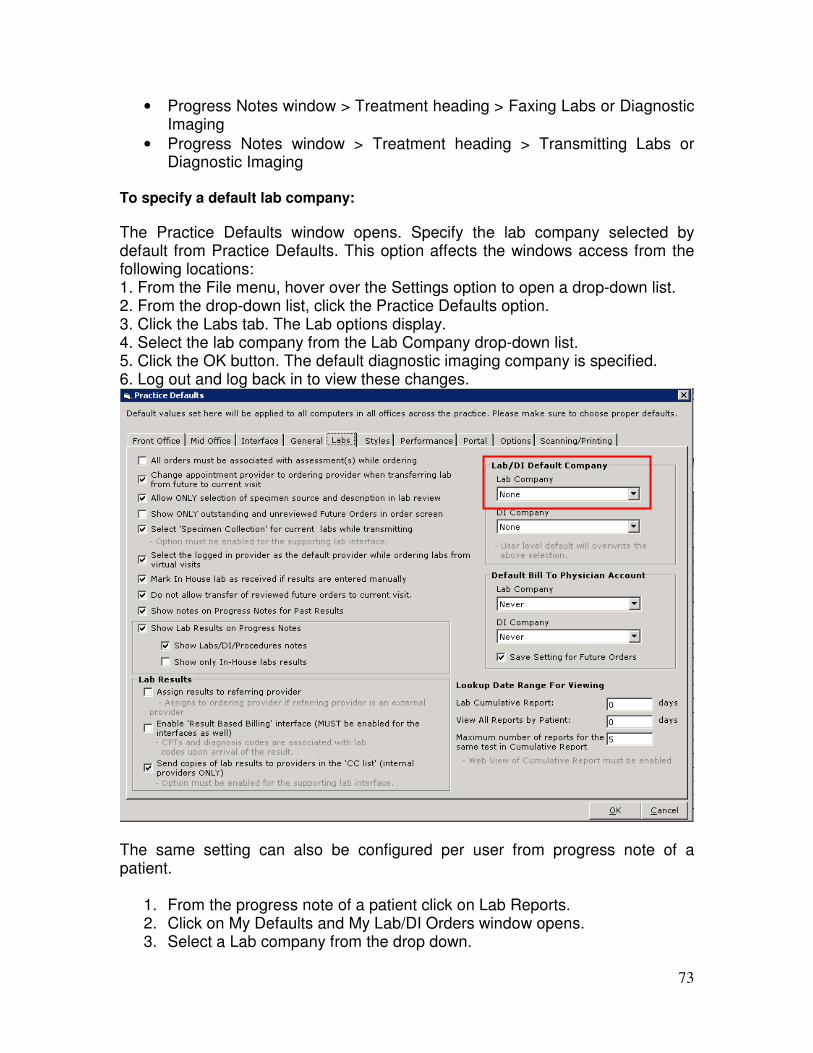
• Progress Notes window > Treatment heading > Faxing Labs or Diagnostic Imaging
• Progress Notes window > Treatment heading > Transmitting Labs or Diagnostic Imaging
To specify a default lab company:
The Practice Defaults window opens. Specify the lab company selected by default from Practice Defaults. This option affects the windows access from the following locations: 1. From the File menu, hover over the Settings option to open a drop-down list. 2. From the drop-down list, click the Practice Defaults option. 3. Click the Labs tab. The Lab options display. 4. Select the lab company from the Lab Company drop-down list. 5. Click the OK button. The default diagnostic imaging company is specified. 6. Log out and log back in to view these changes.
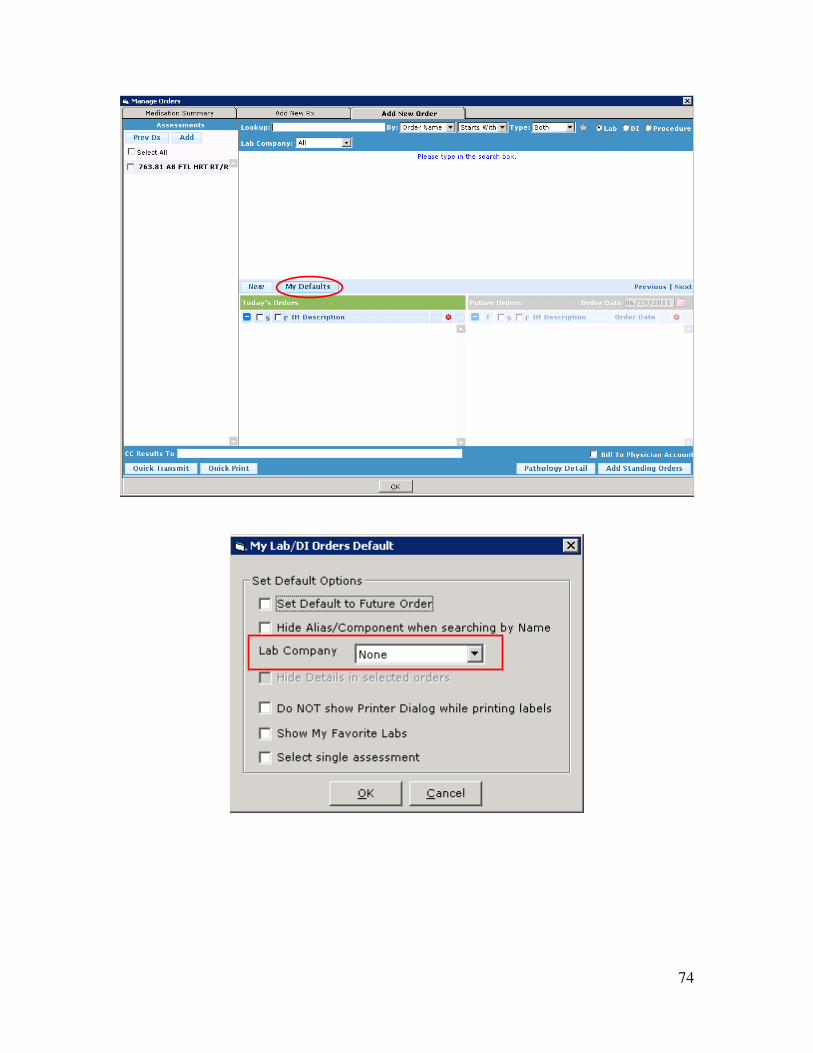
The same setting can also be configured per user from progress note of a patient.
1. From the progress note of a patient click on Lab Reports. 2. Click on My Defaults and My Lab/DI Orders window opens. 3. Select a Lab company from the drop down.
74