Embed Size (px)
Citation preview

Bizagi BPM Suite
Loan Assessment Process
Lab
Submitted By: Shilpa Kochar Student ID: N8690723 Unit: Minor Project 1 INN690
Supervised By: Professor Marcello La Rosa

BIZAGI-Loan Assessment Process Lab
Page 1 of 94
Overview This report deals with the automation of “Loan Assessment” process example used in Chapter 9 of M. Dumas, M. La Rosa, J. Mendling, H.A. Reijers, Fundamentals of Business Process Management, Springer 2013.Complete process description can be downloaded from http://fundamentals-of-bpm.org/wp-content/uploads/LoanAssessmentProcessDescription.zip. Bizagi BPM Suite is used to automate the Loan Assessment process. The Suite consists of two tools: Bizagi Studio, which is the construction module and Bizagi BPM Server for execution and control. In Bizagi Studio the user defines the model associated to the business process (flowchart, business rules, user interface, etc.) for process execution. Models are stored in a database and then used at runtime for process execution by Bizagi BPM Server. Bizagi BPM Server executes a Work Portal for end users. This lab was done using Bizagi BPM Suite Xpress Edition v. 10.4. It is expected the instructions provided in this lab also work for Bizagi BPM Suite Enterprise Edition v. 10.4. The tool can be downloaded from http://www.bizagi.com/en/products/bizagi-bpm-suite/download. This report provides detailed step-by-step description to automate the process starting from designing a process model till the work portal where the process is tested. The report serves as a tutorial for performing process automation using Bizagi.

BIZAGI-Loan Assessment Process Lab
Page 2 of 94
Contents
Overview ....................................................................................................................................................... 1
1. Creating a Project in BIZAGI BPM Suite .................................................................................................... 3
2. Model the Process .................................................................................................................................... 5
3. Process Data ............................................................................................................................................ 14
4. Forms Creation ........................................................................................................................................ 26
4.1 Activity: Enter Application Data ........................................................................................................ 27
4.2 Activity: Check Application Form Completeness .............................................................................. 34
4.3 Activity: Complete Application Form ................................................................................................ 34
4.4 Activity: Check Credit History............................................................................................................ 35
4.5 Activity: Assess Loan Risk .................................................................................................................. 38
4.6 Activity: Appraise Property ............................................................................................................... 38
4.7 Activity: Assess Eligibility .................................................................................................................. 39
4.8 Activity: Reject Application ............................................................................................................... 42
4.9 Activity: Prepare and Send Acceptance Pack .................................................................................... 42
4.10 Activity: Prepare and Send Home Insurance Quote ....................................................................... 43
4.11 Activity: Verify Repayment Agreement .......................................................................................... 44
4.12 Activity: Take Final Decision ............................................................................................................ 45
5. Business Rules ......................................................................................................................................... 46
5.1 Transition Conditions ........................................................................................................................ 46
5.2 Activity Actions ................................................................................................................................. 52
5.3 Event Actions .................................................................................................................................... 71
6. Performers .............................................................................................................................................. 73
7. Work Portal ............................................................................................................................................. 77
7.1 Users ................................................................................................................................................. 82
7.2 Testing the Work Portal .................................................................................................................... 85
8. Conclusion ............................................................................................................................................... 93
References .................................................................................................................................................. 94
BIZAGI-Loan Assessment Process Lab
Page 3 of 94
1. Creating a Project in BIZAGI BPM Suite a) Click the Bizagi icon on your desktop to open the application and select New to create a new Bizagi project.
b) Type a name for the Project: Bizagi_BPM_Project and click Next.

BIZAGI-Loan Assessment Process Lab
Page 4 of 94
c) Bizagi will start creating a project. This may take several minutes.

BIZAGI-Loan Assessment Process Lab
Page 5 of 94
d) Once done Bizagi Studio will open and you will see the Process Wizard. The Wizard guides you through all the
necessary steps to automate your Process.
2. Model the Process Process modeling is the first step in the automation of a Process. Bizagi Process Modeler is a business process modeling and documentation tool. The modeler enables you to visually diagram, model and document business processes in industry-standard BPMN (Business Process Model and Notation). BPMN is a worldwide accepted format for process modeling.
a) To create a Process click the New Process link from the first step of the Process wizard.

BIZAGI-Loan Assessment Process Lab
Page 6 of 94
Type the name of the Process- Loan Assessment Process and click Ok
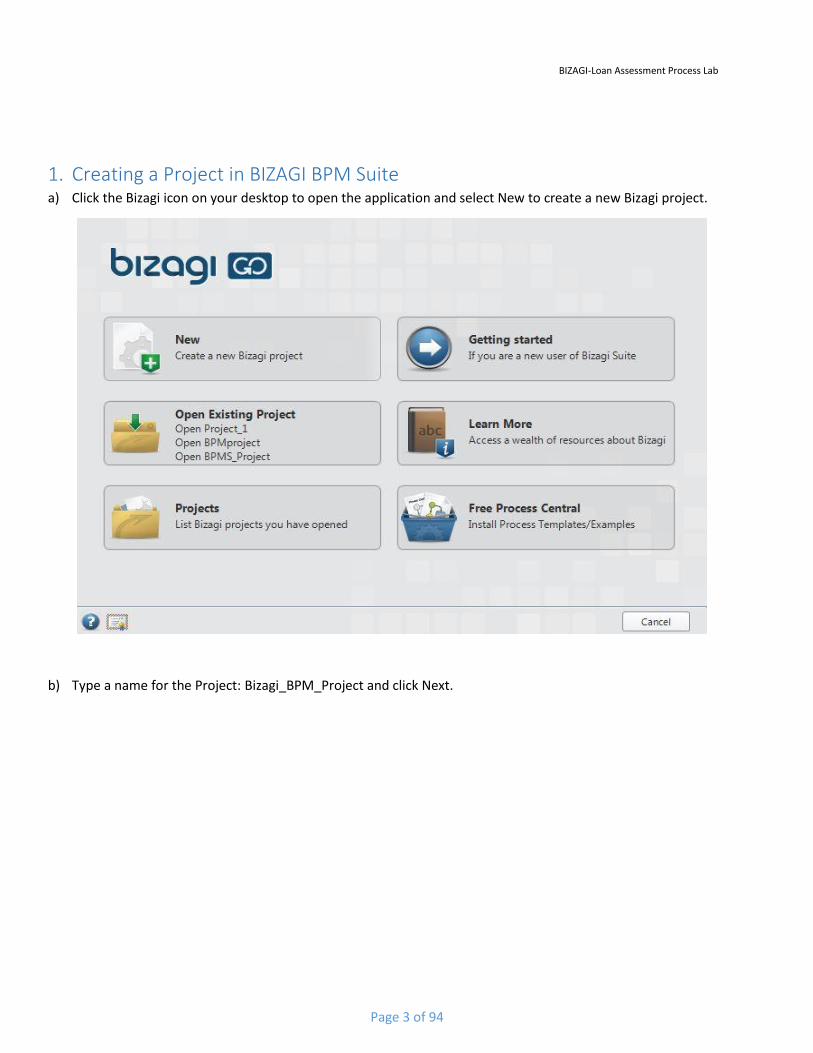
The Process Modeler, included in the Bizagi BPM Suite, will open.
A Pool consisting of one Lane will load upon startup. To name the Process, right-click on the Pool and select
Edit Text. Type Loan Assessment Process.
BIZAGI-Loan Assessment Process Lab
Page 7 of 94
b) Drag and drop 4 lanes to the pool (from swimlanes under palette) so that we have 5 lanes in total. These will
be named as: Applicant, Loan Officer, Financial Officer, Property Appraiser and Insurance Sales
Representative. To rename a lane, right-click on the particular lane and select Edit Text. Type the required
name. Or simply double-click on lane name and change the name.

BIZAGI-Loan Assessment Process Lab
Page 8 of 94
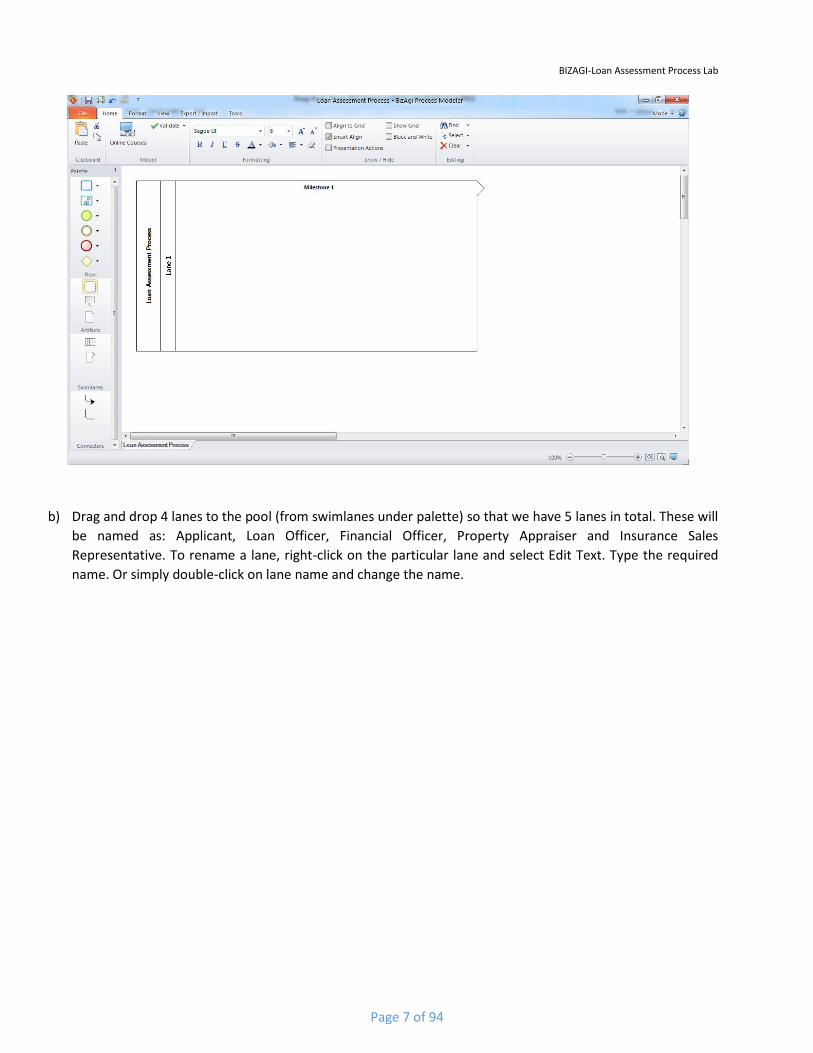
c) Next, we will divide our process model into 3 stages namely-Check, Assess and Approval. To do this, drag and
drop a Milestone from the Palette (from swimlanes section). Rename the milestones by double clicking on
default names.
Note: You can adjust the height and width of pool, lanes and milestones by placing cursor on the lines and
dragging these as desired.
BIZAGI-Loan Assessment Process Lab
Page 9 of 94
d) Now, we will add shapes to our Process. Select the Start Event from the Palette and drop it to the applicant
lane of the Process diagram. The figures have a Pie Menu that allows the easy selection of shapes to be
included in the diagram. It is displayed when positioning the mouse over a figure. The icons of the shapes that
can be dragged and dropped are displayed when clicking on the figure.
Select the Task from the Pie Menu and place it besides the Start shape.
Rename the new task to Enter Application Data. You may rename the shapes and transitions by double-clicking
on them.

BIZAGI-Loan Assessment Process Lab
Page 10 of 94
Create the following activities in each of the following swimlanes by dropping a Task from the palette and giving the appropriate name:
Role Tasks
Applicant Enter Application Data Complete Application Form
Loan Officer Check Application Form Completeness Assess Eligibility Prepare and Send Acceptance Pack Reject Application Verify Repayment Agreement Take Final Decision
Financial Officer Check Credit History Assess Loan Risk
Property Appraiser Appraise Property
Insurance Sales rep Prepare and Send Home Insurance Quote
The process diagram will look similar to the one below:
e) Now add the remaining shapes (events and gateways) and connect these using connectors. The process diagram
should look like the one given below:

BIZAGI-Loan Assessment Process Lab
Page 11 of 94
f) Right-click on the Check Application Form Completeness task and transform it to a Script Task. Do the same for Assess
Loan Risk task as well.
Similarly, change the Reject Application task type to Send Task.
Note:
1. Script Task: A Script Task is an automatic task in which a script is executed by the server. It has no human
intervention and does not connect to any external service.
2. User Task: Is a typical “workflow” Task where a human performer performs the Task that has to be completed
in a certain amount of time. (By default, a task is a User Task)
3. Send Task: A Send Task is a simple Task that is designed to send a Message. Once the Message has been sent,
the Task is completed.

BIZAGI-Loan Assessment Process Lab
Page 12 of 94
Similar to the task types, we can transform the gateways and events to a specific Gateway Type and Event Type
respectively i.e. by right clicking on a gateway or an event and selecting the particular type from the list available.
g) Now, we need to add the timer event to the tasks- Complete Application Form and Verify Repayment Agreement.
To do this, right-click on the task and select Attach event and select Timer.
Add any remaining end events to the diagram and give them appropriate names. Now we have the complete process
model.
(Note: Please make corrections to the initial model to include an OR gateway and 2 end events after task Take
Final Decision as seen in above image)
h) Validate the model to check for any possible errors. You can see the errors in the diagram by double clicking on
description of error in diagram validation message box. Correct all the errors and save your process model.

BIZAGI-Loan Assessment Process Lab
Page 13 of 94
i) Some parameters (properties) like the Duration and Help text must be updated in the Process Activities when the
Process diagram is completed.
o Right-click on the Process name and select Properties.
o Enter the Description of the Process: This process controls the loan requests of the applicants. o Scroll down to the bottom of the window and define the Duration. Give an estimated time (25 days), a
lower limit (15) and an upper limit (34). These durations define the SLA of your Process.
o When you are done, close the Properties window by clicking the Cross icon (“x”) on the right.
j) Once the properties for process has been entered, configure the following properties for each User Activity:
Activity Help Text Duration
(days)
Timer Evenet
Duraion (days)
Enter Application Data Fill in all the mandatory information 1
Complete Application Form Complete/correct the information 5 5
Check Credit History Check credit history of the applicant to
assess risk
3
Appraise Property Check the market value of the property
and its surrounding properties
3
Assess Eligibility Determine if applicant id eligible or not
for the loan
2
Prepare and Send Acceptance Pack Determine repayment schedule and
prepare acceptance pack
2
Verify Repayment Agreement Verify form returned by applicant for
agreed terms and conditions
15 14
Take Final Decision Take final decision on the application 2
Prepare and Send Home Insurance Quote
Generate and print the Quotations and
send to the applicant
2
Note: The help text will be displayed to the end user when the Activity is executed in the Work Portal.
k) Once you are finished, Save your changes and close the Process Modeler Suite to return to the Process Wizard.

BIZAGI-Loan Assessment Process Lab
Page 14 of 94
3. Process Data Once the Process Diagram has been created we’ll proceed to the Data Model creation. This Data Model
will include all the information required by the Process.
a) In the second step of the Process Wizard select Model Data.
b) A window will display where you should enter the Process Entity. The Process Entity is the entity that gives
you access to the rest of the data model, the starting point. Name it Loan Application and click Ok.

BIZAGI-Loan Assessment Process Lab
Page 15 of 94
c) A new window to design the data model, containing the Process Entity will display. The creation of entities,
attributes, and relationships can be completed in this editor. Right-click on the entity Loan Application and select Edit Attribute List.
Add the following attributes:
Display Name Type
Name String
Surname String
Email String
Home Phone Integer
Cell Phone Integer
Current Address Extended Text
Previous Address Extended Text
Current Employer String
Monthly Net Revenue Currency
Bank Name String
Account Type String
Account Number String
Property Type String
Property Address Extended Text
Purchasing Price Currency
Loan Amount Currency
Loan Duration (years) String
Start Date Date-Time
Loan Interest Rate String

BIZAGI-Loan Assessment Process Lab
Page 16 of 94
Interest Type Parameter Entity
Insurance Quote Required Boolean
Application Number Integer
Submission Date Date-Time
Revision Date Date-Time
Status Parameter Entity
Comments Extended Text
Eligibility Boolean
Loan Officer ID Integer
The attribute list for Loan Application will look as illustrated in the following screen.
d) Note that we have Interest Type and Status as Parameter Entities. This is because these entities will have
pre-defined values. To create parameter entity, in the Type column, select Entity ->Parameter Entity ->
New Entity. A new window will open to create properties for parameter entity. Check the box Manage
values in Production environment only and click next.

BIZAGI-Loan Assessment Process Lab
Page 17 of 94
In the Attributes List screen, add attribute Interest Type (string) and click Finish.
Do the same for Status attribute as well.
e) The entity Loan Application also related to a user entity. The user entity, known in Bizagi as WFUser is
created by default for all projects, and is used to store all the information related to the end users. We need a relationship to this entity but since it is already created by default we just need to relate it. Press ‘Add’ button to add entity Officer and relate "Officer" to the SYSTEM entity (you need Entity option
and then the System sub-option to find the WFUSER table)
f) Click Next. A Summary window will display for the Loan Application entity.

BIZAGI-Loan Assessment Process Lab
Page 18 of 94
g) Click Finish. The data for Loan application is ready and is presented in a graphical way in the diagram
screen.
BIZAGI-Loan Assessment Process Lab
Page 19 of 94
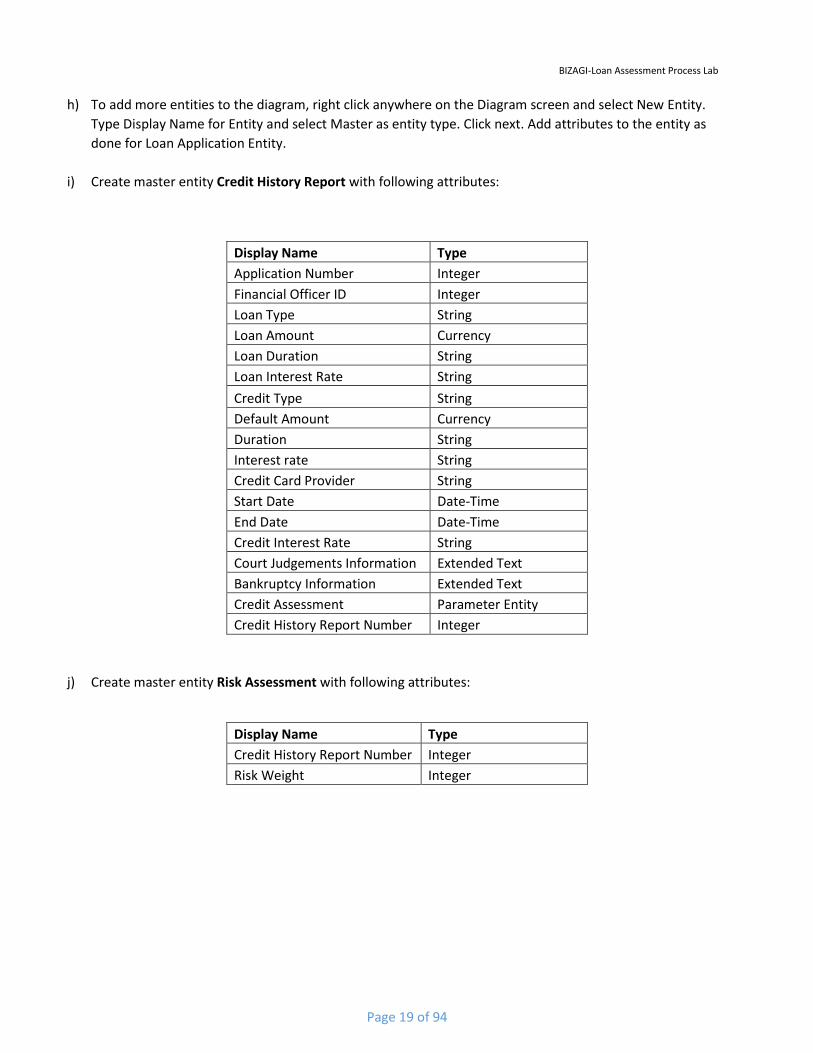
h) To add more entities to the diagram, right click anywhere on the Diagram screen and select New Entity.
Type Display Name for Entity and select Master as entity type. Click next. Add attributes to the entity as
done for Loan Application Entity.
i) Create master entity Credit History Report with following attributes:
Display Name Type
Application Number Integer
Financial Officer ID Integer
Loan Type String
Loan Amount Currency
Loan Duration String
Loan Interest Rate String
Credit Type String
Default Amount Currency
Duration String
Interest rate String
Credit Card Provider String
Start Date Date-Time
End Date Date-Time
Credit Interest Rate String
Court Judgements Information Extended Text
Bankruptcy Information Extended Text
Credit Assessment Parameter Entity
Credit History Report Number Integer
j) Create master entity Risk Assessment with following attributes:
Display Name Type
Credit History Report Number Integer
Risk Weight Integer

BIZAGI-Loan Assessment Process Lab
Page 20 of 94
k) Create master entity Property Appraisal with following attributes:
Display Name Type
Application Number Integer
Property Appraiser ID Integer
A Surrounding Property Value Currency
B Surrounding Property Value Currency
C Surrounding Property Value Currency
Estimated Property Market Value Currency
Comments on Property String
l) Create master entity Repayment Agreement with following attributes:
Display Name Type
Application Number Integer
Monthly Repayment Amount Currency
Number of Repayments Integer
m) Create master entity Home Insurance Quote with following attributes:
Display Name Type
Application Number Integer
Home Insurance Total Cost Currency
Additional Cost on Monthly Repayment Currency
Insurance Terms & Conditions Extended Text
Insurance Sales Rep ID Integer
n) Create master entity Agreement Summary with following attributes:
Display Name Type
Application Number Integer
Conditions Agreed Boolean
Repayment Agreed Boolean
Agreement Copy link File
Application Approved Boolean

BIZAGI-Loan Assessment Process Lab
Page 21 of 94
o) The diagram will now look like the screen below:
Note: You can drag and reposition the entities as desired
p) Now we need to establish relationship between different entities.
o Click on relationships which is at the top-left corner of window.
o Relationship Wizard will open up. Click next on the welcome screen.
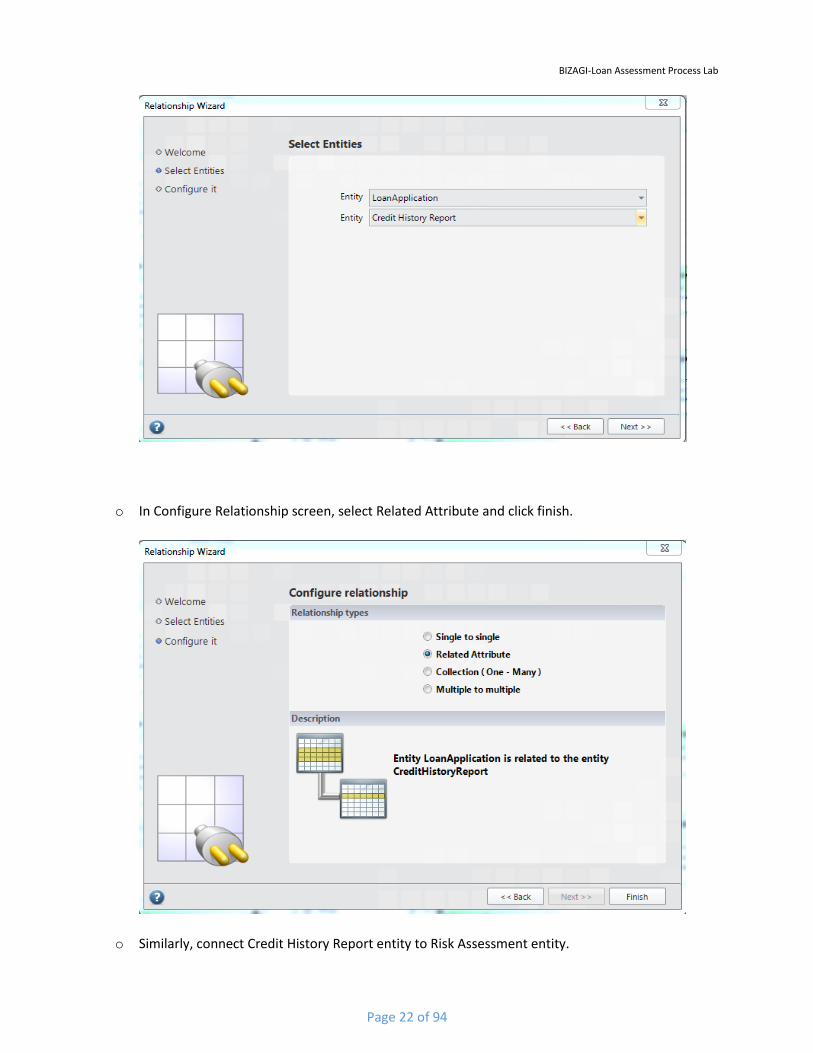
o In the select entities screen, select the two entities between which relation will be created, in
this case select Loan Application and Credit History Report and click next
BIZAGI-Loan Assessment Process Lab
Page 22 of 94
o In Configure Relationship screen, select Related Attribute and click finish.
o Similarly, connect Credit History Report entity to Risk Assessment entity.

BIZAGI-Loan Assessment Process Lab
Page 23 of 94
o Connect remaining entities to Loan Application Entity.
Final Diagram should look like the screen below:
q) Save the data model and close the Diagram window to return to the Process Wizard.
- Assign values to Parameter entities
Before proceeding to next step in wizard, we must define values for parameter entities we created in
process data so that these will be available for use in creating Forms and Rules.
This will be done in the work portal. Click on the green Run icon on top-left corner of window. Work Portal
will open in web browser.
The parameters entities that we created and the values that will be assigned to them are as under:
Parameter Values
Interest Type Variable, Fixed
Status Incomplete, Complete, Assessed, Rejected, Cancelled, Approved
Credit Assessment AAA, AA, A, BBB, BB, B
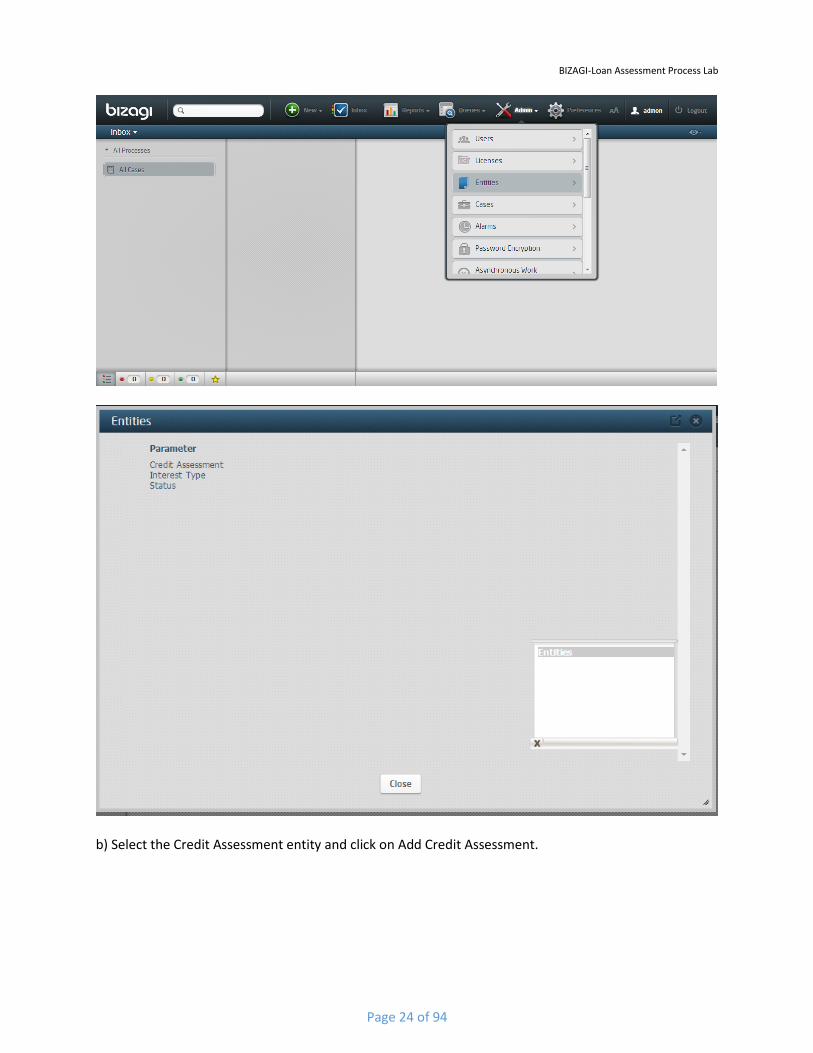
a) Go to the Admin option in the Work Portal and select Entities; a new window will display a list of the Parameter Entities.
BIZAGI-Loan Assessment Process Lab
Page 24 of 94
b) Select the Credit Assessment entity and click on Add Credit Assessment.

BIZAGI-Loan Assessment Process Lab
Page 25 of 94
b) Enter the values for Credit Assessment (given in table above) one by one and click Save.
c) Click Return. Add the values for parameters Status and Interest Type in a similar way as done for
Credit Assessment.
d) Click Close and exit the browser.

BIZAGI-Loan Assessment Process Lab
Page 26 of 94
4. Forms Creation
Once the Process Diagram and the Data Model are ready we will proceed to create the forms (screens)
associated with each one of the human activities of the Process. Forms are used to enter and display
required information, so that end users may interact with the Process.
Now go to the Third step of the Process Wizard: Define Forms.
You’ll see a diagram where only user Tasks are available to create Forms in. User Tasks that have no forms associated will be highlighted with an exclamation mark.

BIZAGI-Loan Assessment Process Lab
Page 27 of 94
4.1 Activity: Enter Application Data
a) Select the Activity Enter Application Data by clicking on it. The following screen will appear:
b) Click on the Controls tab to include a Group. Go to Containers and drag and drop a Group to the DROP HERE section

BIZAGI-Loan Assessment Process Lab
Page 28 of 94
c) Double-click on it and type Applicant Information. Then click on the Check icon.

BIZAGI-Loan Assessment Process Lab
Page 29 of 94
d) Click on the Data tab and expand LoanApplication entity to include the attributes in the group. Drag and drop the elements from the Data Model. First drag and drop Name attribute. Click on the Name field, its properties will display. Locate the Required property and select the Yes option. This will make the control mandatory.
e) Go back to the Data tab. Drag and drop the following attributes from the Data Model as shown below. Surname, Email, Home Phone, Cell Phone, Current Address, Previous Address.

BIZAGI-Loan Assessment Process Lab
Page 30 of 94
f) These fields will be mandatory (except previous address which is optional). Select them all holding down the CTRL key. Their Properties will be displayed. Select the Check mark on the Required property.

BIZAGI-Loan Assessment Process Lab
Page 31 of 94
g) Now drag and drop a group into the Applicant Information group and include attributes: Current Employer, Monthly Net Revenue, Bank Name, Account Type and Account Number. Set the property for all these as Required as these are mandatory fields.
h) Drag and drop three Groups from the Containers section in the Controls tab (below Applicant Information group), and name them: Property Information, Loan Information and Administration Information.

BIZAGI-Loan Assessment Process Lab
Page 32 of 94
i) Include the following attributes from Data tab in respective groups: o Property Information: Property Type, Property Address, Purchasing Price o Loan Information: Loan Amount, Loan Duration, Start Date, Loan Interest Rate, Interest Type,
Insurance Quote Required o Administration Information: Application Number, Submission Date, Revision Date, Status,
Comments, Eligibility, Loan Officer ID
j) Set the Required property to Yes for all the attributes in Property Information and Loan Information group. Set the Editable property to NO for all attributes in Administration Information group.

BIZAGI-Loan Assessment Process Lab
Page 33 of 94
k) Save the form and close it to return to the process wizard.
BIZAGI-Loan Assessment Process Lab
Page 34 of 94
4.2 Activity: Check Application Form Completeness
Since this is a Script Task, no Form must be related. In step 4 of the Process Wizard (Business Rules-
Activity Actions) we will see how the configuration is done for this Task.
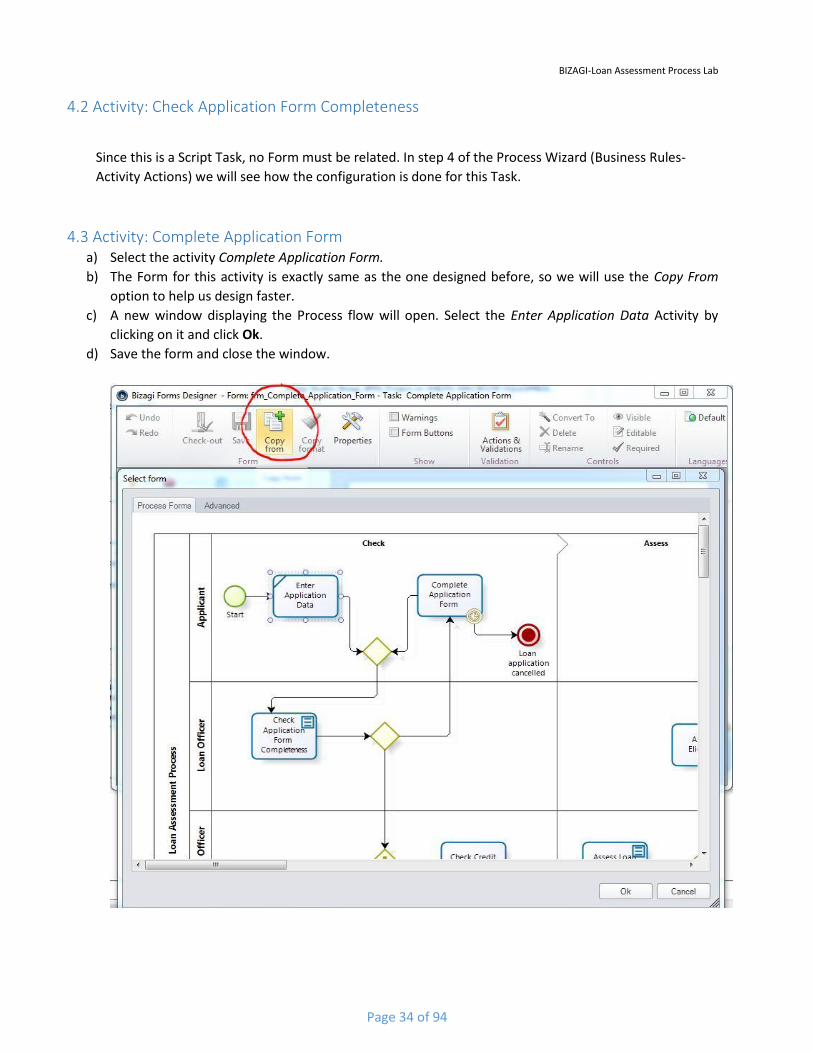
4.3 Activity: Complete Application Form a) Select the activity Complete Application Form.
b) The Form for this activity is exactly same as the one designed before, so we will use the Copy From
option to help us design faster.
c) A new window displaying the Process flow will open. Select the Enter Application Data Activity by
clicking on it and click Ok.
d) Save the form and close the window.

BIZAGI-Loan Assessment Process Lab
Page 35 of 94
4.4 Activity: Check Credit History
a) Select the activity Check Credit History.
b) Go to Controls -> Containers -> Tab. Drag and drop a tab to the Drop Here section.
c) Name this tab as Credit History Report.
d) Click on plus sign next to the tab to add another tab and name it as Loan Application.
e) For Loan Application tab, we will use the Copy From option to copy the application form from first
activity. Because this form is read only, set the Editable property to No for all the attributes.

BIZAGI-Loan Assessment Process Lab
Page 36 of 94
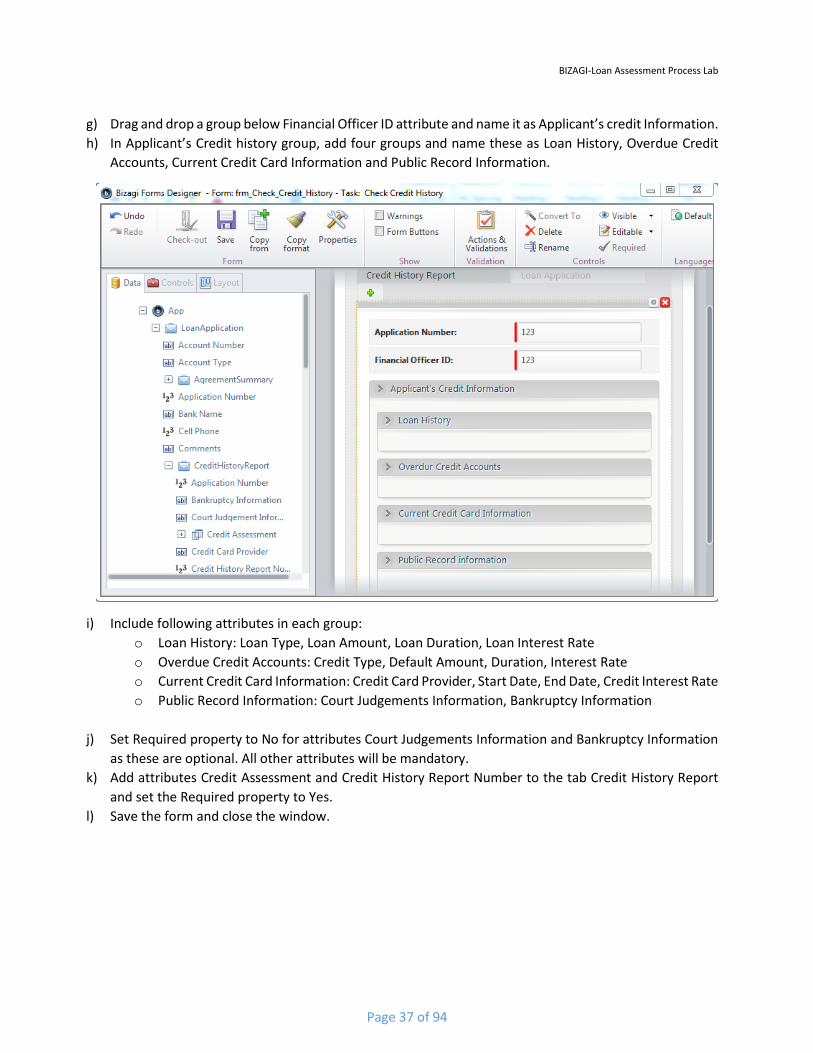
f) Now, go to Credit History Report tab. In Data section, expand the CreditHistoryReport entity and add
attributes Application Number and Financial Officer ID. Set the Required property to Yes.
BIZAGI-Loan Assessment Process Lab
Page 37 of 94
g) Drag and drop a group below Financial Officer ID attribute and name it as Applicant’s credit Information.
h) In Applicant’s Credit history group, add four groups and name these as Loan History, Overdue Credit
Accounts, Current Credit Card Information and Public Record Information.
i) Include following attributes in each group:
o Loan History: Loan Type, Loan Amount, Loan Duration, Loan Interest Rate
o Overdue Credit Accounts: Credit Type, Default Amount, Duration, Interest Rate
o Current Credit Card Information: Credit Card Provider, Start Date, End Date, Credit Interest Rate
o Public Record Information: Court Judgements Information, Bankruptcy Information
j) Set Required property to No for attributes Court Judgements Information and Bankruptcy Information
as these are optional. All other attributes will be mandatory.
k) Add attributes Credit Assessment and Credit History Report Number to the tab Credit History Report
and set the Required property to Yes.
l) Save the form and close the window.

BIZAGI-Loan Assessment Process Lab
Page 38 of 94
4.5 Activity: Assess Loan Risk
Since this is a script task, no form is required for this activity. We will configure this activity in next step of
process wizard.
4.6 Activity: Appraise Property a) Select activity Appraise Property. b) In the Forms Designer, drag and drop a group into the Drop Here section and name it as Property
Appraisal. c) In the Data tab, expand PropertyAppraisal entity and add following attributes to the group: Loan
Application Number, Property Appraiser ID, A Surrounding Property Value, B Surrounding Property Value, C Surrounding Property Value, Estimated Property Market Value and Comments on Property.
d) Set Required Property to Yes for all the attributes except Comments attribute which is optional. e) Save form and close the window.

BIZAGI-Loan Assessment Process Lab
Page 39 of 94
4.7 Activity: Assess Eligibility In this activity, loan officer is shown a form containing loan application along with risk assessment and
property appraisal form. The latter two are not-editable. So for this activity we’ll again use Tabs to design
the form.
a) Select activity Assess Eligibility.
b) In form designer window go to Controls -> Containers -> Tab. Drag and drop a tab into the drop here
section. Name this as Loan Application.
c) Add two more tabs by clicking on the plus sign and name these as Risk Assessment and Property
Appraisal.

BIZAGI-Loan Assessment Process Lab
Page 40 of 94
d) Go to Loan Application tab and select Copy From option. Copy the form from first activity i.e. Enter
Application Data. (You may have to drag and drop groups into the tab as they may appear outside the
tab)
e) Click on group Applicant Information, this will display group properties. Set Editable property to No.
f) Similarly all other groups except Administration Information will be set to read only with Editable
property set to No.
g) For Administration Information group, set the Editable Property to Yes and Required Property to No.

BIZAGI-Loan Assessment Process Lab
Page 41 of 94
h) Go to Risk Assessment tab and add attributes Credit History Report Number and Risk Weight by
expanding entity CreditHistoryReport and then RiskAssessment from Data tab.
i) Set Editable property to No for both the attributes.

BIZAGI-Loan Assessment Process Lab
Page 42 of 94
j) Go to Property Appraisal tab and sect Copy From option. Copy the form from activity Appraise
Property.
k) Set the Editable property to No for all the attributes in Property Appraisal tab.
l) Save form and close Forms Designer window.
4.8 Activity: Reject Application This activity requires a message to be sent to the applicant to inform him about rejection of loan
application. No user activity will be involved here, so there will be no form for this activity.
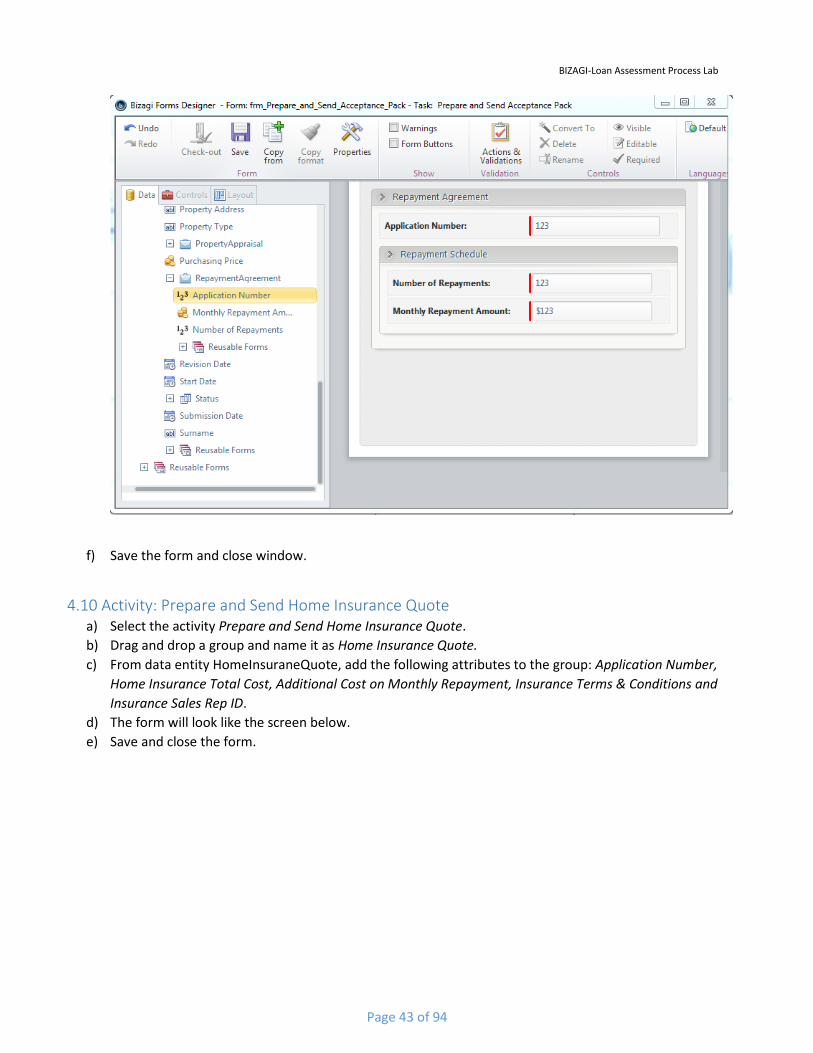
4.9 Activity: Prepare and Send Acceptance Pack a) Select activity Prepare and Send Acceptance Pack.
b) In forms designer window, drag and drop a group into the drop here section and name it as Repayment
Agreement.
c) Add following attributes to the group: Loan Application Number, Monthly Repayment Amount and
Number of Repayments.
d) Editable and Required property will be set to Yes.
e) The form should look like the screen below (note there is a group Repayment Schedule within group
Repayment Agreement).
BIZAGI-Loan Assessment Process Lab
Page 43 of 94
f) Save the form and close window.
4.10 Activity: Prepare and Send Home Insurance Quote a) Select the activity Prepare and Send Home Insurance Quote.
b) Drag and drop a group and name it as Home Insurance Quote.
c) From data entity HomeInsuraneQuote, add the following attributes to the group: Application Number,
Home Insurance Total Cost, Additional Cost on Monthly Repayment, Insurance Terms & Conditions and
Insurance Sales Rep ID.
d) The form will look like the screen below.
e) Save and close the form.

BIZAGI-Loan Assessment Process Lab
Page 44 of 94
4.11 Activity: Verify Repayment Agreement a) Select activity Verify Repayment Agreement.
b) Drag and drop a group and name it as Agreement Summary.
c) Add following attributes to the group by expanding data entity AgreementSummary: Application
Number, Conditions Agreed, Repayment Agreed and Agreement Copy Link.
d) Set above attribute properties to Editable and Required (Yes) except Agreement link.
e) Save and close the form.

BIZAGI-Loan Assessment Process Lab
Page 45 of 94
4.12 Activity: Take Final Decision a) Select activity Take Final Decision.
b) In Forms Designer window, click Copy from option and select activity Verify Repayment Agreement.
c) Add attribute Application Approved to the form
d) Tick mark the option Form Buttons at the top.
e) Click on Save button to open its properties. Change the Button Caption to Approve and select the
option Next for Actions property.
f) Similarly, rename the Next button as Reject and select the option Next for Actions property.
g) Save and close the form.

BIZAGI-Loan Assessment Process Lab
Page 46 of 94
g) Select the green arrow at the top right of the Forms Designer to return to the
Process Wizard view.
5. Business Rules The next step in the Process Wizard is the definition of business rules that control the Process routing. The first rules to be completed are known as transition rules. These rules evaluate conditions and decide
where the Process flow is to continue. They return True or False and they are associated to Gateway shapes.
Since there are two paths after the Gateway we will create a rule for one of the Transitions and make the
other the default ‘Else’ condition.
5.1 Transition Conditions a) To create a Business Rule go to the fourth step of the Process Wizard and select Define Expressions:

BIZAGI-Loan Assessment Process Lab
Page 47 of 94
b) The Rule editor will be opened highlighting the transitions that have no rule associated.

BIZAGI-Loan Assessment Process Lab
Page 48 of 94
c) Select the transition named Yes that emerges from gateway Form Complete? by clicking on the transition.
Three options will be presented to take a route: o Always: when selected Bizagi will always take that path ignoring the other sequence flows. o Else: when selected Bizagi will take that path when no other path is valid. We recommend
always having one sequence flow with this option. o Based on the result of an expression: when selected Bizagi will evaluate an expression to take
or not the selected path. d) Select Based on the result of an expression. The list of system expression and previously created
expressions will display. Since there are no expressions created, click New.
e) The Expression Manager Editor will display. f) Drag and drop the attribute Status from the Data Model on the left to the condition item. Select the
function is Equal to and then select ‘Complete’ from the drop down menu.

BIZAGI-Loan Assessment Process Lab
Page 49 of 94
g) Click OK
h) Select the transition named No that emerges from gateway Form Complete? by clicking on it. Select Else from the options displayed, and then click Ok.
i) We will do the same for other three gateways as well. Select the transition Yes for gateway Applicant Eligible?
j) Select Based on the result of an expression and click New. k) Drag and drop the attribute Eligibility from the Data Model on the left to the condition item. Select the
function is Equal to and choose the true option. Click OK

BIZAGI-Loan Assessment Process Lab
Page 50 of 94
l) Select the transition No for gateway Applicant Eligible? by clicking on it. Select Else from the options displayed, and then click Ok.
m) Select the transition Yes for gateway Quote Requested? n) Select Based on the result of an expression and click New. o) Drag and drop the attribute Insurance Quote Required from the Data Model on the left to the condition
item. Select the function is Equal to and choose the true option. Click OK

BIZAGI-Loan Assessment Process Lab
Page 51 of 94
p) Select the transition No for gateway Quote Requested? by clicking on it. Select Else from the options
displayed, and then click Ok. q) Select the transition No for gateway Applicant Eligible? by clicking on it. Select Else from the options
displayed, and then click Ok. r) Select the transition Yes for gateway Application Approved? s) Select Based on the result of an expression and click New. t) Drag and drop the attribute Application Approved from the Data Model on the left to the condition
item. Select the function is Equal to and choose the true option. Click OK

BIZAGI-Loan Assessment Process Lab
Page 52 of 94
u) Select the transition No for gateway Application Approved? by clicking on it. Select Else from the options displayed, and then click Ok
v) Go back to the Process Wizard by clicking the green arrow on the top right corner of the screen.
5.2 Activity Actions We will create rules for the script tasks and message tasks so that they are executed automatically when activity is initiated. Go to the fourth step of the Process Wizard and select Activities Actions.

BIZAGI-Loan Assessment Process Lab
Page 53 of 94
A new window will display the activities for which you can add actions.
Activity: Check Application Form Completeness -To set Application Number, Officer ID, Submission Date and Revision Date a) Select Check Application Form Completeness Activity. b) Select the On Enter option. Then click on the Plus icon to add an Action and select Expression.

BIZAGI-Loan Assessment Process Lab
Page 54 of 94
c) Expression Manager will be displayed, click New.
d) The Expression editor will display. Fill the Display Name and Description as follows; this information will let you identify the Expression for later use.
e) Right-click on the arrow in design view and select Add Expression. Type Date, Case and Officer ID and click Ok.

BIZAGI-Loan Assessment Process Lab
Page 55 of 94
f) Right-click on the module just included and select Properties. g) The Expression editor will display. Click on Data Model and select the Application Number attribute.
Click Ok.
BIZAGI-Loan Assessment Process Lab
Page 56 of 94
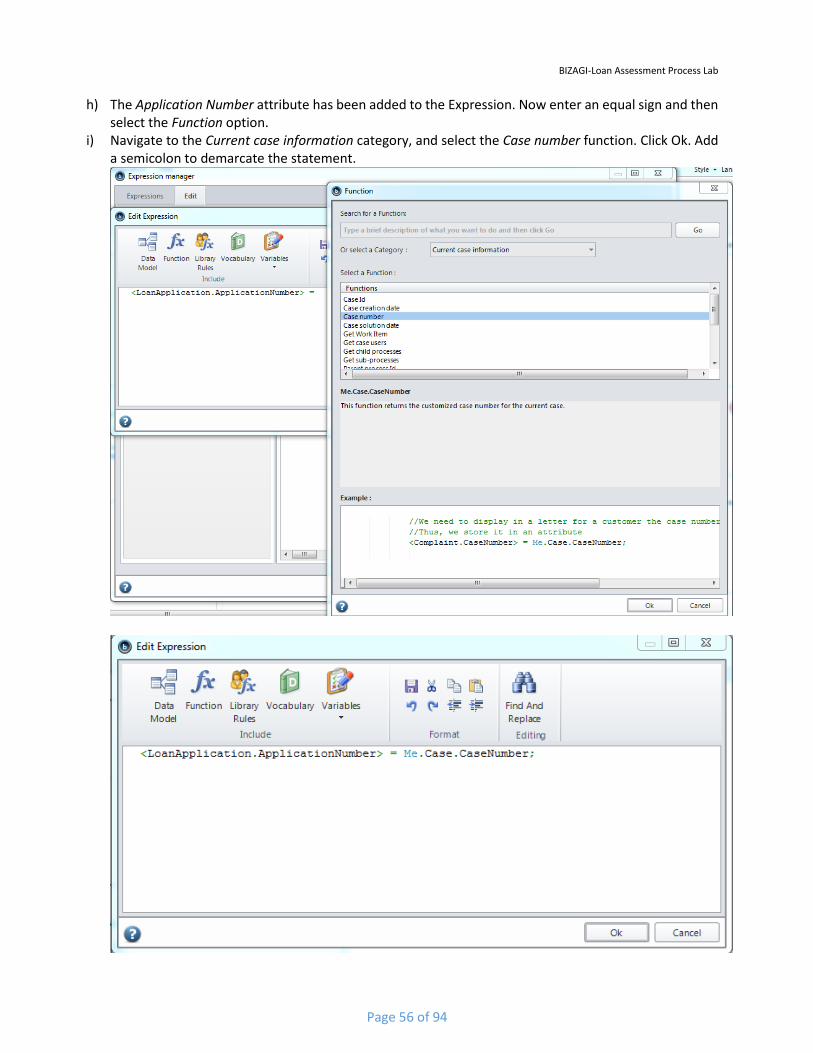
h) The Application Number attribute has been added to the Expression. Now enter an equal sign and then select the Function option.
i) Navigate to the Current case information category, and select the Case number function. Click Ok. Add a semicolon to demarcate the statement.

BIZAGI-Loan Assessment Process Lab
Page 57 of 94
j) To set submission date, go to data model and select Submission Date attribute. Now enter an equal sign and then select the Function option.
k) Navigate to the Date & time category, and select the Today function. Click Ok. Add a semicolon to demarcate the statement.
l) We will repeat the above two steps for Revision Date attribute and write ‘AddDays (1)’ at the end of statement as shown below.
m) Go to data model and select Loan Officer ID attribute. Enter an equal sign and select Function option. n) Navigate to the Current user information category, and select the User Id of current user function. Click
Ok. Add a semicolon to demarcate the statement o) Click Ok to close the expression editor window. Click Ok on Expression manager window to return to
activity actions window.
BIZAGI-Loan Assessment Process Lab
Page 58 of 94
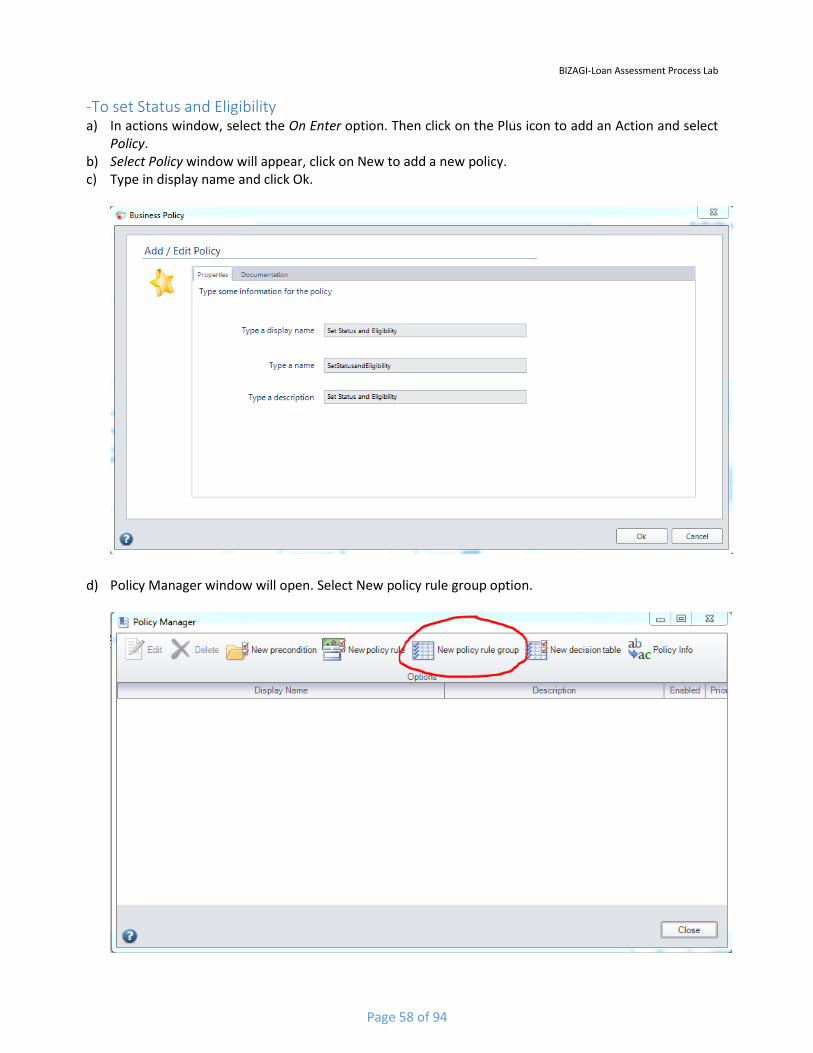
-To set Status and Eligibility a) In actions window, select the On Enter option. Then click on the Plus icon to add an Action and select
Policy. b) Select Policy window will appear, click on New to add a new policy. c) Type in display name and click Ok.
d) Policy Manager window will open. Select New policy rule group option.

BIZAGI-Loan Assessment Process Lab
Page 59 of 94
e) In Rule Group window, we need to add definitions for all the attributes we have in Loan Application form. Right click on Xpath definitions and select New Definition.
f) In New definition data window, type display name as Name and click Next. g) Select Name attribute and click Next.
h) In the next window select the option ‘This definition will be used to get a value’ and click Finish. Xpath Definition Name has been added.
i) Similarly, add all other attributes we added in Loan Application form except Previous Address (optional attribute) and those that were present in Administration Information group.
j) From Administration Information group, we need to add only Status and Eligibility attributes and we’ll select the option ‘This definition will be used to set a value’ for these two.
k) Now we have all the attributes in Definitions section as seen in screen below. Note that attributes Status and Eligibility are shown with Blue color to represent that these attributes will be used to set the value and all other are green in color.

BIZAGI-Loan Assessment Process Lab
Page 60 of 94
l) Now drag and drop all the definitions which will be used to get value i.e. those with green color one by one to the If section and select operator ‘is not null’. (This may take a lot of time as the wizard doesn’t respond properly and hangs very often)

BIZAGI-Loan Assessment Process Lab
Page 61 of 94
m) Now drag Set definitions i.e. Status and Eligibility to Then section. For Status, select the value ‘Complete’ and for Eligibility, select Boolean value True.
n) Check the Use Else box on top right corner and drag Status and Eligibilty to Else section. For Status, select the value ‘Incomplete’ and for Eligibility, select False.
o) Click on Apply and you will see summary of rule group. p) Click Finish.

BIZAGI-Loan Assessment Process Lab
Page 62 of 94

BIZAGI-Loan Assessment Process Lab
Page 63 of 94
Activity: Assess Loan Risk -Set Credit History Report Number a) Select activity Assess Loan Risk b) Select the On Enter option. Then click on the Plus icon to add an Action and select Expression. c) Expression Manager will be displayed, click New. d) The Expression editor will display. Fill the Display Name and Description as follows; this information
will let you identify the Expression for later use.
e) Right-click on the arrow in design view and select Add Expression. Type Report Reference Number and
click Ok. f) Right-click on the module just included and select Properties. g) The Expression editor will display. Click on Data Model and select the Credit History Report Number
attribute from Risk Assessment entity. Click Ok.

BIZAGI-Loan Assessment Process Lab
Page 64 of 94
h) The Credit History Report Number attribute has been added to the Expression. Now enter an equal
sign and then go to Data Model again and select the Credit History Report Number attribute from Credit History Report entity. Click Ok.
i) The expression will be: <LoanApplication.CreditHistoryReport.RiskAssessment.CreditHistoryReportNumbe
r> = <LoanApplication.CreditHistoryReport.CreditHistoryReportNumber>
j) Click Ok on Expression Manager window to return to Activity Actions.

BIZAGI-Loan Assessment Process Lab
Page 65 of 94
-Set Risk Weight a) In actions window, select the On Enter option. Then click on the Plus icon to add an Action and select
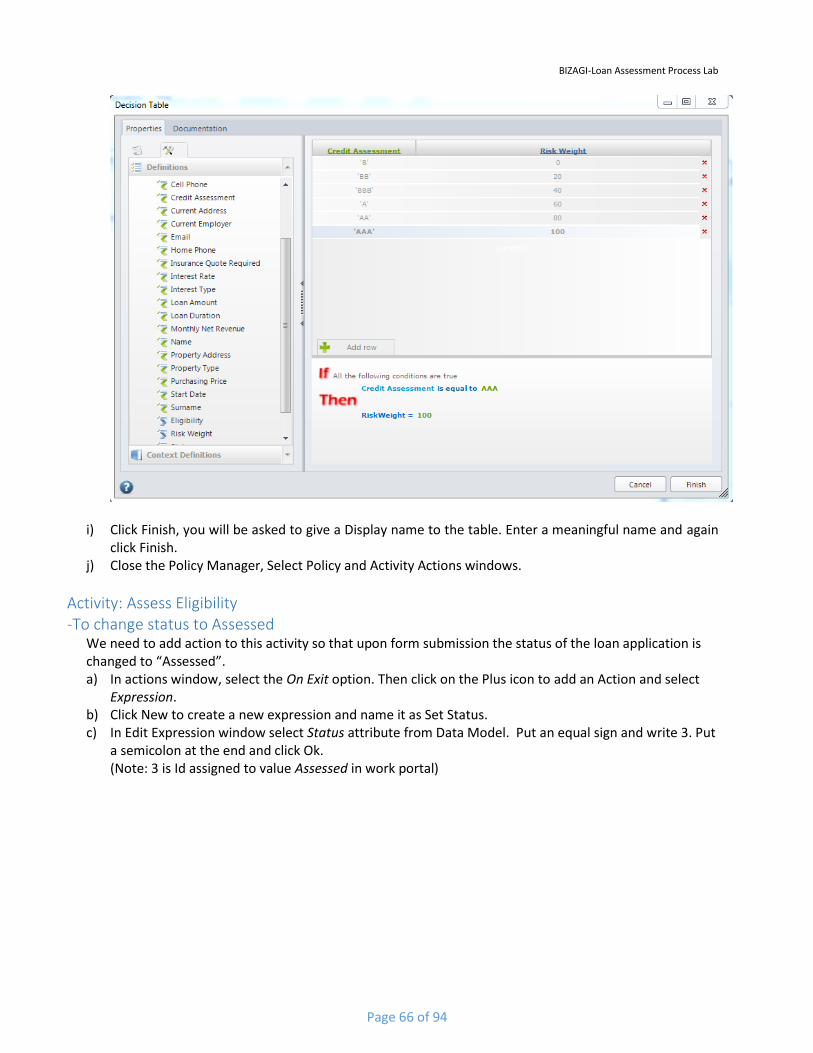
Policy. b) Select Policy window will appear, click on New to add a new policy. c) Type in display name as ‘Set Risk Weight’ and click Ok. d) Policy Manager window will open. Select New decision table option. e) First we need to add Xpath definitions for Credit Assessment (from Credit History Report entity) and
Risk Weight (From Risk Assessment entity). f) Here Credit Assessment attribute will be used to get value and Risk Weight will be used to set value. g) Drag and drop Credit Assessment and Risk Weight to right pane.
h) Add 6 rows by clicking Add Row button and enter values as shown below:
BIZAGI-Loan Assessment Process Lab
Page 66 of 94
i) Click Finish, you will be asked to give a Display name to the table. Enter a meaningful name and again click Finish.
j) Close the Policy Manager, Select Policy and Activity Actions windows.
Activity: Assess Eligibility -To change status to Assessed
We need to add action to this activity so that upon form submission the status of the loan application is changed to “Assessed”. a) In actions window, select the On Exit option. Then click on the Plus icon to add an Action and select
Expression. b) Click New to create a new expression and name it as Set Status. c) In Edit Expression window select Status attribute from Data Model. Put an equal sign and write 3. Put
a semicolon at the end and click Ok. (Note: 3 is Id assigned to value Assessed in work portal)

BIZAGI-Loan Assessment Process Lab
Page 67 of 94
Activity: Reject Application -To change status to rejected a) Similar to the Assess Eligibility task, add an expression such that status of the application is changed to
‘Rejected’ when this task is initiated i.e. On Enter. (Note: 4 here refers to Status value Rejected)

BIZAGI-Loan Assessment Process Lab
Page 68 of 94
-To send e-mail message Bizagi has functionality to send e-mail messages automatically during task execution. Email messages are messages sent by email that provide information on the case, or its status, to those related to the process. There has to be availability on the mail server, which is specified in the installation, in order that messages can be sent. (Follow instructions on the following link to configure e-Mail server: http://wiki.bizagi.com/en/index.php?title=SMTP_Configuration )
There are two types of e-mails: Automatic Messages and User Configured Messages. For this project, we will use User Configured Messages.
a) Select send message task Reject Application. b) In actions window, select the On Exit option. Then click on the Plus icon to add an Action
and select e-Mail. c) e-Mail Definition Window will open up where we will configure the email message to be
sent to the applicant in case of rejection. d) Click on the To button to add addressee. In the E-mail account selection window,
navigate in the entity-relationship model to Email attribute where the e-mail address or applicant will be saved and click Ok.
e) Enter the Subject and type desired message. Note that we can include loan application data into the message by using XPath Field option at top left corner of window.
f) Other way to include values of attributes is to indicate between diamond brackets, the path to the attribute. When '<' is typed, a new window will show the information available:

BIZAGI-Loan Assessment Process Lab
Page 69 of 94
g) Click Save.
BIZAGI-Loan Assessment Process Lab
Page 70 of 94
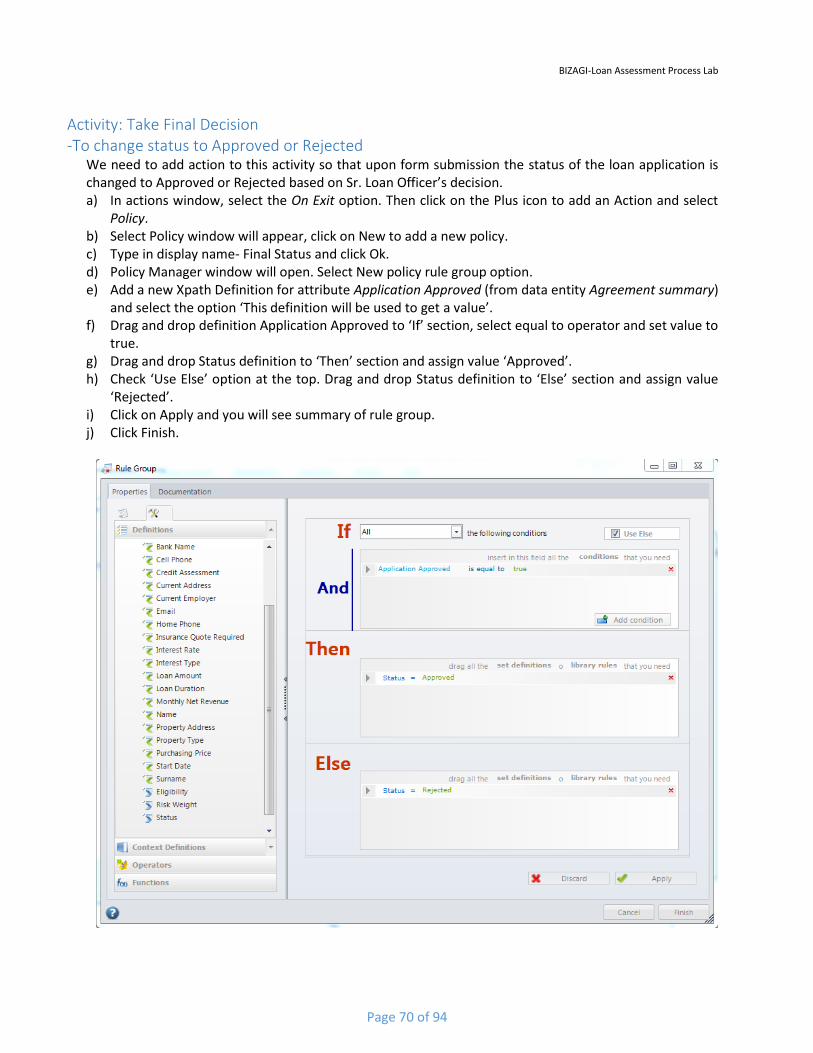
Activity: Take Final Decision -To change status to Approved or Rejected
We need to add action to this activity so that upon form submission the status of the loan application is changed to Approved or Rejected based on Sr. Loan Officer’s decision. a) In actions window, select the On Exit option. Then click on the Plus icon to add an Action and select
Policy. b) Select Policy window will appear, click on New to add a new policy. c) Type in display name- Final Status and click Ok. d) Policy Manager window will open. Select New policy rule group option. e) Add a new Xpath Definition for attribute Application Approved (from data entity Agreement summary)
and select the option ‘This definition will be used to get a value’. f) Drag and drop definition Application Approved to ‘If’ section, select equal to operator and set value to
true. g) Drag and drop Status definition to ‘Then’ section and assign value ‘Approved’. h) Check ‘Use Else’ option at the top. Drag and drop Status definition to ‘Else’ section and assign value
‘Rejected’. i) Click on Apply and you will see summary of rule group. j) Click Finish.

BIZAGI-Loan Assessment Process Lab
Page 71 of 94
5.3 Event Actions Now, we need to set rules for all the end message events to enable them to send an email to applicant
when process is ended by reaching any of these events.
-Events: Loan application cancelled, Rejection notified to applicant
Follow the steps given for Reject Application task and configure an email message for all the three end
events which are notifying applicant of rejection.

BIZAGI-Loan Assessment Process Lab
Page 72 of 94
-Event: Approval notified to applicant
Follow the steps given for Reject Application task and configure an email message for the event Approval
notified to applicant. Change the message body and subject line to notify approval.

BIZAGI-Loan Assessment Process Lab
Page 73 of 94
6. Performers The resources assignment is a very important stage within Bizagi. The responsible resources for each one
of the Process activities are defined in this stage.
To configure the performers go to the fifth step of the Process Wizard.
The activities that do not have a Performer configured will be the ones highlighted in the workflow.
Activity: Enter Application Data
a) Once in the diagram select the Activity by clicking on it, you’ll find the Performers assignment window.

BIZAGI-Loan Assessment Process Lab
Page 74 of 94
b) Click Add condition. c) Select User Property: Positions, Value: Organization and then press New.
d) Type Applicant in the new tab that appears and click Save. e) Now select Value Applicant and click Ok to save the Performer Condition and Ok again to save the
performer.

BIZAGI-Loan Assessment Process Lab
Page 75 of 94
Activity: Complete Application Form
Assign the position Applicant to this activity as well (no need to create new one)
Activity: Check Credit History
Create a new position- Financial officer and assign to the activity.
Activity: Appraise Property
Create a new position- Property Appraiser and assign to the activity

BIZAGI-Loan Assessment Process Lab
Page 76 of 94
Activity: Assess Eligibility, Prepare and Send Acceptance Pack and Verify Repayment
Agreement
Create a new position- Loan Officer and assign to all the three activities.
Activity: Prepare and Send Home Insurance Quote
Create a new position- Insurance Sales Rep and assign to the activity
Activity: Take Final Decision
Create a new position- Sr. Loan Officer and assign to the activity
Close the Diagram by clicking the green arrow to return to the Process Wizard.

BIZAGI-Loan Assessment Process Lab
Page 77 of 94
7. Work Portal So far, the Process flow chart has been completed along with the structuring of the Process information,
the Forms design for each one of the Process activities, the definition of the business rules and the
performers. Now we are ready to configure the Work Portal.
Click on the seventh step of the Process Wizard and select Deploy Process.
In the next window that appears, check Test and click Next.

BIZAGI-Loan Assessment Process Lab
Page 78 of 94
In advanced options window, check the options given and select Next.

BIZAGI-Loan Assessment Process Lab
Page 79 of 94
You will be asked to select your server and enter SQL server ID and password. Enter the required details
and click Next. (Note: Bizagi SQL server ID- sa, Password-Bizagi10GO)
You will be shown a Summary of your selections, click Finish.
A warning message will appear. Select Yes.
Deployment will begin. This may take several minutes to finish.

BIZAGI-Loan Assessment Process Lab
Page 80 of 94

BIZAGI-Loan Assessment Process Lab
Page 81 of 94
Once Deployment is finished, select Run Process option from seventh step of the wizard and then select
Development.
You can also click the Green icon on the Ribbon for a quick access to the Portal.

BIZAGI-Loan Assessment Process Lab
Page 82 of 94
7.1 Users The work portal will have six users so that the behavior of the assignments can be verified. We will now
create the users directly from the web application. The following table presents the user list.
User User Name Password Domain
Applicant Applicant Admin domain
Loan Officer Loan_officer Admin domain
Sr. Loan Officer SrLoan_officer Admin domain
Financial Officer Financial_officer Admin domain
Property Appraiser Property_appraiser Admin domain
Insurance Sales Rep Insurance_salesrep Admin domain
a) To create the user select the Admin Menu and click the Users option.
b) Click on New User

BIZAGI-Loan Assessment Process Lab
Page 83 of 94
c) Fill out the information from the table above for User- Applicant. Deselect all checkboxes in the Basic
Information tab: Expired Password, Locked Account and Send Mail with Password to User. Doing so will
bypass authentication and SMTP server validations.

BIZAGI-Loan Assessment Process Lab
Page 84 of 94
d) To Add the Position for the user go to the Organizations tab and select the position you want to add. Save the user by clicking Add/Update.
e) Repeat above steps (b) to (d) to create rest five users as per the table given above.
f) When all the users have been created, click on the Search button in Users window (located above New
User button) to display users list.
g) Click close.
h) Close the browser window.

BIZAGI-Loan Assessment Process Lab
Page 85 of 94
7.2 Testing the Work Portal Now we will test if the process designed works as desired or not.
a) Select the Run option from Bizagi BPM suite to open the Work Portal, you’ll be asked to enter one of
the credentials for the users created. Enter the process using the Applicant User.
BIZAGI-Loan Assessment Process Lab
Page 86 of 94
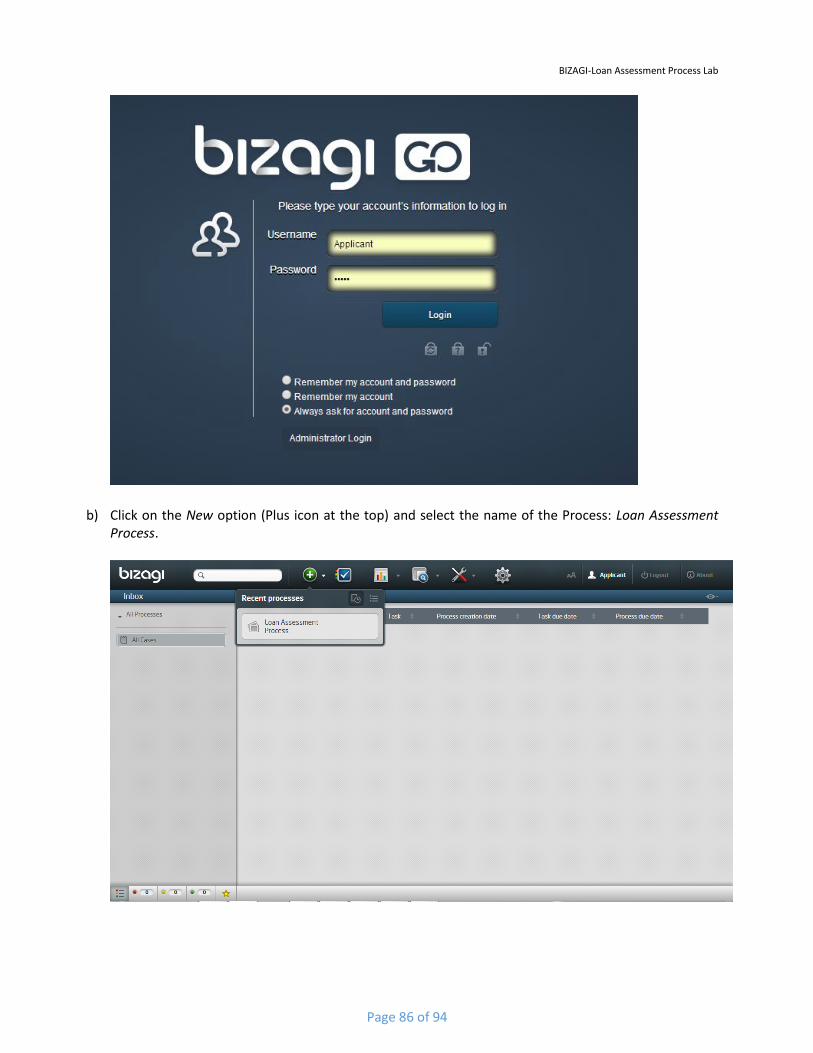
b) Click on the New option (Plus icon at the top) and select the name of the Process: Loan Assessment Process.
BIZAGI-Loan Assessment Process Lab
Page 87 of 94
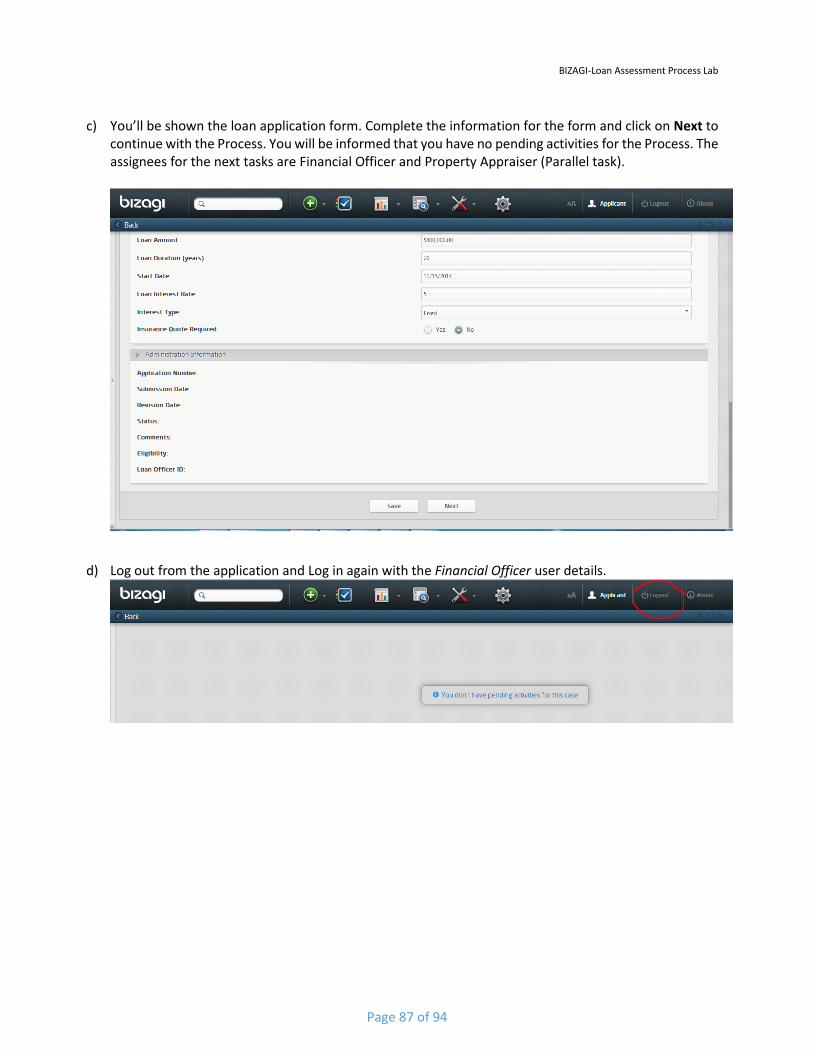
c) You’ll be shown the loan application form. Complete the information for the form and click on Next to
continue with the Process. You will be informed that you have no pending activities for the Process. The assignees for the next tasks are Financial Officer and Property Appraiser (Parallel task).
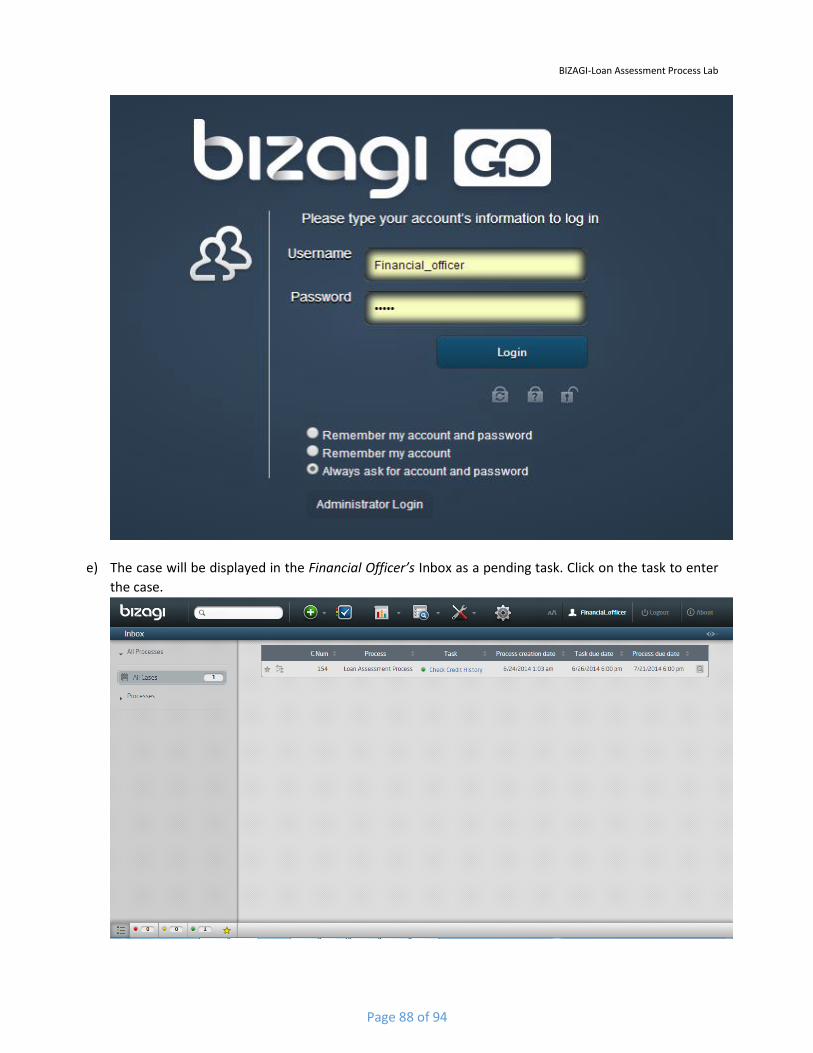
d) Log out from the application and Log in again with the Financial Officer user details.
BIZAGI-Loan Assessment Process Lab
Page 88 of 94
e) The case will be displayed in the Financial Officer’s Inbox as a pending task. Click on the task to enter
the case.
BIZAGI-Loan Assessment Process Lab
Page 89 of 94
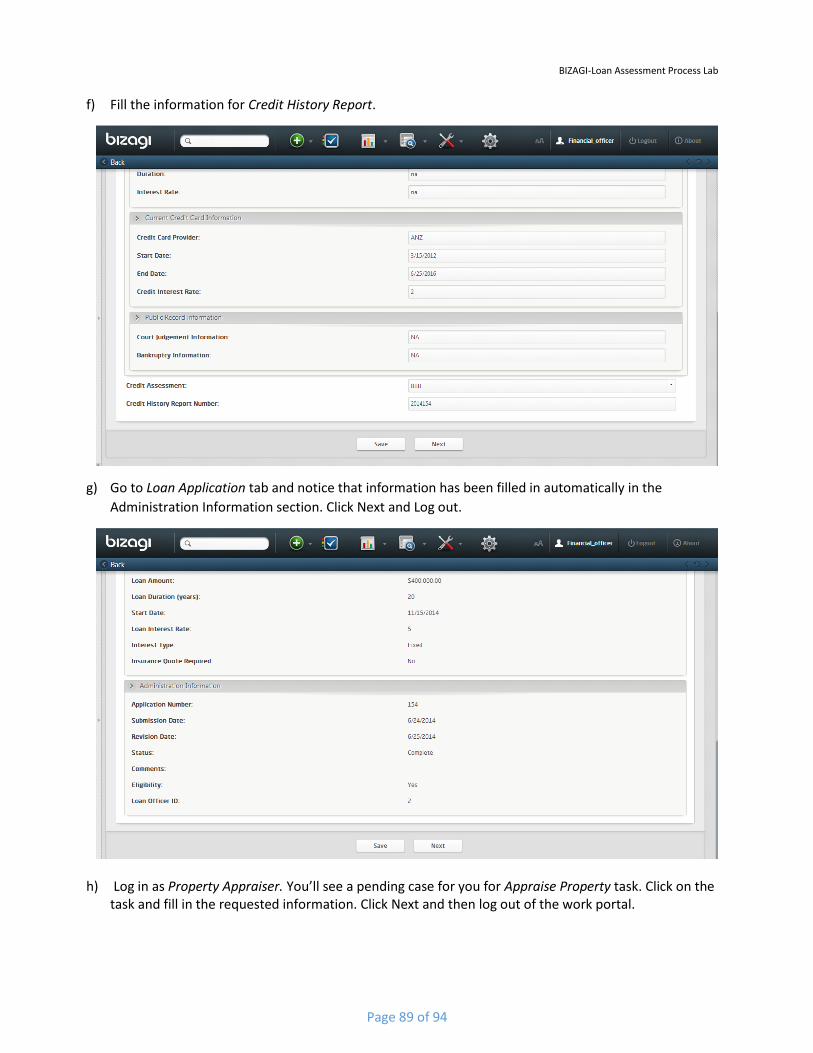
f) Fill the information for Credit History Report.
g) Go to Loan Application tab and notice that information has been filled in automatically in the
Administration Information section. Click Next and Log out.
h) Log in as Property Appraiser. You’ll see a pending case for you for Appraise Property task. Click on the
task and fill in the requested information. Click Next and then log out of the work portal.

BIZAGI-Loan Assessment Process Lab
Page 90 of 94
i) Now log in as Loan Officer. You’ll see a case pending for task Assess Eligibility. Click on task to complete activity. You’ll be shown Loan Application form, you can change the eligibility and add comments in case of ineligibility.
j) Go to Risk Assessment tab and notice the risk weight filled in corresponding to the credit assessment entered by Financial Officer.

BIZAGI-Loan Assessment Process Lab
Page 91 of 94
k) Click Next and you will be taken to next task i.e. Prepare and Send Acceptance pack. You can choose to save the form and complete it later. Note that in case eligibility would have been No, the process will go to Reject Application task and terminate. Fill in the Repayment Agreement Form and click Next.
l) You will see Agreement Summary form designed to Verify Repayment Agreement. Fill in the required information (you can choose to upload a file here) and click Next. You will see a message that there are no pending action for this case. Log out of the work portal. Note that, because applicant selected did not request an Insurance Quote, the task Prepare and Send Home Insurance quote was skipped.

BIZAGI-Loan Assessment Process Lab
Page 92 of 94
m) Log in as Sr. Loan Officer. You will be shown Agreement Summary form with buttons Approve or Reject. Click on either of these and the process ends after this task.

BIZAGI-Loan Assessment Process Lab
Page 93 of 94
8. Conclusion The project helped to gain working knowledge to diagram the flow of Processes, the design and creation
of its data structure, designing forms, the definition of business rules and configuration of assignation
rules for each one of the manual activities. The final result was an easy-to-use Work Portal, which shows
accurately the model created in Bizagi Studio; this result could be achieved because of the data driven
concept of Bizagi.
Bizagi is a user-friendly tool which is easy to understand and use. Its numerous functionalities allow to
model and automate the processes easily. But, there is a lot more to learn about the tool which was
beyond the scope of this project. One needs to be familiar with the powerful features available to take
complete advantage of the tool.

BIZAGI-Loan Assessment Process Lab
Page 94 of 94
References
Bizagi - Business Process Management (BPM) – BPMS and Workflow. Bizagi.com. Retrieved 2 March 2014
- 23 June 2014, from http://www.bizagi.com
Dumas, M., La Rosa, M., Mendling, J. and Reijers, H. (2013). Fundamentals of Business Process
Management. 1st ed. Berlin, Heidelberg: Springer.
Help.bizagi.com,.(2014). Bizagi BPM Suite User's Guide. Retrieved 25 April 2014, from
http://help.bizagi.com/bpmsuite/en/index.html?reusing_expressions.htm
Wikipedia, (2014). Bizagi. Retrieved 20 June 2014, from http://en.wikipedia.org/wiki/Bizagi