Embed Size (px)
Citation preview
Update and New Features Guide

020211Blackbaud NetCommunity©2011 Blackbaud, Inc. This publication, or any part thereof, may not be reproduced or transmitted in any form or by any means, electronic, or mechanical, including photocopying, recording, storage in an information retrieval system, or otherwise, without the prior written permission of Blackbaud, Inc.
The information in this manual has been carefully checked and is believed to be accurate. Blackbaud, Inc., assumes no responsibility for any inaccuracies, errors, or omissions in this manual. In no event will Blackbaud, Inc., be liable for direct, indirect, special, incidental, or consequential damages resulting from any defect or omission in this manual, even if advised of the possibility of damages.
In the interest of continuing product development, Blackbaud, Inc., reserves the right to make improvements in this manual and the products it describes at any time, without notice or obligation.
All Blackbaud product names appearing herein are trademarks or registered trademarks of Blackbaud, Inc.
All other products and company names mentioned herein are trademarks of their respective holder.
BBNC‐OCCUpdate‐2011
Contents
UPDATE BLACKBAUD NETCOMMUNITY . . . . . . . . . . . . . . . . . . . . . . . . . . . . . . . . . . . . . 1
Important Pre‐Update Recommendations . . . . . . . . . . . . . . . . . . . . . . . . . . . . . . . . . . . . . . . . . . . . . . . . 1Install the Update . . . . . . . . . . . . . . . . . . . . . . . . . . . . . . . . . . . . . . . . . . . . . . . . . . . . . . . . . . . . . . . . . . . . 2Post Update Checklist . . . . . . . . . . . . . . . . . . . . . . . . . . . . . . . . . . . . . . . . . . . . . . . . . . . . . . . . . . . . . . . . . 2
Configure Facebook Integration . . . . . . . . . . . . . . . . . . . . . . . . . . . . . . . . . . . . . . . . . . . . . . . . . . . . . . . . 3
6.25 NEW FEATURES AND ENHANCEMENTS . . . . . . . . . . . . . . . . . . . . . . . . . . . . . . . . . 5
Site Explorer . . . . . . . . . . . . . . . . . . . . . . . . . . . . . . . . . . . . . . . . . . . . . . . . . . . . . . . . . . . . . . . . . . . . . . . . 6Parts . . . . . . . . . . . . . . . . . . . . . . . . . . . . . . . . . . . . . . . . . . . . . . . . . . . . . . . . . . . . . . . . . . . . . . . . . . . . . . . 6Image Library . . . . . . . . . . . . . . . . . . . . . . . . . . . . . . . . . . . . . . . . . . . . . . . . . . . . . . . . . . . . . . . . . . . . . . . 18Friendly URLs . . . . . . . . . . . . . . . . . . . . . . . . . . . . . . . . . . . . . . . . . . . . . . . . . . . . . . . . . . . . . . . . . . . . . . . 19
Administration . . . . . . . . . . . . . . . . . . . . . . . . . . . . . . . . . . . . . . . . . . . . . . . . . . . . . . . . . . . . . . . . . . . . . 19CAPTCHA for New User Registration Forms . . . . . . . . . . . . . . . . . . . . . . . . . . . . . . . . . . . . . . . . . . . . . . 20Site Copy . . . . . . . . . . . . . . . . . . . . . . . . . . . . . . . . . . . . . . . . . . . . . . . . . . . . . . . . . . . . . . . . . . . . . . . . . . 21
NetCommunity Page in The Raiser’s Edge . . . . . . . . . . . . . . . . . . . . . . . . . . . . . . . . . . . . . . . . . . . . . . . . 23Phone Formats . . . . . . . . . . . . . . . . . . . . . . . . . . . . . . . . . . . . . . . . . . . . . . . . . . . . . . . . . . . . . . . . . . . . . 24Memberships . . . . . . . . . . . . . . . . . . . . . . . . . . . . . . . . . . . . . . . . . . . . . . . . . . . . . . . . . . . . . . . . . . . . . . 24
6.35 NEW FEATURES AND ENHANCEMENTS . . . . . . . . . . . . . . . . . . . . . . . . . . . . . . . . 27
Site Explorer . . . . . . . . . . . . . . . . . . . . . . . . . . . . . . . . . . . . . . . . . . . . . . . . . . . . . . . . . . . . . . . . . . . . . . . 27Pages & Templates . . . . . . . . . . . . . . . . . . . . . . . . . . . . . . . . . . . . . . . . . . . . . . . . . . . . . . . . . . . . . . . . . . 28Parts . . . . . . . . . . . . . . . . . . . . . . . . . . . . . . . . . . . . . . . . . . . . . . . . . . . . . . . . . . . . . . . . . . . . . . . . . . . . . . 28
Administration . . . . . . . . . . . . . . . . . . . . . . . . . . . . . . . . . . . . . . . . . . . . . . . . . . . . . . . . . . . . . . . . . . . . . 30Email Settings . . . . . . . . . . . . . . . . . . . . . . . . . . . . . . . . . . . . . . . . . . . . . . . . . . . . . . . . . . . . . . . . . . . . . . 30Supported Languages . . . . . . . . . . . . . . . . . . . . . . . . . . . . . . . . . . . . . . . . . . . . . . . . . . . . . . . . . . . . . . . . 31Site Tracking . . . . . . . . . . . . . . . . . . . . . . . . . . . . . . . . . . . . . . . . . . . . . . . . . . . . . . . . . . . . . . . . . . . . . . . 31Social Media . . . . . . . . . . . . . . . . . . . . . . . . . . . . . . . . . . . . . . . . . . . . . . . . . . . . . . . . . . . . . . . . . . . . . . . 31
Email . . . . . . . . . . . . . . . . . . . . . . . . . . . . . . . . . . . . . . . . . . . . . . . . . . . . . . . . . . . . . . . . . . . . . . . . . . . . . 33
1chapter
Update Blackbaud NetCommunity
Important Pre-Update Recommendations. . . . . . . . . . . . . . . . . . . . . . . . . . . . . . . . . . . . . . . . . . . . . . 1
Install the Update. . . . . . . . . . . . . . . . . . . . . . . . . . . . . . . . . . . . . . . . . . . . . . . . . . . . . . . . . . . . . . . . . . 2
Post Update Checklist. . . . . . . . . . . . . . . . . . . . . . . . . . . . . . . . . . . . . . . . . . . . . . . . . . . . . . . . . . . . . . 2
This guide provides information and procedures about how to update your server and workstations to Blackbaud NetCommunity 6.35. In additional, the New Features and Enhancements chapter provides information about new enhancements available in this version of Blackbaud NetCommunity to help you comply with the Payment Card Industry Data Security Standards (PCI DSS). Before you install the update, review the pre‐update recommendations and installation requirements.
Important Pre-Update RecommendationsThis section provides important notes you should read before you attempt to update Blackbaud NetCommunity. Before you move on to the update procedure, we recommend you verify each item in this list. Many items in this section are important precautions you should take to make sure your update is successful. If you ignore recommendations in this list, you may have problems during the update process.
To successfully integrate with Blackbaud NetCommunity 6.35 in a PCI DSS‐compliant environment, you must use The Raiser’s Edge 7.91. As a best practice, we recommend that you use The Raiser’s Edge 7.91 patch 12. You must first upgrade to Blackbaud NetCommunity 6.35, then immediately upgrade to The Raiser’s Edge 7.91. For Support assistance, go to support.blackbaud.com.
To successfully upgrade to Blackbaud NetCommunity 6.35, verify you update from, at a minimum, version 5.60, patch 5.
We recommend you install Blackbaud NetCommunity in a separate test environment and install the update. After you update the test environment, you can test the update to make sure it was successful. In the test environment, the Blackbaud NetCommunity web service will not be enabled, including the mailing, CapWiz subscription, and credit card processing services. If your organization cannot adequately support a separate test environment, contact Blackbaud Interactive Services or your account executive for assistance.
We recommend you run any unprocessed transactions in The Raiser’s Edge.
1
2 CHAPTER 1
Back up your Blackbaud NetCommunity database and The Raiser’s Edge database.
Back up the Custom folder in the Blackbaud NetCommunity directory.
Back up your web.config files.
We recommend you review the System Requirements to verify your environment can support this version of Blackbaud NetCommunity. For the latest System Requirements, visit www.blackbaud.com.
We recommend you review the New Features and Enhancements chapter in this guide. Consider how your organization can use these features to improve your operations.
Determine when to install the update. Depending on the size of your database and the number of transactions, it may take several hours for the update procedure to run revisions.
You can upgrade the Menu (Deprecated) part to the more powerful Menu part to support Website Accessibility (WAI) standards and to include more style options. Certain style options in the Menu (Deprecated) part may not convert to Menu. Fully test a converted menu and re‐create style options if necessary. For information about how to upgrade the Menu (Deprecated) part, see the Website Design Guide.
Install the UpdateFor Blackbaud NetCommunity 6.35, the upgrade requires that you perform additional steps because you are upgrading NetCommunity to the Infinity platform. For information about how to update to Blackbaud NetCommunity 6.35, see the Infinity Installation and Upgrade Guide.
Post Update ChecklistAfter you update Blackbaud NetCommunity, perform these items to ensure your installation of Blackbaud NetCommunity and your Blackbaud NetCommunity website operate correctly.
After you update Blackbaud NetCommunity, your System Administrator should stop and restart the Blackbaud NetCommunity Service and the Blackbaud NetCommunity COM Service.
After you update Blackbaud NetCommunity, make sure to set the system’s time zone in Sites and then review the dates and times set for any future calendar events created before the upgrade. You may need to adjust the dates and times so they reflect the appropriate time zone.
Update your Raiser’s Edge web service and The Raiser’s Edge plug‐ins.
Install the latest version of your customized files. Customizations must be compatible with Blackbaud NetCommunity 6.35.
Note: During the update, the update utility preserves your database and application settings and updates them to the new version.
Warning: Your customizations must be compatible with version 6.35. If you created the customizations, please contact your System Administrator before you begin the update process. If Blackbaud created the customizations, please contact Blackbaud Support to verify you have the latest version of the customized files. For Support assistance, go to www.support.blackbaud.com.

UPDATE BLACKBAUD NETCOMMUNITY 3
With a Facebook Profile Link part, website users can link their user networking accounts on your website to their accounts on the social network utility Facebook. Before you can design a Facebook Profile Link part, you must first configure the integration between your website and Facebook. For information about how to configure the integration, see “Configure Facebook Integration” on page 3.
Directory results are sortable. All column headings, with the exception of attributes, education history, and phones, appear as hyperlinks. To maintain your current Directory styles after you update, you may copy CSS information from .DirectoryListingHeading to the following new class elements: .BBListingHeadingLink, .BBListingHeadingLink:active, .BBListingHeadingLink:hover, .BBListingHeadingLink:visited, .BBListingHeadingLink:link.
Configure Facebook IntegrationYou can design and add a Facebook Profile Link part to any page on your website. With a Facebook Profile Link part, website users can link their user networking accounts on your website to their accounts on the social network utility Facebook. Before you can design a Facebook Profile Link part, you must first configure the integration between your website and Facebook. To configure the integration, you must create a Facebook application and edit the Web.config file for your website with the keys to the application.
Create a Facebook application for your website
1. Log into your Facebook account, and go to http://www.facebook.com/developers. If you have not added Developer to your account, allow it to access your Facebook account.
2. In Developer, create an application.
3. From the Canvas tab, enter the address of your website in the Canvas Callback URL field.
4. Under Canvas Settings, select FBML in the Render Method field.
5. Submit the application to the Facebook Application Directory.
6. In the <appSettings> section of the Web.config file for your website, enter <add key=”FBAppKey” value=”[API Key]”/> and <add key=”FBSecret” value=”[Secret]”/>, where [API Key] and [Secret] are the values from the API Key and Secret fields on the application’s Basic tab.
Facebook Integration FeaturesWhen you integrate with Facebook, several features appear in Blackbaud NetCommunity.
• Use the Facebook Profile Link part to capture the Facebook profile URL for User Networking members on your Blackbaud NetCommunity website. When users integrate their User Networking accounts with Facebook, they can import photos and captions from Facebook to your website.
Note: For information about the fields on the application form, access the Facebook help file.
Note: You can include the Facebook Profile Link part on any web page. The part does not have to associate with a User Networking Manager part. When a user first clicks the link from a Blackbaud NetCommunity page to a Facebook profile, a profile update transaction processes for The Raiser’s Edge. After you download the profile update, the user’s Facebook profile URL appears on the constituent record.
4 CHAPTER 1
In addition, the Friends tab for the User Networking part includes a Facebook friends list. Users click a friend’s link to navigate to the friend’s Facebook profile.
For more information about the Facebook Profile Link and User Networking parts, see the User Networking Guide.
• After a website user integrates the User Networking and Facebook accounts, when the user selects to upload a photo album to your website, an Add Photos from Facebook link appears on the screen. The user clicks the link to import a photo album or an individual picture from Facebook. This applies to all areas of the website where photo albums are used, including slideshows, personal pages, fundraiser personal pages, and profile displays. For more information about uploading photos on your website, see the Website Design Guide.
• In Facebook, you can create custom applications for your organization to acquire constituents and publish live content from your website. Users must add the application to their Facebook profile to display the content. Your Blackbaud NetCommunity web server stores the application, and Facebook communicates with your web server to include pages from the application on Facebook profiles. Custom applications in Facebook can display features such as news, events, campaign thermometers, wall posts when a user joins your organization, and a mutual friends list for your organization. Custom applications can also process new constituents and donations that Blackbaud NetCommunity then downloads to The Raiser’s Edge. For more information, see the Integrated Facebook Application: Open Platform Toolkit post on labs.blackbaud.com.
Note: For a user to import photos and captions from a Facebook account to a User Networking account, you must first enable photos on the User Networking Manager part. For information about how to enable photos, see the User Networking Guide.
Note: Facebook custom applications are beyond the scope of Blackbaud Support.
2chapter
6.25 New Features and Enhancements
Site Explorer. . . . . . . . . . . . . . . . . . . . . . . . . . . . . . . . . . . . . . . . . . . . . . . . . . . . . . . . . . . . . . . . . . . . . . 6
Administration . . . . . . . . . . . . . . . . . . . . . . . . . . . . . . . . . . . . . . . . . . . . . . . . . . . . . . . . . . . . . . . . . . . 19
NetCommunity Page in The Raiser’s Edge . . . . . . . . . . . . . . . . . . . . . . . . . . . . . . . . . . . . . . . . . . . . 23
This chapter provides an overview of new features and enhancements for Blackbaud NetCommunity 6.25. For more details about the features and enhancements, see the help file. To access help, click Help from within the program. For information about how to update to Blackbaud NetCommunity 6.25, see “Update Blackbaud NetCommunity” on page 1. For information about how to install Blackbaud NetCommunity for the first time, see the Blackbaud Infinity Installation Guide.
The new features and enhancements include:
• “Documents” on page 7
• “Donation Form” on page 8
• “Event Registration Form” on page 9
• “Language Selector” on page 9
• “Membership Form” on page 9
• “Payment 2.0” on page 10
• “Suggested Content” on page 12
• “Search” on page 13
• “Tags Tab” on page 13
• “Transaction Manager” on page 13
• “User Photos Form” on page 18
• “Image Library” on page 18
• “Friendly URLs” on page 19
• “CAPTCHA for New User Registration Forms” on page 20
Note: You must use The Raiser’s Edge 7.91 or higher to integrate with Blackbaud NetCommunity 6.25. For Support assistance, go to support.blackbaud.com. As a best practice, we recommend that you use The Raiser’s Edge 7.91 patch 21 or higher.
2
6 CHAPTER 2
• “Site Copy” on page 21
• “NetCommunity Page in The Raiser’s Edge” on page 23
Site ExplorerThe following Site explorer enhancements are available in Blackbaud NetCommunity 6.25. For more information about these features, see the Website Design Guide.
• “Parts” on page 6
• “Friendly URLs” on page 19
• “Image Library” on page 18
PartsSeveral parts now retain biographical information for anonymous users on your website. For example, an anonymous user can register for an event on your site and then navigates to the membership page to become a member. The title, first name, last name, address, city, state, ZIP code, phone and email information that the user originally entered on the donation page automatically appears on the membership page. If necessary, the user can edit the information.
The following parts retain biographical information for anonymous users:
• Anonymous Newsletter Subscription
• Donation Form
• eCards
• Event Registration Form
• Fundraiser
• Membership Form
• Payment
• Payment 2.0
• User Login
In addition, Blackbaud NetCommunity 6.25 also includes several additional new and updated parts.
Tip: When an anonymous user closes the browser or remains idle on a page for too long, the biographical information is not retained for another part on a page.
6.25 NEW FEATURES AND ENHANCEMENTS 7
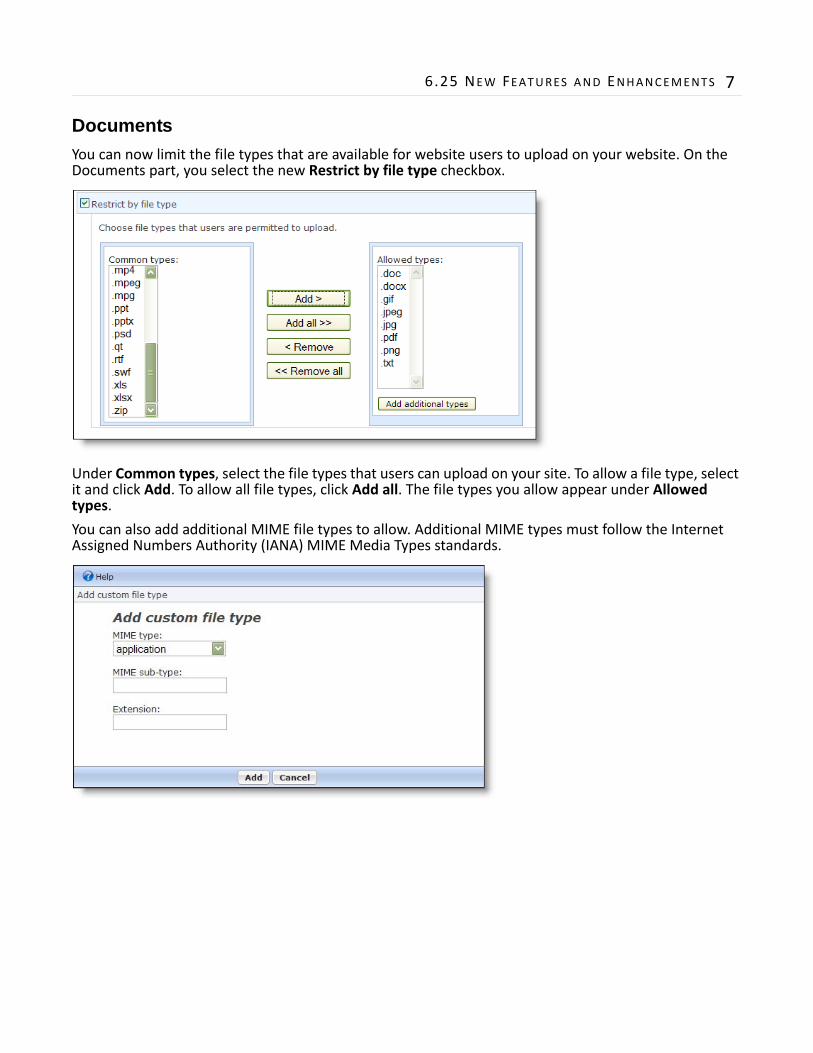
DocumentsYou can now limit the file types that are available for website users to upload on your website. On the Documents part, you select the new Restrict by file type checkbox.
Under Common types, select the file types that users can upload on your site. To allow a file type, select it and click Add. To allow all file types, click Add all. The file types you allow appear under Allowed types.
You can also add additional MIME file types to allow. Additional MIME types must follow the Internet Assigned Numbers Authority (IANA) MIME Media Types standards.
8 CHAPTER 2
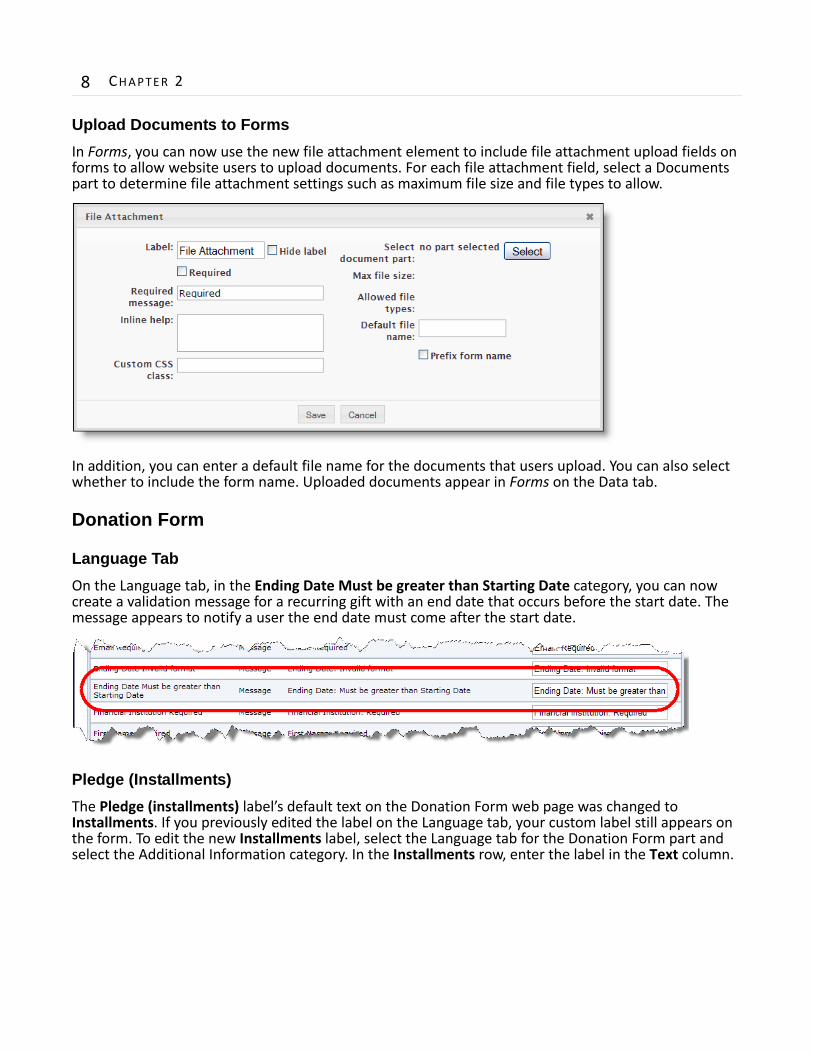
Upload Documents to FormsIn Forms, you can now use the new file attachment element to include file attachment upload fields on forms to allow website users to upload documents. For each file attachment field, select a Documents part to determine file attachment settings such as maximum file size and file types to allow.
In addition, you can enter a default file name for the documents that users upload. You can also select whether to include the form name. Uploaded documents appear in Forms on the Data tab.
Donation Form
Language TabOn the Language tab, in the Ending Date Must be greater than Starting Date category, you can now create a validation message for a recurring gift with an end date that occurs before the start date. The message appears to notify a user the end date must come after the start date.
Pledge (Installments)The Pledge (installments) label’s default text on the Donation Form web page was changed to Installments. If you previously edited the label on the Language tab, your custom label still appears on the form. To edit the new Installments label, select the Language tab for the Donation Form part and select the Additional Information category. In the Installments row, enter the label in the Text column.
6.25 NEW FEATURES AND ENHANCEMENTS 9
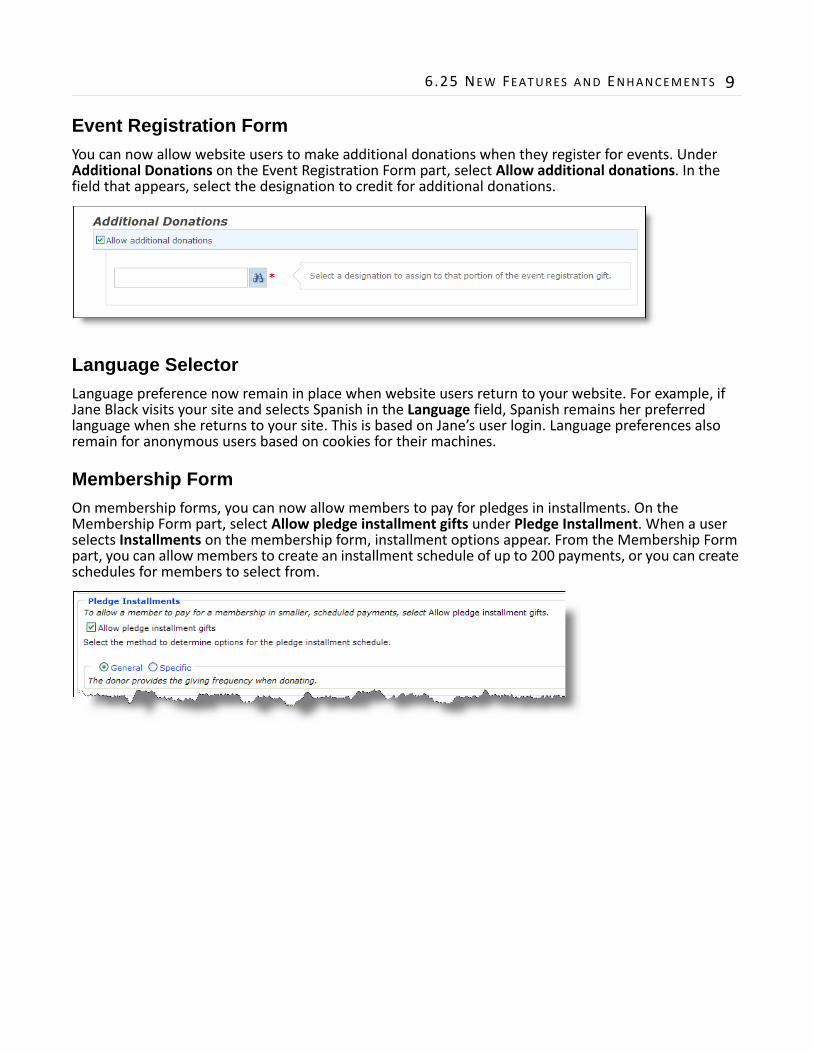
Event Registration FormYou can now allow website users to make additional donations when they register for events. Under Additional Donations on the Event Registration Form part, select Allow additional donations. In the field that appears, select the designation to credit for additional donations.
Language SelectorLanguage preference now remain in place when website users return to your website. For example, if Jane Black visits your site and selects Spanish in the Language field, Spanish remains her preferred language when she returns to your site. This is based on Jane’s user login. Language preferences also remain for anonymous users based on cookies for their machines.
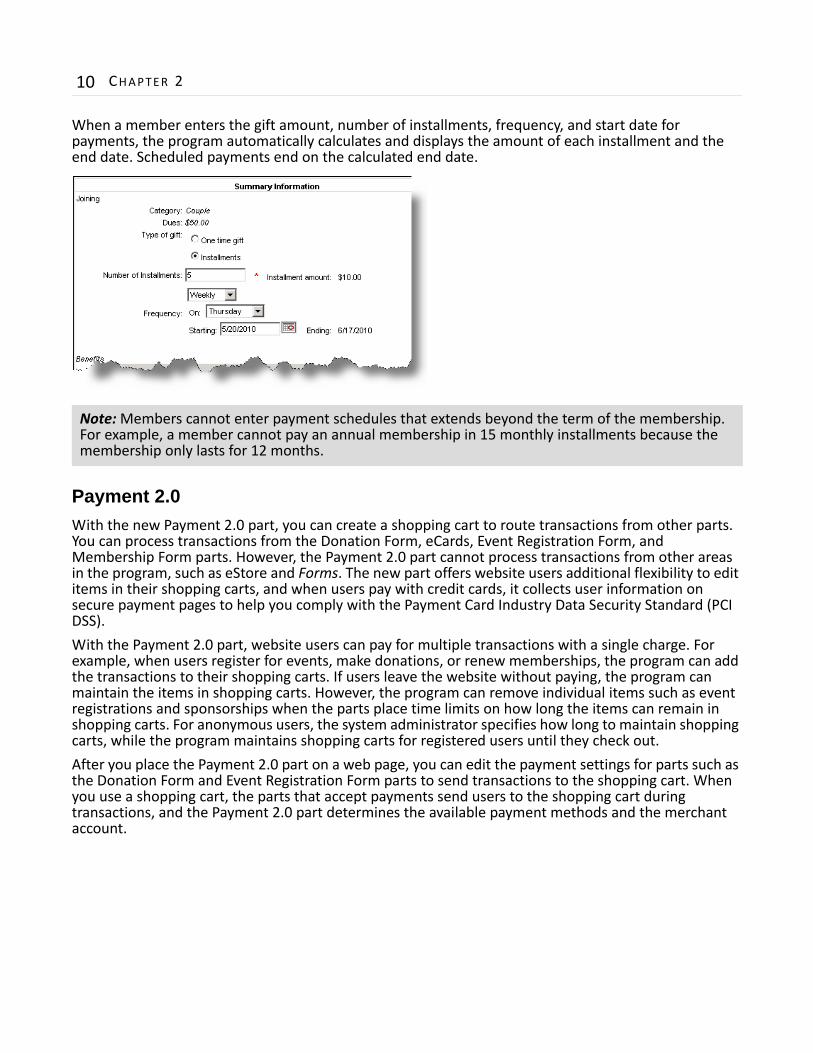
Membership FormOn membership forms, you can now allow members to pay for pledges in installments. On the Membership Form part, select Allow pledge installment gifts under Pledge Installment. When a user selects Installments on the membership form, installment options appear. From the Membership Form part, you can allow members to create an installment schedule of up to 200 payments, or you can create schedules for members to select from.
10 CHAPTER 2
When a member enters the gift amount, number of installments, frequency, and start date for payments, the program automatically calculates and displays the amount of each installment and the end date. Scheduled payments end on the calculated end date.
Payment 2.0With the new Payment 2.0 part, you can create a shopping cart to route transactions from other parts. You can process transactions from the Donation Form, eCards, Event Registration Form, and Membership Form parts. However, the Payment 2.0 part cannot process transactions from other areas in the program, such as eStore and Forms. The new part offers website users additional flexibility to edit items in their shopping carts, and when users pay with credit cards, it collects user information on secure payment pages to help you comply with the Payment Card Industry Data Security Standard (PCI DSS).
With the Payment 2.0 part, website users can pay for multiple transactions with a single charge. For example, when users register for events, make donations, or renew memberships, the program can add the transactions to their shopping carts. If users leave the website without paying, the program can maintain the items in shopping carts. However, the program can remove individual items such as event registrations and sponsorships when the parts place time limits on how long the items can remain in shopping carts. For anonymous users, the system administrator specifies how long to maintain shopping carts, while the program maintains shopping carts for registered users until they check out.
After you place the Payment 2.0 part on a web page, you can edit the payment settings for parts such as the Donation Form and Event Registration Form parts to send transactions to the shopping cart. When you use a shopping cart, the parts that accept payments send users to the shopping cart during transactions, and the Payment 2.0 part determines the available payment methods and the merchant account.
Note: Members cannot enter payment schedules that extends beyond the term of the membership. For example, a member cannot pay an annual membership in 15 monthly installments because the membership only lasts for 12 months.
6.25 NEW FEATURES AND ENHANCEMENTS 11
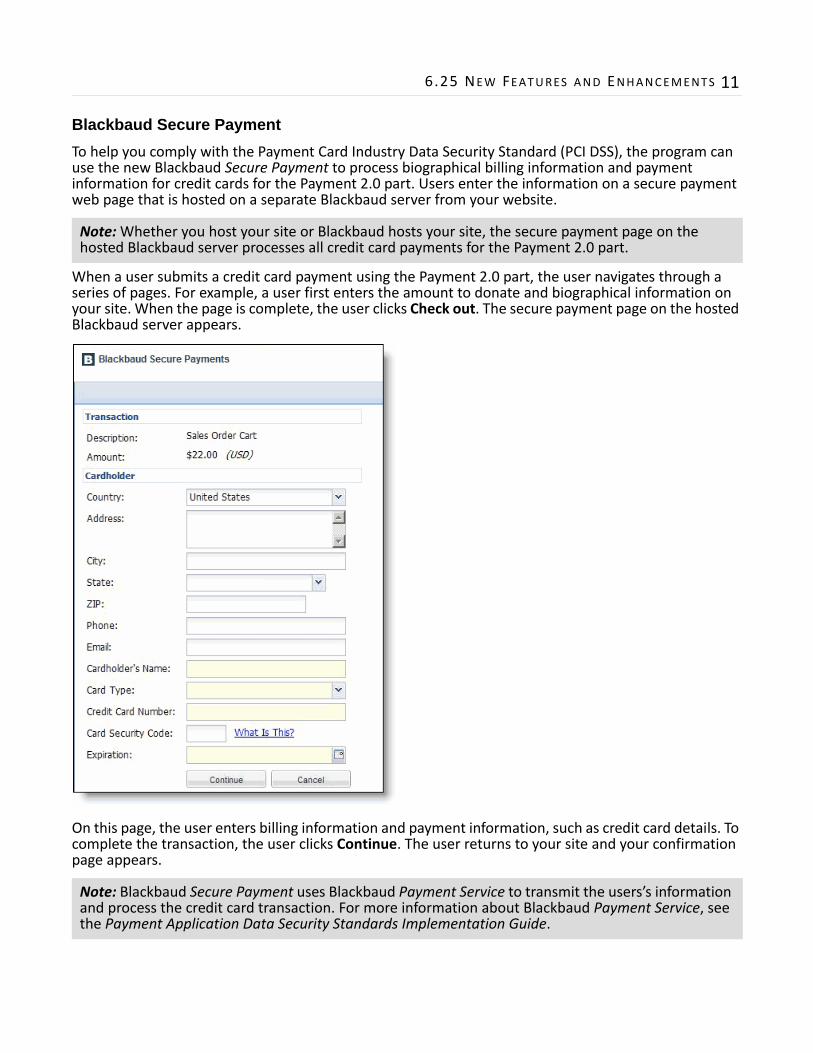
Blackbaud Secure PaymentTo help you comply with the Payment Card Industry Data Security Standard (PCI DSS), the program can use the new Blackbaud Secure Payment to process biographical billing information and payment information for credit cards for the Payment 2.0 part. Users enter the information on a secure payment web page that is hosted on a separate Blackbaud server from your website.
When a user submits a credit card payment using the Payment 2.0 part, the user navigates through a series of pages. For example, a user first enters the amount to donate and biographical information on your site. When the page is complete, the user clicks Check out. The secure payment page on the hosted Blackbaud server appears.
On this page, the user enters billing information and payment information, such as credit card details. To complete the transaction, the user clicks Continue. The user returns to your site and your confirmation page appears.
Note: Whether you host your site or Blackbaud hosts your site, the secure payment page on the hosted Blackbaud server processes all credit card payments for the Payment 2.0 part.
Note: Blackbaud Secure Payment uses Blackbaud Payment Service to transmit the users’s information and process the credit card transaction. For more information about Blackbaud Payment Service, see the Payment Application Data Security Standards Implementation Guide.
12 CHAPTER 2
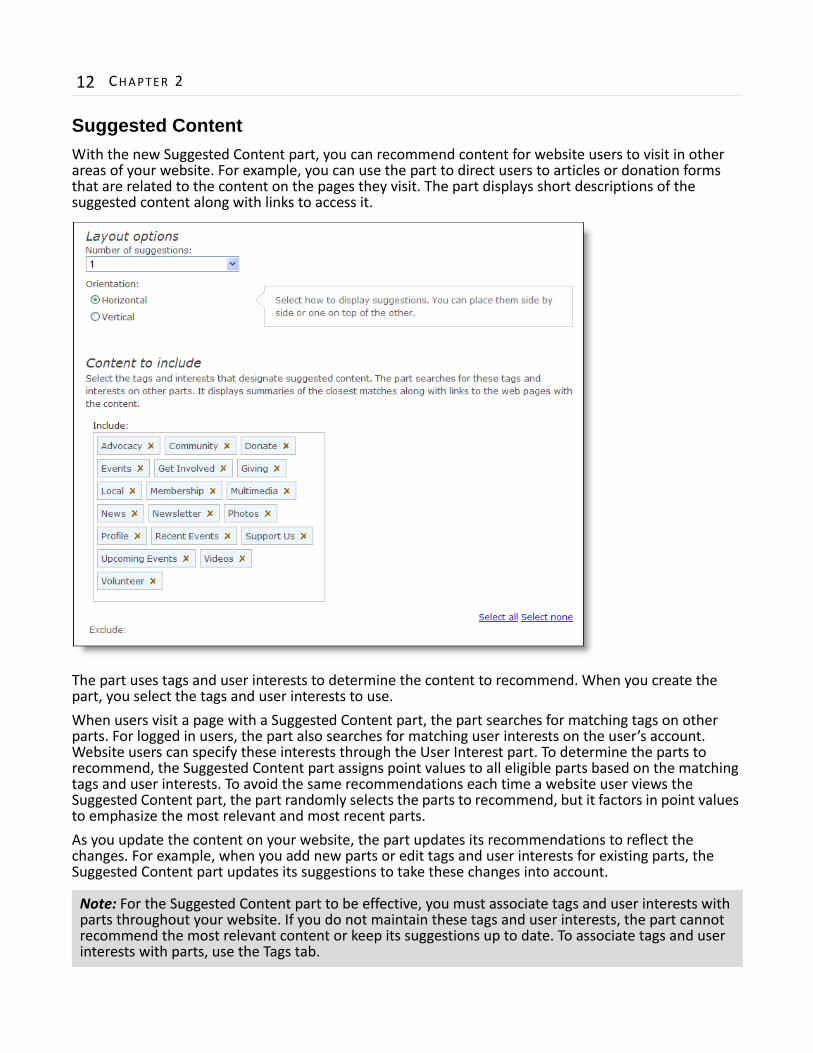
Suggested ContentWith the new Suggested Content part, you can recommend content for website users to visit in other areas of your website. For example, you can use the part to direct users to articles or donation forms that are related to the content on the pages they visit. The part displays short descriptions of the suggested content along with links to access it.
The part uses tags and user interests to determine the content to recommend. When you create the part, you select the tags and user interests to use.
When users visit a page with a Suggested Content part, the part searches for matching tags on other parts. For logged in users, the part also searches for matching user interests on the user’s account. Website users can specify these interests through the User Interest part. To determine the parts to recommend, the Suggested Content part assigns point values to all eligible parts based on the matching tags and user interests. To avoid the same recommendations each time a website user views the Suggested Content part, the part randomly selects the parts to recommend, but it factors in point values to emphasize the most relevant and most recent parts.
As you update the content on your website, the part updates its recommendations to reflect the changes. For example, when you add new parts or edit tags and user interests for existing parts, the Suggested Content part updates its suggestions to take these changes into account.
Note: For the Suggested Content part to be effective, you must associate tags and user interests with parts throughout your website. If you do not maintain these tags and user interests, the part cannot recommend the most relevant content or keep its suggestions up to date. To associate tags and user interests with parts, use the Tags tab.
6.25 NEW FEATURES AND ENHANCEMENTS 13
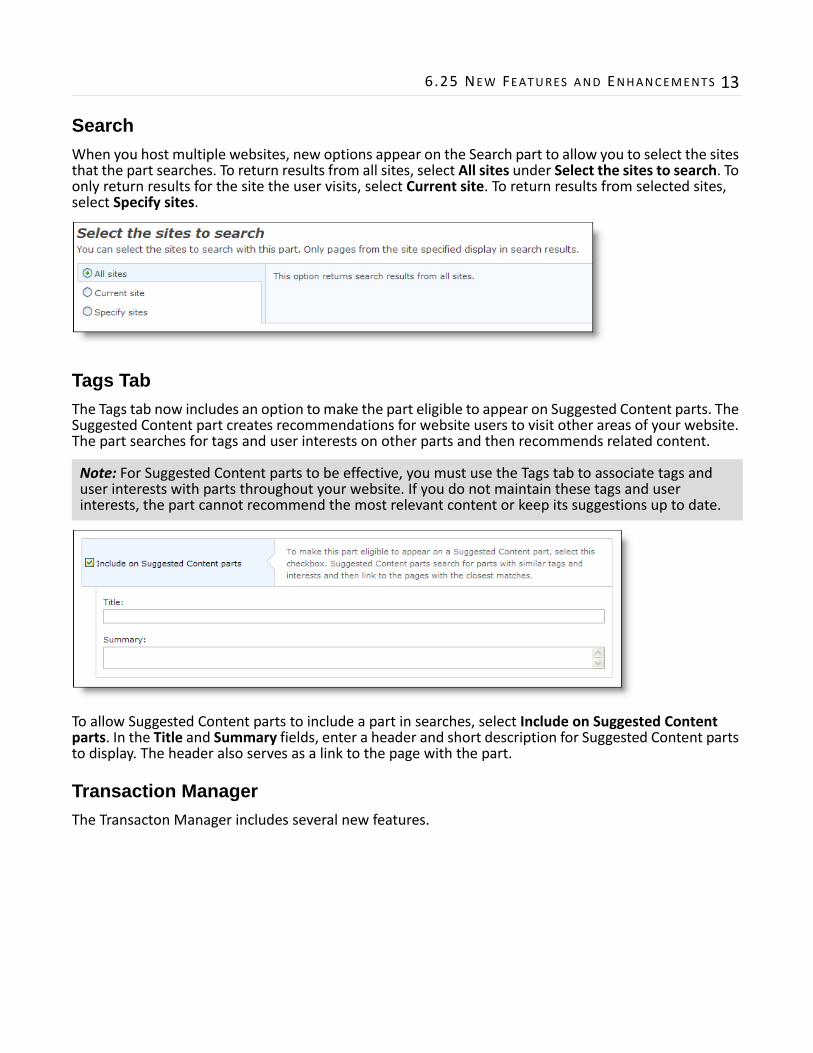
SearchWhen you host multiple websites, new options appear on the Search part to allow you to select the sites that the part searches. To return results from all sites, select All sites under Select the sites to search. To only return results for the site the user visits, select Current site. To return results from selected sites, select Specify sites.
Tags TabThe Tags tab now includes an option to make the part eligible to appear on Suggested Content parts. The Suggested Content part creates recommendations for website users to visit other areas of your website. The part searches for tags and user interests on other parts and then recommends related content.
To allow Suggested Content parts to include a part in searches, select Include on Suggested Content parts. In the Title and Summary fields, enter a header and short description for Suggested Content parts to display. The header also serves as a link to the page with the part.
Transaction ManagerThe Transacton Manager includes several new features.
Note: For Suggested Content parts to be effective, you must use the Tags tab to associate tags and user interests with parts throughout your website. If you do not maintain these tags and user interests, the part cannot recommend the most relevant content or keep its suggestions up to date.
14 CHAPTER 2
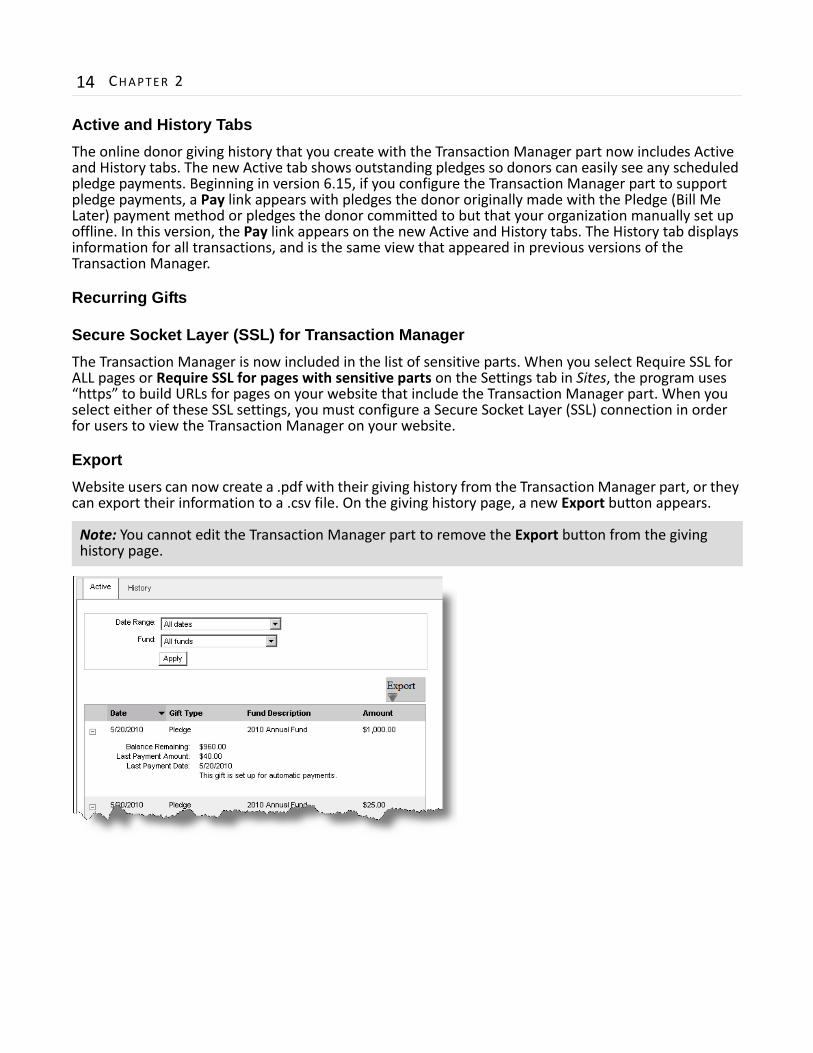
Active and History TabsThe online donor giving history that you create with the Transaction Manager part now includes Active and History tabs. The new Active tab shows outstanding pledges so donors can easily see any scheduled pledge payments. Beginning in version 6.15, if you configure the Transaction Manager part to support pledge payments, a Pay link appears with pledges the donor originally made with the Pledge (Bill Me Later) payment method or pledges the donor committed to but that your organization manually set up offline. In this version, the Pay link appears on the new Active and History tabs. The History tab displays information for all transactions, and is the same view that appeared in previous versions of the Transaction Manager.
Recurring Gifts
Secure Socket Layer (SSL) for Transaction ManagerThe Transaction Manager is now included in the list of sensitive parts. When you select Require SSL for ALL pages or Require SSL for pages with sensitive parts on the Settings tab in Sites, the program uses “https” to build URLs for pages on your website that include the Transaction Manager part. When you select either of these SSL settings, you must configure a Secure Socket Layer (SSL) connection in order for users to view the Transaction Manager on your website.
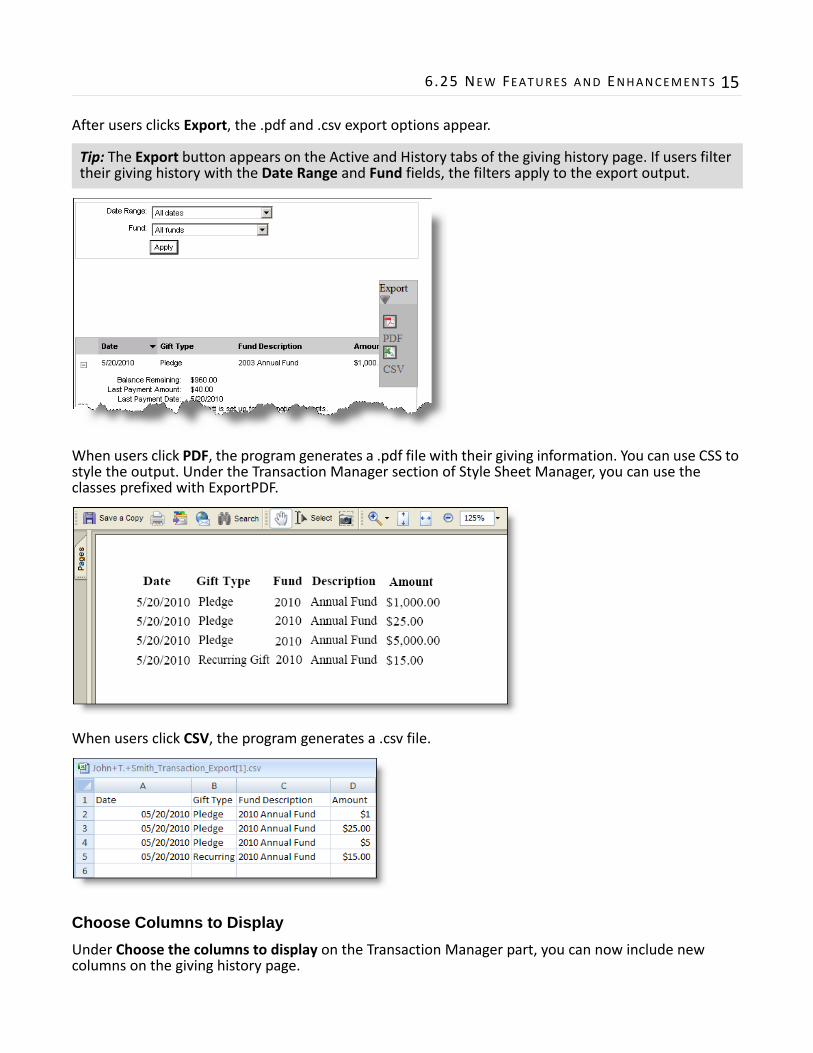
ExportWebsite users can now create a .pdf with their giving history from the Transaction Manager part, or they can export their information to a .csv file. On the giving history page, a new Export button appears.
Note: You cannot edit the Transaction Manager part to remove the Export button from the giving history page.
6.25 NEW FEATURES AND ENHANCEMENTS 15
After users clicks Export, the .pdf and .csv export options appear.
When users click PDF, the program generates a .pdf file with their giving information. You can use CSS to style the output. Under the Transaction Manager section of Style Sheet Manager, you can use the classes prefixed with ExportPDF.
When users click CSV, the program generates a .csv file.
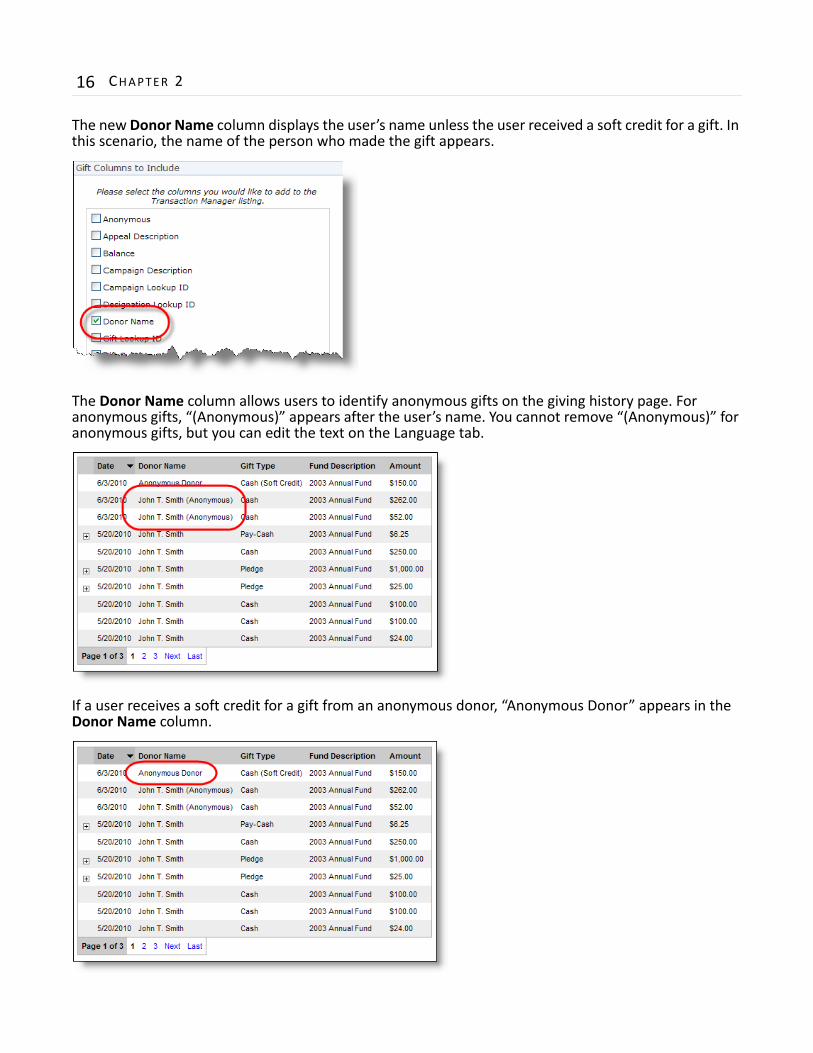
Choose Columns to DisplayUnder Choose the columns to display on the Transaction Manager part, you can now include new columns on the giving history page.
Tip: The Export button appears on the Active and History tabs of the giving history page. If users filter their giving history with the Date Range and Fund fields, the filters apply to the export output.
16 CHAPTER 2
The new Donor Name column displays the user’s name unless the user received a soft credit for a gift. In this scenario, the name of the person who made the gift appears.
The Donor Name column allows users to identify anonymous gifts on the giving history page. For anonymous gifts, “(Anonymous)” appears after the user’s name. You cannot remove “(Anonymous)” for anonymous gifts, but you can edit the text on the Language tab.
If a user receives a soft credit for a gift from an anonymous donor, “Anonymous Donor” appears in the Donor Name column.
6.25 NEW FEATURES AND ENHANCEMENTS 17
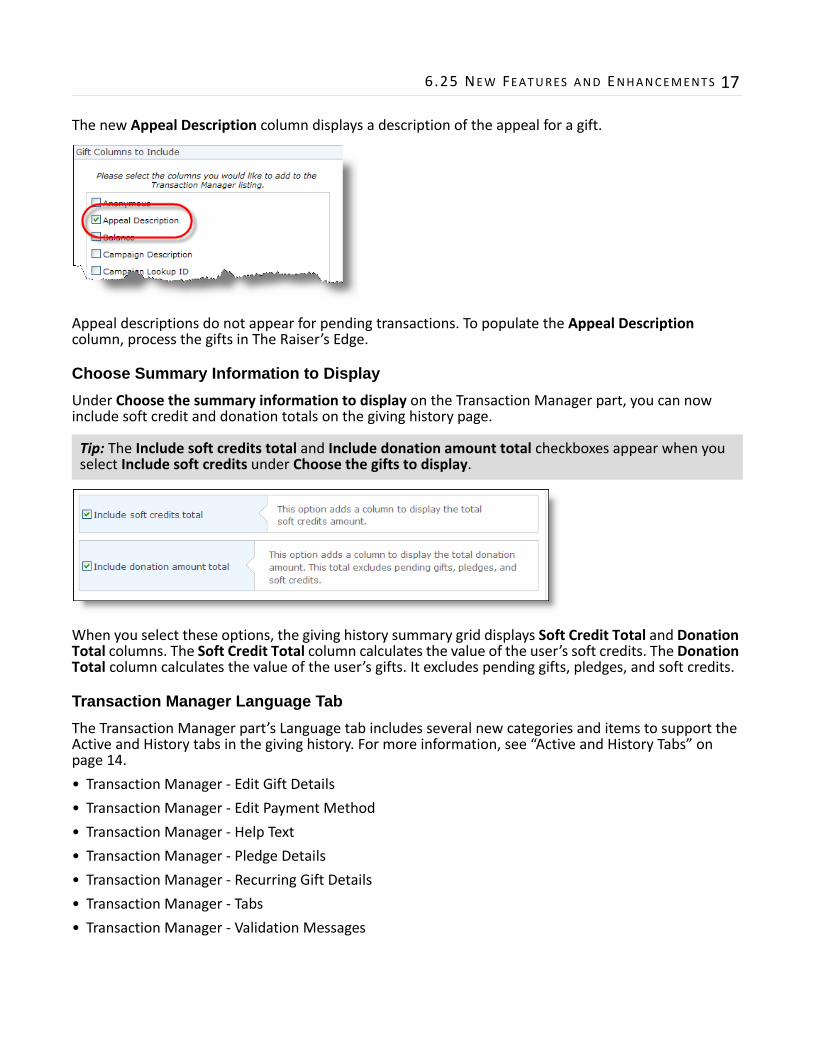
The new Appeal Description column displays a description of the appeal for a gift.
Appeal descriptions do not appear for pending transactions. To populate the Appeal Description column, process the gifts in The Raiser’s Edge.
Choose Summary Information to DisplayUnder Choose the summary information to display on the Transaction Manager part, you can now include soft credit and donation totals on the giving history page.
When you select these options, the giving history summary grid displays Soft Credit Total and Donation Total columns. The Soft Credit Total column calculates the value of the user’s soft credits. The Donation Total column calculates the value of the user’s gifts. It excludes pending gifts, pledges, and soft credits.
Transaction Manager Language TabThe Transaction Manager part’s Language tab includes several new categories and items to support the Active and History tabs in the giving history. For more information, see “Active and History Tabs” on page 14.
• Transaction Manager ‐ Edit Gift Details
• Transaction Manager ‐ Edit Payment Method
• Transaction Manager ‐ Help Text
• Transaction Manager ‐ Pledge Details
• Transaction Manager ‐ Recurring Gift Details
• Transaction Manager ‐ Tabs
• Transaction Manager ‐ Validation Messages
Tip: The Include soft credits total and Include donation amount total checkboxes appear when you select Include soft credits under Choose the gifts to display.
18 CHAPTER 2
User Photos FormThe User Photos Form part now includes an option to enter a maximum size for the thumbnails that appear on user profile pages. Previously, you could only set a size limit on full‐size images.
In the Max height/width for thumbnails field, enter the size limit for thumbnails. When users select images on a user photos form, the thumbnail that appears on their profile pages must meet this size restriction.
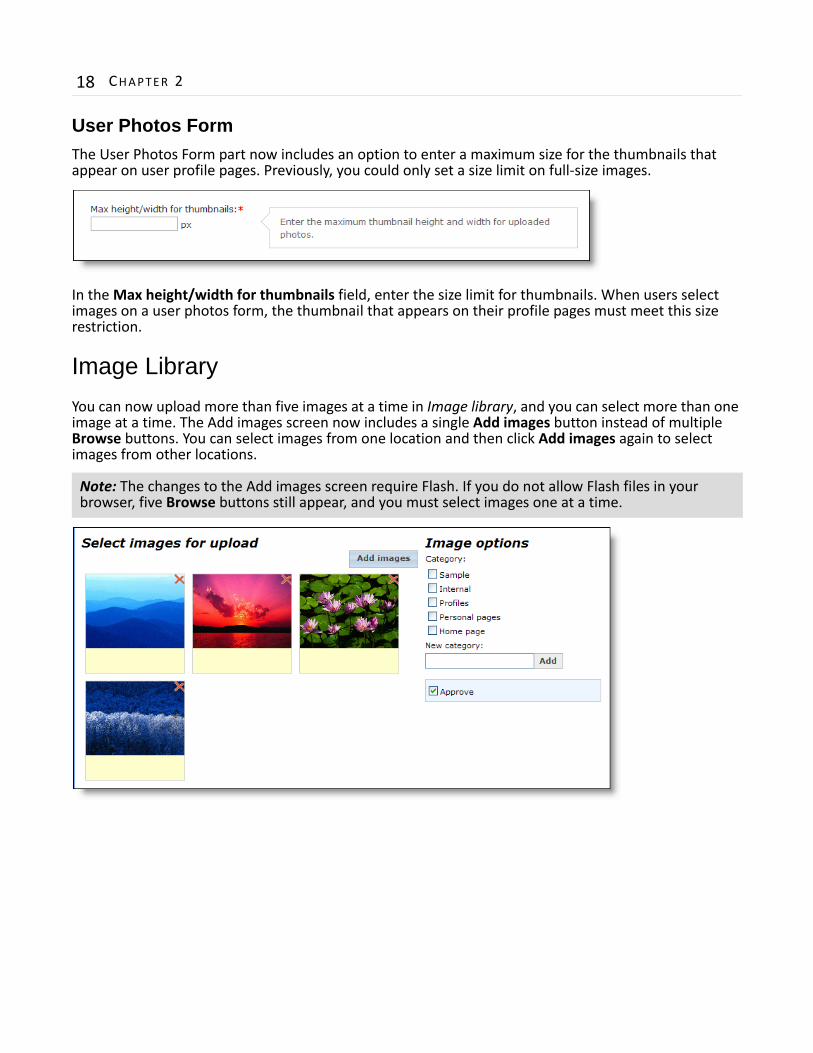
Image LibraryYou can now upload more than five images at a time in Image library, and you can select more than one image at a time. The Add images screen now includes a single Add images button instead of multiple Browse buttons. You can select images from one location and then click Add images again to select images from other locations.
Note: The changes to the Add images screen require Flash. If you do not allow Flash files in your browser, five Browse buttons still appear, and you must select images one at a time.
6.25 NEW FEATURES AND ENHANCEMENTS 19
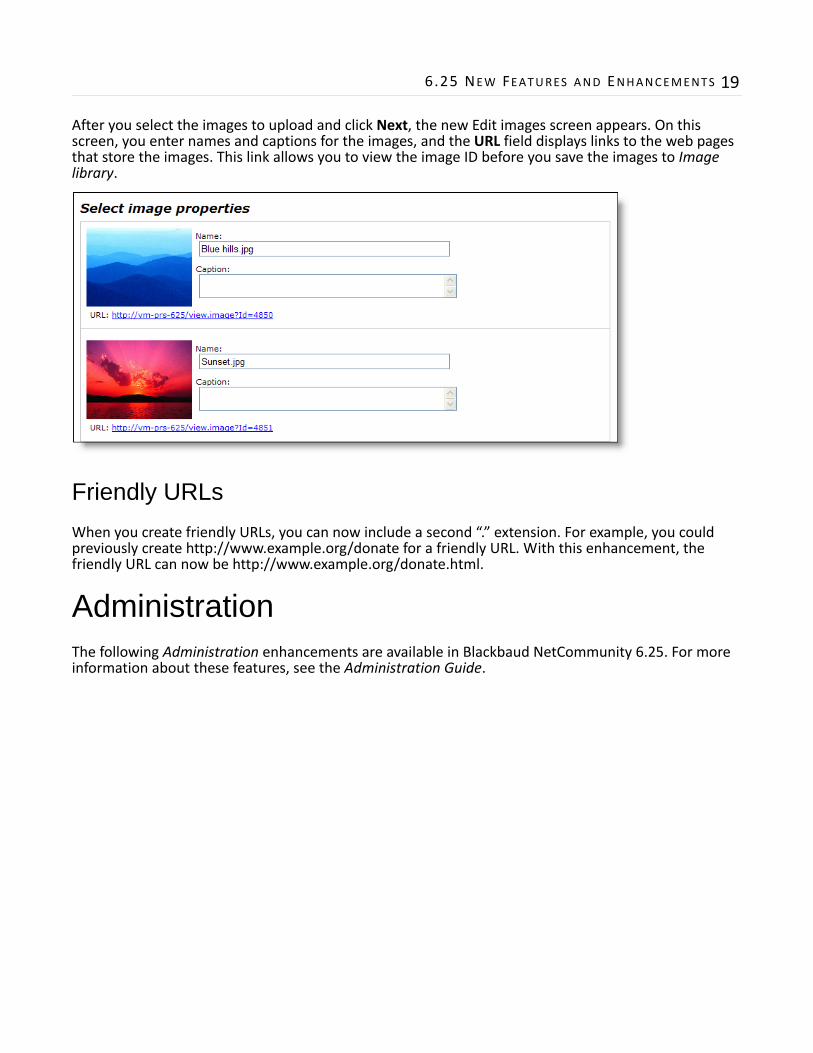
After you select the images to upload and click Next, the new Edit images screen appears. On this screen, you enter names and captions for the images, and the URL field displays links to the web pages that store the images. This link allows you to view the image ID before you save the images to Image library.
Friendly URLsWhen you create friendly URLs, you can now include a second “.” extension. For example, you could previously create http://www.example.org/donate for a friendly URL. With this enhancement, the friendly URL can now be http://www.example.org/donate.html.
AdministrationThe following Administration enhancements are available in Blackbaud NetCommunity 6.25. For more information about these features, see the Administration Guide.
20 CHAPTER 2
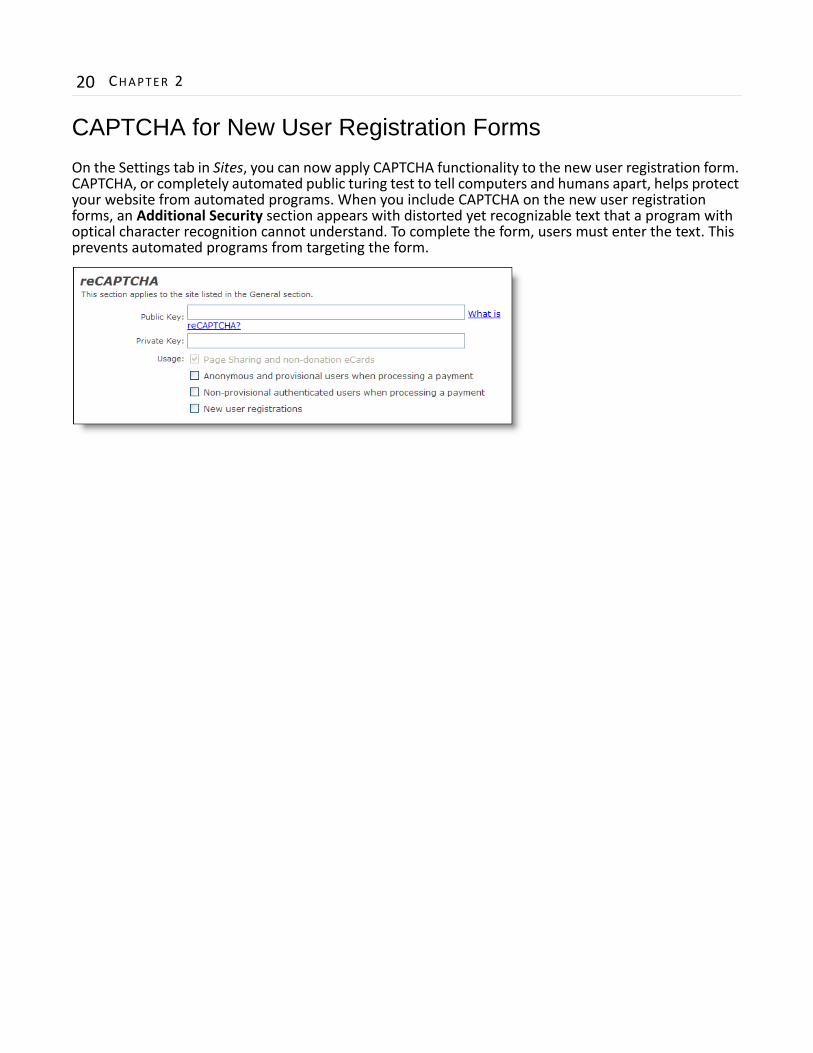
CAPTCHA for New User Registration FormsOn the Settings tab in Sites, you can now apply CAPTCHA functionality to the new user registration form. CAPTCHA, or completely automated public turing test to tell computers and humans apart, helps protect your website from automated programs. When you include CAPTCHA on the new user registration forms, an Additional Security section appears with distorted yet recognizable text that a program with optical character recognition cannot understand. To complete the form, users must enter the text. This prevents automated programs from targeting the form.
6.25 NEW FEATURES AND ENHANCEMENTS 21
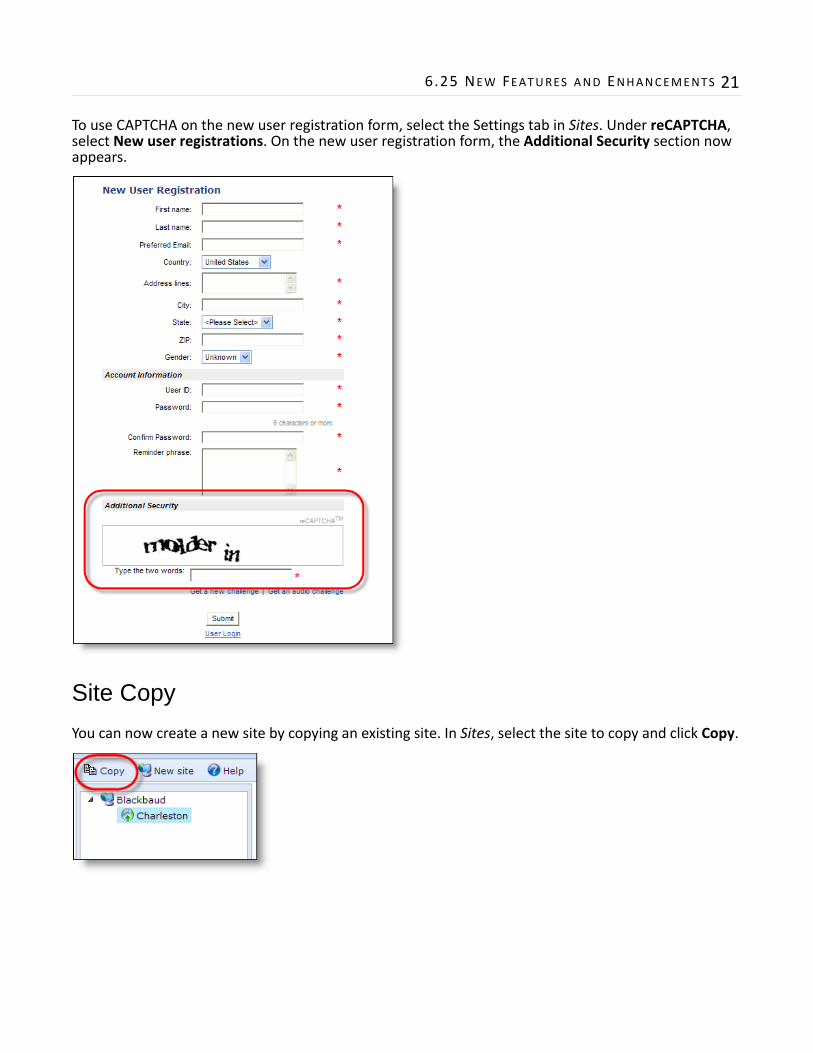
To use CAPTCHA on the new user registration form, select the Settings tab in Sites. Under reCAPTCHA, select New user registrations. On the new user registration form, the Additional Security section now appears.
Site CopyYou can now create a new site by copying an existing site. In Sites, select the site to copy and click Copy.
22 CHAPTER 2
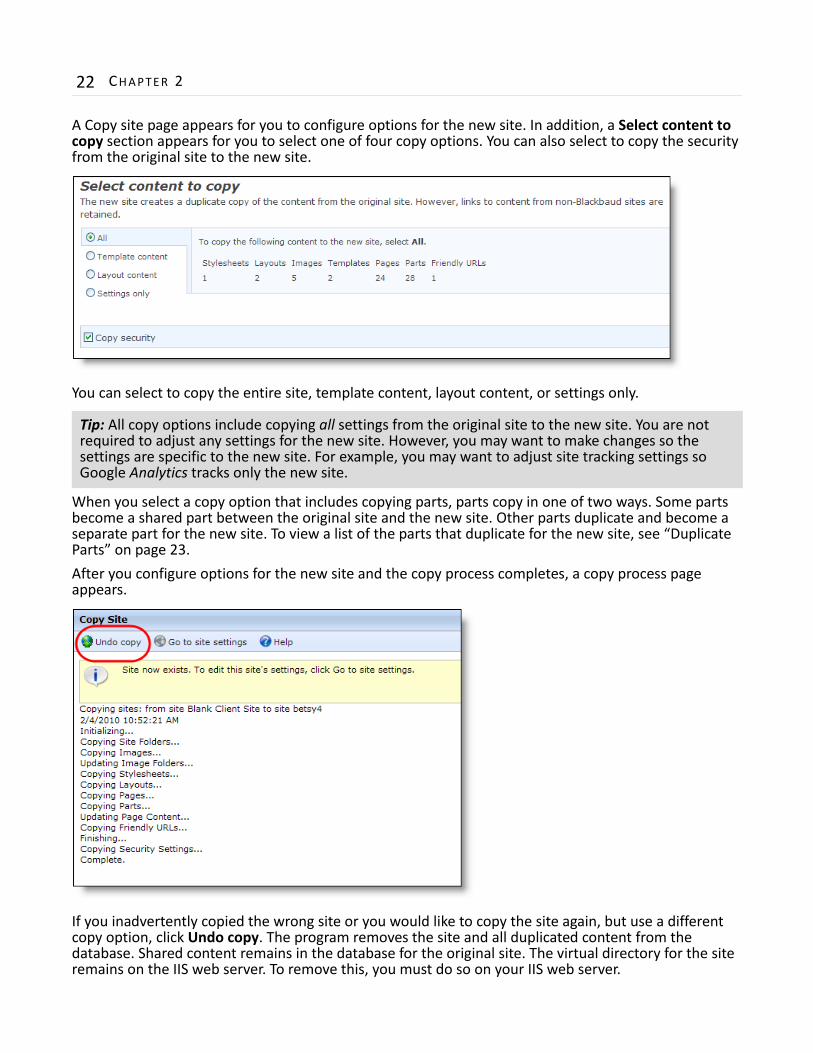
A Copy site page appears for you to configure options for the new site. In addition, a Select content to copy section appears for you to select one of four copy options. You can also select to copy the security from the original site to the new site.
You can select to copy the entire site, template content, layout content, or settings only.
When you select a copy option that includes copying parts, parts copy in one of two ways. Some parts become a shared part between the original site and the new site. Other parts duplicate and become a separate part for the new site. To view a list of the parts that duplicate for the new site, see “Duplicate Parts” on page 23.
After you configure options for the new site and the copy process completes, a copy process page appears.
If you inadvertently copied the wrong site or you would like to copy the site again, but use a different copy option, click Undo copy. The program removes the site and all duplicated content from the database. Shared content remains in the database for the original site. The virtual directory for the site remains on the IIS web server. To remove this, you must do so on your IIS web server.
Tip: All copy options include copying all settings from the original site to the new site. You are not required to adjust any settings for the new site. However, you may want to make changes so the settings are specific to the new site. For example, you may want to adjust site tracking settings so Google Analytics tracks only the new site.
6.25 NEW FEATURES AND ENHANCEMENTS 23
Duplicate PartsWhen you select a copy option that includes copying parts, parts copy in one of two ways. Some parts become shared between the original site and the new site. Other parts duplicate and become a separate part for the new site.
The following parts duplicate when you copy a site and select a copy option that includes parts. The “*” indicates parts that duplicate but do not include website user data. For example, the Discussion Group duplicates for the new site. However, the posts do not duplicate.
NetCommunity Page in The Raiser’s EdgeThe following enhancements to the NetCommunity page in The Raiser’s Edge are available when you integrate with Blackbaud NetCommunity 6.25. For more information about these features, see the Blackbaud NetCommunity & The Raiser’s Edge Integration Guide.
Note: Parts that do not appear in the table are shared between the original site and the new site.
Anonymous Newsletter Subscription
Facebook Profile Link Payment User Email Preferences Form
Change User ID/Password
Flash Player Payment Summary User Interests Form
*Content Comparison Formatted Text & Images
*Poll User Link Module
Directory Formatted Text & Images (Secured)
Profile Display User Login
*Discussion Group Frame Profile Form User Photos Form
*Documents Giving Search Quick Search *Weblog
Donation Form Language Selector Search
eCards Membership Form Slideshow
Email Forwarding Form
Menu 2.0 *Survey
*Event Calendar Navigation Buttons Tag Display
*Event Calendar Group
News Reader Targeted Content
*Event Calendar Highlights
Page Sharing Transaction Manager
24 CHAPTER 2
Phone FormatsPhone numbers that you process to The Raiser’s Edge now inherit the phone format for that phone type. For example, if John Smith submits “8431234567” as his home phone number on a donation form but The Raiser’s Edge uses the format “###‐###‐####” for the home phone type, the program formats John’s phone number as 843‐123‐4567 on his constituent record.
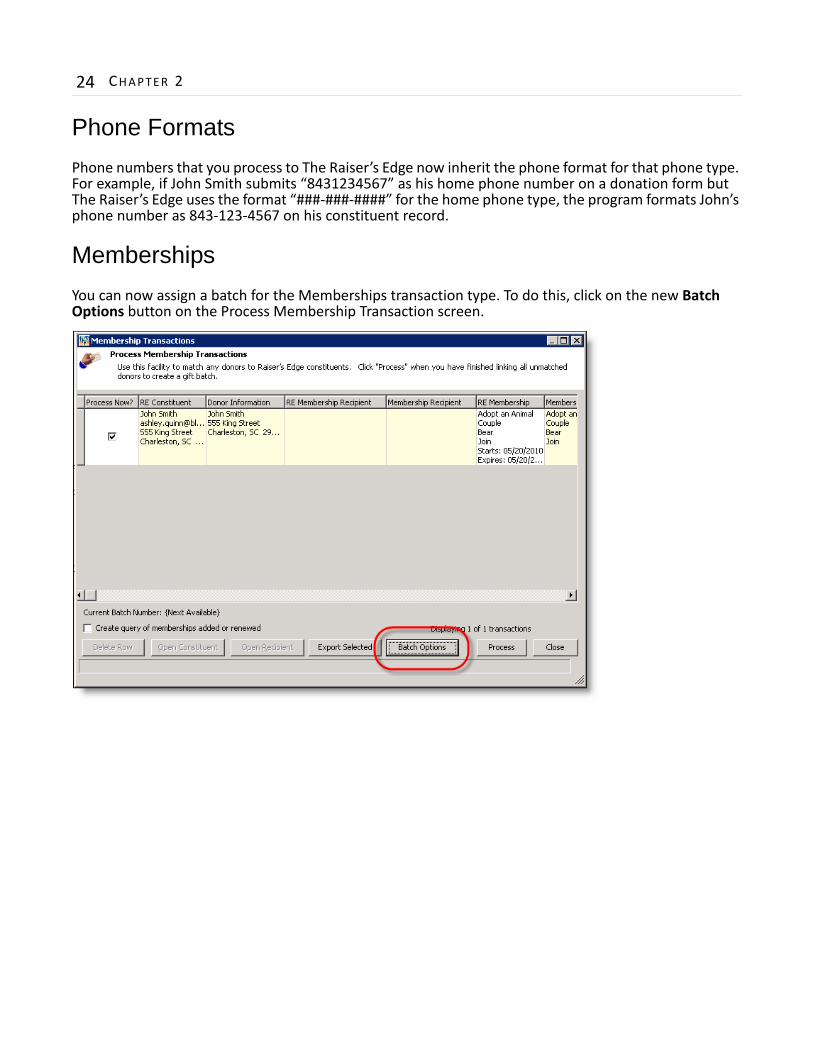
MembershipsYou can now assign a batch for the Memberships transaction type. To do this, click on the new Batch Options button on the Process Membership Transaction screen.
6.25 NEW FEATURES AND ENHANCEMENTS 25
The existing Transaction Options screen appears, and you can assign a batch to the membership transactions.
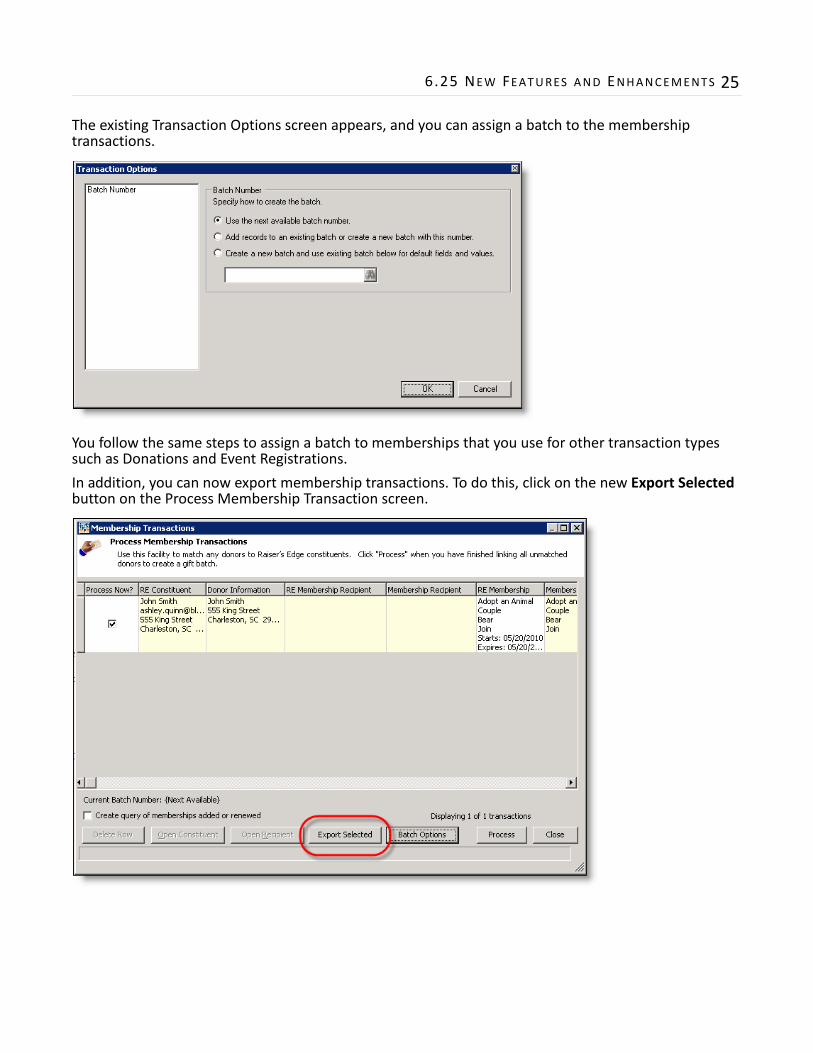
You follow the same steps to assign a batch to memberships that you use for other transaction types such as Donations and Event Registrations.
In addition, you can now export membership transactions. To do this, click on the new Export Selected button on the Process Membership Transaction screen.
26 CHAPTER 2
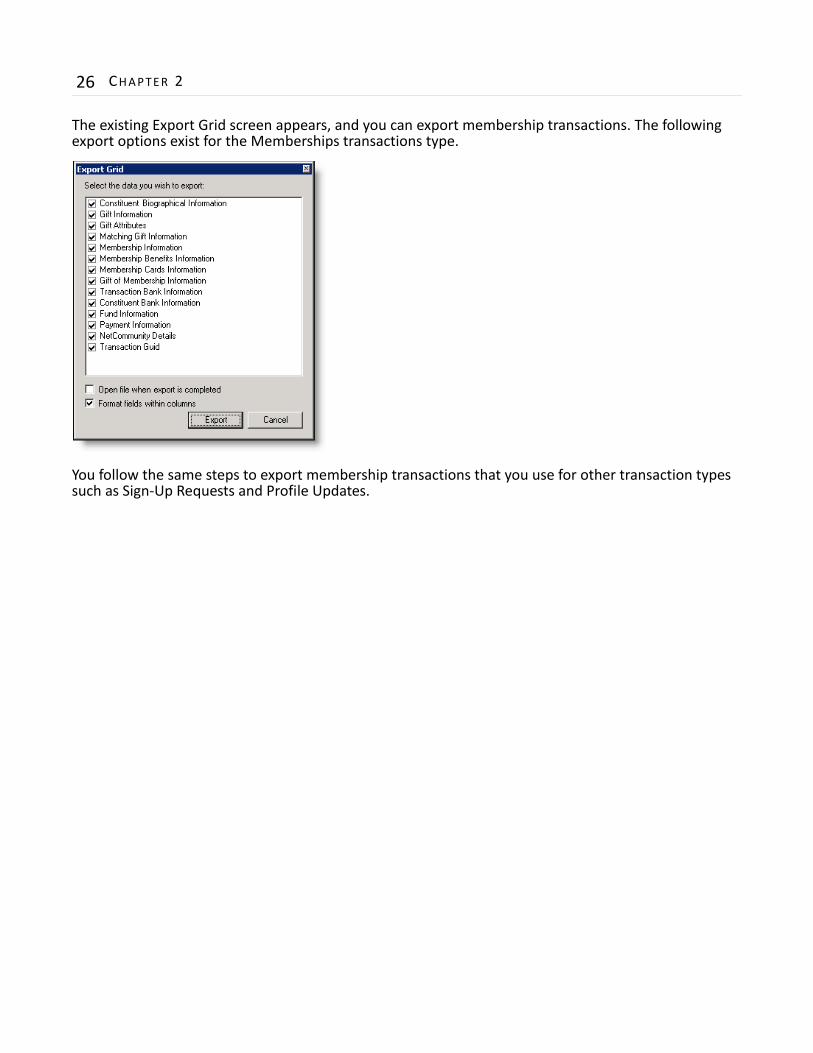
The existing Export Grid screen appears, and you can export membership transactions. The following export options exist for the Memberships transactions type.
You follow the same steps to export membership transactions that you use for other transaction types such as Sign‐Up Requests and Profile Updates.
3chapter
6.35 New Features and Enhancements
Site Explorer. . . . . . . . . . . . . . . . . . . . . . . . . . . . . . . . . . . . . . . . . . . . . . . . . . . . . . . . . . . . . . . . . . . . . 27
Administration . . . . . . . . . . . . . . . . . . . . . . . . . . . . . . . . . . . . . . . . . . . . . . . . . . . . . . . . . . . . . . . . . . . 30
Email . . . . . . . . . . . . . . . . . . . . . . . . . . . . . . . . . . . . . . . . . . . . . . . . . . . . . . . . . . . . . . . . . . . . . . . . . . . 33
This chapter provides an overview of new features and enhancements for Blackbaud NetCommunity 6.35. For information about how to update to Blackbaud NetCommunity 6.35, see “Update Blackbaud NetCommunity” on page 1. For information about how to install Blackbaud NetCommunity for the first time, see the Blackbaud Infinity Installation Guide.
The new features and enhancements include:
• “Pages & Templates” on page 28
• “Directory” on page 58
• “Payment Summary 2.0” on page 28
• “Query Results Display” on page 64
• “Suggested Content” on page 66
• “Transaction Manager” on page 29
• “Unformatted Text” on page 29
• “Email Settings” on page 30
• “Name Format Types” on page 75
• “Site Tracking” on page 31
Site ExplorerThe following Site explorer enhancements are available in Blackbaud NetCommunity 6.35. For more information about these features, see the Website Design Guide.
• “Pages & Templates” on page 28
Note: You must use The Raiser’s Edge 7.91 or higher to integrate with Blackbaud NetCommunity 6.35. For Support assistance, go to support.blackbaud.com. As a best practice, we recommend that you use The Raiser’s Edge 7.91 patch 12.
3

28 CHAPTER 3
• “Parts” on page 28
Pages & TemplatesIn Pages & templates, you can now enable menu links on the page design screen. On the menu part, click the blue flag icon and select Enable navigation.
The menu links enable. When you click a link, the page design screen for the associated page appears.
PartsVersion 6.35 includes updates to several parts.
Page SharingThe ability to create an email and use one to share content from a Page Sharing part has been removed in Blackbaud NetCommunity 6.15, patch 64.
Payment Summary 2.0The new Payment Summary 2.0 part works with Payment 2.0 parts to provide website users a summary view of their payments. The payment summary can display the number of items on a payment page and their total cost. It can also provide a link to view the payment page and pay for transactions. You can also include a summary grid that lists the items added to the cart and provides a brief description of each. When you add a link and place the summary on a page template, a website user can access the payment page from any web page that uses that template. You can also use merge fields to create two versions of the summary: one for an empty payment page and one for a page with transactions.
6.35 NEW FEATURES AND ENHANCEMENTS 29
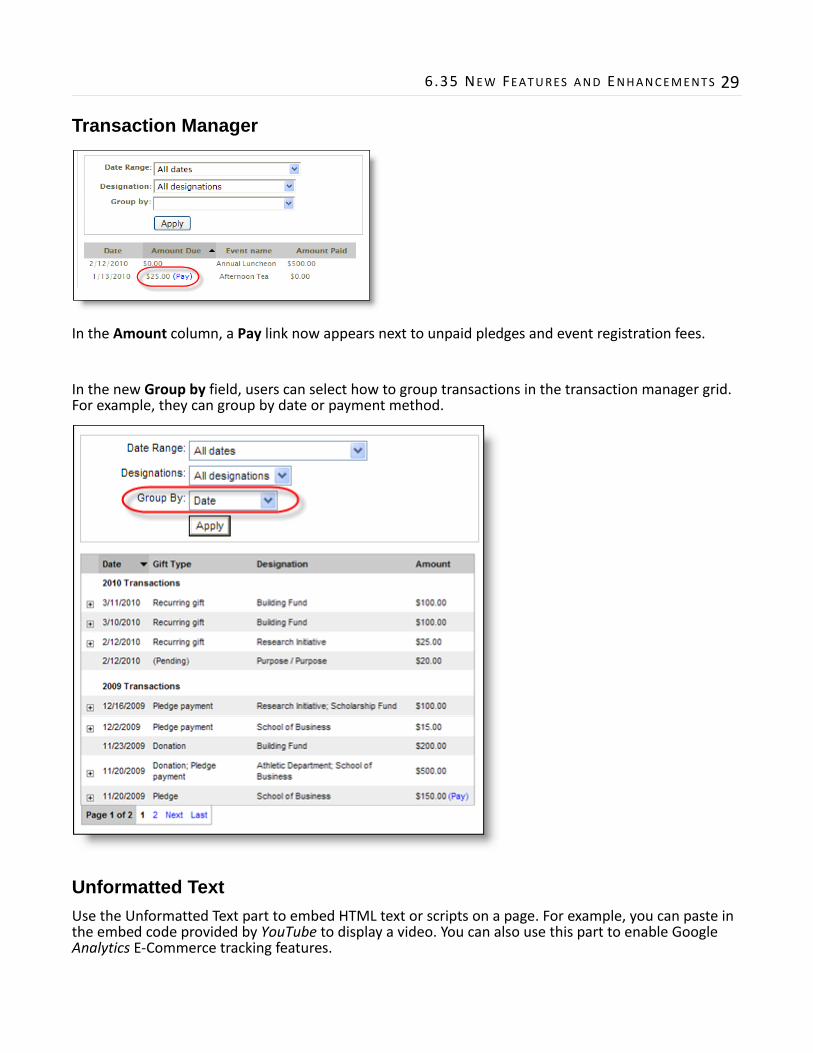
Transaction Manager
In the Amount column, a Pay link now appears next to unpaid pledges and event registration fees.
In the new Group by field, users can select how to group transactions in the transaction manager grid. For example, they can group by date or payment method.
Unformatted TextUse the Unformatted Text part to embed HTML text or scripts on a page. For example, you can paste in the embed code provided by YouTube to display a video. You can also use this part to enable Google Analytics E‐Commerce tracking features.
30 CHAPTER 3
AdministrationThe following Administration enhancements are available in Blackbaud NetCommunity 6.35. For more information about these features, see the Administration Guide.
In an effort to improve the configuration of site settings, this version includes numerous usability enhancements in Sites & settings. Sections and settings were moved to improve how settings are organized. Labels and help text were updated to clarify how settings work.
Email SettingsYou can now use links in email messages to autofill forms with constituent data even if users are not logged in to your website. In Sites & settings, a new Email settings section appears under General on the Settings tab for organization settings.
To autofill forms with constituent data when users click links in email messages, select Use email links to autofill forms. This setting autofills forms with biographical details such as constituent names and contact information such as phone numbers and addresses.
This setting pulls data from constituent records even if users are not logged in. However, the setting only applies to links when you use queries to create list of recipients for the email messages.
Note: This setting does not apply to forms that require users to log in because email links cannot bypass login requirements. For example, you cannot use an email link to autofill a user profile form because users must log in to view this form.
6.35 NEW FEATURES AND ENHANCEMENTS 31
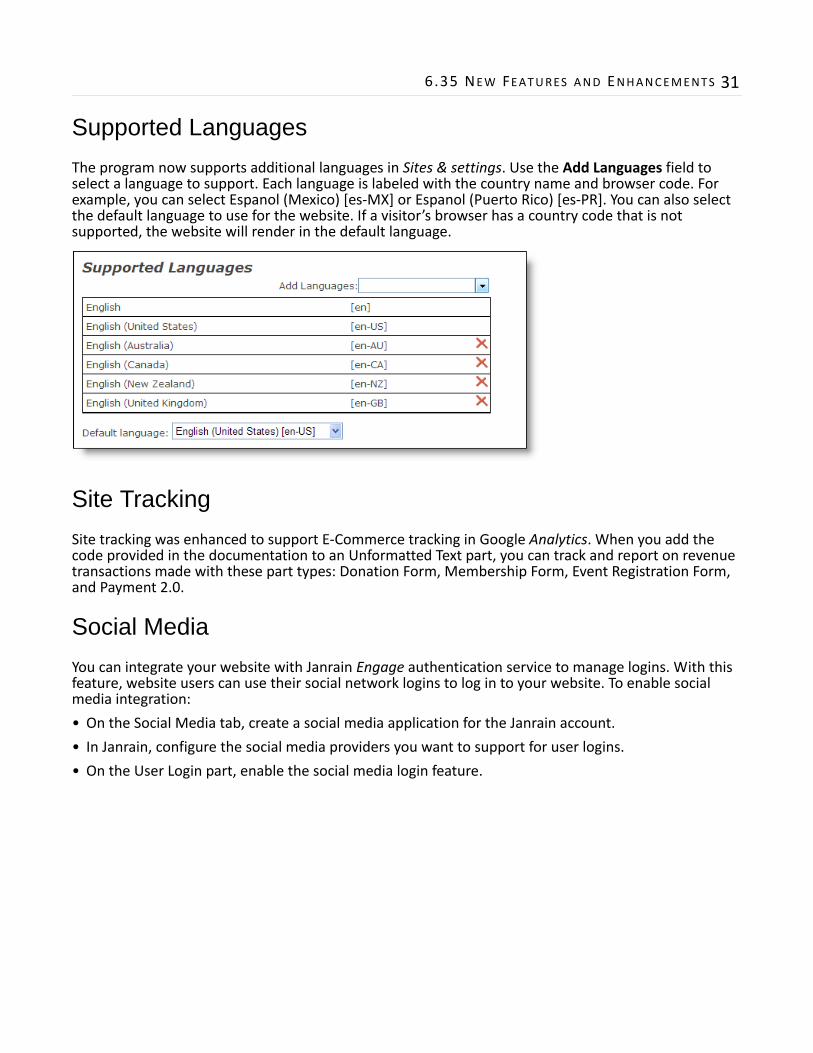
Supported LanguagesThe program now supports additional languages in Sites & settings. Use the Add Languages field to select a language to support. Each language is labeled with the country name and browser code. For example, you can select Espanol (Mexico) [es‐MX] or Espanol (Puerto Rico) [es‐PR]. You can also select the default language to use for the website. If a visitor’s browser has a country code that is not supported, the website will render in the default language.
Site TrackingSite tracking was enhanced to support E‐Commerce tracking in Google Analytics. When you add the code provided in the documentation to an Unformatted Text part, you can track and report on revenue transactions made with these part types: Donation Form, Membership Form, Event Registration Form, and Payment 2.0.
Social MediaYou can integrate your website with Janrain Engage authentication service to manage logins. With this feature, website users can use their social network logins to log in to your website. To enable social media integration:
• On the Social Media tab, create a social media application for the Janrain account.
• In Janrain, configure the social media providers you want to support for user logins.
• On the User Login part, enable the social media login feature.
32 CHAPTER 3
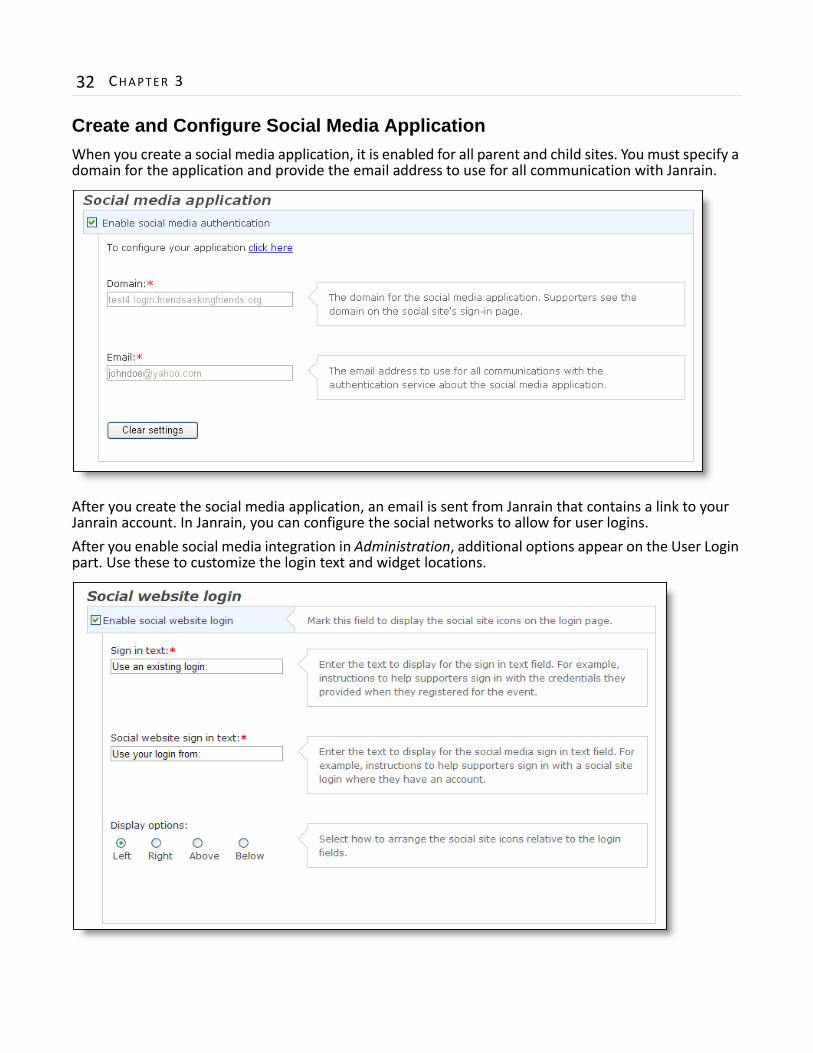
Create and Configure Social Media ApplicationWhen you create a social media application, it is enabled for all parent and child sites. You must specify a domain for the application and provide the email address to use for all communication with Janrain.
After you create the social media application, an email is sent from Janrain that contains a link to your Janrain account. In Janrain, you can configure the social networks to allow for user logins.
After you enable social media integration in Administration, additional options appear on the User Login part. Use these to customize the login text and widget locations.
6.35 NEW FEATURES AND ENHANCEMENTS 33
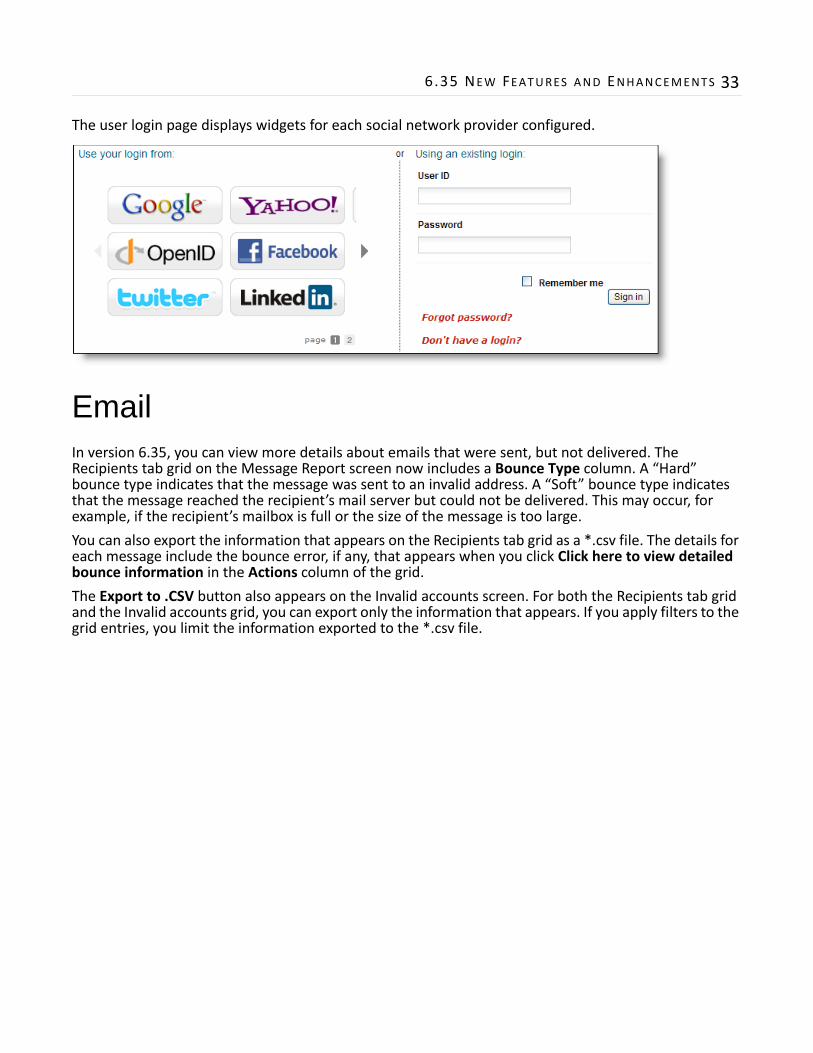
The user login page displays widgets for each social network provider configured.
EmailIn version 6.35, you can view more details about emails that were sent, but not delivered. The Recipients tab grid on the Message Report screen now includes a Bounce Type column. A “Hard” bounce type indicates that the message was sent to an invalid address. A “Soft” bounce type indicates that the message reached the recipient’s mail server but could not be delivered. This may occur, for example, if the recipient’s mailbox is full or the size of the message is too large.
You can also export the information that appears on the Recipients tab grid as a *.csv file. The details for each message include the bounce error, if any, that appears when you click Click here to view detailed bounce information in the Actions column of the grid.
The Export to .CSV button also appears on the Invalid accounts screen. For both the Recipients tab grid and the Invalid accounts grid, you can export only the information that appears. If you apply filters to the grid entries, you limit the information exported to the *.csv file.

34 CHAPTER 3