Embed Size (px)
Citation preview

www.petmap.com 800-231-6370 or 813-289-5555
Patent No. D531,313 S and other Foreign and US Patents
Pending Ramsey Medical, Inc.
Developed by: Ramsey Medical, Inc.
Easier to Use for the
Veterinary Staff Species and Cuff Site
specific for best accuracy
Gentle on the animal Simple, Quick, Effective way
to measure and monitor blood pressure in cats and dogs
Distributed by: CardioCommand, Inc.
Blood Pressure Measurement
made Easier and More Accurate!
Blood Pressure Measurement in Animals
Measuring accurate blood pressure (BP) on animals is not trivial, (it is much more difficult than in humans) and lots of experience and attention to every detail is important: limb selection, proper cuff size, snug fit of the cuff, position of animal so that no weight or pressure is on the measurement limb or cuff, a relaxed and still animal (let the owner hold it in a comfortable position), an experienced and VERY PATIENT measurement person and possibly a patient assistant as well. And, multiple BP measurements MUST be made during the BP measurement session.
Experts in the field of animal BP measurement stress the important elements of the blood pressure determination process are the skill, experience, and patience of the person measuring BP. The most important element taught is the patience of the person measuring the BP and their rapport with the animal.
Instructors teach that readings on at least 25-50 animals should be completed before practitioners consider themselves experienced and skilled in taking BP. The measurement process is an art, a skill, and a science all in one . . . when done well.
The best way to learn to use the petMAP is to practice taking readings on your finger. This will allow you to get comfortable with the device prior to using it on patients. Even after practice, it may take 10 - 25 minutes to get the 4-8 good readings (minimal animal motion during the reading and the determination completed in under 45-60 seconds) needed to accurately assess the animal’s BP. The use of petMAP’s unique “Nominal Session BP Value” (NSBP) is recommended as the charted BP for the session since it eliminates “outliers” which can distort an ordinary average of the BP values and hence is a more robust measure of the animal’s true pressure during the session.
Remember that research has shown that if an animal is upset or agitated due to handling or due to the measurement procedure itself, it will take 8-10 minutes, after the animal is calmed and relaxed, for the animal’s blood pressure to return to normal. Measurements on an agitated animal are not an indication of their normal BP and are usually worthless clinically when diagnosing a hypertensive animal. Manual Copyright © 2005-2008 by Ramsey Medical, Inc. All rights reserved. No part of this publication may be reproduced or distributed in any form or by any means, without the prior written permission of Ramsey Medical, Inc.
Page 2
Table of Contents
Description 3
Applications / Advantages 4
Controls and Indicators 5
General Information and Helpful Tips 9
Operating Instructions 10
Blood Pressure Values 15
Battery Replacement 16
CritterCuff™ Information 17
Maintenance 19
Troubleshooting 19
Specifications 21
Warranty 23
Repairs 23
Product Information 24
EXPLANATION OF SYMBOLS
On / Off momentary switch
Multi-Function Button
Page 3
petMAP™ New Technology for Better Accuracy
The Ramsey Medical, Inc. petMAP is a battery powered veterinary blood pressure measuring device which has been optimized for accuracy by comparison to intra-arterial BP measurements in dogs and cats at three different cuff sites. Based on our development studies in dogs and cats, this optimization for both species and cuff site is necessary for improved accuracy and the best possible correlation with directly measured intra-arterial pressures, the “gold standard” for BP. This unique accuracy enhancing feature is proprietary to Ramsey Medical, Inc., and is only available with petMAP, and other Ramsey Medical BP measurement devices.
petMAP utilizes the oscillometric method which simplifies the measurement of blood pressure in companion animals. petMAP measures all of the blood pressure parameters (systolic, diastolic, mean arterial pressure, and heart rate), enabling accurate diagnosis and management of hypertension. The petMAP is also useful for monitoring BP and heart rate during surgical and dental procedures on animals under anesthesia.
petMAP provides another unique and proprietary feature, the “Nominal Session BP” (NSBP) which enhances the Veterinarian’s ability to accurately diagnose, trend, and manage hypertension in animals over time. The NSBP is displayed for the user by cycling the power OFF then ON after a BP measurement session with an animal is finished. All of the session readings are then analyzed by the petMAP and a “Nominal Session BP” is displayed. This “Nominal Session BP” is not an average of the BP readings, but a substantially more robust statistical measure of the animal’s nominal BP during the BP session since it eliminates BP outliers.
Page 4
Applications & Advantages The petMAP offers major advantages over previous veterinary blood pressure (BP) measuring devices and methods. It is small, fits comfortably in the hand, is quiet (so the animal remains calmer and less stressed, enhancing accuracy), and can be carried easily in a pocket. The sensitivity of petMAP permits BP measurement in cats and dogs, as well as in larger animals. The accompanying CritterCuffs™ are specifically designed to be soft for animal comfort, and sensitive to enhance measurement accuracy. Additionally, the enhanced accuracy achieved by allowing the user to select the specific species (dog or cat) and the specific cuff site (forearm, tail, or hind foot) is unique and significantly improves the accuracy when compared to direct intra-arterial pressure measurements. Also unique and proprietary to petMAP is the automatic computation of the “Nominal Session BP” (NSBP) after the measurement session is completed. This NSBP is available simply by cycling the power OFF then ON. Using petMAP, the BP can be measured in awake or anesthetized animals. In awake animals, the petMAP is less stressful to the animal as compared to the Doppler method since there is no need for clipping of fur, no application of ultrasonic coupling gel, and no need to position a transducer over the animal’s artery. Also, since petMAP is quiet, it does not alarm the animal like the unfamiliar sounds from the Doppler unit’s speaker box.
In summary, the petMAP’s advantages over prior veterinary BP devices are many. In addition to improved accuracy and the automatic computation of the NSBP, advantages are:
Small size, hand held, easily carried in a pocket, battery powered using two ordinary and easily replaced AAA batteries and there is:
No clipping of fur . . . time consuming and frightens the animal. No messy gel . . . required using Doppler . . . and is . . . messy. No transducer to connect, position, hold, readjust, and break. No speaker box to connect, position, and frighten the animal. No speaker, alarms, or startup noises to disturb the animal. No long, thick, and cumbersome hose to deal with.
Page 5
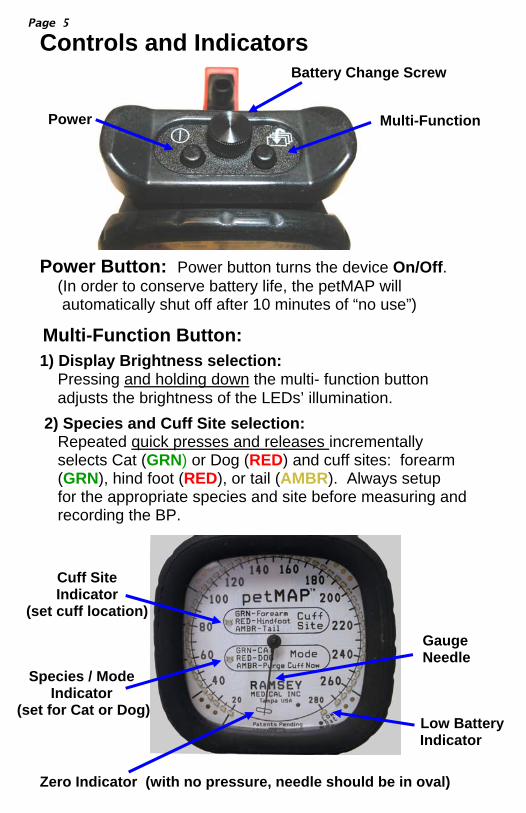
Controls and Indicators
Power Button: Power button turns the device On/Off. (In order to conserve battery life, the petMAP will automatically shut off after 10 minutes of “no use”)
Multi-Function Button: 1) Display Brightness selection:
Pressing and holding down the multi- function button adjusts the brightness of the LEDs’ illumination.
2) Species and Cuff Site selection: Repeated quick presses and releases incrementally selects Cat (GRN) or Dog (RED) and cuff sites: forearm (GRN), hind foot (RED), or tail (AMBR). Always setup for the appropriate species and site before measuring and recording the BP.
Power Multi-Function
Battery Change Screw
Zero Indicator (with no pressure, needle should be in oval)
Cuff Site Indicator
(set cuff location)
Low Battery Indicator
Gauge Needle
Species / Mode Indicator
(set for Cat or Dog)
Page 6
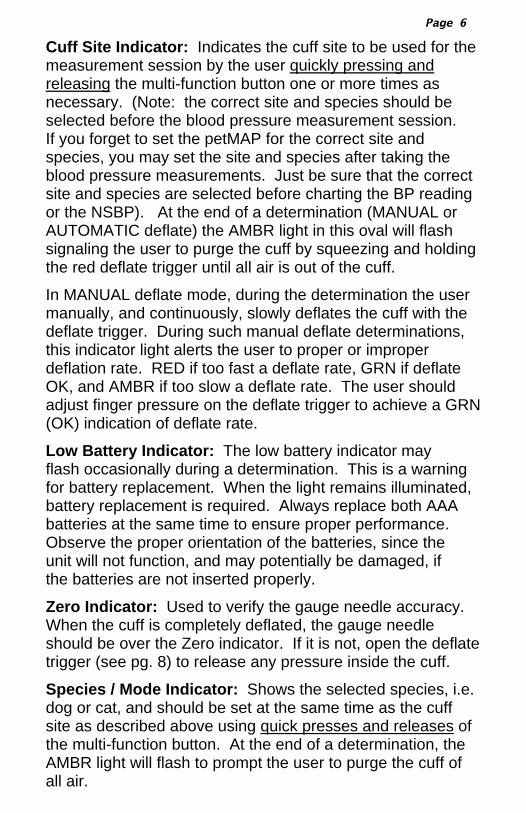
Cuff Site Indicator: Indicates the cuff site to be used for the measurement session by the user quickly pressing and releasing the multi-function button one or more times as necessary. (Note: the correct site and species should be selected before the blood pressure measurement session. If you forget to set the petMAP for the correct site and species, you may set the site and species after taking the blood pressure measurements. Just be sure that the correct site and species are selected before charting the BP reading or the NSBP). At the end of a determination (MANUAL or AUTOMATIC deflate) the AMBR light in this oval will flash signaling the user to purge the cuff by squeezing and holding the red deflate trigger until all air is out of the cuff.
In MANUAL deflate mode, during the determination the user manually, and continuously, slowly deflates the cuff with the deflate trigger. During such manual deflate determinations, this indicator light alerts the user to proper or improper deflation rate. RED if too fast a deflate rate, GRN if deflate OK, and AMBR if too slow a deflate rate. The user should adjust finger pressure on the deflate trigger to achieve a GRN (OK) indication of deflate rate.
Low Battery Indicator: The low battery indicator may flash occasionally during a determination. This is a warning for battery replacement. When the light remains illuminated, battery replacement is required. Always replace both AAA batteries at the same time to ensure proper performance. Observe the proper orientation of the batteries, since the unit will not function, and may potentially be damaged, if the batteries are not inserted properly.
Zero Indicator: Used to verify the gauge needle accuracy. When the cuff is completely deflated, the gauge needle should be over the Zero indicator. If it is not, open the deflate trigger (see pg. 8) to release any pressure inside the cuff.
Species / Mode Indicator: Shows the selected species, i.e. dog or cat, and should be set at the same time as the cuff site as described above using quick presses and releases of the multi-function button. At the end of a determination, the AMBR light will flash to prompt the user to purge the cuff of all air.
Optimized Mode: Optimization for species (dog, cat) and cuff site (forearm, hind foot, tail) is a unique and proprietary design feature of the petMAP and provides its determination values the best possible correlation with intra-arterial pressures. These petMAP settings are called the “Optimized” modes. Previous generation BP measurement devices are not specifically optimized to better correlate with direct intra-arterial measurements in cats and dogs and for cuff site. Consequently, they will typically read lower BPs than the readings obtained with the petMAP, assuming that the petMAP is set appropriately for the species and the cuff site on which the BP measurement is being made. Non-Optimized Mode: If a user is more comfortable with the lower readings because of what they have seen in the past with older generation devices, the petMAP can be set to display “non-optimized” values. This petMAP mode will correlate better with the lower readings the user is accustomed to seeing, but the values will not correlate as well with intra-arterial pressures. The non-optimized mode (ie. both lights out) is the normal mode when petMAP is used on any species other than a dog or cat. In order to set the petMAP to the “non-optimized” mode (the mode that gives lower BP readings), quickly press and release the multi-function button on the right side of the unit until there are no LEDs lit in either the Cuff Site or Mode indicators. The unit will then display the “non-optimized” BP values. The “non-optimized” nominal session value may also be seen using the multi-function button as described in Step 11. of the Operating Instructions section.
Page 7
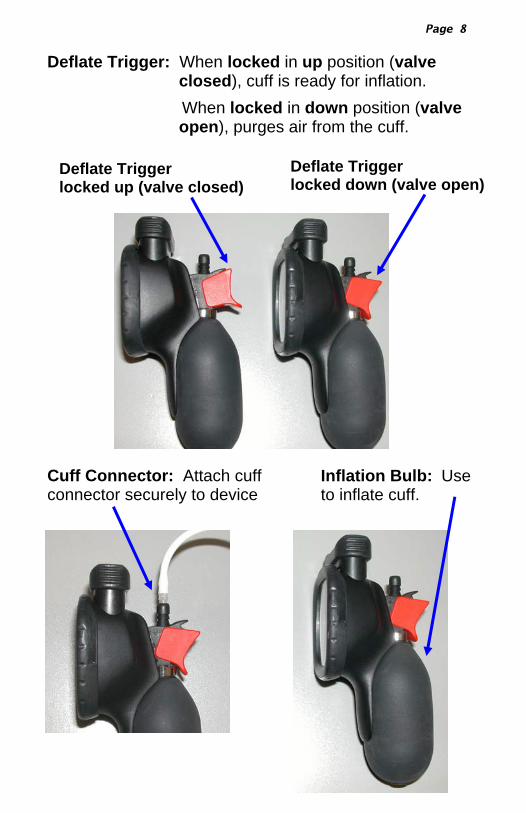
Inflation Bulb: Use to inflate cuff.
Page 8
Deflate Trigger: When locked in up position (valve closed), cuff is ready for inflation.
When locked in down position (valve open), purges air from the cuff.
Cuff Connector: Attach cuff connector securely to device
Deflate Trigger locked up (valve closed)
Deflate Trigger locked down (valve open)
Page 9
GENERAL INFORMATION & HELPFUL TIPS
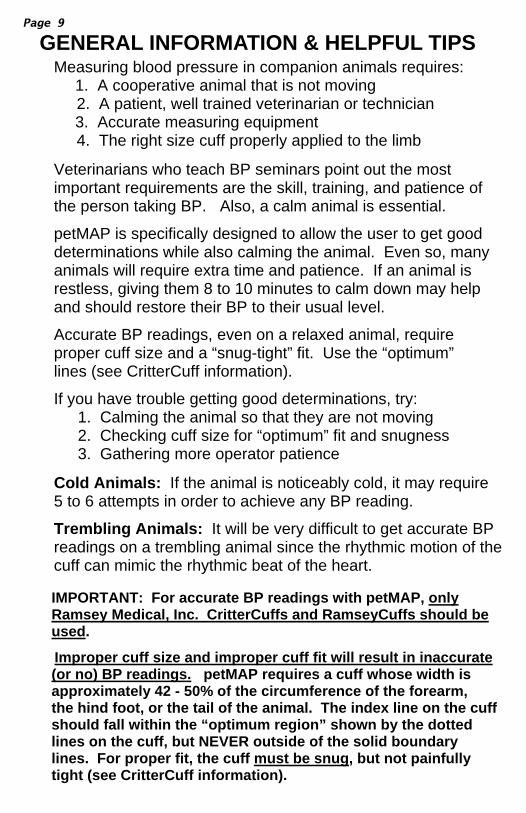
IMPORTANT: For accurate BP readings with petMAP, only Ramsey Medical, Inc. CritterCuffs and RamseyCuffs should be used.
Improper cuff size and improper cuff fit will result in inaccurate (or no) BP readings. petMAP requires a cuff whose width is approximately 42 - 50% of the circumference of the forearm, the hind foot, or the tail of the animal. The index line on the cuff should fall within the “optimum region” shown by the dotted lines on the cuff, but NEVER outside of the solid boundary lines. For proper fit, the cuff must be snug, but not painfully tight (see CritterCuff information).
Measuring blood pressure in companion animals requires: 1. A cooperative animal that is not moving 2. A patient, well trained veterinarian or technician 3. Accurate measuring equipment 4. The right size cuff properly applied to the limb
Veterinarians who teach BP seminars point out the most important requirements are the skill, training, and patience of the person taking BP. Also, a calm animal is essential.
petMAP is specifically designed to allow the user to get good determinations while also calming the animal. Even so, many animals will require extra time and patience. If an animal is restless, giving them 8 to 10 minutes to calm down may help and should restore their BP to their usual level.
Accurate BP readings, even on a relaxed animal, require proper cuff size and a “snug-tight” fit. Use the “optimum” lines (see CritterCuff information).
If you have trouble getting good determinations, try: 1. Calming the animal so that they are not moving 2. Checking cuff size for “optimum” fit and snugness 3. Gathering more operator patience
Cold Animals: If the animal is noticeably cold, it may require 5 to 6 attempts in order to achieve any BP reading.
Trembling Animals: It will be very difficult to get accurate BP readings on a trembling animal since the rhythmic motion of the cuff can mimic the rhythmic beat of the heart.
Page 10
OPERATING INSTRUCTIONS:
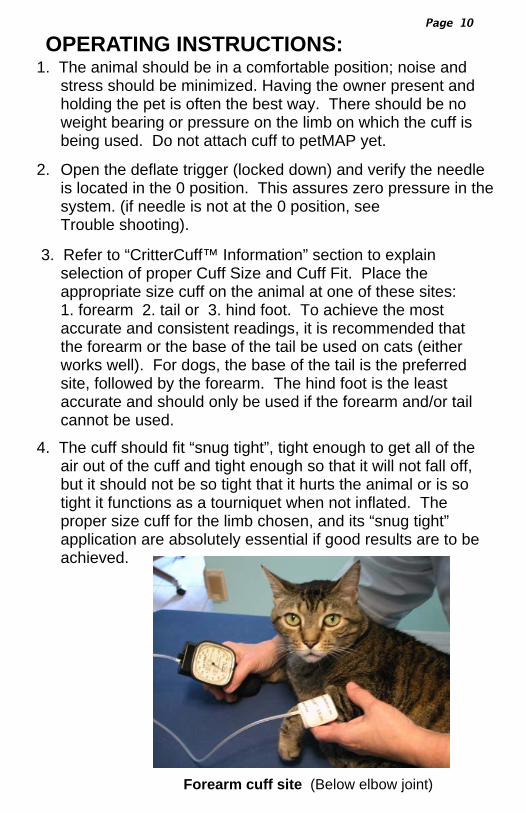
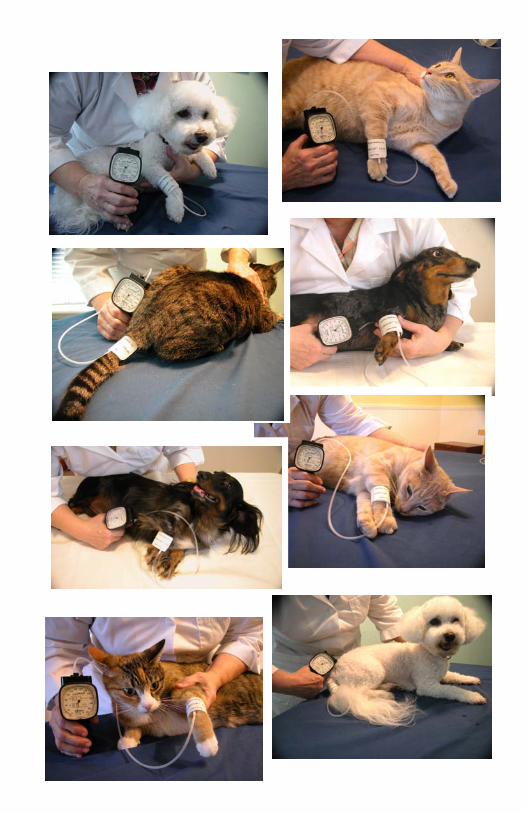
Forearm cuff site (Below elbow joint)
1. The animal should be in a comfortable position; noise and stress should be minimized. Having the owner present and holding the pet is often the best way. There should be no weight bearing or pressure on the limb on which the cuff is being used. Do not attach cuff to petMAP yet.
2. Open the deflate trigger (locked down) and verify the needle is located in the 0 position. This assures zero pressure in the system. (if needle is not at the 0 position, see Trouble shooting).
3. Refer to “CritterCuff™ Information” section to explain selection of proper Cuff Size and Cuff Fit. Place the appropriate size cuff on the animal at one of these sites: 1. forearm 2. tail or 3. hind foot. To achieve the most accurate and consistent readings, it is recommended that
the forearm or the base of the tail be used on cats (either works well). For dogs, the base of the tail is the preferred site, followed by the forearm. The hind foot is the least
accurate and should only be used if the forearm and/or tail cannot be used.
4. The cuff should fit “snug tight”, tight enough to get all of the air out of the cuff and tight enough so that it will not fall off, but it should not be so tight that it hurts the animal or is so tight it functions as a tourniquet when not inflated. The proper size cuff for the limb chosen, and its “snug tight” application are absolutely essential if good results are to be achieved.
5. Turn the petMAP ON. If there is a “Nominal Session BP” (NSBP) from the previous BP measurement
session, it will be displayed until the cuff pressure is raised over 30 mmHg at which time that NSBP will be erased and “forgotten forever” so make sure it has been recorded before starting a new BP session. If Cuff Site and Species LED’s are not illuminated, quickly press and release the multi-function button to select the proper site and species. (See Multi-Function Button instructions: Step 2).
If there is no NSBP stored in the unit, there will be a sequential illumination of each of the LEDs to verify that all are functioning properly. (Subsequently, several other LEDs will then flash indicating the version of the operating software. These can be ignored unless needed by customer support.) When a steady red or green light is illuminated in the Species indicator oval, the device is ready for cuff inflation to make a BP determination. (If no red or green LED, quickly press and release the multi-function button to select species and cuff site.) This red or green light will stay illuminated as long as the device is ON, except when the AMBR light is flashing, which indicates that the user should purge the cuff by squeezing the deflate trigger to remove all pressure from the system.
6. Attach the cuff hose to the petMAP securely, and verify
that the deflate trigger is in the closed (up) position.
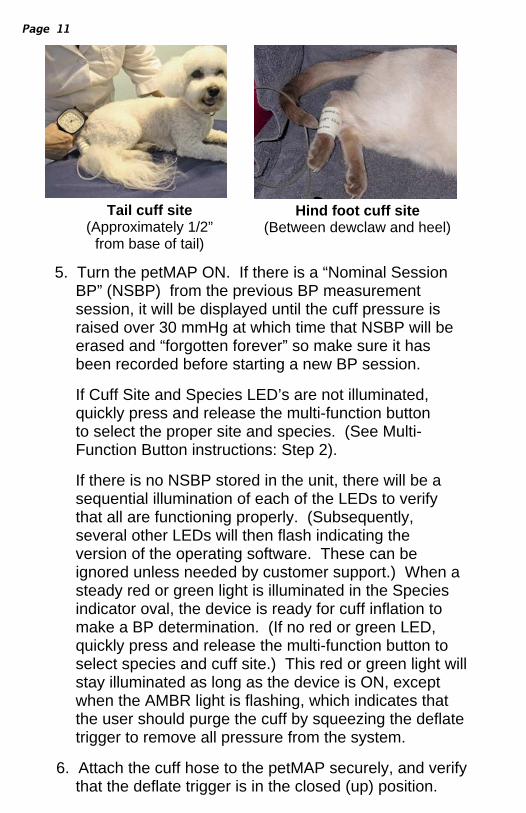
Tail cuff site (Approximately 1/2”
from base of tail)
Hind foot cuff site (Between dewclaw and heel)
Page 11
Page 12
7. Cuff Inflation: One steady firm (but gentle) squeeze of the inflation bulb will inflate most cuffs (be careful not to open the deflate trigger while inflating). As you increase cuff size more than one bulb inflation may be required. Inflate the cuff 35 – 40 mmHg higher than the expected systolic pressure. (Typically for older cats, utilize an initial inflation pressure of 200-220 mmHg and slightly lower for young cats and most dogs.) DO NOT OVER-INFLATE. Over-inflation (pressures beyond 260 mmHg) may cause dam-age to the petMAP and harm the animal. The gauge nee-dle and the illuminated LED should track together and agree during the inflation. (If during inflation the gauge needle and LED are not in agreement within approximately +/- 5 mmHg, see Troubleshooting).
The petMAP cuff can be automatically or manually deflated.
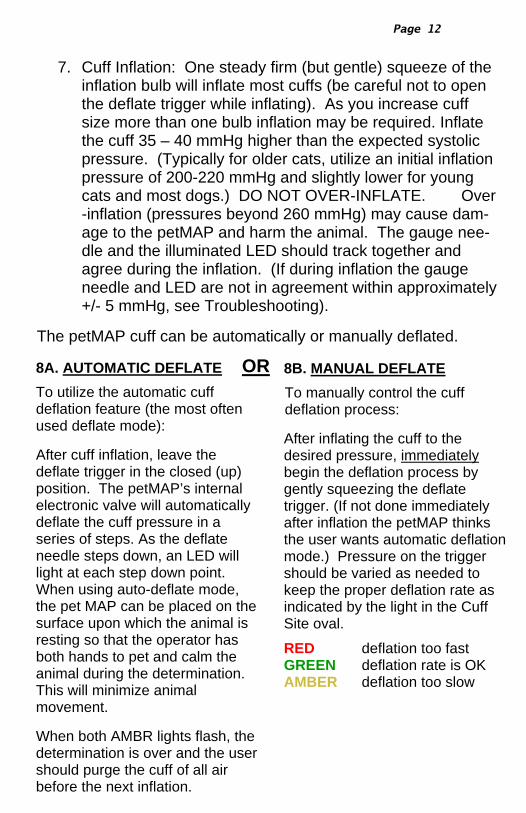
8A. AUTOMATIC DEFLATE
To utilize the automatic cuff deflation feature (the most often used deflate mode): After cuff inflation, leave the deflate trigger in the closed (up) position. The petMAP’s internal electronic valve will automatically deflate the cuff pressure in a series of steps. As the deflate needle steps down, an LED will light at each step down point. When using auto-deflate mode, the pet MAP can be placed on the surface upon which the animal is resting so that the operator has both hands to pet and calm the animal during the determination. This will minimize animal movement. When both AMBR lights flash, the determination is over and the user should purge the cuff of all air before the next inflation.
8B. MANUAL DEFLATE
To manually control the cuff deflation process: After inflating the cuff to the desired pressure, immediately begin the deflation process by gently squeezing the deflate trigger. (If not done immediately after inflation the petMAP thinks the user wants automatic deflation mode.) Pressure on the trigger should be varied as needed to keep the proper deflation rate as indicated by the light in the Cuff Site oval.
RED deflation too fast GREEN deflation rate is OK AMBER deflation too slow
OR
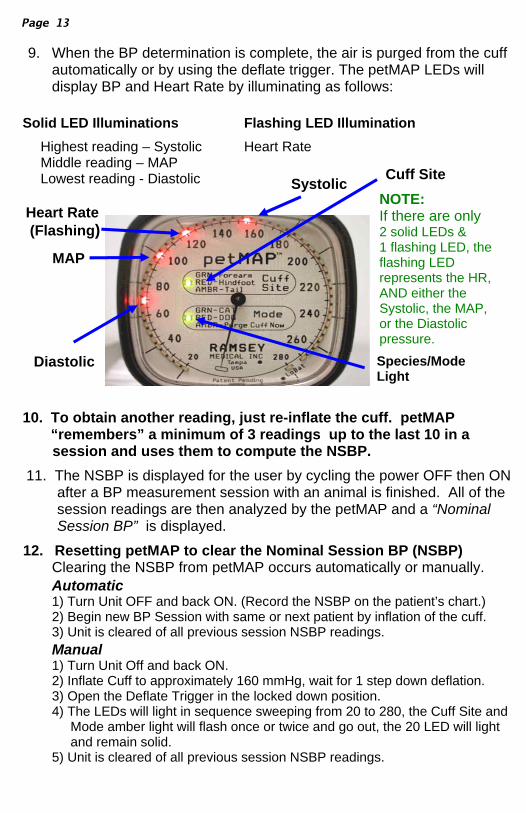
9. When the BP determination is complete, the air is purged from the cuff automatically or by using the deflate trigger. The petMAP LEDs will display BP and Heart Rate by illuminating as follows:
Solid LED Illuminations Flashing LED Illumination
Highest reading – Systolic Heart Rate Middle reading – MAP Lowest reading - Diastolic
10. To obtain another reading, just re-inflate the cuff. petMAP “remembers” a minimum of 3 readings up to the last 10 in a
session and uses them to compute the NSBP.
11. The NSBP is displayed for the user by cycling the power OFF then ON after a BP measurement session with an animal is finished. All of the session readings are then analyzed by the petMAP and a “Nominal
Session BP” is displayed.
12. Resetting petMAP to clear the Nominal Session BP (NSBP) Clearing the NSBP from petMAP occurs automatically or manually. Automatic 1) Turn Unit OFF and back ON. (Record the NSBP on the patient’s chart.) 2) Begin new BP Session with same or next patient by inflation of the cuff. 3) Unit is cleared of all previous session NSBP readings. Manual 1) Turn Unit Off and back ON. 2) Inflate Cuff to approximately 160 mmHg, wait for 1 step down deflation. 3) Open the Deflate Trigger in the locked down position.
4) The LEDs will light in sequence sweeping from 20 to 280, the Cuff Site and Mode amber light will flash once or twice and go out, the 20 LED will light and remain solid.
5) Unit is cleared of all previous session NSBP readings.
Page 13
NOTE: If there are only 2 solid LEDs & 1 flashing LED, the flashing LED represents the HR, AND either the Systolic, the MAP, or the Diastolic pressure.
Systolic
Species/Mode Light
Cuff Site
MAP
Heart Rate (Flashing)
Diastolic
Page 14
NOTE: If for any reason the petMAP is unable to get a BP reading, all LEDs will sequence once to indicate the failure to determine the BP. The AMBR LEDs will flash to indicate to the user to completely purge the cuff, which the user should do by fully opening the deflate trigger (locked down position). Determine and correct the reason for the BP measurement difficulty. Often the problem is one or more of:
1) movement during the determination (calm the animal) 2) cuff is not proper size or snugness (check size/fit) 3) initial cuff inflation is too low (pump cuff higher)
Remember that measuring accurate BP on animals is not trivial and attention to every detail is important. For example, steps to improve the measurement process after a failure might include one or more of the following: (1) resize or tighten the cuff (2) reposition the animal so that there is no weight bearing on the limb on which the cuff is being used (3) calm the animal by petting it to reassure it until it is again relaxed and not moving, waiting 8-10 min for animal to re-establish its normal BP after calming it (4) change cuff to another site if repeated failures. Experts in the field of animal BP measurement stress that the most important elements contributing to the success of the blood pressure measurement session are the skill, experience, and patience of the person measuring the pressure. They also suggest that it will typically take 10-25 minutes to get the 4-8 GOOD readings needed to accu-rately measure the animal’s pressure. Remember, if the animal is upset, it will take 8-10 minutes for the animal’s blood pressure to return to normal once the animal is calmed.
CAUTION: Do not keep the cuff inflated on an animal for more than a minute. Animal distress, blood circulation interference, and even injury to the animal could potentially occur. Protracted determination times are generally caused by excessive animal movement and should be terminated by deflating the cuff fully and then starting again.

Page 15
Blood Pressure Values in Cats and Dogs Blood pressure (BP) is most accurately measured directly using an intra-arterial catheter. Knowing an animal's BP is often required for diagnosis and treatment. However, since intra-arterial pressures are often impossible or impractical to measure, a variety of indirect measurement devices (Doppler and oscillometric) have been developed to permit estimation of an animal's BP. It is important to note that the different methods and different brands of indirect BP devices will likely produce different BP values in the same animal, as each estimates blood pressure in a somewhat different way. Further, all indirect methods are dependent on the state of the animal and, to some extent, the experience and skill of the user. petMAP has been designed to better correlate with intra-arterial pressure readings through its optimizations for species and cuff site. The result of this better correlation with intra-arterial readings is that petMAP’s readings will almost always be 10-20% higher than Doppler or other oscillometric devices. If correlation of petMAP BP readings with other BP devices (other than direct intra-arterial readings) is desired by the user, petMAP should be used in the non-optimized mode (described elsewhere in this manual). "Normal” BP in companion animals varies with the species, age of the animal, method used for BP determination, and the emotional state of the animal as a result of animal handling and other circumstances. "Normal” systolic values can range from 110 to160 mmHg and most diastolic values range from 55 to 100 mmHg, if the animal is undisturbed and at rest. Normal BP is different for cats and dogs and can also vary by breed within species. Hypertension is generally characterized as pressure >170/110 mmHg in relaxed animals; hypotension is pressure <90/50 mmHg in the awake animal. However, much of the BP data that has been used to establish these ranges has been
measured with indirect devices and, as previously mentioned, most of these devices (Doppler and oscillometric) underestimate the intra-arterial systolic pressure by 10-20%. The study of hypertension and its treatment is an evolving subject in veterinary medicine. It is suggested that veterinarians refer to the literature, including the ACVIM Consensus Statements, published on this topic.
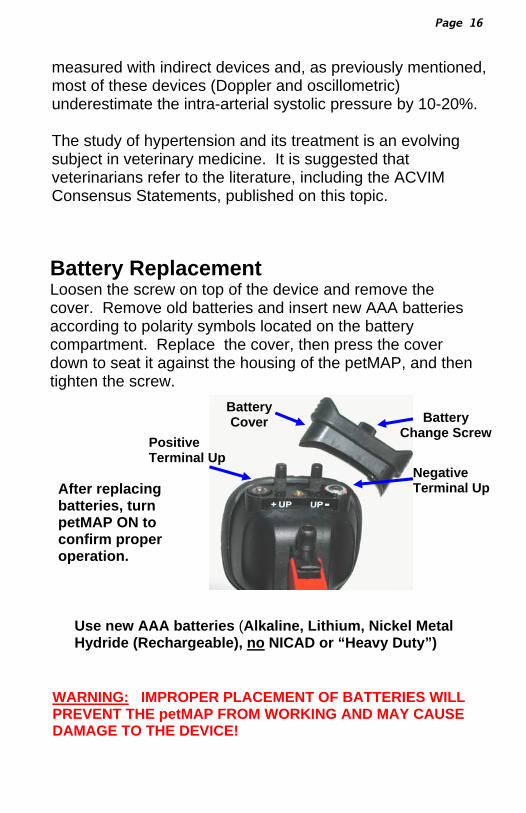
Battery Replacement
Loosen the screw on top of the device and remove the cover. Remove old batteries and insert new AAA batteries according to polarity symbols located on the battery compartment. Replace the cover, then press the cover down to seat it against the housing of the petMAP, and then tighten the screw.
Use new AAA batteries (Alkaline, Lithium, Nickel Metal Hydride (Rechargeable), no NICAD or “Heavy Duty”)
WARNING: IMPROPER PLACEMENT OF BATTERIES WILL PREVENT THE petMAP FROM WORKING AND MAY CAUSE DAMAGE TO THE DEVICE!
Page 16
Negative Terminal Up After replacing
batteries, turn petMAP ON to confirm proper operation.
Battery Change Screw
Battery Cover
Positive Terminal Up
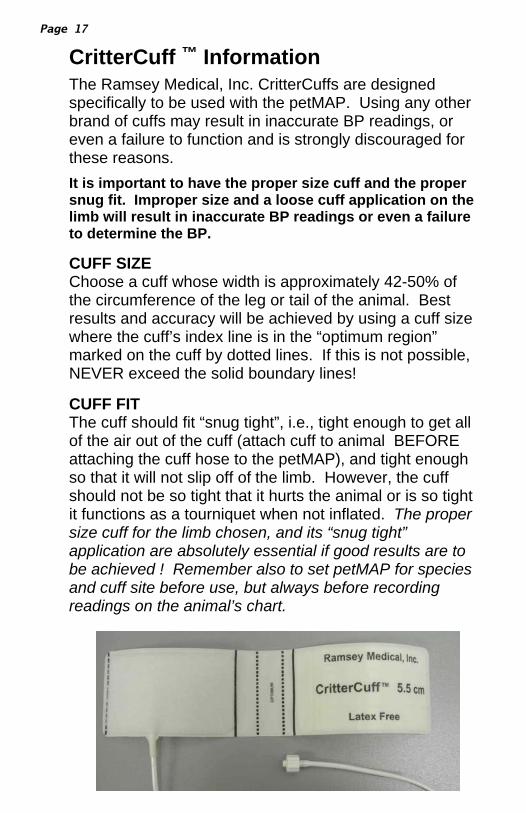
CritterCuff Information
The Ramsey Medical, Inc. CritterCuffs are designed specifically to be used with the petMAP. Using any other brand of cuffs may result in inaccurate BP readings, or even a failure to function and is strongly discouraged for these reasons.
It is important to have the proper size cuff and the proper snug fit. Improper size and a loose cuff application on the limb will result in inaccurate BP readings or even a failure to determine the BP. CUFF SIZE Choose a cuff whose width is approximately 42-50% of the circumference of the leg or tail of the animal. Best results and accuracy will be achieved by using a cuff size where the cuff’s index line is in the “optimum region” marked on the cuff by dotted lines. If this is not possible, NEVER exceed the solid boundary lines! CUFF FIT The cuff should fit “snug tight”, i.e., tight enough to get all of the air out of the cuff (attach cuff to animal BEFORE attaching the cuff hose to the petMAP), and tight enough so that it will not slip off of the limb. However, the cuff should not be so tight that it hurts the animal or is so tight it functions as a tourniquet when not inflated. The proper size cuff for the limb chosen, and its “snug tight” application are absolutely essential if good results are to be achieved ! Remember also to set petMAP for species and cuff site before use, but always before recording readings on the animal’s chart.
™
Page 17
Page 18
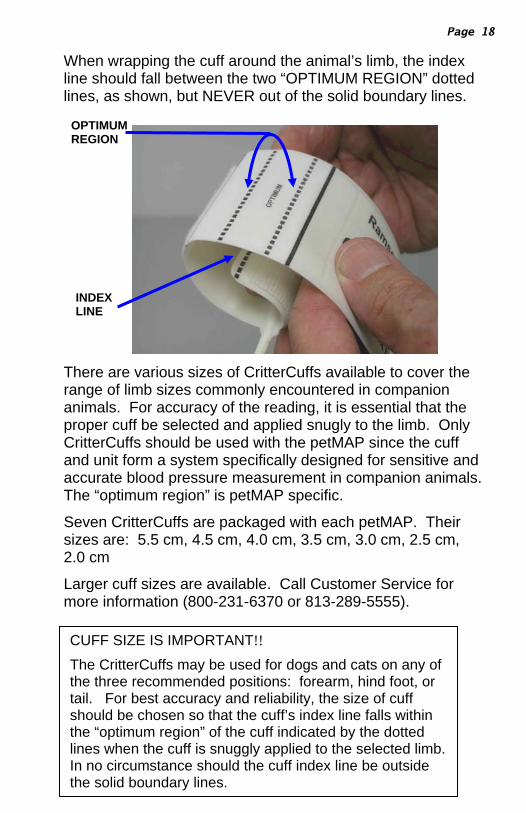
When wrapping the cuff around the animal’s limb, the index line should fall between the two “OPTIMUM REGION” dotted lines, as shown, but NEVER out of the solid boundary lines.
There are various sizes of CritterCuffs available to cover the range of limb sizes commonly encountered in companion animals. For accuracy of the reading, it is essential that the proper cuff be selected and applied snugly to the limb. Only CritterCuffs should be used with the petMAP since the cuff and unit form a system specifically designed for sensitive and accurate blood pressure measurement in companion animals. The “optimum region” is petMAP specific.
Seven CritterCuffs are packaged with each petMAP. Their sizes are: 5.5 cm, 4.5 cm, 4.0 cm, 3.5 cm, 3.0 cm, 2.5 cm, 2.0 cm
Larger cuff sizes are available. Call Customer Service for more information (800-231-6370 or 813-289-5555).
CUFF SIZE IS IMPORTANT!!
The CritterCuffs may be used for dogs and cats on any of the three recommended positions: forearm, hind foot, or tail. For best accuracy and reliability, the size of cuff should be chosen so that the cuff’s index line falls within the “optimum region” of the cuff indicated by the dotted lines when the cuff is snuggly applied to the selected limb. In no circumstance should the cuff index line be outside the solid boundary lines.
INDEX LINE
OPTIMUM REGION

Page 19
Cleaning:
CritterCuffs: Clean cuffs with a damp cloth or hand wash in warm water with mild detergent or soap; do not allow water to get into the cuff tube. Pat cuff dry initially on a towel, and air dry until fully dry and ready for use.
petMAP: Clean with a cloth dampened with warm water or a mild bleach solution. Do not use alcohol or cleaning solutions which contain alcohol. Do not immerse in water or other liquids.
TROUBLESHOOTING
NOTE: At the first indication of any petMAP malfunction, the first attempt at resolving the problem should be to replace the batteries with known fresh batteries.
While inflating cuff, if illuminated LED (light emitting diode) and gauge needle do not track together and agree, within +/- 5 mmHg:
1. Open the deflation valve with the trigger and assure that there is no pressure in the system. Now turn petMAP OFF and then ON again. The device should automatically reset for correct tracking.
2. If the first power cycle does not correct tracking, repeat On/Off cycle up to 2 additional times.
3. If after the 3rd try, the LED and gauge needle are still not tracking together while the cuff is being inflated, the device is out of calibration and should be returned to the manufacturer or service center for checkout and re-calibration.
Difficulty obtaining consistent BP readings (greater than +/- 15 mmHg from reading to reading)
1. Animal is moving. Calm animal until they are relaxed so determinations can be made during periods of non-movement.
2. Wrong size cuff used; use a cuff sized so that the index line is in the “optimum” region when snugly fitted to the
limb.
MAINTENANCE
Page 20
3. Cuff not properly snug, i.e., not tight enough on initial placement. Tighten cuff on the limb. 4. Cuff is not in correct location on forearm, hind
foot, or tail. Reposition cuff or move to another approved site and set petMAP, using multi-function button.
5. Check LoBat light. Replace batteries if indicated. 6. Zero not set properly on power up. Make sure there
is no pressure in the system when the petMAP is first powered up by opening the deflate trigger first and/or removing the cuff connector from the unit to assure atmospheric pressure, before turning Power ON.
Difficulty obtaining consistent BP readings in MANUAL Deflate Mode. 1. Pressure is being released too fast or too slow.
Deflate Rate indicator will illuminate green when correct deflation rate is used.
2. Check steps 1 – 6 above.
Unit will not turn on, or shuts off after powering up. 1. Replace batteries. 2. If batteries do not fix problem, return unit for
service.
Cuff will not inflate. 1. Check cuff connection. 2. Verify deflate trigger is in the up position (valve
closed position). 3. Check cuff and hose for leaks or damage.
Strange petMAP behavior. 1. Replace batteries. 2. If batteries do not fix problem, return unit for service.
Page 21
For Animal Use Only Method of BP Measurement: Oscillometric. Accuracy optimized for species (dog/cat) and
blood pressure cuff site (forearm, tail, hind foot).
Parameters Measured: Systolic, diastolic, mean arterial pressure (MAP), and heart
rate (HR).
Modes: Semi-Automatic with manual deflate
Semi-Automatic with auto deflate
Blood Pressure Range: 30-260 mmHg
Cuff Pressure Display Accuracy:
+/- 2 mmHg. Pressure calibration assured if gauge needle and LED display track together during cuff inflation.
BP Accuracy: Accuracy optimized for species and cuff site to enhance correlation with intra-arterial BP measurements.
BP displayed within +/- 2 mmHg. Heart Rate Range:
40—220 BPM Heart Rate Accuracy:
+/- 3% HR displayed within +/- 2 BPM.
Power: 2 each AAA batteries (Alkaline, Lithium, Nickel Metal Hydride (Rechargeable), no NICAD or “Heavy Duty”)
Battery Life: Approximately 5 hrs. (300 readings with unit OFF between readings).
SPECIFICATIONS
Page 22
Operating Environment: Temperature: 10°C to 40°C (50°F to 104°F) Humidity: 15% - 90%, non-condensing Altitude: - 500 feet (152 meters) below sea level to +8,000 feet (2438 meters) above sea
level
Storage Temperature: -20°C to 55°C (-4°F to 131°F)
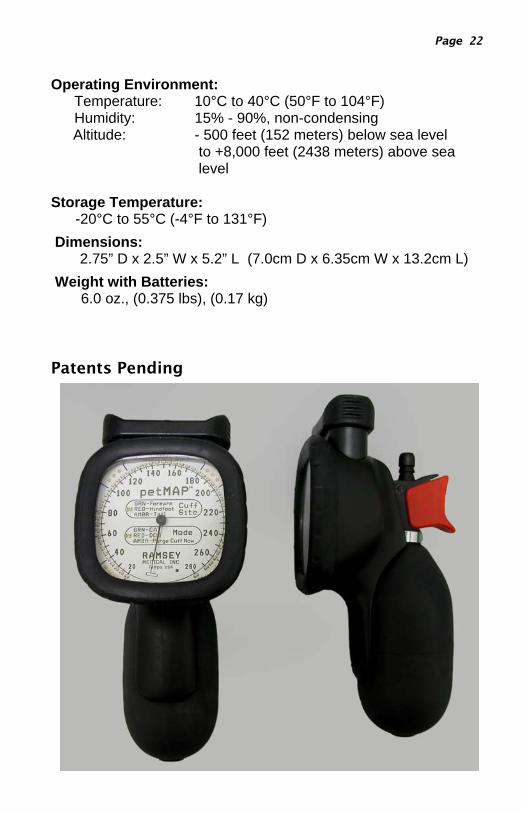
Dimensions: 2.75” D x 2.5” W x 5.2” L (7.0cm D x 6.35cm W x 13.2cm L)
Weight with Batteries: 6.0 oz., (0.375 lbs), (0.17 kg)
Patents Pending
WARRANTY The Ramsey Medical, Inc. petMAP™ is covered by a one year warranty against defects in materials and workmanship. Damage resulting from inappropriate use or physical abuse is not covered by the warranty. Units returned for warranty service will be repaired or replaced at the discretion of Ramsey Medical, Inc.
REPAIRS Please include a complete description of the difficulty with all units returned for service. All units returned for repairs (warranty and non-warranty) should be sent to: CardioCommand, Inc. 4920 W. Cypress St., Ste. 110 Tampa, FL 33607 Phone: 800-231-6370 813-289-5555 ext. 224 Fax: 813-289-5454
The Ramsey Medical petMAP is distributed and supported in the USA by:
CardioCommand, Inc. 4920 W. Cypress St., Ste. 110 Tampa, FL 33607 www.cardiocommand.com
800-231-6370 or 813-289-5555 petMAP may also be purchased in both the USA and internationally from other selected distributors.
Page 23
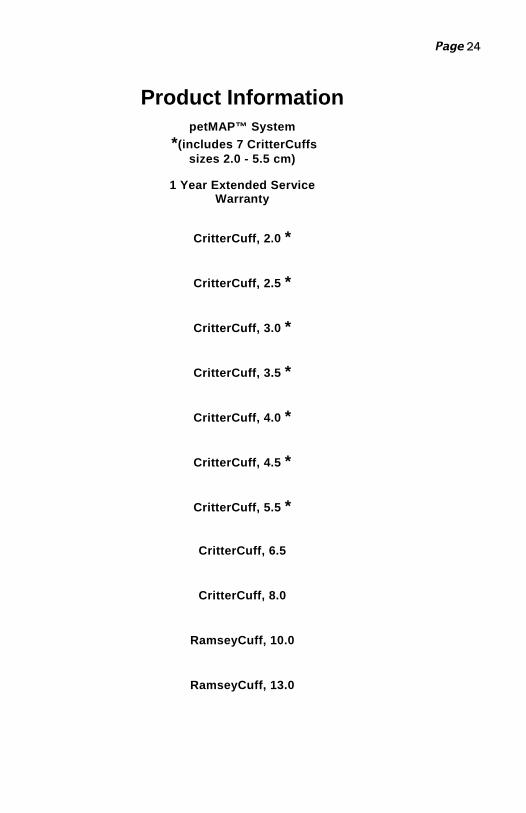
Product Information petMAP™ System
*(includes 7 CritterCuffs sizes 2.0 - 5.5 cm)
1 Year Extended Service Warranty
CritterCuff, 2.0 *
CritterCuff, 2.5 *
CritterCuff, 3.0 *
CritterCuff, 3.5 *
CritterCuff, 4.0 *
CritterCuff, 4.5 *
CritterCuff, 5.5 *
CritterCuff, 6.5
CritterCuff, 8.0
RamseyCuff, 10.0
RamseyCuff, 13.0
Page 24

Notes:
AWR400001-K 110602
Phone: 800-231-6370 813-289-5555 Fax: 813-289-5454 Website: www.petmap.com E-mail: [email protected]
4920 W. Cypress St. Suite 110 Tampa, FL 33607
RAMSEY Medical, Inc.
Tampa, FL 33607 USA
petMAP, statMAP, and CritterCuff are registered trademarks of
Ramsey Medical, Inc. Patent No. D531,313 S and other Foreign and US Patents Pending
Manual Revision K 06/22/11
Applies to units with CE serial number labels
Developed by: Ramsey Medical, Inc.
Distributed by: CardioCommand, Inc.