Embed Size (px)
Citation preview

MDS4001
MDS4001LA
MDS4001PLUS
MDS4001LAT
BLOOD PRESSURE UNITUSER’S MANUAL

TABLE OF CONTENTSINTRODUCTION AND INTENDED USE 3SYMBOL IDENTIFICATION 4IMPORTANT SAFETY INFORMATION 4MEASUREMENT ACCURACY 5HELPFUL INFORMATION ABOUT BLOOD PRESSURE 6CORRECT METHOD OF MEASUREMENT 10PARTS IDENTIFICATION 11PREPERATION BEFORE TAKING A MEASUREMENT 14SETTING TALKING FEATURE 17TAKING A MEASUREMENT 18MEMORY FUNCTION 20ERROR INDICATORS AND TROUBLESHOOTING 21TROUBLESHOOTING 22MEDLINE BLOOD PRESSURE CUFF TABLE 23CARE AND MAINTENANCE 24SENSOR CALIBRATION MODE 24 SPECIFICATIONS 25 BLOOD PRESSURE LOG 26WARRANTY 27
3
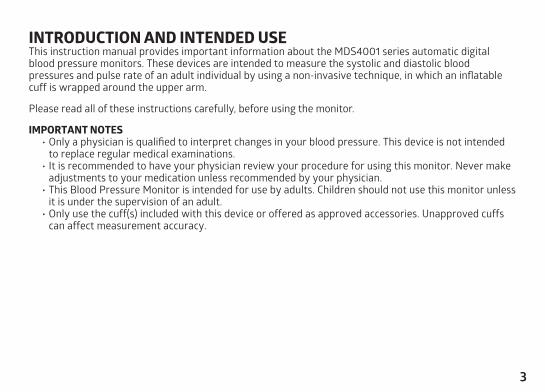
INTRODUCTION AND INTENDED USEThis instruction manual provides important information about the MDS4001 series automatic digital blood pressure monitors. These devices are intended to measure the systolic and diastolic blood pressures and pulse rate of an adult individual by using a non-invasive technique, in which an inflatable cuff is wrapped around the upper arm.
Please read all of these instructions carefully, before using the monitor.
IMPORTANT NOTES• Only a physician is qualified to interpret changes in your blood pressure. This device is not intended
to replace regular medical examinations.• It is recommended to have your physician review your procedure for using this monitor. Never make
adjustments to your medication unless recommended by your physician.• This Blood Pressure Monitor is intended for use by adults. Children should not use this monitor unless
it is under the supervision of an adult.• Only use the cuff(s) included with this device or offered as approved accessories. Unapproved cuffs
can affect measurement accuracy.

4
SYMBOL IDENTIFICATIONThe following symbols may appear in this manual, on the blood pressure monitor, or on its accessories.
Warning
Type B: Identifies applied part complying with IEC 60601-1
Class II
Refer to instruction manual
Keep Dry: Protect from moisture.
Disposal: Do not dispose this product with household waste.
IMPORTANT SAFETY INFORMATION Warning
• Consult with your physician before using this device on an arm where intravascular access or therapy, or an arteriovenous shunt, is present because of temporary interference to blood flow which could result in injury.
• Consult your physician before using this device if you have had a mastectomy.• Too frequent measurements can cause injury, due to blood flow interference.• Do not apply the cuff over a wound, as it can cause further injury.• Do not kink the cuff hose, as this may cause the cuff pressure to continuously increase, which can
interfere with blood flow and result in injury.• Do not inflate the cuff on the same limb to which other monitoring medical electrical (ME) equipment is
applied. This can cause temporary loss of function of the monitoring ME equipment.• Make sure that operation of this device does not result in prolonged impairment of blood circulation.
5
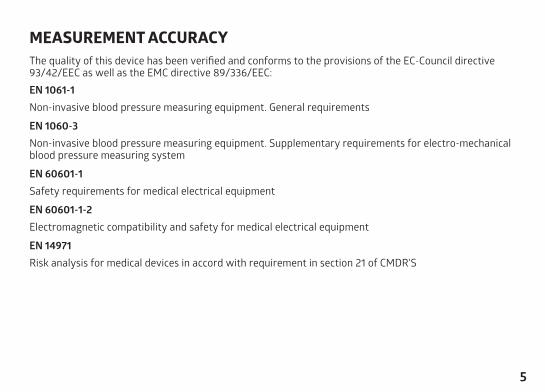
MEASUREMENT ACCURACY The quality of this device has been verified and conforms to the provisions of the EC-Council directive 93/42/EEC as well as the EMC directive 89/336/EEC: EN 1061-1Non-invasive blood pressure measuring equipment. General requirements
EN 1060-3Non-invasive blood pressure measuring equipment. Supplementary requirements for electro-mechanical blood pressure measuring system
EN 60601-1Safety requirements for medical electrical equipment
EN 60601-1-2 Electromagnetic compatibility and safety for medical electrical equipment
EN 14971 Risk analysis for medical devices in accord with requirement in section 21 of CMDR'S

6
HELPFUL INFORMATION ABOUT BLOOD PRESSUREWhat is Blood Pressure?Blood pressure is the force that blood exerts on the arteries. This force is constantly changing asthe heart beats. When the heart contracts, blood pressure reaches its highest value. This is calledsystolic blood pressure. When the heart relaxes between beats, the value of blood pressure is lower.This is called the diastolic blood pressure. The unit of measure for blood pressure is millimeterof mercury, abbreviated mmHg. For example, an individual’s blood pressure may be measured as 120 mmHg (systolic) and 80 mmHg (diastolic). This would be spoken as “120 over 80” and written as “120/80”.
What Affects Blood Pressure?Blood pressure can be affected by the following factors: eating, drinking alcohol or caffeine, smoking, stress, exercise, physiologic condition, measurement site, body position, temperature, humidity, altitude, and many other factors. Remember that blood pressure can also vary throughout the day. It is important to take measurements at the same time each day, and under the same conditions.

7
Typical Daily Blood Pressure Fluctuations
What is High Blood Pressure? Hypertension, or high blood pressure, is a condition where an individual’s blood pressure remains high over a long period of time. Consult with your physician with any questions or concerns you may have about hypertension.
Example: 35-yr old male

8
Blood Pressure ClassificationThe World Health Organization (WHO) and the International Society of Hypertension (ISH)
Monitor Pressure Gauge and IndicatorThe pressure gauge allows quick detection of your blood pressureclassification. The indicator displays a segment, based on your measurement, corresponding to the WHO and ISH classification.
Note: The pressure gauge indicator is approximate. Please consult your physician to interpret your blood pressure measurements.
Pressure Gauge
Pressure GaugeIndicator

9
Why is it Important to Measure Your Blood Pressure at Home? Having your blood pressure taken at the doctor’s office may cause you to become nervous, thus artificially raising your reading. Having the ability to take your blood pressure at home makes it easy to record a log of your daily readings. This will help you gain a greater understanding of your blood pressure reading and the factors that affect it. Be sure that you share your information withyour physician.
Hints for Accurate Measurement1. Relax and try to remain still for 5 to 10 minutes before a measurement.2. Remove any clothing on the upper arm so that the cuff can be placed directly on the skin. Constricting
garments may cause an inaccurate reading.3. Perform measurements on the same arm (preferably the LEFT arm).4. Refrain from eating, smoking and drinking (especially alcoholic beverages) before a measurement.
These activities can affect your blood pressure.5. Remember that blood pressure varies continuously throughout the day. Try to take your blood pres
sure at the same time each day.6. Do not be concerned with the results of one measurement. Many measurements, recorded over an
extended period of time, will provide a better indication of your blood pressure. 7. Relax for 5 to 10 minutes before remeasuring your blood pressure.
8. Because many factors can affect your blood pressure, daily fluctuations of 25 to 50 mmHg are common.
Please note: Some individuals with hypertension, diabetes, kidney disorders, arteriosclerosis or poor circulation may see a significant difference in blood pressure readings taken from the wrist as compared to readings from the upper arm. It is recommended that you consult with your physician concerning the use of this monitor.

10
CORRECT METHOD OF MEASUREMENTTo obtain the most accurate blood pressure measurement, please follow these important directions:1.Sit comfortably in a chair with your back supported. Place both feet flat on the floor and keep your
legs uncrossed.
2.Rest your left arm on a table and position your palm upwards.
IMPORTANT: The arm cuff must be at the same level as your heart, or accurate measurement will not be possible. (Your heart is located slightly below your left armpit.)
3.Remain still, avoid moving or talking during the measurement.
+- +
-+
-
+-
SYSmmHg
DIAmmHg
+- +
-+
-
+-
SYSmmHg
DIAmmHg
+- +
-+
-
+-
SYSmmHg
DIAmmHgFeet Flat on Floor Position Arm at Heart Level Avoid Moving or Talking

11
PARTS IDENTIFICATIONContents Monitor, arm cuff, four (4) "AA" alkaline batteries, instruction manual, quick start guide
Accessories
Monitor
Arm cuff
Air Tube Connector
Cuff Hose
Air Tube SocketLCD Display
Memory Button
Set ButtonStart/Stop Button

12
AC Adapter
The MDS4001 series has a 120V AC adaptor port to allow you to supply power from an outlet in your home. We recommend you only use the AC adapter (item number: M-IADE01) intended for the MDS4001 series items. Please contact Medline at 1-855-441-8737 if you would like to purchase an AC adapter.
Connecting the AC Adapter to the Monitor:1.Insert the AC adapter into an outlet.
2.Connect the AC adapter plug into the AC adapter port on the right side of the device.
Disconnecting the AC Adapter from the Monitor:1.Turn the device off by pressing the START/STOP button.
2.Disconnect the AC adapter plug from the device.
AC Adaptor Port
Plug
AC Adapter

13
Display Marks
Arrhythmia Detection Function:The arrhythmia detection symbol will appear on the display, if pulse irregularities were detected during the measurement. This result may deviate from your normal blood pressure, in which case repeat the measurement. It is important to remain still and avoid talking during the measurement.Note: We recommend you consult your physician if you see the arrhythmia detection symbol frequently.
10.Pulse Rate11.Time12.Systolic Blood Pressure13.Diastolic Blood Pressure14.Millimeters of mercury (mmHg) Measurement Unit15.Kilopascals (kPa) Measurement Unit16.Memory Frequency17.Measuring
1.Date2.User 13.User 24.Volume5.Inflating/Deflating6.Pressure Gauge Indicator7.Battery Display8.Average (AVG)9.Arrhythmia Detection Function
1 11
12
13
14151617
2
3
456789
10

14
PREPERATION BEFORE TAKING A MEASUREMENTBattery Installation/Replacement1. Slide the battery cover off in the direction of the arrow.
2. Install or replace the four alkaline “AA” batteries, noting the proper orientation of positive (+) and negative (-) terminals in the battery compartment.
3. Replace the battery cover.
Note:• Replace all batteries whenever appears on the display or when the display does not light up.•Remove the batteries if the device will not be used for an extended period of time.•Removing the batteries will erase all readings stored in the memory.•Batteries are hazardous waste. Do not dispose of them with household garbage.
Battery compartment

15
Setting Date and Time1.When the display is off, hold the SET button for 5 seconds, or until the year in the upper right corner
begins to flash.
2.Press the MEM (Memory) button to advance the year, until the proper value is displayed.
3.Once the year is selected, press the SET button to switch between month, day, hour, and minute.
4.Press the MEM (Memory) button to advance the digit, one value at a time, for the selected date or time setting.
Selecting mmHg or kPa Measurement Units
1.When the display is off, hold START/STOP button for 10 seconds, or until the digits on the screen start to flash.
2.Press the MEM (Memory) button to select mmHg or kPa.
Year
Month/Day Hour/Minute

16
How to Apply the Arm Cuff1.Place the cuff directly on your bare upper arm.
2.Adjust the cuff so that the bottom edge lies about 1 inch above the elbow on the inside of the arm.
3.Align the Artery Mark ( ) over the brachial artery, which runs down the inner arm. Position the cuff hose straight down your arm, in line with the middle finger.
4.Pull the end of the cuff and secure it snugly with the hook and loop closures. You should be able to fit two fingers between your arm and the cuff.
5.Confirm the indicator at the top, outer edge of the cuff lies within the fit range ( ).
6.Plug the air tube connector into the socket on the left side of the monitor.
IMPORTANT: Make sure the cuff hose remains straight along the arm and unkinked during measurement. Avoid compression and restriction of tubing.
+- +
-+
-
+-
SYSmmHg
DIAmmHg
Artery Mark
Brachial Mark
Palm Facing Up
1 inch
+- +
-+
-
+-
SYSmmHg
DIAmmHg
Index and Proper Fit Range
Air Tube Connector

17
SETTING TALKING FEATUREThe MDS4001LAT Talking Model can be set to announce your measurement results, according to the following method: NOTE: The MDS4001LAT has a gray faceplate. If your device does not have a gray faceplate, the following instructions are not relevant for your device.
1.When the display is off, hold the SET button for about 5 seconds, or until the year in the upper right
corner begins to flash.
2.Press the SET button again to move through the date and time settings, until SP in the lower left corner begins to flash.
3.Press the MEM (Memory) button to switch between languages: SP 01 is English, SP 02 is Spanish, and SP OF is off.
4.Press the SET button again to confirm the language selected and return the device to the initial display off screen.

18
TAKING A MEASUREMENTPlease read the previous section on proper cuff placement and body position.1.Press the SET button and select [ ] or [ ], in the upper
left hand corner of the LCD screen, to indicate which user is taking the measurement.
2.Press the START/STOP button. The arm cuff will begin to inflate automatically. The cuff will be quite snug for a short while, this is normal.
Note: TO END a measurement for any reason, press the START/STOP button again.
3.After the inflation, the cuff will slowly deflate to
take the measurement. The will flash, indicating that the measurement is in process.
Note: If the device determined that the initial inflation pressure was insufficient, it will reinflate at a higher pressure.
4.The device will completely deflate when the measurement is finished. The systolic and diastolic pressure, pulse rate, and pressure gauge indicator will be displayed
Start
Inflating
Deflating
Complete
Systolic
Diastolic
Pressure Gauge Indicator
Pulse Rate

19
Note:
• The device will automatically shut off after 1 minute, or it can be powered off by pressing the START/STOP button.
• If during a measurement the power drops to an insufficient level, the device will end the measure-ment and (low battery) will be displayed. Please replace the batteries and repeat the measure-ment.
• If the device cannot detect your pulse, it will end the measurement. Please wait a few minutes, make sure that the cuff is positioned properly, and try again.

20
MEMORY FUNCTIONMemory Input When a valid measurement is made, the result (systolic, diastolic, pulse rate, date and time) will be stored in the memory auto-matically as soon as the device is turned off or when another measurement is initiated. The device can store up to 90 readings for each of 2 users, and also compute the average of the latest 3 readings. When more than 90 readings are stored, the oldest ones will be replaced.
Memory Recall1.When the display is off, press the MEM button to show the
average (AVG) of all recorded results.
2.Press the MEM button again and 01 will appear in the lower right hand corner, indicating the latest measurement in the memory.
3.Continue pressing the MEM button to display additional past readings, sequentially.
Memory Erase1.When the display is off, press the MEM button.
2.Press the MEM button again and hold it down for more than 3 seconds to erase all stored results.
Memory Frequency

21
ERROR INDICATORS AND TROUBLESHOOTINGERRORINDICATORS
CAUSE CORRECTION
Incomplete inflation of arm cuff
• Check if the cuff is firmly connected to the device• Make sure the cuff hose remains straight and unkinked during measurement• Reposition the cuff correctly (see pg. 16) and try the measurement again• If the Er message persists, call product support
Cuff over-inflated and released
automatically
• Take a break, remove all clothing from upper arm, reposition the cuff correctly (see pg. 16) and try the measurement again• Make sure the cuff hose remains straight and unkinked during measurement
Could not obtain the pulse rate• Reposition the cuff correctly (see pg. 16) and try the measurement again• Please refrain from talking or moving during measurement
Strong electromagnetic interference
(mobile phone or computer)
• Make sure the cuff hose remains straight and unkinked during measurement• Remove sources of interference (mobile phone or computer)• Take a break, reposition the cuff correctly (see pg. 16) and try the measurement again
Irregular pulse rate or blood pressure• Take a break, reposition the cuff and your body position correctly (see pg. 16) and try the measurement again• Please refrain from talking or moving during measurement

22
PROBLEM CAUSE CORRECTION
Nothing appears in the display, after START/STOP button is pressed
Batteries are drained Replace the batteries with new ones
Batteries are inserted incorrectly Reinstall the batteries with positive and negative terminals in correct position (see pg. 14)
Cuff does not inflate
Tube connector is not fully inserted into device Firmly insert connector into air socket on left side of device
Tube connector is broken Call product supportCuff hose is compressed or restricted Make sure hose remains straight and unkinked during measurement
Cuff is not fastened properly Reposition the cuff correctly (see pg. 16)Battery voltage is too low Replace all batteries with new ones
Blood pressure readings are too high or too low
Cuff is not fastened properly Reposition the cuff correctly (see pg. 16)Body and arm are not positioned properly Reposition your body and arm correctly (see pg. 10)
Movement or talking during measurement Remain seated, and please refrain from moving or talking during measurement
Repeated measurement on same arm within short time period
Wait 5 to 10 minutes between measurements
Blood pressurereadings are variable
Possible factors: time of day, emotional state, daily activities or exercise, smoking, drinking alcohol or caffeine, eating, certain medications (see pg. 6)
Take measurement at same time each day, and under the same conditions
TROUBLESHOOTING

23
MEDLINE BLOOD PRESSURE CUFF TABLEIf you need a different-sized cuff, please consult the table below for information about the different sizes available. Replacement cuffs fit all Medline-branded automatic digital blood pressure moni-tors. Contact Medline Industries, Inc. at 1-800-MEDLINE or visit www.medline.com if you need to purchase a new cuff. Provide the appropriate item number from the table below.
MEDLINE ITEM NUMBER SIZE MEASUREMENT RANGE (cm)
MDS9970 Small Adult 17-22 cm
MDS9971 Adult 22-30 cm
MDS9972 Large Adult 30-42 cm
MDS9973 Extra Large Adult 42-48 cm
MDS9974 Universal 22-42 cm
BLOOD PRESSURE MONITOR
ITEM NUMBER
INCLUDED ARM CUFF
ITEM NUMBER
ARM CUFF SIZE MEASUREMENT RANGE (cm)
MDS4001 MDS9971 Adult 22-30 cm
MDS4001LA MDS9972 Large Adult 30-42 cm
MDS4001LAT MDS9972 Large Adult 30-42 cm
MDS4001PLUS MDS9971 & MDS9972
Adult & Large Adult
22-30 cm & 30-42 cm
24
SENSOR CALIBRATION MODEThe blood pressure device should only be calibrated by the manufacturer.
CARE AND MAINTENANCE• Keep the device away from high temperatures, high humidity and direct sunlight.• Keep sharp objects away from the cuff and tubing.• Do not press the START/STOP button without the cuff around your arm to avoid excess pressure
build up that may damage the cuff.• Use the device at a sufficient distance from devices with strong electrical fields, such as television,
microwave ovens, X-ray equipment, etc.• Do not subject the device to strong impact or drop it on the floor.• Do not disassemble or modify the device or the cuff.• Remove the batteries when the device is to be stored for extended periods of time.
Use only a soft dry cloth to clean the unit. Do not use solvents or other petroleum-based cleaners.

25
SPECIFICATIONSManufacturer Model:
Medline Item Numbers:
Memory Function:
Display:
Measuring Range:
Sensor Accuracy:
Inflation System:
Arm Size Ranges:
Batteries:
Automatic Power-off:
Reference Method for Clinical Trials:
Weight:
Operating Condition:
Storage and Transport Condition:
Standard Cited:
BA-803
MDS4001, MDS4001LA, MDS4001PLUS, MDS4001LAT
Storage and recall 2x90 measurements with average
LCD
Pressure: 0-280 mmHg Pulse: 40-199/minute
Pressure: ±3mmHg Pulse: ±5%
Electro-pneumatic pump
17-42 cm (6.7-16.5 inches)
l.5V alkaline (LR6/AA)X4
Approx. 1 minute after measurement
Auscultatory measurement
Approximately 420g(without batteries)
41°F ~ 104°F (5°C ~ 40°C) 10%~90%RH
-4°F ~ 149°F (-20°C ~ 65°C) 10%~95%RH
EN 1060-1 EN 60601-1-2
EN 1060-3 EN 14971
EN 60601-1

26
BLOOD PRESSURE LOG

27
WarrantyMedline Industries, Inc. warrants this digital blood pressure monitor against any defects in material and workmanship for a period of one (1) year after the date of purchase. The associated parts, specifically the cuff, are warranted for a period of six (6) months after the date of purchase or for ten thousand (10,000) uses, whichever comes first. These uses include, but are not limited to, inflation of the bladder and attach-ment of the cuff hook and loop closure. Excluding cases of freight damage, tampering, clear abuse,misuse, or accidents, Medline Industries, Inc. will, at its discretion, repair or replace this sphygmomanometer and/or its parts during the warranty period without charge. No representative or person is authorized to assume for us any liability in connection with the sale of the products, of Medline Industries, Inc. This warranty gives you specific legal rights, and you may also have other rights that may vary from state to state. Prior to shipping any product, please contact either Medline Industries, Inc. at 1 -800-MEDLINE or an authorized Medline sales representative with any warranty concerns.

www.medline.com ©2021 Medline Industries, Inc. Manufactured for Medline Industries, Inc., Three Lakes Drive, Northfield, IL 60093 USA. Product of Taiwan, Finished in China. 1-800-MEDLINE V2 RD21DGA

MDS4001
MDS4001LA
MDS4001PLUS
MDS4001LAT
TENSIÓMETROMANUAL DEL USUARIO

CONTENIDOINTRODUCCIÓN Y USO PREVISTO 31IDENTIFICACIÓN DE LOS SÍMBOLOS 32INFORMACIÓN IMPORTANTE SOBRE LA SEGURIDAD 32EXACTITUD DE LA MEDICIÓN 33INFORMACIÓN ÚTIL SOBRE LA PRESIÓN ARTERIAL 34MÉTODO DE MEDICIÓN CORRECTO 38IDENTIFICACIÓN DE COMPONENTES 39PREPARACIÓN ANTES DE REALIZAR UNA MEDICIÓN 42CONFIGURACIÓN DE LA FUNCIÓN DE VOZ 45REALIZAR UNA MEDICIÓN 46FUNCIÓN DE MEMORIA 48INDICADORES DE ERROR Y SOLUCIÓN DE PROBLEMAS 49SOLUCIÓN DE PROBLEMAS 50TABLA DE MANGUITOS DE PRESIÓN ARTERIAL MEDLINE 51CUIDADO Y MANTENIMIENTO 52MODO DE CALIBRACIÓN DEL SENSOR 52ESPECIFICACIONES 53REGISTRO DE PRESIÓN ARTERIAL 54GARANTÍA 55

31
INTRODUCCIÓN Y USO PREVISTOEste manual de instrucciones ofrece información importante sobre la serie MDS4001 de tensiómetros automáticos digitales. Estos dispositivos están indicados para medir la presión arterial sistólica y diastólica y el pulso de una persona adulta mediante el uso de una técnica no invasiva, en la que se coloca un manguito inflable alrededor de la parte superior del brazo.
Lea atentamente todas estas instrucciones antes de usar el tensiómetro.
NOTAS IMPORTANTES• Solo un médico está calificado para interpretar los cambios en su presión arterial. Este dispositivo
no tiene el propósito de reemplazar los exámenes médicos periódicos.• Se recomienda que su médico revise el procedimiento que usted sigue para usar este tensiómetro.
A menos que se base en la recomendación de su médico, nunca haga ajustes en su medicamento.• Este tensiómetro está diseñado para ser usado por adultos. A menos que sea bajo la supervisión
de un adulto, los niños no deben usar este dispositivo.• Use únicamente el o los manguitos incluidos con este dispositivo o los ofrecidos como accesorios
aprobados. Los manguitos no aprobados pueden afectar la exactitud de la medición.

32
IDENTIFICACIÓN DE LOS SÍMBOLOSLos siguientes símbolos pueden aparecer en este manual, en el tensiómetro o en sus accesorios.
Advertencia
Tipo B: identifica la pieza aplicada que cumple con la norma IEC 60601-1
Clase II
Consulte el manual de instrucciones
Mantener seco: proteger de la humedad.
Eliminación: no elimine este producto con la basura del hogar.
INFORMACIÓN IMPORTANTE SOBRE LA SEGURIDAD Advertencia
• Consulte con su médico antes de usar este dispositivo en un brazo donde haya acceso o terapia intravascular, o una derivación arteriovenosa debido a una interferencia temporal en el flujo sanguíneo, lo cual podría causar lesiones.
• Consulte con su médico antes de usar este dispositivo si se ha sometido a una mastectomía.• Realizar mediciones con demasiada frecuencia puede causar daños al interferir con el flujo sanguíneo.• No ponga el manguito sobre una herida, ya que puede causar más lesiones.• No tuerza la manguera del manguito, ya que ello puede hacer que la presión del manguito aumente
continuamente, lo que puede interferir con el flujo sanguíneo y provocar lesiones.• No infle el manguito en la misma extremidad en la que se aplique otro equipo electromédico (EM)
de monitorización. Ello puede provocar la pérdida temporal de la función del equipo electromédico de monitorización.
• Cerciórese de que el funcionamiento de este dispositivo no provoque un deterioro prolongado de la circulación sanguínea.

33
EXACTITUD DE LA MEDICIÓN La calidad de este dispositivo se ha verificado y concuerda con las disposiciones de la directiva 93/42/CEE del Consejo de la UE, así como con la directiva 89/336/CEE sobre CEM:
EN 1061-1
Equipo no invasivo para medir la presión arterial. Requisitos generales
EN 1060-3
Equipo no invasivo para medir la presión arterial. Requisitos complementarios para sistemas electromecánicos de medición de la presión arterial
EN 60601-1
Requisitos de seguridad para equipos electromédicos
EN 60601-1-2
Compatibilidad electromagnética y seguridad para equipos electromédicos
EN 14971
Análisis de riesgos para dispositivos médicos de conformidad con el requisito de la sección 21 de la CMDR (Regulación canadiense para equipos médicos, por sus siglas en inglés)

34
INFORMACIÓN ÚTIL SOBRE LA PRESIÓN ARTERIAL¿Qué es la presión arterial?La presión arterial es la fuerza que ejerce la sangre en las arterias. Esta fuerza cambia constantemente mientras el corazón late. Cuando el corazón se contrae, la presión arterial alcanza su valor más alto. Esto se llama presión arterial sistólica. Cuando el corazón se relaja entre latidos, el valor de la presión arterial es menor. Esto se llama presión arterial diastólica. La unidad de medida de la presión arterial es el milímetro de mercurio, abreviado como mmHg. Por ejemplo, la presión arterial de una persona puede medirse como 120 mmHg (sistólica) y 80 mmHg (diastólica). Esto se expresaría en forma oral como “120 sobre 80” y como “120/80” en forma escrita.
¿Qué afecta a la presión arterial?La presión arterial puede verse afectada por los siguientes factores: comer, beber alcohol o cafeína, fumar, estrés, ejercicio, estado fisiológico, lugar de medición, posición corporal, temperatura, humedad, altitud y muchos otros factores. Recuerde que la presión arterial también puede variar a lo largo del día. Es importante realizar mediciones a la misma hora todos los días y en las mismas condiciones.

35
Fluctuaciones típicas diarias de la presión arterial
Presión arterial (mm
Hg)
sistólica
diastólica
HoraAlmuerzo
Horas laborales
Conducir a casa
Horas familiares
Relación sexual
Dormir
Conducir al trabajo
Horas en cirugía
Ejemplo: Hombre de 35 años
¿Qué es la presión arterial alta? La hipertensión, o presión arterial alta, es una afección en la que la presión arterial de la persona permanece alta durante un período prolongado. Consulte con su médico si tiene preguntas o inquietudes acerca de la hipertensión.
36
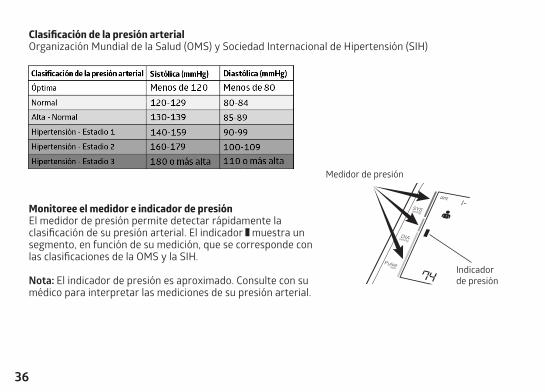
Clasificación de la presión arterialOrganización Mundial de la Salud (OMS) y Sociedad Internacional de Hipertensión (SIH)
Monitoree el medidor e indicador de presiónEl medidor de presión permite detectar rápidamente la clasificación de su presión arterial. El indicador muestra un segmento, en función de su medición, que se corresponde con las clasificaciones de la OMS y la SIH.
Nota: El indicador de presión es aproximado. Consulte con su médico para interpretar las mediciones de su presión arterial.
Medidor de presión
Indicador de presión

37
¿Por qué es importante medirse la presión arterial en el hogar? La medición de la presión arterial en el consultorio del médico puede ponerle nervioso/a y aumentar artificialmente la lectura. Cuando usted mide su presión arterial en el hogar es fácil llevar un registro de sus lecturas diarias. Esto le ayudará a comprender mejor sus lecturas de la presión arterial y los factores que la afectan. Asegúrese de compartir la información con su médico.
Consejos para realizar una medición exacta1. Relájese y trate de permanecer quieto durante 5 a 10 minutos antes de una medición.2. Descubra la parte superior del brazo, de modo que pueda colocar el manguito directamente sobre
la piel. Las prendas apretadas pueden dar lugar a una lectura inexacta.3. Realice las mediciones en el mismo brazo (de preferencia en el brazo IZQUIERDO).4. Absténgase de comer, fumar y beber (sobre todo bebidas alcohólicas) antes de una medición, ya que
estas actividades pueden afectar su presión arterial.5. Recuerde que la presión arterial varía continuamente durante todo el día. Trate de medir su presión
arterial a la misma hora cada día.6. No se preocupe por los resultados de una sola medición. Muchas mediciones, registradas durante
un período extendido, proporcionarán una mejor indicación de su presión arterial. 7. Relájese durante al menos 5 a 10 minutos antes de realizar otra medición.8. Debido a que muchos factores pueden afectar su presión arterial, las fluctuaciones diarias de
25 a 50 mmHg son comunes.Tenga en cuenta: Algunas personas con hipertensión, diabetes, trastornos renales, arteriosclerosis o mala circulación pueden ver una diferencia significativa en las lecturas de la presión arterial medidas en la muñeca en comparación con las mediciones realizadas en la parte superior del brazo. Se recomienda que consulte con su médico acerca del uso de este tensiómetro.

38
MÉTODO DE MEDICIÓN CORRECTOPara obtener la medición más exacta de la presión arterial, siga estas indicaciones importantes:1. Siéntese cómodamente en una silla con la espalda apoyada. Coloque ambos pies apoyados por completo
en el piso y no cruce las piernas.2. Apoye el brazo izquierdo sobre una mesa y coloque la palma hacia arriba.
IMPORTANTE: El manguito de brazo debe estar al mismo nivel que el corazón, de otro modo no podrá realizar una medición exacta. (El corazón está ubicado levemente debajo de la axila izquierda).
3. Quédese quieto/a, evite moverse o hablar durante la medición.
+- +
-+
-
+-
SYSmmHg
DIAmmHg
+- +
-+
-
+-
SYSmmHg
DIAmmHg
+- +
-+
-
+-
SYSmmHg
DIAmmHg
Los pies planos en el piso Coloque el brazo a nivel del corazón Evite moverse o hablar

39
IDENTIFICACIÓN DE COMPONENTESContenidoMonitor, manguito de brazo, cuatro (4) baterías alcalinas “AA”, manual de instrucciones, guía de inicio rápido
Accesorios
Monitor
Manguito de brazo
Conector del tubo de aire
Manguera del manguito
Toma del tubo de airePantalla LCD
Botón de memoria
Botón de configuraciónBotón START/STOP (Iniciar/Parar)

40
Adaptador de CA
La serie MDS4001 tiene un puerto adaptador de 120 V de CA que permite alimentar el dispositivo desde un tomacorriente de su casa. Recomendamos que solo utilice el adaptador de CA (número de artículo: M-IADE01) diseñado para los productos de la serie MDS4001. Comuníquese con Medline al 1-855-441-8737 si desea comprar un adaptador de CA.
Conexión del adaptador de CA al monitor:1. Enchufe el adaptador de CA en un tomacorriente.2. Conecte la clavija del adaptador de CA en el puerto del adaptador de CA que está en el lado
derecho del dispositivo. Desconexión del adaptador de CA del monitor:1. Apague el dispositivo presionando el botón START/STOP (Iniciar/Parar).2. Desconecte la clavija del adaptador de CA del dispositivo.
Puerto del adaptador de CA
Clavija
Adaptador de CA

41
Signos de la pantalla
Función de detección de arritmia:El símbolo de detección de arritmia aparecerá en la pantalla si se detectaron irregularidades en el pulso durante la medición. Este resultado puede desviarse de su presión arterial normal, en cuyo caso repita la medición. Es importante permanecer quieto y evitar hablar durante la medición.Nota: Le recomendamos que consulte con su médico si ve el símbolo de detección de arritmia con frecuencia.
10. Pulso11. Hora (TIME)12. Presión sistólica13. Presión diastólica14. Unidad de medida en milímetros de mercurio (mmHg)15. Unidad de medida en kilopascales (kPa)16. Frecuencia de memoria17. Realizando medición
1. Fecha (DATE)2. Usuario 13. Usuario 24. Volumen5. Inflado/Desinflado6. Indicador de presión7. Indicador de batería8. Promedio (AVG)9. Función de detección de arritmia
1 11
12
13
14151617
2
3
456789
10

42
PREPARACIÓN ANTES DE REALIZAR UNA MEDICIÓNInstalación/reemplazo de baterías1. Deslice la tapa del compartimiento de baterías hacia afuera en la
dirección de la flecha.2. Instale o reemplace las cuatro baterías alcalinas “AA” prestando
atención a la dirección correcta de los terminales positivo (+) y negativo (-) indicada en el compartimiento de baterías.
3. Vuelva a colocar la tapa del compartimento de baterías.
Nota:• Reemplace todas las baterías cuando aparezca en la pantalla
o cuando esta no se ilumine.• Retire las baterías si no va a usar el dispositivo por un
período prolongado.• Al retirar las baterías, se borrarán todas las lecturas guardadas
en la memoria.• Las baterías son un residuo peligroso. No las deseche junto con
los residuos domésticos.
Compartimiento de baterías

43
Ajuste de fecha y hora1. Cuando la pantalla esté apagada, mantenga pulsado el botón SET (Configurar) durante 5 segundos,
o hasta que el año en la esquina superior derecha comience a parpadear.
2. Presione el botón MEM (Memoria) para cambiar el año hasta alcanzar el valor deseado. 3. Cuando haya seleccionado el año, presione el botón SET (Configurar) para cambiar entre mes,
día, hora y minuto.
4. Presione el botón MEM (Memoria) para avanzar los dígitos, de uno en uno, para la configuración de fecha y hora.
Selección de unidades de medida mmHg o kPa1. Cuando la pantalla esté apagada, mantenga pulsado el botón START/STOP (Iniciar/Parar) durante
10 segundos, o hasta que los dígitos en la pantalla comiencen a parpadear.2. Pulse el botón MEM (Memoria) para seleccionar mmHg o kPa.
Año
Mes/día Hora/minuto

44
Cómo ponerse el manguito de brazo1. Colóquese el manguito directamente en la parte superior
del brazo desnudo.2. Ajuste el manguito de modo que el borde inferior quede
aproximadamente a 1 pulgada por encima del codo en el lado interno del brazo.
3. Alinee la marca arterial ( ) sobre la arteria braquial, que corre por la parte interna del brazo. Ubique la manguera del manguito de modo que baje recta por su brazo, en línea con su dedo medio.
4. Tire del extremo del manguito y fíjelo firmemente con los cierres de velcro. Deberían poder caber dos dedos entre su brazo y el manguito.
5. Confirme que el indicador en el borde superior externo del manguito se encuentra dentro del margen de ajuste ( ).
6. Enchufe el conector del tubo de aire en el puerto de acceso en el lado izquierdo del monitor.
IMPORTANTE: Cerciórese de que la manguera del manguito permanezca recta a lo largo del brazo y sin doblarse durante la medición. Evite la compresión y restricción del tubo.
+- +
-+
-
+-
SYSmmHg
DIAmmHg
Marca arterial
Marca braquial
Palma hacia arriba
1 pulgada
+- +
-+
-
+-
SYSmmHg
DIAmmHg
Índice y margen de ajuste adecuado
Conector del tubo de aire

45
CONFIGURACIÓN DE LA FUNCIÓN DE VOZEl modelo con voz MDS4001LAT puede configurarse para anunciar los resultados de sus mediciones si realiza el siguiente método:
NOTA: El MDS4001LAT tiene una cubierta gris. Si su dispositivo no tiene una cubierta gris, las instrucciones que se indican a continuación no serán aplicables.
1. Cuando la pantalla esté apagada, mantenga pulsado el botón SET (Configurar) durante unos 5 segundos, o hasta que el año en la esquina superior derecha comience a parpadear.
2. Pulse de nuevo el botón SET (Configurar) para desplazarse por los ajustes de fecha y hora, hasta que SP en la esquina inferior izquierda comience a parpadear.
3. Pulse el botón MEM (Memoria) para alternar entre idiomas. SP 01 es inglés, SP 02 es español y SP OF es apagado.
4. Vuelva a pulsar el botón SET (Configurar) para confirmar el idioma seleccionado y devolver el dispositivo a la pantalla inicial de visor apagado.

46
REALIZAR UNA MEDICIÓNLea la sección anterior para conocer la correcta colocación del manguito y posición del cuerpo.
1. Presione el botón SET (Configurar) y seleccione [ ] o [ ], en la esquina superior izquierda de la pantalla LCD, para indicar qué usuario está tomando la medición.
2. Presione el botón START/STOP (Iniciar/Parar). El manguito comenzará a inflarse automáticamente. El manguito estará bien ceñido durante un tiempo breve. Esto es normal.
Nota: Para FINALIZAR una medición por cualquier motivo, vuelva a pulsar el botón START/STOP (Iniciar/Parar).
3. Tras inflarse, el manguito se desinflará lentamente para tomar la medición. El símbolo parpadeará, indicando que la medición está en curso.
Nota: Si el dispositivo determina que la presión inicial de inflado fue insuficiente, volverá a inflar el manguito a una presión más alta.
4. El manguito se desinflará completamente tras concluir la medición. Se mostrarán la presión sistólica, la presión diastólica, el pulso y el indicador de presión. Sistólica
Diastólica
Indicador de presión
Pulso
Inicio
Inflado
Desinflado
Completado

47
Nota:
• El dispositivo se apagará automáticamente después de 1 minuto, o se puede apagar pulsando el botón START/STOP (Iniciar/Parar).
• Si durante la medición la energía disminuye a un nivel insuficiente, el dispositivo finalizará la medición y aparecerá la indicación (batería baja). Reemplace las baterías y repita la medición.
• Si el dispositivo no puede detectar el pulso, finalizará la medición. Espere unos minutos, cerciórese de que el manguito esté correctamente puesto y vuelva a intentarlo.

48
FUNCIÓN DE MEMORIAIngreso en la memoria Cuando se realiza una medición válida, el resultado (presión sistólica, presión diastólica, pulso, fecha y hora) se almacena automáticamente en la memoria en cuanto el dispositivo se apaga o al iniciarse otra medición. El dispositivo puede almacenar hasta 90 lecturas para cada uno de los 2 usuarios y también calcular un promedio de las últimas 3 lecturas. Cuando haya más de 90 lecturas almacenadas, se reemplazarán las más antiguas.
Recuperación de memoria1. Cuando la pantalla esté apagada, pulse el botón MEM (Memoria)
para mostrar el promedio (AVG) de todos los resultados registrados.
2. Vuelva a presionar el botón MEM (Memoria) y aparecerá “01” en la esquina inferior derecha, indicando la lectura más reciente en la memoria.
3. Continúe pulsando el botón MEM (Memoria) para mostrar más lecturas anteriores de forma secuencial.
Borrar memoria1. Cuando la pantalla esté apagada, pulse el botón MEM (Memoria).2. Pulse de nuevo el botón MEM (Memoria) y manténgalo
pulsado durante al menos 3 segundos para borrar todos los resultados almacenados.
Frecuencia de la memoria

49
INDICADORES DE ERROR Y SOLUCIÓN DE PROBLEMASINDICADORES DE ERROR
CAUSA CORRECCIÓN
Inflado incompleto del manguito de brazo
• Verifique que el manguito esté firmemente conectado al dispositivo• Cerciórese de que la manguera del manguito permanezca recta y sin
doblarse durante la medición• Vuelva a ponerse el manguito correctamente (consulte la pág. 16)
y realice la medición nuevamente• Si el mensaje “Er” (error) persiste, póngase en contacto con el servicio
de asistencia técnica
El manguito se infló en exceso y se desinfló automáticamente
• Tómese un descanso, quítese toda la ropa de la parte superior del brazo, vuelva a ponerse el manguito correctamente (consulte la pág. 16) y realice la medición nuevamente
• Cerciórese de que la manguera del manguito permanezca recta y sin doblarse durante la medición
No se pudo obtener el pulso• Vuelva a ponerse el manguito correctamente (consulte la pág. 16)
y realice la medición nuevamente• Evite hablar o moverse durante la medición
Interferencia electromagnética potente (teléfono celular o computadora)
• Cerciórese de que la manguera del manguito permanezca recta y sin dobleces durante la medición
• Retire las fuentes de interferencia (teléfono celular o computadora)• Tómese un descanso, vuelva a ponerse el manguito correctamente
(consulte la pág. 16) y realice la medición nuevamente
Pulso o presión arterial irregulares• Tómese un descanso, vuelva a ponerse el manguito y adopte la postura
correcta (consulte la pág. 16) y realice la medición nuevamente• Evite hablar o moverse durante la medición

50
PROBLEMA CAUSA CORRECCIÓNNo aparece nada en la pantalla tras pulsar el botón START/STOP (Iniciar/Parar)
Las baterías están agotadas Reemplace las baterías
Las baterías no están insertadas correctamente Vuelva a instalar las baterías con los terminales positivo y negativo en la posición correcta (consulte la pág. 14)
El manguito no se infla
El conector del tubo no está insertado completamente en el dispositivo
Inserte firmemente el conector en el orificio de acceso de aire en el lado izquierdo del dispositivo
El conector del tubo está roto Llame al servicio de asistencia técnicaLa manguera del manguito está comprimida o restringida
Cerciórese de que la manguera permanezca recta y sin doblarse durante la medición
El manguito no está ajustado correctamente Vuelva a ponerse el manguito correctamente (consulte la pág. 16)El voltaje de la batería es demasiado bajo Reemplace todas las baterías
Las lecturas de la presión arterial son muy altas o muy bajas
El manguito no está ajustado correctamente Vuelva a ponerse el manguito correctamente (consulte la pág. 16)El cuerpo y el brazo no están posicionados correctamente
Reposicione su cuerpo y brazo correctamente (consulte la pág. 10)
Usted se mueve o habla durante la medición Permanezca sentado y absténganse de moverse o de hablar durante la medición
Medición repetida en el mismo brazo en un tiempo corto
Espere de 5 a 10 minutos entre cada medición
Las lecturas de la presión arterial son variables
Posibles factores: la hora del día, el estado emocional, las actividades o el ejercicio diarios, fumar, beber alcohol o cafeína, comer, ciertos medicamentos (consulte la página 6)
Realice las mediciones a la misma hora todos los días y en las mismas condiciones
SOLUCIÓN DE PROBLEMAS

51
TABLA DE MANGUITOS DE PRESIÓN ARTERIAL MEDLINESi necesita un manguito de diferente tamaño, consulte la siguiente tabla para obtener información sobre los diferentes tamaños disponibles. Los manguitos de repuesto funcionan en todos los monitores de presión arterial automáticos digitales de la marca Medline. Comuníquese con Medline Industries, Inc. llamando al 1-800-MEDLINE o visite www.medline.com si necesita comprar un manguito nuevo. Proporcione el número de artículo apropiado de la tabla que figura a continuación.
NÚMERO DE ARTÍCULO MEDLINE TAMAÑO INTERVALO DE MEDICIÓN (cm)
MDS9970 Adulto pequeño 17-22 cm
MDS9971 Adulto 22-30 cm
MDS9972 Adulto grande 30-42 cm
MDS9973 Adulto extragrande 42-48 cm
MDS9974 Universal 22-42 cm
NÚMERO DE ARTÍCULO DEL TENSIÓMETRO
NÚMERO DE ARTÍCULO DEL MANGUITO INCLUIDO
TAMAÑO DEL MANGUITO DE BRAZO
INTERVALO DE MEDICIÓN (cm)
MDS4001 MDS9971 Adulto 22-30 cm
MDS4001LA MDS9972 Adulto grande 30-42 cm
MDS4001LAT MDS9972 Adulto grande 30-42 cm
MDS4001PLUS MDS9971 y MDS9972 Adulto y adulto grande
22-30 cm y 30-42 cm

52
MODO DE CALIBRACIÓN DEL SENSOREl dispositivo de presión arterial solo debe ser calibrado por el fabricante.
CUIDADO Y MANTENIMIENTO• Mantenga el dispositivo alejado de temperaturas y humedad altas y de la luz directa del sol.• No acerque objetos punzantes al manguito ni el tubo.• No pulse el botón START/STOP (Iniciar/Parar) si el manguito no está colocado alrededor del brazo
a fin de evitar una acumulación excesiva de presión que podría dañar el manguito.• Use el dispositivo a suficiente distancia de los aparatos con campos eléctricos fuertes, tales como
televisores, hornos de microondas, equipos de rayos X, etc.• No someta el dispositivo a golpes fuertes y evite que caiga al piso.• No desmonte ni modifique el dispositivo ni el manguito.• Retire las baterías cuando vaya a guardar el dispositivo por períodos prolongados.
Solo use un paño suave y seco para limpiar la unidad. No use solventes ni otros limpiadores a base de petróleo.

53
ESPECIFICACIONESModelo del fabricante: BA-803Números de artículo Medline: MDS4001, MDS4001LA, MDS4001PLUS, MDS4001LATFunción de memoria: Almacena, recupera y calcula el promedio de
90 mediciones para cada uno de 2 usuariosPantalla: LCDIntervalo de medición: Presión: 0-280 mmHg Pulso: 40-199/minutoExactitud del sensor: Presión: ±3 mmHg Pulso: ±5%Sistema de inflado: Bomba electroneumáticaMárgenes de tamaño del brazo: 17-42 cm (6.7-16.5 pulgadas)Baterías: l.5 V alcalinas (LR6/AA)X4Apagado automático: Aprox. 1 minuto después de la mediciónMétodo de referencia para ensayos clínicos: Medición auscultatoriaPeso: Aproximadamente 420 g (sin baterías)Condiciones de funcionamiento: 41°F ~ 104°F (5°C ~ 40°C) 10~90% HRCondiciones de almacenamiento y transporte: -4°F ~ 149°F (-20°C ~ 65°C) 10~95% HRNorma citada: EN 1060-1 EN 60601-1-2 EN 1060-3 EN 14971 EN 60601-1

54
REGISTRO DE PRESIÓN ARTERIALFechaHora
Pulso
Condición corporal

55
GARANTÍAMedline Industries, Inc. garantiza este tensiómetro digital contra defectos de materiales y mano de obra durante un período de un (1) año tras la fecha de compra. Las piezas asociadas (concretamente, el manguito) están garantizadas durante un período de seis (6) meses tras la fecha de compra o de diez mil (10,000) usos, lo que ocurra primero. Estos usos incluyen, entre otros, el inflado del manguito y la conexión del cierre de velcro del manguito. Al margen de casos por daños de transporte, alteración indebida, señales claras de maltrato, uso erróneo o accidentes, Medline Industries, Inc., actuando a discreción propia, reparará o reemplazará este esfigmomanómetro y/o sus componentes sin costo durante el período de garantía. Ningún representante o persona está autorizado para asumir en nuestro nombre ninguna responsabilidad en relación con la venta de los productos de Medline Industries, Inc. Esta garantía le otorga derechos legales específicos, y también es posible que usted tenga otros derechos que pueden variar de un estado a otro. Antes de enviar ningún producto, sírvase contactar bien con Medline Industries, Inc. al 1-800-MEDLINE o bien con un representante de ventas autorizado de Medline para comunicar sus dudas relacionadas con la garantía.

www.medline.com ©2021 Medline Industries, Inc. Fabricado para: Medline Industries, Inc., Three Lakes Drive, Northfield, IL 60093 EE. UU. Producto de Taiwán, Terminado en China 1-800-MEDLINE V2 RD21DGA