Embed Size (px)
Citation preview
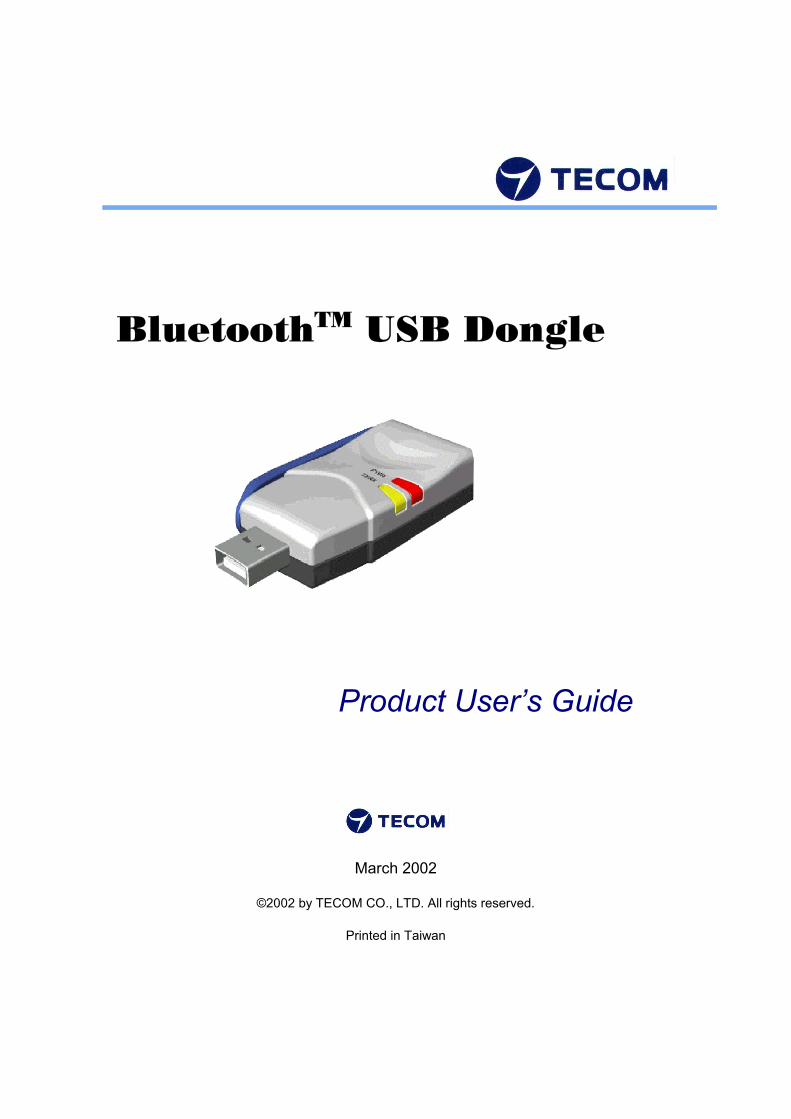
BluetoothTM USB Dongle
Product User’s Guide
March 2002
©2002 by TECOM CO., LTD. All rights reserved.
Printed in Taiwan

©2002 by TECOM CO., LTD. All rights reserved.
2
Application Setup & User’s Guide
Trademark(s) ™ and Registered Trademark(s) ® TECOM and the TECOM logo are trademarks of TECOM CO., LTD. The BLUETOOTH trademarks are owned by Bluetooth SIG, Inc. USA and licensed to TECOM CO., LTD. Microsoft, Windows, Outlook are registered trademarks of Microsoft Corporation. Other brand and product names may be registered trademarks or trademarks of their respective holders. BTW is Copyright Widcomm, Inc. and the BTW software is licensed to TECOM CO., LTD Winroute Lite is Copyright Tiny Software, Inc.

©2002 by TECOM CO., LTD. All rights reserved.
3
TABLE OF CONTENTS
INTRODUCTION............................................................................................................. 5 THE BLUETOOTH TECHNOLOGY.................................................................................................................. 5 WHAT IS BTW ............................................................................................................................................ 5 WHAT’S IN THE BOX.................................................................................................................................... 5 WHAT’S NEW .............................................................................................................................................. 6 ICONS USED FOR BLUETOOTH DEVICES AND SERVICES ................................................................................ 6
Device icons for Windows XP................................................................................................................. 6 Service icons for Windows XP................................................................................................................ 7 Device icons for Windows 98SE / ME / 2000 ......................................................................................... 8
GETTING STARTED...................................................................................................... 9 MY BLUETOOTH PLACES............................................................................................................................. 9 FINDING BLUETOOTH DEVICES.................................................................................................................... 9 FINDING SERVICES..................................................................................................................................... 10 SETTING UP A NEW CONNECTION............................................................................................................... 11
Using the Connection Wizard............................................................................................................... 11 DETERMINING A CONNECTION STATUS ...................................................................................................... 12 BLUETOOTH TRAY .................................................................................................................................... 13
CLIENT APPLICATIONS............................................................................................ 14 ABOUT CLIENT AND SERVER..................................................................................................................... 14 BLUETOOTH SERIAL PORT......................................................................................................................... 14 DIAL-UP NETWORKING ............................................................................................................................. 15 FAX ........................................................................................................................................................... 16 FILE TRANSFER ......................................................................................................................................... 17
Types of File Transfer operations......................................................................................................... 17 INFORMATION EXCHANGE......................................................................................................................... 18 INFORMATION SYNCHRONIZATION............................................................................................................ 19 NETWORK ACCESS .................................................................................................................................... 19
Windows 2000, Server-side Setup......................................................................................................... 20 Windows XP, Server-side Setup............................................................................................................ 20 Windows 98SE & Windows ME, Server-side Setup.............................................................................. 20 Configuring the server.......................................................................................................................... 20 Configuring the routing software ......................................................................................................... 21
CONFIGURATION PANEL ......................................................................................... 21 ACCESSIBILITY TAB .................................................................................................................................. 21
Adding and deleting devices ................................................................................................................. 22 DISCOVERY TAB........................................................................................................................................ 22 GENERAL TAB........................................................................................................................................... 24 HARDWARE TAB ....................................................................................................................................... 25
Hardware Tab – Advanced Settings dialog box ................................................................................... 26 INFORMATION EXCHANGE TAB ................................................................................................................. 26
File Transfer......................................................................................................................................... 27 Send Business Card .............................................................................................................................. 27 Receive Business Card.......................................................................................................................... 27
LOCAL SERVICES TAB............................................................................................................................... 27 Property settings which are common to all of the local services.......................................................... 28 Adding a user-defined Bluetooth Serial Port........................................................................................ 28 Removing a user-defined Bluetooth Serial Port ................................................................................... 29 Changing a local service’s properties .................................................................................................. 29

©2002 by TECOM CO., LTD. All rights reserved.
4
NOTIFICATIONS TAB.................................................................................................................................. 30 VERSION INFO TAB ................................................................................................................................... 31
SECURITY...................................................................................................................... 32 INTRODUCTION.......................................................................................................................................... 32 AUTHENTICATION ..................................................................................................................................... 32 AUTHORIZATION ....................................................................................................................................... 32 ENCRYPTION ............................................................................................................................................. 33 LEVELS OF SECURITY ................................................................................................................................ 33 LINK KEY.................................................................................................................................................. 33 PAIRING DEVICES...................................................................................................................................... 34 PASSKEY ................................................................................................................................................... 35 SECURITY REQUEST DIALOG BOX............................................................................................................. 35
Security Request Dialog Box – Advanced Option................................................................................. 35
TROUBLESHOOTING ................................................................................................. 37
TECHNICAL SUPPORT............................................................................................... 39
DECLARATION OF CONFORMITY......................................................................... 40
LIMITED HARDWARE WARRANTY....................................................................... 41
©2002 by TECOM CO., LTD. All rights reserved.
5
INTRODUCTION
The Bluetooth Technology Bluetooth is a worldwide standard for the wireless exchange of data between two compatible devices. It utilizes short-distance radio link technology and replaces the traditional cable connections to enable wireless connections between desktop and laptop computers, cellular phones, scanners, digital cameras, printers, and other devices. You can now transfer files between two computers, dial up to the Internet using the host computer’s modem or a cell phone, or even share a network connection without literally attaching your cables to a device. To put it simply, Bluetooth unplugs all your cables and lets you forget about cable clutter for a change.
What is BTW BTW is the solution for the seamless integration of Bluetooth technology into personal computers that TECOM has created. It provides you with the means to locate other Bluetooth-enabled devices in the immediate vicinity, allowing you to make use of the services that the remote devices offer. These services, which range from gaining access to the Internet to sending a fax transmission, make mobile computing so much more convenient than ever before. Installation of the Bluetooth USB dongle is easy. This user’s guide will guide you through the process of making wireless connection between your devices. For an overview of the features added in this version, please refer to the section What’s New on page 6. To see an updated version of the Bluetooth software, please check out our Website at www.tecomproduct.com. BTW supports:
Windows 2000 Windows 98SE (Second Edition) Windows Me (Millennium Edition) Windows XP Professional Windows XP Home Edition
What’s in the box Check if the following items are included in the package. If there are any items missing, please contact your dealer.
Quick Installation Guide Bluetooth USB Dongle CD-ROM (includes Quick Installation Guide, Product User’s Guide,
Application Setup Guide, Bluetooth software for Windows, and Acrobat Reader) USB Extension Cable
©2002 by TECOM CO., LTD. All rights reserved.
6
What’s new BTW has an extensive list of features that you will find extremely helpful.
A Connection Wizard that helps you set up new connections and
places a shortcut icon on your desktop. An extensive right-click context sensitive menu support throughout,
including the ability to: − Access the Bluetooth Configuration Panel − Create connection shortcuts − Discover services − Display connection status − Display properties for connections, shortcuts to connections, local
devices and services, remote devices and services − Open and close connections − Pair and unpair devices − Refresh lists of devices, services, and folder contents A content sensitive Help in the Bluetooth Configuration Panel. A Relative Signal Strength Indicator / Properties dialog box has been
added in every connection. (Simply right-click the connection and select Status to open the dialog box.) An enhanced Windows system tray functions that provide quick access
to: − My Bluetooth Places (by double-clicking the Bluetooth icon) − Speedy connection establishment (by right-clicking the Bluetooth
icon, select Services, and then the service that you want.)
Note: BTW displays only the devices that offer the service. − The Connection Wizard.
Icons used for Bluetooth devices and services Before we move on to the next chapter about the various Bluetooth devices and services, it is important to get familiar first with the icons that you will see and know what they mean. Each Bluetooth icon changes its color to provide at-a-glance feedback about the status of a device or service. In the next few tables below, you will find both device and service icons in different colors, depending on which Windows platform you are using. Here, we divide the icon types into two – one for Windows XP, and the other for Windows 98SE / ME / 2000.
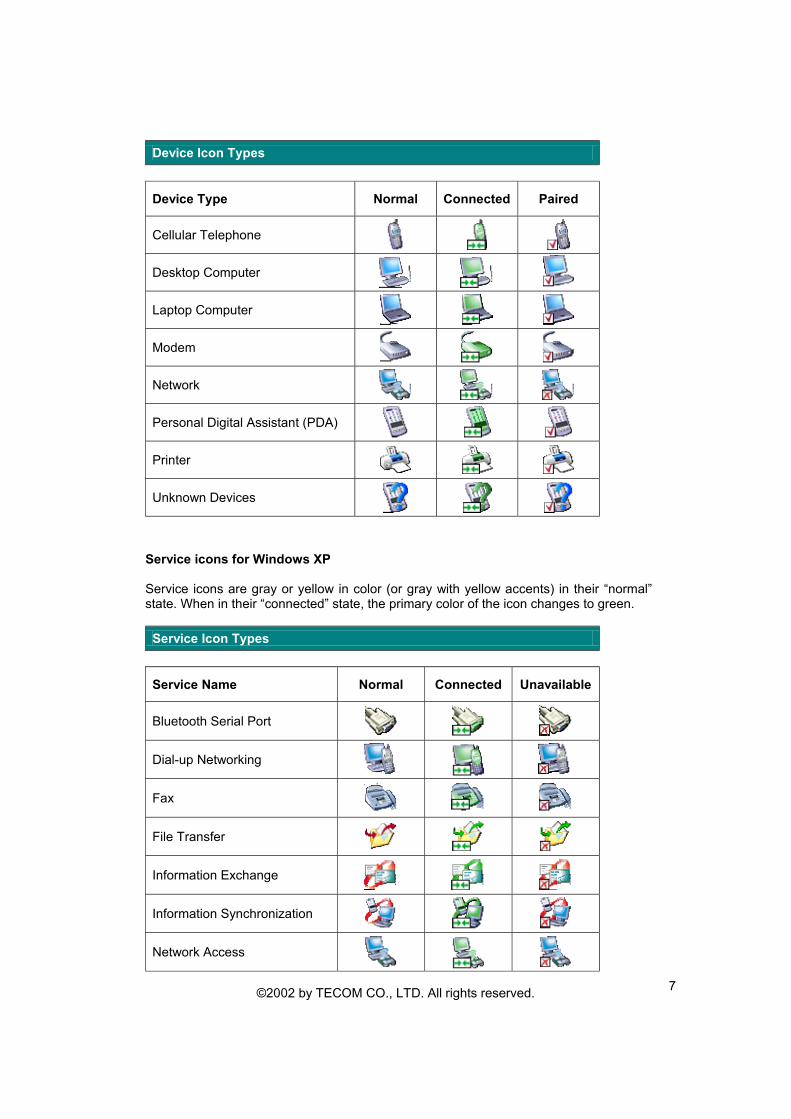
Device icons for Windows XP The device icons are blue in color with yellow accents in their “normal” state. When in their “connected” state, they become green with yellow accents. Devices that are paired with this computer display a “check” mark in the lower-left portion of the icon.
©2002 by TECOM CO., LTD. All rights reserved.
7
Device Icon Types
Device Type Normal Connected Paired
Cellular Telephone
Desktop Computer
Laptop Computer
Modem
Network
Personal Digital Assistant (PDA)
Printer
Unknown Devices
Service icons for Windows XP Service icons are gray or yellow in color (or gray with yellow accents) in their “normal” state. When in their “connected” state, the primary color of the icon changes to green.
Service Icon Types
Service Name Normal Connected Unavailable
Bluetooth Serial Port
Dial-up Networking
Fax
File Transfer
Information Exchange
Information Synchronization
Network Access
©2002 by TECOM CO., LTD. All rights reserved.
8
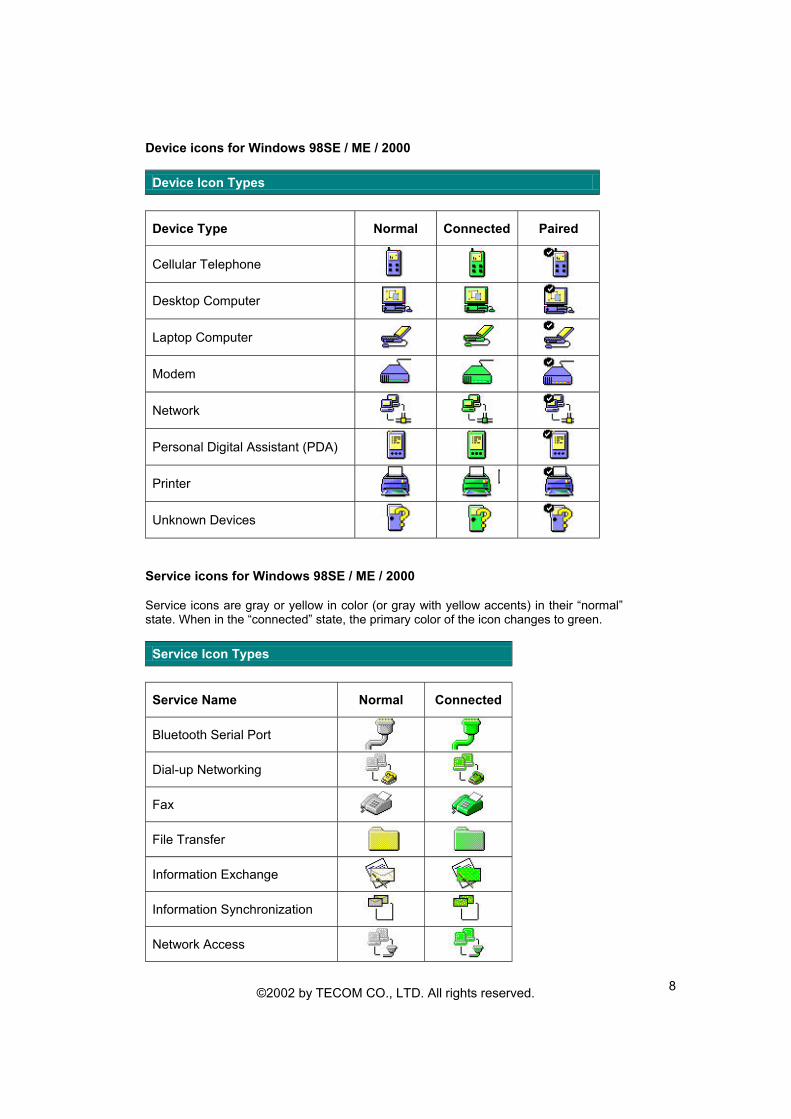
Device icons for Windows 98SE / ME / 2000
Device Icon Types
Device Type Normal Connected Paired
Cellular Telephone
Desktop Computer
Laptop Computer
Modem
Network
Personal Digital Assistant (PDA)
Printer
Unknown Devices
Service icons for Windows 98SE / ME / 2000 Service icons are gray or yellow in color (or gray with yellow accents) in their “normal” state. When in the “connected” state, the primary color of the icon changes to green.
Service Icon Types
Service Name Normal Connected
Bluetooth Serial Port
Dial-up Networking
Fax
File Transfer
Information Exchange
Information Synchronization
Network Access
©2002 by TECOM CO., LTD. All rights reserved.
9
GETTING STARTED
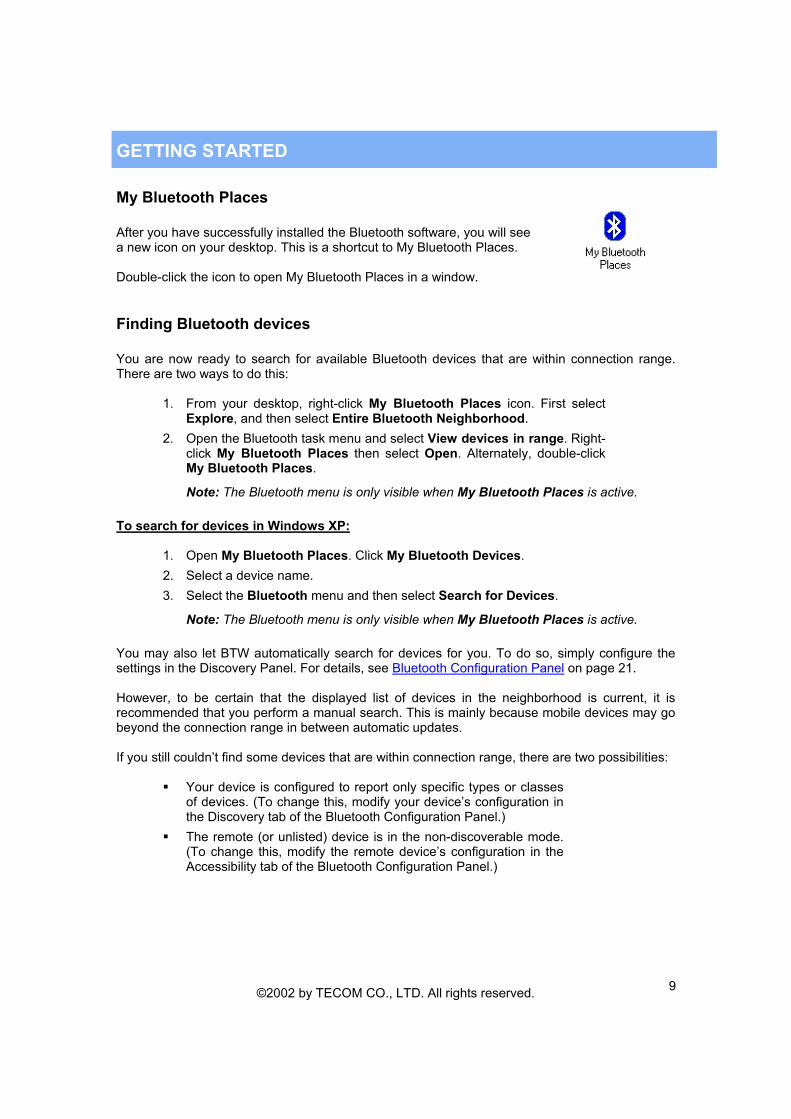
My Bluetooth Places After you have successfully installed the Bluetooth software, you will see a new icon on your desktop. This is a shortcut to My Bluetooth Places. Double-click the icon to open My Bluetooth Places in a window.
Finding Bluetooth devices You are now ready to search for available Bluetooth devices that are within connection range. There are two ways to do this:
1. From your desktop, right-click My Bluetooth Places icon. First select Explore, and then select Entire Bluetooth Neighborhood.
2. Open the Bluetooth task menu and select View devices in range. Right-click My Bluetooth Places then select Open. Alternately, double-click My Bluetooth Places.
Note: The Bluetooth menu is only visible when My Bluetooth Places is active. To search for devices in Windows XP:
1. Open My Bluetooth Places. Click My Bluetooth Devices. 2. Select a device name. 3. Select the Bluetooth menu and then select Search for Devices.
Note: The Bluetooth menu is only visible when My Bluetooth Places is active. You may also let BTW automatically search for devices for you. To do so, simply configure the settings in the Discovery Panel. For details, see Bluetooth Configuration Panel on page 21. However, to be certain that the displayed list of devices in the neighborhood is current, it is recommended that you perform a manual search. This is mainly because mobile devices may go beyond the connection range in between automatic updates. If you still couldn’t find some devices that are within connection range, there are two possibilities:
Your device is configured to report only specific types or classes of devices. (To change this, modify your device’s configuration in the Discovery tab of the Bluetooth Configuration Panel.)
The remote (or unlisted) device is in the non-discoverable mode. (To change this, modify the remote device’s configuration in the Accessibility tab of the Bluetooth Configuration Panel.)
©2002 by TECOM CO., LTD. All rights reserved.
10
Finding services After discovering the devices you can have access to, you may perform Service Discovery. Each available device that you have discovered in the Bluetooth Neighborhood provides you with several services. To find out what these services are, simply do either of the following:
Double-click a device in the Bluetooth Neighborhood, OR Right-click a device and select Discover Available Services.
The services that BTW supports are as follows:
Bluetooth Serial Port establishes a wireless connection between two Bluetooth devices. The serial connection can be used by applications as though there is a serial cable between the devices.
Dial-up Networking allows you to use a modem on another Bluetooth device to connect to the Internet and send/receive e-mail.
Fax allows you to send a fax transmission through another Bluetooth device.
File Transfer (Public Folder) allows you to perform file system operations on another Bluetooth device such as browse, drag-and-drop, open, print, cut/copy, paste, delete, rename, etc.
Information Exchange (Inbox) allows you to exchange Personal Information Manager (PIM) data such as business cards, calendar items, e-mail messages, and notes.
Information Synchronization allows you to synchronize Personal Information Manager (PIM) data between two Bluetooth devices.
Network Access allows you to gain access to the Internet using another Bluetooth device’s Local Area Network (LAN) connection.
Note: Not all Bluetooth devices provide all of these services. For instance, network gateways only displays the Network Access service to let you have access to the Local Area Network (LAN) connection.
©2002 by TECOM CO., LTD. All rights reserved.
11
Setting up a new connection Now that you know how to discover available devices and their services, you are now ready to make a Bluetooth connection with another device. Setting up a new connection is fast and easy, especially if it’s through the Connection Wizard. Using the Connection Wizard The Connection Wizard walks you through the process of setting up a new Bluetooth connection with another device. Although a connection is not established right away, a shortcut is placed in My Bluetooth Places. To use the connection, double-click the shortcut icon. To set up a new connection:
1. Start the Connection Wizard by right-clicking the Bluetooth icon in the Windows system tray.
2. Select Services from the pop-up menu, and then select Connection Wizard from the submenu. The Connection Wizard screen appears.
3. Click the Select a service drop-down menu, and select the type of connection that you want to establish.
Note: The specific service will be selected later, if necessary. 4. Now select the device that will provide the service by clicking the
Select a device that provides the service drop-down menu.
Note: To update the list of devices displayed, click the Search Devices button. 5. [Optional procedure] – Select the Require secure encrypted
connection option to enable Authentication and Encryption for this connection.
6. Click Next. There are two possibilities: If in the previous Select a Service drop-down menu, more
than one service appears on the selected device (for example, “multiple Bluetooth Serial Ports”), then the Select Bluetooth Service dialog box appears. In this case, simply select the specific service to be used, and then click OK to close the dialog box. If in the previous Select a Service drop-down menu, there is
only one service that appears, the next Connection Wizard screen is displayed.
7. If you have previously selected the Require secure encrypted
connection option, a security screen may appear. The security screen WILL NOT appear if the devices have been paired.
Notes:
− Pairing or ‘bonding’ is the process of associating Bluetooth devices with each other. It is recommended that you pair your device with frequently used ones. This helps establish a permanent security link between the devices and enable quick access to the available services without having to enter passwords.
©2002 by TECOM CO., LTD. All rights reserved.
12
− To establish a paired relationship with the remote device while using this Wizard, enter your Personal Identification Number in the PIN Code of the security screen, and then click the Next button.
− To establish a paired relationship with the remote device the first time this connection is used, leave the PIN Code blank in the security screen, and then click the Next button.
8. The last Connection Wizard screen appears. The top of the screen
provides basic information about the new connection, including the device name and the service that it provides.
Note: If this information is NOT correct, click the Back button to return to the previous screen. From that screen, select the correct device and service.
9. In Connection Name, enter a descriptive name for the connection,
for example, “BT Serial Connection to Joe’s Desktop.” This will be visible to other people when they discover your device.
Determining a connection status The Bluetooth Connection Status dialog box displays information about the status of a connection. It is also where you disconnect an active connection. To display the Connection Status dialog box:
1. Open My Bluetooth Places and select My Device. 2. Right-click a service name and then select Status from the pop-up menu.
To display the Connection Status dialog box in Windows XP:
1. Open My Bluetooth Places and select a device. 2. Right-click a service name and then select Status from the pop-up menu.
The Connection Status dialog box opens and provides the following information:
Status: tells you whether you are Connected or Disconnected. Device Name: the name of the device to which your computer is
connected. Duration: the length of time this connection has been established,
displayed in hours, minutes, and seconds. Depending on the service, the connection may time out (automatically disconnect) after a specific period of inactivity.
Activity: the number of bytes sent and received over the connection. Signal Strength: a variable scale that ranges from Too Weak through
Good to Too Strong.
©2002 by TECOM CO., LTD. All rights reserved.
13
Also in the dialog box you will find three ‘control’ buttons:
Properties: click this button to display the Bluetooth Properties dialog box for the connection.
Disconnect: click this button to end your current connection. Close: click this button to close the Bluetooth Connection Status
dialog box. Stop (in Windows XP): click this button to disable the service
wherever applicable. You may change the power transmission level of your computer. To do this:
1. From the Bluetooth Configuration Panel, select the Hardware tab.
Note: To open the Bluetooth Configuration Panel, right-click the Bluetooth Tray icon on the Windows system tray. Select Setup and then Configuration from the submenu. For details, please refer to the section on Bluetooth Configuration Panel on page 21.
2. Click the Advanced button. 3. Specify the settings on the Maximum Power Transmission
drop-down list.
Bluetooth Tray In an earlier section, we mentioned that after installing the software, you would find a shortcut icon to My Bluetooth Places on your desktop. However, there is another icon that you will see after successful installation of the software. But this time, it is displayed on your taskbar. Normally located on the lower right-hand corner of your computer screen, the Windows system tray will now have an additional icon. This is the Bluetooth Tray. The Bluetooth Tray provides quick access to numerous Bluetooth operations. In this section, we will discuss the many uses of this icon. From this tray, you can:
Have access to My Bluetooth Places: double-click the Bluetooth tray icon.
Have access to the Bluetooth Configuration Panel: right-click the Bluetooth tray icon. Select Setup, and then select Configuration from the submenu.
Have access to the Bluetooth Security dialog box: right-click the Bluetooth tray icon. Select Setup, and then select Security from the submenu.
Have access to the Bluetooth Connection Wizard: right-click the Bluetooth tray icon. Select Services, and then select Connection Wizard from the submenu.
Exchange Business Cards with another Bluetooth Computer: right-click the Bluetooth tray icon. Select Services, and then select Business Card Exchange from the submenu.
Search for, and connect to, a specific service: right-click the Bluetooth tray icon. Select Services, and then select the desired
©2002 by TECOM CO., LTD. All rights reserved.
14
service from the submenu. An additional submenu will appear, containing one or more of the following options: − Find Devices, OR − Other Devices (and one or more device names). The
device name(s) will be present if your computer has previously used this service and has connected through this method at least once before. If a device name is present in the submenu, selecting that device will re-initialize the connection.
The Bluetooth Configuration Tray also allows you to search for and connect to the following services: (Details will be discussed in the next chapter)
Bluetooth Serial Port(s) Dial-up Networking Fax File Transfer Information Synchronization Network Access
CLIENT APPLICATIONS
About Client and Server Before we start discussing about what each of the services does, let us briefly tell you a bit about Client and Server since we will be mentioning a lot of these two in this chapter. In order for two Bluetooth devices to exchange data, they must establish a connection. However, before a connection is established, one device must request a connection with the other. This is the Client. The second device that accepts or rejects the connection is then known as the Server. Many Bluetooth devices can act as both client and server.
Bluetooth Serial Port The Bluetooth Serial Port service allows two Bluetooth devices to establish a wireless connection through a virtual communications port and then use that connection as if it were a hardwired serial cable between those devices. Connection is initiated from the client. To establish a Bluetooth serial port connection:
1. On the Client, open My Bluetooth Places by double-clicking the icon on your desktop.
2. Select Entire Bluetooth Neighborhood.
©2002 by TECOM CO., LTD. All rights reserved.
15
3. Right-click anywhere except on a device name and select Refresh from the pop-up menu. This updates your current list of available devices.
4. Right-click the server (the receiver of your request) with which you want to establish a connection. Select Discover Available Services from the pop-up menu to display an updated list of available services.
5. Double-click Bluetooth Serial Port. A dialog box appears, containing the communications port number assigned to this connection by the client. The application that will use this connection must be configured to send data to this port.
Depending on the security configuration, the dialog box that provides communications port information may not appear until after Authentication and Authorization have been accomplished. The application on the server must be configured to use the correct communications port. To determine the communications port that the service will use:
1. On the Server, open My Bluetooth Places by double-clicking the icon on your desktop.
2. Right-click My Device and select Properties from the pop-up menu. 3. In the Bluetooth Configuration Panel, select the Local Services tab. 4. Double-click the Bluetooth Serial Port service to display its Service
Properties dialog box. The Service Properties dialog box displays the communications port that the connection is using.
To close a Bluetooth serial port connection:
1. On the Client, open My Bluetooth Places by double-clicking the icon on your desktop.
2. Select the device that is providing the Bluetooth Serial Port service. 3. Right-click Bluetooth Serial Port and then select Disconnect
Bluetooth Serial Port from the pop-up menu.
Another method to close the connection is from the Server. However, this is not recommended:
1. On the Server, open My Bluetooth Places by double-clicking the icon on your desktop.
2. Select My Device. 3. Right-click Bluetooth Serial Port and then select Stop to close
the service. The service must be re-started before it will be available to remote devices.
Note: To restart connection, right-click Bluetooth Serial Port and select Start from the pop-up menu.
Dial-up Networking The Dial-up Networking service allows a Bluetooth client to use a modem that is physically connected a different Bluetooth device (acting as the server). Once a wireless connection is
©2002 by TECOM CO., LTD. All rights reserved.
16
established between the two devices, the client can use the server’s modem as if it were a local device on the client. Connection is initiated from the Client. To establish a Dial-up Networking session:
1. On the Client, open My Bluetooth Places by double-clicking the icon on your desktop.
2. Select Entire Bluetooth Neighborhood. 3. Right-click anywhere except on a device name and then select
Refresh from the pop-up menu for an updated list. 4. Right-click the server that will provide the Dial-up Networking
Service and select Discover Available Services from the pop-up menu to display an updated list of available services.
5. In My Bluetooth Places, double-click Dial-up Networking. 6. The Connect To dialog box opens, prompting you to fill in your
user name, password, and the phone number to be dialed. 7. Click the Dial button. Selecting the Save password checkbox will
let you connect to the same number in the future without having to type in all the connecting information.
You can now open a Web browser and connect to the Internet as if the modem was attached to your computer. To close a Dial-up Networking connection:
1. On the Client, open My Bluetooth Places by double-clicking the icon on your desktop.
2. Select the device that is providing the Dial-up Networking service. 3. Right-click Dial-up Networking and then select Disconnect Dial-
up Networking from the pop-up menu.
Fax The Fax service allows a Bluetooth client to perform a wireless fax transmission using a device that is physically attached to a Bluetooth server. Connection is initiated from the Client. To send a fax:
1. On the Client, open My Bluetooth Places by double-clicking the icon on your desktop.
2. Select Enter Bluetooth Neighborhood. 3. Right-click anywhere except on a device name and select
Refresh from the pop-up menu to see an updated list. 4. Right-click the server that will provide the Fax service and then
select Discover Available Services to display an updated list of services.
5. Double-click Fax.
©2002 by TECOM CO., LTD. All rights reserved.
17
Once the fax connection is established, you need to open or create the document to be faxed and use the Print or Send to Fax Recipient option available in most applications. The Fax connection automatically closes when the transmission is complete.
File Transfer The File Transfer service allows a Bluetooth device to perform file operations on the default File Transfer directory – and all the forders and files that it contains – of another Bluetooth device. To perform a folder or file operation:
1. On the device from which the File Transfer service will be used, open My Bluetooth Places by double-clicking the icon on your desktop.
2. Select Entire Bluetooth Neighborhood. 3. Right-click anywhere except on a device name and then select
Refresh from the pop-up menu to see an updated list. 4. Right-click the device that you want to transfer files to and then
select Discover Available Services to display an updated list of available services.
5. Click the plus (+) sign right next to Public Folder to expand that folder. If there are subfolders, click all the plus (+) signs until you see all the files under the subfolders.
Types of File Transfer operations There are various types of file operations that you can perform. With My Bluetooth Places opened, right-click a folder and select an option from the pop-up menu. A dialog box appears, its title varies depending on the operation being carried out. In the dialog box that is displayed, you will see the current operation indicated at the bottom of the box. The types of operations that can be accomplished are:
Open: there are two items you may open: − Files: are opened in the application associated with them. − Folders: are expanded to show their file contents.
Print: sends the selected Server file to the Client’s default printer. Send to:
− 3.5” Floppy Drive: copies the selected item(s) from the server to the client’s 3.5” floppy drive.
− My Shared Folder: copies the selected item(s) from the server to the default File Transfer folder on the client.
Cut: copies a folder and its contents, or individually selected files
in a folder, to the Windows clipboard. When the clipboard contents are pasted to a new location, the originally selected file(s) on the server are deleted.

©2002 by TECOM CO., LTD. All rights reserved.
18
Copy: copies a folder and its contents, or individually selected files in a folder, to the Windows clipboard.
Delete: removes selected file(s) and/or folder(s) on the server. Rename: allows you to change an empty folder’s name. Properties: displays the file or folder’s properties in a dialog box.
Other options may appear, depending on the content in which the menu appears:
Update: refreshes the contents of a folder. New Folder: creates a new folder on the server. Abort FTP Operation: cancels an ongoing File Transfer operation.
Information Exchange The Information Exchange service provides a way to send and receive Microsoft Outlook items to and from another Bluetooth device, such as a Personal Digital Assistant (PDA) or notebook computer. The supported Outlook items are:
Business cards (*.vcf and *.vcd) Calendar entries (*.vcs) Notes (*.vnt) Messages (*.vmg)
There are three types of operations:
Send – sends an object to another device. Receive – requests an object from another device. Exchange – sends a client object and receives a server object.
You can set the default location of your business card and the location where you received items from the Bluetooth Configuration Panel. To send, receive, or exchange an object:
1. On the Client, open My Bluetooth Places by double-clicking the icon on your desktop.
2. Right-click the Inbox icon of the remote device and then select an option from the pop-up menu.
Notes: Business cards are sent, received, or exchanged without further intervention.
To send calendar items, notes, and messages, go to the folder that contains the item you want to send out. Then select the item and click Open.
©2002 by TECOM CO., LTD. All rights reserved.
19
Information Synchronization The Information Synchronization service is used to match information between a Bluetooth client and a Bluetooth server. A perfect example would be a Personal Information Manager (PIM) database. BTW supports synchronization with devices that support IrMC v1.1 and exchange the v2.1 vCard format. If Information Synchronization is used for the first time with a new application, it may take a few minutes to synchronize the database. This is how it works – it merges data from both devices, deletes duplicate entries, and then copies the updated database to both devices. Following the first attempt, subsequent uses of Information Synchronization for the same application will be much faster – only the changes that have been made since the devices were last synchronized will be exchanged. Microsoft Outlook is the only Personal Information Manager that this release of BTW supports. Outlook permits duplicate entries, so all duplicates may not be exchanged in the synchronization process. The only thing synchronized would be Outlook’s default contacts folder. Items in the subfolders will not be synchronized. This means that if you have moved items from the default folder to a subfolder, they will seem to be deleted after the next synchronization. To apply Information Synchronization:
1. On the client, open My Bluetooth Places by double-clicking the icon on your computer.
2. Select Entire Bluetooth Neighborhood. 3. Right-click anywhere except on a device name and then select
Refresh from the pop-up menu to see an updated list. 4. Right-click the server that you want to synchronize with and then
select Discover Available Services to display an updated list of available services.
5. Double-click Information Synchronization. A dialog box appears, displaying the synchronization progress. Once the process is complete, the connection automatically closes.
Network Access The Network Access service allows a Bluetooth client to use a Local Area Network (LAN) connection that is physically attached to a Bluetooth server. Possible network access servers include:
Bluetooth-enabled computers that have a hardwired Ethernet connection Stand-alone Bluetooth Network Access Points
The Bluetooth server must be specifically configured to provide Network Access service. However, after a Bluetooth device is configured as a Network Access server, it cannot act as a Network Access client without being re-configured.
©2002 by TECOM CO., LTD. All rights reserved.
20
In the next sections to follow, we will discuss about how to set up Network Access in different Windows platforms. Windows 2000, Server-side Setup
1. From the Windows Control Panel, select Network and Dial-up Connections.
2. Right-click the Local Area Connection icon and select Properties. The Local Area Connection Properties dialog box opens.
3. Click the Sharing tab. Select Enable Internet Connection Sharing.
4. Click OK. 5. Click Yes to enable Internet connection sharing.
Windows XP, Server-side Setup
1. Have your Windows XP compact disc handy. You may need it during the setup process.
2. From the Windows Control Panel, select Network Connections. 3. Right-click the Local Area Connection icon and then select Properties.
The Local Area Connection Properties dialog box opens. 4. Click the Advanced tab. Select Enable Internet Connection
Sharing to allow network users to connect, control, or disable this Internet connection.
5. Select Allow other network users to connect through this computer’s Internet connection.
6. Click OK. Windows 98SE & Windows ME, Server-side Setup Internet Protocol routing software is required on Windows 98SE and Windows ME servers. A downloadable trial version of WinRoute Lite is available on the Tiny Software, Inc. Website – http://www.tinysoftware.com/ To configure the server:
1. From the Windows Control Panel, double-click the Network icon. 2. Click the Configuration tab. Select TCP/IP -> Bluetooth LAN
Access Server Driver (scroll down if necessary). 3. Click Properties and select the IP Address tab. 4. Select Specify an IP address. 5. Enter an IP address (suggested value – 192.168.1.1) and a
Subnet Mask (suggested value – 255.255.255.0). 6. Click OK in both dialog boxes. 7. Click Yes to restart the computer.
©2002 by TECOM CO., LTD. All rights reserved.
21
To configure the routing software:
1. In the Windows system tray, right-click the WinRoute icon and select Administration.
2. Click the Settings tab. Select 2nd network adapter. 3. From the Network adapter drop-down list, select any adapter
other than the TECOM USB Dongle. 4. Click the Settings button. 5. Click the DHCP tab. From the Adapter drop-down list, select the
TECOM Bluetooth Windows 9x Adapter. 6. Select Enable DHCP Server. 7. Type in the client IP address range fields:
− From: 210 − To: 240
8. Click OK and then minimize (do not close) the WinRoute Administration configuration panel.
CONFIGURATION PANEL The Bluetooth Configuration Panel provides access to various settings including Bluetooth services, hardware, security, and events notification. In this chapter, we will thoroughly discuss each of the tabs in the Configuration Panel. There are two ways to open the Bluetooth Configuration Panel. Use either one of the following:
Click the Start menu, go to Settings and select Control Panel. From the Windows Control Panel, select Bluetooth Configuration.
Right-click the Bluetooth Tray icon on the Windows system tray. Select Setup and then select Configuration from the submenu.
Accessibility Tab The Accessibility tab in the Bluetooth Configuration Panel lets you specify which remote devices can have access to your computer. However, please note that the security settings that you have configured in the General, Local Services, and Client Applications tab may affect which devices can have access to your computer. To allow your computer to be discovered by other devices, simply select Let other Bluetooth devices discover this computer. This will allow remote Bluetooth devices to find and report your computer. However, this option will not be available if you have selected Allow no devices to connect. You can also control the types of devices that are allowed to connect to your computer. The Allow drop-down menu gives you the following options:
©2002 by TECOM CO., LTD. All rights reserved.
22
All devices to connect: All remote devices are permitted to connect to your computer.
No devices to connect: No remote devices will be permitted to initiate a connection with your computer. However, your computer can still initiate a connection with other remote Bluetooth devices.
Only paired devices to connect: Only devices that have been paired with your computer are allowed to connect to it.
Only devices listed below to connect: Only the listed devices are allowed to connect to your computer (see the next section, Adding and deleting devices for details).
Adding and deleting devices At times you want to limit the number of devices that can have access to your computer. This section tells you how to add or delete the number of allowed devices, giving you the option to specify just how many devices are permitted to connect to your computer at a given time. Before you begin, select the Only devices listed below to connect option from the Accessibility tab in the Bluetooth Configuration Panel. To add a device to the list of devices allowed to connect to your computer:
1. Open the Bluetooth Configuration Panel by right-clicking the Bluetooth Tray icon on the Windows system tray. Select Setup and then select Configuration from the submenu. The Bluetooth Configuration Panel is displayed.
2. Click the Accessibility tab. 3. Click the Add Device button. The Devices with access dialog
box opens. 4. Select the device(s) you want to add and click OK.
Note: Multiple devices can be selected at the same time by holding the SHIFT or CTRL key down as you select the devices.
To delete a device from the list of devices allowed to connect to your computer:
1. Open the Bluetooth Configuration Panel by right-clicking the Bluetooth Tray icon on the Windows system tray. Select Setup and then select Configuration from the submenu. The Bluetooth Configuration Panel is displayed.
2. Click the Accessibility tab. 3. In the list of devices allowed to connect, click the name of the
device you want to remove. 4. Click the Delete button.
Discovery Tab The Discovery tab lets you specify whether your computer will do an automatic search for other Bluetooth devices or not, how often it searches for them, and what type of devices it discovers.
©2002 by TECOM CO., LTD. All rights reserved.
23
If you prefer to have your computer perform a periodic search for other Bluetooth devices, simply select the Look for other Bluetooth devices option. Make sure you enter the number of minutes (choose between 1 and 60) as this represents how often you want BTW to search for devices. Also in this tab, you can specify the devices that you want your computer to report. BTW can screen out devices that you do not find necessary to access. You can choose between the following by selecting one from the drop-down list:
Report all Bluetooth devices, OR Report only selected Bluetooth devices (see the next sections,
Adding specific devices and Deleting specific devices for details.) You can specify BTW to report only specific devices, specific class(es) of device(s), or specific type(s) of device(s) within a class. The discovered devices can be mixed-and-matched – you can discover one or more specific devices, classes of devices, and types of devices within a class at the same time. To have BTW report only specific devices:
1. Open the Bluetooth Configuration Panel by right-clicking the Bluetooth Tray icon on the Windows system tray. Select Setup and then select Configuration from the submenu. The Bluetooth Configuration Panel is displayed.
2. Click the Discovery tab. 3. Select Report only selected Bluetooth devices from the drop-
down list. 4. Click the Add Device button. The Discoverable devices dialog
box opens. 5. Select the device you want discovered and click OK.
Notes: Multiple devices can be selected at the same time by holding the SHIFT or CTRL key down as you select the devices.
The device(s) that you want to add to the list must be within radio range. Devices that are not within radio range will NOT appear in the list of devices.
To report only a specific class of device:
1. Open the Bluetooth Configuration Panel by right-clicking the Bluetooth Tray icon on the Windows system tray. Select Setup and then select Configuration from the submenu. The Bluetooth Configuration Panel is displayed.
2. Click the Discovery tab. 3. Select Report only selected Bluetooth devices from the drop-
down list. 4. Click the Add Device button. The Discoverable devices dialog
box opens. 5. Select Allow this computer to discover specific devices or
types of devices within a class. 6. From the Class drop-down list, select a class of devices to be
discovered.
©2002 by TECOM CO., LTD. All rights reserved.
24
7. Click OK. To report only a specific type of device within a class:
1. Follow steps 1 to 6 in the previous procedure (To report only a specific class of device).
2. From the Type drop-down list, select the specific type of device to be reported.
3. Click OK. To remove a device from the list of devices to be discovered:
1. Open the Bluetooth Configuration Panel by right-clicking the Bluetooth Tray icon on the Windows system tray. Select Setup and then select Configuration from the submenu. The Bluetooth Configuration Panel is displayed.
2. Click the Discovery tab. 3. Select the device you want to remove. 4. Click the Delete button.
Note: If you have not selected the Report only selected Bluetooth devices option, the Delete button will not be available.
To temporarily override the discovery of specific devices:
1. Open the Bluetooth Configuration Panel by right-clicking the Bluetooth Tray icon on the Windows system tray. Select Setup and then select Configuration from the submenu. The Bluetooth Configuration Panel is displayed.
2. Click the Discovery tab. 3. Select Report all Bluetooth devices. The specifically (and
previously) selected devices will be discovered along with all other devices.
Notes: To re-enable specific device discovery, re-select Report only selected Bluetooth devices.
When all devices are deleted, an error message will appear if Report all Bluetooth devices is not selected.
General Tab The General tab in the Bluetooth Configuration Panel lets you change the settings of your device properties and system security. In this tab, you will see two sections – Identity and Security.
©2002 by TECOM CO., LTD. All rights reserved.
25
Identity section:
Computer name: enter a unique name to identify your computer to other Bluetooth devices in the vicinity; this field cannot be left blank.
Computer type: select either Desktop or Laptop from the drop-down menu to help identify your device type when other Bluetooth devices search for your computer.
Security section:
High: requires other Bluetooth devices to enter a Personal Identification Number (PIN) before they are allowed to connect to your computer. Your computer and the connected device will then exchange data using encrypted links.
Medium: this is selected by default. Anyone can connect to you without having to type in a password. Security is configured at the service level, which means that each individual service must have its security settings (Authentication, Authorization, and Encryption) set independently.
Hardware Tab
The Hardware tab provides basic information about the Bluetooth hardware installed in this computer. In some cases, it allows you to have access to the Advanced Settings dialog box. In this tab, you will see the following sections: Devices:
Name: the name of the device, e.g., TECOM Bluetooth Device. Type: the type of device you have, e.g., USB.
Device Properties:
Manufacturer: the name of the company that made the device you selected in the Devices section of this dialog box.
Firmware Revision: the manufacturer’s firmware version number. Device Status: indicates if the device is operating properly or if
there is a problem or conflict. Device Address: displays the Bluetooth Device Address (BDA or
BD_Addr) programmed into this device when it was manufactured. HCI Version: the version number of the Bluetooth Specification
that the Host Controller Interface (HCI) complies with. HCI Revision: the revision number of the Bluetooth Specification
that the Host Controller Interface (HCI) complies with. LMP Version: the version number of the Bluetooth Specification
that the Link Manager Protocol (LMP) complies with. LMP Revision: the revision number of the Bluetooth Specification
that the Link Manager Protocol (LMP) complies with.
©2002 by TECOM CO., LTD. All rights reserved.
26
LMP Sub Version: the sub-version number of the Bluetooth Specification that the Link Manager Protocol (LMP) complies with.
Advanced:
Advanced: this button displays the Advanced Settings dialog box, allowing you to select the country code and transmission power settings.
Note: This option is not available on all systems.
Hardware Tab – Advanced Settings dialog box As mentioned in the previous section, the Advanced Settings dialog box is not always available. Depending on the country where the hardware is sold and/or where it will be used, you may or may not have the Advanced button in the Hardware tab of your Configuration Panel. However, if you do have the Advanced button in the Hardware tab, click the button to open the Advanced Settings dialog box. From this dialog box, you can set the following properties:
Country Code − North America, Europe (except France), and Japan − France and China
Maximum Transmission Power − High − Medium − Low
Once you’re done, click the Apply button to implement the changes. A dialog box appears with a notification, prompting you to reset the Bluetooth device attached to this computer before any changes will take effect. Click Cancel to save the changes – the changes will be applied the next time you restart your Bluetooth device. Additional option for Windows XP users: Click the Yes button to reset the Bluetooth device now—all open Bluetooth connections will be closed.
Information Exchange Tab The Information Exchange tab allows you to change the settings of the following:
My Shared Directory: the highest-level directory on this computer that a remote device has permission to access.
©2002 by TECOM CO., LTD. All rights reserved.
27
My Business Card: the path to your electronic business card. My Inbox Directory: the path to the directory that will be used to
save incoming business cards, notes, e-mail messages, and calendar items.
Now let’s look at each section and see how you could specify their settings. File Transfer My Shared Directory displays the highest-level directory to which a remote Bluetooth computer has access. This directory and its sub-directories are visible in the remote device’s My Bluetooth Places. Click the Browse button and look for the directory that you want to share with other people. Send Business Card My Business Card displays the specified path to the directory on your computer that contains your electronic business card. Select the Send Business Card on Request option to allow remote devices to retrieve your business card. Click the Browse button and look for the directory that contains your business card. Receive Business Card My Inbox Directory displays the specified path to the directory on your computer where inbound Personal Information Manager (PIM) items such as Business Cards, Notes, Calendar entries, and Messages with be saved. Select the types of items you want to retrieve by clicking the appropriate boxes. Then click the Browse button to look for the directory where you want them saved. Select the Save Object in Personal Information Manager option to save incoming objects directly into the PIM. Please note that when this option is selected, the path specified in My Inbox Directory will not be used.
Local Services Tab The Local Services tab allows you to change the settings of all the services that your computer has made available to other remote devices. Each service can be configured individually to change its security, name, and other settings. The Local Services tab also provides you with the option of adding and deleting user-defined serial services. We will discuss the details on how to do that later in this section. The following are the names of the local services that BTW provides: (Please note that names of all the services will be displayed even though the server may not be able to support all of them.)
Bluetooth Serial Port Dial-up Networking Fax File Transfer Information Exchange
©2002 by TECOM CO., LTD. All rights reserved.
28
Information Synchronization Network Access
Property settings which are common to all of the local services We mentioned earlier that you could change the settings of each service individually. However, all of the local services will have common settings for all of the following:
Authentication Authorization Encryption Startup Service name
While each of the local service includes all of the above common settings, some services have an additional setting that is only available to it and will not be found elsewhere:
Network Access: has an additional setting for the maximum number of connections allowed at any time.
Dial-up Networking: has an additional setting for selecting the modem that the service will be using.
Fax: has an additional setting for selecting the modem that the service will be using.
Bluetooth Serial Port: has an additional setting for selecting the communications port that the service will be using.
Adding a user-defined Bluetooth Serial Port Most applications that use a serial connection may also use wireless Bluetooth Serial port service to transfer data. The Bluetooth Serial Port replaces all physical cables, thus reducing clutter. When using BTW, you will have one pre-configured Bluetooth Serial Port. However, you can always add another when needed. Similarly, you may remove it any time. To add a Bluetooth Serial Port:
1. Open the Bluetooth Configuration Panel by right-clicking the Bluetooth Tray icon on the Windows system tray. Select Setup and then select Configuration from the submenu. The Bluetooth Configuration Panel is displayed.
2. Click the Local Services tab. 3. Click the Add Serial Service button. 4. In the Service Properties dialog box that appears, modify these:
Enter a unique name (less than 99 alphanumeric characters). Select the appropriate security settings. Select Startup if you want the service to start automatically
when BTW initializes. From the COM Port drop-down list, select a communications
port that is not assigned to any other service.
©2002 by TECOM CO., LTD. All rights reserved.
29
5. Click OK. Removing a user-defined Bluetooth Serial Port
1. Open the Bluetooth Configuration Panel by right-clicking the Bluetooth Tray icon on the Windows system tray. Select Setup and then select Configuration from the submenu. The Bluetooth Configuration Panel is displayed.
2. Click the Local Services tab. 3. Select the port you want to remove. 4. Click Delete.
Note: The Delete button is only available when the Bluetooth Serial Port service or a user-defined serial port service is selected.
Changing a local service’s properties Earlier, we discussed about the five property settings that each of the local services would have. Here, we’ll show you how to change a local service’s properties and what the options are. To change a local service’s properties:
1. Open the Bluetooth Configuration Panel by right-clicking the Bluetooth Tray icon on the Windows system tray. Select Setup and then select Configuration from the submenu. The Bluetooth Configuration Panel is displayed.
2. Click the Local Services tab. 3. Double-click the service name. 4. Select the appropriate boxes or leave them cleared, depending
on what you want BTW to do. Startup: enabled by default. When enabled, it starts the
service when BTW initializes. If Startup is disabled, you can still start the service manually.
Note: To start the service manually at a later time, simply right-click the service and select Start from the pop-up menu.
Authorization: disabled by default. When enabled, it requires
confirmation by the server operator before a remote device is allowed to connect to this service. Authentication is automatically enabled when Authorization is selected.
Encryption: disabled by default. When enabled, it encrypts data exchanged by the Bluetooth server and the Bluetooth client. Encryption applies ONLY to the Bluetooth connection. Data transmitted to/from a modem, Local Area Network, etc, is NOT affected by this setting. Authentication is automatically enabled when Encryption is enabled.
Authentication: disabled by default. When enabled, it requires that the client and server exchange a passkey or Link Key before a connection is established. Devices are paired automatically when authentication is complete.
©2002 by TECOM CO., LTD. All rights reserved.
30
Service Name: enter a service name (no more than 99 alphanumeric characters) in this field. In most cases, a service name is supplied by default. However, in environments where there is more than one device of the same type or one device provides more than one service of the same type (this is only possible with the Bluetooth Serial Port service), the service name can be customized.
5. Click OK. To stop a local service, simply right-click the service and select Stop from the pop-up menu. Stopped services are no longer available for use by clients. You may also see a summary of information about each local service from Windows Explorer. To do this, open your Windows Explorer. With Local Device selected, click the View menu, then select Details. You will find the following basic information:
Service: the name of the service Startup: tells you whether it’s automatic or manual. Status:
− Started (COM#) – the service is running and ready to use COM# − Not Started – the service is not running (not available to clients) − Connected (COM#) – the service is in use, the local port is COM# − Connected – the service is in use.
Device name if connected: − Empty field – the service is not connected. − A device name and Bluetooth Device Address – identifies the
device that is using the service. At times you need to interrupt a connection from the server side. To do this, simply right-click the local service and then select Stop from the pop-up menu. To restart the service later, right-click the local service and then select Start.
Notifications Tab The Notifications tab in the Bluetooth Configuration Panel lets you associate sound (in the form of Windows *.wav file) with specific Bluetooth events. Sounds can be associated with several events on an individual basis, depending on security settings, including such cases:
When a PIN code is required When a remote device attempts to access:
− files on this computer (in Windows XP only) − a Bluetooth port − the Dial-up network service − the LAN Access service − the Fax service
When a remote device attempts to send:
©2002 by TECOM CO., LTD. All rights reserved.
31
− information items − synchronization information
To associate a sound with a Bluetooth event:
1. Open the Bluetooth Configuration Panel by right-clicking the Bluetooth Tray icon on the Windows system tray. Select Setup and then select Configuration from the submenu. The Bluetooth Configuration Panel is displayed.
2. Click the Notifications tab. 3. In the Notify column of the Events list, select the checkbox
associated with the event. 4. In the Sound section, click the Browse button and look for the
sound file (*.wav) that you want to use for notification. 5. To hear a preview of the sound, click Play.
Note: To hear the sound, the Notify checkbox must be selected. Otherwise, the sound file will not play even if it has been assigned.
6. Click OK.
Version Info Tab The Version Info tab displays the name and version number of the software components of BTW. There are no options to configure on this tab.
©2002 by TECOM CO., LTD. All rights reserved.
32
SECURITY
Introduction Each service that the server provides can be configured to require the following:
Authorization: the server operator must acknowledge all connection attempts before a connection is established.
Authentication: the server requires a Personal Identification Number code (PIN, also referred to as a “passkey”) or a Link Key before a connection is established.
Encryption: all data sent between the Bluetooth client and Bluetooth server is encrypted. The encryption key is based on the Authentication Link Key. Encryption requires that Authentication be enabled.
All three – Authorization, Authentication, and Encryption – are disabled by default. Devices can also be paired, a process that eliminates the need to enter a PIN code each time access is attempted.
Authentication Authentication is used to verify identity. It requires a passkey or Link Key from the remote device. When a remote device attempts access to a unit, a visual and/or audio warning notifies the local operator of the invitation. The local operator can open a dialog box that provides:
1. The user-friendly name of the device attempting access. 2. A place for the local operator to enter a Bluetooth passkey.
The operator of the remote system must then enter the identical passkey. If no passkey is supplied or if the notification is ignored after a preset timeout, access will be denied. In cases wherein devices are paired, those devices automatically exchange a Link Key and authentication is carried out without operator intervention.
Authorization Authorization is yes-or-no security. When a remote device attempts to connect, a visual and/or audio warning alerts the server operator. The server operator then responds by clicking the Bluetooth Tray icon in the Windows system tray to open a dialog box that displays:
1. The user-friendly name of the device attempting to connect. 2. The local service to which the remote device is attempting to
connect.
©2002 by TECOM CO., LTD. All rights reserved.
33
The server operator may grant or deny access to the service by clicking an on-screen button. If the server operator ignores the Authorization notification after a preset timeout, access will be denied.
Encryption Encrypting translates data into an unreadable format using a secret key or password. Decrypting the data requires the same key or password that was used to encrypt it. Encryption in BTW is based on the same passkey or Link Key that is used for Authentication. If Authentication is not enabled, the key will not be available and encryption will not take place. To be able to use Encryption, Authentication must first be enabled. To enable Encryption for a service:
1. Right-click a service name and select Properties from the pop-up menu. This displays the Bluetooth Properties dialog box.
2. Select the Encryption option. If Authentication is disabled, it will automatically be enabled when you select Encryption.
3. Click OK.
Levels of Security Security for local services may be configured on an individual basis. The configuration options that are available are:
Startup: Automatic or Manual Authorization Authentication Encryption
To gain access to the security settings for a local service:
1. Open the Bluetooth Configuration Panel by right-clicking the Bluetooth Tray icon on the Windows system tray. Select Setup and then select Configuration from the submenu. The Bluetooth Configuration Panel is displayed.
2. Click the Local Services tab. 3. Double-click the service name.
Note: Bluetooth-enabled devices from different vendors may handle security in a slightly different manner. Please refer to the user’s guide that came with your Bluetooth device for additional information.
Link Key A Link Key is a unique, internally generated access code. Link Keys are generated automatically when devices are paired or when authentication is enabled.
©2002 by TECOM CO., LTD. All rights reserved.
34
Link Keys are created by combining the following three items:
The Passkey The Bluetooth Device Address An internally generated random number
Pairing Devices Pairing devices establishes a rather permanent relationship between two devices. It creates a permanent security link between the two and enables easy access to all the available services without having to enter access information every time a connection is attempted. Paired devices share a unique Link Key that they exchange when they are establishing the connection. Moreover, the mate of a pair will always appear in My Bluetooth Places even if the mate is disconnected or is beyond connection range. Paired devices remain paired even in the following scenario:
One of the devices is not powered up. A service connection is interrupted or the service stopped. One or both devices have been rebooted.
When Authentication is enable, devices are paired the very first time they attempt to connect, but only after a successful passkey exchange. To pair devices before attempting a connection:
1. In the Windows system tray, right-click the Bluetooth Tray icon. Select Setup and then select Security from the submenu.
2. The Bluetooth Security dialog box appears, prompting BTW to perform a device inquiry to update its list of devices in the area.
3. Once the inquiry is complete, you will see a Found Devices pane in the dialog box. Click the name of the device to be paired.
4. Click the Execute Pairing button. 5. The Bluetooth Passkey Request dialog box opens, prompting
you to enter a Bluetooth passkey. 6. Click OK.
If you select the checkbox on the main screen, you will be permitted to connect to all services without Authorization. When devices are paired, the configuration information is saved on both devices. These paired devices will then remain “paired” until the relationship is broken on both devices. To break a paired device relationship:
1. In the Windows system tray, right-click the Bluetooth Tray icon. Select Setup and then select Security from the submenu.
2. The Bluetooth Security dialog box appears, displaying a Paired Devices list.
3. Select a device from the list and click the Delete button.
©2002 by TECOM CO., LTD. All rights reserved.
35
4. Click Done to confirm the change.
Note: Pairing must be broken on both devices.
Passkey A Passkey is a password that is made up of 16 or less characters. Passkeys are also referred to as PIN codes, or Personal Identification Numbers. In BTW, passkeys are used in the Authentication and Encryption process.
Security Request Dialog Box Depending on your security settings, you may see a Bluetooth Authorization or Bluetooth Passkey Request dialog box when a connection is attempted. But this is only if you have either Authorization or Authentication enabled. The method of notification depends on the version of your Windows:
Windows 2000, Windows ME, and Windows XP – a bubble message is displayed over the Bluetooth Tray icon in the Windows system tray.
Windows 98SE – the BTW icon in the Windows system tray blinks.
Regardless of the version of your Windows, click the Bluetooth Tray icon in the Windows system tray and then follow the on-screen instructions. The instructions vary, depending on the security configuration of the system. If the security notification is ignored after a preset timeout, the connection request will fail. In the Security Request dialog box, you will see the following:
Device Name: displays the user-friendly name of the device that is attempting to connect.
Request to access: displays the service that the remote device is trying to access.
OK: grants permission to establish connection. Cancel: connection is denied. Advanced: please see next section for details. A checkbox that, when enabled, grants or authorizes the connecting
device access to all of the available services. Security Request Dialog Box – Advanced Option This section includes a brief introduction to the Advanced option that you will see in the Security Request dialog box. On the main page of the Bluetooth Authorization and Bluetooth Passkey Request dialog boxes, there is a checkbox that says, check this box to ALWAYS allow this device to access
©2002 by TECOM CO., LTD. All rights reserved.
36
ALL the services of your computer. Once you select this checkbox, you are authorizing the connecting device to gain access to all the services available on your computer at all times. Therefore, if you want to limit the services that this connecting device may use, here’s what you can do:
Click the Advanced button. A dialog box appears, prompting you to select the services that
the connecting device is authorized to use. When a service is selected, that service will NOT require authorization in the future.
Note: Regardless of whether the main dialog box is for Authorization or Authentication, these options pertain to Authorization options. They do not affect Authentication.
Click Authorize or Authenticate.
©2002 by TECOM CO., LTD. All rights reserved.
37
TROUBLESHOOTING Below you will find the most frequently asked questions that we get from our customers. Q: What is a valid Bluetooth Device Address (BDA) and where can I find it? Can I change the BDA? A: Every Bluetooth device has a unique 48-bit binary Bluetooth Device Address, or BDA, burned into its Read-Only Memory (ROM). This address cannot be changed by the end-user. A device’s BDA is usually displayed in hexadecimal format. Therefore, if you see a BDA with 00:D0:B7:03:2E:9F, that is a valid BDA. You may find your device’s BDA in the Hardware tab of your Configuration Panel. Q: I get an “X” mark on my Service icon. What does that mean? A: Icons for Services that are not available will have a red “X” mark in their lower left-hand corner. Services may be unavailable because the necessary hardware (such as the modem for Dial-up Networking) is not installed. Q: Windows can’t seem to detect my USB dongle device. What do I do? A: First, go to your Control Panel and select System. Then select Device Manager to see if the USB dongle is enabled. If it’s not, simply unplug the USB dongle off its port and then plug it back in. If after doing this, Windows still cannot detect your device, unplug the USB dongle and re-install its software. Q: How do I use my USB dongle in such applications as wireless printing, active synchronization with PDA, dial-up networking, network access, and file transfer? A: Details to these can be found in the Application Setup Guide, which is included in the USB dongle installation CD. Q: Why can’t I connect to a paired device? A: Paired devices are always displayed in My Bluetooth Places even if the remote device is out of connection range or is turned off. If you can’t connect to a paired device, verify that the remote member of the pair is within radio range and powered up before you attempt to connect again. Q: I can’t discover services on an unpaired remote device. What is the problem? A: The remote device may not be powered up or may be out of range. To correct this problem, first verify that the remote device is turned on. If it is, make sure that the remote device is in ‘Connectable’ mode. To do this, open the Bluetooth Configuration Panel and select Accessibility tab. Also perform a Search for Devices to determine if the device is within range. Q: The Dial-up Networking service does not start. Is this a problem? A: The Dial-up Networking service will never start unless a properly configured modem is attached to the server. (Please refer to the Application Setup Guide for details). What you can do:
Verify that the modem is usable as a local device from the server. In the Bluetooth Configuration Panel, click the Local Services tab,
and then double-click the Dial-up Networking service. Click the down arrow in the Modem field. Select the Startup
checkbox and then select the modem that will be used to dial up. Click OK. Click OK to close the Bluetooth Configuration Panel.
©2002 by TECOM CO., LTD. All rights reserved.
38
Q: How do I determine the Bluetooth Device Address (BDA) of my hardware device and the version number of both the Bluetooth Specification and the Link Manager Protocol (LMP)? A: Open the Bluetooth Configuration Panel and click the Hardware tab. Select Device Properties and then select Device Address. There you will see the BDA of the selected Bluetooth device and the version number of both the Host Controller Interface and the Link Manager Protocol. Q: How do I test a Network Access connection? A: If the client is hardwired to the LAN, simply unplug the hardwired connection to ensure that the test checks the wireless connection rather than the hardwired connection. If the server has access to the Internet, open a browser on the client device and connect to the World Wide Web. You may also Ping the server from the DOS prompt. Q: Why do I get an “Unknown Port” message when I attempt to use a Bluetooth Serial Port? A: The unknown Port error message usually means that an attempt was made to connect to a port that was in use. Additional Bluetooth Serial Ports can be added if they are required. Q: What can I do when uninstalling BTW cannot be completed, due to reasons such as electricity stops? A: Using CD-Rom to re-install the BTW, and then remove the driver. Q: What can I do when functions don’t run normally? A: Un-plug and plug the dongle, or re-start PC. Q: How to turn off warning message during installation under Window XP? A: Perform the following before BTW installation, to turn off warnings during installation of BTW. Start Menu->My Computer->View System Information (Properties)->Hardware->Driver Signing->Ignore. After installation, the previous setting may be restored if desired.

©2002 by TECOM CO., LTD. All rights reserved.
39
TECHNICAL SUPPORT If you are still experiencing problems after reading this Product User’s Guide and the Troubleshooting section, you may either contact our technical support at: [email protected] OR, simply click our URL address www.tecomproduct.com to go to our company Website. Product Information If you want the latest version and other information about the product and/or software, please check out our Website at www.tecomproduct.com TECOM CO., LTD. Hsin-chu, Taiwan 23 R&D Road 2, Science-Based Industrial Park, Hsin-Chu, Taiwan R.O.C. Tel: +886-3-5775141
40
Important Information TECOM Model must be installed and used in strict accordance with the manufacturer’s instructions as described in the user documentation that comes with the product. The device complies with the following radio frequency and safety standards. Federal Communications Commission (FCC) Compliance Notice Radio Frequency Notice Changes or modifications to this unit not expressly approved by the party responsible for compliance could void the user authority to operate the equipment. This device complies with part 15 of the FCC Rules. Operation is subject to the following two conditions: 1.This device may not cause harmful interference. 2.This device must accept any interference received, including interference that may cause undesired operation. The users manual or instruction manual for an intentional or unintentional radiator shall caution the user that changes or modifications not expressly approved by the party responsible for compliance could void the user’s authority to operate the equipment Note: This equipment has been tested and found to comply with the limits for a Class B digital device, pursuant to part 15 of the FCC Rules. These limits are designed to provide reasonable protection against harmful interference in a residential installation. This equipment generates, uses and can radiate radio frequency energy and, if not installed and used in accordance with the instructions, may cause harmful interference to radio communications. However, there is no guarantee that interference will not occur in a particular installation. If this equipment does not cause harmful interference to radio or television reception, which can be determined by turning the equipment off and on, the user is encouraged to try to correct the interference by one or more of the following measures: (1) Reorient or relocate the receiving antenna, (2) Increase the separation between the equipment and receiver, (3) Connect the equipment into an outlet on a circuit different from that to which the receiver is connected, (4) Consult the dealer or an experienced radio/TV technician for help.
Interference Notice TECOM Model is a radio device that might cause interference with other non-Bluetooth devices
(for instance, devices using wireless LAN). 802.11b technology might cause degradation on the performance of TECOM Bluetooth
devices. CAUTION: 1.To comply with FCC RF exposure compliance requirements, a separation distance of at least 20 cm must be maintained between the antenna of this device and all persons. 2.This Transmitter must not be co-located or operating in conjunction with any other antenna or transmitter. Department of Communications-Canada Canadian Compliance Statement This Class B Digital apparatus meets all the requirements of the Canadian Interference Causing Equipment Regulations. Cet appareil numerique de la classe B respect les exigencies du Reglement sur le material broilleur du Canada. This device complies with Class B Limits of Industry of Canada. Operation is subject to the following two conditions: 1) this device may not cause harmful interference, and 2) this device must accept any interference received, including interference that may cause undesired operation. This device is certified to the requirements of RSS-139-1 and RSS-210 for 2.4 GHz spread spectrum devices. The use of this device in a system operating ether partially or completely outdoors may require the user to obtain a license for the system according to the Canadian regulations. For further information, contact local Industry Canada office. EN 55 022 Statement: CE Warning This is to certify that the Model is shielded against the generation of radio interference in accordance with the application of Council Directive 89/336/EEC, Article 4a. Conformity is declared by the application of EN55 022 Class B. This is a Class B product. In a domestic environment, this product may cause radio interference, in which case the user may be required to take adequate measures. CE Declaration of Conformity For the following equipment: Product Name: Bluetooth USB DongleIs herewith confirmed to comply with the requirements set out in the Council Directive on the Approximation of the Laws of the Member States relating to 1999/5/EC R&TTE Directive. For the evaluation regarding the Directives, the following standards were applied: ETSI 300
DECLARATION OF CONFORMITY

41
Subject to the provisions described below, this TECOM product is protected for one (1) year against defects in material and workmanship.
If the product fails to perform as described above within the warranted period, it will be repaired or replaced with the same or functionally equivalent product by TECOM, at its discretion, free of charge provided you: (1) have, within thirty (30) days of the original date of purchase, completed and returned the Registration Card which accompanied the products when shipped, or go to support page at www.tecomproduct.com to register on line, (2) return the failed product to TECOM designated repair facility with shipping charge prepaid, and (3) provide TECOM with proof of the original date of purchase. Repaired or replacement products will be returned to you with shipping charges prepaid.
Replacement products may be refurbished or contain refurbished materials. If TECOM by its sole determination, is unable to repair or replace the defective product, it will refund the depreciated purchase price of the product.
This warranty does not apply if, in the judgment of TECOM, the product fails due to damage from shipment, handling, storage, accident, abuse or misuse, or if it has been used or maintained in a manner not conforming to product manual instructions, has been modified in any way, or has had any serial number removed or defected. Repair by anyone other than TECOM or an approved agent will void this warranty. The maximum liability of TECOM under this warranty is limited to the purchase rice of the product covered by the warranty.
Prior to returning any defective product, the end customer or the reseller from whom the end customer original purchased the product must obtain a Return Materials Authorization (RMA) number from TECOM. All defective products should be returned to TECOM with shipping charges prepaid.
Except as specifically provided in this statement or as required by law, the warranties and remedies stated above are exclusive and in lieu of all others, oral or written, express or implied. Any and all other warranties, including implied warranties of merchantability, fitness for a particular purpose and non-infringement of third party rights are expressly excluded. TECOM shall not under any circumstances be liable to any person for any special, incidental, indirect or consequential damages, including without or revenues or costs of replacement goods, even if TECOM is informed in advance of the possibility of such damages.
LIMITED HARDWARE WARRANTY