Embed Size (px)
DESCRIPTION
BMC Atrium Core 7.6.03 Product Catalog and DML Guide
Citation preview
www.bmc.com
BMC Atrium Core 7.6.03
Product Catalog and DML Guide
August 2010

If you have comments or suggestions about this documentation, contact Information Development by email at [email protected].
Contacting BMC Software
You can access the BMC Software website at http://www.bmc.com. From this website, you can obtain information about the company, its products, corporate offices, special events, and career opportunities.
United States and Canada
Address BMC SOFTWARE INC2101 CITYWEST BLVDHOUSTON TX 77042-2827 USA
Telephone 713 918 8800 or800 841 2031
Fax 713 918 8000
Outside United States and Canada
Telephone (01) 713 918 8800 Fax (01) 713 918 8000
© Copyright 2005–2007, 2009–2010 BMC Software, Inc.
BMC, BMC Software, and the BMC Software logo are the exclusive properties of BMC Software, Inc., are registered with the U.S. Patent and Trademark Office, and may be registered or pending registration in other countries. All other BMC trademarks, service marks, and logos may be registered or pending registration in the U.S. or in other countries. All other trademarks or registered trademarks are the property of their respective owners.
IBM is the trademark or registered trademark of International Business Machines Corporation in the United States, other countries, or both.
IT Infrastructure Library® is a registered trademark of the Office of Government Commerce and is used here by BMC Software, Inc., under license from and with the permission of OGC.
ITIL® is a registered trademark, and a registered community trademark of the Office of Government Commerce, and is registered in the U.S. Patent and Trademark Office, and is used here by BMC Software, Inc., under license from and with the permission of OGC.
Java, Javadoc, Solaris, and Sun are trademarks or registered trademarks of Sun Microsystems, Inc., in the U.S. and other countries.
Linux is the registered trademark of Linus Torvalds.
Oracle is a registered trademark of Oracle Corporation.
UNIX is the registered trademark of The Open Group in the US and other countries.
BMC Software considers information included in this documentation to be proprietary and confidential. Your use of this information is subject to the terms and conditions of the applicable End User License Agreement for the product and the proprietary and restricted rights notices included in this documentation.
Restricted Rights Legend
U.S. Government Restricted Rights to Computer Software. UNPUBLISHED -- RIGHTS RESERVED UNDER THE COPYRIGHT LAWS OF THE UNITED STATES. Use, duplication, or disclosure of any data and computer software by the U.S. Government is subject to restrictions, as applicable, set forth in FAR Section 52.227-14, DFARS 252.227-7013, DFARS 252.227-7014, DFARS 252.227-7015, and DFARS 252.227-7025, as amended from time to time. Contractor/Manufacturer is BMC Software, Inc., 2101 CityWest Blvd., Houston, TX 77042-2827, USA. Any contract notices should be sent to this address.
Customer Support
You can obtain technical support by using the Support page on the BMC Software website or by contacting Customer Support by telephone or email. To expedite your inquiry, please see “Before Contacting BMC Software.”
Support Website
You can obtain technical support from BMC Software 24 hours a day, 7 days a week at http://www.bmc.com/support. From this website, you can:
■ Read overviews about support services and programs that BMC Software offers.■ Find the most current information about BMC Software products.■ Search a database for problems similar to yours and possible solutions.■ Order or download product documentation.■ Report a problem or ask a question.■ Subscribe to receive email notices when new product versions are released.■ Find worldwide BMC Software support center locations and contact information, including email addresses, fax
numbers, and telephone numbers.
Support by telephone or email
In the United States and Canada, if you need technical support and do not have access to the Web, call 800 537 1813 or send an email message to [email protected]. (In the Subject line, enter SupID:yourSupportContractID, such as SupID:12345.) Outside the United States and Canada, contact your local support center for assistance.
Before Contacting BMC Software
Have the following information available so that Customer Support can begin working on your issue immediately:
■ Product information
— Product name— Product version (release number)— License number and password (trial or permanent)
■ Operating system and environment information
— Machine type— Operating system type, version, and service pack— System hardware configuration— Serial numbers— Related software (database, application, and communication) including type, version, and service pack or
maintenance level
■ Sequence of events leading to the problem
■ Commands and options that you used
■ Messages received (and the time and date that you received them)
— Product error messages— Messages from the operating system, such as file system full— Messages from related software
License key and password information
If you have a question about your license key or password, contact Customer Support through one of the following methods:
■ E-mail [email protected]. (In the Subject line, enter SupID:<yourSupportContractID>, such as SupID:12345.)
■ In the United States and Canada, call 800 537 1813. Outside the United States and Canada, contact your local support center for assistance.
■ Submit a new issue at http://www.bmc.com/support.
Contents
BMC Atrium Core documentation 9
Chapter 1 Introduction to BMC Atrium Product Catalog 13
An overview of the Product Catalog. . . . . . . . . . . . . . . . . . . . . . . . . . . . . . . . . . . . . . . . . 14Advantages of using the Product Catalog . . . . . . . . . . . . . . . . . . . . . . . . . . . . . . . . . 16Product Catalog data . . . . . . . . . . . . . . . . . . . . . . . . . . . . . . . . . . . . . . . . . . . . . . . . . . 17Managing products . . . . . . . . . . . . . . . . . . . . . . . . . . . . . . . . . . . . . . . . . . . . . . . . . . . . 18Platform and operating system support in the Product Catalog . . . . . . . . . . . . . . 19
Multitenancy support in the Product Catalog . . . . . . . . . . . . . . . . . . . . . . . . . . . . . . . . . 20Definitive Media Library and approved products . . . . . . . . . . . . . . . . . . . . . . . . . . . . . 22
Using the DML and DHL . . . . . . . . . . . . . . . . . . . . . . . . . . . . . . . . . . . . . . . . . . . . . . . 22Using multitenancy with DML and DHL . . . . . . . . . . . . . . . . . . . . . . . . . . . . . . . . . 23
Accessing the Product Catalog. . . . . . . . . . . . . . . . . . . . . . . . . . . . . . . . . . . . . . . . . . . . . . 23Understanding the Product Catalog Console . . . . . . . . . . . . . . . . . . . . . . . . . . . . . . . . . 24Using the Product Catalog and DML with other BMC applications . . . . . . . . . . . . . . 25
Chapter 2 Normalization and the Product Catalog 27
Overview of normalization and the Product Catalog . . . . . . . . . . . . . . . . . . . . . . . . . . 28Configuring the Product Catalog for normalization . . . . . . . . . . . . . . . . . . . . . . . . . . . 29Configuring the Normalization Engine to populate Product Catalog entries . . . . . . 30
Chapter 3 Planning and implementing categorization 31
Overview of product categorization . . . . . . . . . . . . . . . . . . . . . . . . . . . . . . . . . . . . . . . . . 32Benefits of categorization . . . . . . . . . . . . . . . . . . . . . . . . . . . . . . . . . . . . . . . . . . . . . . . . . . 32Use of product categorization by BMC products . . . . . . . . . . . . . . . . . . . . . . . . . . . . . . 33
Records that use product categorization . . . . . . . . . . . . . . . . . . . . . . . . . . . . . . . . . . 33BMC product features that use product categorization. . . . . . . . . . . . . . . . . . . . . . 38Product categorization and discovery . . . . . . . . . . . . . . . . . . . . . . . . . . . . . . . . . . . . 39
Implementing categorization . . . . . . . . . . . . . . . . . . . . . . . . . . . . . . . . . . . . . . . . . . . . . . . 47Defining the product categorization structure . . . . . . . . . . . . . . . . . . . . . . . . . . . . . 47Using “Other” as a value in categorization . . . . . . . . . . . . . . . . . . . . . . . . . . . . . . . . 48Setting up product categorization data . . . . . . . . . . . . . . . . . . . . . . . . . . . . . . . . . . . 49Managing product categorization changes . . . . . . . . . . . . . . . . . . . . . . . . . . . . . . . . 56
Contents 5
Chapter 4 Configuring the Product Catalog 59
Product Catalog permissions . . . . . . . . . . . . . . . . . . . . . . . . . . . . . . . . . . . . . . . . . . . . . . . 60Viewing and searching for product entries in the Product Catalog . . . . . . . . . . . . . . . 61
Viewing and searching for products . . . . . . . . . . . . . . . . . . . . . . . . . . . . . . . . . . . . . . 61Viewing and searching entries by organization . . . . . . . . . . . . . . . . . . . . . . . . . . . . 62
Searching for and editing product and manufacturer alias entries . . . . . . . . . . . . . . . 63Searching for and modifying new Product Catalog entries . . . . . . . . . . . . . . . . . . . . . . 65
Viewing and editing details of new products . . . . . . . . . . . . . . . . . . . . . . . . . . . . . . 66Deleting offline products . . . . . . . . . . . . . . . . . . . . . . . . . . . . . . . . . . . . . . . . . . . . . . . 67Creating product name and manufacturer aliases . . . . . . . . . . . . . . . . . . . . . . . . . . 67Viewing and editing association details of new products . . . . . . . . . . . . . . . . . . . . 70Deleting associations of new products . . . . . . . . . . . . . . . . . . . . . . . . . . . . . . . . . . . . 71
Creating custom Product Catalog entries . . . . . . . . . . . . . . . . . . . . . . . . . . . . . . . . . . . . . 71Adding Product Catalog entries . . . . . . . . . . . . . . . . . . . . . . . . . . . . . . . . . . . . . . . . . 72Creating a product alias . . . . . . . . . . . . . . . . . . . . . . . . . . . . . . . . . . . . . . . . . . . . . . . . 74Adding product model and version information . . . . . . . . . . . . . . . . . . . . . . . . . . . 75Adding patch information . . . . . . . . . . . . . . . . . . . . . . . . . . . . . . . . . . . . . . . . . . . . . . 76
Specifying locations for Product Catalog entries . . . . . . . . . . . . . . . . . . . . . . . . . . . . . . . 76Adding products to a suite . . . . . . . . . . . . . . . . . . . . . . . . . . . . . . . . . . . . . . . . . . . . . . . . . 78Adding related files to a patch entry . . . . . . . . . . . . . . . . . . . . . . . . . . . . . . . . . . . . . . . . . 78Creating product files . . . . . . . . . . . . . . . . . . . . . . . . . . . . . . . . . . . . . . . . . . . . . . . . . . . . . 79Using signatures to identify products . . . . . . . . . . . . . . . . . . . . . . . . . . . . . . . . . . . . . . . . 79
Associating a signature with a product . . . . . . . . . . . . . . . . . . . . . . . . . . . . . . . . . . . 80Relating companies to Product Catalog entries . . . . . . . . . . . . . . . . . . . . . . . . . . . . . . . . 81
Removing the relationship between an entry and a company . . . . . . . . . . . . . . . . 83Approving products, versions, and patches for DML and DHL. . . . . . . . . . . . . . . . . . 83Deleting Product Catalog entries . . . . . . . . . . . . . . . . . . . . . . . . . . . . . . . . . . . . . . . . . . . . 85Cloning product entries . . . . . . . . . . . . . . . . . . . . . . . . . . . . . . . . . . . . . . . . . . . . . . . . . . . . 86Configuring datasets for normalization . . . . . . . . . . . . . . . . . . . . . . . . . . . . . . . . . . . . . . 86Mapping product categorization aliases . . . . . . . . . . . . . . . . . . . . . . . . . . . . . . . . . . . . . . 87Modifying the list of platforms. . . . . . . . . . . . . . . . . . . . . . . . . . . . . . . . . . . . . . . . . . . . . . 88
Chapter 5 Managing companies 89
Creating and managing companies . . . . . . . . . . . . . . . . . . . . . . . . . . . . . . . . . . . . . . . . . . 90Creating a company alias . . . . . . . . . . . . . . . . . . . . . . . . . . . . . . . . . . . . . . . . . . . . . . . . . . 91Defining company locations . . . . . . . . . . . . . . . . . . . . . . . . . . . . . . . . . . . . . . . . . . . . . . . . 92Defining company contact information . . . . . . . . . . . . . . . . . . . . . . . . . . . . . . . . . . . . . . 93Defining time information for a company . . . . . . . . . . . . . . . . . . . . . . . . . . . . . . . . . . . . 93Multitenancy in the Calbro Services example . . . . . . . . . . . . . . . . . . . . . . . . . . . . . . . . . 93
Chapter 6 Importing and updating data 97
Importing and exporting custom Product Catalog data. . . . . . . . . . . . . . . . . . . . . . . . . 98Exporting data from the Product Catalog. . . . . . . . . . . . . . . . . . . . . . . . . . . . . . . . . . . . 101Importing Product Catalog data. . . . . . . . . . . . . . . . . . . . . . . . . . . . . . . . . . . . . . . . . . . . 102
Creating the data . . . . . . . . . . . . . . . . . . . . . . . . . . . . . . . . . . . . . . . . . . . . . . . . . . . . . 103Validating the data. . . . . . . . . . . . . . . . . . . . . . . . . . . . . . . . . . . . . . . . . . . . . . . . . . . . 110Importing the data . . . . . . . . . . . . . . . . . . . . . . . . . . . . . . . . . . . . . . . . . . . . . . . . . . . . 111
6 Product Catalog and DML Guide
Appendix A Best practice categorization 113
Tier 1—Hardware . . . . . . . . . . . . . . . . . . . . . . . . . . . . . . . . . . . . . . . . . . . . . . . . . . . . . . . 114Tier 1—Miscellaneous . . . . . . . . . . . . . . . . . . . . . . . . . . . . . . . . . . . . . . . . . . . . . . . . . . . . 117Tier 1—Network. . . . . . . . . . . . . . . . . . . . . . . . . . . . . . . . . . . . . . . . . . . . . . . . . . . . . . . . . 119Tier 1—Software. . . . . . . . . . . . . . . . . . . . . . . . . . . . . . . . . . . . . . . . . . . . . . . . . . . . . . . . . 120Additional categorization for BMC discovery products . . . . . . . . . . . . . . . . . . . . . . . 122
Appendix B Using the Product Catalog from BMC BladeLogic Client Automation 123
Overview of accessing BMC Atrium Product Catalog . . . . . . . . . . . . . . . . . . . . . . . . . 124Downloading and running BMC Remedy AR System security scripts . . . . . . . . . . . 125
Unicode and SQL Server . . . . . . . . . . . . . . . . . . . . . . . . . . . . . . . . . . . . . . . . . . . . . . 126Unicode and Oracle. . . . . . . . . . . . . . . . . . . . . . . . . . . . . . . . . . . . . . . . . . . . . . . . . . . 126
Configuring parameters for the BMC BladeLogic Client Automation database . . . 126Configuring Oracle BMC BladeLogic Client Automation to access Oracle BMC
Remedy AR System . . . . . . . . . . . . . . . . . . . . . . . . . . . . . . . . . . . . . . . . . . . . . . . . 127Configuring Oracle BMC BladeLogic Client Automation to access SQL Server
BMC Remedy AR System . . . . . . . . . . . . . . . . . . . . . . . . . . . . . . . . . . . . . . . . . . . 127Configuring SQL Server BMC BladeLogic Client Automation for Oracle BMC
Remedy AR System . . . . . . . . . . . . . . . . . . . . . . . . . . . . . . . . . . . . . . . . . . . . . . . . 131Configuring SQL Server BMC BladeLogic Client Automation for SQL Server
BMC Remedy AR System . . . . . . . . . . . . . . . . . . . . . . . . . . . . . . . . . . . . . . . . . . . 132Establishing access to the BMC Remedy AR System database . . . . . . . . . . . . . . . . . . 132Establishing connectivity to the Product Catalog . . . . . . . . . . . . . . . . . . . . . . . . . . . . . 133
Prerequisites for connection. . . . . . . . . . . . . . . . . . . . . . . . . . . . . . . . . . . . . . . . . . . . 133Establishing the connection between databases . . . . . . . . . . . . . . . . . . . . . . . . . . . 134
Verifying connectivity to the Product Catalog . . . . . . . . . . . . . . . . . . . . . . . . . . . . . . . 135Troubleshooting connectivity issues . . . . . . . . . . . . . . . . . . . . . . . . . . . . . . . . . . . . . . . . 135What’s next? . . . . . . . . . . . . . . . . . . . . . . . . . . . . . . . . . . . . . . . . . . . . . . . . . . . . . . . . . . . . 136
Glossary 137
Index 147
Contents 7

8 Product Catalog and DML Guide
BMC Atrium Core documentation
This section describes the complete set of BMC Atrium Core documentation, including manuals, Help systems, videos, and so on.
Unless otherwise noted, documentation is available on the BMC Atrium Core documentation media (DVD or Electronic Product Download bundle) and on the BMC Customer Support site, free of charge, at http://www.bmc.com/support.
To find this documentation on the BMC Customer Support site, choose Product Documentation > Supported Product A-Z List > BMC Atrium CMDB Enterprise Manager > 7.6.03.
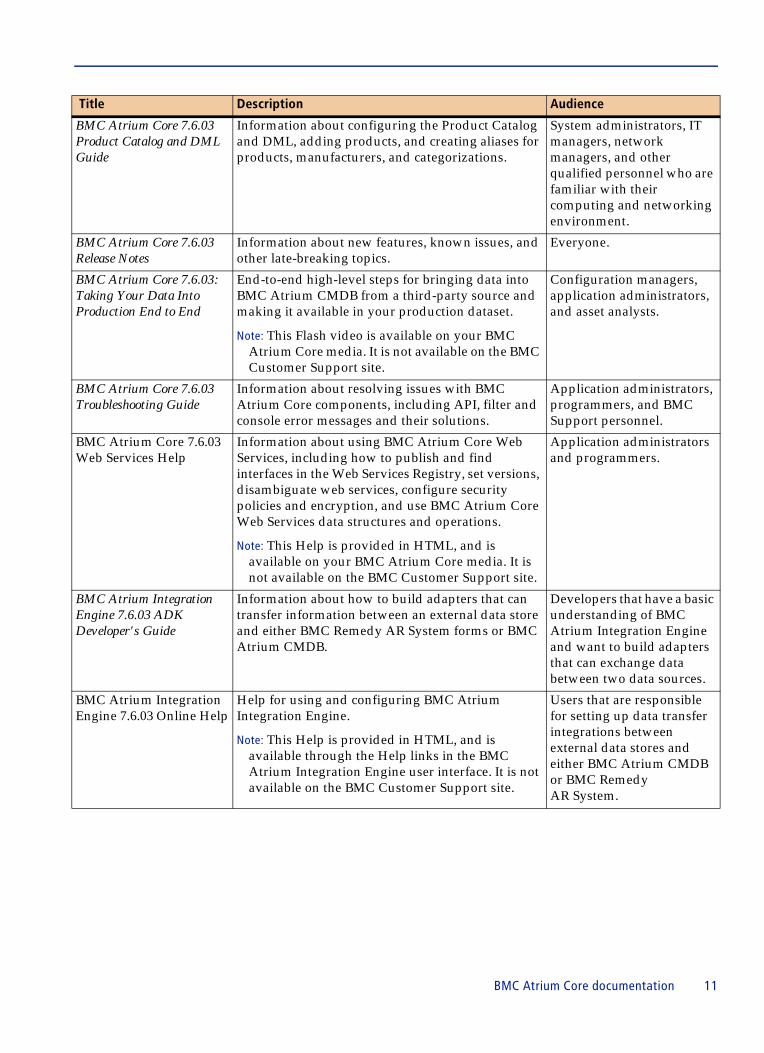
Title Description Audience
BMC Atrium CMDB 7.6.03 Administrator's Guide
Information about setting permissions, configuring federation, modifying the data model, configuring an impact model, and other administrative tasks in BMC Atrium CMDB.
Configuration managers, application administrators, and asset analysts.
BMC Atrium CMDB 7.6.03 Common Data Model Diagram
Hierarchical diagram of all classes in the Common Data Model (CDM) including unique attributes and applicable relationships.
Configuration managers, application administrators, and asset analysts.
BMC Atrium CMDB 7.6.03 Data Model Help
Description and details of superclasses, subclasses, attributes, and relationship classes for each class. Contains only information about the CDM at first, but you can update it to include information about data model extensions that you install.
Note: This Help is provided in HTML, and is available on your BMC Atrium Core media. It is not available on the BMC Customer Support site.
Configuration managers, application administrators, and asset analysts.
BMC Atrium CMDB 7.6.03 Data Modeling Guide
Best practices for using the classes that BMC provides for BMC Atrium CMDB (both the CDM and extensions) to model complex business entities, focusing on the use of multiple related CIs to model an entity rather than on general information about a class or attribute.
Configuration managers, application administrators, and asset analysts.
BMC Atrium CMDB 7.6.03 Normalization and Reconciliation Guide
Information about normalizing data in BMC Atrium CMDB and reconciling CIs from different data providers into a single production dataset.
Configuration managers, application administrators, and asset analysts.
BMC Atrium Core documentation 9
BMC Atrium Core 7.6.03
BMC Atrium CMDB 7.6.03 Online Help
Help for using and configuring BMC Atrium CMDB, including BMC Atrium Product Catalog, Reconciliation Engine, Normalization Engine, and so on.
Note: This Help is provided in HTML, and is available through the Help links in the BMC Atrium CMDB user interface. It is not available on the BMC Customer Support site.
Configuration managers, application administrators, asset analysts, and users that work with CIs and need to understand the relationships that exist within BMC Atrium CMDB.
BMC Atrium CMDB 7.6.03 User's Guide
Information about using BMC Atrium CMDB, including searching for and comparing CIs and relationships, relating CIs, viewing history, running impact simulations, and viewing federated data.
Users that work with CIs and need to understand the relationships that exist within BMC Atrium CMDB.
BMC Atrium Core 7.6.03 Compatibility Matrix
Information about the BMC Atrium Core configurations that are expected to work properly based on design, testing, or general understanding of the interaction between products.
Note: Download the BMC Atrium Core 7.6.03 Compatibility Matrix from the BMC Customer Support site at http://www.bmc.com/support/reg/remedy-compatibility-tables.html?c=n.
Configuration managers, application administrators, and asset analysts.
BMC Atrium Core 7.6.03 Concepts and Planning Guide
Information about CMDB concepts and high-level steps for planning and implementing BMC Atrium Core.
Anyone who wants to learn about and understand BMC Atrium Core products, CMDBs in general, and the functionality of BMC Atrium CMDB in particular.IT leaders, configuration managers, application administrators, and asset analysts are some who will benefit from this information.
BMC Atrium Core 7.6.03 Developer’s Reference Guide
Information about creating API programs using C API functions and data structures.
Application administrators and programmers.
BMC Atrium Core 7.6.03 Installation Guide
Information about installing, upgrading, and uninstalling BMC Atrium Core features.
Application administrators.
BMC Atrium CMDB 7.6.03 Javadoc Help
Information about Sun™ Java™ classes, methods, and variables that integrate with BMC Atrium CMDB.
Note: This Help is provided in HTML, and is available on your BMC Atrium Core media. It is not available on the BMC Customer Support site.
Application programmers.
BMC Atrium Core 7.6.03 Master Index
Combined index of all guides. Everyone.
Title Description Audience
10 Product Catalog and DML Guide
BMC Atrium Core 7.6.03 Product Catalog and DML Guide
Information about configuring the Product Catalog and DML, adding products, and creating aliases for products, manufacturers, and categorizations.
System administrators, IT managers, network managers, and other qualified personnel who are familiar with their computing and networking environment.
BMC Atrium Core 7.6.03 Release Notes
Information about new features, known issues, and other late-breaking topics.
Everyone.
BMC Atrium Core 7.6.03: Taking Your Data Into Production End to End
End-to-end high-level steps for bringing data into BMC Atrium CMDB from a third-party source and making it available in your production dataset.
Note: This Flash video is available on your BMC Atrium Core media. It is not available on the BMC Customer Support site.
Configuration managers, application administrators, and asset analysts.
BMC Atrium Core 7.6.03 Troubleshooting Guide
Information about resolving issues with BMC Atrium Core components, including API, filter and console error messages and their solutions.
Application administrators, programmers, and BMC Support personnel.
BMC Atrium Core 7.6.03 Web Services Help
Information about using BMC Atrium Core Web Services, including how to publish and find interfaces in the Web Services Registry, set versions, disambiguate web services, configure security policies and encryption, and use BMC Atrium Core Web Services data structures and operations.
Note: This Help is provided in HTML, and is available on your BMC Atrium Core media. It is not available on the BMC Customer Support site.
Application administrators and programmers.
BMC Atrium Integration Engine 7.6.03 ADK Developer's Guide
Information about how to build adapters that can transfer information between an external data store and either BMC Remedy AR System forms or BMC Atrium CMDB.
Developers that have a basic understanding of BMC Atrium Integration Engine and want to build adapters that can exchange data between two data sources.
BMC Atrium Integration Engine 7.6.03 Online Help
Help for using and configuring BMC Atrium Integration Engine.
Note: This Help is provided in HTML, and is available through the Help links in the BMC Atrium Integration Engine user interface. It is not available on the BMC Customer Support site.
Users that are responsible for setting up data transfer integrations between external data stores and either BMC Atrium CMDB or BMC Remedy AR System.
Title Description Audience
BMC Atrium Core documentation 11
BMC Atrium Core 7.6.03
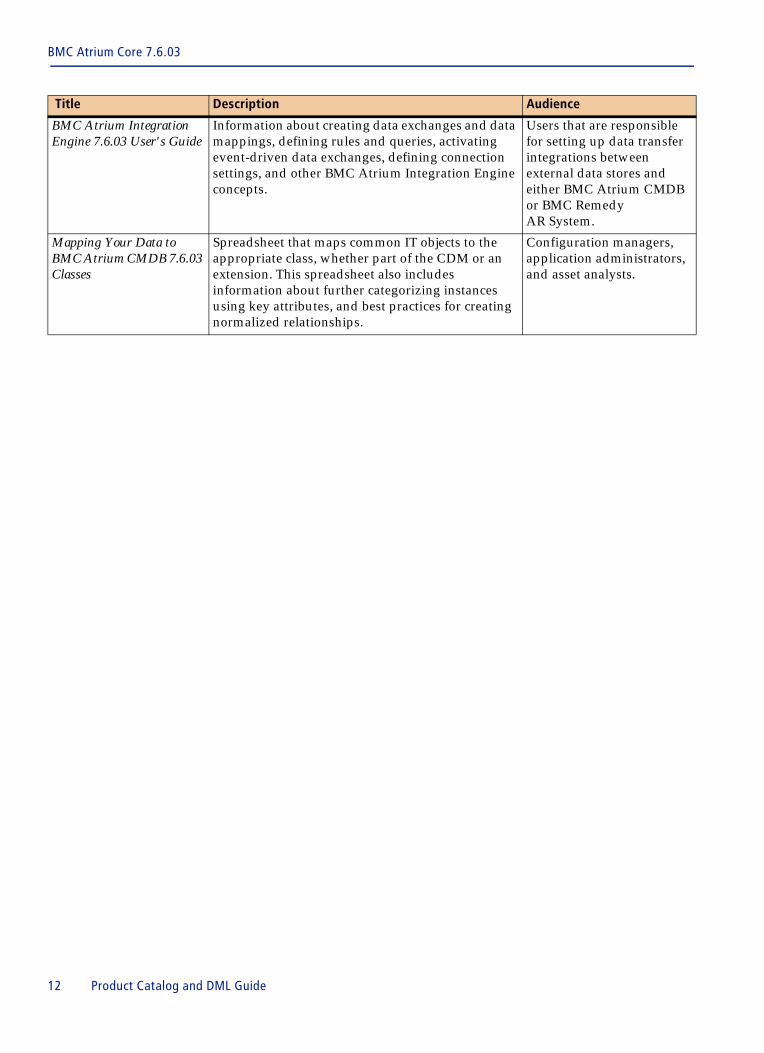
BMC Atrium Integration Engine 7.6.03 User's Guide
Information about creating data exchanges and data mappings, defining rules and queries, activating event-driven data exchanges, defining connection settings, and other BMC Atrium Integration Engine concepts.
Users that are responsible for setting up data transfer integrations between external data stores and either BMC Atrium CMDB or BMC Remedy AR System.
Mapping Your Data to BMC Atrium CMDB 7.6.03 Classes
Spreadsheet that maps common IT objects to the appropriate class, whether part of the CDM or an extension. This spreadsheet also includes information about further categorizing instances using key attributes, and best practices for creating normalized relationships.
Configuration managers, application administrators, and asset analysts.
Title Description Audience
12 Product Catalog and DML Guide
Chapter
1
Introduction to BMC Atrium Product CatalogThis section presents an overview of the BMC Atrium Product Catalog application and Definitive Media Library.
In version 7.5.00, the BMC application called Definitive Software Library (DSL) was renamed as BMC Atrium Product Catalog (Product Catalog).
The following topics are provided:
� An overview of the Product Catalog (page 14)� Multitenancy support in the Product Catalog (page 20)� Definitive Media Library and approved products (page 22)� Accessing the Product Catalog (page 23)� Understanding the Product Catalog Console (page 24)� Using the Product Catalog and DML with other BMC applications (page 25)
Chapter 1 Introduction to BMC Atrium Product Catalog 13
BMC Atrium Core 7.6.03
An overview of the Product CatalogThe Product Catalog is a BMC Remedy Action Request System (BMC Remedy AR System) application that is part of the BMC Atrium Core solution. Make sure that the AR User Fixed license is installed, to enable you to access and use the Product Catalog.
The Product Catalog includes several components to manage products for companies and organizations. The Product Catalog has several purposes:
� Provide identifying characteristics of products as product metadata
� Provide a single name for each product and its versions
� Manage products by categorization, life cycle, development status, approval status, and other attributes
� Manage products by companies and organizations (multitenancy)
� Provide data for normalization and discovery, including storage of product signatures
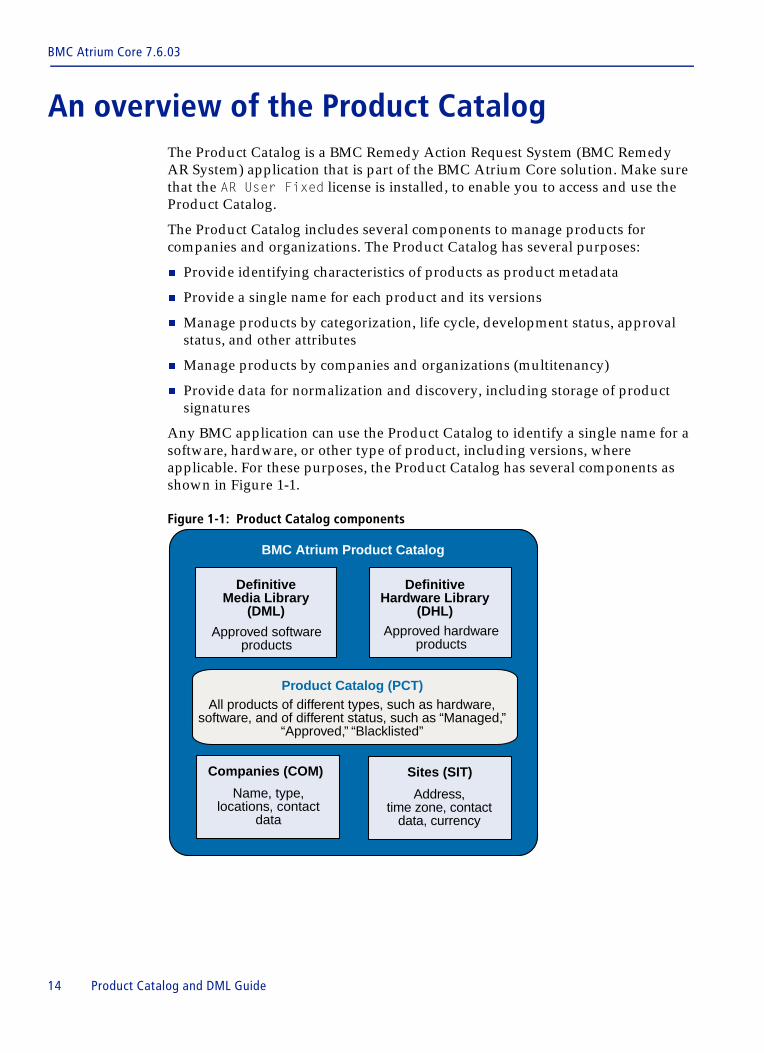
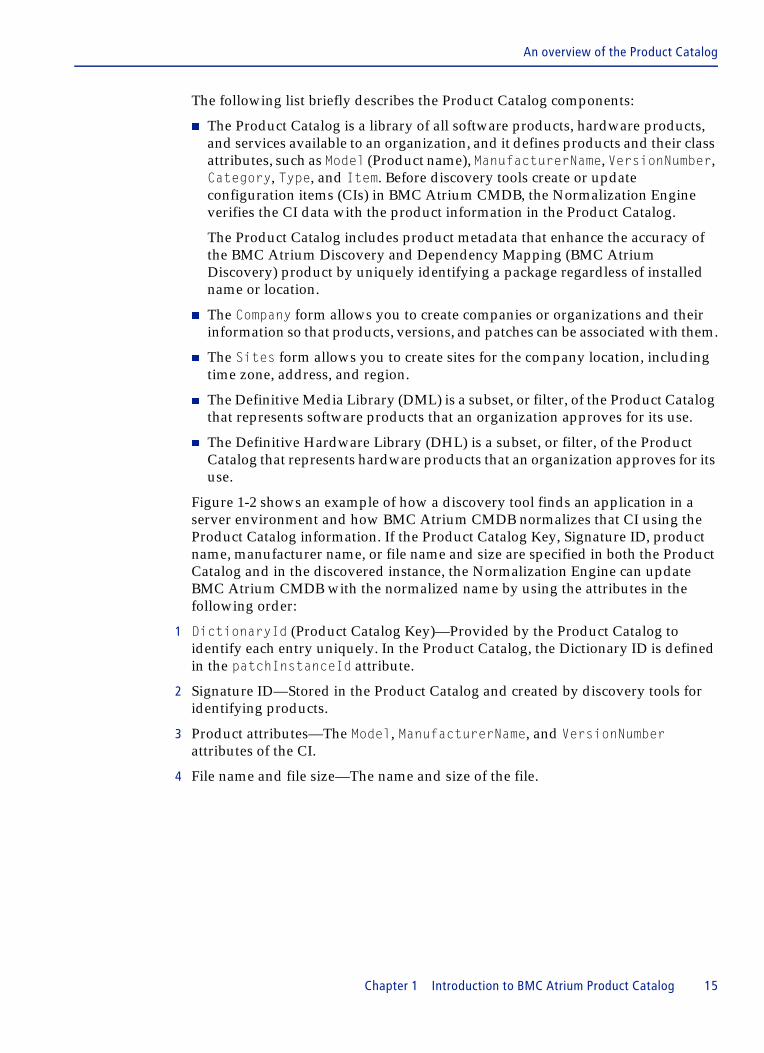
Any BMC application can use the Product Catalog to identify a single name for a software, hardware, or other type of product, including versions, where applicable. For these purposes, the Product Catalog has several components as shown in Figure 1-1.
Figure 1-1: Product Catalog components
BMC Atrium Product Catalog
Companies (COM)
Name, type, locations, contact
data
Product Catalog (PCT)All products of different types, such as hardware,
software, and of different status, such as “Managed,” “Approved,” “Blacklisted”
Sites (SIT)
Address, time zone, contact
data, currency
DefinitiveMedia Library
(DML)
Approved software products
DefinitiveHardware Library
(DHL)Approved hardware
products
14 Product Catalog and DML Guide
An overview of the Product Catalog
The following list briefly describes the Product Catalog components:
� The Product Catalog is a library of all software products, hardware products, and services available to an organization, and it defines products and their class attributes, such as Model (Product name), ManufacturerName, VersionNumber, Category, Type, and Item. Before discovery tools create or update configuration items (CIs) in BMC Atrium CMDB, the Normalization Engine verifies the CI data with the product information in the Product Catalog.
The Product Catalog includes product metadata that enhance the accuracy of the BMC Atrium Discovery and Dependency Mapping (BMC Atrium Discovery) product by uniquely identifying a package regardless of installed name or location.
� The Company form allows you to create companies or organizations and their information so that products, versions, and patches can be associated with them.
� The Sites form allows you to create sites for the company location, including time zone, address, and region.
� The Definitive Media Library (DML) is a subset, or filter, of the Product Catalog that represents software products that an organization approves for its use.
� The Definitive Hardware Library (DHL) is a subset, or filter, of the Product Catalog that represents hardware products that an organization approves for its use.
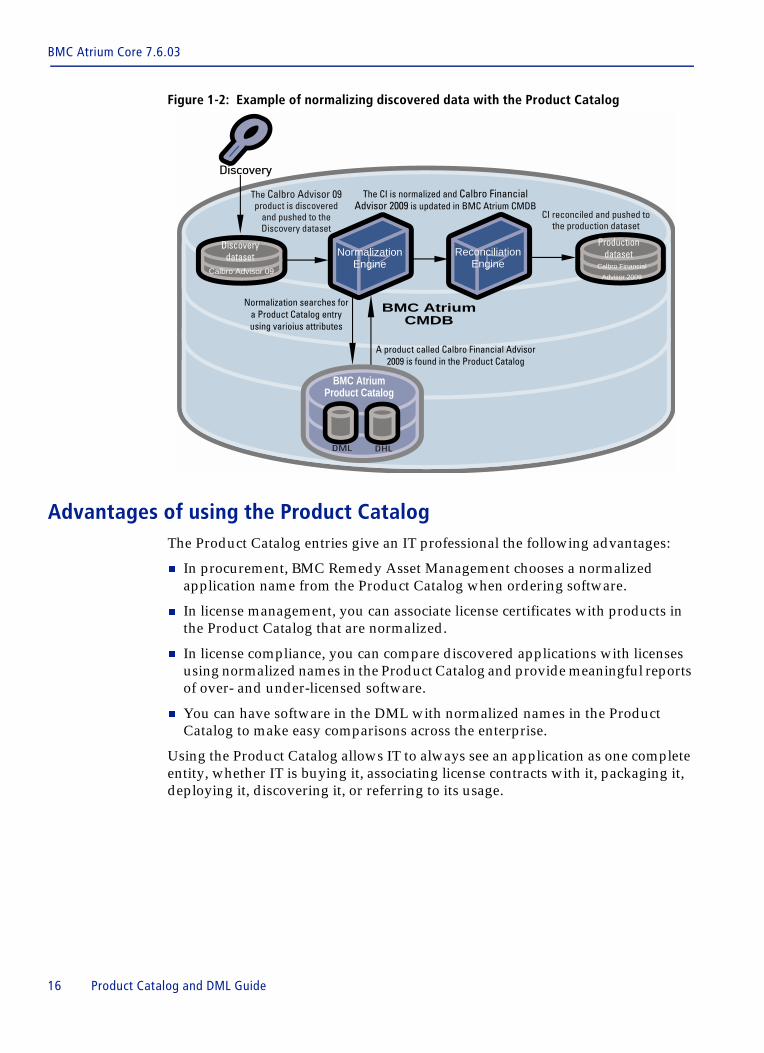
Figure 1-2 shows an example of how a discovery tool finds an application in a server environment and how BMC Atrium CMDB normalizes that CI using the Product Catalog information. If the Product Catalog Key, Signature ID, product name, manufacturer name, or file name and size are specified in both the Product Catalog and in the discovered instance, the Normalization Engine can update BMC Atrium CMDB with the normalized name by using the attributes in the following order:
1 DictionaryId (Product Catalog Key)—Provided by the Product Catalog to identify each entry uniquely. In the Product Catalog, the Dictionary ID is defined in the patchInstanceId attribute.
2 Signature ID—Stored in the Product Catalog and created by discovery tools for identifying products.
3 Product attributes—The Model, ManufacturerName, and VersionNumber attributes of the CI.
4 File name and file size—The name and size of the file.
Chapter 1 Introduction to BMC Atrium Product Catalog 15
BMC Atrium Core 7.6.03
Figure 1-2: Example of normalizing discovered data with the Product Catalog
Advantages of using the Product CatalogThe Product Catalog entries give an IT professional the following advantages:
� In procurement, BMC Remedy Asset Management chooses a normalized application name from the Product Catalog when ordering software.
� In license management, you can associate license certificates with products in the Product Catalog that are normalized.
� In license compliance, you can compare discovered applications with licenses using normalized names in the Product Catalog and provide meaningful reports of over- and under-licensed software.
� You can have software in the DML with normalized names in the Product Catalog to make easy comparisons across the enterprise.
Using the Product Catalog allows IT to always see an application as one complete entity, whether IT is buying it, associating license contracts with it, packaging it, deploying it, discovering it, or referring to its usage.
The Calbro Advisor 09 product is discovered
and pushed to the Discovery dataset
The CI is normalized and Calbro Financial Advisor 2009 is updated in BMC Atrium CMDB
CI reconciled and pushed to the production dataset
Normalization searches for a Product Catalog entry using varioius attributes
Normalization Engine
Reconciliation Engine
BMC AtriumCMDB
Productiondataset
BMC AtriumProduct Catalog
DML DHL
Discovery dataset
Calbro Advisor 09
A product called Calbro Financial Advisor 2009 is found in the Product Catalog
Calbro Financial
Advisor 2009
16 Product Catalog and DML Guide
An overview of the Product Catalog
Product Catalog dataYou can add Product Catalog data in the following ways:
� Create Product Catalog entries manually—From the Product Catalog Console, you can create new products, versions, and patches and define their status options. For more information, see “Creating custom Product Catalog entries” on page 71.
� Import data from external files—You can import data from an external file or from staging forms using BMC Remedy User. For more information, see “Importing Product Catalog data” on page 102.
� Use the Normalization Engine to create entries—If you have a dataset that has normalized CIs, you can configure the Normalization Engine to create Product Catalog entries from the dataset. You must configure this option before normalizing the dataset. For guidelines and procedures, see the BMC Atrium CMDB 7.6.03 Normalization and Reconciliation Guide.
The Product Catalog data, not the DML, is used to normalize discovered data. The Product Catalog entries are the definitive, or master, names and descriptions of products, including hardware, software, network devices, and services. The Product Catalog entries are displayed hierarchically by the major releases of a product and then broken down further by the exact versions. For the exact versions, you can specify a Storage Location for the master.
Each Product Catalog entry can have an accompanying model or version and an optional patch. You can also set a market version for a Product Catalog entry. The market version is used by the software license management engine to determine whether that Product Catalog entry must have a related software license contract. For example, if Calbro Services wants to track multiple service packs and versions for Microsoft Excel as instances of version 2003, Andrew Admin sets the market version field for the Microsoft Excel Product Catalog entry.
You can manually specify the market version for a product entry in the Product Catalog or use the Version Rollup feature in the Normalization Engine. The Version Rollup feature normalizes multiple version strings to a common market version value, based on default or custom rules. For information about the Version Rollup feature, see the BMC Atrium CMDB 7.6.03 Normalization and Reconciliation Guide.
NOTE If a CI instance corresponds to a Product Catalog entry for which the market version is set and the CI instance also maps to a Version Rollup rule, the market version value in the Product Catalog has higher priority by default. However, you can change the default configuration to assign higher priority to the Version Rollup rule in the Normalization Engine. For more information, see the BMC Atrium CMDB 7.6.03 Normalization and Reconciliation Guide.
Chapter 1 Introduction to BMC Atrium Product Catalog 17
BMC Atrium Core 7.6.03
In addition to Product Catalog entries and Storage Locations, another component of the Product Catalog is the Product Suites, which are groups of one or more Product Catalog entries. For example, the Microsoft Office suite contains Word, Excel, Powerpoint, and Outlook. You can use the Suite Rollup feature in the Normalization Engine to create suites and assign existing products to the suites. You can also use the Suite Rollup feature to create rules that identify instances as a suite or suite component. For more information about the Suite Rollup feature, see the BMC Atrium CMDB 7.6.03 Normalization and Reconciliation Guide.
The Product Catalog enables application administrators to facilitate software license management and software deployment by adding or modifying Product Catalog entries, Storage Locations, and Product Suites using the Product Catalog Console.
Managing productsThe Product Catalog has several status options for products that allow you different options to manage the products for your organization:
� Approved—Authorize a product to be installed in the organizational environment.
Approved products are in the DML or DHL, depending on whether they are software or hardware.
NOTE If the Allow Unapproved CIs option is enabled in the Normalization console, the Normalization Engine normalizes CIs of the products that are not approved in the Product Catalog. If this option is disabled, CIs are still created for the unapproved products, but the NormalizationStatus attribute for those CIs is set to Normalized Not Approved.
� Managed—Track the product in the organizational environment.
The Product Catalog does not do anything when this option is set. Instead, other applications, such as BMC Remedy IT Service Management (BMC Remedy ITSM), can interpret and use this option to take actions, such as manage CIs in BMC Atrium CMDB.
NOTE Not all approved products are managed. For example, the Notepad++ or Winzip applications could be approved products in an organization, but the organization may not choose to track and manage them, because they do not require licences.
� Hide Product—Disable the display of a product in the Product Catalog Console.
Hidden products are not removed from the Product Catalog and appear in search results if they match the criteria. You can use this option to reduce the number of displayed products in the Product Catalog Console.
18 Product Catalog and DML Guide
An overview of the Product Catalog
� Life Cycle—A product’s phase, which a product such as BMC Remedy ITSM could use to define actions. For example, you could decide that patch 2 of a finance application can only be installed in the production environment if it is marked as Released.
� Development: The product is being created or assembled and is not yet tested.
� Test: The product has completed development but is being validated.
A Test product could be approved for a select group of people for testing purposes. For example, Calbro Services decided to approve a product that they were developing. The approved product was available only for an internal group who would be testing the product.
� Released: The product has completed development and testing, and it is ready for use in the production environment.
� Normalized Product—Use the alias that has been defined for the product.
For more information about aliases, see “Creating a product alias” on page 74.
� Blacklisted Product—Mark a product as a security risk.
This field can be used to create a ticket to remove the blacklisted product from the organizational environment. The Product Catalog does not do anything when this option is set; instead, other applications, such as BMC Remedy ITSM, can interpret and use this option to manage products or CIs in BMC Atrium CMDB.
You can set these options at the product, version, and patch levels, but the status is propagated downstream. If you change the status of a product, then its associated versions and patch entries also have the options set implicitly (through workflow). The Product Catalog does not propagate the status upstream, from patches upwards to the version and product.
You must set the status options when relating a product to a company to allow for each company to have its own status options for each product. For more information about setting status options on products, see “Relating companies to Product Catalog entries” on page 81.
Platform and operating system support in the Product CatalogThe Product Catalog supports data providers populating platform and operating system information for the product model and version. This support allows a product to have multiple entries for the same product and version, with different platforms and operating systems. You can then create patches that are specific to a combination of operating system and platform.
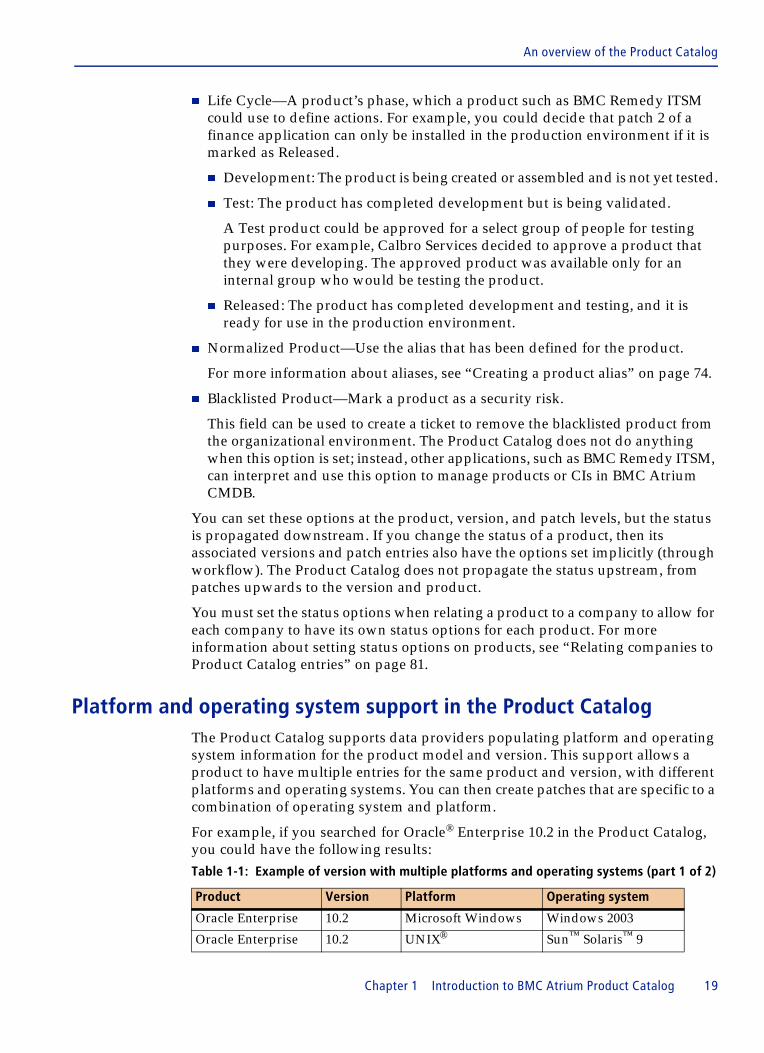
For example, if you searched for Oracle® Enterprise 10.2 in the Product Catalog, you could have the following results: Table 1-1: Example of version with multiple platforms and operating systems (part 1 of 2)
Product Version Platform Operating system
Oracle Enterprise 10.2 Microsoft Windows Windows 2003
Oracle Enterprise 10.2 UNIX® Sun™ Solaris™ 9
Chapter 1 Introduction to BMC Atrium Product Catalog 19
BMC Atrium Core 7.6.03
To search for products by platform or operating system, you must use the Advanced Search feature in the Product Catalog Console. For example, to search for products on the UNIX platform, you could use the expression ‘Platform’ LIKE “UNIX”. To search for products by operating system, use an expression such as 'Operating System' LIKE "Solaris 9". For more information about searching products, see “Viewing and searching for products” on page 61.
For each platform, you must create a separate model/version entry and specify the platform and operating system. For each version, you can then add a patch for that platform and operating system. For more information about modifying the list of platforms, see “Modifying the list of platforms” on page 88.
Multitenancy support in the Product CatalogThe Product Catalog supports defining approved products for different organizations. Multitenancy allows you to have a single Product Catalog shared among multiple organizations but tracks the approved products for each organization from the same Product Catalog data.
For each organization, you can define the approved items for the version and patch levels, not just the product name. All the other options in the Product Catalog are separated for each products by organization as well, such as the following attributes:
� Managed
� Blacklisted
� Mark for Deletion
� Hidden
� Life Cycle
� Status
Multitenancy can also be used when a smaller company is part of another company and their finances are managed separately. For example, Calfin Services is a part of Calbro Services. Their finances are managed separately. Both companies use the same Product Catalog. With multitenancy, they can access products that are approved for their own organizations.
Oracle Enterprise 10.2 UNIX Solaris 10
Oracle Enterprise 10.2 UNIX HP-UX 11
Oracle Enterprise 10.2 UNIX Red Hat Linux® AS 3.0
Table 1-1: Example of version with multiple platforms and operating systems (part 2 of 2)
Product Version Platform Operating system
20 Product Catalog and DML Guide
Multitenancy support in the Product Catalog
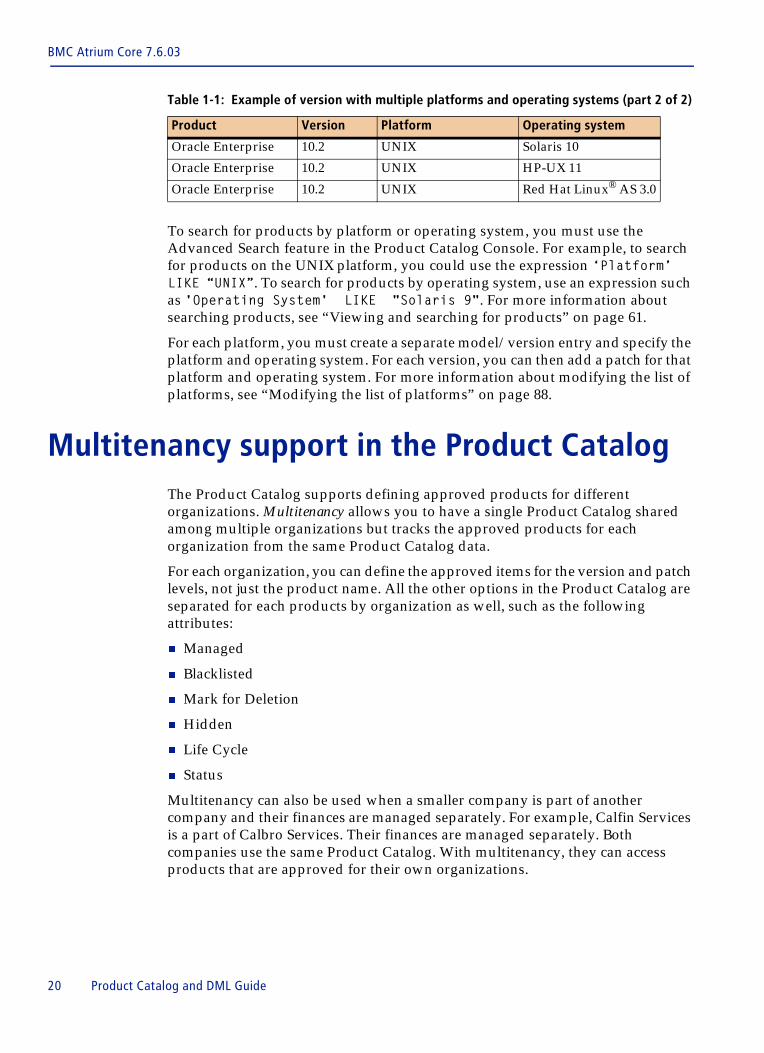
Calbro Services can track the software and hardware approved for each company. Rather than create a separate Product Catalog for each company, Calbro Services uses one Product Catalog to manage the approved software and hardware for Calbro Services and Calfin Services. Figure 1-3 on page 21 shows what Oracle versions and patches Calbro Services and Calfin Services have approved.
Figure 1-3: Multitenancy example
The approval, status, and other flags are segregated by company so that Calbro Servicesdoes not use Oracle versions approved by Calfin Services. Calfin Services has not approved Oracle 10g R2 and does not see it as approved, even though Calbro Services has approved it. The figure also shows the example of a globally approved version. Only the 9.2.0.06 and 9.2.0.07 patches of Oracle 9i R2 are globally approved.
For more multitenancy and Calbro Services examples, see “Multitenancy in the Calbro Services example” on page 93.
Oracle
10.1.0.4
10.1.0.3
9i R2
9.2.0.08
9.2.0.07
9.2.0.06
CalbroServices
CalfinServices
10g R2Oracle
Oracle
10.2.0.4
10.2.0.3
10.2.0.2
10g R1
10.1.0.5
Chapter 1 Introduction to BMC Atrium Product Catalog 21
BMC Atrium Core 7.6.03
Definitive Media Library and approved products
The Definitive Media Library (DML) is an IT Infrastructure Library® (ITIL®) concept. In ITIL v3, the Definitive Media Library replaced the Definitive Software Library that was in v2. The DML is the software products that an organization has reviewed and authorized for use in its production environment. You can define the DML by enabling the Approved option for a product, version, or patch. With the 7.5.00 release of the BMC Atrium Core product, the Definitive Software Library (DSL) product has been renamed to BMC Atrium Product Catalog (Product Catalog). The DML in the Product Catalog stores all products, not just those specified in an ITIL DSL or DML.
In the Product Catalog, you can approve products and specify their storage location. The DML contains the metadata of master product copies and includes not just software metadata but also the metadata of other types of media such as databases and files. Configuration Items (CIs) that are stored in BMC Atrium CMDB can include software, release packages, patches, system images, and so on.
An organization can manage its approved software using the DML, making the DML customer-specific.
As the DML defines approved software, the Product Catalog uses the Definitive Hardware Library (DHL) to designate all approved hardware products in an organization. The DHL is a repository of all approved hardware products in an organization. In the Product Catalog, you can approve hardware products and define their storage location. The CIs of the hardware products are stored in BMC Atrium CMDB.
The procedure to approve products for the DHL is the same as approving products for the DML. For more information, see “Approving products, versions, and patches for DML and DHL” on page 83. Multitenancy is also supported for DHL.
Using the DML and DHLWhen you install the Product Catalog, the DML and DHL are initially empty. To populate the libraries with product entries, you must approve the products in the Product Catalog.
You can approve products in the Product Catalog in the Company and Module Relationships area of the PCT: Product Catalog Setup form. For more information about approving products, see “Approving products, versions, and patches for DML and DHL” on page 83.
You can search for the products in the DML or DHL from the Product Catalog Console. You can select Definitive Media Library or Definitive Hardware Library from the Product Catalog View to view the products listed in the DML or DHL.
22 Product Catalog and DML Guide
Accessing the Product Catalog
Using multitenancy with DML and DHLMultiple organizations can access the software and hardware products from the Product Catalog and maintain separate DMLs and DHLs. With multitenancy support, you can approve products for different organizations. Each organization can manage and approve its own products without being affected by other organizations sharing the same Product Catalog. For each organization, you can approve items at the product, version, or patch level.
For more information about multitenancy, see “Multitenancy support in the Product Catalog” on page 20.
Accessing the Product CatalogYou can manage the Product Catalog using a graphical user interface or APIs:
� Product Catalog Console access
You can access the BMC Atrium Core Console from:
� BMC Remedy User
� A browser
Enter the following URL, and log in:
http://midtierServer:midtierport/arsys
Click the Atrium Core Console link. From the Application Launcher menu, select Applications > Product Catalog.
For more information about accessing the BMC Atrium Core Console, see the BMC Atrium CMDB 7.6.03 User's Guide.
� API access
You can programmatically manage the Product Catalog using the BMC Remedy AR System APIs, including Java™, C++, web services, and forms. For more information, see the BMC Remedy Action Request System 7.6.03 Form and Application Objects Guide and BMC Remedy Action Request System 7.6.03 Java API guides.
Chapter 1 Introduction to BMC Atrium Product Catalog 23
BMC Atrium Core 7.6.03
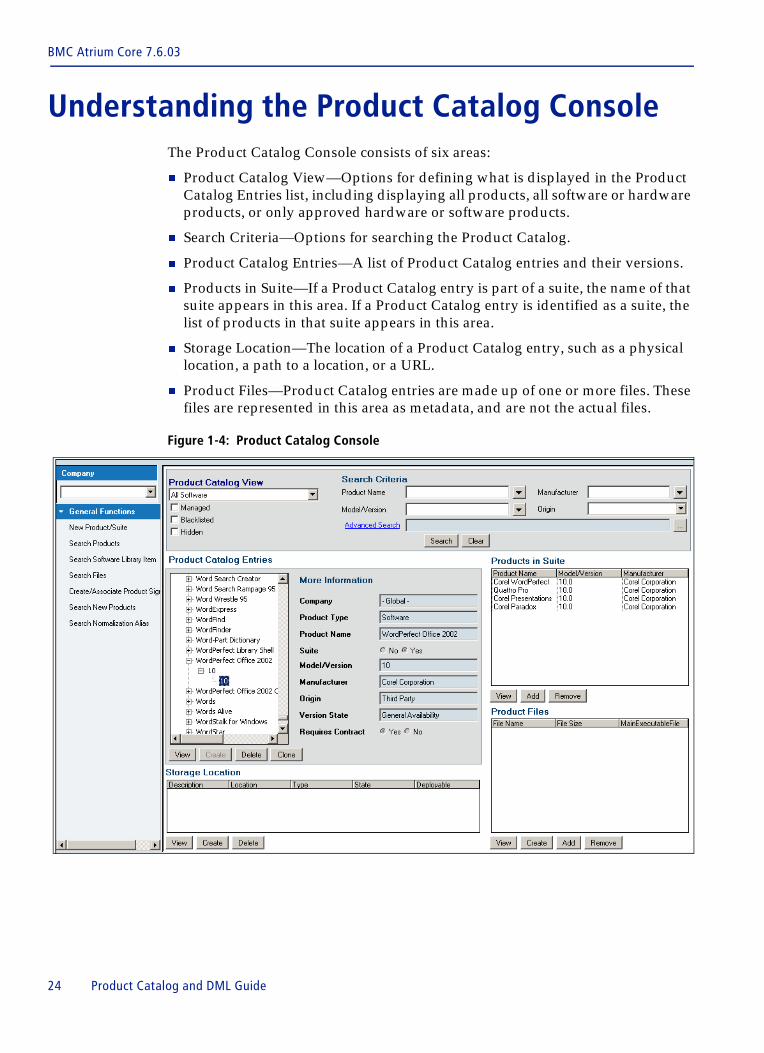
Understanding the Product Catalog ConsoleThe Product Catalog Console consists of six areas:
� Product Catalog View—Options for defining what is displayed in the Product Catalog Entries list, including displaying all products, all software or hardware products, or only approved hardware or software products.
� Search Criteria—Options for searching the Product Catalog.
� Product Catalog Entries—A list of Product Catalog entries and their versions.
� Products in Suite—If a Product Catalog entry is part of a suite, the name of that suite appears in this area. If a Product Catalog entry is identified as a suite, the list of products in that suite appears in this area.
� Storage Location—The location of a Product Catalog entry, such as a physical location, a path to a location, or a URL.
� Product Files—Product Catalog entries are made up of one or more files. These files are represented in this area as metadata, and are not the actual files.
Figure 1-4: Product Catalog Console
24 Product Catalog and DML Guide
Using the Product Catalog and DML with other BMC applications
Using the Product Catalog and DML with other BMC applications
For information about using the Product Catalog with specific BMC applications, see the following documentation:
� BMC Configuration Automation for Clients Report Center Guide, which provides a listing of predefined DML queries located in the Report Center Query Library. For details, see the Service Management integration section in Appendix I, “Query Library list.”
� BMC Configuration Automation for Clients Application Packager Guide, which describes how to store packages created in Application Packager as a Storage Location within the Product Catalog.
� BMC Configuration Automation for Clients Configuration Discovery Integration for CMDB Implementation Guide, which describes how to use the DML in conjunction with BMC Atrium CMDB and Configuration Discovery.
� BMC Configuration Automation for Clients Transmitter and Proxy Guide, which describes how to configure the master transmitter and CMS to work with the DML.
� BMC Remedy Asset Management User’s Guide, which describes how to use the DML within the Asset Management system.
� BMC Remedy Change Management User’s Guide, which describes how to use the DML within the Change Management system.
� BMC Configuration Automation for Clients Package Deployment CLI Guide, which describes how to use Content Replicator to store data as a Storage Location within the Product Catalog.
BMC BladeLogic Client Automation documents and BMC Remedy AR System documents are available at the following website: http://www.bmc.com/support.
Chapter 1 Introduction to BMC Atrium Product Catalog 25

BMC Atrium Core 7.6.03
26 Product Catalog and DML Guide
Chapter
2
Normalization and the Product CatalogThis section presents an overview of how normalization and the Product Catalog fit together and interact to normalize configuration items (CIs). This section also provides information about the different aliases used in by the Normalization Engine and the Product Catalog.
The following topics are provided:
� Overview of normalization and the Product Catalog (page 28)� Configuring the Product Catalog for normalization (page 29)� Configuring the Normalization Engine to populate Product Catalog entries
(page 30)
Chapter 2 Normalization and the Product Catalog 27
BMC Atrium Core 7.6.03
Overview of normalization and the Product Catalog
As part of BMC Atrium CMDB, the Normalization Engine provides a centralized, customizable, and uniform way to overcome consistency problems by normalizing attributes for hardware and software products. The Normalization Engine and Product Catalog interact with each other in two ways:
� The Normalization Engine requires the Product Catalog to normalize CI attributes.
� The Normalization Engine can create Product Catalog entries when it does not find a matching product for a CI.
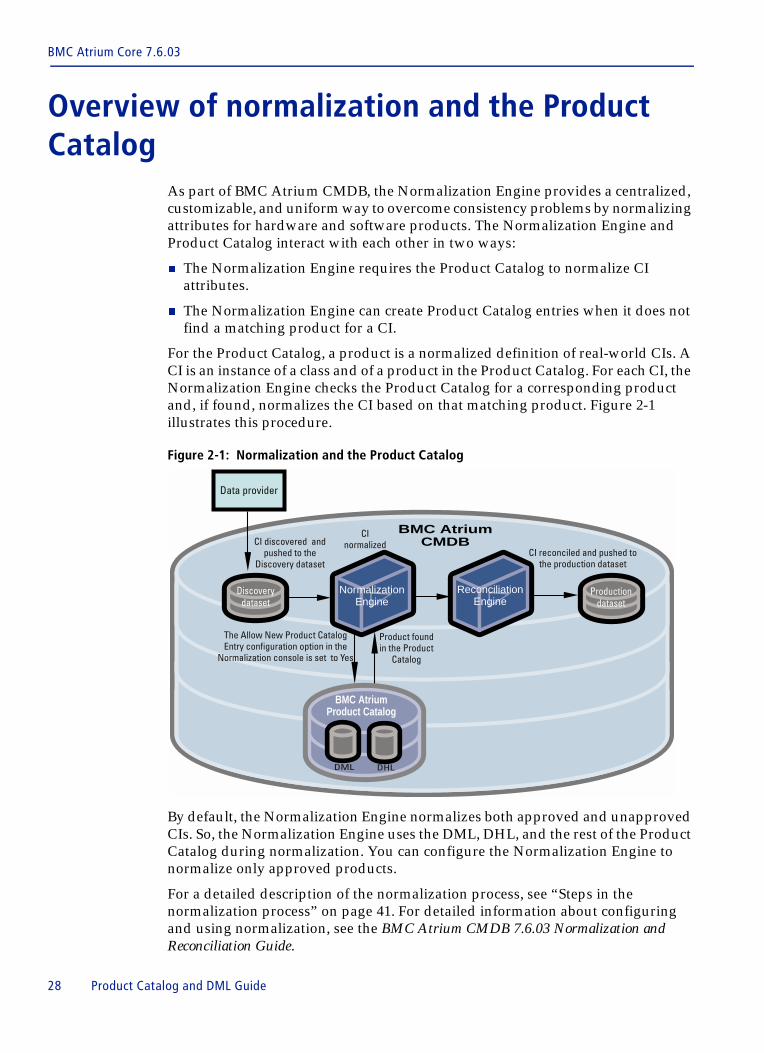
For the Product Catalog, a product is a normalized definition of real-world CIs. A CI is an instance of a class and of a product in the Product Catalog. For each CI, the Normalization Engine checks the Product Catalog for a corresponding product and, if found, normalizes the CI based on that matching product. Figure 2-1 illustrates this procedure.
Figure 2-1: Normalization and the Product Catalog
By default, the Normalization Engine normalizes both approved and unapproved CIs. So, the Normalization Engine uses the DML, DHL, and the rest of the Product Catalog during normalization. You can configure the Normalization Engine to normalize only approved products.
For a detailed description of the normalization process, see “Steps in the normalization process” on page 41. For detailed information about configuring and using normalization, see the BMC Atrium CMDB 7.6.03 Normalization and Reconciliation Guide.
CI discovered and pushed to the
Discovery dataset
Product found in the Product
Catalog
CI normalized
CI reconciled and pushed to the production dataset
The Allow New Product Catalog Entry configuration option in the
Normalization console is set to Yes
Normalization Engine
Reconciliation Engine
BMC AtriumCMDB
Discoverydataset
Productiondataset
Data provider
BMC AtriumProduct Catalog
DML DHL
28 Product Catalog and DML Guide
Configuring the Product Catalog for normalization
Configuring the Product Catalog for normalization
For the Normalization Engine to normalize CIs successfully, you must complete the following steps to configure the Product Catalog.
Step 1 Create or import Product Catalog entries for the class instances that you want to normalize.
Because the Normalization Engine uses product definitions to normalize CIs, you must populate the Product Catalog by importing products, manually creating products, or using the Normalization Engine to create products. For more information about methods to populate the Product Catalog, see “Creating Product Catalog entries” on page 50.
Step 2 With the NE:ProductNameAlias form, create product and manufacturer aliases.
For most CIs, the Normalization Engine finds Product Catalog entries for a CI with the values for the CI’s Model and ManufacturerName attributes. If one of these do not match that for a Product Catalog entry, you can prevent CIs from failing normalization by correcting a Model or ManufacturerName value with an alias.
In the normalization workflow, the Normalization Engine always checks for a Model or ManufacturerName alias. If the CI has a Model or ManufacturerName alias, the Normalization Engine replaces the CI’s Model or ManufacturerName attribute value with the alias and searches for an entry in the Product Catalog.
For more information, see “Creating product name and manufacturer aliases” on page 67.
Step 3 Create product categorization aliases for the following reasons:
� If the combination of the values of Product Category, Product Type, Product Item, Product Name, and Manufacturer/Vendor is not in the Product Catalog data. Or, if these values are in the Product Catalog but are not related to the company for whom the CI is being submitted.
� If a CI’s Model or ManufacturerName attribute has no value. For more information about null values and normalization, see the BMC Atrium CMDB 7.6.03 Normalization and Reconciliation Guide.
� If the Allow new Product Catalog entry option is enabled in the Normalization Engine.
Step 4 After setting up normalization, run the Normalization Simulation utility to preview normalization results.
If the Normalization Engine failed to normalize CIs, the utility notes whether the a Model or ManufacturerName value is null. You can create aliases for these failed CIs. For more information about the Normalization Simulation utility, see the BMC Atrium CMDB 7.6.03 Normalization and Reconciliation Guide.
Chapter 2 Normalization and the Product Catalog 29

BMC Atrium Core 7.6.03
Configuring the Normalization Engine to populate Product Catalog entries
If you use the option to create Product Catalog entries with the Normalization Engine, you must complete the following steps to make sure that the products are correctly created.
For more information about configuring normalization and using the Normalization Simulation utility, see the BMC Atrium CMDB 7.6.03 Normalization and Reconciliation Guide.
Step 1 From the Configuration Editor in the Normalization console, enable the Allow New Product Catalog Entry option for a dataset.
This option cannot be enabled only for certain classes. Make sure that the CIs in such a dataset have been manually normalized.
Step 2 From the Configuration Editor in the Normalization console, enable the Version Normalization Feature option for a dataset.
Step 3 From the Normalization Features in the Normalization console, make sure that the appropriate Version Rollup rules are activated.
The Version Rollup rules enable you to normalize multiple version strings to a common market version value.
Step 4 From the Configuration Editor in the Normalization console, enable the Suite Rollup Normalization Feature option for a dataset.
Step 5 From Normalization Features in the Normalization console, configure the appropriate Suite Rollup rules.
You can use the Suite Rollup feature to create new suites in the Product Catalog and assign existing products to the suites. The Suite Rollup rules can also identify instances as a suite or suite component.
Step 6 After setting up normalization, run the Normalization Simulation utility to preview normalization results.
Step 7 From the Normalization console, create and run a normalization job.
Step 8 In the Product Catalog Console, after the normalization job runs, review the new Product Catalog entries and make changes to their status flags as needed.
30 Product Catalog and DML Guide
Chapter
3
Planning and implementing categorizationProduct categorization is leveraged by multiple BMC applications. By understanding the product-specific use of categorization, you can determine the impact when setting up product categorization or when making additions and changes to the product category structure.
Whether you are setting up the product categorization from scratch or fine-tuning the best practice values to fit your needs, the best practice guidelines in this book can help you avoid common pitfalls.
The values provided in Appendix A, “Best practice categorization” have been defined using experience gained during many service management implementations. You can use these values to more quickly implement any of the applications that use product categorization.
The following topics are provided:
� Overview of product categorization (page 32)� Benefits of categorization (page 32)� Use of product categorization by BMC products (page 33)� Implementing categorization (page 47)
Chapter 3 Planning and implementing categorization 31
BMC Atrium Core 7.6.03
Overview of product categorizationProduct categorization divides CIs into groups. Using the three-tier structure of product categorization, you can create successively smaller, more tightly defined groups. You can create groups of CIs in Tier 1. In Tier 2, you can define smaller groups of each of those groups. In Tier 3, you can create even smaller groups within these groups.
For example, you might use Tier 1 to divide CIs into hardware and software groups. Within the hardware group, you might define Tier 2 groups for disk device, peripheral, processing unit, and virtual systems. Within processing unit, you might define Tier 3 groups for desktop, laptop, mainframe, personal digital assistant, and server.
The associated Product Name and Manufacturer fields provide the opportunity to achieve to an even more fine-grained grouping of CIs. Version can be specified on CIs but is not part of the Product Catalog.
Product categorization is defined in the Product Catalog. CIs stored in BMC Atrium CMDB include this categorization in equivalent fields defined at the BMC_BaseElement CDM class level, as show in Table 3-1.
Benefits of categorizationA well-thought-out product categorization structure is used to more efficiently perform the following activities:
� Reporting
� Searching
� Workflow
Even though the product categorization is focused on the categorization of CIs, the BMC Remedy ITSM suite, and other BMC products use product categorization. The different ways in which the product categorization can be leveraged are described in the following section.
Table 3-1: Product categorization fields on the CI and in the Product Catalog
Categorization fields in the Product Catalog
Categorization attributes on the CI
Example values
Tier 1 Category Hardware
Tier 2 Type Processing Unit
Tier 3 Item Server
Manufacturer ManufacturerName IBM® Corporation
Product Name Model IBM x445
32 Product Catalog and DML Guide

Use of product categorization by BMC products
Use of product categorization by BMC products
In addition to dividing CIs into groups, the same product categorization structure is also used to classify other entities within BMC Remedy IT Service Management, such as incidents and change requests. This section lists the records that use the product categorization, and it also documents the product features that use this classification. This information can help you to determine the impact of the product categorization structure being planned.
Records that use product categorizationTable 3-2 lists how product categorization is used to classify records throughout BMC products.
Table 3-2: Use of product categorization to classify records (part 1 of 3)
Product Entity Description
BMC Atrium CMDB CIs A CI is any item that must be managed to deliver an IT service. Information about each CI is recorded in the BMC Atrium CMDB.Product categorization is used to classify CIs.
BMC Remedy Asset Management
Bulk inventory BMC Remedy Asset Management extends BMC Atrium CMDB with a class for bulk inventory. Bulk inventory items are ordered in quantity and are not tracked by an individual record for each item. The total quantity of a bulk inventory item is tracked against reorder levels. Product categorization is used to classify bulk inventory CIs.
Schedules Schedules can be created to notify IT or asset management personnel (or to create a change request) when maintenance for CIs is necessary. For example, an IT technician might perform routine maintenance for all printers in a company once every six months.Product categorization is used to search for CIs to relate to the schedule.
Chapter 3 Planning and implementing categorization 33
BMC Atrium Core 7.6.03
BMC Remedy Change Management
Change requests A change is the addition, modification, or removal of anything that could have an effect on IT services. Change Management is the process that controls the lifecycle of all changes.Product categorization applied to change requests can be used to automatically route the requests for assignment and approval.
Tasks and task templates A task is a unit of work that must be completed to implement an incident, problem investigation, or change request. In the BMC Remedy Change Management application, an administrator can create task templates that can be reused for the same type of requests.Product categorization can be used to determine the applicable task template for a change request.
BMC Atrium Product Catalog
Product Catalog entries A Product Catalog entry is an entry in the Product Catalog that represents the master name of a software, hardware, service, or other CI.The Product Catalog includes the three tiers of categorization, together with the product name and manufacturer.In BMC Remedy Asset Management, Product Catalog entries can be related to software contracts. Software License Management matches the product categorization of CIs to Product Catalog entries that are related to software contracts to determine the utilization of software contracts.
BMC Remedy Knowledge Management
Solutions Reusable solutions to customer problems are stored in a database. Product categorization can be used to match solutions with incidents and requests.
Table 3-2: Use of product categorization to classify records (part 2 of 3)
Product Entity Description
34 Product Catalog and DML Guide
Use of product categorization by BMC products
BMC Remedy Service Desk (a BMC Remedy ITSM application)
Incidents An incident is an unplanned interruption to an IT service or a reduction in the quality of an IT service. In BMC Remedy ITSM, product categorization can be used to classify the incident, and can also be used to classify the resolution of the incident.Categorization can be used in the incident matching function to search for applicable solutions, incidents, known errors, and problem investigations. Categorization can also be used to automatically assign the incident to the appropriate support group.
Known errors A known error is a problem that has been successfully diagnosed and for which a temporary workaround or permanent solution has been identified.When a known error is categorized, it can be matched to incidents. Categorization can also be used to automatically assign the known error to the appropriate support group.
Problem investigations A problem is the root cause of one or more incidents. Problem Management is the process that manages the lifecycle of all problems.When a problem investigation is categorized, it can be matched to incidents. Categorization can also be used to automatically assign the problem investigation to the appropriate support group.
Script mapping Scripts are detailed instructions that are set up by an administrator to prompt users with questions that can assist with resolving or assigning an incident.Script mapping determines which scripts are available for an incident. Product categorization can be used to determine the applicable script for an incident.
BMC Atrium Product Catalog
Product Catalog entries A Product Catalog entry is an entry in the Product Catalog that represents the master name of a software application.In BMC Remedy Asset Management, Product Catalog entries can be related to software contracts. Software License Management matches the product categorization of CIs to Product Catalog entries that are related to software contracts to determine the utilization of software contracts.
Table 3-2: Use of product categorization to classify records (part 3 of 3)
Product Entity Description
Chapter 3 Planning and implementing categorization 35
BMC Atrium Core 7.6.03
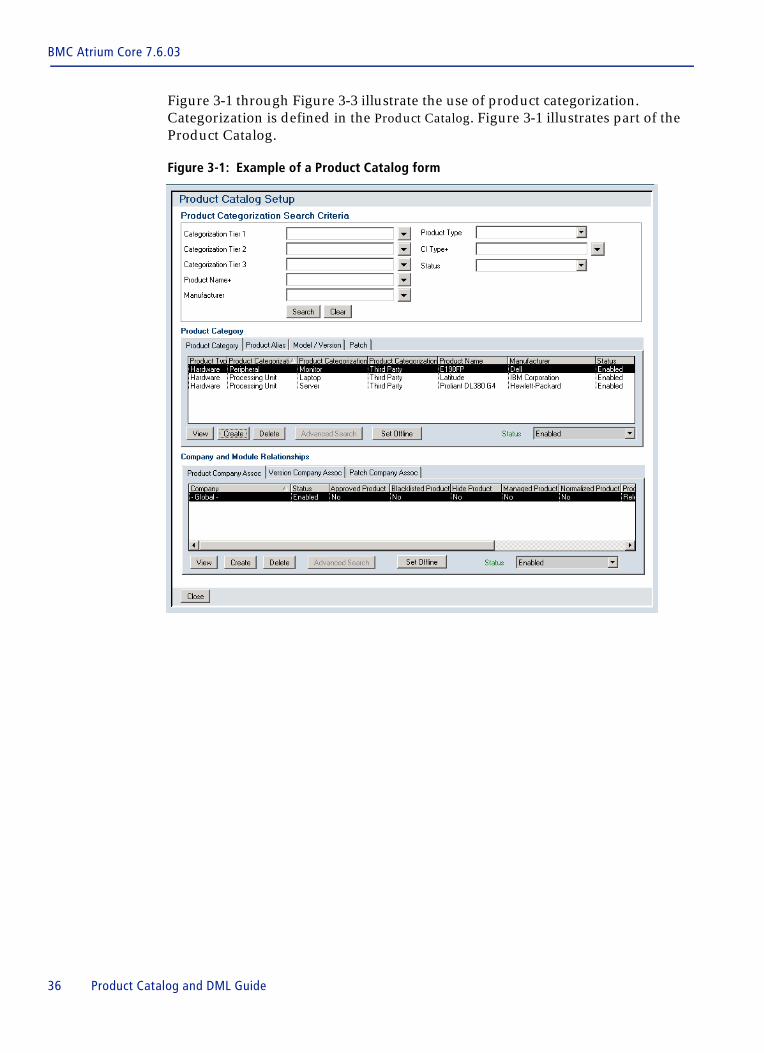
Figure 3-1 through Figure 3-3 illustrate the use of product categorization. Categorization is defined in the Product Catalog. Figure 3-1 illustrates part of the Product Catalog.
Figure 3-1: Example of a Product Catalog form
36 Product Catalog and DML Guide
Use of product categorization by BMC products
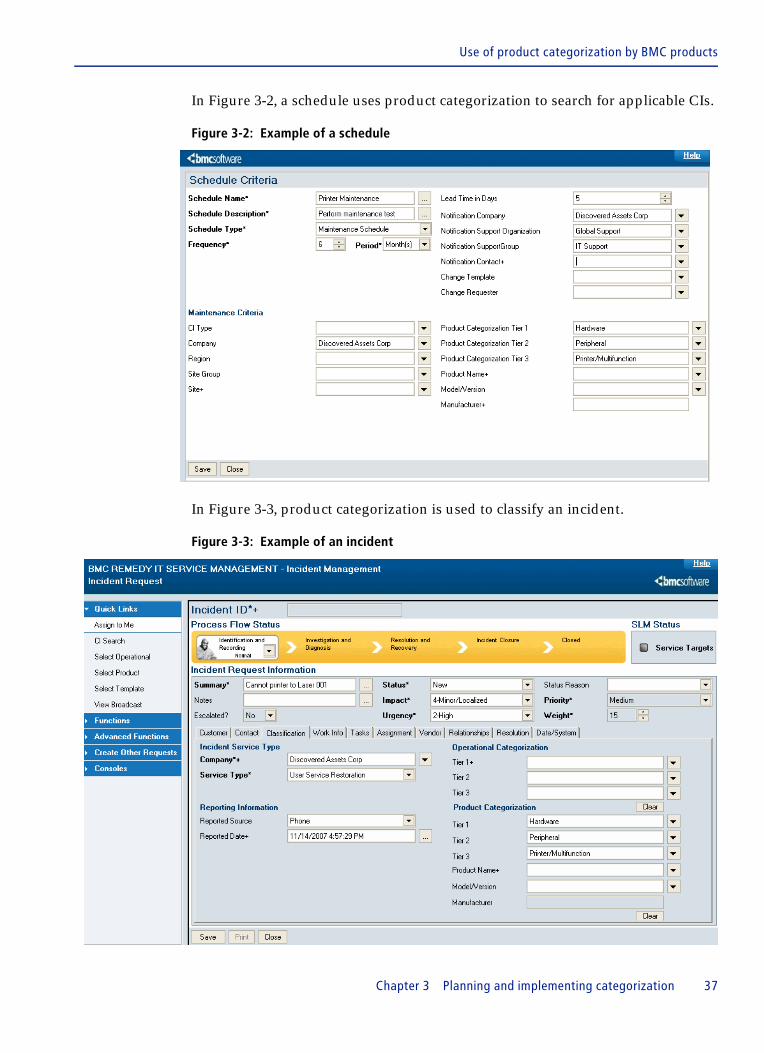
In Figure 3-2, a schedule uses product categorization to search for applicable CIs.
Figure 3-2: Example of a schedule
In Figure 3-3, product categorization is used to classify an incident.
Figure 3-3: Example of an incident
Chapter 3 Planning and implementing categorization 37
BMC Atrium Core 7.6.03
BMC product features that use product categorizationThe classification of the records listed in Table 3-2 on page 33 is used to provide the following reporting, searching, and workflow capabilities:
Reporting
� Analytics
� Dashboards
� Reports included with the product
Searching
� Incident matching
� BMC Remedy Knowledge Management
� Online searches
Workflow
� Approval—Approval routings for change requests can be configured to be automatically applied based on product categorization.
� Assignment—For all entities that can be assigned (such as incidents, change requests, and CI unavailability), workflow can be configured to automatically assign entities to the appropriate support group based on product categorization.
� Depreciation—In BMC Remedy Asset Management, the CI depreciation method can be configured to be automatically applied based on product categorization.
� Discovery—BMC Discovery and BMC Configuration Automation for Clients Configuration Discovery Integration for CMDB assign three tiers of categorization to CIs that they discover.
� Notifications—In BMC Remedy Asset Management, notifications can be configured to be sent automatically upon the state transition of a CI, such as when a CI is deployed or is down. This notification can be configured based on product categorization.
� Service Level Management—Product categorization values can be used to set conditions to determine whether a Service Level Agreement (SLA) applies.
� Software License Management—Software License Management matches the product categorization of CIs to Product Catalog entries that are related to software contracts to determine the use of software contracts.
38 Product Catalog and DML Guide
Use of product categorization by BMC products
Product categorization and discoveryCIs in BMC Atrium CMDB require valid product categorization. When a CI is discovered, it must include valid product categorization.
Before inserting or updating a CI in BMC Atrium CMDB, BMC Atrium Core categorize the CI by one of the following methods:
� If the CI has a class of BMC_Product, BMC Atrium Core look up the CI in the Product Catalog. (For BMC Atrium Discovery, this is a local copy of the Product Catalog.) If the product finds a match for the CI, it applies the categorization from the Product Catalog to the CI. The three tiers of categorization used in the Product Catalog are Software, Application, and Thirdparty.
� If the CI has a class other than BMC_Product or is not found in the Product Catalog, products referring Product Catalog (see Table 3-3 on page 40) use an XML file to determine the categorization of the CI. Whether this XML file is the default product categorization or the best practice categorization is selected during installation of the product. For more information about default categorization, see “Default product categorization data in BMC Atrium Core” on page 40.
When a CI is inserted or updated in BMC Atrium CMDB, the Normalization Engine makes sure that CIs are inserted only with valid categorization.
In a typical CMDB deployment, all new CIs or CI updates are first added to import datasets, which are then normalized and reconciled with the production dataset. You can set up a normalization job so that, whenever a CI is submitted to be created or updated, the CI’s attributes are normalized with the values defined in the Product Catalog.
The Normalization Engine checks against the Product Catalog, which stores the definition of categorization data, and either validates or rejects the CI. For more information about the normalization process, see “Steps in the normalization process” on page 41.
Chapter 3 Planning and implementing categorization 39
BMC Atrium Core 7.6.03
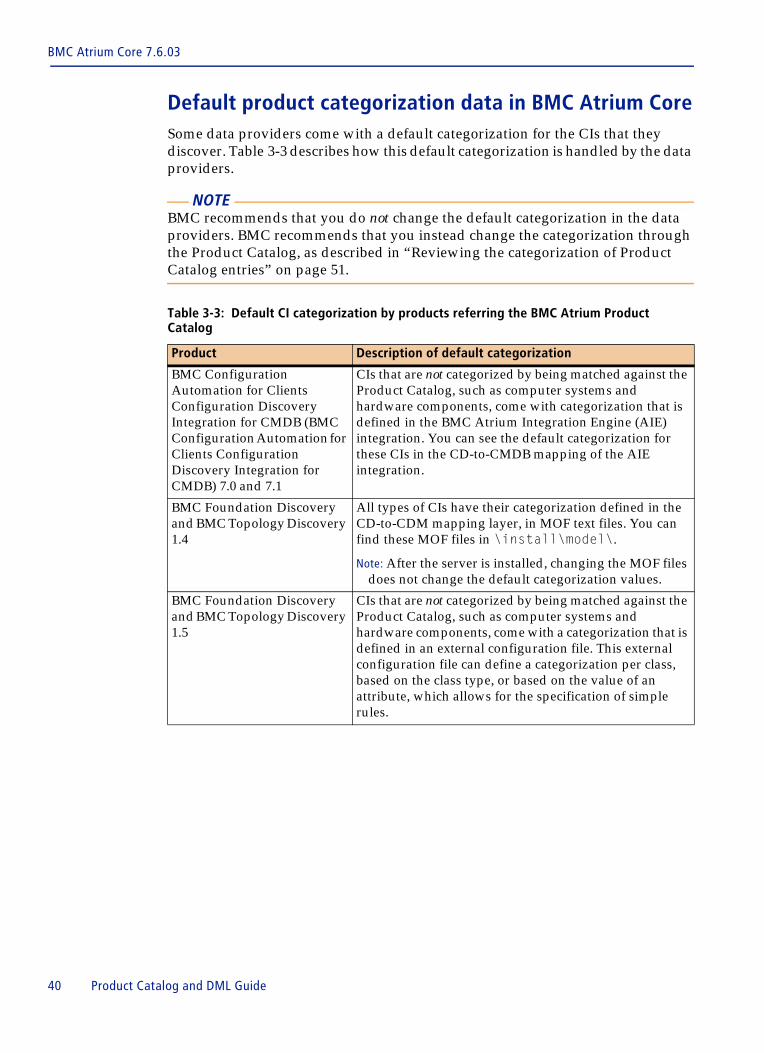
Default product categorization data in BMC Atrium CoreSome data providers come with a default categorization for the CIs that they discover. Table 3-3 describes how this default categorization is handled by the data providers.
NOTE BMC recommends that you do not change the default categorization in the data providers. BMC recommends that you instead change the categorization through the Product Catalog, as described in “Reviewing the categorization of Product Catalog entries” on page 51.
Table 3-3: Default CI categorization by products referring the BMC Atrium Product Catalog
Product Description of default categorization
BMC Configuration Automation for Clients Configuration Discovery Integration for CMDB (BMC Configuration Automation for Clients Configuration Discovery Integration for CMDB) 7.0 and 7.1
CIs that are not categorized by being matched against the Product Catalog, such as computer systems and hardware components, come with categorization that is defined in the BMC Atrium Integration Engine (AIE) integration. You can see the default categorization for these CIs in the CD-to-CMDB mapping of the AIE integration.
BMC Foundation Discovery and BMC Topology Discovery 1.4
All types of CIs have their categorization defined in the CD-to-CDM mapping layer, in MOF text files. You can find these MOF files in \install\model\.
Note: After the server is installed, changing the MOF files does not change the default categorization values.
BMC Foundation Discovery and BMC Topology Discovery 1.5
CIs that are not categorized by being matched against the Product Catalog, such as computer systems and hardware components, come with a categorization that is defined in an external configuration file. This external configuration file can define a categorization per class, based on the class type, or based on the value of an attribute, which allows for the specification of simple rules.
40 Product Catalog and DML Guide

Use of product categorization by BMC products
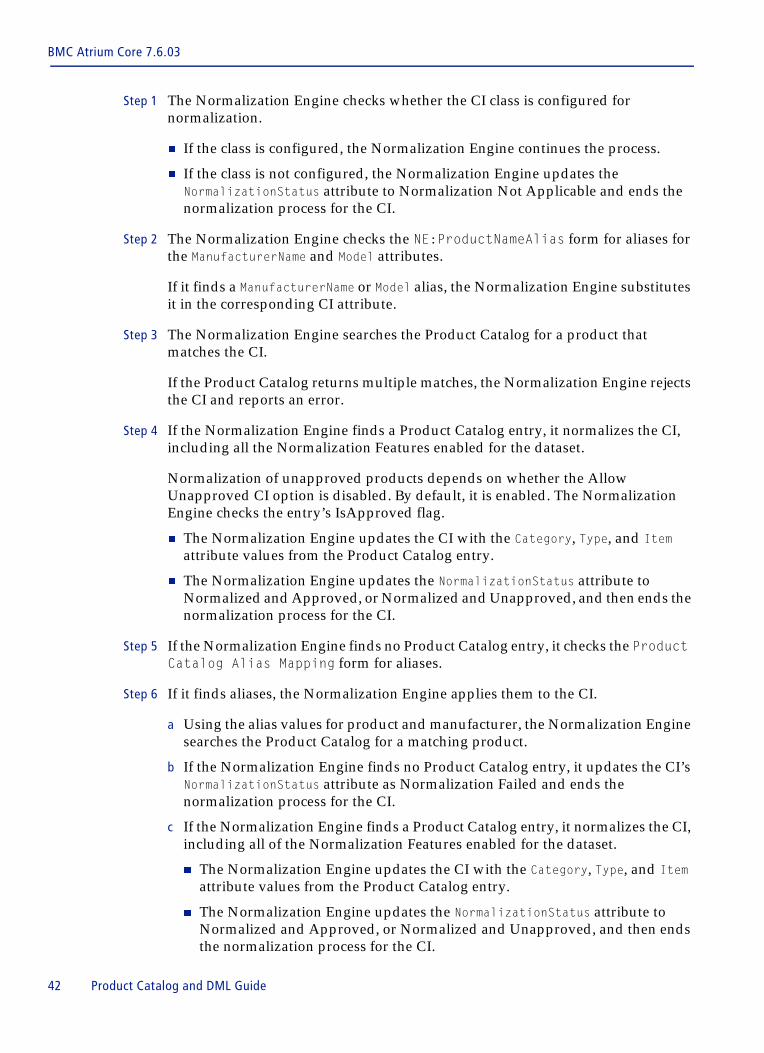
Steps in the normalization processThe Normalization Engine performs validation against different scenarios. The CI being validated falls into one of the scenarios indicated in the following steps. The Normalization Engine performs validation sequentially. The steps illustrated in Figure 3-4 describe the checks and actions performed in this process.
Figure 3-4: Normalization process
Is class set up for normalization?
Update the NormalizationStatus
attribute and exit
Replace product and manufacturer names from the NE:ProductNameAlias
form
Search for the product in the Product Catalog Is there an entry?
Normalize CI and update the
NormalizationStatus attribute
Yes
Yes
No
No
Is there an alias in the Product Catalog Alias
Mapping form?
Yes No
Use mapped values
Search for the product in the
Product CatalogIs there an entry?
Allow New Product Catalog
Entry option enabled?
Get CTI values and replace them
in the CI
Yes
No
Update the NormalizationStatus
attribute and exit
Create entry in the Product Catalog
Yes
No
Is there an alias in NE:ProductNameAlias
form?
Use supplied product and manufacturer
names
No
Yes
2 3
1
4
6
5
7
Chapter 3 Planning and implementing categorization 41
BMC Atrium Core 7.6.03
Step 1 The Normalization Engine checks whether the CI class is configured for normalization.
� If the class is configured, the Normalization Engine continues the process.
� If the class is not configured, the Normalization Engine updates the NormalizationStatus attribute to Normalization Not Applicable and ends the normalization process for the CI.
Step 2 The Normalization Engine checks the NE:ProductNameAlias form for aliases for the ManufacturerName and Model attributes.
If it finds a ManufacturerName or Model alias, the Normalization Engine substitutes it in the corresponding CI attribute.
Step 3 The Normalization Engine searches the Product Catalog for a product that matches the CI.
If the Product Catalog returns multiple matches, the Normalization Engine rejects the CI and reports an error.
Step 4 If the Normalization Engine finds a Product Catalog entry, it normalizes the CI, including all the Normalization Features enabled for the dataset.
Normalization of unapproved products depends on whether the Allow Unapproved CI option is disabled. By default, it is enabled. The Normalization Engine checks the entry’s IsApproved flag.
� The Normalization Engine updates the CI with the Category, Type, and Item attribute values from the Product Catalog entry.
� The Normalization Engine updates the NormalizationStatus attribute to Normalized and Approved, or Normalized and Unapproved, and then ends the normalization process for the CI.
Step 5 If the Normalization Engine finds no Product Catalog entry, it checks the Product Catalog Alias Mapping form for aliases.
Step 6 If it finds aliases, the Normalization Engine applies them to the CI.
a Using the alias values for product and manufacturer, the Normalization Engine searches the Product Catalog for a matching product.
b If the Normalization Engine finds no Product Catalog entry, it updates the CI’s NormalizationStatus attribute as Normalization Failed and ends the normalization process for the CI.
c If the Normalization Engine finds a Product Catalog entry, it normalizes the CI, including all of the Normalization Features enabled for the dataset.
� The Normalization Engine updates the CI with the Category, Type, and Item attribute values from the Product Catalog entry.
� The Normalization Engine updates the NormalizationStatus attribute to Normalized and Approved, or Normalized and Unapproved, and then ends the normalization process for the CI.
42 Product Catalog and DML Guide
Use of product categorization by BMC products
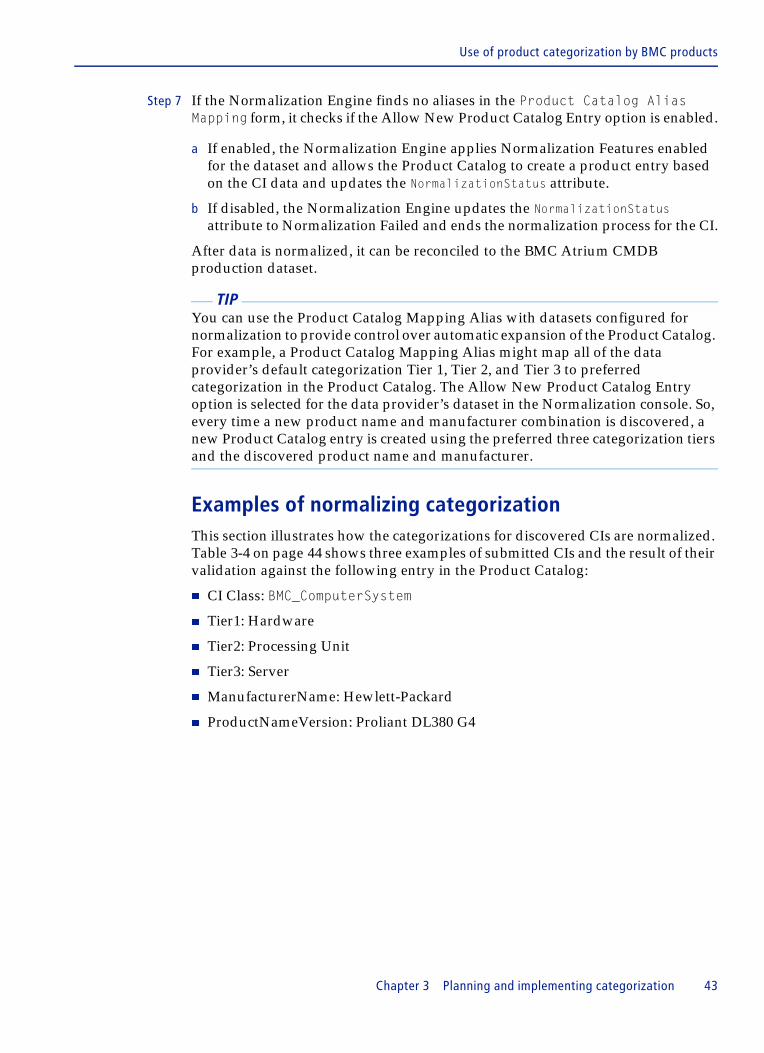
Step 7 If the Normalization Engine finds no aliases in the Product Catalog Alias Mapping form, it checks if the Allow New Product Catalog Entry option is enabled.
a If enabled, the Normalization Engine applies Normalization Features enabled for the dataset and allows the Product Catalog to create a product entry based on the CI data and updates the NormalizationStatus attribute.
b If disabled, the Normalization Engine updates the NormalizationStatus attribute to Normalization Failed and ends the normalization process for the CI.
After data is normalized, it can be reconciled to the BMC Atrium CMDB production dataset.
TIP You can use the Product Catalog Mapping Alias with datasets configured for normalization to provide control over automatic expansion of the Product Catalog. For example, a Product Catalog Mapping Alias might map all of the data provider’s default categorization Tier 1, Tier 2, and Tier 3 to preferred categorization in the Product Catalog. The Allow New Product Catalog Entry option is selected for the data provider’s dataset in the Normalization console. So, every time a new product name and manufacturer combination is discovered, a new Product Catalog entry is created using the preferred three categorization tiers and the discovered product name and manufacturer.
Examples of normalizing categorizationThis section illustrates how the categorizations for discovered CIs are normalized. Table 3-4 on page 44 shows three examples of submitted CIs and the result of their validation against the following entry in the Product Catalog:
� CI Class: BMC_ComputerSystem
� Tier1: Hardware
� Tier2: Processing Unit
� Tier3: Server
� ManufacturerName: Hewlett-Packard
� ProductNameVersion: Proliant DL380 G4
Chapter 3 Planning and implementing categorization 43
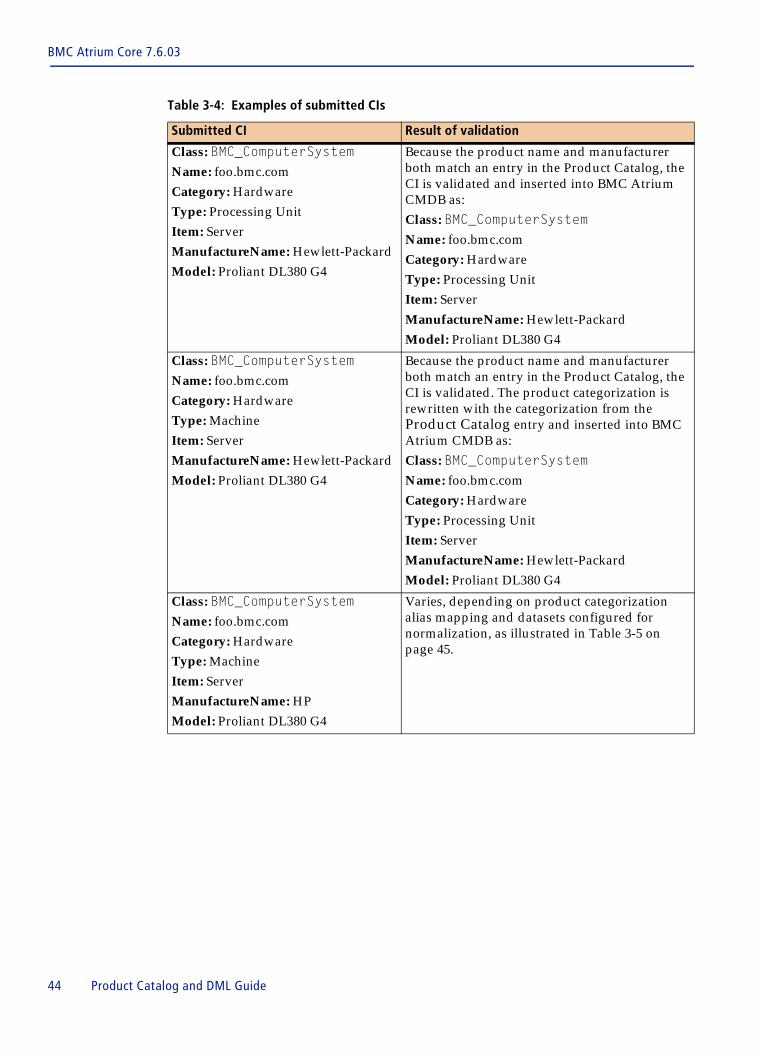
BMC Atrium Core 7.6.03
Table 3-4: Examples of submitted CIs
Submitted CI Result of validation
Class: BMC_ComputerSystemName: foo.bmc.comCategory: HardwareType: Processing UnitItem: ServerManufactureName: Hewlett-PackardModel: Proliant DL380 G4
Because the product name and manufacturer both match an entry in the Product Catalog, the CI is validated and inserted into BMC Atrium CMDB as:Class: BMC_ComputerSystemName: foo.bmc.comCategory: HardwareType: Processing UnitItem: Server
ManufactureName: Hewlett-PackardModel: Proliant DL380 G4
Class: BMC_ComputerSystemName: foo.bmc.comCategory: HardwareType: MachineItem: ServerManufactureName: Hewlett-PackardModel: Proliant DL380 G4
Because the product name and manufacturer both match an entry in the Product Catalog, the CI is validated. The product categorization is rewritten with the categorization from the Product Catalog entry and inserted into BMC Atrium CMDB as:Class: BMC_ComputerSystemName: foo.bmc.comCategory: HardwareType: Processing UnitItem: ServerManufactureName: Hewlett-PackardModel: Proliant DL380 G4
Class: BMC_ComputerSystemName: foo.bmc.comCategory: HardwareType: MachineItem: ServerManufactureName: HPModel: Proliant DL380 G4
Varies, depending on product categorization alias mapping and datasets configured for normalization, as illustrated in Table 3-5 on page 45.
44 Product Catalog and DML Guide
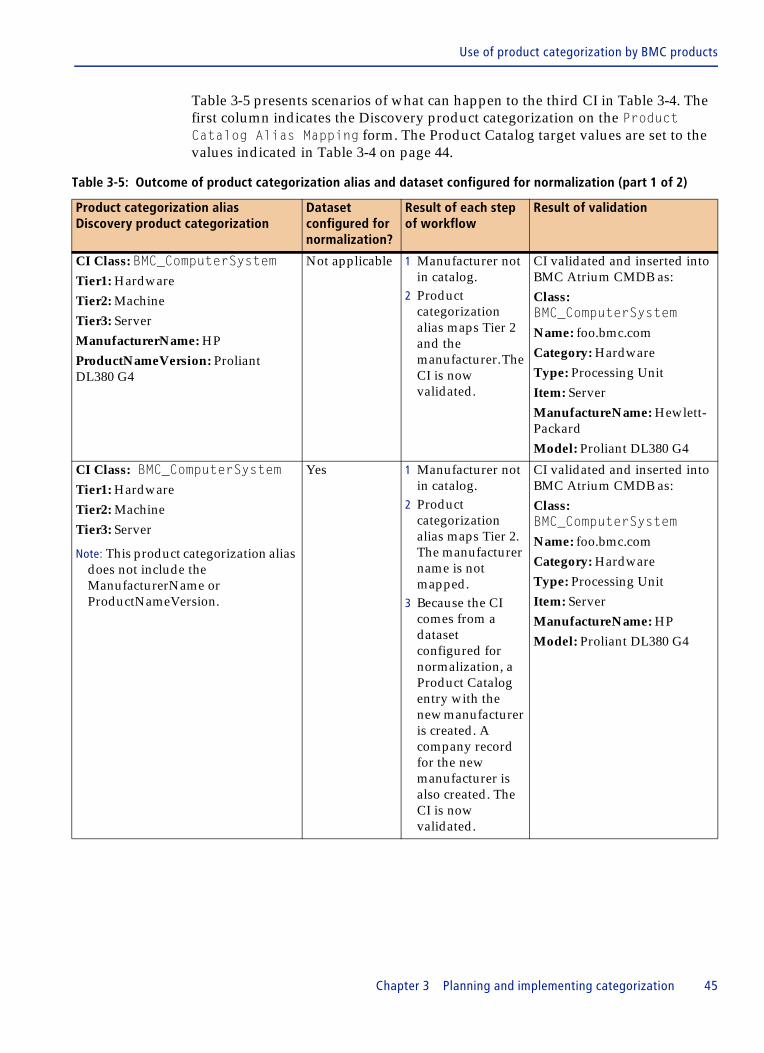
Use of product categorization by BMC products
Table 3-5 presents scenarios of what can happen to the third CI in Table 3-4. The first column indicates the Discovery product categorization on the Product Catalog Alias Mapping form. The Product Catalog target values are set to the values indicated in Table 3-4 on page 44.
Table 3-5: Outcome of product categorization alias and dataset configured for normalization (part 1 of 2)
Product categorization aliasDiscovery product categorization
Dataset configured for normalization?
Result of each step of workflow
Result of validation
CI Class: BMC_ComputerSystemTier1: HardwareTier2: MachineTier3: ServerManufacturerName: HPProductNameVersion: Proliant DL380 G4
Not applicable 1 Manufacturer not in catalog.
2 Product categorization alias maps Tier 2 and the manufacturer. The CI is now validated.
CI validated and inserted into BMC Atrium CMDB as:Class: BMC_ComputerSystemName: foo.bmc.comCategory: HardwareType: Processing UnitItem: ServerManufactureName: Hewlett-PackardModel: Proliant DL380 G4
CI Class: BMC_ComputerSystemTier1: HardwareTier2: MachineTier3: Server
Note: This product categorization alias does not include the ManufacturerName or ProductNameVersion.
Yes 1 Manufacturer not in catalog.
2 Product categorization alias maps Tier 2. The manufacturer name is not mapped.
3 Because the CI comes from a dataset configured for normalization, a Product Catalog entry with the new manufacturer is created. A company record for the new manufacturer is also created. The CI is now validated.
CI validated and inserted into BMC Atrium CMDB as:Class: BMC_ComputerSystemName: foo.bmc.comCategory: HardwareType: Processing UnitItem: ServerManufactureName: HPModel: Proliant DL380 G4
Chapter 3 Planning and implementing categorization 45
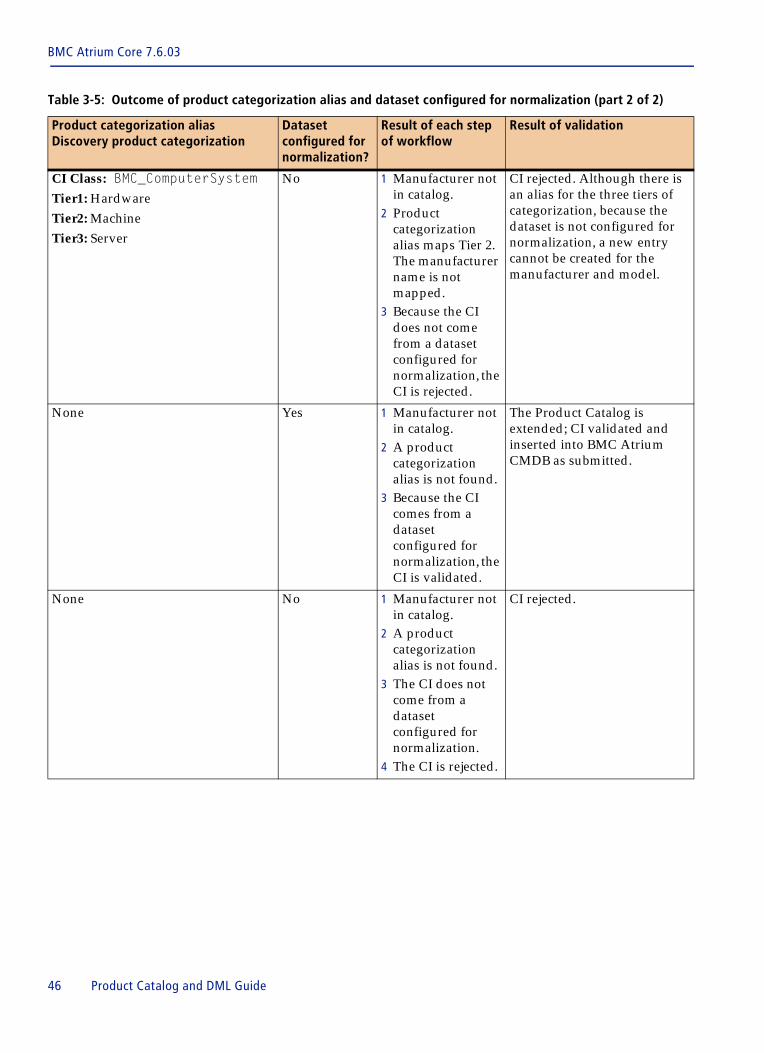
BMC Atrium Core 7.6.03
CI Class: BMC_ComputerSystemTier1: HardwareTier2: MachineTier3: Server
No 1 Manufacturer not in catalog.
2 Product categorization alias maps Tier 2. The manufacturer name is not mapped.
3 Because the CI does not come from a dataset configured for normalization, the CI is rejected.
CI rejected. Although there is an alias for the three tiers of categorization, because the dataset is not configured for normalization, a new entry cannot be created for the manufacturer and model.
None Yes 1 Manufacturer not in catalog.
2 A product categorization alias is not found.
3 Because the CI comes from a dataset configured for normalization, the CI is validated.
The Product Catalog is extended; CI validated and inserted into BMC Atrium CMDB as submitted.
None No 1 Manufacturer not in catalog.
2 A product categorization alias is not found.
3 The CI does not come from a dataset configured for normalization.
4 The CI is rejected.
CI rejected.
Table 3-5: Outcome of product categorization alias and dataset configured for normalization (part 2 of 2)
Product categorization aliasDiscovery product categorization
Dataset configured for normalization?
Result of each step of workflow
Result of validation
46 Product Catalog and DML Guide
Implementing categorization
Implementing categorizationTo implement categorization for BMC Atrium Core, you must complete the following steps:
Step 1 Define the product categorization structure.
To build a comprehensive and consistent product categorization structure, BMC recommends that you first identify all distinct entities that will be stored in BMC Atrium CMDB.
If you have already defined a product categorization structure, you can skip this step. Otherwise, use the guidelines described in “Defining the product categorization structure” on page 47.
For a comprehensive example of product categorizations, see Appendix A, “Best practice categorization.”
Step 2 Set up the categorization data, including the Product Catalog and product categorization aliases.
Product categorization aliases map CI categorization coming from data providers to the categorization you defined in the Product Catalog. For more information, see “Setting up product categorization data” on page 49.
Defining the product categorization structureBMC Atrium Core products provide a categorization structure, but you can define your own categorization structure in BMC Remedy IT Service Management.
BMC recommends that you note the following points when you define the product categorization structure:
� BMC Atrium Discovery and BMC Configuration Automation for Clients Configuration Discovery Integration for BMC Atrium CMDB can be installed with either default categorization or best practice categorization. The default categorization matches the version installed with BMC Topology Discovery 1.4.00 and earlier. The best practice categorization is listed in Appendix A, “Best practice categorization.”
� You must use the same categorization in both discovery products, which can extend your Product Catalog. If you use different categorization for the BMC Atrium Core products, extensions to the BMC Atrium Core will be inconsistent.
� You can override all or part of the BMC discovery products categorization with categorization that you define.
Chapter 3 Planning and implementing categorization 47
BMC Atrium Core 7.6.03
BMC recommends that you adhere to the following guidelines when adding new values to the product categorization or modifying existing product categorization values:
� Do not include brand names or manufacturer names.
This additional information for CIs can be captured in the Product Name, Model/Version, and Manufacturer fields.
� Limit the number of values from which a user can choose.
The more values a user sees in a list, the less likely the user is to actually review them all and pick the right one. Lists of up to ten values are considered manageable.
� All values should be mutually exclusive.
Ambiguous values cause unreliable results in searches and reporting.
� Each list of values should be complete.
When the list is not complete, users choose values that are not accurate, which negatively impacts the effectiveness of the product categorization structure.
� Specify all three tiers.
Specifying all tiers makes sure that the same level of detail is registered in all instances.
� The Product Catalog should reflect the CIs in BMC Atrium CMDB.
Information about components, such as memory and CPU type, can be either attributes of the computer system (or virtual system) or separate CIs. If this information is recorded as an attribute of the computer system, do not include that component in the product categorization structure. For information about planning CIs in BMC Atrium CMDB, see BMC Atrium Core 7.6.03 Concepts and Planning Guide.
TIP Plan your categorization structure carefully before implementing the Product Catalog in your production environment. Modifying the Product Catalog can cause inconsistency in search results and reporting if records with the old categorization values are not updated.
Using “Other” as a value in categorizationTo allow users to make accurate selections, if a category might not be complete, you can add the value Other Type of Item, where Item is the applicable item, such as Card.
TIP BMC recommends that you use the value Other Type of Item, instead of Other. Users are less likely to use this value as a default and more likely to use it only when no other option applies.
48 Product Catalog and DML Guide
Implementing categorization
If you include Other Type of Item values in the Product Catalog, perform reporting on a regular basis to make sure that the Other Type of Item values are not abused and, if the numbers justify it, to add new values to the product categorization structure.
Use the Other Type of Item value only for the third tier. If a CI has no applicable Tier 1 or Tier 2 defined, the CI falls outside the scope of the CMDB and should not be registered.
Be aware that rather than search for the appropriate categorization, people might select the “Other” value because it is easy to use. To keep the full value of your categorization, you might choose not to create “Other” categories and to use an alternative generic term in the third tier. For example, your third tier under Software, Software Application might include values for the supported classes of applications and also a value of Unsupported. This example value is broad enough to catch software not yet classified, but is less likely to be selected for established supported software that clearly matches an existing category.
BMC recommends that if you are creating alternative generic terms in the third level, do not use the term New. A user who manually registers a new CI might be tempted to select the New value because it is a new CI.
Setting up product categorization dataThis section describes how to set up product categorization data. Product categorization data includes the Product Catalog and Product Catalog alias mapping. You set up product categorization data in a pre-production environment and then deploy it to your production environment.
Pre-production environments include test, development, or QA environments. The pre-production environment must have BMC Atrium Core installed.
If you have not yet implemented the Product Catalog in your production environment, you must start with an empty Product Catalog in your pre-production environment.
If you are using product categorization in your production BMC Remedy ITSM environment, you must bring your production Product Catalog into the pre-production environment by performing the following actions:
1 On your production server, follow the instructions in “Exporting data from the Product Catalog” on page 101.
2 On your pre-production server, follow the instructions in “Importing Product Catalog data” on page 102.
Chapter 3 Planning and implementing categorization 49
BMC Atrium Core 7.6.03
Summary of setting up product categorization dataFollowing are the high-level steps for setting up product categorization data. The sections that follow provide detailed steps. Shortcuts to this process are indicated as tips in the relevant procedures.
Step 1 Create Product Catalog entries by importing from external files or creating entries through the Normalization Engine. See “Creating Product Catalog entries” on page 50.
Step 2 Run through all your discovery processes in the pre-production environment. See “Running the discovery process in the pre-production environment” on page 51.
Step 3 Review the Product Catalog and re-categorize Product Catalog entries, as required. See “Reviewing the categorization of Product Catalog entries” on page 51 and “Modifying product categorization attributes” on page 54.
Step 4 Export the data from the revised Product Catalog. See “Importing and exporting custom Product Catalog data” on page 98.
Step 5 Import the revised Product Catalog into the production environment. See “Importing and exporting custom Product Catalog data” on page 98.
Now when data is discovered, the categorization validation workflow replaces the categorization on the CI with the revised Product Catalog values. This replacement is based on the incoming product name and manufacturer name, along with the product categorization alias configuration.
TIP If you use multiple discovery products, you can use this procedure to make sure that CIs are categorized consistently, even if you choose not to use product categorization in BMC Remedy ITSM.
Creating Product Catalog entriesYou can add products to the Product Catalog in the following ways:
� Import data from external files—You can import data from an external file or from staging forms using BMC Remedy User. For more information, see “Importing Product Catalog data” on page 102.
� Use the Normalization Engine to create entries—If you have configured a dataset for normalization, the Normalization Engine can create Product Catalog entries from the dataset. For detailed instructions about creating Product Catalog entries using Normalization Engine, see the “Configuring datasets” section in the BMC Atrium CMDB 7.6.03 Normalization and Reconciliation Guide.
50 Product Catalog and DML Guide
Implementing categorization
NOTE When using the Normalization Engine to create product entries, verify that the CIs in the dataset contain values that you want to apply to all CIs. You should manually normalize the CIs in the dataset, or you could created duplicate entries for a product in the Product Catalog. If you have duplicates in the Product Catalog, you must manually remove them. For example, make sure that all CIs for a specific product have the same Name, Manufacturername, Model, PatchNumber, VersionNumber, Category, Type, and Item values.
Running the discovery process in the pre-production environmentIf you allow the Normalization Engine to create Product Catalog entries, you must run your discovery process. Make sure that you get representative data from the providers. Ideally, you are categorizing a comprehensive list of entities. The more comprehensive the list, the easier you can define the right categorization for those CIs, and the easier you can manage the content of the Product Catalog.
The number of CIs is not important; the discovery should include as many distinct types of CIs that are representative of your environment. For example, discovering 10 HP Proliant computers and inserting the CIs is no more helpful than discovering one. However, if you have two different models of a computer in your environment, you want to discover both models.
When this step is complete, the Product Catalog is populated with entries created by all the data providers.
For instructions on running the discovery process, see BMC Foundation Discovery and BMC Topology Discovery: Discovering and Managing Configuration Data and the BMC Configuration Automation for Clients CMS and Tuner Guide.
TIP If you are not able to run the discovery process at this time, you can look at the default categorization to see what categorization is assigned during discovery. For more information about default categorization, see “Default product categorization data in BMC Atrium Core” on page 40.
Reviewing the categorization of Product Catalog entriesThe Product Catalog contains entries for the representative CI entities being discovered. For each product name and manufacturer, the Product Catalog entry is set to a default categorization. You must review the Product Catalog.
NOTE If you did not run the discovery data and export the data to BMC Atrium CMDB, you must review either the discovered data reports or the default categorization, instead of the Product Catalog. In this situation, you will still re-categorize Product Catalog entries where required by your review.
Chapter 3 Planning and implementing categorization 51
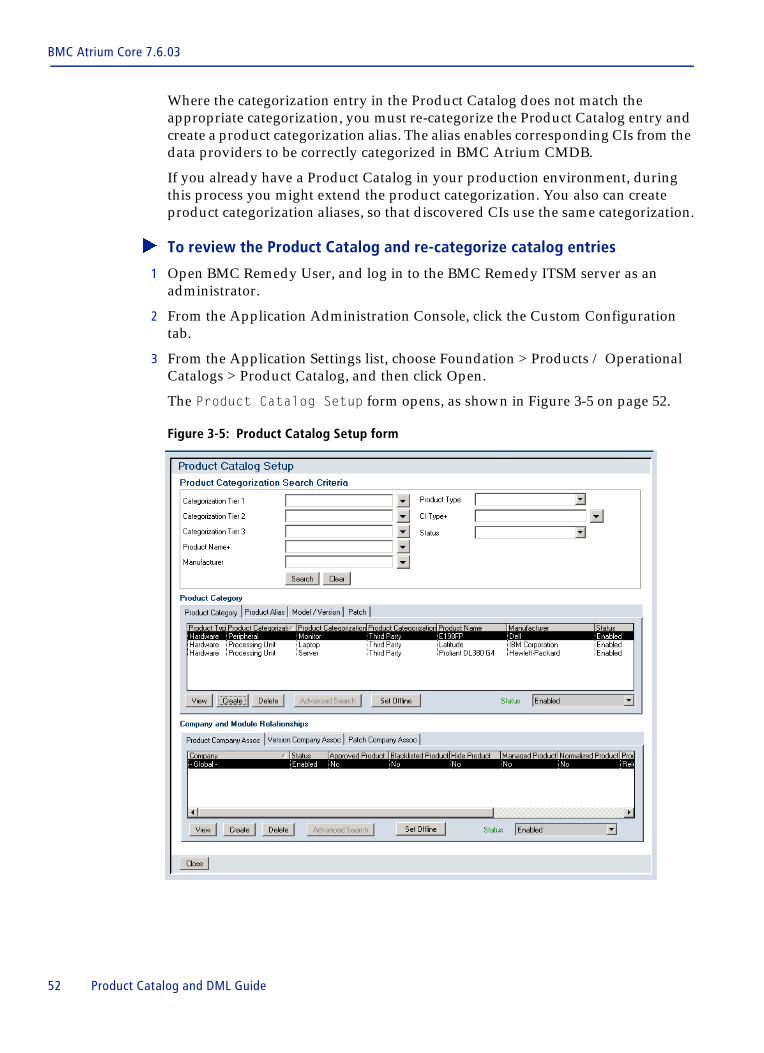
BMC Atrium Core 7.6.03
Where the categorization entry in the Product Catalog does not match the appropriate categorization, you must re-categorize the Product Catalog entry and create a product categorization alias. The alias enables corresponding CIs from the data providers to be correctly categorized in BMC Atrium CMDB.
If you already have a Product Catalog in your production environment, during this process you might extend the product categorization. You also can create product categorization aliases, so that discovered CIs use the same categorization.
� To review the Product Catalog and re-categorize catalog entries
1 Open BMC Remedy User, and log in to the BMC Remedy ITSM server as an administrator.
2 From the Application Administration Console, click the Custom Configuration tab.
3 From the Application Settings list, choose Foundation > Products / Operational Catalogs > Product Catalog, and then click Open.
The Product Catalog Setup form opens, as shown in Figure 3-5 on page 52.
Figure 3-5: Product Catalog Setup form
52 Product Catalog and DML Guide

Implementing categorization
TIP The CI Type field defines which BMC Atrium CMDB class is associated with a Product Catalog entry. If you have a large number of Product Catalog entries, you might find it easier to work with entries for one CI type at a time.
4 Specify the search criteria for the portion of the Product Catalog that you will review, and then click Search.
To review the entire Product Catalog, leave the search criteria fields blank.
5 Based on the results of your review, perform actions as indicated in Table 3-6. Detailed procedures for performing these actions follow the table.
As you review and revise Product Catalog entries, use the rules indicated in “Defining the product categorization structure” on page 47.
Table 3-6: Actions to perform based on review of the Product Catalog (part 1 of 2)
Results of review Actions to perform Instructions
The Product Catalog entry for a product and manufacturer is different from the default categorization applied by a discovery product.
If you expect that other products might be discovered using this default categorization, you can create a Product Catalog alias mapping to map the three levels of default discovery categorization to the three levels in the Product Catalog.No other action is required. When CIs for this product and manufacturer are discovered, the categorization validation workflow automatically resets the categorization to the values in the Product Catalog.
“Mapping product categorization aliases” on page 87
A Product Catalog entry that was created from a discovery dataset exists for a product and manufacturer. The appropriate categorization does not exist.
Delete unwanted Product Catalog entries that have not been applied to records in the production environment.
“Deleting Product Catalog entries” on page 85
Set as offline Product Catalog entries that have been applied to records in the production environment.
Note: A selection that is offline cannot be applied to new records.
From the Product Catalog Console, search for the product by clicking Search Products. Select the product and click Set Offline.
Create the appropriate categorization.If you expect that other products might be discovered using this default categorization, you can create a Product Catalog alias mapping to map the three levels of default discovery categorization to the three levels in the Product Catalog.
“Adding Product Catalog entries” on page 72.
“Mapping product categorization aliases” on page 87.
Chapter 3 Planning and implementing categorization 53
BMC Atrium Core 7.6.03
6 Repeat step 4 on page 53 and step 5 until you have completely reviewed the Product Catalog and no further modification to categorization is required.
Modifying product categorization attributesAfter you have reviewed the Product Catalog, you may need to change categorization of products. After creating a product in the Product Catalog, you can modify the categorizations using the following methods:
� With the PCT:ProductVersionJoin form
After you have installed the Product Catalog, you can modify the categorizations with this Product Catalog form. You can use this method if you do not have BMC Remedy ITSM installed.
� With the BMC Remedy ITSM Data Wizard
After you have installed the Product Catalog and BMC Remedy ITSM, you can modify the categorizations with the Data Wizard.
If you are upgrading and already use the default, or legacy, categorizations with BMC Atrium Discovery and Dependency Mapping or BMC Configuration Management Configuration Discovery Integration for BMC Atrium CMDB, you should continue to use them. Otherwise, you should use the best practice categorizations.
If you modify product categorizations in the Product Catalog, you must also update CI categorizations in BMC Remedy ITSM records with the BMC Remedy ITSM Data Wizard. If you are using BMC Knowledge Management Express, use the Search and Replace tool to change knowledge articles.
For example, Calbro Services imported data for the Product Catalog through staging forms and wants to use the best practice categorization. Oracle 10g has the following categorization values:
� Category—Software
� Type—Operating System Software
� Item—Custom
No Product Catalog entries exist for a categorization that you want.
Create the categorization. “Adding Product Catalog entries” on page 72.
Exactly one catalog entry exists for a product name and manufacturer. It is the correct categorization.
No action is required. None
Table 3-6: Actions to perform based on review of the Product Catalog (part 2 of 2)
Results of review Actions to perform Instructions
54 Product Catalog and DML Guide
Implementing categorization
To use the best practice categorization, Calbro Services must change the categorization to the following values:
� Category—Software
� Type—Operating System Software
� Item—Standard OS
For more information about the BMC Remedy ITSM Data Wizard, see the BMC Remedy ITSM Data Management Administrator’s Guide.
WARNING Before using the data wizard, back up your database.
Before you begin
� To maintain data integrity while modifying the product categorization attributes, you should disable escalations, reconciliation jobs, Discovery products, and the Distributed Server Option (DSO). When you have completed modifying the product categorizations, you can restart these components.
� Run the data wizard to update categorization at times when the systems are unavailable for general use, such as a scheduled change windows.
� Install or create the Product Catalog data.
� To modify product categorization attributes with the BMC Remedy ITSM Data Wizard
1 Access the data wizard.
a Log in to the BMC Remedy AR System server as an administrator.
b From the Application Administration Console, click the Custom Configuration tab.
c From the Application Settings list, choose Foundation > Data Management Tool > Data Wizard Console.
2 Select the Update target values action.
3 For the type of data to update, select Product Categorization.
When you select the type of data, a window appears, prompting you for the target value and the new value.
4 Select the CI type for which to modify the categorization.
For example, to modify a BMC_Product entry, select System Component > Product.
5 Select the Product Name and Manufacturer for which to modify the categorization.
6 For each of the categorization tiers, enter or select the target value.
7 For each of the categorization tiers, specify the new value.
You can click Copy to copy the target value and then make the appropriate changes, or you can type the new value. You must specify a new value for each target value.
Chapter 3 Planning and implementing categorization 55
BMC Atrium Core 7.6.03
8 Click Go.
You are prompted to confirm whether to proceed. When you proceed, the Data Wizard Status window appears, listing forms to be updated. As the update is processed, the status changes from Pending to Complete.
If you close the Data Wizard Status window, you can open it by clicking View Status. However, after the update is complete, you cannot reopen this window.
� To change categorization with the PCT:ProductVersionJoin form
1 From the Product Catalog Console, choose Open > Object List.
2 In the Find tab, search for PCT:ProductVersionJoin.
3 Select the form in the results, and click Search.
4 Type in the search criteria, such as the product name, and click Search.
TIP You may use broad search criteria for a longer list of products to modify. For example, to modify all the operating system entries, you might set Product Categorization Tier 2 to Operating System and Product Categorization Tier 2 to Third Party. Then, modify and save each product in the search results.
5 From the results, select the desired product, and modify the categorization as needed.
6 Click Save.
Managing product categorization changesAfter you set up the Product Catalog, you might want to complete the following tasks:
� Add a new Product Catalog entry.
You can add new entries without affecting existing data.
� Delete a Product Catalog entry.
In general, you should avoid deleting Product Catalog entries. If the categorization has not yet been applied to any records, you can safely delete the Product Catalog entry. If the categorization has been applied to records, you can set the catalog entry offline instead. Offline catalog entries still exist but cannot be applied to new records. Product categorization is applied to CIs in BMC Atrium CMDB, but is also used in other BMC applications, as described in “Use of product categorization by BMC products” on page 33.
56 Product Catalog and DML Guide
Implementing categorization
� Modify a Product Catalog entry.
You cannot modify Product Catalog entries. You must create a new entry and either delete the old entry or set it offline. If you set up Product Catalog alias mapping for the old entry, you must update the alias to map to the new categorization.
When you modify the Product Catalog, these changes are not automatically propagated to existing CIs in BMC Atrium CMDB or to other records. You must propagate the categorization changes, which can be a lengthy process.
Consider how this change affects reporting and searches. For example, if you make what seems like a simple name change in a value, this change can cause inconsistency in reports and in search results if the records with that particular value are not also updated.
BMC recommends that deletion and modification of categorization be managed as exceptions on a production system.
By using a pre-production system to set up, modify, test, and validate categorization, you minimize the need for deleting and modifying existing categorization on the production system. In general, on the production system, only extensions to the Product Catalog should occur.
Chapter 3 Planning and implementing categorization 57

BMC Atrium Core 7.6.03
58 Product Catalog and DML Guide

Chapter
4
Configuring the Product CatalogThis section describes how an application administrator can configure the Product Catalog to add or modify Product Catalog entries and Storage Locations in the Product Catalog to facilitate software license management and deployment.
The following topics are provided:
� Product Catalog permissions (page 60)� Viewing and searching for product entries in the Product Catalog (page 61)� Searching for and editing product and manufacturer alias entries (page 63)� Searching for and modifying new Product Catalog entries (page 65)� Creating custom Product Catalog entries (page 71)� Specifying locations for Product Catalog entries (page 76)� Adding products to a suite (page 78)� Adding related files to a patch entry (page 78)� Creating product files (page 79)� Using signatures to identify products (page 79)� Relating companies to Product Catalog entries (page 81)� Approving products, versions, and patches for DML and DHL (page 83)� Deleting Product Catalog entries (page 85)� Deleting Product Catalog entries (page 85)� Cloning product entries (page 86)� Configuring datasets for normalization (page 86)� Mapping product categorization aliases (page 87)� Modifying the list of platforms (page 88)
Chapter 4 Configuring the Product Catalog 59
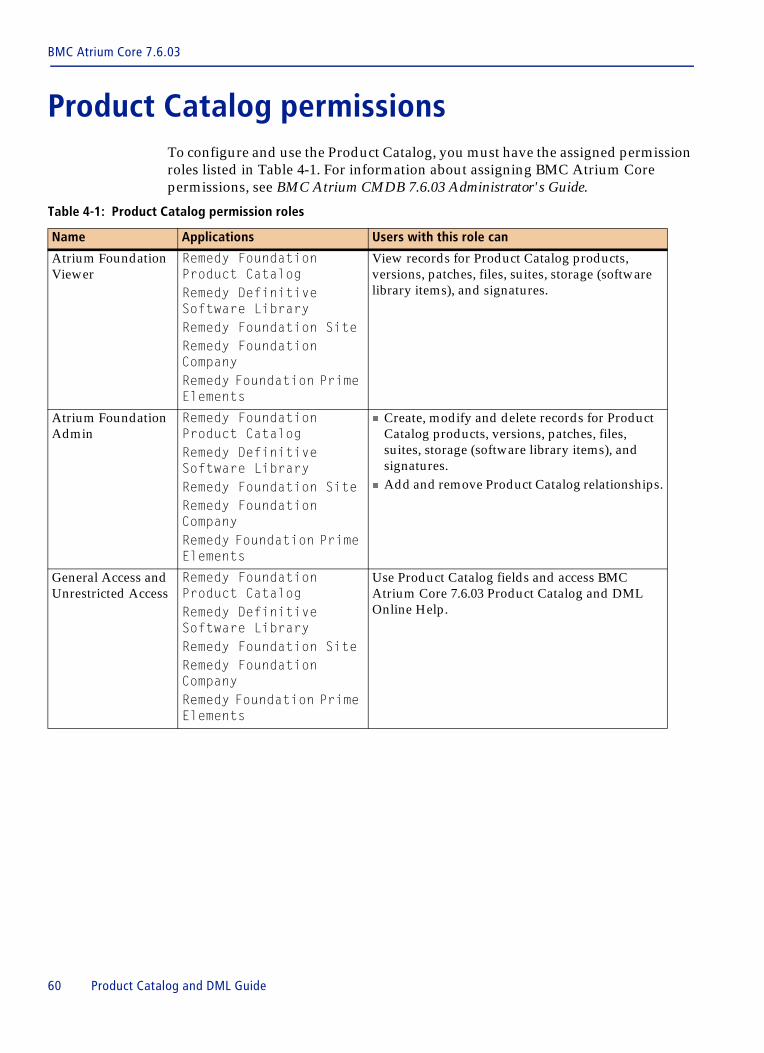
BMC Atrium Core 7.6.03
Product Catalog permissionsTo configure and use the Product Catalog, you must have the assigned permission roles listed in Table 4-1. For information about assigning BMC Atrium Core permissions, see BMC Atrium CMDB 7.6.03 Administrator's Guide.
Table 4-1: Product Catalog permission roles
Name Applications Users with this role can
Atrium Foundation Viewer
Remedy Foundation Product CatalogRemedy Definitive Software LibraryRemedy Foundation SiteRemedy Foundation CompanyRemedy Foundation Prime Elements
View records for Product Catalog products, versions, patches, files, suites, storage (software library items), and signatures.
Atrium Foundation Admin
Remedy Foundation Product CatalogRemedy Definitive Software LibraryRemedy Foundation SiteRemedy Foundation CompanyRemedy Foundation Prime Elements
� Create, modify and delete records for Product Catalog products, versions, patches, files, suites, storage (software library items), and signatures.
� Add and remove Product Catalog relationships.
General Access and Unrestricted Access
Remedy Foundation Product CatalogRemedy Definitive Software LibraryRemedy Foundation SiteRemedy Foundation CompanyRemedy Foundation Prime Elements
Use Product Catalog fields and access BMC Atrium Core 7.6.03 Product Catalog and DML Online Help.
60 Product Catalog and DML Guide
Viewing and searching for product entries in the Product Catalog
Viewing and searching for product entries in the Product Catalog
This section describes how to view and search for products in the Product Catalog and search entries in the Product Catalog by organization.
Viewing and searching for productsYou can define what types of products are displayed in the Product Catalog Entries list. From this list, you can create and view model and version, patch, location, product files, and related suites.
NOTE A product must have model or version information before it appears in the Product Catalog Entries list.
To search for products by platform or operating system, use the Advanced Search feature to create expressions such as ‘Platform’ LIKE “UNIX” or 'Operating System' LIKE "Solaris 9".
Best practice
BMC recommends that you do not make unqualified searches to avoid time outs due to a large volume of data retrieval. Limit the number of search entries to be displayed by specifying values, such as the manufacturer name or product name, in the Search Criteria area.
� To search for products
1 From Product Catalog View, select the type of products to view.
� Definitive Media Library—The software that you have marked as approved in the Product Catalog.
� Definitive Hardware Library—The hardware that you have marked as approved in the Product Catalog.
� All software—All approved and unapproved software in the Product Catalog.
� All hardware—All approved and unapproved hardware in the Product Catalog.
� All products—All approved and unapproved software, hardware, and other types of products in the Product Catalog.
2 (optional) You can select the following settings to view only those products with the following matching states.
� Managed
� Blacklisted
� Hidden
Chapter 4 Configuring the Product Catalog 61

BMC Atrium Core 7.6.03
For example, if you select Managed, only products that have been marked as Managed are shown. If you do not select Managed, then both managed and non-managed products are displayed.
3 To display by particular product attributes, select or type values for any of the following fields:
� Product Name
� Model/Version
� Manufacturer
� Origin
4 To build an expression for a more complex search, click Advanced Search and specify the criteria.
To view an expression, click the ... button; however, you cannot edit the expression in this window.
5 Click Search.
Viewing and searching entries by organizationYou can view the product entries that are related to an organization in the Product Catalog Console.
Before you begin
Make sure you have related entries to companies or organizations that you want to search for.
� To view Product Catalog entries by organization
1 Log in to BMC Remedy User as the user related to the organization for which you want to view the entries.
2 From the Company list, select the organization, and search for products.
Only the products that have association to Global or to the organization for which you want to view the products appear.
For example, Betty Admin, who is configured as a user for Calbro Services can view the products that are associated to Calbro Services only. Charlie Admin, who is configured as a user for Calfin Services can view the products that are associated to Calfin Services only.
You can search and view the Product Catalog entries that have changed because of:
� Manual changes (Custom)
� The Normalization Engine (Normalization)
� Import from staging forms (Custom)
You can search the entries based on creator, source dataset, or data status. You can search and view the changes from the PCM:SearchProductCatalogChanges form.
62 Product Catalog and DML Guide
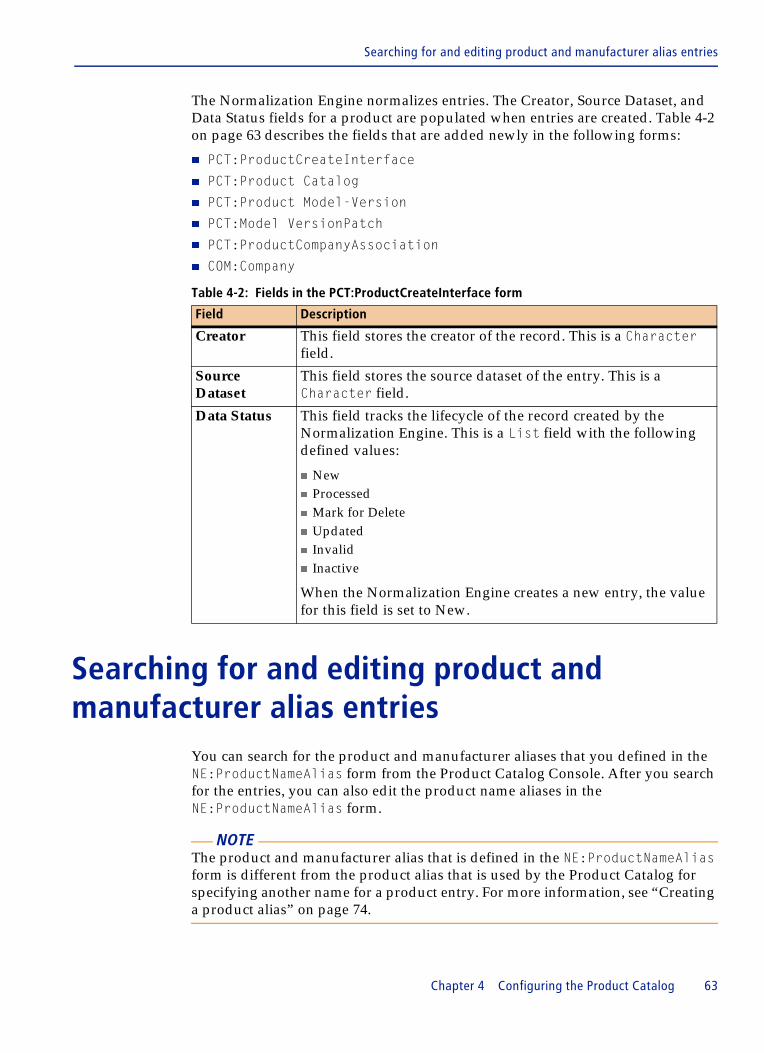
Searching for and editing product and manufacturer alias entries
The Normalization Engine normalizes entries. The Creator, Source Dataset, and Data Status fields for a product are populated when entries are created. Table 4-2 on page 63 describes the fields that are added newly in the following forms:
� PCT:ProductCreateInterface
� PCT:Product Catalog
� PCT:Product Model-Version
� PCT:Model VersionPatch
� PCT:ProductCompanyAssociation
� COM:Company
Searching for and editing product and manufacturer alias entries
You can search for the product and manufacturer aliases that you defined in the NE:ProductNameAlias form from the Product Catalog Console. After you search for the entries, you can also edit the product name aliases in the NE:ProductNameAlias form.
NOTE The product and manufacturer alias that is defined in the NE:ProductNameAlias form is different from the product alias that is used by the Product Catalog for specifying another name for a product entry. For more information, see “Creating a product alias” on page 74.
Table 4-2: Fields in the PCT:ProductCreateInterface form
Field Description
Creator This field stores the creator of the record. This is a Character field.
Source Dataset
This field stores the source dataset of the entry. This is a Character field.
Data Status This field tracks the lifecycle of the record created by the Normalization Engine. This is a List field with the following defined values:
� New� Processed� Mark for Delete� Updated� Invalid� Inactive
When the Normalization Engine creates a new entry, the value for this field is set to New.
Chapter 4 Configuring the Product Catalog 63
BMC Atrium Core 7.6.03
� To search for product and manufacturer alias entries from the Product Catalog Console
1 From the Product Catalog Console, choose General Functions > Search Normalization Alias.
2 In the NE:ProductNameAlias form, specify any of the following details:
� AttributeName: ManufacturerName or ModelName attribute
� AliasName: Name of the discovered product or manufacturer
NOTE Do not specify the product alias that you specified in the Product Catalog for AliasName.
� ActualName: Product or manufacturer name that you have specified for the product in the Product Catalog
� Submitter: Name of the user who created the alias
� Submit Date: Date on which the alias was created
� Last Modified Date: Date on which the alias was last updated
� Last Modified By: Name of the user who last updated the alias
� Status: Status of the alias as New, Assigned, Fixed, Rejected, or Closed
3 Click Search.
You can now edit the product name alias entries and save them in the NE:ProductNameAlias form.
NOTE While editing an alias from the NE:ProductNameAlias form, if you edit an alias so that it is the same as an alias that already exists, an error message is displayed.
For information about creating product and manufacturer aliases, see “Creating product name and manufacturer aliases” on page 67.
64 Product Catalog and DML Guide
Searching for and modifying new Product Catalog entries
Searching for and modifying new Product Catalog entries
You can search for new product entries in the Product Catalog. New entries can be created in the following ways:
� Manually created products (where Creator is Custom)
� Imported through staging forms (where Creator is Custom)
� Created by the Normalization Engine (where Creator is Normalization)
You can create, edit, or delete manufacturer or product name aliases for these product entries. Alias entries are added to the NE:ProductNameAlias form.
� To search for new entries
1 From the Product Catalog Console, choose General Functions > Search New Products.
2 In the Search New Product Catalog Searches window, specify the Product Name and Manufacturer.
3 Select the Creator, or accept the default selection of Normalization.
Custom entries are those entries that you have created manually or by importing data from a different vendor. Normalization entries are those that are created through the Normalization Engine.
4 Specify the From Date and To Date to limit the date range.
5 Specify whether you want to view data with New, Work In Progress, or Completed status by selecting the status from the Data Status list.
6 Click Search.
By default, the products listed in the Discovered/New Products table are sorted based on the date and time. The most recently discovered product is listed at the top in the table. Alias product entries are also listed in the table.
NOTE When an alias is created for a product, the status of the alias product entry is displayed as Offline.
After you modify a new entry, it does not appear again in the Discovered/New Products table, because it no longer remains a new entry, but becomes a modified entry.
Chapter 4 Configuring the Product Catalog 65
BMC Atrium Core 7.6.03
After you have searched for changed products, you can perform the following actions:
� View and edit the details of a product. For more information, see “Viewing and editing details of new products” on page 66.
� Delete an offline product. For more information, see “Deleting offline products” on page 67.
� Create Alias. For more information, see “Creating product name and manufacturer aliases” on page 67.
� View and edit Company and Product Status Relationships. For more information, see “Viewing and editing association details of new products” on page 70.
� Delete Company and Product Status Relationships. For more information, see “Deleting associations of new products” on page 71.
Viewing and editing details of new productsYou can view and edit the details of new products in the Product Catalog.
� To view and edit the details of a new product
1 Search for the product by specifying the search criteria. For more information, see “To search for new entries” on page 65.
2 From the Products tab of the Discovered/New Products table, select a product.
3 Click View.
4 In the Product Update window, view and edit the details of the product.
5 Click Save and then Close.
WARNING When you click Save, the product name or manufacturer name is saved as an alias.
6 From the Model/Version tab of the Discovered/New Products table, select a version.
7 Click View.
8 In the Product Model/Version window, view and edit the details of the product.
9 Click Save and then Close.
66 Product Catalog and DML Guide

Searching for and modifying new Product Catalog entries
Deleting offline productsYou can delete only those products that are marked as Offline in the Product Catalog. When you delete a product, its versions and company and relationship associations are also deleted.
� To delete an offline product
1 Search for the product by specifying the search criteria. For more information, see “To search for new entries” on page 65.
2 From the Products tab of the Discovered/New Products table, select an offline product.
NOTE The Delete button is disabled for a product that is not marked as Offline.
3 Click Delete.
4 Click OK to confirm the deletion.
Creating product name and manufacturer aliasesYou can create product name and manufacturer aliases for new products in the Product Catalog. Alias entries are added to the NE:ProductNameAlias form.
If you want to use values that are different from the values provided by the Discovery products, you must delete the existing Product Catalog entries and also create aliases for the new entries. This is because during normalization, entries are matched with the product entries in the Product Catalog before they are matched with aliases. Consequently, if you do not delete the existing Product Catalog entries, matching takes place with the existing entries and is not matched with the values that you specified.
You can create aliases for a product only if the status of the newly added product is Enabled.
NOTE The status of an alias is always Offline. You cannot create an alias for an existing alias.
For example, Calbro Services has the following Product Catalog entry for one of their applications:
� Model: Financial Advisor Pro
� ManufacturerName: Calbro Services
� VersionNumber: 1.0
� Category: Software
� Type : Software Application/System
� Item : Financial/Resource Planning Application
Chapter 4 Configuring the Product Catalog 67
BMC Atrium Core 7.6.03
But in their discovery dataset, the CIs have the following attribute values with no values for Category, Type, and Item:
� Model: Financial Advisor Pro
� ManufacturerName: CFS
� VersionNumber: 1.0
The CIs fail to normalize, but Calbro Services notices that the ManufacturerName values for the CI and Product Catalog entry do not match. The staff creates a ManufacturerName alias where the Normalization Engine substitutes Calbro Services for CFS and then normalizes the CI using the matching product values.
Marking a new product as an alias for an existing productYou can mark a new product as an alias of an existing product for normalization. When you mark a product as an alias, the status of that product is changed to Offline.
� To mark a new product as an alias for an existing product
1 Search for an existing product by specifying the search criteria. For more information, see “To search for new entries” on page 65.
2 From the Products tab of the Discovered/New Products table, select the product.
3 Click Convert to Alias.
4 In the Find Similar Products area of the Convert Discovered/New Product to Alias window, search for the product for which you want to create the alias by specifying the first word of the product name followed by %.
Example: Adobe%
All records except those that have been marked as aliases are displayed in the table.
5 From the list of products in the Similar Products table, select the product for which you want to mark the discovered product as an alias.
6 Click Create Product Name Alias to mark the discovered product as a product name alias for the product selected from the Similar Products table.
NOTE You cannot mark a product as an alias if it is of a different Product Type than the selected product.
7 Click Yes to confirm the creation of the alias.
The discovered product is listed in the Normalization Alias table.
68 Product Catalog and DML Guide
Searching for and modifying new Product Catalog entries
Marking a new manufacturer as an aliasAfter you search for a new product, you can mark its manufacturer as an alias. When you mark the manufacturer as an alias, the status of that product is changed to Offline.
� To mark a new product manufacturer as an alias for an existing product
1 Search for the product by specifying the search criteria. For more information, see “To search for new entries” on page 65.
2 From the Products tab of the Discovered/New Products table, select a product.
3 Click Convert to Alias.
4 In the Find Similar Products area of the Convert Discovered/New Product to Alias window, search for the product for which you want to create the alias by specifying the first word of the product name followed by %.
Example: Adobe%
All records except those that have been marked as alias are displayed in the table.
5 From the list of products in the Similar Products table, select the product for which you want to mark the manufacturer as an alias.
6 Click Create Manufacturer Alias to mark the discovered product manufacturer as a manufacturer alias for the product selected from the Similar Products table.
NOTE If you select a product from the table that has the same manufacturer as the discovered product, you cannot mark it as an alias for the discovered product.
7 Click Yes to confirm the creation of the alias and list in the Normalization Alias table as a manufacturer alias.
Creating aliases for a new productYou can create an alias for a new product. You can create a product name alias or a manufacturer alias. When you create an alias, the status of that alias is changed to Offline.
� To create an alias for a new product
1 Search for the product by specifying the search criteria. For more information, see “To search for new entries” on page 65.
2 From the Products tab of the Discovered/New Products table, select a product.
3 Click Convert to Alias.
4 In the Normalization Alias area of the Convert Discovered/New Product to Alias window, click Create.
Chapter 4 Configuring the Product Catalog 69
BMC Atrium Core 7.6.03
5 In the Add Normalization Alias window, perform the following actions:
a For the AttributeName, select ManufacturerName or ModelName.
b Specify the AliasName.
You can precede or follow the alias name with the % wildcard to associate multiple alias values with a product. For example, instead of creating multiple aliases (MS Word 2000, Word 2000, and Micro Word 2000) for the Microsoft Word 2000 product, you can use the % wildcard to create one alias, %Word 2000%. In the normalization process, the Normalization Engine uses the LIKE operator to check for a Model or ManufacturerName alias.
c Click Add.
d Click OK to confirm the creation of the alias.
e Click Close.
The alias is displayed in the Normalization Alias table.
Deleting an alias from the Normalization Alias tableYou can delete entries from the Normalization Alias table for a selected product.
� To delete entries from the Normalization Alias table
1 Search for the product by specifying the search criteria. For more information, see “To search for new entries” on page 65.
2 From the Products tab of the Discovered/New Products table, select a product.
3 Click Convert to Alias.
4 From the Normalization Alias table in the Convert Discovered/New Product to Alias window, select an entry.
5 Click Delete.
6 Click Yes to confirm the deletion.
Viewing and editing association details of new productsYou can view and edit the association details of new products in the Product Catalog.
� To view and edit the association details of new products
1 Search for the product by specifying the search criteria. For more information, see “To search for new entries” on page 65.
2 From the Products tab of the Discovered/New Products table, select a product.
3 In the Company and Product Status Relationships table, from the Product Company Assoc tab, select the company.
4 Click View.
5 In the Company/Module Relationship window, view and edit the details.
70 Product Catalog and DML Guide
Creating custom Product Catalog entries
6 Click Save and then Close.
7 In the Company and Product Status Relationships table, from the Version Company Assoc tab, select the company.
8 Click View.
9 From the Company/Version Relationship, view the company and edit the details.
10 Click Save and then Close.
Deleting associations of new productsYou can delete the association details of new products in the Product Catalog.
� To delete association details of new or discovered products
1 Search for the product by specifying the search criteria. For more information, see “To search for new entries” on page 65.
2 From the Products tab of the Discovered/New Products table, select a product.
3 In the Product Status Relationships table, from the Product Company Assoc tab, select the company.
4 Click Delete.
5 Click Yes to confirm the deletion.
6 From the Version Company Assoc tab of the Company and Product Status Relationships table, select the company.
7 Click Delete.
8 Click Yes to confirm the deletion.
Creating custom Product Catalog entriesTo add custom Product Catalog entries, you can create entries individually or import them in bulk from external files or staging forms. For instructions about importing custom entries, see “Importing and exporting custom Product Catalog data” on page 98.
Before you begin
To create custom Product Catalog entries, you must be assigned to the Atrium Foundation Admin and General Access groups to perform the following tasks:
� Add Product Catalog entries.
� Add product model and version information.
� Add patch information (if needed).
Chapter 4 Configuring the Product Catalog 71
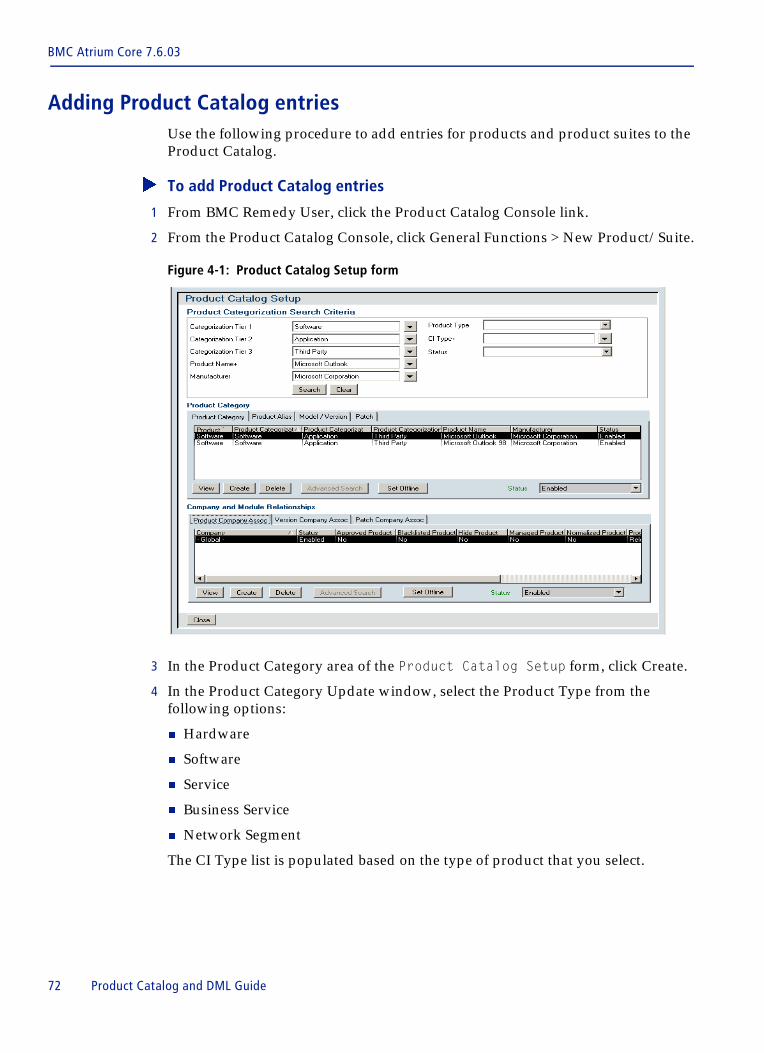
BMC Atrium Core 7.6.03
Adding Product Catalog entriesUse the following procedure to add entries for products and product suites to the Product Catalog.
� To add Product Catalog entries
1 From BMC Remedy User, click the Product Catalog Console link.
2 From the Product Catalog Console, click General Functions > New Product/Suite.
Figure 4-1: Product Catalog Setup form
3 In the Product Category area of the Product Catalog Setup form, click Create.
4 In the Product Category Update window, select the Product Type from the following options:
� Hardware
� Software
� Service
� Business Service
� Network Segment
The CI Type list is populated based on the type of product that you select.
72 Product Catalog and DML Guide
Creating custom Product Catalog entries
NOTE The Product Type is used only to broadly classify product entries within the Product Catalog and to appropriately populate the CI Type list. Product categorization does not refer to the Product Type or CI Type fields to categorize products.
5 From the CI Type list, select the CI class for which you want to create the product.
CI Type is the type of configuration item that this Product Catalog entry represents.
6 Specify the Product Categorization Tier 1.
If the value for a tier is already in the Product Catalog, you can select it. Otherwise, you must enter the new value.
7 Specify the following details:
� Product Categorization Tier 2
� Product Categorization Tier 3
The Product Categorization Tier 2 list is populated based on the categorization that you select for tier 1, and the Product Categorization Tier 3 list is populated based on the categorization that you select for tier 2.
8 Specify the Product Name.
9 Perform one of the following actions for specifying the creator or vendor for the product:
� Select the manufacturer from the Manufacturer list.
� Click New to create a new Manufacturer.
� In the New Manufacture window, specify the Company.
� Select the Status of the manufacturer.
For more information about the Status, see step 11.
10 Click Save and then Close.
11 Select the Status for the product.
This field enables you to specify a status for this entry and allows the application to search on the status. The status is informational only; it does not cause any actions to occur. The status options are:
� Proposed—Temporarily prevents the product category from being selected by an application.
� Enabled—Enables the product category to be selected by an application. A product category must be set to Enabled for it them appear in lists for product fields.
� Offline—Specifies that the product category is offline and temporarily unavailable.
Chapter 4 Configuring the Product Catalog 73
BMC Atrium Core 7.6.03
� Obsolete—Specifies that the product category is obsolete and no longer available.
� Archive—Specifies that the selected product category has been archived.
� Delete—Shows that the status of the selected product category has been set to Delete. Product Catalog entries are deleted using the Delete button on the Product Category tab on the Product Category Setup form.
NOTE You must be part of the BMC Remedy AR System administrator group to actually delete the record.
� (clear)—Clears the Status field.
12 For Origin, select Custom.
The Third Party option is used for products provided by BMC.
13 If the product is a suite of products, select Yes for Suite Definition.
14 Click Save, and then click Close.
When you save the product category, it is automatically related to the Global company. This makes the product category available on other forms, such as the Incident form, for all operating and customer companies.
You can now create model and version information for the product.
Creating a product aliasThe Product Catalog uses a product alias for naming products. A product alias specifies another name for a product in the Product Catalog. When you create this alias, you change the Product Catalog entry for the product. Product aliases are used in BMC Remedy Change Management, license compliance, Report Center, and other reports that use Product Catalog data. For example, you can use the product alias of a software CI to generate a report for outdated licenses for that software.
NOTE This alias is not used in normalization. To create a product or manufacturer alias for normalization, see “Creating product name and manufacturer aliases” on page 67.
You can create product aliases to use in reports and references. For example, Calbro Services wanted to have the product named Microsoft Notepad listed in reports as Notepad without modifying the Product Name value. So Calbro Services created an alias of Notepad for the Microsoft Notepad product.
74 Product Catalog and DML Guide
Creating custom Product Catalog entries
� To add product alias
1 From the Product Catalog Console, click General Functions > New Product/Suite.
2 From the Product Catalog Setup window, search for a product, or create one.
3 From the Product Category area, select the product.
4 On the Product Alias tab, click Create.
5 In the Product Alias Update window, specify the Product Alias.
6 Click Save.
7 In the Company and Module Relationships area, click View.
8 Set the Normalized Product status to Yes.
9 Click Save.
Adding product model and version informationUse the following procedure to add model and version information for a product. From the Product Model/Version window, you can also define the platform, operating system, availability, support, part number, and locale information for a version or model of the product.
NOTE A product must have model or version information before it appears in the Product Catalog Entries list.
� To add product model and version information
1 From General Functions > New Product/Suite, search for a product, or create one.
2 From the Product Catalog Setup window, select a product.
3 In the Product Category area, click the Model/Version tab, and click Create.
4 In the Product Model/Version field, enter the product version.
If you do not know the version, click Unknown.
5 In the Product Model/Version State field, select the status of the version, such as Future Consideration or General Availability.
6 For Requires Contract, select Yes or No.
If you select Yes, this means that this Product Catalog entry must be related to a Software License contract in BMC Remedy Asset Management to facilitate software license compliance of specified software configuration items. For more information, see the BMC Remedy Asset Management User’s Guide.
7 For Market Version, enter the common product version with which the software licenses should be associated.
For example, if Calbro Services wants to track the multiple service packs and versions for Microsoft Excel as instances of version 2003, Andrew Admin enters 2003 in the Market Version field of the Microsoft Excel Product Catalog entry.
Chapter 4 Configuring the Product Catalog 75
BMC Atrium Core 7.6.03
The Market Version value is used by the software license management engine to determine if the Product Catalog entry must have a related software license contract.
8 Enter any optional information.
9 Click Save.
You can now create patch information for the model or version.
Adding patch informationYou can define another level of identification for a software Product Catalog entry by creating a related patch ID. For example, you might have a software Product Catalog entry called Microsoft Word 2000, version 1.0, patch SP3.
� To create a related patch ID
1 From the Product Catalog Console, search for a product.
2 Expand the product list, and select a version or model.
For more information, see “Viewing and searching for products” on page 61.
NOTE If you select the product instead of a version or model, clicking Create opens the Model/Version window.
3 In the Product Catalog Entries area, click Create.
4 From the Status list, select a status.
5 In the Patch Last Build ID field, enter the patch number.
6 (optional) Add a build date and description.
7 Click Save.
When you save the patch, it is automatically related to the Global company.
Specifying locations for Product Catalog entries
To specify the location of a patch defined for a Product Catalog entry, create a Storage Location. When a patch is marked as Approved, it can be installed from the specified Storage Location for that patch. You can also add up to three attachments for each location.
76 Product Catalog and DML Guide
Specifying locations for Product Catalog entries
� To create a Storage Location
1 In the Product Catalog Entries area of the Product Catalog Console, select the patch for which you want to specify a location.
2 In the Storage Location area, click Create.
3 Enter a description for the patch.
4 For Type, select the type of location.
� Marimba—Signifies that the entry or location is a BMC BladeLogic Client Automation tuner.
� Other—Signifies an entry or location other than a BMC BladeLogic Client Automation tuner.
5 Enter a location for the patch, such as a physical location, a path to a location, or a URL.
6 Select Active or Inactive in the State field.
7 To make the patch active and available for deployment, select Active for the State and Yes for Deployable.
8 Click Save, and then click Close.
� To add an attachment to a Storage Location
1 From the Product Catalog Entries area of the Product Catalog Console, select the patch for the Storage Location.
2 From the Storage Location table, select an item and click View.
The Software Library Item form appears.
Using the Add button on the Attachments table, you can add up to three attachments per Storage Location record.
3 Click Add.
The Attachment Details dialog box appears.
4 Select a Status, and enter a description of the attachment.
5 In the Attachments table, right-click, and choose Add to add an attachment.
6 Browse to select the attachment.
7 Click Save, then click Close.
Chapter 4 Configuring the Product Catalog 77
BMC Atrium Core 7.6.03
Adding products to a suiteAfter you have created or modified your Product Catalog entries, you can add the products that should be part of a suite to the Products in Suite table from the Product Catalog Console.
You define which Product Catalog entries are suites by selecting the Yes option for Suite Definition on the Product Category Update form. See “Creating custom Product Catalog entries” on page 71.
NOTE You can use the Suite Rollup feature in the Normalization Engine to create suites and assign existing products as members of the suites. The Suite Rollup rules identify CI instances as a suite or a suite component. For more information about the Suite Rollup feature, see the BMC Atrium CMDB 7.6.03 Normalization and Reconciliation Guide
� To add products to a suite
1 In the Product Catalog Entries area of the Product Catalog Console, select a product model or version that is a suite.
2 In the Products in Suite area, click Add.
3 From the Product ID list, select a manufacturer, product, and version to add to this suite, then click Save.
4 Repeat the procedure for each product that you want to appear in the suite.
5 Click Close.
Adding related files to a patch entryProduct Catalog patch entries are made up of one or more files. These files are represented in the Product Files area as metadata, and are not the patch files. You can select an existing file to relate to a patch entry.
� To add related files to an entry
1 In the Product Catalog Entries area on the Product Catalog Console, select a patch.
2 In the Product Files area, click Add.
3 From the File ID list, select the name of the patch file to relate to this entry.
TIP To find the file more quickly, limit the search, for example, by typing %.exe% in the File ID field, then clicking the down arrow by the field.
If the file name does not appear in this list, return to the Product Files table and click Create to add it.
78 Product Catalog and DML Guide
Creating product files
4 If this file is the main executable, select the Yes option.
5 Click Save.
Creating product filesIf a product’s files do not exist in the Product Catalog, you can create them.
� To create a product file
1 In the Product Catalog Entries area on the Product Catalog Console, select a product.
2 In the Product Files area, click Create.
3 For File Name, type the name of the file and its extension.
4 For File Size, type the size (in bytes) of the file, such as 820512.
5 (optional) For CRC, specify the check value for the file, such as ADE50E9F.
6 (optional) For Timestamp, click the ... button to define the date and time for the file, such as 11/23/2001 4:00:00 PM.
7 Click Save.
8 In the AR System User - Note dialog box, click OK.
You can now select the file to relate it to a patch entry.
Using signatures to identify productsA signature identifies a product, and BMC Atrium Discovery can create and associate signatures for products in the Product Catalog. BMC Atrium Discovery can upload manually created signature files into the Product Catalog and associate it to a product in the Product Catalog.
Each signature is associated with a Signature ID, which is a random unique string. A signature is a unique ID associated with a product ID. The Product Catalog does not interpret it or use it for any other purpose.
Signature files are stored in the Product Catalog as attachments, such as an XML or text file. The maximum attachment file size defined by BMC Remedy AR System is 5 MB. If no Signature ID is provided, the Signature ID is automatically generated and populated from the product information using the following algorithm:
part : vendor : product : version : update : edition : language
The following example shows the signature for Microsoft Office 2002 Patch 10.0.2627.0:
:microsoft_product:microsoft_Office:2003:11.0.5614.0 Ent.::
:Microsoft_Corporation:Microsoft_Outlook:2002:10.0.2627.0::
Chapter 4 Configuring the Product Catalog 79
BMC Atrium Core 7.6.03
NOTE You can also modify the generated Signature ID or provide a unique string ID manually.
The following information is used to create signature entries in the PCT:Signature form:
� Signature ID: Random unique string
� Version: Signature version
� Grouping: User-defined signature groups, such as Test or Production to logically segregate your data
� Type: User-defined string, such as dynamic or static, used for data segregation
� Signature file: Location of the signature file
Associating a signature with a productUse the following procedure to associate a signature file with a product in the Product Catalog.
Before you begin
If the product, model or version, and patch information does not already exist in the Product Catalog, create it.
� To associate a signature with a product
1 In the Product Catalog Console, select General Functions > Create/Associate Product Signature.
2 In the Signature Product Association window, from the Product Key list, select a product.
TIP Use a pattern search with %pattern% to get a shorter list of products. For example, if you enter %note%, only products with note in the name are listed, such as Notepad, Programmer NotePad, and LotusNotes.
3 (optional) For Platform, enter the platform for the software product.
A Signature ID is automatically generated.
NOTE You can modify the automatically generated Signature ID. While modifying the signature ID, avoid special characters.
4 To associate a signature with the product, click New Signature.
5 In the Product Signature window, specify the Logical Data Group.
80 Product Catalog and DML Guide
Relating companies to Product Catalog entries
6 Specify the Type and Version of the signature.
You can specify your own type and version for the signature to make the signature unique.
7 To attach a signature file, right-click under Filename and select Add.
8 Browse and select the signature file, and click Open.
9 From the Status list, select the status for the product.
10 To save the new signature record, click Save.
11 To save the signature association, click Save.
NOTE When you customize the signature data, make sure that you include the PDL:ESIDsignatureCustom and PDL:ESIDsignatureProductCustom forms during Product Catalog data migration.
Relating companies to Product Catalog entriesYou can relate Product Catalog entries to companies to keep the Product Catalog entries associated with different companies separate (to control access by company, organization, or group).
You can associate companies to products, versions, and patches. If a Product Catalog entry is associated with Global, then it is available to all companies or organizations, and you cannot specify a company relationship. By default, when you add or create Product Catalog entries, they have a Global relationship. For example, Microsoft Office Word 2003 has a Global relationship in the Product Catalog of Calbro Services. So, Microsoft Office Word 2003 is available for both Calbro Services and Calfin Services.
TIP Configure relationships with Global first and apply company-specific rules only for multi-tenants. This will reduce the number of records in the Product Catalog that must be maintained for each customer.
Before you begin
Create software product and version entries for products to which you want to relate entries.
� To relate a company to Product Catalog entries
1 Open the Product Catalog Setup form, from General Functions > Search Products.
2 In the Product Category area of the Product Catalog Setup form, select a product to relate to a company.
For example, Andrew Admin selects the Adobe Reader.
Chapter 4 Configuring the Product Catalog 81

BMC Atrium Core 7.6.03
3 (optional) In the Model Version tab, select a version or model for the selected product.
For example, Betty Admin selects version 8.0 of the Adobe Reader for Calbro Services and Charlie Admin selects version 9.0 of the Adobe Reader for Calfin Services.
4 (optional) In the Patch tab, select a patch for the selected version.
5 In the Company and Module Relationships area, click Create.
NOTE If a Global relationship exists, you must delete it, and then click Create.
6 From the Company list, select the company to relate to the selected Product Catalog entries.
NOTE Only companies that are set as Operating Company or Customer are available in the list.
For example, Andrew Admin selects the Calbro Services and Calfin Services for the Adobe Reader product.
7 For Status, select the needed value.
This parameter enables you to set the product to different statuses and allows the application to search on the status to view. The various statuses are informational only; they to not cause any actions to occur. This field contains the following options:
� Proposed: Temporarily prevents the product category from being selected by an application.
� Enabled: Enables the product category to be selected by an application. Product categories must be set to Enabled for it to appear in lists for product fields.
� Offline: Specifies that the product category is offline and temporarily unavailable.
� Obsolete: Specifies that the product category is obsolete and no longer available.
� Archive: Specifies that the selected product category has been archived.
� Delete: Specifies that the selected product category has been deleted. Product Catalog entries are deleted using the Delete button on the Product Category tab on the Product Category Setup form.
� (clear): Clears the Status field.
8 Select the Product Status Flags.
For more information about the status options, see “Managing products” on page 18.
9 Click Save.
82 Product Catalog and DML Guide
Approving products, versions, and patches for DML and DHL
Removing the relationship between an entry and a companyYou can remove the relationship between a Product Catalog entry and a company without deleting either record.
� To remove the relationship between an entry and a company
1 From the Product Catalog Console, choose General Functions > Search Products.
2 In the Product Categorization Search Criteria area, enter your criteria, and click Search.
Results matching your search criteria appear in the tables.
3 On the Product Category tab, select the entry with the relationship to remove.
The company that the entry is related to appears on the Company and Module Relationships area.
4 In the Company and Module Relationships area, click Delete.
Approving products, versions, and patches for DML and DHL
As part of managing your products, approving products in the Product Catalog is important. Approved products are available in the DML or DHL, depending on whether they are software or hardware. By default, the Normalization Engine normalizes both approved and unapproved CIs. If you disable the Allow Unapproved CIs option in the Normalization console, the Normalization Engine still normalizes CIs of the products that are not approved in the Product Catalog but sets the NormalizationStatus attribute for those CIs to Normalized Not Approved.
� To approve individual products
1 From the Product Catalog Console, choose General Functions > Search Products.
2 Perform one of the following actions:
� To view a list of products, click in the table to refresh it.
� Specify the search criteria to view the product in the table.
3 Select a product in the Product Category area.
4 In the Company and Module Relationships area, select the Product Company Assoc tab.
5 Perform one of the following actions:
� Select Global and click View.
� If you have set up multitenancy, select the specific company, and click View.
Chapter 4 Configuring the Product Catalog 83

BMC Atrium Core 7.6.03
6 In the Company/Module Relationship window, perform the following steps:
a For Approved Product, select Yes.
b Select the Status Flag and update other details.
7 Click Save and Close.
� To approve versions of products
1 From the Product Catalog Console, choose General Functions > Search Products.
2 Perform one of the following actions:
� To view a list of products, click in the table to refresh it.
� Specify the search criteria to view the product in the table.
3 Select a product in the Product Category area.
4 On the Model/Version tab, select a version or model for the selected product.
5 In the Company and Module Relationships area, select the Version Company Assoc tab.
6 Perform one of the following actions:
� Select Global and click View.
� If you have set up multitenancy, select the specific company, and click View.
7 In the Company/Version Relationship window, perform the following steps:
a For Approved Version, select Yes.
b Select the Status Flag and update other details.
8 Click Save and Close.
� To approve patches of products
1 From the Product Catalog Console, choose General Functions > Search Products.
2 Perform one of the following actions:
� To view a list of products, click in the table to refresh it.
� Specify the search criteria to view the product in the table.
3 Select a product in the Product Category area.
4 On the Patch tab, select a patch for the selected product.
5 In the Company and Module Relationships area, select the Patch Company Assoc tab.
6 Perform one of the following actions:
� Select Global and click View.
� If you have set up multitenancy, select the specific company, and click View.
84 Product Catalog and DML Guide
Deleting Product Catalog entries
7 In the Company/Patch Relationship window, perform the following steps:
a For Approved Patch, select Yes.
b Select the Status Flag and update other details.
8 Click Save and Close.
� To approve products in bulk
1 In BMC Remedy User, open the PCT:ProductVersionJoin form in Search mode.
2 Click Search to list all Product Catalog records.
3 Select all products, versions, and patches that you want to approve.
4 Choose Actions > Modify All.
5 For Approved Version, select Yes.
6 Click Save.
7 In the confirmation dialog box, click Yes.
All the selected products are marked as approved.
Deleting Product Catalog entriesYou can delete Product Catalog entries using the Delete button on the Product Category tab on the Product Category Setup form.
� To delete a Product Catalog entry
1 From the Product Catalog Console, click Search Products.
2 In the Product Categorization Search Criteria area, enter your criteria, then click Search.
Results matching your search criteria appear in the tables.
3 On the Product Category tab, select the entry to delete.
4 In the Product Category area, click Delete.
NOTE If an entry is related to a Storage Location, a message appears stating that you cannot delete the entry. If this happens, open the Product Catalog Console and delete the Storage Locations that are related to this entry, then repeat this procedure.
Best practice
If you want to delete entries in bulk, or remove the existing data from your Product Catalog, BMC recommends that you contact Customer Support to delete your data.
Chapter 4 Configuring the Product Catalog 85
BMC Atrium Core 7.6.03
Cloning product entriesYou can duplicate, or clone, existing product entries. You might use this when a product name changes, but you do not want to modify the original entry. When you clone a product, you can change the product name, categorization, status, version, and other attributes. The original entry is set to offline.
� To clone a product entry
1 In the Product Catalog Entries area of the Product Catalog Console, select the patch to clone.
2 Click Clone.
3 In the Clone Product Catalog Entry window, enter a new name for the cloned product.
4 Modify the product information as needed.
5 Click Save.
Configuring datasets for normalizationTo ensure that data from a dataset is normalized, you must configure the dataset for normalization in the Normalization console.
When a dataset is configured for normalization and a new CI is discovered, the categorization validation workflow performs a lookup for the product entry in the existing Product Catalog entries to validate the CI. If no entries are found, the product entry is compared with the product categorization aliases.
To configure a dataset for normalization, make sure that you select the Allow New Product Catalog Entry option for that dataset in the Normalization console. Every time a new product name and manufacturer combination is discovered, a new Product Catalog entry is created using the preferred three categorization tiers and the discovered product name and manufacturer. The CI is then validated and related to a global company.
If a dataset is not configured for normalization, the categorization validation workflow does not check the categorization of a discovered CI and the CI could be rejected.
For more information, see the BMC Atrium CMDB 7.6.03 Normalization and Reconciliation Guide.
CIs are not validated and created for products that are not in the Product Catalog and that are coming from a dataset that is not configured for normalization.
86 Product Catalog and DML Guide
Mapping product categorization aliases
NOTE When you install BMC Atrium Discovery, or BMC Configuration Automation for Clients Configuration Discovery Integration for CMDB, or both in a server environment that has BMC Atrium Product Catalog already installed, the BMC Topology Import and BMC Configuration Import datasets are configured for normalization, and you can skip this procedure.
If you install BMC Remedy ITSM after you deploy the BMC Atrium CMDB extensions from BMC Atrium Discovery, you must redeploy the extensions.
BMC Remedy Asset Management, BMC Remedy Change Management, BMC Remedy Incident Management, or BMC Remedy Problem Management must be installed for this feature.
Mapping product categorization aliasesProduct categorization aliases are used to rewrite the product categorization of a discovered CI to the preferred categorization. You can map incoming CI categorizations from a discovery product to categorizations that you define in the Product Catalog Alias Mapping form. When the CI is normalized, it receives the mappings defined in the Product Catalog Alias Mapping form.
For example, if you specify Desktop in the Categorization Tier 1 field in the Discovery Product Categorization area and Hardware in the Categorization Tier 1 field in the Mapped Product Categorization area, any incoming CI that is received as Desktop for tier 1 is saved as Hardware for tier 1.
NOTE BMC recommends that you do not map product names for different CI types, such as mapping product names of a software CI to a hardware CI.
Follow this procedure to set up a product categorization alias. Use Table 3-6 on page 53 to determine when this procedure is required.
NOTE A product alias is not the same as product categorization alias. A product alias is a shortcut for the product name, which can be used by Product Catalog users.
� To map discovery categorization to product categorization
1 From the Object List, open the Product Catalog Alias Mapping form.
2 Select the CI Type of the categorization that you are mapping.
3 In the Discovery Product Categorization and Mapped Product Categorization areas, select the information to be mapped for the selected CI type.
Chapter 4 Configuring the Product Catalog 87
BMC Atrium Core 7.6.03
TIP Include Product Name and Manufacturer in the mapping only if you want to rewrite the Product Name and Manufacturer supplied from the discovery dataset. By leaving these fields blank, you can extend the Product Catalog with the appropriate product categorization for newly discovered products.
4 Click Save.
Modifying the list of platforms To create a list of platforms in the Product Model/Version form, modify the PCT:OSPlatformMenuItems form. For more information about platform support for products, see “Platform and operating system support in the Product Catalog” on page 19.
� To modify the list of platforms
1 From the Object List, open the PCT:OSPlatformMenuItems form in New mode.
2 For OS Label, type the name of the operating system platform, such as HP-UX 11, Windows Vista, Mac OS 10.5, FreeBSD 7, or Sun Solaris 10.
3 For Platform Label, enter the name of the operating system, such as UNIX, Linux, Windows, Mac OS, or Solaris.
4 For Menu Order, select the platform’s position in the list, where 1 is the first list item.
NOTE If you do not select a value for Menu Order or if multiple platforms are assigned the same value, the platforms are listed in alphabetical order. Platforms with two or more words are then listed in alphabetical order based on the second string, for example, Windows 2003, Windows NT, and Windows Vista.
5 For Locale, to create localized versions, type a value such as en_US.
6 For Status, click the appropriate status for the platform.
The default is Enabled, and only platforms with any other status do not appear in the list.
7 Click Save.
88 Product Catalog and DML Guide
Chapter
5
Managing companiesThe Product Catalog includes forms for creating and updating company and site information.
Although the Site and Region forms are provided with the Product Catalog, they are used as part of BMC Remedy IT Service Management. For more information, see the BMC Remedy IT Service Management 7.5.00 Configuration Guide.
The following topics are provided:
� Creating and managing companies (page 90)� Creating a company alias (page 91)� Defining company locations (page 92)� Defining company contact information (page 93)� Defining time information for a company (page 93)� Multitenancy in the Calbro Services example (page 93)
Chapter 5 Managing companies 89
BMC Atrium Core 7.6.03
Creating and managing companiesYou can create and modify companies and organizations from the Company form. You can then associate products, versions, and patches with companies. Company information is used in multitenancy environments, which are used to segregate product data by companies or business units. For more information about multitenancy, see “Multitenancy support in the Product Catalog” on page 20.
You can define a company for more than one type, so a company can be a combination of a Customer, Generic Contact, Operating Company, Vendor, and Supplier. You must be in the Administrator group to create companies.
You cannot approve a company. You can enable or disable a company using the COM:Company form.
If you have BMC Remedy ITSM installed, follow the procedures described in the BMC Remedy IT Service Management 7.6.03 Configuration Guide.
� To create a company
1 Open the Company form.
From File > Open > Object List, select Company, and click New.
2 In the Company field, enter the company or organization name.
3 Select the Type from the items described in Table 5-1.
Table 5-1: Company types
Company type Description Supports multitenancy
Customer An external company for which you provide services.
Yes
Generic Contact Other companies that you want to see include on the People form.
Yes
Manufacturer A company that manufactures a product in the Product Catalog.
No
Operating Company A company or business unit for which your company or organization provides services.
Yes
Supplier Third-party supplier of products. Used by Asset Management.
No
Vendor Third-party vendor that provide services for your company or organization.
Yes
90 Product Catalog and DML Guide
Creating a company alias
4 For Status, select the company’s status.
NOTE If you are using BMC Remedy Asset Management and BMC Atrium Discovery, do not set companies to offline in BMC Remedy Asset Management if they are used to set the ManufacturerName attribute in a BMC Atrium Discovery CI, because it causes BMC Atrium Discovery to fail when creating CIs with those companies as Manufacturer.
5 (optional) In the Company ID field, enter a unique external identifier for the company.
NOTE BMC Remedy Asset Management can use the Company ID field to store the Supplier ID data.
6 (optional) In the Abbreviation field, enter the abbreviated version of the company name.
7 (optional) In the Category field, enter a category that describes the type of company you are creating.
8 (optional) In the Description field, enter detailed information about the company.
9 Click Save.
Depending on the status, the company is now available for selection in other forms, such as the Company and Module Relationships forms.
10 Complete the following tasks as needed for a company.
� “Creating a company alias” on page 91
� “Defining company locations” on page 92
� “Defining company contact information” on page 93
� “Defining time information for a company” on page 93
Creating a company aliasA company alias is another term that you can use to reference a company. This makes searching for a company easier because companies can be identified by more than one name. You can define one or more aliases for a company.
� To add a company alias
1 From the Company list in the Company form, select a company.
2 From the Alias tab, click Update Alias.
3 In the Company Alias Update dialog box, enter a company alias into the field at the top of the dialog box.
Chapter 5 Managing companies 91
BMC Atrium Core 7.6.03
TIP If your underlying database is case-sensitive, creating a company alias in lowercase enables users to add information in uppercase or lowercase.
4 Click Add.
5 Click Close.
The company alias appears in lists for the Company field on forms.
� To modify a company alias
1 From the Company list in the Company form, select a company.
2 From the Alias tab, click Update Alias.
3 Select the company alias to modify.
4 Update the alias name, and click Modify.
5 Click Close.
Defining company locationsCompany locations are sites that represent a physical location (such as a building) for a company.
� To create locations
1 From the Company list in the Company form, select a company.
2 Click Update Locations.
3 In the Location Update window, complete the following fields.
� For Site, enter the site name.
� For Country, enter the name of the country.
� For City, enter the name of the city.
4 Click Add.
5 When you are finished configuring the company locations, click Close.
92 Product Catalog and DML Guide
Defining company contact information
Defining company contact informationYou can define the contact information for the company.
� To add company contact information
1 From the Company list in the Company form, select a company.
2 From the Miscellaneous tab, complete the following fields.
3 Click Save.
Defining time information for a companyYou can view and modify the hours of operation for each company.
� To add company time information
1 From the Company list in the Company form, select a company.
2 From the Miscellaneous tab, complete the following fields.
3 Click Save.
Multitenancy in the Calbro Services exampleAndrew Admin is the administrator for both Calbro Services and Calfin Services. Andrew Admin configures the following users for these organizations:
� Betty Admin for Calbro Services
� Charlie Admin for Calfin Services
Table 5-2: Company contact fields
Field Description
Hot Line The main number for the company.
Email The primary email address for the company.
Web Page The URL of the primary website for the company.
Table 5-3: Company time fields
Field Description
Hours of Operation The business hours of the company location.
Time Zone The time zone of the company location.
Chapter 5 Managing companies 93
BMC Atrium Core 7.6.03
Andrew Admin creates two user accounts and assigns them the following groups to access Product Catalog for their respective companies:
� Atrium Foundation Admin
� General Access
� Automatically generated group for respective companies
To do this, Andrew Admin performs the following actions:
Step 1 Create companies using the Company form.
Step 2 Locate the automatically generated group for each company.
Step 3 Create a user account for each company with the appropriate group assignments.
� To create a company
1 From BMC Remedy User as Andrew Admin, click File > Open > Object List.
2 Select the Company form and click New.
3 In the Company field, enter Calbro Services.
4 Andrew Admin selects Operating Company as the Type.
For information about the company types, see Table 5-1 on page 90.
5 For Status, select the company’s status.
6 Click Save.
7 Repeat step 1 to step 6 to create Calfin Services as a company.
� To find the Group Names for the companies
1 From BMC Remedy User as Andrew Admin, open the BMC Remedy AR System Administration Console.
2 Select Application > Users/Groups/Roles > Groups.
3 From the Group Information form in the Long Group Name field, type Calbro Services, and click Search.
4 Note the Group Name for Calbro Services.
5 Repeat step 3 and step 4 for Calfin Services.
In this example, the Group Name of Calbro Services is 1000000006, and of Calfin Services is 1000000007.
� To create Product Catalog users for each company
1 From BMC Remedy User as Andrew Admin, open the AR System Administration Console.
2 Select Application > Users/Groups/Roles > Users.
3 From BMC Remedy User, select Actions > New.
94 Product Catalog and DML Guide
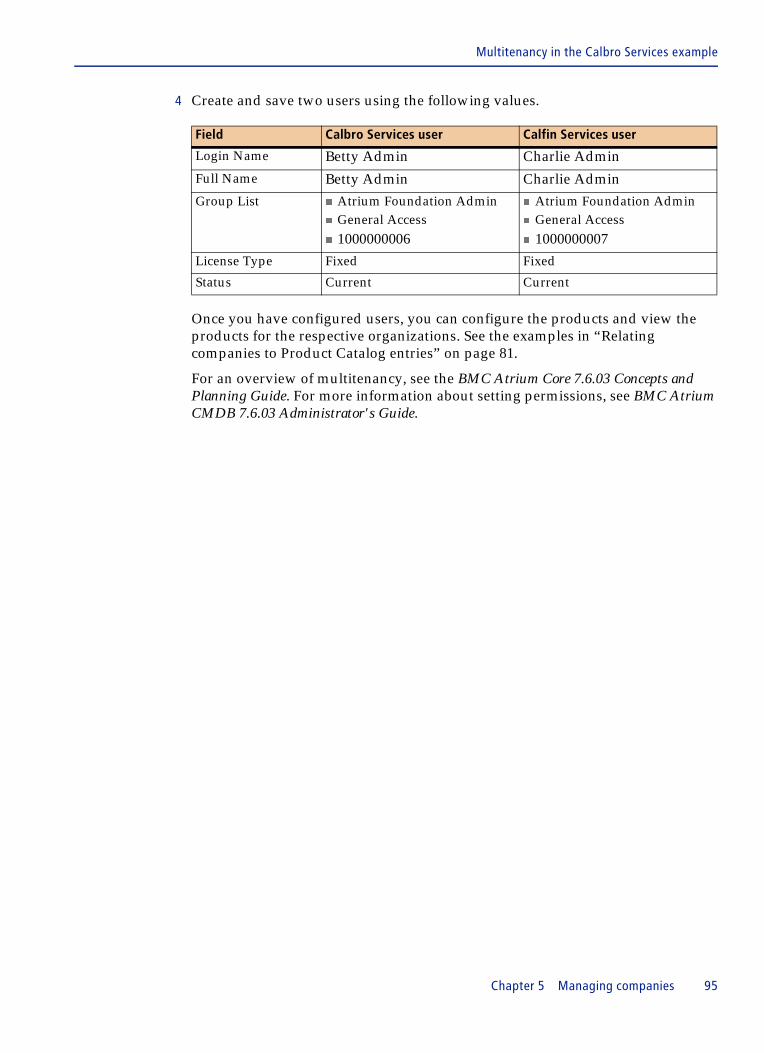
Multitenancy in the Calbro Services example
4 Create and save two users using the following values.
Once you have configured users, you can configure the products and view the products for the respective organizations. See the examples in “Relating companies to Product Catalog entries” on page 81.
For an overview of multitenancy, see the BMC Atrium Core 7.6.03 Concepts and Planning Guide. For more information about setting permissions, see BMC Atrium CMDB 7.6.03 Administrator's Guide.
Field Calbro Services user Calfin Services user
Login Name Betty Admin Charlie AdminFull Name Betty Admin Charlie AdminGroup List � Atrium Foundation Admin
� General Access� 1000000006
� Atrium Foundation Admin� General Access� 1000000007
License Type Fixed Fixed
Status Current Current
Chapter 5 Managing companies 95

BMC Atrium Core 7.6.03
96 Product Catalog and DML Guide
Chapter
6
Importing and updating dataYou can import product information into the Product Catalog from external files or other sources. You can also update product data that BMC provides.
The following topics are provided:
� Importing and exporting custom Product Catalog data (page 98)� Exporting data from the Product Catalog (page 101)� Importing Product Catalog data (page 102)
Chapter 6 Importing and updating data 97
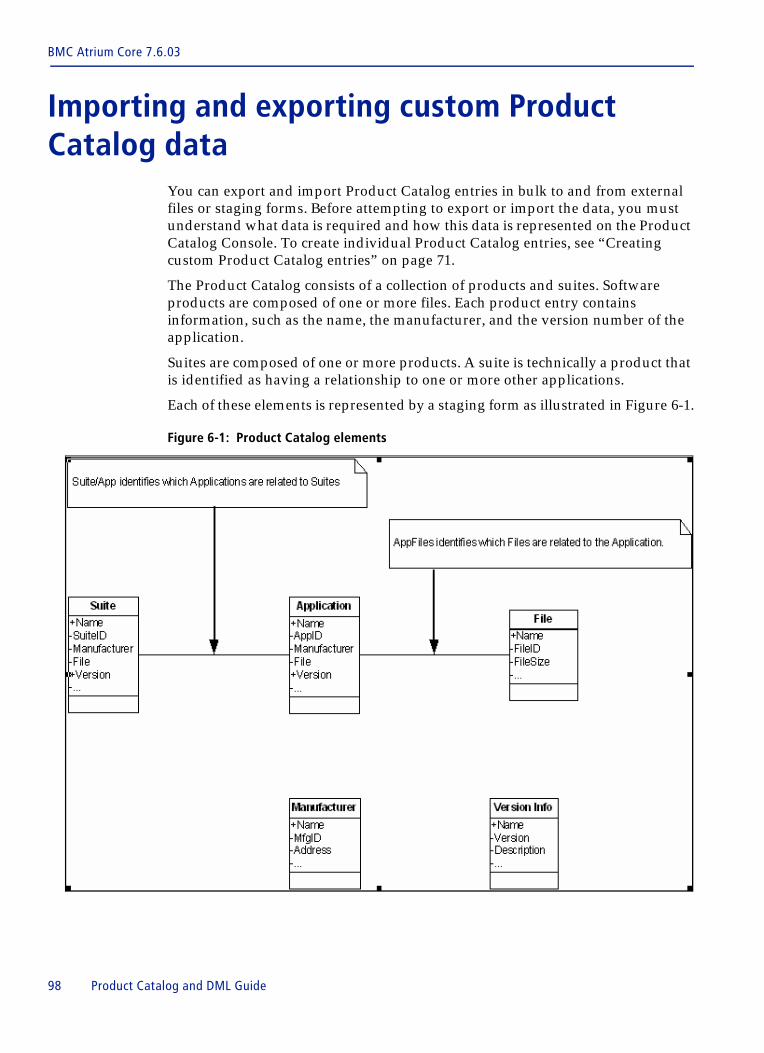
BMC Atrium Core 7.6.03
Importing and exporting custom Product Catalog data
You can export and import Product Catalog entries in bulk to and from external files or staging forms. Before attempting to export or import the data, you must understand what data is required and how this data is represented on the Product Catalog Console. To create individual Product Catalog entries, see “Creating custom Product Catalog entries” on page 71.
The Product Catalog consists of a collection of products and suites. Software products are composed of one or more files. Each product entry contains information, such as the name, the manufacturer, and the version number of the application.
Suites are composed of one or more products. A suite is technically a product that is identified as having a relationship to one or more other applications.
Each of these elements is represented by a staging form as illustrated in Figure 6-1.
Figure 6-1: Product Catalog elements
98 Product Catalog and DML Guide
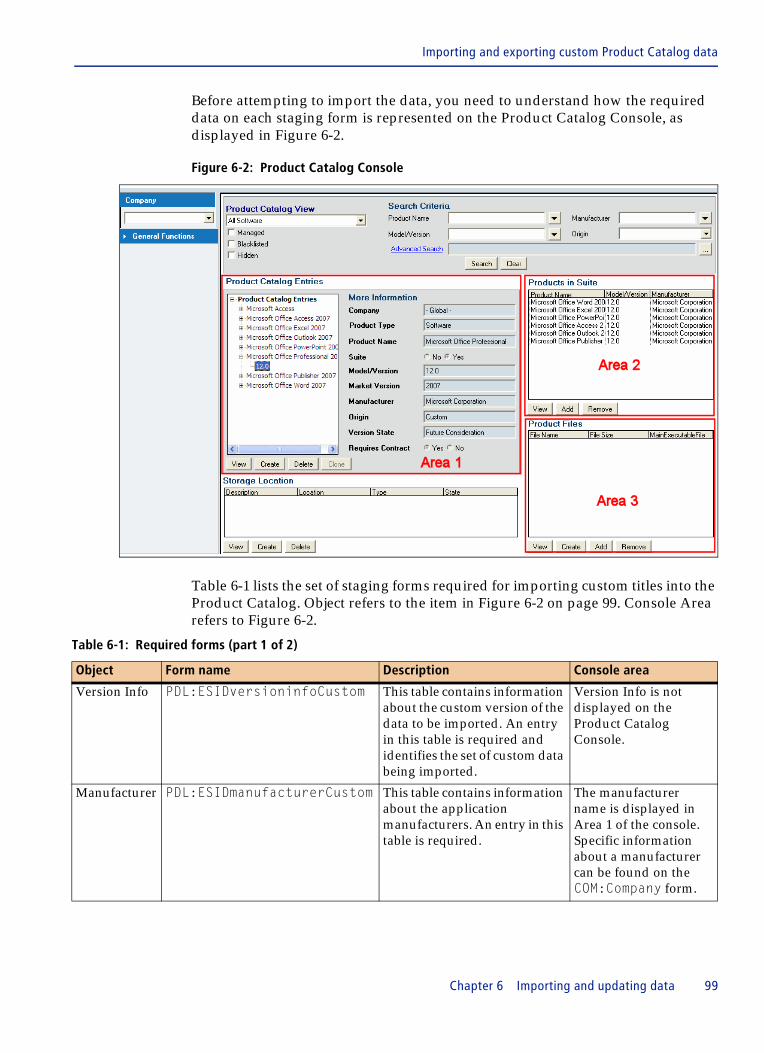
Importing and exporting custom Product Catalog data
Before attempting to import the data, you need to understand how the required data on each staging form is represented on the Product Catalog Console, as displayed in Figure 6-2.
Figure 6-2: Product Catalog Console
Table 6-1 lists the set of staging forms required for importing custom titles into the Product Catalog. Object refers to the item in Figure 6-2 on page 99. Console Area refers to Figure 6-2.
Table 6-1: Required forms (part 1 of 2)
Object Form name Description Console area
Version Info PDL:ESIDversioninfoCustom This table contains information about the custom version of the data to be imported. An entry in this table is required and identifies the set of custom data being imported.
Version Info is not displayed on the Product Catalog Console.
Manufacturer PDL:ESIDmanufacturerCustom This table contains information about the application manufacturers. An entry in this table is required.
The manufacturer name is displayed in Area 1 of the console. Specific information about a manufacturer can be found on the COM:Company form.
Chapter 6 Importing and updating data 99
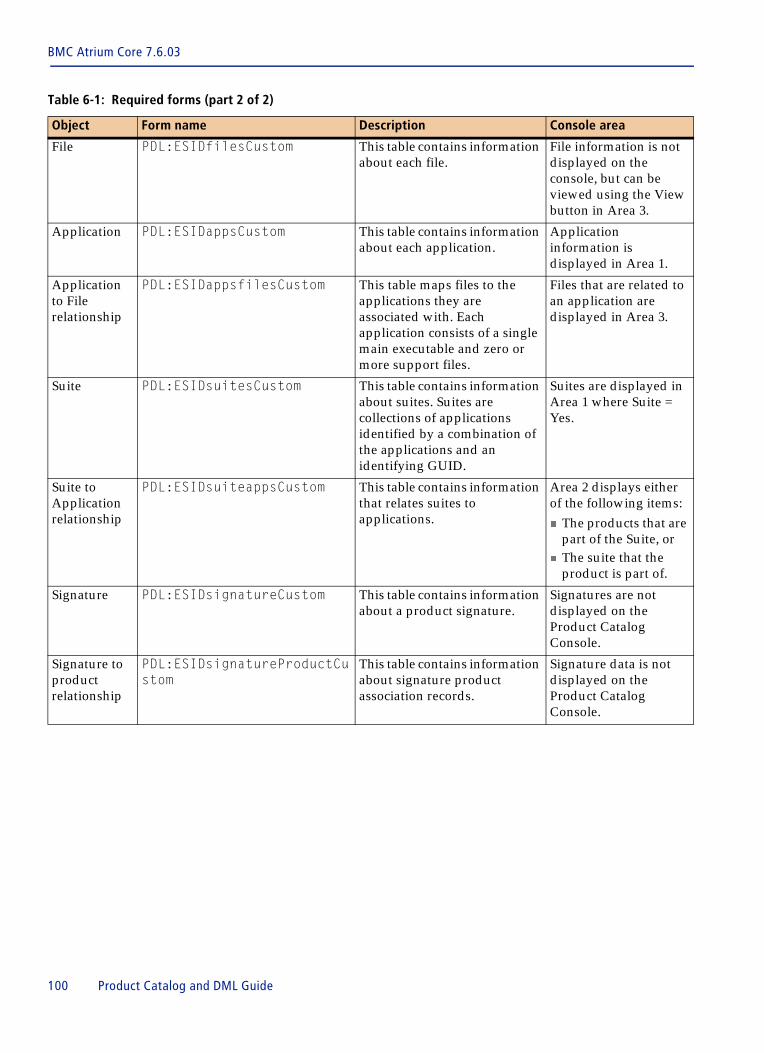
BMC Atrium Core 7.6.03
File PDL:ESIDfilesCustom This table contains information about each file.
File information is not displayed on the console, but can be viewed using the View button in Area 3.
Application PDL:ESIDappsCustom This table contains information about each application.
Application information is displayed in Area 1.
Application to File relationship
PDL:ESIDappsfilesCustom This table maps files to the applications they are associated with. Each application consists of a single main executable and zero or more support files.
Files that are related to an application are displayed in Area 3.
Suite PDL:ESIDsuitesCustom This table contains information about suites. Suites are collections of applications identified by a combination of the applications and an identifying GUID.
Suites are displayed in Area 1 where Suite = Yes.
Suite to Application relationship
PDL:ESIDsuiteappsCustom This table contains information that relates suites to applications.
Area 2 displays either of the following items:� The products that are
part of the Suite, or� The suite that the
product is part of.
Signature PDL:ESIDsignatureCustom This table contains information about a product signature.
Signatures are not displayed on the Product Catalog Console.
Signature to product relationship
PDL:ESIDsignatureProductCustom
This table contains information about signature product association records.
Signature data is not displayed on the Product Catalog Console.
Table 6-1: Required forms (part 2 of 2)
Object Form name Description Console area
100 Product Catalog and DML Guide
Exporting data from the Product Catalog
Exporting data from the Product CatalogYou must export a number of forms from the pre-production server, as indicated in Table 6-1 on page 99. When an alias is defined for the form, you must use the alias to open the form in BMC Remedy User.
Before you begin
Create a new report of AR System type for each staging form. When designing this report, include all the fields. You use this report to export the data in .arx format.
� To export data from the Product Catalog
1 With your web browser, log in to the BMC Remedy ITSM server as an administrator.
2 Use one of the following methods to open the appropriate form:
� Enter the direct URL.
http://midTierServer:portNumber/arsys/forms/arSystemServer/
yourForm
For example, to open the PDL:ESIDversioninfoCustom form:
http://CalbroServer:8080/arsys/forms/SanJoseServer/
PDL:ESIDversioninfoCustom
� Open the Object List to search for the form.
http://midTierServer:portNumber/arsys/forms
If the form has an alias, you must search for the alias. Otherwise, search for the form name. If you see two versions of the form listed, select the object listed as a Form, and not the Join Form.
For more information about creating reports and configuring the object list, see the BMC Remedy Action Request System 7.6.03 Mid Tier Guide.
3 Make sure that the form is in Search mode.
4 Search for all records in the form or for just the subset that you want to export.
To search for all records, leave the form blank and click Search.
If an error occurs when you perform an unqualified search or if your query hits the 1000-record query limit, perform the following steps:
a Open the IT Home page.
b Open the AR System Administration Console for the BMC Remedy ITSM server.
c Click System > General > Server Information.
d On the AR System Administration: Server Information form, click the Configuration tab.
e Select Allow Unqualified Searches.
Chapter 6 Importing and updating data 101
BMC Atrium Core 7.6.03
f In the Server Table Chunk Size field, enter a different value (for example, 0, for unlimited records returned in the query). This setting can result in slower performance.
g Click OK.
You can then return to the form and perform the search.
5 Create reports to export the data from the staging forms.
a Select all the records returned in the search.
b Click the Report button.
When the Reporting Console opens, reports that are associated with the form and that you have permission to access appear in the list. The list can include AR System, BIRT, and Crystal types of reports. If no reports appear in the Reporting Console list, you must create a new AR System type of report.
c To generate .arx output, select an AR System type report, as identified in the Report Type field.
All the records that you selected are passed to the report.
If no reports appear in the Reporting Console list, either there is no report associated with this form or you do not have permission to access it. In that case, you must create a new AR System type of report.
d In the Destination field, select File.
e In the Format field, select AR Export.
f Enter a name for your report.
Change the file name to the form name, and do not use illegal characters.
g Click Run.
6 Repeat this procedure for each staging form that you are exporting.
Importing Product Catalog dataYou can import custom data into the Product Catalog by performing the following steps.
Step 1 Create the data by loading it into the appropriate staging forms. (See “Creating the data” on page 103.)
Step 2 Validate the data. (See “Validating the data” on page 110.)
Step 3 Import the data from the staging forms to the Product Catalog forms. (See “Importing the data” on page 111.)
102 Product Catalog and DML Guide
Importing Product Catalog data
Creating the dataBefore creating the data, you must decide if you will import custom data on a regular basis. If you import custom data more than once, you must make sure that you are using a unique version number. However, if you clear all entries from the custom staging forms before starting a subsequent custom data import, then the unique version number is not required.
NOTE When you import custom data, the BMC_Product and BMC_OperatingSystem classes are populated with entries. No products exist for other classes.
Loading the data into the staging formsYou can use BMC Remedy Data Import to load data from supported data sources, such as formatted files and spreadsheets, into the following custom staging forms:
� PDL:ESIDversioninfoCustom
� PDL:ESIDmanufacturerCustom
� PDL:ESIDfilesCustom
� PDL:ESIDappsCustom
� PDL:ESIDappsfilesCustom
� PDL:ESIDsuitesCustom
� PDL:ESIDsuiteappsCustom
� PDL:ESIDsignatureCustom
� PDL:ESIDsignatureProductCustom
NOTE To load data using spreadsheets, you also need to create mapping files that specify which spreadsheet fields map to the destination form fields.
You can also manually create entries in each of the staging forms. The required fields and sample data are shown in the following tables.
Chapter 6 Importing and updating data 103
BMC Atrium Core 7.6.03
Common fields in staging formsTable 6-2 lists fields that exist on all the staging forms. The Sample Data column shows the data values that produce the Product Catalog entries displayed in the Product Catalog Console.
Table 6-3 through Table 6-11 list the fields in each of the staging forms.
PDL:ESIDversioninfoCustomThis staging form contains information about the version of custom data that loaded into the Product Catalog. Use this data to keep track of which version of custom data is installed on your system.
Table 6-2: Common fields in staging forms
Field name Description Maximum length
Values Sample data
dataStatus Status field used to track import progress. All entries should be created as New.
� New� Validated� Inactive� Imported� Update
EventCommand Action field used to trigger import.
60
Status Additional status field used to track import status.
� New� Assigned� Fixed� Rejected� Closed
New
Short Description Stores error notes during import.
254 None or "."
None or "." Data version identifier. Used on all the forms to identify which custom version this entry belongs to.
50 Sample data version
Table 6-3: PDL:ESIDversioninfoCustom fields (part 1 of 2)
Field name Description Maximum length
Sample data
component Component name 20 Sample
versionmajor Major version number 1
versionminor Minor version number 0
versionmaint Maintenance version number 0
versionbuild Build version number 1
104 Product Catalog and DML Guide
Importing Product Catalog data
PDL:ESIDmanufacturerCustomThis staging form contains information about the manufacturers whose applications are loaded in the Product Catalog.
Entries where the manufacturer country is not known can be marked with country = "UNKNOWN" and countrycode = "ZY."
description Complete version number in string format
20 Sample Custom Data
recver Not currently used 255
Table 6-4: DL:ESIDmanufacturerCustom fields
Field name Description Maximum length
Sample data
name Manufacturer name 254 Sample Manufacturer
mfgid Manufacturer ID - ID assigned to this manufacturer, as referenced in the COM:Company form
30 Mfgl
address1 Manufacturer address 90 (address1 + address2)
1234 Main Street
address2 Manufacturer address
city Manufacturer city 60 Sunnyvale
state Manufacturer state 60 CA
zip Manufacturer zip 15 94086
country Manufacturer country 60 United States
businessphone Manufacturer phone 50 (408) 777-1234
techsupport Manufacturer technical support information
http://support.sample.com
customerservice Manufacturer support reference
45 (800) 777-1234
url Manufacturer web address
128 www.sample.com
comments Miscellaneous comments
254
countrycode Two-character ISO country code
2 US
Table 6-3: PDL:ESIDversioninfoCustom fields (part 2 of 2)
Field name Description Maximum length
Sample data
Chapter 6 Importing and updating data 105
BMC Atrium Core 7.6.03
PDL:ESIDfilesCustomThis staging form contains metadata about the files that are related to applications. Each entry contains the file name and file size of each file that is associated to an application.
PDL:ESIDappsCustomThis staging form contains information about the applications that are loaded in the Product Catalog. Each entry contains the application name and references the manufacturer by manufacturer ID. The main executable file is referenced by file ID.
Table 6-5: PDL:ESIDfilesCustom
Field name Description Maximum length
Sample data
name File name 254 sample.exe
kbfileid Unique file ID 30 File1
filesize File size in bytes 50 9482
quickcrc CRC (ISO 3309) based on the first 1024 bytes of the file
50
timestamp DOS-style date/time stamp of the file
versionmajor File major version number 60 1
versionminor File minor version number 60 1
versionmaint File maintenance version number
60 1
versionbuild File build version number 60 1
Table 6-6: PDL:ESIDappsCustom Fields (part 1 of 2)
Field name Description Maximum length Sample data
name Application name 254 Sample Application
kbappid Application ID 30 App1
filesize File size in bytes 50 9482
mfgid Manufacturer ID 90 (address1 + address2)
Mfgl
versionstring Application version in string format
240 1.0.0.1
versionmajor Application major version number
60 1
versionminor Application minor version number
60 0
versionmaint Application maintenance version number
60 0
versionbuild Application build version number
60 1
106 Product Catalog and DML Guide
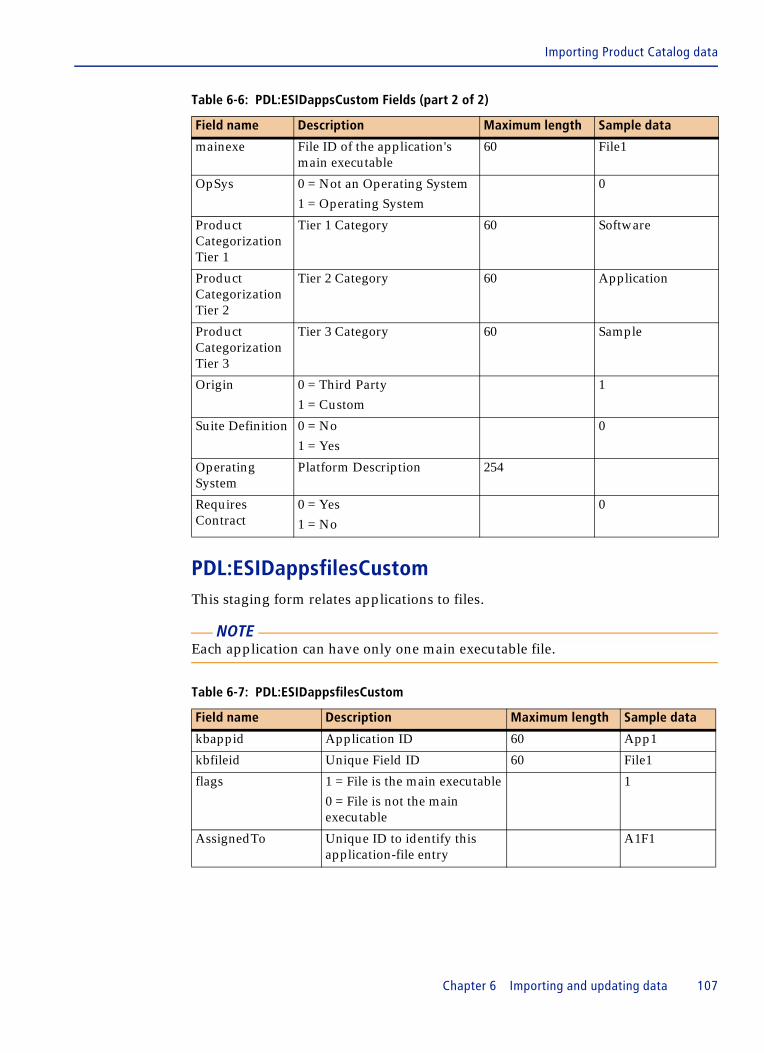
Importing Product Catalog data
PDL:ESIDappsfilesCustomThis staging form relates applications to files.
NOTE Each application can have only one main executable file.
mainexe File ID of the application's main executable
60 File1
OpSys 0 = Not an Operating System1 = Operating System
0
Product Categorization Tier 1
Tier 1 Category 60 Software
Product Categorization Tier 2
Tier 2 Category 60 Application
Product Categorization Tier 3
Tier 3 Category 60 Sample
Origin 0 = Third Party1 = Custom
1
Suite Definition 0 = No1 = Yes
0
Operating System
Platform Description 254
Requires Contract
0 = Yes1 = No
0
Table 6-7: PDL:ESIDappsfilesCustom
Field name Description Maximum length Sample data
kbappid Application ID 60 App1
kbfileid Unique Field ID 60 File1
flags 1 = File is the main executable0 = File is not the main executable
1
AssignedTo Unique ID to identify this application-file entry
A1F1
Table 6-6: PDL:ESIDappsCustom Fields (part 2 of 2)
Field name Description Maximum length Sample data
Chapter 6 Importing and updating data 107
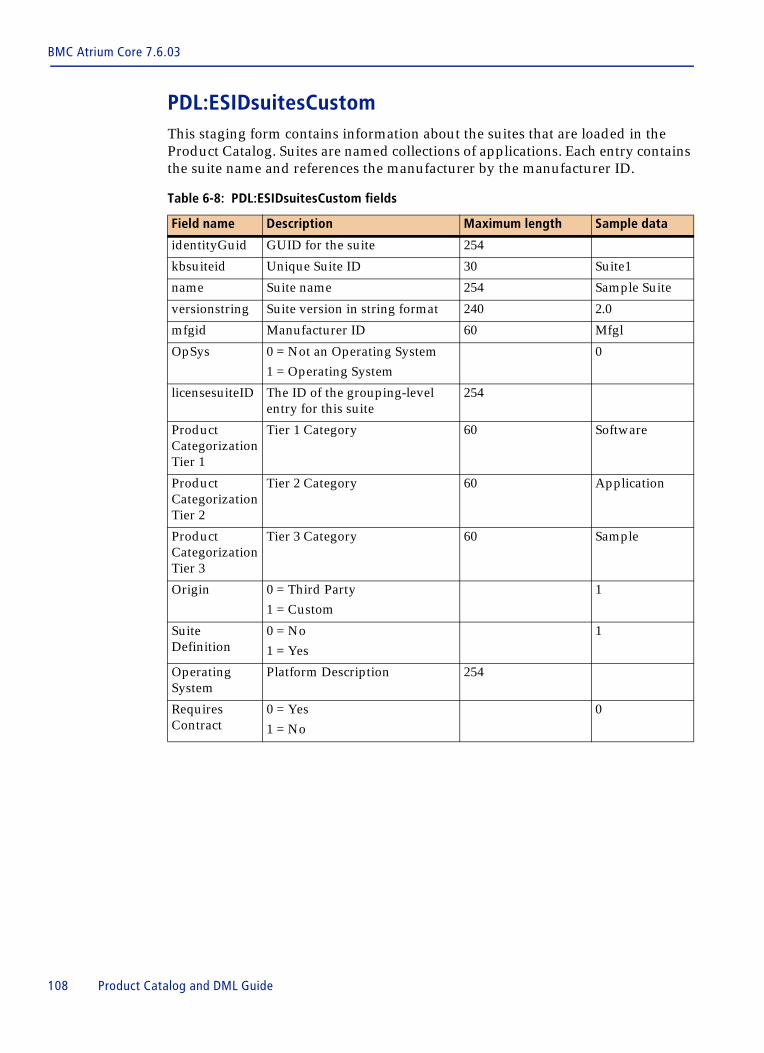
BMC Atrium Core 7.6.03
PDL:ESIDsuitesCustomThis staging form contains information about the suites that are loaded in the Product Catalog. Suites are named collections of applications. Each entry contains the suite name and references the manufacturer by the manufacturer ID.
Table 6-8: PDL:ESIDsuitesCustom fields
Field name Description Maximum length Sample data
identityGuid GUID for the suite 254
kbsuiteid Unique Suite ID 30 Suite1
name Suite name 254 Sample Suite
versionstring Suite version in string format 240 2.0
mfgid Manufacturer ID 60 Mfgl
OpSys 0 = Not an Operating System1 = Operating System
0
licensesuiteID The ID of the grouping-level entry for this suite
254
Product Categorization Tier 1
Tier 1 Category 60 Software
Product Categorization Tier 2
Tier 2 Category 60 Application
Product Categorization Tier 3
Tier 3 Category 60 Sample
Origin 0 = Third Party1 = Custom
1
Suite Definition
0 = No1 = Yes
1
Operating System
Platform Description 254
Requires Contract
0 = Yes1 = No
0
108 Product Catalog and DML Guide
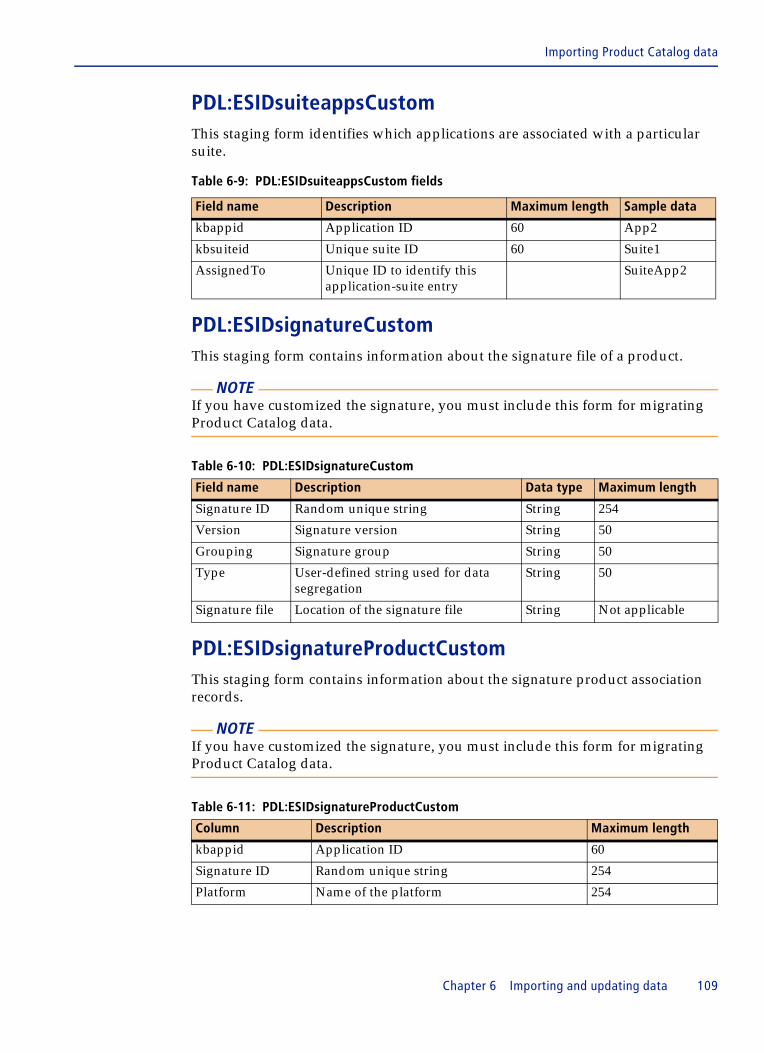
Importing Product Catalog data
PDL:ESIDsuiteappsCustomThis staging form identifies which applications are associated with a particular suite.
PDL:ESIDsignatureCustomThis staging form contains information about the signature file of a product.
NOTE If you have customized the signature, you must include this form for migrating Product Catalog data.
PDL:ESIDsignatureProductCustomThis staging form contains information about the signature product association records.
NOTE If you have customized the signature, you must include this form for migrating Product Catalog data.
Table 6-9: PDL:ESIDsuiteappsCustom fields
Field name Description Maximum length Sample data
kbappid Application ID 60 App2
kbsuiteid Unique suite ID 60 Suite1
AssignedTo Unique ID to identify this application-suite entry
SuiteApp2
Table 6-10: PDL:ESIDsignatureCustom
Field name Description Data type Maximum length
Signature ID Random unique string String 254
Version Signature version String 50
Grouping Signature group String 50
Type User-defined string used for data segregation
String 50
Signature file Location of the signature file String Not applicable
Table 6-11: PDL:ESIDsignatureProductCustom
Column Description Maximum length
kbappid Application ID 60
Signature ID Random unique string 254
Platform Name of the platform 254
Chapter 6 Importing and updating data 109
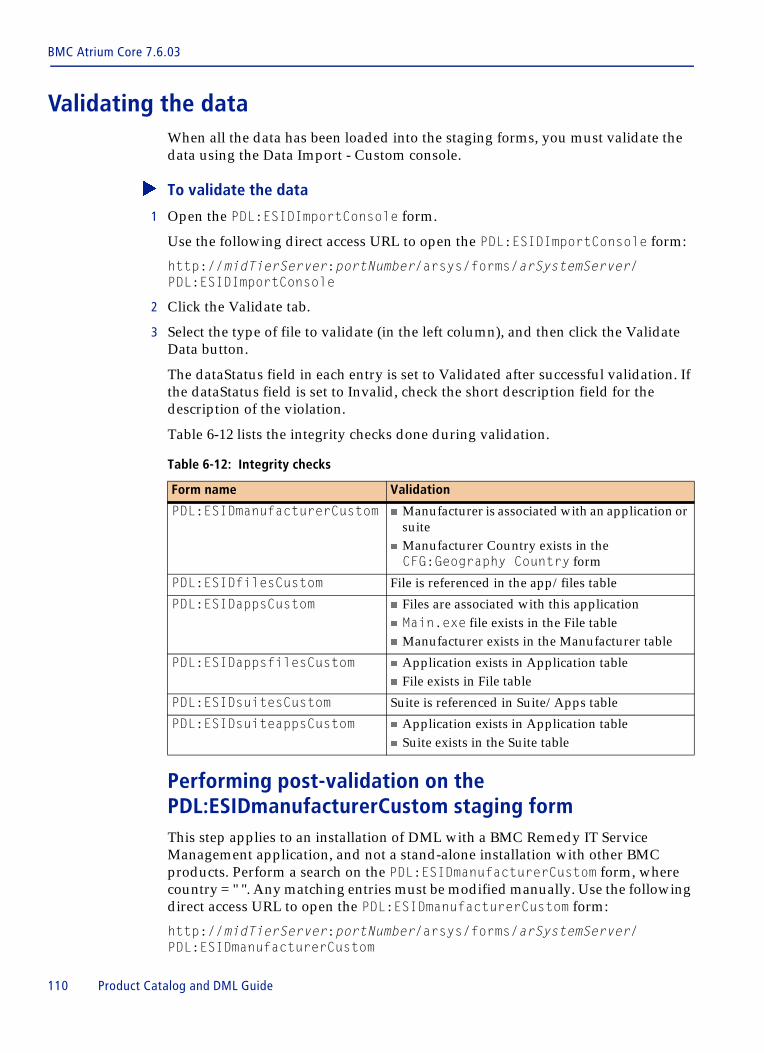
BMC Atrium Core 7.6.03
Validating the data When all the data has been loaded into the staging forms, you must validate the data using the Data Import - Custom console.
� To validate the data
1 Open the PDL:ESIDImportConsole form.
Use the following direct access URL to open the PDL:ESIDImportConsole form:
http://midTierServer:portNumber/arsys/forms/arSystemServer/PDL:ESIDImportConsole
2 Click the Validate tab.
3 Select the type of file to validate (in the left column), and then click the Validate Data button.
The dataStatus field in each entry is set to Validated after successful validation. If the dataStatus field is set to Invalid, check the short description field for the description of the violation.
Table 6-12 lists the integrity checks done during validation.
Performing post-validation on the PDL:ESIDmanufacturerCustom staging formThis step applies to an installation of DML with a BMC Remedy IT Service Management application, and not a stand-alone installation with other BMC products. Perform a search on the PDL:ESIDmanufacturerCustom form, where country = " ". Any matching entries must be modified manually. Use the following direct access URL to open the PDL:ESIDmanufacturerCustom form:
http://midTierServer:portNumber/arsys/forms/arSystemServer/PDL:ESIDmanufacturerCustom
Table 6-12: Integrity checks
Form name Validation
PDL:ESIDmanufacturerCustom � Manufacturer is associated with an application or suite
� Manufacturer Country exists in the CFG:Geography Country form
PDL:ESIDfilesCustom File is referenced in the app/files table
PDL:ESIDappsCustom � Files are associated with this application� Main.exe file exists in the File table� Manufacturer exists in the Manufacturer table
PDL:ESIDappsfilesCustom � Application exists in Application table� File exists in File table
PDL:ESIDsuitesCustom Suite is referenced in Suite/Apps table
PDL:ESIDsuiteappsCustom � Application exists in Application table� Suite exists in the Suite table
110 Product Catalog and DML Guide
Importing Product Catalog data
� To perform the post-validation step
1 From the CFG:GeographyCountry file, locate the entry that corresponds to the country code.
2 Change the status for that entry to ENABLED.
3 For the matching entry, copy the country name, and enter in the PDL:ESIDmanufacturer entry, where country = " ".
Importing the dataAfter the data is successfully validated, you are ready to import the data into the BMC Atrium Product Catalog forms.
� To import the data
1 Open the PDL:ESIDImportConsole form.
Use the following direct access URL to open the PDL:ESIDImportConsole form.
http://midTierServer:portNumber/arsys/forms/arSystemServer/PDL:ESIDImportConsole
2 Click Import Data.
After the import completes, you can check to see if the data has been imported correctly. Open each of the following forms in search mode where datastatus = imported. All records have datastatus = imported when they are imported correctly.
� PDL_ESIDversioninfoCustom
� PDL_ESIDmanufacturerCustom
� PDL_ESIDfilesCustom
� PDL_ESIDappsCustom
� PDL_ESIDappfilesCustom
� PDL_ESIDsuitesCustom
� PDL_ESIDsuiteappsCustom
Chapter 6 Importing and updating data 111

BMC Atrium Core 7.6.03
112 Product Catalog and DML Guide
Appendix
A
Best practice categorizationThis appendix provides the best practice categorization values provided by BMC. You might use this information as a starting point for your discussions and analysis of the categorization appropriate to your organization.
This categorization can be installed with BMC Atrium Discovery and Dependency Mapping and BMC Configuration Discovery to categorize discovered configuration items (CIs).
Some categorization values are not applied by the BMC discovery products to CIs, either because the CI is not discovered or because the Common Data Model (CDM) class and discovered attributes are not sufficient to map a CI to a categorization.
For information about planning categorization, see “Planning and implementing categorization” on page 31.
The following topics are provided:
� Tier 1—Hardware (page 114)� Tier 1—Miscellaneous (page 117)� Tier 1—Network (page 119)� Tier 1—Software (page 120)� Additional categorization for BMC discovery products (page 122)
Appendix A Best practice categorization 113
BMC Atrium Core 7.6.03
Tier 1—HardwareTable A-1 provides best practice categorization values when Tier 1 is Hardware. The table includes both the applicable CI type and CDM class. Where applicable, an attribute value is listed for the CDM class.
Table A-1: Best practice categorization values for hardware CIs (part 1 of 3)
Tier 2 Tier 3 CI type CDM class (and attribute value, if not applicable to all instances)
Card Network Interface Card System Component—Network Port
BMC_NetworkPort
Processor Card System Component—Card
BMC_CardCardType=BaseBoard
Video Card System Component—Card
BMC_CardCardType=VideoCard
Voice Card System Component—Card
BMC_CardCardType=SoundCard
Other Type of Card System Component—Card
BMC_CardCardType=Other
Component CPU System Component—Processor
BMC_Processor
Memory System Component—Memory
BMC_Memory
Data Center Patch Panel System Component—Hardware System Component
BMC_HardwareSystemComponent
Rack/Cabinet System Component—Chassis
BMC_Chassis
Row System Component—Logical System Component
BMC_LogicalSystemComponent
114 Product Catalog and DML Guide
Tier 1—Hardware
Disk Device Disk Array System—Computer System
BMC_ComputerSystemPrimary Capability is any of the following values:� Storage� StorageSubsystem� RAIDStorageDevice
Disk Controller System Component—Hardware System Component
BMC_HardwareSystemComponent
Disk Drive Applies to:� System Component—
CDROM Drive� System Component—
Disk Drive� System Component—
Floppy Drive
Applies to the following CDM classes:� BMC_CDROMDrive� BMC_DiskDrive� BMC_FloppyDrive
Disk Partition System Component—Disk Partition
BMC_DiskPartition
Peripheral Docking Station System Component—Hardware System Component
BMC_HardwareSystemComponent
Monitor System Component—Monitor
BMC_Monitor
Printer/Multifunction System—Printer BMC_PrinterThis also applies to BMC_ComputerSystem, where Primary Capability=Print.
Projector Equipment BMC_Equipment
Scanner Equipment BMC_Equipment
Terminal System Component—Hardware System Component
BMC_HardwareSystemComponent
Power Supply Emergency Power Generator
Equipment BMC_Equipment
Uninterrupted Power Supply
System Component—UPS BMC_UPS
Table A-1: Best practice categorization values for hardware CIs (part 2 of 3)
Tier 2 Tier 3 CI type CDM class (and attribute value, if not applicable to all instances)
Appendix A Best practice categorization 115
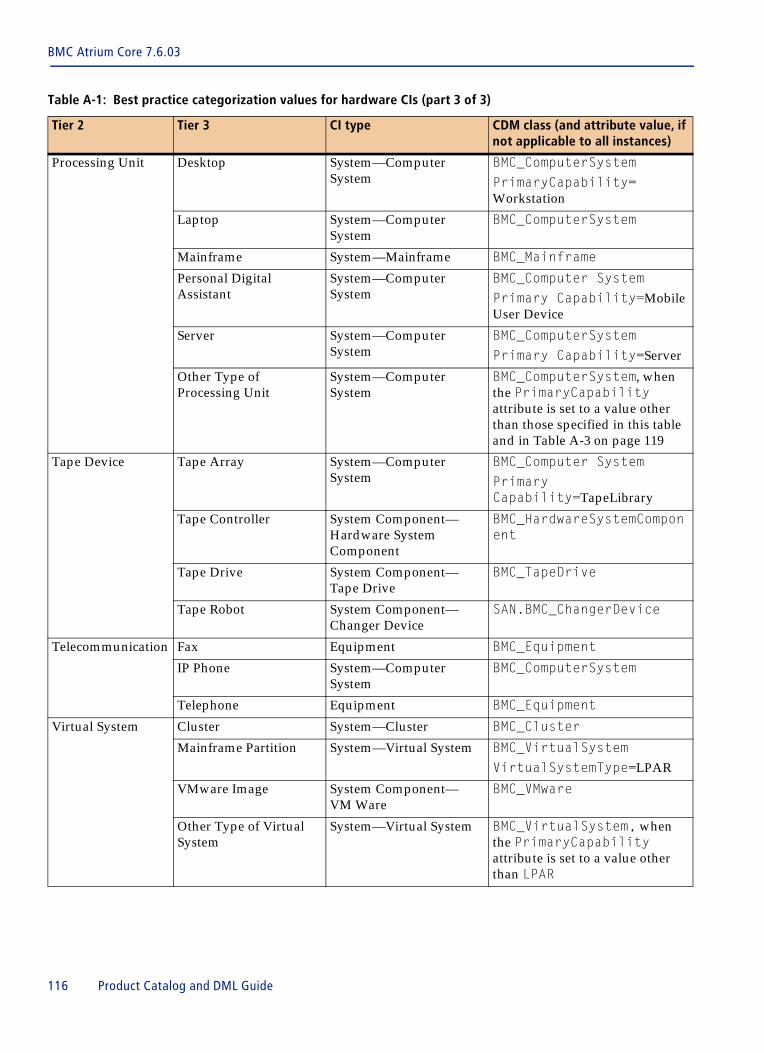
BMC Atrium Core 7.6.03
Processing Unit Desktop System—Computer System
BMC_ComputerSystemPrimaryCapability=Workstation
Laptop System—Computer System
BMC_ComputerSystem
Mainframe System—Mainframe BMC_Mainframe
Personal Digital Assistant
System—Computer System
BMC_Computer SystemPrimary Capability=Mobile User Device
Server System—Computer System
BMC_ComputerSystemPrimary Capability=Server
Other Type of Processing Unit
System—Computer System
BMC_ComputerSystem, when the PrimaryCapability attribute is set to a value other than those specified in this table and in Table A-3 on page 119
Tape Device Tape Array System—Computer System
BMC_Computer SystemPrimary Capability=TapeLibrary
Tape Controller System Component—Hardware System Component
BMC_HardwareSystemComponent
Tape Drive System Component—Tape Drive
BMC_TapeDrive
Tape Robot System Component—Changer Device
SAN.BMC_ChangerDevice
Telecommunication Fax Equipment BMC_Equipment
IP Phone System—Computer System
BMC_ComputerSystem
Telephone Equipment BMC_Equipment
Virtual System Cluster System—Cluster BMC_Cluster
Mainframe Partition System—Virtual System BMC_VirtualSystemVirtualSystemType=LPAR
VMware Image System Component—VM Ware
BMC_VMware
Other Type of Virtual System
System—Virtual System BMC_VirtualSystem, when the PrimaryCapability attribute is set to a value other than LPAR
Table A-1: Best practice categorization values for hardware CIs (part 3 of 3)
Tier 2 Tier 3 CI type CDM class (and attribute value, if not applicable to all instances)
116 Product Catalog and DML Guide
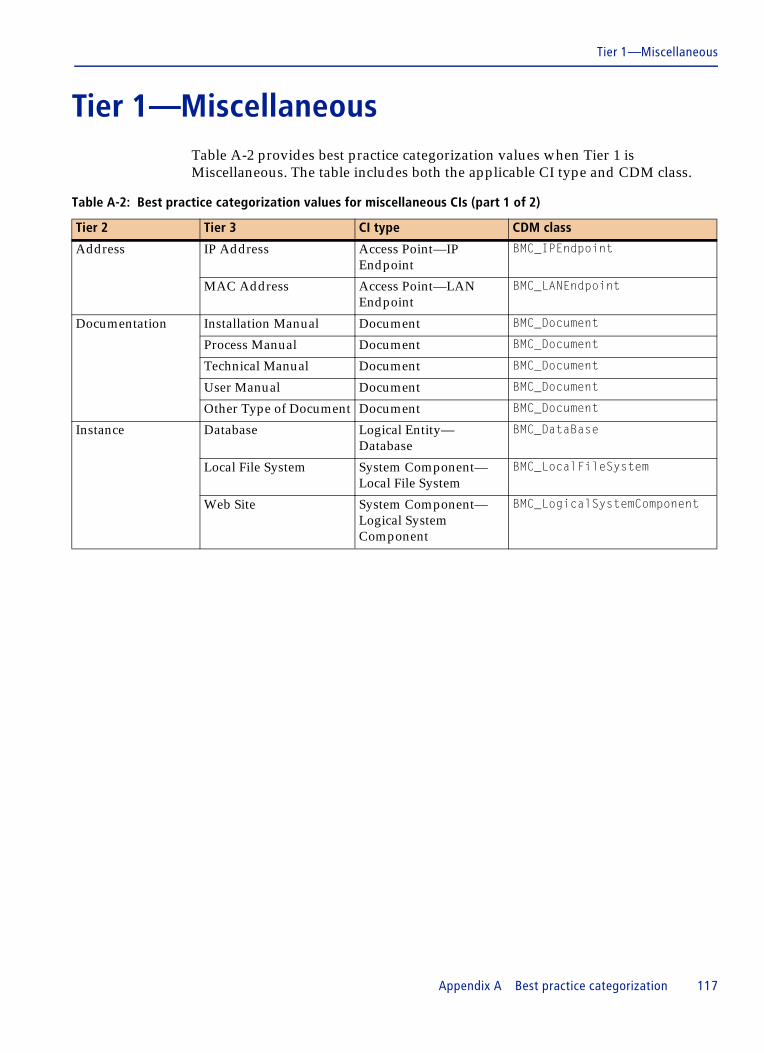
Tier 1—Miscellaneous
Tier 1—MiscellaneousTable A-2 provides best practice categorization values when Tier 1 is Miscellaneous. The table includes both the applicable CI type and CDM class.
Table A-2: Best practice categorization values for miscellaneous CIs (part 1 of 2)
Tier 2 Tier 3 CI type CDM class
Address IP Address Access Point—IP Endpoint
BMC_IPEndpoint
MAC Address Access Point—LAN Endpoint
BMC_LANEndpoint
Documentation Installation Manual Document BMC_Document
Process Manual Document BMC_Document
Technical Manual Document BMC_Document
User Manual Document BMC_Document
Other Type of Document Document BMC_Document
Instance Database Logical Entity—Database
BMC_DataBase
Local File System System Component—Local File System
BMC_LocalFileSystem
Web Site System Component—Logical System Component
BMC_LogicalSystemComponent
Appendix A Best practice categorization 117
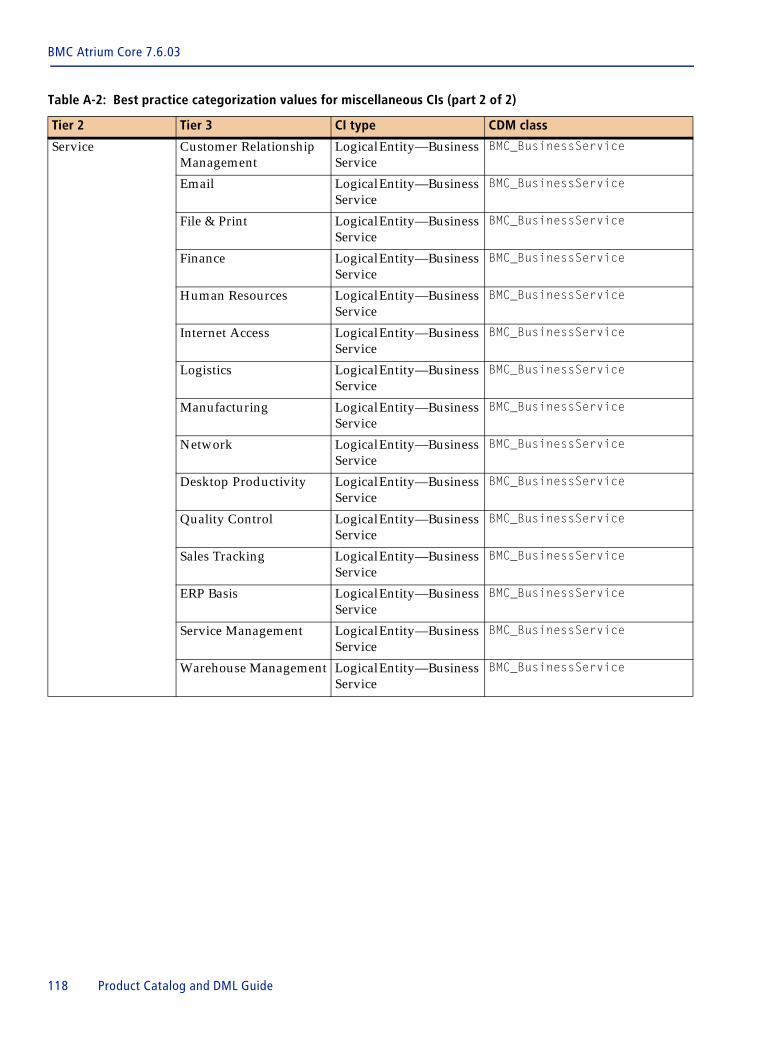
BMC Atrium Core 7.6.03
Service Customer Relationship Management
Logical Entity—Business Service
BMC_BusinessService
Email Logical Entity—Business Service
BMC_BusinessService
File & Print Logical Entity—Business Service
BMC_BusinessService
Finance Logical Entity—Business Service
BMC_BusinessService
Human Resources Logical Entity—Business Service
BMC_BusinessService
Internet Access Logical Entity—Business Service
BMC_BusinessService
Logistics Logical Entity—Business Service
BMC_BusinessService
Manufacturing Logical Entity—Business Service
BMC_BusinessService
Network Logical Entity—Business Service
BMC_BusinessService
Desktop Productivity Logical Entity—Business Service
BMC_BusinessService
Quality Control Logical Entity—Business Service
BMC_BusinessService
Sales Tracking Logical Entity—Business Service
BMC_BusinessService
ERP Basis Logical Entity—Business Service
BMC_BusinessService
Service Management Logical Entity—Business Service
BMC_BusinessService
Warehouse Management Logical Entity—Business Service
BMC_BusinessService
Table A-2: Best practice categorization values for miscellaneous CIs (part 2 of 2)
Tier 2 Tier 3 CI type CDM class
118 Product Catalog and DML Guide
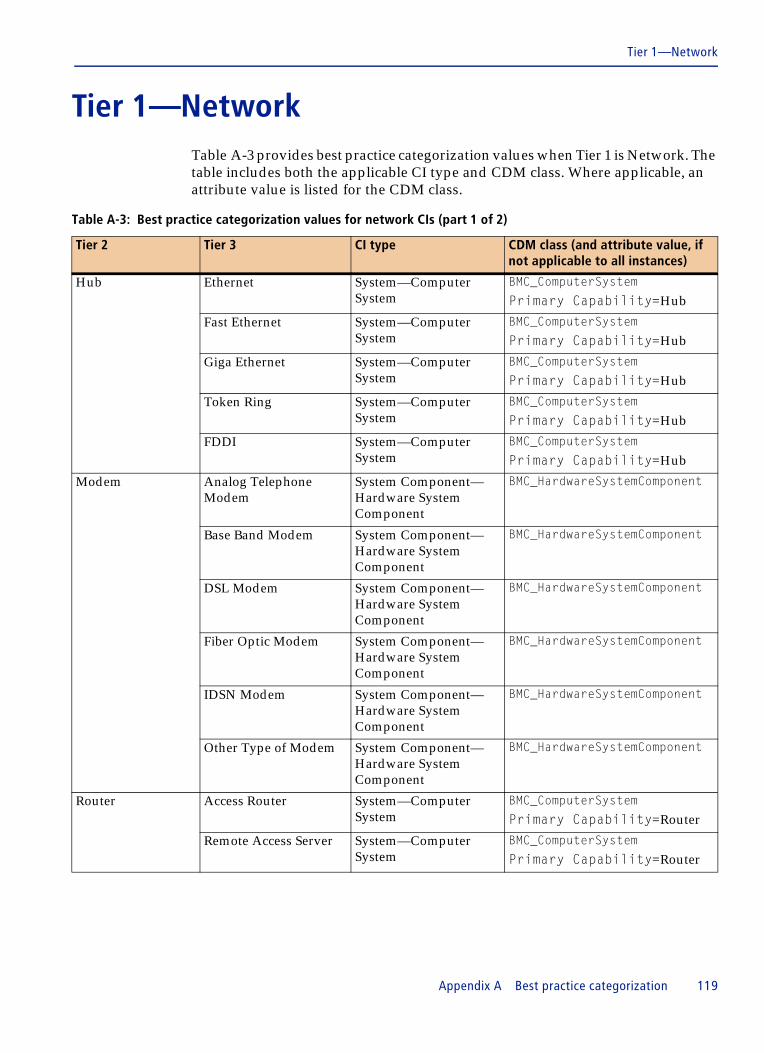
Tier 1—Network
Tier 1—NetworkTable A-3 provides best practice categorization values when Tier 1 is Network. The table includes both the applicable CI type and CDM class. Where applicable, an attribute value is listed for the CDM class.
Table A-3: Best practice categorization values for network CIs (part 1 of 2)
Tier 2 Tier 3 CI type CDM class (and attribute value, if not applicable to all instances)
Hub Ethernet System—Computer System
BMC_ComputerSystem
Primary Capability=Hub
Fast Ethernet System—Computer System
BMC_ComputerSystem
Primary Capability=Hub
Giga Ethernet System—Computer System
BMC_ComputerSystem
Primary Capability=Hub
Token Ring System—Computer System
BMC_ComputerSystem
Primary Capability=Hub
FDDI System—Computer System
BMC_ComputerSystem
Primary Capability=Hub
Modem Analog Telephone Modem
System Component—Hardware System Component
BMC_HardwareSystemComponent
Base Band Modem System Component—Hardware System Component
BMC_HardwareSystemComponent
DSL Modem System Component—Hardware System Component
BMC_HardwareSystemComponent
Fiber Optic Modem System Component—Hardware System Component
BMC_HardwareSystemComponent
IDSN Modem System Component—Hardware System Component
BMC_HardwareSystemComponent
Other Type of Modem System Component—Hardware System Component
BMC_HardwareSystemComponent
Router Access Router System—Computer System
BMC_ComputerSystem
Primary Capability=Router
Remote Access Server System—Computer System
BMC_ComputerSystem
Primary Capability=Router
Appendix A Best practice categorization 119
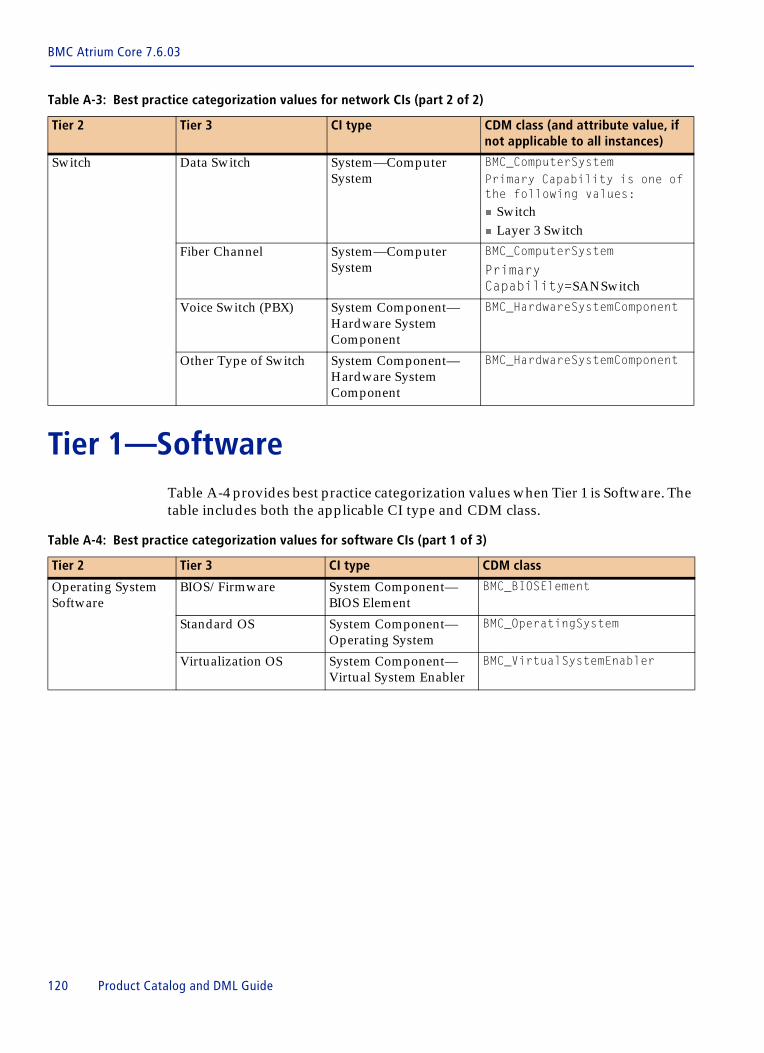
BMC Atrium Core 7.6.03
Tier 1—SoftwareTable A-4 provides best practice categorization values when Tier 1 is Software. The table includes both the applicable CI type and CDM class.
Switch Data Switch System—Computer System
BMC_ComputerSystemPrimary Capability is one of the following values:� Switch� Layer 3 Switch
Fiber Channel System—Computer System
BMC_ComputerSystem
Primary Capability=SANSwitch
Voice Switch (PBX) System Component—Hardware System Component
BMC_HardwareSystemComponent
Other Type of Switch System Component—Hardware System Component
BMC_HardwareSystemComponent
Table A-3: Best practice categorization values for network CIs (part 2 of 2)
Tier 2 Tier 3 CI type CDM class (and attribute value, if not applicable to all instances)
Table A-4: Best practice categorization values for software CIs (part 1 of 3)
Tier 2 Tier 3 CI type CDM class
Operating System Software
BIOS/Firmware System Component—BIOS Element
BMC_BIOSElement
Standard OS System Component—Operating System
BMC_OperatingSystem
Virtualization OS System Component—Virtual System Enabler
BMC_VirtualSystemEnabler
120 Product Catalog and DML Guide
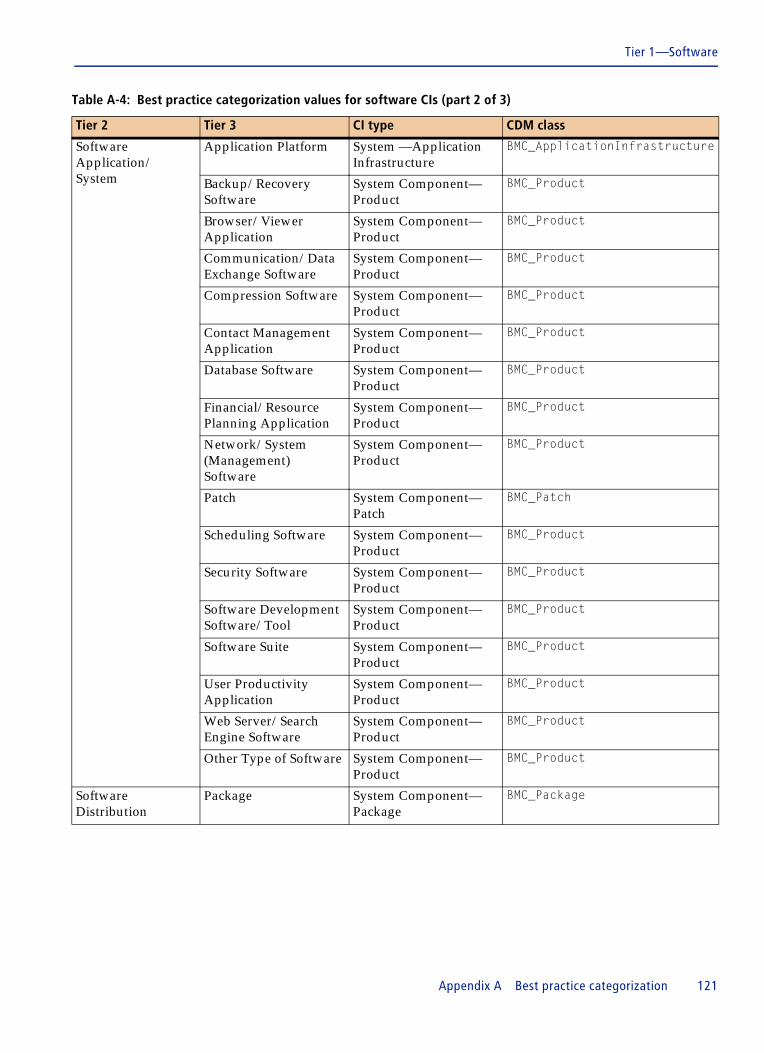
Tier 1—Software
Software Application/ System
Application Platform System —Application Infrastructure
BMC_ApplicationInfrastructure
Backup/Recovery Software
System Component—Product
BMC_Product
Browser/Viewer Application
System Component—Product
BMC_Product
Communication/Data Exchange Software
System Component—Product
BMC_Product
Compression Software System Component—Product
BMC_Product
Contact Management Application
System Component—Product
BMC_Product
Database Software System Component—Product
BMC_Product
Financial/Resource Planning Application
System Component—Product
BMC_Product
Network/System (Management) Software
System Component—Product
BMC_Product
Patch System Component—Patch
BMC_Patch
Scheduling Software System Component—Product
BMC_Product
Security Software System Component—Product
BMC_Product
Software Development Software/Tool
System Component—Product
BMC_Product
Software Suite System Component—Product
BMC_Product
User Productivity Application
System Component—Product
BMC_Product
Web Server/Search Engine Software
System Component—Product
BMC_Product
Other Type of Software System Component—Product
BMC_Product
Software Distribution
Package System Component—Package
BMC_Package
Table A-4: Best practice categorization values for software CIs (part 2 of 3)
Tier 2 Tier 3 CI type CDM class
Appendix A Best practice categorization 121
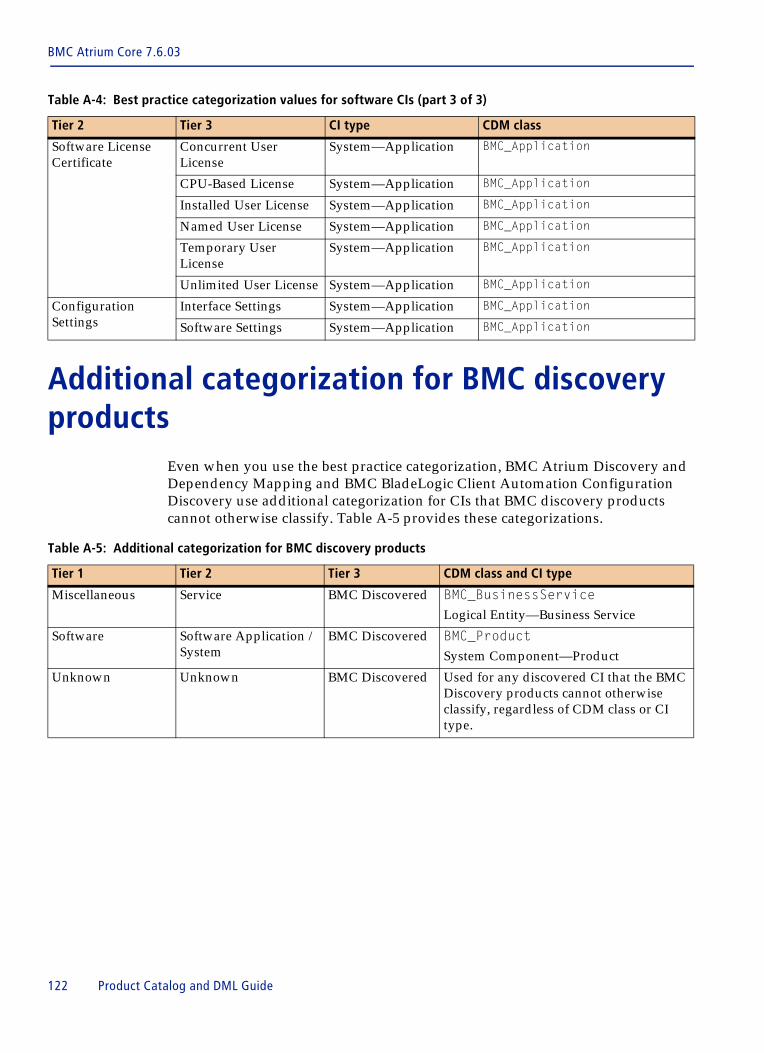
BMC Atrium Core 7.6.03
Additional categorization for BMC discovery products
Even when you use the best practice categorization, BMC Atrium Discovery and Dependency Mapping and BMC BladeLogic Client Automation Configuration Discovery use additional categorization for CIs that BMC discovery products cannot otherwise classify. Table A-5 provides these categorizations.
Software License Certificate
Concurrent User License
System—Application BMC_Application
CPU-Based License System—Application BMC_Application
Installed User License System—Application BMC_Application
Named User License System—Application BMC_Application
Temporary User License
System—Application BMC_Application
Unlimited User License System—Application BMC_Application
Configuration Settings
Interface Settings System—Application BMC_Application
Software Settings System—Application BMC_Application
Table A-4: Best practice categorization values for software CIs (part 3 of 3)
Tier 2 Tier 3 CI type CDM class
Table A-5: Additional categorization for BMC discovery products
Tier 1 Tier 2 Tier 3 CDM class and CI type
Miscellaneous Service BMC Discovered BMC_BusinessServiceLogical Entity—Business Service
Software Software Application / System
BMC Discovered BMC_ProductSystem Component—Product
Unknown Unknown BMC Discovered Used for any discovered CI that the BMC Discovery products cannot otherwise classify, regardless of CDM class or CI type.
122 Product Catalog and DML Guide
Appendix
B
Using the Product Catalog from BMC BladeLogic Client AutomationRead this section only if you need to access the Product Catalog from BMC BladeLogic Client Automation, formerly called BMC Configuration Management.
The following topics are provided:
� Overview of accessing BMC Atrium Product Catalog (page 124)� Downloading and running BMC Remedy AR System security scripts (page 125)� Configuring parameters for the BMC BladeLogic Client Automation database
(page 126)� Establishing access to the BMC Remedy AR System database (page 132)� Establishing connectivity to the Product Catalog (page 133)� Verifying connectivity to the Product Catalog (page 135)� Troubleshooting connectivity issues (page 135)� What’s next? (page 136)
Appendix B Using the Product Catalog from BMC BladeLogic Client Automation 123
BMC Atrium Core 7.6.03
Overview of accessing BMC Atrium Product Catalog
BMC Atrium Product Catalog is an application that runs on the BMC Remedy Action Request System (BMC Remedy AR System). This section describes how to establish a communication link between BMC Configuration Automation for Clients and the BMC Remedy AR System allowing connectivity to the Product Catalog. This link allows BMC CM products, such as Report Center and Configuration Discovery, to access the Product Catalog.
The Product Catalog provides normalization (standardization) of software attributes for third-party applications throughout an enterprise. Attribute standardization facilitates reporting on software deployed in the enterprise when you run queries in the Report Center application.
An overview of the steps needed to establish access to the Product Catalog from BMC CM follows. Each step is described in detailed in subsequent sections.
1 Download and run a security script against the BMC Remedy AR System database. This script creates a database user (CCM_USER) who has read-only access to selected data in the AR System database. Running this script is the only configuration task you need to perform on the AR System database. For detailed instructions, see “Downloading and running BMC Remedy AR System security scripts” on page 125.
2 Manually configure parameters for BMC BladeLogic Client Automation to allow for connectivity. For detailed instructions, see “Configuring parameters for the BMC BladeLogic Client Automation database” on page 126.
3 Establish access to the BMC Remedy AR System database. For detailed instructions, see “Establishing access to the BMC Remedy AR System database” on page 132.
4 Establish connectivity to DML by installing the DB Connector for BMC Remedy Action Request System schema on the BMC CM database. For detailed instructions, see “Establishing connectivity to the Product Catalog” on page 133.
124 Product Catalog and DML Guide
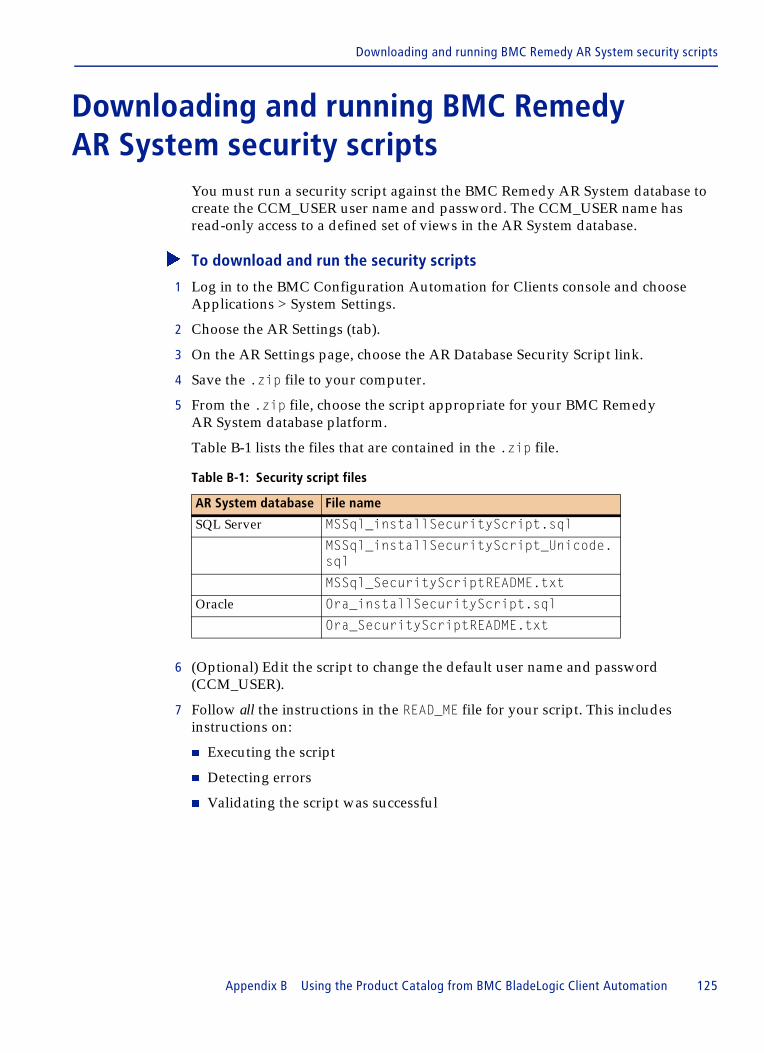
Downloading and running BMC Remedy AR System security scripts
Downloading and running BMC Remedy AR System security scripts
You must run a security script against the BMC Remedy AR System database to create the CCM_USER user name and password. The CCM_USER name hasread-only access to a defined set of views in the AR System database.
� To download and run the security scripts
1 Log in to the BMC Configuration Automation for Clients console and choose Applications > System Settings.
2 Choose the AR Settings (tab).
3 On the AR Settings page, choose the AR Database Security Script link.
4 Save the .zip file to your computer.
5 From the .zip file, choose the script appropriate for your BMC Remedy AR System database platform.
Table B-1 lists the files that are contained in the .zip file.
6 (Optional) Edit the script to change the default user name and password (CCM_USER).
7 Follow all the instructions in the READ_ME file for your script. This includes instructions on:
� Executing the script
� Detecting errors
� Validating the script was successful
Table B-1: Security script files
AR System database File name
SQL Server MSSql_installSecurityScript.sql
MSSql_installSecurityScript_Unicode.sql
MSSql_SecurityScriptREADME.txt
Oracle Ora_installSecurityScript.sql
Ora_SecurityScriptREADME.txt
Appendix B Using the Product Catalog from BMC BladeLogic Client Automation 125
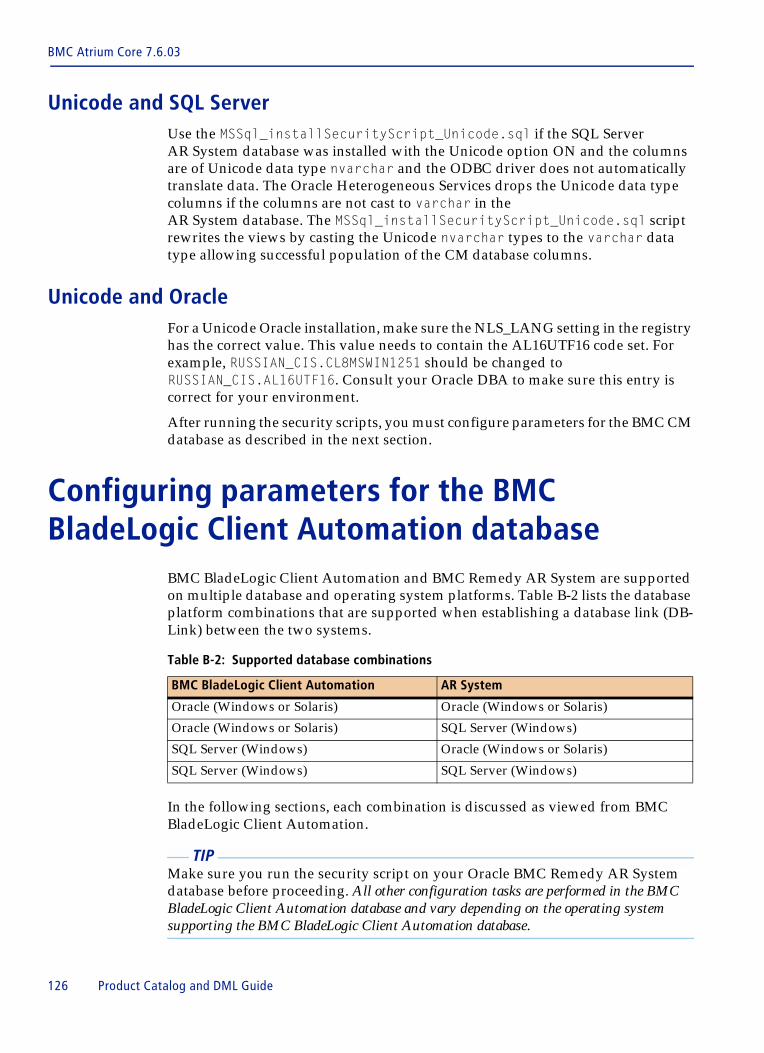
BMC Atrium Core 7.6.03
Unicode and SQL Server Use the MSSql_installSecurityScript_Unicode.sql if the SQL Server AR System database was installed with the Unicode option ON and the columns are of Unicode data type nvarchar and the ODBC driver does not automatically translate data. The Oracle Heterogeneous Services drops the Unicode data type columns if the columns are not cast to varchar in theAR System database. The MSSql_installSecurityScript_Unicode.sql script rewrites the views by casting the Unicode nvarchar types to the varchar data type allowing successful population of the CM database columns.
Unicode and Oracle For a Unicode Oracle installation, make sure the NLS_LANG setting in the registry has the correct value. This value needs to contain the AL16UTF16 code set. For example, RUSSIAN_CIS.CL8MSWIN1251 should be changed to RUSSIAN_CIS.AL16UTF16. Consult your Oracle DBA to make sure this entry is correct for your environment.
After running the security scripts, you must configure parameters for the BMC CM database as described in the next section.
Configuring parameters for the BMC BladeLogic Client Automation database
BMC BladeLogic Client Automation and BMC Remedy AR System are supported on multiple database and operating system platforms. Table B-2 lists the database platform combinations that are supported when establishing a database link (DB-Link) between the two systems.
In the following sections, each combination is discussed as viewed from BMC BladeLogic Client Automation.
TIP Make sure you run the security script on your Oracle BMC Remedy AR System database before proceeding. All other configuration tasks are performed in the BMC BladeLogic Client Automation database and vary depending on the operating system supporting the BMC BladeLogic Client Automation database.
Table B-2: Supported database combinations
BMC BladeLogic Client Automation AR System
Oracle (Windows or Solaris) Oracle (Windows or Solaris)
Oracle (Windows or Solaris) SQL Server (Windows)
SQL Server (Windows) Oracle (Windows or Solaris)
SQL Server (Windows) SQL Server (Windows)
126 Product Catalog and DML Guide

Configuring parameters for the BMC BladeLogic Client Automation database
Configuring Oracle BMC BladeLogic Client Automation to access Oracle BMC Remedy AR System
If both your BMC BladeLogic Client Automation and BMC Remedy AR System databases are Oracle databases, the operating system on which they are running is not a configuration issue.
� To configure Oracle BMC BladeLogic Client Automation to access BMC Remedy AR System
� On your CM Oracle instance, add an entry for the AR System database in the tnsnames.ora file (located in the $ORACLE_HOME/network/admin directory).
You are now ready to access the BMC Remedy AR System database, as described in “Establishing access to the BMC Remedy AR System database” on page 132.
Configuring Oracle BMC BladeLogic Client Automation to access SQL Server BMC Remedy AR System
Instructions for configuring an Oracle BMC BladeLogic Client Automation database depend on the supporting operating system.
� Configuring Oracle BMC BladeLogic Client Automation on Windows (page 127)
� Configuring Oracle BMC BladeLogic Client Automation on Solaris (page 128)
Configuring Oracle BMC BladeLogic Client Automation on Windows
� To configure Oracle BMC BladeLogic Client Automation on Windows
1 Install the Microsoft ODBC driver for SQL Server, if not present, on the BMC BladeLogic Client Automation database. The driver is packaged with the SQL Server client software install.
2 On your BMC BladeLogic Client Automation Oracle instance, define a Data Source Name (DSN) for the BMC Remedy AR System database.
a From the Windows Control Panel, navigate to Administrative Tools > Data Sources (ODBC).
b Click System DSN tab.
c Click Add.
d From the list of displayed drivers, select SQL Server.
e Enter any name for the Data Source, for example, ARServer. Going forward, the data source is referred to as the DSN.
f Enter the host name for the BMC Remedy AR System database.
g Select SQL Server Authentication Mode.
Appendix B Using the Product Catalog from BMC BladeLogic Client Automation 127
BMC Atrium Core 7.6.03
h Enter the system administrator user name and password.
i Change the default database to BMC Remedy AR System.
j Accept all other defaults, then select Test Data Source.
You can now create a Heterogeneous Services Initialization File, as described in “Creating a Heterogeneous Services Initialization File” on page 129.
Configuring Oracle BMC BladeLogic Client Automation on Solaris
NOTE The following instructions have been validated only for use with the following DataDirect 5.1 driver: SQL Server 32-bit ODBC driver for UNIX platform.
� To configure Oracle BMC BladeLogic Client Automation on Solaris
1 From the http://www.datadirect.com website, download the SQL Server 32-bit ODBC driver for UNIX platform.
2 Install the driver using the instructions provided by the vendor.
3 On your BMC BladeLogic Client Automation Oracle instance, define a Data Source Name (DSN) for the SQL Server BMC Remedy AR System database.
a Find the odbc.ini file located in the driver directory.
b Edit the file as follows:
Driver=ODBCInstallDirectory/lib/ivmsss21.so
This is the ODBC library path. The location depends on where the ODBC driver was installed.
Description=DataDirect 5.1 SQL Server Wire Protocol
Address=sqlserverHostname, sqlserverPort
AlternateServers=
AnsiNPW=Yes
ConnectionRetryCount=0
ConnectionRetryDelay=3
Database=ARSystem
LoadBalancing=0
LogonID=systemAdminUsername
Password=aystemAdminPassword
QuotedId=No
In this example, replace the values for sqlserverHostname, sqlserverPort, systemAdminUsername, and systemAdminPassword with values that correspond to the BMC Remedy AR System database. In this example, the BMC Remedy AR System database name used is ARSystem.
128 Product Catalog and DML Guide
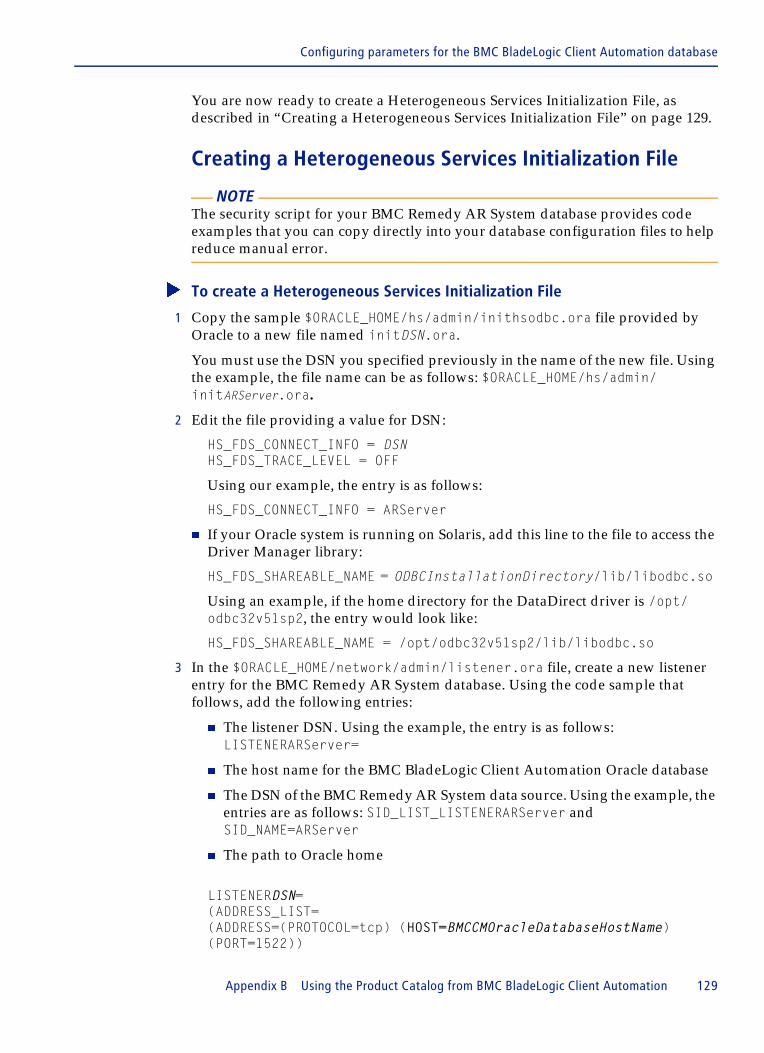
Configuring parameters for the BMC BladeLogic Client Automation database
You are now ready to create a Heterogeneous Services Initialization File, as described in “Creating a Heterogeneous Services Initialization File” on page 129.
Creating a Heterogeneous Services Initialization File
NOTE The security script for your BMC Remedy AR System database provides code examples that you can copy directly into your database configuration files to help reduce manual error.
� To create a Heterogeneous Services Initialization File
1 Copy the sample $ORACLE_HOME/hs/admin/inithsodbc.ora file provided by Oracle to a new file named initDSN.ora.
You must use the DSN you specified previously in the name of the new file. Using the example, the file name can be as follows: $ORACLE_HOME/hs/admin/initARServer.ora.
2 Edit the file providing a value for DSN:
HS_FDS_CONNECT_INFO = DSNHS_FDS_TRACE_LEVEL = OFF
Using our example, the entry is as follows:
HS_FDS_CONNECT_INFO = ARServer
� If your Oracle system is running on Solaris, add this line to the file to access the Driver Manager library:
HS_FDS_SHAREABLE_NAME = ODBCInstallationDirectory/lib/libodbc.so
Using an example, if the home directory for the DataDirect driver is /opt/odbc32v51sp2, the entry would look like:
HS_FDS_SHAREABLE_NAME = /opt/odbc32v51sp2/lib/libodbc.so
3 In the $ORACLE_HOME/network/admin/listener.ora file, create a new listener entry for the BMC Remedy AR System database. Using the code sample that follows, add the following entries:
� The listener DSN. Using the example, the entry is as follows: LISTENERARServer=
� The host name for the BMC BladeLogic Client Automation Oracle database
� The DSN of the BMC Remedy AR System data source. Using the example, the entries are as follows: SID_LIST_LISTENERARServer and SID_NAME=ARServer
� The path to Oracle home
LISTENERDSN=(ADDRESS_LIST=(ADDRESS=(PROTOCOL=tcp) (HOST=BMCCMOracleDatabaseHostName) (PORT=1522))
Appendix B Using the Product Catalog from BMC BladeLogic Client Automation 129
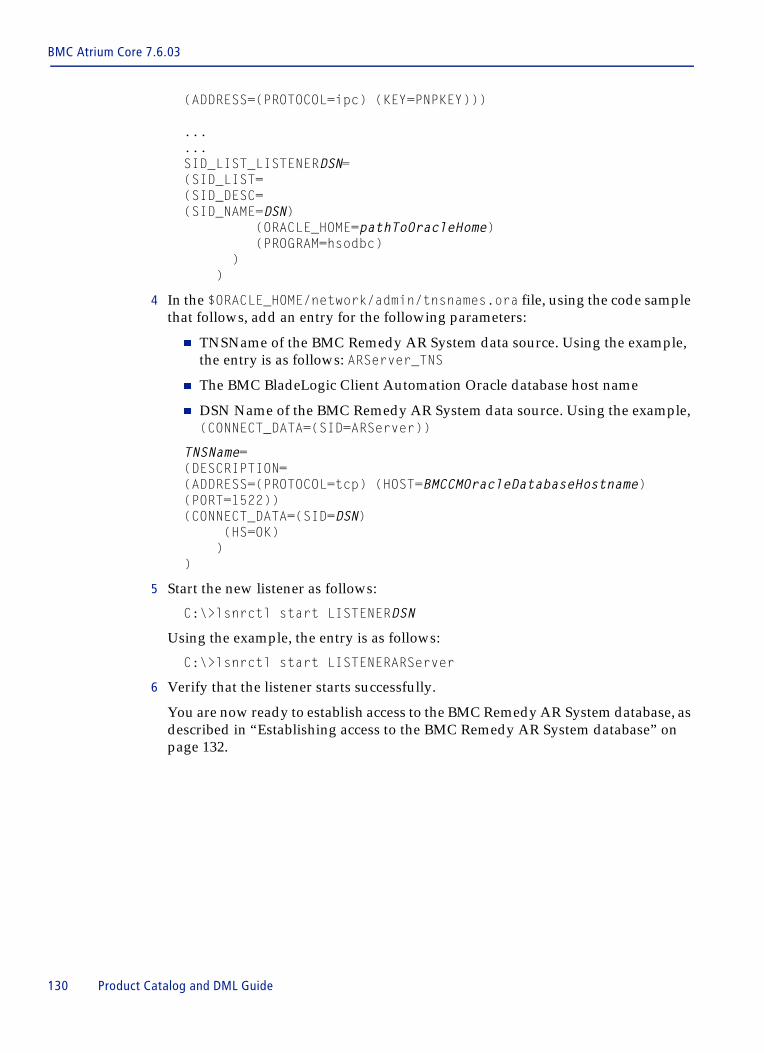
BMC Atrium Core 7.6.03
(ADDRESS=(PROTOCOL=ipc) (KEY=PNPKEY)))
...
...SID_LIST_LISTENERDSN=(SID_LIST=(SID_DESC=(SID_NAME=DSN) (ORACLE_HOME=pathToOracleHome) (PROGRAM=hsodbc) ) )
4 In the $ORACLE_HOME/network/admin/tnsnames.ora file, using the code sample that follows, add an entry for the following parameters:
� TNSName of the BMC Remedy AR System data source. Using the example, the entry is as follows: ARServer_TNS
� The BMC BladeLogic Client Automation Oracle database host name
� DSN Name of the BMC Remedy AR System data source. Using the example, (CONNECT_DATA=(SID=ARServer))
TNSName= (DESCRIPTION=(ADDRESS=(PROTOCOL=tcp) (HOST=BMCCMOracleDatabaseHostname) (PORT=1522))(CONNECT_DATA=(SID=DSN) (HS=OK) ))
5 Start the new listener as follows:
C:\>lsnrctl start LISTENERDSN
Using the example, the entry is as follows:
C:\>lsnrctl start LISTENERARServer
6 Verify that the listener starts successfully.
You are now ready to establish access to the BMC Remedy AR System database, as described in “Establishing access to the BMC Remedy AR System database” on page 132.
130 Product Catalog and DML Guide
Configuring parameters for the BMC BladeLogic Client Automation database
Configuring SQL Server BMC BladeLogic Client Automation for Oracle BMC Remedy AR System
Perform the following actions to configure SQL Server BMC BladeLogic Client Automation for Oracle BMC Remedy AR System.
� To configure
1 On your SQL Server BMC BladeLogic Client Automation computer, verify that the SQL Server Agent is running.
The SQL Server Agent must be running on a BMC BladeLogic Client Automation SQL Server database regardless of the BMC Remedy AR System database platform that you are using. This agent is needed to enable caching of remote views.
To check if the SQL Server Agent is running, use the SQL Server Service Manager. If SQL Server Agent is not running, you can start the agent from Service Manager. You can also set the SQL Server Agent to auto-start when the operating system starts.
Alternatively, you can use the SQL Server Enterprise Manager to access your SQL Server. Under the Management folder, you will see the SQL Server Agent. If the SQL Server Agent is running, a green icon is displayed. Otherwise, choose SQL Server Agent > Start.
2 Prepare Windows for connecting to an Oracle BMC Remedy AR System database.
a If not already installed on your Windows computer, download and install Microsoft Data Access Component (MDAC) 2.8 from the following website: http://www.microsoft.com/downloads.
b After installing MDAC 2.8, run the mtxoci81_win2k.reg registry file located in the C:\Program Files\Common Files\System\Ole DB\ directory. You use the registry file to modify registry key values based on the Oracle version on which your BMC Remedy AR System database is running. For example, for Oracle 9 make the following changes:
[HKEY_LOCAL_MACHINE\SOFTWARE\Microsoft\MSDTC\MTxOCI]
"OracleXaLib"="oraclient9.dll"
"OracleSqlLib"="orasql9.dll"
"OracleOciLib"="oci.dll"
c Verify the registry keys are successfully created.
NOTE Additional information about Oracle databases residing on a Windows operating system is available at http://support.microsoft.com/kb/280106/.
3 Install the Oracle client and Oracle OLE DB Driver on the computer that hosts your SQL Server CM database.
a Run the Oracle Universal Installer and choose to install Oracle Client.
Appendix B Using the Product Catalog from BMC BladeLogic Client Automation 131
BMC Atrium Core 7.6.03
NOTE Make sure the installation type you choose includes the Oracle OLE DB driver in the installation. The following instructions have been validated for this driver only.
b Change the following registry setting value from 0 to 1: HKEY_LOCAL_MACHINE\SOFTWARE\Microsoft\MSSQLServer\Providers\OraOLEDB.Oracle\AllowInProcess.
c If this registry key entry is not present, open the Security folder > Linked Servers > New Linked Server.
d At the Provider name, choose the Oracle Provider for OLEDB > Provider Options > In Process.
e Verify that the registry value shows up in the Providers key.
4 Add an entry for the BMC Remedy AR System Oracle instance in the $ORACLE_HOME/network/admin/tnsnames.ora file.
You are now ready to establish access to the BMC Remedy AR System database, as described in “Establishing access to the BMC Remedy AR System database” on page 132.
Configuring SQL Server BMC BladeLogic Client Automation for SQL Server BMC Remedy AR System
No special configuration tasks are needed. You can establish access to the BMC Remedy AR System database, as described in “Establishing access to the BMC Remedy AR System database” on page 132.
Establishing access to the BMC Remedy AR System database
You must establish access to the BMC Remedy AR System database before you can establish the connection between BMC BladeLogic Client Automation and BMC Remedy AR System databases. Use the BMC BladeLogic Client Automation console to enter the BMC Remedy AR System database connection information.
� To establish access to the BMC Remedy AR System database
1 From the BMC BladeLogic Client Automation console, choose Applications > System Settings > AR Settings (tab) > AR Database link.
2 On the AR Database page, provide network and security settings to access the BMC Remedy AR System database.
a In the AR database type field, select a database type from the list.
132 Product Catalog and DML Guide
Establishing connectivity to the Product Catalog
b In the AR database host name field, enter the name of the computer on which the BMC Remedy AR System database is running.
c In the AR database port field, enter the port number used to remotely connect to the database. The default port numbers are 1521 for Oracle and 1433 for SQL Server.
d In the AR database service name field, enter the BMC Remedy AR System database name.
� For an SQL Server to SQL Server connection, the default is ARSystem.
� For any connection involving an Oracle database, use the TNS name you specified in the tnsnames.ora file.
e In the AR database user name field, enter the user name (CCM_USER if using the default) created by the BMC Remedy AR System database security script.
f In the AR database user password field, enter the password (CCM_USER if using the default) created by the BMC Remedy AR System database security script.
For more information, see “Downloading and running BMC Remedy AR System security scripts” on page 125.
3 Click OK.
You can now establish the connection between databases, described in the next section.
Establishing connectivity to the Product Catalog
This section describes how to establish a connection between the BMC BladeLogic Client Automation and BMC Remedy AR System databases allowing access to the Product Catalog.
Prerequisites for connectionBefore establishing the connection between the BMC BladeLogic Client Automation and BMC Remedy AR System databases, make sure you have:
1 Terminated all user connections to the database instance.
2 Disabled the Inventory plug-in. You should disable this plug-in before performing any database tasks, such as updating the schema. For instructions about disabling the Inventory plug-in, see the Report Center online help.
3 Configured the BMC BladeLogic Client Automation inventory database using the Core schema. You must install the Core schema before you install an additional schema.
Appendix B Using the Product Catalog from BMC BladeLogic Client Automation 133
BMC Atrium Core 7.6.03
Establishing the connection between databasesTo establish the connection between the CM database and theBMC Remedy AR System database, you must install the DB Connector for the BMC Remedy AR System schema.
This schema uses a communication protocol allowing remote connectivity across databases and the execution of distributed queries across heterogeneous databases. Installing this schema creates the connection to the BMC Remedy AR System database and redefines some of the BMC BladeLogic Client Automation database views allowing BMC BladeLogic Client Automation applications to access the Definitive Media Library in the BMC Remedy AR System database.
Log in to the BMC BladeLogic Client Automation console and use Schema Manager to connect to the BMC BladeLogic Client Automation database.
� To establish the connection between the BMC BladeLogic Client Automation and AR System databases
1 From the top-level tab bar of the console, choose Applications > Console > Schema Manager.
2 On the Welcome to Schema Manager page, click Database.
The Database page appears.
3 Select the type of database you installed from the Database type list.
4 Supply the host name, port number, and, for Oracle, the database system ID. (For SQL Server, the database name is invdb.)
The database administrator (DBA) can provide you with these values. The default port numbers are 1521 (for Oracle) and 1433 (for SQL Server).
5 Supply the system administrator user name and password.
Often, on Oracle, the system administrator user name is system and the default password is manager; on SQL Server, the user name is often sa, and the default password is no password. Contact your local DBA for the appropriate user name and password.
6 Supply the password for the inventory user.
The default password is inventory for the inventory user.
7 Supply the password for the user_view user.
The default password is user_view for the user_view user.
8 Click Connect.
The Database Schemas page appears, and the Schema Modules tab is displayed.
134 Product Catalog and DML Guide
Verifying connectivity to the Product Catalog
� To connect to the Definitive Media Library
1 On the Schema Modules tab, for the item called DB Connector for BMC Remedy Action Request System, click Install.
2 On the Install Options page that appears, select Easy install.
3 Click Install.
When the operation is finished, a page appears indicating the installation is complete.
You now have connectivity to the Definitive Media Library.
Verifying connectivity to the Product Catalog Using Report Center Query Library, run one of the predefined Product Catalog queries. If a SQL error is displayed, you are not connected to the Product Catalog. If the query displays an empty result, the connection works. For details, see the Service Management integration section in Appendix I, “Query Library list,” in the BMC Configuration Automation for Clients Report Center Guide.
Troubleshooting connectivity issues If you are unable to access the Product Catalog, some troubleshooting tips follow:
� Check for typos, unmatched braces, and so on in the listener.ora, tnsnames.ora, or initDSNName.ora configuration files.
� Verify (ping) the AR System host is running.
� Verify the AR System database port is listening.
� For Oracle, run tnsping using the TNS name entry for AR System.
� For Oracle, check for consistent naming conventions in sqlnet.ora.
� For Oracle, reactivate the listener. If that fails, try restarting the server.
� Verify you are using the correct DSN name from the tnsnames.ora configuration file.
� Check your tnsnames, listener, and DSN configurations thoroughly if the following error messages are displayed when connecting from an Oracle CM database:
� ORA-04052: error occurred when looking up remote object CCM_USER.CCM_PDL_PRODUCTDICTIONARYPATCH@LINK_TO_AR_DB ORA-00604: error occurred at recursive SQL level 2 ORA-28545: error diagnosed by Net8 when connecting to an agent NCRO: Failed to make RSLV connection ORA-02063: preceding 2 lines from LINK_TO_AR_DB ORA-06512: at line nnn
Appendix B Using the Product Catalog from BMC BladeLogic Client Automation 135
BMC Atrium Core 7.6.03
� ORA-02068: following severe error from LINK_TO_AR_DB ORA-28511: lost RPC connection to heterogeneous remote agent using SID=(DESCRIPTION=(ADDRESS=(PROTOCOL=TCP)(HOST=arserver.abc..com)(PORT=1533))(CONNECT_DATA=(SID=ARServer)))
� If the following error message is displayed, ORA-00054: resource busy and acquire with NOWAIT specified ORA-06512: at line nnn, restart the listener and try again. If that fails, try restarting the database instance and try again.
What’s next? In the Report Center application, the Query Library contains a folder for Service Management Integration queries that you can run. If you wish to create custom Product Catalog entries in the Product Catalog or other customization tasks, see “Configuring the Product Catalog” on page 59.
136 Product Catalog and DML Guide
Glossary
abstract classA class that has attributes but of which no instances can be created. An abstract class exists for the purpose of creating an organizational layer without a database join. See also data replication.
accountAn entity or party whose data is represented in BMC Atrium Core, and to whom specific levels of permission can be granted. Specifying instance permission by account enables BMC Atrium Core to support multitenancy.
activityAn individual reconciliation task that can be grouped together in a defined sequence to form a reconciliation job. You can run an activity only as part of a job, never by itself. See also Comparison activity, Copy Dataset activity, Delete Dataset activity, Execute Job activity, Identification activity, Merge activity, Purge Dataset activity, Rename Dataset activity.
Adapter Development KitThe Adapter Development Kit is a software development kit that lets you build your own adapters to interact with BMC Atrium Integration Engine. The Adapter Development Kit interface defines a set of C++ objects that are used by the AIE service to manage data exchanges that use these adapters.
AIE Definitions AdminA BMC Atrium Integration Engine application role. Members can view, create, and modify data mappings and data exchanges, and manage the configuration and connection settings. See also AIE User.
AIE serviceThe AIE service obtains the defined data exchange from the Data Exchange application and completes the transfer of data by communicating with the adapter specified in the data exchange definition. The AIE service can connect to a BMC Remedy AR System server. It runs as a client to the BMC Remedy AR System server using the BMC Remedy AR System application programming interface (API).
AIE UserA BMC Atrium Integration Engine application role. Members can view data mappings, data exchanges, and configuration and connection settings. See also AIE Definitions Admin.
Atrium ExplorerA component of BMC Atrium CMDB that graphically displays the relationships between CIs. It can also be embedded in other BMC Remedy AR System-based applications.
attributeA property or characteristic of a class, such as the IP address of a computer system. An attribute equates to a column on a database table or a field on a BMC Remedy AR System form.
attribute permissionPermission to view or change the value in the attribute for any instance, assuming valid instance permissions.
attribute substitutionA method of data federation in context that uses placeholders to represent attributes from a linked class. Launching the link triggers the respective attribute values to be substituted for the placeholders.
Glossary 137
BMC Atrium Core 7.6.03
auditA logging of attribute values and other information for purposes of tracking the history of changes to instance data. An audit is triggered when the value of one or more specified attributes changes or when the instance is created or deleted.
base classA class that has no superclass.
BMC Atrium Core ConsoleThe main user interface of BMC Atrium CMDB, accessible from both web and BMC Remedy User clients. The BMC Atrium Core Console replaced the CMDB Console.
BMC Atrium Integration EngineA product that enables you to transfer large amounts of data between third-party data sources and both the BMC Remedy AR System and BMC Atrium CMDB.
BMC Atrium Product CatalogA BMC Remedy AR System application that is part of the BMC Atrium Core solution and provides data for normalization and discovery, including storage of product signatures, and tracks and manages products by categorization, life cycle, development status, approval status, and other attributes.
bulk functionsA set of functions you can use to create, update, and delete multiple instances in a single call. These functions can manipulate instances of different classes in a single operation.
Business Service Management (BSM)The concept of prioritizing IT efforts to support the overall goals of the business.
cardinalityThe number of members a relationship class can have on each side. Cardinality can be one to one, one to many, many to one, or many to many.
cascading deleteTo automatically delete, or mark as deleted the destination member of a relationship when the source member is deleted or marked.
Categories, Types, and Items (CTI)A method formerly used for categorizing assets in BMC Remedy Asset Management. Category, Type, and Item are each an attribute on the BMC_BaseElement class, so you can use CTIs in BMC Atrium CMDB.
categorization classA class that does not have its own BMC Remedy AR System form, but stores its instance data in the form of its superclass, preventing the need for a database join.
CDMSee Common Data Model (CDM).
childSee destination.
CISee configuration item (CI).
CI classA class that defines a type of configuration item (CI), such as a computer system or software application.
CIMSee Common Information Model (CIM).
classMetadata in BMC Atrium CMDB that defines a type of object, usually a configuration item (CI) or relationship. Either of these types of class can store data as a regular class, categorization class, abstract class, or abstract class with data replication. You can apply the final class and singleton class options to it as well.
Class ManagerA component of BMC Atrium CMDB where you can view, create, modify, and delete the classes and attributes that make up the data model, as well as view a list of subclasses for each class.
class permissionsPermission to view instances of a class in the BMC Atrium CMDB interface or access them with BMC Remedy AR System workflow.
CMDBSee Configuration Management Database (CMDB).
138 Product Catalog and DML Guide
Glossary
CMDB ConsoleSee BMC Atrium Core Console.
CMDB Console AdminAn application role. Members can perform searches from the BMC Atrium Core Console, view, create, and modify federation definitions, and perform BMC Atrium Core Console administrative tasks.
CMDB Console UserAn application role. Members can perform searches from the BMC Atrium Core Console and view federation definitions.
CMDB Data ChangeAn application role. Members can view, create, and modify instances if they have row-level security.
CMDB Data Change AllAn application role. Members can view, create, and modify instances independent of row-level security.
CMDB Data ViewAn application role. Members can view instances if they have row-level security.
CMDB Definitions AdminAn application role. Members can view, create, modify, and delete classes.
CMDB Definitions ViewerAn application role. Members can view class definitions.
CMDB Extended DataRelated data or CI attributes linked to or from BMC Atrium CMDB.
CMDB RE Definitions AdminAn application role. Members can view, create, modify, and delete reconciliation definitions and can start and cancel jobs.
CMDB RE Manual IdentificationAn application role. Members can identify instances manually.
CMDB RE UserAn application role. Members can view reconciliation definitions and can start and cancel jobs.
cmdbdriverA utility that executes BMC Atrium CMDB C API functions from a command line, prompting for parameters.
Common Data Model (CDM)The object-oriented, hierarchical set of classes in BMC Atrium CMDB used to represent types of CIs and relationships. The CDM is based on industry standards such as the Common Information Model (CIM) and Microsoft Windows Management Instrumentation.
Common Information Model (CIM)A definition of management information developed by the Distributed Management Task Force (DMTF) that facilitates the exchange of management information between systems.
Comparison activityA Reconciliation Engine activity that compares identified instances between two datasets, either producing a report that shows the differences or executing workflow.
configuration dataData about your IT environment, consisting of CIs and relationships.
configuration item (CI)A physical, logical, or conceptual entity that is part of your IT environment and has configurable attributes. Examples include computer systems, buildings, employees, software, and business services. One of the two types of classes in BMC Atrium CMDB. See also relationship.
Configuration Management Database (CMDB)A database that stores information about your IT configuration, including both CIs and relationships.
consumerAn application that works with data in BMC Atrium CMDB. It might view the data or modify it. See also provider.
Copy Dataset activityA Reconciliation Engine activity that copies instances from one dataset to another.
Glossary 139
BMC Atrium Core 7.6.03
CTISee Categories, Types, and Items (CTI).
data exchangeA BMC Atrium Integration Engine integration object that you execute to transfer data. A data exchange specifies the source and destination in a data transfer, the adapter to be used for the transfer, and the connection parameters to connect to the external data store. A data mapping is associated with a data exchange to transfer data.
data mappingA BMC Atrium Integration Engine integration object that defines the data to be transferred. A data mapping defines the source and destination of a data transfer, the primary key, and other fields and attributes. You can use a data mapping by associating it with a data exchange.
data replicationAn option for abstract classes. With this option, the instances of all subclasses are replicated to a single form to allow you to search the abstract class as though it had data. Only the attributes inherited from the abstract class are replicated.
datasetA logical group of data in BMC Atrium CMDB. A dataset can represent data from a particular source, a snapshot from a particular date, or other purpose. The dataset used by BMC Software products for reconciled production data is named BMC Asset. See also overlay dataset.
Dataset Merge PrecedenceA pairing of a dataset with a Precedence group. Each Merge activity references a collection of these, called a Dataset Merge Precedence set.
defined datasetOne of a pair of dataset IDs that is specified when executing a job with dynamic dataset substitution. The job is executed with the working dataset in place of the defined dataset.
Definitive Hardware Library (DHL)The Definitive Hardware Library (DHL) is a subset, or filter, of the Product Catalog that represents hardware products that are marked as approved for use in an organization.
Definitive Media Library (DML)A repository where approved software configurations are stored. Installed instances of the software can be checked against the DML for compliance with licenses and policies. From the 7.5.00 release of BMC Atrium Core, Definitive Software Library (DSL) has been renamed to Definitive Media Library.
Definitive Software Library (DSL)See Definitive Media Library (DML).
Delete Dataset activityA Reconciliation Engine activity that deletes instances from one or more datasets without removing the dataset itself. See also cascading delete, hard delete, soft delete.
destinationThe CI class defined as Class 2 in a relationship class, or an instance of that CI class as a member of such a relationship. Also known as the child member. In a weak relationship, the destination is the weak member.
discoveryThe act of scanning your environment for configuration data.
discovery applicationAn application that scans your environment for configuration data and can act as a provider to BMC Atrium CMDB.
Distributed Management Task Force (DMTF)An organization appointed to facilitate the exchange of management information by promoting the initiation of industry standards and interoperability.
DHLSee Definitive Hardware Library (DHL).
DMLSee Definitive Media Library (DML).
140 Product Catalog and DML Guide
Glossary
DMTFSee Distributed Management Task Force (DMTF).
DSLSee Definitive Media Library (DML).
Enterprise Integration EngineSee BMC Atrium Integration Engine.
eventA particular type of change to the instances of specified classes. You can publish an event so that any instance of it is written to the CMDB:Events form. You can receive notification each time an instance of the event occurs by polling the form.
Exclusion ruleA rule that specifies an attribute to be excluded from participation in a Comparison activity.
Execute Job activityA Reconciliation Engine activity that executes a job.
extensionA logical set of classes and attributes, usually in its own namespace, that is not part of the Common Data Model (CDM).
extension loaderThe cmdbExtLoader program, which is used for installing data model extensions and importing other BMC Atrium CMDB data and metadata.
federated dataData linked from CIs in BMC Atrium CMDB but stored externally. Federated data might represent more attributes of the CIs or related information such as change requests on the CIs.
federated interfaceAn instance of the BMC_FederatedInterface class that specifies how to access a particular type of federated data. See also federated link.
federated linkThe connection between a class or CI and a federated interface.
federated productA product that holds federated data. It can be linked to more than one federated interface.
federationThe act of linking CIs in BMC Atrium CMDB to external data.
Federation ManagerA component of BMC Atrium CMDB that you can use to manage federated data. From the Federation Manager, you can view, create, and modify federated products, federated interfaces, and federated links.
filterA set of criteria for restricting the information displayed by the Atrium Explorer. This is different from a BMC Remedy AR System filter.
final classA class that cannot have subclasses.
foreign key substitutionA method of federation that assigns a key from the federated product to each linked CI. Foreign key substitution is useful when no attributes that also exist in BMC Atrium CMDB are stored in the federated product.
graph walkThe act of searching for CIs and relationships in BMC Atrium CMDB.
graph walk functionsA set of specific functions that are used to search for CIs and relationships in BMC Atrium CMDB. Use these functions when you want to search for CIs regardless of their class or relationship.
groupA set of a particular type of reconciliation definition that is referenced by an activity. See also Identification group, Precedence group, Qualification group, Workflow Execution group.
GUIDA globally unique identifier, automatically generated by the BMC Remedy AR System server. GUIDs are used for instance IDs, reconciliation IDs, and other cases where a unique value must be generated without human interaction.
Glossary 141
BMC Atrium Core 7.6.03
hard delete The act of removing an instance from BMC Atrium CMDB. See also soft delete.
Identification activityA Reconciliation Engine activity that matches instances from two or more datasets and assigns them the same identity, meaning that they represent the same real-life object.
Identification groupA set of Identification rules that collectively identify instances from a particular dataset against other datasets. Each dataset that participates in an Identification activity is paired with one Identification group.
Identification ruleA rule used when identifying instances between datasets. When two instances match the qualification for the rule, they are assigned the same reconciliation ID.
identitySee reconciliation ID.
incidentDefined by ITIL® as any event that is not part of the standard operation of a service and that causes, or might cause, an interruption to, or a reduction in, the quality of that service.
incremental mergeA Merge activity that only processes instances created or modified since the activity was last run, saving otherwise useless processing time. Setting Force Attribute Merge to No makes a Merge activity incremental.
instanceAn actual incarnation of a particular class, represented as a record in BMC Atrium CMDB. Both CIs and relationships are instances of their respective classes.
instance IDA GUID that BMC Atrium CMDB applies to each instance to uniquely identify it.
instance permissionsThe right to view or modify a specific instance. These permissions are called row-level security and write security, respectively.
instantiateTo create an instance of a class.
ITIL®
The IT Infrastructure Library® (ITIL) is an internationally accepted set of best practices developed by the British government for management of IT services.
jobA group of one or more reconciliation activities executed in sequence. You cannot run an activity by itself; only as part of a job. You can start a job manually, with a schedule, with an Execute Job activity, with workflow, or with an API program.
key queryLimits the records transferred in a data transfer in the BMC Atrium Integration Engine. See also row-level query.
Merge activityA Reconciliation Engine activity that merges two or more datasets into a single complete and correct dataset based on precedence values that favor the strengths of each dataset.
metadataDefinitions that describe the data stored in BMC Atrium CMDB. Metadata includes classes in the data model and special classes to define things such as datasets and federation objects.
multitenancyThe separation of data and access so that a single BMC Atrium CMDB can contain the data of multiple parties, but each party can access only their own data. See also account, role.
namespaceA logical set of classes and attributes in the data model, usually related to a specific consumer or provider. The Common Data Model (CDM) uses the BMC.CORE namespace.
142 Product Catalog and DML Guide

Glossary
normalizeTo ensure that data of the same type follows the same text formatting conventions. This helps reconciliation by making it more likely for instances to match in an Identification activity.
Normalization EngineA BMC Atrium CMDB application that provides a centralized, customizable, and uniform way to overcome consistency problems by normalizing attributes for software and hardware products.
orphanAn instance that has been physically deleted from source datasets but still exists in the target dataset into which they merge.
overlay datasetA dataset that provides a layer in which to make changes that are pending approval. API queries to the dataset seamlessly return its modified instances along with unmodified instances from the underlying regular dataset.
parentSee source.
Precedence groupThe definition of an overall precedence value for a dataset. It can optionally contain precedence values for specific classes and attributes within the dataset.
precedence valueA method of assigning weight to specific datasets, classes, and attributes in a Merge activity. Attribute precedence values override class precedence values, which override dataset precedence values.
primary keyA primary key uniquely identifies a row of data. In BMC Atrium Integration Engine you must specify the attributes of a CI class and the corresponding fields in the external data store to create the primary key. After a data transfer, the primary key is the link that matches a record in the external data store with its counterpart in BMC Atrium CMDB.
Product CatalogThe BMC Atrium Core component that provides normalized manufacturer names, model names, categorization values, and other information about hardware and software products.
product categorizationDivides CIs into groups. Using the three-tier structure of product categorization, you can create successively smaller, more tightly defined groups. You can create groups of CIs in Tier 1 followed by smaller groups in Tier 2 and Tier 3.
production datasetThe dataset that serves as the single source of reference for your organization and from which you make business decisions. It acts as the target dataset in most Merge activities.
providerAn application, often a discovery application, that loads bulk data into BMC Atrium CMDB. See also consumer.
provisioningThe process of providing access to resources, such as printers, telephones, and so on, and to information, such as permissions, databases, and so on.
publishTo make an event available so that instances of it can be written to the CMDB:Events form.
Purge Dataset activityA Reconciliation Engine activity that removes instances that have been marked as deleted from one or more datasets.
QualificationA Boolean statement that is evaluated to determine whether an instance should be included in an activity.
Qualification groupA set of Qualifications that can be used in various types of activity. An instance that meets one or more Qualifications in the group is included in the activity.
Glossary 143
BMC Atrium Core 7.6.03
reconciliationThe process of managing data in multiple datasets using the Reconciliation Engine. The main activities of reconciliation are identifying, comparing, and merging datasets, though the Reconciliation Engine performs other activities as well.
reconciliation definitionAn entity defined in the Reconciliation Manager such as a job, activity, or group.
Reconciliation EngineThe component of BMC Atrium CMDB that reconciles data from different datasets.
reconciliation IDA GUID that the Reconciliation Engine assigns to instances in different datasets that represent the same real-life object.
Reconciliation ManagerThe component of BMC Atrium CMDB that you can use to manage reconciliation definitions.
regular classA class that stores its instance data in its own BMC Remedy AR System form. See also abstract class, categorization class.
related informationInformation about a CI that does not qualify as attributes of the CI, and should therefore not be stored in a Configuration Management Database (CMDB).
relationshipA connection between two CIs such as a dependency or membership. It is an instance of a relationship class. See also configuration item (CI).
relationship classA class that defines a type of relationship between CIs, such as a dependency or membership.
relationship filterSee filter.
relationship keyA relationship key uniquely identifies a row of data in a relationship mapping. In BMC Atrium Integration Engine you must specify the attributes of a primary CI class and a secondary CI class to create the relationship key. After a data transfer, the relationship key is the link that matches a record in the external data store with its counterpart in BMC Atrium CMDB.
Rename Dataset activityA reconciliation activity that renames a dataset without changing its ID, preserving references to the dataset from any reconciliation definitions.
roleA designation that grants permissions to more than one BMC Remedy AR System group.
row-level queryLimits the transfer of data on a row-by-row basis in the BMC Atrium Integration Engine. See also key query.
row-level securityThe permission required to view a specific instance. See also write security.
ruleOne or more criteria that, when met, cause an action. The types of rules used in BMC Atrium Core are Exclusion rule, Identification rule, and Workflow Execution rule.
rulesetA group of rules.
service level agreementA contract between a service provider and a purchaser that defines the level of service.
service modelThe CIs and relationships that define business services and the resources that deliver and support them, enabling you to see infrastructure items in a business context.
singleton classAn optional class characteristic that restricts the class to holding only one instance.
144 Product Catalog and DML Guide
Glossary
snapshotA set of data that represents a configuration at a certain point in time, usually stored in its own dataset. There can be multiple snapshots of a given configuration.
soft deleteThe act of marking an instance as deleted from BMC Atrium CMDB by setting the MarkAsDeleted attribute to Yes. See also hard delete.
sourceThe CI class defined as Class 1 in a relationship class, or an instance of that CI class as a member of such a relationship. Also known as the parent member. In a weak relationship, the source is the strong member.
subclassA class that is derived from another class, which is called its superclass. The subclass inherits all the attributes of its superclass and any superclasses above it in the hierarchy, and can also participate in relationships defined for all superclasses.
superclassA class from which other classes, called subclasses, are derived.
synchronizationThe automatic process of creating BMC Remedy AR System forms and workflow to represent a class that has just been created or modified. The class is not available until synchronization completes.
text normalizationSee normalize.
unqualified dataInformation about an unknown device at a known IP endpoint. If you discover an IP address, but lack the credentials to identify the device at that endpoint, data for that device is unqualified. For example, the device might be a laptop computer, printer, router, or some other type of device. BMC Atrium CMDB stores unqualified data as BMC_ComputerSystem instances.
weak referenceSee weak relationship.
weak relationshipAn optional characteristic for relationship classes, signifying that the members of a relationship form a composite object that can be reconciled as one. The destination member is considered the weak member of a weak relationship, existing as part of the source member (also known as the strong member).
Windows Management Instrumentation (WMI)The Microsoft application of the Web-Based Enterprise Management initiative for an industry standard for accessing management information.
WMISee Windows Management Instrumentation (WMI).
workflowBMC Remedy AR System objects such as active links, escalations, and filters that perform actions against data.
Workflow Execution groupA set of Workflow Execution rules. Each Comparison activity can optionally reference one Workflow Execution group.
Workflow Execution ruleA rule used when comparing instances between datasets. When a compared instance matches the qualification for the rule, specified BMC Remedy AR System workflow is executed against the instance or the instance against which it is compared.
working datasetOne of a pair of dataset IDs that is specified when executing a job with dynamic dataset substitution. The job is executed with the working dataset in place of the defined dataset.
write securityThe permission required along with row-level security to modify or delete a specific instance. See also row-level security.
Glossary 145

BMC Atrium Core 7.6.03
146 Product Catalog and DML Guide
A B C D E F G H I J K L M N O P Q R S T U V W X Y Z
Index
Aaccessing
BMC Remedy AR System database 124, 132Product Catalog from CM 124, 133
addingaliases, company 91product entries 72products to suites 78related files to patch entries 78Software Library Item attachments 77
aliasescompany, adding 91company, modifying 92
approvingpatches 84products 83products in bulk 85versions 84
AR Database link 132Asset Management, using with Product Catalog 16Atrium Core, configuring Product Catalog 59Atrium Foundation Admin role 60Atrium Foundation Viewer role 60Attachment Details form 77attachments, adding to Software Library Items 77
Bbest practices
categorization 113setting up categorization in pre-production 49
BMC Atrium Product Catalogcategorizing product entries 35creating entries 71defined 14exporting data 101fields 32modifying categorization values 48product files 24queries 135
BMC Atrium Product Catalog entriesadding product suites 78creating custom 71deleting 85patches
adding related files 78creating 76creating related IDs 76specifying locations 76
relating to companies 81removing company relationships 83
BMC Configuration Automation for Clients and Action Request supported platforms 126
BMC Configuration Automation for Clients, using with Product Catalog 123
BMC products, using with Product Catalog 25BMC Remedy Action Request System (BMC Remedy
AR System)about 135CM supported platforms 126security script 124, 125
BMC Remedy Asset Management, categorizing bulk inventory and schedules 33
BMC Remedy Change Management, categorizing change requests and templates 34
BMC Remedy ITSM, categorizing records 33BMC Remedy Knowledge Management, categorizing
solutions 34BMC Remedy Service Desk, categorizing incidents,
known errors, problem investigations, and scripts 35
BMC Software, contacting 2bulk inventory, categorizing 33
Ccategorization
benefits 32best practices 113creating new entries 72data, summary 50
Index 147
A B C D E F G H I J K L M N O P Q R S T U V W X Y Z
default values 40, 122discovery 39fields on CI and Product Catalog 32hardware configuration items 114implementing 47managing changes 56miscellaneous configuration items 117network configuration items 119normalization examples 43normalization steps 41overview 32planning and implementing 31re-categorizing 51reporting 38reviewing 51searching 38setting up data 49, 51software configuration items 120structure, defining 47use by product features 38use in BMC products 33use in BMC Remedy ITSM 33use of "Other" as a value 48validation workflow 39workflows 38
categorizingbulk inventory 33change requests 34configuration items 33incidents 35known errors 35problem investigations 35Product Catalog entries 34, 35solutions 34
CCM_USER 124, 125, 133CMDB, categorizing configuration items 33companies
adding aliases 91aliases, modifying 92
companies, relating to Product Catalog entries 81Company Alias Update dialog box 91Company dialog box 90, 94configuration items, categorizing 33configuring, Product Catalog 59Connect button 134creating
custom Product Catalog entries 71patches for Product Catalog entries 76product entries 72product files 79related patch IDs 76Software Library Items 77
custom data, importing and exporting 98customer support 3customizing Product Catalog entries 71
Ddata
custom, importing and exporting 98importing custom 102
Data Source Name (DSN) 127data, exporting custom 101Database link 132database user, CCM_USER 124database, port numbers 134dataset, configuring for normalization 43, 86DB 124, 135DB-Link 126default categorization values 122default values, categorization 40defining categorization structure 47, 49Definitive Media Library
defined 15See BMC Atrium Product Catalog
Definitive Product Library Console 78Definitive Software Library
See BMC Atrium Product Catalogdeleting
Product Catalog entries 85Product Catalog relationships 83
dialog boxesCompany Alias Update 91Company and Organization 90, 94
discoverycategorization 39
discovery process, running in pre-production environment 51
DML. See BMC Atrium Product Catalogdocumentation, websites 25DSL. See BMC Atrium Product Catalog
EEasy installation 135exporting, custom data 101
Ffiles
creating for products 79relating to patches 78
forms
148 Product Catalog and DML Guide

A B C D E F G H I J K L M N O P Q R S T U V W X Y Z
Attachment Details 77Product Catalog Alias Mapping 87Product Catalog Setup 72, 76Software Library Item 77staging 103
GGeneral Access role 60
Hhardware CIs, categorizing 114Heterogeneous Services Initialization File 129HS_FDS_CONNECT_INFO 129HS_FDS_SHAREABLE_NAME 129HS_FDS_TRACE_LEVEL 129
IIDs, related patch 76implementing categorization 47importing
custom data 102inventory password 134
Llicense management 16location of Product Catalog entry patch 76
Mmanaging categorization changes 56Microsoft Data Access Component (MDAC) 131modifying
company aliases 92list of platforms 88Product Catalog categorization values 48
mtxoci81_win2k.reg registry file 131
Nnetwork configuration items, categorizing 119
Oother, categorization value 48
Ppatches
creating for entries 76creating related IDs 76in the Product Catalog adding files 78specifying locations 76
permissionsAtrium Foundation Admin role 60Atrium Foundation Viewer role 60General Access role 60Unrestricted Access role 60
planning, categorization 31platforms, modifying list of 88port numbers for databases 134pre-production environment, running discovery
process 51Product Catalog Alias Mapping form 87Product Catalog Console
about 24entries 24Product Catalog View 24Product Category tab 83, 85products in suite 24Search Criteria 24Storage Location 24
Product Catalog Setup formcreating related patch IDs 76customizing entries 72
product categorization. See categorizationProduct Category tab 83, 85product support 3products
adding entries 72adding to suites 78creating files for 79
Products in Suite table 78
Qqueries
Product Catalog 135Service Management Integration 136
Rrecategorizing Product Catalog entries 51, 54relationships
company and Product Catalog entry 81Product Catalog entry 81
reporting, categorization 38reviewing, categorization 51
Index 149
A B C D E F G H I J K L M N O P Q R S T U V W X Y Z
rolesAtrium Foundation Admin 60Atrium Foundation Viewer 60General Access 60Unrestricted Access 60
Ssearching categorizations 38security script 124Service Management Integration queries 136setting up, categorization data 49software configuration items, categorizing 120staging forms, for importing data 103Storage Location
adding attachments 77creating 77
Storage Location form 77suites, adding products 78support, customer 3supported database platforms 126system administrator user name and password 134
Ttabs, Product Category 83technical support 3tnsnames.ora file 127
UUnicode option 126unrelating companies and dictionary entries 83Unrestricted Access role 60user_view password 134
Vvalidating, custom data 110
Wworkflow
categorization 38categorization validation 39
Zzip file, BMC Remedy AR System security script 125
150 Product Catalog and DML Guide


*160656**160656**160656**160656*
*160656*