Embed Size (px)
Citation preview

BMERS V 6.2 Software Installation Guide
U.S. National Library of Medicine (NLM)
Disaster Information Management Research Center (DIMRC)
V2018.03.08

BMERS Installation Instructions
NLM| Disaster Information Management Research Center (DIMRC) 1
2
Office of the Disaster Information Management Research Center (DIMRC)
Specialized Information Services Division, National Library of Medicine
Two Democracy Plaza, Suite 440
6707 Democracy Boulevard, MSC 4876
Bethesda, Maryland, 20892
Phone: 301-496-1131 / Toll Free: 1-888-FINDNLM
Fax: 1-301-480-9680
URL: http://disasterinfo.nlm.nih.gov

BMERS Installation Instructions
NLM| Disaster Information Management Research Center (DIMRC) 2
Table of Contents Introduction .................................................................................................................................................. 1
The BMERS Software Distribution ............................................................................................................ 1
Other Included Third-Party Software Products ........................................................................................ 2
Third-Party Software Products not included but can be used with BMERS ............................................. 2
Installation Process Overview ................................................................................................................... 3
Detailed Installation Steps ............................................................................................................................ 5
1.0 Download & Launch BmersSetup.exe ................................................................................................. 5
2.0 Install BMERS & 3rd Party Software ..................................................................................................... 5
2.1 Install XAMPP .................................................................................................................................... 10
2.2 Install hMailServer ......................................................................................................................... 14
2.3 Apache Service will be ReStarted by BMERS Setup ....................................................................... 18
2.4 hMailServer Script will be installed by BMERS Setup. ................................................................... 18
2.5 BMERS Setup ends with final installation notes .................................................................... 18
3.0 Customize the BMERS Account Plan .............................................................................................. 19
3.1 Add, Modify or Delete Mail Accounts ............................................................................................ 20
3.2 Bulk Load Mail Accounts into BMERS with an XML File................................................................. 21
3.3 Add, Modify or Delete Call-Signs. .................................................................................................. 22
3.4 Reset, Backup or Restore BMERS Data. ......................................................................................... 23
3.4.1 Reset BMERS Data. ........................................................................................................................ 24
3.4.3 Backup BMERS Data. ...................................................................................................................... 25
3.4.4 Restore BMERS Data from Backup Files. ....................................................................................... 26
3.4.5 Configuration Logs. ........................................................................................................................ 27
4.0 Select Default Call-Sign from the Configuration ............................................................................ 28
5.0 Initialize and Test Paclink and/or RMS Express. ............................................................................ 29
6.0 Test the System .............................................................................................................................. 33
Troubleshooting .......................................................................................................................................... 36
Appendix A: Configuration Properties ........................................................................................................ 40
Appendix B: Uninstall BMERS & 3rd Party programs ................................................................................... 44

BMERS Installation Instructions
NLM| Disaster Information Management Research Center (DIMRC) 1
Introduction
This document describes the steps necessary to install and configure the software components of the
BHEPP Military Affiliate Radio System (MARS) Emergency Radio-email System (BMERS) version 3.0.
BMERS was developed by the U.S. National Library of Medicine’s Disaster Information Management
Research Center (DIMRC) for the Bethesda Hospitals’ Emergency Preparedness Partnership (BHEPP) as a
backup email system during disasters. It is envisioned that BMERS can be useful in other settings where
emergency, resilient Internet email capabilities may be needed.
The BHEPP hospitals have a resilient, private network that links the Hospital Command Centers (HCCs)
together via laser beams and fiber optics links. BMERS leverages this private hospital network and digital
amateur radio technology to provide the BHEPP hospitals with resilient email communications when the
Internet becomes unavailable to the hospitals and over a large surrounding geographical area. This
radio-email system uses the Winlink 2000 (WL2K) system (http://www.winlink.org), which was
developed by Amateur Radio Safety Foundation (ARSF) volunteers and is available to amateur and MARS
licensed radio operators for sending and receiving Internet email via radio communications. BMERS
greatly extends the WL2K model by allowing multiple Emergency Operations Center staff to
communicate via Internet email from multiple locations via the same radio station, which can be
operated by a single licensed radio operator, during a disaster situation. BMERS implements a local area
network to give users access to the email capabilities using a standard web browser. Users are assigned
BMERS-specific, role-based email addresses within the BMERS network.
The current version of the BMERS software can be installed on a standard MS Windows-based PC. Using
BMERS also requires amateur radio equipment compatible with the Winlink 2000 system. As of August
2015, the BMERS software has been tested only on Microsoft Windows XP (SP2/SP3), Windows Server
2008, and Windows 7 (SP1), 8.1 (32-bit and 64-bit) Operating Systems. For more details, visit the BMERS
website at http://www.nihrac.org/home/bmers.
The BMERS Software Distribution
The DIMRC BMERS software can be obtained in a ZIP file (DIMRC-Radiomail-6.x.x.zip) from
http://www.nihrac.org/Resources.
The BMERS software includes a customized version of Afterlogic Webmail Lite PHP version 6.5. The
Afterlogic Webmail Lite PHP is an open source version of a commercial product
(http://www.afterlogic.com/webmail-client) that provides a browser-based email and collaboration
front end. Note that a license key was required for the Mailbee Webmail Pro v4.2 product included with
earlier versions of the BMERS software, but beginning with BMERS Version 2.0 a license key is no longer
required.

BMERS Installation Instructions
NLM| Disaster Information Management Research Center (DIMRC) 2
Other Included Third-Party Software Products
BMERS also makes use of the following third-party products, and these product’s specific versions have
been tested & included in BMERSSetup.exe
XAMPP (Apache Friends) (versions 1.7.4 V6 included in BMERS Setup)
XAMPP (http://www.apachefriends.org/en/xampp.html) is an easy-to-install Apache distribution
containing MySQL, PHP and Perl. BMERS uses only the Apache HTTPD, MySQL and PHP
components.
hMailServer (hMailServer.com) (version 5.3.3 included in BMERS Setup)
hMailServer (http://www.hmailserver.com/) is a free email server for Microsoft Windows that
supports the common email protocols (IMAP, SMTP and POP3).
Ajax Chat (http://frug.github.io/AJAX-Chat/) (version 0.8.7 included in BMERS Setup)
Paclink (Winlink.org) (with version 4.3.4.0 included in BMERS Setup)
Paclink (http://www.winlink.org/ClientSoftware) controls the radio equipment and handles the
transfer of email via radio and the Winlink 2000 system. It provides a POP/SMTP server to allow
interfacing with email clients and related email applications. It uses the B2F message transfer
protocol that supports attachments, multiple addresses, and tactical addresses.
RMSExpress (Winlink.org) (tested with version 1.4.3.0 )
Third-Party Software Products not included but can be used with BMERS
RMSExpress (http://www.winlink.org/ClientSoftware) controls the radio equipment and handles
the transfer of email via radio and the Winlink 2000 system.
BMERS Installation Instructions
NLM| Disaster Information Management Research Center (DIMRC) 3
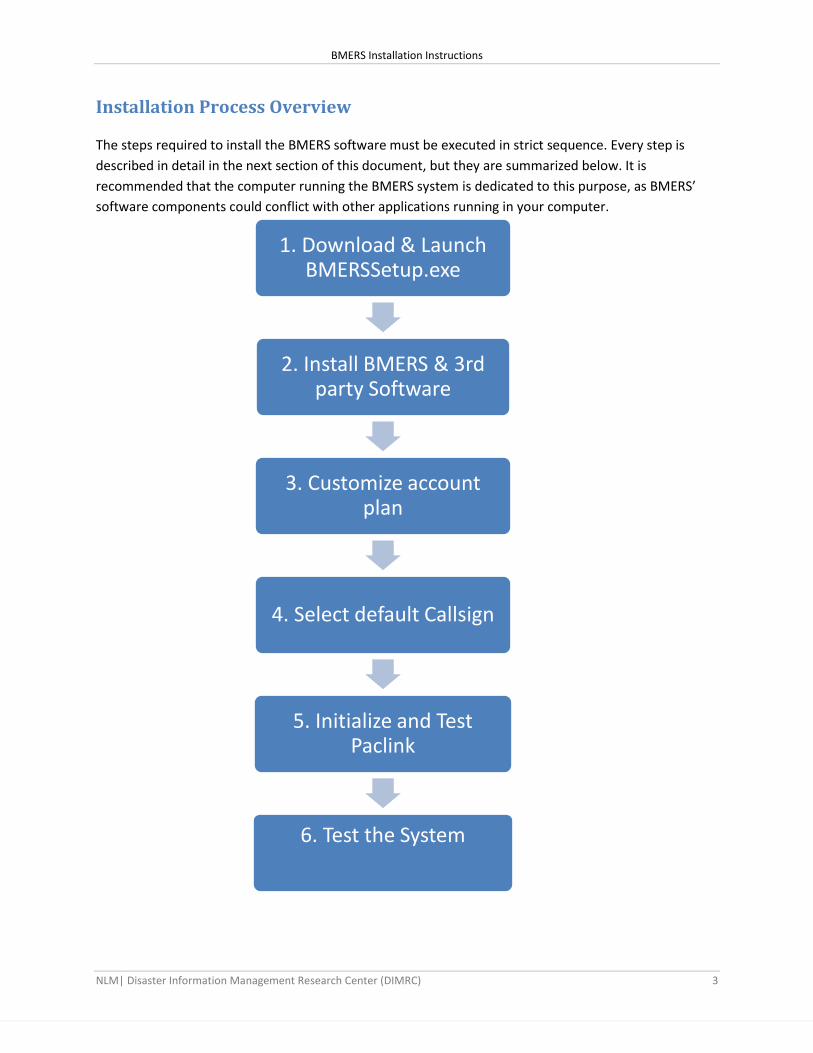
Installation Process Overview
The steps required to install the BMERS software must be executed in strict sequence. Every step is
described in detail in the next section of this document, but they are summarized below. It is
recommended that the computer running the BMERS system is dedicated to this purpose, as BMERS’
software components could conflict with other applications running in your computer.
1. Download & Launch BMERSSetup.exe
2. Install BMERS & 3rd party Software
3. Customize account plan
4. Select default Callsign
5. Initialize and Test Paclink
6. Test the System

BMERS Installation Instructions
NLM| Disaster Information Management Research Center (DIMRC) 4
Prerequisites The following resources are required for installing the BMERS software:
A (dedicated) computer with Windows Server 2008, 2012, Windows XP SP3, Windows 7 (SP1), or
Windows 8.1 installed and configured with the latest security patches. The installation
instructions include operating-system-specific information. Windows XP systems require
Microsoft .NET v3.5 runtime with SP1 installed.
A MARS and/or amateur (ham) radio callsign. This generally means that you must be a licensed
amateur radio or MARS radio operator.
A Pactor radio modem and driver software (e.g., SCS PTC-IIusb). You may obtain the required
driver from http://www.scs-ptc.com/downloads/usb-driver-for-scs-ptc-iiusb-and-scs-dsp-tnc. If
you have a SCS PTC-IIusb radio modem, installation instructions for Windows XP can be found in
Section 3.2 of the PTC-IIusb Manual (http://www.scs-ptc.com/downloads/ptc-iiusb-
manual/releases/4.0/manual40usb.pdf).
The latest version of the DIMRC BMERS software.
An user account/email address plan:
o Pick a domain name for your BMERS installation. This domain name will be used only
internally in your own private local area network, which will be implemented around
your radio station for your local users. It is recommended that this domain name does
NOT match a valid, registered domain name, since otherwise the BMERS email server
may not work properly if it is accidentally, or purposely, connected to the Internet (e.g.,
a potential domain name for your network could be “MyEmergency1.net”).
o Define a list of user account names. These account names combined with your chosen
domain name form the email addresses of your users on BMERS. It is recommended
that email account names correspond to staff positions in the served organization’s
Emergency Operations Center, such as standard staff positions defined in the Incident
Command System. For example, a potential user account for an Incident Commander at
a hospital could be “[email protected]”. BMERS is provided with a
template account plan file that can be optionally modified to suit your local needs.
Additional details are provided in the next sections of this document. Again, please read this Installation
Guide fully before attempting to install the BMERS software.
BMERS Installation Instructions
NLM| Disaster Information Management Research Center (DIMRC) 5
Detailed Installation Steps
The instructions below will assume that the default values of installation settings (especially installation
directories) are used unless stated otherwise. They will further assume that all of the steps are executed
while logged on in your computer as an Administrator (that is, you are using a Windows user account
that is part of the Windows Administrator group). It will also be assumed that you are using a computer
dedicated to running BMERS, and that you are fairly familiar with the process of installing and
configuring software in your computer.
When using a 64-bit Windows systems, any mention in this guide of the ‘C:\Program Files’
directory should be replaced by ‘C:\Program Files (x86)’.
1.0 Download & Launch BmersSetup.exe
The DIMRC BMERS software can be obtained in a ZIP file (DIMRC-Radiomail-6.x.x.zip) from
http://www.nihrac.org/Resources. Download this zip file and extract all contents to a directory on your
local machine then launch BmerSetup.exe as an Administrator.
2.0 Install BMERS & 3rd Party Software
The following steps explain how to install BMERS & 3rd party software. (Paclink is automatically installed by BMERS Setup without any user input). Some of the pages (i.e. welcome, license, release notes, program folder name, etc.) has been omitted from this documentation.

BMERS Installation Instructions
NLM| Disaster Information Management Research Center (DIMRC) 6
Winlink Accounts Information:
Either HAM and/or Mars Winlink Account information must be entered in order to esatablish a radio
connection. If you don’t know your Grid-Square, you can obtain it by clicking on the link (Check your
Grid_Square) provided on the BMERS Setup screen. Once you are on the Grid Locator Page
(http://www.levinecentral.com/ham/grid_square.php), you can get your Grid-Square information by
providing city, state, zip or your callsign.
BMERS Installation Instructions
NLM| Disaster Information Management Research Center (DIMRC) 7
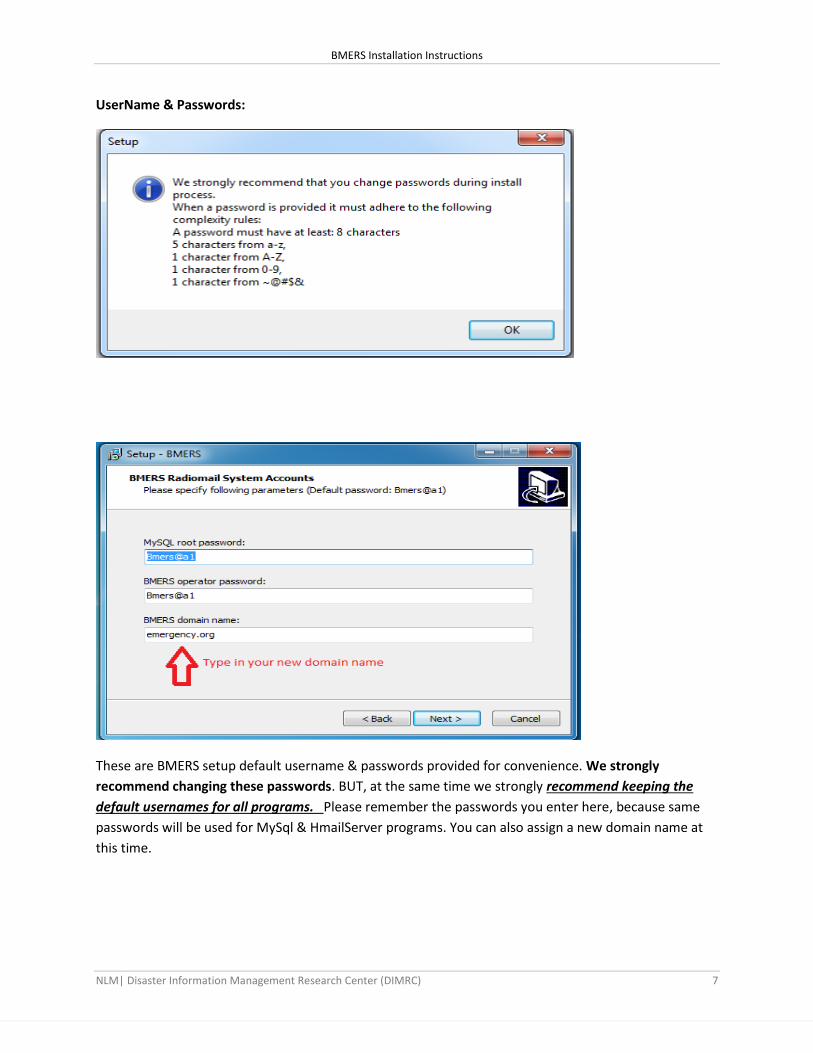
UserName & Passwords:
These are BMERS setup default username & passwords provided for convenience. We strongly
recommend changing these passwords. BUT, at the same time we strongly recommend keeping the
default usernames for all programs. Please remember the passwords you enter here, because same
passwords will be used for MySql & HmailServer programs. You can also assign a new domain name at
this time.

BMERS Installation Instructions
NLM| Disaster Information Management Research Center (DIMRC) 8
As we have included in the setup program assigning same password (or easy to remember pattern) for
all installed programs will simplify administration tasks in an emergency situation.

BMERS Installation Instructions
NLM| Disaster Information Management Research Center (DIMRC) 9
Program Destination: We strongly recommend keeping the default destination folders for all
programs.
Component selection: will be done automatically based on the 3rd party software installed or not-
installed on the computer. If the 3rd party software already installed, it will not be listed under
components as an option. If you would like to reinstall any of the 3rd party software please uninstall first.
Installation progress:

BMERS Installation Instructions
NLM| Disaster Information Management Research Center (DIMRC) 10
2.1 Install XAMPP
The following steps explain how to install the XAMPP software package. BMERS requires MySQL, Apache
HTTPD and PHP, which are all provided by XAMPP.
Windows 7 Note:
Open the Services panel and check to see whether Windows Remote
Management Service or Worldwide Web Publishing Service are running. If so,
these services (which listen on port 80) must be set to manual and stopped;
otherwise XAMPP’s Apache service will not start.
BMERS Setup will prompt you for the Xampp Installation.
Windows Server 2008 and Windows 7:
The following warning about Windows Vista User Access Control (or UAC) will
be displayed:
Windows Server 2008 and Windows 7: (cont.)
Click OK and proceed to install in the default location (when possible, or
another location not affected by UAC). After the installer has started, you will
be asked for XAMPP installation options. Check ‘Install Apache as a service’
and ‘Install MySQL as a service’:

BMERS Installation Instructions
NLM| Disaster Information Management Research Center (DIMRC) 11
After the installer has started, you will be asked for XAMPP installation options. Check
‘Install Apache as a service’ and ‘Install MySQL as a service’
Windows XP:
When asked if you want to keep blocking program “Apache HTTP Server”,
select “Unblock”.
BMERS Installation Instructions
NLM| Disaster Information Management Research Center (DIMRC) 12
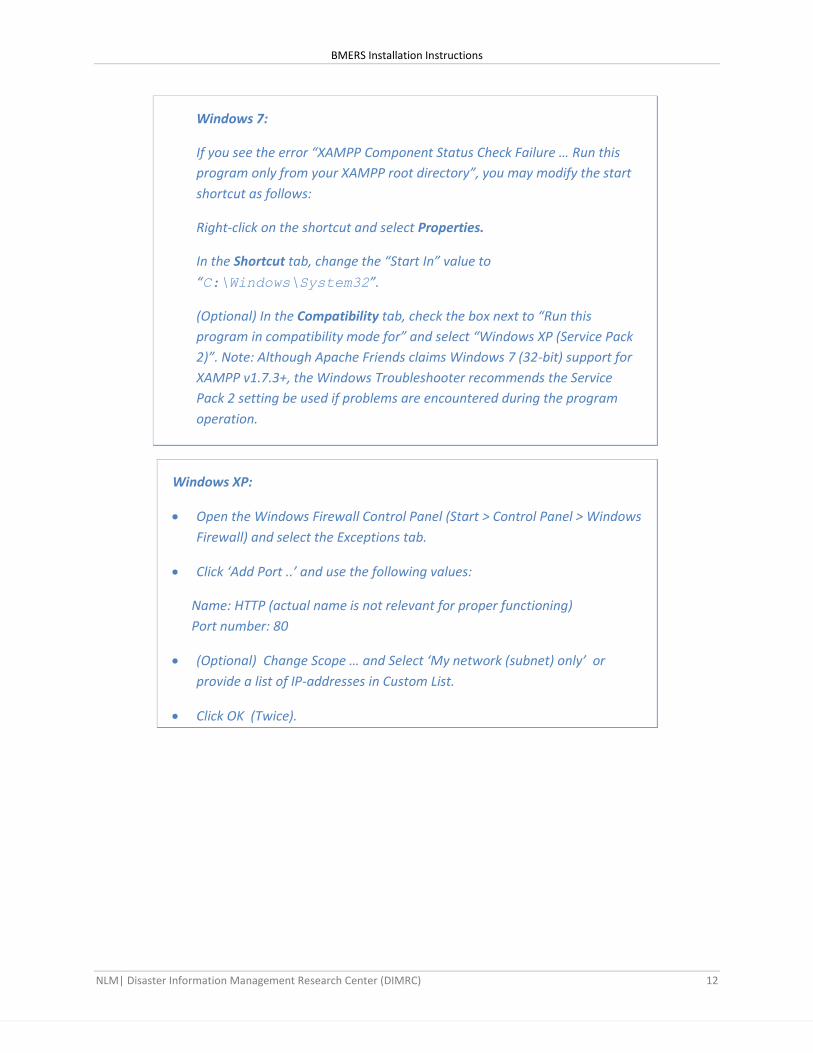
Windows 7:
If you see the error “XAMPP Component Status Check Failure … Run this
program only from your XAMPP root directory”, you may modify the start
shortcut as follows:
Right-click on the shortcut and select Properties.
In the Shortcut tab, change the “Start In” value to
“C:\Windows\System32”.
(Optional) In the Compatibility tab, check the box next to “Run this
program in compatibility mode for” and select “Windows XP (Service Pack
2)”. Note: Although Apache Friends claims Windows 7 (32-bit) support for
XAMPP v1.7.3+, the Windows Troubleshooter recommends the Service
Pack 2 setting be used if problems are encountered during the program
operation.
Windows XP:
Open the Windows Firewall Control Panel (Start > Control Panel > Windows
Firewall) and select the Exceptions tab.
Click ‘Add Port ..’ and use the following values:
Name: HTTP (actual name is not relevant for proper functioning)
Port number: 80
(Optional) Change Scope … and Select ‘My network (subnet) only’ or
provide a list of IP-addresses in Custom List.
Click OK (Twice).

BMERS Installation Instructions
NLM| Disaster Information Management Research Center (DIMRC) 13
NOTE: If another firewall rule already exists for port 80, enable that rule.
NOTE: When using another firewall program, make sure it allows (at a minimum incoming) traffic on
port 80.
Windows 7:
Open the Windows Firewall Control Panel (Start > Control Panel > System &
Security > Windows Firewall); then click Allow a Program Through Firewall.
See http://maximumpcguides.com/windows-7/allow-a-program-through-the-
windows-7-firewall/ for details of how to allow Incoming Port 80 access.
1.3 (Optional) Test by opening a browser (preferably on another computer on your network, in order to
verify the firewall allows outside access to web applications). Browse to http://<ip-address or
computer name or use localhost>. You should see the XAMPP splash page (/xampp/splash.php):

BMERS Installation Instructions
NLM| Disaster Information Management Research Center (DIMRC) 14
2.2 Install hMailServer
BMERS Setup will prompt you for the hMailServer Installation.
After reading the License Agreement, select “I agree to the agreement” and then select a
“destination location”. We recommend keeping the default value “Program Files\hMailserver”.
Accept the default “Full Installation” on the screen that asks ‘Select Components screen by clicking
“Next>”’. Select a database server type of “Use external database engine...”.
Click “Next “ on the next two screens to continue and, finally click “Install”.
Click “Next” to continue with the database wizard.

BMERS Installation Instructions
NLM| Disaster Information Management Research Center (DIMRC) 15
Enter the password for the hMailServer administrator (same password entered earlier on the BMERS
Setup hMailServer System Accounts Page) and click “OK”.
Select “Create a new hMailServer database“:
On the “Select database server type” window, select “MySQL”.

BMERS Installation Instructions
NLM| Disaster Information Management Research Center (DIMRC) 16
Enter server connection information: (you must use the same values entered on the
BMERS Setup hMailServer System Accounts Page)
Database server address: localhost
Port: 3306 (keep default)
Database name: The default is “hmailserver”.
Authentication/Username: The default value is hmailserver
Authentication/password:
Set hMailServer service dependency: Select mysql (mysql) for Service
Click “Next” to create the database.
Click “Close” to continue.

BMERS Installation Instructions
NLM| Disaster Information Management Research Center (DIMRC) 17
In the completion dialog ensure that "Run hMailServer Administrator" is checked and click "Finish".
(Note that the completion dialog may be hidden behind other windows. If so, use Alt-Tab to bring it to
the foreground.)
After a brief pause verify that the hMailServer Administrator application appears. The BMERS
‘install.cmd’ script will populate the Domains and Settings sections automatically, so no further entries
need to be made at this time. (If a password prompt appears instead, re-enter the hMail Administrator
password and refer to the troubleshooting section.)
We recommend enabling logging under setting for future trouble shooting if needed.
Click “Exit” to close the administrator program.
(Optional) Pin 'Start > All Programs > hMailServer > hMailServer Administrator' to the Start
Menu, for easy access.

BMERS Installation Instructions
NLM| Disaster Information Management Research Center (DIMRC) 18
2.3 Apache Service will be ReStarted by BMERS Setup
2.4 hMailServer Script will be installed by BMERS Setup.
2.5 BMERS Setup ends with final installation notes

BMERS Installation Instructions
NLM| Disaster Information Management Research Center (DIMRC) 19
3.0 Customize the BMERS Account Plan
By launching BMERS Admin http://localhost/operator/admin or from the Windows Start->All
Programs->BMERS->Admin customize the account plan.
Please wait until the login screen appears:

BMERS Installation Instructions
NLM| Disaster Information Management Research Center (DIMRC) 20
3.1 Add, Modify or Delete Mail Accounts
You can add, modify or delete mail accounts in “Mail Accounts” tab.
NOTE ! Make sure to Save your changes by pressing on ‘SAVE’.
Once the accounts are saved, notification will appear on the top of the page.

BMERS Installation Instructions
NLM| Disaster Information Management Research Center (DIMRC) 21
3.2 Bulk Load Mail Accounts into BMERS with an XML File.
XML File Format for upload:
<?xml version="1.0"?>
<domain>
<account name="operator" isPrivileged="YES" password="Bmers@a1"/>
<account name="ic-A" password="Qu!6NNSg"/>
<account name="vip-A" isPrivileged="YES" password="Sd$48IEC"/>
<account name="dis-A" password="Qg-8TT5D"/>
<account name="com-A" password="He@4sG$W"/>
</domain>
1-Choose XML File to Upload
2-Load
3-Save (after making any necessary changes)

BMERS Installation Instructions
NLM| Disaster Information Management Research Center (DIMRC) 22
3.3 Add, Modify or Delete Call-Signs.
NOTE ! Make sure to Save your changes by pressing on ‘SAVE’.
Once the callsigns are saved, notification will appear on the top of the page.

BMERS Installation Instructions
NLM| Disaster Information Management Research Center (DIMRC) 23
3.4 Reset, Backup or Restore BMERS Data.
You can “Reset” to Initial Setup State, Backup or Restore BMERS data.
NOTE ! Reset & Restore will overwrite all existing data!
Prior to Reset & Restore, BMERS system will Automatically create a backup with a date & time stamp.
Make sure to take a note of this Backup’s date & time so that you can revert (restore) to that particular
date & time if needed.
BMERS Installation Instructions
NLM| Disaster Information Management Research Center (DIMRC) 24
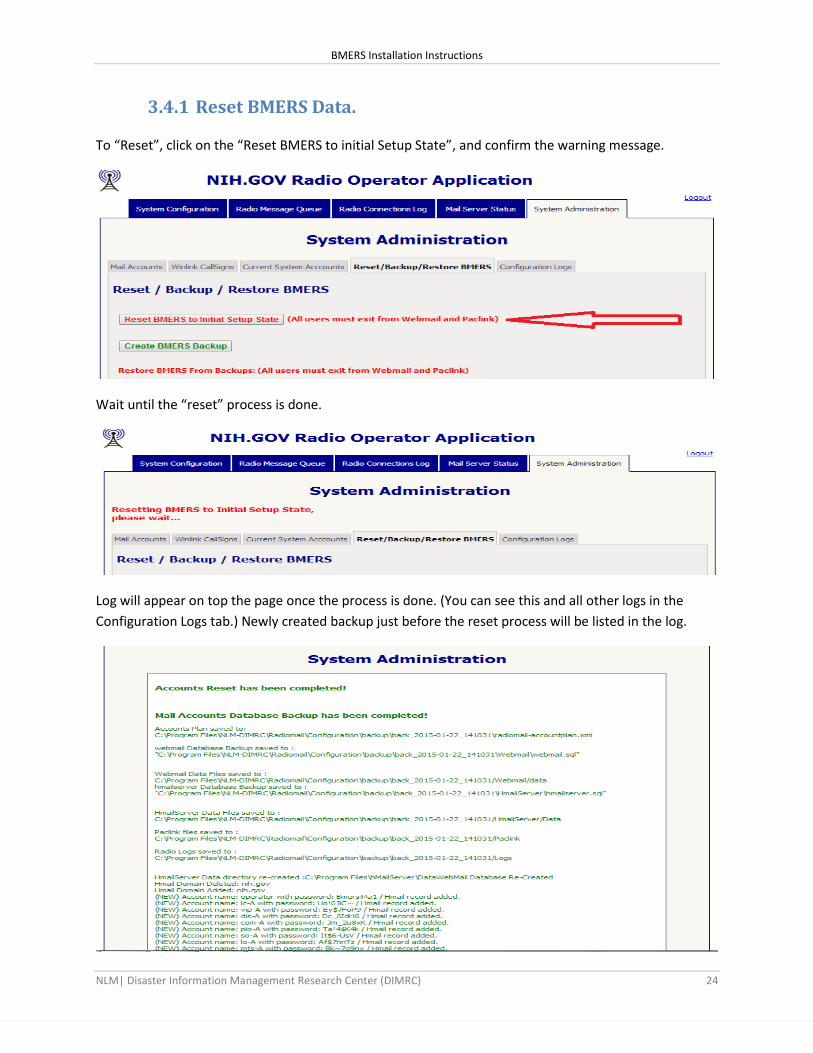
3.4.1 Reset BMERS Data.
To “Reset”, click on the “Reset BMERS to initial Setup State”, and confirm the warning message.
Wait until the “reset” process is done.
Log will appear on top the page once the process is done. (You can see this and all other logs in the
Configuration Logs tab.) Newly created backup just before the reset process will be listed in the log.

BMERS Installation Instructions
NLM| Disaster Information Management Research Center (DIMRC) 25
3.4.3 Backup BMERS Data.
Even though BMERS create a backup before each reset & restore, you may want to create a backup of
the BMERS systems at mission critical time frames.
Simply click on the Backup button to create a new backup.
Log will appear on top the page once the process is done. (You can see this and all other logs in the
Configuration Logs tab.)

BMERS Installation Instructions
NLM| Disaster Information Management Research Center (DIMRC) 26
3.4.4 Restore BMERS Data from Backup Files.
You can restore (or revert) to any previously created BMERS Backup.
Simply select a desired date & time of the backup, click on the restore button, and confirm the warning
message.
Log will appear on top the page once the process is done. (You can see this and all other logs in the
Configuration Logs tab.)

BMERS Installation Instructions
NLM| Disaster Information Management Research Center (DIMRC) 27
3.4.5 Configuration Logs.
Every Admin (Configuration) process will create logs and these logs can be accessed from “Configuration
Logs” tab under Admin page. Log records are stored in descending chronological order.

BMERS Installation Instructions
NLM| Disaster Information Management Research Center (DIMRC) 28
4.0 Select Default Call-Sign from the Configuration
Before the BMERS system can be used, default call-sign must be selected from the Configuration
page. This process also applies to changing of call-signs.
1-Click on the change button.
.
2- Click on Select for the desired call-sign.
3-Click on “Show Radio as on”
Finished:
.

BMERS Installation Instructions
NLM| Disaster Information Management Research Center (DIMRC) 29
5.0 Initialize and Test Paclink and/or RMS Express.
Starting with BMERS version 6.0.2 RMS Express is also supported.
In order to use RMS Express with BMERS, RMS Express MUST be installed into its default installation
directory of C:\RMS Express, and configured for each call sign.
NOTE: RMS Express help and download available from: http://www.winlink.org/RMSExpress
Since both RMS Express and Paclink will be using same ports for SMTP (9025) and POP3 (9110), only one
of them can be active at any given time.
NOTE: Paclink Help file is available in: C:\Program Files (x86)\NLM-DIMRC\Radiomail\PacLink\Help
directory.
5.1 Run Paclink as Administrator from BMERS program group.
Window XP:
The following window may pop up. Allow Paclink to connect to the Internet by
clicking on the “Unblock” button.
5.2 Update Channel list and create your TNC Channels as explained in Paclink Help File.
5.3 (Optional) Disable the Paclink firewall rule (Windows XP):
5.3.1 Open the Windows Firewall panel (Start > Control Panel > Windows Firewall).
5.3.2 Go to the Exceptions tab and find Paclink
5.3.3 Uncheck Paclink and click OK.

BMERS Installation Instructions
NLM| Disaster Information Management Research Center (DIMRC) 30
NOTE: If you want to test the system without an actual radio, you could re-enable this firewall rule,
in order to allow Paclink to exchange messages with the Winlink2000 server via the Internet.
5.4 Configure Additional Call Sign accounts
When you change the station call sign all components of the BMERS Radiomail system must be properly configured to reflect that change. The Radiomail Operator application provides you with the ability to use a single PacLink instance to support several call signs and takes care of all of the related housekeeping tasks in the background. Note that when you change call signs using the Operator application, the current PacLink configuration is saved in <PACLINK_HOME>\PacLink-
<callsign>.ini.
Start the BMERS Radiomail Operator application by opening http://localhost/operator in your browser. Enter the password for the radiomail manager role (default username: operator) and click the ‘Login’ button. Upon successful login you will be presented with the System Configuration page. Notice that the currently configured call sign is displayed below an icon that indicates whether the call sign is for a MARS account or a HAM account.

BMERS Installation Instructions
NLM| Disaster Information Management Research Center (DIMRC) 31
To switch to a different call sign: 5.4.1 Stop PacLink if you have not already done so. If PacLink is not stopped the application will issue
an error message in the next step.
5.4.2 Click on the ‘Change’ button located below the call sign. You will be presented with a list of the call signs defined in your account plan.
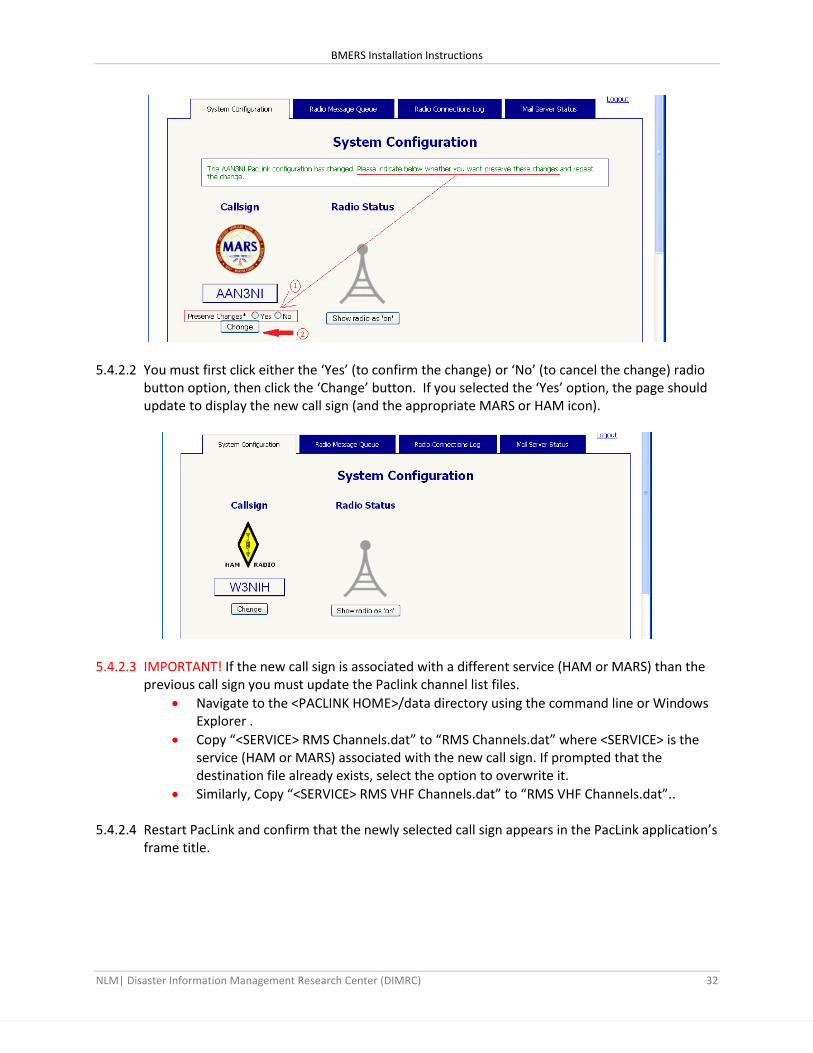
5.4.2.1 Click on ‘Select’ in the Actions column for the new call sign after noting which call sign you are
choosing. The page will display a message and a confirmation control, but the original call sign will still be displayed.
BMERS Installation Instructions
NLM| Disaster Information Management Research Center (DIMRC) 32
5.4.2.2 You must first click either the ‘Yes’ (to confirm the change) or ‘No’ (to cancel the change) radio
button option, then click the ‘Change’ button. If you selected the ‘Yes’ option, the page should update to display the new call sign (and the appropriate MARS or HAM icon).
5.4.2.3 IMPORTANT! If the new call sign is associated with a different service (HAM or MARS) than the
previous call sign you must update the Paclink channel list files.
Navigate to the <PACLINK HOME>/data directory using the command line or Windows Explorer .
Copy “<SERVICE> RMS Channels.dat” to “RMS Channels.dat” where <SERVICE> is the service (HAM or MARS) associated with the new call sign. If prompted that the destination file already exists, select the option to overwrite it.
Similarly, Copy “<SERVICE> RMS VHF Channels.dat” to “RMS VHF Channels.dat”..
5.4.2.4 Restart PacLink and confirm that the newly selected call sign appears in the PacLink application’s frame title.

BMERS Installation Instructions
NLM| Disaster Information Management Research Center (DIMRC) 33
6.0 Test the System
6.1 Verify the operator application.
6.1.1 Log in as operator (point your web browser to http://localhost/operator) using the user
id operator and the password you have chosen for the operator application (VALUE<
radiomail-manager.password>).
6.1.1 Click on the “Radio Message Queue” tab and verify that no messages are shown.
6.1.2 Click on the “Mail Server Status” tab and verify that no messages are shown.
6.1.3 Click “Deliver Now” and verify that a message “Message delivery is in progress” is
shown (may take a minute or so), and verify no messages are shown.
6.2 Verify that the Chat function is working .
6.2.1 Log in as using an account from your account plan (http://localhost/webmailphp).
6.2.2 Click on the button-link near the top of the screen with the text ‘Chat’.
6.2.3 You should see a chat login dialog.
6.2.4 Login with your BMERS username & password.

BMERS Installation Instructions
NLM| Disaster Information Management Research Center (DIMRC) 34
6.2.5 You should see a chat dialog with public & private chat channels.
6.2.6 You can test the chat feature by logging in from a remote computer with a different user
name.
6.2.7 Close the dialog.
6.3 Verify you can send regular email messages internally in your network.
6.3.1 Log in as using an account from your account plan (http://localhost/webmailphp).
6.3.2 Send one or more messages to one or more other accounts from your account plan, by
clicking on “New Message” and sending a message to one of the contacts.
6.3.3 Verify receipt by logging in under the other accounts and checking their “Inbox”.
6.3.4 Send replies.
6.4 Verify you can send text messages internally.
6.4.1 Log in as using an account from your account plan (http://localhost/webmailphp).
6.4.2 Send one or more text messages to other accounts from your account plan by clicking
on “New Text”.
6.4.3 Verify the text message that appears in the “Sent Items” folder.
6.4.4 Verify receipt by logging in under the other accounts and checking their “Inbox”.
6.5 Verify you can send text messages to external addresses.
6.5.1 Log in as using an account from your account plan (http://localhost/webmailphp).
6.5.2 Stop Paclink (if running).
6.5.3 Send one or more text messages to an external email address (that you have access to)
by clicking on “New Text”.
6.5.4 Log in as operator (http://localhost/operator) using operator/<The password you have
chosen (VALUE< radiomail-manager.password>).
6.5.5 Click on the “Radio Message Queue” tab and verify no messages are shown.
6.5.6 Start Paclink and wait until it states “Paclink ready”.
6.5.7 Click on the “Mail Server Status” tab and verify your text message is listed.
6.5.8 Click “Deliver Now” and verify a message. “Message delivery is in progress” is shown
(may take a minute or so). Now no messages should be listed.
6.5.9 Click on the “Radio Message Queue” tab and verify your text message is now listed.
6.5.10 Your message should also be listed in the Paclink SMTP/POP session activity window
(RHS) as SMTP link from <your MARS callsign>.
6.5.11 Find a radio connection (or use the Internet telnet channel) and perform Connect.
6.5.12 Verify your message was sent: The Paclink session statistics should NOT state 0/0
message bytes sent (but the number of bytes sent).
6.5.13 Verify that you received the message.
6.6 Verify you can receive text messages from external addresses (assumes step 10.5 has been
performed).

BMERS Installation Instructions
NLM| Disaster Information Management Research Center (DIMRC) 35
6.6.1 Send a reply (following the instructions in the message).
6.6.2 Find a radio connection (or use the Internet telnet channel) and perform Connect .
6.6.3 Verify your message was sent: The Paclink session statistics should NOT state 0/0
message bytes received (but the number of bytes sent).
6.6.4 Wait until hMailServer retrieves the newly received message (a few minutes): Your
message should be listed in the Paclink SMTP/POP session activity window (RHS) as <ID>
delivered to <your MARS callsign>.
6.6.5 Log in as using the sending account from your account plan
(http://localhost/webmailphp) to verify that you received the reply (you may need to
click “Check Mail”).

BMERS Installation Instructions
NLM| Disaster Information Management Research Center (DIMRC) 36
Troubleshooting
1. Problem: Paclink does not accept messages from hMailServer:
File C:\Program Files\hMailServer\logs\hmailserver_events.log
shows the error message:
[OnEmailFromPaclink]: Body does not contain destination
address. (From: )
No or invalid authentication information (either for SMTP relay or POP retrieval).
Possible solutions:
POP: Verify the password information in the hMailServer external account settings of the
gateway account.
SMPT: Verify the SMPT account settings , especially the password (must match the value
specified in the Paclink.ini file).
2. Problem: Paclink receives message from winlink.org, but message never materializes.
No account directory for gateway account.
Possible solution: Verify directory “C:\Paclink\Accounts\BHEPP-0GTW_Account”
exists.
3. Problem: Paclink fails to change radio frequency when a channel is selected.
No connection to radio modem or incorrect COM port specified.
Possible solution: Use Windows Device Manage to verify that the SCS PTCusb modem appears
on the COM port that you configured.
Incorrect or incomplete channel configuration.
Possible solution: Open the PacLink.ini file in <PACLINK_HOME>\Bin. Verify that both the “TNC
Serial Port” and “Radio Control Port” properties are set to the COM port value you configured,
that the “Radio Control” property is set to “Via PTCII”(if that is your modem) and that the “Radio
Model” property corresponds with your station’s radio.
4. Problem: Webmail: When sending an email, an error message with the text “Can’t send
message. [RCV] 550 A valid address is required.” appears.
A recipient email address was invalid.
Possible solution: Change the email address to a valid email address.

BMERS Installation Instructions
NLM| Disaster Information Management Research Center (DIMRC) 37
5. Problem: Webmail: When sending an email, an error message with the text “Can’t send
message. Can’t connect to SMTP server. Check SMTP settings.”
appears.
Possible solutions:
The mail server is not running: Check that hMailServer is running.
The user account is configured incorrectly.
6. Problem: Webmail: Mail is sent with, but not in Radio Queue.
Possible solutions:
In order to send mail via Radio, either Paclink or RMSExpress needs to be used.
Since both RMS Express and Paclink will be using same ports for SMTP (9025) and POP3 (9110),
only one of them can be active at any given time.
And since RMSExpress is not a server software, BMERS Mail Relay Service must be running
when RMSExpress is the chosen radio software to deliver & receive message from BMERS.
Check your Mail Server Status, Message Queue or Radio Connections Log pages. If you see
following message, proceed to #1 & #2 for solutions.

BMERS Installation Instructions
NLM| Disaster Information Management Research Center (DIMRC) 38
1-If your chosen radio software is RMSExpress: (Default configuration)
a- Open Control Panel->Administrative tools->Services and make sure that BMERS Mail
Relay service is running.
b- If BMERS Mail Relay Service doesn’t start, please see Application Event Logs from
Windows Event Viewer for specific error messages. (Paclink must NOT be running
for BMERS Mail Relay service to start.
c- Make Sure RMSExpress is installed in the default location C:\RMS Express and
configured.
Once you are done, you can verify from BMERS Operator. If BMERS Mail Relay Service is
running, following page will display (RMS Express) as the Radio Software.
If you get the following message, you need to complete your transmissions in RMS
Express, and exit. BMERS Mail Relay Service will not deliver messages to RMS Express
while RMS Express is running.

BMERS Installation Instructions
NLM| Disaster Information Management Research Center (DIMRC) 39
2-If your chosen radio software is Paclink:
a- Make sure the Paclink is running and configured.
Once you are done, you can verify from BMERS Operator. If Paclink is running,
following page will display (Paclink) as the Radio Software.
7. Problem: Webmail: Poor performance, it takes long time for mails to appear in the RMS Express
queue, and/or it takes long time to see radio status page.
Possible solutions: Since BMERS Mail Relay is not deleting any records from RMS Express
Registry.txt, and none of the messages, Operator should perform cleanup of emails in al folders
in RMS Express time to time to prevent performance deterioration.

BMERS Installation Instructions
NLM| Disaster Information Management Research Center (DIMRC) 40
Appendix A: Configuration Properties
Note that the configuration file follows the Java properties file format. The file also contains
commented out configuration options (lines starting with the # character) for options for which
the default will be used. These values can be changed. For a new value to be used, remove the
comment character (#) from the beginning of the line. Instructions on how to make changes are
at the top of the file.
The following properties can be specified in the file. For each property, it is indicated whether the
property value must be given (R = required), or can be overridden (M = modifiy), while running the
prepare.cmd script .
The environment variable %ProgramFiles% will be used to determine the various directories. Please
note that on 64-bit systems, %ProgramFiles% typically resolves to “C:\Program Files (x86)”,
whereas on 32-bit systems it resolves tp “C:\Program Files ”.
Property Default Value Prepare Description
MySQL properties mysql.root.password R Password of the MySQL root
user.
mysql.path C:\xampp\mysql M Path to MySQL installation directory.
mysql.service.name mysql M Name of Windows MySQL service.
Apache properties apache.htdocs %ProgramFiles%\NLM-
DIMRC\ Radiomail\apache\htdocs
accountplan.domain R Denotes the internal domain name. This value will be used to populate the account plane template.
hMailServer properties hmail.admin.user Administrator M Name of the hmailServer
administrator user account.
hmail.admin. password
R Password of the hmailServer administrator user account.

BMERS Installation Instructions
NLM| Disaster Information Management Research Center (DIMRC) 41
Property Default Value Prepare Description
hmail.database. schema
Hmailserver M Name of the hmailServer MySQL database.
hmail.database.user Hmailserver M Name of the hmailServer MySQL user account.
hmail.database. password
R Password of the hmailServer. MySQL user account.
hmail.path %ProgramFiles%\hMailServer
M Directory where hMail is installed.
hmail.service.name hMailServer M Name of the Windows hMailServer service.
hmail.text. maxBodylength
600 Maximum body length of radiomail text messages. Limits the size of text messages that can be sent via radio (by non-privileged users).
hmail.text. maxSubjectlength
60 Maximum subject length of radiomail text messages. Limits the size of text messages that can be sent via radio (by non-privileged users).
hmail.instructions. mars
<-- TO REPLY, KEEP THIS ADDRESS IN FIRST LINE OF YOUR REPLY AND INSERT '//MARS R/' IN SUBJECT LINE. KEEP REPLY UNDER 500 CHARACTERS.)
Instructions for recipients of radio messages (to comply with WinLink 200 rules) that are inserted into each text message when using a MARS callsign.
hmail.instructions. ham
INSERT '//WL2K/' IN SUBJECT LINE. KEEP REPLY UNDER 500 CHARACTERS.)
Instructions for recipients of radio messages (to comply with WinLink 200 rules) that are inserted into each text message when using a ham radio callsign.
hmail.localhost Localhost Name of the host that HMail is installed on.
hmail.SMTP.retry. number
288 (Integer) number indicating the number of retries for delivering email (to Paclink).
hmail.SMTP.retry. interval
5 (Integer) number indicating the number of minutes in between retries for delivering email (to Paclink).

BMERS Installation Instructions
NLM| Disaster Information Management Research Center (DIMRC) 42
Property Default Value Prepare Description
hmail.paclink.POP. port
9110 Number of Paclink POP ports. Since both hMailServer and Paclink serve as a mailserver, they need to use a different port. Must match paclink.POP.port!
hmail.paclink.SMTP. port
9025 Number of Paclink SMTP ports. Since both hMailServer and Paclink serve as a mailserver, they need to use a different port. Must match paclink.SMTP.port!
Webmail properties webmail.admin. password
R Password of the Webmail administrator account (mailadm) that allows access to the admin web pages of the Webmail application.
webmail.database. schemaName
webmail M Name of MySQL Webmail database schema.
webmail.database. user
webmail M Name of MySQL Webmail user account.
webmail.database. password
R Password of MySQL Webmail user account.
webmail.data.path %ProgramFiles%\NLM-DIMRC\ Radiomail\apache\data
M Location of the Webmail configuration files.
webmail.inbox. refreshRate
120 Number of seconds between automatic refreshing of inbox.
webmail.service. name
Apache2.2 Name of the Windows Apache (Webmail/operator application) service.
webmail.inbox. refreshAtLogin
True Indicates whether the Webmail application should automatically check for new messages at login.
webmail.htdocs.path %ProgramFiles%\NLM-DIMRC\ Radiomail\apache\htdocs\webmailphp
Indicates the location where the Webmail htdocs (PHP scripts) are located.
Paclink properties paclink.path %ProgramFiles%\NLM-
DIMRC\ Radiomail\Paclink Directory where Paclink is
installed.
BMERS Installation Instructions
NLM| Disaster Information Management Research Center (DIMRC) 43
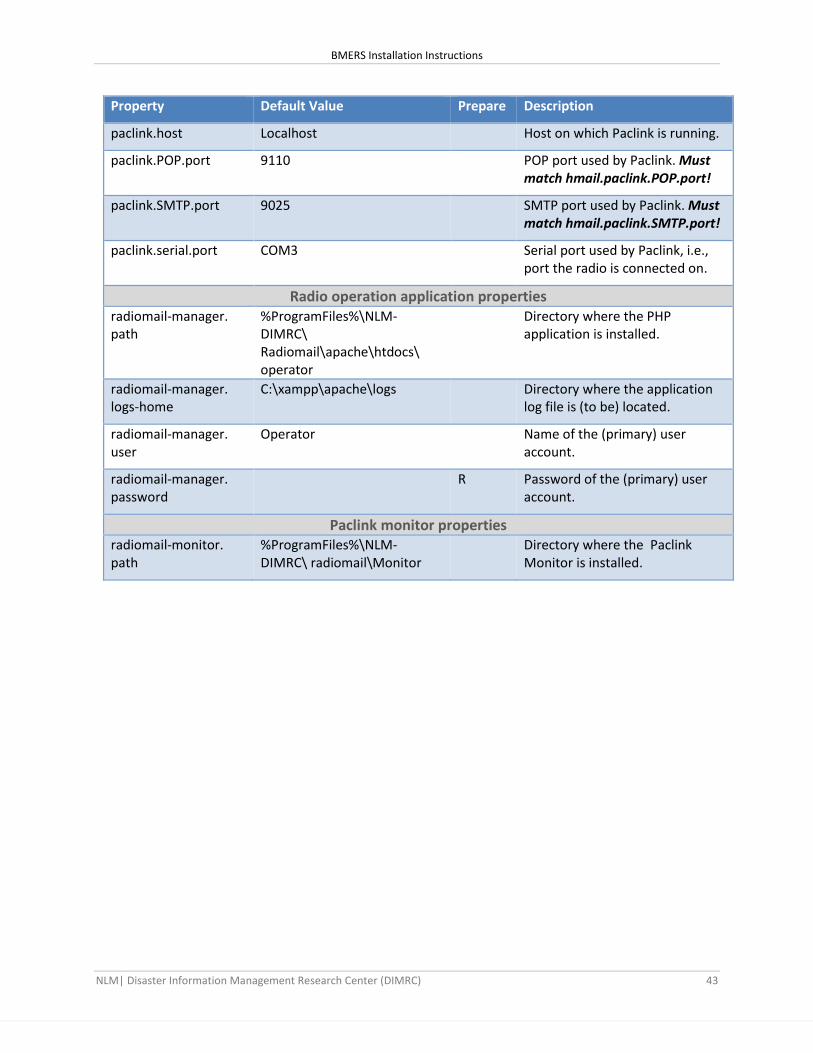
Property Default Value Prepare Description
paclink.host Localhost Host on which Paclink is running.
paclink.POP.port 9110 POP port used by Paclink. Must match hmail.paclink.POP.port!
paclink.SMTP.port 9025 SMTP port used by Paclink. Must match hmail.paclink.SMTP.port!
paclink.serial.port COM3 Serial port used by Paclink, i.e., port the radio is connected on.
Radio operation application properties radiomail-manager. path
%ProgramFiles%\NLM-DIMRC\ Radiomail\apache\htdocs\ operator
Directory where the PHP application is installed.
radiomail-manager. logs-home
C:\xampp\apache\logs
Directory where the application log file is (to be) located.
radiomail-manager. user
Operator Name of the (primary) user account.
radiomail-manager. password
R Password of the (primary) user account.
Paclink monitor properties radiomail-monitor. path
%ProgramFiles%\NLM-DIMRC\ radiomail\Monitor
Directory where the Paclink Monitor is installed.
BMERS Installation Instructions
NLM| Disaster Information Management Research Center (DIMRC) 44
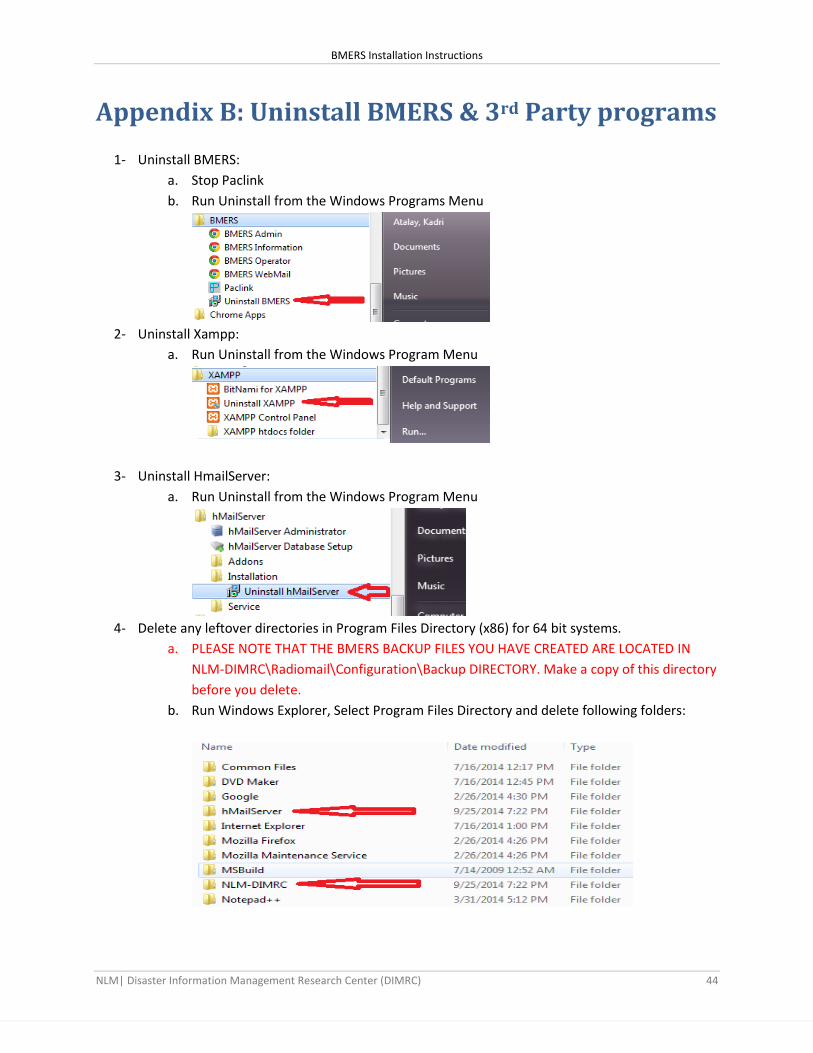
Appendix B: Uninstall BMERS & 3rd Party programs
1- Uninstall BMERS:
a. Stop Paclink
b. Run Uninstall from the Windows Programs Menu
2- Uninstall Xampp:
a. Run Uninstall from the Windows Program Menu
3- Uninstall HmailServer:
a. Run Uninstall from the Windows Program Menu
4- Delete any leftover directories in Program Files Directory (x86) for 64 bit systems.
a. PLEASE NOTE THAT THE BMERS BACKUP FILES YOU HAVE CREATED ARE LOCATED IN
NLM-DIMRC\Radiomail\Configuration\Backup DIRECTORY. Make a copy of this directory
before you delete.
b. Run Windows Explorer, Select Program Files Directory and delete following folders:

BMERS Installation Instructions
NLM| Disaster Information Management Research Center (DIMRC) 45
THIS PAGE INTENTIONALLY LEFT BLANK.