Embed Size (px)
Citation preview
Bochs for Windows
A Quick Start Guide and Tutorial Rev. 1.1
Contents
1. Download the required files
2. Installation of Bochs and the Diskexplorer utility
3. Create floppy, hard disk and CD-ROM image files
4. Make a bootable CD-ROM image or LiveCD
5. Running Bochs
6. Using the Bochs internal debugger
7. Peter-Bochs - a debugger with a GUI
8. The Bochs Enhanced Debugger
Bochs is a C++ program which simulates a complete Intel x86 computer. It emulates not only an Intel processor but also mostPC peripherals such as hard disks, CD-ROM drives, floppy drives, VGA cards etc. Instead of disk devices Bochs uses diskimage files to which you have to copy the program and data files you want to use. Bochs is mainly used for operating system,protected mode application and driver development due to its excellent debugging features.
Most people use Bochs on Windows and this is the platform this guide is written for. It starts with very simply steps for theabsolute beginner but also includes a detailed description how to use the debugging features for protected mode debugging.
1. Download the required files
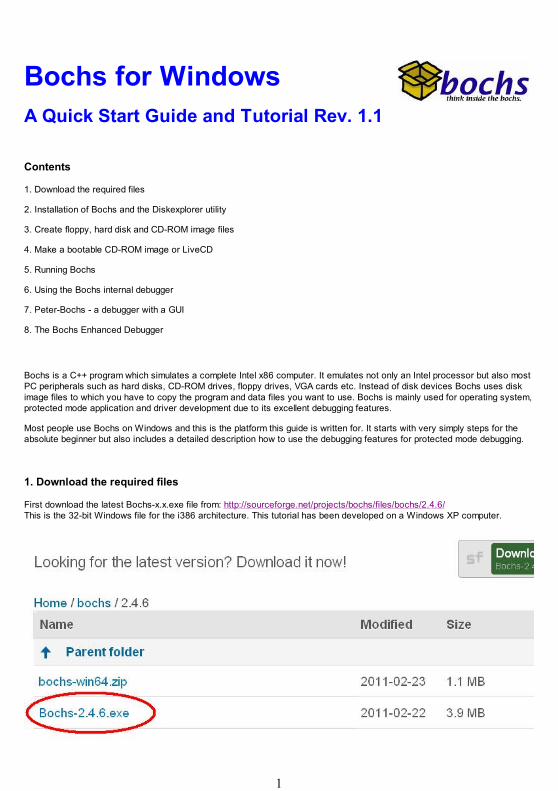
First download the latest Bochs-x.x.exe file from: http://sourceforge.net/projects/bochs/files/bochs/2.4.6/This is the 32-bit Windows file for the i386 architecture. This tutorial has been developed on a Windows XP computer.
1
By the time you read this there may be a newer version than 2.4.6 available.
The bochs-win64.zip file is a version which has been compiled as a native Windows x86-64 application. You can copy thatinto the folder the Bochs-2.3.6.exe file has installed all its files in. On a 64bit PC with Win7 you can run it as a 64bitapplication, select "run as administrator" for that. Also this version requires the BXSHARE environment variable to be set as afull path to this bochs directory. You can set that this way:
Right click on the computer icon on your desktop and choose the properties option. In the next window select advancedsystem settings in the left pane. In the system properties window select the advanced tab and click on environment variables.In the environment variables window enter BXSHARE as a system variable.
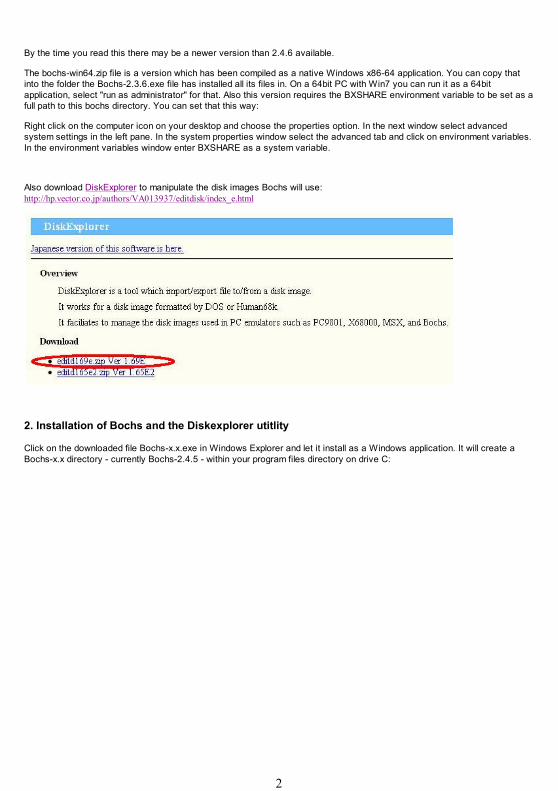
Also download DiskExplorer to manipulate the disk images Bochs will use:http://hp.vector.co.jp/authors/VA013937/editdisk/index_e.html
2. Installation of Bochs and the Diskexplorer utitlity
Click on the downloaded file Bochs-x.x.exe in Windows Explorer and let it install as a Windows application. It will create aBochs-x.x directory - currently Bochs-2.4.5 - within your program files directory on drive C:
2
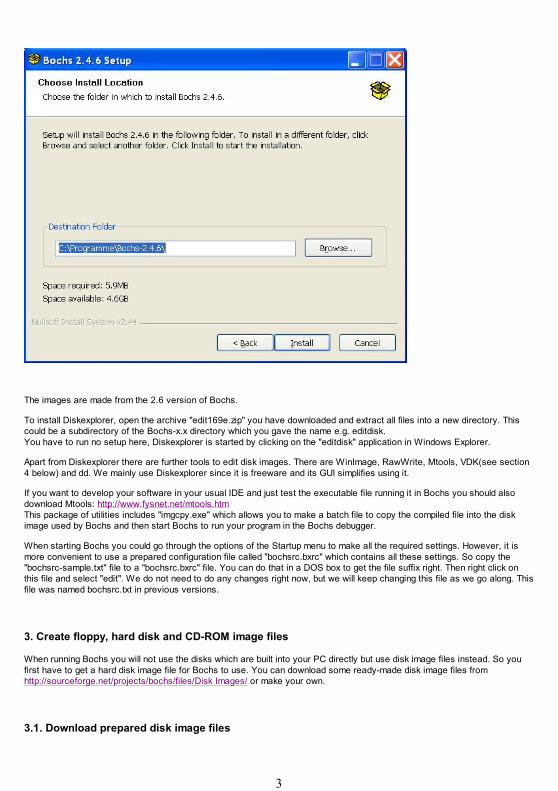
The images are made from the 2.6 version of Bochs.
To install Diskexplorer, open the archive "edit169e.zip" you have downloaded and extract all files into a new directory. Thiscould be a subdirectory of the Bochs-x.x directory which you gave the name e.g. editdisk.You have to run no setup here, Diskexplorer is started by clicking on the "editdisk" application in Windows Explorer.
Apart from Diskexplorer there are further tools to edit disk images. There are WinImage, RawWrite, Mtools, VDK(see section4 below) and dd. We mainly use Diskexplorer since it is freeware and its GUI simplifies using it.
If you want to develop your software in your usual IDE and just test the executable file running it in Bochs you should alsodownload Mtools: http://www.fysnet.net/mtools.htmThis package of utilities includes "imgcpy.exe" which allows you to make a batch file to copy the compiled file into the diskimage used by Bochs and then start Bochs to run your program in the Bochs debugger.
When starting Bochs you could go through the options of the Startup menu to make all the required settings. However, it ismore convenient to use a prepared configuration file called "bochsrc.bxrc" which contains all these settings. So copy the"bochsrc-sample.txt" file to a "bochsrc.bxrc" file. You can do that in a DOS box to get the file suffix right. Then right click onthis file and select "edit". We do not need to do any changes right now, but we will keep changing this file as we go along. Thisfile was named bochsrc.txt in previous versions.
3. Create floppy, hard disk and CD-ROM image files
When running Bochs you will not use the disks which are built into your PC directly but use disk image files instead. So youfirst have to get a hard disk image file for Bochs to use. You can download some ready-made disk image files fromhttp://sourceforge.net/projects/bochs/files/Disk Images/ or make your own.
3.1. Download prepared disk image files
3
If you decide to download e.g. the FreeDOS image, you will receive a 3 MB ZIP file. This contains two floppy disk image filescalled a.img and b.img as well as a hard disk image file called c.img. It also contains a "bochsrc.bxrc" file which is a preparedBochs configuration file so Bochs can use these disk image files. If you extract these files into your Bochs-x.x directory, allyou have to do is start Bochs and select "Start simulation" from the Bochs Start Menu to run FreeDos within Bochs.
3.2. Create new disk image files
Before creating your own disk image file go to the Bochs-x.x directory and copy the bochsrc-sample.txt file to a file namedbochsrc.bxrc to use this as your Bochs configuration file. You will edit this file to your needs later but you should copy it now.Using the bochsrc.bxrc file you configure the hard disk, floppy disk and CD-ROM image files, the boot sequence, the mouse,serial and parallel ports and many other options.
To create your own hard disk image file, click on the BXIMAGE application within the Bochs-x.x directory and run theBXIMAGE program.
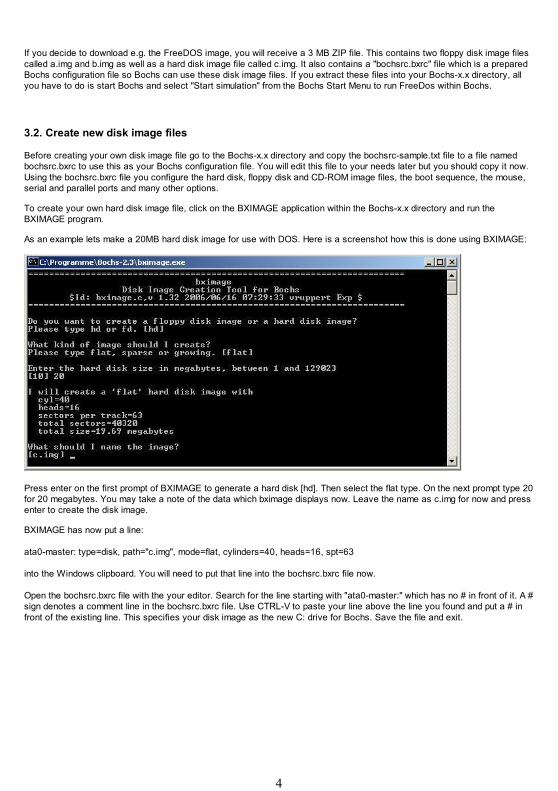
As an example lets make a 20MB hard disk image for use with DOS. Here is a screenshot how this is done using BXIMAGE:
Press enter on the first prompt of BXIMAGE to generate a hard disk [hd]. Then select the flat type. On the next prompt type 20for 20 megabytes. You may take a note of the data which bximage displays now. Leave the name as c.img for now and pressenter to create the disk image.
BXIMAGE has now put a line:
ata0-master: type=disk, path="c.img", mode=flat, cylinders=40, heads=16, spt=63
into the Windows clipboard. You will need to put that line into the bochsrc.bxrc file now.
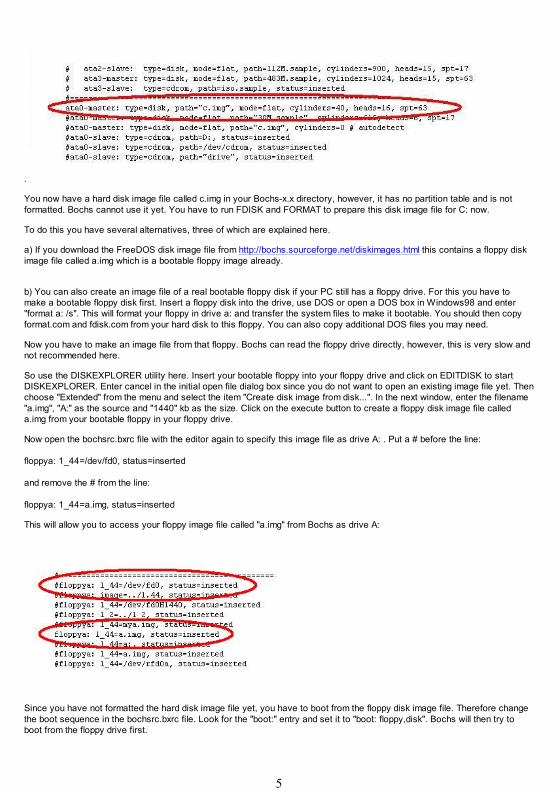
Open the bochsrc.bxrc file with the your editor. Search for the line starting with "ata0-master:" which has no # in front of it. A #sign denotes a comment line in the bochsrc.bxrc file. Use CTRL-V to paste your line above the line you found and put a # infront of the existing line. This specifies your disk image as the new C: drive for Bochs. Save the file and exit.
4
.
You now have a hard disk image file called c.img in your Bochs-x.x directory, however, it has no partition table and is notformatted. Bochs cannot use it yet. You have to run FDISK and FORMAT to prepare this disk image file for C: now.
To do this you have several alternatives, three of which are explained here.
a) If you download the FreeDOS disk image file from http://bochs.sourceforge.net/diskimages.html this contains a floppy diskimage file called a.img which is a bootable floppy image already.
b) You can also create an image file of a real bootable floppy disk if your PC still has a floppy drive. For this you have tomake a bootable floppy disk first. Insert a floppy disk into the drive, use DOS or open a DOS box in Windows98 and enter"format a: /s". This will format your floppy in drive a: and transfer the system files to make it bootable. You should then copyformat.com and fdisk.com from your hard disk to this floppy. You can also copy additional DOS files you may need.
Now you have to make an image file from that floppy. Bochs can read the floppy drive directly, however, this is very slow andnot recommended here.
So use the DISKEXPLORER utility here. Insert your bootable floppy into your floppy drive and click on EDITDISK to startDISKEXPLORER. Enter cancel in the initial open file dialog box since you do not want to open an existing image file yet. Thenchoose "Extended" from the menu and select the item "Create disk image from disk...". In the next window, enter the filename"a.img", "A:" as the source and "1440" kb as the size. Click on the execute button to create a floppy disk image file calleda.img from your bootable floppy in your floppy drive.
Now open the bochsrc.bxrc file with the editor again to specify this image file as drive A: . Put a # before the line:
floppya: 1_44=/dev/fd0, status=inserted
and remove the # from the line:
floppya: 1_44=a.img, status=inserted
This will allow you to access your floppy image file called "a.img" from Bochs as drive A:
Since you have not formatted the hard disk image file yet, you have to boot from the floppy disk image file. Therefore changethe boot sequence in the bochsrc.bxrc file. Look for the "boot:" entry and set it to "boot: floppy,disk". Bochs will then try toboot from the floppy drive first.
5
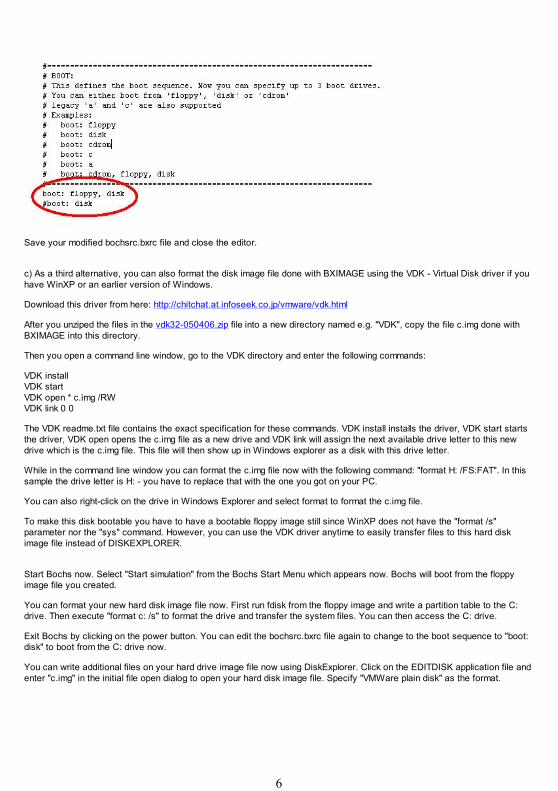
Save your modified bochsrc.bxrc file and close the editor.
c) As a third alternative, you can also format the disk image file done with BXIMAGE using the VDK - Virtual Disk driver if youhave WinXP or an earlier version of Windows.
Download this driver from here: http://chitchat.at.infoseek.co.jp/vmware/vdk.html
After you unziped the files in the vdk32-050406.zip file into a new directory named e.g. "VDK", copy the file c.img done withBXIMAGE into this directory.
Then you open a command line window, go to the VDK directory and enter the following commands:
VDK installVDK startVDK open * c.img /RWVDK link 0 0
The VDK readme.txt file contains the exact specification for these commands. VDK install installs the driver, VDK start startsthe driver, VDK open opens the c.img file as a new drive and VDK link will assign the next available drive letter to this newdrive which is the c.img file. This file will then show up in Windows explorer as a disk with this drive letter.
While in the command line window you can format the c.img file now with the following command: "format H: /FS:FAT". In thissample the drive letter is H: - you have to replace that with the one you got on your PC.
You can also right-click on the drive in Windows Explorer and select format to format the c.img file.
To make this disk bootable you have to have a bootable floppy image still since WinXP does not have the "format /s"parameter nor the "sys" command. However, you can use the VDK driver anytime to easily transfer files to this hard diskimage file instead of DISKEXPLORER.
Start Bochs now. Select "Start simulation" from the Bochs Start Menu which appears now. Bochs will boot from the floppyimage file you created.
You can format your new hard disk image file now. First run fdisk from the floppy image and write a partition table to the C:drive. Then execute "format c: /s" to format the drive and transfer the system files. You can then access the C: drive.
Exit Bochs by clicking on the power button. You can edit the bochsrc.bxrc file again to change to the boot sequence to "boot:disk" to boot from the C: drive now.
You can write additional files on your hard drive image file now using DiskExplorer. Click on the EDITDISK application file andenter "c.img" in the initial file open dialog to open your hard disk image file. Specify "VMWare plain disk" as the format.
6
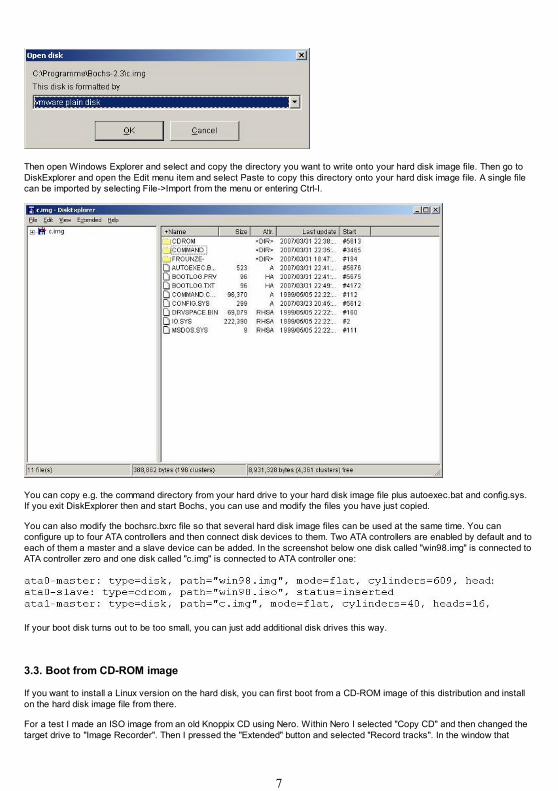
Then open Windows Explorer and select and copy the directory you want to write onto your hard disk image file. Then go toDiskExplorer and open the Edit menu item and select Paste to copy this directory onto your hard disk image file. A single filecan be imported by selecting File->Import from the menu or entering Ctrl-I.
You can copy e.g. the command directory from your hard drive to your hard disk image file plus autoexec.bat and config.sys.If you exit DiskExplorer then and start Bochs, you can use and modify the files you have just copied.
You can also modify the bochsrc.bxrc file so that several hard disk image files can be used at the same time. You canconfigure up to four ATA controllers and then connect disk devices to them. Two ATA controllers are enabled by default and toeach of them a master and a slave device can be added. In the screenshot below one disk called "win98.img" is connected toATA controller zero and one disk called "c.img" is connected to ATA controller one:
If your boot disk turns out to be too small, you can just add additional disk drives this way.
3.3. Boot from CD-ROM image
If you want to install a Linux version on the hard disk, you can first boot from a CD-ROM image of this distribution and installon the hard disk image file from there.
For a test I made an ISO image from an old Knoppix CD using Nero. Within Nero I selected "Copy CD" and then changed thetarget drive to "Image Recorder". Then I pressed the "Extended" button and selected "Record tracks". In the window that
7

opens then I could select to copy the CD track to an ISO file. I specified to save this ISO image in the bochs-x.x. directoryand selected "Knoppix.iso" as the name of the file. Finally I pressed the "Start" button in this window to have Nero copy thedata from the CD to the ISO image file.
Then the bochsrc.bxrc file needs to be modified to include this ISO image file as a CD-ROM drive:
To boot from this ISO image you have to change the boot order in the bochsrc.bxrc file:
Also Linux needs more RAM memory than the default 32 MB so we increase this to 512 MB although 128 MB should besufficient:
When you boot Bochs now, it will load Knoppix. However you will need to wait a lot of minutes for that! Here is a screenshot
8
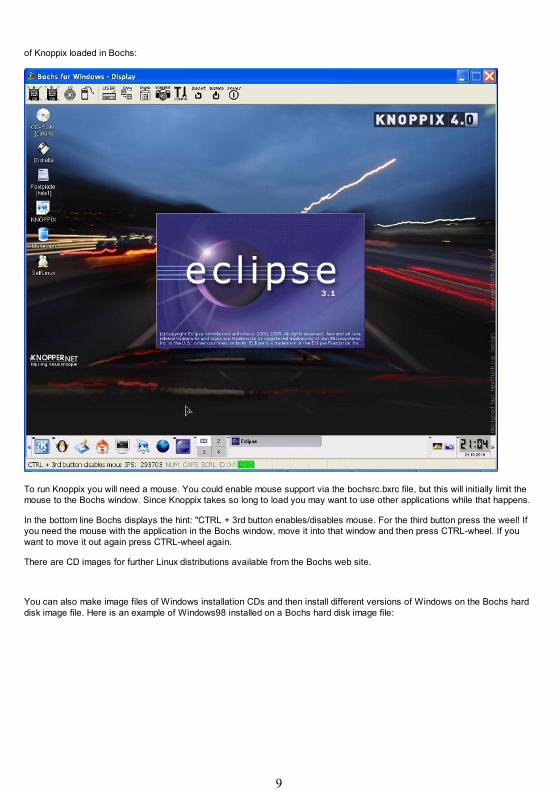
of Knoppix loaded in Bochs:
To run Knoppix you will need a mouse. You could enable mouse support via the bochsrc.bxrc file, but this will initially limit themouse to the Bochs window. Since Knoppix takes so long to load you may want to use other applications while that happens.
In the bottom line Bochs displays the hint: "CTRL + 3rd button enables/disables mouse. For the third button press the weel! Ifyou need the mouse with the application in the Bochs window, move it into that window and then press CTRL-wheel. If youwant to move it out again press CTRL-wheel again.
There are CD images for further Linux distributions available from the Bochs web site.
You can also make image files of Windows installation CDs and then install different versions of Windows on the Bochs harddisk image file. Here is an example of Windows98 installed on a Bochs hard disk image file:
9
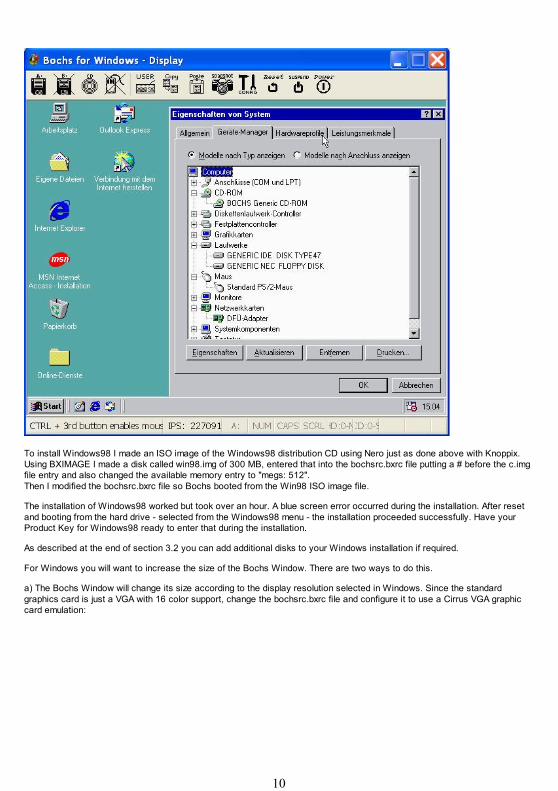
To install Windows98 I made an ISO image of the Windows98 distribution CD using Nero just as done above with Knoppix.Using BXIMAGE I made a disk called win98.img of 300 MB, entered that into the bochsrc.bxrc file putting a # before the c.imgfile entry and also changed the available memory entry to "megs: 512".Then I modified the bochsrc.bxrc file so Bochs booted from the Win98 ISO image file.
The installation of Windows98 worked but took over an hour. A blue screen error occurred during the installation. After resetand booting from the hard drive - selected from the Windows98 menu - the installation proceeded successfully. Have yourProduct Key for Windows98 ready to enter that during the installation.
As described at the end of section 3.2 you can add additional disks to your Windows installation if required.
For Windows you will want to increase the size of the Bochs Window. There are two ways to do this.
a) The Bochs Window will change its size according to the display resolution selected in Windows. Since the standardgraphics card is just a VGA with 16 color support, change the bochsrc.bxrc file and configure it to use a Cirrus VGA graphiccard emulation:
10
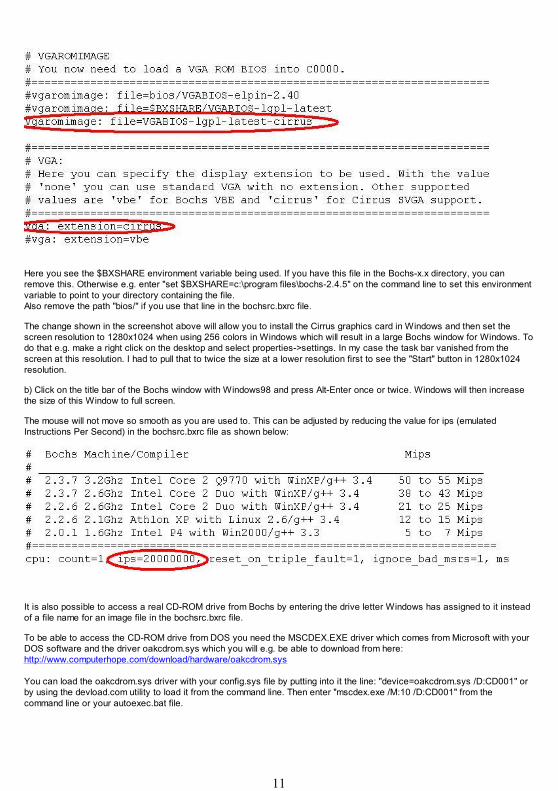
Here you see the $BXSHARE environment variable being used. If you have this file in the Bochs-x.x directory, you canremove this. Otherwise e.g. enter "set $BXSHARE=c:\program files\bochs-2.4.5" on the command line to set this environmentvariable to point to your directory containing the file.Also remove the path "bios/" if you use that line in the bochsrc.bxrc file.
The change shown in the screenshot above will allow you to install the Cirrus graphics card in Windows and then set thescreen resolution to 1280x1024 when using 256 colors in Windows which will result in a large Bochs window for Windows. Todo that e.g. make a right click on the desktop and select properties->settings. In my case the task bar vanished from thescreen at this resolution. I had to pull that to twice the size at a lower resolution first to see the "Start" button in 1280x1024resolution.
b) Click on the title bar of the Bochs window with Windows98 and press Alt-Enter once or twice. Windows will then increasethe size of this Window to full screen.
The mouse will not move so smooth as you are used to. This can be adjusted by reducing the value for ips (emulatedInstructions Per Second) in the bochsrc.bxrc file as shown below:
It is also possible to access a real CD-ROM drive from Bochs by entering the drive letter Windows has assigned to it insteadof a file name for an image file in the bochsrc.bxrc file.
To be able to access the CD-ROM drive from DOS you need the MSCDEX.EXE driver which comes from Microsoft with yourDOS software and the driver oakcdrom.sys which you will e.g. be able to download from here:http://www.computerhope.com/download/hardware/oakcdrom.sys
You can load the oakcdrom.sys driver with your config.sys file by putting into it the line: "device=oakcdrom.sys /D:CD001" orby using the devload.com utility to load it from the command line. Then enter "mscdex.exe /M:10 /D:CD001" from thecommand line or your autoexec.bat file.
11
4. Make a bootable CD-ROM image or LiveCD
Most users have Windows installed on their PC and the hard disk is formatted as one big NTFS partiton. If you havedeveloped a new operating system or an application based on a different operating system most users will not be able to testthat on their PC. A LiveCD will overcome this problem. The user will just boot their PC with the CD inserted and run theoperating system or application without any installation required.
If you have installed a bootable operating system on your c.img file, you can make a bootable CD-ROM or LiveCD from it.This is not easy though and usually requires some time till you get it to work.
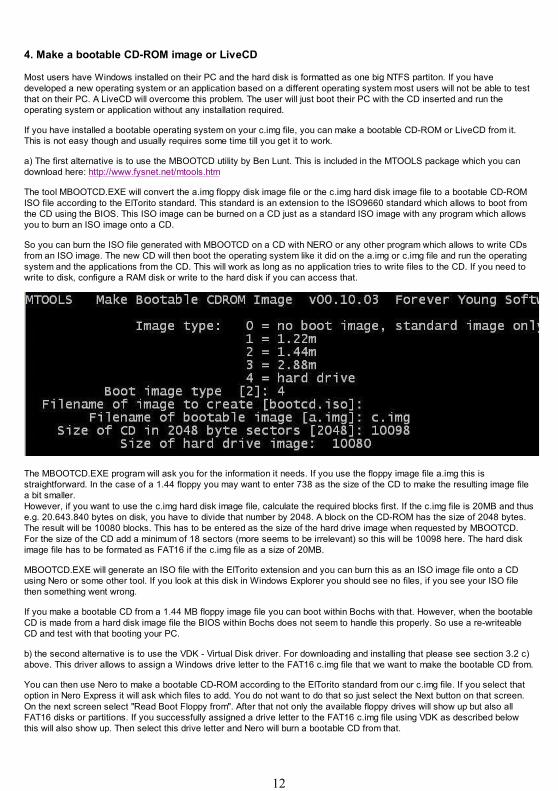
a) The first alternative is to use the MBOOTCD utility by Ben Lunt. This is included in the MTOOLS package which you candownload here: http://www.fysnet.net/mtools.htm
The tool MBOOTCD.EXE will convert the a.img floppy disk image file or the c.img hard disk image file to a bootable CD-ROMISO file according to the ElTorito standard. This standard is an extension to the ISO9660 standard which allows to boot fromthe CD using the BIOS. This ISO image can be burned on a CD just as a standard ISO image with any program which allowsyou to burn an ISO image onto a CD.
So you can burn the ISO file generated with MBOOTCD on a CD with NERO or any other program which allows to write CDsfrom an ISO image. The new CD will then boot the operating system like it did on the a.img or c.img file and run the operatingsystem and the applications from the CD. This will work as long as no application tries to write files to the CD. If you need towrite to disk, configure a RAM disk or write to the hard disk if you can access that.
The MBOOTCD.EXE program will ask you for the information it needs. If you use the floppy image file a.img this isstraightforward. In the case of a 1.44 floppy you may want to enter 738 as the size of the CD to make the resulting image filea bit smaller.However, if you want to use the c.img hard disk image file, calculate the required blocks first. If the c.img file is 20MB and thuse.g. 20.643.840 bytes on disk, you have to divide that number by 2048. A block on the CD-ROM has the size of 2048 bytes.The result will be 10080 blocks. This has to be entered as the size of the hard drive image when requested by MBOOTCD.For the size of the CD add a minimum of 18 sectors (more seems to be irrelevant) so this will be 10098 here. The hard diskimage file has to be formated as FAT16 if the c.img file as a size of 20MB.
MBOOTCD.EXE will generate an ISO file with the ElTorito extension and you can burn this as an ISO image file onto a CDusing Nero or some other tool. If you look at this disk in Windows Explorer you should see no files, if you see your ISO filethen something went wrong.
If you make a bootable CD from a 1.44 MB floppy image file you can boot within Bochs with that. However, when the bootableCD is made from a hard disk image file the BIOS within Bochs does not seem to handle this properly. So use a re-writeableCD and test with that booting your PC.
b) the second alternative is to use the VDK - Virtual Disk driver. For downloading and installing that please see section 3.2 c)above. This driver allows to assign a Windows drive letter to the FAT16 c.img file that we want to make the bootable CD from.
You can then use Nero to make a bootable CD-ROM according to the ElTorito standard from our c.img file. If you select thatoption in Nero Express it will ask which files to add. You do not want to do that so just select the Next button on that screen.On the next screen select "Read Boot Floppy from". After that not only the available floppy drives will show up but also allFAT16 disks or partitions. If you successfully assigned a drive letter to the FAT16 c.img file using VDK as described belowthis will also show up. Then select this drive letter and Nero will burn a bootable CD from that.
12
To use VDK to assign a Windows drive letter to the c.img file enter the following commands assuming "Y" is an unused driveletter you can use:
VDK installVDK startVDK open * c.img /RW /L:Y
(VDK open,blank,asterisk,blank,c.img)
vdk will show a partition table of the hard disk image file now and the partition it assigned the drive letter "Y" to. Please makea note of the partition number this drive letter is assigned to. If the partition number is e.g. 1 then enter now:
VDK link 0 1 Y
Then go into Windows Explorer and see if the drive letter "Y" has been successfully assigned and after a right-click on thisdrive letter the properties window shows that the drive has the FAT format.
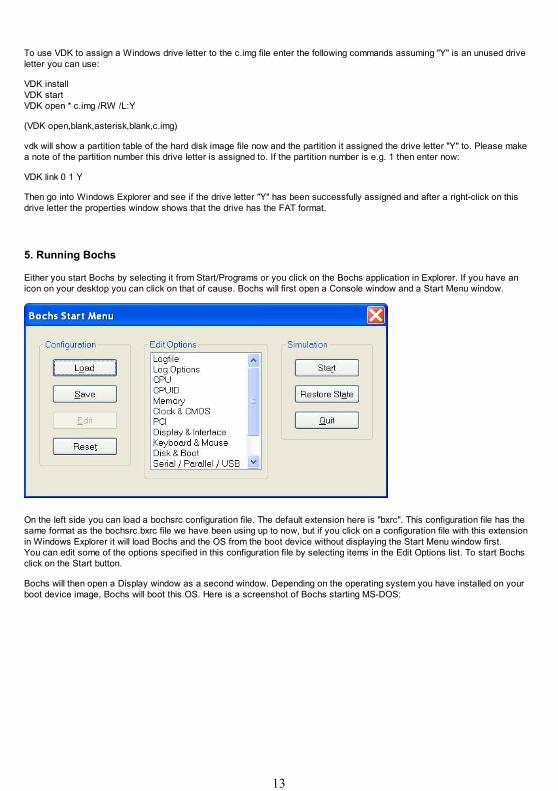
5. Running Bochs
Either you start Bochs by selecting it from Start/Programs or you click on the Bochs application in Explorer. If you have anicon on your desktop you can click on that of cause. Bochs will first open a Console window and a Start Menu window.
On the left side you can load a bochsrc configuration file. The default extension here is "bxrc". This configuration file has thesame format as the bochsrc.bxrc file we have been using up to now, but if you click on a configuration file with this extensionin Windows Explorer it will load Bochs and the OS from the boot device without displaying the Start Menu window first.You can edit some of the options specified in this configuration file by selecting items in the Edit Options list. To start Bochsclick on the Start button.
Bochs will then open a Display window as a second window. Depending on the operating system you have installed on yourboot device image, Bochs will boot this OS. Here is a screenshot of Bochs starting MS-DOS:
13
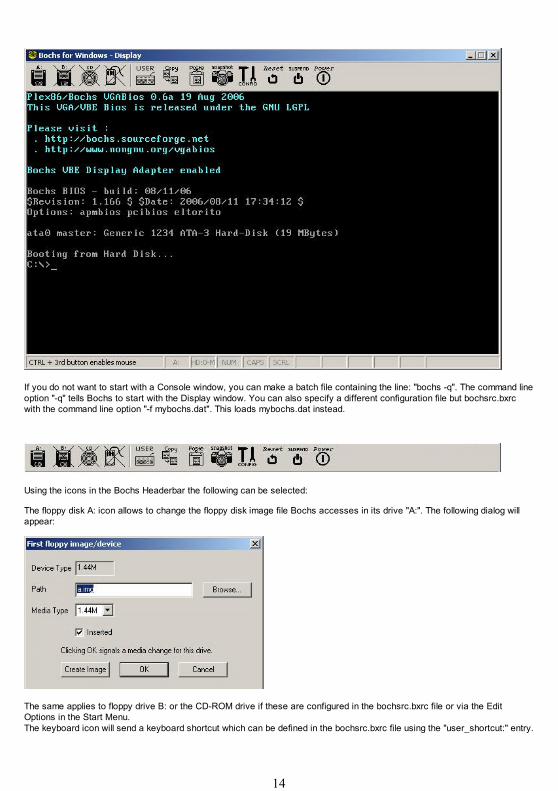
If you do not want to start with a Console window, you can make a batch file containing the line: "bochs -q". The command lineoption "-q" tells Bochs to start with the Display window. You can also specify a different configuration file but bochsrc.bxrcwith the command line option "-f mybochs.dat". This loads mybochs.dat instead.
Using the icons in the Bochs Headerbar the following can be selected:
The floppy disk A: icon allows to change the floppy disk image file Bochs accesses in its drive "A:". The following dialog willappear:
The same applies to floppy drive B: or the CD-ROM drive if these are configured in the bochsrc.bxrc file or via the EditOptions in the Start Menu.The keyboard icon will send a keyboard shortcut which can be defined in the bochsrc.bxrc file using the "user_shortcut:" entry.
14
After clicking on this icon, a small window will appear which allows to edit the shortcut before it is send.The copy icon will paste the text on the screen into the Windows clipboard while the snapshot icon allows to copy it to a textfile.The paste icon will paste the text in the Windows clipboard as simulated keystrokes into the current Bochs window. Keyboardmapping has to be enabled for this by defining a keymap file from e.g. the keymaps directory in the bochsrc.bxrc file.The reset icon allows to perform a reset of the simulation while the power icon will stop the simulation and terminate Bochs.The suspend icon allows to save current simulation state to a disk. You can retrieve that by clicking on the "Restore State"button in the Start Menu when you load Bochs again.
Since Bochs is an Emulator, programs will not run as fast as they do outside of Bochs.
6. Using the Bochs internal debugger
Bochs features an internal debugger, which is useful for operating system and protected mode development.
A common sample I found in the Internet is debugging a boot loader. To run this sample first click on the bochsdbg applicationfile in the Bochs-x.x directory. This will open two windows: the display window plus a console window which provides debuginformation and allows to enter commands at the prompt: <bochs:x>
We know that the BIOS will load the MBR of the boot disk to the address 0x7C00 in memory and jump to that location inmemory to continue execution there. The MBR of a disk formated with DOS begins with a jump instruction, hex EB xx 90 orhex E9 xx xx. So set a breakpoint at this address using the following command: "lb 0x7C00". "0x" specifies a hexadecimalvalue. "lb" stands for "Set a linear address instruction breakpoint". Bochs will stop as soon as CS:IP points to address0x7C00. You can also use a segment:offset pair address with the "vb" command. "vb" stands for "Set a virtual addressinstruction breakpoint". In this case you would enter the command: "vb 0x0000:0x7C00".
After setting this breakpoint enter "c" for continue. Bochs will start and stop at 0x7C00. It shows that it finds the instruction EB(jump near) at that point.
15
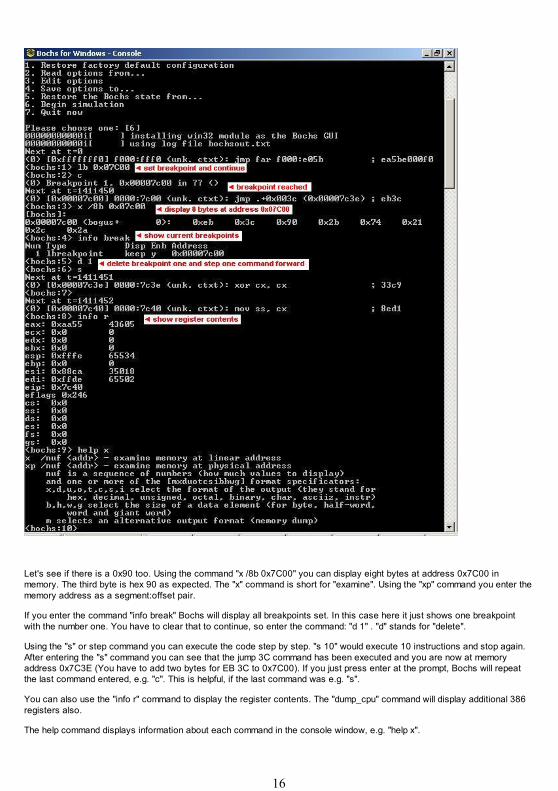
Let's see if there is a 0x90 too. Using the command "x /8b 0x7C00" you can display eight bytes at address 0x7C00 inmemory. The third byte is hex 90 as expected. The "x" command is short for "examine". Using the "xp" command you enter thememory address as a segment:offset pair.
If you enter the command "info break" Bochs will display all breakpoints set. In this case here it just shows one breakpointwith the number one. You have to clear that to continue, so enter the command: "d 1" . "d" stands for "delete".
Using the "s" or step command you can execute the code step by step. "s 10" would execute 10 instructions and stop again.After entering the "s" command you can see that the jump 3C command has been executed and you are now at memoryaddress 0x7C3E (You have to add two bytes for EB 3C to 0x7C00). If you just press enter at the prompt, Bochs will repeatthe last command entered, e.g. "c". This is helpful, if the last command was e.g. "s".
You can also use the "info r" command to display the register contents. The "dump_cpu" command will display additional 386registers also.
The help command displays information about each command in the console window, e.g. "help x".
16
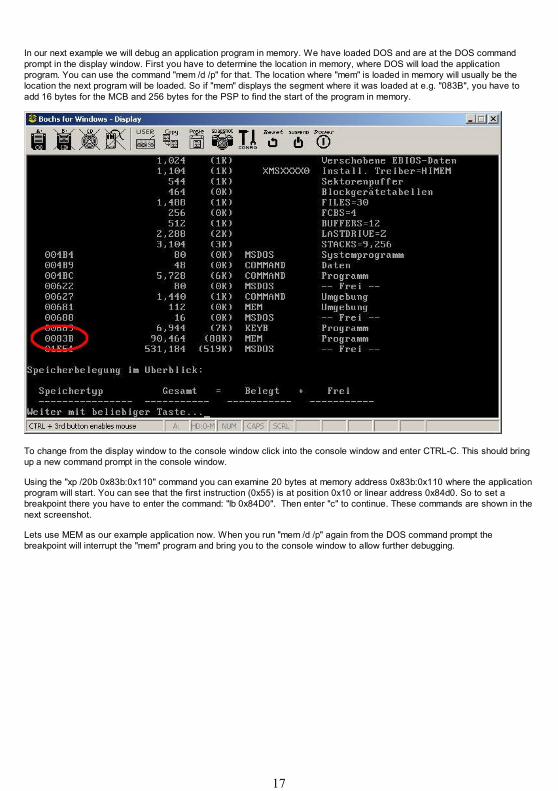
In our next example we will debug an application program in memory. We have loaded DOS and are at the DOS commandprompt in the display window. First you have to determine the location in memory, where DOS will load the applicationprogram. You can use the command "mem /d /p" for that. The location where "mem" is loaded in memory will usually be thelocation the next program will be loaded. So if "mem" displays the segment where it was loaded at e.g. "083B", you have toadd 16 bytes for the MCB and 256 bytes for the PSP to find the start of the program in memory.
To change from the display window to the console window click into the console window and enter CTRL-C. This should bringup a new command prompt in the console window.
Using the "xp /20b 0x83b:0x110" command you can examine 20 bytes at memory address 0x83b:0x110 where the applicationprogram will start. You can see that the first instruction (0x55) is at position 0x10 or linear address 0x84d0. So to set abreakpoint there you have to enter the command: "lb 0x84D0". Then enter "c" to continue. These commands are shown in thenext screenshot.
Lets use MEM as our example application now. When you run "mem /d /p" again from the DOS command prompt thebreakpoint will interrupt the "mem" program and bring you to the console window to allow further debugging.
17
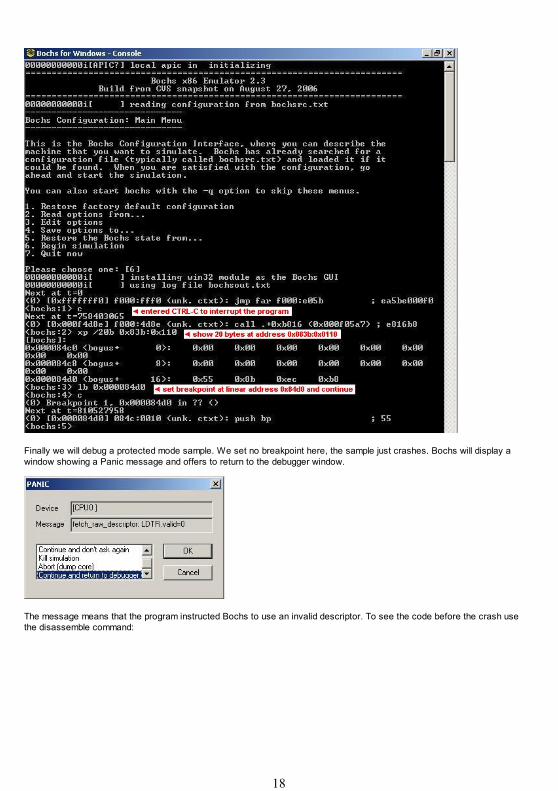
Finally we will debug a protected mode sample. We set no breakpoint here, the sample just crashes. Bochs will display awindow showing a Panic message and offers to return to the debugger window.
The message means that the program instructed Bochs to use an invalid descriptor. To see the code before the crash usethe disassemble command:
18

Since the code crashed at linear address 0x00988f enter the command "disassemble 0x009880 0x00988f" to disassemblethe instructions from memory location 0x009880 to 0x00988f. The instruction specified as the end will not be disassembled.
To see the code of a called procedure you just add the relative address of the procedure to the call statement address. In thescreenshot above this is done for the call instruction at address 0x009886.
We will now look at the registers to find clues for the crash. The dump_cpu command will show the contents of all registers:
19

Furthermore, the "info" command provides helpful information. "info gdt" lists the defined descriptors in the global descriptortable and "info idt" lists the descriptors in the interrupt descriptor table. These tables can be displayed with the "x" commandtoo. The command"x /28hx 0x0a436" would display the gdt as 28 words in hexadecimal.
Here you can see that there are 7 descriptors (0-6) defined in the gdt while the dump_cpu command showed that the limit inthe gdtr is set to 0x2f or 48 decimal. Since you need 8 bytes for each descriptor, the limit is supposed to be set to 0x38 or56.
If you want to inspect the registers at a specific position in your program, you can insert a "magic_break" into your code. Thisis the assembler instruction "XCHG BX,BX" and has to be enabled first in the bochsrc.bxrc file:
20
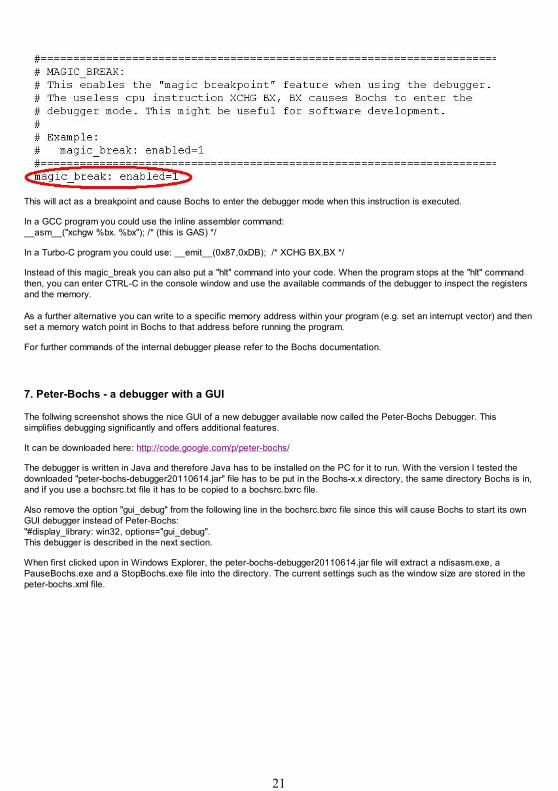
This will act as a breakpoint and cause Bochs to enter the debugger mode when this instruction is executed.
In a GCC program you could use the inline assembler command:__asm__("xchgw %bx. %bx"); /* (this is GAS) */
In a Turbo-C program you could use: __emit__(0x87,0xDB); /* XCHG BX,BX */
Instead of this magic_break you can also put a "hlt" command into your code. When the program stops at the "hlt" commandthen, you can enter CTRL-C in the console window and use the available commands of the debugger to inspect the registersand the memory.
As a further alternative you can write to a specific memory address within your program (e.g. set an interrupt vector) and thenset a memory watch point in Bochs to that address before running the program.
For further commands of the internal debugger please refer to the Bochs documentation.
7. Peter-Bochs - a debugger with a GUI
The follwing screenshot shows the nice GUI of a new debugger available now called the Peter-Bochs Debugger. Thissimplifies debugging significantly and offers additional features.
It can be downloaded here: http://code.google.com/p/peter-bochs/
The debugger is written in Java and therefore Java has to be installed on the PC for it to run. With the version I tested thedownloaded "peter-bochs-debugger20110614.jar" file has to be put in the Bochs-x.x directory, the same directory Bochs is in,and if you use a bochsrc.txt file it has to be copied to a bochsrc.bxrc file.
Also remove the option "gui_debug" from the following line in the bochsrc.bxrc file since this will cause Bochs to start its ownGUI debugger instead of Peter-Bochs:"#display_library: win32, options="gui_debug".This debugger is described in the next section.
When first clicked upon in Windows Explorer, the peter-bochs-debugger20110614.jar file will extract a ndisasm.exe, aPauseBochs.exe and a StopBochs.exe file into the directory. The current settings such as the window size are stored in thepeter-bochs.xml file.
21

To start the peter-bochs-debugger and Bochs you should make a batch file containing the following command:(adjust the pathto bochsdbg.exe as required)
java -jar peter-bochs-debugger20110614.jar c:\Program Files\Bochs-2.4.6\bochsdbg.exe -q -f bochsrc.bxrc
This will open a Bochs display window and the Peter-Bochs debugger window as shown above. Move the Bochs displaywindow to the side of the debugger window to simplify switching between the two.
Unfortunately there is only very little docoumentation available yet. The features of this debugger can be found on this page:http://code.google.com/p/peter-bochs/wiki/features
Lets make a tour of the new debugger. The list of icons below the menu bar has the following functions:
When you start Peter-Bochs, Bochs will be started but not run yet. So the first icon "Start bochs" should only be used whenBochs had been stopped with the "Stop bochs" icon before. The "Run bochs" icon will cause Bochs to start running and bootthe operating system. It will switch to a "Pause bochs" icon then.Peter-Bochs will clear its window to grey and wait for you to press the "Pause bochs" icon to temporarily stop the applicationrunning in the Bochs window. As an alternative you can put a magic_break as described at the end of the previous chapterinto your code. It will then update the information in all its windows and read out address translation information if paging isenabled by a protected mode program.The "Step" icon lets Bochs execute an instruction of the application in the Bochs window and again takes time to do anupdate. You can also use the drop-down arrow to the right of the "Step" icon to select a number of steps or specify to executeuntil a certain condition is met. "Fast Step" will execute ten instructions without updating the address translation. You can
22
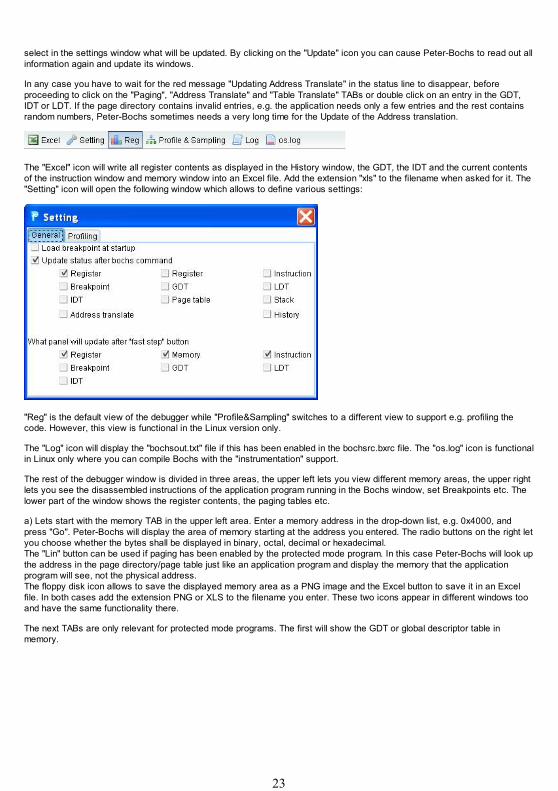
select in the settings window what will be updated. By clicking on the "Update" icon you can cause Peter-Bochs to read out allinformation again and update its windows.
In any case you have to wait for the red message "Updating Address Translate" in the status line to disappear, beforeproceeding to click on the "Paging", "Address Translate" and "Table Translate" TABs or double click on an entry in the GDT,IDT or LDT. If the page directory contains invalid entries, e.g. the application needs only a few entries and the rest containsrandom numbers, Peter-Bochs sometimes needs a very long time for the Update of the Address translation.
The "Excel" icon will write all register contents as displayed in the History window, the GDT, the IDT and the current contentsof the instruction window and memory window into an Excel file. Add the extension "xls" to the filename when asked for it. The"Setting" icon will open the following window which allows to define various settings:
"Reg" is the default view of the debugger while "Profile&Sampling" switches to a different view to support e.g. profiling thecode. However, this view is functional in the Linux version only.
The "Log" icon will display the "bochsout.txt" file if this has been enabled in the bochsrc.bxrc file. The "os.log" icon is functionalin Linux only where you can compile Bochs with the "instrumentation" support.
The rest of the debugger window is divided in three areas, the upper left lets you view different memory areas, the upper rightlets you see the disassembled instructions of the application program running in the Bochs window, set Breakpoints etc. Thelower part of the window shows the register contents, the paging tables etc.
a) Lets start with the memory TAB in the upper left area. Enter a memory address in the drop-down list, e.g. 0x4000, andpress "Go". Peter-Bochs will display the area of memory starting at the address you entered. The radio buttons on the right letyou choose whether the bytes shall be displayed in binary, octal, decimal or hexadecimal.The "Lin" button can be used if paging has been enabled by the protected mode program. In this case Peter-Bochs will look upthe address in the page directory/page table just like an application program and display the memory that the applicationprogram will see, not the physical address.The floppy disk icon allows to save the displayed memory area as a PNG image and the Excel button to save it in an Excelfile. In both cases add the extension PNG or XLS to the filename you enter. These two icons appear in different windows tooand have the same functionality there.
The next TABs are only relevant for protected mode programs. The first will show the GDT or global descriptor table inmemory.
23
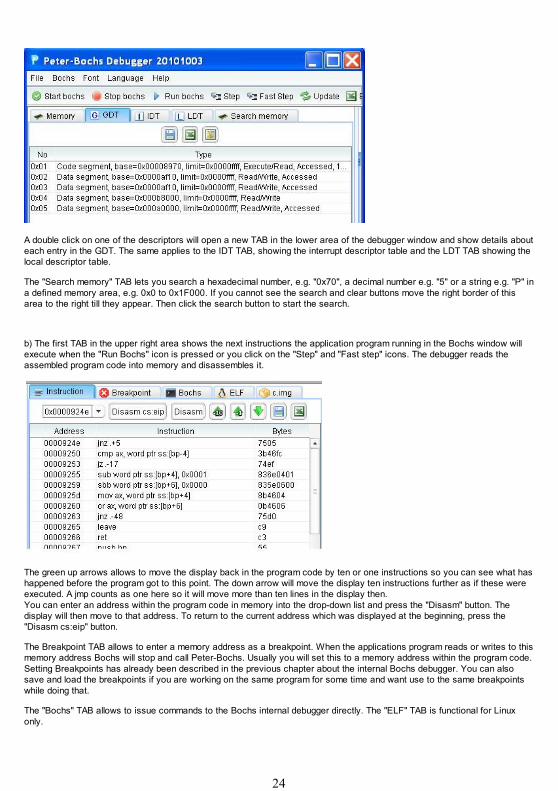
A double click on one of the descriptors will open a new TAB in the lower area of the debugger window and show details abouteach entry in the GDT. The same applies to the IDT TAB, showing the interrupt descriptor table and the LDT TAB showing thelocal descriptor table.
The "Search memory" TAB lets you search a hexadecimal number, e.g. "0x70", a decimal number e.g. "5" or a string e.g. "P" ina defined memory area, e.g. 0x0 to 0x1F000. If you cannot see the search and clear buttons move the right border of thisarea to the right till they appear. Then click the search button to start the search.
b) The first TAB in the upper right area shows the next instructions the application program running in the Bochs window willexecute when the "Run Bochs" icon is pressed or you click on the "Step" and "Fast step" icons. The debugger reads theassembled program code into memory and disassembles it.
The green up arrows allows to move the display back in the program code by ten or one instructions so you can see what hashappened before the program got to this point. The down arrow will move the display ten instructions further as if these wereexecuted. A jmp counts as one here so it will move more than ten lines in the display then.You can enter an address within the program code in memory into the drop-down list and press the "Disasm" button. Thedisplay will then move to that address. To return to the current address which was displayed at the beginning, press the"Disasm cs:eip" button.
The Breakpoint TAB allows to enter a memory address as a breakpoint. When the applications program reads or writes to thismemory address Bochs will stop and call Peter-Bochs. Usually you will set this to a memory address within the program code.Setting Breakpoints has already been described in the previous chapter about the internal Bochs debugger. You can alsosave and load the breakpoints if you are working on the same program for some time and want use to the same breakpointswhile doing that.
The "Bochs" TAB allows to issue commands to the Bochs internal debugger directly. The "ELF" TAB is functional for Linuxonly.
24
The last TAB to the right allows to read a hex dump of the disk image file the application program is running from. It is also ahex editor and allows to modify the bytes in this file.
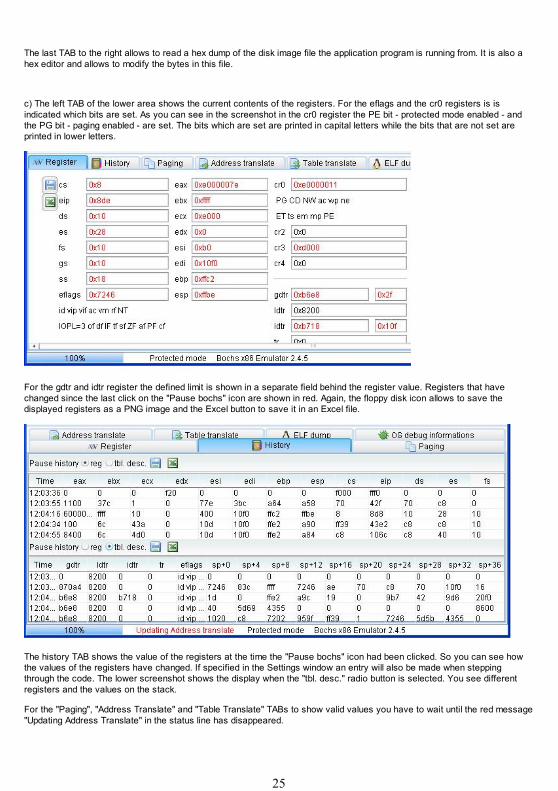
c) The left TAB of the lower area shows the current contents of the registers. For the eflags and the cr0 registers is isindicated which bits are set. As you can see in the screenshot in the cr0 register the PE bit - protected mode enabled - andthe PG bit - paging enabled - are set. The bits which are set are printed in capital letters while the bits that are not set areprinted in lower letters.
For the gdtr and idtr register the defined limit is shown in a separate field behind the register value. Registers that havechanged since the last click on the "Pause bochs" icon are shown in red. Again, the floppy disk icon allows to save thedisplayed registers as a PNG image and the Excel button to save it in an Excel file.
The history TAB shows the value of the registers at the time the "Pause bochs" icon had been clicked. So you can see howthe values of the registers have changed. If specified in the Settings window an entry will also be made when steppingthrough the code. The lower screenshot shows the display when the "tbl. desc." radio button is selected. You see differentregisters and the values on the stack.
For the "Paging", "Address Translate" and "Table Translate" TABs to show valid values you have to wait until the red message"Updating Address Translate" in the status line has disappeared.
25
To demonstrate the paging display, I run a sample from Alexei Frounze which you can download from here:http://members.tripod.com/protected_mode/alexfru/08.zip
This example sets up one page directory which covers the 4 MB memory area from 0x0 to 0x400000. This includes the 1MBwhich can be accessed by real mode programs. Then the program writes colored bars of 4k size into the graphic display areaat linear address 0xA0000 which is below 1MB. So one bar is exactly the size of a page table entry. When the page tableentries in this area are reversed the bars are displayed in different order on the screen without change to the display functionof the program.
Unfortunately this program uses just one entry in the page directory and the other entries are not initialised so these containinvalid data. Therefore you have to wait two minutes until the red message "Updating Address Translate" in the status line hasdisappeared. Adding the line: "memset(pagedir+1,0,4092);" after writing the first page directory entry will fix this.
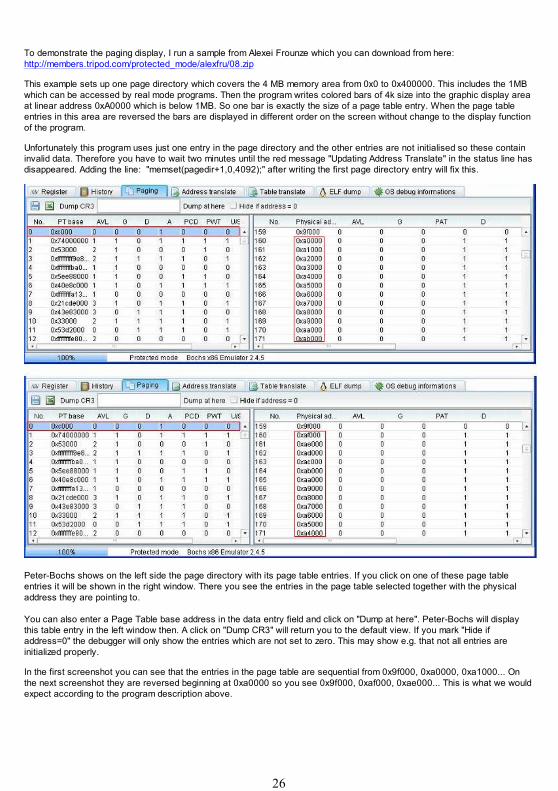
Peter-Bochs shows on the left side the page directory with its page table entries. If you click on one of these page tableentries it will be shown in the right window. There you see the entries in the page table selected together with the physicaladdress they are pointing to.
You can also enter a Page Table base address in the data entry field and click on "Dump at here". Peter-Bochs will displaythis table entry in the left window then. A click on "Dump CR3" will return you to the default view. If you mark "Hide ifaddress=0" the debugger will only show the entries which are not set to zero. This may show e.g. that not all entries areinitialized properly.
In the first screenshot you can see that the entries in the page table are sequential from 0x9f000, 0xa0000, 0xa1000... Onthe next screenshot they are reversed beginning at 0xa0000 so you see 0x9f000, 0xaf000, 0xae000... This is what we wouldexpect according to the program description above.
26
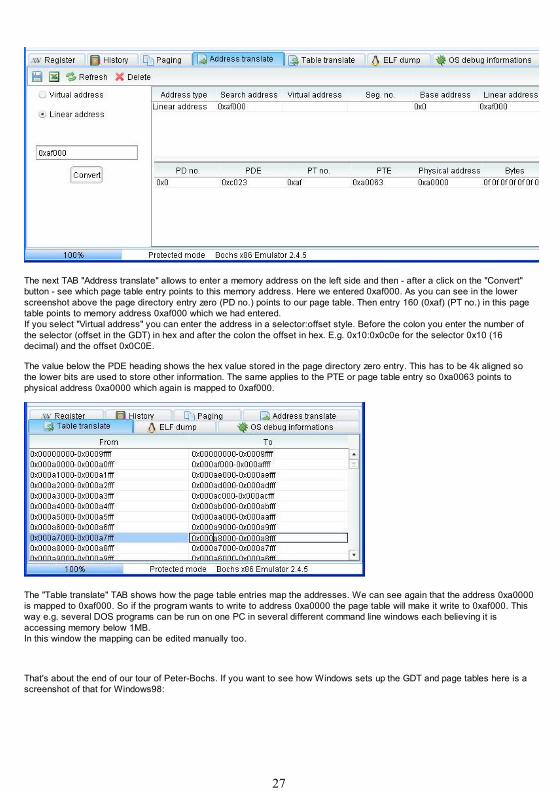
The next TAB "Address translate" allows to enter a memory address on the left side and then - after a click on the "Convert"button - see which page table entry points to this memory address. Here we entered 0xaf000. As you can see in the lowerscreenshot above the page directory entry zero (PD no.) points to our page table. Then entry 160 (0xaf) (PT no.) in this pagetable points to memory address 0xaf000 which we had entered.If you select "Virtual address" you can enter the address in a selector:offset style. Before the colon you enter the number ofthe selector (offset in the GDT) in hex and after the colon the offset in hex. E.g. 0x10:0x0c0e for the selector 0x10 (16decimal) and the offset 0x0C0E.
The value below the PDE heading shows the hex value stored in the page directory zero entry. This has to be 4k aligned sothe lower bits are used to store other information. The same applies to the PTE or page table entry so 0xa0063 points tophysical address 0xa0000 which again is mapped to 0xaf000.
The "Table translate" TAB shows how the page table entries map the addresses. We can see again that the address 0xa0000is mapped to 0xaf000. So if the program wants to write to address 0xa0000 the page table will make it write to 0xaf000. Thisway e.g. several DOS programs can be run on one PC in several different command line windows each believing it isaccessing memory below 1MB.In this window the mapping can be edited manually too.
That's about the end of our tour of Peter-Bochs. If you want to see how Windows sets up the GDT and page tables here is ascreenshot of that for Windows98:
27
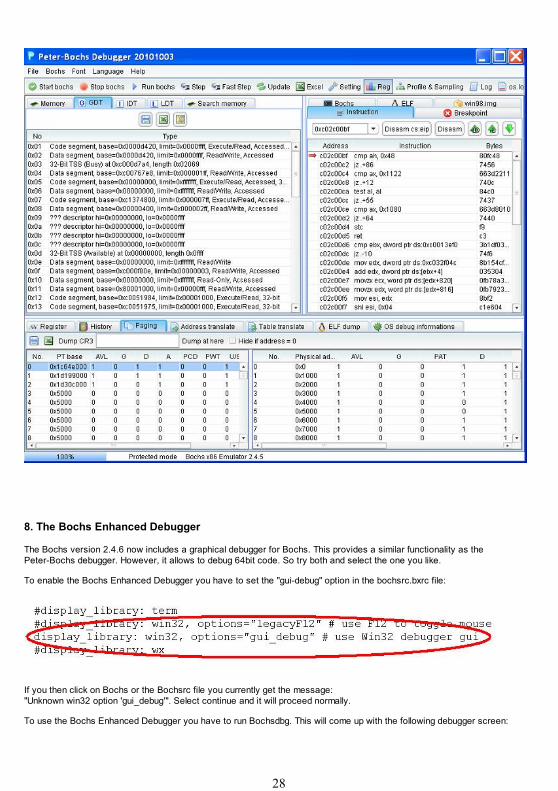
8. The Bochs Enhanced Debugger
The Bochs version 2.4.6 now includes a graphical debugger for Bochs. This provides a similar functionality as thePeter-Bochs debugger. However, it allows to debug 64bit code. So try both and select the one you like.
To enable the Bochs Enhanced Debugger you have to set the "gui-debug" option in the bochsrc.bxrc file:
If you then click on Bochs or the Bochsrc file you currently get the message:"Unknown win32 option 'gui_debug'". Select continue and it will proceed normally.
To use the Bochs Enhanced Debugger you have to run Bochsdbg. This will come up with the following debugger screen:
28
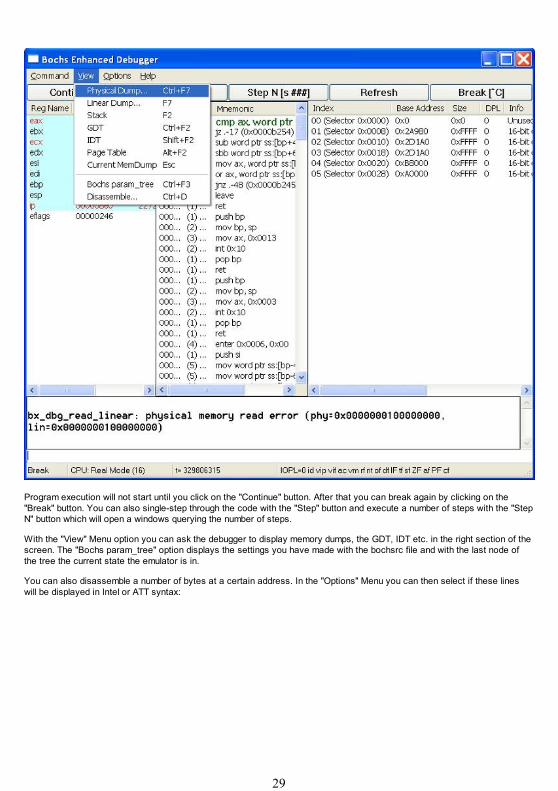
Program execution will not start until you click on the "Continue" button. After that you can break again by clicking on the"Break" button. You can also single-step through the code with the "Step" button and execute a number of steps with the "StepN" button which will open a windows querying the number of steps.
With the "View" Menu option you can ask the debugger to display memory dumps, the GDT, IDT etc. in the right section of thescreen. The "Bochs param_tree" option displays the settings you have made with the bochsrc file and with the last node ofthe tree the current state the emulator is in.
You can also disassemble a number of bytes at a certain address. In the "Options" Menu you can then select if these lineswill be displayed in Intel or ATT syntax:
29

Per default the Bochs Enhanced Debugger will only show a limited number of register contents. This menu allows to selectadditional registers you may want to view in the left section of the window.
I hope this tutorial was interesting to read, provided some new ideas how to use Bochs and above all helpful to you, thereader.
Updated 15th of October 2011, Georg Potthast
30