Embed Size (px)
Citation preview
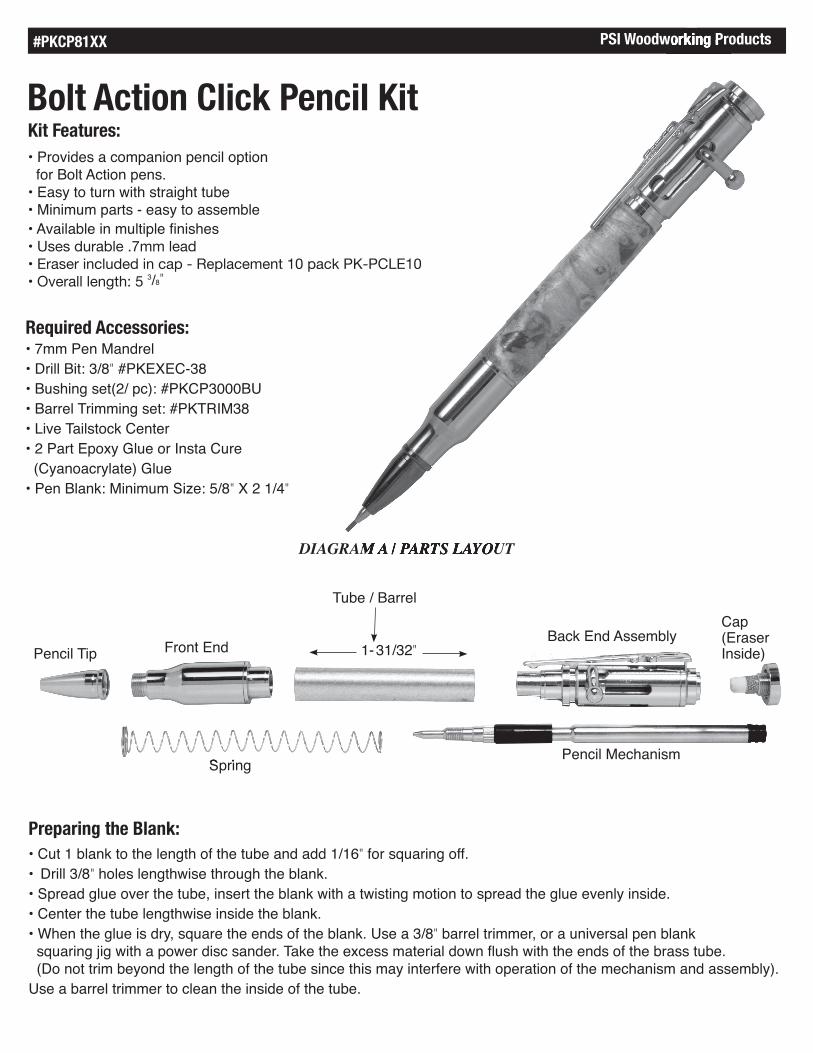
Required Accessories:• 7mm Pen Mandrel• Drill Bit: 3/8" #PKEXEC-38• Bushing set(2/ pc): #PKCP3000BU• Barrel Trimming set: #PKTRIM38• Live Tailstock Center• 2 Part Epoxy Glue or Insta Cure (Cyanoacrylate) Glue• Pen Blank: Minimum Size: 5/8" X 2 1/4"
#PKCP81XX PSI Woodworking Products
Bolt Action Click Pencil Kit
Preparing the Blank:• Cut 1 blank to the length of the tube and add 1/16" for squaring off.• Drill 3/8" holes lengthwise through the blank.• Spread glue over the tube, insert the blank with a twisting motion to spread the glue evenly inside.• Center the tube lengthwise inside the blank.• When the glue is dry, square the ends of the blank. Use a 3/8" barrel trimmer, or a universal pen blank squaring jig with a power disc sander. Take the excess material down fl ush with the ends of the brass tube. (Do not trim beyond the length of the tube since this may interfere with operation of the mechanism and assembly). Use a barrel trimmer to clean the inside of the tube.
Kit Features: • Provides a companion pencil option for Bolt Action pens. • Easy to turn with straight tube• Minimum parts - easy to assemble• Available in multiple fi nishes• Uses durable .7mm lead• Eraser included in cap - Replacement 10 pack PK-PCLE10• Overall length: 5
₃/₈"
DIAGRAM A / PARTS LAYOUT
Pencil Tip
Tube / Barrel
Spring
Cap(Eraser Inside)
Pencil Mechanism
Front EndBack End Assembly
PSI Woodworking Products
DIAGRAM A / PARTS LAYOUT
1- 31/32"
Spring
#PKCP81XX PSI Woodworking Products
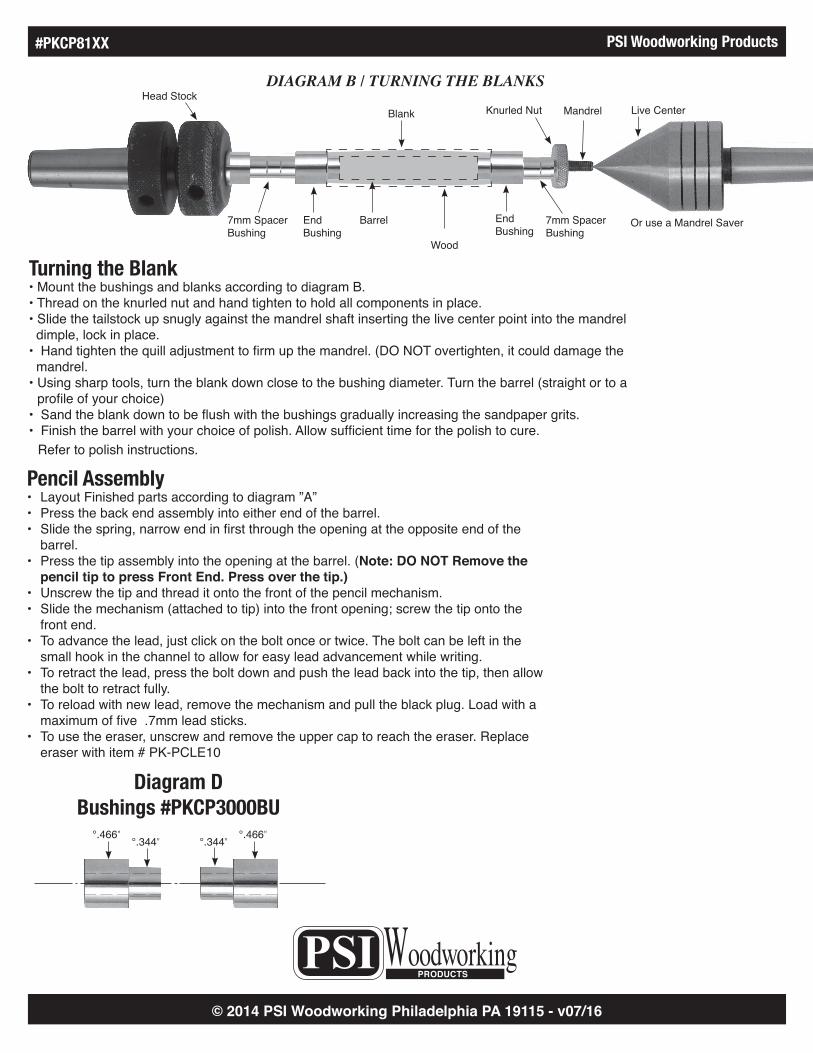
Pencil Assembly• Layout Finished parts according to diagram ”A”• Press the back end assembly into either end of the barrel.• Slide the spring, narrow end in fi rst through the opening at the opposite end of the
barrel.• Press the tip assembly into the opening at the barrel. (Note: DO NOT Remove the
pencil tip to press Front End. Press over the tip.)• Unscrew the tip and thread it onto the front of the pencil mechanism. • Slide the mechanism (attached to tip) into the front opening; screw the tip onto the
front end.• To advance the lead, just click on the bolt once or twice. The bolt can be left in the
small hook in the channel to allow for easy lead advancement while writing.• To retract the lead, press the bolt down and push the lead back into the tip, then allow
the bolt to retract fully.• To reload with new lead, remove the mechanism and pull the black plug. Load with a
maximum of fi ve .7mm lead sticks.• To use the eraser, unscrew and remove the upper cap to reach the eraser. Replace
eraser with item # PK-PCLE10
Diagram DBushings #PKCP3000BU
© 2014 PSI Woodworking Philadelphia PA 19115 - v07/16
Turning the Blank• Mount the bushings and blanks according to diagram B. • Thread on the knurled nut and hand tighten to hold all components in place. • Slide the tailstock up snugly against the mandrel shaft inserting the live center point into the mandrel dimple, lock in place. • Hand tighten the quill adjustment to fi rm up the mandrel. (DO NOT overtighten, it could damage the mandrel. • Using sharp tools, turn the blank down close to the bushing diameter. Turn the barrel (straight or to a profi le of your choice)• Sand the blank down to be fl ush with the bushings gradually increasing the sandpaper grits.• Finish the barrel with your choice of polish. Allow suffi cient time for the polish to cure. Refer to polish instructions.
DIAGRAM B / TURNING THE BLANKSHead Stock
7mm Spacer Bushing
Or use a Mandrel Saver
Blank Knurled Nut
Barrel
Live CenterMandrel
End Bushing
Wood
End Bushing
7mm Spacer Bushing
°.466" °.344" °.344" °.466"


![Blank Blank 10 · 2016. 10. 6. · Blank Blank 10 ARTIST DISCOGRAPHY (2001) Movie Score/Soundtrack - A Sharp Pencil [An Angry Chicken, SG] (2004) Brendon P - A New Day [Planet Music]](https://img.pdfslide.net/doc/110x75/610a20eef6e009444c5304ea/blank-blank-10-2016-10-6-blank-blank-10-artist-discography-2001-movie-scoresoundtrack.jpg)