Embed Size (px)
Citation preview

BOOK PUBLISHING SERVICES
PDF INSTRUCTIONSInstructions for Creating PostScript and PDF Filesfrom Adobe InDesign
System Setup Recommendations Adobe InDesign 1.5 PC/MAC…………………………………………………………….3 Adobe InDesign 2.0 PC/MAC…………………………………………………………...16 Adobe InDesign CS (v.3.0.1) & CS2 (v.4.0) MAC………………………………….... 22
Updated on September 7, 2005
2Updated on September 7 2005
RECOMMENDATIONS
General System Recommendations
RRD recommends maintaining a “clean” system fonts folder, which means keeping only the requiredsystem fonts within this folder. Installing Acrobat will install fonts that are not strictly necessary, suchas Adobe Sans MM, Adobe Serif MM, Arial, Book Antiqua, Bookman Old Style, Century Gothic,Century Schoolbook, Courier New, Letter Gothic MT, Times NR, and MT Extra Bold. This iscomplicated under MacOS X, where font resources may reside in several different locations.
RRD recommends the use of a font utility such as Adobe Type Manager or Suitcase to manage fonts.Creating font sets for job specific fonts will save time in organization, activation, and deactivation offonts.
Suggested Plug-Ins, XTensions, PPDs, and Applications to Create Good PDF Files
RRD recommends that you avoid some potential file problems by downloading and installing thefollowing helpers (please note that you must restart your applications after installation for changes totake place):
Prinergy Distiller Plug-in—This is a plug-in for Acrobat Distiller with an automatic installer that willinstall it directly onto your system. The Distiller plug-in is available for free at www.prinergy.com(follow the “Support & Services” link to the “Self Help: Downloads” page), and helps avoid potentialproblems caused by programs that utilize RGB color space (like FrameMaker and MS Word), fixeshairline rules, and deals with compression issues. This file may also be downloaded from the RRDonnelley Book platform site at www.rrdbook.com.
Prinergy Refiner PPD—PostScript Printer Description files (PPD files) are text files that provide auniform approach to using the diverse features of devices that contain PostScript interpreters. ThePrinergy Refiner PPD helps avoid potential problems by addressing issues like memory, fontavailability, TrueType font handling, resolution, paper size, etc. PPDs should not be confused withPostScript drivers or printer drivers like LaserWriter 8.x that are used to convert the desktopapplications’ drawing routines into PostScript. This file is available from the RR Donnelley Bookplatform website at www.rrdbook.com.
Enfocus PitStop—Customers who preflight files before submission dramatically increase their firsttime success in preflight. We suggest using Enfocus’s PitStop program (www.enfocus.com) forpreflighting PDF files. Preflight settings files for PitStop tailored to RR Donnelley’s recommendedsettings are available from the RR Donnelley Book platform website at www.rrdbook.com.
Please note that RRD’s PDF guidelines are only nominally different from those of other suppliersusing a PDF workflow. However, if you plan to use a different set of instructions for creatingPostScript and PDF, we strongly urge you to submit a test file before submitting live job files.
3Updated on September 7 2005
Although InDesign is capable of exporting PDF files in one step, Adobe recommends notusing this feature in versions prior to InDesign 2.0
The following instructions will demonstrate how to create a reusable printer style with all ofyour settings.
Contact your RR Donnelley division for details.
4Updated on September 7 2005
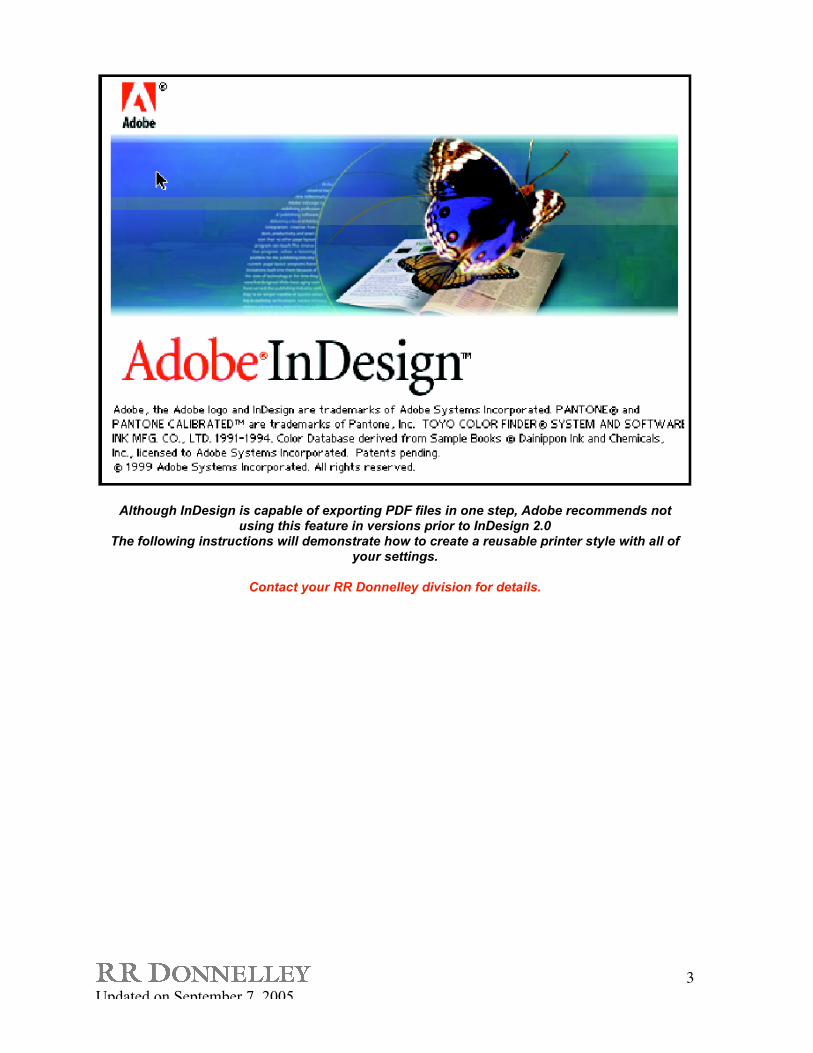
DEFINING PRINTER STYLES – INDESIGN 1.5 MAC
File Menu Select: Printer Styles… Define
Define Printer Styles Select: New…
New Printer Style Create a name and read message

5Updated on September 7 2005
DEFINING PRINTER STYLES – INDESIGN 1.5 MACContinued
Virtual Printer Select: Virtual Printer
(If you do not have this print driver, go towww.adobe.com and download the free Virtual Printer Plug-in)
Paper: US Letter Orientation: Vertical (portrait) Scale: 100%
Deselect: Booklet
PostScript Options Deselect: Flip Horizontal
Deselect: Flip Vertical Deselect: Invert Image Deselect: Substitute FOnts
Deselect: Smooth Text Deselect: Smooth Graphics Deselect: Precision Bitmap Alignment
Deselect: Unlimited Downloadable Fonts
6Updated on September 7 2005
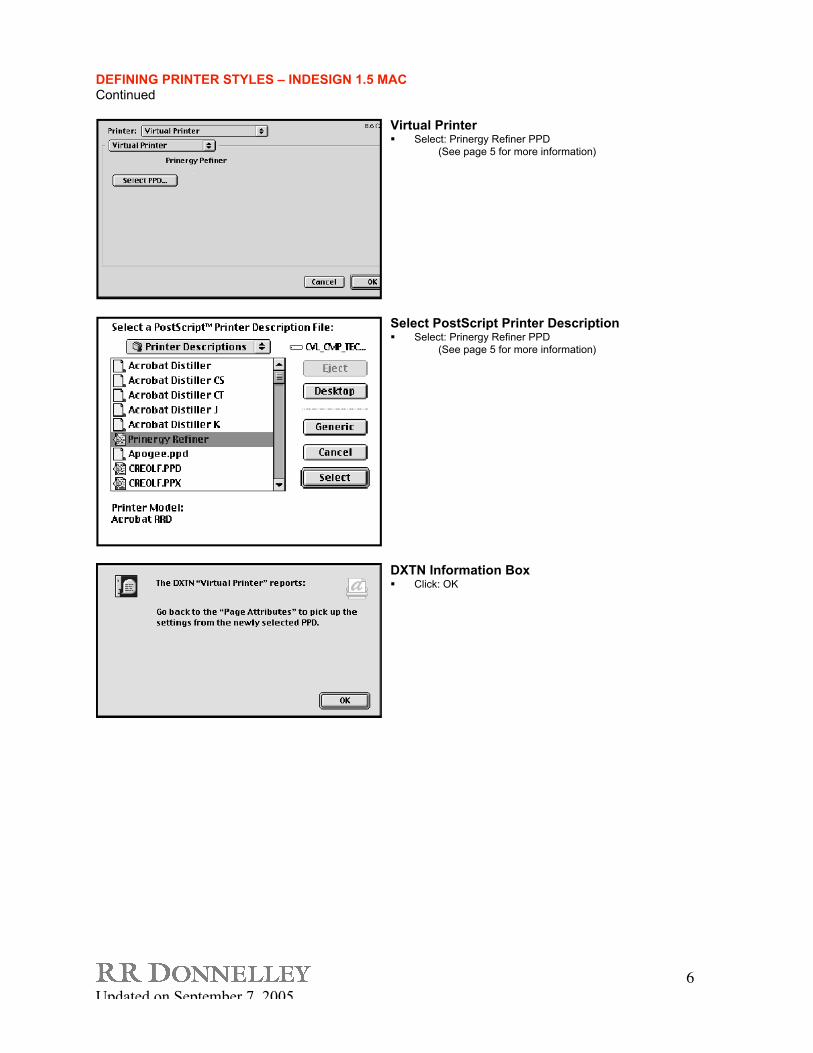
DEFINING PRINTER STYLES – INDESIGN 1.5 MACContinued
Virtual Printer Select: Prinergy Refiner PPD
(See page 5 for more information)
Select PostScript Printer Description Select: Prinergy Refiner PPD
(See page 5 for more information)
DXTN Information Box Click: OK
7Updated on September 7 2005
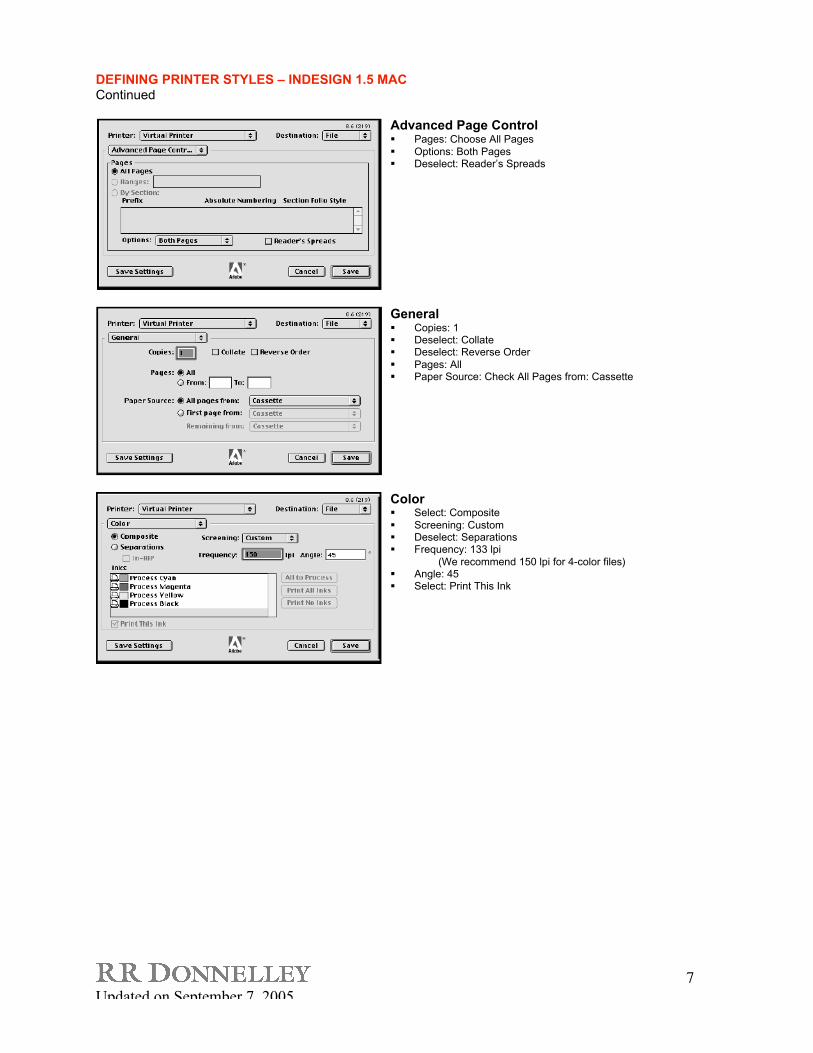
DEFINING PRINTER STYLES – INDESIGN 1.5 MACContinued
Advanced Page Control Pages: Choose All Pages
Options: Both Pages Deselect: Reader’s Spreads
General Copies: 1 Deselect: Collate Deselect: Reverse Order
Pages: All Paper Source: Check All Pages from: Cassette
Color Select: Composite
Screening: Custom Deselect: Separations Frequency: 133 lpi
(We recommend 150 lpi for 4-color files) Angle: 45 Select: Print This Ink

8Updated on September 7 2005
DEFINING PRINTER STYLES – INDESIGN 1.5 MACContinued
Scale and Fit Tiling: None
Scale: Check X and Y Width: 100 Height: 100
Select: Constrain Proportions Deselect: Scale to Fit Select: Center Page in Imageable Area
Graphics Send Image Data: All
Deselect: OPI/DCS Image Replacement Deselect: Proof Print Select: Font Downloading—Complete
Deselect: Font Downloading—None Select: Font Downloading—Download PPD Fonts Deselect: Gradient Options—Force Continuous Tone
Behavior Deselect: Gradient Options—PostScript Level 1
Compatibility
Deselect: Omit—EPS Deselect: Omit—PDF Deselect: Omit—Bitmap images
Page Marks Deselect: All Printers Marks Type: Default Select:Crop Marks
Select:Page Information Select:Registration Marks Deselect: Color Bars
Deselect: Bleed Marks Bleed: 9 points (note 30 pts. as shown here)
9Updated on September 7 2005
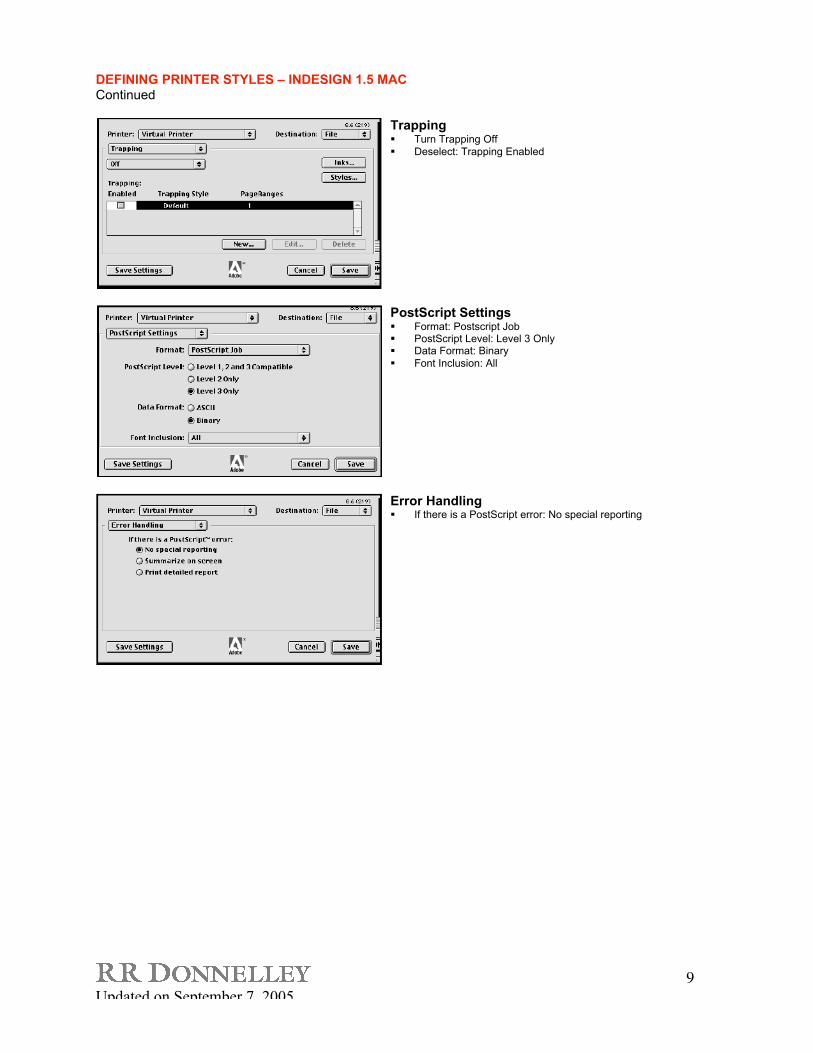
DEFINING PRINTER STYLES – INDESIGN 1.5 MACContinued
Trapping Turn Trapping Off
Deselect: Trapping Enabled
PostScript Settings Format: Postscript Job PostScript Level: Level 3 Only Data Format: Binary
Font Inclusion: All
Error Handling If there is a PostScript error: No special reporting
10Updated on September 7 2005
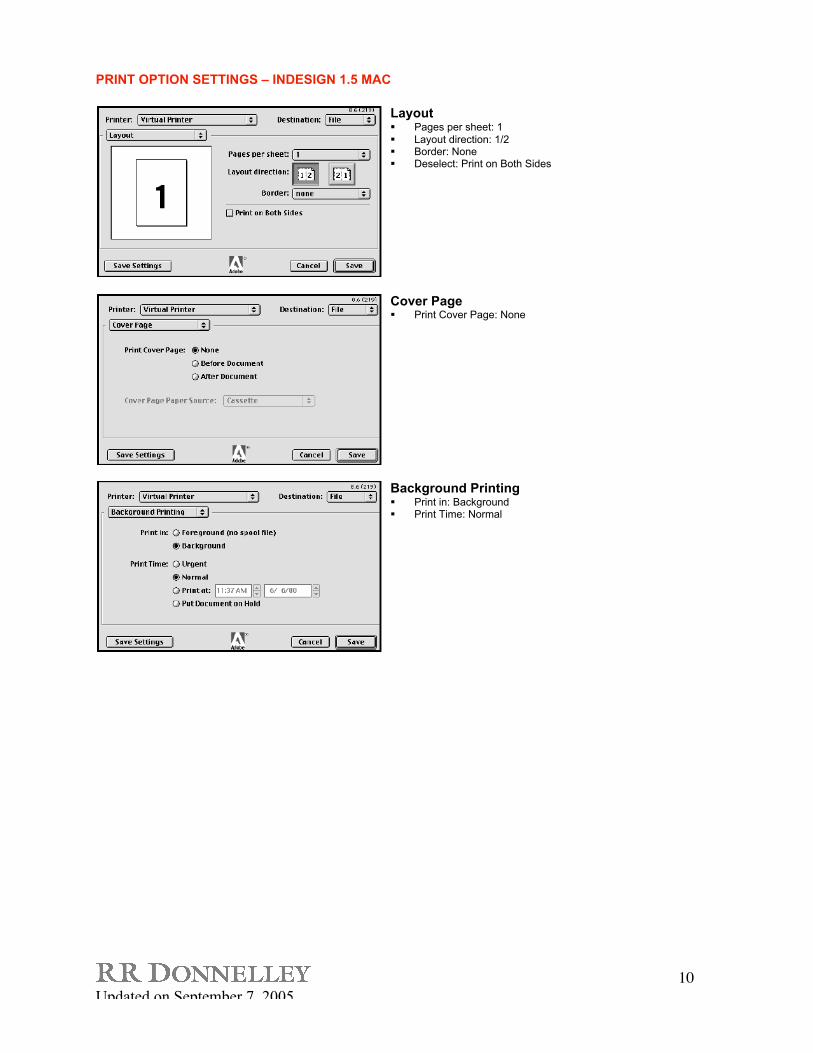
PRINT OPTION SETTINGS – INDESIGN 1.5 MAC
Layout Pages per sheet: 1
Layout direction: 1/2 Border: None Deselect: Print on Both Sides
Cover Page Print Cover Page: None
Background Printing Print in: Background Print Time: Normal

11Updated on September 7 2005
PRINT OPTION SETTINGS – INDESIGN 1.5 MACContinued
Create File
Define Printer Style New printer style will now be available for use every time
document is printed
12Updated on September 7 2005
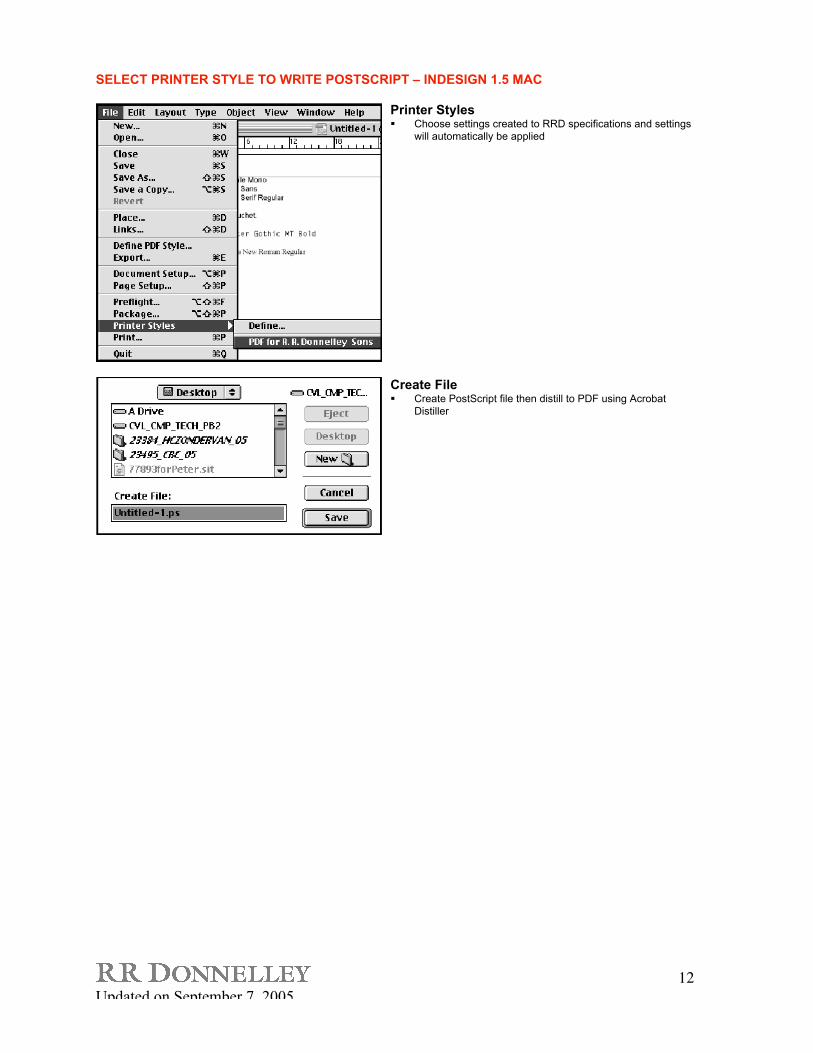
SELECT PRINTER STYLE TO WRITE POSTSCRIPT – INDESIGN 1.5 MAC
Printer Styles Choose settings created to RRD specifications and settings
will automatically be applied
Create File Create PostScript file then distill to PDF using Acrobat
Distiller

13Updated on September 7 2005
PRINT OPTIONS SETTINGS – INDESIGN 1.5 PCContinued
File Select: Print…
Print Name: Select the printer that has been set up with the
Prinergy Refiner PPD
(See page 5 for more information) Select: Print to file Number of copies: 1
Advanced Page Control Tab Select: All Pages Options: Select Both Pages
Deselect: Reader’s Spreads
14Updated on September 7 2005
PRINT OPTION SETTINGS – INDESIGN 1.5 PCContinued
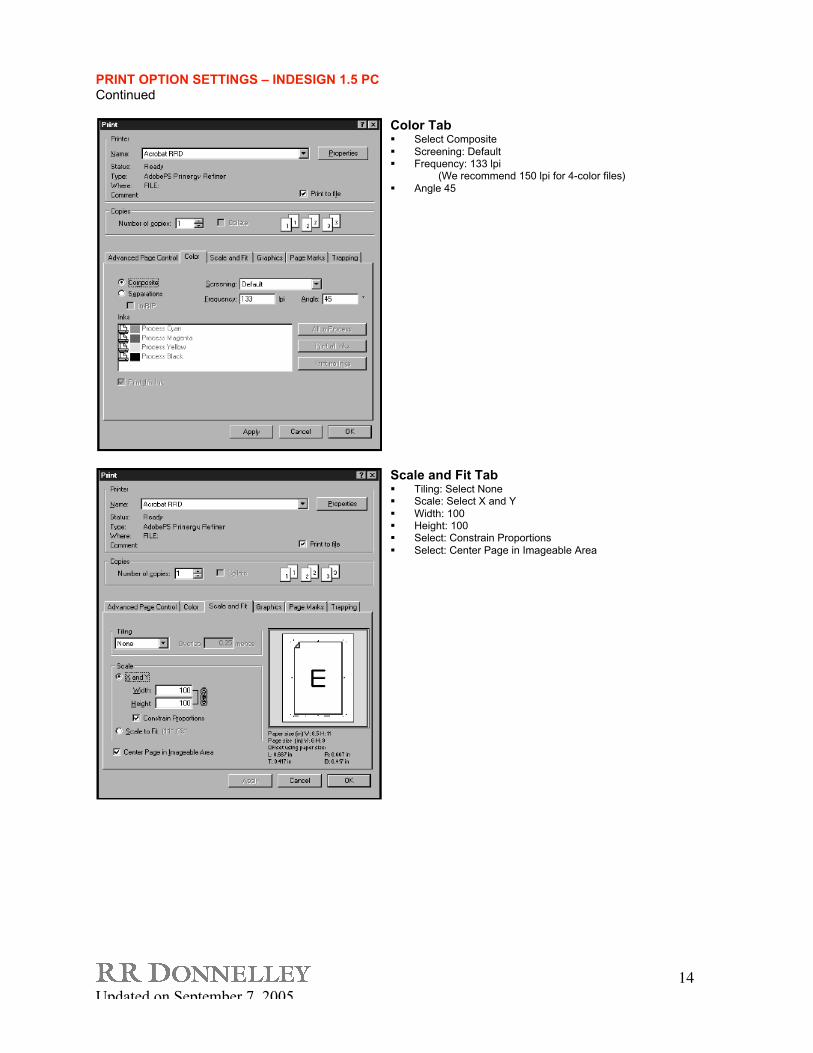
Color Tab Select Composite
Screening: Default Frequency: 133 lpi
(We recommend 150 lpi for 4-color files)
Angle 45
Scale and Fit Tab Tiling: Select None Scale: Select X and Y
Width: 100 Height: 100 Select: Constrain Proportions
Select: Center Page in Imageable Area
15Updated on September 7 2005
PRINT OPTION SETTINGS – INDESIGN 1.5 PCContinued
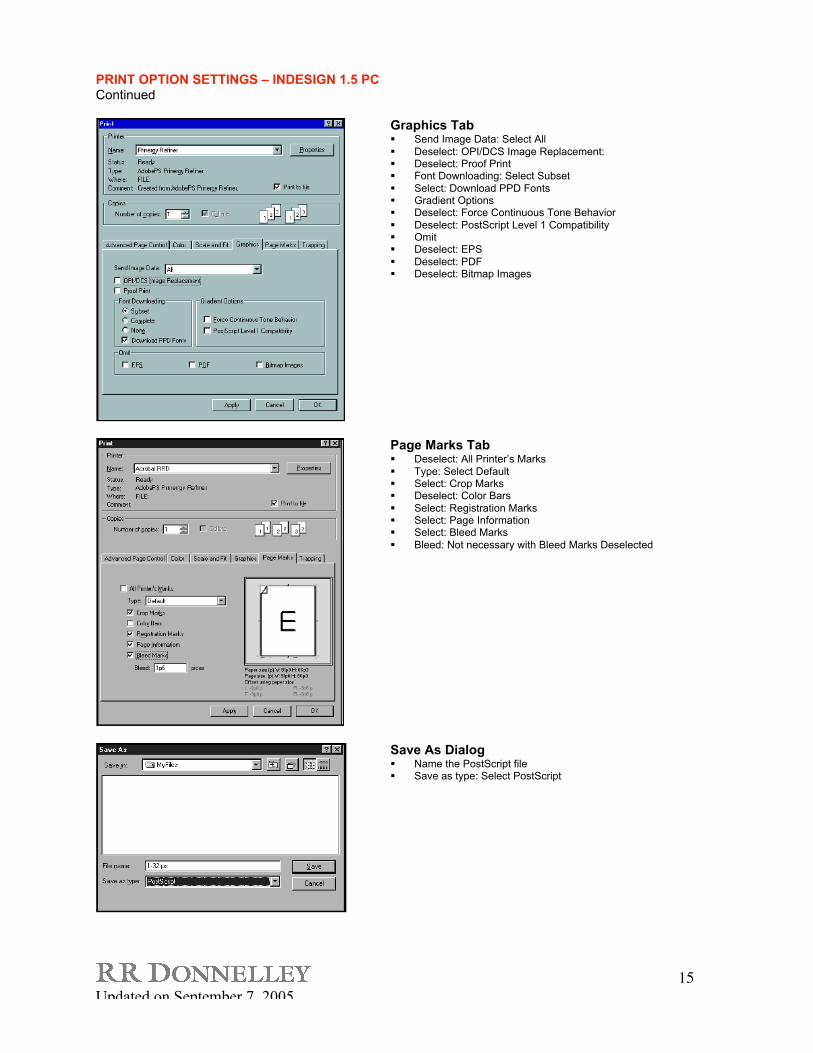
Graphics Tab Send Image Data: Select All
Deselect: OPI/DCS Image Replacement: Deselect: Proof Print Font Downloading: Select Subset
Select: Download PPD Fonts Gradient Options Deselect: Force Continuous Tone Behavior
Deselect: PostScript Level 1 Compatibility Omit Deselect: EPS
Deselect: PDF Deselect: Bitmap Images
Page Marks Tab Deselect: All Printer’s Marks
Type: Select Default Select: Crop Marks Deselect: Color Bars
Select: Registration Marks Select: Page Information Select: Bleed Marks
Bleed: Not necessary with Bleed Marks Deselected
Save As Dialog Name the PostScript file Save as type: Select PostScript
16Updated on September 7 2005
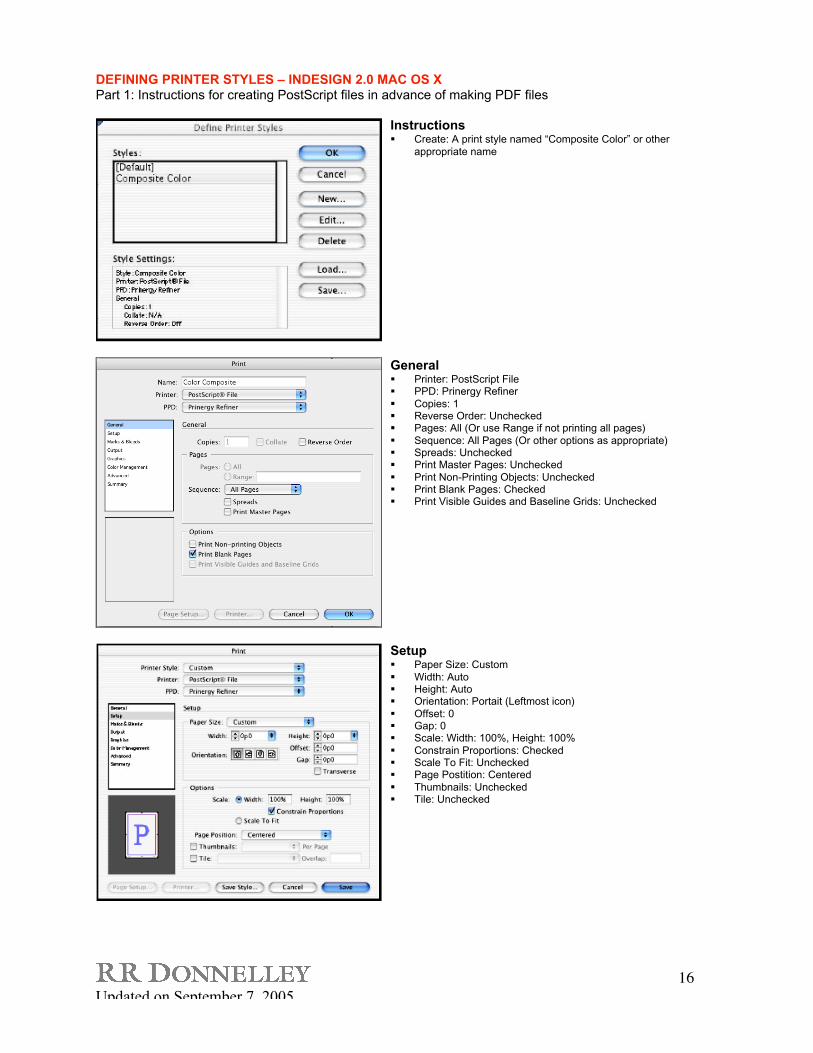
DEFINING PRINTER STYLES – INDESIGN 2.0 MAC OS XPart 1: Instructions for creating PostScript files in advance of making PDF files
Instructions Create: A print style named “Composite Color” or other
appropriate name
General Printer: PostScript File PPD: Prinergy Refiner
Copies: 1 Reverse Order: Unchecked Pages: All (Or use Range if not printing all pages)
Sequence: All Pages (Or other options as appropriate) Spreads: Unchecked Print Master Pages: Unchecked
Print Non-Printing Objects: Unchecked Print Blank Pages: Checked Print Visible Guides and Baseline Grids: Unchecked
Setup Paper Size: Custom
Width: Auto Height: Auto Orientation: Portait (Leftmost icon)
Offset: 0 Gap: 0 Scale: Width: 100%, Height: 100%
Constrain Proportions: Checked Scale To Fit: Unchecked Page Postition: Centered
Thumbnails: Unchecked Tile: Unchecked
17Updated on September 7 2005
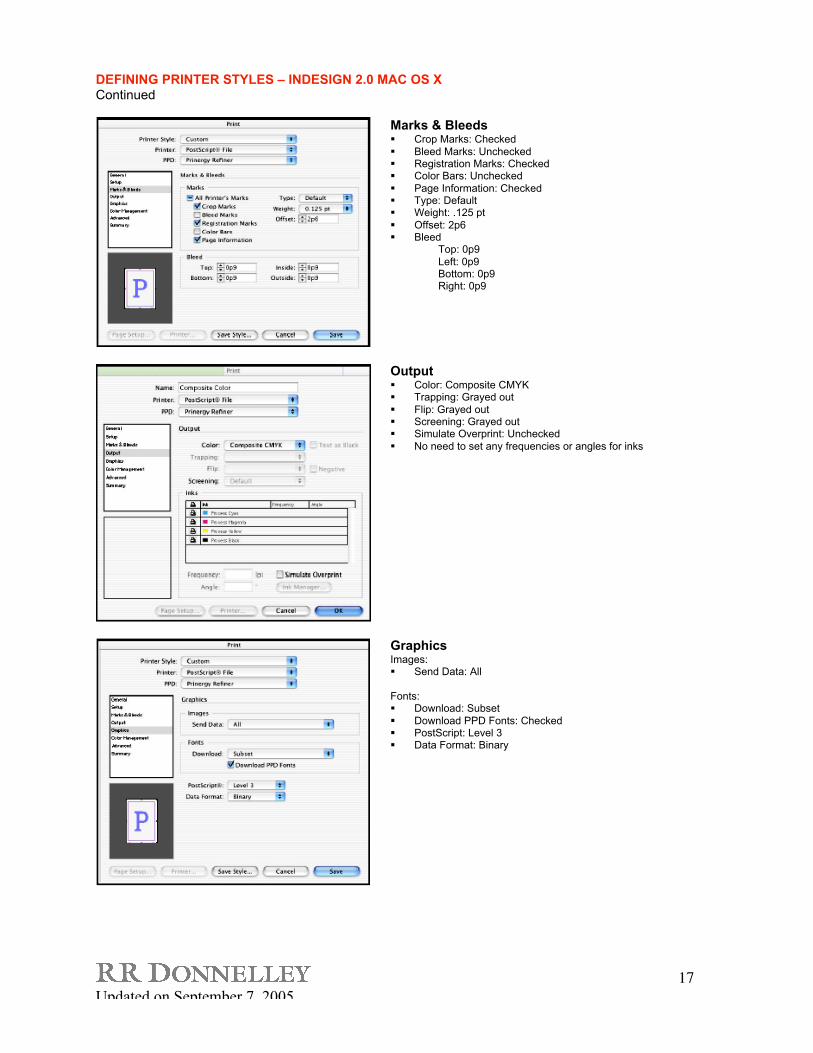
DEFINING PRINTER STYLES – INDESIGN 2.0 MAC OS XContinued
Marks & Bleeds Crop Marks: Checked
Bleed Marks: Unchecked Registration Marks: Checked Color Bars: Unchecked
Page Information: Checked Type: Default Weight: .125 pt
Offset: 2p6 Bleed
Top: 0p9
Left: 0p9Bottom: 0p9Right: 0p9
Output Color: Composite CMYK Trapping: Grayed out
Flip: Grayed out Screening: Grayed out Simulate Overprint: Unchecked
No need to set any frequencies or angles for inks
GraphicsImages: Send Data: All
Fonts: Download: Subset
Download PPD Fonts: Checked PostScript: Level 3 Data Format: Binary

18Updated on September 7 2005
DEFINING PRINTER STYLES – INDESIGN 2.0 MAC OS XContinued
Color ManagementSource Space:
Document: Selected Proof: Unselected
Print Space: Profile: Document CMYK
AdvancedOPI: OPI Image Replacement: Unchecked Omit For OPI:
EPS: Unchecked PDF: Unchecked Bitmap Images: Unchecked
Gradients: Force Continuous Tone Behavior: Unchecked
Transparency Flattener: Style: High Resolution
Ignore Spread Overrides: Unchecked Click on OK to Save Print Style
To use Print Style: Choose from Menu File>Print Style>Composite Color (or
whatever you named it).
The print style will load all the settings you saved
Click on the OK button shown at left to begin printing
PostScript
Name PostScript file and choose destination folder
19Updated on September 7 2005
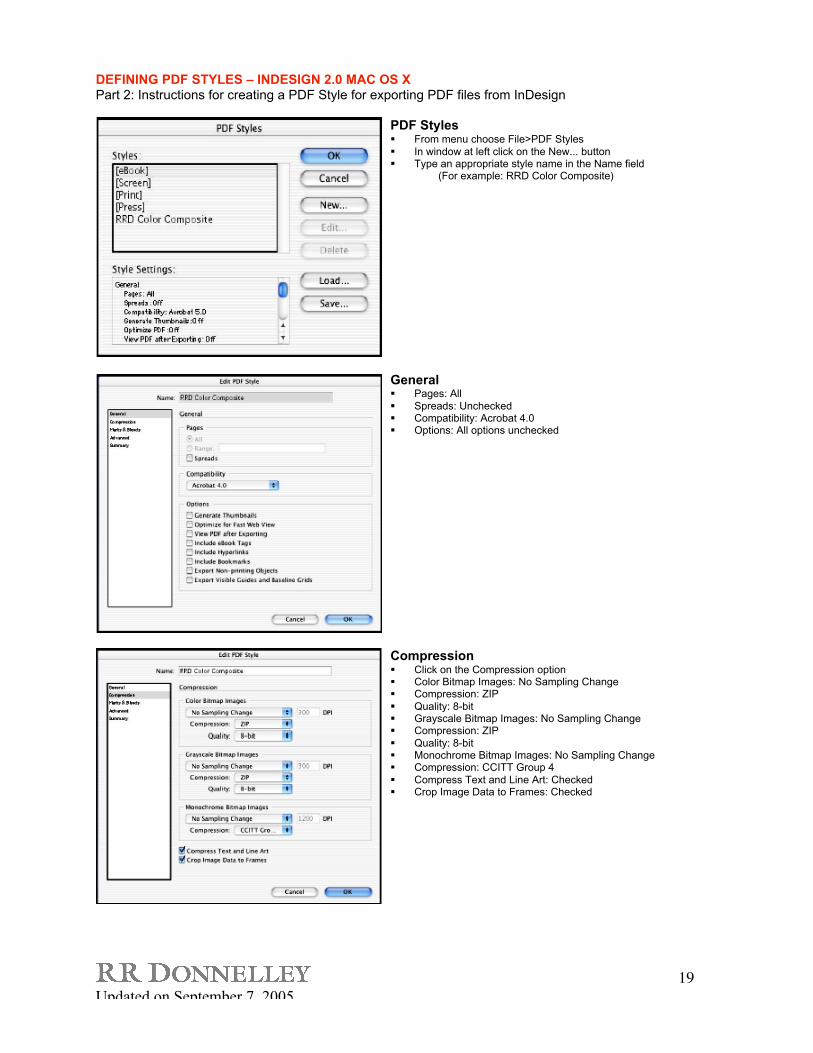
DEFINING PDF STYLES – INDESIGN 2.0 MAC OS XPart 2: Instructions for creating a PDF Style for exporting PDF files from InDesign
PDF Styles From menu choose File>PDF Styles
In window at left click on the New... button Type an appropriate style name in the Name field
(For example: RRD Color Composite)
General Pages: All
Spreads: Unchecked Compatibility: Acrobat 4.0 Options: All options unchecked
Compression Click on the Compression option Color Bitmap Images: No Sampling Change Compression: ZIP
Quality: 8-bit Grayscale Bitmap Images: No Sampling Change Compression: ZIP
Quality: 8-bit Monochrome Bitmap Images: No Sampling Change Compression: CCITT Group 4
Compress Text and Line Art: Checked Crop Image Data to Frames: Checked
20Updated on September 7 2005
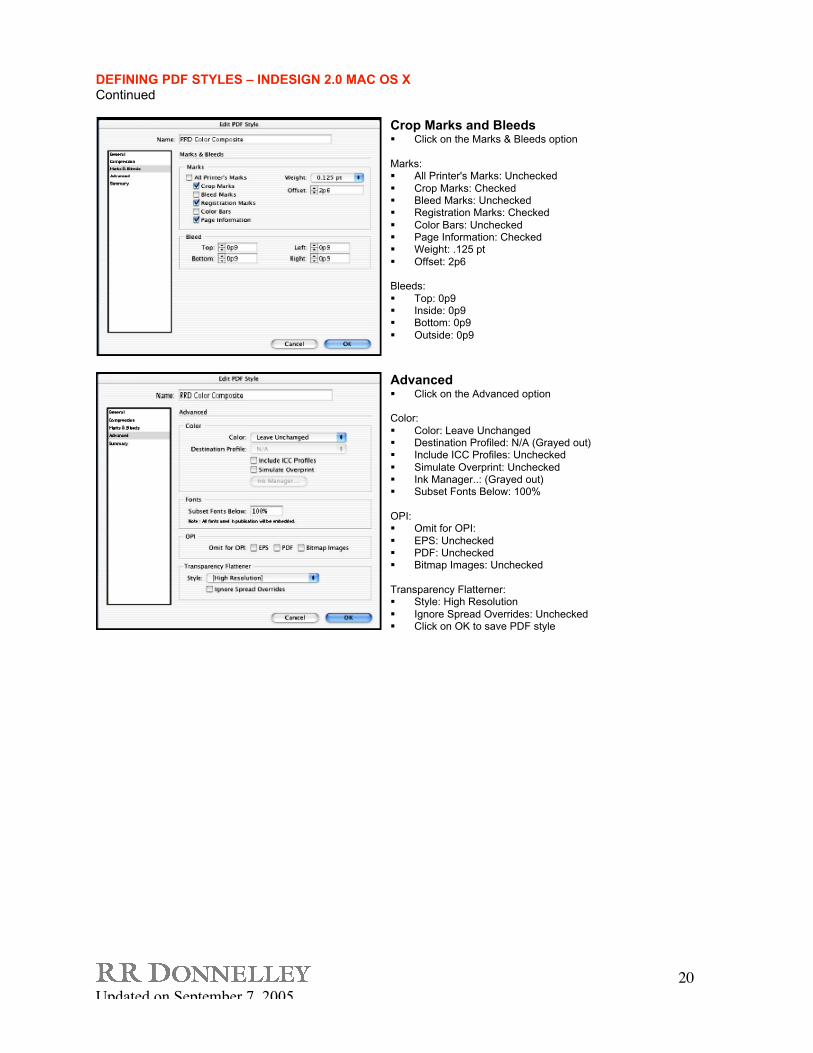
DEFINING PDF STYLES – INDESIGN 2.0 MAC OS XContinued
Crop Marks and Bleeds Click on the Marks & Bleeds option
Marks: All Printer's Marks: Unchecked
Crop Marks: Checked Bleed Marks: Unchecked Registration Marks: Checked
Color Bars: Unchecked Page Information: Checked Weight: .125 pt
Offset: 2p6
Bleeds:
Top: 0p9 Inside: 0p9 Bottom: 0p9
Outside: 0p9
Advanced Click on the Advanced option
Color:
Color: Leave Unchanged Destination Profiled: N/A (Grayed out) Include ICC Profiles: Unchecked
Simulate Overprint: Unchecked Ink Manager..: (Grayed out) Subset Fonts Below: 100%
OPI: Omit for OPI:
EPS: Unchecked PDF: Unchecked Bitmap Images: Unchecked
Transparency Flatterner: Style: High Resolution
Ignore Spread Overrides: Unchecked Click on OK to save PDF style
21Updated on September 7 2005
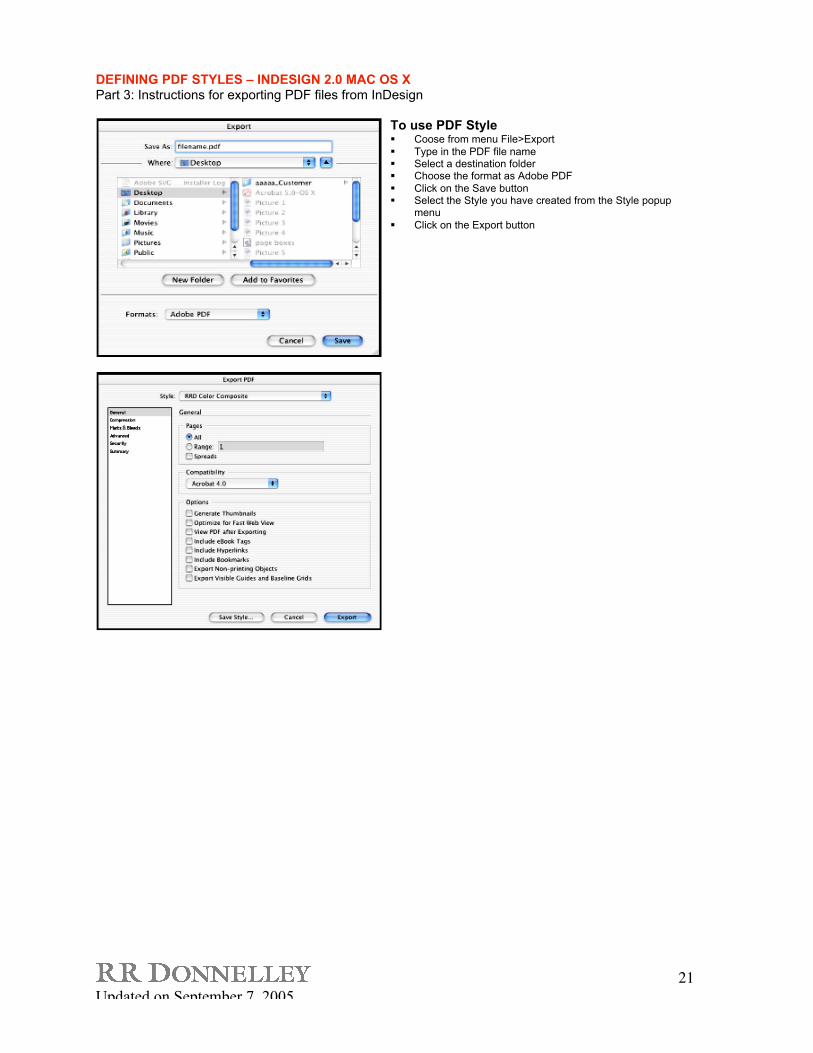
DEFINING PDF STYLES – INDESIGN 2.0 MAC OS XPart 3: Instructions for exporting PDF files from InDesign
To use PDF Style Coose from menu File>Export
Type in the PDF file name Select a destination folder Choose the format as Adobe PDF
Click on the Save button Select the Style you have created from the Style popup
menu
Click on the Export button

23Updated on September 7 2005
DEFINING PRINTER STYLES – INDESIGN CS AND CS2 FOR MAC OS XPart 1: Instructions for creating PostScript files in advance of making PDF files
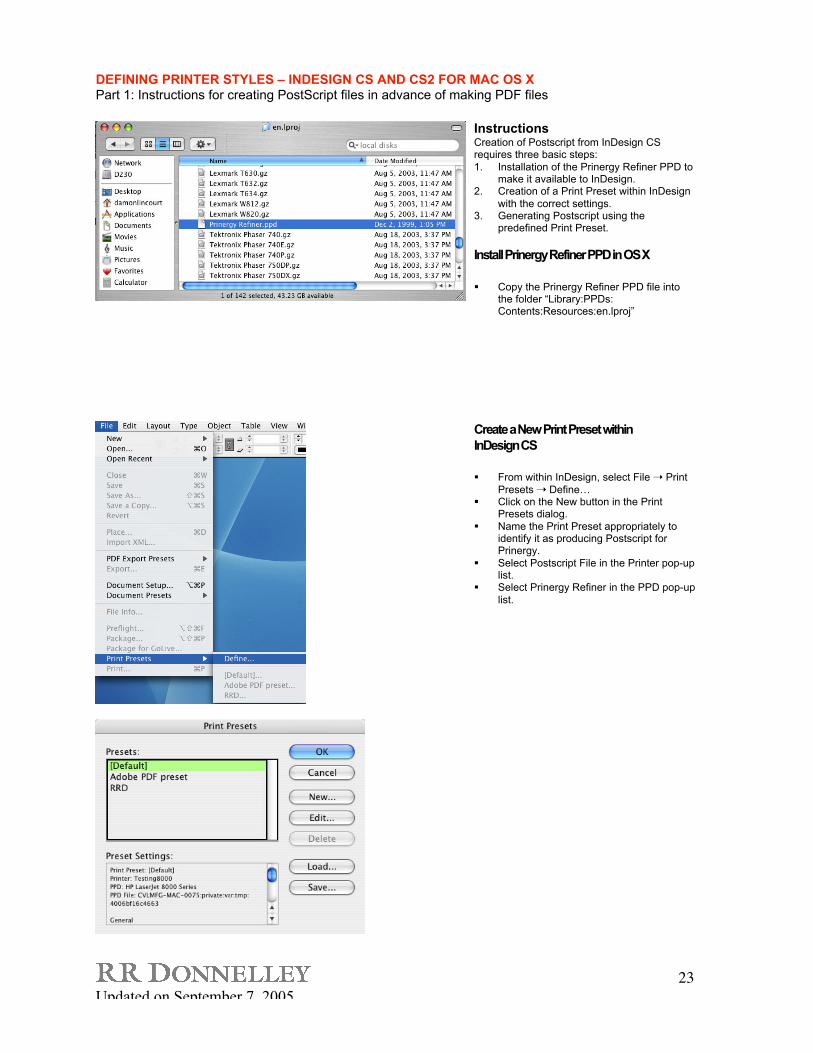
InstructionsCreation of Postscript from InDesign CSrequires three basic steps:
1. Installation of the Prinergy Refiner PPD tomake it available to InDesign.
2. Creation of a Print Preset within InDesign
with the correct settings.3. Generating Postscript using the
predefined Print Preset.
Install Prinergy Refiner PPD in OS X
Copy the Prinergy Refiner PPD file intothe folder “Library:PPDs:Contents:Resources:en.lproj”
Create a New Print Preset within
InDesign CS
From within InDesign, select File Print
Presets Define… Click on the New button in the Print
Presets dialog.
Name the Print Preset appropriately toidentify it as producing Postscript forPrinergy.
Select Postscript File in the Printer pop-uplist.
Select Prinergy Refiner in the PPD pop-up
list.
24Updated on September 7 2005
DEFINING PRINTER STYLES – INDESIGN CS AND CS2 FOR MAC OS XContinued
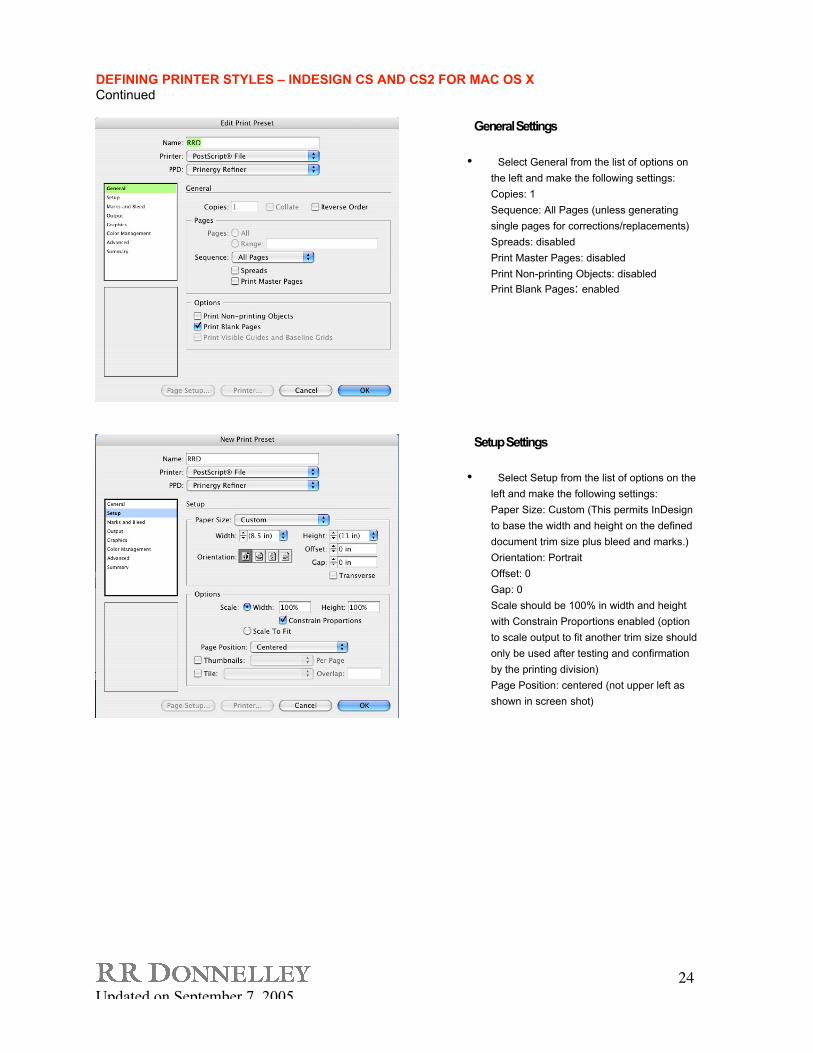
General Settings
• Select General from the list of options on
the left and make the following settings:
Copies: 1
Sequence: All Pages (unless generating
single pages for corrections/replacements)
Spreads: disabled
Print Master Pages: disabled
Print Non-printing Objects: disabled
Print Blank Pages: enabled
Setup Settings
• Select Setup from the list of options on the
left and make the following settings:
Paper Size: Custom (This permits InDesign
to base the width and height on the defined
document trim size plus bleed and marks.)
Orientation: Portrait
Offset: 0
Gap: 0
Scale should be 100% in width and height
with Constrain Proportions enabled (option
to scale output to fit another trim size should
only be used after testing and confirmation
by the printing division)
Page Position: centered (not upper left as
shown in screen shot)

25Updated on September 7 2005
DEFINING PRINTER STYLES – INDESIGN CS AND CS2 FOR MAC OS XContinued
Marks and Bleed
Select Marks and Bleed from the list ofoptions on the left and make the following
settings:Marks: Enable only Crop Marks,Registration Marks, and Page Information
Type: DefaultWeight: .25 ptOffset: .4167 in
In Bleed and Slug area:Use Document Bleed Settings: disabledBleed on all sides: .125 inInclude Slug Area: disabled
Output
Select Output from the list of options on
the left and make the following settings:Color: Composite Leave Color Unchanged(suitable for process color work and for
spot color work)Trapping: disabled (by default)Flip: None
Screening: disabled (by default)Inks: Review list to verify no unintendedcolors are included (simply disabling
output of undesired colors could result inelements missing from final file)Frequency and Angle: disabled (by
default)
26Updated on September 7 2005
DEFINING PRINTER STYLES – INDESIGN CS AND CS2 FOR MAC OS XContinued
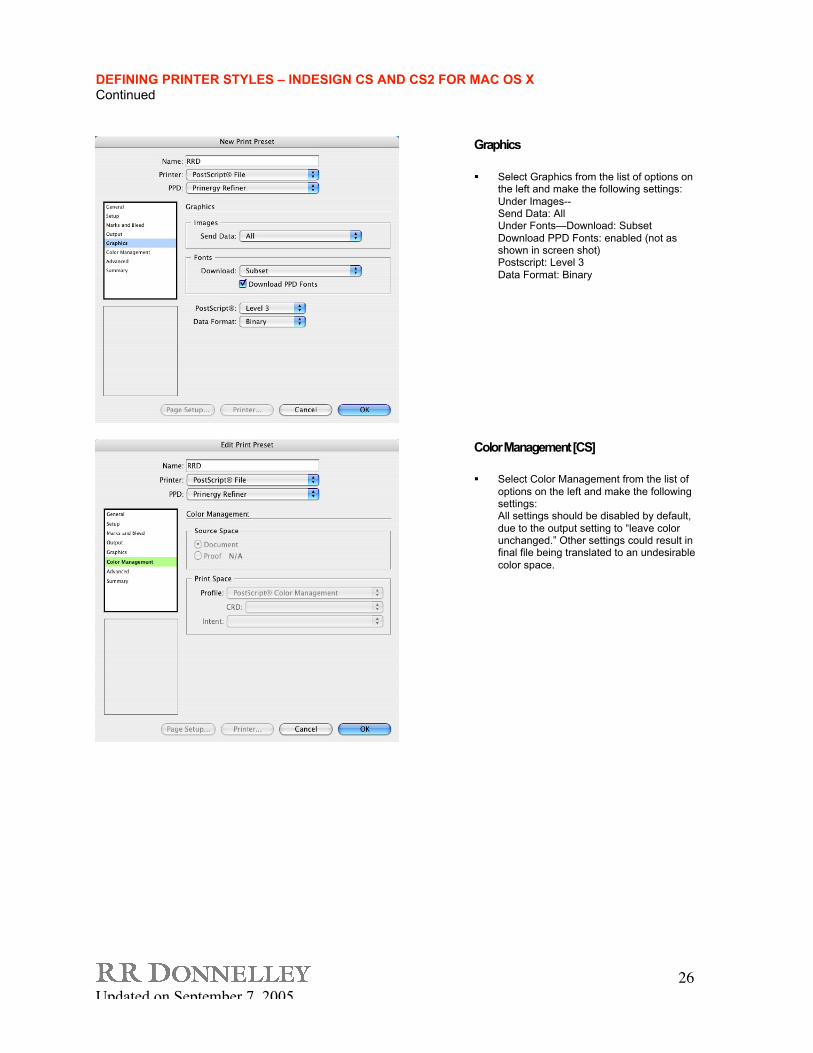
Graphics
Select Graphics from the list of options onthe left and make the following settings:
Under Images--Send Data: AllUnder Fonts—Download: Subset
Download PPD Fonts: enabled (not asshown in screen shot)Postscript: Level 3
Data Format: Binary
Color Management [CS]
Select Color Management from the list of
options on the left and make the followingsettings:All settings should be disabled by default,
due to the output setting to “leave colorunchanged.” Other settings could result infinal file being translated to an undesirable
color space.
27Updated on September 7 2005
DEFINING PRINTER STYLES – INDESIGN CS AND CS2 FOR MAC OS XContinued
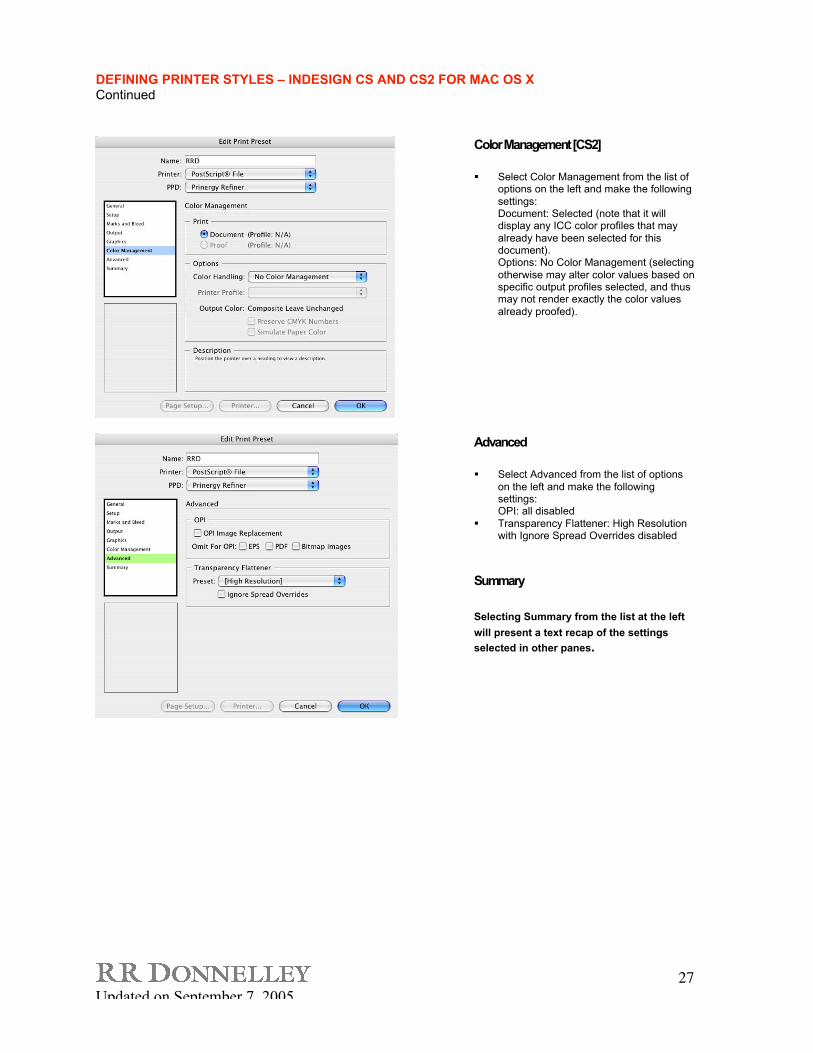
Color Management [CS2]
Select Color Management from the list ofoptions on the left and make the following
settings:Document: Selected (note that it willdisplay any ICC color profiles that may
already have been selected for thisdocument).Options: No Color Management (selecting
otherwise may alter color values based onspecific output profiles selected, and thusmay not render exactly the color values
already proofed).
Advanced
Select Advanced from the list of options
on the left and make the followingsettings:OPI: all disabled
Transparency Flattener: High Resolutionwith Ignore Spread Overrides disabled
Summary
Selecting Summary from the list at the left
will present a text recap of the settings
selected in other panes.
28Updated on September 7 2005
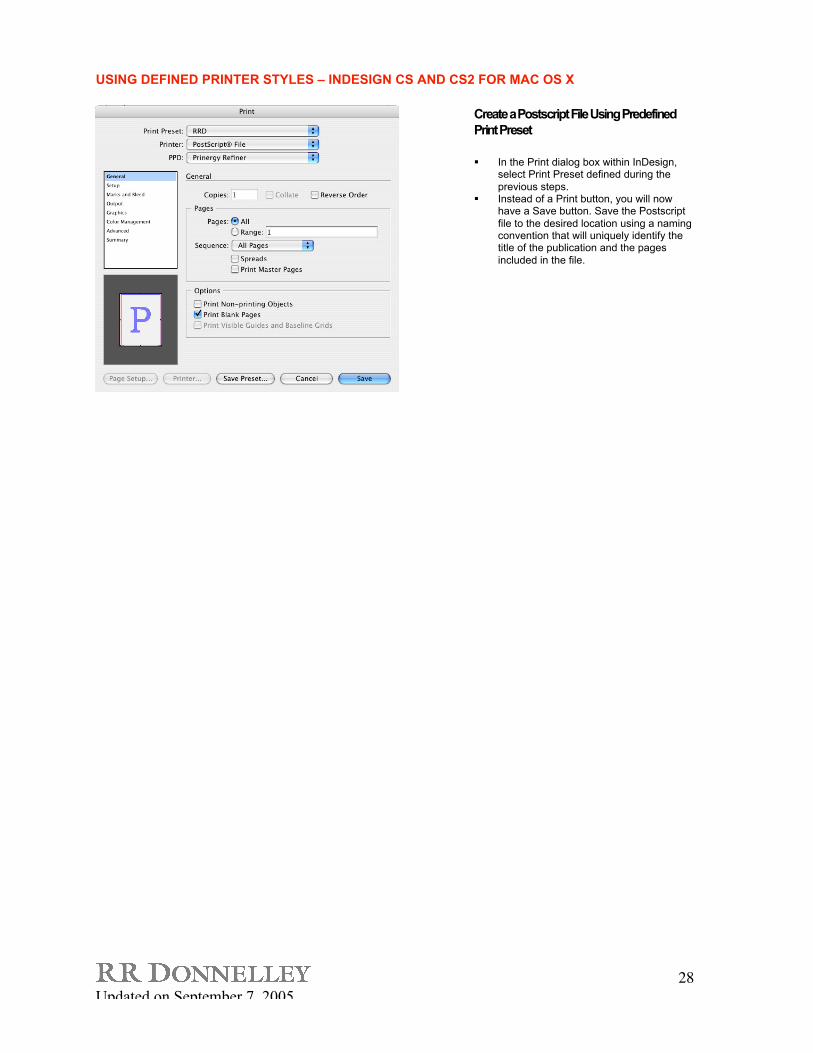
USING DEFINED PRINTER STYLES – INDESIGN CS AND CS2 FOR MAC OS X
Create a Postscript File Using Predefined
Print Preset
In the Print dialog box within InDesign,select Print Preset defined during the
previous steps. Instead of a Print button, you will now
have a Save button. Save the Postscript
file to the desired location using a namingconvention that will uniquely identify thetitle of the publication and the pages
included in the file.

29Updated on September 7 2005
DEFINING EXPORT PDF PRESET – INDESIGN CS AND CS2 FOR MAC OS XPart 2: While it is our recommendation to write Postscript from InDesign and use Acrobat Distiller tocreate PDFs, these instructions are suitable for creating an Export PDF preset for creating PDFsdirectly from InDesign. Where InDesign CS and CS2 differ, alternate screen shots are presented.
Instructions
From the File menu in InDesign, selectPDF Export Presets -> Define. In theresulting dialog box, click on the “New”
button to begin creating an export preset(our example here is named“RRD_PDF_Export.”
General [CS]
In the General pane:
Make sure Spreads is disabled.Compatibility set to Acrobat 5 (PDF 1.4).Embed Page Thumbnails enabled.
No other options enabled.
General [CS2]
In the General pane:
Standard: None (PDFs for RR Donnelleydo not necessarily have to be certified toone of the PDF/X standards.)
Make sure Spreads is disabled.Compatibility set to Acrobat 5 (PDF 1.4).Embed Page Thumbnails enabled.
No other options enabled.

30Updated on September 7 2005
DEFINING EXPORT PDF PRESET – INDESIGN CS AND CS2 FOR MAC OS XContinued
Compression
In the Compression pane:Do Not Downsample color images.
Compression for color images set to ZIP.Image Quality for color images 8-bit.Do Not Downsample grayscale images.
Compression for grayscale images set toZIP.Image quality for grayscaled images 8-bit.
Do Not Downsample monochromeimages.Compression for monochrome set to
CCITT Group 4.Compress Text and Line Art enabled.Crop Image Data to Frames disabled.
Marks and Bleeds
In the Marks and Bleeds pane:Enable Crop Marks, Registration Marks,and Page Information.
Type = Default.Weight = .25 pt. (NOT .125, as shown inthis screen shot).
Offset = .4167 inch.Disable Use Document Bleed Settings.Set the bleed on all sides to .125 inch.
Disable Include Slug Area.

31Updated on September 7 2005
DEFINING EXPORT PDF PRESET – INDESIGN CS AND CS2 FOR MAC OS XContinued
Output [CS2]
In the Output pane:Color = No Color Conversion (applies no
color management, preserves valuespresently set within images).Profile Inclusion Policy: Don’t Include
Profiles (assumes file and images are allin final color space and no colorconversions should be needed).
PDF/X options should be disabled bydefault.
Advanced [CS]
In the Advanced pane:Color = Leave Unchanged (applies no
color management, preserves valuespresently set within images).Disable Include ICC Profiles.
PDF/X options should be disabled bydefault.Subset fonts when percent of characters
used is less than 100% (subsets all fontsembedded).OPI disabled for all images.
Transparency Flattener should bedisabled by default.

32Updated on September 7 2005
DEFINING EXPORT PDF PRESET – INDESIGN CS AND CS2 FOR MAC OS XContinued
Advanced [CS2]
In the Advanced pane: Subset fonts when percent of characters
used is less than 100% (subsets all fontsembedded IF font license permitsembedding).
OPI disabled for all images.Transparency Flattener should bedisabled by default.
Exporting PDF Using Defined Preset
From the File menu in InDesign select
Export . . . Select a location for the exported PDF and
name appropriately to identify the title and
page range. From the resulting dialog, select the
Export Preset previously defined from the
available pop-up list. Enable none of the available Security
options.
Click on the Export button.