Embed Size (px)
Citation preview
BPME How To Guide
Page 1
BPME How to Guide
Overview
Created by : Mike Myburgh Date : 12-10-2020 Version : 1.0 Draft

BPME How To Guide
Page 2
Table of contents
1 Service Calls in BPME1.1 General Information
1.1.1 BPME Services API1.1.2 Calling a Pageflow as Rest Service1.1.3 Calling a Process as Rest Service1.1.4 Calling a Rest Service from a Form
BPME How To Guide
Page 3
1 Service Calls in BPME
1.1 General Information Although they seem very similar, the Pageflow and process initiate Rest service calls are actually very different. A Pageflow represents data that is linked to a user interface that accepts inputs, outputs and inouts. The data also have to be structured in this way. The process simply expects JSON data payload that represents the data being passed into the process.
1.1.1 BPME Services API BPM Enterprise has a great new feature in that the API Explorer was designed to expose all engine API’s that will allow users to test and execute API’s through the swagger interface. As you will see there are many API’s for different sections in the engine, but for rest services we will be using the 2 below. Pageflow http://<ipaddress>:<port>/apps/api-explorer/index.html#!/swaggerUi?feature=..%2Fyaml%2FPageflowEngine-v01.yaml Process http://<ipaddress>:<port>/apps/api-explorer/index.html#!/swaggerUi?feature=..%2Fyaml%2FProcessManagementService.yaml
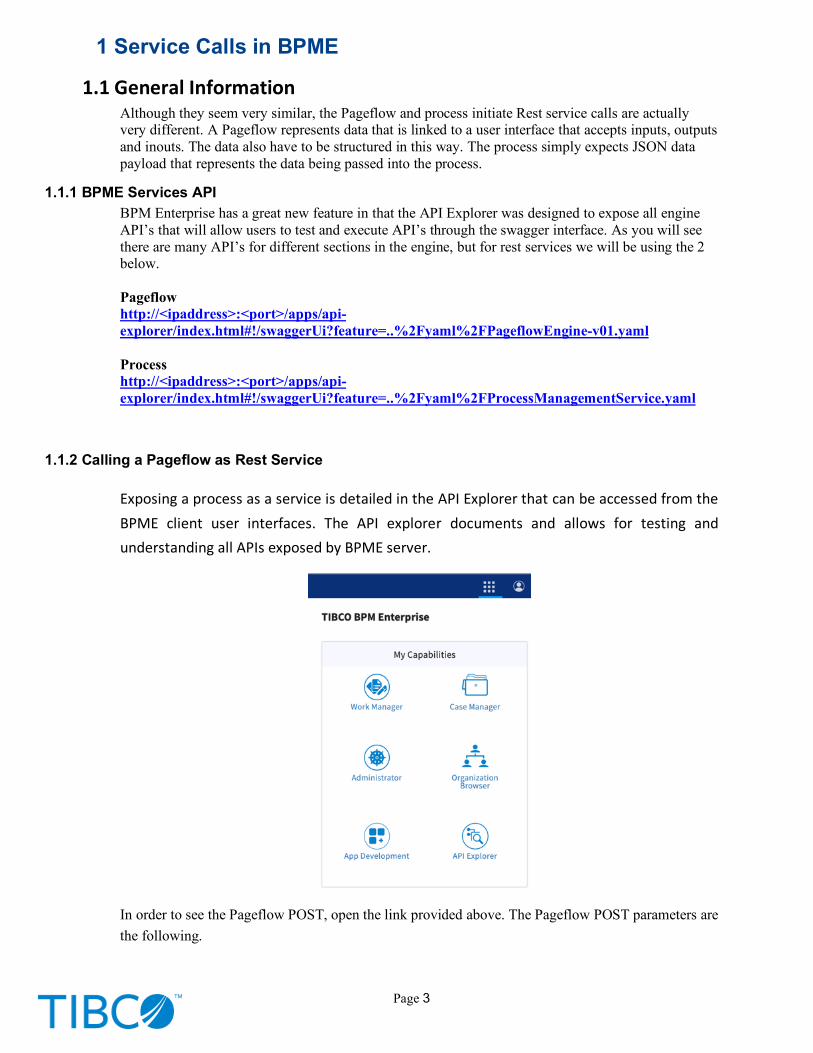
1.1.2 Calling a Pageflow as Rest Service Exposing a process as a service is detailed in the API Explorer that can be accessed from the BPME client user interfaces. The API explorer documents and allows for testing and understanding all APIs exposed by BPME server.
In order to see the Pageflow POST, open the link provided above. The Pageflow POST parameters are the following.
BPME How To Guide
Page 4
{ "moduleName": "string", "processName": "string", "moduleVersion": "string", "data": "string" }
It is possible to get the POST input parameters input values by executing the GET /Pageflows REST call in the API. It returns an array of available/deployed Pageflows on the server. An extract is provided below.
[ { "processId": "106", "processName": "Service", "processLabel": "Service", "processExtName": "processOut/pageflow/changeHealth_forms.xpdl/Service.bpel", "processType": "PAGEFLOW", "channelIds": [ "openspaceGWTPull_DefaultChannel" ], "moduleId": "21", "moduleName": "/changeHealth_forms/Process Packages/changeHealth_forms.xpdl", "moduleInternalName": "/changeHealth_forms/Process Packages/changeHealth_forms.xpdl", "moduleVersion": "1.0.0.20201208102700023" },…….
The module version can be truncated to “1.0.0” when executing the POST, so it's not required to add the entire version number, as this will change every time you deploy a new version of the process and for that reason you do not want to include the entire version number.
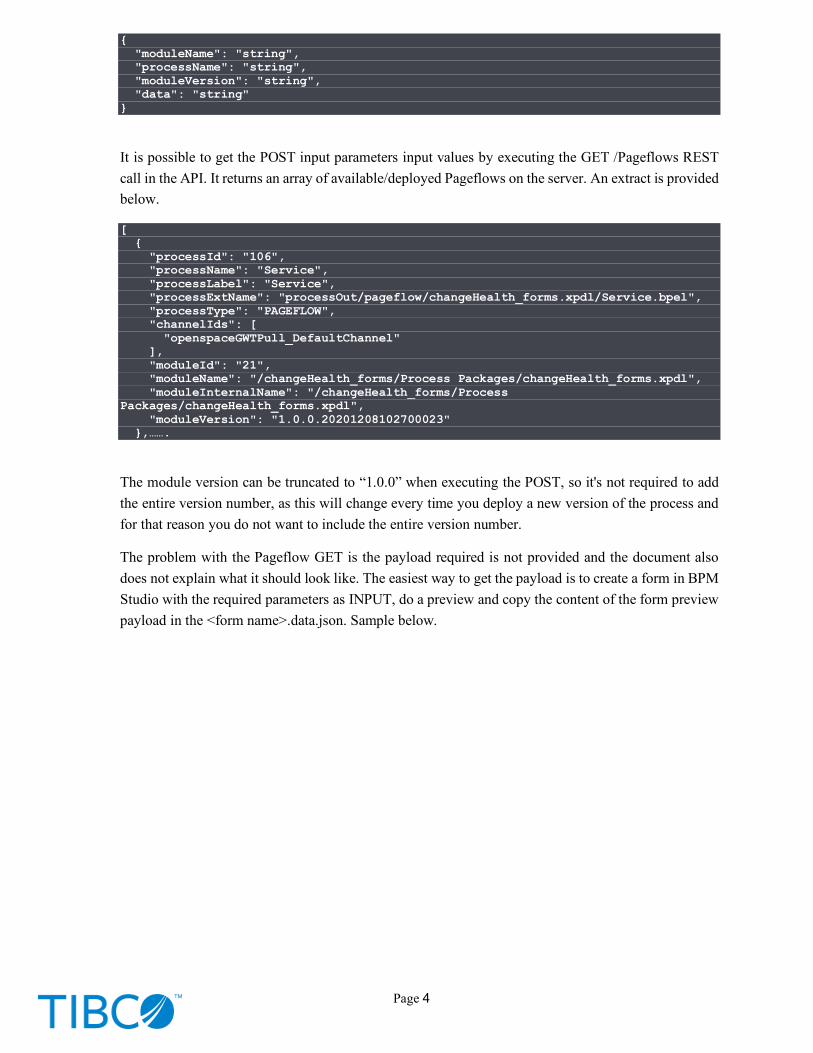
The problem with the Pageflow GET is the payload required is not provided and the document also does not explain what it should look like. The easiest way to get the payload is to create a form in BPM Studio with the required parameters as INPUT, do a preview and copy the content of the form preview payload in the <form name>.data.json. Sample below.

BPME How To Guide
Page 5
This payload can be used in BW to create the XML Schema. There is also a problem with this. When your input data contains more than one Case Class, BW does not create the complete XML Schema. The way I did it was to create an XML schema for each element separately and manually copied all the elements into the structured complex type. My example should show this.
This should give you an idea of the data required to call the Pageflow REST Service. Let’s look at the BWCE project provided. This BWCE project can be found in the same folder as this
document called Process_Pageflow_RestServiceStart.zip
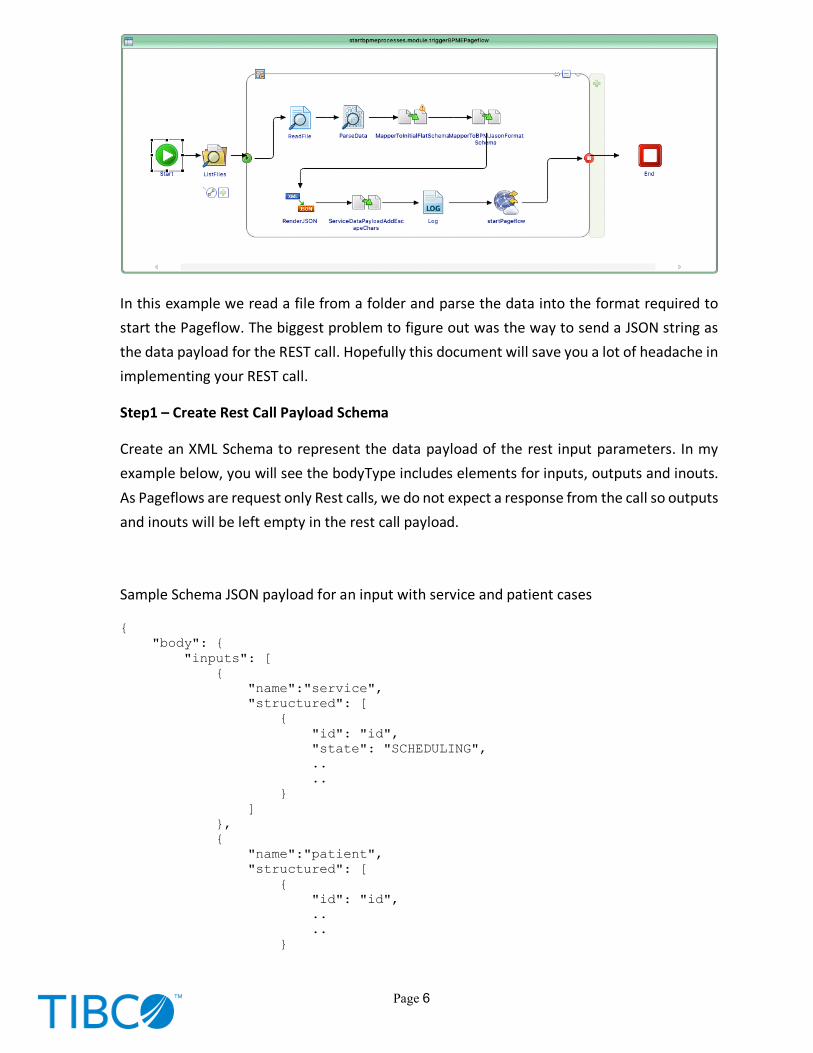
We will use the process below to illustrate the implementation of the service call as there are a couple of things that need to be done to get the Rest call payload data in the correct format to call the POST method.
BPME How To Guide
Page 6
In this example we read a file from a folder and parse the data into the format required to start the Pageflow. The biggest problem to figure out was the way to send a JSON string as the data payload for the REST call. Hopefully this document will save you a lot of headache in implementing your REST call.
Step1 – Create Rest Call Payload Schema
Create an XML Schema to represent the data payload of the rest input parameters. In my example below, you will see the bodyType includes elements for inputs, outputs and inouts. As Pageflows are request only Rest calls, we do not expect a response from the call so outputs and inouts will be left empty in the rest call payload.
Sample Schema JSON payload for an input with service and patient cases
{ "body": { "inputs": [ { "name":"service", "structured": [ { "id": "id", "state": "SCHEDULING", .. .. } ] }, { "name":"patient", "structured": [ { "id": "id", .. .. }
BPME How To Guide
Page 7
] } ], "outputs": [ ], "inouts": [ ] } }
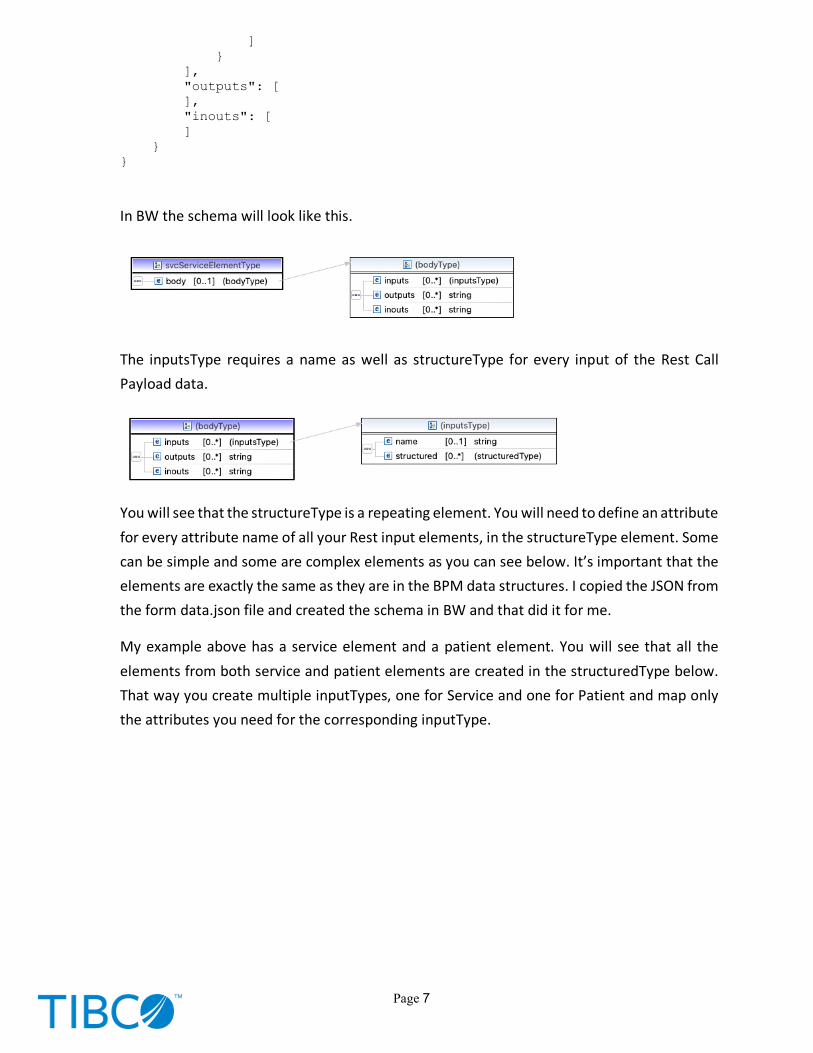
In BW the schema will look like this.
The inputsType requires a name as well as structureType for every input of the Rest Call Payload data.
You will see that the structureType is a repeating element. You will need to define an attribute for every attribute name of all your Rest input elements, in the structureType element. Some can be simple and some are complex elements as you can see below. It’s important that the elements are exactly the same as they are in the BPM data structures. I copied the JSON from the form data.json file and created the schema in BW and that did it for me.
My example above has a service element and a patient element. You will see that all the elements from both service and patient elements are created in the structuredType below. That way you create multiple inputTypes, one for Service and one for Patient and map only the attributes you need for the corresponding inputType.
BPME How To Guide
Page 8
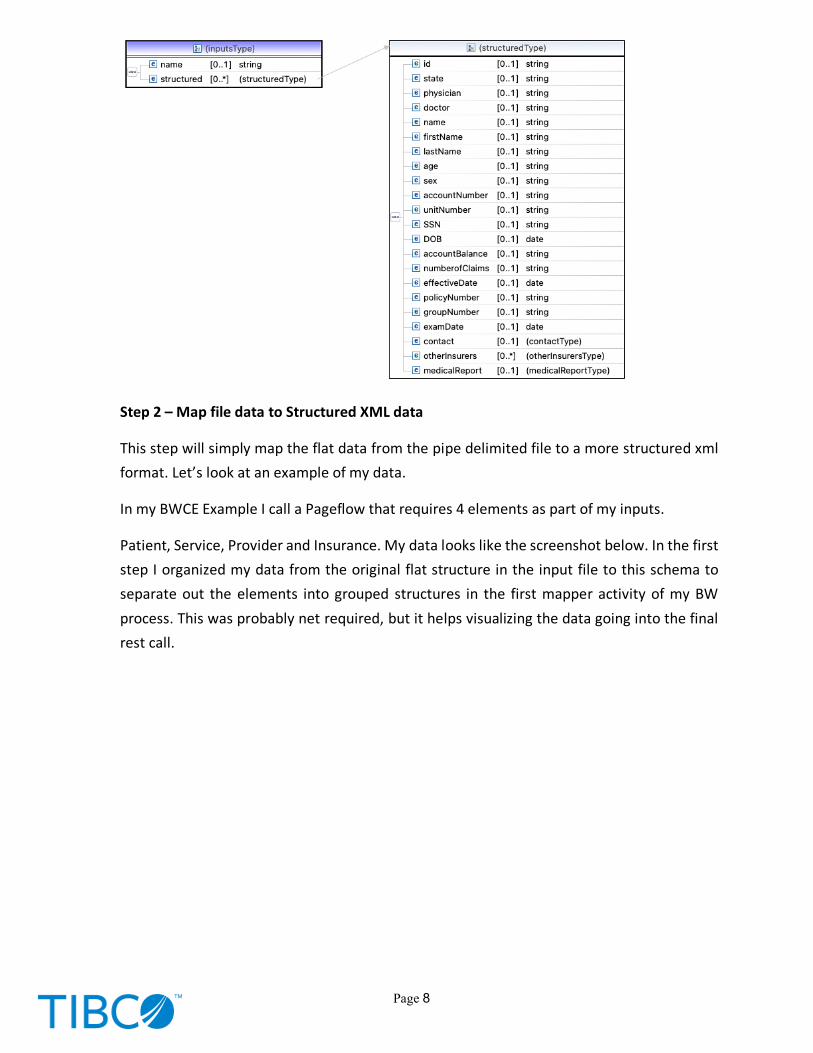
Step 2 – Map file data to Structured XML data
This step will simply map the flat data from the pipe delimited file to a more structured xml format. Let’s look at an example of my data.
In my BWCE Example I call a Pageflow that requires 4 elements as part of my inputs.
Patient, Service, Provider and Insurance. My data looks like the screenshot below. In the first step I organized my data from the original flat structure in the input file to this schema to separate out the elements into grouped structures in the first mapper activity of my BW process. This was probably net required, but it helps visualizing the data going into the final rest call.
BPME How To Guide
Page 9
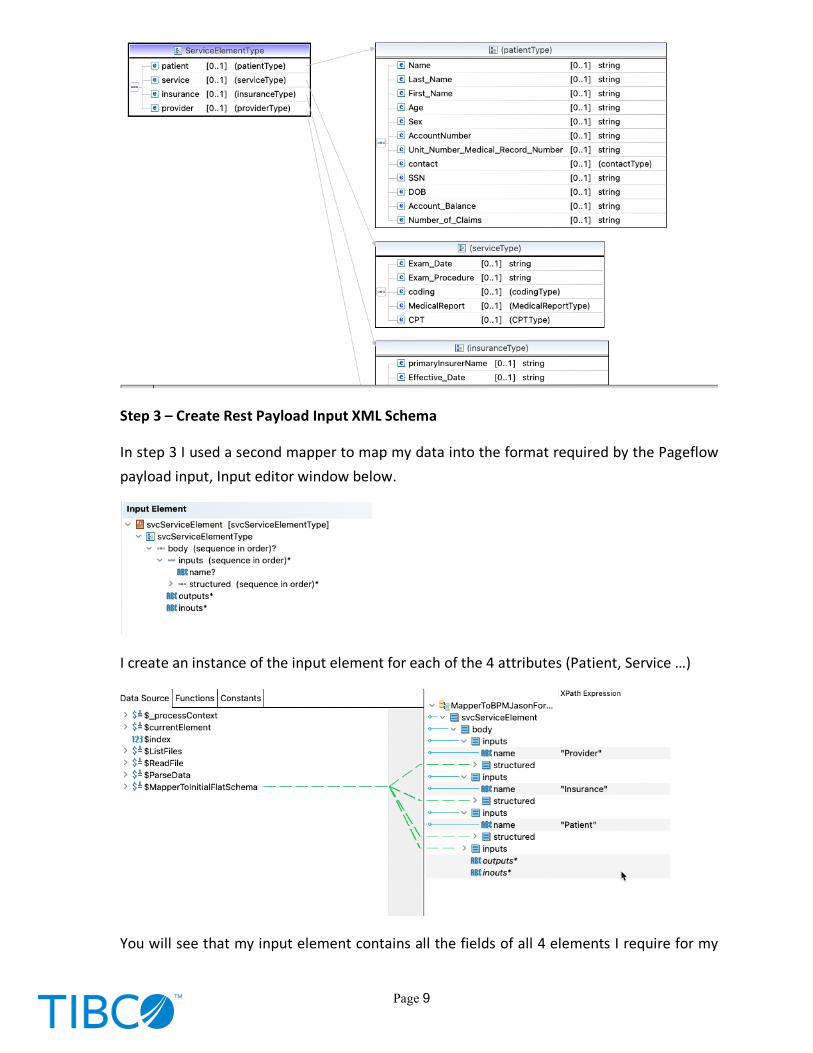
Step 3 – Create Rest Payload Input XML Schema
In step 3 I used a second mapper to map my data into the format required by the Pageflow payload input, Input editor window below.
I create an instance of the input element for each of the 4 attributes (Patient, Service …)
You will see that my input element contains all the fields of all 4 elements I require for my
BPME How To Guide
Page 10
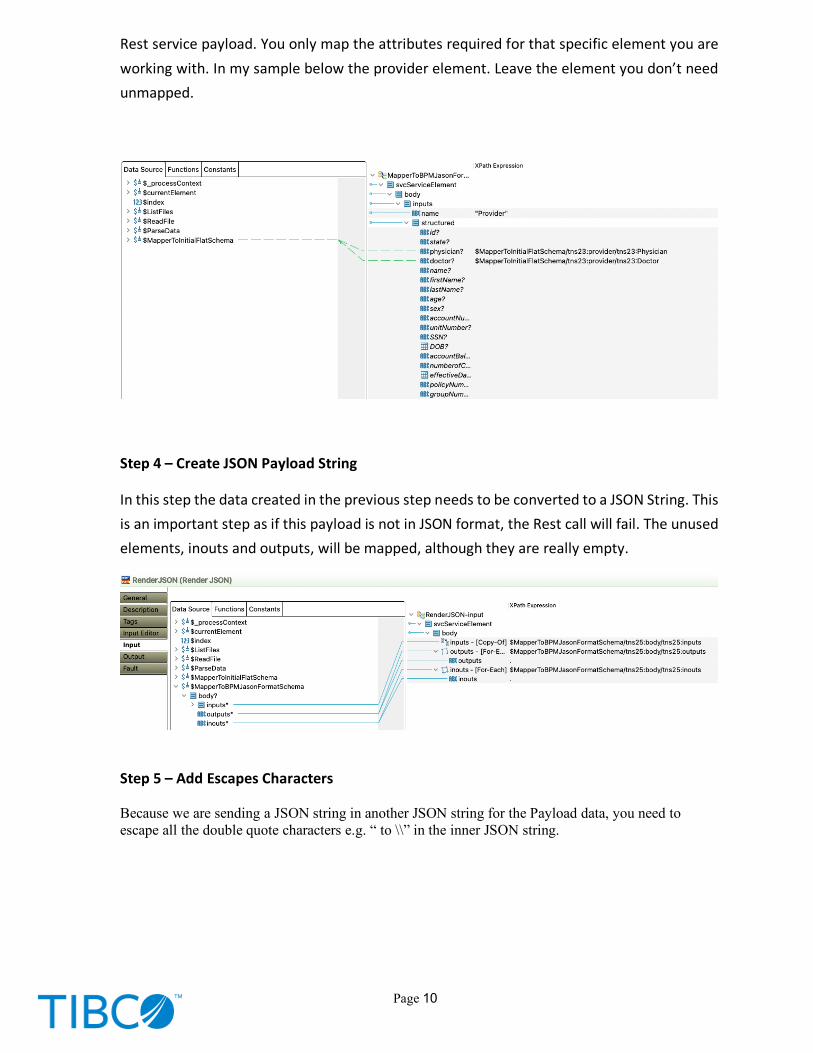
Rest service payload. You only map the attributes required for that specific element you are working with. In my sample below the provider element. Leave the element you don’t need unmapped.
Step 4 – Create JSON Payload String
In this step the data created in the previous step needs to be converted to a JSON String. This is an important step as if this payload is not in JSON format, the Rest call will fail. The unused elements, inouts and outputs, will be mapped, although they are really empty.
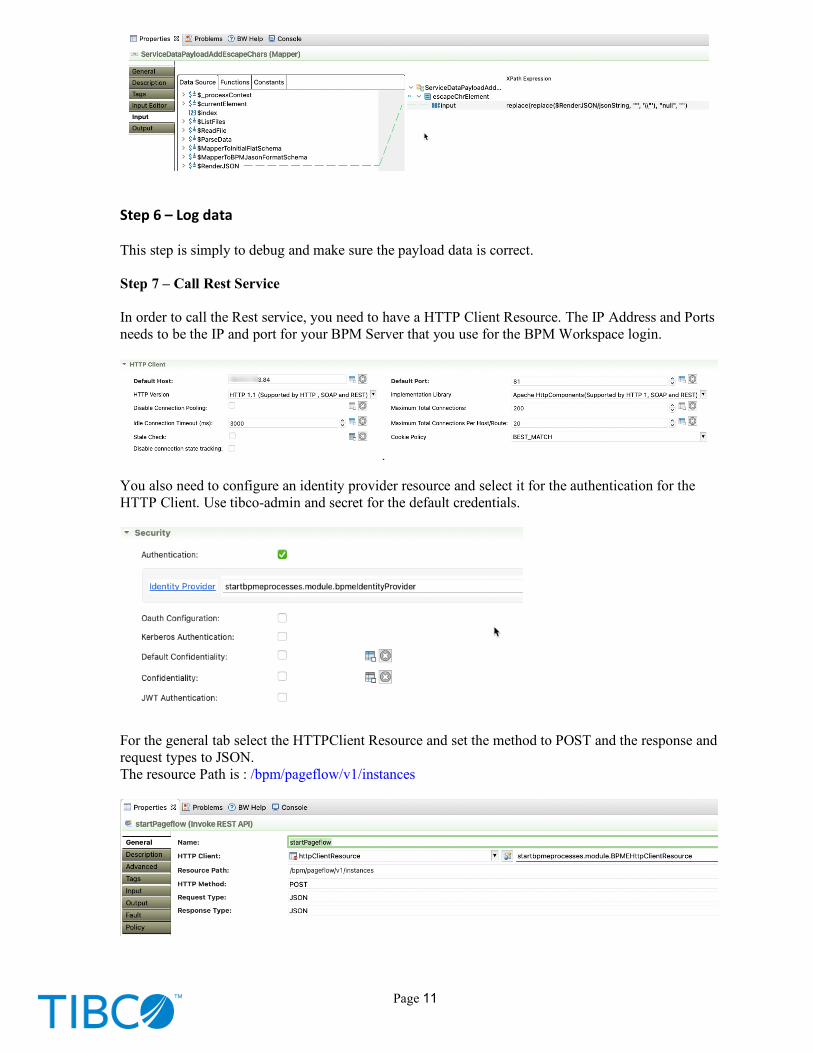
Step 5 – Add Escapes Characters
Because we are sending a JSON string in another JSON string for the Payload data, you need to escape all the double quote characters e.g. “ to \\” in the inner JSON string.
BPME How To Guide
Page 11
Step 6 – Log data
This step is simply to debug and make sure the payload data is correct. Step 7 – Call Rest Service In order to call the Rest service, you need to have a HTTP Client Resource. The IP Address and Ports needs to be the IP and port for your BPM Server that you use for the BPM Workspace login.
You also need to configure an identity provider resource and select it for the authentication for the HTTP Client. Use tibco-admin and secret for the default credentials.
For the general tab select the HTTPClient Resource and set the method to POST and the response and request types to JSON. The resource Path is : /bpm/pageflow/v1/instances

BPME How To Guide
Page 12
In the Input tab, configure the inputs like the screenshot below.
The ASCII content looks like this. concat('{"moduleName": "/changeHealth_busServices/Process Packages/changeHealth_busServices.xpdl","processName": "svcCaptureService","moduleVersion": "1.0.0","data":"', $ServiceDataPayloadAddEscapeChars/tns21:input, '"}')
1.1.3 Calling a Process as Rest Service The main difference in the Rest service calling a process rather than a pageflow is the data structure.
Instead of this structure with inputs, outputs and inputs like below:
{ "body": { "inputs": [ { "name":"Patient", "structured": [ { "id": "id", "state": "NEW", "name": "name", "firstName": "firstName", .. } ] } ], "outputs": [ ], "inouts": [ ] }
BPME How To Guide
Page 13
}
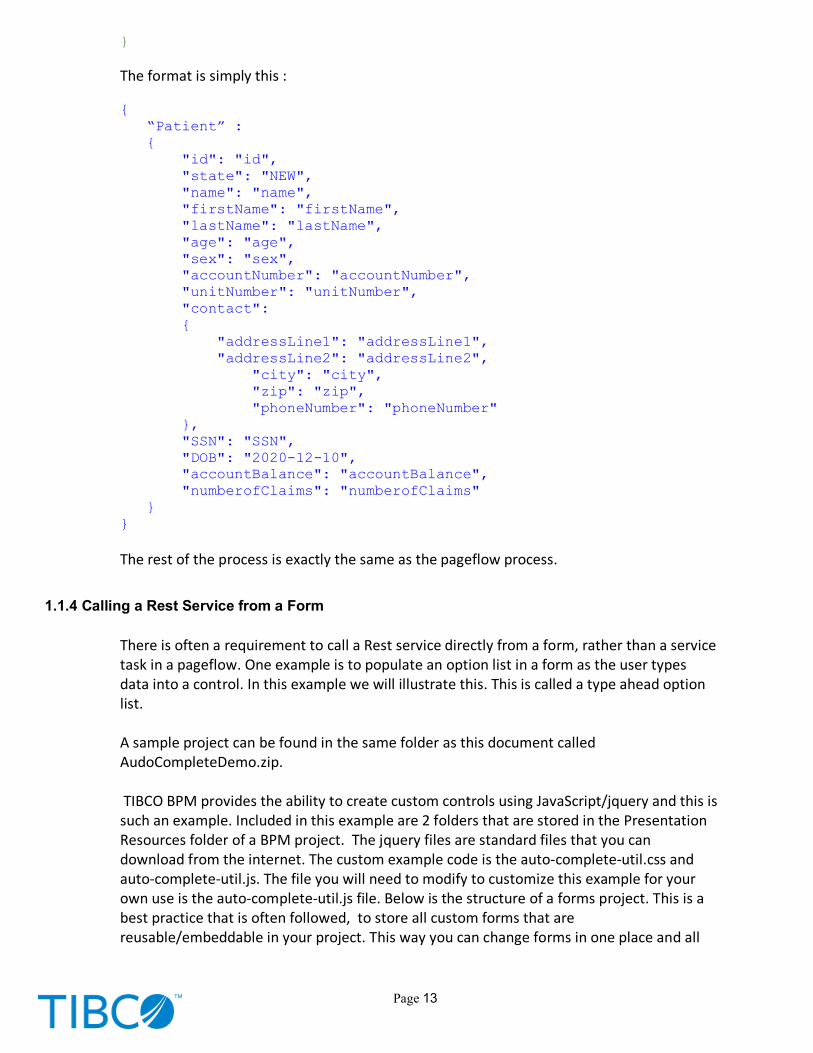
The format is simply this :
{ “Patient” : { "id": "id", "state": "NEW", "name": "name", "firstName": "firstName", "lastName": "lastName", "age": "age", "sex": "sex", "accountNumber": "accountNumber", "unitNumber": "unitNumber", "contact": { "addressLine1": "addressLine1", "addressLine2": "addressLine2", "city": "city", "zip": "zip", "phoneNumber": "phoneNumber" }, "SSN": "SSN", "DOB": "2020-12-10", "accountBalance": "accountBalance", "numberofClaims": "numberofClaims" } } The rest of the process is exactly the same as the pageflow process.
1.1.4 Calling a Rest Service from a Form
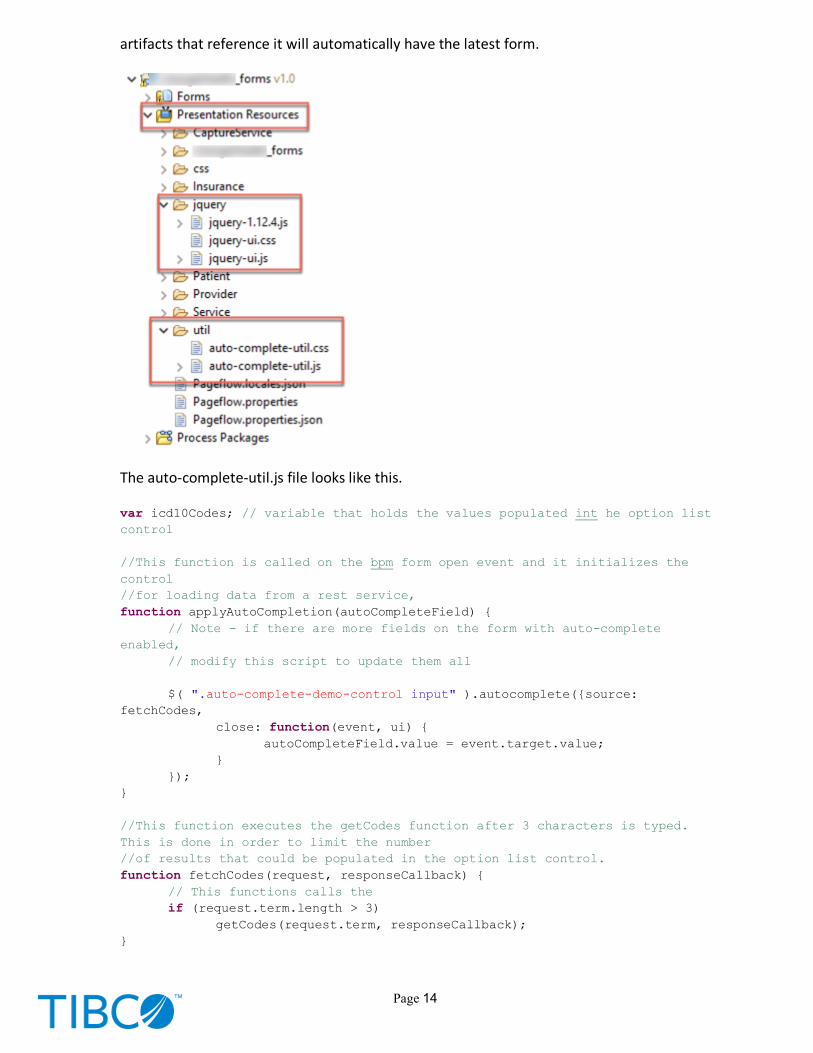
There is often a requirement to call a Rest service directly from a form, rather than a service task in a pageflow. One example is to populate an option list in a form as the user types data into a control. In this example we will illustrate this. This is called a type ahead option list. A sample project can be found in the same folder as this document called AudoCompleteDemo.zip. TIBCO BPM provides the ability to create custom controls using JavaScript/jquery and this is such an example. Included in this example are 2 folders that are stored in the Presentation Resources folder of a BPM project. The jquery files are standard files that you can download from the internet. The custom example code is the auto-complete-util.css and auto-complete-util.js. The file you will need to modify to customize this example for your own use is the auto-complete-util.js file. Below is the structure of a forms project. This is a best practice that is often followed, to store all custom forms that are reusable/embeddable in your project. This way you can change forms in one place and all
BPME How To Guide
Page 14
artifacts that reference it will automatically have the latest form.
The auto-complete-util.js file looks like this. var icd10Codes; // variable that holds the values populated int he option list control //This function is called on the bpm form open event and it initializes the control //for loading data from a rest service, function applyAutoCompletion(autoCompleteField) { // Note - if there are more fields on the form with auto-complete enabled, // modify this script to update them all $( ".auto-complete-demo-control input" ).autocomplete({source: fetchCodes, close: function(event, ui) { autoCompleteField.value = event.target.value; } }); } //This function executes the getCodes function after 3 characters is typed. This is done in order to limit the number //of results that could be populated in the option list control. function fetchCodes(request, responseCallback) { // This functions calls the if (request.term.length > 3) getCodes(request.term, responseCallback); }
BPME How To Guide
Page 15
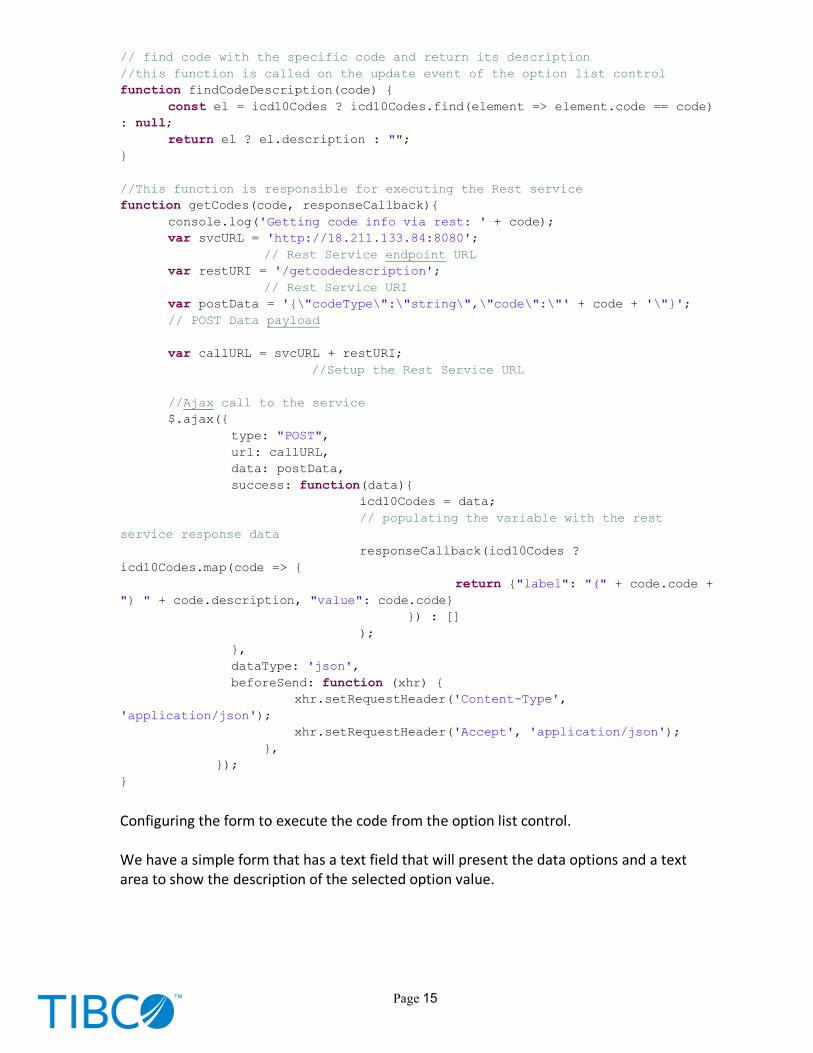
// find code with the specific code and return its description //this function is called on the update event of the option list control function findCodeDescription(code) { const el = icd10Codes ? icd10Codes.find(element => element.code == code) : null; return el ? el.description : ""; } //This function is responsible for executing the Rest service function getCodes(code, responseCallback){ console.log('Getting code info via rest: ' + code); var svcURL = 'http://18.211.133.84:8080'; // Rest Service endpoint URL var restURI = '/getcodedescription'; // Rest Service URI var postData = '{\"codeType\":\"string\",\"code\":\"' + code + '\"}'; // POST Data payload var callURL = svcURL + restURI; //Setup the Rest Service URL //Ajax call to the service $.ajax({ type: "POST", url: callURL, data: postData, success: function(data){ icd10Codes = data; // populating the variable with the rest service response data responseCallback(icd10Codes ? icd10Codes.map(code => { return {"label": "(" + code.code + ") " + code.description, "value": code.code} }) : [] ); }, dataType: 'json', beforeSend: function (xhr) { xhr.setRequestHeader('Content-Type', 'application/json'); xhr.setRequestHeader('Accept', 'application/json'); }, }); }
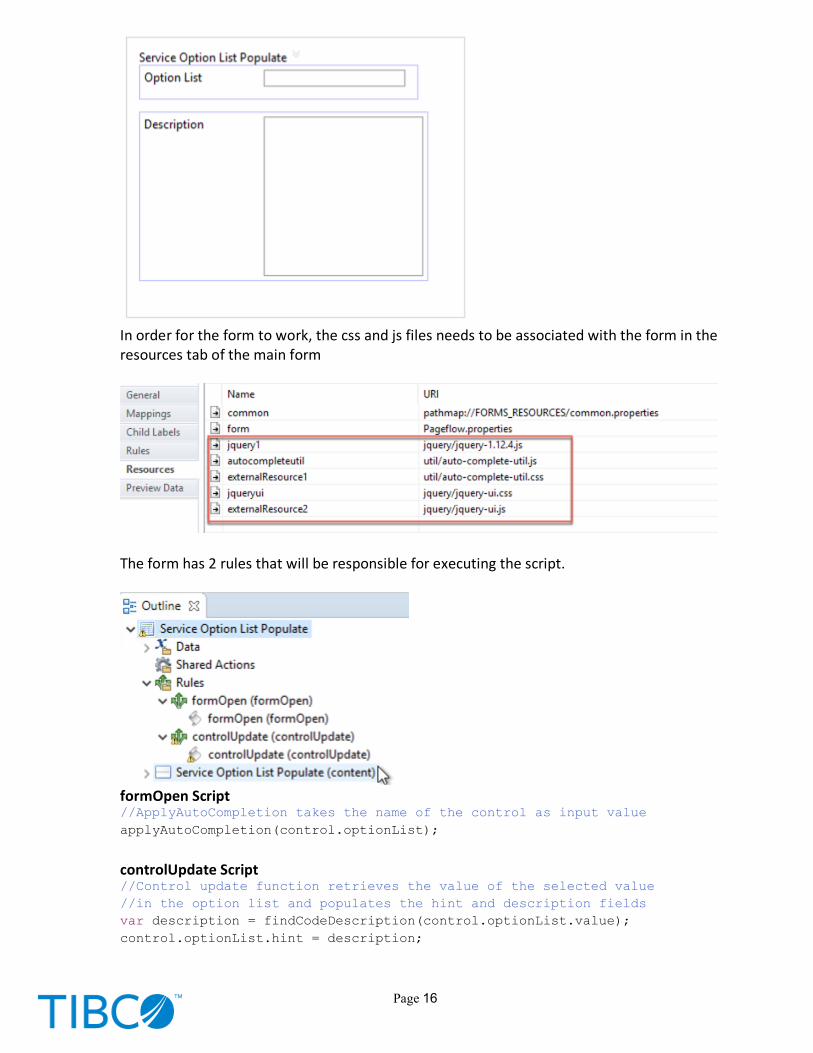
Configuring the form to execute the code from the option list control. We have a simple form that has a text field that will present the data options and a text area to show the description of the selected option value.
BPME How To Guide
Page 16
In order for the form to work, the css and js files needs to be associated with the form in the resources tab of the main form
The form has 2 rules that will be responsible for executing the script.
formOpen Script //ApplyAutoCompletion takes the name of the control as input value applyAutoCompletion(control.optionList);
controlUpdate Script //Control update function retrieves the value of the selected value //in the option list and populates the hint and description fields var description = findCodeDescription(control.optionList.value); control.optionList.hint = description;
BPME How To Guide
Page 17
control.description.value = description;
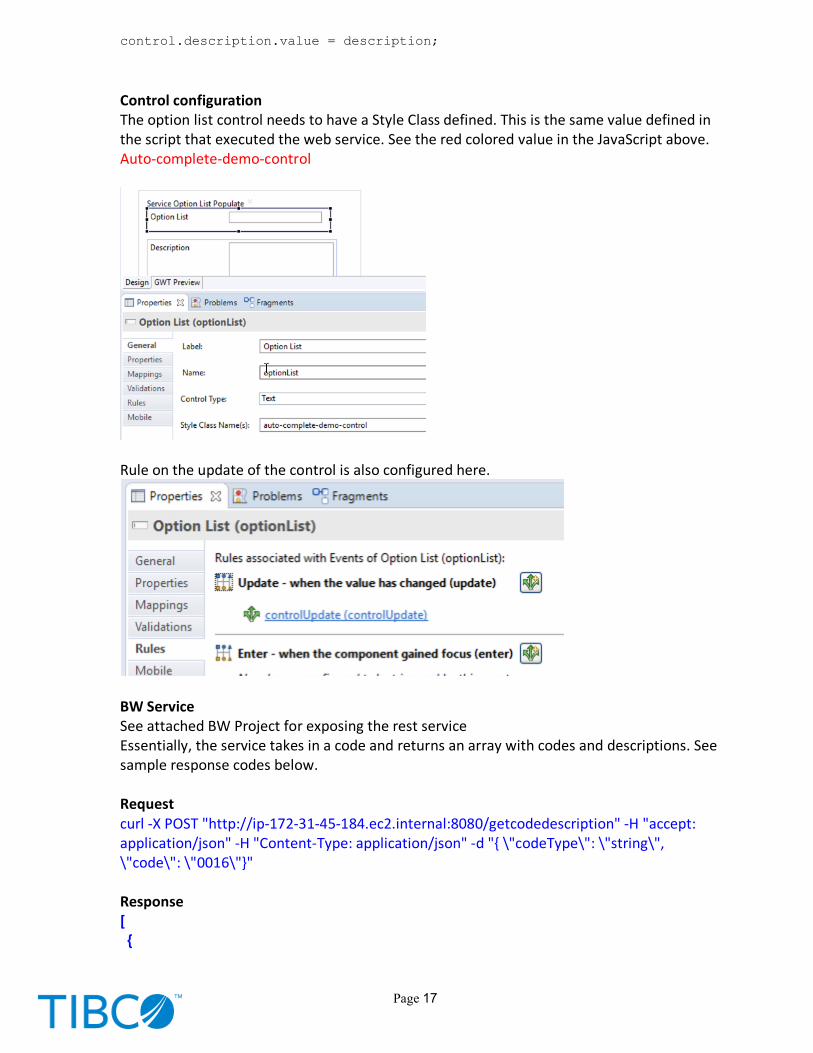
Control configuration The option list control needs to have a Style Class defined. This is the same value defined in the script that executed the web service. See the red colored value in the JavaScript above. Auto-complete-demo-control
Rule on the update of the control is also configured here.
BW Service See attached BW Project for exposing the rest service Essentially, the service takes in a code and returns an array with codes and descriptions. See sample response codes below. Request curl -X POST "http://ip-172-31-45-184.ec2.internal:8080/getcodedescription" -H "accept: application/json" -H "Content-Type: application/json" -d "{ \"codeType\": \"string\", \"code\": \"0016\"}" Response [ {
BPME How To Guide
Page 18
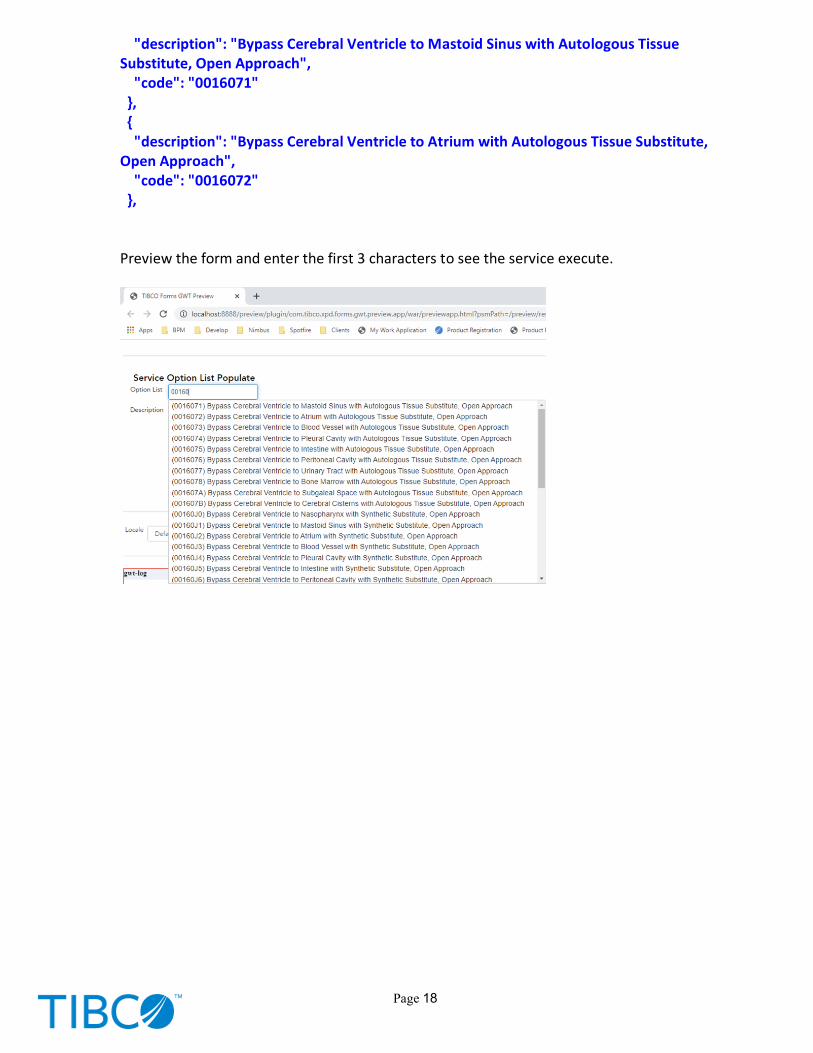
"description": "Bypass Cerebral Ventricle to Mastoid Sinus with Autologous Tissue Substitute, Open Approach", "code": "0016071" }, { "description": "Bypass Cerebral Ventricle to Atrium with Autologous Tissue Substitute, Open Approach", "code": "0016072" }, Preview the form and enter the first 3 characters to see the service execute.