Embed Size (px)
DESCRIPTION
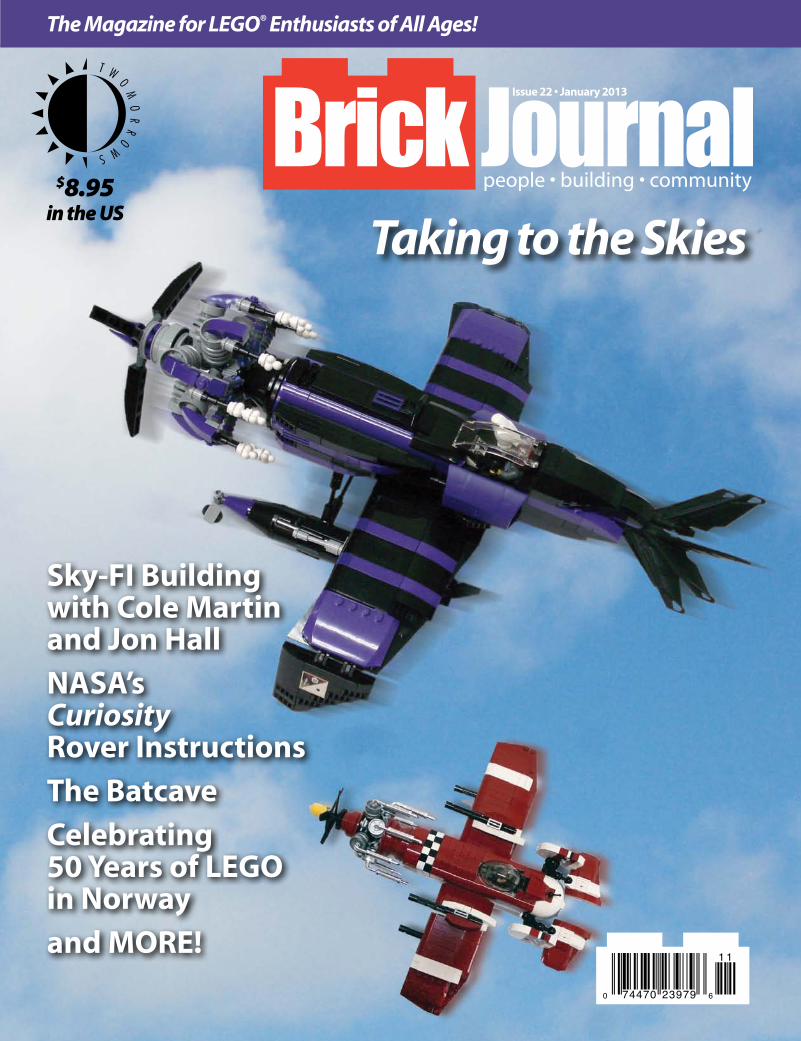
BrickJournal #22 (84 full-color pages, $8.95), the magazine for LEGO enthusiasts, takes to the skies with aviation building! Ralph Savelsberg takes off with his custom LEGO fighter models, followed by a squadron of articles on Sky-Fi planes by Fradel Gonzales and Cole Martin! Step-by-step instructions to build a Sky-Fi plane are also included in this issue, along with our regular feature on minifigure customization by Jared Burks, AFOLs by Greg Hyland, other step-by-step "You Can Build It" instructions, and more! So yell "Geronimo!" and dive into LEGO plane building in BrickJournal #22! Edited by Joe Meno.
Citation preview
$8.95in the US
Issue 22 • January 2013
0 74470 23979 6
1 1
Taking to the Skies
Sky-FI Building with Cole Martin and Jon HallNASA’s Curiosity Rover Instructions The BatcaveCelebrating 50 Years of LEGO in Norwayand MORE!
The Magazine for LEGO® Enthusiasts of All Ages!

1
Issue 22 • January 2013
Contents From the Editor ...................................................2
PeopleAre J. Heiseldal .....................................................3To the Batcave! ....................................................8 BrickStix®: A Timeline ..................................18Celebrating 50 Years of LEGO® in Norway ..........................................................20 Building The Norwegian Royal Palace......................................................22 Building Snowy Mountain ......................24 NASA AFOL! .......................................................26 You Can Build It: Curiosity Rover ..............................................28
Building You Can Build It: T-16 Skyhopper .............................................37Minifigure Customization 101: Fun With a Vacuum! .................................40Century Fighters .............................................44
Community Sky-Fi: Building in the Aerial Universe of Crimson Skies® and Dieselpunk .......................................................49 Cole Martin: Sky-Flyer! .................................56 You Can Build It: Modular Pirate Interceptor .................60Jon Hall: LEGO Aviator! ...............................67The LEGO Group Takes to the Air! ......73From the Designer’s Desk ........................76Community Ads .............................................78Last Word .............................................................79AFOLs......................................................................80
3
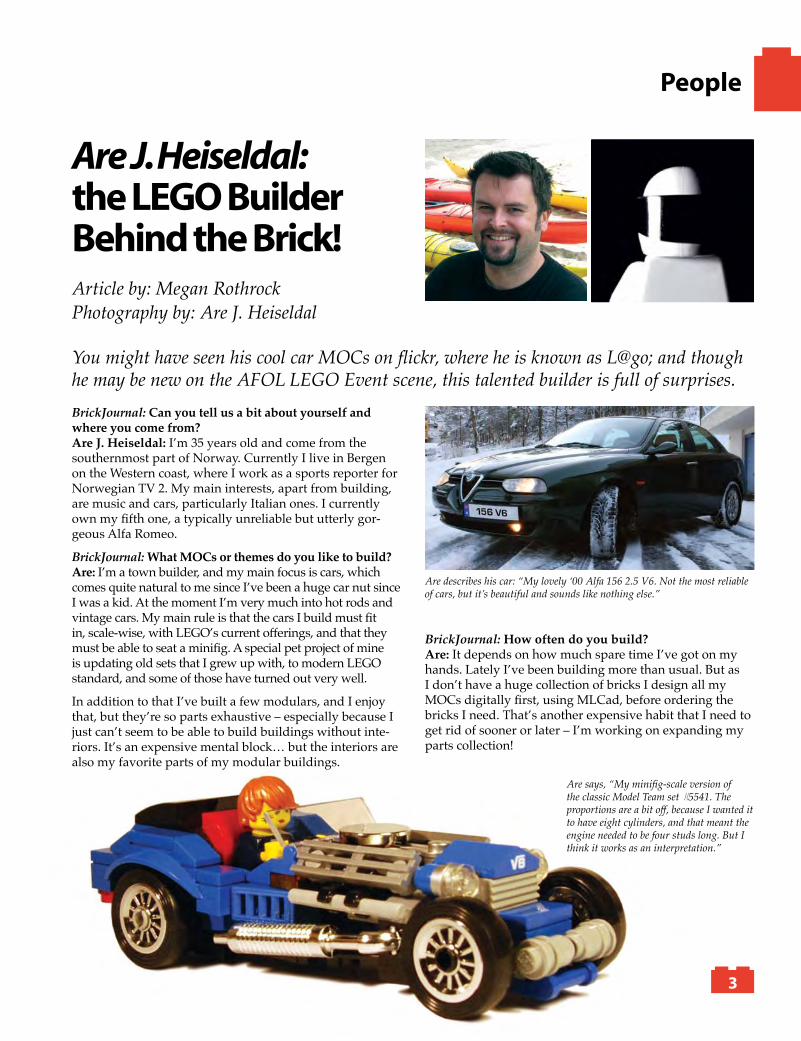
Are J. Heiseldal: the LEGO Builder Behind the Brick!
BrickJournal: Can you tell us a bit about yourself and where you come from?Are J. Heiseldal: I’m 35 years old and come from the southernmost part of Norway. Currently I live in Bergen on the Western coast, where I work as a sports reporter for Norwegian TV 2. My main interests, apart from building, are music and cars, particularly Italian ones. I currently own my fifth one, a typically unreliable but utterly gor-geous Alfa Romeo.
BrickJournal: What MOCs or themes do you like to build?Are: I’m a town builder, and my main focus is cars, which comes quite natural to me since I’ve been a huge car nut since I was a kid. At the moment I’m very much into hot rods and vintage cars. My main rule is that the cars I build must fit in, scale-wise, with LEGO’s current offerings, and that they must be able to seat a minifig. A special pet project of mine is updating old sets that I grew up with, to modern LEGO standard, and some of those have turned out very well.
In addition to that I’ve built a few modulars, and I enjoy that, but they’re so parts exhaustive – especially because I just can’t seem to be able to build buildings without inte-riors. It’s an expensive mental block… but the interiors are also my favorite parts of my modular buildings.
Article by: Megan RothrockPhotography by: Are J. Heiseldal
You might have seen his cool car MOCs on flickr, where he is known as L@go; and though he may be new on the AFOL LEGO Event scene, this talented builder is full of surprises.
BrickJournal: How often do you build?Are: It depends on how much spare time I’ve got on my hands. Lately I’ve been building more than usual. But as I don’t have a huge collection of bricks I design all my MOCs digitally first, using MLCad, before ordering the bricks I need. That’s another expensive habit that I need to get rid of sooner or later – I’m working on expanding my parts collection!
Are says, “My minifig-scale version of the classic Model Team set #5541. The proportions are a bit off, because I wanted it to have eight cylinders, and that meant the engine needed to be four studs long. But I think it works as an interpretation.”
Are describes his car: “My lovely ‘00 Alfa 156 2.5 V6. Not the most reliable of cars, but it’s beautiful and sounds like nothing else.”
People
4
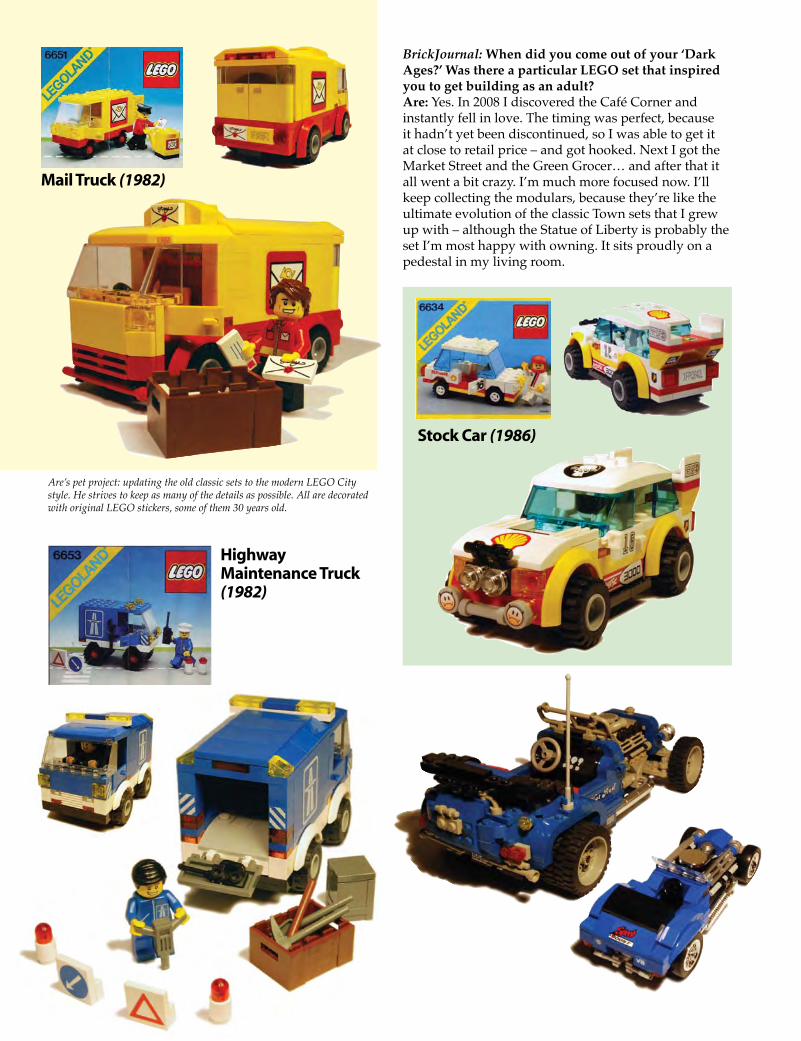
BrickJournal: When did you come out of your ‘Dark Ages?’ Was there a particular LEGO set that inspired you to get building as an adult?Are: Yes. In 2008 I discovered the Café Corner and instantly fell in love. The timing was perfect, because it hadn’t yet been discontinued, so I was able to get it at close to retail price – and got hooked. Next I got the Market Street and the Green Grocer… and after that it all went a bit crazy. I’m much more focused now. I’ll keep collecting the modulars, because they’re like the ultimate evolution of the classic Town sets that I grew up with – although the Statue of Liberty is probably the set I’m most happy with owning. It sits proudly on a pedestal in my living room.
Are’s pet project: updating the old classic sets to the modern LEGO City style. He strives to keep as many of the details as possible. All are decorated with original LEGO stickers, some of them 30 years old.
Highway Maintenance Truck (1982)
Mail Truck (1982)
Stock Car (1986)
8
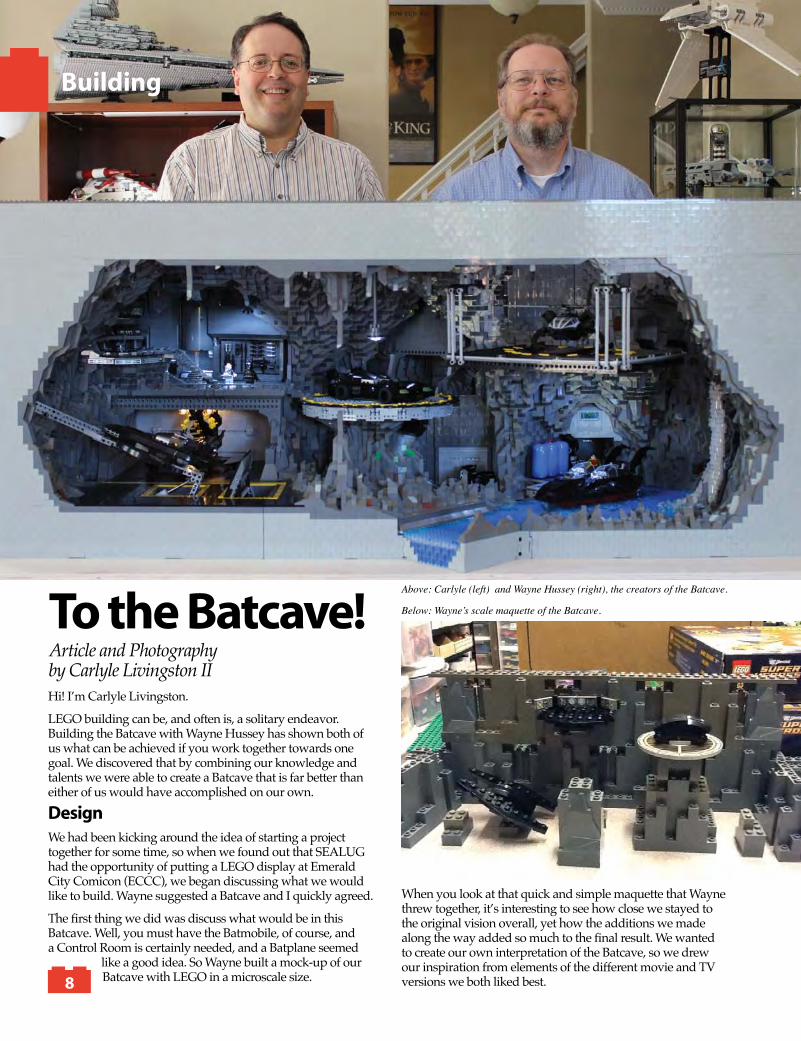
To the Batcave!Article and Photography by Carlyle Livingston IIHi! I’m Carlyle Livingston.
LEGO building can be, and often is, a solitary endeavor. Building the Batcave with Wayne Hussey has shown both of us what can be achieved if you work together towards one goal. We discovered that by combining our knowledge and talents we were able to create a Batcave that is far better than either of us would have accomplished on our own.
DesignWe had been kicking around the idea of starting a project together for some time, so when we found out that SEALUG had the opportunity of putting a LEGO display at Emerald City Comicon (ECCC), we began discussing what we would like to build. Wayne suggested a Batcave and I quickly agreed.
The first thing we did was discuss what would be in this Batcave. Well, you must have the Batmobile, of course, and a Control Room is certainly needed, and a Batplane seemed
like a good idea. So Wayne built a mock-up of our Batcave with LEGO in a microscale size.
When you look at that quick and simple maquette that Wayne threw together, it’s interesting to see how close we stayed to the original vision overall, yet how the additions we made along the way added so much to the final result. We wanted to create our own interpretation of the Batcave, so we drew our inspiration from elements of the different movie and TV versions we both liked best.
Building
Above: Carlyle (left) and Wayne Hussey (right), the creators of the Batcave.
Below: Wayne’s scale maquette of the Batcave.
10
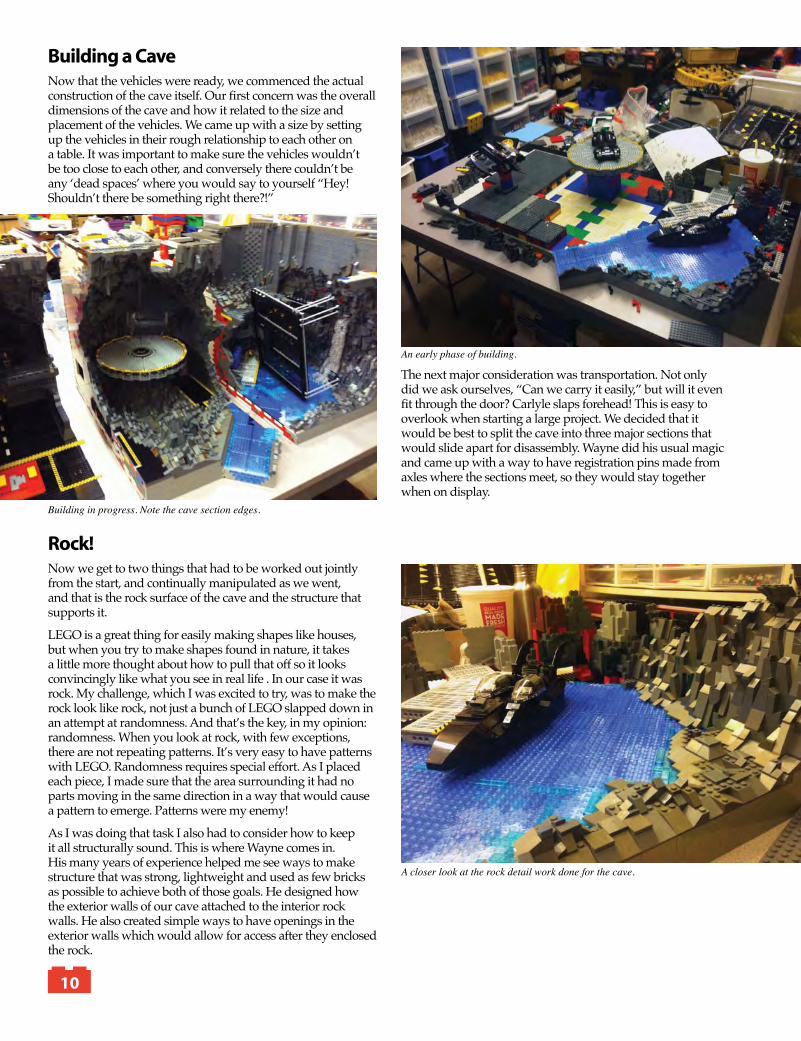
Building a CaveNow that the vehicles were ready, we commenced the actual construction of the cave itself. Our first concern was the overall dimensions of the cave and how it related to the size and placement of the vehicles. We came up with a size by setting up the vehicles in their rough relationship to each other on a table. It was important to make sure the vehicles wouldn’t be too close to each other, and conversely there couldn’t be any ‘dead spaces’ where you would say to yourself “Hey! Shouldn’t there be something right there?!”
The next major consideration was transportation. Not only did we ask ourselves, “Can we carry it easily,” but will it even fit through the door? Carlyle slaps forehead! This is easy to overlook when starting a large project. We decided that it would be best to split the cave into three major sections that would slide apart for disassembly. Wayne did his usual magic and came up with a way to have registration pins made from axles where the sections meet, so they would stay together when on display.
Rock!Now we get to two things that had to be worked out jointly from the start, and continually manipulated as we went, and that is the rock surface of the cave and the structure that supports it.
LEGO is a great thing for easily making shapes like houses, but when you try to make shapes found in nature, it takes a little more thought about how to pull that off so it looks convincingly like what you see in real life . In our case it was rock. My challenge, which I was excited to try, was to make the rock look like rock, not just a bunch of LEGO slapped down in an attempt at randomness. And that’s the key, in my opinion: randomness. When you look at rock, with few exceptions, there are not repeating patterns. It’s very easy to have patterns with LEGO. Randomness requires special effort. As I placed each piece, I made sure that the area surrounding it had no parts moving in the same direction in a way that would cause a pattern to emerge. Patterns were my enemy!
As I was doing that task I also had to consider how to keep it all structurally sound. This is where Wayne comes in. His many years of experience helped me see ways to make structure that was strong, lightweight and used as few bricks as possible to achieve both of those goals. He designed how the exterior walls of our cave attached to the interior rock walls. He also created simple ways to have openings in the exterior walls which would allow for access after they enclosed the rock.
Building in progress. Note the cave section edges.
An early phase of building.
A closer look at the rock detail work done for the cave.
20
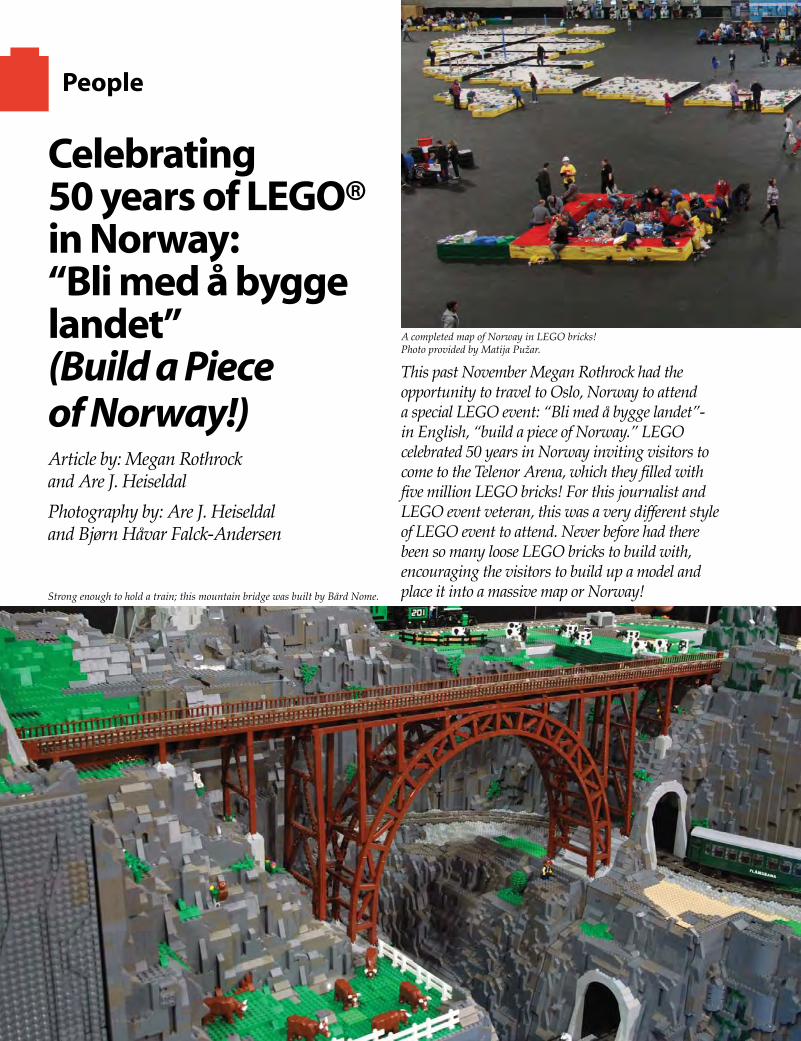
Strong enough to hold a train; this mountain bridge was built by: Bård Nome
Celebrating 50 years of LEGO® in Norway: “Bli med å bygge landet” (Build a Piece of Norway!)Article by: Megan Rothrock and Are J. Heiseldal Photography by: Are J. Heiseldal and Bjørn Håvar Falck-Andersen
A completed map of Norway in LEGO bricks! Photo provided by Matija Pužar.
This past November Megan Rothrock had the opportunity to travel to Oslo, Norway to attend a special LEGO event: “Bli med å bygge landet”- in English, “build a piece of Norway.” LEGO celebrated 50 years in Norway inviting visitors to come to the Telenor Arena, which they filled with five million LEGO bricks! For this journalist and LEGO event veteran, this was a very different style of LEGO event to attend. Never before had there been so many loose LEGO bricks to build with, encouraging the visitors to build up a model and place it into a massive map or Norway!
People
Strong enough to hold a train; this mountain bridge was built by Bård Nome.
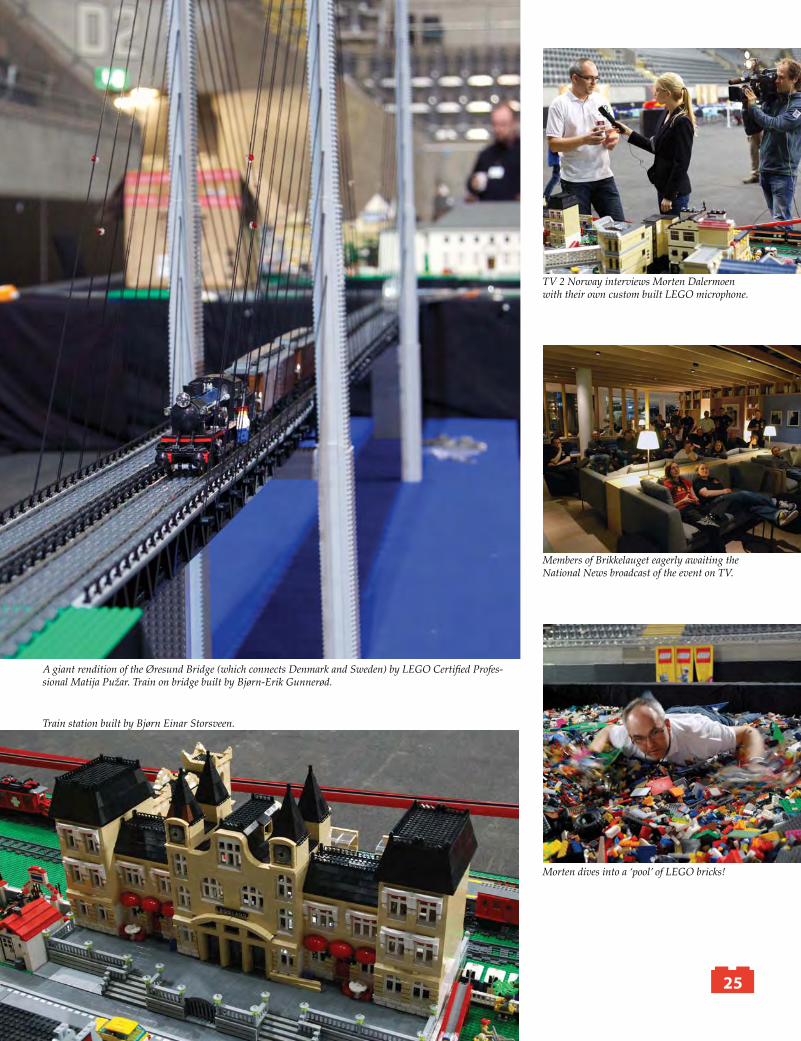
25
A giant rendition of the Øresund Bridge (which connects Denmark and Sweden) by LEGO Certified Profes-sional Matija Pužar. Train on bridge built by Bjørn-Erik Gunnerød.
Train station built by Bjørn Einar Storsveen.
TV 2 Norway interviews Morten Dalermoen with their own custom built LEGO microphone.
Morten dives into a ‘pool’ of LEGO bricks!
Members of Brikkelauget eagerly awaiting the National News broadcast of the event on TV.
26
People
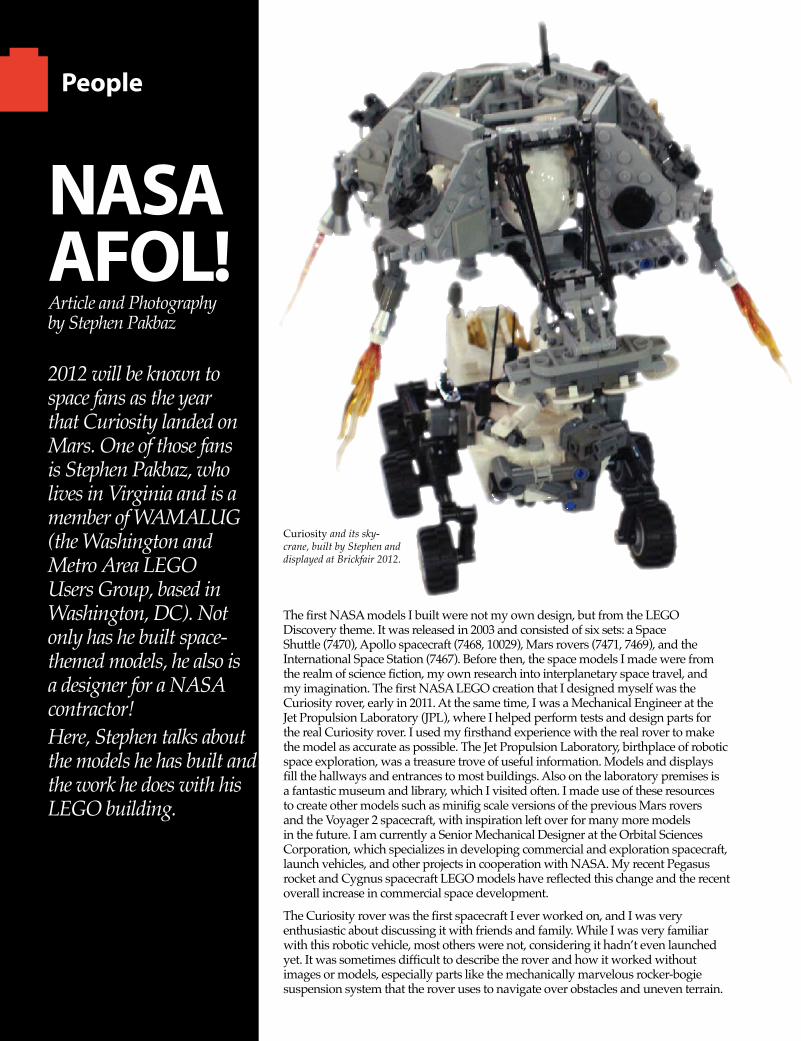
NASA AFOL!Article and Photography by Stephen Pakbaz
2012 will be known to space fans as the year that Curiosity landed on Mars. One of those fans is Stephen Pakbaz, who lives in Virginia and is a member of WAMALUG (the Washington and Metro Area LEGO Users Group, based in Washington, DC). Not only has he built space-themed models, he also is a designer for a NASA contractor! Here, Stephen talks about the models he has built and the work he does with his LEGO building.
The first NASA models I built were not my own design, but from the LEGO Discovery theme. It was released in 2003 and consisted of six sets: a Space Shuttle (7470), Apollo spacecraft (7468, 10029), Mars rovers (7471, 7469), and the International Space Station (7467). Before then, the space models I made were from the realm of science fiction, my own research into interplanetary space travel, and my imagination. The first NASA LEGO creation that I designed myself was the Curiosity rover, early in 2011. At the same time, I was a Mechanical Engineer at the Jet Propulsion Laboratory (JPL), where I helped perform tests and design parts for the real Curiosity rover. I used my firsthand experience with the real rover to make the model as accurate as possible. The Jet Propulsion Laboratory, birthplace of robotic space exploration, was a treasure trove of useful information. Models and displays fill the hallways and entrances to most buildings. Also on the laboratory premises is a fantastic museum and library, which I visited often. I made use of these resources to create other models such as minifig scale versions of the previous Mars rovers and the Voyager 2 spacecraft, with inspiration left over for many more models in the future. I am currently a Senior Mechanical Designer at the Orbital Sciences Corporation, which specializes in developing commercial and exploration spacecraft, launch vehicles, and other projects in cooperation with NASA. My recent Pegasus rocket and Cygnus spacecraft LEGO models have reflected this change and the recent overall increase in commercial space development.
The Curiosity rover was the first spacecraft I ever worked on, and I was very enthusiastic about discussing it with friends and family. While I was very familiar with this robotic vehicle, most others were not, considering it hadn’t even launched yet. It was sometimes difficult to describe the rover and how it worked without images or models, especially parts like the mechanically marvelous rocker-bogie suspension system that the rover uses to navigate over obstacles and uneven terrain.
Curiosity and its sky-crane, built by Stephen and displayed at Brickfair 2012.
28
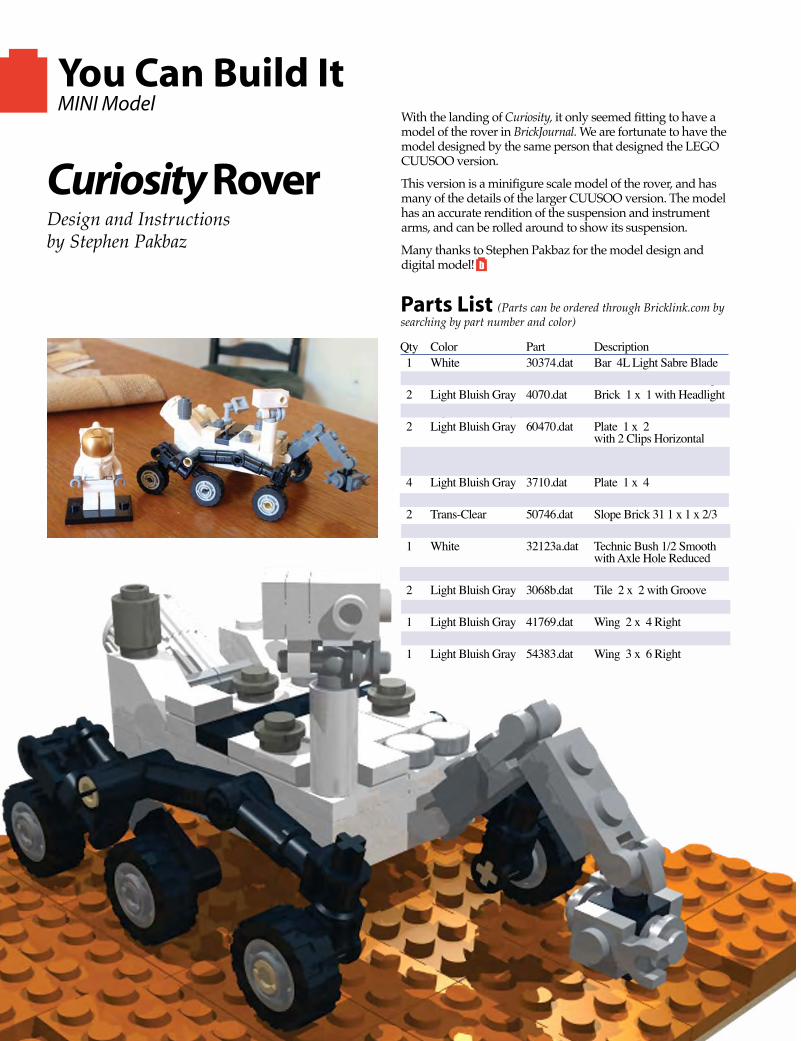
Qty Color Part Description 1 White 30374.dat Bar 4L Light Sabre Blade 1 White 4070.dat Brick 1 x 1 with Headlight 2 Light Bluish Gray 4070.dat Brick 1 x 1 with Headlight 1 Light Bluish Gray 3023.dat Plate 1 x 2 2 Light Bluish Gray 60470.dat Plate 1 x 2 with 2 Clips Horizontal 2 Light Bluish Gray 48336.dat Plate 1 x 2 with Handle Type 2 4 Light Bluish Gray 3710.dat Plate 1 x 4 1 Light Bluish Gray 2420.dat Plate 2 x 2 Corner 2 Trans-Clear 50746.dat Slope Brick 31 1 x 1 x 2/3 2 Light Bluish Gray 50746.dat Slope Brick 31 1 x 1 x 2/3 1 White 32123a.dat Technic Bush 1/2 Smooth with Axle Hole Reduced 2 Red 3069b.dat Tile 1 x 2 with Groove 2 Light Bluish Gray 3068b.dat Tile 2 x 2 with Groove 1 Light Bluish Gray 41770.dat Wing 2 x 4 Left 1 Light Bluish Gray 41769.dat Wing 2 x 4 Right 1 Light Bluish Gray 54384.dat Wing 3 x 6 Left 1 Light Bluish Gray 54383.dat Wing 3 x 6 Right
Parts List (Parts can be ordered through Bricklink.com by searching by part number and color)
You Can Build It MINI Model
Design and Instructions by Stephen Pakbaz
Curiosity Rover
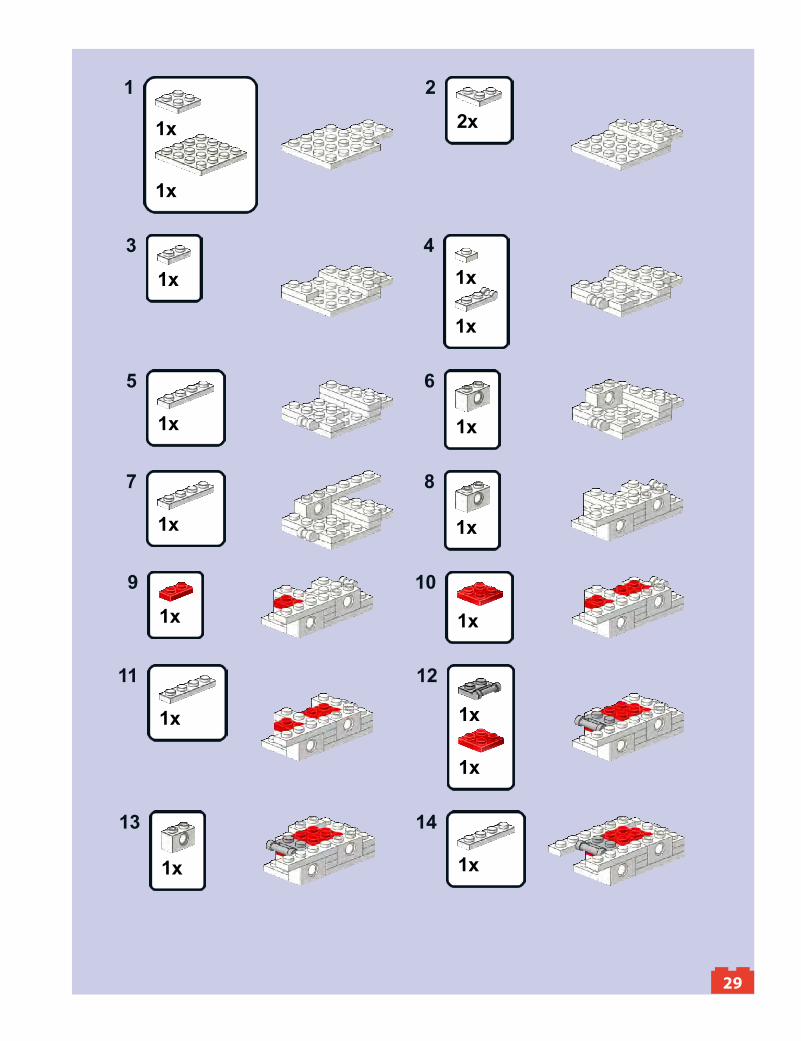
With the landing of Curiosity, it only seemed fitting to have a model of the rover in BrickJournal. We are fortunate to have the model designed by the same person that designed the LEGO CUUSOO version.
This version is a minifigure scale model of the rover, and has many of the details of the larger CUUSOO version. The model has an accurate rendition of the suspension and instrument arms, and can be rolled around to show its suspension.
Many thanks to Stephen Pakbaz for the model design and digital model!
29
1x
7
1x
8
1x
13 14
1x
1x
9
1x
10
1x
11 12
1x
1x
1x
1x
1
2x
2
1x
3
1x
1x
4
6
1x
5
1x
29
37
Qty Color Part Description 1 White 30374.dat Bar 4L Light Sabre Blade 1 White 4070.dat Brick 1 x 1 with Headlight 2 Light Bluish Gray 4070.dat Brick 1 x 1 with Headlight 1 Light Bluish Gray 3023.dat Plate 1 x 2 2 Light Bluish Gray 60470.dat Plate 1 x 2 with 2 Clips Horizontal 2 Light Bluish Gray 48336.dat Plate 1 x 2 with Handle Type 2 4 Light Bluish Gray 3710.dat Plate 1 x 4 1 Light Bluish Gray 2420.dat Plate 2 x 2 Corner 2 Trans-Clear 50746.dat Slope Brick 31 1 x 1 x 2/3 2 Light Bluish Gray 50746.dat Slope Brick 31 1 x 1 x 2/3 1 White 32123a.dat Technic Bush 1/2 Smooth with Axle Hole Reduced 2 Red 3069b.dat Tile 1 x 2 with Groove 2 Light Bluish Gray 3068b.dat Tile 2 x 2 with Groove 1 Light Bluish Gray 41770.dat Wing 2 x 4 Left 1 Light Bluish Gray 41769.dat Wing 2 x 4 Right 1 Light Bluish Gray 54384.dat Wing 3 x 6 Left 1 Light Bluish Gray 54383.dat Wing 3 x 6 Right
You Can Build It MINI Model
Design and Instructions by Christopher Deck
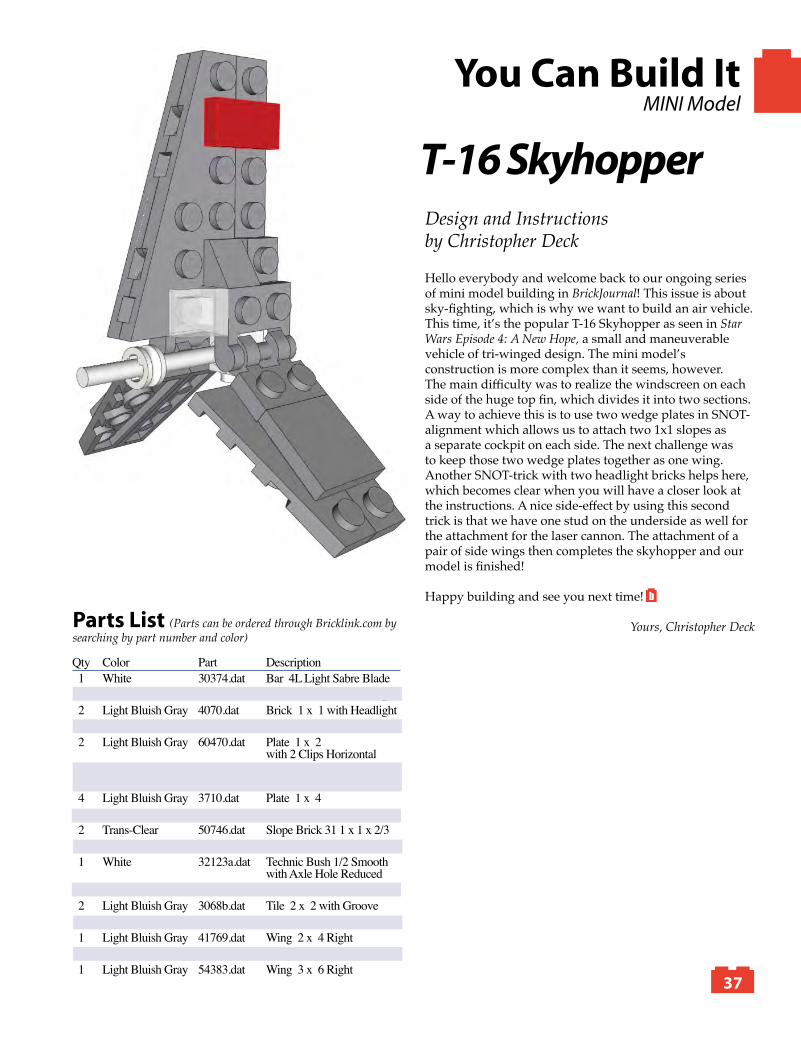
T-16 Skyhopper
Hello everybody and welcome back to our ongoing series of mini model building in BrickJournal! This issue is about sky-fighting, which is why we want to build an air vehicle. This time, it’s the popular T-16 Skyhopper as seen in Star Wars Episode 4: A New Hope, a small and maneuverable vehicle of tri-winged design. The mini model’s construction is more complex than it seems, however.The main difficulty was to realize the windscreen on each side of the huge top fin, which divides it into two sections. A way to achieve this is to use two wedge plates in SNOT-alignment which allows us to attach two 1x1 slopes as a separate cockpit on each side. The next challenge was to keep those two wedge plates together as one wing. Another SNOT-trick with two headlight bricks helps here, which becomes clear when you will have a closer look at the instructions. A nice side-effect by using this second trick is that we have one stud on the underside as well for the attachment for the laser cannon. The attachment of a pair of side wings then completes the skyhopper and our model is finished!
Happy building and see you next time!
Yours, Christopher DeckParts List (Parts can be ordered through Bricklink.com by searching by part number and color)
40
Building
Minifig Customization 101:
Fun With a Vacuum!by Jared K. Burks
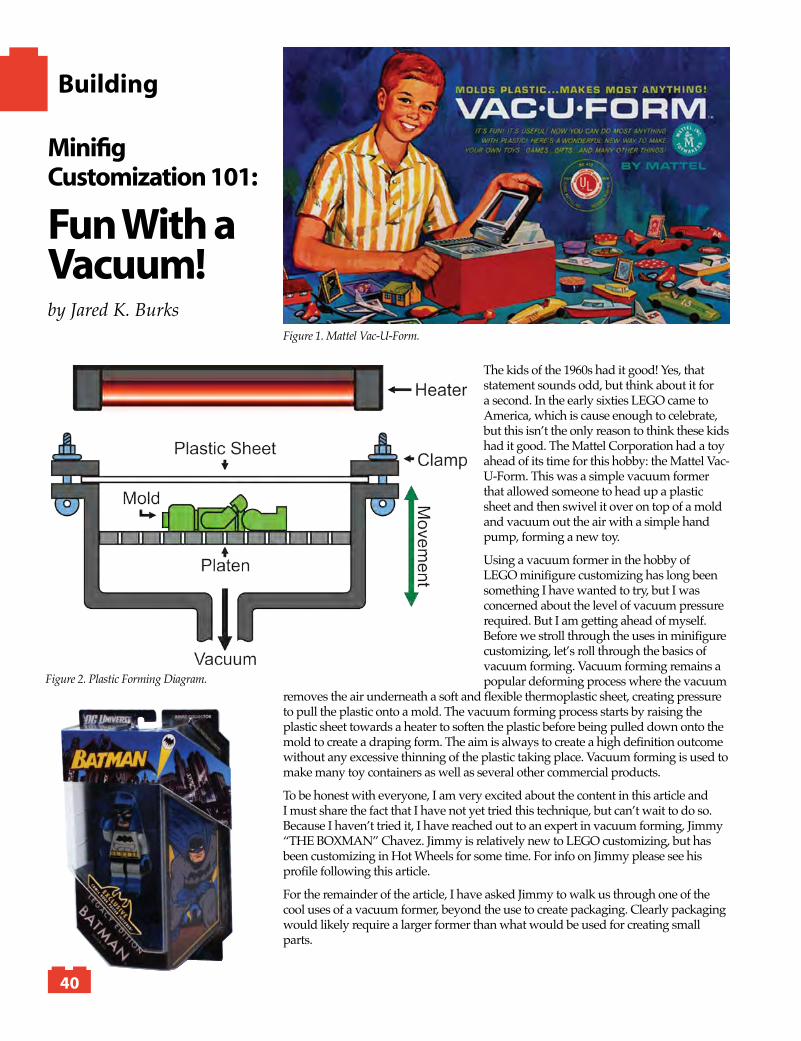
The kids of the 1960s had it good! Yes, that statement sounds odd, but think about it for a second. In the early sixties LEGO came to America, which is cause enough to celebrate, but this isn’t the only reason to think these kids had it good. The Mattel Corporation had a toy ahead of its time for this hobby: the Mattel Vac-U-Form. This was a simple vacuum former that allowed someone to head up a plastic sheet and then swivel it over on top of a mold and vacuum out the air with a simple hand pump, forming a new toy.
Using a vacuum former in the hobby of LEGO minifigure customizing has long been something I have wanted to try, but I was concerned about the level of vacuum pressure required. But I am getting ahead of myself. Before we stroll through the uses in minifigure customizing, let’s roll through the basics of vacuum forming. Vacuum forming remains a popular deforming process where the vacuum
removes the air underneath a soft and flexible thermoplastic sheet, creating pressure to pull the plastic onto a mold. The vacuum forming process starts by raising the plastic sheet towards a heater to soften the plastic before being pulled down onto the mold to create a draping form. The aim is always to create a high definition outcome without any excessive thinning of the plastic taking place. Vacuum forming is used to make many toy containers as well as several other commercial products.
To be honest with everyone, I am very excited about the content in this article and I must share the fact that I have not yet tried this technique, but can’t wait to do so. Because I haven’t tried it, I have reached out to an expert in vacuum forming, Jimmy “THE BOXMAN” Chavez. Jimmy is relatively new to LEGO customizing, but has been customizing in Hot Wheels for some time. For info on Jimmy please see his profile following this article.
For the remainder of the article, I have asked Jimmy to walk us through one of the cool uses of a vacuum former, beyond the use to create packaging. Clearly packaging would likely require a larger former than what would be used for creating small parts.
Figure 1. Mattel Vac-U-Form.
Figure 2. Plastic Forming Diagram.
44
Building
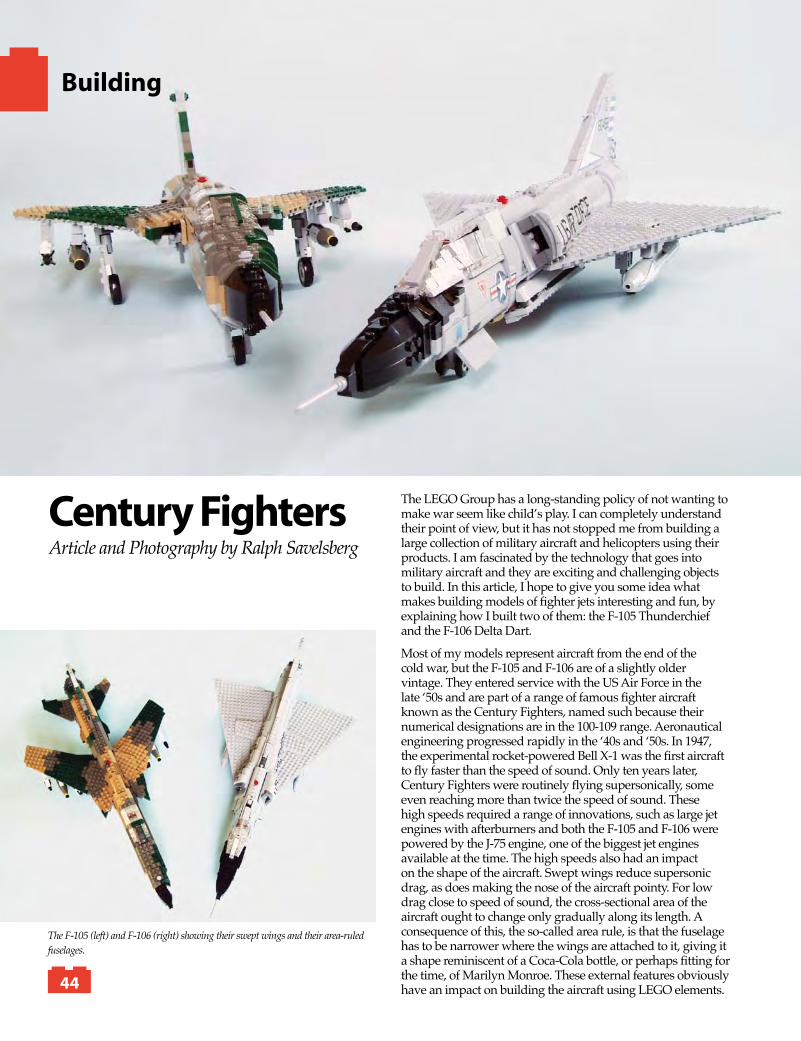
Century FightersArticle and Photography by Ralph Savelsberg
The LEGO Group has a long-standing policy of not wanting to make war seem like child’s play. I can completely understand their point of view, but it has not stopped me from building a large collection of military aircraft and helicopters using their products. I am fascinated by the technology that goes into military aircraft and they are exciting and challenging objects to build. In this article, I hope to give you some idea what makes building models of fighter jets interesting and fun, by explaining how I built two of them: the F-105 Thunderchief and the F-106 Delta Dart.
Most of my models represent aircraft from the end of the cold war, but the F-105 and F-106 are of a slightly older vintage. They entered service with the US Air Force in the late ‘50s and are part of a range of famous fighter aircraft known as the Century Fighters, named such because their numerical designations are in the 100-109 range. Aeronautical engineering progressed rapidly in the ‘40s and ‘50s. In 1947, the experimental rocket-powered Bell X-1 was the first aircraft to fly faster than the speed of sound. Only ten years later, Century Fighters were routinely flying supersonically, some even reaching more than twice the speed of sound. These high speeds required a range of innovations, such as large jet engines with afterburners and both the F-105 and F-106 were powered by the J-75 engine, one of the biggest jet engines available at the time. The high speeds also had an impact on the shape of the aircraft. Swept wings reduce supersonic drag, as does making the nose of the aircraft pointy. For low drag close to speed of sound, the cross-sectional area of the aircraft ought to change only gradually along its length. A consequence of this, the so-called area rule, is that the fuselage has to be narrower where the wings are attached to it, giving it a shape reminiscent of a Coca-Cola bottle, or perhaps fitting for the time, of Marilyn Monroe. These external features obviously have an impact on building the aircraft using LEGO elements.
The F-105 (left) and F-106 (right) showing their swept wings and their area-ruled fuselages.
45
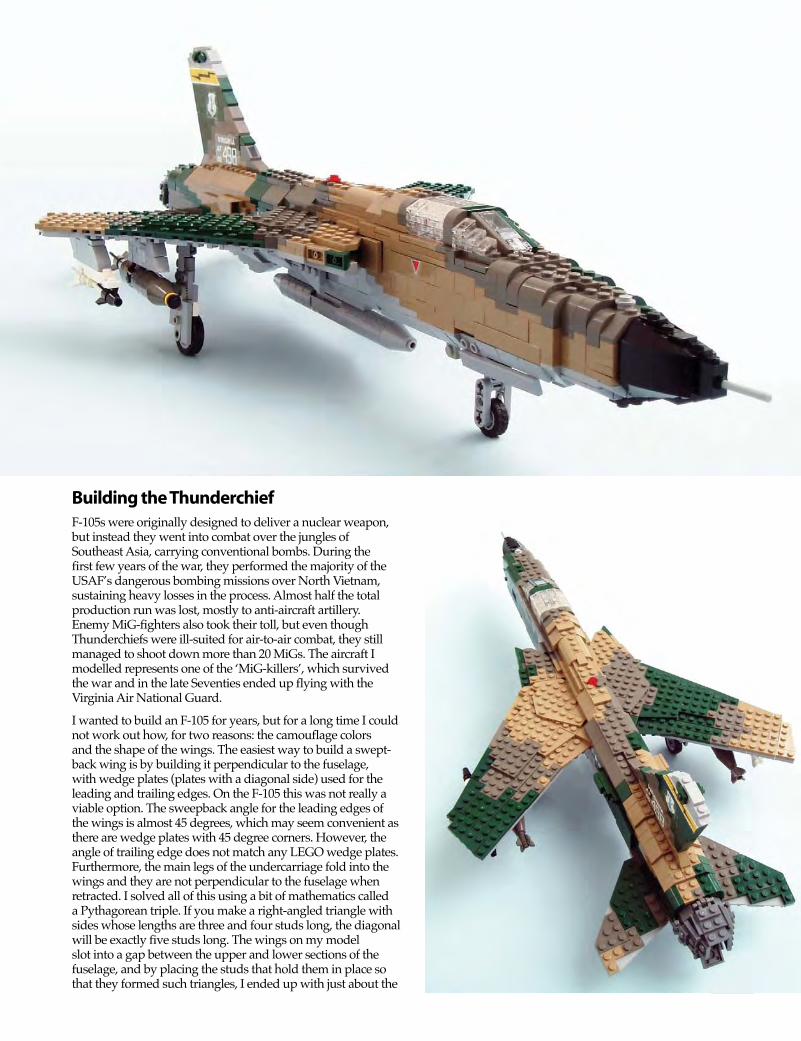
Building the ThunderchiefF-105s were originally designed to deliver a nuclear weapon, but instead they went into combat over the jungles of Southeast Asia, carrying conventional bombs. During the first few years of the war, they performed the majority of the USAF’s dangerous bombing missions over North Vietnam, sustaining heavy losses in the process. Almost half the total production run was lost, mostly to anti-aircraft artillery. Enemy MiG-fighters also took their toll, but even though Thunderchiefs were ill-suited for air-to-air combat, they still managed to shoot down more than 20 MiGs. The aircraft I modelled represents one of the ‘MiG-killers’, which survived the war and in the late Seventies ended up flying with the Virginia Air National Guard.
I wanted to build an F-105 for years, but for a long time I could not work out how, for two reasons: the camouflage colors and the shape of the wings. The easiest way to build a swept-back wing is by building it perpendicular to the fuselage, with wedge plates (plates with a diagonal side) used for the leading and trailing edges. On the F-105 this was not really a viable option. The sweepback angle for the leading edges of the wings is almost 45 degrees, which may seem convenient as there are wedge plates with 45 degree corners. However, the angle of trailing edge does not match any LEGO wedge plates. Furthermore, the main legs of the undercarriage fold into the wings and they are not perpendicular to the fuselage when retracted. I solved all of this using a bit of mathematics called a Pythagorean triple. If you make a right-angled triangle with sides whose lengths are three and four studs long, the diagonal will be exactly five studs long. The wings on my model slot into a gap between the upper and lower sections of the fuselage, and by placing the studs that hold them in place so that they formed such triangles, I ended up with just about the
49
Community
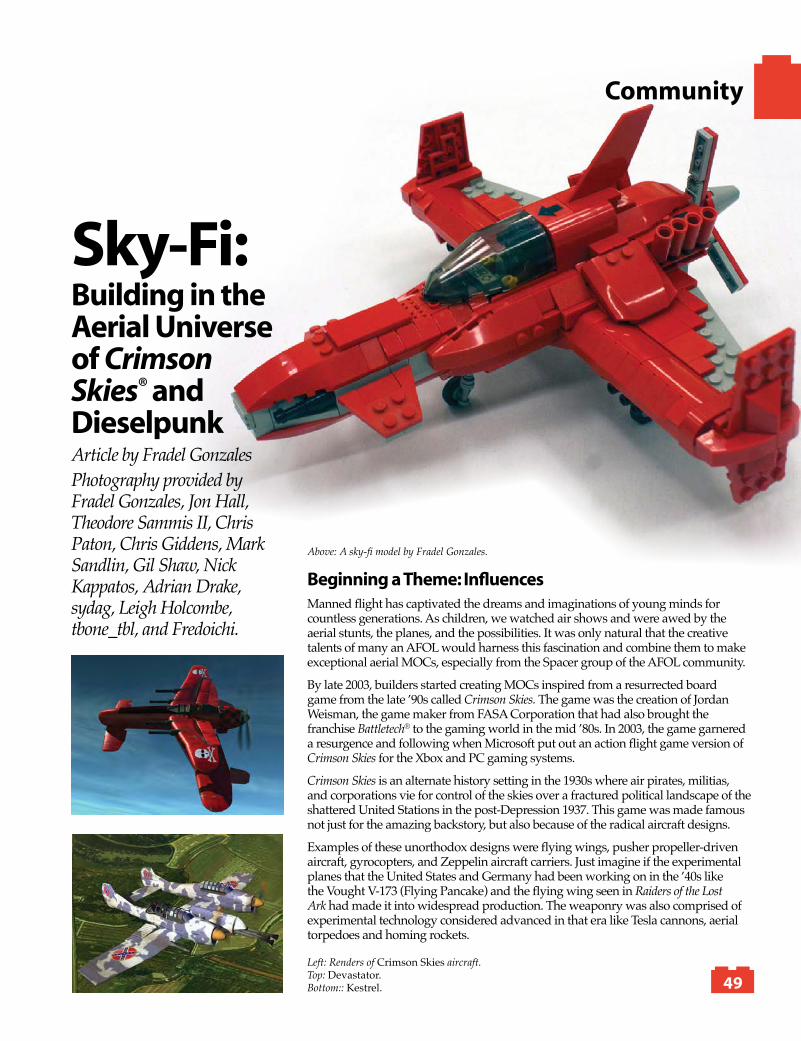
Sky-Fi:Building in the Aerial Universe of Crimson Skies® and DieselpunkArticle by Fradel GonzalesPhotography provided by Fradel Gonzales, Jon Hall, Theodore Sammis II, Chris Paton, Chris Giddens, Mark Sandlin, Gil Shaw, Nick Kappatos, Adrian Drake, sydag, Leigh Holcombe, tbone_tbl, and Fredoichi.
Beginning a Theme: InfluencesManned flight has captivated the dreams and imaginations of young minds for countless generations. As children, we watched air shows and were awed by the aerial stunts, the planes, and the possibilities. It was only natural that the creative talents of many an AFOL would harness this fascination and combine them to make exceptional aerial MOCs, especially from the Spacer group of the AFOL community.
By late 2003, builders started creating MOCs inspired from a resurrected board game from the late ’90s called Crimson Skies. The game was the creation of Jordan Weisman, the game maker from FASA Corporation that had also brought the franchise Battletech® to the gaming world in the mid ’80s. In 2003, the game garnered a resurgence and following when Microsoft put out an action flight game version of Crimson Skies for the Xbox and PC gaming systems.
Crimson Skies is an alternate history setting in the 1930s where air pirates, militias, and corporations vie for control of the skies over a fractured political landscape of the shattered United Stations in the post-Depression 1937. This game was made famous not just for the amazing backstory, but also because of the radical aircraft designs.
Examples of these unorthodox designs were flying wings, pusher propeller-driven aircraft, gyrocopters, and Zeppelin aircraft carriers. Just imagine if the experimental planes that the United States and Germany had been working on in the ’40s like the Vought V-173 (Flying Pancake) and the flying wing seen in Raiders of the Lost Ark had made it into widespread production. The weaponry was also comprised of experimental technology considered advanced in that era like Tesla cannons, aerial torpedoes and homing rockets.
Left: Renders of Crimson Skies aircraft. Top: Devastator. Bottom:: Kestrel.
Above: A sky-fi model by Fradel Gonzales.
50
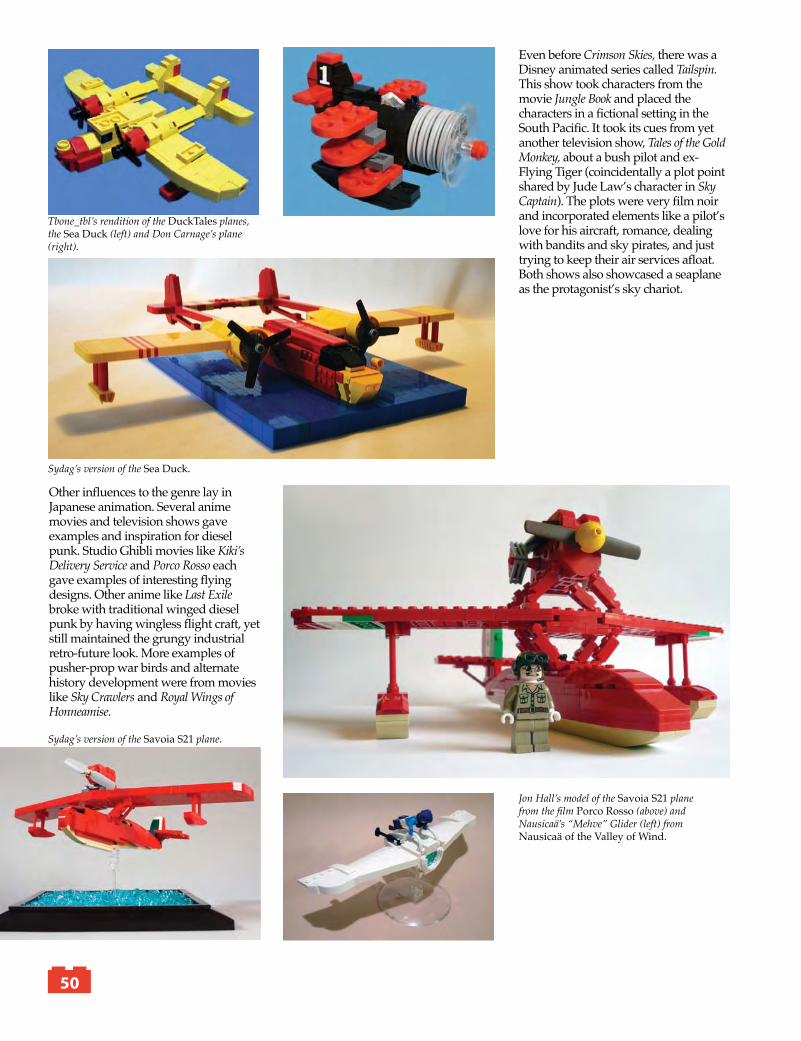
Even before Crimson Skies, there was a Disney animated series called Tailspin. This show took characters from the movie Jungle Book and placed the characters in a fictional setting in the South Pacific. It took its cues from yet another television show, Tales of the Gold Monkey, about a bush pilot and ex-Flying Tiger (coincidentally a plot point shared by Jude Law’s character in Sky Captain). The plots were very film noir and incorporated elements like a pilot’s love for his aircraft, romance, dealing with bandits and sky pirates, and just trying to keep their air services afloat. Both shows also showcased a seaplane as the protagonist’s sky chariot.
Sydag’s version of the Sea Duck.
Other influences to the genre lay in Japanese animation. Several anime movies and television shows gave examples and inspiration for diesel punk. Studio Ghibli movies like Kiki’s Delivery Service and Porco Rosso each gave examples of interesting flying designs. Other anime like Last Exile broke with traditional winged diesel punk by having wingless flight craft, yet still maintained the grungy industrial retro-future look. More examples of pusher-prop war birds and alternate history development were from movies like Sky Crawlers and Royal Wings of Honneamise.
Tbone_tbl’s rendition of the DuckTales planes, the Sea Duck (left) and Don Carnage’s plane (right).
Jon Hall’s model of the Savoia S21 plane from the film Porco Rosso (above) and Nausicaä’s “Mehve” Glider (left) from Nausicaä of the Valley of Wind.
Sydag’s version of the Savoia S21 plane.
56
BrickJournal: How do you build a model? Do you sketch it out beforehand or just build it? Cole: When I get an idea for a model, I will usually sketch it first to get all the details down on paper. Then I like to take those shapes I have and apply them to the LEGO system.
BrickJournal: How long does it take to build a model? Cole: Well, it takes me a long time I think compared to most adult builders because in-between models I take long breaks of not building anything. This attributes to forgetting things to where I have this constant re-learning curve going on. It varies from one week, to two months being the longest.
BrickJournal: What’s the best part of building? What’s the hardest part of building? Cole: The best part of building is to me the finished product. We’re able to transfer our ideas from our minds to the LEGO medium, and in turn the finished model displays that original idea. So you can actually see visually what I was thinking.
The hardest part of building to me is the brainstorming and figuring out the techniques to use to achieve the angles I want. And this is very difficult at times because of the LEGO itself. Sometimes they just don’t make the part you want or need, so you have to compromise.
BrickJournal: What is your favorite model you have built, and what is your favorite LEGO set? Cole: My personal favorite is a plane I did that I called Strato Magnetto. It’s the dark red aircraft shown in this article. My favorite LEGO set was the recent Space Police set called Smash ’n’ Grab. It made me laugh in the store when I saw it! Real space criminals, stealing an ATM. Yes! Epic!
BrickJournal: What are you planning to build in the future? Cole: I am planning on continuing a theme I started a while back I call Sky Skulls. It consists of dark red, black, and white aircraft. I am working on and sketching an interceptor aircraft at the time of this issue. I may do some mercenary planes in the future as well. We’ll see.
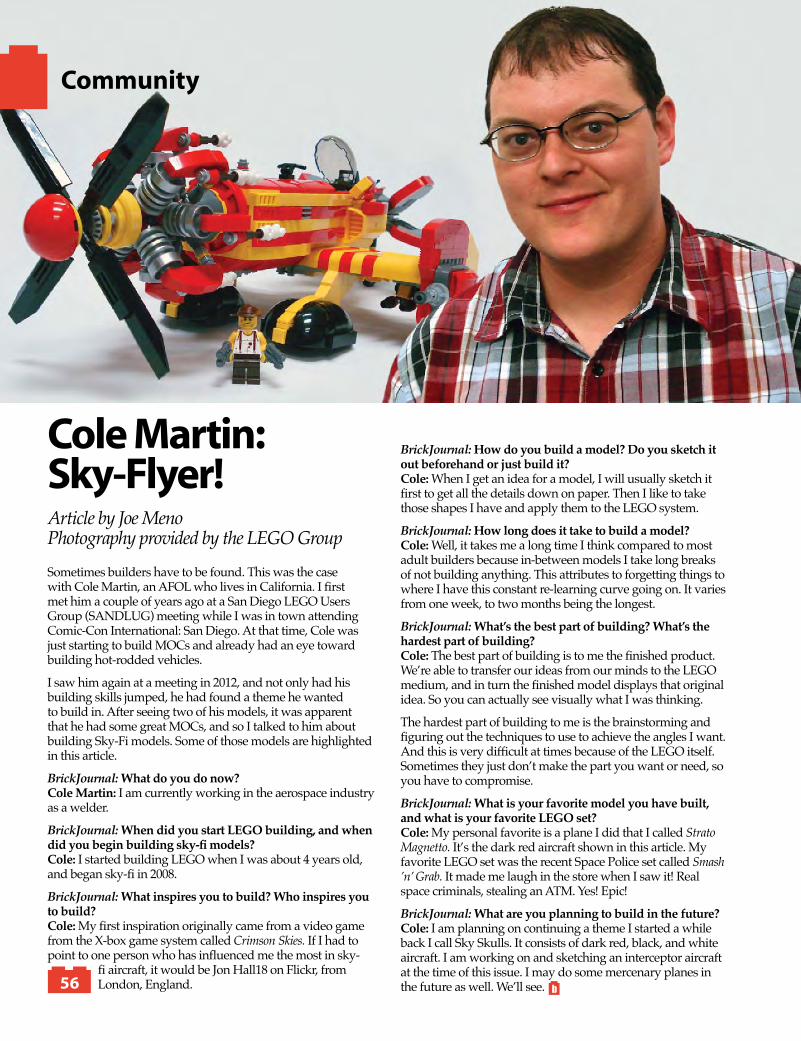
Community
Cole Martin:Sky-Flyer!Article by Joe Meno Photography provided by the LEGO GroupSometimes builders have to be found. This was the case with Cole Martin, an AFOL who lives in California. I first met him a couple of years ago at a San Diego LEGO Users Group (SANDLUG) meeting while I was in town attending Comic-Con International: San Diego. At that time, Cole was just starting to build MOCs and already had an eye toward building hot-rodded vehicles.
I saw him again at a meeting in 2012, and not only had his building skills jumped, he had found a theme he wanted to build in. After seeing two of his models, it was apparent that he had some great MOCs, and so I talked to him about building Sky-Fi models. Some of those models are highlighted in this article.
BrickJournal: What do you do now? Cole Martin: I am currently working in the aerospace industry as a welder.
BrickJournal: When did you start LEGO building, and when did you begin building sky-fi models? Cole: I started building LEGO when I was about 4 years old, and began sky-fi in 2008.
BrickJournal: What inspires you to build? Who inspires you to build? Cole: My first inspiration originally came from a video game from the X-box game system called Crimson Skies. If I had to point to one person who has influenced me the most in sky-
fi aircraft, it would be Jon Hall18 on Flickr, from London, England.
57
The next four aircraft are example of Cole’s work. He was gracious enough to take some time to describe each plane for BrickJournal:
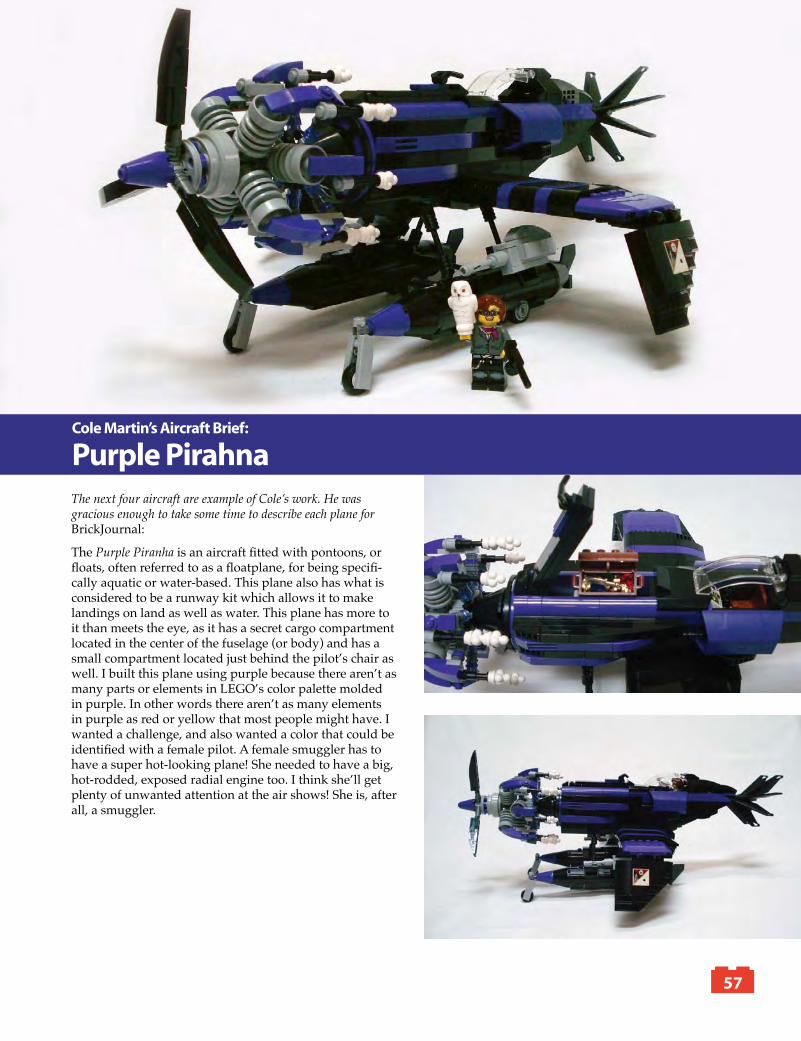
The Purple Piranha is an aircraft fitted with pontoons, or floats, often referred to as a floatplane, for being specifi-cally aquatic or water-based. This plane also has what is considered to be a runway kit which allows it to make landings on land as well as water. This plane has more to it than meets the eye, as it has a secret cargo compartment located in the center of the fuselage (or body) and has a small compartment located just behind the pilot’s chair as well. I built this plane using purple because there aren’t as many parts or elements in LEGO’s color palette molded in purple. In other words there aren’t as many elements in purple as red or yellow that most people might have. I wanted a challenge, and also wanted a color that could be identified with a female pilot. A female smuggler has to have a super hot-looking plane! She needed to have a big, hot-rodded, exposed radial engine too. I think she’ll get plenty of unwanted attention at the air shows! She is, after all, a smuggler.
Cole Martin’s Aircraft Brief:
Purple Pirahna
60
You Can Build It Sky-Fi MINI Model
Qty Color Part Description2 White 2335p30.dat Flag 2 x 2 with Jolly Roger
Pattern 2 White 2420.dat Plate 2 x 2 Corner 4 Black 2420.dat Plate 2 x 2 Corner 2 Black 2444.dat Plate 2 x 2 with Hole1 Black 2496.dat Wheel Trolley 2 Black 2540.dat Plate 1 x 2 with Handle2 Dark Red 3021.dat Plate 2 x 3 1 Black 3021.dat Plate 2 x 3 2 Dark Red 3023.dat Plate 1 x 2 1 Black 3023.dat Plate 1 x 2 4 Black 3024.dat Plate 1 x 1 2 Black 3069b.dat Tile 1 x 2 with Groove2 Black 3139.dat Tyre 4/80 x 8 Single
Smooth Type 1 2 Light Bluish Gray 3464.dat Wheel Centre with Stub
Axles 2 Dark Red 3623.dat Plate 1 x 3 2 Black 3623.dat Plate 1 x 3 1 Dark Red 3665.dat Slope Brick 45 2 x 1
Inverted2 White 3665.dat Slope Brick 45 2 x 1
Inverted 1 Black 3666.dat Plate 1 x 6 1 Light Bluish Gray 3673.dat Technic Pin 2 Dark Red 3710.dat Plate 1 x 4 1 Black 3710.dat Plate 1 x 4 3 Black 4081b.dat Plate 1 x 1 with Clip Light
Type 2 2 Black 4150.dat Tile 2 x 2 Round 2 Light Bluish Gray 4274.dat Technic Pin 1/2 1 Black 4617b.dat Propeller 3 Blade 5.5
Diameter with Technic Peghole
Parts List (Parts can be ordered through Bricklink.com by searching by part number and color)
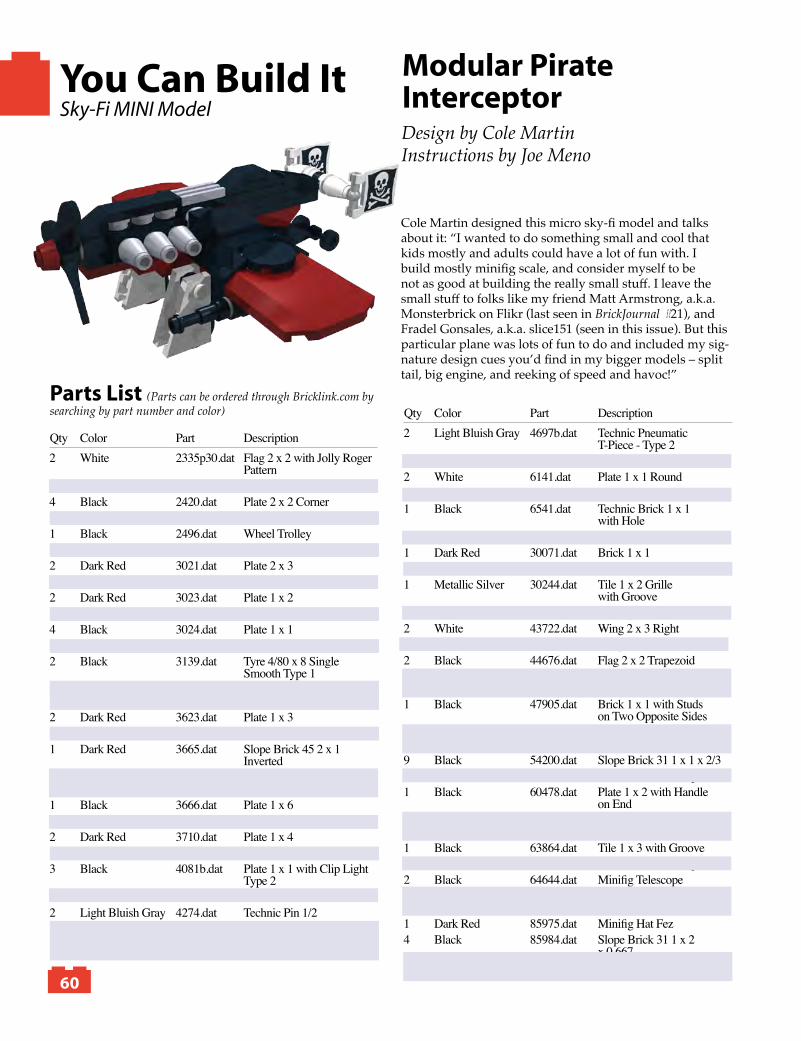
Modular Pirate Interceptor
Cole Martin designed this micro sky-fi model and talks about it: “I wanted to do something small and cool that kids mostly and adults could have a lot of fun with. I build mostly minifig scale, and consider myself to be not as good at building the really small stuff. I leave the small stuff to folks like my friend Matt Armstrong, a.k.a. Monsterbrick on Flikr (last seen in BrickJournal #21), and Fradel Gonsales, a.k.a. slice151 (seen in this issue). But this particular plane was lots of fun to do and included my sig-nature design cues you’d find in my bigger models – split tail, big engine, and reeking of speed and havoc!”
Qty Color Part Description2 Light Bluish Gray 4697b.dat Technic Pneumatic
T-Piece - Type 2 5 Metallic Silver 6141.dat Plate 1 x 1 Round 2 White 6141.dat Plate 1 x 1 Round 5 Black 6141.dat Plate 1 x 1 Round 1 Black 6541.dat Technic Brick 1 x 1
with Hole 1 Black 30039.dat Tile 1 x 1 with Groove1 Dark Red 30071.dat Brick 1 x 1 1 Black 30071.dat Brick 1 x 1 1 Metallic Silver 30244.dat Tile 1 x 2 Grille
with Groove 1 Black 30377.dat MinifigMechanicalArm2 White 43722.dat Wing 2 x 3 Right 2 White 43723.dat Wing 2 x 3 Left 2 Black 44676.dat Flag 2 x 2 Trapezoid2 Dark Red 45677.dat Wedge 4 x 4 x 0.667
Curved 1 Black 47905.dat Brick 1 x 1 with Studs
on Two Opposite Sides1 Black 52107.dat Brick 1 x 2 with Studs
on Sides 9 Black 54200.dat Slope Brick 31 1 x 1 x 2/36 Metallic Silver 59900.dat Cone 1 x 1 with Stop1 Black 60478.dat Plate 1 x 2 with Handle
on End 1 Black 61409.dat Slope Brick 18 2 x 1
x 2/3 Grille 1 Black 63864.dat Tile 1 x 3 with Groove2 White 64288.dat Cone 1 x 1 with Stop2 Black 64644.dat MinifigTelescope1 Light Bluish Gray 76263.dat Technic Flex-System
Hose 2L (40LDU) 1 DarkRed 85975.dat MinifigHatFez4 Black 85984.dat Slope Brick 31 1 x 2
x 0.667
Design by Cole Martin Instructions by Joe Meno
67
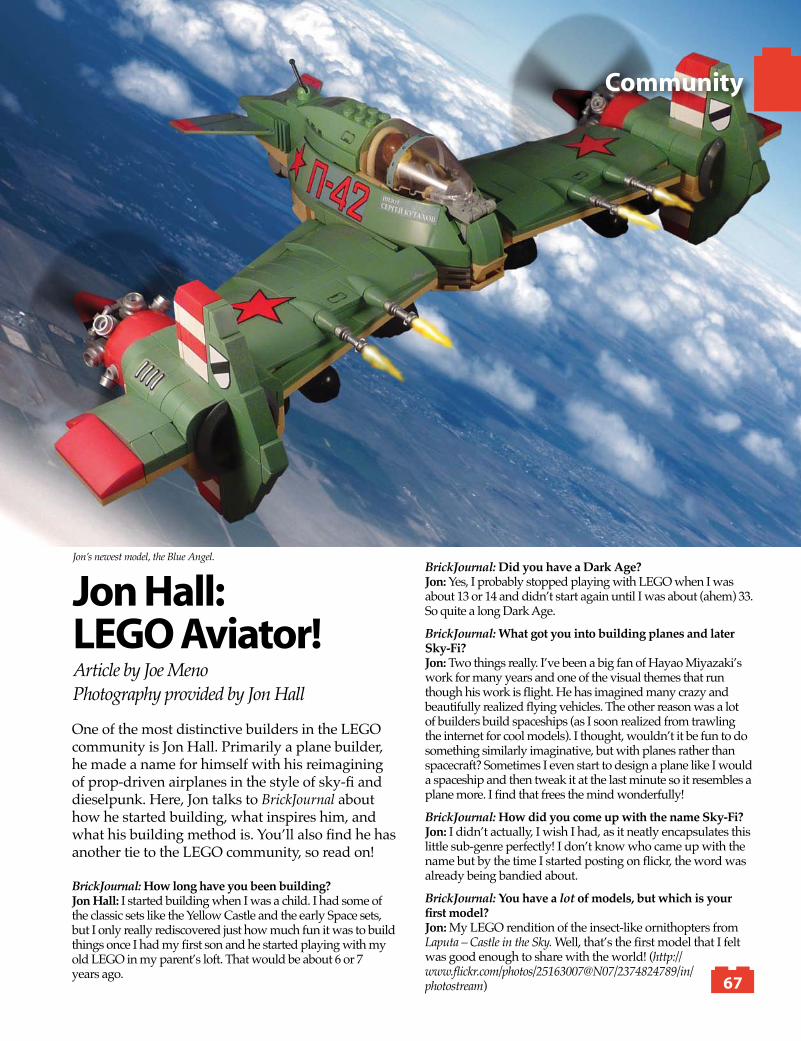
Jon’s newest model, the Blue Angel.
Community
Jon Hall: LEGO Aviator!Article by Joe MenoPhotography provided by Jon Hall
BrickJournal: How long have you been building? Jon Hall: I started building when I was a child. I had some of the classic sets like the Yellow Castle and the early Space sets, but I only really rediscovered just how much fun it was to build things once I had my first son and he started playing with my old LEGO in my parent’s loft. That would be about 6 or 7 years ago.
BrickJournal: Did you have a Dark Age? Jon: Yes, I probably stopped playing with LEGO when I was about 13 or 14 and didn’t start again until I was about (ahem) 33. So quite a long Dark Age.
BrickJournal: What got you into building planes and later Sky-Fi? Jon: Two things really. I’ve been a big fan of Hayao Miyazaki’s work for many years and one of the visual themes that run though his work is flight. He has imagined many crazy and beautifully realized flying vehicles. The other reason was a lot of builders build spaceships (as I soon realized from trawling the internet for cool models). I thought, wouldn’t it be fun to do something similarly imaginative, but with planes rather than spacecraft? Sometimes I even start to design a plane like I would a spaceship and then tweak it at the last minute so it resembles a plane more. I find that frees the mind wonderfully!
BrickJournal: How did you come up with the name Sky-Fi? Jon: I didn’t actually, I wish I had, as it neatly encapsulates this little sub-genre perfectly! I don’t know who came up with the name but by the time I started posting on flickr, the word was already being bandied about.
BrickJournal: You have a lot of models, but which is your first model? Jon: My LEGO rendition of the insect-like ornithopters from Laputa – Castle in the Sky. Well, that’s the first model that I felt was good enough to share with the world! (http://www.flickr.com/photos/25163007@N07/2374824789/in/photostream)
One of the most distinctive builders in the LEGO community is Jon Hall. Primarily a plane builder, he made a name for himself with his reimagining of prop-driven airplanes in the style of sky-fi and dieselpunk. Here, Jon talks to BrickJournal about how he started building, what inspires him, and what his building method is. You’ll also find he has another tie to the LEGO community, so read on!
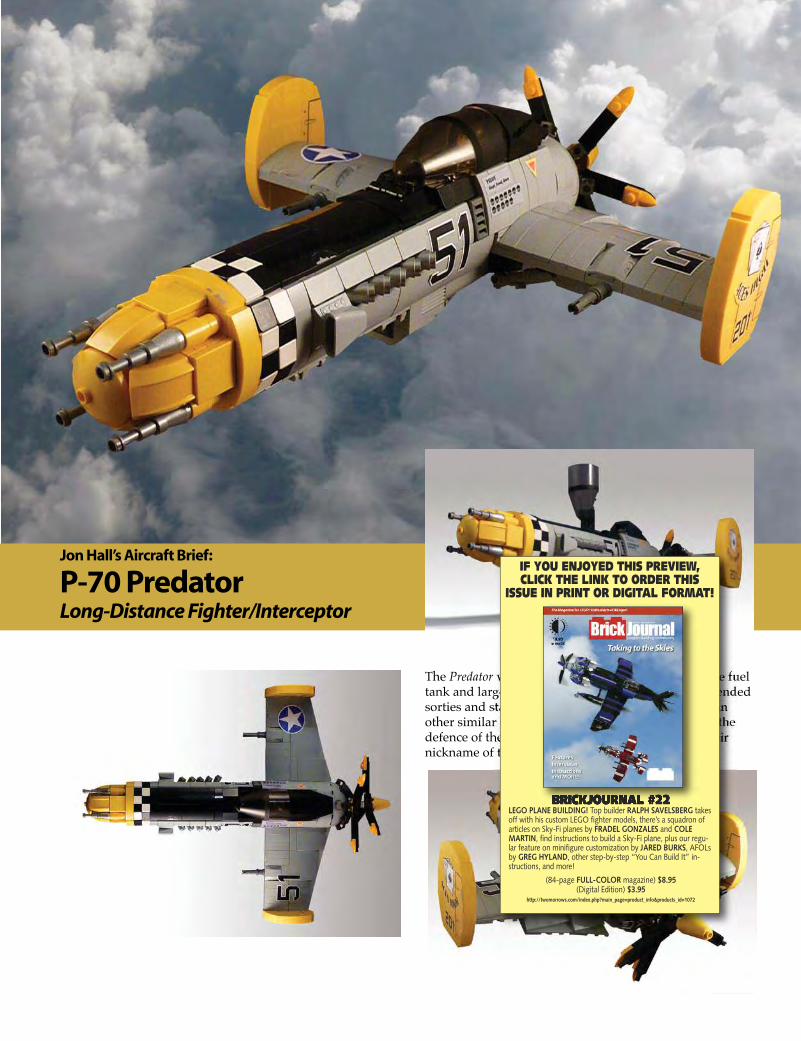
Long-Distance Fighter/Interceptor
The
sorties and stay in the air longer before refuelling than
defence of the Meneres Straits where they earned their
BRICKJOURNAL #22 LEGO PLANE BUILDING! Top builder RALPH SAVELSBERG takesoff with his custom LEGO fighter models, there’s a squadron ofarticles on Sky-Fi planes by FRADEL GONZALES and COLEMARTIN, find instructions to build a Sky-Fi plane, plus our regu-lar feature on minifigure customization by JARED BURKS, AFOLsby GREG HYLAND, other step-by-step “You Can Build It” in-structions, and more!
(84-page FULL-COLOR magazine) $8.95 (Digital Edition) $3.95
http://twomorrows.com/index.php?main_page=product_info&products_id=1072
IF YOU ENJOYED THIS PREVIEW,CLICK THE LINK TO ORDER THIS
ISSUE IN PRINT OR DIGITAL FORMAT!

![PAPER-44Aptitude Test for Architecture PART-A ... · 4 - DA ] [ 3 ] [ P.T.O. 22 22 22 22 22 22 22 22 22 22 22 22 22 22 003. The relation R defined on the set of all real numbers by](https://img.pdfslide.net/doc/110x75/5f06d2767e708231d419e89f/paper-44aptitude-test-for-architecture-part-a-4-da-3-pto-22-22.jpg)