Embed Size (px)
Citation preview

4980 Great America ParkwaySanta Clara, CA 95054 USA1-800-437-1663
Brio.Report Developer’s GuideVersion 6.0

Brio.Report Developer’s Guide Version 6.0
Part Number 4200042
© Copyright 2000 Brio Technology
All rights reserved. Printed in the USA.
This publication pertains to SQR Server and to any subsequent release until otherwise
indicated in new editions or technical notes. Information in this document is subject
to change without notice. The software described herein is furnished under a license
agreement, and it may be used or copied only in accordance with the terms of the
agreement.
Limited Warranty
The SQR Server application and Developer’s Guide are sold “as is,” without warrant as
to their performance, merchantability, or fitness for any particular purpose. The entire
risk as to the results and performance of this program is assumed by you.
However, to the original purchaser only, the publisher warrants the magnetic medium
on which the program is recorded to be free from defects in materials and faulty
workmanship under normal use for a period of ninety days from the date of purchase.
If during the ninety-day period the medium should become defective, it may be
returned to the publisher for a replacement without charge, provided you have
previously executed a software license agreement.
Brio.Enterprise, Brio Technology, Inc., the Brio logo, Brio ONE, Brio, SQR,
SQR Execute, SQR Print, Brio.Report Viewer, Brio.Report Builder,
Brio.Report Activator, Thin-Client Analysis, ONE/WebClient, Brio.Portal, ONE/API,
ONE/Integrator, ONE/Publisher, ONE/Script, Instant HTML, Enterprise Information
Portal, Empowered Reports, Report Surfing, and Smartcuts are trademarks or
registered trademarks of Brio Technology.
All other company and product names used herein may be the trademarks or
registered trademarks of their respective companies.

Table of Contents
Introduction
Audience . . . . . . . . . . . . . . . . . . . . . . . . . . . . . . . . . . . . . . . . . . . . . . . . . . . . xiii
How to Use the Brio.Report Developer’s Guide . . . . . . . . . . . . . . . . . . . . xiii
What’s New in 6.0? . . . . . . . . . . . . . . . . . . . . . . . . . . . . . . . . . . . . . . . . . . . . xivSQR Server 6.0 for DDO . . . . . . . . . . . . . . . . . . . . . . . . . . . . . . . . . . . . xiv
Multiple Platform Support . . . . . . . . . . . . . . . . . . . . . . . . . . . . . . . xivAggregation Functions for DDO-JDBC Datasources . . . . . . . . . . xvMultiple Datasource Connections . . . . . . . . . . . . . . . . . . . . . . . . . xvEnhanced LIST Variable Support . . . . . . . . . . . . . . . . . . . . . . . . . . xviTYPE Qualifier (DDO-SAP version only) . . . . . . . . . . . . . . . . . . . xvi
Multi-byte Encoding . . . . . . . . . . . . . . . . . . . . . . . . . . . . . . . . . . . . . . . xviEncodings Keys. . . . . . . . . . . . . . . . . . . . . . . . . . . . . . . . . . . . . . . . . xviEncoding Support in Prior Versions. . . . . . . . . . . . . . . . . . . . . . . . xvii
Color Printing. . . . . . . . . . . . . . . . . . . . . . . . . . . . . . . . . . . . . . . . . . . . . xviii
Related Documents . . . . . . . . . . . . . . . . . . . . . . . . . . . . . . . . . . . . . . . . . . . xix
Syntax Conventions . . . . . . . . . . . . . . . . . . . . . . . . . . . . . . . . . . . . . . . . . . . xix
Setting up the Sample Database . . . . . . . . . . . . . . . . . . . . . . . . . . . . . . . . . xx
If You Need Help . . . . . . . . . . . . . . . . . . . . . . . . . . . . . . . . . . . . . . . . . . . . . xxi
PART ONE SQR Basics
CHAPTER 1 Simple SQR Program
Creating and Running an SQR Program . . . . . . . . . . . . . . . . . . . . . . . . . . 1-2
SQR Output . . . . . . . . . . . . . . . . . . . . . . . . . . . . . . . . . . . . . . . . . . . . . . . . . 1-3

CHAPTER 2 Headings and Footings
Subdividing the Page. . . . . . . . . . . . . . . . . . . . . . . . . . . . . . . . . . . . . . . . . . . 2-1
Adding the Heading and Footing . . . . . . . . . . . . . . . . . . . . . . . . . . . . . . . . 2-2Page Heading. . . . . . . . . . . . . . . . . . . . . . . . . . . . . . . . . . . . . . . . . . . . . . 2-3Page Footing . . . . . . . . . . . . . . . . . . . . . . . . . . . . . . . . . . . . . . . . . . . . . . 2-3
Comments . . . . . . . . . . . . . . . . . . . . . . . . . . . . . . . . . . . . . . . . . . . . . 2-3Page Numbering . . . . . . . . . . . . . . . . . . . . . . . . . . . . . . . . . . . . . . . . 2-3Print Position . . . . . . . . . . . . . . . . . . . . . . . . . . . . . . . . . . . . . . . . . . 2-4
Order of Execution . . . . . . . . . . . . . . . . . . . . . . . . . . . . . . . . . . . . . . . . . 2-4
CHAPTER 3 Selecting Data from the Database
SQR SELECT Statement . . . . . . . . . . . . . . . . . . . . . . . . . . . . . . . . . . . . . . . . 3-3Syntax of the SELECT Statement . . . . . . . . . . . . . . . . . . . . . . . . . . . . . 3-3Positioning Data . . . . . . . . . . . . . . . . . . . . . . . . . . . . . . . . . . . . . . . . . . . 3-4
CHAPTER 4 Column Variables
Using a Column Variable in a Condition . . . . . . . . . . . . . . . . . . . . . . . . . . 4-1
Changing the Column Variable Name . . . . . . . . . . . . . . . . . . . . . . . . . . . . 4-2
CHAPTER 5 Break Logic
Using ON-BREAK. . . . . . . . . . . . . . . . . . . . . . . . . . . . . . . . . . . . . . . . . . . . . 5-3
Skipping Lines Between Groups . . . . . . . . . . . . . . . . . . . . . . . . . . . . . . . . . 5-4
Arranging Multiple Break Columns . . . . . . . . . . . . . . . . . . . . . . . . . . . . . . 5-5
Break Processing with Enhancements . . . . . . . . . . . . . . . . . . . . . . . . . . . . . 5-7Handling Page Breaks . . . . . . . . . . . . . . . . . . . . . . . . . . . . . . . . . . . . . . . 5-10Printing the Date. . . . . . . . . . . . . . . . . . . . . . . . . . . . . . . . . . . . . . . . . . . 5-11Obtaining Totals . . . . . . . . . . . . . . . . . . . . . . . . . . . . . . . . . . . . . . . . . . . 5-11Hyphens and Underscores . . . . . . . . . . . . . . . . . . . . . . . . . . . . . . . . . . . 5-13
Setting Break Procedures with BEFORE and AFTER . . . . . . . . . . . . . . . . 5-13Understanding the Order of Events. . . . . . . . . . . . . . . . . . . . . . . . . . . . 5-14
Step 1. Process BEFORE Procedures. . . . . . . . . . . . . . . . . . . . . . . . 5-18Step 2. Select First Row of Data. . . . . . . . . . . . . . . . . . . . . . . . . . . . 5-18Step 3. Select Subsequent Rows of Data . . . . . . . . . . . . . . . . . . . . . 5-18Step 4. Process AFTER Procedures . . . . . . . . . . . . . . . . . . . . . . . . . 5-19
Controlling Page Breaks with Multiple ON-BREAK Columns. . . . . . . . . 5-19
Saving a Value When a Break Occurs . . . . . . . . . . . . . . . . . . . . . . . . . . . . . 5-20
Using ON-BREAK on a Hidden Column . . . . . . . . . . . . . . . . . . . . . . . . . . 5-20
Restrictions and Limitations of ON-BREAK . . . . . . . . . . . . . . . . . . . . . . . 5-23
iv Table of Contents

CHAPTER 6 SETUP Section
Creating the SETUP Section . . . . . . . . . . . . . . . . . . . . . . . . . . . . . . . . . . . . 6-1
Using DECLARE-LAYOUT . . . . . . . . . . . . . . . . . . . . . . . . . . . . . . . . . . . . . 6-2
Overriding the Default Settings . . . . . . . . . . . . . . . . . . . . . . . . . . . . . . . . . 6-4
Declaring the Page Orientation. . . . . . . . . . . . . . . . . . . . . . . . . . . . . . . . . . 6-4
PART TWO SQR Reports
CHAPTER 7 Master/Detail Reports
Creating a Master/Detail Report . . . . . . . . . . . . . . . . . . . . . . . . . . . . . . . . . 7-2
Correlating Subqueries . . . . . . . . . . . . . . . . . . . . . . . . . . . . . . . . . . . . . . . . 7-4
CHAPTER 8 Cross-Tabular Reports
Arrays. . . . . . . . . . . . . . . . . . . . . . . . . . . . . . . . . . . . . . . . . . . . . . . . . . . . . . . 8-2
Creating the Array . . . . . . . . . . . . . . . . . . . . . . . . . . . . . . . . . . . . . . . . . . . . 8-4
Grouping by Category . . . . . . . . . . . . . . . . . . . . . . . . . . . . . . . . . . . . . . . . . 8-5
Using Multiple Arrays . . . . . . . . . . . . . . . . . . . . . . . . . . . . . . . . . . . . . . . . . 8-8
CHAPTER 9 Printing Mailing Labels
Defining Columns and Rows. . . . . . . . . . . . . . . . . . . . . . . . . . . . . . . . . . . . 9-2
Running the Program . . . . . . . . . . . . . . . . . . . . . . . . . . . . . . . . . . . . . . . . . 9-4
CHAPTER 10 Creating Form Letters
Laying Out the Letter . . . . . . . . . . . . . . . . . . . . . . . . . . . . . . . . . . . . . . . . . . 10-1
CHAPTER 11 Exporting Data to Other Applications
PART THREE Fonts and Graphics
CHAPTER 12 Using Graphics
Adding Graphics. . . . . . . . . . . . . . . . . . . . . . . . . . . . . . . . . . . . . . . . . . . . . . 12-2
Sharing Images among Reports. . . . . . . . . . . . . . . . . . . . . . . . . . . . . . . . . . 12-6
Printing Bar Codes . . . . . . . . . . . . . . . . . . . . . . . . . . . . . . . . . . . . . . . . . . . . 12-10
CHAPTER 13 Business Charts
Creating a Chart . . . . . . . . . . . . . . . . . . . . . . . . . . . . . . . . . . . . . . . . . . . . . . 13-2
Defining a Chart . . . . . . . . . . . . . . . . . . . . . . . . . . . . . . . . . . . . . . . . . . . . . . 13-5
Printing a Chart . . . . . . . . . . . . . . . . . . . . . . . . . . . . . . . . . . . . . . . . . . . . . . 13-6
Running the Program . . . . . . . . . . . . . . . . . . . . . . . . . . . . . . . . . . . . . . . . . 13-7
Table of Contents v

Passing Data to the Chart . . . . . . . . . . . . . . . . . . . . . . . . . . . . . . . . . . . . . . . 13-8
Changing Colors in New Graphics . . . . . . . . . . . . . . . . . . . . . . . . . . . . . . . 13-9Specifying Chart Data Series Colors . . . . . . . . . . . . . . . . . . . . . . . . . . . 13-9Specifying Chart Item Colors . . . . . . . . . . . . . . . . . . . . . . . . . . . . . . . . 13-10
CHAPTER 14 Changing Fonts
Positioning Text. . . . . . . . . . . . . . . . . . . . . . . . . . . . . . . . . . . . . . . . . . . . . . . 14-1
Using WRAP . . . . . . . . . . . . . . . . . . . . . . . . . . . . . . . . . . . . . . . . . . . . . . . . . 14-5
CHAPTER 15 Writing Printer-Independent Reports
Guidelines for Printer-Independent Reports . . . . . . . . . . . . . . . . . . . . . . . 15-1
PART FOUR Advanced SQR Programming
CHAPTER 16 Dynamic SQL and Error Checking
Using Variables in SQL . . . . . . . . . . . . . . . . . . . . . . . . . . . . . . . . . . . . . . . . . 16-2
Dynamic SQL . . . . . . . . . . . . . . . . . . . . . . . . . . . . . . . . . . . . . . . . . . . . . . . . 16-3
SQL Error Checking . . . . . . . . . . . . . . . . . . . . . . . . . . . . . . . . . . . . . . . . . . . 16-6
SQL and Substitution Variables . . . . . . . . . . . . . . . . . . . . . . . . . . . . . . . . . . 16-7
CHAPTER 17 Procedures, Argument Passing, and Local Variables
Procedures . . . . . . . . . . . . . . . . . . . . . . . . . . . . . . . . . . . . . . . . . . . . . . . . . . . 17-2
Local Variables. . . . . . . . . . . . . . . . . . . . . . . . . . . . . . . . . . . . . . . . . . . . . . . . 17-2
Argument Passing . . . . . . . . . . . . . . . . . . . . . . . . . . . . . . . . . . . . . . . . . . . . . 17-3
CHAPTER 18 Multiple Reports
CHAPTER 19 Using DML and DDL
SQL Statements . . . . . . . . . . . . . . . . . . . . . . . . . . . . . . . . . . . . . . . . . . . . . . . 19-1
Using BEGIN-SQL . . . . . . . . . . . . . . . . . . . . . . . . . . . . . . . . . . . . . . . . . . . . 19-2
CHAPTER 20 Working with Comma Separated Files—CSV
Declaring a Connection to a CSV Data Source . . . . . . . . . . . . . . . . . . . . . 20-1
Viewing CSV Metadata. . . . . . . . . . . . . . . . . . . . . . . . . . . . . . . . . . . . . . . . . 20-1
Creating and Executing MD Queries . . . . . . . . . . . . . . . . . . . . . . . . . . . . . 20-2
vi Table of Contents

CHAPTER 21 Working with Multi-Dimensional Data Sources—OLAP
Declaring a Connection to an OLAP Server . . . . . . . . . . . . . . . . . . . . . . . 21-1
Viewing Cube Metadata. . . . . . . . . . . . . . . . . . . . . . . . . . . . . . . . . . . . . . . . 21-2
Creating and Executing MD Queries . . . . . . . . . . . . . . . . . . . . . . . . . . . . . 21-2
Measures . . . . . . . . . . . . . . . . . . . . . . . . . . . . . . . . . . . . . . . . . . . . . . . . . . . . 21-2
Column Order . . . . . . . . . . . . . . . . . . . . . . . . . . . . . . . . . . . . . . . . . . . . . . . 21-3
CHAPTER 22 Working with Dates
Date Arithmetic . . . . . . . . . . . . . . . . . . . . . . . . . . . . . . . . . . . . . . . . . . . . . . 22-2
Date Formats. . . . . . . . . . . . . . . . . . . . . . . . . . . . . . . . . . . . . . . . . . . . . . . . . 22-4
String to Date Conversions . . . . . . . . . . . . . . . . . . . . . . . . . . . . . . . . . . . . . 22-5
Date to String Conversions . . . . . . . . . . . . . . . . . . . . . . . . . . . . . . . . . . . . . 22-5
Using Dates with the INPUT Command . . . . . . . . . . . . . . . . . . . . . . . . . . 22-6
Date Edit Masks . . . . . . . . . . . . . . . . . . . . . . . . . . . . . . . . . . . . . . . . . . . . . . 22-6
Declaring Date Variables . . . . . . . . . . . . . . . . . . . . . . . . . . . . . . . . . . . . . . . 22-8
CHAPTER 23 National Language Support
Locales . . . . . . . . . . . . . . . . . . . . . . . . . . . . . . . . . . . . . . . . . . . . . . . . . . . . . . 23-1
Available Locales. . . . . . . . . . . . . . . . . . . . . . . . . . . . . . . . . . . . . . . . . . . . . . 23-2
Default Locale . . . . . . . . . . . . . . . . . . . . . . . . . . . . . . . . . . . . . . . . . . . . . . . . 23-2
Switching Locales . . . . . . . . . . . . . . . . . . . . . . . . . . . . . . . . . . . . . . . . . . . . . 23-3
Modifying Locale Preferences . . . . . . . . . . . . . . . . . . . . . . . . . . . . . . . . . . . 23-4
Keywords—NUMBER, MONEY, and DATE . . . . . . . . . . . . . . . . . . . . . . . 23-4
CHAPTER 24 Interoperability
Calling SQR from Another Application . . . . . . . . . . . . . . . . . . . . . . . . . . . 24-2
Using the SQR API . . . . . . . . . . . . . . . . . . . . . . . . . . . . . . . . . . . . . . . . . . . . 24-2
Extending SQR—UFUNC.C . . . . . . . . . . . . . . . . . . . . . . . . . . . . . . . . . . . . 24-5
Adding a User Function . . . . . . . . . . . . . . . . . . . . . . . . . . . . . . . . . . . . . . . . 24-6Step 1. Add Function Prototype . . . . . . . . . . . . . . . . . . . . . . . . . . . . . . 24-6Step 2. Add Entry to USERFUNCS Table. . . . . . . . . . . . . . . . . . . . . . . 24-7Step 3. Add Implementation Code . . . . . . . . . . . . . . . . . . . . . . . . . . . . 24-8Step 4. Relink SQR . . . . . . . . . . . . . . . . . . . . . . . . . . . . . . . . . . . . . . . . . 24-9
Table of Contents vii

ufunc on Windows 95 & NT . . . . . . . . . . . . . . . . . . . . . . . . . . . . . . . . . . . . 24-10
Implementing New User Functions on Windows 95 & NT . . . . . . . . . . . 24-10
Integrating Brio.Report 6.0 and Brio.Portal 6.0.1 . . . . . . . . . . . . . . . . . . . 24-11
Brio.Report 6.0 and Brio.Portal 6.0.1 integration for NT platforms . . . . 24-11
Brio.Report 6.0 and Brio.Portal 6.0.1 Integration for UNIX Platforms. . 24-12
XML Support in SQR . . . . . . . . . . . . . . . . . . . . . . . . . . . . . . . . . . . . . . . . . . 24-13
CHAPTER 25 Testing and Debugging
Using the Test Feature. . . . . . . . . . . . . . . . . . . . . . . . . . . . . . . . . . . . . . . . . . 25-1
Using the #DEBUG Command . . . . . . . . . . . . . . . . . . . . . . . . . . . . . . . . . . 25-2
Using Compiler Directives for Debugging . . . . . . . . . . . . . . . . . . . . . . . . . 25-3
Common Programming Errors . . . . . . . . . . . . . . . . . . . . . . . . . . . . . . . . . . 25-4
CHAPTER 26 Performance and Tuning
SQR Performance and SQL Statements . . . . . . . . . . . . . . . . . . . . . . . . . . . 26-1
Simplifying a Complex SELECT . . . . . . . . . . . . . . . . . . . . . . . . . . . . . . . . . 26-2
Using LOAD-LOOKUP to Simplify Joins . . . . . . . . . . . . . . . . . . . . . . . . . . 26-3
Improving SQL Performance with Dynamic SQL . . . . . . . . . . . . . . . . . . . 26-5
Examining SQL Cursor Status . . . . . . . . . . . . . . . . . . . . . . . . . . . . . . . . . . . 26-6
Avoiding Temporary Database Tables . . . . . . . . . . . . . . . . . . . . . . . . . . . . . 26-7Using and Sorting Arrays . . . . . . . . . . . . . . . . . . . . . . . . . . . . . . . . . . . . 26-7
Sorting . . . . . . . . . . . . . . . . . . . . . . . . . . . . . . . . . . . . . . . . . . . . . . . . 26-8QuickSort and National Language . . . . . . . . . . . . . . . . . . . . . . . . . 26-12
Using and Sorting Flat Files . . . . . . . . . . . . . . . . . . . . . . . . . . . . . . . . . . 26-12
Creating Multiple Reports in One Pass . . . . . . . . . . . . . . . . . . . . . . . . . . . . 26-15
Tuning SQR Numerics . . . . . . . . . . . . . . . . . . . . . . . . . . . . . . . . . . . . . . . . . 26-15
Compiling SQR Programs and Using SQR Execute. . . . . . . . . . . . . . . . . . 26-16
Processing Limits . . . . . . . . . . . . . . . . . . . . . . . . . . . . . . . . . . . . . . . . . . . . . 26-16
Buffering Fetched Rows . . . . . . . . . . . . . . . . . . . . . . . . . . . . . . . . . . . . . . . . 26-17
Executing Programs on the Database Server . . . . . . . . . . . . . . . . . . . . . . . 26-17
viii Table of Contents

PART FIVE Running and Printing
CHAPTER 27 Compiling Programs and Using SQR Execute
CHAPTER 28 Printing Issues
CHAPTER 29 Using the SQR Command Line
Command-Line Flags. . . . . . . . . . . . . . . . . . . . . . . . . . . . . . . . . . . . . . . . . . 29-2
Specifying Command-Line Arguments . . . . . . . . . . . . . . . . . . . . . . . . . . . 29-3How SQR Retrieves the Arguments . . . . . . . . . . . . . . . . . . . . . . . . . . . 29-3Specifying Arguments and Argument Files . . . . . . . . . . . . . . . . . . . . . 29-4Using an Argument File . . . . . . . . . . . . . . . . . . . . . . . . . . . . . . . . . . . . . 29-4Passing Command-Line Arguments—Other Approaches . . . . . . . . 29-5Reserved Characters . . . . . . . . . . . . . . . . . . . . . . . . . . . . . . . . . . . . . . . . 29-6Creating an Argument File from a Report . . . . . . . . . . . . . . . . . . . . . . 29-6
Using Batch Mode . . . . . . . . . . . . . . . . . . . . . . . . . . . . . . . . . . . . . . . . . . . . 29-7VAX/VMS . . . . . . . . . . . . . . . . . . . . . . . . . . . . . . . . . . . . . . . . . . . . . . . . 29-7UNIX, Windows 95/98, and Windows NT/2000. . . . . . . . . . . . . . . . . 29-7
CHAPTER 30 Working with HTML
SQR Capabilities Available with HTML. . . . . . . . . . . . . . . . . . . . . . . . . . . 30-2Producing HTML Output . . . . . . . . . . . . . . . . . . . . . . . . . . . . . . . . . . . 30-2HTML Output . . . . . . . . . . . . . . . . . . . . . . . . . . . . . . . . . . . . . . . . . . . . 30-3Using -PRINTER:EH . . . . . . . . . . . . . . . . . . . . . . . . . . . . . . . . . . . . . . . 30-3Setting HTML Attributes under -PRINTER:EH . . . . . . . . . . . . . . . . . 30-5
Specifying HTML Title . . . . . . . . . . . . . . . . . . . . . . . . . . . . . . . . . . 30-6Specifying Background Color . . . . . . . . . . . . . . . . . . . . . . . . . . . . . 30-6Specifying a Background Image for the Report. . . . . . . . . . . . . . . 30-6Specifying Hyperlinks . . . . . . . . . . . . . . . . . . . . . . . . . . . . . . . . . . . 30-7Specifying Text Color. . . . . . . . . . . . . . . . . . . . . . . . . . . . . . . . . . . . 30-7Specifying HTML Colors . . . . . . . . . . . . . . . . . . . . . . . . . . . . . . . . 30-8Including Your Own HTML Tags . . . . . . . . . . . . . . . . . . . . . . . . . . 30-8
Using -PRINTER:HT . . . . . . . . . . . . . . . . . . . . . . . . . . . . . . . . . . . . . . . 30-9“Bursting” and Demand Paging . . . . . . . . . . . . . . . . . . . . . . . . . . . . . . 30-10Setting Attributes with HTML Procedures . . . . . . . . . . . . . . . . . . . . . 30-14
Table of Contents ix

Using Additional HTML Procedures . . . . . . . . . . . . . . . . . . . . . . . . . . 30-14Output File Types . . . . . . . . . . . . . . . . . . . . . . . . . . . . . . . . . . . . . . . . . . 30-15Testing . . . . . . . . . . . . . . . . . . . . . . . . . . . . . . . . . . . . . . . . . . . . . . . . . . . 30-15
Using HTML Procedures in an SQR Program . . . . . . . . . . . . . . . . . . . . . . 30-16How to Use HTML Procedures . . . . . . . . . . . . . . . . . . . . . . . . . . . . . . . 30-16Positioning Objects. . . . . . . . . . . . . . . . . . . . . . . . . . . . . . . . . . . . . . . . . 30-17Table Procedures . . . . . . . . . . . . . . . . . . . . . . . . . . . . . . . . . . . . . . . . . . . 30-19Headings . . . . . . . . . . . . . . . . . . . . . . . . . . . . . . . . . . . . . . . . . . . . . . . . . 30-21Highlighting . . . . . . . . . . . . . . . . . . . . . . . . . . . . . . . . . . . . . . . . . . . . . . 30-21Hypertext Links. . . . . . . . . . . . . . . . . . . . . . . . . . . . . . . . . . . . . . . . . . . . 30-22Images . . . . . . . . . . . . . . . . . . . . . . . . . . . . . . . . . . . . . . . . . . . . . . . . . . . 30-23Lists . . . . . . . . . . . . . . . . . . . . . . . . . . . . . . . . . . . . . . . . . . . . . . . . . . . . . 30-23Paragraph Formatting . . . . . . . . . . . . . . . . . . . . . . . . . . . . . . . . . . . . . . 30-25User-Defined HTML . . . . . . . . . . . . . . . . . . . . . . . . . . . . . . . . . . . . . . . 30-26
Modifying an Existing SQR Program . . . . . . . . . . . . . . . . . . . . . . . . . . . . . 30-26
Publishing the Report . . . . . . . . . . . . . . . . . . . . . . . . . . . . . . . . . . . . . . . . . . 30-29Viewing the Published Report . . . . . . . . . . . . . . . . . . . . . . . . . . . . . . . . 30-29Publishing Using an Automated Process . . . . . . . . . . . . . . . . . . . . . . . 30-30Publishing Using a CGI Script . . . . . . . . . . . . . . . . . . . . . . . . . . . . . . . . 30-31Creating the Fill-Out Form . . . . . . . . . . . . . . . . . . . . . . . . . . . . . . . . . . 30-32Creating the CGI Script . . . . . . . . . . . . . . . . . . . . . . . . . . . . . . . . . . . . . 30-33Passing Arguments to the SQR Program . . . . . . . . . . . . . . . . . . . . . . . 30-35
CHAPTER 31 Tables of Contents
DECLARE-T0C . . . . . . . . . . . . . . . . . . . . . . . . . . . . . . . . . . . . . . . . . . . . . . . 31-1
TOC-ENTRY . . . . . . . . . . . . . . . . . . . . . . . . . . . . . . . . . . . . . . . . . . . . . . . . . 31-2
Cust.sqr. . . . . . . . . . . . . . . . . . . . . . . . . . . . . . . . . . . . . . . . . . . . . . . . . . . . . . 31-3
Index
x Table of Contents

Introduction
Welcome to the Brio.Report Developer’s Guide. This guide is designed to help you learn SQR, a specialized language for database processing and reporting. By working through code examples, you will learn how to write SQR programs that select data from a database and present it in a report.
This Developer’s Guide is filled with real examples and sample programs, and we encourage you to copy code from it. It will help you create the kinds of SQR programs that are important to your organization.
The first three parts of the Developer’s Guide teach basic uses of SQR. You will learn how to:
� Create a variety of reports, such as tabular, cross-tabular and master/detail reports.
� Produce mailing labels, form letters, and envelopes.
� Enhance your reports with typeset-quality fonts and graphics.
� Produce graphs and charts that will help you present data and trends in visual terms.

The next two parts of the Developer’s Guide describe the advanced features and uses of SQR. You will learn how to:
� Create HTML output and publish your reports on the Internet or an Intranet or Extranet.
� Create reports that can be easily ported between different systems and databases and that support different printer and display types.
� Create reports that format dates, numbers, and money according to local preferences.
� Integrate SQR with other software packages, such as front-end user interface tools and spreadsheets.
� Extend SQR with procedures and functions written in C.
� Test and debug your programs.
� Tune your programs for optimum performance.
The tips and techniques you find here will help you take advantage of SQR’s advanced capabilities. Many of these techniques will save you time in developing reports for your organization.
The code examples also demonstrate good SQR programming style. We recommend that you adopt this standard style because it will make your code easier for other SQR programmers to read.
The program examples in this guide can be run without modification against the Oracle, SYBASE, and Informix databases. The examples can also be run against other databases with minor modifications. If your database is not named here, consult the SQR Language Reference or Brio Technology® Technical Support for additional information.
xii Introduction

AudienceThis guide was written for programmers developing reports for relational databases. To use this guide effectively, you need a working knowledge of SQL and experience in writing software programs. You also need to be familiar with your particular database and operating system.
How to Use the Brio.Report Developer’s GuideIf this is your first time using SQR, the first three parts of this guide (through Chapter 15) give you everything that you need to get started. The rest of the Developer’s Guide discusses advanced features and more technical issues.
You can use this book by simply reading it and studying the code examples. However, we encourage you to try these programs for yourself and to experiment with them. Try making some changes to our examples and see how they run.
To try the sample programs, you must first install SQR. If you have not already installed SQR on your system, see the installation instructions provided with SQR.
If you installed all of the program components, you will find the sample programs in the tutorial directory. If you did not include the Developer’s Guide files in the original installation, you may want to rerun the installation program to install just these files.
You can run the Developer’s Guide programs on any hardware platform, but you may find it somewhat easier to review SQR program results from the Windows platform, and using the SQR Viewer or Web browser to check results.
Note You can set up the sample database and run the sample programs with any user name and password. We recommend, however, that you use an account that does not hold important
data.
This guide describes the features for SQR Version 6.0, and the code examples require SQR Version 6.0 or higher.
�
How to Use the Brio.Report Developer’s Guide xiii

What’s New in 6.0?SQR Server 6.0 provides expanded DDO functionality, multi-byte encoding, and color-printing support.
SQR Server 6.0 for DDOSQR Server 6.0 for DDO provides the following new features:
� Multiple platform support
� Datasource-specific aggregation functions
� Multiple datasource connections
� Enhanced LIST variable support
� TYPE qualifier (DDO-SAP version only)
Multiple Platform SupportSQR Server 6.0 for DDO now supports most UNIX platforms in addition to Windows NT. Version 6.0 includes the necessary DDO drivers for simultaneous access to most relational datasources via JDBC as well as to many nonrelational datasources. The Windows NT-only DDO driver for SAP has been tuned to provide improved BAPI access.
SQR Server 6.0 for DDO supports the following:
UNIX platforms
� HP-UX on HP/PA-RISC
� AIX on IBM/PowerPC
� Solaris on Sun/SPARC
� Solaris on Sun/Intel
� SNI Reliant UNIX on Siemens/Intel
� DG-UX on DG/Intel
� Linux on Intel
� SCO UnixWare on Intel
� Sequent DYNIX on Sequent/Intel
� Tru64 UNIX on Compaq/Alpha
xiv Introduction

Nonrelational datasources
� XML (not yet certified)
� CSV (not yet certified)
� OLE DB (via the Microsoft ADO OLE DB client; not yet certified)
� SAP R/3 (from Windows NT only)
Relational datasources through JDBC
� ODBC
� Oracle Thin Client
� Oracle OCI Client
� Sybase Thin Client
� DB/2 Thin Client
� Informix Thin Client
� Microsoft SQL Server Thin Client
Aggregation Functions for DDO-JDBC DatasourcesSQR Server 6.0 for DDO allows you to name datasource-specific aggregation functions in place of column names from within a BEGIN-SELECT block. This shifts the processing burden from the SQR Server system to the datasource host and usually improves performance. The aggregation function feature also makes it possible to use literals (such as empty column) and simple mathematical operations (such as 5+10) in place of column names.
Multiple Datasource ConnectionsSQR Server 6.0 for DDO now supports multiple discrete connections to a given datasource. Each datasource connection can take a unique name, improving reporting performance and scalability.
What’s New in 6.0? xv

Enhanced LIST Variable SupportThe SQR LIST variable can hold many rows of data (similar to the array function), but prior to SQR Server 6.0 for DDO, you could only modify the entire row of a list item. SQR Server 6.0 for DDO allows you to modify a specific row element of any list item. Random access to specific row elements improves reporting flexibility and efficiency.
TYPE Qualifier (DDO-SAP version only)In SQR Server 6.0 for DDO-SAP, the TYPE=datatype qualifier used in a BEGIN-SELECT block is optional. When you report on datasources that provide adequate metadata (such as SAP), withholding the TYPE qualifier allows SQR to generate code that is more efficient and portable than it would be otherwise.
Multi-byte EncodingSQR Server 6.0 allows you to specify different encodings for the database, input files, output files, and report files. Version 6.0 also supports the NCHAR (national character) column type for databases such as Microsoft SQL Server 7.0 and Oracle 8.x.
Note When you specify different encodings in the SQR.INI file, the SQR engine does not perform
character conversion. You can only mix encodings that are logical supersets or subsets of one another. For example, you can combine SJIS and ASCII or EBCDIC and EBCDIK1027; however, you cannot combine SJIS with EBCDIC or UTF-8 with SJIS.
Encodings KeysThe Environment section(s) of SQR.INI specifies these various encodings. As with other Environment section settings, SQR first checks the Environment section of its database type and then checks the Common Environment section. For example, an ODBC version of SQR first checks the [Environment:ODBC] section of SQR.INI for a setting and, if not found, then checks the [Environment:Common] section.
�
xvi Introduction

The following list describes the encoding keys for SQR Server 6.0:
� ENCODING-DATABASE: the character data retrieved from and inserted into the database.
� ENCODING-FILE-INPUT: all character data read from files. This includes SQR source files, include files, and files read or written with the OPEN command.
� ENCODING-FILE-OUTPUT: the log file and data written to the console.
� ENCODING-REPORT-OUTPUT: the report generated by SQR Server (for example, a LIS file or PostScript file).
Valid values for the encoding keys are:
� ASCII
� EBCDIC
� SJIS
� JEUC
� EBCDIK290
� EBCDIK1027
� UTF-8
� UCS-2
If not specified, encodings default to ASCII (or EBCDIC on AS/400 or MVS). You can use the encoding key ENCODING to override the default.
You can specify UCS-2 as the value only for the ENCODING-DATABASE key. If you specify UCS-2 as the value for any other encoding keys, SQR Server 6.0 changes the encoding to UTF-8.
Encoding Support in Prior VersionsPrior to version 5.1, SQR Server employed separate executables (the “J” executables) to support the Japanese character encodings Shift-JIS (SJIS) and JEUC. SQR Server 6.0 continues to support the following character encodings in one set of executables:
� ASCII
� EBCDIC
What’s New in 6.0? xvii

� SJIS
� JEUC
� EBCDIK290
� EBCDIK1027
� UTF-8
� UCS-2 (Database only)
Versions before SQR Server 5.1 permitted only one encoding to be specified in the SQR.INI file. This single encoding applied to all character data that SQR encountered in the course of execution.
Color PrintingSQR Server 6.0 supports color printing, which allows you to define default colors globally and to redefine colors for a specific job by specify RGB values. The default setting is no color, with the following default colors implicitly installed:
black = (0, 0, 0)
white = (255, 255, 255)
gray = (128, 128, 128)
silver = (192, 192, 192)
red = (255, 0, 0)
green = ( 0, 255, 0)
blue = ( 0, 0, 255)
yellow = (255, 255, 0)
purple = (128, 0, 128)
olive = (128, 128, 0)
navy = (0, 0, 128)
aqua = (0, 255, 255)
lime = ( 0, 128, 0)
maroon = (128, 0, 0)
teal = (0, 128, 128)
fuchsia = (255, 0, 255)
xviii Introduction
Related DocumentsIn addition to this Developer’s Guide, the Brio.Report® product includes the following documentation:
� SQR Language Reference contains a complete reference to SQR commands, arguments, and command-line flags.
� Brio.Report Builder Developer’s Guide explains how to quickly create SQR reports, using the graphical SQR development tool on Windows 95/98 and Windows NT/2000 systems.
� SQR Server Installation Guide contains installation instructions and configuration information specific to your platform.
� Brio.Report Builder Installation Guide contains installation instructions and configuration information specific to your platform.
� SQR Server Release Notes describes enhancements and new features.
� Brio.Report Builder Release Notes describes enhancements and new features.
Syntax ConventionsSyntax and code examples use the following conventions:
Tab le 1 Syntax Conventions
Symbol Description
{ } Braces enclose required items.
[ ] Square brackets enclose optional items.
... An ellipsis shows that the preceding parameter can be repeated.
| A vertical bar separates alternatives within brackets, braces, or parentheses.
' A single quote starts and ends a literal text constant or any argument that has more than one word.(Caution: If you are copying codes directly from the examples in the pdf file, make sure that you change the slanted quotes to regular quotes or else you will get an error message.)
, A comma separates multiple arguments.
Syntax Conventions xix

Setting up the Sample DatabaseTo run the sample programs in this guide, you need to create a sample database. To do so, run the loadall.sqr program.
Change to the SAMPLE directory. On the command line, enter:
sqr loadall username/password
If SQR is installed on Windows NT or Windows 95, you can run loadall.sqr by double-clicking the Loadall icon. If your system does not display this icon, execute loadall.sqr from the SQR product’s SAMPLEW directory.
If an individual table already exists, you are prompted to:
A—Abort the load.
S—Skip the specified table.
R—Reload the specified table.
C—Reload all tables.
You can also run this as a batch program by the preferred option (A, S, R, or C) on the command-line. For example:
sqr loadall username/password a
( ) Parentheses must enclose an argument or element.
BOLD UPPER-CASE
SQR commands and arguments are specified in bold uppercase.
Italic Information and values that you must supply are specified in italics.
Tab le 1 Syntax Conventions
Symbol Description
xx Introduction

If You Need HelpIf you are unable to resolve an SQR question or problem using product documentation and you have a valid Brio Technology support agreement, you can contact Brio Technical Support from 6:00 AM to 5:30 PM Pacific Time at 1.800.437.1663 (within North America) or, +1.619.610.5769 (outside of North America). You can also send an email message to [email protected]. Please be prepared to provide a valid customer number and company name. You will also need to know the version of SQR you are using, your operating system and database names and versions. If you want to execute a Brio support agreement, please call 1.888.473.6391.
If You Need Help xxi


1P A R T O N E
1SQR Basics


1 Simple SQR Program
In this chapter, you will learn the following three SQR commands:
� BEGIN-PROGRAM,
� END-PROGRAM
You will also learn how to create and run an SQR program.
The first sample program is the simplest SQR program. It prints a text string.
Program ex1a.sqrbegin-program
print 'An SQR Program.' (1,1)end-program
Note For your convenience, all of the program examples and their output files are included with the installation.
�
1-1

Creating and Running an SQR ProgramOpen a text editor and enter the code printed above exactly as shown or open the ex1a.sqr file found in the TUTORIAL directory.
If you are actually writing the sample program code, the next step is to save your code. SQR programs are normally given a file extension of. sqr. Save this program with the name ex1a.sqr.
Run the sample program. Use the command appropriate to your operating system to change to the directory in which you saved the program. Then, enter the appropriate SQR program command at the system command prompt or from within the SQR application’s graphical user interface, where available. SQR on UNIX systems, is always run from the command line. You can run SQR from the command line or from a GUI on Windows systems.
If you are entering the information from the command line, include “sqr” or “sqrw”, the SQR program name and connectivity string, all on one line. On SQR for Windows systems, SQR is invoked from the command line with “sqrw”. On UNIX systems, SQR is invoked from the command line with “sqr”. The following syntax shows you how to run SQR from the command line:
[sqr or sqrw] [program] [connectivity] [flags ...] [args ...][@file ...]
Consult Table 1. SQR Command-Line Arguments and Table 2. SQR Command-Line Flags in the SQR Language Reference for a complete explanation of connectivity, flags, and arguments.
In a common configuration, you may be running SQR on Windows NT against an Oracle database located on another machine in your network. The command that you should then execute would have the following format:
sqrw ex1a username/password@servername -KEEP
If you correctly replace username, password, and servername with the appropriate information, you should see a command line similar to:
sqrw ex1a sammy/baker@rome -KEEP
To produce the desired output file for this exercise, the -KEEP flag is used in our example. Do not worry about its presence at this stage.
1-2 Simple SQR Program
SQR OutputSQR normally places the SQR program output files in the directory from which you run the program. The output file has the same file name as the SQR file that created it, but the file extension is different.
The output files should appear as soon as your program has finished running. If you specified the -KEEP argument, one output file is in SQR Portable Format (recognizable by its .SPF extension). SQR Portable Format is discussed later in this guide but for now, you can easily view the sample program’s .SPF file output, ex1a.spf, on Windows platforms with the SQR Viewer GUI (sometimes referred to as an “SPF viewer”) or from within Brio.Report Builder using the File|Open menu commands. The SQR Viewer is invoked from the command line with “sqrwv”.
On Windows and UNIX systems, the program also produces an output file with an .LIS extension. You can view this output file type from the command line with such commands as TYPE on Windows systems or CAT, MORE, and VI on UNIX systems. Use the command appropriate to your system to view or print the .LIS file.
No matter what platform you are using, the output will look like this:
Output for Program ex1a.sqr
An SQR Program.
You may also see a character such as ^L, or <FF> at the end of this output file. It is the form feed character that ejects the last page. In this guide, we do not show the form-feed characters.
Take another look at sample program ex1a.sqr. This program consists of three lines of code, starting with BEGIN-PROGRAM and ending with END-PROGRAM. These two commands and the code between them make up the PROGRAM section, which is used to control the order of processing. The PROGRAM section is required, and you may have only one. It is typically placed at or near the top of the program.
SQR Output 1-3

The PROGRAM section contains a PRINT command, which in this case prints the text “An SQR Program.” This text is enclosed in single quotation marks ('), which are used in SQR to distinguish literal text from other program elements.
The last element of the PRINT command gives the position on the output page. An output page can be thought of as a grid of lines and columns. The “(1,1)” indicates line one, column one, which is the top left corner of the page.
Note In SQR, you must place each command on a new line. You can indent SQR commands.
Summary� The PROGRAM section is where execution of the program begins.
� The PRINT command can be used to print a text string.
� Print position can be expressed by a pair of numbers enclosed in parentheses.
� Enter each command on a new line.
�
1-4 Simple SQR Program

2 Headings and Footings
This chapter explains how to create page headings and footings using the BEGIN-HEADING and BEGIN-FOOTING commands.
Subdividing the PageTypically, every page of a report has some information about the report itself, such as the title, the date, and the page number. In SQR, the page can be subdivided into three logical areas.
� The top area of the page is the heading, which is where we normally print the report title and the date.
� The bottom area of the page is the footing, which is where we normally print the page number.
� The middle part of the page is called the body, which is where we print the report data.
The following diagram shows the structure of a page with heading, body, and footing.
Heading
Body
Footing
1234123456789101112345
Headinglines
Body lines
Footinglines
Subdividing the Page 2-1
The diagram also shows that the heading, body, and footing each have independent line numbers. You can print in each of these page areas using line numbers that are relative to the top corner of that area without being concerned about the size of the other areas. In other words, you can print to the first line of the body using line number 1, independent of the size of the heading.
Adding the Heading and FootingThe program you wrote in Chapter 1, “Simple SQR Program.”can be expanded by adding a page heading and footing. Here is the code:
Program ex2a.sqrbegin-program
print 'An SQR Program.' (1,1)end-program
begin-heading 1print 'Tutorial Report' (1) center
end-heading
begin-footing 1! print "Page n of m" in the footingpage-number (1,1) 'Page 'last-page () ' of '
end-footing
Output for Program ex2a.sqr
Tutorial ReportAn SQR Program.
Page 1 of 1
2-2 Headings and Footings

Page HeadingYou define the page heading in the HEADING section. The section starts with BEGIN-HEADING and ends with END-HEADING. The BEGIN-HEADING command is followed by a number, which is the number of lines reserved for the heading. In our example, the heading takes exactly one line and consists of the text “Tutorial Report.” The CENTER argument ensures that the text is centered on the line.
Page FootingYou define the page footing in the FOOTING section, which starts with BEGIN-FOOTING and ends with END-FOOTING. The command BEGIN-FOOTING is followed by the number 1, which means that the footing will take one line. This line consists of the text “Page 1 of 1.”
Note that any space reserved for the heading and footing is taken away from the body. With one line each in the heading and footing, the maximum possible size of the body of our report is reduced by two lines. Note also that line 1 of the body is actually the first line after the heading.
CommentsThe first line in the FOOTING section is a comment. Comments are preceded by an exclamation mark, and they extend from the exclamation mark to the end of the line. If you want to print an exclamation mark, you must type it twice to tell SQR not to take it as the beginning of a comment. For example:
print 'An SQR Program!!' (1,1)
Page NumberingThe PAGE-NUMBER command prints the text “Page “ and the current page number. The LAST-PAGE command prints the number of the last page, preceded by the word “of,” which is bracketed by spaces. In our example, SQR prints “Page 1 of 1” because there is only one page.
Adding the Heading and Footing 2-3

Print PositionNote the parentheses in the PRINT, PAGE-NUMBER, and LAST-PAGE commands. Numbers in these parentheses give the position for printing. A position in SQR is expressed as three numbers in parentheses—(line,column,width)—where line is the line number, column is the column (character position), and width is the width of the text.
In many cases, a position consists only of the line and column numbers. The width is normally omitted because it defaults to the width of the text being printed. If you also omit the line and column numbers, the print position defaults to the current position, the position following the last item printed. In the example, the LAST-PAGE command has the position “()” so the current position here is the position following the page number.
Print position is a point within the area of the page, or more precisely, within the heading, body, or footing. The position (1,1) in the heading is not the same as the position (1,1) in the body. Line 1 of the body is the first line below the heading. In the program, the heading has only one line, so line 1 of the body is actually the second line of the page. Similarly, line 1 of the footing is at the bottom of the page. It is the first line following the body.
Order of ExecutionThe PRINT command actually places text in memory, not on paper. SQR always prepares a page in memory before printing it to paper, performing the body first, then the HEADING and FOOTING sections. In this case, “An SQR Program” is executed first, then “Tutorial Report” and “Page 1 of 1.”
Summary� An SQR program can have HEADING and FOOTING sections, which create the
heading and footing of a report page.
� The CENTER option of the PRINT command centers text on a line.
� Exclamation marks are used to precede comments.
� Page numbers can be printed in a “Page n of m” format with the PAGE-NUMBER and LAST-PAGE commands.
� Print positions are expressed by numbers enclosed in parentheses.
2-4 Headings and Footings

3 Selecting Data from the Database
This chapter describes how to write a program that lists data from the database and prints it in columns. You will learn the BEGIN-SELECT command, which is the principal means of retrieving data from the database and printing it in a report.
Because the BEGIN-SELECT command is used in a procedure, you will also learn how to use procedures. Here is the code. An explanation of it follows.
Program ex3a.sqrbegin-program
do list_customersend-program
begin-heading 4print 'Customer Listing' (1) centerprint 'Name' (3,1)print 'City' (,32)print 'State' (,49)print 'Phone' (,55)
end-heading
begin-footing 1! Print "Page n of m" in the footingpage-number (1,1) 'Page 'last-page () ' of '
end-footing
begin-procedure list_customersbegin-selectname (,1)city (,32)state (,49)phone (,55)
position (+1) ! Advance to the next linefrom customersend-selectend-procedure ! list_customers
3-1

Output for Program ex3a.sqr
Customer Listing
Name City State Phone
Gregory Stonehaven Everretsville OH 2165553109Alfred E Newman & Company New York NY 2125552311Eliot Richards Queens NY 2125554285Isaiah J Schwartz and Company Zanesville OH 5185559813Harold Alexander Fink Davenport IN 3015553645Harriet Bailey Mamaroneck NY 9145550144Clair Butterfield Teaneck NJ 2015559901Quentin Fields Cleveland OH 2165553341Jerry's Junkyard Specialties Frogline NH 6125552877Kate's Out of Date Dress Shop New York NY 2125559000Sam Johnson Bell Harbor MI 3135556732Joe Smith and Company Big Falls NM 8085552124Corks and Bottles, Inc. New York NY 2125550021Harry's Landmark Diner Miningville IN 3175550948
Page 1 of 1
The PROGRAM section consists of a single DO command, which invokes the procedure list_customers.
In SQR, a procedure is a group of commands that are performed one after the other, like a procedure (or subroutine) in other programming languages. A DO command invokes a procedure.
We recommend that you break your program logic into procedures and keep the PROGRAM section small. It should normally consist of a few DO commands for the main components of your report.
The HEADING section (shown again here) creates headings for the report columns. Four lines are reserved for the heading.
begin-heading 4print 'Customer Listing' (1) centerprint 'Name' (3,1)print 'City' (,32)print 'State' (,49)print 'Phone' (,55)
end-heading
3-2 Selecting Data from the Database

The title Customer Listing is printed on line 1. Line 2 is left blank. The first column heading, Name is positioned at line 3 of the heading, character position 1. The rest of the column-heading commands omit the line numbers in their positions and default to the current line. Line 4 of the heading is left blank.
SQR SELECT StatementLook again at the list_customers procedure, which starts with BEGIN-PROCEDURE and ends with END-PROCEDURE. Note the comment following the END-PROCEDURE command. It shows the procedure is being ended, which is helpful when you have a program with many procedures. (You can also omit the exclamation point: END-PROCEDURE main.)
The procedure itself contains a SELECT paragraph, which starts with BEGIN-SELECT and ends with END-SELECT.
The SELECT paragraph is unique. It combines a SQL SELECT statement with SQR processing in a seamless way. The actual SQL statement is:
SELECT NAME, CITY, STATE, PHONEFROM CUSTOMERS
Syntax of the SELECT StatementIn an SQR SELECT paragraph, the word SELECT is omitted, and there are no commas between the column names. Instead, each column is on its own line. You can also place SQR commands between the column names, and these commands are executed for every record that the SELECT fetches.
Note You must name each individual column in a table—the SELECT * FROM statement is not
allowed in SQR.
SQR distinguishes column names from SQR commands in a SELECT paragraph by their indentation. Column names must be placed at the beginning of a line. SQR commands must be indented at least one space—in the following example, the POSITION command is indented to prevent it
�
SQR SELECT Statement 3-3
from being taken as a column name. The word FROM must be the first word in a line. The rest of the SQR SELECT statement is then written freely, after SQL syntax.
You can think of the SELECT paragraph as a loop. The SQR commands, including printing of columns, are executed in a loop, once for each record that SELECT returns. The loop ends after the last record is returned.
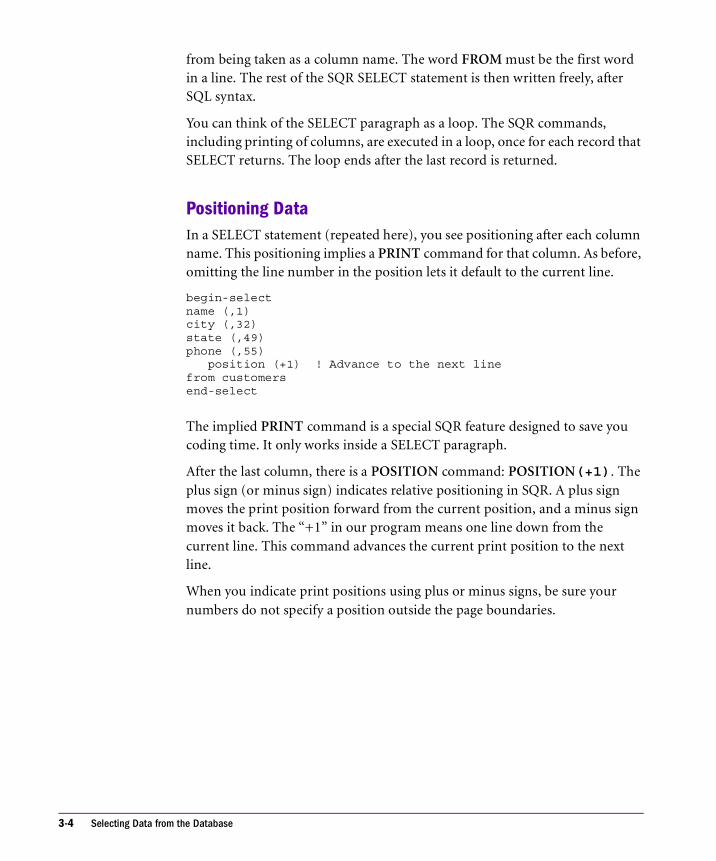
Positioning DataIn a SELECT statement (repeated here), you see positioning after each column name. This positioning implies a PRINT command for that column. As before, omitting the line number in the position lets it default to the current line.
begin-selectname (,1)city (,32)state (,49)phone (,55)
position (+1) ! Advance to the next linefrom customersend-select
The implied PRINT command is a special SQR feature designed to save you coding time. It only works inside a SELECT paragraph.
After the last column, there is a POSITION command: POSITION(+1). The plus sign (or minus sign) indicates relative positioning in SQR. A plus sign moves the print position forward from the current position, and a minus sign moves it back. The “+1” in our program means one line down from the current line. This command advances the current print position to the next line.
When you indicate print positions using plus or minus signs, be sure your numbers do not specify a position outside the page boundaries.
3-4 Selecting Data from the Database

Summary� The DO command invokes a procedure.
� A procedure begins with BEGIN-PROCEDURE and ends with END-PROCEDURE.
� A SELECT paragraph begins with BEGIN-SELECT and ends with END-SELECT.
� SQR commands in a SELECT paragraph must be indented at least one space to prevent them from being taken for column names.
� In a SELECT statement, you can print a column by entering it at the beginning of a line with a position qualifier. This is called an implied PRINT command.
� The POSITION command gives a position.
SQR SELECT Statement 3-5

3-6 Selecting Data from the Database

4 Column Variables
This chapter explains how to name database columns with variables and how to use their values in conditions and commands.
Using a Column Variable in a ConditionWhen you select columns from the database in a SELECT paragraph, you can immediately print them using a position. For example:
begin-selectphone (,1)
position (+1)from customersend-select
But what if you want to use the value of phone for another purpose, for example, in a condition? The following example shows you how to do this.
begin-programdo list_customers
end-program
begin-procedure list_customersbegin-selectphone
if &phone = ''print 'No phone' (,1)
elseprint &phone (,1)
end-ifposition (+1)
from customersend-selectend-procedure ! list_customers
4-1

The phone column is an SQR column variable. Column variables are preceded with an ampersand (&).
Unlike other program variables, column variables are read-only. You can use their existing value, but you cannot assign a new value to a column variable.
In the sample program, &phone is a column variable that you can use in SQR commands as if it were a string, date, or numeric variable, depending on its contents. In the condition, &phone is compared to ' ', an empty string. If &phone is an empty string, the program prints “No phone” instead.
Changing the Column Variable NameNote that the column variable &phone inherited its name from the phone column. This is the default, but you can change it, as the following example demonstrates.
begin-selectphone &cust_phone
if &cust_phone = ''print 'No phone' (,1)
elseprint &cust_phone (,1)
end-ifposition (+1)
from customersend-selectWhy would you want to change the name of the column variable?One reason is that you may want to use a selected column in anexpression that has no name. For example:begin-selectcount(name) &cust_cnt (,1)
if &cust_cnt < 100print 'Less than 100 customers'
end-ifposition (+1)
from customersgroup by city, stateend-select
In this example, the expression count(name) is selected. In the program, you store this expression in the column variable &cust_cnt and refer to it afterwards by that name.
4-2 Column Variables

Summary� In SQR, you can refer to database columns as variables. Precede a column
variable with an ampersand (&).
� Column variables can be used in commands and conditions. You can rename column variables to receive the value of expressions.
Changing the Column Variable Name 4-3

4-4 Column Variables

5 Break Logic
This chapter describes techniques for using break logic in your SQR programs. It also presents some additional techniques to enhance the appearance of reports that use break logic.
A break is a change in the value of a column or variable. Records with the same value—for example, records with the same value for state—logically belong to a group. When a break occurs, a new group begins.
There are a number of reasons to use break logic in a report. It allows you to:
� Add white space to your reports.
� Avoid printing redundant data.
� Perform conditional processing on variables that change.
� Print subtotals.
For example, you may want to prepare a sales report with records grouped by product, region, or salesperson (or all three). Break logic allows you to do all that and more—you can print column headings, count records, subtotal a column, and perform additional processing on the count or subtotal.
To see how a break works, you can write a program similar to the one in Chapter 3, “Selecting Data from the Database” and then add break logic to it. The break logic makes the grouping more apparent.
5-1

Here is the program without break logic.
Program ex5a.sqrbegin-program
do list_customersend-programbegin-heading 2
print 'State' (1,1)print 'City' (1,7)print 'Name' (1,24)print 'Phone' (1,55)
end-heading
begin-procedure list_customersbegin-selectstate (,1)city (,7)name (,24)phone (,55)
position (+1) ! Advance to the next linefrom customersorder by state, city, nameend-selectend-procedure ! list_customers
Output for Program ex5a.sqr
State City Name Phone
IN Davenport Harold Alexander Fink 3015553645IN Miningville Harry's Landmark Diner 3175550948MI Bell Harbor Sam Johnson 3135556732NH Frogline Jerry's Junkyard Specialties 6125552877NJ Teaneck Clair Butterfield 2015559901NM Big Falls Joe Smith and Company 8085552124NY Mamaroneck Harriet Bailey 9145550144NY New York Alfred E Newman & Company 2125552311NY New York Corks and Bottles, Inc. 2125550021NY New York Kate's Out of Date Dress Shop 2125559000NY Queens Eliot Richards 2125554285OH Cleveland Quentin Fields 2165553341OH Everretsville Gregory Stonehaven 2165553109OH Zanesville Isaiah J Schwartz and Company 5185559813
When you sort the output by state, city, and name (note the ORDER BY clause in the BEGIN-SELECT), the records are grouped by state. To make the grouping more apparent, you can add a break.
5-2 Break Logic

Using ON-BREAKIn the program shown here, the ON-BREAK option of the PRINT command accomplishes two related tasks—it starts a new group each time the value of state changes, and prints state only when its value changes. Note that ON-BREAK works as well for implicit as for explicit PRINT commands, such as in the following example, where state, city, name, and phone are implicitly printed as part of the SELECT paragraph.
The program here is identical to ex5a.sqr with the exception of the line that prints the state column. This line appears in bold.
Program ex5b.sqrbegin-program
do list_customersend-program
begin-heading 2print 'State' (1,1)print 'City' (1,7)print 'Name' (1,24)print 'Phone' (1,55)
end-headingbegin-procedure list_customersbegin-selectstate (,1) on-breakcity (,7)name (,24)phone (,55)
position (+1) ! Advance to the next linefrom customersorder by state, city, nameend-selectend-procedure ! list_customers
Using ON-BREAK 5-3

Output for Program ex5b.sqr
State City Name Phone
IN Davenport Harold Alexander Fink 3015553645Miningville Harry's Landmark Diner 3175550948
MI Bell Harbor Sam Johnson 3135556732NH Frogline Jerry's Junkyard Specialties 6125552877NJ Teaneck Clair Butterfield 2015559901NM Big Falls Joe Smith and Company 8085552124NY Mamaroneck Harriet Bailey 9145550144
New York Alfred E Newman & Company 2125552311New York Corks and Bottles, Inc. 2125550021New York Kate's Out of Date Dress Shop 2125559000Queens Eliot Richards 2125554285
OH Cleveland Quentin Fields 2165553341Everretsville Gregory Stonehaven 2165553109Zanesville Isaiah J Schwartz and Company 5185559813
With break processing, the state abbreviation is printed only once for each group.
Skipping Lines Between GroupsYou can further enhance the visual effect of break processing by inserting one or more lines between groups. To do so, use the SKIPLINES qualifier with ON-BREAK. Here is the list_customers procedure from ex5b.sqr, with the modified line shown in bold.
begin-selectstate (,1) on-break skiplines=1city (,7)name (,24)phone (,55)
position (+1) ! Advance to the next linefrom customersorder by state, city, nameend-select
5-4 Break Logic

Output for modified Program ex5b.sqrState City Name Phone
IN Davenport Harold Alexander Fink 3015553645Miningville Harry's Landmark Diner 3175550948
MI Bell Harbor Sam Johnson 3135556732
NH Frogline Jerry's Junkyard Specialties 6125552877
NJ Teaneck Clair Butterfield 2015559901
NM Big Falls Joe Smith and Company 8085552124
NY Mamaroneck Harriet Bailey 9145550144New York Alfred E Newman & Company 2125552311New York Corks and Bottles, Inc. 2125550021New York Kate's Out of Date Dress Shop 2125559000Queens Eliot Richards 2125554285
OH Cleveland Quentin Fields 2165553341EverretsvilleGregory Stonehaven 2165553109Zanesville Isaiah J Schwartz and Company 5185559813
Arranging Multiple Break ColumnsAs you can see in the previous example, you can also have multiple customers within a city. You can apply the same break concept to the city column to make this grouping of customers more apparent. Add another ON-BREAK to the program so that city is also printed only when its value changes.
When you have multiple breaks, you must arrange them in a hierarchy. In the sample program, the breaks concern geographical units, so it is logical to arrange them according to size—first state, then city. This sort of arrangement is called nesting, and the breaks are said to be nested.
To ensure that the breaks are properly nested, use the LEVEL keyword. This argument numbers breaks by level and specifies that the columns are printed in order of increasing break levels, from left to right. Number your breaks in the same order in which they are sorted in the ORDER BY clause. For more information on LEVEL, see “Understanding the Order of Events” on page 5-14. The LEVEL qualifier allows you to control the order in which you call break procedures. You will learn more about this technique in “Setting Break Procedures with BEFORE and AFTER” on page 5-13. The next example is identical to ex5a.sqr with the exception of the two lines that print the state and city columns. These two lines are shown in bold.
Arranging Multiple Break Columns 5-5

Program ex5c.sqrbegin-program
do list_customersend-program
begin-heading 2print 'State' (1,1)print 'City' (1,7)print 'Name' (1,24)print 'Phone' (1,55)
end-heading
begin-procedure list_customersbegin-selectstate (,1) on-break level=1city (,7) on-break level=2name (,24)phone (,55)
position (+1) ! Advance to the next linefrom customersorder by state, city, nameend-selectend-procedure ! list_customers
Output for Program ex5c.sqr
State City Name Phone
IN Davenport Harold Alexander Fink 3015553645Miningville Harry's Landmark Diner 3175550948
MI Bell Harbor Sam Johnson 3135556732NH Frogline Jerry's Junkyard Specialties 6125552877NJ Teaneck Clair Butterfield 2015559901NM Big Falls Joe Smith and Company 8085552124NY Mamaroneck Harriet Bailey 9145550144
New York Alfred E Newman & Company 2125552311Corks and Bottles, Inc. 2125550021Kate's Out of Date Dress Shop 2125559000
Queens Eliot Richards 2125554285OH Cleveland Quentin Fields 2165553341
Everretsville Gregory Stonehaven 2165553109Zanesville Isaiah J Schwartz and Company 5185559813
As you can see, there are three customers in New York, so the city name for the second and third customers is left blank.
5-6 Break Logic

Break Processing with EnhancementsWhen you use break logic, you may want to enhance your report by controlling page breaks or calculating counts and totals for the ON-BREAK column. The following example illustrates these techniques.
The program selects the customer's name, address, and telephone number from the database. The break processing is performed on the state column. Here is the code.
Program ex5d.sqrbegin-program
do list_customersend-program
begin-heading 4print 'Customers Listed by State' (1) centerprint $current-date (1,1) Edit 'DD-Mon-YYYY'print 'State' (3,1)print 'Customer Name, Address and Phone Number' (,11)print '-' (4,1,9) fillprint '-' (4,11,40) fill
end-heading
begin-footing 2! print "Page n of m"page-number (1,1) 'Page 'last-page () ' of '
end-footing
begin-procedure state_totprint ' Total Customers for State: ' (+1,1)print #state_total () edit 999,999position (+3,1) ! Leave 2 blank lines.let #cust_total = #cust_total + #state_totallet #state_total = 0
end-procedure ! state_totbegin-procedure list_customerslet #state_total = 0let #cust_total = 0begin-select! The 'state' field will only be printed when it! changes. The procedure 'state_tot' will also be! executed only when the value of 'state' changes.state (,1) on-break print=change/top-page after=state_totname (,11)addr1 (+1,11) ! continue on second lineaddr2 (+1,11) ! continue on third linecity (+1,11) ! continue on fourth linephone (,+2) edit (xxx)bxxx-xxxx ! Edit for easy reading.
! Skip 1 line between listings.
Break Processing with Enhancements 5-7

! Since each listing takes 4 lines, we specify 'need=4' to! prevent a customer's data from being broken across two pages.next-listing skiplines=1 need=4let #state_total = #state_total + 1
from customersorder by state, nameend-selectif #cust_total > 0
print ' Total Customers: ' (+3,1)print #cust_total () edit 999,999 ! Total customers printed.
elseprint 'No customers.' (1,1)
end-ifend-procedure ! list_customers
Output for Program ex5d.sqr
29-Apr-1996 Customers Listed by State
State Customer Name, Address and Phone Number--------- ----------------------------------------IN Harold Alexander Fink
32077 Cedar StreetWest EndDavenport (301) 555-3645
Harry's Landmark Diner17043 Silverfish RoadSouth ParkMiningville (317) 555-0948
Total Customers for State: 2
MI Sam Johnson37 Cleaver StreetSandy AcresBell Harbor (313) 555-6732
Total Customers for State: 1
NH Jerry's Junkyard SpecialtiesCrazy Lakes CottagesRural Delivery #27Frogline (612) 555-2877
Total Customers for State: 1
NJ Clair Butterfield371 Youngstown BlvdQuit WoodsTeaneck (201) 555-9901
5-8 Break Logic

Total Customers for State: 1
NM Joe Smith and Company1711 Sunset BlvdEast RiverBig Falls (808) 555-2124
Total Customers for State: 1
NY Alfred E Newman & Company2837 East Third StreetGreenwich VillageNew York (212) 555-2311
Page 1 of 2
29-Apr-1996 Customers Listed by State
State Customer Name, Address and Phone Number--------- ----------------------------------------NY Corks and Bottles, Inc.
167 East Blvd.JamaicaNew York (212) 555-0021
Eliot Richards2134 Partridge AveJamaicaQueens (212) 555-4285
Harriet Bailey47 Season StreetBellevue ParkMamaroneck (914) 555-0144
Kate's Out of Date Dress Shop2100 Park AveEast Side CityNew York (212) 555-9000
Total Customers for State: 5
OH Gregory StonehavenMiddlebrook RoadGrey QuarterEverretsville (216) 555-3109
Isaiah J Schwartz and Company37211 Columbia BlvdSweet AcresZanesville (518) 555-9813
Quentin Fields37021 Cedar Road
Break Processing with Enhancements 5-9

BeachwoodCleveland (216) 555-3341
Total Customers for State: 3
Total Customers: 14
Page 2 of 2
Take a close look at the code. The data is printed using a SELECT paragraph in the list_customers procedure. The state and the customer name are printed on the first line. The customer's address and phone number are printed on the next three lines.
The program also uses the argument AFTER=STATE_TOT. This argument calls the state_tot procedure after each change in the value of state. The order of processing is explained in “Setting Break Procedures with BEFORE and AFTER” on page 5-13.
Handling Page BreaksIf a page break occurs within a group, you may want to reprint headings and the value of the break column at the top of the new page.
To control the printing of the value, use PRINT=CHANGE/TOP-PAGE. With this qualifier, the value of the ON-BREAK column is printed when it changes and after every page break. In this example, the value of state is printed not only when it changes, but whenever the report starts a new page.
To format records, use the NEXT-LISTING command. This command serves two purposes. The SKIPLINES=1 argument skips one line between records, then renumbers the current line as line 1. The NEED=4 argument prevents a listing from being split over two pages by specifying the minimum number of lines needed to write a new listing on the current page. In this case, if fewer than four lines are left on a page, SQR starts a new page.
5-10 Break Logic

Break Processing with Enhancements 5-11
Printing the DateIn the HEADING section, the reserved variable $current-date prints the date and the time. This variable is initialized with the date and time of the client machine at the start of program execution. SQR provides predefined, or reserved, variables for a variety of uses. For a complete listing of reserved variables, see the SQR Language Reference.
In this example, the complete command is PRINT $current-date (1,1) EDIT 'DD/MM/YYYY'. It prints the date and time at position 1,1 of the heading. The EDIT argument specifies an edit mask, or format, for printing the date. SQR provides a large variety of edit masks for use in formatting numbers, dates, and strings. They are fully described in the SQR Language Reference.
Note that the PRINT command for the report title precedes the command for the $current-date reserved variable, even though the date is on the left and the title is on the right. SQR always assembles a page in memory before printing, so the order of these commands does not matter as long as you use the correct print position qualifiers.
The last two commands in the HEADING section print a string of hyphens under the column headings. Note the use of the FILL option of the PRINT command. It tells SQR to fill the specified width with this pattern, which is a good way to print a line.
In the FOOTING section, we print the “Page n of m” as we did in earlier examples.
Obtaining TotalsThe program ex5d.sqr also prints two totals—a subtotal of customers in each state and a grand total of all customers. These calculations are performed with two numeric variables, one for the subtotals and one for the grand totals. Their names are #state_total and #cust_total, respectively.
SQR has a small set of variable types. The most common types are numeric variables and the string variables. All numeric variables in SQR are preceded with a pound sign (#) and all string variables are preceded with a dollar sign ($). An additional SQR variable type is the date variable (see Chapter 20, “Working with Comma Separated Files—CSV”).

In SQR, numeric and string variables are not explicitly declared. Instead, they are implicitly defined by their first use. All numeric variables start out as zero and all string variables start out as null, so there is normally no need to initialize them. The string variables are of varying length and can hold long strings of characters as well as short ones. Assigning a new value to a string variable, automatically adjusts its length.
In the list_customers procedure, #state_total and #cust_total are set to zero at the beginning of the procedure. This initialization is optional and is done for clarity only. The variable #state_total is incremented by 1 for every row selected.
When the value of state changes, the program calls the state_tot procedure and prints the value of #state_total. Note the use of the edit mask EDIT 999,999, which formats the number.
This procedure also employs the LET command. LET is the assignment command in SQR, for building complex expressions. Here, LET adds the value of #state_total to #cust_total. At the end of the procedure, #state_total is reset to zero.
The list_customers procedure contains an example of SQR's if-then-else logic. The condition starts with IF followed by an expression. If the expression evaluates to true or to a number other than zero, the subsequent commands are executed. Otherwise, if there is an ELSE part to the IF, those commands are executed. IF commands always end with an END-IF.
In ex5d.sqr, the value of #cust_total is examined. If it is greater than zero, the query has returned rows of data, and the program will print the string Total Customers: and the value of #cust_total.
If #cust_total is equal to zero, the query has not returned any data. In that case, the program prints the string No customers.
5-12 Break Logic

Hyphens and UnderscoresYou may have noticed that many SQR commands, such as BEGIN-PROGRAM and BEGIN-SELECT, use a hyphen, whereas procedure and variable names use an underscore.
Procedure and variable names can contain either a hyphen or underscore, but we strongly recommend you use an underscore. Using underscores in procedure and variable names helps you distinguish them from SQR commands. It also prevents confusion when you mix variable names and numbers in an expression, where hyphens could be mistaken for minus signs.
Setting Break Procedures with BEFORE and AFTERWhen you print variables with ON-BREAK, you can automatically call procedures before and after each break in a column. The BEFORE and AFTER qualifiers give you this capability. For example:
begin-selectstate (,1) on-break before=state_heading after=state_tot
The BEFORE qualifier automatically calls the state_heading procedure to print headings before each group of records of the same state. Similarly, the AFTER qualifier automatically calls the state_tot procedure to print totals after each group of records.
All BEFORE procedures are automatically invoked before each break, including the first—in other words, before the SELECT is even processed. Similarly, all AFTER procedures are invoked after each break, including the last group—in other words, upon completion of the SELECT.
Setting Break Procedures with BEFORE and AFTER 5-13

Understanding the Order of EventsYou can define a hierarchy of break columns by using the LEVEL qualifier of ON-BREAK. In ex5c.sqr, for example, state was defined as LEVEL=1 and city as LEVEL=2.
When a break occurs at one level, it also forces breaks on variables with higher LEVEL qualifiers. In the sample program, a break on state also means a break on city.
A break on a variable can trigger many other events. The value can be printed, lines skipped, procedures automatically called, and the old value saved. It is important to know the order of events, particularly where there are multiple ON-BREAK columns.
The following SELECT statement has breaks on three levels.
begin-selectstate (,1) on-break level=1after=state_tot skiplines=2city (,7) on-break level=2after=city_tot skiplines=1zip (,45) on-break level=3after=zip_totfrom customersorder by state, city, zipend-select
The breaks are processed as follows:
1. When zip breaks, the city_tot procedure is executed.
2. When city breaks, first the zip_tot procedure is executed, then the city_tot procedure is executed, and one line is skipped (SKIPLINES=1). Both city and zip are printed in the next record.
3. When state breaks, the zip_tot, city_tot, and state_tot procedures are processed in that order. One line is skipped after the city_tot procedure is executed, and two lines are skipped after the state_tot procedure is executed. All three columns—state, city, and zip—are printed in the next record.
The following program (ex5e.sqr) demonstrates the order of events in break processing. It has three ON-BREAK columns, each with a LEVEL argument and a BEFORE and AFTER procedure. The BEFORE and AFTER procedures print strings to indicate the order of processing.
5-14 Break Logic

Program ex5e.sqrbegin-setup
declare-Layoutdefaultend-declare
end-setup
begin-programdo main
end-program
begin-procedure aprint 'AFTER Procedure for state LEVEL 1' (+1,40)end-procedure
begin-procedure bprint 'AFTER Procedure city LEVEL 2' (+1,40)end-procedure
begin-procedure cprint 'AFTER Procedure zip LEVEL 3' (+1,40)end-procedure
begin-procedure aaprint 'BEFORE Procedure state LEVEL 1' (+1,40)end-procedure
begin-procedure bbprint 'BEFORE Procedure city LEVEL 2' (+1,40)end-procedure
begin-procedure ccprint 'BEFORE Procedure zip LEVEL 3' (+1,40)end-procedure
begin-procedure main localbegin-select
add 1 to #countprint 'Retrieved row #' (+1,40)print #count (,+10)Edit 9999position (+1)
state (3,1) On-Break Level=1 after=a before=aacity (3,10) On-Break Level=2 after=b before=bbzip (3,25) On-Break Level=3 after=c before=cc Edit xxxxxnext-listing Need=10
from customersorder by state,city,zipend-selectend-procedure
begin-heading 3print $current-date (1,1) edit 'DD-MM-YYYY'page-number (1,60) 'Page 'last-page () ' of '
Setting Break Procedures with BEFORE and AFTER 5-15

print 'STATE' (3,1)print 'CITY' (3,10)print 'ZIP' (3,25)print 'Break Processing sequence' (3,40)
end-heading
Output for Program ex5e.sqr
02-05-1996 Page 1 of 3
STATE CITY ZIP Break Processing sequence
BEFORE Procedure state LEVEL 1IN Davenport 62130 BEFORE Procedure city LEVEL 2
BEFORE Procedure zip LEVEL 3Retrieved row # 1
Retrieved row # 2Miningville 40622
AFTER Procedure zip LEVEL 3AFTER Procedure city LEVEL 2BEFORE Procedure city LEVEL 2BEFORE Procedure zip LEVEL 3
Retrieved row # 3MI Bell Harbor 40674
AFTER Procedure zip LEVEL 3AFTER Procedure city LEVEL 2
AFTER Procedure for state LEVEL 1BEFORE Procedure state LEVEL 1BEFORE Procedure city LEVEL 2BEFORE Procedure zip LEVEL 3
Retrieved row # 4NH Frogline 04821
AFTER Procedure zip LEVEL 3AFTER Procedure city LEVEL 2
AFTER Procedure for state LEVEL 1BEFORE Procedure state LEVEL 1BEFORE Procedure city LEVEL 2BEFORE Procedure zip LEVEL 3
Retrieved row # 5NJ Teaneck 00355
AFTER Procedure zip LEVEL 3AFTER Procedure city LEVEL 2
AFTER Procedure for state LEVEL 1BEFORE Procedure state LEVEL 1BEFORE Procedure city LEVEL 2BEFORE Procedure zip LEVEL 3
Retrieved row # 6NM Big Falls 87893
5-16 Break Logic

AFTER Procedure zip LEVEL 3AFTER Procedure city LEVEL 2
AFTER Procedure for state LEVEL 1BEFORE Procedure state LEVEL 1BEFORE Procedure city LEVEL 2BEFORE Procedure zip LEVEL 3
02-05-1996 Page 2 of 3
STATE CITY ZIP Break Processing sequence
Retrieved row # 7NY Mamaroneck 10833
AFTER Procedure zip LEVEL 3AFTER Procedure city LEVEL 2
AFTER Procedure for state LEVEL 1BEFORE Procedure state LEVEL 1BEFORE Procedure city LEVEL 2BEFORE Procedure zip LEVEL 3
Retrieved row # 8New York 10002
AFTER Procedure zip LEVEL 3AFTER Procedure city LEVEL 2BEFORE Procedure city LEVEL 2BEFORE Procedure zip LEVEL 3
Retrieved row # 910134
AFTER Procedure zip LEVEL 3BEFORE Procedure zip LEVEL 3
Retrieved row # 1010204
AFTER Procedure zip LEVEL 3BEFORE Procedure zip LEVEL 3
Retrieved row # 11Queens 10213
AFTER Procedure zip LEVEL 3AFTER Procedure city LEVEL 2BEFORE Procedure city LEVEL 2BEFORE Procedure zip LEVEL 3
Retrieved row # 12OH Cleveland 44121
AFTER Procedure zip LEVEL 3AFTER Procedure city LEVEL 2
AFTER Procedure for state LEVEL 1BEFORE Procedure state LEVEL 1BEFORE Procedure city LEVEL 2BEFORE Procedure zip LEVEL 3
Setting Break Procedures with BEFORE and AFTER 5-17

Retrieved row # 13Everretsville 40233
AFTER Procedure zip LEVEL 3AFTER Procedure city LEVEL 2BEFORE Procedure city LEVEL 2BEFORE Procedure zip LEVEL 3
02-05-1996 Page 3 of 3
STATE CITY ZIP Break Processing sequence
Retrieved row # 14Zanesville 44900
AFTER Procedure zip LEVEL 3AFTER Procedure city LEVEL 2BEFORE Procedure city LEVEL 2BEFORE Procedure zip LEVEL 3
AFTER Procedure zip LEVEL 3AFTER Procedure city LEVEL 2
AFTER Procedure for state LEVEL 1
The following steps explain the order of processing in detail.
Step 1. Process BEFORE ProceduresBEFORE procedures are processed in ascending order by LEVEL before the first row of the query is retrieved. If no data is selected, BEFORE procedures are not executed.
Step 2. Select First Row of DataThe first row of data is selected.
Step 3. Select Subsequent Rows of DataProcessing of the SELECT command continues. When a break occurs on any column, it also triggers breaks on columns at the same or higher levels. Events occur in the following order:
1. AFTER procedures are processed in descending order from the highest level to the level of the current ON-BREAK column.
5-18 Break Logic

2. SAVE variables are set with the value of the previous ON-BREAK column. See “Saving a Value When a Break Occurs” on page 5-20 for an explanation of the SAVE argument.
3. BEFORE procedures are processed in ascending order from the current level to the highest level.
4. If SKIPLINES was specified, the current line position is advanced.
5. The value of the new group is printed (unless PRINT=NEVER is specified).
Step 4. Process AFTER ProceduresAfter the SELECT is complete, if any rows were selected, AFTER procedures are processed in descending order by LEVEL.
Controlling Page Breaks with Multiple ON-BREAK ColumnsWhere multiple columns have ON-BREAK, page breaks call for careful planning. While it may be acceptable to have a page break within a group, you probably would not want to have one within a record.
You can prevent page breaks within a record by following four simple rules:
� Place ON-BREAK columns ahead of other columns in your SELECT statement.
� Place the lower-level ON-BREAK columns ahead of the higher-level ON-BREAK columns in your SELECT statement.
� Use the same line positions for all ON-BREAK columns.
� Avoid using WRAP and ON-BREAK together on one column.
Controlling Page Breaks with Multiple ON-BREAK Columns 5-19
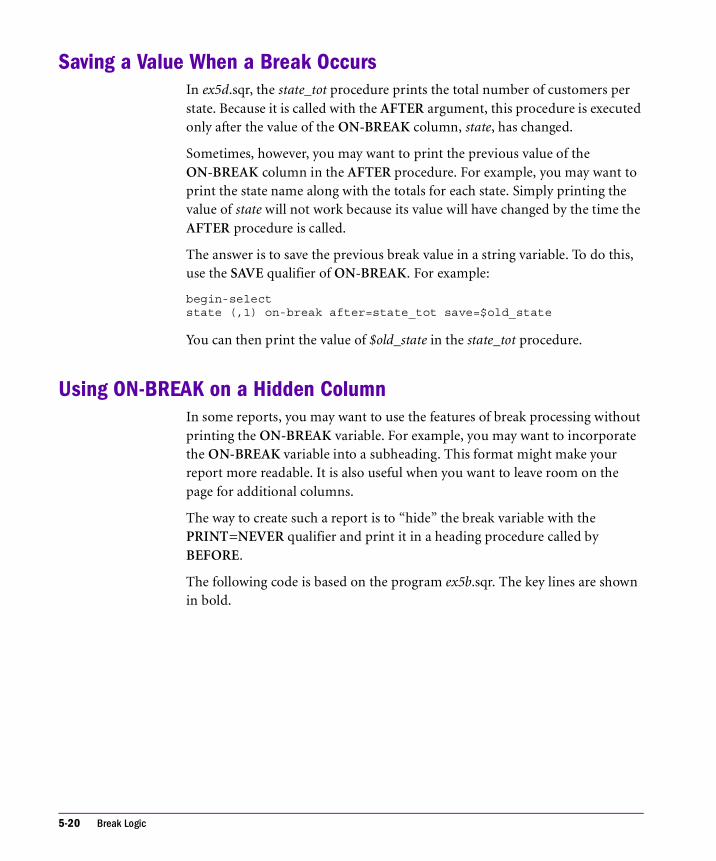
5-20 Break Logic
Saving a Value When a Break OccursIn ex5d.sqr, the state_tot procedure prints the total number of customers per state. Because it is called with the AFTER argument, this procedure is executed only after the value of the ON-BREAK column, state, has changed.
Sometimes, however, you may want to print the previous value of the ON-BREAK column in the AFTER procedure. For example, you may want to print the state name along with the totals for each state. Simply printing the value of state will not work because its value will have changed by the time the AFTER procedure is called.
The answer is to save the previous break value in a string variable. To do this, use the SAVE qualifier of ON-BREAK. For example:
begin-selectstate (,1) on-break after=state_tot save=$old_state
You can then print the value of $old_state in the state_tot procedure.
Using ON-BREAK on a Hidden ColumnIn some reports, you may want to use the features of break processing without printing the ON-BREAK variable. For example, you may want to incorporate the ON-BREAK variable into a subheading. This format might make your report more readable. It is also useful when you want to leave room on the page for additional columns.
The way to create such a report is to “hide” the break variable with the PRINT=NEVER qualifier and print it in a heading procedure called by BEFORE.
The following code is based on the program ex5b.sqr. The key lines are shown in bold.

Program ex5f.sqrbegin-program
do list_customersend-program
begin-procedure list_customersbegin-selectstate () on-break before=state_heading print=never level=1city (,1) on-break level=2name (,18)phone (,49)
position (+1) ! Advance to the next linefrom customersorder by state, city, nameend-selectend-procedure ! list_customers
begin-procedure state_headingprint 'State: ' (+1,1) bold ! Advance a line and print
'State:'print &state (,8) bold ! Print the state column hereprint 'City' (+1,1) bold ! Advance a line and print 'City'print 'Name' (,18) boldprint 'Phone' (,49) boldprint '-' (+1,1,58) fillposition (+1) ! Advance to the next line
end-procedure ! state_headingNote that this program has no HEADING section. Instead, a procedure prints column headings for each state rather than at the top of each page.
Note also that the &state variable can be referenced throughout the program, even though the state column was not printed as part of the break.
The most interesting line in the program is this one from the SELECT statement:
state () on-break before=state_heading print=never level=1
This line defines the break processing for state. The BEFORE qualifier specifies that the state_heading procedure is called automatically before each change in state. In this program, this break is set to LEVEL=1.
The PRINT=NEVER qualifier makes the state column a hidden column and specifies that it is not printed as part of the SELECT statement. Instead, it is printed in the state_heading procedure. In this procedure, the state column is referred to as the column variable &state.
The city column is assigned a LEVEL=2 break.
Using ON-BREAK on a Hidden Column 5-21
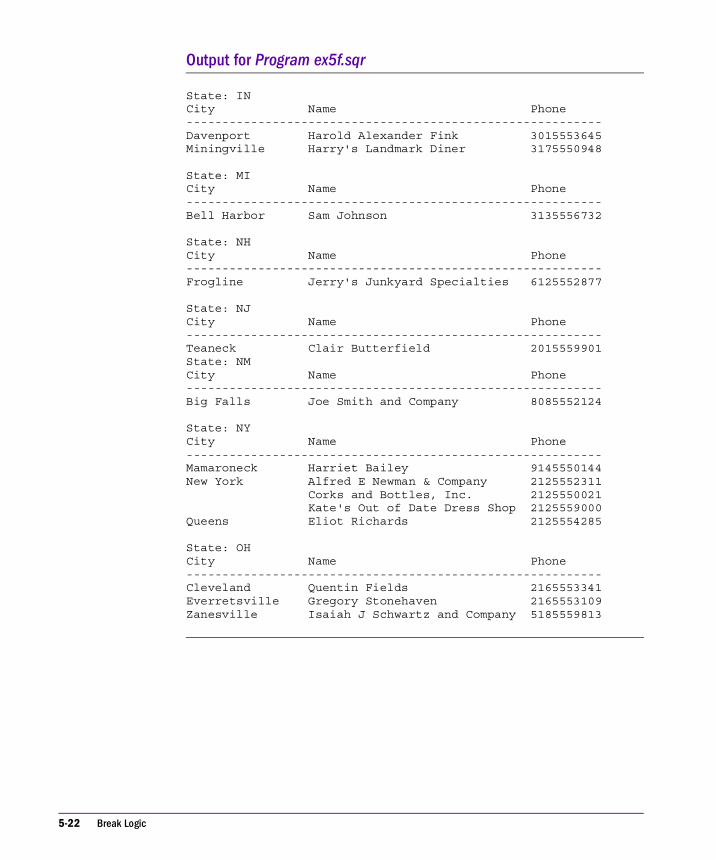
Output for Program ex5f.sqr
State: INCity Name Phone----------------------------------------------------------Davenport Harold Alexander Fink 3015553645Miningville Harry's Landmark Diner 3175550948
State: MICity Name Phone----------------------------------------------------------Bell Harbor Sam Johnson 3135556732
State: NHCity Name Phone----------------------------------------------------------Frogline Jerry's Junkyard Specialties 6125552877
State: NJCity Name Phone----------------------------------------------------------Teaneck Clair Butterfield 2015559901State: NMCity Name Phone----------------------------------------------------------Big Falls Joe Smith and Company 8085552124
State: NYCity Name Phone----------------------------------------------------------Mamaroneck Harriet Bailey 9145550144New York Alfred E Newman & Company 2125552311
Corks and Bottles, Inc. 2125550021Kate's Out of Date Dress Shop 2125559000
Queens Eliot Richards 2125554285
State: OHCity Name Phone----------------------------------------------------------Cleveland Quentin Fields 2165553341Everretsville Gregory Stonehaven 2165553109Zanesville Isaiah J Schwartz and Company 5185559813
5-22 Break Logic

Restrictions and Limitations of ON-BREAKON-BREAK cannot be used with SQR numeric variables. If you need to perform break processing on a numeric variable, you must first move its value to a string variable and set ON-BREAK on that. For example:
begin-selectamount_received &amount
move &amount to $amount $$9,999.99print $amount (+1,1) on-break
from cash_receiptsorder by amount_receivedend-select
The maximum number of ON-BREAK levels is determined by the ON-BREAK setting in the [Processing-Limits] section of the SQR.INI file. The default is 30, but you may increase this setting. Its maximum value is 64K-1 (65,535). For more information on SQR.INI, see the SQR Language Reference.
Summary� PRINT ON-BREAK performs special processing when a value changes, such as the
state column in a listing of customer addresses.
� ON-BREAK SKIPLINES inserts space between groups of records.
� ON-BREAK LEVEL arranges breaks hierarchically.
� PRINT=CHANGE/TOP-PAGE prints a column after a page break or after a change in the column's value.
� NEXT-LISTING keeps a group of lines on the same page.
� The SQR reserved variable $current-date holds the current date and time.
� SQR provides numeric, string, and date variables. Numeric variables are preceded with a pound sign (#) and start out as 0. String variables are preceded with a dollar sign ($) and start out as null. There is no need to initialize either variable type.
� LET is the SQR assignment command. It allows you to build expressions.
� The BEFORE and AFTER arguments set break procedures.
� The SET and LEVEL qualifiers, in conjunction with BEFORE and AFTER, determine the order of events.
� The SAVE qualifier saves the value of a previous group to a variable.
Restrictions and Limitations of ON-BREAK 5-23

� ON-BREAK cannot be used with SQR numeric variables. If you need to perform break processing on a numeric variable, you must first move its value to a string variable and set ON-BREAK on that.
� The ON-BREAK setting in the SQR.INI file determines the maximum number of ON-BREAK levels in a program.
5-24 Break Logic

6 SETUP Section
This chapter introduces the SQR SETUP section. This section is not required in a program, but it is very useful.
The SETUP section holds all the declarations. Declarations define certain report characteristics and the source and attributes of various report components, such as charts and images. The SETUP section is evaluated when your program is compiled.
Creating the SETUP SectionThe SETUP section, if present, is typically placed at the top of the program before the PROGRAM section. It begins with BEGIN-SETUP and ends with END-SETUP.
The following commands can be issued in the SETUP section. If used, they are processed at compile time, before the program begins executing. For more information about the following commands, see the SQR Language Reference.
Tab le 6 -1 Commands Available in the SETUP Section
Command Comments
ALTER-LOCALE Can also appear in a procedure.
ASK Allowed only in SETUP section.
BEGIN-SQL Can also appear in a procedure. Executed when a run-time file (.SQT) is loaded.
CREATE-ARRAY Can also appear in a procedure.
DECLARE-CHART
DECLARE-IMAGE
6-1

Using DECLARE-LAYOUTOne common declaration used in the SETUP section is the DECLARE-LAYOUT command. This command sets the page layout and includes such important options as the paper size and margins.
Here is a typical SETUP section:
begin-setup! Declare the default layout for this reportdeclare-layout default
paper-size=(8.5,11)left-margin=1 right-margin=1top-margin=1 bottom-margin=1
end-declareend-setup
In the preceding example, the DECLARE-LAYOUT command sets the paper size to 8 1/2 by 11 inches, with all margins at 1 inch.
In SQR, data is positioned on the page using line and character position coordinates. Think of the page as a grid where each cell holds one character. With such a grid, in a position qualifier consisting of (line,column,width), column and width are numbers that denote characters and spaces.
DECLARE-LAYOUT
DECLARE-PRINTER
DECLARE-PROCEDURE
DECLARE-REPORT
DECLARE-TOC
DECLARE-VARIABLE Can also appear in a local procedure.
LOAD-LOOKUP Can also appear in a procedure.
USE SYBASE only.
Tab le 6 -1 Commands Available in the SETUP Section (Continued)
Command Comments
6-2 SETUP Section

The SQR page layout is shown here.
The diagram shows how the main attributes of the DECLARE-LAYOUT command affect the structure of the page. The PAPER-SIZE argument defines the dimensions of the entire page, including margins. The arguments TOP-MARGIN, LEFT-MARGIN, BOTTOM-MARGIN, and RIGHT-MARGIN define the margins. In SQR, you cannot print in the margins.
In the preceding sample code, the left margin will use 10 spaces and the top margin will use 6 lines. The page width will accommodate 65 characters (without the margins) and 54 lines.
The default mapping of characters and lines to inches is 10 CPI (characters per inch) and 6 LPI (lines per inch). This means that each character cell is 1/10 inch wide and 1/6 inch high. These settings are used when a program does not contain a DECLARE-LAYOUT command.
Paper size (width)
Pap
ersi
ze(h
eigh
t)Line
heig
ht
Character width
Topmargin
Rightmargin
Bottommargin
Leftmargin
Using DECLARE-LAYOUT 6-3

Overriding the Default SettingsYou can override the default settings by using the LINE-HEIGHT and CHAR-WIDTH arguments in the DECLARE-LAYOUT command. These arguments adjust the dimensions of the grid, which implies a change in the meaning of column and line. If your DECLARE-LAYOUT paragraph includes the arguments LINE-HEIGHT=1 and CHAR-WIDTH=1, the cells in the grid will measure 1 point by 1 point (1 point = 1/72 inch or approx. 0.35 mm). In that case, column is a dimension given in points. The length of a string, however, is still given in characters.
Alternatively, you can use the MAX-LINES and MAX-COLUMNS arguments of the DECLARE-LAYOUT command to specify the number of lines on the page and the number of characters to fit across the page. SQR calculates the line height and character width based on these settings and the size of the page and margins.
Specify coordinates in terms of lines and character positions. The first line from the top is 1 and the first column (from the left) is 1. There is no coordinate 0.
Declaring the Page OrientationThe DECLARE-LAYOUT command also allows you to declare the page orientation. Note that this declaration does not affect how SQR uses position coordinates. Line and character positions are not transposed when page orientation is switched. The only effect of the ORIENTATION option of the DECLARE-LAYOUT command is that SQR switches the printer to the specified orientation, portrait or landscape. The default mode is portrait.
Summary
� The SETUP section holds declarations and several commands. Most commands in the SETUP section are performed at compile time.
� DECLARE-LAYOUT sets the page layout and includes such important options as the paper size and margins.
6-4 SETUP Section

2P A R T T W O
2SQR Reports


7 Master/Detail Reports
This chapter presents master/detail reports, that show hierarchical informFation. The information is normally retrieved from multiple tables that have a one-to-many relationship, such as customers and orders. The customer information is the “master” and the orders are the “detail.”
In many cases, you can obtain such information with a single SQR SELECT statement. In such a program, the data from the master table is joined with data from the detail table. You can implement break logic as described in Chapter 5, “Break Logic,” to group the detail records for each master record.
This type of report has one major disadvantage—if a master record has no associated detail records, it is not displayed. If you need to show all master records, whether they have detail records or not, this type of report will not meet your needs.
7-1

Creating a Master/Detail ReportThe solution is to create a master/detail report with one SELECT that retrieves records from the master table, followed by separate SELECT statements that retrieve the detail records associated with each master record.
The code example in this chapter produces just such a report. In our example, one BEGIN-SELECT returns the names of customers. For each customer, two additional BEGIN-SELECT commands are executed, one to retrieve order information and another to retrieve payment information.
The following diagram depicts the BEGIN-SELECT structure in this example.
When one query returns master information and another query returns detail information, the detail query is nested within the master query.
In our sample program, one query returns customer names and two nested queries return detail information. The nested queries are invoked once for each customer, each one retrieving records that correspond to the current customer. A bind variable correlates the subqueries in the WHERE clause. This variable correlates the customer number (cust_num) with the current customer record. (See Chapter 16, “Dynamic SQL and Error Checking,” for a more detailed explanation of bind variables.)
Program ex7a.sqrbegin-program
do mainend-programbegin-procedure mainbegin-select
Print 'Customer Information' (,1)Print '-' (+1,1,45) Fill
name (+1,1,25)city (,+1,16)
Customers
Orders
Payments
7-2 Master/Detail Reports

state (,+1,2)cust_num
do cash_receipts(&cust_num)do orders(&cust_num)position (+2,1)
from customersend-selectend-procedure ! main
begin-procedure cash_receipts (#cust_num)let #any = 0
begin-selectif not #any
print 'Cash Received' (+2,10)print '-------------' (+1,10)let #any = 1
end-ifdate_received (+1,10,20) edit 'DD-MON-YY'amount_received (,+1,13) Edit $$$$,$$0.99from cash_receipts awhere a.cust_num = #cust_numend-selectend-procedure ! cash_receipts
begin-procedure orders (#cust_num)let #any = 0
begin-selectif not #any
print 'Orders Booked' (+2,10)print '-------------' (+1,10)let #any = 1
end-ifa.order_numorder_date (+1,10,20) Edit 'DD-MON-YY'description (,+1,20)c.price * b.quantity (,+1,13) Edit $$$$,$$0.99from orders a, ordlines b, products cwhere a.order_num = b.order_num
and b.product_code = c.product_codeand a.cust_num = #cust_num
end-selectend-procedure ! orders
begin-heading 3print $current-date (1,1) Edit 'DD-MON-YYYY'page-number (1,69) 'Page '
end-heading
Creating a Master/Detail Report 7-3

Correlating SubqueriesProgram ex7a.sqr consists of three procedures, main, cash_receipts, and orders, which correspond to the three queries. The procedure main is the master. It retrieves the customer names. For each customer, we invoke the procedures cash_receipts to list the cash receipts, if there are any, and orders to list the customer’s orders, if there are any.
The procedures take the variable cust_num as an argument. This feature is discussed in more detail in Chapter 17, “Procedures, Argument Passing, and Local Variables.” As you can see, cash_receipts and orders are called many times, once for each customer. Each time, the procedures perform the same query with a different value for the cust_num variable in the WHERE clause.
Note the use of the IF command and the numeric variable #any in these procedures. When the BEGIN-SELECT command returns no records, SQR will not execute the following PRINT commands. Thus, the headings for these procedures are only displayed for those customers who have records in the detail tables.
The procedure orders demonstrates the use of an expression in the BEGIN-SELECT. The expression is c.price * b.quantity.
Finally, note that the format given to the dollar amount with the argument EDIT “$$$$,$$0.99.” This format uses a “floating-to-the-right” money symbol. If there are fewer digits than the six that we allowed here, the dollar sign floats to the right and stay close to the number.
Note See Chapter 20, “Working with Comma Separated Files—CSV,” for more information on
formatting dates.�
7-4 Master/Detail Reports

Output for Program ex7a.sqr
6-APR-1996 Page 1
Customer Information---------------------------------------------Gregory Stonehaven Everretsville OH
Cash Received-------------01-FEB-94 $130.00
Customer Information---------------------------------------------Alfred E Newman & Company New York NY
Cash Received-------------01-MAR-94 $140.00
Customer Information---------------------------------------------Eliot Richards Queens NY
Cash Received-------------16-JAN-94 $220.1217-JAN-94 $260.00
Orders Booked-------------02-MAY-94 Whirlybobs $239.1902-MAY-94 Canisters $3,980.25
Customer Information---------------------------------------------Isaiah J Schwartz and Com Zanesville OH
Cash Received-------------18-JAN-94 $190.0002-JAN-94 $1,100.00
Orders Booked-------------02-MAY-94 Hop scotch kits $6,902.0002-MAY-94 Wire rings $19,872.90
Correlating Subqueries 7-5

Customer Information---------------------------------------------Harold Alexander Fink Davenport IN
Cash Received-------------01-FEB-94 $1,200.0001-MAR-94 $1,300.00
Orders Booked-------------19-MAY-94 Ginger snaps $44.2819-MAY-94 Modeling clay $517.05
Summary� Multiple BEGIN-SELECT commands can be used to retrieve detail information from
different database tables.
� Queries that retrieve detail information are nested in the queries that retrieve master information.
� Bind Variables join subqueries to the main query.
7-6 Master/Detail Reports

8 Cross-Tabular Reports
This chapter presents cross-tabular reports, which are matrix- or spreadsheet-like reports. These reports are useful for presenting summary numeric data. Cross-tabular reports vary in format. Look at the following example, which shows sales revenue summarized by product by sales channel.
Revenue by Product by Sales Channel
Product Direct Sales Resellers Mail Order Total---------- ------------ --------- ----------- -------A $2,100 $1,209 $0 $3,309B $120 $311 $519 $950C $2 $0 $924 $926---------- ------------ --------- ----------- -------Total $2,222 $1,520 $1,443 $5,185
This report is based on many sales records. The three middle columns correspond to sales channel categories. Each row corresponds to a product. The records fall into nine groups: three products sold through three sales channels. Some groups have no sales (such as mail order for Product A).
Each category can be a discrete value of some database column or a set of values. For example, Resellers can be domestic resellers plus international distributors.
A category can also represent a range, as demonstrated in the next example.
Orders by Product by Order SizeProductCategory Less than 10 10 to 100 More than 100 Total----------- ------------ --------- ------------- -------Durable 200 120 0 320Nondurable 122 311 924 1876----------- ------------ --------- ------------- -------Total 322 431 1443 2196
In this example, the rows correspond to nondescript categories. Products are classified as durable or nondurable. The columns represent ranges of order size.
8-1

For each record selected, the program must determine the range to which it belongs and add 1 to the count for that category. The numbers in the cells are counts, but they could be sums, averages, or any other expression.
Of course, there are other types of cross-tabular reports. These reports become more complex when the number of columns is not predefined and when there are more columns than can fit across the page.
ArraysIn many cases, the program must process all the records before it can begin printing the data. During the processing, the program needs to keep the data in some buffer where it can accumulate the numbers. This can be done in an SQR array.
An array is a unit of storage that consists of rows and columns and exists in memory. An array is similar to a database table, but it exists only in memory.
The next sample program specifies an array called order_qty to hold the sum of the quantity of orders in a given month. This specific example could be programmed without an array, but as you will see later, using one can be beneficial. Data retrieved once and stored in an array can be presented in many ways without additional database queries. The data can even be presented in a chart, as shown later in Chapter 13, “Business Charts.”
This example demonstrates an SQR feature called a “three-dimensional array.” This type of array has fields (columns) and rows, and it also has repeating fields (the third dimension). In the order_qty array, the first field is the product description. The second field is the order quantity of each month. There are three months in the example; therefore, this field repeats three times.
SQR references arrays in expressions such as array_name.field(sub1[,sub2]). Sub1 is the first subscript, the row number. The row count starts with zero. The second subscript (sub2) is specified when the field repeats. Repeating fields are also numbered starting with zero. The subscript can be a literal or an SQR numeric variable.
8-2 Cross-Tabular Reports

Program ex8a.sqr#define max_products 100
begin-setupcreate-array
name=order_qty size={max_products}field=product:char field=month_qty:number:3
end-setup
begin-programdo select_datado print_array
end-program
begin-procedure print_arraylet #entry_cnt = #ilet #i = 0while #i <= #entry_cnt
let $product = order_qty.product(#i)let #jan = order_qty.month_qty(#i,0)let #feb = order_qty.month_qty(#i,1)let #mar = order_qty.month_qty(#i,2)let #prod_tot = #jan + #feb + #marprint $product (,1,30)print #jan (,32,9) edit 9,999,999print #feb (,42,9) edit 9,999,999print #mar (,52,9) edit 9,999,999print #prod_tot (,62,9) edit 9,999,999position (+1)let #jan_total = #jan_total + #janlet #feb_total = #feb_total + #feblet #mar_total = #mar_total + #marlet #i = #i + 1
end-whilelet #grand_total = #jan_total + #feb_total + #mar_totalprint 'Totals' (+2,1)print #jan_total (,32,9) edit 9,999,999print #feb_total (,42,9) edit 9,999,999print #mar_total (,52,9) edit 9,999,999print #grand_total (,62,9) edit 9,999,999
end-procedure print_arraybegin-procedure select_databegin-selectorder_date! The quantity for this orderquantity! the product for this orderdescription
if #i = 0 and order_qty.product(#i) = ''let order_qty.product(#i) = &description
end-ifif order_qty.product(#i) != &description
let #i = #i + 1if #i >= {max_products}
Arrays 8-3

display 'Error: There are more than {max_products} products'stop
end-iflet order_qty.product(#i) = &description
end-iflet #j = to_number(datetostr(&order_date,'MM')) - 1if #j < 3
let order_qty.month_qty(#i,#j) =order_qty.month_qty(#i,#j) + &quantity
end-iffrom orders a, ordlines b, products cwhere a.order_num = b.order_numand b.product_code = c.product_codeorder by descriptionend-selectend-procedure ! select_data
begin-heading 4print $current-date (1,1)print 'Order Quantity by Product by Month' (1,18)page-number (1,64) 'Page 'print 'Product' (3,1)print ' January' (,32)print ' February' (,42)print ' March' (,52)print ' Total' (,62)print '-' (4,1,70) Fill
end-heading
Creating the ArrayYou must define the size of an array when you create it. The program creates the array order_qty with a size of 100.
The command #DEFINE MAX_PRODUCTS 100 defines the constant max_products as a substitution variable. The sample program uses this constant to define the size of the array. It is a good practice to use #DEFINE because it displays our limit at the top of the program source. Otherwise, it would be buried in the code.
The SETUP section creates the array using the CREATE-ARRAY command. All SQR arrays are created before the program begins executing. Their size must be known at compile time. If you do not know exactly how many rows you will have, you must over-allocate and specify an upper bound. In the example, the array has 100 rows, even though the program only uses 12 rows to process the sample data.
8-4 Cross-Tabular Reports

The preceding program has two procedures: select_data and print_array. Select_data performs the database query, as its name suggests. While the database records are being processed, nothing prints, and the data accumulates in the array. When the processing is over, the procedure print_array does two things. The procedure loops through the array and prints the data, but it also adds up the month totals and prints them at the bottom.
The report summarizes the product order quantities for each month, which are the records ordered by the product description. The procedure then fills the array one product at a time. For each record selected, the procedure checks to see if it’s a new product; if it is, the array is incremented by row subscript #i. The procedure also adds the quantity to the corresponding entry in the array based on the month.
There is one complication with this program—how to obtain the month. Date manipulation can vary among databases, and to write truly portable code calls for careful planning.
The key is the datetostr function in the following command:
let #j = to_number(datetostr(&order_date, 'MM')) - 1
This function converts the order_date column into a string. (The ‘MM’ edit mask specifies that only the month part be converted.) The resulting string is then converted to a number; if it is less than 3, it represents January, February, or March, and is added to the array.
Grouping by CategoryThe next example is a cross-tabular report that groups the products by price range. This grouping cannot be done using a SQL GROUP BY clause. Moreover, to process the records in order of price category, the program would have to sort the table by price. The example shows how to do it without sorting the data.
The program uses an SQR EVALUATE command to determine the price category and assign the array subscript #i to 0, 1, or 2. Then it adds the order quantity to the array cell that corresponds to the price category (row) and the month (column).
Grouping by Category 8-5

Output for Program ex8a.sqr
11-JUN-96 Order Quantity by Product by Month Page 1
Product January February March Total---------------------------------------------------------------Canisters 3 0 0 3Curtain rods 2 8 18 28Ginger snaps 1 10 0 11Hanging plants 1 20 0 21Hookup wire 16 15 0 31Hop scotch kits 2 0 0 2Modeling clay 5 0 0 5New car 1 9 0 10Thimble 7 20 0 27Thingamajigs 17 0 120 137Widgets 4 0 12 16Wire rings 1 0 0 1
Totals 60 82 150 292
Program ex8b.sqr#define max_categories 3
begin-setupcreate-array
name=order_qty size={max_categories}field=category:char field=month_qty:number:3
end-setup
begin-programdo select_datado print_array
end-program
begin-procedure print_arraylet #i = 0while #i < {max_categories}
let $category = order_qty.category(#i)let #jan = order_qty.month_qty(#i,0)let #feb = order_qty.month_qty(#i,1)let #mar = order_qty.month_qty(#i,2)let #category_tot = #jan + #feb + #marprint $category (,1,31)print #jan (,32,9) edit 9,999,999print #feb (,42,9) edit 9,999,999print #mar (,52,9) edit 9,999,999print #category_tot (,62,9) edit 9,999,999position (+1)let #jan_total = #jan_total + #janlet #feb_total = #feb_total + #feb
8-6 Cross-Tabular Reports

let #mar_total = #mar_total + #marlet #i = #i + 1
end-whilelet #grand_total = #jan_total + #feb_total + #mar_totalprint 'Totals' (+2,1)print #jan_total (,32,9) edit 9,999,999print #feb_total (,42,9) edit 9,999,999print #mar_total (,52,9) edit 9,999,999print #grand_total (,62,9) edit 9,999,999
end-procedure print_array
begin-procedure select_datalet order_qty.category(0) = '$0-$4.99'let order_qty.category(1) = '$5.00-$100.00'let order_qty.category(2) = 'Over $100'
begin-selectorder_date! the price / price category for the orderc.price &price
move &price to #price_numevaluate #price_numwhen < 5.0
let #i = 0break
when <= 100.0let #i = 1break
when-otherlet #i = 2break
end-evaluate! The quantity for this orderquantity
let #j = to_number(datetostr(&order_date,'MM')) - 1if #j < 3
let order_qty.month_qty(#i,#j) =order_qty.month_qty(#i,#j) + &quantity
end-iffrom orders a, ordlines b, products cwhere a.order_num = b.order_numand b.product_code = c.product_codeend-selectend-procedure ! select_data
begin-heading 5print $current-date (1,1)page-number (1,64) 'Page 'print 'Order Quantity by Product Price Category by Month'
(2,11)print 'Product Price Category' (4,1)print ' January' (,32)print ' February' (,42)print ' March' (,52)print ' Total' (,62)print '-' (5,1,70) Fill
end-heading
Grouping by Category 8-7

Output for Program ex8b.sqr
11-JUN-96 Page 1Order Quantity by Product Price Category by Month
Product Price Category January February March Total----------------------------------------------------------------------$0-$4.99 28 45 12 85$5.00-$100.00 25 28 138 191Over $100 7 9 0 16
Totals 60 82 150 292
Using Multiple ArraysUsing SQR arrays to buffer the data offers several advantages. In the last example, you saw how it eliminated the need to sort the data. Another advantage is that you can combine the two sample reports into one. With one pass on the data, you can fill the two arrays and then print the two parts of the report.
The next sample program performs the work done by the first two programs. The SETUP section specifies two arrays—one to summarize monthly orders by product, and another to summarize monthly orders by price range.
Program ex8c.sqr#define max_categories 3#define max_products 100
begin-setupcreate-array
name=order_qty size={max_products}field=product:char field=month_qty:number:3
create-arrayname=order_qty2 size={max_categories}field=category:char field=month_qty:number:3
end-setupbegin-program
do select_datado print_arrayprint '-' (+2,1,70) fillposition (+1)do print_array2
end-program
8-8 Cross-Tabular Reports

begin-procedure print_arraylet #entry_cnt = #ilet #i = 0while #i <= #entry_cnt
let $product = order_qty.product(#i)let #jan = order_qty.month_qty(#i,0)let #feb = order_qty.month_qty(#i,1)let #mar = order_qty.month_qty(#i,2)let #prod_tot = #jan + #feb + #marprint $product (,1,30)print #jan (,32,9) edit 9,999,999print #feb (,42,9) edit 9,999,999print #mar (,52,9) edit 9,999,999print #prod_tot (,62,9) edit 9,999,999position (+1)let #i = #i + 1
end-whileend-procedure ! print_array
begin-procedure print_array2let #i = 0while #i < {max_categories}
let $category = order_qty2.category(#i)let #jan = order_qty2.month_qty(#i,0)let #feb = order_qty2.month_qty(#i,1)let #mar = order_qty2.month_qty(#i,2)let #category_tot = #jan + #feb + #marprint $category (,1,31)print #jan (,32,9) edit 9,999,999print #feb (,42,9) edit 9,999,999print #mar (,52,9) edit 9,999,999print #category_tot (,62,9) edit 9,999,999position (+1)let #jan_total = #jan_total + #janlet #feb_total = #feb_total + #feblet #mar_total = #mar_total + #marlet #i = #i + 1
end-whilelet #grand_total = #jan_total + #feb_total + #mar_totalprint 'Totals' (+2,1)print #jan_total (,32,9) edit 9,999,999print #feb_total (,42,9) edit 9,999,999print #mar_total (,52,9) edit 9,999,999print #grand_total (,62,9) edit 9,999,999
end-procedure ! print_array2begin-procedure select_data
let order_qty2.category(0)='$0-$4.99'let order_qty2.category(1)='$5.00-$100.00'let order_qty2.category(2)='Over $100'
begin-selectorder_date! the price / price category for the orderc.price &price
move &price to #price_numevaluate #price_num
Using Multiple Arrays 8-9
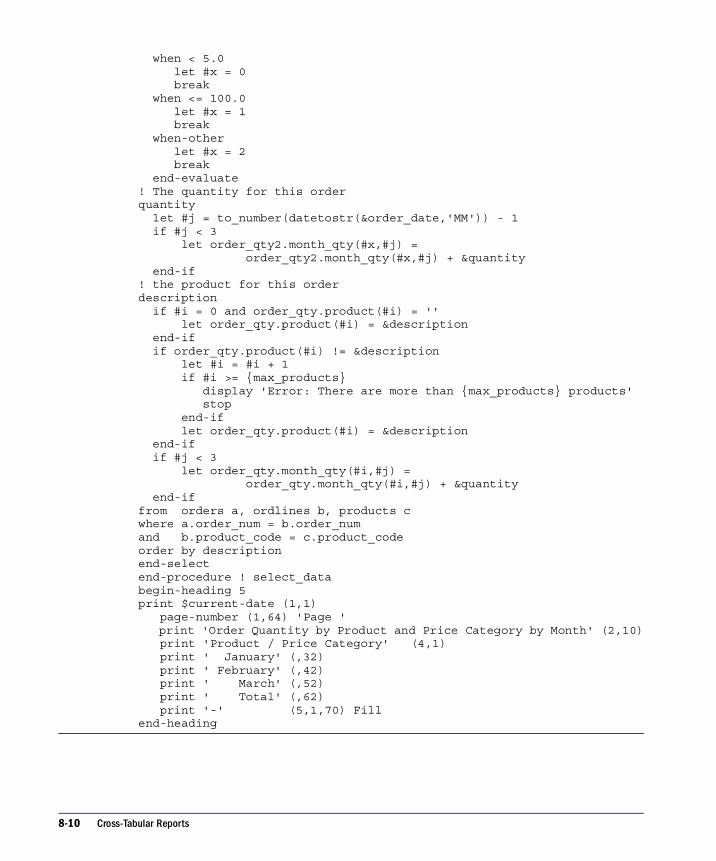
when < 5.0let #x = 0break
when <= 100.0let #x = 1break
when-otherlet #x = 2break
end-evaluate! The quantity for this orderquantity
let #j = to_number(datetostr(&order_date,'MM')) - 1if #j < 3
let order_qty2.month_qty(#x,#j) =order_qty2.month_qty(#x,#j) + &quantity
end-if! the product for this orderdescription
if #i = 0 and order_qty.product(#i) = ''let order_qty.product(#i) = &description
end-ifif order_qty.product(#i) != &description
let #i = #i + 1if #i >= {max_products}
display 'Error: There are more than {max_products} products'stop
end-iflet order_qty.product(#i) = &description
end-ifif #j < 3
let order_qty.month_qty(#i,#j) =order_qty.month_qty(#i,#j) + &quantity
end-iffrom orders a, ordlines b, products cwhere a.order_num = b.order_numand b.product_code = c.product_codeorder by descriptionend-selectend-procedure ! select_databegin-heading 5print $current-date (1,1)
page-number (1,64) 'Page 'print 'Order Quantity by Product and Price Category by Month' (2,10)print 'Product / Price Category' (4,1)print ' January' (,32)print ' February' (,42)print ' March' (,52)print ' Total' (,62)print '-' (5,1,70) Fill
end-heading
8-10 Cross-Tabular Reports

Output for Program ex8c.sqr
11-JUN-96 Page 1Order Quantity by Product and Price Category by Month
Product / Price Category January February March Total----------------------------------------------------------------------Canisters 3 0 0 3Curtain rods 2 8 18 28Ginger snaps 1 10 0 11Hanging plants 1 20 0 21Hookup wire 16 15 0 31Hop scotch kits 2 0 0 2Modeling clay 5 0 0 5New car 1 9 0 10Thimble 7 20 0 27Thingamajigs 17 0 120 137Widgets 4 0 12 16Wire rings 1 0 0 1
----------------------------------------------------------------------$0-$4.99 28 45 12 85$5.00-$100.00 25 28 138 191Over $100 7 9 0 16
Totals 60 82 150 292
SQR arrays are also advantageous in programs that produce charts. With the data for the chart already in the array, presenting this cross-tab as a bar chart is easy. For more information on charts, see Chapter 13, “Business Charts.”
Summary� Cross-tabular reports are matrix- or spreadsheet-like reports that are useful for
presenting summary data.
� CREATE-ARRAY can assemble data for a report in arrays.
� Arrays can be referenced in expressions.
� Procedures can be written to select data for an array and print it.
� EVALUATE can be used to place data in the correct row of the array.
� Using multiple arrays reduces database calls.
Using Multiple Arrays 8-11

8-12 Cross-Tabular Reports

9 Printing Mailing Labels
This chapter explains how to print mailing labels and similar information. The process is quite simple. A SQR SELECT paragraph retrieves the addresses and prints them on the page.
Sometimes you will need to print labels in multiple columns. The page then becomes a matrix of rows and columns of labels. SQR allows you to print into columns with the commands COLUMNS and NEXT-COLUMN in conjunction with NEXT-LISTING.
The following program prints mailing labels in a format of three columns by ten rows. It also counts the number of labels printed and prints that number on the last sheet of the report.
Program ex9a.sqr#define MAX_LABEL_LINES 10#define LINES_BETWEEN_LABELS 3
begin-setupdeclare-layout default
paper-size=(10,11) left-margin=0.33end-declare
end-setup
begin-programdo mailing_labels
end-program
begin-procedure mailing_labelslet #label_count = 0let #label_lines = 0columns 1 29 57 ! enable columnsalter-printer font=5 point-size=10
begin-selectname (1,1,30)addr1 (2,1,30)citystatezip
move &zip to $zip XXXXX-XXXX
9-1

let $last_line = &city || ', ' || &state || ' ' || $zipprint $last_line (3,1,30)next-column at-end=newlineadd 1 to #label_countif #current-column = 1
add 1 to #label_linesif #label_lines = {MAX_LABEL_LINES}
new-pagelet #label_lines = 0
elsenext-listing no-advance skiplines={LINES_BETWEEN_LABELS}
end-ifend-if
from customersend-select
use-column 0 ! disable columnsnew-pageprint 'Labels printed on ' (,1)print $current-date ()print 'Total labels printed = ' (+1,1)print #label_count () edit 9,999,999
end-procedure ! mailing_labels
Defining Columns and RowsThe command COLUMNS 1 29 57 defines the starting position for three columns. The first column starts at character position 1, the second at character position 29, and the third at character position 57.
Program ex9a.sqr writes the first address into the first column, the second address into the second, the third address into the third. The fourth address is written into the second row of the first column, just below the first label. When ten lines of labels are complete, a new page starts. After the last page of labels has been printed, the program prints a summary page showing the number of labels printed.
Note the technique for composing the last line of the label. The city, state, and zip columns are moved to string variables. The command LET $last_line = &city || ', ' || &state || ' ' || $zip combines the city, state, and zip code, plus appropriate punctuation and spacing, into a string, which it stores in the variable $last_line. In this way, city, state, and zip code are printed without unnecessary gaps.
9-2 Printing Mailing Labels

The program defines two counters, #label_count and #label_lines. The first counter, #label_count, counts the total number of labels and prints it on the summary page. The second counter, #label_lines, counts the number of rows of labels that were printed. When the program has printed the number of lines defined by {MAX_LABEL_LINES}, it starts a new page and resets the #label_lines counter.
After each row of labels, the NEXT-LISTING command redefines the print position for the next row of labels as line 1. NEXT-LISTING skips the specified number of lines (SKIPLINES) from the last line printed (NO-ADVANCE) and sets the new position as line 1.
Note the use of the ALTER-PRINTER command. This command changes the font in which the report is printed. For more information on changing fonts in SQR, see Chapter 14, “Changing Fonts.”
The sample program prints the labels in 10-point Times Roman, which is a proportionally spaced font. In Windows, you can use proportionally spaced fonts with any printer that supports fonts or graphics. On other platforms, SQR directly supports HP LaserJet printers and PostScript printers.
Printing and printer support are explained in greater detail in Chapter 28, “Printing Issues.”For more information on using proportionally spaced fonts, see Chapter 14, “Changing Fonts.”
In the sample program, the command DECLARE-LAYOUT defines a page width of 10 inches. This width accommodates the printing of the third column, which contains 30 characters and begins at character position 57. SQR assumes a default character grid of 10 characters per inch, which would cause the third column to print beyond the paper edge if this report used the default font. The 10-point Times Roman used here, however, condenses the text so that it will fit on the page. The page width is set at 10 inches to prevent SQR from treating the third-column print position as an error.
Defining Columns and Rows 9-3

Running the ProgramWhen you print with a proportionally spaced font, you must use a slightly different technique for running the program and viewing the output. If you are using a platform such as UNIX or VMS, specify the printer type with the -PRINTER:xx flag. If you are using an HP LaserJet, enter -PRINTER:HP (or -printer:hp). If you are using a PostScript printer, enter -PRINTER:PS (or -printer:ps) on the command line.
For example:
sqr ex9a username/password -printer:hp
You can also use the -KEEP command-line flag to produce output in the SQR Portable File format (SPF) and print it using SQR Print. You still need to use the -PRINTER:xx flag when printing. SQR Portable File format is covered in greater detail in Chapter 28, “Printing Issues.”
With Brio.Report Builder, neither -PRINTER:xx nor -KEEP is required. The output automatically appears in the Viewer window after the report has been run. Here is a portion of the output.
Output for Program ex9a.sqr
Gregory Stonehaven Alfred E Newman & Company Eliot RichardsMiddlebrook Road 2837 East Third Street 2134 Partridge AveEverretsville, OH 40233-1000 New York, NY 10002-1001 Queens, NY 10213-1002
Isaiah J Schwartz and Company Harold Alexander Fink Harriet Bailey37211 Columbia Blvd 32077 Cedar Street 47 Season StreetZanesville, OH 44900-1300 Davenport, IN 62130-1025 Mamaroneck, NY 10833-1660
Clair Butterfield Quentin Fields Jerry's Junkyard Specialties371 Youngstown Blvd 37021 Cedar Road Crazy Lake CottagesTeaneck, NJ 00355-4530 Cleveland, OH 44121-9475 Frogline, NH 04821-9876
Kate's Out of Date Dress Shop Sam Johnson Joe Smith and Company2100 Park Ave 37 Cleaver Street 1711 Sunset BlvdNew York, NY 10134-2030 Bell Harbor, MI 40674-3900 Big Falls, NM 87893-7070
Corks and Bottles, Inc. Harry's Landmark Diner167 East Blvd. 17043 Silverfish RoadNew York, NY 10204-1234 Miningville, IN 40622-4321
9-4 Printing Mailing Labels

The report produces the output in three columns corresponding to the dimensions of a sheet of mailing label stock. In the preceding example, the report prints the labels left to right, filling each row of labels before moving down the page.
You can also print the labels from the top down, filling each column before moving to the next column of labels. The code is shown here. The differences between this code and the previous one are shown in bold. The output is not printed here, but you can run the file and view it using the same procedure you used for the previous example.
Program ex9b.sqr#define MAX_LABEL_LINES 10#define LINES_BETWEEN_LABELS 3
begin-setupdeclare-layout default
paper-size=(10,11) left-margin=0.33end-declare
end-setup
begin-programdo mailing_labels
end-program
begin-procedure mailing_labelslet #Label_Count = 0let #Label_Lines = 0columns 1 29 57 ! enable columns
alter-printer font=5 point-size=10begin-selectname (0,1,30)addr1 (+1,1,30)citystatezip
move &zip to $zip xxxxx-xxxxlet $last_line = &city || ', ' || &state || ' ' || $zipprint $last_line (+1,1,30)add 1 to #label_countadd 1 to #label_linesif #label_lines = {MAX_LABEL_LINES}
next-column goto-top=1 at-end=newpagelet #label_lines = 0
elseposition (+1)position (+{LINES_BETWEEN_LABELS})
end-iffrom customersend-select
Running the Program 9-5

use-column 0 ! disable columnsnew-pageprint 'Labels printed on ' (,1)print $current-date ()print 'Total labels printed = ' (+1,1)print #label_count () edit 9,999,999
end-procedure ! mailing_labels
Summary� A SELECT paragraph can retrieve data for mailing labels and other similar reports.
� COLUMNS define report columns.
� Counters, such as #label_count and #label_lines, produce summary information about a report, such as the number of labels printed. Counters also determine when a page is full.
� NEXT-LISTING ends the current listing and begins another.
� ALTER-PRINTER can be used to specify fonts.
9-6 Printing Mailing Labels

10 Creating Form Letters
This chapter explains how to create a form letter. It explains the SQR DOCUMENT section and introduces two new commands: BEGIN-DOCUMENT and END-DOCUMENT.
Laying Out the LetterTo create form letters, you use a DOCUMENT section. It starts with a BEGIN-DOCUMENT command and ends with an END-DOCUMENT command. Between these commands, you lay out the letter and insert variables where you want data from the database to be inserted. SQR inserts the value of the variable when the document prints. To leave blank lines in a letter, you must explicitly mark them with a.b (see the sample code that follows).
Another way to mix data with the letter is to use document markers. These are placeholders in the DOCUMENT section where you can print data after the DOCUMENT section. Document markers are denoted with a name preceded by the at sign (@).
The sample program demonstrates the use of variables as well as document markers. SQR prints the contents of the variable in the position where it is placed in the DOCUMENT section. For example, in the program that follows, the customer’s name is printed on the first line.
Using a document marker is less direct, but provides more flexibility in positioning the contents of variables. The sample program uses a document marker to position the city, state, and zip code because the city name varies in length and thus affects the position of the state name and zip code.
This use of document markers is demonstrated in the simple form letter program ex10a.sqr.
10-1

Program ex10a.sqrbegin-program
do mainend-program
begin-procedure mainbegin-selectnameaddr1addr2citystatezip
do write_letterfrom customersorder by nameend-selectend-procedure ! main
begin-procedure write_letterbegin-document (1,1)&name&addr1&addr2@city_state_zip.b.b
$current-dateDear Sir or Madam:.b
Thank you for your recent purchases from ACME Inc. We wouldlike to tell you about our limited-time offer. During thismonth, our entire inventory is marked down by 25%. Yes, you canbuy your favorite merchandise and save too.
To place an order simply dial 800-555-ACME. Delivery is freetoo, so don't wait..b.b
Sincerely,Clark AxelotleACME Inc.
end-documentposition () @city_state_zipprint &city ()print ', ' ()print &state ()print ' ' ()print &zip () edit xxxxx-xxxxnew-pageend-procedure ! write_letter
10-2 Creating Form Letters

First, SQR performs the main procedure and the SELECT statement. Next, it performs the write_letter procedure and the DOCUMENT section. The POSITION command sets the position to the appropriate line, which is given by the marker @city_state_zip. The program prints the city, then continues printing the other elements to the current position. The state name, and zip code automatically prints in the correct positions with appropriate punctuation.
Output for Program ex10a.sqr
Alfred E Newman & Company2837 East Third StreetGreenwich VillageNew York, NY 10002-1001
10-MAY-1996Dear Sir or Madam:
Thank you for your recent purchases from ACME Inc. We wouldlike to tell you about our limited-time offer. During thismonth, our entire inventory is marked down by 25%. Yes, you canbuy your favorite merchandise and save too. To place an ordersimply dial 800-555-ACME. Delivery is free too, so don't wait.
Sincerely,Clark AxelotleACME Inc.
You will find another example of a form letter in Chapter 12, “Using Graphics.”
Summary� To print form letters, use variables or document markers inserted in the
DOCUMENT section to place data in the text.
Laying Out the Letter 10-3

10-4 Creating Form Letters

11 Exporting Data to Other Applications
This chapter shows you how to create a tab-delimited file that is suitable for exporting data to many applications.
The following program example creates such a file, which you can load into a document such as a spreadsheet. The tabs create columns in your spreadsheet or word processing document that correspond to the columns in your database table.
Program ex11a.sqrbegin-setup! No margins, wide enough for the widest record! and no page breaksdeclare-layout default
left-margin=0 top-margin=0max_columns=160 formfeed=no
end-declareend-setup
begin-programdo main
end-program
begin-procedure mainencode '<009>' into $sep ! Separator character is TABlet $cust_num = 'Customer Number'let $name = 'Customer Name'let $addr1 = 'Address Line 1'let $addr2 = 'Address Line 2'let $city = 'City'let $state = 'State'let $zip = 'Zip Code'let $phone = 'Phone Number'let $tot = 'Total'string $cust_num $name $addr1 $addr2
$city $state $zip $phone $tot by $sep into $col_hdsprint $col_hds (1,1)new-page
11-1
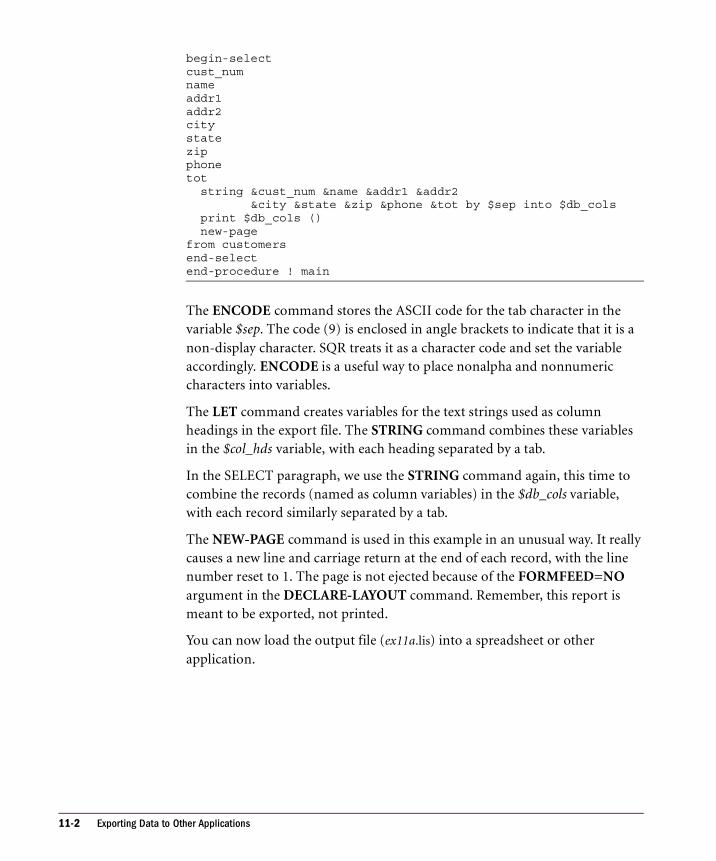
begin-selectcust_numnameaddr1addr2citystatezipphonetot
string &cust_num &name &addr1 &addr2&city &state &zip &phone &tot by $sep into $db_cols
print $db_cols ()new-page
from customersend-selectend-procedure ! main
The ENCODE command stores the ASCII code for the tab character in the variable $sep. The code (9) is enclosed in angle brackets to indicate that it is a non-display character. SQR treats it as a character code and set the variable accordingly. ENCODE is a useful way to place nonalpha and nonnumeric characters into variables.
The LET command creates variables for the text strings used as column headings in the export file. The STRING command combines these variables in the $col_hds variable, with each heading separated by a tab.
In the SELECT paragraph, we use the STRING command again, this time to combine the records (named as column variables) in the $db_cols variable, with each record similarly separated by a tab.
The NEW-PAGE command is used in this example in an unusual way. It really causes a new line and carriage return at the end of each record, with the line number reset to 1. The page is not ejected because of the FORMFEED=NO argument in the DECLARE-LAYOUT command. Remember, this report is meant to be exported, not printed.
You can now load the output file (ex11a.lis) into a spreadsheet or other application.
11-2 Exporting Data to Other Applications

Summary� A tab-delimited output file can export data into other applications.
� The contents of database column variables can also be exported.
� ENCODE can place the ASCII code for a tab into a value.
� LET can place text in variables for export.
� STRING can create a variable holding several text or data items separated by a variable representing a tab or other separator character.
11-3

11-4 Exporting Data to Other Applications

3P A R T T H R E E
3Fonts and Graphics


12-1
12 Using Graphics
This chapter explains how to add graphical features to SQR reports. You will learn how to include a logo or other graphic in a report, change the font, and draw solid lines.
The following example produces a simple tabular report similar to the one in Chapter 3, “Selecting Data from the Database.”
Program ex12a.sqrbegin-setupdeclare-layout defaultend-declare
end-setup
begin-programdo main
end-program
begin-procedure mainbegin-selectname (,1,30)city (,+1,16)state (,+1,5)tot (,+1,11) edit 99999999.99next-listing no-advance need=1let #grand_total = #grand_total + &tot
from customersend-selectprint '-' (,55,11) fillprint 'Grand Total' (+1,40)print #grand_total (,55,11) edit 99999999.99end-procedure ! main
begin-heading 5print $current-date (1,1) Edit 'DD-MON-YYYY'page-number (1,60) 'Page 'print 'Name' (3,1)print 'City' (,32)print 'State' (,49)print 'Total' (,61)print '-' (4,1,65) fill
end-heading

The SETUP section contains a DECLARE-LAYOUT command that specifies the default layout without defining any options. The purpose of specifying the default layout is to use its margin settings, which are defined as 1/2 inch. Without DECLARE-LAYOUT, the report would have no margins.
Note the PRINT command with the FILL option. This command produces dashed lines, which is a simple way to draw lines for a report printed on a line printer. On a graphical printer, however, it is possible to draw solid lines. “Adding Graphics” next, shows you how to take advantage of this feature.
06-JUN-96 Page 1
Name City State Total---------------------------------------------------------------
Gregory Stonehaven Everretsville OH 39.00Alfred E Newman & Company New York NY 42.00Eliot Richards Queens NY 30.00Isaiah J Schwartz and Company Zanesville OH 33.00Harold Alexander Fink Davenport IN 36.00Harriet Bailey Mamaroneck NY 21.00Clair Butterfield Teaneck NJ 24.00Quentin Fields Cleveland OH 27.00Jerry's Junkyard Specialties Frogline NH 12.00Kate's Out of Date Dress Shop New York NY 15.00Sam Johnson Bell Harbor MI 18.00Joe Smith and Company Big Falls NM 3.00Corks and Bottles, Inc. New York NY 6.00Harry's Landmark Diner Miningville IN 9.00
---------Grand Total 315.00
Adding GraphicsThe next sample program includes graphical features—a logo, solid lines, and a change of font in the heading. Text that has changed is shown in bold.
Program ex12b.sqrbegin-setupdeclare-layout defaultend-declare
end-setup
begin-programdo main
end-programbegin-procedure mainbegin-selectname (,1,30)city (,+1,16)state (,+1,5)tot (,+1,11) edit 99999999.99
12-2 Using Graphics
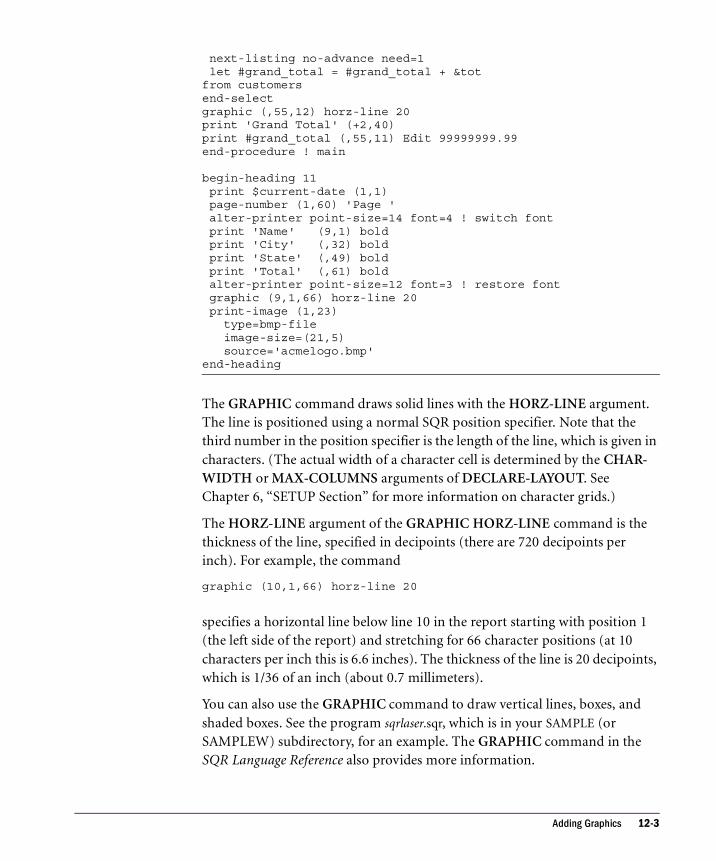
next-listing no-advance need=1let #grand_total = #grand_total + &tot
from customersend-selectgraphic (,55,12) horz-line 20print 'Grand Total' (+2,40)print #grand_total (,55,11) Edit 99999999.99end-procedure ! main
begin-heading 11print $current-date (1,1)page-number (1,60) 'Page 'alter-printer point-size=14 font=4 ! switch fontprint 'Name' (9,1) boldprint 'City' (,32) boldprint 'State' (,49) boldprint 'Total' (,61) boldalter-printer point-size=12 font=3 ! restore fontgraphic (9,1,66) horz-line 20print-image (1,23)
type=bmp-fileimage-size=(21,5)source='acmelogo.bmp'
end-heading
The GRAPHIC command draws solid lines with the HORZ-LINE argument. The line is positioned using a normal SQR position specifier. Note that the third number in the position specifier is the length of the line, which is given in characters. (The actual width of a character cell is determined by the CHAR-WIDTH or MAX-COLUMNS arguments of DECLARE-LAYOUT. See Chapter 6, “SETUP Section” for more information on character grids.)
The HORZ-LINE argument of the GRAPHIC HORZ-LINE command is the thickness of the line, specified in decipoints (there are 720 decipoints per inch). For example, the command
graphic (10,1,66) horz-line 20
specifies a horizontal line below line 10 in the report starting with position 1 (the left side of the report) and stretching for 66 character positions (at 10 characters per inch this is 6.6 inches). The thickness of the line is 20 decipoints, which is 1/36 of an inch (about 0.7 millimeters).
You can also use the GRAPHIC command to draw vertical lines, boxes, and shaded boxes. See the program sqrlaser.sqr, which is in your SAMPLE (or SAMPLEW) subdirectory, for an example. The GRAPHIC command in the SQR Language Reference also provides more information.
Adding Graphics 12-3

The ALTER-PRINTER command in ex12b.sqr changes the font for the heading. When used a second time, it restores the normal font for the rest of the report. The FONT option selects a font (typeface) that is supported by the printer. The font is specified by number, but the number is printer-specific. On a PostScript printer, for example, font 3 is Courier, font 4 is Helvetica, and font 5 is Times Roman. For more information on fonts, see DECLARE-PRINTER in the SQR Language Reference.
The POINT-SIZE option specifies type size in points. You can use a whole number or even a fraction (for example, POINT-SIZE=10.5). The following command changes the font to 14-point Helvetica:
alter-printer point-size=14 font=4 ! switch font
The PRINT-IMAGE command inserts the logo. PRINT-IMAGE is followed by a print position corresponding to the top left corner of the image (line 1, column 19 in our example). The TYPE option specifies the image file type. In our example, the image is stored in Windows bitmap format (bmp-file). The size of the image is specified in terms of columns (width) and lines (height). In the example, the image is 30 characters wide (3 inches) and 7 lines high (1 1/6 inches).
In SQR, images are always stored in external files. The format of the image must match that of the printer you are using. These formats are:
� Windows—bmp file images
� PostScript printer or viewer—eps file
� HP LaserJet—hpgl file images
� HTML output—GIF or JPEG formats (gif file or jpeg file)
For more information on HTML output, see Chapter 28, “Printing Issues.”
The SOURCE option specifies the file name of the image file. In our example, the file is Acmelogo.bmp. The file is assumed to reside in the current directory or in the directory where SQR is installed (you can place the logo file in either of these two places). The file can reside in any directory, however, as long as you specify a full pathname for the image file.
12-4 Using Graphics

Output for Program ex12b.sqr
The output file now contains graphic language commands. SQR can produce output suitable for HP LaserJet printers in a file format that uses the HP PCL language or output suitable for PostScript printers in a file format that uses the PostScript language. SQR can also produce printer-independent output files in a special format called SQR Portable Format (SPF).
SQR can create a printer-specific output file (an LIS file) or create the output in portable format (SPF). When you create an SPF file, the name of the image file is copied into it, and the image is processed at print time, when printer-specific output is generated. When SPF files are used, a change in the contents of the image file is reflected in the report the next time you print it or view it. You can create printer-specific output by using SQR or SQR Execute to directly generate an LIS file or by using SQR Print to generate an LIS file from an SPF file.
For more information on SQR Portable Format, see Chapter 28, “Printing Issues.”
Adding Graphics 12-5

Sharing Images among ReportsYou can place logos and other images in a report using only the PRINT-IMAGE command. However, the DECLARE-IMAGE command is useful if you want several programs to share the definition of an image.
Program ex12c.sqr prints a simple form letter. It shows how to print a logo using the DECLARE-IMAGE and PRINT-IMAGE commands and how to print a signature using only PRINT-IMAGE.
Because the image is shared among several reports, the command DECLARE-IMAGE is contained in this file, acme.inc:
File acme.inc declare-image acme_logo
type=bmp-fileimage-size=(30,7)source='acmelogo.bmp'
end-declare
This file declares an image with acme-logo as the name. It specifies the logo used in the last sample program. The declaration includes the type and source file for the image. As you will see, when the image is printed, you do not need to respecify these attributes.
Multiple programs can share the declaration and include the file acme.inc. If you later need to change an attribute, such as the source, you only need to change it in one place. The image size is specified and provides the default.
If you need to change the size of an image in a particular report, use the IMAGE-SIZE argument of the PRINT-IMAGE command. It will override the image size specified in DECLARE-IMAGE.
12-6 Using Graphics

Program ex12c.sqrbegin-setup#include 'acme.inc'end-setup
begin-programdo main
end-program
begin-procedure mainbegin-selectnameaddr1addr2citystatezipphone
do write_letterfrom customersorder by nameend-selectend-procedure ! main
begin-procedure write_lettermove &city to $cszconcat ', ' with $cszconcat &state with $cszconcat ' ' with $cszmove &zip to $zip xxxxx-xxxxconcat $zip with $cszmove &phone to $phone_no (xxx)bxxx-xxxx ! Edit phone number.begin-document (1,1,0)&name @logo&addr1&addr2$csz.b.b.b
$current-dateDear &name.b
Thank you for your inquiry regarding Encore, Maestro!!, ourrevolutionary teaching system for piano and organ. If you've alwayswanted to play an instrument but felt you could never master one,Encore, Maestro!! is made for you..b
Now anyone who can hum a tune can play one too. Encore, Maestro!!begins with a step-by-step approach to some of America's favoritesongs. You'll learn the correct keyboarding while hearing the soundsyou make through the headphones provided with the Encore, Maestro!!
Sharing Images among Reports 12-7

system. From there, you'll advance to intricate compositions withdazzling melodic runs. Encore, Maestro!! can even teach you toimprovise your own solos..b
Whether you like classical, jazz, pop, or blues, Encore,Maestro!! is the music teacher for you..b
A local representative will be calling you at $phone_noto set up an in-house demonstration, so get ready to play yourfavorite tunes!!.b
Sincerely,@signature
.b
.bClark Axelotle
end-documentposition () @logoprint-image acme-logo ()
image-size=(16,4)position () @signatureprint-image ()
type=bmp-fileimage-size=(12,3)source='clark.bmp'
new-pageend-procedure ! write_letter
The #INCLUDE command, which is performed at compile time, pulls in text from another file. In this program, you can see the command #INCLUDE 'acme.inc' includes the code from the file acme.inc .
The DOCUMENT section begins with a BEGIN-DOCUMENT command and ends with an END-DOCUMENT command. It uses variables and document markers to print inside the letter. The program uses variables for the name and address, the date, and the phone number. It uses document markers for the logo and signature.
Document markers are placeholders in the letter. The program uses the document markers @logo and @signature in a POSITION command before printing each image. The document markers make it unnecessary to specify the position of these items in the PRINT-IMAGE command. Instead, you simply print to the current position.
12-8 Using Graphics

Sharing Images among Reports 12-9
The date is prepared with the reserved variable $current-date. It is printed directly in the DOCUMENT section without issuing a PRINT command.
The program uses the CONCAT command to put together the city, state, and zip code. In the DOCUMENT section, variables retain their predefined size. A column variable, for example, will remain the width of the column as defined in the database. You can print the date and phone number directly, however, because they fall at the end of a line, without any following text.
Output for Program ex12c.sqr (File ex12c.spf)

Printing Bar CodesSQR supports a wide variety of bar code types, which you can include in your SQR report.
To create a bar code, use the PRINT-BAR-CODE command. Specify the position of the bar code in an ordinary position qualifier. In separate arguments, specify the bar code type, height, text to be encoded, caption, and optional check sum. For example:
print-bar-code (1,1)type=1height=0.5text='01234567890'caption='0 12345 67890'
Arguments to PRINT-BAR-CODE may be variables or literals. This example produces the following bar code.
For further information, see the PRINT-BAR-CODE command in the SQR Language Reference.
Summary� DECLARE-LAYOUT sets a margin.
� GRAPHIC draws solid lines or shaded boxes.
� ALTER-PRINTER chooses a font.
� PRINT-IMAGE prints a logo or other graphic in the report.
� DECLARE-IMAGE allows you to share images among reports.
� The #INCLUDE command includes commands from other files in a program.
� CONCAT combines multiple data elements into one variable.
� PRINT-BAR-CODE creates bar codes.
12-10 Using Graphics

13 Business Charts
This chapter shows how to present information visually with graphs, charts, and histograms.
Business charts are useful tools for presenting summary data. SQR provides two commands for creating charts, DECLARE-CHART and PRINT-CHART, and a rich set of chart types—line, pie, bar, stacked bar, 100% bar, overlapped bar, floating bar, histogram, area, stacked area, 100% area, xy-scatter plot and high-low-close.
You can customize many attributes of SQR charts by turning on three-dimensional effects or setting titles and legends. SQR charts are also portable—you can move them from one hardware platform to another.
A business chart can be prepared using data held in an array, just like a cross-tabular report (see Chapter 8, “Cross-Tabular Reports”). If you have already written a cross-tabular report, just one more step creates a chart using the data already collected in the array.
13-1

Creating a ChartThe following example builds on the report created in Chapter 8, “Cross-Tabular Reports” (ex8c.sqr). That example combined the two reports in one program. The following program produces two charts corresponding to the two cross-tabs.
Here is the code. The lines that were changed or added are shown in bold.
Program ex13a.sqr#define max-categories 3#define max-products 100
begin-setupcreate-array
name=order_qty size={max-products}field=product:char field=month_qty:number:3
create-arrayname=order_qty2 size={max-categories}field=category:char field=month_qty:number:3
declare-chart orders-stacked-barchart-size=(70,30)title='Order Quantity'legend-title='Month'type=stacked-bar
end-declare ! orders-stacked-barend-setup
begin-programdo select_datado print_arrayprint '-' (+2,1,70) fillposition (+1)do print_array2new-pagelet $done = 'YES' ! Don't need heading any moredo print_the_charts
end-program
begin-procedure print_arraylet #entry_cnt = #ilet #i = 0while #i <= #entry_cnt
let $product = order_qty.product(#i)let #jan = order_qty.month_qty(#i,0)let #feb = order_qty.month_qty(#i,1)let #mar = order_qty.month_qty(#i,2)let #prod_tot = #jan + #feb + #marprint $product (,1,30)print #jan (,32,9) edit 9,999,999print #feb (,42,9) edit 9,999,999
13-2 Business Charts

print #mar (,52,9) edit 9,999,999print #prod_tot (,62,9) edit 9,999,999position (+1)let #i = #i + 1
end-whileend-procedure ! print_arraybegin-procedure print_array2
let #i = 0while #i < {max_categories}
let $category = order_qty2.category(#i)let #jan = order_qty2.month_qty(#i,0)let #feb = order_qty2.month_qty(#i,1)let #mar = order_qty2.month_qty(#i,2)let #category_tot = #jan + #feb + #marprint $category (,1,31)print #jan (,32,9) edit 9,999,999print #feb (,42,9) edit 9,999,999print #mar (,52,9) edit 9,999,999print #category_tot (,62,9) edit 9,999,999position (+1)let #jan_total = #jan_total + #janlet #feb_total = #feb_total + #feblet #mar_total = #mar_total + #marlet #i = #i + 1
end-whilelet #grand_total = #jan_total + #feb_total + #mar_totalprint 'Totals' (+2,1)print #jan_total (,32,9) edit 9,999,999print #feb_total (,42,9) edit 9,999,999print #mar_total (,52,9) edit 9,999,999print #grand_total (,62,9) edit 9,999,999
end-procedure ! print_array2
begin-procedure select_datalet order_qty2.category(0)='$0-$4.99'let order_qty2.category(1)='$5.00-$100.00'let order_qty2.category(2)='Over $100'
begin-selectorder_date! the price / price category for the orderc.price &price
move &price to #price_numevaluate #price_numwhen < 5.0
let #x = 0break
when <= 100.0let #x = 1break
when-otherlet #x = 2break
end-evaluate! The quantity for this orderquantity
Creating a Chart 13-3

let #j = to_number(datetostr(&order_date,'MM')) - 1if #j < 3
let order_qty2.month_qty(#x,#j) =order_qty2.month_qty(#x,#j) + &quantity
end-if! the product for this orderdescription
if #i = 0 and order_qty.product(#i) = ''let order_qty.product(#i) = &description
end-ifif order_qty.product(#i) != &description
let #i = #i + 1if #i >= {max_products}
display 'Error: There are more than {max_products}products'
stopend-iflet order_qty.product(#i) = &description
end-ifif #j < 3
let order_qty.month_qty(#i,#j) =order_qty.month_qty(#i,#j) + &quantity
end-iffrom orders a, ordlines b, products cwhere a.order_num = b.order_numand b.product_code = c.product_codeorder by descriptionend-selectend-procedure ! select_data
begin-heading 5if not ($done = 'YES')print $current-date (1,1)page-number (1,64) 'Page 'print 'Order Quantity by Product and Price Category by Month'
(2,10)print 'Product / Price Category' (4,1)print ' January' (,32)print ' February' (,42)print ' March' (,52)print ' Total' (,62)Print '-' (5,1,70) Fill
end-ifend-heading
13-4 Business Charts

begin-procedure print_the_chartsprint-chart orders-stacked-bar (+2,1)
data-array=order_qtydata-array-row-count=12data-array-column-count=4data-array-column-labels=('Jan','Feb','Mar')
sub-title='By Product By Month'new-pageprint-chart orders-stacked-bar (+2,1)
data-array=order_qty2data-array-row-count=3data-array-column-count=4data-array-column-labels=('Jan','Feb','Mar')sub-title='By Price Category By Month'
end-procedure ! print_the_charts
Defining a ChartThe two chart sections in program ex13a.sqr are specified with the DECLARE-CHART command in the SETUP section and are named orders-stacked-bar. The width and height of the charts are specified in terms of character cells. The charts generated by this program will be 70 characters wide, which is 7 inches on a default layout. The height (or depth; these terms are used interchangeably) of the charts is 30 lines, which translates to 5 inches at 6 lines per inch. These dimensions define a rectangle that contains the chart. The box that surrounds the chart is drawn by default, but you can disable it using the qualifier BORDER=NO.
The title is centered at the top of the chart. The text generated by LEGEND-TITLE must fit in the small legend box above the categories, so keep this description short. In general, you will find that charts look best when the text items are short. Here is the DECLARE-CHART command.
declare-chart orders-stacked-barchart-size=(70,30)title='Order Quantity'legend-title='Month'type=stacked-bar
end-declare ! orders-stacked-bar
The heading is printed on the first page only.
Defining a Chart 13-5
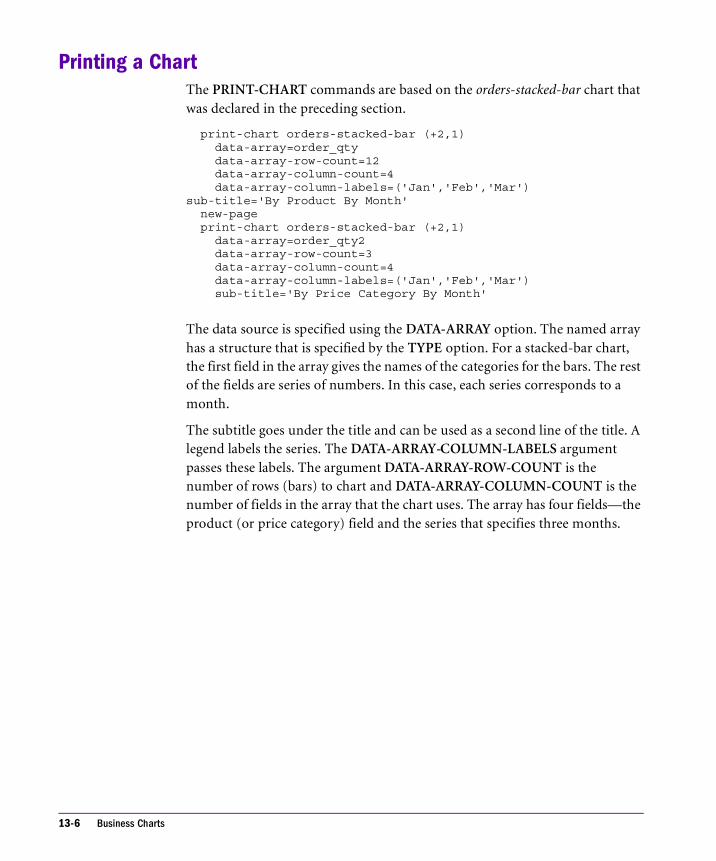
Printing a ChartThe PRINT-CHART commands are based on the orders-stacked-bar chart that was declared in the preceding section.
print-chart orders-stacked-bar (+2,1)data-array=order_qtydata-array-row-count=12data-array-column-count=4data-array-column-labels=('Jan','Feb','Mar')
sub-title='By Product By Month'new-pageprint-chart orders-stacked-bar (+2,1)
data-array=order_qty2data-array-row-count=3data-array-column-count=4data-array-column-labels=('Jan','Feb','Mar')sub-title='By Price Category By Month'
The data source is specified using the DATA-ARRAY option. The named array has a structure that is specified by the TYPE option. For a stacked-bar chart, the first field in the array gives the names of the categories for the bars. The rest of the fields are series of numbers. In this case, each series corresponds to a month.
The subtitle goes under the title and can be used as a second line of the title. A legend labels the series. The DATA-ARRAY-COLUMN-LABELS argument passes these labels. The argument DATA-ARRAY-ROW-COUNT is the number of rows (bars) to chart and DATA-ARRAY-COLUMN-COUNT is the number of fields in the array that the chart uses. The array has four fields—the product (or price category) field and the series that specifies three months.
13-6 Business Charts

Running the ProgramWhen you create a graphical report, you must use a slightly different technique for running the program and viewing the output. If you are using a platform such as UNIX or VMS, specify the printer type with the -PRINTER:xx flag. If you are using an HP LaserJet, enter -PRINTER:HP (or -printer:hp). If you are using a PostScript printer, enter -PRINTER:PS (or -printer:ps) on the command line. For example:
sqr ex9a username/password -printer:hp
You can also use the -KEEP command-line flag to produce output in the SQR Portable File format (SPF) and print it using SQR Print. You still need to use the -PRINTER:xx flag when printing. SQR Portable File format is covered in greater detail in Chapter 28, “Printing Issues.”
With Brio.Report Builder, neither -PRINTER:xx nor -KEEP is required. The output automatically appears in the Viewer or Web browser window after the report has been run. A portion of the output is shown next. The charts will appear on pages 2 and 3 of the report.
Output for Program ex13a.sqr (File ex13a.spf)
Running the Program 13-7

Passing Data to the ChartThe procedure for passing the data to the chart is to use the first field for the descriptions of bars (or lines or areas) and then use one or more additional fields with series of numbers. This procedure is common to many chart types, including line, bar, stacked-bar, 100% bar, overlapped bar, histogram, area, stacked-area, and 100% area. You can omit the first field and SQR uses cardinal numbers (1, 2, 3...) for the bars. Only text fields are used for these options.
For pie charts, only one series is allowed. Pie charts are also a special case because you can specify which segments to “explode,” or pull away, from the center of the pie. Using a third field in the array, you can have a series of ‘Y’ and ‘N’ values that indicate whether or not to explode the segment. If ‘Y’ is the value in the first row of the array, the pie segment that corresponds to the first row is exploded. With pie charts, you cannot omit the first field with the descriptions.
Pie charts display the numeric value next to each segment. The description is displayed in the legend. In addition, SQR displays the percentage next to the value. You can disable this feature by using the qualifier PIE-SEGMENT-PERCENT-DISPLAY=NO.
13-8 Business Charts

When data is passed to an xy scatter plot or a floating-bar chart, the series are paired. A pair in a floating-bar chart represents the base and height of the bars. A pair in an xy-scatter plot represents x and y coordinates. In an xy-scatter plot, the first field does not have descriptions. In a floating-bar chart, the first field may or may not have descriptions for the bars. For both types, you can have one or more pairs of series.
Changing Colors in New GraphicsThis section describes how to create a SQR COLOR-PALETTE its use within the DECLARE-CHART and PRINT-CHART commands, and the various chart item keywords.
Specifying Chart Data Series ColorsColor palettes in the new graphics set the colors of each data point in a data series. Specify the color palette to be used in a Business Chart by creating a SQR COLOR-PALETTE using the CREATE-COLOR-PALETTE command. The following code demonstrates how to create the color palette.
Create-Color-PaletteName = 'Test-Palette'Color_1 = (100,133,238)Color_2 = (0, 0, 255)Color_3 = (0,255,0)Color_4 = (0,0,255)Color_5 = (0,0,0)
You can specify any number of palettes, with up to 64 colors defined in each palette. If there are more data points in the data sets than defined colors in the palette, the palette resets and continues to set the data point colors from Color_1 to Color_n.
After a color palette has been defined, it can be used within the DECLARE-CHART and PRINT-CHART commands to specify the color palette to be used. The following code demonstrates the use of a color palette:
Print-Chart test_ChartCOLOR-PALETTE = 'Test-Palette'
Changing Colors in New Graphics 13-9

Note New Graphics is not applicable with HP LaserJet or PostScript output. When you generate HP or PS output with a NewGraphics=TRUE setting, an LIS file is generated, but the charts will be printed blank.
Note New Graphics will output grayscale charts with resolution of True Color on WinNT machines. Replacing JRE 1.1.7B with JRE 1.1.8 will correct this problem.
Replacing JRE 1.1.7B with JRE 1.1.8 Under the [Environment Common] section of SQR.INI add the following two entries:
SQR_JRE_EXE=C:\BrioONE\jre\jre118\bin\jre.exeSQR_JRE_VER=118
Specifying Chart Item Colors You can specify the foreground and background colors of the individual areas within a Business Chart using, ITEM-COLOR = (rgb-value) within the DECLARE-CHART and PRINT-CHART commands. An example of a Business Chart is shown here.
�
�
13-10 Business Charts

Table 13-1 lists chart item keywords that are valid for ITEM-COLOR.
Summary� Use DECLARE-CHART and PRINT-CHART to print charts.
� Data arrays assemble and process the data used in making a chart.
� Use COLOR-PALETTE and ITEM-COLOR to specify colors.
Tab le 13-1 Chart Item Keywords and Description
Keyword Description
ChartBackground Background color of entire chart area
ChartForeground Text and Line color of chart area
HeaderBackground Area within the text box specified for the Title and sub-Title
HeaderForeground Text color of the Title and Sub-Title
FooterBackground Area within the text box specified for the X Axis label
FooterForeground Text color of the X Axis label
LegendBackground Area within the box defining the legend
LegendForeground Text and Outline color of the Legend
ChartAreaBackground Area that includes the body of the chart
ChartAreaForeground Text and Line colors of the chart area
PlotAreaBackground Area within the X and Y Axis of a chart
PlotAreaForeground Text and Line colors of the Plot Area
Changing Colors in New Graphics 13-11

13-12 Business Charts

14 Changing Fonts
This chapter explains how to print text in different fonts.
To select a font in SQR, you use the commands DECLARE-PRINTER and ALTER-PRINTER. The DECLARE-PRINTER command sets the default font for the entire report. The ALTER-PRINTER command changes the font anywhere in the report and the change remains in effect until the next ALTER-PRINTER.
If you want to set a font for the entire report, use ALTER-PRINTER, which is not printer-specific, at the beginning of the program. If you are writing a printer-independent report, be aware that the attributes you set with DECLARE-PRINTER only take effect when you print your report with the printer you specify with the TYPE argument. To specify a printer at print time, use the -PRINTER:xx command-line flag.
Positioning TextIn SQR, you position text according to a grid. That grid is set by default to 10 characters per inch and 6 lines per inch, but you can give it another definition by altering the CHAR-WIDTH and LINE-HEIGHT parameters of the DECLARE-LAYOUT command.
Note however that character grid and character size function independently of one another. Fonts print in the size set by DECLARE-PRINTER or ALTER-PRINTER, not the size defined by the grid. A character grid is best used for positioning the first character in a string. It can only express the width of a string in terms of the number of characters it contains, not in an actual linear measurement, such as inches or picas.
When you use a proportionally spaced font, the number of letters that you print may no longer match the number of character cells that the text actually fills. For example, in the sample code given in the next page, the word “Proportionally” fills only 9 cells, although it contains 14 letters.
14-1

When you print consecutive text strings, the actual position at the end of a string may differ from the position SQR assumes according to the grid. For this reason, we advise you to concatenate consecutive pieces of text and print them as one.
For example, instead of writing code such as:
alter-printer font=5 ! select a proportional fontprint &first_name () ! print first nameprint ' ' () ! print a spaceprint &last_name () ! print the last namealter-printer font=3 ! restore the font
You should write code such as:
alter-printer font=5 ! select a proportional font! concatenate the namelet $full_name = &first_name || ' ' || &last_nameprint $full_name () ! print the namealter-printer font=3 ! restore the font
The WRAP and CENTER options of the PRINT command also require special consideration when used with proportional fonts. They both calculate the text length based on the character count in the grid, which is not the same as its dimensional width. The use of these options with proportional fonts is explained after the output example.
Look at the sample program. It consists of a list of reminders from the reminders table. It is printed in a mix of fonts—Times Roman in two different sizes, plus Helvetica bold.
Program ex14a.sqrbegin-setupdeclare-layout default
paper-size=(10,11)end-declare
end-setup
begin-programdo main
end-program
begin-procedure main! Set Times Roman as the font for the reportalter-printer font=5 point-size=12begin-selectremind_date (,1,20) edit 'DD-MON-YY'reminder (,+1) wrap 60 5
14-2 Changing Fonts

position (+2)from remindersend-selectend-procedure ! main
begin-heading 7print $current-date (1,1) Edit 'DD-MON-YYYY'page-number (1,60) 'Page '! Use large font for the titlealter-printer font=5 point-size=24print 'Reminder List' (3,25)! Use Helvetica for the column headingsalter-printer font=4 point-size=12print 'Date' (6,1) boldprint 'Reminder' (6,22) boldgraphic (6,1,66) horz-line! Restore the fontalter-printer font=5 point-size=12
end-heading
The report uses the default layout grid of 10 characters per inch and 6 lines per inch, both for positioning the text and for setting the length of the solid line.
The font is set at the beginning of the main procedure to font 5, which is Times Roman. The point size was not set, so it remains at the default of 12. In the HEADING section, its size is set to 24 points to print the title.
The column headings are set to 12-point Helvetica with the command ALTER-PRINTER FONT=4 POINT-SIZE=12. The BOLD option of the PRINT command specifies that they are printed in bold.
Under the column headings, there is a solid line. Note that it is positioned at line 6, the same as the column headings. SQR is designed to draw the solid line as an underline. At the end the HEADING section, the font is restored to Times Roman.
Positioning Text 14-3

Output for Program ex14a.sqr (File ex14a.spf)
In an SQR program, the report heading is performed after the body. A font change in the heading does not effect the font used in the body of the current page, although it changes the font used in the body of subsequent pages. Make sure you keep track of your font changes. We recommend that you return fonts to their original settings in the same section in which you change them.
Positioning the title requires careful coding. The CENTER option of the PRINT command will not work because it does not account for the actual size of the text. Instead, position the title by estimating its length. In this case, the title should start 2 1/2 inches from the left margin. The character coordinates will be “(3,25),” which is line 3, character position 25. Remember that the character grid used for positioning assumes 10 characters per inch. Therefore, 25 characters translates to 2 1/2 inches.
14-4 Changing Fonts

Using WRAPThe WRAP option of the PRINT command prints the text of the reminder column. This option wraps text based on a given width, which is 60 characters in the sample program.
The WRAP option works only on the basis of the width given in the character grid. It does not depend on the font.
Text printed in Times Roman takes about 30-50 percent less room than the same text in Courier (the default font, which is a fixed-size font). This means that a column with a nominal width of 44 characters (the width of the reminder column) can actually hold as many as 66 letters when printed in the Times Roman font. To be conservative, specify a width of 60.
The other argument of the WRAP option is the maximum number of lines. Because the reminder column in the database is 240 characters wide, at 60 characters per line, no more than five lines are needed. Remember, this setting only specifies the maximum number of lines. SQR does not use more lines than necessary.
SQR calculates the maximum number of characters on a line using the page dimensions in the DECLARE-LAYOUT command (the default is 8 1/2 inches wide). In the sample program, 8 1/2 inches minus the inch used in the margins is 7 1/2 inches, or 75 characters at 10 CPI. Printing 60 characters starting from position 22 could exceed this maximum and cause an error or undesirable output. To avoid this error, define the page as wider than it actually is. This definition is given by the argument PAPER-SIZE=(10,11) in the DECLARE-LAYOUT command.
Summary� DECLARE-PRINTER and ALTER-PRINTER specify fonts.
� DECLARE-PRINTER is printer-specific. ALTER-PRINTER is printer-neutral.
� The BOLD, CENTER, and WRAP options of the PRINT command format text.
Using WRAP 14-5

14-6 Changing Fonts

15 Writing Printer-Independent Reports
This chapter explains how to prepare printer-independent reports, which can be run on any printer that SQR supports or can be distributed electronically.
To create a printer-independent report, you must write a program that avoids using any characteristics that are unique to a specific printer.
As you will see, complete printer independence may be too restrictive. However, the closer you can get to a truly printer-independent report, the better.
Guidelines for Printer-Independent Reports� Your program should not assume or require a specific printer. Your
program should be free of the following commands: GRAPHIC FONT (use ALTER-PRINTER instead), PRINTER-INIT, PRINTER-DEINIT, USE-PRINTER-TYPE (except for using this command to select a printer at run time, as demonstrated in “Modified Program ex3a.sqr” on page 15-3), and the CODE-PRINTER and CODE qualifiers of the PRINT command.
� DECLARE-PRINTER, PRINT-DIRECT, the CODE or CODE-PRINTER qualifiers of the PRINT command, and the SYMBOL-SET argument of the ALTER-PRINTER command only define behavior when a specific printer is used.
� Your report should be readable if printed on a line printer. Graphics or solid lines printed with the graphic command are not printed on a line printer. Test your graphical report on a line printer.
15-1
� Use only a small set of fonts. Font numbers 3, 4, 5 and their boldface versions are the same regardless of the type of printer you use (except for a line printer). Font 3 is Courier, font 4 is Helvetica, and font 5 is Times Roman. Note that on some HP printers, Helvetica may not be available. This reduces the common fonts to fonts 3 and 5 only.
� Be aware of certain limitations. Eps-file images can only be printed on PostScript printers. Hpgl-file images can only be printed on HP LaserJet Series 3 or higher or printers that emulate HP PCL at that level. Bmp-file images can only be printed using Windows. Gif-file and jpeg-file images are suitable only for HTML output. PRINT-IMAGE and PRINT-CHART may not work with old printers that use PostScript Level 1 or HP LaserJet Series II.
If your report is printer-neutral and does not specify a printer, you can specify the printer at run time in two ways.
The first way is to use the -PRINTER:xx command-line flag, which specifies the output type for your report. Use the following commands:
� -PRINTER:LP for line-printer output
� -PRINTER:PS for PostScript output
� -PRINTER:HP for HP LaserJet output
� -PRINTER:WP for Windows output
� -PRINTER:HT for HTML output.
If you are using Brio.Report Builder, enter these command-line flags in the Parameters field of the Run dialog box. If you are using the system shell, enter the following on the command line:
sqr test username/password -printer:ps
Note Currently, PRINTER:WP sends output to the default Windows printer. To specify a nondefault
Windows printer, enter the following command: -PRINTER:WP:{Printer Name}. The {Printer Name} is the name assigned to your printer. For example, to send output to a Windows printer named NewPrinter, you would use -PRINTER:WP:NewPrinter. If your printer name has spaces,
enclose the entire command in double quotes.
�
15-2 Writing Printer-Independent Reports
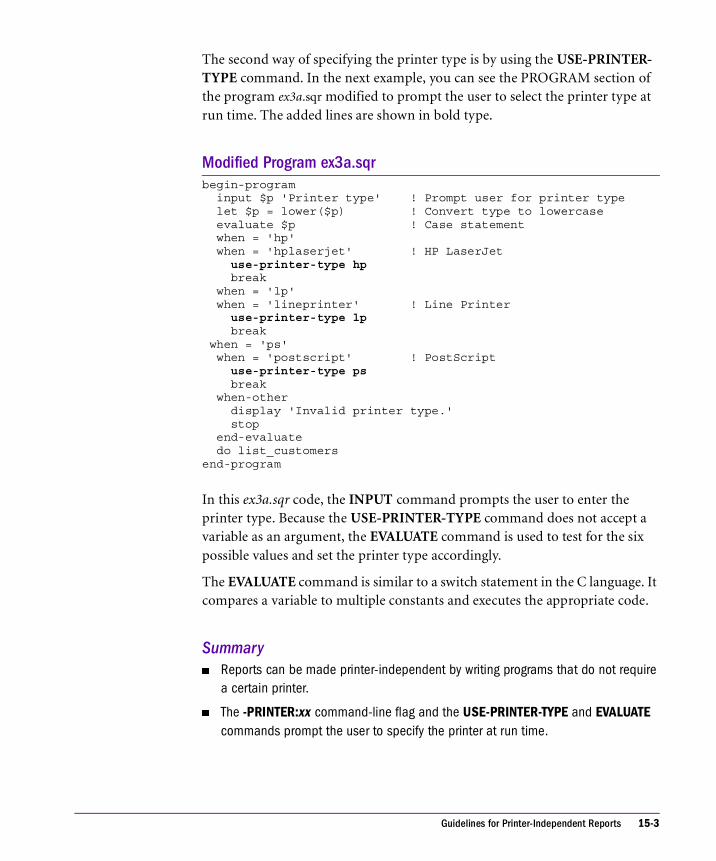
The second way of specifying the printer type is by using the USE-PRINTER-TYPE command. In the next example, you can see the PROGRAM section of the program ex3a.sqr modified to prompt the user to select the printer type at run time. The added lines are shown in bold type.
Modified Program ex3a.sqrbegin-program
input $p 'Printer type' ! Prompt user for printer typelet $p = lower($p) ! Convert type to lowercaseevaluate $p ! Case statementwhen = 'hp'when = 'hplaserjet' ! HP LaserJet
use-printer-type hpbreak
when = 'lp'when = 'lineprinter' ! Line Printer
use-printer-type lpbreak
when = 'ps'when = 'postscript' ! PostScript
use-printer-type psbreak
when-otherdisplay 'Invalid printer type.'stop
end-evaluatedo list_customers
end-program
In this ex3a.sqr code, the INPUT command prompts the user to enter the printer type. Because the USE-PRINTER-TYPE command does not accept a variable as an argument, the EVALUATE command is used to test for the six possible values and set the printer type accordingly.
The EVALUATE command is similar to a switch statement in the C language. It compares a variable to multiple constants and executes the appropriate code.
Summary� Reports can be made printer-independent by writing programs that do not require
a certain printer.
� The -PRINTER:xx command-line flag and the USE-PRINTER-TYPE and EVALUATE commands prompt the user to specify the printer at run time.
Guidelines for Printer-Independent Reports 15-3

15-4 Writing Printer-Independent Reports

4P A R T F O U R
4Advanced SQR Programming


16 Dynamic SQL and Error Checking
This chapter describes how to vary the SQL statement based on a user’s selection criteria or other report parameters.
SQR provides three ways to vary an SQL statement:
� Using variables in SQL
� Dynamic SQL
� SQL and substitution variables
SQR provides three ways to do error checking:
� ON-ERROR procedures
� Commands with ON-ERROR options
� The INPUT command
16-1

Using Variables in SQLThe SQL language supports the use of variables. An SQL statement containing variables is considered static. When SQR executes this statement several times, it executes the same statement, even if the values of the variables change. Because SQL only allows variables in places where literals are allowed (such as in a WHERE clause or INSERT statement), the database can parse the statement before the values for the variables are given.
Sample program, ex16a.sqr, selects customers from a state that the user specifies.
Program ex16a.sqrbegin-program
do list_customers_for_stateend-program
begin-procedure list_customers_for_stateinput $state maxlen=2 type=char 'Enter state abbreviation'let $state = upper($state)begin-selectname (,1)
position (+1)from customerswhere state = $stateend-selectend-procedure ! list_customers_for_state
Note the use of the $state variable in the SELECT paragraph. When you use a variable in a SQL statement in SQR, the SQL statement sent to the database contains that variable. SQR “binds” the variable before the SQL is executed. In many cases, the database only needs to parse the SQL statement once. The only thing that changes between executions of the SELECT statement is the value of the variable. This is the most common example of varying a SELECT statement.
In this program, the INPUT command prompts the user to enter the value of state. The arguments MAXLEN and TYPE check the input, ensuring that the user enters a string of no more than two characters. If the entry is incorrect, INPUT reprompts.
16-2 Dynamic SQL and Error Checking

The program converts the contents of the $state variable to uppercase, which allows the user to input the state without worrying about the case. In the example, state is uppercase in the database. The example shows the LET command used with the SQR upper function.
You could let the SQL perform the conversion to uppercase. You would do so by using where state = upper($state) if you are using Oracle or SYBASE or by using where state = ucase($state) if you are using another database. However, SQR allows you to write database-independent code by moving the use of such SQL extensions to the SQR code.
When you run this program, you must specify one of the states included in the sample data for the program to return any records. At the prompt, enter IN, MI, NH, NJ, NM, NY, or OH. If you enter NY (the state where most of the customers in the sample data reside), SQR generates the following output.
Output for Program ex16a.sqr
Alfred E Newman & CompanyEliot RichardsHarriet BaileyKate's Out of Date Dress ShopCorks and Bottles, Inc.
Dynamic SQLYou may find the restriction against using variables where only literals are allowed too limiting in some cases. In the following example, the ordering of the records changes based on the user’s selection. The program runs the SELECT twice. The first time, the first column is called name and the second column is called city, and the program sorts the records by name with a secondary sort by city. The second time, the first column is the city and the second is name, and the program sorts by city with a secondary sort by name. The first SELECT statement will therefore be:
select name, cityfrom customersorder by name, city
Dynamic SQL 16-3

The second SELECT statement will be:
select city, namefrom customersorder by city, name
As you can see, the statements are different. SQR actually constructs the statement each time before executing it. This technique is called dynamic SQL, and it is illustrated in the following example. To take full advantage of the error-handling procedure, run it with the command-line flag -CB.
Program ex16b.sqrbegin-program
let $col1 = 'name'let $col2 = 'city'let #pos = 32do list_customers_for_stateposition (+1)let $col1 = 'city'let $col2 = 'name'let #pos = 18do list_customers_for_state
end-program
begin-procedure give_warningdisplay 'Database error occurred'display $sql-error
end-procedure ! give_warning
begin-procedure list_customers_for_statelet $my_order = $col1 || ',' || $col2
begin-select on-error=give_warning[$col1] &column1=char (,1)[$col2] &column2=char (,#pos)
position (+1)from customersorder by [$my_order]end-selectend-procedure ! list_customers_for_state
When you use variables in a SQL statement in SQR to replace literals and more, you make them dynamic variables by enclosing them in square brackets. For example, when you use the dynamic variable [$my_order] in the ORDER BY clause of the SELECT statement, SQR places the text from the variable $my_order in that statement. Each time the statement is executed, if the text changes, a new statement is compiled and executed.
16-4 Dynamic SQL and Error Checking

Other dynamic variables used are [$col1] and [$col2]. They substitute the names of the columns in the SELECT statement. The variables &column1 and &column2 are column variables.
You can use dynamic variables to produce reports like this one. Note that the data in the first half of the report is sorted differently than the data in the second half.
Note the error-handling procedure give_warning. It is discussed in “SQL Error Checking” on page 16-6.
Output for Program ex16b.sqr
Alfred E Newman & Company New YorkClair Butterfield TeaneckCorks and Bottles, Inc. New YorkEliot Richards QueensGregory Stonehaven EverretsvilleHarold Alexander Fink DavenportHarriet Bailey MamaroneckHarry's Landmark Diner MiningvilleIsaiah J Schwartz and Company ZanesvilleJerry's Junkyard Specialties FroglineJoe Smith and Company Big FallsKate's Out of Date Dress Shop New YorkQuentin Fields ClevelandSam Johnson Bell Harbor
Bell Harbor Sam JohnsonBig Falls Joe Smith and CompanyCleveland Quentin FieldsDavenport Harold Alexander FinkEverretsville Gregory StonehavenFrogline Jerry's Junkyard SpecialtiesMamaroneck Harriet BaileyMiningville Harry's Landmark DinerNew York Alfred E Newman & CompanyNew York Corks and Bottles, Inc.New York Kate's Out of Date Dress ShopQueens Eliot RichardsTeaneck Clair ButterfieldZanesville Isaiah J Schwartz and Company
Dynamic SQL 16-5

SQL Error CheckingSQR checks and reports database errors for SQL statements. When an SQR program is compiled, SQR checks the syntax of the SELECT, UPDATE, INSERT, and DELETE SQL statements in your program. Any SQL syntax error is detected and reported at compile time, before the execution of the report begins.
When you use dynamic SQL, SQR cannot check the syntax until run time. In that case, the content of the dynamic variable is used to construct the SQL statement, which can allow syntax errors to occur in run time. Errors could occur if the dynamic variables selected or used in a WHERE or ORDER BY clause were incorrect.
SQR traps any run-time error, reports the error, and aborts the program. If you want to change this default behavior, use the ON-ERROR option of the BEGIN-SELECT or BEGIN-SQL paragraphs.
begin-select on-error=give_warning[$col1] &column1=char (,1)[$col2] &column2=char (,#pos)
position (+1)from customersorder by [$my_order]end-select
In this example, if a database error occurs, SQR invokes a procedure called give_warning instead of reporting the problem and aborting. Write this procedure as follows:
begin-procedure give_warningdisplay 'Database error occurred'display $sql-error
end-procedure ! give_warning
16-6 Dynamic SQL and Error Checking

This procedure displays the error message but does not abort the execution of the program. Instead, execution continues at the statement immediately following the SQL or SELECT paragraph. Note the use of the variable $sql-error, which is a special SQR reserved variable. It contains the error message text from the database and is automatically set by SQR after a database error occurs.
SQR has a number of reserved, or predefined, variables. For example, the variable $sqr-program has the name of the program that is running. The variable $username has the user name that was used to log on to the database. The variable #page-count has the page number for the current page.
For a complete list of reserved variables, see “SQR Reserved Variables” on page 1-19 in the SQR Language Reference.
SQL and Substitution VariablesSQR uses the value of this substitution variable to complete the SELECT statement at compile time. Because the SELECT statement is complete at compile time, SQR can check its syntax before execution begins. From this point on, the value of {my_order} cannot change and the SQL statement is considered static.
In the following program, the ASK command in the SETUP section prompts the user at compile time. The value that the user enters is placed in a special kind of variable called a substitution variable. This variable can be used to substitute any command, argument, or part of a SQL statement at compile time. This example is less common, but it demonstrates the difference between compile-time and run-time substitutions.
SQL and Substitution Variables 16-7

Program ex16c.sqrbegin-setupask my_order 'Enter the column name to sort by (name or city)'
end-setup
begin-programdo list_customers_for_state
end-program
begin-procedure give_warningdisplay 'Database error occurred'display $sql-error
end-procedure ! give_warning
begin-procedure list_customers_for_statebegin-select on-error=give_warningname (,1)city (,32)
position (+1)from customersorder by {my_order}end-selectend-procedure ! list_customers_for_state
In this case, the ASK command prompts the user for the value of the substitution variable {my_order}, which is used to sort the output. If the argument is passed on the command line, there will be no prompt. When you run this program, enter name, city, or both (in either order and separated by a comma). The program produces a report sorted accordingly.
You can only use the ASK command in the SETUP section. SQR executes ASK commands at compile time before program execution begins. Therefore, all ASK commands are executed before any INPUT command.
INPUT is more flexible than ASK. You can use INPUT inside loops. You can validate the length and type of data input and reprompt if it is not valid. We have seen an example of reprompting in “Using Variables in SQL” on page 16-2.
ASK can be more powerful. Substitution variables set in an ASK command let you modify commands that are normally quite restrictive. The following code shows this technique.
16-8 Dynamic SQL and Error Checking

begin-setupask hlines 'Number of lines for heading'
end-setup
begin-programprint 'Hello, World!!' (1,1)
end-program
begin-heading {hlines}print 'Report Title' () center
end-heading
In this example, the substitution variable {hlines} defines the number of lines that the heading will occupy. The BEGIN-HEADING command normally expects a literal and does not allow a run-time variable. When a substitution variable is used with this command, its value is modified at compile time.
For further information on the ASK and INPUT commands, see Chapter 27, “Compiling Programs and Using SQR Execute.”
Summary� Dynamic variables are variables used in a SQL statement to replace more than
literals. They are enclosed in square brackets.
� You can customize SQR's run-time error handling.
� SQR has a number of reserved variables. For a full listing, see the table “SQR Reserved Variables” on page 1-19 in the SQR Language Reference.
� Substitution variables entered by the ASK command can be used in place of any command, argument, or SQL statement at compile time. They are enclosed in curly braces.
SQL and Substitution Variables 16-9

16-10 Dynamic SQL and Error Checking

17 Procedures, Argument Passing, and Local Variables
This chapter examines SQR procedures. It explains how to pass parameters in a procedure and illustrates the difference between global and local procedures. In particular, it shows how to reference global variables from within a local procedure.
The sample code in this chapter shows a procedure that spells out a number and a program for printing checks that uses this procedure. When printing checks, you normally need to spell out the dollar amount, as shown here.
In the sample code, Spell.inc it is assumed that the checks are preprinted and that our program only has to print such items as the date, name, and amount.
17-1

ProceduresSQR procedures that contain variables that are visible throughout the program are called global procedures. These procedures can also directly reference any program variable.
In contrast, procedures that take arguments, such as the spell_number procedure in this chapter’s check-printing sample code, are local procedures. In SQR, any procedure that takes arguments is automatically considered local.
Variables introduced in a local procedure are only readable inside the Spell.inc procedure. This useful feature avoids name collisions. In the spell_number procedure is in an include file because other reports may also want to use it.
Local VariablesWhen you create library procedures that can be used in many programs, make them local. Then, if a program has a variable with the same name as a variable used in the procedure, there will not be a collision. SQR treats the two variables as separate.
We recommend that you declare a procedure as local even if it does not take any arguments. Simply place the keyword LOCAL after the procedure name in the BEGIN-PROCEDURE command.
To reference a global variable from a local procedure, insert an underscore between the prefix character (#, $, or &) and the variable name. Use the same technique to reference reserved variables such as #current-line. These variables are always global, that you can reference from a local procedure.
SQR supports recursive procedure calls, but it maintains only one copy of a local variable. A procedure does not allocate new instances of the local variables on a stack, as C or Pascal would.
17-2 Procedures, Argument Passing, and Local Variables

Argument PassingProcedure arguments are treated as local variables. Arguments can be either numeric, date, or text variables or strings. If an argument is preceded with a colon, its value is passed back to the calling procedure.
In the following example, spell_number takes two arguments. The first argument is the check amount. This argument is a number, and the program passes it to the procedure. There is no need for the procedure to pass it back.
The second argument is the result that the procedure passes back to the calling program. We precede this variable with a colon, which means that the value of this argument is copied back at the end of the procedure. The colon is only used when the argument is declared in the BEGIN-PROCEDURE command.
Look at the following code. It is not a complete program, but it is the spell_number procedure, which is stored in the file spell.inc. The check-printing program includes this code using an #INCLUDE command.
File spell.inc begin-procedure spell_number(#num,:$str)
let $str = ''! break the number to it's 3-digit partslet #trillions = floor(#num / 1000000000000)let #billions = mod(floor(#num / 1000000000),1000)let #millions = mod(floor(#num / 1000000),1000)let #thousands = mod(floor(#num / 1000),1000)let #ones = mod(floor(#num),1000)! spell each 3-digit partdo spell_3digit(#trillions,'trillion',$str)do spell_3digit(#billions,'billion',$str)do spell_3digit(#millions,'million',$str)do spell_3digit(#thousands,'thousand',$str)do spell_3digit(#ones,'',$str)
end-procedure ! spell_number
begin-procedure spell_3digit(#num,$part_name,:$str)let #hundreds = floor(#num / 100)let #rest = mod(#num,100)if #hundreds
do spell_digit(#hundreds,$str)concat 'hundred ' with $str
end-ifif #restdo spell_2digit(#rest,$str)end-ifif #hundreds or #rest
if $part_name != ''concat $part_name with $str
Argument Passing 17-3

concat ' ' with $strend-if
end-ifend-procedure ! spell_3digitbegin-procedure spell_2digit(#num,:$str)
let #tens = floor(#num / 10)let #ones = mod(#num,10)if #num < 20 and #num > 9
evaluate #numwhen = 10
concat 'ten ' with $strbreak
when = 11concat 'eleven ' with $strbreak
when = 12concat 'twelve ' with $strbreak
when = 13concat 'thirteen ' with $strbreak
when = 14concat 'fourteen ' with $strbreak
when = 15concat 'fifteen ' with $strbreak
when = 16concat 'sixteen ' with $strbreak
when = 17concat 'seventeen ' with $strbreak
when = 18concat 'eighteen ' with $strbreak
when = 19concat 'nineteen ' with $strbreak
end-evaluateelse
evaluate #tenswhen = 2
concat 'twenty' with $strbreak
when = 3concat 'thirty' with $strbreak
when = 4concat 'forty' with $strbreak
when = 5concat 'fifty' with $strbreak
when = 6concat 'sixty' with $str
17-4 Procedures, Argument Passing, and Local Variables

breakwhen = 7
concat 'seventy' with $strbreak
when = 8concat 'eighty' with $strbreak
when = 9concat 'ninety' with $strbreak
end-evaluateif #num > 20
if #onesconcat '-' with $str
elseconcat ' ' with $str
end-ifend-ifif #ones
do spell_digit(#ones,$str)end-if
end-ifend-procedure ! spell_2digitbegin-procedure spell_digit(#num,:$str)
evaluate #numwhen = 1
concat 'one ' with $strbreak
when = 2concat 'two ' with $strbreak
when = 3concat 'three ' with $strbreak
when = 4concat 'four ' with $strbreak
when = 5concat 'five ' with $strbreak
when = 6concat 'six ' with $strbreak
when = 7concat 'seven ' with $strbreak
when = 8concat 'eight ' with $strbreak
when = 9concat 'nine ' with $strbreak
end-evaluateend-procedure ! spell_digit
Argument Passing 17-5

The result argument is reset in the procedure, because the program begins with an empty string and keeps concatenating the parts of the number to it. The program only supports numbers up to 999 trillion.
The number is broken into its three-digit parts: trillions, billions, millions, thousands, and ones. Another procedure spells out the three-digit numbers such as “one hundred twelve.” Note that the word and is inserted only between dollars and cents, but not between three-digit parts. This format is common for check printing in dollars.
Note the use of math functions such as floor and mod. SQR has a rich set of functions that can be used in expressions. These functions are listed and described under the LET command in the SQR Language Reference.
The series of EVALUATE commands in the number-spelling procedures are used to correlate the numbers stored in the variables with the strings used to spell them out.
This is the full program that prints the checks.
Program ex17a.sqr#include 'spell.inc'
begin-setupdeclare-layout defaultend-declare
end-setupbegin-program
do mainend-program
begin-procedure mainalter-printer font=5 point-size=15
begin-selectname &namesum(d.price * c.quantity) * 0.10 &refund
do print_check(&refund)from customers a, orders b,
ordlines c, products dwhere a.cust_num = b.cust_numand b.order_num = c.order_numand c.product_code = d.product_codegroup by namehaving sum(d.price * c.quantity) * 0.10 >= 0.01
end-selectend-procedure ! main
begin-procedure print_check(#amount)print $_current-date (3,45) edit 'DD-Mon-YYYY'
17-6 Procedures, Argument Passing, and Local Variables

print &_name (8,12)move #amount to $display_amt 9,999,990.99! enclose number with asterisks for securitylet $display_amt = '**' || ltrim($display_amt,' ') || '**'print $display_amt (8,58)if #amount < 1.00
let $spelled_amount = 'Zero dollars 'else
do spell_number(#amount,$spelled_amount)let #len = length($spelled_amount)! Change the first letter to uppercaselet $spelled_amount = upper(substr($spelled_amount,1,1))
|| substr($spelled_amount,2,#len - 1)concat 'dollars ' with $spelled_amount
end-iflet #cents = round(mod(#amount,1) * 100, 0)let $cents_amount = 'and ' || edit(#cents,'00') || ' cents'concat $cents_amount with $spelled_amountprint $spelled_amount (12,12)print 'Rebate' (16,12)print ' ' (20)next-listing need=20
end-procedure ! print_check
The main procedure starts by setting the font to 15-point Times Roman. The SELECT paragraph is a join of several tables. (A join is created when you select data from more than one database table in the same SELECT paragraph.) The customers table has the customer’s name. The program joins it with the orders and ordlines tables to get the customer’s order details. It also joins with the products table for the price.
The following expression adds up all of the customer’s purchases and calculates a 10 percent rebate:
sum(d.price * c.quantity) * 0.10
The statement groups the records by the customer name, one check per customer. This is done with the following clause:
group by namehaving sum(d.price * c.quantity) * 0.10 >= 0.01
The HAVING clause eliminates checks for less than 1 cent.
The procedure print_check is a local procedure. Note the way it references the date and customer name with &_current-date and &_name, respectively.
Argument Passing 17-7

Summary� Variables in global procedures are visible throughout the program.
� Variables in local procedures are visible only within the procedure.
� To reference a global variable from a local procedure, place an underscore between the prefix character #, $, or & and the variable name.
� To pass an argument back to its calling procedure, preface it with a colon.
17-8 Procedures, Argument Passing, and Local Variables

18 Multiple Reports
This chapter shows you how to create multiple reports from one program. This powerful feature can save a significant amount of processing time. You can create multiple reports based on common data, selecting the database records only once and creating different reports simultaneously.
The alternative—writing separate programs for the different reports—would require you to perform a separate database query for each report. Repeated queries are costly because database operations are often the most resource-consuming or time-consuming part of creating a report.
The following example, ex18a.sqr, shows how SQR allows you to write multiple reports with different layouts and different heading and footing sections. The sample program prints three reports—the labels from Chapter 9, “Printing Mailing Labels,” the form letter from Chapter 10, “Creating Form Letters,”and the listing report from Chapter 3, “Selecting Data from the Database.” All three reports are based on exactly the same data.
Program ex18a.sqr#define MAX_LABEL_LINES 10#define LINES_BETWEEN_LABELS 3
begin-setupdeclare-layout labels
paper-size=(10,11) left-margin=0.33end-declaredeclare-layout form_letterend-declaredeclare-layout listingend-declaredeclare-report labels
layout=labelsend-declaredeclare-report form_letter
layout=form_letterend-declaredeclare-report listing
layout=listing
18-1

end-declareend-setupbegin-program
do mainend-program
begin-procedure maindo init_mailing_labels
begin-selectnameaddr1addr2citystatezip
move &zip to $zip xxxxx-xxxxphone
do print_labeldo print_letterdo print_listing
from customersend-select
do end_mailing_labelsend-procedure ! main
begin-procedure init_mailing_labelslet #label_count = 0let #label_lines = 0use-report labelscolumns 1 29 57 ! enable columnsalter-printer font=5 point-size=10
end-procedure ! init_mailing_labels
begin-procedure print_labeluse-report labelsprint &name (1,1,30)print &addr1 (2,1,30)let $last_line = &city || ', ' || &state || ' ' || $zipprint $last_line (3,1,30)next-column at-end=newlineadd 1 to #label_countif #current-column = 1
add 1 to #label_linesif #label_lines = {MAX_LABEL_LINES}
new-pagelet #label_lines = 0
elsenext-listing no-advance skiplines={LINES_BETWEEN_LABELS}
end-ifend-if
end-procedure ! print_labelbegin-procedure end_mailing_labels
use-report labelsuse-column 0 ! disable columnsnew-page
18-2 Multiple Reports

print 'Labels printed on ' (,1)print $current-date ()print 'Total labels printed = ' (+1,1)print #label_count () edit 9,999,999
end-procedure ! end_mailing_labels
begin-procedure print_letteruse-report form_letterbegin-document (1,1)&name&addr1&addr2@city_state_zip.b.b
$current-dateDear Sir or Madam:.b
Thank you for your recent purchases from ACME Inc. We wouldlike to tell you about our limited time offer. During thismonth, our entire inventory is marked down by 25%. Yes, you canbuy your favorite merchandise and save too.
To place an order simply dial 800-555-ACME. Delivery is freetoo, so don't wait..b.b
Sincerely,Clark AxelotleACME Inc.
end-documentposition () @city_state_zipprint &city ()print ', ' ()print &state ()print ' ' ()move &zip to $zip xxxxx-xxxxprint $zip ()new-pageend-procedure ! print_letterbegin-heading 4 for-reports=(listing)print 'Customer Listing' (1) center
print 'Name' (3,1)print 'City' (,32)print 'State' (,49)print 'Phone' (,55)
end-heading
begin-footing 1 for-reports=(listing)! Print "Page n of m" in the footingpage-number (1,1) 'Page 'last-page () ' of '
end-footing
begin-procedure print_listinguse-report listing
18-3

print &name (,1)print &city (,32)print &state (,49)print &phone (,55)position (+1)
end-procedure ! print_listing
The SETUP section defines three layouts and three different reports that use these layouts. The labels report requires a layout that is different from the default. The other two reports use a layout that is identical to the default layout. It would be possible to save the last layout declaration and use the form-letter layout for the listing. However, unless there is a logical reason why the two layouts should be the same, it is better to keep separate layouts. The name of the layout indicates which report uses it.
The main procedure performs the SELECT. Note that it is only performed once and includes all the columns for all the reports. The phone column is only used in the listing report and the addr2 column is only used in the form-letter report. The other columns are used in more than one report.
For each record selected, three procedures are executed. Each procedure processes one record for its corresponding report. The print_label procedure prints one label, print_letter prints one letter, and print_listing prints one line into the listing report. Each procedure begins by setting the SQR printing context to its corresponding report. SQR sets the printing context with the USE-REPORT command.
SQR allows you to define HEADING and FOOTING sections for each report. This example only defines the heading and footing for the listing report, because the other two reports do not use them. The FOR-REPORTS option of the BEGIN-HEADING and BEGIN-FOOTING commands specifies the report name. The parentheses are required. Note that the USE-REPORT command is not needed in the heading or the footing. The report is implied by the FOR-REPORTS option.
Most of the code for ex18a.sqr is taken from ex9a.sqr, ex10a.sqr, and ex3a.sqr. Because this program creates output with proportional fonts, you must run it with the -KEEP or -PRINTER:xx command-line flags. (If you are running the report with Brio.Report Builder, you may omit -KEEP. See Chapter 9, “Printing Mailing Labels,” for more information on running reports with proportional fonts.)
18-4 Multiple Reports

When you run ex18a.sqr, you get three output files that match the output files for ex9a, ex10a, and ex3a, respectively. These output files have the names ex18a.lis (labels), ex18a.l01 (form letter), and ex18a.l02 (customer listing). If you specify -KEEP, the output files are named ex18a.spf, ex18a.s01, and ex18a.s02, respectively.
If you are running Brio.Report Builder, the Viewer window opens automatically after you run the programs, but only the first output file, ex18a.spf, is displayed. You can view the other output files by selecting File→Open.
Summary� Writing multiple reports simultaneously with one program reduces database
queries.
� You can define separate reports in the SETUP section.
� USE-REPORT sets the printing context for each report.
� The FOR-REPORTS option of BEGIN-HEADING and BEGIN-FOOTING defines headings and footings for individual reports.
18-5

18-6 Multiple Reports
19 Using DML and DDL
This chapter describes the most common SQL commands you can use in SQR and explains their uses with examples.
SQL StatementsAlthough SELECT may be the most common SQL statement, you can also perform other SQL commands in SQR. Here are a few examples:
� If the program prints important documents such as checks, tickets, or invoices, you may need to update the database to indicate that the document was printed. This is easily performed in SQR with a SQL UPDATE statement.
� You can use SQR to load data into the database. SQR can read and write external files and construct records. SQR can also insert these records into the database using a SQL INSERT statement.
� If you need to hold intermediate results in a temporary database table, you can create two SQL paragraphs in your SQR program (CREATE TABLE and DROP TABLE) to create this table at the beginning of the program and drop the table at the end.
These are only a few examples. SQR can perform any SQL statement, and this feature is used often.
19-1

Using BEGIN-SQLAn SQL statement other than a SELECT statement must use the BEGIN-SQL paragraph.
The following example loads data from an external file into the database. It demonstrates two important features of SQR—handling external files and performing database inserts. This program loads the tab-delimited file created by the program ex11a.sqr.
Program ex19a.sqrbegin-setup
begin-sql on-error=skip ! table may already existcreate table customers_ext (
cust_num int not null,name varchar (30),addr1 varchar (30),addr2 varchar (30),city varchar (16),state varchar (2),zip varchar (10),phone varchar (10),tot int)
end-sqlend-setup
begin-programdo main
end-program
begin-procedure main
#if {sqr-database} = 'Sybase'begin-sql
begin transactionend-sql
#endifencode '<009>' into $sepopen 'ex11a.lis' as 1 for-reading record=160:varyread 1 into $rec:160 ! skip the first record, column headingswhile 1
read 1 into $rec:160if #end-file
breakend-ifunstring $rec by $sep into $cust_num $name
$addr1 $addr2 $city $state $zip $phone $totmove $cust_num to #cust_nummove $tot to #totbegin-sql
19-2 Using DML and DDL

insert into customers_ext (cust_num, name,addr1, addr2, city, state, zip, phone, tot)
values(#cust_num, $name, $addr1, $addr2, $city,$state, $zip, $phone, #tot)
end-sqlend-while
#if {sqr-database} = 'Sybase'begin-sql
commit transactionend-sql
#else#if {sqr-database} <> 'Informix'
begin-sqlcommit
end-sql#endif#endif
close 1end-procedure ! main
The program starts by creating the table customers_ext. If the table already exists, you will get an error message. To ignore this error message, use the ON-ERROR=SKIP option. See Chapter 16, “Dynamic SQL and Error Checking,” for more information on error handling.
The program reads the records from the file and inserts each record into the database by using an INSERT statement inside a BEGIN-SQL paragraph. The input file format is one record per line, with each field separated by the separator character. When the end of the file is encountered (if #end-file), the program branches out of the loop. Note that #end-file is an SQR reserved variable. For a complete list of reserved variables, see the SQR Language Reference.
The last step is to commit the changes to the database and close the file. You do this with a SQL COMMIT statement inside a BEGIN-SQL paragraph. Alternatively, you can use the SQR COMMIT command. For Oracle databases, we recommend you use the SQR COMMIT.
Note that the code may be database-specific. If you are using Informix, for example, and your database was created with transaction logging, you must add a BEGIN WORK and a COMMIT WORK, much like the SYBASE example of BEGIN TRANSACTION and COMMIT TRANSACTION.
Using BEGIN-SQL 19-3

Summary� A BEGIN-SQL paragraph can be used to perform SQL statements other than
SELECT.
� To insert database records, use SQL commands such as INSERT and COMMIT inside the BEGIN-SQL paragraph. For Oracle databases, use the SQR COMMIT.
19-4 Using DML and DDL

20 Working with Comma Separated Files—CSV
This chapter describes the process of getting data from the CSV Data Source, viewing metadata, and creating and executing MDqueries.
Declaring a Connection to a CSV Data SourceTo start accessing the data from the CSV Data Source, Declare-Connection must be established to a registered data source (See DDO Registry Properties).
� Enter Declare-Connection followed by a connection_name_literal CSV.
� Enter DSN, this is the logical data source name as recorded in the DDO Registry.
(User and Password are associated with CSV data sources)
Declare-Connection CSVdsn=CSVsourceEnd-Declare
Viewing CSV MetadataWhen creating queries, it is often helpful to view the structure of the CSV file that you are querying. You can browse a CSV file’s metadata, that is, information about the file’s structure, by running the DDO Query Editor and selecting a schema in the Schema View drop-down list box and viewing its selectable column list.
20-1

Creating and Executing MD QueriesYou construct queries in the same manner you access relational databases. You can choose a sample script from the Samples directory and run or modify it, or construct your own. The scripts in the sample directory are included when the SQR-DDO port is installed. You can edit this file with a text editor or create files of your own. To properly access a CSV datasource, a Data Object must be defined. The data object is declared after the Begin-Execute command and prior to the Begin-Select command. For CSV queries, the DDO GetData paradigm is used for data access.
ExampleBegin-Execute
Connection=CSVGetData='customer.csv' (Data Object)
Begin-Select
Customer_numtype=number (+1,1)Name type=char (,11)phone type=char (,41)addr_line1 type=char (+1,11)addr_line2 type=char (+1,11)city type=char (+1,11)state type=char (+1,11)zip type=number (,41)
From Rowsets=(1)
End-Select
End-Execute
Summary� To access data from the CSV source you must establish Declare-Connection to a
registered data source.
� You can browse a CSV file’s metadata through the DDO Query Editor.
� The data object is declared after the Begin-Execute command and prior to the Begin-Select command.
20-2 Working with Comma Separated Files—CSV

21 Working with Multi-Dimensional Data Sources—OLAP
This chapter describes the process of getting data from multi-dimensional data sources, viewing cube metadata, and creating and executing MDqueries.
Declaring a Connection to an OLAP ServerTo access data from MD Data Source, Declare-Connection must be established to a registered data source (See DDO Registry Properties).
To establish a Declare-Connection, follow these steps:
1. Enter Declare-Connection followed by a connection_name_literal ‘OLAP’.
2. Enter DSN, the logical data source name as recorded in the DDO Registry.
3. Enter user and password.
4. Enter set-member parameter.
Declare-Connection OLAPdsn=MSOLAPuser=Administratorpassword=administratorset-members=('product','all products.drink.alcoholicbeverages.beer and wine','time','1997.Q1' )set-levels= ('product', 2)set-generations= ('product', 5)End-Declare
21-1

Viewing Cube MetadataWhen you create MD queries for use with a multidimensional database, it is often helpful to view the structure of the cube you are querying.
You can browse a cube’s metadata (information about the schema’s structure) by running the DDO TestTool and selecting a schema.
Select the schema in the Schema View drop-down list box. Explore the schema’s dimensions and measures in the tree view and member panes below the list.
Creating and Executing MD QueriesYou construct MD queries in the same manner that relational databases are accessed. You can choose sample scripts from the Samples directory and run or modify it, or construct your own. The scripts in the sample directory are included when the SQR-DDO port is installed. You can edit this file with a text editor or create files of your own. To properly access an MD datasource, a Catalog Schema and Data Object must be defined after the Begin-Execute command and before the Begin-Select declaration of the schema and object. For MD queries, the DDO GetData paradigm is used for data access.
MeasuresMeasures are the numeric data of primary interest to MD users. Some common measures are sales, cost, expenditures, and production count. Measures are aggregations stored for quick retrieval by users querying cubes. Each measure is stored in a column in a fact table in the data warehouse. A measure can contain multiple columns combined in an expression. For example, the Profit measure is the difference of two numeric columns: Sales and Cost.
To select a measure column, the format is ‘measure’, dot, ‘measure name’ (measure.profit). This is regardless of the name used by the data source to declare measures.
21-2 Working with Multi-Dimensional Data Sources—OLAP
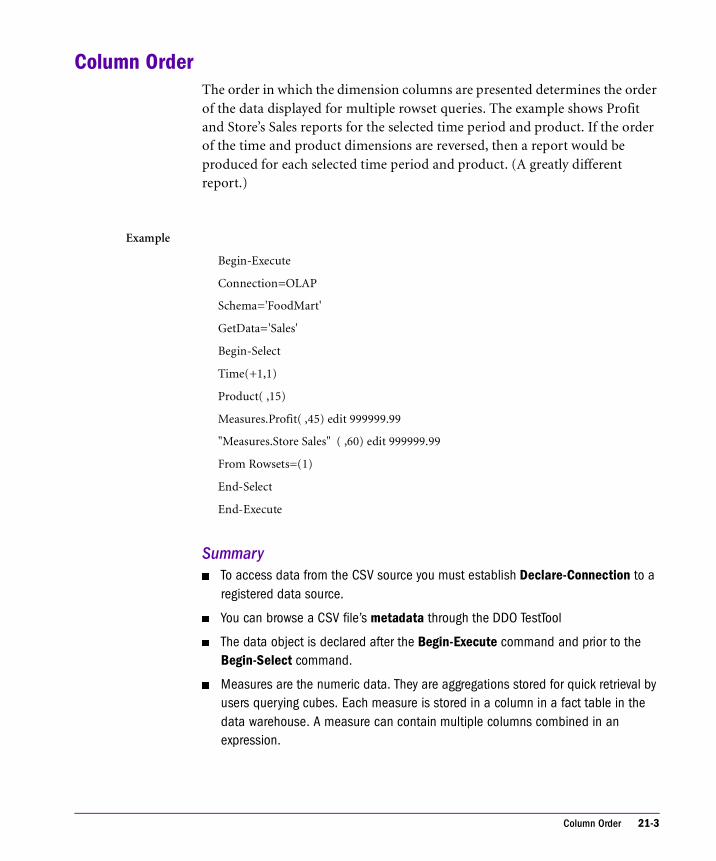
Column OrderThe order in which the dimension columns are presented determines the order of the data displayed for multiple rowset queries. The example shows Profit and Store’s Sales reports for the selected time period and product. If the order of the time and product dimensions are reversed, then a report would be produced for each selected time period and product. (A greatly different report.)
Example
Begin-Execute
Connection=OLAP
Schema='FoodMart'
GetData='Sales'
Begin-Select
Time(+1,1)
Product( ,15)
Measures.Profit( ,45) edit 999999.99
"Measures.Store Sales" ( ,60) edit 999999.99
From Rowsets=(1)
End-Select
End-Execute
Summary� To access data from the CSV source you must establish Declare-Connection to a
registered data source.
� You can browse a CSV file’s metadata through the DDO TestTool
� The data object is declared after the Begin-Execute command and prior to the Begin-Select command.
� Measures are the numeric data. They are aggregations stored for quick retrieval by users querying cubes. Each measure is stored in a column in a fact table in the data warehouse. A measure can contain multiple columns combined in an expression.
Column Order 21-3

21-4 Working with Multi-Dimensional Data Sources—OLAP

22 Working with Dates
This chapter explains how to handle dates with SQR.
SQR has powerful capabilities in date arithmetic, editing, and manipulation. A date can be represented as a character string or in an internal format using the SQR date datatype.
The date datatype allows you to store dates in the range of January 1, 4712 B.C. to December 31, 9999 A.D. It also stores the time of day with the precision of a microsecond. The internal date representation always keeps the year as a four-digit value. We strongly recommend that you always keep dates with four-digit year values (and not truncate to two digits) to avoid date problems at the turn of the century.
Date values can be obtained in one of five ways:
� By selecting a date column from the database
� By using INPUT to get a date from the user
� By referencing or printing the reserved variable $current-date
� As a result of an SQR date function: dateadd, datediff, datenow, or strdodate
� By declaring a date variable using the DECLARE-VARIABLE command
For most applications, it is not necessary to declare date variables. Date variables are discussed in the section, “Declaring Date Variables” on page 22-8.
22-1

Date ArithmeticMany applications require date calculations. You may need to add or subtract a number of days from a given date, subtract one date from another to find a time difference, or compare dates to find if one date is later, earlier, or the same as another date. SQR allows you to easily perform these calculations in your program.
Many databases allow you to perform date calculations in SQL, but that can be awkward if you are trying to write portable code, because the syntax varies between databases. Instead, perform those calculations in SQR—your programs will be portable, because they won’t rely on a particular SQL syntax.
The dateadd function adds or subtracts a number of specified time units from a given date. The datediff function returns the difference between two specified dates in the time units you specify—years, quarters, months, weeks, days, hours, minutes, or seconds. Fractions are allowed—you can add 2.5 days to a given date. Conversion between time units is also allowed—you can add, subtract, or compare dates using days and state the difference using weeks.
The datenow function returns the current local date and time. In addition, SQR provides a reserved date variable, $current-date, which is automatically initialized with the local date and time at the beginning of the program.
You can compare dates by using the usual operators (< , =, or >) in an expression. The datetostr function converts a date to a string. The strtodate function converts a string to a date.
The following code uses functions to add 30 days to the invoice date and compare it to the current date:
begin-selectorder_num (,1)invoice_date
if dateadd(&invoice_date,'day',30) < datenow()print 'Past Due Order' (,12)
elseprint 'Current Order' (,12)
end-ifposition (+1)
end-select
In this example, the functions dateadd and datenow are used to compare dates. The function dateadd adds 30 days to the invoice date (&invoice_date). The resulting date is then compared with the current date, which is returned by
22-2 Working with Dates

datenow. If the invoice is older than 30 days, the program prints the string “Past Due Order.” If the invoice is 30 days old or less, the program prints the string “Current Order.”
To subtract a given number of days from a date, use the dateadd function with a negative argument. This technique is demonstrated in the next example. In this example, the IF condition compares the invoice date with the date of 30 days before today. The condition is equivalent to that of the previous example.
if &invoice_date < dateadd(datenow(),'day',-30)
This condition can also be written as follows using the datediff function. Note that the comparison is now a simple numeric comparison, not a date comparison:
if datediff(datenow(),&invoice_date,'day') > 30
All three IF statements are equivalent, and they demonstrate the flexibility provided by these functions.
Here is another technique for comparing dates:
begin-selectorder_date
if &order_date > strtodate('3/1/1996','dd/mm/yyyy')print 'Current Order' ()
elseprint 'Past Due Order' ()
end-iffrom ordersend-select
The IF statement has a date column on the left side and the strtodate function on the right side. The strtodate function returns a date type, which is compared with the column &order_date. When the order date is later than January 3, 1996, the condition is satisfied. If the date includes the time of day, the comparison will be satisfied for orders of January 3, 1996 with a time of day greater than 00:00.
In the next example, the date is truncated to remove the time-of-day portion of a date:
if strtodate(datetostr(&order_date,'dd/mm/yyyy'),'dd/mm/yyyy')>
strtodate('3/1/1996','dd/mm/yyyy')
Date Arithmetic 22-3

In this example, the datetostr function converts the order date to a string that only stores the day, month, and year. The strtodate function then converts this value back into a date. With these two conversions, the time-of-day portion of the order date is omitted. Now when it is compared with January 3, 1996, only dates that are of January 4 or later will satisfy the condition.
Date FormatsSQR allows you to specify date constants and date values in a special format that is recognized without the use of an edit mask. This is called the literal date format. For example, you can use a value in this format in the strtodate function without the use of an edit mask. This format has the advantage of being independent of any specific database or language preference.
The literal date format is SYYYYMMDD[HH24[MI[SS[NNNNNN]]]]. The first S in this format represents an optional minus sign. If preceded with a minus sign, the string represents a date B.C. The digits that follow represent year, month, day, hours, minutes, seconds, and microseconds. The literal date format assumes a 24-hour clock.
Note The literal date format assumes a 24-hour clock.
You may omit one or more time elements from the right part of the format. A default is assumed for the missing elements. Here are some examples:
let $a = strtodate('19960409')let $a = strtodate('19960409152000')
The first LET statement assigns the date of April 9, 1996 to the variable $a. The time portion defaults to 00:00. The second LET statement assigns 3:20 in the afternoon of April 9, 1996 to $a. The respective outputs (when printed with the edit mask ‘DD-MON-YYYY HH:MI AM’) will be:
09-APR-1996 12:00 AM09-APR-1996 03:20 PM
�
22-4 Working with Dates

You can also specify a date format with the environment variable SQR_DB_DATE_FORMAT. You can specify this as an environment variable or in the SQR.INI file. For more information on the SQR.INI file, see Chapter 8, “SQR.INI” in the SQR Language Reference.
String to Date ConversionsIf you convert a string variable or constant to a date variable without specifying an edit mask that identifies the format of the string, SQR applies a date format. This implicit conversion takes place with the following commands:
� MOVE
� The strtodate function
� The commands DISPLAY, PRINT, or SHOW, when used to output a string variable as a date.
SQR will attempt to apply date formats in the following order:
1. The format specified in SQR_DB_DATE_FORMAT
2. The database-dependent format
3. The literal date format SYYYYMMDD[HH24[MI[SS[NNNNNN]]]]
Date to String ConversionsIf you convert a date variable to a string without specifying an edit mask, SQR applies a date format. This implicit conversion takes place with the following commands:
� MOVE
� The datetostr function
� The commands DISPLAY, PRINT, or SHOW, when used to output a date variable
Date to String Conversions 22-5

SQR attempts to apply date formats in the following order:
1. The format specified in SQR_DB_DATE_FORMAT
2. The database-dependent format
Database-dependent formats are listed in the Table 2-29 on page 2-227 in the SQR Language Reference.
Using Dates with the INPUT CommandThe INPUT command also supports dates. A date can be loaded into a date or string variable. For string variables, use the TYPE=DATE qualifier. A format for the date should be specified. Here is an example:
input $start_date 'Enter starting date' type=dateformat='dd/mm/yyyy'
In this example, the user is prompted with Enter starting date: (the colon is automatically added). The user then types in the value, which is validated as a date using the “dd/mm/yyyy” format. The value is loaded into the variable $start_date.
Date Edit MasksWhen you print dates, you can format them with an edit mask. For example:
print &order_date () edit 'Month dd, YYYY'
This command prints the order date in the specified format. The name of the order date month is printed followed by the day of the month, a comma, and four-digit year. SQR provides a rich set of date edit masks. See the Table 2-27 on page 2-225 in the SQR Language Reference for a complete listing.
If the value of the date value being edited is March 14, 1996 at 9:35 in the morning, the edit masks produce the following results.
22-6 Working with Dates

If the edit mask contains other text, it is also printed. For example:
print &order_date () edit ’As of Month dd, YYYY’
This command prints the string “As of March 14, 1996” if the order date is March 14, 1996. Because the words “As of” are not recognized as date mask elements, they are simply printed.
Tab le 22-1 Sample Date Edit Masks
Edit Mask Result Description
dd/mm/yyyy 14/03/1996
DD-MON-YYYY 14-MAR-1996
'Month dd, YYYY.' March 14, 1996. An edit mask containing blank space must be enclosed in single quotes.
MONTH-YYYY MARCH-1996 Name of the month in uppercase followed by four-digit year
HH:MI 09:35
'HH:MI AM' 09:35 AM Meridian indicators. An edit mask contain-ing blank space must be enclosed in single quotes.
YYYYMMDD 19960314
DD.MM.YY 14.03.96
Mon Mar Abbreviated name of the month
Day Thursday Day of the week
DY THU Abbreviated name of day of the week
Q 1 Quarter
WW 11 Week of the year
W 2 Week of the month
DDD 74 Day of the year
DD 14 Day of the month (1-31)
D 5 Day of the week (Sunday = 1)
Date Edit Masks 22-7

A backslash forces the character that follows into the output. This technique is useful when you want to print text that would otherwise be recognized as a date mask element. For example, a mask of “The \mo\nth is month” results in the output string of “The month is march”. Without the backslashes, the output string would be “The march is march”. The second backslash is needed because “n” is a valid date edit mask element.
In some cases, combining date edit mask elements can result in ambiguity. One example is the mask 'DDDD', which could be interpreted as various combinations of 'DDD' (day of year), 'DD' (day of month), and 'D' (day of week). To resolve such ambiguity, use a vertical bar as a delimiter between format elements. For example, 'DDD' followed by 'D' can be written as 'DDD|D'.
The masks MON, MONTH, DAY, DY, AM, PM, BC, AD, and RM are case-sensitive and follow the case of the mask entered. For example, if the month is January, the mask Mon yields “Jan” and MON yields “JAN”. All other masks are case-insensitive and can be entered in either uppercase or lowercase.
In addition, national language support is provided for the following masks: MON, MONTH, DAY, DY, AM, PM, BC, and AD. See the ALTER-LOCALE command or the Chapter 8, “SQR.INI.”in the SQR Language Reference for additional information.
Declaring Date VariablesTo hold date values in your program, use date variables. Like string variables, date variables are prefixed with a dollar sign ($). You must explicitly declare date variables using the DECLARE-VARIABLE command.
Date variables are useful for holding results of date calculations. For example:
begin-setupdeclare-variable
date $cend-declare
end-setup...let $c = strtodate('March 1, 1996 12:00','Month dd, yyyy hh:mi')print $c () edit 'dd/mm/yyyy'
In this example, $c is declared as a date variable. Later, it is assigned the value of noon on March 1, 1996. The variable $c is then printed with the edit mask 'dd/mm/yyyy', which yields 01/03/1996.
22-8 Working with Dates

Date variables can be initialized with date literals as shown in the following example:
begin-setupdeclare-variable
date $cend-declare
end-setup...let $c = '19960409152000'
The LET statement assigns 3:20 in the afternoon of April 9, 1996 to $c.
Summary� Obtain date values by selecting a date column from the database, printing or
referencing the reserved variable $current-date, or using an SQR date function such as dateadd, datediff, datenow, or strtodate.
� Perform date arithmetic and date comparison by using the date functions.
� The SQR literal date format is SYYYYMMDD[HH24[MI[SS[NNNNNN]]]]. For this format, a 24-hour clock is assumed.
� You can also specify a date format with the environment variable SQR_DB_DATE_FORMAT. This format can be specified as an environment variable or specified in the SQR.INI file.
� Declare date variables with the DECLARE-VARIABLE command.
Declaring Date Variables 22-9

22-10 Working with Dates

23 National Language Support
This chapter describes SQR features for national language support (NLS). This support is provided through the concept of locales. This chapter describes SQR locales and explains how to use them to write programs that automatically adapt to local preferences.
LocalesA locale is a set of local preferences for language, currency, and the presentation of dates and numbers. For example, one locale may use English, dollar currency, dates in “dd/mm/yy” format, numbers with commas separating the thousands, and a period for the decimal place.
A locale contains default edit masks for number, money, and date. Use these edit masks to specify the keywords NUMBER, MONEY, and DATE, respectively. You can specify these keywords in the INPUT, MOVE, DISPLAY, SHOW, and PRINT commands. Their use is discussed and demonstrated in this chapter.
A locale also contains settings for currency symbol, thousands separator, decimal separator, date separator, and time separator. A locale contains settings for N/A, AM, PM, BC, and AD in the language of the locale.
A locale contains a setting for names of the days of the week and names of the months in the language of the locale. It also contains settings for how to handle lower/upper case editing of these names.
These settings are described in detail in the reference section for the command “ALTER-LOCALE” on page 2-8 in the SQR Language Reference.
23-1

Available LocalesSQR provides predefined locales such as US-English, UK-English, German, French, and Spanish. You can easily define additional locales or modify existing locales by editing the SQR.INI file. For more information about the SQR.INI file, see Chapter 8, “SQR.INI,” in the SQR Language Reference.
With the ALTER-LOCALE command, you can choose a locale—at the beginning of your program or anywhere else. You can even have different parts of your program use different locales.
You can select a locale with this command:
alter-locale locale = 'German'
Default LocaleThe SQR.INI file defines a default locale. Most or all of your programs can use the same locale, and specifying the default locale in the SQR.INI file makes it unnecessary to specify the locale in every program.
When you install SQR, the default locale is set to the reserved locale called “System.” System is not a real locale. It defines the behavior of older versions of SQR, before national language support was added. The preferences in the system locale are hard-coded in the product and cannot be set or defined in the SQR.INI; however, System settings can be altered at run time using ALTER-LOCALE. The date preferences are dependent on the database you are using. Therefore, date format preferences in the system locale are different for every database you use with SQR.
Different sites can have different locales as the default. For example, an office in Paris might use the “French” locale, and an office in London might use the “UK-English” locale. To adapt your program to any location, use the default locale. Your program will automatically respect the local preferences, which are specified in the SQR.INI file of the machine on which it is run. For example, you can print the number 5120 using the following command:
print #invoice_total () edit '9,999,999.99'
23-2 National Language Support

The setting of the default locale in the SQR.INI file controls the format. In London, the result might be 5,120.00, and in Paris 5.120,00. The delimiters for thousands and the decimal—the comma and the period—are switched automatically according to the preferences of the locale.
Tip Changing the settings of the default locale can change the behavior of existing programs. For example, if you change the default locale to French, programs that used to print dates in English may now print them in French. Be sure that you review and test existing programs when making a change to the default locale.
Switching Locales You can switch from one locale to another any number of times during program execution. This technique is useful for writing reports that use multiple currencies, or reports that have different sections for different locales.
To switch to another locale, use the ALTER-LOCALE command. For example, to switch to the Spanish locale:
alter-locale locale = 'Spanish'
From this point in the program, the locale is Spanish.
Consider this example:
begin-procedure print_data_in_spanish! Save the current localelet $old_locale = $sqr-locale! Change the locale to "Spanish"alter-locale locale = 'Spanish'! Print the datado print_data! restore the locale to the previous settingalter-locale locale = $old_locale
end-procedure
In this example, the locale is switched to Spanish and later restored to the previous locale before it was switched. To do that, the locale setting before it is changed is read in the reserved variable $sqr-locale and stored in $old_locale. The value of $old_locale is then used in the ALTER-LOCALE command at the end of the procedure.
�
Switching Locales 23-3

Modifying Locale PreferencesWith the ALTER-LOCALE command, you can modify any individual preference in a locale. The ALTER-LOCALE command only affects the current program. It does not modify the SQR.INI file.
Here is an example of how you can modify default preferences in a locale:
alter-localedate-edit-mask = 'Mon-DD-YYYY'money-edit-mask = '$$,$$$,$$9.99'
To restore modified locale preferences to their defaults, you can reselect the modified locale. For example, suppose that the locale was US-English and the date and money edit masks were modified using the preceding code. The following code resets the changed date and money edit masks:
alter-locale locale = 'US-English'
Keywords—NUMBER, MONEY, and DATEThe commands DISPLAY, MOVE, PRINT, and SHOW allow you to specify the keywords NUMBER, MONEY, and DATE in place of an explicit number or date edit mask. These keywords can be useful in two cases.
The first case is when you want to write programs that automatically adapt to the default locale. By using the keywords NUMBER, MONEY, and DATE, you tell SQR to take these edit masks from the default locale settings.
The second case is when you want to specify your number, money, and date formats once at the top of your program and use these formats throughout your report. In this case, you define these formats with an ALTER-LOCALE command at the top of your program. Then when you use the keywords NUMBER, MONEY, and DATE later in your program, they format number, money, and date outputs with the masks defined in the ALTER-LOCALE command.
Whether you set the locale in the SQR.INI file or in your program, these keywords have the same effect. In the following example, these keywords are used with the PRINT command to produce output for the US-English and French locales:
23-4 National Language Support

let #num_var = 123456let #money_var = 123456let $date_var = strtodate('19960520152000')! set locale to US-Englishalter-locale locale = 'US-English'print 'US-English locale' (1,1)print 'With NUMBER keyword ' (+1,1)print #num_var (,22) NUMBERprint 'With MONEY keyword ' (+1,1)print #money_var (,22) MONEYprint 'With DATE keyword ' (+1,1)print $date_var (,22) DATE
! set locale to FrenchALTER-LOCALE locale = 'French'print 'French locale' (+2,1)print 'With NUMBER keyword ' (+1,1)print #num_var (,22) NUMBERprint 'With MONEY keyword ' (+1,1)print #money_var (,22) MONEYprint 'With DATE keyword ' (+1,1)print $date_var (,22) DATE
The output will be as follows:
US-English localeWith NUMBER keyword 123,456.00With MONEY keyword $123,456.00With DATE keyword May 20, 1996
French localeWith NUMBER keyword 123.456,00With MONEY keyword 123.456,00 FWith DATE keyword 20 mai 1996
Summary� Local preferences for language, currency, and the presentation of dates and
numbers can be specified in a locale.
� Predefined locales are specified in the SQR.INI file.
� You can edit the SQR.INI file to alter predefined locales or to create new ones.
� You can switch among locales by using the command ALTER-LOCALE. You can also specify individual preferences for a locale by using ALTER-LOCALE.
� You can also specify formats with the keywords NUMBER, MONEY, and DATE.
Keywords—NUMBER, MONEY, and DATE 23-5

23-6 National Language Support

24 Interoperability
This chapter describes how SQR can interoperate with other applications or be extended with additional functions.
Applications can run SQR programs using the SQR API (application program interface). An SQR program can also call an external application’s API.
This interoperability is depicted in the two diagrams shown here.
F igu re 24-1 External Application Invoking an SQR Program Using the SQR API
F igu re 24-2 SQR Calling an External Application’s API Using UFUNC.C
ExternalApplication
SQRExecute
SQR API
ExternalApplication
SQRExecute
UFUNC.C
24-1

This chapter describes how to invoke an SQR program from another application using the SQR API. This API is provided through a DLL on Windows and through an object library on other platforms.
The chapter also explains how to invoke an external application’s API by using the UFUNC.C interface.
Calling SQR from Another ApplicationThe following techniques can be used to invoke an SQR program from another application:
� Using the SQR command line – The application initiates a process for running SQR. The SQR command includes all the necessary parameters. The SQR command line is covered in Chapter 29, “Using the SQR Command Line.”
� Using the SQR API – The application makes a call to the SQR API. This method is covered in the next section.
� Using Brio.Report Activator – Brio.Report Activator runs on Windows 95/NT and supports application development environments that support ActiveX. For example, Oracle Developer/2000, VisualBasic, PowerBuilder, Delphi, and so on.
Using the SQR APIThe SQR API is provided on Windows through a DLL (Dynamic Link Library). You can use the SQR API from any application that is capable of calling DLL functions. For C and C++ applications, a header file, SQRAPI.H, and an import library (SQRWIN.LIB) are provided. SQR requires the following DLLs to run: For Windows 95 & NT, they are SQRW.DLL, BCLW32.DLL, LIBSTI32.DLL, and STIMAGES.DLL. The aforementioned DLL files are located in the BINW directory.
On platforms other than Windows, the SQR API is provided as a static library (sqr.a or SQR.LIB). For C and C++ applications, a header file, SQRAPI.H (or sqrapi.h), is provided. Be sure to include the SQR API library and your database library when you link your C or C++ application. Two additional libraries are required: bcl.a and libsti.a. See the SQR Server Installation Guide for more information about linking with SQR.
24-2 Interoperability

Table 24-1 describes the API functions defined for calling SQR.
For the benefit of C/C++ programmers, the APIs are declared in the file SQRAPI.H. Include this header file in your source code:
#include 'sqrapi.h'
When you call SQR from a program, the most recently run SQR program is saved in memory. If the same SQR program is run again with either the same or different arguments, the program is not scanned again and the SQL statements are not parsed again. This feature provides a significant improvement in processing time.
To force SQR to release its memory and database cursors, call sqrend() at any time.
Although memory is automatically released when the program exits, you must call sqrend before the calling program exits to ensure that SQR properly cleans up any database resources such as database cursors and temporary stored procedures.
Tab le 24-1 SQR API
Function Description
int sqr(char *) Runs an SQR program. Passes the address of a null terminated string containing an SQR command line, including program name, connectivity information, flags, and arguments. This is a synchro-nous call. It returns when the SQR program has completed. This function returns zero (0) if it is successful.
void sqrcancel(void) Cancels a running SQR program. The program may not stop immedi-ately because SQR waits for any currently pending database opera-tions to complete.
Because the sqr function does not return until the SQR program has completed, sqrcancel is called using another thread or some similar asynchronous method.
int sqrend(void) Releases memory and closes cursors. Cursors can be left open to speed up repeated execution of the same SQR program. Call this function after the last program execution, or optionally between SQR program executions.
This function always returns zero (0).
Using the SQR API 24-3

To relink SQR on all UNIX platforms, use the sqrmake and makefile files located in $SQRDIR/../lib. After you invoke sqrmake and optionally select the specific database version to link with, the SQR executables are recreated.
Check which ‘cc’ command line gets created and invoked for SQR, and adapt it to your program. Each UNIX platform and database has its own requirements. Consult your operating system and database product documentation for specific information.
You may see the following output when you relink with Sybase CT-LIB 11.x under Sun/Solaris 2.5.1:
cc -o {user program} {user objects} {user libraries} \$SQRDIR/../lib/sqr.a $SQRDIR/../lib/bcl.a \$SQRDIR/../lib/pdf.a $SQRDIR/../lib/libsti.a \-L$ (SYBASE) /lib -Bstatic -lct -lcs -ltcl -lcomm \-lintl -Bdynamic -lm -lnsl -ldl
Check the make files or link scripts that are supplied with SQR for details. You may want to copy and modify those to link in your program.
To call SQR, call sqr() and pass a command line. For example, in C:
status = sqr("myprog sammy/baker arg1 arg2 arg3");if (status != 0)
...error occurred...
Table 24-2 describes error values returned by SQR, both standalone and callable.
Tab le 24-2 Error Values Returned by the SQR API
Non-VMS VMS Reason
0 1 Normal exit
1 0 Error exit
2 0x2622 Cannot process SQRERR.DAT
3 0x2632 Command-line flag in error
4 0x2642 Problem creating .SQT file
5 0x2652 Program did not compile
6 0x2662 Problem with .SQR/.SQT file (open/read)
24-4 Interoperability

The VMS codes are given in hexadecimal notation. SQR uses the 0x2600 group for its error messages to avoid conflict with VMS error messages. Error codes 9 and 12 are only applicable to the Windows release.
Extending SQR—UFUNC.CThe SQR language can be extended by adding user functions written in standard languages such as C. This feature allows you to integrate your own code and third-party libraries into SQR. For example, suppose you had a library for communication over a serial line, with functions for initiating the connection and sending and receiving data. SQR would allow you to call these functions from SQR programs.
To extend SQR in this way, you must prepare the functions, “tell” SQR about them, and then link the objects (and libraries) with the SQR objects and libraries to form a new SQR executable. The new SQR executable will then recognize the new functions as if they were standard SQR functions.
One example of such an extension would be an initcap function. Oracle users are familiar with this function. The function initcap changes the first letter of every word to uppercase and changes the rest of the letters to lowercase. The result value in the following example would be“Mr. Joseph Jefferson.”
let $a = initcap('MR. JOSEPH JEFFERSON')
7 0x2672 Problem with .LIS file (create/write)
8 0x2682 Problem with .ERR file (create/write)
9 0x2692 Problem with .LOG file (create/write)
10 0x26A2 Problem with POSTSCRI.STR file (open/read)
11 0x26B2 Cannot call SQR recursively
12 0x26C2 Problem with Windows
13 0x26D2 Internal error occurred
14 0x26E2 Problem with SQRWIN.DLL
15 0x26F2 Problem with -ZCF file
Tab le 24-2 Error Values Returned by the SQR API (Continued)
Non-VMS VMS Reason
Extending SQR—UFUNC.C 24-5

Adding a User FunctionThe following example demonstrates how to extend SQR with an initcap function.
The key to the process is an SQR source file called UFUNC.C. This file contains the list of user-defined functions. It also contains comments with a description of the process of adding a function to SQR. UFUNC.C is provided in the LIB subdirectory (LIBW in Windows).
To add initcap to SQR, you need to add it to a global array called userfuncs in UFUNC.C.
Step 1. Add Function PrototypeBegin by adding a function prototype to the function declaration list.
static void max CC_ARGS((int, double *[], double *));static void split CC_ARGS((int, char *[], double *));static void printarray CC_ARGS((int, char*[], double *));static void initcap CC_ARGS((int, char *[], char *, int));
The preceding code segment is taken from the file UFUNC.C. The first three lines are part of the original UFUNC.C. The line that adds the initcap function is shown in bold. You can find the modified version of UFUNC.C in the TUTORIAL directory.
This code defines a prototype for a C function called initcap. The prototype is required by the C compiler. Note that the name of the C function does not have to be the same as the name of the SQR function. The SQR name for the function is defined in the next step.
The CC_ARGS macro makes your code portable between compilers that expect full ANSI prototyping and compilers where the argument prototype is omitted. You could also write:
static void initcap();
24-6 Interoperability

Note also that the keyword STATIC means that the code for initcap will be added in the file UFUNC.C. If you have the code in a separate file, remove the STATIC keyword.
The first argument of the C function is the argument count of the corresponding SQR function. In the case of initcap, this argument count should be 1 because initcap takes exactly one argument.
The second argument of the C function is an array of pointers. This array is the argument list. In this case, since initcap only takes one argument, only the first pointer is actually used.
The third argument of the C function is a pointer to the result buffer. Since initcap returns a string, we will define it as char*.
The last argument sets the maximum length of the result string. The length of this string is the size of the result buffer, which you must not overflow. You cannot return a value that is longer than the maximum length. The maximum length is typically around 2000 bytes, depending on platform.
Step 2. Add Entry to USERFUNCS Table The next step is to tell SQR about our initcap function. As stated before, this table exists in the UFUNC.C file. Here is the modified code:
} userfuncs[] ={/* (2) Define functions in userfuncs table:
Number ofName Return_type Arguments Arg_Types Function---- ----------- --------- --------- -------- */"max", 'n', 0, "n", PVR max,"split", 'n', 0, "C", PVR split,"printarray", 'n', 4, "cnnc", PVR printarray,"initcap", 'c', 1, "c", PVR initcap,/* Last entry must be NULL—do not change */"", '\0', 0, "", 0
};
Adding a User Function 24-7
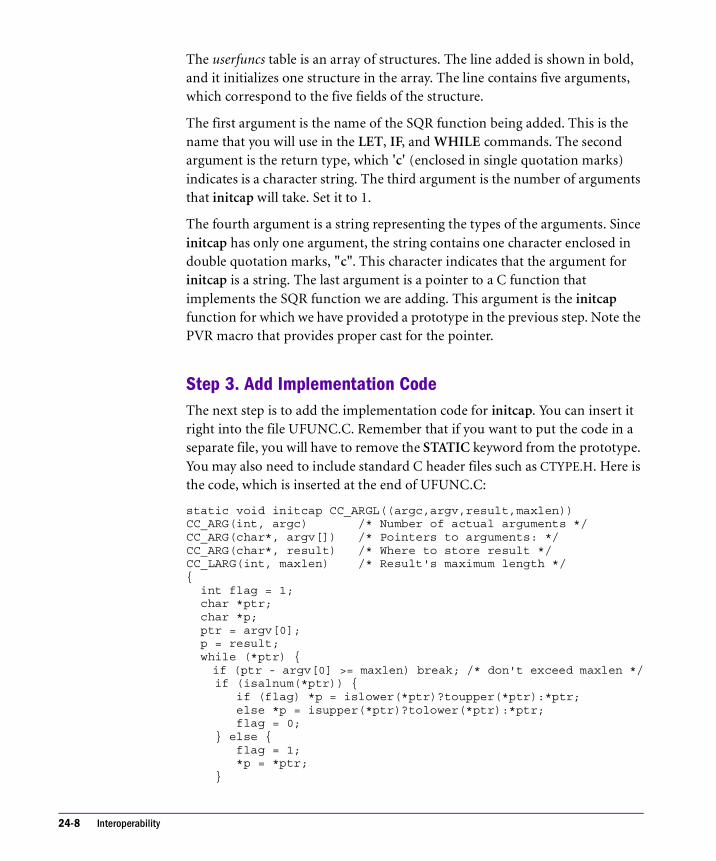
The userfuncs table is an array of structures. The line added is shown in bold, and it initializes one structure in the array. The line contains five arguments, which correspond to the five fields of the structure.
The first argument is the name of the SQR function being added. This is the name that you will use in the LET, IF, and WHILE commands. The second argument is the return type, which 'c' (enclosed in single quotation marks) indicates is a character string. The third argument is the number of arguments that initcap will take. Set it to 1.
The fourth argument is a string representing the types of the arguments. Since initcap has only one argument, the string contains one character enclosed in double quotation marks, "c". This character indicates that the argument for initcap is a string. The last argument is a pointer to a C function that implements the SQR function we are adding. This argument is the initcap function for which we have provided a prototype in the previous step. Note the PVR macro that provides proper cast for the pointer.
Step 3. Add Implementation CodeThe next step is to add the implementation code for initcap. You can insert it right into the file UFUNC.C. Remember that if you want to put the code in a separate file, you will have to remove the STATIC keyword from the prototype. You may also need to include standard C header files such as CTYPE.H. Here is the code, which is inserted at the end of UFUNC.C:
static void initcap CC_ARGL((argc,argv,result,maxlen))CC_ARG(int, argc) /* Number of actual arguments */CC_ARG(char*, argv[]) /* Pointers to arguments: */CC_ARG(char*, result) /* Where to store result */CC_LARG(int, maxlen) /* Result's maximum length */{
int flag = 1;char *ptr;char *p;ptr = argv[0];p = result;while (*ptr) {if (ptr - argv[0] >= maxlen) break; /* don't exceed maxlen */if (isalnum(*ptr)) {
if (flag) *p = islower(*ptr)?toupper(*ptr):*ptr;else *p = isupper(*ptr)?tolower(*ptr):*ptr;flag = 0;
} else {flag = 1;*p = *ptr;
}
24-8 Interoperability

p++; ptr++;}*p = '\0';return;
}
Note the use of the CC_ARGL, CC_ARG, and CC_LARG macros. You can also write the code as follows (only the first five lines are shown).
static void initcap(argc,argv,result,maxlen)int argc; /* Number of actual arguments */char* argv[]; /* Pointers to arguments: */char* result; /* Where to store result */int maxlen; /* Result's maximum length */
Step 4. Relink SQRAfter you have modified UFUNC.C, you must relink SQR. Use the make file that is provided in the LIB (or LIBW) subdirectory of SQR. This step is highly specific to operating systems and databases. SQR is linked with the database libraries, whose names and locations tend to vary. You may have to modify the make file for your system. After SQR is relinked, you are ready to test. Try the following program:
begin-programlet $a = initcap('MR. JOSEPH JEFFERSON')print $a ()
end-program
The result in the output file should be:
Mr. Joseph Jefferson
For further information on argument types in user-defined functions, see the comments in the UFUNC.C file.
Adding a User Function 24-9

ufunc on Windows 95 & NTOn Windows 95 & NT, ufunc now resides in SQREXT.DLL. You can rebuild SQREXT.DLL using any language or tool, as long as the appropriate calling protocol is maintained. The source code for SQREXT.DLL is included in the shipped package (EXTUFUNC.C).
When SQRW.DLL and SQRWT.DLL are loaded, they look for SQREXT.DLL in the same directory and for any DLLs specified in the [SQR Extension] section in SQR.INI. If SQRW.DLL and SQRWT.DLL find SQREXT.DLL and the DLLs specified in the SQR.INI file, they make the following calls in all the DLLs, passing the instance handle (of the calling module) and three function pointers:
void InitSQRExtension (HINSTANCE hInstance,FARPROC lpfnUFuncRegister,FARPROC lpfnConsole,FARPROC lpfnError);
Implementing New User Functions on Windows 95 & NTYou can implement new user functions in SQREXT.DLL or any other extension DLL. All the extension DLLs must have the InitSQRExtension() function exported. If you choose to implement user functions in SQREXT.DLL, you should rebuild the DLL using the supplied make file, SQREXT.MAK. If new extension DLLs containing new user functions are to be used, they must be listed in the [SQR Extension] section in SQR.INI in the system directory.
For any ufunc, you must register it by making the following call in InitSQRExtension().
lpfnUFuncRegister(struct ufnns* ufunc);
The function pointer lpfnUFuncRegister is passed in from the calling module. Refer to EXTUFUNC.C for the definition of struct ufnns and the sample user functions.
24-10 Interoperability

Integrating Brio.Report 6.0 and Brio.Portal 6.0.1You can integrate Brio.Report and Brio.Portal with the following instructions for NT and UNIX platforms. Before you proceed, remember that these instructions assume that the SQR environment variable points to where you have installed SQR (for example, D:\BrioONE\SQRServer\ORA)and that PORTAL refers to where you have installed Brio.Portal (for example, D:\BrioONE).
Therefore, if your paths for these two environment variables are different than the default path, substitute the proper path in the instructions that follow.
Brio.Report 6.0 and Brio.Portal 6.0.1 integration for NT platformsFollow the steps below to integrate Brio.Report into an already existing Brio.Portal:
1. Install the Portal.
2. Install Brio.Report 6.0.
3. Shut down all Portal Services.
4. Make a back-up copy of: BrioONE\BrioPortal\server\JF_{machinename}\sqrp
5. Copy BrioONE\{database}\BINW to: BrioONE\BrioPortal\server\JF_{machinename}\sqrp
6. Copy BrioONE\{database}\IMAGES to: BrioONE\BrioPortal\server\JF_{machinename}\sqrp
7. Edit the BrioONE\BrioPortal\server\JF_{machinename}\sqrp\binw\sqr.ini, confirm the following:
8. SQRDIR={drive}:\ BrioONE\BrioPortal\server\JF_{machinename}\sqrp\binw
9. SQRIBE_HOME={drive}:\ BrioONE
10.Copy BrioONE\{database}\IMAGES\*.gif to BrioONE\ONEWEbClient\wsmedia
11.Copy BrioONE\{database}\IMAGES\*.gif to BrioONE\ONEWEbClient\wsmedia\sqr
12.Restart all Portal Services.
Brio.Report 6.0 and Brio.Portal 6.0.1 integration for NT platforms 24-11

Caution If Brio.Portal 6.0.x is installed after SQR 6.0, then required SQR components will be overwritten. To correct this problem, you must reinstall SQR.
Brio.Report 6.0 and Brio.Portal 6.0.1 Integration for UNIX Platforms
The following instructions are for integrating Brio.Report into an already existing Brio.Portal:
1. Install the Portal.
2. Install Brio.Report 6.0.
3. Shut down all Portal Services.
4. Make a back-up copy of: BrioONE/BrioPortal/server/JF_{machinename}/sqrp
5. Copy BrioONE/{database}/BINW to: BrioONE/BrioPortal/server/JF_{machinename}/sqrp
6. If both SQR and Portal are not installed under BrioONE (or in the same directory) then do the following:
Copy {SQR_installation_directory}/lib/spf60.zip to {Portal_installation_directory}/lib
7. Copy BrioONE/{database}/IMAGES to: BrioONE/BrioPortal/server/JF_{machinename}/sqrp
8. Shutdown the WebClient server.
9. Copy BrioONE/{database}/IMAGES/*.gif to: BrioONE/ONEWEbClient/wsmedia
10.Copy BrioONE/{database}/IMAGES/*.gif to: BrioONE/ONEWEbClient/wsmedia/sqr
11.Copy BrioONE/{database}/IMAGES/*.cab to: BrioONE/ONEWEbClient/wsmedia/lib
12.Copy BrioONE/{database}/IMAGES/*.jar to: BrioONE/ONEWEbClient/wsmedia/lib
13.Copy BrioONE/{database}/IMAGES/*.properties to: BrioONE/ONEWEbClient/wsmedia/lib
!
24-12 Interoperability

14.Restart all Portal Services.
15.Restart the WebClient server.
Caution If Brio.Portal 6.0.x is installed after SQR 6.0, then required SQR components will be overwritten. To correct this problem, you must reinstall SQR.
XML Support in SQR
SQR supports XML by using syntax very similar to the syntax used to access relational datasources. This similarity provides an advantage in that SQR programs that access XML will look and behave very much like programs that access other datasources. On the downside, not every possible XML file can be queried effectively, especially those containing elements that nest recursively. Information on the proper use of SQR with XML will make this clear. Please consult the ‘readme’ file for your installation for the most up-to-date information concerning XML support.
The syntax for specifying an XML query involves using the ‘GETDATA=’ clause in the BEGIN-EXECUTE section, specification of element or unique attribute names as ‘columns’, and specification of a single element name in the ‘From’ clause. The ‘GETDATA’ should specify the name of the XML file to be accessed, and the ‘From’ clause element serves to focus the query on a particular section of the XML file. For instance, the following query would be appropriate for accessing the XML file,‘example1.xml’:
Begin-ExecuteGETDATA=’example1’
Begin-SelectCompanyName type=char (+1,1)EmployeeName type=char ( , 30)PhoneNumber type=char ( , 60)From Employee_DetailsEnd-SelectEnd-Execute
!
XML Support in SQR 24-13

Example1.xml: (DTD section is required but not shown here.)<Company CompanyName=’abc’>
<Employee_Details><EmployeeName>John Doe</EmployeeName><PhoneNumber>123-555-1111</PhoneNumber>
</Employee_Details><Employee_Details>
<EmployeeName>Jane Smith</EmployeeName><PhoneNumber>123-555-2222</PhoneNumber>
</Employee_Details></Company>
XML support in SQR is provided through use of the DDO XML driver, which is installed with SQR. It uses a DDO Registry entry that specifies the directory tree containing the XML file(s) you want to access. You may define more than one registry entry, if you wish to place XML files in more than one directory tree. Use the DDO Registry Editor to create each registry entry. An appropriate process would be as follows:
1. Create a directory, place one or more sample XML files in it.
2. Use the DDO Registry Editor to create an entry that specifies the new directory.
3. Use the DDO Query Editor to access that datasource, and verify that your XML files are readable by DDO.
4. Create your SQR programs that access those files.
The current DDO XML driver requires the Document Type Definition (DTD) to be embedded in the XML file being processed. It does not yet support having the DTD in a separate file. See the example XML files provided for practical examples containing embedded DTDs. Note that Brio.Report Builder automatically generates XML files with appropriately embedded DTD information.
While XML is case-sensitive, most of SQR is not. Therefore, for XML to be read properly by SQR, the element names within the XML file should not depend on case sensitivity for uniqueness.
24-14 Interoperability

To allow SQR to preserve the case of an element or attribute identifier you specify, define an alias for the column variable:
PhoneNumber &pn=char ( , 60)
The elements or attributes that are queried (the ‘columns’) must have a single instance associated with each occurrence of a particular element, usually the one specified in the ‘From’ clause. In other words, there must be an element whose occurrences essentially define the ‘rows’ of the result, and to which all the elements being queried are uniquely related. All elements and attributes queried must be parents or immediate children of that element. In the example above, occurrences of Employee_Details define the result rows, EmployeeName and PhoneNumber are immediate children of Employee_Details, and there is a unique occurrence of the parent CompanyName. If there were two PhoneNumbers under Employee_Details, such as:
<Employee_Details><EmployeeName>John</EmployeeName><PhoneNumber>123-555-1111</PhoneNumber><PhoneNumber>123-555-3333</PhoneNumber>
</Employee_Details>
it would not be possible to query for both EmployeeName and PhoneNumber, because the above rules are broken. There is not a single instance of PhoneNumber for each occurrence of Employee_Details, and EmployeeName is not a parent or immediate child of PhoneNumber.
When elements are specified as the ‘column’ to be queried, either the content of that element must be simple text (#PCDATA), as for EmployeeName and PhoneNumber shown here, or the first attribute or content element must be text. This allows the element name to be specified as the ‘column’ to be queried in situations when the attribute name is not unique, as shown here.
XML Support in SQR 24-15

Example2.xml: (DTD section is required but not shown here.)<Company value=’company1’>
<Employee value=’John’><PhoneNumber value=’123-555-1111’/><Site>Headquarters</Site>
</Employee><Employee value=’Jane’>
<PhoneNumber value=’123-555-2222’/><Site>Sales Office</Site>
</Employee></Company>
Begin-ExecuteGETDATA=’example2’
Begin-SelectCompany type=char (+1,1)Employee type=char ( , 20)PhoneNumber type=char ( , 40)Site type=char (, 60)From EmployeeEnd-SelectEnd-Execute
Summary� Applications can run SQR programs using the SQR API (application program
interface).
� An SQR program can also call an external application’s API.
� You can extend SQR with third-party libraries and functions written in standard languages such as C.
� To extend SQR, add functions to the userfuncs global array in the UFUNC.C file.
� You can integrate Brio.Report and Brio.Portal.
� SQR supports XML.
24-16 Interoperability

25 Testing and Debugging
This chapter describes the SQR functionality designed to help with the testing and debugging of SQR programs. This chapter focuses on facilities in the SQR language and command-line options.
Using the Test FeatureDuring the development of an SQR program, you frequently test it by running it and examining its output. In many cases, you are only interested in the first few pages of the report.
To speed the cycle of running and viewing a few pages, use the -T command-line flag. The -T flag lets reports finish more quickly because all BEGIN-SELECT ORDER BY clauses are ignored. The database does not sort the data and the first set of records are selected sooner. Enter the desired number of test pages after the -T flag. For example, -T6 causes the program to stop after six pages of output have been created.
Note If your program contains break logic, the breaks can occur in unexpected locations because
the ORDER BY clause is ignored.
To test a report file called customer.sqr, enter the following command:
sqr customer username/password -T3
The -T3 flag specifies that the program will stop running after 3 pages have been produced.
When the test completes successfully, check it by displaying the output file on your screen or printing it. The default name of the output file is the same as the program file with the extension .LIS. For example, if your report is named customer.sqr, the output file is named customer.lis.
�
25-1

If you are using Brio.Report Builder, select Limit to nn pages in the Run dialog.
When the development of your program is complete, run it without the -T flag. Your program processes all ORDER BY clauses and run to completion. If the program creates more than one report, the -T flag restriction applies only to the first report.
Using the #DEBUG CommandWhen debugging a program it is often useful to:
� Display data or show when a procedure or query executes by using temporary SHOW or DISPLAY commands in key places in the program.
� Isolate problem areas by temporarily skipping the parts of the program that work correctly.
� Temporarily cause additional behavior in questionable areas of the program. For example, display or modify variables that you suspect are causing a problem.
SQR provides the #DEBUG command to help you make temporary changes to your code. You can use the #DEBUG command to conditionally process portions of your program.
Precede the command with #DEBUG, as shown in the following example:
#debug display $s
When the #DEBUG precedes a command, that command is processed only if the -DEBUG flag is specified on the SQR command line. In this example, the value of $s is displayed only when you run the program with -DEBUG.
You can achieve debug multiple commands by using up to 10 letters or digits to differentiate between them. Indicate which command is to be debugged on the -DEBUG flag, as shown in the following example:
sqr myreport username/password -DEBUGabc
In this example, commands preceded by #DEBUG, #DEBUGa, #DEBUGb, or #DEBUGc are compiled when the program is executed. Commands preceded with #DEBUGd are not compiled because d was not specified in the -DEBUG command-line flag.
25-2 Testing and Debugging

Using Compiler Directives for DebuggingYou can conditionally compile entire sections of your program using the five compiler directives:
� #IF
� #ELSE
� #END-IF or #ENDIF
� #IFDEF
� #IFNDEF
You can use the value of a substitution variable, declared by a #DEFINE command, to turn on or off a set of statements, as shown in the following example:
#define DEBUG_SESSION Y
#if DEBUG_SESSION = 'Y'begin-procedure dump_array
let #i = 0while #i < #counter
! Get data from the arrayget $state $city $name $phone from customer_array(#i)print $state (,1)print $city (,7)print $name (,24)print $phone (,55)position (+1)add 1 to #i
end-whileend-procedure ! dump_array#end-if
The dump_array procedure is only used for debugging. By defining DEBUG_SESSION as Y, the dump_array procedure is included in the program. Later, you can change DEBUG_SESSION to N and exclude the dump_array procedure from the program. The #IF command in this example is case-insensitive.
Using Compiler Directives for Debugging 25-3

Common Programming ErrorsThe most common programming error using SQR is mistyping variable names. Because SQR does not require variables to be declared, it does not issue an error message when variables names are mistyped. Instead, SQR considers the mistyped variable as if it is another variable.
For example:
let #customer_access_code = 55print #customer_acess_code ()
This example will not print 55 because we mistyped the variable name. Can you see the typo? One c in acess on the PRINT command is missing.
A related problem has to do with global versus local variables. If you refer to a global variable in a local procedure without preceding it with an underscore, SQR does not issue an error message. Instead, it is taken as a new local variable name. For example:
begin-procedure mainlet $area = 'North'do proc
end-procedure ! main
begin-procedure proc localprint $area () ! Should be $_area
end-procedure
In this example, the local procedure proc prints the value of the local variable $area and not the global variable $area. It prints nothing because the local $area variable did not receive a value. To refer to the global variable, use $_area.
Such small errors are hard to detect because SQR considers #customer_acess_code as simply another variable with a value of zero.
25-4 Testing and Debugging

Summary� You can speed up the testing cycle by using the -T command-line flag.
� You can conditionally process sections of a program by using the #DEBUG command and the -DEBUG command-line flag.
� You can conditionally compile entire sections of your program using the five compiler directives #IF, #ELSE, #END-IF, #IFDEF, and #IFNDEF.
� The most common programming error is the mistyping of variable names.
Common Programming Errors 25-5

25-6 Testing and Debugging

26 Performance and Tuning
Performance considerations are an important aspect of application development. This chapter examines some of the issues that affect the performance of SQR programs. This chapter also describes certain SQR capabilities that can help you write high-performance programs.
SQR Performance and SQL StatementsWhenever your program contains a BEGIN-SELECT, BEGIN-SQL, or EXECUTE command, it performs an SQL statement. Processing SQL statements typically consumes significant computing resources. Tuning SQL statements typically yields higher performance gains than tuning any other part of your program.
General tuning of SQL is outside the scope of this book. Tuning SQL is often specific to the type of database that you are using—tuning SQL statements for an ORACLE database may be different than tuning SQL statements for DB2. This chapter focuses on SQR tools for simplifying SQL statements and reducing the number of SQL executions. There are several techniques, including:
� Simplifying a complex SELECT
� Using LOAD-LOOKUP to simplify joins
� Using dynamic SQL
� Examining cursor status
� Using an array or flat file instead of a temporary database table.
� Writing programs that create multiple reports
� Tuning SQR numerics
26-1
� Running compiled programs with SQR Execute
� Adjusting processing limits
� Buffering fetched rows
� Running programs on the server
Simplifying a Complex SELECTWith relational database design, information is often “normalized” by storing data entities in separate tables. To display the normalized information, you must write a SELECT statement that joins these tables together. With many database systems, performance suffers when you join more than three or four tables in one SELECT.
With SQR, you can perform multiple SELECT statements and nest them as we saw in Chapter 7, “Master/Detail Reports.” In this way, you can break a large join into several simpler SELECTS. For example, a SELECT statement that joins orders and products tables can be broken into two SELECTS. The first SELECT retrieves the orders in which we are interested. For each order retrieved, a second SELECT retrieves the products that were ordered. The second SELECT is correlated to the first SELECT by having a condition such as:
where order_num = &order_num
This condition specifies that the second SELECT only retrieves products for the current order.
Similarly, if your report is based on products ordered, you can make the first SELECT retrieve the products, and make the second SELECT retrieve the orders for each product.
This method improves performance in many cases, but not all. To achieve the best performance, you may need to experiment with the different alternatives.
26-2 Performance and Tuning

Using LOAD-LOOKUP to Simplify Joins Database tables often contain key columns such as a product code or customer number. To retrieve a certain piece of information, you join two or more tables that contain the same column. For example, to obtain a product description, you can join the orders table with the products table, using the product_code column as the key.
With LOAD-LOOKUP, you can reduce the number of tables that are joined in one SELECT. Use this command in conjunction with one or more LOOKUP commands.
The LOAD-LOOKUP command defines an array containing a set of keys and values and loads it into memory. The LOOKUP command looks up a key in the array and returns the associated value. In some programs, this technique performs better than a conventional table join.
LOAD-LOOKUP can be used in the SETUP section or in a procedure. If used in the SETUP section, it is processed only once. If used in a procedure, it is processed each time it is encountered.
LOAD-LOOKUP retrieves two fields from the database, the KEY field and the RETURN_VALUE field. Rows are ordered by KEY and stored in an array. The KEY field must be unique and contain no NULL values.
When the LOOKUP command is used, the array is searched (using a “binary” search) to find the RETURN_VALUE field corresponding to the KEY referenced in the lookup.
The following example illustrates LOAD-LOOKUP and LOOKUP:
Example begin-setupload-lookup
name=prodstable=productskey=product_codereturn_value=description
end-setup...begin-selectorder_num (+1,1)product_code
lookup prods &product_code $descprint $desc (,15)
from orderlinesend-select
Using LOAD-LOOKUP to Simplify Joins 26-3

In this example, the LOAD-LOOKUP command loads an array with the product_code and description columns from the products table. The lookup array is named prods. The product_code column is the key and the description column is the return value. In the SELECT paragraph, a LOOKUP on the prods array retrieves the description for each product_code. This technique eliminates the need to join the products table in the SELECT.
If the ordlines and products tables were simply joined in the SELECT (without LOAD-LOOKUP), the code would look like this:
Example
begin-selectorder_num (+1,1)ordlines.product_codedescription (,15)from ordlines, productswhere ordlines.product_code = products.product_codeend-select
Which is faster, a database join or LOAD-LOOKUP? It depends on your program. LOAD-LOOKUP improves performance in the following situations:
� When it is used with multiple SELECTS
� When it keeps the number of tables being joined from exceeding three or four
� When the number of entries in the LOAD-LOOKUP table is small compared to the number of rows in the SELECT, and they are used often
� When most entries in the LOAD-LOOKUP table are used
Tip You can concatenate columns if you want RETURN_VALUE to return more than one column. The concatenation symbol is database-specific.
�
26-4 Performance and Tuning

Improving SQL Performance with Dynamic SQLChapter 16, “Dynamic SQL and Error Checking,” explained how to use dynamic SQL variables. Dynamic SQL can also be used in some situations to simplify a SQL statement and gain performance.
Example
begin-selectorder_numfrom orders, customerswhere order.customer_num = customers.customer_numand ($state = 'CA' and order_date > $start_date
or $state != 'CA' and ship_date > $start_date)end-select
In this example, a given value of $state, order_date or ship_date is compared to $start_date. The OR operator in the condition makes such multiple comparisons possible. With most databases, an OR operator slows processing. It can cause the database to perform more work than necessary.
However, the same work can be done with a simpler SELECT. For example, if $state is ‘CA,’ the following SELECT would work:
Example
begin-selectorder_numfrom orders, customerswhere order.customer_num = customers.customer_numand order_date > $start_dateend-select
Dynamic SQL allows you to check the value of $state and create the simpler condition:
if $state = 'CA'let $datecol = 'order_date'
elselet $datecol = 'ship_date'
end-ifbegin-selectorder_numfrom orders, customerswhere order.customer_num = customers.customer_numand [$datecol] > $start_dateend-select
Improving SQL Performance with Dynamic SQL 26-5

The substitution variable [$datecol] substitutes the name of the column to be compared with $state_date. The SELECT is simpler and no longer uses an OR. In most cases, this use of dynamic SQL improves performance.
Examining SQL Cursor StatusBecause SQR programs select and manipulate data from a SQL database, it is helpful to understand how SQR handles SQL statements and queries.
SQR programs can perform multiple SQL statements. Moreover, the same SQL statement can be executed many times.
When your program executes, a pool of SQL statement handles—called cursors—is maintained. A cursor is a storage location for one SQL statement, for example, SELECT, INSERT, or UPDATE. Every SQL statement uses a cursor for processing. A cursor holds the context for the execution of a SQL statement.
The cursor pool consists of 30 cursors, and its size cannot be changed. When a SQL statement is re-executed, its cursor can be immediately reused if it is still in the cursor pool. When your SQR program executes more than 30 different SQL statement, cursors in the pool are reassigned.
To examine how cursors are managed, use the -S command-line flag. This flag causes cursor status information to be displayed at the end of a run.
The following information is displayed for each cursor:
Cursor #nn:SQL = <SQL statement>Compiles = nnExecutes = nnRows = nn
The listing also includes the number of compiles, which vary according to the database and the complexity of the query. With Oracle, for example, a simple query is compiled only once. With SYBASE, a SQL statement is compiled before it is first executed and recompiled for the purpose of validation during the SQR compile phase. Therefore, you may see two compiles for a SQL statement. Later when the SQL is re-executed, if its cursor is found in the cursor pool, it can proceed without recompiling.
26-6 Performance and Tuning

Avoiding Temporary Database TablesPrograms often use temporary database tables to hold intermediate results. Creating, updating, and deleting database temporary tables is a very resource-consuming task, however, and can hurt your program’s performance. SQR provides two alternatives to using temporary database tables.
The first alternative is to store intermediate results in an SQR array. The second is to store intermediate results in a local flat file. Both techniques can bring about a significant performance gain. You can use the SQR language to manipulate data stored in an array or a flat file.
These two methods are explained and demonstrated in the following sections. Methods for sorting data in SQR arrays or flat files are also explained.
Using and Sorting ArraysChapter 8, “Cross-Tabular Reports,” introduced the array as a means of holding data records during program execution.
An SQR array can hold as many records as can fit in memory. During the first pass, when records are retrieved from the database, you can store them in the array. Subsequent passes on the data can be made without additional database access.
The following code retrieves records, prints them, and saves them into an array named customer_array.
Example create-array name=customer_array size=1000field=state:char field=city:charfield=name:char field=phone:char
let #counter = 0begin-selectstate (,1)city (,7)name (,24)phone (,55)
position (+1)put &state &city &name &phone into customer_array(#counter)add 1 to #counter
from customersend-select
Avoiding Temporary Database Tables 26-7

This example creates an array named customer_array. The array has four fields that correspond to the four columns selected from the customers table, and it can hold up to 1,000 rows. If the customers table had more than 1,000 rows, it would be necessary to create a larger array.
The SELECT prints the data. The PUT command then stores the data in the array. Chapter 8, “Cross-Tabular Reports,” showed how to use the LET command to assign values to array fields. The PUT command performs the same work, but with fewer lines of code. With PUT, you can assign all four fields in one command.
The #counter variable serves as the array subscript. It starts with zero and maintains the subscript of the next available entry. At the end of the SELECT, the value of #counter is the number of records in the array.
The next piece of code retrieves the data from customer_array and prints it:
Example
let #i = 0while #i < #counter
get $state $city $name $phone from customer_array(#i)print $state (,1)print $city (,7)print $name (,24)print $phone (,55)position (+1)add 1 to #i
end-while
In this piece of code, #i goes from 0 to #counter-1. The fields from each record are moved into the corresponding variables $name, $city, $state, and $phone. These values are then printed.
SortingIn many cases, intermediate results must be sorted by a different field. The following program shows how to sort customer_array by name. The program uses a well-known sorting algorithm called QuickSort. You can copy this code into your program, make appropriate changes, and use it to sort your array. For further information on QuickSort, see the book Fundamentals of Data Structures by Horowitz and Sahni, 1983.
26-8 Performance and Tuning

Program ex26a.sqr
#define MAX_ROWS 1000
begin-setupcreate-array name=customer_array size={MAX_ROWS}
field=state:char field=city:charfield=name:char field=phone:char
!! Create a helper array that is used in the sort!create-array name=QSort size={MAX_ROWS}
field=n:number field=j:numberend-setup
begin-programdo main
end-programbegin-procedure mainlet #counter = 0!! Print customers sorted by state!begin-selectstate (,1)city (,7)name (,24)phone (,55)
position (+1)! Put data in the arrayput &state &city &name &phone into customer_array(#counter)add 1 to #counter
from customersorder by stateend-selectposition (+2)!! Sort customer_array by name!let #last_row = #counter - 1do QuickSort(0, 0, #last_row)!! Print customers (which are now sorted by name)!let #i = 0while #i < #counter
! Get data from the arrayget $state $city $name $phone from customer_array(#i)print $state (,1)print $city (,7)print $name (,24)print $phone (,55)position (+1)add 1 to #i
end-while
Avoiding Temporary Database Tables 26-9

end-procedure ! main!! QuickSort!! Purpose: Sort customer_array by name.! This is a recursive function. Since SQR does not allocate! local variables on a stack (they are all static), this! procedure uses a helper array.!! #level - Recursion level (used as a subscript to the helper! array)! #m - The "m" argument of the classical QuickSort! #n - The "n" argument of the classical QuickSort!begin-procedure QuickSort(#level, #m, #n)
if #m < #nlet #i = #mlet #j = #n + 1! Sort key is "name"let $key = customer_array.name(#m)while 1
add 1 to #iwhile #i <= #j and customer_array.name(#i) < $key
add 1 to #iend-whilesubtract 1 from #jwhile #j >= 0 and customer_array.name(#j) > $key
subtract 1 from #jend-whileif #i < #j
do QSortSwap(#i, #j)else
breakend-if
end-whiledo QSortSwap(#m, #j)add 1 to #level! Save #j and #nlet QSort.j(#level - 1) = #jlet QSort.n(#level - 1) = #nsubtract 1 from #jdo QuickSort(#level, #m, #j)! restore #j and #nlet #j = QSort.j(#level - 1)let #n = QSort.n(#level - 1)add 1 to #jdo QuickSort(#level, #j, #n)subtract 1 from #level
end-ifend-procedure ! QuickSort!!! QSortSwap!! Purpose: Swaps records #i and #j of customer_array
26-10 Performance and Tuning

!! #i - Array subscript! #j - Array subscript!begin-procedure QSortSwap(#i, #j)
get $state $city $name $phone from customer_array(#i)let customer_array.state(#i) = customer_array.state(#j)let customer_array.city(#i) = customer_array.city(#j)let customer_array.name(#i) = customer_array.name(#j)let customer_array.phone(#i) = customer_array.phone(#j)put $state $city $name $phone into customer_array(#j)
end-procedure ! QSortSwap
The QuickSort algorithm uses a recursive procedure, which means that it calls itself. SQR maintains only one copy of the procedure’s local variables. In QuickSort the variables #j and #n are overwritten when QuickSort calls itself.
For the algorithm to work properly, the program must save the values of these two variables before making the recursive call, then restore those values when the call completes. QuickSort can call itself recursively many times, so the program may need to save many copies of #j and #n. To do this, add a #level variable that maintains the depth of recursion. In this example, a helper array, Qsort, is used to hold multiple values of #j and #n.
The QuickSort procedure takes three arguments. The first is the recursion level (or depth), which is #level, as previously described. The second and third arguments are the beginning and end of the range of rows to be sorted. Each time QuickSort calls itself, the range gets smaller. The main procedure starts QuickSort by calling it with the full range of rows.
The QSortSwap procedure swaps two rows in customer_array. Typically, rows with a lower key value are moved up.
The procedures QuickSort and QSortSwap in ex24a.sqr refer to customer_array and its fields. If you plan to use these procedures to sort an array in your applications, you will need to change these references to the applicable array and fields. The QuickSort procedure sorts in ascending order.
Avoiding Temporary Database Tables 26-11

QuickSort and National LanguageThe QuickSort procedure does not support National Language Sensitive character string sort. The comparisons
while #i <= #j and customer_array.name(#i) < $keyandwhile #j >= 0 and customer_array.name(#j) > $key
are simple string comparisons. They work well for US ASCII English, but they may not sort correctly with other languages. For such languages, you may need to write a National Language Sensitive character string comparison and add that to SQR. Chapter 24, “Interoperability,”explains how to add functions to SQR. The QuickSort procedure will then be modified as follows.
while #i <= #j and NLS_STRING_COMPARE(customer_array.name(#i),$key)while #j >= 0 and NLS_STRING_COMPARE($key,customer_array.name(#j))
Using and Sorting Flat FilesAn alternative to an array is a flat file. You can use a flat file when the required array size exceeds available memory. As is the case with an array, you may need a sorting utility that supports NLS.
The sample code in the previous section can be rewritten to use a file instead of an array. The advantage of using a file is that the program is not constrained by the amount of memory that is available. The disadvantage of using a file is that the program will perform more I/O. However, it may still be faster than performing another SQL statement to retrieve the same data.
This program uses the UNIX sort utility to sort the file by name. This example can be extended to include other operating systems.
The following code is rewritten to use the file cust.dat instead of the array.
26-12 Performance and Tuning

Program ex26b.sqr
begin-programdo main
end-program
begin-procedure main!! Open cust.dat!open 'cust.dat' as 1 for-writing record=80:varybegin-selectstate (,1)city (,7)name (,24)phone (,55)
position (+1)! Put data in the filewrite 1 from &name:30 &state:2 &city:16 &phone:10
from customersorder by stateend-selectposition (+2)!! Close cust.datclose 1! Sort cust.dat by name!call system using 'sort cust.dat > cust2.dat' #statusif #status <> 0
display 'Error in sort'stop
end-if!! Print customers (which are now sorted by name)!open 'cust2.dat' as 1 for-reading record=80:varywhile 1 ! loop until break
! Get data from the fileread 1 into $name:30 $state:2 $city:16 $phone:10if #end-file
break ! End of file reachedend-ifprint $state (,1)print $city (,7)print $name (,24)print $phone (,55)position (+1)
end-while!! close cust2.datclose 1end-procedure ! main
Avoiding Temporary Database Tables 26-13
The program starts by opening a file cust.dat.
open 'cust.dat' as 1 for-writing record=80:vary
The OPEN command opens the file for writing and assigns it file number 1. You can open as many as 12 files in one SQR program. The file is set to support records of varying length with a maximum of 80 bytes (characters). For this example, you could also use fixed-length records.
As the program selects records from the database and prints them, it writes them to cust.dat.
write 1 from &name:30 &state:2 &city:16 &phone:10
The WRITE command writes the four columns into file number 1—the currently open cust.dat. It writes the name first, which makes it easier to sort the file by name. The program writes fixed-length fields—for example, &name:30 specifies that the name column uses exactly 30 characters. If the actual name is shorter, it is padded with blanks. When the program has finished writing data to the file, it closes the file using the CLOSE command.
The file is sorted with the UNIX sort utility.
call system using 'sort cust.dat > cust2.dat' #status
The command sort cust.dat > cust2.dat is sent to the UNIX system. It invokes the UNIX sort command to sort cust.dat and direct the output to cust2.dat. The completion status is saved in #status; a status of 0 indicates success. Because name is at the beginning of each record, the file is sorted by name.
Next, we open cust2.dat for reading. The command
read 1 into $name:30 $state:2 $city:16 $phone:10
reads one record from the file and places the first 30 characters in $name. The next two characters are placed in $state and so on. When the end of the file is encountered, the reserved variable #end-file is automatically set to 1 (true). The program checks for #end-file and breaks out of the loop when the end of the file is reached. Finally, the program closes the file using the CLOSE command.
26-14 Performance and Tuning

Creating Multiple Reports in One PassSometimes you must create multiple reports that are based on the same data. In many cases, these reports are similar, with only a difference in layout or summary. Typically, you can create multiple programs and even reuse code. However, if each program is executed separately, the database has to repeat the query. Such repeated processing is often unnecessary.
With SQR, one program can create multiple reports simultaneously. In this method, a single program creates multiple reports, making just one pass on the data, greatly reducing the amount of database processing. The multiple report feature of SQR is described in Chapter 18, “Multiple Reports.”
Tuning SQR NumericsSQR provides three types of numeric values:
� Machine floating point numbers
� Decimal numbers
� Integers
Machine floating point numbers are the default. They use the floating point arithmetic provided by the hardware. This method is very fast. It uses binary floating point and normally holds up to 15 digits of precision.
Some accuracy can be lost when converting decimal fractions to binary floating point numbers. To overcome this loss of accuracy, you can sometimes use the ROUND option of commands such as ADD, SUBTRACT, MULTIPLY, and DIVIDE. You can also use the round function of LET or numeric edit masks that round the results to the desired precision.
Decimal numbers provide exact math and precision of up to 38 digits. Math is performed in software. This is the most accurate method, but also the slowest.
Integers can be used for numbers that are known to be integers. There are several benefits for using integers: They enforce the integer type by not allowing fractions, and they adhere to integer rules when dividing numbers. Integer math is also the fastest, typically faster than floating point numbers.
Tuning SQR Numerics 26-15

If you use the DECLARE-VARIABLE command, the -DNT command-line flag, or the DEFAULT-NUMERIC entry in the [Default-Settings] section of the SQR.INI file, you can choose the type of numbers that SQR uses. Moreover, you can select the type for individual variables in the program with the DECLARE-VARIABLE command. When you choose decimal numbers, you can also specify the desired precision.
Selecting the numeric type for variables allows you to fine-tune the precision of numbers in your program. For most applications, however, this type of tuning does not yield a significant performance improvements and we recommend selecting decimal. The default is machine floating point to provide compatibility with older releases of the product.
Compiling SQR Programs and Using SQR ExecuteCompiling your SQR program can improve its performance. The compiled program is stored in a run-time (.SQT) file. You can then run it with SQR Execute. Your program runs faster because it skips the compile phase. This method is explained in Chapter 27, “Compiling Programs and Using SQR Execute.”
Processing LimitsA startup file and the [Processing-Limits] section of SQR.INI can define the sizes and limitations of some of the internal structures used by SQR. An -M command-line flag can specify a startup file whose entries override those set in SQR.INI. If you use the -M command-line flag, then corresponding sections of the file are not processed. Many of these settings have a direct impact on memory requirements.
Tuning of memory requirements used to be significant with older 16-bit operating systems such as Windows 3.1. Today, most operating systems use virtual memory and tuning memory requirements would normally not affect performance in any significant way. The only case where you might need to be concerned with [Processing-Limits] settings is with large SQR programs that exceed default [Processing-Limits] settings. In such cases you must increase the corresponding settings.
26-16 Performance and Tuning

Buffering Fetched RowsWhen a BEGIN-SELECT command is executed, records are fetched from the database server. To improve performance, they are fetched in groups rather than one at a time. The default is groups of 10 records. The records are buffered, and your program processes these records one at a time. A database fetch operation is therefore performed after every 10 records, instead of after every single record. This is a substantial performance gain. If the database server is on another computer, then network traffic is also significantly reduced.
The number of records to fetch together can be modified using the -B command-line flag or for an individual BEGIN-SELECT command using its -B option. In both cases, you specify the number of records to be fetched together. For example -B100 specifies that records be fetched in groups of 100. This means that the number of database fetch operations is further reduced.
This feature is currently available with SQR for ODBC and SQR for the Oracle or SYBASE databases.
Executing Programs on the Database ServerYou can reduce network traffic and greatly improve performance by running SQR programs directly on the database server machine. The SQR server product is available on many server platforms including Windows NT and UNIX.
Executing Programs on the Database Server 26-17
SummaryThe following techniques can improve the performance of your SQR programs:
� Simplify complex SELECT statements.
� Use LOAD-LOOKUP to simplify joins.
� Use dynamic SQL instead of a condition in a SELECT statement.
� Avoid using temporary database tables. Two alternatives to temporary database tables are SQR arrays and flat files.
� Write programs that create multiple reports with one pass on the data.
� Use the most efficient numeric type for numeric variables (machine floating point, decimal, or integer).
� Save compiled SQR programs and rerun them with SQR Execute.
� Adjust settings in the [Processing-Limits] section of SQR.INI or in a startup file.Increase buffering of rows in SELECT statements with the -B flag
� Execute programs on the database server machine.
26-18 Performance and Tuning

5P A R T F I V E
5Running and Printing


27 Compiling Programs and Using SQR Execute
This chapter explains how to save and run compiled versions of your SQR programs.
For the user, running an SQR program is a one-step process. For SQR, however, there are two steps—compiling the program and executing it. When compiling a program, SQR:
� Reads, interprets, and validates the program
� “Preprocesses” substitution variables and certain commands—ASK, #DEFINE, #INCLUDE, #IF, and #IFDEF
� Validates SQL statements
� Performs the SETUP section
SQR allows you to save the compiled version of a program and use it when you rerun a report. That way, you perform the compile step only once and skip it in subsequent runs. Note that SQR does not compile the program into machine language. SQR creates a ready-to-execute version of your program that is already compiled and validated. This file is portable between different hardware platforms and between some databases.
The steps are simple. Run the SQR executable (sqr for Unix systems or sqrw for Windows systems) against your SQR program file and include the-RS command-line flag to save the run-time file. SQR creates a file with a file name extension of .sqt. You should enter something similar to the following:
sqrw ex1a.sqr sammy/baker@rome -RS
27-1

Run the SQR executable (“sqr” or “sqrw”) with the -RT command-line flag to execute the . SQT file. Execution is faster because the program is already compiled. An example of this is as follows:
sqrw ex1a.sqt sammy/baker@rome -RT
The SQR product distribution includes SQR Execute (the SQRT program). SQR Execute is capable of running .sqt files, but does not include the code that compiles an SQR program. (This program is equivalent to running SQR with -RT.) You can run the .sqt file by invoking SQR Execute from the command line with “sqrt” (on UNIX systems) or “sqrwt” (on Windows systems). An example of running SQR Execute from the command line is as follows:
sqrwt ex1a.sqt sammy/baker@rome
It is important to realize that after you save the run-time (.sqt) file, SQR no longer performs any compile-time steps such as executing #IF, #INCLUDE, or ASK commands or performing the SETUP section. These were already performed at the time that the program was compiled and the run-time file was saved.
You must make a clear distinction between what is performed at compile time and what is performed at run time. Think of compile-time steps as defining what the report is. Commands such as #IF or ASK allow you to customize your report at compile time. For run-time customization, you should use commands such as IF and INPUT.
A list of SQR features that apply at compile time and their possible run-time equivalents follows. In some cases, no equivalent exists and you will have to work your way around the limitation. For example, you may have to use substitution variables with commands that require a constant and do not allow a variable. We demonstrated this solution in Chapter 15, “Writing Printer-Independent Reports,”where we worked around the limitation of the USE-PRINTER-TYPE command, which does not accept a variable as an argument.
27-2 Compiling Programs and Using SQR Execute

Summary� To save a compiled version of an SQR program, use the -RS command-line flag.
� To run a precompiled program, use the -RT command-line flag or SQR Execute.
Tab le 27-1 Compile-time Commands and Run-time Equivalents
Compile Time Run Time
Substitution variables Use regular SQR variables. If you are substituting parts of a SQL statement, use dynamic SQL instead. See Chapter 16, “Dynamic SQL and Error Checking.”
ASK INPUT
#DEFINE LET
#IF IF
INCLUDE No equivalent
DECLARE-LAYOUT, margins No equivalent
Number of heading or footing lines ALTER-REPORT
DECLARE-CHART PRINT-CHART
DECLARE-IMAGE PRINT-IMAGE
DECLARE-PROCEDURE USE-PROCEDURE
DECLARE-PRINTER ALTER-PRINTER (where possible)
USE (SYBASE only) -DB command-line flag
27-3

27-4 Compiling Programs and Using SQR Execute

28 Printing Issues
This chapter discusses technical issues relevant to printing. Specifically, this chapter examines the SQR command-line flags that specify output file type and the printer for which it is produced . Also, DECLARE-PRINTER command and printing issues that pertain to multiple reports are explored here. You may recall from Chapter 18, “Multiple Reports,” that a program can produce more than one report.
Except on the Microsoft Windows platform, SQR does not actually print the report. SQR creates an output file that contains the report, but it does not print it directly. The output file can be a printer-specific file or an SQR portable file (SPF). SQR portable files have a default extension of .spf or .snn (for multiple
reports).
Table 28-1 summarizes SQR command-line flags and the types of output they produce.
Tab le 28-1 Command Line Flags and Output Types
Command Line Flag Output File Extension File Format Suitable for
-PRINTER:EH .htm Enhanced HTML Intranet/Internet
-PRINTER:HP .lis PCL HP LaserJet printer
-PRINTER:HT .htm HTML Intranet/Internet
-PRINTER:LP .lis ASCII Line printer
-PRINTER:PS .lis PostScript PostScript printer
-PRINTER:WP Output goes directly to the default printer without being saved to a file. You can set your default printer using the Windows Control Panel.
Windows
28-1

Note When no flags are specified, SQR produces a line printer output unless otherwise set in the SQR program with DECLARE-PRINTER, USE-PRINTER-TYPE, or the PRINTER-TYPE option of
DECLARE-REPORT.
SQR Portable File (SPF) is a printer-independent file format that allows for all the SQR graphical features, including fonts, lines, boxes, shaded areas, charts, bar codes, and images.
This file format is very useful for saving the output of a report. SPF files can be distributed electronically and read with the SQR Viewer. Producing SPF output also allows you to decide later where to print it. When you are ready to print an SPF file, you can do so with the SQR Viewer or SQR Print.
The DECLARE-PRINTER command specifies printer-specific settings for the printers that SQR supports: line printer, PostScript, HP LaserJet, and HTML. The DECLARE-PRINTER command itself does not cause the report to be produced for a specific printer. To specify a specific format, use one of the following three methods:
� Use the -PRINTER:xx command-line flag. For example -PRINTER:PS causes SQR to produce a PostScript output. If your program creates multiple reports, such as the program ex18a.sqr from Chapter 18, “Multiple Reports,” the -PRINTER:xx flag effects all the reports.
-NOLIS .spf or .Snn SQR Portable Format SQR Print and SQR Viewer can print this file to different printers.
-KEEP .spf or .Snn (in addi-tion to the .lis file that is normally created)
SQR Portable Format and the format of the .lis file
SQR Print and SQR Viewer can print this .spf file to different printers.
No flag .lis ASCII, PCL, or Post-Script
Line printer, HP Laser-Jet, or PostScript, respectively.
Tab le 28-1 Command Line Flags and Output Types (Continued)
Command Line Flag Output File Extension File Format Suitable for
�
28-2 Printing Issues

� Use the USE-PRINTER-TYPE command in your report. You must use this command before you print anything because SQR cannot switch printer type in the middle of a program. USE-PRINTER-TYPE PS, for example, causes SQR to produce PostScript output.
� Use the PRINTER-TYPE option of the DECLARE-REPORT command. The DECLARE-REPORT command is normally used when your program generates more than one report, as we discussed in Chapter 18, “Multiple Reports.”
For example:
declare-report labelslayout=labelsprinter-type=ps
end-declare
causes SQR to produce PostScript output for the labels report.
The DECLARE-PRINTER command defines settings for line printers, PostScript, or HP LaserJet printers. Specify the type of printer using the TYPE option of the DECLARE-PRINTER command or one of the predefined printers DEFAULT-LP, DEFAULT-PS, DEFAULT-HP, and DEFAULT-HT.
Your program may have more than one DECLARE-PRINTER command if you define settings for each of the printer types. The settings for a particular printer only take effect when output is produced for that printer. When your program generates multiple reports, you can define settings for each printer for each report. To make a DECLARE-PRINTER command apply to a specific report, use the FOR-REPORTS option.
How is the output file named? The output file normally has the same name as your program, but with a different file extension. The default file extension is .lis for PostScript (PS), HP Laserjet (HP), or Line Printer (LP). If you are generating an SQR Portable File, the default extension is .spf. If you would like SQR to use another name for the output file (including a user-defined file extension), you can use the -F option on the command line. For example, if you want to use chapter1.out as the output of the program ex1a.sqr, the command to run SQR is as follows:
sqr ex1a username/password -fchapter1.out
28-3

When your program creates more than one report, you can name the output file by using multiple -F flags as follows:
sqr ex20a username/password -flabel.lis -fletter.lis -flisting.lis
Note that you cannot directly name .spf files. You can still use the -F command-line flag to name the file, but you cannot control the file name extension. For example:
sqr ex20a username/password -flabel.lis -fletter.lis -flisting.lis -nolis
The -NOLIS command-line flag causes SQR to produce .spf files instead of .lis files. The actual file names will be label.spf, letter.s01, and listing.s02. Note that the second .spf file is named .s01 and the third .s02. SQR supplies file extensions such as these when your program generates multiple reports.
Different operating systems require different techniques for printing the output. On platforms other than Windows, if the output is in SPF format, you first use SQR Print to create the printer-specific file. For example, the following command invokes SQR Print to create a PostScript file myreport.lis from the output file myreport.spf:
sqrp myreport.spf -printer:ps
Note that this is a one-way conversion—an .spf file can be turned into an .lis file, but an .lis file cannot be turned into an .spf file.
Table 28-2 summarizes the commands and command-line options that you can use on different systems to send your report output to the printer. Consult your operating system documentation for details.
28-4 Printing Issues

In any case, we recommend that you check with your systems administrator about other procedures or commands applicable to printing output files at your site.
Summary� Command-line flags create output files appropriate for different platforms and
printers.
� DECLARE-PRINTER specifies printer-specific settings, but it does not itself cause the report to be prepared for a specific printer.
� To prepare a report for a specific printer, use the -PRINTER:xx command-line flag, the USE-PRINTER-TYPE command, or the DECLARE-REPORT command with the printer-type option.
� The -F command-line flag allows you to name output files (including file extensions).
� The -NOLIS and -KEEP command-line flags create files in SQR portable format with an .spf extension.
Tab le 28-2 Print Commands by Operating System
O/S Command Command-Line Options
UNIX SysV lp myreport.lislp myreport.lis -d ...
Use -D for printer destination. You can use the UNIX “at” command to schedule the printing time.
UNIX BSD lpr myreport.lis
VMS PRINT MYREPORT.lis /QUEUE for printer destination
/COPIES for number of copies
/AFTER for printing time
/PASSALL to resolve printing issues
Windows SQR prints directly. You can also use SQR Print or Brio.Report Builder.
Use the Print Setup dialog in SQR Print, Brio.Report Builder, or the SQR Viewer to choose a printer destination. Use SQR Print to print multi-ple copies.
You can also use the File Manager Copy command to copy the file to the printer destina-tion (for example, lpt1).
28-5

28-6 Printing Issues

29 Using the SQR Command Line
This chapter explains how to use the SQR command line to specify flags and pass arguments to your program. This technique is a good way to modify your program at run time.
Command-line flags such as -Bnn, -KEEP, or -S can be entered on the command line to modify some aspect of program execution or output. Command-line arguments are typically answers to requests (made in the SQR program by ASK or INPUT commands) for user input.
The syntax of the SQR command line is as follows:
SQR [program] [connectivity] [flags ...] [args ...] [@file ...]
where: Table 5-1 on page 29-1.
Tab le 5 -1 SQR Command Line Arguments
Argument Description
program The name of your program. The default file type or extension is .SQR. If entered as "?" or omitted, SQR prompts you for the program name. On UNIX-based systems, if your shell uses the question mark as a wild card character, you must precede it with a backslash (\).
connectivity The information needed by SQR to connect to the database. If entered as "?" or omitted, SQR prompts you for it.
DB2 Ssname/SQLid is the subsystem nameand SQL authorization ID to use.
Informix Database is the name of the database touse.
29-1

Command-Line FlagsCommand-line flags begin with a hyphen. When a flag has an argument, the argument must be entered directly after the flag with no intervening space. See the SQR Language Reference for a complete discussion of SQR command-line flags.
ODBC Data_Source_Name/[Username]/[Password] is the name you give to the ODBC driver when you set up the driver, your user name, and password for the database.
Oracle [Username]/[Password[@Data-base]] is your user name and passwordfor the database. You can also specify theconnection string for the database (for example, @B:ORASERVER).
SYBASE Username/[Password] is your username and password for the database.
flags Any of the flags listed in the SQR Language Reference.
Arguments used by SQR while the program is running. Arguments listed here are used by the ASK and INPUT commands rather than prompting the user. Arguments must be entered on the command line in the same sequence they are expected by the program—first all ASK arguments in order and then INPUT arguments in order.
File containing program arguments, one argument per line. Arguments listed in the file are processed one at a time. The command-line arguments pro-gram, connectivity, and args can be specified in this file.
args...
@file...
Tab le 5 -1 SQR Command Line Arguments (Continued)
Argument Description
29-2 Using the SQR Command Line

Specifying Command-Line ArgumentsYou can pass an almost unlimited number of command-line arguments to SQR at run time. On some platforms, the operating system imposes a limit on the number of arguments or the total size of the command line. Passing arguments is especially useful in automated reports, such as those invoked by scripts or menu-driven applications.
You can pass arguments to SQR on the command line, in files, or with the environment variable SQRFLAGS. When you pass arguments in a file, reference the file name on the command line and put one argument on each line of the file. You thus avoid any limits imposed by the operating system.
To reference a file on the command line, precede its name with the at sign (@) as shown in the following example:
sqr myreport sammy/baker arg1 arg2 @file.dat
In this example, arg1 and arg2 are passed to SQR, followed by the file file.dat. Each line in file.dat has an additional argument.
How SQR Retrieves the ArgumentsWhen the ASK and INPUT commands execute, SQR checks to see if you entered any arguments on the command line or if an argument file has been opened. If either has happened, SQR uses this input instead of prompting the user. After the available arguments are used, subsequent ASK or INPUT commands prompt the user for input. If the INPUT command is used with the BATCH-MODE argument, SQR does not prompt the user, but instead returns a status meaning "No more arguments."
SQR processes all ASK commands before INPUT commands.
Note If you compiled your SQR program into an .SQT file, ASK commands will have already been processed. Use INPUT instead.
�
Specifying Command-Line Arguments 29-3

Specifying Arguments and Argument FilesYou can mix argument files with simple arguments, as shown in the following example:
sqr rep2 sammy/baker 18 @argfile1.dat "OH" @argfile2.dat "NewYork"
This command line passes SQR the number 18, the contents of argfile1.dat, the value OH, the contents of argfile2.dat, and the value "New York", in that order.
The OH argument is in quotes to ensure that SQR uses uppercase OH. When a command-line argument is case-sensitive or contains spaces, it must be enclosed in quotes. Arguments stored in files do not require quotes and cannot contain them; the actual strings with uppercase characters and any spaces are passed to SQR.
Using an Argument File If you wanted to print the same report on different printers with different characteristics, you could save values for the different page sizes, printer initializations, and fonts in separate files and use a command-line argument to specify which file to use. For example, the following command line passes the value 18 to SQR:
sqr myreport sammy/baker 18
An #INCLUDE command in the report file chooses file printer18.dat based on the command-line argument:
begin-setupask num ! Printer number.#include 'printer{num}.dat'! Contains #DEFINE commands for
! printer and paper width and lengthdeclare-layout report
paper-size =({paper_width} {paper_length})end-declare
end-setup
In this example, the ASK command assigns the value 18 to the variable num; 18 is a compile-time argument. The #INCLUDE command then uses the value of num to include the file printer18.dat, which could include commands similar to the following:
29-4 Using the SQR Command Line

! Printer18.dat-definitions for printer in Bldg 4.#define paper_length 11#define paper_width 8.5#define bold_font LS12755#define light_font LS13377#define init HM^J73011
Passing Command-Line Arguments—Other Approaches SQR examines an argument file for a program name, user name, or password if none is provided on the command line. The following command line omits the program name, user name, and password:
sqr @argfile.dat
The first two lines of the argument file for this example contain the program name and user name/password:
myreportsammy/baker18OH...
If you do not want to specify the report name, user name, or password on the command line or in an argument file, use the question mark (?). SQR prompts the user to supply these. For example:
sqr myreport ? @argfile.dat
In this example, the program prompts the user for the user name and password instead of taking them from the first line in the argument file.
You can use more than one question mark on the command line, as shown in the following example:
sqr ? ? @argfile.dat
In this example, the user is prompted for the program name and user name/password.
Note SQR for Windows does not accept the SQR program name and database connectivity to be
part of the argument file.�
Specifying Command-Line Arguments 29-5

Reserved CharactersThe hyphen (-) and at sign (@) characters have special meaning on the command line. The hyphen precedes an SQR flag, and the at sign precedes an argument file name. To use either of these characters as the first character of a command-line argument, double the character to indicate that it is a literal hyphen or at sign, as shown in the following example:
sqr myreport ? --17 @argfile.dat @@X2H44
In this example, the double hyphen and double at sign are interpreted as single literal characters.
Creating an Argument File from a Report You can create an argument file for one program from the output of another program. For example, you could print a list of account numbers to the file acctlist.dat, then run a second report with the following command:
sqr myreport sammy/baker @acctlist.dat
End acctlist.dat with a flag such as "END," as shown in the following example:
123344134455156664...
END
An SQR program could use the numbers in acctlist.dat with an INPUT command, as shown in the following example:
begin-procedure get_companynext:input $accountbatch-mode status = #status
if #status = 3goto end_proc
end-ifbegin-selectcust_num, co_name, contact, addr, city, state, zip
do print-page ! Print page with! complete company data
from customerswhere cust_num = $accountend-selectgoto next ! Get next account numberend_proc:end-procedure !get_company
29-6 Using the SQR Command Line

Using Batch Mode SQR lets you run reports in batch mode in VAX/VMS, UNIX, Windows NT, and Windows 95/98 operating systems.
VAX/VMSYou can run your SQR reports in batch mode using the supplied procedure, SUBMITSQR.COM. This DCL command procedure prompts you for the name of your report, your username/password, run-time arguments for the program (if supplied), then writes a temporary command procedure and submits it to the batch queue.
UNIX, Windows 95/98, and Windows NT/2000You can create UNIX shell scripts or MS-DOS batch (.bat) files to run SQR. Include the SQR command line in the file as you type it at the keyboard.
Summary� Enter a flag on the command line to modify program execution or output.
� Specify a command-line argument to supply information requested by an ASK or INPUT command.
� Specify multiple arguments in an argument file referenced on the command line.
� Use a question mark on the command line to prompt a user for input.
� Use batch mode to run multiple programs.
Using Batch Mode 29-7

29-8 Using the SQR Command Line

30 Working with HTML
This chapter explains how to generate HTML from an SQR program output and how to publish that output onto a Web site so that it will be available over an Intranet, Extranet, or the Internet.
This chapter also explains how to create a script that allows users browsing the Internet or an Intranet to request execution of an SQR program and view its output.
Note SQR makes it easy to generate professional quality HTML report files. It is not necessary to be an HTML “expert” to generate fine quality HTML output with SQR. Though, if you wish to create
customized HTML output using SQR’s HTML procedures, you may find it helpful to learn more about HTML. Many books and web sites offer information on this subject.
�
30-1

SQR Capabilities Available with HTMLThe SQR language has a rich set of available features, but some of these features are not available for HTML output due to the limitations of that format.
The SQR features supported under HTML include:
� Images.
� Font sizing. The SQR language specifies font sizes in points. HTML specifies font sizes in a value from one to six. A point size specified in an SQR program is mapped into an appropriate HTML font size.
� Font styles. The bold and underline font styles are supported.
� Centering.
The SQR features not currently supported for HTML output include:
� Font selection
� Bar codes
� Lines and boxes (Using -PRINTER:HT)
Producing HTML OutputYou can produce HTML output from an SQR programusing one of four methods. Each method provides a different level of HTML features.
� Running an unmodified SQR program with the command-line flag -PRINTER:EH makes its HTML 3.0 or 3.2 output viewable in a Web browser.
� Running an unmodified SQR program with the command-line flag -PRINTER:HT makes its HTML 2.0 output viewable in a Web browser.
� Using two HTML procedures—html_set_head_tags and html_set_body_attributes—allows you to define a title and background image for the HTML output. With this method, you must still use the command-line flag -PRINTER:HT.
� Using additional HTML procedures produces output with a full set of HTML features, including lists, tables, and hypertext links. With this method, you must still use the command-line flag -PRINTER:HT.
30-2 Working with HTML

The procedures used in the last two options are contained in a file called html.inc. To utilize HTML procedures, the SQR program must include the command:
#include 'html.inc'
The file HTML.INC is located in the SAMPLE (or SAMPLEW) directory. Use the command-line flag -I to specify its path.
HTML OutputWhen an SQR program is used to generate HTML output, that output contains HTML tags. An HTML tag is a character sequence that defines how information is displayed in a Web browser.
HTML output looks something like this:
<HTML><HEAD><TITLE>myreport.lis</TITLE></HEAD><BODY>
This code is just a portion of the HTML output that SQR generates. The tags it contains indicate the start and end points of HTML formatting.
For example, in the HTML code shown above, the tag <HTML> defines the output that follows as HTML output. The tags <TITLE> and </TITLE> enclose the report title—in this case, myreport.lis. The <BODY> tag indicates that the information following it comprises the body of the report.
Using -PRINTER:EHYou can generate Enhanced HTML output from an SQR program using the command-line flag -PRINTER:EH. This produces output that contains HTML formatting tags such as those shown in “HTML Output.” All output is displayed as fully formatted HTML 3.0 or 3.2 text. Using -PRINTER:EH, you can easily output high-quality HTML from SQR programs by just issuing a command similar to:
sqrw myreport.sqr sammy/baker@rome -PRINTER:EH
SQR Capabilities Available with HTML 30-3
You can control the version of HTML that is used by editing the [Enhanced-HTML] parameter FullHTML in the sqr.ini file. Set FullHTML equal to TRUE for HTML 3.2 or FALSE for HTML 3.0. Adjust this based upon the level of HTML your web browser supports. The -PRINTER:EH default output is HTML 3.0.
If you have existing .SPF files for which you want to generate Enhanced HTML output, it is not necessary to re-run your SQR program. You can invoke SQR Print (sqrp or sqrwp, depending on your platform) to output Enhanced HTML from .SPF files by using a command similar to:
sqrwp myreport.spf -PRINTER:EH
From within the SQR Viewer, you can also output this same high-quality HTML by selecting FileS→Save as HTML. It’s as simple as that. The HTML level output from the SQR Viewer is also determined by your sqr.ini file settings and has the same default value.
You can also generate Enhanced HTML files with precompiled SQR program files (“.sqt files”). Run the SQT file against SQR Execute with a command similar to the following:
sqrwt myreport.sqt sammy/baker@rome -PRINTER:EH
As is true of executing any .SQT file, you can run it against SQR (or SQRW, on Windows platforms) by including the -RT flag. To generate Enhanced HTML use the -PRINTER:EH flag in the command:
sqrw myreport.sqr sammy/baker@rome -RT -PRINTER:EH
Chapter 7, “Master/Detail Reports,” contains Program ex7a.sqr, which produces a simple master/detail report. By running it with -PRINTER:EH, you can produce HTML output which, when viewed from a web browser, is similar to the following example. Note that a “banner” frame is produced that contains the means to navigate through the report. You can enter a specific page number and press <Enter> on your keyboard (or click “Go!”). You can also use the navigation links to move through the pages in any order you wish—“First”, “Last”, “Previous”, or “Next”.
30-4 Working with HTML

-PRINTER:EH Output for Program ex7a.sqr (in Web browser)
With -PRINTER:EH you can also use additional flags such as -EH_CSV, -EH_CSV:file, -EH_Icons:dir, and -EH_Scale:{nn} to modify the ouput. These flags only work with -PRINTER:EH. -EH_CSV creates an additional output file in Comma Separated Value (CSV)format. -EH_CSV:file associates the CSV icon with the specified file. -EH_Icons:dir specifies the directory where the HTML should look for the referenced icons. -EH_Scale:{nn} sets the scaling factor from 50 to 200.
Setting HTML Attributes under -PRINTER:EHIn certain cases, you may want additional control over the Enhanced HTML code that is generated with -PRINTER:EH. SQR supports extensions that allow you to control the generated HTML. By using these extensions, you can specify features such as the HTML title, background color (or image), text color, and hyperlinks.
Enhanced HTML extensions also allow you to include your own HTML tags in the output. These tags are passed through to the output without change. You can use this feature to include advanced HTML capabilities such as JavaScript and <APPLET> tags.
SQR Capabilities Available with HTML 30-5

Specifying HTML TitleThe HTML page title normally appears on the caption bar of the browser window and is also used when creating a bookmark for the page. It is placed between the <TITLE> </TITLE> HTML tags. You can specify the title of the HTML page by using the %%Title extension at the beginning of your SQR program by entering:
Print-Direct Printer=html '%%Title Monthly Sales'
Specifying Background ColorYou can specify a background color for the pages generated with -PRINTER:EH by using the %%Body-BgColor extension. Enter code similar to the following at the beginning of your program:
Print-Direct Printer=html '%%Body-BgColor #0000FF'
To set the background color for the navigation bar, enter code similar to the following:
Print-Direct Printer=html '%%Nav-Body-BgColor #0000FF'
For information about specifying colors, see “Specifying HTML Colors” on page 30-8.
Specifying a Background Image for the ReportIf you want to use a background image for the report pages that enhanced HTML generates, insert %%Background extension at the beginning of your program:
Print-Direct Printer=html '%%Background tile.gif'
To set the background image for the navigation bar, enter code similar to the following:
Print-Direct Printer=html '%%Nav-BackgroundD:\jpegdir\house.jpg'
The background attribute can be any valid URL. If you do not specify Nav-Background while the body background is specified, then the background image specified for the body is used both in the body and in the navigation bar. If you want to prevent this and want no image to appear in the navigation bar, then you must specify in code similar to the following:
Print-Direct printer=html '%%Nav-Background EMPTY'
30-6 Working with HTML

Specifying HyperlinksThe %%Href extension specifies a hyperlink in your report. This extension allows you to make a text, number, image, or chart object into a link. The object can be the item on which you click to activate the link or it could be the location in the page where the link takes you. The latter is specified using the %%Anchor extension.
For example, examine the following piece of code:
Print-Direct Printer=html '%%Href #section2'Print 'ABC' ()...Print-Direct Printer=html '%%Anchor section2'Print 'XYZ' ()
In our example, clicking the ABC text on the page will jump to the XYZ text.
When using frames or multiple browser windows, you can control which frame displays the target of the link using the target option of the %%Href extension. For example, specify on one line
Print-Direct Printer=html '%%Href target="_top"http://www.brio.com'
Specifying Text ColorThe %%Color and %%ResetColor extensions change the color of text. The following code example demonstrates this capability:
If &Salary > 100000Print-Direct Printer=html '%%Color #FF0000'End-IfPrint &Salary ()If &Salary > 100000Print-Direct Printer=html '%%ResetColor'End-If
In our example, when the value of the column is over 100000, we print it in red. The %%Color extension affects all text (and number) printing from this point on. This is similar to the behavior of the ALTER-PRINTER command. A subsequent invocation of %%Color with a different color value sets the current color to the new color. To restore the color back to the default (normally, black) use the %%ResetColor extension.
SQR Capabilities Available with HTML 30-7

Specifying HTML Colors
Specifying color as an RGB hexadecimal value is the only way to designate color in SQR. Your browser documentation should contain a complete listing of supported colors and their hexadecimal values.
To specify color as an RGB hexadecimal value, enter a # character followed by six hexadecimal digits. The first two digits specify the intensity of the red, the next two specify the green, and the last two specify the blue. For example, green would be #00FF00.
Including Your Own HTML TagsThe SQR PRINT with CODE-PRINTER=HT provides a means for you to inject any text into the HTML output. SQR makes no attempt to check the text you are printing. This text could have anything that your browser understands.
Be careful however not to try to use this hook for formatting as it is very likely that your formatting will conflict with -PRINTER:EH enhanced HTML formatting. -PRINTER:EH enhanced HTML makes extensive use of HTML tables.
To gain full control over formatting, you can use the HTML procedures that are defined in html.inc and are documented in this chapter and in the SQR Language Reference.By invoking the html_on procedure, you instruct Enhanced HTML to perform no formatting at all. Then specify all formatting using the HTML procedures in html.inc or by using SQR PRINT with CODE-PRINTER=HT to insert HTML codes.
When you use SQR PRINT with CODE-PRINTER=HT, Enhanced HTML does not translate special symbols that are used in HTML tags such as ‘<', '>’, and ‘&’.
30-8 Working with HTML

Using -PRINTER:HTAnother method for generating HTML output from an SQR program is by running your program with the command-line flag -PRINTER:HT. Alternatively, you can make some simple modifications to your program. Add either DECLARE-PRINTER with the argument TYPE=HT or USE-PRINTER-TYPE HT.
With these methods, HTML output is generated as follows:
� All output displays as preformatted text, using the HTML <PRE> </PRE> tags.
� Text is positioned on the page by the position coordinates specified in the SQR program.
� Text is displayed using a fixed-width font such as Courier.
� Font sizes are mapped to an appropriate HTML font size.
� HTML reserved characters are mapped into the corresponding HTML sequence. The characters <, >, &, " are mapped into the character sequences <, >, &, and ", respectively. This prevents the Web browser from mistaking such output as an HTML sequence.
Chapter 7, “Master/Detail Reports,” contains Program ex7a.sqr produces a simple master/detail report. By running it with -PRINTER:HT, you can produce HTML output which, when viewed from a web browser, is similar to the following example. Note that a left frame is produced with hyperlinks to each page of the report. The right frame also features a navigation bar that appears at the top of every page in the report. The navigation bar permits you to move the first page and last page or move one page forward or back from your relative page viewing position.
SQR Capabilities Available with HTML 30-9

-PRINTER:HT Output for Program ex7a.sqr (in Web browser)
“Bursting” and Demand PagingWe have shown you how, with SQR, you can generate HTML format reports using -PRINTER:EH or -PRINTER:HT command-line flags. But what if you want your HTML files to be smaller in size for faster load time or divided on the basis of report page ranges? Or, you might want to preview a report’s Table of Contents in your web browser without generating an entire report. You can do all of these things by using -BURST:{xx} in conjunction with -PRINTER:EH or -PRINTER:HT.
Using -BURST:P (or BURST:P1) with -PRINTER:EH or -BURST:P1 with -PRINTER:HT, you can generate HTML ouput files burst by report page numbers—one report page per .htm file. (This is frequently referred to as demand paging.) So, if you have a 25 page report, it is divided into 25 separate .htm output files. Using -PRINTER:HT, you can also specify the report page ranges you want to see within an HTML file. For example, -BURST:P0,1,3-5 generates an HTML file containing only report page numbers 1, 3, 4 and 5. You can then focus on information that is truly of interest.
30-10 Working with HTML

Similarly, if you specify -PRINTER:HT with -BURST:T, only the Table of Contents file is generated. And, if you if you specify -PRINTER:HT with -BURST:S, report output is generated according to symbolic Table of Contents entries. Using -BURST:S, you can specify the numeric level to burst on. (for example, -BURST:S2 bursts on level 2). If you have used DECLARE-TOC and TOC-ENTRY commands in your SQR program, your Table of Contents will provide more detailed information than simple hyperlinked page numbers as illustrated in the following example.
As an example of how simple it is to use DECLARE-TOC and TOC-ENTRY to improve the information available in generated HTML output, we modified Program ex7a.sqr.
We added the following code to the beginning of Program ex7a.sqr:
begin-setupdeclare-toc common
for-reports=(all)dot-leader=yesindentation=2
end-declareend-setup
We also added code to the body of the program—in the main procedure immediately after the begin-select and Print ‘Customer Information’ (,1)
toc-entry text = &name
The HTML ouput from the modified Program ex7a.sqr is shown in the illustrations that follow.
SQR Capabilities Available with HTML 30-11

-PRINTER:HT with -BURST:T Output for Modified Program ex7a.sqr
-PRINTER:HT Output from Modified Program ex7a.sqr
30-12 Working with HTML

-PRINTER:EH Output Table of Contents File from Modified Program ex7a.sqr
SQR Capabilities Available with HTML 30-13

Setting Attributes with HTML ProceduresYou can use SQR’s HTML procedures html_set_head_tags and html_set_body_attributes to define a title and background image for a report. To use these procedures, the SQR program must include the file html.inc, as described in “Producing HTML Output” on page 30-2. You must also run the program using the command-line flag -PRINTER:HT.
These procedures must be called at the start of the program. For example:
do html_set_head_tags('<TITLE>Monthly Report</TITLE>')do html_set_body_attributes('BACKGROUND="/images/mylogo.gif"')
The first line of this code causes the title “Monthly Report” to be displayed. Specifically, the entire sequence ‘<TITLE>Monthly Report</TITLE>’ is passed as an argument to the procedure html_set_head_tags. Note that the argument is enclosed in single quotes.
The second line causes the background image mylogo.gif to be displayed for the Web page. Again, an argument is passed to the procedure. Note that the entire argument is enclosed in single quotes, while the file name and path are enclosed in double quotes.
Together, these two lines of code generate the following HTML output.
<HTML><HEAD><TITLE>My Report</TITLE></HEAD><BODY BACKGROUND="/images/mylogo.gif">
Using Additional HTML ProceduresUsing additional HTML procedures in the SQR program provides enhanced capabilities, including:
� Highlighting, including HTML physical tags and logical markup tags. (HTML physical tags include subscript, superscript, and strikethrough. HTML logical markup tags include citation, code, keyboard, and sample.)
� Headings
� Hypertext links
� Lists, including ordered lists, unordered lists, definition lists, directory lists, and menus
30-14 Working with HTML

� Paragraph formatting, including paragraph breaks, line breaks, and horizontal dividers
� Tables, including captions, rows, columns, and column headings
Output File TypesAn SQR report named myreport.sqr creates a FRAME file (myreport.htm) and report output file(s). The OUTPUT-FILE-MODE entry in the [Default-Setting] section of the SQR.INI file controls the report output file extensions. When set to SHORT, the report output files use the form myreport.hzz and when set to LONG, the files use the form myreport_zz.htm. The value of zz ranges from 00 to 99 and reflects the report number.
The FRAME file shows a list (hypertext links) of report pages in one frame and the report text in another frame. Each report output file contains a list of pages (hypertext links) at the end of the file. If myreport.sqr created multiple reports, then the FRAME file contains a link to each report output file. In addition, each report output file contains links to the other report output files that were created during the program run.
TestingHTML output produced by an SQR program can be previewed on a local system. This is a good way to test the output before it is published on a Web site.
To test a program’s output, open the file in the Web browser. If your Web browser supports the HTML FRAME construct, open the FRAME file (myreport_frm.htm); otherwise open the report output file (myreport.h00, myreport_00.htm).
SQR Capabilities Available with HTML 30-15

Using HTML Procedures in an SQR ProgramTo enhance the appearance of the HTML output, use HTML procedures in an SQR program.
An SQR program with these procedures generates output as described above in “Using Printer:HT,” with the following exceptions:
� The HTML <PRE> </PRE> tags are not used.
� Text is displayed using a proportional font such as Arial.
� Positioning values specified in the SQR program are ignored. Text, HTML tags, and other information are placed in the HTML output in the order in which they are generated by the SQR program.
� White space, such as spaces between PRINT commands, is removed.
Note See the SQR Language Reference for more information on the HTML procedures available with
SQR.
How to Use HTML ProceduresWhen using the HTML procedures, include the file html.inc, as described in “Producing HTML Output” on page 30-2. As before, you must run the SQR program with the -PRINTER:HT command-line flag.
The SQR program must also call the procedure html_on at the start of the program. The command that calls this procedure is:
do html_on
Additionally, the program must specify a large page length to prevent page breaks. SQR automatically inserts the page navigation hypertext links and an HTML <HR> tag at a page break. If a page break falls in the middle of an HTML construct, such as a table, the output can display incorrectly. Use the command DECLARE-LAYOUT with a large MAX-LINES setting to prevent page breaks from occurring.
�
30-16 Working with HTML

Positioning ObjectsWhen HTML procedures are turned on:
� HTML output is generated without the <PRE></PRE> tags.
� All position qualifiers in the SQR program are ignored, and program output and HTML tags are placed in the output file in the order in which they are generated, regardless of their position qualifiers.
� The text printed in a BEGIN-HEADING section does not appear at the top of the page. Since no positioning is done, text in the heading appears at the bottom.
� White space, such as spaces between PRINT commands is removed.
Thus, the HTML procedures must be used to format the report.
The following SQR code does not use the HTML procedures to format the output.
print 'Report summary:' (1,1)print 'Amount billed:' (3,1)print #amount_amount (3,20)print 'Total billed:' (4,1)print #total_amount (4,20)
The output from the sample code, as displayed by the Web browser, follows. Note that all the text appears on the same line with no spaces between the data.
With the HTML procedures for line breaks and a table, the output can be formatted properly.
Using HTML Procedures in an SQR Program 30-17

The following SQR code uses the procedure html_br to separate the first two lines of text. The procedures html_table, html_tr, html_td, and html_table_end are used to display the totals in a tabular format. Note that an empty string is passed to each procedure as it is called. This empty string is required if no other argument is passed.
print 'Report summary:' (1,1)do html_br(2,'')
do html_table('')do html_tr('')do html_td('WIDTH=300')print 'Amount billed:' (3,1)do html_td('')print #amount_amount (3,20)do html_tr('')do html_td('WIDTH=300')print 'Total billed:' (4,1)do html_td('')print #total_amount (4,20)do html_table_end
The output from the preceding code is displayed by the Web browser as follows.
30-18 Working with HTML

Table ProceduresWhen the HTML procedures are turned on, all positioning values in the SQR program are ignored. Thus, the position values cannot be used to display records in a tabular format. To display records in a tabular format use the following procedures:
� Tables – call html_table to start a table and html_table_end to end a table.
� Captions – call html_caption to mark the start of a table caption and html_caption_end to mark the end of the table caption. The end is typically implied and html_caption_end is not needed, but it can be used for completeness.
� Rows – call html_tr to mark the start of a new row in the table and html_tr_end to mark the end of the row. The end is typically implied and html_tr_end is not needed, but it can be used for completeness.
� Column headings –call html_th to mark the start of a column heading and html_th_end to mark the end of the column heading. The end is typically implied and html_th_end is not needed, but it can be used for completeness.
� Columns –call html_td to mark the start of a column and html_td_end to mark the end of the column. The end is typically implied and html_td_end is not needed, but it can be used for completeness.
The following SQR program uses these table procedures to display information in a tabular format.
Program ex30a.sqr
#include 'html.inc'
begin-programdo main
end-program
! set a large page length to prevent page breaksbegin-setup
declare-layout defaultmax-lines=750
end-declareend-setup
begin-procedure main! turn on HTML procedures
Using HTML Procedures in an SQR Program 30-19

do html_on! start the table and display the column headingsdo html_table('border')do html_caption('')print 'Customer Records' (1,1)do html_tr('')do html_th('')print 'Cust No' (+1,1)do html_th('')print 'Name' (,10)! display each recordbegin-select
do html_tr('')do html_td('')
cust_num (1,1,6) edit 099999do html_td('')
name (1,10,25)next-listing skiplines=1 need=1
from customersend-select! end the tabledo html_table_endend-procedure
Output for Program ex30a.sqr
30-20 Working with HTML
HeadingsThe heading procedures display text using heading levels such as those used in this book. The available heading levels range from one to six; a first-level heading is the highest. To use the heading procedures, call the appropriate heading procedure before the text is output. After the text is output, call the corresponding end procedure.
The following SQR code displays text as a second-level heading:
do html_h2('')print 'A Level 2 Heading' (1,1)do html_h2_end
HighlightingThe highlighting procedures provide the ability to display text in the various HTML highlighting styles. Highlighting is also called logical markup.
To use the highlighting procedures, call the appropriate highlighting procedure before the text is output. After the text is output, call the corresponding end procedure.
The following highlighting procedures are available:
� Blink – call html_blink and html_blink_end.
� Citation – call html_cite and html_cite_end.
� Code – call html_code and html_code_end.
� Keyboard –call html_kbd and html_kbd_end.
� Sample – call html_sample and html_sample_end.
� Strike – call html_strike and html_strike_end.
� Subscript –call html_sub and html_sub_end.
� Superscript –call html_sup and html_sup_end.
The following SQR code displays text in the subscript style:
print 'Here is ' (1,1)do html_sub('')print 'subscript' ()do html_sub_endprint ' text' ()
Using HTML Procedures in an SQR Program 30-21

Hypertext LinksThe hypertext link procedures provide the ability to create hypertext links and hypertext link anchors. When the user clicks on the hypertext link, the Web browser switches to the top of the specified HTML document, to a point within the specified document, or to a link anchor within the same document. A hypertext link can point to the home page of a Web site, for example.
To insert a hypertext link, use the procedure html_a, output the information that is to become the hypertext link, and use the procedure html_a_end to mark the end of the hypertext link. Two useful attributes for the procedure html_a, are the HREF and NAME attributes. Use the HREF attribute to specify where the hypertext link points to. Use the NAME attribute to specify an anchor to which a hypertext link can point. These attributes are passed as arguments to the procedure html_a.
The following SQR code creates an anchor and two hypertext links. The anchor is positioned at the top of the document. The first hypertext link points to the HTML document home.html. The second hypertext link points to the anchor named TOP in the current document. Note the pound sign (#) in the argument, which indicates that the named anchor is a point within a document. The third link points to an anchor named POINT1 in the document mydoc.html.
do html_a('HREF=home.html')print 'Goto home page' ()do html_a_end
do html_a('NAME=TOP')do html_a_end
print 'At the top of document' ()do html_br(40, '')print 'At the bottom of document' ()do html_p('')
do html_a('HREF=#TOP')print 'Goto top of document' ()do html_a_end
do html_a ('HREF=mydoc.html#POINT1')print 'Goto point1 in mydoc.html' ()do html_a_end
30-22 Working with HTML

ImagesAn image can be included in an HTML output with the PRINT-IMAGE command or the procedure html_img. Both of these produce the HTML <IMG> tag.
The PRINT-IMAGE command displays images for all printer types but only allows you to specify the image type and source. The html_img procedure displays images only for HTML printer type but it allows you to specify any of the attributes available for an HTML <IMG> tag.
For HTML output, only files of the GIF or JPEG format can be used. With PRINT-IMAGE, use the argument TYPE=GIF-FILE or TYPE=JPEG-FILE, respectively.
ListsThe list procedures display lists. To use these procedures, call the appropriate procedure before the list is output. After the list is output, call the corresponding end procedure.
The following list procedures are available:
� Definition (for lists of terms and their definitions) – call html_dl and html_dl_end.
� Directory – call html_dir and html_dir_end.
� Menus – call html_menu and html_menu_end.
� Ordered (numbered or lettered) lists – call html_ol and html_ol_end.
� Unordered (bulleted) lists – call html_ul and html_ul_end.
To display a list, except for the definition list, call the appropriate list procedure before starting the output. Call html_li to identify each item in the list; you can also call html_li_end for completeness. After specifying the output, call the corresponding end procedure.
Using HTML Procedures in an SQR Program 30-23
The following code displays an ordered list:
do html_ol('')do html_li('')print 'First item in list' (1,1)do html_li_end
do html_li('')print 'Second item in list' (+1,1)do html_li_end
do html_li('')print 'Last item in list' (+1,1)do html_li_enddo html_ol_end
To display a definition list call html_dl before starting the output. Call html_dt to identify a term and html_dd to identify a definition. After specifying the output, call html_dl_end. You can also call html_dd_end and html_dt_end for completeness.
The following code displays a definition list:
do html_dl('')do html_dt('')print 'A daisy' (1,1)do html_dt_enddo html_dd('')print 'A sweet and innocent flower' (+1,1)do html_dd_enddo html_dt('')print 'A rose' (+1,1)do html_dt_enddo html_dd('')print 'A very passionate flower' (+1,1)do html_dd_enddo html_ol_end
30-24 Working with HTML

Paragraph FormattingThe HTML procedures provide various paragraph-formatting capabilities. To use these procedures, call the appropriate paragraph procedure before the list is output.
The following procedures are available:
� Paragraph breaks – call html_p to mark the start of a paragraph and html_p_end to mark the end. Many HTML constructs imply an end of paragraph; thus, the procedure html_th_end is not needed, but it can be used for completeness.
� Line breaks – call html_br to insert a line break.
� Horizontal dividers (usually a sculpted line) – call html_hr to insert a horizontal divider.
� Prevent line wrapping – call html_nobr to mark the start of a section of text that cannot be wrapped by the Web browser to fit the width of the browser window. Use the procedure html_nobr_end to mark the end.
The following code uses the paragraph-formatting procedures to format text into paragraphs:
print 'Here is some normal text' (1,1)do html_p('ALIGN=RIGHT')print 'Here is right aligned text' (+1,1)do html_br(1,'')print 'and a line break' (+1,1)do html_p_enddo html_hr('')do html_nobr('')print 'A very long line of text that cannot be wrapped' (+1,1)do html_nobr_end
Using HTML Procedures in an SQR Program 30-25

User-Defined HTMLYou can incorporate your own HTML tags into the HTML output. To do so, use the PRINT command with the argument CODE-PRINTER=HT.
Text printed with this argument is placed only in the HTML output generated when the HTML printer type is specified. With all other printer types, the text is not placed in the output. In addition, the specified text is placed directly in the HTML output without any modifications, such as the mapping of reserved characters.
The following SQR code uses the HTML <B> tag to print bold text:
print '<B>' () code-printer=htprint 'Bold text' ()print '</B>' () code-printer=ht
Modifying an Existing SQR ProgramIn this section, an existing SQR program, ex12a.sqr, is modified to use HTML procedures. (The modified program is named Program ex30b.sqr). First, examine the output from ex12a.sqr when this program is run without modifications using the command-line flag -PRINTER:HT. Three HTML files are generated: ex12a.htm, ex12a_frm.htm, and ex12a_toc.htm. If your web browser supports HTML frames, after opening ex12a_frm.htm, you should see the following:
30-26 Working with HTML

Modifying an Existing SQR Program 30-27
Program ex30b.sqr
#include 'html.inc'
begin-setupdeclare-layout default
max-lines=10000end-declare
end-setup
begin-programdo main
end-programbegin-procedure main
do html_on
print $current-date (1,1) edit 'DD-MON-YYYY'do html_p('')
do html_table('BORDER')do html_tr('')do html_th('WIDTH=250')print 'Name' (3,1)do html_th('WIDTH=120')print 'City' (,32)do html_th('WIDTH=60')print 'State' (,49)do html_th('WIDTH=90')print 'Total' (,61)
begin-selectdo html_tr('')do html_td('')
name (,1,30)do html_td('')
city (,+1,16)do html_td('')
state (,+1,5)do html_td('ALIGN=RIGHT')
tot (,+1,11) edit 99999999.99next-listing no-advance need=1let #grand_total = #grand_total + &tot
from customersend-select
do html_tr('')do html_tr('')do html_td('COLSPAN=3 ALIGN=RIGHT')
print 'Grand Total' (+1,40)do html_td('ALIGN=RIGHT')
print #grand_total (,55,11) edit 99999999.99do html_table_end
end-procedure ! main

In this code, a DECLARE-LAYOUT command with a large page length setting specified in the MAX-LINES argument is issued to prevent page breaks.
The procedure html_on is used to turn on the HTML procedures.
The procedures html_table, html_tr, html_td, and html_th are used to position the information in a tabular format. Note the arguments passed to the HTML procedures. BORDER produces the sculpted border seen in the output that follows. WIDTH defines the width of the columns. ALIGN right-aligns the text in the Total column. COLSPAN causes the label Grand Total to be spanned beneath three columns of data.
Instead of using a HEADING section, the procedure tr_th is used to display column headings.
Output for Program ex30b.sqr
30-28 Working with HTML

Publishing the ReportA report generated by an SQR program can be published onto the Web site. Thereafter, the user of a Web browser can view the report over the Internet or an Intranet by specifying the report’s URL address.
To publish a report:
1. Run the SQR program.
2. Determine where the report output will be stored on the Web server. The directory must be one that is pointed to by a URL on your server. See your Webmaster for more details on creating a URL.
3. Copy the generated HTML output files to the chosen directory on the Web server. If the output is generated on a client PC, use a utility such as FTP to transfer the HTML output files to the Web server.
Note If you choose the zip file option, a zip file is created for the generated HTML output in addition to the files being placed in the file system.
4. Create hypertext links in a home page or other Web site that point to the report files so users browsing the network can navigate to the report and view it.
To support older Web browsers that do not support the HTML FRAME construct, create two separate hypertext links—one pointing to the FRAME file (.htm) and labeled to indicate frame version, and another pointing to the report output file and labeled to indicate nonframe version. If the report was created with HTML procedures, however, it should only contain a single page. In that case, a listing of report pages contained in the FRAME file would not be needed. Only the report output file would be required for publication on a Web site.
Viewing the Published ReportYou use a Web browser to view a report that is published onto a Web site. To do this, specify a URL address in your Web browser, for example: http://www.myserver.com/myreport.htm.
Publishing the Report 30-29

Publishing Using an Automated ProcessThe Webmaster can create a program that automates the publishing process. The program should run the SQR program and copy the output to the appropriate location. You can even launch the program using a scheduling utility to automatically run the program and publish it on the Web site at specified times. See the documentation of your particular scheduling software for more details.
The sample Bourne shell program that follows performs the following tasks:
� Sets the necessary environment variables.
� Runs the SQR program /usr2/reports/myreport.sqr and generates the output files /usr2/reports/myreport.htm and /usr2/reports/myreport.h00.
� Specifies /dev/null as the source of standard input to prevent the program from hanging if it requires input.
� Redirects the standard output to /usr2/reports/myreport.out to capture any status messages. The output file can be viewed at a later time to diagnose any problems.
� Copies the generated report files to the directory /usr2/web/docs to publish it on the Web server. (Use the directory name appropriate for your server.)
Here is the code:
#! /bin/sh
# set the appropriate environment valuesORACLE_SID=oracle7; export ORACLE_SIDORACLE_HOME=/usr2/oracle7; export ORACLE_HOMESQRDIR=/usr2/sqr/bin; export SQRDIR
# invoke the SQR programsqr /usr2/reports/myreport.sqr orauser/orapasswd \
-PRINTER:ht -I$SQRDIR \> /usr2/reports/myreport.out 2>&1 < /dev/null
# copy over the outputcp /usr2/reports/myreport.htm /usr2/web/docscp /usr2/reports/myreport.h00 /usr2/web/docs
30-30 Working with HTML

Note The environment variables and the file names must be adjusted to fit your particular environment.
Publishing Using a CGI ScriptIn the CGI script method, the user of a Web browser can run an SQR report and view the output. One way to allow the user to run an SQR report is by providing a fill-out form.
When a user runs an SQR report through a Web site, the following process occurs:
1. The user of the Web browser navigates to a fill-out form.
2. The user enters information on the fill-out form and presses a button to invoke the CGI script.
3. The CGI script runs the SQR program.
4. The CGI script copies the report output file to the standard output.
5. The user views the report.
This process requires the following items:
� The fill-out form
� The CGI script
� The SQR program
�
Publishing the Report 30-31

30-32 Working with HTML
Creating the Fill-Out FormThis section explains how to create an HTML fill-out form that allows the user to enter some values and launch the request.
For more information on implementing an HTML fill-out form, see HTML documentation available in print or on the Internet.
The following HTML code defines a fill-out form with three radio buttons and a submit button. The radio buttons allow the user to specify the sorting criteria. The submit button invokes the CGI script.
Here is the HTML code:
<HTML><TITLE>View Customer Information</TITLE><FORM METHOD=POST ACTION="/cgi-bin/myreport.sh"><B>Select the Field to Sort By</B><P><DIR><INPUT TYPE="radio" NAME="rb1" VALUE="cust_num" CHECKED>Number<BR><INPUT TYPE="radio" NAME="rb1" VALUE="name"> Name<BR><INPUT TYPE="radio" NAME="rb1" VALUE="city"> City<BR><P><INPUT TYPE="submit" NAME="run" VALUE="Run Report"></DIR></FORM></HTML>
The FORM METHOD tag specifies that the CGI script /cgi-bin/myreport.sh will be invoked when the submit button is pressed. The URL address of the CGI script must be adjusted to fit your particular environment.
In the INPUT tags, the attribute TYPE=“radio” defines a radio button. The VALUE attribute of the selected radio button is passed by way of the CGI script to the SQR program, as shown in the following example.
The fill-out form looks like the form shown here.

Creating the CGI ScriptThe CGI script is launched when a user makes a request from a fill-out form. A CGI script can be any executable program. We do not recommend that SQR be called directly as a CGI script—a Perl script, a shell script, or a C program all provide simpler routines for processing as a CGI script.
For more information on implementing a CGI script, see the HTML documentation available in print or on the Internet.
The CGI script performs the following tasks:
� Reads the contents of the standard input stream and parses it to obtain the values entered on the fill-out form. If the fill-out form has no input fields, this step is not required.
� Identifies the output as being in HTML format by outputting the string “Content-type: text/html” along with an extra empty line to the standard output stream.
� Invokes the SQR program. Values entered by the user on the fill-out form are passed to the SQR program by way of the CGI script and the command line.
� Outputs the generated .LIS file to the standard output stream. The .HTM file is not used because it points to the .LIS file with a relative URL address. The relative address does not tell the Web browser where to find the .LIS file. We also recommend that you make provisions within your SQR program to output an error message.
The following Bourne shell is an example of a CGI script.
#! /bin/sh
# set the appropriate environment valuesORACLE_SID=oracle7; export ORACLE_SIDORACLE_HOME=/usr2/oracle7; export ORACLE_HOMESQRDIR=/usr2/sqr/bin; export SQRDIR
# identify the output as being HTML formatecho "Content-type: text/html"echo ""
# get values from fill-out form using the POST methodread TEMPSTRSORTBY=`echo $TEMPSTR | sed "s;.*rb1=;;s;&.*;;"`
# invoke the SQR programsqr7 /usr2/reports/myreport.sqr orauser/orapasswd \
-PRINTER:ht -f/tmp/myreport$$.lis -I$SQRDIR "$SORTBY" \
Publishing the Report 30-33

> /tmp/myreport$$.out 2>&1 < /dev/nullif [ $? -eq 0 ]; then
# display the outputcat /tmp/myreport$$.lis
else# error ocurred, display the errorecho "<HTML><BODY><PRE>"echo "FAILED TO RUN SQR PROGRAM"cat /tmp/myreport$$.outecho "</PRE></BODY></HTML>"
fi
# remove temp filesrm /tmp/myreport$$.*
This script first sets the necessary environment variables. Next, it outputs the string Content-type: text/html along with an extra empty line to the standard output stream to identify the text as being HTML format.
The script retrieves the value of the selected radio button into the variable SORTBY. The value is passed to the SQR program on the command line.
The script runs the SQR program. The report file /usr2/reports/myreport.sqr is used and the file /tmp/myreport$$.lis is generated. In addition, the script redirects the standard input from /dev/null to prevent the program from hanging if the program requires any input. It also redirects the standard output to /tmp/myreport$$.out to capture any status messages. The $$ is the process ID of the program and is used as a unique identifier to prevent any multiuser problems.
The script then copies the generated report file to the standard output stream. If an error occurs it outputs the status message file instead to allow the user to view the status messages. Finally, it deletes any temporary files.
30-34 Working with HTML
Passing Arguments to the SQR ProgramThe SQR program must be modified to accept values entered by the user on the fill-out form.
The following code is the procedure main from Program ex30b.sqr. It has been modified to use the SORT BY value passed from the CGI script. The $sortby variable is obtained from the command line with an INPUT command and used as dynamic variables in the ORDER BY clause. The modified lines are shown in bold.
begin-procedure maininput $sortby 'Sort by' type=chardo html_ondo html_table('')do html_tr('')do html_th('')print 'Name' (3,1)do html_th('')print 'City' (,32)do html_th('')print 'State' (,49)begin-select
do html_tr('')do html_td('')
name (,1,30)do html_td('')
city (,+1,16)do html_td('')
state (,+1,5)next-listing no-advance need=1let #grand_total = #grand_total + &tot
from customersorder by [$sortby]end-select
Publishing the Report 30-35

Summary� Running an existing SQR program with the -PRINTER:EH or -PRINTER:HT
command-line flag produces HTML output.
� Modifying an SQR program with the argument TYPE=HT of the DECLARE-PRINTER command or USE-PRINTER-TYPE HT also produces HTML output.
� An SQR program run that produces HTML output creates a FRAME file (myreport.htm) and report output file(s) (myreport.h00, myreport_00.htm).
� To generate customized HTML output, use HTML procedures. These procedures are contained in a file called html.inc.
� To use these HTML procedures, include the file html.inc in your SQR program and call the procedure html_on.
� The command PRINT-IMAGE and the HTML procedure <IMG> provide support for GIF and JPEG images.
� To publish an SQR report on a Web server, run the SQR program and copy the output file to the Web server.
� To automate the publishing process, use a shell script or a scheduling utility.
� To allow users to request an SQR report, use a CGI script and a fill-out form.
� A fill-out form allows users to request an SQR program and specify values such as sorting criteria.
� A CGI script invokes the SQR program and passes values entered in the fill-out form to it.
30-36 Working with HTML

31 Tables of Contents
This chapter describes how to create Tables of Contents for your reports. In the simplest form, you accomplish this through the use of two SQR commands: DECLARE-TOC and TOC-ENTRY.
DECLARE-T0CDECLARE-TOC defines a Table of Contents and its attributes. When generating multiple reports and Tables of Contents from one SQR program, you can also use the TOC argument of the DECLARE-REPORT command.
The DECLARE-TOC command must be issued in your program’s SETUP section similar to the following example:
begin-setupdeclare-toc toc_name
for-reports = (all)dot-leader = yesindentation = 2
end-declare...
end-setup
After the DECLARE-TOC command, specify a Table of Contents name. The FOR-REPORTS argument allows you to specify the reports within the SQR program that use this Table of Contents. (Use (all) if you want all the reports to use one Table of Contents.) Specifying individual report names is only necessary when you are generating multiple reports with different TOCs from one program. DOT-LEADER specifies whether or not a dot leader will precede the page number. (The default setting is NO and the DOT-LEADER is
31-1

suppressed in all HTML output except when -BURST:T with -PRINTER:HT are also specified.) INDENTATION specifies the number of spaces that each level will be indented by. (The default setting is 4.)
DECLARE-TOC also supports procedures frequently used for setup and initialization purposes: BEFORE-TOC, AFTER-TOC, BEFORE-PAGE, and AFTER-PAGE. BEFORE-TOC specifies a procedure to be executed before the Table of Contents is generated. If no Table of Contents is generated, the procedure does not execute. AFTER-TOC specifies a procedure to be executed after the Table of Contents is generated. If no Table of Contents is generated, the procedure does not execute. BEFORE-PAGE specifies a procedure to be executed at the start of every page. AFTER-PAGE specifies a procedure to be executed at the end of each page.
TOC-ENTRYTOC-ENTRY places an entry into the Table of Contents and takes the mandatory argument TEXT which specifies the text to be placed in the Table of Contents. Legal text includes text literals, variables, and columns. To include levels in your Table of Contents, use the LEVEL argument, which specifies the level at which to place the text. (If this argument is not specified, the previous level’s value is used.)
If you are writing programs that generate multiple reports, you have some options to choose from. As previously mentioned, you can use the FOR-REPORTS argument of the DECLARE-TOC command to identify the reports to which the DECLARE-TOC applies. Alternatively, you can use the TOC argument of the DECLARE-REPORT command to specify the name of the Table of Contents you want the report to use. Your program can have multiple DECLARE-TOC statements and multiple DECLARE-REPORT statements. However, you must include the FOR-TOCS argument in your DECLARE-TOC statements or the TOC argument in your DECLARE-REPORT statements.
31-2 Tables of Contents

To specify the name of the Table of Contents applicable to a given report using the TOC argument of the DECLARE-REPORT command, include code similar to the following in the SETUP section of your program:
begin-setupdeclare-report
toc = toc_nameend-declare
.
.
.end-setup
In Chapter 28, “Printing Issues,” we modified ex7a.sqr to use the DECLARE-TOC and TOC-ENTRY commands. Then, we generated HTML output from the modified program using the -PRINTER:EH and -PRINTER:HT command-line flags. Under HTML, the Table of Contents file is a hyper-linked point of navigation for the online report.
But, you may also want to generate ouput files for printing reports on paper. And the Table of Contents features work here as well. To test this, run the modified version of ex7a.sqr program from Chapter 28, “Printing Issues,” and print it from an .LIS file (or use -PRINTER:WP on Windows). The Table of Contents ouput contain the traditional dot leaders and necessary page numbers relating to a hardcopy report.
Cust.sqrThe following program is based on cust.sqr, which is located in the SAMPLE (or SAMPLEW) directory. The program identifies the Table of Contents with the specific name cust_toc. The dot leader is turned ON. Indentation is set to 3. One Table of Contents level is set using the TOC-ENTRY command’s LEVEL=1 argument. The BEFORE-PAGE and AFTER-TOC arguments of the DECLARE-TOC command are used to print simple messages here.
Cust.sqr 31-3

Table of Contents Sample Program #1
begin-setupdeclare-toc cust_toc
for-reports=(all)dot-leader=yesindentation=3after-toc=after_tocbefore-page=before_page
end-declareend-setup
begin-programdo main
end-program
begin-procedure after_tocposition (+1,1)print 'After TOC' () boldposition (+1,1)
end-procedure
begin-procedure before_pageposition (+1,1)print 'Before Page' () boldposition (+1,1)
end-procedure
begin-procedure mainbegin-select
print 'Customer Info' ()print '-' (+1,1,62) Fill
name (+1,1,25)toc-entry text = &name level = 1
cust_num (,35,30)city (+1,1,16)state (,17,2)phone (+1,1,15) edit (xxx)bxxx-xxxx
position (+2,1)from customersorder by nameend-selectend-procedure ! main
begin-heading 3print $current-date (1,1) Edit 'DD-MON-YYYY'page-number (1,69) 'Page '
end-heading
The following program is also based on cust.sqr. It is similar to the previous program but declares two Table of Contents levels. This program also creates Table of Contents specific headings and footings. The FOR-TOCS argument of
31-4 Tables of Contents

the BEGIN-HEADING and BEGIN-FOOTING commands allows you to specify, by name, the Table of Contents to which the particular heading or footing section applies. So, if your program is generating multiple reports with multiple Tables of Contents, you can apply unique or common headings and footings to reports and Tables of Contents. The Table of Contents heading of this program prints Table of Contents and the page number. The page numbers in the Table of Contents print as roman numerals. The Table of Contents footing prints Company Confidential.
Table of Contents Sample Program #2
begin-setupdeclare-report custend-declare
declare-toc cust_tocfor-reports=(cust)dot-leader=yesindentation=3after-toc=after_tocbefore-page=before_page
end-declare
declare-variableinteger #num_tocinteger #num_page
end-declareend-setup
begin-programuse-report custdo main
end-program
begin-procedure after_tocposition (+1,1)print 'After TOC' () boldposition (+1,1)
end-procedure
begin-procedure before_pageposition (+1,1)print 'Before Page' () boldposition (+1,1)
end-procedure
begin-procedure mainbegin-select
print 'Customer Info' ()print '-' (+1,1,62) Fill
Cust.sqr 31-5

name (+1,1,25)toc-entry text = &name level = 1
cust_num (,35,30)city (+1,1,16)state (,17,2)phone (+1,1,15) edit (xxx)bxxx-xxxx
position (+2,1)do orders(&cust_num)position (+2,1)
from customersorder by nameend-selectend-procedure ! main
begin-procedure orders (#cust_num)let #any = 0
begin-selectif not #any
print 'Orders Booked' (+2,10)print '-------------' (+1,10)let #any = 1
end-ifb.order_numb.product_codeorder_date (+1,10,20) Edit 'DD-MON-YYYY'description (,+1,20)
toc-entry text = &description level=2
c.price * b.quantity (,+1,13) Edit $$$$,$$0.99from orders a, ordlines b, products cwhere a.order_num = b.order_num
and b.product_code = c.product_codeand a.cust_num = #cust_num
order by b.order_num, b.product_codeend-selectend-procedure ! ordersbegin-footing 3for-tocs=(cust_toc)print 'Company Confidential' (1,1,0) center
print $current-date (1,1) Edit 'DD-MON-YYYY'end-footing
begin-heading 3for-tocs=(cust_toc)print 'Table of Contents' (1,1) bold centerlet $page = roman(#page-count)print 'Page ' (1,69)print $page ()
end-heading
begin-heading 3print $current-date (1,1) Edit 'DD-MON-YYYY'page-number (1,69) 'Page '
end-heading
31-6 Tables of Contents
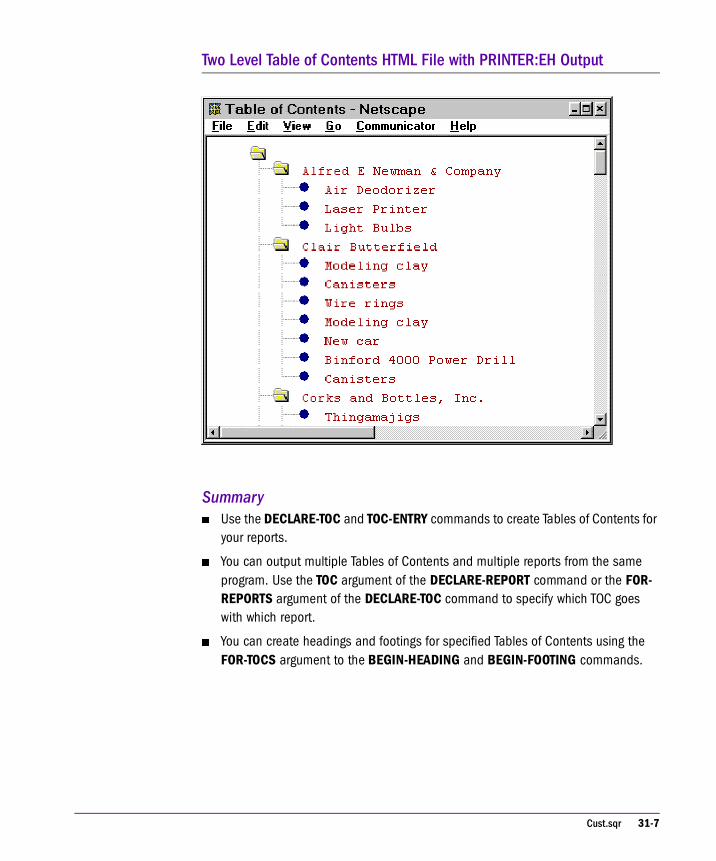
Two Level Table of Contents HTML File with PRINTER:EH Output
Summary� Use the DECLARE-TOC and TOC-ENTRY commands to create Tables of Contents for
your reports.
� You can output multiple Tables of Contents and multiple reports from the same program. Use the TOC argument of the DECLARE-REPORT command or the FOR-REPORTS argument of the DECLARE-TOC command to specify which TOC goes with which report.
� You can create headings and footings for specified Tables of Contents using the FOR-TOCS argument to the BEGIN-HEADING and BEGIN-FOOTING commands.
Cust.sqr 31-7

31-8 Tables of Contents

Index
Symbols
! (comment character), 2-3
#DEBUG, 25-2
#DEFINE, 27-1
#ELSE, 25-3
#ENDIF, 25-3
#IF, 25-3, 27-1
#if, 27-2
#IFDEF, 25-3, 27-1
#IFNDEF, 25-3
#INCLUDE, 27-1
#include, 27-2
#page-count, 16-7
$current-date, 5-11
$sqr-locale, 23-3
$sqr-program, 16-7
$username, 16-7
.SQT files, 27-1
A
ALTER-LOCALE, 23-2, 23-3
ALTER-PRINTER, 12-4
alter-printer, 14-1
argument files, 29-4
argument passingproaplvch, 17-1
arguments
command-line, 29-3
creating file from reports, 29-6
used with ASK or INPUT, 29-3
arrays, 8-2, 13-6
multiple, 8-8
performance issues, 26-7
ASK, 16-8, 27-1, 27-2, 29-3
ask, 16-8
B
background color for the navigation bar, 30-6
background image for the navigation bar, 30-6
bar codes, 12-10
batch mode, 29-7
BATCH-MODE argument, 29-3
BEGIN-FOOTING, 2-1, 31-4
FOR-REPORTS option with, 18-4
BEGIN-HEADING, 2-1, 31-4
FOR-REPORTS option with, 18-4
BEGIN-PROCEDURE, 3-3
BEGIN-PROGRAM, 1-1
BEGIN-SELECT, 3-1, 7-2
order by clause with, 5-2
BEGIN-select, 7-1
begin-select, 7-4
with HAVING clause, 17-7
BEGIN-SQL, 19-2
on-error option with, 19-3
bind variables, 16-2
Index 1

bitmaps, 12-4, 15-2
bmp-file, 12-4, 15-2
BOLD option
with PRINT, 14-3
bottom-margin option, 6-3
break logicbrklogic, 5-1
breaks, nesting, 5-5
Brio.Portal, 24-11
-BURST
{xx}, 30-10
P, 30-10
S, 30-11
T, 30-11
Bursting, 30-10
C
center option, 14-2, 14-4
CGI script, 30-31, 30-33
character grid, 1-4, 6-2, 9-3, 14-1
chartscharts15, 13-1
CODE-PRINTER qualifier, 30-26
code-printer qualifier, 15-1
columnar data, printing, 9-1
command line
using reserved characters on, 29-6
using special characters, 29-5
command-line
arguments, 29-3
command-line flags, 28-1, 29-2
comments, 2-3
compiling SQR programs
performance issues, 26-16
compilingcmplch, 27-1
connectivity, 1-2
counters, 9-3
CREATE-ARRAY, 8-4
cross-tabular reportsctrptch, 8-1
D
data-array option, 13-6
DATA-ARRAY-COLUMN-COUNT argument, 13-6
DATA-ARRAY-ROW-COUNT argument, 13-6
database inserts, 19-2
date arithmetic, 22-2
date variables, 22-8
dateadd function, 22-2
datediff function, 22-2
datenow function, 22-2
dates, 22-1
comparing, 22-2
converting from strings, 22-2, 22-5
converting to strings, 22-2, 22-5
formats, 22-4
datetostr function, 22-2
DB2, 29-1
DDL (Data Definition Language)dmlddlch, 19-1
-DEBUG flag, 25-2
debugging SQR programs, 25-1
declarations, 6-1
DECLARE-CHART
title option with, 13-5
DECLARE-IMAGE, 12-6
DECLARE-LAYOUT, 6-2, 12-2
defining page width with, 9-3
MAX-COLUMNS option with, 6-4
MAX-LINES option with, 6-4
orientation option with, 6-4
paper-size option with, 6-3
setting margins with, 6-3
DECLARE-PRINTER, 28-1, 28-2, 28-3
for-reports option with, 28-3
type option with, 28-3
declare-printer, 15-1
DECLARE-REPORT, 31-1
PRINTER-TYPE option with, 28-3
DECLARE-TOC, 31-1
2 Index

delete, 16-6
Demand Paging, 30-10
DML (Data Manipulation Language)dmlddlch, 19-1
document markers, 10-1, 12-8
DOCUMENT section, 10-1
document section, 10-1, 12-8, 12-9
dynamic SQL, 16-6
dynamic SQLdynamsqlx2, 16-3
dynamic variables, 16-4, 16-5
E
edit masks
case sensitivity, 22-8
dates, 22-6
ELSE, 5-12
encode, 11-2
end-footing, 2-3
end-heading, 2-3
end-if, 5-12
end-procedure, 3-3
END-PROGRAM, 1-1
end-program, 1-3
end-select, 3-3
end-setup, 6-1
Enhanced HTML, 30-3
eps-file, 12-4, 15-2
EVALUATE, 8-5
exclamation mark, 2-3
external files, 19-2
F
-f command-line flag, 28-3, 28-4
fill option, 5-11, 12-2
fill-out form, 30-32
flags, 1-2
floor function, 17-6
FONT option, 12-4
footing, 2-3
FOR-REPORTS option
with DECLARE-PRINTER, 28-3
for-reports option, 18-4
functions, 17-6
G
GIF format, 30-23
global variables, 17-2
GRAPHIC, 12-3
graphics, 12-1
H
having clause
with BEGIN-SELECT, 17-7
heading, 2-1, 2-3
headings with HTML, 30-14, 30-21
highlighting with HTML, 30-14, 30-21
horz-line option, 12-3
hpgl-file, 12-4, 15-2
HTML FRAME construct, 30-15, 30-29
HTMLhtml, 31-1
hypertext links, 30-14, 30-22
hyphens, 5-13
I
IF, 5-12
if, 7-4
images
with HTML, 30-23
indentation, 3-3
Informix, 29-1
initcap function, 24-6
INPUT, 15-3, 22-6, 29-3
Input, 16-8
input, 27-2
Index 3

insert, 16-6, 19-3
Integrating Brio.Report 6.0, 24-11
interoperabilityinteroperability, 24-1
J
joins, 17-7
performance issues, 26-3
JPEG format, 30-23
K
-KEEP command-line flag, 28-2
L
LaserJet printers, 12-5, 15-2
LAST-PAGE, 2-3
left-margin option, 6-3
LET, 11-2
let
use of functions in, 24-8
level keyword, 5-5
lists with HTML, 30-14, 30-23
LOAD-LOOKUP, 26-3
local procedures, 17-2
local variables, 17-1
locales
switching, 23-3
localeslocales, 23-1
LOOKUP, 26-3
loops, 3-4
M
mailing labels, 9-1
master/detail reportsmdch, 7-1
mod function, 17-6
MS-DOS, 29-7
multiple reports
performance issues, 26-15
multiple reportsmultrprtsch, 18-1
N
national language support, 23-1
need argument, 5-10
no-advance option, 9-3
-NOLIS command-line flag, 28-2
-nolis command-line flag, 28-4
O
ON-BREAK
limitations, 5-23
logic, 5-3
ON-ERROR option, 16-1
on-error option, 16-6, 19-3
Oracle, 29-2
ORDER BY clause
with BEGIN-SELECT, 5-2
order by clause, 16-4
orientation option, 6-4
P
page breaks
with ON-BREAK, 5-10, 5-19
paragraph formatting with HTML, 30-15, 30-25
passing command-line arguments, 29-5
performance issues, 26-1
pie-segment-percent-display qualifier, 13-8
point-size option, 12-4
POSITION, 12-8
position, print, 1-4, 2-4, 3-4, 6-2, 12-3, 12-4
PostScript printers, 12-4, 12-5, 15-2
PRINT, 1-1, 3-4
FILL option with, 5-11
4 Index

fill option with, 12-2
ON-BREAK option with, 5-3
with BOLD, 14-3
WRAP option withwrap, 14-5
PRINT-CHART
data-array option with, 13-6
DATA-ARRAY-COLUMN-COUNT argument with, 13-6
DATA-ARRAY-ROW-COUNT argument with, 13-6
sub-title argument with, 13-6
type option with, 13-6
print-chart, 13-1, 15-2
print-direct, 15-1
-PRINTER
EH, 30-3
HT, 30-9
xx command-line flag, 15-2, 28-1
-printer
xx command-line flag, 28-2
printer-deinit, 15-1
printer-independent reportsprntndpndtch, 15-1
printer-init, 15-1
printer-type option, 28-3
PRINT-IMAGE, 12-8, 30-23
source option with, 12-4
type option with, 12-4
Print-image, 15-2
procedures, 3-2, 3-3, 17-2
proceduresproaplvch, 17-1
PROGRAM section, 1-3, 1-4, 3-2
R
recursive procedures, 26-11
report arguments file on command line, 29-2
report body, 2-1
reserved characters with HTML, 30-9
reserved variables, 16-7, 17-2
-RS command-line flag, 27-1
-RT command-line flag, 27-2
running SQR programs
in UNIX, 1-2
in Windows, 1-2
run-time
arguments, 29-4
S
script files, 29-7
SELECT paragraph, 16-4
select paragraph, 3-3, 3-4, 5-10, 9-1, 16-6
SETUP section, 27-2
with multiple reports, 18-4
SETUP sectionsetupch, 6-1
SKIPLINES argument, 5-4
skiplines argument, 5-10, 9-3
source option, 12-4
SPF file format, 12-5, 28-1, 28-2, 28-4
spf file format, 12-5, 28-2
SPF Viewer, 1-3
spreadsheets, exporting to, 11-1
SQL and substitution variablessqlnsubvar, 16-7
SQL cursor status
performance issues, 26-6
SQL error checkingsqlerrchk, 16-6
SQL statements
and SQR performance, 26-1
SQR
calling from another application, 24-2
SQR APIsqrapi, 24-2
SQR Execute, 27-2
performance issues, 26-16
SQR Executecmplch, 27-1
SQR Portable FormatSee SPF file format, 12-5
SQR Print, 28-2
SQR Viewer, 28-2
SQR Workbench for Windows, 18-5
Index 5

SQR.INI, 23-2
SQRW, 1-2
static keyword, 24-8
STRING, 11-2
strtodate function, 22-2
substitution variables, 16-7, 16-8, 16-9
sub-title argument, 13-6
SYBASE, 29-2
symbol-set argument, 15-1
T
-T command-line flag, 25-1
tab-delimited file, 11-1
Tables of Contents, 31-1
tables with HTML, 30-15
Technical Support, xxi
temporary database tables
performance issues, 26-7
testing SQR programs, 25-1
text
positioning, 14-1
title option, 13-5
TOC-ENTRY, 31-1
top-margin option, 6-3
tuning issues, 26-1
type option, 12-4, 13-6, 28-3
U
ufunc on Windows 95, 24-10
ufunc on Windows NT, 24-10
UFUNC.C, 24-5
underscores, 5-13
UNIX, 29-7
upper function, 16-3
USE-PRINTER-TYPE, 28-3
user functions
with Windows 95, 24-10
with Windows NT, 24-10
userfuncs, 24-6, 24-8, 24-16
V
variables
common error with, 25-4
defining, 5-12
for positioning, 10-1
in documents, 12-8
variables in SQLusvarx1, 16-2
VMS, 29-7
SUBMITSQR.COM, 29-7
W
Windows 95
user functions with, 24-10
Windows NT
user functions with, 24-10
WRAP optionwrap, 14-5
6 Index