Embed Size (px)
Citation preview
InfoExchange PortalAdministrator’s Guide
Version 6.0.0
BroadVision,® Inc.585 Broadway
Redwood City, CA 94063(650) 261-5100
BroadVision ®
InfoExchange Portal™

ii BroadVision, Inc
InfoExchange Portal Administrator’s Guide
Copyright © 1995-2001 BroadVision®, Inc. All rights reserved.585 Broadway, Redwood City, California 94063 U.S.A.Printed in the United States of America
This manual and the software described in it are copyrighted.Under the copyright laws, this manual or the software may not be copied, in whole or in part,without prior written consent of BroadVision, Inc., or its assignees, except for purposes of internaluse by licensed customers of BroadVision. This manual and the software described in it areprovided under the terms of a license between BroadVision and the recipient, and their use issubject to the terms of that license.
RESTRICTED RIGHTS LEGEND: Use, duplication, or disclosure by the government is subject torestrictions as set forth in subparagraph (c)(l)(ii) of the Rights in Technical Data and ComputerSoftware clause at DFARS 252.227-7013 and FAR 52.227-19.
The product described in this manual may be protected by one or more U.S. and Internationalpatents. Certain applications of BroadVision One-To-One® software are covered by U.S. patent5,710,887.
DISCLAIMER: BroadVision, Inc. makes no representations or warranties with respect to thecontents or use of this publication. Further, BroadVision, Inc. reserves the right to revise thispublication and to make changes in its contents at any time, without obligation to notify any personor entity of such revisions or changes.
TRADEMARKS: BroadVision and BroadVision One-To-One are registered trademarks ofBroadVision, Inc., in the United States and the European Community, and are trademarks ofBroadVision, Inc., in other countries. The BroadVision logo, WorldView, Xtravert, Interleaf+ VirtualPrinter, and QuickSilver are trademarks of BroadVision, Inc., in the United States and othercountries.
Acrobat and the Acrobat logo are trademarks of Adobe Systems Incorporated.Adept is a trademark of Arbortext, Inc.IBM Lotus XSL Edition and IBM Parser for Java are trademarks of IBM Corp.IONA and Orbix are trademarks of IONA Technologies, Ltd.Macromedia and Dreamweaver are trademarks of Macromedia, Inc.Monotype Corsiva and Monotype Sorts are trademarks of Monotype Typography Ltd.RSA, MD5, and RC2 are trademarks of RSA Data Security, Inc.Rogue Wave, .h++, Tools.h++, and DBtools.h++ are trademarks of Rogue Wave Software, Inc.Verity, Topic, SEARCH’97, and Verity knowledgemanagement are trademarks of Verity, Inc.XML Authority is a trademark of Extensibility, Inc.
All other trademarks, service marks, and trade names belong to their respective owners. BroadVision, Inc.disclaims any proprietary interest in the marks and names of others.
Contains security software from RSA Data Security, Inc.This version supports international security with RC2 and MD5.

Contents
1 BroadVision InfoExchange Portal 5Overview .......................................................................................................................................................5Before you use the Admin Tool ..................................................................................................................6Using the InfoExchange Portal Admin Tool ............................................................................................6Command line utilities and other features ...............................................................................................7Starting the Admin Tool ..............................................................................................................................8Admin Tool files ...........................................................................................................................................9
2 Site Presentation 11Introduction ................................................................................................................................................11Administering qualifiers ...........................................................................................................................12
Adding a qualifier ..............................................................................................................................13Editing a qualifier ...............................................................................................................................14Adding a qualifier value ...................................................................................................................14Editing a qualifier value ....................................................................................................................15Deleting a qualifier value ..................................................................................................................15Deleting a qualifier .............................................................................................................................15
Administering program types ..................................................................................................................16Adding a program type .....................................................................................................................16Editing a program type .....................................................................................................................17Deleting a program type ...................................................................................................................17
Administering portlets ..............................................................................................................................18Registering a portlet ...........................................................................................................................18
Registering a portlet ...................................................................................................................19Adding portlets to home pages without using the shortcut ................................................22
Editing a portlet ..................................................................................................................................22Deleting a portlet ................................................................................................................................24Re-registering a portlet ......................................................................................................................24Adding portlets to configurable home pages ................................................................................28
Administering channels ............................................................................................................................28Adding channels ................................................................................................................................30Editing channels .................................................................................................................................36Moving channels ................................................................................................................................42Deleting channels ...............................................................................................................................43
Administering programs ...........................................................................................................................44Finding existing programs ................................................................................................................44Adding programs ...............................................................................................................................46
Using a rule set as the program content source .....................................................................51Using a category as the program content source ...................................................................52Using a content item as the program content source ............................................................53Using a script as the program content source ........................................................................55Using a URL as the program content source ..........................................................................55
InfoExchange Portal Administrator’s Guide i

Using a portlet as the program content source ......................................................................56Finishing the Add Program to Channel form ........................................................................56
Editing programs ...............................................................................................................................58Using a rule set as the program content source .....................................................................63Using a category as the program content source ...................................................................64Using a content item as the program content source ............................................................65Using a script as the program content source ........................................................................67Using a URL as the program content source ..........................................................................67Using a portlet as the program content source ......................................................................68Finishing the Edit Program in Channel form .........................................................................68
Deleting programs .............................................................................................................................69Administering home page types ..............................................................................................................69
Configuring InfoExchange Portal for transient guests .................................................................70Creating a page type ..........................................................................................................................71Editing a page type ............................................................................................................................73Adding blocks .....................................................................................................................................74Editing blocks .....................................................................................................................................77Removing blocks ................................................................................................................................80Removing a page type .......................................................................................................................80
3 User Administration 81Introduction ................................................................................................................................................81Administering access groups ...................................................................................................................82
Creating access groups .....................................................................................................................83Editing Access Groups ......................................................................................................................85Deleting access groups ......................................................................................................................85Adding a category to an access group ............................................................................................86Removing a category from an access group ...................................................................................87
Administering user templates ..................................................................................................................87Adding a user template .....................................................................................................................88Editing a user template .....................................................................................................................95Deleting a user template .................................................................................................................102
Administering organizations ..................................................................................................................102Browsing the organization hierarchy ............................................................................................103Adding an organization ..................................................................................................................104Editing an organization ...................................................................................................................106Deleting an organization .................................................................................................................109
Administering user accounts ..................................................................................................................109Adding a user account .................................................................................................................... 111Finding existing user accounts .......................................................................................................116Editing a visitor’s account ..............................................................................................................118Changing a visitor’s profile ............................................................................................................124
Administering a project collaboration page .........................................................................................126Using a project collaboration page ................................................................................................127Authorizinging project collaboration page access ......................................................................127Using the Project Collaboration Page Wizard ..............................................................................131Deleting a project .............................................................................................................................135Project components ..........................................................................................................................136Adding a task to a project collaboration page .............................................................................137Updating a task in a project collaboration page ..........................................................................141Obtaining an overview of the project ............................................................................................143Adding a discussion group .............................................................................................................144Updating a discussion group .........................................................................................................147Adding a message to a discussion group .....................................................................................148Activating and deactivating a discussion group .........................................................................148Activating and deactivating a discussion group message .........................................................149
ii BroadVision, Inc

Deleting a discussion group ...........................................................................................................149Deleting a discussion group message ...........................................................................................149Adding a participant to a project collaboration page .................................................................150Removing a participant from a project .........................................................................................153Adding a project group to a project collaboration page .............................................................153Updating a project group to a project collaboration page ..........................................................155Removing a project group from a project .....................................................................................156Adding a program to a project collaboration page .....................................................................156Removing a program from a project .............................................................................................159Adding a product to the project collaboration page ...................................................................159Removing a product group from a project ...................................................................................161Viewing project contacts .................................................................................................................162Adding a phase to a project collaboration page ..........................................................................163Updating a phase in a project collaboration page .......................................................................164
Administering closed-loop process management ...............................................................................165Setting up user accounts to administer closed-loop process management .............................166
Setting up a new visitor to administer closed-loop process management .......................167Setting up an existing visitor to administer leads ...............................................................169
Setting up a user template for closed-loop process management ............................................172
4 Site Maintenance 177Introduction ..............................................................................................................................................177Administering the filter cache ................................................................................................................177Administering the home page cache .....................................................................................................179Running InfoExchange Portal reports ...................................................................................................180
List channels, programs, user templates or users which have a given qualifier value ..181List channels and programs a given user can navigate ......................................................181List channels with no qualifier set .........................................................................................182List programs with no qualifier set ........................................................................................182Show all information for a given page type .........................................................................182List user templates for a given page type .............................................................................183List users assigned to a given user template ........................................................................183List users who chose a given program on their home page ...............................................183
5 Command Line Utilities 185The content purge utility .........................................................................................................................185The bulk loader utility .............................................................................................................................186
Running the bulk loader utility ......................................................................................................186Formatting the bulk loader utility data file ..................................................................................187Actions supported by the bulk loader utility ...............................................................................187
AddBlock ...................................................................................................................................188AddChannel ..............................................................................................................................188AddPageType ............................................................................................................................189AddProgram ..............................................................................................................................189AddProgramType .....................................................................................................................190AddQualifierValues ..................................................................................................................191AddQualValsToChannel ..........................................................................................................191AddQualValsToContent ..........................................................................................................192AddQualValsToProgram .........................................................................................................192AddQualValsToUser ................................................................................................................193AddQualValsToUserTemplate ................................................................................................193AddUserTemplate ....................................................................................................................194BookmarkChannels ..................................................................................................................194BookmarkContents ...................................................................................................................194BookmarkPrograms ..................................................................................................................195
InfoExchange Portal Administrator’s Guide iii
DeleteBlock ................................................................................................................................195DeleteChannel ...........................................................................................................................195DeletePageType .........................................................................................................................196DeleteProgram ..........................................................................................................................196DeleteProgramType ..................................................................................................................196DeleteQualifier ..........................................................................................................................197DeleteUserTemplate .................................................................................................................197RemoveQualifierFromChannel ..............................................................................................197RemoveQualifierFromContent ...............................................................................................198RemoveQualifierFromProgram ..............................................................................................198RemoveQualifierFromUser .....................................................................................................198RemoveQualifierFromUserTemplate .....................................................................................199RemoveQualValsFromChannel ..............................................................................................199RemoveQualValsFromContent ...............................................................................................200RemoveQualValsFromProgram ..............................................................................................200RemoveQualValsFromUser .....................................................................................................200RemoveQualValsFromUserTemplate ....................................................................................201SetDefaultBookmarkedChannels ...........................................................................................201SetDefaultBookmarkedContents ............................................................................................202SetDefaultBookmarkedPrograms ...........................................................................................202SetParentChannelsForProgram ..............................................................................................202SetProgramOrder ......................................................................................................................203SetQualifier ................................................................................................................................203SetQualValsForChannel ...........................................................................................................204SetQualValsForContent ...........................................................................................................204SetQualValsForProgram ..........................................................................................................204SetQualValsForUser .................................................................................................................205SetQualValsForUserTemplate .................................................................................................206UnbookmarkChannels .............................................................................................................206UnbookmarkContents ..............................................................................................................206UnbookmarkPrograms ............................................................................................................207
Dependencies when loading data ..................................................................................................208Qualifier cache utilities ............................................................................................................................209
Dumping the qualifier cache to a file ............................................................................................209Loading the qualifier cache from a file ..........................................................................................209
Setting qualifiers on content items in a content type ..........................................................................210
6 Getting Technical Support 211Support for Third-Party Software Products .........................................................................211
Index 213
iv BroadVision, Inc

1 BroadVision InfoExchange Portal
This document describes the features and administration of BroadVision InfoExchange Portal.
The following topics are discussed in this chapter:
● “Overview” on page 5
● “Before you use the Admin Tool” on page 6
● “Using the InfoExchange Portal Admin Tool” on page 6
● “Command line utilities and other features” on page 7
● “Starting the Admin Tool” on page 8
● “Admin Tool files” on page 9
OverviewBroadVision® InfoExchange Portal™ is an enterprise-class application solution individuals andwork groups use over corporate intranets and extranets to interactively capture, publish, anddistribute knowledge. This application lets individuals organize information into interactivechannels accessible through the Web.
BroadVision InfoExchange Portal also provides functionality to enhance the relationship between ahost enterprise, its customers, and its partners.
As part of the organization process, administrators use the Admin Tool to identify the channels andprograms that contain the information, create accounts for each visitor, and define the user templates,program types, access groups, organizations, and qualifiers the system uses to determine whichinformation to present to each visitor.
Once these are in place, you can set up visitor configurable home pages, project collaboration pages,and closed-loop process management.
InfoExchange Portal also comes with command line utilities that enable you to process largequantities of data for administrative tasks.
InfoExchange Portal Administrator’s Guide 5

Chapter 1 BroadVis ion InfoExchange PortalBefore you use the Admin Tool
Before you use the Admin ToolPrograms can either point to or refer to the following sources of content:
● content category
● rules that return a list of contents
● specific content item
● BroadVision content (a URL or script)
● a portlet
These sources must be created before you can create a program or use the Admin Tool.
Therefore, you must execute the following steps in the One-To-One Command Center to set up yourenvironment for the Admin Tool:
1. Create a category in the Matching Rules content type.
You must do this before you create a program type.
2. Create a category.
You must do this before you create a program with a category as its content source.
3. Create a content item.
You must do this before you create a program with a content item as its content source.
4. Create a rule set.
You must do this before you create a program with a rule set as its content source.
Using the InfoExchange Portal Admin ToolTo begin using Admin Tool, see the next section, “Starting the Admin Tool” on page 8.
The steps for using the Admin Tool to present content to visitors are:
1. Create categories to classify content using the One-To-One Command Center.
2. Create content and put content in categories using Publishing Center or Instant Publisher.
3. Create one or more qualifiers as described in “Administering qualifiers” on page 12.
4. Create one or more program types to display the content as described in “Administeringprogram types” on page 16.
5. Register any portlets you want to use as described in “Administering portlets” on page 18.
6. Define channels using the Admin Tool as described in “Administering channels” on page 28.
7. Create one or more programs under a channel to display the content as described in“Administering programs” on page 44.
8. Create one or more page types that identify the configurable home page type for new useraccounts as described in “Administering home page types” on page 69.
6 BroadVision, Inc

Chapter 1 BroadVis ion InfoExchange PortalCommand l ine ut i l i t ies and other features
9. Create one or more blocks in the page type as described in “Adding blocks” on page 74.
10. Create one or more access groups as described in “Administering access groups” on page 82.
11. Create one or more user templates as described in “Administering user templates” on page 87.Select the channels, programs, and content that appear in the user template’s preset bookmarks.
12. Create one or more organizations as described in “Administering organizations” on page 102.
13. Create user accounts that identify the user templates for the new site visitors as described in“Administering user accounts” on page 109.
14. Set the default user template for the guest user account in the bv1to1.conf file.
15. Set up closed-loop processes as described in “Administering closed-loop process management”on page 165.
The end of this document contains descriptions for “Getting Technical Support.”
For information about creating the publishing and find forms to use with InfoExchange Portal,see the Publishing Center Developer’s Guide and Instant Publisher Guide.
Command line utilities and other featuresThe following sections describe command line utilities used in administering InfoExchange Portal:
● “The content purge utility” on page 185
● “The bulk loader utility” on page 186
● “Qualifier cache utilities” on page 209
● “Setting qualifiers on content items in a content type” on page 210
You can also change the maximum number of content items with qualifiers stored in the filter cacheas described in “Administering the filter cache” on page 177 and enable and configure the homepage cache as described in “Administering the home page cache” on page 179.
To obtain site information and statistics, you can run reports included with InfoExchange Portal asdescribed in “Running InfoExchange Portal reports” on page 180.
InfoExchange Portal Administrator’s Guide 7

Chapter 1 BroadVis ion InfoExchange PortalStart ing the Admin Tool
Starting the Admin ToolStart the InfoExchange Portal Admin Tool loading iepadmin.html located in your site’s documentroot directory. For example:
http://bvsn.com/iepadmin.html
To use the InfoExchange Portal Admin Tool before any user templates and administativefunctions have been defined, use iepadmin for the login name, and imiepadmin for thepassword. Using the information in “Editing a visitor’s account” on page 118, immediatelychange this password so others cannot use it to log in. This account is a Site Admin by default.
You can also start the Admin Tool by choosing one of the administrator links from an applicationyou create, such as the BVAdvenTech example application included with InfoExchange Portal.When you are using InfoExchange Portal, you see only those administrator links to which you havea corresponding administrator function.
To use the Admin Tool you must have either Site Admin or Service Admin privileges or be able toadminister a specified channel or organization. Visitors with Site Admin or Service Adminprivileges can perform site presentation, user administration, and site maintenance functions for thespecified service; visitors with Site Admin privileges can administer any service on the site. See“Editing a visitor’s account” on page 118 for information about changing a visitor’s administrativefunction.
To find the iepadmin account so you can change its password, as a Site Admin, follow thedirections in “Editing a visitor’s account” on page 118, making sure you search the entire siterather than just the service.
8 BroadVision, Inc

Chapter 1 BroadVis ion InfoExchange PortalAdmin Tool f i les
When you successfully log into the InfoExchange Portal Admin Tool, the following welcome screenappears:
Admin Tool filesThe Admin Tool scripts and images are located in the following directories:
File Description
document_root/knowledge/admin/images/... Admin Tool images
script_root/knowledge/admin/scripts/... Admin Tool scripts
document_root/erm_app/pubs/... InfoExchange Portal administrationdocumentation
InfoExchange Portal Administrator’s Guide 9

Chapter 1 BroadVis ion InfoExchange PortalAdmin Tool f i les
10 BroadVision, Inc
2 Site Presentation
The InfoExchange Portal site presentation hierarchy describes the site views that can be presented tovisitors. This chapter discusses InfoExchange Portal features that control site presentation.
The following topics are discussed in this chapter:
● “Introduction,” next
● “Administering qualifiers” on page 12
● “Administering program types” on page 16
● “Administering portlets” on page 18
● “Administering channels” on page 28
● “Administering programs” on page 44
● “Administering home page types” on page 69
IntroductionQualifiers are navigation filters that control the view of channels and programs a visitor can see. Eachqualifier can be considered a type of visitor community. Each qualifier value setting for a channel orprogram potentially decreases its visibility to a visitor. Each qualifier encoding for a user template oruser account restricts a visitor’s view. Setting qualifier values for a channel or program is optional.
Channels and programs are parts of the InfoExchange Portal navigation hierarchy. Channels definethe navigation hierarchy structure; they are high-level, logical groupings of content (programs)organized for the distribution. The Channel Administrator designs and creates the channels withone goal in mind: to distribute the right information quickly and easily to the right people. Programsclassify one or more content items into meaningful groups. The program type for a programdetermines what type of items are presented.
You must create at least one program type before you can create any programs.
Portlets are reusable interface components that provide access to web-based resources. Portlets letyou customize and extend BroadVision InfoExchange Portal to display and integrate external orlegacy data sources that reside outside of the One-To-One Enterprise databases such as SAP,PeopleSoft, and Microsoft Exchange Server. The InfoExchange Portal Admin Tool provides thenecessary framework to allow you to easily control and manage the access and display of a portlet.
Access groups determine the kind of access you have, as a group member, to the content items in thecategories and subcategories created for an interactive service. A Publishing Center Administratorcan create access groups using Publishing Center, or you can create access groups using the Admin
InfoExchange Portal Administrator’s Guide 11

Chapter 2 Site Presentat ionAdminister ing qual i f iers
Tool. Using the Admin Tool you can make a visitor a member of one or more groups according tothe content items the visitor works with and the kind of access the visitor needs to do his or herwork.
Page Types define the appearance of a visitor’s home page. You can use the Admin Tool to enable avisitor to change information displayed on the home page.
You must create at least one page type before you can create a user template.
Administering qualifiersThe InfoExchange Portal Site Admin or Service Admin sets qualifier values for each channel,program, and user template. The user template settings are applied to each new site visitor when auser account is created using that user template. Modifications to a user template’s qualifiers do notaffect existing user accounts created from the same template because each visitor’s settings are onlyassociated with that visitor at the time the account is assigned to a user template. The Site Admin orService Admin can override each visitor’s qualifier settings at any time.
Each visitor is presented with a view of the channels and programs hierarchy most relevant to himor her. This view is composed on demand by matching the setting of qualifiers for the visitor againstthe setting for each channel or program as the visitor navigates through the hierarchy.
There are two key tasks for administering qualifiers:
● defining a complete set of qualifiers
● selecting qualifiers for each user template, channel, and program
A visitor can change the settings of some qualifier values in a Customize page in an InfoExchangePortal site such as the BVAdventech sample application. The Site Admin or Service Admin decideswhich qualifiers are displayed in the visitor’s profile editor.
For a detailed discussion of qualifiers and how they affect the display of channels and programs, seethe InfoExchange Developer’s Guide.
Qualifiers and their values are defined and set by the Site Admin or Service Admin. Visitors can setsome qualifier values in their personal profile. Qualifier settings are optional; when a channel orprogram has no qualifier values for a particular qualifier, the qualifier is ignored during matching.
A site or service administrator can set the qualifier values that apply to each channel or program. Allvalues that apply may be selected for each qualifier. For example, the Sales Collateral channel mighthave the English value selected for the qualifier Language, while Events in North America mighthave both the English and French values set for Language.
You cannot use the Admin Tool to configure your site so you can set qualifiers on content itemsin a content type. Instead, you must follow the steps listed in “Setting qualifiers on contentitems in a content type” on page 210.
This section contains information about:
● Adding a qualifier
● Editing a qualifier
● Adding a qualifier value
● Deleting a qualifier
12 BroadVision, Inc

Chapter 2 Site Presentat ionAdminister ing qual i f iers
You must have the Site Admin or Service Admin administrative function to perform qualifieradministration with the Admin Tool.
Click Qualifiers in the left frame to view existing qualifiers and add new ones.
Adding a qualifier
To add a qualifier, click Add Qualifier. The Add Qualifier form appears.
The Add Qualifier form determines the following values:
● Qualifier is the name of the qualifier.
● Add Values enables you to add values separated by a semicolon (;).
● Allow Visitors to Edit All Values specifies whether a visitor can modify the values for thatqualifier in the visitor’s customization profile.
Each visitor can set this qualifier if you choose the Allow Visitors to Edit All Values setting
To blank the form, click Reset. When you are finished, click Save at the bottom of the page to savethe new qualifier.
Click to edit aqualifier
Click to add aqualifier
Click todelete aqualifier
InfoExchange Portal Administrator’s Guide 13

Chapter 2 Site Presentat ionAdminister ing qual i f iers
Editing a qualifier
To edit a qualifier, click Edit to the left of the qualifier name. The Edit Qualifier form appears.
The Edit Qualifier form lets you change the name of the Qualifier.
To add a qualifier value, see“Adding a qualifier value,” next; to edit a qualifier value, see “Editing aqualifier value” on page 15.
Adding a qualifier value
To add a qualifier value, select the Add Value link in the Add Qualifier or Edit Qualifier form.
Here you can:
● Add a Value for the specified qualifier.
● Enable all visitors to set this qualifier value in their customization profile if you choose Editableby Visitor.
To clear the form, click Reset. When you are finished, click Save at the bottom of the page to save thenew qualifier value.
Click to edit aqualifier value
Click to delete aqualifier value
14 BroadVision, Inc

Chapter 2 Site Presentat ionAdminister ing qual i f iers
Editing a qualifier value
To edit a qualifier value, select [Edit] to the left of the qualifier value in the Add Qualifier or EditQualifier form.
When you edit a value you are only changing the name displayed in the Admin Tool and notthe name used internally for matching.
Here you can change the following values:
● Change the selected Value for the specified qualifier.
● Enable all visitors to set this qualifier value in their customization profile if you choose Editableby Visitor.
● Editable by Visitor Change whether a visitor can modify the values for that qualifier in thevisitor’s customization profile by selecting or deselecting the Editable by Visitor setting.
To undo your changes, click Reset. When you are finished, click Save at the bottom of the page tosave changes made to the qualifier value.
Deleting a qualifier value
To delete a qualifier value, in the Edit Qualifier window click [Delete] to the left of the qualifier value.You are then asked for confirmation before the value is deleted from the list of values for thatqualifier. Note that deleted qualifier values cannot be “undeleted.”
Deleting a qualifier
In the Qualifiers window, select [Delete] to the left of a qualifier name to delete it; you are then askedfor confirmation before the qualifier is deleted. Note that deleted qualifiers cannot be “undeleted.”
Deleting a value and deleting a qualifier can affect the visibility of the presentation hierarchy.Because you can delete a qualifier being used by a channel or program, BroadVisionrecommends you adjust the settings of relevant channels, programs, user templates, and useraccounts before you delete a qualifier.
InfoExchange Portal Administrator’s Guide 15

Chapter 2 Site Presentat ionAdminister ing program types
Administering program typesAn InfoExchange Portal site presents programs as links that when clicked, display the contentsof the program, whether it be a rule set, a category, a content item, a script, a URL, or a portlet.The program type defines the type of items presented by a program.
This section contains information about:
● Adding a program type
● Editing a program type
● Deleting a program type
Before you can add a program type, you must use the One-To-One Command Center to create acategory of rule sets (the category can be empty).
Click Program Types in the left frame to view the existing program types.
Adding a program type
To add a program type, click [Add Program Type]. The Add Program Type form appears.
1. Enter the Program Type Name. This identifies the program type.
2. Select the Program Content Type from the drop-down list. This defines the content type of thecontent source of programs of that program type. When a program is assigned to a programtype, the content source category picker and content source content picker in the programdisplay categories and content of the content type chosen in that program type.
Click to edit aprogram type
Click to add aprogram type
Click to deletea program type
16 BroadVision, Inc

Chapter 2 Site Presentat ionAdminister ing program types
3. Select a Rule Set Category from the drop-down list. This defines what rule sets are available asthe content source of programs of that program type. When a program is assigned to a programtype, the content source rule set picker in the program displays the rule sets located in thecategory chosen in that program type.
4. To clear the form, click Reset. When you are finished, click Save at the bottom of the page tosave the new program type.
Once you click Save, you cannot change the Program Content Type or Rule Set Category for aprogram type.
Editing a program type
To edit an existing program type, click [Edit] to the left of the program type name.
The form has the same fields as the Add Program Type form, but you can only change the ProgramType Name.
To undo your changes to the page, click Reset. When you are finished, click Save at the bottom of thepage to save changes.
Deleting a program type
To delete an existing program type description, click Delete to the left of the program type name.
A confirmation window appears. Click OK to delete the program type.
You cannot delete program types that still have programs using that program type.
InfoExchange Portal Administrator’s Guide 17

Chapter 2 Site Presentat ionAdminister ing port lets
Administering portletsTo perform portlet administration with the Admin Tool, you must have Site Admin or ServiceAdmin privileges.
A portlet is a reusable interface component that enables you to expand an InfoExchange Portal siteby providing access to web-based resources, such as news, stock quotes, and e-mail. A portlet andits display parameters are defined by the following files:
● an XML registration file (required)
● a block script (required)
● a page script (optional)
● a visitor configuration script (optional)
The block script, page script, and visitor configuration script for a portlet can be written as eitherJavaScript or Java Server Pages that can be called directly from a BroadVision application page. Thescripts must all be the same type of file as defined in the XML registration file (either JavaScript orJSP, but not both).
Once registered, the portlet can be called from a block on the visitor’s home page (block script). Thevisitor configuration script enables visitors to customize the portlet if there are any visitor-configurable parameters of the portlet. Optionally, there may be a page to display the portlet outputin a larger window (page script) as part of the ordinary browsing through channels and programs.
The InfoExchange Developer’s Guide contains detailed information on writing these files.
InfoExchange Portal provides a portlet registry in the One-To-One Enterprise database to manageand maintain the administrative tasks. The Portlets option in the left menu of the InfoExchangePortal Admin Tool enables you to administer portlets and manage their attributes. Once a portlet isregistered, visitors with access to it can place it on their home pages.
You can add portlets to the registry using information from an XML registration file. Thisregistration file specifies the attributes of this portlet and who is allowed to modify those attributes.The InfoExchange Developer’s Guide contains detailed information about the contents of the XMLregistration file and the portlet Document Type Definition (DTD).
A portlet is registered when its XML registration file and loading the data into portlet tables. Theregistration process is described in this section.
Registering a portlet
Before you register a portlet, you need to copy the files provided by the portlet developer into thescript_root/portlets directory.
To register a portlet:
● select [Register New Portlet] in the Portlets window and use the shortcut to register a portlet.
● using the [Add New Channel], [Add New Program] or [Edit Program], and [Add Page Type] or[Edit Page Type] commands.
18 BroadVision, Inc
Chapter 2 Site Presentat ionAdminister ing port lets
Registering a portlet
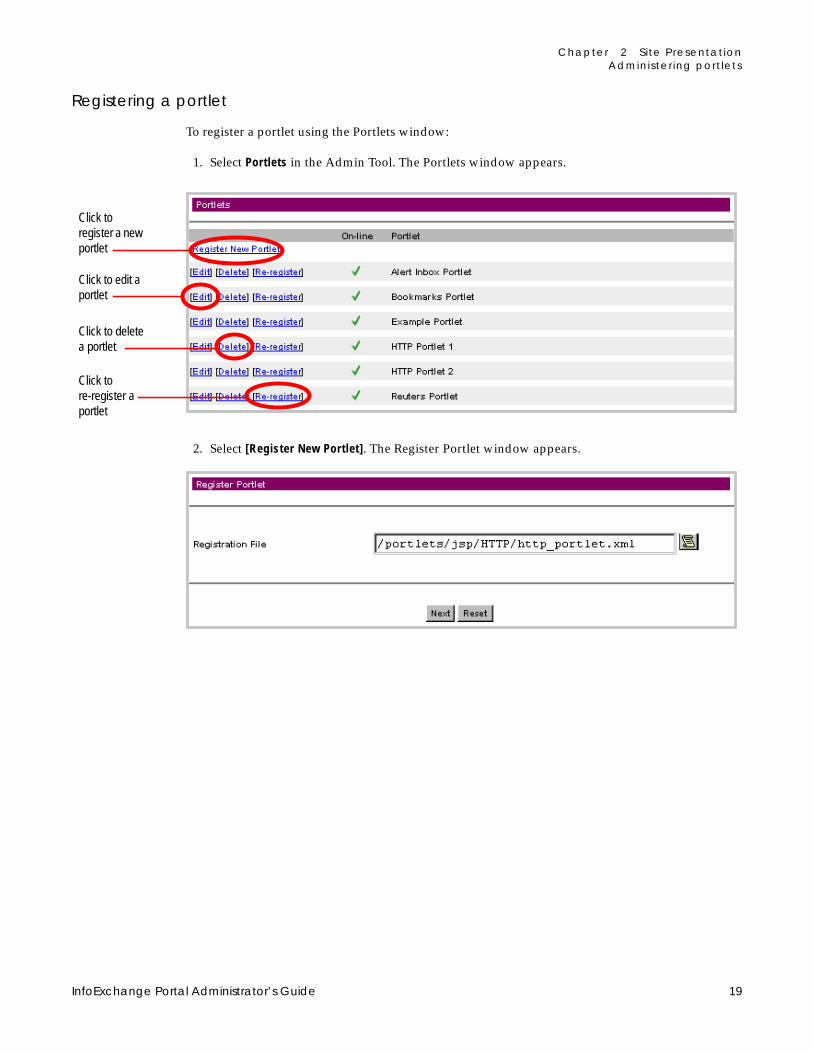
To register a portlet using the Portlets window:
1. Select Portlets in the Admin Tool. The Portlets window appears.
2. Select [Register New Portlet]. The Register Portlet window appears.
Click to edit aportlet
Click toregister a newportlet
Click to deletea portlet
Click tore-register aportlet
InfoExchange Portal Administrator’s Guide 19
Chapter 2 Site Presentat ionAdminister ing port lets
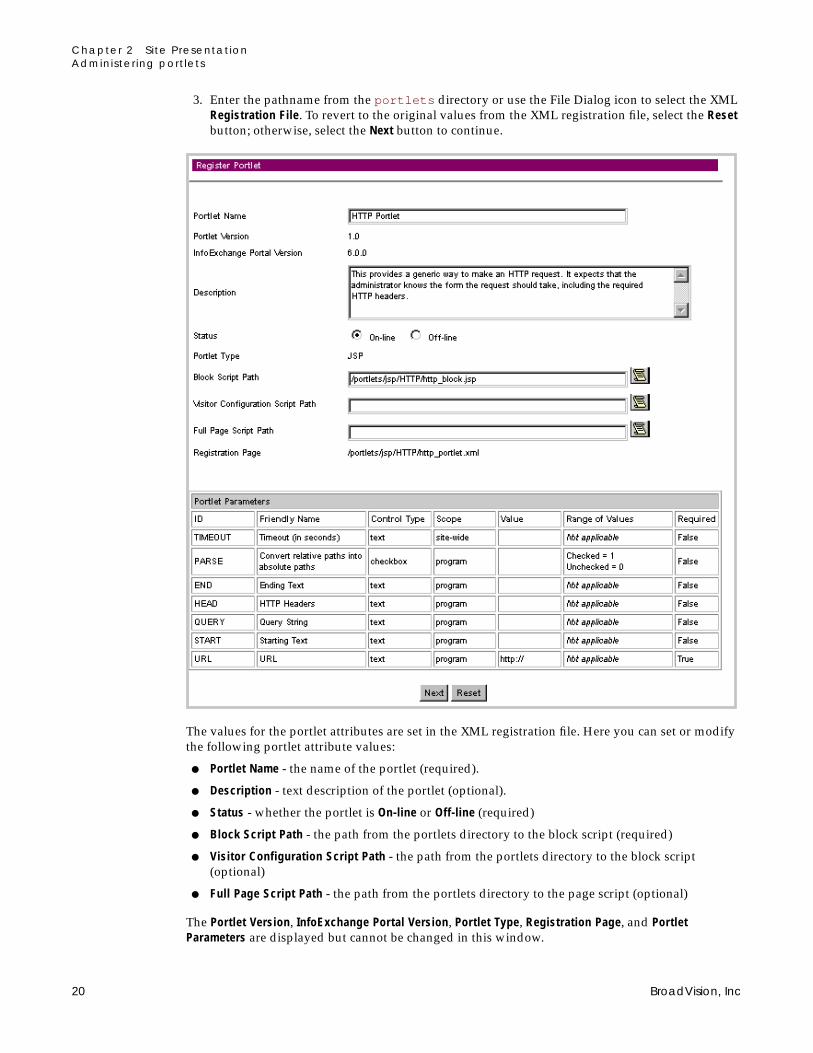
3. Enter the pathname from the portlets directory or use the File Dialog icon to select the XMLRegistration File. To revert to the original values from the XML registration file, select the Resetbutton; otherwise, select the Next button to continue.
The values for the portlet attributes are set in the XML registration file. Here you can set or modifythe following portlet attribute values:
● Portlet Name - the name of the portlet (required).
● Description - text description of the portlet (optional).
● Status - whether the portlet is On-line or Off-line (required)
● Block Script Path - the path from the portlets directory to the block script (required)
● Visitor Configuration Script Path - the path from the portlets directory to the block script(optional)
● Full Page Script Path - the path from the portlets directory to the page script (optional)
The Portlet Version, InfoExchange Portal Version, Portlet Type, Registration Page, and PortletParameters are displayed but cannot be changed in this window.
20 BroadVision, Inc

Chapter 2 Site Presentat ionAdminister ing port lets
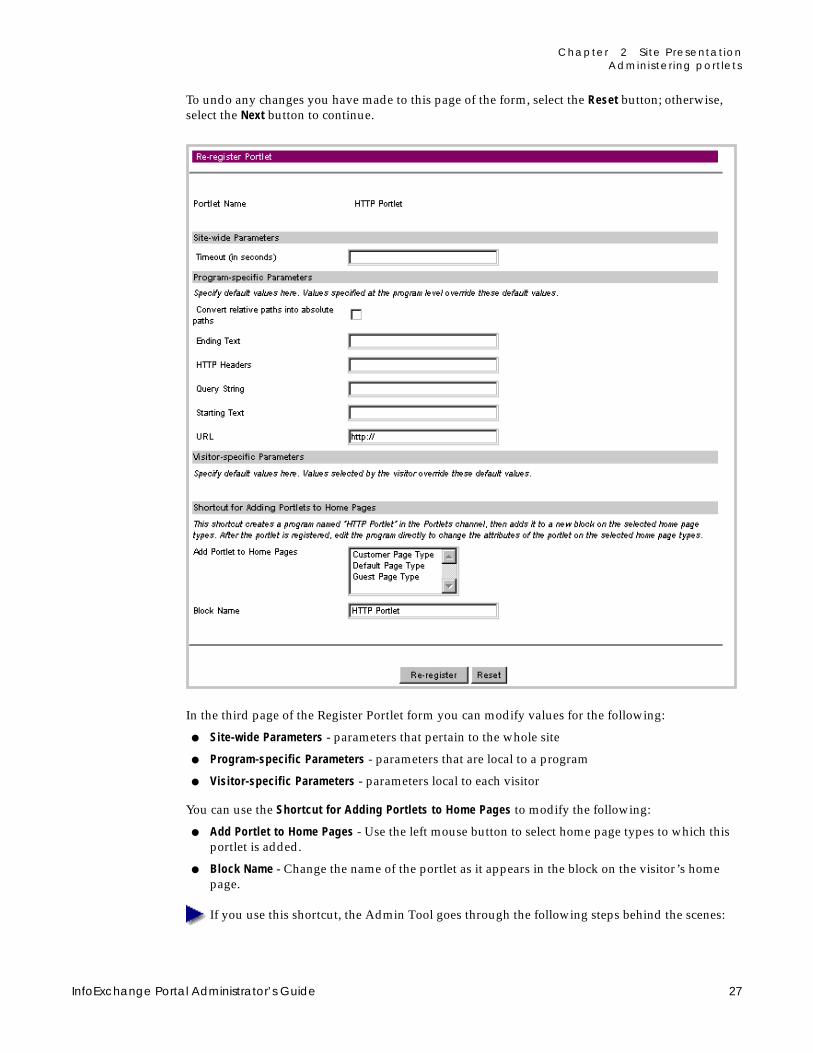
To undo any changes you have made to this page of the form, select the Reset button; otherwise,select the Next button to continue.
In the third page of the Register Portlet form you can enter the default values for the following:
• Site-wide Parameters - parameters that pertain to the use of the portlet in the current service.
• Program-specific Parameters - parameters that are local to a program. These values aredefaults. If changed, the values do not propagate to programs already created.
• Visitor-specific Parameters - parameters local to each visitor. These values are defaults. Ifchanged, the values do not propagate to visitors who have set their own values.
You can also use the Shortcut for Adding Portlets to Home Pages. Here you can:
● Add Portlet to Home Pages - Use the left mouse button to select home page types to which thisportlet is added.
● Block Name - Change the name of the portlet as it appears in the block on the visitor’s homepage.
InfoExchange Portal Administrator’s Guide 21

Chapter 2 Site Presentat ionAdminister ing port lets
If you use this shortcut, the Admin Tool goes through the following steps behind the scenes:
• It creates a program with the same name as the portlet. This program is in the Portletschannel (which is off-line by default so visitors cannot navigate to it). This program has noqualifiers set, making it visible to all visitors who select it.
• It creates an optional block on each selected home page with the name of the portlet.
• It adds the newly-created program to this optional block.
You can modify programs and blocks created with the shortcut just like any that were createdwith other InfoExchange Portal Admin Tool windows.
To undo your changes, click the Reset button; otherwise, click the Register button to register the newportlet into a channel named Portlets.
Adding portlets to home pages without using the shortcut
There are reasons you may not want to use the shortcut for adding portlets to home pages:
● You want to register the portlet in a channel other than Portlets.
● You want to specify different attributes when the portlet runs under different programs.
● You want to set qualifiers on the portlet.
If you have any of these requirements, follow these steps to register a portlet:
1. Navigate to the channel in which you want to register this portlet. See “Administeringchannels” on page 28 for information on adding and editing channels.
2. Add the portlet as the content source for a new or existing program. See “Administeringprograms” on page 44 for information on adding and editing programs.
3. Edit the page type and add a new block or modify an existing block to point to the program. See“Administering home page types” on page 69 for details.
Editing a portlet
These are the steps you must follow to edit a portlet:
1. Select Portlets in the Admin Tool. The Portlets window appears.
Click to edit aportlet
Click toregister a newportlet
Click to deletea portlet
Click tore-register aportlet
22 BroadVision, Inc

Chapter 2 Site Presentat ionAdminister ing port lets
2. Select [Edit] to the left of the name of the portlet you want to edit.
Here you can set or modify the following portlet attribute values:
● Portlet Name - the name of the portlet (required).
● Description - text description of the portlet (optional).
● Status - whether the portlet is On-line or Off-line (required)
● Block Script Path - the path from the portlets directory to the block script (required)
● Visitor Configuration Script Path - the path from the portlets directory to the block script(optional)
● Full Page Script Path - the path from the portlets directory to the page script (optional)
InfoExchange Portal Administrator’s Guide 23
Chapter 2 Site Presentat ionAdminister ing port lets
● Site-wide Parameters - parameters that pertain to the use of the portlet in the current service.
● Program-specific Parameters - parameters that are local to a program. These values are defaults.If changed, the values do not propagate to programs already created.
● Visitor-specific Parameters - parameters local to each visitor
The Portlet Version, InfoExchange Portal Version, Portlet Type, Registration Page, and PortletParameters are displayed but cannot be changed in this window.
To undo your changes, click the Reset button; otherwise, click the Save button to save the changesyou have made to the portlet attributes.
Deleting a portlet
To delete a portlet, in the Portlets window, select [Delete] to the left of the name of the portlet youwant to edit. A pop-up window appears asking you to confirm your decision with the followingwarning:
WARNING:
Deleting a portlet will also delete all programs containing the portlet. If those programs areincluded in blocks on a visitor’s home page, those blocks will be empty. If you intend to registerthis portlet again, you should choose Re-register, which will preserve the relationship withexisting programs, rather than Delete.
Are you sure you want to delete this Portlet?
Deleting the portlet also deletes the portlet attributes from the visitor profile.
If you decide you do not want to delete the portlet, select the Cancel button; otherwise select the OKbutton to delete the portlet.
Re-registering a portlet
If you have made significant changes to a portlet that is already assigned to existing programs, youcan re-register the portlet. This enables you to add or delete portlet parameters and functionalitywhile keeping the portlet in the program. If a program with a re-registered portlet is included in ablock on a visitor’s home page, the block will still contain content.
Re-registering a portlet parses the registration file again. It overrides the script paths and allportlet dynamic attributes. If a dynamic attribute is removed from the XML file or its ID ischanged, it is removed from the specification of this portlet, as well as from any visitors orprograms that have this portlet registered.
24 BroadVision, Inc

Chapter 2 Site Presentat ionAdminister ing port lets
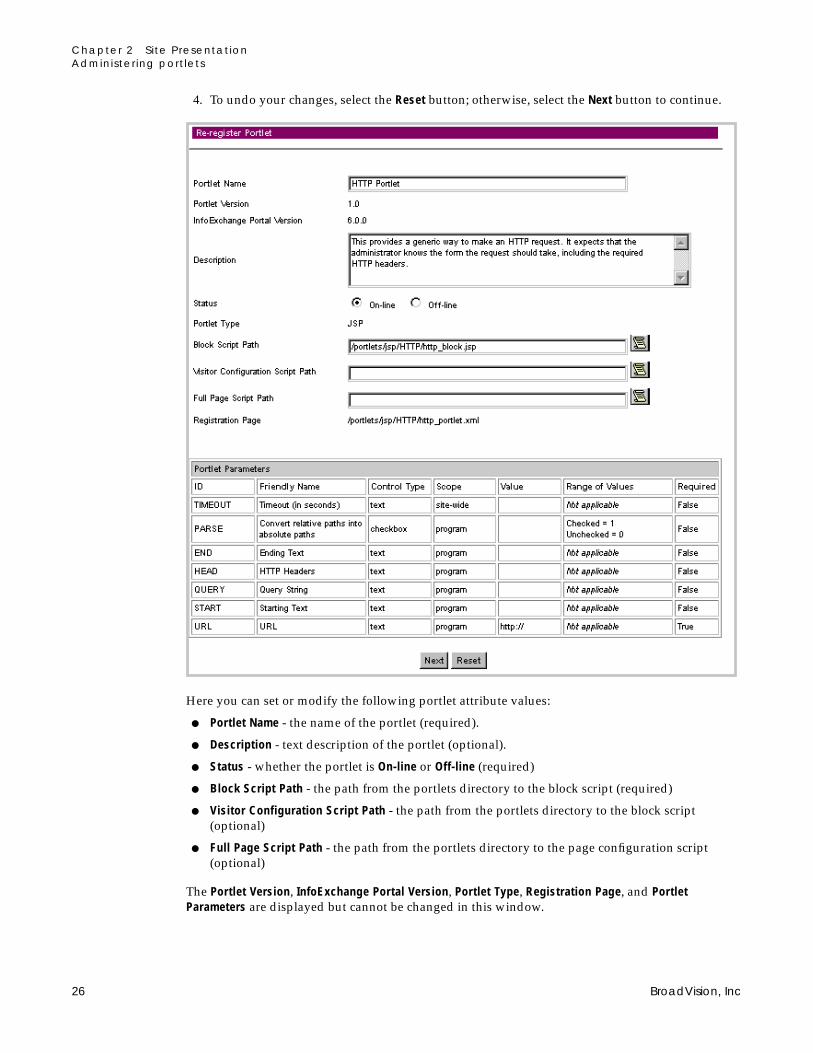
These are the steps you must follow to re-register a portlet:
1. In the Portlets window, select [Re-register] to the left of the portlet you want to re-register. Thefirst page of the Re-register Portlet form appears.
2. Enter or use the File Dialog (scroll) icon to input the XML Registration File name.
3. By default, the re-registration process overrides only the dynamic attributes and script pathsfrom the original XML registration file. To override all registration file parameters, includingName and Description, select the checkbox to the right of Override old portlet name anddescription with values from registration file.
InfoExchange Portal Administrator’s Guide 25
Chapter 2 Site Presentat ionAdminister ing port lets
4. To undo your changes, select the Reset button; otherwise, select the Next button to continue.
Here you can set or modify the following portlet attribute values:
● Portlet Name - the name of the portlet (required).
● Description - text description of the portlet (optional).
● Status - whether the portlet is On-line or Off-line (required)
● Block Script Path - the path from the portlets directory to the block script (required)
● Visitor Configuration Script Path - the path from the portlets directory to the block script(optional)
● Full Page Script Path - the path from the portlets directory to the page configuration script(optional)
The Portlet Version, InfoExchange Portal Version, Portlet Type, Registration Page, and PortletParameters are displayed but cannot be changed in this window.
26 BroadVision, Inc
Chapter 2 Site Presentat ionAdminister ing port lets
To undo any changes you have made to this page of the form, select the Reset button; otherwise,select the Next button to continue.
In the third page of the Register Portlet form you can modify values for the following:
● Site-wide Parameters - parameters that pertain to the whole site
● Program-specific Parameters - parameters that are local to a program
● Visitor-specific Parameters - parameters local to each visitor
You can use the Shortcut for Adding Portlets to Home Pages to modify the following:
● Add Portlet to Home Pages - Use the left mouse button to select home page types to which thisportlet is added.
● Block Name - Change the name of the portlet as it appears in the block on the visitor’s homepage.
If you use this shortcut, the Admin Tool goes through the following steps behind the scenes:
InfoExchange Portal Administrator’s Guide 27
Chapter 2 Site Presentat ionAdminister ing channels
• It creates a program with the same name as the portlet. This program is in the Portletschannel (which is off-line by default so visitors cannot navigate to it). This program has noqualifiers set, making it visible to all visitors who select it.
• It creates an optional block on each selected home page with the name of the portlet.
• It adds the newly-created program to this optional block.
You can modify programs and blocks created with the shortcut just like any that were createdwith other InfoExchange Portal Admin Tool windows.
To undo your changes, click the Reset button; otherwise, click the Re-register button to register thenew portlet.
Adding portlets to configurable home pages
1. Create a new program in an appropriate channel (or modify the program created through theshortcut). Point it to the new portlet, and set its program-scope portlet attributes. See“Administering programs” on page 44 for details on how to do this.
2. Create or modify a page type. Add a new block to the page type, and reference the program inthe block. The block can contain multiple programs, each of which may or may not contain aportlet. See “Administering home page types” on page 69 for details on administering homepage types.
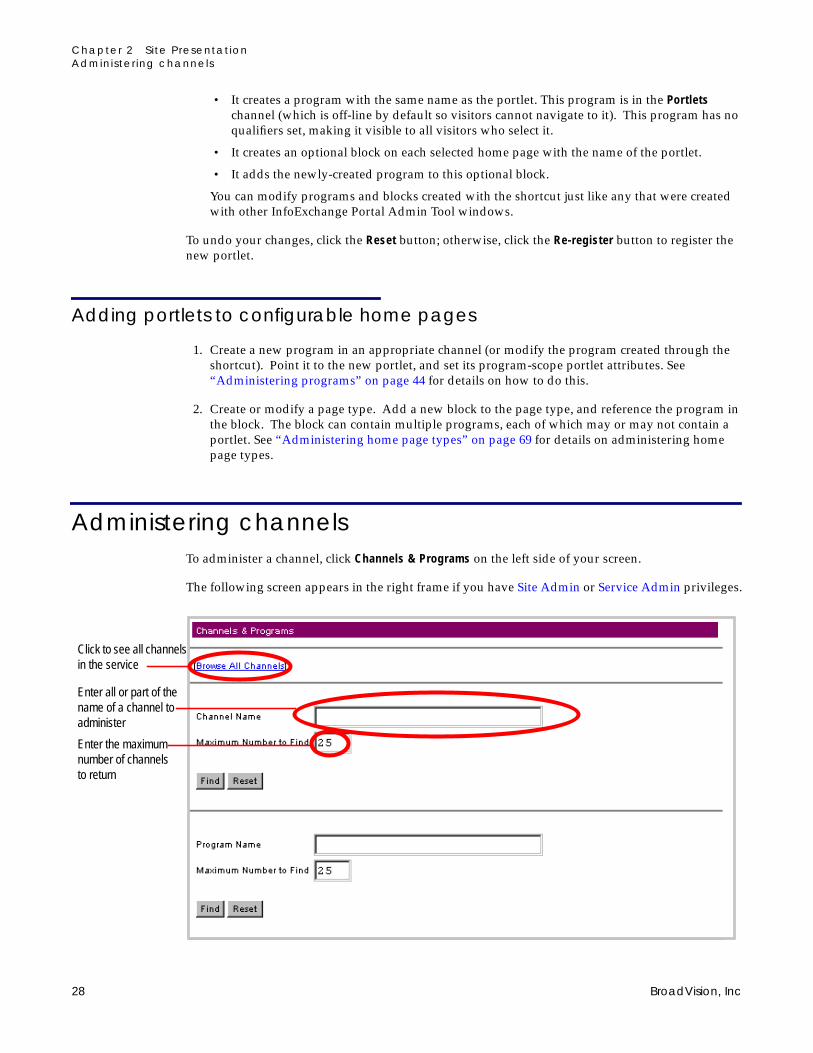
Administering channelsTo administer a channel, click Channels & Programs on the left side of your screen.
The following screen appears in the right frame if you have Site Admin or Service Admin privileges.
Click to see all channelsin the service
Enter the maximumnumber of channelsto return
Enter all or part of thename of a channel toadminister
28 BroadVision, Inc

Chapter 2 Site Presentat ionAdminister ing channels
The following screen appears in the right frame if you are a Channel Administrator (you do nothave Site Admin or Service Admin privileges but can administer one or more channels).
In this scenario you have the option of viewing all channels, including those you cannot administerby selecting [Browse All Channels], or to only see the channels you can administer, select[Browse My Channels].
In either scenario, you can enter a string or substring to search for within the channels in the servicein the Channel Name box in the right frame, then enter the maximum number of channels to bereturned in the Maximum Number to Find box. To find all channels, leave the Channel Name boxempty. Click the Find box. The results appear in the right frame.
The channels are retrieved from the database, sorted alphabetically by their paths, and areorganized like a directory tree with the subchannels under the channels.
Click to only returnchannels you canadminister
Enter the maximumnumber of channels toreturn
Enter all or part of thename of a channel toadminister
Click to return allchannels includingthose you cannotadminister
InfoExchange Portal Administrator’s Guide 29

Chapter 2 Site Presentat ionAdminister ing channels
Adding channels
To add a channel, select the [Browse All Channels] or [Browse My Channels] link at the top of theframe.
Click to edit achannel
Click to add achannel
Click to deletea channel
Click tonavigate to asubchannel
30 BroadVision, Inc

Chapter 2 Site Presentat ionAdminister ing channels
Only a Site Admin or Service Admin can add a channel to the Root channel. ChannelAdministrators can only add subchannels to the channels they can administer.
1. Navigate down to channels you can administer, then select [Add Channel] at the top of the pageto add a channel. In this example, we add the top-level channel Customers.
2. On the first page of the form, enter the Channel Name. This is the text that appears on the linkwhen the channel is displayed to the visitor.
3. You can enter an optional text Description of the channel.
4. Channel Manager and Channel Manager E-mail are optional; they contain the name and e-mailaddress of the person responsible for managing the channel.
● Status can be:
• On-line (visitors can see it)
• Off-line (visitors cannot see it)
5. Choose either a script (including its relative path) or URL for the Channel Start Page. Either canserve as the channel’s “Welcome” page. The filename path of a script is relative to theInteraction Manager’s script root directory. Click the scroll icon for a file dialog in which youcan select a script.
Click to select a scriptor enter a URL as theChannel Start Page
Click to select qualifiersfor this channel
Click to select theadministrators of thischannel
InfoExchange Portal Administrator’s Guide 31

Chapter 2 Site Presentat ionAdminister ing channels
The Channel Start Page script path used in the BVAdventech sample application is /adventech/scripts/channel/default.jsp.
To set a default value for the start page script input field, set km_default_channel_page in$BV1TO1_VAR/lib/script_library/bv_km_utils.js.
6. Select Qualifiers enables you to restrict which channels and programs a visitor can see. In somecases a visitor can also be permitted to administer some qualifiers. Qualifiers are optional; youmay select zero or more qualifier values per channel.
If no qualifiers have been defined, the Qualifiers lists do not appear, and no values can beselected for the channel.
a. Click Find under Select Qualifiers; a pop-up window appears in which you can view the listof qualifiers in the service in groups of ten.
b. To find the qualifiers you want to add:
• Enter a string in the Search box to return a list of qualifiers with names that contain thesearch string
• Select a letter under the Search box to retrieve all qualifiers that begin with that letter, orselect All to retrieve all qualifiers.
c. Select the box next to each qualifier you want to select, select Check All to select all listedqualifiers, or select Clear All to deselect all listed qualifiers. To abort the operation, clickCancel. Otherwise, when you have finished selecting qualifiers, click Done.
7. Use Select Administrators to determine who can administer this channel.
32 BroadVision, Inc
Chapter 2 Site Presentat ionAdminister ing channels
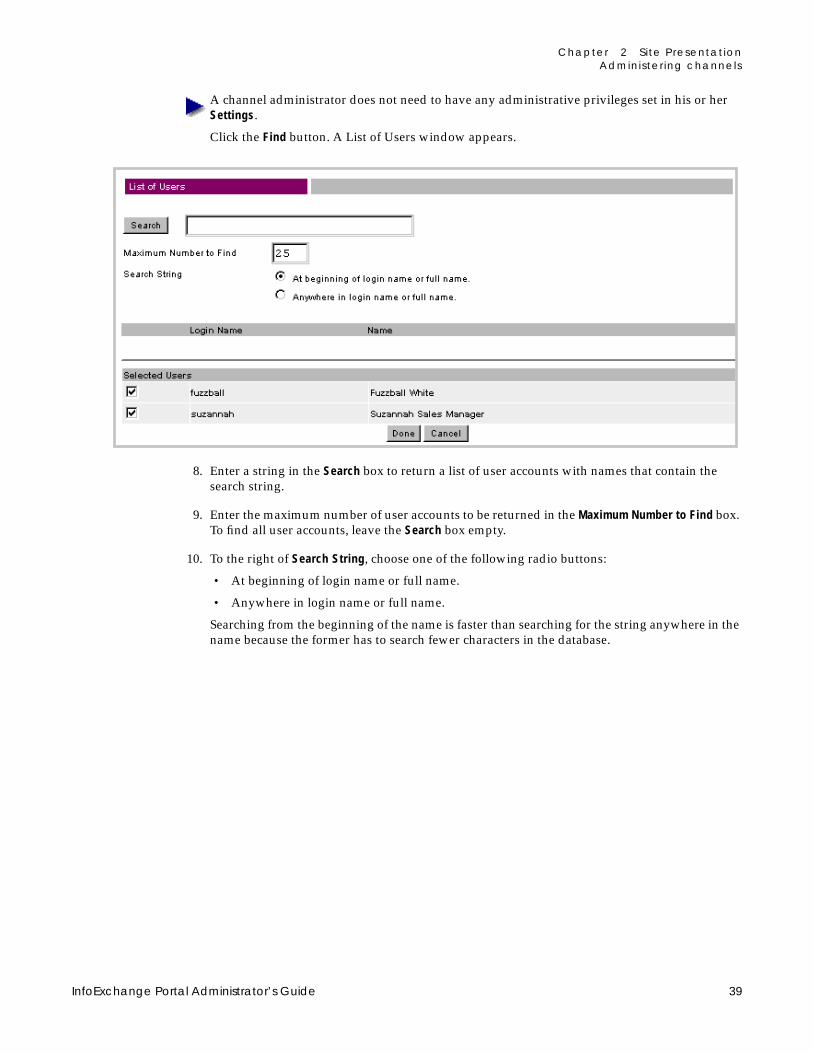
A channel administrator does not need to have any administrative privileges set in his or herSettings.
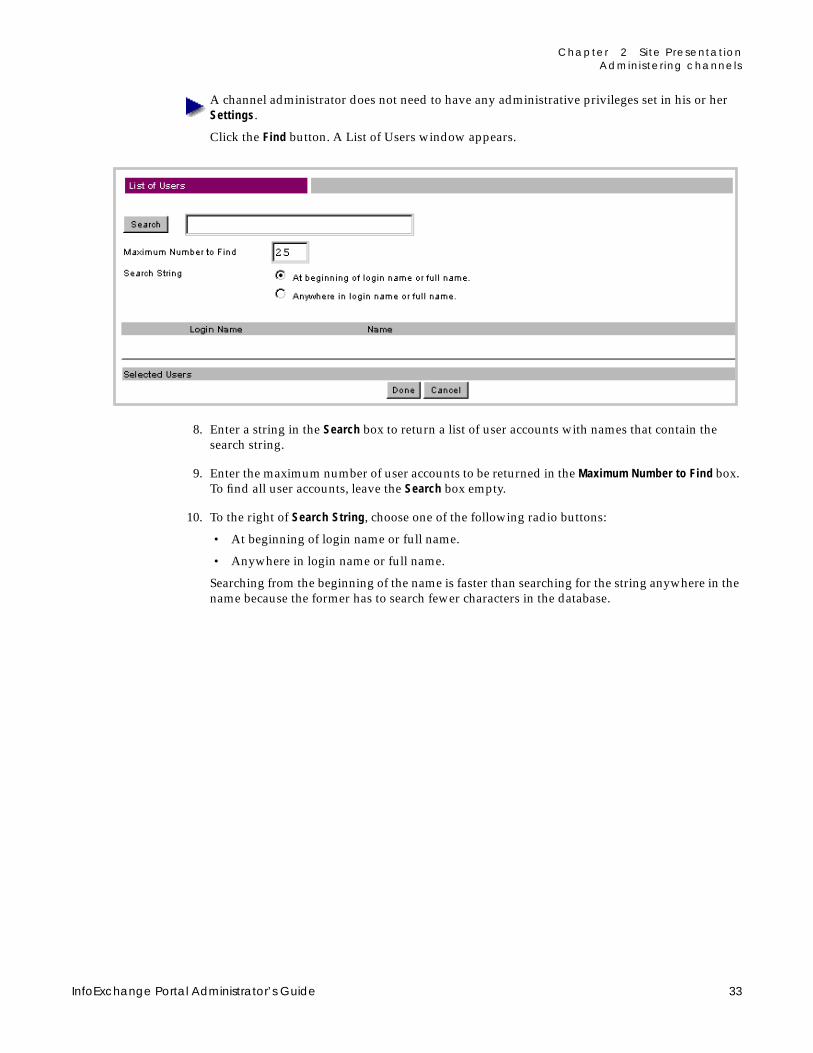
Click the Find button. A List of Users window appears.
8. Enter a string in the Search box to return a list of user accounts with names that contain thesearch string.
9. Enter the maximum number of user accounts to be returned in the Maximum Number to Find box.To find all user accounts, leave the Search box empty.
10. To the right of Search String, choose one of the following radio buttons:
• At beginning of login name or full name.
• Anywhere in login name or full name.
Searching from the beginning of the name is faster than searching for the string anywhere in thename because the former has to search fewer characters in the database.
InfoExchange Portal Administrator’s Guide 33

Chapter 2 Site Presentat ionAdminister ing channels
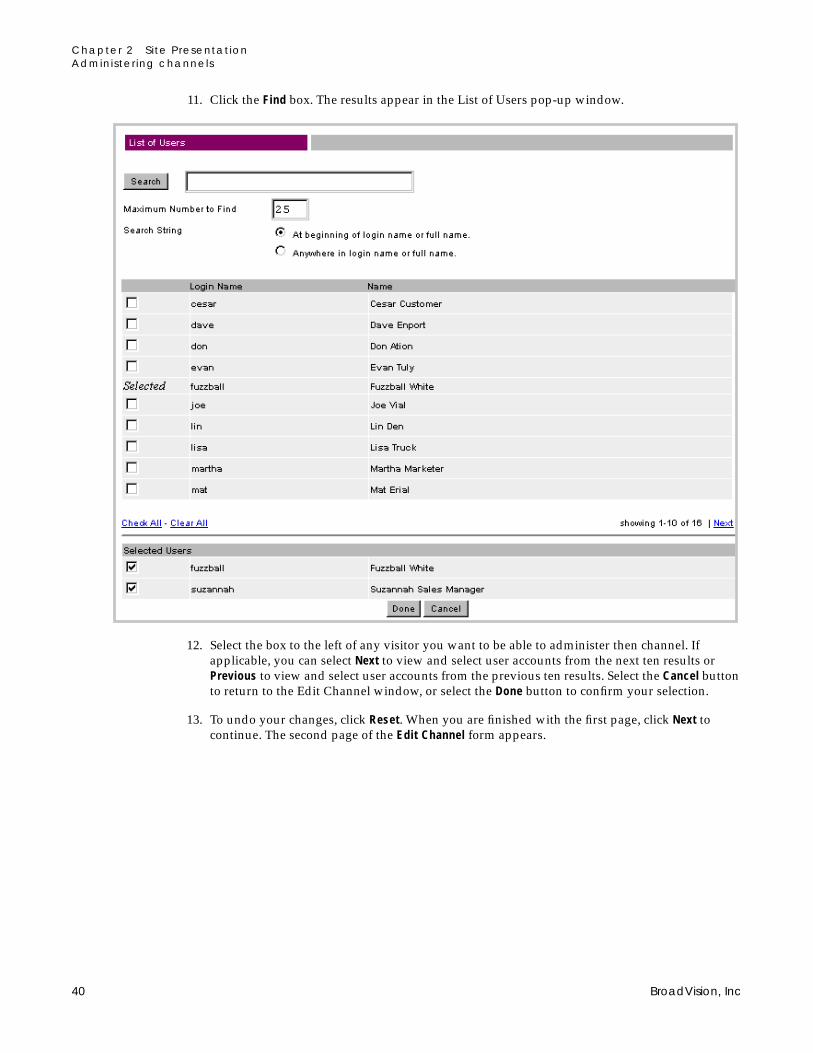
11. Click the Find box. The results appear in the List of Users pop-up window.
12. Select the box to the left of any visitor you want to be able to administer then channel. Ifapplicable, you can select Next to view and select user accounts from the next ten results orPrevious to view and select user accounts from the previous ten results. Select the Cancel buttonto return to the Add Channel window, or select the Done button to confirm your selection.
13. To undo your changes, click Reset. When you are finished with the first page, click Next tocontinue. The second page of the Add Channel form appears.
34 BroadVision, Inc

Chapter 2 Site Presentat ionAdminister ing channels
Your changes are not made until you click Save on the second page.
14. Here you can set values for each of the selected qualifiers.
If no qualifiers have been defined for your site, the Qualifiers lists do not appear, and youcannot select any values.
A visitor sees a channel when, for each qualifier of the channel or program that has one or moreselected values, a selected value in that qualifier matches a selected value in the qualifier of theuser account settings.
If a qualifier of the channel has no selected values (for example, if you do not select anylanguages for the qualifier Language), InfoExchange Portal ignores that qualifier in performingthe match. Selecting the Not Applicable box below the qualifier values causes there to be nofurther restrictions on which visitors can see the channel.
When you add a subchannel, the initial navigation filter settings are the same as the parentchannel’s settings. You can override this, but your overrides can only further restrict whichvisitors can view the channel; selecting more qualifiers than the parent channel has selecteddoes not increase visibility of the channel. When the parent channel’s settings are changed,these changes do not propagate to existing subchannels.
15. To undo your changes, click the Reset button. When you are finished with the second page, clickSave at the bottom of the page to save changes made to both pages of the form. The SuccessfullyAdded Channel frame appears and displays the parameters set for that channel.
InfoExchange Portal Administrator’s Guide 35
Chapter 2 Site Presentat ionAdminister ing channels
Editing channels
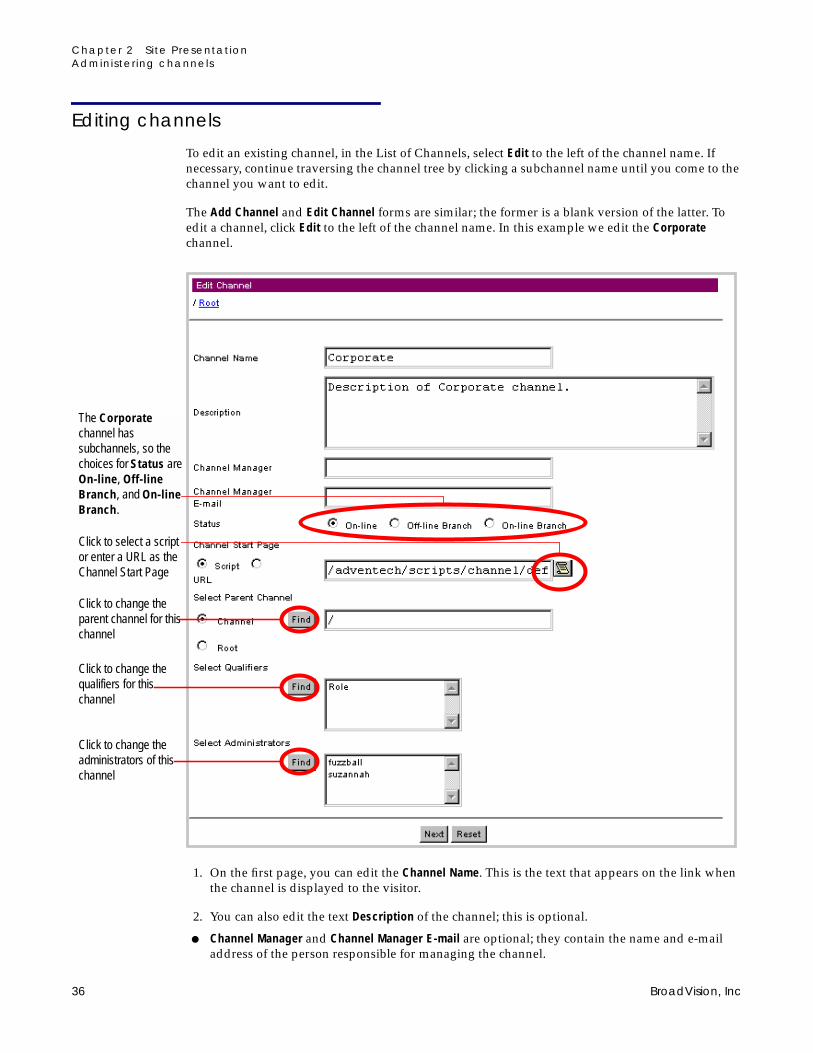
To edit an existing channel, in the List of Channels, select Edit to the left of the channel name. Ifnecessary, continue traversing the channel tree by clicking a subchannel name until you come to thechannel you want to edit.
The Add Channel and Edit Channel forms are similar; the former is a blank version of the latter. Toedit a channel, click Edit to the left of the channel name. In this example we edit the Corporatechannel.
1. On the first page, you can edit the Channel Name. This is the text that appears on the link whenthe channel is displayed to the visitor.
2. You can also edit the text Description of the channel; this is optional.
● Channel Manager and Channel Manager E-mail are optional; they contain the name and e-mailaddress of the person responsible for managing the channel.
Click to select a scriptor enter a URL as theChannel Start Page
Click to change theparent channel for thischannel
Click to change theadministrators of thischannel
Click to change thequalifiers for thischannel
The Corporatechannel hassubchannels, so thechoices for Status areOn-line, Off-lineBranch, and On-lineBranch.
36 BroadVision, Inc

Chapter 2 Site Presentat ionAdminister ing channels
● Status can be:
• On-line (visitors can see it)
• Off-line (visitors cannot see it)
• Off-line Branch (visitors cannot see it or its subchannels)
• On-line Branch (visitors can see it or its subchannels)
If a channel has no subchannels, the choices for Status are On-line and Off-line. If the channelhas subchannels, the choices for Status are On-line, Off-line Branch, and On-line Branch.Off-line Branch makes the channel and its subchannels invisible to visitors when you save thechannel edits. On-line Branch makes a channel and its subchannels visible when you save thechannel edits. If the parent channel is Off-line, the subchannel’s status is Off-line, and thechannel cannot be made On-line until you make the parent channel On-line.
3. Choose either a script (including its relative path) or URL for the Channel Start Page. Either canserve as the channel’s “Welcome” page. The filename path of a script is relative to theInteraction Manager’s script root directory. Click the scroll icon for a file dialog in which youcan select a script.
The Channel Start Page script path used in the BVAdventech sample application is /adventech/scripts/channel/default.jsp.
To set a default value for the start page script input field, set km_default_channel_page in$BV1TO1_VAR/lib/script_library/bv_km_utils.js.
4. Use Select Parent Channel to assign a parent channel to the new channel. Click the Find button.A List of Channels pop-up window appears.
5. You can list your top-level channels, search the channels for the service, or navigate through thechannel hierarchy to the channel you want to use as the parent channel. Select the box to the leftof the channel you want to use as the parent channel. Select the Cancel button to return to theEdit Channel window, or select the Done button to confirm your selection.
InfoExchange Portal Administrator’s Guide 37

Chapter 2 Site Presentat ionAdminister ing channels
6. Select Qualifiers enables you to restrict which channels and programs a visitor can see. In somecases a visitor can also be permitted to administer some qualifiers. Qualifiers are optional; youmay select zero or more qualifier values per channel.
If no qualifiers have been defined, the Qualifiers lists do not appear, and no values can beselected for the user template.
a. Click Find under Select Qualifiers; a pop-up window appears in which you can view the listof qualifiers in the service in groups of ten.
To find the qualifiers you want to add:
• Enter a string in the Search box to return a list of qualifiers with names that contain thesearch string
• Select a letter under the Search box to retrieve all qualifiers that begin with that letter, orselect All to retrieve all qualifiers.
b. Select the box next to each qualifier you want to select, select Check All to select all listedqualifiers, or select Clear All to deselect all listed qualifiers. When you have finishedselecting qualifiers, click Done.
c. In the box to the right of the Find button, use the left mouse button to highlight the qualifiersyou want to assign to the channel.
7. Use Select Administrators to determine who can administer this channel.
38 BroadVision, Inc
Chapter 2 Site Presentat ionAdminister ing channels
A channel administrator does not need to have any administrative privileges set in his or herSettings.
Click the Find button. A List of Users window appears.
8. Enter a string in the Search box to return a list of user accounts with names that contain thesearch string.
9. Enter the maximum number of user accounts to be returned in the Maximum Number to Find box.To find all user accounts, leave the Search box empty.
10. To the right of Search String, choose one of the following radio buttons:
• At beginning of login name or full name.
• Anywhere in login name or full name.
Searching from the beginning of the name is faster than searching for the string anywhere in thename because the former has to search fewer characters in the database.
InfoExchange Portal Administrator’s Guide 39
Chapter 2 Site Presentat ionAdminister ing channels
11. Click the Find box. The results appear in the List of Users pop-up window.
12. Select the box to the left of any visitor you want to be able to administer then channel. Ifapplicable, you can select Next to view and select user accounts from the next ten results orPrevious to view and select user accounts from the previous ten results. Select the Cancel buttonto return to the Edit Channel window, or select the Done button to confirm your selection.
13. To undo your changes, click Reset. When you are finished with the first page, click Next tocontinue. The second page of the Edit Channel form appears.
40 BroadVision, Inc

Chapter 2 Site Presentat ionAdminister ing channels
Your changes are not made until you click Save on the second page.
14. Here you can change values for each of the selected qualifiers by holding down the Control keyand clicking the left mouse button over the name of the qualifier value you want to select ordeselect.
If no qualifiers have been defined for your site, the Qualifiers lists do not appear, and youcannot select any values.
A visitor sees a channel when, for each qualifier of the channel or program that has one or moreselected values, a selected value in that qualifier matches a selected value in the qualifier of theuser account settings.
If a qualifier of the channel has no selected values (for example, if you do not select anylanguages for the qualifier Language), InfoExchange Portal ignores that qualifier in performingthe match. Selecting the Not Applicable box below the qualifier values causes there to be nofurther restrictions on which visitors can see the channel.
15. When the qualifier settings of the parent channel are changed, these changes can propagate toexisting subchannels if you select Apply Qualifier Changes to Subchannels. Deselecting thiscauses qualifier changes to a parent channel to not propagate down to subchannels.
To undo your changes, click the Reset button. When you are finished with the second page, clickSave at the bottom of the page to save changes made to both pages of the form.
InfoExchange Portal Administrator’s Guide 41
Chapter 2 Site Presentat ionAdminister ing channels
Moving channels
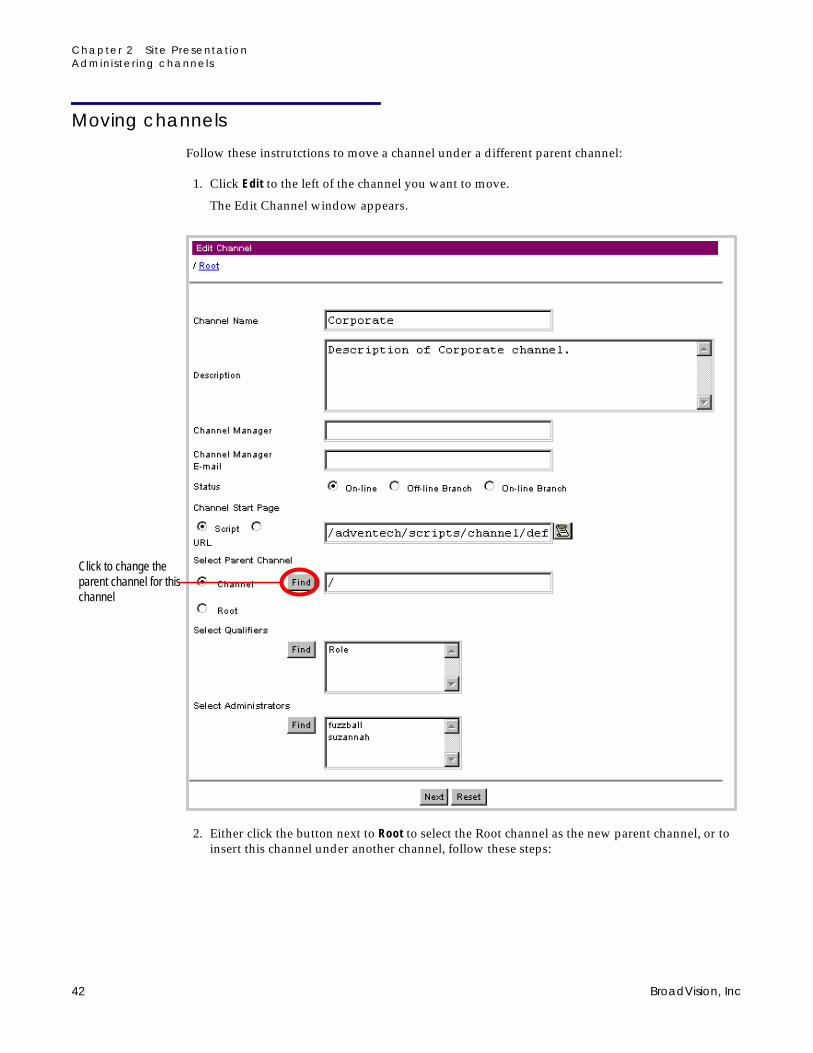
Follow these instrutctions to move a channel under a different parent channel:
1. Click Edit to the left of the channel you want to move.
The Edit Channel window appears.
2. Either click the button next to Root to select the Root channel as the new parent channel, or toinsert this channel under another channel, follow these steps:
Click to change theparent channel for thischannel
42 BroadVision, Inc

Chapter 2 Site Presentat ionAdminister ing channels
3. Use Select Parent Channel to assign a parent channel to the new channel. Click the Find button.A List of Channels window appears.
4. You can list your top-level channels, search the channels for the service, or navigate through thechannel hierarchy to the channel you want to use as the parent channel. Select the box to the leftof the channel you want to use as the parent channel. Select the Cancel button to return to theEdit Channel window, or select the Done button to confirm your selection.
5. Click Next to proceed to the next page, then click Save to save your changes.
To view the channel under its new parent, navigate to and select the name of the parent channel.
Deleting channels
When you delete a channel, you also delete its subchannels. Programs that belonged only to thatchannel appear at the bottom of the channels and programs list. If the visitor has added theseprograms to their home page, the programs will still be available to them. Visitors will not be able tonavigate to the programs, but the programs will still appear on the home page. To continue usingprograms belonging to a deleted channel, reassign them to other channels before deleting them.
Click Delete to the left of a channel name to delete it; you are then asked for confirmation before thechannel is deleted. Note that deleted channels cannot be “undeleted.”
You may want to prevent visitors from seeing certain channels or programs. To take a channel off-line, edit the channel, then change the Status setting for that channel. The visitors can still see theprograms associated with this channel through their home pages. You must take each program off-line to hide it.
InfoExchange Portal Administrator’s Guide 43
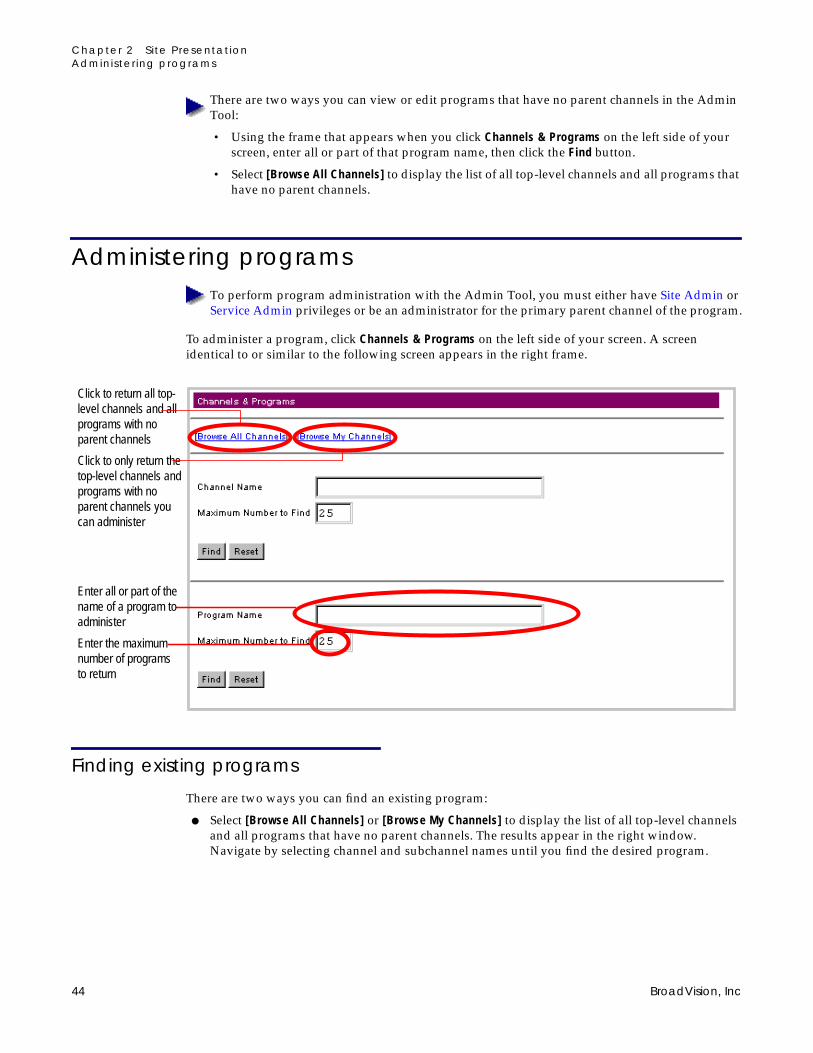
Chapter 2 Site Presentat ionAdminister ing programs
There are two ways you can view or edit programs that have no parent channels in the AdminTool:
• Using the frame that appears when you click Channels & Programs on the left side of yourscreen, enter all or part of that program name, then click the Find button.
• Select [Browse All Channels] to display the list of all top-level channels and all programs thathave no parent channels.
Administering programsTo perform program administration with the Admin Tool, you must either have Site Admin orService Admin privileges or be an administrator for the primary parent channel of the program.
To administer a program, click Channels & Programs on the left side of your screen. A screenidentical to or similar to the following screen appears in the right frame.
Finding existing programs
There are two ways you can find an existing program:
● Select [Browse All Channels] or [Browse My Channels] to display the list of all top-level channelsand all programs that have no parent channels. The results appear in the right window.Navigate by selecting channel and subchannel names until you find the desired program.
Enter the maximumnumber of programsto return
Enter all or part of thename of a program toadminister
Click to only return thetop-level channels andprograms with noparent channels youcan administer
Click to return all top-level channels and allprograms with noparent channels
44 BroadVision, Inc

Chapter 2 Site Presentat ionAdminister ing programs
● Enter the name of the program or part of the name in the Program Name box, then enter themaximum number of programs to be returned in the Maximum Number to Find box. To find allprograms, leave the Program Name box empty. Click the Find button. The results appear in theright window.
Click to edit aprogram
Click to deletea program
InfoExchange Portal Administrator’s Guide 45

Chapter 2 Site Presentat ionAdminister ing programs
Adding programs
To add a program, follow these steps.
1. To add a program, find a list of channels, then select one of the channels to navigate down towhere you can add a program to a subchannel.
2. When you are at the level where you want to add a program, select [Add Program] at the top ofthe program list. In this example, we add the program Antarctic Sales to the channel ProductAnnouncements.
Click to add aprogram tothis channel
Name of thechannel towhich theprogram isbeing added
46 BroadVision, Inc
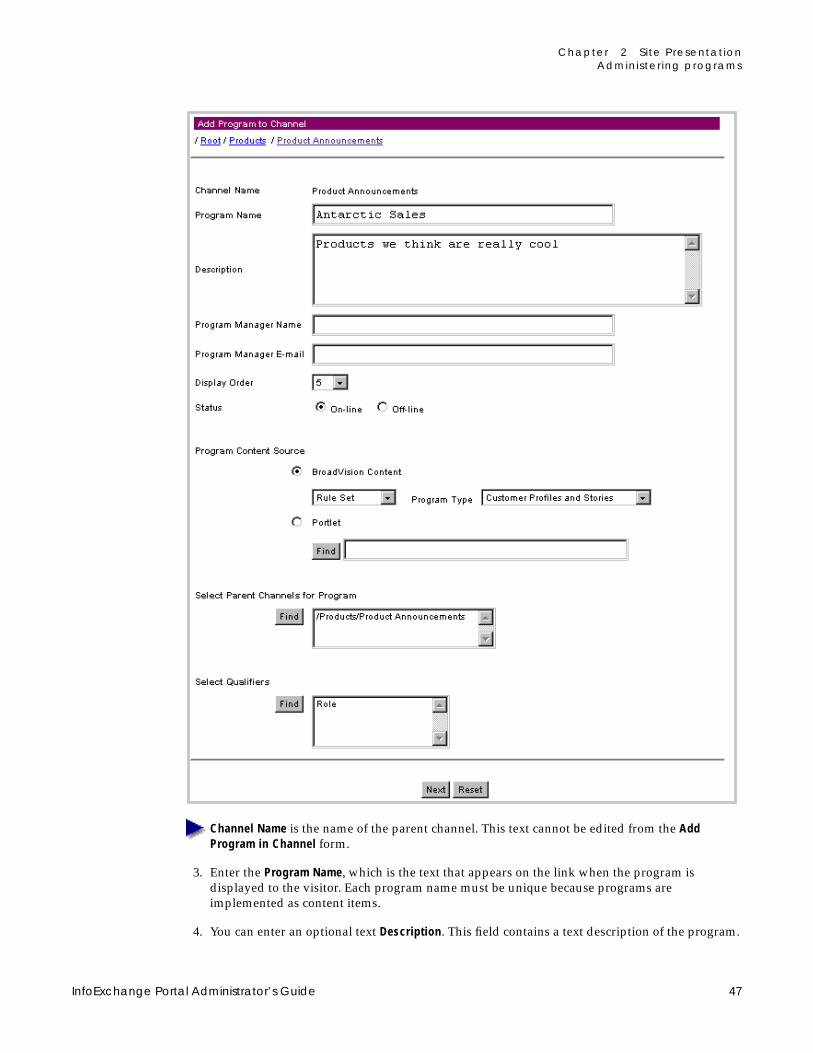
Chapter 2 Site Presentat ionAdminister ing programs
Channel Name is the name of the parent channel. This text cannot be edited from the AddProgram in Channel form.
3. Enter the Program Name, which is the text that appears on the link when the program isdisplayed to the visitor. Each program name must be unique because programs areimplemented as content items.
4. You can enter an optional text Description. This field contains a text description of the program.
InfoExchange Portal Administrator’s Guide 47
Chapter 2 Site Presentat ionAdminister ing programs
5. The Program Manager Name and Program Manager E-mail are optional; they contain the name ande-mail address of the person responsible for managing the program.
6. Choose a Display Order number from the list. This is the position of this program in the list of thechannel’s programs. The Admin Tool displays programs by Display Order in the list of achannel’s programs. When you choose other parent channels for the program (Select ParentChannels for Program), the program is added as the last program displayed in those other parentchannels.
7. Choose either On-line or Off-line for the Status. On-line means visitors can see the program;Off-line means visitors cannot see it.
8. Enter a Program Content Source to serve as the “Welcome” page for the program.
• When you select BroadVision Content, the source of content for the script must be one of thefollowing:
You must also select a Program Type from the drop-down list. This controls what rule sets,categories, and content you can pick as the program content source on the second page ofthe Add Program to Channel form. InfoExchange Portal uses the content type setting in theProgram Type to determine which categories and content are available for selection. The ruleset category in the Program Type determines which rule sets are available for use as theprogram content source. Unclassified rule sets cannot be used as the program contentsource.
• When you select Portlet, you must use the Find button to bring up a Find Portlet windowfrom which you can select the portlet.
9. Use Select Parent Channels for Program to add or change the parent channels for the program.Although a program can become parentless when its parent channel is deleted, you cannotcreate a program that does not have a parent channel.
As a channel administrator, when you select parent channels, you can select parent channelsyou cannot administer as long as you are able to administer the primary parent channel for theprogram.
Rule Set Select a rule set from the list of rule sets in the rule set category specified in theProgram Type as defined by the One-To-One Command Center. When a visitor toan InfoExchange Portal site chooses the link for this program, the rules in that ruleset are evaluated and the matching content items appear as the program list.
Category Categories are defined by the One-To-One Command Center. Click Find to select acategory from the categories in the content type of the program type. When a visitorto an InfoExchange Portal site chooses the link for a program, the content items inthe category appear as the program list. When you select Include content fromsubcategories, the content in the subcategories also appear in the program list.Note that the category list displayed by Find presents both on-line and off-linecategories.
Content item Click Find to select a content item in the content type of the program type. Enter anypart of the content item name in the Find dialog box; all items that have that nameappear in the results list. The list presents both on-line and off-line content.
Script The path from the script root to a script.
URL The URL of a site to use.
48 BroadVision, Inc

Chapter 2 Site Presentat ionAdminister ing programs
a. Click the Find button. A List of Channels window appears.
b. You can list your top-level channels, search the channels for the service, or navigate throughthe channel hierarchy to channels you want to use as parent channels. Select the box to theleft of each channel you want to use as the parent channel of the program. Select the Cancelbutton to return to the Add Program to Channel window, or select the Done button toconfirm your selection.
c. Select channels to add to the available selection of parent channels, then click Done at thebottom of the form. The Channels you checked appear as selected in the Select ParentChannels for Program box.
10. Select Qualifiers enables you to restrict which programs a visitor can see. In some cases a visitorcan also be permitted to administer some qualifiers. Qualifiers are optional; you may select zeroor more qualifier values per program.
If no qualifiers have been defined, the Qualifiers lists do not appear, and no values can beselected for the program.
InfoExchange Portal Administrator’s Guide 49

Chapter 2 Site Presentat ionAdminister ing programs
a. Click Find under Select Qualifiers; a pop-up window appears in which you can view the listof qualifiers in the service in groups of ten.
To find the qualifiers you want to add:
• Enter a string in the Search box to return a list of qualifiers with names that contain thesearch string
• Select a letter under the Search box to retrieve all qualifiers that begin with that letter, orselect All to retrieve all qualifiers.
b. Select the box next to each qualifier you want to select, select Check All to select all listedqualifiers, or select Clear All to deselect all listed qualifiers. When you have finishedselecting qualifiers, click Done.
11. To undo your changes, click Reset. When you are finished with the first page, click Next tocontinue. Note that your changes are not made until you click Save on the next page.
The appearance fo the second page of the Add Program to Channel form differs based on yourprogram content source.
50 BroadVision, Inc

Chapter 2 Site Presentat ionAdminister ing programs
Using a rule set as the program content source
If you chose BroadVision Content as the program content source and selected Rule Set, the top of thenext window is similar to this:
1. Set the Program Start Page by selecting a page script and a block script. A page script is the screenprogram full welcome page; a block script displays a program in a home page block.
If loaded, the InfoExchange Portal sample application page scripts are located in the directoryscript_root/adventech/scripts/browse, the BVAdvenTech sample program script islocated in the directory script_root/adventech/scripts/browse/program.jsp, andthe BVAdvenTech sample block scripts are located in the directory script_root/adventech/scripts/home/embed. Additional sample block scripts are located in$BV1TO1/erm_app/examples/block_scripts.
Use the links to navigate to the script you want to use. The path of the script from thescript_root directory now appears in the Add Program to Channel window.
2. Set the following Program Content Source parameters:
• Rule Set - Use the drop-down menu to select a rule set to use for the program content
• Publishing Category - Either enter the text or use the Find button and use the pop-upCategory Dialog window to navigate to the Publishing Center category to which the contentis published.
• Instant Publisher Form - Either enter the text or use the scroll icon to select the path from thescript root to the Instant Publisher form for publishing to this program.
• Only show links for readable content - Select the box to the left of this text if you only wantlinks to be visible for content the visitor can access.
3. Complete the form as described in “Finishing the Add Program to Channel form” on page 56.
Select a Rule Set forthe Program ContentSource
Enter or select aPublishing Centercategory
Click to only showvisitors links to contentthey can access
Enter or select a PageScript Path nad aBlock Script Path forthe Program StartPage
InfoExchange Portal Administrator’s Guide 51

Chapter 2 Site Presentat ionAdminister ing programs
Using a category as the program content source
If you chose BroadVision Content as the program content source and selected Category, the top of thenext window is similar to this:
1. Set the Program Start Page by selecting a page script and a block script. A page script is the screenprogram full welcome page; a block script displays a program in a home page block.
If loaded, the InfoExchange Portal sample application page scripts are located in the directoryscript_root/adventech/scripts/browse, the BVAdvenTech sample program script islocated in the directory script_root/adventech/scripts/browse/program.jsp, andthe BVAdvenTech sample block scripts are located in the directory script_root/adventech/scripts/home/embed. Additional sample block scripts are located in$BV1TO1/erm_app/examples/block_scripts.
Use the links to navigate to the script you want to use. The path of the script from thescript_root directory now appears in the Add Program to Channel window.
2. Set the following Program Content Source parameters:
• Category - Either enter the text or use the Find button and use the pop-up Category Dialogwindow to navigate to the Publishing Center category to which the content is published.
• Instant Publisher Form - Either enter the text or use the scroll icon to select the path from thescript root to the Instant Publisher form for publishing to this program.
• Include content from subcategories - Select the box to the left of this text if you want thevisitor to be able to access content in subcategories of the selected category.
• Only show links for readable content - Select the box to the left of this text if you only wantlinks to be visible for content the visitor can access.
3. Complete the form as described in “Finishing the Add Program to Channel form” on page 56.
Select a Category forthe Program ContentSource
Enter or select the pathto the Instant Publisherform
Check to give visitorsaccess to subcategories
Enter or select a PageScript Path and aBlock Script Path forthe Program StartPage
Click to only showvisitors links to contentthey can access
52 BroadVision, Inc

Chapter 2 Site Presentat ionAdminister ing programs
Using a content item as the program content source
If you chose BroadVision Content as the program content source and selected Content Item, the top ofthe next window is similar to this:
1. Set the Program Start Page by selecting a page script and a block script. A page script is the screenprogram full welcome page; a block script displays a program in a home page block.
If loaded, the InfoExchange Portal sample application page scripts are located in the directoryscript_root/adventech/scripts/browse, the BVAdvenTech sample program script islocated in the directory script_root/adventech/scripts/browse/program.jsp, andthe BVAdvenTech sample block scripts are located in the directory script_root/adventech/scripts/home/embed. Additional sample block scripts are located in$BV1TO1/erm_app/examples/block_scripts.
Use the links to navigate to the script you want to use. The path of the script from thescript_root directory now appears in the Add Program to Channel window.
2. Under Program Content Source, click the Find button to the left of Content Item to use theFind Content pop-up box to locate the content item
To find the content item you want to use:
Select a Content Itemfor the ProgramContent Source
Enter or select a PageScript Path and aBlock Script Path forthe Program StartPage
InfoExchange Portal Administrator’s Guide 53
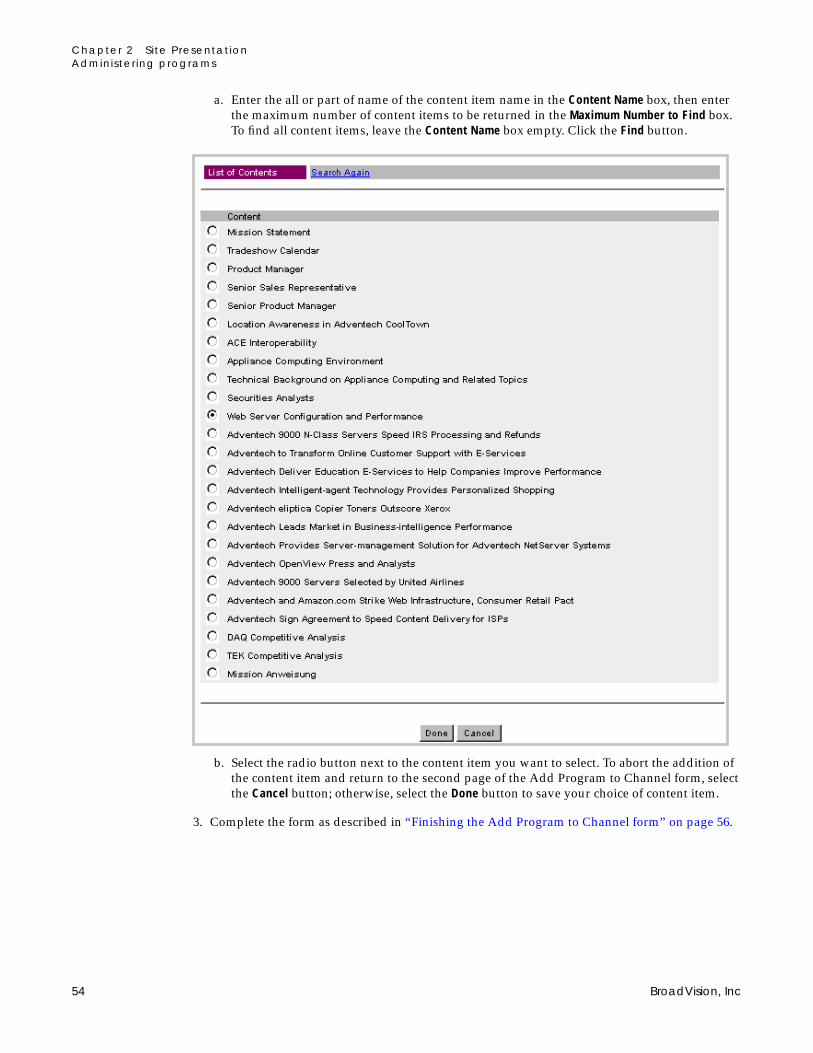
Chapter 2 Site Presentat ionAdminister ing programs
a. Enter the all or part of name of the content item name in the Content Name box, then enterthe maximum number of content items to be returned in the Maximum Number to Find box.To find all content items, leave the Content Name box empty. Click the Find button.
b. Select the radio button next to the content item you want to select. To abort the addition ofthe content item and return to the second page of the Add Program to Channel form, selectthe Cancel button; otherwise, select the Done button to save your choice of content item.
3. Complete the form as described in “Finishing the Add Program to Channel form” on page 56.
54 BroadVision, Inc

Chapter 2 Site Presentat ionAdminister ing programs
Using a script as the program content source
If you chose BroadVision Content as the program content source and selected Script, the top of thenext window is similar to this:
1. Set the Program Start Page by selecting a page script and a block script. A page script is the screenprogram full welcome page; a block script displays a program in a home page block.
If loaded, the InfoExchange Portal sample application page scripts are located in the directoryscript_root/adventech/scripts/browse, the BVAdvenTech sample program script islocated in the directory script_root/adventech/scripts/browse/program.jsp, andthe BVAdvenTech sample block scripts are located in the directory script_root/adventech/scripts/home/embed. Additional sample block scripts are located in$BV1TO1/erm_app/examples/block_scripts.
Use the links to navigate to the script you want to use. The path of the script from thescript_root directory now appears in the Add Program to Channel window.
2. Complete the form as described in “Finishing the Add Program to Channel form” on page 56.
Using a URL as the program content source
If you chose BroadVision Content as the program content source and selected URL, the top of the nextwindow is similar to this:
1. Set the Program Start Page by entering a URL.
2. Complete the form as described in “Finishing the Add Program to Channel form” on page 56.
Enter or select a PageScript Path and aBlock Script Path forthe Program StartPage
Enter or select theURL for the ProgramStart Page
InfoExchange Portal Administrator’s Guide 55
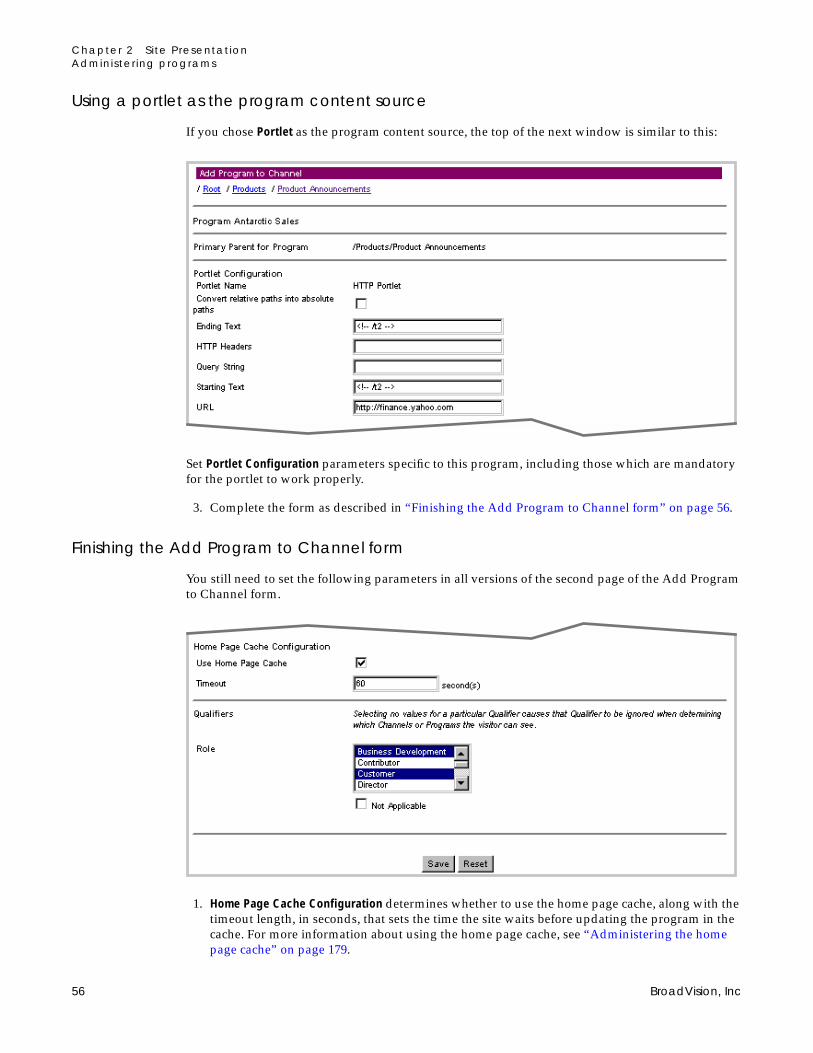
Chapter 2 Site Presentat ionAdminister ing programs
Using a portlet as the program content source
If you chose Portlet as the program content source, the top of the next window is similar to this:
Set Portlet Configuration parameters specific to this program, including those which are mandatoryfor the portlet to work properly.
3. Complete the form as described in “Finishing the Add Program to Channel form” on page 56.
Finishing the Add Program to Channel form
You still need to set the following parameters in all versions of the second page of the Add Programto Channel form.
1. Home Page Cache Configuration determines whether to use the home page cache, along with thetimeout length, in seconds, that sets the time the site waits before updating the program in thecache. For more information about using the home page cache, see “Administering the homepage cache” on page 179.
56 BroadVision, Inc

Chapter 2 Site Presentat ionAdminister ing programs
2. The Auxiliary Data fields provide you with three integer and three string fields for enteringadditional data. These fields are optional.
For example, a Channel Administrator might want to store the program manager’s phonenumber with the program. The program’s start page script can fetch that additional data anddisplay it to the visitor. A program has three text fields and three numeric fields for additionaldata. The developer of a site can access these additional fields (INTCOL1, INTCOL2, INTCOL3,STRCOL1, STRCOL2, and STRCOL3).
3. Set values for each of the selected Qualifiers.
If no qualifiers have been defined for your site, the Qualifiers lists do not appear, and youcannot select any values.
A visitor sees a program when, for each qualifier of the channel or program that has one ormore selected values, a selected value in that qualifier matches a selected value in the qualifierof the user account settings.
If a qualifier of the program has no selected values (for example, if you do not select anylanguages for the qualifier Language), InfoExchange Portal ignores that qualifier in performingthe match. Selecting the Not Applicable box below the qualifier values causes there to be nofurther restrictions on which visitors can see the program.
To undo your changes to the page, click the Reset button. When you are finished with the secondpage, click the Save button at the bottom of the page to save changes made to both pages of theform.
InfoExchange Portal Administrator’s Guide 57
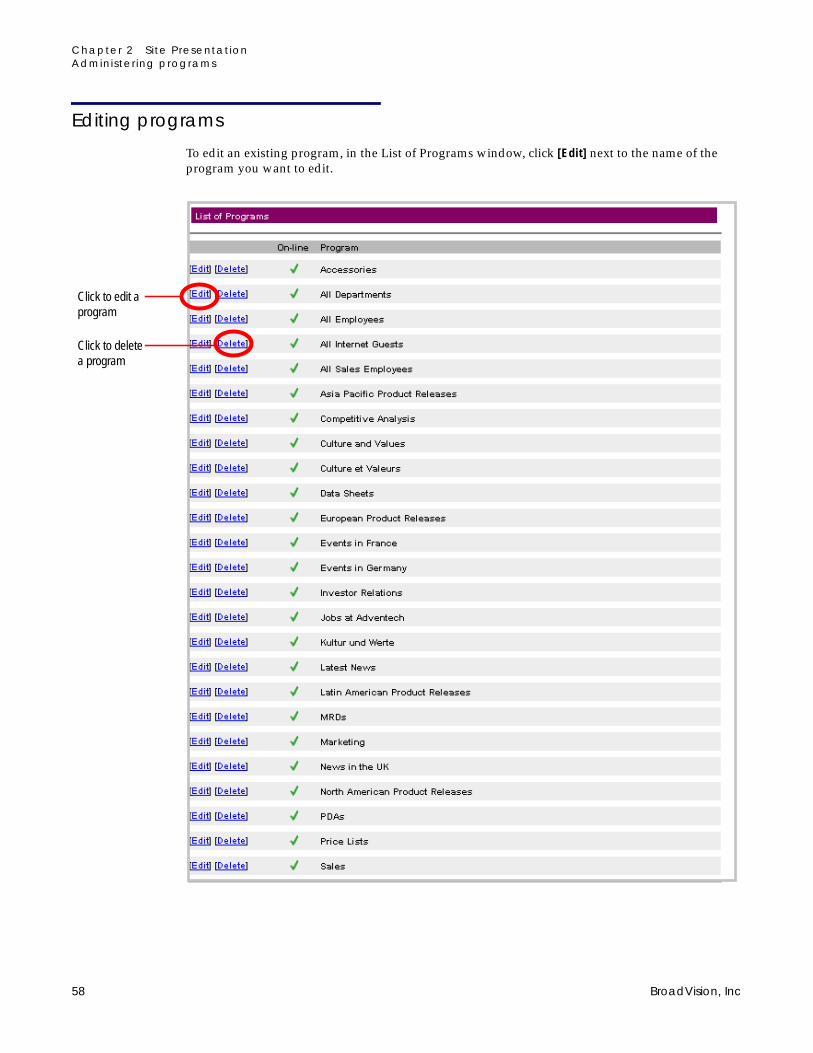
Chapter 2 Site Presentat ionAdminister ing programs
Editing programs
To edit an existing program, in the List of Programs window, click [Edit] next to the name of theprogram you want to edit.
Click to edit aprogram
Click to deletea program
58 BroadVision, Inc

Chapter 2 Site Presentat ionAdminister ing programs
The Edit Program in Channel form appears similar. In this example we edit the All Departmentsprogram.
Channel Name is the name of the parent channel. This text cannot be edited from the EditProgram in Channel form.
InfoExchange Portal Administrator’s Guide 59

Chapter 2 Site Presentat ionAdminister ing programs
You can modify the following values on the first page of the form:
1. Program Name - This is the text that appears on the link when the program is displayed to thevisitor. Each program name must be unique because programs are implemented as contentitems.
2. Description - This optional text field contains a text description of the program.
3. The Program Manager Name and Program Manager E-mail are also optional; they contain the nameand e-mail address of the person responsible for managing the program.
4. The Display Order - you can change the number from the list to change the position of thisprogram in the list of the channel’s programs. The Admin Tool displays programs by DisplayOrder in the list of a channel’s programs. When you choose other parent channels for theprogram (Select Parent Channels for Program), the program is added as the last programdisplayed in those other parent channels.
5. Choose either On-line or Off-line for the Status. On-line means visitors can see the program;Off-line means visitors cannot see it.
6. Program Content Source - this serves as the “Welcome” page for the program.
• When you select BroadVision Content, the source of content for the script must be one of thefollowing:
Program Type - you can select a different one from the dropdown list. This controls what rulesets, categories, and content you can pick as the program content source on the second pageof the Edit Program in Channel form. InfoExchange Portal uses the content type setting in theProgram Type to determine which categories and content are available for selection. The ruleset category in the Program Type determines which rule sets are available for use as theprogram content source. Unclassified rule sets cannot be used as the program contentsource.
• When you select Portlet, you must use the Find button to bring up a Find Portlet windowfrom which you can select the portlet.
7. Select Parent Channels for Program - you can change the parent channels for the program.Although a program can become parentless when its parent channel is deleted, you cannotcreate a program that does not have a parent channel.
Rule Set Select a rule set from the list of rule sets in the rule set category specified in theProgram Type as defined by the One-To-One Command Center. When a visitor toan InfoExchange Portal site chooses the link for this program, the rules in that ruleset are evaluated and the matching content items appear as the program list.
Category Categories are defined by the One-To-One Command Center. Click Find to select acategory from the categories in the content type of the program type. When a visitorto an InfoExchange Portal site chooses the link for a program, the content items inthe category appear as the program list. When you select Include content fromsubcategories, the content in the subcategories also appear in the program list.Note that the category list displayed by Find presents both on-line and off-linecategories.
Content item Click Find to select a content item in the content type of the program type. Enter anypart of the content item name in the Find dialog box; all items that have that nameappear in the results list. The list presents both on-line and off-line content.
Script The path from the script root to a script.
URL The URL of a site to use.
60 BroadVision, Inc

Chapter 2 Site Presentat ionAdminister ing programs
As a channel administrator, when you select parent channels, you can select parent channelsyou cannot administer as long as you are able to administer the primary parent channel for theprogram.
a. Click the Find button. A List of Channels window appears.
b. You can list your top-level channels, search the channels for the service, or navigate throughthe channel hierarchy to channels you want to use as parent channels. Select the box to theleft of each channel you want to use as the parent channel of the program. Select the Cancelbutton to return to the Edit Program in Channel window, or select the Done button toconfirm your selection.
c. Select channels to add to the available selection of parent channels, then click Done at thebottom of the form. The Channels you checked appear as selected in the Select ParentChannels for Program box.
InfoExchange Portal Administrator’s Guide 61
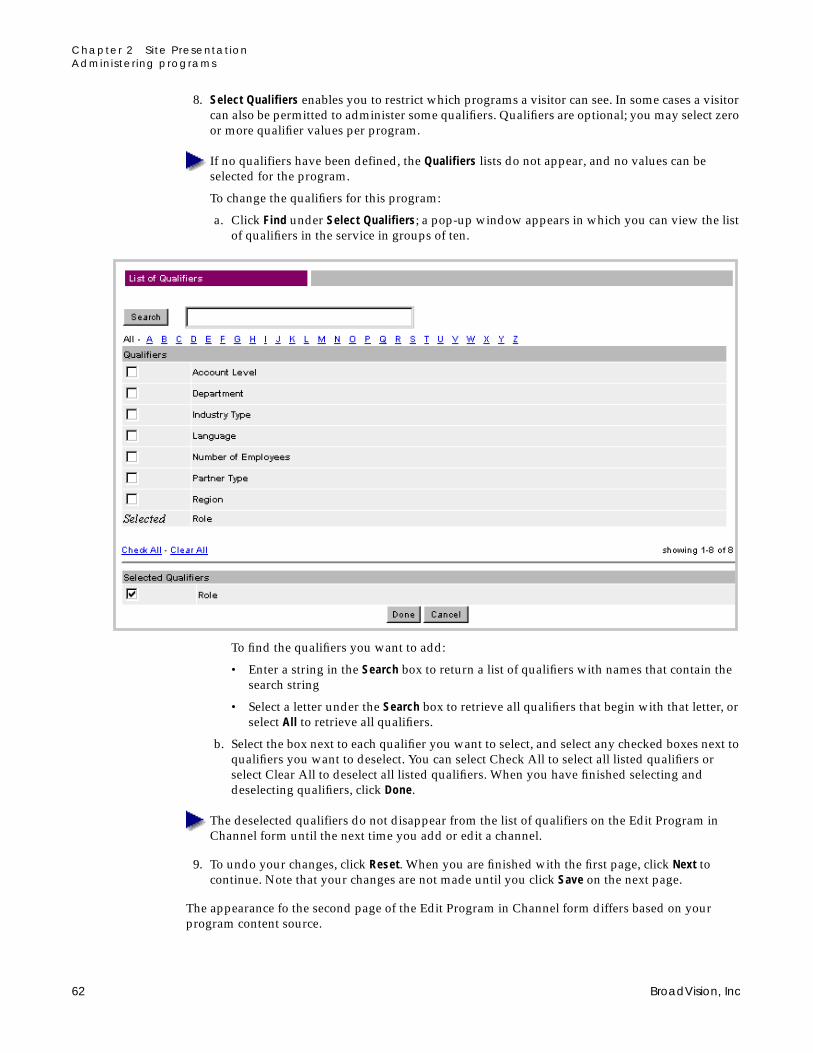
Chapter 2 Site Presentat ionAdminister ing programs
8. Select Qualifiers enables you to restrict which programs a visitor can see. In some cases a visitorcan also be permitted to administer some qualifiers. Qualifiers are optional; you may select zeroor more qualifier values per program.
If no qualifiers have been defined, the Qualifiers lists do not appear, and no values can beselected for the program.
To change the qualifiers for this program:
a. Click Find under Select Qualifiers; a pop-up window appears in which you can view the listof qualifiers in the service in groups of ten.
To find the qualifiers you want to add:
• Enter a string in the Search box to return a list of qualifiers with names that contain thesearch string
• Select a letter under the Search box to retrieve all qualifiers that begin with that letter, orselect All to retrieve all qualifiers.
b. Select the box next to each qualifier you want to select, and select any checked boxes next toqualifiers you want to deselect. You can select Check All to select all listed qualifiers orselect Clear All to deselect all listed qualifiers. When you have finished selecting anddeselecting qualifiers, click Done.
The deselected qualifiers do not disappear from the list of qualifiers on the Edit Program inChannel form until the next time you add or edit a channel.
9. To undo your changes, click Reset. When you are finished with the first page, click Next tocontinue. Note that your changes are not made until you click Save on the next page.
The appearance fo the second page of the Edit Program in Channel form differs based on yourprogram content source.
62 BroadVision, Inc

Chapter 2 Site Presentat ionAdminister ing programs
Using a rule set as the program content source
If you chose BroadVision Content as the program content source and selected Rule Set, the top of thenext window is similar to this:
1. You can change the Program Start Page by selecting a different page script or block script. A page scriptis the screen program full welcome page; a block script displays a program in a home page block.
If loaded, the InfoExchange Portal sample application page scripts are located in the directoryscript_root/adventech/scripts/browse, the BVAdvenTech sample program script islocated in the directory script_root/adventech/scripts/browse/program.jsp, andthe BVAdvenTech sample block scripts are located in the directory script_root/adventech/scripts/home/embed. Additional sample block scripts are located in$BV1TO1/erm_app/examples/block_scripts.
Use the links to navigate to the script you want to use. The path of the script from thescript_root directory now appears in the Edit Program in Channel window.
2. You can edit the following Program Content Source parameters:
• Rule Set - Use the drop-down menu to select a rule set to use for the program content
• Publishing Category - Either enter the text or use the Find button and use the pop-upCategory Dialog window to navigate to the Publishing Center category to which the contentis published.
• Instant Publisher Form - Either enter the text or use the scroll icon to select the path from thescript root to the Instant Publisher form for publishing to this program.
• Only show links for readable content - Select the box to the left of this text if you only wantlinks to be visible for content the visitor can access.
3. Complete the form as described in “Finishing the Edit Program in Channel form” on page 68.
Select a Rule Set forthe Program ContentSource
Enter or select aPublishing Centercategory
Click to only showvisitors links to contentthey can access
Enter or select a PageScript Path and aBlock Script Path forthe Program StartPage
InfoExchange Portal Administrator’s Guide 63

Chapter 2 Site Presentat ionAdminister ing programs
Using a category as the program content source
If you chose BroadVision Content as the program content source and selected Category, the top of thenext window is similar to this:
1. You can change the Program Start Page by selecting a different page script or block script. A pagescript is the screen program full welcome page; a block script displays a program in a home pageblock.
If loaded, the InfoExchange Portal sample application page scripts are located in the directoryscript_root/adventech/scripts/browse, the BVAdvenTech sample program script islocated in the directory script_root/adventech/scripts/browse/program.jsp, andthe BVAdvenTech sample block scripts are located in the directory script_root/adventech/scripts/home/embed. Additional sample block scripts are located in$BV1TO1/erm_app/examples/block_scripts.
Use the links to navigate to the script you want to use. The path of the script from thescript_root directory now appears in the Add Program to Channel window.
2. You can change the following Program Content Source parameters:
• Category - Either enter the text or use the Find button and use the pop-up Category Dialogwindow to navigate to the Publishing Center category to which the content is published.
• Instant Publisher Form - Either enter the text or use the scroll icon to select the path from thescript root to the Instant Publisher form for publishing to this program.
• Include content from subcategories - Select the box to the left of this text if you want thevisitor to be able to access content in subcategories of the selected category; deselect it if youwant to deny access to content in subcategories of the selected category.
• Only show links for readable content - Select the box to the left of this text if you only wantlinks to be visible for content the visitor can access. If deselected, visitors see links to allcontent whether or not they can access it.
3. Complete the form as described in “Finishing the Edit Program in Channel form” on page 68.
Select a Category forthe Program ContentSource
Enter or select the pathto the Instant Publisherform
Check to give visitorsaccess to subcategories
Enter or select a PageScript Path or BlockScript Path for theProgram Start Page
Click to only showvisitors links to contentthey can access
64 BroadVision, Inc
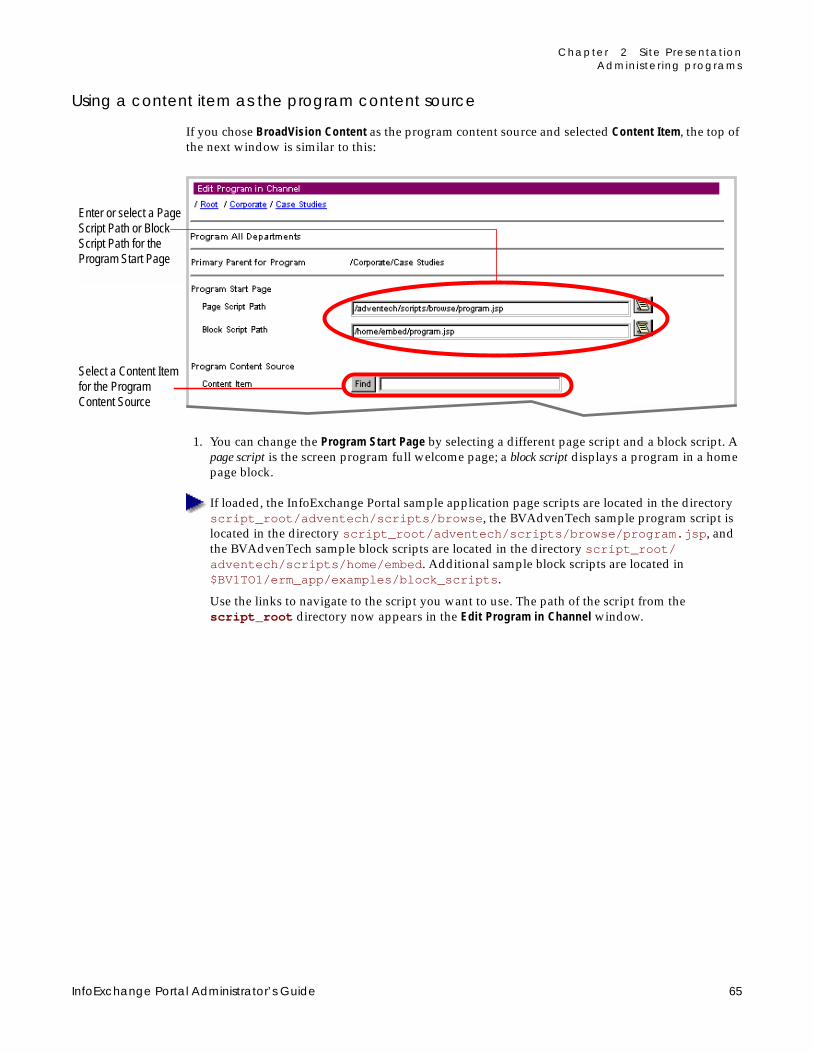
Chapter 2 Site Presentat ionAdminister ing programs
Using a content item as the program content source
If you chose BroadVision Content as the program content source and selected Content Item, the top ofthe next window is similar to this:
1. You can change the Program Start Page by selecting a different page script and a block script. Apage script is the screen program full welcome page; a block script displays a program in a homepage block.
If loaded, the InfoExchange Portal sample application page scripts are located in the directoryscript_root/adventech/scripts/browse, the BVAdvenTech sample program script islocated in the directory script_root/adventech/scripts/browse/program.jsp, andthe BVAdvenTech sample block scripts are located in the directory script_root/adventech/scripts/home/embed. Additional sample block scripts are located in$BV1TO1/erm_app/examples/block_scripts.
Use the links to navigate to the script you want to use. The path of the script from thescript_root directory now appears in the Edit Program in Channel window.
Select a Content Itemfor the ProgramContent Source
Enter or select a PageScript Path or BlockScript Path for theProgram Start Page
InfoExchange Portal Administrator’s Guide 65

Chapter 2 Site Presentat ionAdminister ing programs
2. You can change the content item. Under Program Content Source, click the Find button to the leftof Content Item to use the Find Content pop-up box to locate the content item
To find the content item you want to use:
a. Enter all or part of name of the content item name in the Content Name box, then enter themaximum number of content items to be returned in the Maximum Number to Find box. Tofind all content items, leave the Program Name box empty. Click the Find button.
b. Select the radio button next to the content item you want to select. To abort the addition ofthe content item and return to the second page of the Edit Program in Channel form, selectthe Cancel button; otherwise, select the Done button to save your choice of content item.
3. Complete the form as described in “Finishing the Edit Program in Channel form” on page 68.
66 BroadVision, Inc
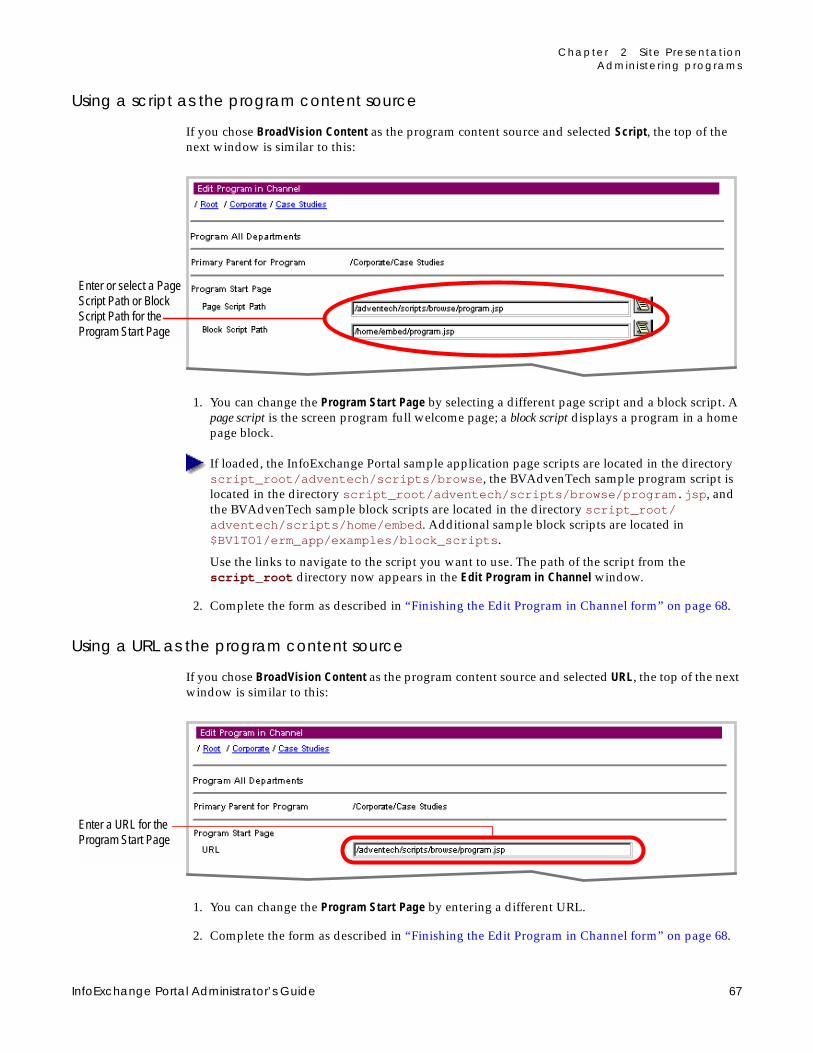
Chapter 2 Site Presentat ionAdminister ing programs
Using a script as the program content source
If you chose BroadVision Content as the program content source and selected Script, the top of thenext window is similar to this:
1. You can change the Program Start Page by selecting a different page script and a block script. Apage script is the screen program full welcome page; a block script displays a program in a homepage block.
If loaded, the InfoExchange Portal sample application page scripts are located in the directoryscript_root/adventech/scripts/browse, the BVAdvenTech sample program script islocated in the directory script_root/adventech/scripts/browse/program.jsp, andthe BVAdvenTech sample block scripts are located in the directory script_root/adventech/scripts/home/embed. Additional sample block scripts are located in$BV1TO1/erm_app/examples/block_scripts.
Use the links to navigate to the script you want to use. The path of the script from thescript_root directory now appears in the Edit Program in Channel window.
2. Complete the form as described in “Finishing the Edit Program in Channel form” on page 68.
Using a URL as the program content source
If you chose BroadVision Content as the program content source and selected URL, the top of the nextwindow is similar to this:
1. You can change the Program Start Page by entering a different URL.
2. Complete the form as described in “Finishing the Edit Program in Channel form” on page 68.
Enter or select a PageScript Path or BlockScript Path for theProgram Start Page
Enter a URL for theProgram Start Page
InfoExchange Portal Administrator’s Guide 67

Chapter 2 Site Presentat ionAdminister ing programs
Using a portlet as the program content source
If you chose Portlet as the program content source, the top of the next window is similar to this:
You can edit Portlet Configuration parameters specific to this program, including those which aremandatory for the portlet to work properly.
3. Complete the form as described in “Finishing the Edit Program in Channel form” on page 68.
Finishing the Edit Program in Channel form
You can change the following on the second page of all versions of the Edit Channel in Programform.
1. Home Page Cache Configuration determines whether to use the home page cache, along with thetimeout length, in seconds, that sets the time the site waits before updating the block in thecache. For more information about using the home page cache, see “Administering the homepage cache” on page 179.
68 BroadVision, Inc

Chapter 2 Site Presentat ionAdminister ing home page types
2. The Auxiliary Data fields provide you with three integer and three string fields for enteringadditional data. These fields are optional.
For example, a Channel Administrator might want to store the program manager’s phonenumber with the program. The program’s start page script can fetch that additional data anddisplay it to the visitor. A program has three text fields and three numeric fields for additionaldata. The developer of a site can access these additional fields (INTCOL1, INTCOL2, INTCOL3,STRCOL1, STRCOL2, and STRCOL3).
3. Set values for each of the selected Qualifiers.
If no qualifiers have been defined for your site, the Qualifiers lists do not appear, and youcannot select any values.
A visitor sees a program when, for each qualifier of the channel or program that has one ormore selected values, a selected value in that qualifier matches a selected value in the qualifierof the user account settings.
If a qualifier of the program has no selected values (for example, if you do not select anylanguages for the qualifier Language), InfoExchange Portal ignores that qualifier in performingthe match. Selecting the Not Applicable box below the qualifier values causes there to be nofurther restrictions on which visitors can see the program.
To undo your changes to the page, click the Reset button. When you are finished with the secondpage, click the Save button at the bottom of the page to save changes made to both pages of theform.
4. To undo your changes to the page, click Reset at the bottom of the page. When you are finishedwith the second page, click Save at the bottom of the page to save changes made to both pagesof the form.
Deleting programs
Click Delete to delete a program and remove it from the channel. A confirmation window appears;click OK. The block is then deleted from the site.
Deleting a program does not delete the content items the program references. When you deletea program, it is also deleted from all its parent channels. Deleted programs cannot beundeleted. To remove a program from one channel, edit the program and deselect the channelin the list box of parent channels.
Administering home page typesInfoExchange Portal enables visitors to configure their home page, which is the page they first seewhen they log into a site. The Site Administrator defines the available options in a home page, andvisitors to the site can configure their home page by choosing from those options.
Each home page contains one or more blocks, which are groups of topics a visitor can arrange,collapse, expand, add to, or delete from a home page. For example, in the BV Adventech sampleapplication, if you log in as a visitor, you see a home page comprised of one or more blocks. Thelinks underneath each block are called topics. A topic is an InfoExchange Portal program. Page typesenable you to define home pages containing blocks and topics.
InfoExchange Portal Administrator’s Guide 69

Chapter 2 Site Presentat ionAdminister ing home page types
InfoExchange Portal home pages also support transient guests, or visitors to a site who have notlogged in.
Configuring InfoExchange Portal for transient guests
Many sites allow a visitor to have limited access to a site without logging in. The BVAdvenTechsample application start page provides limited access to a transient guest, enables the transientguest to create an account with the site, and enables a registered visitor to log into the site throughthe bvadventech.html start page.
The bvadventech.html page takes you to a script that displays Login and Register links in theupper right-hand corner.
While user profiles for registered visitors are maintained in the database, profiles for transientguests are maintained in memory only. However, when a transient guest leaves the site, all knownprofile information about the visitor is discarded. This classification is used by sites where thevisitor's identity is not integral to the application, such as sites that allow anonymous browsing.
Each visitor’s user account, including the transient guest user account, is associated with a usertemplate. The user template defines the access groups and qualifiers assigned to a new user account.Each user template is associated with a page type. The Page Types screen is where you define theinformation a visitor sees on his or her home page.
You must do the following before a transient guest can “log into” your site:
● set qualifiers
● set and configure access groups
● assign transient guest to a user template
“Administering qualifiers” on page 12 contains information on setting qualifiers, as well as settingand configuring access groups.
“Administering user templates” on page 87 contains information on creating and modifying usertemplates.
When you load the InfoExchange Portal sample data, you load additional data to support transientguests, including a “Guest” user template and a “Guest” page type. The user templates and pagetypes for transient and registered visitors are administered using the InfoExchange Portal AdminTool. The designation of which user template is used for transient guests is set in the bv1to1.conffile.
Specifically, you need to set the service-specific parameter default_user_template in thebv1to1.conf file. You can set its value to “Guest” as in the following example from theBVAdvenTech sample application, or you may set the value to any existing user template.
service Adventech {parameterdefault_user_template = "Guest"email_address = "[email protected]"postal_address = "12345 Main St, San Jose, CA"www_url = "bvadventech.com"
}
This causes all visitors to the Adventech service in the web site to be logged in with the “Guest”user template.
70 BroadVision, Inc

Chapter 2 Site Presentat ionAdminister ing home page types
The sample script guestlogin.jsp contains code that creates a transient guest and assigns thetransient guest to the default user template for all transient guests.
A transient guest can:
● select the optional and default blocks
● control the layout of the selected blocks
● change the heading and subheading colors
When a transient guest registers, any heading and subheading colors they have chosen arepreserved and override the user template default heading and subheading colors which arehard-coded in the guestlogin.jsp script.
Creating a page type
To administer configurable home pages, you must first create a page type. This involves creating andnaming one or more blocks in the page type, and then specifying which programs are in the block. Avisitor can configure a personal home page by choosing from the blocks you define, and then bychoosing from the programs within the selected blocks. A visitor can also select the order of blocksand of programs within the blocks.
To create a page type, select Page Types in the left menu of the Admin Tool. A screen similar to thefollowing appears:
Select Add Page Type to create a new page type.
Enter the following parameters:
● Page Type Name
A user template references a page type. When you add or modify a user account, you can assignit a user template, which in turn causes you to indirectly assign a page type to a visitor. In the
Click to edit a pagetype
Click to add a pagetype
Click to delete apage type
InfoExchange Portal Administrator’s Guide 71
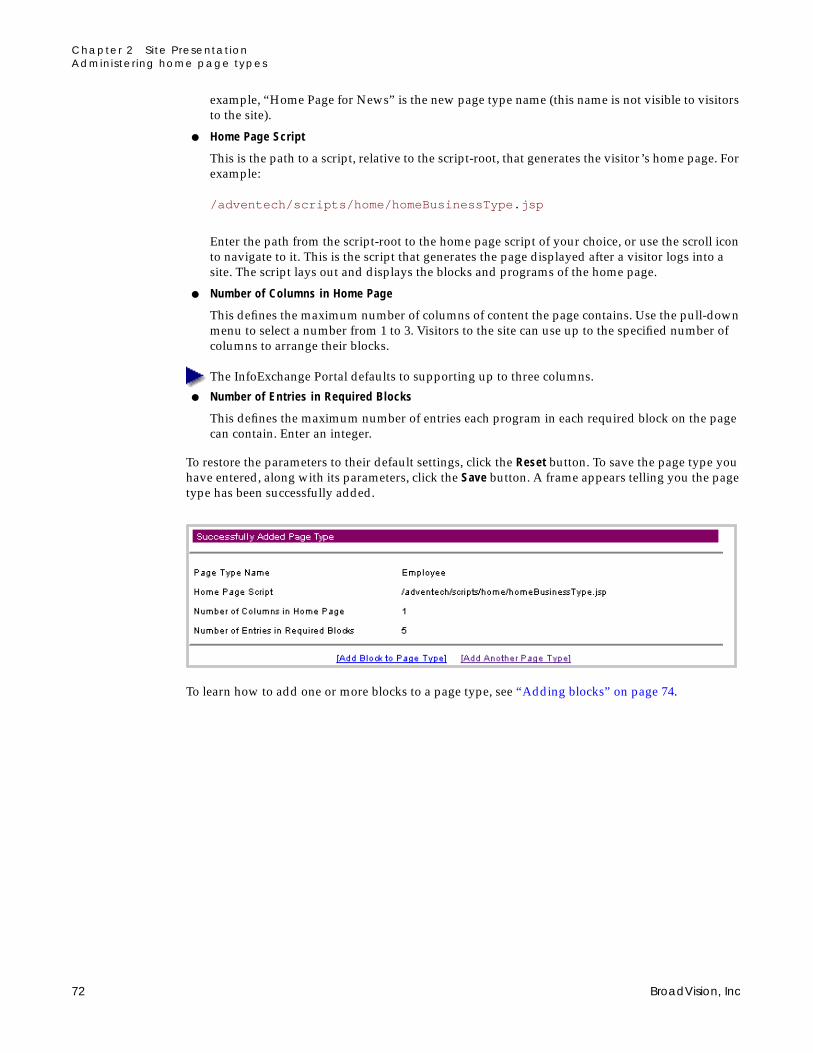
Chapter 2 Site Presentat ionAdminister ing home page types
example, “Home Page for News” is the new page type name (this name is not visible to visitorsto the site).
● Home Page Script
This is the path to a script, relative to the script-root, that generates the visitor’s home page. Forexample:
/adventech/scripts/home/homeBusinessType.jsp
Enter the path from the script-root to the home page script of your choice, or use the scroll iconto navigate to it. This is the script that generates the page displayed after a visitor logs into asite. The script lays out and displays the blocks and programs of the home page.
● Number of Columns in Home Page
This defines the maximum number of columns of content the page contains. Use the pull-downmenu to select a number from 1 to 3. Visitors to the site can use up to the specified number ofcolumns to arrange their blocks.
The InfoExchange Portal defaults to supporting up to three columns.
● Number of Entries in Required Blocks
This defines the maximum number of entries each program in each required block on the pagecan contain. Enter an integer.
To restore the parameters to their default settings, click the Reset button. To save the page type youhave entered, along with its parameters, click the Save button. A frame appears telling you the pagetype has been successfully added.
To learn how to add one or more blocks to a page type, see “Adding blocks” on page 74.
72 BroadVision, Inc

Chapter 2 Site Presentat ionAdminister ing home page types
Editing a page type
To edit an existing page type, click the [Edit] link to the left of the page type you wish to edit. TheEdit Page Type frame appears:
From the Edit Page Type window you can change the following page type parameters:
● Page Type Name
This appears in the User Template as the name of the page type when you assign a page type toa user template. In this example, “Customer Page Type” is the current page type.
● Home Page Script
This is the path to a script, relative to the script-root, that generates the visitor’s home page. Forexample:
/adventech/scripts/home/homeBusinessType.jsp
Enter the path from the script-root to the home page script of your choice, or use the scroll iconto navigate to it. This is the script that generates the page displayed after a visitor logs into asite. The script lays out and displays the blocks and programs of the home page.
● Number of Columns in Home Page
This defines the maximum number of columns of content the page contains. Use the drop-downmenu to select a number from 1 to 3. Visitors to the site can use up to the specified number ofcolumns to arrange their blocks.
● Number of Entries in Required Blocks
This defines the maximum number of entries in each of the required blocks.
You can also add or edit blocks to this page type. To add a block, see “Adding blocks,” next; to edit ablock, see “Editing blocks” on page 77.
InfoExchange Portal Administrator’s Guide 73
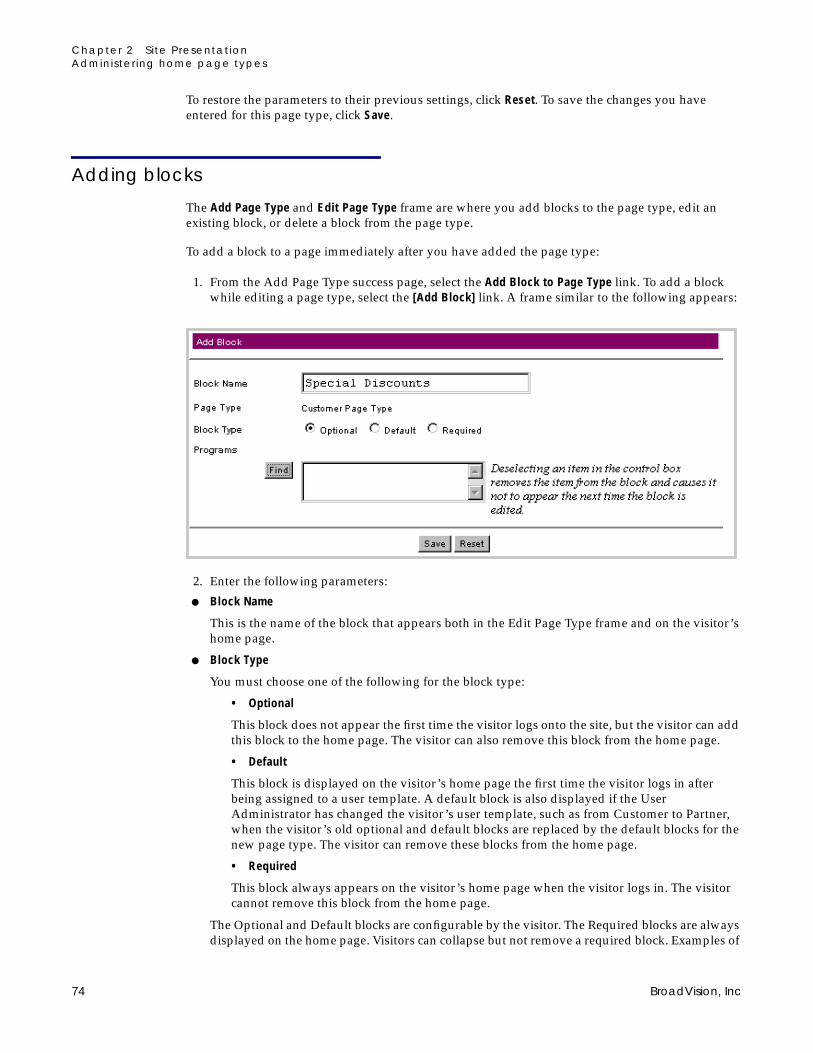
Chapter 2 Site Presentat ionAdminister ing home page types
To restore the parameters to their previous settings, click Reset. To save the changes you haveentered for this page type, click Save.
Adding blocks
The Add Page Type and Edit Page Type frame are where you add blocks to the page type, edit anexisting block, or delete a block from the page type.
To add a block to a page immediately after you have added the page type:
1. From the Add Page Type success page, select the Add Block to Page Type link. To add a blockwhile editing a page type, select the [Add Block] link. A frame similar to the following appears:
2. Enter the following parameters:
● Block Name
This is the name of the block that appears both in the Edit Page Type frame and on the visitor’shome page.
● Block Type
You must choose one of the following for the block type:
• Optional
This block does not appear the first time the visitor logs onto the site, but the visitor can addthis block to the home page. The visitor can also remove this block from the home page.
• Default
This block is displayed on the visitor’s home page the first time the visitor logs in afterbeing assigned to a user template. A default block is also displayed if the UserAdministrator has changed the visitor’s user template, such as from Customer to Partner,when the visitor’s old optional and default blocks are replaced by the default blocks for thenew page type. The visitor can remove these blocks from the home page.
• Required
This block always appears on the visitor’s home page when the visitor logs in. The visitorcannot remove this block from the home page.
The Optional and Default blocks are configurable by the visitor. The Required blocks are alwaysdisplayed on the home page. Visitors can collapse but not remove a required block. Examples of
74 BroadVision, Inc

Chapter 2 Site Presentat ionAdminister ing home page types
required blocks are the “CEO Announcements” and “Department News” blocks. New visitorssee the required and default blocks when they first log in.
● Programs
To add an existing program to a block, click Find; a Find Program pop-up window appears.
Enter the name of the program or a substring of the name in the Program Name box, then enterthe maximum number of programs to be returned. To find all programs, leave the Program Name
InfoExchange Portal Administrator’s Guide 75

Chapter 2 Site Presentat ionAdminister ing home page types
box empty. To clear the form, click the Reset button; otherwise, click the Find button. The resultsappear with check boxes to the left.
You can also search for a different set of programs by clicking the Search Again link at thetop of the form. Use the left mouse button to select the check boxes to the left of the programor programs you want to add to the available selection of programs, then click Done at thebottom of the form. All programs you checked appear as selected in the box to the right ofthe Find button and can be selected or deselected by using the left button on your mouse.
3. To clear the Block Name field and deselect all programs shown, click Reset. To save the block,click Save.
76 BroadVision, Inc

Chapter 2 Site Presentat ionAdminister ing home page types
Editing blocks
The bottom half of the Edit Page Type frame contains the blocks associated with that page. Each pagemust have at least one block to be useful.
To edit a block for a page:
1. Click the Edit link next to the block name. A frame similar to the following appears:
2. You can change the following parameters:
● Block Name
This is the name of the block that appears both in the Edit Page Type frame and on the visitor’shome page.
● Block Type
You must choose one of the following for the block type:
• Optional
This block type does not appear the first time the visitor logs onto the site, but the visitorcan add this block type to the home page. The visitor can also remove this block type fromthe home page.
• Default
This block type is displayed on the visitor’s home page the first time the visitor logs in afterbeing assigned to a user template. A default block type is also displayed if the UserAdministrator has changed the visitor’s user template, such as from Customer to Partner,when the visitor’s old optional and default block types are replaced by the default blocktypes for the new page type. The visitor can remove these block types from the home page.
• Required
This block type always appears on the visitor’s home page when the visitor logs in. Thevisitor cannot remove this block type from the home page.
InfoExchange Portal Administrator’s Guide 77

Chapter 2 Site Presentat ionAdminister ing home page types
● Programs
To add an existing program to a block:
a. Click Find; a Find Program form appears.
b. Enter the name of the program or a substring of the name in the Program Name box, thenenter the maximum number of programs to be returned. To find all programs, leave theProgram Name box empty. Click Find. The results appear with check boxes to the left.
78 BroadVision, Inc

Chapter 2 Site Presentat ionAdminister ing home page types
You can also search for a different set of programs by clicking the Search Again link at the top ofthe form.
c. Use the left button on your mouse to select the check boxes to the left of the program orprograms you want to add to the available selection of programs, then click Done at thebottom of the form.
All programs you checked appear as selected in the box to the right of the Find button andcan be selected or deselected by using the left button on your mouse. To remove a programfrom a block, deselect it in the box to the right of Programs. The program will not show up inthe list of programs in the Programs box the next time you edit the block.
3. To reset the Block Name field and select only the original programs shown, click Reset. To savethe block, click Save.
InfoExchange Portal Administrator’s Guide 79

Chapter 2 Site Presentat ionAdminister ing home page types
Removing blocks
To remove a block, click the [Delete] link to the left of the block you wish to remove. A confirmationwindow appears; click OK. The block is then deleted from the page.
Removing a page type
To remove an existing page type, click the [Delete] link to the left of the page type you wish toremove. A confirmation window appears; click OK. The page type is then deleted, and the links toblocks associated with that page type are removed.
You cannot delete a page type being used by a user template.
80 BroadVision, Inc

3 User Administration
This chapter explains how you create and configure user accounts for an InfoExchange Portal site.
The following topics are discussed in this chapter:
● “Introduction,” next
● “Administering access groups” on page 82
● “Administering user templates” on page 87
● “Administering organizations” on page 102
● “Administering user accounts” on page 109
● “Administering a project collaboration page” on page 126
● “Administering closed-loop process management” on page 165
IntroductionAn access group grants privileges by Publishing Center content category to all visitors in that accessgroup.
User Templates determine the default settings for a user account. These default settings includeaccess groups, qualifiers, and home pages.
You must create a user template before you can create any user accounts.
Organizations let you define a hierarchy of divisions, departments, groups, and so forth.
The terms users and visitors are used interchangeably by InfoExchange Portal to refer to the end-users of an InfoExchange Portal site. Each visitor accesses a site via his or her user account. Thisaccount sets a visitor’s user template, organizations, and administrative rights for channels andorganizations.
The project collaboration page is a page created by an employee (such as a sales representative or anengagement manager) for sharing information about a project with fellow employees, customers,and partners. Using a project collaboration page, a group of people can follow, track, and share dataabout the project in its various phases.
Closed-loop process management changes the collaborative nature of enterprise relationshipmanagement by automatically tracking specific uses of an enterprise portal. The InfoExchangePortal closed-loop process management system enables visitors to track and manage action items,ticket items, or leads.
InfoExchange Portal Administrator’s Guide 81

Chapter 3 User Administ rat ionAdminister ing access groups
Administering access groupsAn access group grants privileges by content category to all visitors in a group. An access group isdefined by the name and the category access privileges it grants to its members. To grant visitorsaccess privileges, you add them to the appropriate access groups.
To administer access groups, you must be a BroadVision InfoExchange Portal Site Admin orService Admin and a Publishing Center Administrator. The Publishing Center User’s Guide hasinformation on how to become a Publishing Center Administrator.
As a member of an access group, you have one of the following privileges for the content items inthe categories associated with the access group:
To administer access groups, select Access Groups in the left frame. A display similar to thefollowing appears in the right frame:
Privileges to content Definition
None Grants no access to the content items in the categories and subcategoriesassociated with the group
Read on-line Grants read-only access to the on-line content items in the categories andsubcategories associated with the access group.
Read Grants read-only access to the content items in the categories andsubcategories associated with the access group, regardless of the status of theitems.
Write Lets you add new content items to, modify existing items in, delete, andschedule the reclassification of the items in the categories and subcategoriesassociated with the group.
Approve Lets you change the status of content items, and schedule status changes inthe future. Approval access also includes the Write access privileges.
Click to edit anaccess group
Click to add anaccess group
Click to delete anaccess group
82 BroadVision, Inc
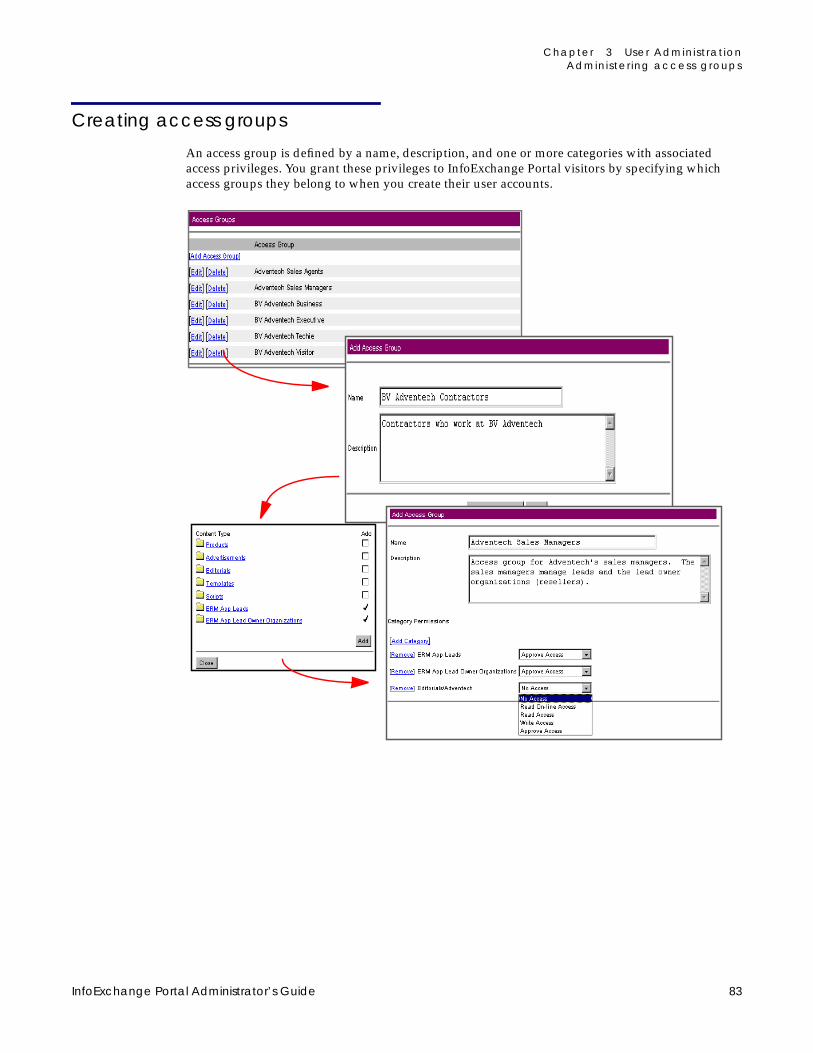
Chapter 3 User Administ rat ionAdminister ing access groups
Creating access groups
An access group is defined by a name, description, and one or more categories with associatedaccess privileges. You grant these privileges to InfoExchange Portal visitors by specifying whichaccess groups they belong to when you create their user accounts.
InfoExchange Portal Administrator’s Guide 83

Chapter 3 User Administ rat ionAdminister ing access groups
Follow these instructions to create an access group:
1. In the right frame, select the Add Access Group link.
2. In the first page of the Add Access Group form enter the Name (required) and a Description(optional) of the access group.
Click Reset if you want to clear the form; otherwise, click Save and Next to save the access groupand open the next page of the Add Access Group form.
3. Add categories using the [Add Category] link under Category Permissions as discussed in“Adding a category to an access group” on page 86.
4. Choose privileges for each category as discussed in Step 5 on page 87, then save your changesas discussed in Step 6 on page 87.
See the Publishing Center User’s Guide for information on these permissions.
5. Click Reset if you want to clear the form; otherwise, click Save to save the changes.
84 BroadVision, Inc
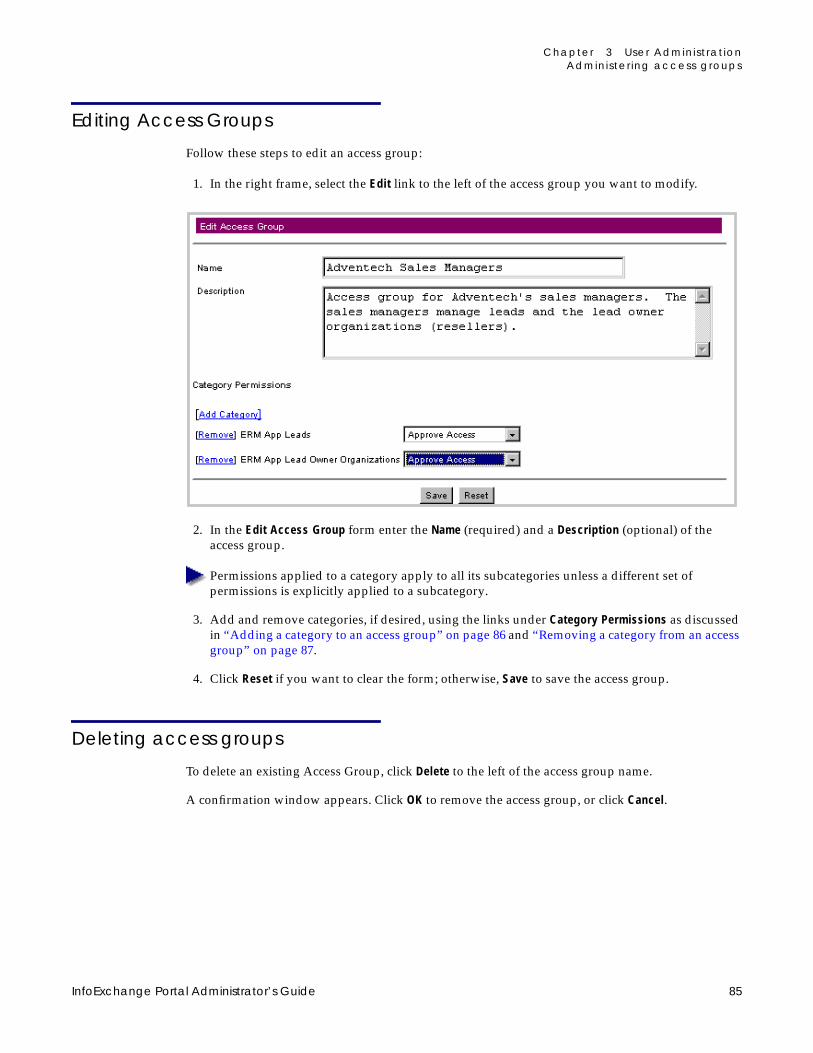
Chapter 3 User Administ rat ionAdminister ing access groups
Editing Access Groups
Follow these steps to edit an access group:
1. In the right frame, select the Edit link to the left of the access group you want to modify.
2. In the Edit Access Group form enter the Name (required) and a Description (optional) of theaccess group.
Permissions applied to a category apply to all its subcategories unless a different set ofpermissions is explicitly applied to a subcategory.
3. Add and remove categories, if desired, using the links under Category Permissions as discussedin “Adding a category to an access group” on page 86 and “Removing a category from an accessgroup” on page 87.
4. Click Reset if you want to clear the form; otherwise, Save to save the access group.
Deleting access groups
To delete an existing Access Group, click Delete to the left of the access group name.
A confirmation window appears. Click OK to remove the access group, or click Cancel.
InfoExchange Portal Administrator’s Guide 85
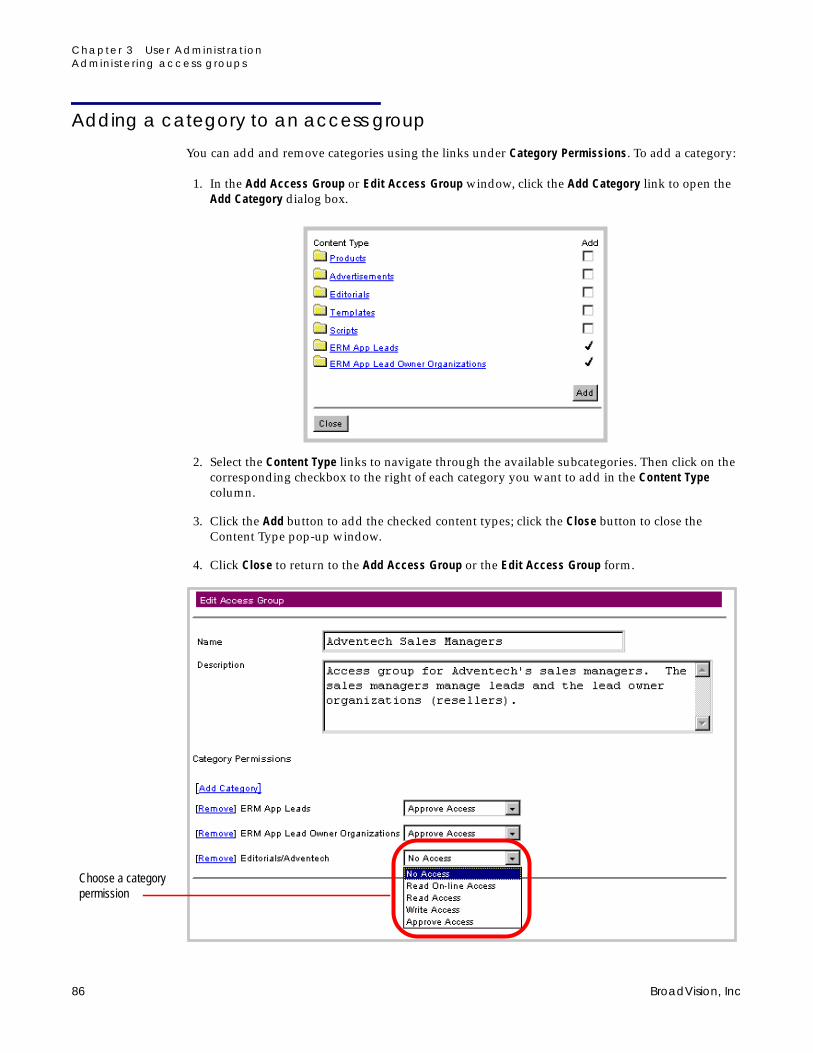
Chapter 3 User Administ rat ionAdminister ing access groups
Adding a category to an access group
You can add and remove categories using the links under Category Permissions. To add a category:
1. In the Add Access Group or Edit Access Group window, click the Add Category link to open theAdd Category dialog box.
2. Select the Content Type links to navigate through the available subcategories. Then click on thecorresponding checkbox to the right of each category you want to add in the Content Typecolumn.
3. Click the Add button to add the checked content types; click the Close button to close theContent Type pop-up window.
4. Click Close to return to the Add Access Group or the Edit Access Group form.
Choose a categorypermission
86 BroadVision, Inc

Chapter 3 User Administ rat ionAdminister ing user templates
5. Make sure the privileges for each category listed are correct.
Choose one of the following category permissions from the menu to the right of the category:
• No Access
• Read On-line Access
• Read Access
• Write Access
• Approve Access
See the Publishing Center User’s Guide for information on these permissions.
6. Click Reset if you want to clear the form; otherwise, click Save to save the changes.
Removing a category from an access group
To remove a category click the Remove link to the left of the category name. A dialog appearsprompting you with:
Are you sure you want to remove this permission?
Click OK to confirm, or click Cancel to return to the previous form.
Administering user templatesUser templates determine the content visitors to a site can see by defining the page types for thevisitor’s home page, along with access groups and qualifiers for new user accounts assigned to thatuser template. A user template also determines the preset bookmarked channels, programs, andcontent. Click User Templates in the left frame to administer user templates.
This section contains information about:
● Adding a user template
● Editing a user template
● Deleting a user template
BroadVision recommends you create a new user template for administrators, and then create atleast one administrator account from that user template. See “Editing a visitor’s account” onpage 118 for a description of the administrative functions and what it means to be a Site Admin
InfoExchange Portal Administrator’s Guide 87

Chapter 3 User Administ rat ionAdminister ing user templates
or Service Admin. You must have the Site Admin or Service Admin administrative function toperform user template administration with the Admin Tool. See “Administering user accounts”on page 109 for more information on setting up a Site Admin or Service Admin user account.
Adding a user template
To add a user template, click Add User Template at the top of the frame.
When you save the specifications for the scripts and page types, all existing user accountsderived from the user template are adjusted accordingly.
In this example we add the user template Sanitation Engineer.
Click to edit auser template
Click to add auser template
Click to delete auser template
88 BroadVision, Inc

Chapter 3 User Administ rat ionAdminister ing user templates
1. On the first page of the Add User Template form enter the User Template Name and optionalDescription.
User template names must be unique.
2. In the Scripts section, enter the Personal Profile. This is the profile editor script used in theInfoExchange Portal site. All visitors assigned to the same user template share the samepersonal profile editor. The path of the script must be relative to the script-root. You can eitherenter it or use the scroll icon to navigate to the script’s path relative to the script-root.
3. Still in the Scripts section, enter the Matching Profile. This is the matching attribute editor scriptused in the InfoExchange Portal site. All visitors assigned to the same user template share thesame matching attribute editor. The path of the script must be relative to the script-root. Youcan either enter it or use the scroll icon to navigate to the script’s path relative to the script-root.
4. For Status, choose either on-line (user accounts assigned this template can log into theInfoExchange Portal site) or off-line (cannot login).
5. In the Page Type drop-down list choose the page type. This is the type of page displayed when auser account assigned to that user template logs into the InfoExchange Portal site. The pagetype defines the script used as the “home page” for the visitor and the blocks and programs onthe home page.
6. Select Qualifiers enables you to restrict which channels, programs, and content items a visitorcan see. In some cases a visitor can also be permitted to select his or her own values for somequalifiers.
If no qualifiers have been defined, the Qualifiers lists do not appear, and no values can beselected for the user template.
a. Click Find under Select Qualifiers; a pop-up window appears in which you can view the listof qualifiers in the service in groups of ten.
b. To find the qualifiers you want to add:
InfoExchange Portal Administrator’s Guide 89
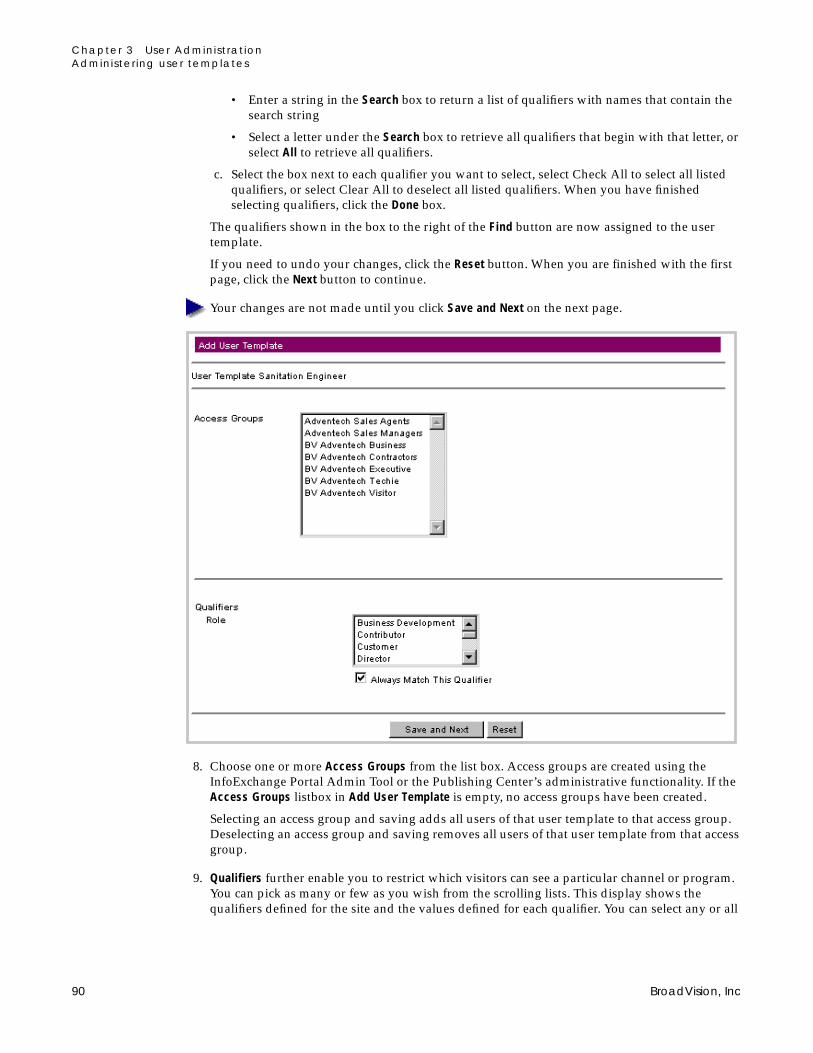
Chapter 3 User Administ rat ionAdminister ing user templates
• Enter a string in the Search box to return a list of qualifiers with names that contain thesearch string
• Select a letter under the Search box to retrieve all qualifiers that begin with that letter, orselect All to retrieve all qualifiers.
c. Select the box next to each qualifier you want to select, select Check All to select all listedqualifiers, or select Clear All to deselect all listed qualifiers. When you have finishedselecting qualifiers, click the Done box.
The qualifiers shown in the box to the right of the Find button are now assigned to the usertemplate.
If you need to undo your changes, click the Reset button. When you are finished with the firstpage, click the Next button to continue.
7. Your changes are not made until you click Save and Next on the next page.
8. Choose one or more Access Groups from the list box. Access groups are created using theInfoExchange Portal Admin Tool or the Publishing Center’s administrative functionality. If theAccess Groups listbox in Add User Template is empty, no access groups have been created.
Selecting an access group and saving adds all users of that user template to that access group.Deselecting an access group and saving removes all users of that user template from that accessgroup.
9. Qualifiers further enable you to restrict which visitors can see a particular channel or program.You can pick as many or few as you wish from the scrolling lists. This display shows thequalifiers defined for the site and the values defined for each qualifier. You can select any or all
90 BroadVision, Inc

Chapter 3 User Administ rat ionAdminister ing user templates
qualifier values for the user template using the left mouse button to select one, the shift keywith the left mouse button to select multiple qualifier values, and the Control key with the leftmouse button to deselect qualifier values.
To set all qualifier values, including ones added later, check the Always Match This Qualifier box.
A visitor sees a channel or program when a selected value in a qualifier of a channel or programmatches a selected value in the qualifier of the visitor’s user account settings.
Initial settings of qualifier values come from the user template; when a user account is created,that visitor automatically inherits settings from the user template. A Site Admin or ServiceAdmin can override all settings for any visitor at any time; an administer of an organization canoverride settings for any visitor within that organization. Only site qualifiers marked AllowVisitors to Edit All Values appear in a visitor’s profile editor, enabling the visitor to modify theselected values. The initial settings from the user template are the default settings for the useraccount. See “Administering qualifiers” on page 12 for the settings for marking Allow Visitors toEdit All Values.
If no qualifiers have been defined for the site, the Qualifiers lists do not appear and you cannotselect values.
InfoExchange Portal Administrator’s Guide 91

Chapter 3 User Administ rat ionAdminister ing user templates
10. If you need to undo your changes, click Reset. When you are finished with this page, click Saveand Next to continue.
11. On the third page of the Add User Template form Select the preset bookmarked Channels. Clickthe Find button to add values to the listbox.
a. A Find Channel pop-up box appears.
92 BroadVision, Inc

Chapter 3 User Administ rat ionAdminister ing user templates
b. Enter the name of the channel or a substring of the name in the Channel Name box, thenenter the maximum number of channels to be returned. To find all channels, leave theChannel Name box empty. Click Find. The results appear with check boxes to the left.
c. Click on the check boxes to select channels to add to the available selection of channels, thenclick Done at the bottom of the form. All channels you checked appear as selected in theSelect the preset bookmarked Channels box and can be selected or deselected.
12. To Select the preset bookmarked Programs, choose one or more from the scrolling list or clickFind; a Find Program form appears.
InfoExchange Portal Administrator’s Guide 93
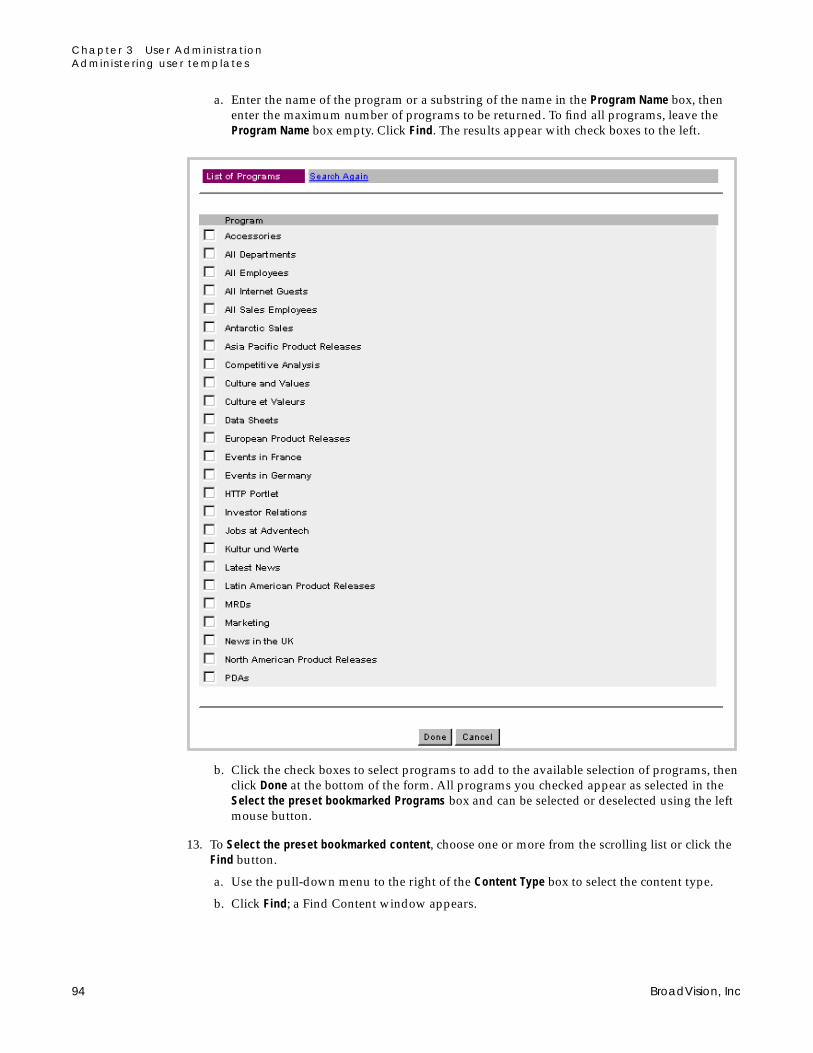
Chapter 3 User Administ rat ionAdminister ing user templates
a. Enter the name of the program or a substring of the name in the Program Name box, thenenter the maximum number of programs to be returned. To find all programs, leave theProgram Name box empty. Click Find. The results appear with check boxes to the left.
b. Click the check boxes to select programs to add to the available selection of programs, thenclick Done at the bottom of the form. All programs you checked appear as selected in theSelect the preset bookmarked Programs box and can be selected or deselected using the leftmouse button.
13. To Select the preset bookmarked content, choose one or more from the scrolling list or click theFind button.
a. Use the pull-down menu to the right of the Content Type box to select the content type.
b. Click Find; a Find Content window appears.
94 BroadVision, Inc
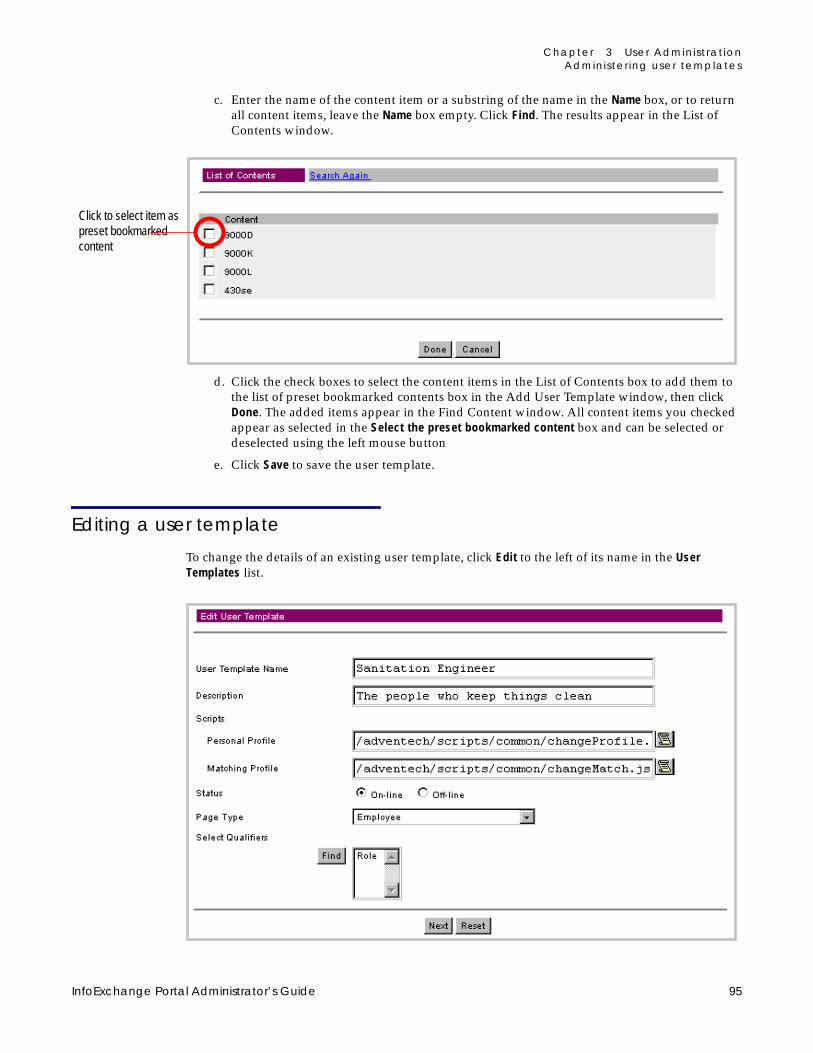
Chapter 3 User Administ rat ionAdminister ing user templates
c. Enter the name of the content item or a substring of the name in the Name box, or to returnall content items, leave the Name box empty. Click Find. The results appear in the List ofContents window.
d. Click the check boxes to select the content items in the List of Contents box to add them tothe list of preset bookmarked contents box in the Add User Template window, then clickDone. The added items appear in the Find Content window. All content items you checkedappear as selected in the Select the preset bookmarked content box and can be selected ordeselected using the left mouse button
e. Click Save to save the user template.
Editing a user template
To change the details of an existing user template, click Edit to the left of its name in the UserTemplates list.
Click to select item aspreset bookmarkedcontent
InfoExchange Portal Administrator’s Guide 95

Chapter 3 User Administ rat ionAdminister ing user templates
When you save the specifications for the scripts, page types, and access groups, all useraccounts of the user template are adjusted accordingly, however, changes to the qualifier valuesdo not affect the qualifiers assigned to individual visitors.
Here you can alter any of the following in the first page of the Edit User Template form:
1. The User Template Name field and optional Description field. Note that user template namesmust be unique.
2. In the Scripts section, the Personal Profile and Matching Profile. The former is the profile editorscript used in the InfoExchange Portal site; the latter is the matching attribute editor script usedin the InfoExchange Portal site. All visitors assigned to the same user template share the samepersonal profile editor and matching attribute editor. The path of both scripts must be relativeto the script-root. You can either enter a path or use the scroll icon to navigate to the script’spath relative to the script-root.
3. For Status, you can change between on-line (user accounts assigned this template can log intothe InfoExchange Portal site) or off-line (cannot login).
4. In the Page Type drop-down list choose the page type. This is the type of page displayed when auser account assigned to that user template logs into the InfoExchange Portal site. The pagetype defines the script used as the “home page” for the visitor and the blocks and programs onthe home page.
5. Select Qualifiers enables you to restrict which channels and programs a visitor can see. In somecases a visitor can also be permitted to select his or her own values of some qualifiers.
If no qualifiers have been defined, the Qualifiers lists do not appear, and no values can beselected for the user template.
a. Click Find under Select Qualifiers; a pop-up window appears in which you can view the listof qualifiers in the service in groups of ten.
96 BroadVision, Inc

Chapter 3 User Administ rat ionAdminister ing user templates
To find the qualifiers you want to add:
• Enter a string in the Search box to return a list of qualifiers with names that contain thesearch string.
• Select a letter under the Search box to retrieve all qualifiers that begin with that letter, orselect All to retrieve all qualifiers.
b. Select the box next to each qualifier you want to select or deselect, select Check All to selectall listed qualifiers, or select Clear All to deselect all listed qualifiers. When you havefinished selecting qualifiers, click Done. For information about adding, editing, andremoving organizations, see “Administering organizations” on page 102.
c. In the box to the right of the Find button, use the left mouse button to highlight the qualifiersyou want to assign to the user template.
6. If you need to undo your changes, click Reset. When you are finished with the first page, clickNext to continue. Note that your changes are not made until you click Save and Next on the nextpage.
On the second page of the Edit User Template form you can change the following:
7. You can choose another one of the Access Groups from the list box. Access Groups are createdusing the InfoExchange Admin Tool or the Publishing Center’s admin functionality. If theAccess Group listbox in Edit User Template is empty, no access groups have been created.
Selecting an access group and saving adds all users of that user template to that access group.Deselecting an access group and saving removes all users of that user template from that accessgroup.
When you change the access groups in a user template, visitors currently logged on are affectedimmediately.
InfoExchange Portal Administrator’s Guide 97

Chapter 3 User Administ rat ionAdminister ing user templates
8. Qualifiers further enable you to restrict which visitors can see a particular channel or program.You can pick as many or few as you wish from the scrolling lists. This display shows thequalifiers defined for the site and the values defined for each qualifier. Use the left mousebutton to select and deselect qualifiers, or to enable all values that are ever assigned to thequalifier, select the box to the left of Always Match This Qualifier.
A visitor sees a channel or program when a selected value in a qualifier of a channel or programmatches a selected value in the qualifier of the visitor’s user account settings.
Initial settings of qualifier values come from the user template; when a user account is created,that visitor automatically inherits settings from the user template. A Site Admin or ServiceAdmin can override all settings for any visitor at any time; an administer of an organization canoverride settings for any visitor within that organization. Only site qualifiers marked AllowVisitors to Edit All Values appear in a visitor’s profile editor, enabling the visitor to modify theselected values. The initial settings from the user template are the default settings for the useraccount. See “Administering qualifiers” on page 12 for the settings for marking Allow Visitors toEdit All Values.
If no qualifiers have been defined for the site, the Qualifiers lists do not appear and you cannotselect values.
98 BroadVision, Inc

Chapter 3 User Administ rat ionAdminister ing user templates
9. If you need to undo your changes, click Reset. When you are finished with this page, click Saveand Next to continue.
10. On the third page of the Edit User Template form, Select the preset bookmarked channels to addor remove bookmarked channels.
a. Click Find; a Find Channel form appears.
InfoExchange Portal Administrator’s Guide 99

Chapter 3 User Administ rat ionAdminister ing user templates
b. Enter the name of the channel or a substring of the name in the Channel Name box, thenenter the maximum number of channels to be returned. To find all channels, leave theChannel Name box empty. Click Find. The results appear with check boxes to the left.
c. Click on the check boxes to select channels to add to the available selection of channels, thenclick Done at the bottom of the form. All channels you checked appear as selected in theSelect the preset bookmarked Channels box and can be selected or deselected.
11. To Select the preset bookmarked Programs, choose one or more from the scrolling list or clickFind; a Find Program form appears.
100 BroadVision, Inc

Chapter 3 User Administ rat ionAdminister ing user templates
a. Enter the name of the program or a substring of the name in the Program Name box, thenenter the maximum number of programs to be returned. To find all programs, leave theProgram Name box empty. Click Find. The results appear with check boxes to the left.
b. Click the check boxes to select programs to add to the available selection of programs, thenclick Done at the bottom of the form. All programs you checked appear as selected in theSelect the preset bookmarked Programs box and can be selected or deselected using the leftmouse button.
12. To Select the preset bookmarked content, choose one or more from the scrolling list or click theFind button.
a. Use the menu to the right of the Content Type box to select the content type.
b. Click Find; a Find Content window appears.
InfoExchange Portal Administrator’s Guide 101

Chapter 3 User Administ rat ionAdminister ing organizat ions
c. Enter the name of the content item or a substring of the name in the Name box, or to returnall content items, leave the Name box empty. Click Find. The results appear in the List ofContents window.
d. Click the check boxes to select the content items in the List of Contents box to add them tothe list of preset bookmarked contents box in the Edit User Template window, then clickDone to save your changes. The added items appear in the Find Content window. Allcontent items you checked appear as selected in the Select the preset bookmarked contentbox and can be selected or deselected using the left mouse button
e. Click Save to save the User Template.
13. Click Save to save your changes to the user template.
Deleting a user template
You may sometimes need to delete a user template from InfoExchange.
1. Click Delete to the left of a user template name to delete it.
2. You are then asked for confirmation before the user template is deleted; click OK. Note thatdeleted user templates cannot be “undeleted.”
You cannot delete a user template while visitors are assigned to that user template.
Administering organizationsAn organization usually represents a formal business unit, such as a department or a division.However, an organization can also represent a special project that is not part of the normal, long-term organizational structure of the company. Visitors can belong to more than one organization.Visitors in a higher level organization usually approve purchases for visitors in the organizationsimmediately below them.
This section covers the following topics:
● “Browsing the organization hierarchy,” next
● “Adding an organization” on page 104
● “Editing an organization” on page 106
Click to select item aspreset bookmarkedcontent
102 BroadVision, Inc

Chapter 3 User Administ rat ionAdminister ing organizat ions
● “Deleting an organization” on page 109
Browsing the organization hierarchy
A corporate account consists of a top-level organization with other corporate organizationsunderneath. A company’s organization can be graphically depicted as a hierarchical tree structurewith boxes representing different organizations and lines showing reporting relationships betweenthose organizations.
Although all visitors can view the organizational structure, only organization managers can create,update, or delete an organizational structure. When a Site Admin or Service Admin creates acorporate account, the Admin Tool automatically creates the top-level organization for the account.The organization manager then sets up the suborganizations and visitors underneath this top-levelorganization. Visitors can view organizations by the hierarchal tree structure or by an alphabetizedlisting.
To view your organization’s hierarchy, first select Organizations in the left menu. In the right framethe Organizations window appears with your top-level organization and an Edit link to its left. Ifyou do not have Site Admin or Service Admin privileges but can administer an organization, the[Browse My Organization] link appears; select it to list the top-levels of the organizations you canadminister.
Select the top-level organization name to navigate to the organizations underneath it.
Click to view thisorganization
Click to navigate downthis organization
Click to list the top-levelorganizations I canadminister
Click to view anorganization youcannot administer
Click to navigateup a level
Click to deletethis organization
Click to edit thisorganization
Click to navigatedown a level
InfoExchange Portal Administrator’s Guide 103
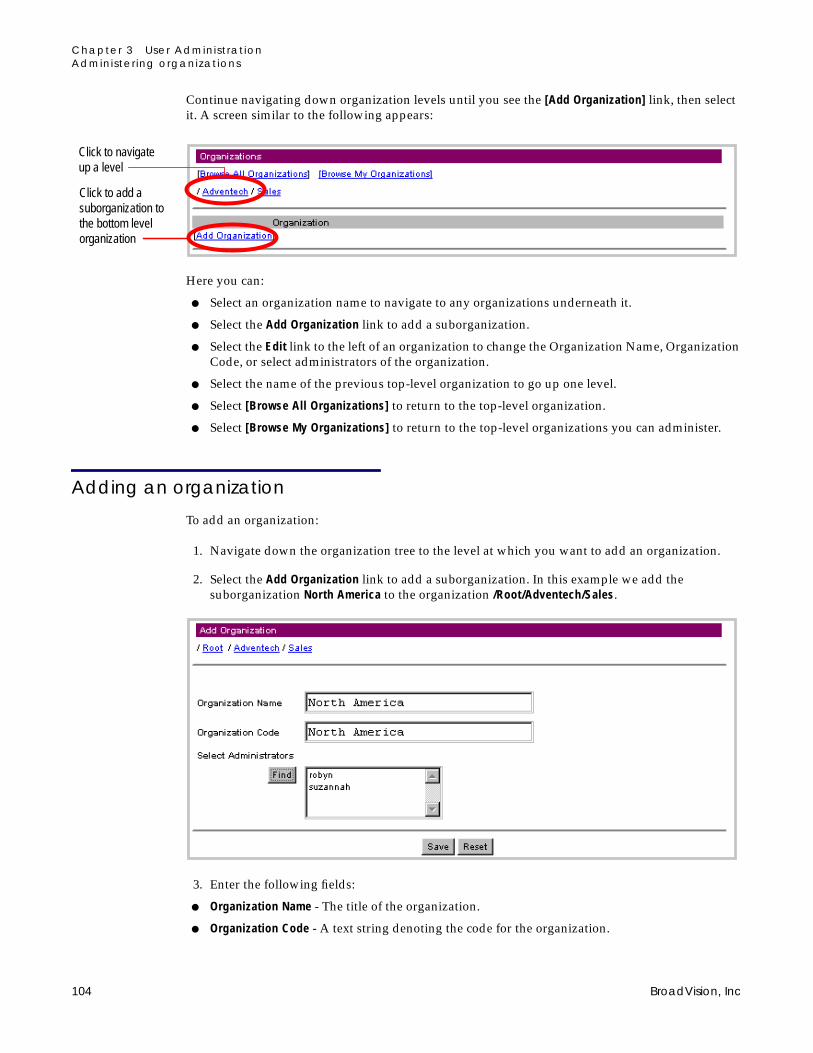
Chapter 3 User Administ rat ionAdminister ing organizat ions
Continue navigating down organization levels until you see the [Add Organization] link, then selectit. A screen similar to the following appears:
Here you can:
● Select an organization name to navigate to any organizations underneath it.
● Select the Add Organization link to add a suborganization.
● Select the Edit link to the left of an organization to change the Organization Name, OrganizationCode, or select administrators of the organization.
● Select the name of the previous top-level organization to go up one level.
● Select [Browse All Organizations] to return to the top-level organization.
● Select [Browse My Organizations] to return to the top-level organizations you can administer.
Adding an organization
To add an organization:
1. Navigate down the organization tree to the level at which you want to add an organization.
2. Select the Add Organization link to add a suborganization. In this example we add thesuborganization North America to the organization /Root/Adventech/Sales.
3. Enter the following fields:
● Organization Name - The title of the organization.
● Organization Code - A text string denoting the code for the organization.
Click to add asuborganization tothe bottom levelorganization
Click to navigateup a level
104 BroadVision, Inc
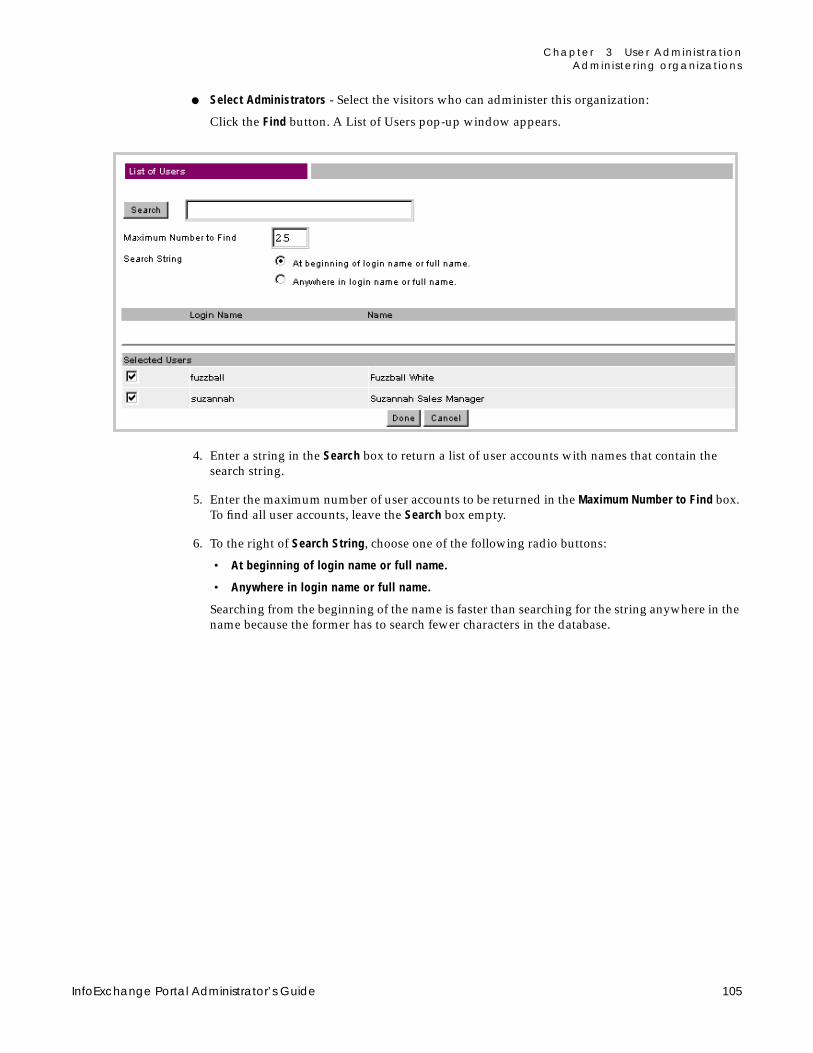
Chapter 3 User Administ rat ionAdminister ing organizat ions
● Select Administrators - Select the visitors who can administer this organization:
Click the Find button. A List of Users pop-up window appears.
4. Enter a string in the Search box to return a list of user accounts with names that contain thesearch string.
5. Enter the maximum number of user accounts to be returned in the Maximum Number to Find box.To find all user accounts, leave the Search box empty.
6. To the right of Search String, choose one of the following radio buttons:
• At beginning of login name or full name.
• Anywhere in login name or full name.
Searching from the beginning of the name is faster than searching for the string anywhere in thename because the former has to search fewer characters in the database.
InfoExchange Portal Administrator’s Guide 105
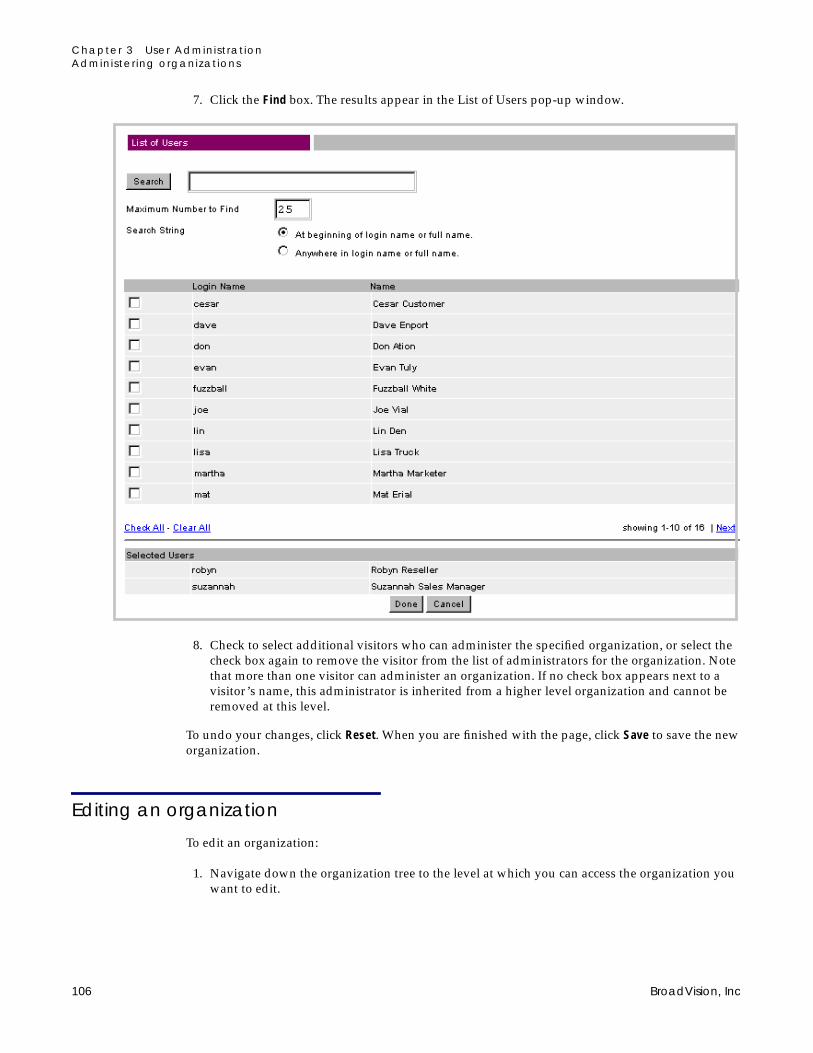
Chapter 3 User Administ rat ionAdminister ing organizat ions
7. Click the Find box. The results appear in the List of Users pop-up window.
8. Check to select additional visitors who can administer the specified organization, or select thecheck box again to remove the visitor from the list of administrators for the organization. Notethat more than one visitor can administer an organization. If no check box appears next to avisitor’s name, this administrator is inherited from a higher level organization and cannot beremoved at this level.
To undo your changes, click Reset. When you are finished with the page, click Save to save the neworganization.
Editing an organization
To edit an organization:
1. Navigate down the organization tree to the level at which you can access the organization youwant to edit.
106 BroadVision, Inc
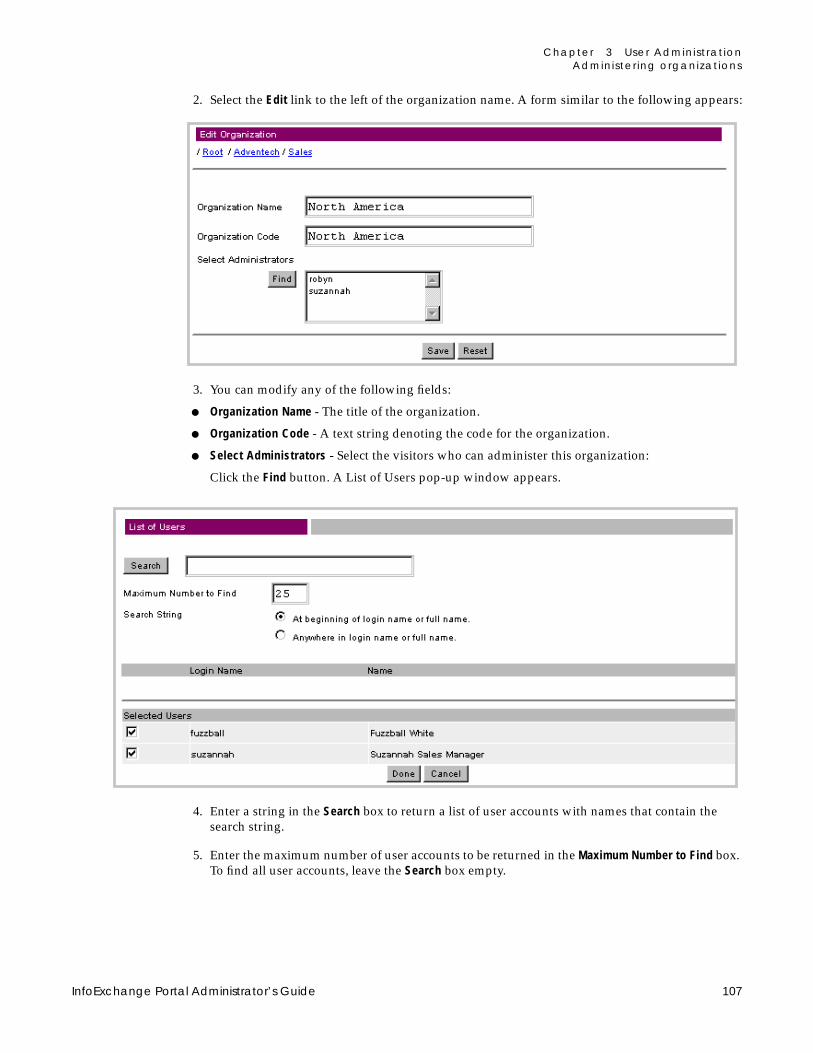
Chapter 3 User Administ rat ionAdminister ing organizat ions
2. Select the Edit link to the left of the organization name. A form similar to the following appears:
3. You can modify any of the following fields:
● Organization Name - The title of the organization.
● Organization Code - A text string denoting the code for the organization.
● Select Administrators - Select the visitors who can administer this organization:
Click the Find button. A List of Users pop-up window appears.
4. Enter a string in the Search box to return a list of user accounts with names that contain thesearch string.
5. Enter the maximum number of user accounts to be returned in the Maximum Number to Find box.To find all user accounts, leave the Search box empty.
InfoExchange Portal Administrator’s Guide 107

Chapter 3 User Administ rat ionAdminister ing organizat ions
6. To the right of Search String, choose one of the following radio buttons:
• At beginning of login name or full name.
• Anywhere in login name or full name.
Searching from the beginning of the name is faster than searching for the string anywhere in thename because the former has to search fewer characters in the database.
7. Click the Find box. The results appear in the List of Users pop-up window.
8. Check to select additional visitors who can administer the specified organization, or select thecheck box again to remove the visitor from the list of administrators for the organization. Notethat more than one visitor can administer an organization. If no check box appears next to avisitor’s name, this administrator is inherited from a higher level organization and cannot beremoved at this level.
To undo your changes, click Reset. When you are finished with the page, click Save to save yourchanges to the organization.
108 BroadVision, Inc

Chapter 3 User Administ rat ionAdminister ing user accounts
Deleting an organization
You may sometimes need to delete an organization from InfoExchange Portal.
1. Select [Delete] to the left of an organization name to delete it.
2. You are then asked for confirmation before the organization is deleted; click OK. Note thatdeleted organizations cannot be “undeleted.”
Administering user accountsThe content users of InfoExchange Portal see is based in part on the information defined in theiraccounts. Using the Admin Tool, you can add or remove a visitor, see his or her administrativeprivileges in the site (if any), and assign his or her user template.
This section discusses the following topics:
● “Adding a user account” on page 111
● “Finding existing user accounts” on page 116
● “Editing a visitor’s account” on page 118
● “Changing a visitor’s profile” on page 124
To perform user account administration with the Admin Tool, you need to have the Site Adminor Service Admin administrative function.
CAUTION The Admin Tool has iepadmin as the default site administrator with the defaultpassword imiepadmin. BroadVision recommends you use this account to set up the first useraccount. Change the password on this account to prevent break-ins to your system! To change thispassword you must be a Site Admin; because the iepadmin account is not assigned to aspecific service, you must select Entire Site to the right of Search Within. See “Finding existinguser accounts” on page 116 contains information on obtaining a list of visitors; “Editing avisitor’s account” on page 118 contains information on how to change a password.
InfoExchange Portal Administrator’s Guide 109

Chapter 3 User Administ rat ionAdminister ing user accounts
To add or edit a user account, click Users in the left frame. The following form appears in the rightframe:
You cannot delete a user account using the InfoExchange Portal Admin Tool. To remove a useraccount from the database, you must edit the database using SQL.
Click to add auser account
Enter search string(optional)
Select one todetermine how thesearch is performed
Select one to choosewhether to searchonly within thisservice or within theentire site
Enter maximumnumber of resultsto return
110 BroadVision, Inc

Chapter 3 User Administ rat ionAdminister ing user accounts
Adding a user account
To add a user account, click the [Add User] at the top of the frame. The Add User form appears.
InfoExchange Portal Administrator’s Guide 111
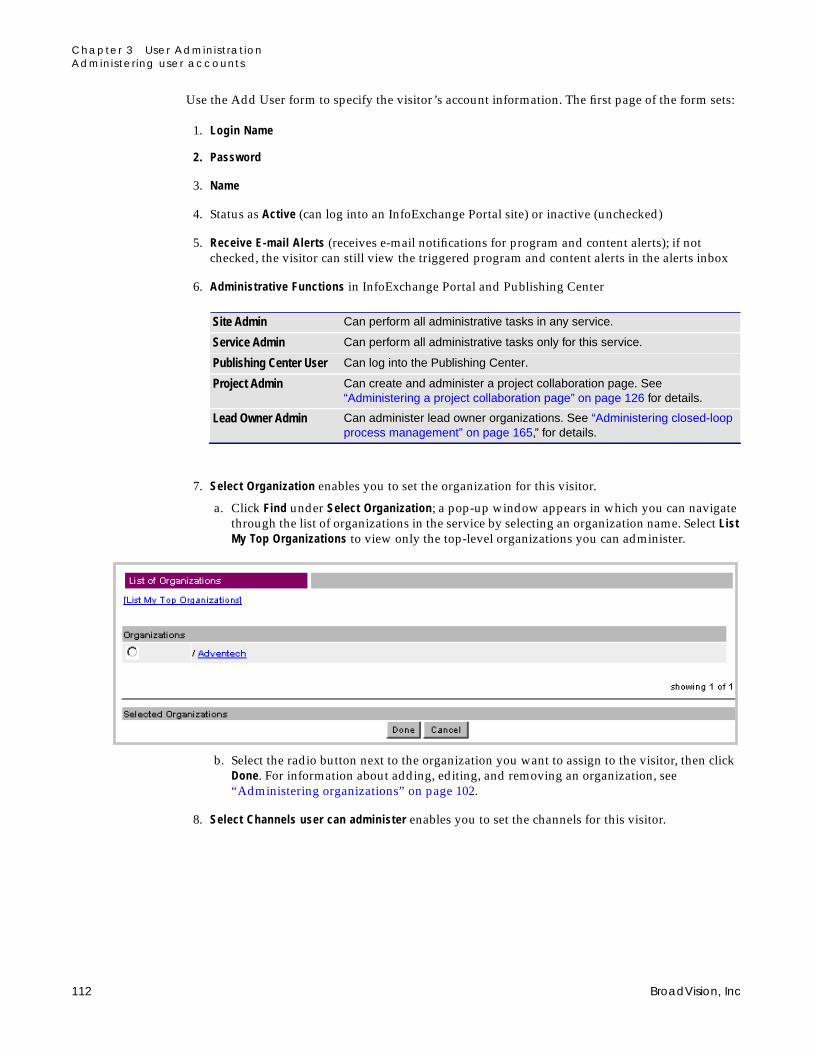
Chapter 3 User Administ rat ionAdminister ing user accounts
Use the Add User form to specify the visitor’s account information. The first page of the form sets:
1. Login Name
2. Password
3. Name
4. Status as Active (can log into an InfoExchange Portal site) or inactive (unchecked)
5. Receive E-mail Alerts (receives e-mail notifications for program and content alerts); if notchecked, the visitor can still view the triggered program and content alerts in the alerts inbox
6. Administrative Functions in InfoExchange Portal and Publishing Center
7. Select Organization enables you to set the organization for this visitor.
a. Click Find under Select Organization; a pop-up window appears in which you can navigatethrough the list of organizations in the service by selecting an organization name. Select ListMy Top Organizations to view only the top-level organizations you can administer.
b. Select the radio button next to the organization you want to assign to the visitor, then clickDone. For information about adding, editing, and removing an organization, see“Administering organizations” on page 102.
8. Select Channels user can administer enables you to set the channels for this visitor.
Site Admin Can perform all administrative tasks in any service.
Service Admin Can perform all administrative tasks only for this service.
Publishing Center User Can log into the Publishing Center.
Project Admin Can create and administer a project collaboration page. See“Administering a project collaboration page” on page 126 for details.
Lead Owner Admin Can administer lead owner organizations. See “Administering closed-loopprocess management” on page 165,” for details.
112 BroadVision, Inc

Chapter 3 User Administ rat ionAdminister ing user accounts
a. Click Find under Select Channels user can administer; a pop-up window appears in whichyou can navigate through the list of channels and subchannels in the service by selecting achannel name. Select List My Top Channels to view only those channels you can administer.
b. Select the check box next to the channels you want to enable the visitor to administer, thenclick Done. For information about adding, editing, and removing channels, see“Administering channels” on page 28.
c. In the box to the right of the Find button, use the left mouse button to highlight the channelsyou want the visitor to be able to administer.
9. Select Organizations user can administer enables you to set the organizations this visitor canadminister. To enable this visitor to administer one or more organizations:
a. Click Find under Select Organizations user can administer; a pop-up window appears inwhich you can navigate through the list of organizations in the service by selecting theorganization name. Select List My Top Organizations to view only those organizations towhich you belong.
InfoExchange Portal Administrator’s Guide 113

Chapter 3 User Administ rat ionAdminister ing user accounts
b. Select the check box next to each organization you want to enable the visitor to administer,then click Done. For information about adding, editing, and removing organizations, see“Administering organizations” on page 102.
A visitor can administer organizations without being a member of them.
10. User Template sets the default user account settings; these determine what content the visitorcan see. When you assign a visitor to a different user template, the visitor’s access groupmembership and qualifiers are reset to those of the new user template. Select a user template forthe visitor from the list in the pull-down menu. See “Administering user templates” on page 87for information on adding and editing user templates.
When you select a visitor’s user template, you are also indirectly assigning the visitor a pagetype. A page type contains default blocks; these default blocks are assigned to the new visitor.
The visitor sees the home page and all preset bookmarked channels, programs, and contentitems of the user template.
11. Select Qualifiers enables you to restrict which channels and programs a visitor can see. In somecases a visitor can also be permitted to set his or her own values for some qualifiers.
If no qualifiers have been defined, the Qualifiers lists do not appear, and no values can beselected for that visitor account.
a. Click Find under Select Qualifiers; a pop-up window appears in which you can view the listof qualifiers in the service in groups of ten.
To find the qualifiers you want to add:
• Enter a string in the Search box to return a list of qualifiers with names that contain thesearch string
• Select a letter under the Search box to retrieve all qualifiers that begin with that letter, orselect All to retrieve all qualifiers.
114 BroadVision, Inc
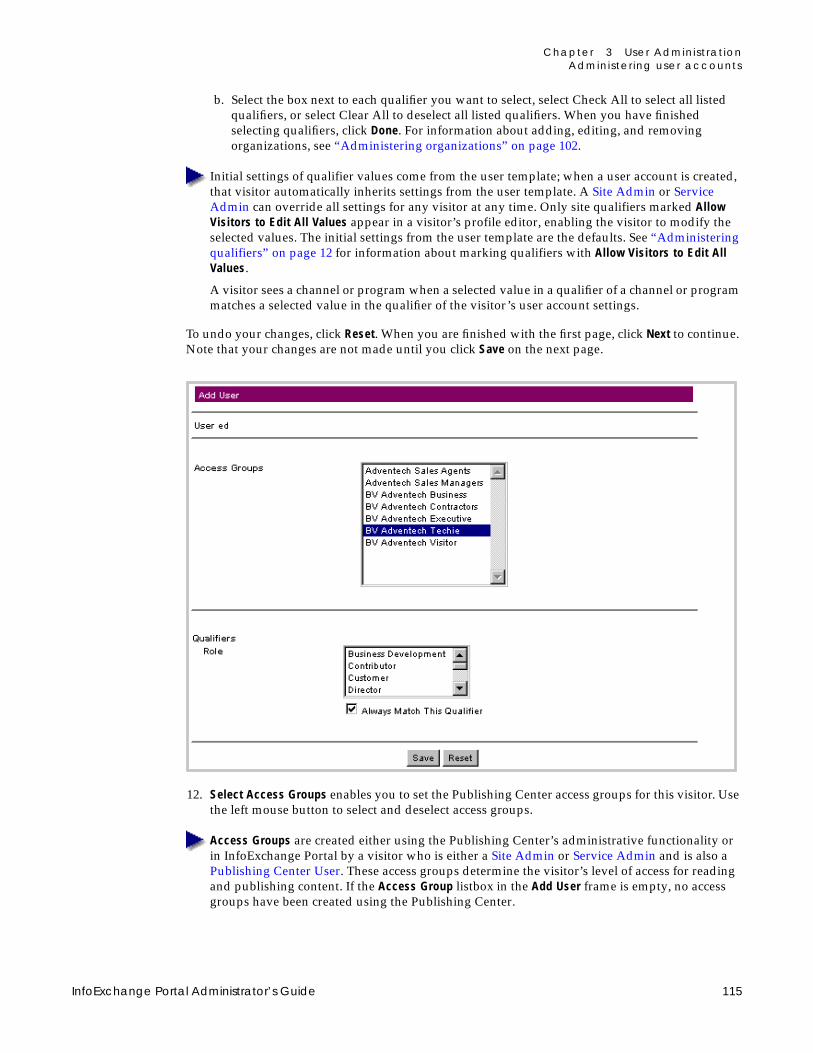
Chapter 3 User Administ rat ionAdminister ing user accounts
b. Select the box next to each qualifier you want to select, select Check All to select all listedqualifiers, or select Clear All to deselect all listed qualifiers. When you have finishedselecting qualifiers, click Done. For information about adding, editing, and removingorganizations, see “Administering organizations” on page 102.
Initial settings of qualifier values come from the user template; when a user account is created,that visitor automatically inherits settings from the user template. A Site Admin or ServiceAdmin can override all settings for any visitor at any time. Only site qualifiers marked AllowVisitors to Edit All Values appear in a visitor’s profile editor, enabling the visitor to modify theselected values. The initial settings from the user template are the defaults. See “Administeringqualifiers” on page 12 for information about marking qualifiers with Allow Visitors to Edit AllValues.
A visitor sees a channel or program when a selected value in a qualifier of a channel or programmatches a selected value in the qualifier of the visitor’s user account settings.
To undo your changes, click Reset. When you are finished with the first page, click Next to continue.Note that your changes are not made until you click Save on the next page.
12. Select Access Groups enables you to set the Publishing Center access groups for this visitor. Usethe left mouse button to select and deselect access groups.
Access Groups are created either using the Publishing Center’s administrative functionality orin InfoExchange Portal by a visitor who is either a Site Admin or Service Admin and is also aPublishing Center User. These access groups determine the visitor’s level of access for readingand publishing content. If the Access Group listbox in the Add User frame is empty, no accessgroups have been created using the Publishing Center.
InfoExchange Portal Administrator’s Guide 115

Chapter 3 User Administ rat ionAdminister ing user accounts
13. Qualifiers enables you to assign values to the selected qualifiers, thus restricting which channelsand programs a visitor can see. Use the left mouse button to select and deselect qualifiers, or toenable all values that are ever assigned to the qualifier, select the box to the left of Always MatchThis Qualifier.
Selecting all the qualifier values listed is not the same as selecting Always Match This Qualifier.When you select the qualifier values listed, values added to the qualifier later do not apply tothe visitor, whereas when you select Always Match This Qualifier, all future values assigned tothe qualifier will apply to the visitor.
To undo your changes, click Reset. When you are finished with the page, click Save to save the newuser account.
Finding existing user accounts
To find existing user accounts:
1. Enter all or part of the visitor’s name or login name in the User Name box. To list the first N of allthe user accounts where N is the maximum number of results to be returned, leave the UserName field empty.
2. Enter the maximum number of results to be returned in the Maximum Number to Find box. Thesearch is case-sensitive.
3. To the right of Search String, select whether the Admin Tool searches for results beginning withthe string or including the string by choosing either “At beginning of login name or full name.” or“Anywhere in login name or full name.”
Selecting “At beginning of login name or full name.” performs a faster search than selecting“Anywhere in login name or full name.”
Enter search string(optional)
Select one todetermine how thesearch is performed
Select one to choosewhether to searchonly within thisservice or within theentire site
Enter maximumnumber of resultsto return
116 BroadVision, Inc

Chapter 3 User Administ rat ionAdminister ing user accounts
4. To the right of Search Within, select whether the Admin Tool searches for results from just thisservice or from the entire site by choosing either “Current service.” or “Entire site.”
To access the iepadmin user account you must search with the “Entire site.”
The results appear as the List of Users.
Click to edit theLogin Name, Password,Organizations, AccessGroups, User Template,Qualifiers, QualifierValues, and Channelsand Organizations thevisitor can administer.
Click to add auser account
Click to change thename, address, city,state, zip code, ande-mail address of thevisitor who accessesthis user account
InfoExchange Portal Administrator’s Guide 117

Chapter 3 User Administ rat ionAdminister ing user accounts
Editing a visitor’s account
To edit a visitor’s login name or password, make the account active or inactive, enable or disablee-mail alerts, or change the account’s user template, organizations, access groups, qualifiers, orchange the channels and organizations the visitor can administer, click Settings in the row thatcontains the user account name.
Use the Edit User forms to change the user account information.
118 BroadVision, Inc
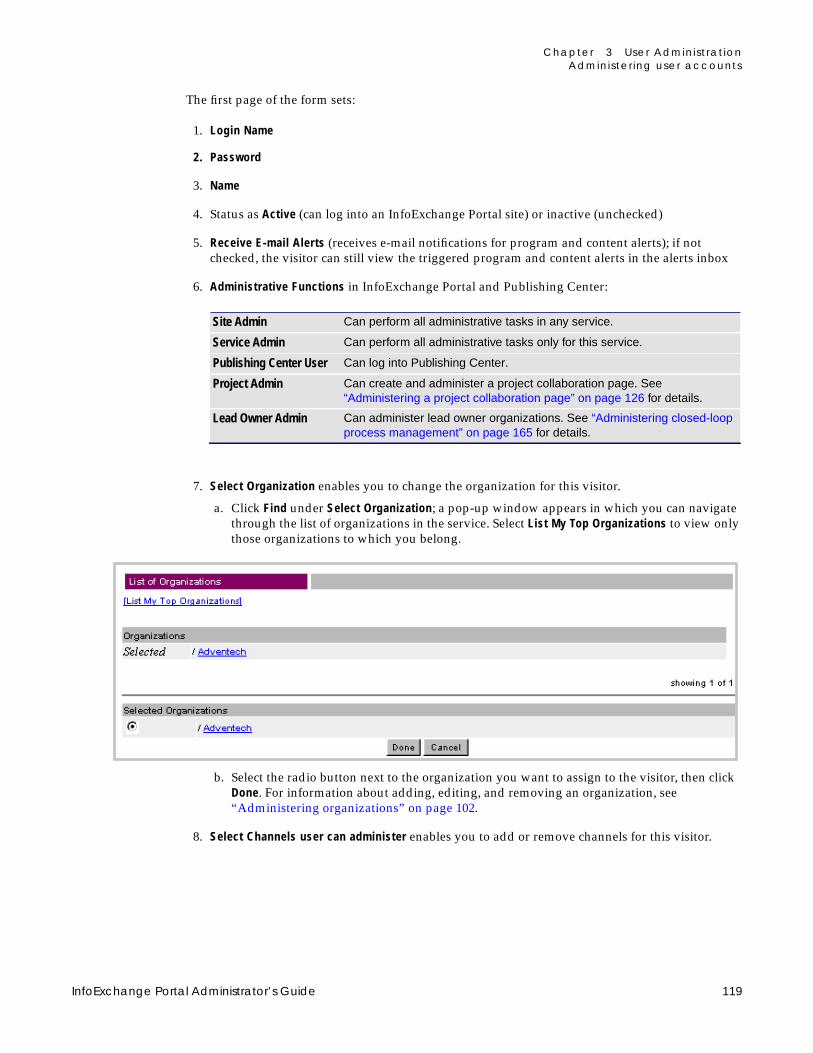
Chapter 3 User Administ rat ionAdminister ing user accounts
The first page of the form sets:
1. Login Name
2. Password
3. Name
4. Status as Active (can log into an InfoExchange Portal site) or inactive (unchecked)
5. Receive E-mail Alerts (receives e-mail notifications for program and content alerts); if notchecked, the visitor can still view the triggered program and content alerts in the alerts inbox
6. Administrative Functions in InfoExchange Portal and Publishing Center:
7. Select Organization enables you to change the organization for this visitor.
a. Click Find under Select Organization; a pop-up window appears in which you can navigatethrough the list of organizations in the service. Select List My Top Organizations to view onlythose organizations to which you belong.
b. Select the radio button next to the organization you want to assign to the visitor, then clickDone. For information about adding, editing, and removing an organization, see“Administering organizations” on page 102.
8. Select Channels user can administer enables you to add or remove channels for this visitor.
Site Admin Can perform all administrative tasks in any service.
Service Admin Can perform all administrative tasks only for this service.
Publishing Center User Can log into Publishing Center.
Project Admin Can create and administer a project collaboration page. See“Administering a project collaboration page” on page 126 for details.
Lead Owner Admin Can administer lead owner organizations. See “Administering closed-loopprocess management” on page 165 for details.
InfoExchange Portal Administrator’s Guide 119
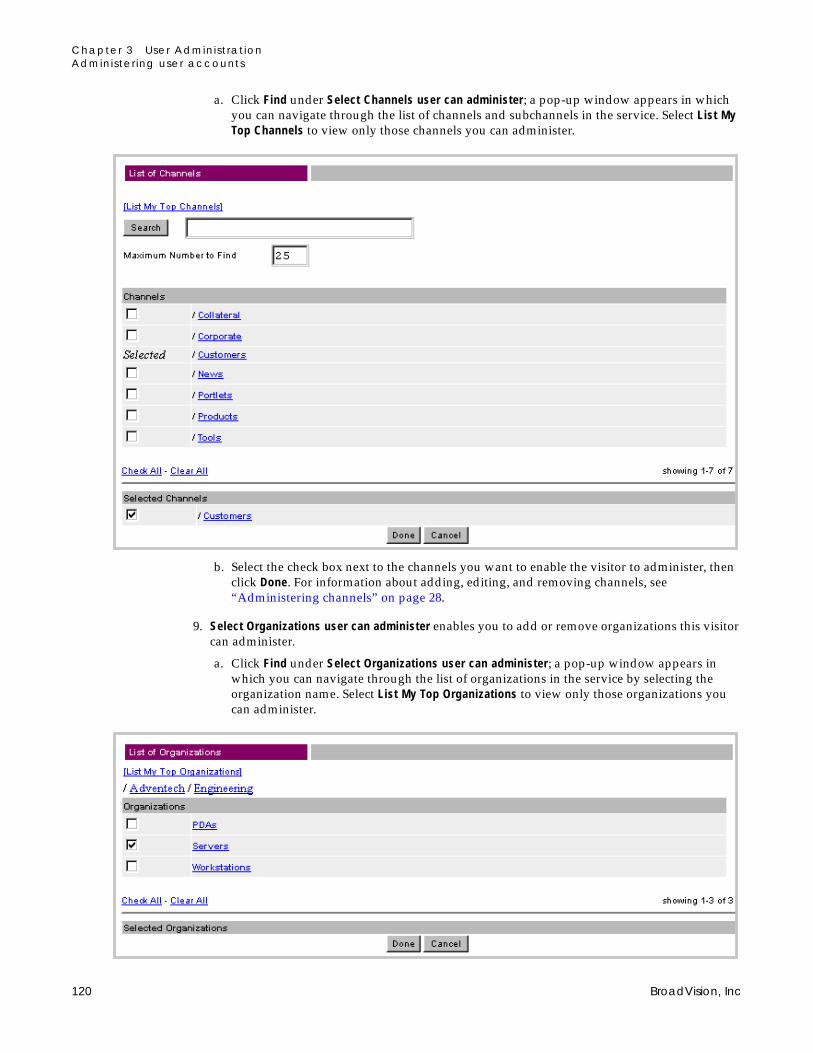
Chapter 3 User Administ rat ionAdminister ing user accounts
a. Click Find under Select Channels user can administer; a pop-up window appears in whichyou can navigate through the list of channels and subchannels in the service. Select List MyTop Channels to view only those channels you can administer.
b. Select the check box next to the channels you want to enable the visitor to administer, thenclick Done. For information about adding, editing, and removing channels, see“Administering channels” on page 28.
9. Select Organizations user can administer enables you to add or remove organizations this visitorcan administer.
a. Click Find under Select Organizations user can administer; a pop-up window appears inwhich you can navigate through the list of organizations in the service by selecting theorganization name. Select List My Top Organizations to view only those organizations youcan administer.
120 BroadVision, Inc

Chapter 3 User Administ rat ionAdminister ing user accounts
A visitor can administer organizations without being a member of them.
b. Select the check box next to the organizations you want to enable the visitor to administer,then click Done. For information about adding, editing, and removing organizations, see“Administering organizations” on page 102.
10. User Template sets the default user account settings; these determine what content the visitorcan see. When you assign a visitor to a different user template, the visitor’s access groupmembership and qualifiers are reset to those of the new user template. Select a user template forthe visitor from the list in the menu box. See “Administering user templates” on page 87” forinformation on adding and editing user templates.
When you select a visitor’s user template, you are also indirectly assigning the visitor a pagetype. A page type contains default blocks; these default blocks are assigned to the new visitor.
The visitor sees the home page and all preset bookmarked channels, programs, and contentitems of the user template.
11. Select Qualifiers enables you to restrict which channels and programs a visitor can see. In somecases a visitor can also be permitted to administer some qualifiers.
If no qualifiers have been defined, the Qualifiers lists do not appear, and no values can beselected for that visitor account.
a. Click Find under Select Qualifiers; a pop-up window appears in which you can view the listof qualifiers in the service in groups of ten.
To find the qualifiers you want to add or remove:
• Enter a string in the Search box to return a list of qualifiers with names that contain thesearch string
• Select a letter under the Search box to retrieve all qualifiers that begin with that letter, orselect All to retrieve all qualifiers.
InfoExchange Portal Administrator’s Guide 121
Chapter 3 User Administ rat ionAdminister ing user accounts
b. Select the box next to each qualifier you want to select, select the box next to each selectedqualifier to deselect it, select Check All to select all listed qualifiers, or select Clear All todeselect all listed qualifiers. When you have finished selecting qualifiers, click Done. Forinformation about adding, editing, and removing organizations, see “Administeringorganizations” on page 102.
c. In the box to the right of the Find button, use the left mouse button to highlight the qualifiersyou want to assign to the visitor.
Initial settings of qualifier values come from the user template. When the user template ischanged, all settings for the visitor change, and the visitor automatically inherits qualifiersettings from the user template. A Site Admin or Service Admin can override all settings for anyvisitor at any time. Only site qualifiers marked Allow Visitors to Edit All Values appear in avisitor’s profile editor, enabling the visitor to modify the selected values. The initial settingsfrom the user template are the defaults. See “Administering qualifiers” on page 12 forinformation about marking qualifiers with Allow Visitors to Edit All Values.
A visitor sees a channel or program when a selected value in a qualifier of a channel or programmatches a selected value in the qualifier of the visitor’s user account settings.
122 BroadVision, Inc

Chapter 3 User Administ rat ionAdminister ing user accounts
To undo your changes, click Reset. When you are finished with the first page, click Next to continue.Note that your changes are not made until you click Save on the next page.
InfoExchange Portal Administrator’s Guide 123

Chapter 3 User Administ rat ionAdminister ing user accounts
The second page of the Edit User form lets you modify the following values:
1. Access Groups enables you to set the Publishing Center access groups for this visitor. Use theleft mouse button to select and deselect access groups.
Access Groups are created either using the Publishing Center’s administrative functionality orin InfoExchange Portal by a visitor who is either a Site Admin or Service Admin and is also aPublishing Center User. These access groups determine the visitor’s level of access for readingand publishing content. If the Access Group listbox in the Edit User frame is empty, no accessgroups have been created using the Publishing Center.
2. Qualifiers enables you to assign values to the selected qualifiers, thus restricting which channelsand programs a visitor can see. Use the left mouse button to select and deselect qualifiers, or toenable all values that are ever assigned to the qualifier, select the box to the left of Always MatchThis Qualifier.
Selecting all the qualifier values listed is not the same as selecting Always Match This Qualifier.When you select the qualifier values listed, values added to the qualifier later do not apply tothe visitor, whereas when you select Always Match This Qualifier, all future values assigned tothe qualifier will apply to the visitor.
To undo your changes, click Reset. To undo your changes, click Reset. When you are finished withthe second page, click Save at the bottom of the page to save changes made on both pages of theform.
Changing a visitor’s profile
To change the visitor’s profile information:
1. Find existing user accounts:
a. Enter all or part of the visitor’s name or login name in the User Name box. To list the first Nof all the user accounts where N is the maximum number of results to be returned, leave theUser Name field empty.
Enter search string(optional)
Select one todetermine how thesearch is performed
Select one to choosewhether to searchonly within thisservice or within theentire site
Enter maximumnumber of resultsto return
124 BroadVision, Inc

Chapter 3 User Administ rat ionAdminister ing user accounts
b. Then enter the maximum number of results to be returned in the Maximum Number to Findbox. The search is case-sensitive.
c. To the right of Search String, select whether the Admin Tool searches for results beginningwith the string or including the string by choosing either “At beginning of login name or fullname.” or “Anywhere in login name or full name.”
Selecting “At beginning of login name or full name.” performs a faster search than selecting“Anywhere in login name or full name.”
d. To the right of Search Within, select whether the Admin Tool searches for results from justthis service or from the entire site by choosing either “Current service.” or “Entire site.”
The results appear as the List of Users.
Click to change thename, address, city,state, zip code, ande-mail address of thevisitor who accessesthis user account
InfoExchange Portal Administrator’s Guide 125

Chapter 3 User Administ rat ionAdminister ing a project col laborat ion page
2. Click Profile to the left of the visitor whose profile you want to edit.
The Edit Profile form is a script, userprofupdate.jsp, that can be modified to includeadditional user profile attributes. This script, like all the Admin Tool scripts, is located in thescript_root/knowledge/admin/scripts directory.
3. Make any changes you want to make to the profile.
4. To undo your changes, click the Reset button; otherwise click the Save button to save yourchanges.
Administering a project collaboration pageProject collaboration allows a group of people to follow, track, and share data about a project.
The project collaboration page is a page created by an employee (such as a sales representative or anengagement manager) for sharing information about a project with fellow employees, customers,and partners. A project collaboration page pertains to a single project, and the life cycle of thatproject contains one or more phases. Multiple phases can be in progress simultaneously.Information that can be shared about a project includes tasks, meetings, and announcements.
Discussion groups allow the project participants to freely exchange ideas. Files can be attached tomessages posted to a discussion group. The messages in the discussion groups are threaded.Visitors who belong to a project group see all of the project collaboration content tagged for thatproject group in the projects for which they are registered participants.
When someone creates a project collaboration page using the project collaboration page wizard, thewizard automatically creates a public discussion group open to all participants in that project group.A project owner can add more discussion groups by clicking Discussions in the project collaborationpage.
126 BroadVision, Inc

Chapter 3 User Administ rat ionAdminister ing a project col laborat ion page
Using a project collaboration page
The project collaboration page has two types of users: owners and participants.
The owners of a project can:
● add and remove participants from the collaboration’s community.
● add and remove users from the list of owners.
● mark participants that go into the contact list.
● attach an image file for the collaboration page.
● add and delete discussion groups.
● moderate discussion groups.
● add and delete phases in the collaboration. Note that deleting a phase deletes all associatedtasks, meetings, and announcements.
● delete a collaboration. Note that deleting a collaboration deletes all the phases for thatcollaboration.
● mark which phase is the current phase. All participants see that phase initially when they go tothe project collaboration page.
● associate products with the collaboration and dissociate products from the collaboration.
● associate programs with phases of the collaboration and dissociate those programs from thecollaboration.
Participants in a project collaboration can:
● read, add, and edit projects, phases, tasks, meetings, and announcements.
● add messages to and read discussion groups.
Participants are assigned to different groups within a project. The default group is “Public”; allparticipants are members of the “Public” group. You can create additional groups for the project,such as “Guests”, “Private”, or “Customers”.
Authorizinging project collaboration page access
The Site Admin or Service Admin authorizes who can create a project collaboration page. Typicallya limited set of employees are authorized to create a project collaboration page. Other levels ofaccess to parts of a project depend on the visitor’s access level.
The following access privileges relate to tasks:
● A project owner can edit and delete tasks.
● A task owner can edit his/her tasks.
● A participant in a project group can view tasks in that group.
● A visitor not in a project group cannot access tasks assivned to that project group.
The following access privileges relate to meetings:
● A project owner can edit and delete any meeting.
● A meeting owner can edit and delete his/her meeting.
Only a project owner or announcement author can edit or delete an announcement.
InfoExchange Portal Administrator’s Guide 127

Chapter 3 User Administ rat ionAdminister ing a project col laborat ion page
Only project owners can add, edit, or delete discussion groups and phases as well as attach ordetach programs and products.
To change authorization of a visitor:
1. Select Users in the left menu of the Admin tool.
2. Find existing user accounts:
a. Enter all or part of the visitor’s name or login name in the User Name box. To list all the useraccounts, leave the User Name field empty.
b. Then enter the maximum number of results to be returned in the Maximum Number to Findbox. The search is case-sensitive.
c. To the right of Search String, select whether the Admin Tool searches for results beginningwith the string or including the string by choosing either “At beginning of login name or fullname.” or “Anywhere in login name or full name.”
d. To the right of Search Within, select whether the Admin Tool searches for results from justthis service or from the entire site by choosing either “Current service.” or “Entire site.”
Click to add auser account
Enter search string(optional)
Select one todetermine how thesearch is performed
Select one to choosewhether to searchonly within thisservice or within theentire site
Enter maximumnumber of resultsto return
128 BroadVision, Inc

Chapter 3 User Administ rat ionAdminister ing a project col laborat ion page
The results appear as the List of Users.
Click to edit thevisitor’s administrativeprivileges
InfoExchange Portal Administrator’s Guide 129

Chapter 3 User Administ rat ionAdminister ing a project col laborat ion page
3. In the List of Users frame, select the Settings link for the user whose authorization you want tochange.
4. In the Administrative Functions section of the Edit User window, select Project Admin to enablethe visitor to create a project collaboration page, or select Project Admin a second time to disablethe privilege for this visitor. Select Next at the bottom of the page, then select Save at the bottomof the second Edit User window to save the settings for this visitor.
For more information on creating and editing user accounts, see Chapter 1, “AdministeringUser Accounts.”
Select to enable thevisitor to administerproject collaborationpages
130 BroadVision, Inc

Chapter 3 User Administ rat ionAdminister ing a project col laborat ion page
Using the Project Collaboration Page Wizard
To start a collaboration, an authorized visitor uses the Project Collaboration Page wizard fromwithin a page produced with InfoExchange Portal.
The following examples use the BVAdvenTech sample application.
To get to the Project Collaboration wizard in the BVAdvenTech sample application
1. Log in as a project administrator (such as user “miles” with password “miles”).
2. Select the PROJECTS tab.
Click to start the Project CollaborationWizard
InfoExchange Portal Administrator’s Guide 131
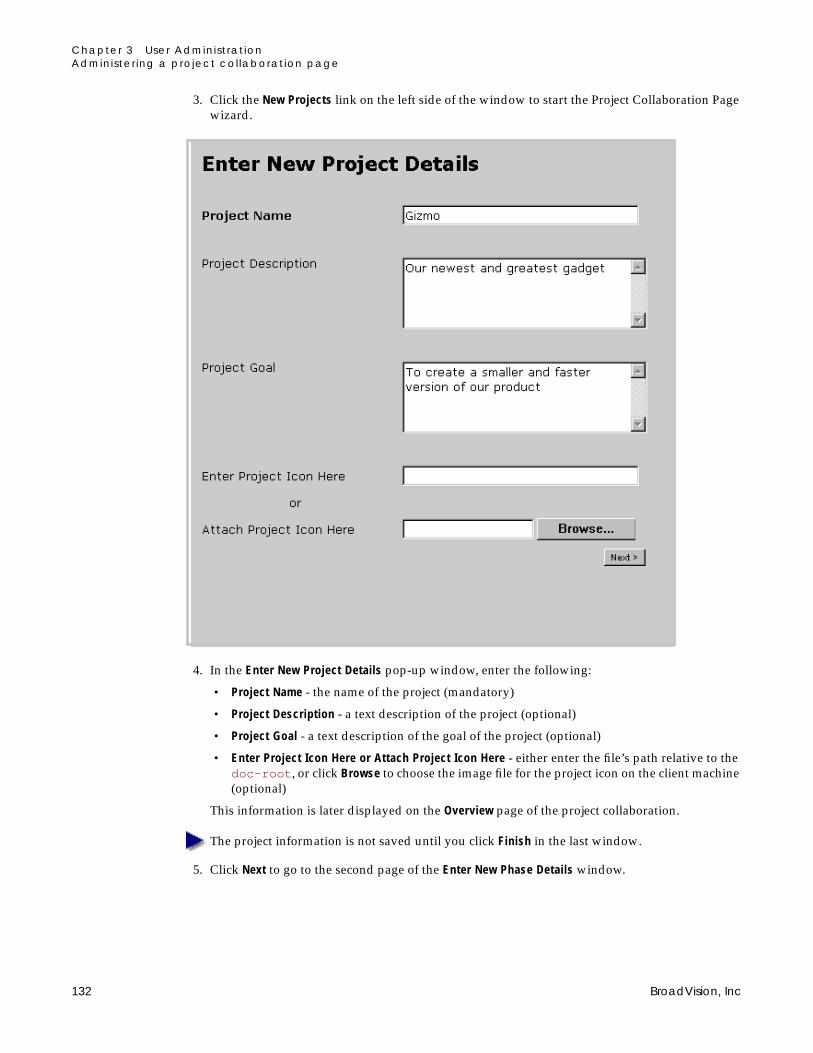
Chapter 3 User Administ rat ionAdminister ing a project col laborat ion page
3. Click the New Projects link on the left side of the window to start the Project Collaboration Pagewizard.
4. In the Enter New Project Details pop-up window, enter the following:
• Project Name - the name of the project (mandatory)
• Project Description - a text description of the project (optional)
• Project Goal - a text description of the goal of the project (optional)
• Enter Project Icon Here or Attach Project Icon Here - either enter the file’s path relative to thedoc-root, or click Browse to choose the image file for the project icon on the client machine(optional)
This information is later displayed on the Overview page of the project collaboration.
The project information is not saved until you click Finish in the last window.
5. Click Next to go to the second page of the Enter New Phase Details window.
132 BroadVision, Inc
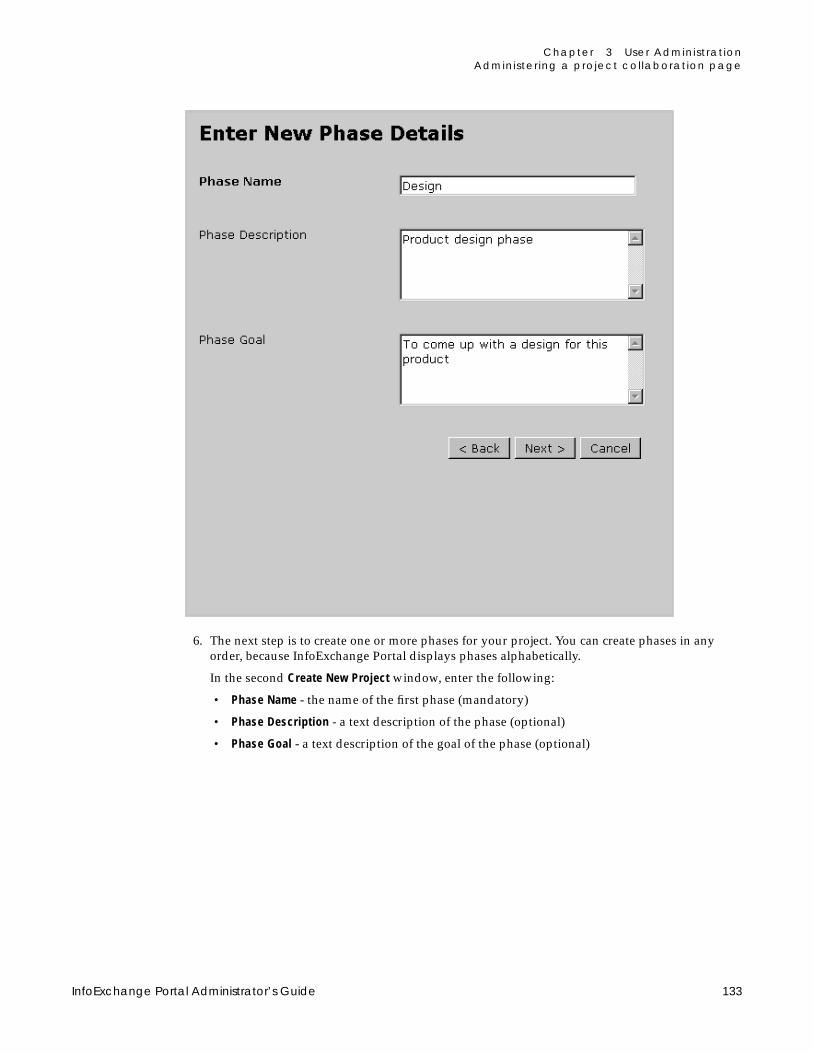
Chapter 3 User Administ rat ionAdminister ing a project col laborat ion page
6. The next step is to create one or more phases for your project. You can create phases in anyorder, because InfoExchange Portal displays phases alphabetically.
In the second Create New Project window, enter the following:
• Phase Name - the name of the first phase (mandatory)
• Phase Description - a text description of the phase (optional)
• Phase Goal - a text description of the goal of the phase (optional)
InfoExchange Portal Administrator’s Guide 133

Chapter 3 User Administ rat ionAdminister ing a project col laborat ion page
7. To return to the previous window, click Back. To abort the creation of the new project, clickCancel. Click Next to go to the project summary window.
The project summary window is divided into four sections:
● Phases - the phases of the project. Click the radio button under the word Current to make aphase in the list the current phase. Participants see the current phase as the default phase whenthey go to the project collaboration page. For information on adding phases to a project, see“Adding a phase to a project collaboration page” on page 163
● Participants - the visitors participating in the project collaboration page. Any Owner can addother owners for the collaboration. Click the box under the word Contact to list a visitor in theContacts page of the project collaboration. For information on adding participants to a project,see “Adding a participant to a project collaboration page” on page 150
● Products - the products related to the project. The Products page in the project has links toinformation on the related products. For example, if the project is a pre-sales collaboration, theproducts are the ones the prospect is considering for purchase. For information on addingproducts to a project, see “Adding a product to the project collaboration page” on page 159
● Programs - the programs associated with a phase of the project or with all phases of the project.Programs can contain content relevant to a phase, such as “Best Practices.” For information onadding programs to a project, see “Adding a program to a project collaboration page” onpage 156
Click to save thenew project
Click to add aprogram to thisproject
Click to add a phaseto this project
Click to add aparticipant to thisproject
Click to add aproduct to thisproject
Select to makethis project thecurrent project
Check to make thisvisitor an owner ofthis project
Check to make thisvisitor a contact forthis project
Click to edit thisphase
134 BroadVision, Inc
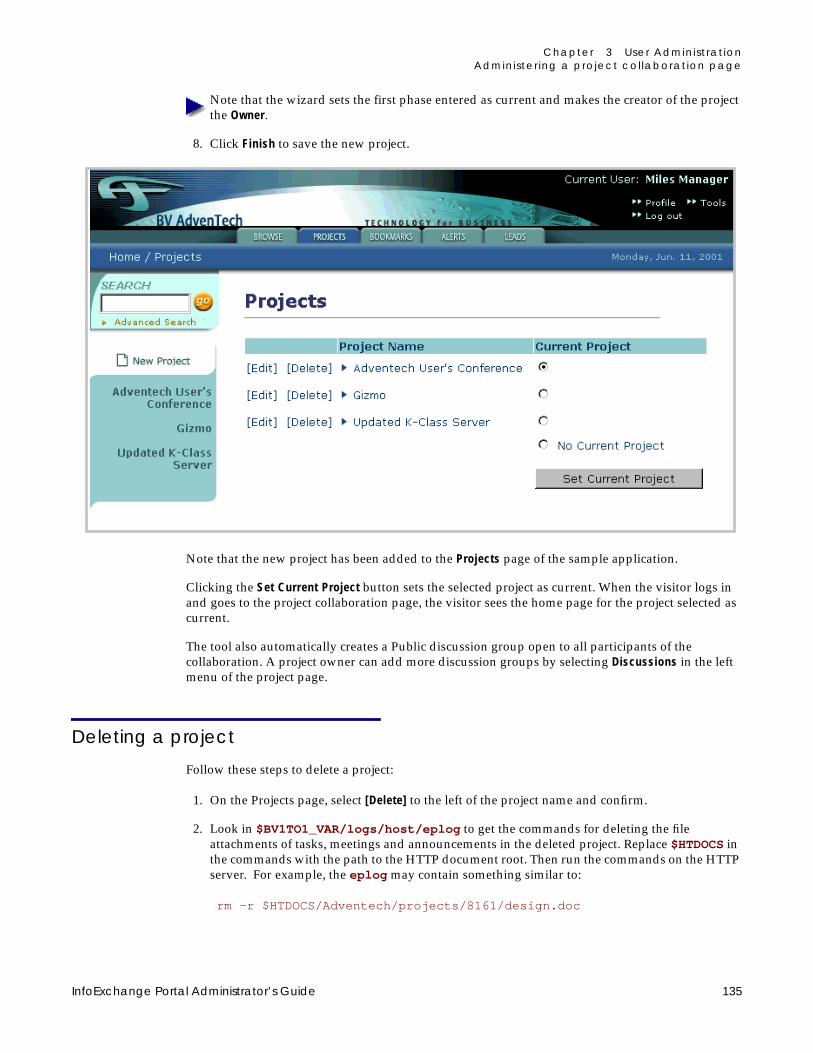
Chapter 3 User Administ rat ionAdminister ing a project col laborat ion page
Note that the wizard sets the first phase entered as current and makes the creator of the projectthe Owner.
8. Click Finish to save the new project.
Note that the new project has been added to the Projects page of the sample application.
Clicking the Set Current Project button sets the selected project as current. When the visitor logs inand goes to the project collaboration page, the visitor sees the home page for the project selected ascurrent.
The tool also automatically creates a Public discussion group open to all participants of thecollaboration. A project owner can add more discussion groups by selecting Discussions in the leftmenu of the project page.
Deleting a project
Follow these steps to delete a project:
1. On the Projects page, select [Delete] to the left of the project name and confirm.
2. Look in $BV1TO1_VAR/logs/host/eplog to get the commands for deleting the fileattachments of tasks, meetings and announcements in the deleted project. Replace $HTDOCS inthe commands with the path to the HTTP document root. Then run the commands on the HTTPserver. For example, the eplog may contain something similar to:
rm -r $HTDOCS/Adventech/projects/8161/design.doc
InfoExchange Portal Administrator’s Guide 135

Chapter 3 User Administ rat ionAdminister ing a project col laborat ion page
The file format is:
doc_root/service/projects/project_OID/document_name
where:
3. Look in $BV1TO1_VAR/logs/host/dflog to get the commands for deleting the discussiongroups’ attachment files of the deleted project, and replace <docroot> in the command withthe path to your HTTP document root.
For example, the dflog file might contain something similar to:
rm -rf <docroot>/bv_dgattachments/8212
where 8212 is the OID of the discussion group.
For more information on the methods for discussion groups see the Developer’s Guide to Componentsand Scripts. For more information on handling attachments, see the InfoExchange Developer’s Guide.
Project components
The tool bar of the sample application has a Projects tab that lists all the collaborations in which thatvisitor participates, or if the visitor has chosen a current project, that project is displayed.
A project contains the following kinds of data:
● tasks - a time-ordered list of tasks that have an associated title, description, owner, start date,start time, due date, due time, completion date, completion time, priority, phase, group, andzero or more file attachments. The list is sorted by due date in the project collaboration page.
● meetings - a time-ordered list of meetings, each having a name, description, owner, meetingdate, agenda, minutes, and zero or more file attachments. Meetings are sorted by meeting datein the collaboration page.
● overview - a summary printout of the project name, descritpion, goal, icon, and phases, alongwith a check mark indicating the current phase.
● discussion groups - the discussion groups associated with the project. You can add, edit,deactivate, or delete discussion groups here.
● announcements - a time-ordered list of announcements that have an associated name,description, and zero or more file attachments. Announcements are sorted by creation date inthe project collaboration page.
● participants - the people who are participating in the project.
● groups - the project groups associated with the project. You can add, edit, deactivate, or deleteproject groups here.
● programs - the programs associated with a phase of the project or with all phases of the project.Programs can contain content relevant to a phase, such as “Best Practices”.
doc_root is the HTTP document root
service is the service name, using the same case as in bv1to1.conf
projects is the directory containing your projects
project_OID is the OID for each project
document_name is the name of the attached document
136 BroadVision, Inc

Chapter 3 User Administ rat ionAdminister ing a project col laborat ion page
● products - links to product catalog pages.
● contacts - links to people who are the contacts for a project; the contact list is a subset of all theparticipants of a collaboration. Each contact has a textual description displayed next to thename that contains for example, the person’s role.
● phases - the phases associated with the project.
Adding a task to a project collaboration page
To add a task to a project:
1. Select the name of the project to which the task is to be added. A page for that project similar tothe following appears.
Click one of these to adda task to this project
InfoExchange Portal Administrator’s Guide 137

Chapter 3 User Administ rat ionAdminister ing a project col laborat ion page
2. Either select the page icon to the right of My Tasks, or select Tasks in the left menu and select thepage icon to the left of Add New Task.
The Add New Task window appears.
138 BroadVision, Inc

Chapter 3 User Administ rat ionAdminister ing a project col laborat ion page
Enter the following information:
• Name - name of the task (required).
• Description - description of the task (optional).
• Groups - use the left mouse button to select the groups to which this task applies (required).See “Adding a project group to a project collaboration page” on page 153 for information oncreating project groups.
• Owner - use the left mouse button to select the project owner from the pull-down menu(required).
• Start Date - use the left mouse button to select the start date from the pull-down menus.Select the calendar icon to use the Date Picker pop-up window (required).
• Start Time - use the left mouse button to select the start time from the pull-down menus(required).
• Due Date - use the left mouse button to select the due date from the pull-down menus. Selectthe calendar icon to use the Date Picker pop-up window (required).
• Due Time - use the left mouse button to select the due time from the pull-down menus(required).
• Priority - use the left mouse button to select the priority from the pull-down menu(required).
• Attachments - enter the Attachment Name, and either enter or use the Browse... button tonavigate to the Attachment File (optional).
3. To blank the Add New Task form, click the Reset button; otherwise, click the Save button to savethe new task.
InfoExchange Portal Administrator’s Guide 139

Chapter 3 User Administ rat ionAdminister ing a project col laborat ion page
The new task appears in the Tasks window.
140 BroadVision, Inc

Chapter 3 User Administ rat ionAdminister ing a project col laborat ion page
Updating a task in a project collaboration page
To update a task in a project, click [Edit] to the left of the task name. The Update Task windowappears.
InfoExchange Portal Administrator’s Guide 141

Chapter 3 User Administ rat ionAdminister ing a project col laborat ion page
Here you can update the following information:
● Name - name of the task.
● Description - description of the task.
● Groups - use the left mouse button to select or deselect groups to which this task applies(required). See “Adding a project group to a project collaboration page” on page 153 forinformation on creating project groups.
● Owner - use the left mouse button to select the project owner from the pull-down menu(required).
● Start Date - use the left mouse button to select the start date from the pull-down menus. Selectthe calendar icon to use the Date Picker pop-up window (required).
● Start Time - use the left mouse button to select the start time from the pull-down menus(required).
● Due Date - use the left mouse button to select the due date from the pull-down menus. Select thecalendar icon to use the Date Picker pop-up window (required).
● Due Time - use the left mouse button to select the due time from the pull-down menus(required).
● Completion Date - use the left mouse button to select the due date from the pull-down menus.Select the calendar icon to use the Date Picker pop-up window (optional).
● Completion Time - use the left mouse button to select the due time from the pull-down menus(optional).
● Priority - use the left mouse button to select the priority from the pull-down menu (required).
● Attachments - enter the Attachment Name, and either enter or use the Browse... button to navigateto the Attachment File (optional).
● Completed - use the left mouse button to select the check box to the right to indicate this phasehas been completed (optional).
To remove any changes you have made to the task, click the Reset button; otherwise, click the Savebutton to save the new task.
142 BroadVision, Inc

Chapter 3 User Administ rat ionAdminister ing a project col laborat ion page
Obtaining an overview of the project
To see an overview of the selected project, on the Project page, select Overview in the left menu. TheProject Name, Project Description, Project Goal, Project Icon, Phases, and an indicator of the currentphase for the project appear.
InfoExchange Portal Administrator’s Guide 143
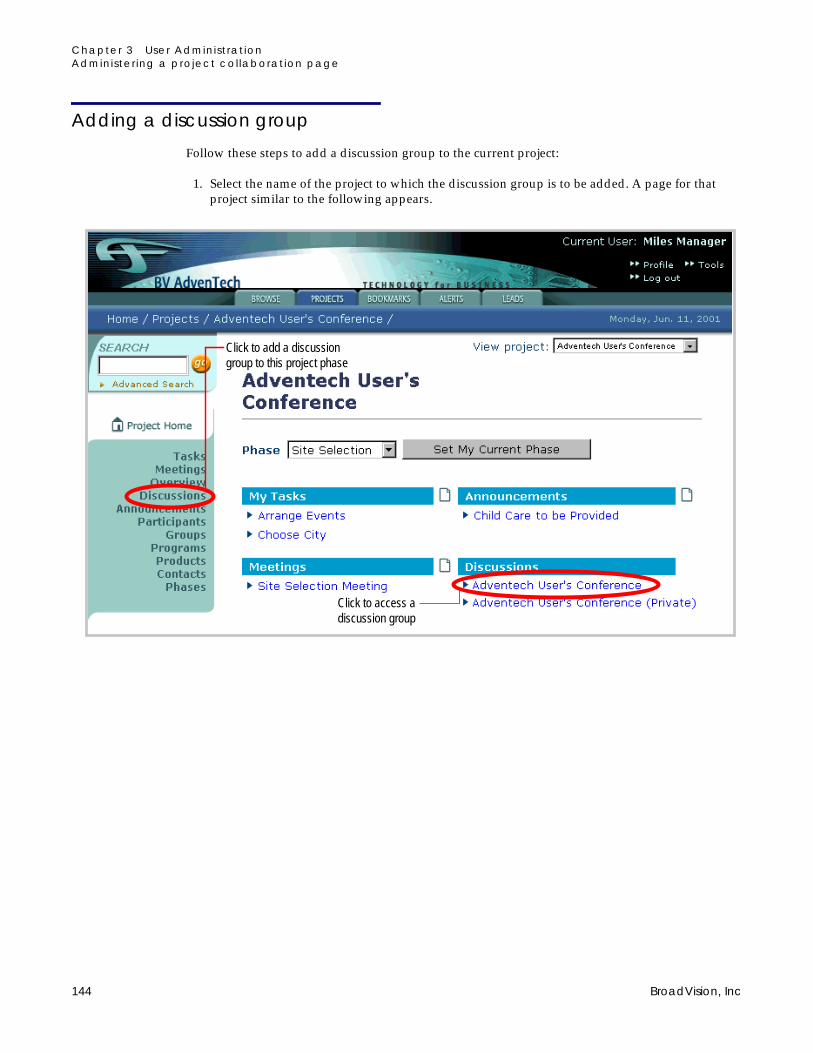
Chapter 3 User Administ rat ionAdminister ing a project col laborat ion page
Adding a discussion group
Follow these steps to add a discussion group to the current project:
1. Select the name of the project to which the discussion group is to be added. A page for thatproject similar to the following appears.
Click to add a discussiongroup to this project phase
Click to access adiscussion group
144 BroadVision, Inc

Chapter 3 User Administ rat ionAdminister ing a project col laborat ion page
2. On the Projects page, select Discussions in the left menu.
Click to add a discussiongroup to this project
InfoExchange Portal Administrator’s Guide 145

Chapter 3 User Administ rat ionAdminister ing a project col laborat ion page
3. Under Discussions, select Add New Discussion Group.
The Add New Discussion Group window appears.
Enter the following information:
• Discussion Group Name - name of the new discussion group (required).
• Groups - use the left mouse button to select one or more access groups which can participatein the discussion group (required).
4. To clear the Add New Discussion Group form, click the Reset button; otherwise, click the Savebutton to save the new discussion group.
146 BroadVision, Inc
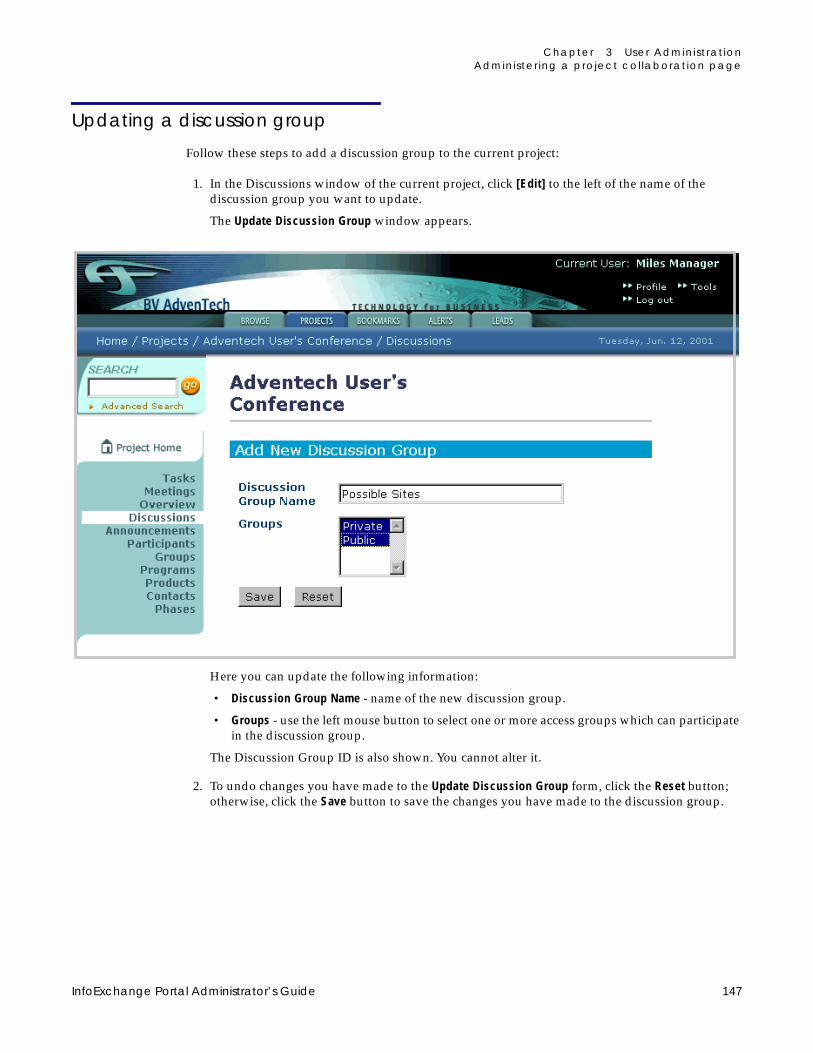
Chapter 3 User Administ rat ionAdminister ing a project col laborat ion page
Updating a discussion group
Follow these steps to add a discussion group to the current project:
1. In the Discussions window of the current project, click [Edit] to the left of the name of thediscussion group you want to update.
The Update Discussion Group window appears.
Here you can update the following information:
• Discussion Group Name - name of the new discussion group.
• Groups - use the left mouse button to select one or more access groups which can participatein the discussion group.
The Discussion Group ID is also shown. You cannot alter it.
2. To undo changes you have made to the Update Discussion Group form, click the Reset button;otherwise, click the Save button to save the changes you have made to the discussion group.
InfoExchange Portal Administrator’s Guide 147

Chapter 3 User Administ rat ionAdminister ing a project col laborat ion page
Adding a message to a discussion group
To add a message to a discussion group:
1. On the Project page, select the name of the discussion group.
2. The View Discussion Group window appears with a form enabling you to post to this group.Your E-mail Address is automatically entered. Here you can enter a Title, the Content of themessage, and add any Attachment.
3. To clear the message form, click the Reset button; otherwise, click the Save button to post themessage to the discussion group.
Activating and deactivating a discussion group
Whenever you create a discussion group, it is activated by default. To deactivate a discussion group,select the [Deactivate] link to the left of the discussion group name. The name of the link is changedto [Activate], and the discussion group is deactivated.
To activate a discussion group, select the [Activate] link to the left of the discussion group name. Thename of the link is changed to [Deactivate], and the discussion group is activated.
148 BroadVision, Inc

Chapter 3 User Administ rat ionAdminister ing a project col laborat ion page
Activating and deactivating a discussion group message
Whenever you create a message, it is activated by default. To deactivate a discussion groupmessage, select the [Deactivate] link to the right of the message title. The name of the link is changedto [Activate], and the message is deactivated.
To activate a message, select the [Activate] link to the right of the message title. The name of the linkis changed to [Deactivate], and the message is activated.
Deleting a discussion group
Follow these steps to delete one or more discussion groups:
1. Select the [Delete] link to the left of the discussion group you want to remove. A pop-upwindow asks you to confirm; click OK. The discussion group is deleted.
2. Look in $BV1TO1_VAR/logs/host/dflog to get the command for deleting the attachmentfiles of the deleted discussion group, and replace <docroot> in the command with the path toyour HTTP document root.
For example, the dflog file might contain something similar to:
rm -rf <docroot>/bv_dgattachments/8212
where 8212 is the OID of the discussion group.
Deleting a discussion group message
Follow these steps to delete a message from a discussion group:
1. Select the [Delete] link to the right of the message you want to remove. A pop-up window asksyou to confirm; click OK. The message and all replies to it are deleted.
2. Look in $BV1TO1_VAR/logs/host/dflog to get the commands for deleting the attachmentfiles of the deleted message, and replace <docroot> in the command with the path to yourHTTP document root.
For example, the dflog file might contain something similar to:
rm -rf <docroot>/bv_dgattachments/8212/mymessage.txt
where 8212 is the OID of the discussion group.
InfoExchange Portal Administrator’s Guide 149

Chapter 3 User Administ rat ionAdminister ing a project col laborat ion page
Adding a participant to a project collaboration page
To add a participant to a project:
1. On the Project page, select Participants in the left menu.
Click to add a participantto this project
150 BroadVision, Inc

Chapter 3 User Administ rat ionAdminister ing a project col laborat ion page
2. Click Add New Participant.
The Add New Participant window appears.
3. To find a specific visitor, enter all or part of the user account name in the User Name box. To listall visitors, leave the User Name field empty. Then enter the maximum number of results to bereturned in the Max Number to find box and click the Find Participant box. The search is case-sensitive.
InfoExchange Portal Administrator’s Guide 151

Chapter 3 User Administ rat ionAdminister ing a project col laborat ion page
4. Click the Find Participant button.
The results appear in the bottom half of the Add Participant window.
152 BroadVision, Inc
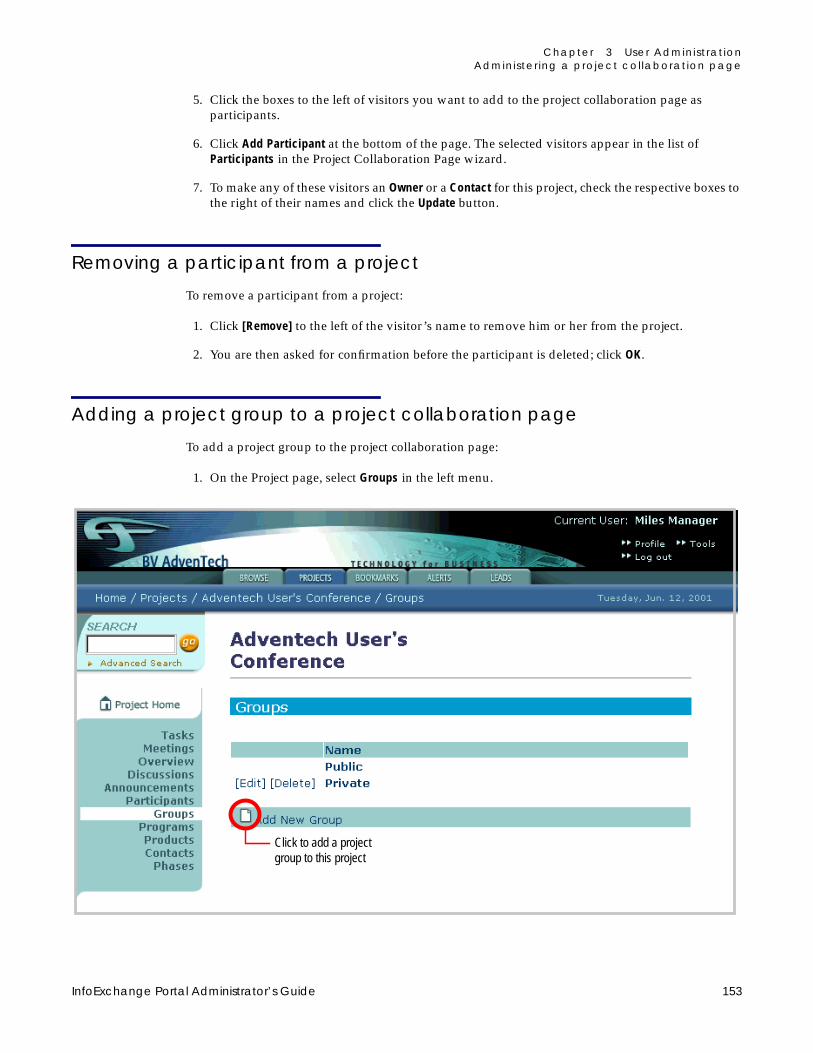
Chapter 3 User Administ rat ionAdminister ing a project col laborat ion page
5. Click the boxes to the left of visitors you want to add to the project collaboration page asparticipants.
6. Click Add Participant at the bottom of the page. The selected visitors appear in the list ofParticipants in the Project Collaboration Page wizard.
7. To make any of these visitors an Owner or a Contact for this project, check the respective boxes tothe right of their names and click the Update button.
Removing a participant from a project
To remove a participant from a project:
1. Click [Remove] to the left of the visitor’s name to remove him or her from the project.
2. You are then asked for confirmation before the participant is deleted; click OK.
Adding a project group to a project collaboration page
To add a project group to the project collaboration page:
1. On the Project page, select Groups in the left menu.
Click to add a projectgroup to this project
InfoExchange Portal Administrator’s Guide 153

Chapter 3 User Administ rat ionAdminister ing a project col laborat ion page
1. Click Add New Group.
2. Enter the following:
• Name - name of the group (required).
• Description - description of the (optional).
3. Select Group Members by using the left mouse button to check the boxes to the left of the namesof people you want in the group (required). Note that project owners are automaticallymembers of all project groups.
4. To clear the Add New Group form, click the Reset button; otherwise, click the Save button to savethe new project group.
154 BroadVision, Inc

Chapter 3 User Administ rat ionAdminister ing a project col laborat ion page
Updating a project group to a project collaboration page
To update a project group in the project collaboration page:
1. Click [Edit] to the left name of the project group you want to update.
The Update Group window appears.
2. Here you can change the following:
• Name - name of the group.
• Description - description of the group.
• Group Members - use the left mouse button to select or deselect the boxes to the left of thenames of people you want in the group.
3. To remove any changes you have made to the project group, click the Reset button; otherwise,click the Save button to save the changes you have made to the project group.
InfoExchange Portal Administrator’s Guide 155
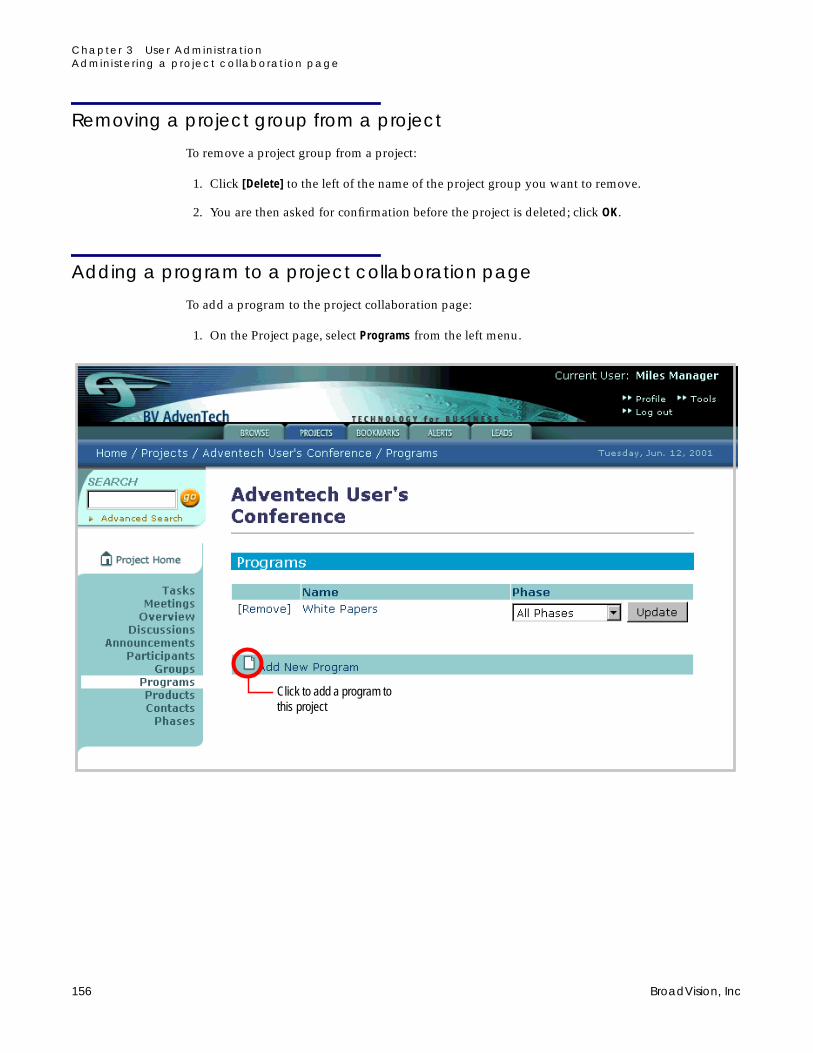
Chapter 3 User Administ rat ionAdminister ing a project col laborat ion page
Removing a project group from a project
To remove a project group from a project:
1. Click [Delete] to the left of the name of the project group you want to remove.
2. You are then asked for confirmation before the project is deleted; click OK.
Adding a program to a project collaboration page
To add a program to the project collaboration page:
1. On the Project page, select Programs from the left menu.
Click to add a program tothis project
156 BroadVision, Inc

Chapter 3 User Administ rat ionAdminister ing a project col laborat ion page
2. Click Add New Program.
The Add New Program window appears.
3. To find an existing program, enter all or part of the program name in the Program Name box. Tolist all programs, leave the Program Name field empty. Then enter the maximum number ofresults to be returned in the Max Number to find box and click the Find Program box. The search iscase-insensitive.
InfoExchange Portal Administrator’s Guide 157
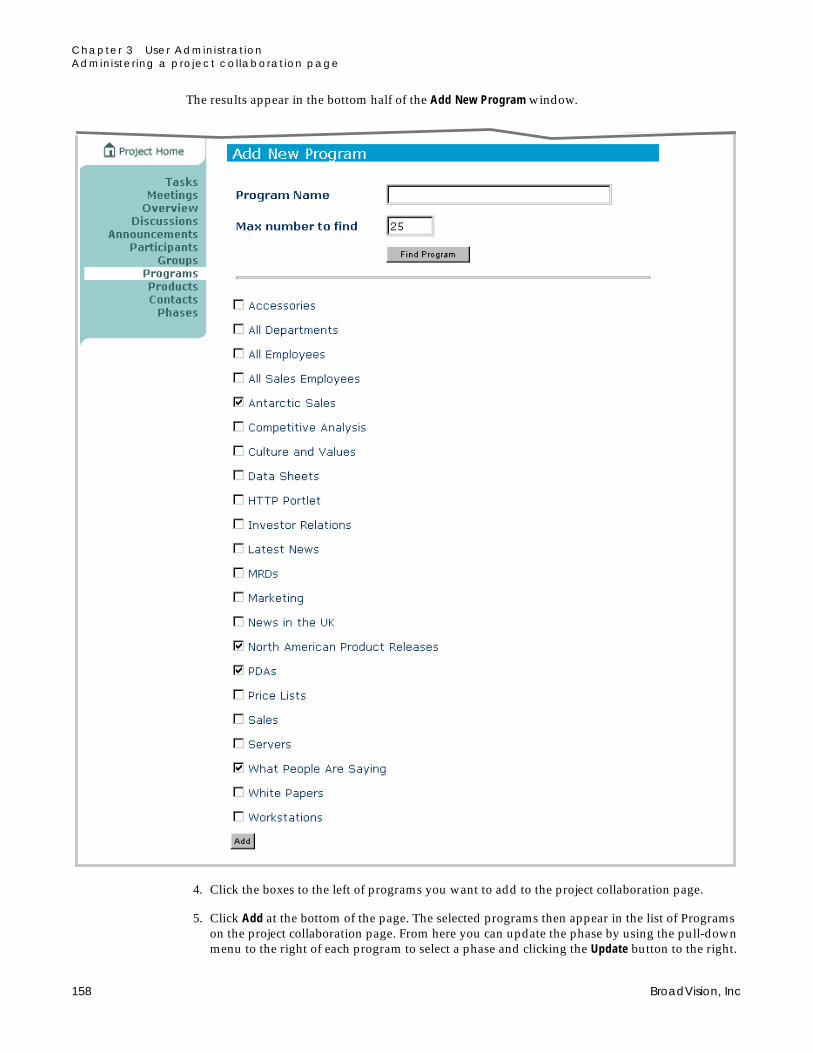
Chapter 3 User Administ rat ionAdminister ing a project col laborat ion page
The results appear in the bottom half of the Add New Program window.
4. Click the boxes to the left of programs you want to add to the project collaboration page.
5. Click Add at the bottom of the page. The selected programs then appear in the list of Programson the project collaboration page. From here you can update the phase by using the pull-downmenu to the right of each program to select a phase and clicking the Update button to the right.
158 BroadVision, Inc
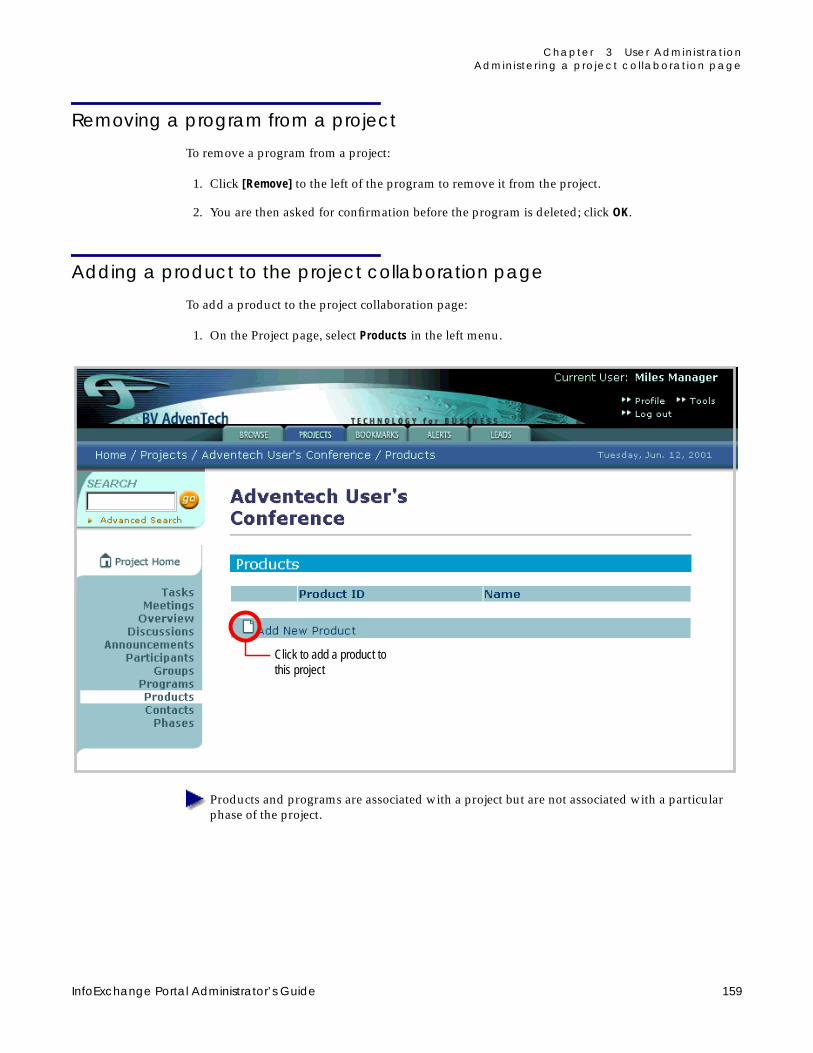
Chapter 3 User Administ rat ionAdminister ing a project col laborat ion page
Removing a program from a project
To remove a program from a project:
1. Click [Remove] to the left of the program to remove it from the project.
2. You are then asked for confirmation before the program is deleted; click OK.
Adding a product to the project collaboration page
To add a product to the project collaboration page:
1. On the Project page, select Products in the left menu.
Products and programs are associated with a project but are not associated with a particularphase of the project.
Click to add a product tothis project
InfoExchange Portal Administrator’s Guide 159

Chapter 3 User Administ rat ionAdminister ing a project col laborat ion page
2. Click Add New Product.
The Add New Product window appears.
3. To find an existing product, enter all or part of the product ID in the Product ID box. To list all theproducts, leave the Product ID field empty. Then enter the maximum number of results to bereturned in the Max Number to find box. The search is not case-sensitive.
Click to add a product tothis project
160 BroadVision, Inc

Chapter 3 User Administ rat ionAdminister ing a project col laborat ion page
The results appear in the bottom half of the Add New Product window.
4. Click the boxes to the left of products you want to add to the project collaboration page, thenclick the Add button at the bottom of the page. The selected products then appear in the list ofProducts.
Removing a product group from a project
To remove a product from a project:
1. Click [Remove] to the left of the name of the product you want to remove
2. You are then asked for confirmation before the product is removed; click OK.
InfoExchange Portal Administrator’s Guide 161
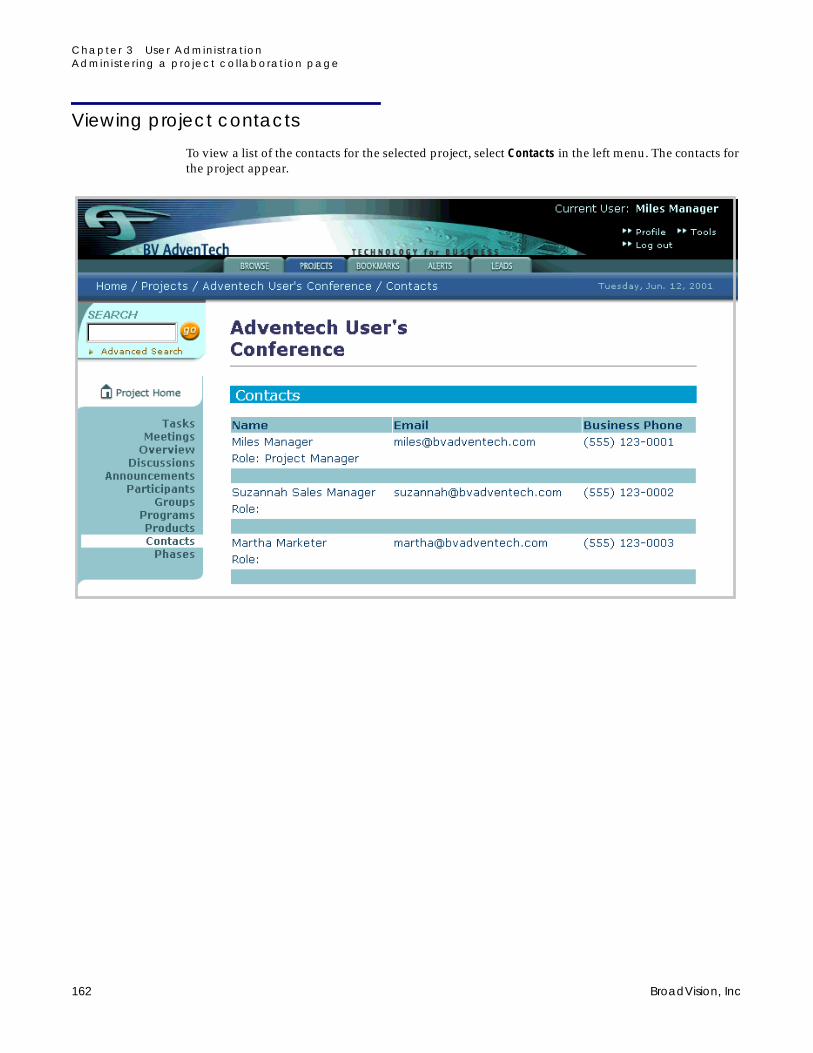
Chapter 3 User Administ rat ionAdminister ing a project col laborat ion page
Viewing project contacts
To view a list of the contacts for the selected project, select Contacts in the left menu. The contacts forthe project appear.
162 BroadVision, Inc

Chapter 3 User Administ rat ionAdminister ing a project col laborat ion page
Adding a phase to a project collaboration page
To add a phase to the project:
1. On the Project page, select Phases from the left menu.
Click to add a phase tothis project
InfoExchange Portal Administrator’s Guide 163

Chapter 3 User Administ rat ionAdminister ing a project col laborat ion page
2. Click Add New Phase.
In the Add New Phase window enter the following:
• Name - name of the phase (required).
• Description - description of the phase (optional).
• Goal - the goal of this phase (optional).
3. To clear the entries in the phase, click the Reset button. Click the Save button to save the newphase.
Updating a phase in a project collaboration page
To update a phase in the project:
1. On the Project page, select Phases from the left menu.
164 BroadVision, Inc

Chapter 3 User Administ rat ionAdminister ing closed-loop process management
2. Click [Edit] to the left of the phase you want to update.
The Update Phase window appears.
3. Here you can update the following:
• Name - name of the phase.
• Description - description of the phase.
• Goal - the goal of this phase.
4. To remove any changes you have made to the project group, click the Reset button; otherwise,click the Save button to save the changes you have made to the phase.
Administering closed-loop process managementClosed-loop process management changes the collaborative nature of enterprise relationshipmanagement by automatically tracking specific uses of an enterprise portal. The InfoExchangePortal closed-loop process management system can be used to track and manage action items, ticketitems, or leads. In most implementations, tickets and action items are generated through a page inthe site, such as the collaboration page. For example, ticket items can be issues discovered during ameeting or posted on the collaboration page, and action items can be defined steps within a phase ofa project.
InfoExchange Portal Administrator’s Guide 165

Chapter 3 User Administ rat ionAdminister ing closed-loop process management
A lead is generated when a visitor accessing an InfoExchange Portal site requests information fromthe site, such as a White Paper, or engages in some other action where the visitor fills in an instantpublisher form and provides information about himself or herself, such as filling out a troubleticket. Submitting the form creates a lead content item and automatically routes it to a lead ownerusing a matching alert. An InfoExchange Portal page can also be set up so clicking a link creates alead content item by calling the appropriate component APIs.
The goal of closed-loop process management is to turn visits to a web site into action items. A newitem, such as an action, ticket, or lead, is created using an instant publisher form. Items advancingthrough the closed-loop process are never lost, as the system tracks the progress and the individualsinvolved. A manager can quickly see which items are new, resolved, unresolved, or deleted. If anindividual to whom an item has been assigned cannot resolve the issue or complete the task, themanager can assign the item to someone else.
If the item owner does not act on the action item by a specified time, the owner is sent an e-mailreminder. After a specified number of reminders have been sent, the action item is automaticallyforwarded to the manager.
The database administrator needs to extend the lead content type and visitor profile table withcustom attributes appropriate to the InfoExchange Portal customer’s needs for closed-loop processmanagement. The Lead content type contains attributes for name, e-mail address, and visitorcontact information (such as e-mail, fax, and phone). All other attributes are sample attributes.
The database administrator needs to extend the Owner Organization content type with customattributes appropriate to the site’s needs for closed-loop process management. The OwnerOrganization content type contains attributes for Lead Owner Name, Office, Address, City, State,Zip, Contact Person, and Lead Manager (the host enterprise sales manager managing leads withthat office).
Setting up user accounts to administer closed-loop process management
You need to identify which visitors (for example, a sales manager or reseller) are allowed to managethe lead owner organizations.
All visitors that are contacts for a lead owner organization (lead owner organizations are called“sales agents” in the BVAdventech reference application):
● must be in a Publishing Center access group that grants read or higher permission on the rootcategory of the BV_EP_LEAD content type to be able to see the Leads tab in the BVAdventechreference application (see Session.leadPermission in the files login_adventech.jspand topNav.jsp)
● must be in a Publishing Center access group that grants write or higher permission on eachBV_EP_LEAD category containing the leads assigned to them to be able to edit their leads
All visitors that are sales managers:
● must be in a Publishing Center access group that grants read or higher permission on theBV_EP_LEAD content type's root category to be able to see the Leads tab in the BVAdventechreference application (see Session.leadPermission in the files login_adventech.jspand topNav.jsp)
● must be in a Publishing Center access group that grants write or higher permission on theBV_EP_LEAD category(s) containing the leads assigned to the contact persons of the ownerorganizations managed by that sales manager
166 BroadVision, Inc
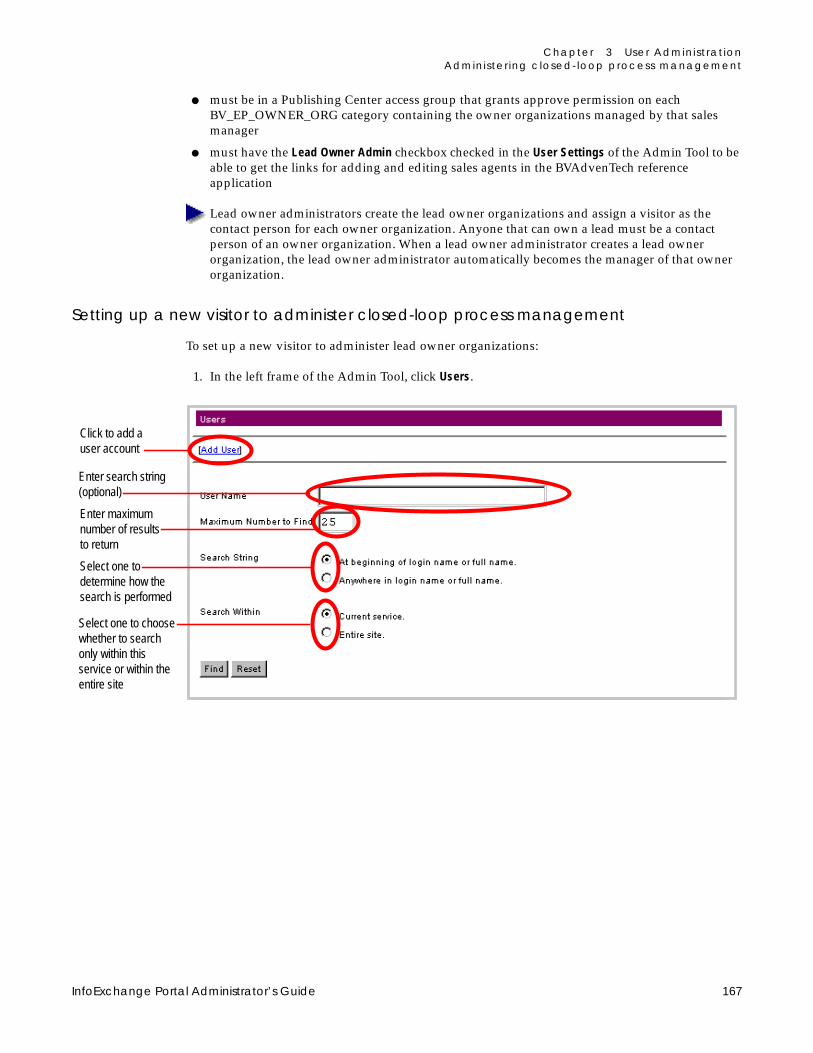
Chapter 3 User Administ rat ionAdminister ing closed-loop process management
● must be in a Publishing Center access group that grants approve permission on eachBV_EP_OWNER_ORG category containing the owner organizations managed by that salesmanager
● must have the Lead Owner Admin checkbox checked in the User Settings of the Admin Tool to beable to get the links for adding and editing sales agents in the BVAdvenTech referenceapplication
Lead owner administrators create the lead owner organizations and assign a visitor as thecontact person for each owner organization. Anyone that can own a lead must be a contactperson of an owner organization. When a lead owner administrator creates a lead ownerorganization, the lead owner administrator automatically becomes the manager of that ownerorganization.
Setting up a new visitor to administer closed-loop process management
To set up a new visitor to administer lead owner organizations:
1. In the left frame of the Admin Tool, click Users.
Click to add auser account
Enter search string(optional)
Select one todetermine how thesearch is performed
Select one to choosewhether to searchonly within thisservice or within theentire site
Enter maximumnumber of resultsto return
InfoExchange Portal Administrator’s Guide 167

Chapter 3 User Administ rat ionAdminister ing closed-loop process management
2. To add a user account, click the [Add User] link at the top of the frame. The Add User formappears.
3. Use the left mouse button to select Lead Owner Admin to enable the visitor to add, edit, anddelete lead owner organizations. For example, if the visitor is a sales manager responsible forlead owner organizations, check this box.
4. Follow the rest of account creation as described in “Adding a user account” on page 45.
Check to enable thisvisitor to add, edit, anddelete lead ownerorganizations
168 BroadVision, Inc

Chapter 3 User Administ rat ionAdminister ing closed-loop process management
Setting up an existing visitor to administer leads
To set up an existing visitor to administer lead owner organizations:
1. In the Users frame, enter all or part of the visitor’s name or login name in the User Name box. Tolist the first N of all the user accounts where N is the maximum number of results to bereturned, leave the User Name field empty.
2. Enter the maximum number of results to be returned in the Maximum Number to Find box. Thesearch is case-sensitive.
3. To the right of Search String, select whether the Admin Tool searches for results beginning withthe string or including the string by choosing either “At beginning of login name or full name.” or“Anywhere in login name or full name.”
Selecting “At beginning of login name or full name.” performs a faster search than selecting“Anywhere in login name or full name.”
Enter search string(optional)
Select one todetermine how thesearch is performed
Select one to choosewhether to searchonly within thisservice or within theentire site
Enter maximumnumber of resultsto return
InfoExchange Portal Administrator’s Guide 169

Chapter 3 User Administ rat ionAdminister ing closed-loop process management
4. To the right of Search Within, select whether the Admin Tool searches for results from just thisservice or from the entire site by choosing either “Current service.” or “Entire site.”
The results appear as the List of Users.
Click to edit thesetting thatenables this visitorto add, edit, anddelete lead ownerorganizations
170 BroadVision, Inc

Chapter 3 User Administ rat ionAdminister ing closed-loop process management
5. Click Settings in the row that contains the user account name.
6. Use the left mouse button to select Lead Owner Admin to enable the visitor to add, edit, anddelete lead owner organizations. For example, if the visitor is a sales manager responsible forlead owner organizations, check this box.
7. Follow the rest of account creation as described in “Editing a visitor’s account” on page 51.
Check to enable thisvisitor to add, edit, anddelete lead ownerorganizations
InfoExchange Portal Administrator’s Guide 171
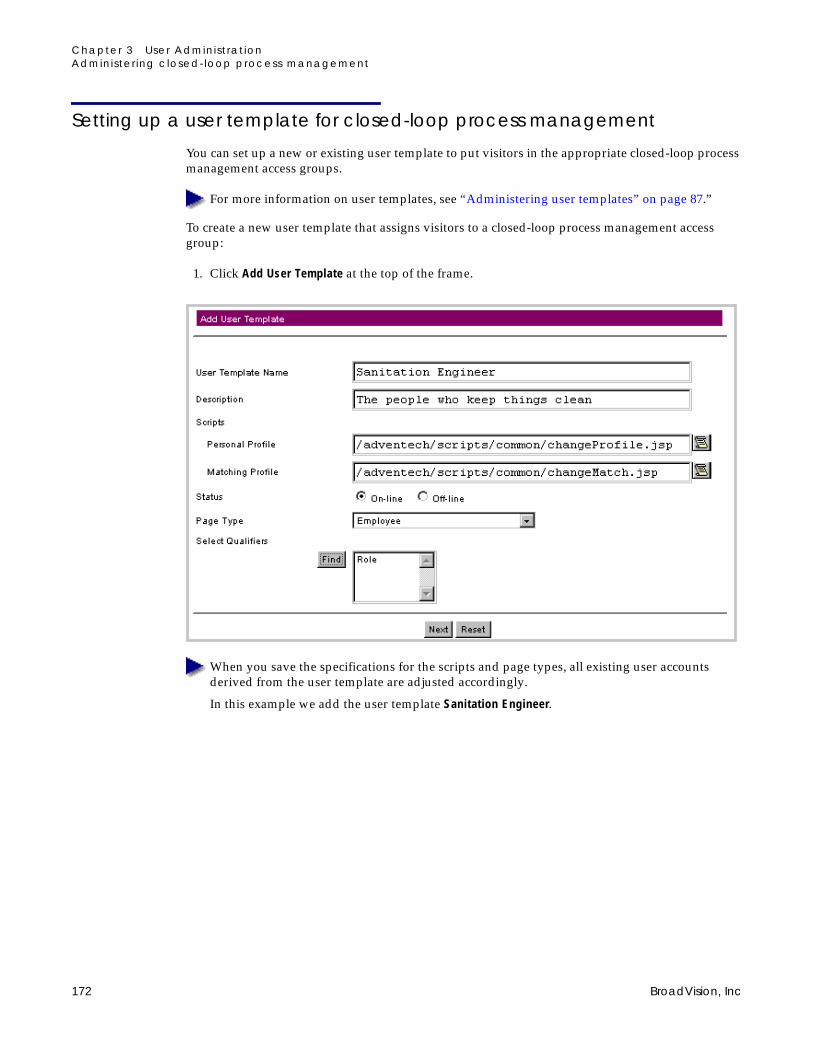
Chapter 3 User Administ rat ionAdminister ing closed-loop process management
Setting up a user template for closed-loop process management
You can set up a new or existing user template to put visitors in the appropriate closed-loop processmanagement access groups.
For more information on user templates, see “Administering user templates” on page 87.”
To create a new user template that assigns visitors to a closed-loop process management accessgroup:
1. Click Add User Template at the top of the frame.
When you save the specifications for the scripts and page types, all existing user accountsderived from the user template are adjusted accordingly.
In this example we add the user template Sanitation Engineer.
172 BroadVision, Inc

Chapter 3 User Administ rat ionAdminister ing closed-loop process management
2. Click Next to go to the second page of the Add User Template form.
3. Use the left mouse button to select Adventech Sales Agents to give visitors with this usertemplate access to work on leads. Use the left mouse button to select Adventech Sales Managersto give the visitors with the user template permission to add, edit, and delete lead ownerorganizations. All users who are contacts for an owner organization must be in Adventech SalesAgents; all sales managers must be in Adventech Sales Managers.
If you do not load the BVAdvenTech sample application, you are prompted during installationfor the name of your service. This name appears instead of Adventech (MyService Sales Agentsand MyService Sales Managers).
4. Click Save and Next to save your changes to the user template and go to the third page of theAdd User Template form. Click Save to save any further changes to the user template.
Click to enablevisitors with theuser template towork on leadson specifiedworkflow states
Click to givevisitors with theuser templatepermission toadd, edit, anddelete leadownerorganizations
InfoExchange Portal Administrator’s Guide 173

Chapter 3 User Administ rat ionAdminister ing closed-loop process management
To enable an existing user template to put visitors in the appropriate closed-loop processmanagement access groups:
1. Click Edit to the left of its name in the User Templates list to change the details of an existing usertemplate.
174 BroadVision, Inc

Chapter 3 User Administ rat ionAdminister ing closed-loop process management
2. Click Next to go to the second page of the Edit User Template form.
3. Use the left mouse button to select Adventech Sales Agents to give visitors with this usertemplate access to work on leads. Use the left mouse button to select Adventech Sales Managersto give the visitors with the user template permission to add, edit, and delete lead ownerorganizations. All users who are contacts for an owner organization must be in Adventech SalesAgents; all sales managers must be in Adventech Sales Managers.
If you do not load the BVAdvenTech sample application, you are prompted during installationfor the name of your service. This name will appear instead of Adventech.
4. Click Save and Next to save your changes to the user template and go to the third page of theEdit User Template form. Click Save to save any further changes to the user template.
Click to enablevisitors with theuser template towork on leadson specifiedworkflow states
Click to givevisitors with theuser templatepermission toadd, edit, anddelete leadownerorganizations
InfoExchange Portal Administrator’s Guide 175

Chapter 3 User Administ rat ionAdminister ing closed-loop process management
176 BroadVision, Inc

4 Site Maintenance
InfoExchange Portal comes with features that enable you to configure and monitor your site.
The following topics are discussed in this chapter:
● “Introduction,” next
● “Administering the filter cache” on page 177
● “Administering the home page cache” on page 179
● “Running InfoExchange Portal reports” on page 180
IntroductionThe filter cache lets you set the size of the cache used for storing the qualifiers of content.
The home page cache lets you enable, disable, and set the size of the cache used for recurring textdisplayed on a visitor’s home page.
The InfoExchange Portal Admin Tool comes with a series of reports you can run to obtain siteinformation and statistics.
Administering the filter cacheThe filter cache enablers you to store qualifier values for content items either on disk or in memory.You can set the size of the cache used for storing the qualifiers of content. By using a filter cache youcan speed up performance of your InfoExchange Portal site by not having to look up the qualifierson content items multiple in the database each time.
The types of information to be stored in the filter cache are set in the bv1to1.conf file using theep_filter_enabled_cnt_types parameter. For example:
ep_filter_enabled_cnt_types="EDITORIAL, PRODUCT"
InfoExchange Portal Administrator’s Guide 177
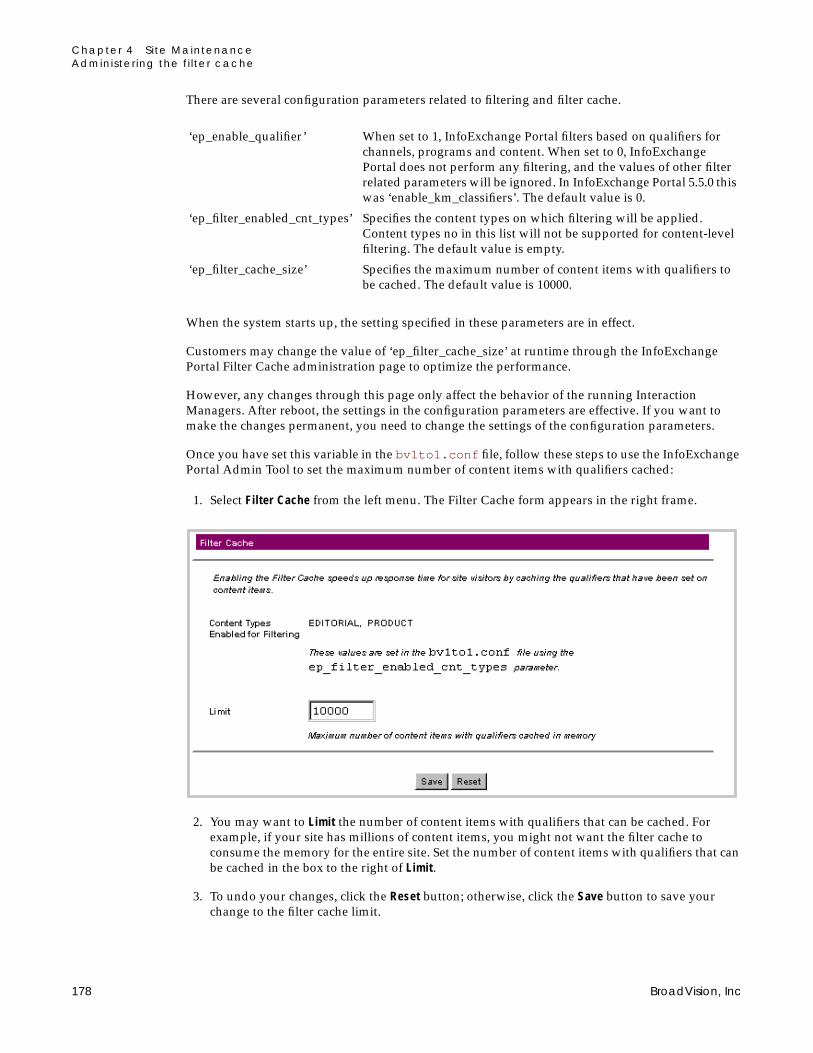
Chapter 4 Site MaintenanceAdminister ing the f i l ter cache
There are several configuration parameters related to filtering and filter cache.
When the system starts up, the setting specified in these parameters are in effect.
Customers may change the value of ‘ep_filter_cache_size’ at runtime through the InfoExchangePortal Filter Cache administration page to optimize the performance.
However, any changes through this page only affect the behavior of the running InteractionManagers. After reboot, the settings in the configuration parameters are effective. If you want tomake the changes permanent, you need to change the settings of the configuration parameters.
Once you have set this variable in the bv1to1.conf file, follow these steps to use the InfoExchangePortal Admin Tool to set the maximum number of content items with qualifiers cached:
1. Select Filter Cache from the left menu. The Filter Cache form appears in the right frame.
2. You may want to Limit the number of content items with qualifiers that can be cached. Forexample, if your site has millions of content items, you might not want the filter cache toconsume the memory for the entire site. Set the number of content items with qualifiers that canbe cached in the box to the right of Limit.
3. To undo your changes, click the Reset button; otherwise, click the Save button to save yourchange to the filter cache limit.
‘ep_enable_qualifier’ When set to 1, InfoExchange Portal filters based on qualifiers forchannels, programs and content. When set to 0, InfoExchangePortal does not perform any filtering, and the values of other filterrelated parameters will be ignored. In InfoExchange Portal 5.5.0 thiswas ‘enable_km_classifiers’. The default value is 0.
‘ep_filter_enabled_cnt_types’ Specifies the content types on which filtering will be applied.Content types no in this list will not be supported for content-levelfiltering. The default value is empty.
‘ep_filter_cache_size’ Specifies the maximum number of content items with qualifiers tobe cached. The default value is 10000.
178 BroadVision, Inc

Chapter 4 Site MaintenanceAdminister ing the home page cache
Administering the home page cacheThe home page cache lets you enable, disable, and set the size of the cache used for recurring itemsdisplayed on a visitor’s home page. Enabling the home page cache speeds up performance of anInfoExchange Portal site when loading a home page.
The home page cache is modeled after the One-To-One Enterprise persistent request cache:
● Strings are saved to the file system in a directory structure based on a key.
● Strings are retrieved based on a key determined by the application.
Configurable home pages make it easy to add lots of blocks and programs, which in turn make thehome page slower to generate. The home page cache stores the output of programs in blocks in thehome page. When you use the home page cache, this output is stored as text on the file system, inmemory, or in both, so some blocks do not have to be regenerated.
The InfoExchange Portal home page cache differs from the One-To-One Enterprise request cache inthat it stores the text at program and block level rather than at page level.
The following default values are set in the bv1to1.conf file:
● ep_text_cache_status - sets the status of the InfoExchange Portal home page cache. Avalue of “0” disables the home page cache; a value of “1” enables it. For example:
ep_text_cache_status="1"
The default value of ep_text_cache_status is “1”.
● ep_text_cache_level - determines how the InfoExchange Portal home page cache is stored:
• A value of “0” indicates only memory is used for the home page cache.
• A value of “1” indicates both system memory and the file system are used for the homepage cache.
• A value of “2” indicates only the file system is used for the home page cache.
ep_text_cache_level="1"
The default value of ep_text_cache_level is “1”.
● ep_text_cache_root - the root directory where the InfoExchange Portal home page cache isstored. This parameter is required when ep_text_cache_level is set to “1” or “2”.
ep_text_cache_root="/tmp"
● ep_text_cache_size - the number of text strings allowed to stay in memory. This parameteris required when ep_text_cache_level is set to “0” or “1”.
ep_text_cache_size="500"
The default value of ep_text_cache_size is “500”.
InfoExchange Portal Administrator’s Guide 179

Chapter 4 Site MaintenanceRunning InfoExchange Portal reports
You can also use the InfoExchange Portal Admin Tool to enable the home page cache or set themaximum of strings stored in memory by following these directions:
1. Select Home Page Cache from the left menu. The Home Page Cache form appears in the rightframe.
2. To set the Status of the cache, select Enabled or Disabled.
3. You may want to change the Limit of strings that can be cached. For example, if a home page hasmany blocks that rarely change, you might want to increase the home page cache to improveperformance for the site. Set the maximum number of strings that can be cached in the box tothe right of Limit.
4. To undo your changes, select the Reset button; otherwise, select the Save button to save anychanges you have made to the home page cache settings.
Any changes made through the Home Page Cache page at runtime are lost after restartingInfoExchange Portal. To make changes permanent you must edit the parameters in thebv1to1.conf file.
Running InfoExchange Portal reportsThe InfoExchange Portal comes with a series of reports that return site information and statistics. Toaccess these reports, select Reports in the left menu.
180 BroadVision, Inc

Chapter 4 Site MaintenanceRunning InfoExchange Portal reports
The Reports window contains links to the following reports:
1. List channels, programs, user templates or users which have a given qualifier value.
2. List channels and programs a given user can navigate.
3. List channels with no qualifier set.
4. List programs with no qualifier set.
5. Show all information for a given page type.
6. List user templates for a given page type.
7. List users assigned to a given user template.
8. List users who chose a given program on their home page.
This section describes how to run these reports.
List channels, programs, user templates or users which have a given qualifier value
To run this report:
1. Select “List channels, programs, user templates or users which have a given qualifier value.” Thewindow for that report appears.
2. Click Find under Select a Qualifier; a pop-up window appears in which you can view the list ofqualifiers in the service in groups of ten. To find the qualifier you want to retrieve:
a. Enter a string in the Search box to return a list of qualifiers with names that contain thesearch string, or leave the search box blank to retrieve all qualifiers. Then click Search.
Or
b. Select a letter under the Search box to retrieve all qualifiers that begin with that letter.
c. Select the radio button next to the qualifier you want to select.
d. Select the Cancel button to close the window without setting a qualifier, or select the Donebutton.
The qualifier appears in the Reports window next to the Find button, and a drop-down menuappears to the right of Qualifier Value.
3. Use the drop-down menu to select a Qualifier Value.
4. Use the Scope drop-down menu to determine whether to list Channels, Programs, UserTemplates, or Users with the specified qualifier value.
5. Select the List button to run the report.
List channels and programs a given user can navigate
To run this report:
1. Select “List channels and programs a given user can navigate.” The window for that reportappears.
2. Click the Find button under Select a User. A pop-up window appears in which you can view thelist of qualifiers in the service in groups of ten. To find a user:
InfoExchange Portal Administrator’s Guide 181

Chapter 4 Site MaintenanceRunning InfoExchange Portal reports
a. Enter all or part of the user name or login name of the visitors you want to find in the UserName box. To list all the user accounts, leave the User Name field empty.
b. Enter the maximum number of results to be returned in the Maximum Number to Find box.The search is case-sensitive.
c. To the right of Search String, select whether the Admin Tool searches for results beginningwith the string or including the string by choosing either “At beginning of login name or fullname.” or “Anywhere in login name or full name.”
d. Use the left mouse button to select one of the visitors listed.
e. Click Find.
f. Select the Done button to return to the Reports page.
The user name appears in the Reports window next to the Find button.
3. Select the List button to run the report.
The results are a list of top-level channels you can navigate to see the channels and programs thisvisitor can see.
List channels with no qualifier set
To run this report, select “List channels with no qualifier set” The results for that report appear ingroups of ten. You can edit or delete any channel listed using the [Edit] and [Delete] links,respectively, to the left of the channel name.
See “Administering channels” on page 28 for information on how to edit or delete a channel.
List programs with no qualifier set
To run this report, select “List programs with no qualifier set” The results for that report appear ingroups of ten. You can edit or delete any program listed using the [Edit] and [Delete] links,respectively, to the left of the program name.
See “Administering programs” on page 44 for information on how to edit or delete a program.
Show all information for a given page type
To run this report:
1. Select “Show all information for a given page type” The window for that report appears.
2. Use the drop-down menu to select a Page Type.
3. Select the Show button to run the report.
The results show the Page Type Name, Home Page Script, Number of Columns in Home Page, andNumber of Entries in Required Blocks, followed by a table listing the blocks that comprise the pagetype. You can edit or delete any block from the page type using the [Edit] and [Delete] links,respectively, to the left of the block name.
See “Administering home page types” on page 69 for information on how to edit or delete ahome page block.
182 BroadVision, Inc

Chapter 4 Site MaintenanceRunning InfoExchange Portal reports
List user templates for a given page type
To run this report:
1. Select “List user templates for a given page type.” The window for that report appears.
2. Use the drop-down menu to select a Page Type.
3. Select the List button to run the report.
The results are a list of user templates in groups of ten. You can edit or delete any user templatelisted using the [Edit] and [Delete] links, respectively, to the left of the user template name.
List users assigned to a given user template
To run this report:
1. Select “List users assigned to a given user template.” The window for that report appears.
2. Use the drop-down menu to select a User Template.
3. Select the List button to run the report.
The results are a list of user accounts in groups of ten. You can edit the user account settings orprofile using the [Settings] and [Profile] links, respectively, to the left of the user name.
See “Administering user accounts” on page 109 for information on how to edit a visitor’s[Settings] or [Profile].
List users who chose a given program on their home page
To run this report:
1. Select “List users who chose a given program on their home page.” The window for that reportappears.
2. Click the Find button under Select a Program. A pop-up window appears in which you can viewthe list of programs in the service. To find a program:
a. Enter all or part of the name of the program you want to find in the Program Name box. Tolist all programs, leave the Program Name field empty. The search is case-insensitive.
b. Enter the maximum number of results to be returned in the Maximum Number to Find box.
c. Use the left mouse button to select one of the programs listed.
d. Select the Done button to return to the Reports page.
The program name appears in the Reports window next to the Find button.
3. Select the List button to run the report.
The results are a list of user accounts in groups of ten. You can edit the user account settings orprofile using the [Settings] and [Profile] links, respectively, to the left of the user name.
See “Administering user accounts” on page 109 for information on how to edit a visitor’s[Settings] or [Profile].
InfoExchange Portal Administrator’s Guide 183

Chapter 4 Site MaintenanceRunning InfoExchange Portal reports
184 BroadVision, Inc
5 Command Line Utilities
This chapter describes the features and usage of command line utilities used in administeringInfoExchange Portal. The utilities discussed in this chapter are:
● “The content purge utility” on page 185
● “The bulk loader utility” on page 186
● “Qualifier cache utilities” on page 209
● “Setting qualifiers on content items in a content type” on page 210
The content purge utilityThe km_purger utility cleans up obsolete content bookmarks, such as bookmarks of visitors anduser templates, obsolete product references, and obsolete alert specs on content items. When visitorsdelete content items from a content table through the One-To-One Command Center or throughother applications, the bookmarked references to those content items become obsolete. Also, thereferences to these content items in the BV_EP_PROJ_PROD table become obsolete, and the alertspecs on these content items become obsolete.
Over time, the bookmark tables BV_KM_SUBSCRIBED and BV_KM_SUB_DEFAULTS could end upwith many obsolete content bookmarks. Also, table BV_EP_PROJ_PROD could end up with manyobsolete product references, and table BV_ALERT_SPEC could end up with many obsolete alertspecifications. Administrators can run this program to clean up the obsolete entries in these tables.
To remove entries in these tables that correspond to deleted content items, use the utility $BV1TO1/bin/km_purger. The syntax of this utility is:
% $BV1TO1/bin/km_purger [-h] service
where the -h option prints the usage message and service is the name of the service.
You can run km_purger from the UNIX command line or enter it into crontab.
For example, to remove obsolete entries in the above tables of the BV Adventech service, enter:
% $BV1TO1/bin/km_purger Adventech
It is safe to run the km_purger utility when there are no obsolete entries.
The km_purger utility does not depend on the session manager, but it does require One-To-OneEnterprise to be running.
InfoExchange Portal Administrator’s Guide 185

Chapter 5 Command Line Ut i l i t iesThe bulk loader ut i l i ty
The bulk loader utilityUse the bulk loader (km_loader) utility to load large amounts of data into InfoExchange Portal atonce. Unless you specify otherwise, km_loader flushes the cache in all running InteractionManagers after loading data.
Running the bulk loader utility
The command to use km_loader is:
$ $BV1TO1/bin/km_loader [-v] [-f] [-s start_action ] [-n actions]data_file
where:
For example, to execute only the third action in the file load.dat, the command is:
km_loader -s 3 -n 1 load.dat
To execute only the third and fourth actions in the file load.dat, the command is:
km_loader -s 3 -n 2 load.dat
To execute from the third action to the end of the file load.dat, the command is:
km_loader -s 3 load.dat
To execute only the first three actions in the file load.dat, the command is:
km_loader -n 3 load.dat
Running the km_loader utility in “fast” mode (using the -f option) causes your data to loadmore quickly because it turns off the flushing of the cache.
-v is the flag for verbose mode.
-f is the flag for “fast” mode; use only when the Interaction Manager is down.Running km_loader with this option turns off the flushing of the cache.
start_action is an integer with value one or greater that specifies the action in the data file wherekm_loader starts to execute. For value N, km_loader skips the first N-1 actions inthe data file and starts executing from the Nth action. If the -n option is notpresent, km_loader executes actions to the end of the file.
actions is an integer with value 1 or greater that specifies the number of actions to execute.For value N, km_loader starts from where the -s option specifies (if present) orfrom the first action in the data file until N actions are executed or the end of thedata file is reached, whichever comes first.
data_file is the name of the file containing the actions and data.
186 BroadVision, Inc

Chapter 5 Command Line Ut i l i t iesThe bulk loader ut i l i ty
CAUTION If you are using a non-English character set, make sure you use the same character setused by One-To-One Enterprise when preparing the data for InfoExchange Portal. Usingdifferent character sets causes errors.
Formatting the bulk loader utility data file
The data file for km_loader consists of a sequence of actions. Each of these actions has an actionkeyword followed by one or more parameters in the format:
action parameter parameter parameter ...
The number of parameters varies depending on the action.
Lines starting with ‘#’ are considered comments and are ignored; space, newline, and tab areseparators.
Quoted strings are strings that must be enclosed in double quotes (as opposed to single quotes).
For an example of a bulk loader data file, see:
$BV1TO1/erm_app/examples/adventech_data/kwa_obj/km_load_kwa_obj.dat.
Actions supported by the bulk loader utility
The following actions are supported by km_loader:
AddBlock AddChannel
AddPageType AddProgram
AddProgramType AddQualifierValues
AddQualValsToChannel AddQualValsToContent
AddQualValsToProgram AddQualValsToUser
AddQualValsToUserTemplate AddUserTemplate
BookmarkChannels BookmarkContents
BookmarkPrograms DeleteBlock
DeleteChannel DeletePageType
DeleteProgram DeleteProgramType
DeleteQualifier DeleteUserTemplate
RemoveQualifierFromChannel RemoveQualifierFromContent
RemoveQualifierFromProgram RemoveQualifierFromUser
RemoveQualifierFromUserTemplate RemoveQualValsFromChannel
RemoveQualValsFromContent RemoveQualValsFromProgram
RemoveQualValsFromUser RemoveQualValsFromUserTemplate
SetDefaultBookmarkedChannels SetDefaultBookmarkedContents
SetDefaultBookmarkedPrograms SetParentChannelsForProgram
SetProgramOrder SetQualifier
SetQualValsForChannel SetQualValsForContent
InfoExchange Portal Administrator’s Guide 187

Chapter 5 Command Line Ut i l i t iesThe bulk loader ut i l i ty
This section describes the syntax and use of these actions.
AddBlock
Defines a new block.
Syntax AddBlock service block_name block_type page_type_name ’{’ program program... program ’}’
AddChannel
Adds a channel.
Syntax AddChannel service channel_name status description parent_channel_pathchannel_manager_name channel_manager_email channel_page_typechannel_page_path
SetQualValsForProgram SetQualValsForUser
SetQualValsForUserTemplate UnbookmarkChannels
UnbookmarkContents UnbookmarkPrograms
Parameter Description
service quoted string
block_name quoted string
block type quoted string; either “REQUIRED”, “OPTIONAL”, or “DEFAULT”
page_type_name quoted string; name of the page type to which the block belongs
program quoted string; program name
Parameter Description
service quoted string
channel_name quoted string
status quoted string; either “ONLINE” or “OFFLINE”
description quoted string
parent_channel_path quoted string; full path, “ “ indicates no parent channel
channel_manager_name quoted string
channel_manager_email quoted string
channel_page_type quoted string; either “SCRIPT” or “URL”
channel_page_path quoted string
188 BroadVision, Inc
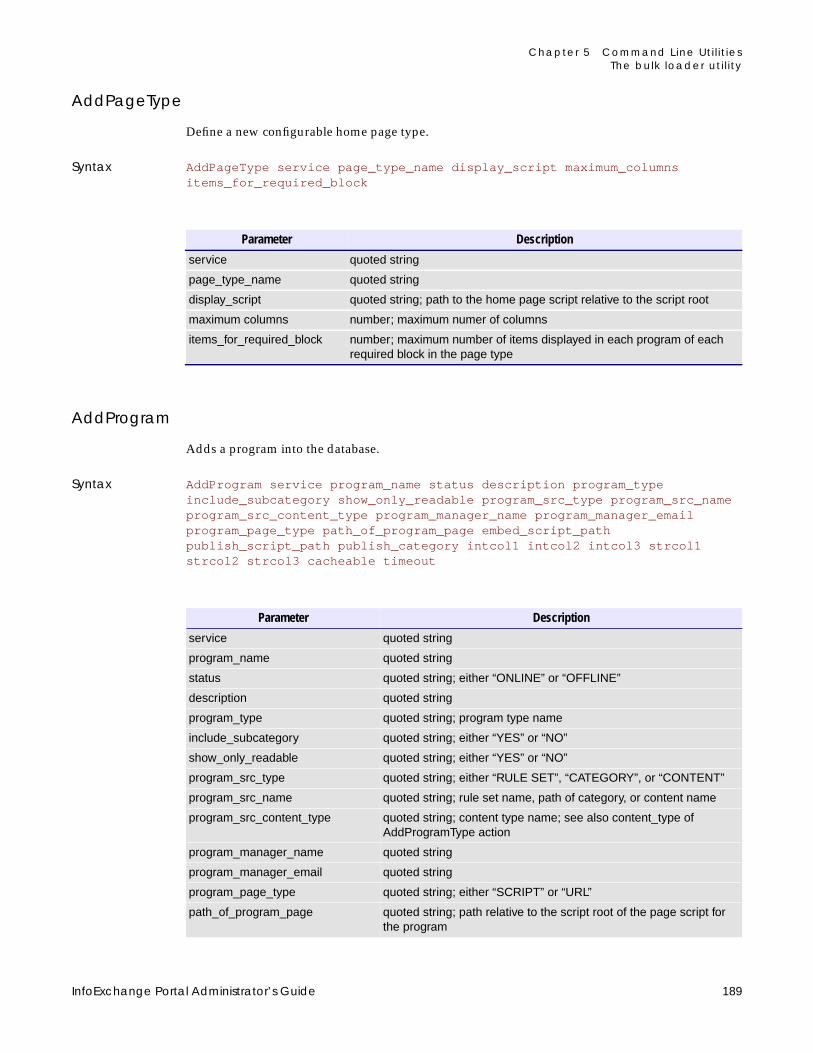
Chapter 5 Command Line Ut i l i t iesThe bulk loader ut i l i ty
AddPageType
Define a new configurable home page type.
Syntax AddPageType service page_type_name display_script maximum_columnsitems_for_required_block
AddProgram
Adds a program into the database.
Syntax AddProgram service program_name status description program_typeinclude_subcategory show_only_readable program_src_type program_src_nameprogram_src_content_type program_manager_name program_manager_emailprogram_page_type path_of_program_page embed_script_pathpublish_script_path publish_category intcol1 intcol2 intcol3 strcol1strcol2 strcol3 cacheable timeout
Parameter Description
service quoted string
page_type_name quoted string
display_script quoted string; path to the home page script relative to the script root
maximum columns number; maximum numer of columns
items_for_required_block number; maximum number of items displayed in each program of eachrequired block in the page type
Parameter Description
service quoted string
program_name quoted string
status quoted string; either “ONLINE” or “OFFLINE”
description quoted string
program_type quoted string; program type name
include_subcategory quoted string; either “YES” or “NO”
show_only_readable quoted string; either “YES” or “NO”
program_src_type quoted string; either “RULE SET”, “CATEGORY”, or “CONTENT”
program_src_name quoted string; rule set name, path of category, or content name
program_src_content_type quoted string; content type name; see also content_type ofAddProgramType action
program_manager_name quoted string
program_manager_email quoted string
program_page_type quoted string; either “SCRIPT” or “URL”
path_of_program_page quoted string; path relative to the script root of the page script forthe program
InfoExchange Portal Administrator’s Guide 189
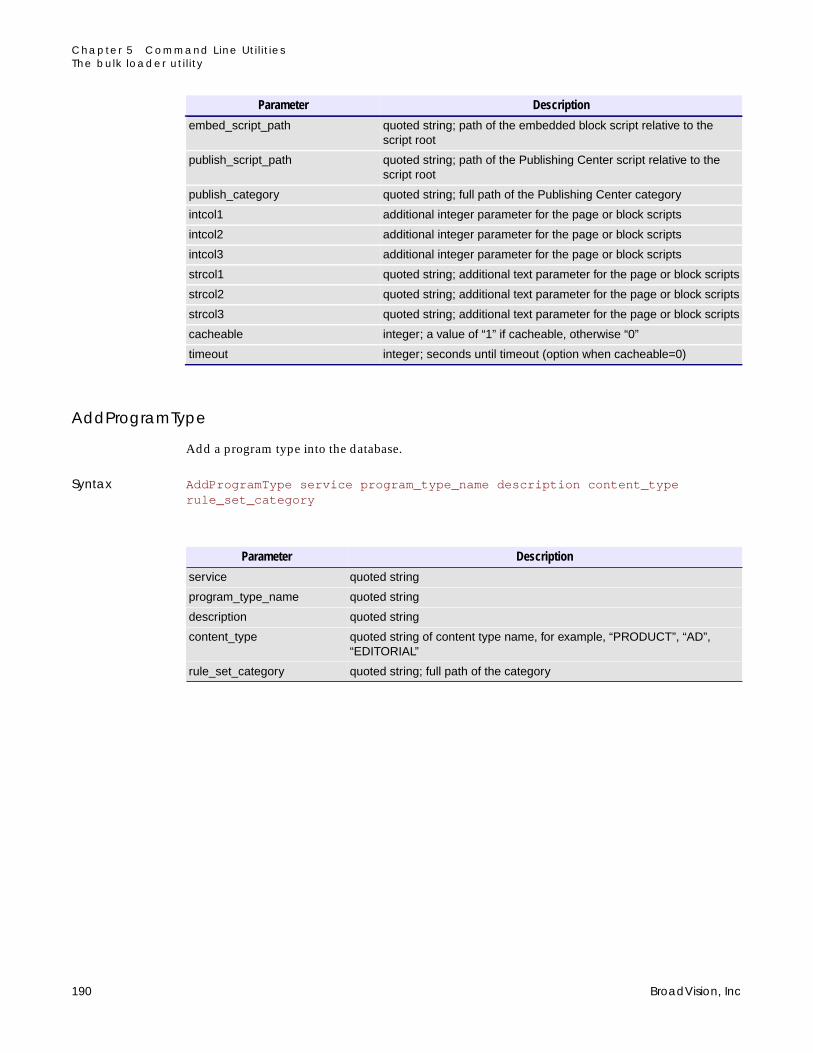
Chapter 5 Command Line Ut i l i t iesThe bulk loader ut i l i ty
AddProgramType
Add a program type into the database.
Syntax AddProgramType service program_type_name description content_typerule_set_category
embed_script_path quoted string; path of the embedded block script relative to thescript root
publish_script_path quoted string; path of the Publishing Center script relative to thescript root
publish_category quoted string; full path of the Publishing Center category
intcol1 additional integer parameter for the page or block scripts
intcol2 additional integer parameter for the page or block scripts
intcol3 additional integer parameter for the page or block scripts
strcol1 quoted string; additional text parameter for the page or block scripts
strcol2 quoted string; additional text parameter for the page or block scripts
strcol3 quoted string; additional text parameter for the page or block scripts
cacheable integer; a value of “1” if cacheable, otherwise “0”
timeout integer; seconds until timeout (option when cacheable=0)
Parameter Description
Parameter Description
service quoted string
program_type_name quoted string
description quoted string
content_type quoted string of content type name, for example, “PRODUCT”, “AD”,“EDITORIAL”
rule_set_category quoted string; full path of the category
190 BroadVision, Inc
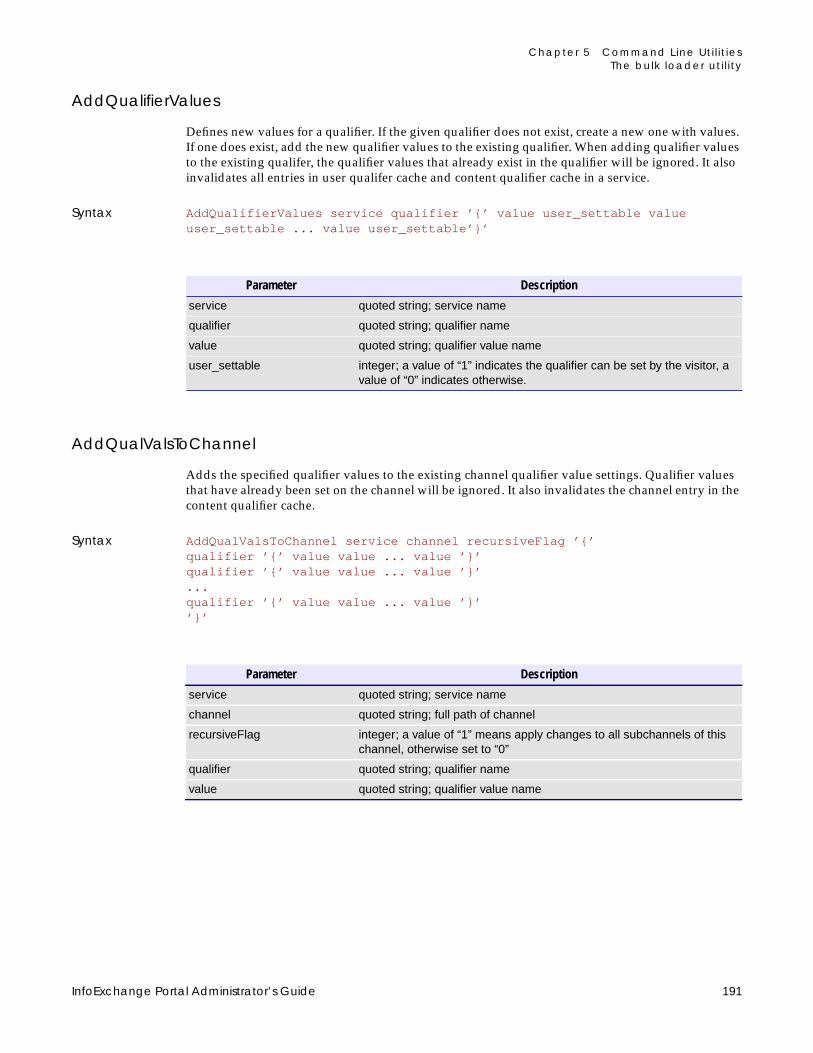
Chapter 5 Command Line Ut i l i t iesThe bulk loader ut i l i ty
AddQualifierValues
Defines new values for a qualifier. If the given qualifier does not exist, create a new one with values.If one does exist, add the new qualifier values to the existing qualifier. When adding qualifier valuesto the existing qualifer, the qualifier values that already exist in the qualifier will be ignored. It alsoinvalidates all entries in user qualifer cache and content qualifier cache in a service.
Syntax AddQualifierValues service qualifier ’{’ value user_settable valueuser_settable ... value user_settable’}’
AddQualValsToChannel
Adds the specified qualifier values to the existing channel qualifier value settings. Qualifier valuesthat have already been set on the channel will be ignored. It also invalidates the channel entry in thecontent qualifier cache.
Syntax AddQualValsToChannel service channel recursiveFlag ’{’qualifier ’{’ value value ... value ’}’qualifier ’{’ value value ... value ’}’...qualifier ’{’ value value ... value ’}’’}’
Parameter Description
service quoted string; service name
qualifier quoted string; qualifier name
value quoted string; qualifier value name
user_settable integer; a value of “1” indicates the qualifier can be set by the visitor, avalue of “0” indicates otherwise.
Parameter Description
service quoted string; service name
channel quoted string; full path of channel
recursiveFlag integer; a value of “1” means apply changes to all subchannels of thischannel, otherwise set to “0”
qualifier quoted string; qualifier name
value quoted string; qualifier value name
InfoExchange Portal Administrator’s Guide 191

Chapter 5 Command Line Ut i l i t iesThe bulk loader ut i l i ty
AddQualValsToContent
Adds the specified qualifier values to the existing qualifier value settings for the content item.Qualifier values that have already been set on the content item will be ignored. It also invalidates thecontent item entry in the content qualifier cache.
Syntax AddQualValsToContent service content_type content_name ’{’qualifier ’{’ value value ... value ’}’qualifier ’{’ value value ... value ’}’...qualifier ’{’ value value ... value ’}’’}’
AddQualValsToProgram
Adds the specified qualifier values to the existing qualifier value settings of the program. Qualifiervalues that have already been set on the program will be ignored. It also invalidates the programentry in the content qualifier cache.
Syntax AddQualValsToProgram service program ’{’qualifier ’{’ value value ... value ’}’qualifier ’{’ value value ... value ’}’...qualifier ’{’ value value ... value ’}’’}’
Parameter Description
service quoted string; service name
content_type quoted string; content type name. See “AddProgramType” for a list ofvalid content types.
content_name quoted string; content name
qualifier quoted string; qualifier name
value quoted string; qualifier value name
Parameter Description
service quoted string; service name
program quoted string; program name
qualifier quoted string; qualifier name
value quoted string; qualifier value name
192 BroadVision, Inc

Chapter 5 Command Line Ut i l i t iesThe bulk loader ut i l i ty
AddQualValsToUser
Adds the specified qualifer values to the user’s existing qualifier value settings. Qualifier values thathave already been set on the user will be ignored. It also invalidates the user entry in the userqualifier cache.
Syntax AddQualValsToUser service user ’{’qualifier ’{’ value value ... value ’}’qualifier ’{’ value value ... value ’}’...qualifier ’{’ value value ... value ’}’’}’
AddQualValsToUserTemplate
Adds the specified qualifer values to the existing qualifier value settings for the user template.Qualifier values that have already been set on the user template will be ignored. It also invalidatesthe user template entry in the content qualifier cache.
Syntax AddQualValsToUserTemplate service user_template ’{’qualifier ’{’ value value ... value ’}’qualifier ’{’ value value ... value ’}’...qualifier ’{’ value value ... value ’}’’}’
Parameter Description
service quoted string; service name
user quoted string; user name
qualifier quoted string; qualifier name
value quoted string; qualifier value name
Parameter Description
service quoted string; service name
user_template quoted string; user template name
qualifier quoted string; qualifier name
value quoted string; qualifier value name
InfoExchange Portal Administrator’s Guide 193
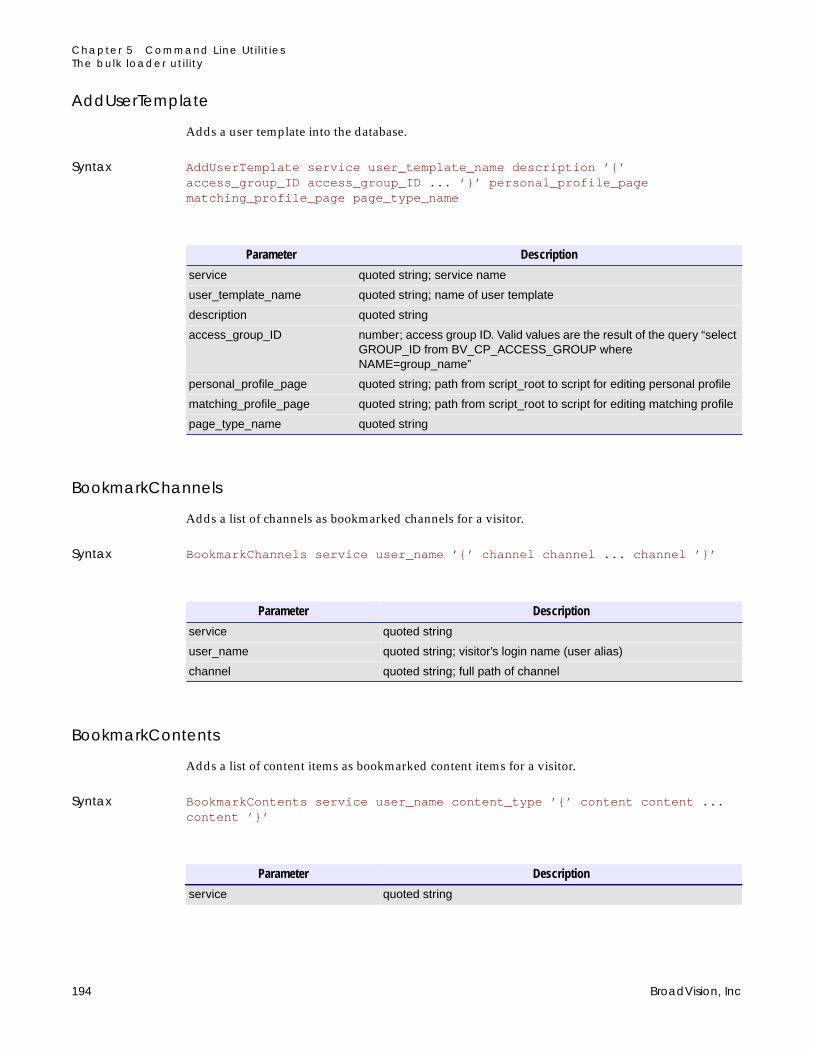
Chapter 5 Command Line Ut i l i t iesThe bulk loader ut i l i ty
AddUserTemplate
Adds a user template into the database.
Syntax AddUserTemplate service user_template_name description ’{’access_group_ID access_group_ID ... ’}’ personal_profile_pagematching_profile_page page_type_name
BookmarkChannels
Adds a list of channels as bookmarked channels for a visitor.
Syntax BookmarkChannels service user_name ’{’ channel channel ... channel ’}’
BookmarkContents
Adds a list of content items as bookmarked content items for a visitor.
Syntax BookmarkContents service user_name content_type ’{’ content content ...content ’}’
Parameter Description
service quoted string; service name
user_template_name quoted string; name of user template
description quoted string
access_group_ID number; access group ID. Valid values are the result of the query “selectGROUP_ID from BV_CP_ACCESS_GROUP whereNAME=group_name”
personal_profile_page quoted string; path from script_root to script for editing personal profile
matching_profile_page quoted string; path from script_root to script for editing matching profile
page_type_name quoted string
Parameter Description
service quoted string
user_name quoted string; visitor’s login name (user alias)
channel quoted string; full path of channel
Parameter Description
service quoted string
194 BroadVision, Inc

Chapter 5 Command Line Ut i l i t iesThe bulk loader ut i l i ty
BookmarkPrograms
Adds a list of programs as bookmarked programs for a visitor.
Syntax BookmarkPrograms service user_name ’{’ program program ... program ’}’
DeleteBlock
Deletes a block from a page type. This action also removes all references to this block in the userprofile tables.
Syntax DeleteBlock service block_name page_type_name
DeleteChannel
Deletes a channel and its subchannels in a service.
Syntax DeleteChannel service channel_name
user_name quoted string; visitor’s login name
content_type quoted string; content type namesee AddProgramType for valid content type names
content quoted string; content name (key)
Parameter Description
Parameter Description
service quoted string
user_name quoted string; visitor’s login name
program quoted string; program name
Parameter Description
service quoted string
block_name quoted string
page_type_name quoted string; name of the page type containing the block
Parameter Description
service quoted string
channel_name quoted string; full path
InfoExchange Portal Administrator’s Guide 195

Chapter 5 Command Line Ut i l i t iesThe bulk loader ut i l i ty
DeletePageType
Deletes a configurable home page type. This action also deletes all the blocks of this page type andcleans up references to these blocks in the user profile tables. This action fails when the page type tobe deleted is in use.
Syntax DeletePageType service page_type_name
DeleteProgram
Deletes a program in a service.
Syntax DeleteProgram service program_name
DeleteProgramType
Deletes a program type in a service. This action fails when the program type to be deleted is in use.
Syntax DeleteProgramType service program_type_name
Parameter Description
service quoted string
page_type_name quoted string
Parameter Description
service quoted string
program_name quoted string
Parameter Description
service quoted string
program_type_name quoted string
196 BroadVision, Inc

Chapter 5 Command Line Ut i l i t iesThe bulk loader ut i l i ty
DeleteQualifier
Deletes a qualifier in a service. It also cleans up references to the qualifier from channels, programs,visitors, user templates, and content items.
Syntax DeleteQualifier service qualifier
DeleteUserTemplate
Deletes a user template in a service. This action fails when the user template to be deleted is in use.
Syntax DeleteUserTemplate service user_template_name
RemoveQualifierFromChannel
Removes the specified qualifier from the channel's qualifier value settings. Qualifiers not set on thechannel are ignored. This function also invalidates the channel's entry in the content qualifiercache.
Syntax RemoveQualifierFromChannel service channel qualifier recursive_flag
Parameter Description
service quoted string; service name
qualifier quoted string; qualifier name
Parameter Description
service quoted string
user_template_name quoted string
Parameter Description
service quoted string; service name.
channel quoted string; full path.
qualifier quoted string; qualifier name.
recursive_flag either “1” to have the changes apply all subchannels of the specifiedchannel, or “0” to only have the changes apply to the parent channel.
InfoExchange Portal Administrator’s Guide 197

Chapter 5 Command Line Ut i l i t iesThe bulk loader ut i l i ty
RemoveQualifierFromContent
Removes the specified qualifier from the content item’s qualifier value settings. Qualifiers not set onthe content item are ignored. This function also invalidates the content item’s entry in the contentqualifier cache.
Syntax RemoveQualifierFromContent service content_type content_name qualifier
RemoveQualifierFromProgram
Removes the specified qualifier from the program’s qualifier value settings. Qualifiers not set on theprogram are ignored. This function also invalidates the program’s entry in the content qualifiercache.
Syntax RemoveQualifierFromProgram service program qualifier
RemoveQualifierFromUser
Removes the specified qualifier from the user’s qualifier settings. Qualifiers not set on the user areignored. This function also invalidates the user account’s entry in the content qualifier cache.
Syntax RemoveQualifierFromUser service user qualifier
Parameter Description
service quoted string; service name
content_type quoted string; content type name. See “AddProgramType” for a list ofvalid content types.
content_name quoted string; content name
qualifier quoted string; qualifier name
Parameter Description
service quoted string; service name
program quoted string; program name
qualifier quoted string; qualifier name
Parameter Description
service quoted string; service name
user quoted string; user name
qualifier quoted string; qualifier name
198 BroadVision, Inc

Chapter 5 Command Line Ut i l i t iesThe bulk loader ut i l i ty
RemoveQualifierFromUserTemplate
Removes the specified qualifier from the user template’s qualifier settings. Qualifiers not set on theuser template are ignored. This function also invalidates the user template’s entry in the contentqualifier cache.
Syntax RemoveQualifierFromUserTemplate service user_template qualifier
RemoveQualValsFromChannel
Removes the specified qualifier values from the channel's qualifier value settings. Qualifier valuesnot set on the channel are ignored. This function also invalidates the channel's entry in the contentqualifier cache.
Syntax RemoveQualValsFromChannel service channel recursive_flag ’{’qualifier ’{’ value value ... value ’}’qualifier ’{’ value value ... value ’}’...qualifier ’{’ value value ... value ’}’’}’
Parameter Description
service quoted string; service name
user_template quoted string; user template name
qualifier quoted string; qualifier name
Parameter Description
service quoted string; service name.
channel quoted string; full path.
recursive_flag either “1” to have the changes apply all subchannels of the specifiedchannel, or “0” to only have the changes apply to the parent channel.
qualifier quoted string; qualifier name.
value quoted string; qualifier value name.
InfoExchange Portal Administrator’s Guide 199

Chapter 5 Command Line Ut i l i t iesThe bulk loader ut i l i ty
RemoveQualValsFromContent
Removes the specified qualifier values from the content item’s qualifier value settings. Qualifiervalues not set on the content item are ignored. This function also invalidates the content item’sentry in the content qualifier cache.
RemoveQualValsFromContent service content_type content_name ’{’qualifier ’{’ value value ... value ’}’qualifier ’{’ value value ... value ’}’...qualifier ’{’ value value ... value ’}’’}’
RemoveQualValsFromProgram
Removes the specified qualifier values from the program’s qualifier value settings. Qualifier valuesnot set on the program are ignored. This function also invalidates the program’s entry in thecontent qualifier cache.
Syntax RemoveQualValsFromProgram service program ’{’qualifier ’{’ value value ... value ’}’qualifier ’{’ value value ... value ’}’...qualifier ’{’ value value ... value ’}’’}’
RemoveQualValsFromUser
Removes the specified qualifier values from the user’s qualifier value settings. Qualifier values notset on the user are ignored. This function also invalidates the user account’s entry in the contentqualifier cache.
Parameter Description
service quoted string; service name
content_type quoted string; content type name. See “AddProgramType” for a list ofvalid content types.
content_name quoted string; content name
qualifier quoted string; qualifier name
value quoted string; qualifier value name
Parameter Description
service quoted string; service name
program quoted string; program name
qualifier quoted string; qualifier name
value quoted string; qualifier value name
200 BroadVision, Inc
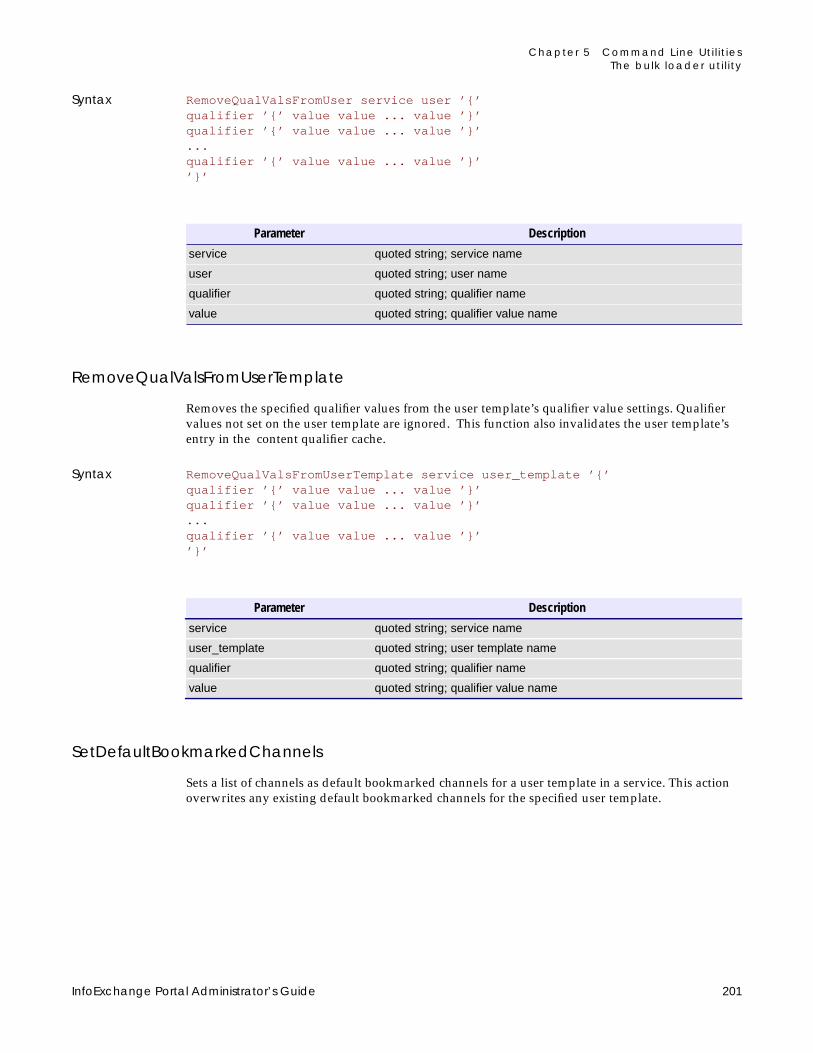
Chapter 5 Command Line Ut i l i t iesThe bulk loader ut i l i ty
Syntax RemoveQualValsFromUser service user ’{’qualifier ’{’ value value ... value ’}’qualifier ’{’ value value ... value ’}’...qualifier ’{’ value value ... value ’}’’}’
RemoveQualValsFromUserTemplate
Removes the specified qualifier values from the user template’s qualifier value settings. Qualifiervalues not set on the user template are ignored. This function also invalidates the user template’sentry in the content qualifier cache.
Syntax RemoveQualValsFromUserTemplate service user_template ’{’qualifier ’{’ value value ... value ’}’qualifier ’{’ value value ... value ’}’...qualifier ’{’ value value ... value ’}’’}’
SetDefaultBookmarkedChannels
Sets a list of channels as default bookmarked channels for a user template in a service. This actionoverwrites any existing default bookmarked channels for the specified user template.
Parameter Description
service quoted string; service name
user quoted string; user name
qualifier quoted string; qualifier name
value quoted string; qualifier value name
Parameter Description
service quoted string; service name
user_template quoted string; user template name
qualifier quoted string; qualifier name
value quoted string; qualifier value name
InfoExchange Portal Administrator’s Guide 201
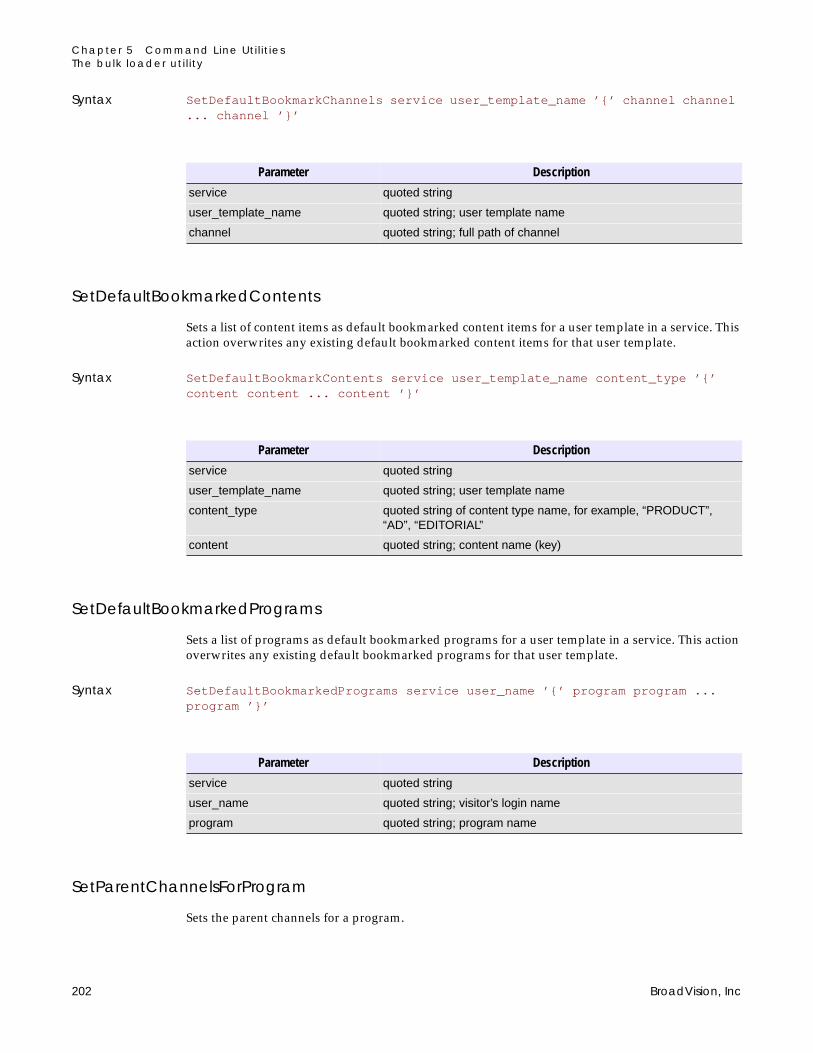
Chapter 5 Command Line Ut i l i t iesThe bulk loader ut i l i ty
Syntax SetDefaultBookmarkChannels service user_template_name ’{’ channel channel... channel ’}’
SetDefaultBookmarkedContents
Sets a list of content items as default bookmarked content items for a user template in a service. Thisaction overwrites any existing default bookmarked content items for that user template.
Syntax SetDefaultBookmarkContents service user_template_name content_type ’{’content content ... content ’}’
SetDefaultBookmarkedPrograms
Sets a list of programs as default bookmarked programs for a user template in a service. This actionoverwrites any existing default bookmarked programs for that user template.
Syntax SetDefaultBookmarkedPrograms service user_name ’{’ program program ...program ’}’
SetParentChannelsForProgram
Sets the parent channels for a program.
Parameter Description
service quoted string
user_template_name quoted string; user template name
channel quoted string; full path of channel
Parameter Description
service quoted string
user_template_name quoted string; user template name
content_type quoted string of content type name, for example, “PRODUCT”,“AD”, “EDITORIAL”
content quoted string; content name (key)
Parameter Description
service quoted string
user_name quoted string; visitor’s login name
program quoted string; program name
202 BroadVision, Inc

Chapter 5 Command Line Ut i l i t iesThe bulk loader ut i l i ty
Syntax SetParentChannelsForProgram service program_name ’{’ parent_channelparent_channel ... ’}’
SetProgramOrder
Sets the display order of a program in a channel.
Syntax SetProgramOrder service program_name parent_channel display_order
SetQualifier
Sets the values of a qualifier. If the named qualifier exists, the existing one is replaced with the newdata and all references to the qualifier values of the old qualifier are removed from all channels,programs, user accounts, user templates, and content items. If the named qualifier does not exist, anew qualifier is created.
Syntax SetQualifier service qualifier_name ’{’ value user_settable valueuser_settable ... value user_settable’}’
Parameter Description
service quoted string
program_name quoted string
parent_channel quoted string; full path
Parameter Description
service quoted string
program_name quoted string
parent_channel quoted string; full path
display_order numeric value; starts at 1
Parameter Description
service quoted string
qualifier_name quoted string
editable whether editable by the visitor; “YES” or “NO”
value quoted string; qualifier value name
user_settable integer; a value of “1” indicates the qualifier can be set by the visitor,a value of “0” indicates otherwise.
InfoExchange Portal Administrator’s Guide 203
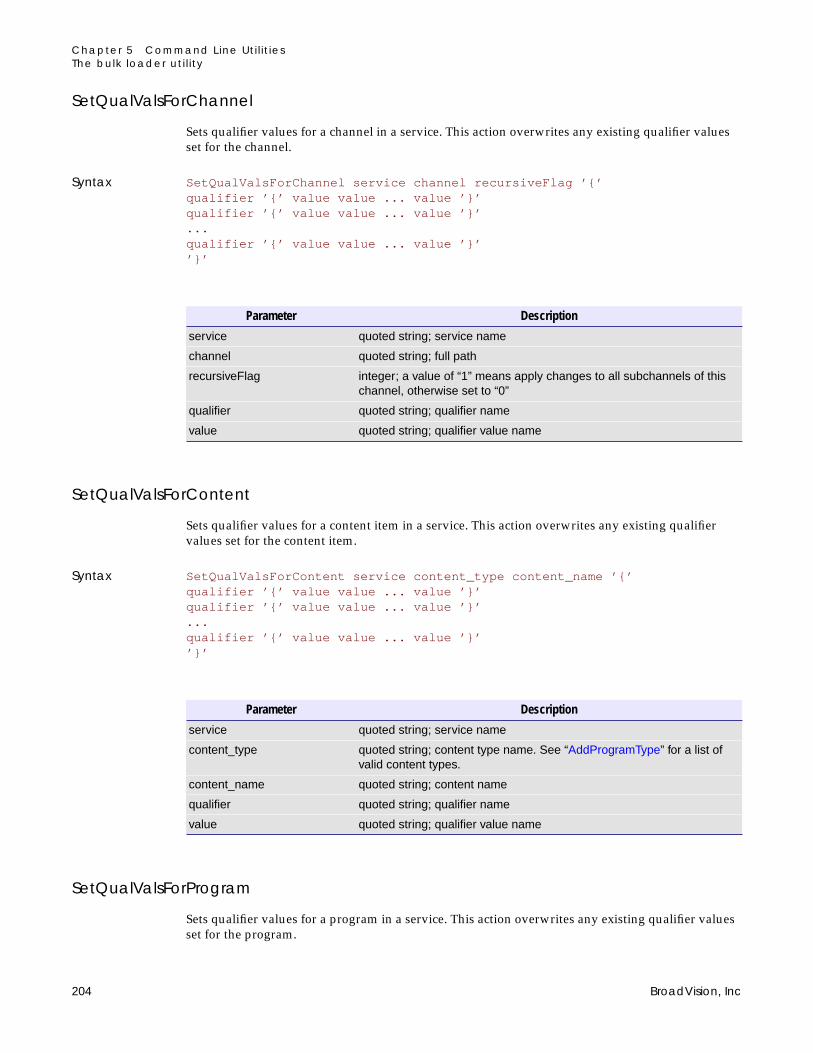
Chapter 5 Command Line Ut i l i t iesThe bulk loader ut i l i ty
SetQualValsForChannel
Sets qualifier values for a channel in a service. This action overwrites any existing qualifier valuesset for the channel.
Syntax SetQualValsForChannel service channel recursiveFlag ’{’qualifier ’{’ value value ... value ’}’qualifier ’{’ value value ... value ’}’...qualifier ’{’ value value ... value ’}’’}’
SetQualValsForContent
Sets qualifier values for a content item in a service. This action overwrites any existing qualifiervalues set for the content item.
Syntax SetQualValsForContent service content_type content_name ’{’qualifier ’{’ value value ... value ’}’qualifier ’{’ value value ... value ’}’...qualifier ’{’ value value ... value ’}’’}’
SetQualValsForProgram
Sets qualifier values for a program in a service. This action overwrites any existing qualifier valuesset for the program.
Parameter Description
service quoted string; service name
channel quoted string; full path
recursiveFlag integer; a value of “1” means apply changes to all subchannels of thischannel, otherwise set to “0”
qualifier quoted string; qualifier name
value quoted string; qualifier value name
Parameter Description
service quoted string; service name
content_type quoted string; content type name. See “AddProgramType” for a list ofvalid content types.
content_name quoted string; content name
qualifier quoted string; qualifier name
value quoted string; qualifier value name
204 BroadVision, Inc

Chapter 5 Command Line Ut i l i t iesThe bulk loader ut i l i ty
Syntax SetQualValsForProgram service program ’{’qualifier ’{’ value value ... value ’}’qualifier ’{’ value value ... value ’}’...qualifier ’{’ value value ... value ’}’’}’
SetQualValsForUser
Sets qualifier values for a user account in a service. This action overwrites any existing qualifiervalues set for the user account.
Syntax SetQualValsForUser service user ’{’qualifier ’{’ value value ... value ’}’qualifier ’{’ value value ... value ’}’...qualifier ’{’ value value ... value ’}’’}’
Parameter Description
service quoted string; service name
program quoted string; program name
qualifier quoted string; qualifier name
value quoted string; qualifier value name
Parameter Description
service quoted string; service name
user quoted string; visitor’s login name
qualifier quoted string; qualifier name
value quoted string; qualifier value name
InfoExchange Portal Administrator’s Guide 205
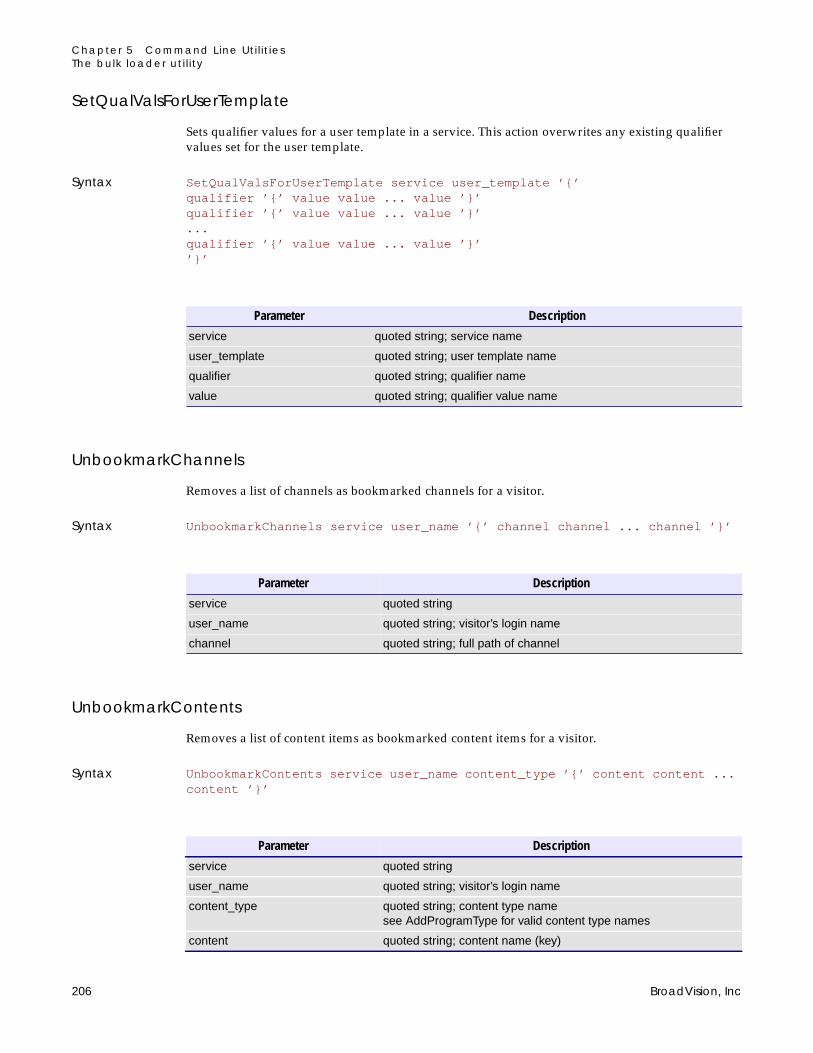
Chapter 5 Command Line Ut i l i t iesThe bulk loader ut i l i ty
SetQualValsForUserTemplate
Sets qualifier values for a user template in a service. This action overwrites any existing qualifiervalues set for the user template.
Syntax SetQualValsForUserTemplate service user_template ’{’qualifier ’{’ value value ... value ’}’qualifier ’{’ value value ... value ’}’...qualifier ’{’ value value ... value ’}’’}’
UnbookmarkChannels
Removes a list of channels as bookmarked channels for a visitor.
Syntax UnbookmarkChannels service user_name ’{’ channel channel ... channel ’}’
UnbookmarkContents
Removes a list of content items as bookmarked content items for a visitor.
Syntax UnbookmarkContents service user_name content_type ’{’ content content ...content ’}’
Parameter Description
service quoted string; service name
user_template quoted string; user template name
qualifier quoted string; qualifier name
value quoted string; qualifier value name
Parameter Description
service quoted string
user_name quoted string; visitor’s login name
channel quoted string; full path of channel
Parameter Description
service quoted string
user_name quoted string; visitor’s login name
content_type quoted string; content type namesee AddProgramType for valid content type names
content quoted string; content name (key)
206 BroadVision, Inc

Chapter 5 Command Line Ut i l i t iesThe bulk loader ut i l i ty
UnbookmarkPrograms
Removes a list of programs as bookmarked programs for a visitor.
Syntax UnbookmarkPrograms service user_name ’{’ program program ... program ’}’
Parameter Description
service quoted string
user_name quoted string; visitor’s login name
program quoted string; program name
InfoExchange Portal Administrator’s Guide 207
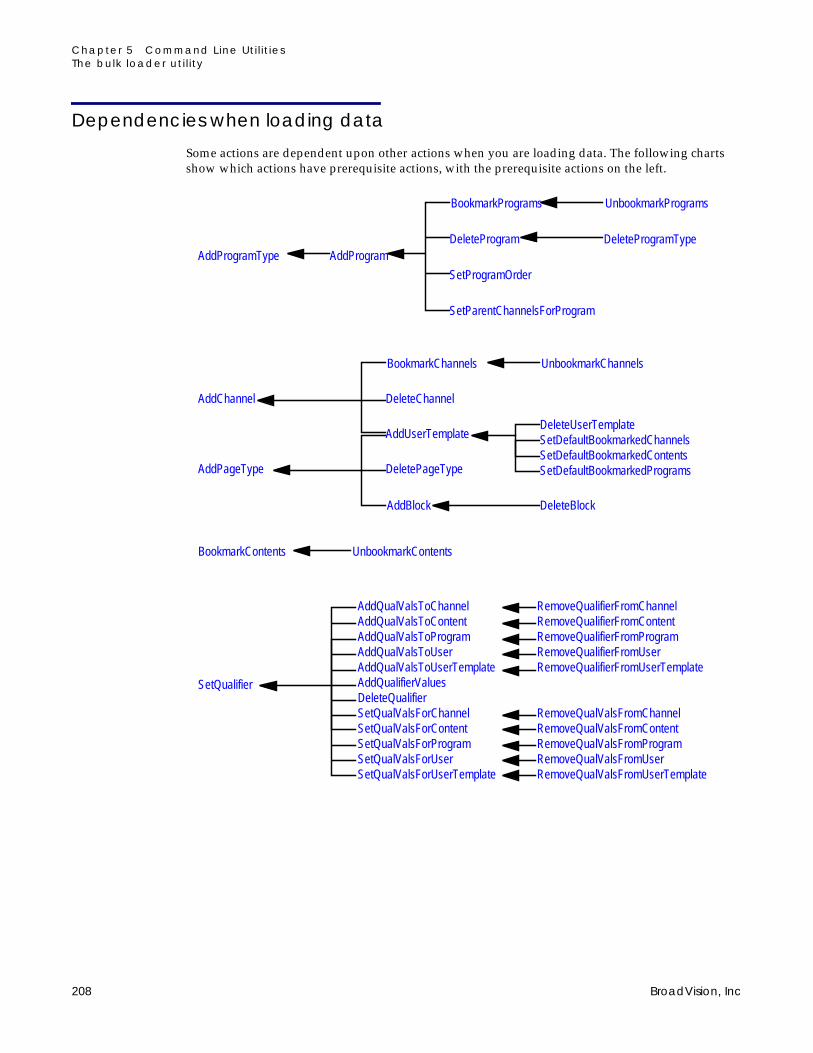
Chapter 5 Command Line Ut i l i t iesThe bulk loader ut i l i ty
Dependencies when loading data
Some actions are dependent upon other actions when you are loading data. The following chartsshow which actions have prerequisite actions, with the prerequisite actions on the left.
AddProgramType AddProgram
BookmarkPrograms
SetParentChannelsForProgram
DeleteProgram
SetProgramOrder
UnbookmarkPrograms
DeleteProgramType
AddChannel
BookmarkChannels
DeletePageType
DeleteChannel
AddUserTemplate
UnbookmarkChannels
AddPageType
AddBlock
DeleteUserTemplateSetDefaultBookmarkedChannelsSetDefaultBookmarkedContentsSetDefaultBookmarkedPrograms
DeleteBlock
BookmarkContents UnbookmarkContents
SetQualifier
AddQualValsToChannelAddQualValsToContentAddQualValsToProgramAddQualValsToUserAddQualValsToUserTemplateAddQualifierValuesDeleteQualifierSetQualValsForChannelSetQualValsForContentSetQualValsForProgramSetQualValsForUserSetQualValsForUserTemplate
RemoveQualifierFromChannelRemoveQualifierFromContentRemoveQualifierFromProgramRemoveQualifierFromUserRemoveQualifierFromUserTemplate
RemoveQualValsFromChannelRemoveQualValsFromContentRemoveQualValsFromProgramRemoveQualValsFromUserRemoveQualValsFromUserTemplate
208 BroadVision, Inc

Chapter 5 Command Line Ut i l i t iesQual i f ier cache ut i l i t ies
Qualifier cache utilitiesInfoExchange Portal comes with two sample JavaScript files located in the directory $BV1TO1/knowledge/admin/scripts that dump the qualifier caches, including the filter cache (dump.js)and load the qualifier caches, including filter cache (load.js). You can use the cache warmuputility that ships with One-To-One Enterprise samples to run these scripts. TheBVI_ContentManager::dumpcache method is described in the BroadVision One-To-OneEnterprise Application Programmer’s Reference.
One-To-One Enterprise includes a set of sample scripts for using dumpcache() andcachewarmup(). The sample scripts and a README file are located in:
$BV1TO1/samples/cache_warmup
Follow the directions in the README file in $BV1TO1/samples/cache_warmup but replace theload.js and dump.js files with the ones from $BV1TO1/knowledge/admin/scripts.
If you have a large, high traffic site, dumping the qualifier caches to a file before shutting down theIMs, and loading qualifier caches from a file after bringing up the IMs will improve the performancewhen navigating through channels, programs, and content.
You must have the System_Admin role to run these scripts. See the Content, Profiles andPersonalization chapter in the BroadVision One-To-One Enterprise Overview for information aboutvisitor roles.
Dumping the qualifier cache to a file
InfoExchange Portal caches qualifiers for channels, programs, and content as visitors navigate thesite and view channels, programs, and content. While running the Interaction Manager, theOne-To-One Enterprise system administrator can use the command line utility cwarmup to save theIDs of the items in the cache to a dump file.
To dump the data in the qualifier cache to a file, enter:
cwarmup download -dump path-script $BV1TO1/knowledge/admin/scripts/dump.js-user iepadmin [-application appName] [-service serviceName>
where:
Loading the qualifier cache from a file
The next time the Interaction Manager is shutdown and then restarted, the One-To-One Enterprisesystem administrator can use the cwarmup utility to load the qualifier caches (including the filtercache) using the IDs in the dump file.
path The path to a file where the dumped data will be stored.
appName The IM application name.
serviceName Name of the current service. For example, Adventech.
InfoExchange Portal Administrator’s Guide 209

Chapter 5 Command Line Ut i l i t iesSett ing qual i f iers on content i tems in a content type
To load the qualifier cache from a file that was created by the cwarmup download script, enter:
cwarmup upload-script $BV1TO1/knowledge/admin/scripts/load.js-dump path -user iepadmin [-application appName]
where:
Setting qualifiers on content items in a content typeTo configure your site so you can set qualifiers on content items in a content type, you must do thefollowing:
1. Add your content type to the end of the parameter ep_filter_enabled_cnt_types in thebv1to1.conf file. For example:
ep_filter_enabled_cnt_types="EDITORIAL, PRODUCT, EP_LEAD"
2. Run the utility add_qv_list_table located in the dbschema directory. The syntax is:
add_qv_list_table service content_type content_name
where:
For example:
add_qv_list_table “ALL_STORE” 308 “EP_LEAD”
3. If the Interaction Manager and One-To-One Enterprise servers are running, shut them downand restart them for the configuration changes to take effect.
% $BV1TO1/bin/imgr_conf -a stop% $BV1TO1/bin/bvconf shutdown% $BV1TO1/bin/bvconf execute% $BV1TO1/bin/imgr_conf -a start
path The path to a file where the dumped data will be stored.
appName The IM application name.
service Service name if the content type is service-specific, otherwise itmust be set to ALL_STORE.
cnt_type Content type ID, for example, “2” for EDITORIAL or “301” forKM_PROGRAM.
cnt_name Content type name, for example, ”EDITORIAL” or“KM_PROGRAM”.
210 BroadVision, Inc

6 Getting Technical Support
Technical Support services are provided on an annual basis to BroadVision customers. A standard90-day warranty is also provided with all software.
If you experience problems in using any of BroadVision’s software products, contact BroadVision’sWorld-wide Customer Support Organization for assistance. Registered customers who have a loginname and password can report problems via BroadVision’s Web site www.broadvision.com. Onthe Web site you can access support-related technical information, report problems, and track reportstatus and responses on the Problem Reports pages. To request a login, please contact yourBroadVision Account Representative.
The Web site is the preferred method of reporting problems; however, if necessary you can reportproblems via e-mail to [email protected]. Please be sure to include the case ID whencommunicating via e-mail.
Information on how to contact Customer Support offices by telephone can be found on theBroadVision Web site.
Support for Third-Party Software Products
To allow for complete testing, BroadVision certifies BroadVision One-To-One products against theversions of third-party products that are released and available sufficiently in advance of thesoftware release date. This often means that third-party vendors release new versions of theirproducts prior to the next release of the BroadVision software. While BroadVision would prefer thatcustomers use the tested and certified software versions, we also understand that customers willoccasionally want or need to use these new versions of third-party products. As long as the vendorguarantees forward compatibility, One-To-One products should work on these new versions.
BroadVision will usually test and certify these newer versions of third-party products in the nextproduct release. This can be a good indicator that the newer versions will work with the previousrelease. In exceptional cases BroadVision may determine that the newer version of a third-partyproduct cannot be used because it fails in some way during the testing cycle. In this case we willcontinue to certify the older version.
BroadVision will support customers who use newer versions of third-party products by workingwith the customer to resolve compatibility problems with the third-party vendor. BroadVision willalso consider, at our option, developing and releasing minor fixes for our products in order toresolve problems with new versions of third-party products.
InfoExchange Portal Administrator’s Guide 211

Chapter 6 Gett ing Technical Support
212 BroadVision, Inc
Index
Aaccess groups
adding a category 86administering 82changing 97creating 83deleting 85editing 85modifying 85privileges 11, 82removing categories 87
access privilegesApprove 82defined 11, 82None 82project collaboration page 127Read 82Read on-line 82Write 82
activatingdiscussion group messages 149discussion groups 148
Add Access Group form 83add_qv_list_table utility 210AddBlock 188AddChannel 188adding
blocks 74, 188categories 86channels 30, 188discussion groups 144, 147groups to project collaboration page 153organizations 104page type 71participants to project collaboration page 150phases to project collaboration page 134product to project collaboration page 159programs 46programs to project collaboration page 134, 156qualifier values 14qualifiers 13
InfoExchange Portal Administrator’s Guide
tasks to project collaboration page 137user accounts 111user templates 88visitors 111
AddPageType 189AddProgram 189AddProgramType 190AddQualifiersToChannel 191AddQualifiersToProgram 192AddQualifiersToUser 193AddQualifiersToUserTemplate 193AddQualifierValues 191AddUserTemplate 194Admin Tool
administrative functions 8login name 8password 8preliminary set up 6
administeringaccess groups 82channels 28closed-loop process management 167filter cache 177home page cache 179home page types 69leads 169organizations 102portlets 18program types 16programs 44project collaboration page 126qualifiers 12running reports 180user accounts 109user templates 87
administrative functions 119described 8Lead Owner Admin 112, 119list of 112Project Admin 112, 119Publishing Center User 112, 119Service Admin 112, 119
213

Index
Site Admin 112, 119Approve access privilege 82attachment files
deleting 149
BBlock Name 74, 77block script
defined 51, 52, 53, 55, 63, 64, 65, 67Block Type 74, 77blocks
adding 188deleting 80in home page 69removing 80
BookmarkChannels 194BookmarkContents 194BookmarkPrograms 195Browse All Channels 29Browse My Channels 29bulk loader utility 186, 187
AddBlock 188AddChannel 188running 186
bv1to1.conf file 7, 136default_user_template 70ep_enable_qualifier 178ep_filter_cache_size 178ep_filter_enabled_cnt_types 178, 210ep_text_cache_level 179ep_text_cache_root 179ep_text_cache_size 179ep_text_cache_status 179filter cache 177home page cache 179home page cache settings 180transient guest default user template 70
BVAdventech sample application 12
Cchanging
user profile 124channels
adding 30, 188Browse All Channels 29Browse My Channels 29deleting 43distributed administration 32, 38, 112, 119distributed administration of 29editing 36
214
moving 42primary parent 44propagating changes to subchannels 41start page 31, 37
cleaning up obsolete bookmarks 185closed loop process management
assigning members 172closed-loop process management
concepts 81, 165definition 81setting up new users 167setting up user accounts 166user template 172
contentsetting qualifiers on 210
creatingaccess groups 83page type 71
cwarmup utility 209
Ddata
bulk loading 186loading 186
data filesformatting for the bulk loader utility 187
deactivatingdiscussion group messages 149discussion groups 148
definingnew blocks 188
DeleteBlock 195DeleteChannel 195DeletePageType 196DeleteProgram 196DeleteProgramType 196DeleteUserTemplate 197deleting
access groups 85attachment files 149blocks 80categories 87discussion groups 149messages 149portlet 24program types 17programs 69projects 135qualifier values 15qualifiers 15user templates 102
discussion groups 135activating 148
BroadVision, Inc

Index
activating messages 149adding 144, 147deactivating 148deactivating messages 149definition 126deleting 149deleting messages from 149
Display Order 48, 60distributed administration
adding subchannels 31channels 29, 32, 38, 112, 119organizations 103, 105, 107, 113, 120qualifiers 32
Dumping the qualifier cache to a file 209
Eead owner organization 167Edit Profile form 126editing
access groups 85blocks in page type 77channels 36organizations 106page type 73program types 17programs 58qualifier values 15qualifiers 14tasks in project collaboration page 141user accounts 118user profile 124user templates 95visitor’s profile 124
ep_enable_qualifier 178ep_filter_cache_size 178ep_filter_enabled_cnt_types 178ep_filter_enabled_cnt_types parameter 177ep_text_cache_level 179ep_text_cache_root 179ep_text_cache_size 179ep_text_cache_status 179
Ffiles
location of 9filter cache
administering 177bv1to1.conf parameter 177ep_enable_qualifier 178ep_filter_cache_size 178
InfoExchange Portal Administrator’s Guide
ep_filter_enabled_cnt_types 178utilities 209
findingprograms 44user accounts 116visitors 116
formatting data files for 187
Gguest
user accounts 70visitor 70
guestlogin.jspuser template colors 71
guestlogin.jsp script 71
Hhome page
adding a portlet to 21, 22, 28administering 69concepts 69page types 71transient guests support 70
home page cacheadministering 179bv1to1.conf settings 179
Iiepadmin.html file 8images
location of 9
Kkm_loader utility 186km_purger utility 185
Llead content type 166Lead Owner Admin administrative function 112, 119lead owner administrator 167links
removing 87
215

Index
Loading the qualifer cache from a file 209
Mmessages
deleting 149modifying
access groups 85
NNone access privilege 82
Oorganizations
adding 104administering 102distributed administration 103, 105, 107, 113, 120editing 106
Ppage script
defined 51, 52, 53, 55, 63, 64, 65, 67page type
adding 71adding blocks 74administering 69creating 71defined 12deleting 80editing 73editing blocks 77erasing 80removing 80
parent channelaccess programs that have no 44adding to a program 48assigning 37changing 42changing for a program 48, 60deleting programs from 69display order of programs in 60for program 48of program 59primary 44
participantsadding to project collaboaration page 134
216
adding to project collaboration page 150phases
adding 163adding to project collaboration page 134creating for project 133updating new 164
portletsadding to home pages 28adding to home pages without the shortcut 22administering 18deleting 24editing parameters of 22optional files 18registering 18required files 18re-registering 24shortcut for adding to home pages 21
primary parent channel 44products
adding to project collaboration page 134, 159profile
editing 124program types
administering 16deleting 17editing 17
programsadding 46adding to project collaboration page 156adding to project collaboration phase 134administering 44deleting 69display order 48, 60editing 58finding 44parent channel 48without a parent channel 44
Project Admin administrative function 112, 119project collaboration
definition 126project collaboration page
adding participant 150adding participants 134adding phases 134, 163adding product 159adding products 134adding program 156adding project groups 153adding task 137administering 126administering access 127authorizing access 127contacts 162deactivating discussion group messages 149deactivating discussion groups 148definition 81, 126
BroadVision, Inc
Index
editing task 141overview 126project overview 143updating phases 164updating project groups 155updating task 141wizard 131
project collaboration phaseadding programs 134
project contactsviewing 162
project group 126project groups
adding to project collaboration page 153updating 155
project overviewviewing 143
projectsdeleting 135
Publishing Center 112permission to use 112
Publishing Center User administrative function 112, 119purge utility 185purging
bookmarks 185
QQualifier cache utilities 209qualifier value
editing 15qualifier values 15
adding 14deleting 15
qualifiers 90, 98adding 13administering 12deleting 15distributed administration of 32editing 14selecting 32, 38, 49, 62setting on content 210
RRead access privilege 82Read on-line access privilege 82removing
access group categories 87links to categories 87
reportsrunning 180
InfoExchange Portal Administrator’s Guide
runningbulk loader 186
Ssample scripts
guestlogin.jsp 71saving a new project 135saving project information 132scripts
location of 9Select Parent Channels for Program 48, 60Service Admin administrative function 112, 119SetDefaultBookmarkedChannels 201SetDefaultBookmarkedContents 202SetDefaultBookmarkedPrograms 202SetParentChannelsForProgram 202SetProgramOrder 203SetQualifier 203SetQualifiersForChannel 204SetQualifiersForUser 205SetQualifiersForUserTemplate 206setting up
existing visitor 169Site Admin administrative function 112, 119subchannels
moving 42
Ttasks
adding to project collaboration page 137editing 141updating 141
tracking information 81, 165transient guests 70
UUnbookmarkChannels 206UnbookmarkContents 206UnbookmarkPrograms 207updating
groups in project collaboration page 155tasks in project collaboration page 141
user accountsadding 111administering 109editing 118editing profile 124finding 116
217

Index
guest 70See Also visitors
user profilechanging 124
User Profile form 126user templates
adding 88administering 87deleting 102editing 95
userprofupdate.jsp script 126utilities
cwarmup 209filter cache 209km_loader utility 186purge utility 185
Vvisitors
adding 111editing settings 118finding 116transient guests 70See Also user accounts
WWizard
project collaboration page 131Write access privilege 82
218
BroadVision, Inc