Embed Size (px)
Citation preview

BRONTOEXTENSIONFORMAGENTO1
2.5 The Bronto extension helps Magento 1 customers to drive more sales faster by creating highly targeted lifecycle marketing campaigns that convert one-time buyers into repeat customers and motivate them to buy more.
Key Features of the Extension
Order Import with Conversion Tracking Seamlessly import past-purchase information, including complete order history and product details, for more informed and more targeted marketing campaigns. Conversion tracking is automatically handled without the need for additional code snippets.
Product Recommendations Insert recommended products into email messages with either API tags or content tags. API tags allow you to insert recommendations into transactional, reminder and review request emails sent via the Bronto Extension. These are based on the contents of your order or cart and can include the following: Related Products, Cross-sells, Up-sells, Recently Viewed, New Products, Bestsellers, Most Viewed, Custom Products. With content tags, you can insert recommended products into any message in Bronto and these can include the following: New Products, Bestsellers, Most Viewed and Custom Products.
Contact Import Map customer information collected on your Magento site to contact fields in Bronto and automatically import the data. In addition to default customer attributes, this can include Reward Points, Store Credit, Customer Group, and even custom customer attributes.
RFM Metrics In Bronto, auto-calculate RFM (Recency, Frequency, Monetary Value) metrics for contacts based on the full order history from Magento. This includes Average Order Value, Total Revenue and others. Use these values for improved segmentation.
Abandoned Cart Reminders Trigger a message or message series in Bronto when a cart is abandoned in Magento—for both registered and guest abandons—personalize and dynamically populate messages with product information.
Wish List Reminders Automatically trigger email reminders to consumers who have not purchased the items on their wish list within a given time period.
Transactional Emails Send transactional messages, such as order and shipping confirmations, directly
through Bronto for maximum control over deliverability and detailed performance metrics. Easily change the look and feel of a message, and add cross- and up-sell offers, without having to involve a developer.
Newsletter Opt-In Automatically add contacts who opt-in for marketing emails on your Magento site to Bronto and keep their subscription status up-to-date.
Post-Purchase Review Requests, Care Notifications and Reorder Reminders Send follow-up product review request, care tips and reorder reminder emails to your customers a set number of days after purchasing, including all product details for strong personalization.
Insert and Automatically Apply Coupon Codes Include Magento coupons in both transactional and reminder emails. Simply select the Shopping Cart Price Rule and a code will automatically be inserted when the message is sent. You can also have the coupon code automatically applied to the customer’s shopping session when a visited URL contains a certain query parameter.
Coupon Manager Integration Easily integrate with Bronto’s separate Coupon Manager app, where you can easily create, manage and distribute unique coupon codes via email or SMS for highly targeted, revenue-generating campaigns. Coupon Manager even allows you to add the unique coupon code as a query parameter on links so the Magento extension can automatically apply the promotion after clicking through. This integration allows redeemed coupons to be tracked within Coupon Manager for advanced revenue reporting and segmentation capabilities within Bronto.
Pop-up Manager Integration Easily integrate with Bronto’s separate Pop-up Manager app, where you can manage multiple versions, perform A/B testing, and customize the design of your pop-up sign-ups in a visual editor.
Cart Recovery Integration Easily integrate with Bronto’s separate Cart Recovery app, simplifying the setup needed within Bronto, to get you capturing carts and recovering more revenue more quickly.
Configuration Guide Provides interactive assistance for getting up and running. They are packed with helpful information so even a pro might learn something from them.
Support for Multiple Stores Managing multiple stores in Magento? Easily change configuration settings and map data from multiple stores to separate accounts in Bronto.

Announcements & News Stay informed of new releases and other important announcements right within the Magento Admin Panel so you can take advantage of the latest and greatest functionality.
Contact Us to Learn More
Not a Bronto customer? To take advantage of the Bronto Extension for Magento, you need a customer subscription to the Bronto Marketing Platform. Please click here to engage with us.
Already a Bronto customer and need help with installation? The Bronto Professional Services team can help you with installation. We have the expertise and resources to help you get up-and-running quickly. Ask your Account Manager for more details.
Interested in partnering with Bronto? Click here to contact your Bronto partner representative to learn more about this extension.
Before You Begin Before you begin the installation, complete the checklist below to ensure success.
1. Ensure you are on Magento community 1.6+ or enterprise 1.9+. 2. Ensure your PHP version is 5.3+.
Note: PHP version 7 is not supported. 3. Read the Release Notes:
o version 2.5 o version 2.4
Disclaimer: The Bronto Extension for Magento was tested in clean Magento environments and Bronto cannot guarantee compatibility with third-party extensions or other site customizations.

Installation There are two ways to install the Magento Extension.
via Magento Connect or via FTP
Note: If you have installed the extension and some functionality is not working and the there is no Bronto Emblem in the header of the extension on the side panel, there might be some files/folders that use incorrect naming convention (e.g. .p, rather than .php). Copying the folders again can resolve this issue, but if might be necessary to manually (visually) cross check all of the files to find misspellings in the file/folder naming conventions.
Note: If you are seeing inconsistent issues with random parts of the implementation, have reinstalled the extension, but still experience random aspects of the integration are not functioning, this is likely an issue with lingering Bronto files from the previous extension installs. If you are not using a custom theme and are still experiencing random issues, you will need to completely uninstall the extension and do a file cleanup to remove lingering Bronto files.
via Magento Connect The Magento Extension for Bronto is distributed and installed via Magento Connect. Magento Connect is a marketplace that allows Magento community members and partners to share their open source or commercial contributions for Magento with the community. More information can be found here.
Please follow the documentation for using Magento Connect to install the Bronto Extension for Magento at http://www.magentocommerce.com/magento-‐connect/new_merchant.
Note: Magento Connect requires writeable permissions to the Magento site root filesystem as described at http://www.magentocommerce.com/wiki/groups/227/magento_connect. If you are unable or unwilling to adjust the permissions as required, you may install the extension via the command line. Follow the instructions in the section Installation using the command line.
Important: If you have a version of the the extension before 2.0, you will need to remove all Bronto files from your server before beginning. Click here for more information.
1. Get the extension key
a. Log in to your account at Magento Connect and search for the extension using the keyword Bronto or by using the direct link: http://www.magentocommerce.com/magento-connect/catalog/product/view/id/16118/
b. Select the Platform (Community or Enterprise). c. Click Install Now. d. Check the box to agree to the extension license agreement e. Click Get Extension Key. f. When the extension key is revealed, click Select Key to copy the key.
2. Disable the cache
a. Go to System > Cache Management. b. If the cache is enabled, click select all on the left, change the drop-down on the
right to Disable and click Submit.
3. Disable debugging
a. Go to System > Tools > Compilation. b. If the compiler is enabled, click Disable.
4. Install the extension
a. Go to System > Magento Connect > Magento Connect Manager. b. Paste the extension key in the field labeled Paste Extension Key to install and
click Install. Magento Connect Manager verifies the extension key and gives you options to Cancel Installation or Proceed.
c. Click Proceed. The console box displays the results of your install. d. Click Refresh to see the extension added to your extensions list. e. Click Return to Admin.
5. Enable the cache
a. If you disabled the cache, go back to System > Cache Management. b. Click select all on the left, change the drop-down to enable and click Submit.
6. Enable debugging
a. If you disabled the compiler, go back to System > Tools > Compilation. b. Click Run Compilation Process.
7. Refresh the cache and log out
a. Click Flush Magento Cache and then click OK. b. Click Flush Cache Storage. c. Click Flush Javascript/CSS Cache. d. Log out and log back in.
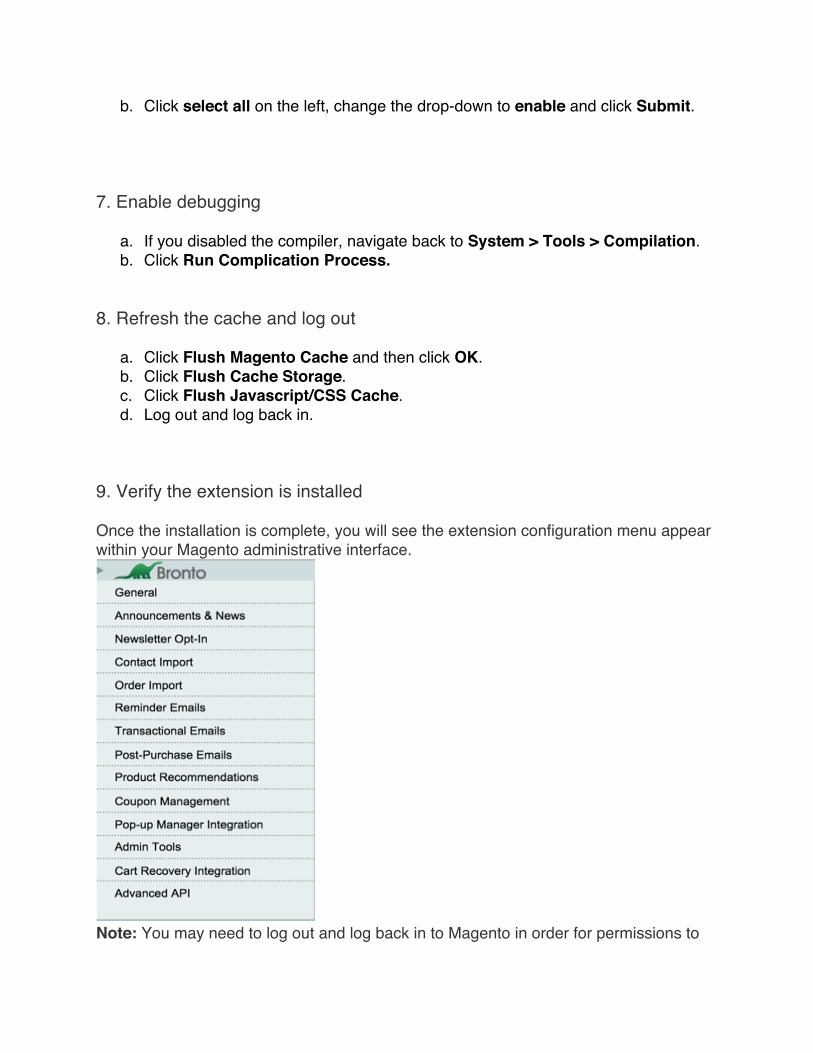
8. Verify the extension is installed
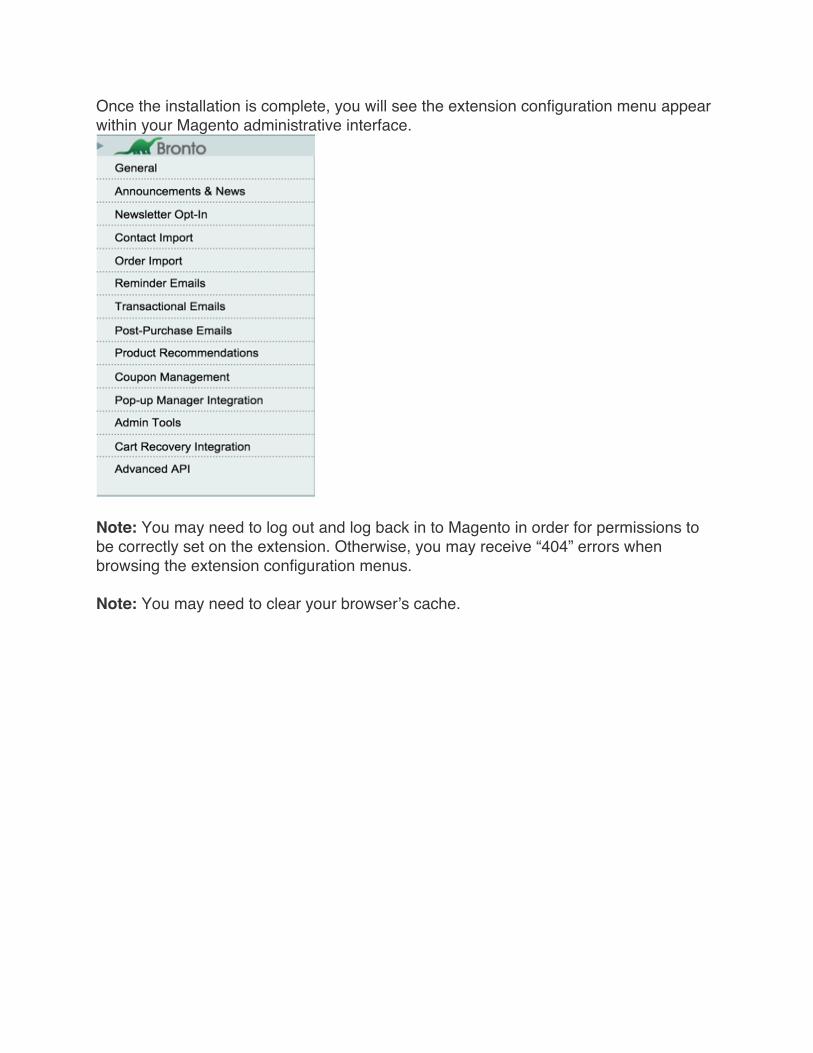
Once the installation is complete, you will see the extension configuration menu appear within your Magento administrative interface.
Note: You may need to log out and log back in to Magento in order for permissions to be correctly set on the extension. Otherwise, you may receive “404” errors when browsing the extension configuration menus.
Note: You may need to clear your browser’s cache.
via FTP
You will need to obtain the latest copy of the extension from the Bronto Professional Services team.
Important: If you have a version of the the extension before 2.0, you will need to remove all Bronto files from your server before beginning. Click here for more information.
1. Get the latest version of the extension
Check the Release Notes page for the latest downloadable version.
2. Remove the old extension
If the extension was installed via Magento Connect, you can leverage the same page to uninstall it. If the extension was installed via FTP, you will need to manually remove it. See Removing the Extension for more details.
3. Disable the cache
a. Go to System > Cache Management. b. If the cache is enabled, click select all on the left, change the drop-down on the
right to Disable and click Submit.
4. Disable debugging
a. Go to System > Tools > Compilation. b. If the compiler is enabled, click Disable.
5. Install the the extension
Unarchive and copy the files into Magento’s home directory. There should be 4 folders: app, lib, shell and skin.
6. Enable the cache
a. If you disabled the cache, go back to System > Cache Management.
b. Click select all on the left, change the drop-down to enable and click Submit.
7. Enable debugging
a. If you disabled the compiler, navigate back to System > Tools > Compilation. b. Click Run Complication Process.
8. Refresh the cache and log out
a. Click Flush Magento Cache and then click OK. b. Click Flush Cache Storage. c. Click Flush Javascript/CSS Cache. d. Log out and log back in.
9. Verify the extension is installed
Once the installation is complete, you will see the extension configuration menu appear within your Magento administrative interface.
Note: You may need to log out and log back in to Magento in order for permissions to
be correctly set on the extension. Otherwise, you may receive “404” errors when browsing the extension configuration menus.
Note: You may need to clear your browser’s cache.

Database Upgrade Script
If, after upgrading your version of the Bronto Extension for Magento via FTP, you notice one of your Bronto module tables is suffering from a missing column, duplicate entries, ambiguous columns, etc, then you will need to trigger a reinstall for that module.
The best way to know if your install was successful, is to monitor your system and exception logs, and look for SQLERRORs with Bronto tables. In v2.2.0, we have provided a PHP script to fix database tables for incomplete installs or upgrades. In our experience, FTP installs may suffer from this since it is not a blocking operation, like installing via Magento Connect. If you discover any SQLERRORS, you can identity the appropriate module by the table name and run the reinstall task described below.
WARNING: For most of the modules, triggering a reinstall will DROP ALL DATA. For order, newsletter, customers, and reminder, you can re-sync the data. For email, you take a snapshot of the data before running this script. System configurations will stay intact, unless you run with the –full flag.
Reinstall tasks
Module Command-line script All Modules > php {MAGENTO_ROOT}/shell/bronto/fix.php -a run --task all Common > php {MAGENTO_ROOT}/shell/bronto/fix.php -a run --task
common Customer Import > php {MAGENTO_ROOT}/shell/bronto/fix.php -a run --task
customer Email Capture > php {MAGENTO_ROOT}/shell/bronto/fix.php -a run --task
emailcapture News & Announcements > php {MAGENTO_ROOT}/shell/bronto/fix.php -a run --task news
Newsletter Subscription
> php {MAGENTO_ROOT}/shell/bronto/fix.php -a run --task newsletter
Order Import > php {MAGENTO_ROOT}/shell/bronto/fix.php -a run --task order
Reminder Emails > php {MAGENTO_ROOT}/shell/bronto/fix.php -a run --task reminder
Post-Purchase Emails > php {MAGENTO_ROOT}/shell/bronto/fix.php -a run --task reviews Transactional Emails > php {MAGENTO_ROOT}/shell/bronto/fix.php -a run --task
Example
Below is an example of repairing the News & Annoucements module.

Command-line script Assuming {MAGENTO_ROOT} is the directory path of your Magento installation:
> php {MAGENTO_ROOT}/shell/bronto/fix.php -a run --task news
Output Bronto News & Announcements: Started Core Resource entry removed for Bronto News & Announcements Bronto News & Announcements: Finished Complete
Defined actions
Action Description -h or –help Shows usage.
-a or –action Perform one of the defined actions below.
list Shows a list of all available tasks. run Runs the Fix process to trigger DB reinstall for specified/all modules.
-t –task Specifies an individual task to run. If not specified, reset will happen on all Bronto Modules.
-r –revert
Specifies a module version to replace the core_resource entry with. This will allow for simply upgrading the module from a specified version. Will cause exception if table changes already exist.
-f –full Removes all Bronto Module entries in core_resource table forcing a reinstall, and removes all core_ config_data entries for the specified module(s) which will clear any previously set configurations.
Help example Assuming {MAGENTO_ROOT} is the directory path of your Magento installation:
> php {MAGENTO_ROOT}/shell/bronto/fix.php -a list
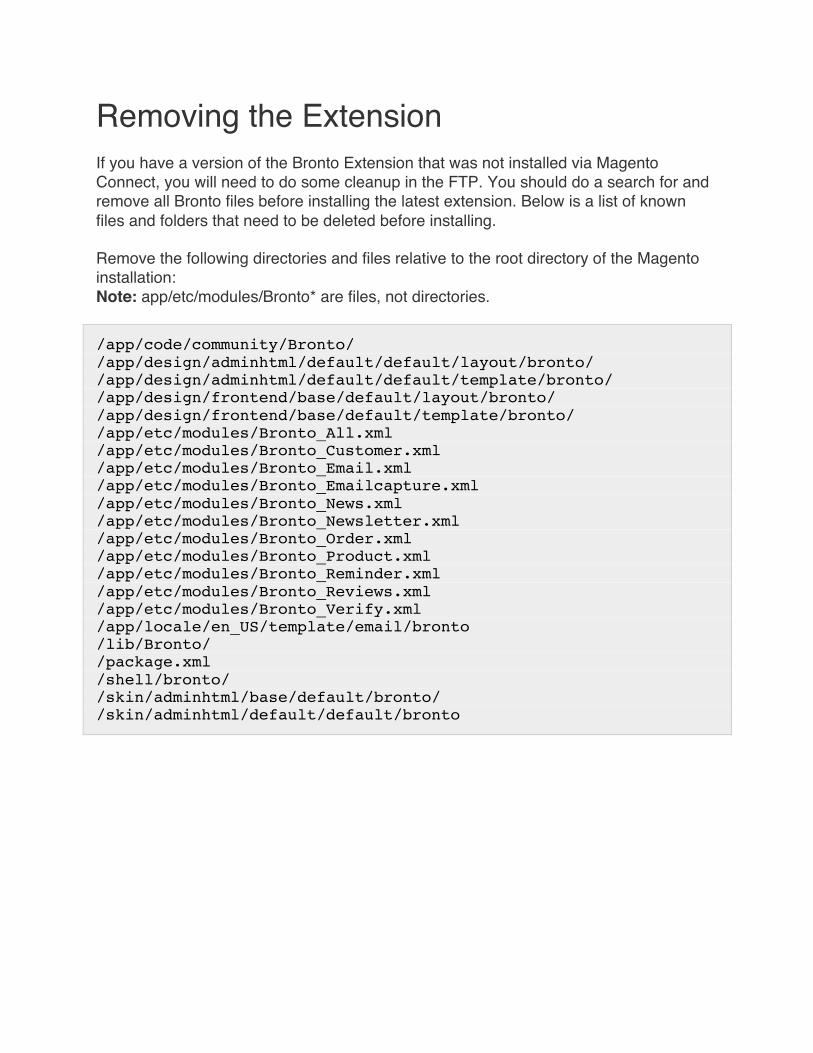
Removing the Extension If you have a version of the Bronto Extension that was not installed via Magento Connect, you will need to do some cleanup in the FTP. You should do a search for and remove all Bronto files before installing the latest extension. Below is a list of known files and folders that need to be deleted before installing.
Remove the following directories and files relative to the root directory of the Magento installation: Note: app/etc/modules/Bronto* are files, not directories.
/app/code/community/Bronto/ /app/design/adminhtml/default/default/layout/bronto/ /app/design/adminhtml/default/default/template/bronto/ /app/design/frontend/base/default/layout/bronto/ /app/design/frontend/base/default/template/bronto/ /app/etc/modules/Bronto_All.xml /app/etc/modules/Bronto_Customer.xml /app/etc/modules/Bronto_Email.xml /app/etc/modules/Bronto_Emailcapture.xml /app/etc/modules/Bronto_News.xml /app/etc/modules/Bronto_Newsletter.xml /app/etc/modules/Bronto_Order.xml /app/etc/modules/Bronto_Product.xml /app/etc/modules/Bronto_Reminder.xml /app/etc/modules/Bronto_Reviews.xml /app/etc/modules/Bronto_Verify.xml /app/locale/en_US/template/email/bronto /lib/Bronto/ /package.xml /shell/bronto/ /skin/adminhtml/base/default/bronto/ /skin/adminhtml/default/default/bronto

Configuration You can configure many parts of Magento to meet your needs.
General The General module controls all Bronto modules. Disabling this module will disable all other Bronto modules. You can find the API token, logging, registration, email formatting options, and Support information here. If you manage multiple stores in Magento, you can easily change configuration settings and map data from multiple stores to separate accounts in Bronto.
1. Create an API token
a. In Bronto, go to Home > Settings. b. Click Data Exchange in the left menu. c. Click Add Access Token at the right of the page. d. Specify a name for the token in the API Token Name text box. You should
specify a descriptive name for the token. e. Check the checkboxes in the Permissions section that best describe the level of
access you want for this token. Your options for API Access Token permissions are:
o Read Access – Allow this token to read data from your account. o Write Access – Allow this token to write data and objects (such as fields,
segments, contacts, etc.) to your account. o Send Access – Allow this token to schedule and send emails from this
account. f. If you want to activate the token now, check the Token is active? Box. You can
always come back and activate the token at a later time. g. Click Save at the bottom right of the page.
2. Add the API token
a. In Magento, go to System > Configuration. b. In the left menu, scroll until you see Bronto and click General. c. In the Settings section, paste the token into the API Token field. The token will
then validate.
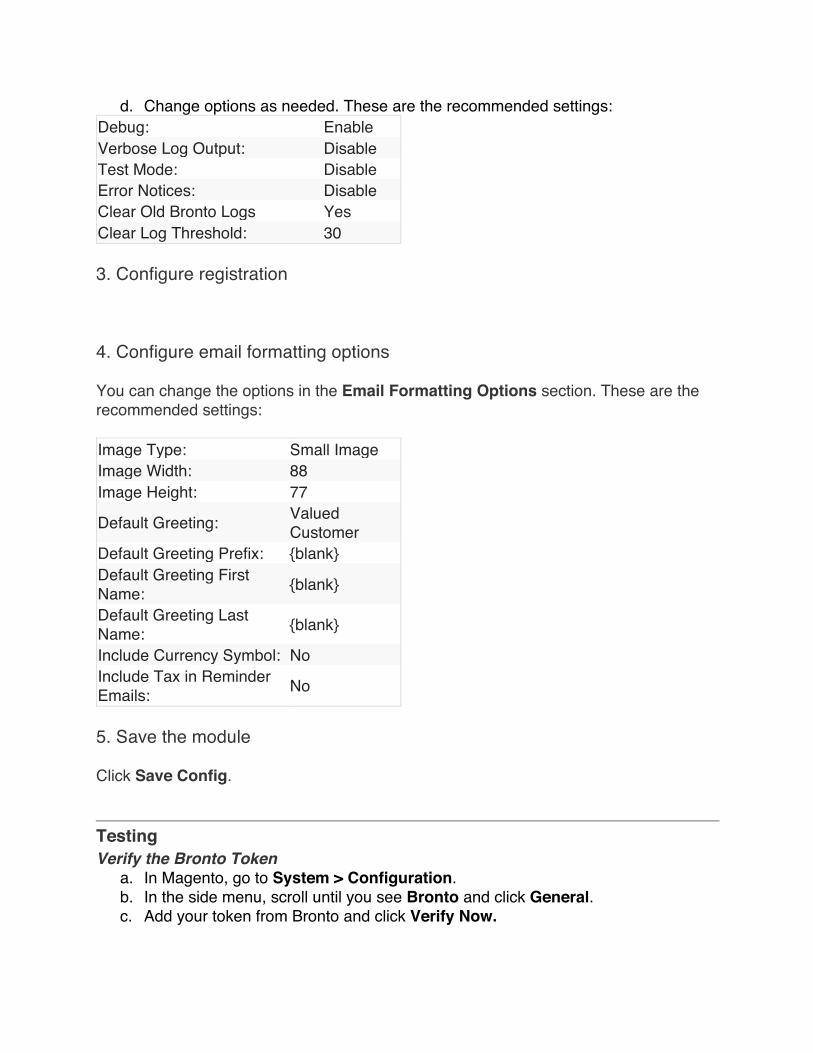
d. Change options as needed. These are the recommended settings: Debug: Enable Verbose Log Output: Disable Test Mode: Disable Error Notices: Disable Clear Old Bronto Logs Yes Clear Log Threshold: 30
3. Configure registration
4. Configure email formatting options
You can change the options in the Email Formatting Options section. These are the recommended settings:
Image Type: Small Image Image Width: 88 Image Height: 77
Default Greeting: Valued Customer
Default Greeting Prefix: {blank} Default Greeting First Name: {blank}
Default Greeting Last Name: {blank}
Include Currency Symbol: No Include Tax in Reminder Emails: No
5. Save the module
Click Save Config.
Testing Verify the Bronto Token
a. In Magento, go to System > Configuration. b. In the side menu, scroll until you see Bronto and click General. c. Add your token from Bronto and click Verify Now.

Newsletter Opt-in You can automatically add contacts who opt-in for marketing emails on your Magento site to Bronto and keep their subscription status up-to-date.
1. Enable the module a. In Magento, go to System > Configuration. b. In the left menu, scroll until you see Bronto and click Newsletter Opt-in. c. In the Settings section, these are the recommended settings:
Enable Module: Yes Use Magento Cron Yes Frequency: Minute Intervals Interval: 15 minutes Start Time: 0 0 0 Limit: 100 Sync Limit: 1000
d. Click Save Config.
2. Configure checkout settings
a. These are the recommended Checkout Settings Show on Logged-In Checkout: Yes Show on Guest Checkout: Yes Show on Register Checkout: Yes Show If Already Subscribed: No Checked by Default: No Checkbox Label Text: Sign up for our newsletter! Checkbox CSS Selector: #billing_address Checkbox CSS Style: –Use Default–
b. Click Save Config.
3. Add newsletter contacts to a Bronto list
a. Under current configuration scope, select the desired site.
b. Uncheck Use Default and select the desired list. Optionally, you can choose to remove unsubscribes from list(s) when the customer unsubscribes.
c. Click Save Config. d. Under current configuration scope, select Default Config to return.

4. Sync subscribers to queue
a. Click Sync Subscribers to Queue until you see the message All Subscribers are synced to the queue.
5. Verify the Cron is running for Scheduled Import
Check the schedule date and confirm it is today’s date. NOTE: The table will remain empty until the cron has completed its first run.
6. Optional: Mark all subscribers imported
Click Mark All Imported and click OK when prompted.
7. Optional: Export active Magento contacts
a. Filter the contacts by Subscribed status and click Search.
b. Click Export.
8. Optional: Import the active contacts to Bronto
Note: Only after you have synced all of your contacts to the queue and all contacts have been imported should you complete this step.
a. In Bronto, go to Tables > Contacts > Manage. b. Click Import. c. Click the check box in the Certify List Compliance and identify the source of the
contacts you are importing and click Next. d. Click the Import from a CSV file or files radio button. e. Click Choose File. and Select the file you want to import and click Open.

f. Optional: Click the First row of file(s) is header row check box if you want the first row in the file to be the header and click Next.
g. Select Update existing contacts, Add new contacts and click Next. h. Select Do not inform them and click Next. i. The only column you will need to map is email address, so click Next. j. Add your contacts to a new list or an existing list(s), depending on what you
selected in Magento and click Next. o To add your contacts to an existing list, click the check box next to the
list(s) you want to add them to. You can use the search box to search for lists created in your account. You can click Select All to select all the lists in your account.
o To add your contacts to a new list, click the New list check box and give your new listan internal and external name.
k. Specify if you want to remove these contacts from any lists and click Next. l. If you wish to be notified via email when the import is finished, click the Send
emailcheck box and provide the email address that will be notified when the import is complete. The email notification will tell you how many contacts were added to your account. It will also tell you how many contacts were not added because they are invalid or duplicates. Click Next.
m. Review the details you have selected for the contact import and click Finish to complete the set-up and begin the import process. Small imports (less than 20k contacts) will complete very quickly – in less than a few minutes. Imports larger than 20K contacts will take longer.
Testing
1. Create a contact and opt-in to the Newsletter
a. Go to the account signup page and make sure to sign up for the newsletter when creating an account.
2. Import the contact to Bronto
a. Either wait for the cron to run or go to System > Configuration.
b. In the left menu, scroll until you see Bronto and click Newsletter Opt-in. c. Click Run Now.
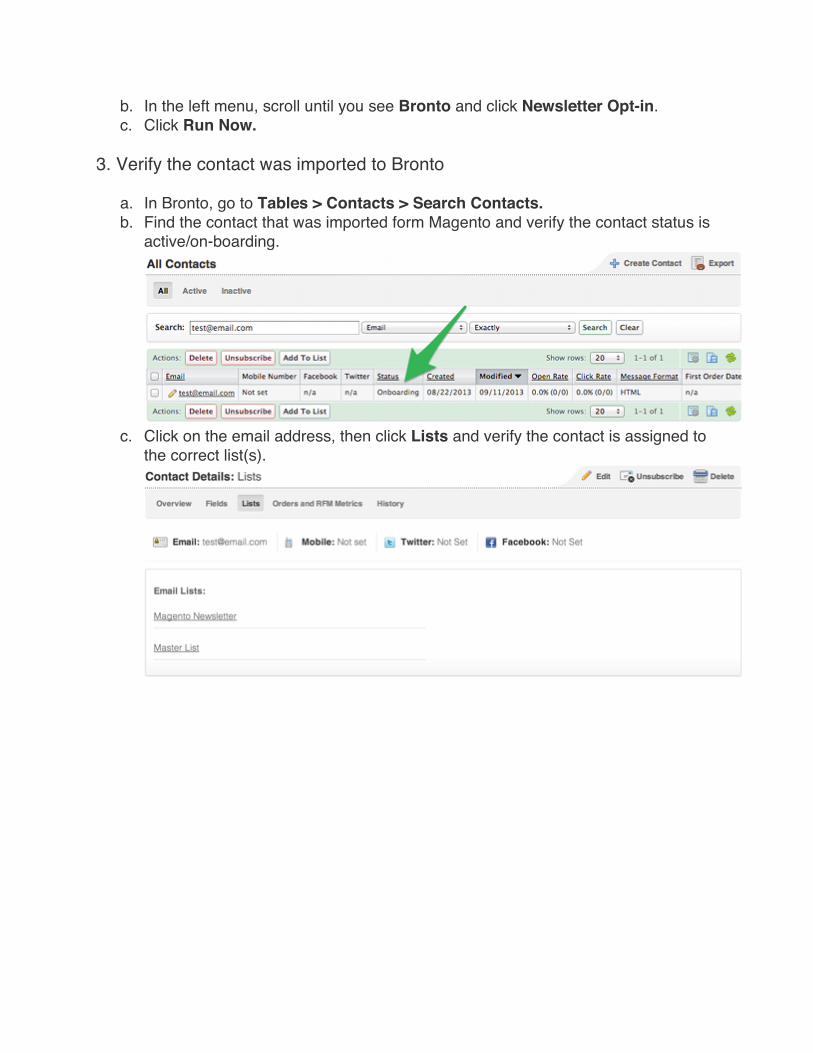
3. Verify the contact was imported to Bronto
a. In Bronto, go to Tables > Contacts > Search Contacts. b. Find the contact that was imported form Magento and verify the contact status is
active/on-boarding.
c. Click on the email address, then click Lists and verify the contact is assigned to
the correct list(s).
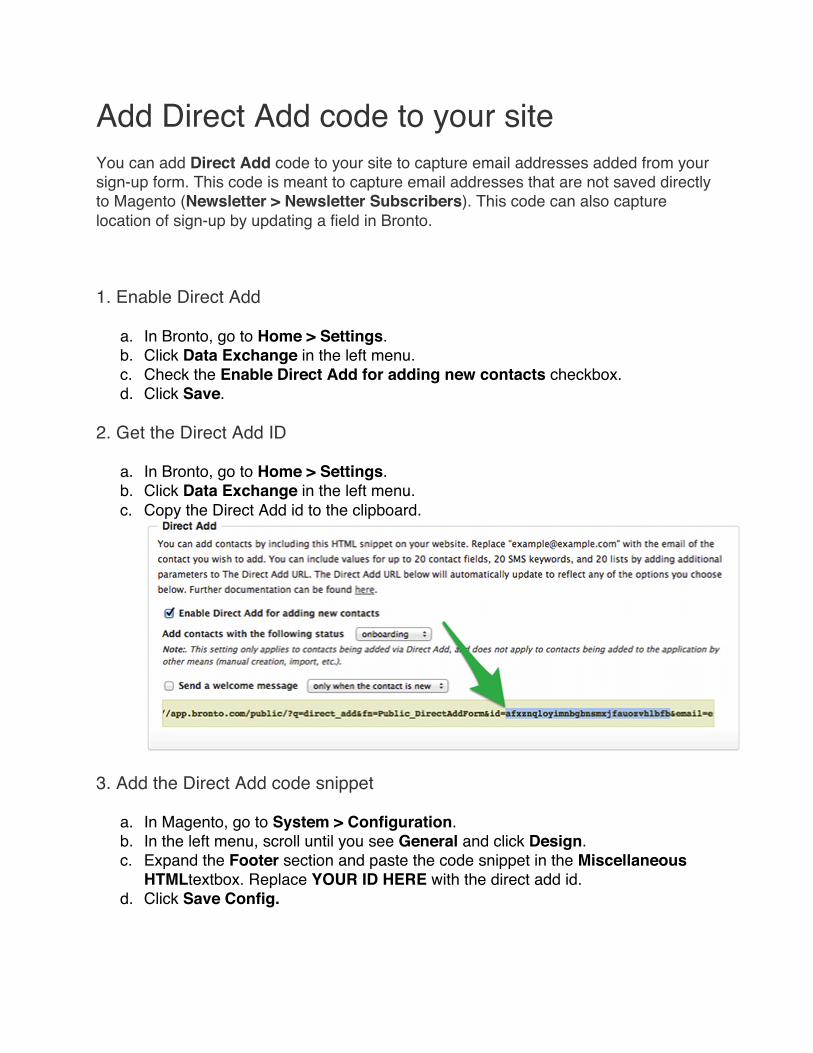
Add Direct Add code to your site You can add Direct Add code to your site to capture email addresses added from your sign-up form. This code is meant to capture email addresses that are not saved directly to Magento (Newsletter > Newsletter Subscribers). This code can also capture location of sign-up by updating a field in Bronto.
1. Enable Direct Add
a. In Bronto, go to Home > Settings. b. Click Data Exchange in the left menu. c. Check the Enable Direct Add for adding new contacts checkbox. d. Click Save.
2. Get the Direct Add ID
a. In Bronto, go to Home > Settings. b. Click Data Exchange in the left menu. c. Copy the Direct Add id to the clipboard.
3. Add the Direct Add code snippet
a. In Magento, go to System > Configuration. b. In the left menu, scroll until you see General and click Design. c. Expand the Footer section and paste the code snippet in the Miscellaneous
HTMLtextbox. Replace YOUR ID HERE with the direct add id. d. Click Save Config.

Contact Import You can map customer information collected on your Magento site to contact fields in Bronto and automatically import the data. In addition to default customer attributes, this can include Reward Points, Store Credit, Customer Group, and even custom customer attributes.
1. Enable the module
a. Navigate to System > Configuration. b. In the left menu, scroll until you see Bronto and click Contact Import. c. In the Settings section, these are the recommended settings:
Enable Module: Yes Use Magento Cron Yes Frequency: Minute Intervals Interval: 15 minutes Start Time: 0 0 0 Limit: 100 Sync Limit: 1000
2. Set Customer Attributes
In the Customer Attributes section, you can map the Magento Customer Attributes to Bronto Fields. You can create fields on the fly by selecting Create New… and entering the name of the new field in the text box that displays below it. If you do not wish to import an attribute, just leave the drop-down set to — None Selected —.
3. Set Customer Address Attributes
In the Address Attributes section, you can map the Magento Customer Address Attributes to Bronto Fields. You can create fields on the fly by selecting Create New… and entering the name of the new field in the text box that displays below it. If you do not wish to import an attribute, just leave the drop-down set to — None Selected —.
4. Optional: Map Magento Fields to Bronto
After you have enabled the modules and clicked Save Config, scroll down and you will have the option to map Magento fields to Bronto. Note: Any custom fields you have created in Magento will appear below the Created From field if you are using Magento Community or the Reward Points field if you are using Magento Enterprise.

5. Save Config
Click Save Config.
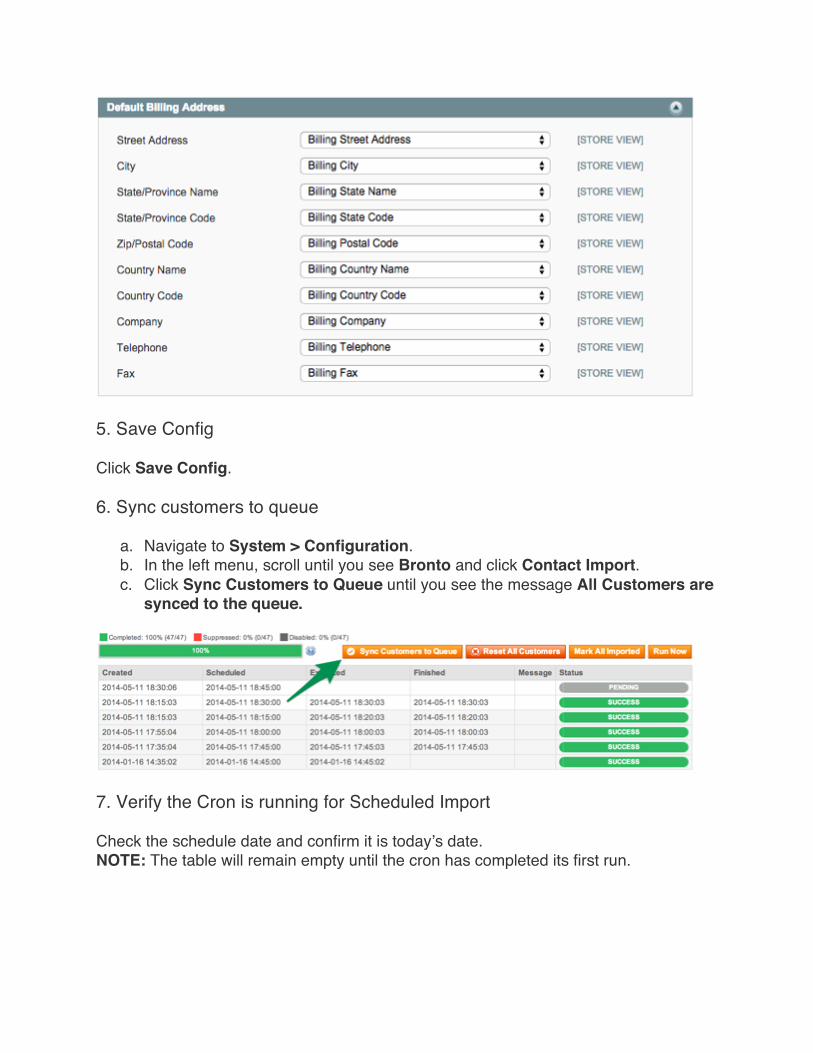
6. Sync customers to queue
a. Navigate to System > Configuration. b. In the left menu, scroll until you see Bronto and click Contact Import. c. Click Sync Customers to Queue until you see the message All Customers are
synced to the queue.
7. Verify the Cron is running for Scheduled Import
Check the schedule date and confirm it is today’s date. NOTE: The table will remain empty until the cron has completed its first run.

Testing 1. Create a contact
Go to the account signup page and create an account.
2. Import the contact to Bronto a. Either wait for the cron to run or Navigate to System > Configuration. b. In the left menu, scroll until you see Bronto and click Contact Import. c. Click Run Now.
3. Verify the contact was imported to Bronto
a. Go to Tables > Contacts > Search Contacts. b. Verify that the contact was imported to Bronto.
a. Click on the email address, then click Fields and verify the field information is correct.
Import your Magento contacts to Bronto You can import your newsletter contacts from Magento so you can send promotional messages during your integration.
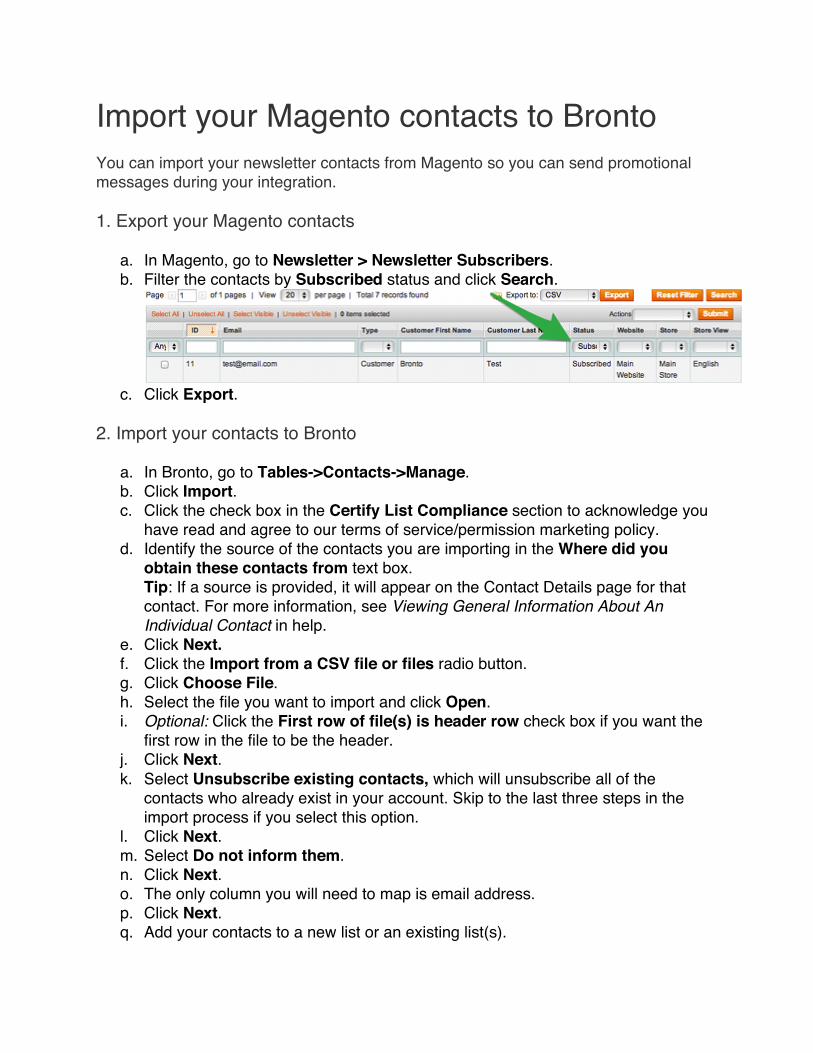
1. Export your Magento contacts
a. In Magento, go to Newsletter > Newsletter Subscribers. b. Filter the contacts by Subscribed status and click Search.
c. Click Export.
2. Import your contacts to Bronto
a. In Bronto, go to Tables->Contacts->Manage. b. Click Import. c. Click the check box in the Certify List Compliance section to acknowledge you
have read and agree to our terms of service/permission marketing policy. d. Identify the source of the contacts you are importing in the Where did you
obtain these contacts from text box. Tip: If a source is provided, it will appear on the Contact Details page for that contact. For more information, see Viewing General Information About An Individual Contact in help.
e. Click Next. f. Click the Import from a CSV file or files radio button. g. Click Choose File. h. Select the file you want to import and click Open. i. Optional: Click the First row of file(s) is header row check box if you want the
first row in the file to be the header. j. Click Next. k. Select Unsubscribe existing contacts, which will unsubscribe all of the
contacts who already exist in your account. Skip to the last three steps in the import process if you select this option.
l. Click Next. m. Select Do not inform them. n. Click Next. o. The only column you will need to map is email address. p. Click Next. q. Add your contacts to a new list or an existing list(s).

o To add your contacts to an existing list, click the check box next to the list(s) you want to add them to. You can use the search box to search for lists created in your account. You can click Select All to select all the lists in your account.
o To add your contacts to a new list, click the New list check box and give your new list an internal and external name.
r. Click Next. s. Specify if you want to remove these contacts from any lists. This step in only
available if you choose Update Existing/ Add New Contacts or Update Existing Contacts.
t. Click Next. u. If you want to be notified via email when the import is finished, click the Send
emailcheck box and provide the email address that will be notified when the import is complete. The email notification will tell you how many contacts were added to your account. It will also tell you how many contacts were not added because they are invalid, duplicates, or previously unsubscribed.
v. Click Next. w. Review the details you have selected for the contact import. x. Click Finish to complete the set-up and begin the import process. Small imports
(less than 20k contacts) will complete very quickly – in less than a few minutes. Imports larger than 20K contacts will take longer.
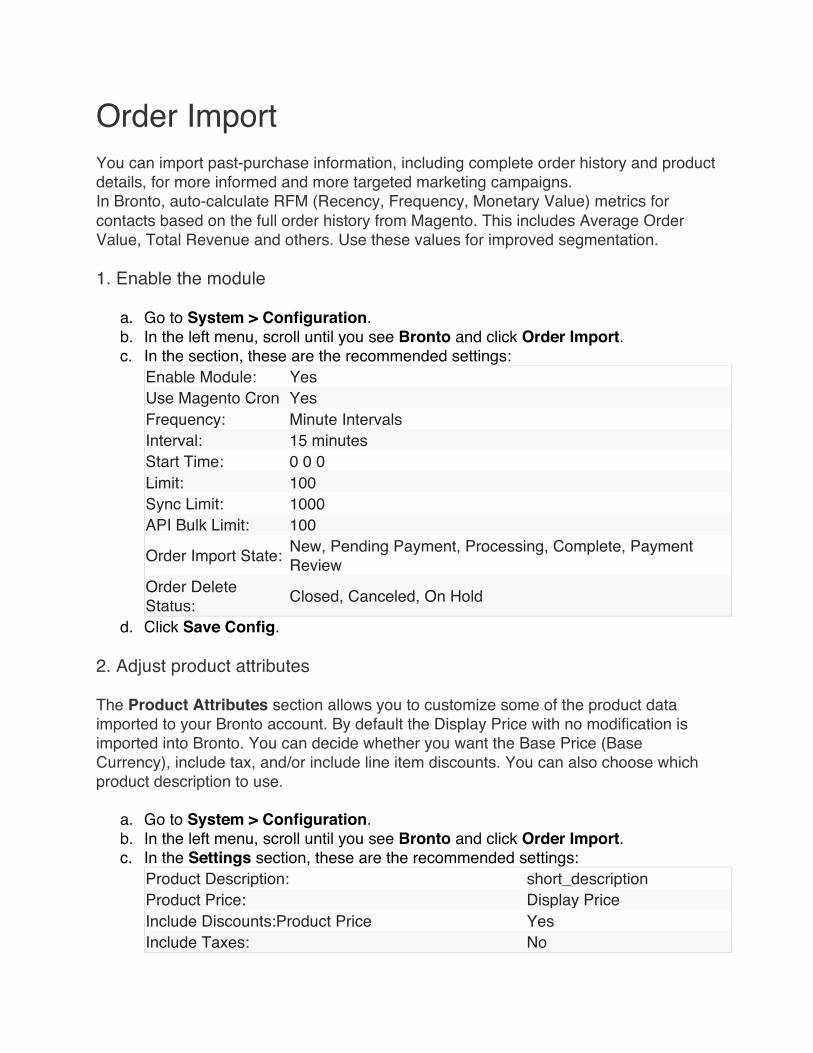
Order Import You can import past-purchase information, including complete order history and product details, for more informed and more targeted marketing campaigns. In Bronto, auto-calculate RFM (Recency, Frequency, Monetary Value) metrics for contacts based on the full order history from Magento. This includes Average Order Value, Total Revenue and others. Use these values for improved segmentation.
1. Enable the module
a. Go to System > Configuration. b. In the left menu, scroll until you see Bronto and click Order Import. c. In the section, these are the recommended settings:
Enable Module: Yes Use Magento Cron Yes Frequency: Minute Intervals Interval: 15 minutes Start Time: 0 0 0 Limit: 100 Sync Limit: 1000 API Bulk Limit: 100
Order Import State: New, Pending Payment, Processing, Complete, Payment Review
Order Delete Status: Closed, Canceled, On Hold
d. Click Save Config.
2. Adjust product attributes
The Product Attributes section allows you to customize some of the product data imported to your Bronto account. By default the Display Price with no modification is imported into Bronto. You can decide whether you want the Base Price (Base Currency), include tax, and/or include line item discounts. You can also choose which product description to use.
a. Go to System > Configuration. b. In the left menu, scroll until you see Bronto and click Order Import. c. In the Settings section, these are the recommended settings:
Product Description: short_description Product Price: Display Price Include Discounts:Product Price Yes Include Taxes: No
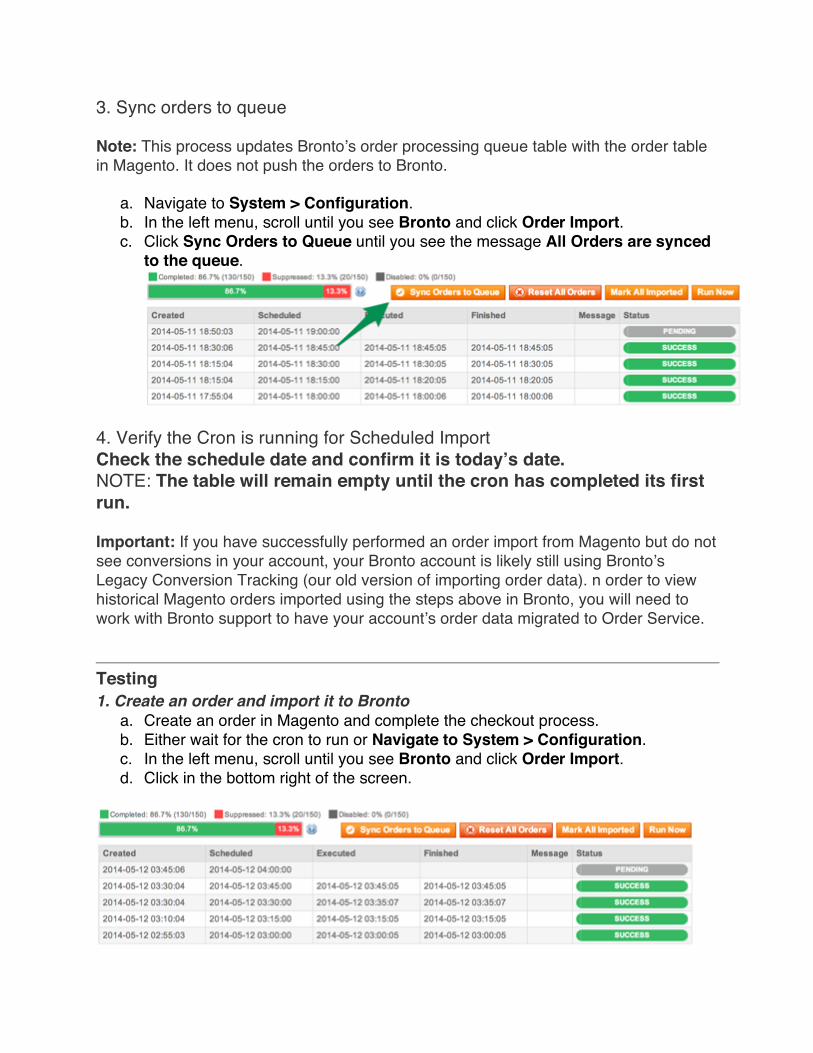
3. Sync orders to queue
Note: This process updates Bronto’s order processing queue table with the order table in Magento. It does not push the orders to Bronto.
a. Navigate to System > Configuration. b. In the left menu, scroll until you see Bronto and click Order Import. c. Click Sync Orders to Queue until you see the message All Orders are synced
to the queue.
4. Verify the Cron is running for Scheduled Import Check the schedule date and confirm it is today’s date. NOTE: The table will remain empty until the cron has completed its first run.
Important: If you have successfully performed an order import from Magento but do not see conversions in your account, your Bronto account is likely still using Bronto’s Legacy Conversion Tracking (our old version of importing order data). n order to view historical Magento orders imported using the steps above in Bronto, you will need to work with Bronto support to have your account’s order data migrated to Order Service.
Testing 1. Create an order and import it to Bronto
a. Create an order in Magento and complete the checkout process. b. Either wait for the cron to run or Navigate to System > Configuration. c. In the left menu, scroll until you see Bronto and click Order Import. d. Click in the bottom right of the screen.
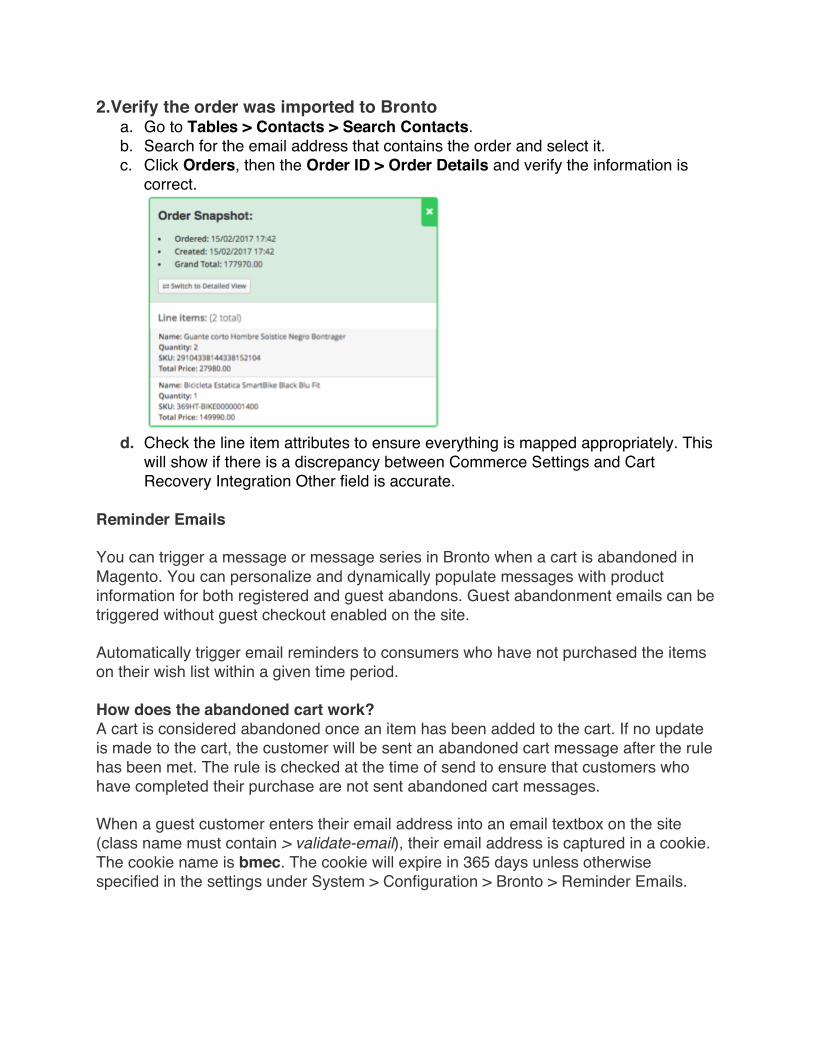
2.Verify the order was imported to Bronto a. Go to Tables > Contacts > Search Contacts. b. Search for the email address that contains the order and select it. c. Click Orders, then the Order ID > Order Details and verify the information is
correct.
d. Check the line item attributes to ensure everything is mapped appropriately. This
will show if there is a discrepancy between Commerce Settings and Cart Recovery Integration Other field is accurate.
Reminder Emails
You can trigger a message or message series in Bronto when a cart is abandoned in Magento. You can personalize and dynamically populate messages with product information for both registered and guest abandons. Guest abandonment emails can be triggered without guest checkout enabled on the site.
Automatically trigger email reminders to consumers who have not purchased the items on their wish list within a given time period.
How does the abandoned cart work? A cart is considered abandoned once an item has been added to the cart. If no update is made to the cart, the customer will be sent an abandoned cart message after the rule has been met. The rule is checked at the time of send to ensure that customers who have completed their purchase are not sent abandoned cart messages.
When a guest customer enters their email address into an email textbox on the site (class name must contain > validate-email), their email address is captured in a cookie. The cookie name is bmec. The cookie will expire in 365 days unless otherwise specified in the settings under System > Configuration > Bronto > Reminder Emails.
A customer can only receive one email per cart, per rule. A customer can be sent another abandoned cart message if they complete their purchase or clear all items from their cart and start again.
You can view current abandoned carts for registered customers by navigating in Magento to Reports > Shopping Cart > Abandoned carts. Currently there is no way to view guest abandoned carts.
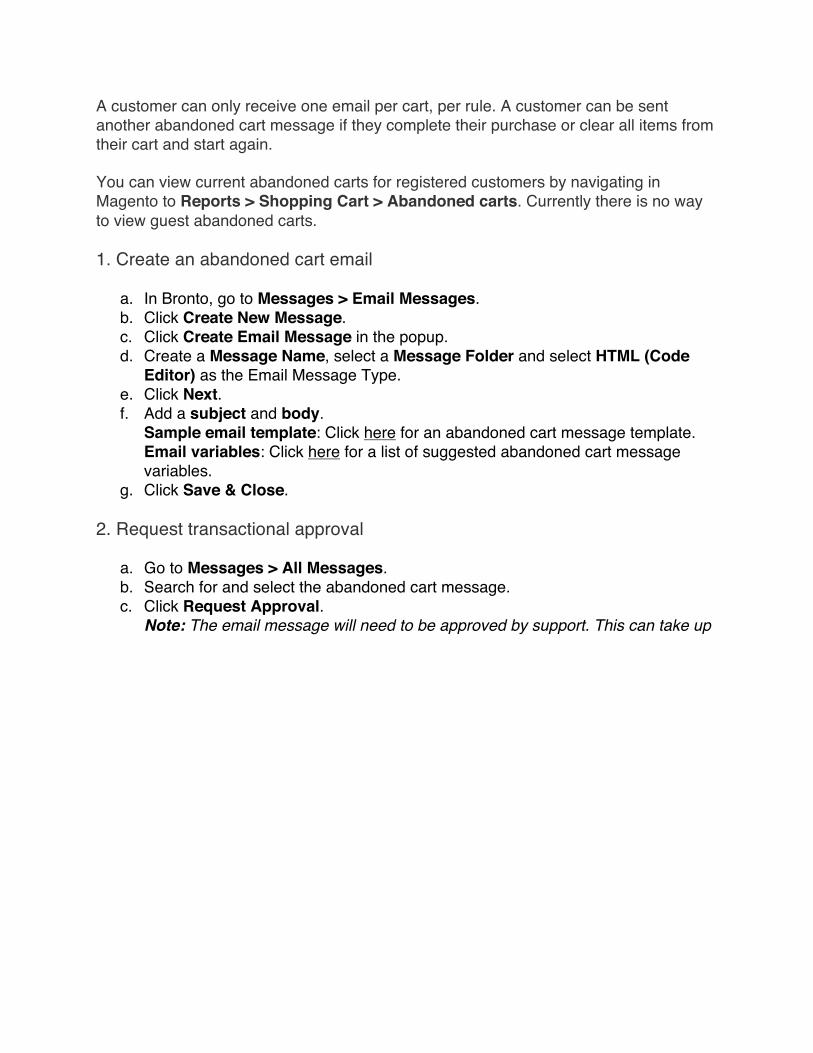
1. Create an abandoned cart email
a. In Bronto, go to Messages > Email Messages. b. Click Create New Message. c. Click Create Email Message in the popup. d. Create a Message Name, select a Message Folder and select HTML (Code
Editor) as the Email Message Type. e. Click Next. f. Add a subject and body.
Sample email template: Click here for an abandoned cart message template. Email variables: Click here for a list of suggested abandoned cart message variables.
g. Click Save & Close.
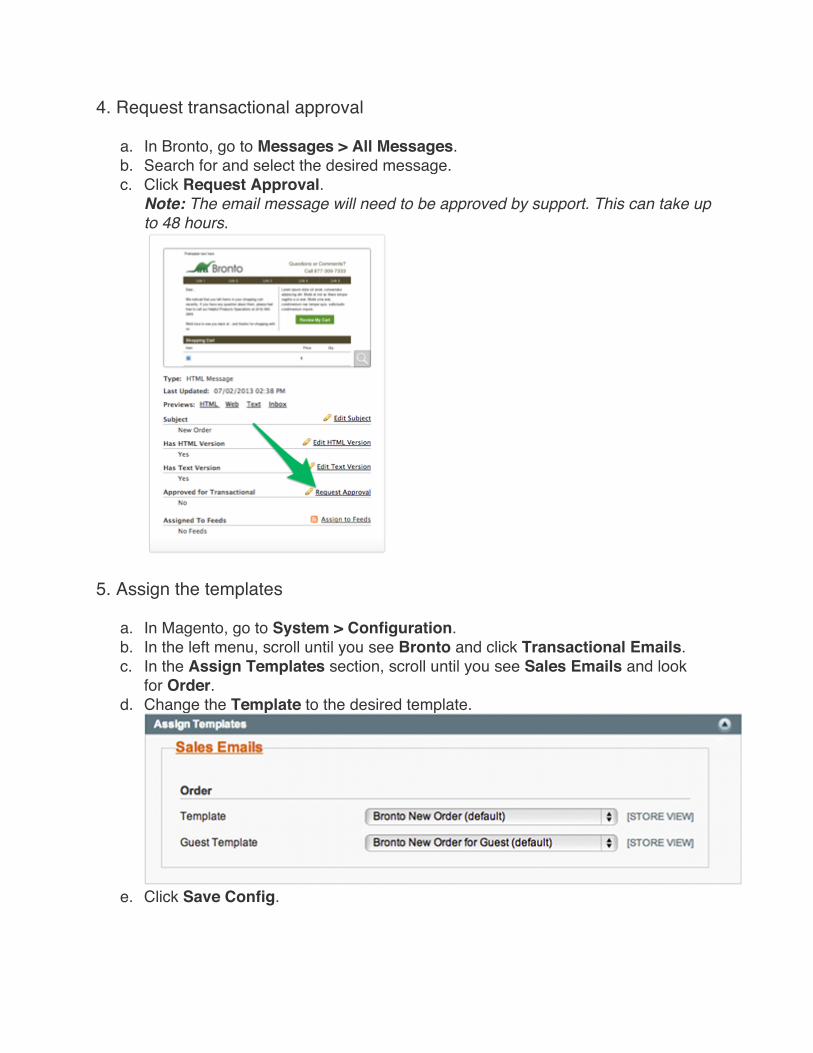
2. Request transactional approval
a. Go to Messages > All Messages. b. Search for and select the abandoned cart message. c. Click Request Approval.
Note: The email message will need to be approved by support. This can take up
to 48 hours.
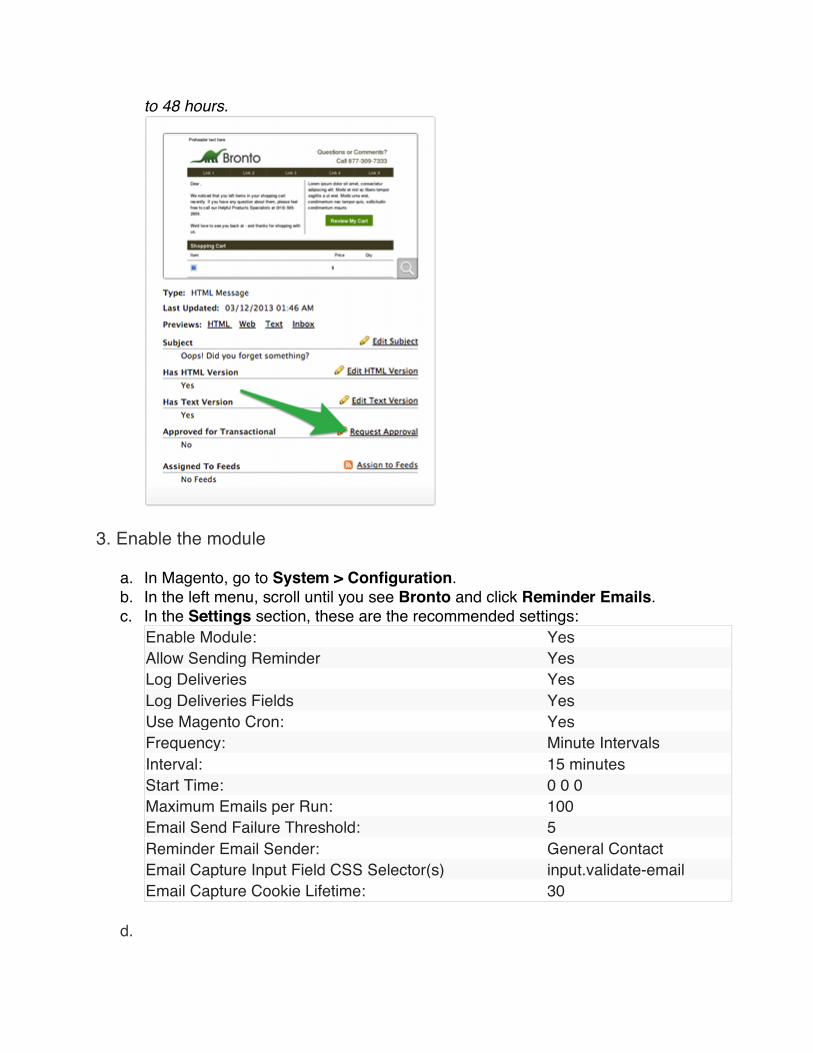
3. Enable the module
a. In Magento, go to System > Configuration. b. In the left menu, scroll until you see Bronto and click Reminder Emails. c. In the Settings section, these are the recommended settings:
Enable Module: Yes Allow Sending Reminder Yes Log Deliveries Yes Log Deliveries Fields Yes Use Magento Cron: Yes Frequency: Minute Intervals Interval: 15 minutes Start Time: 0 0 0 Maximum Emails per Run: 100 Email Send Failure Threshold: 5 Reminder Email Sender: General Contact Email Capture Input Field CSS Selector(s) input.validate-email Email Capture Cookie Lifetime: 30
d.
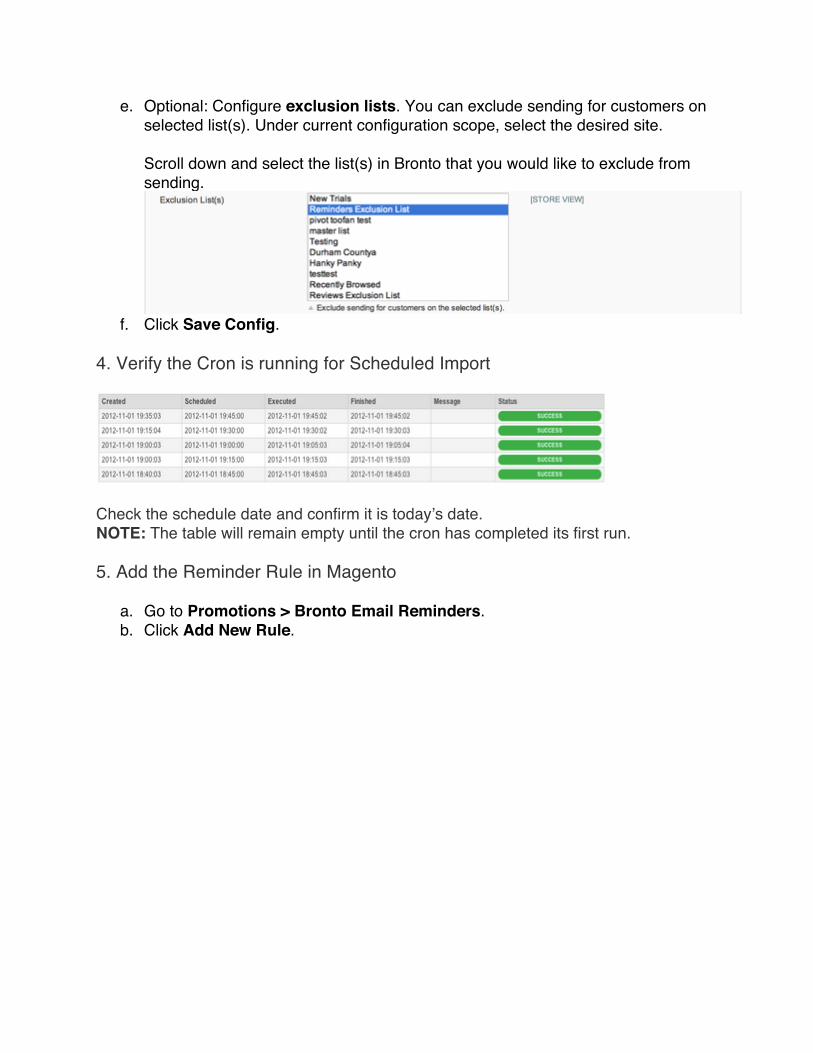
e. Optional: Configure exclusion lists. You can exclude sending for customers on selected list(s). Under current configuration scope, select the desired site. Scroll down and select the list(s) in Bronto that you would like to exclude from sending.
f. Click Save Config.
4. Verify the Cron is running for Scheduled Import
Check the schedule date and confirm it is today’s date. NOTE: The table will remain empty until the cron has completed its first run.
5. Add the Reminder Rule in Magento
a. Go to Promotions > Bronto Email Reminders. b. Click Add New Rule.
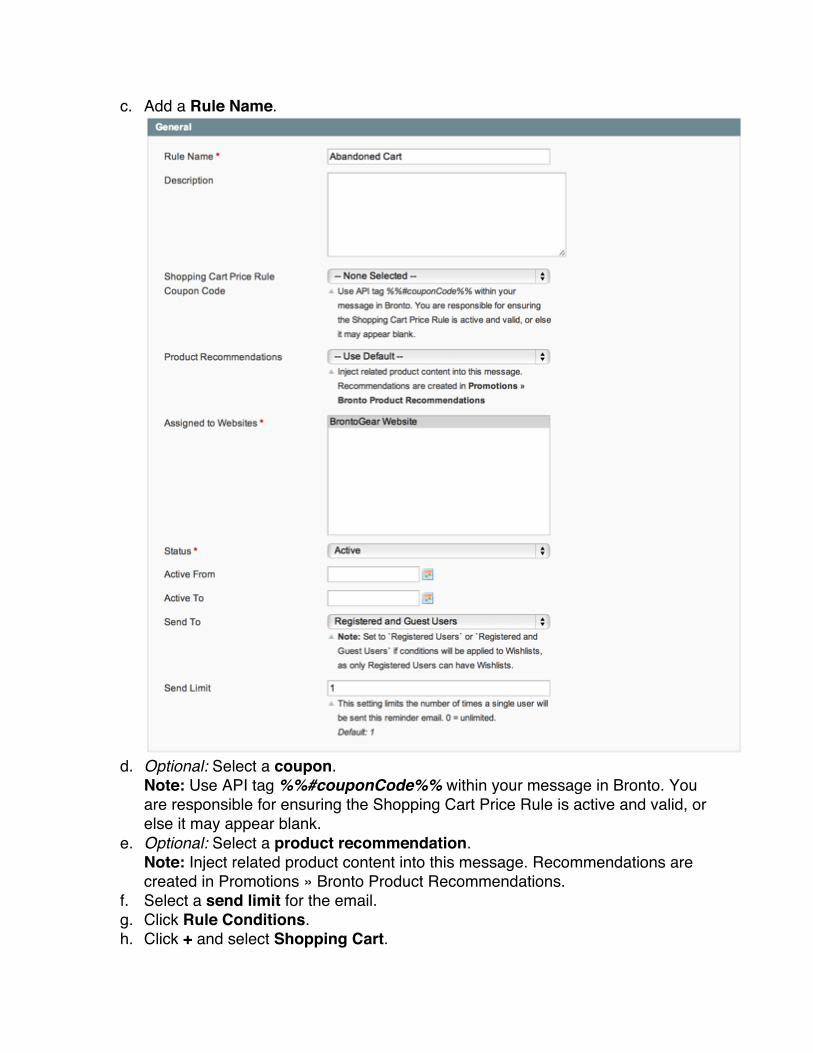
c. Add a Rule Name.
d. Optional: Select a coupon.
Note: Use API tag %%#couponCode%% within your message in Bronto. You are responsible for ensuring the Shopping Cart Price Rule is active and valid, or else it may appear blank.
e. Optional: Select a product recommendation. Note: Inject related product content into this message. Recommendations are created in Promotions » Bronto Product Recommendations.
f. Select a send limit for the email. g. Click Rule Conditions. h. Click + and select Shopping Cart.
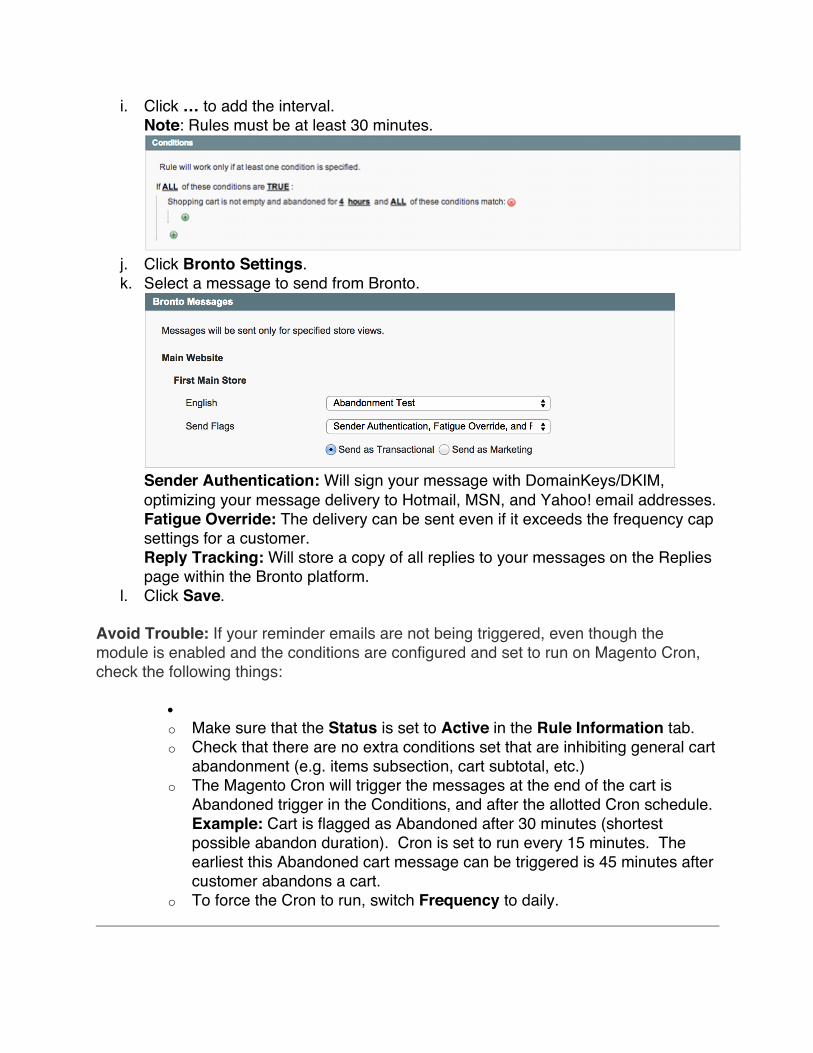
i. Click … to add the interval. Note: Rules must be at least 30 minutes.
j. Click Bronto Settings. k. Select a message to send from Bronto.
Sender Authentication: Will sign your message with DomainKeys/DKIM, optimizing your message delivery to Hotmail, MSN, and Yahoo! email addresses. Fatigue Override: The delivery can be sent even if it exceeds the frequency cap settings for a customer. Reply Tracking: Will store a copy of all replies to your messages on the Replies page within the Bronto platform.
l. Click Save.
Avoid Trouble: If your reminder emails are not being triggered, even though the module is enabled and the conditions are configured and set to run on Magento Cron, check the following things:
• o Make sure that the Status is set to Active in the Rule Information tab. o Check that there are no extra conditions set that are inhibiting general cart
abandonment (e.g. items subsection, cart subtotal, etc.) o The Magento Cron will trigger the messages at the end of the cart is
Abandoned trigger in the Conditions, and after the allotted Cron schedule. Example: Cart is flagged as Abandoned after 30 minutes (shortest possible abandon duration). Cron is set to run every 15 minutes. The earliest this Abandoned cart message can be triggered is 45 minutes after customer abandons a cart.
o To force the Cron to run, switch Frequency to daily.

Testing 1. Add items to your cart
a. Add items to your cart as a guest or a registered user. b. As the abandoned user, do not visit the cart page again until the rule is met.
Rules are located under Promotions > Bronto Email Reminders. TIP: You can check to see how long your cart has been abandoned by navigating to Reports > Shopping Cart > Abandoned Cart.
c. Either wait for the cron to run, or go to Promotions > Bronto Reminder
Emails and select the rule in which you are attempting to meet. d. On the left pane, click Matched Customers. e. Click Match Now.
f. To send the email click Send Now.
Note: You can see what fields were present in the message by click Show in the Fieldscolumn.
2. Verify the email was sent.
Verify the email contains recommendations.
Transactional Emails You can send transactional messages, such as order and shipping confirmations, directly through Bronto for maximum control over deliverability and detailed performance metrics. You can easily change the look and feel of a message, and add cross- and up-sell offers, without having to involve a developer.
1. Enable the module
a. In Magento, go to System > Configuration. b. In the left menu, scroll until you see Bronto and click Transactional Emails. c. In the Settings section, these are the recommended settings:
Enable Module: Yes Allow Sending through Bronto: Yes Log Deliveries: Yes Log Deliveries Fields: Yes Default Price rule Coupon Code: –None selected– Default Product Recommendation: –None selected– Default Sender Flags: –None selected–
d. Click Save Config at the top right of the page.
2. Optional: Import Magento emails into Bronto
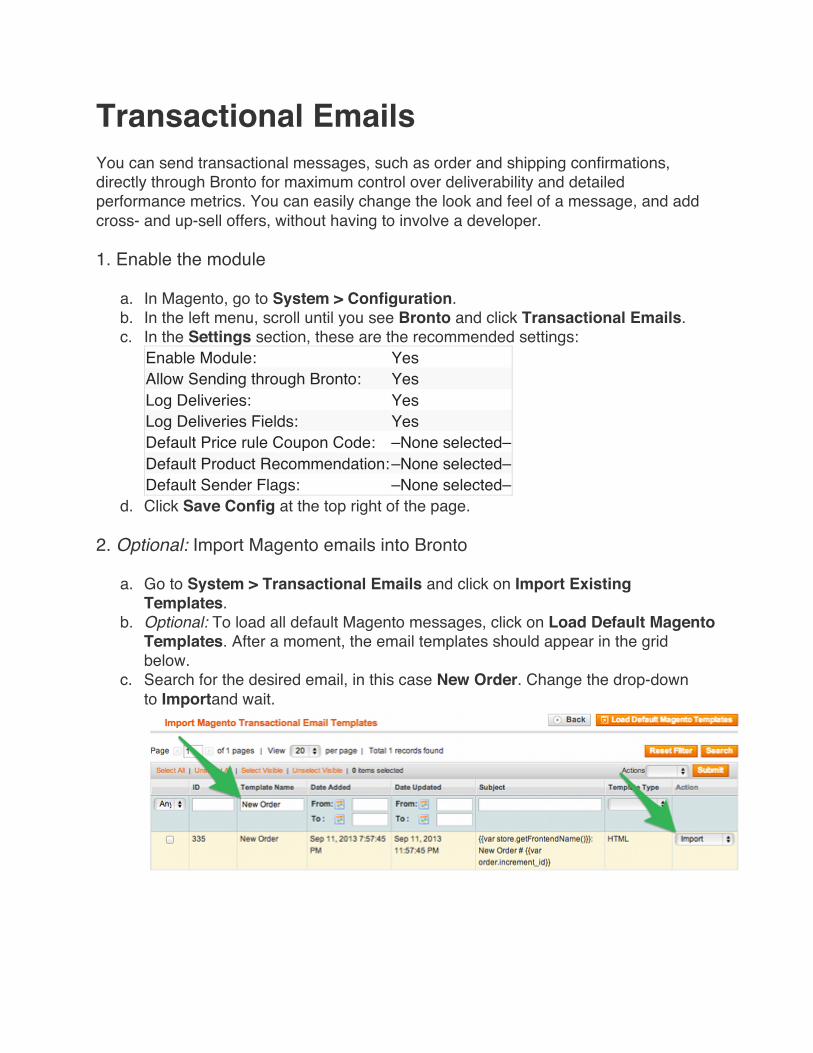
a. Go to System > Transactional Emails and click on Import Existing Templates.
b. Optional: To load all default Magento messages, click on Load Default Magento Templates. After a moment, the email templates should appear in the grid below.
c. Search for the desired email, in this case New Order. Change the drop-down to Importand wait.
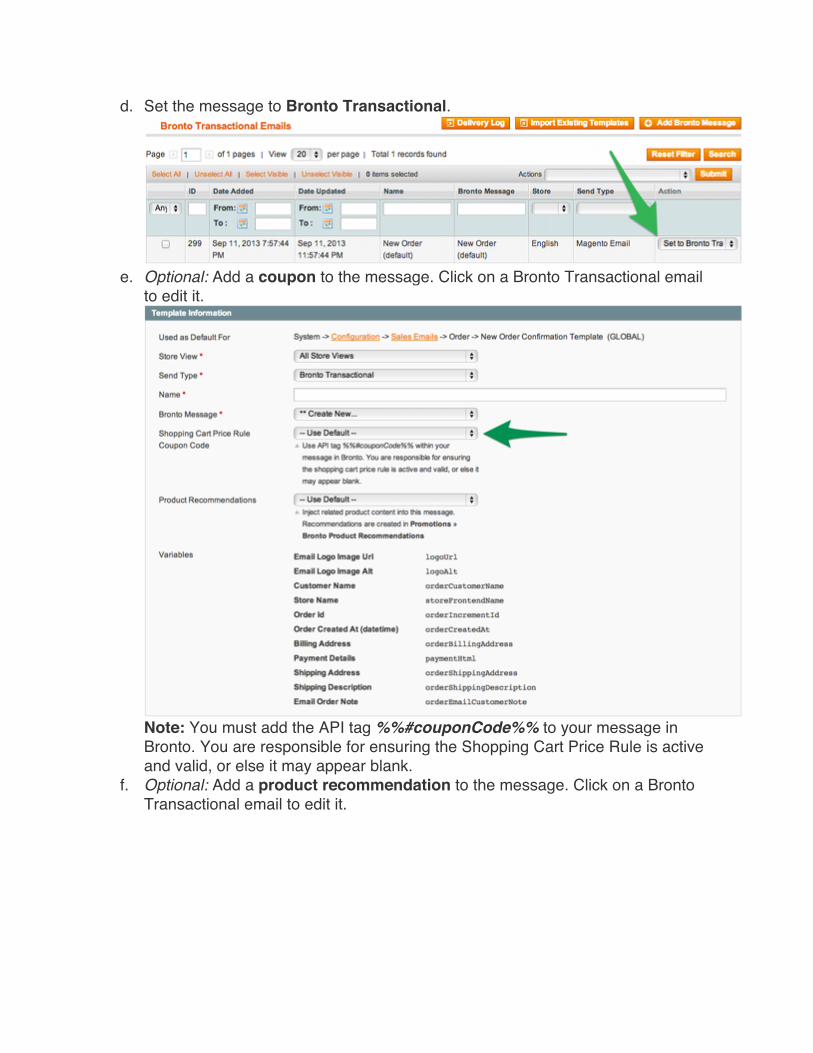
d. Set the message to Bronto Transactional.
e. Optional: Add a coupon to the message. Click on a Bronto Transactional email
to edit it.
Note: You must add the API tag %%#couponCode%% to your message in Bronto. You are responsible for ensuring the Shopping Cart Price Rule is active and valid, or else it may appear blank.
f. Optional: Add a product recommendation to the message. Click on a Bronto Transactional email to edit it.
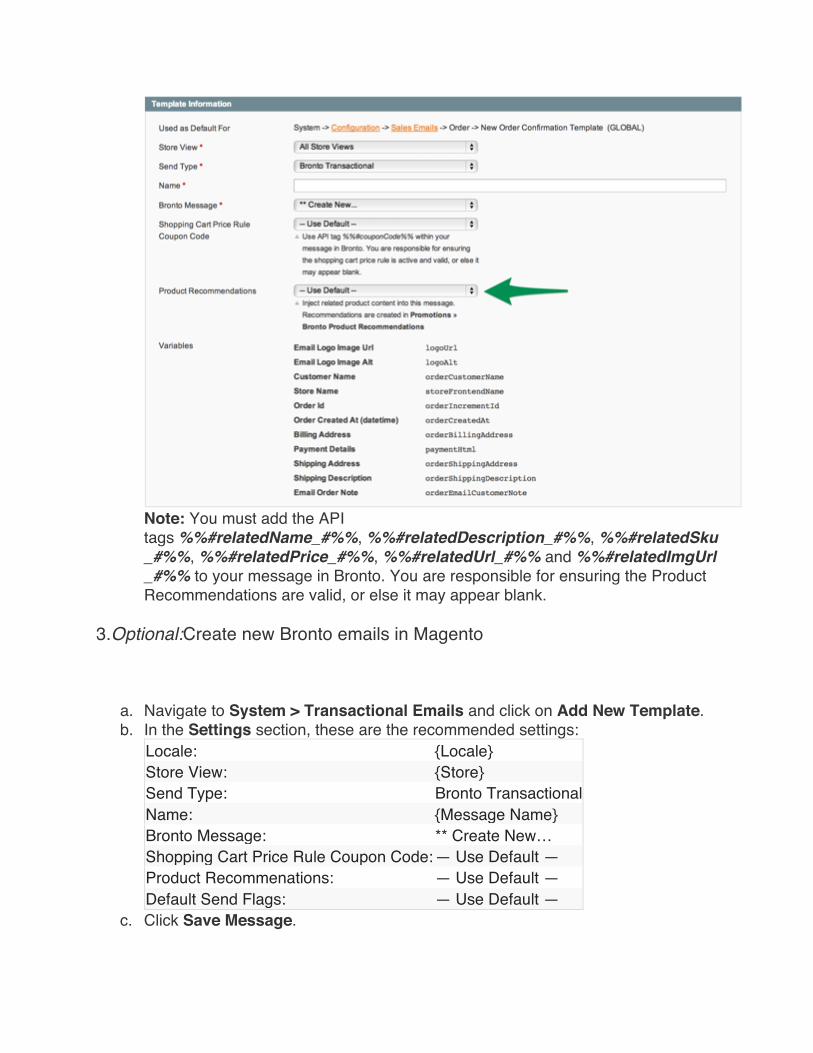
Note: You must add the API tags %%#relatedName_#%%, %%#relatedDescription_#%%, %%#relatedSku_#%%, %%#relatedPrice_#%%, %%#relatedUrl_#%% and %%#relatedImgUrl_#%% to your message in Bronto. You are responsible for ensuring the Product Recommendations are valid, or else it may appear blank.
3.Optional:Create new Bronto emails in Magento
a. Navigate to System > Transactional Emails and click on Add New Template. b. In the Settings section, these are the recommended settings:
Locale: {Locale} Store View: {Store} Send Type: Bronto Transactional Name: {Message Name} Bronto Message: ** Create New… Shopping Cart Price Rule Coupon Code: — Use Default — Product Recommenations: — Use Default — Default Send Flags: — Use Default —
c. Click Save Message.
4. Request transactional approval
a. In Bronto, go to Messages > All Messages. b. Search for and select the desired message. c. Click Request Approval.
Note: The email message will need to be approved by support. This can take up to 48 hours.
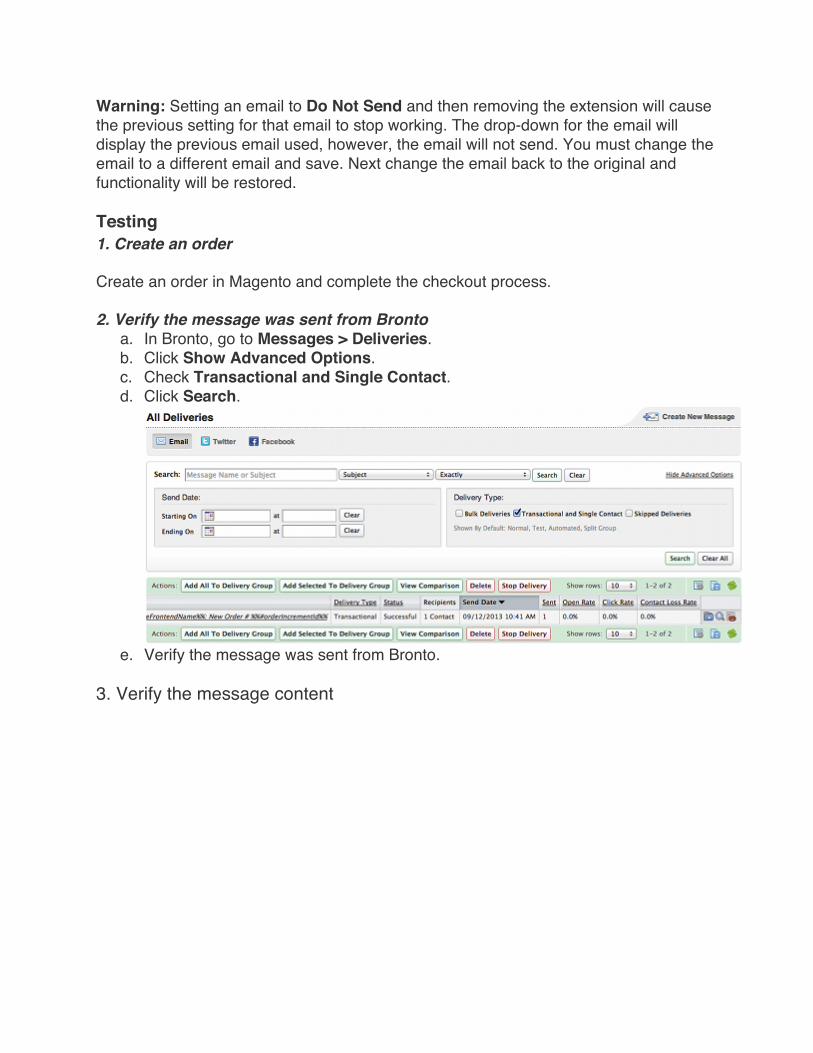
5. Assign the templates
a. In Magento, go to System > Configuration. b. In the left menu, scroll until you see Bronto and click Transactional Emails. c. In the Assign Templates section, scroll until you see Sales Emails and look
for Order. d. Change the Template to the desired template.
e. Click Save Config.
Warning: Setting an email to Do Not Send and then removing the extension will cause the previous setting for that email to stop working. The drop-down for the email will display the previous email used, however, the email will not send. You must change the email to a different email and save. Next change the email back to the original and functionality will be restored.
Testing 1. Create an order
Create an order in Magento and complete the checkout process.
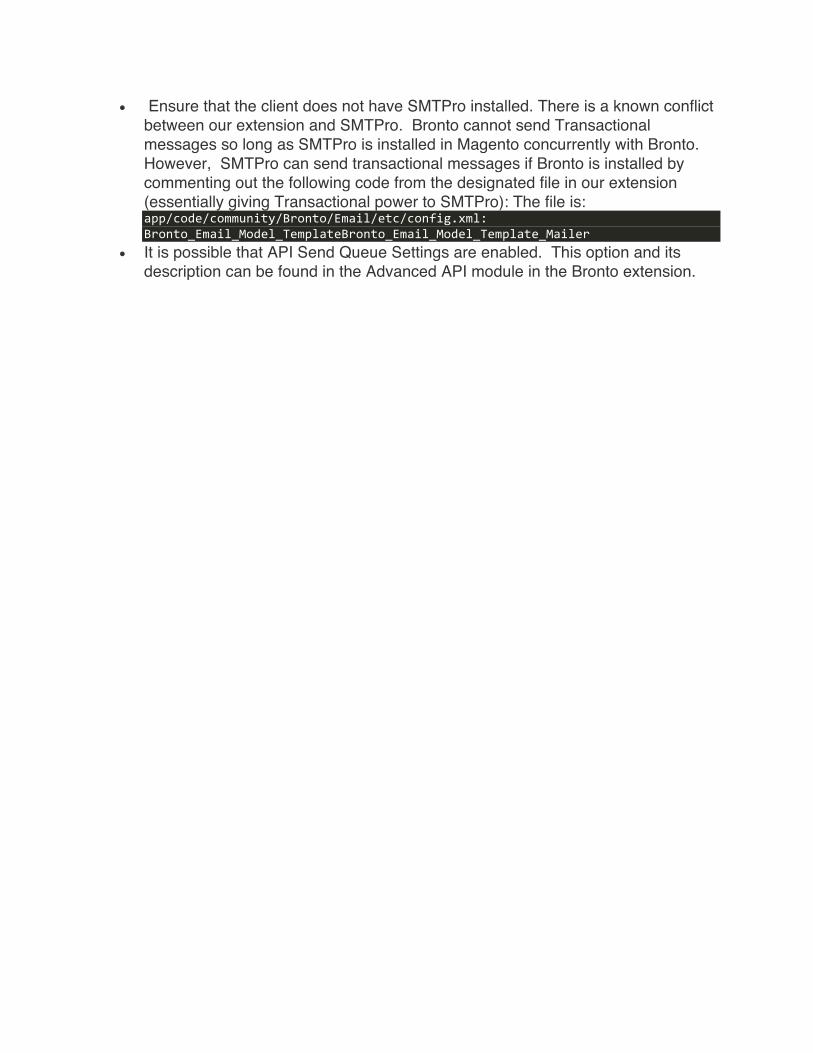
2. Verify the message was sent from Bronto a. In Bronto, go to Messages > Deliveries. b. Click Show Advanced Options. c. Check Transactional and Single Contact. d. Click Search.
e. Verify the message was sent from Bronto.
3. Verify the message content

a. In the deliveries grid, scroll to the right and click the magnifying glass to see the message content.

b. Verify the message content.
Note: If transactional messages are not being triggered through Bronto, check the following things:
• Make sure that in Magento (System>Transactional Emails), the message is set to Bronto Transactional. If this is set to Bronto Marketing and the customer status in Bronto is not set to Active/Onboarding, the customer will not receive the message.
• Make sure that the message in Bronto has been approved for Transactional status.
• Ensure that the client does not have SMTPro installed. There is a known conflict between our extension and SMTPro. Bronto cannot send Transactional messages so long as SMTPro is installed in Magento concurrently with Bronto. However, SMTPro can send transactional messages if Bronto is installed by commenting out the following code from the designated file in our extension (essentially giving Transactional power to SMTPro): The file is: app/code/community/Bronto/Email/etc/config.xml: Bronto_Email_Model_TemplateBronto_Email_Model_Template_Mailer
• It is possible that API Send Queue Settings are enabled. This option and its description can be found in the Advanced API module in the Bronto extension.
Email Variables API message tags are user defined tags that allow you to insert HTML content into the body and subject line of messages using the API. The content you add via API message tags will be added to the message at send time. These tags are used to sync content from your system (order id, address, etc.) with messages you send in the application.
The variables below are broken up into two types, API message tags (%%#field%%) and API loop tags (%%#data_#%%). Loop tags are specially formatted API message tags that allow content to be passed in via the API as an array. For example, if you are using transactional email messages to send a receipt with multiple products, you can use loop tags to create an array containing the relevant information for the products. The following is an example:
Bronto Extension-Specific Emails
• Abandoned Cart or Wishlist Reminders • Post-Purchase Care Tips Notification • Post-Purchase Reorder Reminder • Post-Purchase Review Request
Magento Default Transactional Emails
• Contact Form • Credit Memo Update • Credit Memo Update for Guest • Currency Update Warnings • Forgot Admin Password • Forgot Password • Invoice Update • Invoice Update for Guest • Log Cleanup Warnings • New Account • New Account Confirmation Key • New Account Confirmed • New Credit Memo • New Credit Memo for Guest • New Invoice • New Invoice for Guest • New Order • New Order for Guest • New Shipment
• New Shipment for Guest • Newsletter Subscription Confirmation • Newsletter Subscription Success • Newsletter Unsubscription Success • Order Update • Order Update for Guest • Payment Failed • Product Alerts Cron Error • Product Price Alert • Product Stock Alert • Remind Password • Send Product to a Friend • Send Wishlist • Share Wishlist • Shipment Update • Shipment Update for Guest
Abandoned Cart or Wishlist Reminders
Message Tag Description Message Tag URL to Store’s homepage storeUrl URL to shopping cart cartUrl URL to shopping cart when customer has no session quoteUrl Customer’s first name firstName Customer’s last name lastName Shopping cart subtotal subtotal Shopping cart grand total grandTotal Loop Tag Description Loop Tag Product’s ID productId_# Product’s name productName_# Product’s sku productSku_# Product’s weight productWeight_# Product’s quantity in shopping cart productQty_# Product’s price in shopping cart productPrice_# Product’s subtotal in shopping cart (price * qty) productTotal_# URL to Product productUrl_# URL to Product’s small image productImgUrl_# Products price excluding taxes productPriceExclTax_# Product price including taxes productPriceInclTax_# Related product name relatedName_# Related product description relatedDescription_# Related product sku relatedSku_#

Related product price relatedPrice_# Related product URL relatedUrl_# Related product image URL relatedImgUrl_#
Post-Purchase Care Tips Notification
Message Tag Description Message Tag Order id orderIncrementId Order created date orderCreatedAt Order status orderStatusLabel Order customer name orderCustomerName Post-purchase product id postProductId Post-purchase product name postProductName Post-purchase product sku postProductSku Post-purchase product price postProductPrice Post-purchase product total postProductTotal Post-purchase product quantity postProductQty Post-purchase product description postProductDescription Post-purchase product URL postProductUrl Post-purchase product image URL postProductImgUrl Post-purchase extra content HTML extraContent
Post-Purchase Reorder Reminder
Message Tag Description Message Tag Order id orderIncrementId Order created date orderCreatedAt Order status orderStatusLabel Order customer name orderCustomerName Post-purchase product id postProductId Post-purchase product name postProductName Post-purchase product sku postProductSku Post-purchase product price postProductPrice Post-purchase product total postProductTotal Post-purchase product quantity postProductQty Post-purchase product description postProductDescription Post-purchase product URL postProductUrl Post-purchase product image URL postProductImgUrl Post-purchase extra content HTML extraContent
Post-Purchase Review Request
Message Tag Description Message Tag Order Customer Name orderCustomerName Order Increment Id orderIncrementId order Created At orderCreatedAt Order total orderTotals Loop Tag Description Loop Tag Product Name productName_# Product Image URL productImgUrl_# Product URL productUrl_# Review URL reviewUrl_# Product’s price excluding tax productPriceExclTax_# Product’s price including tax productPriceInclTax_# Product’s name productName_# Product’s sku productSku_# Product’s price productPrice_# Product’s total productTotal_# Product’s quantity productQty_# URL to Product’s small image productImgUrl_# Product’s description productDescription_# Related product name relatedName_# Related product description relatedDescription_# Related product sku relatedSku_# Related product price relatedPrice_# Related product URL relatedUrl_# Related product image URL relatedImgUrl_#
Contact Form
Message Tag Description Message Tag Sender Name dataName Sender Email dataEmail Sender Telephone dataTelephone Comment dataComment
Credit Memo Update
Message Tag Description Message Tag Email Logo emailLogo

Store URL storeURL Store Name storeFrontendName Support Email Address supportEmail Support Phone Number supportPhone Customer Name orderCustomerName Order Id orderIncrementId Order Status orderStatusLabel Link to login to account customerURL Credit Memo Comment comment Order total orderTotals Loop Tag Description Loop Tag Product’s price excluding tax productPriceExclTax_# Product’s price including tax productPriceInclTax_# Product’s name productName_# Product’s sku productSku_# Product’s price productPrice_# Product’s total productTotal_# Product’s quantity productQty_# Product’s URL productUrl_# URL to Product’s small image productImgUrl_# Product’s description productDescription_# Related product name relatedName_# Related product description relatedDescription_# Related product sku relatedSku_# Related product price relatedPrice_# Related product URL relatedUrl_# Related product image URL relatedImgUrl_#
Credit Memo Update for Guest
Message Tag Description Message Tag Email Logo emailLogo Store URL storeURL Store Name storeFrontendName Support Email Address supportEmail Support Phone Number supportPhone Customer Name orderCustomerName Order Id orderIncrementId Order Status orderStatusLabel Link to login to account customerURL

Credit Memo Comment comment Order total orderTotals Loop Tag Description Loop Tag Product’s price excluding tax productPriceExclTax_# Product’s price including tax productPriceInclTax_# Product’s name productName_# Product’s sku productSku_# Product’s price productPrice_# Product’s total productTotal_# Product’s quantity productQty_# Product’s URL productUrl_# URL to Product’s small image productImgUrl_# Product’s description productDescription_# Related product name relatedName_# Related product description relatedDescription_# Related product sku relatedSku_# Related product price relatedPrice_# Related product URL relatedUrl_# Related product image URL relatedImgUrl_#
Currency Update Warnings
Message Tag Description Message Tag Currency Update Warnings warnings
Forgot Admin Password
Message Tag Description Message Tag Email Logo emailLogo Store URL storeURL Store Name storeFrontendName Support Email Address supportEmail Support Phone Number supportPhone Admin Name adminName Admin Password Reset Link adminPasswordResetLink
Forgot Password
Message Tag Description Message Tag Email Logo emailLogo
Store URL storeURL Store Name storeFrontendName Support Email Address supportEmail Support Phone Number supportPhone Customer Name customerName Password Reset Link passwordResetLink
Invoice Update
Message Tag Description Message Tag Email Logo emailLogo Store URL storeURL Store Name storeFrontendName Support Email Address supportEmail Support Phone Number supportPhone Customer Login URL customerURL Customer Name orderCustomerName Order Id orderIncrementId Order Status orderStatusLabel Invoice Comment comment Order total orderTotals Loop Tag Description Loop Tag Product’s price excluding tax productPriceExclTax_# Product’s price including tax productPriceInclTax_# Product’s name productName_# Product’s sku productSku_# Product’s price productPrice_# Product’s total productTotal_# Product’s quantity productQty_# Product’s URL productUrl_# URL to Product’s small image productImgUrl_# Product’s description productDescription_# Gift message giftMessage_# Gift message sender giftMessageFrom_# Gift message recipient giftMessageTo_# Related product name relatedName_# Related product description relatedDescription_# Related product sku relatedSku_# Related product price relatedPrice_# Related product URL relatedUrl_#
Related product image URL relatedImgUrl_#
Invoice Update for Guest
Message Tag Description Message Tag Email Logo emailLogo Store URL storeURL Store Name storeFrontendName Support Email Address supportEmail Support Phone Number supportPhone Customer Login URL customerURL Customer Name orderCustomerName Order Id orderIncrementId Order Status orderStatusLabel Invoice Comment comment Order total orderTotals Loop Tag Description Loop Tag Product’s price excluding tax productPriceExclTax_# Product’s price including tax productPriceInclTax_# Product’s name productName_# Product’s sku productSku_# Product’s price productPrice_# Product’s total productTotal_# Product’s quantity productQty_# Product’s URL productUrl_# URL to Product’s small image productImgUrl_# Product’s description productDescription_# Gift message giftMessage_# Gift message sender giftMessageFrom_# Gift message recipient giftMessageTo_# Related product name relatedName_# Related product description relatedDescription_# Related product sku relatedSku_# Related product price relatedPrice_# Related product URL relatedUrl_# Related product image URL relatedImgUrl_#
Log Cleanup Warnings
Message Tag Description Message Tag
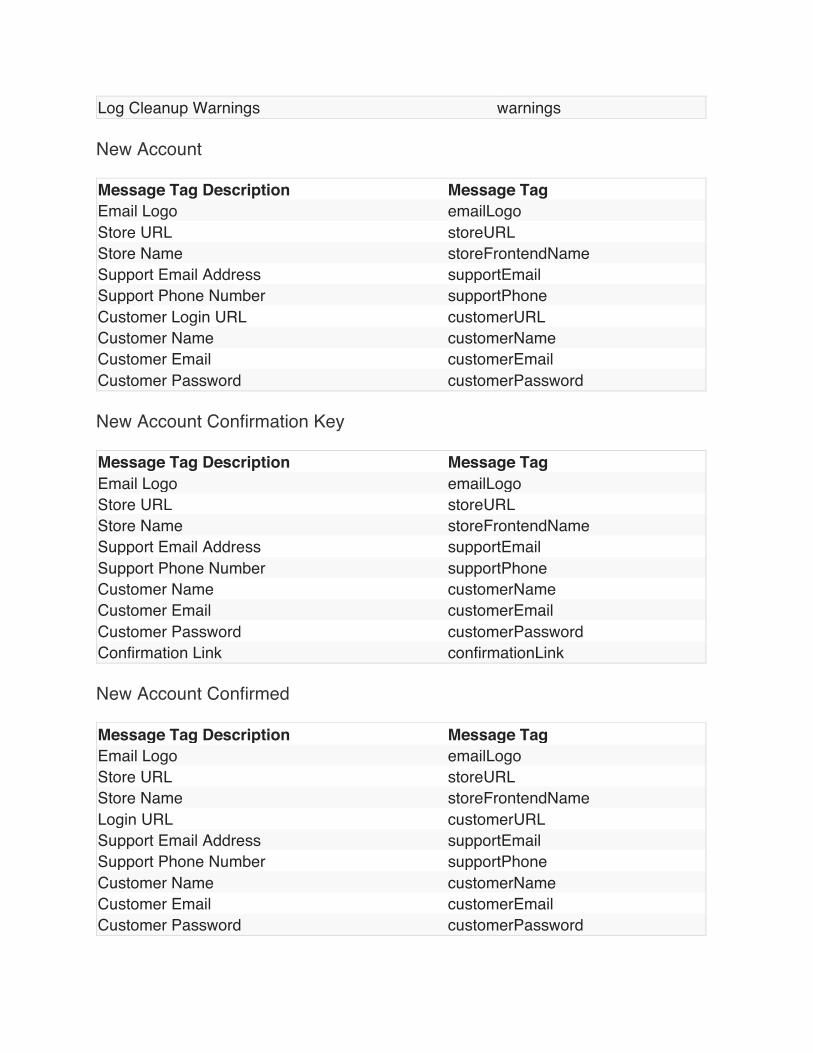
Log Cleanup Warnings warnings
New Account
Message Tag Description Message Tag Email Logo emailLogo Store URL storeURL Store Name storeFrontendName Support Email Address supportEmail Support Phone Number supportPhone Customer Login URL customerURL Customer Name customerName Customer Email customerEmail Customer Password customerPassword
New Account Confirmation Key
Message Tag Description Message Tag Email Logo emailLogo Store URL storeURL Store Name storeFrontendName Support Email Address supportEmail Support Phone Number supportPhone Customer Name customerName Customer Email customerEmail Customer Password customerPassword Confirmation Link confirmationLink
New Account Confirmed
Message Tag Description Message Tag Email Logo emailLogo Store URL storeURL Store Name storeFrontendName Login URL customerURL Support Email Address supportEmail Support Phone Number supportPhone Customer Name customerName Customer Email customerEmail Customer Password customerPassword
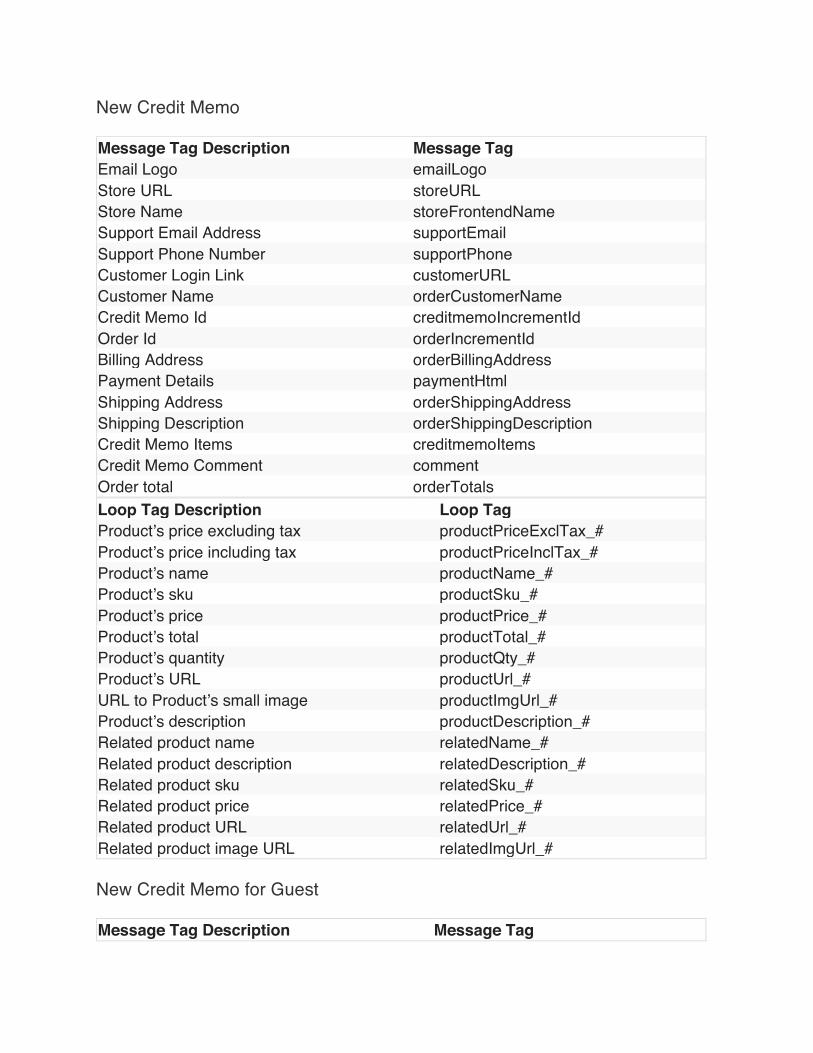
New Credit Memo
Message Tag Description Message Tag Email Logo emailLogo Store URL storeURL Store Name storeFrontendName Support Email Address supportEmail Support Phone Number supportPhone Customer Login Link customerURL Customer Name orderCustomerName Credit Memo Id creditmemoIncrementId Order Id orderIncrementId Billing Address orderBillingAddress Payment Details paymentHtml Shipping Address orderShippingAddress Shipping Description orderShippingDescription Credit Memo Items creditmemoItems Credit Memo Comment comment Order total orderTotals Loop Tag Description Loop Tag Product’s price excluding tax productPriceExclTax_# Product’s price including tax productPriceInclTax_# Product’s name productName_# Product’s sku productSku_# Product’s price productPrice_# Product’s total productTotal_# Product’s quantity productQty_# Product’s URL productUrl_# URL to Product’s small image productImgUrl_# Product’s description productDescription_# Related product name relatedName_# Related product description relatedDescription_# Related product sku relatedSku_# Related product price relatedPrice_# Related product URL relatedUrl_# Related product image URL relatedImgUrl_#
New Credit Memo for Guest
Message Tag Description Message Tag
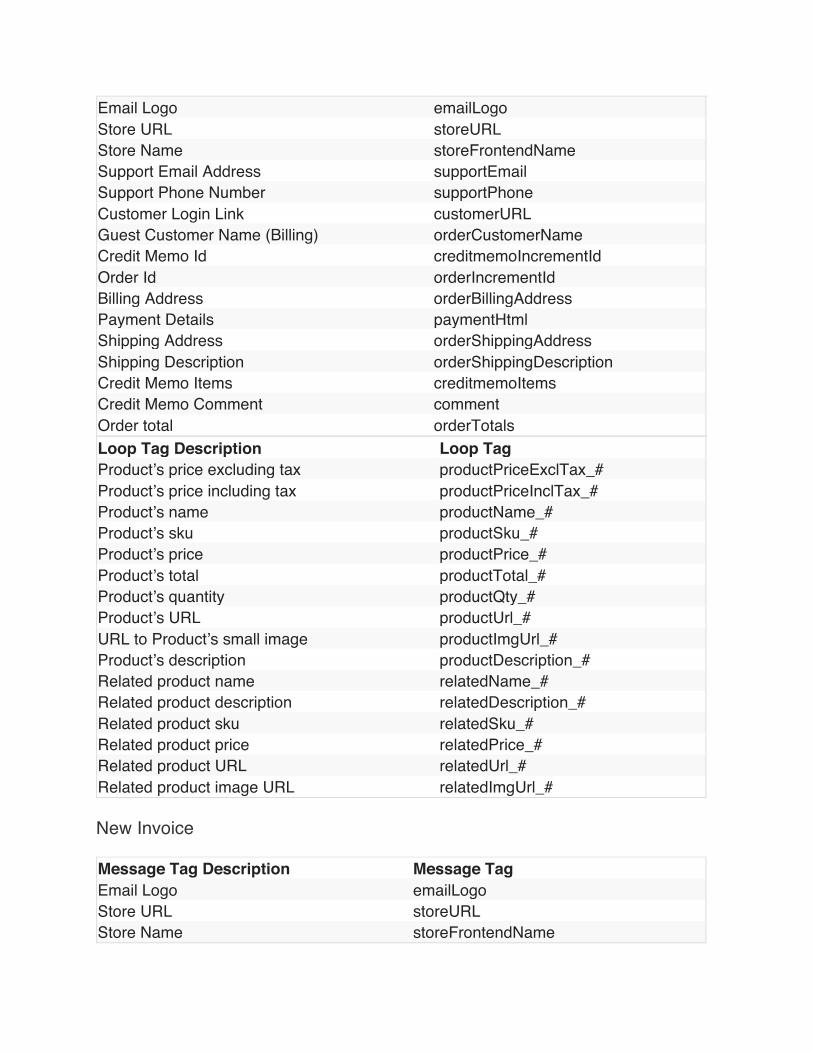
Email Logo emailLogo Store URL storeURL Store Name storeFrontendName Support Email Address supportEmail Support Phone Number supportPhone Customer Login Link customerURL Guest Customer Name (Billing) orderCustomerName Credit Memo Id creditmemoIncrementId Order Id orderIncrementId Billing Address orderBillingAddress Payment Details paymentHtml Shipping Address orderShippingAddress Shipping Description orderShippingDescription Credit Memo Items creditmemoItems Credit Memo Comment comment Order total orderTotals Loop Tag Description Loop Tag Product’s price excluding tax productPriceExclTax_# Product’s price including tax productPriceInclTax_# Product’s name productName_# Product’s sku productSku_# Product’s price productPrice_# Product’s total productTotal_# Product’s quantity productQty_# Product’s URL productUrl_# URL to Product’s small image productImgUrl_# Product’s description productDescription_# Related product name relatedName_# Related product description relatedDescription_# Related product sku relatedSku_# Related product price relatedPrice_# Related product URL relatedUrl_# Related product image URL relatedImgUrl_#
New Invoice
Message Tag Description Message Tag Email Logo emailLogo Store URL storeURL Store Name storeFrontendName
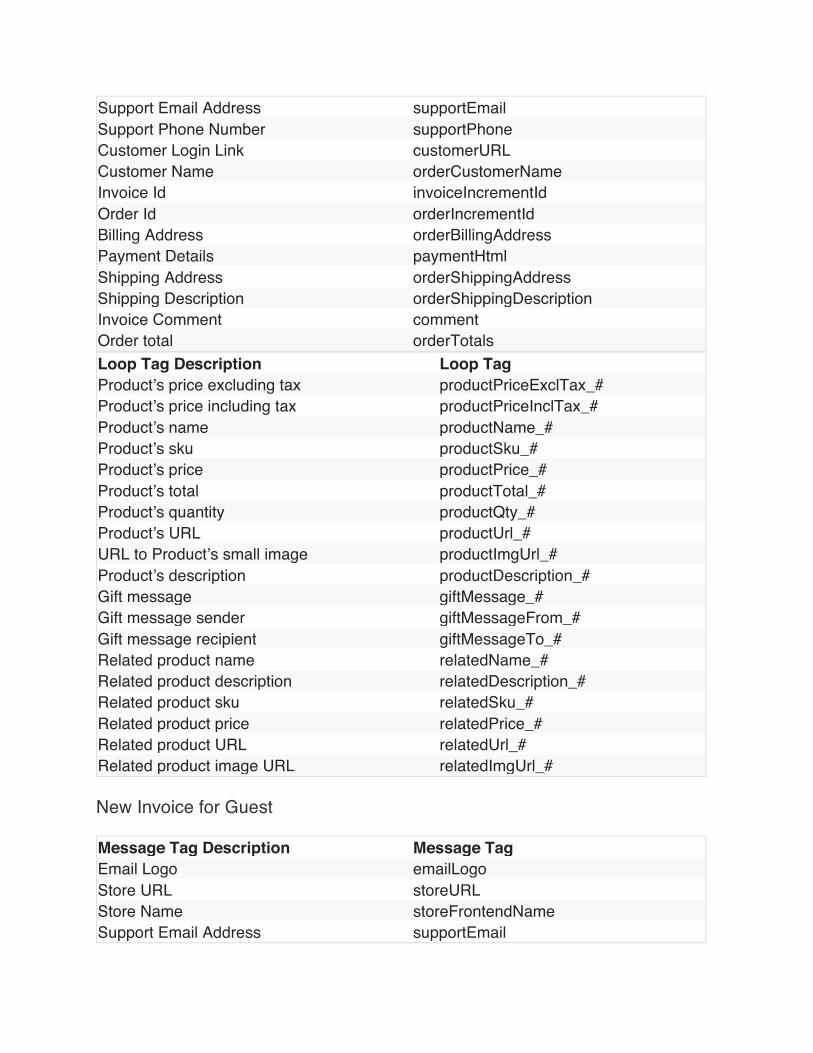
Support Email Address supportEmail Support Phone Number supportPhone Customer Login Link customerURL Customer Name orderCustomerName Invoice Id invoiceIncrementId Order Id orderIncrementId Billing Address orderBillingAddress Payment Details paymentHtml Shipping Address orderShippingAddress Shipping Description orderShippingDescription Invoice Comment comment Order total orderTotals Loop Tag Description Loop Tag Product’s price excluding tax productPriceExclTax_# Product’s price including tax productPriceInclTax_# Product’s name productName_# Product’s sku productSku_# Product’s price productPrice_# Product’s total productTotal_# Product’s quantity productQty_# Product’s URL productUrl_# URL to Product’s small image productImgUrl_# Product’s description productDescription_# Gift message giftMessage_# Gift message sender giftMessageFrom_# Gift message recipient giftMessageTo_# Related product name relatedName_# Related product description relatedDescription_# Related product sku relatedSku_# Related product price relatedPrice_# Related product URL relatedUrl_# Related product image URL relatedImgUrl_#
New Invoice for Guest
Message Tag Description Message Tag Email Logo emailLogo Store URL storeURL Store Name storeFrontendName Support Email Address supportEmail
Support Phone Number supportPhone Guest Customer Name orderCustomerName Invoice Id invoiceIncrementId Order Id orderIncrementId Billing Address orderBillingAddress Payment Details paymentHtml Shipping Address orderShippingAddress Shipping Description orderShippingDescription Invoice Comment comment Order total orderTotals Loop Tag Description Loop Tag Product’s price excluding tax productPriceExclTax_# Product’s price including tax productPriceInclTax_# Product’s name productName_# Product’s sku productSku_# Product’s price productPrice_# Product’s total productTotal_# Product’s quantity productQty_# Product’s URL productUrl_# URL to Product’s small image productImgUrl_# Product’s description productDescription_# Gift message giftMessage_# Gift message sender giftMessageFrom_# Gift message recipient giftMessageTo_# Related product name relatedName_# Related product description relatedDescription_# Related product sku relatedSku_# Related product price relatedPrice_# Related product URL relatedUrl_# Related product image URL relatedImgUrl_#
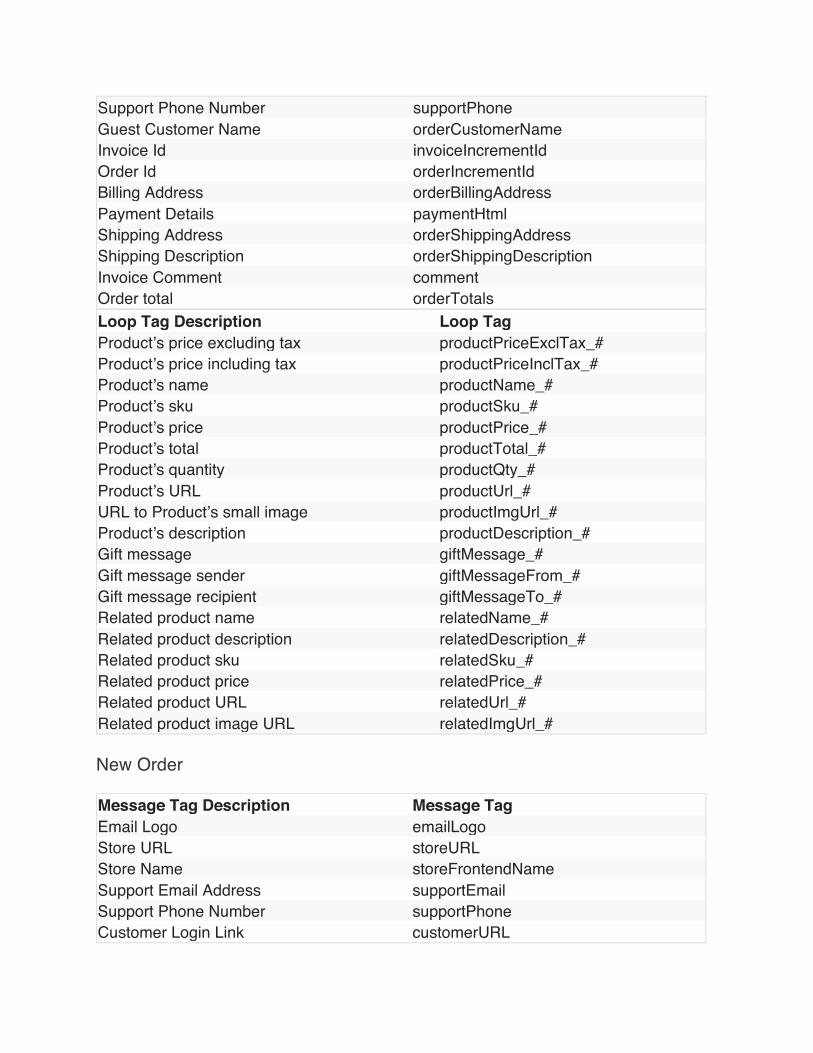
New Order
Message Tag Description Message Tag Email Logo emailLogo Store URL storeURL Store Name storeFrontendName Support Email Address supportEmail Support Phone Number supportPhone Customer Login Link customerURL

Customer Name orderCustomerName Order Id orderIncrementId Order Date orderCreatedAt Billing Address orderBillingAddress Payment Details paymentHtml Shipping Address orderShippingAddress Shipping Description orderShippingDescription Order Items orderItems Email Order Note orderEmailCustomerNote Order total orderTotals Loop Tag Description Loop Tag Product’s price excluding tax productPriceExclTax_# Product’s price including tax productPriceInclTax_# Product’s name productName_# Product’s sku productSku_# Product’s price productPrice_# Product’s total productTotal_# Product’s quantity productQty_# Product’s URL productUrl_# URL to Product’s small image productImgUrl_# Product’s description productDescription_# Gift message giftMessage_# Gift message sender giftMessageFrom_# Gift message recipient giftMessageTo_# Related product name relatedName_# Related product description relatedDescription_# Related product sku relatedSku_# Related product price relatedPrice_# Related product URL relatedUrl_# Related product image URL relatedImgUrl_#
New Order for Guest
Message Tag Description Message Tag Email Logo emailLogo Store URL storeURL Store Name storeFrontendName Support Email Address supportEmail Support Phone Number supportPhone Guest Customer Name orderCustomerName

Order Id orderIncrementId Order Date orderCreatedAt Billing Address orderBillingAddress Payment Details paymentHtml Shipping Address orderShippingAddress Shipping Description orderShippingDescription Order Items orderItems Email Order Note orderEmailCustomerNote Order total orderTotals Loop Tag Description Loop Tag Product’s price excluding tax productPriceExclTax_# Product’s price including tax productPriceInclTax_# Product’s name productName_# Product’s sku productSku_# Product’s price productPrice_# Product’s total productTotal_# Product’s quantity productQty_# Product’s URL productUrl_# URL to Product’s small image productImgUrl_# Product’s description productDescription_# Gift message giftMessage_# Gift message sender giftMessageFrom_# Gift message recipient giftMessageTo_# Related product name relatedName_# Related product description relatedDescription_# Related product sku relatedSku_# Related product price relatedPrice_# Related product URL relatedUrl_# Related product image URL relatedImgUrl_#
New Shipment
Message Tag Description Message Tag Email Logo emailLogo Store URL storeURL Store Name storeFrontendName Support Email Address supportEmail Support Phone Number supportPhone Customer Login Link customerURL Customer Name orderCustomerName

Shipment Id shipmentIncrementId Order Id orderIncrementId Billing Address orderBillingAddress Payment Details paymentHtml Shipping Address orderShippingAddress Shipping Description orderShippingDescription Shipment Items shipmentItems Shipment Tracking Info shipmentTracking Email Order Note orderEmailCustomerNote Shipment Comment comment Order total orderTotals Loop Tag Description Loop Tag Product’s price excluding tax productPriceExclTax_# Product’s price including tax productPriceInclTax_# Product’s name productName_# Product’s sku productSku_# Product’s price productPrice_# Product’s total productTotal_# Product’s quantity productQty_# Product’s URL productUrl_# URL to Product’s small image productImgUrl_# Product’s description productDescription_# Related product name relatedName_# Related product description relatedDescription_# Related product sku relatedSku_# Related product price relatedPrice_# Related product URL relatedUrl_# Related product image URL relatedImgUrl_#
New Shipment for Guest
Message Tag Description Message Tag Email Logo emailLogo Store URL storeURL Store Name storeFrontendName Support Email Address supportEmail Support Phone Number supportPhone Guest Customer Name orderCustomerName Shipment Id shipmentIncrementId Order Id orderIncrementId

Billing Address orderBillingAddress Payment Details paymentHtml Shipping Address orderShippingAddress Shipping Description orderShippingDescription Shipment Items shipmentItems Shipment Tracking Info shipmentTracking Email Order Note orderEmailCustomerNote Shipment Comment comment Order total orderTotals Loop Tag Description Loop Tag Product’s price excluding tax productPriceExclTax_# Product’s price including tax productPriceInclTax_# Product’s name productName_# Product’s sku productSku_# Product’s price productPrice_# Product’s total productTotal_# Product’s quantity productQty_# Product’s URL productUrl_# URL to Product’s small image productImgUrl_# Product’s description productDescription_# Related product name relatedName_# Related product description relatedDescription_# Related product sku relatedSku_# Related product price relatedPrice_# Related product URL relatedUrl_# Related product image URL relatedImgUrl_#
Newsletter Subscription Confirmation
Message Tag Description Message Tag Email Logo emailLogo Store URL storeURL Store Name storeFrontendName Customer Name customerName Subscriber Confirmation Url subConfirmationLink
Newsletter Subscription Success
Message Tag Description Message Tag None None
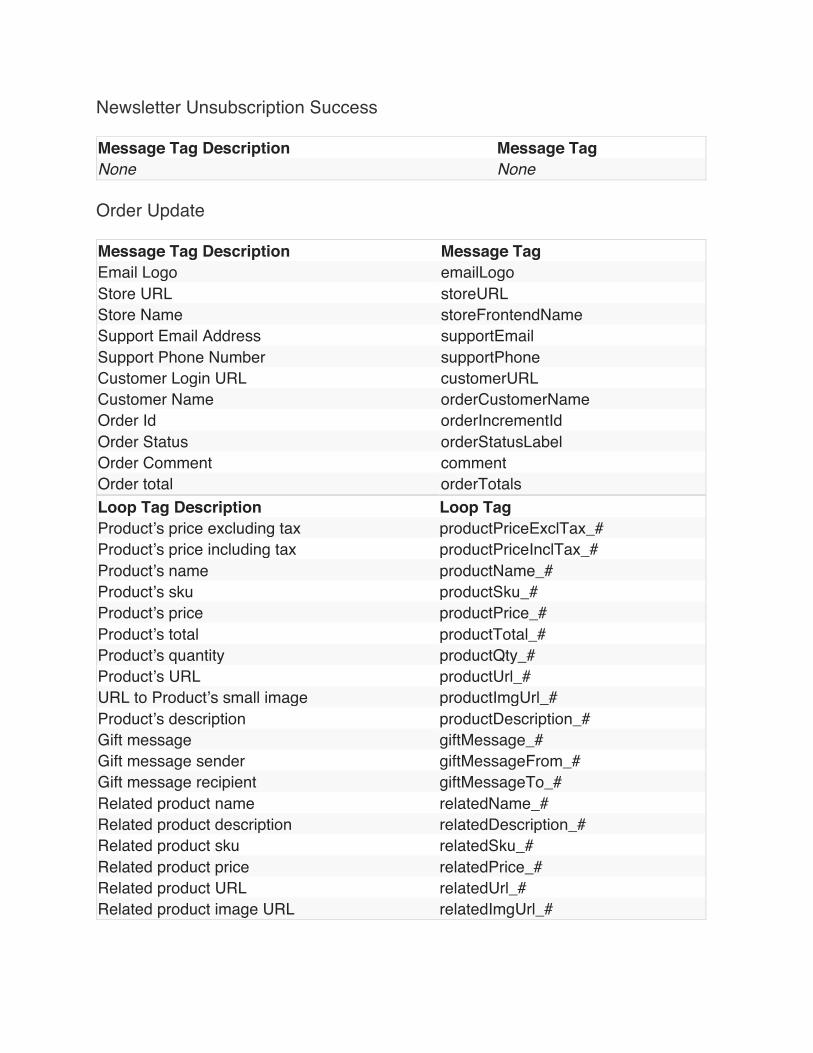
Newsletter Unsubscription Success
Message Tag Description Message Tag None None
Order Update
Message Tag Description Message Tag Email Logo emailLogo Store URL storeURL Store Name storeFrontendName Support Email Address supportEmail Support Phone Number supportPhone Customer Login URL customerURL Customer Name orderCustomerName Order Id orderIncrementId Order Status orderStatusLabel Order Comment comment Order total orderTotals Loop Tag Description Loop Tag Product’s price excluding tax productPriceExclTax_# Product’s price including tax productPriceInclTax_# Product’s name productName_# Product’s sku productSku_# Product’s price productPrice_# Product’s total productTotal_# Product’s quantity productQty_# Product’s URL productUrl_# URL to Product’s small image productImgUrl_# Product’s description productDescription_# Gift message giftMessage_# Gift message sender giftMessageFrom_# Gift message recipient giftMessageTo_# Related product name relatedName_# Related product description relatedDescription_# Related product sku relatedSku_# Related product price relatedPrice_# Related product URL relatedUrl_# Related product image URL relatedImgUrl_#
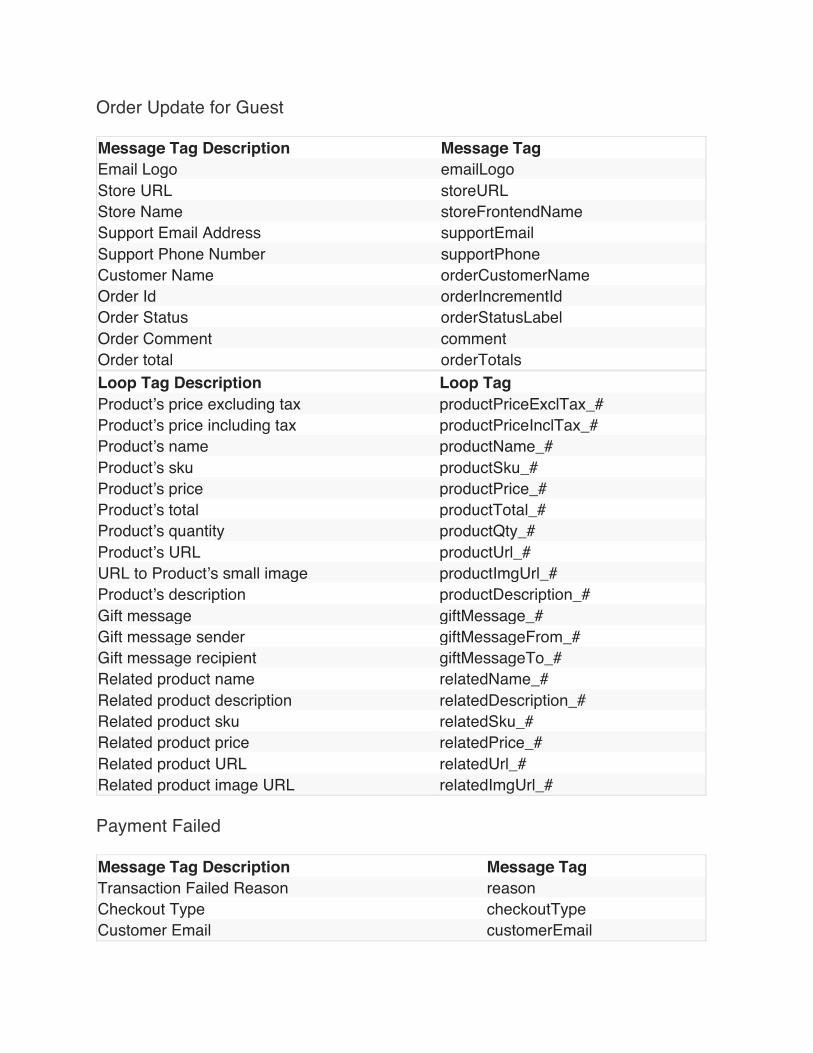
Order Update for Guest
Message Tag Description Message Tag Email Logo emailLogo Store URL storeURL Store Name storeFrontendName Support Email Address supportEmail Support Phone Number supportPhone Customer Name orderCustomerName Order Id orderIncrementId Order Status orderStatusLabel Order Comment comment Order total orderTotals Loop Tag Description Loop Tag Product’s price excluding tax productPriceExclTax_# Product’s price including tax productPriceInclTax_# Product’s name productName_# Product’s sku productSku_# Product’s price productPrice_# Product’s total productTotal_# Product’s quantity productQty_# Product’s URL productUrl_# URL to Product’s small image productImgUrl_# Product’s description productDescription_# Gift message giftMessage_# Gift message sender giftMessageFrom_# Gift message recipient giftMessageTo_# Related product name relatedName_# Related product description relatedDescription_# Related product sku relatedSku_# Related product price relatedPrice_# Related product URL relatedUrl_# Related product image URL relatedImgUrl_#
Payment Failed
Message Tag Description Message Tag Transaction Failed Reason reason Checkout Type checkoutType Customer Email customerEmail
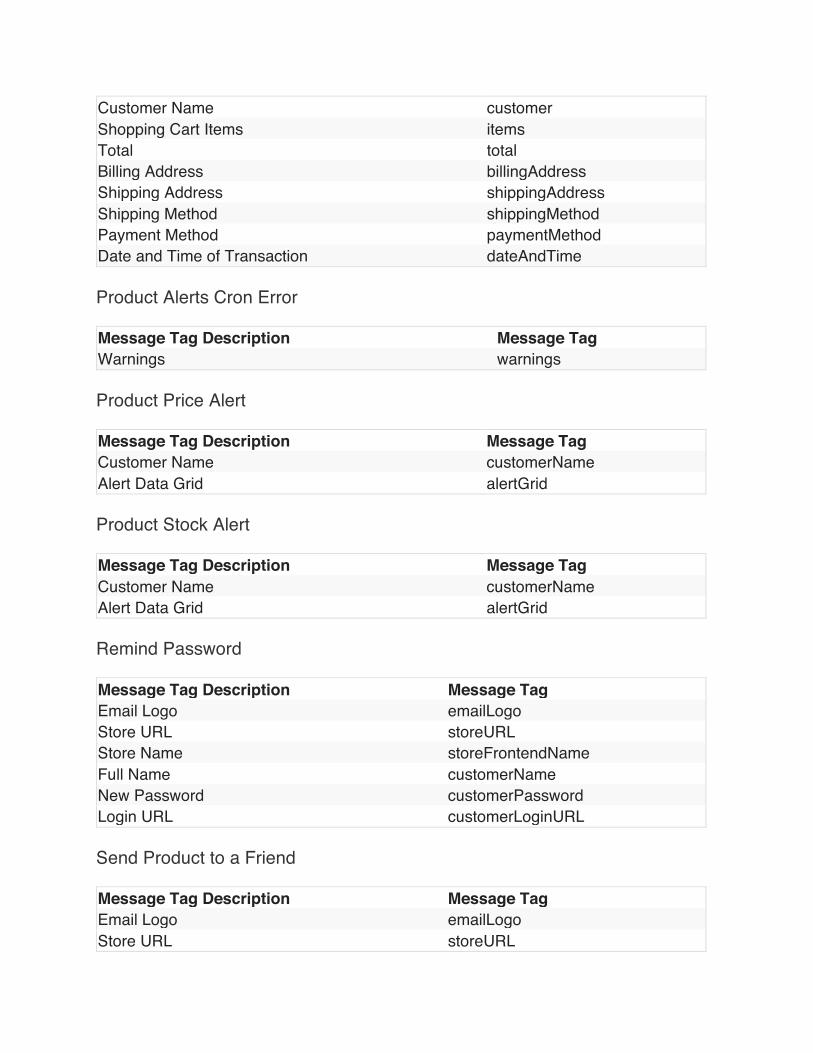
Customer Name customer Shopping Cart Items items Total total Billing Address billingAddress Shipping Address shippingAddress Shipping Method shippingMethod Payment Method paymentMethod Date and Time of Transaction dateAndTime
Product Alerts Cron Error
Message Tag Description Message Tag Warnings warnings
Product Price Alert
Message Tag Description Message Tag Customer Name customerName Alert Data Grid alertGrid
Product Stock Alert
Message Tag Description Message Tag Customer Name customerName Alert Data Grid alertGrid
Remind Password
Message Tag Description Message Tag Email Logo emailLogo Store URL storeURL Store Name storeFrontendName Full Name customerName New Password customerPassword Login URL customerLoginURL
Send Product to a Friend
Message Tag Description Message Tag Email Logo emailLogo Store URL storeURL
Store Name storeFrontendName Support Email Address supportEmail Support Phone Number supportPhone Customer Name customerName Password Reset Link passwordResetLink
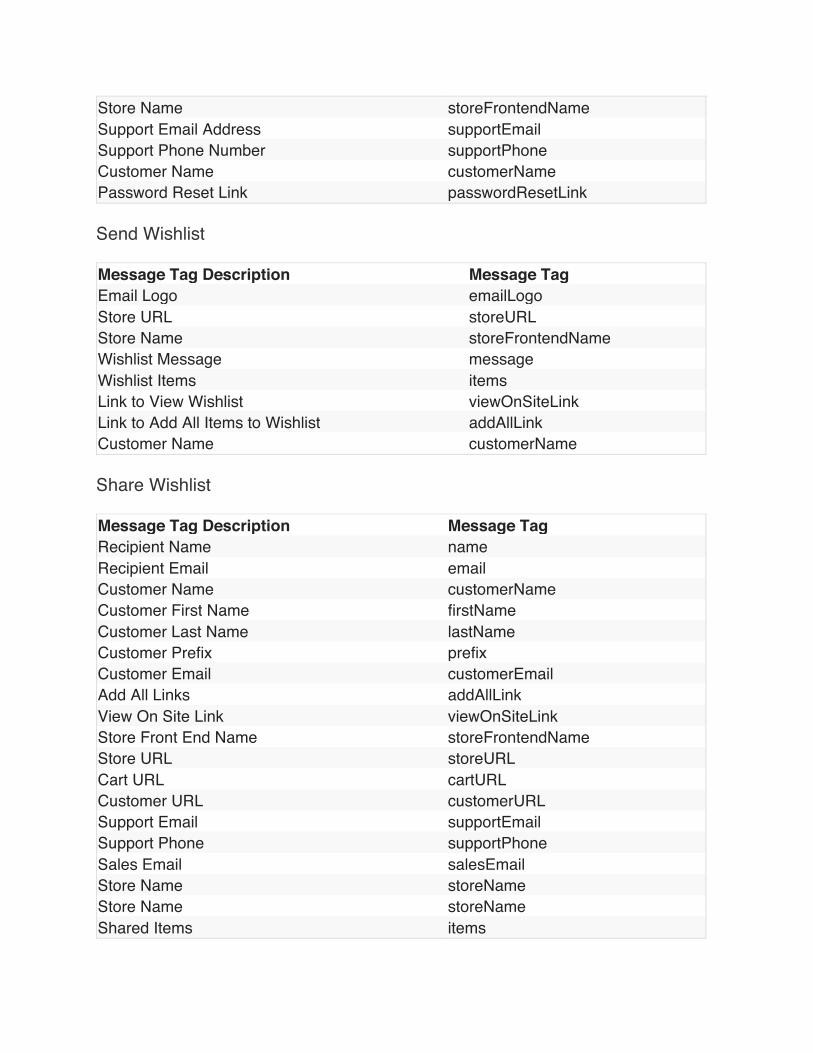
Send Wishlist
Message Tag Description Message Tag Email Logo emailLogo Store URL storeURL Store Name storeFrontendName Wishlist Message message Wishlist Items items Link to View Wishlist viewOnSiteLink Link to Add All Items to Wishlist addAllLink Customer Name customerName
Share Wishlist
Message Tag Description Message Tag Recipient Name name Recipient Email email Customer Name customerName Customer First Name firstName Customer Last Name lastName Customer Prefix prefix Customer Email customerEmail Add All Links addAllLink View On Site Link viewOnSiteLink Store Front End Name storeFrontendName Store URL storeURL Cart URL cartURL Customer URL customerURL Support Email supportEmail Support Phone supportPhone Sales Email salesEmail Store Name storeName Store Name storeName Shared Items items
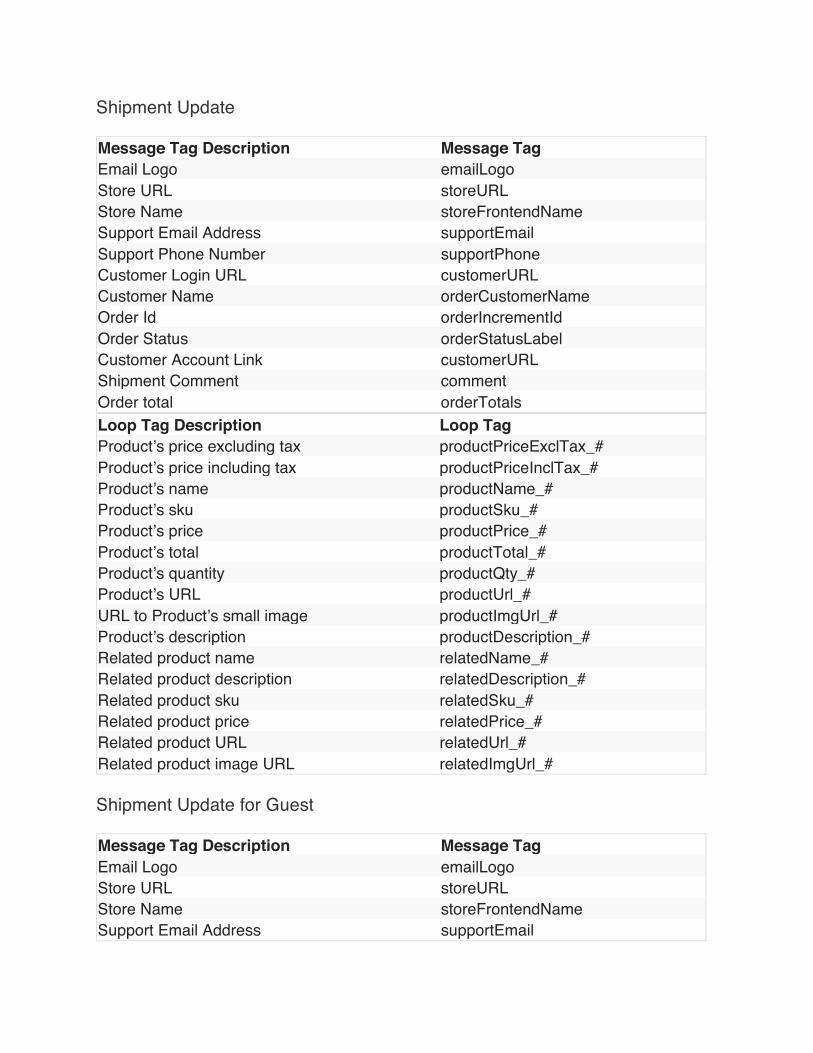
Shipment Update
Message Tag Description Message Tag Email Logo emailLogo Store URL storeURL Store Name storeFrontendName Support Email Address supportEmail Support Phone Number supportPhone Customer Login URL customerURL Customer Name orderCustomerName Order Id orderIncrementId Order Status orderStatusLabel Customer Account Link customerURL Shipment Comment comment Order total orderTotals Loop Tag Description Loop Tag Product’s price excluding tax productPriceExclTax_# Product’s price including tax productPriceInclTax_# Product’s name productName_# Product’s sku productSku_# Product’s price productPrice_# Product’s total productTotal_# Product’s quantity productQty_# Product’s URL productUrl_# URL to Product’s small image productImgUrl_# Product’s description productDescription_# Related product name relatedName_# Related product description relatedDescription_# Related product sku relatedSku_# Related product price relatedPrice_# Related product URL relatedUrl_# Related product image URL relatedImgUrl_#
Shipment Update for Guest
Message Tag Description Message Tag Email Logo emailLogo Store URL storeURL Store Name storeFrontendName Support Email Address supportEmail
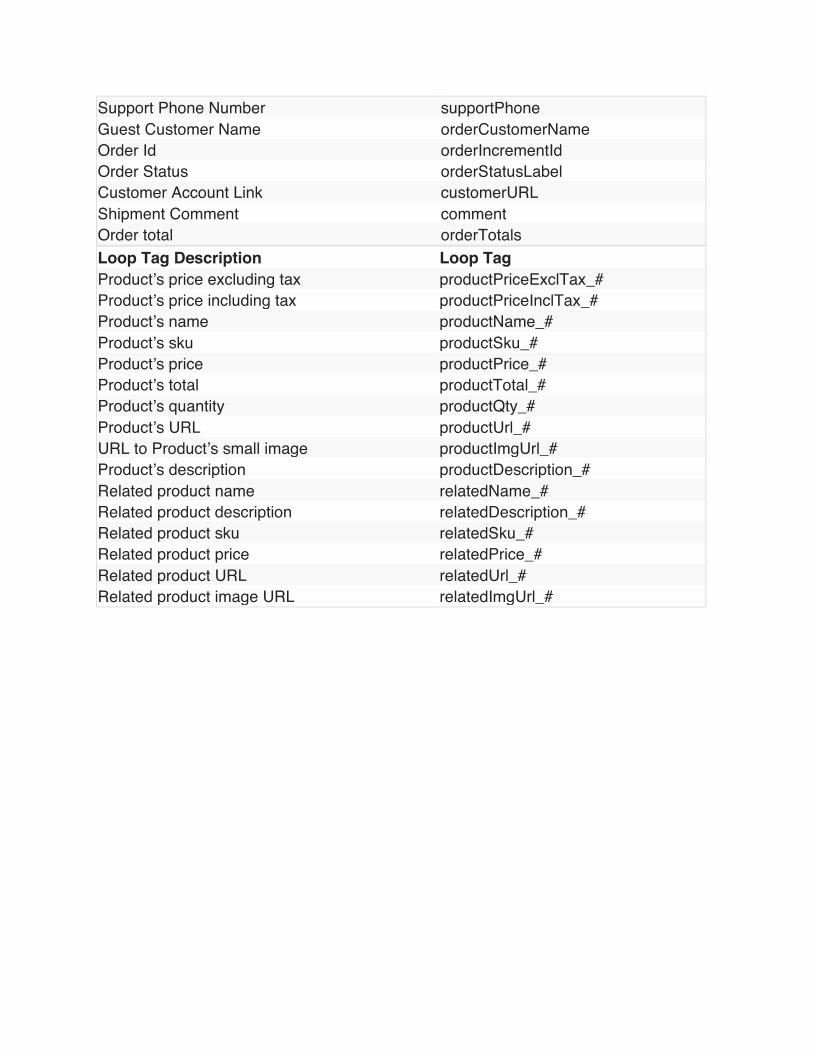
Support Phone Number supportPhone Guest Customer Name orderCustomerName Order Id orderIncrementId Order Status orderStatusLabel Customer Account Link customerURL Shipment Comment comment Order total orderTotals Loop Tag Description Loop Tag Product’s price excluding tax productPriceExclTax_# Product’s price including tax productPriceInclTax_# Product’s name productName_# Product’s sku productSku_# Product’s price productPrice_# Product’s total productTotal_# Product’s quantity productQty_# Product’s URL productUrl_# URL to Product’s small image productImgUrl_# Product’s description productDescription_# Related product name relatedName_# Related product description relatedDescription_# Related product sku relatedSku_# Related product price relatedPrice_# Related product URL relatedUrl_# Related product image URL relatedImgUrl_#
Post-Purchase Emails You can send 3 types of post purchase emails:
Review Request– Review Request is an order-based post-purchase email, containing all of the products for a particular order, set to send at a specified interval. The message will have a link that takes customers to the review section of a product page (or the product page itself) in order to review the product purchased.
Reorder Reminder– Reorder Reminder is a product-based post-purchase email, containing a singular product. An order with multiple products can potentially generate multiple reorder reminders. Reorder frequency can be configured in the product catalog, once enabled. Messages are intended to remind customers to reorder products such as diapers, supplements, etc.
Care Tips Notification– Care Tips Notification is a product-based post-purchase email, containing a singular product. Messages that are sent to customers at a specified interval after completion of an order. An order with multiple products can potentially generate multiple care notifications. Care tip content can be configured in the product catalog, once enabled. This message will offer tips to the customer to be used when caring for their products (e.g. leather products, cloth material products).
Before you begin: 1. Adjust target send time and max scheduled emails
a. In Magento, go to System > Configuration. b. In the left menu, scroll until you see Bronto, and click Post-Purchase Emails. c. In the Settings section, these are the recommended settings:
o Target Time Scheduled Email: — No Adjustment — o Max Scheduled Emails: -1
d. Click Save Config.
2. Create a review, reorder, or care tips notification email
a. In Bronto, to to Messages > Email Messages. b. Click Create New Message. c. Click Create Email Message in the pop-up. d. Create a Message Name, select a Message Folder, and select HTML (Code
Editor) as the Email Message Type. e. Click Next. f. Add a Subject and a Body.
g. Click Save & Close.
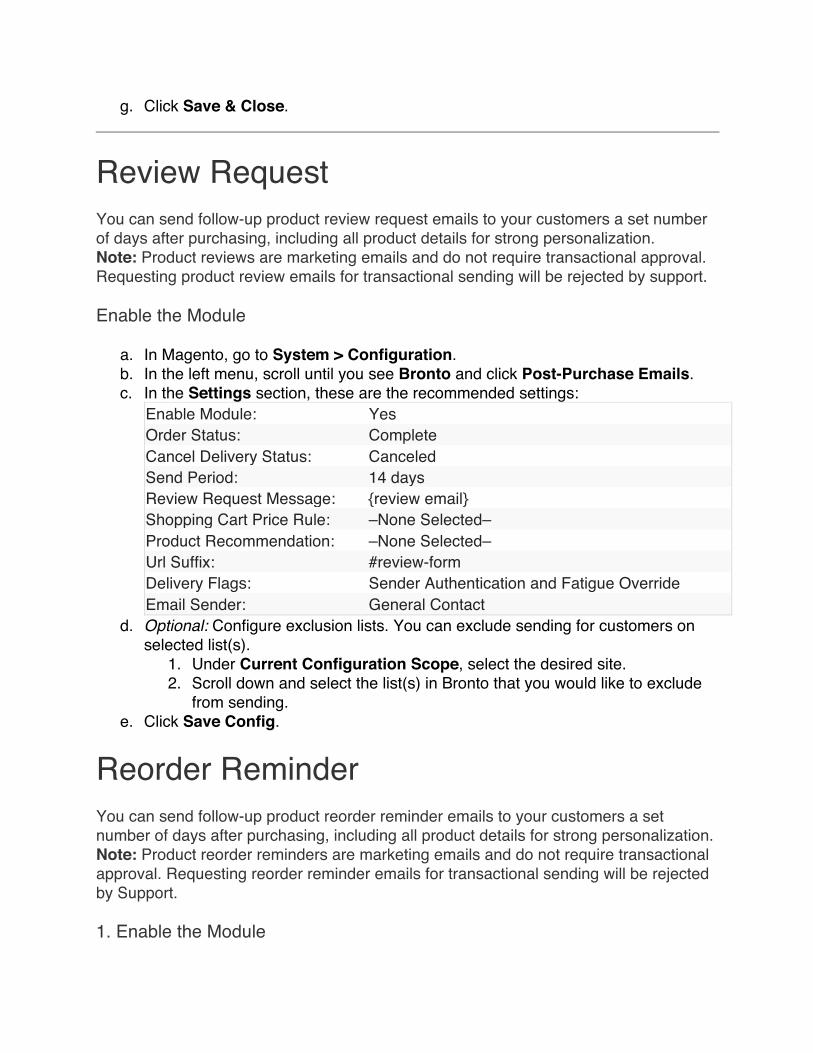
Review Request You can send follow-up product review request emails to your customers a set number of days after purchasing, including all product details for strong personalization. Note: Product reviews are marketing emails and do not require transactional approval. Requesting product review emails for transactional sending will be rejected by support.
Enable the Module
a. In Magento, go to System > Configuration. b. In the left menu, scroll until you see Bronto and click Post-Purchase Emails. c. In the Settings section, these are the recommended settings:
Enable Module: Yes Order Status: Complete Cancel Delivery Status: Canceled Send Period: 14 days Review Request Message: {review email} Shopping Cart Price Rule: –None Selected– Product Recommendation: –None Selected– Url Suffix: #review-form Delivery Flags: Sender Authentication and Fatigue Override Email Sender: General Contact
d. Optional: Configure exclusion lists. You can exclude sending for customers on selected list(s).
1. Under Current Configuration Scope, select the desired site. 2. Scroll down and select the list(s) in Bronto that you would like to exclude
from sending. e. Click Save Config.
Reorder Reminder You can send follow-up product reorder reminder emails to your customers a set number of days after purchasing, including all product details for strong personalization. Note: Product reorder reminders are marketing emails and do not require transactional approval. Requesting reorder reminder emails for transactional sending will be rejected by Support.
1. Enable the Module
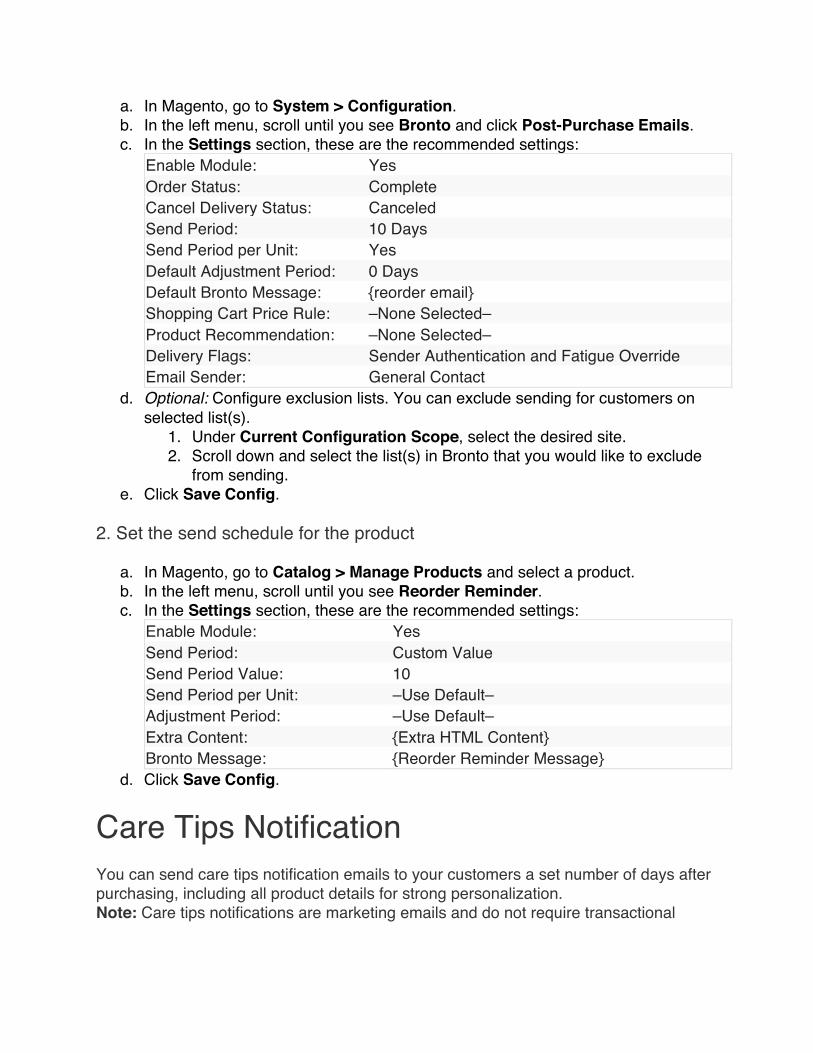
a. In Magento, go to System > Configuration. b. In the left menu, scroll until you see Bronto and click Post-Purchase Emails. c. In the Settings section, these are the recommended settings:
Enable Module: Yes Order Status: Complete Cancel Delivery Status: Canceled Send Period: 10 Days Send Period per Unit: Yes Default Adjustment Period: 0 Days Default Bronto Message: {reorder email} Shopping Cart Price Rule: –None Selected– Product Recommendation: –None Selected– Delivery Flags: Sender Authentication and Fatigue Override Email Sender: General Contact
d. Optional: Configure exclusion lists. You can exclude sending for customers on selected list(s).
1. Under Current Configuration Scope, select the desired site. 2. Scroll down and select the list(s) in Bronto that you would like to exclude
from sending. e. Click Save Config.
2. Set the send schedule for the product
a. In Magento, go to Catalog > Manage Products and select a product. b. In the left menu, scroll until you see Reorder Reminder. c. In the Settings section, these are the recommended settings:
Enable Module: Yes Send Period: Custom Value Send Period Value: 10 Send Period per Unit: –Use Default– Adjustment Period: –Use Default– Extra Content: {Extra HTML Content} Bronto Message: {Reorder Reminder Message}
d. Click Save Config.
Care Tips Notification You can send care tips notification emails to your customers a set number of days after purchasing, including all product details for strong personalization. Note: Care tips notifications are marketing emails and do not require transactional
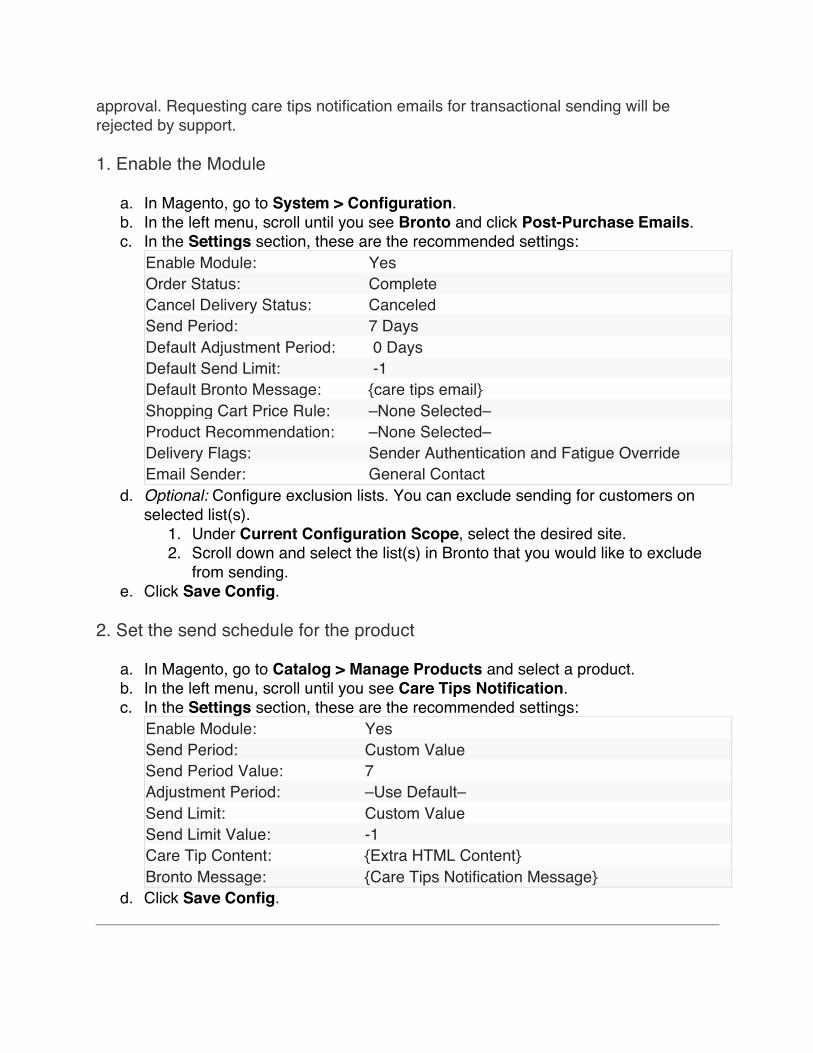
approval. Requesting care tips notification emails for transactional sending will be rejected by support.
1. Enable the Module
a. In Magento, go to System > Configuration. b. In the left menu, scroll until you see Bronto and click Post-Purchase Emails. c. In the Settings section, these are the recommended settings:
Enable Module: Yes Order Status: Complete Cancel Delivery Status: Canceled Send Period: 7 Days Default Adjustment Period: 0 Days Default Send Limit: -1 Default Bronto Message: {care tips email} Shopping Cart Price Rule: –None Selected– Product Recommendation: –None Selected– Delivery Flags: Sender Authentication and Fatigue Override Email Sender: General Contact
d. Optional: Configure exclusion lists. You can exclude sending for customers on selected list(s).
1. Under Current Configuration Scope, select the desired site. 2. Scroll down and select the list(s) in Bronto that you would like to exclude
from sending. e. Click Save Config.
2. Set the send schedule for the product
a. In Magento, go to Catalog > Manage Products and select a product. b. In the left menu, scroll until you see Care Tips Notification. c. In the Settings section, these are the recommended settings:
Enable Module: Yes Send Period: Custom Value Send Period Value: 7 Adjustment Period: –Use Default– Send Limit: Custom Value Send Limit Value: -1 Care Tip Content: {Extra HTML Content} Bronto Message: {Care Tips Notification Message}
d. Click Save Config.
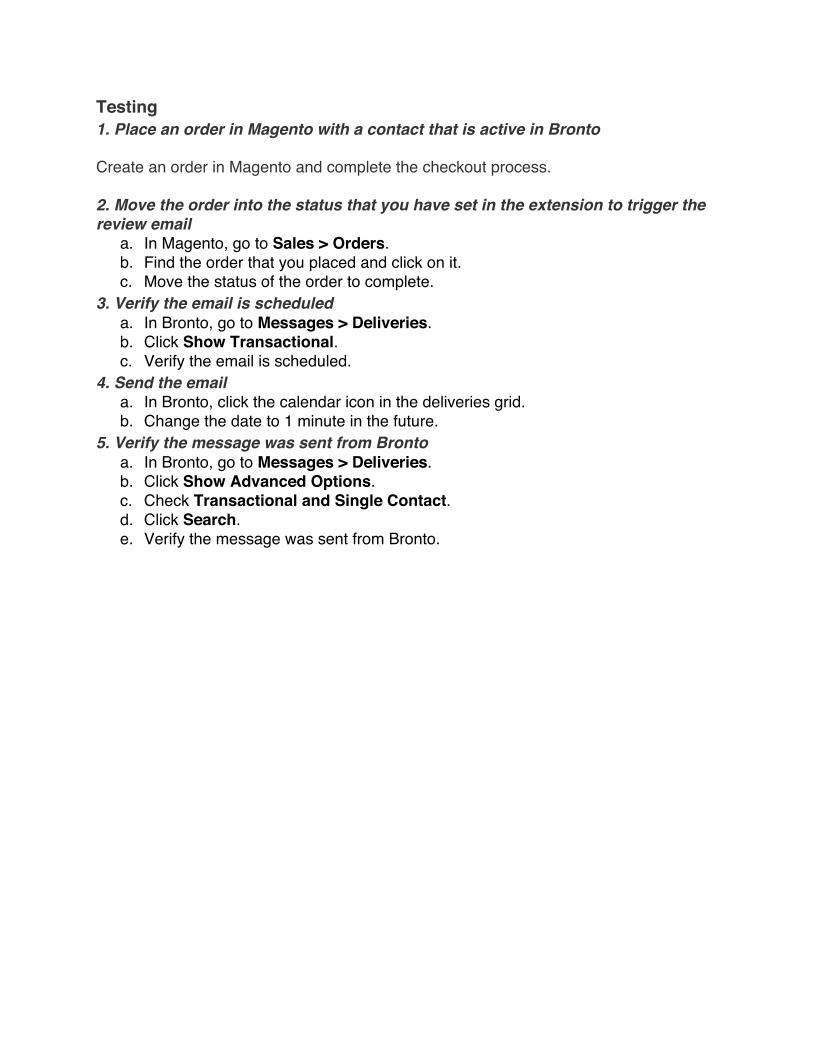
Testing 1. Place an order in Magento with a contact that is active in Bronto
Create an order in Magento and complete the checkout process.
2. Move the order into the status that you have set in the extension to trigger the review email
a. In Magento, go to Sales > Orders. b. Find the order that you placed and click on it. c. Move the status of the order to complete.
3. Verify the email is scheduled a. In Bronto, go to Messages > Deliveries. b. Click Show Transactional. c. Verify the email is scheduled.
4. Send the email a. In Bronto, click the calendar icon in the deliveries grid. b. Change the date to 1 minute in the future.
5. Verify the message was sent from Bronto a. In Bronto, go to Messages > Deliveries. b. Click Show Advanced Options. c. Check Transactional and Single Contact. d. Click Search. e. Verify the message was sent from Bronto.
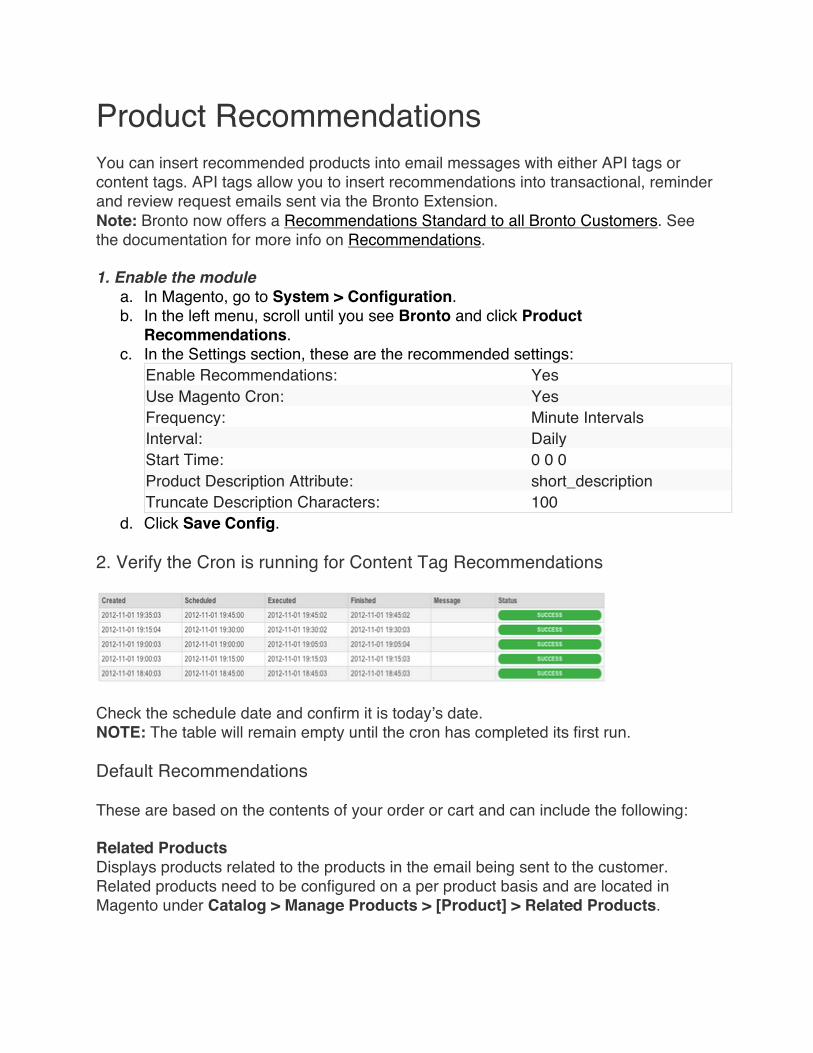
Product Recommendations You can insert recommended products into email messages with either API tags or content tags. API tags allow you to insert recommendations into transactional, reminder and review request emails sent via the Bronto Extension. Note: Bronto now offers a Recommendations Standard to all Bronto Customers. See the documentation for more info on Recommendations.
1. Enable the module a. In Magento, go to System > Configuration. b. In the left menu, scroll until you see Bronto and click Product
Recommendations. c. In the Settings section, these are the recommended settings:
Enable Recommendations: Yes Use Magento Cron: Yes Frequency: Minute Intervals Interval: Daily Start Time: 0 0 0 Product Description Attribute: short_description Truncate Description Characters: 100
d. Click Save Config.
2. Verify the Cron is running for Content Tag Recommendations
Check the schedule date and confirm it is today’s date. NOTE: The table will remain empty until the cron has completed its first run.
Default Recommendations
These are based on the contents of your order or cart and can include the following:
Related Products Displays products related to the products in the email being sent to the customer. Related products need to be configured on a per product basis and are located in Magento under Catalog > Manage Products > [Product] > Related Products.
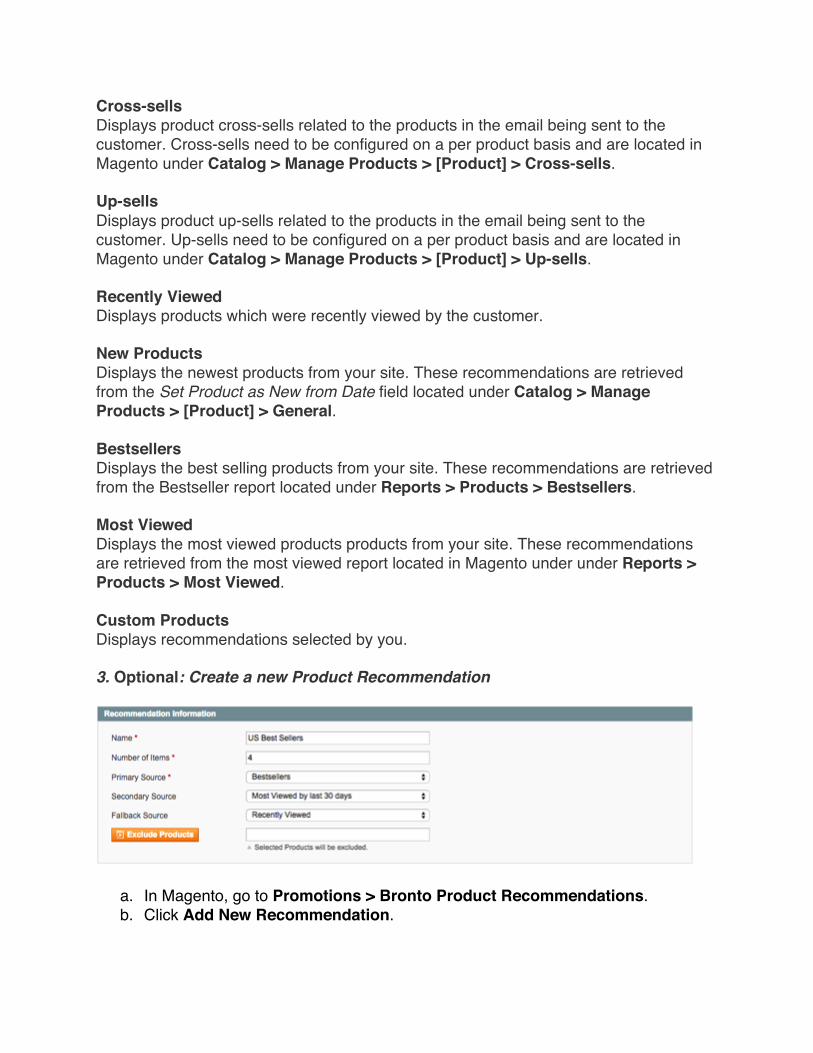
Cross-sells Displays product cross-sells related to the products in the email being sent to the customer. Cross-sells need to be configured on a per product basis and are located in Magento under Catalog > Manage Products > [Product] > Cross-sells.
Up-sells Displays product up-sells related to the products in the email being sent to the customer. Up-sells need to be configured on a per product basis and are located in Magento under Catalog > Manage Products > [Product] > Up-sells.
Recently Viewed Displays products which were recently viewed by the customer.
New Products Displays the newest products from your site. These recommendations are retrieved from the Set Product as New from Date field located under Catalog > Manage Products > [Product] > General.
Bestsellers Displays the best selling products from your site. These recommendations are retrieved from the Bestseller report located under Reports > Products > Bestsellers.
Most Viewed Displays the most viewed products products from your site. These recommendations are retrieved from the most viewed report located in Magento under under Reports > Products > Most Viewed.
Custom Products Displays recommendations selected by you.
3. Optional: Create a new Product Recommendation
a. In Magento, go to Promotions > Bronto Product Recommendations. b. Click Add New Recommendation.

c. Select a name, number of items, primary source, secondary source, fallback sourceand Exclude Products.
d. Click Save. Note: Product recommendations can be used in reminder emails, review emails and transactional emails.
Content Tag Recommendations
With content tags, you can insert recommended products into any message in Bronto and these can include the following:
New Products Displays the newest products from your site. These recommendations are retrieved from the Set Product as New from Date field located under Catalog > Manage Products > [Product]->General.
Bestsellers Displays the best selling products from your site. These recommendations are retrieved from the Bestseller report located under Reports > Products > Bestsellers.
Most Viewed Displays the most viewed products products from your site. These recommendations are retrieved from the most viewed report located in Magento under under Reports > Products > Most Viewed.
Custom Products Displays recommendations selected by you.
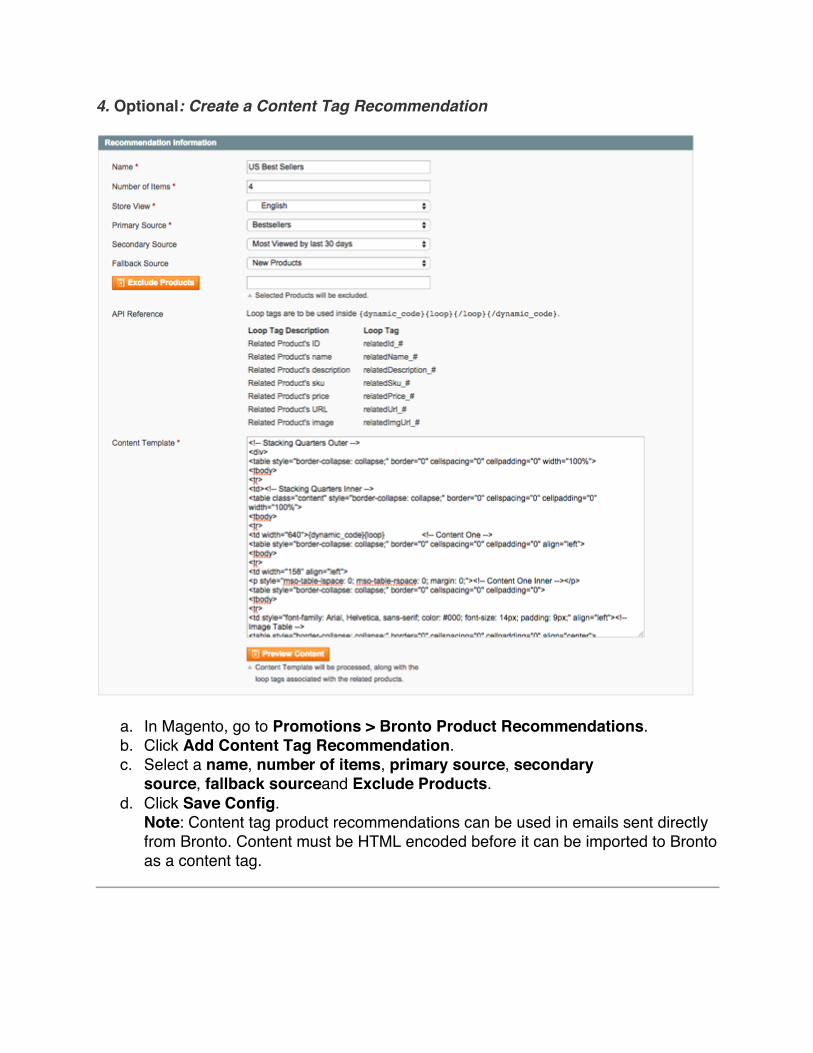
4. Optional: Create a Content Tag Recommendation
a. In Magento, go to Promotions > Bronto Product Recommendations. b. Click Add Content Tag Recommendation. c. Select a name, number of items, primary source, secondary
source, fallback sourceand Exclude Products. d. Click Save Config.
Note: Content tag product recommendations can be used in emails sent directly from Bronto. Content must be HTML encoded before it can be imported to Bronto as a content tag.
Testing 1. Add a recommendation to an email
In Magento, follow the instructions on how to add a transactional email with a product recommendation for a new order. Note: Make sure you add a product recommendation to the email.
2. Create a new order in Magento.
Create an order in Magento and complete the checkout process.
3. Verify the email contains recommendations.
In Bronto, verify the email contains recommendations. Note: You must add these API tags to your message in Bronto:
• %%#relatedName_#%% • %%#relatedDescription_#%% • %%#relatedSku_#%% • %%#relatedPrice_#%% • %%#relatedUrl_#%% • %%#relatedImgUrl_#%%
You are responsible for ensuring the Product Recommendations are valid, or else it may appear blank.

Coupon Management You can integrate with Bronto’s separate Coupon Manager app, where you can create, manage and distribute unique coupon codes via email or SMS for high-impact promotional campaigns.
1. Copy the coupon manager account id from the Coupon Manager App
a. In Bronto, click the gear icon in the Coupon Manager App. b. In the pop-up, select the Redemption JavaScript Snippet. c. In the pop-up, select the Coupon ID and copy it to the clipboard.
2. Add the coupon manager account id to the extension
a. In Magento, go to System > Configuration.
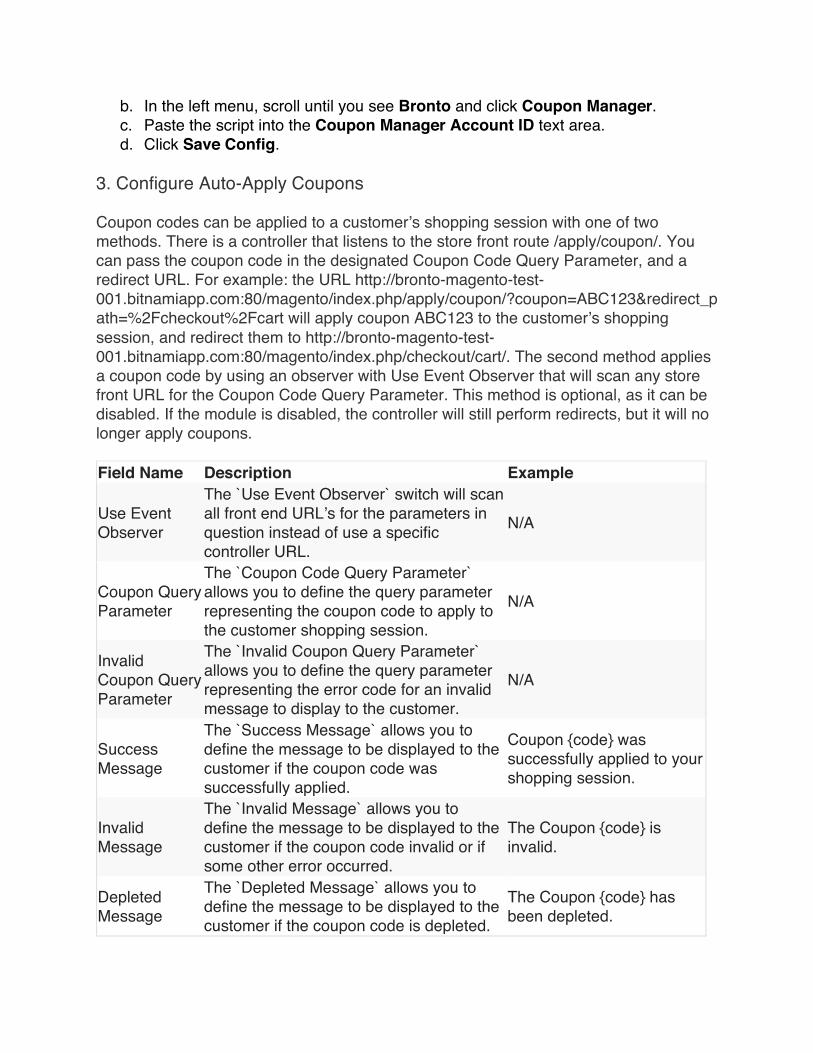
b. In the left menu, scroll until you see Bronto and click Coupon Manager. c. Paste the script into the Coupon Manager Account ID text area. d. Click Save Config.
3. Configure Auto-Apply Coupons
Coupon codes can be applied to a customer’s shopping session with one of two methods. There is a controller that listens to the store front route /apply/coupon/. You can pass the coupon code in the designated Coupon Code Query Parameter, and a redirect URL. For example: the URL http://bronto-magento-test-001.bitnamiapp.com:80/magento/index.php/apply/coupon/?coupon=ABC123&redirect_path=%2Fcheckout%2Fcart will apply coupon ABC123 to the customer’s shopping session, and redirect them to http://bronto-magento-test-001.bitnamiapp.com:80/magento/index.php/checkout/cart/. The second method applies a coupon code by using an observer with Use Event Observer that will scan any store front URL for the Coupon Code Query Parameter. This method is optional, as it can be disabled. If the module is disabled, the controller will still perform redirects, but it will no longer apply coupons.
Field Name Description Example
Use Event Observer
The `Use Event Observer` switch will scan all front end URL’s for the parameters in question instead of use a specific controller URL.
N/A
Coupon Query Parameter
The `Coupon Code Query Parameter` allows you to define the query parameter representing the coupon code to apply to the customer shopping session.
N/A
Invalid Coupon Query Parameter
The `Invalid Coupon Query Parameter` allows you to define the query parameter representing the error code for an invalid message to display to the customer.
N/A
Success Message
The `Success Message` allows you to define the message to be displayed to the customer if the coupon code was successfully applied.
Coupon {code} was successfully applied to your shopping session.
Invalid Message
The `Invalid Message` allows you to define the message to be displayed to the customer if the coupon code invalid or if some other error occurred.
The Coupon {code} is invalid.
Depleted Message
The `Depleted Message` allows you to define the message to be displayed to the customer if the coupon code is depleted.
The Coupon {code} has been depleted.

Expired Message
The `Expired Message` allows you to define the message to be displayed to the customer if the coupon code is expired.
The Coupon {code} has expired.
Conflict Message
The `Conflict Message` allows you to define the message to be displayed to the customer if the coupon code is going to replace the coupon code already applied on their cart.
Your shopping session already has coupon {oldCode} applied. {link} to apply {newCode} instead.
Link Text The `Link Content` allows you to define the contents of the force application link used in the `Conflict Message`.
Click Here
Testing 1. Create an order in Magento using a Coupon Manager coupon.
Assuming you have already imported coupons into Bronto from Magento, create an order in Magento using a Coupon Manager coupon.
2. Verify the coupon was redeems in the Coupon Manager App.
In Bronto, check the stats in the Coupon Manager App to verify that the coupon was redeemed.
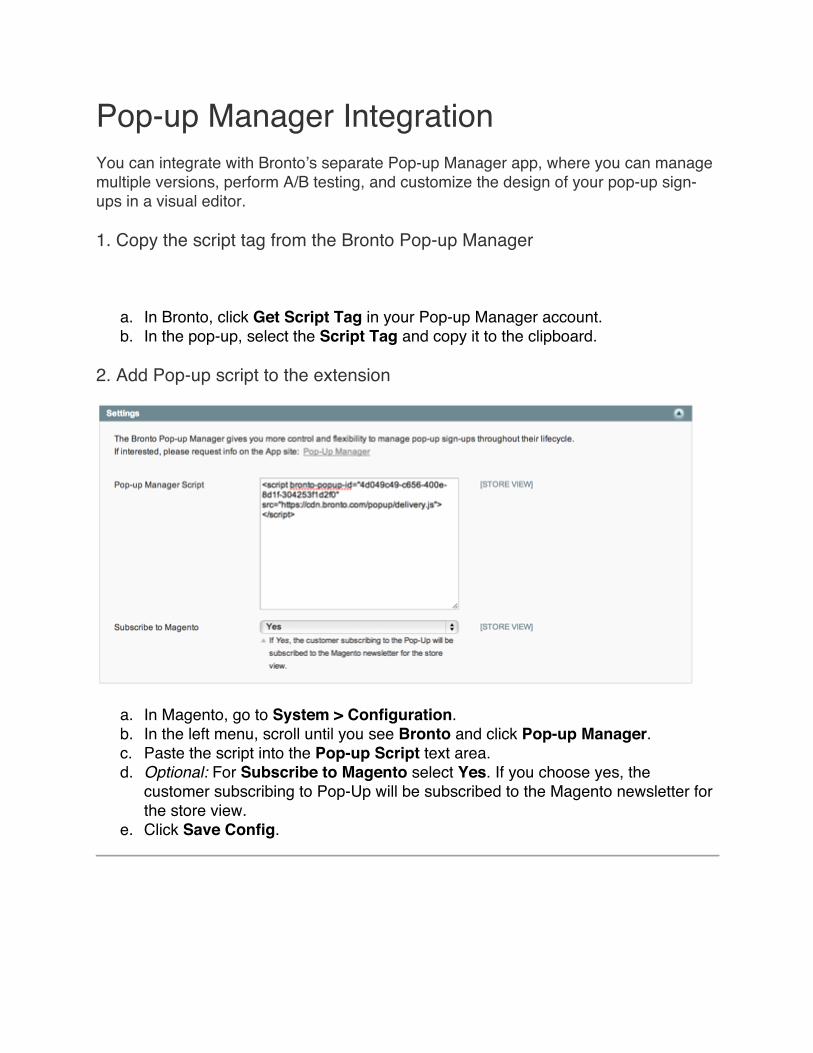
Pop-up Manager Integration You can integrate with Bronto’s separate Pop-up Manager app, where you can manage multiple versions, perform A/B testing, and customize the design of your pop-up sign-ups in a visual editor.
1. Copy the script tag from the Bronto Pop-up Manager
a. In Bronto, click Get Script Tag in your Pop-up Manager account. b. In the pop-up, select the Script Tag and copy it to the clipboard.
2. Add Pop-up script to the extension
a. In Magento, go to System > Configuration. b. In the left menu, scroll until you see Bronto and click Pop-up Manager. c. Paste the script into the Pop-up Script text area. d. Optional: For Subscribe to Magento select Yes. If you choose yes, the
customer subscribing to Pop-Up will be subscribed to the Magento newsletter for the store view.
e. Click Save Config.
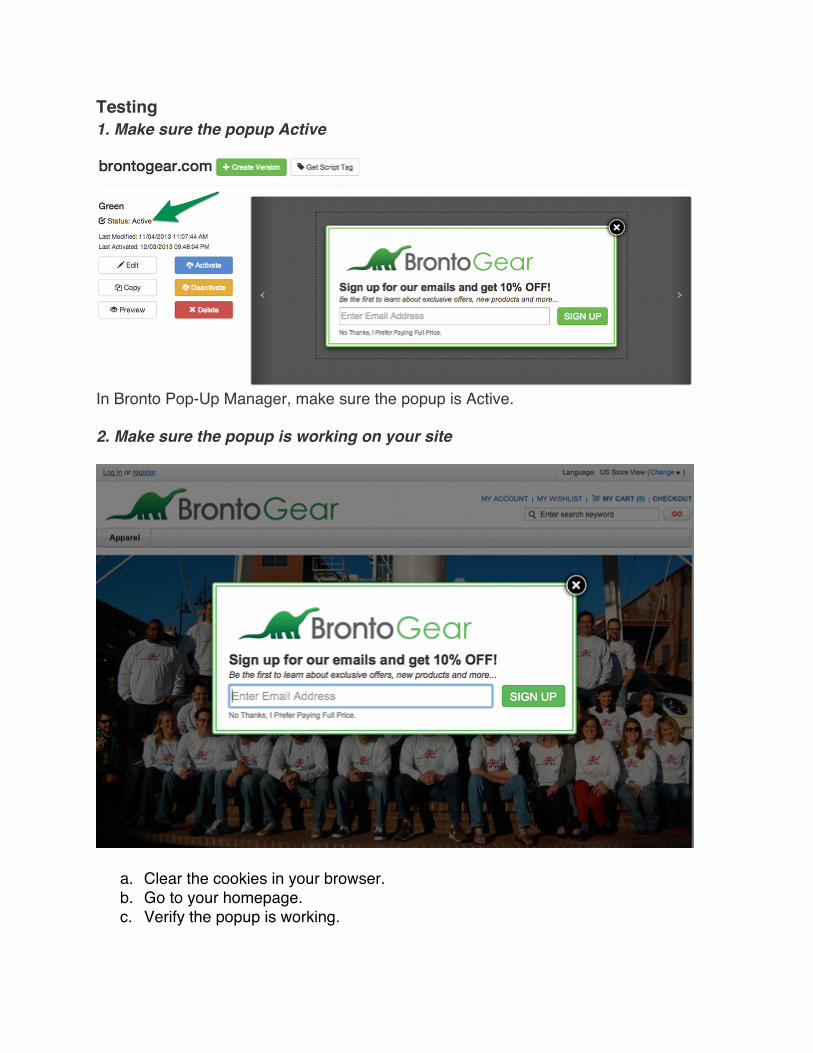
Testing 1. Make sure the popup Active
In Bronto Pop-Up Manager, make sure the popup is Active.
2. Make sure the popup is working on your site
a. Clear the cookies in your browser. b. Go to your homepage. c. Verify the popup is working.
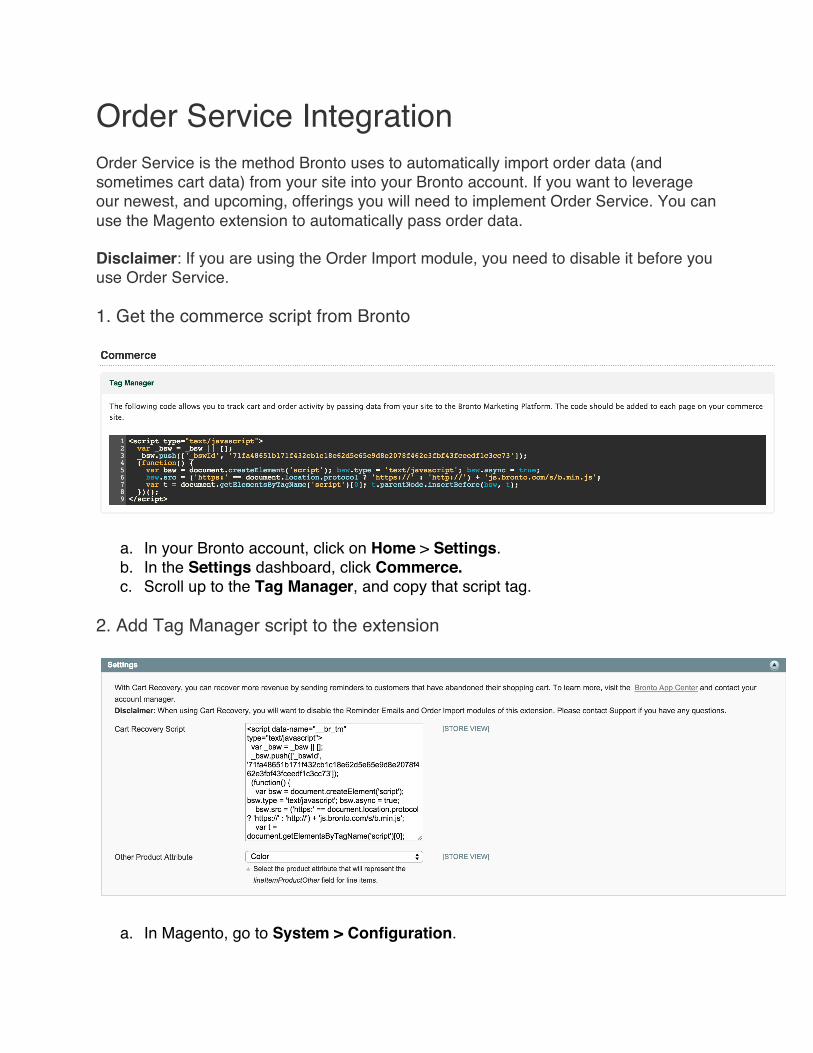
Order Service Integration Order Service is the method Bronto uses to automatically import order data (and sometimes cart data) from your site into your Bronto account. If you want to leverage our newest, and upcoming, offerings you will need to implement Order Service. You can use the Magento extension to automatically pass order data.
Disclaimer: If you are using the Order Import module, you need to disable it before you use Order Service.
1. Get the commerce script from Bronto
a. In your Bronto account, click on Home > Settings. b. In the Settings dashboard, click Commerce. c. Scroll up to the Tag Manager, and copy that script tag.
2. Add Tag Manager script to the extension
a. In Magento, go to System > Configuration.
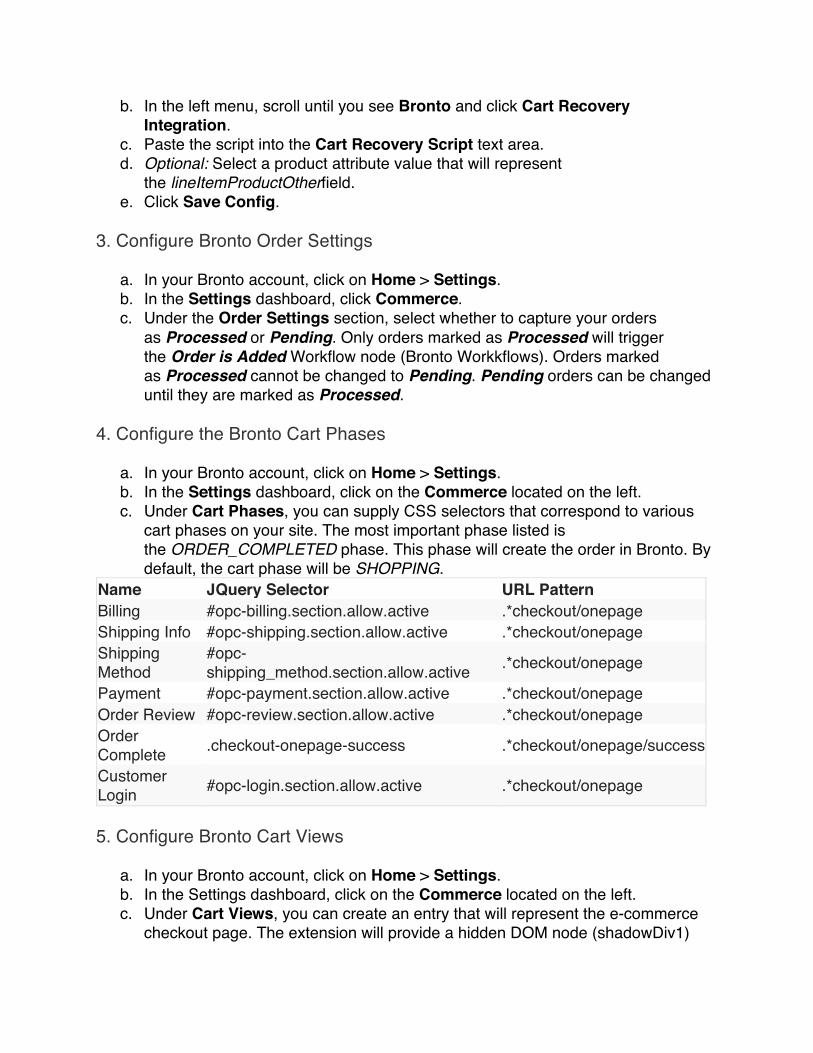
b. In the left menu, scroll until you see Bronto and click Cart Recovery Integration.
c. Paste the script into the Cart Recovery Script text area. d. Optional: Select a product attribute value that will represent
the lineItemProductOtherfield. e. Click Save Config.
3. Configure Bronto Order Settings
a. In your Bronto account, click on Home > Settings. b. In the Settings dashboard, click Commerce. c. Under the Order Settings section, select whether to capture your orders
as Processed or Pending. Only orders marked as Processed will trigger the Order is Added Workflow node (Bronto Workkflows). Orders marked as Processed cannot be changed to Pending. Pending orders can be changed until they are marked as Processed.
4. Configure the Bronto Cart Phases
a. In your Bronto account, click on Home > Settings. b. In the Settings dashboard, click on the Commerce located on the left. c. Under Cart Phases, you can supply CSS selectors that correspond to various
cart phases on your site. The most important phase listed is the ORDER_COMPLETED phase. This phase will create the order in Bronto. By default, the cart phase will be SHOPPING.
Name JQuery Selector URL Pattern Billing #opc-billing.section.allow.active .*checkout/onepage Shipping Info #opc-shipping.section.allow.active .*checkout/onepage Shipping Method
#opc-shipping_method.section.allow.active .*checkout/onepage
Payment #opc-payment.section.allow.active .*checkout/onepage Order Review #opc-review.section.allow.active .*checkout/onepage Order Complete .checkout-onepage-success .*checkout/onepage/success
Customer Login #opc-login.section.allow.active .*checkout/onepage
5. Configure Bronto Cart Views
a. In your Bronto account, click on Home > Settings. b. In the Settings dashboard, click on the Commerce located on the left. c. Under Cart Views, you can create an entry that will represent the e-commerce
checkout page. The extension will provide a hidden DOM node (shadowDiv1)
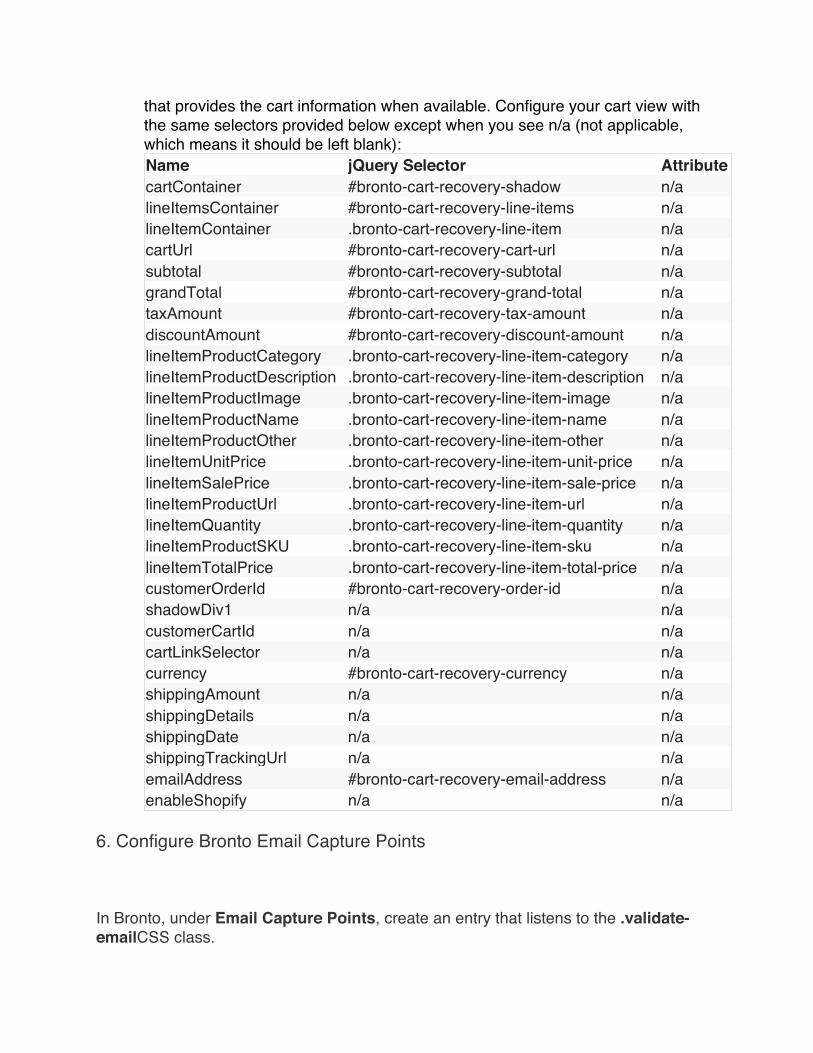
that provides the cart information when available. Configure your cart view with the same selectors provided below except when you see n/a (not applicable, which means it should be left blank): Name jQuery Selector Attribute cartContainer #bronto-cart-recovery-shadow n/a lineItemsContainer #bronto-cart-recovery-line-items n/a lineItemContainer .bronto-cart-recovery-line-item n/a cartUrl #bronto-cart-recovery-cart-url n/a subtotal #bronto-cart-recovery-subtotal n/a grandTotal #bronto-cart-recovery-grand-total n/a taxAmount #bronto-cart-recovery-tax-amount n/a discountAmount #bronto-cart-recovery-discount-amount n/a lineItemProductCategory .bronto-cart-recovery-line-item-category n/a lineItemProductDescription .bronto-cart-recovery-line-item-description n/a lineItemProductImage .bronto-cart-recovery-line-item-image n/a lineItemProductName .bronto-cart-recovery-line-item-name n/a lineItemProductOther .bronto-cart-recovery-line-item-other n/a lineItemUnitPrice .bronto-cart-recovery-line-item-unit-price n/a lineItemSalePrice .bronto-cart-recovery-line-item-sale-price n/a lineItemProductUrl .bronto-cart-recovery-line-item-url n/a lineItemQuantity .bronto-cart-recovery-line-item-quantity n/a lineItemProductSKU .bronto-cart-recovery-line-item-sku n/a lineItemTotalPrice .bronto-cart-recovery-line-item-total-price n/a customerOrderId #bronto-cart-recovery-order-id n/a shadowDiv1 n/a n/a customerCartId n/a n/a cartLinkSelector n/a n/a currency #bronto-cart-recovery-currency n/a shippingAmount n/a n/a shippingDetails n/a n/a shippingDate n/a n/a shippingTrackingUrl n/a n/a emailAddress #bronto-cart-recovery-email-address n/a enableShopify n/a n/a
6. Configure Bronto Email Capture Points
In Bronto, under Email Capture Points, create an entry that listens to the .validate-emailCSS class.
Note: The jQuery selector may vary depending on the format of the email capture point. Example: id = # class = .
Testing Confirm that your order data is in Bronto.
a. Place an order on your site and record the order ID. b. Log into Bronto. c. Got to Tables > Orders. d. Use the order ID to search for the order you placed. e. Verify the email address, order ID, etc. were captured correctly.
If your order is missing, make sure the Bronto script was properly added to and saved in Bronto. If your order data is incorrect, make sure you have mapped your Cart Views in Bronto correctly.
Cart Recovery Integration You can integrate with Bronto’s separate Cart Recovery app, where you can recover more revenue by sending reminders to customers that have abandoned their shopping cart.
Before you complete the steps below, make sure you have completed the Order Service integration. Order Service is required for Cart Recovery to work.
Make sure the Cart Recovery App is enabled. a. In Bronto, go to Apps > Cart Recovery. b. Click Settings. c. Make sure Cart Recovery is toggled on.
Testing Create a workflow to test Cart Recovery.
a. In Bronto, go to Automation > Worflows. b. Click Create New Workflow.

c. Add nodes to the workflow. For Cart Recovery testing you will need to add and set the following nodes:
1. Cart Is Abandonded
§ Carts that have been abandoned one or more time before will be included.
§ Contacts who have placed orders in he last 0 days. 2. List Membership
§ Create a List in Bronto that you will use to filter out everyone but a select number of contact for testing. If your test user is not on this list, a Cart Recovery message will not be received.
3. Cart Status 4. Send Email
§ Send the contact a transactional message: *Select message* § From: Enter desired identifier for company and email address. § Sender authentication will be turned on. § Reply tracking will be turned off. § Frequency caps override will be turned on. § Set products for this delivery (Leave this setting in its default state)
Note: Your first send will be Transactional. All subsequent sends are marketing and will require the appropriate subscription status to receive.

Advanced API You can adjust API Retry Settings and API Send Queue Settings for transactional emails.
API Status
You can verify the status of the API Token and the API Connection. Click the Verify Nowbutton to update the status.
API Send Queue Settings
If you enable send queueing, all transactional emails will be placed in a queue, and most be flushed. While this is a more performant method, real-time sending is essentially disabled. It is highly recommended to flush this queue using the system cron, or the lowest available interval Magento cron.
1. In Magento, go to System > Configuration. 2. In the side menu, scroll until you see Bronto and click Advanced API. 3. In the Settings section, these are the recommended settings:
Enable Module: Yes Use Magento Cron Yes Frequency: Minute Intervals Interval: 5 minutes Start Time: 0 0 0 Limit: 50
4. Click Save Config.
API Retry Settings
During scheduled maintenance or the rare, unplanned outage, this feature will queue up any deliveries that are not sent to be retried later when Bronto’s API returns to its normal state. This applies to all modules: Reminder Emails, Transactional Emails and Review Requests.
1. Go to System > Configuration. 2. In the left menu, scroll until you see Bronto and click Advanced API. 3. In the Settings section, these are the recommended settings:
Enable Module: Yes Use Magento Cron Yes Frequency: Minute Intervals
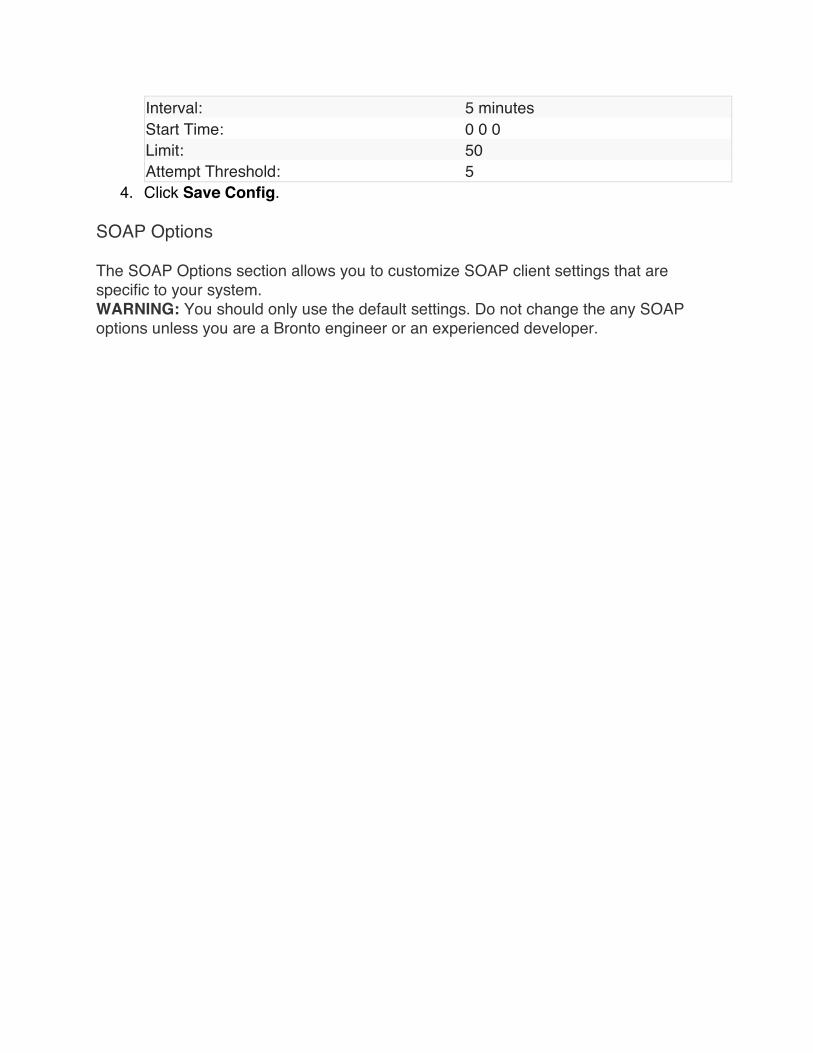
Interval: 5 minutes Start Time: 0 0 0 Limit: 50 Attempt Threshold: 5
4. Click Save Config.
SOAP Options
The SOAP Options section allows you to customize SOAP client settings that are specific to your system. WARNING: You should only use the default settings. Do not change the any SOAP options unless you are a Bronto engineer or an experienced developer.
Admin Tools In admin tools, you can see any configuration conflicts between any other installed modules, and ensure your files all have the correct permissions to run correctly and securely.
Install Status
This section shows you a scoped view of all modules and links to the corresponding configuration pages.
Classpath Inspection
The Classpath Inspection section provides functionality for identifying observers of events and file paths for classes.
Conflict Checker
The Conflict Checker is a helpful tool when you find that something is not working like you expect it to. It will run through the configurations for all installed modules and report any values that are overridden. To start the process, click the Check Module Conflicts button.
Note: This process may take a minute or two to complete, just be patient.
• Check to see if anything Bronto related pops up. • Check to see if any third part integrations are conflicting with Bronto files prior
ESPs (Mandrill, SMTP Pro, MageMail). • Review Old Value and New Value as a Developer may need to comment out Old
Values if conflicts are taking down Bronto functionality.
Permissions Settings
The Permissions Settings section allow you to customize the desired file/folder permissions for your code base. The default settings are based on Magento’s recommended values. If, during the Permissions Validation process, you find that your files/folders are not set to the desired permissions, you can use the provided commands to apply the correct permissions to your system.
Permissions Validation
The Permissions Validation section will traverse your Magento installation, check the

permissions against those specified in the Permissions Settings section, and display the path of any files/folders that have incorrect permissions.
Note:This process may take a minute or two to complete, just be patient. If you get no response from this process, it means that the request timed out, possibly due to a very large number of incorrect permissions in your system.
Cron Settings
The Cron Settings section is provided as an Advanced Option for handling the Cron processes for the Bronto Extension Modules. If you find that the Magento cron management system fails to trigger the cron processes for these modules, you can utilize the cron.phpfile provided with this extension.
1. Go to System > Configuration. 2. In the left menu, scroll until you see Bronto and click Admin Tools. 3. Set the Use Magento Cron setting to No for any modules you wish. 4. Click Save Config. 5. Follow the Cron configuration details below to set up the external cron.
System Cron Examples
Note:You will need to change the owner, php path, and path to Magento to match your environment.
To run the API Send Queue Cron every minute:
* * * * * $CRON_USER /usr/bin/php /var/www/magento/shell/bronto/cron.php -a run -t send
To run the API Retry Cron every 2 minutes:
*/2 * * * * $CRON_USER /usr/bin/php /var/www/magento/shell/bronto/cron.php -a run -t api
To run the Reminder Emails Cron every 15 minutes:
*/15 * * * * $CRON_USER /usr/bin/php /var/www/magento/shell/bronto/cron.php -a run -t reminder
To run the Order Import Cron once Daily at Midnight:
0 0 * * * $CRON_USER /usr/bin/php /var/www/magento/shell/bronto/cron.php -a run -t order
To run the Product Recommendations Cron once Daily at Midnight:

0 0 * * * $CRON_USER /usr/bin/php /var/www/magento/shell/bronto/cron.php -a run -t product
To run the Customer Import Cron twice Daily:
0 */2 * * * $CRON_USER /usr/bin/php /var/www/magento/shell/bronto/cron.php -a run -t customer
To run the Newsletter Opt-In Cron every 30 minutes:
*/30 * * * * $CRON_USER /usr/bin/php /var/www/magento/shell/bronto/cron.php -a run -t newsletter
To run all module Crons once Daily:
0 0 * * * $CRON_USER /usr/bin/php /var/www/magento/shell/bronto/cron.php -a run