Embed Size (px)
Citation preview

Buckingham HouseTEACHER RESOURCE
wanneroo.wa.gov.au

2
Welcome to Buckingham House
John Buckingham built this house during the decade 1880 - 1890. He had come from Devon, England with his father, mother and older brother in the ship ‘Sophia’, arriving in the colony on July 27, 1850 when only two years old. In 1876 he purchased this property of 100 acres, then built the house, married and had seven children. The modest house was constructed of those materials immediately at hand; limestone and timber, including shingles on the roof. It is assumed that John Buckingham lived there until 1906 when Vincent Berriman and family moved in. The house later was leased to David Walker form 1918 to 1920. In 1922 the ownership passed to Catherine Wade, then in 1927 to George Tapping and to his widow about 1940. Benjamin Togno bought it in 1946 and Eleanor and John Neville bought it in 1950 and lived there until 1968 when it was sold to developers. At least one of the families who lived here enclosed the front verandah and it was used as a bedroom for the children. When it was busy as a dairy farm in the 1940s and had several farmhands, the helpers and family all ate meals together in an enclosed back verandah.
The house was going to be demolished in the early 1970s but the then Shire of Wanneroo acquired the house in 1973 together with one acre of land at the time the property was subdivided for housing. It took 15 years of planning and work before the City of Wanneroo opened Buckingham House as a museum, and this ‘Pioneer Activities Program’ began.
We hope you all enjoy your visit today.

3
Buckingham House Activities

4
BUTTER MAKING After a brief introduction to the house and the families that lived here we focus on the property’s role as a diary and the activities associated with running a dairy farm. We discuss how milk used to be collected from a cow and stored, and how cream is used to form butter. This followed by a demonstration of butter making using a wooden butter churn with each student participating in the churning. This butter is then used at morning tea with the damper baked by the students. Most households in the colonial period made their own butter, as they would usually have a cow for milking. As this was a working dairy farm, the families that lived here would have risen around 5.30 in the morning to milk the cows before breakfast. The milk and cream would have been separated using a skimmer or later a mechanical milk separator. This was usually the children’s job. The cream was used to make butter. Equipment.
1 jug filled with 1200mls of cream.
Butter churn
A square of muslin
1 ceramic bowl
2 plates
1 wooden spoon
1 jug filled with water.
Salt
2 butter pats soaked in a jug of water at least an hour before, so that the butter does not stick to the wood.
Method. The cream with a teaspoon of salt added is poured into the butter churn. Salt is added. The lid is placed on and the handle is turned continuously until the cream separates into butter and buttermilk. All the children have an opportunity to turn the handle, taking care not to lift the lid whilst the handle is being turned. Once the cream has hardened to butter it is removed from the butter churn with the wooden spoon and placed into the muslin cloth draped over the bowl. Water is poured through the muslin to wash the buttermilk from the butter, which helps to prolong the butter’s life. The muslin is then squeezed around the butter to remove any excess buttermilk. The butter pats are used (depending on the ambient temperature) to demonstrate how twirls and patterns are formed with the butter for presentation on the table. A block of butter is made from the butter pats, demonstrating how the butter was presented at market to sell. Sometimes a butter stamp would have been used with a design to show which farm it was from. The butter is then used to spread on the damper for morning tea.
5
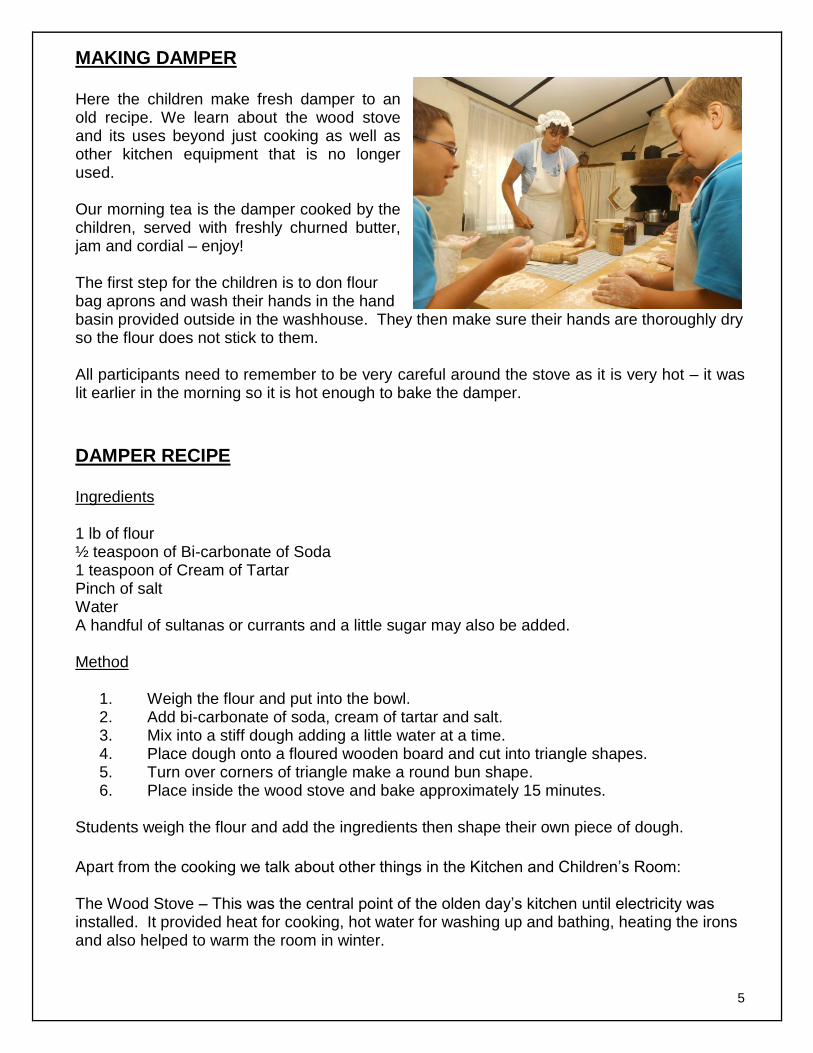
MAKING DAMPER Here the children make fresh damper to an old recipe. We learn about the wood stove and its uses beyond just cooking as well as other kitchen equipment that is no longer used. Our morning tea is the damper cooked by the children, served with freshly churned butter, jam and cordial – enjoy! The first step for the children is to don flour bag aprons and wash their hands in the hand basin provided outside in the washhouse. They then make sure their hands are thoroughly dry so the flour does not stick to them. All participants need to remember to be very careful around the stove as it is very hot – it was lit earlier in the morning so it is hot enough to bake the damper.
DAMPER RECIPE Ingredients 1 lb of flour ½ teaspoon of Bi-carbonate of Soda 1 teaspoon of Cream of Tartar Pinch of salt Water A handful of sultanas or currants and a little sugar may also be added. Method
1. Weigh the flour and put into the bowl. 2. Add bi-carbonate of soda, cream of tartar and salt. 3. Mix into a stiff dough adding a little water at a time. 4. Place dough onto a floured wooden board and cut into triangle shapes. 5. Turn over corners of triangle make a round bun shape. 6. Place inside the wood stove and bake approximately 15 minutes.
Students weigh the flour and add the ingredients then shape their own piece of dough.
Apart from the cooking we talk about other things in the Kitchen and Children’s Room: The Wood Stove – This was the central point of the olden day’s kitchen until electricity was installed. It provided heat for cooking, hot water for washing up and bathing, heating the irons and also helped to warm the room in winter.

6
The Coolgardie Safe – It provided storage for meat, milk and butter in the days before the ice box and the modern refrigerator. Water dripped from a bucket and soaked the hessian sacking draped down the sides of the safe keeping the food inside cool through the process of evaporation. The kitchen utensils – we look at the meat mincer/wheat grister, scales and carpet beater. In the Children’s Bedroom – we look at the bed quilts, rag mat, chamber pot, trunk, school desk, wrought iron beds, candles, kerosene lamp, even the old fly coils. Remember: Hands must be clean before handling food. Do not touch or stand close to wood stove, or handle utensils on top of stove as they are very hot.
WASHING AND IRONING IN THE ‘OLDEN DAYS’
Hand Washing
The children experience washing as it was done before the invention of the washing machine. They wash a garment using scrubbing boards and washtubs then use the mangle to wring out the clothes they have washed. During this process we talk about the soap and rinsing products and the value of these items. The children then discover the washing line and get to hang out their washing using dolly pegs.
Ironing The children learn to iron using hand irons heated over a wood stove and experience a little of the hard work involved in ironing before the electric iron was invented. They actually use an iron, to iron a small handkerchief and learn about the different types of irons and how they were heated and used.
Washday normally took place on a Monday and the ironing took up most of Tuesday. One reason for this was that on Sunday there was often a roast; so the cold leftovers could be served with out interrupting the busy washing schedule to do cooking.

7
Method: 1. Washboards and tubs. Using the washboards standing in the tub of water and a little soap, rub the material up and down the washboard using knuckles and the heal part of the palm of the hand until the article is clean. Notice the washboards are made from different material - corrugated wood and glass. The clothes would normally have been soaked overnight first. Some white articles such as shirt collars and cuffs, and linen would have been left to soak in starch. The soap is used sparingly because it was “precious”. All supplies originally came by ship from England, which took many months. Some soap was made at home out of clarified fat and caustic soda. Wring out the articles and place in rinsing troughs.
2. Rinsing. Notice the troughs are made out of old kerosene tins. Kerosene tins were used to make buckets, washtubs, stoves, pans, milking pales and anything the colonial families could make use of. Blue (from Reckitt’s Blue bags) is used in the final rinsing water to stop the whites going yellow, because a lot of their clothing was made from natural fibres that tended to be white. Wring the water out of the cloth. If sheets or other heavy articles were washed they would be twisted in opposite directions with the children holding on to each end to wring the water out.
3. The Mangle. After the rinsing move over to the mangle and watch carefully as the museum volunteer places the articles between the rollers and turns the handle. The mangle squeezes the excess water out of the clothes. In the ‘olden days’ it was also used to press the bed linen to save ironing. Children often had to help by turning the handle. Notice the lack of safety features so hands must be kept away from the turning rollers. We compare this to how clothes are wrung out at home today using the washing machine’s ‘spin dry’ facility. 4. The washing line. The washing line was just a piece of thin rope strung between two poles or trees. Washed articles were pegged on the line using Dolly pegs. These pegs were also used by children to make dolls or figures because of their shape. The children are shown examples of Dolly peg dolls. Once the damp articles were pegged on, the line was then raised up using a stick called a washing ‘prop’. The museum volunteer will prop up the line once the children have pegged on their washing.
Again we compare this with how clothes are dried today. Some homes have electric clothes driers, used more often in winter and in apartments and flats. However many homes still hang their clothes on clothes lines. The Hills Hoist rotary clothes line was an Australian invention!
8
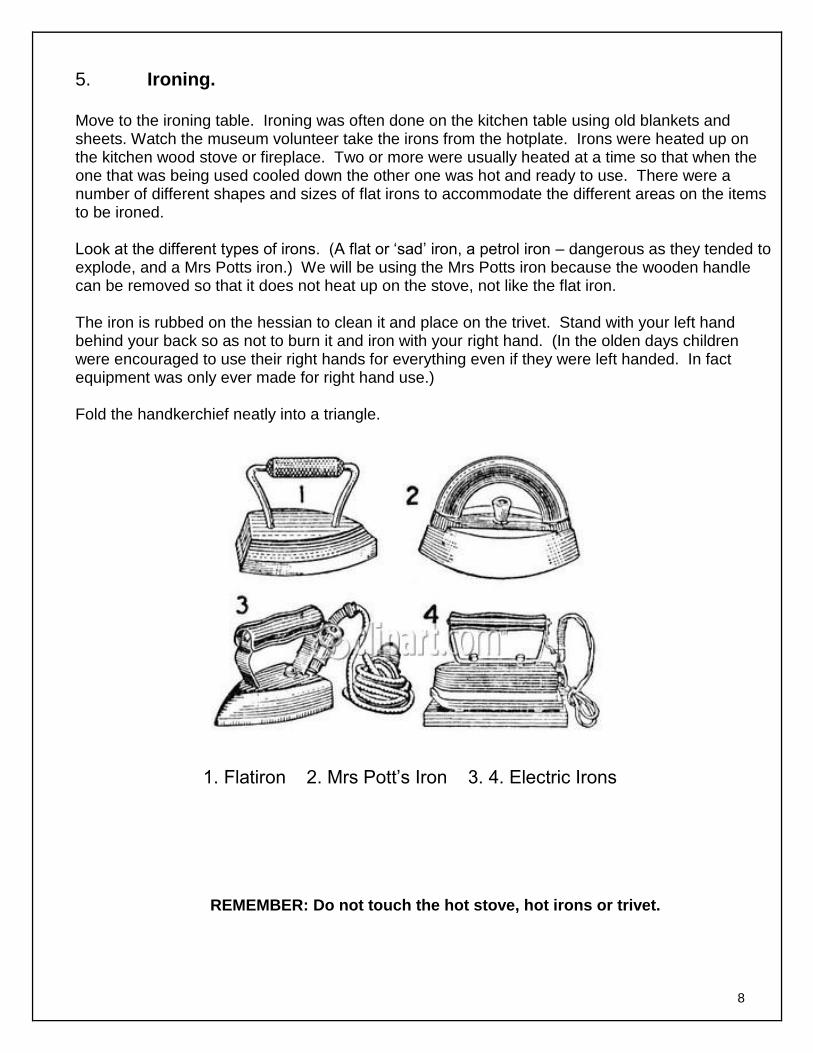
5. Ironing. Move to the ironing table. Ironing was often done on the kitchen table using old blankets and sheets. Watch the museum volunteer take the irons from the hotplate. Irons were heated up on the kitchen wood stove or fireplace. Two or more were usually heated at a time so that when the one that was being used cooled down the other one was hot and ready to use. There were a number of different shapes and sizes of flat irons to accommodate the different areas on the items to be ironed. Look at the different types of irons. (A flat or ‘sad’ iron, a petrol iron – dangerous as they tended to explode, and a Mrs Potts iron.) We will be using the Mrs Potts iron because the wooden handle can be removed so that it does not heat up on the stove, not like the flat iron. The iron is rubbed on the hessian to clean it and place on the trivet. Stand with your left hand behind your back so as not to burn it and iron with your right hand. (In the olden days children were encouraged to use their right hands for everything even if they were left handed. In fact equipment was only ever made for right hand use.) Fold the handkerchief neatly into a triangle.
1. Flatiron 2. Mrs Pott’s Iron 3. 4. Electric Irons
REMEMBER: Do not touch the hot stove, hot irons or trivet.

9
HAND SEWING HESSIAN MATS In the early days it was difficult for people to buy new or replacement items because there were no shops nearby and they had very little money. As many things as possible were reused or made into something else. Recycling is certainly not a ‘new idea’. Hessian bags were used to carry various items that we would use boxes, and large containers to carry today. Because they didn’t have forklifts, the bags were designed to be easily carried by a man on his back. Hessian bags had a long list of uses after they had arrived in the home containing flour, wheat or animal feed. They were reused as many things including floor coverings, aprons, blankets, potholders, covering the Coolgardie safe, storage, even the walls on ‘Bag Houses’. Students will be making fringed mats out of Hessian squares. They will be instructed in how to hand sew their initial using brightly coloured wool. A discussion will be held on what other uses Hessian had and the importance of sewing, mending and recycling in pioneer society. Method
1. The museum volunteer draws the student’s first initial in the centre of the square of hessian with a permanent pen. She then asks what colour wool the student would like and shows them how to sew stitches close together in a running stitch. They then continue the sewing following the line of their initial.
2. The museum volunteer knots the wool at the end of the first colour wool and then shows
how to loop the second choice of wool colour around and around the original stitch in a slipstitch. Always sew in the same direction and catch every stitch until the initial is completed again. The museum volunteer will then help to knot it.
3. The museum volunteer then shows how to do the fringe, by pulling out six threads of
hessian from each side. Your mat is now complete.
Take extra care with the needle and please do not leave it lying around.

10
FARM LIFE AND SKETCHING
In the shed the children are able to examine several pieces of farm machinery and discuss how they were used and what for. The daily routine of farm life will be explained emphasising the duties of children on the farm and how this was different for boys and girls. Here they sketch the farm machinery and house, and hear a little more of the history of the property and how it was run.
Buckingham House farm machinery
One of the dairy farming families who lived at the house and worked the property were the Tognos, who lived here in the 1940s. This group of farm implements belonged to Bert Togno. Mr Togno ploughed the edge of the swamp where he sowed clover and other pasture grasses for feed. He also planted maize. All the farming was done using horse drawn implements, some of which may have been used at their previous Wanneroo dairy farm. The surviving dairying implements have a high degree of significance due to their connection to the property as well as for the rarity of horse drawn implements.
The items are: Cultivator; R.Purser and Co. Seed and Fertiliser drill; No.24 Massey-Harris Hay Cutter (originally had a seat for the operator); Hay Rake (originally had seat for operator); Chaff Cutter (possibly from Bentall & Co, Maldon, UK).

11
FARM LIFE – DUTIES FOR THE CHILDREN
MORNINGS
Boys Girls 5.30am Milk Cows Light or restoke oven 6.00am Separate the milk 6.30am Feed the calves
Feed the chooks and collect the eggs Prepare breakfast, school lunches
7.00am Breakfast Breakfast 7.30am Empty potties, clean Feed babies, bathe, change
nappies 8.00am Polish Boots Make beds, wash dishes 8.30am Leave for School Leave for school
EVENINGS
Milk cows, separate milk Feed the calves Clean out Horse stables and milking pens, hand water vege garden Chop kindling wood and stack Bring in water Oil in lamps Help younger kids with homework Clean teeth with bi-carb soda Listen to reading The family would have a bath once a week having turns using the same bath tub of water. Wash day was once a week usually a Monday. The boys would prepare the wood for the fire in the copper the night before; the girls would help with the ironing and starching.
Pick oranges or apples Pick veges from garden Help with dinner, set table Feed babies, change nappies Churn butter Wash dishes Sweep kitchen floor, Sewing Clean teeth Listen to reading
12
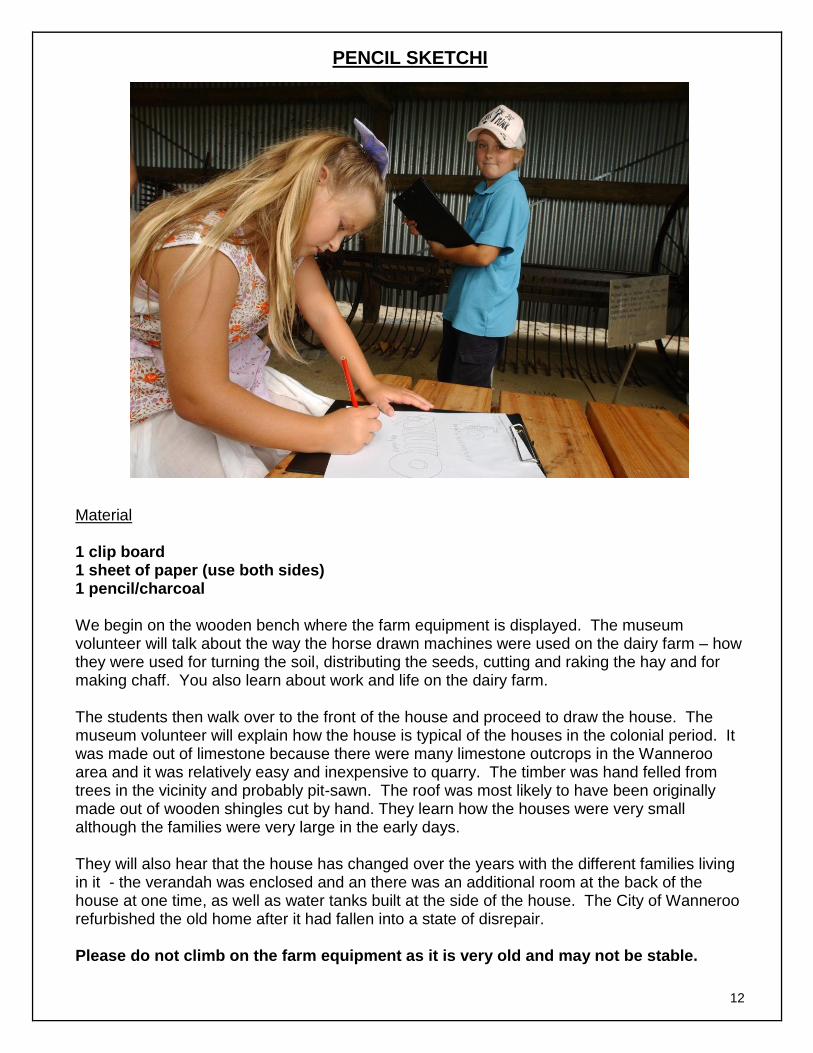
PENCIL SKETCHI
Material 1 clip board 1 sheet of paper (use both sides) 1 pencil/charcoal We begin on the wooden bench where the farm equipment is displayed. The museum volunteer will talk about the way the horse drawn machines were used on the dairy farm – how they were used for turning the soil, distributing the seeds, cutting and raking the hay and for making chaff. You also learn about work and life on the dairy farm. The students then walk over to the front of the house and proceed to draw the house. The museum volunteer will explain how the house is typical of the houses in the colonial period. It was made out of limestone because there were many limestone outcrops in the Wanneroo area and it was relatively easy and inexpensive to quarry. The timber was hand felled from trees in the vicinity and probably pit-sawn. The roof was most likely to have been originally made out of wooden shingles cut by hand. They learn how the houses were very small although the families were very large in the early days. They will also hear that the house has changed over the years with the different families living in it - the verandah was enclosed and an there was an additional room at the back of the house at one time, as well as water tanks built at the side of the house. The City of Wanneroo refurbished the old home after it had fallen into a state of disrepair. Please do not climb on the farm equipment as it is very old and may not be stable.

13
USING BUCKINGHAM HOUSE IN CURRICULUM PLANNING
Society & Environment Learning Outcomes
Science Learning Outcomes
1. Investigation, Communication and Participation
Investigating
Students investigate the ways in which people interact with each other and with their environments in order to make informed decisions and implement relevant social action.
Students investigate to answer questions about the natural and technological world using reflection and analysis to prepare a plan; to collect, process and interpret data; to communicate conclusions; and to evaluate their plan, procedures and findings.
2. Place and Space Communicating Scientifically
Students understand that the interaction people have with places in which they live is shaped by the location, patterns and processes associated with natural and built features.
Students communicate scientific understanding to different audiences for a range of purposes.
3. Resources Science in Daily Life
Students understand that people attempt to meet their needs and wants by making optimum use of limited resources in enterprising ways
Students select and apply scientific knowledge, skills and understandings across a range of contexts in daily life.
4. Culture Acting Responsibly
Students understand that people form groups because their shared understandings of the world, and, in turn, they are influenced by the particular culture so formed.
Students make decisions that include ethical consideration of the impact of the processes and likely products of science on people and the environment.
5. Time, Continuity and Change Science in Society
Students understand that people’s actions and values are shaped by their understanding and interpretation of the past.
Students understand the nature of science as a human activity.
6. Natural and social Systems Earth and Beyond
Students understand that systems provide order to the dynamic natural and social relationships occurring in the world.
Students understand how the physical environment on Earth and its position in the universe impact on the way we live.
7. Active Citizenship Energy and Change
Students demonstrate active citizenship through their behaviours’ and practises in the school environment, in accordance with the principles and values associated with the democratic process, social justice and ecological sustainability.
Students understand the scientific concept of energy and explain that energy is vital to our existence and to our quality of life.
Adapted from ‘Curriculum Planning with the Western Australian Museum 2003’

14
THE RULES FOR OLD FASHIONED GAMES PLAYED AT BUCKINGHAM HOUSE
AT MORNING TEA
Most old games cost little or nothing and often used home made equipment. None of them needed
batteries or to be plugged in.
Now you can play them at school.
ELASTICS
HOPSCOTCH
GARDEN SKITTLES
QUOITS
HOOKEY
MARBLES
KNUCKLEBONES
SKIPPING ROPE
NOUGHTS AND CROSSES
15
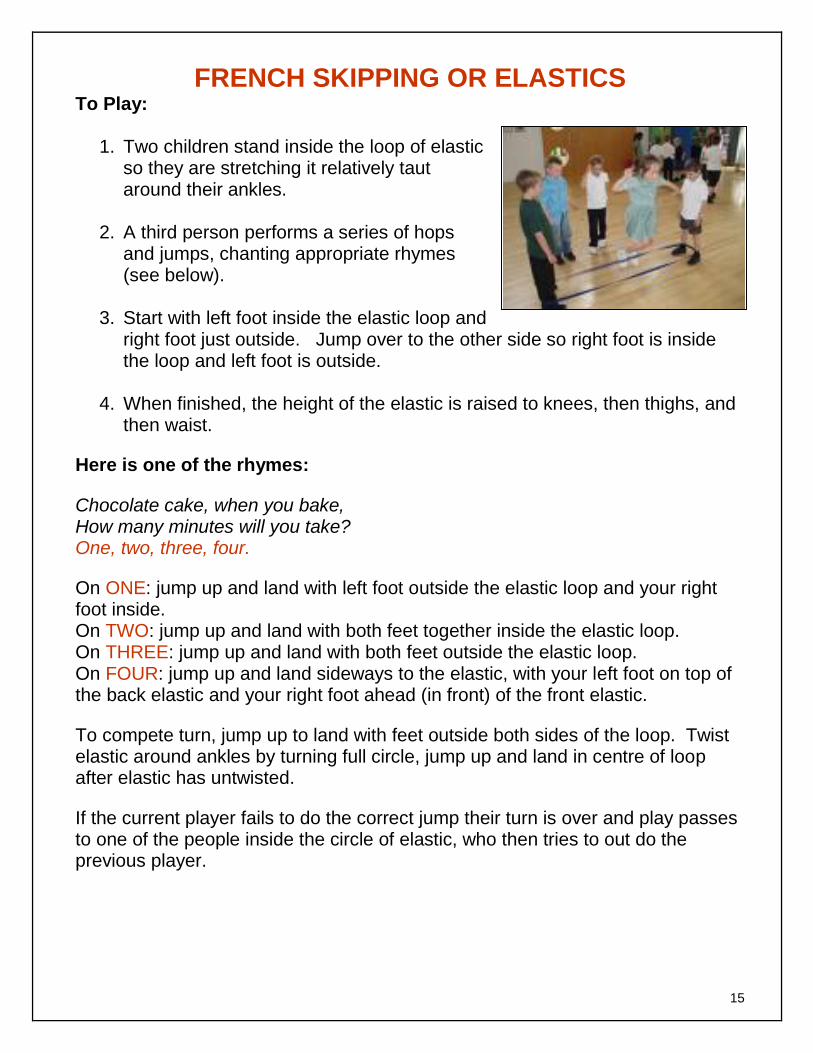
FRENCH SKIPPING OR ELASTICS To Play:
1. Two children stand inside the loop of elastic so they are stretching it relatively taut around their ankles.
2. A third person performs a series of hops
and jumps, chanting appropriate rhymes (see below).
3. Start with left foot inside the elastic loop and
right foot just outside. Jump over to the other side so right foot is inside the loop and left foot is outside.
4. When finished, the height of the elastic is raised to knees, then thighs, and
then waist.
Here is one of the rhymes:
Chocolate cake, when you bake, How many minutes will you take? One, two, three, four.
On ONE: jump up and land with left foot outside the elastic loop and your right foot inside. On TWO: jump up and land with both feet together inside the elastic loop. On THREE: jump up and land with both feet outside the elastic loop. On FOUR: jump up and land sideways to the elastic, with your left foot on top of the back elastic and your right foot ahead (in front) of the front elastic.
To compete turn, jump up to land with feet outside both sides of the loop. Twist elastic around ankles by turning full circle, jump up and land in centre of loop after elastic has untwisted.
If the current player fails to do the correct jump their turn is over and play passes to one of the people inside the circle of elastic, who then tries to out do the previous player.

16
Here are more rhymes:
England, Ireland, Scotland, Wales Inside, outside, inside, on!
Old Mrs Mason broke her basin On the way to London Station.
How much did it cost? One, two, three, four.
Charlie Chaplin sat on a pin. How many inches did it go in?
One, two, three, four.

17
GARDEN SKITTLES
To Play: 1. The path next to the house is the bowling ‘alley’. At one end of the path place the ninepins in a diamond shape so that there is one pin in the first row, two in the second row etc. (see picture below). 2. Move to other end of the path to roll the balls from – you need to be 8 – 10 metres from the skittles. (One person should stay behind the skittles to stop the balls after they are rolled down the alley. When it their turn to roll, they should swap with one of the other players). 3. The first player takes the two balls and using an underarm action rolls the balls down the alley one at a time attempting to knock over as many of the pins as possible. Each pin knocked down scores a point and these pins are removed from play for the second throw. If the player knocks over all the pins with the first ball it is called a strike, and the pins are then reset for another go. In one round a player could score up to of 18 points. 4. After the player has two throws, the pins are reset and the next player takes a turn. 5. The winner is the person with the most points at the end of the game.
18
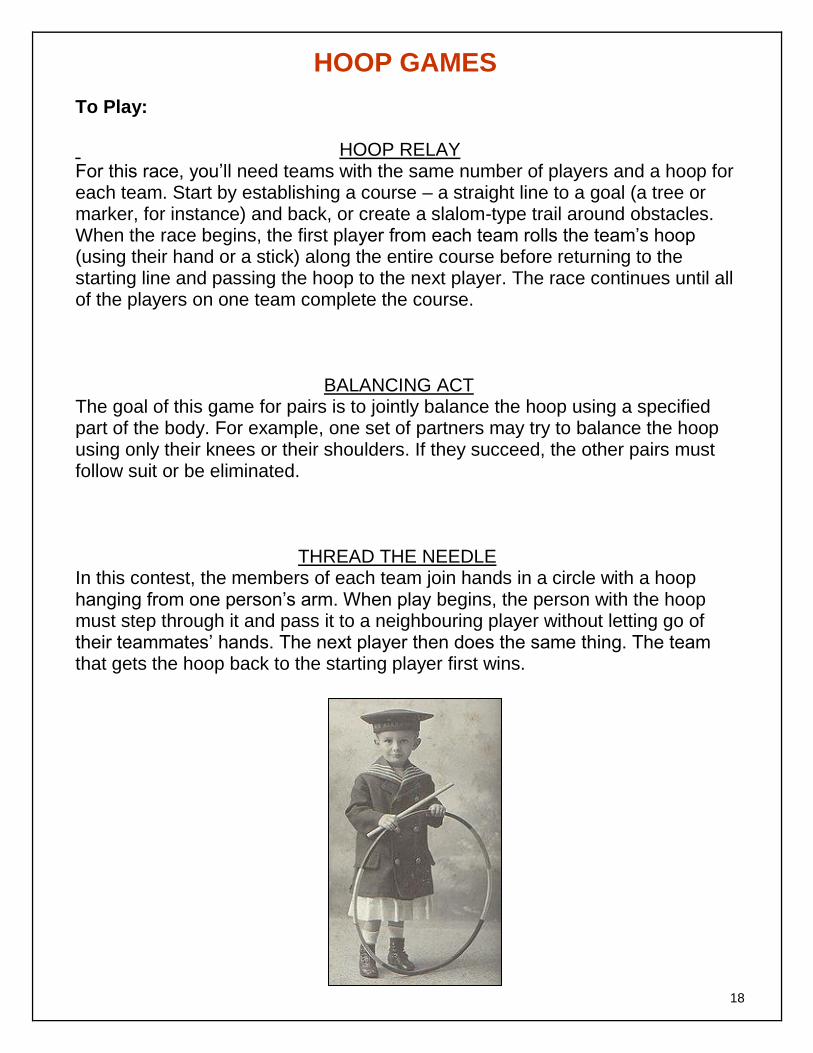
HOOP GAMES
To Play: HOOP RELAY For this race, you’ll need teams with the same number of players and a hoop for each team. Start by establishing a course – a straight line to a goal (a tree or marker, for instance) and back, or create a slalom-type trail around obstacles. When the race begins, the first player from each team rolls the team’s hoop (using their hand or a stick) along the entire course before returning to the starting line and passing the hoop to the next player. The race continues until all of the players on one team complete the course. BALANCING ACT The goal of this game for pairs is to jointly balance the hoop using a specified part of the body. For example, one set of partners may try to balance the hoop using only their knees or their shoulders. If they succeed, the other pairs must follow suit or be eliminated.
THREAD THE NEEDLE In this contest, the members of each team join hands in a circle with a hoop hanging from one person’s arm. When play begins, the person with the hoop must step through it and pass it to a neighbouring player without letting go of their teammates’ hands. The next player then does the same thing. The team that gets the hoop back to the starting player first wins.
19
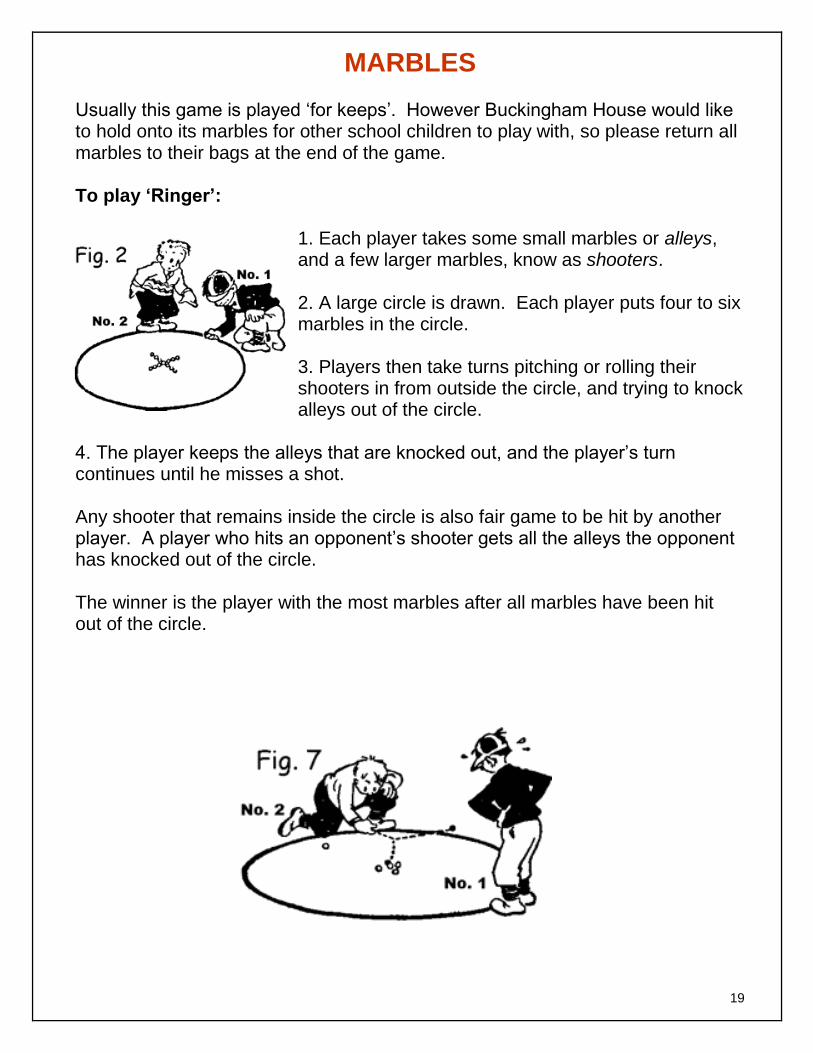
MARBLES Usually this game is played ‘for keeps’. However Buckingham House would like to hold onto its marbles for other school children to play with, so please return all marbles to their bags at the end of the game. To play ‘Ringer’:
1. Each player takes some small marbles or alleys, and a few larger marbles, know as shooters. 2. A large circle is drawn. Each player puts four to six marbles in the circle. 3. Players then take turns pitching or rolling their shooters in from outside the circle, and trying to knock alleys out of the circle.
4. The player keeps the alleys that are knocked out, and the player’s turn continues until he misses a shot. Any shooter that remains inside the circle is also fair game to be hit by another player. A player who hits an opponent’s shooter gets all the alleys the opponent has knocked out of the circle. The winner is the player with the most marbles after all marbles have been hit out of the circle.
20
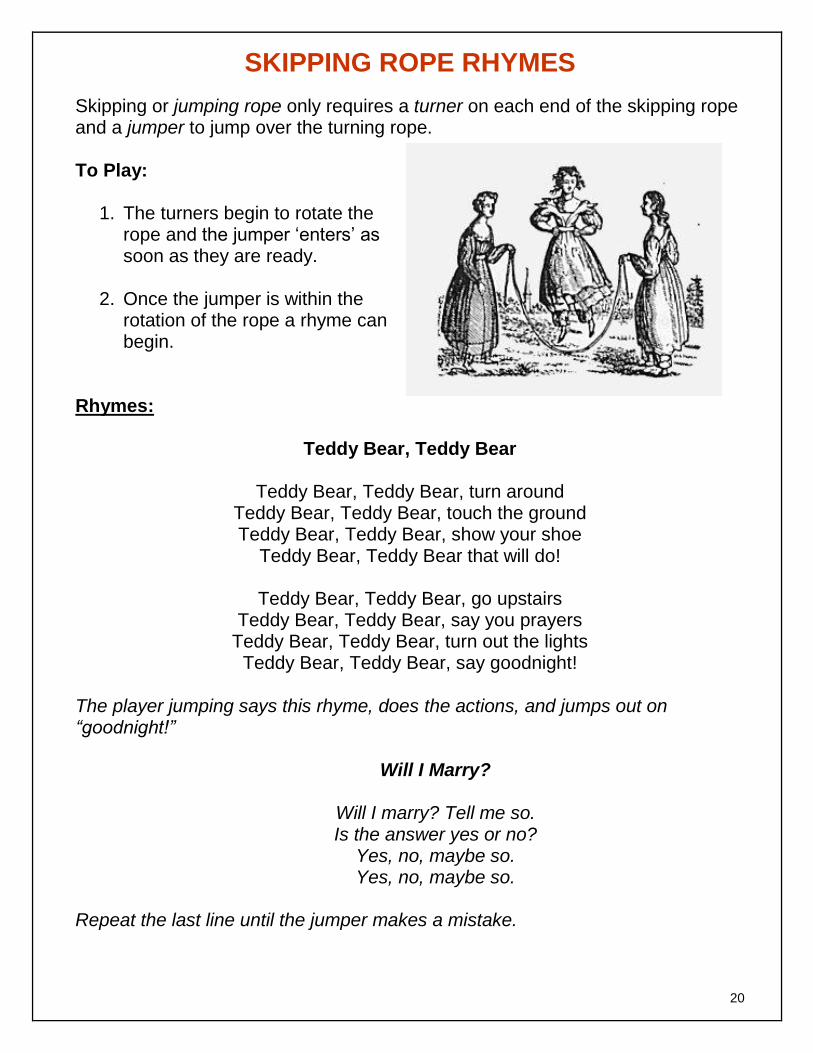
SKIPPING ROPE RHYMES
Skipping or jumping rope only requires a turner on each end of the skipping rope and a jumper to jump over the turning rope. To Play:
1. The turners begin to rotate the rope and the jumper ‘enters’ as soon as they are ready.
2. Once the jumper is within the
rotation of the rope a rhyme can begin.
Rhymes:
Teddy Bear, Teddy Bear
Teddy Bear, Teddy Bear, turn around Teddy Bear, Teddy Bear, touch the ground Teddy Bear, Teddy Bear, show your shoe
Teddy Bear, Teddy Bear that will do!
Teddy Bear, Teddy Bear, go upstairs Teddy Bear, Teddy Bear, say you prayers
Teddy Bear, Teddy Bear, turn out the lights Teddy Bear, Teddy Bear, say goodnight!
The player jumping says this rhyme, does the actions, and jumps out on “goodnight!”
Will I Marry?
Will I marry? Tell me so. Is the answer yes or no?
Yes, no, maybe so. Yes, no, maybe so.
Repeat the last line until the jumper makes a mistake.
21
Rooms for Rent
Rooms for rent, Inquire within As I move out
Let Kara come in.
Substitute name for name of players.
I Like Coffee, I Like Tea
I like coffee, I like tea, I want Tommy
To come in with me.
The first jumper says the rhyme and the player whose name was called, joins the first jumper. They jump together while the second jumper says the rhyme again. The first player jumps out right before the next player jumps in. I’m a Little Dutch Girl I’m a little Dutch girl dressed in blue, Here are the things I like to do. Salute to the Captain, Curtsy to the Queen, Turn my back on a big submarine. The player jumping says this rhyme while doing the actions.

22
HOPSCOTCH To Play:
1. Players take a token and decide what order they will play in.
2. The first player stands in front of the hopscotch court
then tosses their token into square 1. The token must land completely within the square and without touching the line. If the token lands in the wrong square, the player loses their turn.
3. If the token lands successfully, hop on one foot over square 1 to square 2 and
then continue hopping to square 8, turn around, and hop back again. 4. The only time you can put two feet down is on 4/5 and 7/8 where there are two
squares together.
5. When a player reaches the end of the court, they turn around and hop back.
6. Stop in square 2 to pick up your token (don’t put your other foot down!), then hop in square 1, and out.
7. If a player successfully gets back to the start, the player continues their turn by
tossing their token into square number 2, and hops through the squares.
8. Repeat for each numbered square.
All hopping is done on one foot except when two squares are side-by-side. Then two feet can be placed down with one in each square. A player must always hop over any square where a token has been placed. Getting out: A player is out if -
The token does not land in the right square
They step on a line
They lose balance when bending over to pick up the marker and put a second hand or foot down
They go into a square where a marker is
They put two feet down in a single box. A player who gets out puts the token in the square where he or she will resume playing on the next turn, and the next player begins. The first player to complete the hopscotch pattern for every square wins the game.
23
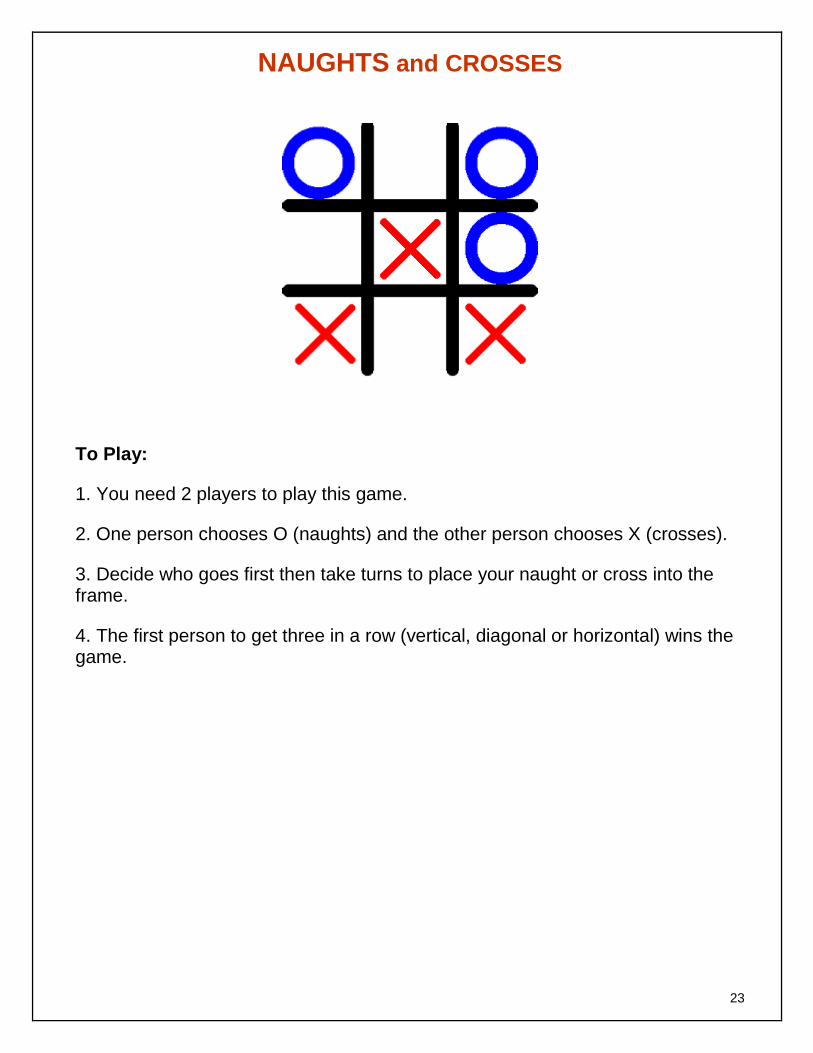
NAUGHTS and CROSSES
To Play:
1. You need 2 players to play this game.
2. One person chooses O (naughts) and the other person chooses X (crosses).
3. Decide who goes first then take turns to place your naught or cross into the frame.
4. The first person to get three in a row (vertical, diagonal or horizontal) wins the game.

24
HOOKEY
Players throw from a distance of 2½ metres. To determine who goes first, each player throws 6 rings and the highest scorer starts the game. To Play: 1. Each player throws 6 rings, one at a time and then adds up the score. 2. If the player manages to get all 6 rings on the board in one turn they get to have another turn. 3. The first player to reach the score of 101 wins the game. 4. Players must throw the exact number to complete their score. Round the Clock – In this game, number 1 must be scored first, then 2, 3, and so until the first player to reach 13 wins.

25
KNUCKLEBONES Also called ‘Jacks’ or ‘Five Stones’.
There are a number of variations of Knucklebones but all use 5 knucklebones or Jacks. After successfully completing each ‘throw’ the player proceeds to the next. If unsuccessful the next player has a turn. To Play: Over Hand Ones: Hold the 5 Jacks in the palm of one hand. Toss them all up and while they are in the air quickly turn your hand and catch as many as possible on the back of the hand. Then toss those caught, reverse hand and catch as many as possible in the palm. (Known as ‘Jockey’). If you catch the maximum of 5 you can go straight to ‘Over Hand Twos’. Keep one in your hand and put aside the remaining Jacks you have caught. Toss the one in your hand; quickly pick one of the previously fallen Jacks up off the ground, then catch the one you threw up. Continue picking up each one in turn. Over Hand Twos, (Threes & Fours): Same as ‘Ones’ only while the Jack is in the air pick up two, (three, then four) off the ground. To help do this sweep the two (three or four) Jacks together with your hand during each toss to ready them for picking up. Scatters Ones: Scatter 5 Jacks on the ground, select and pick up one, toss it in the air and then pick up another, then catch the toss. Repeat until all four are picked up. Scatter Twos, (Threes & Fours): Same as ‘Ones’ only while the Jack is in the air pick up two, (three, then four). Sweeping is not allowed therefore ensure you do not throw too far apart.
26
Dumps Hold the 5 Jacks in the hand, and then dump them in a heap on the ground. Select one without disturbing the others, toss it, quickly pick up the other four then catch the toss. Over Hand Scatters Ones: First ‘Jockey’ and then proceed as in Scatters Ones, Twos & Threes. Clicks: First ‘Jockey’ and put aside all caught but one, toss it, pick up one from the ground, catch the toss and as it is caught the two must click. Continue until all Jacks have been picked up. No Click: Same as above, but no click when caught. Little Jingles: First ‘Jockey’ then proceed as in Scatters Ones but the Jacks caught are held in the catching hand until all are picked up. Big Jingles: First ‘Jockey’ then proceed as in Scatters Ones but this time toss all the Jacks in the air, pick up one then catch all the Jacks, and proceed until all Jacks are picked up and kept in the hand, which increases the number tossed each time. Juggles: First ‘Jockey’ then toss one in the air, pick up one from the ground and toss that one while you catch the first Jack tossed, then catch the second Jack tossed. Continue until all Jacks have been picked up. Horses in the Stable: First ‘Jockey’, then put the tips of the five fingers of the other hand on the ground. Put all Jacks caught in Jockeying into the ‘stable’, toss one and sweep one jack

27
at a time under the arches into the stables. When all Jacks are in the stable, toss the Jack in your hand and pick up remaining 4 Jacks in stable. Through the Arch: As above, but make only one arch with the thumb and forefinger and allow only one ‘sweep’ to get each Jack through.
Over the Line: First Jockey, then put the left hand flat down on ground. Put all Jacks caught on the left hand side of the hand, toss one and place each Jack, one at a time over on to the left hand side. When all are over the line, pick up all Jacks without sweeping. Over the Jump: Same as above but place hand vertically instead of flat on the ground. Thread the Needle: Same as above but the Jacks have to be dropped through a circle made by thumb and forefinger of left hand held above the ground. Catching Flies: As ‘scatters ones’ but the catch must be done snatching in a downward movement.

28
QUOITS
To Play: 1. Decide who goes first and the order you are playing in if there are more than two players, or players may be divided into 2 teams. 2. Each player or team throws six rings or quoits from the toe line 2.5 metres from the wooden peg. (If you manage to get 5 quoits on to the peg and your 6th quoit comes to rest with one side sitting on the peg, you can throw again, but this is very rare!) 3. The player or team having had the most quoits on the peg by the end of the game time is the winner.
29
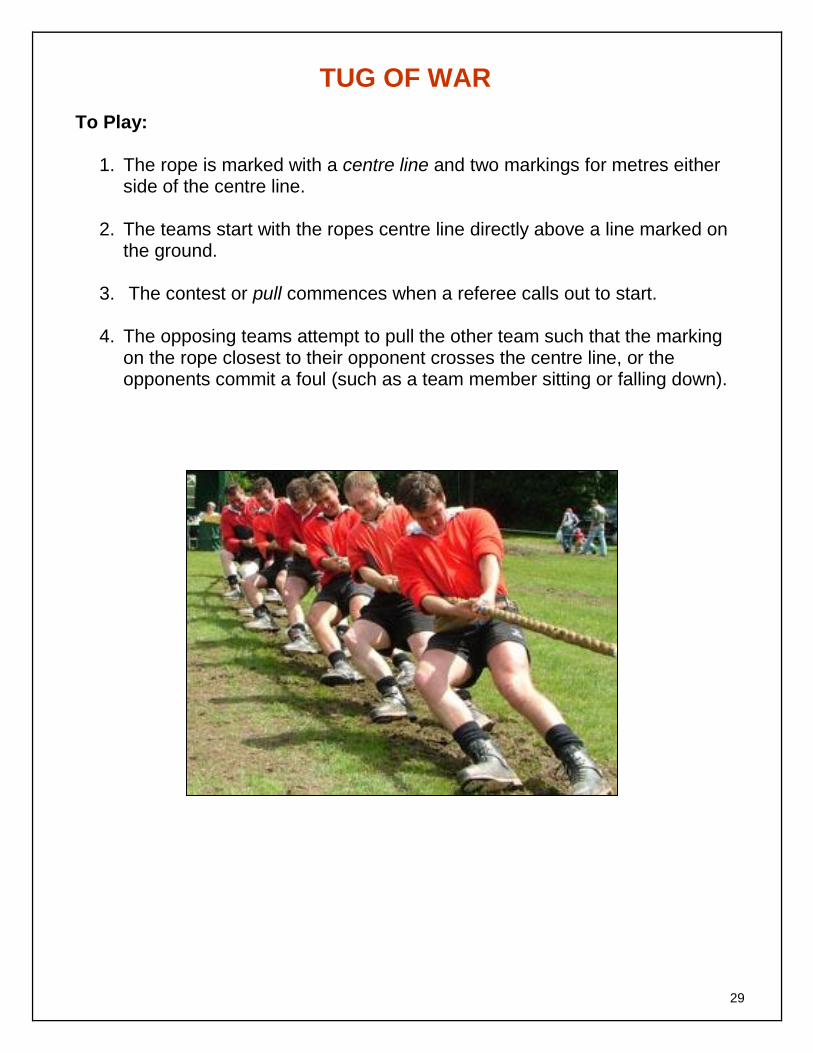
TUG OF WAR
To Play:
1. The rope is marked with a centre line and two markings for metres either side of the centre line.
2. The teams start with the ropes centre line directly above a line marked on
the ground.
3. The contest or pull commences when a referee calls out to start.
4. The opposing teams attempt to pull the other team such that the marking on the rope closest to their opponent crosses the centre line, or the opponents commit a foul (such as a team member sitting or falling down).