Embed Size (px)
Citation preview
7/28/2019 Build Own Robot Arm
http://slidepdf.com/reader/full/build-own-robot-arm 1/10
Robot Arm Page 1 of 6 Developed by IEEE as part of the IEEE Teacher In-Service Program
www.ieee.org/organizations/eab/precollege
Build Your Own Robot Arm
Part of the IEEE Teacher In-Service Program - www.ieee.org/organizations/eab/precollege
L e s s o n F o c u sDevelop a robot arm using common materials. Students will explore design, construction,teamwork, and materials selection and use.
L e s s o n S y n o p s i sParticipating teams of three or four students are provided with a bag including the
materials listed below. Each team must use the materials to design and build a workingrobot arm. The robot arm must be at least 18 inches in length and be able to pick up an
empty Styrofoam cup. Teams of students must agree on a design for the robot arm andidentify what materials will be used. Students will draw a sketch of their agreed upondesign prior to construction. Resulting robot arms are then tested and checked for range
of motion and satisfaction of the given criteria.
A g e L e v e l s10-18.
O b j e c t i v e s
Learn design concepts.
Learn teamwork.
Learn problem solving techniques.
Learn about simple machines.
A n t i c i p a t e d L e a r n e r O u t c o m e sAs a result of this activity, students should develop an understanding of:
design concepts
teamwork needed in the design process
impact of technology in manufacturing
L e s s o n A c t i v i t i e s
Students design and build a working robotic arm from a set of everyday items with a goal
of having the arm be able to pick up a Styrofoam cup. Working in teams of three or fourstudents, the students explore effective teamwork skills while learning simple robot
mechanics.
A l i g n m e n t t o C u r r i c u l u m F r a m e w o r k s
See attached curriculum alignment sheet.
7/28/2019 Build Own Robot Arm
http://slidepdf.com/reader/full/build-own-robot-arm 2/10
Robot Arm Page 2 of 6 Developed by IEEE as part of the IEEE Teacher In-Service Program
www.ieee.org/organizations/eab/precollege
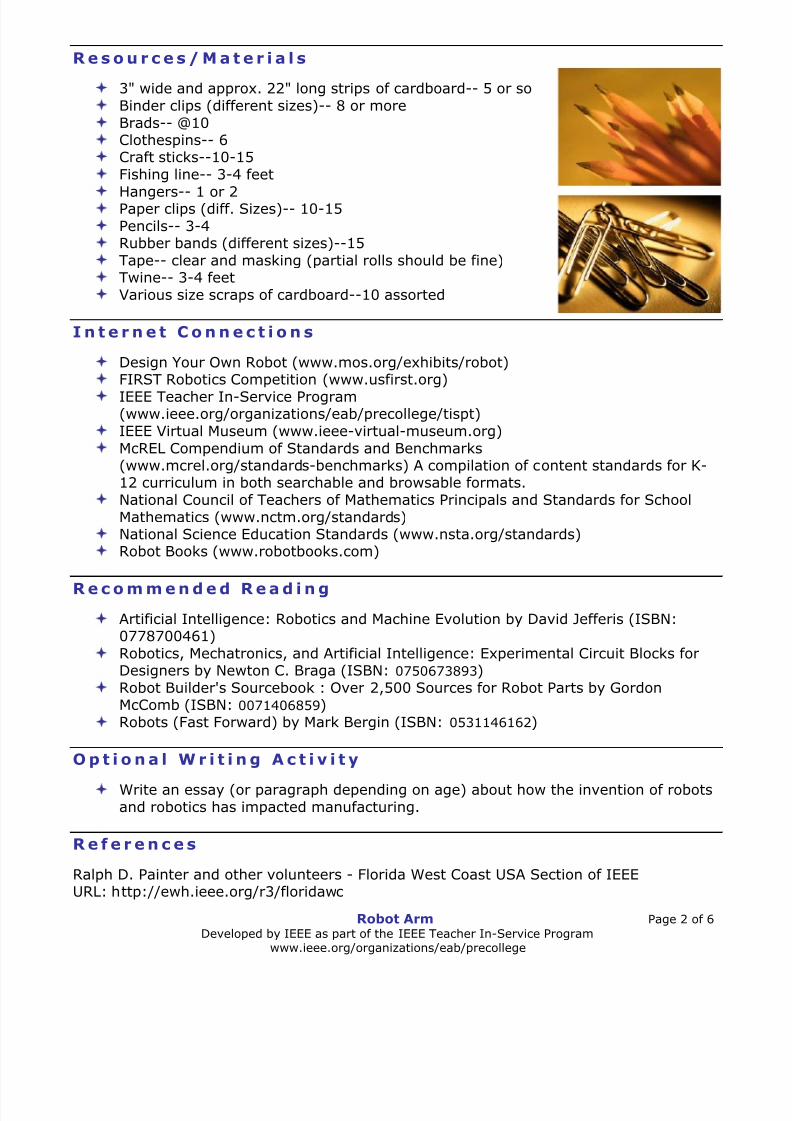
R e s o u r c e s / M a t e r i a l s
3" wide and approx. 22" long strips of cardboard-- 5 or so
Binder clips (different sizes)-- 8 or more
Brads-- @10
Clothespins-- 6
Craft sticks--10-15
Fishing line-- 3-4 feet
Hangers-- 1 or 2 Paper clips (diff. Sizes)-- 10-15
Pencils-- 3-4 Rubber bands (different sizes)--15
Tape-- clear and masking (partial rolls should be fine)
Twine-- 3-4 feet
Various size scraps of cardboard--10 assorted
I n t e r n e t C o n n e c t i o n s
Design Your Own Robot (www.mos.org/exhibits/robot)
FIRST Robotics Competition (www.usfirst.org)
IEEE Teacher In-Service Program(www.ieee.org/organizations/eab/precollege/tispt)
IEEE Virtual Museum (www.ieee-virtual-museum.org)
McREL Compendium of Standards and Benchmarks(www.mcrel.org/standards-benchmarks) A compilation of content standards for K-12 curriculum in both searchable and browsable formats.
National Council of Teachers of Mathematics Principals and Standards for School
Mathematics (www.nctm.org/standards)
National Science Education Standards (www.nsta.org/standards)
Robot Books (www.robotbooks.com)
R e c o m m e n d e d R e a d i n g
Artificial Intelligence: Robotics and Machine Evolution by David Jefferis (ISBN:0778700461)
Robotics, Mechatronics, and Artificial Intelligence: Experimental Circuit Blocks forDesigners by Newton C. Braga (ISBN: 0750673893)
Robot Builder's Sourcebook : Over 2,500 Sources for Robot Parts by GordonMcComb (ISBN: 0071406859)
Robots (Fast Forward) by Mark Bergin (ISBN: 0531146162)
O p t i o n a l W r i t i n g A c t i v i t y
Write an essay (or paragraph depending on age) about how the invention of robotsand robotics has impacted manufacturing.
R e f e r e n c e s
Ralph D. Painter and other volunteers - Florida West Coast USA Section of IEEEURL: http://ewh.ieee.org/r3/floridawc
7/28/2019 Build Own Robot Arm
http://slidepdf.com/reader/full/build-own-robot-arm 3/10
Robot Arm Page 3 of 6 Developed by IEEE as part of the IEEE Teacher In-Service Program
www.ieee.org/organizations/eab/precollege
Build Your Own Robot Arm
F o r T e a c h e r s :A l i g n m e n t t o C u r r i c u l u m F r a m e w o r k s
Note: All Lesson Plans in this series are aligned to the National Science Education
Standards which were produced by the National Research Council and endorsed by the
National Science Teachers Association, and if applicable, also to the InternationalTechnology Education Association's Standards for Technological Literacy or the NationalCouncil of Teachers of Mathematics' Principals and Standards for School Mathematics.
National Science Education Standards Grades 5-8 (ages 10 - 14)CONTENT STANDARD B: Physical Science
As a result of their activities, all students should develop an understanding of
Motions and forces
Transfer of energy
National Science Education Standards Grades 9-12 (ages 14 - 18)
CONTENT STANDARD B: Physical ScienceAs a result of their activities, all students should develop understanding of
Motions and forces
Interactions of energy and matterCONTENT STANDARD E: Science and TechnologyAs a result of activities, all students should develop
Abilities of technological design
Understandings about science and technology
Standards for Technological Literacy - All AgesThe Nature of Technology
Standard 3: Students will develop an understanding of the relationshipsamong technologies and the connections between technology and other fieldsof study.
Technology and Society
Standard 7: Students will develop an understanding of the influence of
technology on history.Design
Standard 9: Students will develop an understanding of engineering design.
Standard 10: Students will develop an understanding of the role of troubleshooting, research and development, invention and innovation, and
experimentation in problem solving.
Abilities for a Technological World
Standard 11: Students will develop abilities to apply the design process.The Designed World
Standard 19: Students will develop an understanding of and be able to select
and use manufacturing technologies.
7/28/2019 Build Own Robot Arm
http://slidepdf.com/reader/full/build-own-robot-arm 4/10
Robot Arm Page 4 of 6 Developed by IEEE as part of the IEEE Teacher In-Service Program
www.ieee.org/organizations/eab/precollege
Build Your Own Robot Arm
F o r T e a c h e r s :
T e a c h e r R e s o u r c e s
Divide your class into teams of three or four students, and provide student handout(attached). Students are then instructed to examine the materials provided (see listbelow) and to work as a team to design and build a robot arm out of the materials. The
robot arm must be at least 18 inches in length and be able to pick up an empty Styrofoamcup. Teams of students must agree on a design for the robot arm and identify what
materials will be used. Students should draw a sketch of their agreed upon design priorto construction.
Explain that teamwork, trial, and error are part of the design process. There is no "right"answer to the problem - each team's creativity will likely generate an arm that is uniquefrom the others designed in your class.
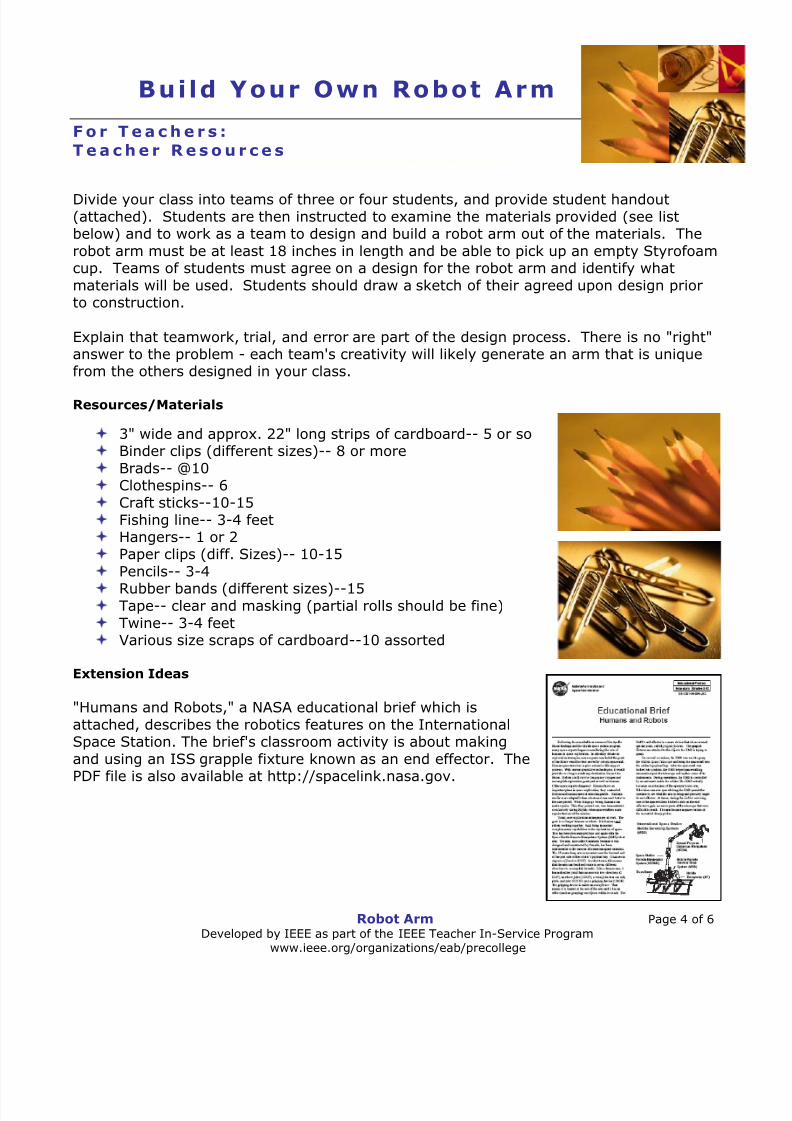
Resources/Materials
3" wide and approx. 22" long strips of cardboard-- 5 or so
Binder clips (different sizes)-- 8 or more
Brads-- @10
Clothespins-- 6
Craft sticks--10-15
Fishing line-- 3-4 feet Hangers-- 1 or 2
Paper clips (diff. Sizes)-- 10-15
Pencils-- 3-4
Rubber bands (different sizes)--15 Tape-- clear and masking (partial rolls should be fine)
Twine-- 3-4 feet Various size scraps of cardboard--10 assorted
Extension Ideas
"Humans and Robots," a NASA educational brief which is
attached, describes the robotics features on the InternationalSpace Station. The brief's classroom activity is about making
and using an ISS grapple fixture known as an end effector. ThePDF file is also available at http://spacelink.nasa.gov.
7/28/2019 Build Own Robot Arm
http://slidepdf.com/reader/full/build-own-robot-arm 5/10
Robot Arm Page 5 of 6 Developed by IEEE as part of the IEEE Teacher In-Service Program
www.ieee.org/organizations/eab/precollege
Build Your Own Robot Arm
S t u d e n t H a n d o u t :
H o w T o B u i l d Y o u r O w n R o b o t A r m
You are a member of a team of three or four students, all working together to design andbuild a robot arm out of the following materials which are provided to you. The robot arm
must be at least 18 inches in length and be able to pick up an empty Styrofoam cup. Yourteam must agree on a design for the robot arm and identify what materials will be used.Your team should draw a sketch of their agreed upon design prior to construction.
Part of the teamwork process is sharing ideas and determining which design your teamwill go with. Trial and error are part of the design process. There is no "right" answer to
the problem - your team's creativity will likely generate an arm that is unique from theothers designed in your class.
Resources/Materials
3" wide and approx. 22" long strips of cardboard-- 5 or so
Binder clips (different sizes)-- 8 or more
Brads-- @10
Clothespins-- 6
Craft sticks--10-15
Fishing line-- 3-4 feet
Hangers-- 1 or 2
Paper clips (diff. Sizes)-- 10-15
Pencils-- 3-4
Rubber bands (different sizes)--15
Tape-- clear and masking (partial rolls should be fine) Twine-- 3-4 feet
Various size scraps of cardboard--10 assorted
7/28/2019 Build Own Robot Arm
http://slidepdf.com/reader/full/build-own-robot-arm 6/10
Robot Arm Page 6 of 6 Developed by IEEE as part of the IEEE Teacher In-Service Program
www.ieee.org/organizations/eab/precollege
Build Your Own Robot Arm
S t u d e n t H a n d o u t :
R o b o t A r m E x e r c i s e Q u e s t i o n s
Did you use all the materials provided to you? Why, or why not?
Which item was most critical to your robot arm design?
How did working as a team of four help in the design process?
Were there any drawbacks to designing as a team?
What did you learn from the designs developed by other teams?
Name three industries that make use of robots in manufacturing:
7/28/2019 Build Own Robot Arm
http://slidepdf.com/reader/full/build-own-robot-arm 7/10
National Aeronautics and
Space Administration
Educational Product
Educators Grades 5-12
EB-2001-04-004-JSC
Educational Brief
Humans and Robots
Following the remarkable successes of the Apollo
Moon landings and the Skylab space station program,
many space experts began reconsidering the role of
humans in space exploration. In a healthy debate on
exploration strategies, some experts concluded the goals
of the future would be best served by robotic spacecraft.
Human space travelers require extensive life support
systems. With current propulsive technologies, it would
just take too long to reach any destination beyond the
Moon. Robots could survive long space voyages and
accomplish exploration goals just as well as humans.
Other space experts disagreed. Humans have an
important place in space exploration, they contended.
Robots and humans are not interchangeable. Humans
are far more adaptable than robots and can react better to
the unexpected. When things go wrong, humans can
make repairs. This, they pointed out, was demonstrated
conclusively during Skylab, when spacewalkers made
repairs that saved the mission.
Today, new exploration strategies are at work. The
goal is no longer humans or robots. It is humans and
robots working together. Each bring important
complimentary capabilities to the exploration of space.
This has been demonstrated time and again with the
Space Shuttle Remote Manipulator System (RMS) robot
arm. The arm, also called Canadarm because it was
designed and constructed by Canada, has been
instrumental to the success of numerous space missions.
The 15-meter-long arm is mounted near the forward endof the port side of the orbiter’s payload bay. It has seven
degrees of freedom (DOF). In robot terms, this means
that the arm can bend and rotate in seven different
directions to accomplish its tasks. Like a human arm, it
has a shoulder joint that can move in two directions (2
DOF); an elbow joint (1 DOF); a wrist joint that can roll,
pitch, and yaw (3 DOF); and a gripping device (1 DOF).
The gripping device is called an end effector . That
means it is located at the end of the arm and it has an
effect (such as grasping) on objects within its reach. The
RMS’s end effector is a snare device that closes around
special posts, called grapple fixtures. The grapple
fixtures are attached to the objects the RMS is trying to
grasp.
On several occasions, the RMS was used to grasp
the Hubble Space Telescope and bring the spacecraft into
the orbiter’s payload bay. After the spacecraft was
locked into position, the RMS helped spacewalking
astronauts repair the telescope and replace some of its
instruments. During operations, the RMS is controlled
by an astronaut inside the orbiter. The RMS actually
becomes an extension of the operator’s own arm.
Television cameras spaced along the RMS permit the
operator to see what the arm is doing and precisely target
its end effector. At times, during the Hubble servicing,
one of the spacewalkers hitched a ride on the end
effector to gain access to parts of the telescope that were
difficult to reach. The arm became a space version of
the terrestrial cherry picker.
Mobile
Transporter (MT)
Mobile RemoteServicer BaseSystem (MSB)
Special Purpose
Dexterous Manipulator(SPDM)
Space StationRemote Manipulator
System (SSRMS)
Truss Beam
International Space StationMobile Servicing System(MSS)
7/28/2019 Build Own Robot Arm
http://slidepdf.com/reader/full/build-own-robot-arm 8/10
Humans and Robots 2 EB-2001-04-004-JSC
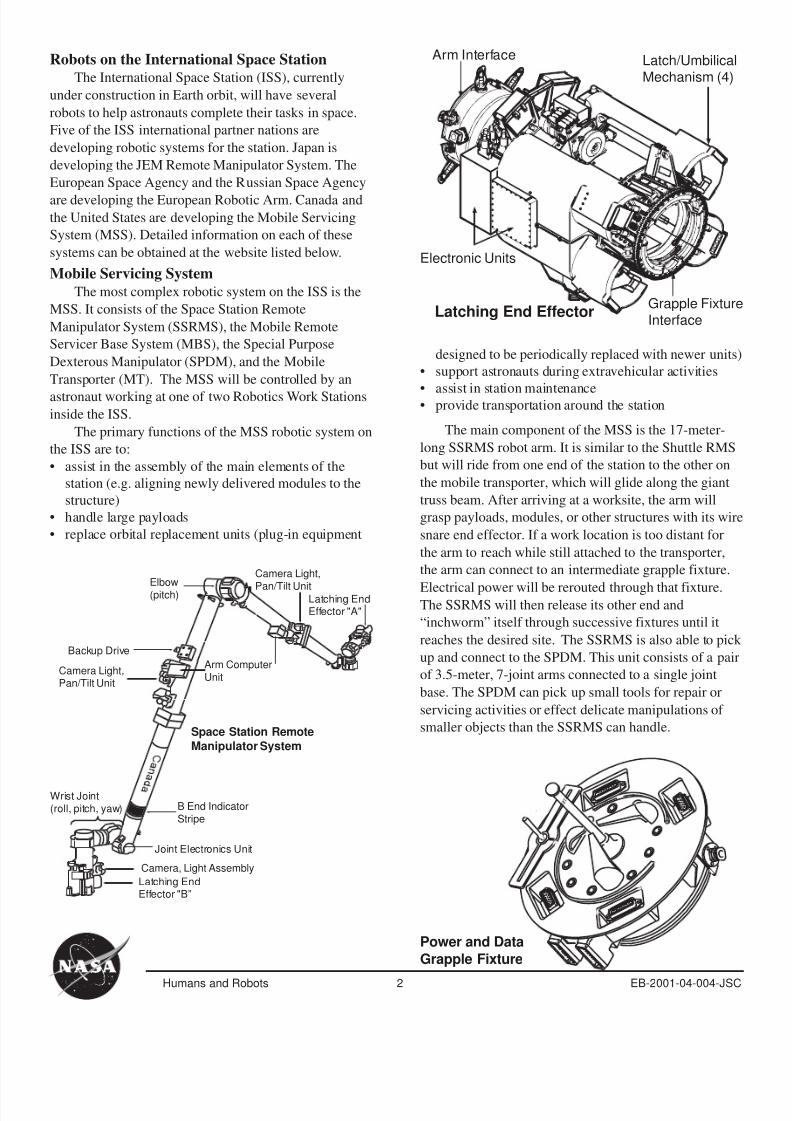
Robots on the International Space Station
The International Space Station (ISS), currently
under construction in Earth orbit, will have several
robots to help astronauts complete their tasks in space.
Five of the ISS international partner nations are
developing robotic systems for the station. Japan is
developing the JEM Remote Manipulator System. The
European Space Agency and the Russian Space Agency
are developing the European Robotic Arm. Canada andthe United States are developing the Mobile Servicing
System (MSS). Detailed information on each of these
systems can be obtained at the website listed below.
Mobile Servicing System
The most complex robotic system on the ISS is the
MSS. It consists of the Space Station Remote
Manipulator System (SSRMS), the Mobile Remote
Servicer Base System (MBS), the Special Purpose
Dexterous Manipulator (SPDM), and the Mobile
Transporter (MT). The MSS will be controlled by an
astronaut working at one of two Robotics Work Stationsinside the ISS.
The primary functions of the MSS robotic system on
the ISS are to:
• assist in the assembly of the main elements of the
station (e.g. aligning newly delivered modules to the
structure)
• handle large payloads
• replace orbital replacement units (plug-in equipment
designed to be periodically replaced with newer units)
• support astronauts during extravehicular activities
• assist in station maintenance• provide transportation around the station
The main component of the MSS is the 17-meter-
long SSRMS robot arm. It is similar to the Shuttle RMS
but will ride from one end of the station to the other on
the mobile transporter, which will glide along the giant
truss beam. After arriving at a worksite, the arm will
grasp payloads, modules, or other structures with its wire
snare end effector. If a work location is too distant for
the arm to reach while still attached to the transporter,
the arm can connect to an intermediate grapple fixture.
Electrical power will be rerouted through that fixture.The SSRMS will then release its other end and
“inchworm” itself through successive fixtures until it
reaches the desired site. The SSRMS is also able to pick
up and connect to the SPDM. This unit consists of a pair
of 3.5-meter, 7-joint arms connected to a single joint
base. The SPDM can pick up small tools for repair or
servicing activities or effect delicate manipulations of
smaller objects than the SSRMS can handle.
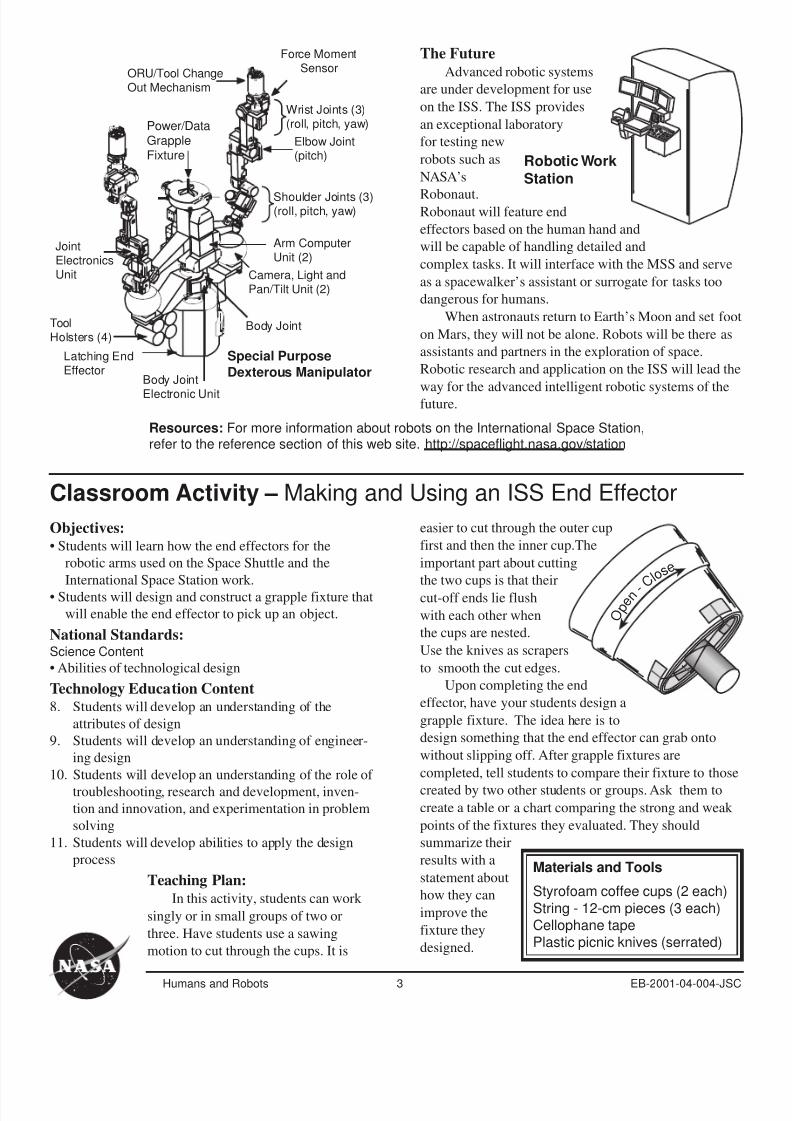
Latching EndEffector "B”
Camera, Light Assembly
Joint Electronics Unit
B End IndicatorStripe
Wrist Joint(roll, pitch, yaw)
Camera Light,Pan/Tilt Unit
Backup Drive
Arm ComputerUnit
Latching EndEffector "A"
Camera Light,
Pan/Tilt UnitElbow(pitch)
Space Station Remote
Manipulator System
Grapple Fixture
Interface
Electronic Units
Arm Interface Latch/Umbilical
Mechanism (4)
Latching End Effector
Power and Data
Grapple Fixture
7/28/2019 Build Own Robot Arm
http://slidepdf.com/reader/full/build-own-robot-arm 9/10
Humans and Robots 3 EB-2001-04-004-JSC
Latching EndEffector
Body Joint
Electronic Unit
ToolHolsters (4)
JointElectronicsUnit
Power/DataGrappleFixture
ORU/Tool ChangeOut Mechanism
Force MomentSensor
Wrist Joints (3)(roll, pitch, yaw)
Elbow Joint(pitch)
Shoulder Joints (3)(roll, pitch, yaw)
Arm ComputerUnit (2)
Camera, Light andPan/Tilt Unit (2)
Body Joint
Special Purpose
Dexterous Manipulator
Robotic Work
Station
The Future
Advanced robotic systems
are under development for use
on the ISS. The ISS provides
an exceptional laboratory
for testing new
robots such as
NASA’s
Robonaut.Robonaut will feature end
effectors based on the human hand and
will be capable of handling detailed and
complex tasks. It will interface with the MSS and serve
as a spacewalker’s assistant or surrogate for tasks too
dangerous for humans.
When astronauts return to Earth’s Moon and set foot
on Mars, they will not be alone. Robots will be there as
assistants and partners in the exploration of space.
Robotic research and application on the ISS will lead the
way for the advanced intelligent robotic systems of thefuture.
Classroom Activity – Making and Using an ISS End Effector
Materials and Tools
Styrofoam coffee cups (2 each)
String - 12-cm pieces (3 each)Cellophane tapePlastic picnic knives (serrated)
Objectives:
• Students will learn how the end effectors for the
robotic arms used on the Space Shuttle and the
International Space Station work.
• Students will design and construct a grapple fixture that
will enable the end effector to pick up an object.
National Standards:Science Content
• Abilities of technological design
Technology Education Content
8. Students will develop an understanding of the
attributes of design
9. Students will develop an understanding of engineer-
ing design
10. Students will develop an understanding of the role of
troubleshooting, research and development, inven-
tion and innovation, and experimentation in problem
solving
11. Students will develop abilities to apply the design
process
Teaching Plan:
In this activity, students can work
singly or in small groups of two or
three. Have students use a sawing
motion to cut through the cups. It is
easier to cut through the outer cup
first and then the inner cup.The
important part about cutting
the two cups is that their
cut-off ends lie flush
with each other when
the cups are nested.
Use the knives as scrapers
to smooth the cut edges.
Upon completing the end
effector, have your students design a
grapple fixture. The idea here is to
design something that the end effector can grab onto
without slipping off. After grapple fixtures are
completed, tell students to compare their fixture to those
created by two other students or groups. Ask them to
create a table or a chart comparing the strong and weak
points of the fixtures they evaluated. They should
summarize their
results with a
statement about
how they can
improve the
fixture they
designed.
O p e n
-
C l o s
e
Resources: For more information about robots on the International Space Station,refer to the reference section of this web site. http://spaceflight.nasa.gov/station
7/28/2019 Build Own Robot Arm
http://slidepdf.com/reader/full/build-own-robot-arm 10/10
Humans and Robots 4 EB-2001-04-004-JSC
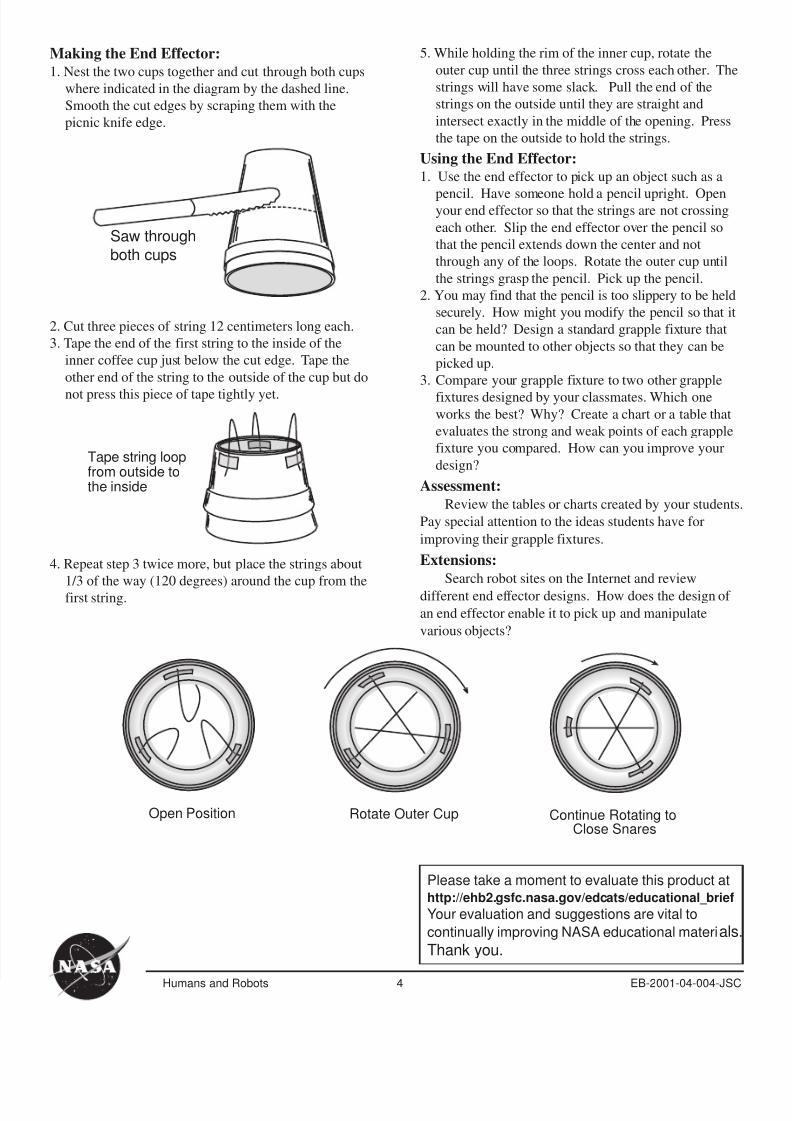
Making the End Effector:
1. Nest the two cups together and cut through both cups
where indicated in the diagram by the dashed line.
Smooth the cut edges by scraping them with the
picnic knife edge.
2. Cut three pieces of string 12 centimeters long each.
3. Tape the end of the first string to the inside of the
inner coffee cup just below the cut edge. Tape the
other end of the string to the outside of the cup but do
not press this piece of tape tightly yet.
4. Repeat step 3 twice more, but place the strings about
1/3 of the way (120 degrees) around the cup from the
first string.
5. While holding the rim of the inner cup, rotate the
outer cup until the three strings cross each other. The
strings will have some slack. Pull the end of the
strings on the outside until they are straight and
intersect exactly in the middle of the opening. Press
the tape on the outside to hold the strings.
Using the End Effector:
1. Use the end effector to pick up an object such as a
pencil. Have someone hold a pencil upright. Openyour end effector so that the strings are not crossing
each other. Slip the end effector over the pencil so
that the pencil extends down the center and not
through any of the loops. Rotate the outer cup until
the strings grasp the pencil. Pick up the pencil.
2. You may find that the pencil is too slippery to be held
securely. How might you modify the pencil so that it
can be held? Design a standard grapple fixture that
can be mounted to other objects so that they can be
picked up.
3. Compare your grapple fixture to two other grapple
fixtures designed by your classmates. Which oneworks the best? Why? Create a chart or a table that
evaluates the strong and weak points of each grapple
fixture you compared. How can you improve your
design?
Assessment:
Review the tables or charts created by your students
Pay special attention to the ideas students have for
improving their grapple fixtures.
Extensions:
Search robot sites on the Internet and review
different end effector designs. How does the design of
an end effector enable it to pick up and manipulate
various objects?
Tape string loopfrom outside tothe inside
Open Position Rotate Outer Cup Continue Rotating toClose Snares
Saw through
both cups
Please take a moment to evaluate this product at
http://ehb2.gsfc.nasa.gov/edcats/educational_brief
Your evaluation and suggestions are vital to
continually improving NASA educational materials.Thank you.