Embed Size (px)
Citation preview

National Oceanic and Atmospheric Administration (NOAA)61
Science | Service | Stewardship Understand the earth
Build Your Own Weather StationBuild Your Own Weather Station
“I believe there is a train under here somewhere!”
Standing tall on North Dakota snow. A March blizzard nearly buried utility poles. Caption jokingly read “I believe there is a train under here somewhere!”
Courtesy Dr. Herbert Kroehl, NGDC
Every year, thousands of lives and millions of dollars are saved by severe weather warnings from the National Weather Service. From its earliest beginnings (on February 9th, 1870), the primary mission of the Na-tional Weather Service has been to protect life and property by providing information about dangerous weather conditions. Originally, the Nation-al Weather Service was called “The Division of Telegrams and Reports for the Benefit of Commerce” and was part of the U.S. Army. Later, its name was shortened to the Weather Bureau and it became part of the Department of Agriculture, then the Department of Commerce.
The first “weathermen” were “observing-sergeants” of the Army’s Sig-nal Service Corps. Weather forecasting in those early years was based almost entirely on the assumption that the weather observed in one location on a particular day would move to downwind locations on following days. Today, satellites, computers, and a variety of scien-tific instruments are added to this basic assumption to make accurate weather predictions and provide warnings about dangerous weather.
Here’s how you can make your own weather observation station!
What You Will Do Build six instruments that you can use to make scientific measurements of your local weather
http://noaa.gov
Discover Your World With NOAA
62
What You Will Needr Five paper cups - Three ounce sizer Two straight plastic soda strawsr Straight pinr Paper punchr Staplerr Sharp pencil with eraserr Felt tip markerr Watch or timer
WarningBe careful with the straight pin!
How to Do It:1. Using a paper punch, punch a hole in four
paper cups about 1/2-inch below the rim of the cups.
2. Punch four equally spaced holes in a fifth paper cup about 1/4-inch below the rim, and a fifth hole in the center of the bottom of the cup (you will probably need to use the pencil to make the hole in the bottom).
3. Push a soda straw through the hole in one of the first four cups. Flatten the end of the straw and staple it to the side of the cup
opposite the hole. Repeat this step with the other straw and another of the first four cups.
4. Slide one of the cup and straw assemblies through two opposite holes in the side of the fifth cup. Push another one-hole cup
onto the straw, and turn this cup so that the open ends of the two cups on the straw face in opposite directions. Flatten the end of the straw, and staple it to the side of the second cup. Measure the distance between the centers of the two cups. This is the diameter of your anemometer.
Build an Anemometer to Measure Wind Speed
3 oz. paper cup
Straw
Pencil
Straight pin
National Oceanic and Atmospheric Administration (NOAA)63
Science | Service | Stewardship Understand the earth
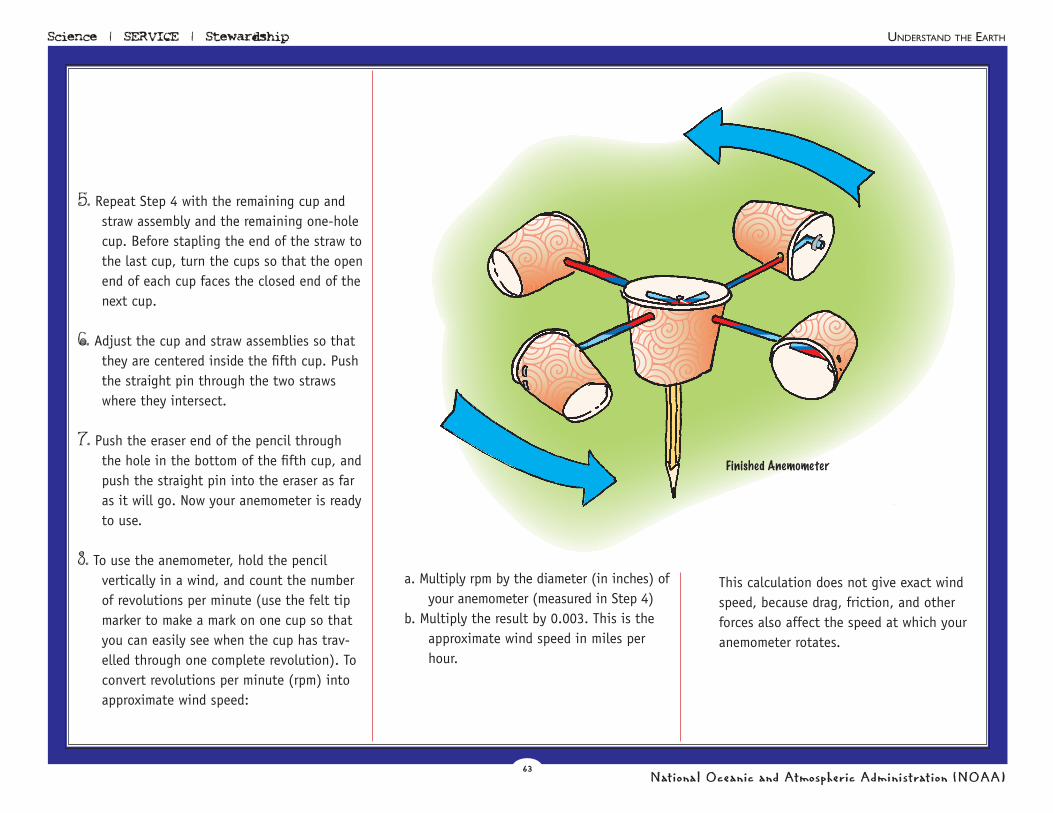
5. Repeat Step 4 with the remaining cup and straw assembly and the remaining one-hole cup. Before stapling the end of the straw to the last cup, turn the cups so that the open end of each cup faces the closed end of the next cup.
6. Adjust the cup and straw assemblies so that they are centered inside the fifth cup. Push the straight pin through the two straws where they intersect.
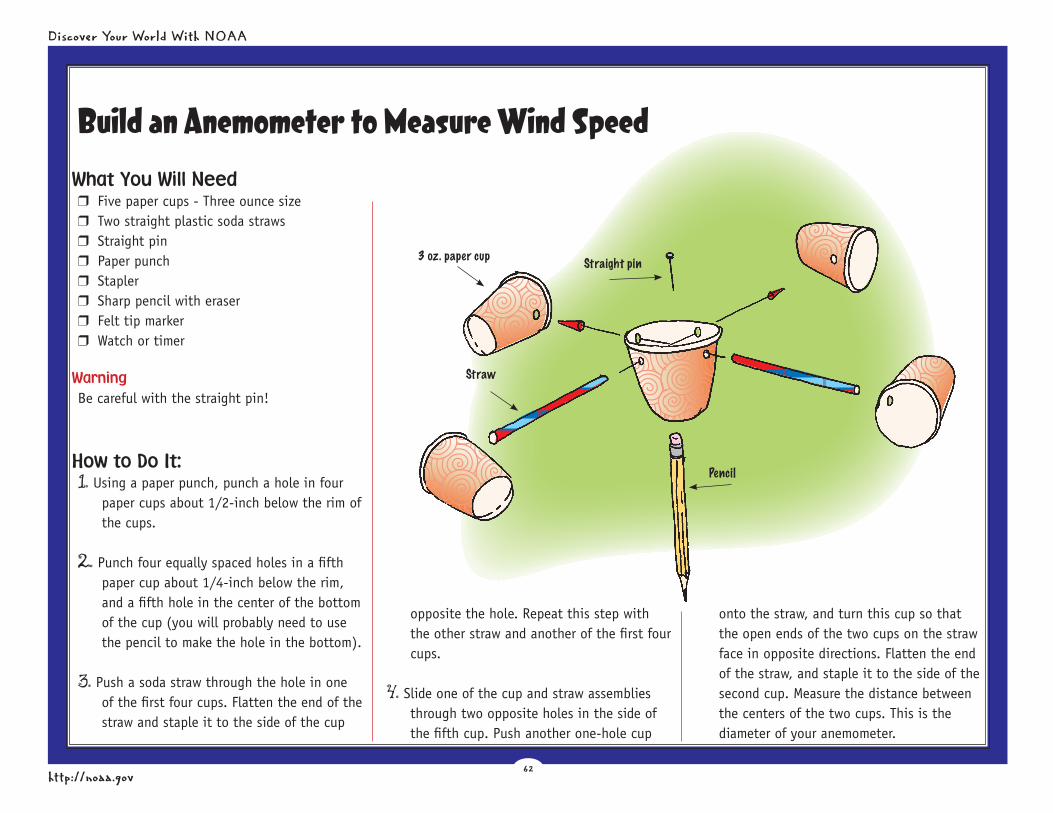
7. Push the eraser end of the pencil through the hole in the bottom of the fifth cup, and push the straight pin into the eraser as far as it will go. Now your anemometer is ready to use.
8. To use the anemometer, hold the pencil vertically in a wind, and count the number of revolutions per minute (use the felt tip marker to make a mark on one cup so that you can easily see when the cup has trav-elled through one complete revolution). To convert revolutions per minute (rpm) into approximate wind speed:
a. Multiply rpm by the diameter (in inches) of your anemometer (measured in Step 4)
b. Multiply the result by 0.003. This is the approximate wind speed in miles per hour.
This calculation does not give exact wind speed, because drag, friction, and other forces also affect the speed at which your anemometer rotates.
Finished Anemometer

http://noaa.gov
Discover Your World With NOAA
64
Build a Weather Vane to Find Wind Direction
What You Will Needr Broomstick or long wooden dowel, about
one inch diameterr Aluminum baking dish, about six inches x
nine inchesr Wood stick, about 3/4 inch square and 12
inches longr Nail, about one inch longr Metal washer with a hole slightly larger than
the nailr Duct taper Small saw or serrated knifer Scissors strong enough to cut the aluminum
baking dishr Ruler or tape measurer Silicone or other glue that will stick to
aluminumr Leather glovesr (Optional) Hand drill, and small drill bit
slightly larger than the nail
WarningBe careful of the sharp edges on the pieces of cut aluminum! Use gloves to protect your hands until the edges are taped.
Mark this spot on the upper surface of the stick, and drive a nail through the marked spot. Be careful: if the nail is too big, the stick will probably split. To avoid this, drill a hole slightly larger than the nail through the marked spot. You may need an adult to help with the drilling.
3. Cut the head and tail pieces of the Weather Vane from the aluminum baking dish using the pattern as a guide. Be Careful—The Edges Are Sharp! Use duct tape to cover the sharp edges.
How to Do It1. Use the saw or serrated knife to cut a notch
about 1/2-inch deep into each end of the wood stick. The notches shuld be parallel (see drawing on page 65).
2. Rotate the stick so that the two slots are vertical. Use the ruler or tape measure to find the exact center of the wood stick.
tail
head

National Oceanic and Atmospheric Administration (NOAA)65
Science | Service | Stewardship Understand the earth
4. Fit the head piece into one of the slots in the wood stick and fit the tail piece into the other slot. Glue the head and tail pieces into place and allow the glue to dry.
5. Attach the Weather Vane to the broomstick or dowel, by placing the washer on one end of the dowel and hammering the nail through the wooden stick into the dowel.
Be sure the stick still moves freely around the nail.
6. Mount your Weather Vane outside where there are no nearby obstructions to block the wind. Try to get the dowel as high as you can while still keeping it steady and secure.
Winds are named according to the direction from which the wind is blowing, so a “north wind” is blowing from the north. The head of the Weather Vane will point to the direc-tion from which the wind is blowing.
head
tail
nail
dowel
washer
broom or long wooden dowel
Finsished Weather Vane

http://noaa.gov
Discover Your World With NOAA
66
Build a Barometer for Measuring Atmospheric Pressure
What You Will Needr 12-inch rulerr Drinking glass or other container with sides
tall enough to support the rulerr Clear plastic drinking straw or piece of clear
plastic tubing, about 12-inches long r Modeling clay or chewing gumr Clear taper (Optional) Food coloring
How to Do It1. Tape the plastic straw or plastic tubing to the
ruler so that one end is lined up with the “1/2-inch” mark on the ruler.
2. Stand the ruler-tubing assembly upright in the glass (or other container), and tape the assembly to the top of the container.
3. Fill the container about 3/4-full of water. If you want colored water, first mix food col-oring with the water in another container.
4. Use the modeling clay or chewing gum (you’ll have to chew it until it is soft enough) to plug the end of the straw or plastic tubing near the top of the ruler.
5. Carefully pour out some of the water so the container is about half full. Be sure the lower end of the straw or tubing stays be-neath the water surface while you do this! When you are finished, the water in the straw or tube should be higher than the water in the container. Your barometer is now fin-ished. Since barometers are sensitive to minor changes in weather conditions, keep your barometer indoors for greatest accuracy.
6. Keep a daily record of the height of the water in the tube, using the scale on the ruler. The water level in the tube will rise and fall as atmospheric pres-sure changes. When atmospheric pressure increases, air presses on the surface of the water in the container causing the height of
the water in the tube to rise. When atmo-spheric pressure decreases, there is less pressure on the surface of the water in the container so the height of the water in the tube falls. Decreasing atmospheric pressure usually indicates that a low pressure area is approaching, and this often brings clouds and rain. Increasing atmospheric pressure often indicates fair weather.
Finished Barometer
glass container
ruler
clear straw or plastic tubing
tape
gum or clay
tape

National Oceanic and Atmospheric Administration (NOAA)67
Science | Service | Stewardship Understand the earth
Build a Screened Thermometer to Measure Air Temperature
What You Will Needr A wooden or plastic box, large enough to
hold the thermometer and your hygrometer; see Step 1 under “How to Do It”
r Thermometer, about 0°F to 120°Fr White paint and paint brushr Nails, screws, glue, or tape to attach the
thermometer to the box
How to Do It1. The wood or plastic box is supposed to pro-
tect your weather instruments from wind, rain, and direct sun, but still allow air to circulate so the instruments can get accu-rate readings. A box with a hinged lid that can be turned on its side is perfect. Turn the box on its side, and cut several slots near what is now the bottom of the box. Paint the outside of the box with white paint, and find a safe, shady outdoor loca-tion. The north side of buildings has the most shade. Try to find a location that is three to four feet above the ground.
2. Attach the thermometer to the back of the box with tape, glue, screws, or nails. The bulb of the thermometer should be about two inches above the bottom of the box.
Build a Hygrometer to Measure Humidity
What You Will Needr Piece of wood or styrofoam about nine
inches long and four inches wider Flat piece of plastic, thin enough to cut with
scissors; about three inches long and one inch wide (an old credit card or laminated luggage tag works well)
r Two small nailsr Three strands of human hair, about eight
inches longr Dimer Gluer Taper Hammerr Scissors
How to Do It 1. Cut the plastic into a pointer as shown on
the pattern below.
2. Poke one of the nails through the pointer near the base of the triangle. Wiggle the nail around until the pointer moves freely and loosely around the nail.
3. Tape the dime onto the pointer near the tip of the triangle.
4. Glue the hair strands onto plastic between the nail hole and the dime.
5. Use a nail to fasten the pointer to the wood or styrofoam base about 3/4 of the way down the side. Be sure the pointer can still turn freely on the nail.
6. Attach the other nail to the base about one inch from the top of the base, in line with the spot where the hair is glued to the pointer.
7. Pull the free ends of the hair tight so that the pointer is horizontal. Wrap the hair Pointer Pattern

http://noaa.gov
Discover Your World With NOAA
68
0
5
10
15
-5-10-15
0
5
10
15
-5-10-15
around the upper nail and glue to hold the hair in place.
8. Make a photocopy of the scale and cut it out. Glue the scale to the base so that the pointer is pointed to the “0” mark. Your hygrometer is finished!
9. Human hair will expand and lengthen when the air is moist, causing the pointer to move down. When the air is dry, the hair will contract and shorten, causing the pointer to move up. Use the scale to record the pointer’s position. Keep your hygrom-eter in a sheltered location. The box used for the screened thermometer is ideal.
Wood or styrofoam
nail
nail dime
plastic pointer
Hair
Finished Hygrometer
National Oceanic and Atmospheric Administration (NOAA)69
Science | Service | Stewardship Understand the earth
Build a Rain Gauge to Measure Rainfall
What You Needr Straight-sided glass or plastic container,
with a diameter of about two inches or less (such as an olive jar)
r Coat hanger or wire bent to make a holding rack (see picture)
r Measuring spoons: One teaspoon and 1/4 teaspoon
r Hammer and nails to secure the rackr Felt tip marker
How to Do It1. Rain gauges measure the amount of rainfall
in cubic inches. So your first task is to make a scale for your container that shows how many cubic inches of water are in the container. One cubic inch of water is about 3 1/4 teaspoons, so you can draw the scale on your container by measuring 3 1/4 teaspoons of water to your container, then drawing a short line at the level of the water. If you look closely, the top of the water will seem to be slightly curved and thickened. Draw your line so that it matches the bottom of the curved surface (which is called a meniscus). This line corresponds to a rainfall of one inch.
2. Add another 3 1/4 teaspoons of water to the container and draw another line. The second line corresponds to a rainfall of two inches.
3. Repeat Step 2 until you have at least five marks on the container. This will be enough for most rain events; but you may want to add another line or two, just in case!
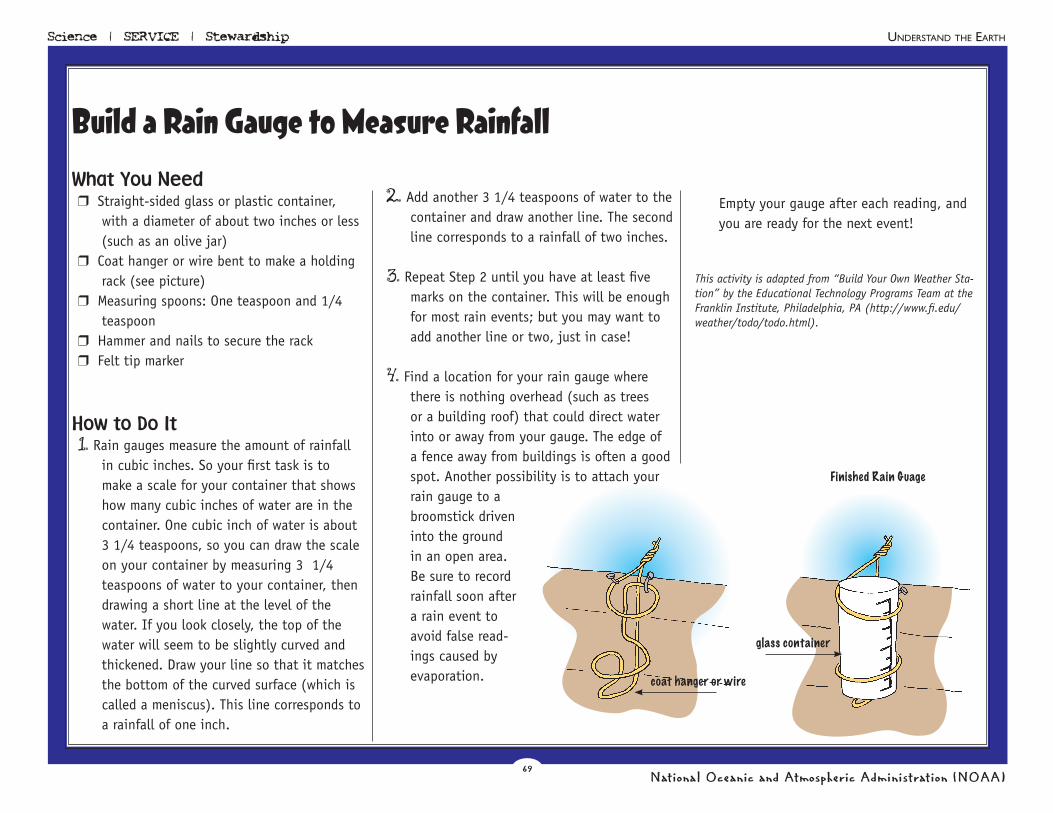
4. Find a location for your rain gauge where there is nothing overhead (such as trees or a building roof) that could direct water into or away from your gauge. The edge of a fence away from buildings is often a good spot. Another possibility is to attach your rain gauge to a broomstick driven into the ground in an open area. Be sure to record rainfall soon after a rain event to avoid false read-ings caused by evaporation.
Empty your gauge after each reading, and you are ready for the next event!
This activity is adapted from “Build Your Own Weather Sta-tion” by the Educational Technology Programs Team at the Franklin Institute, Philadelphia, PA (http://www.fi.edu/weather/todo/todo.html).
glass container
Finished Rain Guage
coat hanger or wire