Embed Size (px)
Citation preview
BUOYANCY COMPENSATOR OWNER’S MANUAL
WARNINGIMPROPER USE OR MISUSE OF THIS BUOYANCY COMPENSATOR, OR ANYDIVING EQUIPMENT, COULD RESULT IN SERIOUS INJURY OR DEATH.
Do not use this Buoyancy Compensator (BC) until you have carefully andcompletely read, understood and followed all instructions and safety precautionsfound in this manual, all inserts that accompanied this manual, and all tags andmarkings found on the Buoyancy Compensator.
Proper training in swimming, scuba diving, buoyancy control, and emergencybuoyancy skills is required to safely use this product. A Buoyancy Compensator is nota substitute for these skills. The user must have successfully completed a course oftraining in SCUBA diving, buoyancy control, and emergency buoyancy skills. Thisinstruction should be from a certified SCUBA instructor of a recognized educationalorganization, such as YMCA, NASDS, PADI, NAUI, SSI, BSAC, CMAS or FIPS, etc.
Retain this manual for your reference.
Review this manual periodically and prior to diving.
If you have any questions or are unclear about any instructions, call SCUBAPRO®
Service or contact any service center listed inside.
The following Norms are compulsory by law in Europe and are the only worldwide official requirements for B.C.'s . SCUBAPRO® has been the first and onlymanufacturer to obtain these certifications:- EN 12628 for CBRD (Combined Buoyancy Rescue Device) that providesdivers with a device for controlling buoyancy that also guarantees a head upposition of the wearer at the surface.- EN 1809: 1997 for B.C. (Buoyancy Compensator) that provides divers with adevice for controlling buoyancy, but does not guarantee a head up position of thewearer at the surface.- EN 250: 2000 for body harness that provides divers with a device for fixingthe tank to the body : it has not to be used deeper than 50 m (164 feet).Each B.C model has an indication of the relevant EU certificate obtained.
I - 1
ENGLISHBuoyancy Compensator Owner’s Manual

WARNINGFAILURE TO READ, UNDERSTAND, AND FOLLOW THE PRECAUTIONS LISTEDBELOW COULD RESULT IN SERIOUS INJURY OR DEATH
THIS IS NOT A LIFE JACKET. Emergency face up flotation may not be provided forall wearers and in all conditions (except for the Master Jacket)This B.C. is not a breathing device
Always perform a pre-dive and post-dive inspection of the B.C.
IMPORTANTBefore use, the SCUBAPRO® Buoyancy Compensators must be matched to one ofthe following inflation mechanisms.
• A.I.R. 2 (Alternate Inflation Regulator 2 style or SCUBAPRO® equivalent).Attaches to the tank/regulator system for push-button buoyancy control and acts asan alternate regulator for emergency breathing, eliminating the need for an“Octopus” regulator. When used with a Pony Bottle and separate regulator first stage(such as a MK20), this system functions as an independent air supply. The A.I.R. 2may also be used for manual deflation and oral inflation of the jacket.
• B.P.I. (Balanced Power Inflator)Provides push-button buoyancy control when attached to existing tank/regulatorsystems and may also be used for manual deflation and oral inflation of the jacket.Your SCUBAPRO® Dealer will assist you in choosing and assembling yourpersonal buoyancy control system.
• I.P.I. (Integrated Power Inflator)Directly connected to the B.C. bag, it allows to inflate your B.C. by using air fromyour SCUBA cylynder.
Your SCUBAPRO® dealer will assist you in choosing and assembling your personalbuoyancy control system.
Buoyancy Compensator Owner’s Manual
I - 2
TABLE OF CONTENTS
1 General Information . . . . . . . . . . . . . . . . . . . . . . . . . . . . . . . . . . . . . . . . . . . . . . . . . . . . . . . . . . . . I - 42 Initial Set Up . . . . . . . . . . . . . . . . . . . . . . . . . . . . . . . . . . . . . . . . . . . . . . . . . . . . . . . . . . . . . . . . . . . . . . . . . . . . . I - 53 Set Up for Double Scuba Cylinders . . . . . . . . . . . . . . . . . . . . . . . I - 84 Ballasting System . . . . . . . . . . . . . . . . . . . . . . . . . . . . . . . . . . . . . . . . . . . . . . . . . . . . . . . . . . . . . . . . . I - 85 Valve Set Up and Operation . . . . . . . . . . . . . . . . . . . . . . . . . . . . . . . . . . . . . . . . I - 126 BC Harness Adjustment General Features . . . . . . I - 177 BC Examination and Procedures . . . . . . . . . . . . . . . . . . . . . . . . . . . . . I - 188 Storage . . . . . . . . . . . . . . . . . . . . . . . . . . . . . . . . . . . . . . . . . . . . . . . . . . . . . . . . . . . . . . . . . . . . . . . . . . . . . . . . . . . . . . . . . I - 199 General Specifications . . . . . . . . . . . . . . . . . . . . . . . . . . . . . . . . . . . . . . . . . . . . . . . . . . . . . I - 20
10 Master Jacket . . . . . . . . . . . . . . . . . . . . . . . . . . . . . . . . . . . . . . . . . . . . . . . . . . . . . . . . . . . . . . . . . . . . . . . . . . I - 2111 Glide Line . . . . . . . . . . . . . . . . . . . . . . . . . . . . . . . . . . . . . . . . . . . . . . . . . . . . . . . . . . . . . . . . . . . . . . . . . . . . . . . . . . . I - 2412 Glide 2000 BW . . . . . . . . . . . . . . . . . . . . . . . . . . . . . . . . . . . . . . . . . . . . . . . . . . . . . . . . . . . . . . . . . . . . . . . I - 2613 Glide 3000 I.P.I. . . . . . . . . . . . . . . . . . . . . . . . . . . . . . . . . . . . . . . . . . . . . . . . . . . . . . . . . . . . . . . . . . . . . . . . I - 2814 Glide 1000 . . . . . . . . . . . . . . . . . . . . . . . . . . . . . . . . . . . . . . . . . . . . . . . . . . . . . . . . . . . . . . . . . . . . . . . . . . . . . . . . . I - 3015 Glide 500 . . . . . . . . . . . . . . . . . . . . . . . . . . . . . . . . . . . . . . . . . . . . . . . . . . . . . . . . . . . . . . . . . . . . . . . . . . . . . . . . . . . . I - 3116 Glide 3D PRO . . . . . . . . . . . . . . . . . . . . . . . . . . . . . . . . . . . . . . . . . . . . . . . . . . . . . . . . . . . . . . . . . . . . . . . . . I - 3217 Glide 3D CLUB . . . . . . . . . . . . . . . . . . . . . . . . . . . . . . . . . . . . . . . . . . . . . . . . . . . . . . . . . . . . . . . . . . . . . . I - 3418 Glide STAR . . . . . . . . . . . . . . . . . . . . . . . . . . . . . . . . . . . . . . . . . . . . . . . . . . . . . . . . . . . . . . . . . . . . . . . . . . . . . . . . I - 3419 Glide Tek (Basic / Pro) - Ladyhawk - Knighthawk I - 36
I - 3
Buoyancy Compensator Owner’s Manual
ENGLISH

1. GENERAL INFORMATION
Primary purpose of the Buoyancy CompensatorThe primary purpose of a Buoyancy Compensator is to make you more comfortableby enabling you to maintain neutral buoyancy at depth.
You are neutrally buoyant when you maintain a specific depth without expendingsignificant physical effort to prevent an ascent or descent from that depth.Inventor and leader in the development of Stabilizing Jackets, SCUBAPRO® offers acomplete range of these items, specifically designed :• Stabilizing Jacket• Adjustable Jacket• Back flotation Jacket
All these models have been provided with inflating, deflating and draining valvesystem and designed to make surface swimming easier.
Back Packs (two sizes)/Back PlateThe materials used for the bag (single or double) even tough, could be not strongenough in certain extreme conditions (for example jumping into water from height) :for this reason Scubapro® invented and improved in the years, the “sandwich” systemthat encloses, with two metal screws, the bag between two semirigid plates (backpack and back plate).
Soft PaddingAll the main internal surfaces of the Jackets, where there is more compression on thebody (such as shoulder lobes, back pack, cummerbunds, etc.) are soft padded.
CummerbundsThis accessory is designed to hold tight but to be comfortable at the same time: forthese reasons it is anatomically designed with a semirigid panel outside, and a softpadding inside, just in contact with the diver’s body. The lenght is easily adjustable, atthe moment, without any tool.
ATTENTIONDo not use your BC as an assist or “lift bag” for bringing objects to the surface.These objects may be lost during the ascent, creating a sudden increase inbuoyancy and loss of buoyancy control.
Buoyancy Compensator Owner’s Manual
I - 4

ENGLISHBuoyancy Compensator Owner’s Manual
I - 5
2. INITIAL SET UP
Low Pressure (LP) hose Connect the low pressure (LP) hose of the Power Inflation Valve or A.I.R. 2 to anunused LP port of the first stage, that must have the same thread (fig. 1).
ATTENTIONDo not attach a L.P. hose to a Scuba regulator high pressure (HP) port or to an airsupply with pressure in excess of 200 psi (13.8 bar). This may result in damage orexplosive failure of the Inflation Valve or Low pressure Hose, which could result ininjury or death.
Fig. 1
SUPER CINCH Q.A. (QUICK ADJUST.)CYLINDER STRAP SET UP AND ATTACHMENT (SINGLE CYLINDER)
The SCUBAPRO® Super Cinch Q.A. cylinder strap allows you to easily fasten your BCto any single SCUBA cylinder.
Set up for a single SCUBA cylinder can be accomplished following these steps :
1) Wet the webbing of the Super Cinch Q.A. cylinder strap prior to tightening. Wrapthe Super Cinch Q.A. (W1) strap (fig. 2 – 1) around the SCUBA cylinder and insertthe end of the stainless steel buckle (B) into the trapezoidal “D” ring (DR1)(fig 2 – 1). Position the SCUBA cylinder so that the cavity (S) of the back platecorresponds to the cylinder shoulder (fig. 2 – 2) with the lever (B) close to the backpack (BP) (fig. 2 – 3).
The cylinder locator strap (L )(fig. 2 – 2), on the top of the back plate, encirclingthe valve neck of the cylinder, prevents the back pack strap assy from slidingdown, while connecting and tightening the Super Cinch Q.A. Once correctlyadjusted, it helps to easily and consistently find the correct position.
2) Close the buckle (C) (fig. 2 – 3). If the webbing strap is too tight to close or too looseto grab the SCUBA cylinder, open the velcro fastener on the webbing and readjust thelength of the Super Cinch Q.A. (W1) webbing (fig. 2 – 1). For extra safety look, slidethe loop (SL) (fig. 2 – 1) around the webbing end (T). With SCUBA cylinder inplace, lift the assembly by the back pack handle and shake firmly to check forsecure fastening. Try to move the backpack up and down on the SCUBA cylinder.If there is movement, the band is not tight enough.
Buoyancy Compensator Owner’s Manual
I - 6

ENGLISHBuoyancy Compensator Owner’s Manual
WARNINGSoak the webbing of the SCUBA air cylinder strap and then tighten prior to eachuse of the BC. Webbing may stretch when initially exposed to water. Failure to soakthe webbing may allow the cylinder strap to loosen around the SCUBA air cylinder.This could result in injury or death.
I - 7
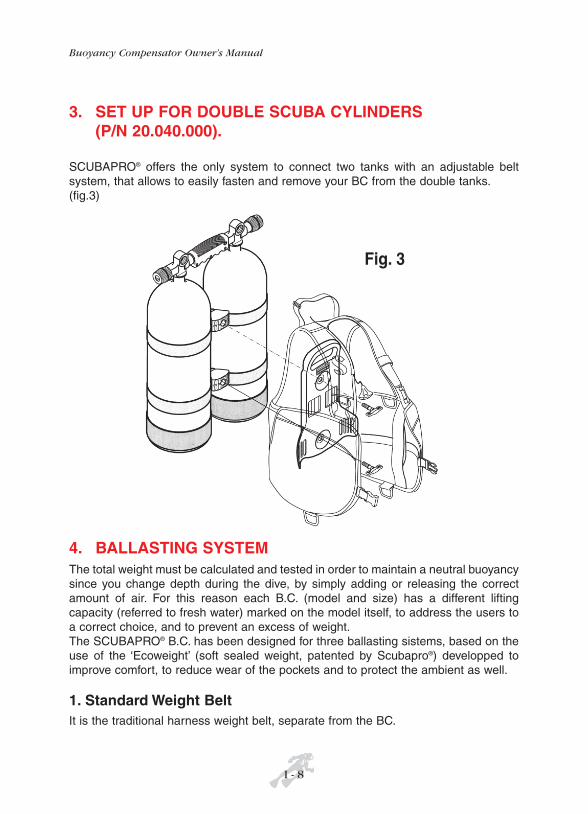
3. SET UP FOR DOUBLE SCUBA CYLINDERS(P/N 20.040.000).
SCUBAPRO® offers the only system to connect two tanks with an adjustable beltsystem, that allows to easily fasten and remove your BC from the double tanks.(fig.3)
4. BALLASTING SYSTEMThe total weight must be calculated and tested in order to maintain a neutral buoyancysince you change depth during the dive, by simply adding or releasing the correctamount of air. For this reason each B.C. (model and size) has a different liftingcapacity (referred to fresh water) marked on the model itself, to address the users toa correct choice, and to prevent an excess of weight.The SCUBAPRO® B.C. has been designed for three ballasting sistems, based on theuse of the ‘Ecoweight’ (soft sealed weight, patented by Scubapro®) developped toimprove comfort, to reduce wear of the pockets and to protect the ambient as well.
1. Standard Weight BeltIt is the traditional harness weight belt, separate from the BC.
I - 8
Buoyancy Compensator Owner’s Manual
Fig. 3
ENGLISHBuoyancy Compensator Owner’s Manual
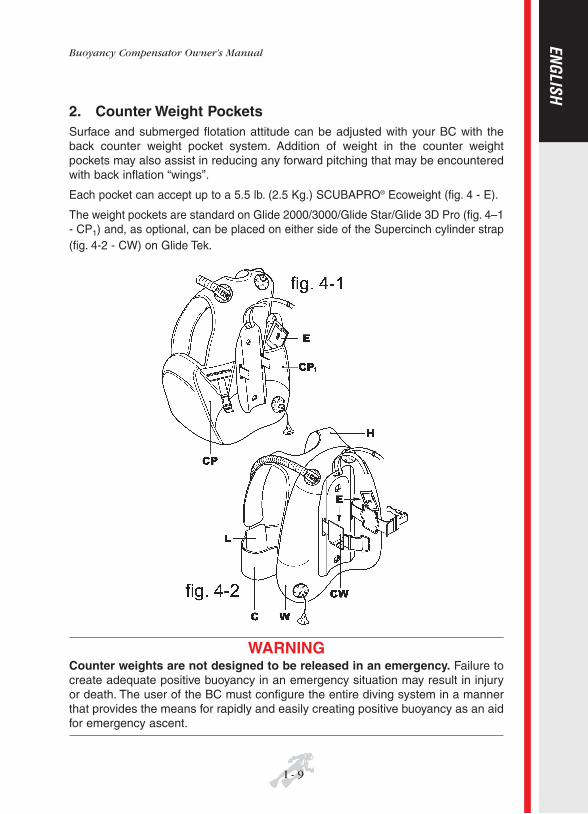
2. Counter Weight PocketsSurface and submerged flotation attitude can be adjusted with your BC with theback counter weight pocket system. Addition of weight in the counter weightpockets may also assist in reducing any forward pitching that may be encounteredwith back inflation “wings”.
Each pocket can accept up to a 5.5 lb. (2.5 Kg.) SCUBAPRO® Ecoweight (fig. 4 - E).
The weight pockets are standard on Glide 2000/3000/Glide Star/Glide 3D Pro (fig. 4–1- CP1) and, as optional, can be placed on either side of the Supercinch cylinder strap(fig. 4-2 - CW) on Glide Tek.
WARNINGCounter weights are not designed to be released in an emergency. Failure tocreate adequate positive buoyancy in an emergency situation may result in injuryor death. The user of the BC must configure the entire diving system in a mannerthat provides the means for rapidly and easily creating positive buoyancy as an aidfor emergency ascent.
I - 9
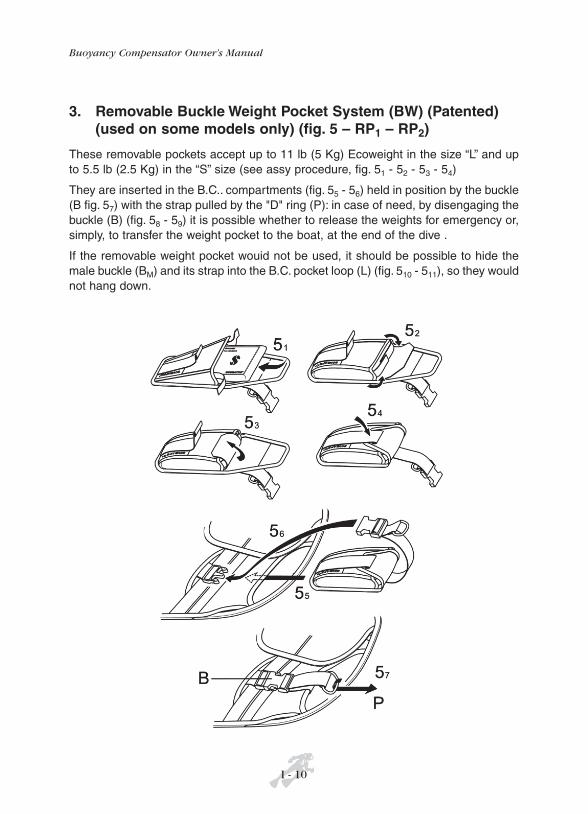
3. Removable Buckle Weight Pocket System (BW) (Patented)(used on some models only) (fig. 5 – RP1 – RP2)
These removable pockets accept up to 11 lb (5 Kg) Ecoweight in the size “L” and upto 5.5 lb (2.5 Kg) in the “S” size (see assy procedure, fig. 51 - 52 - 53 - 54)
They are inserted in the B.C.. compartments (fig. 55 - 56) held in position by the buckle(B fig. 57) with the strap pulled by the "D" ring (P): in case of need, by disengaging thebuckle (B) (fig. 58 - 59) it is possible whether to release the weights for emergency or,simply, to transfer the weight pocket to the boat, at the end of the dive .
If the removable weight pocket wouid not be used, it should be possible to hide themale buckle (BM) and its strap into the B.C. pocket loop (L) (fig. 510 - 511), so they wouldnot hang down.
I - 10
Buoyancy Compensator Owner’s Manual

ENGLISHBuoyancy Compensator Owner’s Manual
ATTENTIONThe Ecoweight (fig. 51) and Removable Pocket (fig. 54) must be perfectly securedwith the buckles fully and correctly engaged (fig. 57) : the loss of the pocket duringdiving causes positive buoyancy and uncontrolled ascent that could result in injuryor death.
I - 11
5. VALVE SET UP AND OPERATION
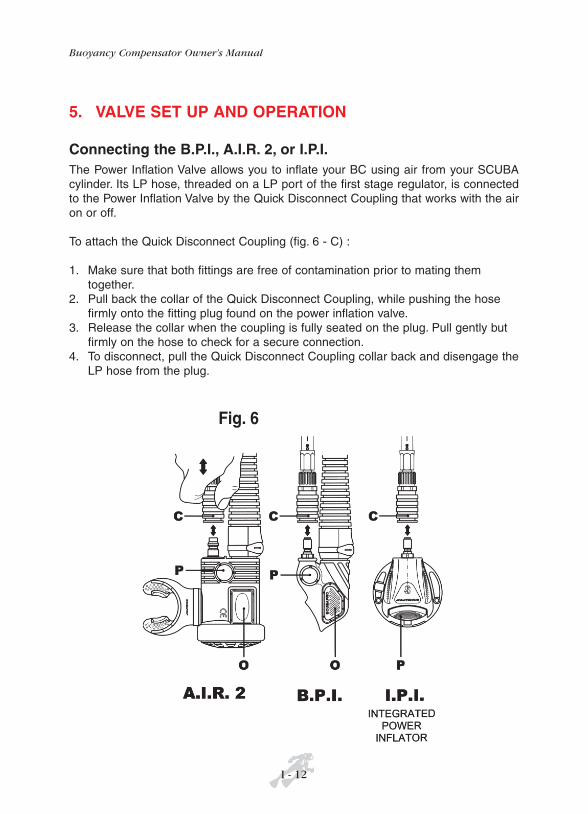
Connecting the B.P.I., A.I.R. 2, or I.P.I.The Power Inflation Valve allows you to inflate your BC using air from your SCUBAcylinder. Its LP hose, threaded on a LP port of the first stage regulator, is connectedto the Power Inflation Valve by the Quick Disconnect Coupling that works with the airon or off.
To attach the Quick Disconnect Coupling (fig. 6 - C) :
1. Make sure that both fittings are free of contamination prior to mating themtogether.
2. Pull back the collar of the Quick Disconnect Coupling, while pushing the hosefirmly onto the fitting plug found on the power inflation valve.
3. Release the collar when the coupling is fully seated on the plug. Pull gently butfirmly on the hose to check for a secure connection.
4. To disconnect, pull the Quick Disconnect Coupling collar back and disengage theLP hose from the plug.
I - 12
Buoyancy Compensator Owner’s Manual
Fig. 6

ENGLISHBuoyancy Compensator Owner’s Manual
WARNINGNever breathe from the BC. Your BC may contain gas residue, liquid, orcontamination that may result in injury or death if inhaled.
Keep water out of the inflatable aircell of the BC. Repeated use of the oral valveor the Overpressure Valve may allow water inside the BC, reducing the amount ofbuoyancy provided by the BC. This could result in injury or death. Drain all waterout of the BC prior to every use.
Inflating the BC with the Power Inflation Valve (on BPI, AIR 2and I.P.I.).To inflate the BC, press the Power Inflation Valve Button (fig. 6-P). Air should enterthe BC. For better control during inflation use short bursts of air by repeatedlypressing and releasing the PIV button.
Inflating the BC with the Oral Valve (on BPI and/or AIR 2)The Oral Valve is typically found on the end of the airway. It allows you to inflateyour BC with your exhaled breath. Use of this valve for inflation is recommendedon the surface, or on land prior to diving. It may be used when you cannot, or donot wish to add air to the BC with the Power Inflation Valve (fig. 6 - O).
1. First exhale a small amount of air into the mouthpiece of the valve to purgeany water that may be trapped there.
2. With the same breath, continue to exhale while deeply depressing the OralInflation Valve Button (fig. 6 - O).
3. Release the Oral Valve Button when you inhale fresh air.4. Repeat steps 2 and 3 until the desired amount of buoyancy is reached.
I - 13
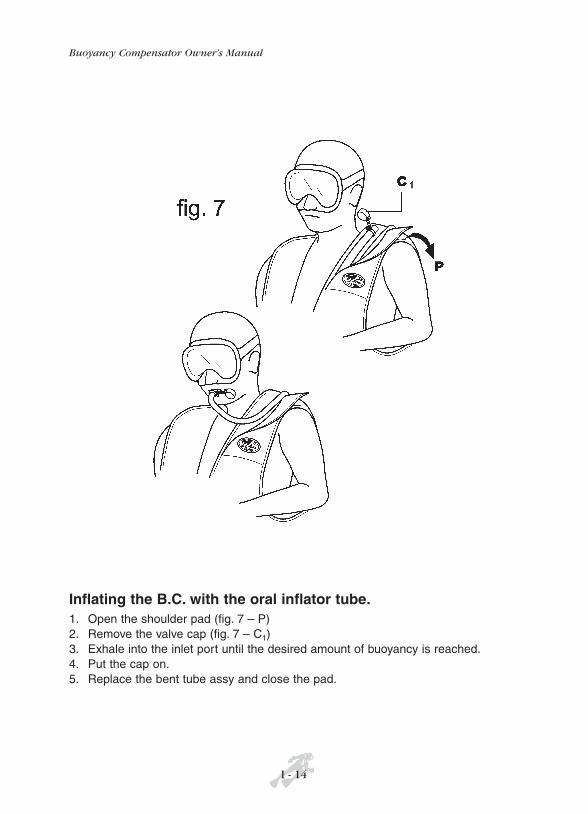
Inflating the B.C. with the oral inflator tube.1. Open the shoulder pad (fig. 7 – P)2. Remove the valve cap (fig. 7 – C1)3. Exhale into the inlet port until the desired amount of buoyancy is reached.4. Put the cap on.5. Replace the bent tube assy and close the pad.
I - 14
Buoyancy Compensator Owner’s Manual
ENGLISHBuoyancy Compensator Owner’s Manual
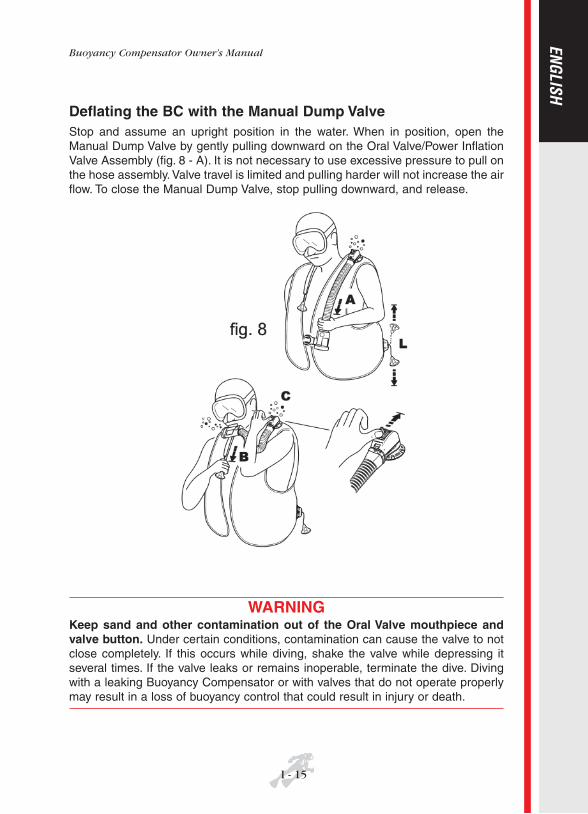
Deflating the BC with the Manual Dump ValveStop and assume an upright position in the water. When in position, open theManual Dump Valve by gently pulling downward on the Oral Valve/Power InflationValve Assembly (fig. 8 - A). It is not necessary to use excessive pressure to pull onthe hose assembly. Valve travel is limited and pulling harder will not increase the airflow. To close the Manual Dump Valve, stop pulling downward, and release.
WARNINGKeep sand and other contamination out of the Oral Valve mouthpiece andvalve button. Under certain conditions, contamination can cause the valve to notclose completely. If this occurs while diving, shake the valve while depressing itseveral times. If the valve leaks or remains inoperable, terminate the dive. Divingwith a leaking Buoyancy Compensator or with valves that do not operate properlymay result in a loss of buoyancy control that could result in injury or death.
I - 15
Deflating the BC with the Oral Valve (BPI and /or AIR 2 only)Assume a head up position in the water. Raise the Oral Valve above and in front ofyour face. (This insures the Oral valve will be positioned above the air bubble in theBC.). Depress the Oral Valve button and visually confirm that air is escaping from themouthpiece. For best control, let air out in a series of short, measured amounts whileobserving the effects on your buoyancy.
IMPORTANT• When breathing from an Air 2 equipped BC, the recommended valve for
dumping air is the shoulder Dump Valve (fig. 8 - B), located on the rightshoulder, of the BC, or the push pin (fig.8 - C) on top.
• The SCUBAPRO® Dual Manual Dump Valve (Patent) has a safety hand pin onthe top (fig. 8 - C) that, by pushing it upward, releases air in case of failure of theManual Dump System (broken cable, pin, etc.) or while breathing from an Air 2.
• If the BC model does not have a right shoulder Dump valve or the push pin, thenthe Air 2 may require removal from the mouth to actuate the Manual Dump Valve(fig. 8 - A).
• With all deflation methods, hold the valve open no longer than needed. Thishelps prevent excess water from entering the BC.
• Do not depress the Oral Valve button when activating the Manual Dump valve, as water may enter the BC through the Oral Valve mouthpiece.
Over Pressure Valve OperationThe Over Pressure Valve prevents over-inflation of the BC. If the internal pressureexceeds the spring pressure in the Over Pressure Valve, the valve automaticallyopens and releases air to prevent damage to the BC. The valve will automaticallyclose when the internal pressure goes below the spring pressure in the Over pressureValve.
Shoulder ValvesSCUBAPRO® Buoyancy Compensators have over pressure valves on either one orboth shoulders that act also as dump valves. The dump valve on the left shoulder isalways present and is activated either by : a) pulling gently on the hose assembly(fig. 8 - A) or b) pushing on the rod that protrudes out of the valve casing (fig. 8 - C)(Patented) : this system could be useful also to purge air of another diver havingproblems (panic, beginner diver, unconsciousness, etc.). The valve on the rightshoulder, if present, is activated by pulling gently on the knob which is connected viaa lanyard to the valve itself (fig. 8 - B). To operate either style of dump valve, orient thevalve to a position higher than the air bubble in the BC. Activate the dump valve untilthe desired amount of buoyancy is reached. Stop pulling/pushing to close the valve(fig. 8 - B)
I - 16
Buoyancy Compensator Owner’s Manual
ENGLISHBuoyancy Compensator Owner’s Manual
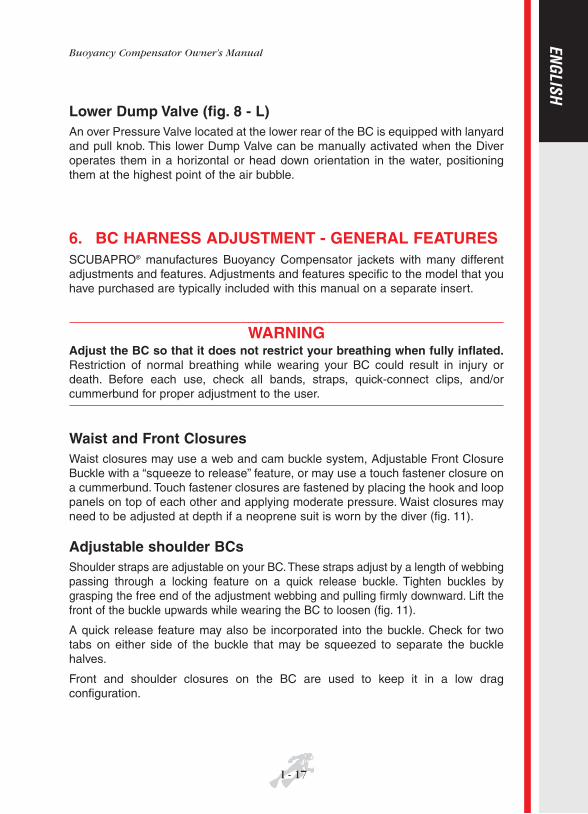
Lower Dump Valve (fig. 8 - L)An over Pressure Valve located at the lower rear of the BC is equipped with lanyardand pull knob. This lower Dump Valve can be manually activated when the Diveroperates them in a horizontal or head down orientation in the water, positioningthem at the highest point of the air bubble.
6. BC HARNESS ADJUSTMENT - GENERAL FEATURES SCUBAPRO® manufactures Buoyancy Compensator jackets with many differentadjustments and features. Adjustments and features specific to the model that youhave purchased are typically included with this manual on a separate insert.
WARNINGAdjust the BC so that it does not restrict your breathing when fully inflated.Restriction of normal breathing while wearing your BC could result in injury ordeath. Before each use, check all bands, straps, quick-connect clips, and/orcummerbund for proper adjustment to the user.
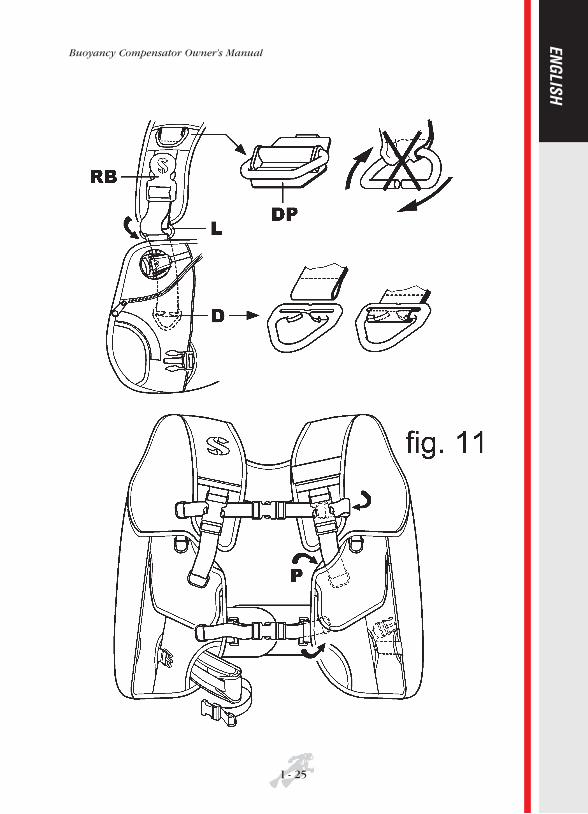
Waist and Front ClosuresWaist closures may use a web and cam buckle system, Adjustable Front ClosureBuckle with a “squeeze to release” feature, or may use a touch fastener closure ona cummerbund. Touch fastener closures are fastened by placing the hook and looppanels on top of each other and applying moderate pressure. Waist closures mayneed to be adjusted at depth if a neoprene suit is worn by the diver (fig. 11).
Adjustable shoulder BCsShoulder straps are adjustable on your BC. These straps adjust by a length of webbingpassing through a locking feature on a quick release buckle. Tighten buckles bygrasping the free end of the adjustment webbing and pulling firmly downward. Lift thefront of the buckle upwards while wearing the BC to loosen (fig. 11).
A quick release feature may also be incorporated into the buckle. Check for twotabs on either side of the buckle that may be squeezed to separate the bucklehalves.
Front and shoulder closures on the BC are used to keep it in a low dragconfiguration.
I - 17

7. BC EXAMINATION AND PROCEDURESPre-dive, dive and post-dive BC examination helps to identify equipment problemsbefore unsafe conditions exist, preventing diving accidents. All equipment must beregularly inspected by an authorized SCUBA equipment repair facility.
WARNINGDO NOT DIVE with a BC that does not pass any of the Pre-Dive, Dive or Post-Dive inspection points and tests. Loss of buoyancy control or air holding integritycould occur, resulting in serious injury or death.
Pre-Dive Visual Inspection and Valve Test:1) Examine the entire BC for cuts, punctures, frayed seams, excessive abrasion,
loose/missing hardware and other damage of any kind.2) Inspect the Oral Valve, Power Inflation Valve, Manual Dump Valve and Over
Pressure Valve(s) for cracks, damage, or contamination.3) Operate the Power Inflation Valve (with the LP hose attached and charged with
air pressure), Oral Valve, manual Dump Valve and Over Pressure Valve,checking for proper operation and resealing. If the OP Valve has a Pull Dump,test it by pulling on the cord.
4) Inflate the BC through the Oral Valve until it is firm. Listen and check for leaks.Let the BC stand inflated for 30 minutes or more, then check the BC for loss ofair.
5) Soak the cylinder band(s) and fit the BC to a SCUBA cylinder, pull up on the BCwhile attached on the SCUBA cylinder, checking that the BC will not slip whilediving.
6) While wearing the BC, adjust the straps and other attachments on the BC for acomfortable fit that does not restrict breathing. Make these adjustments with theBC inflated and while wearing the exposure suit you intend to dive with.
7) Check quick release weight pockets or systems that retain weight (if your BC isequipped with them). Make sure that their retention systems are fully engagedand attached : they have to be released, and the weight removed from yourequipment, quickly.
8) Cross check all valves’ operation and visually inspect your BC with your divepartner before each dive, prior to entering the water.
WARNINGDO NOT DIVE with a BC that is damaged, leaks air, or does not functionproperly. Terminate any dive as safely and quickly as possible if the BC becomesdamaged, leaks air, or does not function properly.
I - 18
Buoyancy Compensator Owner’s Manual
1/4
Post-Dive : BC Cleaning and examination and StorageWith proper care and service, your BC should provide years of enjoyment.Maintenance and care procedures must be observed and are as follows:
1) Rinse the BC thoroughly inside and out with fresh water after every use (donot use any aggressive solvent and/or cleansing liquid).
• Fill the BC Inner Bladder, approximately full with clean fresh waterthrough the Oral valve.
• Orally inflate the BC and shake to distribute water inside of the BC.• Hold the BC upside down, depress the Oral Valve Button, and allow all
water and air to drain from the Oral Valve mouthpiece.• Repeat one or two more times.• Rinse the entire BC with fresh water by dipping in a tub or spraying with a
hose.• Rinse all valves (OI/DV, PIV, MDV, OP) to make sure all sand and other
debris is removed.
2) Dry the BC ; if hanging, make sure it is not in direct sunlight. Dry completelyif storing, slightly inflated.
IMPORTANTAvoid prolonged or repeated exposure to chlorinated water, such as in swimmingpools. Wash your BC immediately after any use in chlorinated water. Chlorinatedwater can oxidize fabrics and materials on your BC, thereby shortening their life,and cause colors (especially neon) to fade. Damage and fading from prolongedexposure to chlorinated water is specifically not covered under warranty.
8. STORAGEStore your BC, after it has fully dried, by partially inflating and then placing it in acool, dark, dry, location : ultraviolet rays will shorten the life of the fabric and causecolors to fade. Slightly grease (with SCUBAPRO® Lubricant Grease), the AIR 2 andBPI couplings.
Inspection and Service IntervalYour BC should be inspected and maintained at an Authorized Service Center atleast once a year, more often if you dive frequently. Any damage caused due tofailure to properly maintain the BC is not covered by the warranty.
I - 19
Buoyancy Compensator Owner’s Manual
ENGLISH
9. GENERAL SPECIFICATIONS
Shelf LifeShelf life is seven years for a new, unused jacket when deflated and stored in a sealedcontainer or bag at typical room temperature, with no exposure to UV.
Operating temperature rangeAir -4° to 122°F -20° to +50°CWater 28° to 104°F -2° to +40°C
WARNINGSpecial Instruction in cold water diving methods, and the specific use of thisproduct in cold water, is required prior to cold water diving (temperatures below10°C/50° F). This instruction is beyond the scope of this manual.
Low pressure Hose / Pneumatic Inflation Valve
WARNINGThis product is designed to use air or nitrogen/oxygen mixtures containing upto 40% oxygen. Use of gas mixtures with increased oxygen, or the addition of heliumor other substances, may cause corrosion, deterioration, premature aging orcomponent failure of metal and rubber parts. These actions may result in loss ofbuoyancy control or air holding integrity of the BC, resulting in injury or death. Non-standard gas mixtures may also present a risk of fire or explosion. Use onlynitrogen/oxygen mixtures containing up to 40% oxygen.
I - 20
LP hose and Pneumatic Inflation Valve operating pressure 95 – 200 psi (6.5 – 13.8 bar)
Low Pressure Hose Fitting threads 3/8 – 24 UNF
O-Rings - Seals EPDM – Buna/Nitrile - Silicone
Buoyancy Compensator Owner’s Manual

10 MASTER JACKET (certified as CBRD-EN 12628, that includes also the EN 1809 norms, that means it can be used as buoyancy compensator underwater as well as Life Jacket on the boat).
The original design of this legendary model has been developed since 1978 : it wasthe first diving Jacket ever produced and the project was so good that up untiltoday, it is, pratically, unchanged.
Master Jacket is quite different from all other models on the market due to its “threedimensional balance” buoyancy control : regardless of the sequence of movementsor in what position the movement begins underwater , the internal air bubble cannotcause rotational movements, which would destabilize the diver(fig. 9 - A).
This outcome is owed to thepeculiar internal bag design,that uses three interconnectingcircles or passageways,permitting the air bubble anunobstructed circulation (fig. 9 -A1). If the ring is interrupted (fig.9 - B), a rotation of the ring 9itself, which would bring one ofthe ends (E or E1) to the highestpoint (where the bubble (O)resides), would cause therotation to stop. If the ring is notinterrupted, however, therotation can continue until itreaches the most stableconfiguration. This guaranteesnot only an unparalleled level ofcomfort during diving, but also a“face-up” position of the diveron the surface, even in case of unconsciousness, providing thus an inherent levelof safety. For this main reason, the Master Jacket has been tested and certified asthe unique worldwide CBRD (Combined Buoyancy Rescue Device) : this meansthat the Jacket can be used as buoyancy compensator underwater as well as a LifeJacket on the boat !
Other skilful technical solutions and quality materials support the basic safety concept :the Master Jacket infact consists of two bags : an internal bag that holds the airbubble, made of polyurethane/polyether, radio frequency welded , and an externalbag made of tough polyester fabric, sewn with thick polyester thread, thatguarantees mechanical and abrasion resistance.
I - 21
Buoyancy Compensator Owner’s Manual
ENGLISH
Fig. 9

The webbing system is conceived for the maximum safety too: infact there areadjustable shoulder belts with 50 mm. (2”) metal buckles, easy to adjust even withthick gloves, to hold tight the diver, even jumping into the water from many meters !The chest straps are elastic to prevent squeezing of the lungs, if the bag is overinflated. Fotoluminescent patches complete the safety features.
In the right epaulette there is an elastic loop ( fig. 10 - L), to hold a blinking light duringthe night dive (such as SCUBAPRO® Safety Light or Strobe Light).
Back pack, back plate, soft padding cummerbund and Supercinch Q.A. are described in theManual (paragraph 1/2).
All valves, inflator and tank band assy, are described in the manual (paragr. 5/6).
In addition, the Master Jacket has the possibility to apply a Pony Bottle System and/orCO2 detonator ( both of them are optional) that fit on special pockets (fig. 10 PB / CO2)so that they do not hang out.
Heavy duty AISI 316 stainless steel “D” rings allow to hook up heavy accessories.
Performances (printed in the patches stitched besides the back pack) are listed below:
Buoyancy Compensator Owner’s Manual
I - 22
Sizes Weight (in air) (Kgf) Max Lifting Buoyancy (N*) Max size of bottle (I)
Small 3.120 200 10 + 10
Medium 3.430 220 10 + 10
Large 3.520 230 10 + 10
XLarge 3.650 250 10 + 10
XXLarge 3.720 250 10 + 10*N=Newton

I - 23
Buoyancy Compensator Owner’s Manual
ENGLISH

11 GLIDE LINE (all Glide’s are EN 1809 and EN 250 – 2000 certified)
This is a family of Jackets which has in common the cut and a worldwide patentedfeature that reduces the drag, and risk to be entangled, underwater : all webbing ends,after the adjustment, can pass inside through the belt connection loops or can beplaced in specific pockets (Patented), so that they don’t float around during the dive(fig. 11 - L/P)
This family consists of a scale of the models that differ from each other for theiraccessories.
Main accessories :1. Belt connection loop (Patented) (fig. 11 – L)2. Replaceable nylon “D” rings (fig. 11 – D)3. 40 mm Stainless steel “D” rings plates (fig. 11 DP) 4. Rotating shoulder buckles (fig. 11 – RB)5. Color coordination pad , to easily individuate the size even from far
(fig. 12 – CC), as follows :(purple as XXS size;pink as XS size;green as S size;blue as M size;yellow as L size;orange as XL size;dark gray as XXL size)
6. Pockets with zippers 7. Carbon Accents
Buoyancy Compensator Owner’s Manual
I - 24
Buoyancy Compensator Owner’s Manual
ENGLISH
I - 25

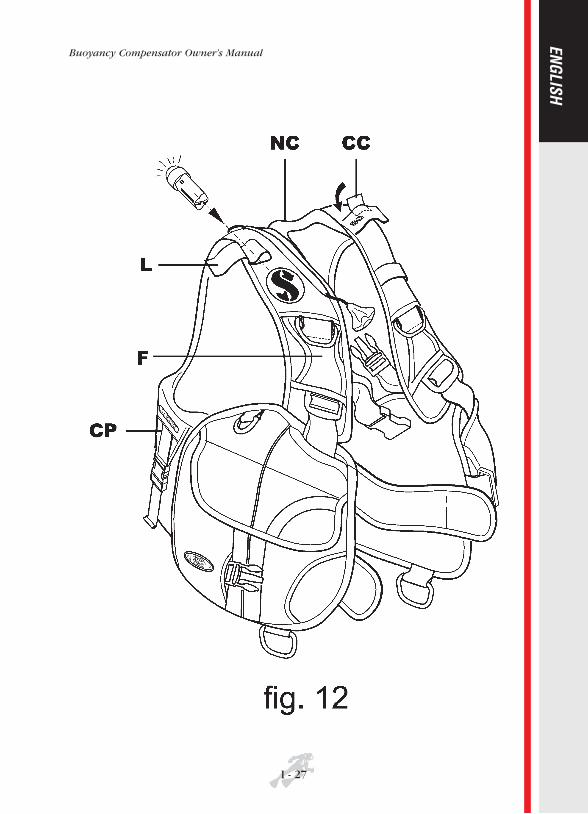
12 GLIDE 2000 BWThis is a single bag adjustable B.C.The material is a 420 denier nylon, polyurethane coated, radio frequency welded.The shoulder lobes and pockets are made of heavy polyesther fabric and threads witha built in soft neck collar (fig. 12 - NC).It has all features and accessories described at paragraph 11. GLIDE LINE (from 1to 6, except 4)The other features are: the Integrated Weight System (paragraph 4 - fig. 5) and twoback extra pockets (fig. 12 - CP) to hold couterweights (fig. 4 - paragraph 4), smallMarker Buoy or other accessories.
To highlight the “Glide” concept, also the shoulder buckles are protected with a fabricpatch (fig. 12 - F). The chest strap is elastic to prevent squeezing of the lungs, if the bagis over inflated : the « D » rings can be placed under the above patch (fig. 12 – F).All main buckles are 50 mm. (2”) for easy handling even with thick gloves.
In the right epaulette (fig. 12 - L) there is an elastic loop, to possibly hold a blinkinglight during the night dive (such as the SCUBAPRO® Safety Light or Strobe Light)
The Glide 2000 BW has the pockets with the integrated weight system (Fig 5, paragr. 4).Bright reflecting stripes and patches are placed in the visible positions, for safety.Internal welded cross walls limit the volume expansion and create a contoured shapearound the diver’s body.
Back packs, back plate, soft padding, cummerbund system and Supercinch Q.A. arethe ones described in the Manual ( paragr. 1/2).The valves and tank band assy are described in the manual (paragr. 5/6).
Performance (printed in the patches stitched besides the back pack) are listed below:
Buoyancy Compensator Owner’s Manual
I - 26
Sizes Weight (in air) (Kgf) Max Lifting Buoyancy (N*) Max size of bottle (I) Color Coord.
XXSmall 2.900 110 7 purple
XSmall 3.050 113 10 neon pink
Small 3.195 152 15 neon green
Medium 3.465 170 15 blue
Large 3.585 187 15 neon yellow
XLarge 3.660 213 15 neon orange
XXLarge 3.680 230 15 dark grey
*N=Newton
I - 27
Buoyancy Compensator Owner’s Manual
ENGLISH
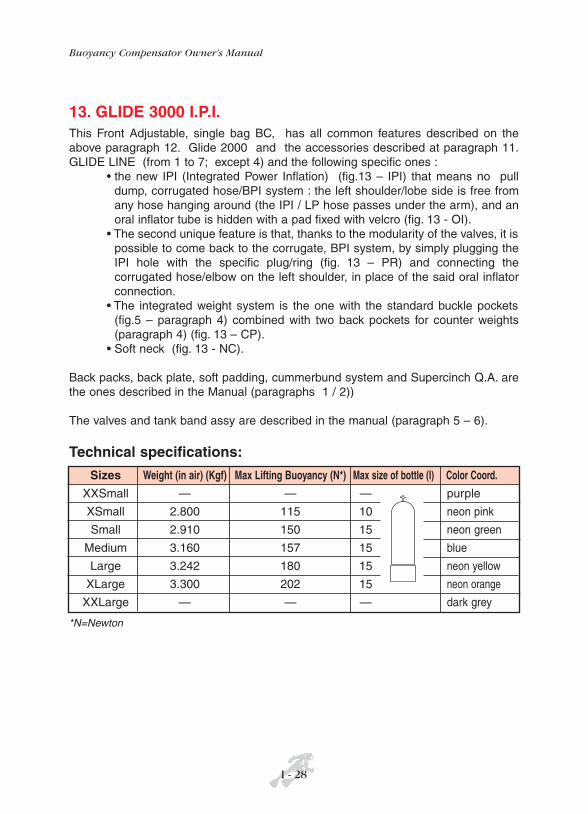
13. GLIDE 3000 I.P.I.This Front Adjustable, single bag BC, has all common features described on theabove paragraph 12. Glide 2000 and the accessories described at paragraph 11.GLIDE LINE (from 1 to 7; except 4) and the following specific ones :
• the new IPI (Integrated Power Inflation) (fig.13 – IPI) that means no pulldump, corrugated hose/BPI system : the left shoulder/lobe side is free fromany hose hanging around (the IPI / LP hose passes under the arm), and anoral inflator tube is hidden with a pad fixed with velcro (fig. 13 - OI).
• The second unique feature is that, thanks to the modularity of the valves, it ispossible to come back to the corrugate, BPI system, by simply plugging theIPI hole with the specific plug/ring (fig. 13 – PR) and connecting thecorrugated hose/elbow on the left shoulder, in place of the said oral inflatorconnection.
• The integrated weight system is the one with the standard buckle pockets(fig.5 – paragraph 4) combined with two back pockets for counter weights(paragraph 4) (fig. 13 – CP).
• Soft neck (fig. 13 - NC).
Back packs, back plate, soft padding, cummerbund system and Supercinch Q.A. arethe ones described in the Manual (paragraphs 1 / 2))
The valves and tank band assy are described in the manual (paragraph 5 – 6).
Technical specifications:
Buoyancy Compensator Owner’s Manual
I - 28
Sizes Weight (in air) (Kgf) Max Lifting Buoyancy (N*) Max size of bottle (I) Color Coord.
XXSmall — — — purple
XSmall 2.800 115 10 neon pink
Small 2.910 150 15 neon green
Medium 3.160 157 15 blue
Large 3.242 180 15 neon yellow
XLarge 3.300 202 15 neon orange
XXLarge — — — dark grey
*N=Newton

I - 29
Buoyancy Compensator Owner’s Manual
ENGLISH

14 GLIDE 1000This is a single bag adjustable B.C.
The material is a 420 denier nylon, polyurethane coated, radio frequency welded.Shoulder lobes and pockets are made of heavy polyesther fabric.
Features and accessories are described at paragraph 11. GLIDE LINE (from 1 to7, except 4, 6).
N. 2 stainless steel « D » rings allow to hook heavy accessories.
Bright stripes and a reflecting patch are placed in the visible positions, for safety.
Internal welded cross walls limit the volume expansion and create a contoured shapearound the diver’s body.
Back packs, back plate, soft padding, cummerbund system and Supercinch Q.A. arethe ones described in the Manual (paragr. 1/2).In the right epaulette (fig. 12 - L) there is an elastic loop, to possibly hold a blinkinglight during the night dive (such as the SCUBAPRO® Flashlight or Strobe Light)
The valves and tank band assy are described in the manual (paragr. 5/6).Performance (printed in the patches stitched besides the back pack) are listed below:
Buoyancy Compensator Owner’s Manual
I - 30
Sizes Weight (in air) (Kgf) Max Lifting Buoyancy (N*) Max size of bottle (I) Color Coord.
XXSmall 2.210 110 7 purple
XSmall 2.320 113 10 neon pink
Small 2.430 152 15 neon green
Medium 2.540 170 15 blue
Large 2.640 187 15 neon yellow
XLarge 2.680 213 15 neon orange
XXLarge 2.760 230 15 dark grey
*N=Newton
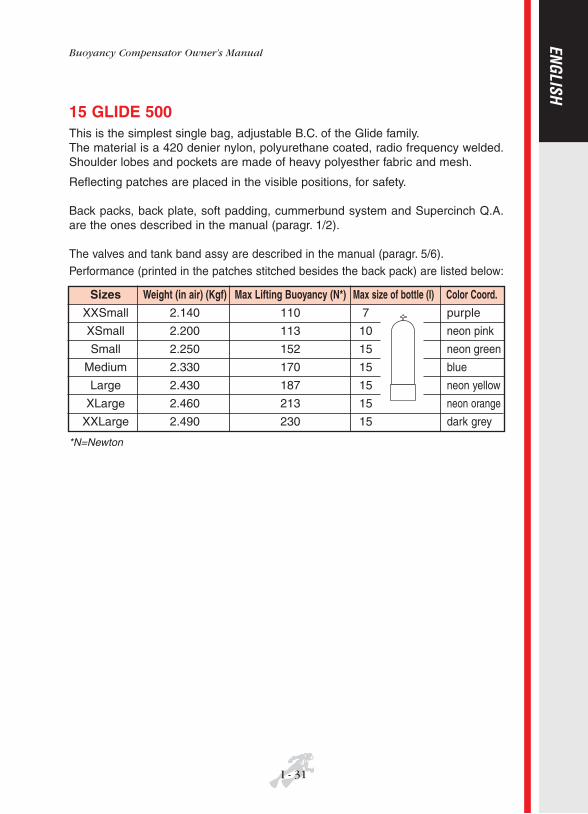
15 GLIDE 500This is the simplest single bag, adjustable B.C. of the Glide family.The material is a 420 denier nylon, polyurethane coated, radio frequency welded.Shoulder lobes and pockets are made of heavy polyesther fabric and mesh.
Reflecting patches are placed in the visible positions, for safety.
Back packs, back plate, soft padding, cummerbund system and Supercinch Q.A.are the ones described in the manual (paragr. 1/2).
The valves and tank band assy are described in the manual (paragr. 5/6).Performance (printed in the patches stitched besides the back pack) are listed below:
I - 31
Buoyancy Compensator Owner’s Manual
ENGLISH
Sizes Weight (in air) (Kgf) Max Lifting Buoyancy (N*) Max size of bottle (I) Color Coord.
XXSmall 2.140 110 7 purple
XSmall 2.200 113 10 neon pink
Small 2.250 152 15 neon green
Medium 2.330 170 15 blue
Large 2.430 187 15 neon yellow
XLarge 2.460 213 15 neon orange
XXLarge 2.490 230 15 dark grey
*N=Newton

16 GLIDE 3D PRO
This model is the compendium of years of SCUBAPRO® experience on the matter. Itis based on the legendary Master Jacket (paragr. 10) which comes from a projectdeveloped since 1978, combined with the new features (Patented) of the Glide family.
Infact like the Master Jacket, it has the “3 dimensional buoyancy control” (see MasterJacket - fig. 9) that guarantees not only an unparalleled level of comfort during diving, butalso a “face up” position of the diver on the surface even in case of unconsciousness, thusproviding an inherent level of safety. Internal welded cross walls limit the volumeexpansion and create a contoured shape around the diver’s body.
The material specifications are the ones described in the Glide Line: it is single bagjacket made of a 420 denier nylon, polyurethane coated, radio frequency welded.
The basic bag is completed and reinforced with heavy polyesther fabric and threadswith a built in soft neck collar (fig. 14 - NC).
Buoyancy Compensator Owner’s Manual
I - 32

Features and accessories are described at the paragraph 11. GLIDE LINE (from1 to 7, except 1,4).Another feature is the inflating system that does not use the traditional bulky anddelicate corrugated hose, but the new I.P.I. inlet valve(fig. 6 & 14 - IPI). As it is swiveling, it allows to place the LP hose and coupling (thesame of BPI) in the preferred position : below the left arm (fig. 14 – LA) held by a logoand/or in the traditional position, passing through the shoulder lobe(fig. 14 – LB).Another feature is the new (Patented) integrated weight system (see BC Manual,paragraph 4 – fig. 5) and two back extra pockets (fig. 14 – CP) to holdcounterweights, small Marker Buoy or other accessories.To highlight the “Glide” concept, all belts and rings can be “hidden” (fig. 14 - F) ifnot used, in order to reduce drag and risk to be entangled. The chest strap (fig. 14 - S) is elastic to prevent squeezing of the lungs, if the bag is over inflated.Stainless steel “D” rings allow to hook heavy accessories.
Under the right epaulette (fig. 14 - L) there is an elastic loop, to possibly hold ablinking light during night dives (such as SCUBAPRO® Strobe or Safety Light).
It has a swivel hook (fig. 14 - H) to fix any accessory, particularly SCUBAPRO®
Navigation Board (optional) with or without Compass.Back packs, back plate, soft padding, cummerbund system and Supercinch Q.A.are the ones described in the Manual (paragr. 1/2).
The valves and tank band assy are described in the manual (paragr. 5 - 6).
Performance (printed in the patches stitched besides the back pack) are listedbelow:
I - 33
Buoyancy Compensator Owner’s Manual
ENGLISH
Sizes Weight (in air) (Kgf) Max Lifting Buoyancy (N*) Max size of bottle (I) Color Coord.
XSmall — — — —
Small 2.780 145 15 neon green
Medium 2.980 171 15 blue
Large 3.020 195 15 neon yellow
XLarge 3.020 203 15 neon orange
XXLarge — — — —
*N=Newton

17 GLIDE 3D CLUB
This is the simplyfied version (configuration) of the Glide 3 D Pro, with the traditionalinflation system (corrugated hose, BPI and/or AIR2) (paragraph 5).
It has the “ 3 dimensional buoyancy control” (see paragraph Master Jacket – fig. 9) thatguarantees not only an unparalleled level of comfort during diving, but also a “face up”position of the diver on the surface even in case of unconsciousness, thus providingan inherent level of safety. Internal welded cross walls limit the volume expansion andcreate a contoured shape around the diver’s body.
Features and accessories are described at the paragraph 11. GLIDE LINE(from1 to 7, except 1, 4).
It is single bag jacket made of a 420 denier nylon, polyurethane coated, radiofrequency welded, completed with heavy polyesther fabric and threads.
To highlight the “Glide” concept, all belts and rings can be “hidden” (fig. 14 – F) if notused, in order to reduce drag and risk to be entangled.
Back packs, back plate, soft padding, cummerbund system and Supercinch Q.A. arethe ones described in the Manual (paragraph 1/2)
The valves and tank band assy are described in the manual (paragraph 5/6).
Performance (printed in the patches stitched besides the back pack) are listed below:
18 GLIDE STARThis new adjustable single bag B.C. has most Glide 2000 BW common features andother specific new ones :1. Design. The front part (shoulder lobes, pockets) has been designed to be as
more compact as possible .2. Lifting capacity. The new bag has the back position semiexpandable (fig. 15 -
SB) to get more lifting capacity, and retractable, by means of two elastic straps(fig. 15 - ES) and, being positioned between bottle and back of the diver, innormal use, it does not create any extra drag.
Buoyancy Compensator Owner’s Manual
I - 34
Sizes Weight (in air) (Kgf) Max Lifting Buoyancy (N*) Max size of bottle (I) Color Coord.
XSmall — — — —
Small 2.090 140 15 neon green
Medium 2.230 153 15 blue
Large 2.270 170 15 neon yellow
XLarge 2.270 180 15 neon orange
XXLarge — — — —
*N=Newton
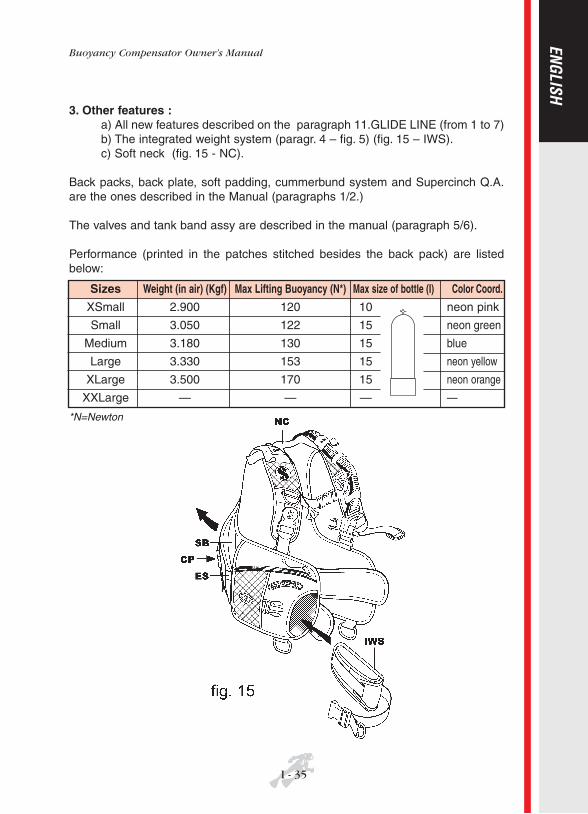
3. Other features :a) All new features described on the paragraph 11.GLIDE LINE (from 1 to 7)b) The integrated weight system (paragr. 4 – fig. 5) (fig. 15 – IWS).c) Soft neck (fig. 15 - NC).
Back packs, back plate, soft padding, cummerbund system and Supercinch Q.A.are the ones described in the Manual (paragraphs 1/2.)
The valves and tank band assy are described in the manual (paragraph 5/6).
Performance (printed in the patches stitched besides the back pack) are listedbelow:
I - 35
Buoyancy Compensator Owner’s Manual
ENGLISH
Sizes Weight (in air) (Kgf) Max Lifting Buoyancy (N*) Max size of bottle (I) Color Coord.
XSmall 2.900 120 10 neon pink
Small 3.050 122 15 neon green
Medium 3.180 130 15 blue
Large 3.330 153 15 neon yellow
XLarge 3.500 170 15 neon orange
XXLarge — — — —
*N=Newton
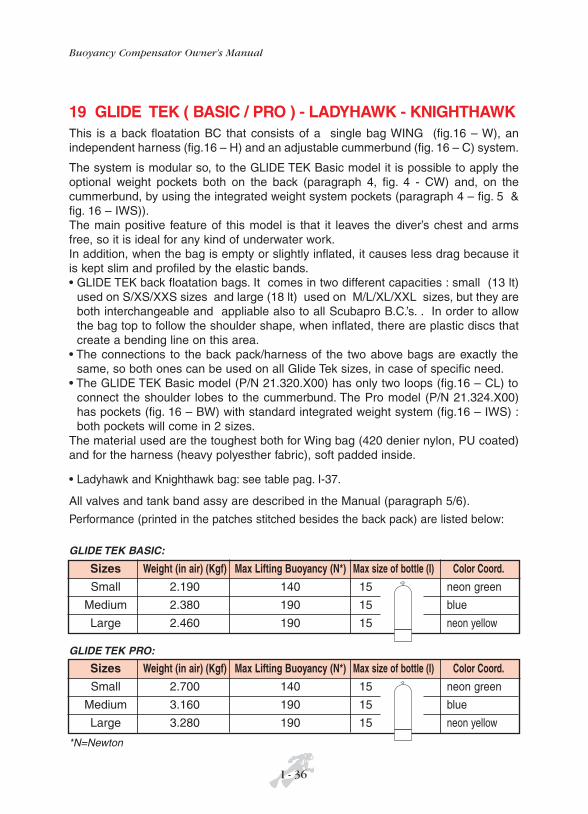
19 GLIDE TEK ( BASIC / PRO ) - LADYHAWK - KNIGHTHAWKThis is a back floatation BC that consists of a single bag WING (fig.16 – W), anindependent harness (fig.16 – H) and an adjustable cummerbund (fig. 16 – C) system.
The system is modular so, to the GLIDE TEK Basic model it is possible to apply theoptional weight pockets both on the back (paragraph 4, fig. 4 - CW) and, on thecummerbund, by using the integrated weight system pockets (paragraph 4 – fig. 5 &fig. 16 – IWS)).The main positive feature of this model is that it leaves the diver’s chest and armsfree, so it is ideal for any kind of underwater work.In addition, when the bag is empty or slightly inflated, it causes less drag because itis kept slim and profiled by the elastic bands.• GLIDE TEK back floatation bags. It comes in two different capacities : small (13 lt)
used on S/XS/XXS sizes and large (18 lt) used on M/L/XL/XXL sizes, but they areboth interchangeable and appliable also to all Scubapro B.C.’s. . In order to allowthe bag top to follow the shoulder shape, when inflated, there are plastic discs thatcreate a bending line on this area.
• The connections to the back pack/harness of the two above bags are exactly thesame, so both ones can be used on all Glide Tek sizes, in case of specific need.
• The GLIDE TEK Basic model (P/N 21.320.X00) has only two loops (fig.16 – CL) toconnect the shoulder lobes to the cummerbund. The Pro model (P/N 21.324.X00)has pockets (fig. 16 – BW) with standard integrated weight system (fig.16 – IWS) :both pockets will come in 2 sizes.
The material used are the toughest both for Wing bag (420 denier nylon, PU coated)and for the harness (heavy polyesther fabric), soft padded inside.
• Ladyhawk and Knighthawk bag: see table pag. I-37.
All valves and tank band assy are described in the Manual (paragraph 5/6).
Performance (printed in the patches stitched besides the back pack) are listed below:
Buoyancy Compensator Owner’s Manual
I - 36
Sizes Weight (in air) (Kgf) Max Lifting Buoyancy (N*) Max size of bottle (I) Color Coord.
Small 2.190 140 15 neon green
Medium 2.380 190 15 blue
Large 2.460 190 15 neon yellow
Sizes Weight (in air) (Kgf) Max Lifting Buoyancy (N*) Max size of bottle (I) Color Coord.
Small 2.700 140 15 neon green
Medium 3.160 190 15 blue
Large 3.280 190 15 neon yellow
*N=Newton
GLIDE TEK BASIC:
GLIDE TEK PRO:

I - 37
Buoyancy Compensator Owner’s Manual
ENGLISH
Sizes Weight (in air) (Kgf) Max Lifting Buoyancy (N*) Max size of bottle (I) Color Coord.
Small 2.970 150 18 black
Medium 3.030 150 18 black
Med/Large 3.070 150 18 black
Large 3.120 150 18 black
*N=Newton
LADYHAWK:
Sizes Weight (in air) (Kgf) Max Lifting Buoyancy (N*) Max size of bottle (I) Color Coord.
Small 2.970 150 18 black
Medium 3.480 200 18 black
Large 3.600 200 18 black
X Large 3.670 200 18 black
XX Large 3.770 200 18 black
KNIGHTHAWK:
Buoyancy Compensator Owner’s Manual
I - 38

Buoyancy Compensator Owner’s Manual
ENGLISH