Embed Size (px)
Citation preview

BUSHING MAINTENANCE
INTRODUCTION
This entry describes the procedure for removing, replacing, and maintaining the bushings in those Turner frames that use bushings in the pivots. The bushings in your Turner are manufactured to extremely high tolerances and should last a long time with routine maintenance. When it does come time to replace them, the job can be accomplished with relative ease and without specialized tools. Study the diagram below (Figure A) to familiarize yourself with the components inside the pivot. The bushings are press fit into a passage machined in the frame (the pivot shell). The pivot shaft is a hard anodized rod of 6061 aluminum which has a helical groove machined in its surface to allow grease distribution (a feature found on 2002 and newer shafts). The grease is introduced via a zerk, located at every pivot. The pivot shaft is hollow and threaded in each end to accept the mounting bolts, but it also has a central shaft machined to accept a 6mm allen wrench (visible in the "cutaway" half on the left). The bushings are stationary in the pivot shell while the suspension arms and pivot shaft rotate as a unit.
Figure A. Before you start work on your pivots, it is important to make sure you have all the tools necessary to successfully complete the job before you. Take a moment to assemble the tools outlined below and organize a work area with good

lighting. Mount the bike on a sturdy bike stand and preview the instructions so you understand the steps before beginning. What you will need (Figure B): 1. 10mm wrench 2. T40 torx wrench (pre-2002 pivot bolts are 5mm allen) 3. 6mm allen 4. 5mm allen 5. 3mm allen 6. Torque wrench 7. T40 torx for torque wrench (pre-2002 pivot bolts are 5mm allen) 8. 8mm socket for torque wrench 9. Flat tip punch 10. Hammer/mallet 11. Crescent wrench/vice grips 12. Manitou Prep M with grease gun head 13. Loctite, blue, medium hold
Figure B.

To make pressing the bushings into the frame easier, a bar-style wood clamp is useful (Figure C).
Figure C. DISASSEMBLY
Step 1. Place a T40 torx or 5mm allen wrench (whichever your bike uses) in either side of the pivot to remove the bolts (Figure D). They are held in with thread-locker and can be in there quite snug so use a good fitting wrench and be careful when backing them out. Only one will break loose. This is normal. Remove the one bolt that loosens.

Figure D. Step 2. The center of the shaft has a 6mm allen wrench machined sleeve. Slide the long end of a 6mm allen down into the center of the shaft. Make sure you push it in a good distance and engage the wrench flats inside the shaft sufficiently: there could be old thread-locker in the way, and it is a snug fit overall. Hold onto the end of the 6mm allen with a crescent wrench, pair of vice-grips or similar to keep the shaft from spinning while you back the other torx or 5mm bolt out (Figure E).

Figure E. Step 3. You can now separate the two suspension members joined by the pivot. Remove the o-rings from each bushing (Figure F) and push the shaft out of the pivot (Figure G).

Figure F.

Figure G. Step 5. You will now carefully tap each bushing out using a flat head punch and a hammer or rubber mallet. It is easy to damage the bushings in this process so it is advised only to do this in order to remove them for replacement with new bushings. Pass the punch through the pivot shell and rest the tip of the punch on the inside lip of the far bushing (Figure H). As you tap and move the bushing out, move the tap around the inside to push the bushing out evenly (Figure I). Take care not to mar the inside of the pivot shell with the punch. Once one bushing has been removed, tap the second bushing out in the same manner. All other bushings can be removed in a similar manner.

Figure H.

Figure I. Congratulations, you have now successfully disassembled your first pivot. The other pivots can be taken apart in a similar manner. The chain stay (Horst link) pivots use a pass-through bolt requiring an 8mm socket and 3mm allen wrench to remove instead of bolts threaded into the spindle. ASSEMBLY
Step 1. Clean the pivot shell thoroughly and inspect it to make sure it is smooth and without burrs. The bushings are pressed into the frame without greasing them or the shell. The bushings are not designed to pivot relative to the frame, but rather the pivot shaft is designed to rotate inside the bushings. Greasing the bushing/frame interface may encourage the bushing to move against the frame and cause wear on the pivot shell which is not desirable. Step 2. Rest one bushing at the entrance to the pivot shell (Figure J).
Figure J. Step 3. Position a wood clamp across the pivot shell taking care to push the bushing in straight and evenly and not to mar the surface of the shell (Figure K). Push the bushing in until the flange is seated against the pivot shell.

Figure K. Step 4. The second bushing is installed in the same way. Rest it against the entrance to the pivot shell and push it in using the wood clamp, taking care to insert it straight and evenly (Figure L).

Figure L. Step 5. Lubricate the shaft and the inside of both bushings with a thin coat of Manitou Prep M grease, and then push the shaft fully into the pivot (Figure M).

Figure M. Step 6. Apply a thin coat of grease to the flat face of the bushing and to both the o-rings, and then place both o-rings over the outside edges of the bushings. You are now ready to slide the suspension arms back over the pivot (Figure N). Because you will be using thread locker to hold the bolts, care should be taken not to allow grease to enter the thread area inside the pivot shaft.
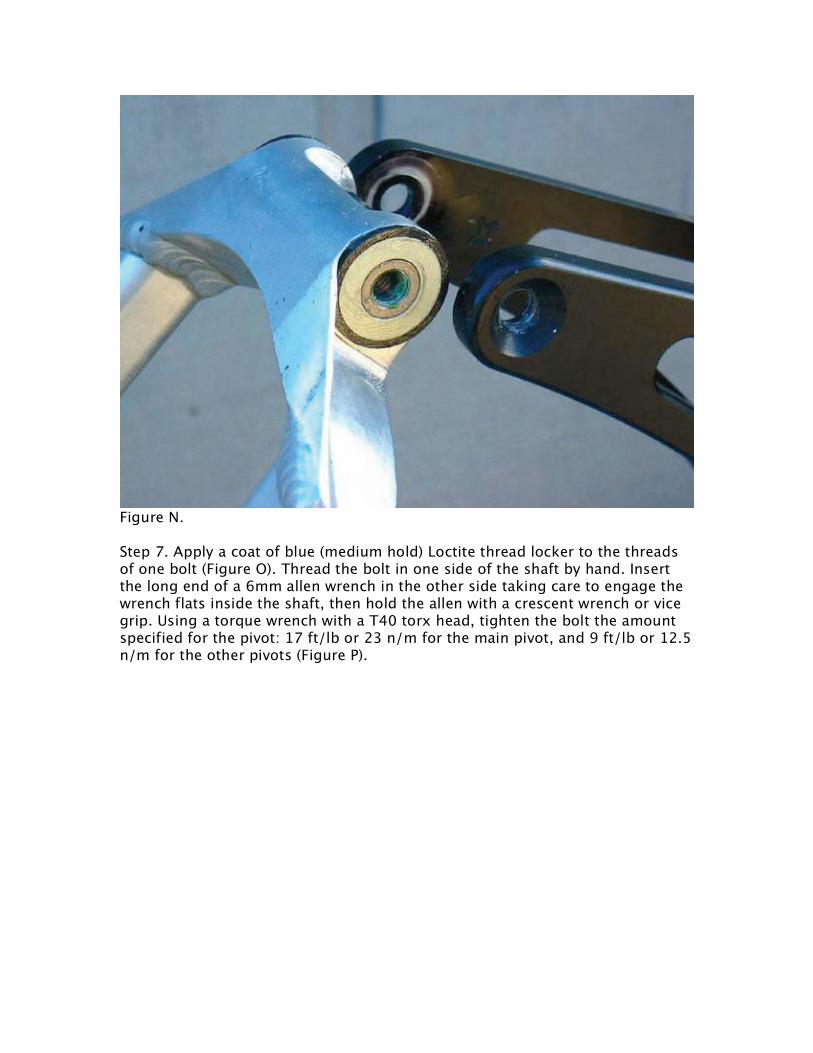
Figure N. Step 7. Apply a coat of blue (medium hold) Loctite thread locker to the threads of one bolt (Figure O). Thread the bolt in one side of the shaft by hand. Insert the long end of a 6mm allen wrench in the other side taking care to engage the wrench flats inside the shaft, then hold the allen with a crescent wrench or vice grip. Using a torque wrench with a T40 torx head, tighten the bolt the amount specified for the pivot: 17 ft/lb or 23 n/m for the main pivot, and 9 ft/lb or 12.5 n/m for the other pivots (Figure P).

Figure O.
Figure P.

Step 8. Put a thin coat of blue Loctite on the second bolt and thread it into the shaft. Holding the pivot steady using a T40 torx head wrench in the bolt already installed, use the torque wrench with a T40 torx head to torque the second bolt to the specifications given in step 7 above. Step 9. The last thing to do is to fill the pivot with fresh grease. Make sure the entrance to the zerk is clean so that you do not push foreign material into the pivot with the grease. Place the grease gunï¿1⁄2s head squarely over the zerk (Figure Q) and pump grease in to the pivot ONLY UNTIL RESISTANCE IS FELT. It is not necessary to purge grease through the pivot until it emerges at the o-rings, but rather only to fill the void inside the pivot shell. Over-pressurizing the pivot with grease will only force the zerk out. If this should happen, clean the grease off the zerkï¿1⁄2s shaft and the inside of the hole the zerk mounts in, and tap the zerk back into place. For more on greasing, see the routine maintenance page.
Figure Q.