Embed Size (px)
Citation preview

Page No.1
Business Process Document (End-User Manual)
eALPS+ Equipment Planning Window
(P3392)
Client: L & T Engineering & Construction Limited - HCP
Record of Release
Version No.
Created By Reviewed By Authorized By Release Date Modifications Done
1.0 Sayali Pradhan/
Bhavin Gandhi
Sainath
Kusumanchi
Srinivas
Koganti Mar 8, 2013 Initial Version
Page No.2
Table of Contents
1.0 Purpose .............................................................................................................. 3 1.1 General Information and Target User .......................................................................... 3 1.2 Overview ............................................................................................................. 3 2.0 EP Uploads & Masters: ............................................................................................... 3 2.1 Crane & Rigging – Master: ............................................................................................ 4 2.2 Upload Crane and Rigging -Details:................................................................................ 13 2.3 Upload Engineering Details: ........................................................................................ 14 2.4 Engineering Details – Master: ....................................................................................... 21 2.5 Upload Holds and Clearances : ..................................................................................... 27 2.6 Holds & Clearance – Master ......................................................................................... 28 2.7 Norms – Activity Duration: .......................................................................................... 33 2.8 Norms – Manpower .................................................................................................... 41 2.9 Upload Norms – Material: ............................................................................................ 47 2.10 Norms – Material - Master: ......................................................................................... 47 3.0 EP- Transaction ...................................................................................................... 57 3.1Assignment of PO Items: ............................................................................................. 57 3.2 WBS Master: ........................................................................................................... 60 3.3 Milestone: .............................................................................................................. 66 3.4 QS Code: ............................................................................................................... 71 3.5 Activity Planning: ..................................................................................................... 76 3.6 Weekly Planning: ..................................................................................................... 84 3.7 Daily Planning: ........................................................................................................ 88 3.8 Progress Updation .................................................................................................... 94 3.9 Measurement: ......................................................................................................... 95 4.0 EP - Reports:.......................................................................................................... 98 4.1 Project Dashboard: ................................................................................................... 99 4.2 S0 – Construction Schedule: ...................................................................................... 100 4.3 S1&S7 Client Invoicing & Subcontractor Billing: .............................................................. 102 4.4 S3 – P&M Schedule: ................................................................................................. 104 4.6 S5 Manpower Schedule: ........................................................................................... 105 4.7 Gang Movement ..................................................................................................... 106 4.8 Equipment Status ................................................................................................... 106 4.9 Erection Front Status .............................................................................................. 108 4.10 Look Ahead Schedule - Work .................................................................................... 109 4.11 QS Billing & Invoicing Report : .................................................................................. 110
Page No.3
1.0 Purpose
1.1 General Information and Target User
This documentation gives an instruction on how this business scenario is processed from a business
point of view. It also provides a step-by-step operational guide, which users can follow to work through
the scenario in a real system.
The target user of this documentation will probably be:
Partners
Customers
Users
1.2 Overview
Equipment Planning Window is a part of eALPS+ Application to take care of Construction Level Planning
Activities of Tagged Equipments. Tagged Equipments are Static, Rotary, and Package Equipments. The
Construction level Activities are Erection, Alignment, Grouting, Hydro test, Box Up, Chemical Cleaning,
etc.
Equipment Planning Window is developed using the latest technology of Flex and Web services. The
application is web enabled & the user can access it through an URL through Internet explorer/Netscape
Navigator. The application has been developed by using Web Services, Java, Flex, SAP technologies to
achieve the desired functionalities.
2.0 EP Uploads & Masters:
This module is used to create the master data and base for the Equipment planning like Equipment
Details, Crane details, and various norms for Manpower, Material & Activity duration and Holds &
Clearance for Equipment activities.
Following are the different uploads & masters available in this module
2.1 Crane & Rigging Master
2.2 Upload Crane and Rigging-Details
2.3 Upload- Engineering Details
2.4 Engineering Details- Master
2.5 Upload -Holds and Clearances
2.6 Holds & Clearance – Master
2.7 Norms – Duration
2.8 Norms – Manpower
2.9 Upload -Norms – Material
2.10 Norms – Material - Master:
Page No.4
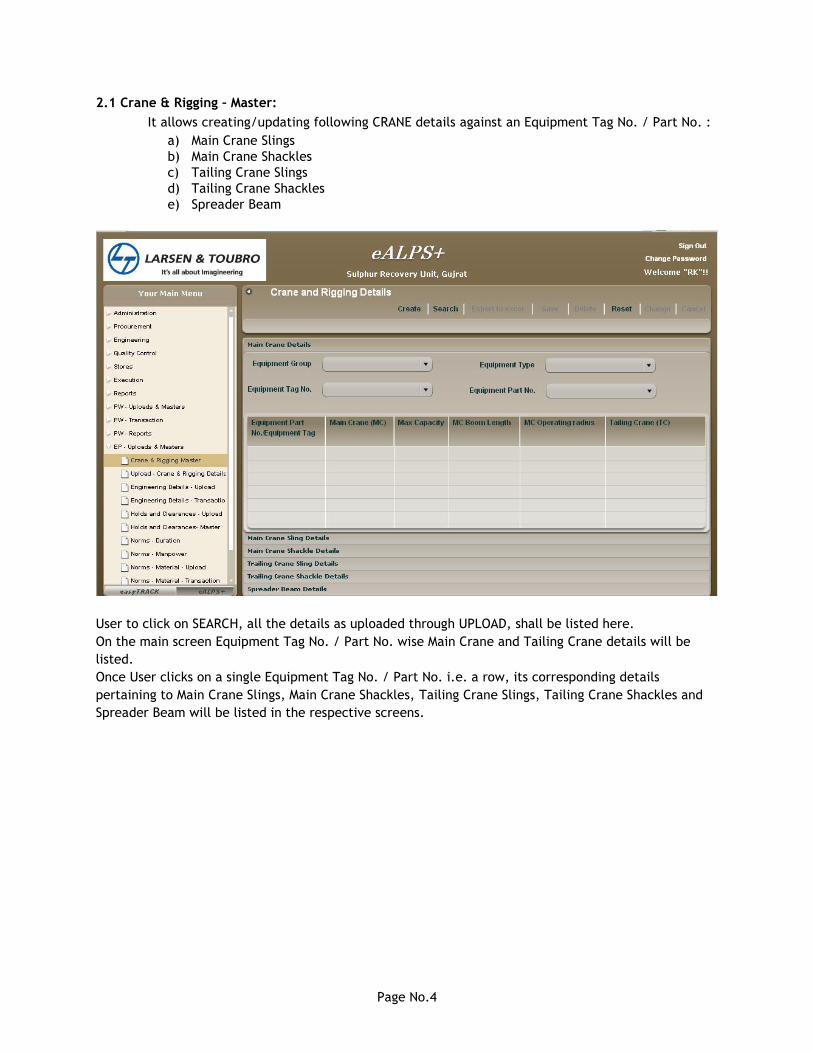
2.1 Crane & Rigging – Master:
It allows creating/updating following CRANE details against an Equipment Tag No. / Part No. :
a) Main Crane Slings
b) Main Crane Shackles
c) Tailing Crane Slings
d) Tailing Crane Shackles
e) Spreader Beam
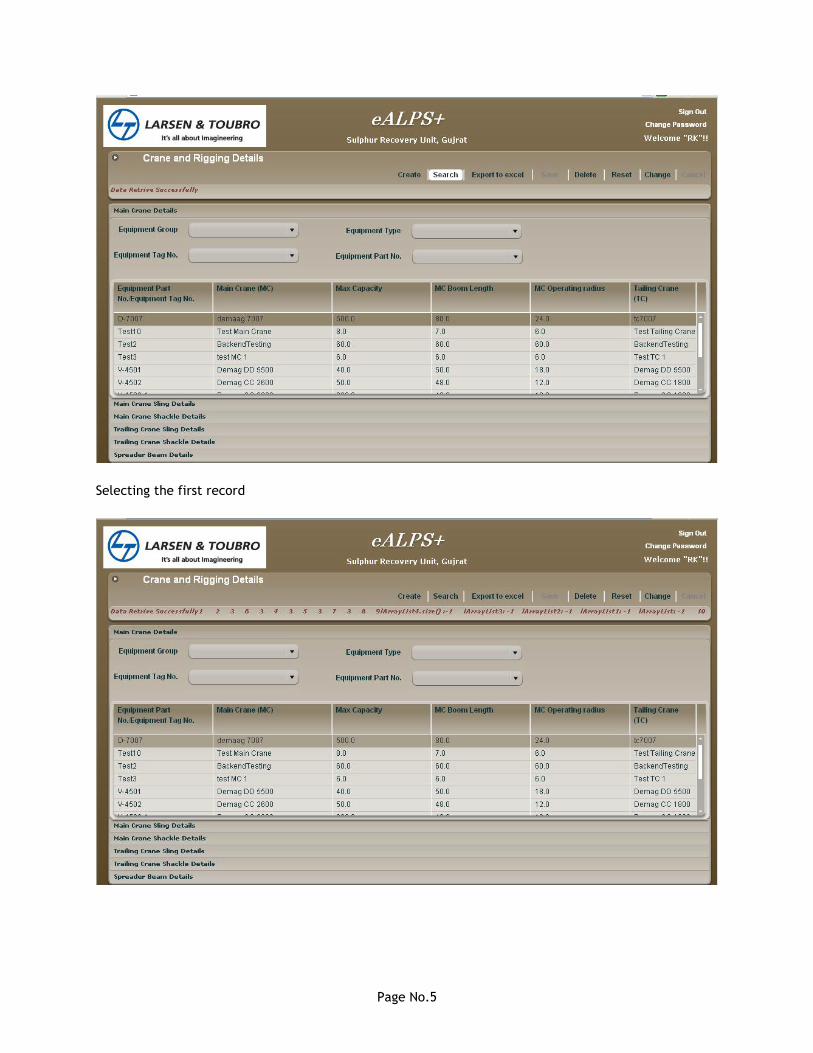
User to click on SEARCH, all the details as uploaded through UPLOAD, shall be listed here.
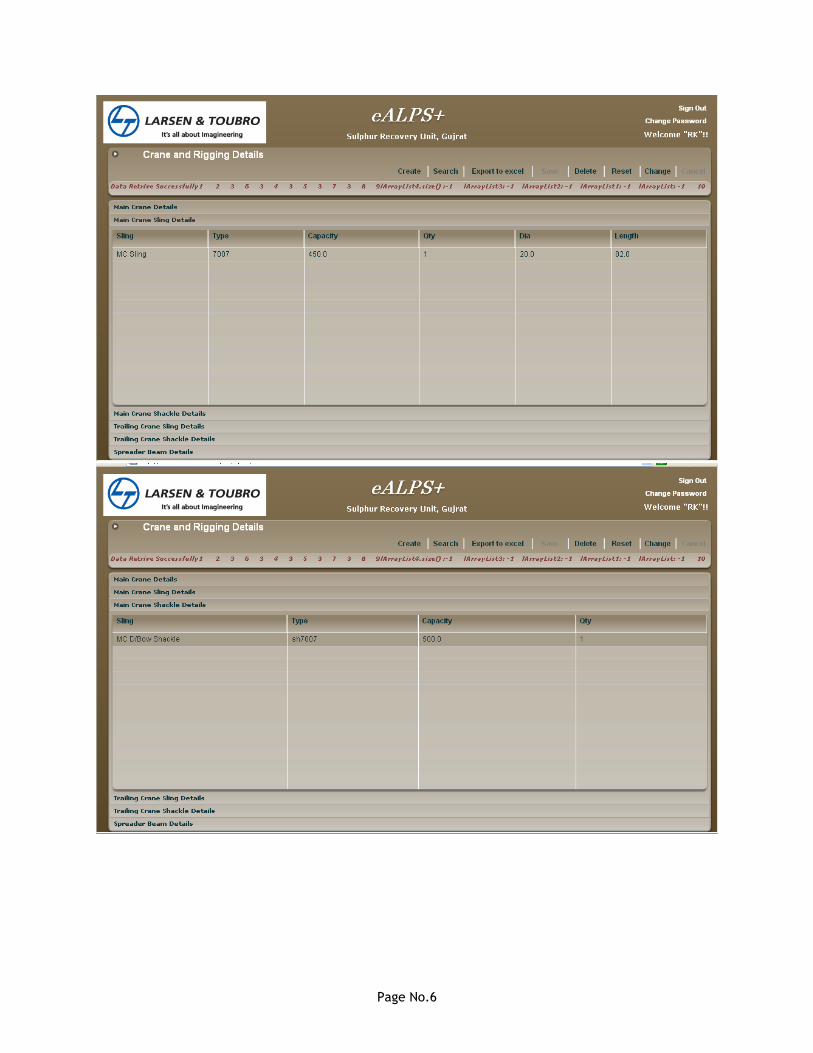
On the main screen Equipment Tag No. / Part No. wise Main Crane and Tailing Crane details will be
listed.
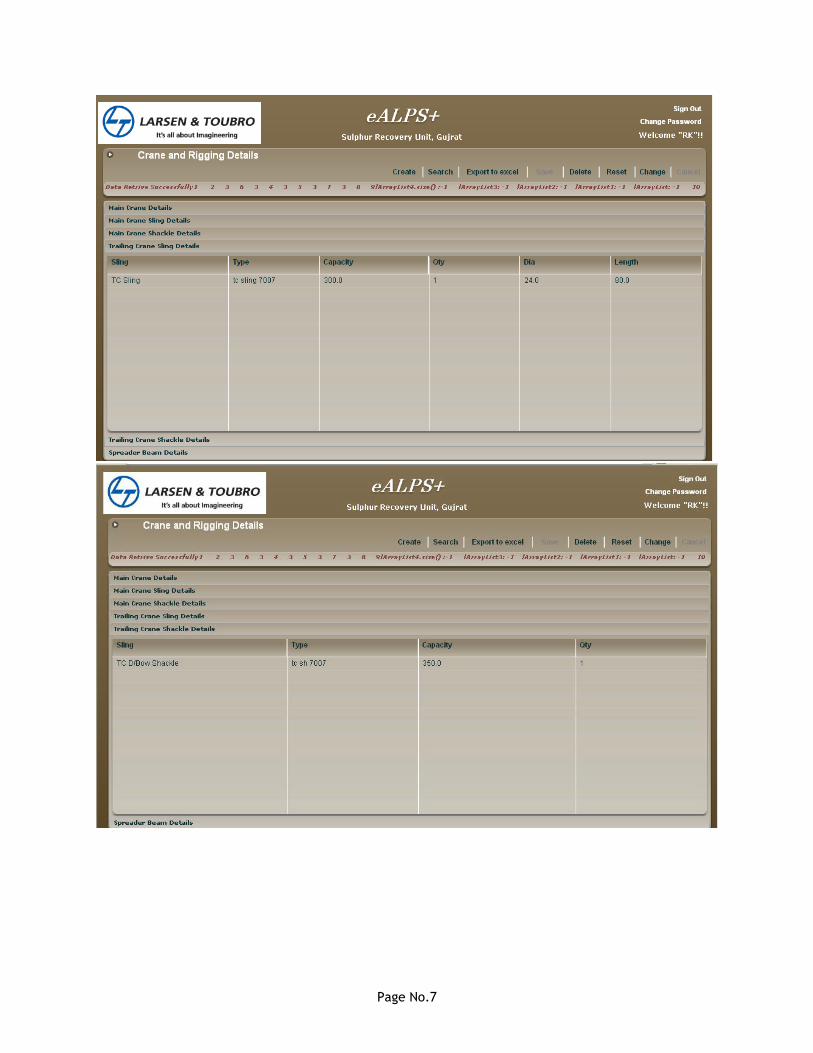
Once User clicks on a single Equipment Tag No. / Part No. i.e. a row, its corresponding details
pertaining to Main Crane Slings, Main Crane Shackles, Tailing Crane Slings, Tailing Crane Shackles and
Spreader Beam will be listed in the respective screens.
Page No.5
Selecting the first record
Page No.6
Page No.7
Page No.8
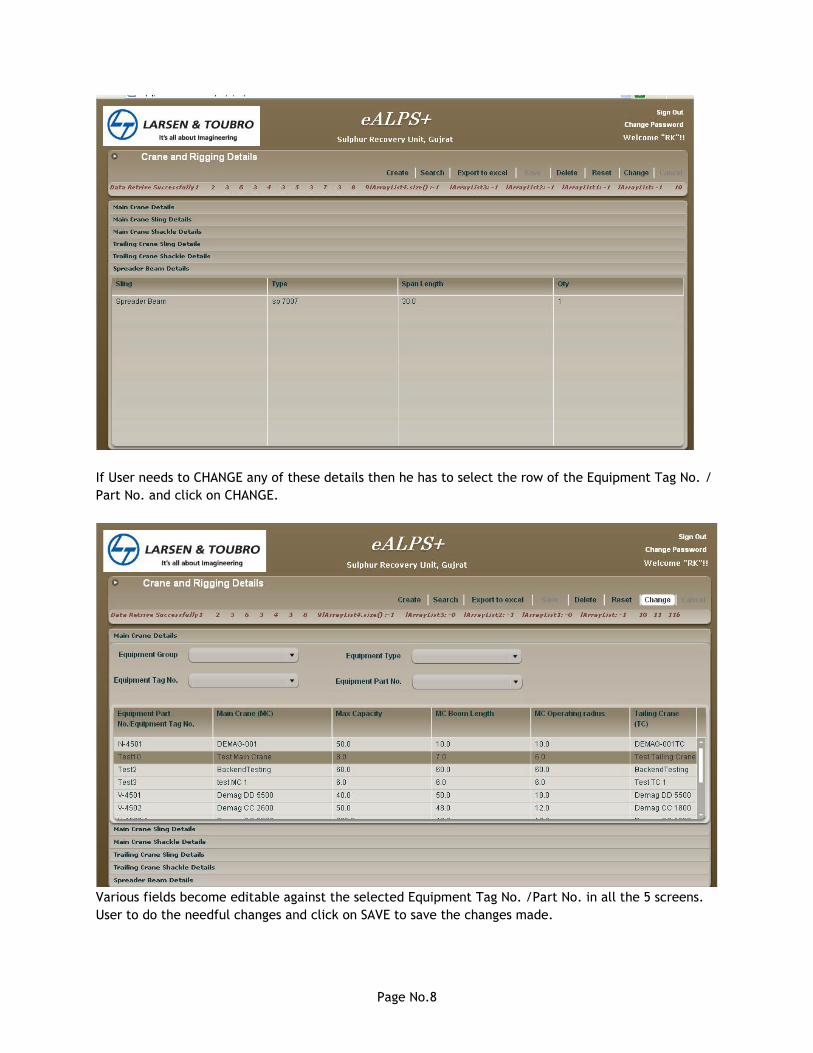
If User needs to CHANGE any of these details then he has to select the row of the Equipment Tag No. /
Part No. and click on CHANGE.
Various fields become editable against the selected Equipment Tag No. /Part No. in all the 5 screens.
User to do the needful changes and click on SAVE to save the changes made.
Page No.9
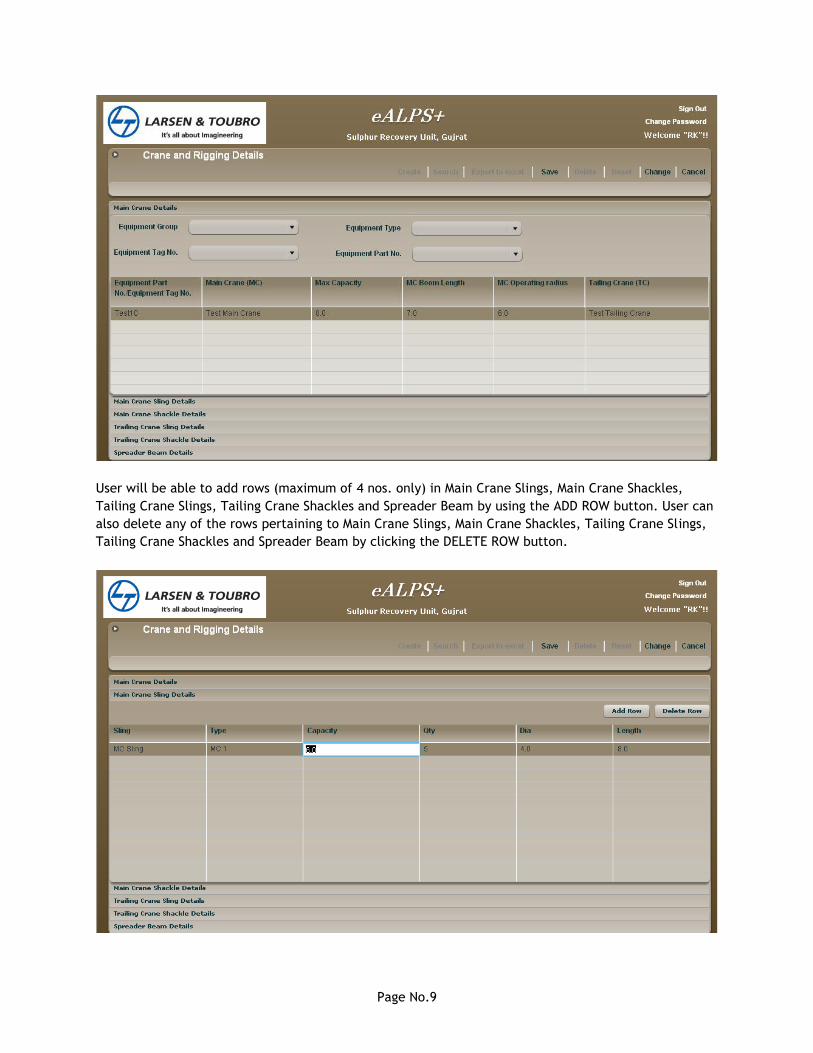
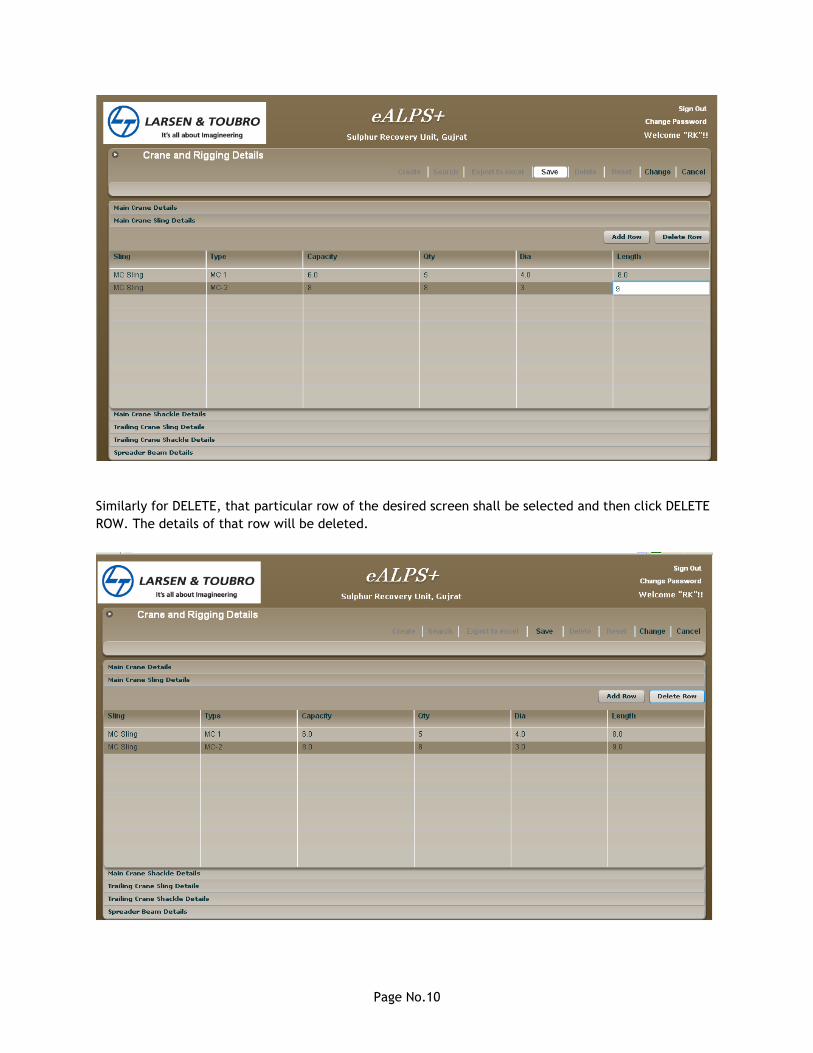
User will be able to add rows (maximum of 4 nos. only) in Main Crane Slings, Main Crane Shackles,
Tailing Crane Slings, Tailing Crane Shackles and Spreader Beam by using the ADD ROW button. User can
also delete any of the rows pertaining to Main Crane Slings, Main Crane Shackles, Tailing Crane Slings,
Tailing Crane Shackles and Spreader Beam by clicking the DELETE ROW button.
Page No.10
Similarly for DELETE, that particular row of the desired screen shall be selected and then click DELETE
ROW. The details of that row will be deleted.
Page No.11
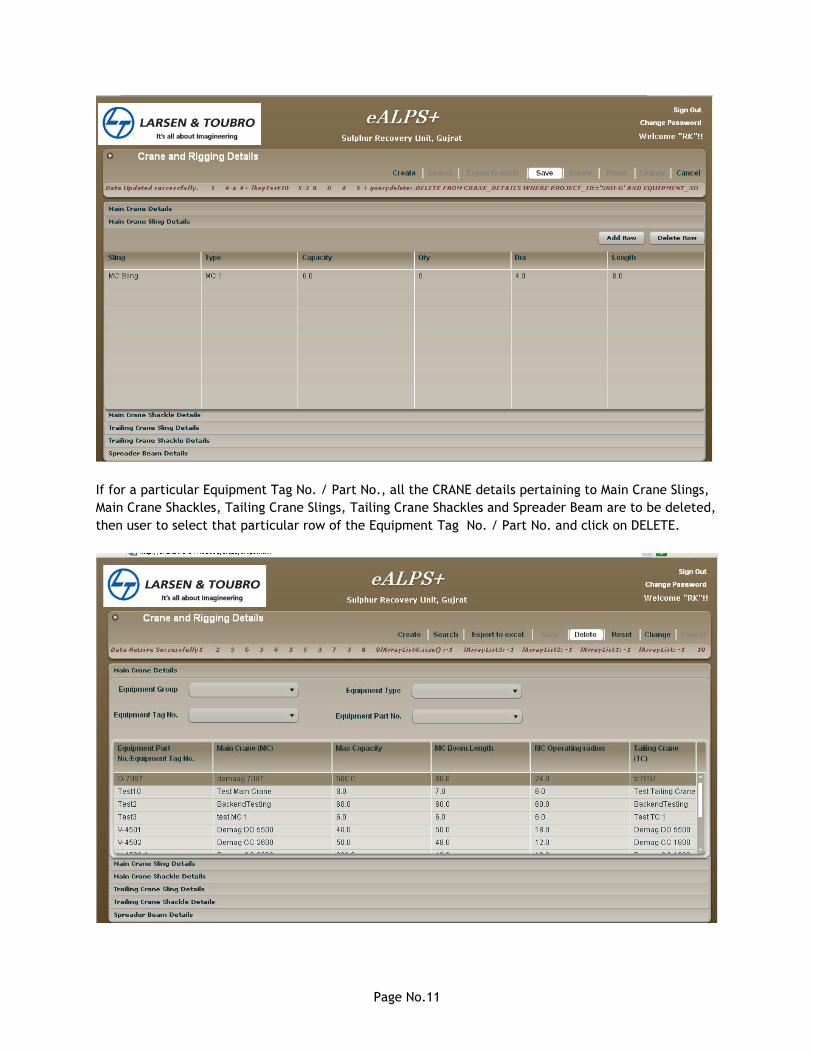
If for a particular Equipment Tag No. / Part No., all the CRANE details pertaining to Main Crane Slings,
Main Crane Shackles, Tailing Crane Slings, Tailing Crane Shackles and Spreader Beam are to be deleted,
then user to select that particular row of the Equipment Tag No. / Part No. and click on DELETE.
Page No.12
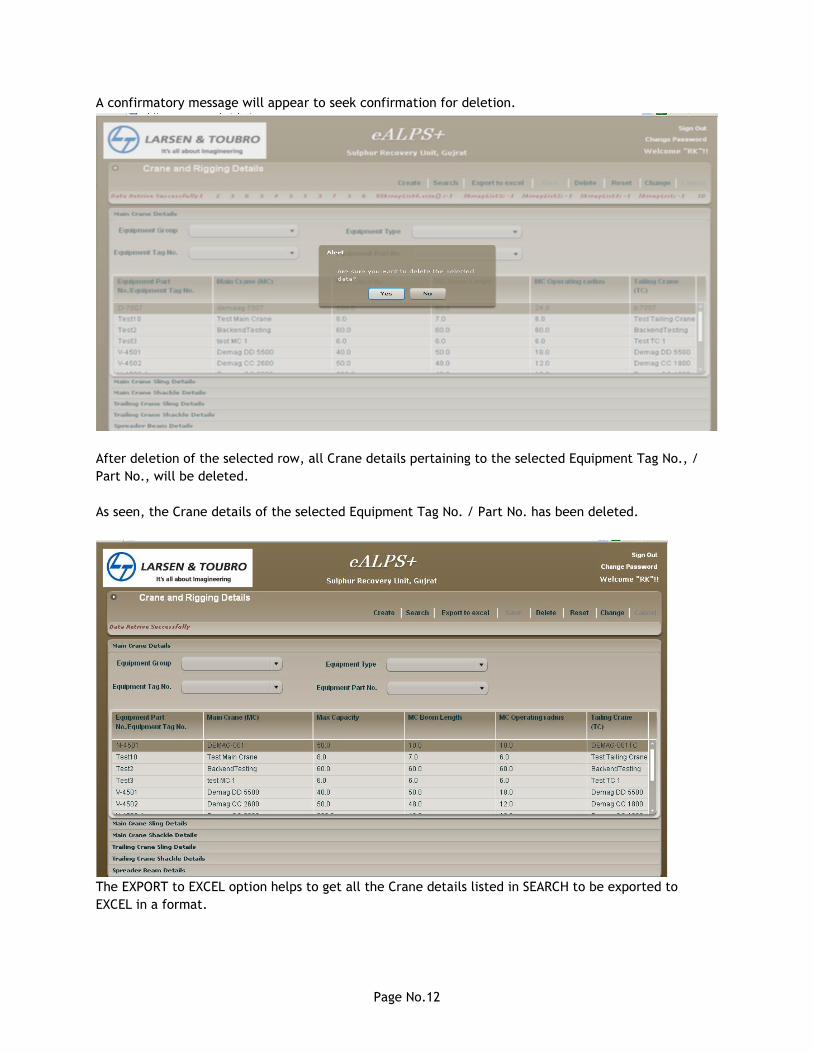
A confirmatory message will appear to seek confirmation for deletion.
After deletion of the selected row, all Crane details pertaining to the selected Equipment Tag No., /
Part No., will be deleted.
As seen, the Crane details of the selected Equipment Tag No. / Part No. has been deleted.
The EXPORT to EXCEL option helps to get all the Crane details listed in SEARCH to be exported to
EXCEL in a format.
Page No.13
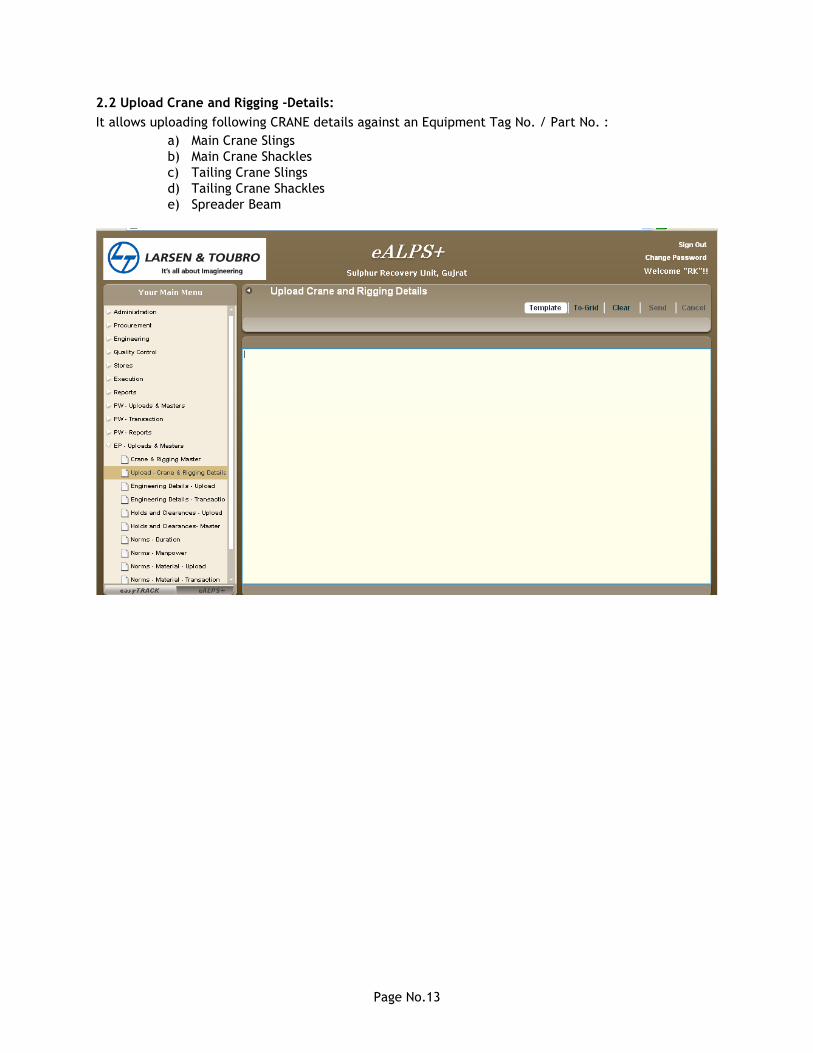
2.2 Upload Crane and Rigging -Details:
It allows uploading following CRANE details against an Equipment Tag No. / Part No. :
a) Main Crane Slings
b) Main Crane Shackles
c) Tailing Crane Slings
d) Tailing Crane Shackles
e) Spreader Beam
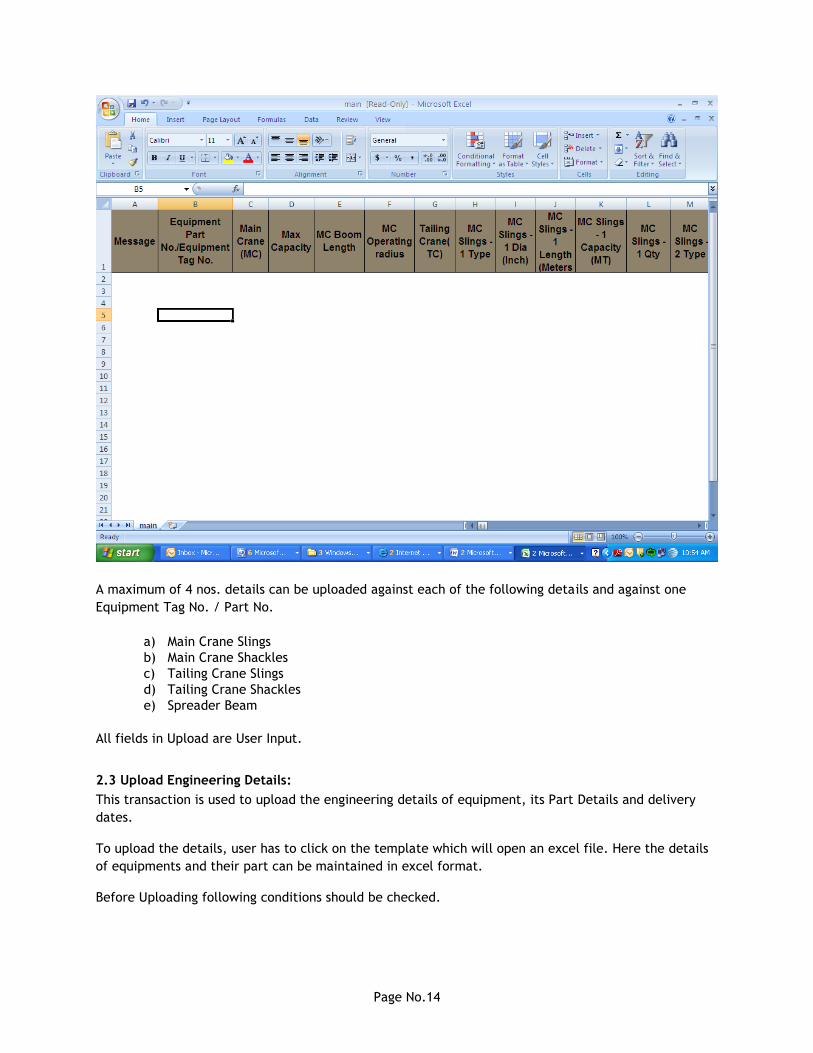
Page No.14
A maximum of 4 nos. details can be uploaded against each of the following details and against one
Equipment Tag No. / Part No.
a) Main Crane Slings
b) Main Crane Shackles
c) Tailing Crane Slings
d) Tailing Crane Shackles
e) Spreader Beam
All fields in Upload are User Input.
2.3 Upload Engineering Details:
This transaction is used to upload the engineering details of equipment, its Part Details and delivery
dates.
To upload the details, user has to click on the template which will open an excel file. Here the details
of equipments and their part can be maintained in excel format.
Before Uploading following conditions should be checked.
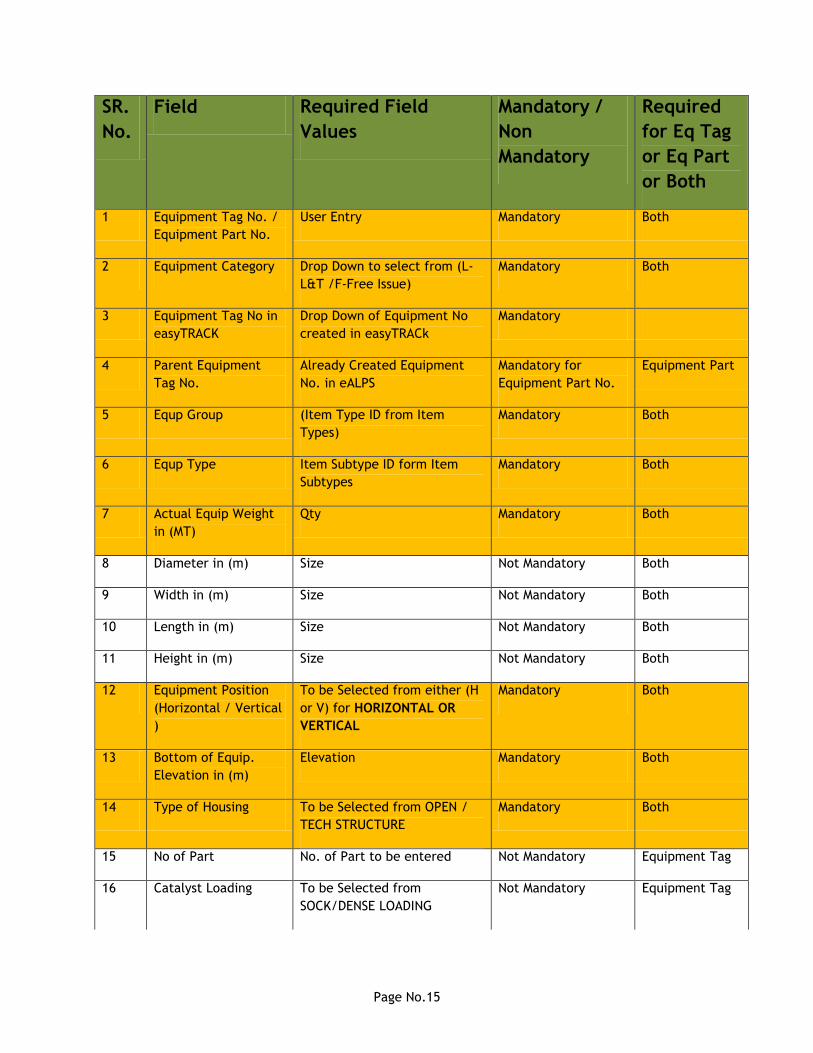
Page No.15
SR.
No.
Field Required Field
Values
Mandatory /
Non
Mandatory
Required
for Eq Tag
or Eq Part
or Both
1 Equipment Tag No. /
Equipment Part No.
User Entry Mandatory Both
2 Equipment Category Drop Down to select from (L-
L&T /F-Free Issue)
Mandatory Both
3 Equipment Tag No in
easyTRACK
Drop Down of Equipment No
created in easyTRACk
Mandatory
4 Parent Equipment
Tag No.
Already Created Equipment
No. in eALPS
Mandatory for
Equipment Part No.
Equipment Part
5 Equp Group (Item Type ID from Item
Types)
Mandatory Both
6 Equp Type Item Subtype ID form Item
Subtypes
Mandatory Both
7 Actual Equip Weight
in (MT)
Qty Mandatory Both
8 Diameter in (m) Size Not Mandatory Both
9 Width in (m) Size Not Mandatory Both
10 Length in (m) Size Not Mandatory Both
11 Height in (m) Size Not Mandatory Both
12 Equipment Position
(Horizontal / Vertical
)
To be Selected from either (H
or V) for HORIZONTAL OR
VERTICAL
Mandatory Both
13 Bottom of Equip.
Elevation in (m)
Elevation Mandatory Both
14 Type of Housing To be Selected from OPEN /
TECH STRUCTURE
Mandatory Both
15 No of Part No. of Part to be entered Not Mandatory Equipment Tag
16 Catalyst Loading To be Selected from
SOCK/DENSE LOADING
Not Mandatory Equipment Tag
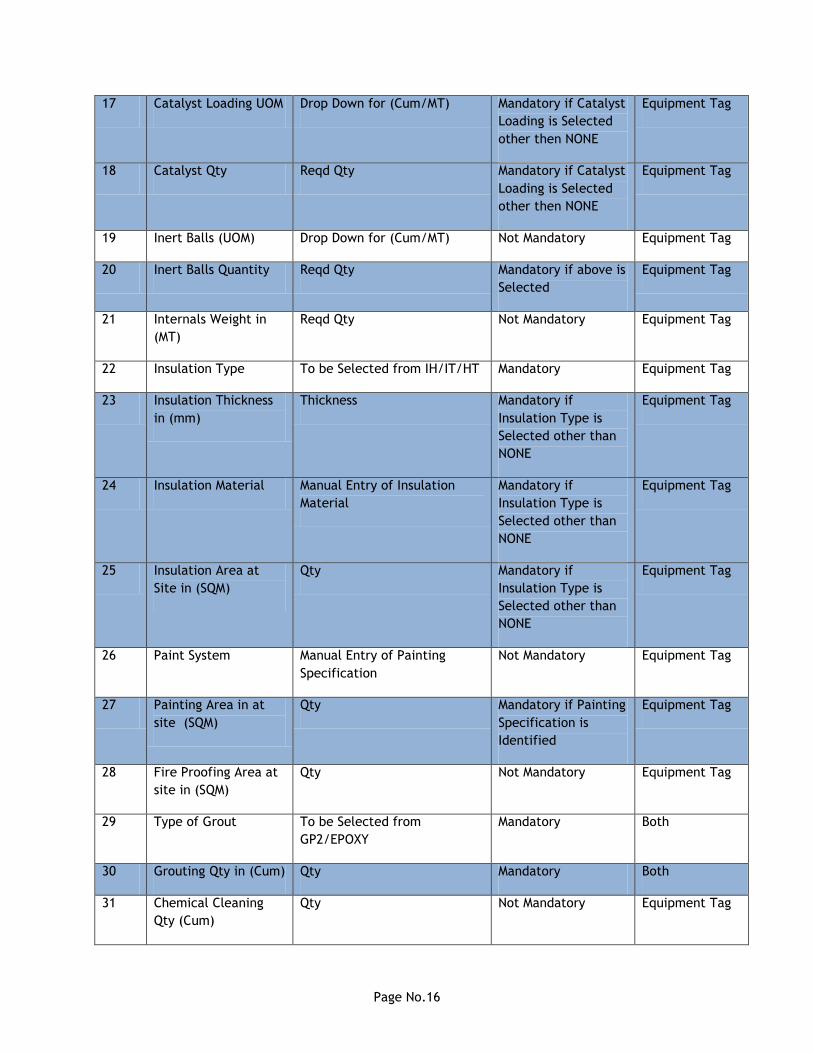
Page No.16
17 Catalyst Loading UOM Drop Down for (Cum/MT) Mandatory if Catalyst
Loading is Selected
other then NONE
Equipment Tag
18 Catalyst Qty Reqd Qty Mandatory if Catalyst
Loading is Selected
other then NONE
Equipment Tag
19 Inert Balls (UOM) Drop Down for (Cum/MT) Not Mandatory Equipment Tag
20 Inert Balls Quantity Reqd Qty Mandatory if above is
Selected
Equipment Tag
21 Internals Weight in
(MT)
Reqd Qty Not Mandatory Equipment Tag
22 Insulation Type To be Selected from IH/IT/HT Mandatory Equipment Tag
23 Insulation Thickness
in (mm)
Thickness Mandatory if
Insulation Type is
Selected other than
NONE
Equipment Tag
24 Insulation Material Manual Entry of Insulation
Material
Mandatory if
Insulation Type is
Selected other than
NONE
Equipment Tag
25 Insulation Area at
Site in (SQM)
Qty Mandatory if
Insulation Type is
Selected other than
NONE
Equipment Tag
26 Paint System Manual Entry of Painting
Specification
Not Mandatory Equipment Tag
27 Painting Area in at
site (SQM)
Qty Mandatory if Painting
Specification is
Identified
Equipment Tag
28 Fire Proofing Area at
site in (SQM)
Qty Not Mandatory Equipment Tag
29 Type of Grout To be Selected from
GP2/EPOXY
Mandatory Both
30 Grouting Qty in (Cum) Qty Mandatory Both
31 Chemical Cleaning
Qty (Cum)
Qty Not Mandatory Equipment Tag
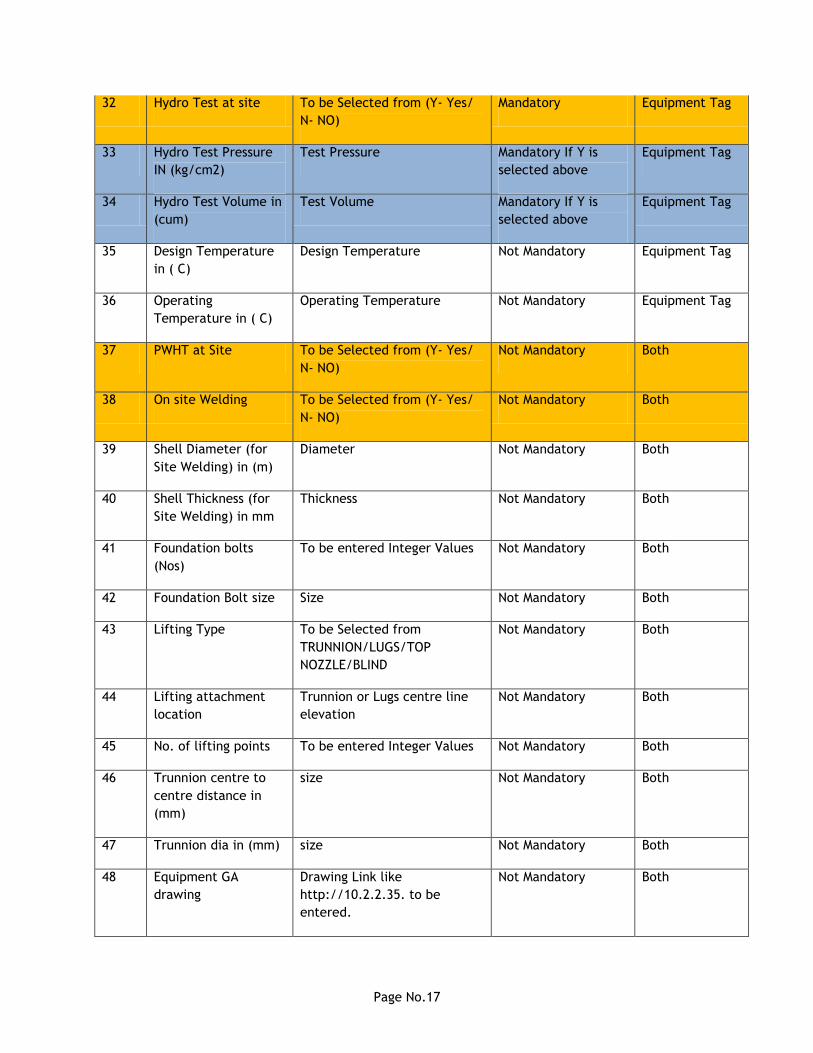
Page No.17
32 Hydro Test at site To be Selected from (Y- Yes/
N- NO)
Mandatory Equipment Tag
33 Hydro Test Pressure
IN (kg/cm2)
Test Pressure Mandatory If Y is
selected above
Equipment Tag
34 Hydro Test Volume in
(cum)
Test Volume Mandatory If Y is
selected above
Equipment Tag
35 Design Temperature
in ( C)
Design Temperature Not Mandatory Equipment Tag
36 Operating
Temperature in ( C)
Operating Temperature Not Mandatory Equipment Tag
37 PWHT at Site To be Selected from (Y- Yes/
N- NO)
Not Mandatory Both
38 On site Welding To be Selected from (Y- Yes/
N- NO)
Not Mandatory Both
39 Shell Diameter (for
Site Welding) in (m)
Diameter Not Mandatory Both
40 Shell Thickness (for
Site Welding) in mm
Thickness Not Mandatory Both
41 Foundation bolts
(Nos)
To be entered Integer Values Not Mandatory Both
42 Foundation Bolt size Size Not Mandatory Both
43 Lifting Type To be Selected from
TRUNNION/LUGS/TOP
NOZZLE/BLIND
Not Mandatory Both
44 Lifting attachment
location
Trunnion or Lugs centre line
elevation
Not Mandatory Both
45 No. of lifting points To be entered Integer Values Not Mandatory Both
46 Trunnion centre to
centre distance in
(mm)
size Not Mandatory Both
47 Trunnion dia in (mm) size Not Mandatory Both
48 Equipment GA
drawing
Drawing Link like
http://10.2.2.35. to be
entered.
Not Mandatory Both
Page No.18
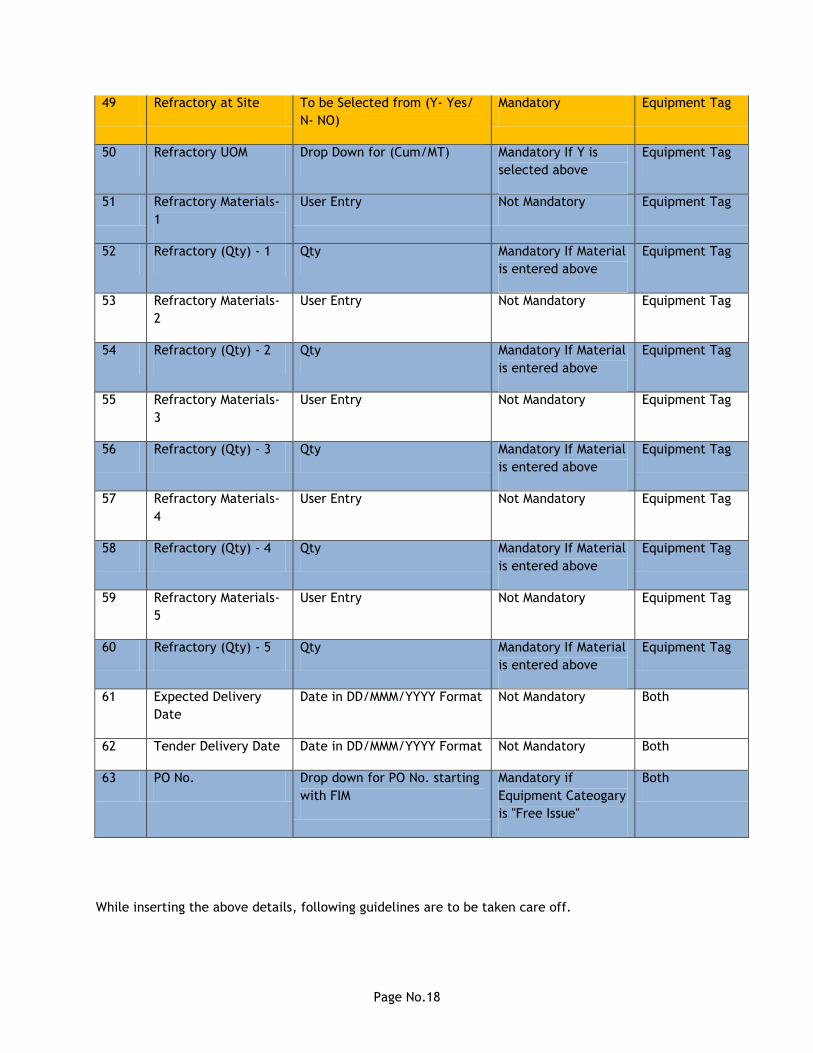
49 Refractory at Site To be Selected from (Y- Yes/
N- NO)
Mandatory Equipment Tag
50 Refractory UOM Drop Down for (Cum/MT) Mandatory If Y is
selected above
Equipment Tag
51 Refractory Materials-
1
User Entry Not Mandatory Equipment Tag
52 Refractory (Qty) - 1 Qty Mandatory If Material
is entered above
Equipment Tag
53 Refractory Materials-
2
User Entry Not Mandatory Equipment Tag
54 Refractory (Qty) - 2 Qty Mandatory If Material
is entered above
Equipment Tag
55 Refractory Materials-
3
User Entry Not Mandatory Equipment Tag
56 Refractory (Qty) - 3 Qty Mandatory If Material
is entered above
Equipment Tag
57 Refractory Materials-
4
User Entry Not Mandatory Equipment Tag
58 Refractory (Qty) - 4 Qty Mandatory If Material
is entered above
Equipment Tag
59 Refractory Materials-
5
User Entry Not Mandatory Equipment Tag
60 Refractory (Qty) - 5 Qty Mandatory If Material
is entered above
Equipment Tag
61 Expected Delivery
Date
Date in DD/MMM/YYYY Format Not Mandatory Both
62 Tender Delivery Date Date in DD/MMM/YYYY Format Not Mandatory Both
63 PO No. Drop down for PO No. starting
with FIM
Mandatory if
Equipment Cateogary
is "Free Issue"
Both
While inserting the above details, following guidelines are to be taken care off.
Page No.19
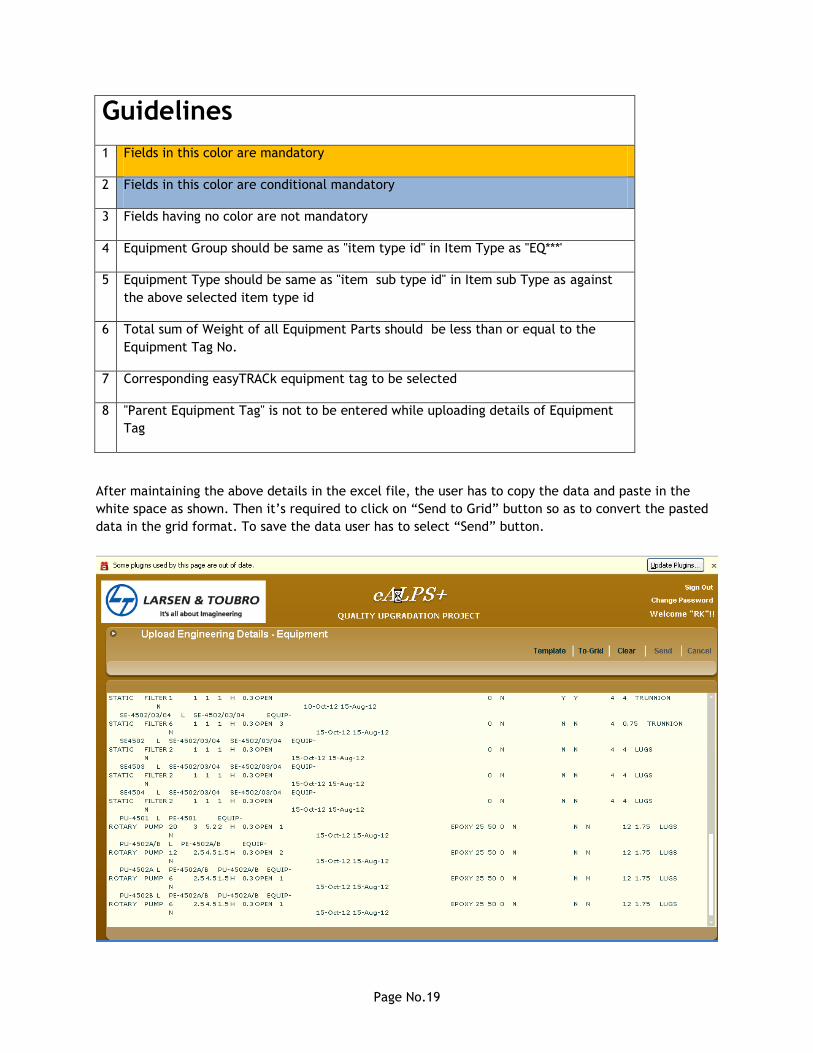
Guidelines
1 Fields in this color are mandatory
2 Fields in this color are conditional mandatory
3 Fields having no color are not mandatory
4 Equipment Group should be same as "item type id" in Item Type as "EQ***'
5 Equipment Type should be same as "item sub type id" in Item sub Type as against
the above selected item type id
6 Total sum of Weight of all Equipment Parts should be less than or equal to the
Equipment Tag No.
7 Corresponding easyTRACk equipment tag to be selected
8 "Parent Equipment Tag" is not to be entered while uploading details of Equipment
Tag
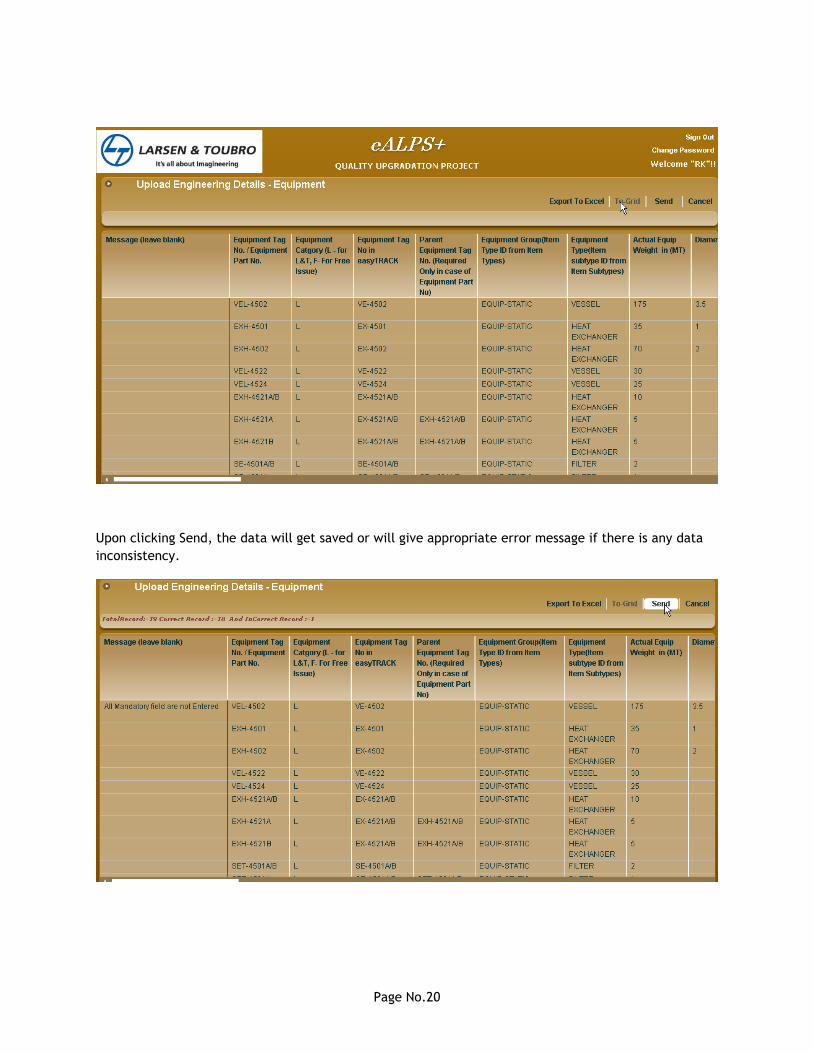
After maintaining the above details in the excel file, the user has to copy the data and paste in the
white space as shown. Then it‟s required to click on “Send to Grid” button so as to convert the pasted
data in the grid format. To save the data user has to select “Send” button.
Page No.20
Upon clicking Send, the data will get saved or will give appropriate error message if there is any data
inconsistency.
Page No.21
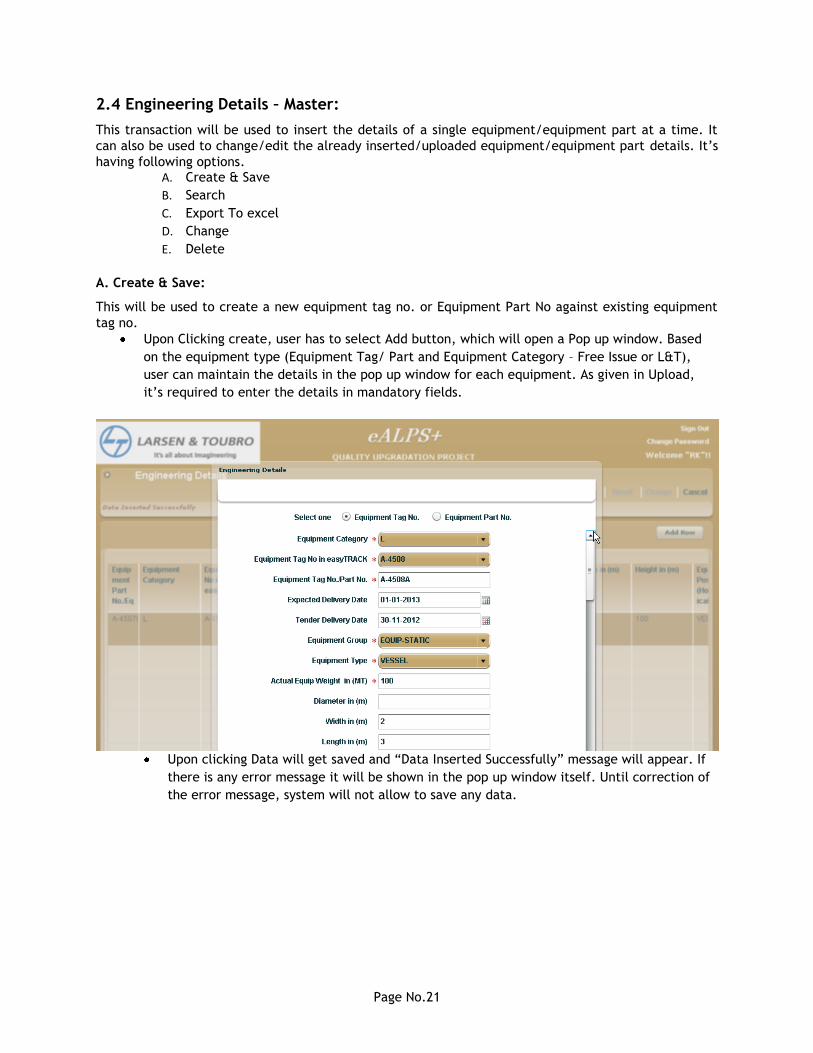
2.4 Engineering Details – Master:
This transaction will be used to insert the details of a single equipment/equipment part at a time. It
can also be used to change/edit the already inserted/uploaded equipment/equipment part details. It‟s
having following options. A. Create & Save
B. Search
C. Export To excel
D. Change
E. Delete
A. Create & Save:
This will be used to create a new equipment tag no. or Equipment Part No against existing equipment
tag no.
Upon Clicking create, user has to select Add button, which will open a Pop up window. Based
on the equipment type (Equipment Tag/ Part and Equipment Category – Free Issue or L&T),
user can maintain the details in the pop up window for each equipment. As given in Upload,
it‟s required to enter the details in mandatory fields.
Upon clicking Data will get saved and “Data Inserted Successfully” message will appear. If
there is any error message it will be shown in the pop up window itself. Until correction of
the error message, system will not allow to save any data.
Page No.22
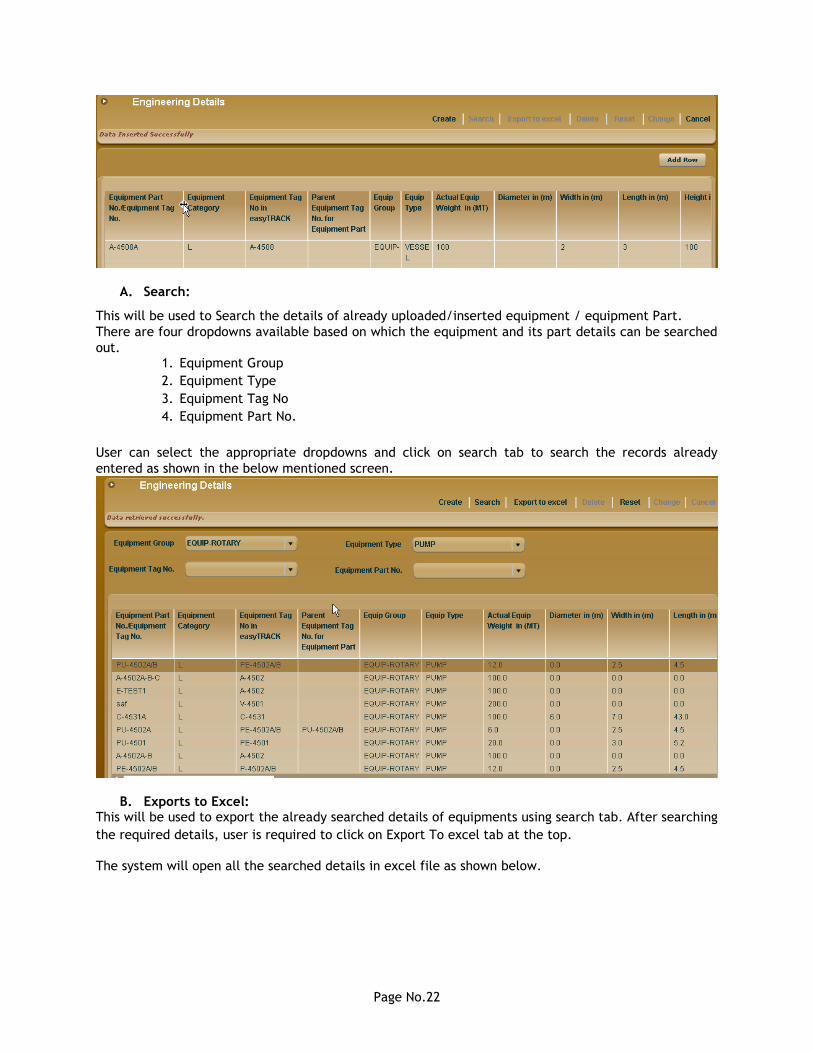
A. Search:
This will be used to Search the details of already uploaded/inserted equipment / equipment Part.
There are four dropdowns available based on which the equipment and its part details can be searched
out. 1. Equipment Group
2. Equipment Type
3. Equipment Tag No
4. Equipment Part No.
User can select the appropriate dropdowns and click on search tab to search the records already
entered as shown in the below mentioned screen.
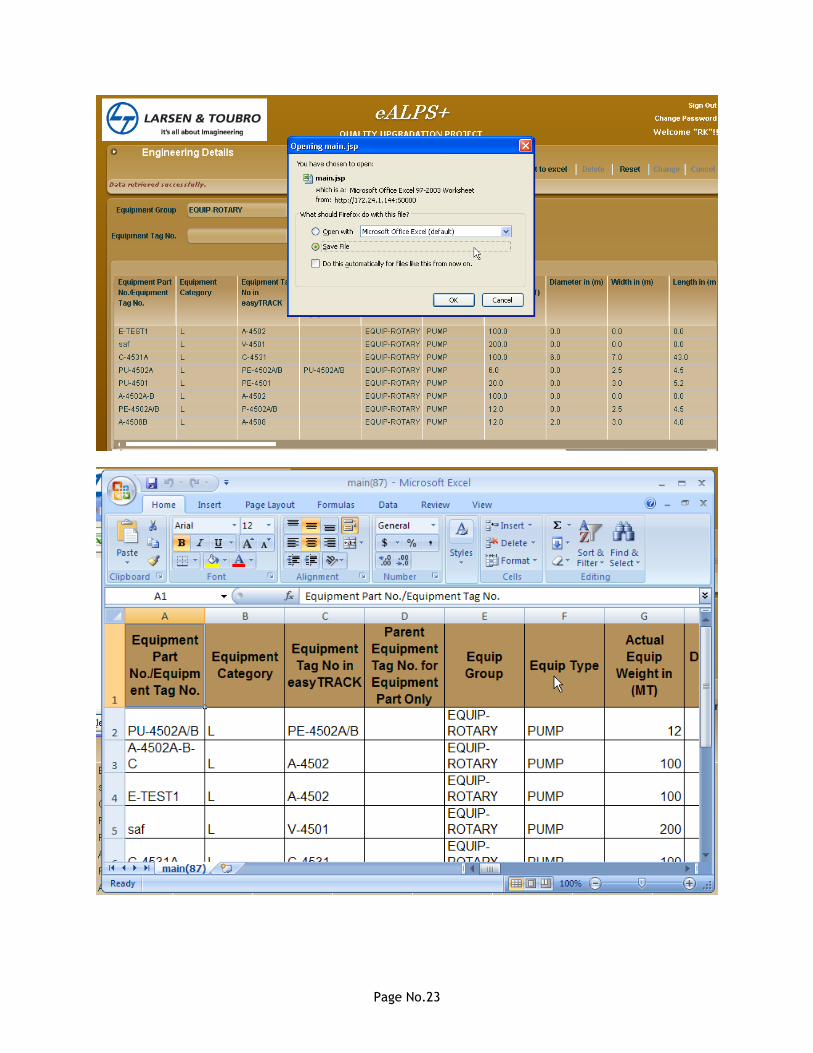
B. Exports to Excel: This will be used to export the already searched details of equipments using search tab. After searching
the required details, user is required to click on Export To excel tab at the top.
The system will open all the searched details in excel file as shown below.
Page No.23
Page No.24
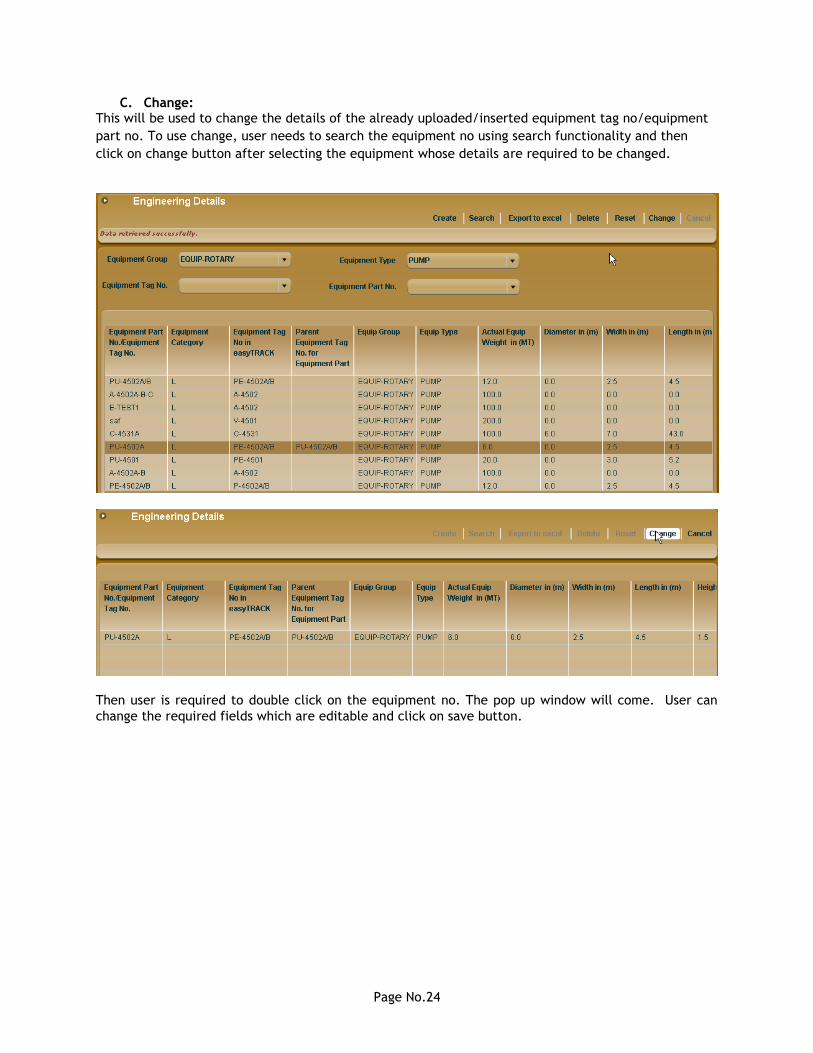
C. Change: This will be used to change the details of the already uploaded/inserted equipment tag no/equipment
part no. To use change, user needs to search the equipment no using search functionality and then
click on change button after selecting the equipment whose details are required to be changed.
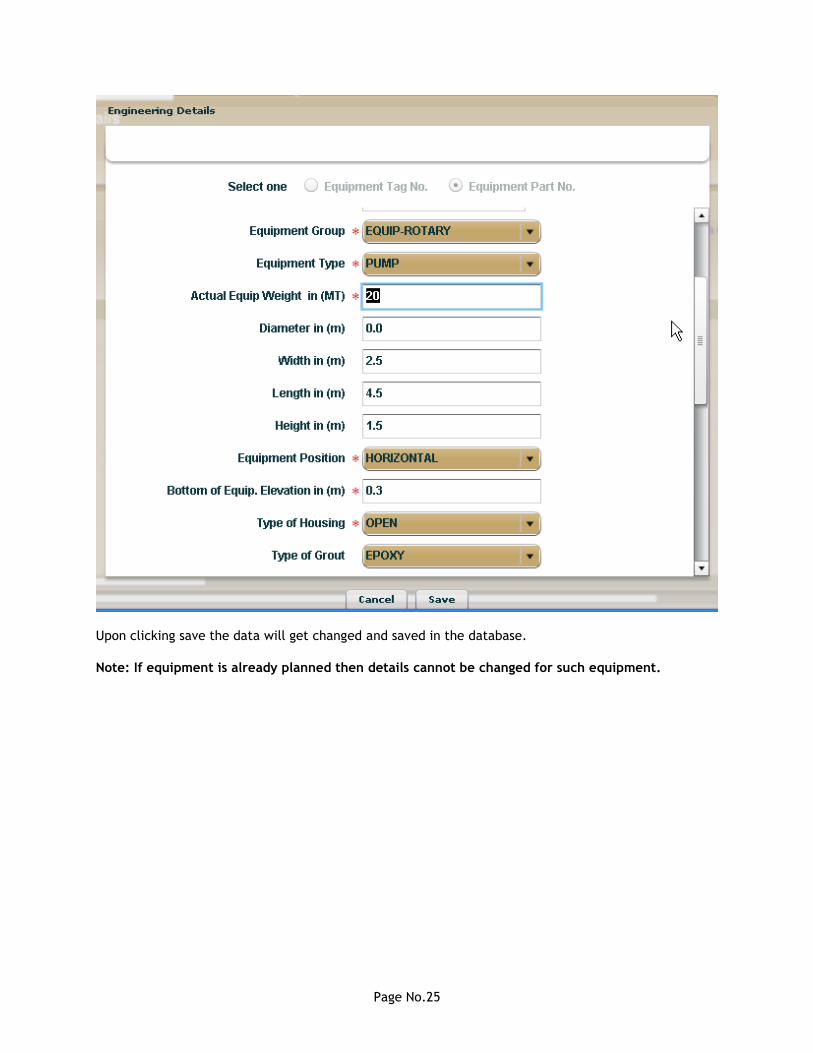
Then user is required to double click on the equipment no. The pop up window will come. User can
change the required fields which are editable and click on save button.
Page No.25
Upon clicking save the data will get changed and saved in the database.
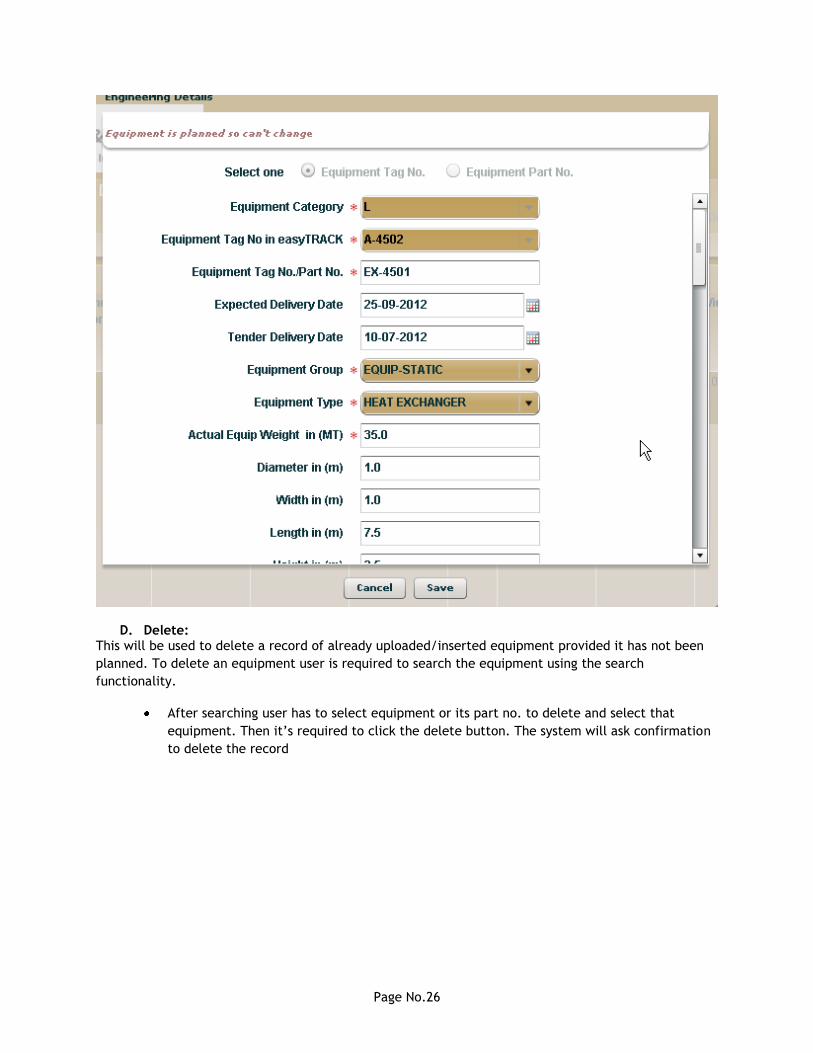
Note: If equipment is already planned then details cannot be changed for such equipment.
Page No.26
D. Delete: This will be used to delete a record of already uploaded/inserted equipment provided it has not been
planned. To delete an equipment user is required to search the equipment using the search
functionality.
After searching user has to select equipment or its part no. to delete and select that
equipment. Then it‟s required to click the delete button. The system will ask confirmation
to delete the record
Page No.27
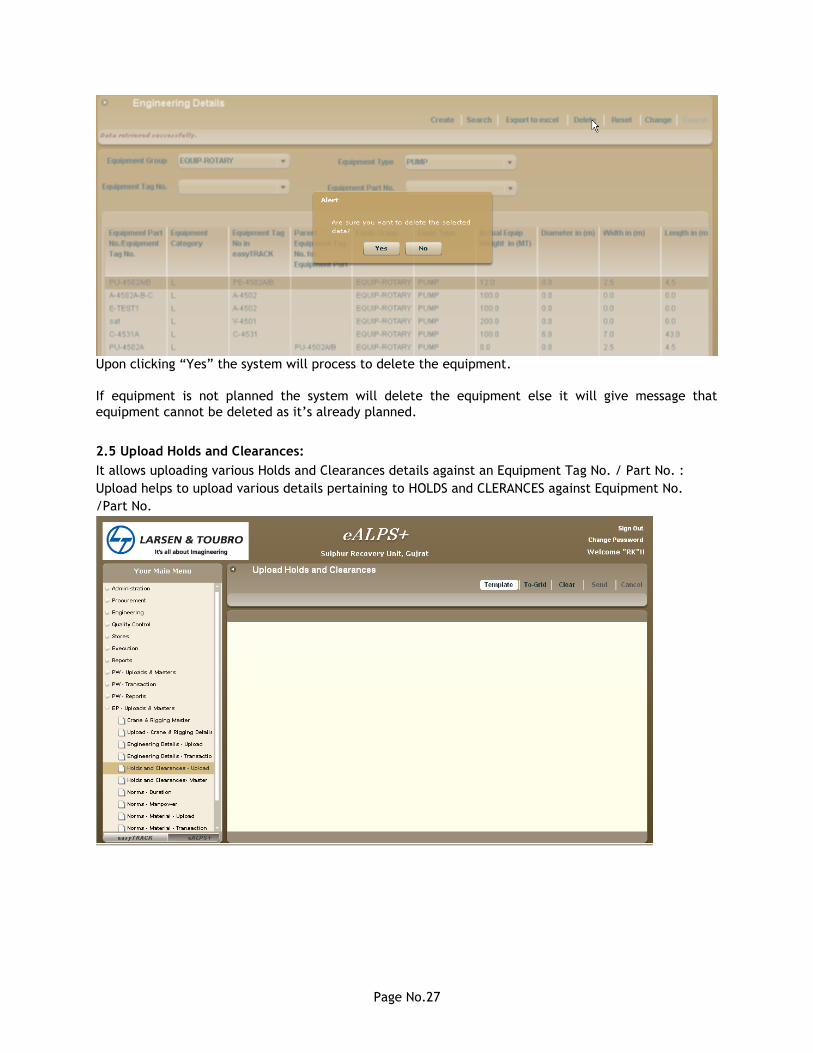
Upon clicking “Yes” the system will process to delete the equipment.
If equipment is not planned the system will delete the equipment else it will give message that
equipment cannot be deleted as it‟s already planned.
2.5 Upload Holds and Clearances:
It allows uploading various Holds and Clearances details against an Equipment Tag No. / Part No. :
Upload helps to upload various details pertaining to HOLDS and CLERANCES against Equipment No.
/Part No.
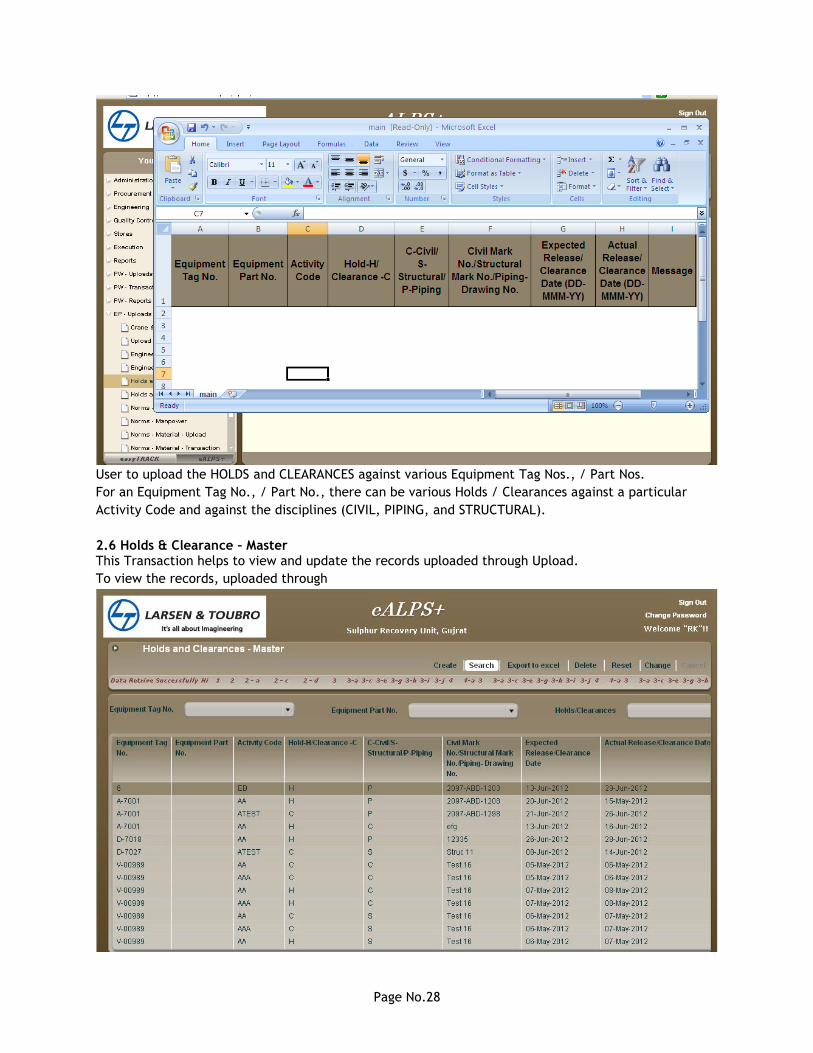
Page No.28
User to upload the HOLDS and CLEARANCES against various Equipment Tag Nos., / Part Nos.
For an Equipment Tag No., / Part No., there can be various Holds / Clearances against a particular
Activity Code and against the disciplines (CIVIL, PIPING, and STRUCTURAL).
2.6 Holds & Clearance – Master This Transaction helps to view and update the records uploaded through Upload.
To view the records, uploaded through
Page No.29
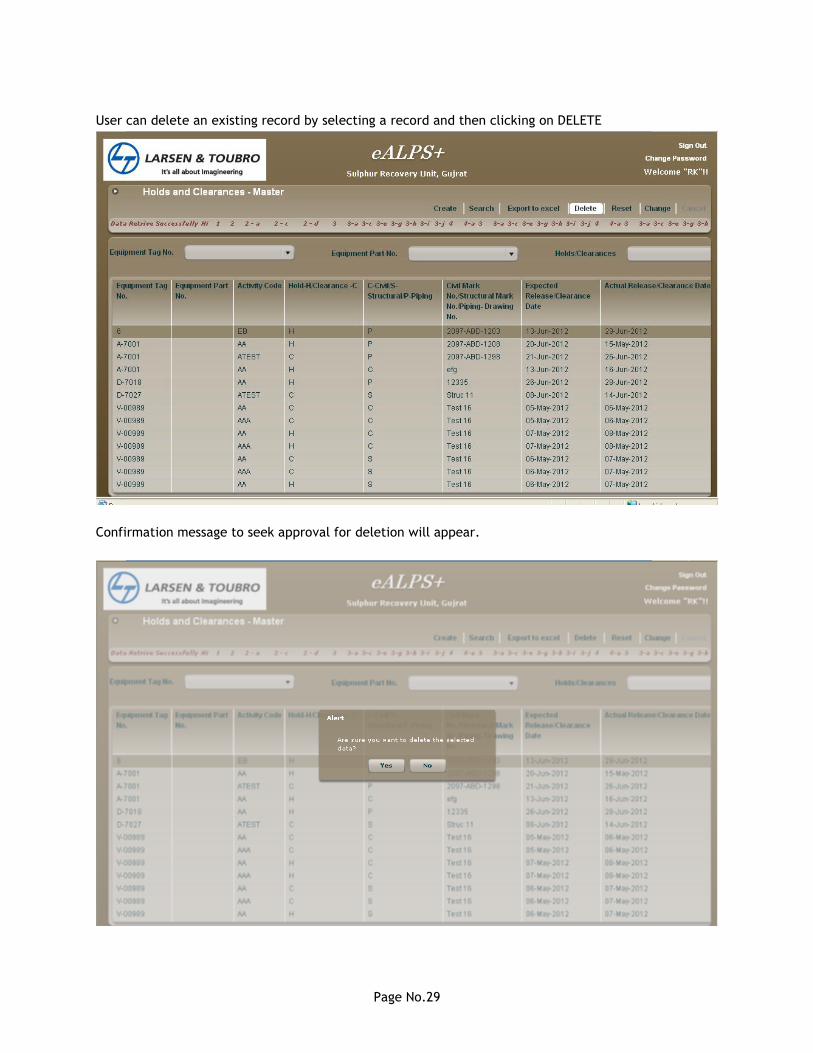
User can delete an existing record by selecting a record and then clicking on DELETE
Confirmation message to seek approval for deletion will appear.
Page No.30
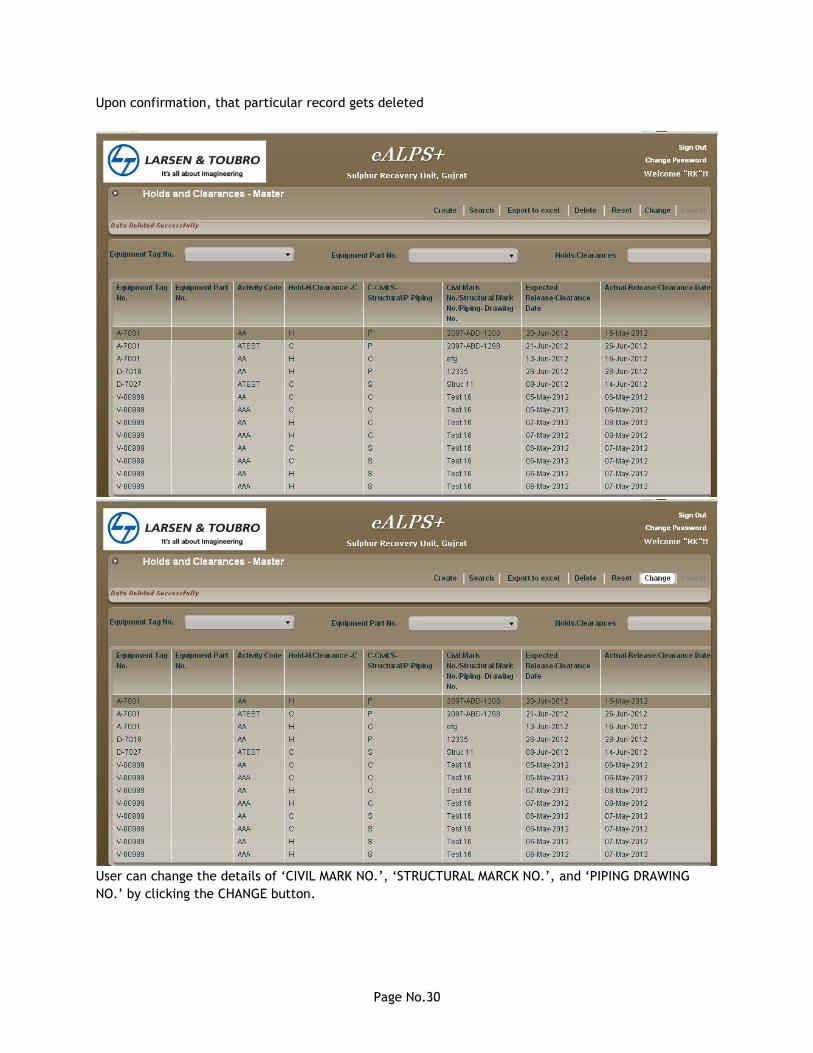
Upon confirmation, that particular record gets deleted
User can change the details of „CIVIL MARK NO.‟, „STRUCTURAL MARCK NO.‟, and „PIPING DRAWING
NO.‟ by clicking the CHANGE button.
Page No.31
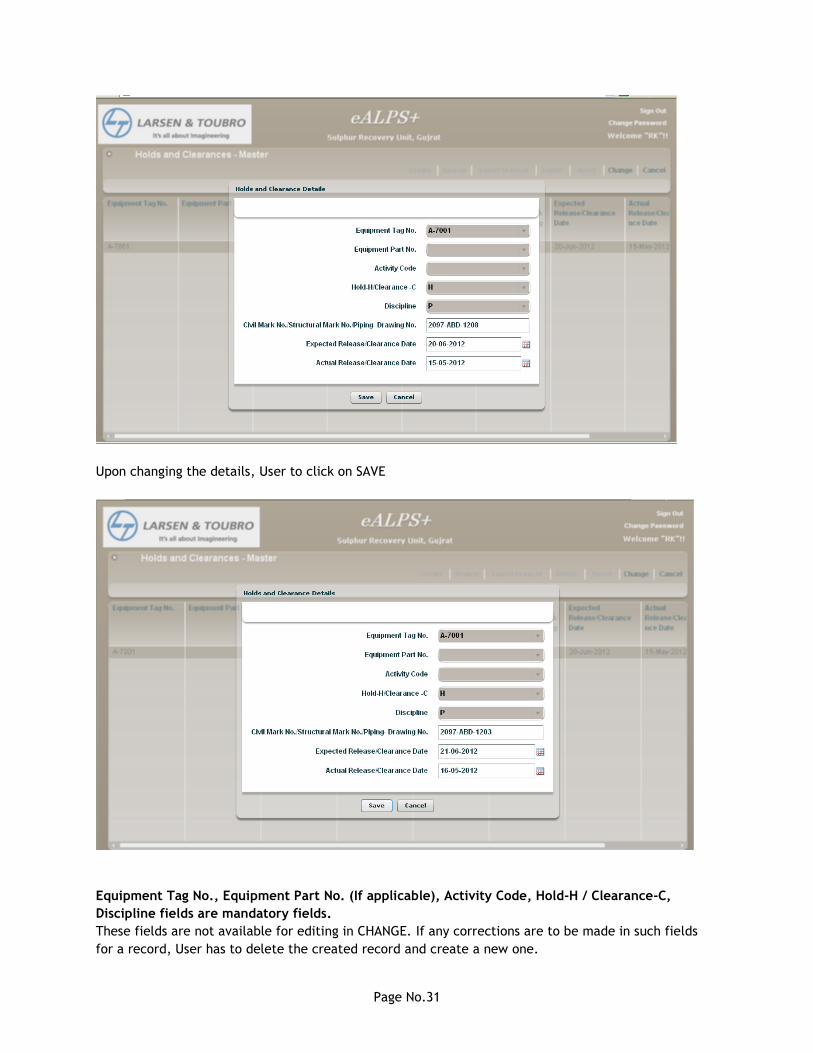
Upon changing the details, User to click on SAVE
Equipment Tag No., Equipment Part No. (If applicable), Activity Code, Hold-H / Clearance-C,
Discipline fields are mandatory fields.
These fields are not available for editing in CHANGE. If any corrections are to be made in such fields
for a record, User has to delete the created record and create a new one.
Page No.32
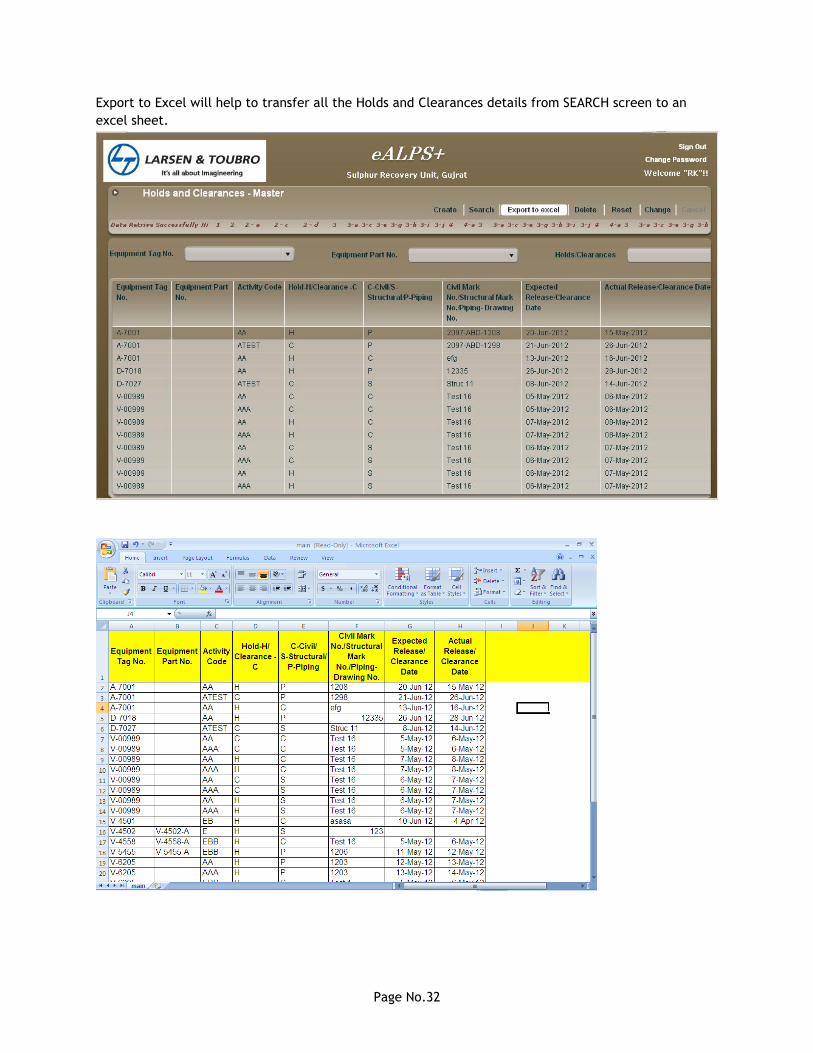
Export to Excel will help to transfer all the Holds and Clearances details from SEARCH screen to an
excel sheet.
Page No.33
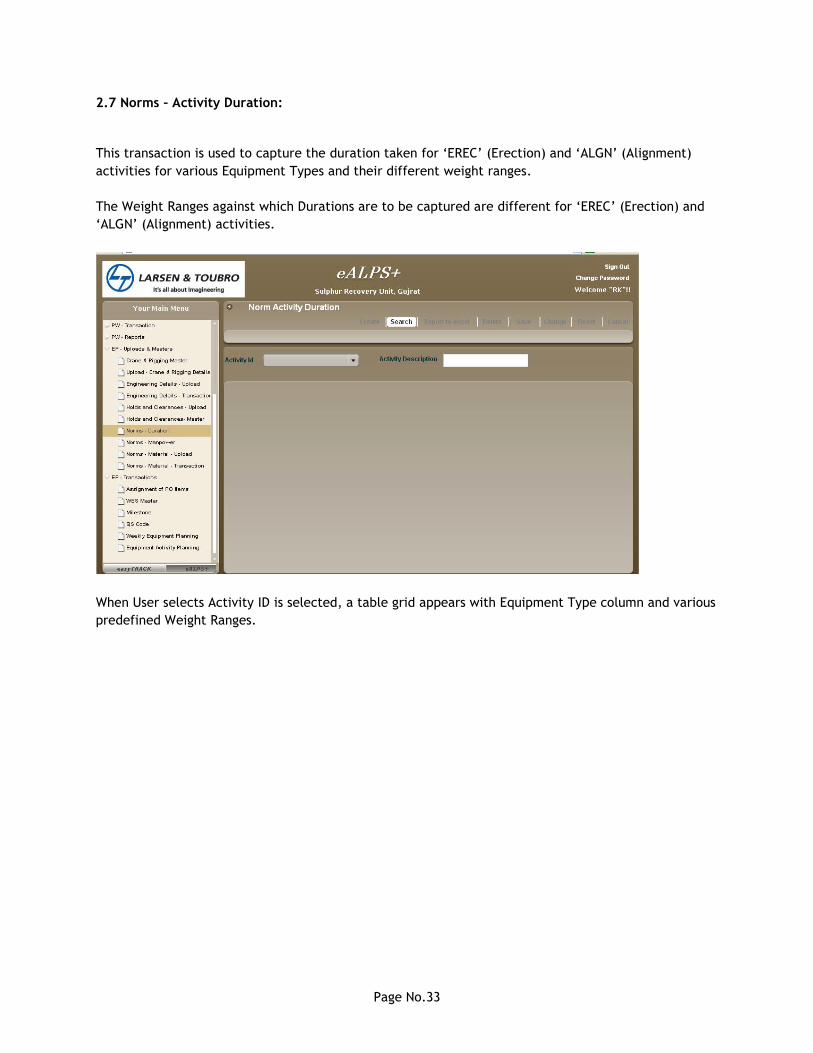
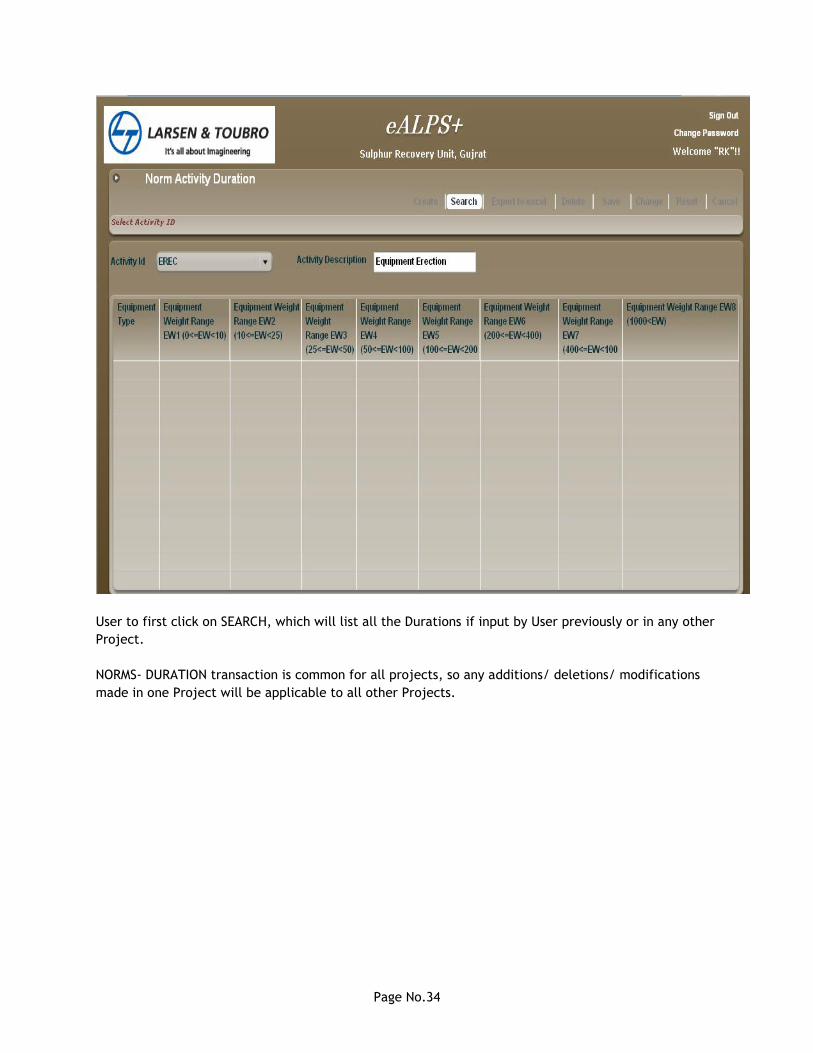
2.7 Norms – Activity Duration:
This transaction is used to capture the duration taken for „EREC‟ (Erection) and „ALGN‟ (Alignment)
activities for various Equipment Types and their different weight ranges.
The Weight Ranges against which Durations are to be captured are different for „EREC‟ (Erection) and
„ALGN‟ (Alignment) activities.
When User selects Activity ID is selected, a table grid appears with Equipment Type column and various
predefined Weight Ranges.
Page No.34
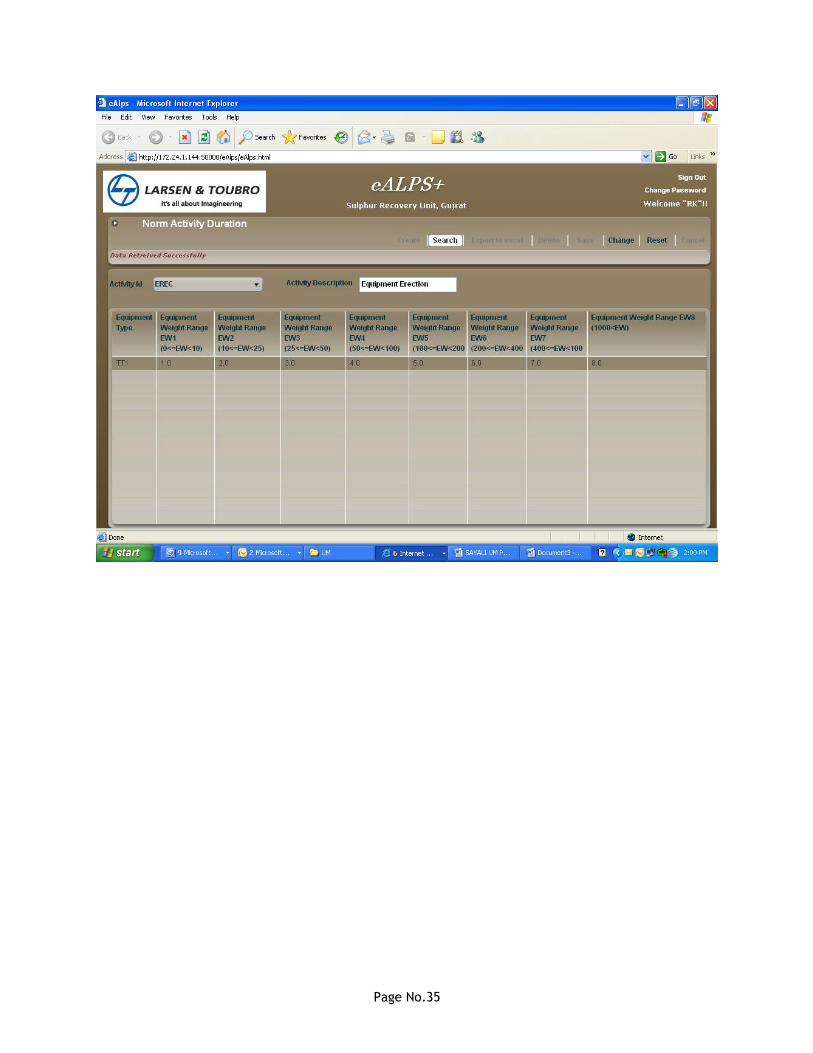
User to first click on SEARCH, which will list all the Durations if input by User previously or in any other
Project.
NORMS- DURATION transaction is common for all projects, so any additions/ deletions/ modifications
made in one Project will be applicable to all other Projects.
Page No.35
Page No.36
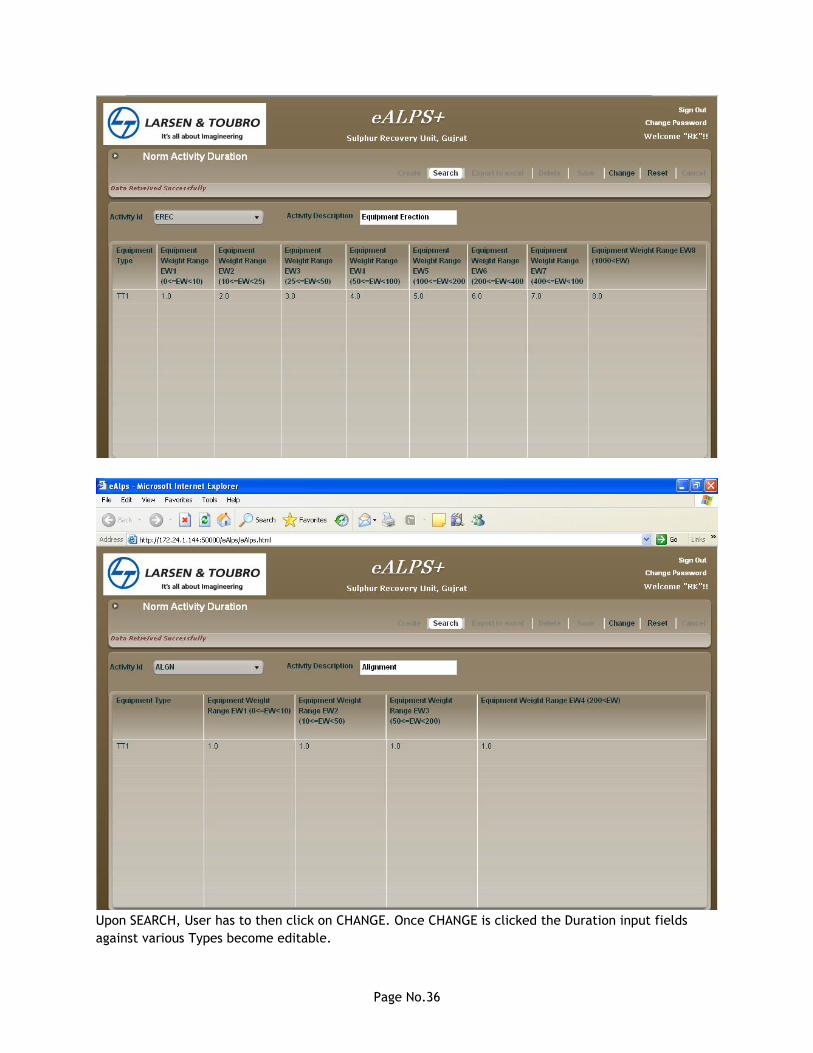
Upon SEARCH, User has to then click on CHANGE. Once CHANGE is clicked the Duration input fields
against various Types become editable.
Page No.37
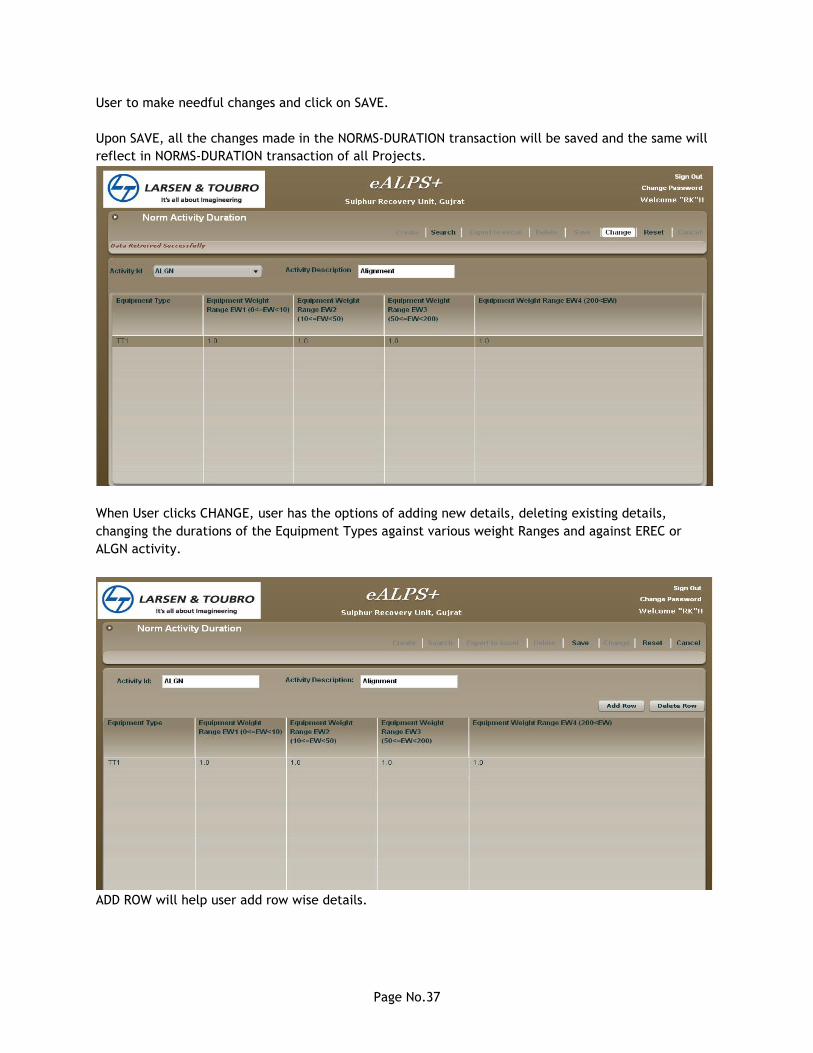
User to make needful changes and click on SAVE.
Upon SAVE, all the changes made in the NORMS-DURATION transaction will be saved and the same will
reflect in NORMS-DURATION transaction of all Projects.
When User clicks CHANGE, user has the options of adding new details, deleting existing details,
changing the durations of the Equipment Types against various weight Ranges and against EREC or
ALGN activity.
ADD ROW will help user add row wise details.
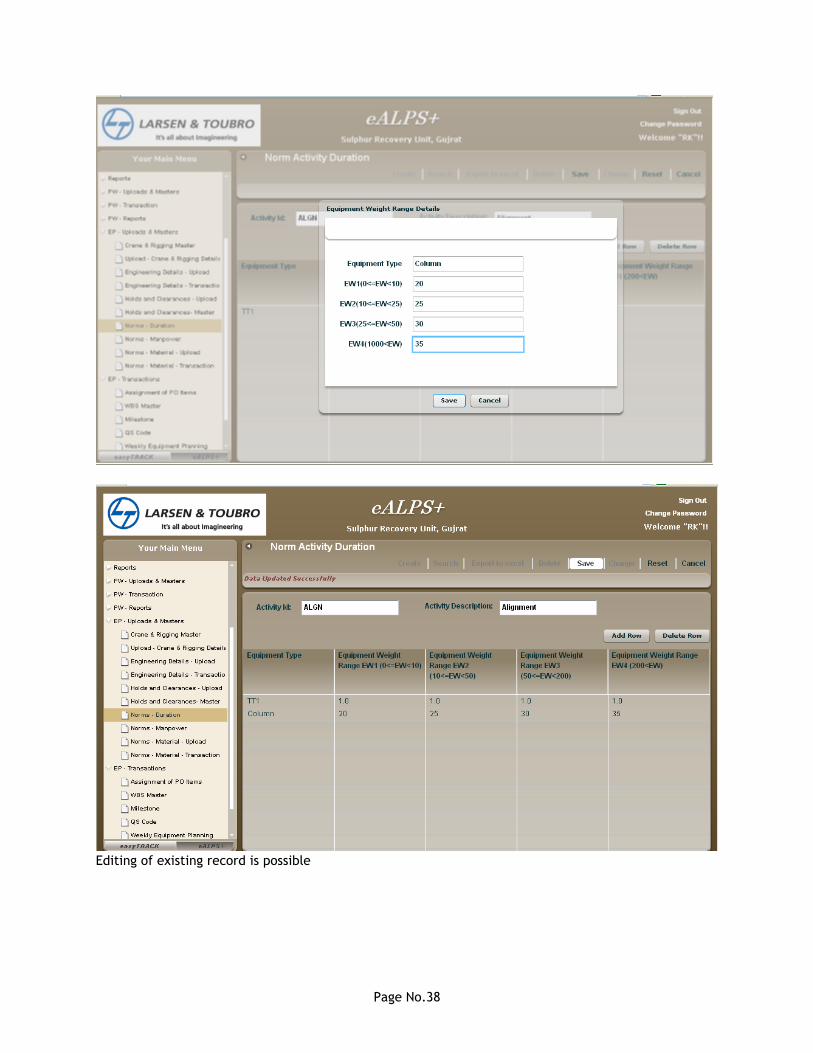
Page No.38
Editing of existing record is possible
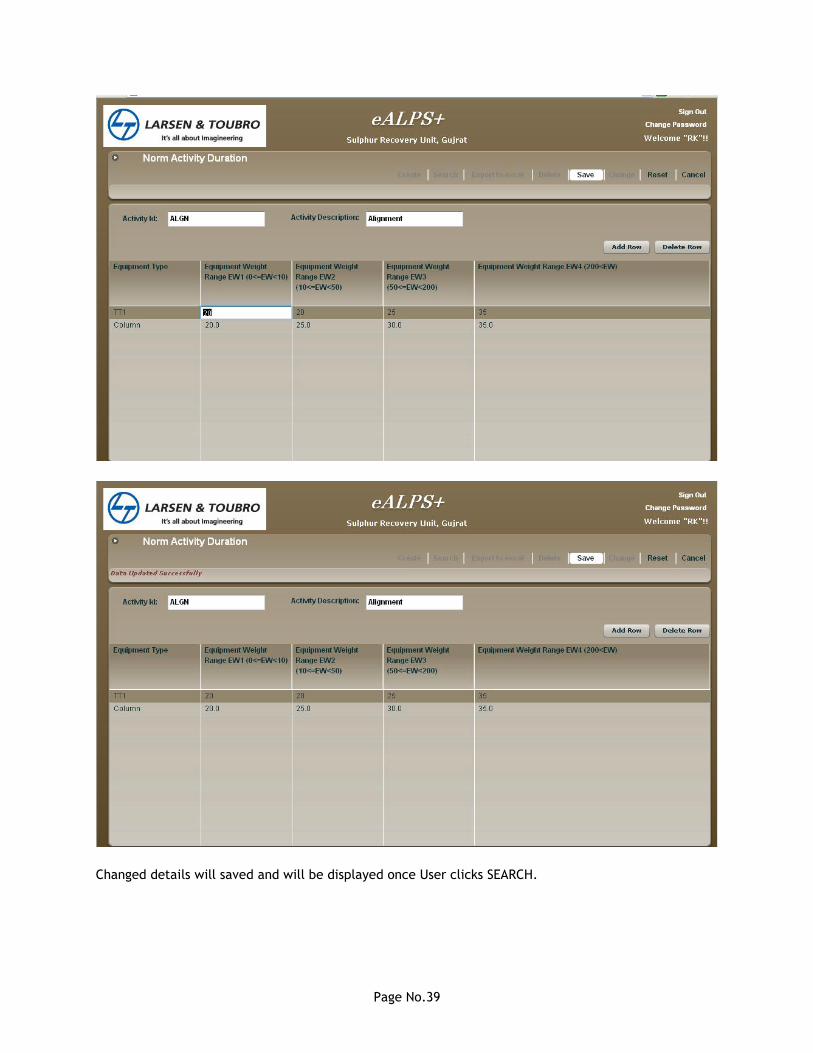
Page No.39
Changed details will saved and will be displayed once User clicks SEARCH.
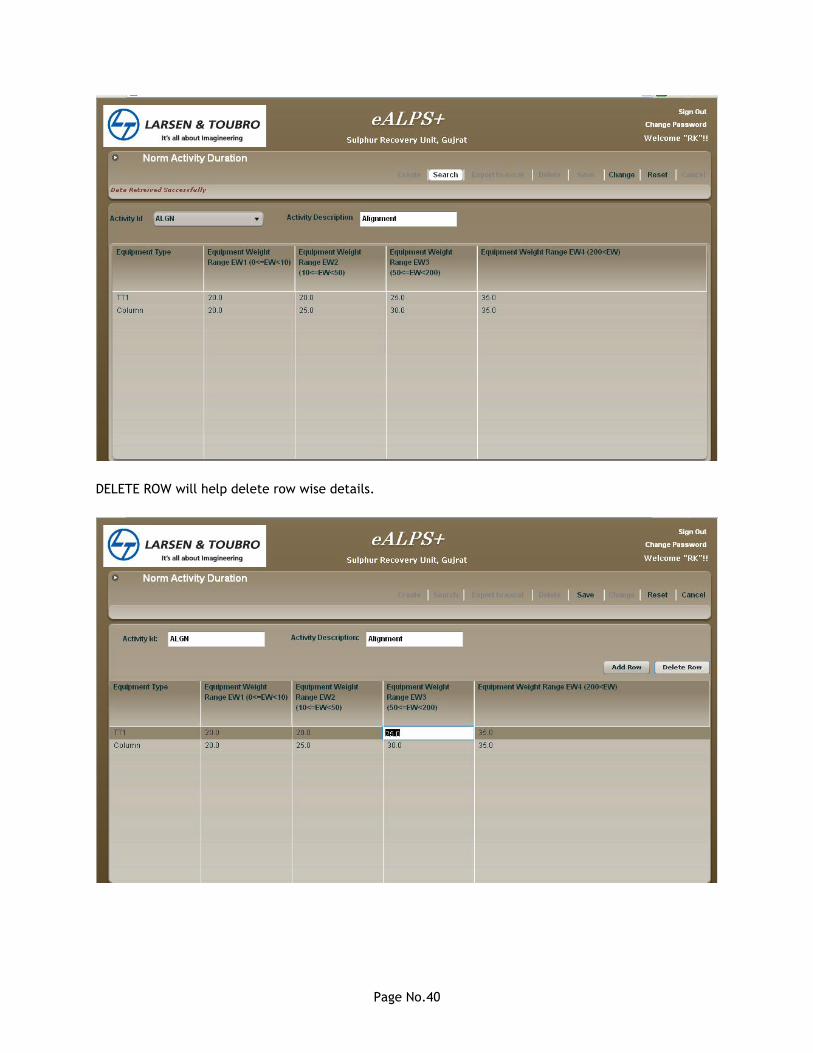
Page No.40
DELETE ROW will help delete row wise details.
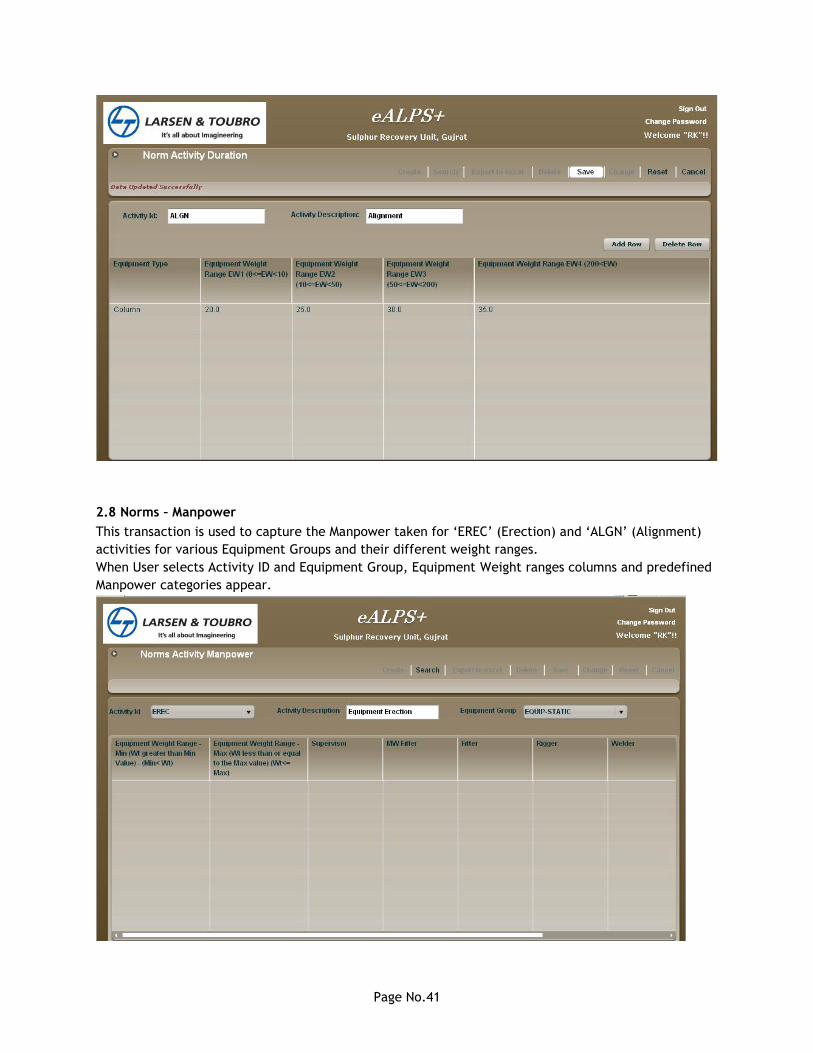
Page No.41
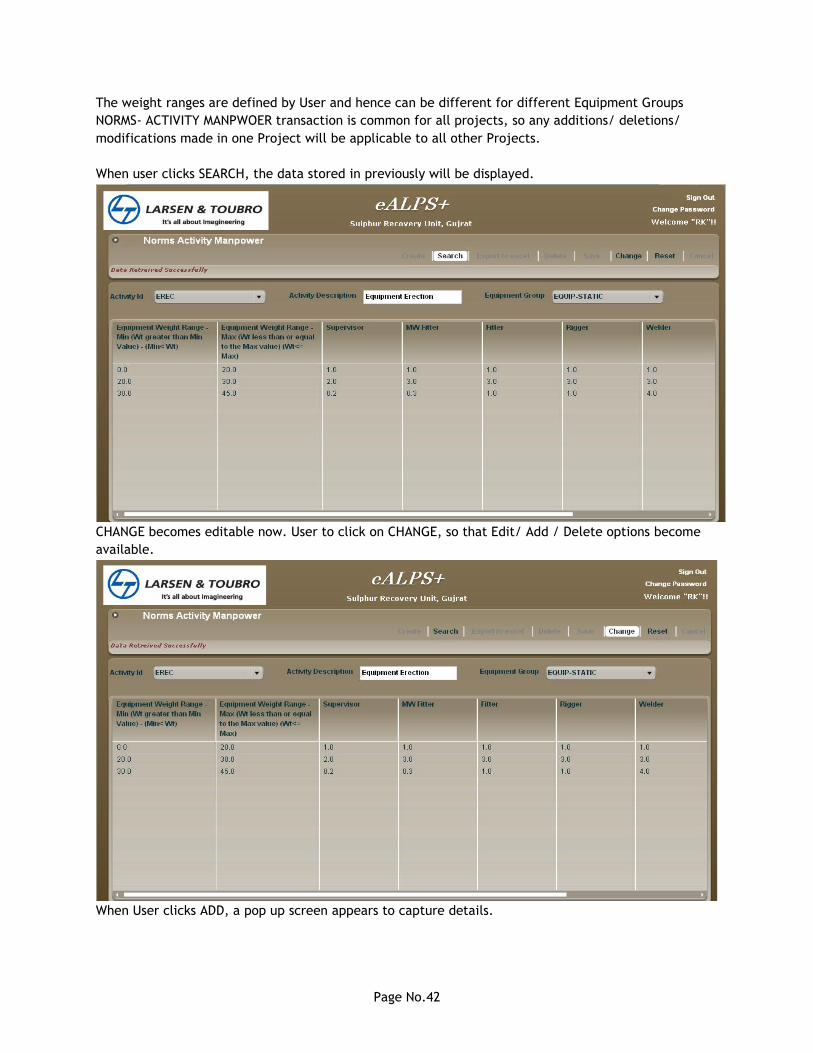
2.8 Norms – Manpower
This transaction is used to capture the Manpower taken for „EREC‟ (Erection) and „ALGN‟ (Alignment)
activities for various Equipment Groups and their different weight ranges.
When User selects Activity ID and Equipment Group, Equipment Weight ranges columns and predefined
Manpower categories appear.
Page No.42
The weight ranges are defined by User and hence can be different for different Equipment Groups
NORMS- ACTIVITY MANPWOER transaction is common for all projects, so any additions/ deletions/
modifications made in one Project will be applicable to all other Projects.
When user clicks SEARCH, the data stored in previously will be displayed.
CHANGE becomes editable now. User to click on CHANGE, so that Edit/ Add / Delete options become
available.
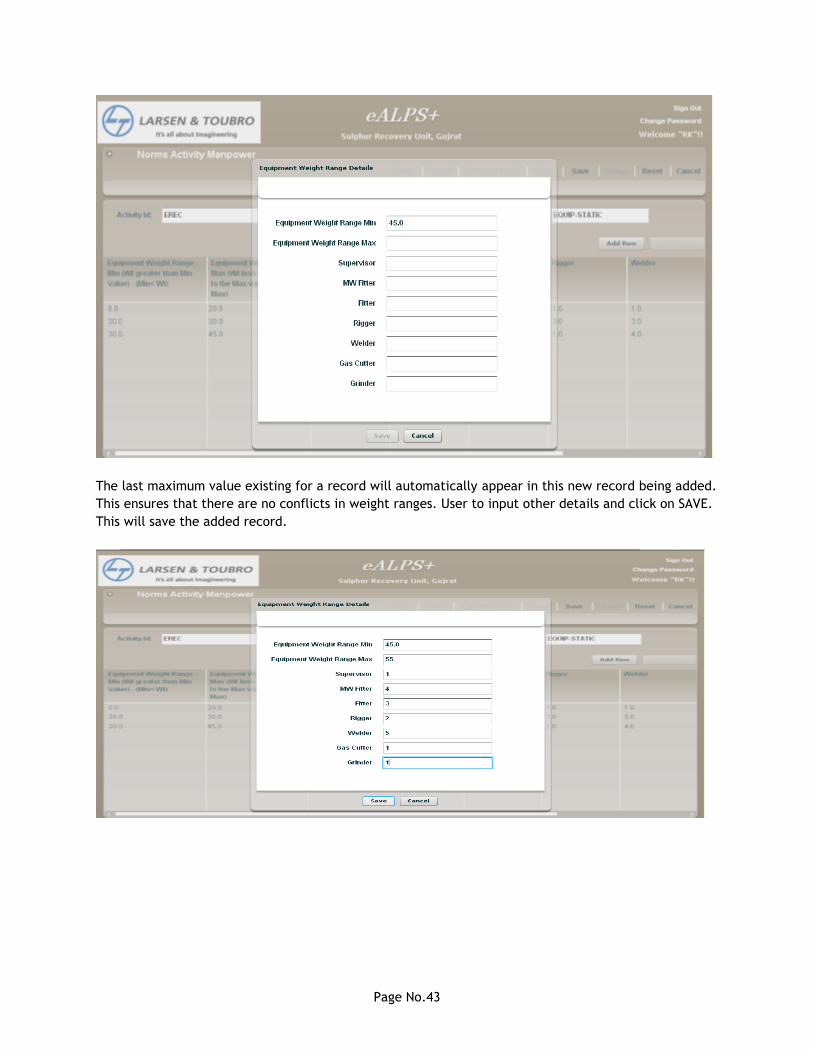
When User clicks ADD, a pop up screen appears to capture details.
Page No.43
The last maximum value existing for a record will automatically appear in this new record being added.
This ensures that there are no conflicts in weight ranges. User to input other details and click on SAVE.
This will save the added record.
Page No.44
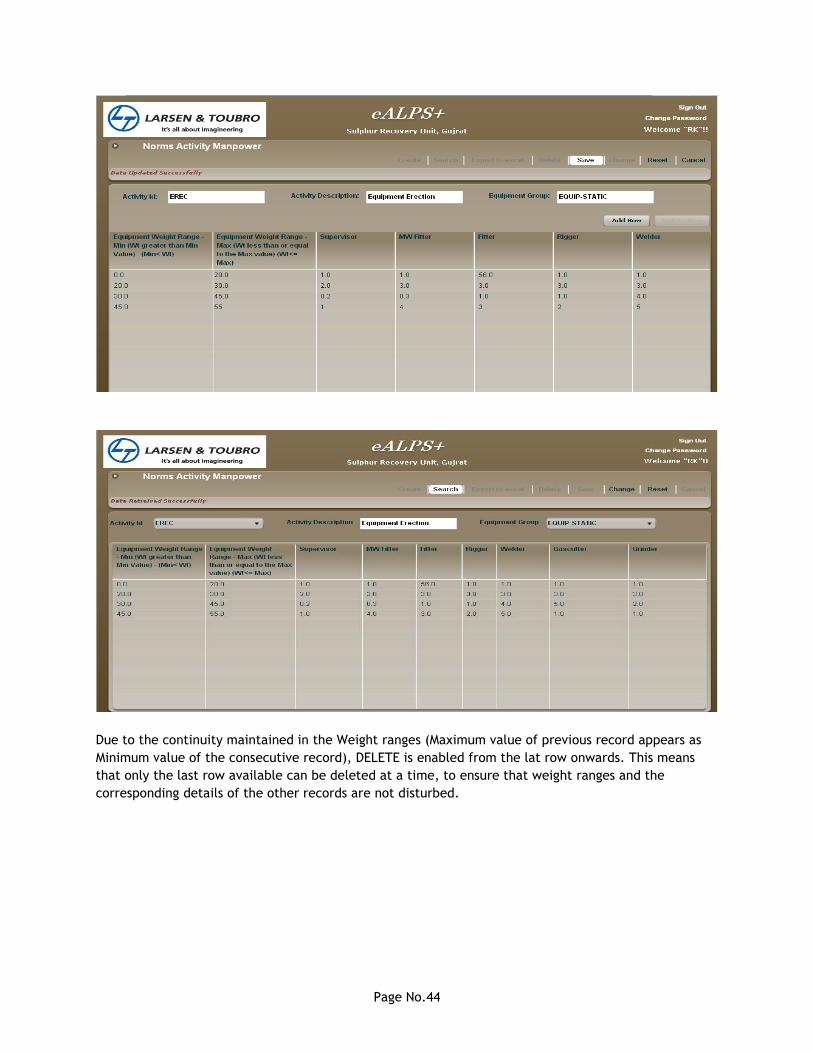
Due to the continuity maintained in the Weight ranges (Maximum value of previous record appears as
Minimum value of the consecutive record), DELETE is enabled from the lat row onwards. This means
that only the last row available can be deleted at a time, to ensure that weight ranges and the
corresponding details of the other records are not disturbed.
Page No.45
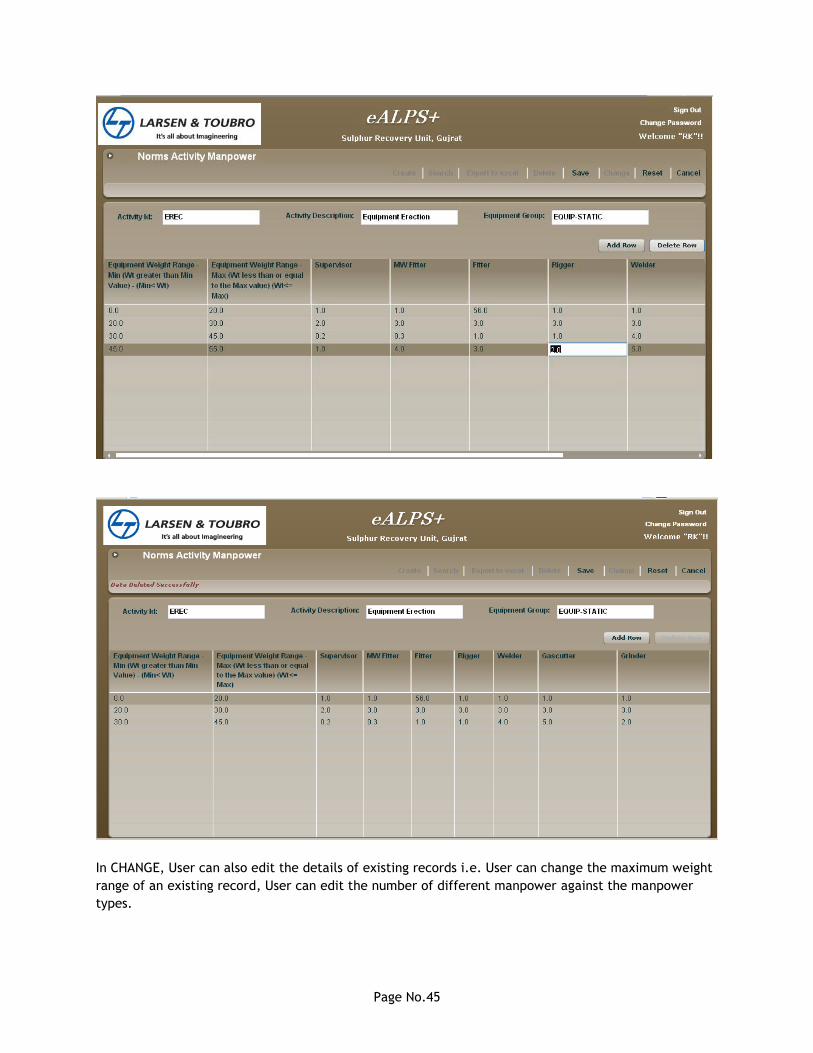
In CHANGE, User can also edit the details of existing records i.e. User can change the maximum weight
range of an existing record, User can edit the number of different manpower against the manpower
types.
Page No.46
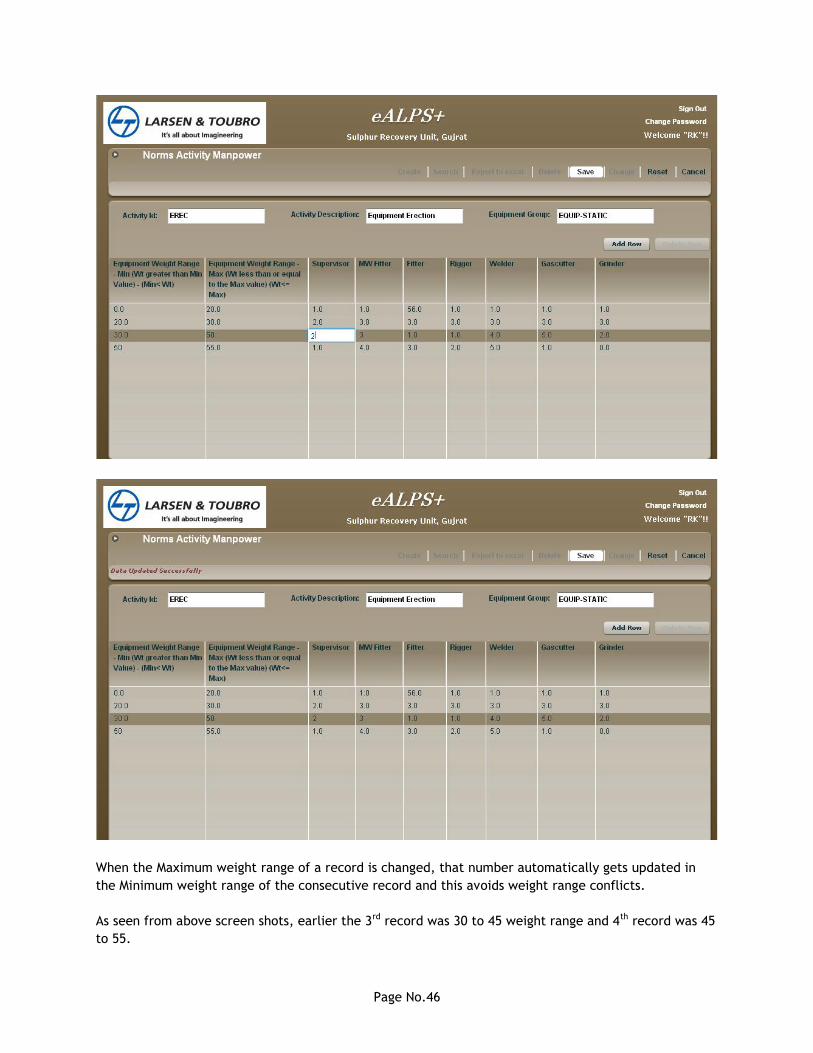
When the Maximum weight range of a record is changed, that number automatically gets updated in
the Minimum weight range of the consecutive record and this avoids weight range conflicts.
As seen from above screen shots, earlier the 3rd record was 30 to 45 weight range and 4th record was 45
to 55.
Page No.47
On CHANGE, the maximum weight range of 3rd record is changed to 50; accordingly, the minimum
weight range of 4th record gets changed to 50 automatically.
The column of Minimum Weight range is never available for editing purpose.
For a combination of “ACTIVITY ID” (EREC and ALGN) and “EQUIPMENT GROUP”, different weight
ranges and number of different manpower required can be saved by User in this transaction.
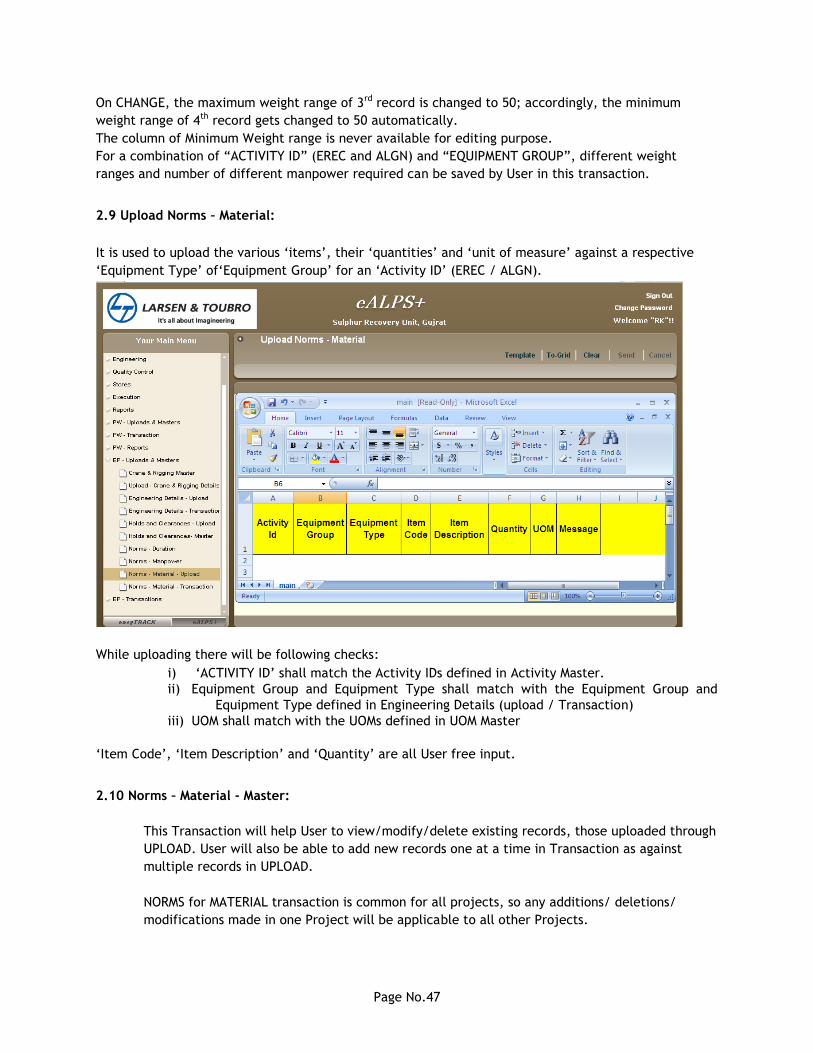
2.9 Upload Norms – Material:
It is used to upload the various „items‟, their „quantities‟ and „unit of measure‟ against a respective
„Equipment Type‟ of„Equipment Group‟ for an „Activity ID‟ (EREC / ALGN).
While uploading there will be following checks:
i) „ACTIVITY ID‟ shall match the Activity IDs defined in Activity Master.
ii) Equipment Group and Equipment Type shall match with the Equipment Group and
Equipment Type defined in Engineering Details (upload / Transaction)
iii) UOM shall match with the UOMs defined in UOM Master
„Item Code‟, „Item Description‟ and „Quantity‟ are all User free input.
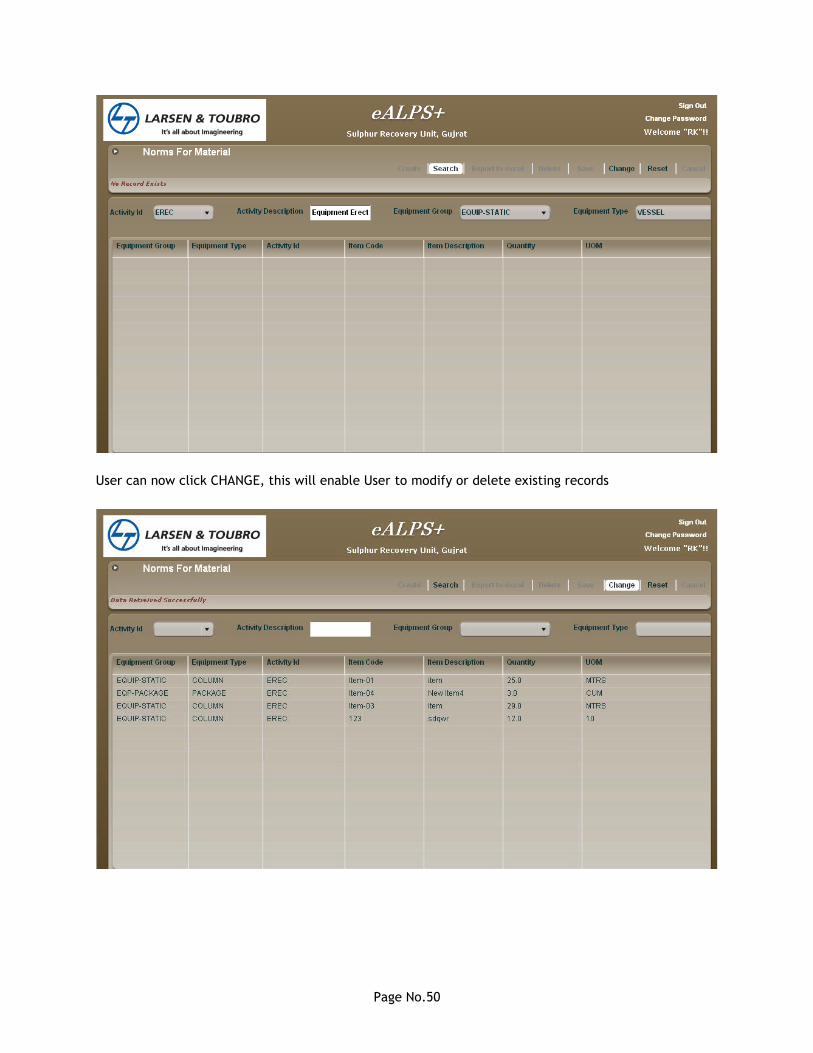
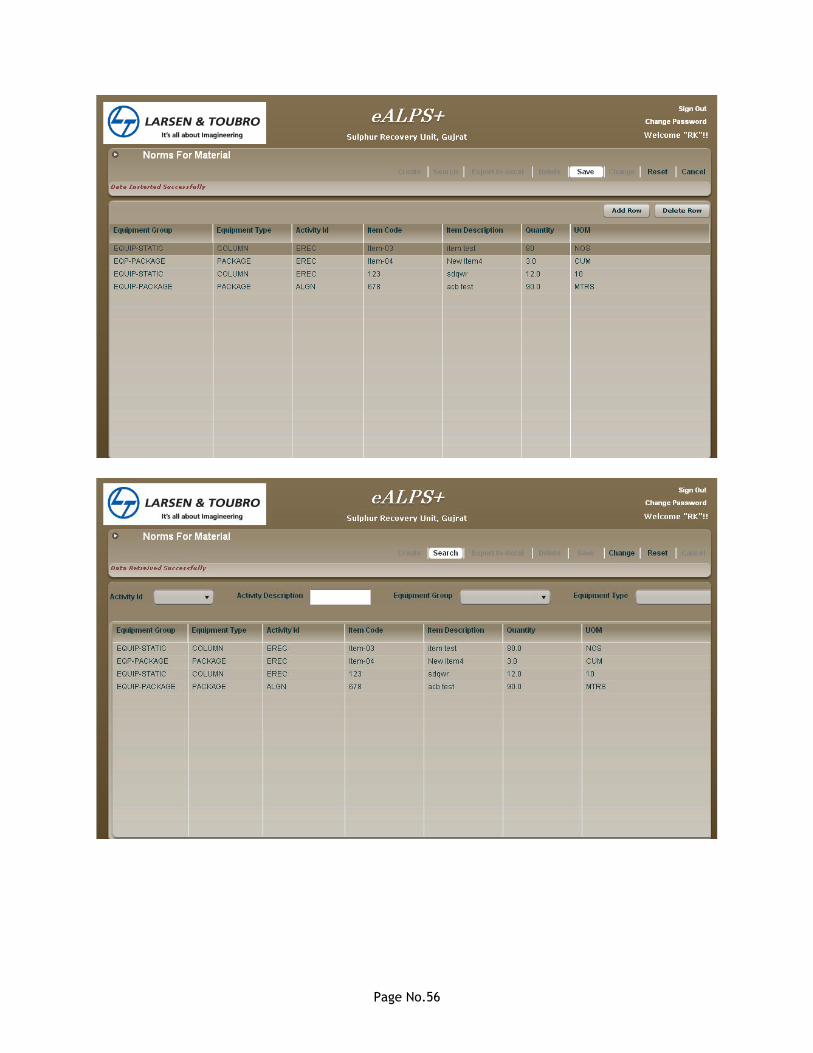
2.10 Norms – Material - Master:
This Transaction will help User to view/modify/delete existing records, those uploaded through
UPLOAD. User will also be able to add new records one at a time in Transaction as against
multiple records in UPLOAD.
NORMS for MATERIAL transaction is common for all projects, so any additions/ deletions/
modifications made in one Project will be applicable to all other Projects.

Page No.48
User to click on SEARCH to view the details uploaded through UPLOAD.
User has to option to sort the details by ACTIVITY ID, EQUIPMENT GROUP and EQUIPMENT TYPE.

Page No.49
Page No.50
User can now click CHANGE, this will enable User to modify or delete existing records
Page No.51
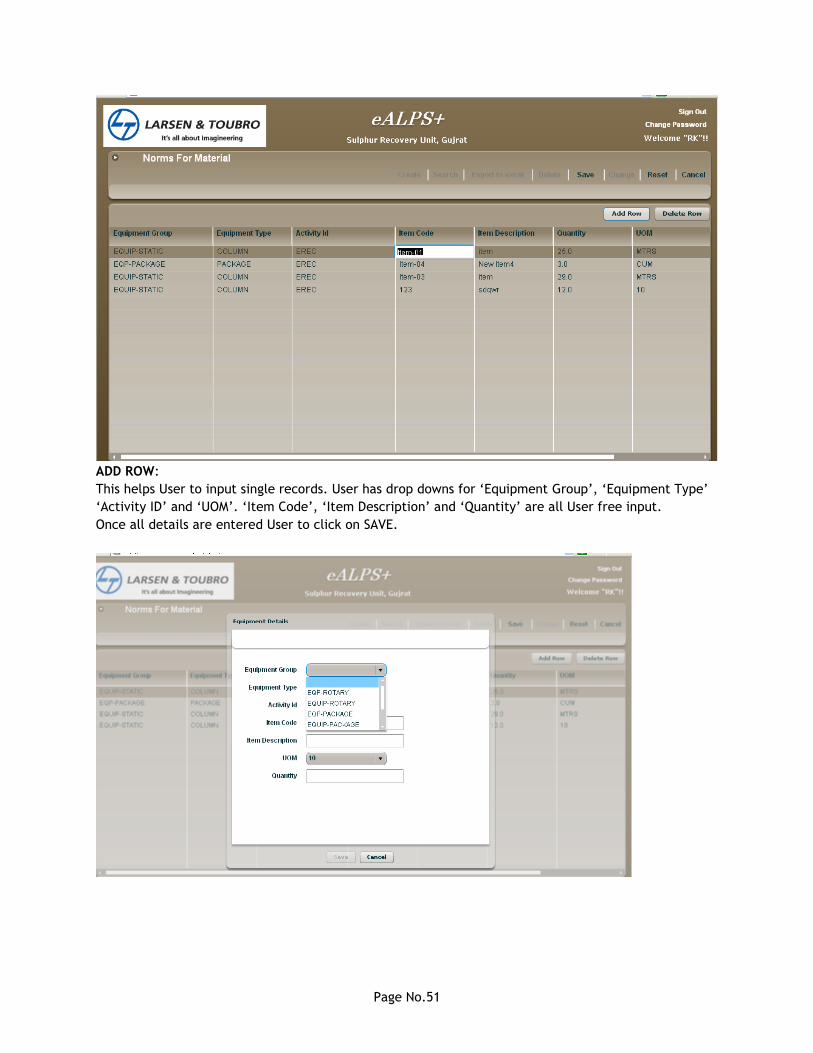
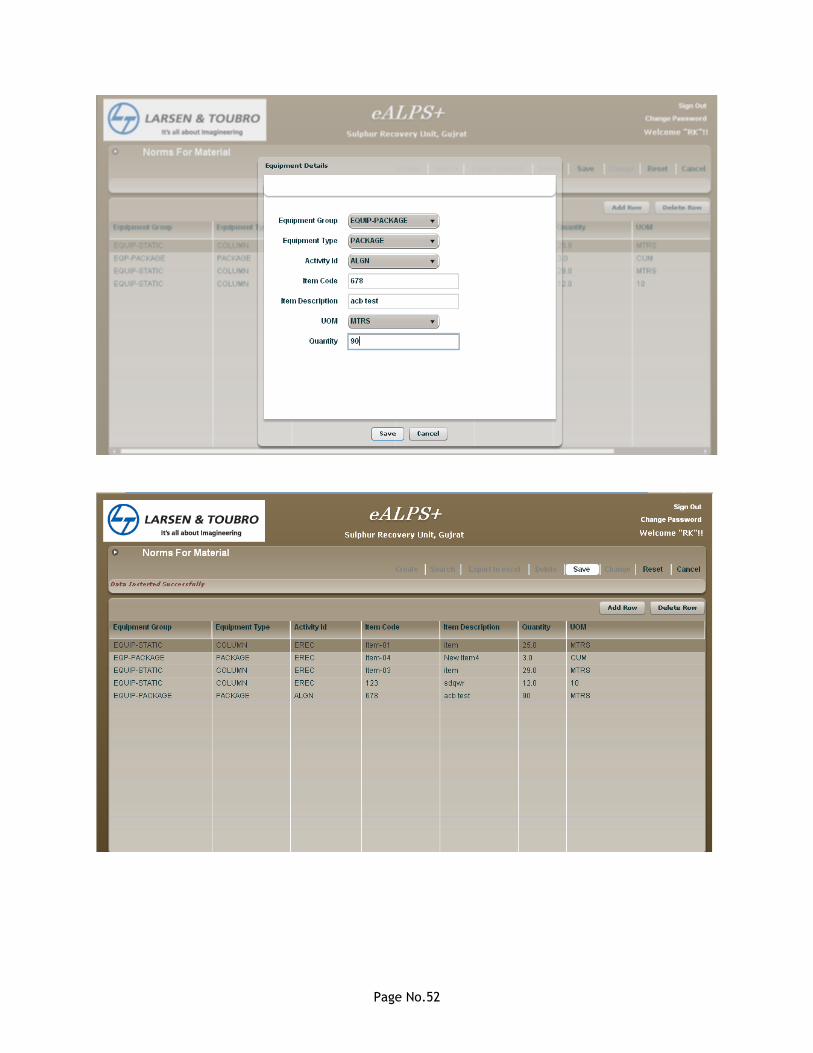
ADD ROW:
This helps User to input single records. User has drop downs for „Equipment Group‟, „Equipment Type‟
„Activity ID‟ and „UOM‟. „Item Code‟, „Item Description‟ and „Quantity‟ are all User free input.
Once all details are entered User to click on SAVE.
Page No.52
Page No.53
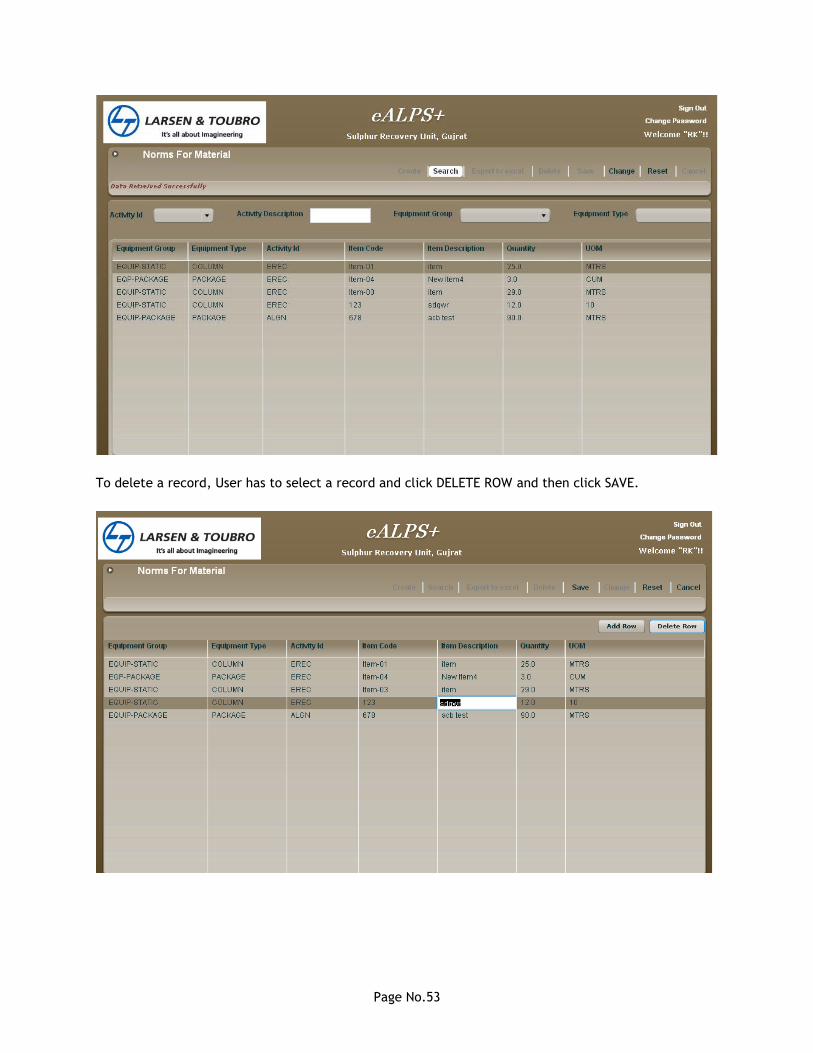
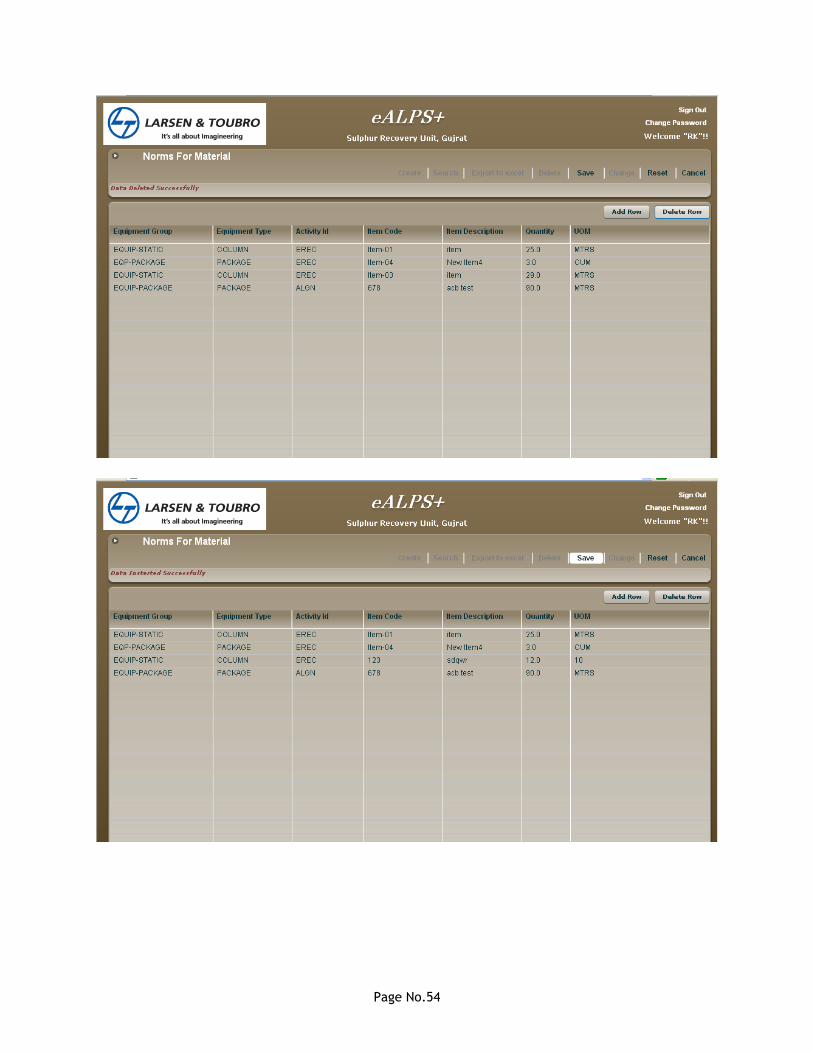
To delete a record, User has to select a record and click DELETE ROW and then click SAVE.
Page No.54
Page No.55
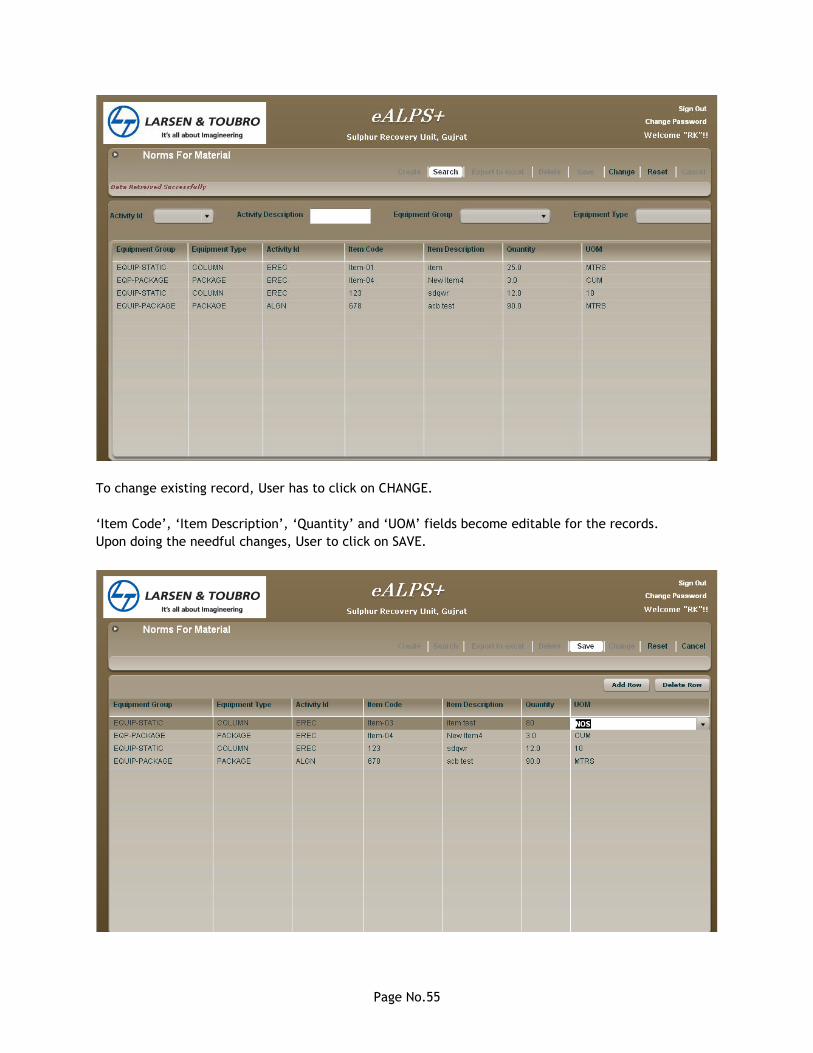
To change existing record, User has to click on CHANGE.
„Item Code‟, „Item Description‟, „Quantity‟ and „UOM‟ fields become editable for the records.
Upon doing the needful changes, User to click on SAVE.
Page No.56
Page No.57
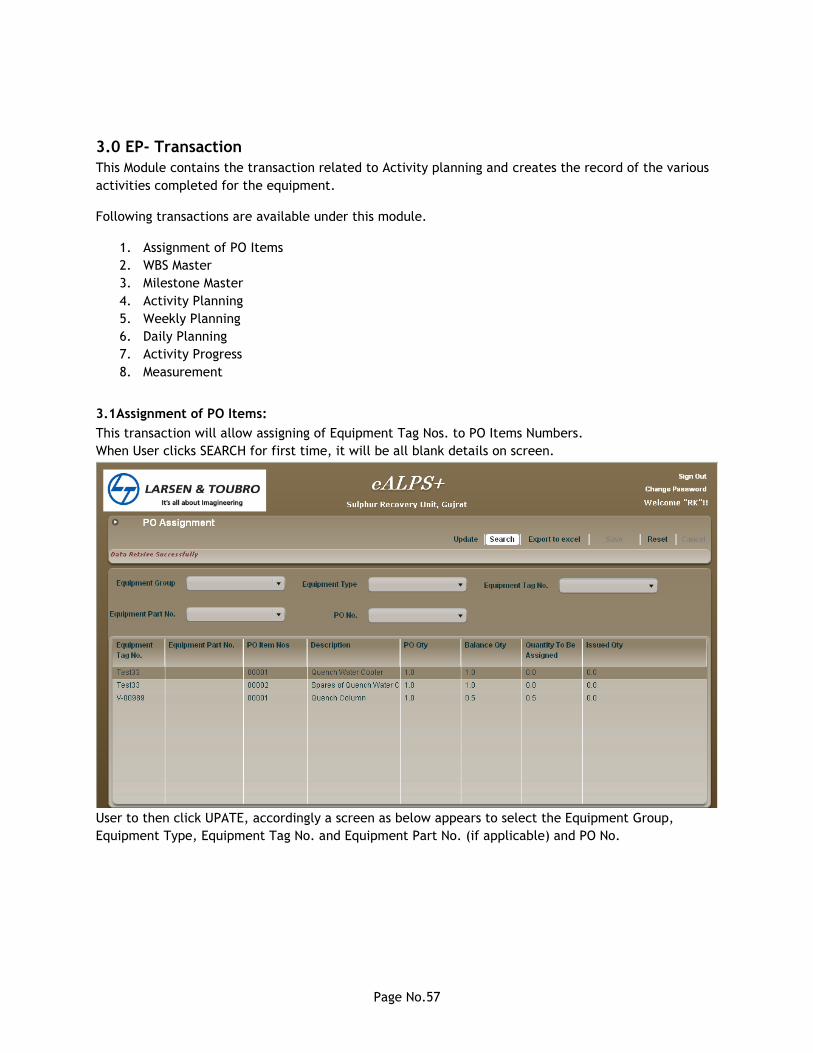
3.0 EP- Transaction
This Module contains the transaction related to Activity planning and creates the record of the various
activities completed for the equipment.
Following transactions are available under this module.
1. Assignment of PO Items
2. WBS Master
3. Milestone Master
4. Activity Planning
5. Weekly Planning
6. Daily Planning
7. Activity Progress
8. Measurement
3.1Assignment of PO Items:
This transaction will allow assigning of Equipment Tag Nos. to PO Items Numbers.
When User clicks SEARCH for first time, it will be all blank details on screen.
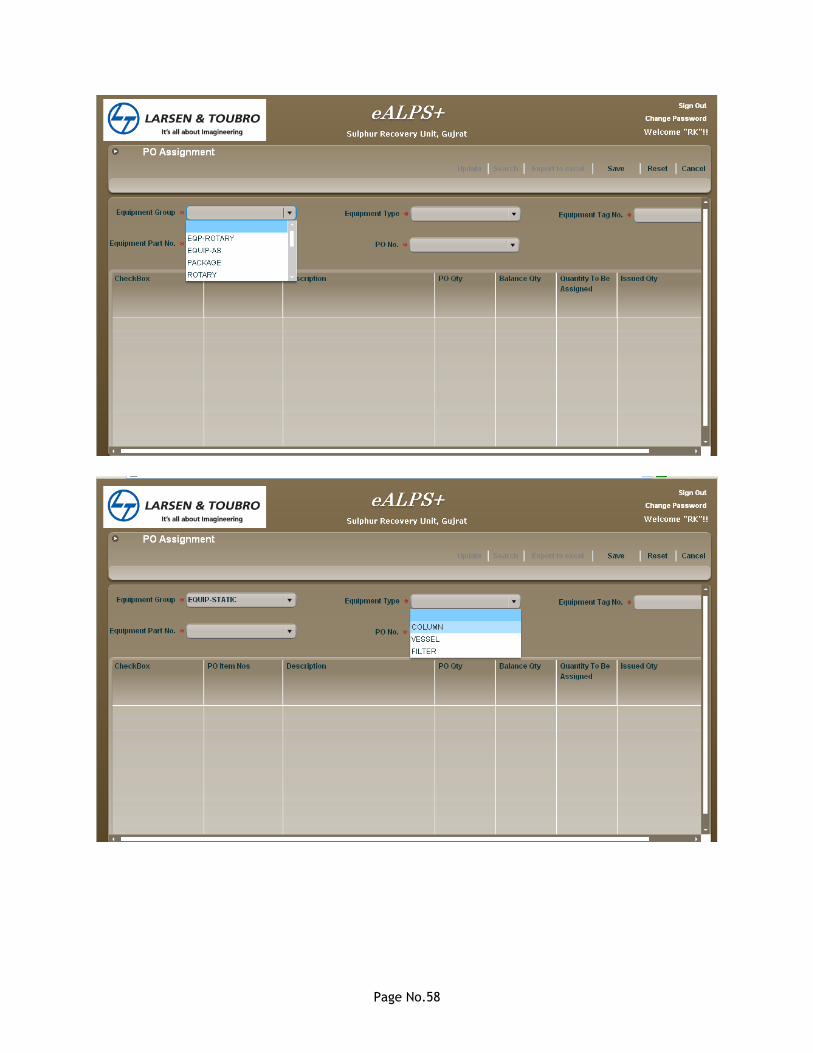
User to then click UPATE, accordingly a screen as below appears to select the Equipment Group,
Equipment Type, Equipment Tag No. and Equipment Part No. (if applicable) and PO No.
Page No.58
Page No.59
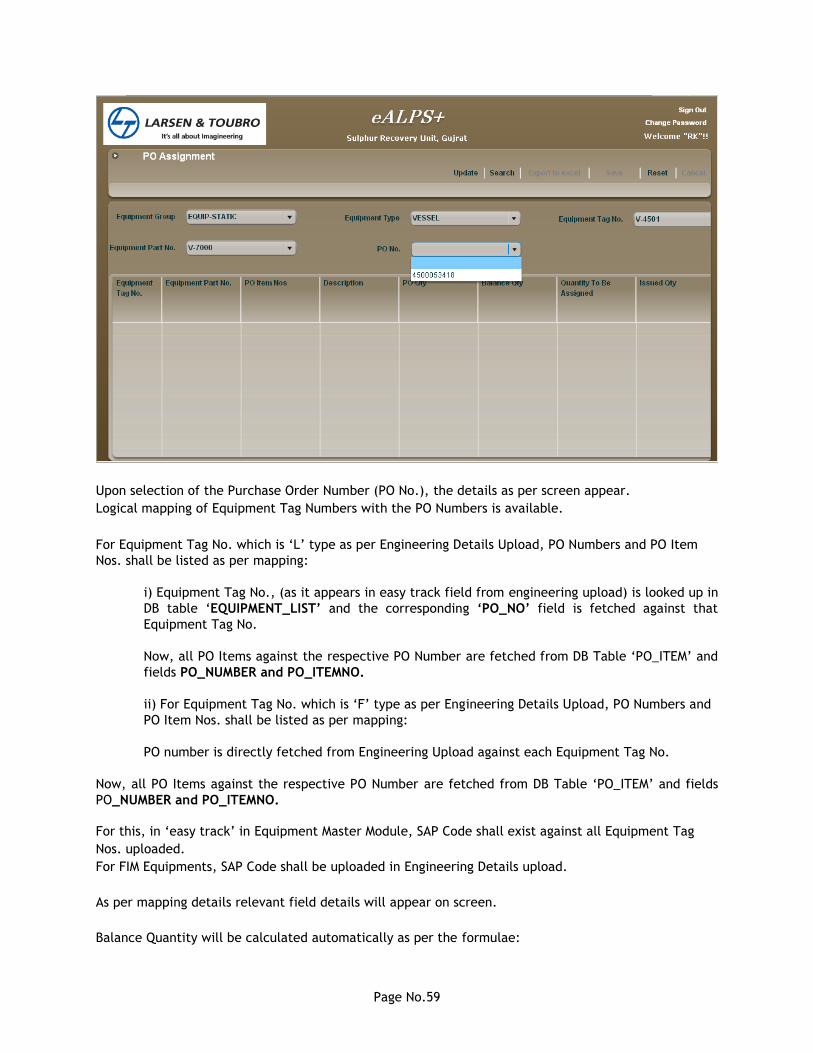
Upon selection of the Purchase Order Number (PO No.), the details as per screen appear.
Logical mapping of Equipment Tag Numbers with the PO Numbers is available.
For Equipment Tag No. which is „L‟ type as per Engineering Details Upload, PO Numbers and PO Item
Nos. shall be listed as per mapping:
i) Equipment Tag No., (as it appears in easy track field from engineering upload) is looked up in
DB table „EQUIPMENT_LIST’ and the corresponding ‘PO_NO’ field is fetched against that
Equipment Tag No.
Now, all PO Items against the respective PO Number are fetched from DB Table „PO_ITEM‟ and
fields PO_NUMBER and PO_ITEMNO.
ii) For Equipment Tag No. which is „F‟ type as per Engineering Details Upload, PO Numbers and
PO Item Nos. shall be listed as per mapping:
PO number is directly fetched from Engineering Upload against each Equipment Tag No.
Now, all PO Items against the respective PO Number are fetched from DB Table „PO_ITEM‟ and fields
PO_NUMBER and PO_ITEMNO.
For this, in „easy track‟ in Equipment Master Module, SAP Code shall exist against all Equipment Tag
Nos. uploaded.
For FIM Equipments, SAP Code shall be uploaded in Engineering Details upload.
As per mapping details relevant field details will appear on screen.
Balance Quantity will be calculated automatically as per the formulae:
Page No.60
Balance Quantity = PO Qty - Cumulative assigned Qty (PO Item Qty assigned to other Equipment Part
Nos.).
„Quantity‟ to be assigned‟ field is free User input. „Issued Qty‟ will be fetched from MIV.
Once User assigns Quantity, User to click SAVE. The details get saved and every time User clicks on
SEARCH, updated details appear.
Balance Quantity will be calculated each time and assignment of PO item is done.
By un-checking the Check boxes, earlier done assignments of PO will be un-assigned. Accordingly,
separate DELETE transaction is not required
3.2 WBS Master:
This transaction is used to create list of WBS for the project, assignment of Equipments to the
WBS and deciding the equipment predecessors.
Following options are available. A. Create & Save
B. Search & Export to Excel
C. Display
D. Change
E. Delete
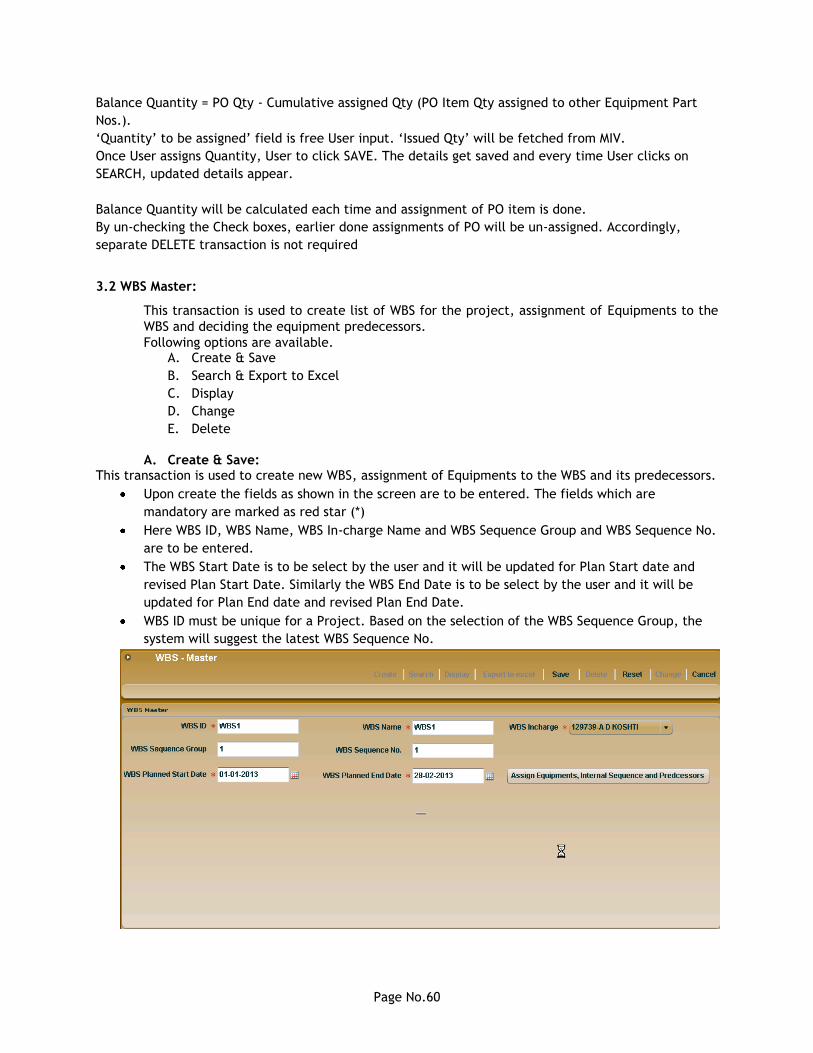
A. Create & Save: This transaction is used to create new WBS, assignment of Equipments to the WBS and its predecessors.
Upon create the fields as shown in the screen are to be entered. The fields which are
mandatory are marked as red star (*)
Here WBS ID, WBS Name, WBS In-charge Name and WBS Sequence Group and WBS Sequence No.
are to be entered.
The WBS Start Date is to be select by the user and it will be updated for Plan Start date and
revised Plan Start Date. Similarly the WBS End Date is to be select by the user and it will be
updated for Plan End date and revised Plan End Date.
WBS ID must be unique for a Project. Based on the selection of the WBS Sequence Group, the
system will suggest the latest WBS Sequence No.
Page No.61
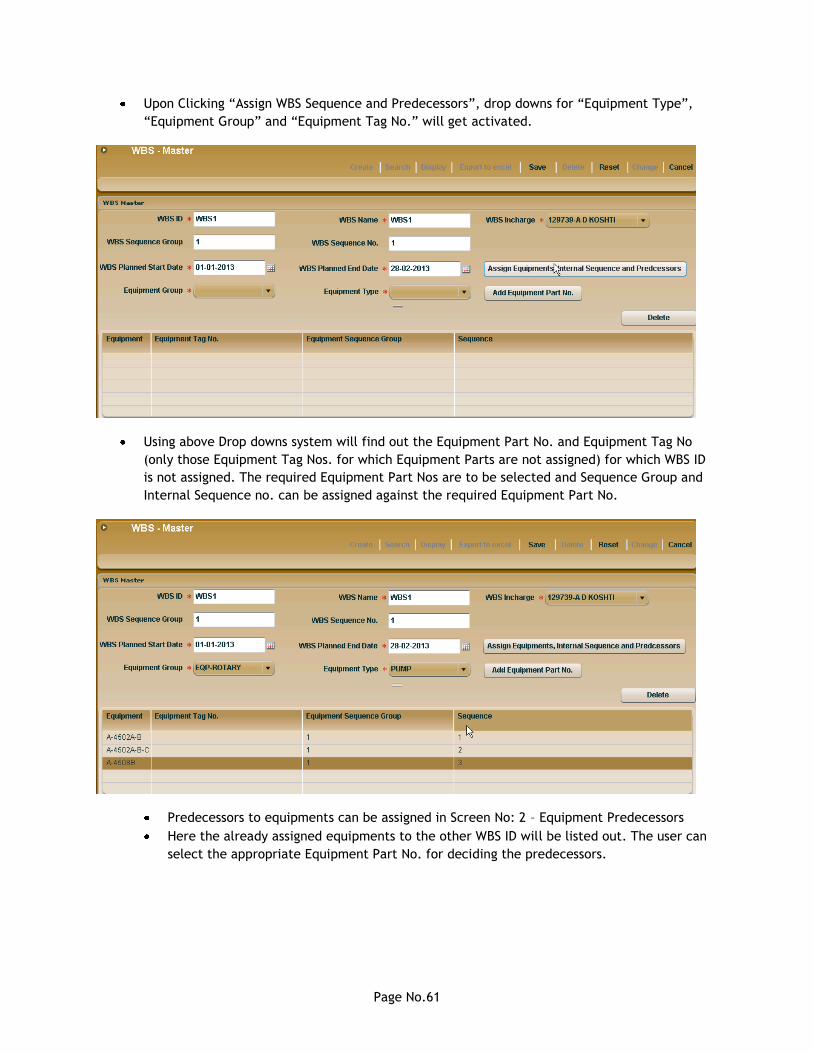
Upon Clicking “Assign WBS Sequence and Predecessors”, drop downs for “Equipment Type”,
“Equipment Group” and “Equipment Tag No.” will get activated.
Using above Drop downs system will find out the Equipment Part No. and Equipment Tag No
(only those Equipment Tag Nos. for which Equipment Parts are not assigned) for which WBS ID
is not assigned. The required Equipment Part Nos are to be selected and Sequence Group and
Internal Sequence no. can be assigned against the required Equipment Part No.
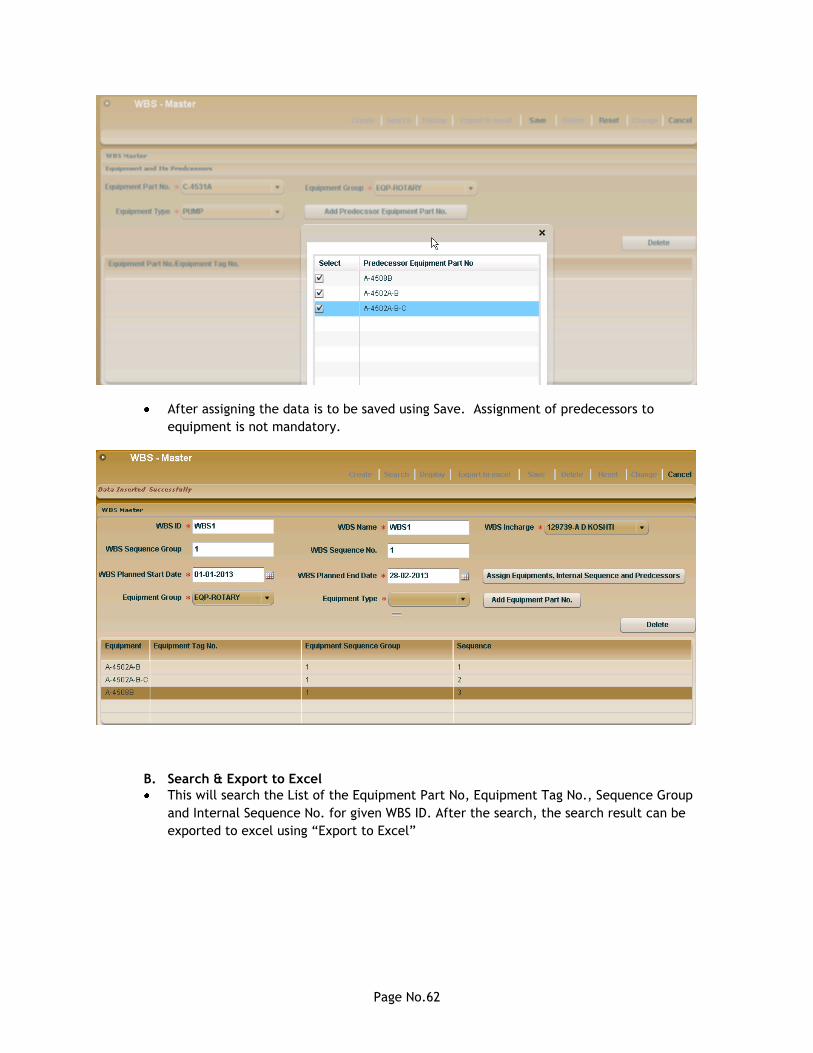
Predecessors to equipments can be assigned in Screen No: 2 – Equipment Predecessors
Here the already assigned equipments to the other WBS ID will be listed out. The user can
select the appropriate Equipment Part No. for deciding the predecessors.
Page No.62
After assigning the data is to be saved using Save. Assignment of predecessors to
equipment is not mandatory.
B. Search & Export to Excel
This will search the List of the Equipment Part No, Equipment Tag No., Sequence Group
and Internal Sequence No. for given WBS ID. After the search, the search result can be
exported to excel using “Export to Excel”
Page No.63
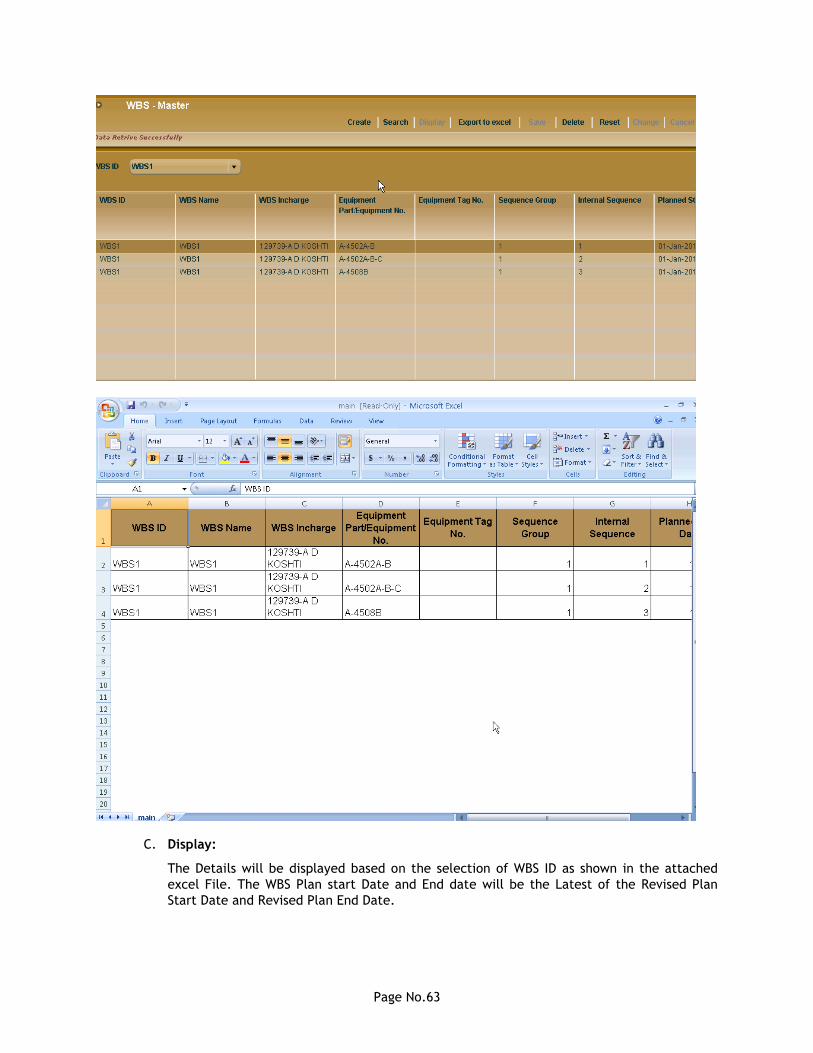
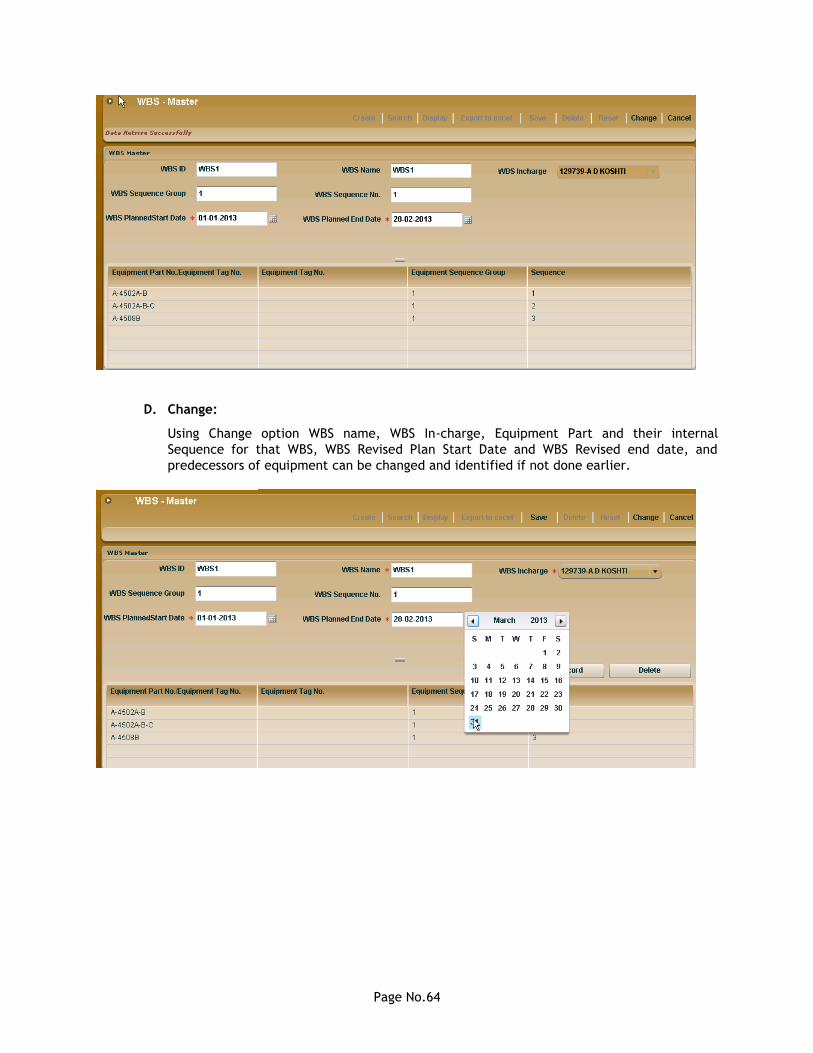
C. Display:
The Details will be displayed based on the selection of WBS ID as shown in the attached
excel File. The WBS Plan start Date and End date will be the Latest of the Revised Plan
Start Date and Revised Plan End Date.
Page No.64
D. Change:
Using Change option WBS name, WBS In-charge, Equipment Part and their internal
Sequence for that WBS, WBS Revised Plan Start Date and WBS Revised end date, and
predecessors of equipment can be changed and identified if not done earlier.
Page No.65
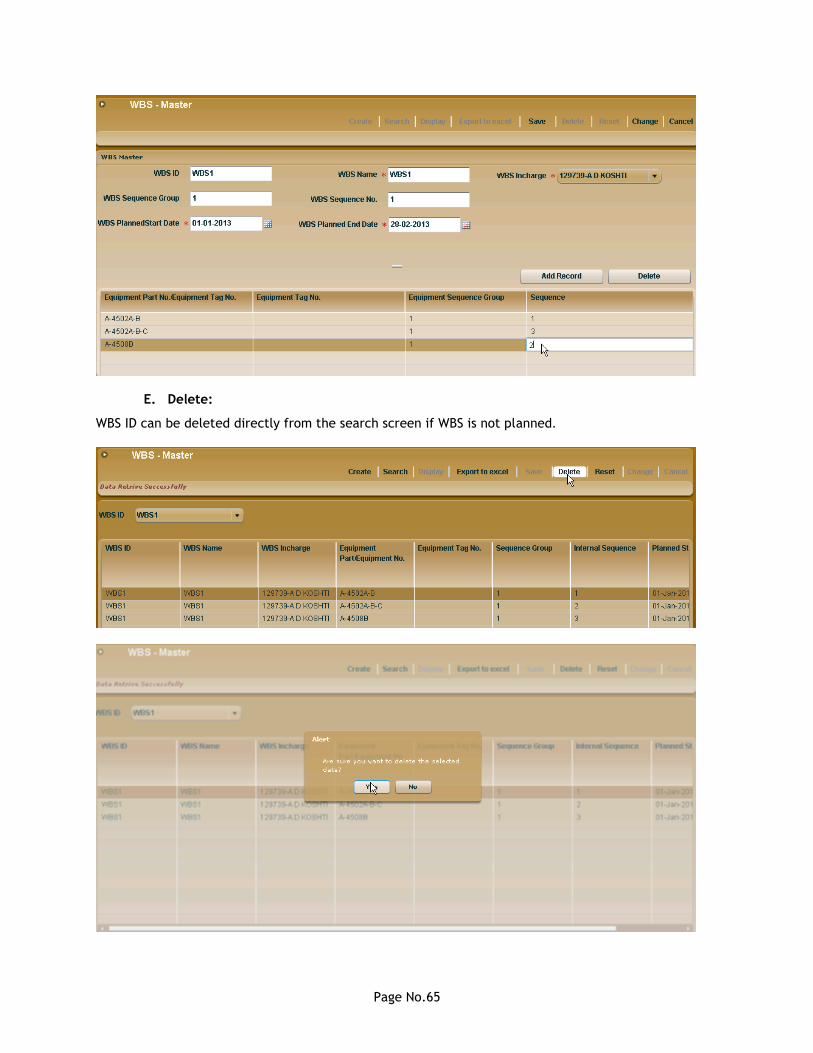
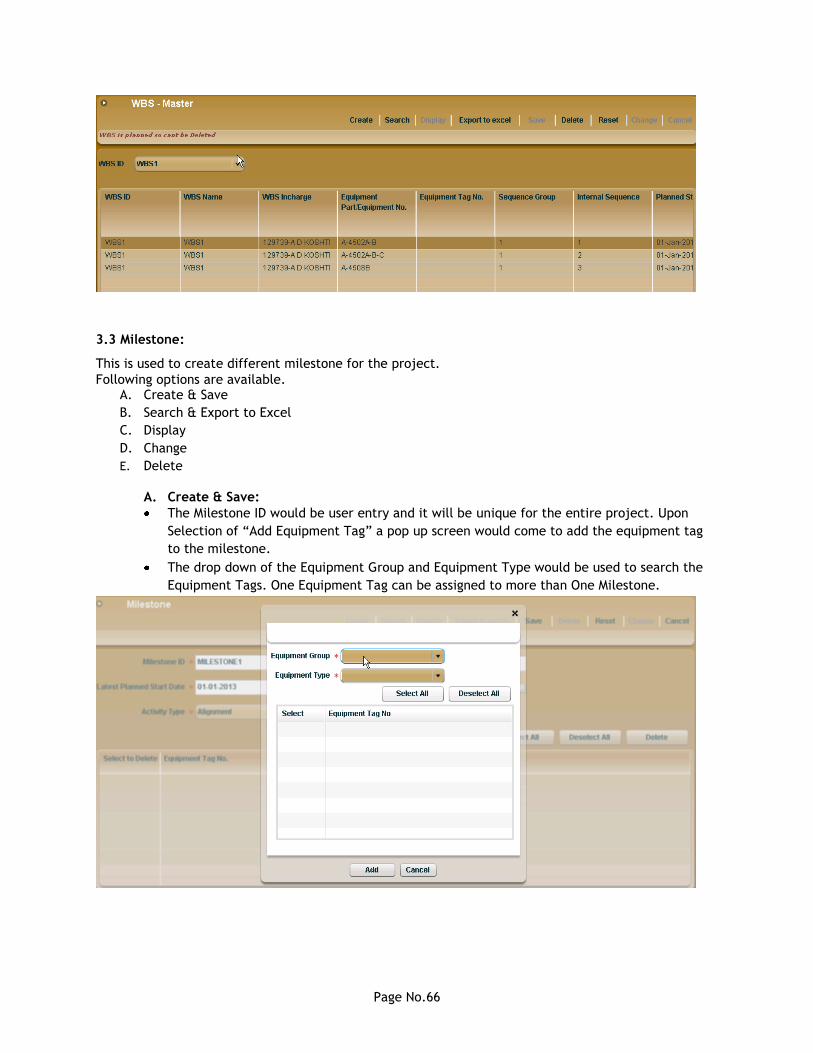
E. Delete:
WBS ID can be deleted directly from the search screen if WBS is not planned.
Page No.66
3.3 Milestone:
This is used to create different milestone for the project.
Following options are available. A. Create & Save
B. Search & Export to Excel
C. Display
D. Change
E. Delete
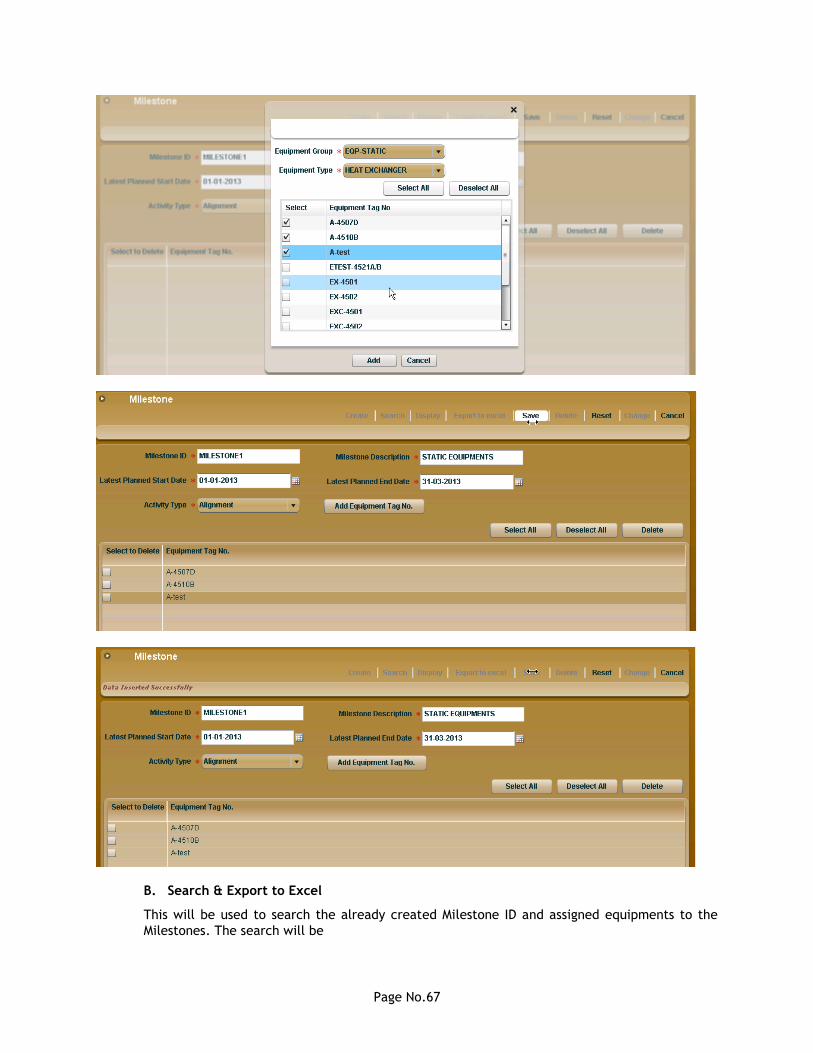
A. Create & Save:
The Milestone ID would be user entry and it will be unique for the entire project. Upon
Selection of “Add Equipment Tag” a pop up screen would come to add the equipment tag
to the milestone.
The drop down of the Equipment Group and Equipment Type would be used to search the
Equipment Tags. One Equipment Tag can be assigned to more than One Milestone.
Page No.67
B. Search & Export to Excel
This will be used to search the already created Milestone ID and assigned equipments to the
Milestones. The search will be
Page No.68
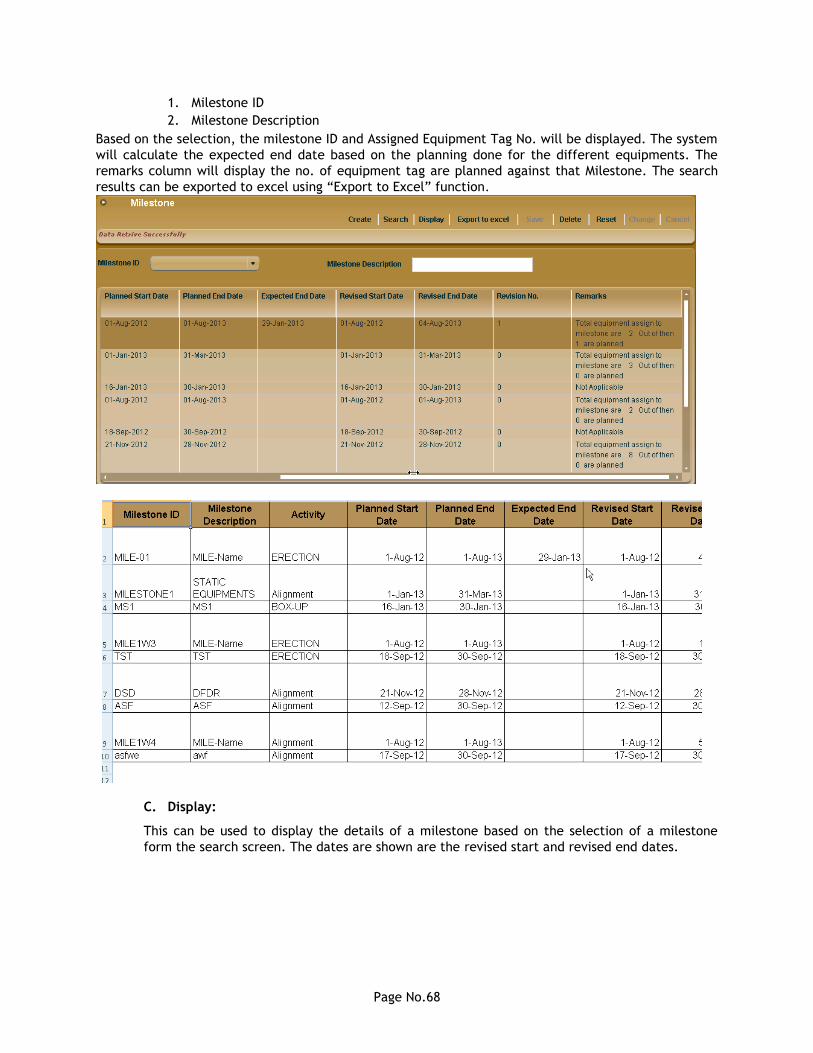
1. Milestone ID
2. Milestone Description
Based on the selection, the milestone ID and Assigned Equipment Tag No. will be displayed. The system
will calculate the expected end date based on the planning done for the different equipments. The
remarks column will display the no. of equipment tag are planned against that Milestone. The search
results can be exported to excel using “Export to Excel” function.
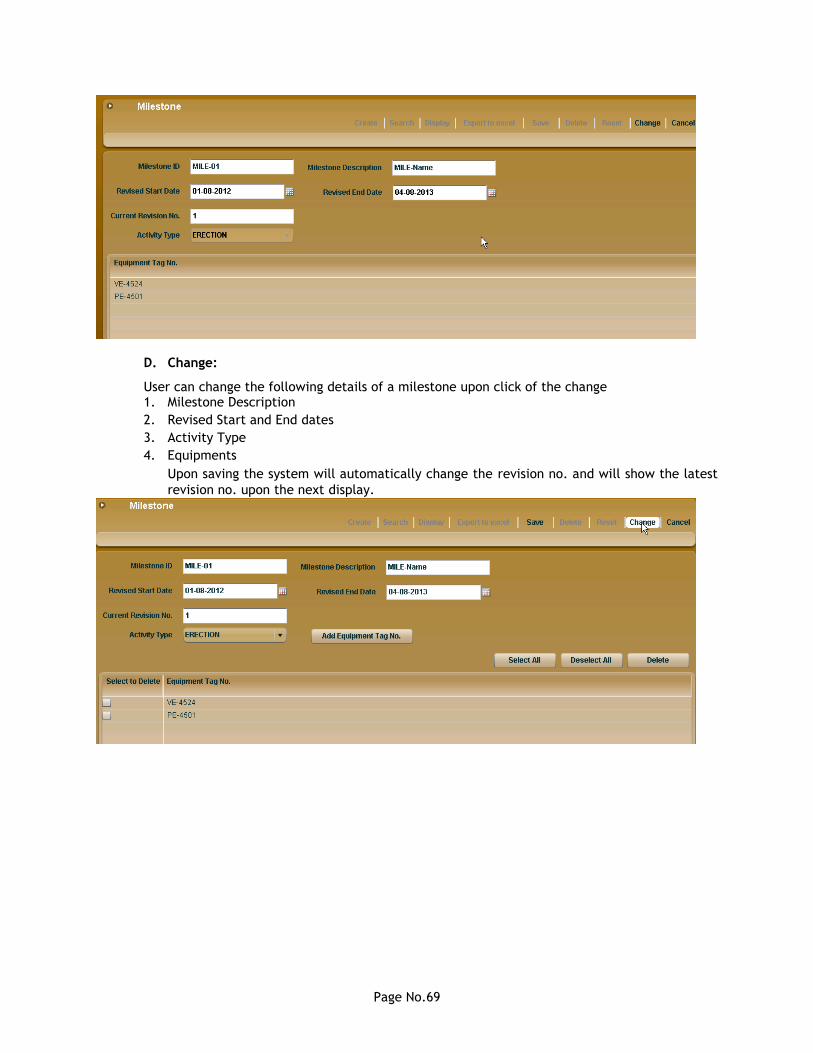
C. Display:
This can be used to display the details of a milestone based on the selection of a milestone
form the search screen. The dates are shown are the revised start and revised end dates.
Page No.69
D. Change:
User can change the following details of a milestone upon click of the change 1. Milestone Description
2. Revised Start and End dates
3. Activity Type
4. Equipments
Upon saving the system will automatically change the revision no. and will show the latest
revision no. upon the next display.

Page No.70

Page No.71
E. Delete:
This will be used to delete the already created milestones. Upon deletion of a milestone, the
equipments assigned to the milestones will also get un- assigned.
3.4 QS Code:
This will be used to quantify the work done and payment to be received from the customer and
payment to be done to the contractor. Following options are available A. Create & Save
B. Search & Export To Excel
C. Display
D. Change
E. Delete
Page No.72
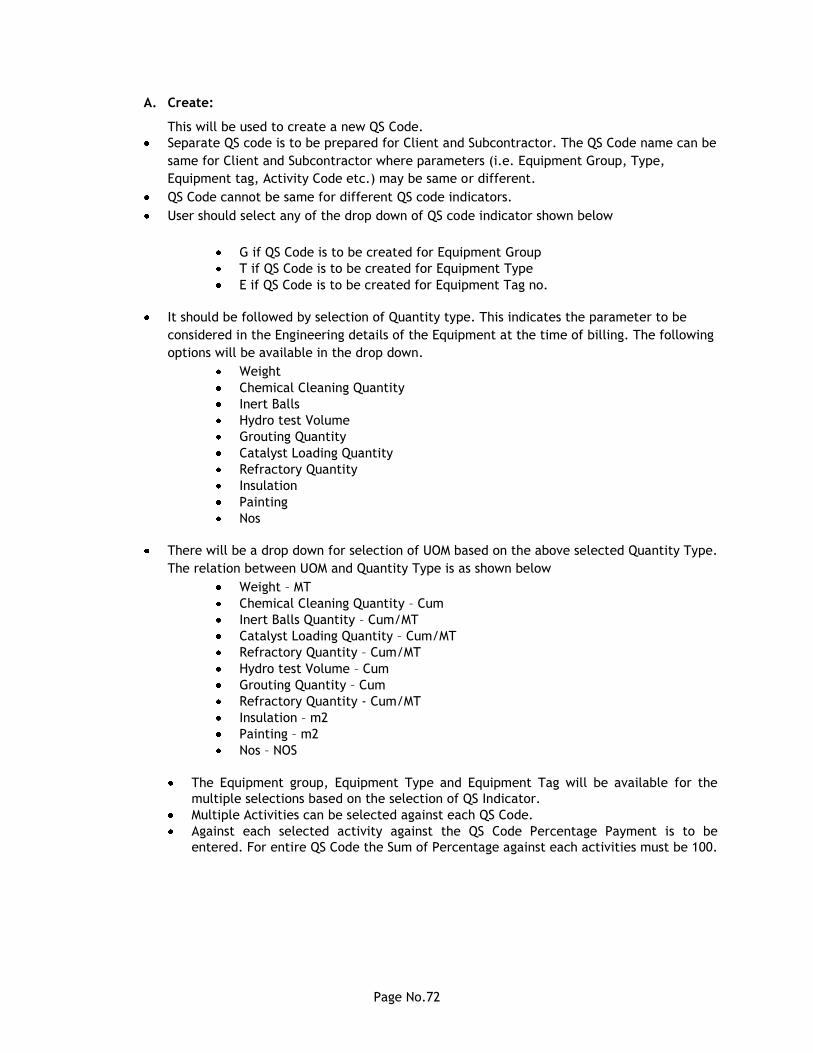
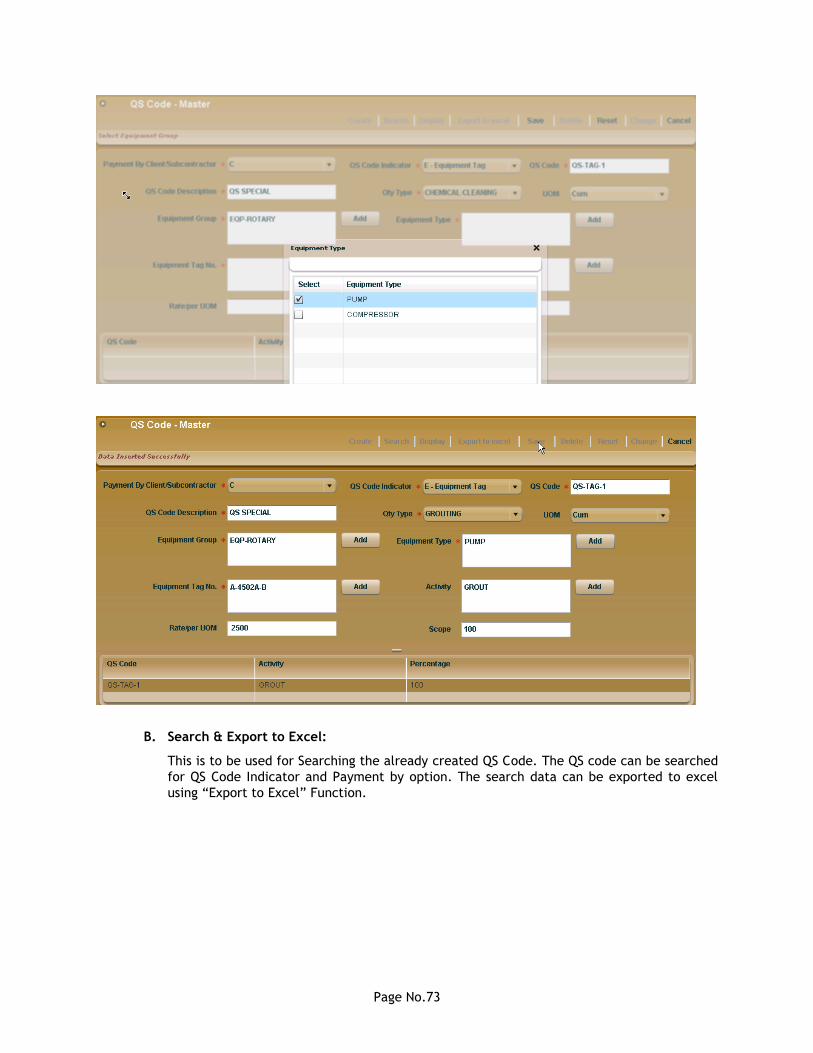
A. Create:
This will be used to create a new QS Code.
Separate QS code is to be prepared for Client and Subcontractor. The QS Code name can be
same for Client and Subcontractor where parameters (i.e. Equipment Group, Type,
Equipment tag, Activity Code etc.) may be same or different.
QS Code cannot be same for different QS code indicators.
User should select any of the drop down of QS code indicator shown below
G if QS Code is to be created for Equipment Group
T if QS Code is to be created for Equipment Type
E if QS Code is to be created for Equipment Tag no.
It should be followed by selection of Quantity type. This indicates the parameter to be
considered in the Engineering details of the Equipment at the time of billing. The following
options will be available in the drop down.
Weight
Chemical Cleaning Quantity
Inert Balls
Hydro test Volume
Grouting Quantity
Catalyst Loading Quantity
Refractory Quantity
Insulation
Painting
Nos
There will be a drop down for selection of UOM based on the above selected Quantity Type.
The relation between UOM and Quantity Type is as shown below
Weight – MT
Chemical Cleaning Quantity – Cum
Inert Balls Quantity – Cum/MT
Catalyst Loading Quantity – Cum/MT
Refractory Quantity – Cum/MT
Hydro test Volume – Cum
Grouting Quantity – Cum
Refractory Quantity - Cum/MT
Insulation – m2
Painting – m2
Nos – NOS
The Equipment group, Equipment Type and Equipment Tag will be available for the
multiple selections based on the selection of QS Indicator.
Multiple Activities can be selected against each QS Code.
Against each selected activity against the QS Code Percentage Payment is to be
entered. For entire QS Code the Sum of Percentage against each activities must be 100.
Page No.73
B. Search & Export to Excel:
This is to be used for Searching the already created QS Code. The QS code can be searched
for QS Code Indicator and Payment by option. The search data can be exported to excel
using “Export to Excel” Function.
Page No.74
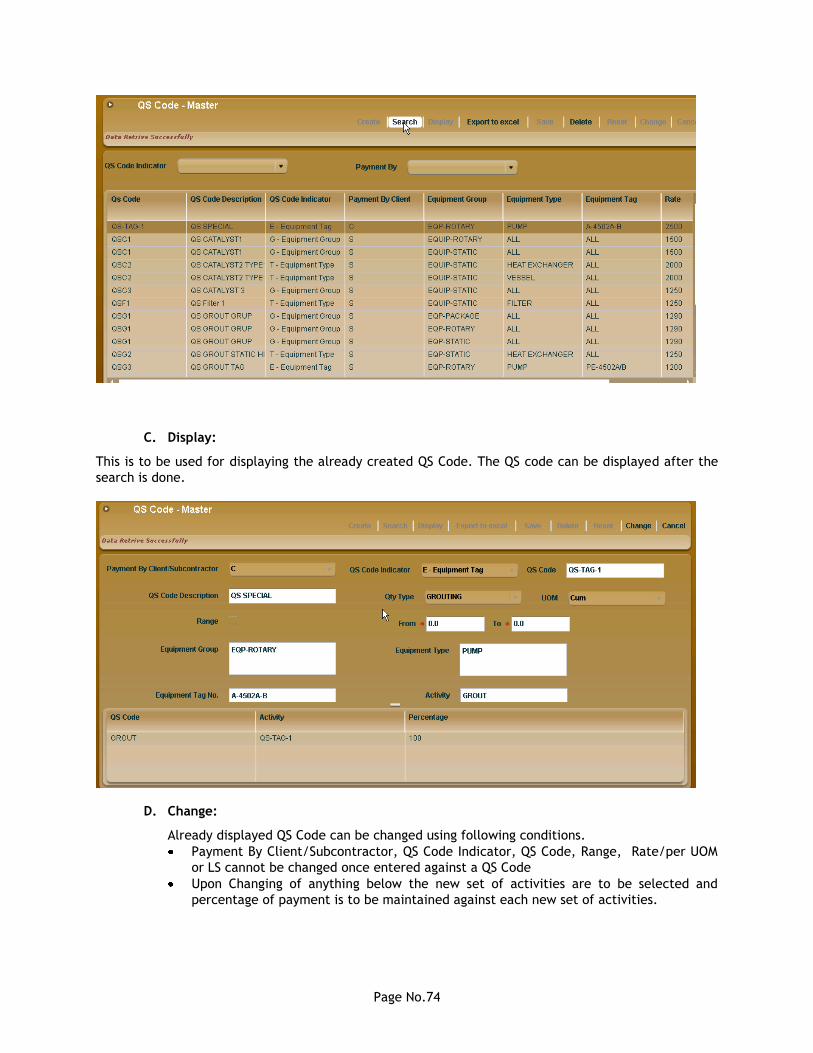
C. Display:
This is to be used for displaying the already created QS Code. The QS code can be displayed after the
search is done.
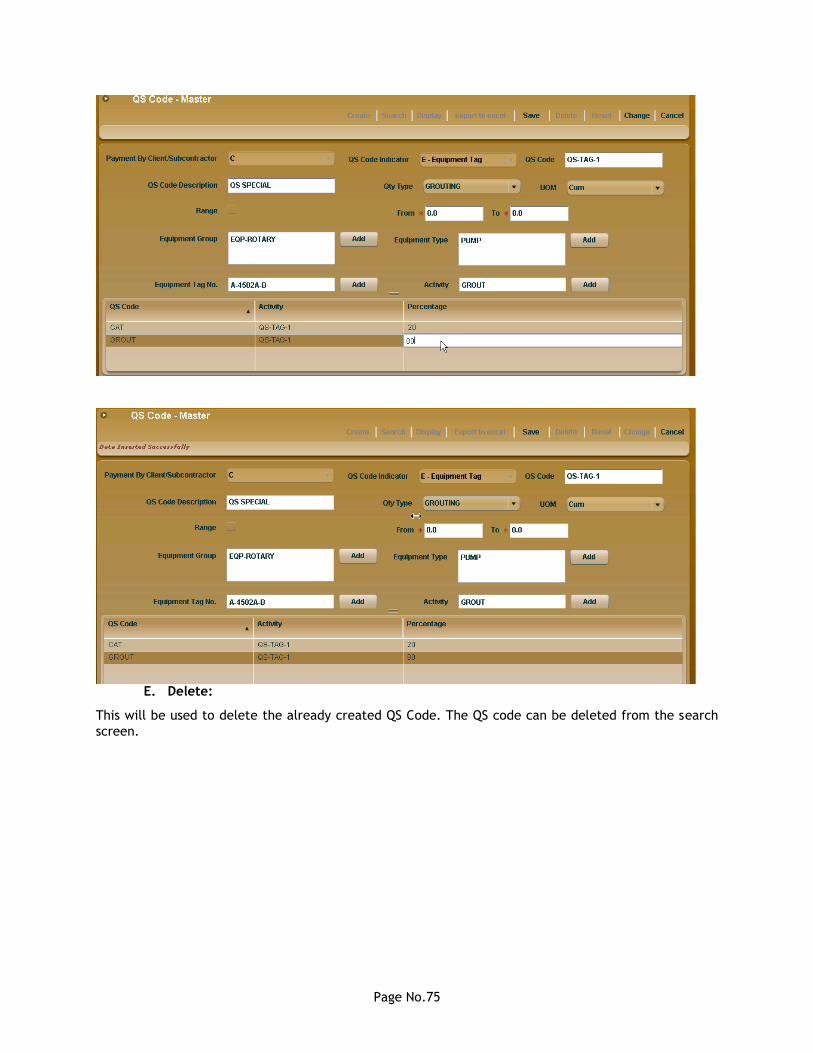
D. Change:
Already displayed QS Code can be changed using following conditions.
Payment By Client/Subcontractor, QS Code Indicator, QS Code, Range, Rate/per UOM
or LS cannot be changed once entered against a QS Code
Upon Changing of anything below the new set of activities are to be selected and
percentage of payment is to be maintained against each new set of activities.
Page No.75
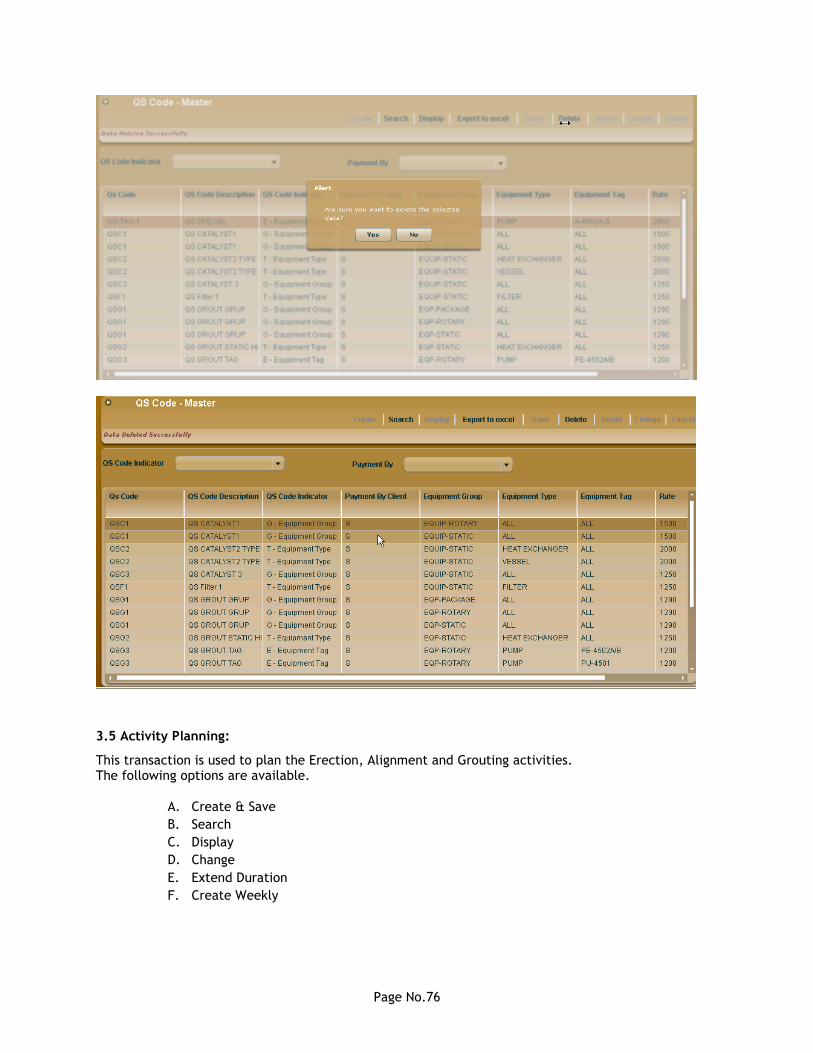
E. Delete:
This will be used to delete the already created QS Code. The QS code can be deleted from the search
screen.
Page No.76
3.5 Activity Planning:
This transaction is used to plan the Erection, Alignment and Grouting activities. The following options are available.
A. Create & Save
B. Search
C. Display
D. Change
E. Extend Duration
F. Create Weekly
Page No.77
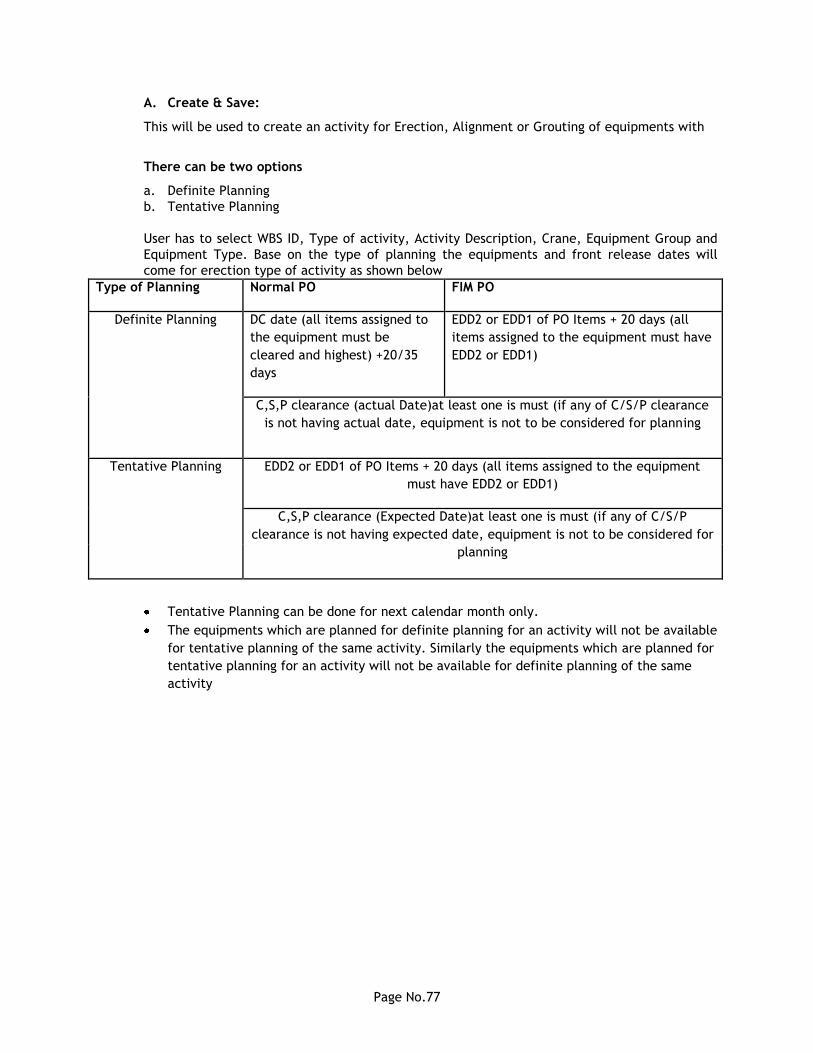
A. Create & Save:
This will be used to create an activity for Erection, Alignment or Grouting of equipments with
There can be two options
a. Definite Planning
b. Tentative Planning
User has to select WBS ID, Type of activity, Activity Description, Crane, Equipment Group and
Equipment Type. Base on the type of planning the equipments and front release dates will
come for erection type of activity as shown below
Type of Planning Normal PO FIM PO
Definite Planning DC date (all items assigned to
the equipment must be
cleared and highest) +20/35
days
EDD2 or EDD1 of PO Items + 20 days (all
items assigned to the equipment must have
EDD2 or EDD1)
C,S,P clearance (actual Date)at least one is must (if any of C/S/P clearance
is not having actual date, equipment is not to be considered for planning
Tentative Planning EDD2 or EDD1 of PO Items + 20 days (all items assigned to the equipment
must have EDD2 or EDD1)
C,S,P clearance (Expected Date)at least one is must (if any of C/S/P
clearance is not having expected date, equipment is not to be considered for
planning
Tentative Planning can be done for next calendar month only.
The equipments which are planned for definite planning for an activity will not be available
for tentative planning of the same activity. Similarly the equipments which are planned for
tentative planning for an activity will not be available for definite planning of the same
activity
Page No.78
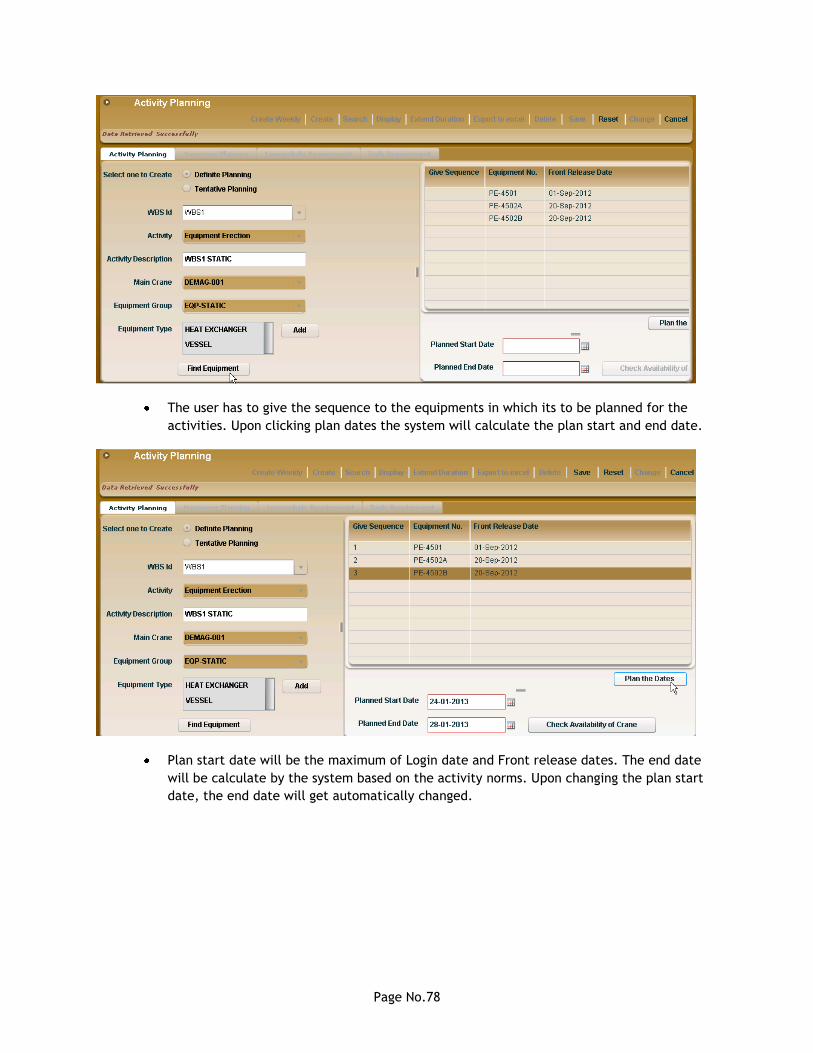
The user has to give the sequence to the equipments in which its to be planned for the
activities. Upon clicking plan dates the system will calculate the plan start and end date.
Plan start date will be the maximum of Login date and Front release dates. The end date
will be calculate by the system based on the activity norms. Upon changing the plan start
date, the end date will get automatically changed.
Page No.79
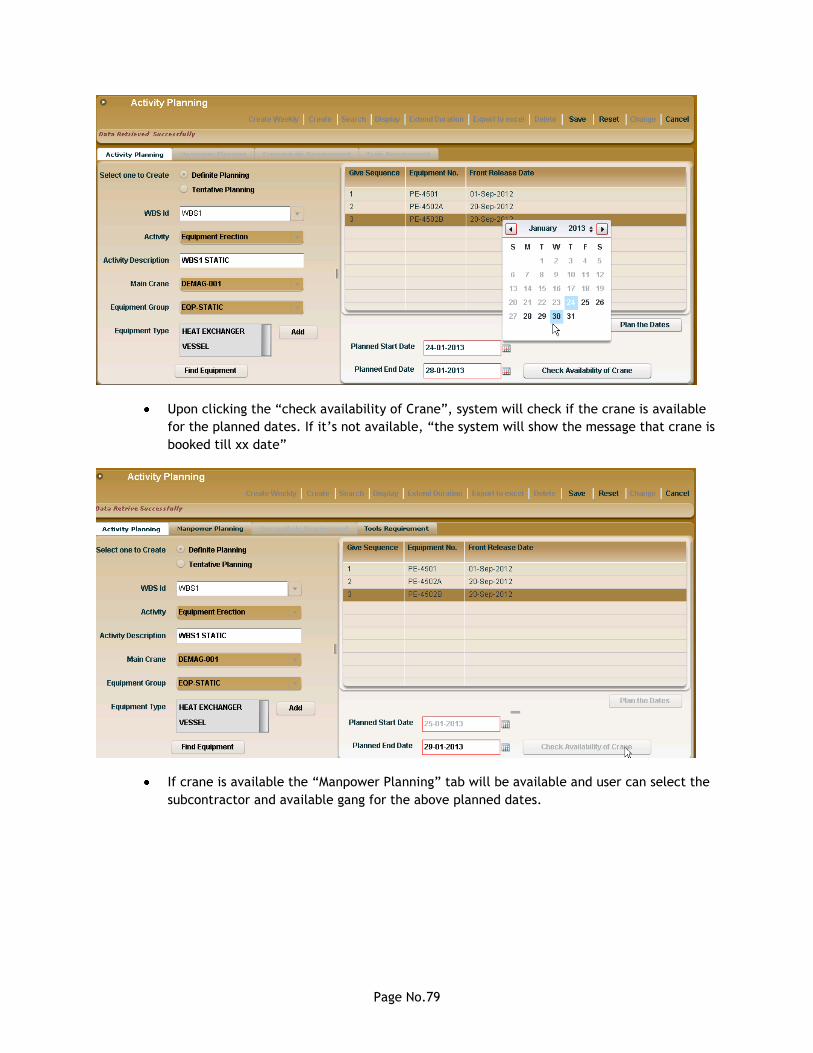
Upon clicking the “check availability of Crane”, system will check if the crane is available
for the planned dates. If it‟s not available, “the system will show the message that crane is
booked till xx date”
If crane is available the “Manpower Planning” tab will be available and user can select the
subcontractor and available gang for the above planned dates.
Page No.80
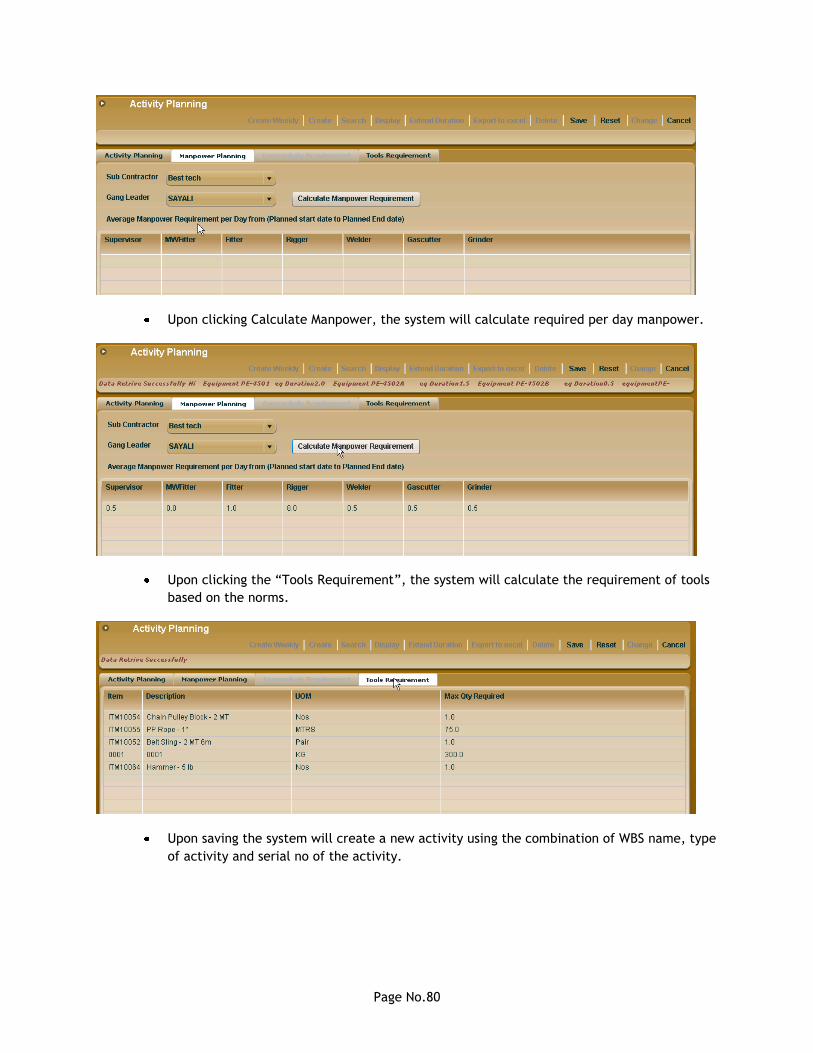
Upon clicking Calculate Manpower, the system will calculate required per day manpower.
Upon clicking the “Tools Requirement”, the system will calculate the requirement of tools
based on the norms.
Upon saving the system will create a new activity using the combination of WBS name, type
of activity and serial no of the activity.

Page No.81
Similarly alignment activity can be planned once the erection activities of the equipments
are planned. And Grouting activities can be planned once the Alignment activities are
planned.
B. Search:
This will be used to search the already created plans. There are two options 1. All activities
2. Pending and Current week activities.
Based on the selection of the above option the system will show the related data of the
selected WBS.
Page No.82
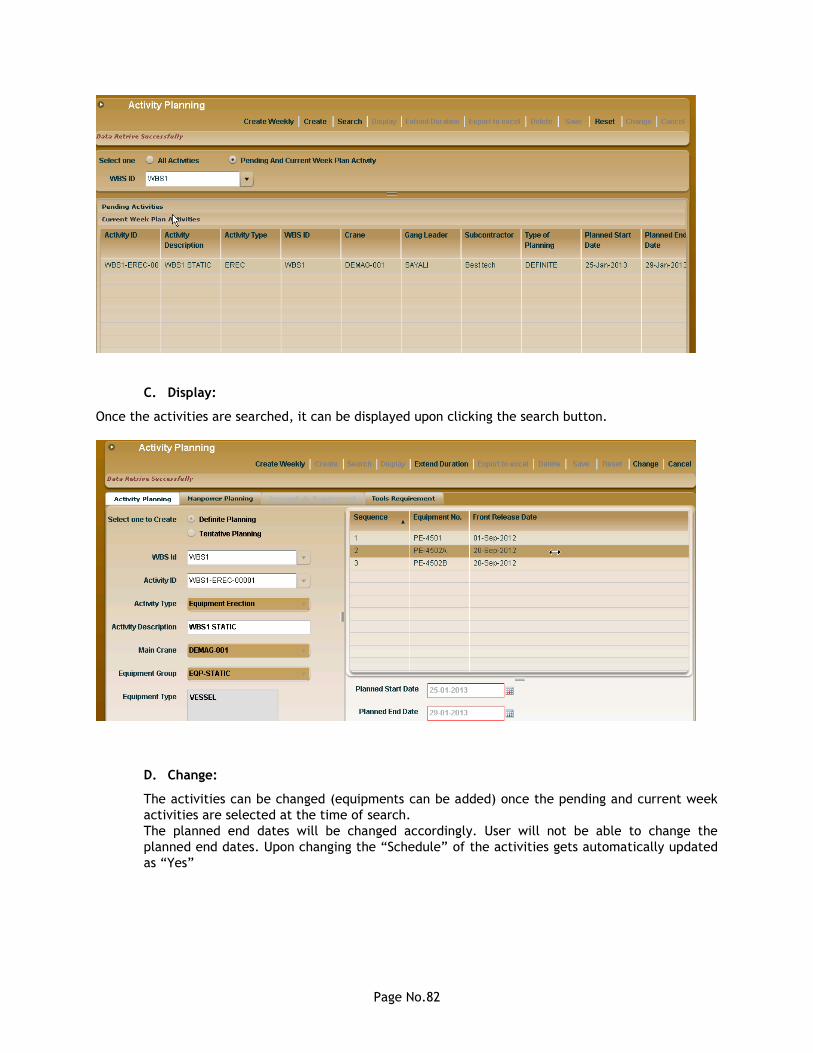
C. Display:
Once the activities are searched, it can be displayed upon clicking the search button.
D. Change:
The activities can be changed (equipments can be added) once the pending and current week
activities are selected at the time of search.
The planned end dates will be changed accordingly. User will not be able to change the
planned end dates. Upon changing the “Schedule” of the activities gets automatically updated
as “Yes”
Page No.83
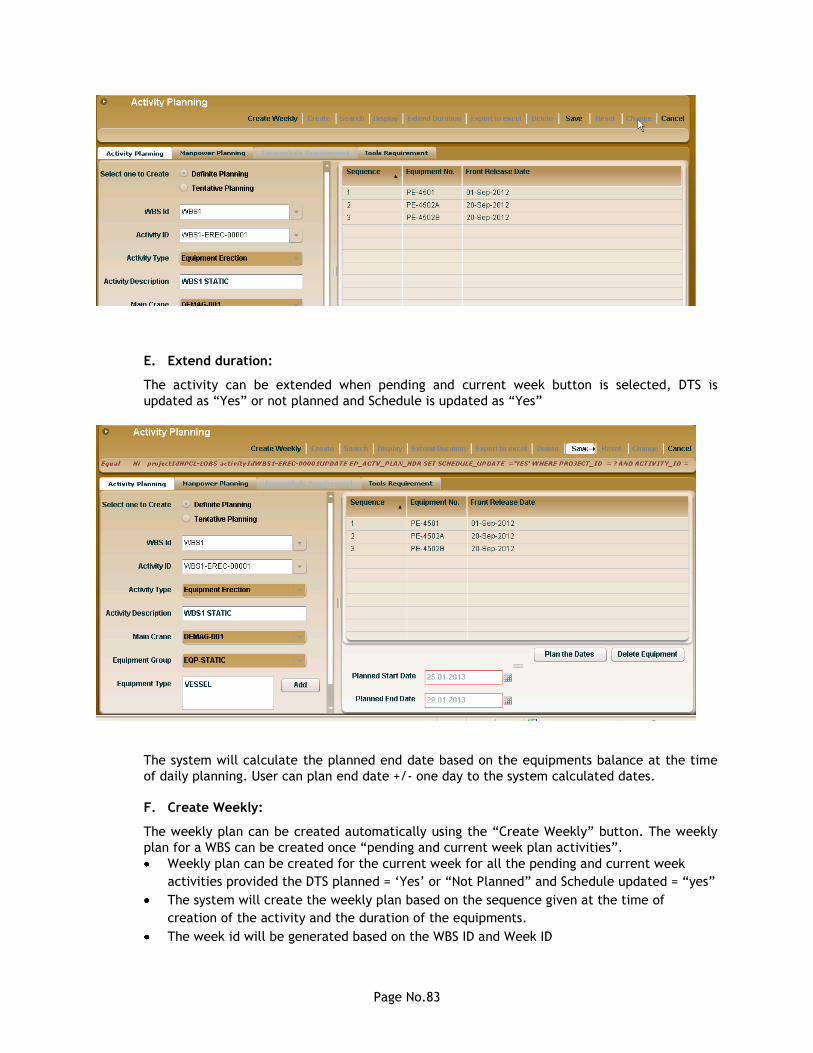
E. Extend duration:
The activity can be extended when pending and current week button is selected, DTS is
updated as “Yes” or not planned and Schedule is updated as “Yes”
The system will calculate the planned end date based on the equipments balance at the time
of daily planning. User can plan end date +/- one day to the system calculated dates.
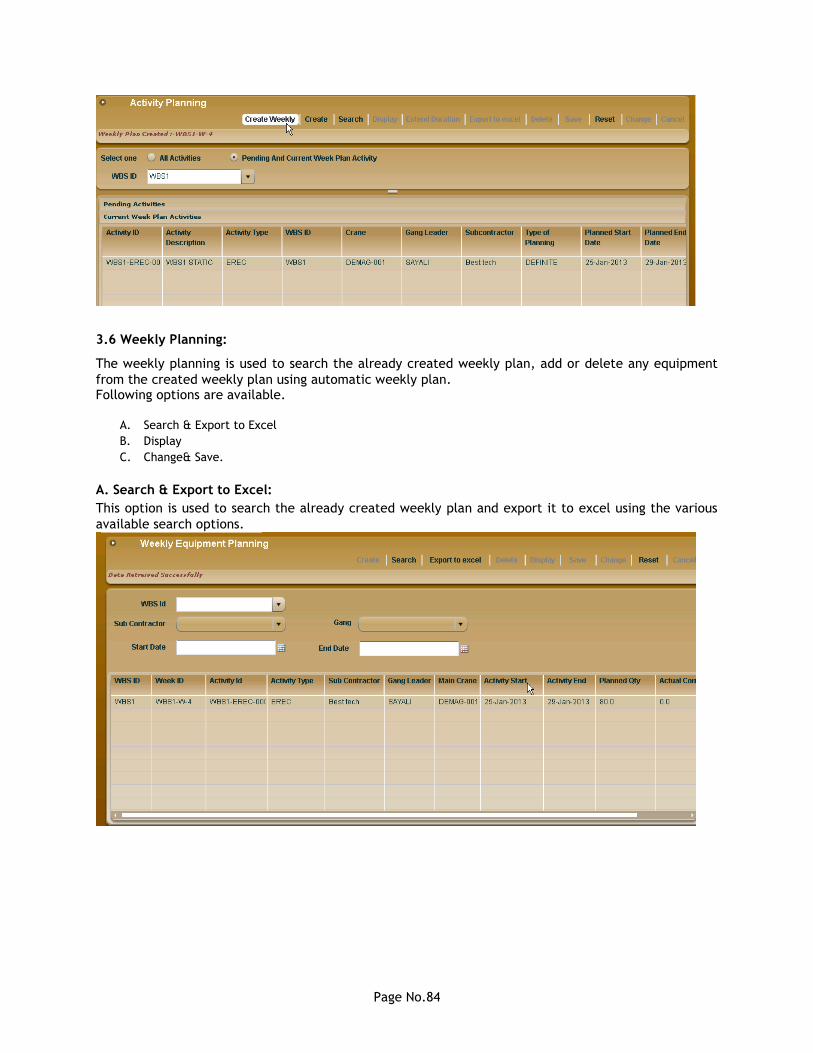
F. Create Weekly:
The weekly plan can be created automatically using the “Create Weekly” button. The weekly
plan for a WBS can be created once “pending and current week plan activities”.
Weekly plan can be created for the current week for all the pending and current week
activities provided the DTS planned = „Yes‟ or “Not Planned” and Schedule updated = “yes”
The system will create the weekly plan based on the sequence given at the time of
creation of the activity and the duration of the equipments.
The week id will be generated based on the WBS ID and Week ID
Page No.84
3.6 Weekly Planning:
The weekly planning is used to search the already created weekly plan, add or delete any equipment
from the created weekly plan using automatic weekly plan. Following options are available.
A. Search & Export to Excel
B. Display
C. Change& Save.
A. Search & Export to Excel:
This option is used to search the already created weekly plan and export it to excel using the various
available search options.
Page No.85
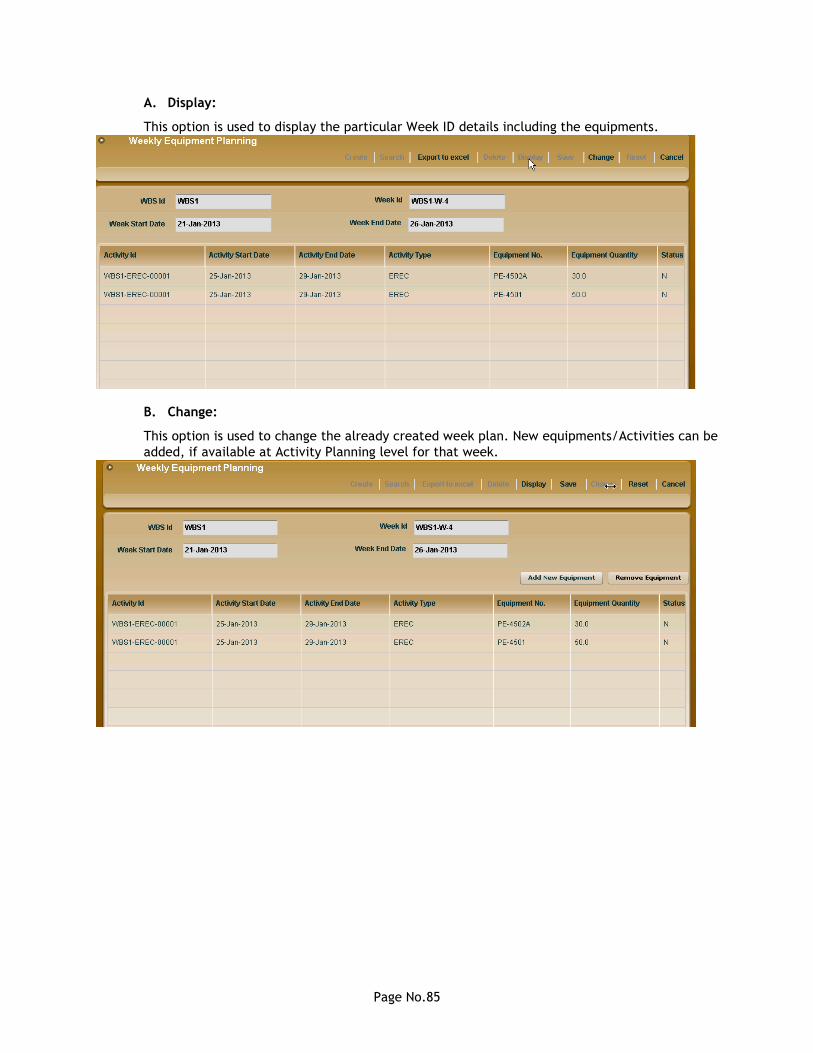
A. Display:
This option is used to display the particular Week ID details including the equipments.
B. Change:
This option is used to change the already created week plan. New equipments/Activities can be
added, if available at Activity Planning level for that week.
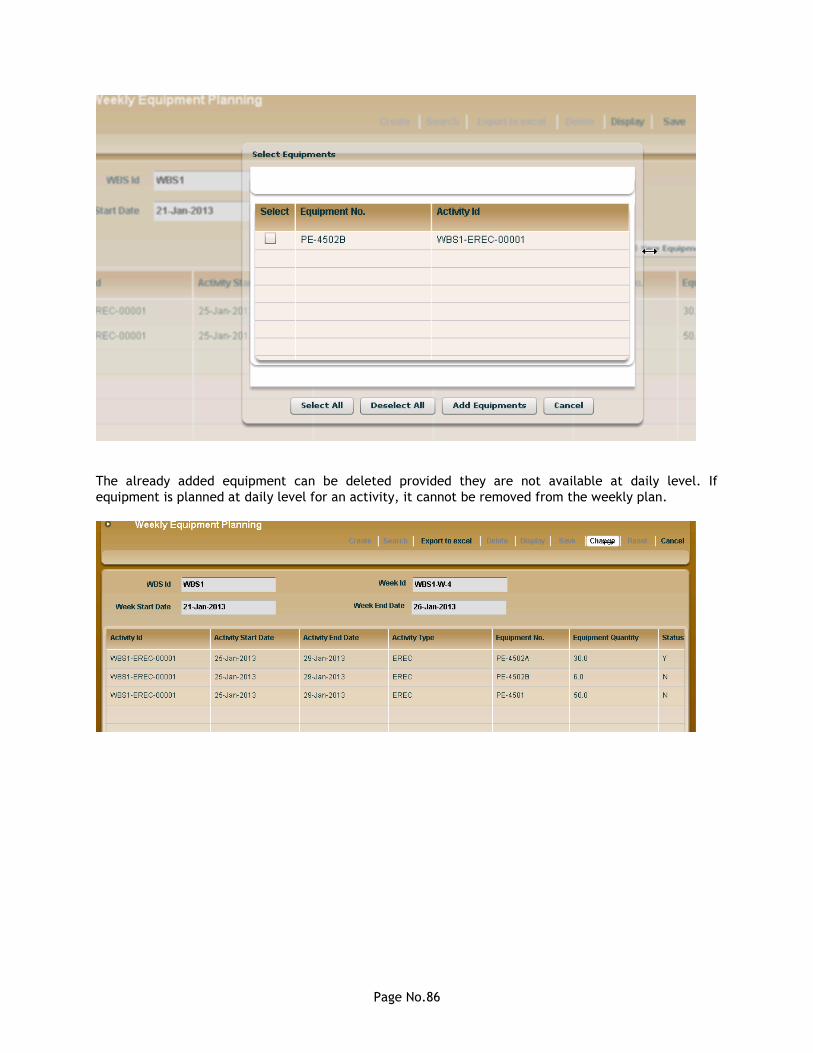
Page No.86
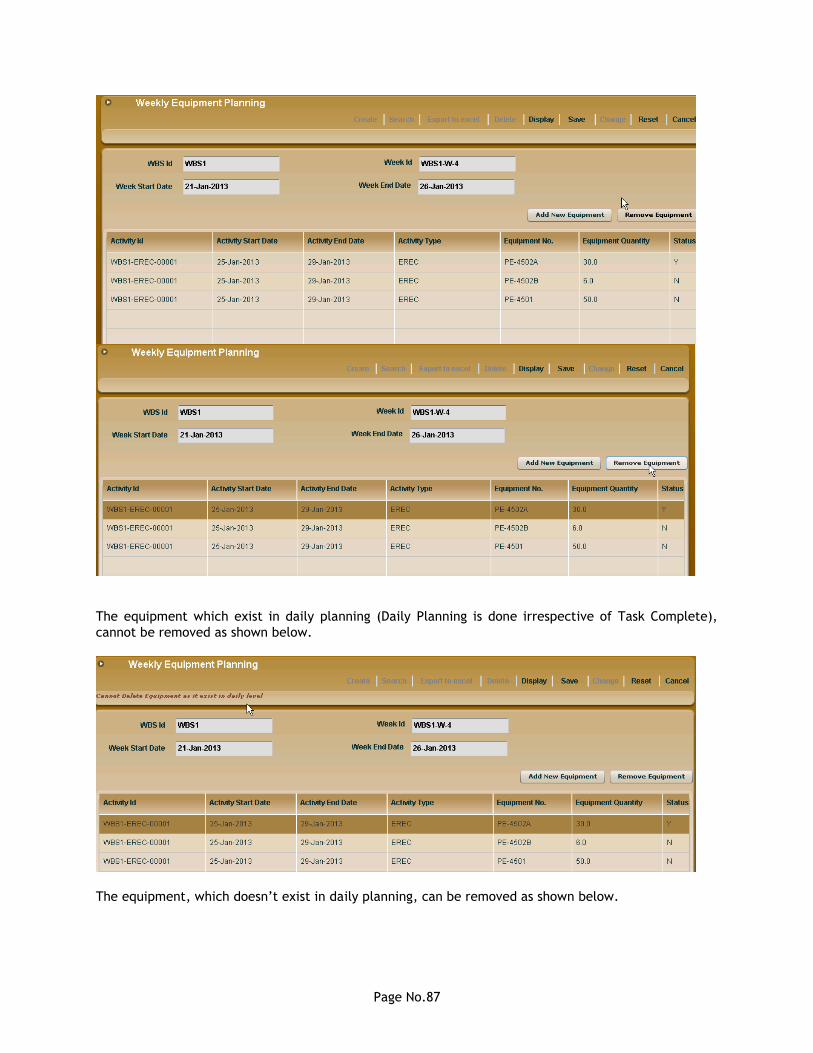
The already added equipment can be deleted provided they are not available at daily level. If
equipment is planned at daily level for an activity, it cannot be removed from the weekly plan.
Page No.87
The equipment which exist in daily planning (Daily Planning is done irrespective of Task Complete),
cannot be removed as shown below.
The equipment, which doesn‟t exist in daily planning, can be removed as shown below.
Page No.88
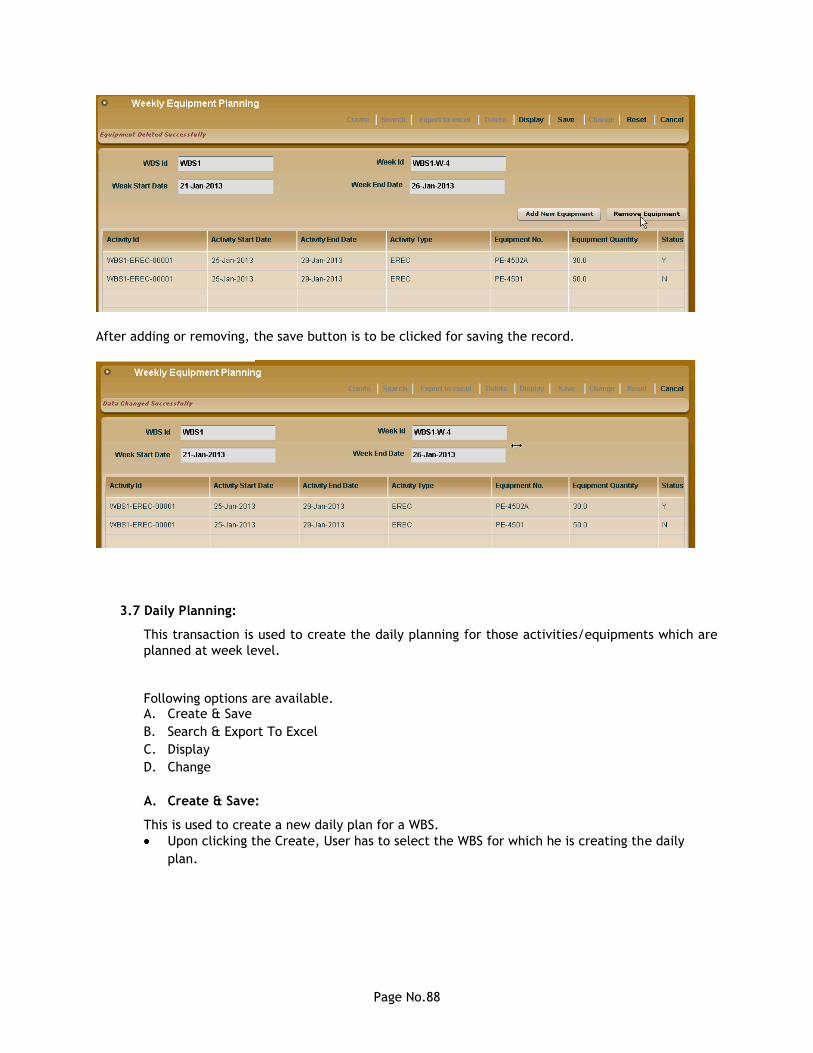
After adding or removing, the save button is to be clicked for saving the record.
3.7 Daily Planning:
This transaction is used to create the daily planning for those activities/equipments which are
planned at week level.
Following options are available. A. Create & Save
B. Search & Export To Excel
C. Display
D. Change
A. Create & Save:
This is used to create a new daily plan for a WBS.
Upon clicking the Create, User has to select the WBS for which he is creating the daily
plan.
Page No.89
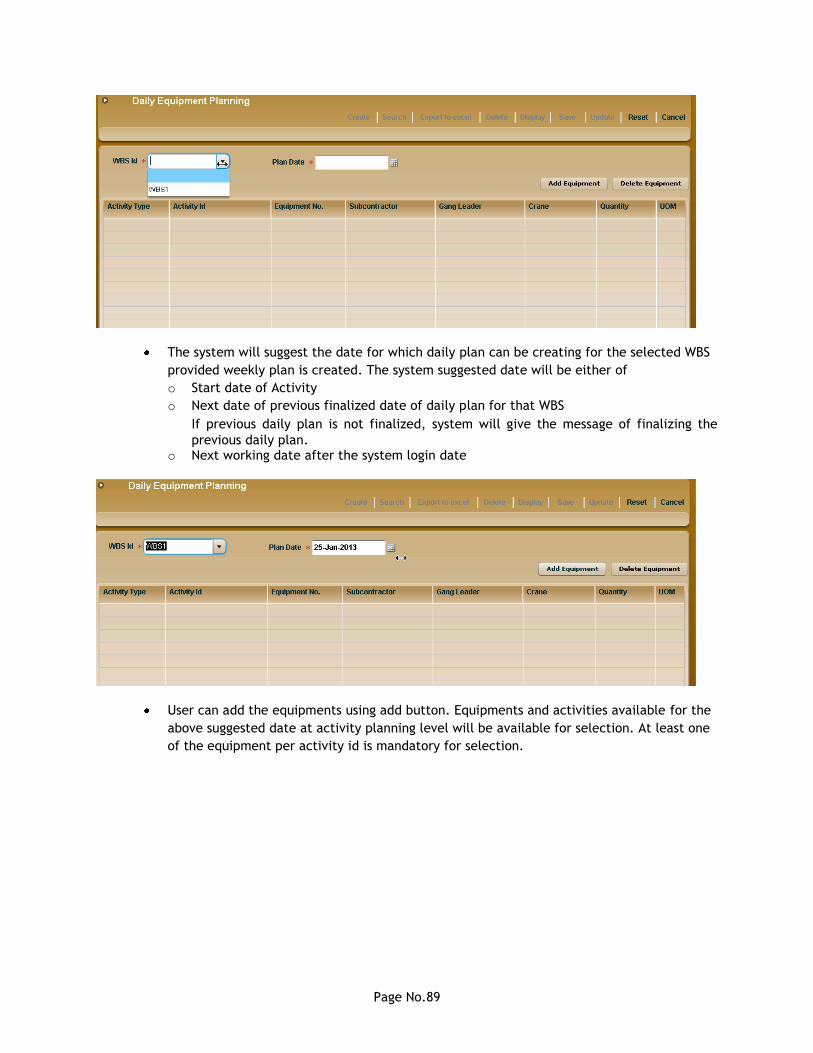
The system will suggest the date for which daily plan can be creating for the selected WBS
provided weekly plan is created. The system suggested date will be either of
o Start date of Activity
o Next date of previous finalized date of daily plan for that WBS
If previous daily plan is not finalized, system will give the message of finalizing the
previous daily plan. o Next working date after the system login date
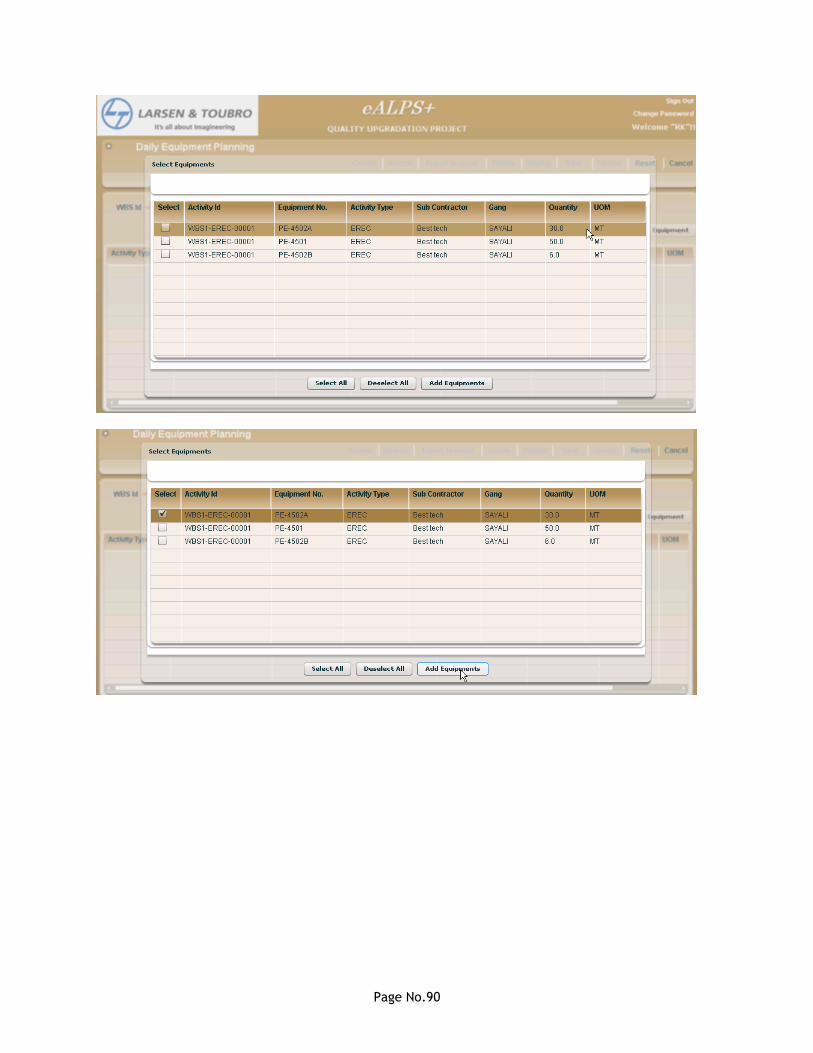
User can add the equipments using add button. Equipments and activities available for the
above suggested date at activity planning level will be available for selection. At least one
of the equipment per activity id is mandatory for selection.
Page No.90
Page No.91
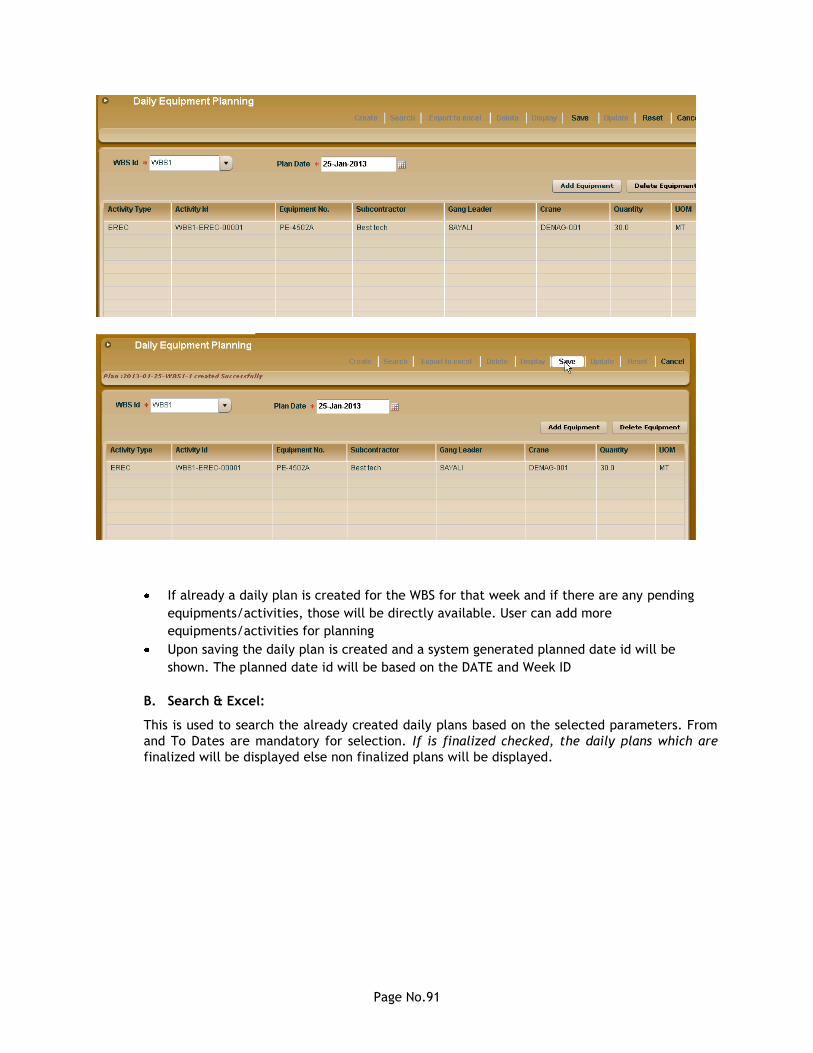
If already a daily plan is created for the WBS for that week and if there are any pending
equipments/activities, those will be directly available. User can add more
equipments/activities for planning
Upon saving the daily plan is created and a system generated planned date id will be
shown. The planned date id will be based on the DATE and Week ID
B. Search & Excel:
This is used to search the already created daily plans based on the selected parameters. From
and To Dates are mandatory for selection. If is finalized checked, the daily plans which are
finalized will be displayed else non finalized plans will be displayed.
Page No.92
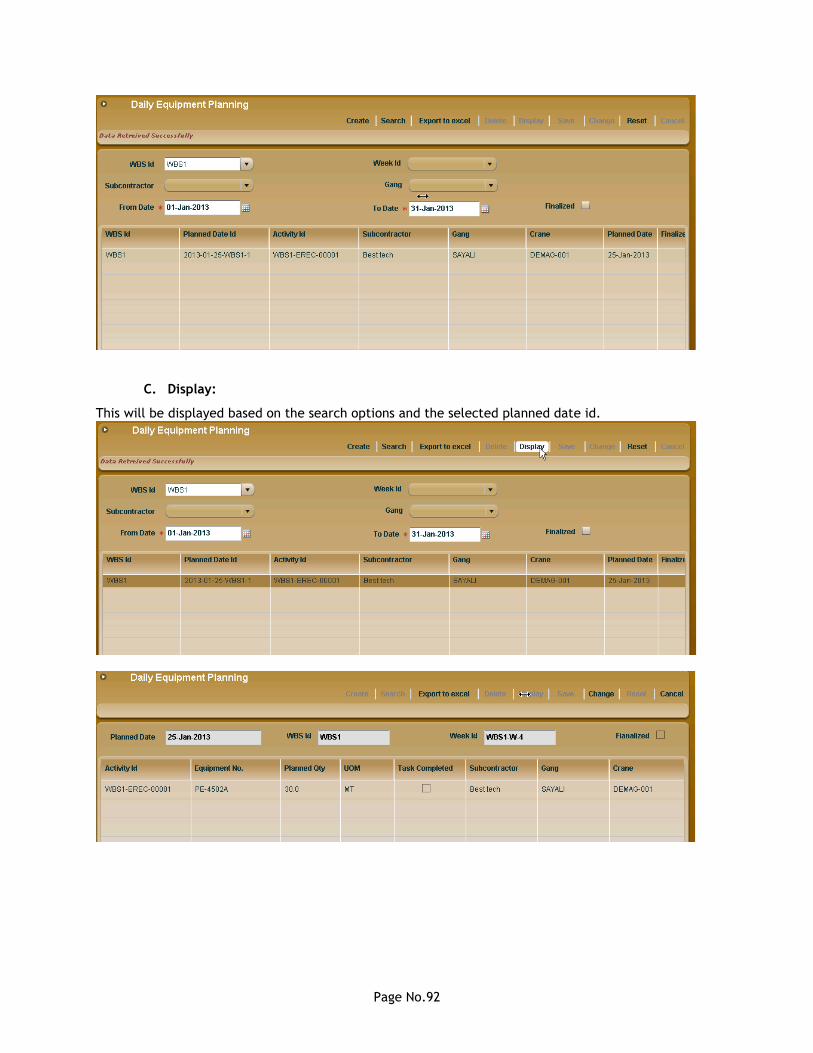
C. Display:
This will be displayed based on the search options and the selected planned date id.
Page No.93
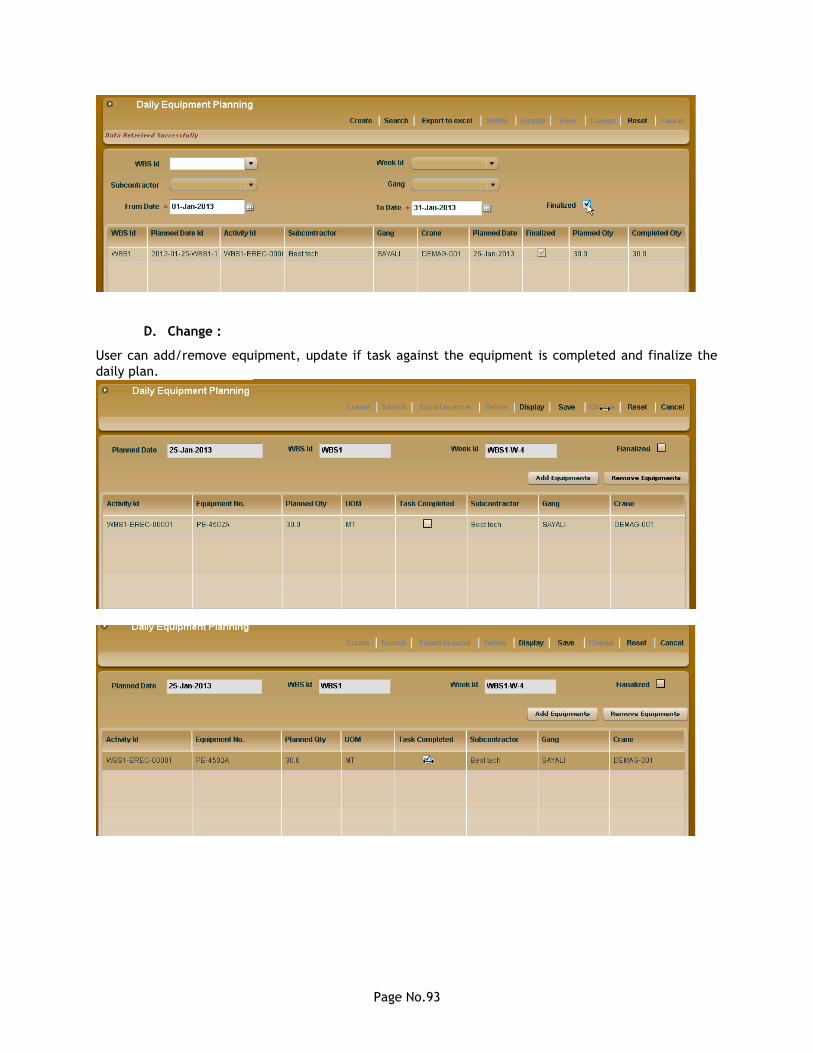
D. Change :
User can add/remove equipment, update if task against the equipment is completed and finalize the
daily plan.
Page No.94
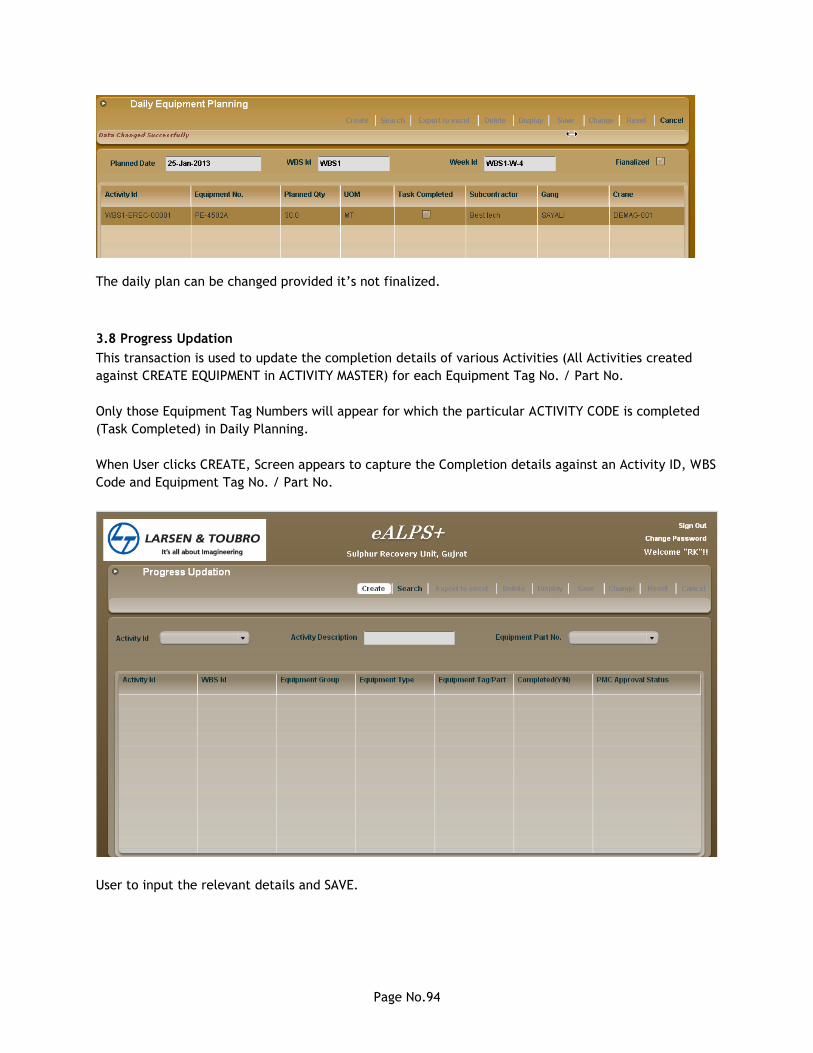
The daily plan can be changed provided it‟s not finalized.
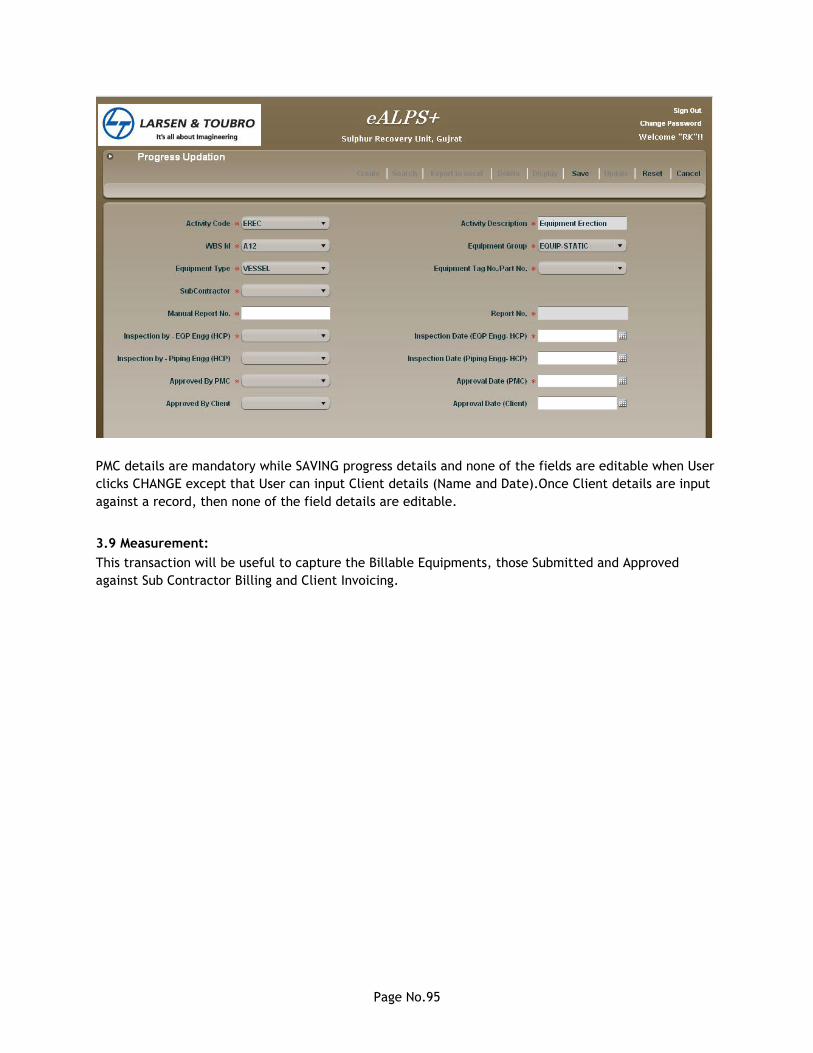
3.8 Progress Updation
This transaction is used to update the completion details of various Activities (All Activities created
against CREATE EQUIPMENT in ACTIVITY MASTER) for each Equipment Tag No. / Part No.
Only those Equipment Tag Numbers will appear for which the particular ACTIVITY CODE is completed
(Task Completed) in Daily Planning.
When User clicks CREATE, Screen appears to capture the Completion details against an Activity ID, WBS
Code and Equipment Tag No. / Part No.
User to input the relevant details and SAVE.
Page No.95
PMC details are mandatory while SAVING progress details and none of the fields are editable when User
clicks CHANGE except that User can input Client details (Name and Date).Once Client details are input
against a record, then none of the field details are editable.
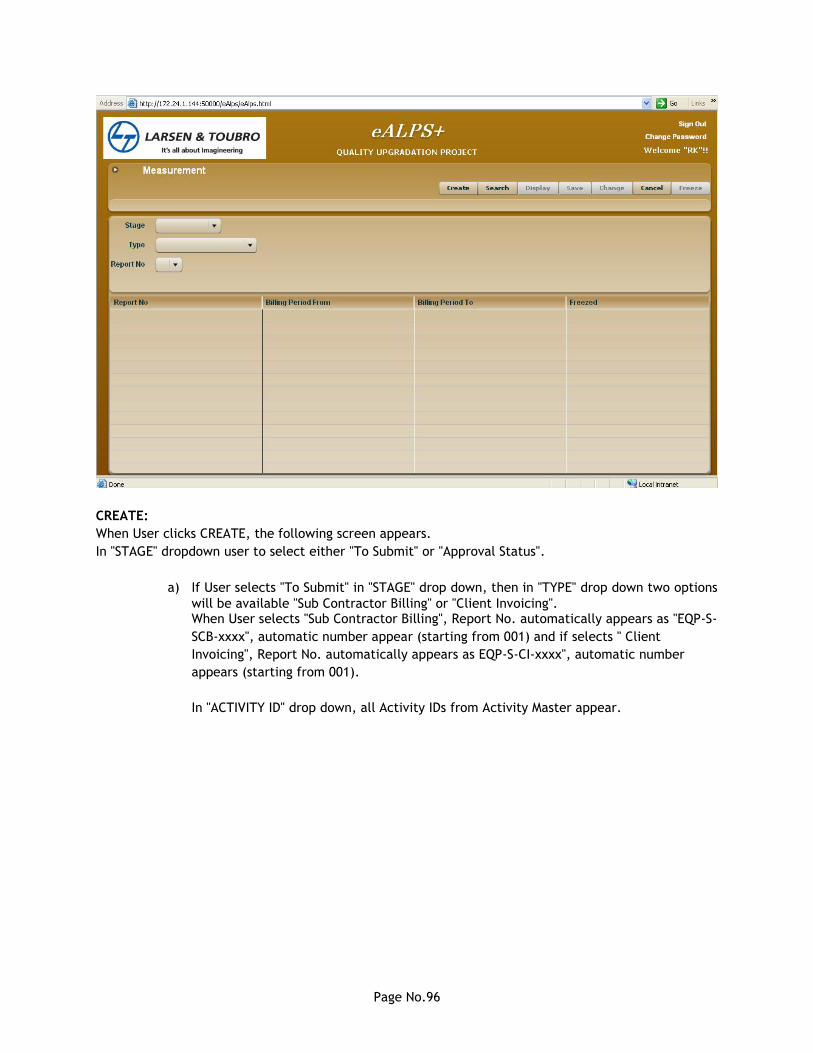
3.9 Measurement:
This transaction will be useful to capture the Billable Equipments, those Submitted and Approved
against Sub Contractor Billing and Client Invoicing.
Page No.96
CREATE:
When User clicks CREATE, the following screen appears.
In "STAGE" dropdown user to select either "To Submit" or "Approval Status".
a) If User selects "To Submit" in "STAGE" drop down, then in "TYPE" drop down two options
will be available "Sub Contractor Billing" or "Client Invoicing". When User selects "Sub Contractor Billing", Report No. automatically appears as "EQP-S-
SCB-xxxx", automatic number appear (starting from 001) and if selects " Client
Invoicing", Report No. automatically appears as EQP-S-CI-xxxx", automatic number
appears (starting from 001).
In "ACTIVITY ID" drop down, all Activity IDs from Activity Master appear.
Page No.97
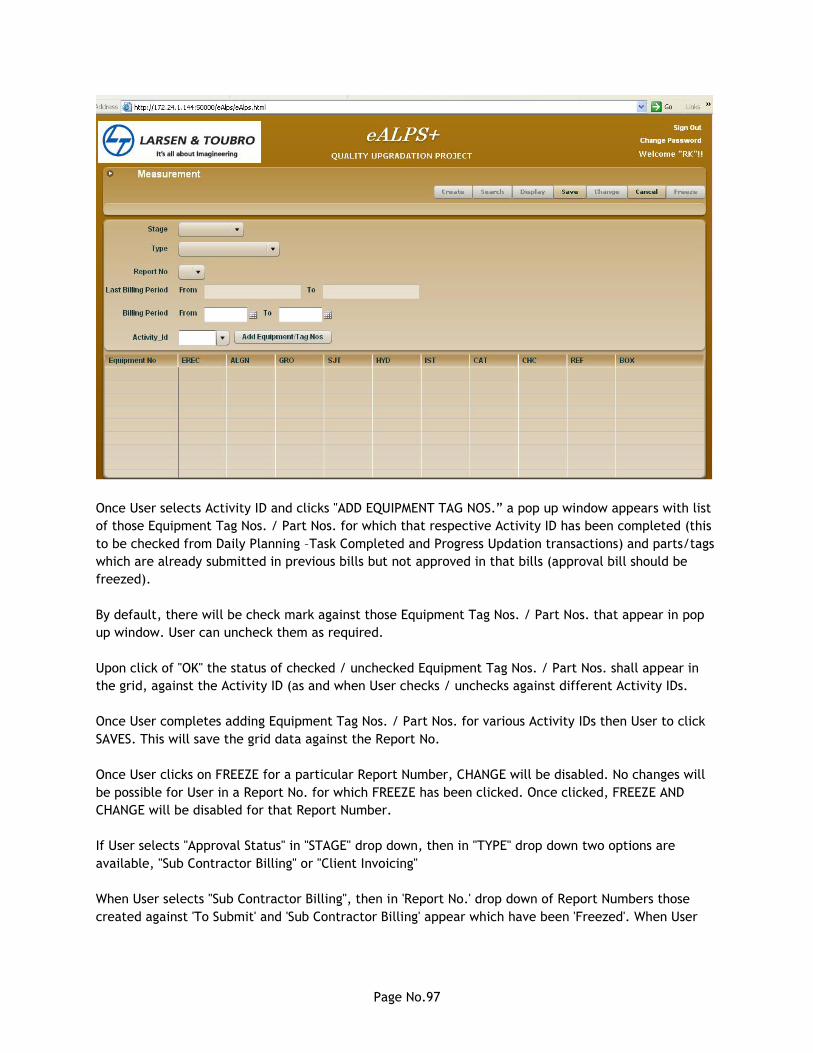
Once User selects Activity ID and clicks "ADD EQUIPMENT TAG NOS.” a pop up window appears with list
of those Equipment Tag Nos. / Part Nos. for which that respective Activity ID has been completed (this
to be checked from Daily Planning –Task Completed and Progress Updation transactions) and parts/tags
which are already submitted in previous bills but not approved in that bills (approval bill should be
freezed).
By default, there will be check mark against those Equipment Tag Nos. / Part Nos. that appear in pop
up window. User can uncheck them as required.
Upon click of "OK" the status of checked / unchecked Equipment Tag Nos. / Part Nos. shall appear in
the grid, against the Activity ID (as and when User checks / unchecks against different Activity IDs.
Once User completes adding Equipment Tag Nos. / Part Nos. for various Activity IDs then User to click
SAVES. This will save the grid data against the Report No.
Once User clicks on FREEZE for a particular Report Number, CHANGE will be disabled. No changes will
be possible for User in a Report No. for which FREEZE has been clicked. Once clicked, FREEZE AND
CHANGE will be disabled for that Report Number.
If User selects "Approval Status" in "STAGE" drop down, then in "TYPE" drop down two options are
available, "Sub Contractor Billing" or "Client Invoicing"
When User selects "Sub Contractor Billing", then in 'Report No.' drop down of Report Numbers those
created against 'To Submit' and 'Sub Contractor Billing' appear which have been 'Freezed'. When User
Page No.98
selects "Client Invoicing", then in 'Report No.' drop down of Report Numbers those created against 'To
Submit' and 'Client Invoicing' appear which have been freezed.
In "ACTIVITY ID" that Activity ID appears against which the selected Report No. was created.
Once User selects Activity ID and clicks “ADD EQUIPMENT TAG NOS." a pop up window appears with list
of those Equipment Tag Nos. / Part Nos. for which in "Stage" "To Submit", those Equipments were
checked against "Type" "Sub Contractor Billing" or "Client Invoicing" respectively.
STAGE and TYPE combination mapping :
STAGE Type Equipment Tag Nos. / Part Nos.
Approval Status
Sub Contractor
Billing
All the list of Equipment Tag Nos./Part Nos. which were checked and FREEZED in STAGE "TO SUBMIT" and TYPE "Sub Contractor Billing" and the "Report No." selected will appear
Approval Status
Client Invoicing
All the list of Equipment Tag Nos./Part Nos. which were checked and FREEZED in STAGE "TO SUBMIT" and TYPE "Client Invoicing" and the "Report No." selected will appear
4.0 EP - Reports:
This module contains following different reports.
1. Project Dashboard
2. S0 – Construction Schedule
3. S1&S7 Client Invoicing & Subcontractor Billing
4. S2- Milestone Schedule
5. S3 – P&M Schedule
6. S5 – Manpower Schedule
7. Gang Movement
8. Equipment Status
9. Erection Front Status
10. Look Ahead Schedule – Work
11. QS Billing & Invoicing report
Page No.99
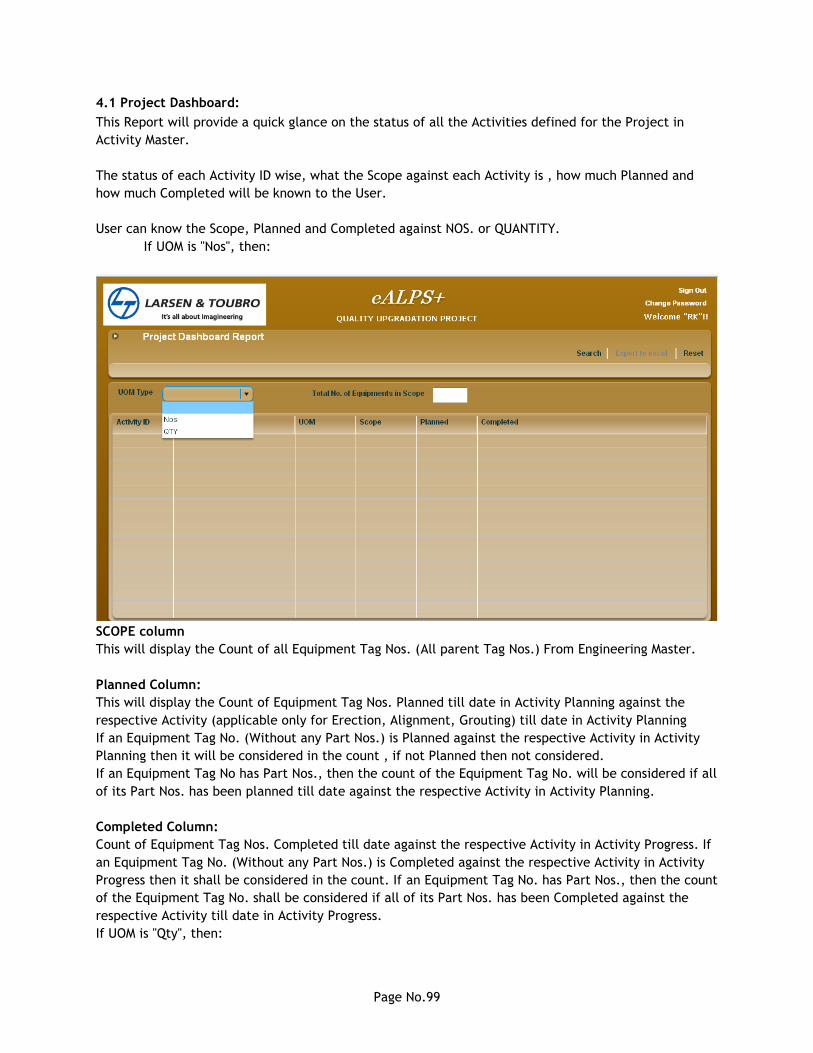
4.1 Project Dashboard:
This Report will provide a quick glance on the status of all the Activities defined for the Project in
Activity Master.
The status of each Activity ID wise, what the Scope against each Activity is , how much Planned and
how much Completed will be known to the User.
User can know the Scope, Planned and Completed against NOS. or QUANTITY.
If UOM is "Nos", then:
SCOPE column
This will display the Count of all Equipment Tag Nos. (All parent Tag Nos.) From Engineering Master.
Planned Column:
This will display the Count of Equipment Tag Nos. Planned till date in Activity Planning against the
respective Activity (applicable only for Erection, Alignment, Grouting) till date in Activity Planning
If an Equipment Tag No. (Without any Part Nos.) is Planned against the respective Activity in Activity
Planning then it will be considered in the count , if not Planned then not considered.
If an Equipment Tag No has Part Nos., then the count of the Equipment Tag No. will be considered if all
of its Part Nos. has been planned till date against the respective Activity in Activity Planning.
Completed Column:
Count of Equipment Tag Nos. Completed till date against the respective Activity in Activity Progress. If
an Equipment Tag No. (Without any Part Nos.) is Completed against the respective Activity in Activity
Progress then it shall be considered in the count. If an Equipment Tag No. has Part Nos., then the count
of the Equipment Tag No. shall be considered if all of its Part Nos. has been Completed against the
respective Activity till date in Activity Progress.
If UOM is "Qty", then:
Page No.100
SCOPE column
This columns displays the Weight of all Equipment Tag Nos.(all parent Tag Nos.) from Engineering
Master.
Planned Column
This will display the Sum of Weight of Equipment Tag Nos. Planned against the respective Activity
(applicable only for Erection, Alignment, and Grouting) till date in Activity Planning.
If an Equipment Tag No. (Without any Part Nos.) is Planned against the respective Activity in Activity
Planning then it's weight will be considered in the summation, if not Planned then not considered.
If an Equipment Tag No. has Part Nos., then the weight of the Equipment Part No. will be considered
which have been planned against the respective Activity till date in Activity Planning. If not planned
then not to be considered.
Completed Column
This will display the Sum of Weight of Equipment Tag Nos. Completed against the respective Activity
till date in Activity Progress.
If an Equipment Tag No. (Without any Part Nos.) is Completed against the respective Activity in Activity
Progress then it will be considered in the count, if not Completed then not to be considered.
If an Equipment Tag No. has Part Nos., the weight of the Equipment Part No. will be considered which
have been completed against the respective Activity till date in Activity Progress. If not completed
then not to be considered.
When UOM is "Nos." and / or "QTY" then against STJ, HYD,IST,CAT,CHC,REF,BOX,PAINT, INS Activities
(Activities other than Erection / Alignment / Grouting ), in "Planned" Column shall appear "NA- Not
Applicable" as these Activities are not Planned in Activity Planning
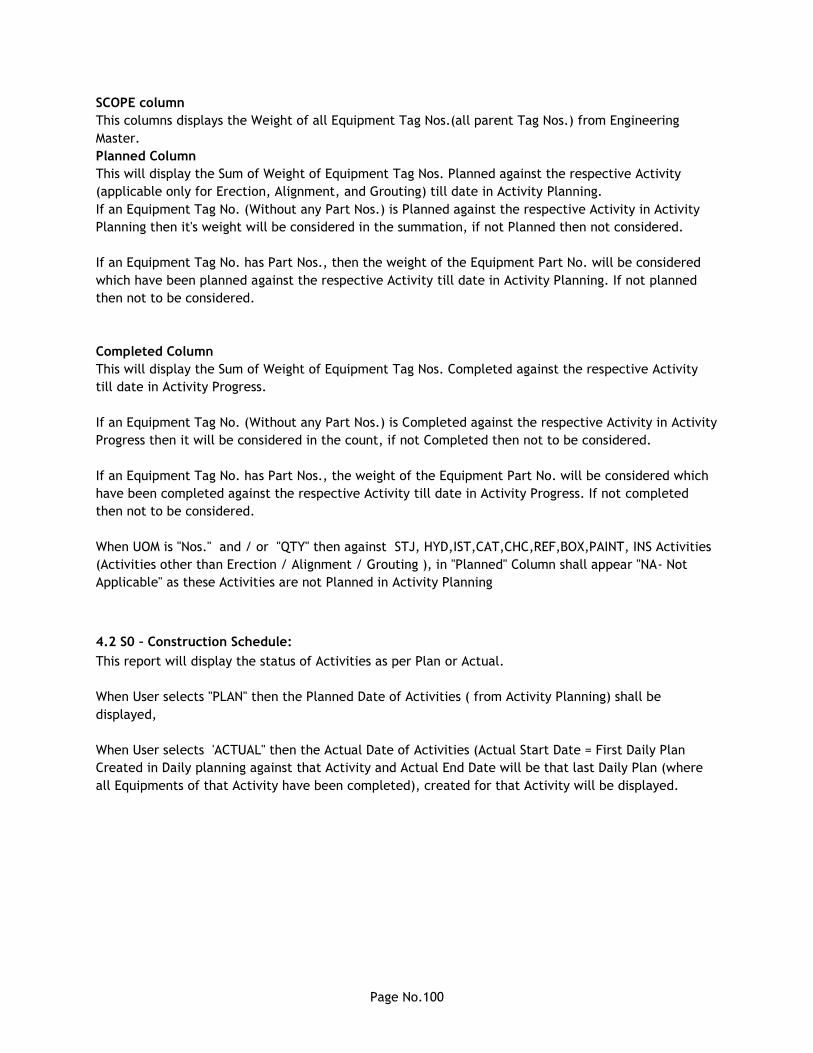
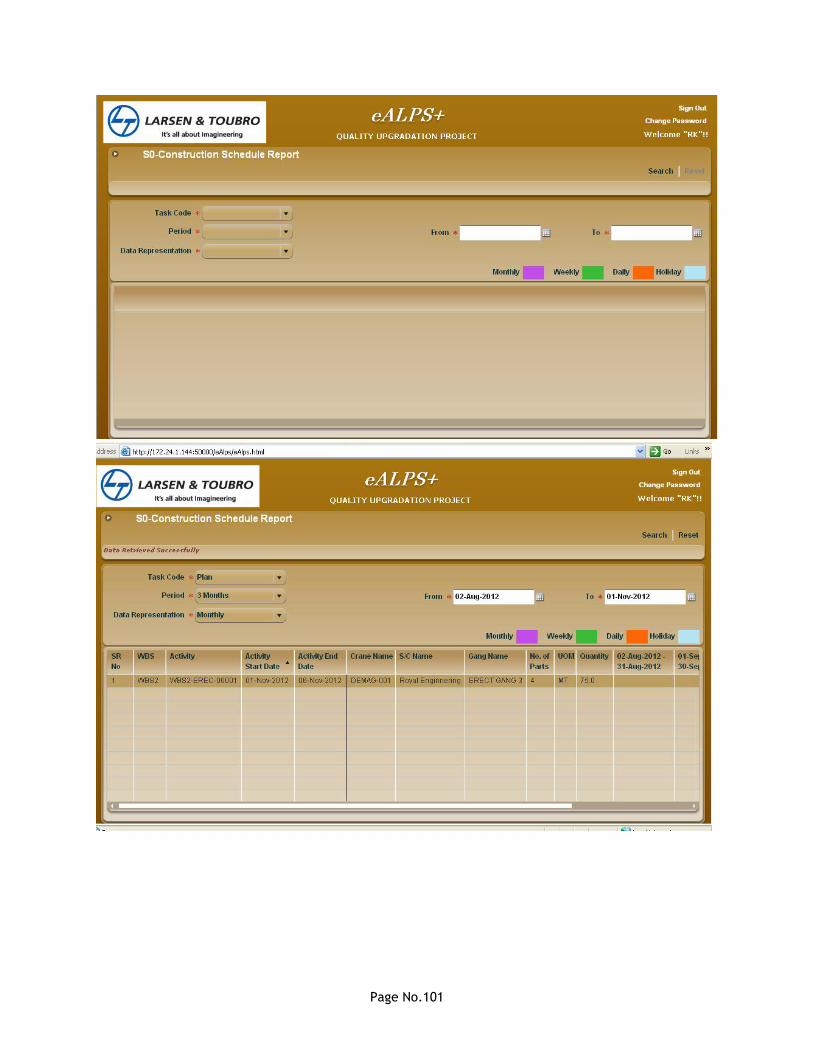
4.2 S0 – Construction Schedule:
This report will display the status of Activities as per Plan or Actual.
When User selects "PLAN" then the Planned Date of Activities ( from Activity Planning) shall be
displayed,
When User selects 'ACTUAL" then the Actual Date of Activities (Actual Start Date = First Daily Plan
Created in Daily planning against that Activity and Actual End Date will be that last Daily Plan (where
all Equipments of that Activity have been completed), created for that Activity will be displayed.
Page No.101
Page No.102
4.3 S1&S7 Client Invoicing & Subcontractor Billing:
This Report will help User know the Billed Quantity and Amount with respect to the “Measurement”
and “QS Code” Transaction.
This report will display data Monthly basis only. If '1 Month'/'2 Month'/ '3 Month'/'6 Month' / 'Project
Duration' is selected, then User to select 'From Month' (drop down of Month and Year)', 'To Month' to
Page No.103
appear automatically (calculate '1 Month'/'2 Month'/ '3 Month'/'6 Month' / 'till date' from the input '
FROM Month'). If 'Custom' selected, then 'FROM' and 'To' Months will be input by User.
WBS" field will list all WBS Names from WBS Master and "WBS Incharge" will list 'WBS Incharge' names
from WBS Master. User will be able to filter data represented in grid with these filters.
„QS CODE', 'QS Description', 'UOM', 'Qty Type', 'Rate' fields will appear from QS Code Master.
Month wise Quantity will appear as below:
a) As per the Qty Type the sum of corresponding Qty of all those Equipment Tag Nos. / Part
Nos. which are part of that QS Code and which have been PLANNED in that month (i.e. their
Date of Activity Planning shall be in that Month).
b) QTY Type and Corresponding Qty mapping :
Qty Type Mapping Qty of Equipment Tag No. / Part No. -from 'Engineering details' master
WEIGHT Equipment Tag No. /Part No. Weight
GROUTING Grouting Qty'
C) Amount will be equal to:
i) For respective QS Code, Rate is per UOM then Amount =„Rate‟ (for the respective QS Code) x
'Qty' (for the month) x 'percentage' (from QS Code, percentage defined for each Activity).
ii) For respective QS Code, Rate is Lump sum i.e. In UOM field in QS Code 'Nos.' appears then
Amount =„Rate‟ (for the respective QS Code) x 'percentage' (from QS Code, percentage defined
for each Activity) [Quantity will be ='1']
6) When 'TYPE' is selected as 'Client Invoicing' then all QS Codes created against 'PAYMENT BY
Client/Subcontractor' = 'C' in QS Code Master shall appear and when 'TYPE' is selected as 'S/C
Billing' then all QS Codes created against 'PAYMENT BY Client/Subcontractor' = 'S' in QS Code
Master against shall appear.
Page No.104
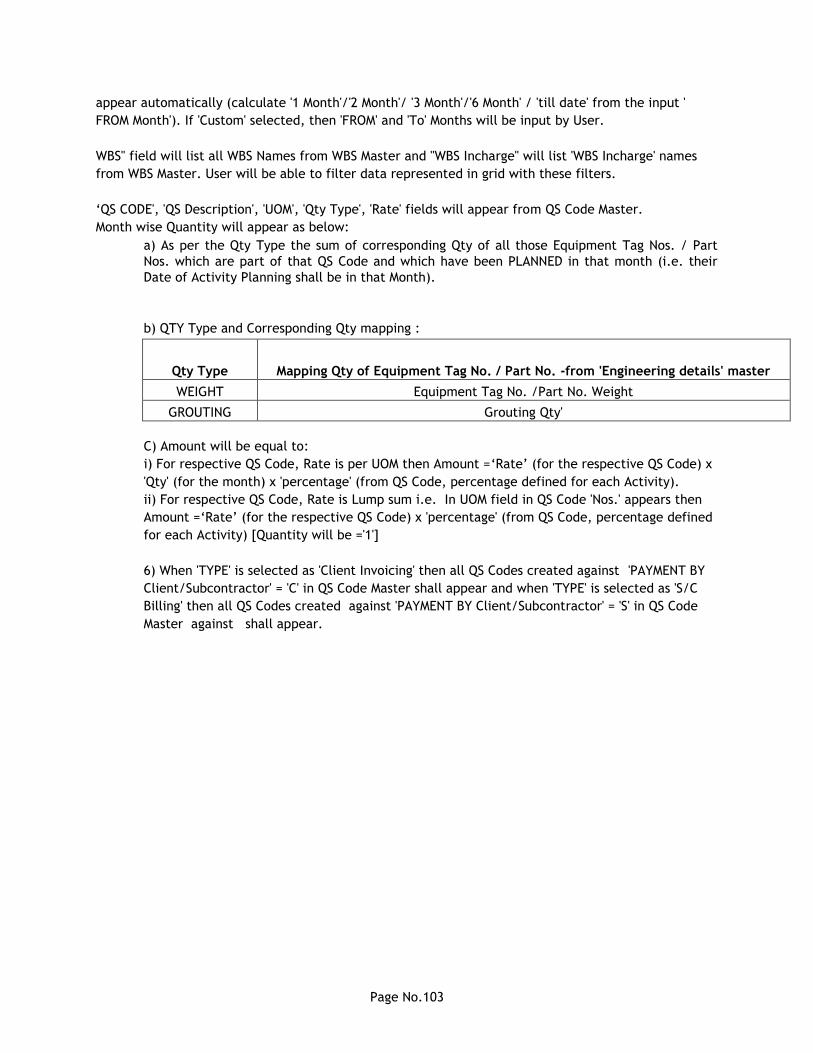
4.4 S3 – P&M Schedule:
This Report will help User to know the Crane occupancy as per the time period for various Activities.
User can select the Time Period for which they want to see the report and the data representation in
Monthly / Weekly / Daily format
"WBS" drop down shall be available for User to select from the list of WBS from WBS Master. When a
WBS is selected, then there shall be a check as to which Equipment Tag Nos. / Part Nos. are included in
that WBS from 'WBS Master'.
Accordingly, there shall be a check as to which Equipment Tag No. /Part No. has which Main Crane
assigned to it from 'Crane and Rigging details'. So only those Crane details shall appear if a particular
WBS is selected in the selection header.
Page No.105
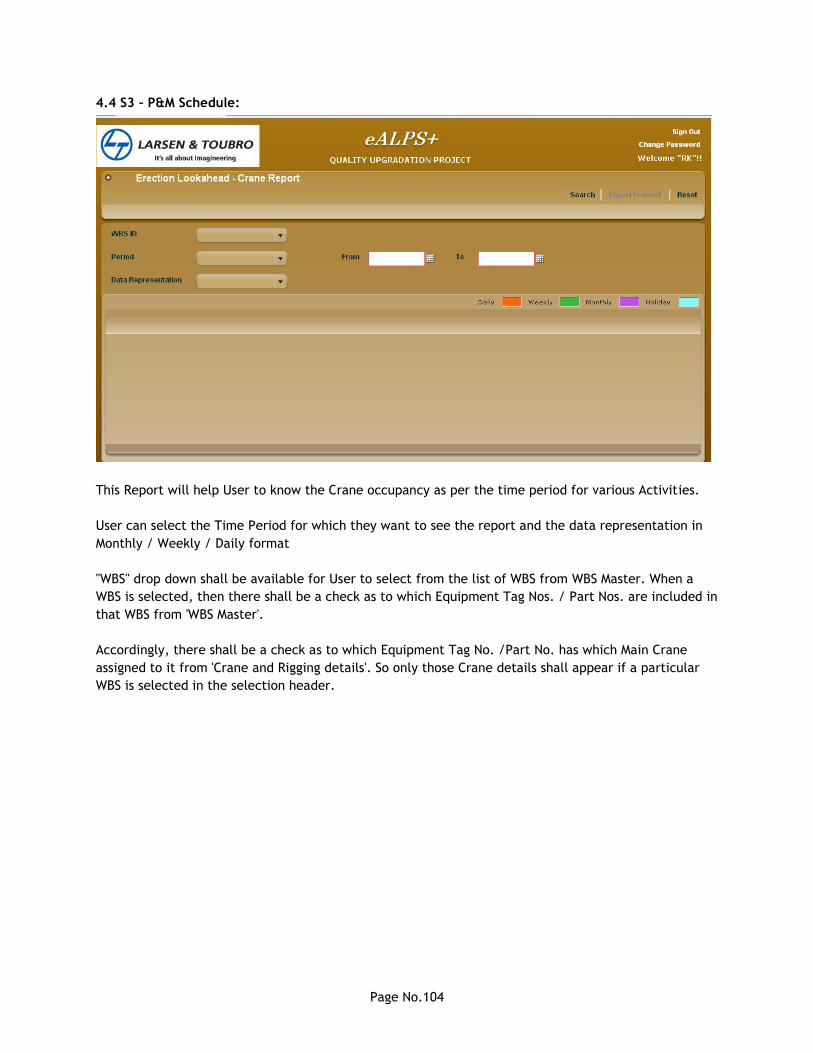
4.6 S5 Manpower Schedule:
This Report will help User to know the Manpower requirement over a selected time period.
User can select the Time Period for which they want to see the report and the data representation in
Monthly / Weekly / Daily format.
User will see the list of different manpower and the number of different Manpower required during the
selected time prior.
The Total i.e. Summation of Manpower appears Column wise, as per the data that is displayed on
screen based on the selection of Time Period.
The data in the report can be sorted as per WBS and Activity Code.
Page No.106
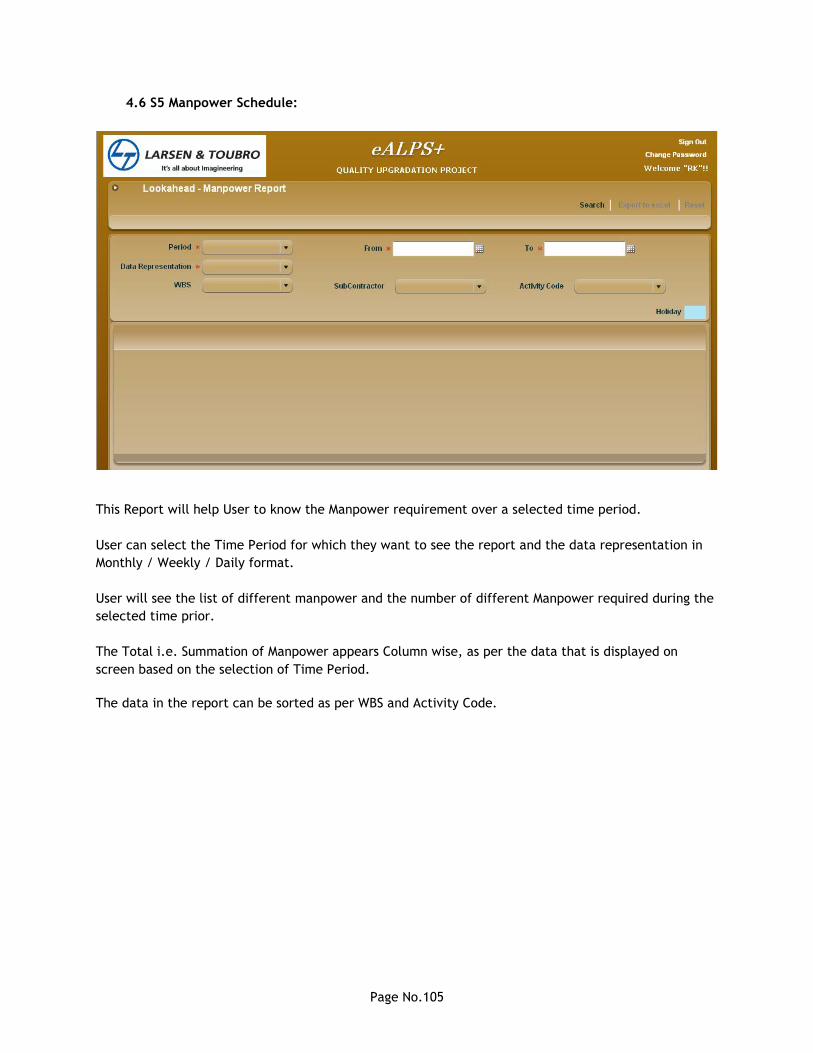
4.7 Gang Movement
This Report will help User to know the Gang occupancy as per the time period for various Activities.
User can select the Time Period for which they want to see the report and the data representation in
Monthly / Weekly / Daily format.
According to the selection, the list of Gangs Planned for the selected time period will be displayed.
The Activity Name against the respective time period for which a Gang has been planned will be
displayed.
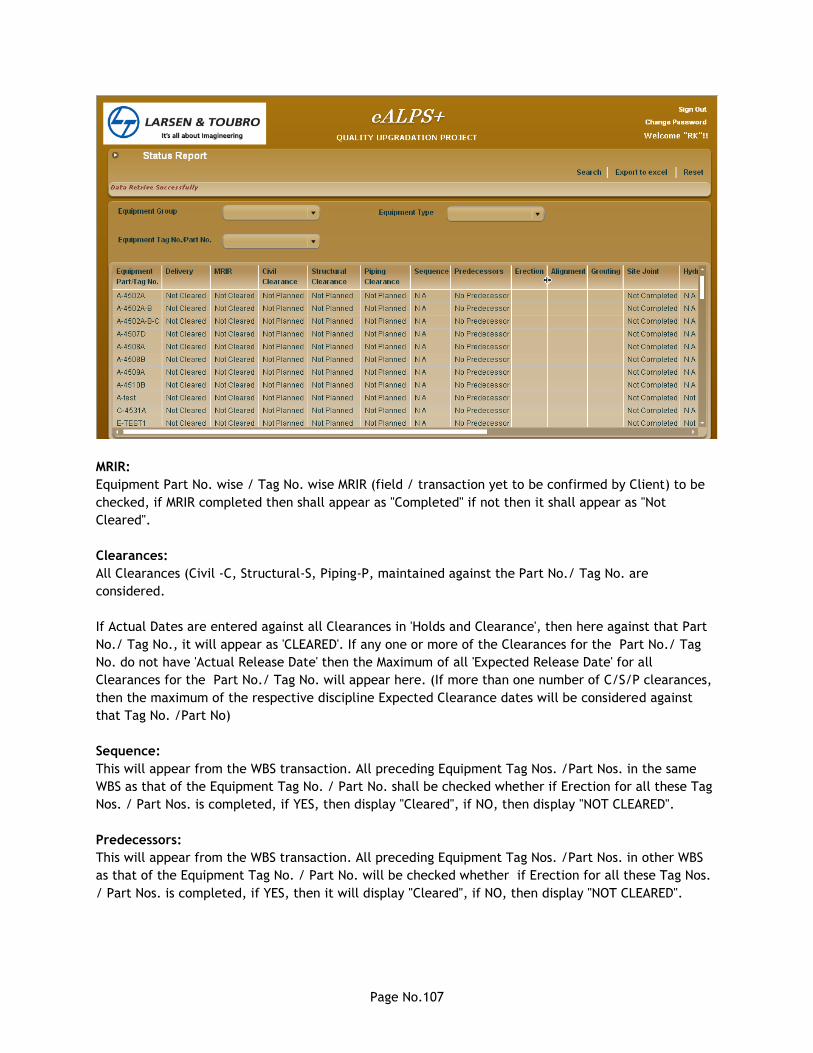
4.8 Equipment Status
This report is useful for User to know the Equipment Tag No. wise status against Civil, Structural and
Piping clearances.
The Sequence and Predecessors of that Equipment Tag No. Further, against each Tag Number the
status against various Activities (as per Activity Master) whether Completed, Not Completed, Planned,
Not Applicable will be displayed.
Page No.107
MRIR:
Equipment Part No. wise / Tag No. wise MRIR (field / transaction yet to be confirmed by Client) to be
checked, if MRIR completed then shall appear as "Completed" if not then it shall appear as "Not
Cleared".
Clearances:
All Clearances (Civil -C, Structural-S, Piping-P, maintained against the Part No./ Tag No. are
considered.
If Actual Dates are entered against all Clearances in 'Holds and Clearance', then here against that Part
No./ Tag No., it will appear as 'CLEARED'. If any one or more of the Clearances for the Part No./ Tag
No. do not have 'Actual Release Date' then the Maximum of all 'Expected Release Date' for all
Clearances for the Part No./ Tag No. will appear here. (If more than one number of C/S/P clearances,
then the maximum of the respective discipline Expected Clearance dates will be considered against
that Tag No. /Part No)
Sequence:
This will appear from the WBS transaction. All preceding Equipment Tag Nos. /Part Nos. in the same
WBS as that of the Equipment Tag No. / Part No. shall be checked whether if Erection for all these Tag
Nos. / Part Nos. is completed, if YES, then display "Cleared", if NO, then display "NOT CLEARED".
Predecessors:
This will appear from the WBS transaction. All preceding Equipment Tag Nos. /Part Nos. in other WBS
as that of the Equipment Tag No. / Part No. will be checked whether if Erection for all these Tag Nos.
/ Part Nos. is completed, if YES, then it will display "Cleared", if NO, then display "NOT CLEARED".
Page No.108
Activities:
All Activities from Activity Master in that Project shall appear. Against each Equipment Tag No.,/ Part
No., if the Actual Date of Completion of each Activity exists in 'Activity Progress' Transaction, then this
field shall display 'Completed'.
If any of the Activity is not completed i.e. Actual Date of Completion of each Activity does not exist in
'Activity Progress' Transaction, then the 'Planned End Date' for those Activities shall appear in this field
from 'Activity Planning' transaction.
If an Activity is not planned for an Equipment Tag No., / Part No., in Activity Planning, it will display
„Not Cleared‟ and if an Activity is not applicable for Equipment Tag No. / Part No. , then it will display
„NA‟.
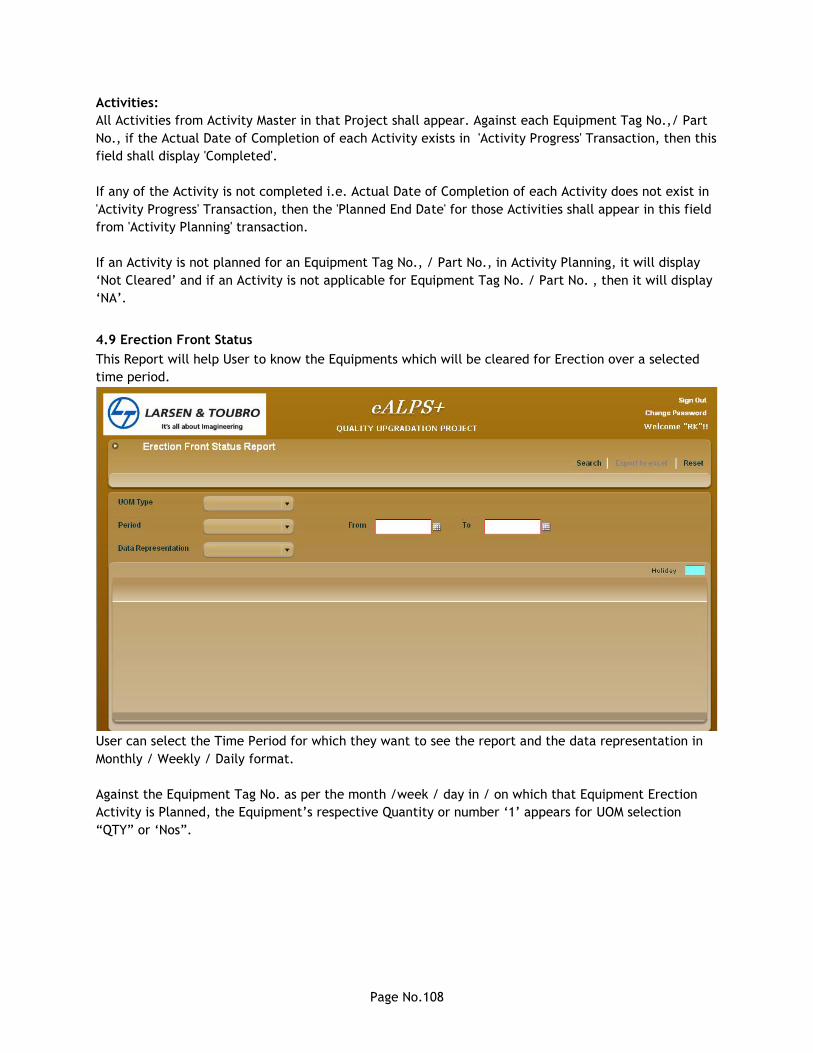
4.9 Erection Front Status
This Report will help User to know the Equipments which will be cleared for Erection over a selected
time period.
User can select the Time Period for which they want to see the report and the data representation in
Monthly / Weekly / Daily format.
Against the Equipment Tag No. as per the month /week / day in / on which that Equipment Erection
Activity is Planned, the Equipment‟s respective Quantity or number „1‟ appears for UOM selection
“QTY” or „Nos”.
Page No.109
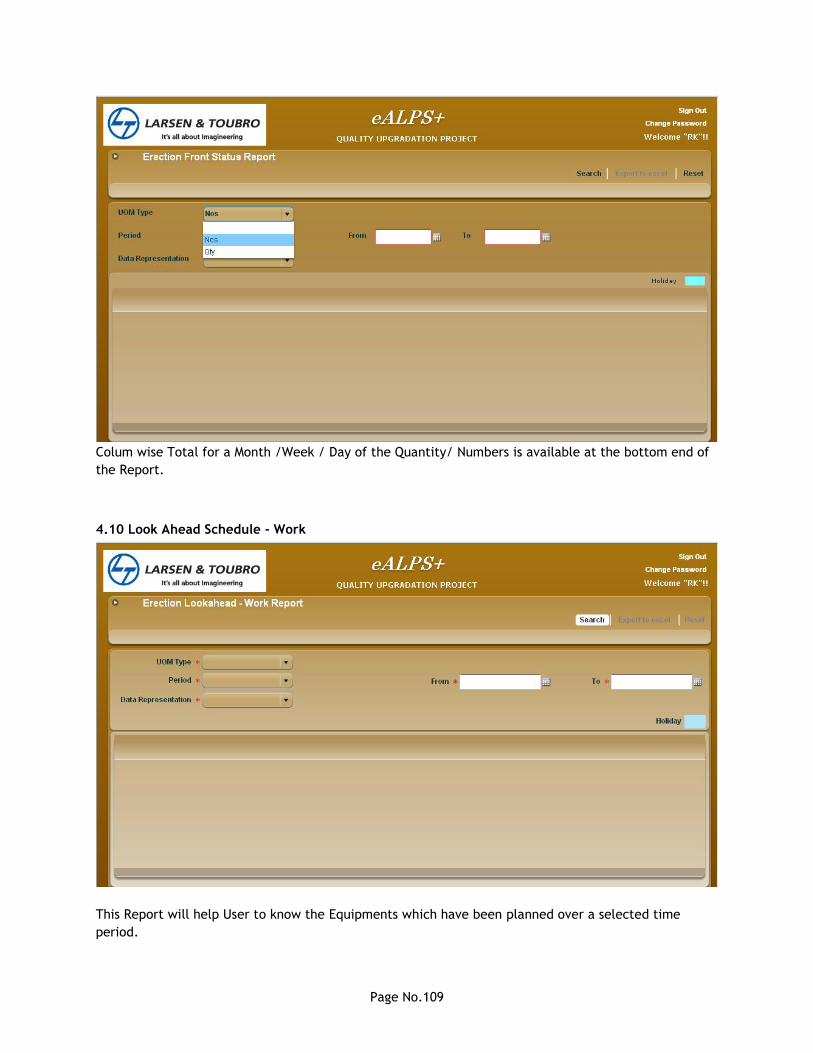
Colum wise Total for a Month /Week / Day of the Quantity/ Numbers is available at the bottom end of
the Report.
4.10 Look Ahead Schedule - Work
This Report will help User to know the Equipments which have been planned over a selected time
period.
Page No.110
User can select the Time Period for which they want to see the report and the data representation in
Monthly / Weekly / Daily format.
Against the Equipment Tag No. as per the month /week / day in / on which that Equipment Erection
Activity is Planned, the Equipment‟s respective Quantity or number „1‟ appears for UOM selection
“QTY” or „Nos”.
4.11 QS Billing & Invoicing Report:
This Report will help the user to know QS Code wise the Invoicing and Billing details for Client and
Subcontractor respectively for a particular Measurement report. It gives the claim and approved qty of
each QS code for the equipment activities which are claimed and approved accordingly.
User has to select the Report For – which contains Client or Subcontractor.
Upon selection of Subcontractor, the “Subcontractor Name” will display. The user has to select the
Name of the subcontractor from the drop down.
All the submitted type of measurement reports for that subcontractor will be available in the
dropdown of Report No. If client is selected, the submitted type of measurement reports of the client
will be available in the drop down. Billing Period will be of the selected report.
Upon clicking the “search” the report will be generated.
The system will show the output of QS Codes which were applicable for the equipments and activities
submitted in the measurement report will be shown.
The report is divided in 4 parts.
1. Up to Previous Bill Claim Qty and Amount
This will be the qty and amount claimed before the above period
2. Up to Previous Bill Approved Qty and Amount
This will be the qty and amount approved before the above period
3. This bill Claim Qty & Amount
This will be the qty and amount Claimed in the selected report
4. This bill Approved Qty & Amount
This will be the qty and amount approved in the selected report