Embed Size (px)
Citation preview
SAP BusinessObjects Postal File PreparationUser’s Guide
SAP BusinessObjects Postal File Preparation 8.00c
March 2009
Copyright information
© 2009 SAP® BusinessObjects™. All rights reserved. SAP BusinessObjects owns the following United States patents, which may cover products that are offered and licensed by SAP BusinessObjects and/or affiliated companies: 5,295,243; 5,339,390; 5,555,403; 5,590,250; 5,619,632; 5,632,009; 5,857,205; 5,880,742; 5,883,635; 6,085,202; 6,108,698; 6,247,008; 6,289,352; 6,300,957; 6,377,259; 6,490,593; 6,578,027; 6,581,068; 6,628,312; 6,654,761; 6,768,986; 6,772,409; 6,831,668; 6,882,998; 6,892,189; 6,901,555; 7,089,238; 7,107,266; 7,139,766; 7,178,099; 7,181,435; 7,181,440; 7,194,465; 7,222,130; 7,299,419; 7,320,122; 7,356,779 and 7,475,062. SAP BusinessObjects and its logos, BusinessObjects, Crystal Reports®, SAP BusinessObjects Rapid Mart™, SAP BusinessObjects Data Insight™, SAP BusinessObjects Desktop Intelligence™, SAP BusinessObjects Rapid Marts®, SAP BusinessObjects Watchlist Security™, SAP BusinessObjects Web Intelligence®, and Xcelsius® are trademarks or registered trademarks of Business Objects, an SAP company and/or affiliated companies in the United States and/or other countries. SAP® is a registered trademark of SAP AG in Germany and/or other countries. All other names mentioned herein may be trademarks of their respective owners.
2 SAP BusinessObjects Postal File Preparation User’s Guide
Table of Contents
Preface .............................................................................................................1Documentation .................................................................................................2Contacting Technical Customer Assurance .....................................................3
Chapter 1:Installation and quick start .......................................................................... 5Install the software ...........................................................................................6The Setup wizard..............................................................................................7
Chapter 2:Mail.dat ........................................................................................................ 11Import Mail.dat files.......................................................................................12Unattended importing.....................................................................................14Validate Mail.dat files ....................................................................................17Edit Mail.dat fields.........................................................................................18Correct errors..................................................................................................19Export Mail.dat files.......................................................................................20Archive Mail.dat files.....................................................................................21Purge Mail.dat files ........................................................................................22
Chapter 3:PostalOne!® ................................................................................................. 23PostalOne! wizard ..........................................................................................24Permit numbers ..............................................................................................30
Chapter 4:Planning........................................................................................................ 31Truck load editing ..........................................................................................32Assign in-home dates .....................................................................................33Edit piece attributes........................................................................................34
Chapter 5:Reports ......................................................................................................... 35Printing options ..............................................................................................36Reports ...........................................................................................................37Error reports ...................................................................................................41
Chapter 6:Flags and tags .............................................................................................. 43Label setup .....................................................................................................44Label types .....................................................................................................46
Index ..............................................................................................................49
Contents 3

4 SAP BusinessObjects Postal File Preparation User’s Guide
Preface
SAP BusinessObjects Postal File Preparation is an affordable solution that supports the ability to claim full-service rates.
The software offers:
Comprehensive validation and editing features for all portions of the Mail.dat
PostalOne! support.
The ability to create multi-stop loads.
Print-on-demand reporting for different statistical reports and mail qualifying documentation.
Creation of flags and tags for trays and sacks.
This document describes the software's features and offers step-by-step instructions. This document is not intended to teach you about your mail.
If you have questions about rules and regulations regarding mail classes, and so on, read the Mailing Standards of the United States Postal Service, Domestic Mail Manual. You can view this manual online at http://pe.usps.gov/text/dmm300/dmm300_landing.htm.
1
Documentation
Use the online help to learn about the windows in the software, and get explanations and helpful tips about the controls in each window. In addition, find steps for performing procedures in the software.
Viewing online help 1. Open SAP BusinessObjects Postal File Preparation.
2. Choose Help > Postal File Preparation Help.
Accessing window-level and field-level help
For window-level help, click the Help button in the desired window.
For field-level help, do the following:
1. Click the question mark (?) icon in the upper right corner of the window. The cursor appears as an arrow with a question mark.
2. Click the desired control.
2 SAP BusinessObjects Postal File Preparation User’s Guide
Contacting Technical Customer Assurance
You can contact Technical Customer Assurance for help with your SAP BusinessObjects product through the SAP Service Market Place (SMP).
1. Go to SAP Service Market Place (http://service.sap.com).
2. Click SAP Support Portal.
3. Enter your S-User ID and password, and then click OK.
4. When prompted for a digital certificate, click OK.
5. Enter your S-User ID and password again, and then click OK.
Report a product error 6. In the SAP Support Portal, click the Help & Support tab.
7. Click Report a Product Error. The Report a Product Error - Customer Messages window appears.
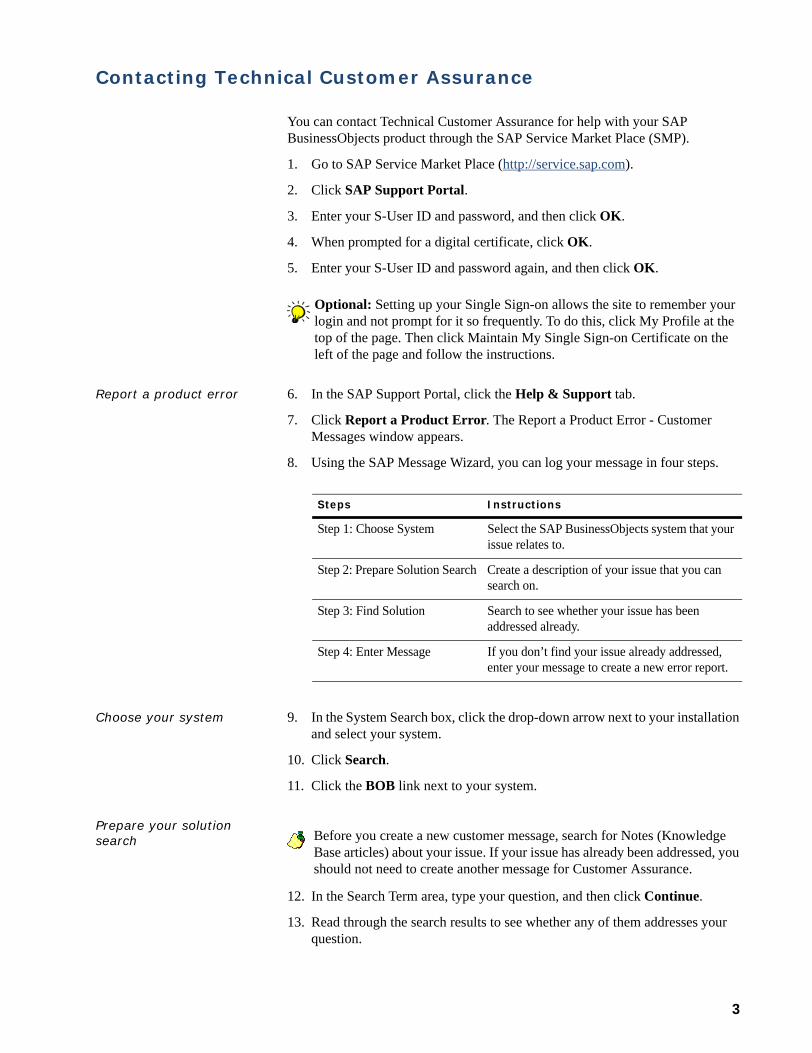
8. Using the SAP Message Wizard, you can log your message in four steps.
Choose your system 9. In the System Search box, click the drop-down arrow next to your installation and select your system.
10. Click Search.
11. Click the BOB link next to your system.
Prepare your solution search
12. In the Search Term area, type your question, and then click Continue.
13. Read through the search results to see whether any of them addresses your question.
Optional: Setting up your Single Sign-on allows the site to remember your login and not prompt for it so frequently. To do this, click My Profile at the top of the page. Then click Maintain My Single Sign-on Certificate on the left of the page and follow the instructions.
Steps Instructions
Step 1: Choose System Select the SAP BusinessObjects system that your issue relates to.
Step 2: Prepare Solution Search Create a description of your issue that you can search on.
Step 3: Find Solution Search to see whether your issue has been addressed already.
Step 4: Enter Message If you don’t find your issue already addressed, enter your message to create a new error report.
Before you create a new customer message, search for Notes (Knowledge Base articles) about your issue. If your issue has already been addressed, you should not need to create another message for Customer Assurance.
3
Enter your message 14. If you do not see any Notes about your question, click Create Message.
15. In the Classification box, choose the component that you want to create a message for. You do so by clicking the icon next to the Component window to see a drop-down list. (By choosing the correct component, you ensure that your message is logged for the appropriate Customer Assurance team.)
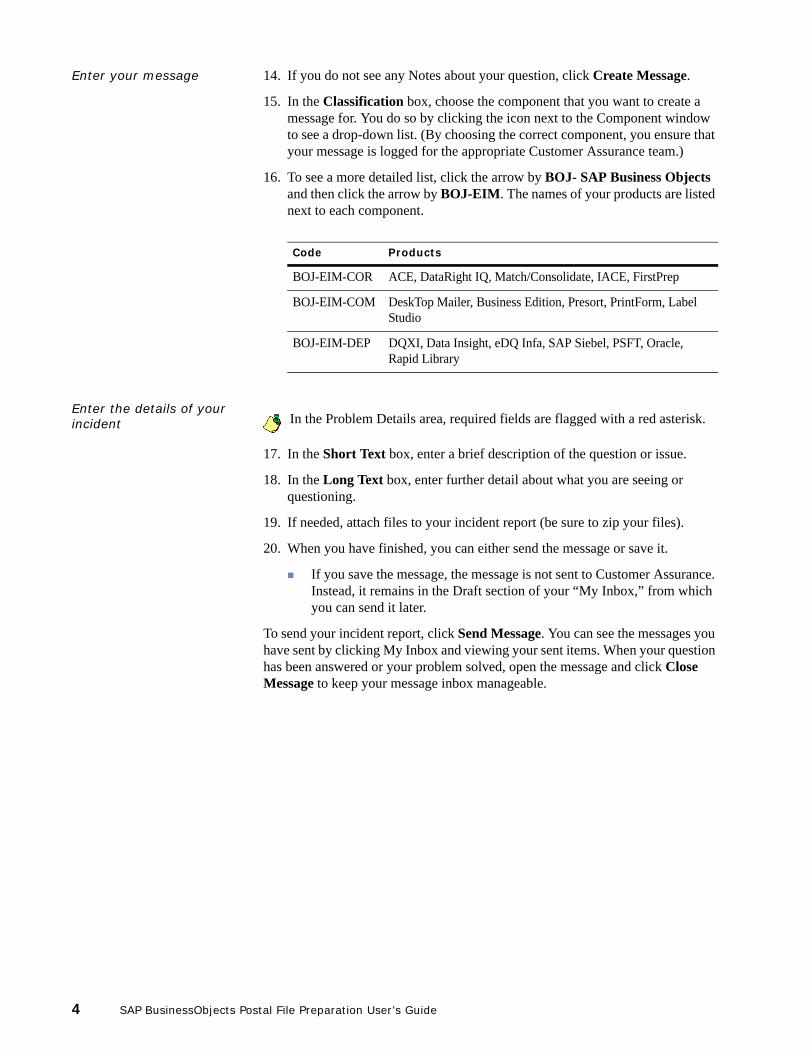
16. To see a more detailed list, click the arrow by BOJ- SAP Business Objects and then click the arrow by BOJ-EIM. The names of your products are listed next to each component.
Enter the details of your incident
17. In the Short Text box, enter a brief description of the question or issue.
18. In the Long Text box, enter further detail about what you are seeing or questioning.
19. If needed, attach files to your incident report (be sure to zip your files).
20. When you have finished, you can either send the message or save it.
If you save the message, the message is not sent to Customer Assurance. Instead, it remains in the Draft section of your “My Inbox,” from which you can send it later.
To send your incident report, click Send Message. You can see the messages you have sent by clicking My Inbox and viewing your sent items. When your question has been answered or your problem solved, open the message and click Close Message to keep your message inbox manageable.
Code Products
BOJ-EIM-COR ACE, DataRight IQ, Match/Consolidate, IACE, FirstPrep
BOJ-EIM-COM DeskTop Mailer, Business Edition, Presort, PrintForm, Label Studio
BOJ-EIM-DEP DQXI, Data Insight, eDQ Infa, SAP Siebel, PSFT, Oracle, Rapid Library
In the Problem Details area, required fields are flagged with a red asterisk.
4 SAP BusinessObjects Postal File Preparation User’s Guide
Chapter 1: Installation and quick start
Read the installation and quick start information in this section to get started with SAP BusinessObjects Postal File Preparation.
Chapter 1: Installation and quick start 5
Install the software
This section includes installation instructions and system requirements.
Operating system requirements
SAP BusinessObjects Postal File Preparation is supported on these Windows operating systems:
Windows XP Professional (32- and 64-bit)Windows 2003 ServerWindows Vista (32- and 64-bit)
System requirements To install and operate the software, we recommend that your system has the following amounts of memory and hard disk space:
A minimum of 128 MB of memory (RAM)A minimum of 60 MB available hard disk space
Install a single workstation
To install to a single workstation:
1. Download the software from the SMP site.
2. Double-click the .exe file.
3. Follow the installation instructions on the screen.
4. When prompted, click No to install the client utility.
Install a server and client system
SAP BusinessObjects Postal File Preparation can be installed on a server system that includes multiple workstations. To do this, you must first install the software onto the server, then set up each workstation (client).
Server installation 1. Follow steps 1-3 from the “Install a single workstation” topic above.
2. Click Yes when you are prompted to install the client utility.
Client installation To set up each workstation:
1. Map a network drive to the server location where the software is installed. For example, if the software is installed to a shared Business Objects applications folder on the server machine, each workstation must map a drive to that folder (\\server1\BusinessObjects_applications, for example).
2. Choose Start > Run from the task bar.
3. Type c:\pw\postalfileprep\client\setup.exe for installing the software (use your own installation drive letter in place of c).
4. Click OK.
!Important: All client workstations must have the same network drive letter mapped to the drive where the software is installed.
6 SAP BusinessObjects Postal File Preparation User’s Guide
The Setup wizard
The first time that you open the software, the Setup wizard starts automatically. The wizard exists to help you enter important and required information upon opening the software. To edit or add new information after you’ve gone through the wizard, choose System > Setup.
Before you start You should have the following information ready to enter before you start the software for the first time. The software requires much of this information, such as file paths, to run.
The IDEAlliance User License Code. See “Enter your IDEAlliance user license code” on page 7 for more information.
Your file paths for support folders such as the import and export folders. See “Define file paths” on page 8 for more information.
The mailers company name, ZIP Code, contact person, phone number, and e-mail address (these are required). See “Enter Company information” on page 8 for more information.
An understanding of what Mail.dat files you’d like the software to create. See “Choose flags and tags print options” on page 9 for more information.
The Dun and Bradstreet DUNS number. See “Choose flags and tags print options” on page 9 for more information.
Enter your IDEAlliance user license code
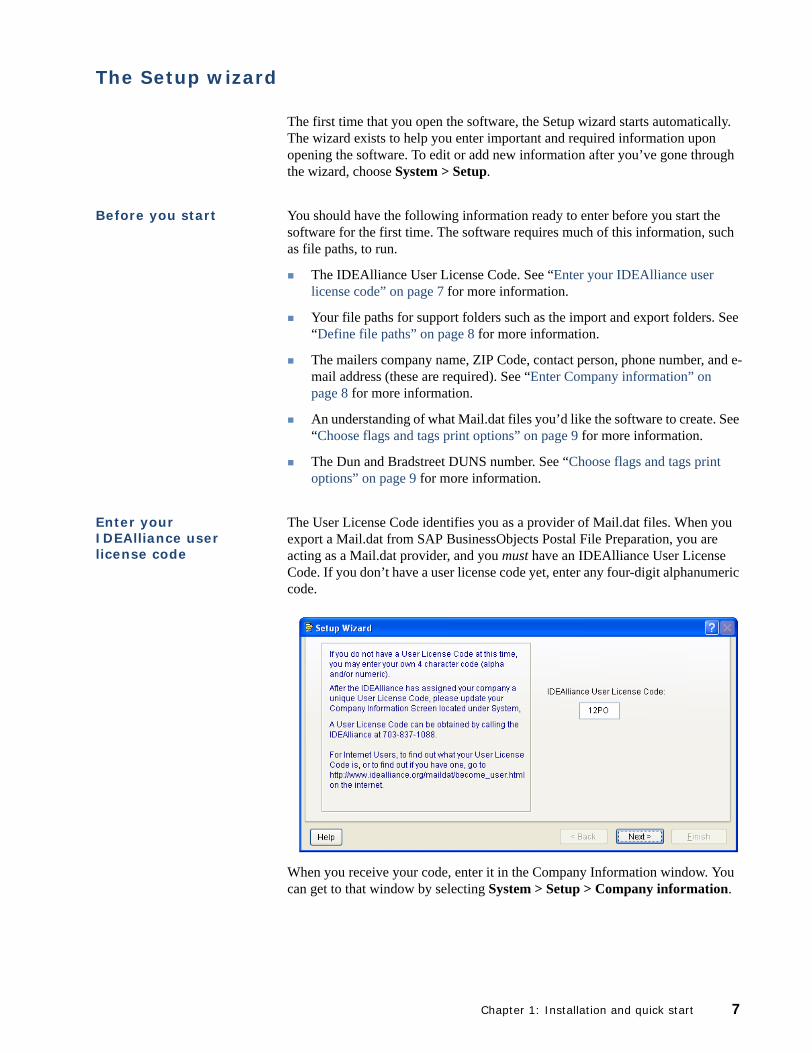
The User License Code identifies you as a provider of Mail.dat files. When you export a Mail.dat from SAP BusinessObjects Postal File Preparation, you are acting as a Mail.dat provider, and you must have an IDEAlliance User License Code. If you don’t have a user license code yet, enter any four-digit alphanumeric code.
When you receive your code, enter it in the Company Information window. You can get to that window by selecting System > Setup > Company information.
Chapter 1: Installation and quick start 7
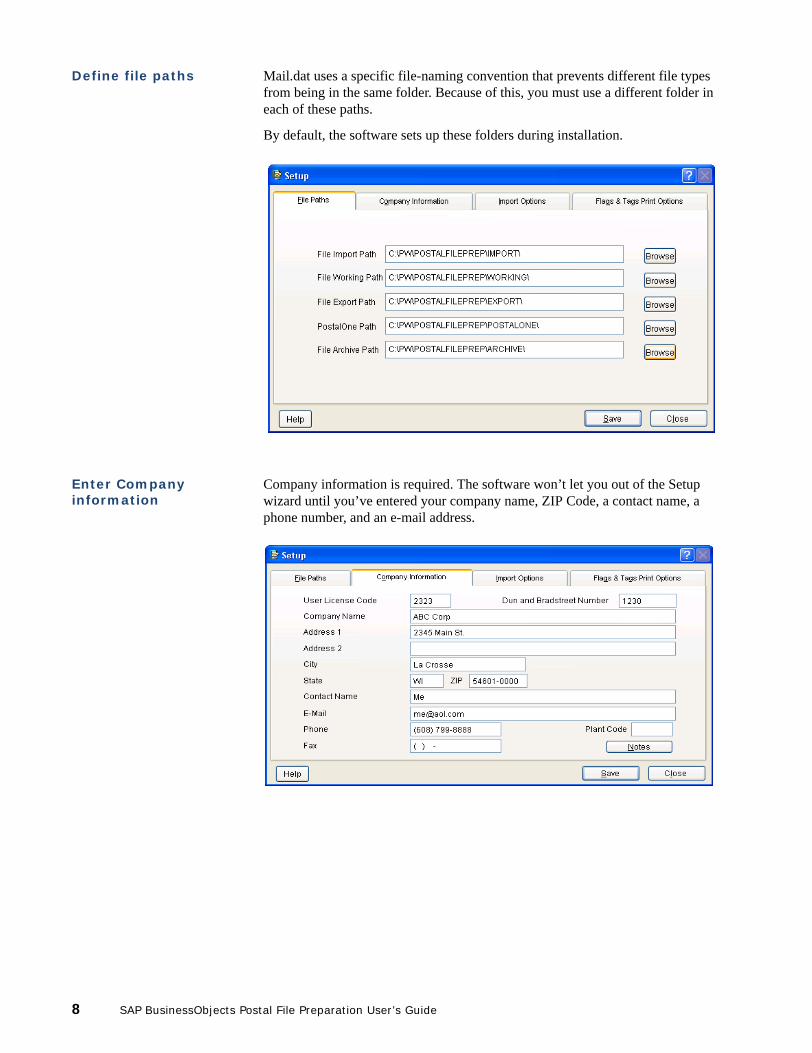
Define file paths Mail.dat uses a specific file-naming convention that prevents different file types from being in the same folder. Because of this, you must use a different folder in each of these paths.
By default, the software sets up these folders during installation.
Enter Company information
Company information is required. The software won’t let you out of the Setup wizard until you’ve entered your company name, ZIP Code, a contact name, a phone number, and an e-mail address.
8 SAP BusinessObjects Postal File Preparation User’s Guide
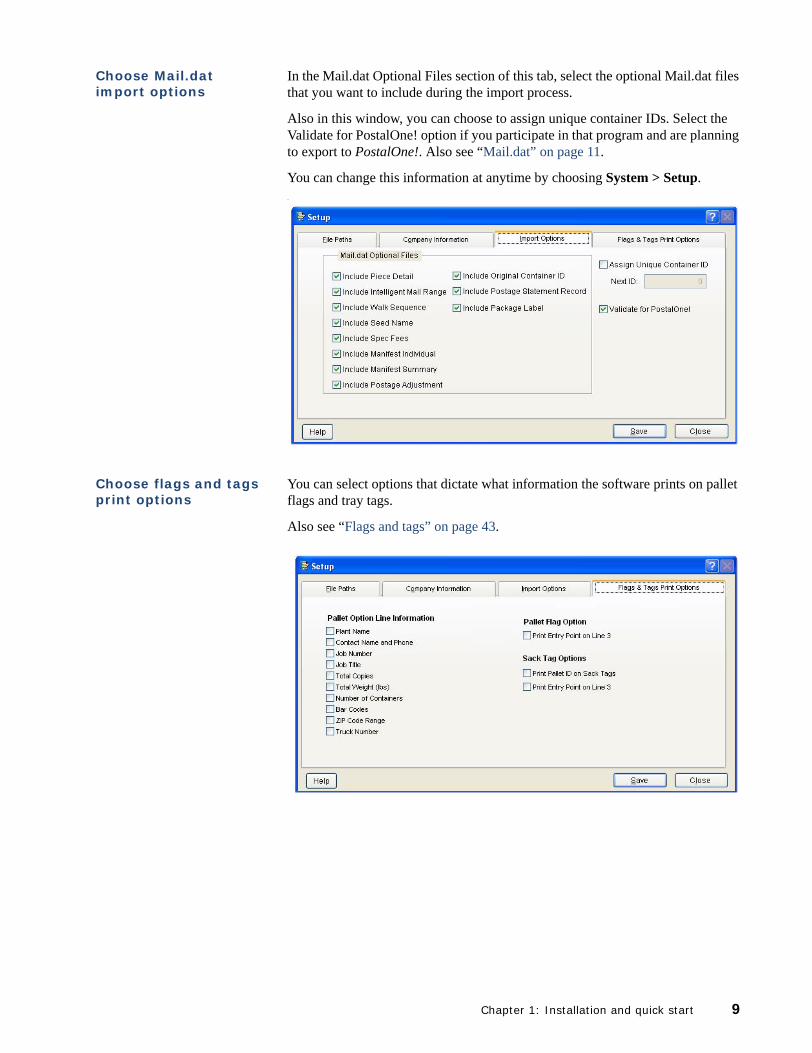
Choose Mail.dat import options
In the Mail.dat Optional Files section of this tab, select the optional Mail.dat files that you want to include during the import process.
Also in this window, you can choose to assign unique container IDs. Select the Validate for PostalOne! option if you participate in that program and are planning to export to PostalOne!. Also see “Mail.dat” on page 11.
You can change this information at anytime by choosing System > Setup.=
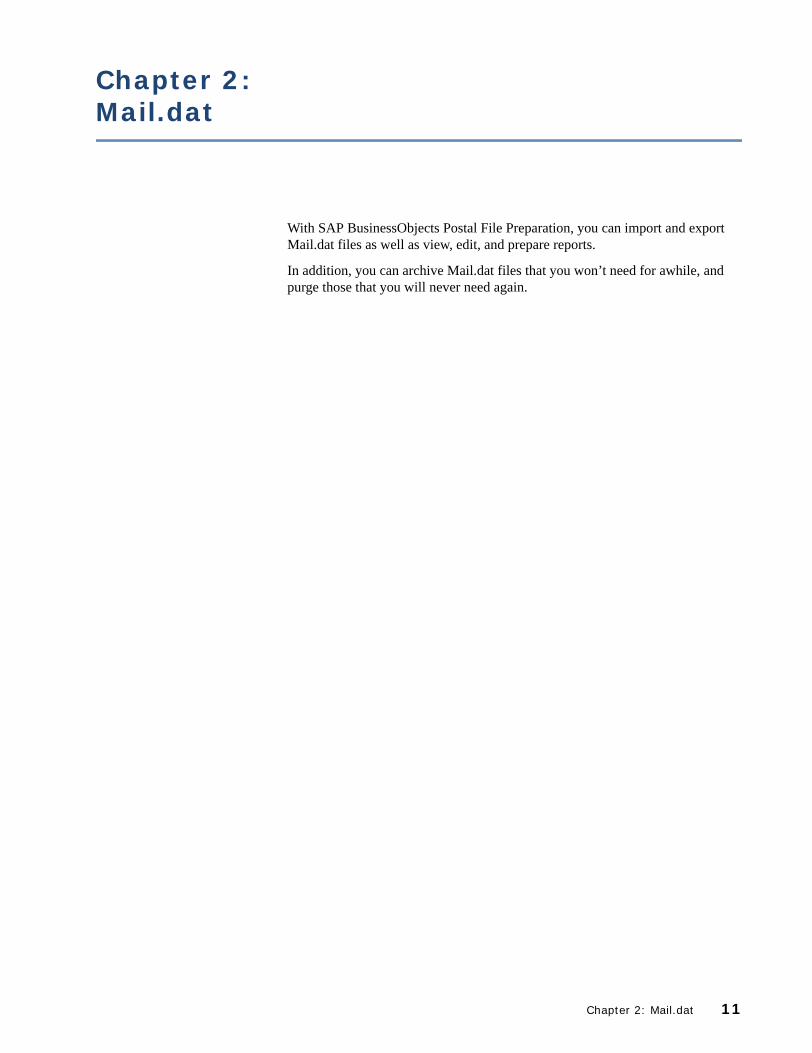
Choose flags and tags print options
You can select options that dictate what information the software prints on pallet flags and tray tags.
Also see “Flags and tags” on page 43.
Chapter 1: Installation and quick start 9

10 SAP BusinessObjects Postal File Preparation User’s Guide
Chapter 2: Mail.dat
With SAP BusinessObjects Postal File Preparation, you can import and export Mail.dat files as well as view, edit, and prepare reports.
In addition, you can archive Mail.dat files that you won’t need for awhile, and purge those that you will never need again.
Chapter 2: Mail.dat 11
Import Mail.dat files
You can set the default path for the import subdirectory through the setup wizard. If you didn’t define your path during setup, do it now by going to System > Setup. The import subdirectory is the default directory that the software points to during the import process.
Before you open or process a Mail.dat, you must first import the file into the software. After you have imported a Mail.dat file, you shouldn’t have to re-import it (see “Re-import Mail.dat files” on page 12 for more information).
To import a Mail.dat file, do the following:
1. Choose File > Import.
If you need to import from a different directory, click New Directory.
2. Select a Mail.dat file and click Import.
3. Assign a customer and permit number to your job. To add or edit customer or permit information, click Add/Edit Customer.
For more information about permit numbers, see “Adding permit numbers” on page 30 and “Editing permit information” on page 30.
For more information about creating a new customer, see “Adding or editing customer information” on page 13.
4. Click OK.
The software validates your Mail.dat and alerts you to any errors that exist. After import, you can open the Mail.dat by choosing File > Open Mail.dat.
Re-import Mail.dat files
After you import a Mail.dat file, you can re-import it if you need to. You may want to do this to restore it to the original condition (for example, you made too many changes and want to start over).
When you re-import a Mail.dat that has already been imported, the one that was imported first is deleted and replaced with the new one. Any changes that you made to the first Mail.dat are lost.
To re-import a Mail.dat:
1. Choose File > Import.
2. Select a Mail.dat and click Import. A message appears telling you that the Mail.dat already exists.
3. Click Yes to overwrite the current Mail.dat.
A sample Mail.dat is available for you to import. You can find the files in the sample directory (for example, c:\pw\postalfileprep\sample).
12 SAP BusinessObjects Postal File Preparation User’s Guide
Retain permit information
When you select a customer in the Customer window that does not have a permit assigned to it, the software queries the Mailer Postage Account (MPA) record.
If the software does find permit information in the MPA record, a message appears asking you if you want to overwrite the current permit information with the information found in the MPA record. Click Yes to overwrite the permit information or click No to keep it.
For more information about permits, see “Adding permit numbers” on page 30 and “Editing permit information” on page 30.
Adding or editing customer information
To add or edit customer information, do the following:
1. In the Assign Customer Code and Permit Number window, choose File > Add Customers/Permits.
2. In the Customer window, click Add or Edit.
3. Enter the new customer information.
For more information, see “Adding permit numbers” on page 30 and “Editing permit information” on page 30.
4. Click Save.
5. Click Exit.
Chapter 2: Mail.dat 13
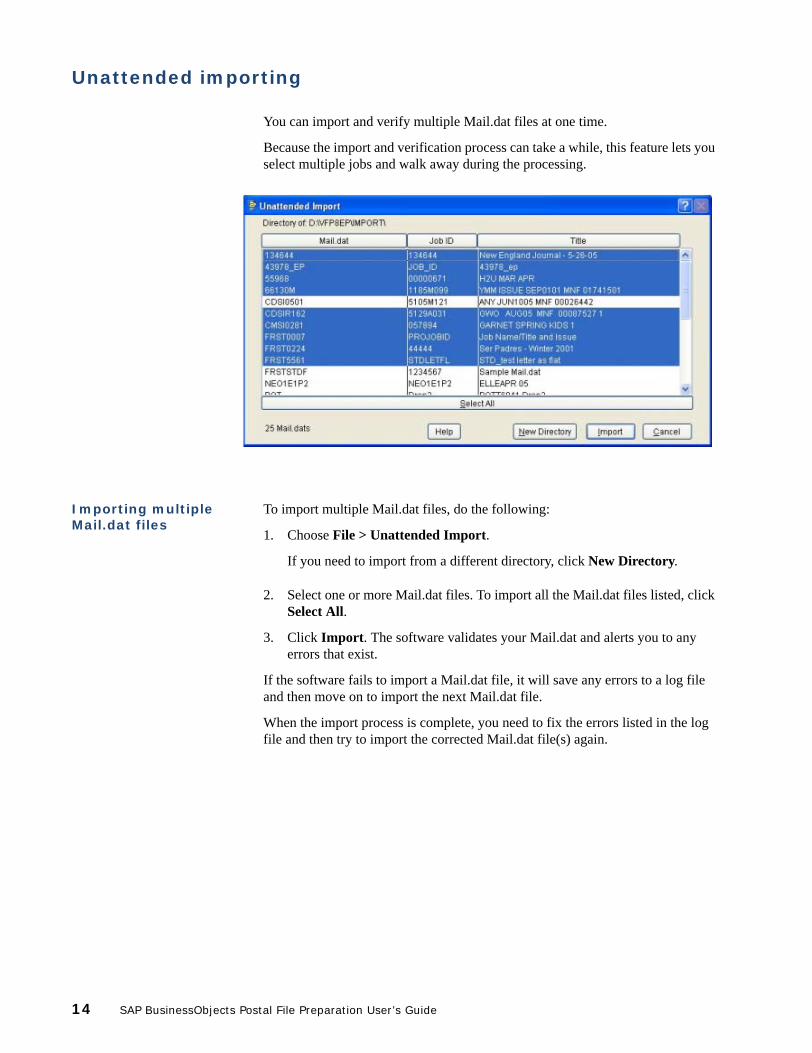
Unattended importing
You can import and verify multiple Mail.dat files at one time.
Because the import and verification process can take a while, this feature lets you select multiple jobs and walk away during the processing.
Importing multiple Mail.dat files
To import multiple Mail.dat files, do the following:
1. Choose File > Unattended Import.
If you need to import from a different directory, click New Directory.
2. Select one or more Mail.dat files. To import all the Mail.dat files listed, click Select All.
3. Click Import. The software validates your Mail.dat and alerts you to any errors that exist.
If the software fails to import a Mail.dat file, it will save any errors to a log file and then move on to import the next Mail.dat file.
When the import process is complete, you need to fix the errors listed in the log file and then try to import the corrected Mail.dat file(s) again.
14 SAP BusinessObjects Postal File Preparation User’s Guide
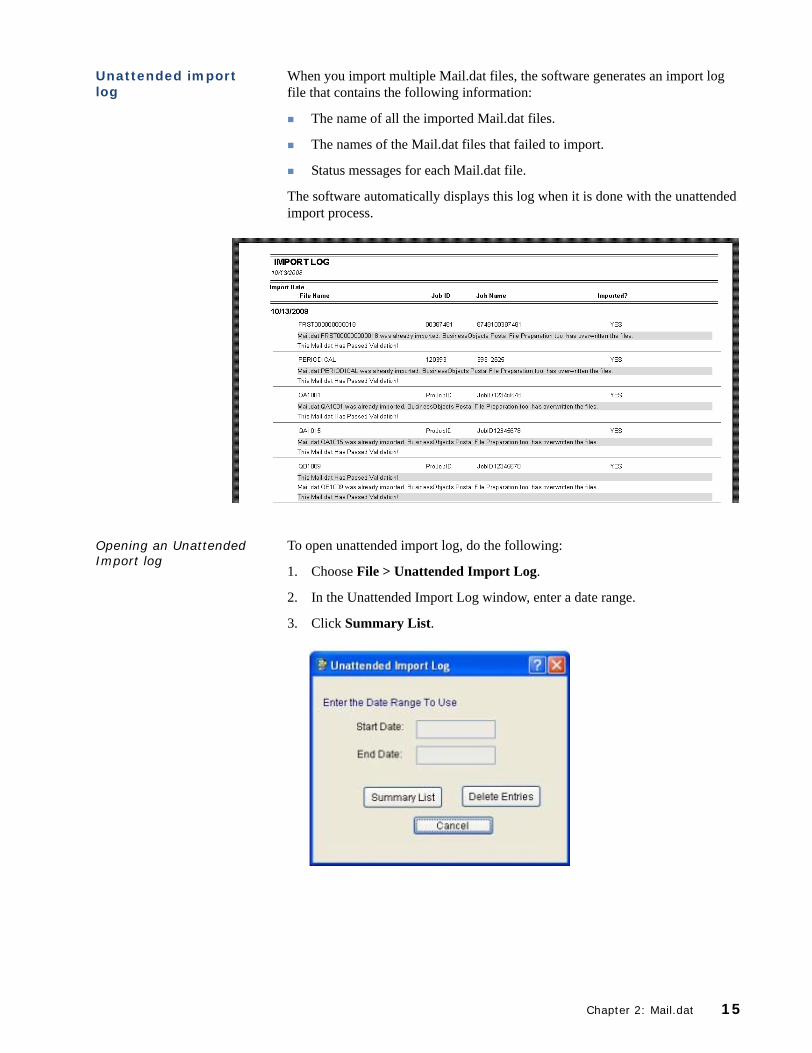
Unattended import log
When you import multiple Mail.dat files, the software generates an import log file that contains the following information:
The name of all the imported Mail.dat files.
The names of the Mail.dat files that failed to import.
Status messages for each Mail.dat file.
The software automatically displays this log when it is done with the unattended import process.
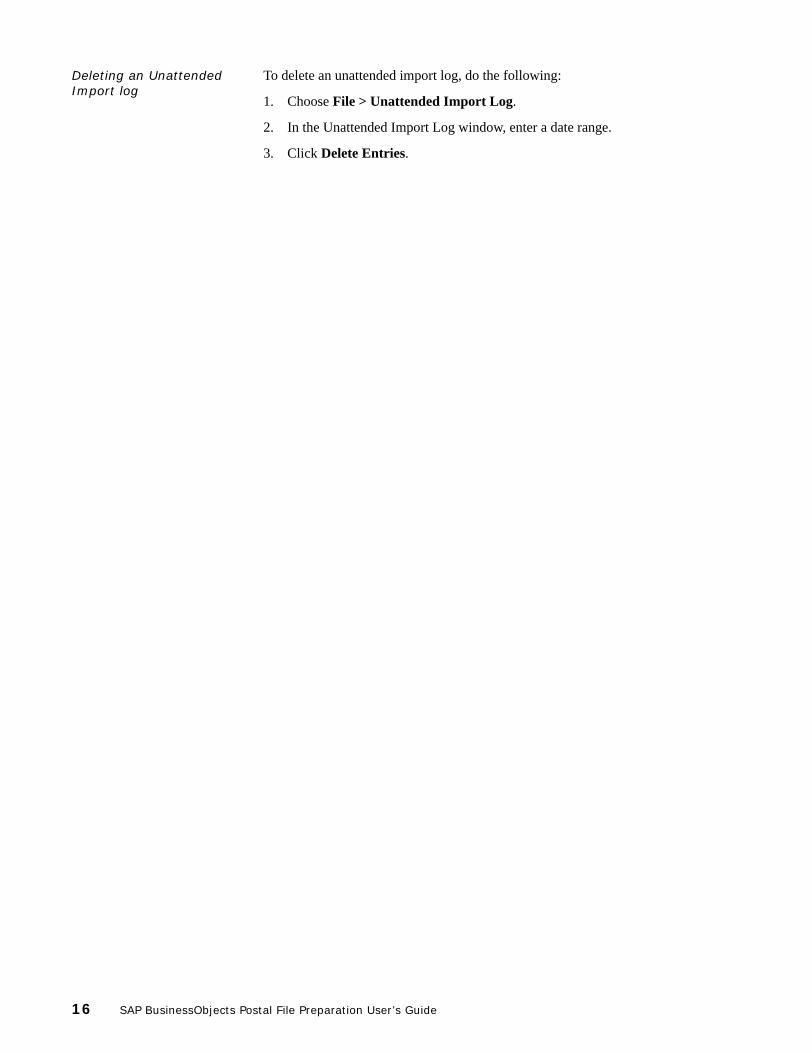
Opening an Unattended Import log
To open unattended import log, do the following:
1. Choose File > Unattended Import Log.
2. In the Unattended Import Log window, enter a date range.
3. Click Summary List.
Chapter 2: Mail.dat 15
Deleting an Unattended Import log
To delete an unattended import log, do the following:
1. Choose File > Unattended Import Log.
2. In the Unattended Import Log window, enter a date range.
3. Click Delete Entries.
16 SAP BusinessObjects Postal File Preparation User’s Guide
Validate Mail.dat files
SAP BusinessObjects Postal File Preparation automatically checks all Mail.dat files for errors.
In some situations the software automatically validates, or prompts you to validate. You can validate your Mail.dat files at any time by choosing Edit > Validate.
There are three levels of validation:
Validation levels Description
Relational A Mail.dat consists of several records that are related through keyed information. The Mail.dat contains errors when there is an incorrect relationship between records. You can fix some relational errors, but some require you to obtain a new Mail.dat from the provider.
Content Some of the fields in the Mail.dat are required. If the provider did not supply the appropriate information, the corresponding field is marked with an error. In most cases, you can correct errors using the editing tool.
Qualification A Mail.dat must be a true representation of the physical mail-ing. That is, the values entered in the Mail.dat must be correct for the type and class of mail. To verify this, the software com-pares summary reports and presort totals to other information in the Mail.dat. You can fix some qualification errors, but some require you to obtain a new Mail.dat from the provider.
Chapter 2: Mail.dat 17

Edit Mail.dat fields
The software provides tools for you to view and edit Mail.dat fields (for instance, to fix errors). Note that there are some fields that you can view, but not change.
To edit a Mail.dat file, do the following:
1. Open the Mail.dat that you want to edit by choosing File > Open Mail.dat.
2. Choose Edit > Edit Mail.dat.
3. Select the record that you want to edit and click OK. The Record Editor window appears for the chosen record.
4. Find the field that contains the error (blue or red).
5. Click Edit.
6. Correct the errors and click Save when you are done.
7. Click Close.
18 SAP BusinessObjects Postal File Preparation User’s Guide
Correct errors
When the software’s verification process detects errors in your Mail.dat, the Mail.dat Validation Error window appears.
This window is also referred to as the Summary Error Report. The Summary Error Report contains the following information:
The name of the table.
The number of errors in that table.
The number of records in the table that contain errors.
To locate an error within your Mail.dat, use one of the following methods:
Double-click the table name.
Highlight the error and click Go To.
You cannot export or perform other functions if errors exist in your Mail.dat.
Modifying information in one record can impact other records in the Mail.dat. Therefore, after you finish fixing errors in the Mail.dat, the sofware may require you to re-validate the Mail.dat file. To re-validate a Mail.dat, choose Edit > Validate.
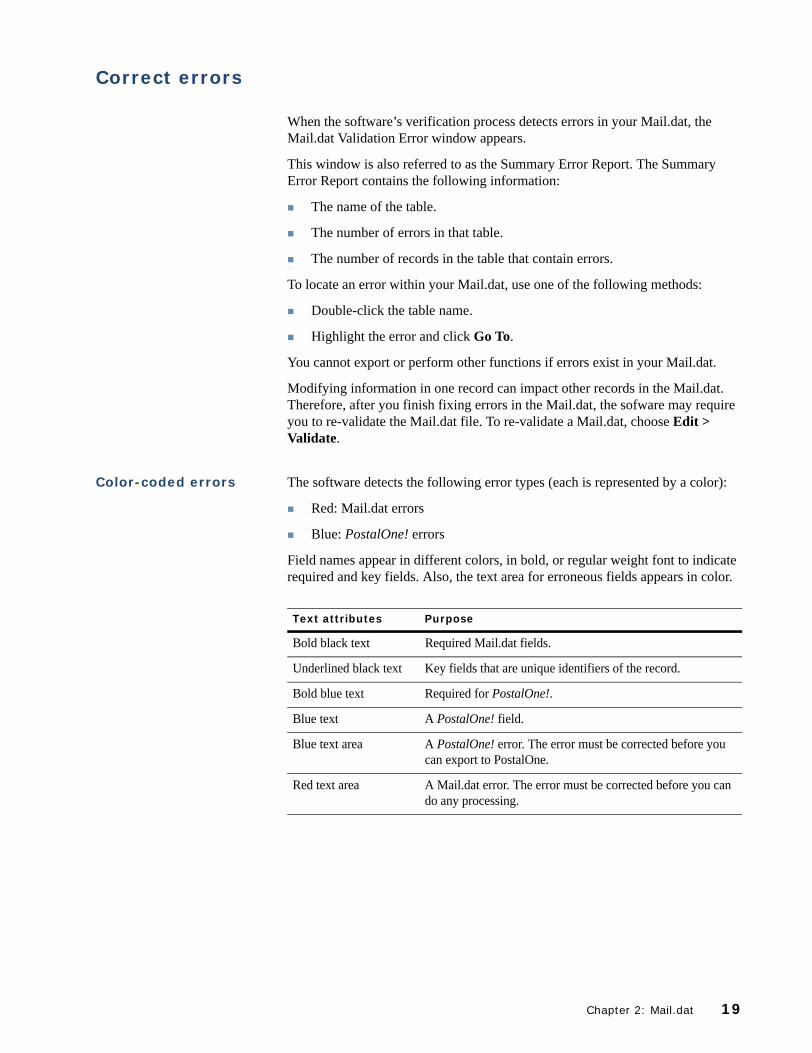
Color-coded errors The software detects the following error types (each is represented by a color):
Red: Mail.dat errors
Blue: PostalOne! errors
Field names appear in different colors, in bold, or regular weight font to indicate required and key fields. Also, the text area for erroneous fields appears in color.
Text attributes Purpose
Bold black text Required Mail.dat fields.
Underlined black text Key fields that are unique identifiers of the record.
Bold blue text Required for PostalOne!.
Blue text A PostalOne! field.
Blue text area A PostalOne! error. The error must be corrected before you can export to PostalOne.
Red text area A Mail.dat error. The error must be corrected before you can do any processing.
Chapter 2: Mail.dat 19
Export Mail.dat files
You can export a Mail.dat so that it’s available for further processing in another program. Exporting let’s you save the Mail.dat with a different name to the Export folder.
If you haven’t already set the path to the Export folder, go to System > Setup. You must set the path before you can export any files.
To export a Mail.dat, do the following:
1. Validate and correct all errors in the Mail.dat. Revalidate to make sure all errors are corrected (see “Correct errors” on page 19 and “Validate Mail.dat files” on page 17).
2. Choose File > Export > Export to Mail.dat.
3. Enter a unique Mail.dat ID Code and click OK.
A file export progress window appears. When the export is complete, the progress window disappears.
Note: If specific errors are present in the Mail.dat, the Export To options are not available.
20 SAP BusinessObjects Postal File Preparation User’s Guide
Archive Mail.dat files
If you have Mail.dat files that you don’t need, you can archive them. Archiving conserves space by compressing the Mail.dat files into a single Mail.dat and saving it to a designated directory.
You can also archive multiple Mail.dat files to save space on your hard drive.
To archive Mail.dat files:
1. Choose System > Archive.
2. Select the Mail.dat and click Archive.
3. Select the destination for the archived Mail.dat.
4. The software compresses and saves the Mail.dat in the directory or onto a device that you specify.
The Archive Status indicates that the archive is complete. Click Done.
Restore Mail.dat files After archiving a Mail.dat, you must restore the file before you can open it again.
When restoring an archived Mail.dat, be sure the archive path in System > Setup is set to the same path as when you originally archived the file.
Chapter 2: Mail.dat 21
Purge Mail.dat files
When you are finished with a Mail.dat, and you are sure that you don’t need to access it again, use the software’s purge feature (System > Purge) to delete your archived or active Mail.dat files.
Purging the Archive folder
1. Choose System > Purge > Archived Mail.dat.
2. Select the Mail.dat that you want to purge and click Delete.
3. The software asks if you are sure you want to Delete the file. Click Yes.
Purging active Mail.dat files
1. Choose System > Purge > Active Mail.dat. The Delete Mail.dat window opens.
2. Select one or more Mail.dat files that you want to purge.
3. Click Delete.
!Important: After files have been purged, you cannot restore them.
22 SAP BusinessObjects Postal File Preparation User’s Guide
Chapter 3: PostalOne!®
SAP BusinessObjects Postal File Preparation prepares Mail.dat information according to PostalOne! standards. You can set shipping dates, assign permits, and correct errors using the software’s convenient PostalOne! wizard.
Register for PostalOne!
To register for PostalOne!, do the following:
1. Visit the PostalOne! registration page at http://www.usps.com/postalone/.
2. Click Learn More under the New Customers heading.
3. Follow the instructions on the PostalOne! web site.
After you register with PostalOne! and they confirm and activate your account, you can send Mail.dat information electronically to the USPS by uploading the information to PostalOne!’s secure web page.
For instructions about uploading Mail.dats to PostalOne!, see the PostalOne! User’s Guide at https://www.usps.com/postalone/guides.htm.
Activate PostalOne! validation
Upon installation, the software automatically activates PostalOne! validation.
To change this setting, do the following:
1. Choose System > Setup and select the Import Options tab.
2. Select or deselect Validate for PostalOne!.
3. Click Save.
4. Click Exit Setup.
Chapter 3: PostalOne!® 23
PostalOne! wizard
The software has a wizard that quickly and easily guides you through all of the necessary steps for exporting PostalOne! files. Start the PostalOne! wizard by choosing Tools > PostalOne.
You must export to PostalOne! using the software before you can upload your files to the PostalOne! web site.
The software saves your files to the directory that you specified in System > Setup > File Paths. The default location is a folder named PostalOne!, which is located in the program’s installation directory.
Here are the wizard windows in the software that you need to complete before you can upload files to PostalOne!.
1. PostalOne! wizard tab 1: Enter Container Information2. PostalOne! wizard tab 2: Assign customer and permit3. PostalOne! wizard tab 3: PostalOne! Populate Fields4. PostalOne! wizard tab 4: PostalOne! Validation Errors5. PostalOne! wizard tab 5: PostalOne! Create Files
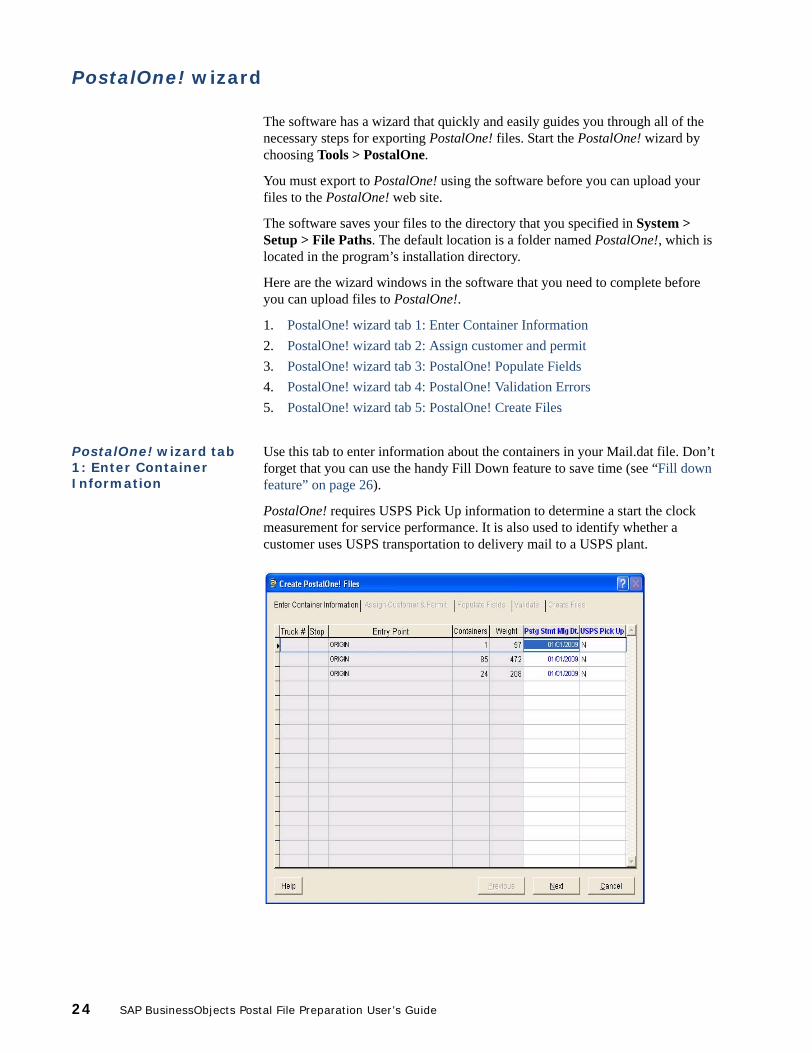
PostalOne! wizard tab 1: Enter Container Information
Use this tab to enter information about the containers in your Mail.dat file. Don’t forget that you can use the handy Fill Down feature to save time (see “Fill down feature” on page 26).
PostalOne! requires USPS Pick Up information to determine a start the clock measurement for service performance. It is also used to identify whether a customer uses USPS transportation to delivery mail to a USPS plant.
24 SAP BusinessObjects Postal File Preparation User’s Guide
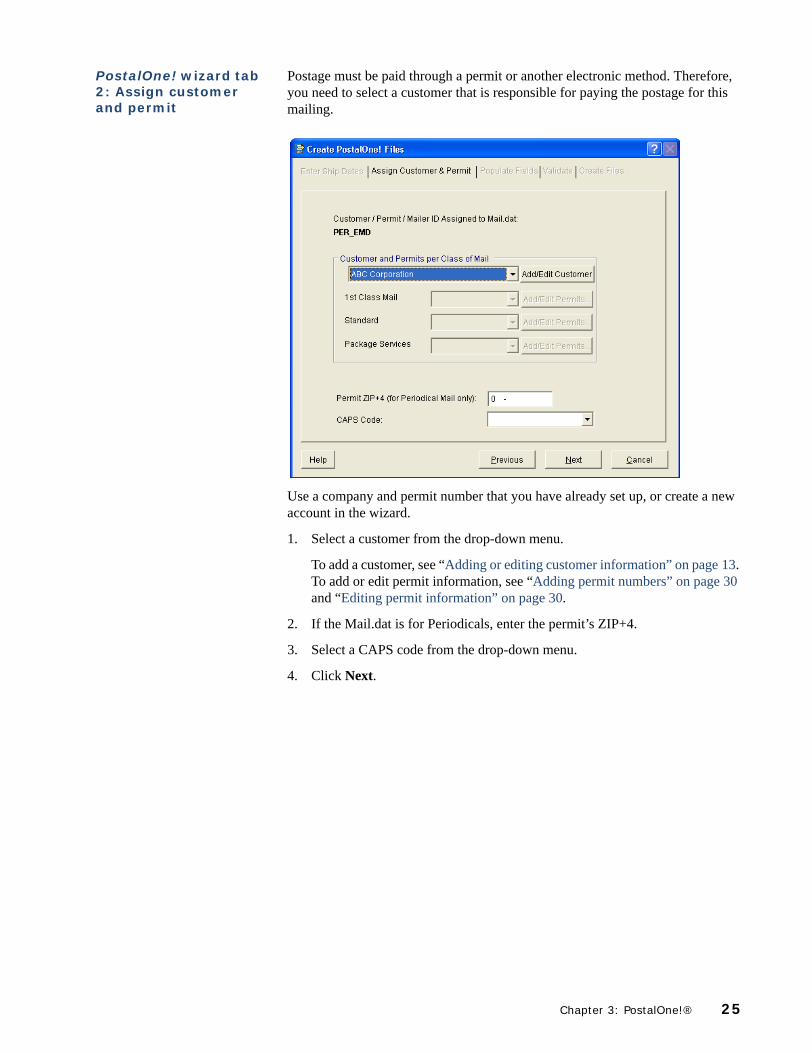
PostalOne! wizard tab 2: Assign customer and permit
Postage must be paid through a permit or another electronic method. Therefore, you need to select a customer that is responsible for paying the postage for this mailing.
Use a company and permit number that you have already set up, or create a new account in the wizard.
1. Select a customer from the drop-down menu.
To add a customer, see “Adding or editing customer information” on page 13. To add or edit permit information, see “Adding permit numbers” on page 30 and “Editing permit information” on page 30.
2. If the Mail.dat is for Periodicals, enter the permit’s ZIP+4.
3. Select a CAPS code from the drop-down menu.
4. Click Next.
Chapter 3: PostalOne!® 25
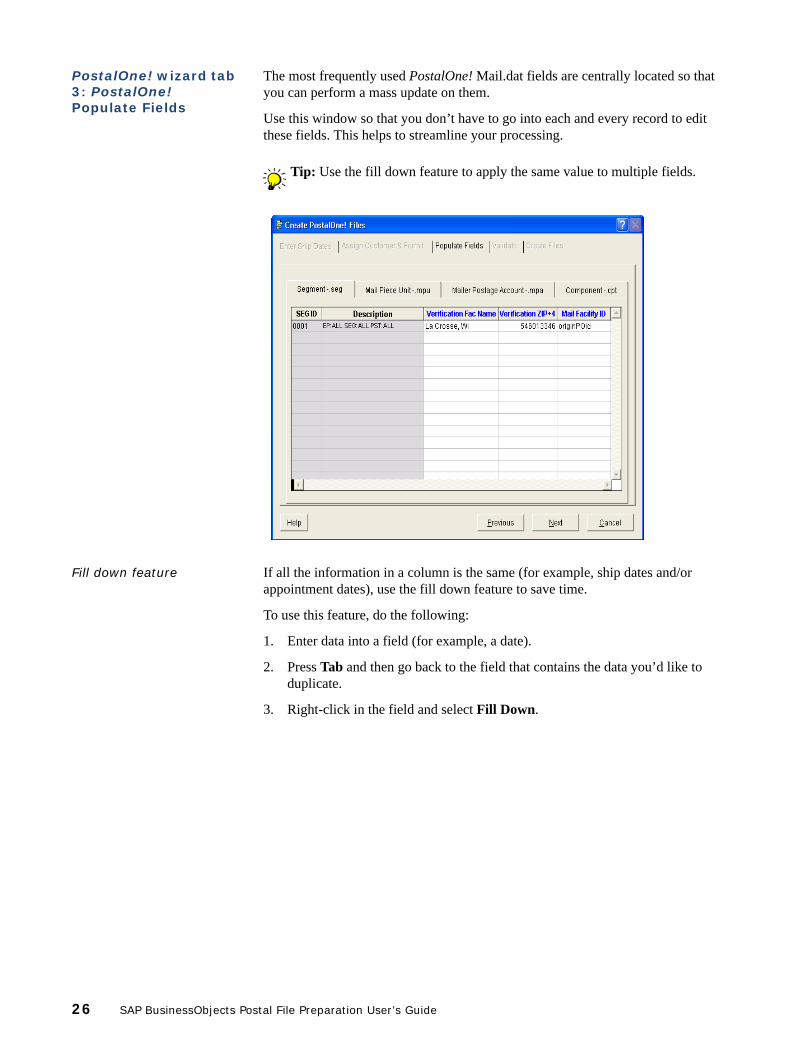
PostalOne! wizard tab 3: PostalOne! Populate Fields
The most frequently used PostalOne! Mail.dat fields are centrally located so that you can perform a mass update on them.
Use this window so that you don’t have to go into each and every record to edit these fields. This helps to streamline your processing.
Fill down feature If all the information in a column is the same (for example, ship dates and/or appointment dates), use the fill down feature to save time.
To use this feature, do the following:
1. Enter data into a field (for example, a date).
2. Press Tab and then go back to the field that contains the data you’d like to duplicate.
3. Right-click in the field and select Fill Down.
Tip: Use the fill down feature to apply the same value to multiple fields.
26 SAP BusinessObjects Postal File Preparation User’s Guide
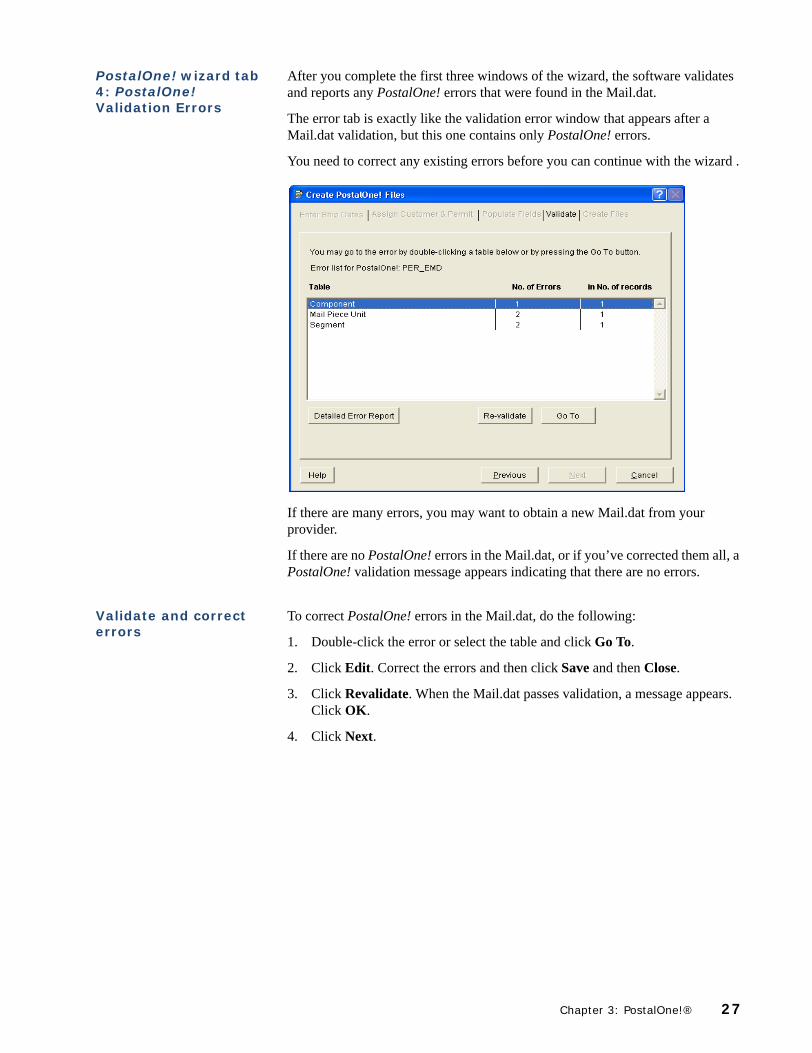
PostalOne! wizard tab 4: PostalOne! Validation Errors
After you complete the first three windows of the wizard, the software validates and reports any PostalOne! errors that were found in the Mail.dat.
The error tab is exactly like the validation error window that appears after a Mail.dat validation, but this one contains only PostalOne! errors.
You need to correct any existing errors before you can continue with the wizard .
If there are many errors, you may want to obtain a new Mail.dat from your provider.
If there are no PostalOne! errors in the Mail.dat, or if you’ve corrected them all, a PostalOne! validation message appears indicating that there are no errors.
Validate and correct errors
To correct PostalOne! errors in the Mail.dat, do the following:
1. Double-click the error or select the table and click Go To.
2. Click Edit. Correct the errors and then click Save and then Close.
3. Click Revalidate. When the Mail.dat passes validation, a message appears. Click OK.
4. Click Next.
Chapter 3: PostalOne!® 27
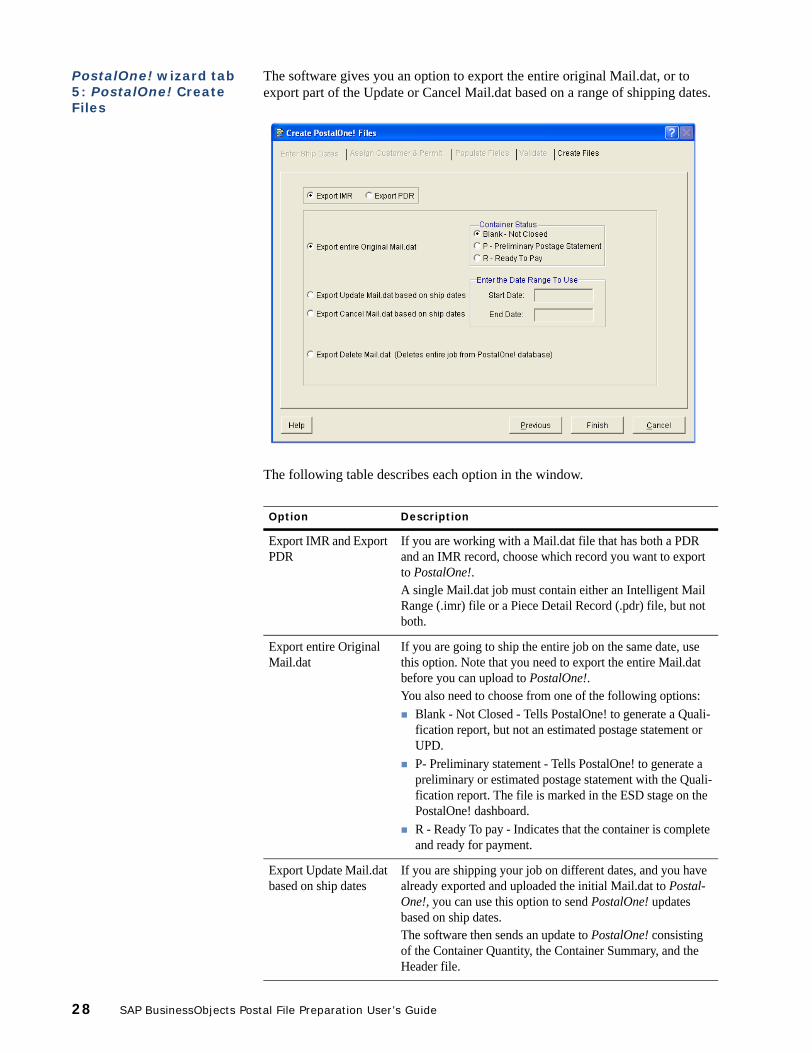
PostalOne! wizard tab 5: PostalOne! Create Files
The software gives you an option to export the entire original Mail.dat, or to export part of the Update or Cancel Mail.dat based on a range of shipping dates.
The following table describes each option in the window.
Option Description
Export IMR and Export PDR
If you are working with a Mail.dat file that has both a PDR and an IMR record, choose which record you want to export to PostalOne!.A single Mail.dat job must contain either an Intelligent Mail Range (.imr) file or a Piece Detail Record (.pdr) file, but not both.
Export entire Original Mail.dat
If you are going to ship the entire job on the same date, use this option. Note that you need to export the entire Mail.dat before you can upload to PostalOne!. You also need to choose from one of the following options:
Blank - Not Closed - Tells PostalOne! to generate a Quali-fication report, but not an estimated postage statement or UPD.P- Preliminary statement - Tells PostalOne! to generate a preliminary or estimated postage statement with the Quali-fication report. The file is marked in the ESD stage on the PostalOne! dashboard.R - Ready To pay - Indicates that the container is complete and ready for payment.
Export Update Mail.dat based on ship dates
If you are shipping your job on different dates, and you have already exported and uploaded the initial Mail.dat to Postal-One!, you can use this option to send PostalOne! updates based on ship dates.The software then sends an update to PostalOne! consisting of the Container Quantity, the Container Summary, and the Header file.
28 SAP BusinessObjects Postal File Preparation User’s Guide
Export Cancel Mail.dat based on ship dates
This option allows you to cancel a PostalOne! job (entire or partial). Cancellation marks only specified containers (based on ship dates) for cancellation. Other remaining containers still appear on the postage payment. When you select this option, the software populates the Con-tainer Status field in the Container Summary table (.csm) with a “C” for Cancel instead of an “R” for Ready to Pay.Important: It is your responsibility to verify that the dates you enter are valid! The software does not do this for you. PostalOne! does, however, verify that your dates are valid and they reject Mail.dat files with invalid dates.
Export Delete Mail.dat The Delete Mail.dat option deletes a Mail.dat and removes the entire job from the PostalOne! database. The software also exports the Header file (.hdr) and the Seg-ment file (.seg). In the Header file, the software sets the Record Status field to “N” for None Transmitted and the record count to zero. In the Segment file, the software sets the Record Status field to “D” for Delete and the Record count to the number of seg-ment records.
Option Description
Chapter 3: PostalOne!® 29
Permit numbers
In an effort to standardize the permit number format that users submit to PostalOne!, IDEAlliance has specific format rules.
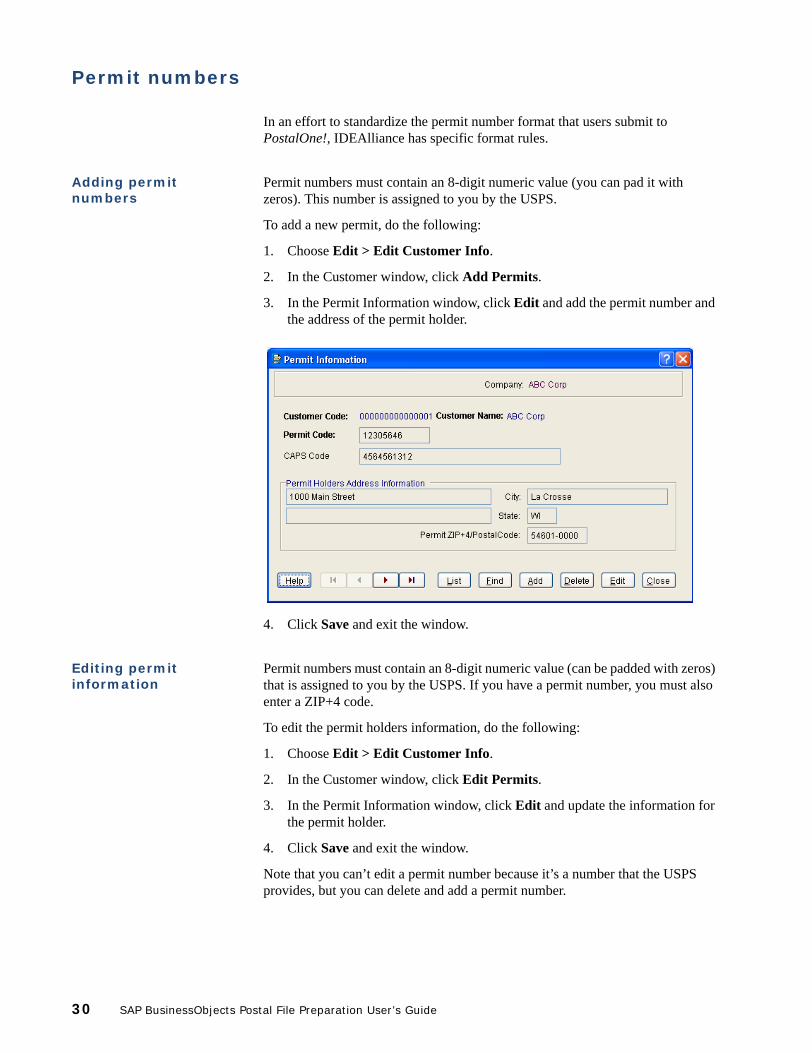
Adding permit numbers
Permit numbers must contain an 8-digit numeric value (you can pad it with zeros). This number is assigned to you by the USPS.
To add a new permit, do the following:
1. Choose Edit > Edit Customer Info.
2. In the Customer window, click Add Permits.
3. In the Permit Information window, click Edit and add the permit number and the address of the permit holder.
4. Click Save and exit the window.
Editing permit information
Permit numbers must contain an 8-digit numeric value (can be padded with zeros) that is assigned to you by the USPS. If you have a permit number, you must also enter a ZIP+4 code.
To edit the permit holders information, do the following:
1. Choose Edit > Edit Customer Info.
2. In the Customer window, click Edit Permits.
3. In the Permit Information window, click Edit and update the information for the permit holder.
4. Click Save and exit the window.
Note that you can’t edit a permit number because it’s a number that the USPS provides, but you can delete and add a permit number.
30 SAP BusinessObjects Postal File Preparation User’s Guide
Chapter 4: Planning
SAP BusinessObjects Postal File Preparation can use information in your Mail.dat files to help you edit truck load assignments and piece weight and advertising percentages.
Chapter 4: Planning 31
Truck load editing
Through truck load editing you can:
Assign truck numbers to pallets, sacks, and trays
Enter dates
Remove containers
If your Mail.dat has a preplan, the software may automatically assign truck numbers (see “Automatic truck number assignment” on page 32).
If your job doesn’t have a preplan, do the following:
1. Choose Edit > Truck Load Editing.
2. In the Select Options for Truck Load Editing window, select one or more segment IDs to include or click Select All. Click OK.
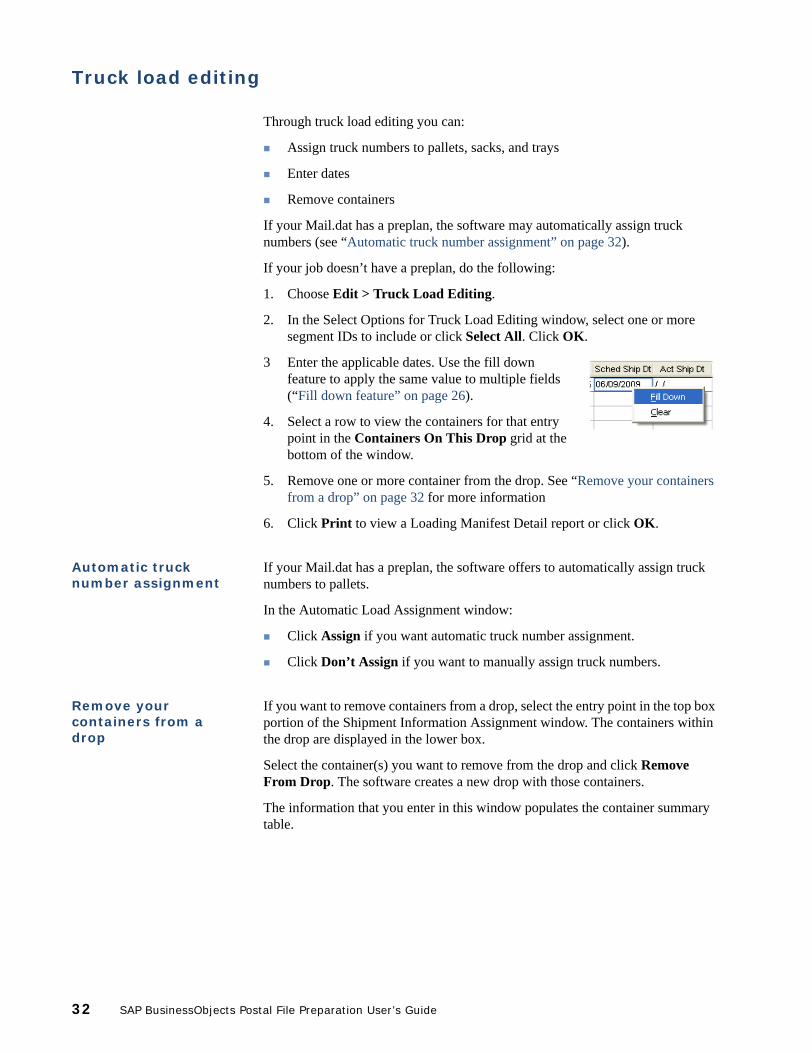
3 Enter the applicable dates. Use the fill down feature to apply the same value to multiple fields (“Fill down feature” on page 26).
4. Select a row to view the containers for that entry point in the Containers On This Drop grid at the bottom of the window.
5. Remove one or more container from the drop. See “Remove your containers from a drop” on page 32 for more information
6. Click Print to view a Loading Manifest Detail report or click OK.
Automatic truck number assignment
If your Mail.dat has a preplan, the software offers to automatically assign truck numbers to pallets.
In the Automatic Load Assignment window:
Click Assign if you want automatic truck number assignment.
Click Don’t Assign if you want to manually assign truck numbers.
Remove your containers from a drop
If you want to remove containers from a drop, select the entry point in the top box portion of the Shipment Information Assignment window. The containers within the drop are displayed in the lower box.
Select the container(s) you want to remove from the drop and click Remove From Drop. The software creates a new drop with those containers.
The information that you enter in this window populates the container summary table.
32 SAP BusinessObjects Postal File Preparation User’s Guide
Assign in-home dates
You can enter dates in the software for indicating to the USPS the date range for a particular piece to be delivered.
To assign in-home dates, do the following:
1. Choose Edit > Assign In-Home Dates.
2. In the row of the job or segment that you want to assign, click in the In Home Start column.
3. Enter a date in MMDDYYYY format and press the Tab key.
4. Enter a second date in the In Home End column. This date can be up to three days later than the In Home Start date.
5. Click OK.
Tip: If all of the segments or jobs in the Mail.dat use the same date, use the fill-down feature to auto-fill the same date for all.
Chapter 4: Planning 33
Edit piece attributes
In many cases, the software estimates the piece attributes during the creation of a Mail.dat. You can then generate reports that accurately reflect your mailing.
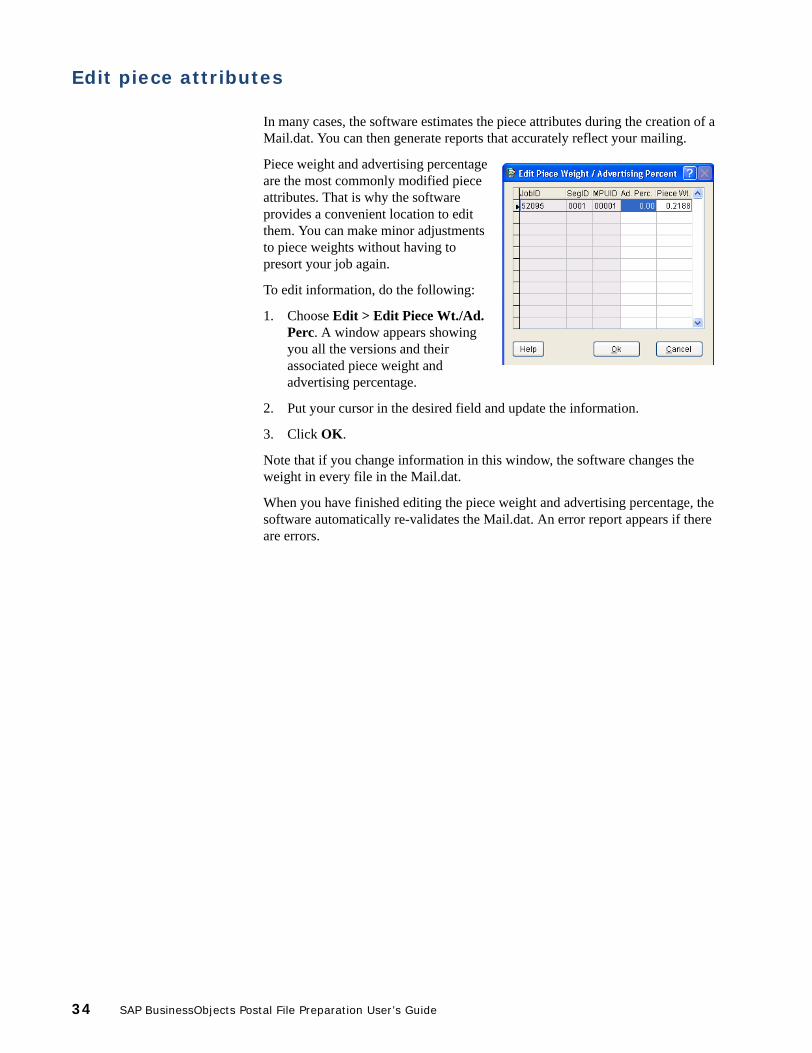
Piece weight and advertising percentage are the most commonly modified piece attributes. That is why the software provides a convenient location to edit them. You can make minor adjustments to piece weights without having to presort your job again.
To edit information, do the following:
1. Choose Edit > Edit Piece Wt./Ad. Perc. A window appears showing you all the versions and their associated piece weight and advertising percentage.
2. Put your cursor in the desired field and update the information.
3. Click OK.
Note that if you change information in this window, the software changes the weight in every file in the Mail.dat.
When you have finished editing the piece weight and advertising percentage, the software automatically re-validates the Mail.dat. An error report appears if there are errors.
34 SAP BusinessObjects Postal File Preparation User’s Guide
Chapter 5: Reports
This section introduces you to SAP BusinessObjects Postal File Preparation reports.
From summary reports to audit trails, you can find a report detailing exactly the information you need.
Chapter 5: Reports 35
Printing options
In the Printing Options window, you can choose how you’d like to view report information.
Select Screen to view your reports or labels on the computer screen.
Select Printer to print your reports or labels.
Select File to save your reports or labels.
About the report examples
Due to space limitations, report samples are condensed. In some cases, sections are removed from report samples, leading to incorrect sums.
To see examples of reports, open one of your Mail.dat files in the software and go to the Reports menu to view them on screen.
36 SAP BusinessObjects Postal File Preparation User’s Guide
Reports
SAP BusinessObjects Postal File Preparation produces the following reports:
“Job Summary” on page 37
“Presort Summary” on page 38
“Containerization Summary” on page 38
“Destination Entry Zone Distribution” on page 39
“Mail Content Audit by Container Type by Package” on page 39
“Palletized Content List report” on page 40
“Error reports” on page 41
For information on pallet flags and sack and tray tags, see “Flags and tags” on page 43.
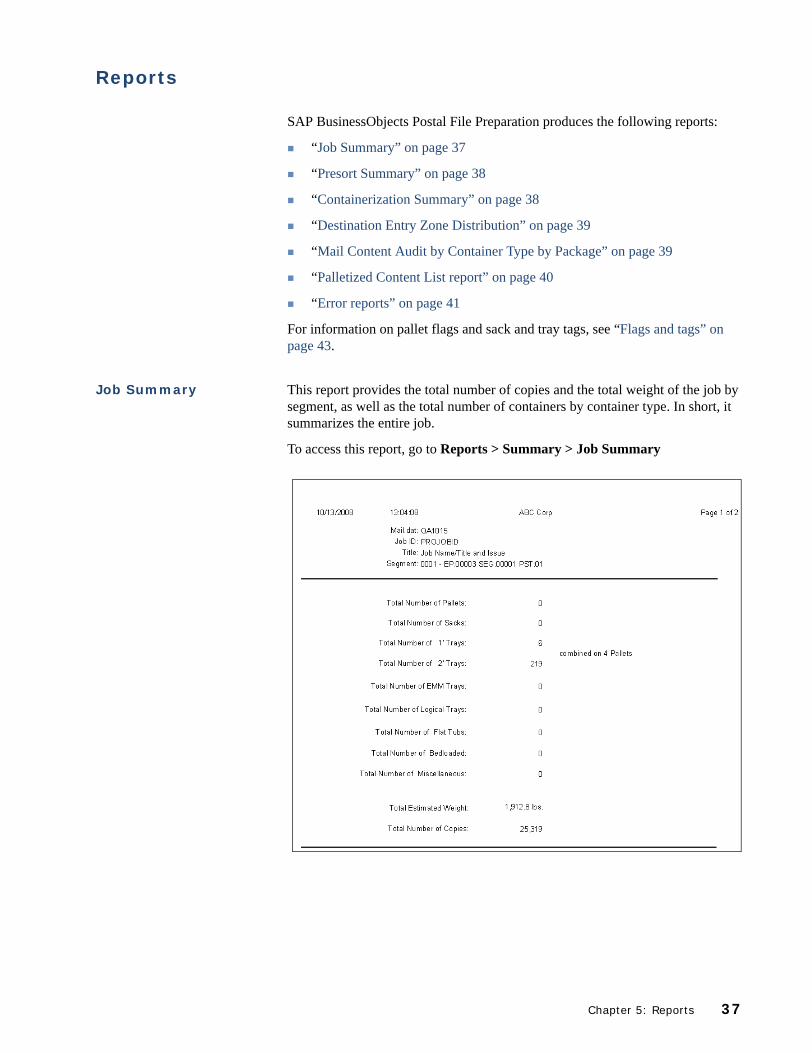
Job Summary This report provides the total number of copies and the total weight of the job by segment, as well as the total number of containers by container type. In short, it summarizes the entire job.
To access this report, go to Reports > Summary > Job Summary
Chapter 5: Reports 37
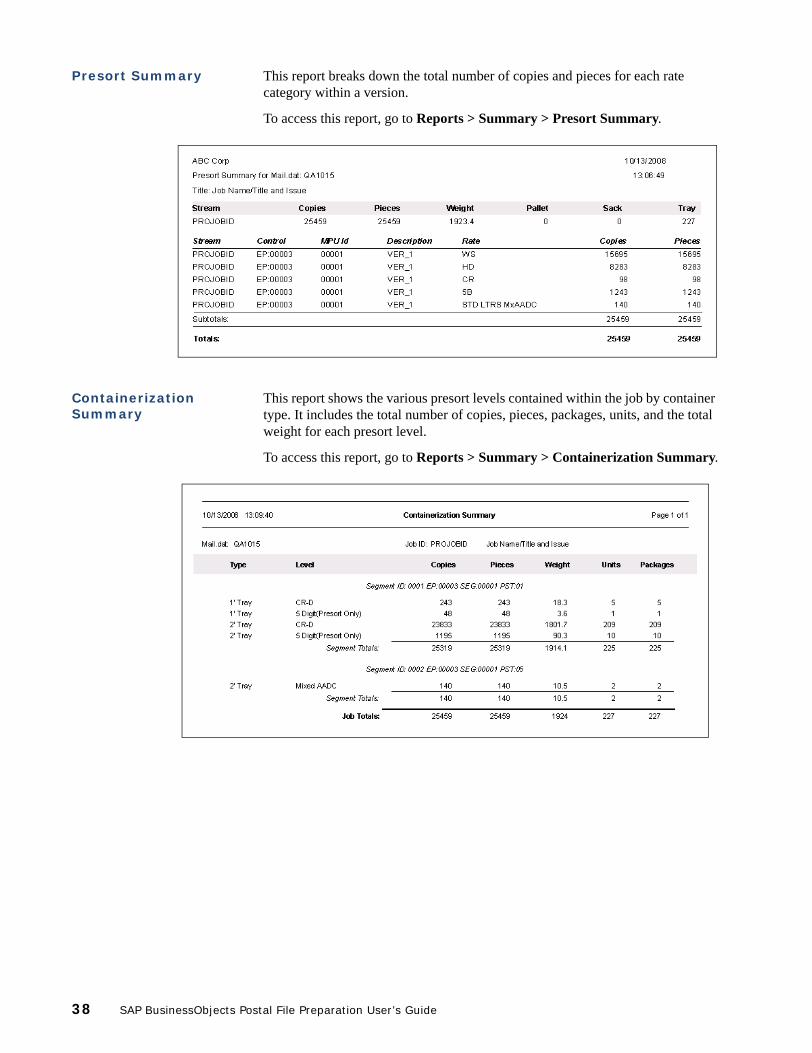
Presort Summary This report breaks down the total number of copies and pieces for each rate category within a version.
To access this report, go to Reports > Summary > Presort Summary.
Containerization Summary
This report shows the various presort levels contained within the job by container type. It includes the total number of copies, pieces, packages, units, and the total weight for each presort level.
To access this report, go to Reports > Summary > Containerization Summary.
38 SAP BusinessObjects Postal File Preparation User’s Guide
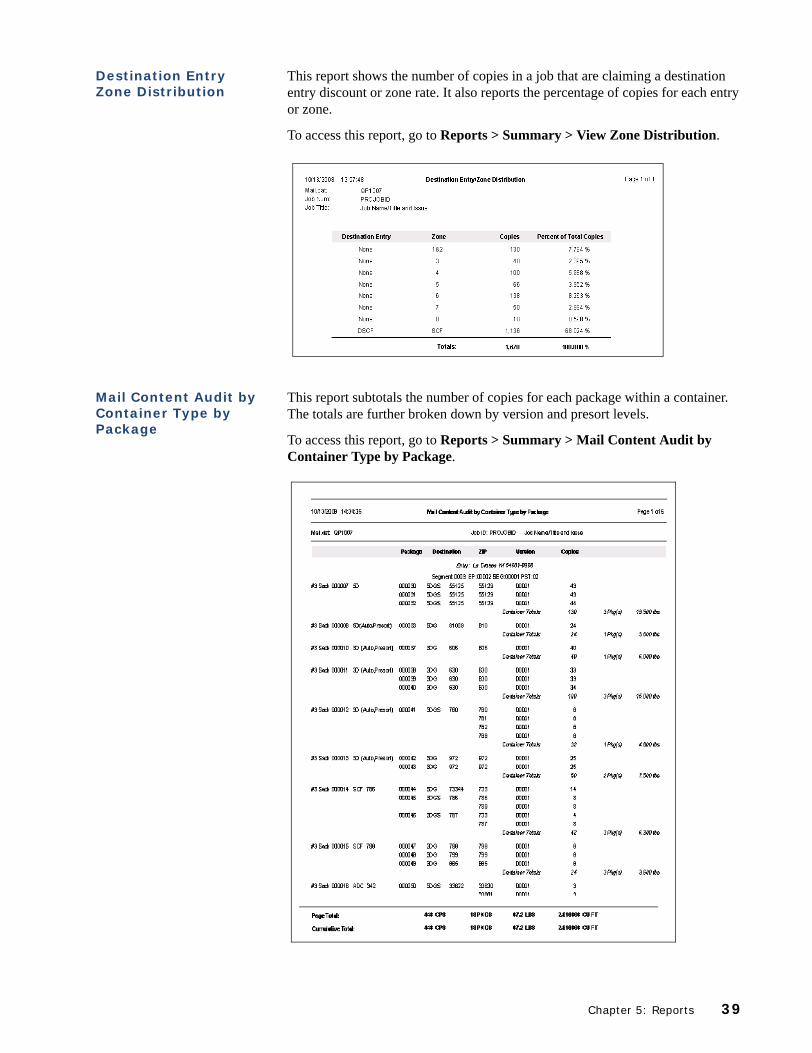
Destination Entry Zone Distribution
This report shows the number of copies in a job that are claiming a destination entry discount or zone rate. It also reports the percentage of copies for each entry or zone.
To access this report, go to Reports > Summary > View Zone Distribution.
Mail Content Audit by Container Type by Package
This report subtotals the number of copies for each package within a container. The totals are further broken down by version and presort levels.
To access this report, go to Reports > Summary > Mail Content Audit by Container Type by Package.
Chapter 5: Reports 39
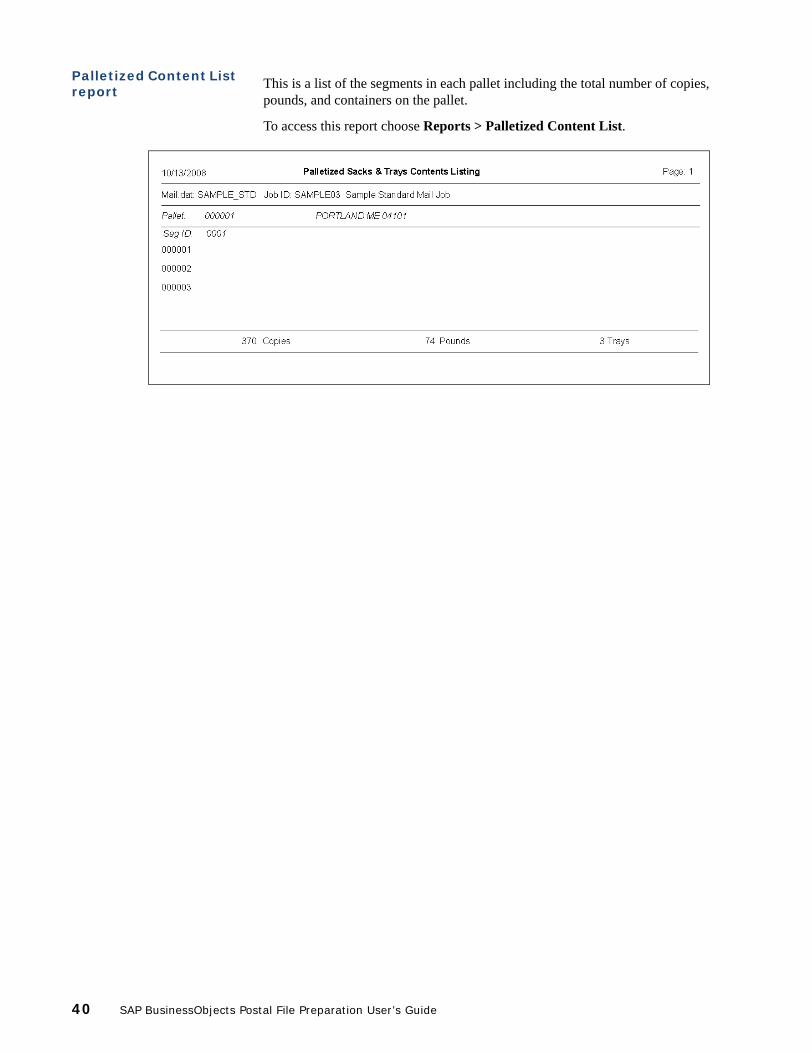
Palletized Content List report
This is a list of the segments in each pallet including the total number of copies, pounds, and containers on the pallet.
To access this report choose Reports > Palletized Content List.
40 SAP BusinessObjects Postal File Preparation User’s Guide
Error reports
SAP BusinessObjects Postal File Preparation’s error reports include:
Summary Error Report
Mail.dat Error Detail (Detailed Error Report)
Summary Error Report
There are two ways to view the Summary Error Report. When the software’s verification process detects errors in your Mail.dat, the Mail.dat Validation Error window appears. Or, you can go directly to the report by choosing Reports > Error Reports > Summary Error Report.
The Summary Error Report (Mail.dat Validation Error window) contains the name of the table, the number of errors in that table, and the number of records in the table that contain errors. You can go directly to the error by double-clicking the table name, or highlighting the error and clicking Go To.
Mail.dat Error Detail (Detailed Error Report)
The Summary Error Report has a Detailed Report button that opens the report. You have the option to view it on screen, print it, or save it to a file.
You can also access the Detailed Error Report by choosing Reports > Error Reports > Detailed Error Report.
The Detailed Error Report provides a listing of each Mail.dat error within a record and gives tips on how to correct the error.
Chapter 5: Reports 41

42 SAP BusinessObjects Postal File Preparation User’s Guide
Chapter 6: Flags and tags
Generate and print your pallet flags, sack tags, and tray tags easily with SAP BusinessObjects Postal File Preparation.
SAP BusinessObjects Postal File Preparation passed the USPS label certification process for Intelligent Mail tray labels. Go to https://ribbs.usps.gov/vendor_info/documents/tech_guides/VENDOR_INFO_ALL_OTHER/IMTLVEND.pdf to view a list of certified vendors.
To get certified, a vendor must send 10-digit and 24-digit labels to the USPS. The USPS then runs tests on the labels to make sure the vendor is using valid USPS-defined formats.
What does this certification mean to you? You can have peace-of-mind knowing that SAP BusinessObjects Postal File Preparation adheres to these USPS standards when creating labels:
Intelligent Mail tray label design specifications.
Technical barcode requirements for the tray barcodes.
Placement of the barcode and human-readable data elements on the label as well as the ability to generate accurate label content.
For more information about this certification, visit the RIBBS website at http://www.ribbs.usps.gov.
Chapter 6: Flags and tags 43
Label setup
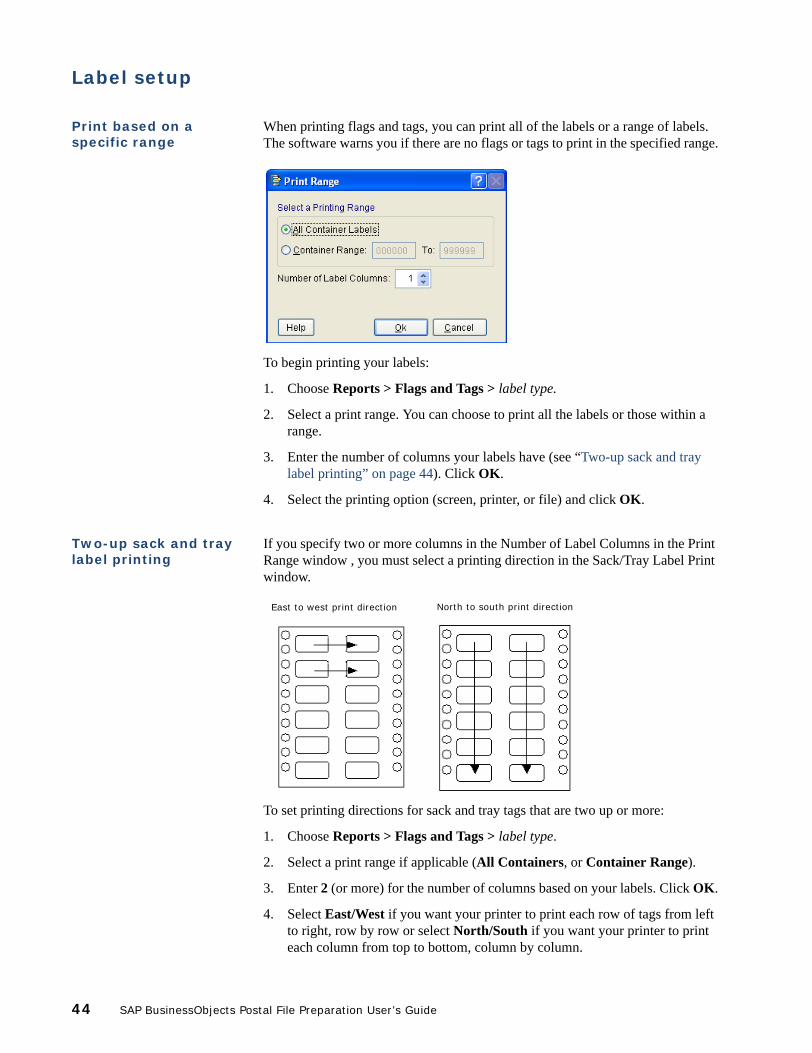
Print based on a specific range
When printing flags and tags, you can print all of the labels or a range of labels. The software warns you if there are no flags or tags to print in the specified range.
To begin printing your labels:
1. Choose Reports > Flags and Tags > label type.
2. Select a print range. You can choose to print all the labels or those within a range.
3. Enter the number of columns your labels have (see “Two-up sack and tray label printing” on page 44). Click OK.
4. Select the printing option (screen, printer, or file) and click OK.
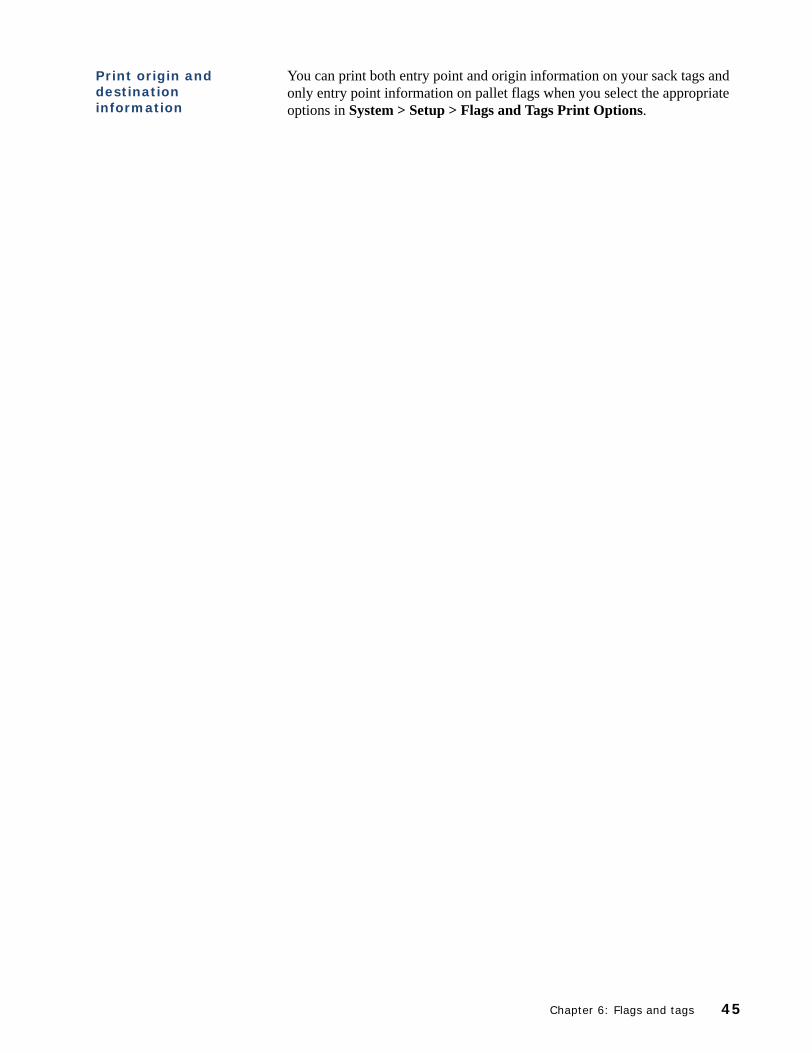
Two-up sack and tray label printing
If you specify two or more columns in the Number of Label Columns in the Print Range window , you must select a printing direction in the Sack/Tray Label Print window.
To set printing directions for sack and tray tags that are two up or more:
1. Choose Reports > Flags and Tags > label type.
2. Select a print range if applicable (All Containers, or Container Range).
3. Enter 2 (or more) for the number of columns based on your labels. Click OK.
4. Select East/West if you want your printer to print each row of tags from left to right, row by row or select North/South if you want your printer to print each column from top to bottom, column by column.
East to west print direction North to south print direction
44 SAP BusinessObjects Postal File Preparation User’s Guide
Print origin and destination information
You can print both entry point and origin information on your sack tags and only entry point information on pallet flags when you select the appropriate options in System > Setup > Flags and Tags Print Options.
Chapter 6: Flags and tags 45
Label types
Sack and tray labels contain information that explains where a sack or tray is destined, its contents, and where it originated. Automation-rate mailings require a barcode. The USPS mandates the appearance and placement of most elements on these label types.
You can control what elements appear on your pallet flags by choosing System > Setup > Flags and Tags Print Options and selecting the options you want.
Select from these types of labels in the software:
10-digit sack tag
24-digit IM sack tag
10-digit tray tags
24-digit IM tray tag
Pallet flags
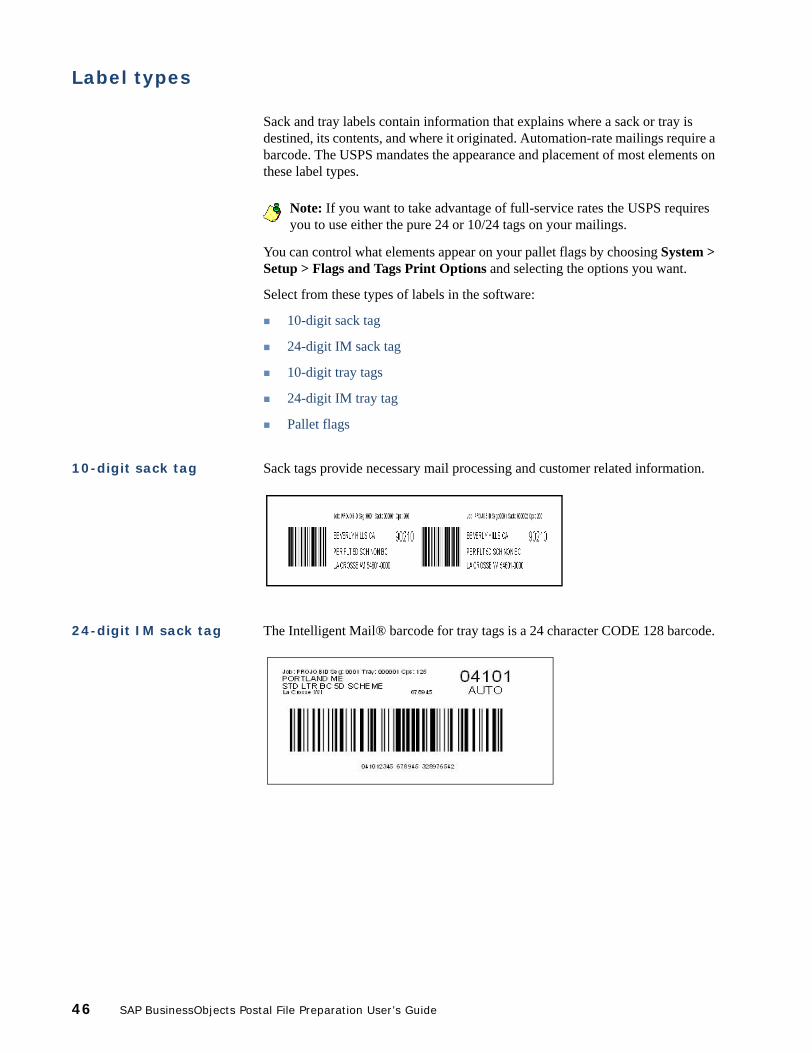
10-digit sack tag Sack tags provide necessary mail processing and customer related information.
24-digit IM sack tag The Intelligent Mail® barcode for tray tags is a 24 character CODE 128 barcode.
Note: If you want to take advantage of full-service rates the USPS requires you to use either the pure 24 or 10/24 tags on your mailings.
46 SAP BusinessObjects Postal File Preparation User’s Guide
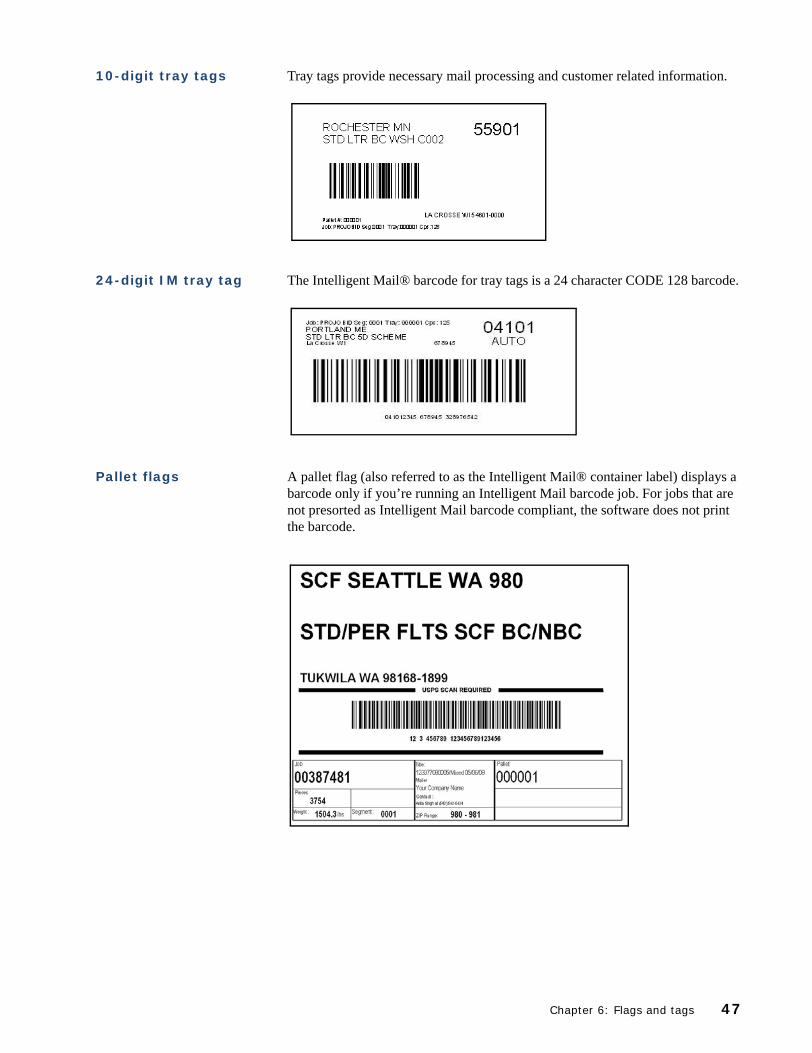
10-digit tray tags Tray tags provide necessary mail processing and customer related information.
24-digit IM tray tag The Intelligent Mail® barcode for tray tags is a 24 character CODE 128 barcode.
Pallet flags A pallet flag (also referred to as the Intelligent Mail® container label) displays a barcode only if you’re running an Intelligent Mail barcode job. For jobs that are not presorted as Intelligent Mail barcode compliant, the software does not print the barcode.
Chapter 6: Flags and tags 47

48 SAP BusinessObjects Postal File Preparation User’s Guide
Index
Aactivate PostalOne! validation, 23add
customer information, 13permit number, 30
archiveMail.dat, 21
assigncustomer and permits, 25truck numbers, 32
Bblue fields
errorsindicator (blue and red), 19
BMC, 41bolded text, 19
Cclient/server installation, 6color coded text, 19company information, 8container information
entering, 24Containerization Summary report, 38correct
errors in the PostalOne! wizard, 27Mail.dat errors, 19
create files, PostalOne!, 28customer and permit, assign, 25customer information
adding or editing, 13assigning, 25
Ddestination information, sack tags, 45Detailed Error Report, 41
Eedit
customer information, 13Mail.dats, 18permit number, 30
error reports, 41errors
correcting in the PostalOne! wizard, 27PostalOne!, 27validating in the PostalOne! wizard, 27
exportfiles, 20PostalOne!, 28
Export Cancel Mail.dat based on ship dates option, 29
Export Delete Mail.dat option, 29Export entire Original Mail.dat option, 28Export IMR and Export PDR options, 28Export Update Mail.dat based on ship dates option, 28
Ffields
populating highly used, 26file paths, 8fill down feature, 26flags, 47
print options, 9folder settings, 8format
permit number, 30
IIDEAlliance user license code, 7import
doing the Mail.dat again, 12Mail.dat, 12Mail.dat options, 9multiple Mail.dat files, 14retain permit information, 13unattended import log, 15unattended Mail.dat files, 14
in-home dates, 33installation
client/server, 6single workstation, 6
JJob Summary report, 37
LLoading Manifest Detail report, 32
MMail Content Audit report, 39Mail.dat
archive, 21correct errors, 19editing, 18import, 12importing multiple files, 14open, 18optional files, 9purging, 22re-importing, 12restore, 21unattended import log, 15unattended importing, 14
Index 49
validate, 17multiple
workstation installation, 6
Oopen
Mail.dat file, 18unattended import log, 15
operating system requirements, 6optional files
Mail.dat, 9origin information, sack tags, 45
Ppallet, 47pallet flags
examples, 47print options, 9
Palletized Content List report, 40permit
retaining information during import, 13permit information, 25permit number
adding and editing, 30format, 30
piece attributesedit, 34
PostalOne!, 23customer and permit information, 25entering container informaiton, 24permit number format, 30populate fields, 26registering for, 23validating errors, 27validation, 23validation errors, 27
PostalOne! wizard, 24Presort Summary, 38print
based on range, 44options for flags and tags, 9options for reports, 36, 44
Purge Mail.dat files, 22
Rred fields, 19Register for PostalOne!, 23re-import, 12removing
pallets, 32report
BMC Summary, 41Container Summary, 38
error, 41Job Summary, 37Loading Manifest Detail, 32Mail Content Audit, 39Presort Summary, 38
restoring Mail.dat files, 21retain permit information when importing, 13
Ssack tags
destination information, 45examples, 46origin information, 45
sample Mail.dat, 12screen view, reports, 36server installation, 6Setup Wizard, 7
company information, 8file paths, 8flags and tags print options, 9IDEAlliance user license code, 7Mail.dat import options, 9
single workstation installation, 6Summary Error Report, 41system requirements, 6
Ttags
print options, 9sack and trays, 46
text colors, 19tray label certification, 43tray tags
examples, 47truck load editing, 32
overview, 32remove pallets, 32
Uunattended import
log, 15opening the log, 15overview, 14
user license code, 7USPS Pick Up information, 24
Vvalidation
errors, 27Mail.dat, 17PostalOne!, 23PostalOne! errors, 27
50 SAP BusinessObjects Postal File Preparation User’s Guide