Embed Size (px)
Citation preview
12 August 2011 Chevy Classics
by Randy Irwin
1955 SIDE STAINLESS INSTALLATION
Parts Needed: Member price
34-32 55 Two-door clip setIncludes clips for fenders, doors, quarter panels, upper & lower paint dividers. 61.74 set
34-03 55 Fender clip set 14.24 set34-04 55 Door clip set 17.09 set34-06 55 Quarter panel clip set 20.89 set34-07 55 Upper & lower paint divider clips 15.19 set11-158 55 Side stainless kit, 2-dr Bel Air sedan
Includes for left and right side: long lower stainless, fender spears, forward upper door molding, rear lower door molding. 455.99 kit
11-155 55 Side stainless kit, 2-dr Bel Air convertible/hardtopIncludes for left and right side: long lower stainless, fender spears, forward upper door molding, rear lower door molding. 455.99 kit
Tools Needed: Phillips screwdriver3/8" Wrench
Time Frame: 2- Hours
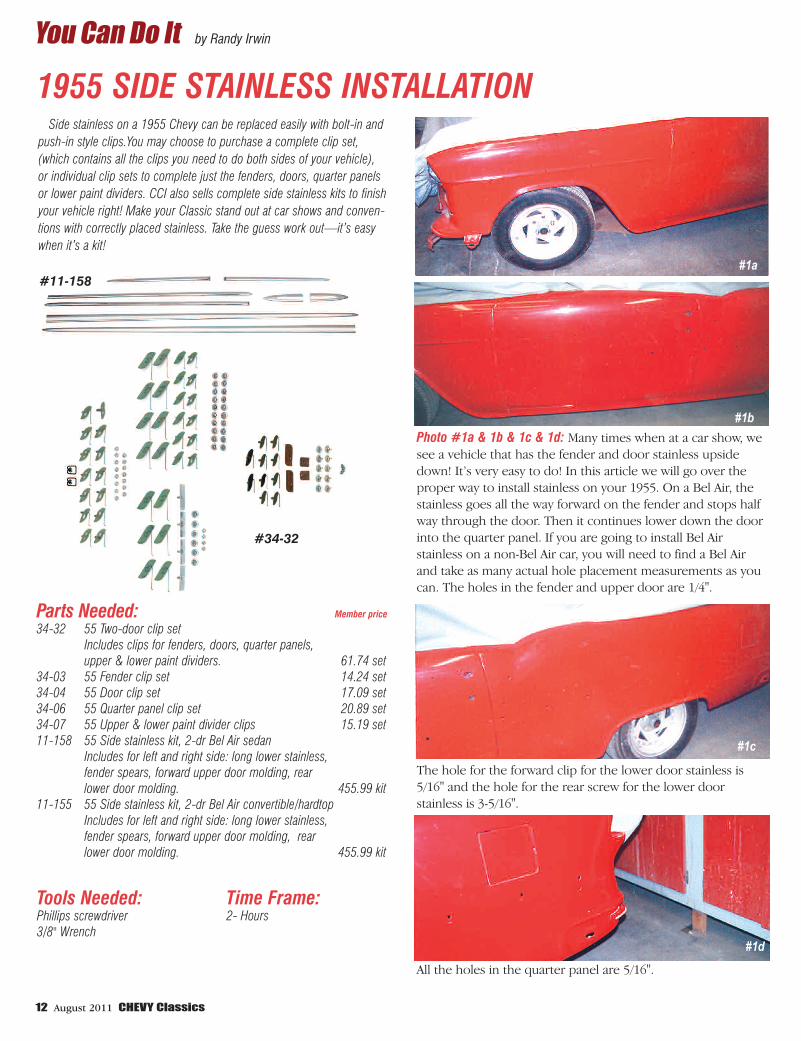
Photo #1a & 1b & 1c & 1d: Many times when at a car show, wesee a vehicle that has the fender and door stainless upsidedown! It’s very easy to do! In this article we will go over theproper way to install stainless on your 1955. On a Bel Air, thestainless goes all the way forward on the fender and stops halfway through the door. Then it continues lower down the doorinto the quarter panel. If you are going to install Bel Airstainless on a non-Bel Air car, you will need to find a Bel Airand take as many actual hole placement measurements as youcan. The holes in the fender and upper door are 1/4".
The hole for the forward clip for the lower door stainless is5/16" and the hole for the rear screw for the lower doorstainless is 3-5/16".
All the holes in the quarter panel are 5/16".
Side stainless on a 1955 Chevy can be replaced easily with bolt-in andpush-in style clips.You may choose to purchase a complete clip set,(which contains all the clips you need to do both sides of your vehicle),or individual clip sets to complete just the fenders, doors, quarter panelsor lower paint dividers. CCI also sells complete side stainless kits to finishyour vehicle right! Make your Classic stand out at car shows and conven-tions with correctly placed stainless. Take the guess work out—it’s easywhen it’s a kit!
#11-158
#1b
#1c
#34-32
#1a
#1d
Chevy Classics August 2011 13
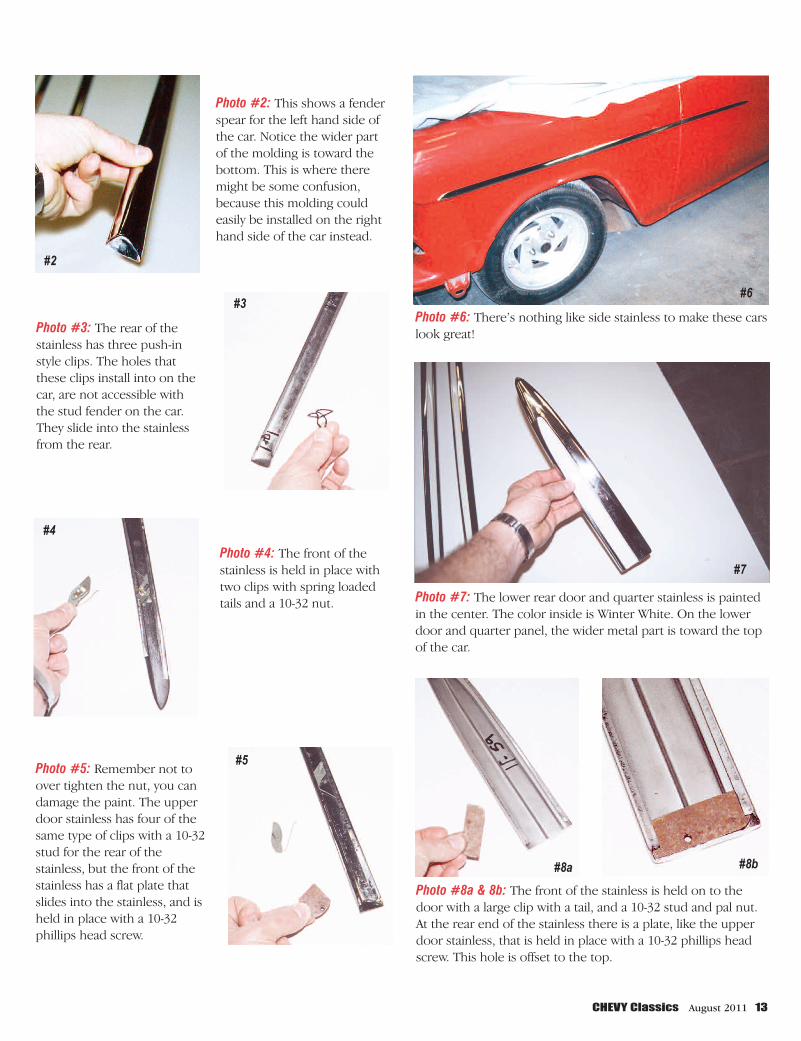
Photo #3: The rear of thestainless has three push-instyle clips. The holes thatthese clips install into on thecar, are not accessible withthe stud fender on the car.They slide into the stainlessfrom the rear.
Photo #2: This shows a fenderspear for the left hand side ofthe car. Notice the wider partof the molding is toward thebottom. This is where theremight be some confusion,because this molding couldeasily be installed on the righthand side of the car instead.
Photo #4: The front of thestainless is held in place withtwo clips with spring loadedtails and a 10-32 nut.
Photo #5: Remember not toover tighten the nut, you candamage the paint. The upperdoor stainless has four of thesame type of clips with a 10-32stud for the rear of thestainless, but the front of thestainless has a flat plate thatslides into the stainless, and isheld in place with a 10-32phillips head screw.
Photo #6: There’s nothing like side stainless to make these carslook great!
Photo #7: The lower rear door and quarter stainless is paintedin the center. The color inside is Winter White. On the lowerdoor and quarter panel, the wider metal part is toward the topof the car.
Photo #8a & 8b: The front of the stainless is held on to thedoor with a large clip with a tail, and a 10-32 stud and pal nut.At the rear end of the stainless there is a plate, like the upperdoor stainless, that is held in place with a 10-32 phillips headscrew. This hole is offset to the top.
#2
#3
#4
#5
#6
#8a #8b
#7
14 August 2011 Chevy Classics
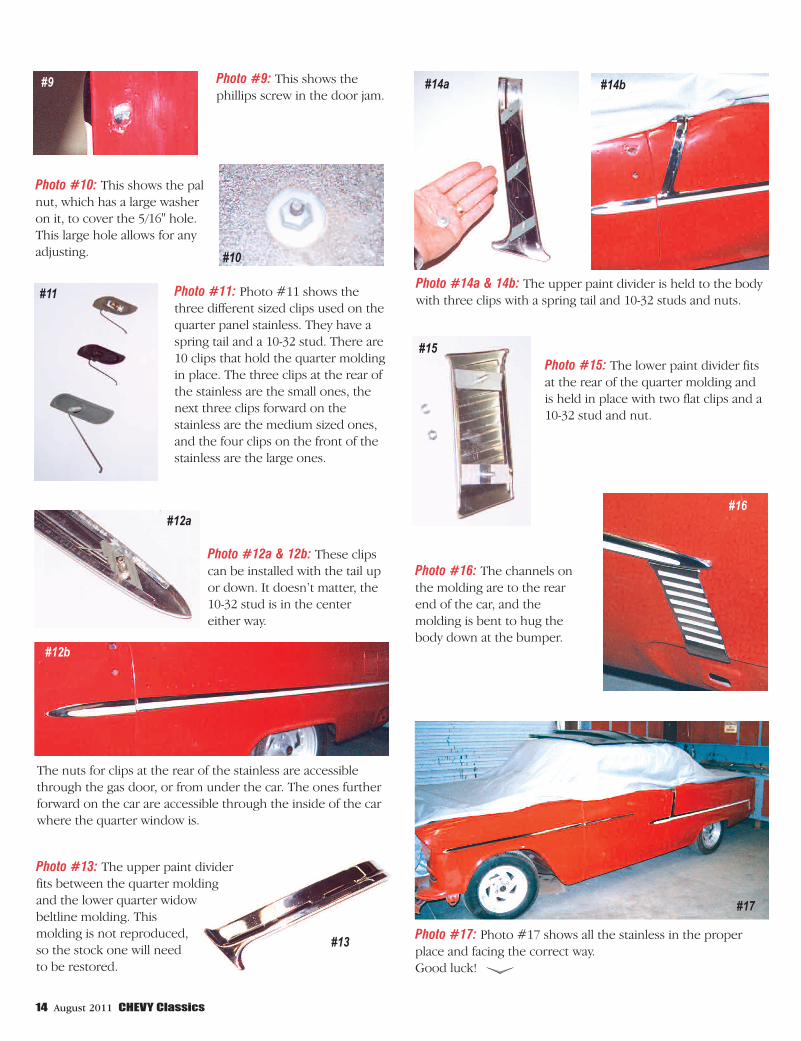
Photo #12a & 12b: These clipscan be installed with the tail upor down. It doesn’t matter, the10-32 stud is in the centereither way.
The nuts for clips at the rear of the stainless are accessiblethrough the gas door, or from under the car. The ones furtherforward on the car are accessible through the inside of the carwhere the quarter window is.
Photo #14a & 14b: The upper paint divider is held to the bodywith three clips with a spring tail and 10-32 studs and nuts.
#9
#10
#13
#14a
#12b
#11
#12a
#15
#16
#17
#14bPhoto #9: This shows thephillips screw in the door jam.
Photo #10: This shows the palnut, which has a large washeron it, to cover the 5/16" hole.This large hole allows for anyadjusting.
Photo #11: Photo #11 shows thethree different sized clips used on thequarter panel stainless. They have aspring tail and a 10-32 stud. There are10 clips that hold the quarter moldingin place. The three clips at the rear ofthe stainless are the small ones, thenext three clips forward on thestainless are the medium sized ones,and the four clips on the front of thestainless are the large ones.
Photo #15: The lower paint divider fitsat the rear of the quarter molding andis held in place with two flat clips and a10-32 stud and nut.
Photo #16: The channels onthe molding are to the rearend of the car, and themolding is bent to hug thebody down at the bumper.
Photo #17: Photo #17 shows all the stainless in the properplace and facing the correct way. Good luck!
Photo #13: The upper paint dividerfits between the quarter moldingand the lower quarter widowbeltline molding. Thismolding is not reproduced,so the stock one will needto be restored.