Embed Size (px)
Citation preview
Version 1.0.2 [Type text] 07/07//2016
CONSORTIUM ON VULNERABILITY TO EXTERNALIZING DISORDERS AND ADDICTIONS [C-VEDA]
C-VEDA MRI Procedures
Standard Operating Procedure
Dr. Rose Dawn Bharath & Prof. Gareth J Barker
07 July 2016
This document provides details of policies and procedures for all Magnetic Resonance Imaging related aspects of the C-VEDA project.
Version 1.0.1 Page 1 of 44 07/07/2016 (This SOP replaces all previous versions)
1 Table of Contents
1 Table of Contents .......................................................................................................... 1
2 General Responsibilities: ............................................................................................... 3
2.1 Responsibilities of Principle Investigator (PI) and other Research Personnel ......... 3
2.2 Responsibilities of the MRI Scanner Operator ........................................................ 4
2.3 Responsibilities of the Facility ................................................................................. 5
2.4 Participants and Safety measures ........................................................................... 6
2.4.1 Screening participants ...................................................................................... 6
2.4.2 Participants’ Safety ........................................................................................... 6
2.4.3 Researchers’ safety .......................................................................................... 7
2.5 Imaging Procedures ................................................................................................ 7
2.5.1 Registration process ......................................................................................... 7
2.5.2 Raising the Request ......................................................................................... 7
2.5.3 Scheduling for the scanning session ................................................................ 7
2.5.4 Time line of the scanning session .................................................................. 10
2.5.5 Overview of the Imaging session .................................................................... 12
2.5.6 Termination of scanning slot........................................................................... 13
2.5.7 Cancellation of Scan Time ............................................................................. 13
2.5.8 Incidental Findings review and Data Transfer ................................................ 13
2.5.9 Data Transfer to the central database site ...................................................... 14
2.5.10 Accounting of the data .................................................................................... 14
2.5.11 Troubleshooting: ............................................................................................ 14
2.6 Data Transfer, Anonymisation, and Upload ........................................................... 15
2.6.1 Site specific data transfer information............................................................. 15
2.6.2 Software ......................................................................................................... 15
2.6.3 Data checking and anonymisation .................................................................. 16
Version 1.0.1 Page 2 of 44 07/07/2016 (This SOP replaces all previous versions)
2.6.4 Uploading of data to the central image database site ..................................... 25
2.7 Quality Control (QC) .............................................................................................. 26
2.7.1 Phantom scans .............................................................................................. 26
2.7.2 Human participants ........................................................................................ 26
3 APPENDIX: EXAMPLE MRI PARTICIPANT SCREENING FORM .............................. 27
4 APPENDIX: EXAMPLE INFORMATION SHEET AND CONSENT FORM ................... 29
5 APPENDIX: ENTERING THE ‘PCS1’ CODE ............................................................... 39
6 APPENDIX: OVERVIEW OF IMAGING SESSION ...................................................... 40
6.1 SITE SPECIFIC PROTOCOL INFORMATION ......... Error! Bookmark not defined.
6.1.1 Bangalore .......................................................... Error! Bookmark not defined.
6.1.2 Chandigarh ........................................................ Error! Bookmark not defined.
6.1.3 Mysore .............................................................. Error! Bookmark not defined.
7 APPENDIX: EXAMPLES OF SCAN ORIENTATIONS ................................................. 40
7.1 3D T1 weighted volume ........................................................................................ 40
7.2 Resting state fMRI................................................................................................. 41
7.3 DTI ........................................................................................................................ 42
8 APPENDIX: DATA TRANSFER ...................................... Error! Bookmark not defined.
8.1 Site Specific Data Transfer Information .................... Error! Bookmark not defined.
8.1.1 Bangalore .......................................................... Error! Bookmark not defined.
8.1.2 Chandigarh ........................................................ Error! Bookmark not defined.
8.1.3 Mysore .............................................................. Error! Bookmark not defined.
9 Version History ............................................................................................................ 44

Version 1.0.1 Page 3 of 44 07/07/2016 (This SOP replaces all previous versions)
2 General Responsibilities:
2.1 Responsibilities of Principle Investigator (PI) and other Research
Personnel
I. The PI will ensure that, at the time of scanning at least one researcher is physically
present in the facility during scanning.
II. Researchers are responsible for the informed consent procedure.
i. For C-VEDA, both the general information sheet and consent form, and
separate forms specific for the MRI will be given to each participant at time of
initial recruitment. Informed consent will be sought at this time.
ii. Immediately before the MRI scanning session, researchers should re-confirm
that participants are aware of what the MRI scanning entails, and are still
willing to participate.
III. Researchers are responsible for initial review of the safety checklist with their
volunteer, both at the time of initial recruitment (if possible) and when the participant
arrives at the MRI scanning centre. (An example safety checklist from the NIMHANS
site is provided in APPENDIX: EXAMPLE MRI PARTICIPANT SCREENING FORM;
MRI scanning sites should use an equivalent form from their Institution, or develop a
local form based on this example).
Note that:
i. If a parent/carer will enter the scanning room with a child participant, a
separate safety checklist must be competed for the parent as well as the
child.
ii. Final review of the safety checklist(s) will take place according to local
Institutional procedures, usually by the MRI Scanner Operator (radiographer);
see below.
IV. Researchers are responsible for the comfort of the subject while in the MRI scanning
area.
V. Researchers must notify the MRI Scanner Operator as soon as possible if they
notice that a device is not working properly.
Version 1.0.1 Page 4 of 44 07/07/2016 (This SOP replaces all previous versions)
2.2 Responsibilities of the MRI Scanner Operator
I. The MRI Scanner Operator is responsible for ensuring the physical and emotional
safety of all research personnel and volunteers/patients within the magnet room.
This includes wearing proper hearing protection and being made aware of the critical
operating areas. The MRI Scanner Operator will usually (depending on Institutional
policies) be responsible for the final review of the safety checklist(s).
II. Institutional policies may require that a member of the research team is present in
the facility when research studies are in progress and/or that when data are being
collected from a volunteer in the magnet at least one additional person, other than
the Operator, be present in the magnet or control room.
i. If this is required by local policies, the Operator is responsible for ensuring
that this is enforced.
ii. If not required by local policies, it nevertheless remains good practice,
which should be adhered to whenever possible.
III. The Operator is responsible for ensuring that all necessary patient safety devices
are operational for a scan session. It is at the discretion of the Operator to cancel the
scan session at any time if any or all of the safety devices are not operational. All
patient safety devices are listed below. Not all safety devices are necessary, but
some means for the participant to communicate with the operator (for example and
emergency squeeze ball connected to an alarm) is essential in all cases.
a. Emergency squeeze ball
b. Audio system
c. Camera(s)
d. First-aid kit and back-board
e. Fire extinguisher
f. Smoke detector
IV. The Operator is responsible for notifying the Facility in-charge/supervisor of any
patient safety device that is not operational.
V. The Operator is responsible for notifying the Facility in-charge/supervisor of any
peripheral device that is not operational. Peripheral devices include but are not
limited to:
a. Stimulus Presentation Systems
Version 1.0.1 Page 5 of 44 07/07/2016 (This SOP replaces all previous versions)
b. Physiological Monitoring Devices
c. Control or Stimulus Presentation Computers
d. Projection Screen
e. RF Coils
Not all peripheral devices are necessary for C-VEDA, but it is essential that the RF
coil used during initial protocol setup is used for all scans; if this coil is broken or not
available, scanning should not be undertaken with an alternate coil.
• See APPENDIX: OVERVIEW OF IMAGING SESSION for details of the coil to
be used at each site.
VI. It is the responsibility of the Operator to screen all items entering the magnet room
for ferrous components. A strong hand held magnet is made available for such
testing.
VII. The Operator is responsible for returning all peripheral devices and any other item
used during the scan session, to their original holding places upon completion of the
scanning session.
2.3 Responsibilities of the Facility
I. The term “Facility” is used to describe the person or organisation with responsibility
for the running of the scanning unit. Depending on the Institution, this may be a
specific person (e.g. “MR technical in-charge”) or a more general departmental
responsibility (e.g. “Department of radiology”).
II. The Facility is responsible for checking all Primary devices daily. Primary devices
are as follow:
a. The magnet system
b. All patient safety devices
III. The Facility will inform Operators and investigators of malfunctions of Primary
devices, if their scan time will be affected.
IV. Secondary devices (such as the Coils, or the Stimulus Presentation Systems, etc,
listed above) may not be checked daily. If one of these devices fails, the facility may
out of courtesy inform operators and investigators. If the Facility is aware of failure of
a specific secondary device that will affect upcoming scan time - for C-VEDA, the
specific RF coil used for the study - the Facility will notify the appropriate operators
and investigators.
Version 1.0.1 Page 6 of 44 07/07/2016 (This SOP replaces all previous versions)
2.4 Participants and Safety measures
2.4.1 Screening participants
Participants must be screened at two stages during a study to determine their suitability for
scanning.
I. Firstly, at recruitment, participants will be asked a set of questions to determine
whether or not they have any metal present in their body that would preclude them
from entering the scanner.
An example safety checklist from the NIMHANS site is provided in APPENDIX:
EXAMPLE MRI PARTICIPANT SCREENING FORM; all MRI scanning sites should
use an equivalent form from their Institution, or develop a local form based on this
example. Copies of the site-specific forms will be provided to the recruitment team
and, where possible, an MRI-knowledgeable researcher will be present during
recruitment to answer questions.
II. Second, at the actual time of scanning, participants must complete the same
checklist as completed at initial recruitment. When the participant arrives at the MRI
scanning centre, the researcher will initially review the safety checklist. Final review
of the safety checklist will take place according to local Institutional procedures,
usually by the MRI Scanner Operator (radiographer) who will ensure that
participants:
a. have met the criteria for entering the scanner and
b. do not have any incidental metal items on their person or clothing (see final
section of APPENDIX: EXAMPLE MRI PARTICIPANT SCREENING FORM).
Note that if a parent/carer will enter the scanning room with a child participant, a separate
safety checklist must be competed and checked for the parent as well as the child.
2.4.2 Participants’ Safety
Participants will be given a full description of the risks associated with MRI scanning as part
of the informed consent process (see APPENDIX: EXAMPLE INFORMATION SHEET AND
CONSENT FORM for examples from the NIMHANS site). The MRI Operator will also
Version 1.0.1 Page 7 of 44 07/07/2016 (This SOP replaces all previous versions)
answer any questions the participant has regarding risks and safety prior to entering the
scanner.
2.4.3 Researchers’ safety
Researchers must also complete a safety screening questionnaire (APPENDIX: EXAMPLE
MRI PARTICIPANT SCREENING FORM, or local Institutional equivalent). This will ensure
that it is safe for researchers to enter the scanning room. While researchers only need to
complete this form once, they will need to ensure at each study session that they have
removed all items from their person or clothing that would preclude them from entering the
scanning room. Researchers must also inform the scanner Operator of any significant
changes that might necessitate them re-completing the safety screening questionnaire.
2.5 Imaging Procedures
2.5.1 Registration process
All participants needs to be registered in the cVEDA project and should have a project ID
(“PCS1 Code”). This will be provided by to the scanner operator by the researcher in the
form of a bar code, which can be automatically entered into the scanner (see below). This
can be in addition to the hospital registration requirements.
2.5.2 Raising the Request
It is the responsibility of the PI/ researcher to raise a request for MRI and to schedule for the
scan time, according to the local Institutional procedures, using site-specific pro-formas. In
the request the category of study should be detailed (e.g. “MRI BRAIN under C-VEDA
research protocol”) so that these subjects are identified as distinct from any clinical group.
In the clinical history, the cVEDA Project code and the PI (Principal Investigator) name can
be mentioned. Where appropriate according to local Institutional procedures, the form
should be printed and handed to the participant to allow them to proceed further.
2.5.3 Scheduling for the scanning session
Scheduling should be arranged according to local Institutional procedures; this may sending
include an eHospital request, and will typically involve study co-ordinator, researcher and/or
participant contacting the radiology front desk. Once the scanning time of the research MR
Scanner is allotted, the participant should be informed, and asked to arrive 30 minutes prior
to the scheduled scan time.
Version 1.0.1 Page 8 of 44 07/07/2016 (This SOP replaces all previous versions)
The researcher should also ensure that the participant is briefed about the procedure and
screened for any contraindications for MRI at this time. The participant (and their
parent/carer, for younger participants) should be briefed as to what will happen:
2.5.3.1 Before the scanning:
• Use of the waiting area.
• Please arrive at least 30 minutes prior to your scheduled scan.
• Please wear loose comfortable clothing made of cotton without metal such as
zippers, hooks and buckles.
o A change of clothes will be provided if necessary.
• Please avoid wearing anything metal, such as watches, jewelry, or hair clips.
• Please bring an attendant with you to take care of your wallet, credit cards, keys,
and pocket change.
• You may eat normally and take your medication, if any, as directed by your
physician.
o Please inform the researcher about any medications that you are currently
on, however, so that they can advise on whether or not you on whether or
not you might need to withhold them immediately prior to the imaging.
o Please refrain from smoking cigarettes or consuming any caffeinated
drinks for at least 3 hours prior to the scan.
• If you have any metal in your body such as plates, screws, metallic fragments,
metal picked from your eyes, or drug infusion pumps, please let the scanner
operator (technologist/radiographer) know.
2.5.3.2 During the scanning:
• It is essential that you are lying still and relaxed. Movements in general, and
head motion in particular, may lead to loss of data. Therefore it is very important
that you lie comfortable on the table. If we ask you to lie down on the table
please let us know whether you are lying in a comfortable position or what
changes are necessary to make it as comfortable as possible.
Version 1.0.1 Page 9 of 44 07/07/2016 (This SOP replaces all previous versions)
• During scanning, you will hear repetitive tapping sounds produced by the
scanner; these can be quite load, and we will provide you ear plugs to the reduce
noise.
• Please consider using the blanket that is provided, as it is difficult to follow the
instructions if you are freezing!
• Between scans, we will contact you in the scanner over the scanner
speaker/headphone using a microphone. If you are feeling unwell and you wish
to get out of the scanner immediately please squeeze the emergency ball which
will be placed on your waist by the investigator.
o If you ask us to, we will stop scanning immediately to get you out of the
scanner.
• To be able to analyse the acquired imaging data it is important to improve data
quality. You can help to improve data quality by lying as still as possible during
the whole investigation and most importantly that you don’t move your head. This
includes that you do not speak during scanning if possible but you may talk to us
in between scans or if we talk to you.
• During breaks between scans you can adjust your body position on the table if
necessary but please make sure you do not move your head. If this is not
possible please let us know and we will do another quick scan to localize your
new head position.
• The whole procedure lasts 60 minutes in total. Therefore we would kindly ask
you to go the toilet before we start with the investigation.
• Please don’t hesitate to ask if you have any further questions with respect to the
scanning procedure.
• After a brief screening procedure, to ensure that this is safe for them, parents /
relatives of young children are encouraged to stay with their ward, inside the
scanner room, during the entire scan session.
Researchers should remember that many participants in the C-VEDA study will be young
children; it is vital that both they and their parents understand what is expected of them
(including things like the need to lie still, and the potential danger from metallic objects in
Version 1.0.1 Page 10 of 44 07/07/2016 (This SOP replaces all previous versions)
the scanner), but also that – as this is a research scan – they are free to stop at any point if
they don’t want to go on.
2.5.4 Time line of the scanning session
2.5.4.1 Prior to the session
a. Explain study, perform initial safety screening and obtain consent
b. Schedule the scanning using the hospital UHID, according to local Institutional
procedures.
2.5.4.2 On the day of the session
a. Perform final MRI safety/risks screen
b. Explain MRI procedures
c. Enter the participant’s name, UHID, and other required details into the scanner (if not
automatically entered from other hospital systems)
d. Use barcode reader to enter the subject project ‘PCS1’ into the appropriate field in
the scanner user interface. See APPENDIX: ENTERING THE ‘PCS1’ CODE for
details.
e. Follow steps to ensure comfort and safety of the subject.
f. The scanner operator will position subject in scanner with:
• A cod liver oil tablet positioned over their right mastoid, and fixed in place with
microspore tape. (This is needed to ensure Right-Left accuracy across
scanners!)
• Earplugs and headphones
• Emergency ball
• Pillow under subject’s knees
• Blanket if needed
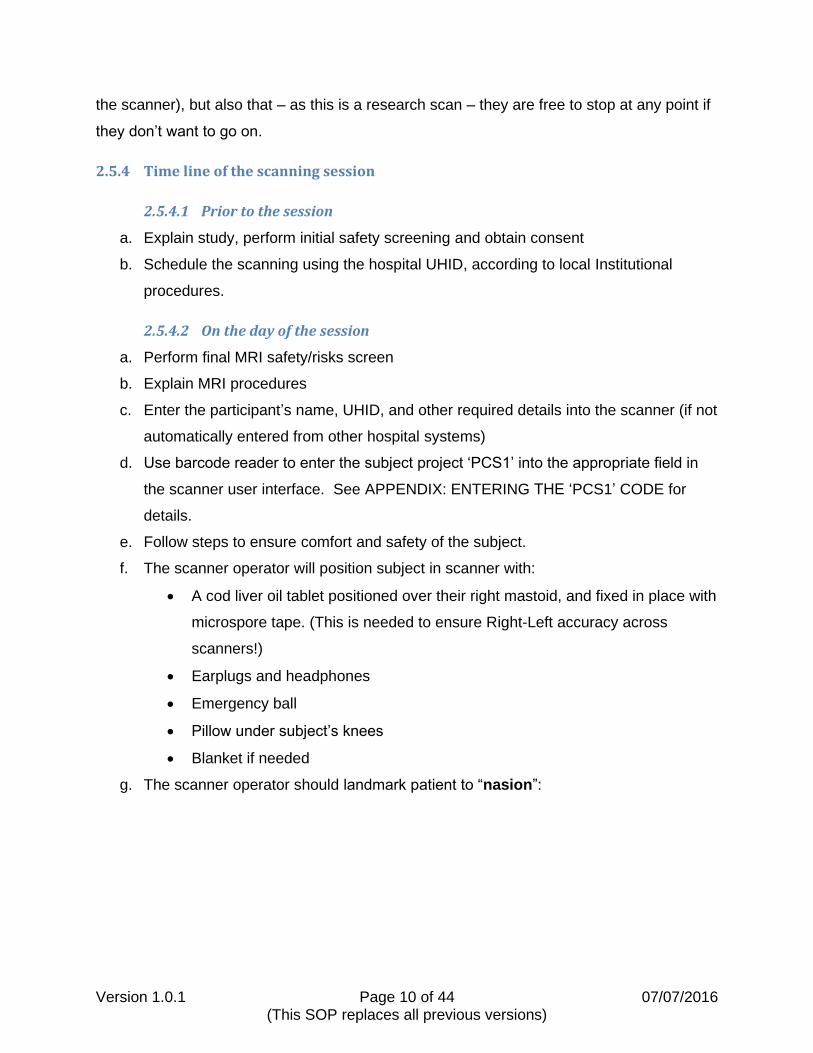
g. The scanner operator should landmark patient to “nasion”:
Version 1.0.1 Page 11 of 44 07/07/2016 (This SOP replaces all previous versions)
h. The scanner operator will return to the scanner control room and talk to the
participant:
• Ask the participant whether he/she is ok and ready to start with the first
scans.
• Remind the participant to lie as still as possible
• Remind the participant that he/she can always press the alarm button if s/he
feels uncomfortable and feels an urgent need to be removed from the
scanner.
• Note that the researcher may also need to talk to the participant between the
scans (and in particular just before the “resting state” scan).
i. If the participant is happy to go ahead, then inform him or her that
scanning is about to start and that there will be some scanner noise
and that he/she will talk again after these scans. (Tell the participant
how long the scan/noise is likely to be, referring to the table below)
i. The scanner operator (radiographer) will perform a scout (localizer) and any
necessary calibration scans (see Overview of the Imaging session, below).
j. When the scout and calibration scans finishes the scanner operator will ask the
participant whether he/she is ok. If the participant is still happy to continue, the
scanner operator will start the first structural scan (see Overview of the Imaging
session, below).
k. After the first structural scan the researcher will again talk to the participant and ask
him or her whether he/she is ok. The researcher will then give the participant
instructions for the resting state functional scan, asking them to lie still with their
eyes open.
l. The scanner operator will then start the resting state scan.
Version 1.0.1 Page 12 of 44 07/07/2016 (This SOP replaces all previous versions)
m. When the scan finishes, the scanner operator will ask the participant whether he/she
is ok. If the participant is still happy to continue, the scanner operator will start the
next scan.
n. Step m is repeated for all remaining sequences.
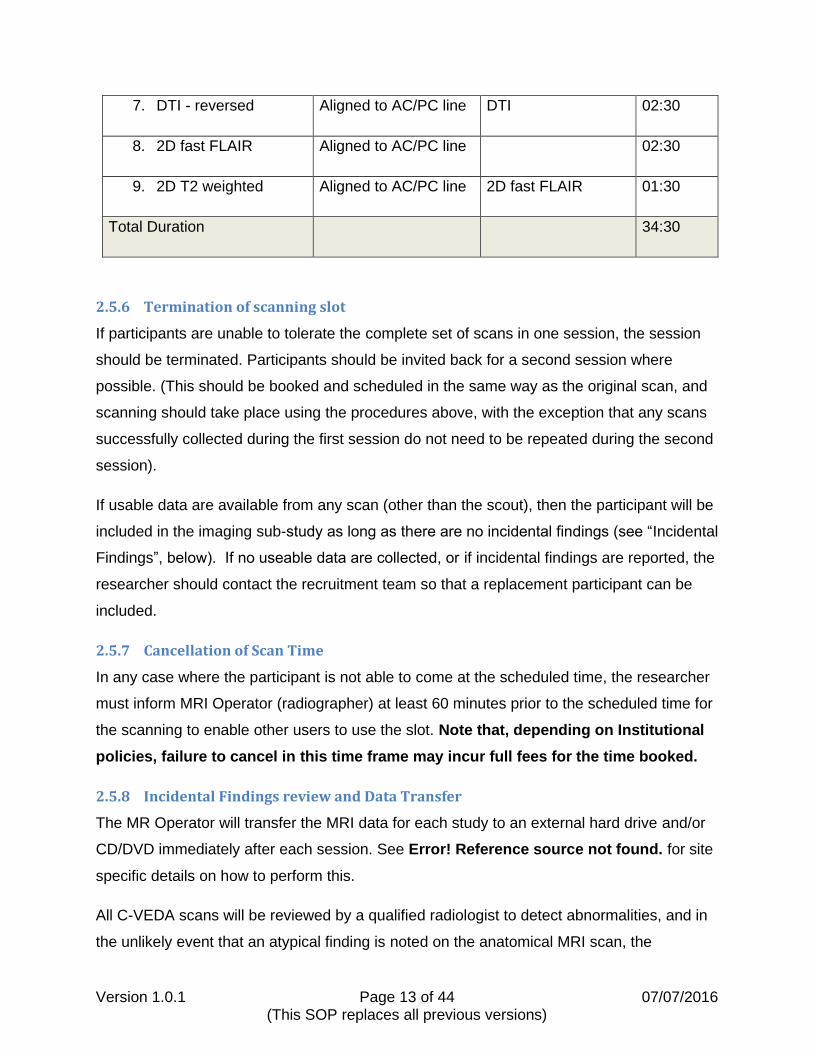
2.5.5 Overview of the Imaging session
NB. Scans to be performed for the C-VEDA study vary slightly between sites because of
manufacturer specific constraints. The table below shows the running order, which is the
same for all sites; please see APPENDIX: OVERVIEW OF IMAGING SESSION for the site
specific timings and details of any additional scans, or sequences to be skipped.
Sequence/Series Orientation
(See APPENDIX:
EXAMPLES OF
SCAN
ORIENTATIONS)
Match prescription
to:
Approx.
Duration
1. Scout image 01:00
2. Site specific
calibration scans, if
necessary
01:00
3. 3D T1 weighted
volume
Pure sagittal
orientation.
Do not rotate.
Do not tilt to AC/PC
09:30
4. Resting state fMRI Aligned to AC/PC line 06:00
5. B0 mapping, if
available
Aligned to AC/PC line Resting state fMRI 01:00
6. DTI Aligned to AC/PC line 09:30
Version 1.0.1 Page 13 of 44 07/07/2016 (This SOP replaces all previous versions)
7. DTI - reversed Aligned to AC/PC line DTI 02:30
8. 2D fast FLAIR Aligned to AC/PC line 02:30
9. 2D T2 weighted Aligned to AC/PC line 2D fast FLAIR 01:30
Total Duration 34:30
2.5.6 Termination of scanning slot
If participants are unable to tolerate the complete set of scans in one session, the session
should be terminated. Participants should be invited back for a second session where
possible. (This should be booked and scheduled in the same way as the original scan, and
scanning should take place using the procedures above, with the exception that any scans
successfully collected during the first session do not need to be repeated during the second
session).
If usable data are available from any scan (other than the scout), then the participant will be
included in the imaging sub-study as long as there are no incidental findings (see “Incidental
Findings”, below). If no useable data are collected, or if incidental findings are reported, the
researcher should contact the recruitment team so that a replacement participant can be
included.
2.5.7 Cancellation of Scan Time
In any case where the participant is not able to come at the scheduled time, the researcher
must inform MRI Operator (radiographer) at least 60 minutes prior to the scheduled time for
the scanning to enable other users to use the slot. Note that, depending on Institutional
policies, failure to cancel in this time frame may incur full fees for the time booked.
2.5.8 Incidental Findings review and Data Transfer
The MR Operator will transfer the MRI data for each study to an external hard drive and/or
CD/DVD immediately after each session. See Error! Reference source not found. for site
specific details on how to perform this.
All C-VEDA scans will be reviewed by a qualified radiologist to detect abnormalities, and in
the unlikely event that an atypical finding is noted on the anatomical MRI scan, the
Version 1.0.1 Page 14 of 44 07/07/2016 (This SOP replaces all previous versions)
participant will be informed. Data from participants with such incidental findings will NOT be
included in the data analysis, so the MR Operator (radiographer) should not pass the
disk/CD/DVD to the researcher until the radiologist has informed them that the scan has
been reviewed, and data may be transferred.
• Note that although their MRI data will not be used, these participants will still remain
part of the study, and all other administrative procedures should be followed as
normal, so that the scanning site can be reimbursed for the scan costs.
2.5.9 Data Transfer to the central database site
For the Mysore site, data will then be sent by courier to the Bangalore site for upload over
the internet; all other sites will upload data directly. See Data Transfer, Anonymization, and
Upload for details of how to perform this data upload.
2.5.10 Accounting of the data
To allow accounting for the scanning, the PI must provide a Scanner Reimbursement Form
for each scanning session, according to local Institutional procedures. This form will
normally be completed in triplicate: one copy will be kept at the scanning center by the
radiographer; one will be passed to the researcher; and one will be with retained the
radiology office for tracking the account detail of the project.
2.5.11 Troubleshooting:
There are many possible interruptions that might occur during the scan period. Some of the
possible causes and remedies are being discussed below.
a. Scanner stopped working:
Restart the system. Inform the vendor. Reschedule the appointment
b. Participant uncooperative:
Talk to them and make sure that they are comfortable. If necessary, reschedule the
appointment and try scanning another day
c. Software crash:
Try to restart the system otherwise contact the vendor
Version 1.0.1 Page 15 of 44 07/07/2016 (This SOP replaces all previous versions)
2.6 Data Transfer, Anonymization, and Upload
2.6.1 Site specific data transfer information
Details of transfer of data from MRI scanner to PC workstation to be used for anonymization
differ at each site, and can be found in Section Error! Reference source not found..
2.6.2 Software
Data will be anonymised using the Dicom Editor tool; the Micro Dicom viewer will be used to
view, manipulate and perform any necessary checks on DICOM format images. In addition,
the 7-zip program can be used to create ZIP files if the computer does not already have
appropriate software for this.
Details on how to install the necessary programs can be found in APPENDIX: DATA
ANONYMIZATION SOFTWARE.
Version 1.0.1 Page 16 of 44 07/07/2016 (This SOP replaces all previous versions)
2.6.3 Data checking and anonymisation
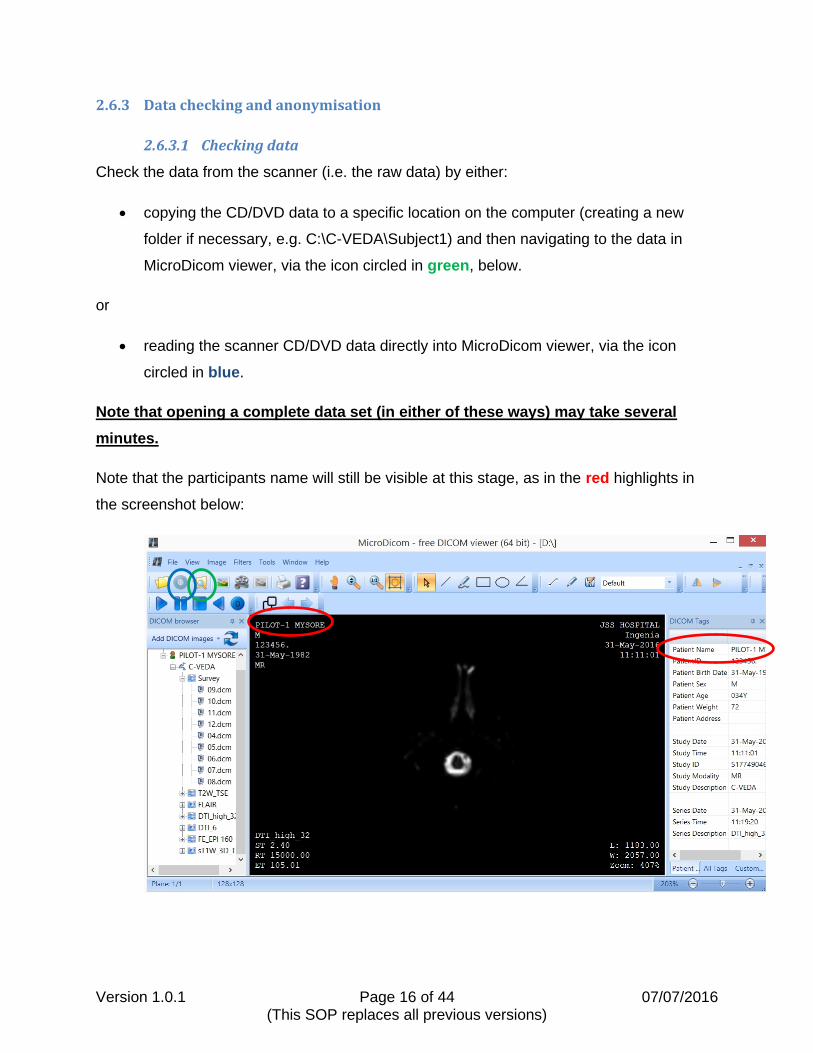
2.6.3.1 Checking data
Check the data from the scanner (i.e. the raw data) by either:
• copying the CD/DVD data to a specific location on the computer (creating a new
folder if necessary, e.g. C:\C-VEDA\Subject1) and then navigating to the data in
MicroDicom viewer, via the icon circled in green, below.
or
• reading the scanner CD/DVD data directly into MicroDicom viewer, via the icon
circled in blue.
Note that opening a complete data set (in either of these ways) may take several
minutes.
Note that the participants name will still be visible at this stage, as in the red highlights in
the screenshot below:
Version 1.0.1 Page 17 of 44 07/07/2016 (This SOP replaces all previous versions)
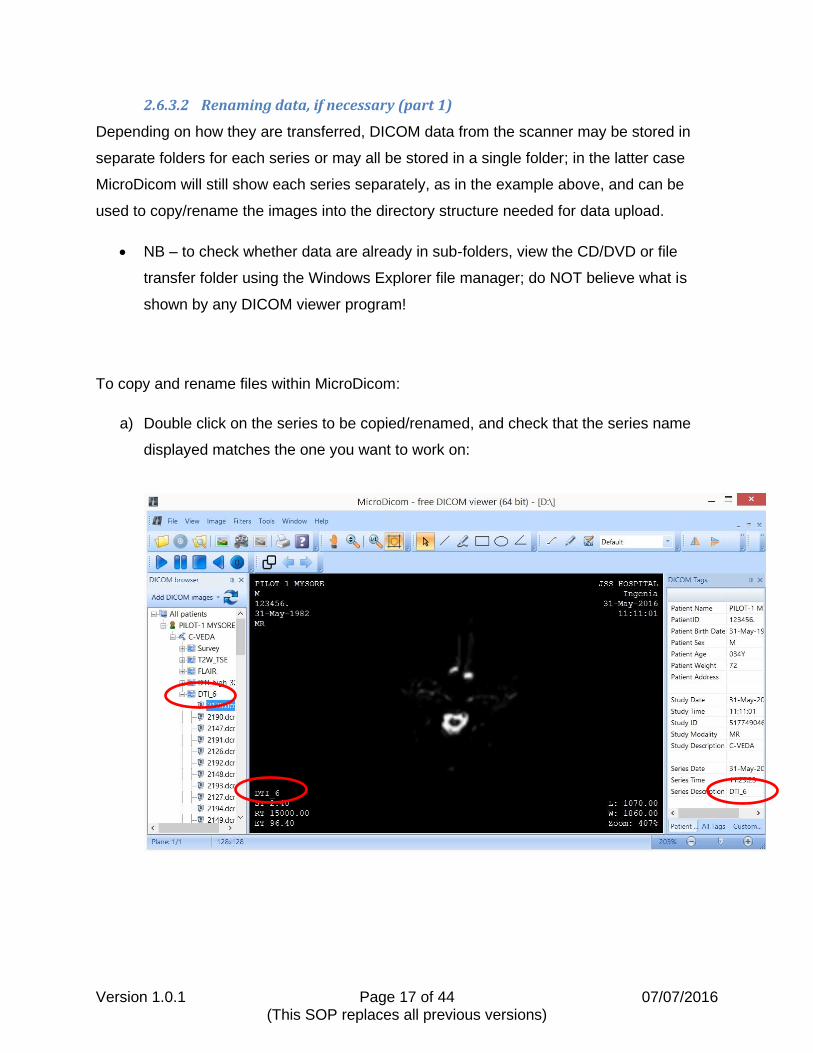
2.6.3.2 Renaming data, if necessary (part 1)
Depending on how they are transferred, DICOM data from the scanner may be stored in
separate folders for each series or may all be stored in a single folder; in the latter case
MicroDicom will still show each series separately, as in the example above, and can be
used to copy/rename the images into the directory structure needed for data upload.
• NB – to check whether data are already in sub-folders, view the CD/DVD or file
transfer folder using the Windows Explorer file manager; do NOT believe what is
shown by any DICOM viewer program!
To copy and rename files within MicroDicom:
a) Double click on the series to be copied/renamed, and check that the series name
displayed matches the one you want to work on:
Version 1.0.1 Page 18 of 44 07/07/2016 (This SOP replaces all previous versions)
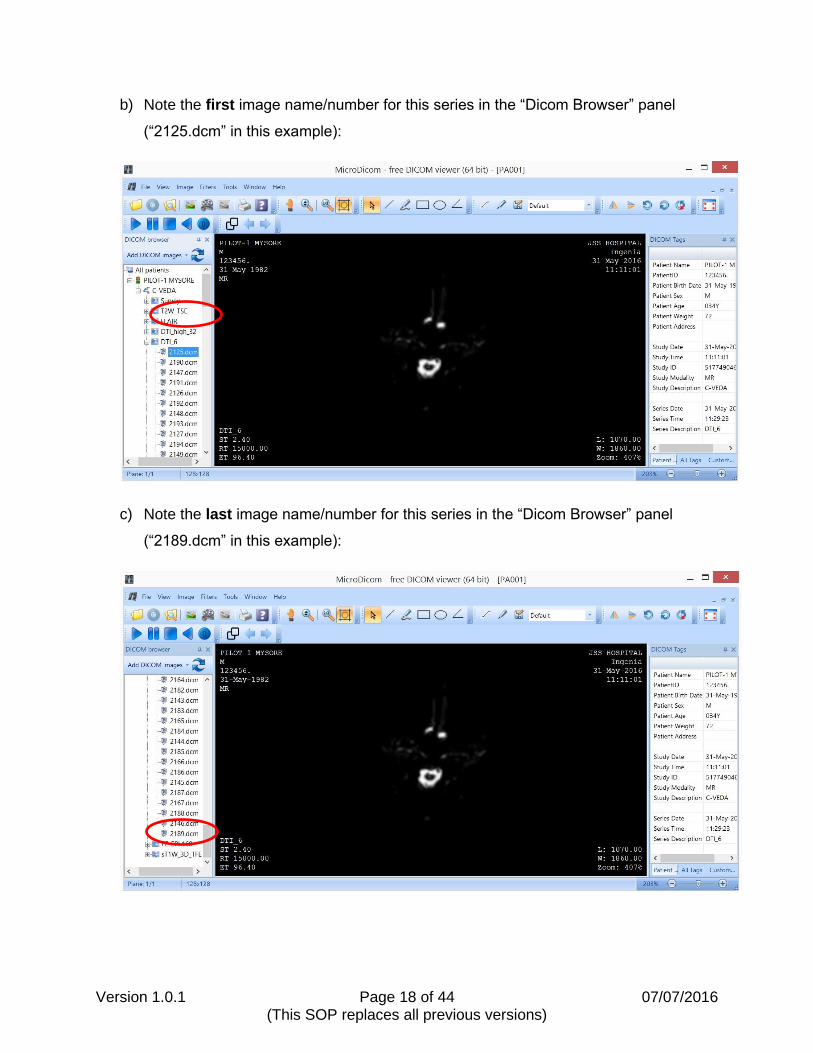
b) Note the first image name/number for this series in the “Dicom Browser” panel
(“2125.dcm” in this example):
c) Note the last image name/number for this series in the “Dicom Browser” panel
(“2189.dcm” in this example):
Version 1.0.1 Page 19 of 44 07/07/2016 (This SOP replaces all previous versions)
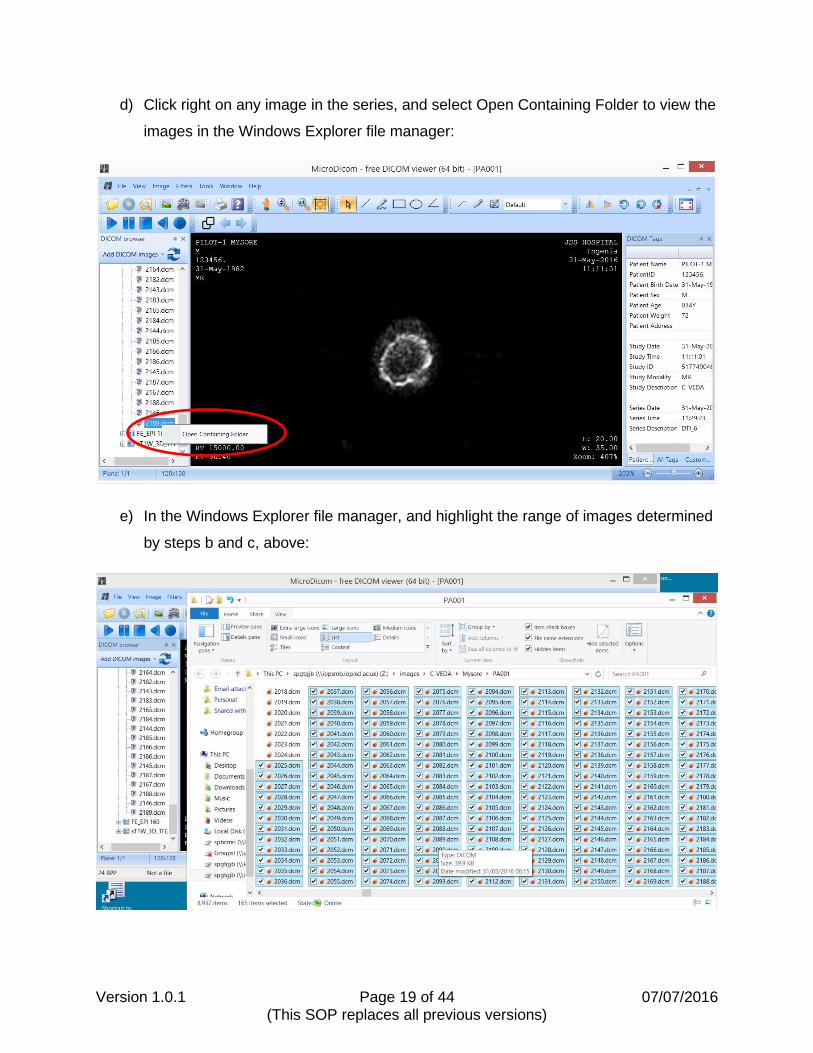
d) Click right on any image in the series, and select Open Containing Folder to view the
images in the Windows Explorer file manager:
e) In the Windows Explorer file manager, and highlight the range of images determined
by steps b and c, above:
Version 1.0.1 Page 20 of 44 07/07/2016 (This SOP replaces all previous versions)
f) Copy these images to a new folder.
• You should create a separate older for each participant, and within this create
sub-folders for each image series. The new folder names depend on the type
of data (i.e. which series) is being considered, and must be one of:
• T1w
• dwi
• dwi_rev
• rest
• FLAIR
• T2w
• Bzero_map
• Please ensure that you name the folders exactly as in the list above; do not
change the case of the folder names, and be careful not to insert spaces or
any other “special characters”.
• Note that the names/numbers of the individual DICOM files are NOT
important; these can be left in whatever format the scanner has created.
g) Repeat steps a-f for any remaining series.
Version 1.0.1 Page 21 of 44 07/07/2016 (This SOP replaces all previous versions)
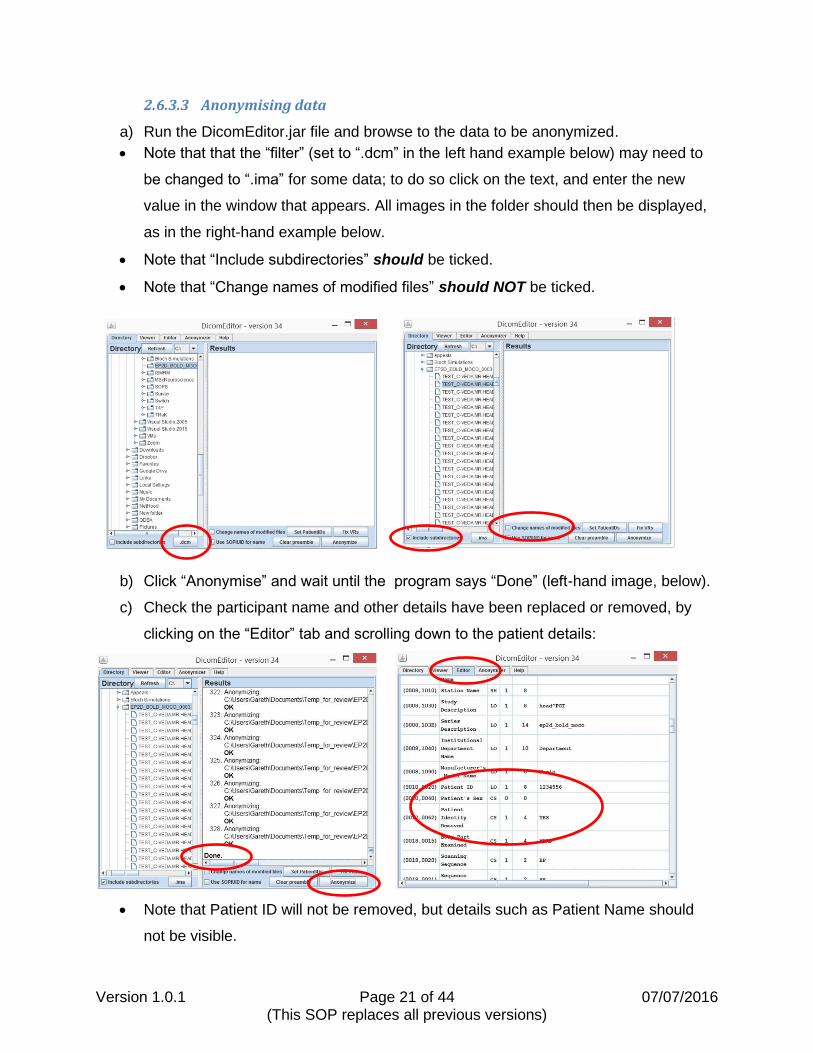
2.6.3.3 Anonymising data
a) Run the DicomEditor.jar file and browse to the data to be anonymized.
• Note that that the “filter” (set to “.dcm” in the left hand example below) may need to
be changed to “.ima” for some data; to do so click on the text, and enter the new
value in the window that appears. All images in the folder should then be displayed,
as in the right-hand example below.
• Note that “Include subdirectories” should be ticked.
• Note that “Change names of modified files” should NOT be ticked.
b) Click “Anonymise” and wait until the program says “Done” (left-hand image, below).
c) Check the participant name and other details have been replaced or removed, by
clicking on the “Editor” tab and scrolling down to the patient details:
• Note that Patient ID will not be removed, but details such as Patient Name should
not be visible.
Version 1.0.1 Page 22 of 44 07/07/2016 (This SOP replaces all previous versions)
2.6.3.4 Renaming data, if necessary (part 2)
Anonymized DICOM files must be arranged into a set of folders with pre-defined names,
before they can be uploaded to the central database site. If this has not already been done,
as described in section Error! Reference source not found. above, then provided that the
DICOM files are already in separate folders for each series, then these folders can simply
be copied/renamed using the Windows Explorer file manager.
The new folder names depend on the type of data (i.e. which series) is being considered,
and must be one of:
• T1w
• dwi
• dwi_rev
• rest
• FLAIR
• T2w
Please ensure that you name the folders exactly as in the list above; do not change the
case of the folder names, and be careful not to insert spaces or any other “special
characters”.
Note that the names/numbers of the individual DICOM files are NOT important; these can
be left in whatever format the scanner has created.

Version 1.0.1 Page 23 of 44 07/07/2016 (This SOP replaces all previous versions)
2.6.3.1 Zipping data
Data for each participant should be combined into a single zip file. If using “7-zip”:
a) Navigate to the folder containing the participant’s data in the Windows Explorer file
manager:
b) Click right over the folder name, and select “7zip-> Add to”:
Version 1.0.1 Page 24 of 44 07/07/2016 (This SOP replaces all previous versions)
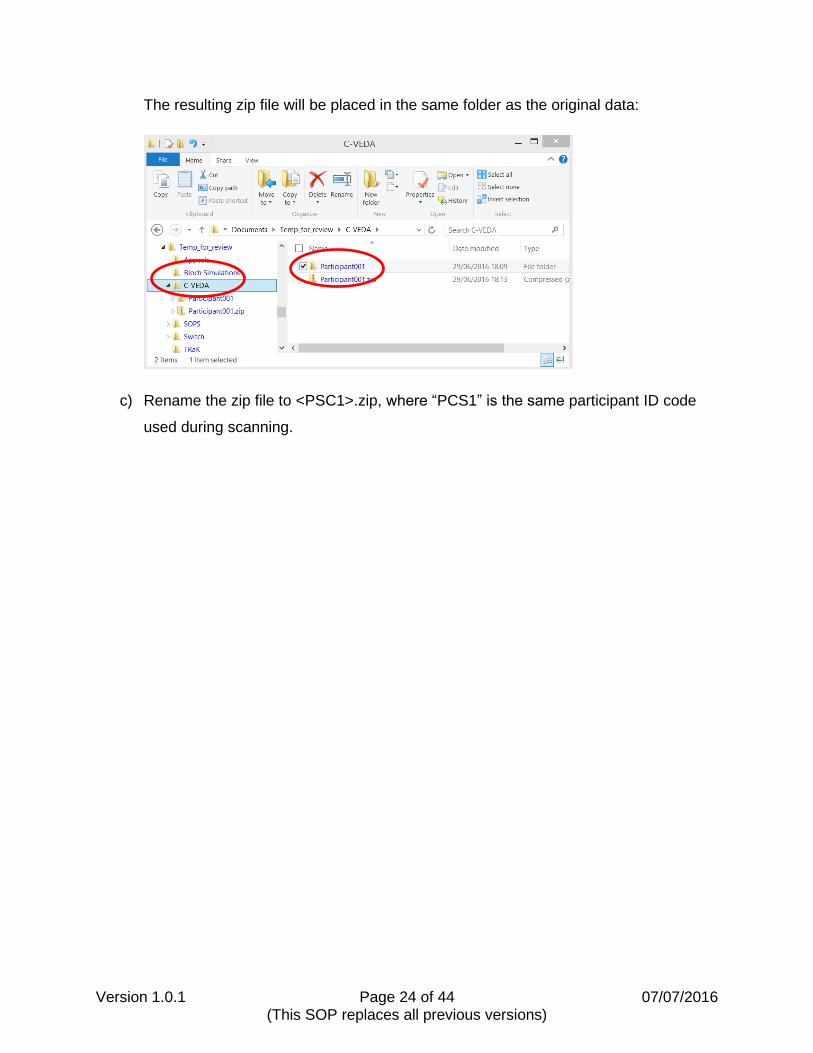
The resulting zip file will be placed in the same folder as the original data:
c) Rename the zip file to <PSC1>.zip, where “PCS1” is the same participant ID code
used during scanning.
Version 1.0.1 Page 25 of 44 07/07/2016 (This SOP replaces all previous versions)
2.6.4 Uploading of data to the central image database site
Data will be anonymised and then uploaded in DICOM format as a single zip file per
participant, as detailed above.
2.6.4.1 Upload
The URL for the upload website is:
https://cveda.nimhans.ac.in/
The website provides options to indicate which scans are included, along with “free text”
comments to allow the reason for any dropped scans to be recorded. Scans will be
identified by a participant ID (PCS1 code) within the DICOM header (entered on the
scanner using a barcode reader, to minimise errors);
Version 1.0.1 Page 26 of 44 07/07/2016 (This SOP replaces all previous versions)
2.7 Quality Control (QC)
2.7.1 Phantom scans
A manufacturer provided spherical phantom will be scanned monthly, during the first week
of the month, at each MRI scanning site. Phantom scans will be identified by a project ID
(“PCS1 Code”), provided by the researcher, which should be entered into the scanner in the
same way as for participant scans. (See APPENDIX: ENTERING THE ‘PCS1’ CODE).
Scans will be visually assessed by the scanner operator for signal uniformity, gross
geometrical distortions and temporal stability; if any artifacts or other problems are detected,
the scanner operator will:
• Use the Institution’s normal procedures to contact the scanner manufacturer, if
appropriate,
• Inform the PI and/or C_VEDA imaging lead for the site, who will in turn report this to
the Imaging Working Group during the next regularly scheduled meeting.
Data should be uploaded to the central database site in the same way as participants’
scans. (See Data Transfer, Anonymization, and Upload).
2.7.2 Human participants
A single volunteer will be identified at each MRI scanning site and will be scanned every 6
months. In addition, the traveling QC monitor, who will visit each site once every 6 months,
will be scanned during their regular visit. The scanning procedures and protocols will be
identical to those for other participants, and both volunteers will be identified by a project ID
(“PCS1 Code”), provided by the researcher, which should be entered into the scanner in the
same way as for participant scans. (See APPENDIX: ENTERING THE ‘PCS1’ CODE).
Data should be anonymized and uploaded to the central database site in the same way as
participants’ scans. (See Data Transfer, Anonymization, and Upload).
Version 1.0.1 Page 27 of 44 07/07/2016 (This SOP replaces all previous versions)
3 APPENDIX: EXAMPLE MRI PARTICIPANT SCREENING FORM
Name: ________________________
Age: ______
D.O.B. _________________
Handedness: right / left / mixed
Please answer “yes” or “no” to the following questions:
1. Have you previously had an MRI?
2. Have you ever been a soldier, grinder, welder, metalworker or hobbyist?
3. Have you EVER had a metallic foreign body in your eye?
4. Have you ever experienced claustrophobia?
5. Have you ever had an epileptic seizure?
6. Have you ever had a head injury?
7. Have you had any visual disorders?
8. Can you see clearly at arm’s length without glasses (contacts are OK)?
9. Do you have:
A cardiac pacemaker or defibrillator?
Aneurysm clip
Cochlear implant
Neurostimulator
Artificial cardiac valve
Caval filter/stent
Port cath

Version 1.0.1 Page 28 of 44 07/07/2016 (This SOP replaces all previous versions)
IUD/Penile implant
Tattoos/body piercing(s)
Dentures/ retainers/braces
Other implanted device(s) or prosthesis
10. Have you had surgery on:
Head/ear
Neck
Spine
Chest
Abdomen
Extremities
Other
11. Are you taking any medications which could make you drowsy?
12. Can you stand without assistance?
13. Are you able to lie on your back for one hour without moving?
Version 1.0.1 Page 29 of 44 07/07/2016 (This SOP replaces all previous versions)
4 APPENDIX: EXAMPLE INFORMATION SHEET AND CONSENT FORM
INFORMED CONSENT FORM FOR PARTICIPANT
Consortium on Vulnerability to Externalizing Disorders and Addictions [c-VEDA]
Dear .........
Introduction
You are being invited to take part in a research study. Before you decide it is important for
you to understand why the research is being done and what it will involve. Please take time
to read the following information carefully and discuss it with friends, relatives and your
treating physician/family doctor if you wish. Ask us if there is anything that is not clear or if
you would like more information. Take time to decide whether or not you wish to take part.
What is the purpose of the study?
We are trying to understand about the exposure to several factors in the environment (for
example mental stress, nutrition, pollution) during different periods of our development (in the
mother’s womb, during childhood, adolescence and young adult life). How these may affect
the different ways our brains develop / mature, and contribute to differences in a person’s
temperament / personality and mental abilities. How these differences may ultimately
increase or decrease the person’s risk of developing problems with sustaining attention,
emotion and impulse control which are thought to increase the risk for addiction to alcohol,
tobacco and drugs and other mental illnesses.
To do this we plan to record, at different points during an individual’s lifetime (developmental
period between 6 and 23 years) information about: exposure to environmental factors,
changes in the genes that control brain development, changes in brain structure and function,
temperament/ personality, assessments of mental functioning and in adolescents and adults
– tobacco, alcohol or drug use.
We aim to involve 10000 individuals, both male and female, from different places in India
individuals (planned) and collect information on birth details (birth weight, conditions at birth,
mother’s health), current height-weight, temperament and psychological functioning including
For Children (persons under 16 years of age) participating in this study, the term “You”
addresses both the participant ("you") and the parent or legally authorized representative
("your child").
Version 1.0.1 Page 30 of 44 07/07/2016 (This SOP replaces all previous versions)
tests of mental function and exposure to environmental risks. We will also collect sputum
(spit) from children and sputum and a sample of blood from willing adolescents and adults,
so that we can study genes. A smaller group of subjects will be invited to undergo voluntary
brain scans (MRI) to study the differences in brain maturation..We also intend, in the future
to conduct repeated measurements of the same, so that we can get a longitudinal picture of
the influences on your brain maturation & growth and how that shapes your/his/her
personality and mental functioning as you/he/she grow(s) into an adult. So, we are also asking
your permission to be contacted on a repeated basis (at around 2 year intervals) in the future.
This is purely a research study of no direct benefit to yourself, and the findings may not be of
immediate clinical relevance. However, in case the assessments should detect any medical
or psychiatric difficulties, we will inform you and refer you for appropriate care.
Why have I been chosen?
You have been invited to participate in this study because: A] You/ your child are already part
of a research study exploring environmental influences at birth on development and growth.
Adding measurements related to brain maturation and mental functioning, will thus 2
significantly increase the value of the information you have already contributed in the
understanding of human development and disease.
B] You/ your child may theoretically be at greater hereditary risk of developing alcohol,
tobacco or other drug problems or problems related to attention, impulse control, emotional
reactivity and behavioral problems, because a close family member has severe alcohol or
drug problems.
Do I have to take part?
No. It is entirely up to you to decide (for yourself / your minor child). You will be given a copy
of this information sheet and have adequate time to read through, think and ask any questions
before making a decision.
If you do decide to take part you will be asked to sign a consent form and given a signed copy
of the consent form to keep.
If you decide to take part you are still free to withdraw at any time without giving a reason. A
decision to withdraw or not to take part, will not affect in any way your routine medical care
here. All reasonable travel costs will be reimbursed by local arrangement.
Version 1.0.1 Page 31 of 44 07/07/2016 (This SOP replaces all previous versions)
What will happen to me if I take part?
After an information session and providing informed consent, you will be asked to visit the
hospital for assessments / complete a questionnaire over a secure Internet site and visit the
hospital for the rest of the assessments.
Assessments include (you/your child may be asked to participate in all or only a few):
1) An interview including tests of mental abilities
2) Collection of sputum and/or blood for isolation of DNA; and sputum for assessment of
the cortisol hormone to measure your response to mild stress
3) Collection of urine for measurement of exposure to environmental toxins
4) Brain measurements using magnetic resonance imaging (MRI)
1) Clinical interview
In the interview, we will ask you, and/ your child about:
1. Circumstances at birth including mother’s health, birth weight – if not already recorded.
2. Temperament and functioning at the current time
3. Psychological tests for mental abilities
4. Illnesses that you, and your family members may have had
5. Exposure to a] psychological stress – adverse childhood circumstances; b] nutritional
status; c] environmental toxins-including cell phone use, proximity to high tension
electric lines
6. Current mental functioning – thoughts, moods, behaviors; and in case of adolescents
and adults- use of tobacco, alcohol & other drugs, other behaviors like internet use,
cell phone use, gambling
These interviews may take 1 to 2 hours, and may be done in one session or 2 sessions if you
so wish. You may refuse to answer any questions if you feel uncomfortable about sharing the
information.
In case you have been contacted because you have been participating in another research
study exploring influences at birth on development and growth, we would ask your permission
to also include information from these records.
Version 1.0.1 Page 32 of 44 07/07/2016 (This SOP replaces all previous versions)
2) Collection of sputum or blood sample for genetic studies
Saliva /Sputum for all participants: You will be asked to provide about 5 ml (approx. 1
teaspoon) of saliva/ sputum by spitting / coughing into a test-tube.
Blood sample (Only for consenting subjects above 12 years):
For adolescents and adults, we will request a blood sample of about 15 ml (2-3 tsp) which
will be collected
What are the possible disadvantages and risks of giving a blood sample? You may
experience some slight discomfort such as bleeding/burning at the site of the needle insertion.
Some people may feel dizzy or feel faint. Very rarely infection may occur at the site of the
needle prick.No serious life threatening complications are likely to occur. Withdrawal of blood
is very similar to the method used to draw blood for routine investigations. The amount of
blood withdrawn is small and is unlikely to cause any health risks such as anemia.
3) MRI (Magnetic Resonance Imaging)
We will examine (only for around 1000 subjects) the structure and function of your brain using
MRI. The procedure is very much like an X-ray or CT scan, but unlike those you will not be
exposed to x-rays as there is no radiation involved in an MRI scan. MRI scans use magnetic
fields, which you will not feel, to produce detailed pictures of the brain. You will be asked to
lie on a long narrow couch for certain about 30 minutes, while the machine takes pictures of
your brain. You will, hear repetitive tapping noises that arise from the scanner and we will
provide earplugs or headphones that you will be required to wear. The space within the large
magnet in which you lie is somewhat confined, and rarely, some people might become
anxious when put into the scanner. In case you develop any discomfort during the procedure,
please let us know and we will immediately take you out of the scanner. Before undergoing
this procedure, we will show you how this procedure is being done. During the process of
scanning both yourself and the doctor or your attendant can talk to each other.
Risks: Magnetic fields do not cause harmful effects at the levels used in the MRI machine.
However, the MR scanner uses a strong magnet that will attract metals and affect electronic
devices. If you have a cardiac pacemaker or any other biomedical device in your body, it is
very important that you tell the operator. As metallic objects experience a strong attraction to
the magnet, it is also important that you tell the operator of any metal objects (especially
surgical clips), devices, or implants in or on your body before entering the magnet room. All
Version 1.0.1 Page 33 of 44 07/07/2016 (This SOP replaces all previous versions)
such objects must be removed (if possible) before entering the magnet room. In some cases,
having those devices means you should not have an MRI scan performed. In addition,
watches and credit cards should also be removed as these could be damaged. You will be
provided a way to secure these items. If you have any history of head or eye injury involving
metal fragments, if you have ever worked in a metal shop, or if you could be pregnant, you
should notify the operator/investigator
We are performing imaging solely for the research purposes described above. It is not a
clinical scan intended for diagnostic or therapeutic purposes. Under no circumstance will the
investigator, research staff, or imaging staff interpret the scan as normal or abnormal. They
are unable to make any medical comments about your scan. The scan will not be looked at
or read for any healthcare treatment or diagnostic purpose. If you want your scan to be
reviewed by a physician so that the physician can look for medical issues, you can request a
copy of your scan. We will provide an electronic copy at no charge.
What if something goes wrong?
If you have any problems after leaving the clinic, such as infection, then please contact the
study doctor who will advise you as to the best way to proceed. If you have any complaints
about the way that the study has been conducted please discuss this with your study doctor,
or you may wish to contact the hospital complaints department.
What is the duration of study involvement?
You are being asked to participate in this research study which is currently for a period of 3
years. So we will contact most of you only once. Some of you may be approached for a repeat
measurement after one year. However, this study is intended to provide the foundation for a
unique long term study of how human brains grow and mature and what factors might
influence this path of brain maturation to increase or decrease the risk for mental difficulties
including addictions. So we would also like to ask if you would permit us to contact you at
about 2 year intervals to repeat these measurements till you reach the age of 30 years.
Who will see my records and know about my taking part?
All data will be coded using unique identification numbers which will be known only to the
main investigators in the research team. Only this code will be indicated in all assessment
Version 1.0.1 Page 34 of 44 07/07/2016 (This SOP replaces all previous versions)
sheets, so your identity will never be revealed. Your name will not be disclosed outside the
clinic or appear on any reports or publications resulting from the study. The data generated
from this research will be anonymous, with no indication of the identity of individuals involved.
What will happen to my blood sample?
The sample will be transported to the tissue culture facility at NIMHANS where tests will be
done, genetic material extracted, and the cells will be cultured. The sample will be given a
unique identification number, and this will be used to label your sample, for confidentiality and
anonymity.
Request to collect and store biospecimens for future research
As part of this research study, we would like to ask you to let us store your biospecimens and
health information for future research on brain development and mental illnesses, beyond
what is planned in this study, with appropriate ethics approval. This research could include
other diseases and involve research tools such as gene sequencing or the creation of cell
lines. These materials and information will be stored in a secure facility at NIMHANS.
• Gene sequencing of your DNA provides researchers with the code to your genetic
material.
Cell lines are living tissue samples that can be grown in a laboratory. A cell line can provide
an unlimited. supply of cells in the future without requiring more samples from you. Each cell
contains your complete DNA.The study doctor can provide you with additional information if
you have questions. You will not benefit financially from the results of any such research (e.g.
if the research leads to commercial development of a new therapy).
You do not have to agree to allow your blood and urine specimens to be stored in order to be
part of this study. You may request at any time that your research samples be removed from
storage and not be used for future research. If you decide you want your samples removed,
you may contact Dr. Vivek Benegal at the NIMHANS at 080-26995275. Once the request is
received, and if your samples have not already been used for other research, they will be
destroyed. If you do not make such a request, your specimens will be stored indefinitely or
until used.
Version 1.0.1 Page 35 of 44 07/07/2016 (This SOP replaces all previous versions)
Will my DNA be analysed?
Yes, your DNA will be analysed for genetic testing
Will you need blood samples from any of my family members?
In order to maximise the knowledge opportunity of the study it would be desirable to obtain a
blood sample/ perform assessments from an unaffected relative such as your parents or
siblings. While we are not collecting genetic information from your family members, we
request your permission to contact them for the same, at a later date.
What do I need to do after the blood sample and assessments?
This is purely a research study. You will be contacted on regular occasions for follow-up and
repeat samples. Each time, you will have the freedom to give or not give samples/time for
assessments.
What will happen to the results of the research study?
The study may be published in scientific journals. The results may also be presented at
scientific conferences. If results are published, this will be done without revealing your identity,
which will always remain confidential.
Who is organising the study?
The research is being conducted as collaboration between the Department of Psychiatry,
National Institute of Mental Health and Neuro Sciences (NIMHANS) and the King’s College,
London, and funded by the Indian Council of Medical Research, Government of India and the
Medical Research Council, United Kingdom. Your doctor, local clinician or researchers will
not receive any personal payment. Dr. Vivek Benegal ( from NIMHANS) and Dr. Gunter
Schumann (from the King’s College) will co-ordinate this research, which will involve other
colleagues form these and other institutions.
Who has reviewed this study?
The study was approved by the NIMHANS and Research Ethics Committee.
If you need any more information about this study please contact:
During working hours: Prof Vivek Benegal (08026995275/9480829478)

Version 1.0.1 Page 36 of 44 07/07/2016 (This SOP replaces all previous versions)
Thank you for taking time to read this information. If you decide to consider taking part in this
study, you will be given a copy of this leaflet for your information.
Undertaking by the investigator:
Your consent to participate in the above study is sought. You have the right to refuse
consent or withdraw the same during any part of the study without giving any reason. In
such an event, you will still receive best possible treatment, without any prejudice. If you
have any doubts about the study, please feel free to clarify the same. Even during the
study, you are free to contact any of the investigators for clarification if you so desire (Dr
Vivek Benegal). All the information/data collected from you will be kept in strict confidence
Consent:
I have been informed about the procedures of the study. The possible risks too have been
explained to me as stated in the information. I have understood that I have the right to refuse
my consent or withdraw it any time during the study without adversely affecting my treatment.
I am aware that by subjecting to this investigation, I will have to give more time for
assessments by the investigating team and that these assessments do not interfere with the
benefits. I………………………………………………………………….the undersigned, give my
consent to be a participant of this study.
________________________ ------------------------------------------------
----
Signature of the Clinician Signature of the Participant
--------------------------------------- ---------------------------------------------------
------
Name of the Clinician Name of the Participant
Date: Address:
________________________ --------------------------------------------------------
-
Signature of the Witness Signature of the Relative
________________________ --------------------------------------------------
-----------
Version 1.0.1 Page 37 of 44 07/07/2016 (This SOP replaces all previous versions)
Signature of the Witness Name of the RelativeStudy ID No
Address:
RESEARCH ASSENT FORM [FOR CHILD PARTICIPANTS]
Consortium on Vulnerability to Externalizing Disorders and Addictions [c-VEDA]
We want to tell you about a research study we are doing. A research study is a way to learn
more about something. We would like to find out more about how the surroundings or
conditions in which children are born and grow up can influence the different ways in which
the brain matures and shapes a person’s mental abilities and increases or decreases the risk
for a number of mental problems in adult life including addictions.
You are being asked to join the study because you have already contributed a lot of
information on human development, by being involved in a study which has been collecting
information about your birth and growing up. We feel that if you can give us some more
information on how your brain is growing and maturing and shaping your mental abilities, it
will help us learn more about human development.
If you agree to join this study, you will be asked to:
1] answer some questions about yourself, your surroundings and conditions you are growing
up in..
2] do a few tasks on a computer to measure your thinking skills and abilities
3] spit into a test tube to collect a teaspoon or two of your saliva
4] allow us to take pictures of your brain in a MRI scanner.
We will ask you to come to the clinic for 2 maybe 3 visits along with your parent(s) and each
visit may last up to 1 to 2 hours.
Risks and Discomforts: MRI scans use magnetic fields, which you will not feel, to produce
detailed pictures of the brain. You will be asked to lie on a long narrow couch for less than 30
minutes, while the machine takes pictures of your brain. You will, hear repetitive tapping
noises from the scanner and we will provide earplugs to reduce the noise. The space in which
you lie is somewhat narrow, and rarely, some people might become anxious when put into
the scanner. In case you develop any discomfort, please let us know and we will immediately
take you out of the scanner. Before undergoing this procedure, we will show you how this
procedure is being done. During the process of scanning both yourself and the doctor and
your parent can talk to each other.
Version 1.0.1 Page 38 of 44 07/07/2016 (This SOP replaces all previous versions)
You do not have to join this study. It is up to you. You can say okay now, and you can change
your mind later. All you have to do is tell us. No one will be mad at you if you change your
mind.
Before you say yes to be in this study, we will answer any questions you have.
If you want to be in this study, please sign your name. You will get a copy of this form to keep
for yourself.
------------------------------ -------------------------------------
--
(Sign your name here) (Date)
Version 1.0.1 Page 39 of 44 07/07/2016 (This SOP replaces all previous versions)
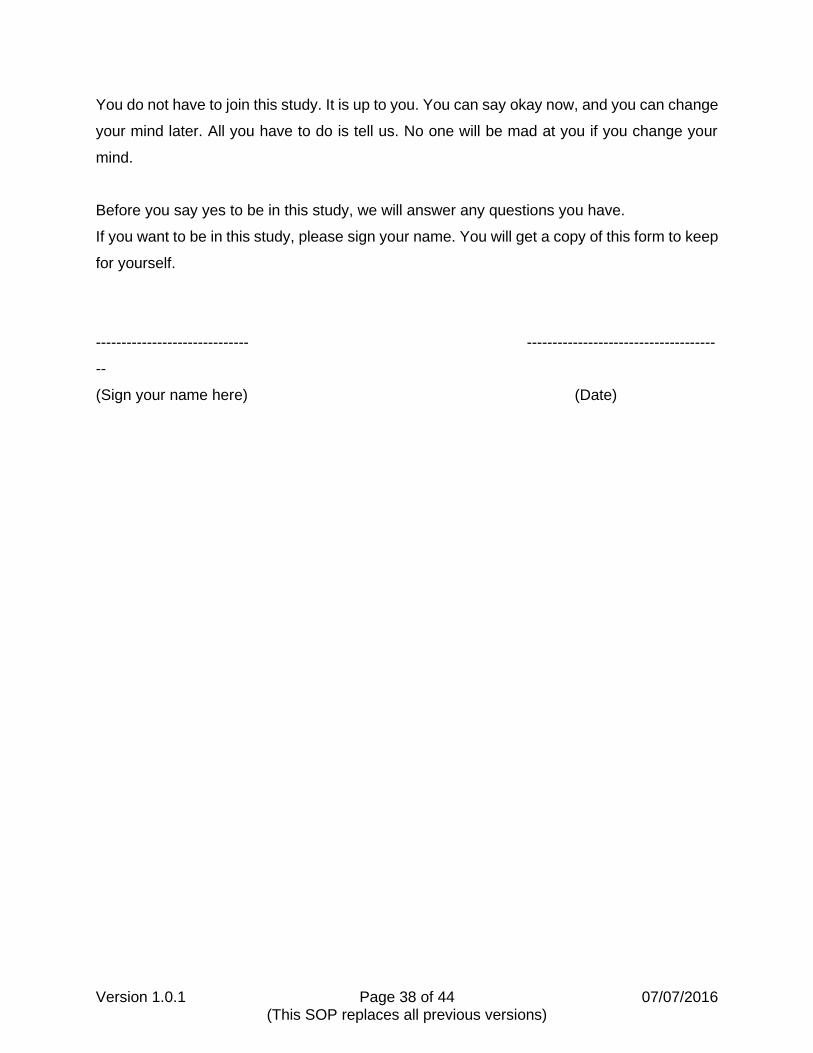
5 APPENDIX: ENTERING THE ‘PCS1’ CODE
The “PCS1 code” is a C_VEDA specific ID that links all the tests done on a particular
participant, including MRI scans. It must be entered into the scanner computer, so that it
will is stored in the image headers.
In order to minimise errors, the PCS code will be entered using a bar code reader:
• Enter subject name, hospital ID and other necessary details by typing them in, in the
normal way.
• Use the bar code reader to enter subject’s “C-VEDA Pseudo code” (PSD) into the
designated field (see site specific information below):
• Connect bar code reader to scanner
computer, if not already connected. (Simply
plug the scanner into any USB port on the
scanner computer).
• Select the designated field (see below)
using the mouse, as normal
• Position the bar code reader over the
participant’s bar code (which will be
provided by the researcher accompanying
the participant) and press the ‘trigger’; the
very long code will automatically be entered
into the designated field.
SITE SPECIFIC INFORMATION:
Site Scanner manufacturer Field in which to enter
code
NIMHANS, Bangalore Siemens Additional Info
PGI, Chandigarh Siemens Additional Info
Mysore Philips Study comments description
Version 1.0.1 Page 40 of 44 07/07/2016 (This SOP replaces all previous versions)
6 APPENDIX: OVERVIEW OF IMAGING SESSION
Site specific protocol information is present in the excel file available at
https://cveda.org/standard-operating-procedures/
7 APPENDIX: EXAMPLES OF SCAN ORIENTATIONS
7.1 3D T1 weighted volume
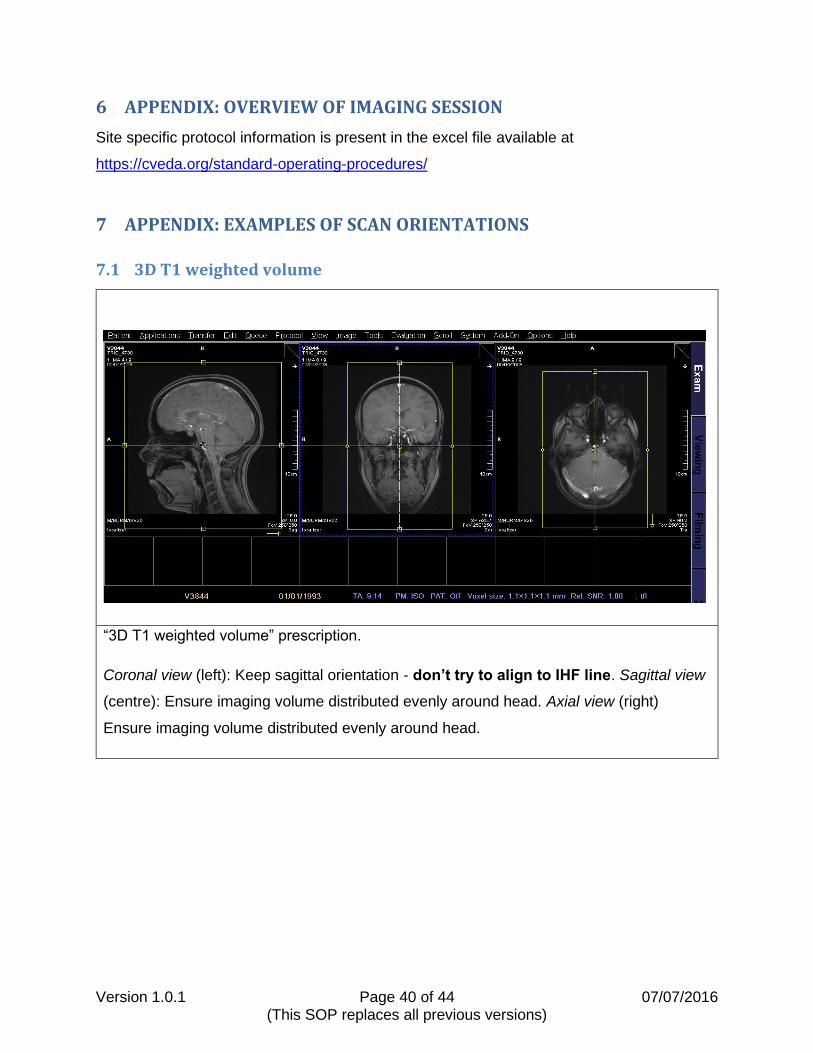
“3D T1 weighted volume” prescription.
Coronal view (left): Keep sagittal orientation - don’t try to align to IHF line. Sagittal view
(centre): Ensure imaging volume distributed evenly around head. Axial view (right)
Ensure imaging volume distributed evenly around head.
Version 1.0.1 Page 41 of 44 07/07/2016 (This SOP replaces all previous versions)
7.2 Resting state fMRI
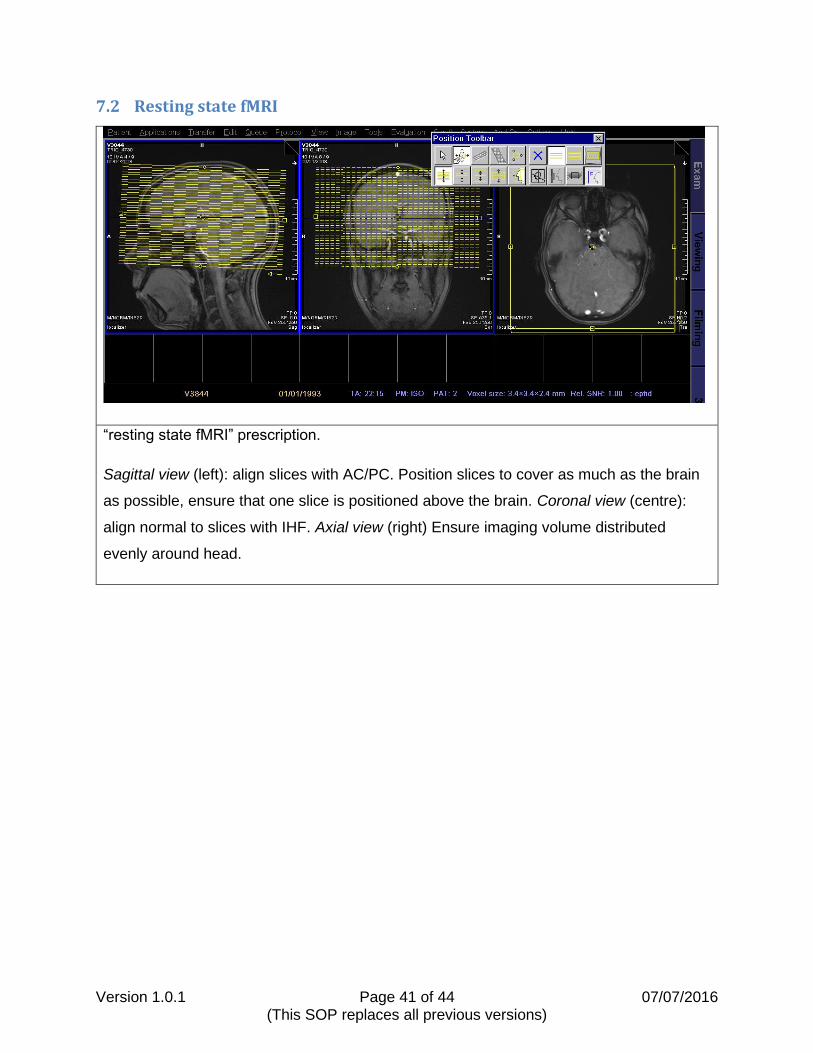
“resting state fMRI” prescription.
Sagittal view (left): align slices with AC/PC. Position slices to cover as much as the brain
as possible, ensure that one slice is positioned above the brain. Coronal view (centre):
align normal to slices with IHF. Axial view (right) Ensure imaging volume distributed
evenly around head.
Version 1.0.1 Page 42 of 44 07/07/2016 (This SOP replaces all previous versions)
7.3 DTI
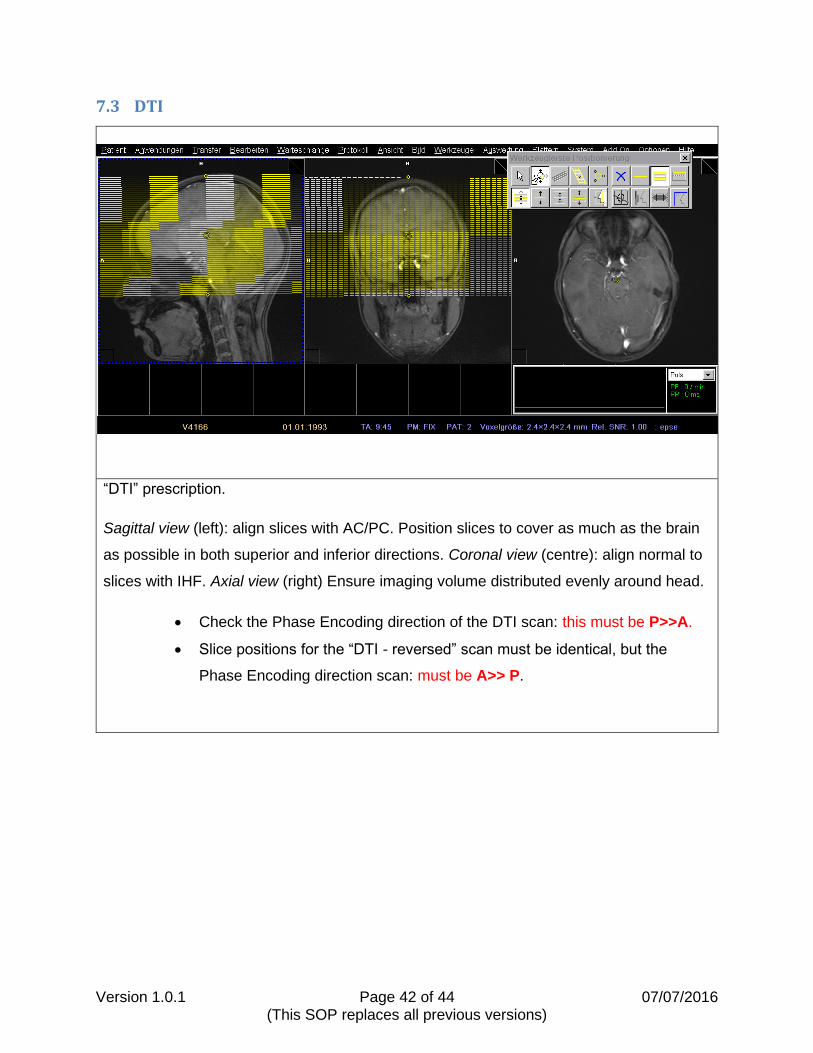
“DTI” prescription.
Sagittal view (left): align slices with AC/PC. Position slices to cover as much as the brain
as possible in both superior and inferior directions. Coronal view (centre): align normal to
slices with IHF. Axial view (right) Ensure imaging volume distributed evenly around head.
• Check the Phase Encoding direction of the DTI scan: this must be P>>A.
• Slice positions for the “DTI - reversed” scan must be identical, but the
Phase Encoding direction scan: must be A>> P.

Version 1.0.1 Page 43 of 44 07/07/2016 (This SOP replaces all previous versions)
8 APPENDIX: DATA ANONYMIZATION SOFTWARE
The following tools will be used for data anonymization; these must be downloaded and
installed on the computers that will be used for data transfer according to the instructions
given on the websites for each program.
• Java, if not already installed on computer. (Required for Dicom Editor) –
http://www.oracle.com/technetwork/java/javase/downloads/jre8-downloads-
2133155.html
o Note: To avoid potential conflicts and security issues, it is recommended to
uninstall all existing versions of Java (via the Windows Control Panel) and
then install the latest version for the site above.
o Note: You must install a 32-bit version of Java, even if your
computer/operating system is 64-bit.
• Java Advanced Imaging ImageIO Tools. (Required for Dicom Editor) –
http://mirc.rsna.org/ImageIO/jai_imageio-1_1-lib-windows-i586-jre.exe
• MicroDicom - http://www.microdicom.com/downloads.html
• Dicom Editor - http://mirc.rsna.org/query
o Note: Click the Download Software link in the left pane in the left pane of the
MIRC home page to obtain a list of all the available software. Download the
installer (DicomEditor-installer.jar) and run it; this will create a folder called
DicomEditor and put the required files inside it.
o C-VEDA specific step – the C-VEDA configuration file, created by Prof
Barker and circulated via email, must be copied into the DicomEditor
folder (replacing the existing configuration file).
o To launch the program, double-click the DicomEditor.jar file. (You can create
a shortcut to that file and put it anyplace convenient)
o See http://mircwiki.rsna.org/index.php?title=DicomEditor for more details.
• 7-zip (if required (i.e. if no software to create zip files already installed on computer))
- http://www.7-zip.org/download.html
Version 1.0.1 Page 44 of 44 07/07/2016 (This SOP replaces all previous versions)
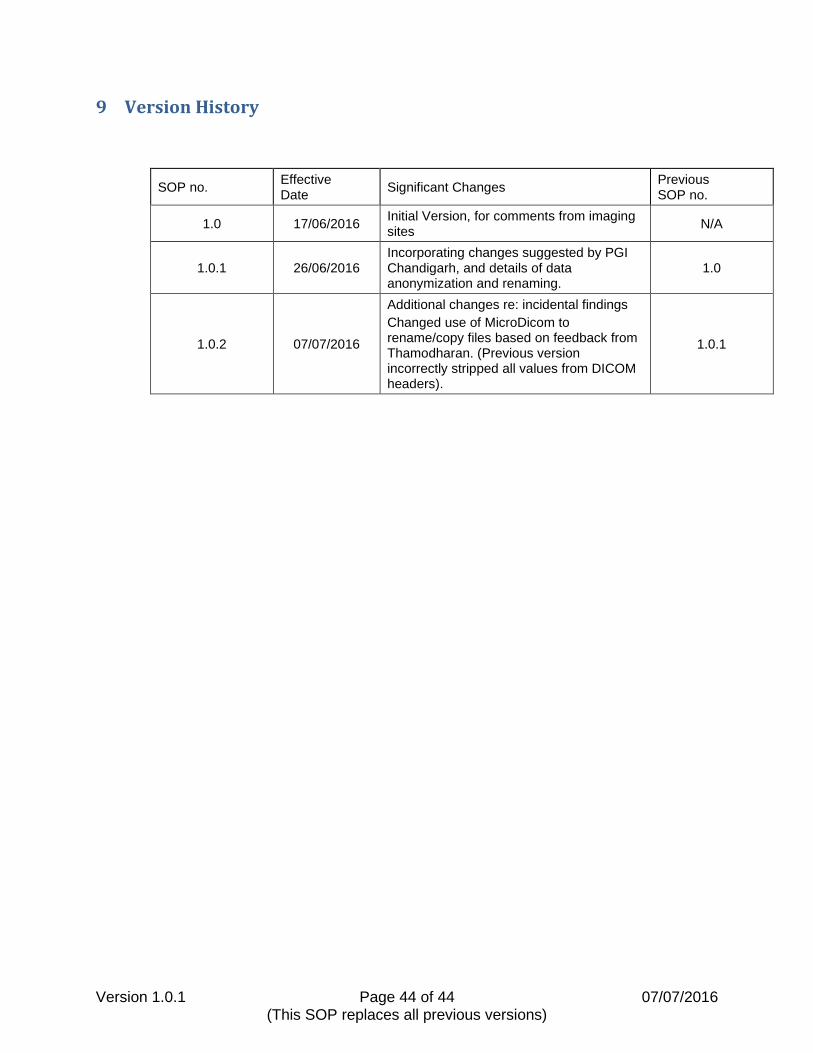
9 Version History
SOP no. Effective Date
Significant Changes Previous SOP no.
1.0 17/06/2016 Initial Version, for comments from imaging sites
N/A
1.0.1 26/06/2016 Incorporating changes suggested by PGI Chandigarh, and details of data anonymization and renaming.
1.0
1.0.2 07/07/2016
Additional changes re: incidental findings
Changed use of MicroDicom to rename/copy files based on feedback from Thamodharan. (Previous version incorrectly stripped all values from DICOM headers).
1.0.1
![Krishna Yajur Veda newest complete - MIU...Krishna Yajur Veda newest complete - MIU ... Yajur Veda]](https://img.pdfslide.net/doc/110x75/5e9132f90107e60dc30af5c7/krishna-yajur-veda-newest-complete-miu-krishna-yajur-veda-newest-complete.jpg)