Embed Size (px)
Citation preview

This guide is for both PowerShot S10 and PowerShot S20 digital cameras.Please read the notice on the next page before using your camera for the first time.Refer to this guide for camera operating instructions and the Software Starter Guide for computer andsoftware related instructions.
Camera User GuideCamera User Guide

Notice: Please ensure that you read and follow the handling and safety precautions onpages 5 to 10 of this guide before attempting to use the camera.
This user guide is for both the PowerShot S10 and PowerShot S20 models. The model shown in thisguide is the PowerShot S20. Unless otherwise noted, the menus and illustrations apply to both thePowerShot S10 and PowerShot S20 models.
PrecautionsCamera Body TemperatureIf your camera is used for prolonged periods, the camera body may become warm. This is not a malfunction andwill not affect the camera’s performance or the stored images. Please be aware of this and take care whenoperating the camera for an extended period.
About the LCD monitorThe LCD monitor is produced with extremely high-precision manufacturing techniques, with more than 99.99%of the pixels operating to specifications. Less than 0.01% of the pixels may occasionally misfire or appear asblack, red or green dots. This has no effect on the recorded image and does not constitute a malfunction.
About 2CR5 Lithium Batteries• Please note that using 2CR5 lithium batteries at low temperatures will severely limit their performance. Even
new batteries may only provide power for a few shots. You can obtain more shots if you warm the battery inyour pocket immediately prior to use. When operating the camera at close to 32˚F (0˚C), keep the LCDmonitor off and compose images with the optical viewfinder.
• Even if the battery charge appears to be depleted while shooting at low temperature ("Lb" shows in thedisplay panel), the battery may still retain a charge when used at room temperature.
• You are advised to use a power kit (sold separately in some regions), a charged battery pack or an AC adapterif you will be using the camera frequently at low temperatures, loading images onto a computer orperforming other tasks that require extended operation.

Disclaimer• While every effort has been made to ensure that the information contained in this guide is accurate and
complete, no liability can be accepted for any errors or omissions. Canon Inc. reserves the right to change thespecifications of the hardware and software described herein at any time without prior notice.
• No part of this guide may be reproduced, transmitted, transcribed, stored in a retrieval system, or translatedinto any language in any form, by any means, without the prior written permission of Canon Inc.
• Canon Inc. makes no warranties for damages resulting from corrupted or lost data due to a mistakenoperation or malfunction of the camera, the software, the CompactFlash™ cards (CF cards), personalcomputers, peripheral devices, or use of non-Canon CF cards.
Trademark Acknowledgments• Canon and PowerShot are trademarks of Canon Inc.• CompactFlash is a trademark of SanDisk Corporation.• IBM is a registered trademark of International Business Machines Corporation.• iBook, iMac and QuickTime are trademarks of Apple Computer, Inc.• Macintosh, PowerBook and Power Macintosh are trademarks of Apple Computer Inc., registered in the United
States and other countries.• Microsoft, Windows and Windows NT are either registered trademarks or trademarks of Microsoft Corporation in
the United States and/or other countries.• Other names and products not mentioned above may be registered trademarks or trademarks of their respective
companies.Copyright © 2000 Canon Inc. All rights reserved.
1
• Connect the equipment into an outlet on a circuitdifferent from that to which the receiver isconnected.
• Consult the dealer or an experienced radio/TVtechnician for help.
Use of shielded cable is required to comply with Class Blimits in Subpart B of Part 15 of the FCC Rules.
Do not make any changes or modifications to theequipment unless otherwise specified in the manual. Ifsuch changes or modifications should be made, youcould be required to stop operation of the equipment.
Canon U.S.A. Inc.One Canon Plaza, Lake Success, NY 11042, U.S.A.Tel No. (516) 328-5600
Canadian Radio Interference RegulationsTHIS CLASS B DIGITAL APPARATUS MEETS ALLREQUIREMENTS OF THE CANADIAN INTERFERENCE-CAUSING EQUIPMENT REGULATIONS.
Règlementation canadienne sur lesinterférences radioCET APPAREIL NUMERIQUE DE LA CLASSE B RESPECTETOUTES LES EXIGENCES DU REGLEMENT SUR LEMATERIEL BROUILLEUR DU CANADA.
FCC Notice(Digital Camera, Model PS 1025 and PC 1002)
This device complies with Part 15 of the FCC Rules.Operation is subject to the following two conditions:(1) This device may not cause harmful interference, and(2) this device must accept any interference received,including interference that may cause undesiredoperation.
Note: This equipment has been tested and found tocomply with the limits for Class B digital devices,pursuant to Part 15 of the FCC Rules. These limits aredesigned to provide reasonable protection againstharmful interference in a residential installation. Thisequipment generates, uses and can radiate radiofrequency energy and, if not installed and used inaccordance with the instructions, may cause harmfulinterference to radio communications. However, thereis no guarantee that interference will not occur in aparticular installation. If this equipment does causeharmful interference to radio or television reception,which can be determined by turning the equipment offand on, the user is encouraged to try to correct theinterference by one or more of the following measures:
• Reorient or relocate the receiving antenna.• Increase the separation between the equipment and
receiver.
2
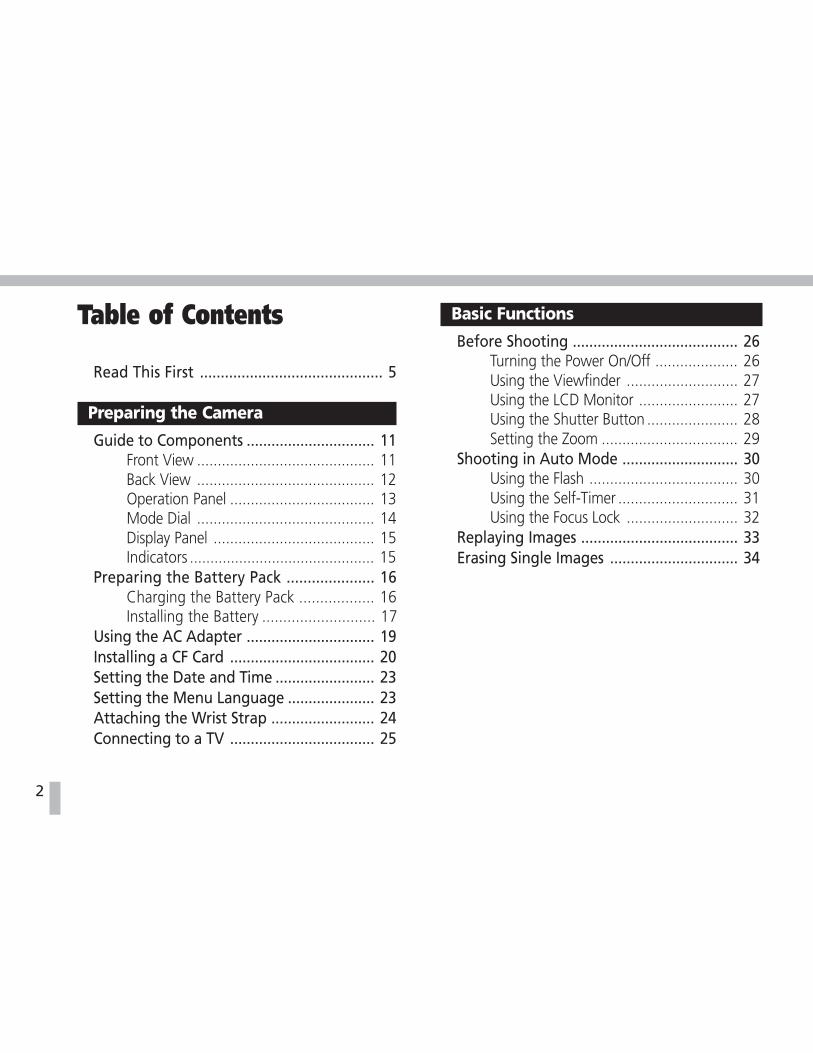
Table of Contents
Read This First ............................................ 5
Preparing the Camera
Guide to Components ............................... 11Front View ........................................... 11Back View ........................................... 12Operation Panel ................................... 13Mode Dial ........................................... 14Display Panel ....................................... 15Indicators ............................................. 15
Preparing the Battery Pack ..................... 16Charging the Battery Pack .................. 16Installing the Battery ........................... 17
Using the AC Adapter ............................... 19Installing a CF Card ................................... 20Setting the Date and Time ........................ 23Setting the Menu Language ..................... 23Attaching the Wrist Strap ......................... 24Connecting to a TV ................................... 25
Basic Functions
Before Shooting ........................................ 26Turning the Power On/Off .................... 26Using the Viewfinder ........................... 27Using the LCD Monitor ........................ 27Using the Shutter Button ...................... 28Setting the Zoom ................................. 29
Shooting in Auto Mode ............................ 30Using the Flash .................................... 30Using the Self-Timer ............................. 31Using the Focus Lock ........................... 32
Replaying Images ...................................... 33Erasing Single Images ............................... 34

3
Shooting
Shooting in Manual Mode ........................ 35Shooting in Image Mode .......................... 36Shooting in Stitch Assist Mode ................. 37
How to Frame a Subject ....................... 38Camera Positioning .............................. 38Shooting ............................................. 39
Changing the Resolution/Compression .... 41Shooting Close-Ups (Macro Mode) ............... 42Shooting Continuously (Continuous Mode) .. 42Adjusting the Exposure Compensation ........ 43Setting the White Balance ........................ 44Shooting with the AE Lock ....................... 45Setting the Exposure Metering Method .. 45Adjusting Image Quality Settings ............. 46Recording Settings .................................... 47
Switching the Digital Zoom On/Off ....... 47Switching the Review Feature On/Off ... 48Resetting the File Number .................... 48
Replaying
Magnifying an Image (Single Image Replay) .. 50Rotating an Image .................................... 50Jumping Images ........................................ 51Viewing Image Information ..................... 52Automated Playback (Slide Show) ............ 52
Starting a Slide Show .......................... 52Selecting Slide Show Images ............... 53Setting the Play Time .......................... 54Setting the Auto Replay On/Off .......... 55
Print Settings (DPOF Settings) ..................... 55Selecting Images for Printing .............. 55Selecting the Print Type ....................... 57Setting the Date/Time Print Function ..... 57Setting the File Number Print Function .. 58Resetting Print Settings ....................... 59

4
Erasing
Quick Erase ............................................... 60Erasing All Images .................................... 60Protecting Images .................................... 61
Camera Settings
Displaying the Setup Menu ..................... 63Setting the Beep On/Off .......................... 64Adjusting the LCD Monitor Brightness .. 64Setting the Date/Time .............................. 65Formatting a CF Card ............................... 65Setting the Language .............................. 66
Appendices
Replacing the Button Battery ................. 67Camera Maintenance ............................... 68
Camera Body ...................................... 68Lens .................................................... 68Optical Viewfinder .............................. 68LCD Monitor ....................................... 68
Troubleshooting ....................................... 69List of Message Codes .............................. 73List of Messages ....................................... 74List of Functions ....................................... 76Specifications ............................................ 77Index .......................................................... 80Canon Customer Support ........................ 82

5
Read This First
Please ReadTest ShotsBefore you shoot images of subjects of importance to you, we highly recommend that you shoot severaltrial images to confirm that you are operating the camera correctly. Please note that Canon Inc., itssubsidiaries and affiliates, and distributors of its digital cameras are not liable for any consequentialdamages arising from any malfunction of a PowerShot camera or CompactFlash™ card (CF card) resultingin the failure of an image to be recorded or to be recorded in a format that is machine sensible.
Warning Against Copyright InfringementPlease note that PowerShot digital cameras are intended for personal use and must be used in a mannerthat respects international and domestic copyright laws and regulations. Please be advised that in certaincases the copying of images from performances, exhibitions, or commercial properties by means of acamera or other device may contravene copyright or other legal rights even if the image was recorded forpersonal use.
Use of the Equipment in a Foreign CountryThis camera is manufactured according to the specifications of the country in which it is sold and thewarranty is only effective in the country of sale. If a problem arises while the camera is in use abroad,please convey it back to the country of sale before proceeding with a warranty claim to a CanonCustomer Support Help Desk.
Thank you for purchasing a Canon product. Please ensure that you readand understand these handling and safety precautions before youoperate your camera and equipment.

6
Safety Precautions• Before using the camera, please ensure that you have read and understood the safety precautions
described below. Always ensure that the camera is operated correctly.
• The safety precautions noted on the following pages are intended to instruct you in the safe and correctoperation of the camera and its accessories to prevent injuries or damage to yourself, other persons andequipment.
• In the next few pages, the term “equipment” refers primarily to the camera and its power supplyaccessories.
WARNINGS• Do not aim the camera directly into the sun or at other intense light sources that could injure your
eyesight.
• Do not trigger the flash in close proximity to human or animal eyes. Exposure to the intense lightproduced by the flash may injure eyesight. In particular, remain at least 39 inches (one meter) away frominfants when using the flash.
• Store this equipment out of the reach of children and infants. Accidental damage to the camera orbatteries by a child could result in serious injury. In addition, placement of the wrist strap around thechild’s neck could result in asphyxiation.
• Be particularly careful to keep the button batteries (CR2016 lithium) used in the camera out of the reachof children. Seek medical assistance immediately if a child swallows a battery.

7
Read
This First
• Do not attempt to disassemble or alter any part of the equipment that is not expressly described in thisguide. Disassembly or alteration may result in high-voltage electrical shock. Internal inspections,alterations and repairs should be conducted by qualified service personnel authorized by your cameradistributor or a Canon Customer Support Help Desk.
• To avoid the risk of high-voltage electrical shock, do not touch the flash portion of the camera if it hasbeen damaged. Similarly, never touch internal portions of the equipment that become exposed as aresult of damage. There is a risk of high-voltage electrical shock. Please take the first opportunity toconsult your camera distributor or a Canon Customer Support Help Desk.
• Stop operating the equipment immediately if it should emit smoke or noxious fumes. Failure to do somay result in fire or electrical shock. Immediately turn the camera’s mode dial to the Off position andremove the camera battery or unplug the power cord from the electrical outlet. Confirm that smoke orfume emissions cease. Please consult your camera distributor or the closest Canon Customer SupportHelp Desk.
• Stop operating the equipment if it is dropped or the casing is damaged. Failure to do so may result infire or electrical shock. Immediately turn the camera’s mode dial to the Off position and remove thecamera battery or unplug the power cord from the electrical outlet. Please consult your cameradistributor or the closest Canon Customer Support Help Desk.
• Prevent the equipment from contact with, or immersion in, water and other liquids. Do not allow liquidsto enter the interior. The camera has not been waterproofed. If the exterior comes into contact withliquids or salt air, wipe it dry with a soft, absorbent cloth. In the event that water or other foreignsubstances enter the interior, immediately turn the camera’s mode dial to Off and remove the camerabattery or unplug the power cord from the electrical outlet. Continued use of the equipment may resultin fire or electrical shock. Please consult your camera distributor or the closest Canon Customer SupportHelp Desk.
8
• Do not use substances containing alcohol, benzene, thinners or other flammable substances to clean ormaintain the equipment. The use of these substances may lead to fire.
• Do not cut, damage, alter or place heavy items on the power adapter cord. Any of these actions maycause an electrical short circuit, which may lead to fire or electrical shock. Replace a broken or damagedpower adapter cord.
• Do not handle the power cord if your hands are wet. Handling it with wet hands may lead to electricalshock. When unplugging the cord, ensure that you hold the rigid portion of the plug. Pulling on theflexible portion of the cord may damage or expose the wire and insulation, creating the potential forfires or electrical shocks.
• Use of power sources not expressly recommended for this equipment may lead to overheating,distortion of the equipment, fire, electrical shock or other hazards. Use only the recommended poweraccessories.
• To connect an interface cable to a port other than a USB port, power down the computer and unplugthe power cord before attempting to connect it to avoid the risk of electrical shock.
• Do not place the batteries near a heat source or expose them to direct flame or heat. Neither shouldyou immerse them in water. Such exposure may damage the batteries and lead to the leakage ofcorrosive liquids, fire, electrical shock, explosion or serious injury.
• Do not attempt to disassemble, alter or apply heat to the batteries. There is serious risk of injury due toan explosion. Immediately flush with water any area of the body, including the eyes and mouth, orclothing, that comes into contact with the inner contents of a battery. If the eyes or mouth contactthese substances, immediately flush with water and seek medical assistance.
• Avoid dropping or subjecting the batteries to severe impacts that could damage the casings. It couldlead to leakage and injury.
9
Read
This First
• Do not short-circuit the battery terminals with metallic objects, such as key holders. It could lead tooverheating, burns and other injuries. Use the supplied battery case to transport or store the batterypack.
• Before you discard a battery, cover the terminals with tape or other insulators to prevent direct contactwith other objects. Contact with the metallic components of other materials in waste containers maylead to fire or explosions. Discard the batteries in specialized waste facilities if available in your area.
• Use of batteries not expressly recommended for this equipment may cause explosions or leaks, resultingin fire, injury and damage to the surroundings. Use only recommended batteries and accessories.
• Use only the recommended compact power adapter to charge the Battery Pack NB-5H rechargeablebatteries. Use of chargers not expressly recommended may result in overheating, distortion, fire orelectrical shock.
• Disconnect the compact power adapter from both the camera and electrical outlet after recharging andwhen the camera is not in use to avoid fires and other hazards.
• The camera terminal of the compact power cord is designed for exclusive use with the PowerShot S10 andPowerShot S20. Do not use it with other products or batteries. There is a risk of fire and other hazards.
CAUTION• Avoid using, placing or storing the equipment in places subject to strong sunlight or high temperatures,
such as the dashboard or trunk (boot) of a car. Exposure to intense sunlight and heat may cause thebatteries to leak, overheat or explode, resulting in fire, burns or other injuries. High temperatures mayalso cause deformation of the casing. Ensure that there is good ventilation when using the compactpower adapter to charge the battery pack or power the camera.
• Do not store the equipment in humid or dusty areas. Storage in these areas could lead to fire, electricalshock or other damage.

10
• Be careful not to bang the camera or subject it to strong impacts or shocks that could lead to injury ordamage the equipment when wearing or holding it by the wrist strap.
• Be careful not to cover the flash with your fingers when shooting. In addition, do not touch the surfaceof the flash after taking several pictures in rapid succession. Either action could result in burns.
• If your camera is used for prolonged periods, the camera body may become warm. Please take carewhen operating the camera for an extended period as your hands may experience a burning sensation.
Preventing MalfunctionsAvoid Strong Magnetic FieldsNever place the camera in close proximity to electric motors or other equipment generating strongelectromagnetic fields. Exposure to strong magnetic fields may cause malfunctions or corrupt image data.
Avoid Condensation Related ProblemsMoving the equipment rapidly between hot and cold temperatures may cause condensation (waterdroplets) to form on its external and internal surfaces. You can avoid this by placing the equipment in anairtight, resealable plastic bag and letting it adjust to temperature changes slowly before removing it fromthe bag.
If Condensation Forms Inside the CameraStop using the camera immediately if you detect condensation. Continued use may damage theequipment. Remove the CF card and battery or power cord (if connected) from the camera and wait untilthe moisture evaporates completely before resuming use.
Extended StorageWhen not using the camera for extended periods of time, remove the battery (except the CR2016 lithiumbutton battery) and store the equipment in a safe place. Storing the camera for extended periods with abattery installed will run down the battery and may damage the camera.
11
Preparing the Camera
Guide to Components
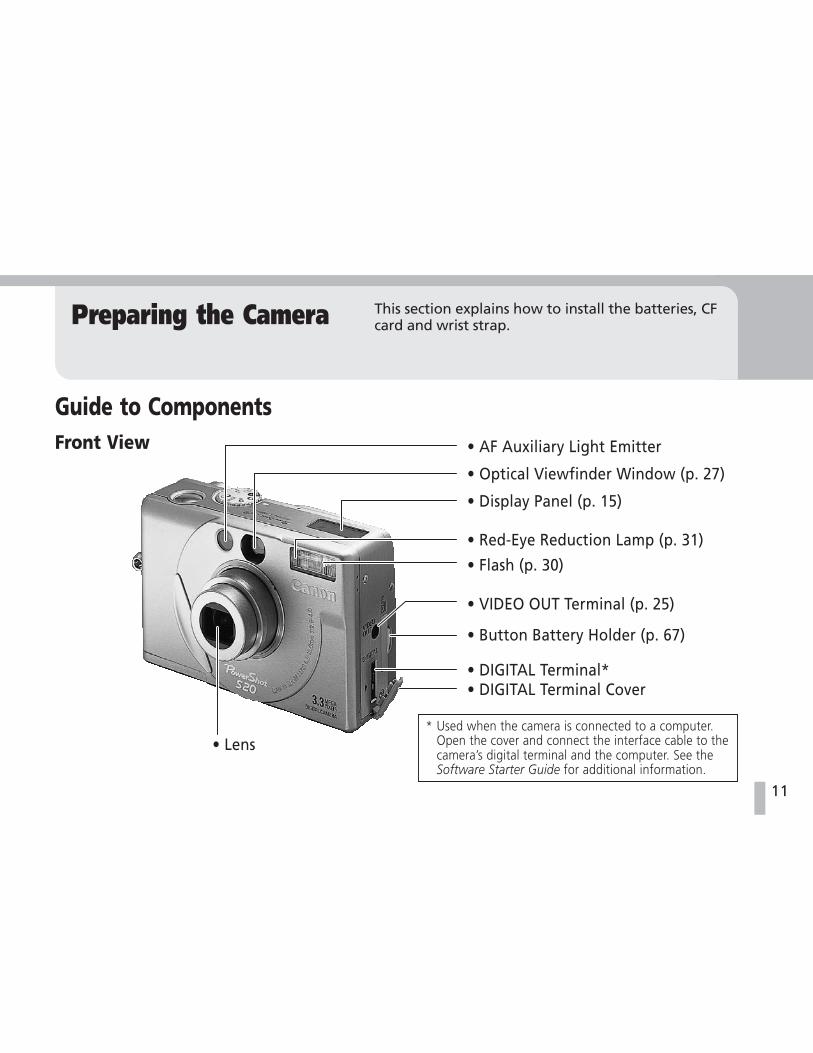
This section explains how to install the batteries, CFcard and wrist strap.
* Used when the camera is connected to a computer.Open the cover and connect the interface cable to thecamera’s digital terminal and the computer. See theSoftware Starter Guide for additional information.
• AF Auxiliary Light Emitter
• Optical Viewfinder Window (p. 27)
• Display Panel (p. 15)
• Red-Eye Reduction Lamp (p. 31)
• Flash (p. 30)
• VIDEO OUT Terminal (p. 25)
• Button Battery Holder (p. 67)
• DIGITAL Terminal*• DIGITAL Terminal Cover
Front View
• Lens

12
* The LCD monitor is produced with extremely high-precision manufacturing techniques. More than99.99% of the pixels operate to specification. Lessthan 0.01% of the pixels may occasionally misfire orappear as black or red dots. This has no effect on therecorded image and does not constitute amalfunction.
• CF Card Slot Cover (p. 20)
• Lock for CF Card Slot Cover (p. 20)
• Strap Holder (p. 24)
• DC Coupler Cable Cover
• Battery Cover (p. 17)
Back View
• Optical Viewfinder (p. 27)
• Battery Cover Lock (p. 17)
• LCD Monitor* (p. 27)
• Tripod Socket
13
Preparin
g th
e Cam
era
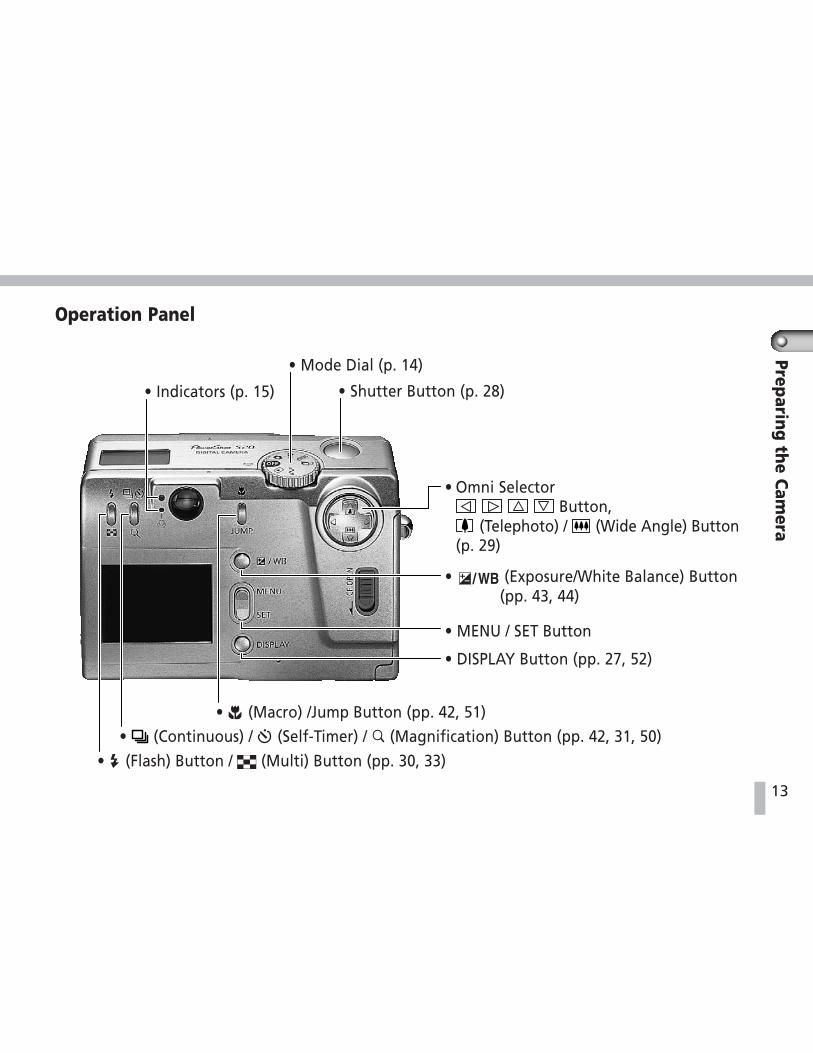
Operation Panel
• Omni Selector Button,
(Telephoto) / (Wide Angle) Button(p. 29)
• (Exposure/White Balance) Button(pp. 43, 44)
• MENU / SET Button
• DISPLAY Button (pp. 27, 52)
• Mode Dial (p. 14)
• (Flash) Button / (Multi) Button (pp. 30, 33)
• Shutter Button (p. 28)• Indicators (p. 15)
• (Macro) /Jump Button (pp. 42, 51)• (Continuous) / (Self-Timer) / (Magnification) Button (pp. 42, 31, 50)

14
Mode DialThe Mode Dial is used to select the recordingand play modes.
• (Off)Turn the dial to this position when the camerais not being used. The lens cover will close andthe camera will power down. (p. 26)
• (Auto Mode)A recording mode in which the cameraautomatically selects most of the settings. (p. 30)
• (Manual Mode)A recording mode in which the imagecompression and resolution, exposurecompensation and white balance can bemanually selected. (p. 35)
• (Image Mode)A recording mode with settings adjusted tospecific circumstances, such as landscapes, nightscenes and black and white images. (p. 36)
• (Stitch Assist Mode)A recording mode that facilitates the creationof a multi-frame panorama that you mergewith the supplied software. (p. 37)
• (Play Mode)The mode that allows images recorded on a CFcard to be replayed and erased. (pp. 33, 50)
• (PC Mode)The mode for exchanging image files with aconnected computer. (See the SoftwareStarter Guide)
• “PC” will appear in the display panelwhen a connection to a computer isestablished.
15
Preparin
g th
e Cam
era
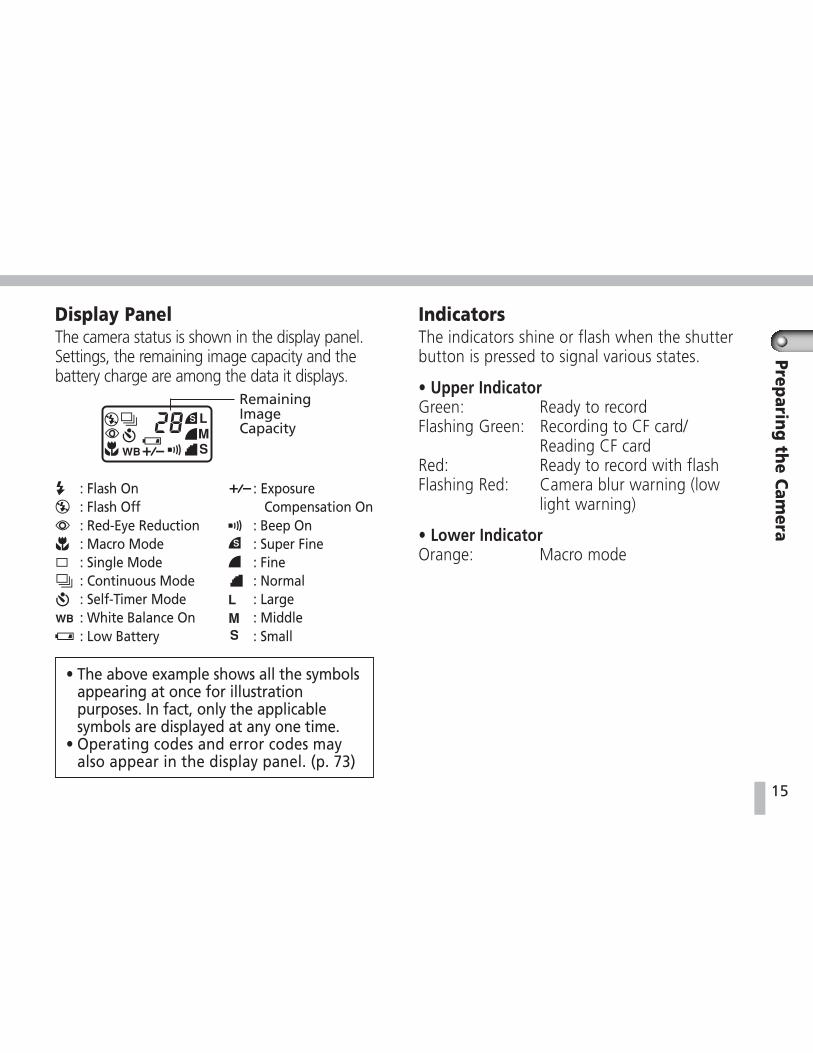
Display PanelThe camera status is shown in the display panel.Settings, the remaining image capacity and thebattery charge are among the data it displays.
• The above example shows all the symbolsappearing at once for illustrationpurposes. In fact, only the applicablesymbols are displayed at any one time.
• Operating codes and error codes mayalso appear in the display panel. (p. 73)
RemainingImageCapacity
IndicatorsThe indicators shine or flash when the shutterbutton is pressed to signal various states.
• Upper IndicatorGreen: Ready to recordFlashing Green: Recording to CF card/
Reading CF cardRed: Ready to record with flashFlashing Red: Camera blur warning (low
light warning)
• Lower IndicatorOrange: Macro mode
: Flash On: Flash Off: Red-Eye Reduction: Macro Mode: Single Mode: Continuous Mode: Self-Timer Mode: White Balance On: Low Battery
: Exposure Compensation On
: Beep On: Super Fine: Fine: Normal: Large: Middle: Small

16
Preparing the Battery PackBattery Pack NB-5H, Compact Power AdapterCA-PS100/100E, power cords, DC CouplerDR-100A and 2CR5 lithium batteries are soldseparately in some regions.To confirm the package contents, see theback of the System Map packaged withyour camera.
Charging the Battery PackUse the procedures below to fully chargeBattery Pack NB-5H.
• The CHARGING indicator will flash green whilethe battery pack is charging. It will change to asteady green when the battery pack is charged.
• Remove the plug from the electrical outletafter the battery pack is charged.
• It takes approximately 90 minutes tocharge the battery pack, taking it from acompletely discharged state to a fullycharged one. (Based on Canon standardtesting conditions using Compact PowerAdapter CA-PS100/100E.)
• Charge times will vary according to theambient temperature and the chargestate of the battery pack.
• To protect and prolong the battery packlife, do not charge it longer than 24hours at a time.
• Do not charge the battery pack in poorlyventilated areas.
• Do not charge batteries other thanBattery Pack NB-5H with the compactpower adapter.
CHARGING Indicator
To AC Electrical Outlet
AC Power Cord
Compact Power AdapterCA-PS100/100E
Battery PackNB-5H

17
Preparin
g th
e Cam
era
• The battery pack continues to dischargea minimal portion of its power whileinstalled in the camera, even with thecamera power off. This will shorten thebattery life. Remove it from the cameraduring extended periods of disuse. Placeit into the case provided and store it in acool, dry place. Be sure to charge it fullybefore using it after a period ofextended storage.
• Repeated recharging before the chargeis completely discharged may diminishthe charge capacity. Completelydischarge and fully charge the batterypack several times to restore its capacity.
• If the time over which the battery packcan be used diminishes substantiallyeven when it is fully charged, the batterypack should be replaced.
Installing the BatteryInstall the 2CR5 lithium battery or therechargeable Battery Pack NB-5H.
1 Turn the Mode Dial to the position.
2 Slide the battery cover lock in thedirection of the arrow and open thebattery cover.
3 Install the battery as shown in thediagram.
2CR5LithiumBattery
BatteryPackNB-5HBattery Terminals

18
4 Close the battery cover.
• A flashing green indicator signals thatan image is being written to, or readfrom, the CF card. Do not open thebattery cover while this is in process.
• Remove the battery from the camerawhen the camera is not in active use.
• Use the rechargeable Battery Pack NB-5H or the AC adapter (sold separately insome regions) when you use the camerafor an extended period of time.
• Replace the supplied 2CR5 lithiumbattery with a new one of the sametype.
Lithium Batteries• The performance of lithium batteries is
severely reduced at low temperatures.Consequently, you may only be able totake a few pictures, even with a brandnew 2CR5 lithium battery. To improvethe performance at low temperatures,warm the battery in your pocket beforeusing it in the camera. It is alsoadvisable to shut off the LCD monitorand use the optical viewfinder tocompose images at temperatures closeto 32˚F (0˚C).
• A lithium battery that appears to havelost its charge at cold temperatures maystill be usable at room temperature.
• Do not use a lithium battery that hasbeen used in another camera. Amalfunction may result.

19
Preparin
g th
e Cam
era
Battery PerformancePowerShot S10/PowerShot S20
* The actual performance may vary from the abovedata according to the shooting conditions and theselected recording mode.
Test ConditionsRecording: 73°F (23°C), (Large)/ (Fine), Zoom used,
flash used once every 4 shots, CF card usedReplay: 73°F (23°C), continuous replay, 5 seconds
per image, CF card used
Using the AC AdapterYou are recommended to use the AC adapterwhen you will be using the camera for arelatively long period of time. Attach the ACadapter as shown below.
• The CAMERA indicator on the compactpower adapter will shine red when it ispowering the camera.
• Always remove the plug from the electricaloutlet when you have finished using thecamera.
DC CouplerDR-100A
Cable Cover
DC Terminal
CameraIndicator(DC Output)
Compact Power Adapter
No. of Images
Battery Pack NB-5H(fully charged)
2CR5 Lithium Battery(Sanyo Brand, new)
LCD MonitorOn
LCD MonitorOff
Approx.55 shots
Approx.230 shots
Approx.65 shots
Approx.400 shots
Replay(Minutes)
Approx.50 min.
Approx.80 min.

20
• Battery Pack NB-5H cannot be chargedwhile the compact power adapter isused to power the camera.
• Do not use the compact power adapterto power any device other than one forwhich Battery Pack NB-5H is specified.
Installing a CF Card• Please note that CF cards formatted or
edited in another manufacturer’scamera or application program may notoperate correctly in the camera.
1 Turn the Mode Dial to the position.
2 Slide the lock for the CF card slot cover tothe open position and open the cover.
3 Insert the CF card with the label facing upand the arrow pointing in as viewed fromthe camera back, pushing it gently inuntil the slot’s eject button is fullyextended.
* The CF card supplied with the camera may varyfrom the one shown in this guide.
4 Close the CF card slot cover gently butfirmly until it locks.
• Never turn off the power or remove the CFcard while the camera is writing to, readingfrom, or erasing from, the CF card.
Arrow
Label
CF Card Eject Button(Push to eject)
21
Preparin
g th
e Cam
era
About CF Cards• CF cards are high-precision electronic
devices. Do not bend, apply force to, orsubject them to shocks or vibration.
• Do not attempt to disassemble or altera CF card.
• Moving a CF card rapidly betweentemperature extremes will causecondensation to form in the card andmay lead to a malfunction. To avoidcondensation, place the CF card into asealed plastic bag before moving it intoa different temperature zone and allowit to adjust slowly to the newtemperature. If condensation forms onthe CF card, put it aside until the waterdroplets have evaporated completely.
• Place the CF card in the supplied casefor storage.
• Do not use or store CF cards in thefollowing types of location.- Locations subject to strong magnetic
fields- Locations subject to dust or sand- Locations subject to high humidity and
high temperatures
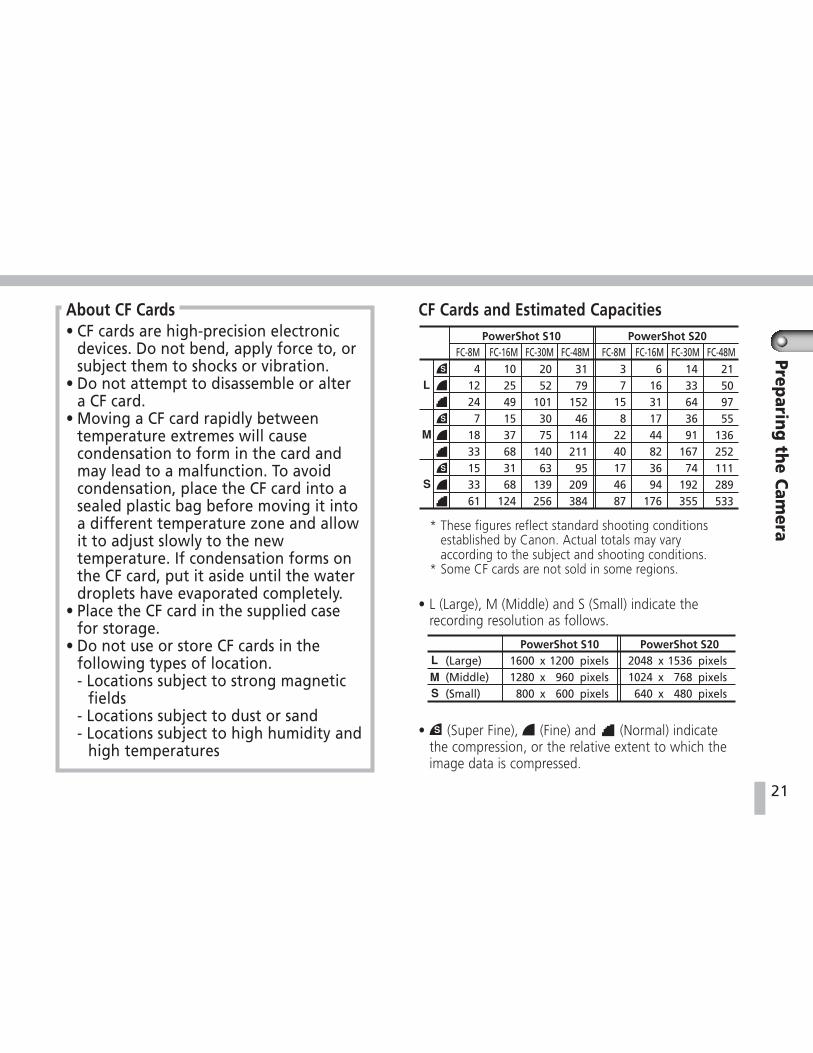
CF Cards and Estimated Capacities
* These figures reflect standard shooting conditionsestablished by Canon. Actual totals may varyaccording to the subject and shooting conditions.
* Some CF cards are not sold in some regions.
• L (Large), M (Middle) and S (Small) indicate therecording resolution as follows.
• (Super Fine), (Fine) and (Normal) indicatethe compression, or the relative extent to which theimage data is compressed.
41224
71833153361
1025491537683168
124
2052
1013075
14063
139256
3179
15246
114211
95209384
FC-8M FC-16M FC-30M FC-48M FC-8M FC-16M FC-30M FC-48MPowerShot S10
37
158
2240174687
616311744823694
176
1433643691
16774
192355
21509755
136252111289533
PowerShot S20
1600 x 1200 pixels1280 x 960 pixels
800 x 600 pixels
(Large)(Middle)(Small)
2048 x 1536 pixels1024 x 768 pixels
640 x 480 pixels
PowerShot S10 PowerShot S20

22
Precautions with CF CardsPlease note that the PC card icon may take amoment (about 1 minute) to appear on theTaskbar of certain computers after insertion ina PC card slot. If this occurs, you should deletethe Windows standard driver and install theSanDisk ATA FlashDisk device driver. Theprocedures are described below. Pleaseconsult your computer manufacturer if youare uncertain about these procedures.
How to Remove the Windows StandardDriver1. Insert the CF card (with adapter) into the
PC card slot. Right-click the [My com-puter] icon and select [Properties].
2. The System Properties dialog will appear.Click the [Device Manager] tab and select[View devices by connection] check box atthe top.
3. Click the [Computer] option, select thedevice with the PC card icon and click the[Remove] button.
4. When the Confirm Device Removal dialogappears, click the [OK] button.
5. Close the System Properties dialog.
6. Remove the CF card from the slot.
How to Install the SanDisk ATA FlashDiskDevice Driver1. Insert the CF card into the PC card slot.
2. The New Hardware Found dialog willappear. Choose the [Select from a list ofalternative drivers] option and click the[OK] button.
3. Select the [Show all devices] option in theSelect Device dialog.
4. Select [SanDisk] in the Manufacturerscategory. SanDisk ATA FlashDisk willautomatically be selected in the Modelscategory. Finish by clicking the [OK]button.

23
Preparin
g th
e Cam
era
Setting the Date and TimeThe Set Date/Time menu will appear the firsttime the camera is turned on after it ispurchased. Use the following procedures toset the correct date and time.
1 Turn the Mode Dial to the , ,, or position. The Set Date/
Time menu will display the first time thecamera is turned on.
2 Set the date, time and date format.• Use the or button to select a field,
such as month, day, year, hour, minute ordate format.
• Use the or buttons to adjust thevalue in a field.
3 Press the SET button• To cancel the setting without changing
the date or time, press the Menu button.
Setting the Menu LanguageYou can change the language in which messagesare displayed. The language menu may appeardifferently on cameras in some regions.
1 Turn the Mode Dial to the position.
2 Press and hold the SET button, then pressthe /JUMP button to display theLanguage menu.
3 Use the and buttons to select alanguage and the SET button to executethe selection.
• The menu language can also be set withstandard Setup menu procedures (p. 66).
The factorydefault for thedate formatmay differfrom thatshown in someregions.

24
Attaching the Wrist Strap1 Slip the small loop at the end of the wrist
strap through the strap holder.
2 Pass the other end of the wrist strapthrough the small loop.
3 Pull the strap through the loop until theloop slips over the plastic part of thestrap.
• Be careful not to wave the cameraabout or to catch it on other itemswhen holding it by the wrist strap.
Strap holder

25
Preparin
g th
e Cam
era
Connecting to a TVThe supplied video cable (VC-100) can beused to connect the camera to a TV to use theTV as a viewfinder for recording or a monitorfor playback.
1 Turn the Mode Dial to the position.
2 Turn off the TV.
3 Connect the video cable to the VIDEOOUT terminal on the camera and theVideo In jack on the TV.
4 Turn on the TV and adjust its settings tovideo input.
5 Turn the camera Mode Dial to the ,, , or position.
You can now record or play images using theregular procedures and the resultant imageswill display on the TV screen. If you arerecording with the camera and the LCDmonitor is off, press the DISPLAY button tohave images display on the TV screen.
• The TV connection cannot be used forthe Stitch Assist mode.
• The LCD monitor is blank while imagesare displayed on the TV monitor.
• The TV screen may go blank betweenimages in replay mode.
• Due to the different video signals usedthroughout the world [NTSC/PAL], acamera purchased in one region of theworld may not display images whenconnected to a TV from another region.
Video Cable
VIDEO OUTTerminal

26
Basic Functions
Before ShootingTurning the Power On/Off
1 Turn the Mode Dial to any position otherthan to power the camera. Thecamera power is off when the Mode Dialis set to and on in any other position.
Power Save Function• Shooting Mode
When the LCD monitor is on, it will automati-cally shut off after approximately 3 minutes ifno functions are accessed. If a further 30minutes, approximately, pass without a functionbeing accessed, the camera will power down.
Now that you have prepared the camera, you areready to try it out. This section explains the basicprocedures for recording, replaying and erasingimages. Try each procedure as you read along.
In Stitch Assist mode, the camera powers downafter approximately 3 minutes if no functionsare accessed.When the LCD monitor is off, the camera willpower down after approximately 30 minutes ifno functions are accessed.
• Play ModeThe camera will power down after approxi-mately 30 minutes if no functions are accessed.
• PC ModeA warning message will display on the computermonitor after approximately 5 minutes if nofunctions are accessed. The camera willautomatically power down 1 minute after that ifno functions are accessed (except when thecamera is powered by an AC adapter).
Press the shutter button halfway torestore power to the camera after thepower save function has activated.
Please note that the power savefunction will not activate while imagesare being replayed in a slide show.

27
Basic fu
nctio
ns
Using the ViewfinderThe camera is equipped with an opticalviewfinder for composing ordinary photographs.
1 Look through the viewfinder to align thecamera with the primary subject.The square brackets (autofocus meteringfield) in the viewfinder should be placed onthe primary subject.
Viewfinder
Square Brackets inViewfinder
Using the LCD MonitorUse the LCD monitor to compose close-upimages in macro mode.
1 Press the DISPLAY button.The button switches the LCD monitorbetween the on, information view and offmodes with each push.
2 Look at the image appearing in the LCDmonitor to compose the shot.Try to align the primary subject in the centerof the screen.
LCD Monitor
28
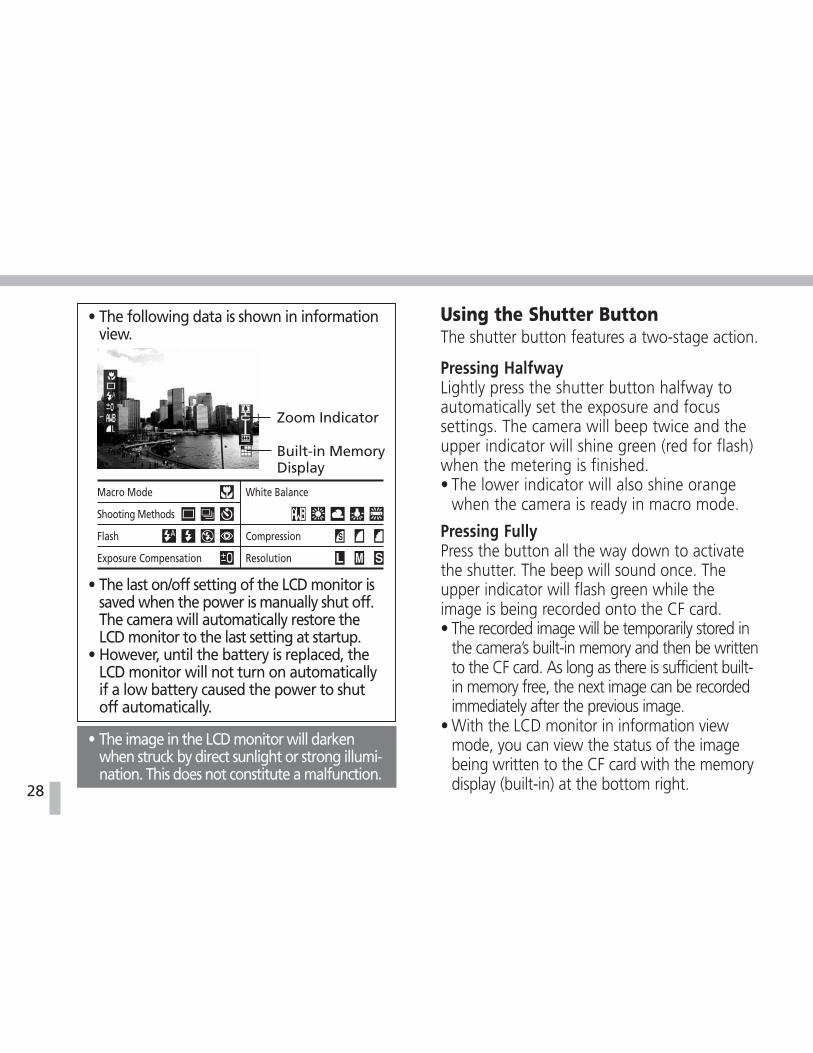
• The following data is shown in informationview.
• The last on/off setting of the LCD monitor issaved when the power is manually shut off.The camera will automatically restore theLCD monitor to the last setting at startup.
• However, until the battery is replaced, theLCD monitor will not turn on automaticallyif a low battery caused the power to shutoff automatically.
• The image in the LCD monitor will darkenwhen struck by direct sunlight or strong illumi-nation. This does not constitute a malfunction.
Zoom Indicator
Using the Shutter ButtonThe shutter button features a two-stage action.
Pressing HalfwayLightly press the shutter button halfway toautomatically set the exposure and focussettings. The camera will beep twice and theupper indicator will shine green (red for flash)when the metering is finished.• The lower indicator will also shine orange
when the camera is ready in macro mode.
Pressing FullyPress the button all the way down to activatethe shutter. The beep will sound once. Theupper indicator will flash green while theimage is being recorded onto the CF card.• The recorded image will be temporarily stored in
the camera’s built-in memory and then be writtento the CF card. As long as there is sufficient built-in memory free, the next image can be recordedimmediately after the previous image.
• With the LCD monitor in information viewmode, you can view the status of the imagebeing written to the CF card with the memorydisplay (built-in) at the bottom right.
Built-in MemoryDisplay
Macro Mode
Shooting Methods
Flash
Exposure Compensation
White Balance
Compression
Resolution
29
Basic fu
nctio
ns
• The camera blur warning icon ( ) will appearat the center of the LCD monitor and theupper indicator will flash red when there isinsufficient light. Activate the flash or securethe camera on a tripod before shooting.
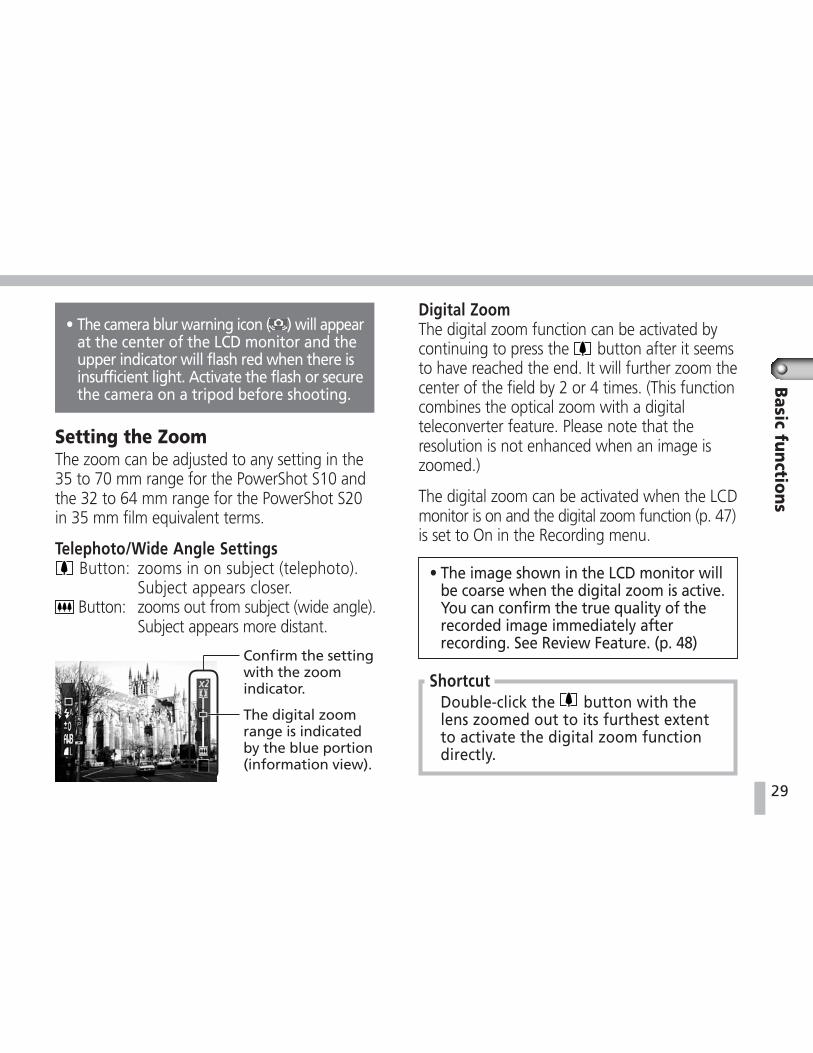
Setting the ZoomThe zoom can be adjusted to any setting in the35 to 70 mm range for the PowerShot S10 andthe 32 to 64 mm range for the PowerShot S20in 35 mm film equivalent terms.
Telephoto/Wide Angle Settings Button: zooms in on subject (telephoto).
Subject appears closer. Button: zooms out from subject (wide angle).
Subject appears more distant.
Confirm the settingwith the zoomindicator.
Digital ZoomThe digital zoom function can be activated bycontinuing to press the button after it seemsto have reached the end. It will further zoom thecenter of the field by 2 or 4 times. (This functioncombines the optical zoom with a digitalteleconverter feature. Please note that theresolution is not enhanced when an image iszoomed.)
The digital zoom can be activated when the LCDmonitor is on and the digital zoom function (p. 47)is set to On in the Recording menu.
• The image shown in the LCD monitor willbe coarse when the digital zoom is active.You can confirm the true quality of therecorded image immediately afterrecording. See Review Feature. (p. 48)
ShortcutDouble-click the button with thelens zoomed out to its furthest extentto activate the digital zoom functiondirectly.
The digital zoomrange is indicatedby the blue portion(information view).
30
Shooting in Auto ModeIn auto mode, the focus, exposure and flashsettings are automatically set, making itpossible for anyone to photograph effortlessly.The resolution is preset to Large and thecompression to Fine and these settings cannotbe changed in this mode.
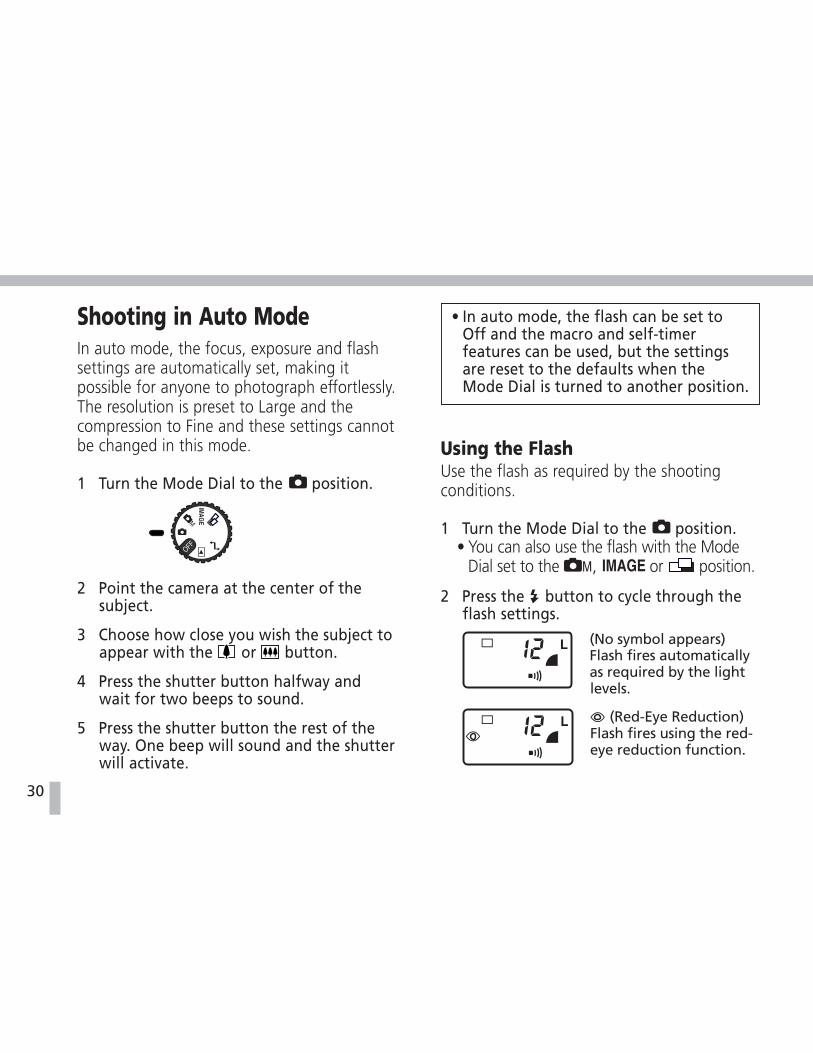
1 Turn the Mode Dial to the position.
2 Point the camera at the center of thesubject.
3 Choose how close you wish the subject toappear with the or button.
4 Press the shutter button halfway andwait for two beeps to sound.
5 Press the shutter button the rest of theway. One beep will sound and the shutterwill activate.
• In auto mode, the flash can be set toOff and the macro and self-timerfeatures can be used, but the settingsare reset to the defaults when theMode Dial is turned to another position.
Using the FlashUse the flash as required by the shootingconditions.
1 Turn the Mode Dial to the position.• You can also use the flash with the Mode
Dial set to the , or position.
2 Press the button to cycle through theflash settings.
(No symbol appears)Flash fires automaticallyas required by the lightlevels.
(Red-Eye Reduction)Flash fires using the red-eye reduction function.

31
Basic fu
nctio
ns
(Flash On)Flash fires with everyshot.
(Flash Off)Flash will not fire
3 Shoot.
• The flash is set to fire when the indicatorshines red.
Flash SettingsThe flash cannot be fired in certain shootingmodes.
Red-Eye ReductionThe red-eye phenomenon is caused bylight reflecting back from eyes photo-graphed in dark areas with a flash. It canbe prevented by recording in the red-eye reduction mode.The mode reduces the red-eye appearanceby lighting an incandescent lamp whenthe shutter button is pressed halfway.
Using the Self-Timer1 Turn the Mode Dial to the position.
• You can also use the self-timer with theMode Dial set to the , or position.
2 Press the button.
3 Press the shutter button.The self-timer indicator will flash and theshutter will activate after 10 seconds. Theflashing will accelerate two seconds prior to
Auto Flash Red-Eye Reduction On OffAuto • - - •Manual • • • •Image • • • •Stitch Assist - - ◊ ◊
Note: ◊ indicates modes in which the flash setting canonly be adjusted for the first image.

32
the shutter activation. To deactivate the self-timer mode, press the button.
• Turn the Mode Dial to to cancel aself-timed shot after the shutter buttonhas been pressed.
Using the Focus LockUse the focus lock to bring a main subject atthe edges of a composition into focus orwhen the subject is not suited to autofocusphotography.
1 Turn the Mode Dial to the , , or position.
2 Aim the camera directly at the subject sothat it is centered in the viewfinder.
3 Press the shutter button halfway andwait until the two beeps sound.
4 Keep your finger on the shutter button,reorient the camera to the desiredcomposition, and press the shutter buttonall the way.A beep will sound and the shutter will activate.
Situations Not Suited to AutofocusPhotography
The following situations are not suitedto autofocus photography.• Subjects with extremely low contrast• Subjects that mix close objects with
distant objects• Subjects with extremely bright objects
at the center of the image• Subjects that are moving quickly
To take photographs under theseconditions lock the forcus on an objectthe same distance away from thecamera as the one you wish to photo-graph and then reposition the camerato achieve your desired shot.
When recording through glass, try toshoot as close to the glass as possible toreduce the chances of light reflectingback off the glass.
• Please see the next section, Shooting,pages 35 to 49, for a description ofother shooting features.
33
Basic fu
nctio
ns
Replaying ImagesPhotographed images can be viewed in playmode on the LCD monitor.
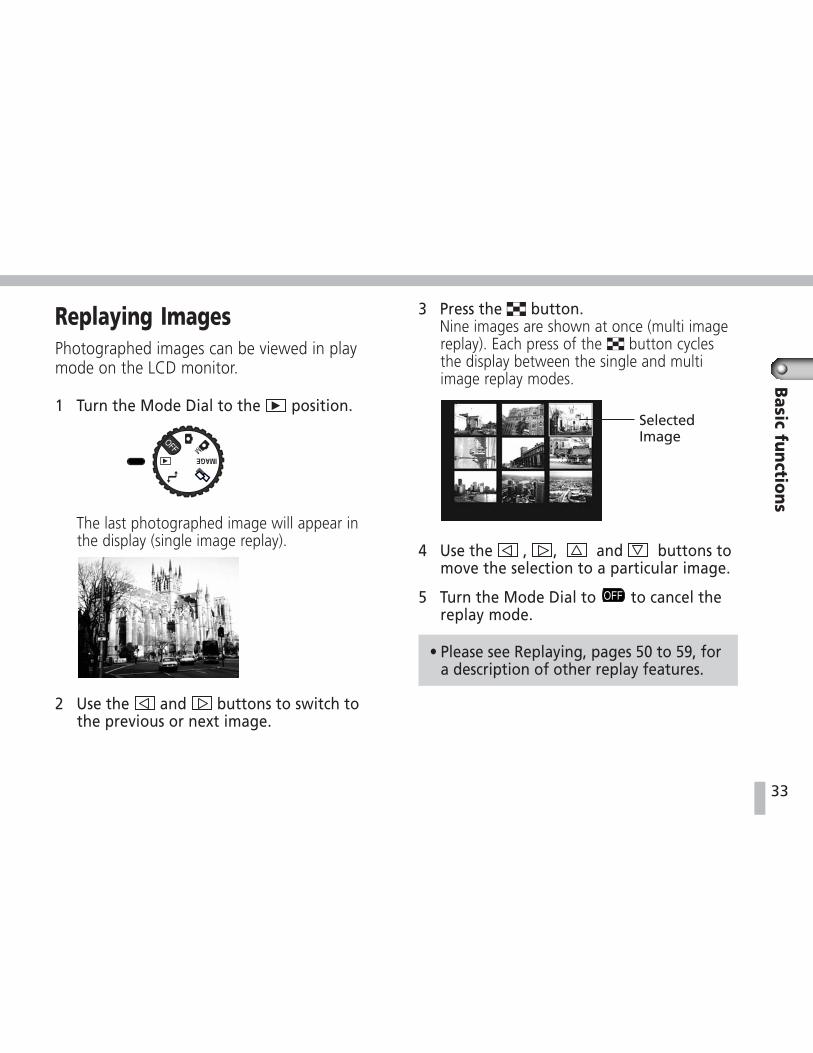
1 Turn the Mode Dial to the position.
The last photographed image will appear inthe display (single image replay).
2 Use the and buttons to switch tothe previous or next image.
3 Press the button.Nine images are shown at once (multi imagereplay). Each press of the button cyclesthe display between the single and multiimage replay modes.
4 Use the , , and buttons tomove the selection to a particular image.
5 Turn the Mode Dial to to cancel thereplay mode.
• Please see Replaying, pages 50 to 59, fora description of other replay features.
SelectedImage
34
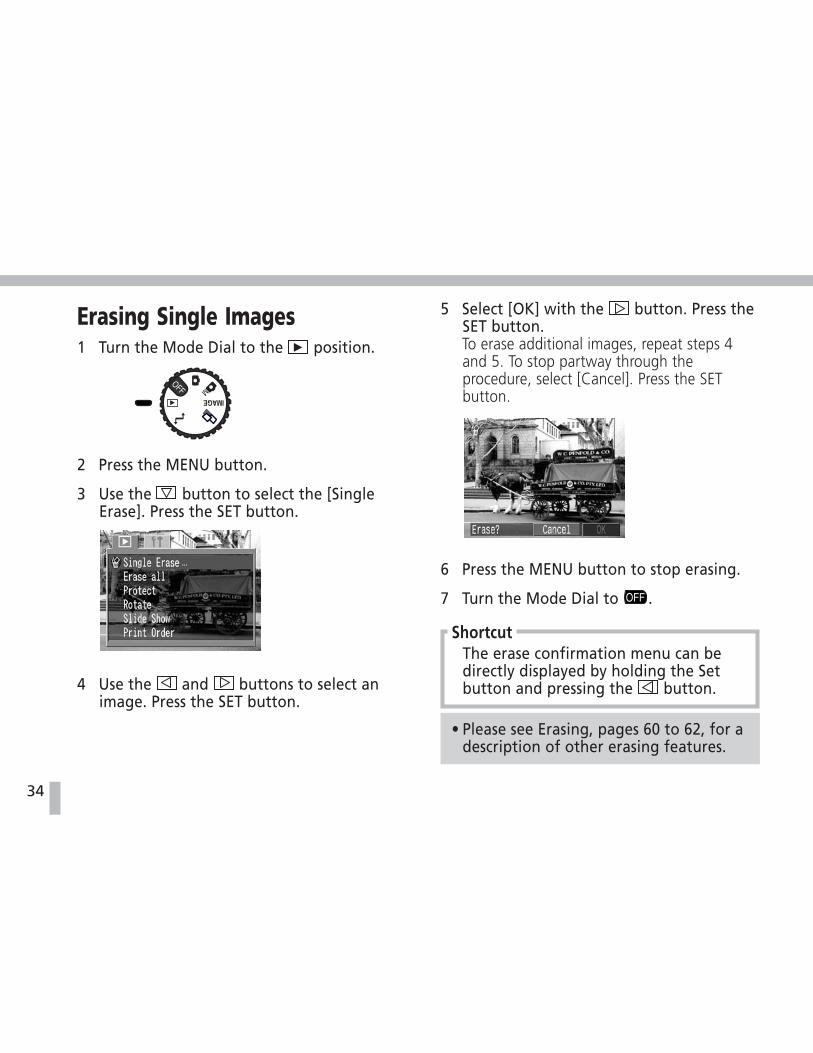
Erasing Single Images1 Turn the Mode Dial to the position.
2 Press the MENU button.
3 Use the button to select the [SingleErase]. Press the SET button.
4 Use the and buttons to select animage. Press the SET button.
5 Select [OK] with the button. Press theSET button.To erase additional images, repeat steps 4and 5. To stop partway through theprocedure, select [Cancel]. Press the SETbutton.
6 Press the MENU button to stop erasing.
7 Turn the Mode Dial to .
ShortcutThe erase confirmation menu can bedirectly displayed by holding the Setbutton and pressing the button.
• Please see Erasing, pages 60 to 62, for adescription of other erasing features.

35
Shooting
Shooting in Manual ModeIn this mode, you can manually select featuressuch as resolution, compression, exposurecompensation and white balance settings.
1 Turn the Mode Dial to the position.
2 Adjust the settings as required.
• You can adjust all settings, such as the flash,continuous shooting, exposure compensa-tion, white balance, image quality (gain,contrast and sharpness) and the AE lock.
• The camera remembers these settings,except for the macro, self-timer andcontinuous mode settings, even when theMode Dial is turned to another position orthe battery is replaced.
This section explains how to photograph in theManual, Image and Stitch Assist modes. Read thissection for a detailed understanding of the generalrecording features.
Functions Available only in manual modeAE Lock (p. 45)Exposure Metering Mode (p. 45)Gain/Contrast/Sharpness (p. 46)
3 Shoot.
36
Shooting in Image ModeIn image mode, the camera automaticallyoptimizes its shooting settings for specificcircumstances, such as landscapes, movingobjects, night scenes and black and whiteimages.
Landscape: for recording broadexpanses of scenery
Fast Shutter: for recording fast movingobjects, such as sportsfigures
Slow Shutter: for recording movingobjects to make themappear blurred, such asriver rapids
Night Scene: for recording night shots ofscenery or people againstdark backgrounds
Black & White: for recording monochromeimages
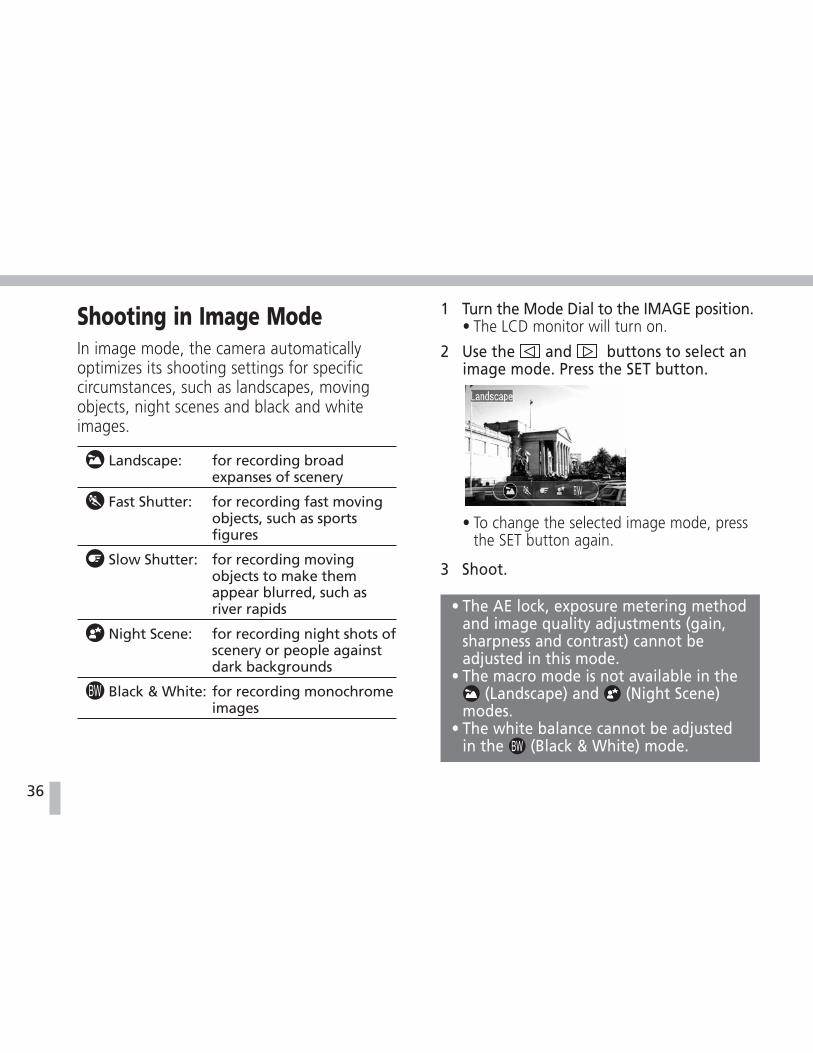
1 Turn the Mode Dial to the IMAGE position.• The LCD monitor will turn on.
2 Use the and buttons to select animage mode. Press the SET button.
• To change the selected image mode, pressthe SET button again.
3 Shoot.
• The AE lock, exposure metering methodand image quality adjustments (gain,sharpness and contrast) cannot beadjusted in this mode.
• The macro mode is not available in the (Landscape) and (Night Scene)
modes.• The white balance cannot be adjusted
in the (Black & White) mode.
37
Sho
otin
g
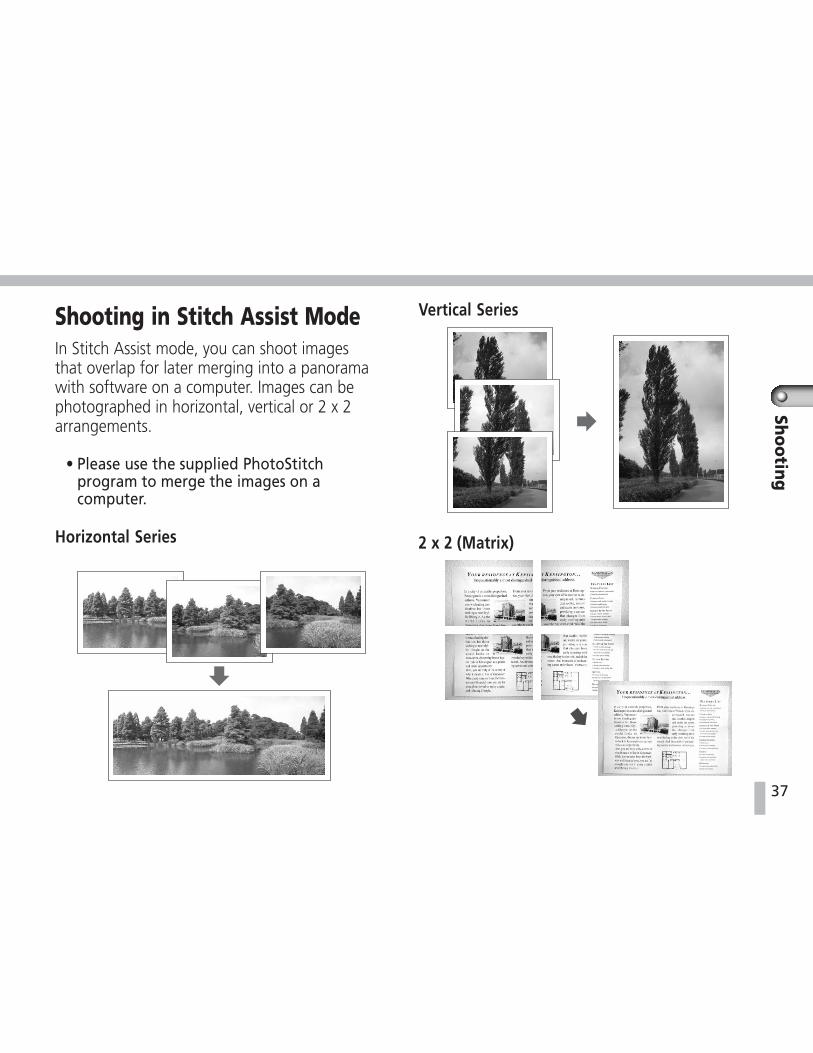
Shooting in Stitch Assist ModeIn Stitch Assist mode, you can shoot imagesthat overlap for later merging into a panoramawith software on a computer. Images can bephotographed in horizontal, vertical or 2 x 2arrangements.
• Please use the supplied PhotoStitchprogram to merge the images on acomputer.
Horizontal Series
Vertical Series
2 x 2 (Matrix)

38
What is the Stitch Function?• Stitching is the process of merging
digital camera images so that the seamsare invisible. Expansive scenes can bedynamically presented in their entirety.
How to Frame a SubjectThe stitch function detects the overlappingportions of adjoining images and mergesthem. When shooting, try to include adistinctive item in the overlapping portion.
• Compose each frame so that it overlaps30% to 50% of the width of the adjoiningimage. Try to keep any vertical misalignmentto within 10% of the image height.
• Do not include moving items in the overlap.
• Do not try to stitch images that include bothdistant and close items. Objects may appearwarped or doubled up.
• Make the brightness as consistent aspossible. The final image will appearunnatural if the difference in brightness istoo large.
Camera PositioningLandscapesTo record distant landscapes, pan the camera(tilt or swivel the camera on its own axis).
For a horizontalseries, swivel thecamera left orright.
39
Sho
otin
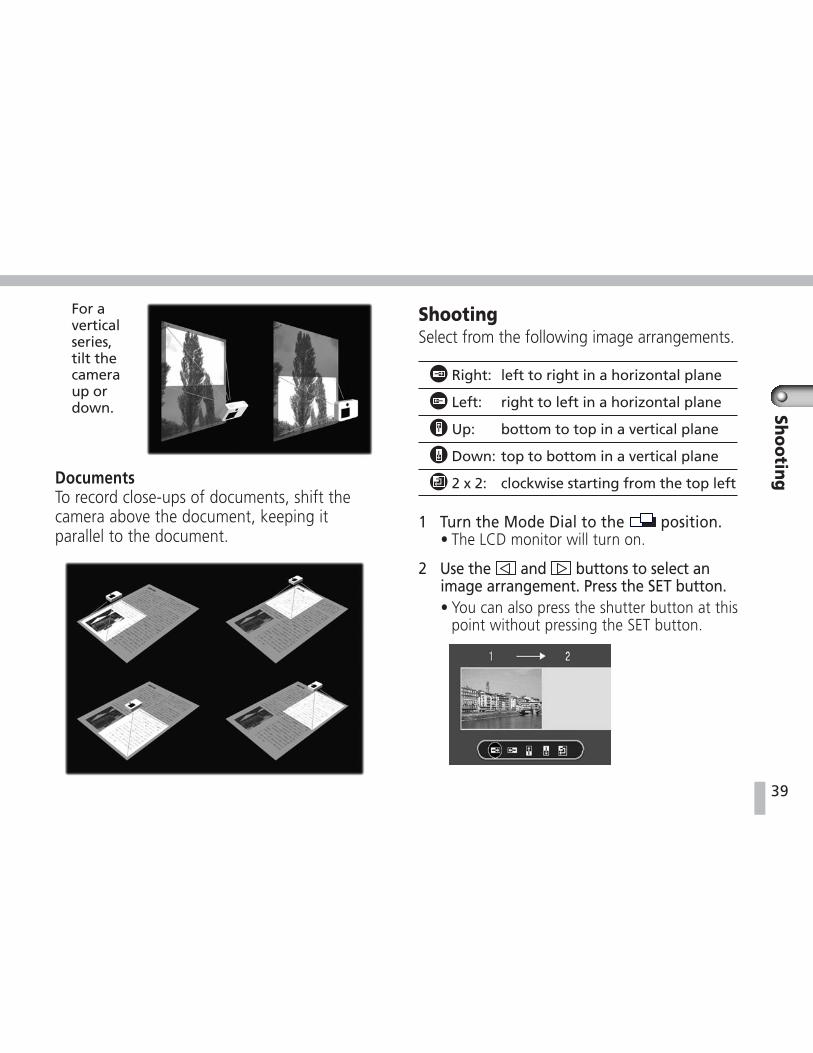
gDocumentsTo record close-ups of documents, shift thecamera above the document, keeping itparallel to the document.
For averticalseries,tilt thecameraup ordown.
ShootingSelect from the following image arrangements.
Right: left to right in a horizontal plane
Left: right to left in a horizontal plane
Up: bottom to top in a vertical plane
Down: top to bottom in a vertical plane
2 x 2: clockwise starting from the top left
1 Turn the Mode Dial to the position.• The LCD monitor will turn on.
2 Use the and buttons to select animage arrangement. Press the SET button.• You can also press the shutter button at this
point without pressing the SET button.
40
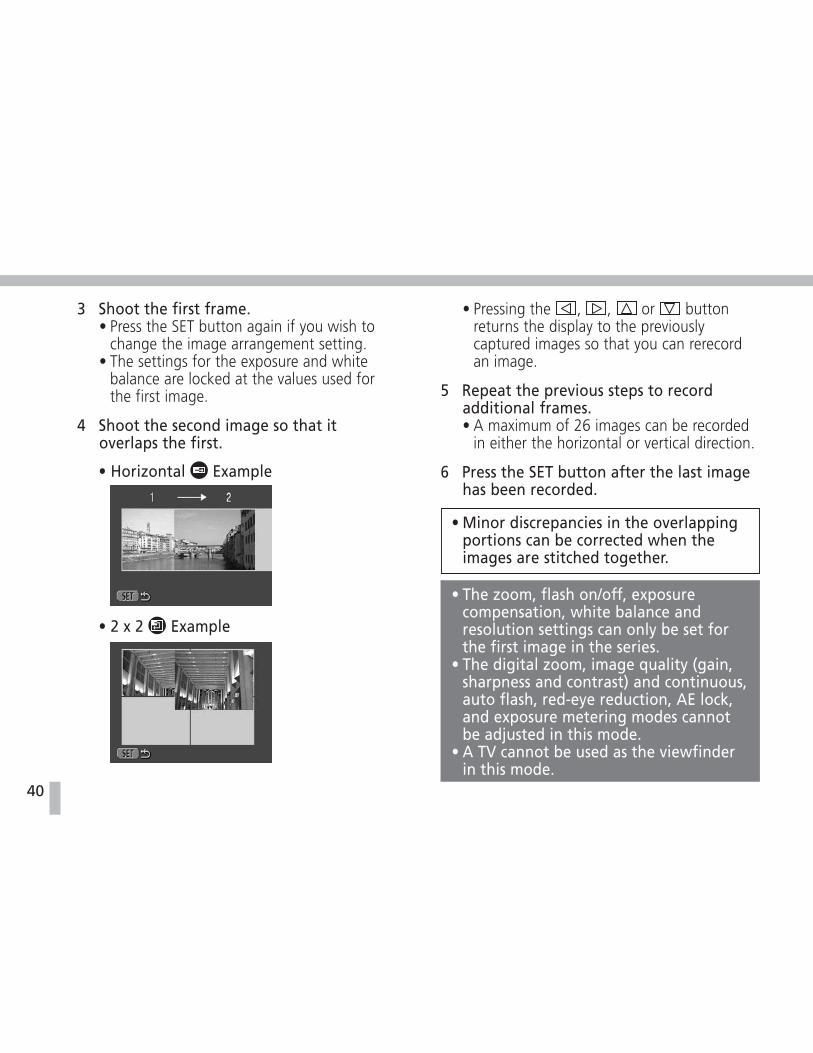
3 Shoot the first frame.• Press the SET button again if you wish to
change the image arrangement setting.• The settings for the exposure and white
balance are locked at the values used forthe first image.
4 Shoot the second image so that itoverlaps the first.
• Horizontal Example
• 2 x 2 Example
• Pressing the , , or buttonreturns the display to the previouslycaptured images so that you can rerecordan image.
5 Repeat the previous steps to recordadditional frames.• A maximum of 26 images can be recorded
in either the horizontal or vertical direction.
6 Press the SET button after the last imagehas been recorded.
• Minor discrepancies in the overlappingportions can be corrected when theimages are stitched together.
• The zoom, flash on/off, exposurecompensation, white balance andresolution settings can only be set forthe first image in the series.
• The digital zoom, image quality (gain,sharpness and contrast) and continuous,auto flash, red-eye reduction, AE lock,and exposure metering modes cannotbe adjusted in this mode.
• A TV cannot be used as the viewfinderin this mode.
41
Sho
otin
g
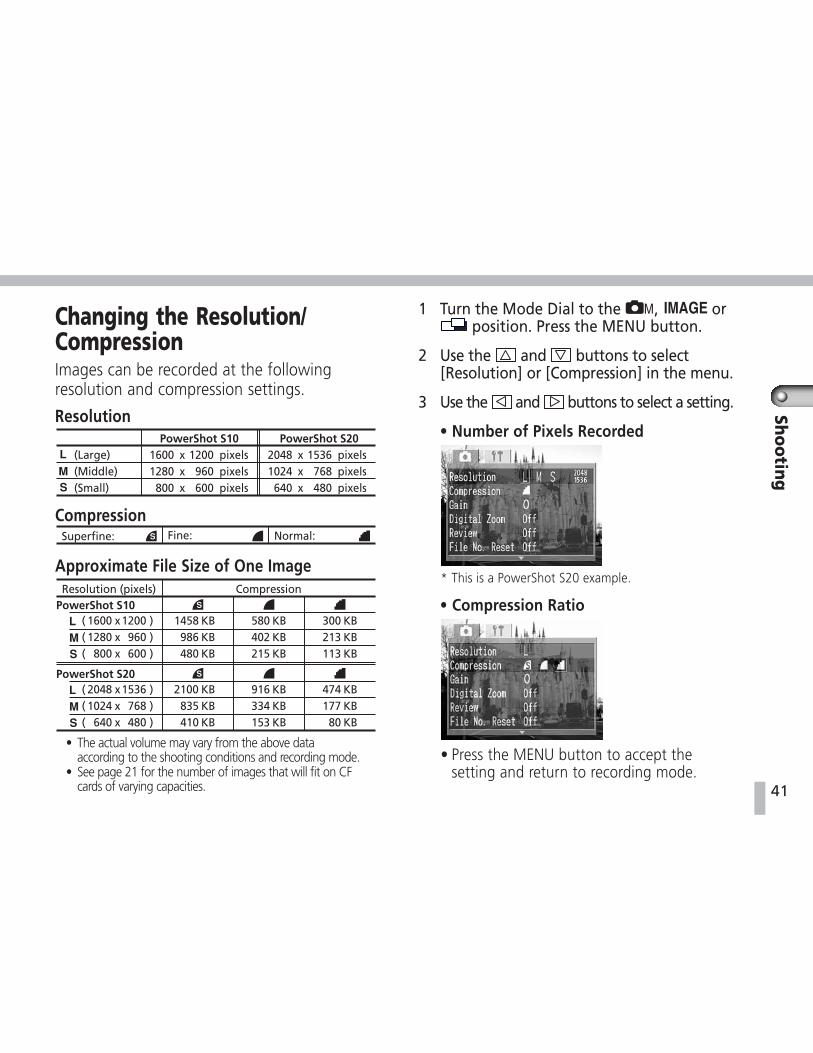
Changing the Resolution/CompressionImages can be recorded at the followingresolution and compression settings.
Resolution
Compression
Approximate File Size of One Image
• The actual volume may vary from the above dataaccording to the shooting conditions and recording mode.
• See page 21 for the number of images that will fit on CFcards of varying capacities.
1 Turn the Mode Dial to the , or position. Press the MENU button.
2 Use the and buttons to select[Resolution] or [Compression] in the menu.
3 Use the and buttons to select a setting.
• Number of Pixels Recorded
* This is a PowerShot S20 example.
• Compression Ratio
• Press the MENU button to accept thesetting and return to recording mode.
1600 x 1200 pixels1280 x 960 pixels
800 x 600 pixels
(Large)(Middle)(Small)
2048 x 1536 pixels1024 x 768 pixels
640 x 480 pixels
PowerShot S10 PowerShot S20
Fine: Normal:Superfine:
PowerShot S10Resolution (pixels) Compression
PowerShot S20
( 1600 x1200 )( 1280 x 960 )( 800 x 600 )
1458 KB986 KB480 KB
580 KB402 KB215 KB
300 KB213 KB113 KB
( 2048 x1536 )( 1024 x 768 )( 640 x 480 )
2100 KB835 KB410 KB
916 KB334 KB153 KB
474 KB177 KB
80 KB

42
Shooting Close-Ups (Macro Mode)Use the macro mode to record subjects closeto the lens. The range is 4.7 to 18 in. (12 to46 cm) from the tip of the lens for thePowerShot S10 and 4.7 to 26 in. (12 to 66cm) for the PowerShot S20. Always use theLCD monitor in macro mode to check theimage composition and focus.
1 Turn the Mode Dial to the , , or position.
2 Press the (Macro) button.
3. Shoot, taking particular care not to letthe camera shake.• Pressing the button again cycles the
macro mode to off.
• The lower indicator will shine orangewhen the shutter button is pressedhalfway in macro mode.
Shooting Continuously(Continuous Mode)1 Turn the Mode Dial to the or
position.
2 Press the button until the iconshows in the Display panel.
3 Shoot.• The camera will shoot continuously while the
shutter button is held down. Recording willstop when you release the shutter button.
• The PowerShot S10 will shoot continuouslyat the speed of 1.7 images per second andthe PowerShot S20 at 0.8 images persecond* (when the LCD monitor is off).
• When the camera’s built-in memorybecomes full, the interval betweenshots will be a little longer.
* These figures reflect standard shooting conditionsestablished by Canon. Actual figures may varyaccording to the subject and shooting conditions.

43
Sho
otin
g
Adjusting the ExposureCompensationUse the exposure compensation feature whena backlit object appears too dark or lights aretoo bright in a night scene.
1 Turn the Mode Dial to the , or position.
2 Press the button to display theexposure compensation settings bar.
3 Use the and buttons to select anadjustment value.
• You can take a shot anytime by pressing theshutter button.
• Press the SET button to close the exposurecompensation settings bar. The chosenexposure compensation setting will remainin effect until it is changed.
• This setting is maintained even after theMode Dial is turned. (The +/- icon willappear in the Display panel and theexposure compensation value will appear inthe LCD monitor.)
• Press the button again to display thewhite balance settings, which can beadjusted at this point.
• Each press of the button cyclesbetween the “no display,” exposurecompensation bar and white balancesettings bar.
• In (Stitch Assist) mode, the exposuresetting is locked after the first image. Itcannot be adjusted from the second imageonward.
ExposureCompensationSettings Bar

44
Setting the White BalanceAdjust the white balance settings to respondto shooting conditions when you arerecording outdoors or under artificialillumination.
Auto: for recording with thesettings automaticallyselected by the camera
Daylight: for recording outdoors on abright day
Cloudy: for recording under overcast,shaded, dusk or evening skies
Tungsten: for recording under tungstenlighting
Fluorescent: for recording underfluorescent lighting
1 Turn the Mode Dial to the , or position.
2 Press the button once to displaythe exposure compensation settings anda second time to display the whitebalance settings.
3 Use the and buttons to select awhite balance mode.
• You can record anytime by pressing theshutter button.
• Press the button or the SET buttonto close the white balance settings bar. Thechosen white balance mode will be in effectthereafter until it is changed.
• This setting is maintained even after theMode Dial is turned. (The icon willappear in the Display panel and theselected white balance icon will appear inthe LCD monitor.)
• In (Stitch Assist) mode, the setting canonly be adjusted for the first image.
45
Sho
otin
g
Shooting with the AE LockWhen the AE lock is used, you can meter theexposure and focus independently. Use this functionwhen you need to change the image compositionafter you have set the exposure setting.
1 Turn the Mode Dial to the position. Pressthe DISPLAY button to turn on the LCD monitor.
2 Aim the camera so that the subject you wishto meter is centered in the LCD monitor.
3 Press and hold the shutter button halfwaywhile you press the SET button.• The AE lock will take effect and the LCD monitor
will display an asterisk (*) close to its center. Theexposure setting will now be maintained even ifyou release the shutter button.
4 Compose the image and shoot.• The camera will focus on the object at the
center of the viewfinder.• The AE lock will release if you press a button
other than the shutter button or if you turn theMode Dial. The AE lock will also automaticallyrelease if the power save function activates.
Setting the Exposure MeteringMethodAlthough the exposure metering method isnormally set to the Center-weighted mode, youcan change it to the spot mode and record animage.
Center-Weighted:measures the average light from theentire image area, weighting thevalue of the light detected at thecenter of the viewfinder more heavily.
Spot: measures the light from the centerof the field only. Use this optionwhen the subject is backlit orsurrounded by bright light.
1 Turn the Mode Dial to the position.Press the DISPLAY button to turn on theLCD monitor.

46
2 Hold the SET button. Press the or button to select a metering method.
• Release the SET button to make the settingeffective.
• In the spot mode, a frame indicating themetering field is shown in the LCD monitor.The camera measures the light in the areacovered by this frame.
• You can record anytime by pressing theshutter button.
Adjusting Image Quality SettingsThe gain, contrast and sharpness can beadjusted for recording.
Gain: 0 (Normal), +1.0 (Gain +1), +2.0 (Gain +2)
Contrast: - (low), 0 (normal), + (high)Sharpness: - (low), 0 (normal), + (high)
1 Turn the Mode Dial to the position.Press the MENU button.
2 Use the and buttons to select the[Gain], [Contrast] or [Sharpness].
3 Use the and buttons to select asetting.
• Gain
47
Sho
otin
g
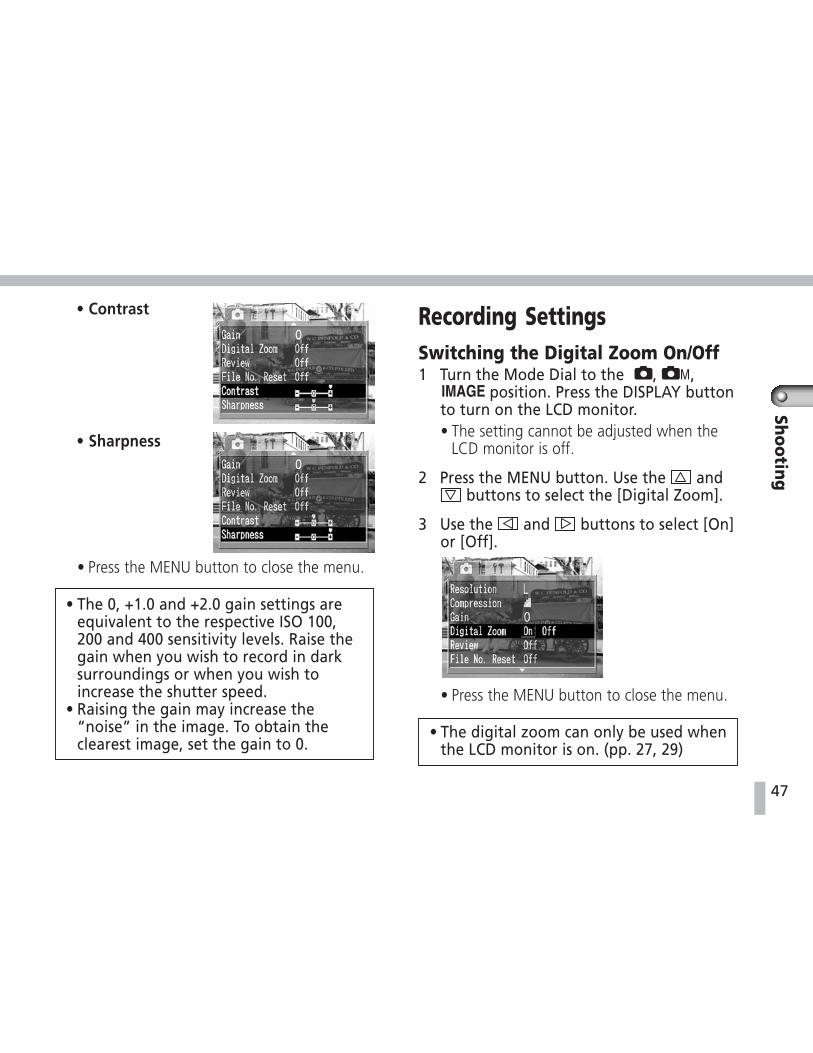
• Contrast
• Sharpness
• Press the MENU button to close the menu.
• The 0, +1.0 and +2.0 gain settings areequivalent to the respective ISO 100,200 and 400 sensitivity levels. Raise thegain when you wish to record in darksurroundings or when you wish toincrease the shutter speed.
• Raising the gain may increase the“noise” in the image. To obtain theclearest image, set the gain to 0.
Recording SettingsSwitching the Digital Zoom On/Off1 Turn the Mode Dial to the , ,
position. Press the DISPLAY buttonto turn on the LCD monitor.• The setting cannot be adjusted when the
LCD monitor is off.
2 Press the MENU button. Use the and buttons to select the [Digital Zoom].
3 Use the and buttons to select [On]or [Off].
• Press the MENU button to close the menu.
• The digital zoom can only be used whenthe LCD monitor is on. (pp. 27, 29)

48
Switching the Review Feature On/OffSetting this feature on or off determineswhether or not you can review the photo-graphed image in the LCD monitor when theLCD monitor is turned off.
1 Turn the Mode Dial to the , ,or position. Press the MENU button.
2 Use the and buttons to select[Review].
3 Use the and buttons to select [On]or [Off].
• Press the MENU button to close the menu.
Review FeatureWhen the review feature is set to On, orwhen the LCD monitor is on, thephotographed image will show in theLCD monitor if you continue to holddown the shutter button fully afterrecording. If you press the SET button atthis point, the image will continue todisplay in the LCD monitor even if yourelease the shutter button. You can alsoerase the image immediately if you wish(p. 60).Cancel the review feature by pressingthe shutter button halfway.
Resetting the File NumberSelect the way image file numbers are assignedwith this feature.
On: The next file number assigned is reset tothe initial value (100-0001) each time anew CF card is inserted. Images recordedonto a CF card containing existing imagesare assigned the next available file numberon that card.

49
Sho
otin
g
Off: The last assigned file number is storedand the next available file number isassigned to an image recorded on anyCF card, including a new CF card.
1 Turn the Mode Dial to the , ,or position. Press the MENU button.
2 Use the and buttons to select [FileNo. Reset].
3 Use the and buttons to select [On]or [Off].
• Press the MENU button to close the menu.
• Recording with the File No. Resetoption set to Off is convenient whenthe image files are downloaded to acomputer because duplicate file namescan be avoided.
File Number ConventionsA photographed image is assigned anumber ranging from 0001 to 9900 andstored in a folder containing up to 100files. The folders are assigned numbersranging from 100 to 998.
• Images shot in continuous or Stitch Assistmode are always kept in the same folder,which may result in some folderscontaining 101 or more files.
100 0001 0002 0099 0100
101 0101 0102 0199 0200
198 9801 9802 9899 9900
200 0001 0002 0099 0100
Folder numbers cannot contain 99 in the last two digits.
50
Replaying
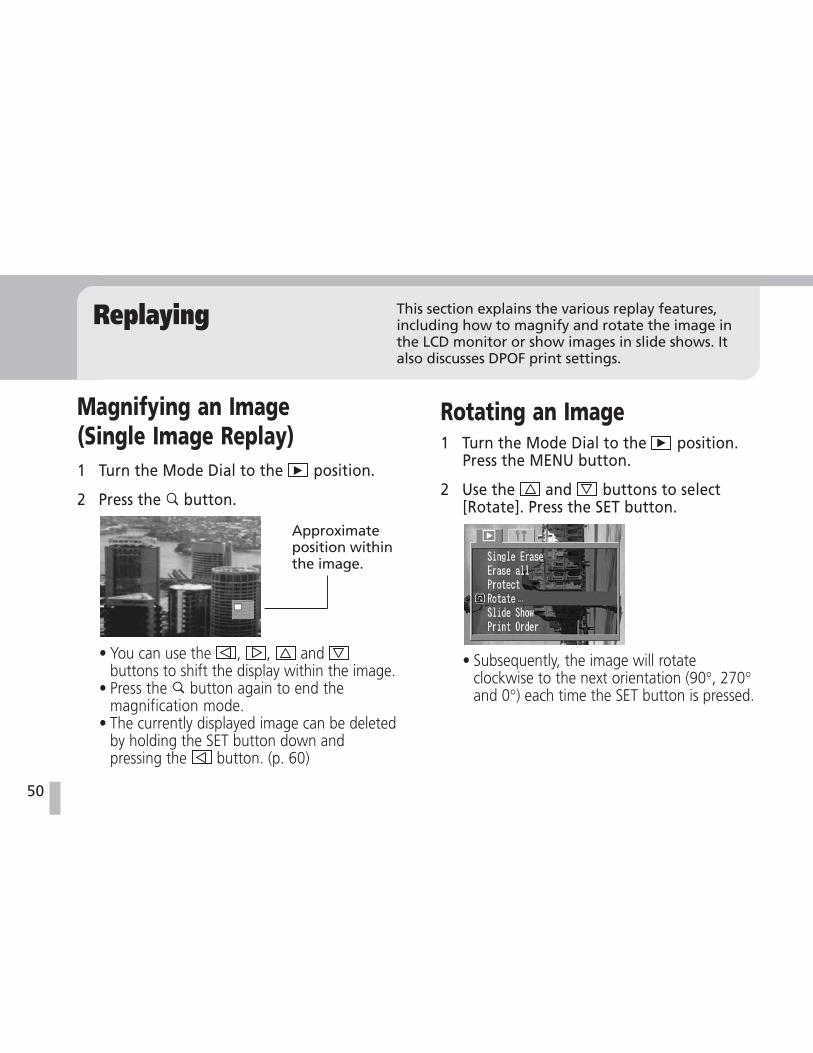
Magnifying an Image(Single Image Replay)1 Turn the Mode Dial to the position.
2 Press the button.
• You can use the , , and buttons to shift the display within the image.
• Press the button again to end themagnification mode.
• The currently displayed image can be deletedby holding the SET button down andpressing the button. (p. 60)
This section explains the various replay features,including how to magnify and rotate the image inthe LCD monitor or show images in slide shows. Italso discusses DPOF print settings.
Approximateposition withinthe image.
Rotating an Image1 Turn the Mode Dial to the position.
Press the MENU button.
2 Use the and buttons to select[Rotate]. Press the SET button.
• Subsequently, the image will rotateclockwise to the next orientation (90°, 270°and 0°) each time the SET button is pressed.

51
Rep
laying
• Press the MENU button to end the Rotatefeature.
• Images that have been rotated with thecamera may not, depending on thesoftware program used for loading, remainrotated when loaded onto the computer.
270°
0°(Original)
90°
Jumping ImagesThe display can be jumped forward or back.
1 Turn the Mode Dial to the position.
2 Press the JUMP button.
Single Image Replay• Press the or button to jump to the
tenth image ahead or behind.• Press and hold the SET button and press the
or button to jump to the first or lastimage.
Multi Image Replay• Press the or button to jump to the
next set of 9 images ahead or behind.• Press and hold the SET button and press the
or button to jump to the first or lastset of 9 images.
• Press the JUMP button again to end thejump feature.
52
Viewing Image Information1 Turn the Mode Dial to the position.
2 Press the DISPLAY button.• The LCD monitor will cycle to the next
display mode (simple, detail, non display)each time the DISPLAY button is pressed.The detail display is not available in multiimage replay mode.
• The following information is shown inthe simple display mode.-File number; Shooting date/time;Protection status ( ).
• The following information is also shownin the detailed display mode.-Image mode ( , , , , )-Macro mode ( )-Shooting methods ( , , )-Flash ( , )-Exposure compensation ( )-White balance ( , , , , )-Compression ( , , )-Resolution ( , , )-Stitch Assist mode status
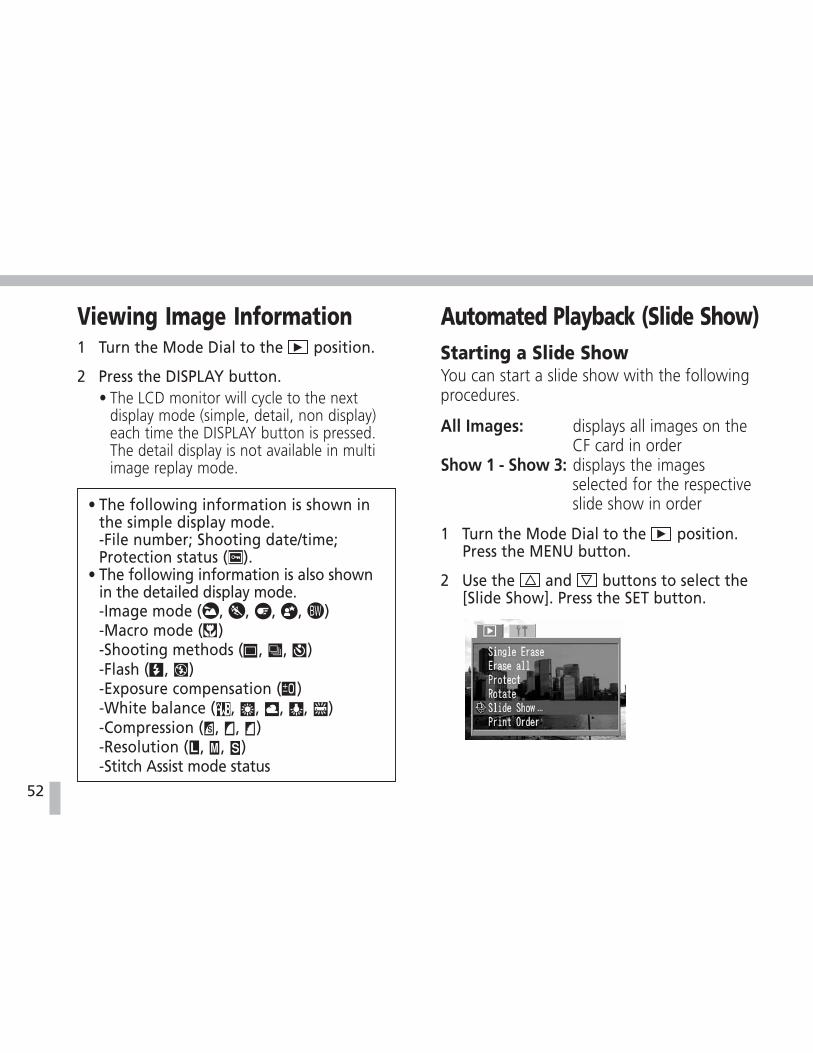
Automated Playback (Slide Show)Starting a Slide ShowYou can start a slide show with the followingprocedures.
All Images: displays all images on theCF card in order
Show 1 - Show 3: displays the imagesselected for the respectiveslide show in order
1 Turn the Mode Dial to the position.Press the MENU button.
2 Use the and buttons to select the[Slide Show]. Press the SET button.

53
Rep
laying
3 Use the and buttons to select[Program].
4 Use the and buttons to select [AllImages], [Show 1], [Show 2] or [Show 3].
5 Use the , , and buttons toselect [Start]. Press the SET button.The slide show will start.• Press the SET button to pause or restart it.• When a slide show is paused, or the Play
Time is set to Manual, you can use the and buttons to view the previous ornext slide.
• Press the MENU button to stop a slide show.
Selecting Slide Show ImagesMark particular images for replay in a slideshow and save them as slide shows 1, 2 or 3.One slide show can contain up to 100 images.
1 Display the Slide Show menu.
2 Use the and buttons to select[Program].
3 Use the and buttons to select[Show 1], [Show 2] or [Show 3].
4 Use the , , and buttons tochoose [Select]. Press the SET button.

54
5 Use the and buttons to movebetween images and the button tomark the image.A number representing the order of themarked image in the slide show will appearat the top of the LCD monitor. The image willautomatically play in that order.
• Press the button to unmark the selectedimage.
• Press the button to switch between thesingle image replay and multi image replaymodes (3 images) to select images.
• When in multi image replay mode, you candeselect all the images at once. Press theSET button, use the and button toselect [OK] and press the SET button.
• Press the MENU button to close the Selectmenu.
Setting the Play TimeYou can set the number of seconds that animage is shown. The available options are 3-10,15 and 30 seconds and manual.
1 Display the Slide Show menu.
2 Use the , , and buttons toselect [Setup]. Press the SET button.
3 Use the and buttons to select [PlayTime].
4 Use the and buttons to select anoption.
• Press the MENU button to close the Setup menu.
• The actual play time of some images mayvary slightly from the specified play time.

55
Rep
laying
Setting the Auto Replay On/OffYou can set the slide show to close after itfinishes displaying all its images or toautomatically repeat.
1 Display the Slide Show menu.
2 Use the , , and buttons toselect [Setup]. Press the SET button.
3 Use the and buttons to select[Repeat].
4 Use the and buttons to select [On]or [Off].
• Press the MENU button to close the Setupmenu.
• Slide shows can be easily edited with thesupplied software, ZoomBrowser EX (Windows)or PowerShot Browser (Macintosh).
Print Settings (DPOF Settings)Images can be marked for printing with DigitalPrint Order Format (DPOF) compliant digitalprinters or at photo developing service outlets.
Selecting Images for PrintingThere are two ways to select images for printing.
Mark Selected Images: selects imagesindividually for printing
Mark All Images: selects all images onthe CF card forprinting (prints 1 copy).
1 Turn the Mode Dial to the position.Press the MENU button.
2 Use the and buttons to select[Print Order]. Press the SET button.
56
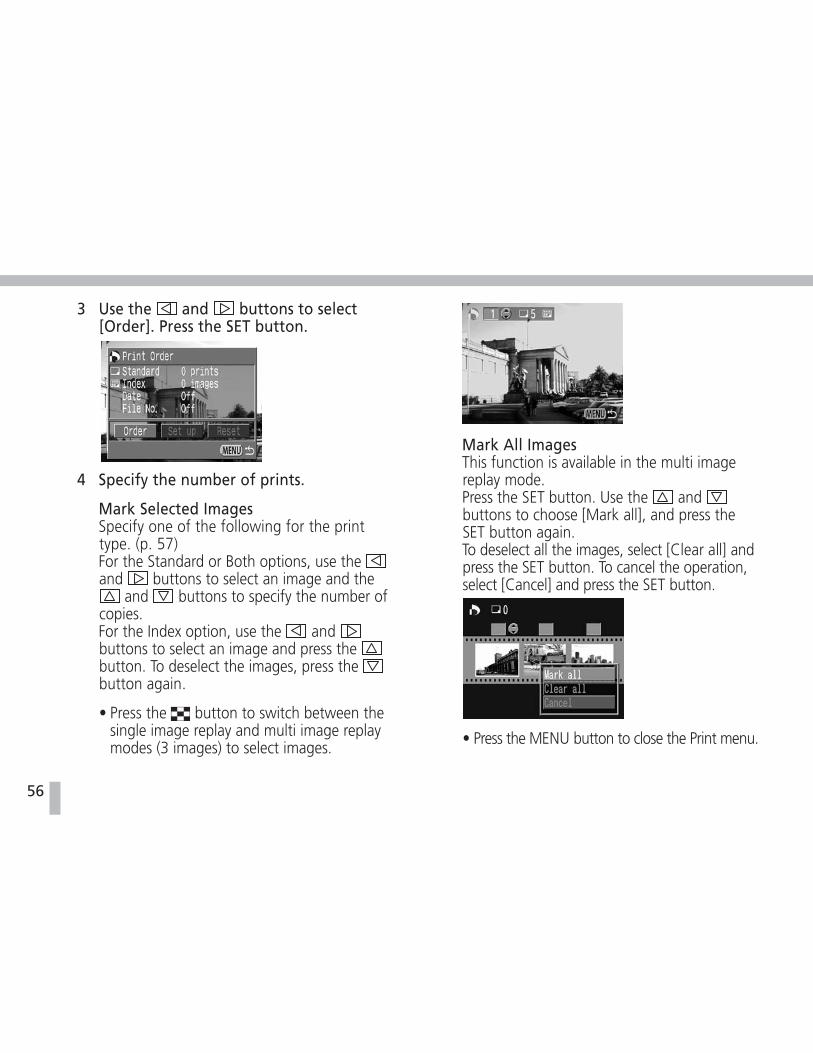
3 Use the and buttons to select[Order]. Press the SET button.
4 Specify the number of prints.
Mark Selected ImagesSpecify one of the following for the printtype. (p. 57)For the Standard or Both options, use the and buttons to select an image and the
and buttons to specify the number ofcopies.For the Index option, use the and buttons to select an image and press the button. To deselect the images, press the button again.
• Press the button to switch between thesingle image replay and multi image replaymodes (3 images) to select images.
Mark All ImagesThis function is available in the multi imagereplay mode.Press the SET button. Use the and buttons to choose [Mark all], and press theSET button again.To deselect all the images, select [Clear all] andpress the SET button. To cancel the operation,select [Cancel] and press the SET button.
• Press the MENU button to close the Print menu.
57
Rep
laying
• Images will be printed in the order ofolder to newer.
• A maximum of 998 images may bemarked for printing.
• Please note that the print settings createdon a CF card by a DPOF-compliant cameraother than a PowerShot S10 orPowerShot S20 may be overwrittenwhen used in either model.
• Some printers or photo developingservices may not be able to handle theprint settings.
Selecting the Print TypeThe following print type may be specified.
Standard: prints one image per pageIndex: prints images in a reduced size in
an index formatBoth: prints both standard prints and an
index
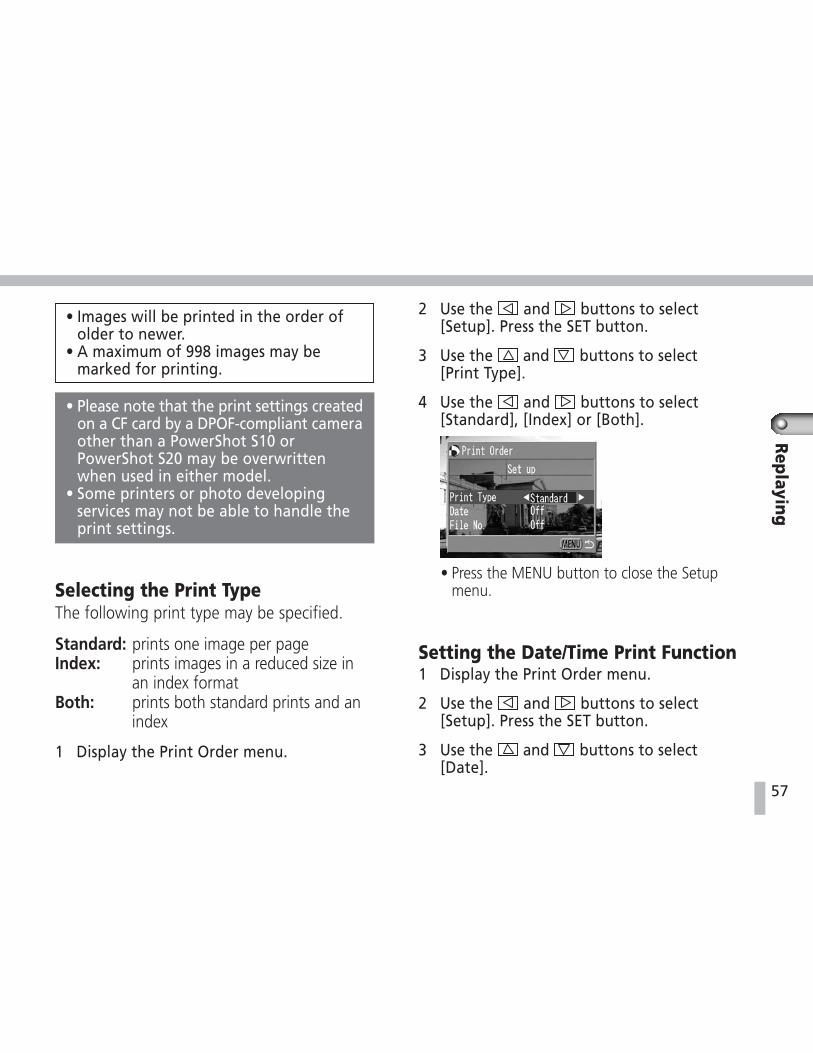
1 Display the Print Order menu.
2 Use the and buttons to select[Setup]. Press the SET button.
3 Use the and buttons to select[Print Type].
4 Use the and buttons to select[Standard], [Index] or [Both].
• Press the MENU button to close the Setupmenu.
Setting the Date/Time Print Function1 Display the Print Order menu.
2 Use the and buttons to select[Setup]. Press the SET button.
3 Use the and buttons to select[Date].

58
4 Use the and buttons to select [On]or [Off].
• Press the MENU button to close the Setupmenu.
• The date printout will be in the styleselected in the Set Date/Time option.(p. 65)
Setting the File Number Print Function1 Display the Print Order menu.
2 Use the and buttons to select[Setup]. Press the SET button.
3 Use the and buttons to select [FileNo.]
4 Use the and buttons to select [On]or [Off].
• Press the MENU button to close the Setupmenu.
• The date and file number data cannotbe selected for printing at the sametime when the print type is set to Index.
59
Rep
laying
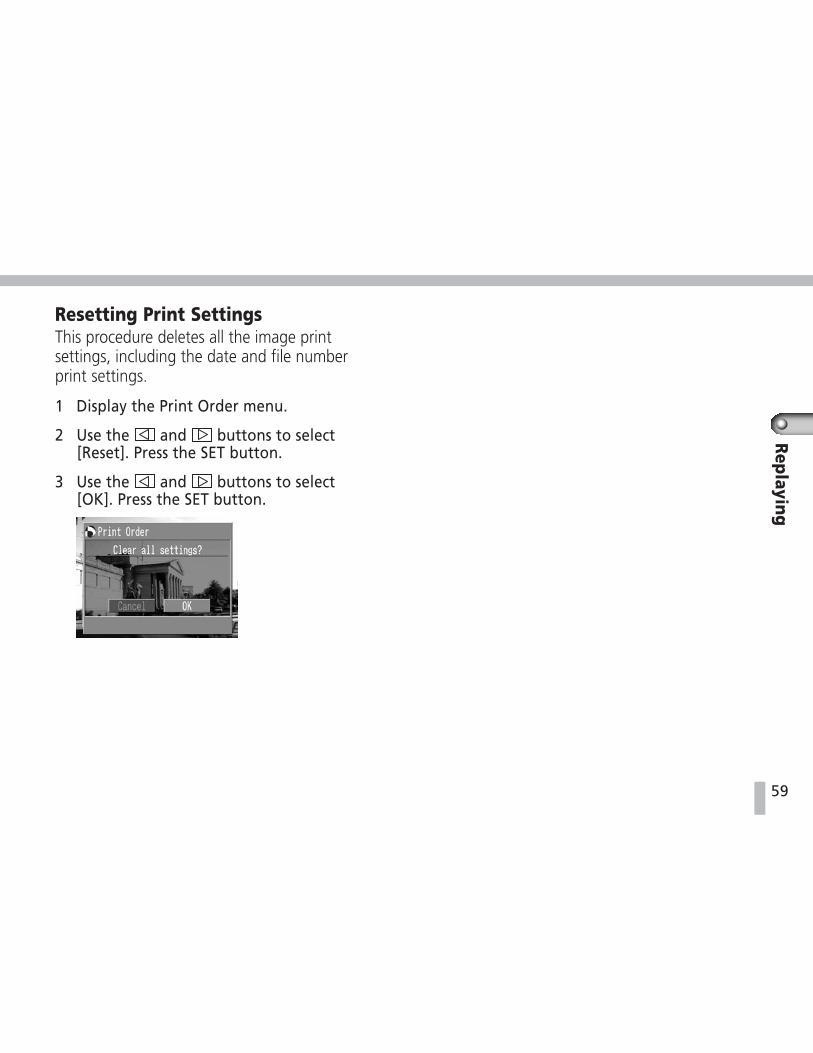
Resetting Print SettingsThis procedure deletes all the image printsettings, including the date and file numberprint settings.
1 Display the Print Order menu.
2 Use the and buttons to select[Reset]. Press the SET button.
3 Use the and buttons to select[OK]. Press the SET button.
60
Erasing
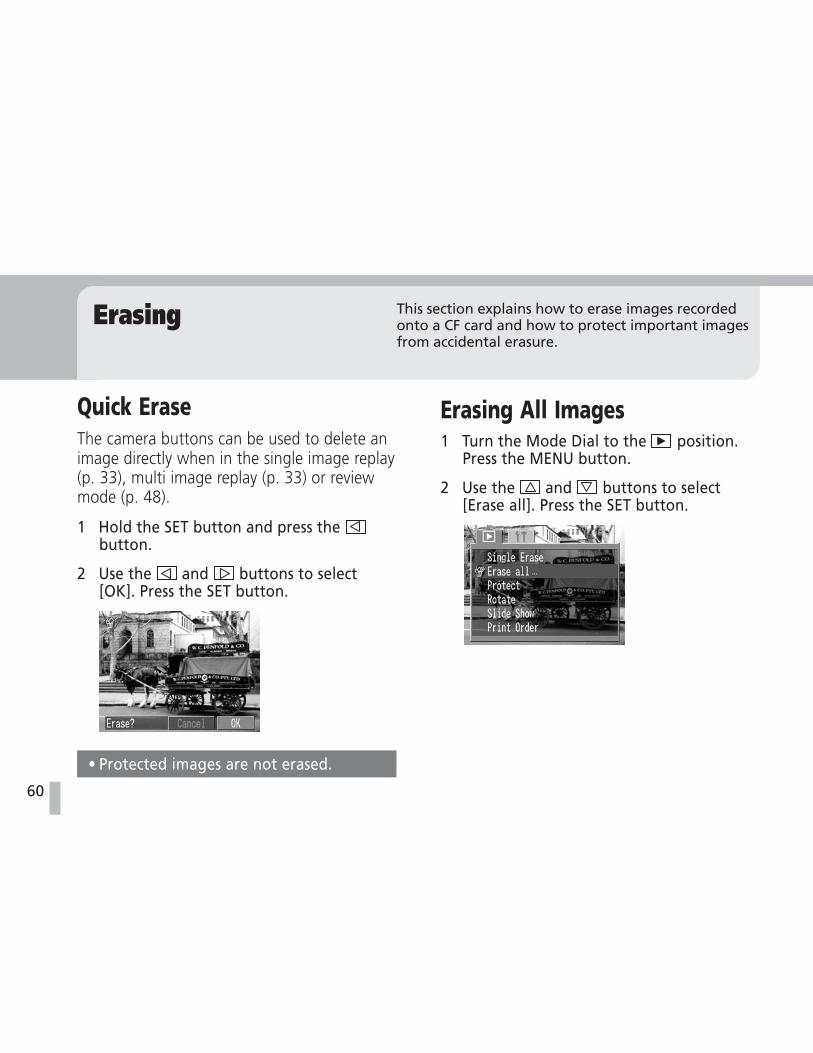
Quick EraseThe camera buttons can be used to delete animage directly when in the single image replay(p. 33), multi image replay (p. 33) or reviewmode (p. 48).
1 Hold the SET button and press the button.
2 Use the and buttons to select[OK]. Press the SET button.
• Protected images are not erased.
This section explains how to erase images recordedonto a CF card and how to protect important imagesfrom accidental erasure.
Erasing All Images1 Turn the Mode Dial to the position.
Press the MENU button.
2 Use the and buttons to select[Erase all]. Press the SET button.

61
Erasing
3 Use the and buttons to select[OK]. Press the SET button.
• If you want to stop the erase procedure,select Cancel.
• Protected images are not erased.• Please note that erased images cannot
be recovered. Please exercise adequatecaution before erasing a file.
Protecting ImagesYou can protect important images to preventtheir accidental erasure.
1 Turn the Mode Dial to the position.Press the MENU button.
2 Use the and buttons to select[Protect]. Press the SET button.
3 Use the and buttons to select animage. Press the SET button to protect it.

62
Protected images will be shown with the icon.
• The image protection is removed if the SETbutton is pressed a second time after Step 3.
• Press the button to switch between thesingle image replay and multi image replaymodes to select images.
• Press the MENU button to close the Setupmenu.
Protected Icon
• All data, including protected images,will be erased when a CF card isformatted with the [Format] command.

63
Camera Settings
Displaying the Setup Menu1 Turn the Mode Dial to the , ,
, or position.
2 Press the MENU button.• The Rec. Menu or Play menu will
display.
3 Use the button to select the Setupmenu.
This section explains about the camera settings,such as the beep, the date and time and CF cardformatting.
• The procedures for accessing the Setupmenu are the same from both the Rec. menu and the Play menu.
• After you have adjusted the settings,press the MENU button to close theSetup menu.
64
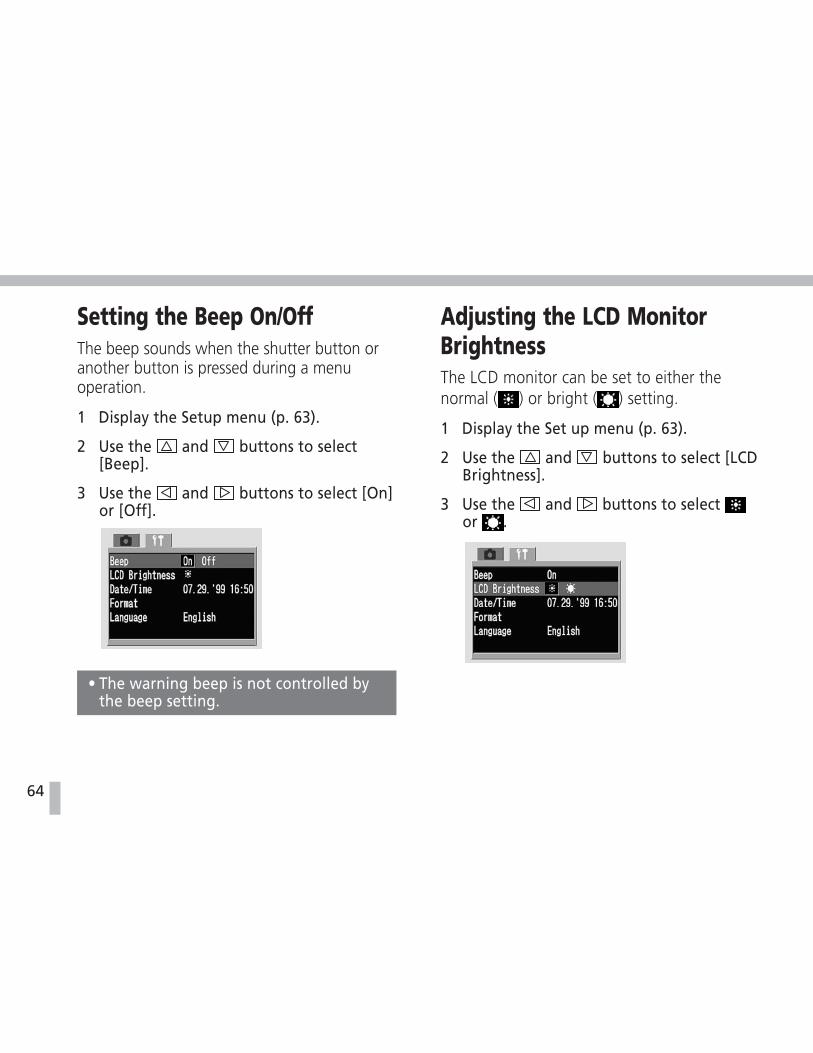
Setting the Beep On/OffThe beep sounds when the shutter button oranother button is pressed during a menuoperation.
1 Display the Setup menu (p. 63).
2 Use the and buttons to select[Beep].
3 Use the and buttons to select [On]or [Off].
• The warning beep is not controlled bythe beep setting.
Adjusting the LCD MonitorBrightnessThe LCD monitor can be set to either thenormal ( ) or bright ( ) setting.
1 Display the Set up menu (p. 63).
2 Use the and buttons to select [LCDBrightness].
3 Use the and buttons to select or .
65
Cam
era Setting
s
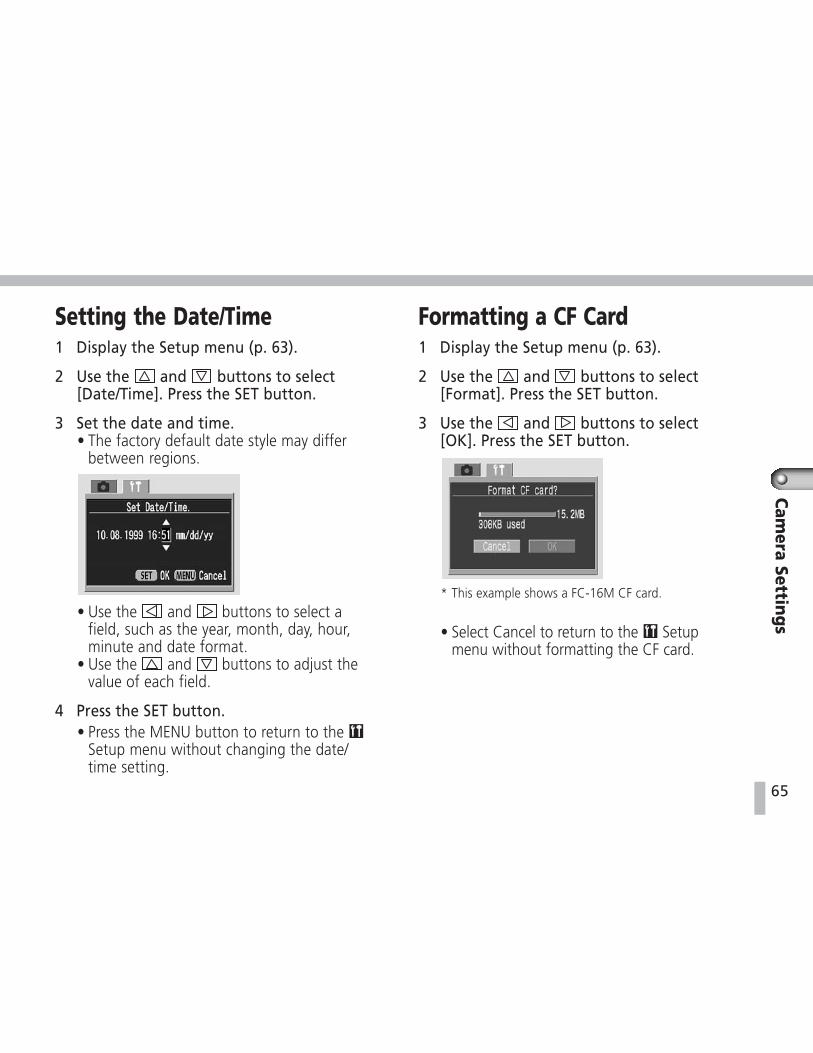
Setting the Date/Time1 Display the Setup menu (p. 63).
2 Use the and buttons to select[Date/Time]. Press the SET button.
3 Set the date and time.• The factory default date style may differ
between regions.
• Use the and buttons to select afield, such as the year, month, day, hour,minute and date format.
• Use the and buttons to adjust thevalue of each field.
4 Press the SET button.• Press the MENU button to return to the
Setup menu without changing the date/time setting.
Formatting a CF Card1 Display the Setup menu (p. 63).
2 Use the and buttons to select[Format]. Press the SET button.
3 Use the and buttons to select[OK]. Press the SET button.
* This example shows a FC-16M CF card.
• Select Cancel to return to the Setupmenu without formatting the CF card.

66
• Please note that formatting a CF carderases all the data on the card,including protected images, sound filesand print settings.
• When a non-Canon brand CF card ismalfunctioning, reformatting it maysolve the problem.
Setting the Language1 Display the Setup menu (p. 63).
2 Use the and buttons to select[Language]. Press the SET button.• The Language menu may appear differently
on cameras in some regions.
3 Use the and buttons to select alanguage. Press the SET button.• Pressing the MENU button instead cancels
the operation, restoring the main Setupmenu without changing the languagesettings.
ShortcutThe language can also be changed inplay mode by holding the SET buttonand pressing the / button.
67
Appendices
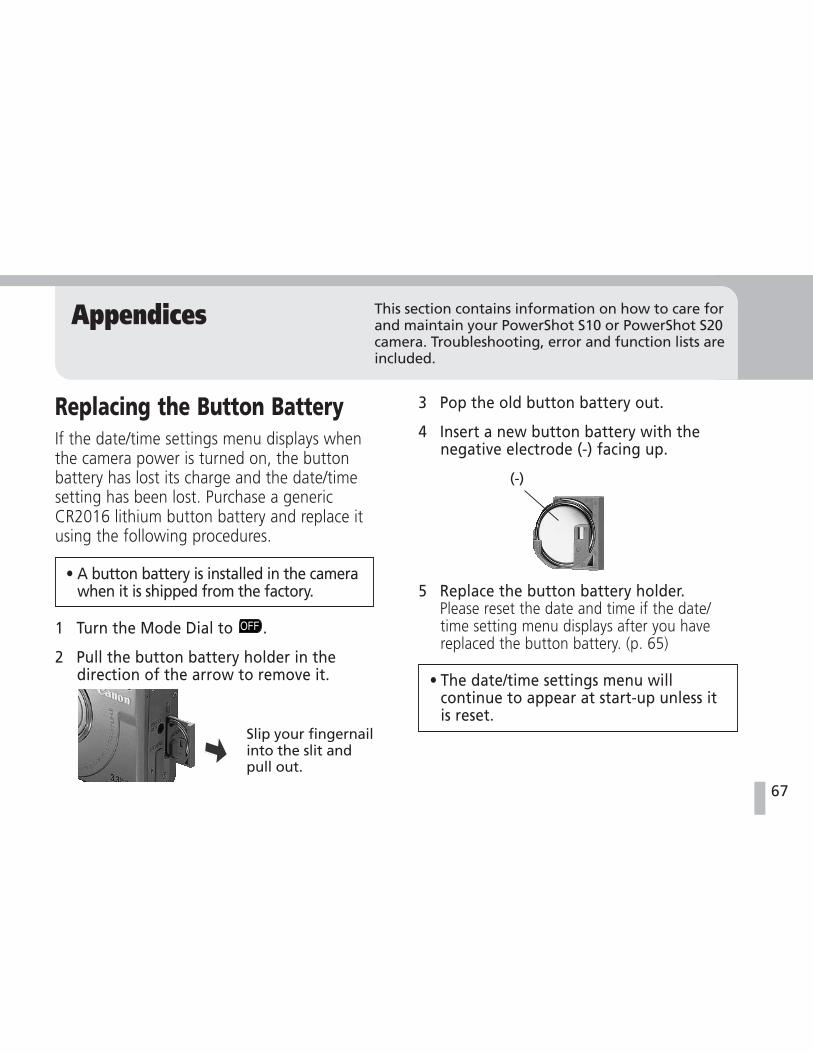
Replacing the Button BatteryIf the date/time settings menu displays whenthe camera power is turned on, the buttonbattery has lost its charge and the date/timesetting has been lost. Purchase a genericCR2016 lithium button battery and replace itusing the following procedures.
• A button battery is installed in the camerawhen it is shipped from the factory.
1 Turn the Mode Dial to .
2 Pull the button battery holder in thedirection of the arrow to remove it.
This section contains information on how to care forand maintain your PowerShot S10 or PowerShot S20camera. Troubleshooting, error and function lists areincluded.
3 Pop the old button battery out.
4 Insert a new button battery with thenegative electrode (-) facing up.
5 Replace the button battery holder.Please reset the date and time if the date/time setting menu displays after you havereplaced the button battery. (p. 65)
• The date/time settings menu willcontinue to appear at start-up unless itis reset.
Slip your fingernailinto the slit andpull out.
(-)

68
Camera MaintenanceFollow the procedures below to clean thecamera body, lens, optical viewfinder and LCDmonitor when they become dirty.
• Never use thinners, benzene, syntheticcleansers or water to clean theequipment. These substances maydistort or damage the equipment.
Camera BodyGently wipe dirt off the camera body with asoft cloth or an eyeglass lens wiper.
LensAfter you have used a generic lens blowerbrush to remove dust and dirt, use a soft clothwith extreme caution to lightly wipe the lensto remove remaining dirt.
• Never use cleansers containing organicsolvents on the camera body or lens. Ifyou cannot remove a stain, contact yourcamera retailer or the closest CanonCustomer Support Help Desk.
Optical ViewfinderUse a lens blower to remove dust and dirt. Ifnecessary, gently wipe it with a soft cloth oreyeglass lens wiper to remove stubborn dirt.
LCD MonitorUse a lens blower to remove dust and dirt. Ifnecessary, gently wipe it with a soft cloth oreyeglass lens wiper to remove stubborn dirt.
• Never rub or press strongly on the LCDmonitor. Rubbing or pressing firmly onit may lead to damage or otherproblems.
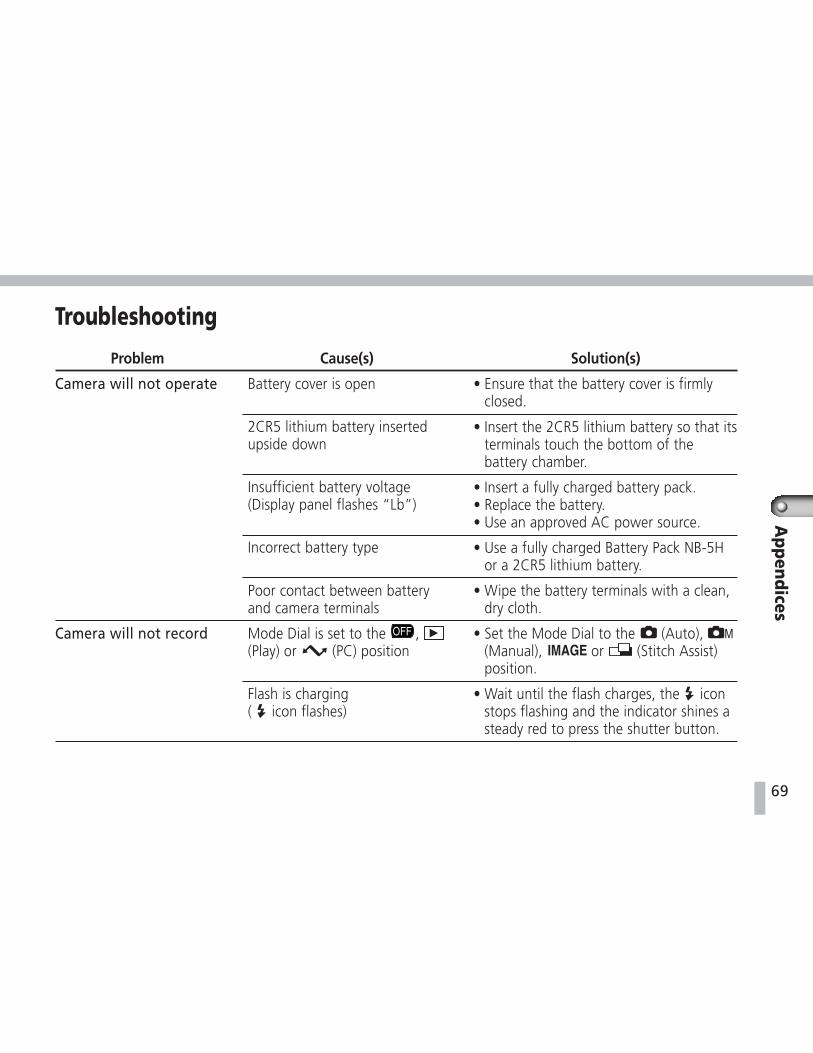
69
Ap
pen
dices
Troubleshooting
Problem Cause(s) Solution(s)
• Ensure that the battery cover is firmlyclosed.
• Insert the 2CR5 lithium battery so that itsterminals touch the bottom of thebattery chamber.
• Insert a fully charged battery pack.• Replace the battery.• Use an approved AC power source.
• Use a fully charged Battery Pack NB-5Hor a 2CR5 lithium battery.
• Wipe the battery terminals with a clean,dry cloth.
• Set the Mode Dial to the (Auto), (Manual), or (Stitch Assist)position.
• Wait until the flash charges, the iconstops flashing and the indicator shines asteady red to press the shutter button.
Battery cover is open
2CR5 lithium battery insertedupside down
Insufficient battery voltage(Display panel flashes “Lb”)
Incorrect battery type
Poor contact between batteryand camera terminals
Mode Dial is set to the ,(Play) or (PC) position
Flash is charging( icon flashes)
Camera will not operate
Camera will not record
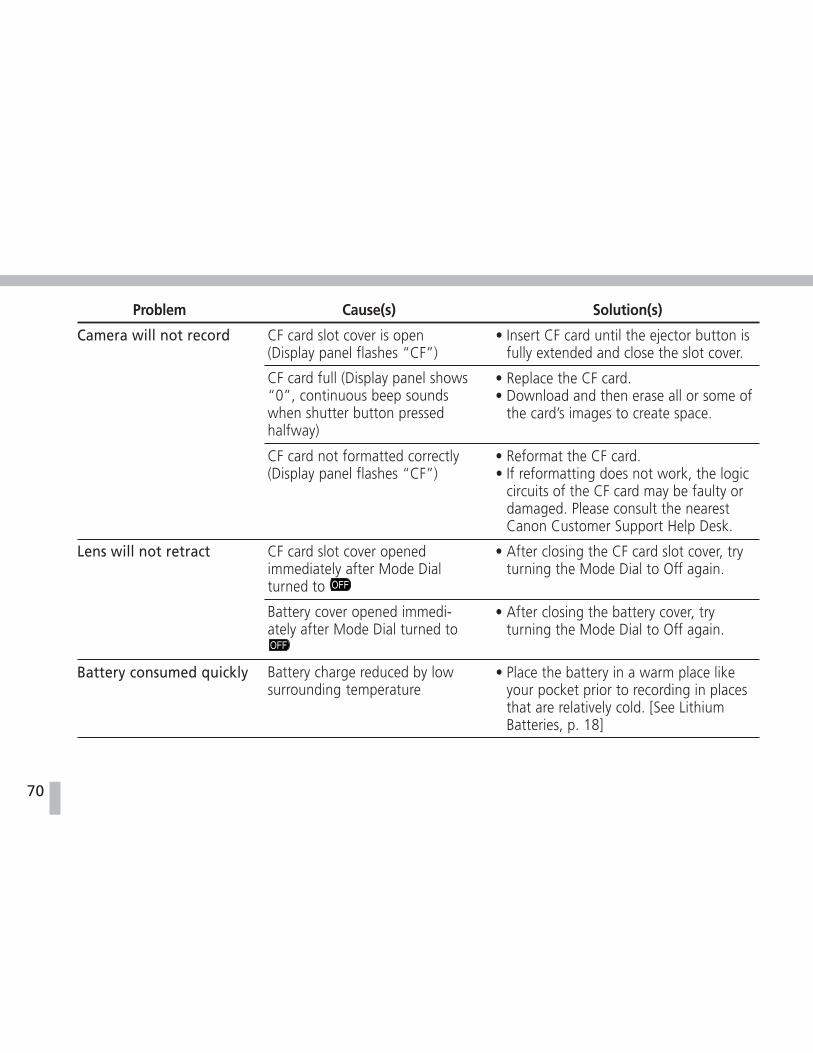
70
Problem Cause(s) Solution(s)
• Insert CF card until the ejector button isfully extended and close the slot cover.
• Replace the CF card.• Download and then erase all or some of
the card’s images to create space.
• Reformat the CF card.• If reformatting does not work, the logic
circuits of the CF card may be faulty ordamaged. Please consult the nearestCanon Customer Support Help Desk.
• After closing the CF card slot cover, tryturning the Mode Dial to Off again.
• After closing the battery cover, tryturning the Mode Dial to Off again.
• Place the battery in a warm place likeyour pocket prior to recording in placesthat are relatively cold. [See LithiumBatteries, p. 18]
Camera will not record
Lens will not retract
Battery consumed quickly
CF card slot cover is open(Display panel flashes “CF”)
CF card full (Display panel shows“0”, continuous beep soundswhen shutter button pressedhalfway)
CF card not formatted correctly(Display panel flashes “CF”)
CF card slot cover openedimmediately after Mode Dialturned to
Battery cover opened immedi-ately after Mode Dial turned to
Battery charge reduced by lowsurrounding temperature

71
Ap
pen
dices
Problem Cause(s) Solution(s)
• Fully charge and discharge the batterypack several times to restore its capacity.
• This battery pack can no longer be used.Replace it with a new one.
• Seat the battery pack more firmly in thecharger.
• Check the AC power cord connection betweenthe electrical outlet and the charger.
• The battery pack won’t charge when thecamera is running off the compact poweradapter. Turn the Mode Dial to .
• Be careful not to move the camera whenpressing the shutter button.
• Ensure that there is at least 18 in. (46 cm)between the lens tip and the subject innormal mode with the PowerShot S10.The PowerShot S20 requires 26 in. (66 cm).
• Use the macro mode to shoot close-upsbetween 4.7 and 18 in. (12 and 46 cm) withthe PowerShot S10. The PowerShot S20range is 4.7 in. to 26 in. (12 to 66 cm).
• Be careful not to block the AF auxiliary lightemitter with your fingers or other items.
Battery consumed quickly
Battery pack will notcharge
Image is blurred, out offocus, or image not asintended
Battery pack capacity reducedbecause of disuse for an extendedperiod of time, such as one year
Battery pack life exceeded
Poor connection between batterypack and compact power adapter
Camera is running off the compactpower adapter
Camera moved
Subject is out of focal range
AF auxiliary light emitter is obscured,hampering autofocus function
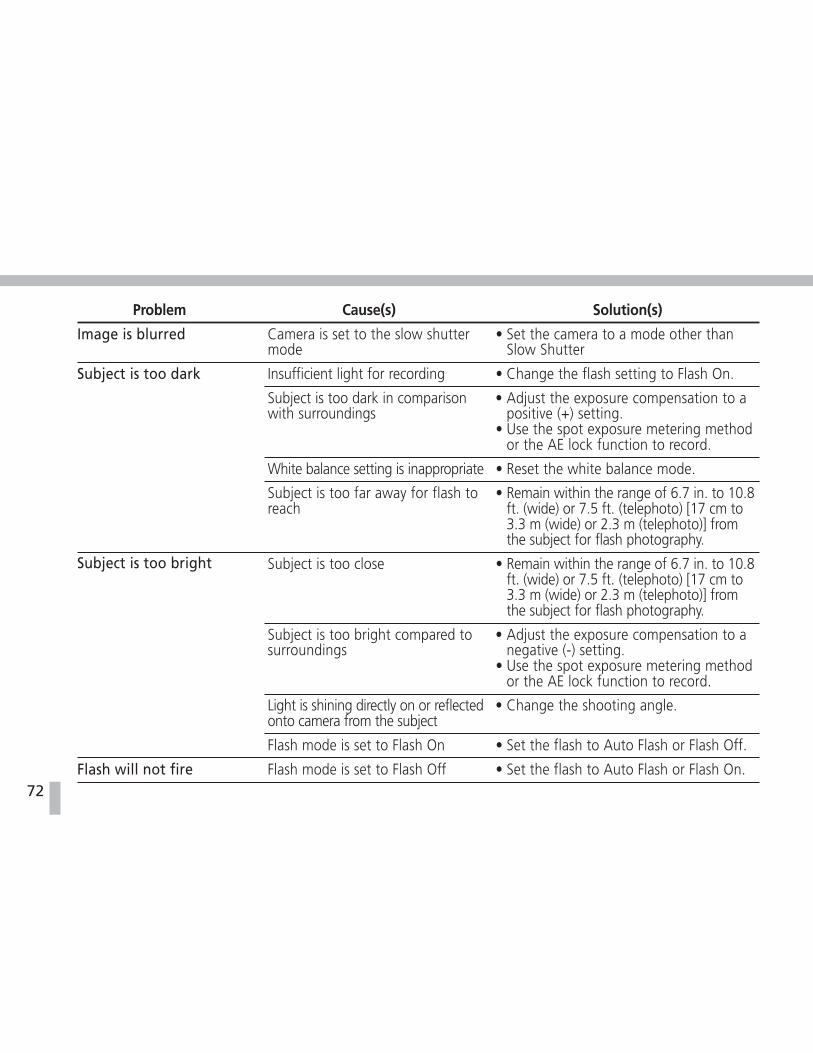
72
Problem Cause(s) Solution(s)
• Set the camera to a mode other thanSlow Shutter
• Change the flash setting to Flash On.
• Adjust the exposure compensation to apositive (+) setting.
• Use the spot exposure metering methodor the AE lock function to record.
• Reset the white balance mode.
• Remain within the range of 6.7 in. to 10.8ft. (wide) or 7.5 ft. (telephoto) [17 cm to3.3 m (wide) or 2.3 m (telephoto)] fromthe subject for flash photography.
• Remain within the range of 6.7 in. to 10.8ft. (wide) or 7.5 ft. (telephoto) [17 cm to3.3 m (wide) or 2.3 m (telephoto)] fromthe subject for flash photography.
• Adjust the exposure compensation to anegative (-) setting.
• Use the spot exposure metering methodor the AE lock function to record.
• Change the shooting angle.
• Set the flash to Auto Flash or Flash Off.
• Set the flash to Auto Flash or Flash On.
Image is blurred
Subject is too dark
Subject is too bright
Flash will not fire
Camera is set to the slow shuttermode
Insufficient light for recording
Subject is too dark in comparisonwith surroundings
White balance setting is inappropriate
Subject is too far away for flash toreach
Subject is too close
Subject is too bright compared tosurroundings
Light is shining directly on or reflectedonto camera from the subject
Flash mode is set to Flash On
Flash mode is set to Flash Off
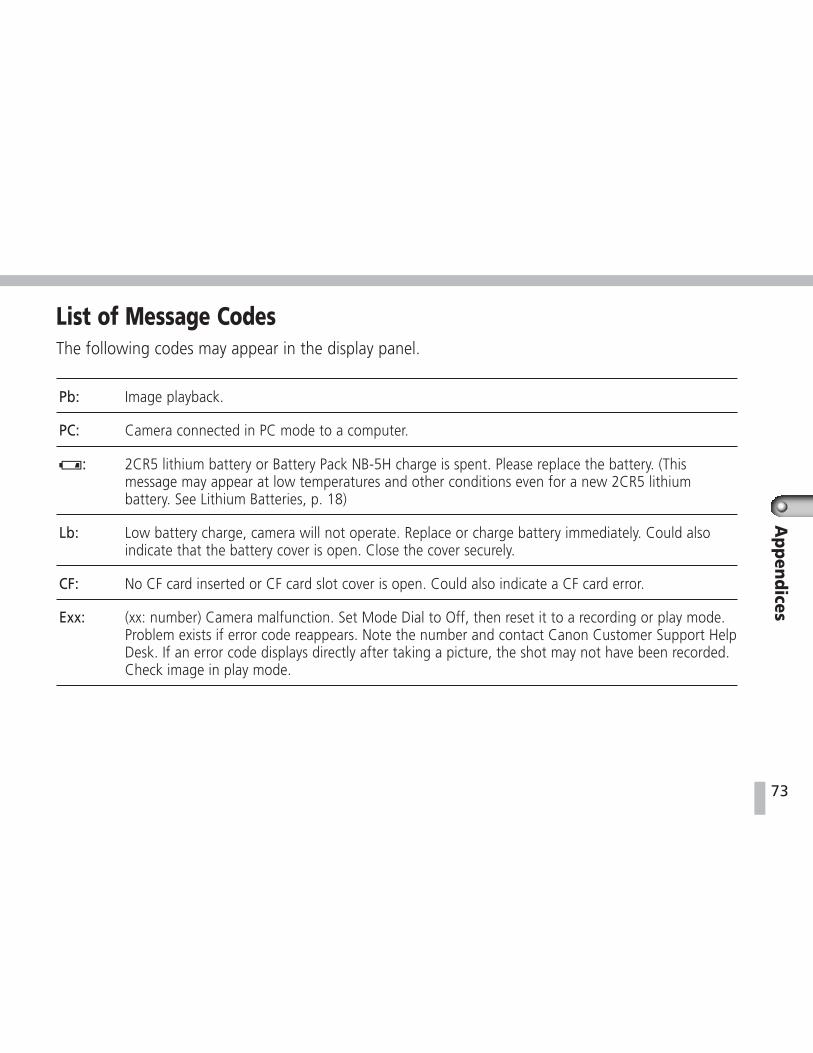
73
Ap
pen
dices
List of Message CodesThe following codes may appear in the display panel.
Pb: Image playback.
PC: Camera connected in PC mode to a computer.
: 2CR5 lithium battery or Battery Pack NB-5H charge is spent. Please replace the battery. (Thismessage may appear at low temperatures and other conditions even for a new 2CR5 lithiumbattery. See Lithium Batteries, p. 18)
Lb: Low battery charge, camera will not operate. Replace or charge battery immediately. Could alsoindicate that the battery cover is open. Close the cover securely.
CF: No CF card inserted or CF card slot cover is open. Could also indicate a CF card error.
Exx: (xx: number) Camera malfunction. Set Mode Dial to Off, then reset it to a recording or play mode.Problem exists if error code reappears. Note the number and contact Canon Customer Support HelpDesk. If an error code displays directly after taking a picture, the shot may not have been recorded.Check image in play mode.
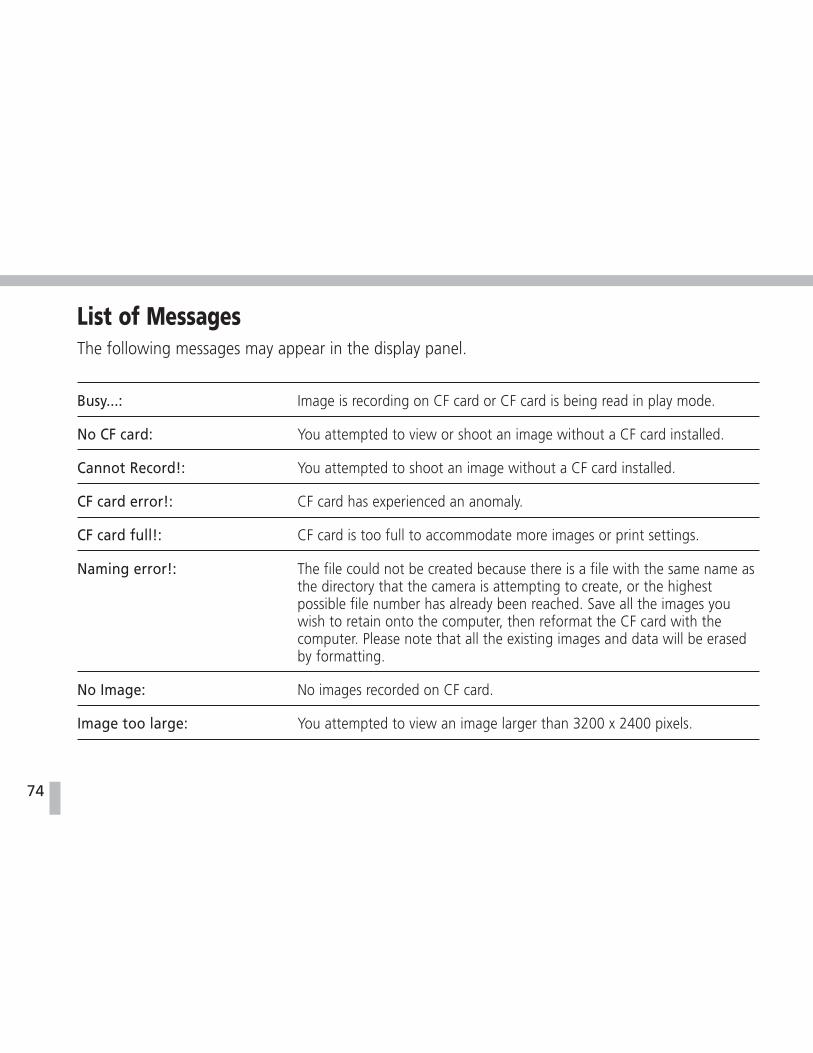
74
List of MessagesThe following messages may appear in the display panel.
Busy...: Image is recording on CF card or CF card is being read in play mode.
No CF card: You attempted to view or shoot an image without a CF card installed.
Cannot Record!: You attempted to shoot an image without a CF card installed.
CF card error!: CF card has experienced an anomaly.
CF card full!: CF card is too full to accommodate more images or print settings.
Naming error!: The file could not be created because there is a file with the same name asthe directory that the camera is attempting to create, or the highestpossible file number has already been reached. Save all the images youwish to retain onto the computer, then reformat the CF card with thecomputer. Please note that all the existing images and data will be erasedby formatting.
No Image: No images recorded on CF card.
Image too large: You attempted to view an image larger than 3200 x 2400 pixels.

75
Ap
pen
dices
Incompatible JPEG format: You attempted to view an incompatible JPEG file.
Corrupted Data: You attempted to view an image with corrupted data
Cannot magnify!: You attempted to magnify an image that was photographed with anothercamera, recorded in a different format, or edited on a computer.
Cannot rotate: You attempted to rotate an image that was photographed with anothercamera, recorded in a different format, or edited on a computer.
Unidentified Image: You attempted to view an image that was recorded in a special format(proprietary format used by the camera of another manufacturer, etc.).
Protected!: You attempted to erase a protected image.
Too many orders.: Too many print settings or slide show image selections. Cannot process anymore .
Cannot complete!: Failed to save print setting or slide show image selection.
Cannot edit!: Cannot change slide show because image selected for slide show has beenedited on another computer.

76
List of FunctionsThe functions available in each recording mode are listed below.
Recording Functions
Image Quality Settings
The shaded areas indicate functions that reset to the default settingwhen the Mode Dial is turned or the camera is powered down.
(1) Default values for Fast Shutter and Black and White modes.(2) Default value for Night Scene mode.(3) Default values for Landscape and Slow Shutter modes.
(4) Macro mode cannot be activated in the Landscape or Night Scene mode.(5) White balance cannot be set in the Black and White mode.
Recording Mode Exposure White Compression ResolutionGain Contrast Sharpness AE Metering
Compensation Balance Method
Auto - - - • - • - - - - - -Manual • • • •* • •* • • • • • •Image • •(5) • •* • •* • • - - - -Stitch Assist ◊ ◊ • •* • ◊* ◊ ◊ - - - -
Recording Mode Digital Flash Recording MethodMacro
Zoom Auto Red-Eye Reduction On Off Single Continuous Self-Timer
Auto • •* - - • •* - • •Manual • •* • • • •* • • •Image • •(1) •(2) • •(3) •* • • •(4)
Stitch Assist - - - ◊ ◊* •* - • •
*: Default Value ◊: Selectable for 1st Frame Only.

77
Ap
pen
dices
Specifications
Lens:
Digital Teleconverter:
Focusing Range:
Image Sensor: Approx. 2.11 million-pixel (total),1/2-inch charge coupled device
(effective pixels: approx. 2.02 million)
6.3 - 12.6 mm(35 mm film equivalent: 35 to 70 mm) /
F2.8 (wide angle) - F4.0 (telephoto)
Standard : 18 in. (46 cm) to infinity ;Macro : 4.7 - 18 in. (12 - 46 cm)
Standard : 26 in. (66 cm) to infinity ;Macro : 4.7 - 26 in. (12 - 66 cm)
x2 / x4
Viewfinder: Real-image optical view finder / 1.8-inch low-temperature polycrystalline silicon TFT LCD
Focusing Method: Through the lens autofocus (TTL AF)
Metering Method: Center weighted metering / Spot metering
Auto Exposure Method: Program (AE lock available)
White Balance Control: Through the lens (TTL) auto/manual
Shutter: Mechanical + electronic
Shutter Speed: 2 to 1/1,000 sec. (2-sec. for Slow Shutter or Night Scene mode)
Flash: Built-in (Auto, On, Off, Red-Eye Reduction)
Flash Range: 6.7 in. - 10.8 ft. (17 cm - 3.3 m) (wide angle), 6.7 in. - 7.5 ft. (17 cm - 2.3 m) (telephoto)
6.5 - 13.0 mm(35 mm film equivalent: 32 to 64 mm) /
F2.9 (wide angle) - F4.0 (telephoto)
Approx. 3.34 million-pixel (total),1/1.8-inch charge coupled device
(effective pixels: approx. 3.24 million)
PowerShot S20PowerShot S10

78
Recording Media: CompactFlash™ card (Type I or Type II)
Image Format: Design rule for Camera File System (Images / Thumbnails : JPEG)
Compression: NORMAL / FINE / SUPER FINE
Sensitivity: Equivalent to ISO 100 / 200 / 400 (ISO 200 / 400 for gain up setting)
Operating Temperatures: 32° - 104° F (0° - 40° C)
Operating Humidity: 10 - 90%
Dimensions: 4.1 x 2.7 x 1.3 inches (105.4 x 69.4 x 33.8 mm) excluding protrusion
Weight: Approx. 9.5 oz. (270 g) excluding battery and CF card
Camera Modes: AUTO / MANUAL / IMAGE / STITCH ASSIST / PLAY / PC
Interface: USB / RS-232C / CF Slot (Type I, II) / Video Out
Power Supply: 2CR5 lithium batteryNickel-hydride Battery Pack NB-5H
Compact Power Adapter CA-PS100 / 100E (with DC Coupler DR-100A)CR2016 lithium battery for date/clock backup
Resolution: 1,600 x 1,200 pixels (Large)1,280 x 960 pixels (Middle)
800 x 600 pixels (Small)
PowerShot S20PowerShot S10
2,048 x 1,536 pixels (Large)1,024 x 768 pixels (Middle)
640 x 480 pixels (Small)
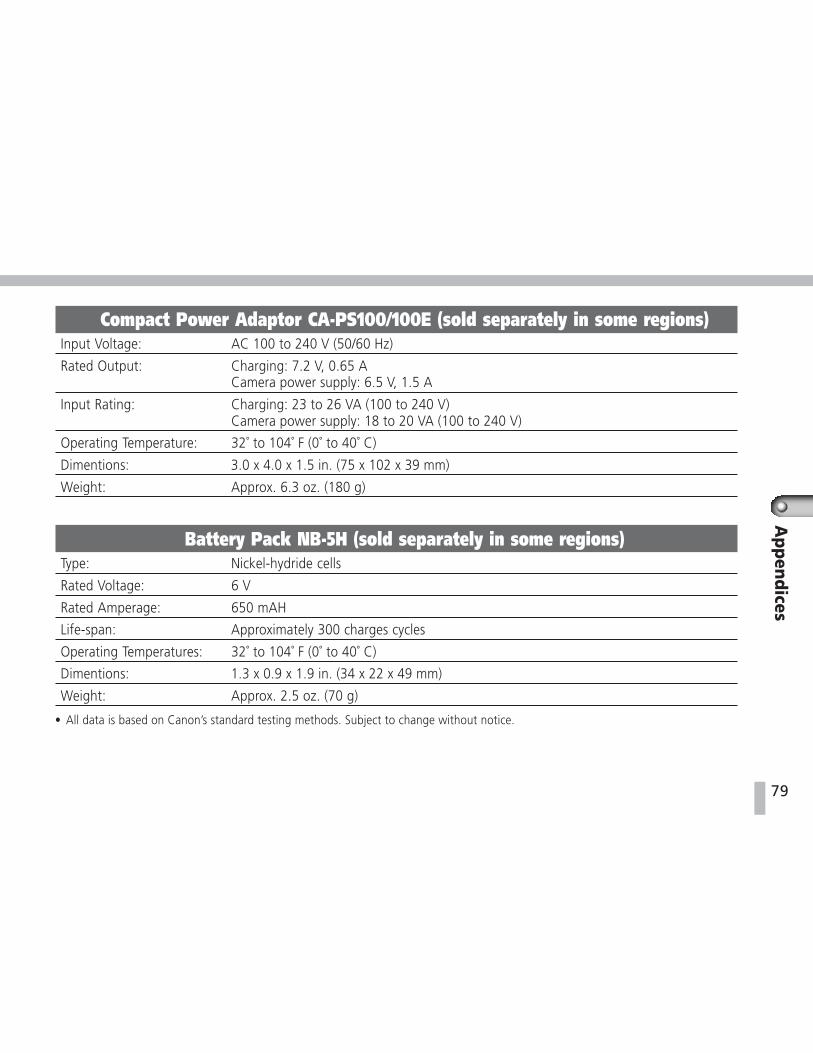
79
Ap
pen
dices
Compact Power Adaptor CA-PS100/100E (sold separately in some regions)Input Voltage: AC 100 to 240 V (50/60 Hz)
Rated Output: Charging: 7.2 V, 0.65 ACamera power supply: 6.5 V, 1.5 A
Input Rating: Charging: 23 to 26 VA (100 to 240 V)Camera power supply: 18 to 20 VA (100 to 240 V)
Operating Temperature: 32˚ to 104˚ F (0˚ to 40˚ C)
Dimentions: 3.0 x 4.0 x 1.5 in. (75 x 102 x 39 mm)
Weight: Approx. 6.3 oz. (180 g)
Battery Pack NB-5H (sold separately in some regions)Type: Nickel-hydride cells
Rated Voltage: 6 V
Rated Amperage: 650 mAH
Life-span: Approximately 300 charges cycles
Operating Temperatures: 32˚ to 104˚ F (0˚ to 40˚ C)
Dimentions: 1.3 x 0.9 x 1.9 in. (34 x 22 x 49 mm)
Weight: Approx. 2.5 oz. (70 g)
• All data is based on Canon’s standard testing methods. Subject to change without notice.
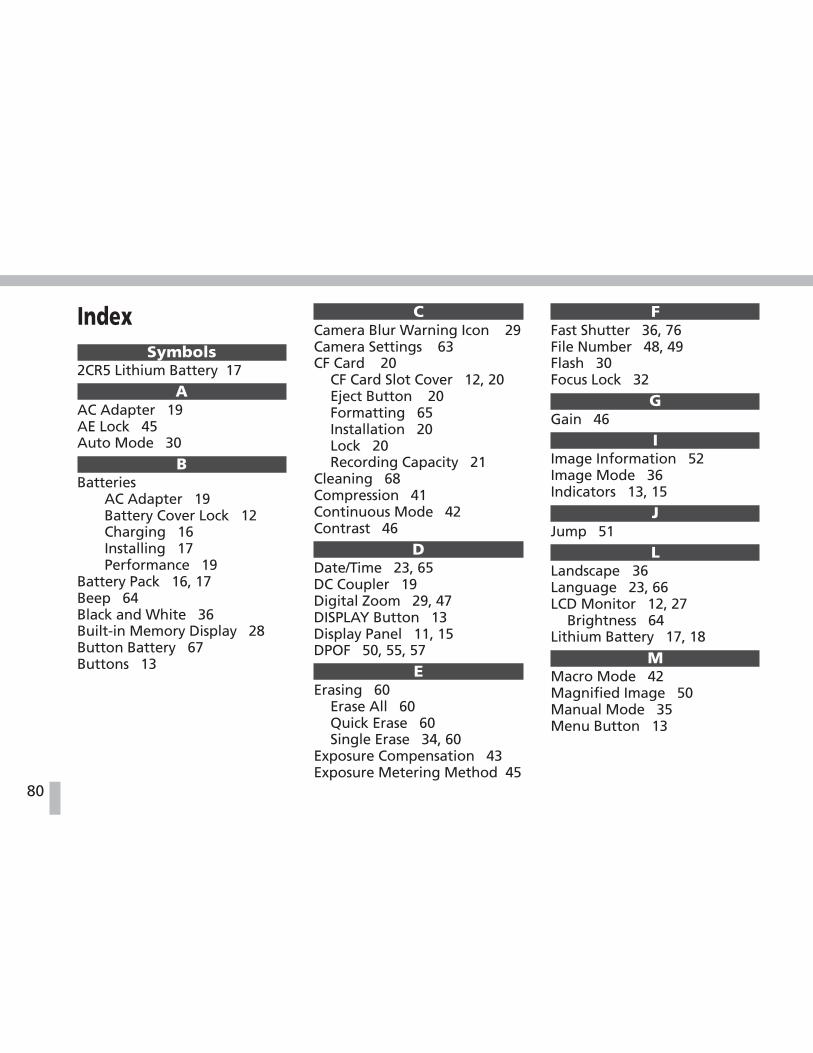
80
IndexSymbols
2CR5 Lithium Battery 17A
AC Adapter 19AE Lock 45Auto Mode 30
BBatteries
AC Adapter 19Battery Cover Lock 12Charging 16Installing 17Performance 19
Battery Pack 16, 17Beep 64Black and White 36Built-in Memory Display 28Button Battery 67Buttons 13
CCamera Blur Warning Icon 29Camera Settings 63CF Card 20
CF Card Slot Cover 12, 20Eject Button 20Formatting 65Installation 20Lock 20Recording Capacity 21
Cleaning 68Compression 41Continuous Mode 42Contrast 46
DDate/Time 23, 65DC Coupler 19Digital Zoom 29, 47DISPLAY Button 13Display Panel 11, 15DPOF 50, 55, 57
EErasing 60
Erase All 60Quick Erase 60Single Erase 34, 60
Exposure Compensation 43Exposure Metering Method 45
FFast Shutter 36, 76File Number 48, 49Flash 30Focus Lock 32
GGain 46
IImage Information 52Image Mode 36Indicators 13, 15
JJump 51
LLandscape 36Language 23, 66LCD Monitor 12, 27
Brightness 64Lithium Battery 17, 18
MMacro Mode 42Magnified Image 50Manual Mode 35Menu Button 13
81
Ap
pen
dices
MenusPlay 63Recording 63Setup 63
Mode Dial 13, 14Modes
Auto 30Image 36Macro 42Manual 35Stitch Assist 37
Multi Image Replay 33, 51N
Night Scene 36O
Omni Selector 13Operation Panel 13Optical Viewfinder 12, 27
PPlay Menu 63Play Mode 50Power On/Off 26Power Save 26
Print Settings 55Selecting Images 55Date/Time 57File Number 58Number of Prints 56Print Type 57Reset 59
Protecting Images 61Q
Quick Erase 60
RRecording
Review 48Video Out 25
Red-Eye Reduction Mode 30Replay
Single 33Multi 33
Resolution 41Review 48Rotate 50
SSafety Instructions 5Self-Timer 31Setup Menu 63Sharpness 46
Shutter Button 13, 28Halfway 28Full 28
Single Image Replay 33Slide Show 52
Auto Replay 55Replay Duration 54Starting 52Selecting Images 53
Slow Shutter 36, 76Stitch Assist Mode 37
TTelephoto 29
VVideo Cable 25VIDEO OUT Terminal 25Viewfinder 27
WWhite Balance 44Wide Angle 29Wrist Strap 24
ZZoom 29
Indicator 29
82
Canon Customer SupportCanon Inc.30-2 Shimomaruko 3-chome, Ohta-ku, Tokyo146-8501, Japan
NORTH AMERICACanon U.S.A., Inc.Canon Customer Care CenterPhone (US): 1-800-828-4040(Available Mon. - Fri., 9 AM to 8 PM Eastern Time)
Canon Canada Inc.Phone (Canada): 1-800-OK-CANON (1-800-652-2666)(24 hours/day, 7 days/week)
EUROPEEurope, Africa & Middle East
Canon Europa N.V.PO Box 2262, 1180 EG Amstelveen, The Netherlands
Canon (UK) Ltd.HelpdeskTel No.: 08705 143 723 (Calls may be recorded.)Fax No.: 08705 143 340 BBS No.: 08705 143 350
Canon France S.A.Hotline : 01.41.99.70.70Tél : 01.41.99.77.77 Télécopie : 01.41.99.79.51
Canon Photo Vidéo France S.A.Hotline : 01.49.04.01.00 Télécopie : 01.49.04.01.01
Canon Deutschland GmbHCanon-Hotline-ServiceCustomer-Support: (02151) 349-555Telefax: (02151) 349-588Info-Desk Tel: (02151) 349-566Info-Desk Fax : (02151) 349-599Mailbox : (02151) 349-577

83
Ap
pen
dices
Canon Euro-Photo GmbHCustomer-Support: (02154) 495-610Info-Desk: (02154) 495-444Fax: (02154) 495-333
Canon Italia S.p.A.Pronto Canon : 02 8249 2000 BBS : 02 8249 2099
Canon Belgium N.V. / S.A.Helpdesk: 0900-10627Tel.: (02) 722.04.11 Fax: (02) 721.32.74
Canon Luxembourg S.A.Tel.: (352) 48 47 961 Fax: (352) 48 47 96232
Canon Nederland N.V.Helpdesk: 023 - 5 681 681Tel.: 023 - 5 670 123 Fax: 023 - 5 670 124
Canon Danmark A/SHotline: 44 88 26 66
Canon España S.A.Help Desk: 906 301 255Tel: (91) 538 45 00 Fax: (91) 411 41 76E-mail: [email protected]
Canon Norge asTlf. 22 62 93 21 Faks: 22 62 06 15E-mail: [email protected]
Finland
Canon OYPuhelin: 010 54420 Fax: 010 544 4571Help Desk: 0600 0 22606 (14,80 mk/min+pvm)Help Desk: 0600 0 22666 (enint. 40mk/puhelu+pvm)Sähköposti: [email protected]
Canon (Schweiz) AGTel. 01-835-6161, Fax 01-835-6860Hotline 0900 57 55 20
Canon Svenska ABStensätravägen 13, S-127 88, Skärholmen, Sweden
Austria
Canon GmbHZetschegasse 11, 1232 Wien, AustriaTel: 01 680 88-0Fax: 01 680 88-222

84
OCEANIACanon Australia Pty. Ltd.Info-Line: (02) 9805 2864
Canon New Zealand Ltd.Info-Line: 0900-522666
ASIACanon Singapore Pte. Ltd.79 Anson Road, #09-01 / 06, Singapore 079906Phone: (65) 532 4400 Fax: (65) 221 7577
Canon Hongkong Co., Ltd.9/F, The Hong Kong Club Building, 3A Chater Road,Central, Hong KongPhone: 852-2739-0802 Fax: 852-2369-7701
Canon Marketing ServicesNo.1 Jalan Kilang Timor, #09-00, Pacific Tech Centre,Singapore 159303Phone: (65) 799 8888 Fax: (65) 273 3317
Canon Marketing (Malaysia) Sdn. Bhd.Wisma General Lumber, Block D, Peremba Square,Saujana Resort, Section U2, 40150,Shah Alam, Selangor Darul Ehsan, MalaysiaPhone: (60) 3 744 6000, (60) 3 745 0055Fax: (60) 3 745 0505
Canon Marketing (Thailand) Co., Ltd.10th Floor, Bangkok City Tower,179/34-45 South Sathorn Road,Bangkok 10120, ThailandPhone: (662) 344 9999 Fax: (662) 344 9910
Canon Marketing (Hongkong) Co., Ltd.10/F, Mirror Tower, 61 Mody Road, Tsimshatsui EastKowloon HongKongPhone: 852-2170-2828 Fax: 852-2723-9684

H-IE-031-V1 0100CH4.2 © 2000 CANON INC. PRINTED IN JAPAN