Embed Size (px)
Citation preview

Canvas User Guide (Students)
Canvas User Guide (Students)
Introduction1
How do I log in to Canvas? 51.1
How do I reset my password? 61.2
How do I get help and submit feedback? 91.3
How are Students added to a course? 111.4
Editing my Profile2
How do I change my Notification Preferences in Canvas? 152.1
Discussions and Announcements with Instructors and Peers3
How do I reply to a Discussion or an Announcement? 193.1
How do I create a new Discussion? 203.2
Conversations with Instructors and Peers4
How do I adjust my Notification Preferences for Conversations? 234.1
How do I access the Conversations Inbox? 254.2
How is my Conversations Inbox organized? 264.3
How do I find my unread messages? 274.4
How many messages are in this Conversation? 284.5
What do comments from the SpeedGrader™ look like inside Conversations? 294.6
How can I tell which course this Conversation belongs to? 304.7
How do I privately respond to an individual in a larger Conversation? 314.8
How do I forward a message from this Conversation? 324.9
How do I delete a message from this Conversation? 344.10
How do I unsubscribe myself from a Conversation? 364.11
How do I archive a Conversation? 374.12
How do I use color labels in Conversations? 394.13
How do I compose a message? 414.14
How do I send a private message to my instructor? 434.15
How do I send a private message to an individual? 454.16
How do I send a message to multiple individuals? 474.17
How do I send a message to a group? 494.18
How do I send a message to my class? 514.19
How do I delete a name from the To: field? 534.20
Where is my original message in this Conversation? 544.21
How do I attach a file to a message? 554.22
How do I attach a media comment to my message? 574.23
Submitting Online Assignments5
How do I submit an online assignment? 615.1
Giving and Receiving Feedback6
Where are my grades? 646.1
Taking Quizzes7
How do I take a quiz? 677.1
Collaborating in Groups8
How do I create a student group? 718.1
Managing Assignments and Events in the Calendar9
How do I add a personal event to the Calendar? 749.1
Uploading, Viewing and Sharing Files10
How does file storage work? 7810.1
Creating ePortfolios11
What is an ePortfolio? 8011.1
Canvas User Guide (Students) - 4
Introduction
Canvas User Guide (Students) - 5
How do I log in to Canvas?
Directions for logging into Canvas for the first time will depend on how your institution has set the
system up. Check with your institution to verify your login info.
Log into Canvas
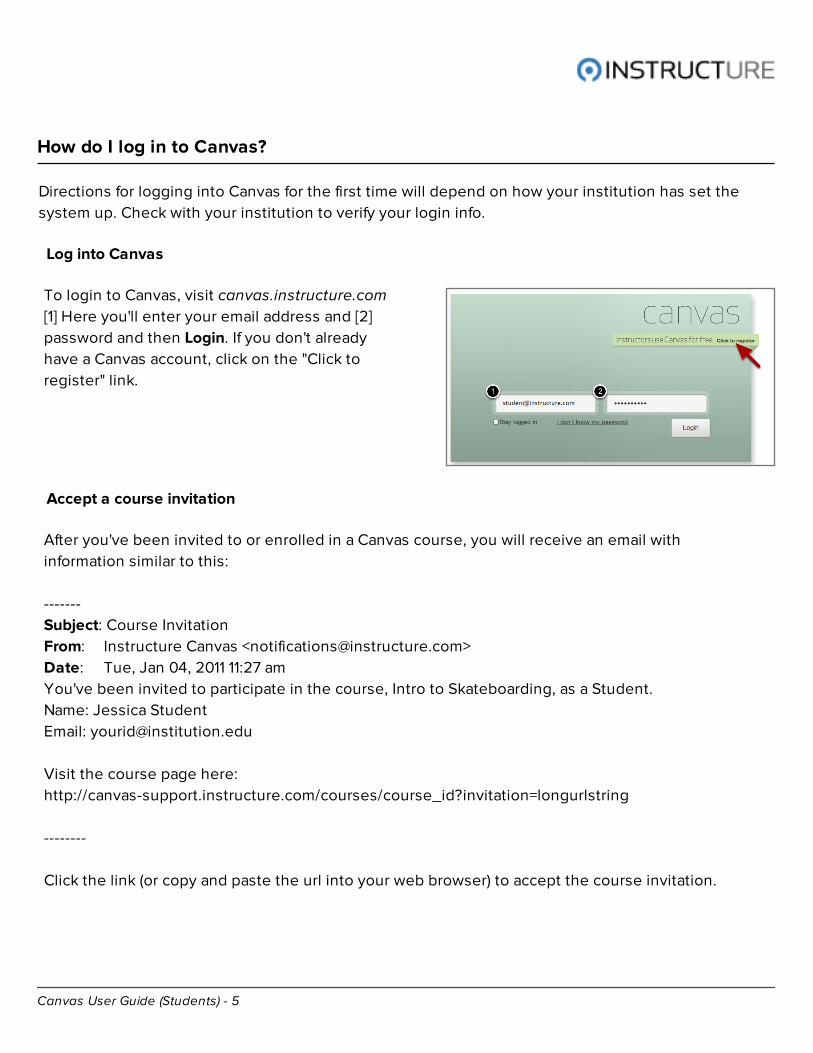
To login to Canvas, visit canvas.instructure.com
[1] Here you'll enter your email address and [2]
password and then Login. If you don't already
have a Canvas account, click on the "Click to
register" link.
Accept a course invitation
After you've been invited to or enrolled in a Canvas course, you will receive an email with
information similar to this:
-------
Subject: Course Invitation
From: Instructure Canvas <[email protected]>
Date: Tue, Jan 04, 2011 11:27 am
You've been invited to participate in the course, Intro to Skateboarding, as a Student.
Name: Jessica Student
Email: [email protected]
Visit the course page here:
http://canvas-support.instructure.com/courses/course_id?invitation=longurlstring
--------
Click the link (or copy and paste the url into your web browser) to accept the course invitation.
Canvas User Guide (Students) - 6
How do I reset my password?
Some days and weeks may have passed since you first accepted your invitation to join a course
and you may have forgotten your password. This lesson will walk you through how to reset your
Canvas password.
Canvas Login Screen
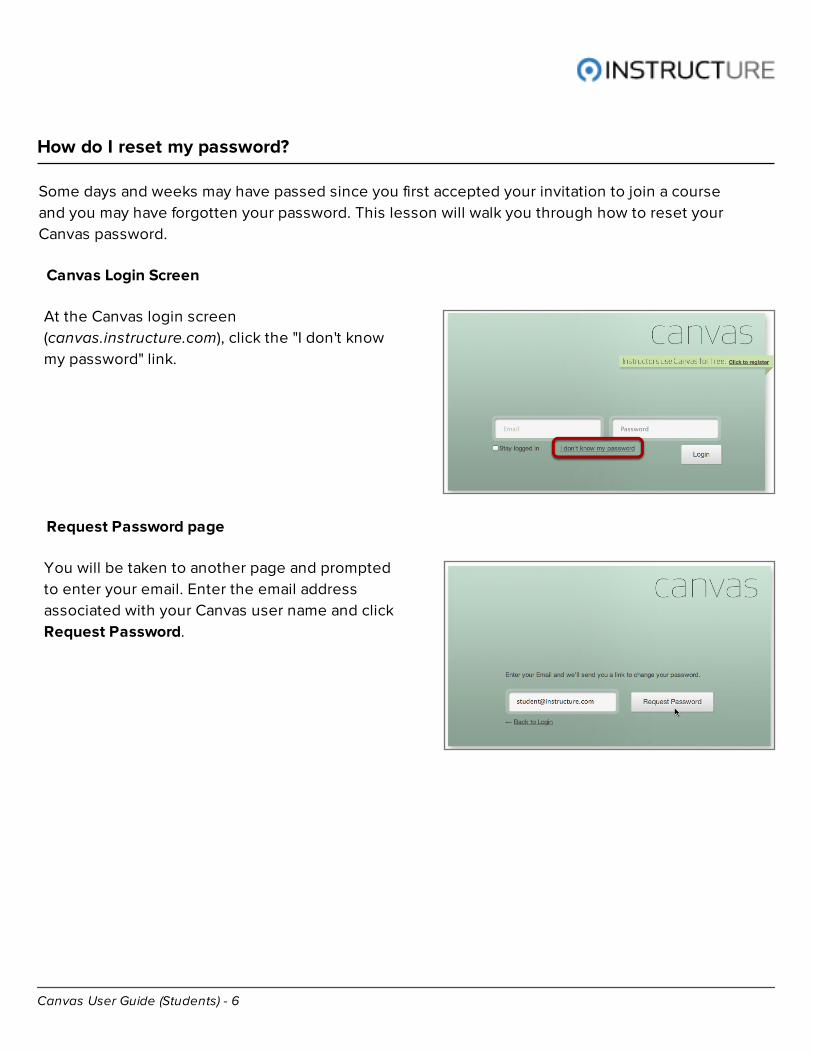
At the Canvas login screen
(canvas.instructure.com), click the "I don't know
my password" link.
Request Password page
You will be taken to another page and prompted
to enter your email. Enter the email address
associated with your Canvas user name and click
Request Password.
Canvas User Guide (Students) - 7
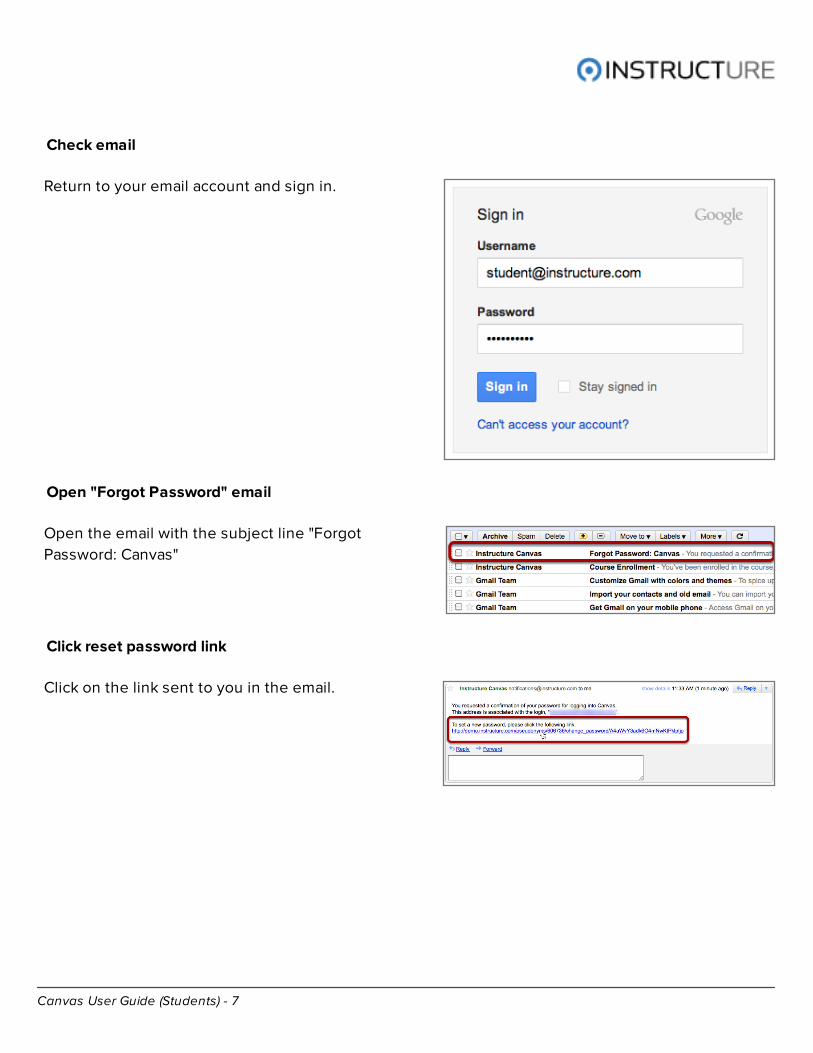
Check email
Return to your email account and sign in.
Open "Forgot Password" email
Open the email with the subject line "Forgot
Password: Canvas"
Click reset password link
Click on the link sent to you in the email.
Canvas User Guide (Students) - 8
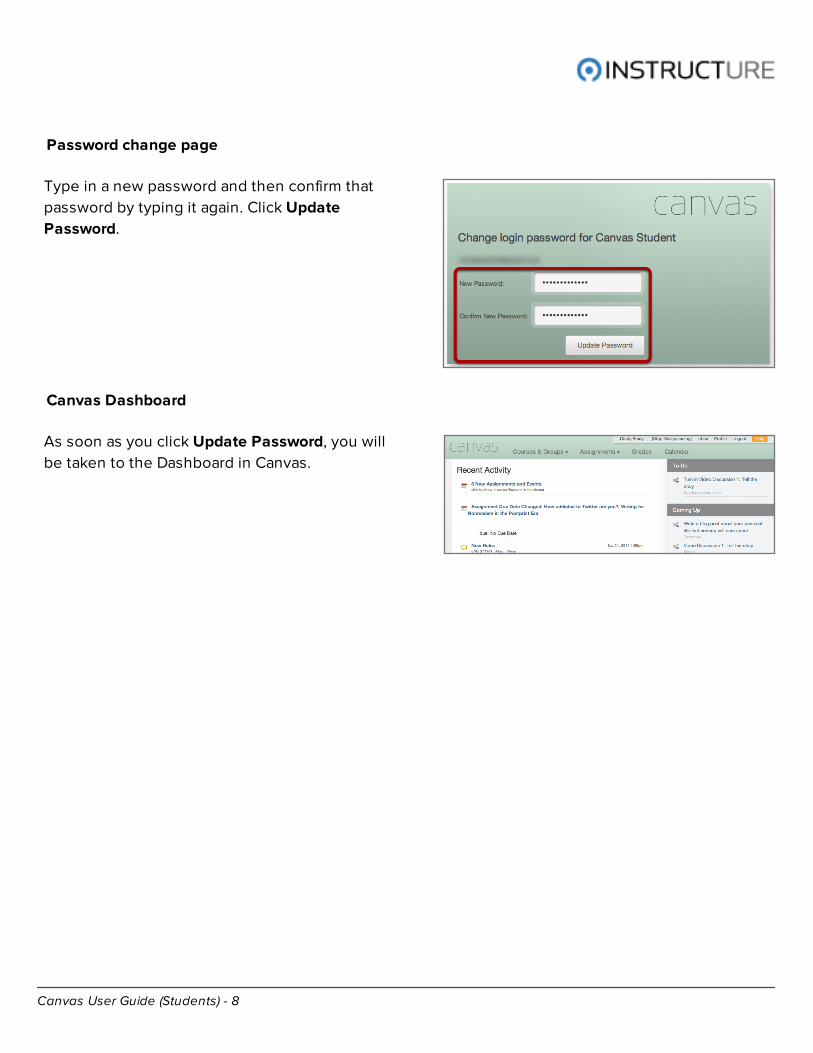
Password change page
Type in a new password and then confirm that
password by typing it again. Click Update
Password.
Canvas Dashboard
As soon as you click Update Password, you will
be taken to the Dashboard in Canvas.
Canvas User Guide (Students) - 9
How do I get help and submit feedback?
Here you will learn how to search Canvas Documentation, request a new feature, and submit
feedback to Canvas Support.
Submitting Feedback and Getting Help
Your feedback is important to us. If you have an
idea or a question, click Help from anywhere in
Canvas to contact your instructor or Canvas
Support.
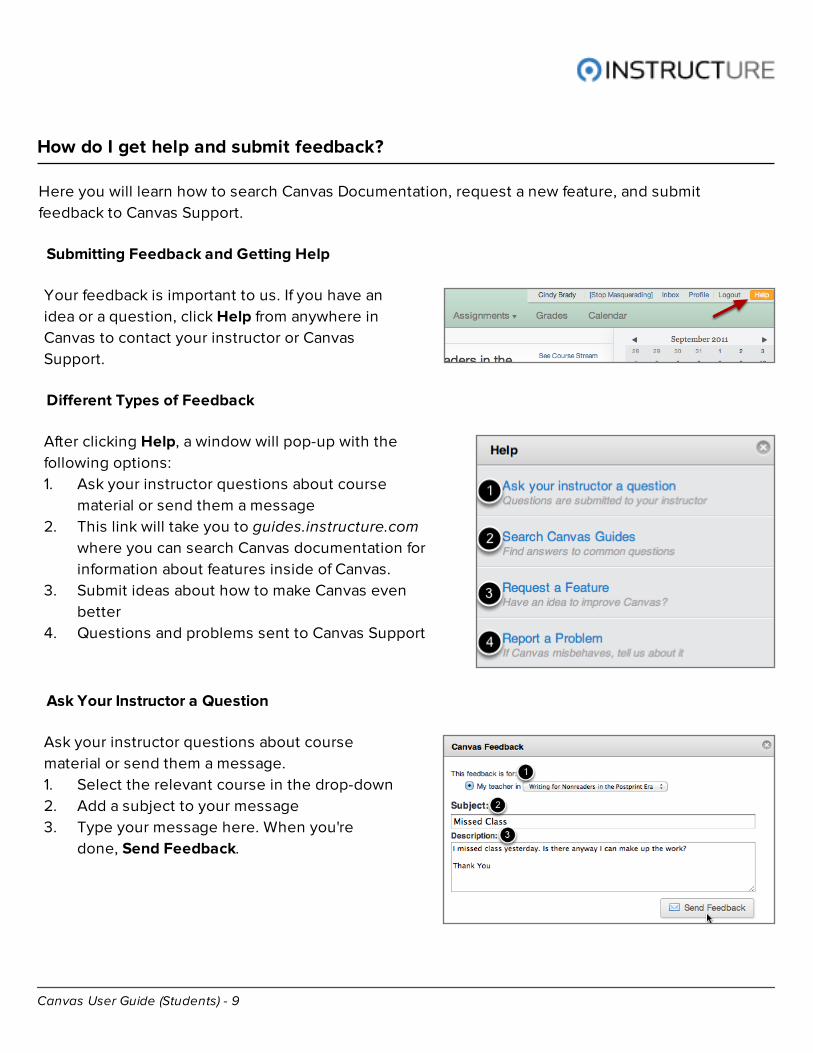
Different Types of Feedback
After clicking Help, a window will pop-up with the
following options:
1. Ask your instructor questions about course
material or send them a message
2. This link will take you to guides.instructure.com
where you can search Canvas documentation for
information about features inside of Canvas.
3. Submit ideas about how to make Canvas even
better
4. Questions and problems sent to Canvas Support
Ask Your Instructor a Question
Ask your instructor questions about course
material or send them a message.
1. Select the relevant course in the drop-down
2. Add a subject to your message
3. Type your message here. When you're
done, Send Feedback.
Canvas User Guide (Students) - 10
Search Canvas Guides
This link will take you to guides.instructure.com where you can search Canvas documentation
for information about features inside of Canvas. Just like this lesson you're reading right now.
Request a Feature
Submit ideas about how to make Canvas even better by clicking on this link or by visiting
help.instructure.com/forums/337215-feature-requests
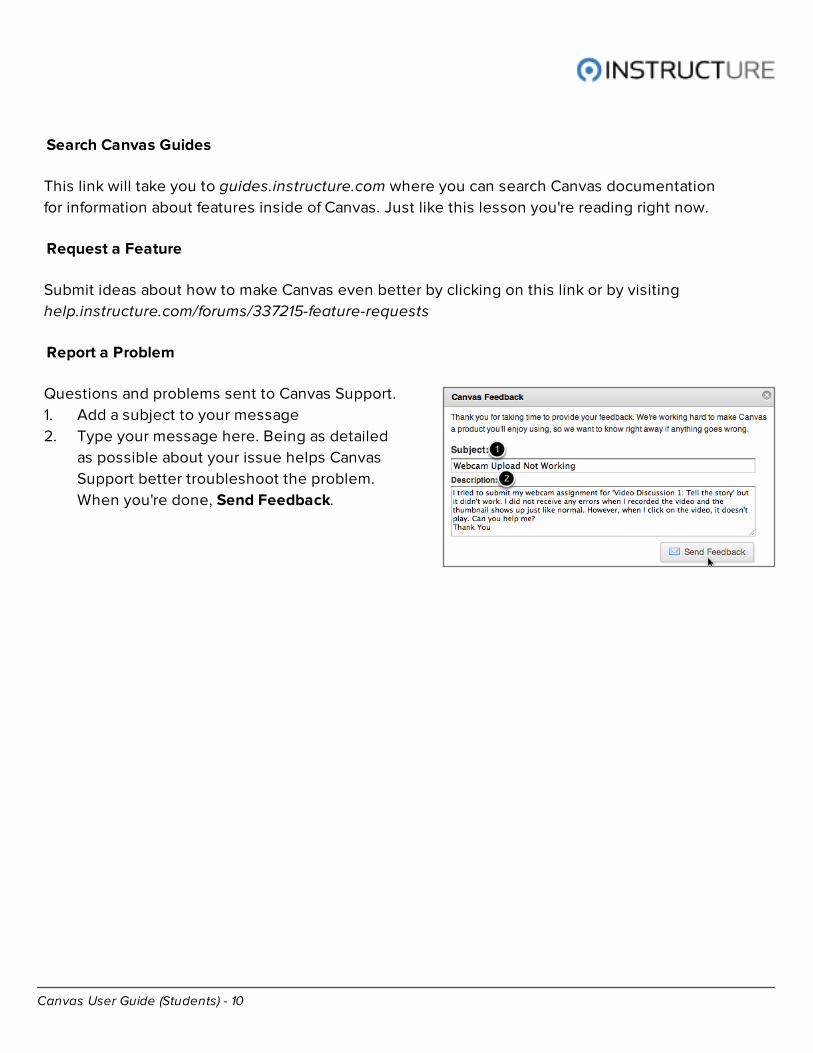
Report a Problem
Questions and problems sent to Canvas Support.
1. Add a subject to your message
2. Type your message here. Being as detailed
as possible about your issue helps Canvas
Support better troubleshoot the problem.
When you're done, Send Feedback.
Canvas User Guide (Students) - 11
How are Students added to a course?
This lesson will describe what an Instructor must do to add an Student to a course. It will also
summarize what the Student needs to do to accept the invitation. This article applies to courses
and enrollments that are created manually. At most institutions, course shells and student
enrollments will be created automatically.
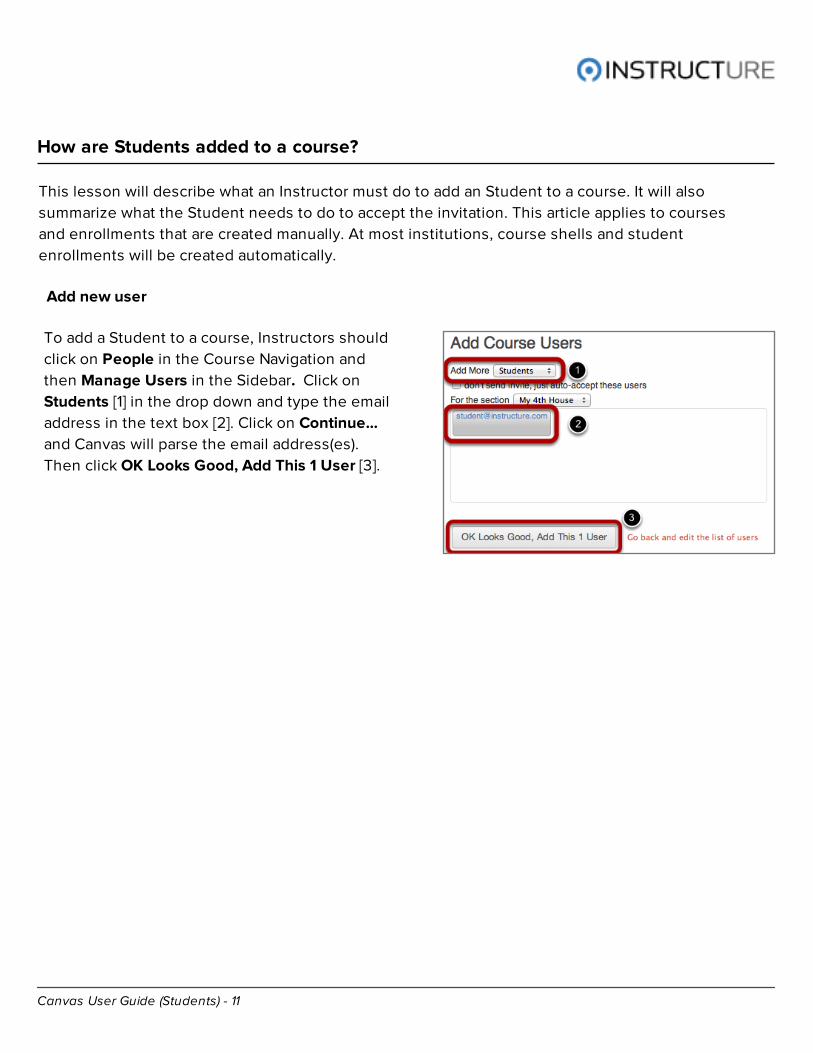
Add new user
To add a Student to a course, Instructors should
click on People in the Course Navigation and
then Manage Users in the Sidebar. Click on
Students [1] in the drop down and type the email
address in the text box [2]. Click on Continue...
and Canvas will parse the email address(es).
Then click OK Looks Good, Add This 1 User [3].
Canvas User Guide (Students) - 12
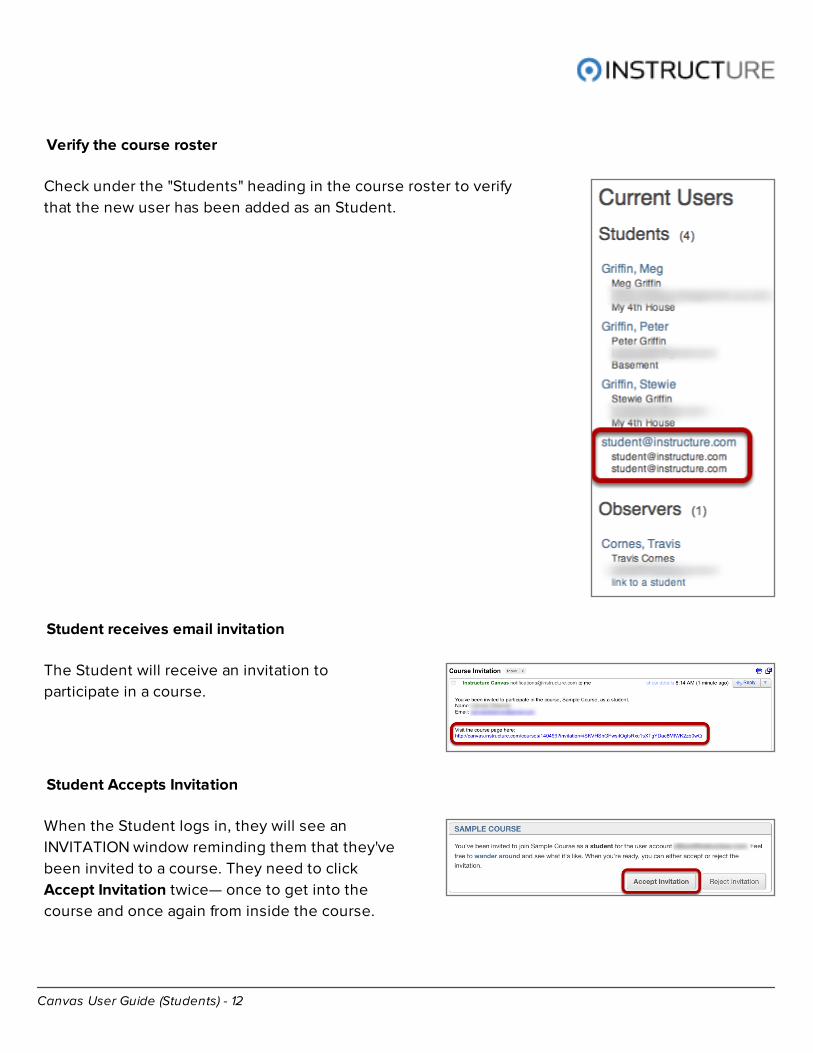
Verify the course roster
Check under the "Students" heading in the course roster to verify
that the new user has been added as an Student.
Student receives email invitation
The Student will receive an invitation to
participate in a course.
Student Accepts Invitation
When the Student logs in, they will see an
INVITATION window reminding them that they've
been invited to a course. They need to click
Accept Invitation twice— once to get into the
course and once again from inside the course.
Canvas User Guide (Students) - 13
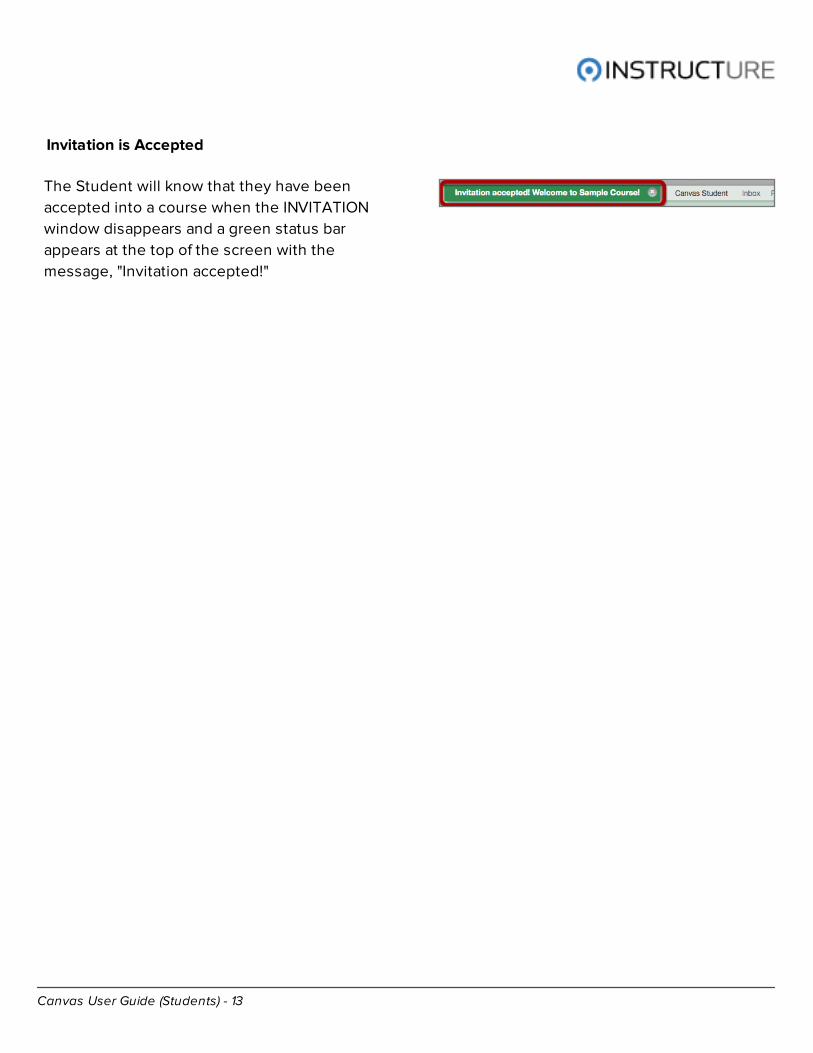
Invitation is Accepted
The Student will know that they have been
accepted into a course when the INVITATION
window disappears and a green status bar
appears at the top of the screen with the
message, "Invitation accepted!"
Canvas User Guide (Students) - 14
Editing my Profile
Canvas User Guide (Students) - 15
How do I change my Notification Preferences in Canvas?
Canvas gives users the ability to receive a variety of different notifications via email, text message,
or other Registered Services. Users can also set different levels of frequency for each type of
notification Canvas offers.
Students may wish to receive grade change Notifications via SMS text messaging. Instructors, on
the other hand, may prefer to receive a daily digest of class activity via email only. Notification
Preferences can be adjusted at any point during a course.
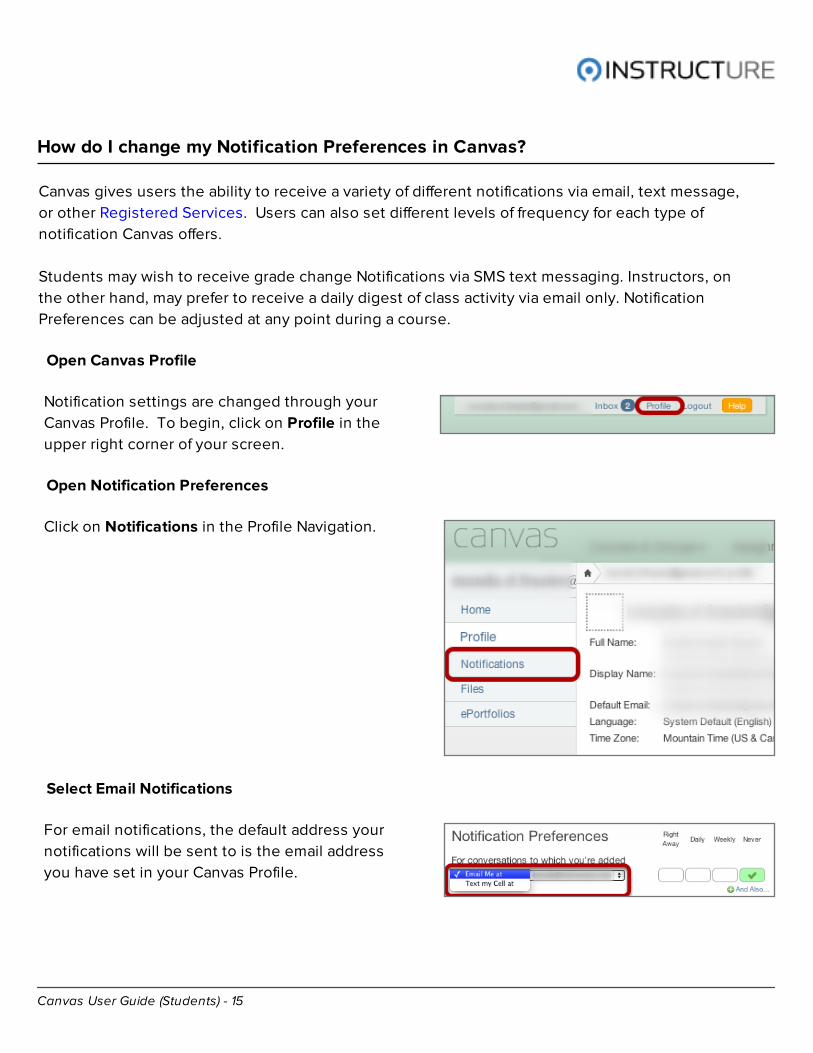
Open Canvas Profile
Notification settings are changed through your
Canvas Profile. To begin, click on Profile in the
upper right corner of your screen.
Open Notification Preferences
Click on Notifications in the Profile Navigation.
Select Email Notifications
For email notifications, the default address your
notifications will be sent to is the email address
you have set in your Canvas Profile.
Canvas User Guide (Students) - 16
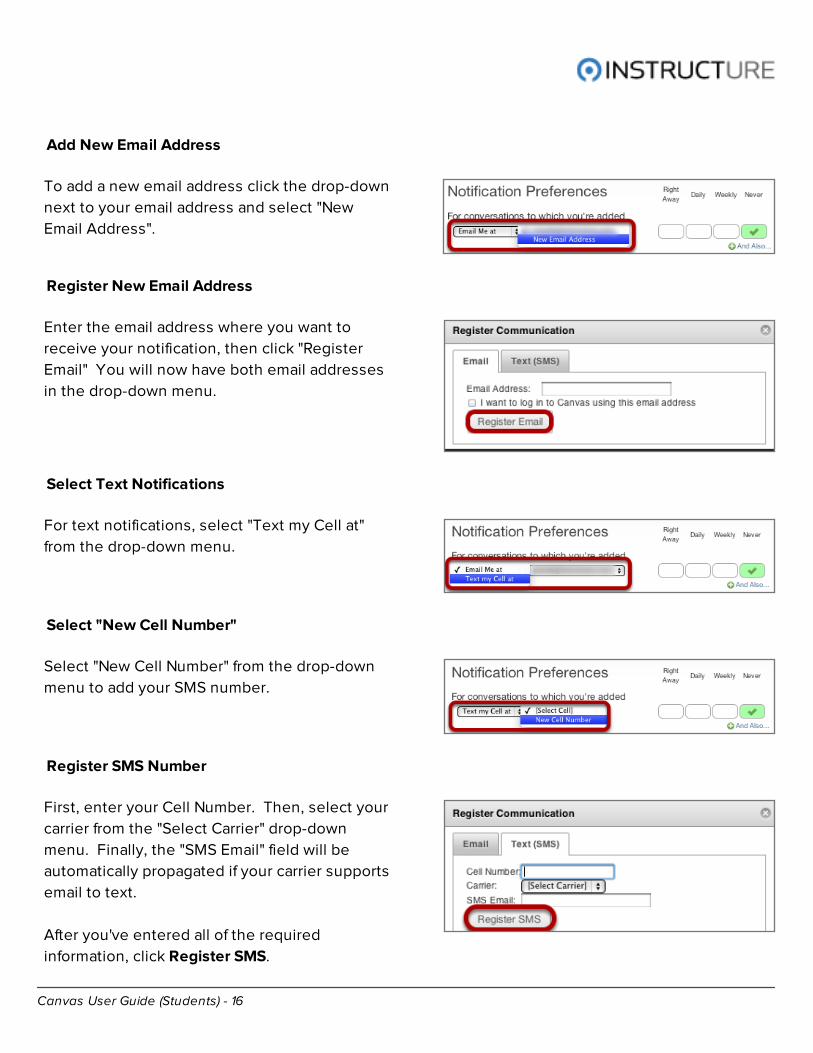
Add New Email Address
To add a new email address click the drop-down
next to your email address and select "New
Email Address".
Register New Email Address
Enter the email address where you want to
receive your notification, then click "Register
Email" You will now have both email addresses
in the drop-down menu.
Select Text Notifications
For text notifications, select "Text my Cell at"
from the drop-down menu.
Select "New Cell Number"
Select "New Cell Number" from the drop-down
menu to add your SMS number.
Register SMS Number
First, enter your Cell Number. Then, select your
carrier from the "Select Carrier" drop-down
menu. Finally, the "SMS Email" field will be
automatically propagated if your carrier supports
email to text.
After you've entered all of the required
information, click Register SMS.
Canvas User Guide (Students) - 17
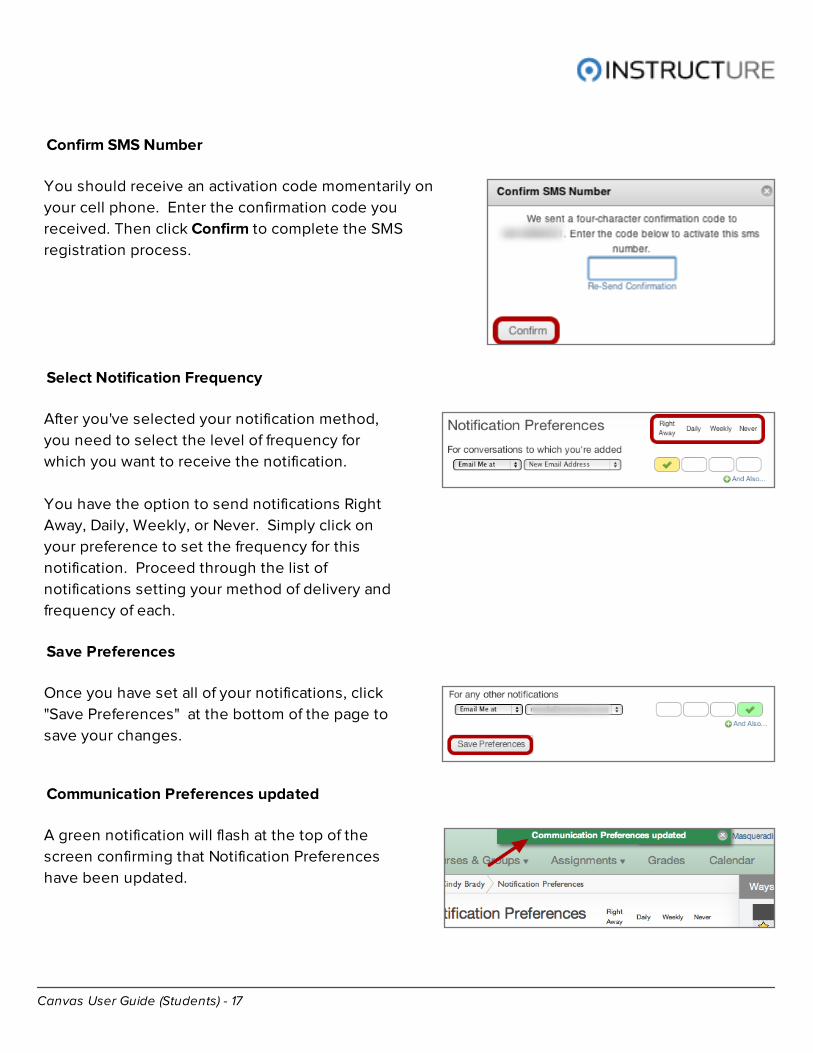
Confirm SMS Number
You should receive an activation code momentarily on
your cell phone. Enter the confirmation code you
received. Then click Confirm to complete the SMS
registration process.
Select Notification Frequency
After you've selected your notification method,
you need to select the level of frequency for
which you want to receive the notification.
You have the option to send notifications Right
Away, Daily, Weekly, or Never. Simply click on
your preference to set the frequency for this
notification. Proceed through the list of
notifications setting your method of delivery and
frequency of each.
Save Preferences
Once you have set all of your notifications, click
"Save Preferences" at the bottom of the page to
save your changes.
Communication Preferences updated
A green notification will flash at the top of the
screen confirming that Notification Preferences
have been updated.
Canvas User Guide (Students) - 18
Discussions and Announcements with
Instructors and Peers
Canvas User Guide (Students) - 19
How do I reply to a Discussion or an Announcement?
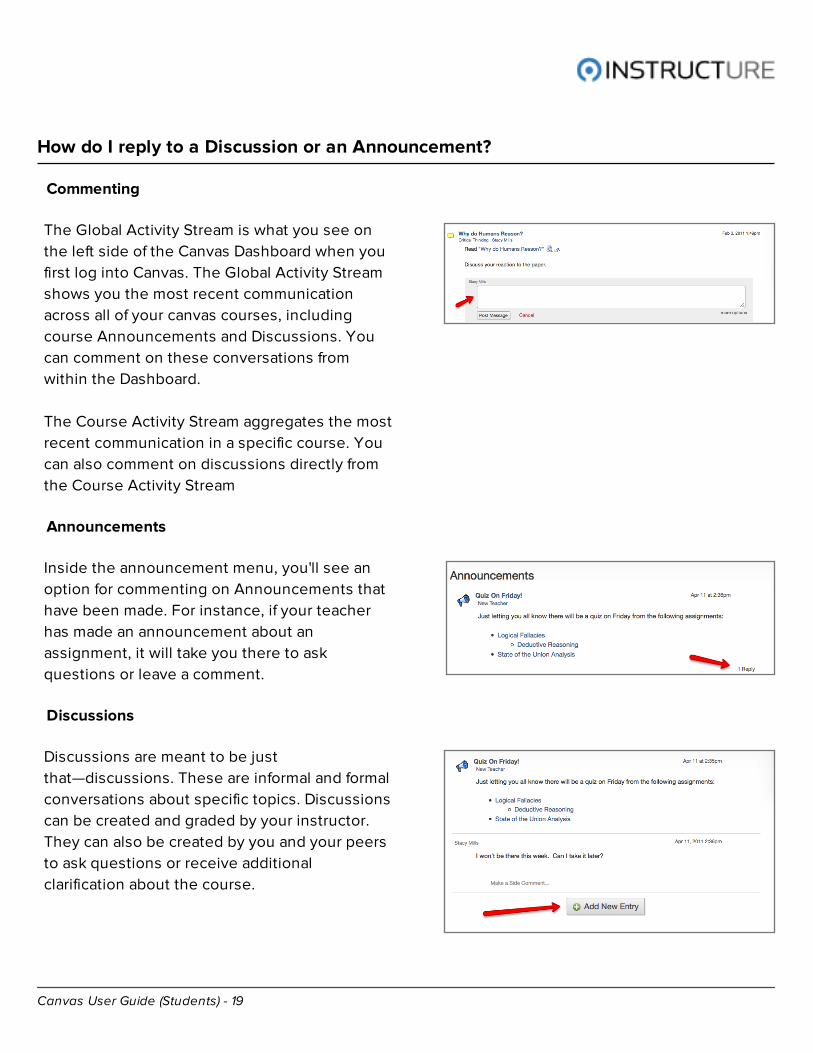
Commenting
The Global Activity Stream is what you see on
the left side of the Canvas Dashboard when you
first log into Canvas. The Global Activity Stream
shows you the most recent communication
across all of your canvas courses, including
course Announcements and Discussions. You
can comment on these conversations from
within the Dashboard.
The Course Activity Stream aggregates the most
recent communication in a specific course. You
can also comment on discussions directly from
the Course Activity Stream
Announcements
Inside the announcement menu, you'll see an
option for commenting on Announcements that
have been made. For instance, if your teacher
has made an announcement about an
assignment, it will take you there to ask
questions or leave a comment.
Discussions
Discussions are meant to be just
that—discussions. These are informal and formal
conversations about specific topics. Discussions
can be created and graded by your instructor.
They can also be created by you and your peers
to ask questions or receive additional
clarification about the course.
Canvas User Guide (Students) - 20
How do I create a new Discussion?
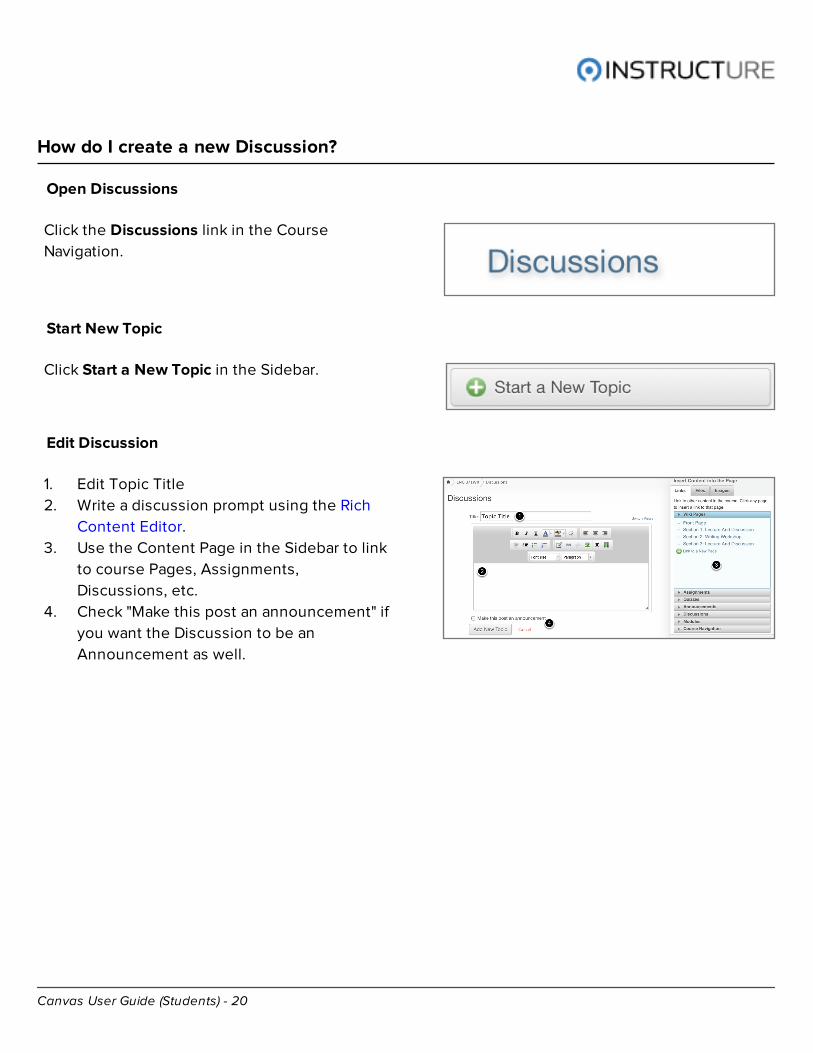
Open Discussions
Click the Discussions link in the Course
Navigation.
Start New Topic
Click Start a New Topic in the Sidebar.
Edit Discussion
1. Edit Topic Title
2. Write a discussion prompt using the Rich
Content Editor.
3. Use the Content Page in the Sidebar to link
to course Pages, Assignments,
Discussions, etc.
4. Check "Make this post an announcement" if
you want the Discussion to be an
Announcement as well.
Canvas User Guide (Students) - 21
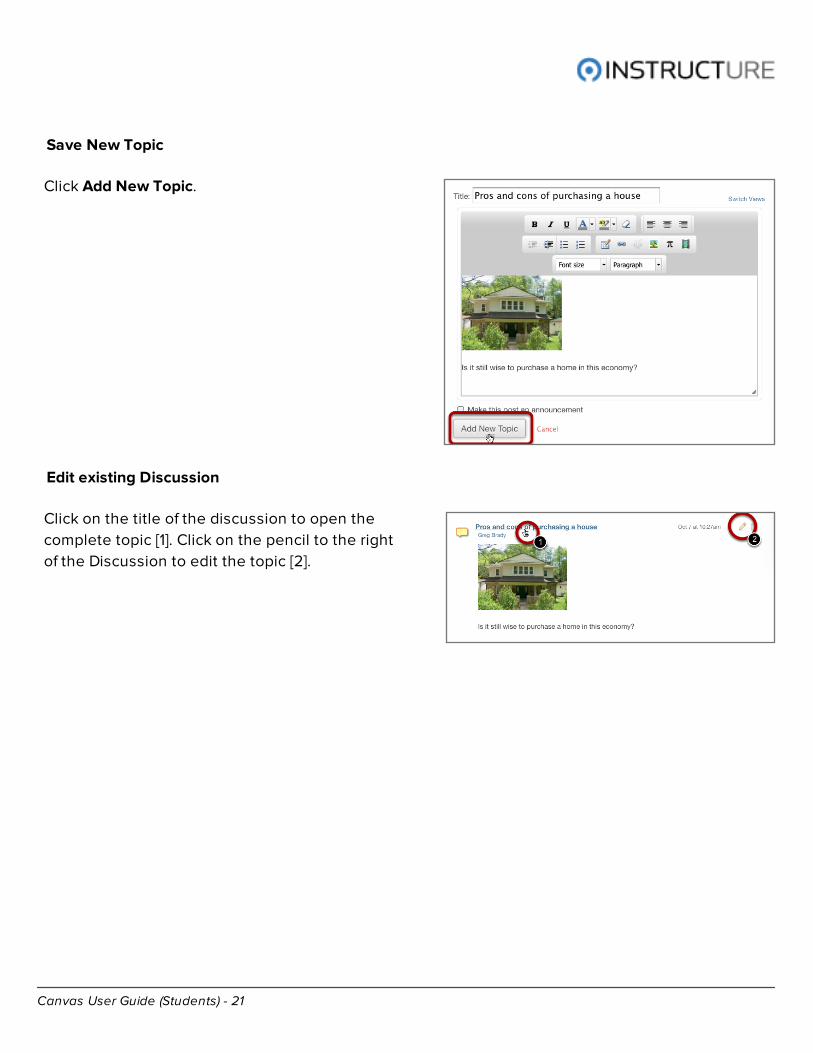
Save New Topic
Click Add New Topic.
Edit existing Discussion
Click on the title of the discussion to open the
complete topic [1]. Click on the pencil to the right
of the Discussion to edit the topic [2].
Canvas User Guide (Students) - 22
Conversations with Instructors and Peers
Canvas User Guide (Students) - 23
How do I adjust my Notification Preferences for Conversations?
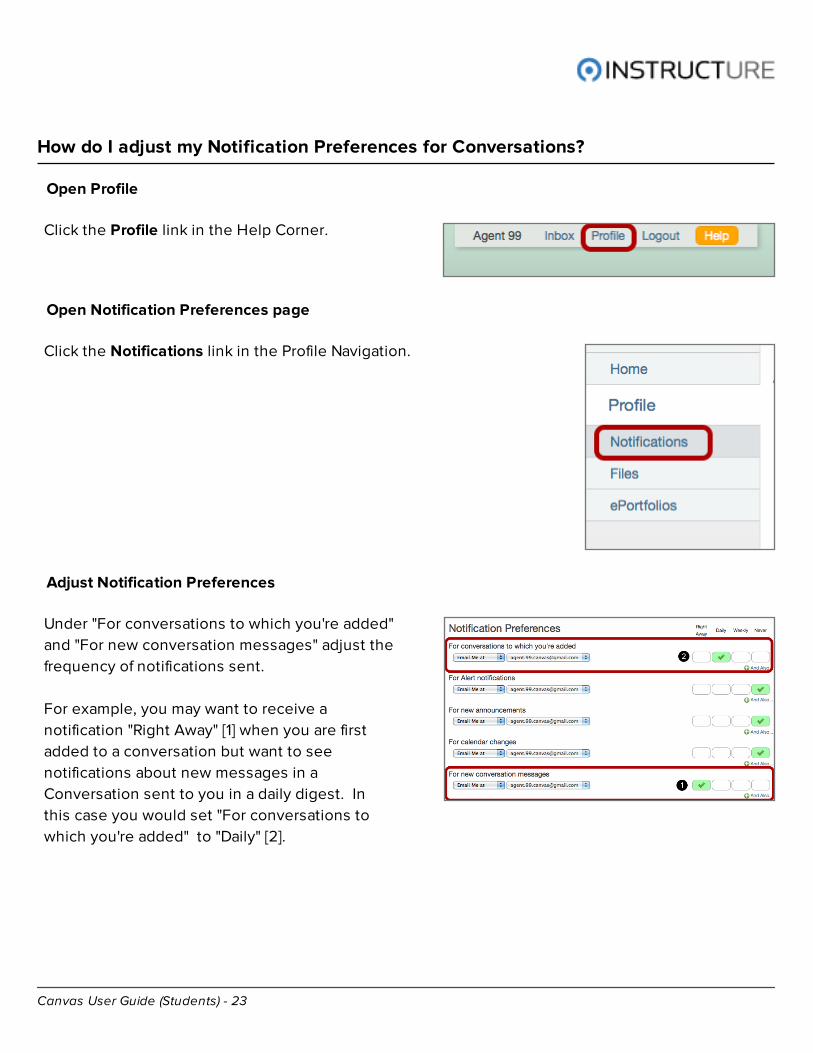
Open Profile
Click the Profile link in the Help Corner.
Open Notification Preferences page
Click the Notifications link in the Profile Navigation.
Adjust Notification Preferences
Under "For conversations to which you're added"
and "For new conversation messages" adjust the
frequency of notifications sent.
For example, you may want to receive a
notification "Right Away" [1] when you are first
added to a conversation but want to see
notifications about new messages in a
Conversation sent to you in a daily digest. In
this case you would set "For conversations to
which you're added" to "Daily" [2].
Canvas User Guide (Students) - 24
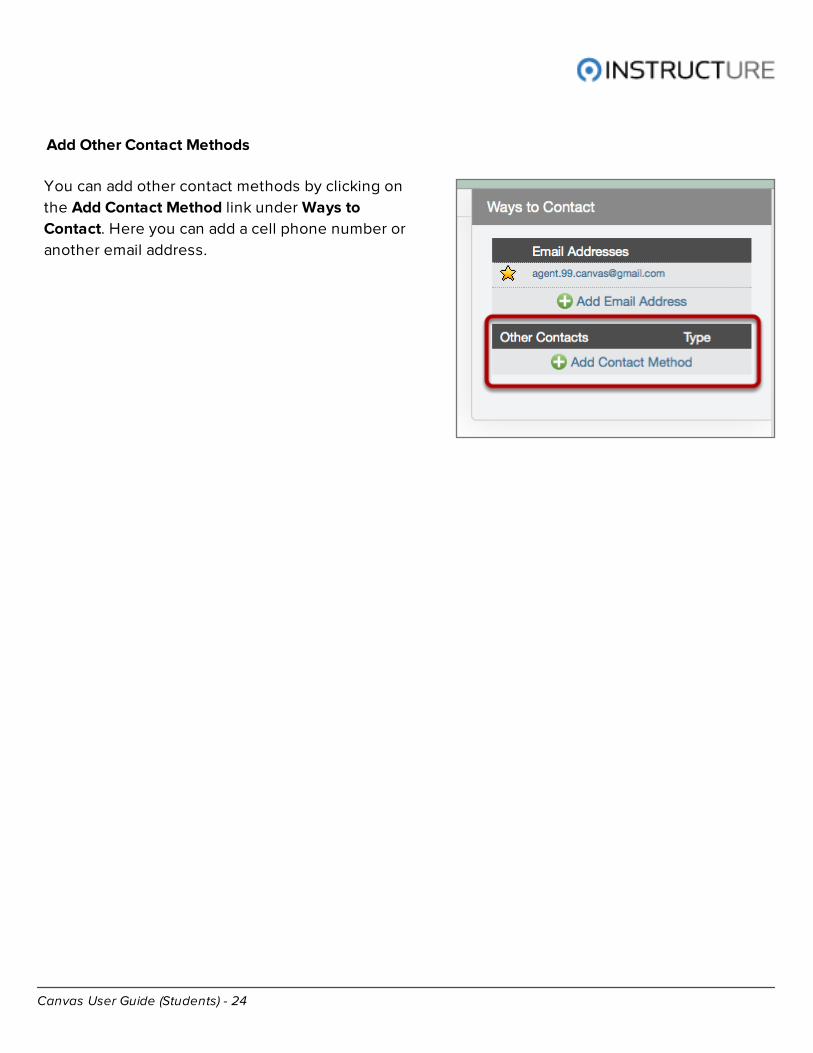
Add Other Contact Methods
You can add other contact methods by clicking on
the Add Contact Method link under Ways to
Contact. Here you can add a cell phone number or
another email address.
Canvas User Guide (Students) - 25
How do I access the Conversations Inbox?
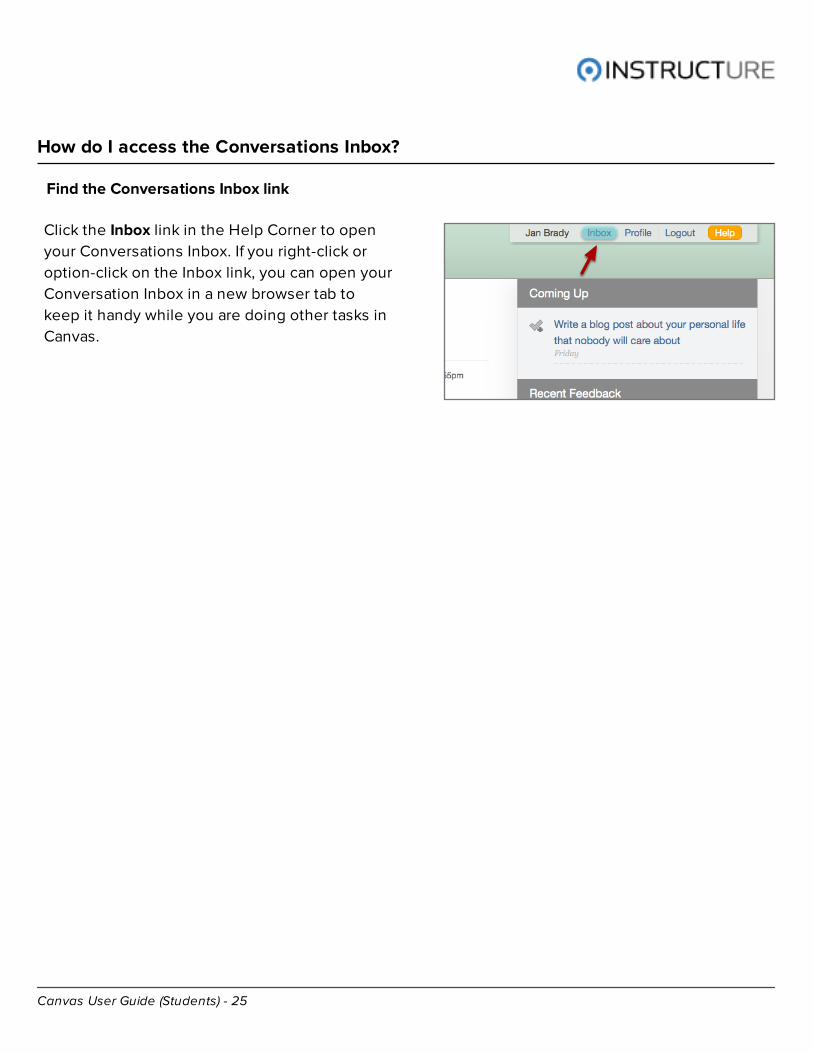
Find the Conversations Inbox link
Click the Inbox link in the Help Corner to open
your Conversations Inbox. If you right-click or
option-click on the Inbox link, you can open your
Conversation Inbox in a new browser tab to
keep it handy while you are doing other tasks in
Canvas.
Canvas User Guide (Students) - 26
How is my Conversations Inbox organized?
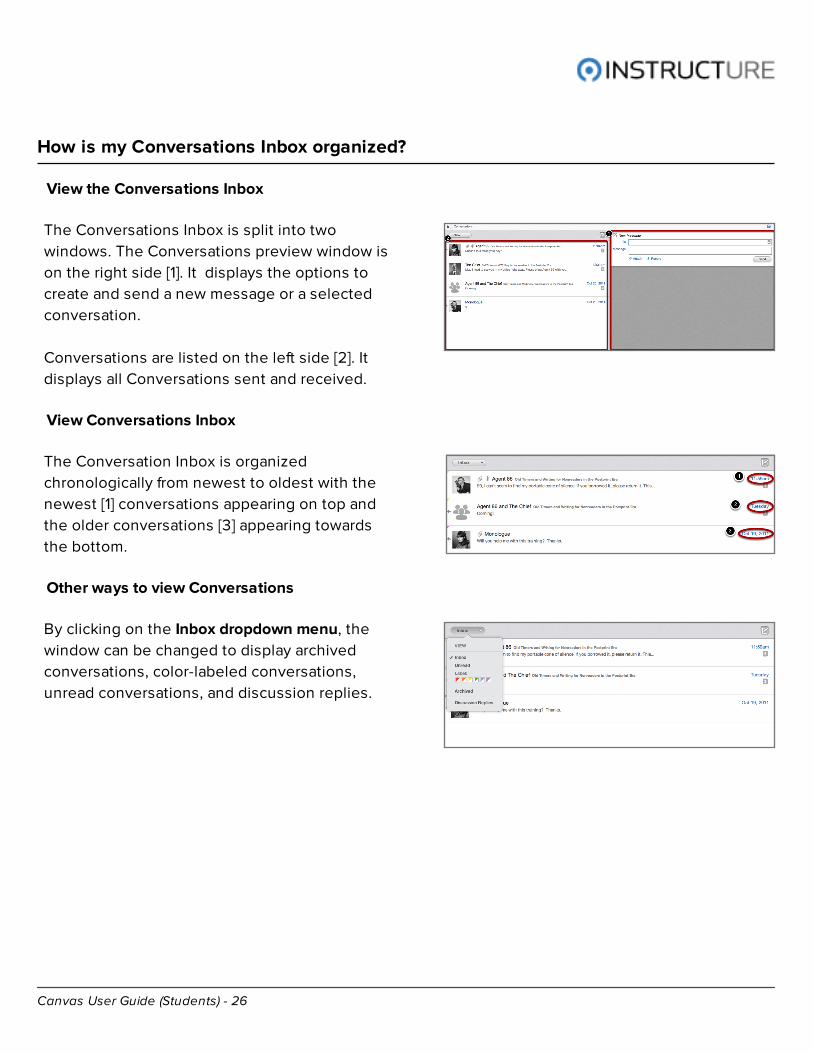
View the Conversations Inbox
The Conversations Inbox is split into two
windows. The Conversations preview window is
on the right side [1]. It displays the options to
create and send a new message or a selected
conversation.
Conversations are listed on the left side [2]. It
displays all Conversations sent and received.
View Conversations Inbox
The Conversation Inbox is organized
chronologically from newest to oldest with the
newest [1] conversations appearing on top and
the older conversations [3] appearing towards
the bottom.
Other ways to view Conversations
By clicking on the Inbox dropdown menu, the
window can be changed to display archived
conversations, color-labeled conversations,
unread conversations, and discussion replies.
Canvas User Guide (Students) - 27
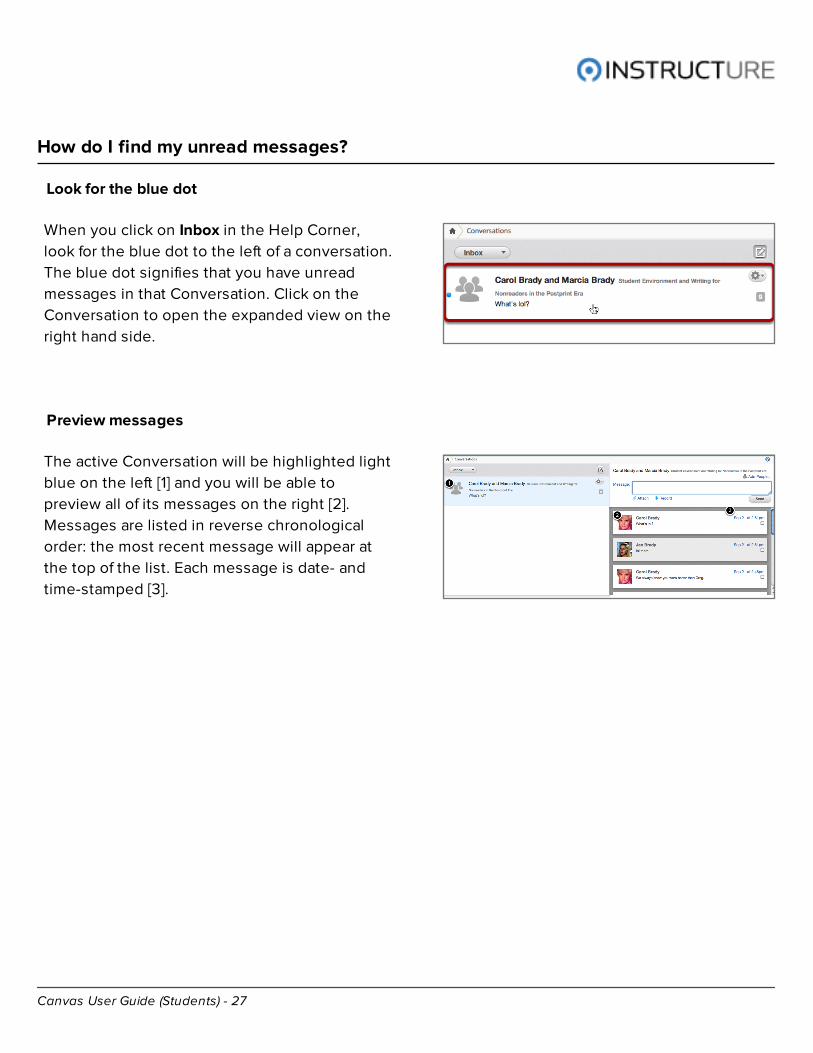
How do I find my unread messages?
Look for the blue dot
When you click on Inbox in the Help Corner,
look for the blue dot to the left of a conversation.
The blue dot signifies that you have unread
messages in that Conversation. Click on the
Conversation to open the expanded view on the
right hand side.
Preview messages
The active Conversation will be highlighted light
blue on the left [1] and you will be able to
preview all of its messages on the right [2].
Messages are listed in reverse chronological
order: the most recent message will appear at
the top of the list. Each message is date- and
time-stamped [3].
Canvas User Guide (Students) - 28
How many messages are in this Conversation?
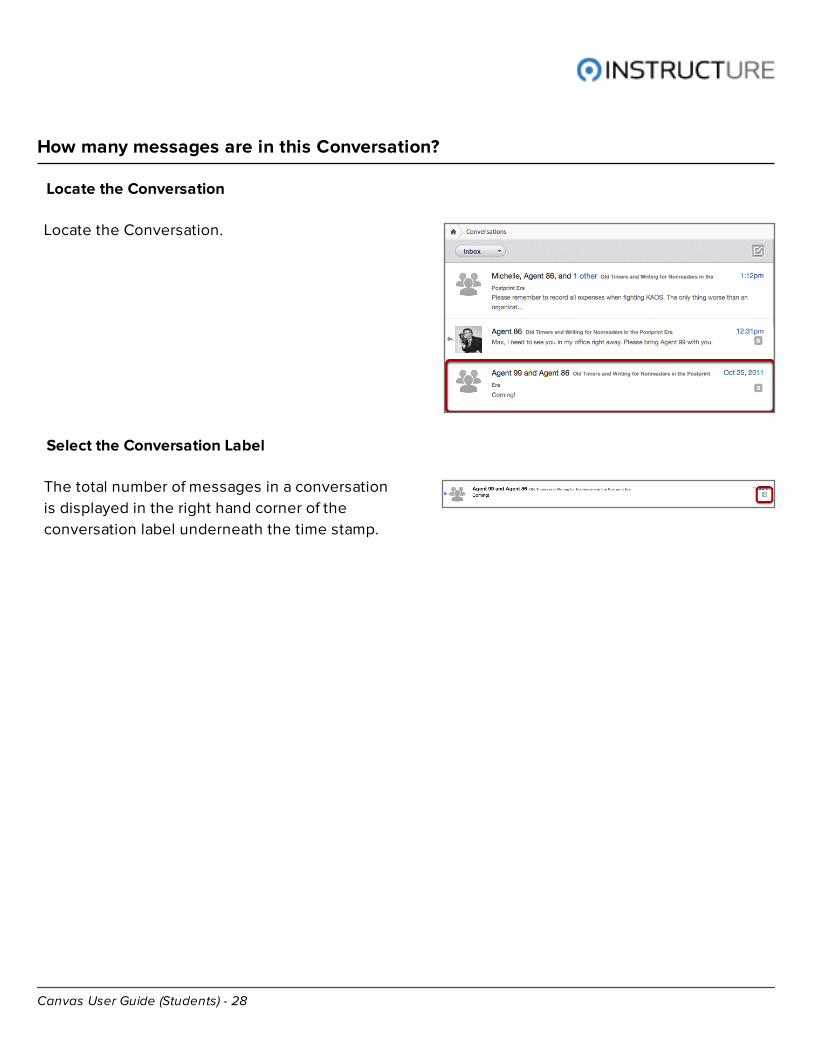
Locate the Conversation
Locate the Conversation.
Select the Conversation Label
The total number of messages in a conversation
is displayed in the right hand corner of the
conversation label underneath the time stamp.

Canvas User Guide (Students) - 29
What do comments from the SpeedGrader™ look like inside Conversations?
In the previous Canvas messaging system, comments from the SpeedGrader™ appeared
automatically. When this system was replaced with the new Conversations feature this changed
slightly. Canvas will find assignment comments made by the teacher and will appear in context
along with messages in any private Conversation between the instructor and the student.
SpeedGrader™ comments will not appear if any other users are part of the Conversation.
In the example above, the student "Kevin
Student" submitted Assignment 2 and "Teacher
Hansen" made several comments on the
assignment.
Assignment comments are slightly indented and
placed inside the expanded view of a
Conversation. This block shows all assignment
comments exchanged between the instructor
and a student. The Assignment name is bolded
[1]. Clicking on the pop-out link next to the
Assignment name links you to the
SpeedGrader™ [2]. The score for the Assignment
appears just below the message date [3].
Canvas User Guide (Students) - 30
How can I tell which course this Conversation belongs to?
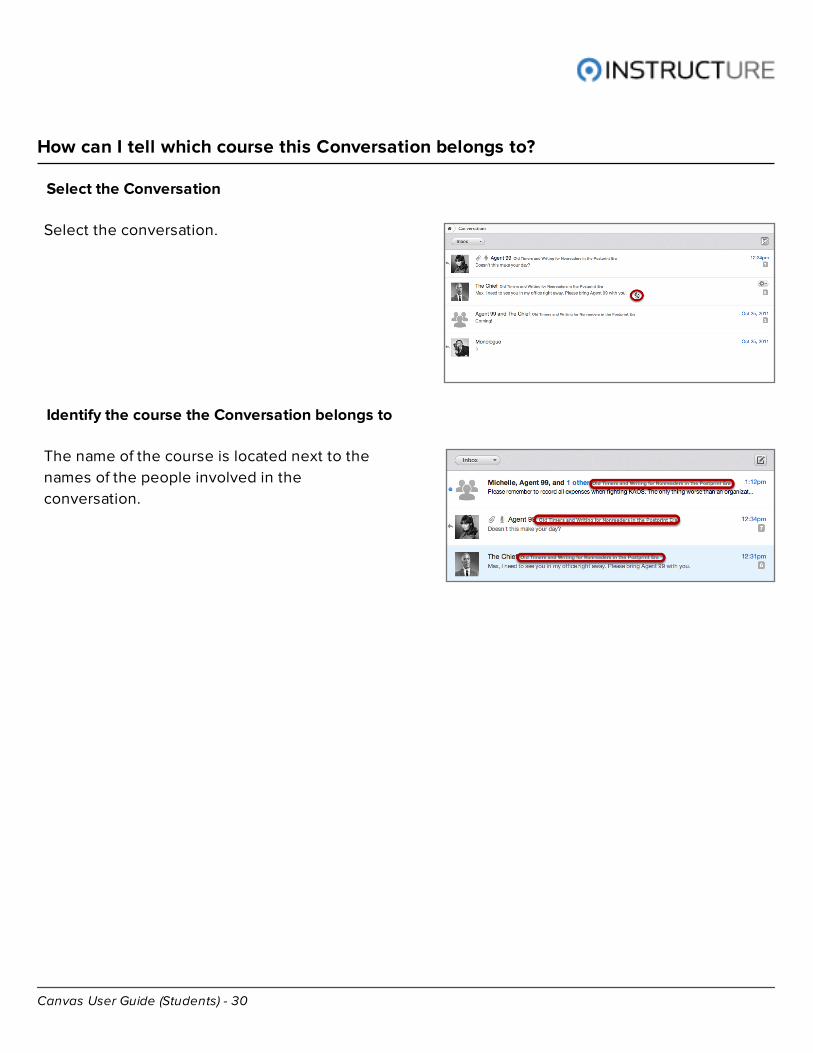
Select the Conversation
Select the conversation.
Identify the course the Conversation belongs to
The name of the course is located next to the
names of the people involved in the
conversation.
Canvas User Guide (Students) - 31
How do I privately respond to an individual in a larger Conversation?
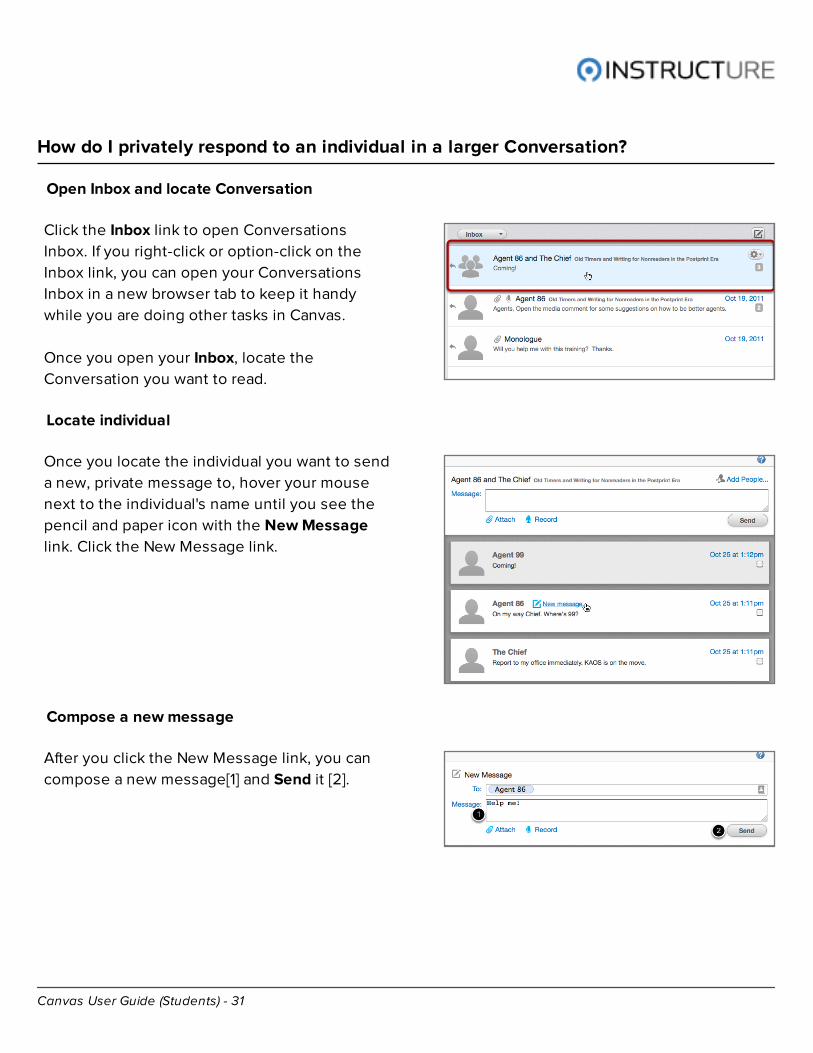
Open Inbox and locate Conversation
Click the Inbox link to open Conversations
Inbox. If you right-click or option-click on the
Inbox link, you can open your Conversations
Inbox in a new browser tab to keep it handy
while you are doing other tasks in Canvas.
Once you open your Inbox, locate the
Conversation you want to read.
Locate individual
Once you locate the individual you want to send
a new, private message to, hover your mouse
next to the individual's name until you see the
pencil and paper icon with the New Message
link. Click the New Message link.
Compose a new message
After you click the New Message link, you can
compose a new message[1] and Send it [2].
Canvas User Guide (Students) - 32
How do I forward a message from this Conversation?
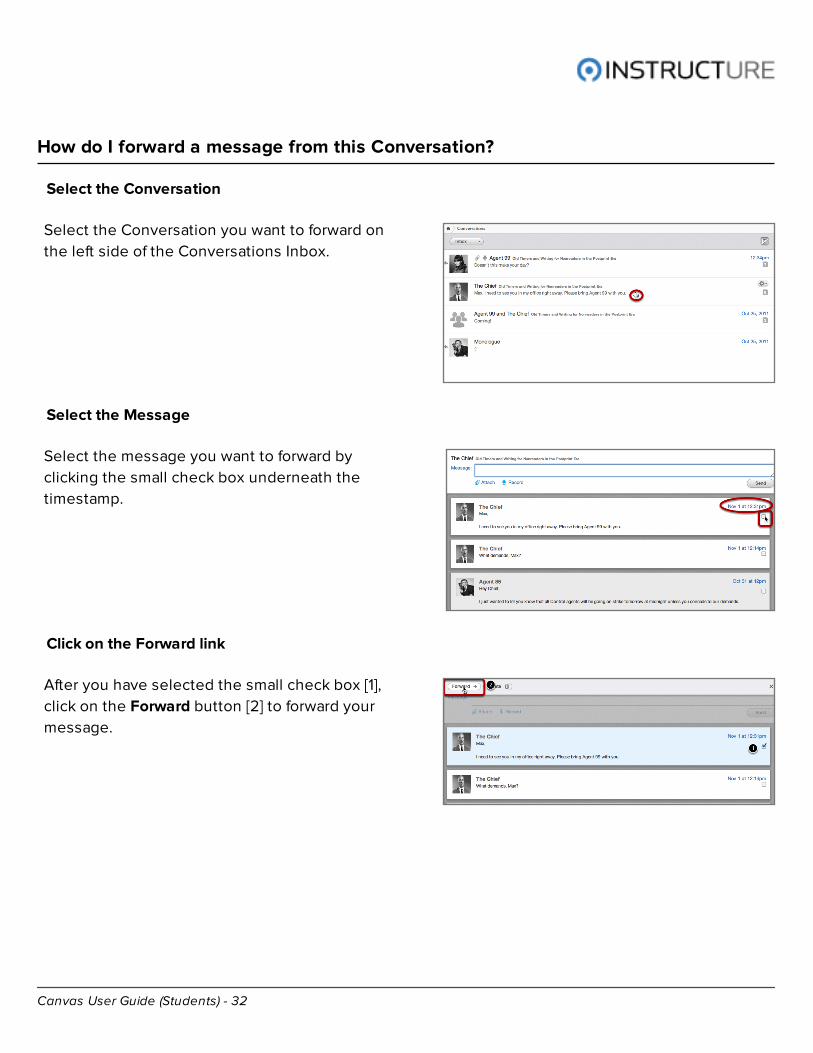
Select the Conversation
Select the Conversation you want to forward on
the left side of the Conversations Inbox.
Select the Message
Select the message you want to forward by
clicking the small check box underneath the
timestamp.
Click on the Forward link
After you have selected the small check box [1],
click on the Forward button [2] to forward your
message.

Canvas User Guide (Students) - 33
Forward the Message
Type the name of the person you wish to
forward the message to in the To: field [1]. If you
want to you may add a personal note in the
Message field [2]. This message can only be
read by the people who are receiving your
forward. Click the Send button to forward the
message [3].
Select and Forward Multiple Messages
You can forward multiple messages in a
conversation by selecting multiple boxes and
repeating the steps above.
Canvas User Guide (Students) - 34
How do I delete a message from this Conversation?
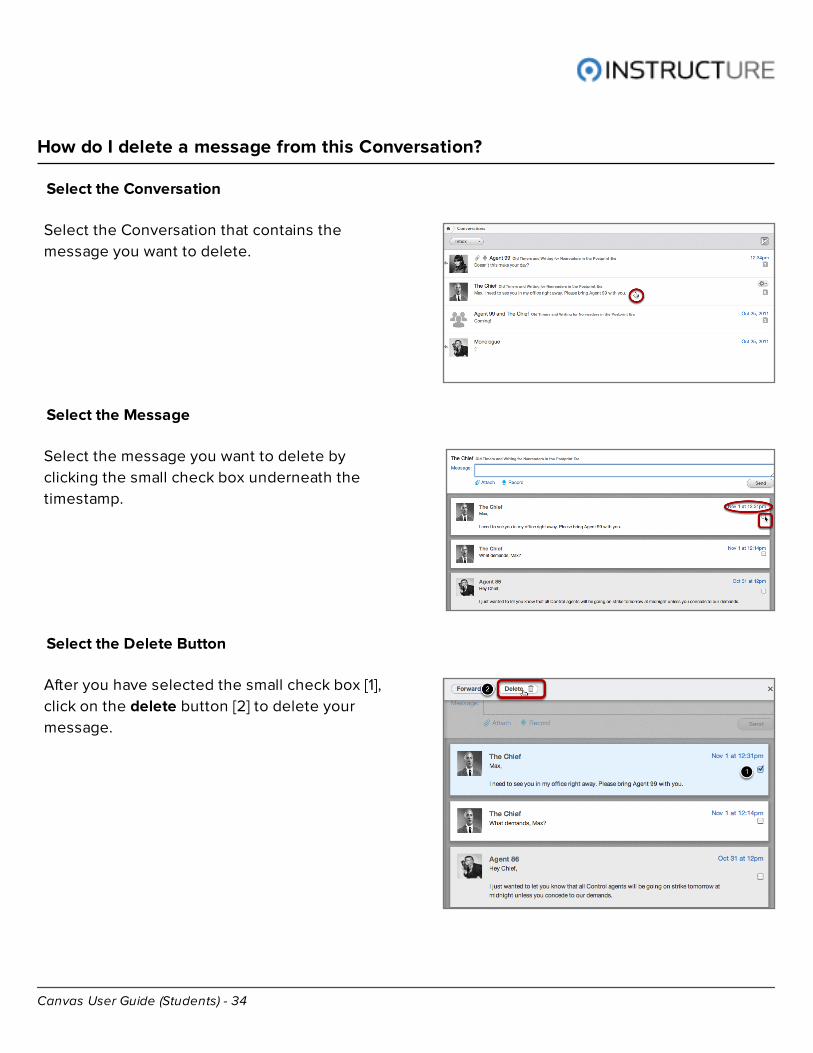
Select the Conversation
Select the Conversation that contains the
message you want to delete.
Select the Message
Select the message you want to delete by
clicking the small check box underneath the
timestamp.
Select the Delete Button
After you have selected the small check box [1],
click on the delete button [2] to delete your
message.
Canvas User Guide (Students) - 35
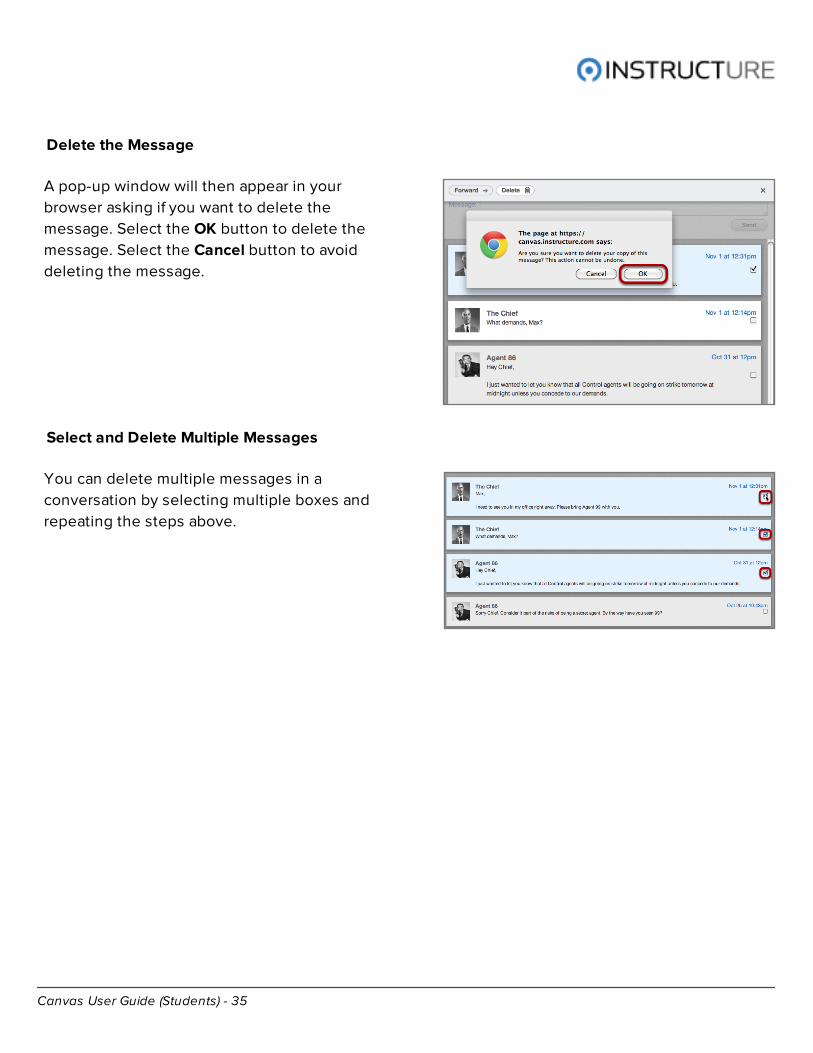
Delete the Message
A pop-up window will then appear in your
browser asking if you want to delete the
message. Select the OK button to delete the
message. Select the Cancel button to avoid
deleting the message.
Select and Delete Multiple Messages
You can delete multiple messages in a
conversation by selecting multiple boxes and
repeating the steps above.
Canvas User Guide (Students) - 36
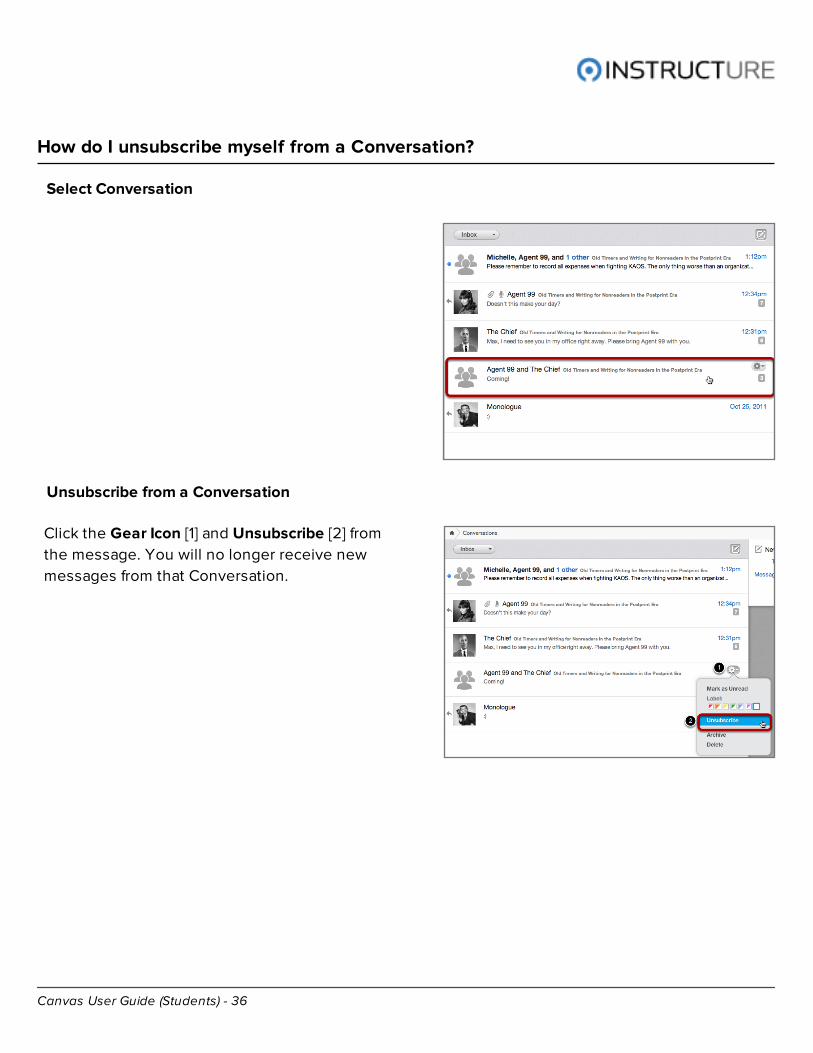
How do I unsubscribe myself from a Conversation?
Select Conversation
Unsubscribe from a Conversation
Click the Gear Icon [1] and Unsubscribe [2] from
the message. You will no longer receive new
messages from that Conversation.
Canvas User Guide (Students) - 37
How do I archive a Conversation?
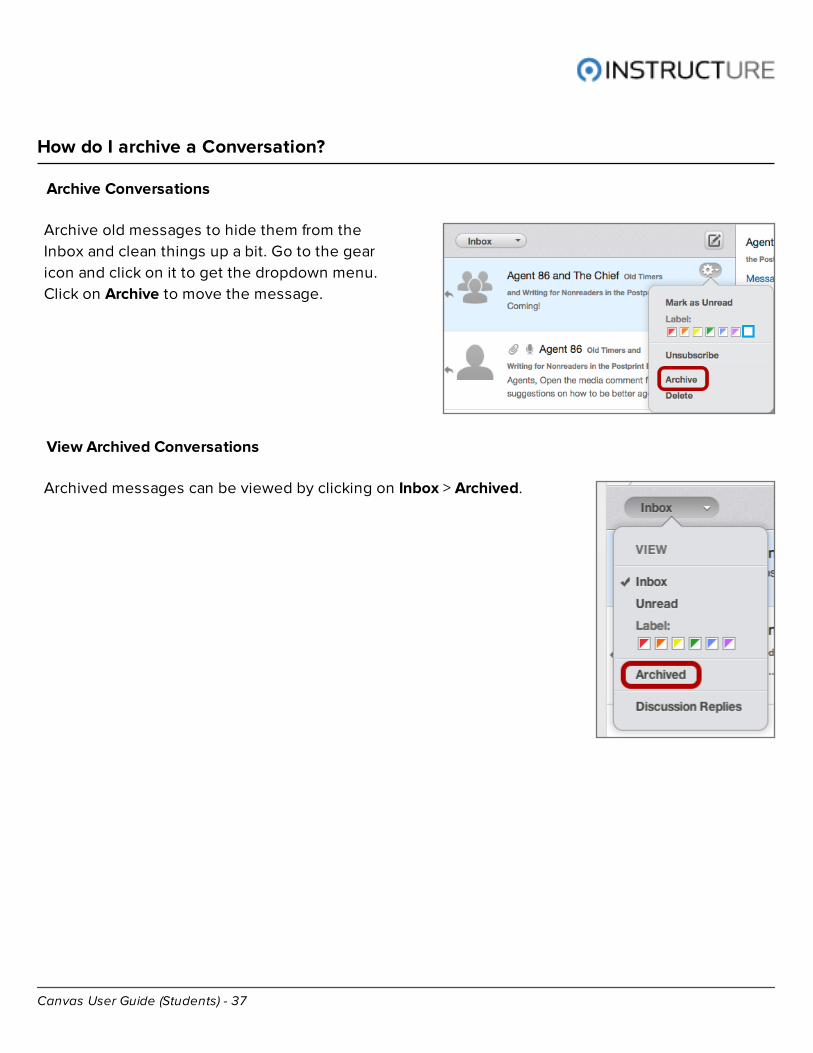
Archive Conversations
Archive old messages to hide them from the
Inbox and clean things up a bit. Go to the gear
icon and click on it to get the dropdown menu.
Click on Archive to move the message.
View Archived Conversations
Archived messages can be viewed by clicking on Inbox > Archived.
Canvas User Guide (Students) - 38
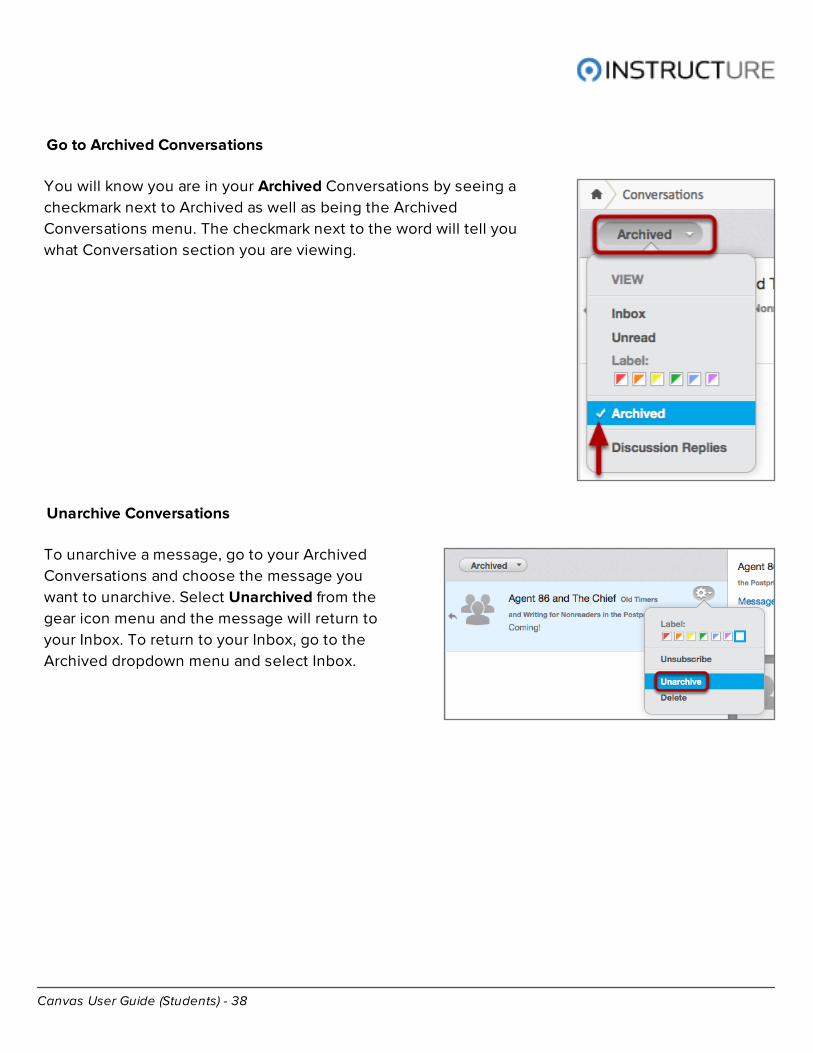
Go to Archived Conversations
You will know you are in your Archived Conversations by seeing a
checkmark next to Archived as well as being the Archived
Conversations menu. The checkmark next to the word will tell you
what Conversation section you are viewing.
Unarchive Conversations
To unarchive a message, go to your Archived
Conversations and choose the message you
want to unarchive. Select Unarchived from the
gear icon menu and the message will return to
your Inbox. To return to your Inbox, go to the
Archived dropdown menu and select Inbox.

Canvas User Guide (Students) - 39
How do I use color labels in Conversations?
Label Messages
Label messages by color. Here are a few
possible meanings that you might give to the 6
colors.
Label Importance
Red = Urgent
Orange = Important
Yellow = Sometime
Getting Things Done
Red = @Action
Orange = @Next Actions
Yellow = @Reference
By Category
Green = Course Messages
Blue = From other Instructors
Orange = From other students
In the upper right-hand corner of each
Conversation is a gear-type icon. Click on it and
select a color to use to label this conversation.
Canvas User Guide (Students) - 40
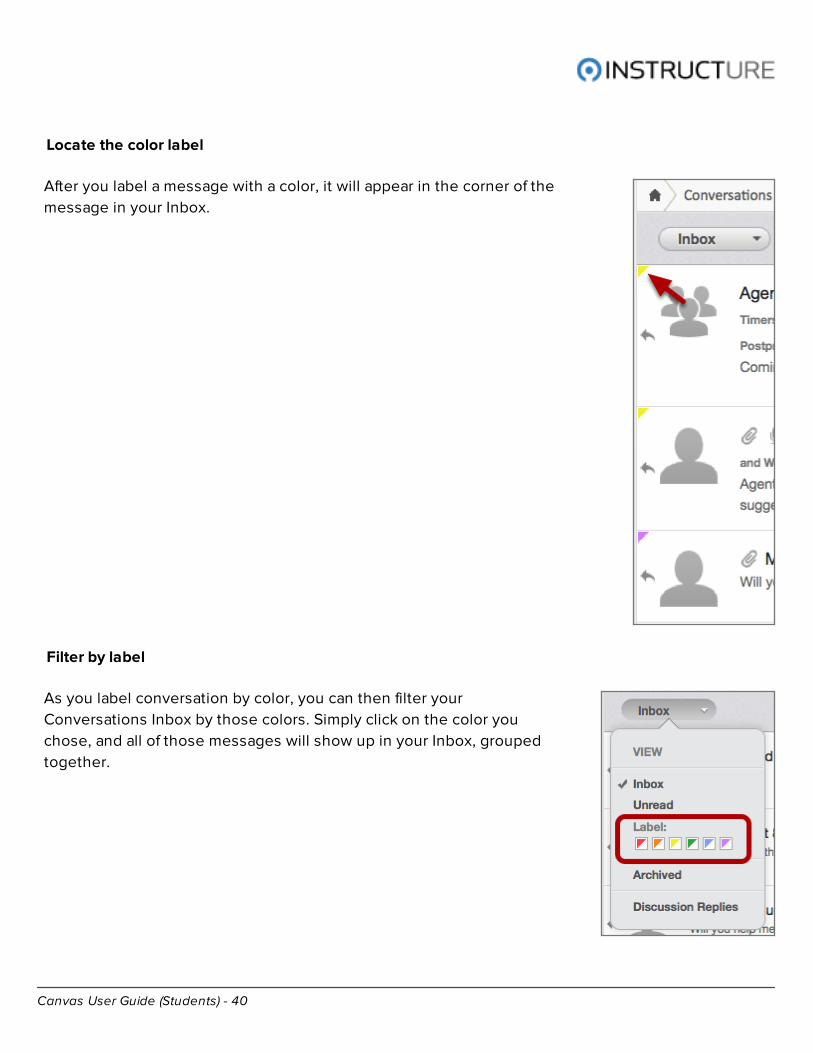
Locate the color label
After you label a message with a color, it will appear in the corner of the
message in your Inbox.
Filter by label
As you label conversation by color, you can then filter your
Conversations Inbox by those colors. Simply click on the color you
chose, and all of those messages will show up in your Inbox, grouped
together.
Canvas User Guide (Students) - 41
How do I compose a message?
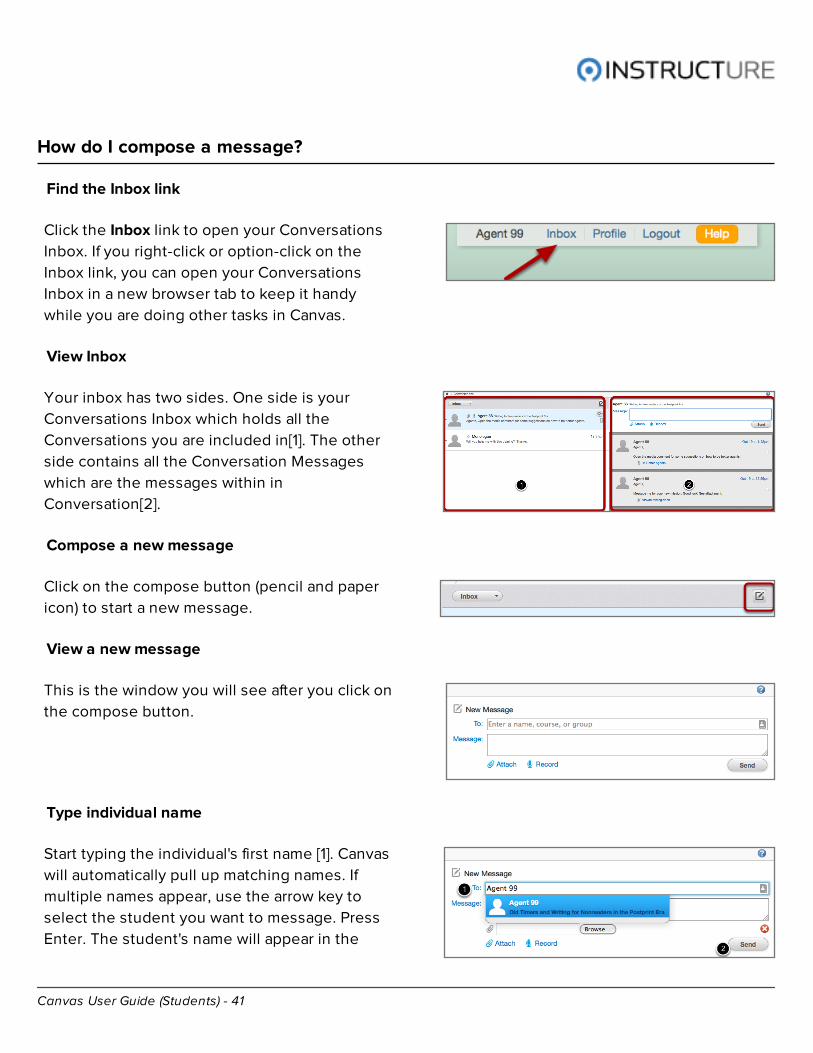
Find the Inbox link
Click the Inbox link to open your Conversations
Inbox. If you right-click or option-click on the
Inbox link, you can open your Conversations
Inbox in a new browser tab to keep it handy
while you are doing other tasks in Canvas.
View Inbox
Your inbox has two sides. One side is your
Conversations Inbox which holds all the
Conversations you are included in[1]. The other
side contains all the Conversation Messages
which are the messages within in
Conversation[2].
Compose a new message
Click on the compose button (pencil and paper
icon) to start a new message.
View a new message
This is the window you will see after you click on
the compose button.
Type individual name
Start typing the individual's first name [1]. Canvas
will automatically pull up matching names. If
multiple names appear, use the arrow key to
select the student you want to message. Press
Enter. The student's name will appear in the
Canvas User Guide (Students) - 42
"To:" field, highlighted in light blue. Write a
message and click Send [2].
If you accidentally select the wrong individual(s),
press Delete (on a MAC keyboard) or Backspace
(on a PC keyboard) to remove the name(s) from
the To: field.
You can also hover over a recipient name and
click on the white x to delete it from the To: field.
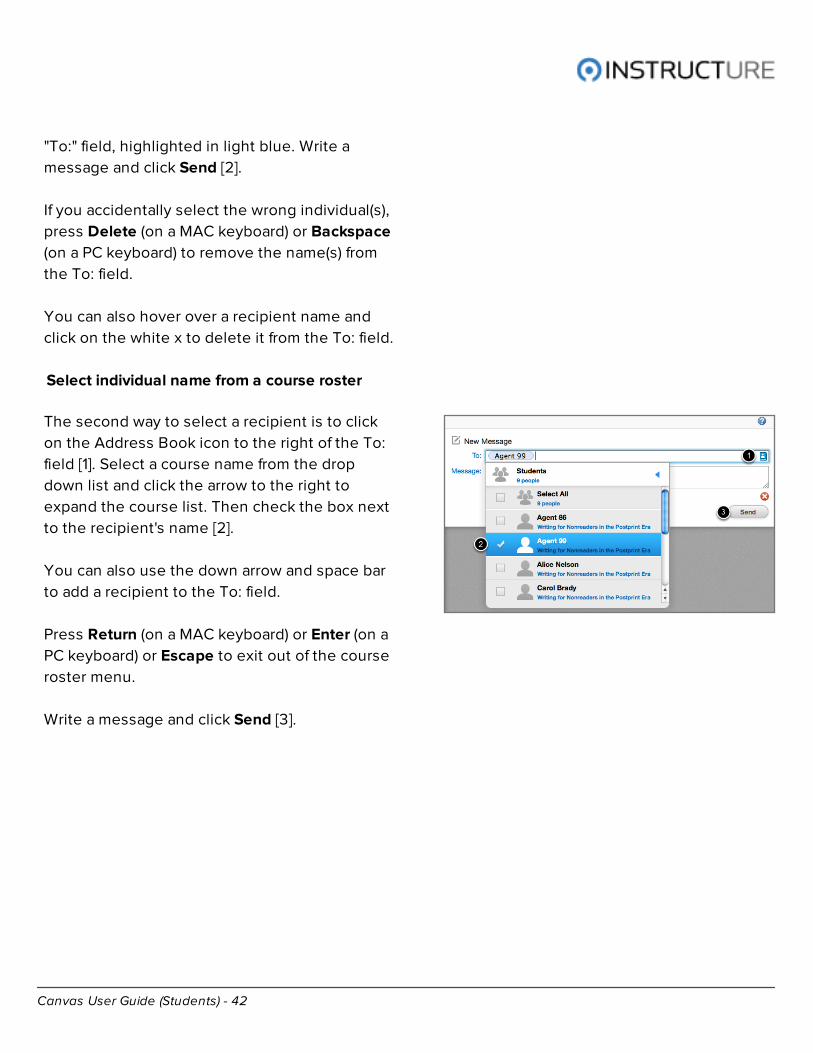
Select individual name from a course roster
The second way to select a recipient is to click
on the Address Book icon to the right of the To:
field [1]. Select a course name from the drop
down list and click the arrow to the right to
expand the course list. Then check the box next
to the recipient's name [2].
You can also use the down arrow and space bar
to add a recipient to the To: field.
Press Return (on a MAC keyboard) or Enter (on a
PC keyboard) or Escape to exit out of the course
roster menu.
Write a message and click Send [3].
Canvas User Guide (Students) - 43
How do I send a private message to my instructor?
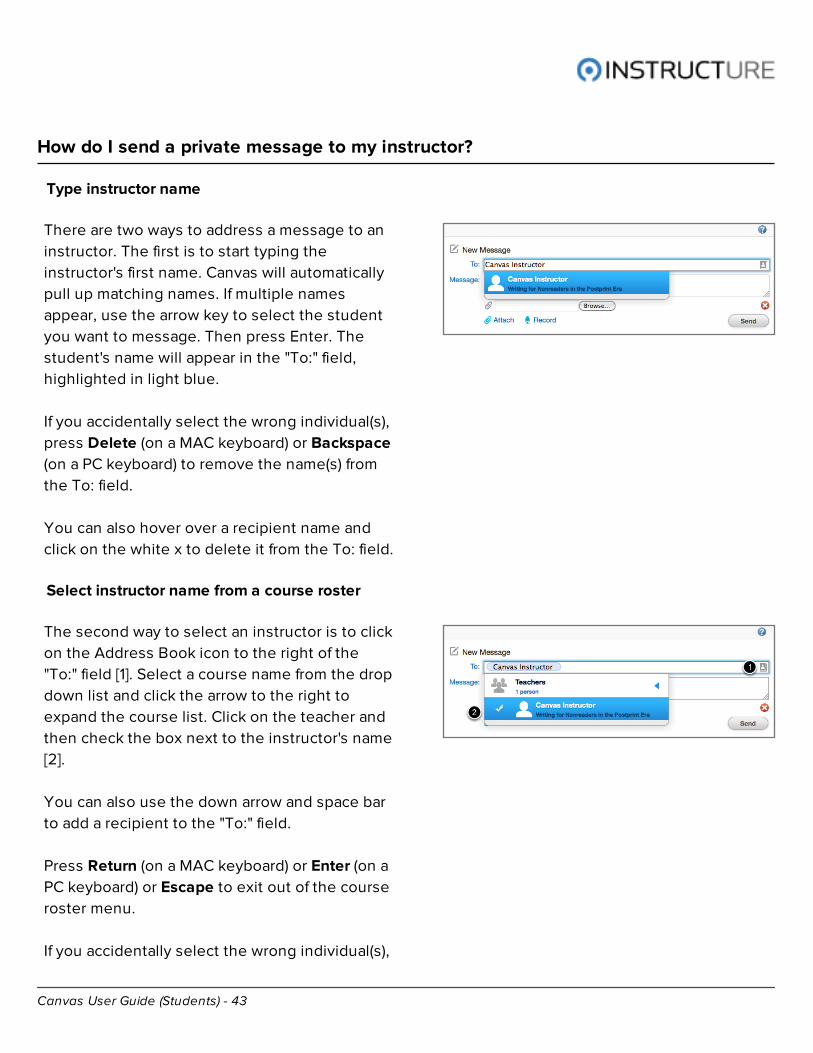
Type instructor name
There are two ways to address a message to an
instructor. The first is to start typing the
instructor's first name. Canvas will automatically
pull up matching names. If multiple names
appear, use the arrow key to select the student
you want to message. Then press Enter. The
student's name will appear in the "To:" field,
highlighted in light blue.
If you accidentally select the wrong individual(s),
press Delete (on a MAC keyboard) or Backspace
(on a PC keyboard) to remove the name(s) from
the To: field.
You can also hover over a recipient name and
click on the white x to delete it from the To: field.
Select instructor name from a course roster
The second way to select an instructor is to click
on the Address Book icon to the right of the
"To:" field [1]. Select a course name from the drop
down list and click the arrow to the right to
expand the course list. Click on the teacher and
then check the box next to the instructor's name
[2].
You can also use the down arrow and space bar
to add a recipient to the "To:" field.
Press Return (on a MAC keyboard) or Enter (on a
PC keyboard) or Escape to exit out of the course
roster menu.
If you accidentally select the wrong individual(s),
Canvas User Guide (Students) - 44
press Delete (on a MAC keyboard) or Backspace
(on a PC keyboard) to remove the name(s) from
the "To:" field. You can also click on the white x
next to the name(s).
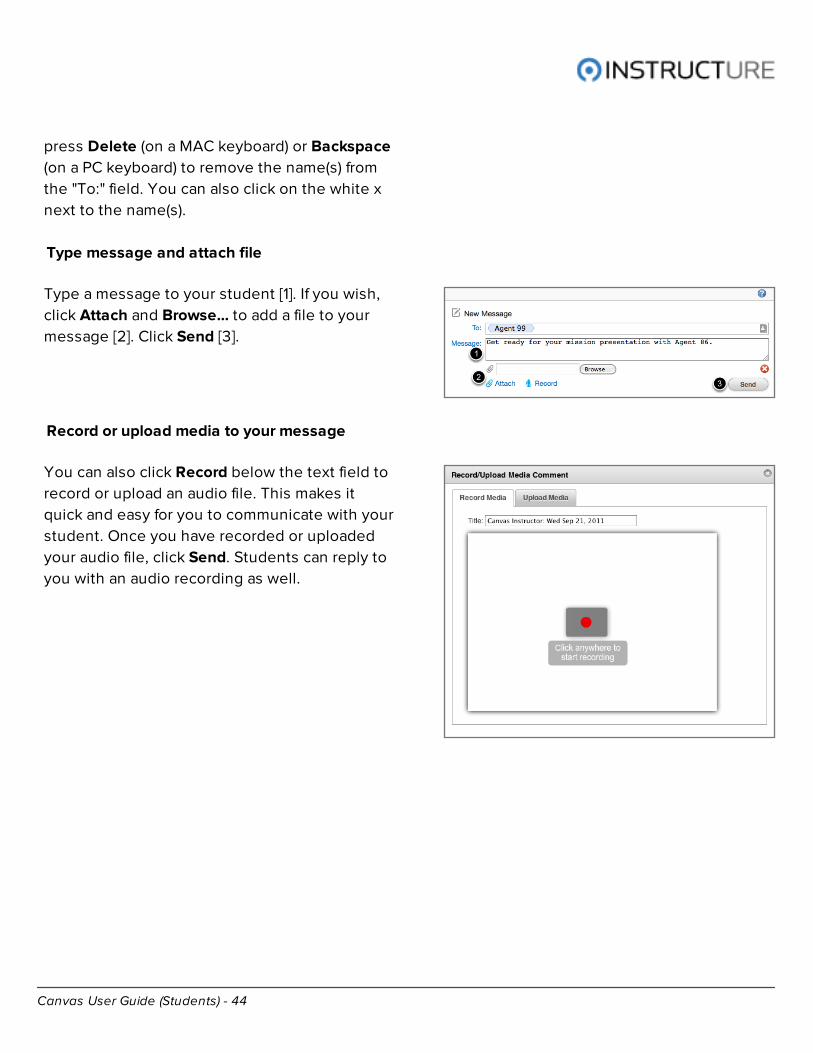
Type message and attach file
Type a message to your student [1]. If you wish,
click Attach and Browse... to add a file to your
message [2]. Click Send [3].
Record or upload media to your message
You can also click Record below the text field to
record or upload an audio file. This makes it
quick and easy for you to communicate with your
student. Once you have recorded or uploaded
your audio file, click Send. Students can reply to
you with an audio recording as well.
Canvas User Guide (Students) - 45
How do I send a private message to an individual?
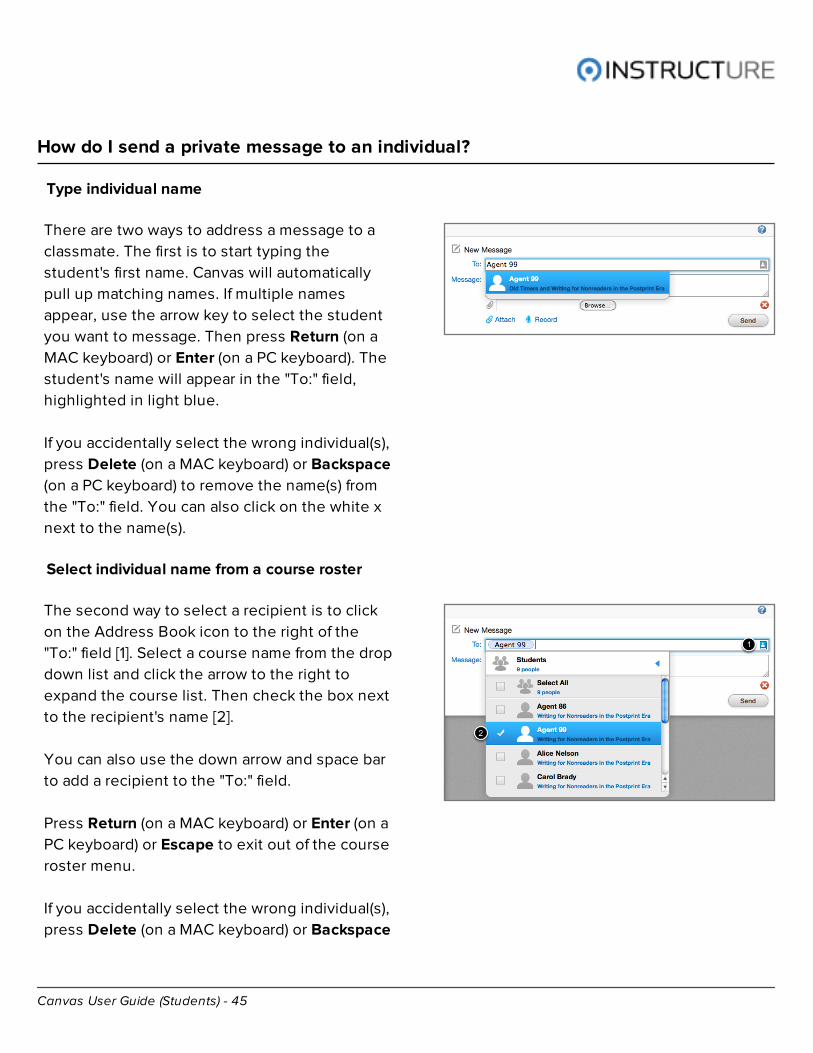
Type individual name
There are two ways to address a message to a
classmate. The first is to start typing the
student's first name. Canvas will automatically
pull up matching names. If multiple names
appear, use the arrow key to select the student
you want to message. Then press Return (on a
MAC keyboard) or Enter (on a PC keyboard). The
student's name will appear in the "To:" field,
highlighted in light blue.
If you accidentally select the wrong individual(s),
press Delete (on a MAC keyboard) or Backspace
(on a PC keyboard) to remove the name(s) from
the "To:" field. You can also click on the white x
next to the name(s).
Select individual name from a course roster
The second way to select a recipient is to click
on the Address Book icon to the right of the
"To:" field [1]. Select a course name from the drop
down list and click the arrow to the right to
expand the course list. Then check the box next
to the recipient's name [2].
You can also use the down arrow and space bar
to add a recipient to the "To:" field.
Press Return (on a MAC keyboard) or Enter (on a
PC keyboard) or Escape to exit out of the course
roster menu.
If you accidentally select the wrong individual(s),
press Delete (on a MAC keyboard) or Backspace
Canvas User Guide (Students) - 46
(on a PC keyboard) to remove the name(s) from
the "To:" field. You can also click on the white x
next to the name(s).
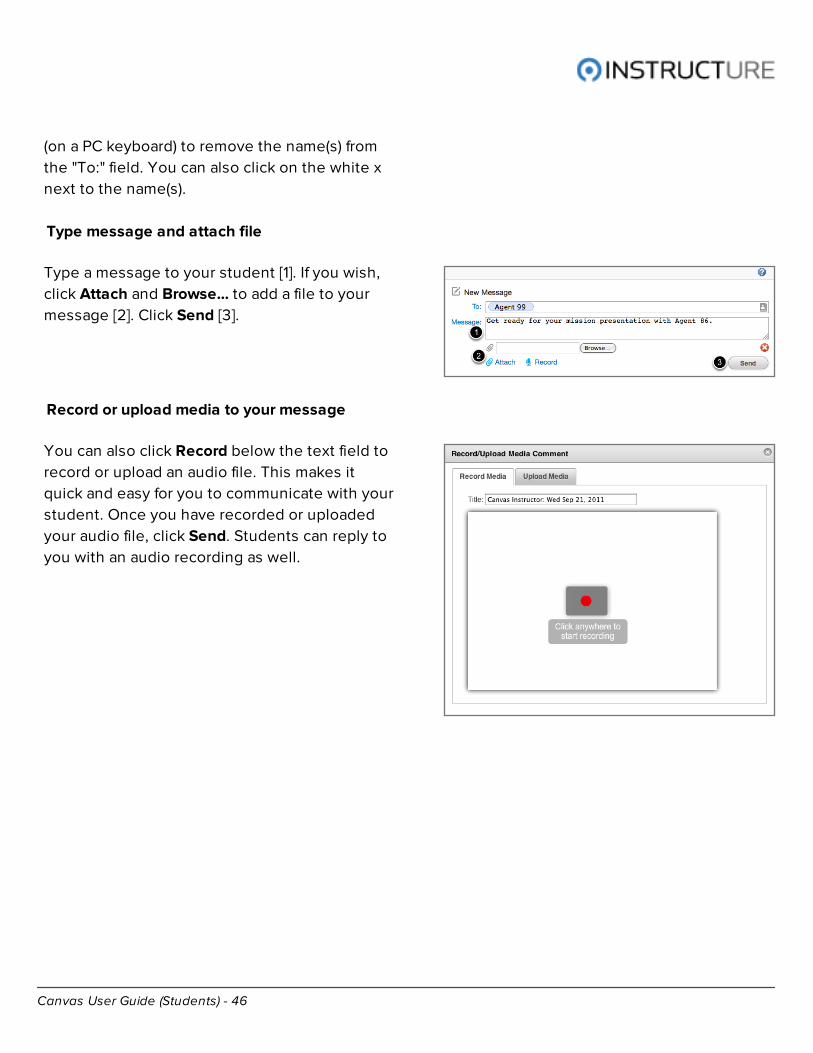
Type message and attach file
Type a message to your student [1]. If you wish,
click Attach and Browse... to add a file to your
message [2]. Click Send [3].
Record or upload media to your message
You can also click Record below the text field to
record or upload an audio file. This makes it
quick and easy for you to communicate with your
student. Once you have recorded or uploaded
your audio file, click Send. Students can reply to
you with an audio recording as well.
Canvas User Guide (Students) - 47
How do I send a message to multiple individuals?
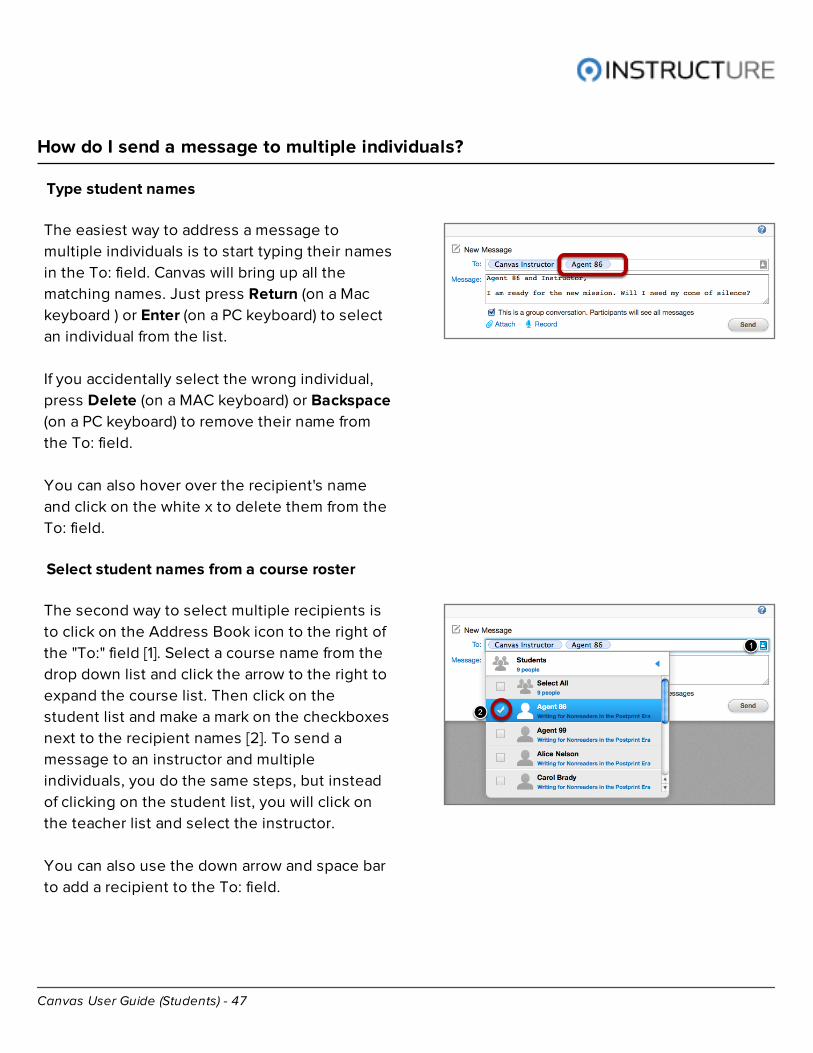
Type student names
The easiest way to address a message to
multiple individuals is to start typing their names
in the To: field. Canvas will bring up all the
matching names. Just press Return (on a Mac
keyboard ) or Enter (on a PC keyboard) to select
an individual from the list.
If you accidentally select the wrong individual,
press Delete (on a MAC keyboard) or Backspace
(on a PC keyboard) to remove their name from
the To: field.
You can also hover over the recipient's name
and click on the white x to delete them from the
To: field.
Select student names from a course roster
The second way to select multiple recipients is
to click on the Address Book icon to the right of
the "To:" field [1]. Select a course name from the
drop down list and click the arrow to the right to
expand the course list. Then click on the
student list and make a mark on the checkboxes
next to the recipient names [2]. To send a
message to an instructor and multiple
individuals, you do the same steps, but instead
of clicking on the student list, you will click on
the teacher list and select the instructor.
You can also use the down arrow and space bar
to add a recipient to the To: field.
Canvas User Guide (Students) - 48
Press Return (on a Mac keyboard ) or Enter (on a
PC keyboard) or Escape to exit out of the course
roster menu.
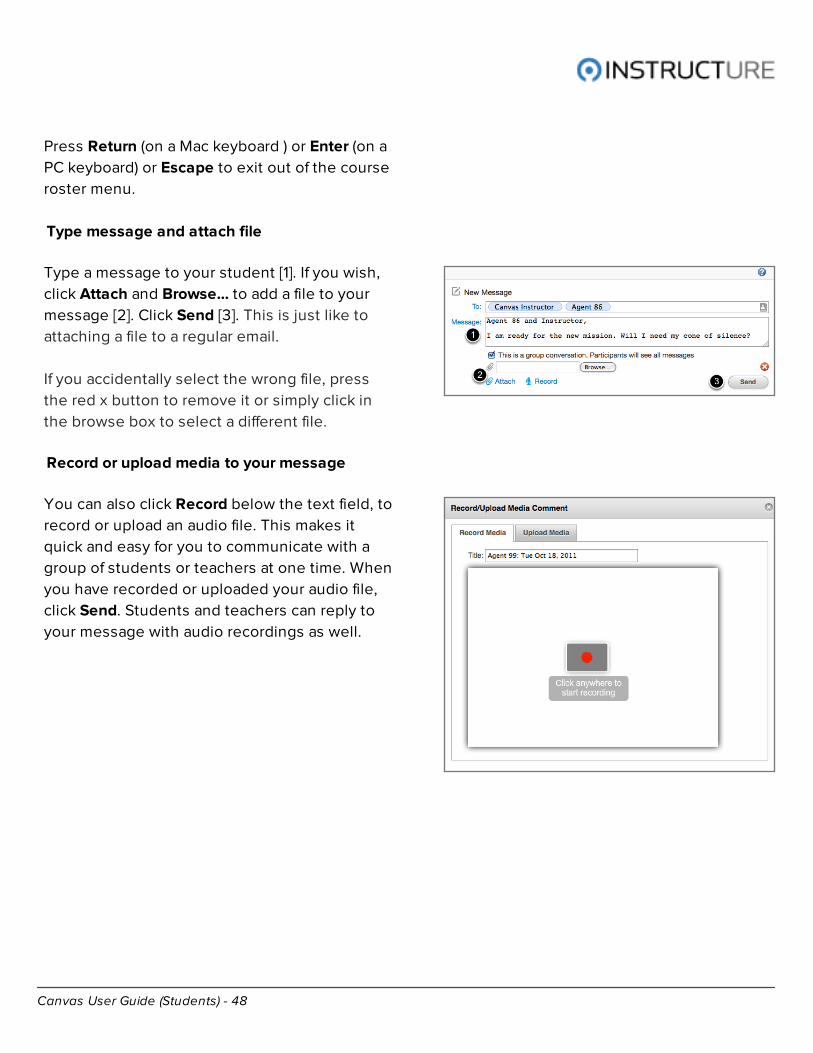
Type message and attach file
Type a message to your student [1]. If you wish,
click Attach and Browse... to add a file to your
message [2]. Click Send [3]. This is just like to
attaching a file to a regular email.
If you accidentally select the wrong file, press
the red x button to remove it or simply click in
the browse box to select a different file.
Record or upload media to your message
You can also click Record below the text field, to
record or upload an audio file. This makes it
quick and easy for you to communicate with a
group of students or teachers at one time. When
you have recorded or uploaded your audio file,
click Send. Students and teachers can reply to
your message with audio recordings as well.
Canvas User Guide (Students) - 49
How do I send a message to a group?
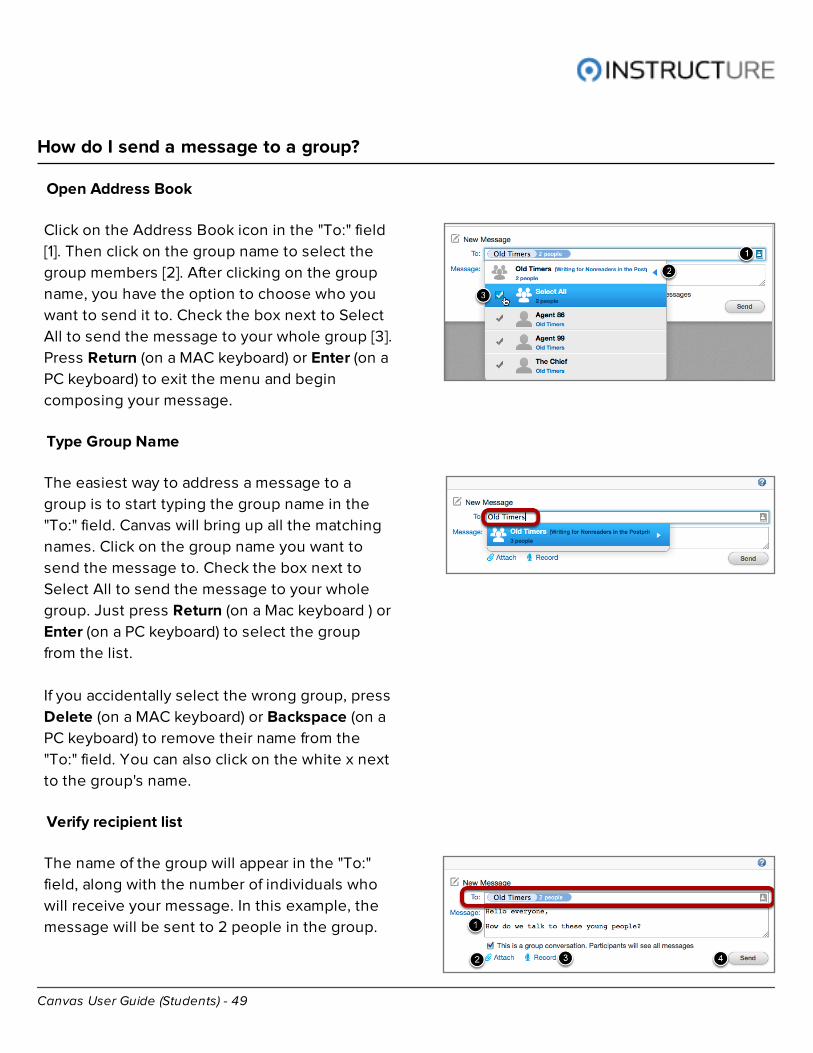
Open Address Book
Click on the Address Book icon in the "To:" field
[1]. Then click on the group name to select the
group members [2]. After clicking on the group
name, you have the option to choose who you
want to send it to. Check the box next to Select
All to send the message to your whole group [3].
Press Return (on a MAC keyboard) or Enter (on a
PC keyboard) to exit the menu and begin
composing your message.
Type Group Name
The easiest way to address a message to a
group is to start typing the group name in the
"To:" field. Canvas will bring up all the matching
names. Click on the group name you want to
send the message to. Check the box next to
Select All to send the message to your whole
group. Just press Return (on a Mac keyboard ) or
Enter (on a PC keyboard) to select the group
from the list.
If you accidentally select the wrong group, press
Delete (on a MAC keyboard) or Backspace (on a
PC keyboard) to remove their name from the
"To:" field. You can also click on the white x next
to the group's name.
Verify recipient list
The name of the group will appear in the "To:"
field, along with the number of individuals who
will receive your message. In this example, the
message will be sent to 2 people in the group.
Canvas User Guide (Students) - 50
If you accidentally select the wrong group, press
Delete (on a MAC keyboard) or Backspace (on a
PC keyboard) to remove their name from the
"To:" field. You can also click on the white x next
to the group's name.
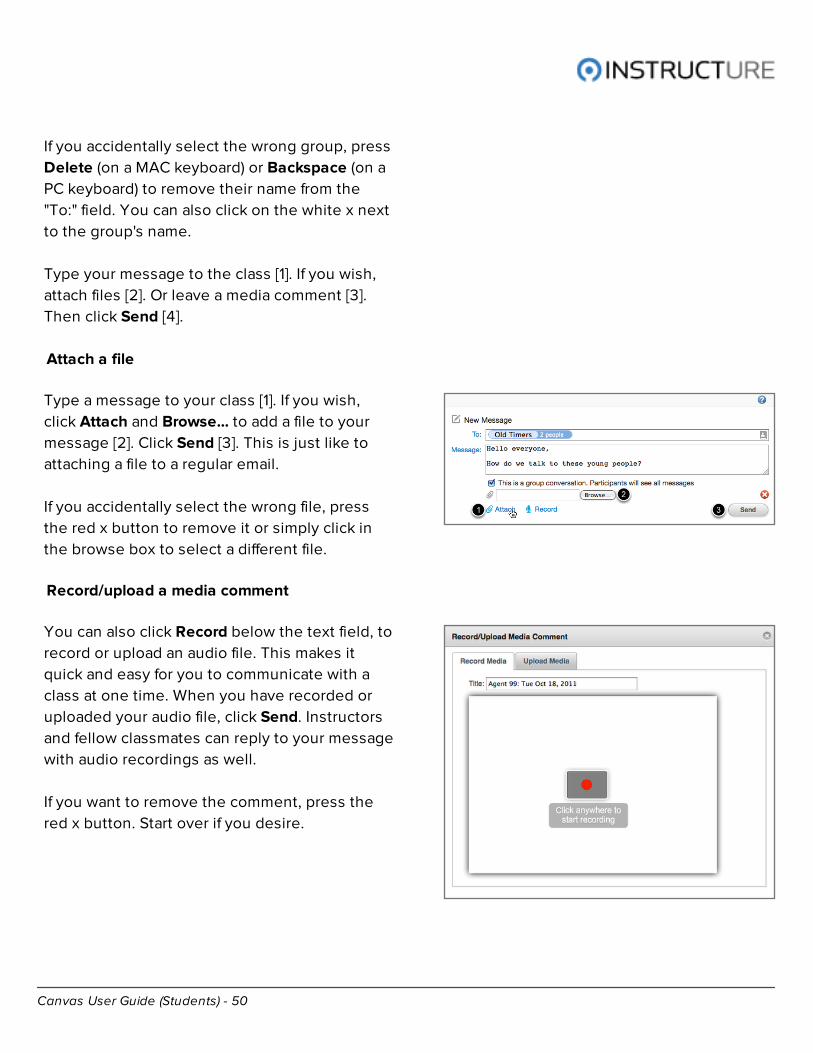
Type your message to the class [1]. If you wish,
attach files [2]. Or leave a media comment [3].
Then click Send [4].
Attach a file
Type a message to your class [1]. If you wish,
click Attach and Browse... to add a file to your
message [2]. Click Send [3]. This is just like to
attaching a file to a regular email.
If you accidentally select the wrong file, press
the red x button to remove it or simply click in
the browse box to select a different file.
Record/upload a media comment
You can also click Record below the text field, to
record or upload an audio file. This makes it
quick and easy for you to communicate with a
class at one time. When you have recorded or
uploaded your audio file, click Send. Instructors
and fellow classmates can reply to your message
with audio recordings as well.
If you want to remove the comment, press the
red x button. Start over if you desire.
Canvas User Guide (Students) - 51
How do I send a message to my class?
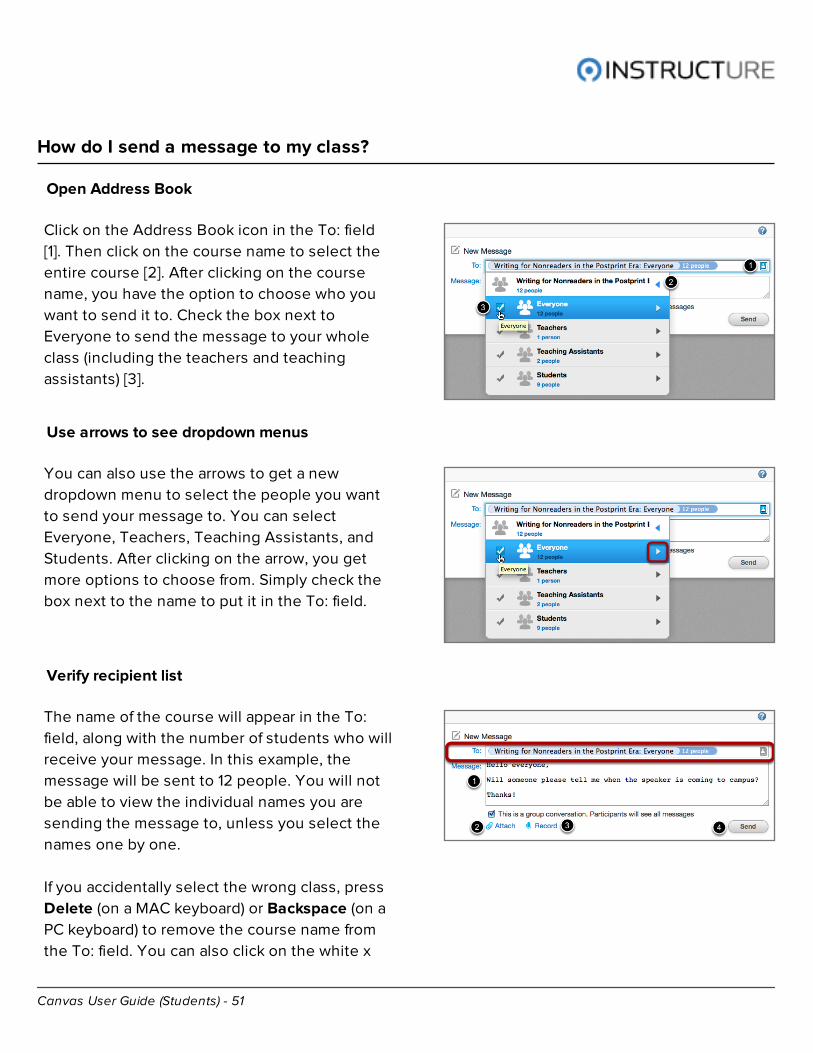
Open Address Book
Click on the Address Book icon in the To: field
[1]. Then click on the course name to select the
entire course [2]. After clicking on the course
name, you have the option to choose who you
want to send it to. Check the box next to
Everyone to send the message to your whole
class (including the teachers and teaching
assistants) [3].
Use arrows to see dropdown menus
You can also use the arrows to get a new
dropdown menu to select the people you want
to send your message to. You can select
Everyone, Teachers, Teaching Assistants, and
Students. After clicking on the arrow, you get
more options to choose from. Simply check the
box next to the name to put it in the To: field.
Verify recipient list
The name of the course will appear in the To:
field, along with the number of students who will
receive your message. In this example, the
message will be sent to 12 people. You will not
be able to view the individual names you are
sending the message to, unless you select the
names one by one.
If you accidentally select the wrong class, press
Delete (on a MAC keyboard) or Backspace (on a
PC keyboard) to remove the course name from
the To: field. You can also click on the white x
Canvas User Guide (Students) - 52
next to the course name.
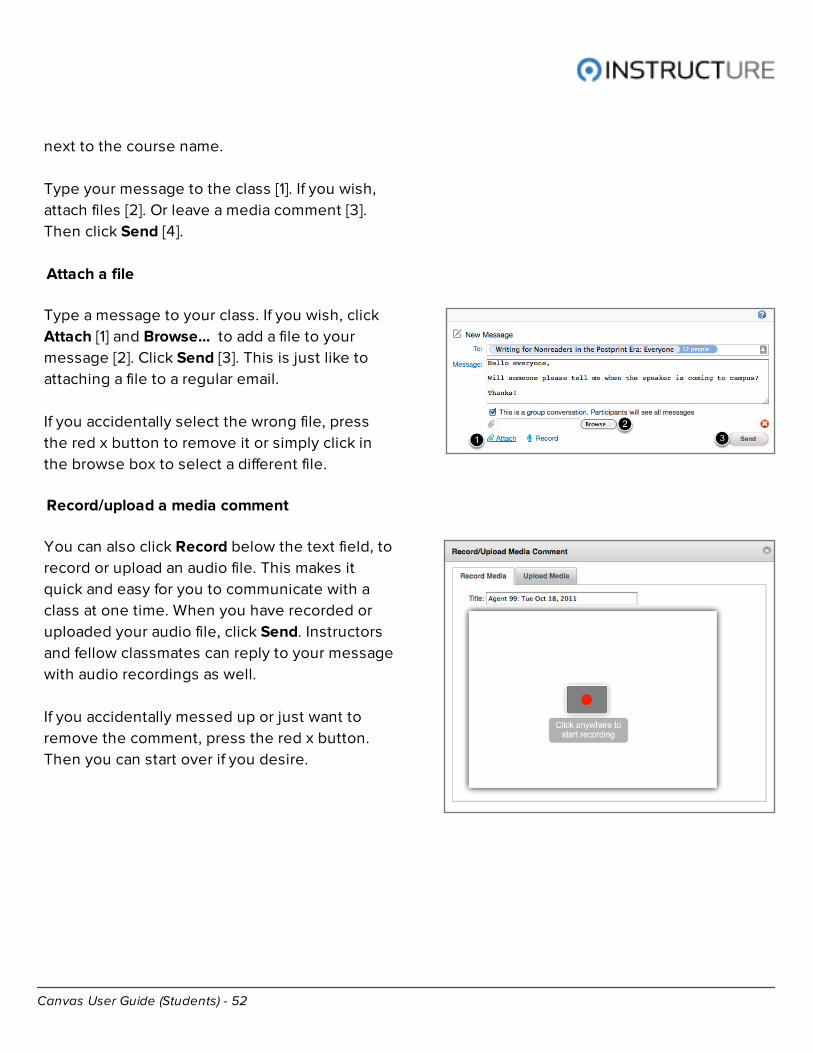
Type your message to the class [1]. If you wish,
attach files [2]. Or leave a media comment [3].
Then click Send [4].
Attach a file
Type a message to your class. If you wish, click
Attach [1] and Browse... to add a file to your
message [2]. Click Send [3]. This is just like to
attaching a file to a regular email.
If you accidentally select the wrong file, press
the red x button to remove it or simply click in
the browse box to select a different file.
Record/upload a media comment
You can also click Record below the text field, to
record or upload an audio file. This makes it
quick and easy for you to communicate with a
class at one time. When you have recorded or
uploaded your audio file, click Send. Instructors
and fellow classmates can reply to your message
with audio recordings as well.
If you accidentally messed up or just want to
remove the comment, press the red x button.
Then you can start over if you desire.
Canvas User Guide (Students) - 53
How do I delete a name from the To: field?
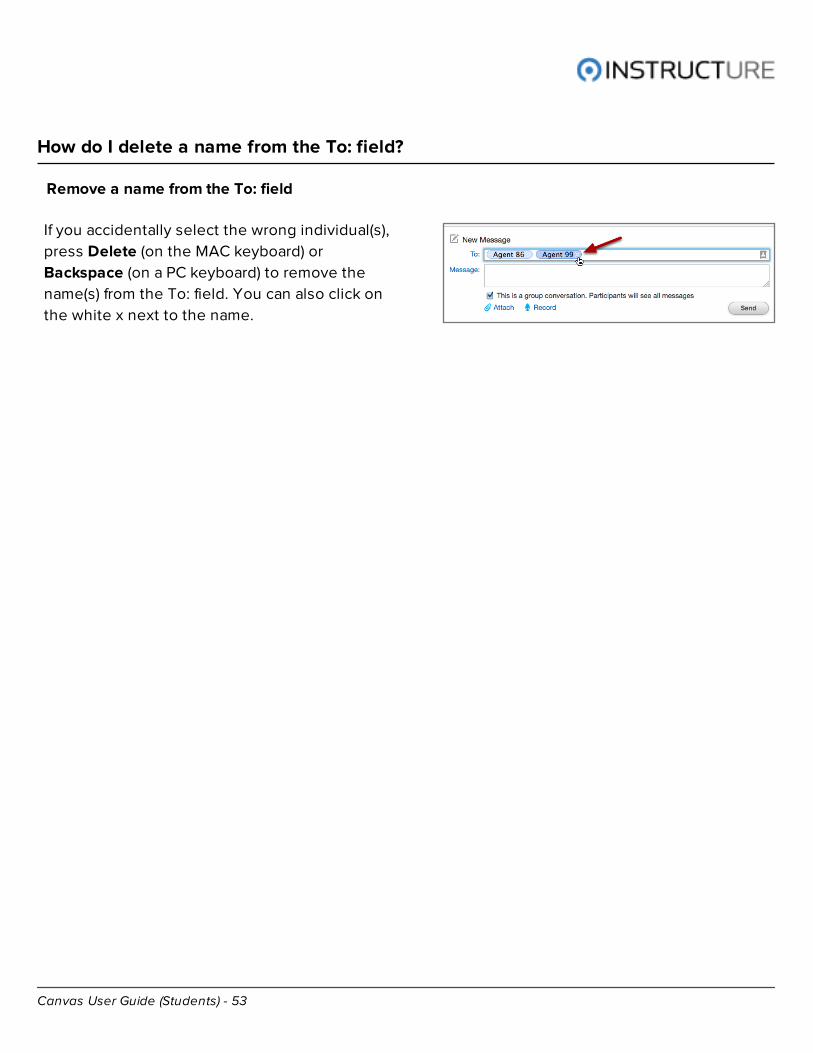
Remove a name from the To: field
If you accidentally select the wrong individual(s),
press Delete (on the MAC keyboard) or
Backspace (on a PC keyboard) to remove the
name(s) from the To: field. You can also click on
the white x next to the name.
Canvas User Guide (Students) - 54
Where is my original message in this Conversation?
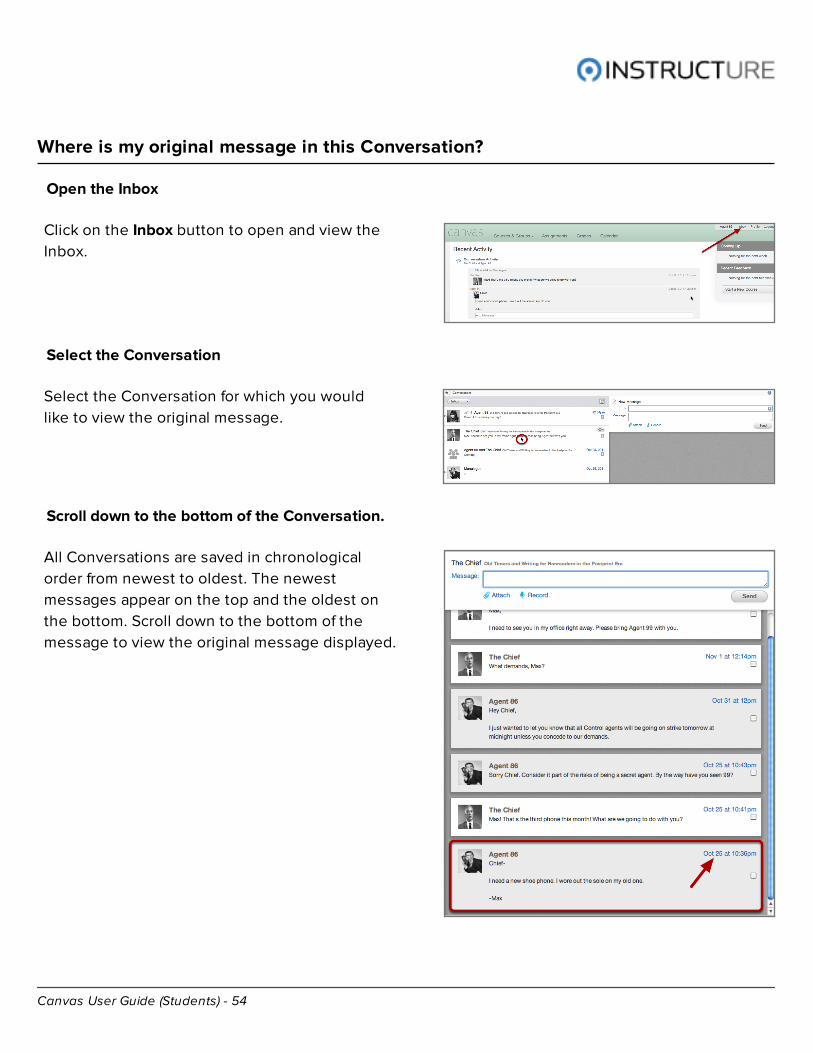
Open the Inbox
Click on the Inbox button to open and view the
Inbox.
Select the Conversation
Select the Conversation for which you would
like to view the original message.
Scroll down to the bottom of the Conversation.
All Conversations are saved in chronological
order from newest to oldest. The newest
messages appear on the top and the oldest on
the bottom. Scroll down to the bottom of the
message to view the original message displayed.
Canvas User Guide (Students) - 55
How do I attach a file to a message?
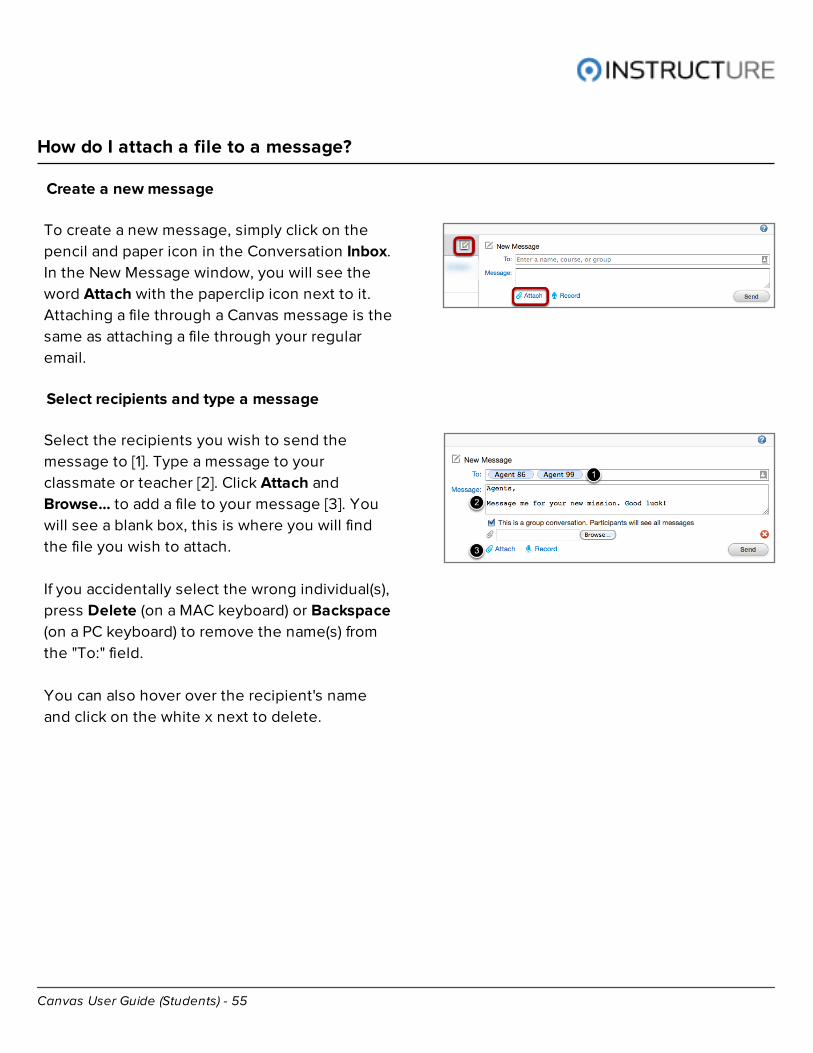
Create a new message
To create a new message, simply click on the
pencil and paper icon in the Conversation Inbox.
In the New Message window, you will see the
word Attach with the paperclip icon next to it.
Attaching a file through a Canvas message is the
same as attaching a file through your regular
email.
Select recipients and type a message
Select the recipients you wish to send the
message to [1]. Type a message to your
classmate or teacher [2]. Click Attach and
Browse... to add a file to your message [3]. You
will see a blank box, this is where you will find
the file you wish to attach.
If you accidentally select the wrong individual(s),
press Delete (on a MAC keyboard) or Backspace
(on a PC keyboard) to remove the name(s) from
the "To:" field.
You can also hover over the recipient's name
and click on the white x next to delete.
Canvas User Guide (Students) - 56
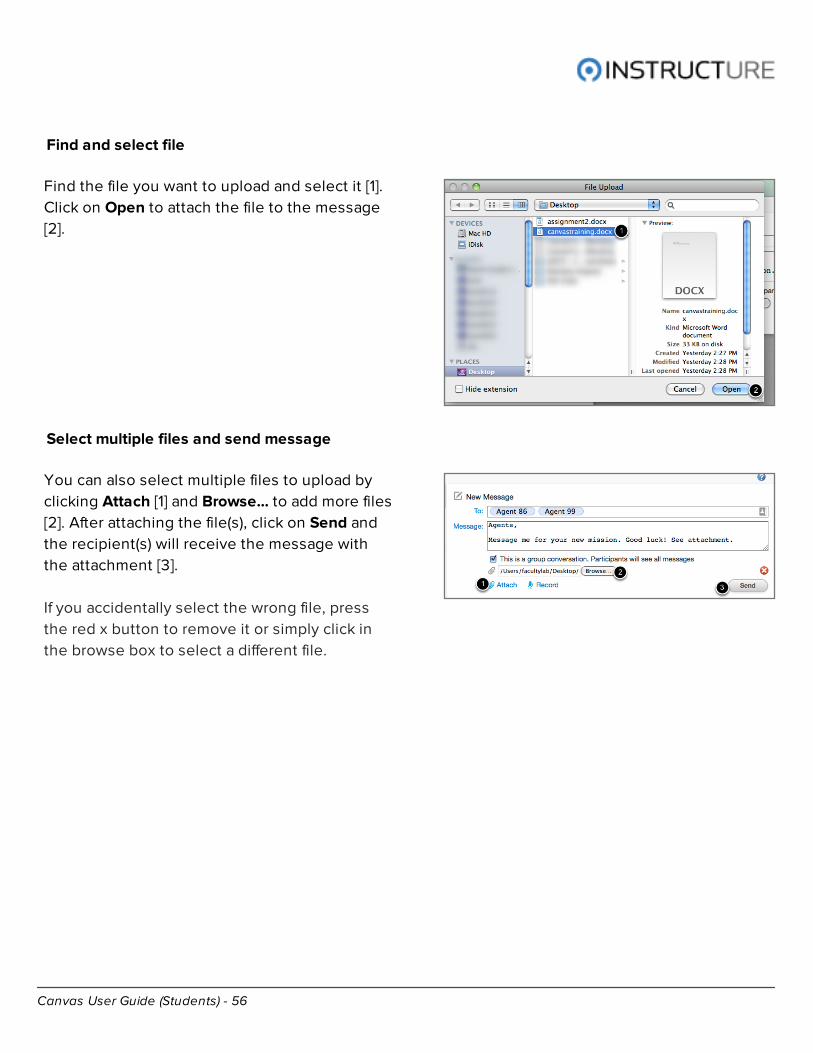
Find and select file
Find the file you want to upload and select it [1].
Click on Open to attach the file to the message
[2].
Select multiple files and send message
You can also select multiple files to upload by
clicking Attach [1] and Browse... to add more files
[2]. After attaching the file(s), click on Send and
the recipient(s) will receive the message with
the attachment [3].
If you accidentally select the wrong file, press
the red x button to remove it or simply click in
the browse box to select a different file.
Canvas User Guide (Students) - 57
How do I attach a media comment to my message?
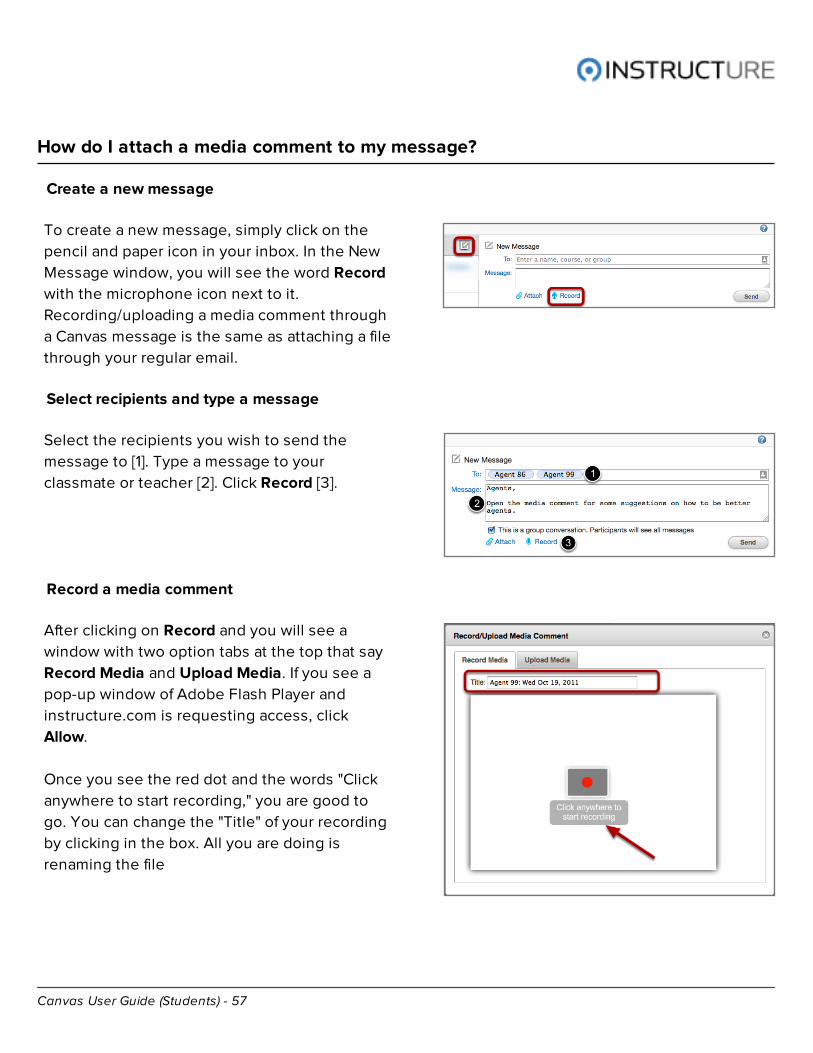
Create a new message
To create a new message, simply click on the
pencil and paper icon in your inbox. In the New
Message window, you will see the word Record
with the microphone icon next to it.
Recording/uploading a media comment through
a Canvas message is the same as attaching a file
through your regular email.
Select recipients and type a message
Select the recipients you wish to send the
message to [1]. Type a message to your
classmate or teacher [2]. Click Record [3].
Record a media comment
After clicking on Record and you will see a
window with two option tabs at the top that say
Record Media and Upload Media. If you see a
pop-up window of Adobe Flash Player and
instructure.com is requesting access, click
Allow.
Once you see the red dot and the words "Click
anywhere to start recording," you are good to
go. You can change the "Title" of your recording
by clicking in the box. All you are doing is
renaming the file
Canvas User Guide (Students) - 58
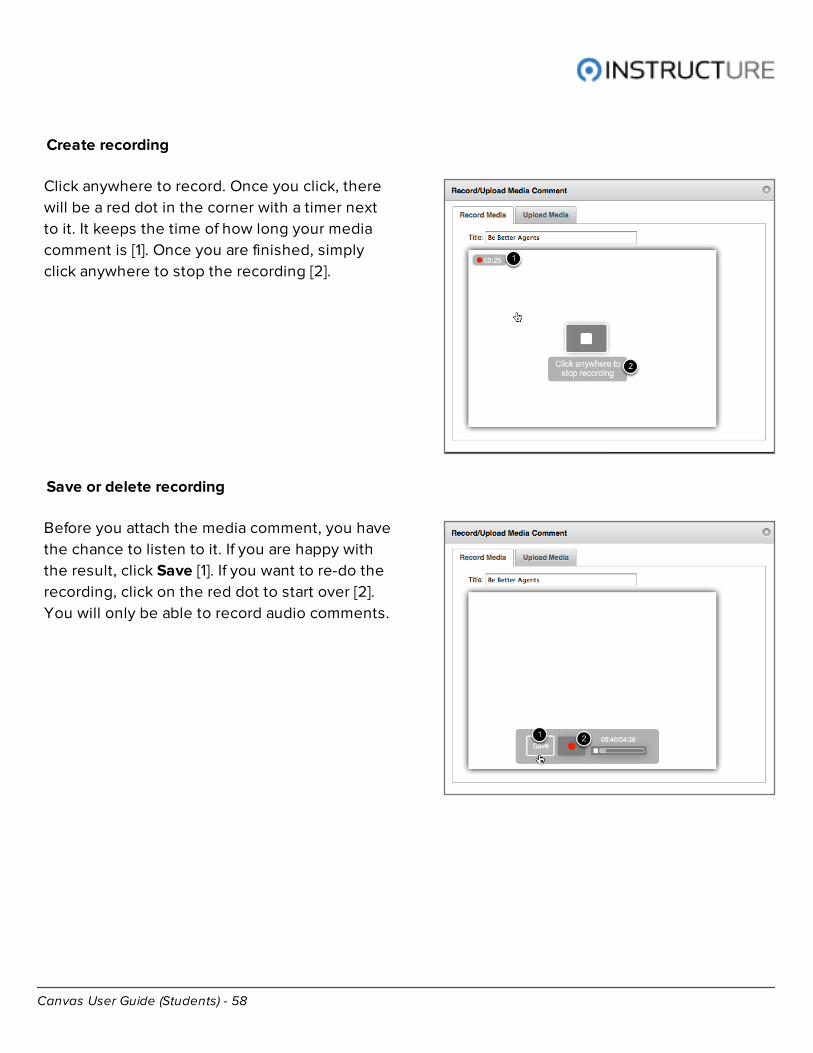
Create recording
Click anywhere to record. Once you click, there
will be a red dot in the corner with a timer next
to it. It keeps the time of how long your media
comment is [1]. Once you are finished, simply
click anywhere to stop the recording [2].
Save or delete recording
Before you attach the media comment, you have
the chance to listen to it. If you are happy with
the result, click Save [1]. If you want to re-do the
recording, click on the red dot to start over [2].
You will only be able to record audio comments.
Canvas User Guide (Students) - 59
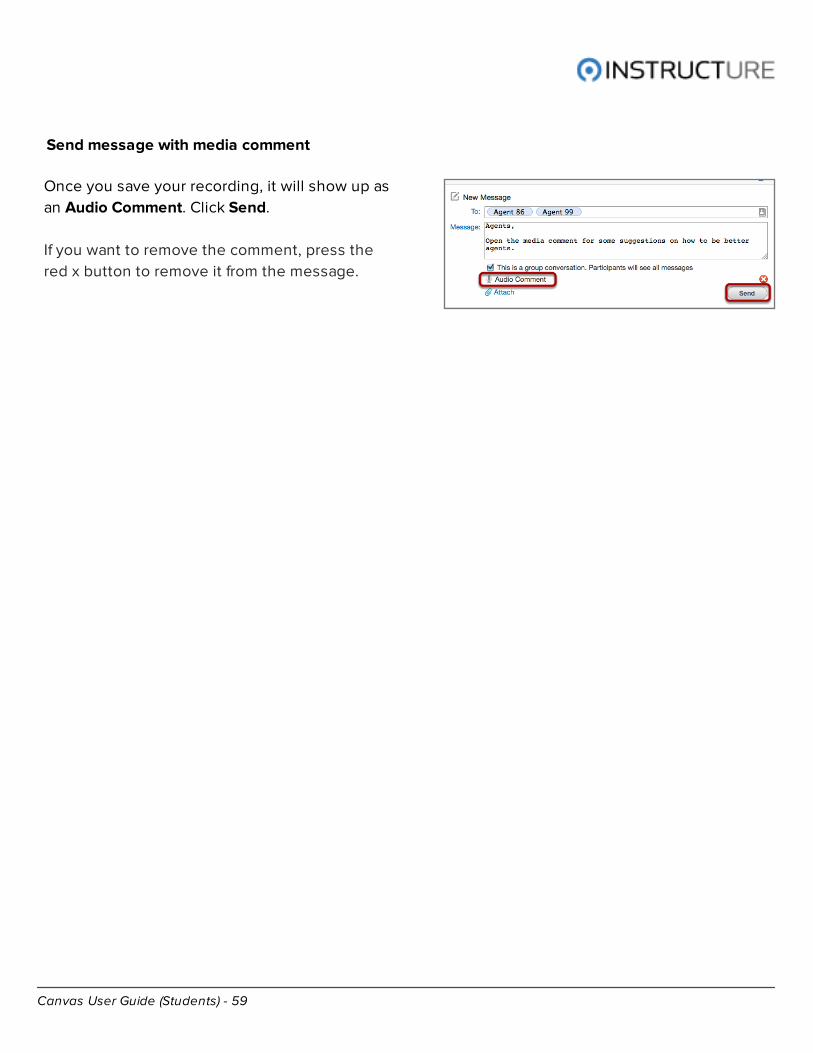
Send message with media comment
Once you save your recording, it will show up as
an Audio Comment. Click Send.
If you want to remove the comment, press the
red x button to remove it from the message.
Canvas User Guide (Students) - 60
Submitting Online Assignments
Canvas User Guide (Students) - 61
How do I submit an online assignment?
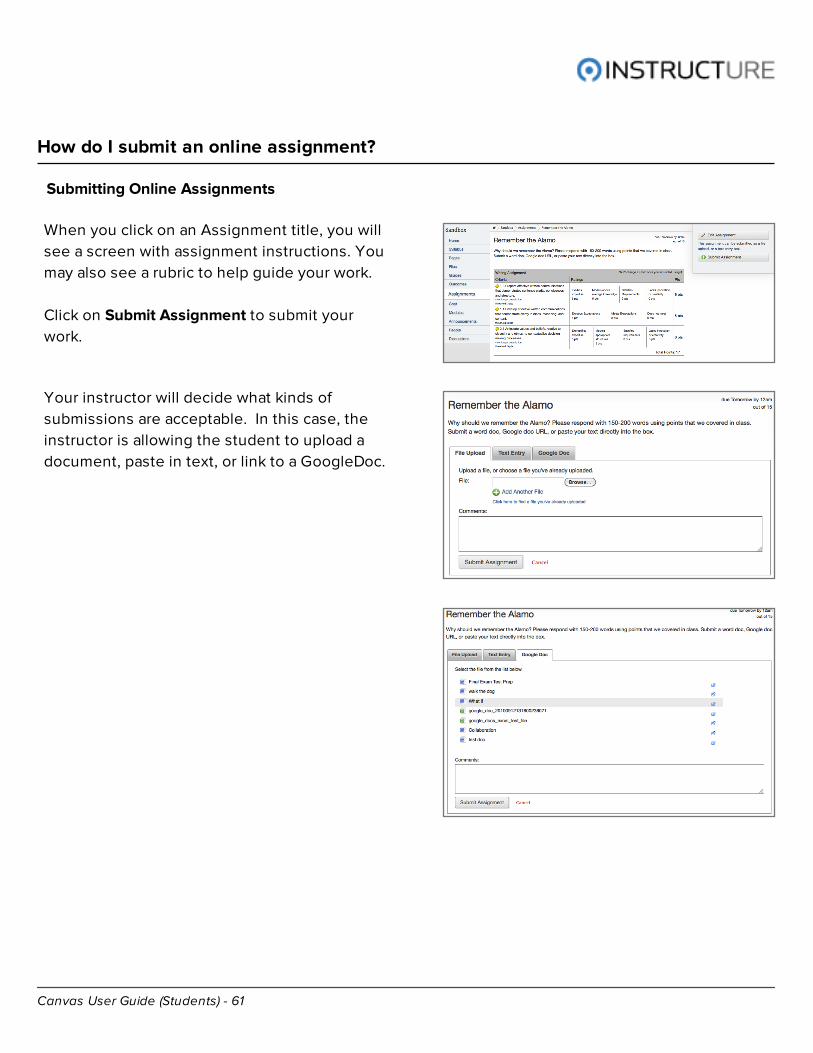
Submitting Online Assignments
When you click on an Assignment title, you will
see a screen with assignment instructions. You
may also see a rubric to help guide your work.
Click on Submit Assignment to submit your
work.
Your instructor will decide what kinds of
submissions are acceptable. In this case, the
instructor is allowing the student to upload a
document, paste in text, or link to a GoogleDoc.
Canvas User Guide (Students) - 62
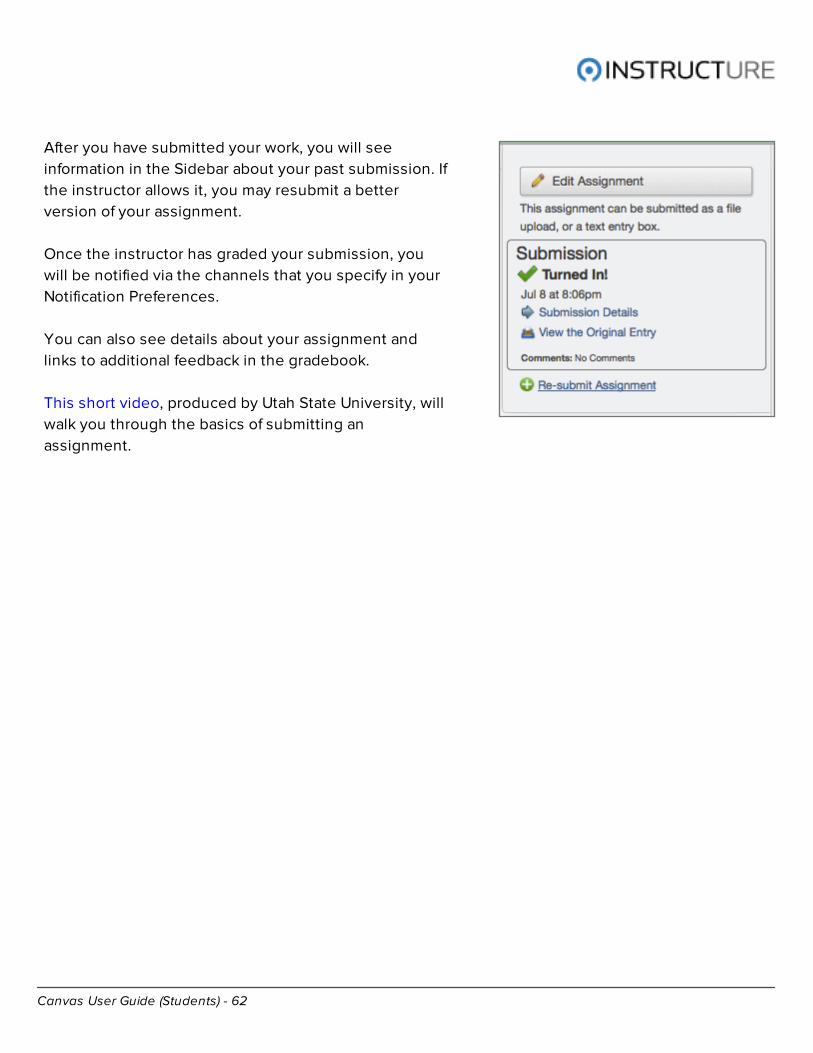
After you have submitted your work, you will see
information in the Sidebar about your past submission. If
the instructor allows it, you may resubmit a better
version of your assignment.
Once the instructor has graded your submission, you
will be notified via the channels that you specify in your
Notification Preferences.
You can also see details about your assignment and
links to additional feedback in the gradebook.
This short video, produced by Utah State University, will
walk you through the basics of submitting an
assignment.
Canvas User Guide (Students) - 63
Giving and Receiving Feedback
Canvas User Guide (Students) - 64
Where are my grades?
Checking Grades
As a Student using Canvas, accessing your grades is simple and easy.
Follow these simple steps below to access your gradebook.
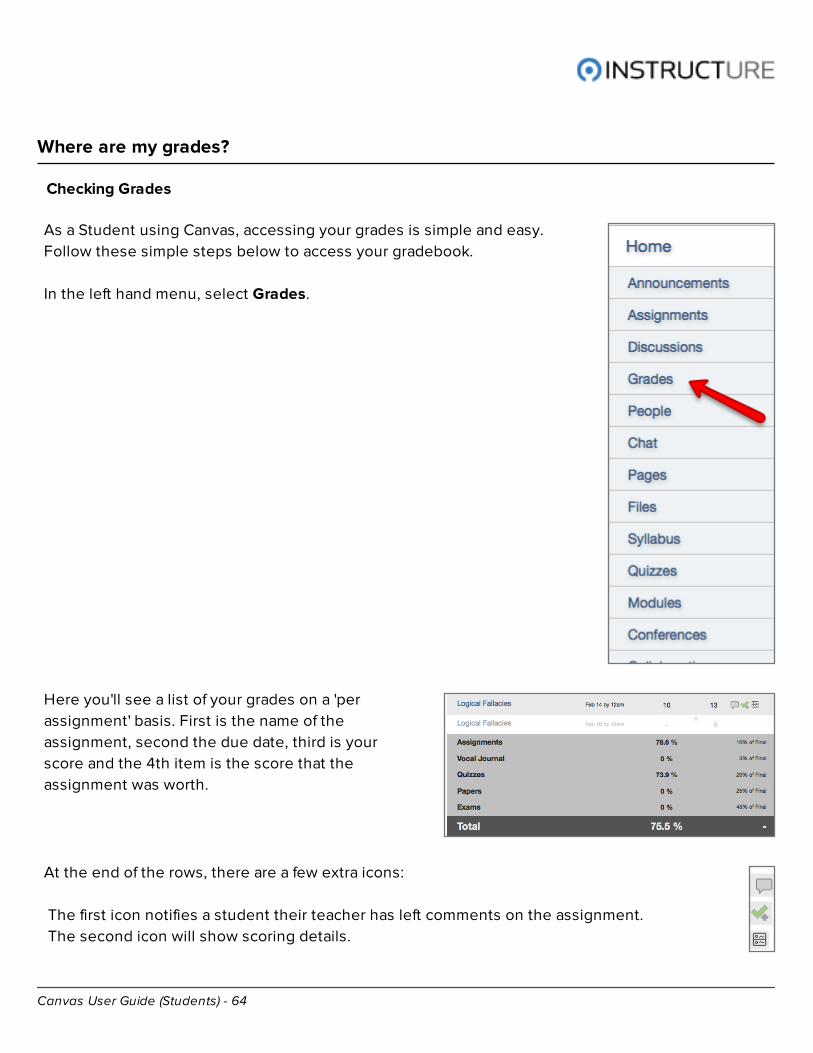
In the left hand menu, select Grades.
Here you'll see a list of your grades on a 'per
assignment' basis. First is the name of the
assignment, second the due date, third is your
score and the 4th item is the score that the
assignment was worth.
At the end of the rows, there are a few extra icons:
The first icon notifies a student their teacher has left comments on the assignment.
The second icon will show scoring details.
Canvas User Guide (Students) - 65
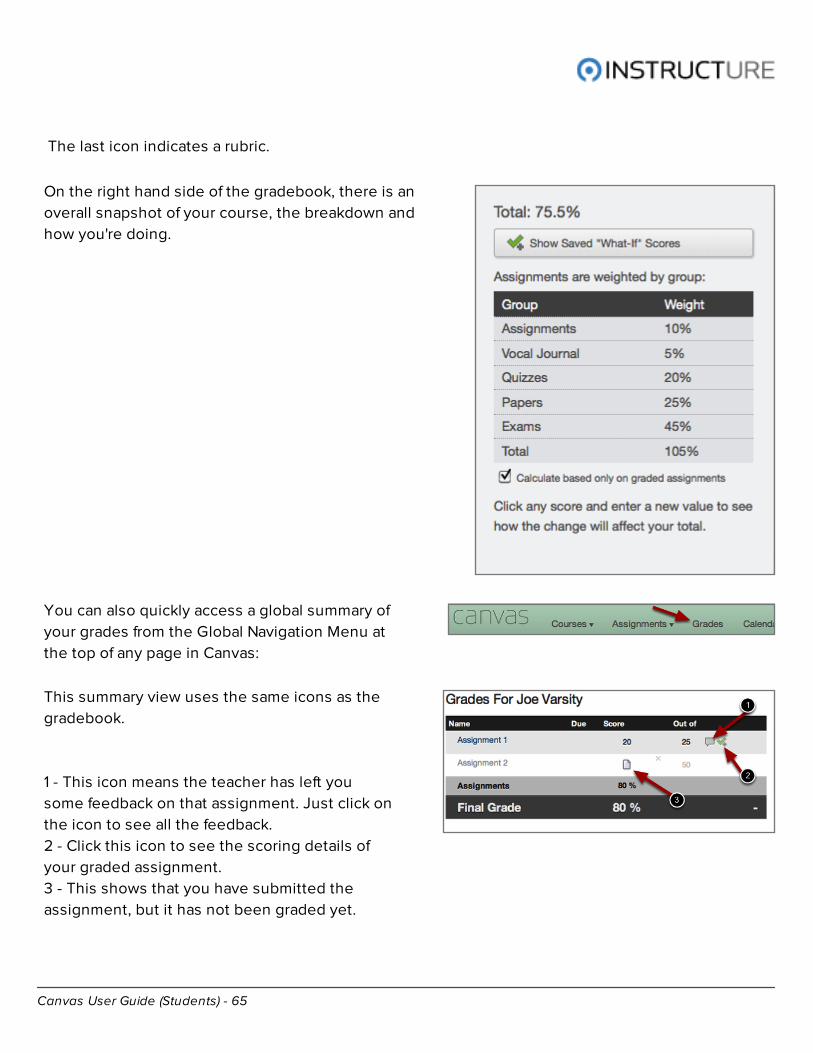
The last icon indicates a rubric.
On the right hand side of the gradebook, there is an
overall snapshot of your course, the breakdown and
how you're doing.
You can also quickly access a global summary of
your grades from the Global Navigation Menu at
the top of any page in Canvas:
This summary view uses the same icons as the
gradebook.
1 - This icon means the teacher has left you
some feedback on that assignment. Just click on
the icon to see all the feedback.
2 - Click this icon to see the scoring details of
your graded assignment.
3 - This shows that you have submitted the
assignment, but it has not been graded yet.

Canvas User Guide (Students) - 66
Taking Quizzes

Canvas User Guide (Students) - 67
How do I take a quiz?
Taking a quiz in Canvas is simple and straightforward. Start by clicking
on the 'Quizzes' link in the menu.
Here you'll see a list of quizzes for the course.
For each of these quizzes you'll see a due date
(if there is one) as well as the point value and
some other details about it.
Find the quiz you'd like to take and click on the
title of the quiz.
Canvas User Guide (Students) - 68
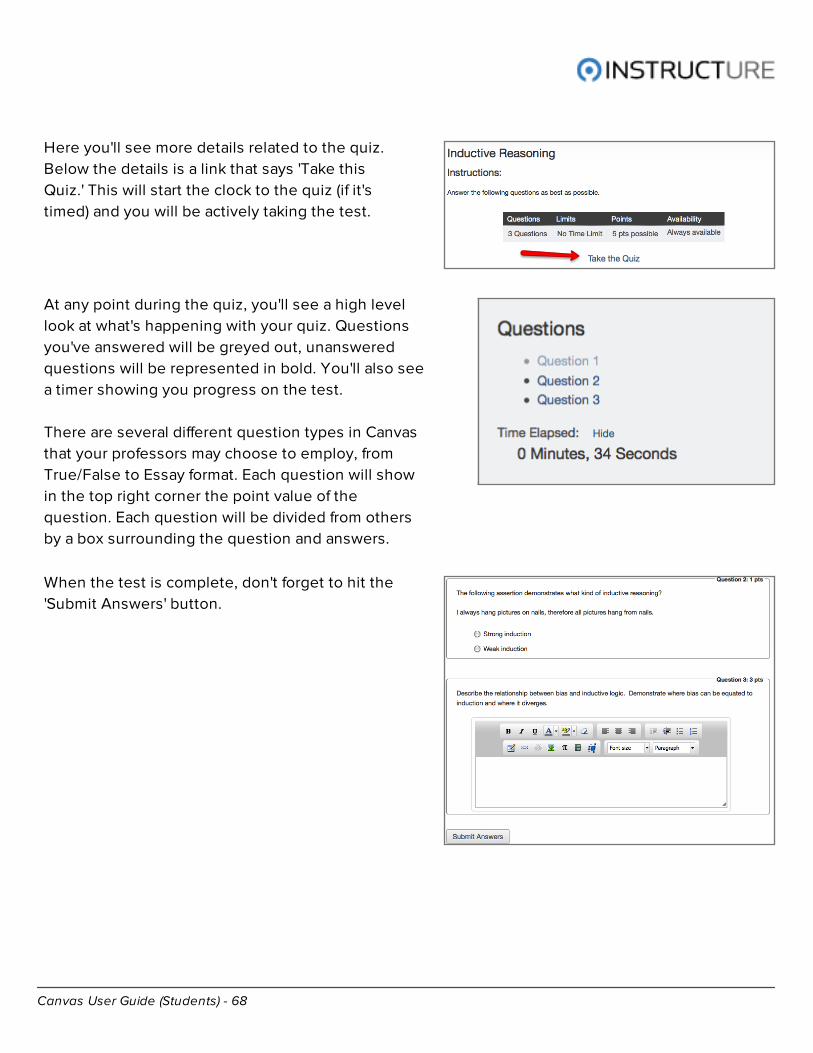
Here you'll see more details related to the quiz.
Below the details is a link that says 'Take this
Quiz.' This will start the clock to the quiz (if it's
timed) and you will be actively taking the test.
At any point during the quiz, you'll see a high level
look at what's happening with your quiz. Questions
you've answered will be greyed out, unanswered
questions will be represented in bold. You'll also see
a timer showing you progress on the test.
There are several different question types in Canvas
that your professors may choose to employ, from
True/False to Essay format. Each question will show
in the top right corner the point value of the
question. Each question will be divided from others
by a box surrounding the question and answers.
When the test is complete, don't forget to hit the
'Submit Answers' button.
Canvas User Guide (Students) - 69
Viewing Quiz Results
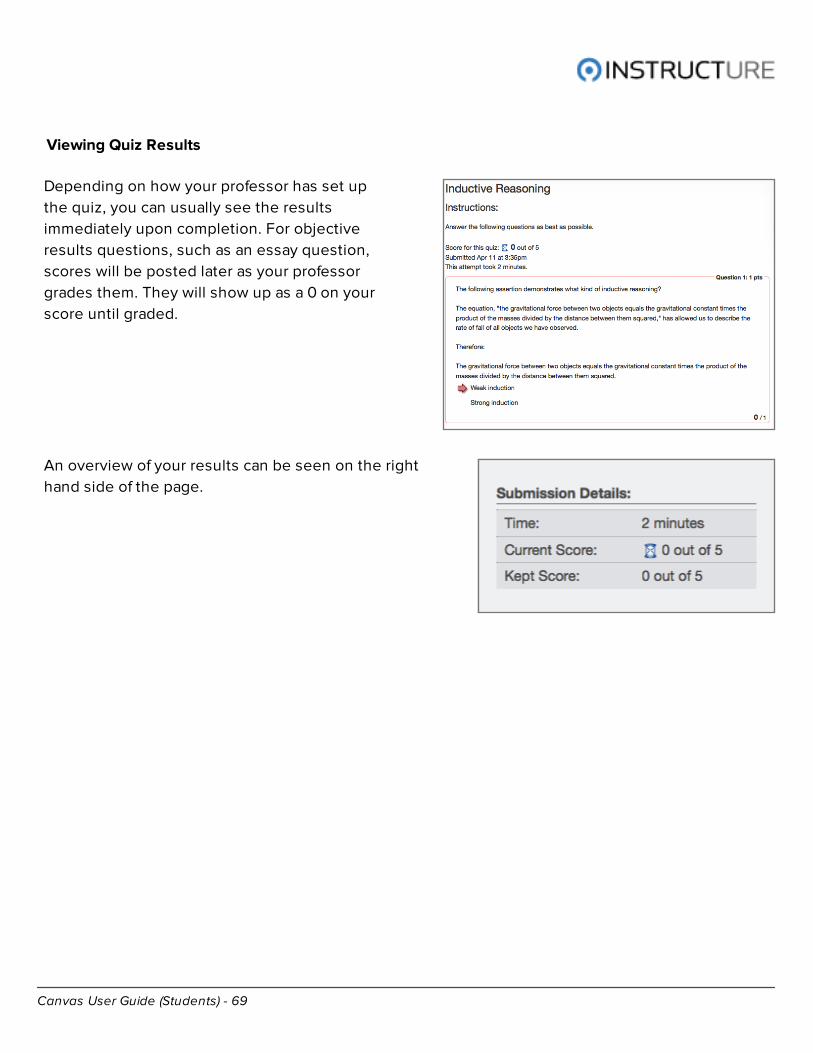
Depending on how your professor has set up
the quiz, you can usually see the results
immediately upon completion. For objective
results questions, such as an essay question,
scores will be posted later as your professor
grades them. They will show up as a 0 on your
score until graded.
An overview of your results can be seen on the right
hand side of the page.
Canvas User Guide (Students) - 70
Collaborating in Groups
Canvas User Guide (Students) - 71
How do I create a student group?
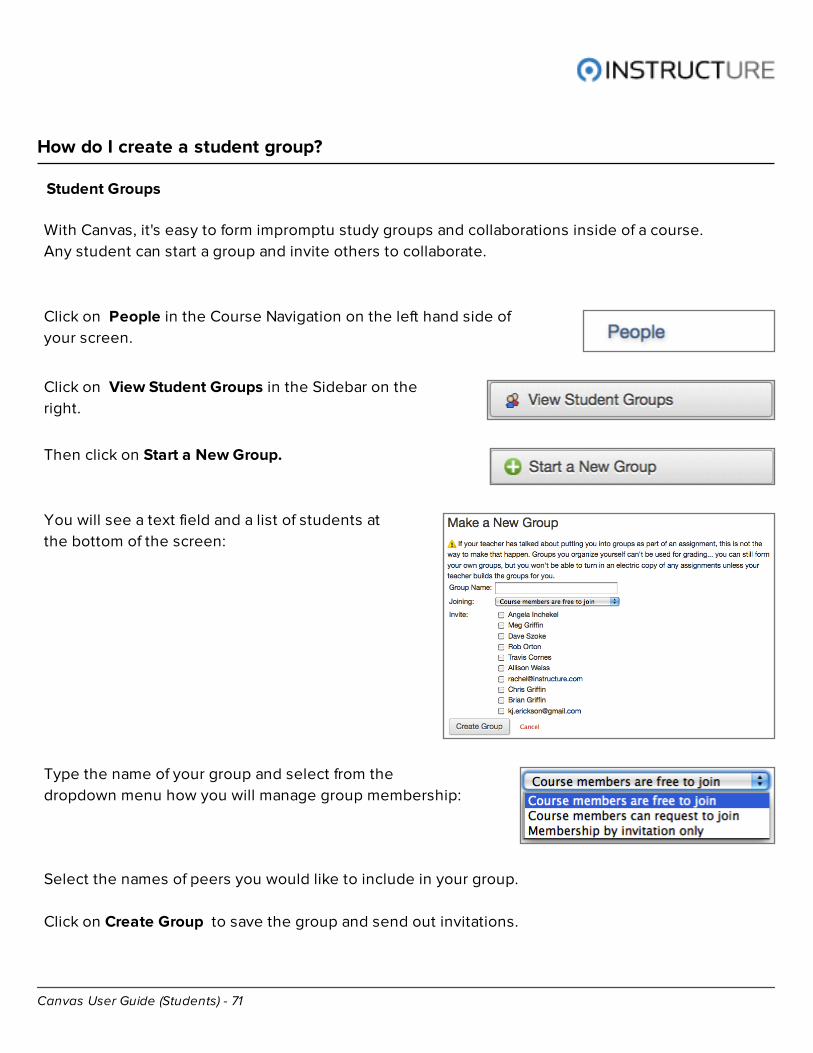
Student Groups
With Canvas, it's easy to form impromptu study groups and collaborations inside of a course.
Any student can start a group and invite others to collaborate.
Click on People in the Course Navigation on the left hand side of
your screen.
Click on View Student Groups in the Sidebar on the
right.
Then click on Start a New Group.
You will see a text field and a list of students at
the bottom of the screen:
Type the name of your group and select from the
dropdown menu how you will manage group membership:
Select the names of peers you would like to include in your group.
Click on Create Group to save the group and send out invitations.
Canvas User Guide (Students) - 72
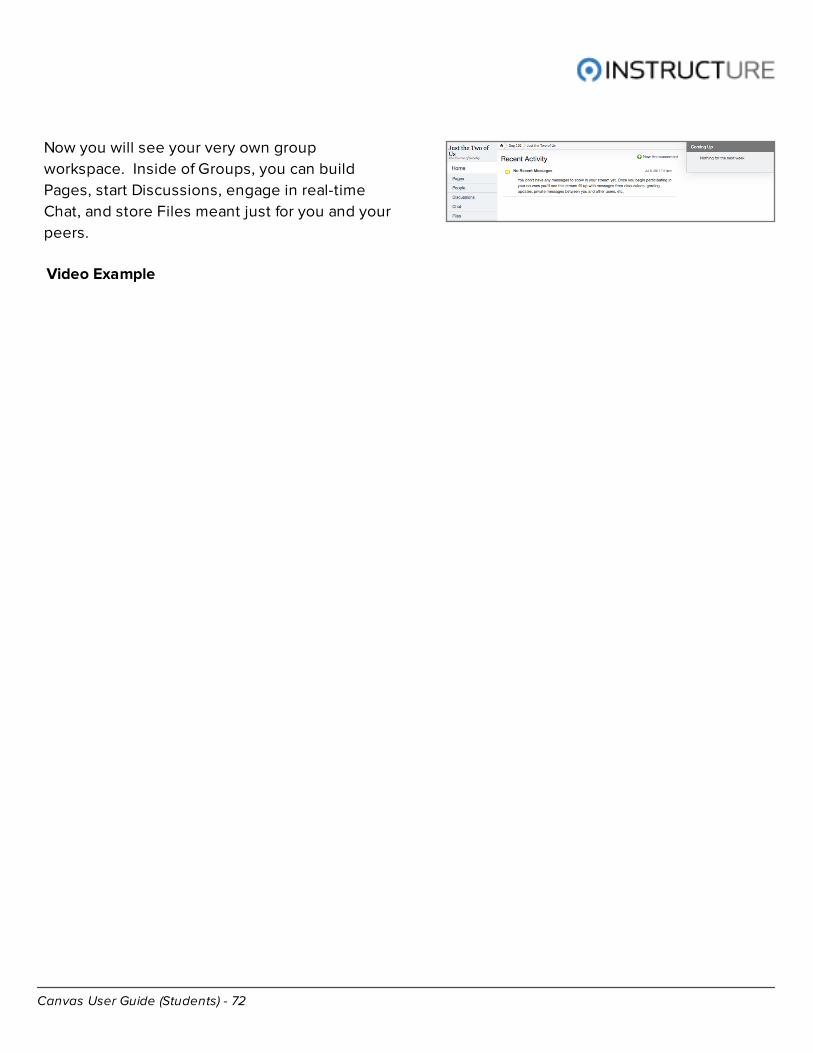
Now you will see your very own group
workspace. Inside of Groups, you can build
Pages, start Discussions, engage in real-time
Chat, and store Files meant just for you and your
peers.
Video Example
Canvas User Guide (Students) - 73
Managing Assignments and Events in the
Calendar
Canvas User Guide (Students) - 74
How do I add a personal event to the Calendar?
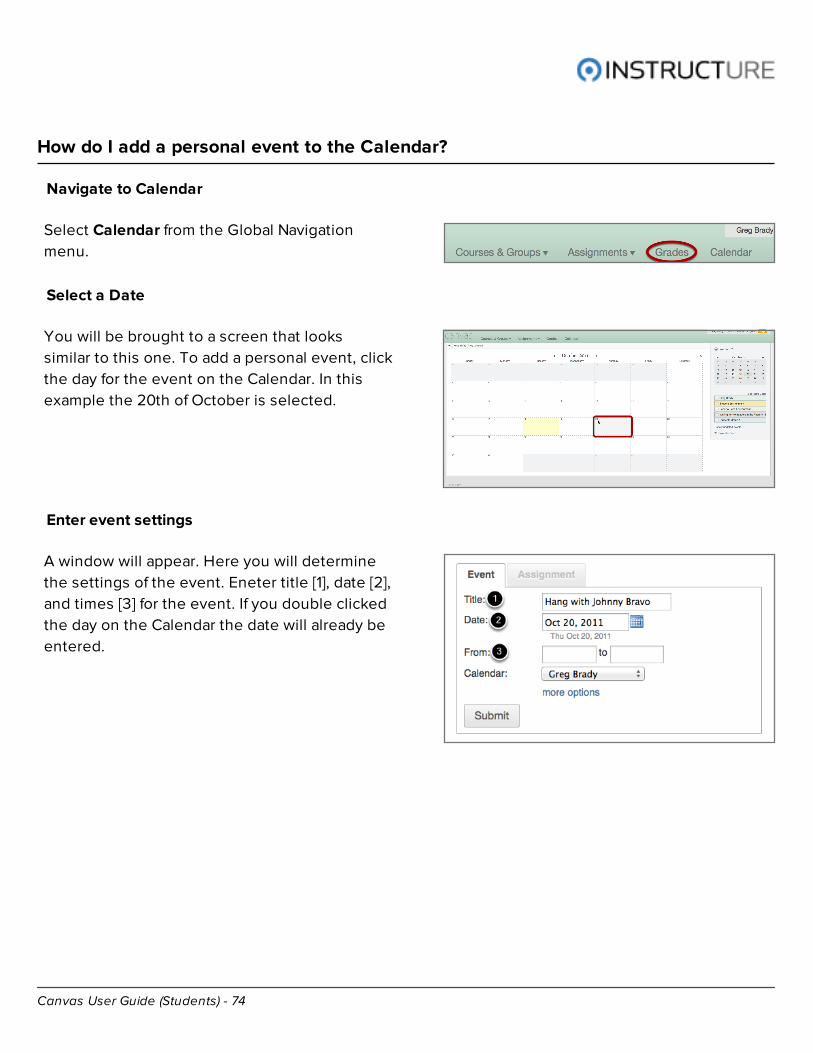
Navigate to Calendar
Select Calendar from the Global Navigation
menu.
Select a Date
You will be brought to a screen that looks
similar to this one. To add a personal event, click
the day for the event on the Calendar. In this
example the 20th of October is selected.
Enter event settings
A window will appear. Here you will determine
the settings of the event. Eneter title [1], date [2],
and times [3] for the event. If you double clicked
the day on the Calendar the date will already be
entered.
Canvas User Guide (Students) - 75
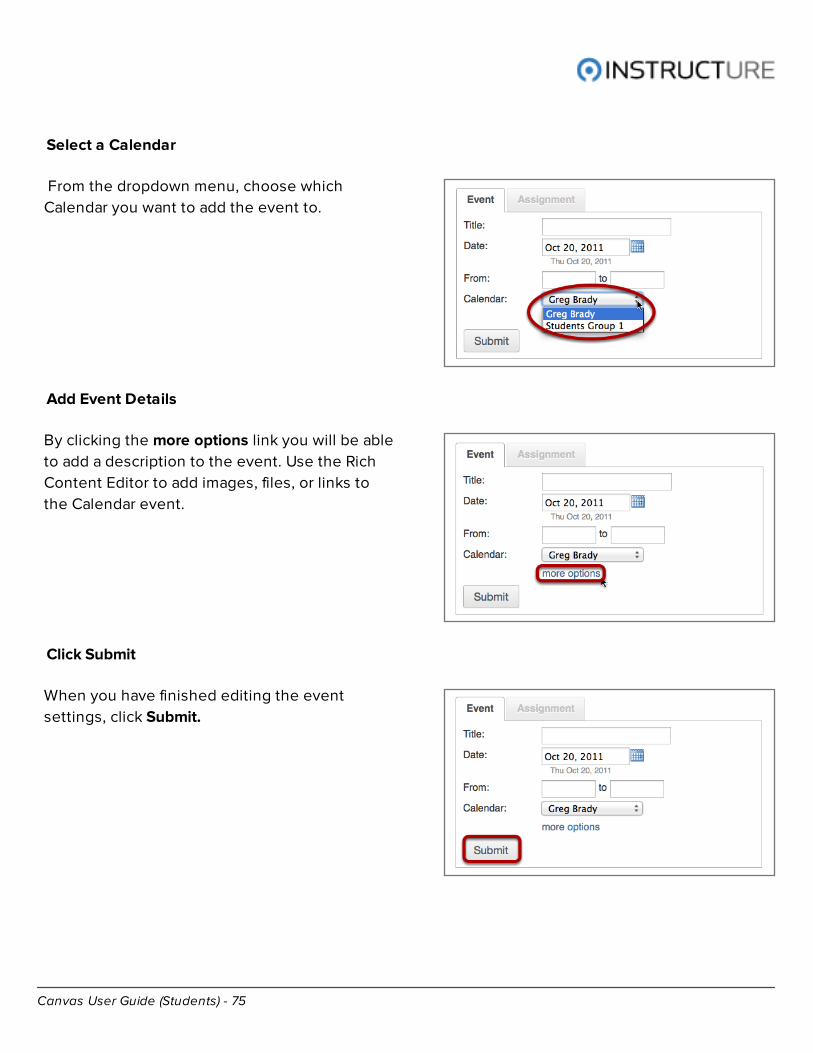
Select a Calendar
From the dropdown menu, choose which
Calendar you want to add the event to.
Add Event Details
By clicking the more options link you will be able
to add a description to the event. Use the Rich
Content Editor to add images, files, or links to
the Calendar event.
Click Submit
When you have finished editing the event
settings, click Submit.
Canvas User Guide (Students) - 76
View Calendar Event
The event will now show on the Calendar. And
you're done!

Canvas User Guide (Students) - 77
Uploading, Viewing and Sharing Files
Canvas User Guide (Students) - 78
How does file storage work?
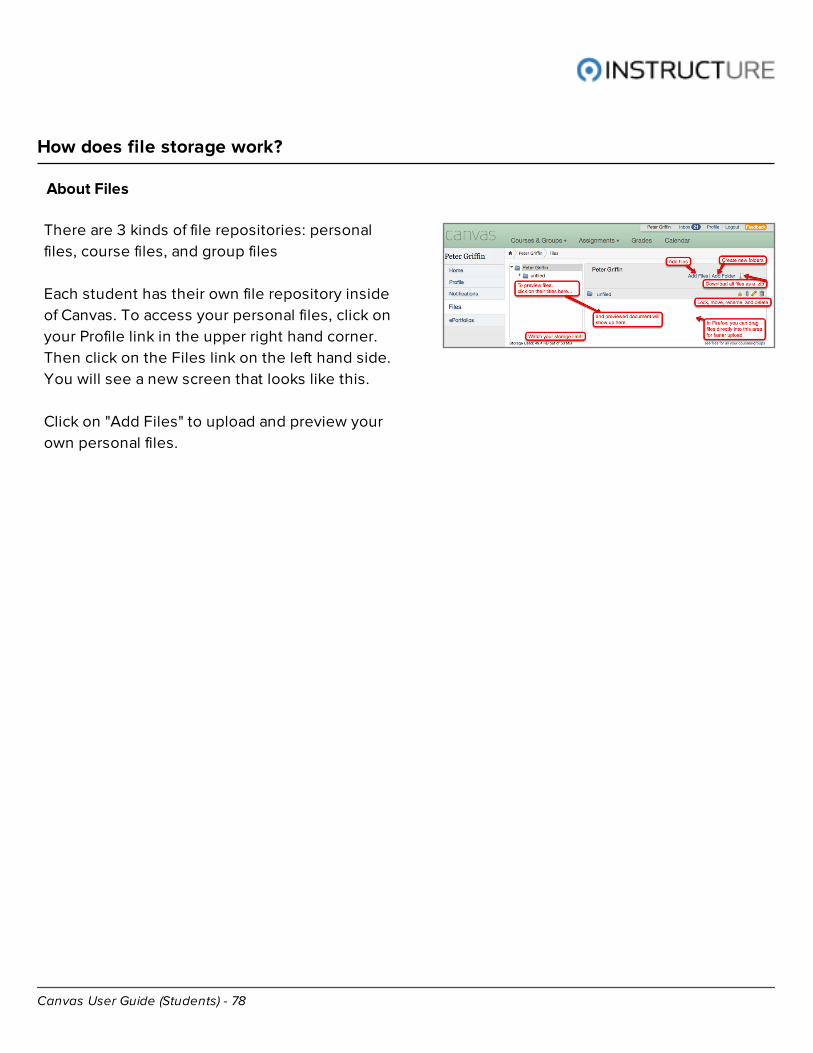
About Files
There are 3 kinds of file repositories: personal
files, course files, and group files
Each student has their own file repository inside
of Canvas. To access your personal files, click on
your Profile link in the upper right hand corner.
Then click on the Files link on the left hand side.
You will see a new screen that looks like this.
Click on "Add Files" to upload and preview your
own personal files.

Canvas User Guide (Students) - 79
Creating ePortfolios

Canvas User Guide (Students) - 80
What is an ePortfolio?
Showcase your best work
An ePortfolio is a place for you to showcase your
good work from a course or academic program.
ePortfolios can be used for course projects, but
they can also be used by student organizations
to create a simple web presence.
ePortfolios in Canvas are basic websites divided
into Sections (left-hand navigation) [1] and Pages
(right-hand navigation) [2] nested inside of each
Section.