Embed Size (px)
Citation preview
Capstone PXE – Spring 2011 – Page 1
Capstone PXE Server Documentation
Thomas Borowiec Taylor Beeson
Tyler Cobb Jared Jones
Capstone PXE – Spring 2011 – Page 2
Table of Contents Section Page(s)
I. Build: Requirements………………………………………………………………………………………………………………………. 3 Configuration & Setup…………………………………………………………………………………………………………. 3-5 Webmin Preparation & Installation……………………………………………………………………………………... 5-6
II. Usage: Start Up……………………………………………………………………………………………………………………………….. 7-8 Adding & Updating Images – Introduction…………………………………………………………………………... 9-12 Adding & Updating Images – Process…………………………………………………………………………………... 13-16 Adding Menus……………………………………………………………………………………………………………………... 17 Updating Menus………………………………………………………………………………………………………………….. 18
III. Support: Known Issues……………………………………………………………………………………………………………………….. 19 Sources………………………………………………………………………………………………………………………………… 20

Capstone PXE – Spring 2011 – Page 3
I. Build
Requirements Ubuntu 9.10 TFTP: sudo apt-get install tftpd-hpa DHCP: sudo apt-get install dhcp3-server NFS: sudo apt-get install nfs-kernel-server
Configuration & Setup TFTP:
- The tftpd-hpa file located in /etc/default should look like this: #Defaults for tftpd-hpa
RUN_DAEMON="yes"
OPTIONS="-l -s /var/lib/tftpboot"
- Copy the vesamenu.c32 and pxelinux.0 from syslinux to your directory:
sudo cp /usr/lib/syslinux/vesamenu.c32 /var/lib/tftpboot/
sudo cp /usr/lib/syslinux/pxelinux.0 /var/lib/tftpboot/
- Create the pxelinux default configuration file:
sudo touch /var/lib/tftpboot/pxelinux.cfg/default [NOTE: You may have to create the pxelinux.cfg folder before creating the default configuration file.] sudo mkdir /var/lib/tftpboot/pxelinux.cfg DHCP:
- The dhcpd.conf file located in /etc/dhcp3 should look like this:
ddns-update-style none;
allow booting;
allow bootp;
option domain-name-servers 8.8.8.8, 8.8.4.4;
default-lease-time 86400;
max-lease-time 604800;
authoritative;
subnet 192.168.25.0 netmask 255.255.255.0 {
range 192.168.25.140 192.168.25.240;
option subnet-mask 255.255.255.0;
option broadcast-address 192.168.25.255;
option routers 192.168.25.1;
filename "pxelinux.0";
next-server 192.168.25.1;
}
host nfsroot {
fixed-address 192.168.25.5;
option routers 192.168.25.1;
option subnet-mask 255.255.255.0;
option broadcast-address 192.168.25.255;
option host-name "nfsroot";
filename "pxelinux.0";
option root-path "/srv/install";
next-server 192.168.25.10;
}

Capstone PXE – Spring 2011 – Page 4
- Set the IP address of your Server to the IP you have set for "next-server" configuration above: 1. Right click your Network Connections at the top right of your screen. 2. Select "Edit Connections..." 3. Select the "Wired" tab. 4. Click on the "IPv4 Settings" tab and set the "Method:" to "Manual" 5. Enter the following values: Address: 192.168.25.1 Netmask: 255.255.255.0 Gateway: 0.0.0.0 (or replace it with a valid one if you have one) 6. Hit "Apply" and close the Network Connections window.
- To apply your IP: 1. Click on Network Connections in the top right of your screen. 2. Select the name of the wired connection if you specified one (in our case it’s PXE) 3. Let Ubuntu disconnect the current connection and apply the one you’ve selected. 4. Right click Network Connections, select "Connection Information" to see if your IP address is set to
your specified IP.
Capstone PXE – Spring 2011 – Page 5
NFS: - Make a directory where you want your NFS share to be located:
sudo mkdir /srv/install
- Edit /etc/exports to make your directory available for install:
/srv/install 192.168.25.0/24(ro,async,no_root_squash,no_subtree_check)
- Export or restart the NFS server to accept the changes:
sudo exportfs -a
Webmin Preparation & Installation
- First install the dependencies
sudo aptitude -y install perl libnet-ssleay-perl openssl libauthen-pam-perl libpam-runtime libio-
pty-perl libmd5-perl apt-show-versions libapt-pkg-perl
- If you get an error saying:
Couldn't find any package whose name or description matched "libmd5-perl"
o Then you will have to download the libmd5-perl .deb file and install it manually from the link below:
http://ftp.debian.org/pool/main/libm/libmd5-perl/
o This can be done by running the following commands:
wget http://ftp.debian.org/pool/main/libm/libmd5-perl/libmd5-perl_2.03-1_all.deb
sudo dpkg -i libmd5-perl_2.03-1_all.deb
- Install Webmin
1. First download the most recent .deb package from:
http://sourceforge.net/projects/webadmin/files/
2. Take the download link from the download mirror and copy and paste it into the terminal along with wget.
wget http://downloads.sourceforge.net/project/webadmin/webmin/1.510/webmin_1.510-
2_all.deb?use_mirror=cdnetworks-us-1
3. Once the package is downloaded, run the following command to install it.
sudo dpkg -i webmin_1.510-2_all.deb
4. After installation, you should see the following message in the terminal:
Webmin install complete. You can now login to https://example.com:10000/
as root with your root password, or as any user who can use sudo
to run commands as root.
Capstone PXE – Spring 2011 – Page 6
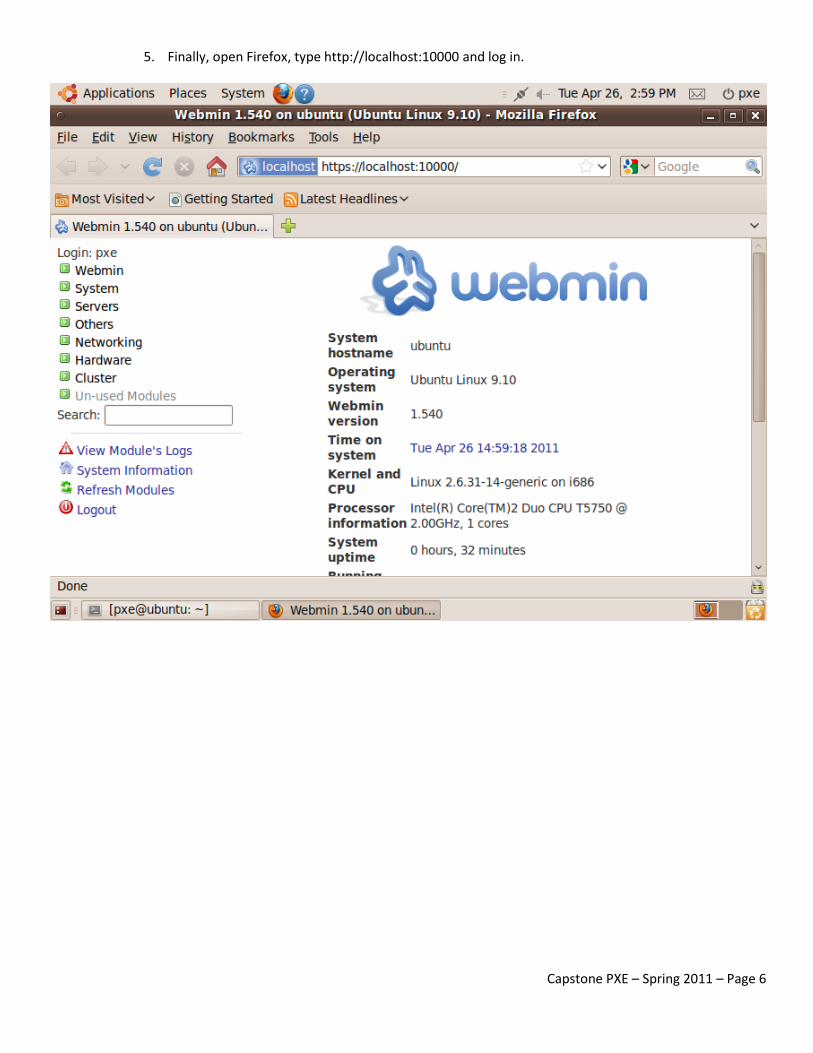
5. Finally, open Firefox, type http://localhost:10000 and log in.
Capstone PXE – Spring 2011 – Page 7
II. Usage
Start Up
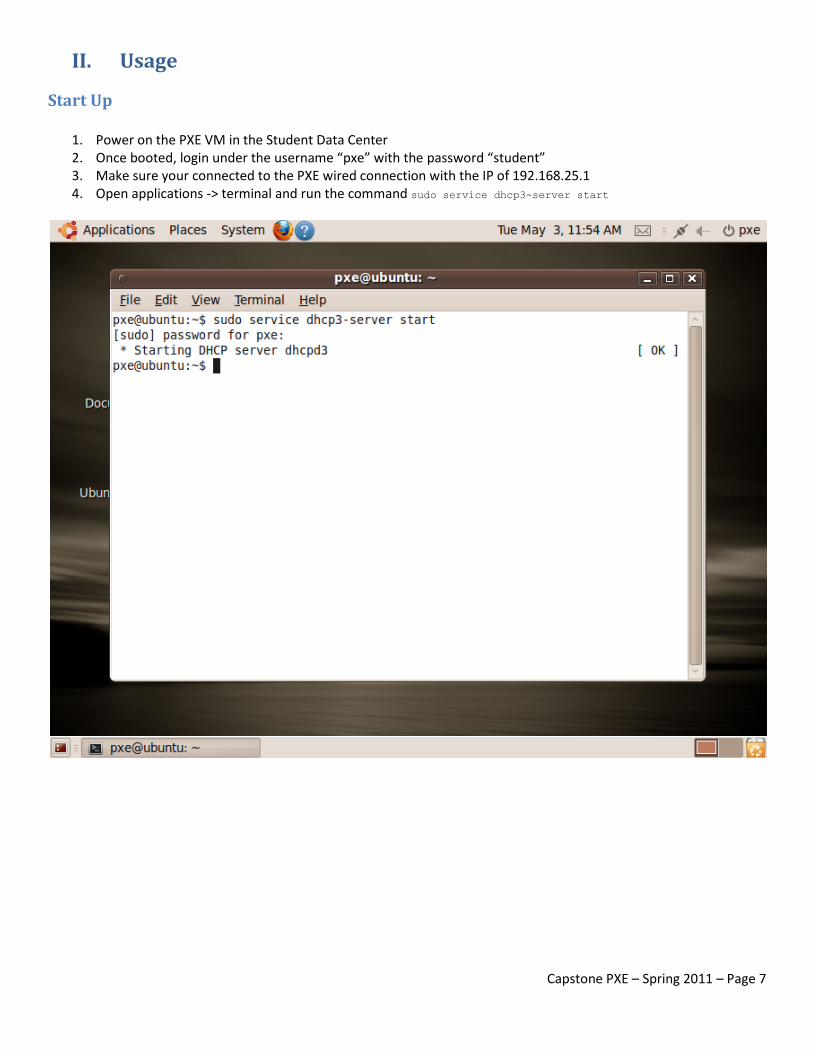
1. Power on the PXE VM in the Student Data Center 2. Once booted, login under the username “pxe” with the password “student” 3. Make sure your connected to the PXE wired connection with the IP of 192.168.25.1 4. Open applications -> terminal and run the command sudo service dhcp3-server start
Capstone PXE – Spring 2011 – Page 8
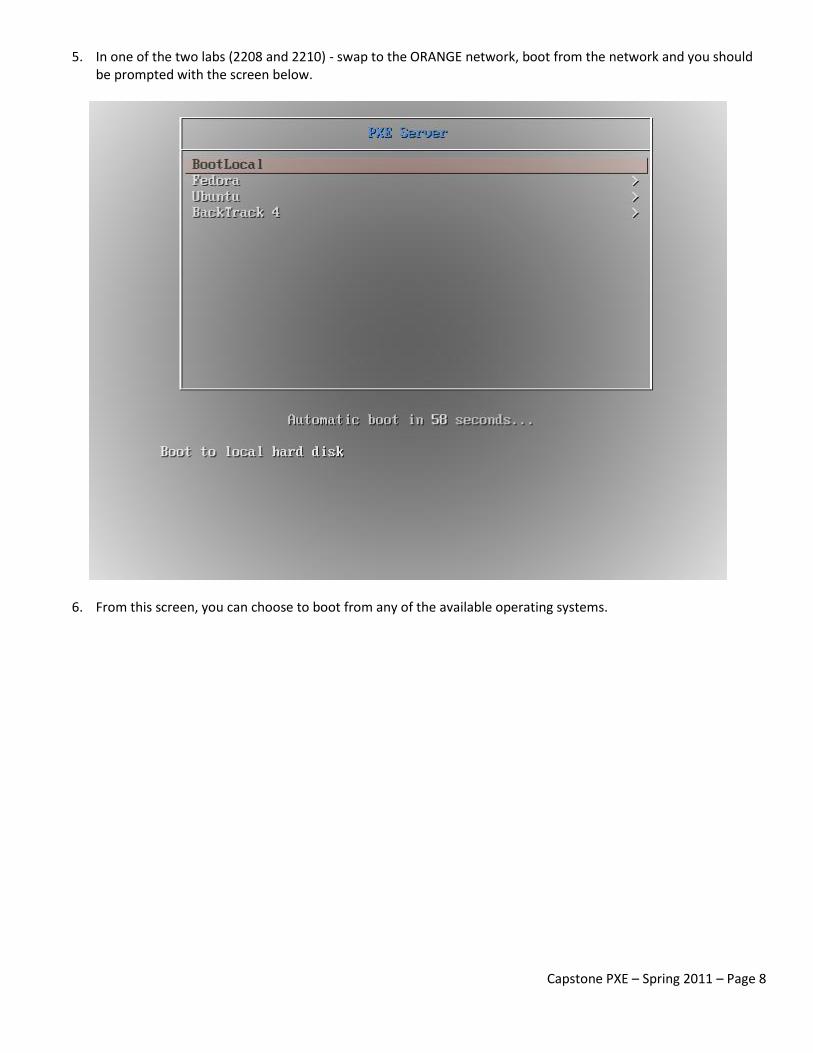
5. In one of the two labs (2208 and 2210) - swap to the ORANGE network, boot from the network and you should be prompted with the screen below.
6. From this screen, you can choose to boot from any of the available operating systems.
Capstone PXE – Spring 2011 – Page 9
Adding & Updating Images - Introduction In order to add or update images, you’ll need to do the following:
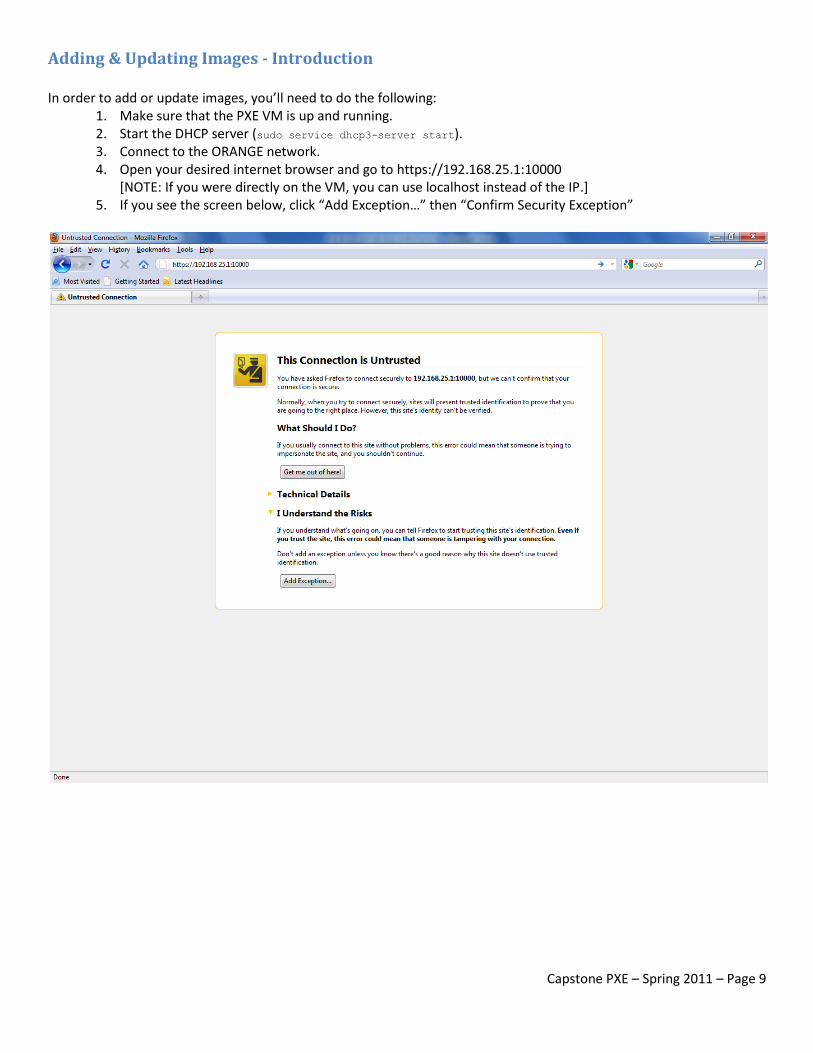
1. Make sure that the PXE VM is up and running. 2. Start the DHCP server (sudo service dhcp3-server start). 3. Connect to the ORANGE network. 4. Open your desired internet browser and go to https://192.168.25.1:10000
[NOTE: If you were directly on the VM, you can use localhost instead of the IP.] 5. If you see the screen below, click “Add Exception…” then “Confirm Security Exception”
Capstone PXE – Spring 2011 – Page 10
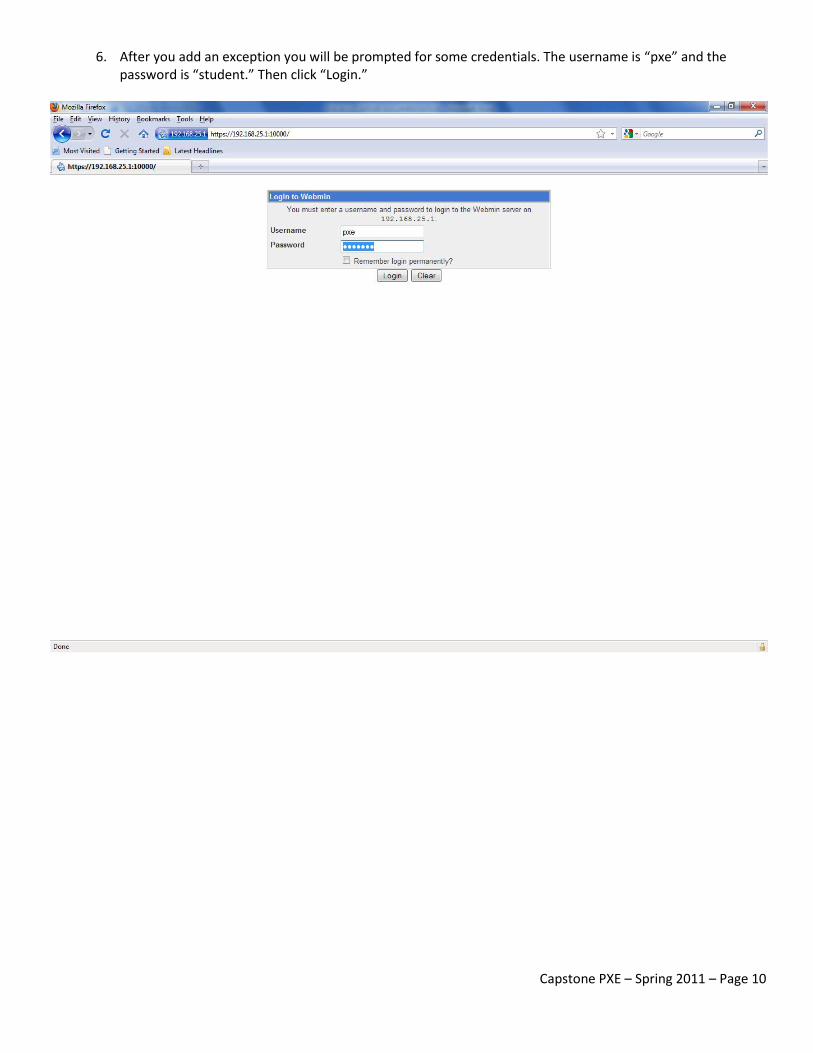
6. After you add an exception you will be prompted for some credentials. The username is “pxe” and the password is “student.” Then click “Login.”
Capstone PXE – Spring 2011 – Page 11
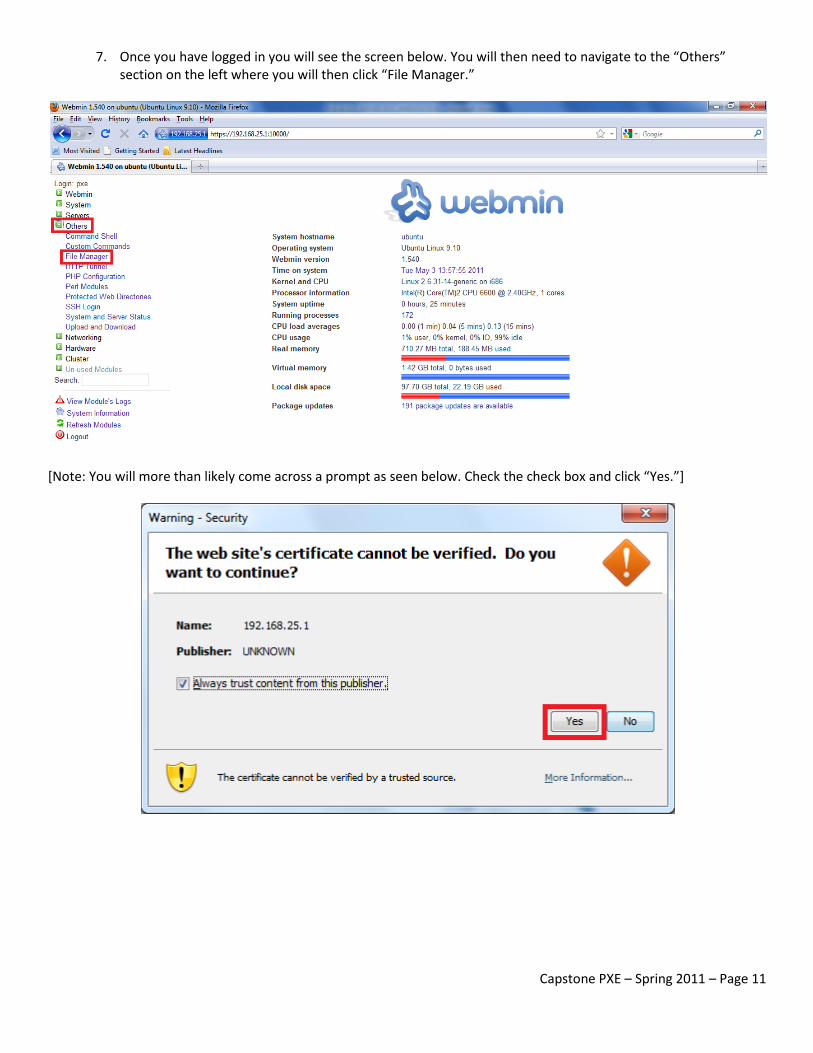
7. Once you have logged in you will see the screen below. You will then need to navigate to the “Others” section on the left where you will then click “File Manager.”
[Note: You will more than likely come across a prompt as seen below. Check the check box and click “Yes.”+
Capstone PXE – Spring 2011 – Page 12
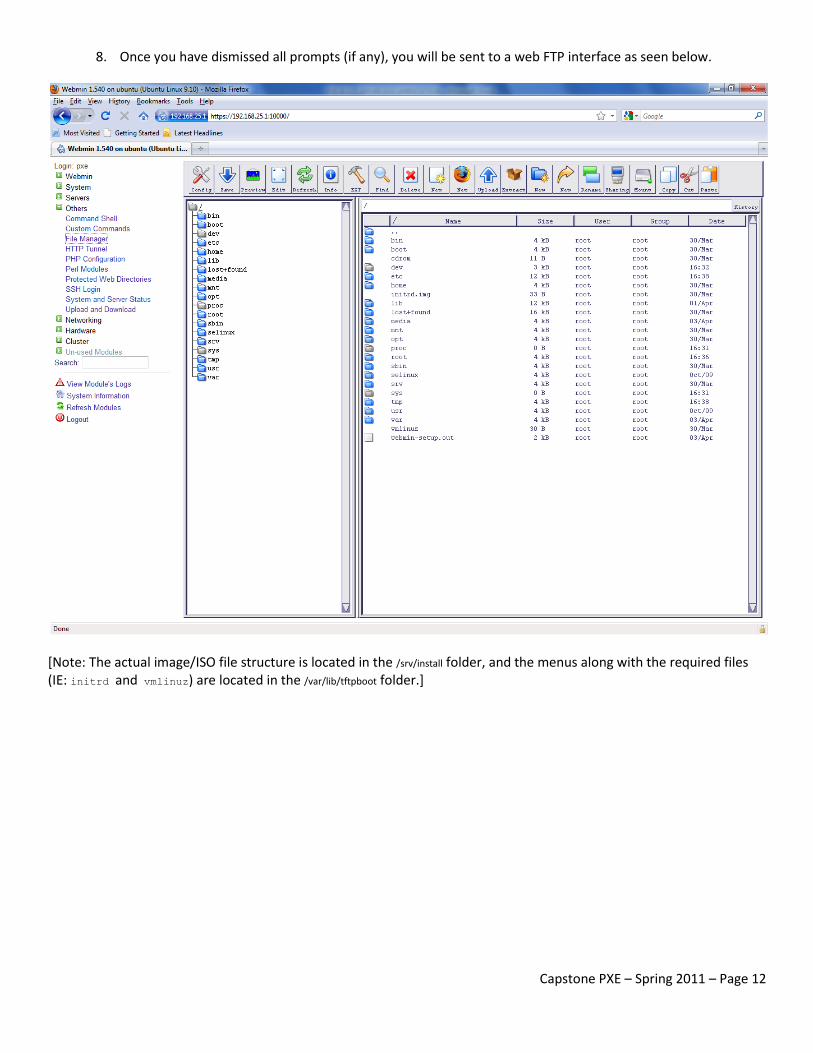
8. Once you have dismissed all prompts (if any), you will be sent to a web FTP interface as seen below.
[Note: The actual image/ISO file structure is located in the /srv/install folder, and the menus along with the required files (IE: initrd and vmlinuz) are located in the /var/lib/tftpboot folder.]

Capstone PXE – Spring 2011 – Page 13
Adding & Updating Images – Process Because our server is not completely capable (yet) of handing ISO’s directly, you will need to extract all the contents of your desired ISO into a folder, where you will then compress the folder into .TAR or .ZIP format for uploading. This section will show you exactly how to do so.
1. Assuming that you still have Webmin open from the previous section, navigate to the /srv/install/ directory where you will then select the folder of the Operating System that you’ll be adding.
[Note: For this example we will be uploading a version of Ubuntu.]
2. To prepare your files for upload, you will need to do the following:
Open your ISO with 7zip.
Select all files in the ISO.
Copy them into a folder on your desktop.
Compress the folder in .TAR or .ZIP format with 7zip.
3. Click the upload button.
Capstone PXE – Spring 2011 – Page 14
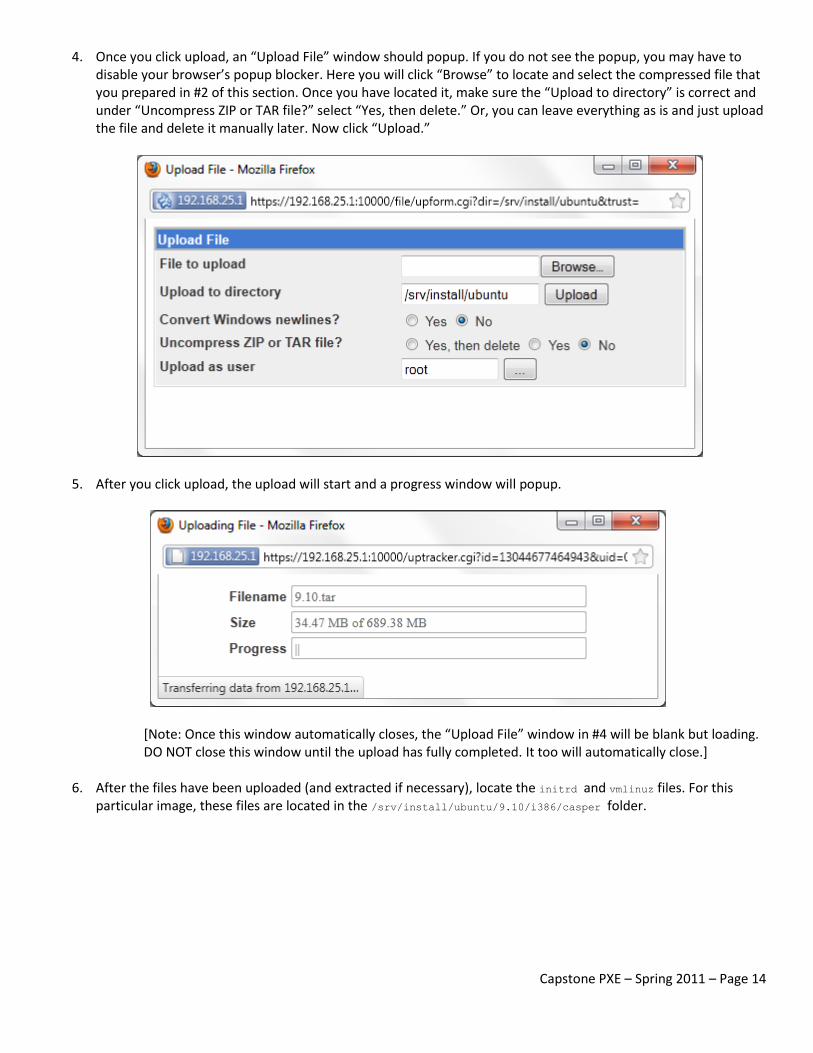
4. Once you click upload, an “Upload File” window should popup. If you do not see the popup, you may have to disable your browser’s popup blocker. Here you will click “Browse” to locate and select the compressed file that you prepared in #2 of this section. Once you have located it, make sure the “Upload to directory” is correct and under “Uncompress ZIP or TAR file?” select “Yes, then delete.” Or, you can leave everything as is and just upload the file and delete it manually later. Now click “Upload.”
5. After you click upload, the upload will start and a progress window will popup.
*Note: Once this window automatically closes, the “Upload File” window in #4 will be blank but loading. DO NOT close this window until the upload has fully completed. It too will automatically close.]
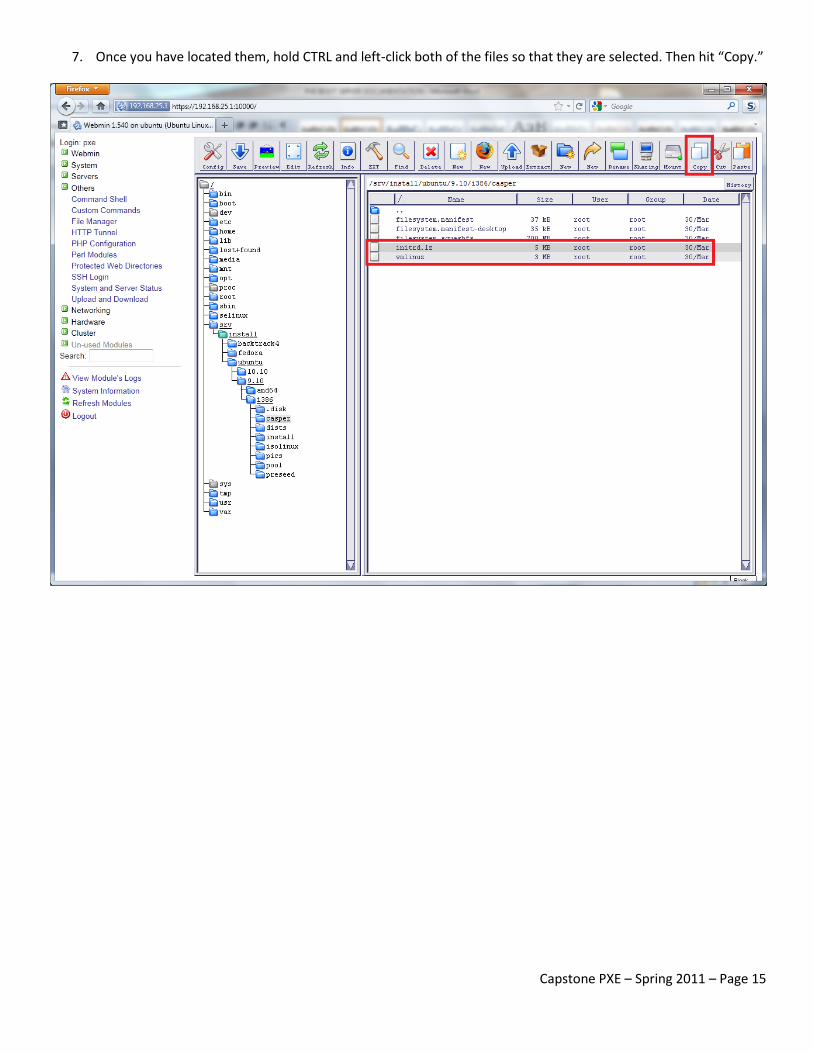
6. After the files have been uploaded (and extracted if necessary), locate the initrd and vmlinuz files. For this
particular image, these files are located in the /srv/install/ubuntu/9.10/i386/casper folder.
Capstone PXE – Spring 2011 – Page 15
7. Once you have located them, hold CTRL and left-click both of the files so that they are selected. Then hit “Copy.”
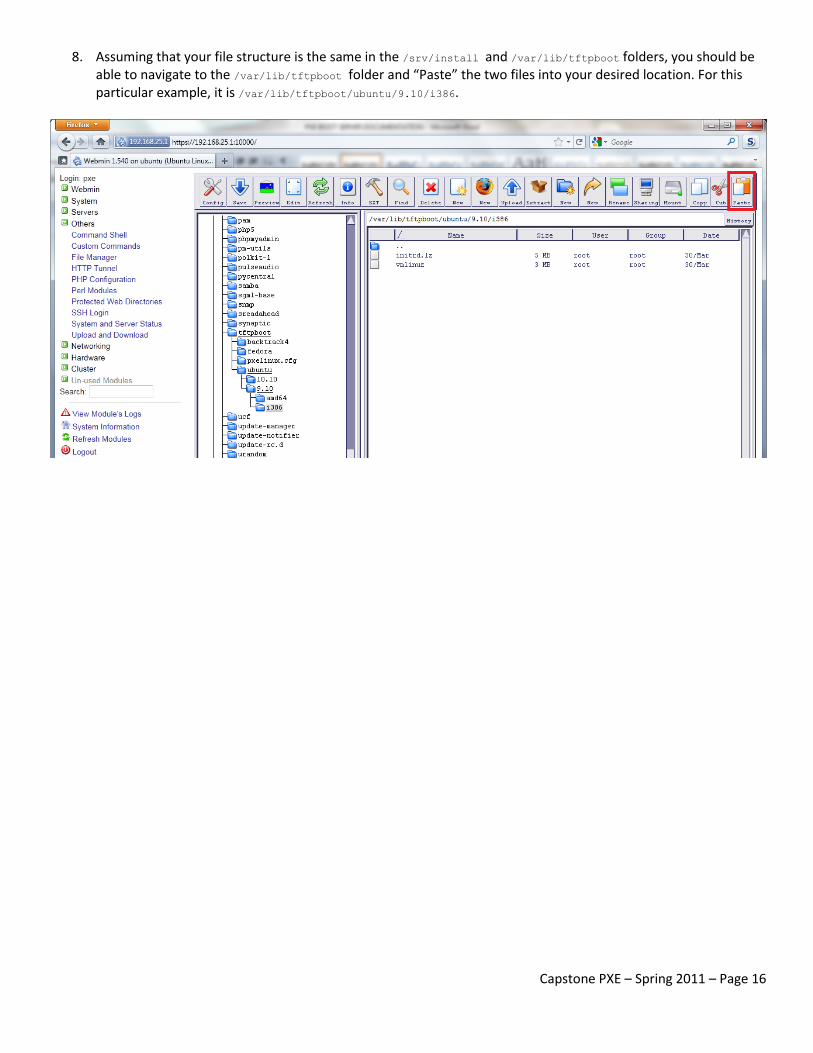
Capstone PXE – Spring 2011 – Page 16
8. Assuming that your file structure is the same in the /srv/install and /var/lib/tftpboot folders, you should be able to navigate to the /var/lib/tftpboot folder and “Paste” the two files into your desired location. For this particular example, it is /var/lib/tftpboot/ubuntu/9.10/i386.
Capstone PXE – Spring 2011 – Page 17
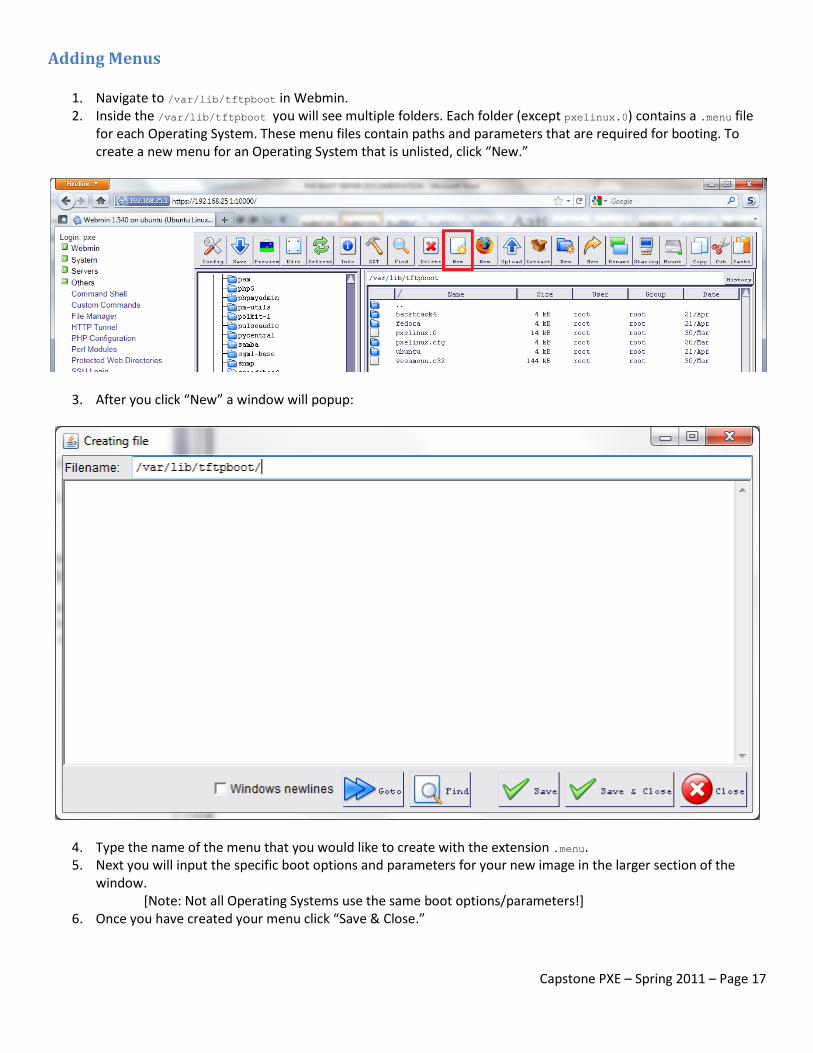
Adding Menus
1. Navigate to /var/lib/tftpboot in Webmin. 2. Inside the /var/lib/tftpboot you will see multiple folders. Each folder (except pxelinux.0) contains a .menu file
for each Operating System. These menu files contain paths and parameters that are required for booting. To create a new menu for an Operating System that is unlisted, click “New.”
3. After you click “New” a window will popup:
4. Type the name of the menu that you would like to create with the extension .menu. 5. Next you will input the specific boot options and parameters for your new image in the larger section of the
window. [Note: Not all Operating Systems use the same boot options/parameters!]
6. Once you have created your menu click “Save & Close.”
Capstone PXE – Spring 2011 – Page 18
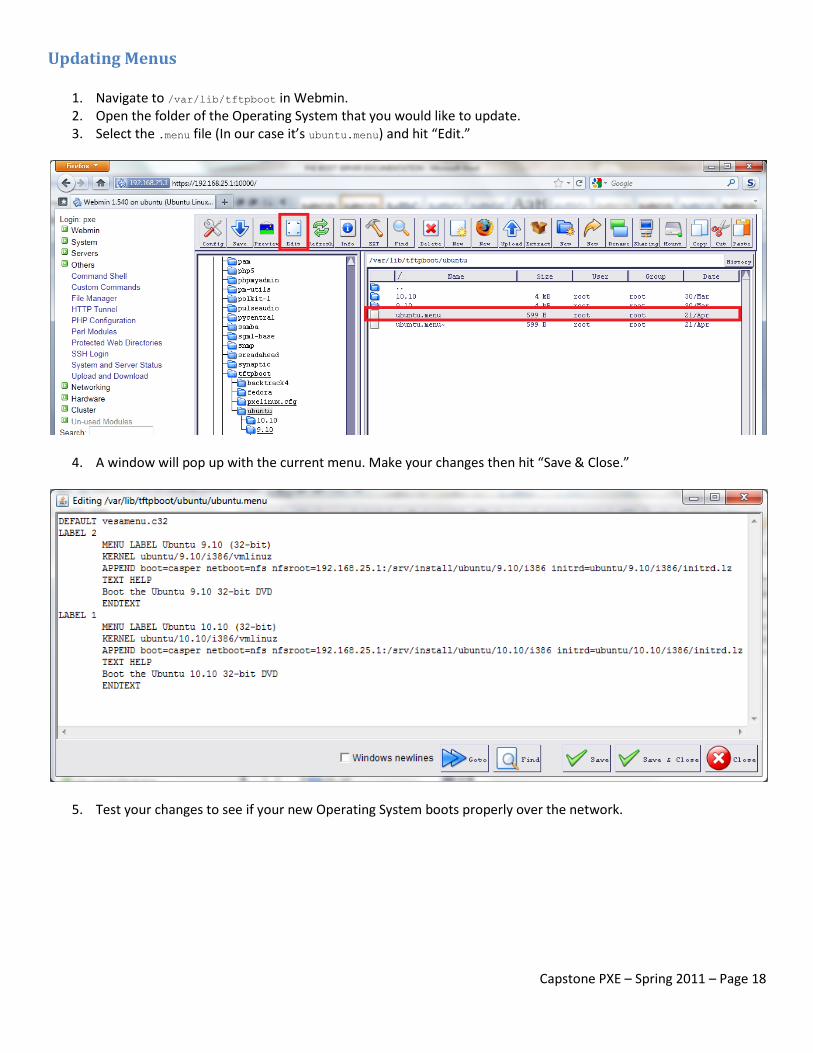
Updating Menus
1. Navigate to /var/lib/tftpboot in Webmin. 2. Open the folder of the Operating System that you would like to update. 3. Select the .menu file (In our case it’s ubuntu.menu) and hit “Edit.”
4. A window will pop up with the current menu. Make your changes then hit “Save & Close.”
5. Test your changes to see if your new Operating System boots properly over the network.
Capstone PXE – Spring 2011 – Page 19
III. Support
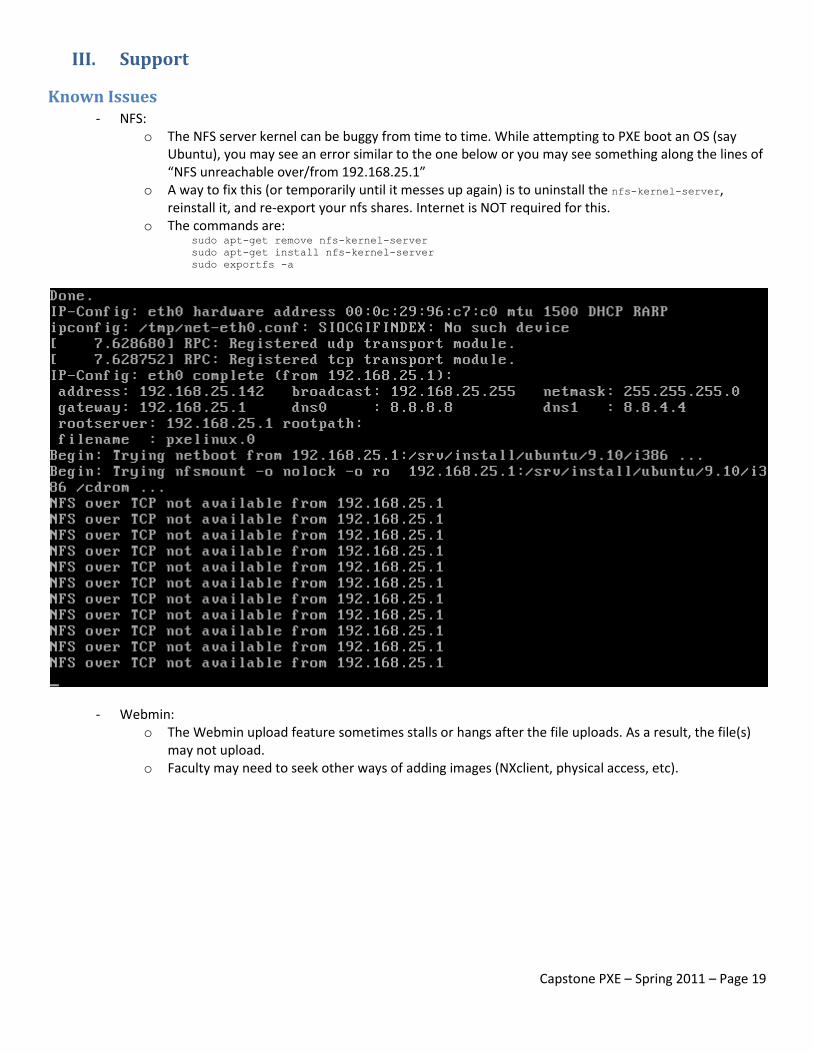
Known Issues - NFS:
o The NFS server kernel can be buggy from time to time. While attempting to PXE boot an OS (say Ubuntu), you may see an error similar to the one below or you may see something along the lines of “NFS unreachable over/from 192.168.25.1”
o A way to fix this (or temporarily until it messes up again) is to uninstall the nfs-kernel-server, reinstall it, and re-export your nfs shares. Internet is NOT required for this.
o The commands are: sudo apt-get remove nfs-kernel-server
sudo apt-get install nfs-kernel-server
sudo exportfs -a
- Webmin: o The Webmin upload feature sometimes stalls or hangs after the file uploads. As a result, the file(s)
may not upload. o Faculty may need to seek other ways of adding images (NXclient, physical access, etc).

Capstone PXE – Spring 2011 – Page 20
Sources
- PXE documentation used for build: https://help.ubuntu.com/community/PXEInstallMultiDistro
- Webmin install guide:
http://www.kelvinwong.ca/2010/05/22/installing-webmin-on-ubuntu-server-10-04-lts-lucid/