Embed Size (px)
Citation preview
CAQH ProView®
Practice Manager Module User Guide
Table of Contents Chapter 1: Introduction ......................................................................................................... 1 CAQH ProView Overview ............................................................................................................... 1 System Security ................................................................................................................................. 2
Chapter 2: Registration .......................................................................................................... 3 Existing Practice Managers ........................................................................................................... 3 New Users – Administrators ......................................................................................................... 3 New Users – Child Accounts .......................................................................................................... 4 Self-‐Registration ............................................................................................................................... 4 Creating a CAQH ProView Username and Password ............................................................ 6 Forgotten Username and/or Password .................................................................................... 8
Chapter 3: Home Page ......................................................................................................... 10
Chapter 4: Manage User ...................................................................................................... 14 Manage Account .............................................................................................................................. 14 Manage Users ................................................................................................................................... 15 Add User ........................................................................................................................................................... 15 Edit User ........................................................................................................................................................... 17 Search for User .............................................................................................................................................. 19
Chapter 5: Manage Practice ............................................................................................... 21 Add List .............................................................................................................................................. 22 Credentialing Contact .................................................................................................................... 25 Practice Location ............................................................................................................................ 26 Hospital Affiliation ......................................................................................................................... 29 Professional Liability Insurance ................................................................................................ 30
Chapter 6: Manage Provider List ..................................................................................... 32
Chapter 7: Bulk Upload ....................................................................................................... 35 Creating a Bulk Upload File ......................................................................................................... 35 Uploading a Bulk Upload File ..................................................................................................... 35
Chapter 8: Export .................................................................................................................. 38 Select Provider(s) to Export ........................................................................................................ 38 Select Sections for Export ............................................................................................................ 40 Single Provider Export ............................................................................................................................... 40 Multiple Providers Export ........................................................................................................................ 41 Using Saved Sections .................................................................................................................................. 42 Review Export Information ..................................................................................................................... 43 Export Summary Page ................................................................................................................................ 44 Export Confirmation ................................................................................................................................... 45
APPENDIX ................................................................................................................................ 46 Provider Status ................................................................................................................................ 46 CAQH Practice Manager Support Center Desk Information ............................................. 47
CAQH ProView Practice Manager User Guide v1.1
1 | P a g e
Chapter 1: Introduction The purpose of this document is to assist you as a Practice Manager in using the CAQH ProView Practice Manager Module. The Practice Manager Module is designed for office managers, allowing for common information to be entered at one time for multiple providers. There is no need to fill out redundant information for each healthcare provider practicing in your office. CAQH ProView Overview CAQH ProView is the healthcare industry’s premier resource for providers to self-‐report professional and practice information to payers, hospitals, large provider groups and health systems. CAQH ProView eliminates duplicative paperwork for these organizations that may require provider profile information for claims administration, credentialing, directory services, and more. If you are an office manager or clinic administrator who assists with gathering information for credentialing or other administrative purposes for multiple providers, the CAQH ProView Practice Manager Module may facilitate your data entry process. The CAQH ProView Practice Manager Module can be accessed at https://proview.caqh.org/pm. The following steps provide you with a high-‐level overview of the process flow when using the CAQH ProView Practice Manager Module. 1. A provider is added to the CAQH ProView system either by self-‐registration or via a health
plan request. 2. Using the CAQH ProView Practice Manager Module, a Practice Manager completes common
sections for multiple providers. 3. The Practice Manager adds the applicable providers to the “Provider List”. 4. The Practice Manager exports the applicable sections and indicates which providers from
the “Provider List” the data should be exported to. 5. The provider logs into CAQH ProView, reviews the available exported data, and then can
choose to import the data into the data profile. 6. The provider completes any remaining required fields and the authorization section, which
allows health plans access to the data profile. 7. The provider completes the attestation and uploads any required supporting
documentation. 8. CAQH reviews the provider’s supporting documentation for quality. 9. The provider status is marked “Initial Profile Complete” or “Reattestation”. (See Appendix
for full list of provider statuses). 10. The completed provider data profile is available to the Participating Organization.
This document will provide additional information and helpful tips for each of the steps that relate to the Practice Manager Module. To learn how providers use CAQH ProView, please refer to the CAQH ProView Provider User Guide.
CAQH ProView Practice Manager User Guide v1.1
2 | P a g e
System Security The confidentiality and security of provider information and the privacy of system users are critical priorities for CAQH. CAQH has implemented information security policies, standards, guidelines, processes, procedures, and best practices to strengthen its security program and to protect its information assets. CAQH ProView is designed to be compliant with laws and regulations relating to the privacy of individually identifiable information. The CAQH ProView solution is housed in secure datacenters where multiple physical and electronic safeguards are implemented. Secure Internet access to application screens, use of passwords, certificates, and powerful Secure Socket Layer (SSL) encryption are used to help ensure only authorized use of the system. Only authenticated users have access to their restricted data over connections that automatically encrypt all information exchanges. Virus detection mechanisms are used to help ensure that the database and the websites are free of viruses. Routine encrypted back-‐ups protect volatile system data and are secured in an off-‐site storage facility.
CAQH ProView Practice Manager User Guide v1.1
3 | P a g e
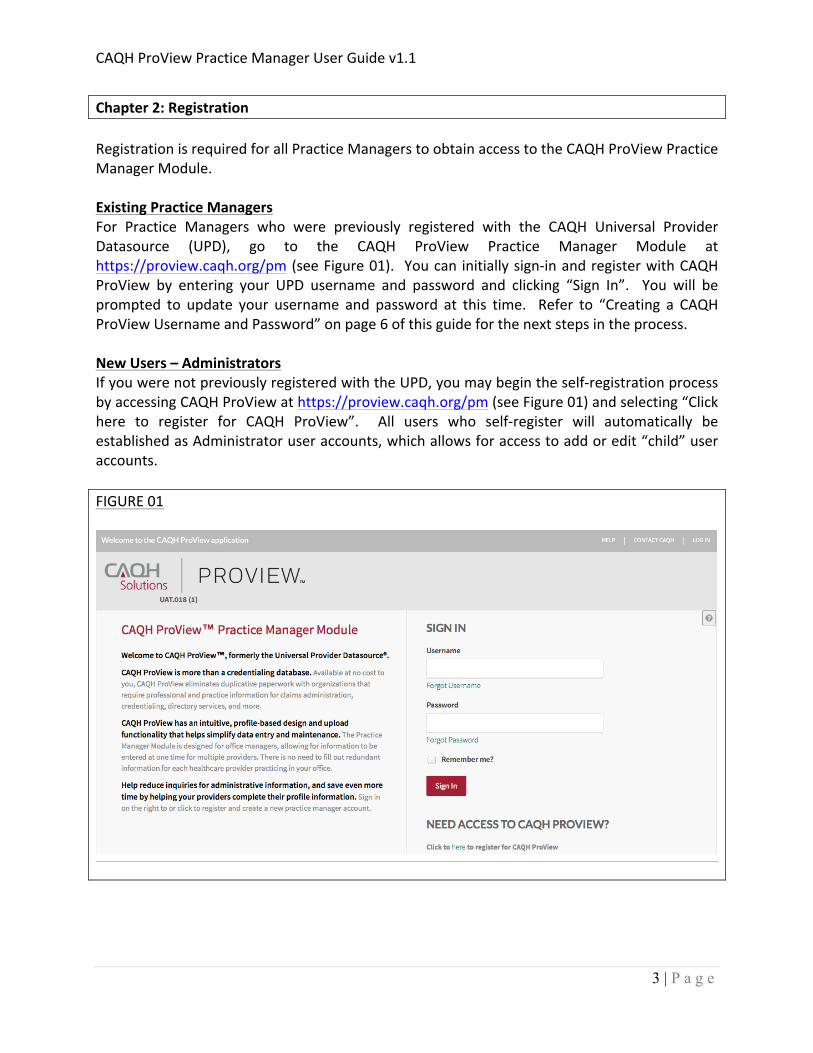
Chapter 2: Registration Registration is required for all Practice Managers to obtain access to the CAQH ProView Practice Manager Module. Existing Practice Managers For Practice Managers who were previously registered with the CAQH Universal Provider Datasource (UPD), go to the CAQH ProView Practice Manager Module at https://proview.caqh.org/pm (see Figure 01). You can initially sign-‐in and register with CAQH ProView by entering your UPD username and password and clicking “Sign In”. You will be prompted to update your username and password at this time. Refer to “Creating a CAQH ProView Username and Password” on page 6 of this guide for the next steps in the process. New Users – Administrators If you were not previously registered with the UPD, you may begin the self-‐registration process by accessing CAQH ProView at https://proview.caqh.org/pm (see Figure 01) and selecting “Click here to register for CAQH ProView”. All users who self-‐register will automatically be established as Administrator user accounts, which allows for access to add or edit “child” user accounts. FIGURE 01
CAQH ProView Practice Manager User Guide v1.1
4 | P a g e
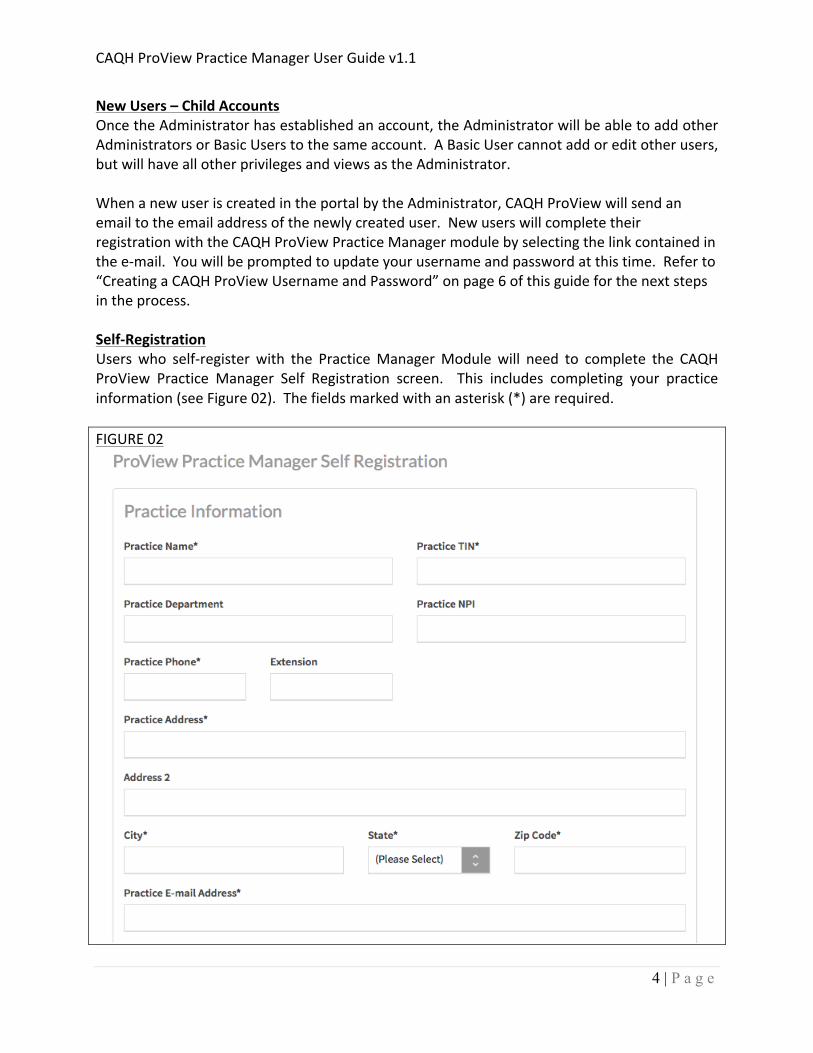
New Users – Child Accounts Once the Administrator has established an account, the Administrator will be able to add other Administrators or Basic Users to the same account. A Basic User cannot add or edit other users, but will have all other privileges and views as the Administrator. When a new user is created in the portal by the Administrator, CAQH ProView will send an email to the email address of the newly created user. New users will complete their registration with the CAQH ProView Practice Manager module by selecting the link contained in the e-‐mail. You will be prompted to update your username and password at this time. Refer to “Creating a CAQH ProView Username and Password” on page 6 of this guide for the next steps in the process. Self-‐Registration Users who self-‐register with the Practice Manager Module will need to complete the CAQH ProView Practice Manager Self Registration screen. This includes completing your practice information (see Figure 02). The fields marked with an asterisk (*) are required. FIGURE 02

CAQH ProView Practice Manager User Guide v1.1
5 | P a g e
You will also need to provide your user account information (see Figure 03). In this section, you can indicate if you would like more information about the Bulk Upload functionality. The Bulk Upload functionality allows large practice groups (more than 50 providers) the ability to upload a data file to the common provider profile sections with the Practice Manager Module. CAQH will process this data file electronically. Refer to Chapter 7: Bulk Upload for more information on this functionality. FIGURE 03
CAQH ProView Practice Manager User Guide v1.1
6 | P a g e
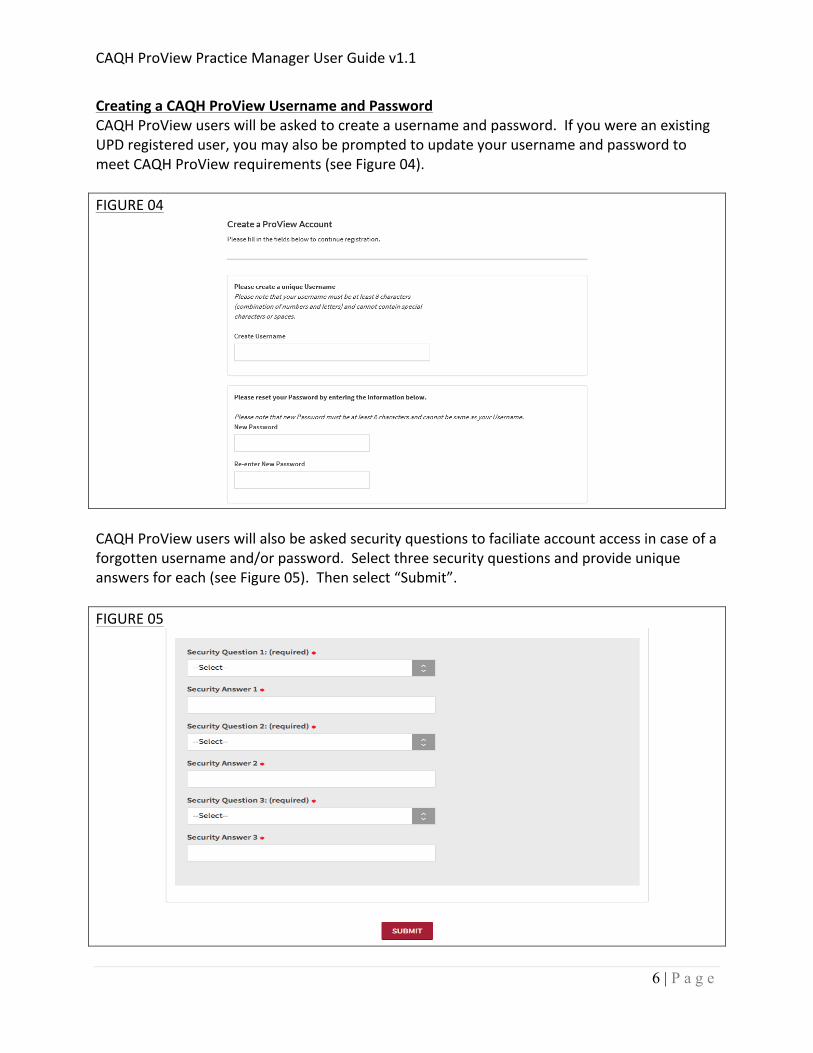
Creating a CAQH ProView Username and Password CAQH ProView users will be asked to create a username and password. If you were an existing UPD registered user, you may also be prompted to update your username and password to meet CAQH ProView requirements (see Figure 04). FIGURE 04
CAQH ProView users will also be asked security questions to faciliate account access in case of a forgotten username and/or password. Select three security questions and provide unique answers for each (see Figure 05). Then select “Submit”. FIGURE 05
CAQH ProView Practice Manager User Guide v1.1
7 | P a g e
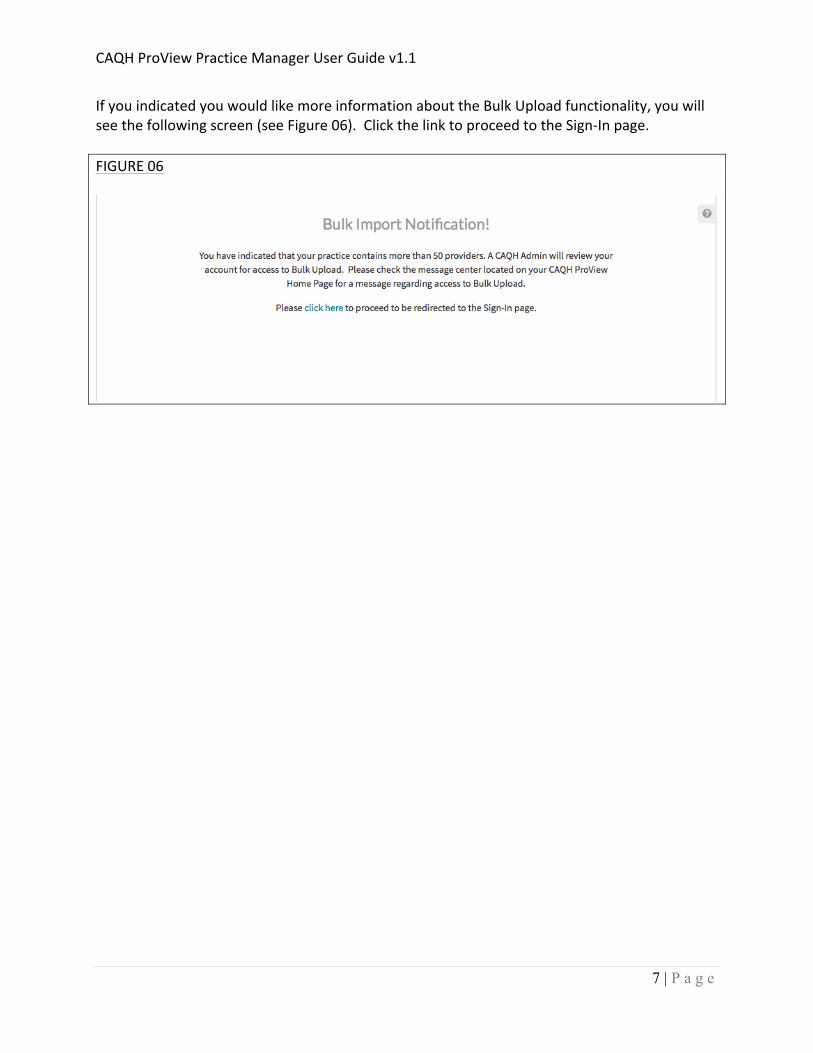
If you indicated you would like more information about the Bulk Upload functionality, you will see the following screen (see Figure 06). Click the link to proceed to the Sign-‐In page. FIGURE 06
CAQH ProView Practice Manager User Guide v1.1
8 | P a g e
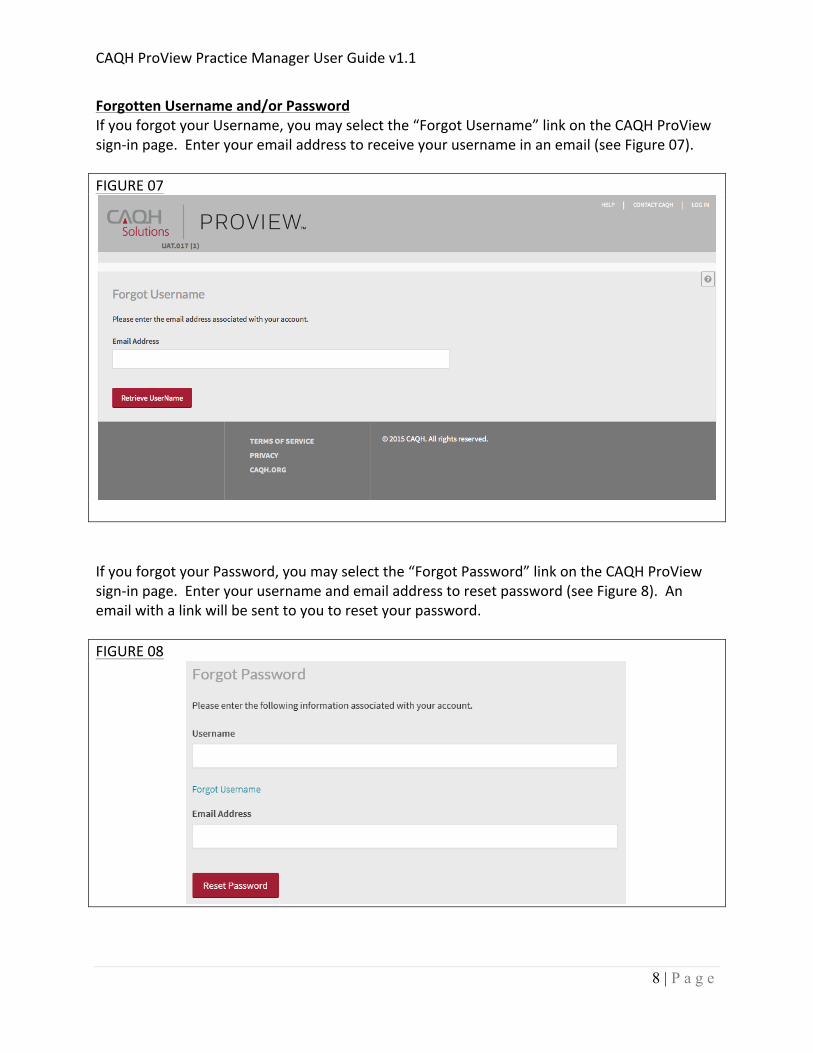
Forgotten Username and/or Password If you forgot your Username, you may select the “Forgot Username” link on the CAQH ProView sign-‐in page. Enter your email address to receive your username in an email (see Figure 07). FIGURE 07
If you forgot your Password, you may select the “Forgot Password” link on the CAQH ProView sign-‐in page. Enter your username and email address to reset password (see Figure 8). An email with a link will be sent to you to reset your password. FIGURE 08
CAQH ProView Practice Manager User Guide v1.1
9 | P a g e
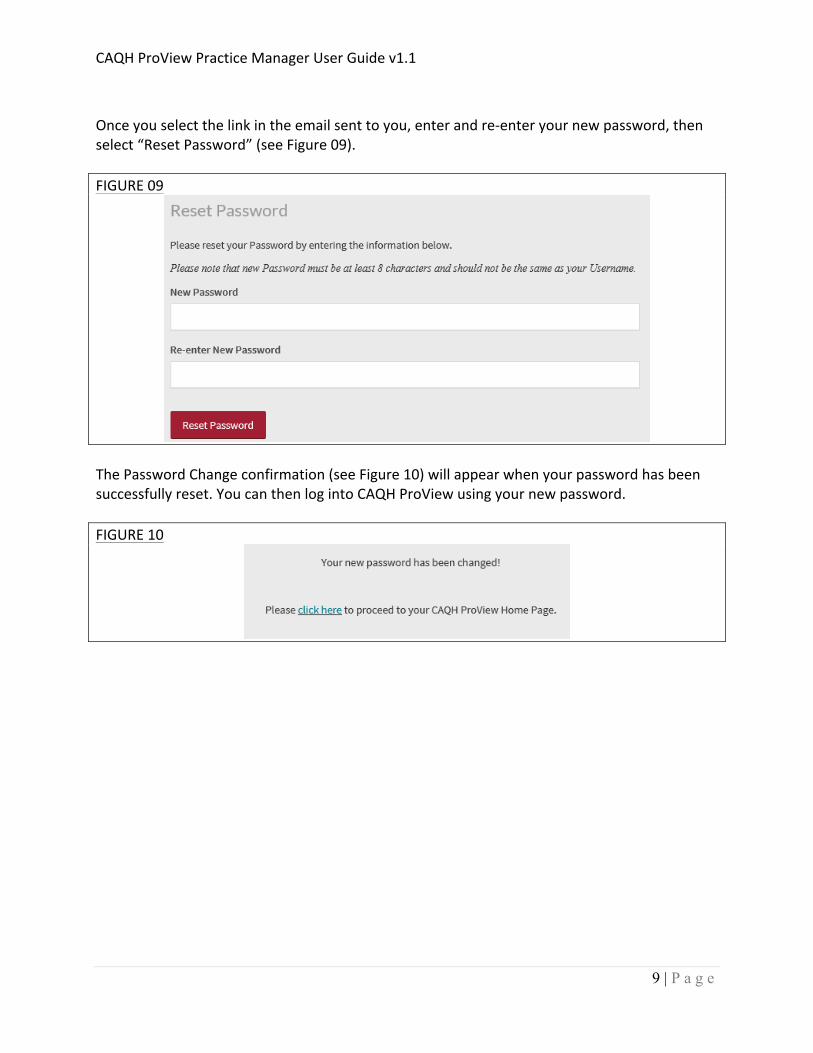
Once you select the link in the email sent to you, enter and re-‐enter your new password, then select “Reset Password” (see Figure 09). FIGURE 09
The Password Change confirmation (see Figure 10) will appear when your password has been successfully reset. You can then log into CAQH ProView using your new password. FIGURE 10
CAQH ProView Practice Manager User Guide v1.1
10 | P a g e
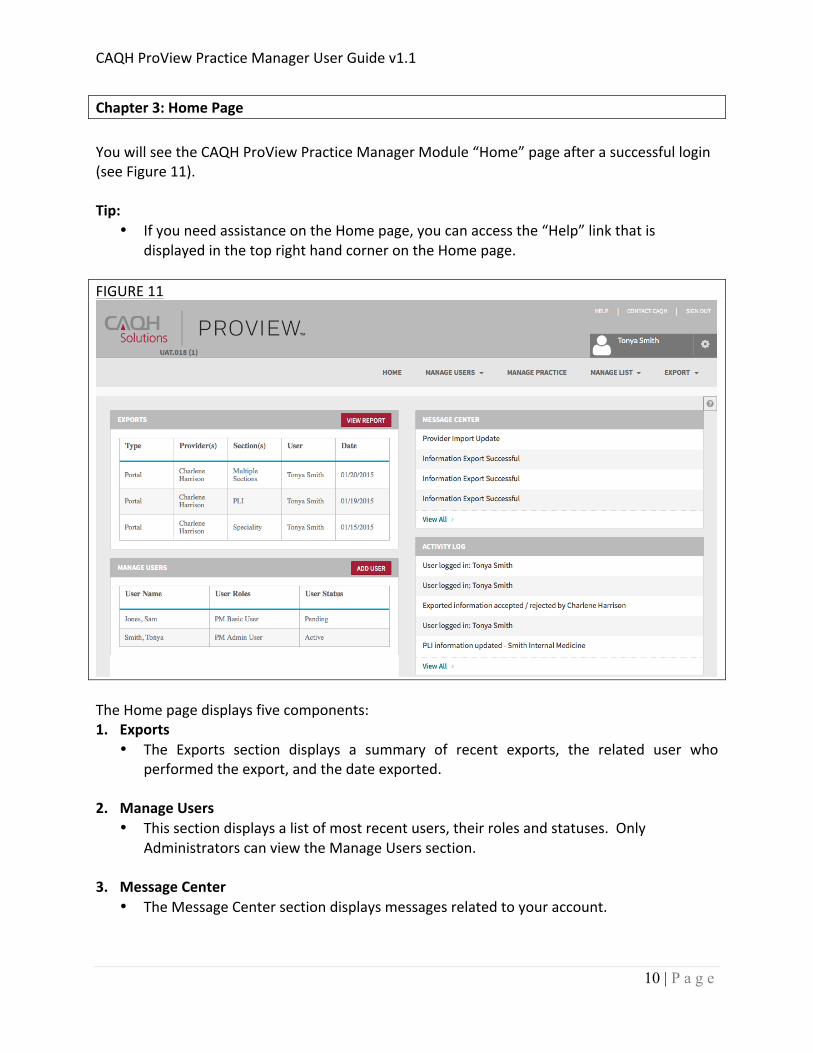
Chapter 3: Home Page You will see the CAQH ProView Practice Manager Module “Home” page after a successful login (see Figure 11). Tip:
• If you need assistance on the Home page, you can access the “Help” link that is displayed in the top right hand corner on the Home page.
FIGURE 11
The Home page displays five components: 1. Exports
• The Exports section displays a summary of recent exports, the related user who performed the export, and the date exported.
2. Manage Users • This section displays a list of most recent users, their roles and statuses. Only
Administrators can view the Manage Users section.
3. Message Center • The Message Center section displays messages related to your account.
CAQH ProView Practice Manager User Guide v1.1
11 | P a g e
4. Activity Log • The Activity Log section displays recent users who have logged into the account and
recent activity within the account.
5. Bulk Upload Exceptions • This section displays a list of Exception Reports from a Bulk Upload processed file. Only
users with Bulk Upload access can view the Bulk Upload Exceptions section.
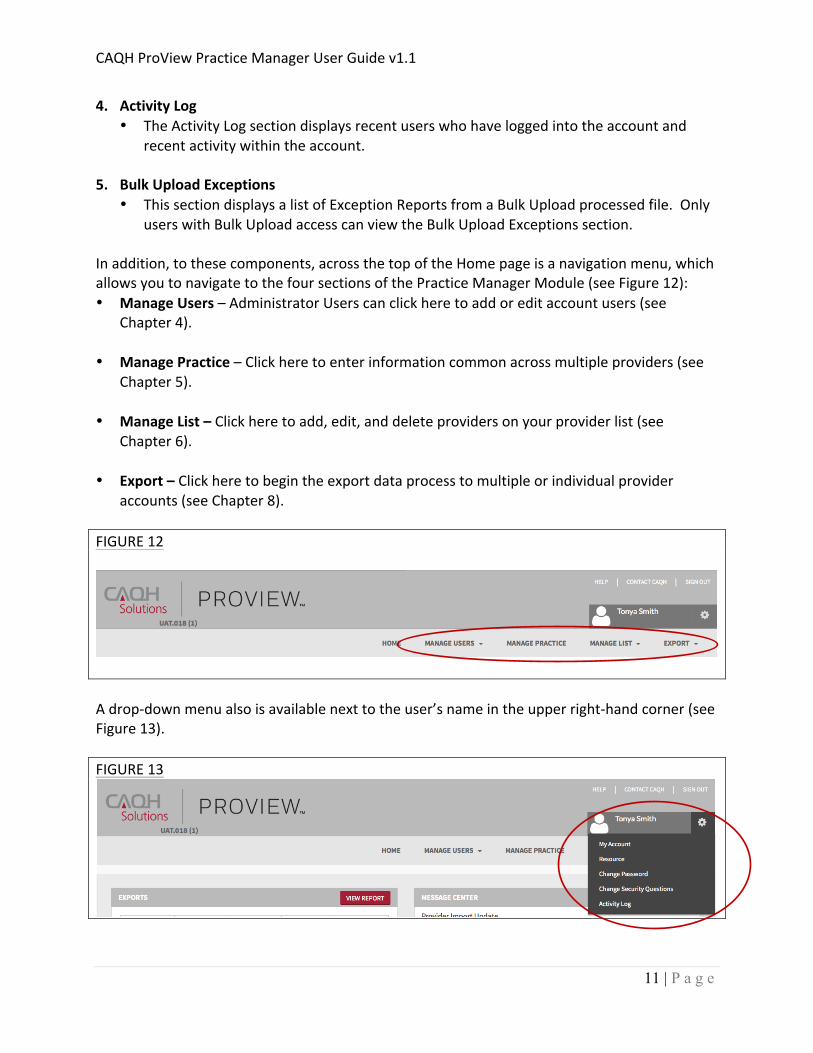
In addition, to these components, across the top of the Home page is a navigation menu, which allows you to navigate to the four sections of the Practice Manager Module (see Figure 12): • Manage Users – Administrator Users can click here to add or edit account users (see
Chapter 4).
• Manage Practice – Click here to enter information common across multiple providers (see Chapter 5).
• Manage List – Click here to add, edit, and delete providers on your provider list (see
Chapter 6). • Export – Click here to begin the export data process to multiple or individual provider
accounts (see Chapter 8). FIGURE 12
A drop-‐down menu also is available next to the user’s name in the upper right-‐hand corner (see Figure 13). FIGURE 13
CAQH ProView Practice Manager User Guide v1.1
12 | P a g e
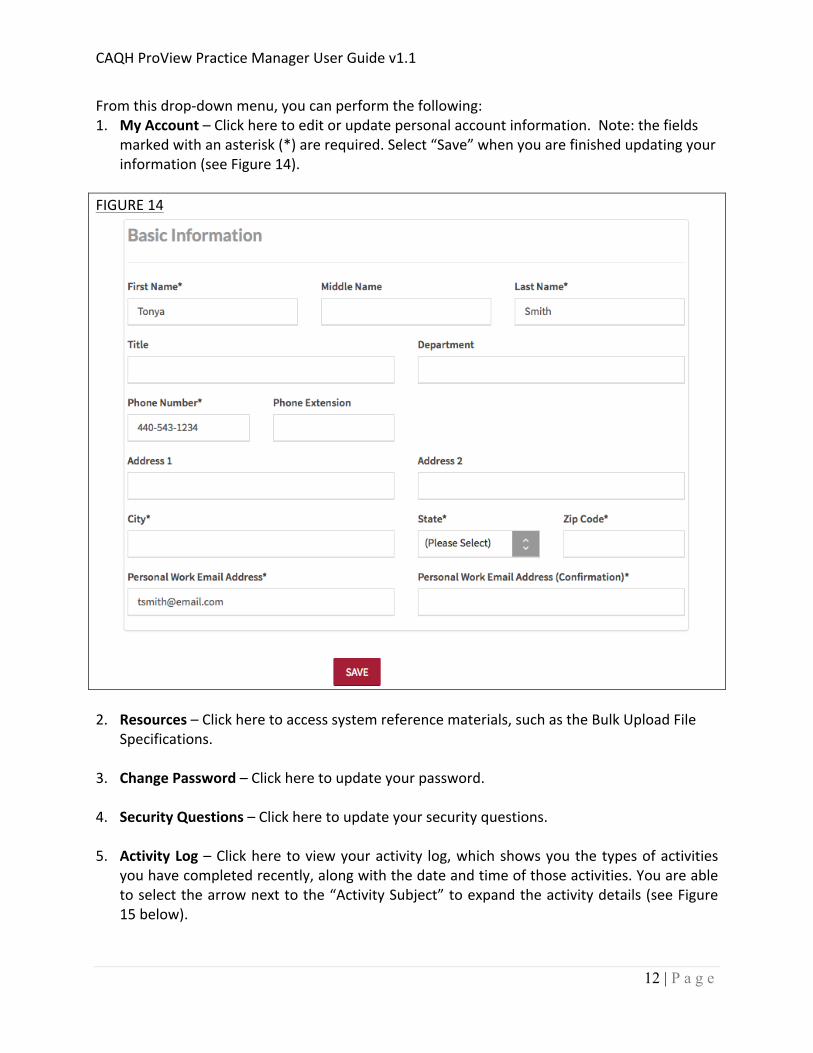
From this drop-‐down menu, you can perform the following: 1. My Account – Click here to edit or update personal account information. Note: the fields
marked with an asterisk (*) are required. Select “Save” when you are finished updating your information (see Figure 14).
FIGURE 14
2. Resources – Click here to access system reference materials, such as the Bulk Upload File Specifications.
3. Change Password – Click here to update your password. 4. Security Questions – Click here to update your security questions.
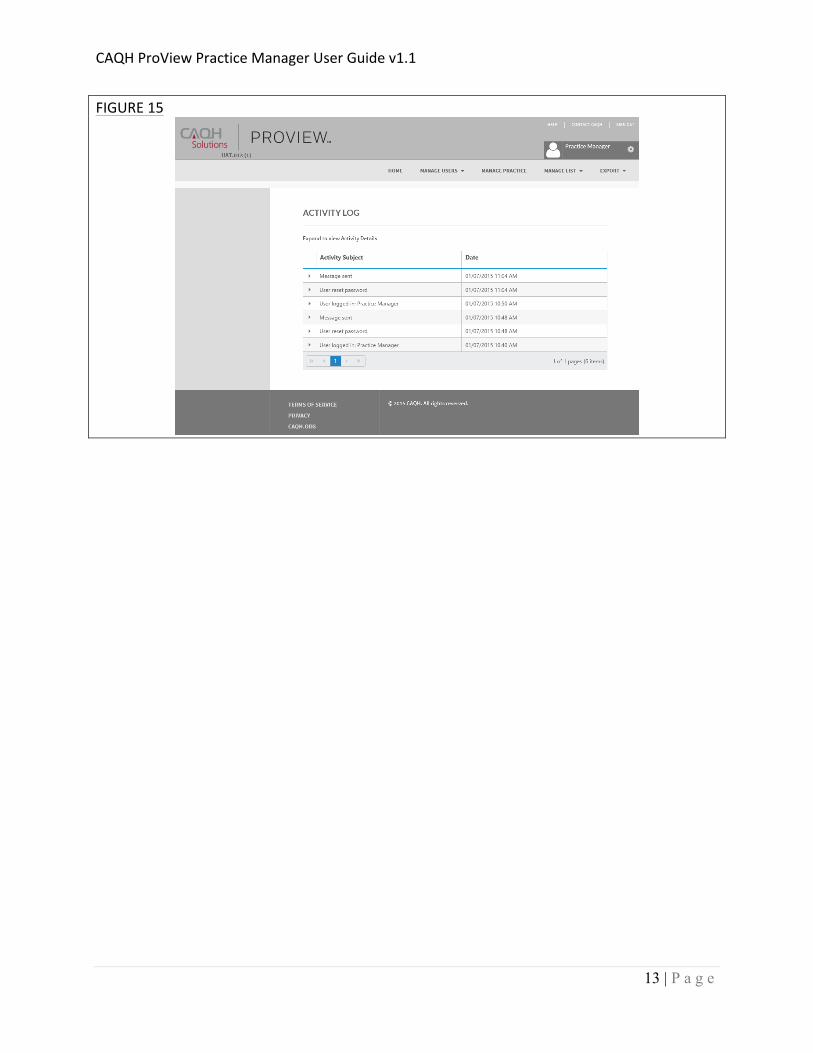
5. Activity Log – Click here to view your activity log, which shows you the types of activities
you have completed recently, along with the date and time of those activities. You are able to select the arrow next to the “Activity Subject” to expand the activity details (see Figure 15 below).
CAQH ProView Practice Manager User Guide v1.1
13 | P a g e
FIGURE 15

CAQH ProView Practice Manager User Guide v1.1
14 | P a g e
Chapter 4: Manage User
If you are an Administrator, you will have access to the “Manage User” section, where you have the ability to add, edit or delete user accounts. From the Home Page, click on “Manage Users” on the top navigation bar to begin the process (see Figure 16). FIGURE 16
From the “Manage Users” drop-‐down menu bar, you can perform the following: Manage Account Click here to edit or update your personal account information. Note: the fields marked with an asterisk (*) are required. Select “Save” when you are finished updating your information (see Figure 17).
FIGURE 17
CAQH ProView Practice Manager User Guide v1.1
15 | P a g e
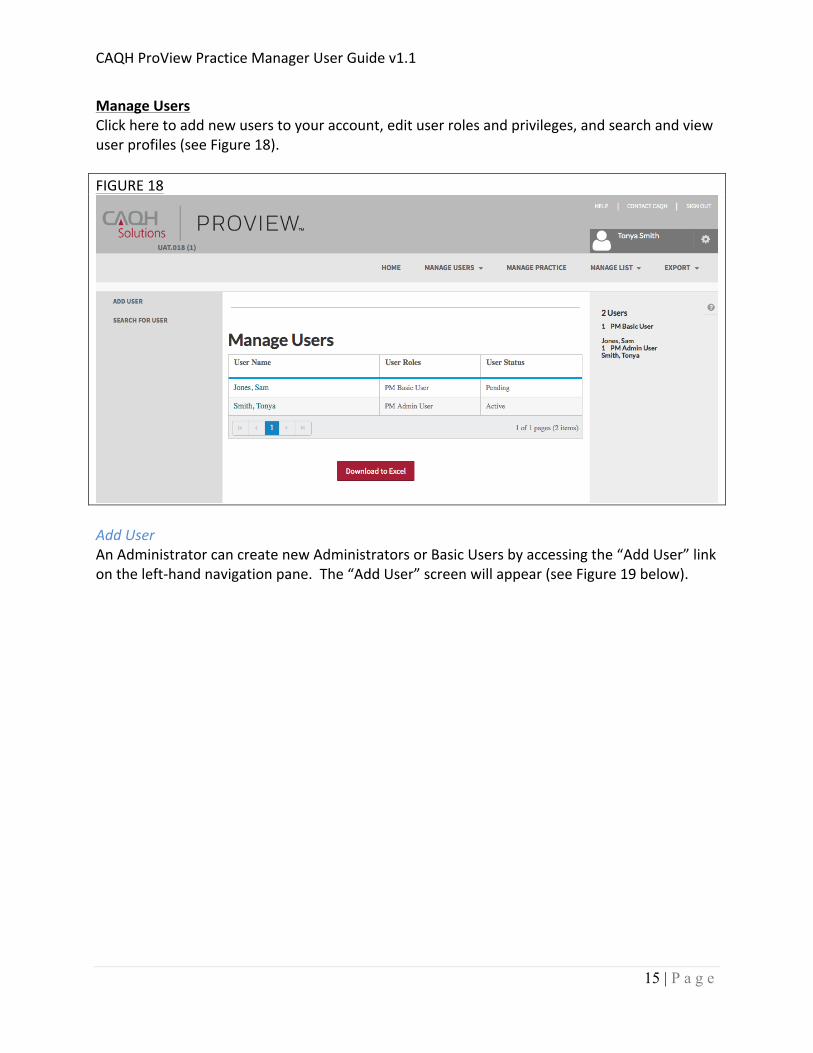
Manage Users Click here to add new users to your account, edit user roles and privileges, and search and view user profiles (see Figure 18).
FIGURE 18
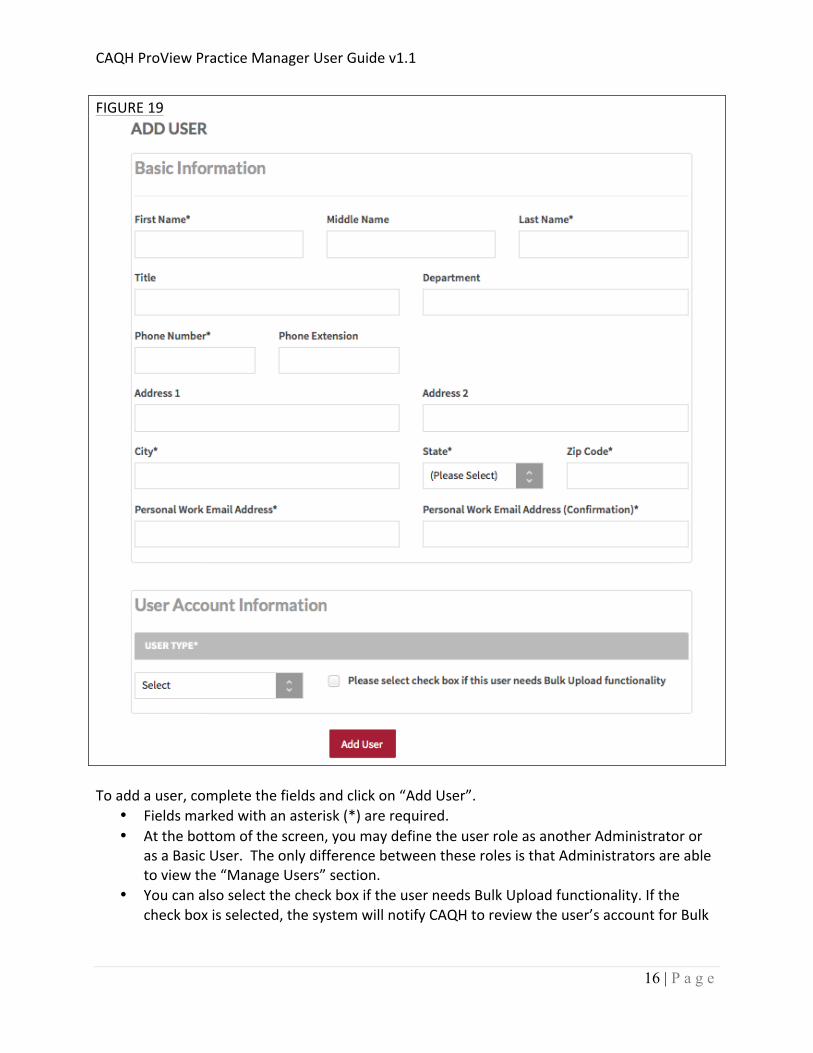
Add User An Administrator can create new Administrators or Basic Users by accessing the “Add User” link on the left-‐hand navigation pane. The “Add User” screen will appear (see Figure 19 below).
CAQH ProView Practice Manager User Guide v1.1
16 | P a g e
FIGURE 19
To add a user, complete the fields and click on “Add User”.
• Fields marked with an asterisk (*) are required. • At the bottom of the screen, you may define the user role as another Administrator or
as a Basic User. The only difference between these roles is that Administrators are able to view the “Manage Users” section.
• You can also select the check box if the user needs Bulk Upload functionality. If the check box is selected, the system will notify CAQH to review the user’s account for Bulk
CAQH ProView Practice Manager User Guide v1.1
17 | P a g e
Upload functionality. CAQH will then review the user before granting or denying Bulk Upload functionality. Meanwhile, the user status will be set to Pending.
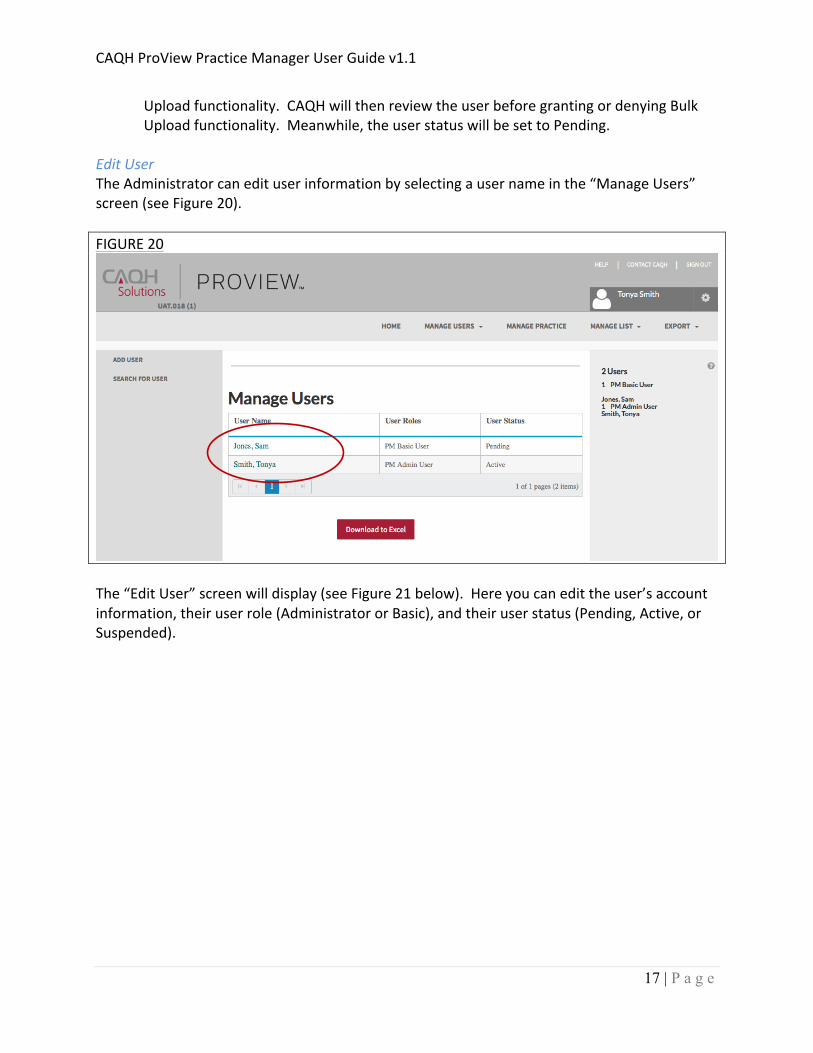
Edit User The Administrator can edit user information by selecting a user name in the “Manage Users” screen (see Figure 20). FIGURE 20
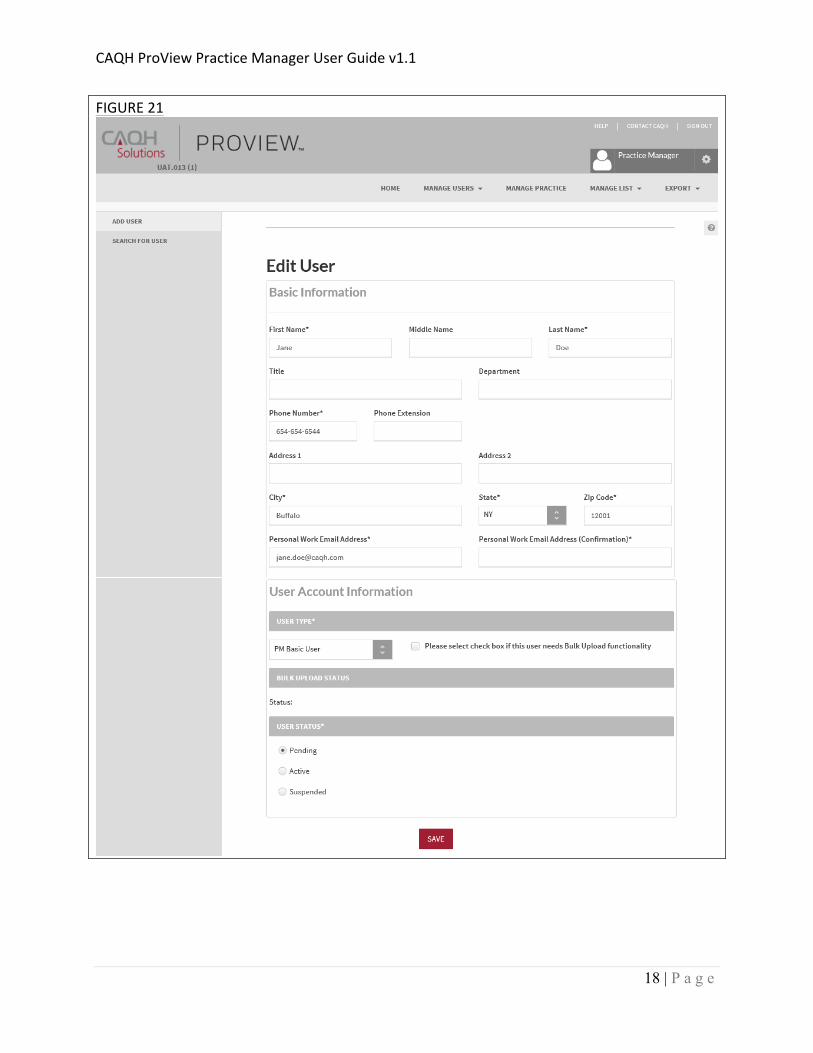
The “Edit User” screen will display (see Figure 21 below). Here you can edit the user’s account information, their user role (Administrator or Basic), and their user status (Pending, Active, or Suspended).
CAQH ProView Practice Manager User Guide v1.1
18 | P a g e
FIGURE 21
CAQH ProView Practice Manager User Guide v1.1
19 | P a g e
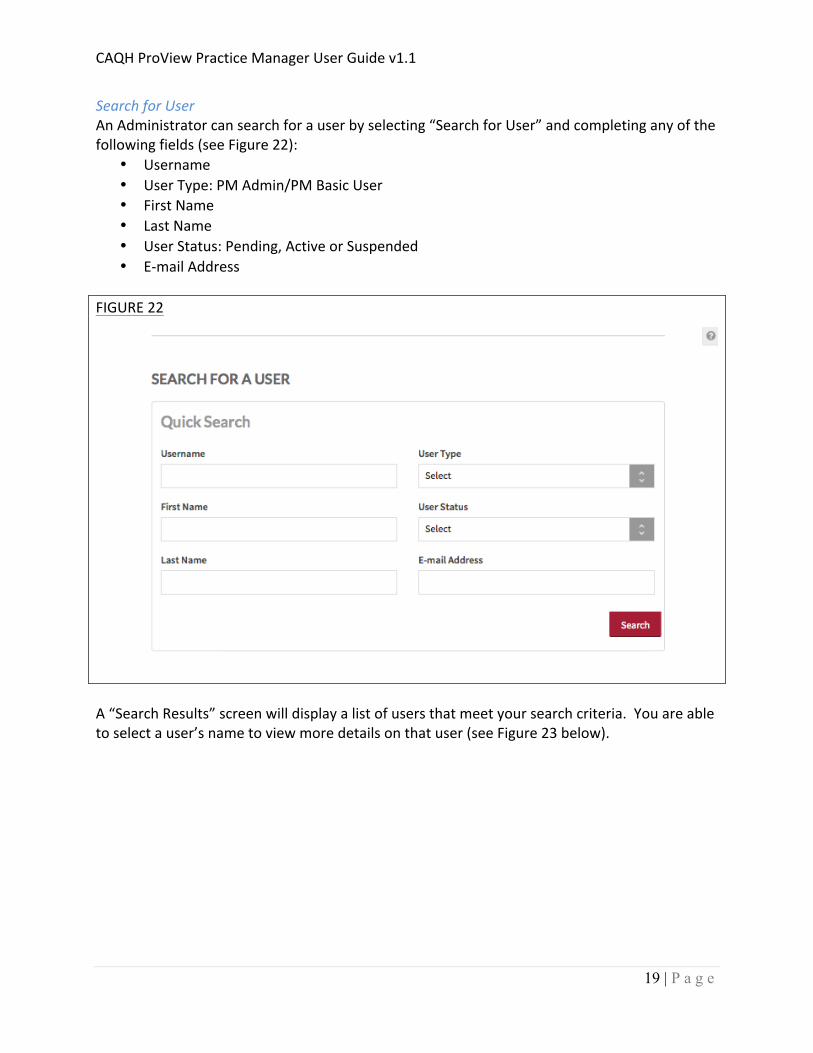
Search for User An Administrator can search for a user by selecting “Search for User” and completing any of the following fields (see Figure 22):
• Username • User Type: PM Admin/PM Basic User • First Name • Last Name • User Status: Pending, Active or Suspended • E-‐mail Address
FIGURE 22
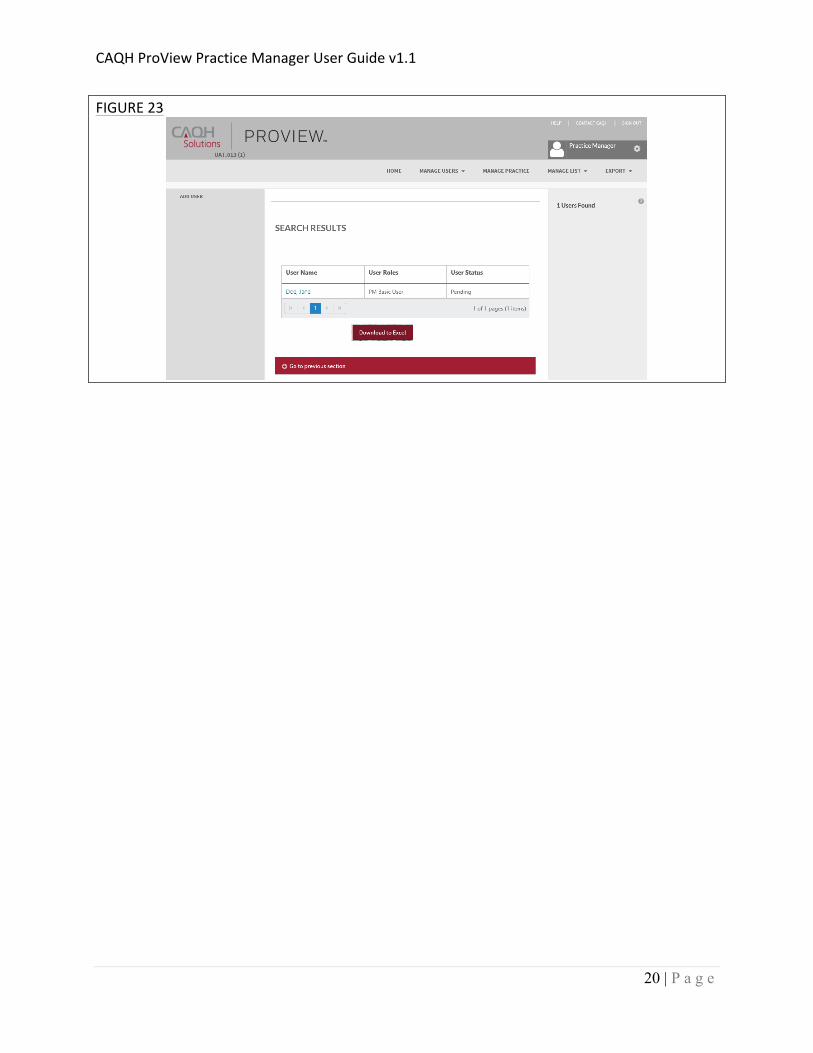
A “Search Results” screen will display a list of users that meet your search criteria. You are able to select a user’s name to view more details on that user (see Figure 23 below).
CAQH ProView Practice Manager User Guide v1.1
20 | P a g e
FIGURE 23
CAQH ProView Practice Manager User Guide v1.1
21 | P a g e
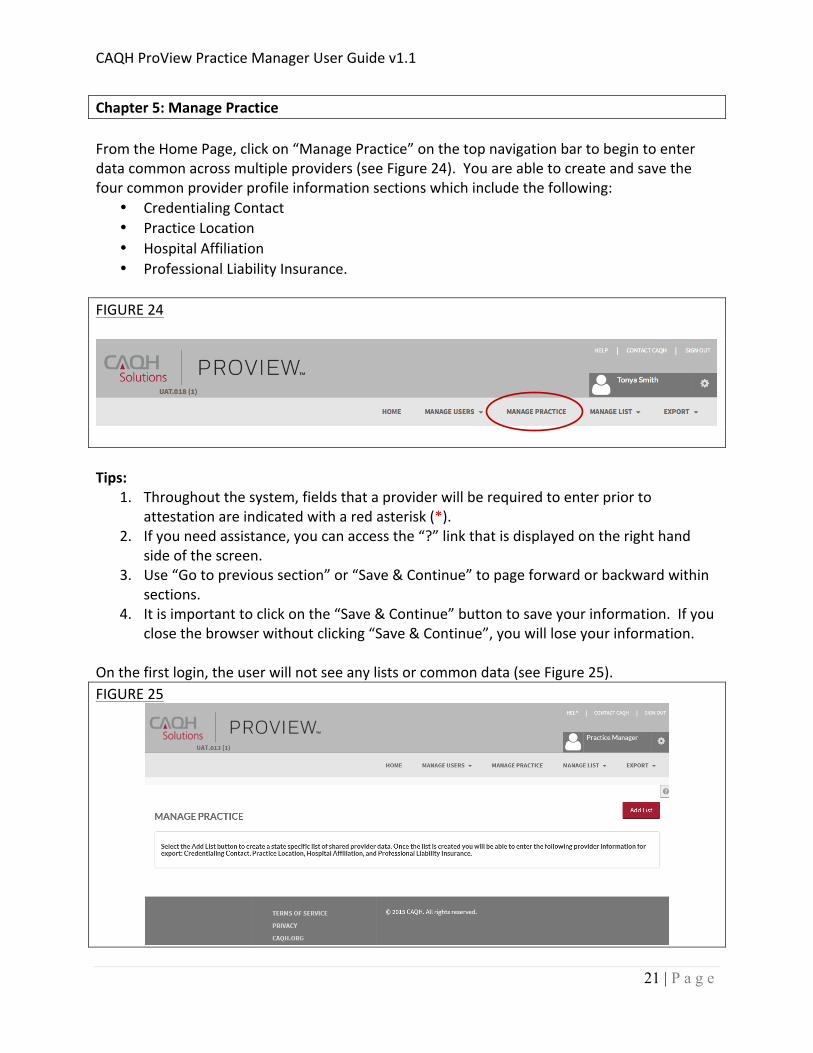
Chapter 5: Manage Practice
From the Home Page, click on “Manage Practice” on the top navigation bar to begin to enter data common across multiple providers (see Figure 24). You are able to create and save the four common provider profile information sections which include the following:
• Credentialing Contact • Practice Location • Hospital Affiliation • Professional Liability Insurance.
FIGURE 24
Tips:
1. Throughout the system, fields that a provider will be required to enter prior to attestation are indicated with a red asterisk (*).
2. If you need assistance, you can access the “?” link that is displayed on the right hand side of the screen.
3. Use “Go to previous section” or “Save & Continue” to page forward or backward within sections.
4. It is important to click on the “Save & Continue” button to save your information. If you close the browser without clicking “Save & Continue”, you will lose your information.
On the first login, the user will not see any lists or common data (see Figure 25). FIGURE 25
CAQH ProView Practice Manager User Guide v1.1
22 | P a g e
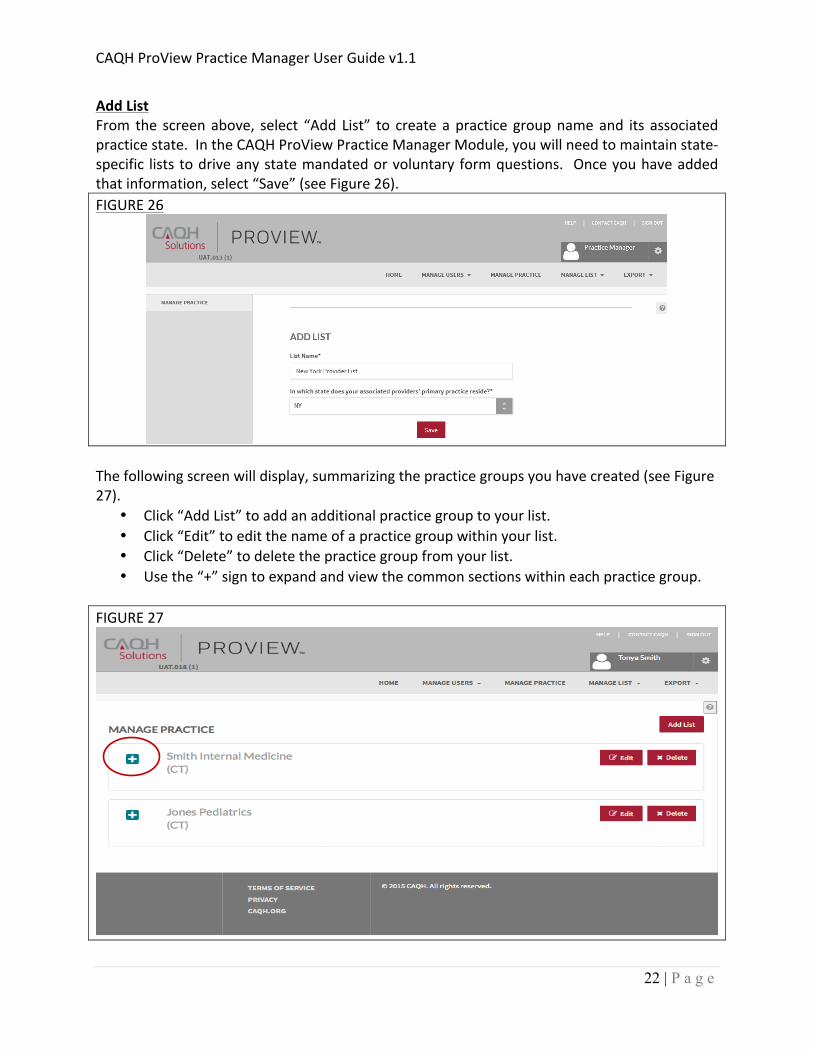
Add List From the screen above, select “Add List” to create a practice group name and its associated practice state. In the CAQH ProView Practice Manager Module, you will need to maintain state-‐specific lists to drive any state mandated or voluntary form questions. Once you have added that information, select “Save” (see Figure 26). FIGURE 26
The following screen will display, summarizing the practice groups you have created (see Figure 27).
• Click “Add List” to add an additional practice group to your list. • Click “Edit” to edit the name of a practice group within your list. • Click “Delete” to delete the practice group from your list. • Use the “+” sign to expand and view the common sections within each practice group.
FIGURE 27
CAQH ProView Practice Manager User Guide v1.1
23 | P a g e
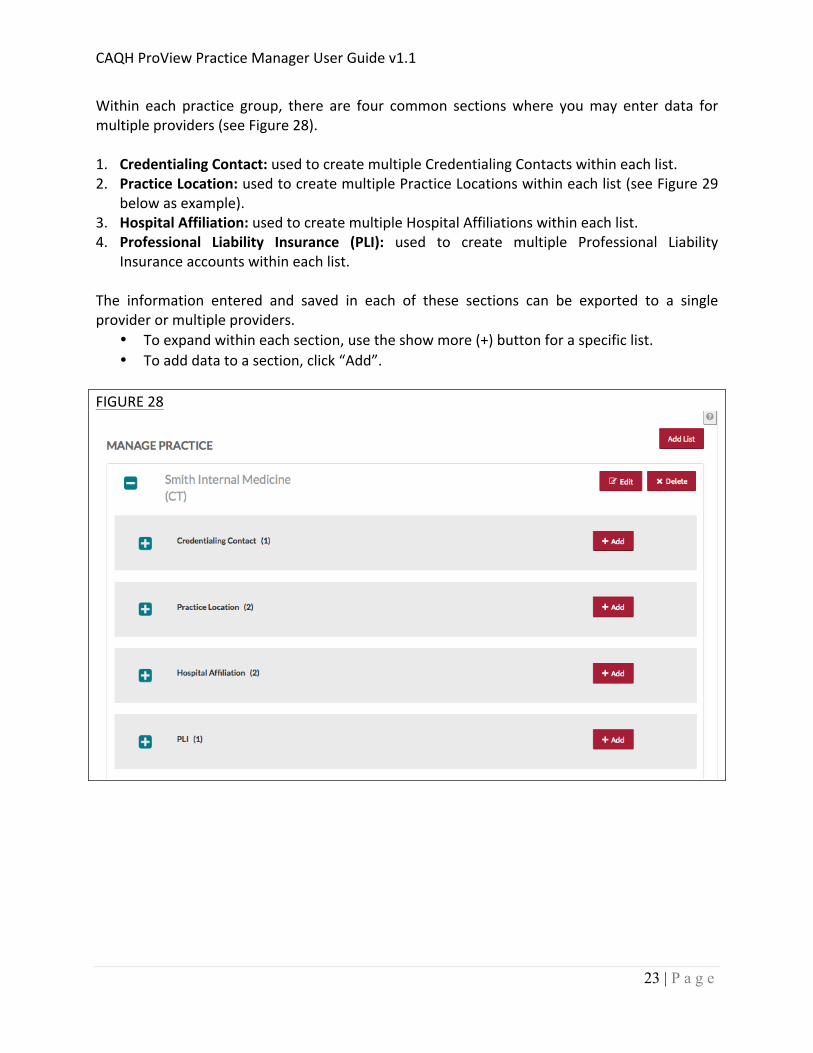
Within each practice group, there are four common sections where you may enter data for multiple providers (see Figure 28). 1. Credentialing Contact: used to create multiple Credentialing Contacts within each list. 2. Practice Location: used to create multiple Practice Locations within each list (see Figure 29
below as example). 3. Hospital Affiliation: used to create multiple Hospital Affiliations within each list. 4. Professional Liability Insurance (PLI): used to create multiple Professional Liability
Insurance accounts within each list. The information entered and saved in each of these sections can be exported to a single provider or multiple providers.
• To expand within each section, use the show more (+) button for a specific list. • To add data to a section, click “Add”.
FIGURE 28
CAQH ProView Practice Manager User Guide v1.1
24 | P a g e
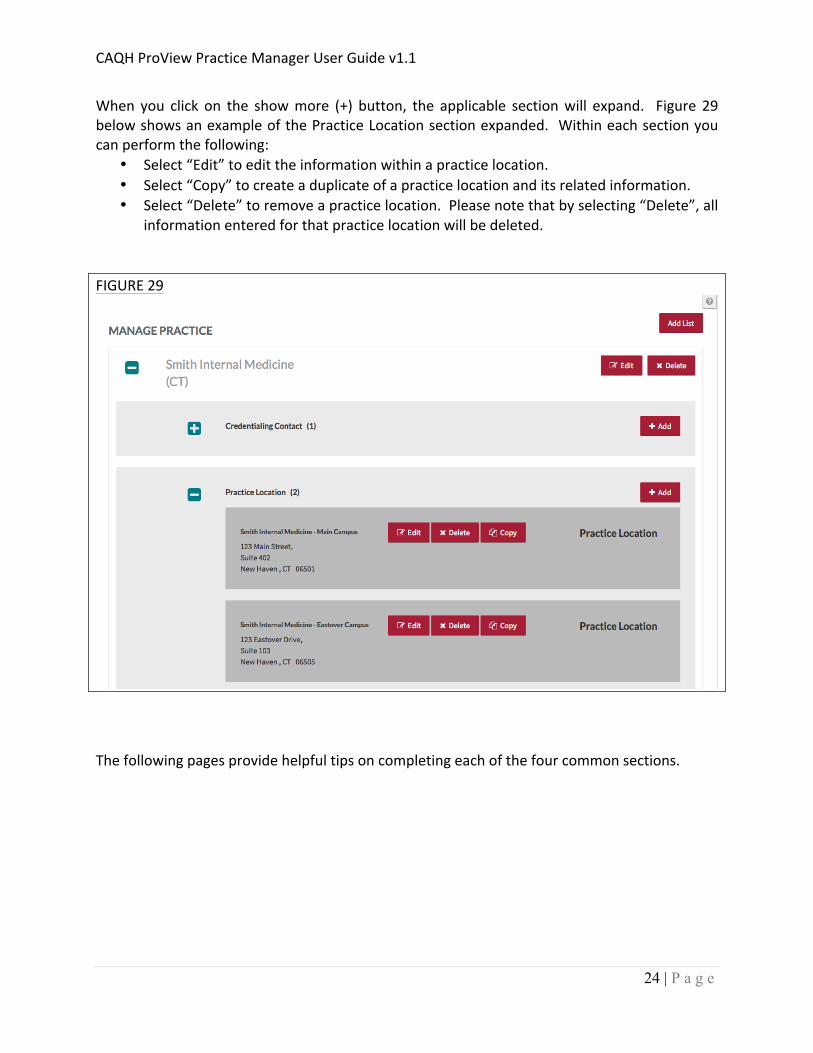
When you click on the show more (+) button, the applicable section will expand. Figure 29 below shows an example of the Practice Location section expanded. Within each section you can perform the following:
• Select “Edit” to edit the information within a practice location. • Select “Copy” to create a duplicate of a practice location and its related information. • Select “Delete” to remove a practice location. Please note that by selecting “Delete”, all
information entered for that practice location will be deleted. FIGURE 29
The following pages provide helpful tips on completing each of the four common sections.
CAQH ProView Practice Manager User Guide v1.1
25 | P a g e
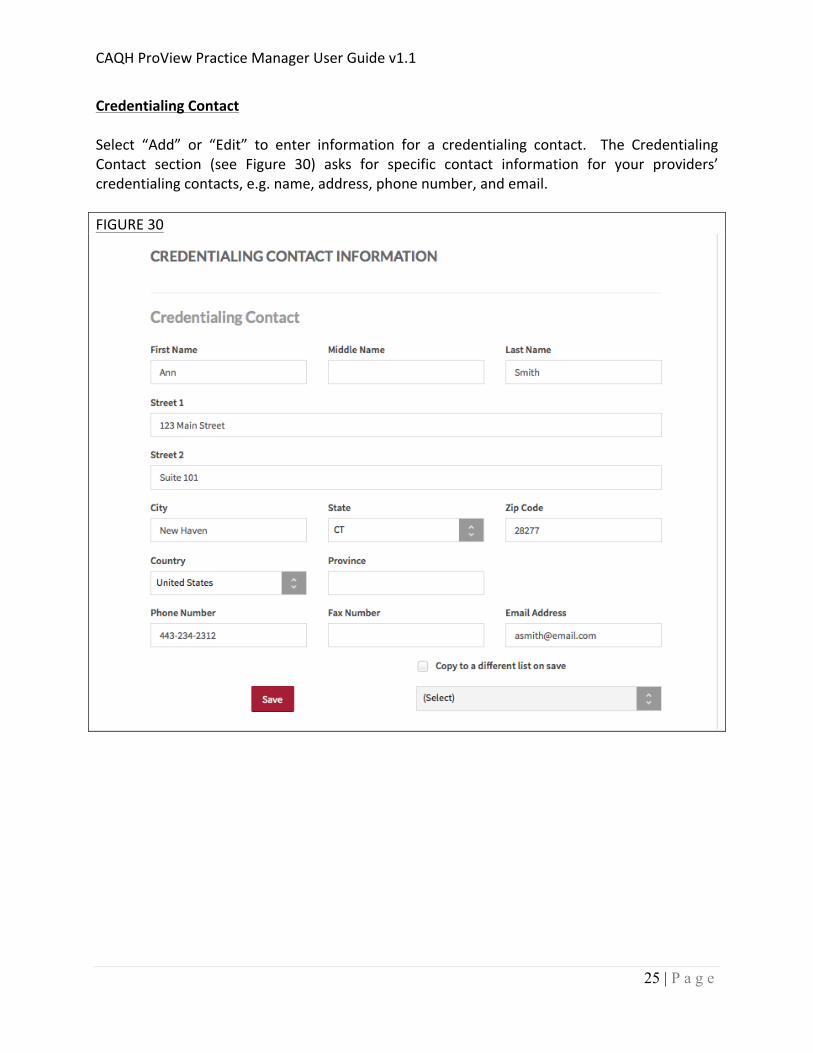
Credentialing Contact Select “Add” or “Edit” to enter information for a credentialing contact. The Credentialing Contact section (see Figure 30) asks for specific contact information for your providers’ credentialing contacts, e.g. name, address, phone number, and email. FIGURE 30

CAQH ProView Practice Manager User Guide v1.1
26 | P a g e
Practice Location
Select “Add” or “Edit” to enter information for a practice location. The Practice Location section (see Figure 31) asks for detailed information regarding your providers’ practice location(s) including general contact information, hours, covering colleagues, practice limitations, accessibility and services provided. Tips:
1. Throughout the screens, required fields that providers must complete prior to their attestation are indicated with a red asterisk (*). To export data, all required fields do not need to be completed by a practice manager, but they will be required before the provider can attest.
2. Use “Go to previous section” or “Save & Continue” to page forward or backward within sections.
3. It is important to click on the “Save & Continue” button to save your information. If you close the browser without clicking “Save & Continue”, you will lose your information.
4. Questions presented to you may vary based on the provider’s primary practice state. FIGURE 31
The subsections are listed below and may vary based on the practice state.
§ General Information o Physician Group/Practice Name
§ Please enter the Practice Name as it appears on a provider’s claim submission so it will match the name for the location that is known to

CAQH ProView Practice Manager User Guide v1.1
27 | P a g e
participating organizations with whom the provider contracts. In most cases, this will not be the practitioner’s name. In some cases, this may be the name as it appears on the W9.
o Address § CAQH requests that you enter the appropriate address for the actual
physical location of the practice. If you do not have a physical practice location, you may enter a P.O. Box; however, please note that health plans intend to use this information for their directories. If you would like to enter a P.O. Box for the billing address, please enter this information in the Billing Contact section at the bottom of this page.
o Group Medicaid Number o Group Medicare Number o NPI Type 2
§ Enter your provider’s group National Provider Identification Number o Phone Numbers o Phone Coverage o Tax Identification Number
§ Hours o Office Hours o Patients
§ Indicate the types of patients accepted into the practice § Coverage & Contact
o Colleagues o Covering Colleagues o Mid-‐Level Practitioners
§ Mid-‐level practitioners include: P.A. (physician's assistant), N.M.W (nurse midwife), N.P (nurse practitioner), or R.N.F.A (registered nurse first assistant).
o Office Manager or Business Staff Contact o Billing Contact o Payment and Remittance
§ Practice Limitations o Limitation
§ A limitation is any restriction the practice has set on the gender or age of the patient population.
o Gender Limitations o Age Limitations o Other Limitation
§ Accessibility o ADA Accessibility
§ The Americans with Disabilities Act (ADA) ensures access to the physical environment for people with disabilities. The ADA Standards establish design requirements for the construction and alteration of facilities subject to the law. These enforceable standards apply to places of public
CAQH ProView Practice Manager User Guide v1.1
28 | P a g e
accommodation, commercial facilities, and state and local government facilities.
o Handicapped Accessibility o Public Transportation Accessibility o Other Accessibility Services o Disabled Accessibility
§ Services o Services
§ Indicate what services are provided at this practice location § Clinical Laboratory Improvement Amendments (CLIA) -‐ Diagnostic testing
helps health care providers screen for or monitor specific diseases or conditions. It also helps assess patient health to make clinical decisions for patient care. The Clinical Laboratory Improvement Amendments (CLIA) regulate laboratory testing and require clinical laboratories to be certificated by their state as well as the Center for Medicare and Medicaid Services (CMS) before they can accept human samples for diagnostic testing. Laboratories can obtain multiple types of CLIA certificates, based on the kinds of diagnostic tests they conduct.
o Interpretation Services
CAQH ProView Practice Manager User Guide v1.1
29 | P a g e
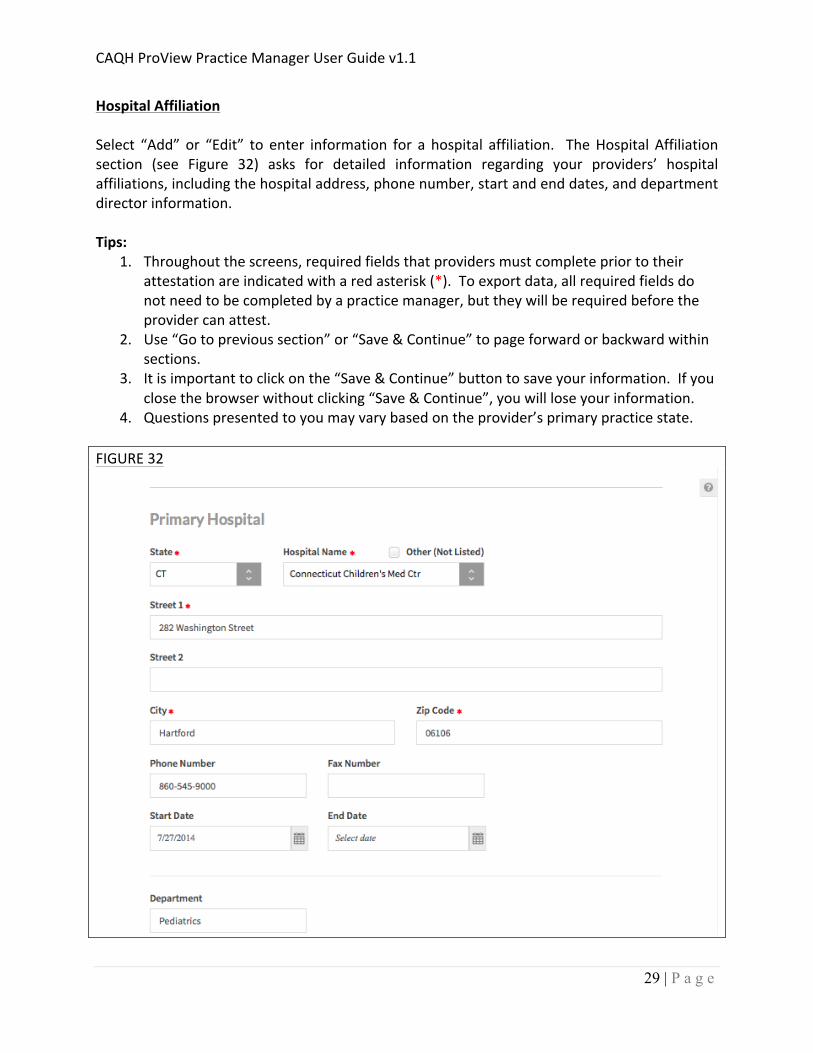
Hospital Affiliation Select “Add” or “Edit” to enter information for a hospital affiliation. The Hospital Affiliation section (see Figure 32) asks for detailed information regarding your providers’ hospital affiliations, including the hospital address, phone number, start and end dates, and department director information. Tips:
1. Throughout the screens, required fields that providers must complete prior to their attestation are indicated with a red asterisk (*). To export data, all required fields do not need to be completed by a practice manager, but they will be required before the provider can attest.
2. Use “Go to previous section” or “Save & Continue” to page forward or backward within sections.
3. It is important to click on the “Save & Continue” button to save your information. If you close the browser without clicking “Save & Continue”, you will lose your information.
4. Questions presented to you may vary based on the provider’s primary practice state. FIGURE 32

CAQH ProView Practice Manager User Guide v1.1
30 | P a g e
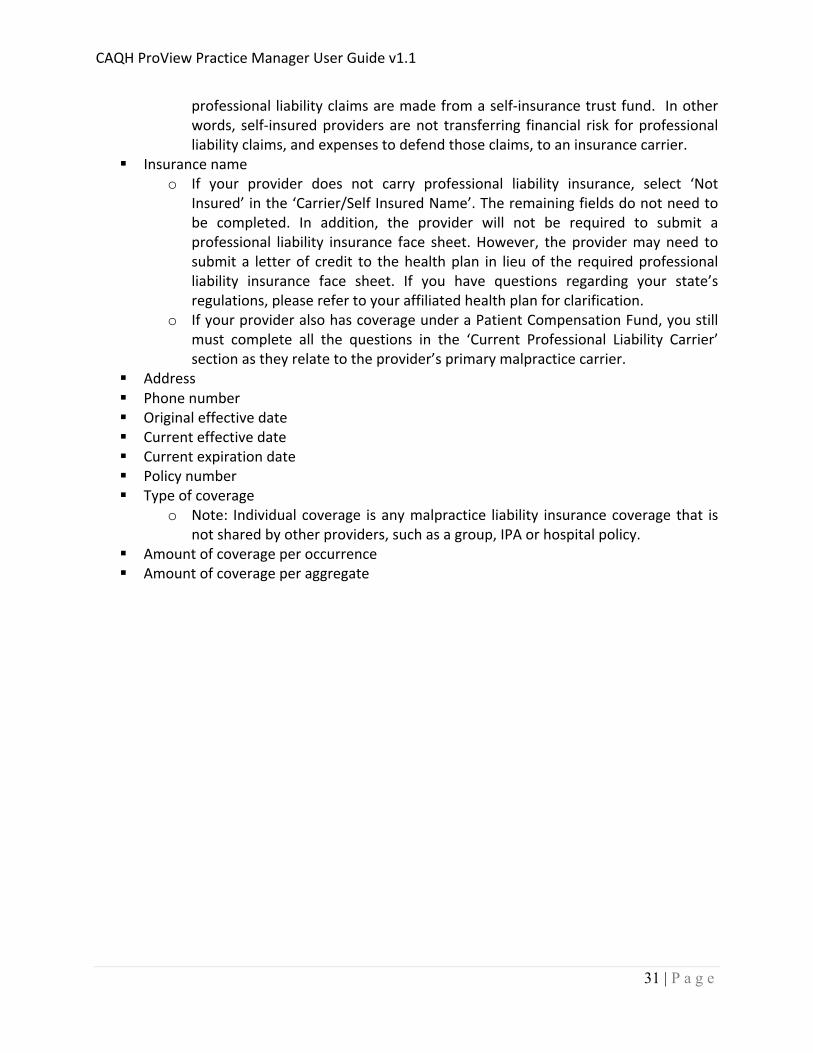
Professional Liability Insurance The Professional Liability Insurance section (see Figure 33) asks for detailed information regarding your providers’ professional liability insurance. Select “Add” or “Edit” to enter information for your providers’ professional liability insurance. Tips:
1. Required fields that providers must complete prior to their attestation are indicated with a red asterisk (*). To export data, all required fields do not need to be completed by a practice manager, but they will be required before the provider can attest.
2. Questions presented to you may vary based on the provider’s primary practice state. FIGURE 33
The questions asked in this section include the following:
• Self-‐insured o Self-‐insured providers are protected from professional liability claims by a
program of self-‐insurance where expense payments and those to satisfy
CAQH ProView Practice Manager User Guide v1.1
31 | P a g e
professional liability claims are made from a self-‐insurance trust fund. In other words, self-‐insured providers are not transferring financial risk for professional liability claims, and expenses to defend those claims, to an insurance carrier.
§ Insurance name o If your provider does not carry professional liability insurance, select ‘Not
Insured’ in the ‘Carrier/Self Insured Name’. The remaining fields do not need to be completed. In addition, the provider will not be required to submit a professional liability insurance face sheet. However, the provider may need to submit a letter of credit to the health plan in lieu of the required professional liability insurance face sheet. If you have questions regarding your state’s regulations, please refer to your affiliated health plan for clarification.
o If your provider also has coverage under a Patient Compensation Fund, you still must complete all the questions in the ‘Current Professional Liability Carrier’ section as they relate to the provider’s primary malpractice carrier.
§ Address § Phone number § Original effective date § Current effective date § Current expiration date § Policy number § Type of coverage
o Note: Individual coverage is any malpractice liability insurance coverage that is not shared by other providers, such as a group, IPA or hospital policy.
§ Amount of coverage per occurrence § Amount of coverage per aggregate
CAQH ProView Practice Manager User Guide v1.1
32 | P a g e
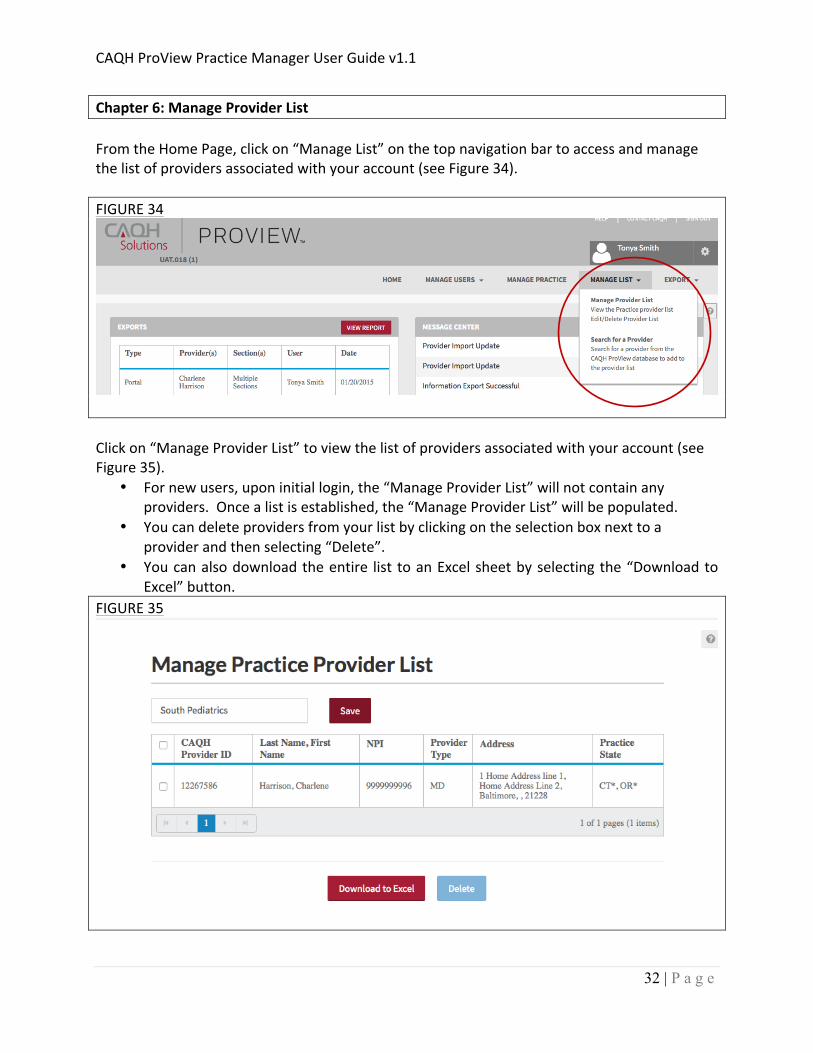
Chapter 6: Manage Provider List From the Home Page, click on “Manage List” on the top navigation bar to access and manage the list of providers associated with your account (see Figure 34). FIGURE 34
Click on “Manage Provider List” to view the list of providers associated with your account (see Figure 35).
• For new users, upon initial login, the “Manage Provider List” will not contain any providers. Once a list is established, the “Manage Provider List” will be populated.
• You can delete providers from your list by clicking on the selection box next to a provider and then selecting “Delete”.
• You can also download the entire list to an Excel sheet by selecting the “Download to Excel” button.
FIGURE 35
CAQH ProView Practice Manager User Guide v1.1
33 | P a g e
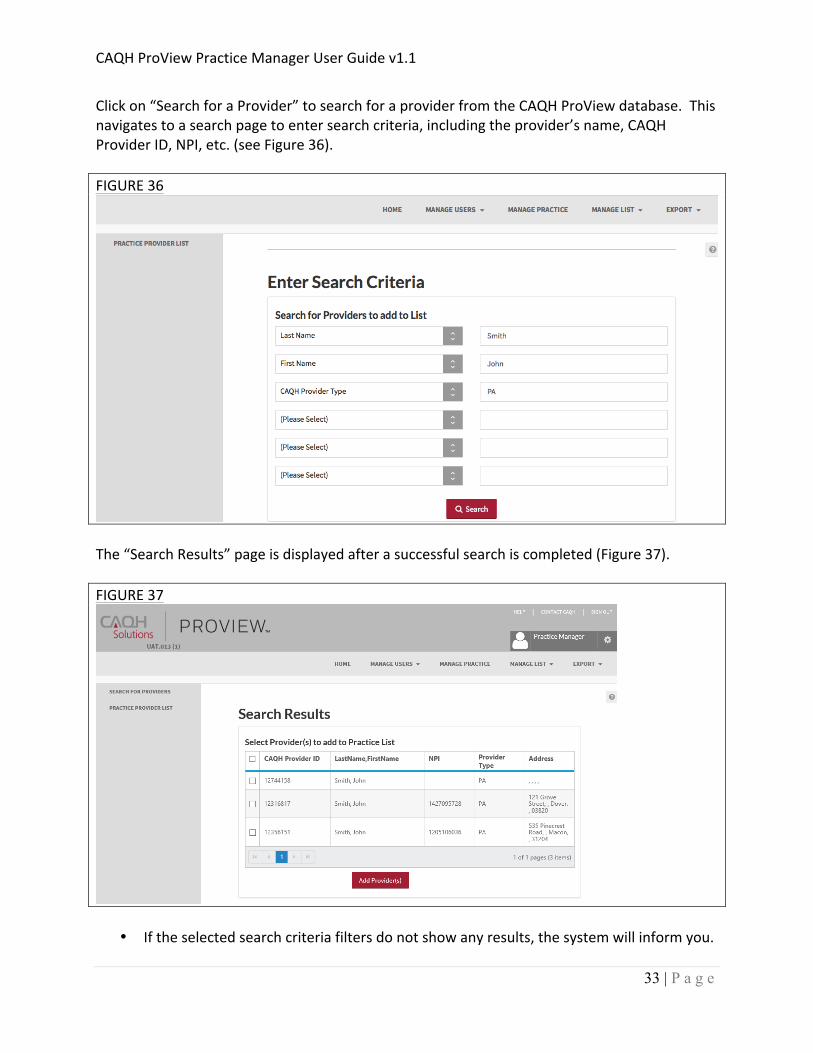
Click on “Search for a Provider” to search for a provider from the CAQH ProView database. This navigates to a search page to enter search criteria, including the provider’s name, CAQH Provider ID, NPI, etc. (see Figure 36). FIGURE 36
The “Search Results” page is displayed after a successful search is completed (Figure 37). FIGURE 37
• If the selected search criteria filters do not show any results, the system will inform you.

CAQH ProView Practice Manager User Guide v1.1
34 | P a g e
• You can select providers from the search results and add them to your provider list by selecting the check box next to a provider and then selecting the “Add Provider(s)” button at the bottom of the results page.
• Alternatively, you can utilize the select all checkboxes in the header row to select all providers at once.

CAQH ProView Practice Manager User Guide v1.1
35 | P a g e
Chapter 7: Bulk Upload This section provides details to users who have been granted access by CAQH to submit a file through the Bulk Upload functionality. The purpose of the Bulk Upload functionality is to assist large practices with the data entry process of the common data profile sections. The Bulk Upload functionality allows large practice groups, with greater than 50 providers, to upload a data file for all providers. Creating a Bulk Upload File The “Bulk Upload Submission Instructions” are located on the “Resources” page, accessible from the drop-‐down menu on the top right of the “Home” page (see Figure 38). This document provides the file template and file specification requirements for the Bulk Upload file. The submitted Bulk Upload file may contain new records, changed records or deleted records. CAQH ProView will process each record, identifying any changes based on the “Action Flag”. FIGURE 38
The Bulk Upload file must be named as listed in the table below. File Name Description Frequency Delimiter ProviderBulkUpload_YYYY_MM_DD_HH_MM.txt
The file name will be required when submitted by PM user.
Ad hoc Pipe delimited
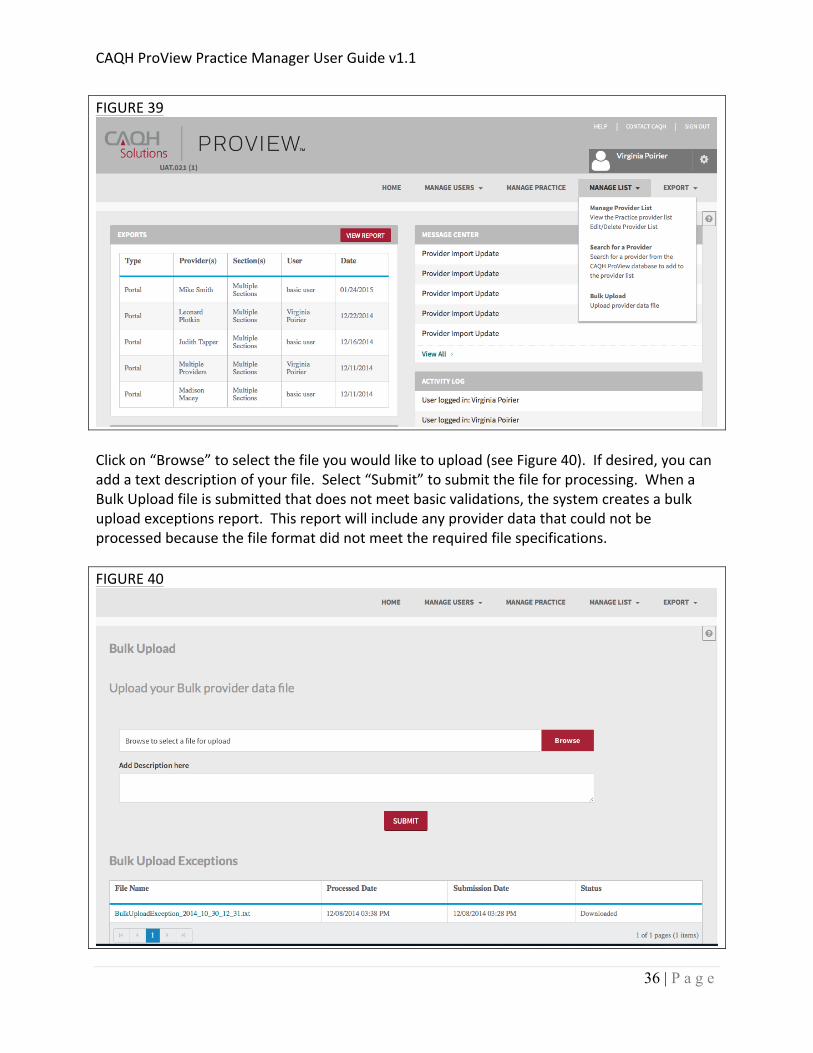
Uploading a Bulk Upload File You can submit the Bulk Upload File to an “Incoming” folder in the CAQH ProView secure FTP server or through the Bulk Upload page on the portal. For users with access to the “Bulk Upload” feature, you can access the bulk upload feature on the portal by clicking on “Bulk Upload” from the “Manage List” navigation menu (see Figure 39 below).
CAQH ProView Practice Manager User Guide v1.1
36 | P a g e
FIGURE 39
Click on “Browse” to select the file you would like to upload (see Figure 40). If desired, you can add a text description of your file. Select “Submit” to submit the file for processing. When a Bulk Upload file is submitted that does not meet basic validations, the system creates a bulk upload exceptions report. This report will include any provider data that could not be processed because the file format did not meet the required file specifications. FIGURE 40

CAQH ProView Practice Manager User Guide v1.1
37 | P a g e
You can submit multiple Bulk Upload files; however, the files will be processed in the order in which they were received. Once the file is processed, the data will automically be exported to the individual provider data profiles. The provider will be able review the data and chose to import the data if desired. The provider will still need to complete any remaining outstanding required fields and complete the attestation process.
CAQH ProView Practice Manager User Guide v1.1
38 | P a g e
Chapter 8: Export
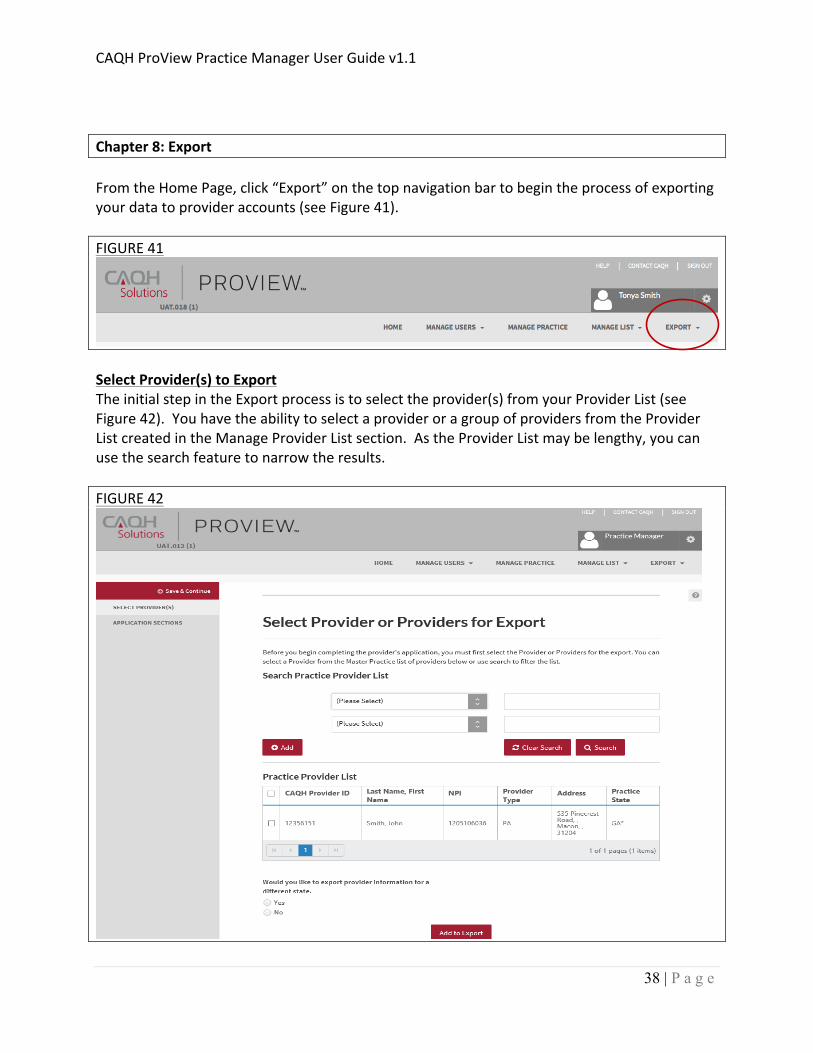
From the Home Page, click “Export” on the top navigation bar to begin the process of exporting your data to provider accounts (see Figure 41). FIGURE 41
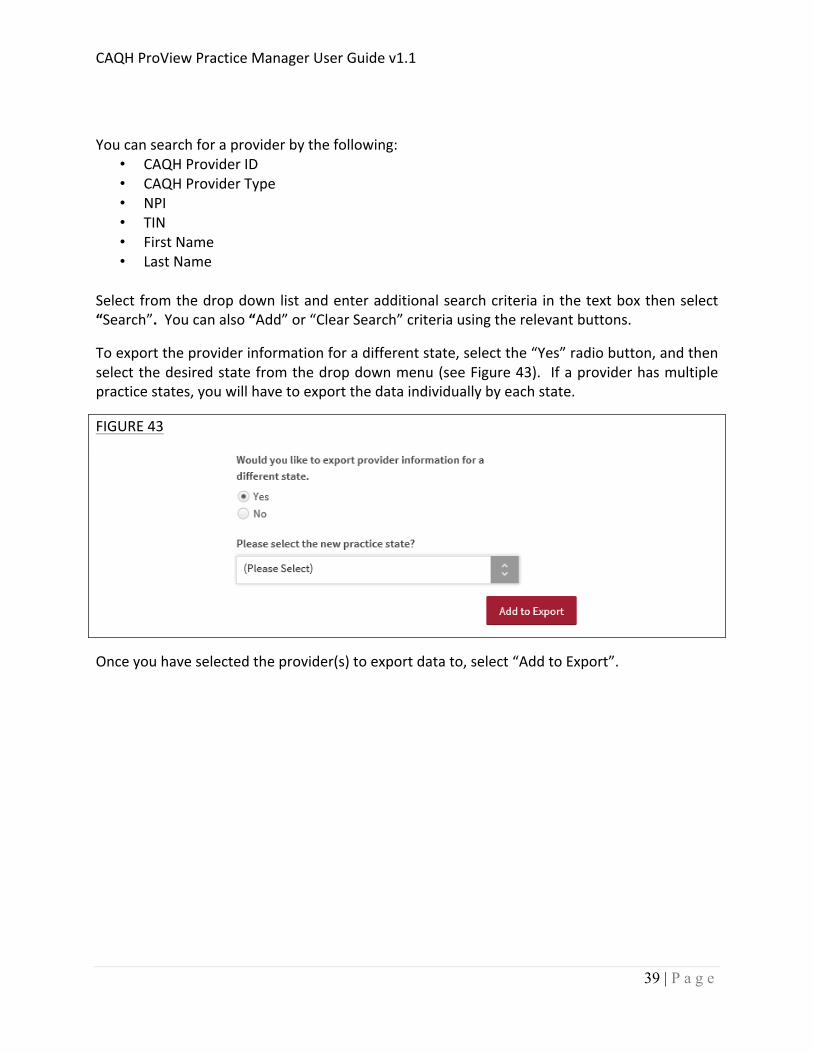
Select Provider(s) to Export The initial step in the Export process is to select the provider(s) from your Provider List (see Figure 42). You have the ability to select a provider or a group of providers from the Provider List created in the Manage Provider List section. As the Provider List may be lengthy, you can use the search feature to narrow the results. FIGURE 42
CAQH ProView Practice Manager User Guide v1.1
39 | P a g e
You can search for a provider by the following:
• CAQH Provider ID • CAQH Provider Type • NPI • TIN • First Name • Last Name
Select from the drop down list and enter additional search criteria in the text box then select “Search”. You can also “Add” or “Clear Search” criteria using the relevant buttons.
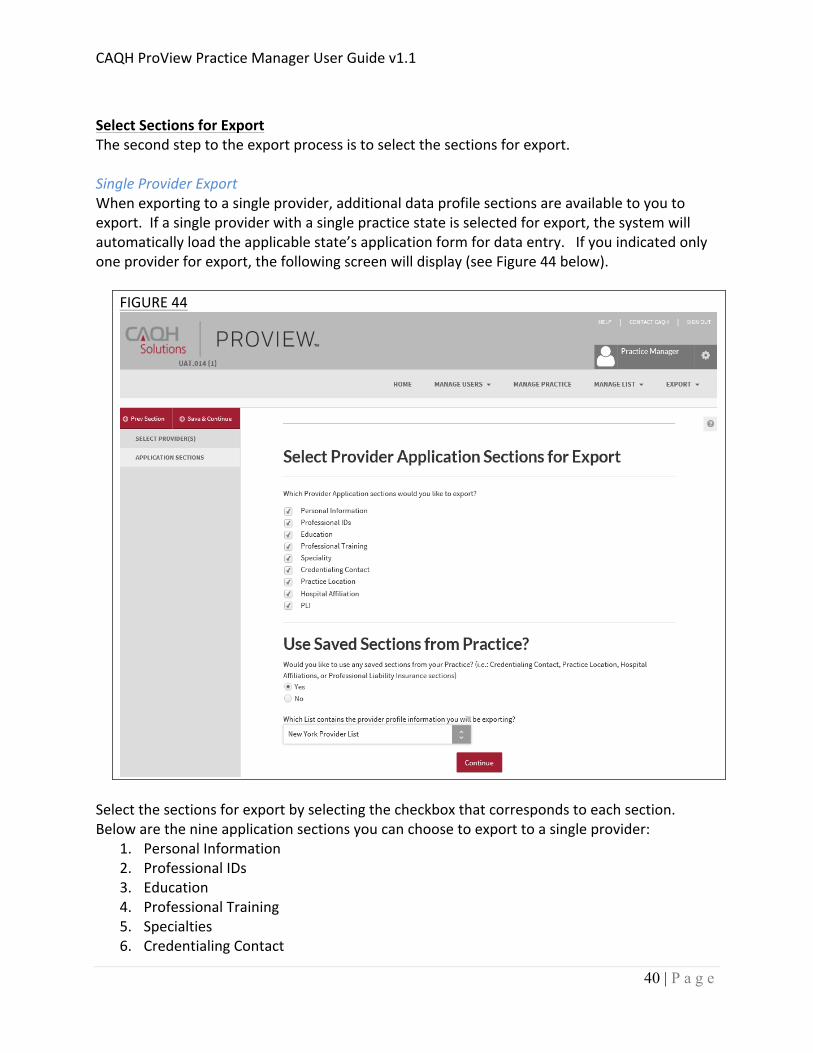
To export the provider information for a different state, select the “Yes” radio button, and then select the desired state from the drop down menu (see Figure 43). If a provider has multiple practice states, you will have to export the data individually by each state.
FIGURE 43
Once you have selected the provider(s) to export data to, select “Add to Export”.
CAQH ProView Practice Manager User Guide v1.1
40 | P a g e
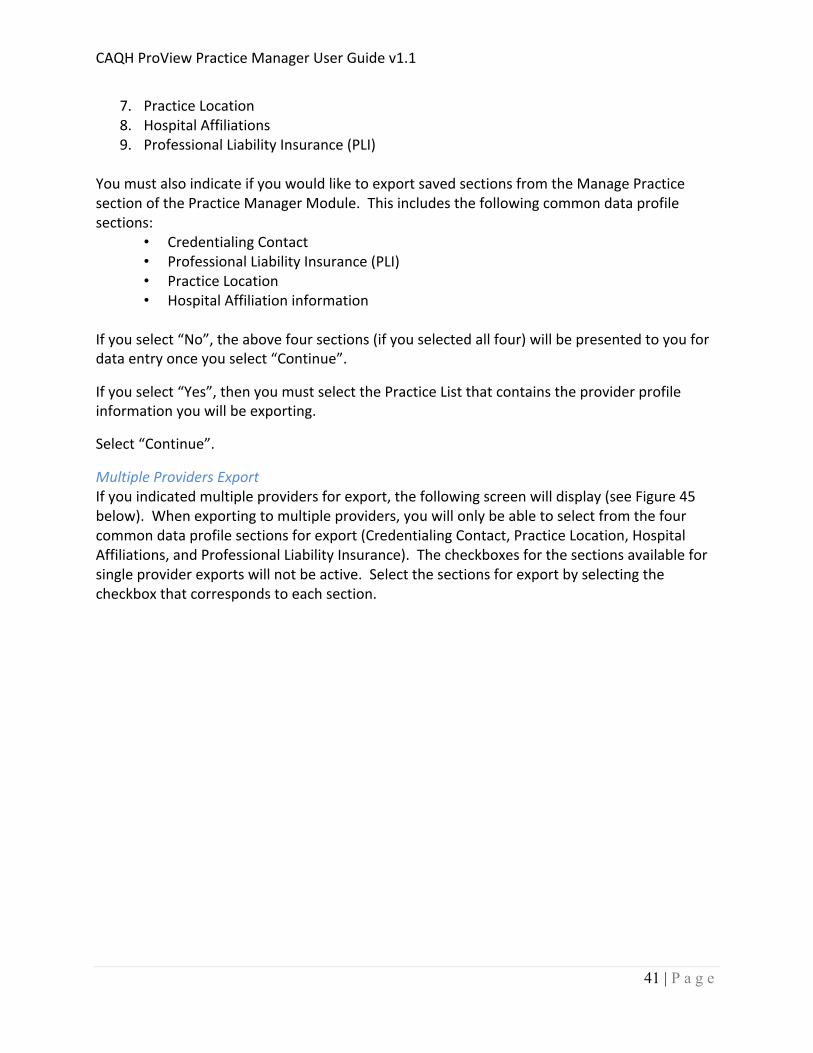
Select Sections for Export The second step to the export process is to select the sections for export. Single Provider Export When exporting to a single provider, additional data profile sections are available to you to export. If a single provider with a single practice state is selected for export, the system will automatically load the applicable state’s application form for data entry. If you indicated only one provider for export, the following screen will display (see Figure 44 below).
FIGURE 44
Select the sections for export by selecting the checkbox that corresponds to each section. Below are the nine application sections you can choose to export to a single provider:
1. Personal Information 2. Professional IDs 3. Education 4. Professional Training 5. Specialties 6. Credentialing Contact
CAQH ProView Practice Manager User Guide v1.1
41 | P a g e
7. Practice Location 8. Hospital Affiliations 9. Professional Liability Insurance (PLI)
You must also indicate if you would like to export saved sections from the Manage Practice section of the Practice Manager Module. This includes the following common data profile sections:
• Credentialing Contact • Professional Liability Insurance (PLI) • Practice Location • Hospital Affiliation information
If you select “No”, the above four sections (if you selected all four) will be presented to you for data entry once you select “Continue”.
If you select “Yes”, then you must select the Practice List that contains the provider profile information you will be exporting.
Select “Continue”.
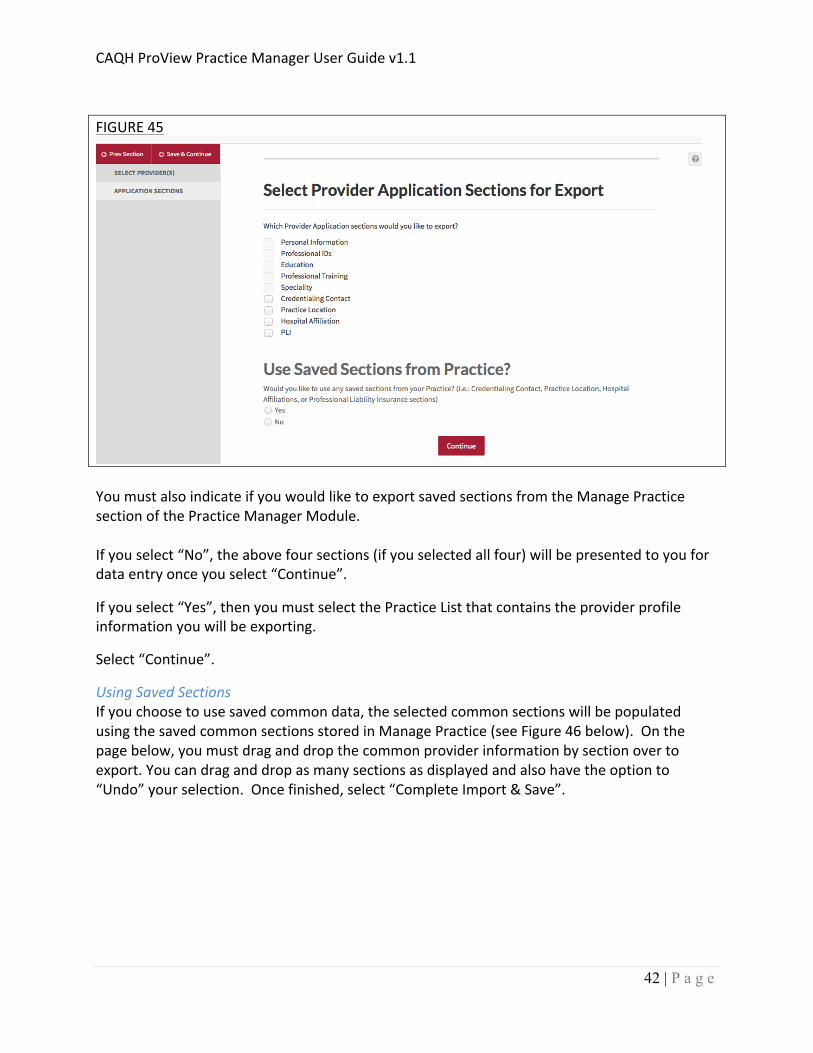
Multiple Providers Export If you indicated multiple providers for export, the following screen will display (see Figure 45 below). When exporting to multiple providers, you will only be able to select from the four common data profile sections for export (Credentialing Contact, Practice Location, Hospital Affiliations, and Professional Liability Insurance). The checkboxes for the sections available for single provider exports will not be active. Select the sections for export by selecting the checkbox that corresponds to each section.
CAQH ProView Practice Manager User Guide v1.1
42 | P a g e
FIGURE 45
You must also indicate if you would like to export saved sections from the Manage Practice section of the Practice Manager Module.
If you select “No”, the above four sections (if you selected all four) will be presented to you for data entry once you select “Continue”.
If you select “Yes”, then you must select the Practice List that contains the provider profile information you will be exporting.
Select “Continue”.
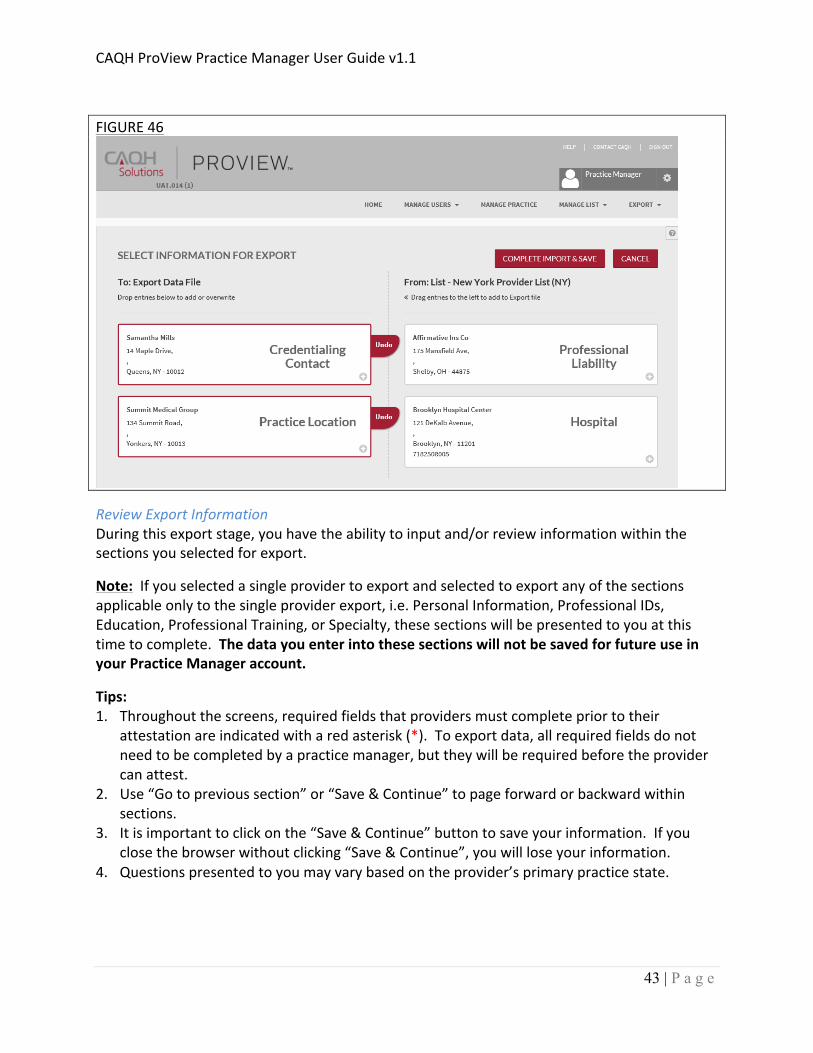
Using Saved Sections If you choose to use saved common data, the selected common sections will be populated using the saved common sections stored in Manage Practice (see Figure 46 below). On the page below, you must drag and drop the common provider information by section over to export. You can drag and drop as many sections as displayed and also have the option to “Undo” your selection. Once finished, select “Complete Import & Save”.
CAQH ProView Practice Manager User Guide v1.1
43 | P a g e
FIGURE 46
Review Export Information During this export stage, you have the ability to input and/or review information within the sections you selected for export.
Note: If you selected a single provider to export and selected to export any of the sections applicable only to the single provider export, i.e. Personal Information, Professional IDs, Education, Professional Training, or Specialty, these sections will be presented to you at this time to complete. The data you enter into these sections will not be saved for future use in your Practice Manager account.
Tips: 1. Throughout the screens, required fields that providers must complete prior to their
attestation are indicated with a red asterisk (*). To export data, all required fields do not need to be completed by a practice manager, but they will be required before the provider can attest.
2. Use “Go to previous section” or “Save & Continue” to page forward or backward within sections.
3. It is important to click on the “Save & Continue” button to save your information. If you close the browser without clicking “Save & Continue”, you will lose your information.
4. Questions presented to you may vary based on the provider’s primary practice state.

CAQH ProView Practice Manager User Guide v1.1
44 | P a g e
Export Summary Page This page shows you which providers were selected, as shown below, in addition to the sections you previously chose to save (See Figure 47). Once you have verified the following information, select “Export”.
• After the data is exported, you will not be able to see any changes to the data that the provider may make.
• You are able to see a record of the export in the “Activity Log” and the “Export History Log” on the Home page.
• NOTE: During future exports, the only provider profile information that is saved in the Practice Manager Module is information that is stored in the four common sections (Credentialing Contact, Practice Location, Hospital Affiliation, and Professional Liability Insurance).
FIGURE 47
CAQH ProView Practice Manager User Guide v1.1
45 | P a g e
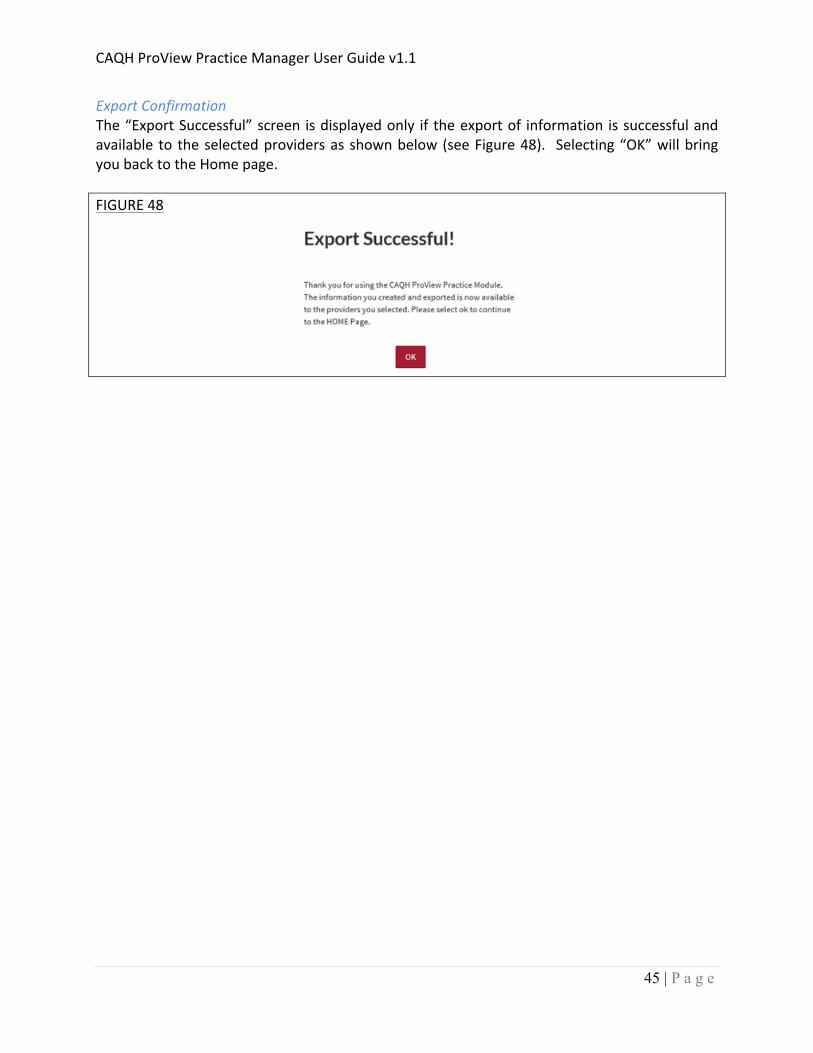
Export Confirmation The “Export Successful” screen is displayed only if the export of information is successful and available to the selected providers as shown below (see Figure 48). Selecting “OK” will bring you back to the Home page. FIGURE 48
CAQH ProView Practice Manager User Guide v1.1
46 | P a g e
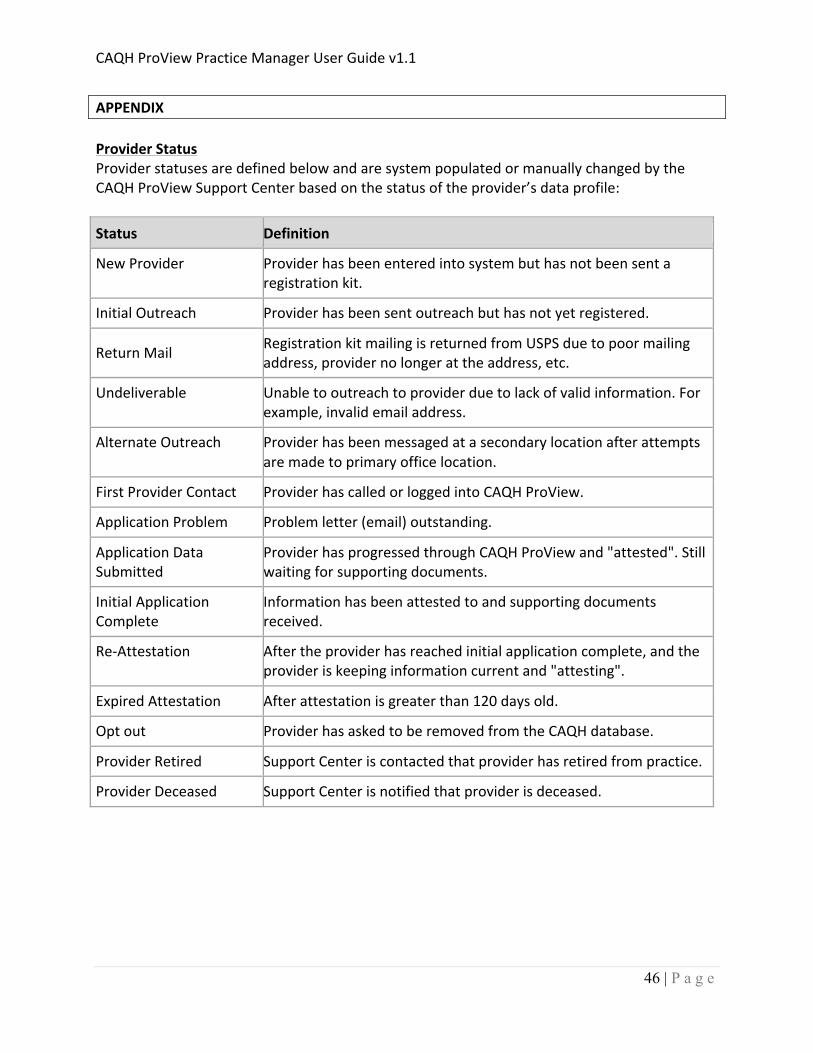
APPENDIX Provider Status Provider statuses are defined below and are system populated or manually changed by the CAQH ProView Support Center based on the status of the provider’s data profile:
Status Definition
New Provider Provider has been entered into system but has not been sent a registration kit.
Initial Outreach Provider has been sent outreach but has not yet registered.
Return Mail Registration kit mailing is returned from USPS due to poor mailing address, provider no longer at the address, etc.
Undeliverable Unable to outreach to provider due to lack of valid information. For example, invalid email address.
Alternate Outreach Provider has been messaged at a secondary location after attempts are made to primary office location.
First Provider Contact Provider has called or logged into CAQH ProView.
Application Problem Problem letter (email) outstanding.
Application Data Submitted
Provider has progressed through CAQH ProView and "attested". Still waiting for supporting documents.
Initial Application Complete
Information has been attested to and supporting documents received.
Re-‐Attestation After the provider has reached initial application complete, and the provider is keeping information current and "attesting".
Expired Attestation After attestation is greater than 120 days old.
Opt out Provider has asked to be removed from the CAQH database.
Provider Retired Support Center is contacted that provider has retired from practice.
Provider Deceased Support Center is notified that provider is deceased.
CAQH ProView Practice Manager User Guide v1.1
47 | P a g e
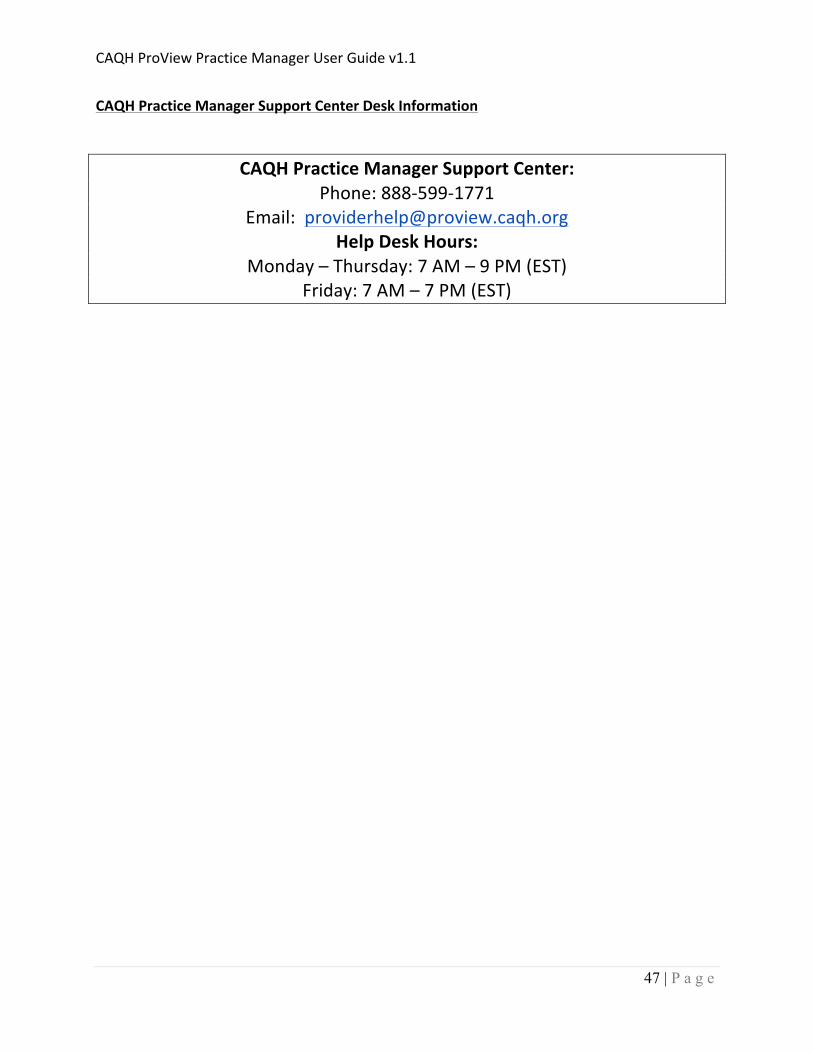
CAQH Practice Manager Support Center Desk Information
CAQH Practice Manager Support Center: Phone: 888-‐599-‐1771
Email: [email protected] Help Desk Hours:
Monday – Thursday: 7 AM – 9 PM (EST) Friday: 7 AM – 7 PM (EST)
CAQH ProView Practice Manager User Guide v1.1
48 | P a g e
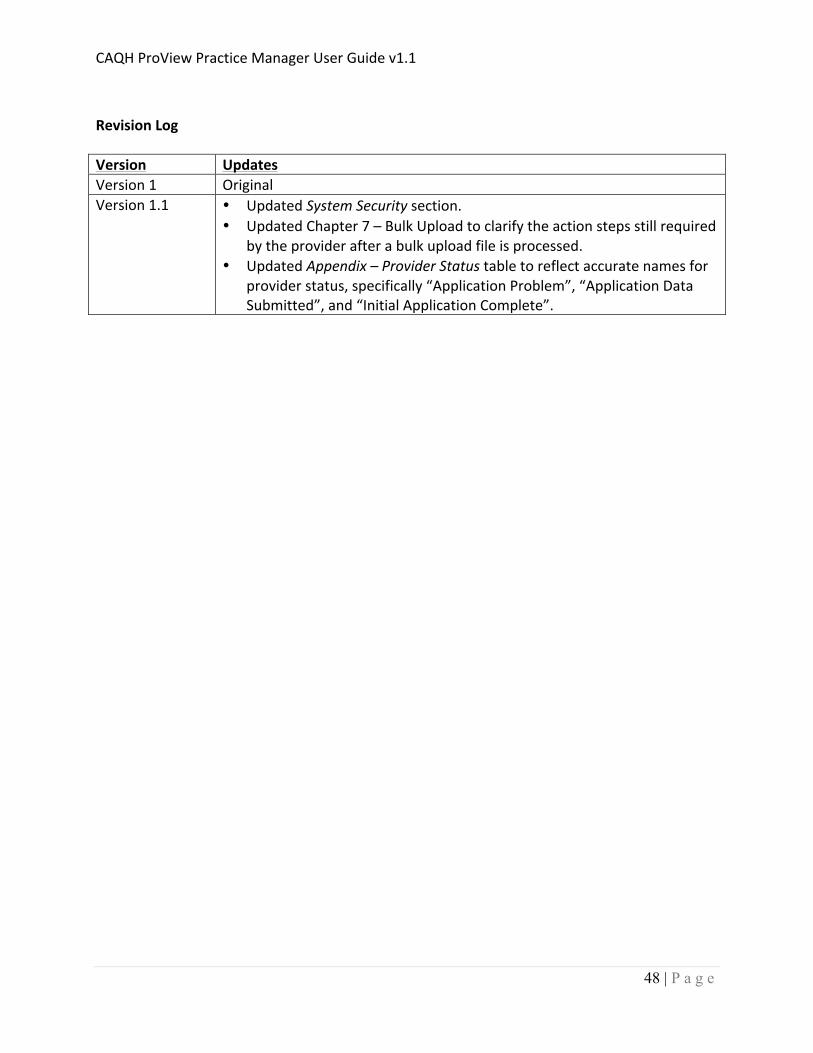
Revision Log Version Updates Version 1 Original Version 1.1 • Updated System Security section.
• Updated Chapter 7 – Bulk Upload to clarify the action steps still required by the provider after a bulk upload file is processed.
• Updated Appendix – Provider Status table to reflect accurate names for provider status, specifically “Application Problem”, “Application Data Submitted”, and “Initial Application Complete”.