Embed Size (px)
Citation preview
1
STRONG. SMART. BEAUTIFUL.
CARE AND MAINTENANCE INSTRUCTIONS
In order to maximize life span, and minimize down time, all MATRIX equipment requires regular cleaning, and
maintenance items performed on a scheduled basis. This document contains detailed instructions on how to perform
these items, the frequency which they should be done, and a check list to sign off each time service is completed for a
specific machine. For more detailed instructions, service manuals are available for most models on our website at
www.matrixfitness.com. Some basic tools and supplies will be necessary to perform these tasks which include (but
may not be limited to):
Metric Allen wrenches
#2 Phillips head screwdriver
Adjustable wrench
Torque wrench (capability to read foot lbs, and inch lbs)
Lint free cleaning cloths
Teflon based spray lubricant (Super Lube Multi-Purpose recommended)
Mild, water soluble, detergent – such as “Simple Green”, or other Matrix approved product
Teflon based synthetic grease lubricant such as “Super Lube”, or other Matrix approved product
Vacuum cleaner w/extendable hose and crevasse tool attachment
This booklet is divided into two categories – Cardio items, and Strength items. Each category is then further divided
into a listing of individual machines that fall within their respective category. Please find the worksheets for any
machines you may have in your facility, and keep them up to date as the required service/maintenance items are
performed. It is critical that you also log the accumulated (total) amount of miles or running hours on the equipment
each time service or maintenance is performed.
You may periodically receive addendums to this document, as the Matrix Technical Support Team identifies items
that require specific attention.
CARDIO MACHINERY
TREADMILLS
T3x, T3x-06, & T3xi-06 Maintenance Light
A blue light on the console will turn on every 5000 miles to remind the owner that maintenance is needed. To
reset this light, press INCLINE DOWN and SPEED DOWN for 3 seconds on 2005 or older units. Press
INCLINE DOWN and SPEED UP for 3 seconds on 2006 or newer units.

2
TREADMILLS - Continued
Treadmill Daily Maintenance Items
1) Clean the entire machine using water and mild detergent such as “Simple Green”, or other Matrix approved
solution (cleaning agents should be alcohol and ammonia free), including: console, handlebar/grip area, and
running belt.
2) Check the Emergency Stop Button (Figure 1) and Safety Cord (Figure 2) for proper operation.
Figure 1 Figure 2
Treadmill Monthly Maintenance Items
1) Inspect the power cord for damage, inspect hand grip areas, and inspect the Emergency Stop Button and
Safety Cord.
2) Vacuum the floor beneath the unit to prevent dust or dirt building up which can affect the performance.
3) Check the running belt for proper tension. To do so:
a. First center the belt. Start the treadmill at 6.0 mph. Turn the left rear roller screw clockwise
to move the belt right (Figure 3) or the right rear roller screw clockwise to move the belt left
(Figure 4). Make adjustments ½ turn at a time, and wait for at least a minute between
adjustments for the belt to equalize.
Figure 3 Figure 4

3
TREADMILLS - Continued
Treadmill Monthly Maintenance - Continued
b. Start the treadmill at 3.0 mph.
c. Stomp down hard on the running belt with one foot. You should be able to make the running
belt hesitate slightly.
d. If you cannot make the running belt hesitate, it is too tight. Loosen the rear roller screws
(turn counter-clockwise) by ½ turn or less on each side and retest.
e. If you can make the running belt stop or hesitate for more than a fraction of a second, it is too
loose. Tighten the rear roller screw by ½ turn or less on each side and retest.
Treadmill Quarterly Maintenance Items
1) Remove the front plastic motor cover, and vacuum the entire inside area of the machine – be careful when
working around the lower control board not to bump any wires or connections loose.
2) With the motor cover off, check the drive belt for visible wear, i.e., cracking, tears, etc. The drive belt should
be replaced if there are any visible signs of damage. Also check the alignment of the drive belt. The drive
belt should be aligned with the front roller pulley (Figure 5). Adjust the motor as needed to resolve alignment
issues, the motor mounting screws holes are slotted (Figure 6).
Figure 5 Figure 6
3) With the motor cover off, start the treadmill and raise the incline setting to the maximum height. Turn the
power switch off at the front of the machine to prevent it from lowering accidentally. Lubricate the incline
motor Acme screw (Matrix recommends using Superlube brand grease with PTFE {Teflon} additive). Also
lubricate the pins at the junction of the elevation motor and incline rack (Figure 8B).
Figure 7 Figure 8 Figure 8b

4
TREADMILLS - Continued Treadmill Bi-Annual Maintenance
1) Remove wax build-up from the front and rear rollers of the machine (a flat screwdriver or a paint scraper /
putty knife work best) (Figures 9 & 10).
Figure 9 Figure 10
2) Inspect the underside of the running belt for damage – checking/cracking, glazed surface.
3) If the belt has damage or wear to it that warrants replacement, please note that the running deck must also be
flipped when a new belt is installed. If the deck has previously been flipped, and no longer has an unused side
available, it needs to be replaced when the new belt is installed. A new belt must ALWAYS be installed to run
on a new deck surface in order to maximize the lifespan of both items.
4) During normal operating conditions, the running belt replacement and deck service may need to be done every
10,000 miles for T1x and T3x treadmills and 20,000 miles for T5x and T7x treadmills.
5) T1x, T1xe, T3x, T3x-06, & T3xi-06 UNITS ONLY – Clean the commutator on the drive motor. To do so:
a. Remove the front motor cover.
b. Remove the cooling fan from the motor (Figure 11).
c. Press a commutator stone (available upon request from Matrix Fitness Systems) to the commutator on
the motor (Figure 12) and slowly turn the belt to clean the commutator.
6) T1x, T1xe, T3x, T3x-06, & T3xi-06 UNITS ONLY – Clean the motor brushes, replace if needed.
Figure 11 Figure 12

5
STEPPERS
Stepper Daily Maintenance
1) Clean the entire machine using water and mild detergent such as “Simple Green”, or other Matrix
approved solutions (cleaning agents should be alcohol and ammonia free).
2) Vacuum the floor beneath the unit to prevent dust or dirt building up which can affect the performance.
Stepper Bi-Annual Maintenance
1) Remove the covers from the unit. Remove the 3 belt pulleys from each side (Figures 13 & 14). Clean
and lubricate the pulleys, then reinstall. (Matrix recommends using Superlube brand grease with PTFE
{Teflon} additive).
Figure 13 Figure 14
2) Check the belts for damage, alignment, and proper tension. Replace as needed.
3) Check the pedal foot pads for damage or wear. Replace as needed.
ELLIPTICAL MACHINES
Elliptical Daily Maintenance
1) Clean the entire machine using water and mild detergent such as “Simple Green”, or other Matrix
approved solutions (cleaning agents should be alcohol and ammonia free).
Elliptical Quarterly Maintenance
1) Check all connecting joint area bolts for tightness.
2) Vacuum the floor beneath the unit to prevent dust or dirt building up which can affect the performance.
3) Insure that there is little, or no free play at all, in the joint assemblies once the bolts have been tightened.
Installation of washer kits may be required if free play does not come out from tightening bolts.
4) Check the pedal foot pad for damage or wear. Replace as needed.

6
5) Remove the plastic covers (Figure 15), and lubricate the ball joint (Figure 16) where the Link Arm and
Vertical Handlebar join together. A grease gun, with a needle fitting adapter is required for this (Matrix
recommends using Superlube brand grease with PTFE {Teflon} additive).
Figure 15 Figure 16
6) Ascent Trainers only – Remove the back plastic covers (Figures 17 & 18), and lubricate the Acme screw
on the left and right incline motors (Matrix recommends using Superlube brand grease with PTFE
{Teflon} additive).
Figure 17 Figure 18
7) I5X Incline Ellipticals only – Start the machine and raise the incline setting to the maximum height. Turn
the power switch off at the front of the machine to prevent the machine from lowering accidentally.
Remove the rear stabilizer cover (Figures 19 & 20), the rear roller end cap (Figure 21) and the center cover
(Figure 22). Lubricate the incline motor Acme screw under the center of the frame (Matrix recommends
using Superlube brand grease with PTFE {Teflon} additive).
Figure 19 Figure 20

7
Figure 21 Figure 22
Elliptical Yearly Maintenance
1) Remove the front round covers and check the belts for damage, alignment, and proper tension. Replace if
needed.
EXERCISE BIKES
Exercise Bikes Daily Maintenance
1) Clean the entire machine including the foot pedals using water and mild detergent such as “Simple Green”,
or other Matrix approved solutions (cleaning agents should be alcohol and ammonia free).
Exercise Bikes Monthly Maintenance
1) Vacuum the floor beneath the unit to prevent dust or dirt building up which can affect the performance.
2) Check the pedal straps for damage. Replace as needed.
Exercise Bikes Quarterly Maintenance
1) Check that pedal and crank assembly are tight, with no free play or wobble in them.
2) Check the condition of the seat upholstery; make sure that the seat adjustment mechanism is operating
smoothly.
Exercise Bikes Yearly Maintenance
1) Open the front covers and check the belts for wear and tension, replace if needed.
8
STRENGTH EQUIPMENT
Strength Daily Maintenance
1) Clean the entire machine using water and mild detergent such as “Simple Green”, or other Matrix
approved solutions (cleaning agents should be alcohol and ammonia free). For weight stack shields use
glass cleaner such as “Windex”.
Strength Weekly Maintenance
1) Visibly inspect the belt and cable assemblies for signs of wear – tearing, frayed edges, cracked or
missing jacketing. Immediately replace any belt or cable with any apparent damage to it. Any
belt replacement must be done using the torque specifications below.
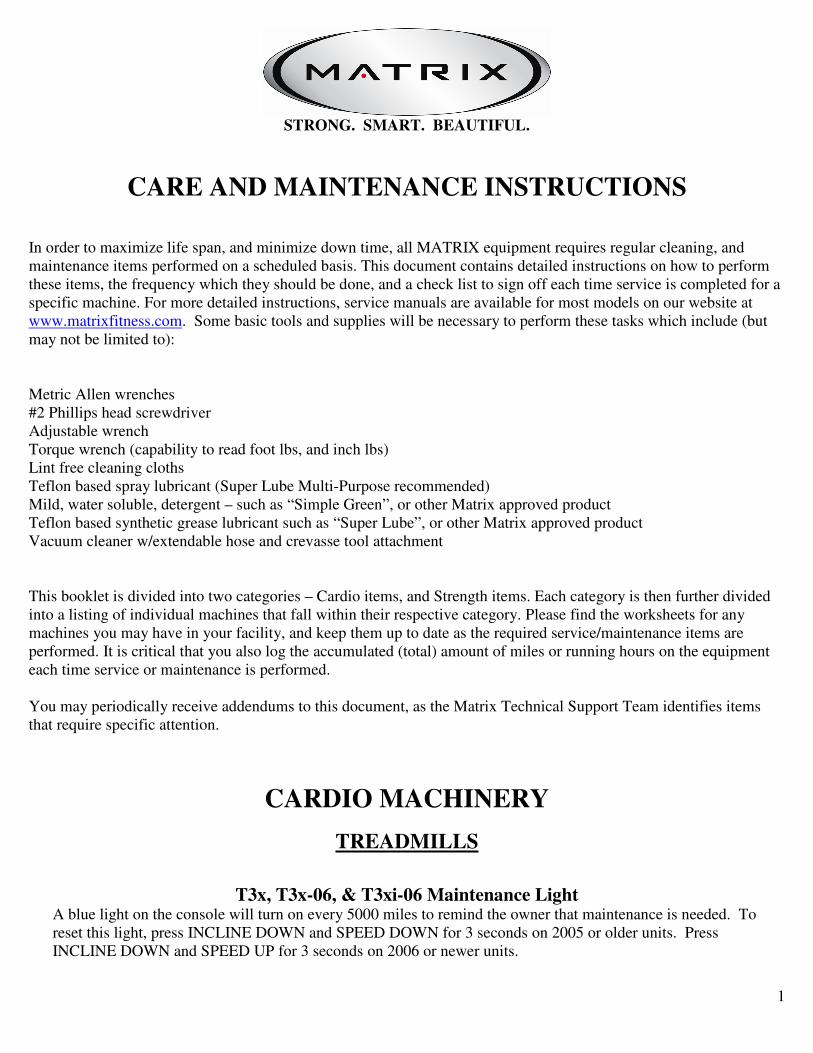
For belting with the “fold over” type clamp (Figure 23), use this specification:
The bolts (with blue Loc-tite – this is important as it acts as a lubricant and is
related to the torque spec) should be tightened to 40 inch pounds using a torque
wrench. The bolts should be tightened in a uniform pattern.
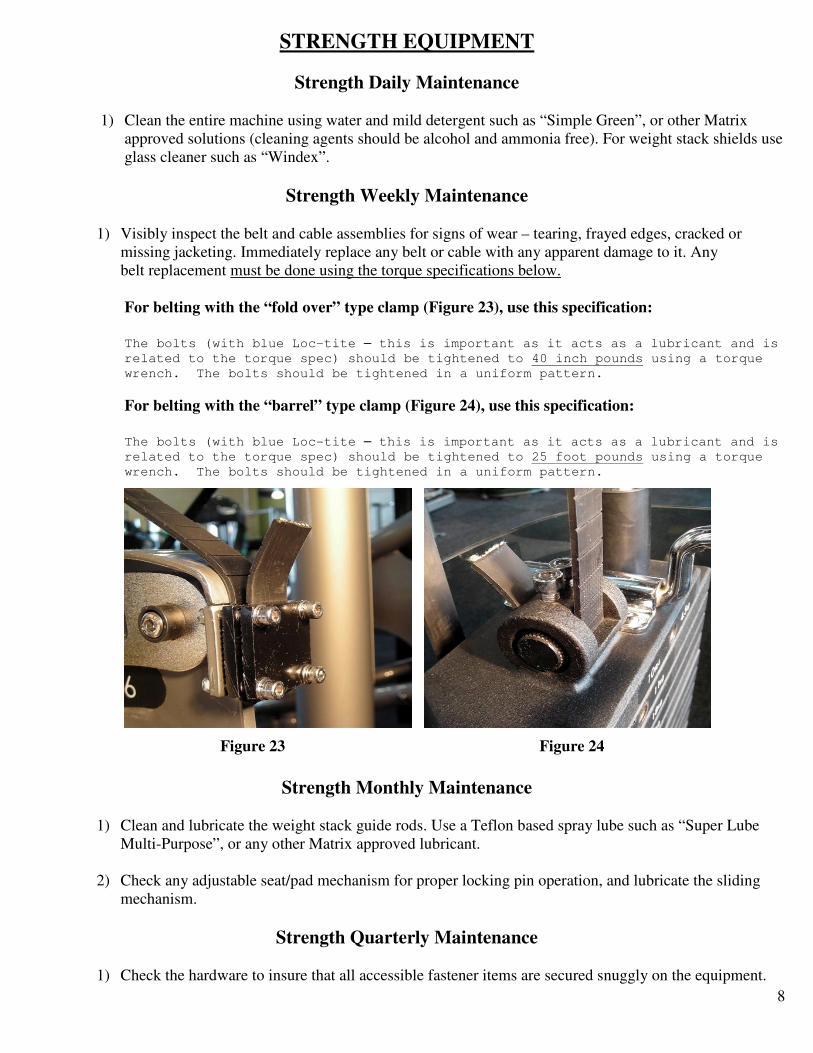
For belting with the “barrel” type clamp (Figure 24), use this specification:
The bolts (with blue Loc-tite – this is important as it acts as a lubricant and is
related to the torque spec) should be tightened to 25 foot pounds using a torque
wrench. The bolts should be tightened in a uniform pattern.
Figure 23 Figure 24
Strength Monthly Maintenance
1) Clean and lubricate the weight stack guide rods. Use a Teflon based spray lube such as “Super Lube
Multi-Purpose”, or any other Matrix approved lubricant.
2) Check any adjustable seat/pad mechanism for proper locking pin operation, and lubricate the sliding
mechanism.
Strength Quarterly Maintenance
1) Check the hardware to insure that all accessible fastener items are secured snuggly on the equipment.

9
STRONG. SMART. BEAUTIFUL
PREVENTATIVE MAINTENANCE CHECKLIST
Facility:
Inspect power cords Check resistance system Clean/lube guide rods
Check E-stop cord/button Lubricate pivot points Inspect belt/cable assy.
Vacuum/clean under cover Check connecting joints Check locking pins
Check motor drive belt Remove covers, check belts Check pulleys
Check running belt Check pedal & crank Inspect upholstery
Flip/replace deck Check/lube seat adjustment Check/tighten hardware
De-wax rollers Verify electronics operation Lubricate Acme screw
Notes/comments
*MAKE ADDITIONAL COPIES AS NEEDED*
Make: Model: S/N
Date:
: Technician: Location:
Make: Model: S/N
Date:
: Technician: Location:

10
STRONG. SMART. BEAUTIFUL
PREVENTATIVE MAINTENANCE CHECKLIST
Facility:
Inspect power cords Check resistance system Clean/lube guide rods
Check E-stop cord/button Lubricate pivot points Inspect belt/cable assy.
Vacuum/clean under cover Check connecting joints Check locking pins
Check motor drive belt Remove covers, check belts Check pulleys
Check running belt Check pedal & crank Inspect upholstery
Flip/replace deck Check/lube seat adjustment Check/tighten hardware
De-wax rollers Verify electronics operation Lubricate Acme screw
Notes/comments
Inspect power cords Check resistance system Clean/lube guide rods
Check E-stop cord/button Lubricate pivot points Inspect belt/cable assy.
Vacuum/clean under cover Check connecting joints Check locking pins
Check motor drive belt Remove covers, check belts Check pulleys
Check running belt Check pedal & crank Inspect upholstery
Flip/replace deck Check/lube seat adjustment Check/tighten hardware
De-wax rollers Verify electronics operation Lubricate Acme screw
Notes/comments
*MAKE ADDITIONAL COPIES AS NEEDED*
Make: Model: S/N
Date:
: Technician: Location:
Make: Model: S/N
Date:
: Technician: Location: