Embed Size (px)
Citation preview
1
Career Pathways in Technology and Livelihood Education (CP-TLE)
HOME ECONOMICS I CLOTHING AND TEXTILES Quarter 4: Pajama Pants Module 3: How to Sew Pajama Pants
Are you comfortable during your sleep moments at night? What do you usually wear when going to bed? Do you want to sleep like a baby or sleep like 10 hours even though you only slept for about four to five hours? Of course, yes, right? So proper attire is recommended for you …. that is wearing pajamas.
As you go along with this module, you will be able to learn, understand and apply the basic concepts and principles following the process and delivery in sewing which is necessary in producing quality and marketable pajama.
2
To start with, try answering this question: Why do you need to understand the basic concepts and principles underlying the process and delivery in sewing pajama pants?
The following questions will help you as you go along with your lessons.
Guide Questions:
1. Why do you need to understand the basic concepts and principles underlying
the process and delivery in sewing pajama pants?
2. Explain the process flow in sewing pajama pants
3. How will you evaluate the finished products?
4. How do you compute for the production cost and selling price of the finished
products?
5. How will you produce original/marketable pajama pants following the basic
concepts and principles underlying the process and delivery of sewing?
6. How is an original and marketable pajama pants produced?
Pre – assessment
Now let’s see how well you know about sewing pajama pants. A. Directions: Write the letter of the most appropriate word/phrase that best complete
each numbered item. Write your answers in your notebook.
1. The one used temporarily in putting garment together is called _______. a. basting b. hemming c. overcastting d. running
2. An arrangement of pattern pieces on fabric is called _______. a. drafting b. layout c. marking d. tracing
EXLORE Your Understanding
3
3. The measurement taken around the waist down to the crotch is called the _____. a. length b. hip depth c. rise d. waist length
4. The part to which the pajama pant casing is attached is the _______. a. back b. bottom c. front d. waistline
5. The measurement taken around the fullest part of the hips is called _______. a. bottom b. rise c. seat d. waist
6. The process by which two pieces of cloth are joined together is called _____. a. folding b. graining c. seaming d. stitching
7. A fabric that has been shrunk during the manufacturing stage is called pre- __________. a. press b. shrunk c. soak d. straight
8. In drafting the pattern for pajama pants, the number of parts that the seat measurement is always divided into _________. a. two b. three c. four d. five
9. The seat scale needed if the measurement of the seat is 32 inches (81.28 cm) is _________. a. 8 inches (20.32 cm) b. 16 inches (40.64 cm) c. 16 ¼ inches (41.28 cm) d. 16 ½ inches (41.91 cm) 10 .If the waist measurement is 24 inches (63.50 cm), the waist scale in inches is _______. a. 4 ½ b. 6 c. 7 ¾ d. 12
11. The fabric that is suitable for pajama pants is called _______. a. cotton b. linen c. rayon d. silk
12. If Jane has to make pajama pants which requires 60 inches of fabric, the number of yards that she is going to buy is _______.
a. 1 ½ yard b. 1 ¾ yards b. 2 yards d. 2 ¾ yards
4
13. In pinning your pattern to the cloth/fabric, you should observe the correct
distances of pins from the edge. The distance should be _______.
a. 1 cm b. 1.25 cm b. 1.5 cm d. 2 cm
14. The intervals of pins when placing it on the pattern pieces is _______. a. 10 cm b. 11 cm c. 12 cm d. 13 cm
15. When sewing, make sure that the light should come from your _______. a. back b. front b. left side d. right side
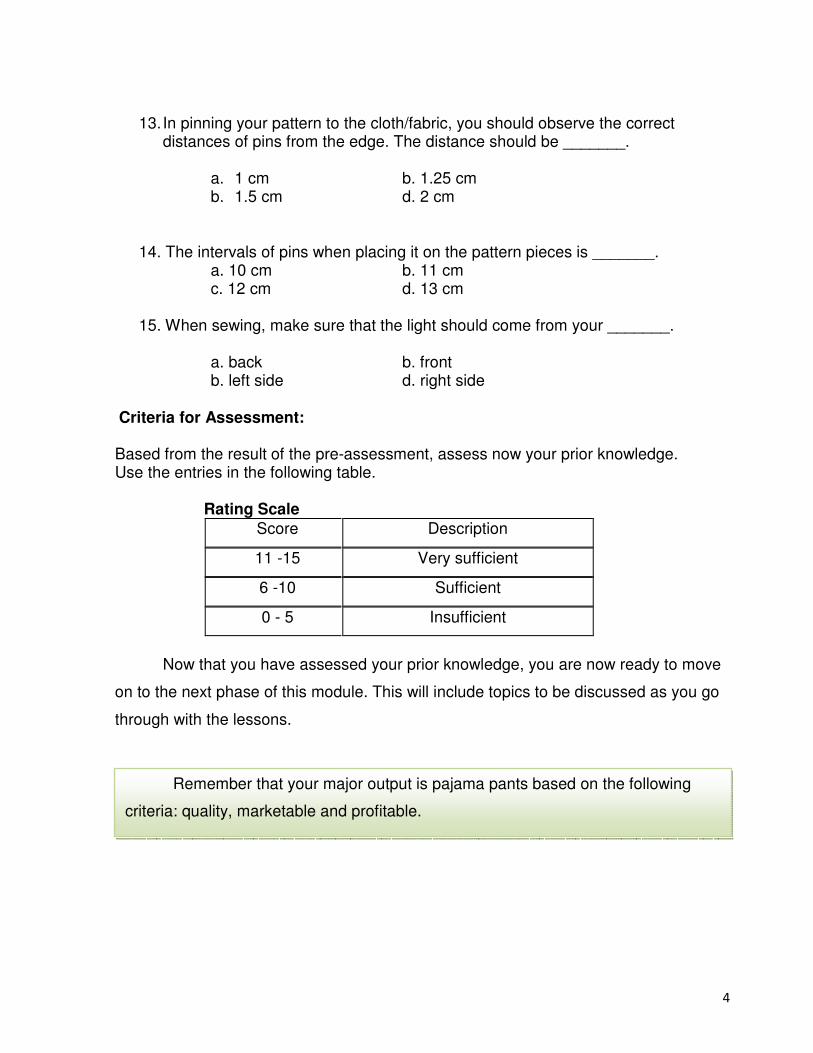
Criteria for Assessment: Based from the result of the pre-assessment, assess now your prior knowledge. Use the entries in the following table. Rating Scale
Score Description
11 -15 Very sufficient
6 -10 Sufficient
0 - 5 Insufficient
Now that you have assessed your prior knowledge, you are now ready to move
on to the next phase of this module. This will include topics to be discussed as you go
through with the lessons.
Remember that your major output is pajama pants based on the following
criteria: quality, marketable and profitable.
5
In this phase, you will learn the basic concepts and principles underlying the
process and delivery in sewing pajama pants.
Lesson 1 – Selecting and Preparing Fabric for Pajama Pants
About Pajamas - Pajamas are fun to make, especially the soft flannel pajama pants. Pajamas can be made into pants, shorts, night shirts, or gowns.
Best Fabric to use - The best fabrics for pajamas are materials which "breathe". This means that, they don't make you sweat or hold moisture. Some suggestions are: light weight cotton, soft flannel, and silk.
Characteristics of a Fabric Suitable for Pajama Pants
Cotton fabrics are appropriate to wear in tropical countries like the Philippines because they are good conductors of heat. Cotton is versatile and durable and it needs frequent laundering. When damp, it is easy to iron using high temperature.
Linen is appropriate for pajama tops and it is popularly called the summer fiber. Linen like cotton needs frequent laundering.
FIRM – UP Your Understanding
Something to Remember:
Simple Pajama Pants made of soft flannel
for any season is a great start for those
learning to sew!
6
Rayon is very similar to silk. Both have low elasticity and resiliency and are quite good conductors of heat.
Guides in Selecting Appropriate Fabric for Oneself
Crumple the fabric in your hand and hold it for 30 seconds. Then release it for about 30 seconds. Observe and see if it wrinkles easily.
See if the fabric is evenly dyed with pleasing colors. The fabric should be clear and not blurred.
Activity 1
Estimate the yardage of your fabric and the other materials needed in constructing your pajama pants.
Lesson 3 – Taking Body Measurements
Taking precise body measurements is only the beginning of many interesting and exciting activities in clothing construction.
To draft the pattern for the pajama pants, you need the measurements of the waist, hips or seat, the desired length of the pajama pants, bottom or hem circumference and the crotch or rise.
Things to remember in taking body measurements:
1. Get a partner to take your measurements.
2. Wear comfortable clothes when measured.
3. Tie a string around your waistline.
4. Use flexible tape measure and pull it snugly but not too tight.
Points to remember:
� Check on the quality and cost of the fabric.
� Always determine the quantity needed to avoid waste of money.
� Your personality and complexion must be considered in fabric
selection.
7
5. Maintain good posture while your partner is taking your measurements.
6. Measure the crotch by using an L-square or a flat chair and a tape measure.
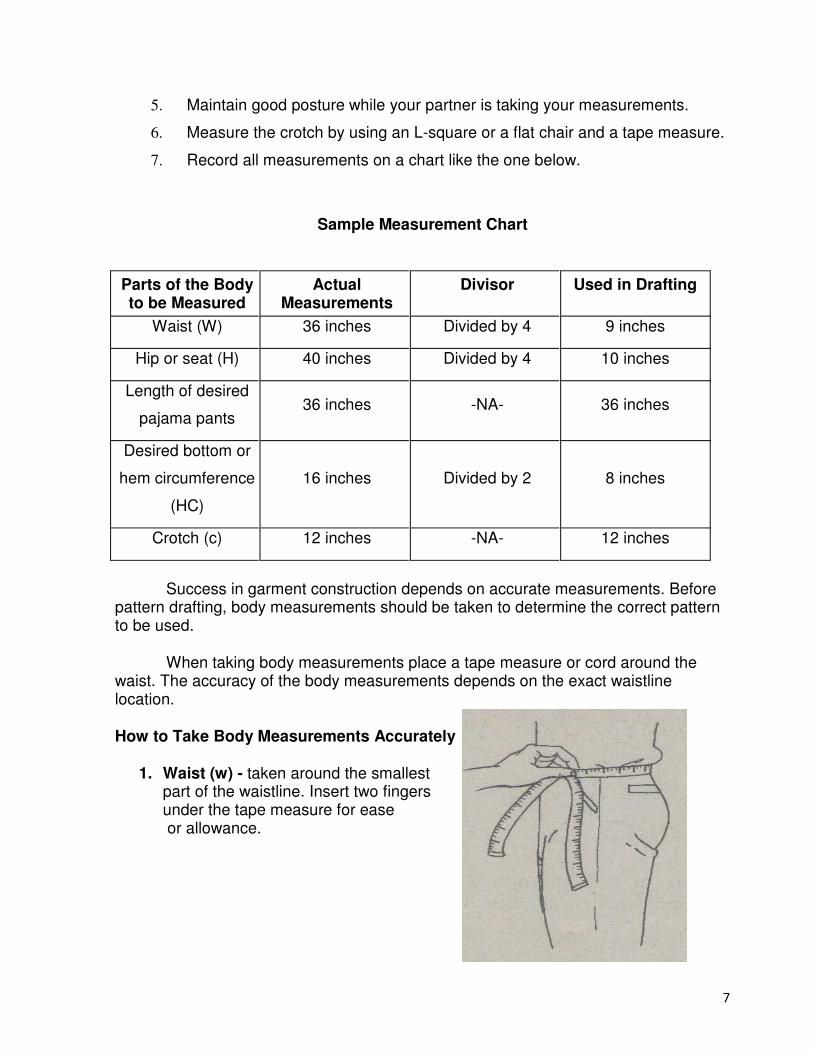
7. Record all measurements on a chart like the one below.
Sample Measurement Chart
Parts of the Body to be Measured
Actual Measurements
Divisor Used in Drafting
Waist (W) 36 inches Divided by 4 9 inches
Hip or seat (H) 40 inches Divided by 4 10 inches
Length of desired
pajama pants 36 inches -NA- 36 inches
Desired bottom or
hem circumference
(HC)
16 inches Divided by 2 8 inches
Crotch (c) 12 inches -NA- 12 inches
Success in garment construction depends on accurate measurements. Before pattern drafting, body measurements should be taken to determine the correct pattern to be used.
When taking body measurements place a tape measure or cord around the waist. The accuracy of the body measurements depends on the exact waistline location.
How to Take Body Measurements Accurately
1. Waist (w) - taken around the smallest part of the waistline. Insert two fingers under the tape measure for ease or allowance.
8
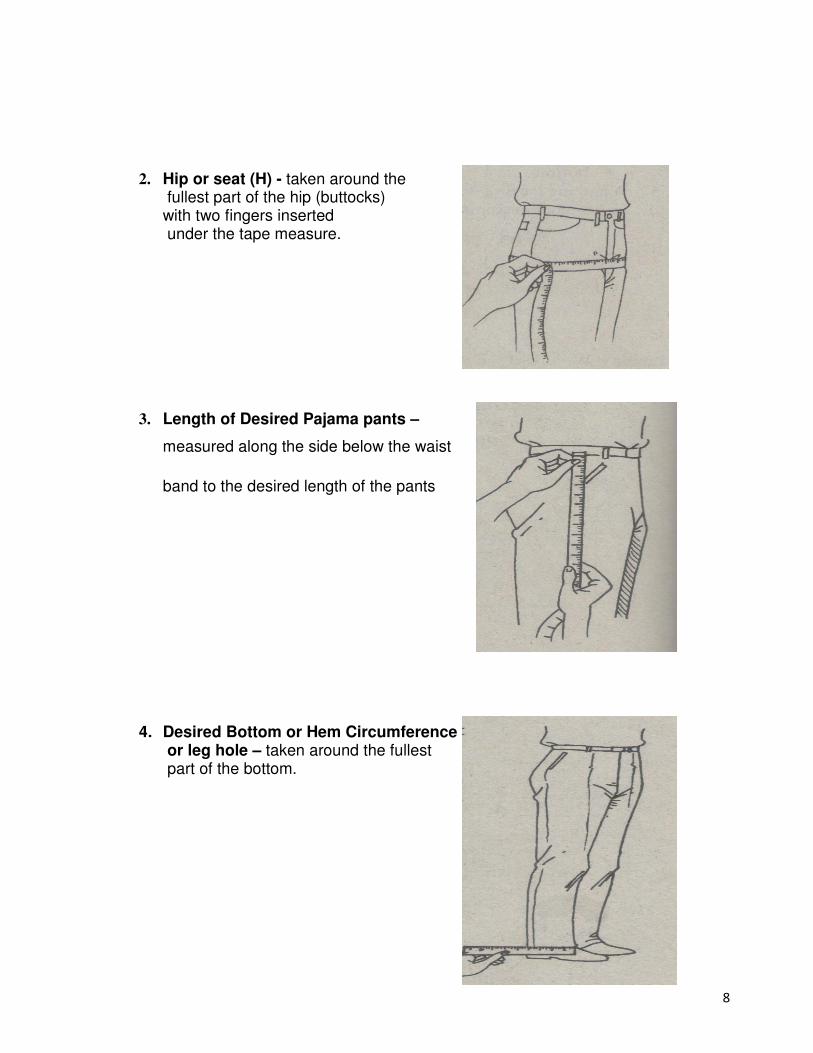
2. Hip or seat (H) - taken around the
fullest part of the hip (buttocks) with two fingers inserted
under the tape measure.
3. Length of Desired Pajama pants –
measured along the side below the waist
band to the desired length of the pants
4. Desired Bottom or Hem Circumference or leg hole – taken around the fullest part of the bottom.
9
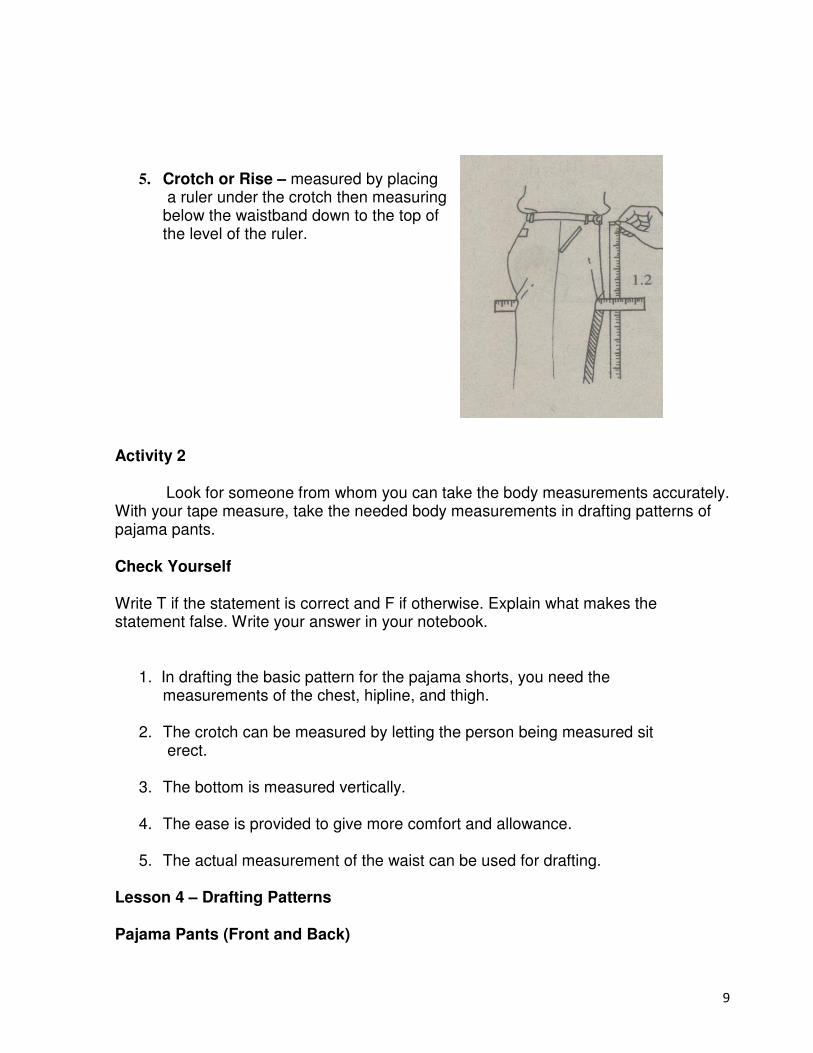
5. Crotch or Rise – measured by placing
a ruler under the crotch then measuring below the waistband down to the top of the level of the ruler.
Activity 2
Look for someone from whom you can take the body measurements accurately. With your tape measure, take the needed body measurements in drafting patterns of pajama pants.
Check Yourself
Write T if the statement is correct and F if otherwise. Explain what makes the statement false. Write your answer in your notebook.
1. In drafting the basic pattern for the pajama shorts, you need the measurements of the chest, hipline, and thigh.
2. The crotch can be measured by letting the person being measured sit erect.
3. The bottom is measured vertically.
4. The ease is provided to give more comfort and allowance.
5. The actual measurement of the waist can be used for drafting.
Lesson 4 – Drafting Patterns
Pajama Pants (Front and Back)
10
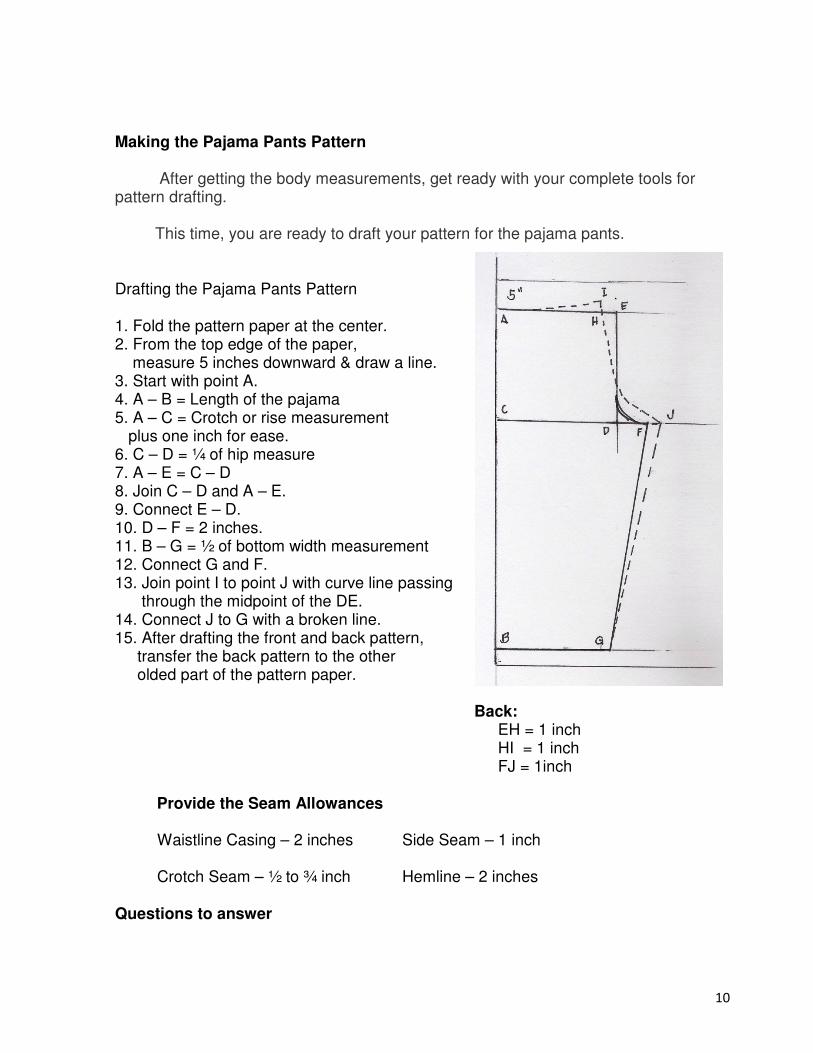
Making the Pajama Pants Pattern After getting the body measurements, get ready with your complete tools for pattern drafting.
This time, you are ready to draft your pattern for the pajama pants.
Drafting the Pajama Pants Pattern
1. Fold the pattern paper at the center. 2. From the top edge of the paper, measure 5 inches downward & draw a line. 3. Start with point A. 4. A – B = Length of the pajama 5. A – C = Crotch or rise measurement plus one inch for ease. 6. C – D = ¼ of hip measure 7. A – E = C – D 8. Join C – D and A – E. 9. Connect E – D. 10. D – F = 2 inches. 11. B – G = ½ of bottom width measurement 12. Connect G and F. 13. Join point I to point J with curve line passing through the midpoint of the DE. 14. Connect J to G with a broken line. 15. After drafting the front and back pattern, transfer the back pattern to the other olded part of the pattern paper. Back: EH = 1 inch HI = 1 inch FJ = 1inch
Provide the Seam Allowances Waistline Casing – 2 inches Side Seam – 1 inch Crotch Seam – ½ to ¾ inch Hemline – 2 inches
Questions to answer
11
1. What is pattern drafting?
2. Why do we put seam allowances on the basic pattern?
Check Yourself
Write only the letter of the correct answer on your notebook.
1. The measurement used to start a pattern for a pair of pajama pants is called _______.
a. hipline b. rise
c. waist d. length of the short
2. To help you draft the pattern for your pajama pants, you should _______.
a. Draft the back pattern first
b. Follow the actual measurement
c. Follow the correct procedure step by step
d. Follow the grain of the cloth
3. Pattern drafting involves pattern _______.
a. cutting b. layout
c. measuring d. pinning
4. If you were to make a pattern for the pajama pants, the first thing to do is _______.
a. Ask somebody to take your measurements
b. Gather the drafting tools needed
c. I will take my own measurement
d. Prepare the pattern paper
5. The measurement used from A – B is the _______.
a. Crotch measure b. Hip measurement
c. Length measurement d. Waist measure
12
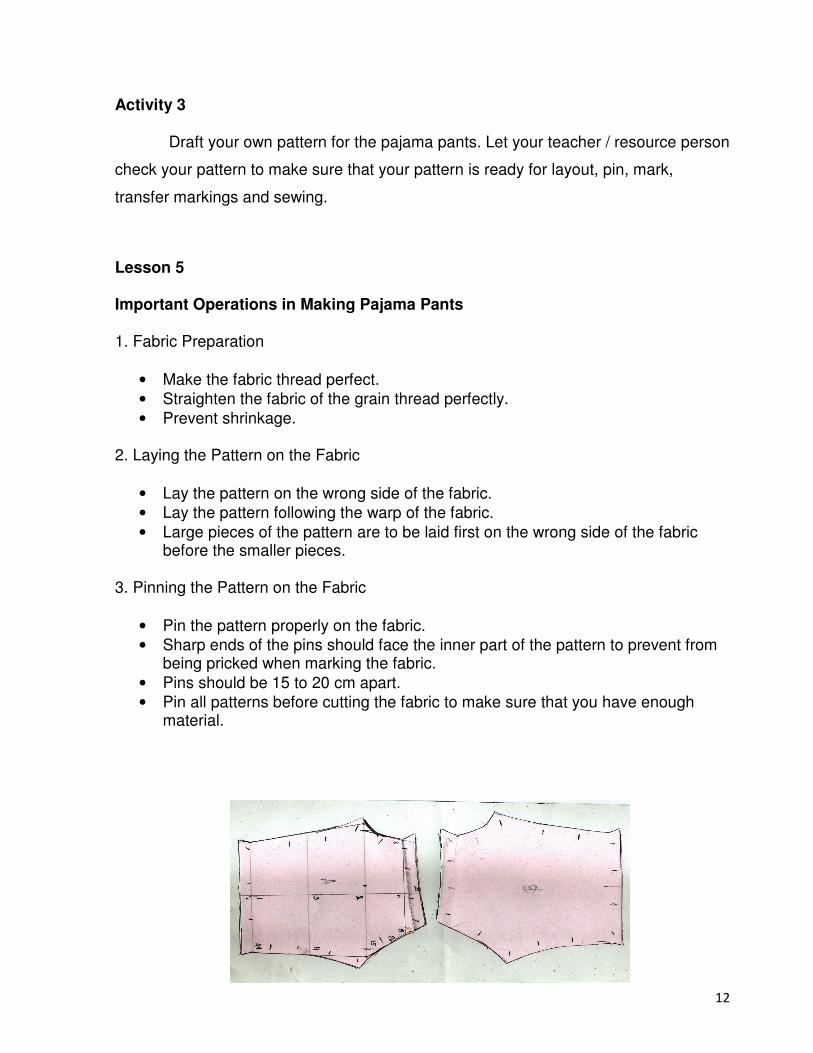
Activity 3
Draft your own pattern for the pajama pants. Let your teacher / resource person
check your pattern to make sure that your pattern is ready for layout, pin, mark,
transfer markings and sewing.
Lesson 5
Important Operations in Making Pajama Pants
1. Fabric Preparation
• Make the fabric thread perfect.
• Straighten the fabric of the grain thread perfectly.
• Prevent shrinkage.
2. Laying the Pattern on the Fabric
• Lay the pattern on the wrong side of the fabric.
• Lay the pattern following the warp of the fabric.
• Large pieces of the pattern are to be laid first on the wrong side of the fabric before the smaller pieces.
3. Pinning the Pattern on the Fabric
• Pin the pattern properly on the fabric.
• Sharp ends of the pins should face the inner part of the pattern to prevent from being pricked when marking the fabric.
• Pins should be 15 to 20 cm apart.
• Pin all patterns before cutting the fabric to make sure that you have enough material.
13
3. Marking the fabric.
• Use a dressmaker's carbon paper, a tracing wheel or a tailor's chalk.
• Transfer markings to the wrong side of the fabric as guide to stitching.
4. Cutting the Fabric
• Cut the fabric with the drafted pattern on the cutting line with the dressmaker's shears.
• Keep pattern and fabric flat on the table.
• Pins should be left on the patterns after cutting the fabric.
• Place the fabric and the pattern flat on table. Keep your left hand on the part you are cutting to prevent the fabric from slipping or pulling out of shape.
• Place the left hand on the pattern and cut with long, even strokes. Use short strokes in curved areas. Use the point of the shears when cutting corners or short distances. Cut the fabric from the wide to narrow areas of each pattern piece.
• Walk around the table as you cut the fabric. Do not pull the cloth near you as the fabric may slip or stretch out of shape.
• After cutting each part, place it aside but do not remove the pins and pattern to keep this ready for marking.
• Keep all scraps of cloth for future use.
5. Transferring of marking to the fabric
• All lines and symbols should be transferred properly to the fabric. Transfer your pattern marks to the fabric by using a tailor’s chalk and dressmaker’s carbon paper with the help of a tracing wheel.
Points to Remember:
Fabric preparation, laying the pattern on the fabric, pinning the
pattern on the fabric, cutting the fabric carefully, and transferring
the markings on the fabric from the pattern are major operations in
the clothing construction.
14
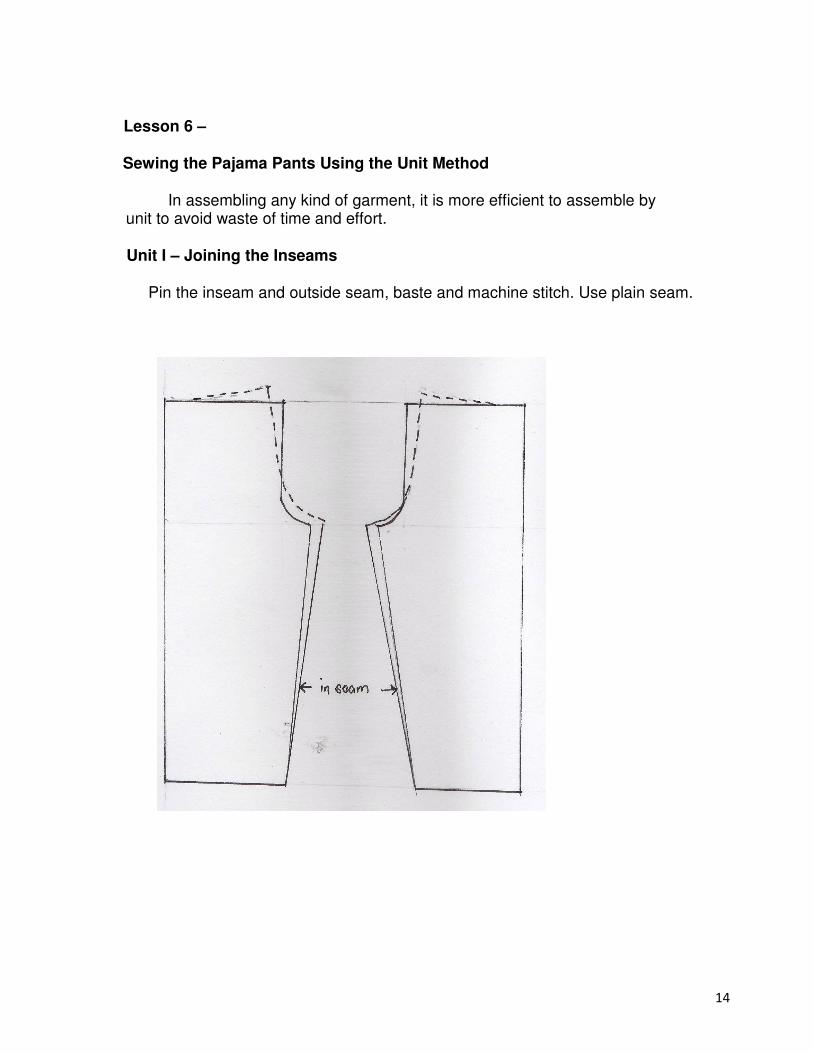
Lesson 6 –
Sewing the Pajama Pants Using the Unit Method
In assembling any kind of garment, it is more efficient to assemble by unit to avoid waste of time and effort.
Unit I – Joining the Inseams
Pin the inseam and outside seam, baste and machine stitch. Use plain seam.
15
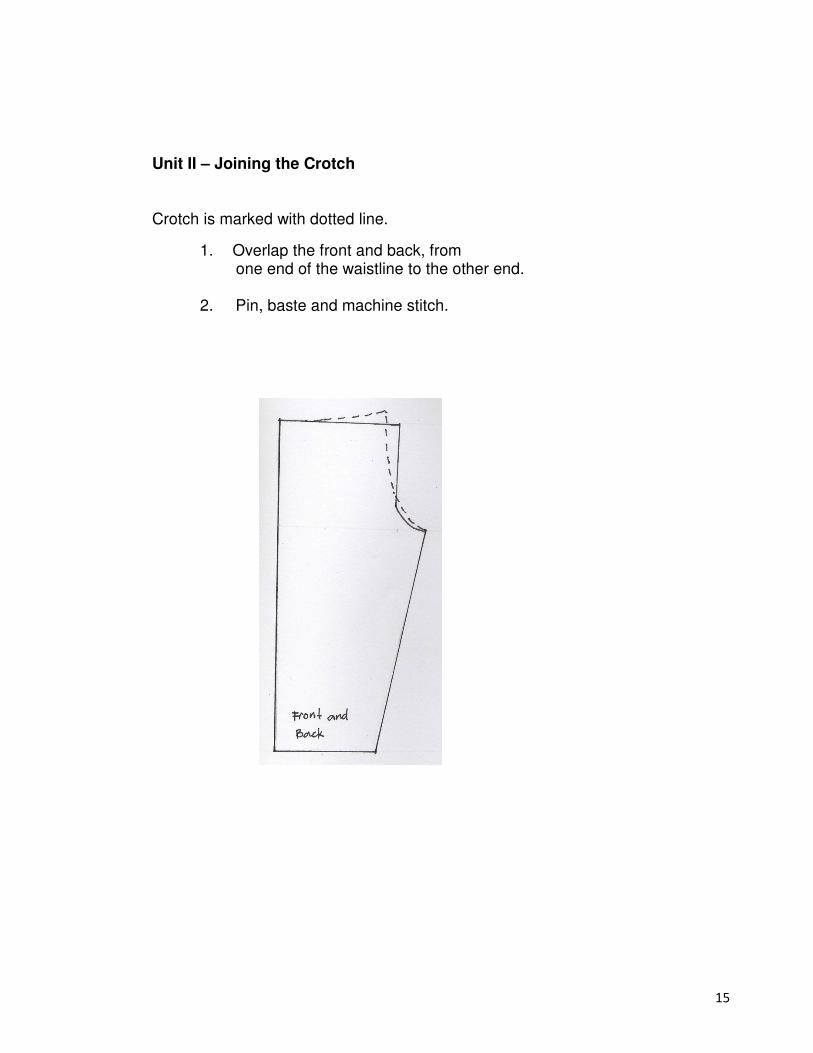
Unit II – Joining the Crotch
Crotch is marked with dotted line.
1. Overlap the front and back, from one end of the waistline to the other end.
2. Pin, baste and machine stitch.
16
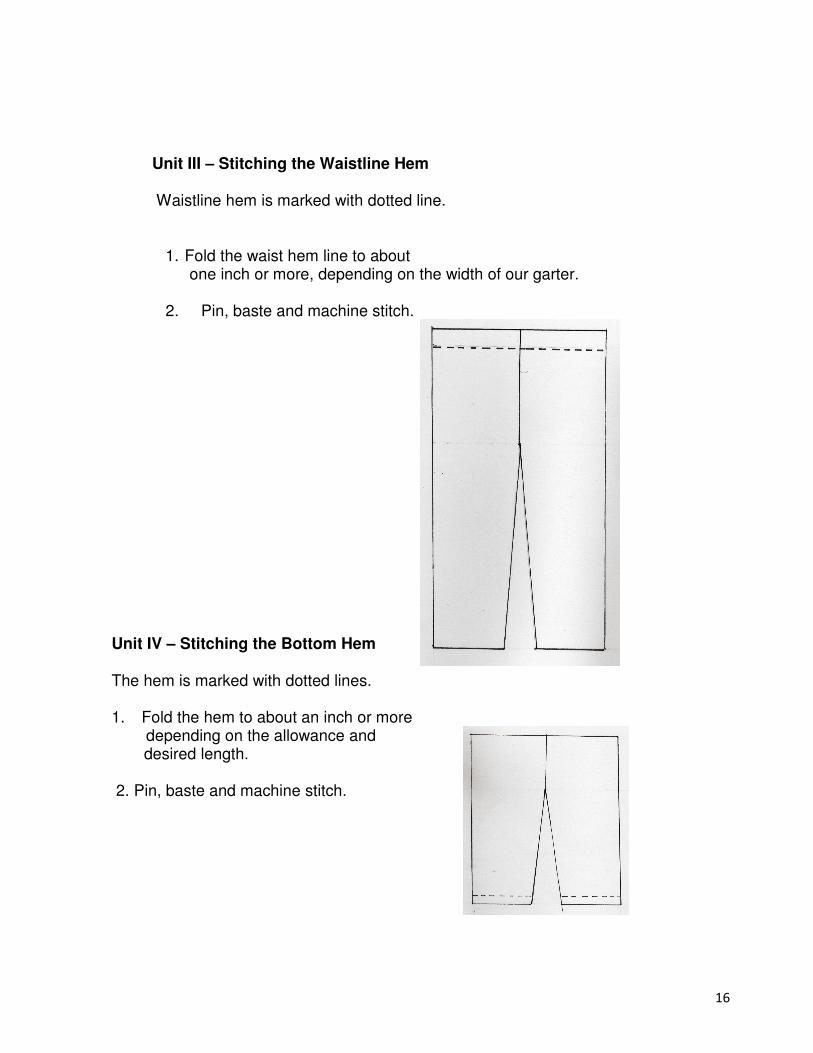
Unit III – Stitching the Waistline Hem
Waistline hem is marked with dotted line.
1. Fold the waist hem line to about one inch or more, depending on the width of our garter.
2. Pin, baste and machine stitch.
Unit IV – Stitching the Bottom Hem
The hem is marked with dotted lines.
1. Fold the hem to about an inch or more depending on the allowance and
desired length.
2. Pin, baste and machine stitch.
17
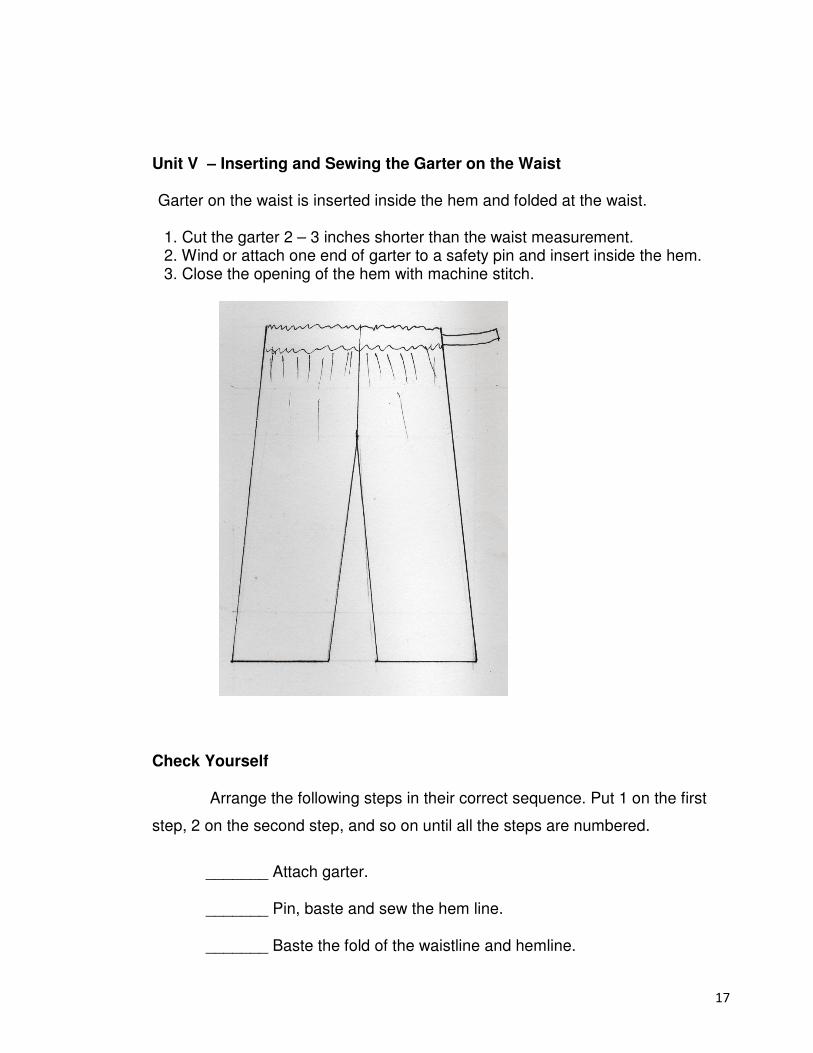
Unit V – Inserting and Sewing the Garter on the Waist
Garter on the waist is inserted inside the hem and folded at the waist. 1. Cut the garter 2 – 3 inches shorter than the waist measurement. 2. Wind or attach one end of garter to a safety pin and insert inside the hem. 3. Close the opening of the hem with machine stitch.
Check Yourself
Arrange the following steps in their correct sequence. Put 1 on the first
step, 2 on the second step, and so on until all the steps are numbered.
_______ Attach garter.
_______ Pin, baste and sew the hem line.
_______ Baste the fold of the waistline and hemline.
18
_______ Pin, baste and sew the center line seam.
Fit and evaluate your finished product.
Your work will be evaluated based on the following criteria.
Neatness…….. 40%
Accuracy ……...40%
Speed …………10%
________
100%
Points to Remember � The Sewing stages are the final stages in clothing construction. � Sew pajama pants by means of the unit method. � When sewing the front and back pants, include the following steps:
• Machine stitch on the basting stitch.
• Sew the self-casing for elasticity
• Remove the basting stitches.
• Remove hanging threads
• Press
• Fit the pajama pants
19
With the knowledge and skills you have learned, sew your pajama pants following the procedure in your project plan. After sewing evaluate the finished product, compute for the selling price and package properly.
Very Good! You have just firmed up your understanding of the content of
this module. You are now ready to move on to the next phase of this module. Be
sure that your teacher has checked your project plan before sewing.
Activity 4
Prepare a project plan. This will guide you in making the your project - Pajama pants.
Project Planning
PROJECT PLAN: PAJAMA PANTS
Name of Student:________________________ Year & Section:______________
I- Name of Project: _______________________ Date Started: _______________
Date Finished: ______________
II- Objectives:
1.
2.
3.
III- Sketch/Drawing:
20
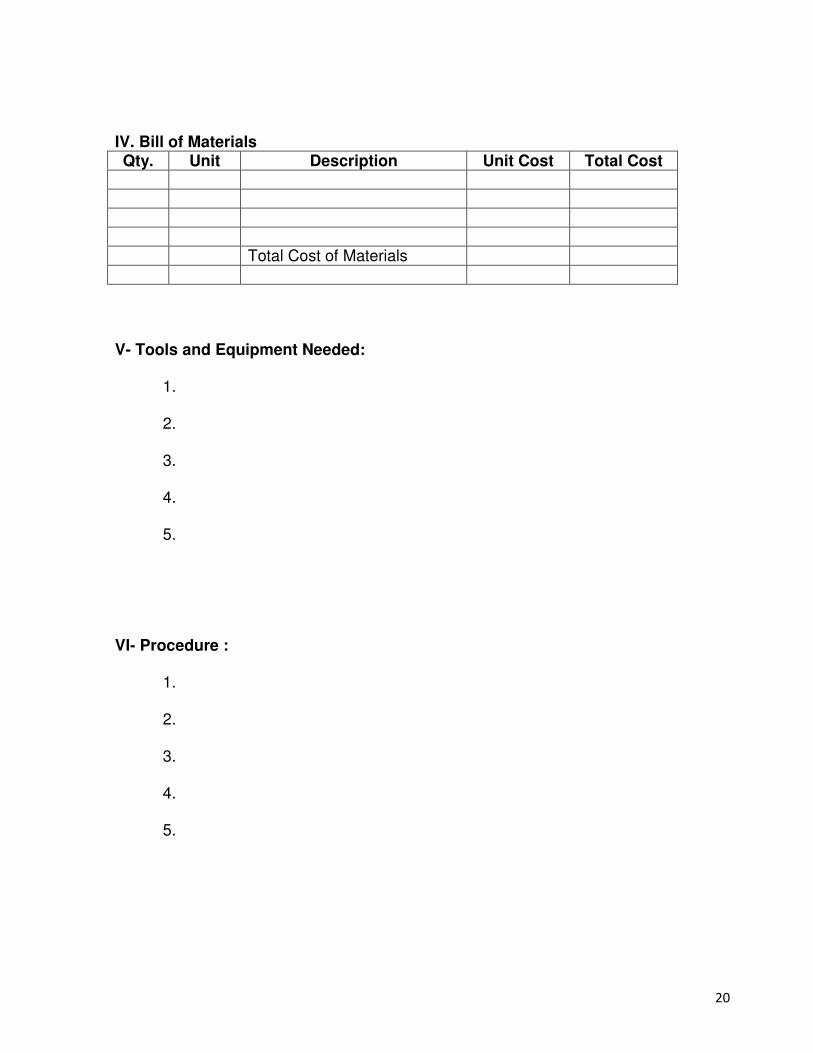
IV. Bill of Materials Qty. Unit Description Unit Cost Total Cost
Total Cost of Materials
V- Tools and Equipment Needed:
1.
2.
3.
4.
5.
VI- Procedure :
1.
2.
3.
4.
5.
21
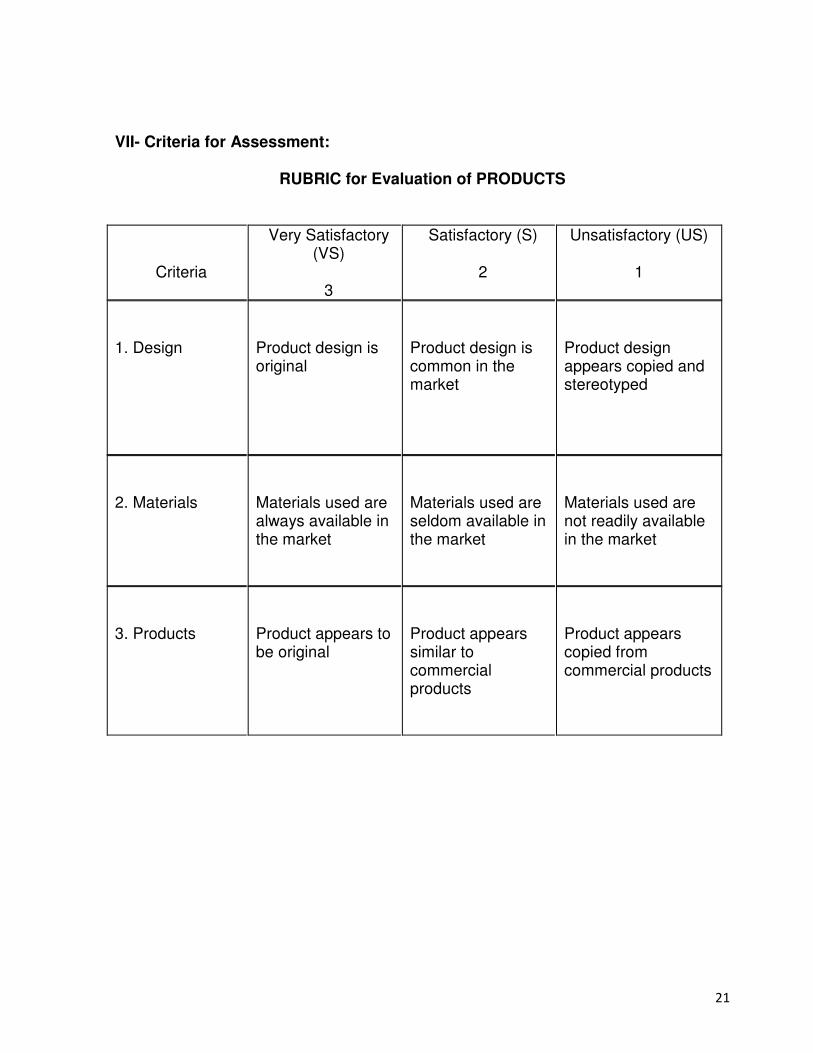
VII- Criteria for Assessment:
RUBRIC for Evaluation of PRODUCTS
Criteria
Very Satisfactory (VS)
3
Satisfactory (S)
2
Unsatisfactory (US)
1
1. Design
Product design is original
Product design is common in the market
Product design appears copied and stereotyped
2. Materials
Materials used are always available in the market
Materials used are seldom available in the market
Materials used are not readily available in the market
3. Products
Product appears to be original
Product appears similar to commercial products
Product appears copied from commercial products
22
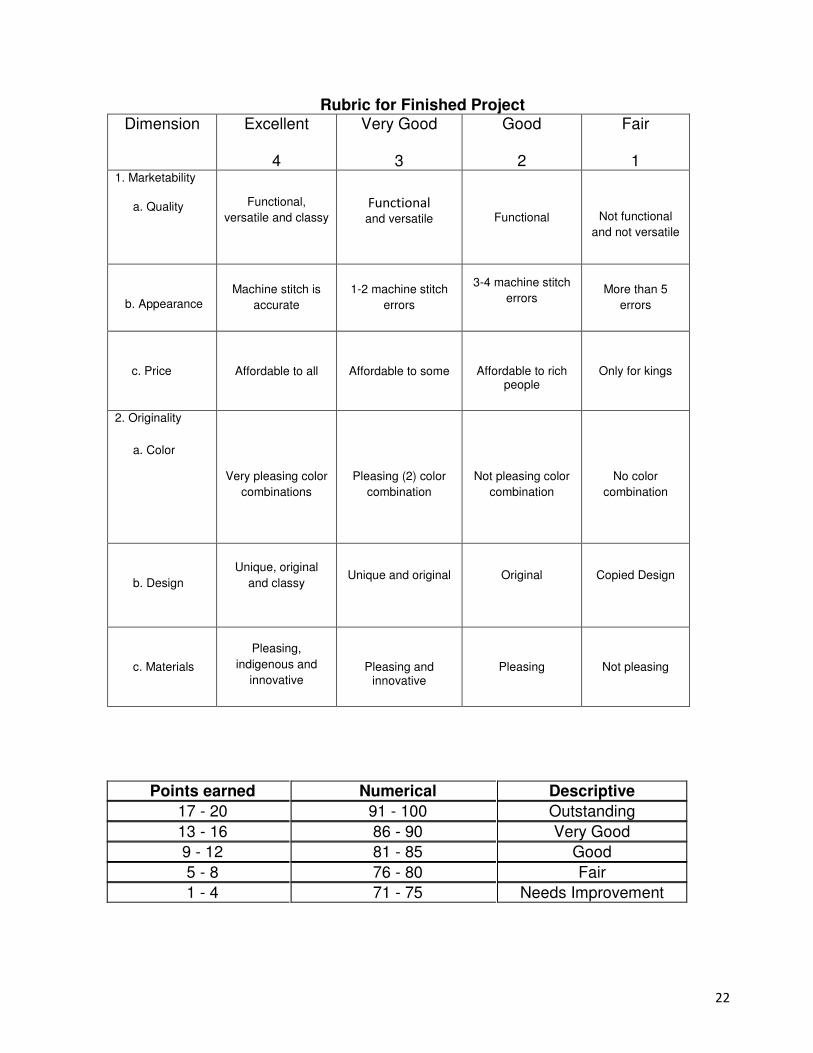
Rubric for Finished Project Dimension Excellent
4
Very Good
3
Good
2
Fair
1 1. Marketability
a. Quality
Functional,
versatile and classy Functional
and versatile
Functional
Not functional
and not versatile
b. Appearance
Machine stitch is
accurate
1-2 machine stitch
errors
3-4 machine stitch
errors
More than 5
errors
c. Price Affordable to all Affordable to some
Affordable to rich people
Only for kings
2. Originality
a. Color
Very pleasing color
combinations
Pleasing (2) color
combination
Not pleasing color
combination
No color
combination
b. Design
Unique, original
and classy
Unique and original
Original
Copied Design
c. Materials
Pleasing,
indigenous and
innovative
Pleasing and innovative
Pleasing
Not pleasing
Points earned Numerical Descriptive
17 - 20 91 - 100 Outstanding
13 - 16 86 - 90 Very Good
9 - 12 81 - 85 Good
5 - 8 76 - 80 Fair
1 - 4 71 - 75 Needs Improvement
23
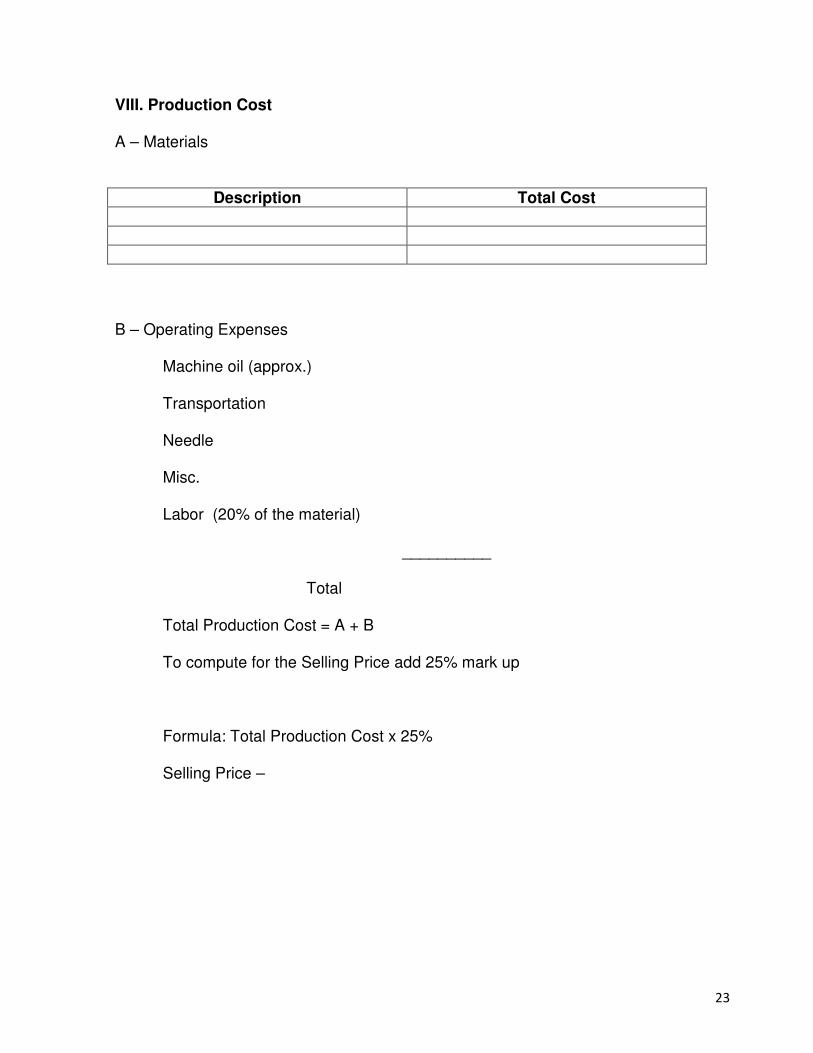
VIII. Production Cost
A – Materials
Description Total Cost
B – Operating Expenses
Machine oil (approx.)
Transportation
Needle
Misc.
Labor (20% of the material)
__________
Total
Total Production Cost = A + B
To compute for the Selling Price add 25% mark up
Formula: Total Production Cost x 25%
Selling Price –

24
IX- Remarks:
_______________________________________________________________________________________________________________________________________________________________________________________________________________________________________________________________________________________________________________________________________________________________________________________________________________________________________________________________________
DEEPEN Your Understanding
In this phase of the module you are now going to deepen your understanding on
the concepts and principles underlying the process and delivery of sewing pajama pants. Translate the project plan into a quality, profitable and marketable pajama pants.
To make your pajama pants look more attractive, trimmings can be applied. You can apply bias tape as piping, appliqués to the pockets and lace to the hem. Things to consider:
1. Design your pajama pants
2. Prepare project plan
3. Sew the pajama pants
4. Evaluate the finished project
5. Compute for the production cost and selling price
6. Packaging and market
25
SUMATIVE TEST:
1. Discuss the steps in sewing pajama pants. 2. Design a pajama pants based on the principles of design. 3. Analyze the outcome and quality of the pajama pants produced with the project
plan. 4. Express how you feeling if you have gainful returns in sewing pajama pants. 5. Self assess your knowledge in sewing pajama pants.
How did you find the activities in this phase of the module? Great!
You are now ready to move on to the next phase of this module.
In this phase of the module, you are now going to apply the basic concepts and principles learned underlying the process and delivery in sewing pajama pants.
Activities:
1. Sew pajama pants
Students group themselves and plan for marketable pajama pants
1. Design your pajama pants
2. Prepare needed tools, materials and equipment 3. Prepare project plan
4. Sew pajama pants
2,.Assess your product using the rubric.
3.Compute for production cost and selling price.
4.Package and sell pajama pants produced.
TRANSFER Your Understanding
26
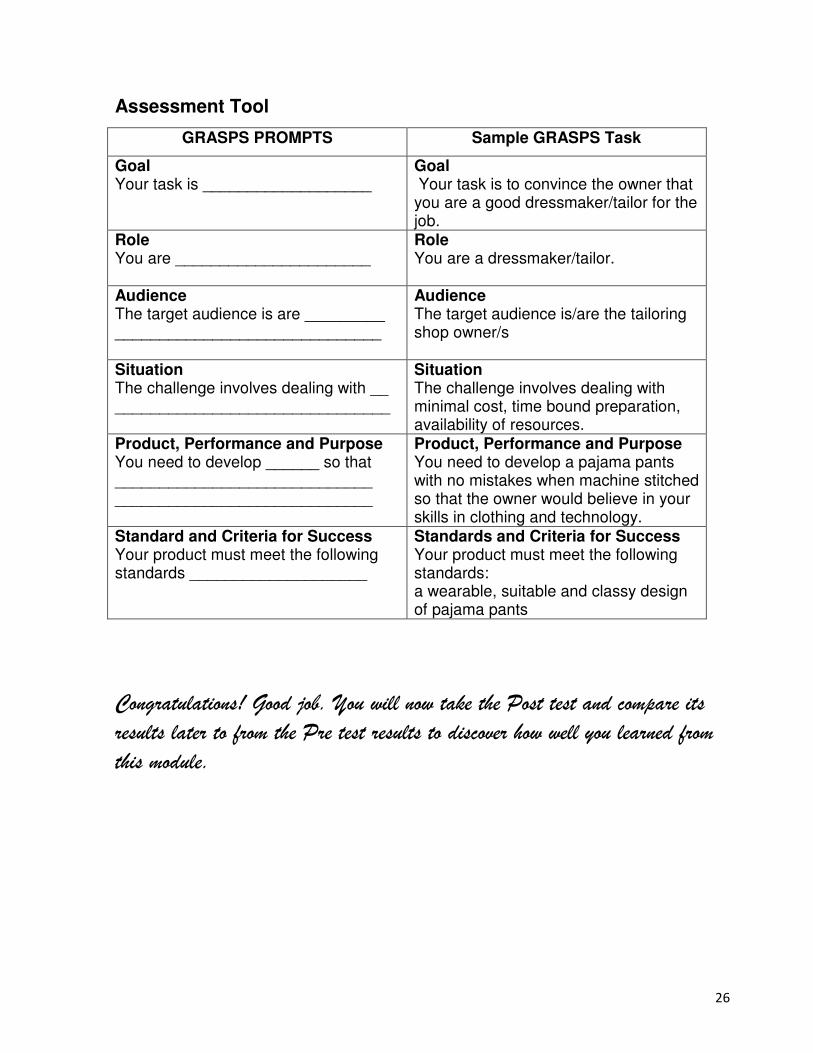
Assessment Tool
GRASPS PROMPTS Sample GRASPS Task
Goal Your task is ___________________
Goal Your task is to convince the owner that you are a good dressmaker/tailor for the job.
Role You are ______________________
Role You are a dressmaker/tailor.
Audience The target audience is are _________ ______________________________
Audience The target audience is/are the tailoring shop owner/s
Situation The challenge involves dealing with __ _______________________________
Situation The challenge involves dealing with minimal cost, time bound preparation, availability of resources.
Product, Performance and Purpose You need to develop ______ so that _____________________________ _____________________________
Product, Performance and Purpose You need to develop a pajama pants with no mistakes when machine stitched so that the owner would believe in your skills in clothing and technology.
Standard and Criteria for Success Your product must meet the following standards ____________________
Standards and Criteria for Success Your product must meet the following standards: a wearable, suitable and classy design of pajama pants
Congratulations! Good job. You will now take the Post test and compare its
results later to from the Pre test results to discover how well you learned from
this module.
27
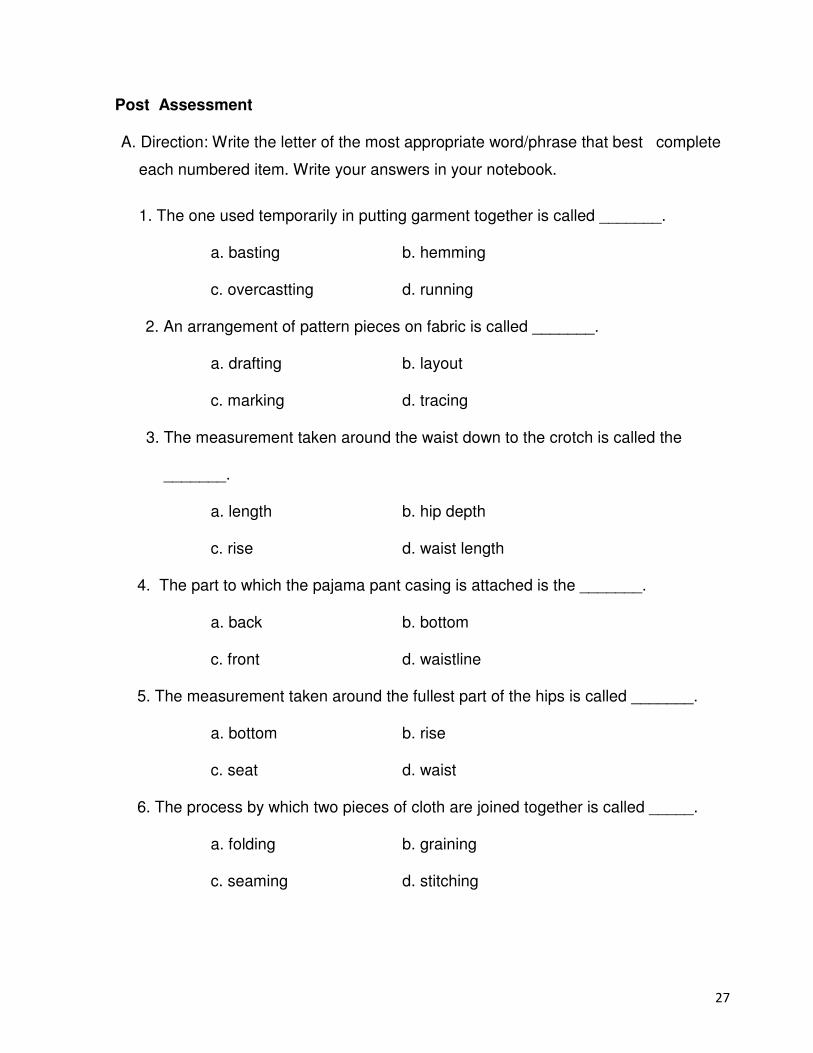
Post Assessment
A. Direction: Write the letter of the most appropriate word/phrase that best complete
each numbered item. Write your answers in your notebook.
1. The one used temporarily in putting garment together is called _______.
a. basting b. hemming
c. overcastting d. running
2. An arrangement of pattern pieces on fabric is called _______.
a. drafting b. layout
c. marking d. tracing
3. The measurement taken around the waist down to the crotch is called the
_______.
a. length b. hip depth
c. rise d. waist length
4. The part to which the pajama pant casing is attached is the _______.
a. back b. bottom
c. front d. waistline
5. The measurement taken around the fullest part of the hips is called _______.
a. bottom b. rise
c. seat d. waist
6. The process by which two pieces of cloth are joined together is called _____.
a. folding b. graining
c. seaming d. stitching
28
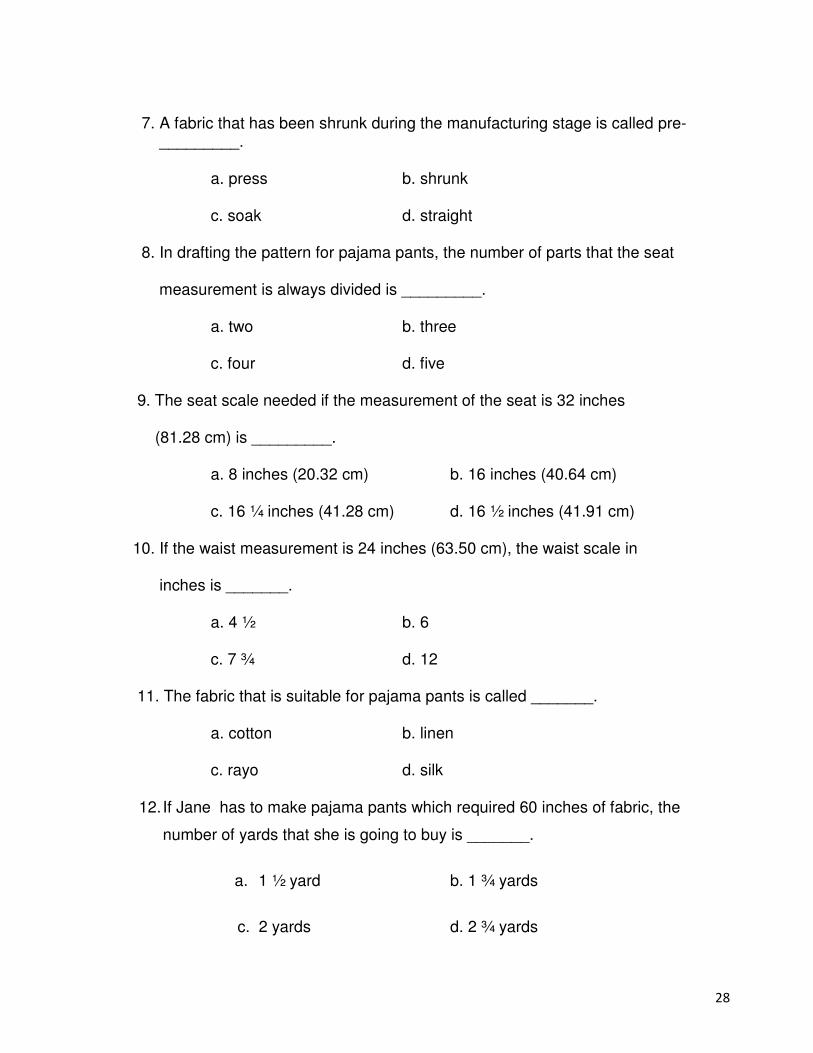
7. A fabric that has been shrunk during the manufacturing stage is called pre- _________.
a. press b. shrunk
c. soak d. straight
8. In drafting the pattern for pajama pants, the number of parts that the seat
measurement is always divided is _________.
a. two b. three
c. four d. five
9. The seat scale needed if the measurement of the seat is 32 inches
(81.28 cm) is _________.
a. 8 inches (20.32 cm) b. 16 inches (40.64 cm)
c. 16 ¼ inches (41.28 cm) d. 16 ½ inches (41.91 cm)
10. If the waist measurement is 24 inches (63.50 cm), the waist scale in
inches is _______.
a. 4 ½ b. 6
c. 7 ¾ d. 12
11. The fabric that is suitable for pajama pants is called _______.
a. cotton b. linen
c. rayo d. silk
12. If Jane has to make pajama pants which required 60 inches of fabric, the
number of yards that she is going to buy is _______.
a. 1 ½ yard b. 1 ¾ yards
c. 2 yards d. 2 ¾ yards
29
13. In pinning your pattern to the cloth/fabric, observe the correct distances of pins
from the edge. It should be _______.
a.1 cm b. 1.25 cm
c. 1.5 cm d. 2 cm
14. The intervals of pins when placing it on the pattern pieces is _______.
a. 10 cm b. 11 cm
c. 12 cm d. 13 cm
15. When sewing, make sure that the light should come from _______. a. behind b. front
b. left side d. right side
After finishing this module, how do you feel?
Check (√) one
______ Satisfied _____ Happy _____ Bored
Hopefully you feel happy, right?
CONGRATULATIONS!CONGRATULATIONS!CONGRATULATIONS!CONGRATULATIONS!
30
Appendix A
KEY TO CORRECTION
EXPLORE Your Understanding
Pre/Post Assessment
1.d 6. c 11. a
2. c 7.a 12. a
3. c 8. c 13. d
4. b 9. b 14. d
5. a 10. d 15. a
FIRM-UP Your Understanding
Activity 1
The teacher will check the measured parts of the body of the students needed in drafting their pattern.
Activity 2
The teacher will check on the accuracy and neatness of the drafted patterns.
Activity 3
31
The teacher check computations of fabric in yards done by the students
Fold fabric and lay out patterns following the procedure given.
Activity 4
The teacher will check on their fitted pajama pants
Activity 5
Teacher will check on the Project Plan made as a guide in sewing the pajama pants.
DEEPEN Your Understanding
Summative Test
1. Assembling the Front and Back Part of a Pajama Pants
2. The design of your pajama pants will be checked by your teacher during your
meeting.
3. A good quality, profitable and marketable pajama pants could be produced
following the project plan.
4. I will be very happy that I have gained from the pajama pants.
5. I was able to apply the concepts and principles underlying the process and
delivery in sewing pajama pants.
32
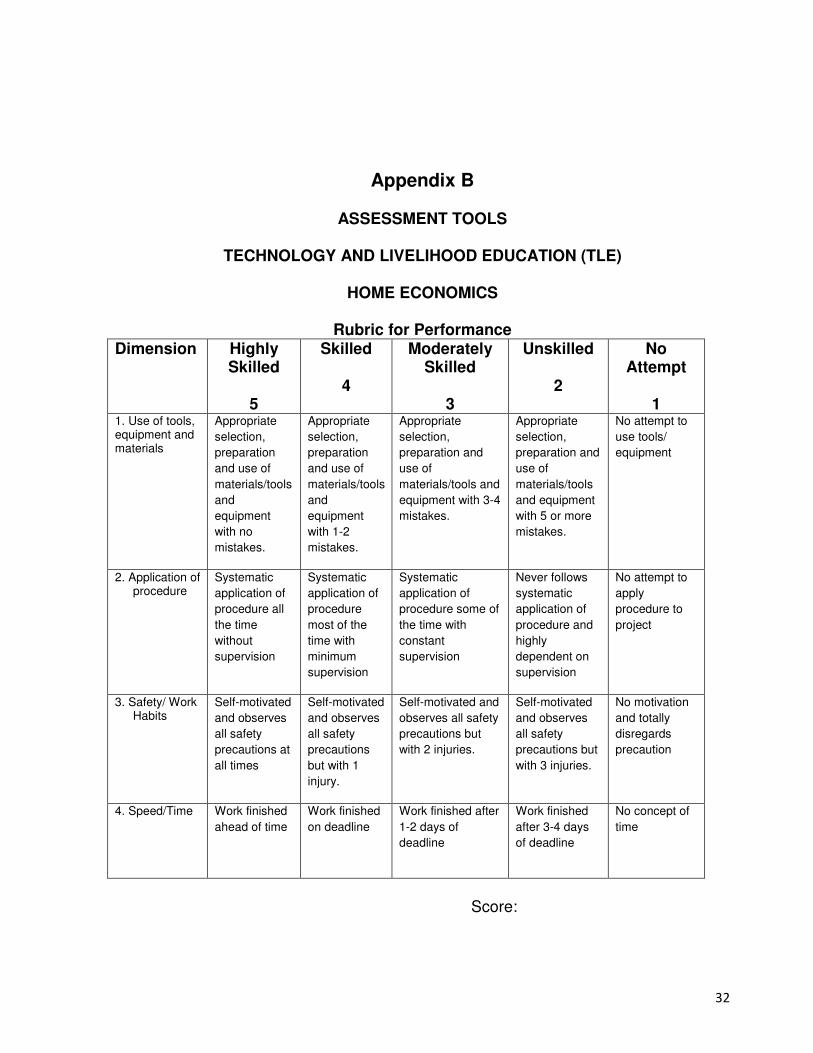
Appendix B
ASSESSMENT TOOLS
TECHNOLOGY AND LIVELIHOOD EDUCATION (TLE)
HOME ECONOMICS
Rubric for Performance Dimension Highly
Skilled
5
Skilled
4
Moderately Skilled
3
Unskilled
2
No Attempt
1 1. Use of tools, equipment and materials
Appropriate
selection,
preparation
and use of
materials/tools
and
equipment
with no
mistakes.
Appropriate
selection,
preparation
and use of
materials/tools
and
equipment
with 1-2
mistakes.
Appropriate
selection,
preparation and
use of
materials/tools and
equipment with 3-4
mistakes.
Appropriate
selection,
preparation and
use of
materials/tools
and equipment
with 5 or more
mistakes.
No attempt to
use tools/
equipment
2. Application of procedure
Systematic
application of
procedure all
the time
without
supervision
Systematic
application of
procedure
most of the
time with
minimum
supervision
Systematic
application of
procedure some of
the time with
constant
supervision
Never follows
systematic
application of
procedure and
highly
dependent on
supervision
No attempt to
apply
procedure to
project
3. Safety/ Work Habits
Self-motivated
and observes
all safety
precautions at
all times
Self-motivated
and observes
all safety
precautions
but with 1
injury.
Self-motivated and
observes all safety
precautions but
with 2 injuries.
Self-motivated
and observes
all safety
precautions but
with 3 injuries.
No motivation
and totally
disregards
precaution
4. Speed/Time Work finished
ahead of time
Work finished
on deadline
Work finished after
1-2 days of
deadline
Work finished
after 3-4 days
of deadline
No concept of
time
Score:
33
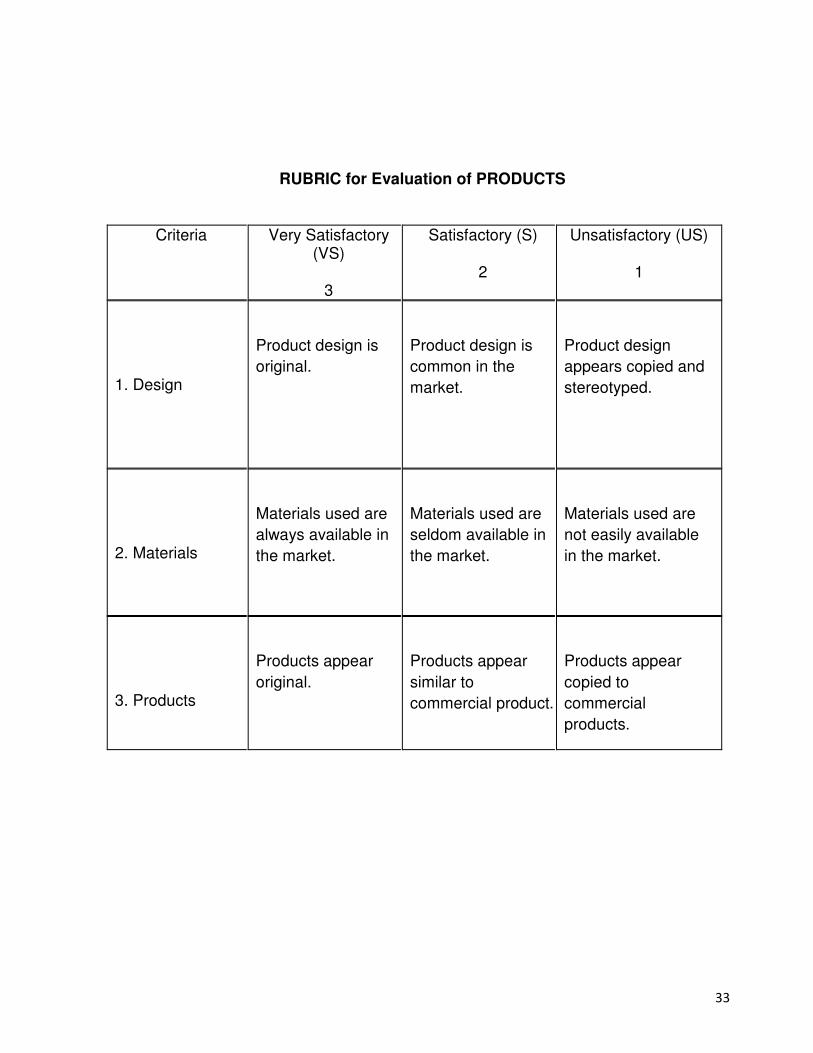
RUBRIC for Evaluation of PRODUCTS
Criteria Very Satisfactory (VS)
3
Satisfactory (S)
2
Unsatisfactory (US)
1
1. Design
Product design is
original.
Product design is
common in the
market.
Product design
appears copied and
stereotyped.
2. Materials
Materials used are
always available in
the market.
Materials used are
seldom available in
the market.
Materials used are
not easily available
in the market.
3. Products
Products appear
original.
Products appear
similar to
commercial product.
Products appear
copied to
commercial
products.
34
Rubric for Finished Project
Dimension Excellent
4
Very Good
3
Good
2
Fair
1 1. Marketability
a. Quality
Functional,
versatile and classy Functional
and versatile
Functional
Not functional
and not versatile
b. Appearance
Machine stitch is
accurate
1-2 machine stitch
errors
3-4 machine stitch
errors
More than 5
errors
c. Price Affordable to all Affordable to some
Affordable to rich people
Only for kings
2. Originality
a. Color
Very pleasing color
combinations
Pleasing (2) color
combination
Not pleasing color
combination
No color
combination
b. Design
Unique, original
and classy
Unique and original
Original
Copied Design
c. Materials
Pleasing,
indigenous and
innovative
Pleasing and innovative
Pleasing
Not pleasing
35
Appendix C
REFERENCES
1. Technology and Home Economics III HOME TECHNOLOGY Clothing I SEDP Series.
2. Home Economics IV by Julia G. Cruz and et al.
3. Home Technology – Clothing I, IMC, SEDP Series
4. Technology and Livelihood Education I, SEDP Series
5. TLE II - by Estifania Gloria L. Lee
6. Effective THE IV – by Cruz and et al.
7. http://www.craftandfabriclinks.com/pj/pajama_pattern.html of pajama
8. http://www.sew-stitch-learn.com/pajamapattern.html
9. lovetosew.com/pajamas.htm