Embed Size (px)
Citation preview

© 2018 Implus Footcare, LLC
A B C A R V E R P R O W O R K O U T G U I D EDAY 1
WEEK 1CARVE STRAIGHT
1 set of 10 reps
CARVE STRAIGHT3 set of 10 reps
CARVE STRAIGHT3 set of 10 reps
CARVE STRAIGHT3 set of 10 reps
CARVE LEFT1 set of 5 reps
CARVE LEFT3 set of 5 reps
CARVE LEFT3 set of 5 reps
CARVE LEFT3 set of 5 repsOFF OFF OFF
CARVE RIGHT1 set of 5 reps
CARVE RIGHT3 set of 5 reps
CARVE RIGHT3 set of 5 reps
CARVE RIGHT3 set of 5 reps
DAY 2 DAY 4DAY 3 DAY 5 DAY 6 DAY 7
CARVE STRAIGHT3 set of 20 reps
CARVE STRAIGHT3 set of 20 reps
CARVE STRAIGHT3 set of 20 reps CARVE STRAIGHT
1 set of 10 reps
R E - T E S T Y O U R L I M I T
T E S T Y O U R L I M I T
CARVE LEFT3 set of 10 reps
CARVE LEFT3 set of 10 reps
CARVE LEFT3 set of 10 reps CARVE LEFT
1 set of 5 repsOFF OFF OFF
CARVE RIGHT3 set of 10 reps
CARVE RIGHT3 set of 10 reps
CARVE RIGHT3 set of 10 reps
CARVE RIGHT1 set of 5 reps
WEEK 3
CARVE STRAIGHT3 set of 15 reps
CARVE LEFT3 set of 8 reps OFFOFF OFF OFF
CARVE RIGHT3 set of 8 reps
WEEK 2
CARVE STRAIGHT3 set of 15 reps
CARVE STRAIGHT3 set of 15 reps
CARVE LEFT3 set of 8 reps
CARVE LEFT3 set of 8 reps
CARVE RIGHT3 set of 8 reps
CARVE RIGHT3 set of 8 reps
C A R V E Y O U R C O R E 2 1 - D A Y W O R K O U T
The outlined workout is a 21-day training program to help you achieve a stronger core and sculpted arms. It is designed for all fitness levels from beginner to advanced. On Day 1 you will test how far you can carve. On Day 21 you will re-test and see how far you have come.
C U S T O M I Z E Y O U R W O R K O U T
Use a wall or stationary object to determine how far you can carve from the starting position.
On day 1 perform 10 repetitions (reps) carving straight out -5 carving left and 5 carving right. Follow the 21-Day workout to strengthen your core and arms.
On day 21 re-test your limit by moving in 6 inch increments away from the wall. Use your new limit as your baseline and repeat the 21-Day workout.
Step 1
Step 2
Step 3
Refer to your User Guide for additional safety instructions.
Before each use, visually inspect the equipment. Never use this equipment if it is not working properly or if there are damaged or worn parts. Call our Customer Service Department at 800-729-5954 with any questions
Consult your physician before starting this or any other exercise program. Fitness training can result in serious injury or death. Risk of injury can be lessened when safe techniques and common sense are practiced. Before beginning your first workout, become familiar with the Harbinger Ab Carver Pro and review all exercise guidelines prior to using the equipment. If you have any questions, consult your physician.
Start out slowly and progress sensibly. Even if you are an experienced exerciser, start with the easier modifications of the exercises and become familiar with all of the exercises before moving on to more advanced modifications.
Use caution when rolling out for the first time as you may roll out excessively. To protect against rolling out too far, place the Harbinger Ab Carver Pro 12 inches from a wall. Use the wall to block your movement and progressively move back as you build up your core strength. Use on a non-skid surface only.
Use this equipment only for the intended use as described by the manufacturer. Do not modify the equipment or use attachments not recommended by the manufacturer.
Do not use this product if you are over 300lbs/136kg
FAILURE TO READ AND FOLLOW THE SAFETY INSTRUCTIONS STATED IN THE USER GUIDE AND ON THIS WORKOUT CHART MAY RESULT IN SERIOUS INJURY OR DEATH.
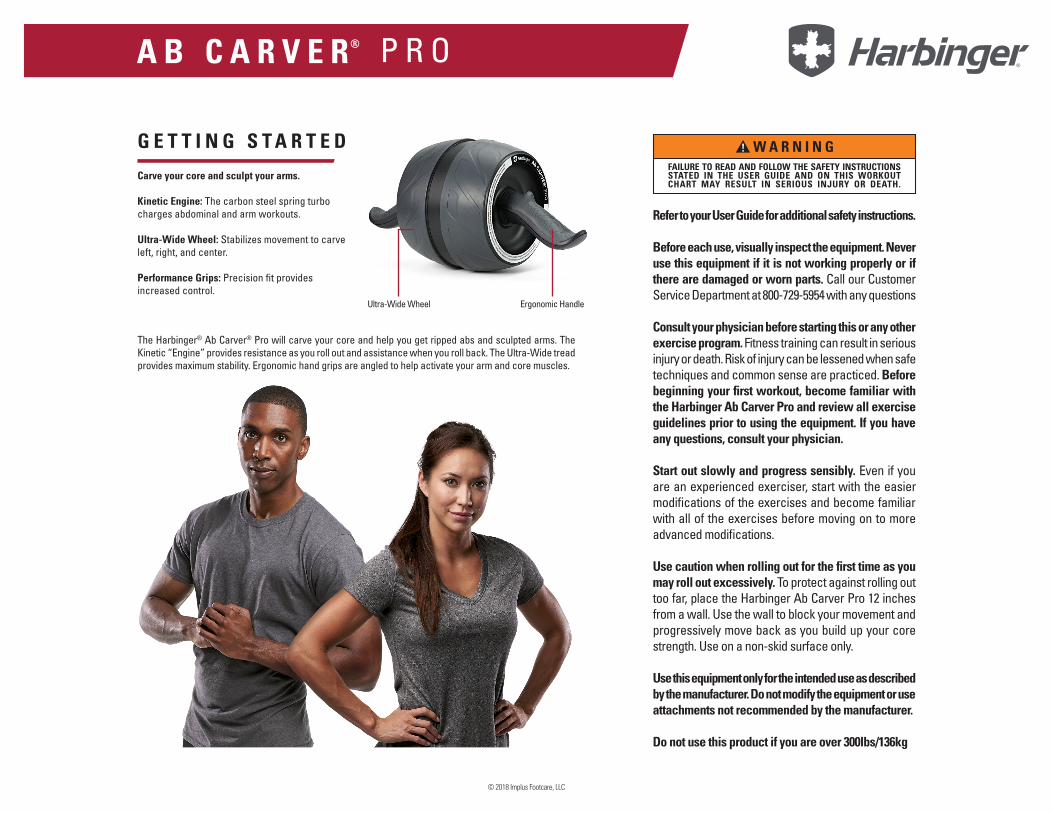
Ultra-Wide Wheel Ergonomic Handle
G E T T I N G S T A R T E D
Carve your core and sculpt your arms.
Kinetic Engine: The carbon steel spring turbo charges abdominal and arm workouts.
Ultra-Wide Wheel: Stabilizes movement to carve left, right, and center.
Performance Grips: Precision fit provides increased control.
The Harbinger® Ab Carver® Pro will carve your core and help you get ripped abs and sculpted arms. The Kinetic “Engine” provides resistance as you roll out and assistance when you roll back. The Ultra-Wide tread provides maximum stability. Ergonomic hand grips are angled to help activate your arm and core muscles.
© 2018 Implus Footcare, LLC
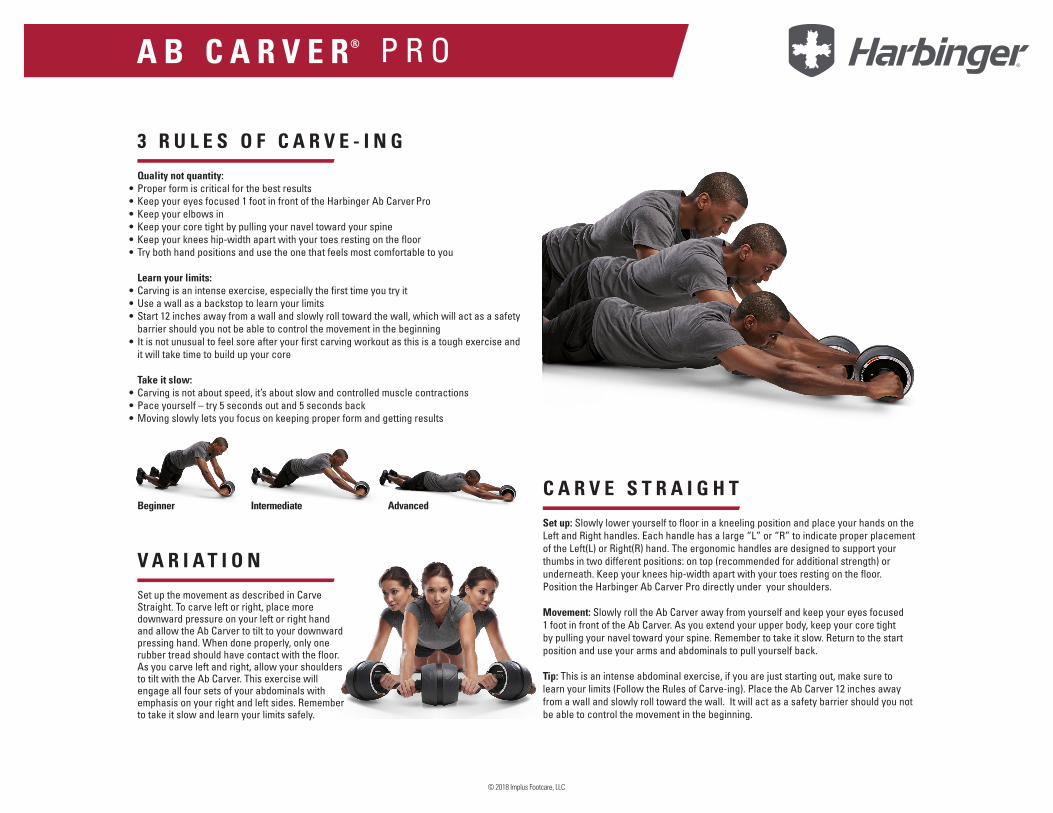
3 R U L E S O F C A R V E - I N G
C A R V E S T R A I G H T
V A R I A T I O N
Quality not quantity: Proper form is critical for the best resultsKeep your eyes focused 1 foot in front of the Harbinger Ab Carver ProKeep your elbows inKeep your core tight by pulling your navel toward your spineKeep your knees hip-width apart with your toes resting on the floorTry both hand positions and use the one that feels most comfortable to you
Learn your limits: Carving is an intense exercise, especially the first time you try itUse a wall as a backstop to learn your limitsStart 12 inches away from a wall and slowly roll toward the wall, which will act as a safety barrier should you not be able to control the movement in the beginningIt is not unusual to feel sore after your first carving workout as this is a tough exercise and it will take time to build up your core
Take it slow: Carving is not about speed, it’s about slow and controlled muscle contractionsPace yourself – try 5 seconds out and 5 seconds backMoving slowly lets you focus on keeping proper form and getting results
Set up: Slowly lower yourself to floor in a kneeling position and place your hands on the Left and Right handles. Each handle has a large “L” or “R” to indicate proper placement of the Left(L) or Right(R) hand. The ergonomic handles are designed to support your thumbs in two different positions: on top (recommended for additional strength) or underneath. Keep your knees hip-width apart with your toes resting on the floor. Position the Harbinger Ab Carver Pro directly under your shoulders.
Movement: Slowly roll the Ab Carver away from yourself and keep your eyes focused 1 foot in front of the Ab Carver. As you extend your upper body, keep your core tight by pulling your navel toward your spine. Remember to take it slow. Return to the start position and use your arms and abdominals to pull yourself back.
Tip: This is an intense abdominal exercise, if you are just starting out, make sure to learn your limits (Follow the Rules of Carve-ing). Place the Ab Carver 12 inches away from a wall and slowly roll toward the wall. It will act as a safety barrier should you not be able to control the movement in the beginning.
Set up the movement as described in Carve Straight. To carve left or right, place more downward pressure on your left or right hand and allow the Ab Carver to tilt to your downward pressing hand. When done properly, only one rubber tread should have contact with the floor. As you carve left and right, allow your shoulders to tilt with the Ab Carver. This exercise will engage all four sets of your abdominals with emphasis on your right and left sides. Remember to take it slow and learn your limits safely.
••••••
•••
•
•••
Beginner Intermediate Advanced
© 2018 Implus Footcare, LLC
FAILURE TO READ AND FOLLOW THE SAFETY INSTRUCTIONS STATED IN THE USER GUIDE AND ON THIS WORKOUT CHART MAY RESULT IN SERIOUS INJURY OR DEATH.
G E T T I N G S T A R T E D
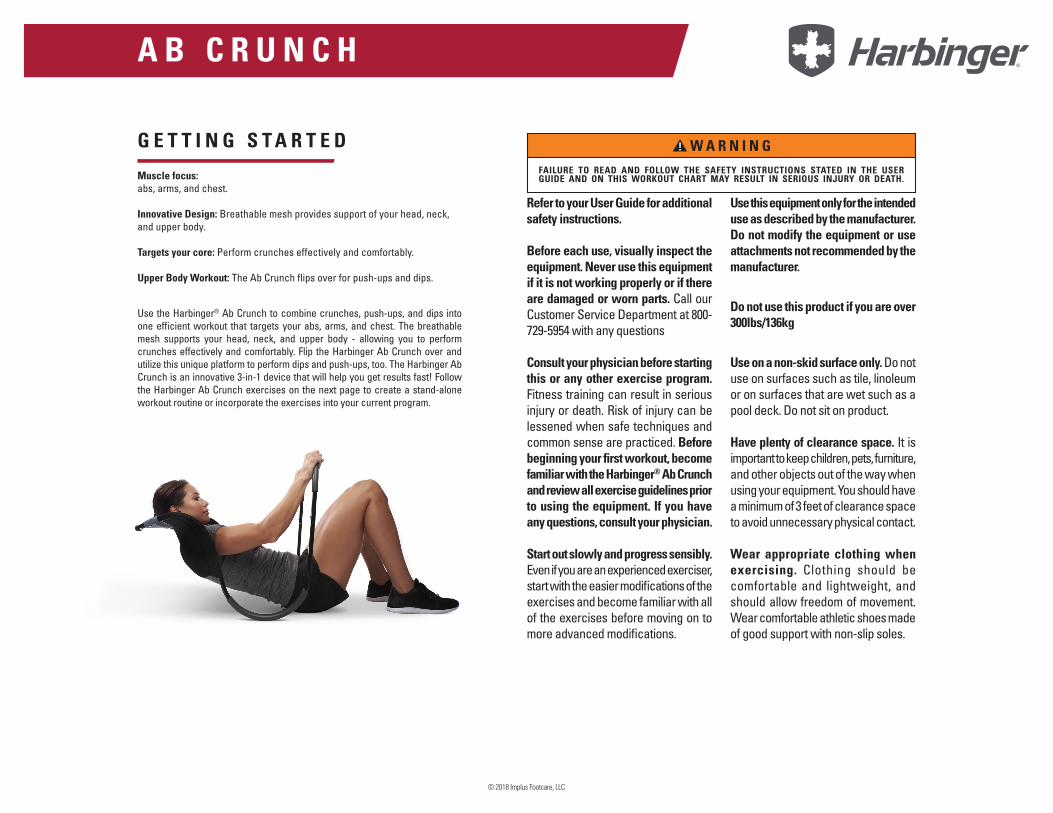
Muscle focus: abs, arms, and chest.
Innovative Design: Breathable mesh provides support of your head, neck, and upper body.
Targets your core: Perform crunches effectively and comfortably.
Upper Body Workout: The Ab Crunch flips over for push-ups and dips.
Use the Harbinger® Ab Crunch to combine crunches, push-ups, and dips into one efficient workout that targets your abs, arms, and chest. The breathable mesh supports your head, neck, and upper body - allowing you to perform crunches effectively and comfortably. Flip the Harbinger Ab Crunch over and utilize this unique platform to perform dips and push-ups, too. The Harbinger Ab Crunch is an innovative 3-in-1 device that will help you get results fast! Follow the Harbinger Ab Crunch exercises on the next page to create a stand-alone workout routine or incorporate the exercises into your current program.
A B C R U N C H
Refer to your User Guide for additional safety instructions.
Before each use, visually inspect the equipment. Never use this equipment if it is not working properly or if there are damaged or worn parts. Call our Customer Service Department at 800-729-5954 with any questions
Consult your physician before starting this or any other exercise program. Fitness training can result in serious injury or death. Risk of injury can be lessened when safe techniques and common sense are practiced. Before beginning your first workout, become familiar with the Harbinger® Ab Crunch and review all exercise guidelines prior to using the equipment. If you have any questions, consult your physician.
Start out slowly and progress sensibly. Even if you are an experienced exerciser, start with the easier modifications of the exercises and become familiar with all of the exercises before moving on to more advanced modifications.
Use this equipment only for the intended use as described by the manufacturer. Do not modify the equipment or use attachments not recommended by the manufacturer.
Do not use this product if you are over 300lbs/136kg
Use on a non-skid surface only. Do not use on surfaces such as tile, linoleum or on surfaces that are wet such as a pool deck. Do not sit on product.
Have plenty of clearance space. It is important to keep children, pets, furniture, and other objects out of the way when using your equipment. You should have a minimum of 3 feet of clearance space to avoid unnecessary physical contact.
Wear appropriate clothing when exercising. Clothing should be comfortable and lightweight, and should allow freedom of movement. Wear comfortable athletic shoes made of good support with non-slip soles.
© 2018 Implus Footcare, LLC
A B C R U N C H
P U S H - U P / C R U N C H / D I P W O R K O U T
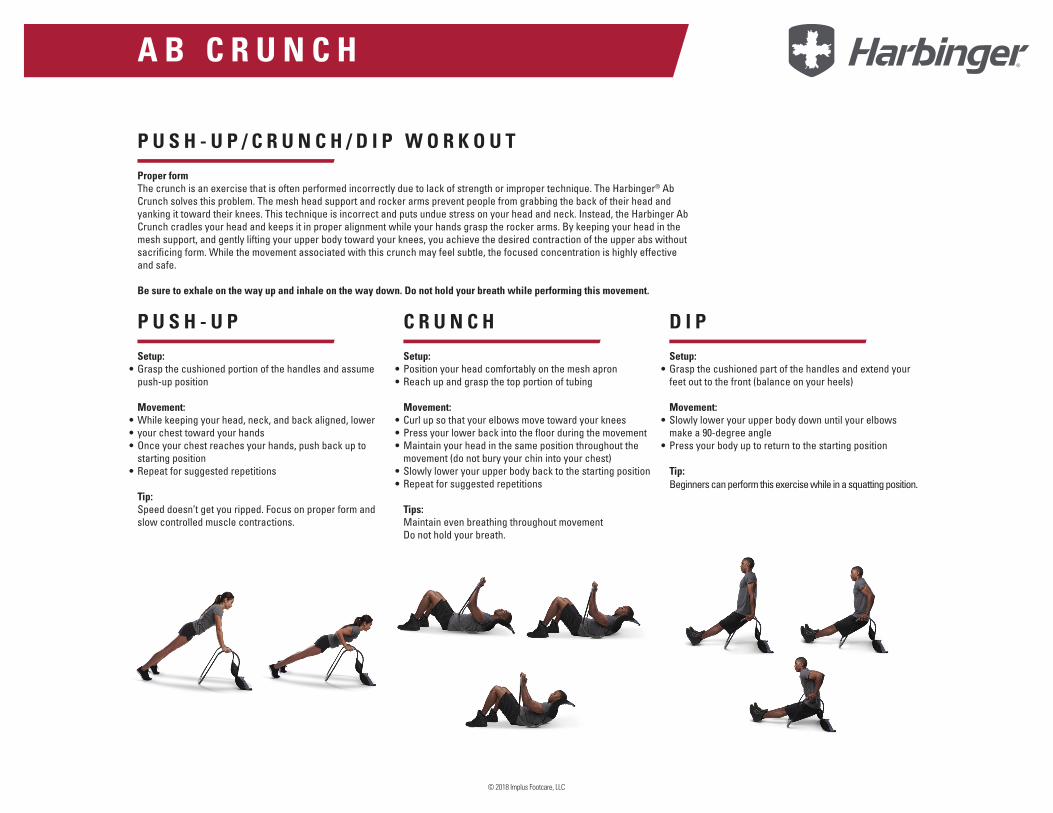
Proper form The crunch is an exercise that is often performed incorrectly due to lack of strength or improper technique. The Harbinger® Ab Crunch solves this problem. The mesh head support and rocker arms prevent people from grabbing the back of their head and yanking it toward their knees. This technique is incorrect and puts undue stress on your head and neck. Instead, the Harbinger Ab Crunch cradles your head and keeps it in proper alignment while your hands grasp the rocker arms. By keeping your head in the mesh support, and gently lifting your upper body toward your knees, you achieve the desired contraction of the upper abs without sacrificing form. While the movement associated with this crunch may feel subtle, the focused concentration is highly effective and safe.
Be sure to exhale on the way up and inhale on the way down. Do not hold your breath while performing this movement.
P U S H - U P C R U N C H
Setup:Grasp the cushioned portion of the handles and assume push-up position
Movement:While keeping your head, neck, and back aligned, lower your chest toward your handsOnce your chest reaches your hands, push back up to starting positionRepeat for suggested repetitions
Tip:Speed doesn’t get you ripped. Focus on proper form and slow controlled muscle contractions.
Setup:Position your head comfortably on the mesh apronReach up and grasp the top portion of tubing
Movement:Curl up so that your elbows move toward your kneesPress your lower back into the floor during the movementMaintain your head in the same position throughout the movement (do not bury your chin into your chest)Slowly lower your upper body back to the starting positionRepeat for suggested repetitions
Tips:Maintain even breathing throughout movementDo not hold your breath.
•
•••
•
••
•••
••
D I P
Setup:Grasp the cushioned part of the handles and extend your feet out to the front (balance on your heels)
Movement:Slowly lower your upper body down until your elbows make a 90-degree anglePress your body up to return to the starting position
Tip:Beginners can perform this exercise while in a squatting position.
•
•
•
© 2018 Implus Footcare, LLC
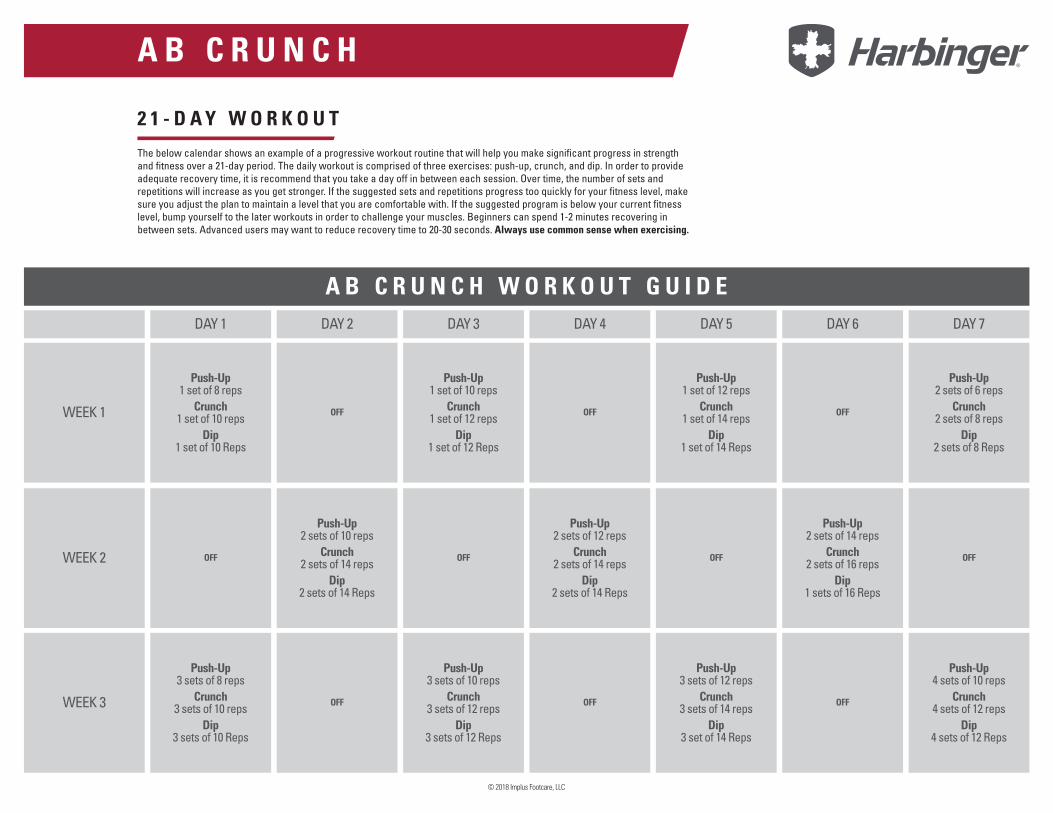
A B C R U N C H W O R K O U T G U I D EDAY 1 DAY 2 DAY 3 DAY 4 DAY 5 DAY 6 DAY 7
OFF
OFF OFF OFF
OFF OFF OFF
OFF OFF OFF
WEEK 1
WEEK 2
WEEK 3
A B C R U N C H
2 1 - D A Y W O R K O U T
The below calendar shows an example of a progressive workout routine that will help you make significant progress in strength and fitness over a 21-day period. The daily workout is comprised of three exercises: push-up, crunch, and dip. In order to provide adequate recovery time, it is recommend that you take a day off in between each session. Over time, the number of sets and repetitions will increase as you get stronger. If the suggested sets and repetitions progress too quickly for your fitness level, make sure you adjust the plan to maintain a level that you are comfortable with. If the suggested program is below your current fitness level, bump yourself to the later workouts in order to challenge your muscles. Beginners can spend 1-2 minutes recovering in between sets. Advanced users may want to reduce recovery time to 20-30 seconds. Always use common sense when exercising.
Push-Up1 set of 8 reps
Crunch1 set of 10 reps
Dip1 set of 10 Reps
Push-Up3 sets of 8 reps
Crunch3 sets of 10 reps
Dip3 sets of 10 Reps
Push-Up2 sets of 10 reps
Crunch2 sets of 14 reps
Dip2 sets of 14 Reps
Push-Up1 set of 10 reps
Crunch1 set of 12 reps
Dip1 set of 12 Reps
Push-Up3 sets of 10 reps
Crunch3 sets of 12 reps
Dip3 sets of 12 Reps
Push-Up2 sets of 12 reps
Crunch2 sets of 14 reps
Dip2 sets of 14 Reps
Push-Up1 set of 12 reps
Crunch1 set of 14 reps
Dip1 set of 14 Reps
Push-Up3 sets of 12 reps
Crunch3 sets of 14 reps
Dip3 set of 14 Reps
Push-Up2 sets of 14 reps
Crunch2 sets of 16 reps
Dip1 sets of 16 Reps
Push-Up2 sets of 6 reps
Crunch2 sets of 8 reps
Dip2 sets of 8 Reps
Push-Up4 sets of 10 reps
Crunch4 sets of 12 reps
Dip4 sets of 12 Reps
© 2018 Implus Footcare, LLC
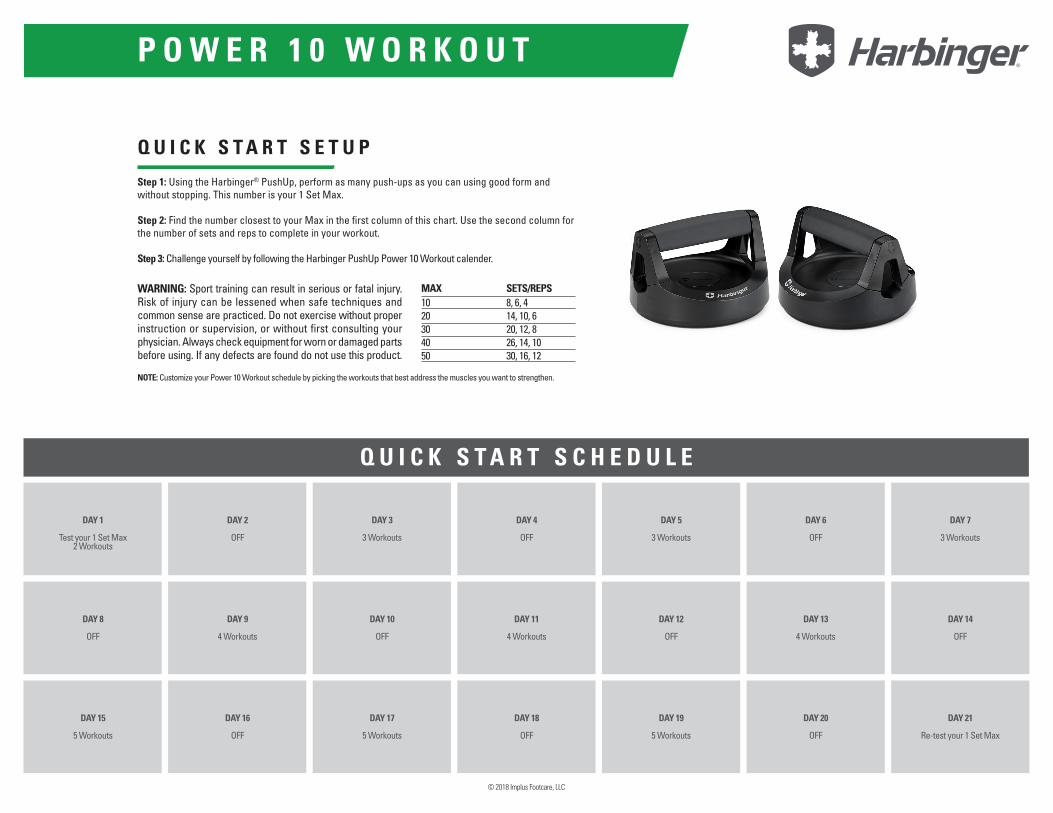
P O W E R 1 0 W O R K O U T
Q U I C K S T A R T S E T U P
Step 1: Using the Harbinger® PushUp, perform as many push-ups as you can using good form and without stopping. This number is your 1 Set Max.
Step 2: Find the number closest to your Max in the first column of this chart. Use the second column for the number of sets and reps to complete in your workout.
Step 3: Challenge yourself by following the Harbinger PushUp Power 10 Workout calender.
NOTE: Customize your Power 10 Workout schedule by picking the workouts that best address the muscles you want to strengthen.
WARNING: Sport training can result in serious or fatal injury. Risk of injury can be lessened when safe techniques and common sense are practiced. Do not exercise without proper instruction or supervision, or without first consulting your physician. Always check equipment for worn or damaged parts before using. If any defects are found do not use this product.
MAX1020304050
8, 6, 414, 10, 620, 12, 826, 14, 1030, 16, 12
SETS/REPS
DAY 1
Test your 1 Set Max2 Workouts
DAY 8
OFF
DAY 15
5 Workouts
DAY 3
3 Workouts
DAY 10
OFF
DAY 17
5 Workouts
DAY 5
3 Workouts
DAY 12
OFF
DAY 19
5 Workouts
DAY 2
OFF
DAY 9
4 Workouts
DAY 16
OFF
DAY 4
OFF
DAY 11
4 Workouts
DAY 18
OFF
DAY 6
OFF
DAY 13
4 Workouts
DAY 20
OFF
DAY 7
3 Workouts
DAY 14
OFF
DAY 21
Re-test your 1 Set Max
Q U I C K S T A R T S C H E D U L E
© 2018 Implus Footcare, LLC
P O W E R 1 0 W O R K O U T
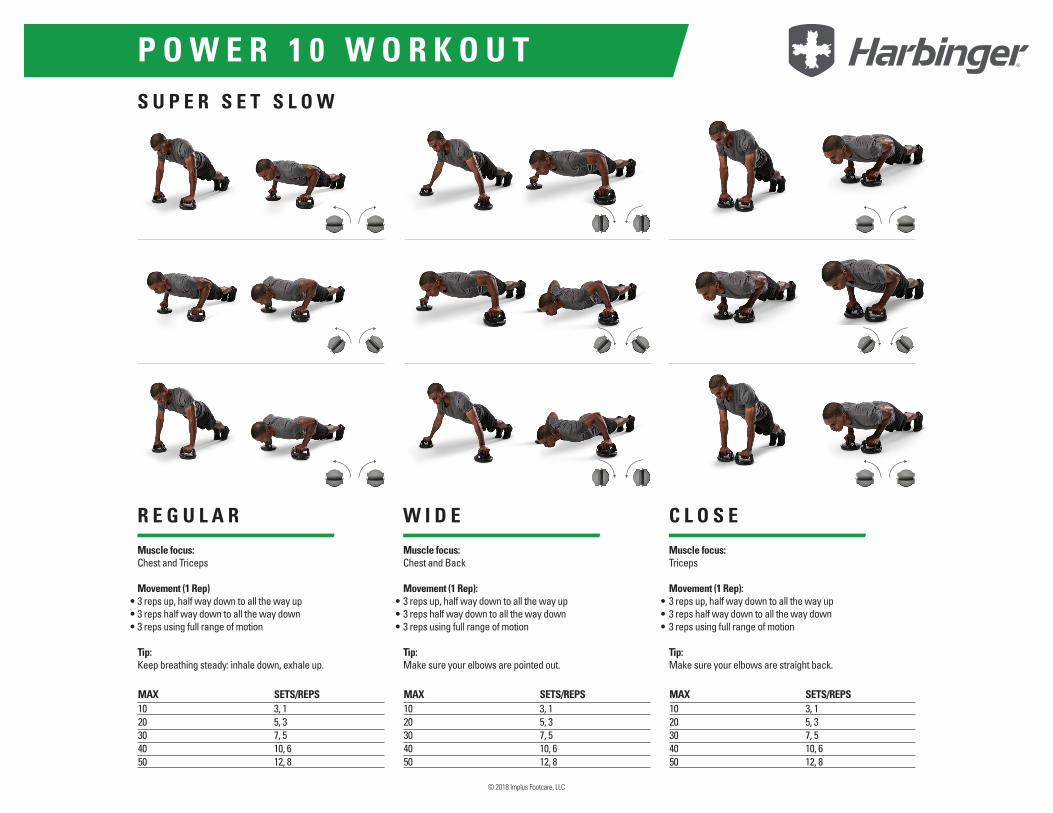
MAX MAX MAX1020304050
1020304050
1020304050
3, 15, 37, 510, 612, 8
3, 15, 37, 510, 612, 8
3, 15, 37, 510, 612, 8
SETS/REPS SETS/REPS SETS/REPS
R E G U L A R W I D E C L O S E
S U P E R S E T S L O W
Muscle focus: Chest and Triceps
Movement (1 Rep) 3 reps up, half way down to all the way up3 reps half way down to all the way down3 reps using full range of motion
Tip: Keep breathing steady: inhale down, exhale up.
•••
•••
•••
Muscle focus: Chest and Back
Movement (1 Rep):3 reps up, half way down to all the way up3 reps half way down to all the way down3 reps using full range of motion
Tip: Make sure your elbows are pointed out.
Muscle focus: Triceps
Movement (1 Rep):3 reps up, half way down to all the way up3 reps half way down to all the way down3 reps using full range of motion
Tip: Make sure your elbows are straight back.
© 2018 Implus Footcare, LLC
P O W E R 1 0 W O R K O U T
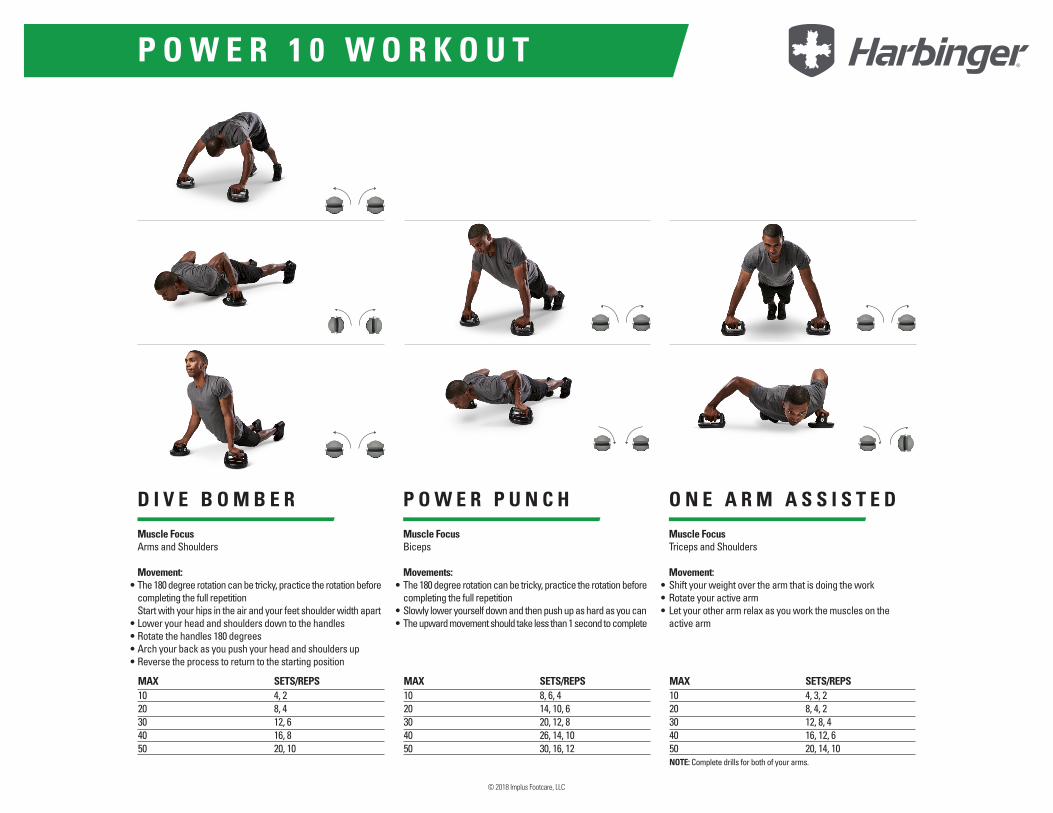
MAX MAX MAX1020304050
1020304050
1020304050
4, 28, 412, 616, 820, 10
8, 6, 414, 10, 620, 12, 826, 14, 1030, 16, 12
4, 3, 28, 4, 212, 8, 416, 12, 620, 14, 10
SETS/REPS SETS/REPS SETS/REPS
D I V E B O M B E R P O W E R P U N C H O N E A R M A S S I S T E D
Muscle Focus Arms and Shoulders
Movement:The 180 degree rotation can be tricky, practice the rotation before completing the full repetition Start with your hips in the air and your feet shoulder width apartLower your head and shoulders down to the handlesRotate the handles 180 degreesArch your back as you push your head and shoulders upReverse the process to return to the starting position
•
••••
•
••
•••
Muscle FocusBiceps Movements:The 180 degree rotation can be tricky, practice the rotation before completing the full repetitionSlowly lower yourself down and then push up as hard as you canThe upward movement should take less than 1 second to complete
Muscle FocusTriceps and Shoulders
Movement:Shift your weight over the arm that is doing the workRotate your active armLet your other arm relax as you work the muscles on the active arm
NOTE: Complete drills for both of your arms.
© 2018 Implus Footcare, LLC
P O W E R 1 0 W O R K O U T
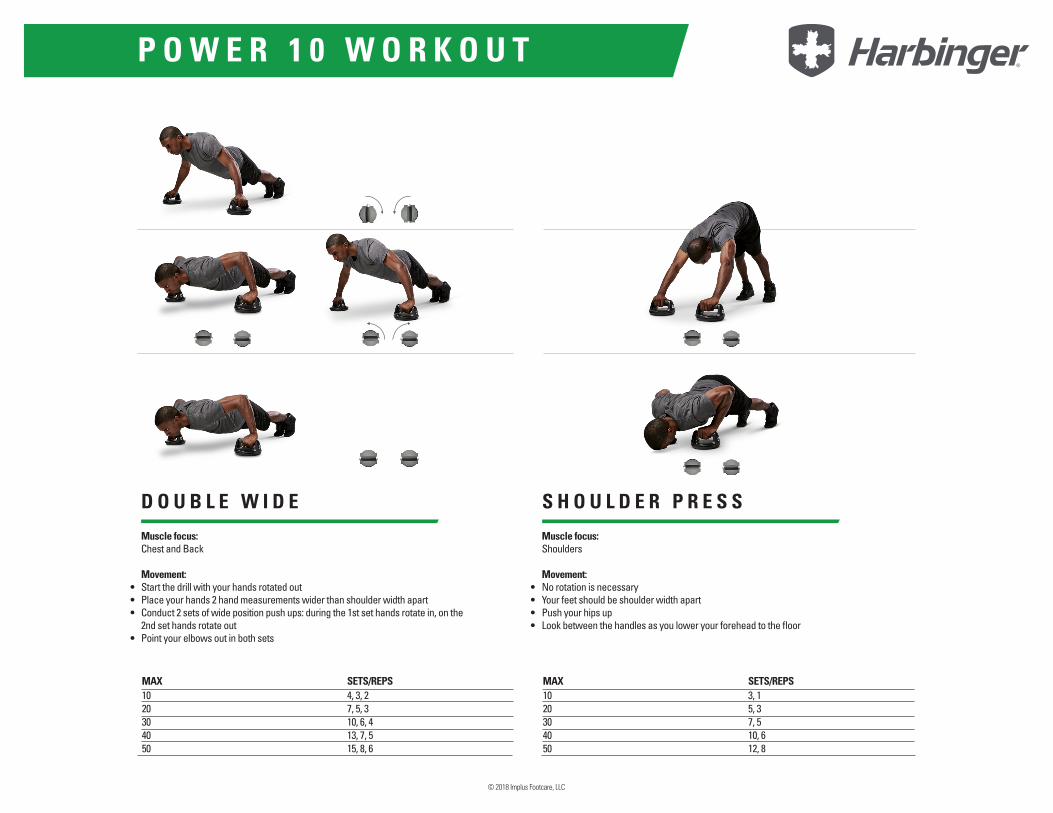
MAX MAX1020304050
1020304050
4, 3, 27, 5, 310, 6, 413, 7, 515, 8, 6
3, 15, 37, 510, 612, 8
SETS/REPS SETS/REPS
D O U B L E W I D E S H O U L D E R P R E S S
Muscle focus: Chest and Back
Movement: Start the drill with your hands rotated outPlace your hands 2 hand measurements wider than shoulder width apartConduct 2 sets of wide position push ups: during the 1st set hands rotate in, on the 2nd set hands rotate outPoint your elbows out in both sets
•••
•
••••
Muscle focus: Shoulders
Movement:No rotation is necessaryYour feet should be shoulder width apartPush your hips upLook between the handles as you lower your forehead to the floor
© 2018 Implus Footcare, LLC
P O W E R 1 0 W O R K O U T
MAX MAX1020304050
1020304050
10, 10, 1015, 15, 1520, 20, 2025, 25, 2530, 30, 30
510152025
SETS/REPS SETS/REPS
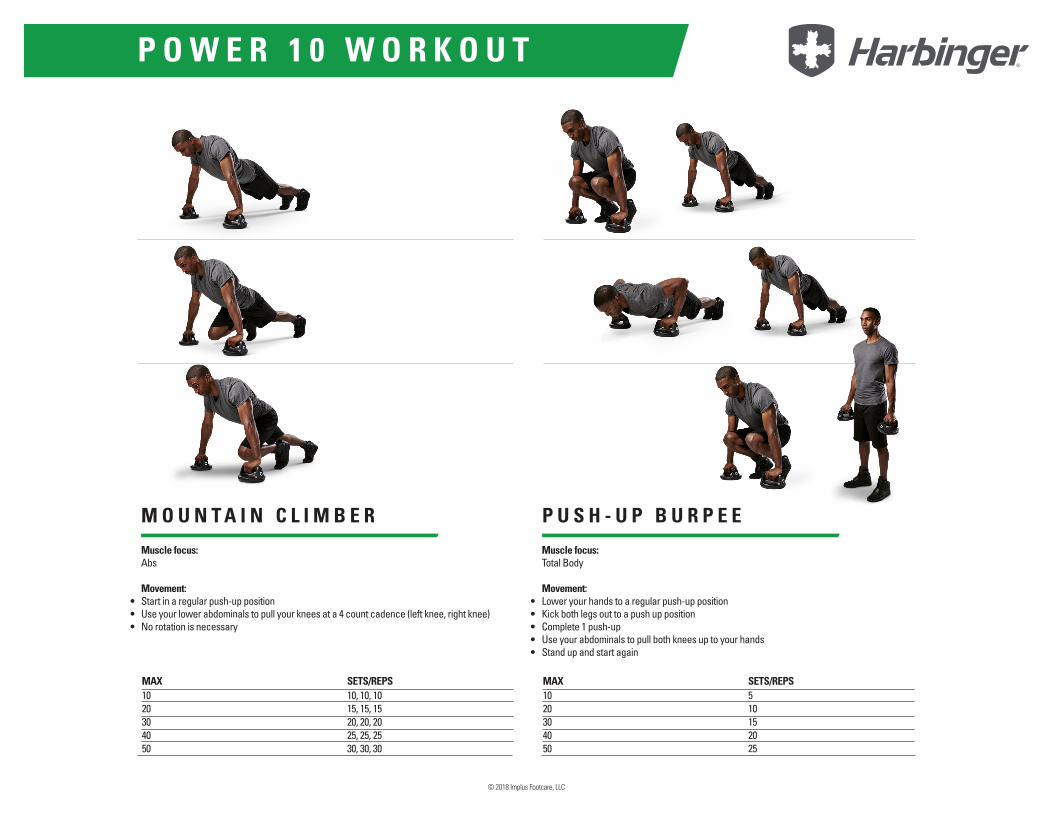
M O U N T A I N C L I M B E R P U S H - U P B U R P E E
Muscle focus: Abs
Movement: Start in a regular push-up positionUse your lower abdominals to pull your knees at a 4 count cadence (left knee, right knee)No rotation is necessary
•••
•••••
Muscle focus: Total Body
Movement:Lower your hands to a regular push-up positionKick both legs out to a push up positionComplete 1 push-upUse your abdominals to pull both knees up to your handsStand up and start again
© 2018 Implus Footcare, LLC
PUSH-UP WORKOUTSW O R K O U T C H A R T
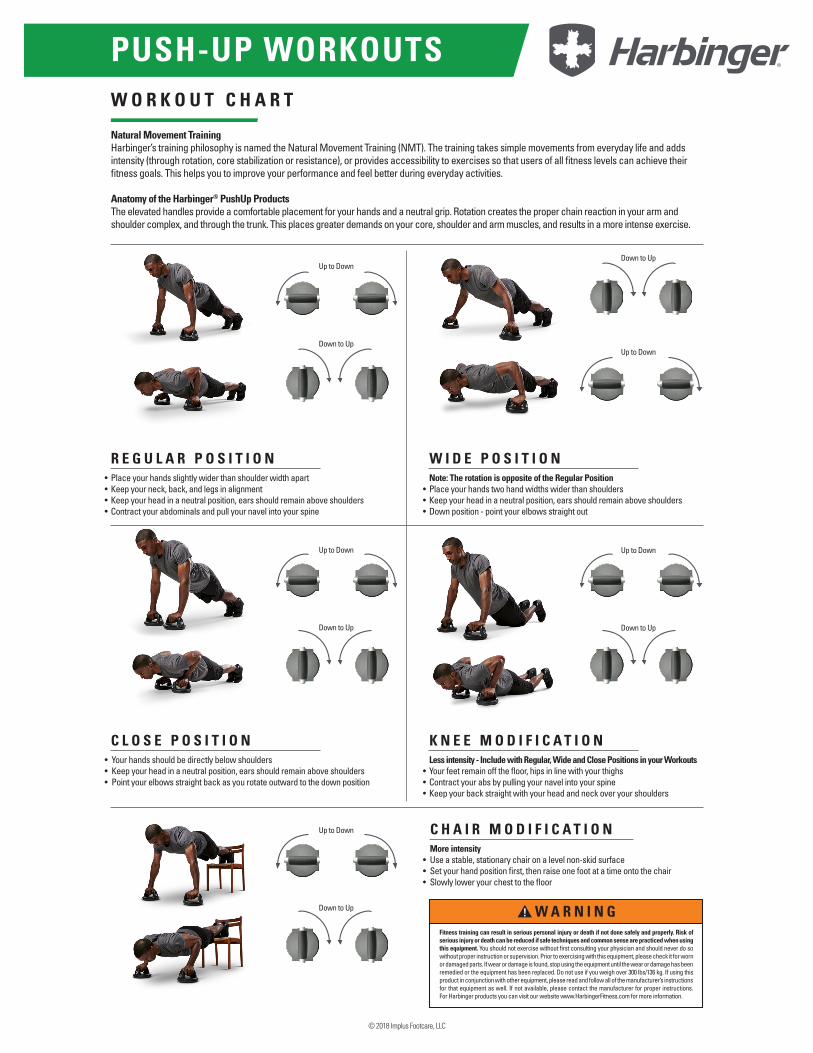
Natural Movement TrainingHarbinger’s training philosophy is named the Natural Movement Training (NMT). The training takes simple movements from everyday life and adds intensity (through rotation, core stabilization or resistance), or provides accessibility to exercises so that users of all fitness levels can achieve their fitness goals. This helps you to improve your performance and feel better during everyday activities.
Anatomy of the Harbinger® PushUp Products The elevated handles provide a comfortable placement for your hands and a neutral grip. Rotation creates the proper chain reaction in your arm and shoulder complex, and through the trunk. This places greater demands on your core, shoulder and arm muscles, and results in a more intense exercise.
R E G U L A R P O S I T I O N
C L O S E P O S I T I O N
W I D E P O S I T I O N
K N E E M O D I F I C A T I O N
C H A I R M O D I F I C A T I O N
Place your hands slightly wider than shoulder width apartKeep your neck, back, and legs in alignmentKeep your head in a neutral position, ears should remain above shouldersContract your abdominals and pull your navel into your spine
••••
•••
•••
•••
•••
Your hands should be directly below shouldersKeep your head in a neutral position, ears should remain above shouldersPoint your elbows straight back as you rotate outward to the down position
Note: The rotation is opposite of the Regular PositionPlace your hands two hand widths wider than shouldersKeep your head in a neutral position, ears should remain above shouldersDown position - point your elbows straight out
Less intensity - Include with Regular, Wide and Close Positions in your WorkoutsYour feet remain off the floor, hips in line with your thighsContract your abs by pulling your navel into your spineKeep your back straight with your head and neck over your shoulders
Fitness training can result in serious personal injury or death if not done safely and properly. Risk of serious injury or death can be reduced if safe techniques and common sense are practiced when using this equipment. You should not exercise without first consulting your physician and should never do so without proper instruction or supervision. Prior to exercising with this equipment, please check it for worn or damaged parts. If wear or damage is found, stop using the equipment until the wear or damage has been remedied or the equipment has been replaced. Do not use if you weigh over 300 lbs/136 kg. If using this product in conjunction with other equipment, please read and follow all of the manufacturer’s instructions for that equipment as well. If not available, please contact the manufacturer for proper instructions. For Harbinger products you can visit our website www.HarbingerFitness.com for more information.
More intensity Use a stable, stationary chair on a level non-skid surfaceSet your hand position first, then raise one foot at a time onto the chairSlowly lower your chest to the floor
Up to Down
Up to Down
Up to Down
Up to Down
Up to Down
Down to Up
Down to Up
Down to Up
Down to Up
Down to Up
© 2018 Implus Footcare, LLC

PUSH-UP WORKOUTSD E F I N E Y O U R W O R K O U T S
C H E C K L I S T
I N C R E A S E Y O U R P U S H - U P M A X I N 2 1 D A Y S
2 - M I N U T E D R I L L S
Step 1: Using the Harbinger® PushUp Pro, perform as many Regular Position push-ups as you can using good form and without stopping. This number is your 1 Set Max.
Step 2: In the 2-Minute Drills chart to the right, find the number closest to your 1 Set Max in the first column. Use that row for the number of repetitions in your workout. For example, if your Max is 12, use the 10 row. If it’s 17, then use the 20 row. If it’s 15, go up or down depending on how well you maintained form doing your 1 Set Max.
Step 3: Start by using the 2-Minute Drills chart. For example, if your Regular Position workout is “8, 6, 4” this means you perform 8 regular push-ups, rest, perform 6, rest, and finish with 4 (all within 2 minutes). At your own pace throughout the day, perform 2-Minute Drills to complete the Wide and Close Position push-ups. See the chart below as an example of how to establish a long term routine.
Note: If you struggle to complete the workouts, use the Knee Modification until you build up enough strength to perform them completely without kneeling. If the workouts are too easy, add some Chair Modifications. Re-test your 1 Set Max after every 21 days and move up the workout chart.
HEAD: Neutral position, keep your ears in line with your shoulders and spineBACK: Straight, keep your lower back flatARMS: As you lower your chest, your upper arms should be parallel to floorABS: Contract your abs and pull your navel toward spineLEGS: Straight, your knees should be in line with your hipsPACE: 2 seconds per push-up (1 second down, 1 second up)BREATHE: Inhale on the way down, exhale on the way up
Note: The sample push-up schedule above is meant to supplement physical training and is not meant as a replacement for a well-rounded workout routine. Please exercise caution when integrating push-ups into your existing training program and listen to your body. If there is pain, do not proceed. As with any balanced training regimen, be sure to integrate total body resistance training, cardiovascular and flexibility sessions into your workouts.
*Use Knee Modification
1 SET MAX REGULAR WIDE CLOSE
0
10
20
30
40
50
4, 3, 2, 1*
8, 6, 4
14, 10, 6
22, 14, 8
26, 14, 8
30, 16, 8
4, 3, 2, 1*
8, 6, 4
14, 10, 6
22, 14, 8
26, 14, 8
30, 16, 8
4, 3, 2, 1*
8, 6, 4
14, 10, 6
22, 14, 8
26, 14, 8
30, 16, 8
Fitness training can result in serious personal injury or death if not done safely and properly. Risk of serious injury or death can be reduced if safe techniques and common sense are practiced when using this equipment. You should not exercise without first consulting your physician and should never do so without proper instruction or supervision. Prior to exercising with this equipment, please check it for worn or damaged parts. If wear or damage is found, stop using the equipment until the wear or damage has been remedied or the equipment has been replaced. Do not use if you weigh over 300 lbs /136 kg. If using this product in conjunction with other equipment, please read and follow all of the manufacturer’s instructions for that equipment as well. If not available, please contact the manufacturer for proper instructions. For Harbinger products you can visit our website www.HarbingerFitness.com for more information.
Day 1: Test your 1 Set Max doing Regular Position push-ups. Add the 2-Minute Drills for Wide and Close Position push-ups.
Day 2-7: Complete 2- Minute Drills for Regular, Wide, and Close Position push-ups at various intervals throughout the day.
Day 8-20: Increase your sets and add variety. See example push-up schedule below.
Day 21: Re-test your 1 Set Max and start your 21-day Workout Schedule again.
Note: Perform your 2-Minute Drills at your own pace during the day. We recommend warming up before performing any workout. Perform the drills 1-4 times per week, incorporating them into your overall training schedule. Never do more than your body can comfortably accomplish.
DAY 11 Regular
1 Wide1 Close
DAY 8OFF
DAY 152 Regular Chair
1 Wide1 Close
DAY 31 Regular
1 Wide1 Close
DAY 10OFF
DAY 172 Regular Chair
1 Wide Chair1 Close Chair
DAY 51 Regular
1 Wide1 Close
DAY 12OFF
DAY 192 Regular Chair
1 Wide1 Close
DAY 72 Regular
1 Wide1 Close
DAY 14OFF
DAY 21Re-test your 1 Set Max
DAY 2OFF
DAY 92 Regular
1 Wide1 Close
DAY 16OFF
DAY 4OFF
DAY 111 Regular Chair
1 Regular1 Wide1 Close
DAY 18OFF
DAY 6OFF
DAY 131 Regular Chair
1 Regular1 Wide1 Close
DAY 20OFF
© 2018 Implus Footcare, LLC
G E T T I N G S T A R T E D
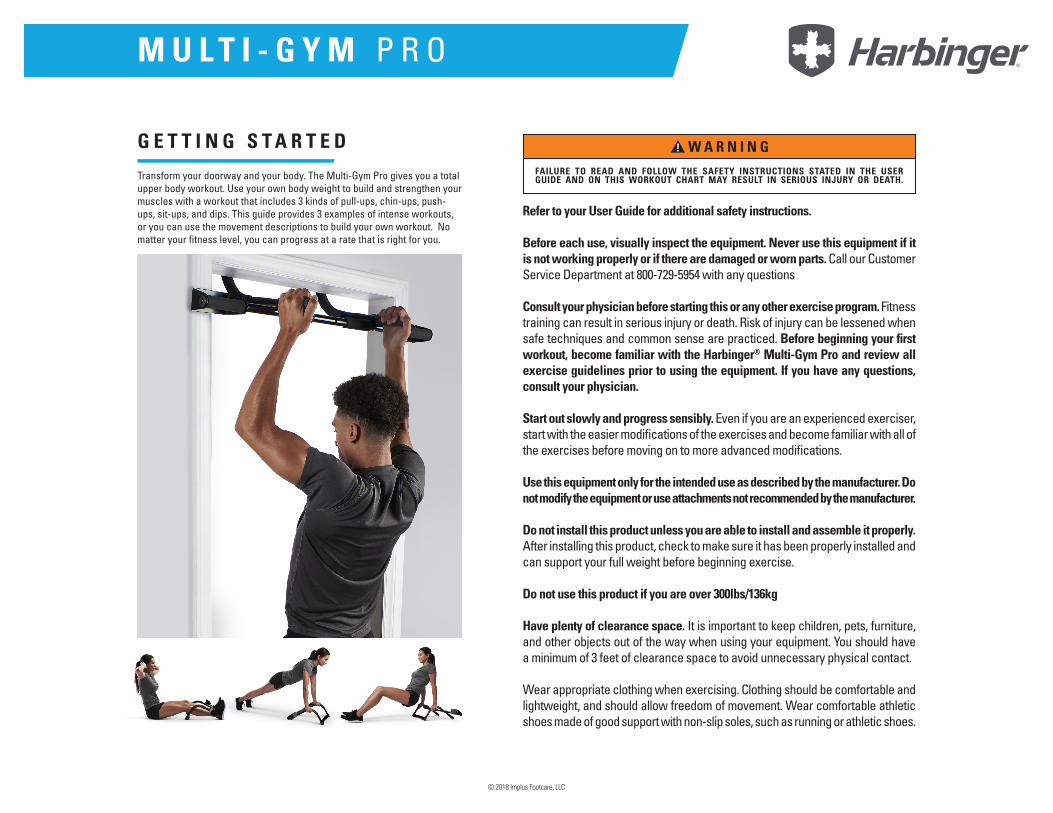
Transform your doorway and your body. The Multi-Gym Pro gives you a total upper body workout. Use your own body weight to build and strengthen your muscles with a workout that includes 3 kinds of pull-ups, chin-ups, push-ups, sit-ups, and dips. This guide provides 3 examples of intense workouts, or you can use the movement descriptions to build your own workout. No matter your fitness level, you can progress at a rate that is right for you.
M U L T I - G Y M P R O
Refer to your User Guide for additional safety instructions.
Before each use, visually inspect the equipment. Never use this equipment if it is not working properly or if there are damaged or worn parts. Call our Customer Service Department at 800-729-5954 with any questions
Consult your physician before starting this or any other exercise program. Fitness training can result in serious injury or death. Risk of injury can be lessened when safe techniques and common sense are practiced. Before beginning your first workout, become familiar with the Harbinger® Multi-Gym Pro and review all exercise guidelines prior to using the equipment. If you have any questions, consult your physician.
Start out slowly and progress sensibly. Even if you are an experienced exerciser, start with the easier modifications of the exercises and become familiar with all of the exercises before moving on to more advanced modifications.
Use this equipment only for the intended use as described by the manufacturer. Do not modify the equipment or use attachments not recommended by the manufacturer.
Do not install this product unless you are able to install and assemble it properly. After installing this product, check to make sure it has been properly installed and can support your full weight before beginning exercise.
Do not use this product if you are over 300lbs/136kg
Have plenty of clearance space. It is important to keep children, pets, furniture, and other objects out of the way when using your equipment. You should have a minimum of 3 feet of clearance space to avoid unnecessary physical contact.
Wear appropriate clothing when exercising. Clothing should be comfortable and lightweight, and should allow freedom of movement. Wear comfortable athletic shoes made of good support with non-slip soles, such as running or athletic shoes.
FAILURE TO READ AND FOLLOW THE SAFETY INSTRUCTIONS STATED IN THE USER GUIDE AND ON THIS WORKOUT CHART MAY RESULT IN SERIOUS INJURY OR DEATH.
© 2018 Implus Footcare, LLC
M U L T I - G Y M P R O
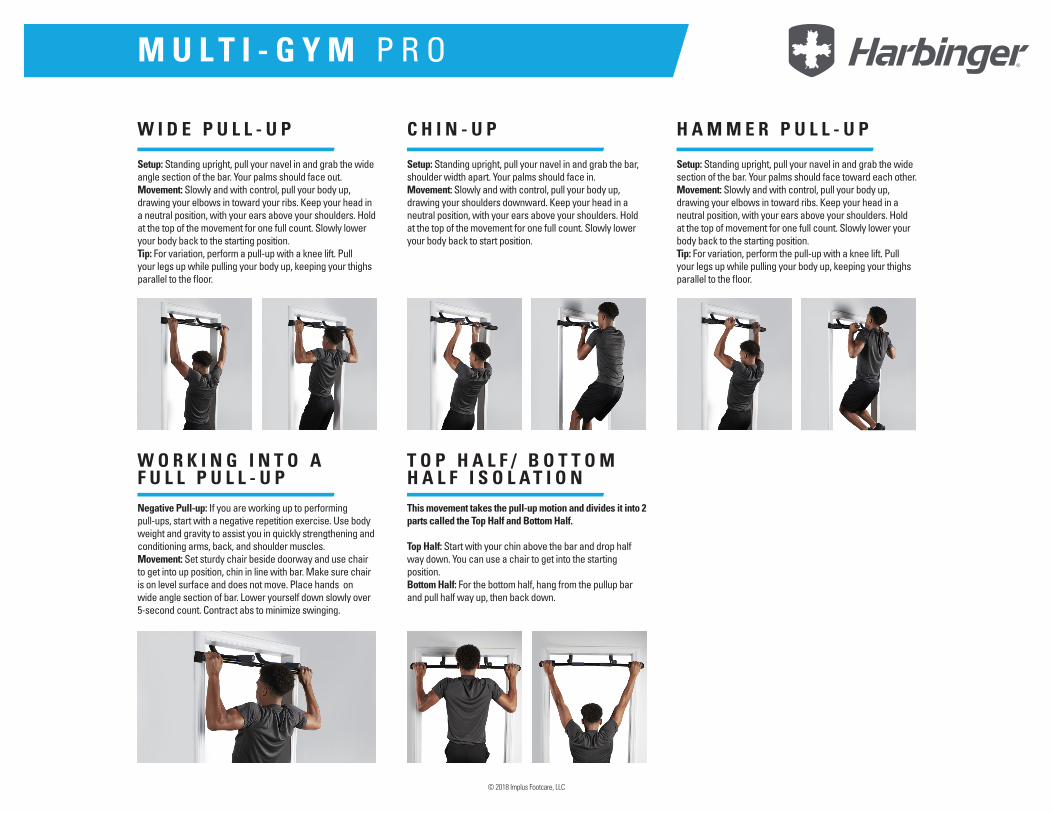
W I D E P U L L - U P
W O R K I N G I N T O A F U L L P U L L - U P
C H I N - U P H A M M E R P U L L - U P
Setup: Standing upright, pull your navel in and grab the wide angle section of the bar. Your palms should face out.Movement: Slowly and with control, pull your body up, drawing your elbows in toward your ribs. Keep your head in a neutral position, with your ears above your shoulders. Hold at the top of the movement for one full count. Slowly lower your body back to the starting position.Tip: For variation, perform a pull-up with a knee lift. Pull your legs up while pulling your body up, keeping your thighs parallel to the floor.
Negative Pull-up: If you are working up to performing pull-ups, start with a negative repetition exercise. Use body weight and gravity to assist you in quickly strengthening and conditioning arms, back, and shoulder muscles.Movement: Set sturdy chair beside doorway and use chair to get into up position, chin in line with bar. Make sure chair is on level surface and does not move. Place hands on wide angle section of bar. Lower yourself down slowly over 5-second count. Contract abs to minimize swinging.
Setup: Standing upright, pull your navel in and grab the bar, shoulder width apart. Your palms should face in.Movement: Slowly and with control, pull your body up, drawing your shoulders downward. Keep your head in a neutral position, with your ears above your shoulders. Hold at the top of the movement for one full count. Slowly lower your body back to start position.
Setup: Standing upright, pull your navel in and grab the wide section of the bar. Your palms should face toward each other.Movement: Slowly and with control, pull your body up, drawing your elbows in toward ribs. Keep your head in a neutral position, with your ears above your shoulders. Hold at the top of movement for one full count. Slowly lower your body back to the starting position.Tip: For variation, perform the pull-up with a knee lift. Pull your legs up while pulling your body up, keeping your thighs parallel to the floor.
T O P H A L F / B O T T O M H A L F I S O L A T I O NThis movement takes the pull-up motion and divides it into 2 parts called the Top Half and Bottom Half.
Top Half: Start with your chin above the bar and drop half way down. You can use a chair to get into the starting position.Bottom Half: For the bottom half, hang from the pullup bar and pull half way up, then back down.
© 2018 Implus Footcare, LLC

M U L T I - G Y M P R O
R E G U L A R P U S H - U P
F U L L S I T - U P
C L O S E P U S H - U P
S T R A I G H T L E G S I T - U P
W I D E P U S H - U P
O B L I Q U E S I T - U P
D I P
Setup: Place your hands shoulder-width apart in a hammer position. Pull your navel in to activate core as you align your head, neck, hips, and legs in a straight line. Keep a strong back throughout the movement by pulling your shoulders back and down. Make sure the unit is on a non-skid surface. Movement: Slowly lower your body down, flexing at your elbows until they form a 90-degree angle. Hold at bottom of the movement for one count. Push back up to the starting position.
Setup: Place the Multi-Gym along the base of a doorway and pull it back so that the foam cushions press against the opposite side of the door. Lay on your back and wedge your feet under the cross bar, knees should be bent at 90-degrees. Hold your hands behind your head, fingertips at your ears, and elbows open.Movement: Activate your abdominals and perform a full sit-up. Lower your back to the starting position with control. Count two seconds up and two seconds down.
Setup: Place your hands directly below your shoulders on the center of the bar. Pull your navel in to activate your core as you align your head, neck, hips, and legs into a straight line. Keep a strong back throughout movement by pulling shoulders back and down. Make sure the unit is on a non-skid surface. Movement: Slowly lower your body down, flexing at your elbows until they form a 90-degree angle. Hold at the bottom of the movement for one count. Push back up to the starting position.
SETUP: Place The Multi-Gym along the base of a doorway and pull it back so that the foam cushions press against the opposite side of the door. Hold your hands behind your head, fingertips at ears, and elbows open. Lay on your back and wedge your feet under the cross bar, keeping your legs straight. Movement: Activate your abdominals and perform a full sit-up. Lower back to the starting position with control. Press belly button to floor keeping your back totally flat. Count two seconds up and two seconds down.Tip: Advanced movement. Only try if you can complete Regular Sit-ups without pain in your lower back.
Setup: Place your hands wider than shoulder-width apart on the crossbar. Pull your navel in to activate your core as you align your head, neck, hips, and legs in a straight line. Keep a strong back throughout the movement by pulling your shoulders back and down. Make sure the unit is on a non-skid surface. Movement: Slowly lower your body down, flexing at your elbows until they form a 90-degree angle. Hold at the bottom of the movement for one count. Push back up to the starting position.
Setup: Place the Multi-Gym along the base of a doorway and pull it back so that the foam cushions press against the opposite side of the door. Hold your hands behind your head, fingertips at ears, elbows open. Lay on your back and wedge your feet under the cross bar, knees should be bent at 90-degrees.Movement: Activate your abdominals and, as you sit up, rotate the trunk to bring one elbow to the opposite knee. Lower back to the starting position with control. Repeat on the other side. Count two seconds up and two seconds down.
Setup: If you struggle to complete a Close Push-up, perform dips. Start in a seated position with your hands on the bent portion of the bar. Make sure the unit is on a non-skid surface. Movement: Lift your body off of the ground, shifting your weight back so your hips are between your hands. Slowly lower down - keeping your elbows as narrow as possible - then press up, performing a tricep dip.
© 2018 Implus Footcare, LLC
M U L T I - G Y M P R O
W O R K O U T C H A R T
DAY 1
DAY 8
DAY 15
TEST 1 SET MAX
Negative Modification(2x 1 Set Max)
3 SETS OF 10 SECOND PULL-UP
3 Sets of Negative (x2)
3 SETS OF 10 SECOND PULL-UP
3 Sets of Negative (x2)
3 SETS OF 10 SECOND PULL-UP
3 Sets of Negative (x2)
RE-TEST YOUR 1 SET MAX
3 Sets of Negative (x2)
1 SET 10-SECOND PULL-UP
Negative Modification (x2)
2 SETS OF 10-SECOND PULL-UP
2 Sets of Negative (x2)
2 SETS OF 10-SECOND PULL-UP
2 Sets of Negative (x2)
2 SETS OF 10-SECOND PULL-UP
2 Sets of Negative (x2)
1 SET 10-SECOND PULL-UP
Negative Modification (x2)
1 SET 10-SECOND PULL-UP
1 Set of Negative Modification (x2)OFF
OFF
OFF
OFF
OFF
OFF
OFF
OFF
OFF OFF
DAY 2
DAY 9
DAY 16
DAY 4
DAY 11
DAY 18
DAY 3
DAY 10
DAY 17
DAY 5
DAY 12
DAY 19
DAY 6
DAY 13
DAY 20
DAY 7
DAY 14
DAY 21
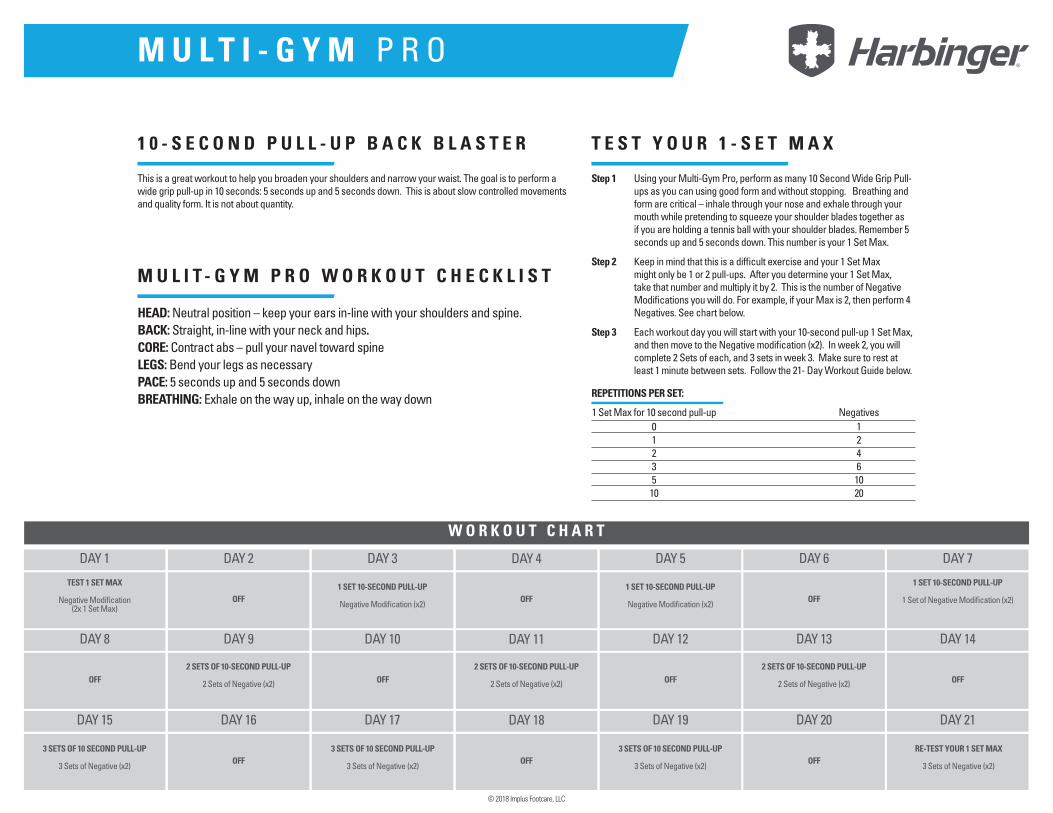
1 0 - S E C O N D P U L L - U P B A C K B L A S T E R T E S T Y O U R 1 - S E T M A X
M U L I T - G Y M P R O W O R K O U T C H E C K L I S T
This is a great workout to help you broaden your shoulders and narrow your waist. The goal is to perform a wide grip pull-up in 10 seconds: 5 seconds up and 5 seconds down. This is about slow controlled movements and quality form. It is not about quantity.
1 Set Max for 10 second pull-up0123510
12461020
Negatives
Using your Multi-Gym Pro, perform as many 10 Second Wide Grip Pull-ups as you can using good form and without stopping. Breathing and form are critical – inhale through your nose and exhale through your mouth while pretending to squeeze your shoulder blades together as if you are holding a tennis ball with your shoulder blades. Remember 5 seconds up and 5 seconds down. This number is your 1 Set Max.
Keep in mind that this is a difficult exercise and your 1 Set Max might only be 1 or 2 pull-ups. After you determine your 1 Set Max, take that number and multiply it by 2. This is the number of Negative Modifications you will do. For example, if your Max is 2, then perform 4 Negatives. See chart below.
Each workout day you will start with your 10-second pull-up 1 Set Max, and then move to the Negative modification (x2). In week 2, you will complete 2 Sets of each, and 3 sets in week 3. Make sure to rest at least 1 minute between sets. Follow the 21- Day Workout Guide below.
HEAD: Neutral position – keep your ears in-line with your shoulders and spine.BACK: Straight, in-line with your neck and hips.CORE: Contract abs – pull your navel toward spineLEGS: Bend your legs as necessaryPACE: 5 seconds up and 5 seconds downBREATHING: Exhale on the way up, inhale on the way down
Step 1
Step 2
Step 3
REPETITIONS PER SET:
© 2018 Implus Footcare, LLC
M U L T I - G Y M P R O
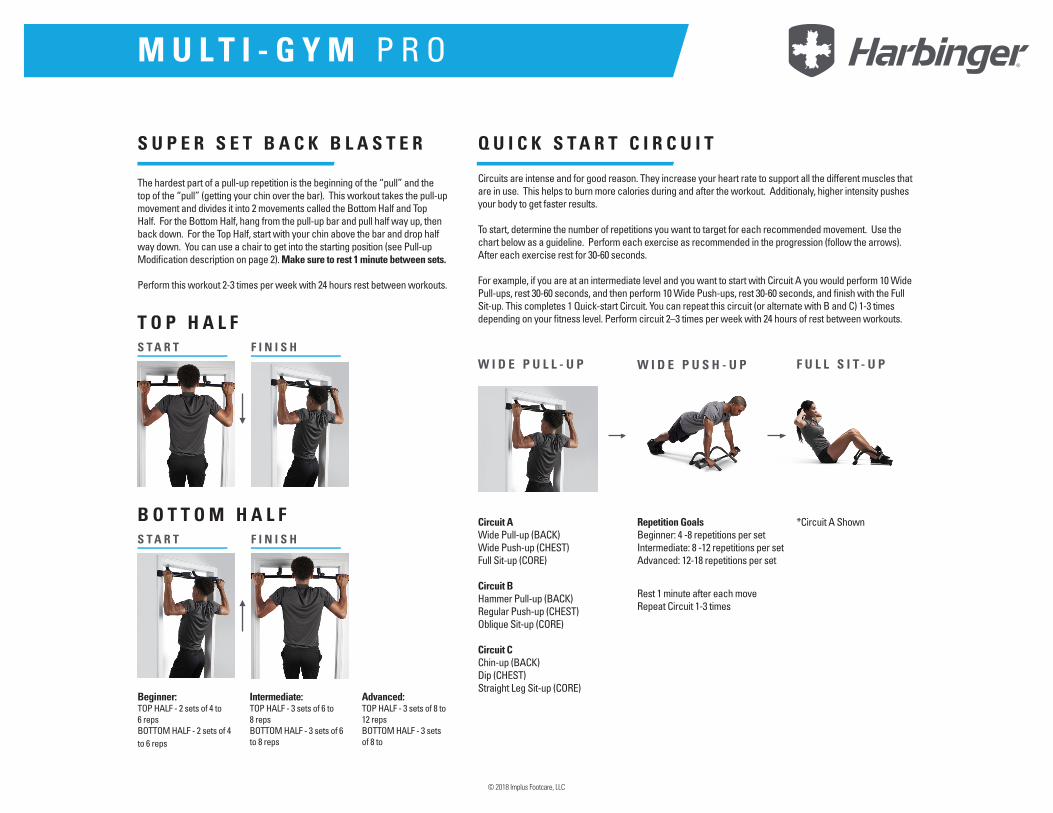
S U P E R S E T B A C K B L A S T E R Q U I C K S T A R T C I R C U I T
T O P H A L F
B O T T O M H A L F
S T A R T
S T A R T
W I D E P U L L - U P W I D E P U S H - U P F U L L S I T - U PF I N I S H
F I N I S H
The hardest part of a pull-up repetition is the beginning of the “pull” and the top of the “pull” (getting your chin over the bar). This workout takes the pull-up movement and divides it into 2 movements called the Bottom Half and Top Half. For the Bottom Half, hang from the pull-up bar and pull half way up, then back down. For the Top Half, start with your chin above the bar and drop half way down. You can use a chair to get into the starting position (see Pull-up Modification description on page 2). Make sure to rest 1 minute between sets.
Perform this workout 2-3 times per week with 24 hours rest between workouts.
Circuits are intense and for good reason. They increase your heart rate to support all the different muscles that are in use. This helps to burn more calories during and after the workout. Additionaly, higher intensity pushes your body to get faster results.
To start, determine the number of repetitions you want to target for each recommended movement. Use the chart below as a guideline. Perform each exercise as recommended in the progression (follow the arrows). After each exercise rest for 30-60 seconds.
For example, if you are at an intermediate level and you want to start with Circuit A you would perform 10 Wide Pull-ups, rest 30-60 seconds, and then perform 10 Wide Push-ups, rest 30-60 seconds, and finish with the Full Sit-up. This completes 1 Quick-start Circuit. You can repeat this circuit (or alternate with B and C) 1-3 times depending on your fitness level. Perform circuit 2–3 times per week with 24 hours of rest between workouts.
Circuit AWide Pull-up (BACK) Wide Push-up (CHEST)Full Sit-up (CORE)
Circuit BHammer Pull-up (BACK) Regular Push-up (CHEST)Oblique Sit-up (CORE)
Circuit CChin-up (BACK) Dip (CHEST)Straight Leg Sit-up (CORE)
Repetition GoalsBeginner: 4 -8 repetitions per setIntermediate: 8 -12 repetitions per setAdvanced: 12-18 repetitions per set
Rest 1 minute after each moveRepeat Circuit 1-3 times
*Circuit A Shown
Beginner:TOP HALF - 2 sets of 4 to 6 repsBOTTOM HALF - 2 sets of 4 to 6 reps
Intermediate:TOP HALF - 3 sets of 6 to 8 repsBOTTOM HALF - 3 sets of 6 to 8 reps
Advanced:TOP HALF - 3 sets of 8 to 12 repsBOTTOM HALF - 3 sets of 8 to
© 2018 Implus Footcare, LLC

M U L T I - G Y M P R O
T H R E E - S E T S U P E R M A X H A R B I N G E R P Y R A M I D
P U L L / P U S H / S I T M O V E M E N T S
Maxing out on pull-ups, push-ups, and sit-ups is the key to peaking from a solid fitness foundation. This pyramid will take every part of your body to the limit. For every 1 pull-up, you should perform 2 push-ups and 3 sit-ups.
Set 1: Perform 1 pull-up, 2 push-ups, and 3 sit-ups followed by a rest 30-60 seconds. Set 2: Perform 2 pull-ups, 4 push-ups, and 6 sit-ups followed by a rest.
Continue up the pyramid, increasing your reps after every set until you reach your maximum level, then start back down the pyramid - decreasing your repetitions per set until you’ve returned to the bottom. Use variations of the pull-up, push-up and sit-up movements during these sets.
If you complete the entire pyramid you should have performed 110 pull-ups, 220 push-ups, and 330 sit-ups.
EXAMPLE: If you can only achieve 6 pull-ups (level 6) and cannot do anymore, go back down the pyramid starting at level 6. Use the list to the left to determine the number of pull, push, and sit movements for each level.
This is an intense workout that will take you to your limit in a short amount of time. Perform your maximum number of push-ups, directly followed by your maximim number of pull-ups, then do as many sit-ups as you can complete in one minute. This is one superset. Go immediately from one exercise to the next, without stopping between exercises or sets. Continue for three supersets. Keep track of the number of reps you performed for each exercise in every set.
Time: 3 minutes
Keep track of how many points you earn each time you complete the 3-Set Supermax to track progress. Add up the number of repetitions you complete in three sets and assign yourself points based on the chart below. Use this workout sheet to tally your points.
SETS123
PULLWideHammerReverse
PULL
TOTAL x3 =
SET 1
SET 2
SET 3
TOTAL REPS
TOTAL POINTS
PUSH
TOTAL x2 =
SIT
TOTAL x1 =
PUSHWideRegular Close
SITFullObliqueStraight Leg
LEVEL 10 - 10 pull-ups, 20 push-ups, 30 sit-upsLEVEL 9 - 9 pull-ups, 18 push-ups, 27 sit-upsLEVEL 8 - 8 pull-ups, 16 push-ups, 24 sit-upsLEVEL 7 - 7 pull-ups, 14 push-ups, 21 sit-upsLEVEL 6 - 6 pull-ups, 12 push-ups, 18 sit-upsLEVEL 5 - 5 pull-ups, 10 push-ups, 15 sit-upsLEVEL 4 - 4 pull-ups, 8 push-ups, 12 sit-upsLEVEL 3 - 3 pull-ups, 6 push-ups, 9 sit-upsLEVEL 2 - 2 pull-ups, 4 push-ups, 6 sit-upsLEVEL 1 - 1 pull-ups, 2 push-ups, 3 sit-ups
Start at level 1
Note: Use the level you max out at as your benchmark, then go back down the pyramid.
Finish at level 1
Perform the push, pull and sit movements directed below for each set:
Fitness training can result in serious personal injury or death if not done safely and properly. Risk of serious injury or death can be reduced if safe techniques and common sense are practiced when using this equipment. You should not exercise without first consulting your physician and should never do so without proper instruction or supervision. Prior to exercising with this equipment, please check it for worn or damaged parts. If wear or damage is found, stop using the equipment until the wear or damage has been remedied or the equipment has been replaced. Do not use this equipment if you weigh more than 300lbs/136kg. If using this product in conjunction with other equipment, please read and follow all of the manufacturer’s instructions for that equipment as well. If not available, please contact the manufacturer for proper instructions.
© 2018 Implus Footcare, LLC
M U L T I - G Y M P R O
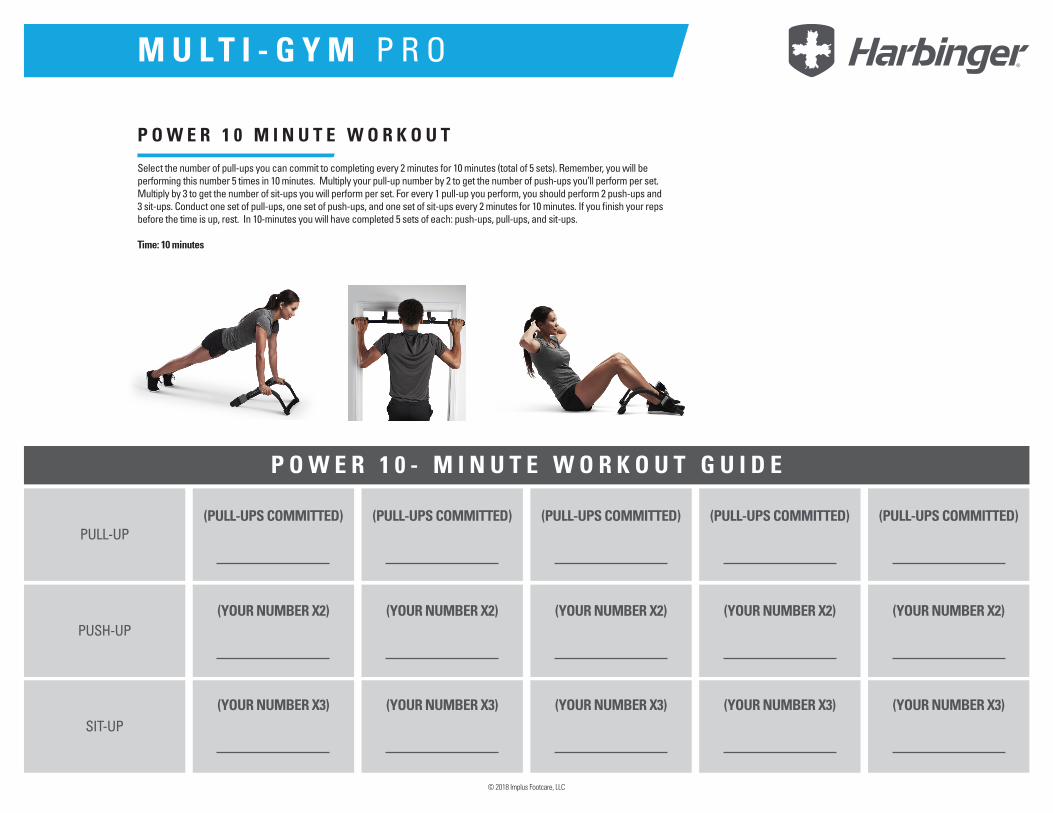
P O W E R 1 0 M I N U T E W O R K O U T
Select the number of pull-ups you can commit to completing every 2 minutes for 10 minutes (total of 5 sets). Remember, you will be performing this number 5 times in 10 minutes. Multiply your pull-up number by 2 to get the number of push-ups you’ll perform per set. Multiply by 3 to get the number of sit-ups you will perform per set. For every 1 pull-up you perform, you should perform 2 push-ups and 3 sit-ups. Conduct one set of pull-ups, one set of push-ups, and one set of sit-ups every 2 minutes for 10 minutes. If you finish your reps before the time is up, rest. In 10-minutes you will have completed 5 sets of each: push-ups, pull-ups, and sit-ups.
Time: 10 minutes
P O W E R 1 0 - M I N U T E W O R K O U T G U I D E
PULL-UP(PULL-UPS COMMITTED)
(YOUR NUMBER X2)
(YOUR NUMBER X3)
(PULL-UPS COMMITTED)
(YOUR NUMBER X2)
(YOUR NUMBER X3)
(PULL-UPS COMMITTED)
(YOUR NUMBER X2)
(YOUR NUMBER X3)
(PULL-UPS COMMITTED)
(YOUR NUMBER X2)
(YOUR NUMBER X3)
(PULL-UPS COMMITTED)
(YOUR NUMBER X2)
(YOUR NUMBER X3)
PUSH-UP
SIT-UP
© 2018 Implus Footcare, LLC
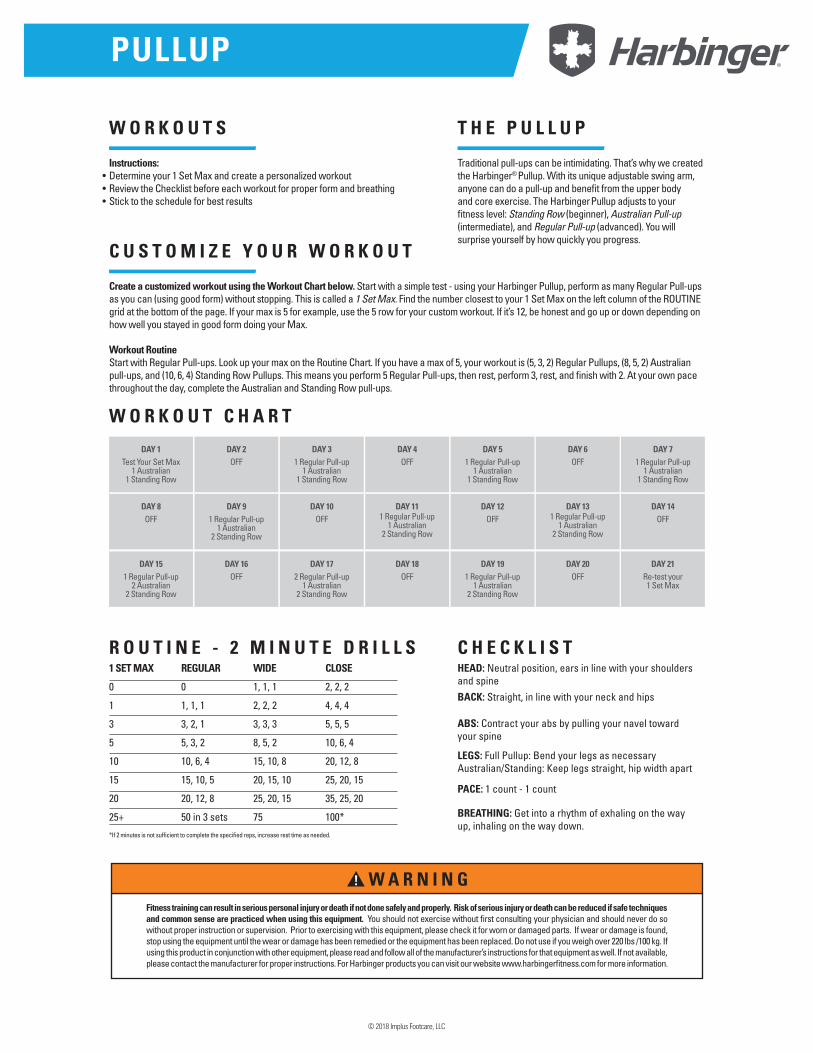
PULLUP
W O R K O U T S
C U S T O M I Z E Y O U R W O R K O U T
W O R K O U T C H A R T
R O U T I N E - 2 M I N U T E D R I L L S C H E C K L I S T
T H E P U L L U P
Instructions:Determine your 1 Set Max and create a personalized workoutReview the Checklist before each workout for proper form and breathingStick to the schedule for best results
Create a customized workout using the Workout Chart below. Start with a simple test - using your Harbinger Pullup, perform as many Regular Pull-ups as you can (using good form) without stopping. This is called a 1 Set Max. Find the number closest to your 1 Set Max on the left column of the ROUTINE grid at the bottom of the page. If your max is 5 for example, use the 5 row for your custom workout. If it’s 12, be honest and go up or down depending on how well you stayed in good form doing your Max.
Workout Routine Start with Regular Pull-ups. Look up your max on the Routine Chart. If you have a max of 5, your workout is (5, 3, 2) Regular Pullups, (8, 5, 2) Australian pull-ups, and (10, 6, 4) Standing Row Pullups. This means you perform 5 Regular Pull-ups, then rest, perform 3, rest, and finish with 2. At your own pace throughout the day, complete the Australian and Standing Row pull-ups.
Traditional pull-ups can be intimidating. That’s why we created the Harbinger® Pullup. With its unique adjustable swing arm, anyone can do a pull-up and benefit from the upper body and core exercise. The Harbinger Pullup adjusts to your fitness level: Standing Row (beginner), Australian Pull-up (intermediate), and Regular Pull-up (advanced). You will surprise yourself by how quickly you progress.
•••
DAY 1Test Your Set Max
1 Australian1 Standing Row
DAY 8OFF
DAY 151 Regular Pull-up
2 Australian2 Standing Row
DAY 31 Regular Pull-up
1 Australian1 Standing Row
DAY 10OFF
DAY 172 Regular Pull-up
1 Australian2 Standing Row
DAY 51 Regular Pull-up
1 Australian1 Standing Row
DAY 12OFF
DAY 191 Regular Pull-up
1 Australian2 Standing Row
DAY 71 Regular Pull-up
1 Australian1 Standing Row
DAY 14OFF
DAY 21Re-test your 1 Set Max
DAY 2OFF
DAY 91 Regular Pull-up
1 Australian2 Standing Row
DAY 16OFF
DAY 4OFF
DAY 111 Regular Pull-up
1 Australian2 Standing Row
DAY 18OFF
DAY 6OFF
DAY 131 Regular Pull-up
1 Australian2 Standing Row
DAY 20OFF
1 SET MAX REGULAR WIDE CLOSE
0
1
3
5
10
15
20
25+
HEAD: Neutral position, ears in line with your shoulders and spineBACK: Straight, in line with your neck and hips
ABS: Contract your abs by pulling your navel toward your spine
LEGS: Full Pullup: Bend your legs as necessary Australian/Standing: Keep legs straight, hip width apart
PACE: 1 count - 1 count
BREATHING: Get into a rhythm of exhaling on the way up, inhaling on the way down.
0
1, 1, 1
3, 2, 1
5, 3, 2
10, 6, 4
15, 10, 5
20, 12, 8
50 in 3 sets
1, 1, 1
2, 2, 2
3, 3, 3
8, 5, 2
15, 10, 8
20, 15, 10
25, 20, 15
75
2, 2, 2
4, 4, 4
5, 5, 5
10, 6, 4
20, 12, 8
25, 20, 15
35, 25, 20
100*
*If 2 minutes is not sufficient to complete the specified reps, increase rest time as needed.
Fitness training can result in serious personal injury or death if not done safely and properly. Risk of serious injury or death can be reduced if safe techniques and common sense are practiced when using this equipment. You should not exercise without first consulting your physician and should never do so without proper instruction or supervision. Prior to exercising with this equipment, please check it for worn or damaged parts. If wear or damage is found, stop using the equipment until the wear or damage has been remedied or the equipment has been replaced. Do not use if you weigh over 220 lbs /100 kg. If using this product in conjunction with other equipment, please read and follow all of the manufacturer’s instructions for that equipment as well. If not available, please contact the manufacturer for proper instructions. For Harbinger products you can visit our website www.harbingerfitness.com for more information.
© 2018 Implus Footcare, LLC
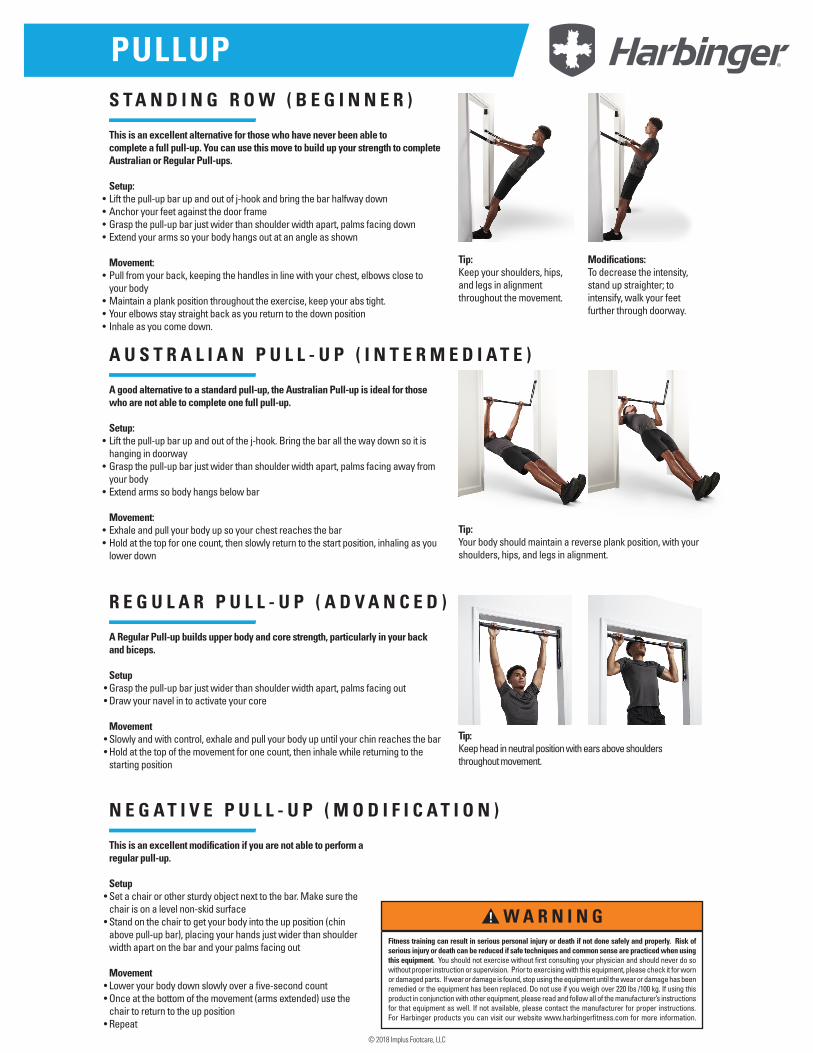
PULLUPS T A N D I N G R O W ( B E G I N N E R )
A U S T R A L I A N P U L L - U P ( I N T E R M E D I A T E )
R E G U L A R P U L L - U P ( A D V A N C E D )
N E G A T I V E P U L L - U P ( M O D I F I C A T I O N )
This is an excellent alternative for those who have never been able tocomplete a full pull-up. You can use this move to build up your strength to complete Australian or Regular Pull-ups.
Setup:Lift the pull-up bar up and out of j-hook and bring the bar halfway downAnchor your feet against the door frameGrasp the pull-up bar just wider than shoulder width apart, palms facing downExtend your arms so your body hangs out at an angle as shown
Movement:Pull from your back, keeping the handles in line with your chest, elbows close to your bodyMaintain a plank position throughout the exercise, keep your abs tight.Your elbows stay straight back as you return to the down positionInhale as you come down.
A good alternative to a standard pull-up, the Australian Pull-up is ideal for those who are not able to complete one full pull-up.
Setup:Lift the pull-up bar up and out of the j-hook. Bring the bar all the way down so it is hanging in doorwayGrasp the pull-up bar just wider than shoulder width apart, palms facing away from your bodyExtend arms so body hangs below bar
Movement:Exhale and pull your body up so your chest reaches the barHold at the top for one count, then slowly return to the start position, inhaling as you lower down
A Regular Pull-up builds upper body and core strength, particularly in your back and biceps.
SetupGrasp the pull-up bar just wider than shoulder width apart, palms facing outDraw your navel in to activate your core
MovementSlowly and with control, exhale and pull your body up until your chin reaches the barHold at the top of the movement for one count, then inhale while returning to the starting position
This is an excellent modification if you are not able to perform a regular pull-up.
SetupSet a chair or other sturdy object next to the bar. Make sure the chair is on a level non-skid surfaceStand on the chair to get your body into the up position (chin above pull-up bar), placing your hands just wider than shoulder width apart on the bar and your palms facing out
MovementLower your body down slowly over a five-second countOnce at the bottom of the movement (arms extended) use the chair to return to the up positionRepeat
Tip:Keep your shoulders, hips, and legs in alignment throughout the movement.
Tip:Your body should maintain a reverse plank position, with your shoulders, hips, and legs in alignment.
Tip:Keep head in neutral position with ears above shoulders throughout movement.
Modifications: To decrease the intensity, stand up straighter; to intensify, walk your feet further through doorway.
••••
•
•••
•
•
•
••
••
••
•
•
••
•
Fitness training can result in serious personal injury or death if not done safely and properly. Risk of serious injury or death can be reduced if safe techniques and common sense are practiced when using this equipment. You should not exercise without first consulting your physician and should never do so without proper instruction or supervision. Prior to exercising with this equipment, please check it for worn or damaged parts. If wear or damage is found, stop using the equipment until the wear or damage has been remedied or the equipment has been replaced. Do not use if you weigh over 220 lbs /100 kg. If using this product in conjunction with other equipment, please read and follow all of the manufacturer’s instructions for that equipment as well. If not available, please contact the manufacturer for proper instructions. For Harbinger products you can visit our website www.harbingerfitness.com for more information.
© 2018 Implus Footcare, LLC

P U S H U P S P O R T
W O R K O U T C H A R T
Body PositionBody position may be changed to increase or decrease exercise difficulty. Place your knees on the floor as a Beginning position, reducing intensity. For intermediate, perform a regular push-up on your toes. For Expert, perform with your feet elevated.
B E G I N N E R E X P E R TI N T E R M E D I A T E
Your knees should be on the floor.
Setup: Knees and toes on the ground. Place Pushup Sport directly under shoulders with hands placed so the thumbs are pointing straight ahead. Movement: Squeeze your glutes and brace your core while slowly lowering your body downward. Push all the way up. Aim for 10-12 reps.
Change your position by elevating your feet.
Setup: Your feet should be elevated. Place the Pushup Sport directly under your shoulders or slightly wider than shoulder width. Your hands should be positioned to where your thumbs are pointing straight ahead.Movement: Squeeze your glutes and brace your core while slowly lowering the body downward. Push all the way up. Aim for 10-12 reps.
This style creates a full push-up from your toes.
Setup: Your toes should be on the ground. Place the Pushup Sport directly under the shoulder or slightly wider than shoulder width. Your hands should be positioned to where your thumbs are pointing straight ahead. Movement: Squeeze your glutes and brace your core while slowly lowering the body downward. Push all the way up. Aim for 10-12 reps.
Fitness training can result in serious personal injury or death if not done safely and properly. Risk of serious injury or death can be reduced if safe techniques and common sense are practiced when using this equipment. You should not exercise without first consulting your physician and should never do so without proper instruction or supervision. Prior to exercising with this equipment, please check it for worn or damaged parts. If wear or damage is found, stop using the equipment until the wear or damage has been remedied or the equipment has been replaced. Do not use if you weigh over 300 lbs /136 kg. If using this product in conjunction with other equipment, please read and follow all of the manufacturer’s instructions for that equipment as well. If not available, please contact the manufacturer for proper instructions. For Harbinger products you can visit our website www.HarbingerFitness.com for more information.
© 2018 Implus Footcare, LLC
P U S H U P S P O R T
D E F I N E Y O U R P U S H - U P W O R K O U T S
Step 1: Using the Harbinger® PushUp Sport, perform as many push-ups as you can using good form and without stopping. This number is your One Set Max.
Step 2: Find the number closest to your Max in the first column of this chart. Use the second column for the number of reps to complete in your workout.
Step 3: Challenge yourself by following the Harbinger PushUp Power 10 Workout calender.
NOTE: Customize your Power 10 Workout schedule by picking the workouts that best address the muscles you want to strengthen.
WARNING: Sport training can result in serious or fatal injury. Risk of injury can be lessened when safe techniques and common sense are practiced. Do not exercise without proper instruction or supervision, or without first consulting your physician. Always check equipment for worn or damaged parts before using. If any defects are found do not use this product.
MAX1020304050
8, 6, 414, 10, 620, 12, 826, 14, 1030, 16, 12
SETS/REPS
DAY 1
2 Workouts
DAY 8
OFF
DAY 15
5 Workouts
DAY 3
3 Workouts
DAY 10
OFF
DAY 17
5 Workouts
DAY 5
3 Workouts
DAY 12
OFF
DAY 19
5 Workouts
DAY 2
OFF
DAY 9
4 Workouts
DAY 16
OFF
DAY 4
OFF
DAY 11
4 Workouts
DAY 18
OFF
DAY 6
OFF
DAY 13
4 Workouts
DAY 20
OFF
DAY 7
3 Workouts
DAY 14
OFF
DAY 21
Re-test your 1 Set Max
Q U I C K S T A R T S C H E D U L E
© 2018 Implus Footcare, LLC

PUSH-UP WORKOUTSD E F I N E Y O U R W O R K O U T S
C H E C K L I S T
I N C R E A S E Y O U R P U S H - U P M A X I N 2 1 D A Y S
2 - M I N U T E D R I L L S
Step 1: Using the Harbinger® PushUp Sport, perform as many Regular Position push-ups as you can using good form and without stopping. This number is your 1 Set Max.
Step 2: In the 2-Minute Drills chart to the right, find the number closest to your 1 Set Max in the first column. Use that row for the number of repetitions in your workout. For example, if your Max is 12, use the 10 row. If it’s 17, then use the 20 row. If it’s 15, go up or down depending on how well you maintained form doing your 1 Set Max.
Step 3: Start by using the 2-Minute Drills chart. For example, if your Regular Position workout is “8, 6, 4” this means you perform 8 regular push-ups, rest, perform 6, rest, and finish with 4 (all within 2 minutes). At your own pace throughout the day, perform 2-Minute Drills to complete the Wide and Close Position push-ups. See the chart below as an example of how to establish a long term routine.
Note: If you struggle to complete the workouts, use the Knee Modification until you build up enough strength to perform them completely without kneeling. If the workouts are too easy, add some Chair Modifications. Re-test your 1 Set Max after every 21 days and move up the workout chart.
Head: Neutral position, keep your ears in line with your shoulders and spineBack: Straight, keep your lower back flatArms: As you lower your chest, your upper arms should be parallel to floorAbs: Contract your abs and pull your navel toward spineLegs: Straight, your knees should be in line with your hipsPace: 2 seconds per push-up (1 second down, 1 second up)Breathe: Inhale on the way down, exhale on the way up
Note: The sample push-up schedule above is meant to supplement physical training and is not meant as a replacement for a well-rounded workout routine. Please exercise caution when integrating push-ups into your existing training program and listen to your body. If there is pain, do not proceed. As with any balanced training regimen, be sure to integrate total body resistance training, cardiovascular and flexibility sessions into your workouts.
*Use Knee Modification
1 SET MAX REGULAR WIDE CLOSE
0
10
20
30
40
50
4, 3, 2, 1*
8, 6, 4
14, 10, 6
22, 14, 8
26, 14, 8
30, 16, 8
4, 3, 2, 1*
8, 6, 4
14, 10, 6
22, 14, 8
26, 14, 8
30, 16, 8
4, 3, 2, 1*
8, 6, 4
14, 10, 6
22, 14, 8
26, 14, 8
30, 16, 8
Fitness training can result in serious personal injury or death if not done safely and properly. Risk of serious injury or death can be reduced if safe techniques and common sense are practiced when using this equipment. You should not exercise without first consulting your physician and should never do so without proper instruction or supervision. Prior to exercising with this equipment, please check it for worn or damaged parts. If wear or damage is found, stop using the equipment until the wear or damage has been remedied or the equipment has been replaced. Do not use if you weigh over 300 lbs /136 kg. If using this product in conjunction with other equipment, please read and follow all of the manufacturer’s instructions for that equipment as well. If not available, please contact the manufacturer for proper instructions. For Harbinger products you can visit our website www.HarbingerFitness.com for more information.
Day 1: Test your 1 Set Max doing Regular Position push-ups. Add the 2-Minute Drills for Wide and Close Position push-ups.
Day 2-7: Complete 2- Minute Drills for Regular, Wide, and Close Position push-ups at various intervals throughout the day.
Day 8-20: Increase your sets and add variety. See example push-up schedule below.
Day 21: Re-test your 1 Set Max and start your 21-day Workout Schedule again.
Note: Perform your 2-Minute Drills at your own pace during the day. We recommend warming up before performing any workout. Perform the drills 1-4 times per week, incorporating them into your overall training schedule. Never do more than your body can comfortably accomplish.
DAY 11 Regular
1 Wide1 Close
DAY 8OFF
DAY 152 Regular Chair
1 Wide1 Close
DAY 31 Regular
1 Wide1 Close
DAY 10OFF
DAY 172 Regular Chair
1 Wide Chair1 Close Chair
DAY 51 Regular
1 Wide1 Close
DAY 12OFF
DAY 192 Regular Chair
1 Wide1 Close
DAY 72 Regular
1 Wide1 Close
DAY 14OFF
DAY 21Re-test your 1 Set Max
DAY 2OFF
DAY 92 Regular
1 Wide1 Close
DAY 16OFF
DAY 4OFF
DAY 111 Regular Chair
1 Regular1 Wide1 Close
DAY 18OFF
DAY 6OFF
DAY 131 Regular Chair
1 Regular1 Wide1 Close
DAY 20OFF
© 2018 Implus Footcare, LLC
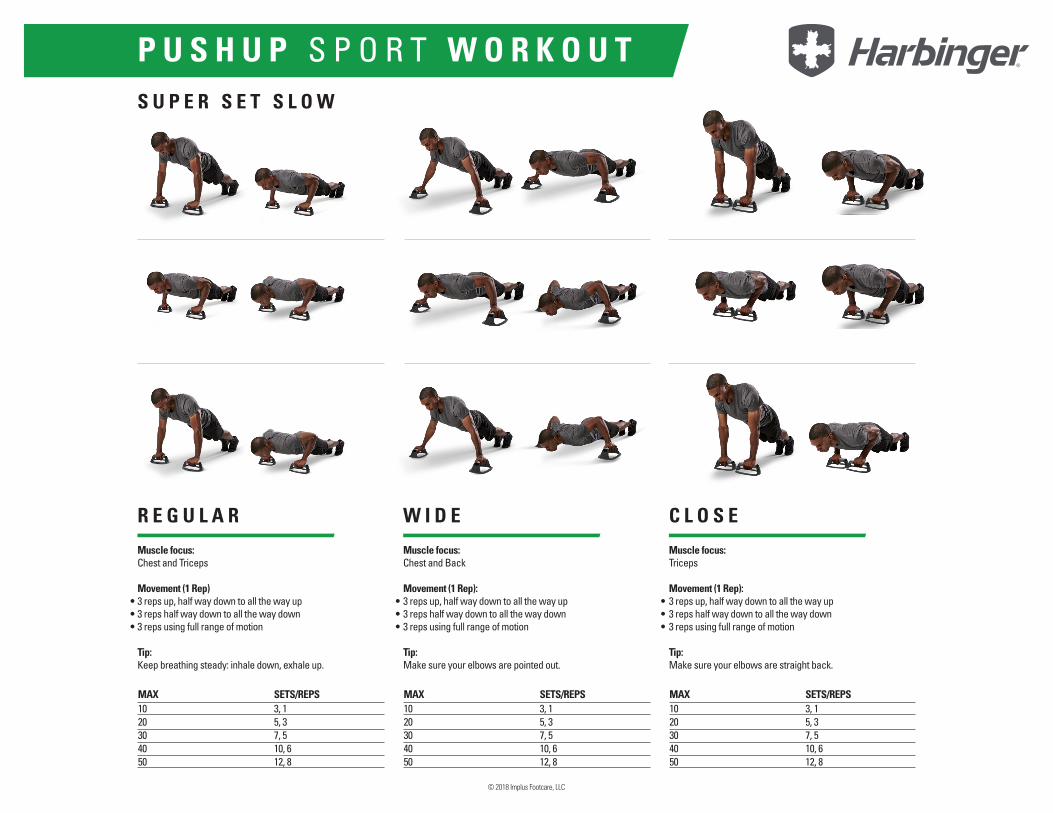
P U S H U P S P O R T W O R K O U T
MAX MAX MAX1020304050
1020304050
1020304050
3, 15, 37, 510, 612, 8
3, 15, 37, 510, 612, 8
3, 15, 37, 510, 612, 8
SETS/REPS SETS/REPS SETS/REPS
R E G U L A R W I D E C L O S E
S U P E R S E T S L O W
Muscle focus: Chest and Triceps
Movement (1 Rep) 3 reps up, half way down to all the way up3 reps half way down to all the way down3 reps using full range of motion
Tip: Keep breathing steady: inhale down, exhale up.
•••
•••
•••
Muscle focus: Chest and Back
Movement (1 Rep):3 reps up, half way down to all the way up3 reps half way down to all the way down3 reps using full range of motion
Tip: Make sure your elbows are pointed out.
Muscle focus: Triceps
Movement (1 Rep):3 reps up, half way down to all the way up3 reps half way down to all the way down3 reps using full range of motion
Tip: Make sure your elbows are straight back.
© 2018 Implus Footcare, LLC
P U S H U P S P O R T W O R K O U T
MAX MAXMAX
1020304050
1020304050
1020304050
10, 10, 1015, 15, 1520, 20, 2025, 25, 2530, 30, 30
3, 15, 37, 510, 612, 8
510152025
SETS/REPS SETS/REPSSETS/REPS
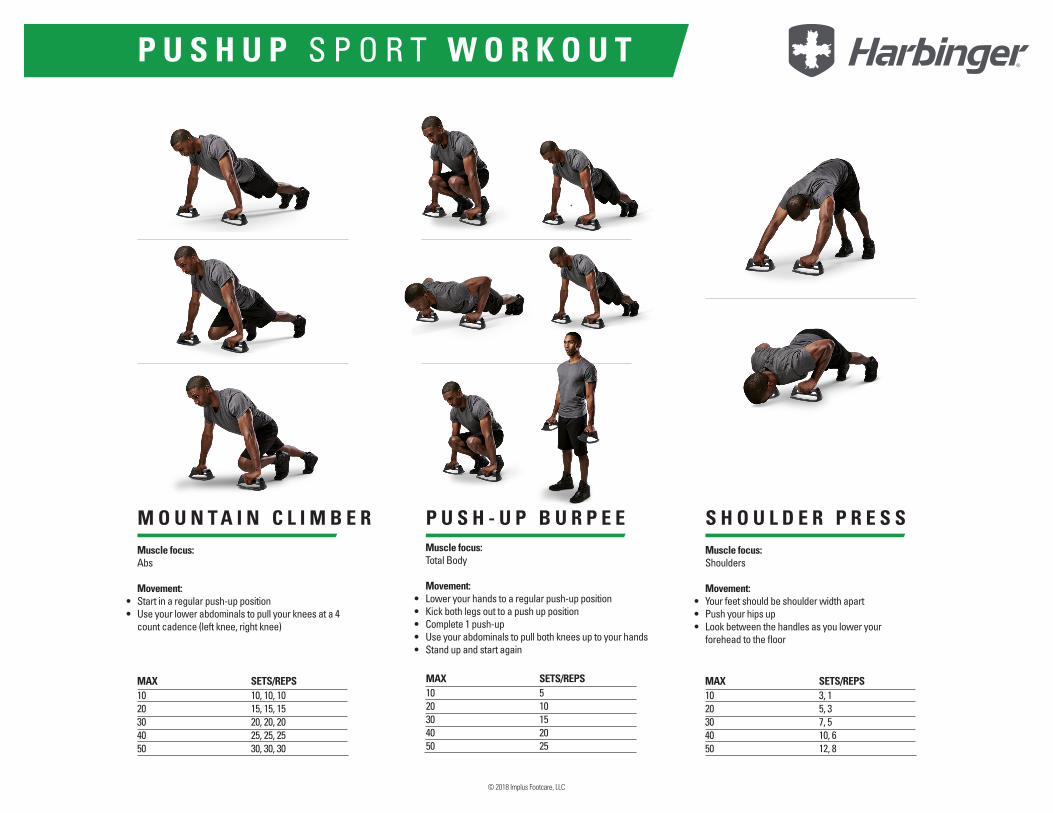
M O U N T A I N C L I M B E R S H O U L D E R P R E S SP U S H - U P B U R P E EMuscle focus: Abs
Movement: Start in a regular push-up positionUse your lower abdominals to pull your knees at a 4 count cadence (left knee, right knee)
Muscle focus: Shoulders
Movement:Your feet should be shoulder width apartPush your hips upLook between the handles as you lower your forehead to the floor
••
•••
•••••
Muscle focus: Total Body
Movement:Lower your hands to a regular push-up positionKick both legs out to a push up positionComplete 1 push-upUse your abdominals to pull both knees up to your handsStand up and start again
© 2018 Implus Footcare, LLC