Embed Size (px)
Citation preview
1 0 / 3 0 / 2 0 1 3 P a g e 1 o f 7
© Copyright 2004-‐2013 Hospitality 101, Inc. All rights reserved. This document may not be copied in part or full without express written permission from Hospitality 101, Inc. All violations will be prosecuted to the fullest extent of the law.
QSG: Customer Complete Overview
Overview Welcome to an easier, more effective way to manage catering! This guide will quickly get you up, running, and placing orders. It covers how to:
• Create an Account • Check Out • Create an Online Wallet • Manage Your Orders • Log In • Reset Your Password • Create an Order
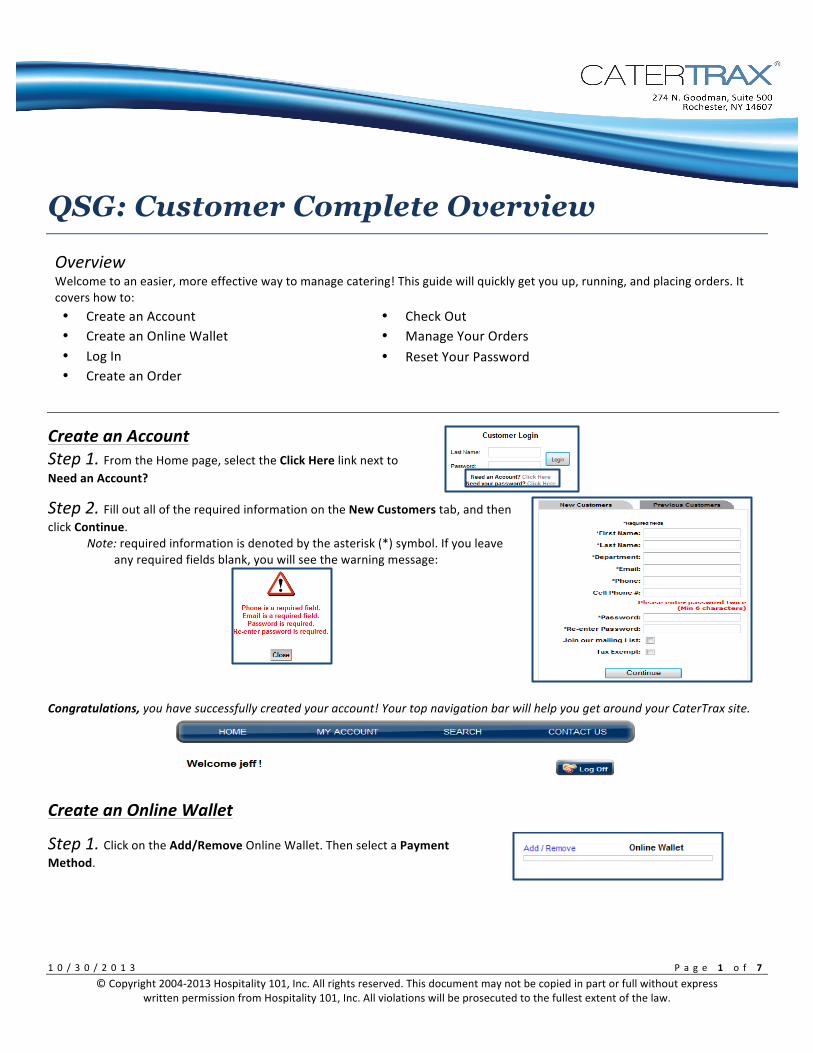
Create an Account Step 1. From the Home page, select the Click Here link next to Need an Account?
Step 2. Fill out all of the required information on the New Customers tab, and then click Continue. Note: required information is denoted by the asterisk (*) symbol. If you leave any required fields blank, you will see the warning message:
Congratulations, you have successfully created your account! Your top navigation bar will help you get around your CaterTrax site.
Create an Online Wallet
Step 1. Click on the Add/Remove Online Wallet. Then select a Payment Method.
QSG: Customer Complete Overview
1 0 / 3 0 / 2 0 1 3 P a g e 2 o f 7
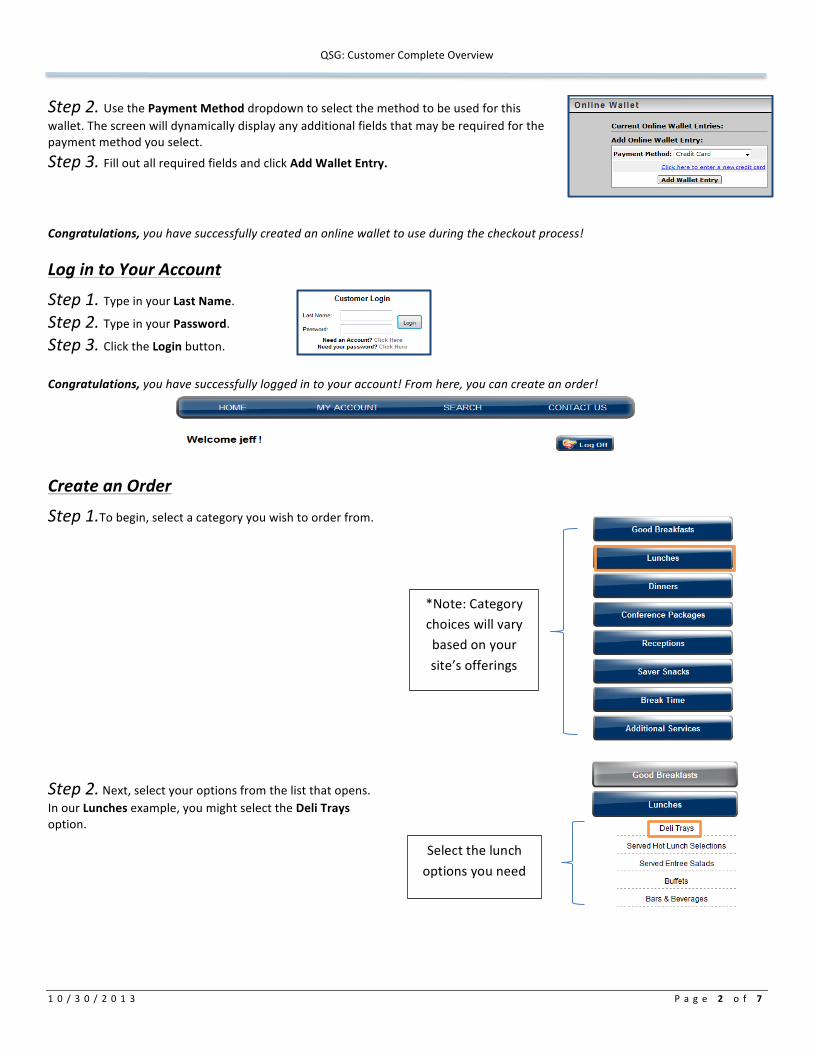
Step 2. Use the Payment Method dropdown to select the method to be used for this wallet. The screen will dynamically display any additional fields that may be required for the payment method you select.
Step 3. Fill out all required fields and click Add Wallet Entry.
Congratulations, you have successfully created an online wallet to use during the checkout process!
Log in to Your Account
Step 1. Type in your Last Name.
Step 2. Type in your Password. Step 3. Click the Login button.
Congratulations, you have successfully logged in to your account! From here, you can create an order!
Create an Order
Step 1.To begin, select a category you wish to order from.
Step 2. Next, select your options from the list that opens. In our Lunches example, you might select the Deli Trays option.
*Note: Category choices will vary based on your
site’s offerings
Select the lunch
options you need
QSG: Customer Complete Overview
1 0 / 3 0 / 2 0 1 3 P a g e 3 o f 7
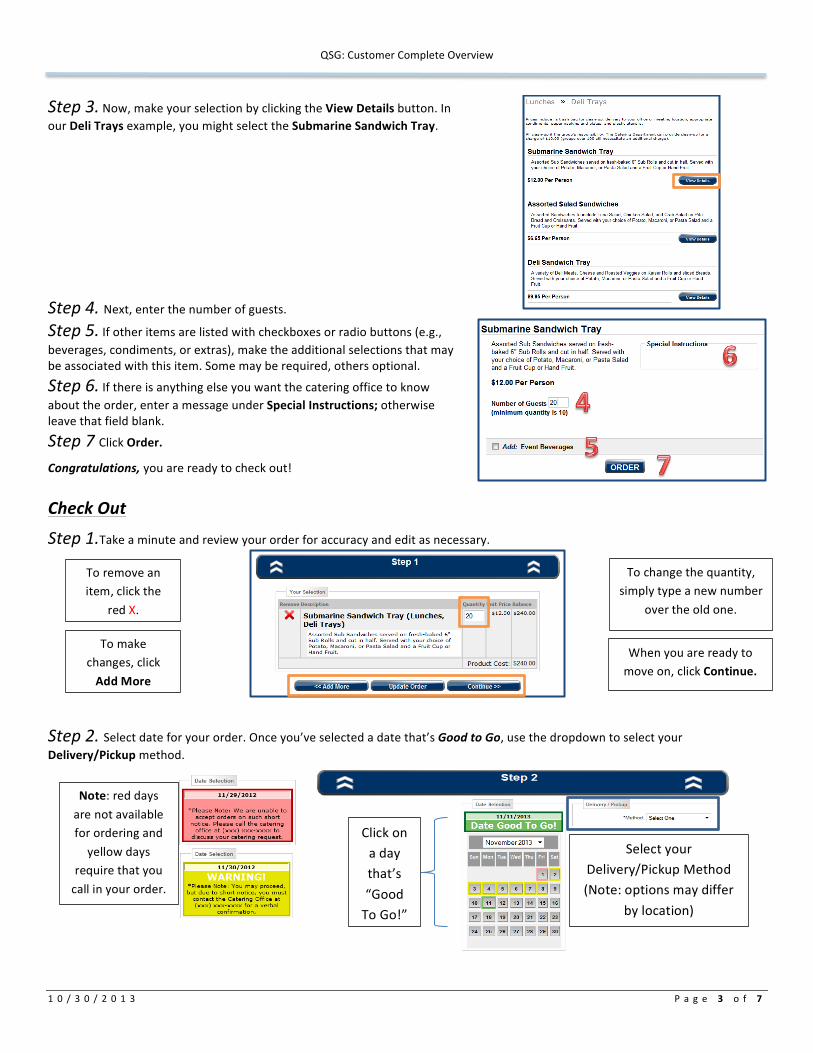
Step 3. Now, make your selection by clicking the View Details button. In our Deli Trays example, you might select the Submarine Sandwich Tray.
Step 4. Next, enter the number of guests.
Step 5. If other items are listed with checkboxes or radio buttons (e.g., beverages, condiments, or extras), make the additional selections that may be associated with this item. Some may be required, others optional.
Step 6. If there is anything else you want the catering office to know about the order, enter a message under Special Instructions; otherwise leave that field blank.
Step 7 Click Order. Congratulations, you are ready to check out!
Check Out
Step 1.Take a minute and review your order for accuracy and edit as necessary.
Step 2. Select date for your order. Once you’ve selected a date that’s Good to Go, use the dropdown to select your Delivery/Pickup method.
To make changes, click
Add More
To remove an item, click the
red X.
When you are ready to move on, click Continue.
To change the quantity, simply type a new number
over the old one.
Click on a day that’s
“Good To Go!”
Note: red days
are not available for ordering and
yellow days require that you
call in your order.
Select your Delivery/Pickup Method (Note: options may differ
by location)
QSG: Customer Complete Overview
1 0 / 3 0 / 2 0 1 3 P a g e 4 o f 7
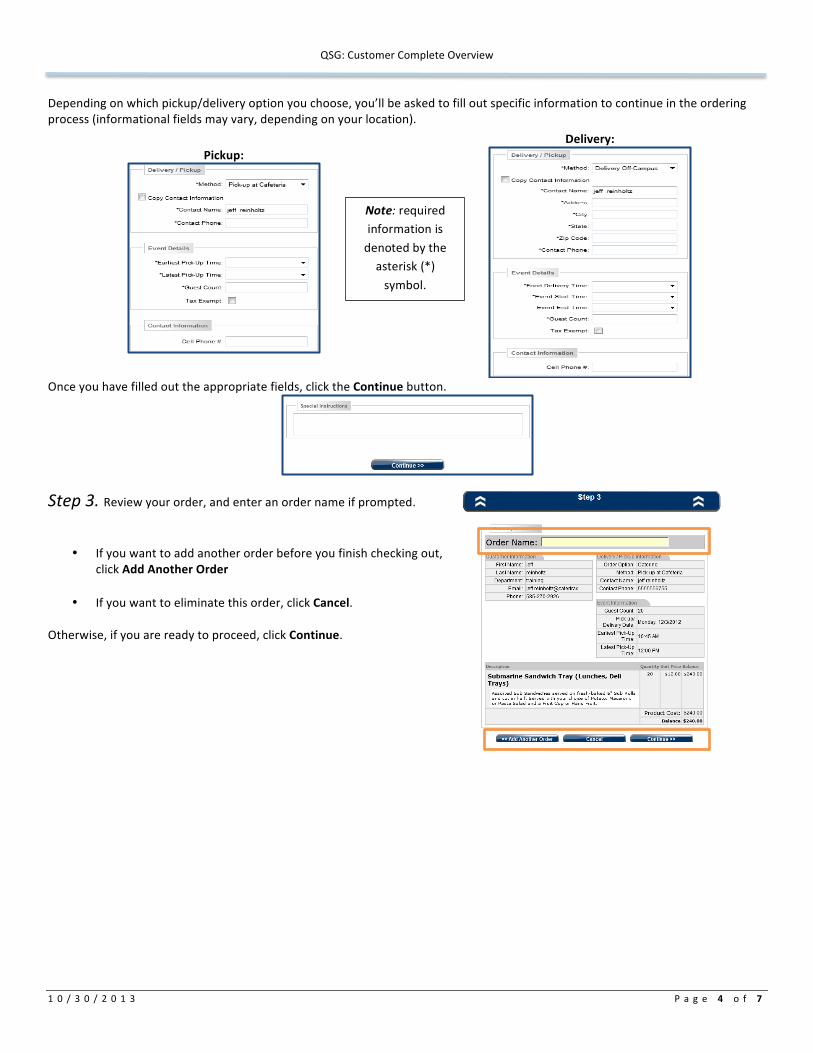
Depending on which pickup/delivery option you choose, you’ll be asked to fill out specific information to continue in the ordering process (informational fields may vary, depending on your location).
Pickup:
Delivery:
Once you have filled out the appropriate fields, click the Continue button.
Step 3. Review your order, and enter an order name if prompted.
• If you want to add another order before you finish checking out, click Add Another Order
• If you want to eliminate this order, click Cancel.
Otherwise, if you are ready to proceed, click Continue.
Note: required information is
denoted by the asterisk (*)
symbol.

QSG: Customer Complete Overview
1 0 / 3 0 / 2 0 1 3 P a g e 5 o f 7
Step 4. Select your payment method from the drop down.
Complete all of the required information (informational fields will vary, depending on your location and payment method), then click Process This Order.
Manage Orders and Request Changes
Step 1. After you log in to your account, click My Account on the home page.
Step 2. Next click on the Manage Orders button.
The Manage Orders page gives you an overview of your orders and access to all of the actions you can take related to the orders.
Step 3. Click to view previous orders, repeat an order, or request changes. You can also select a date range and click Search to find an order you placed during that timeframe.
Note: if the deadline for requesting changes has
passed, the Change icon will not appear by the order Repeat an order
Request a change
View an order
Search by date
QSG: Customer Complete Overview
1 0 / 3 0 / 2 0 1 3 P a g e 6 o f 7
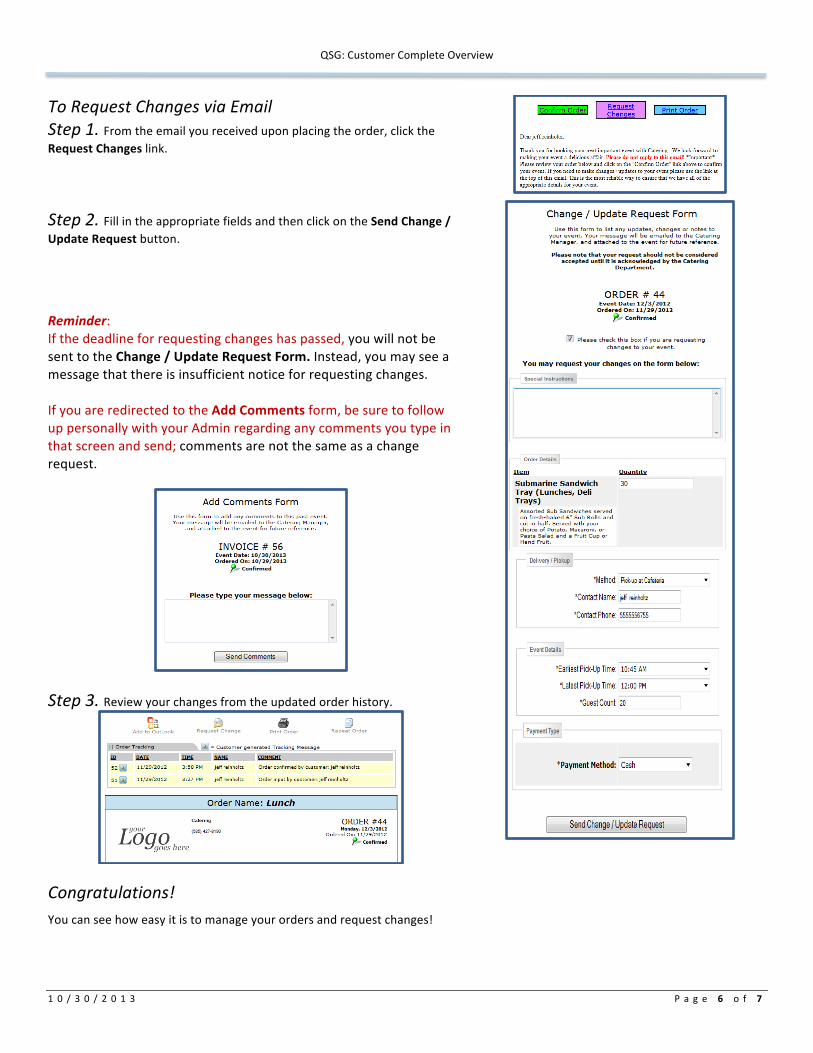
To Request Changes via Email Step 1. From the email you received upon placing the order, click the Request Changes link.
Step 2. Fill in the appropriate fields and then click on the Send Change / Update Request button. Reminder: If the deadline for requesting changes has passed, you will not be sent to the Change / Update Request Form. Instead, you may see a message that there is insufficient notice for requesting changes. If you are redirected to the Add Comments form, be sure to follow up personally with your Admin regarding any comments you type in that screen and send; comments are not the same as a change request.
Step 3. Review your changes from the updated order history.
Congratulations! You can see how easy it is to manage your orders and request changes!
QSG: Customer Complete Overview
1 0 / 3 0 / 2 0 1 3 P a g e 7 o f 7
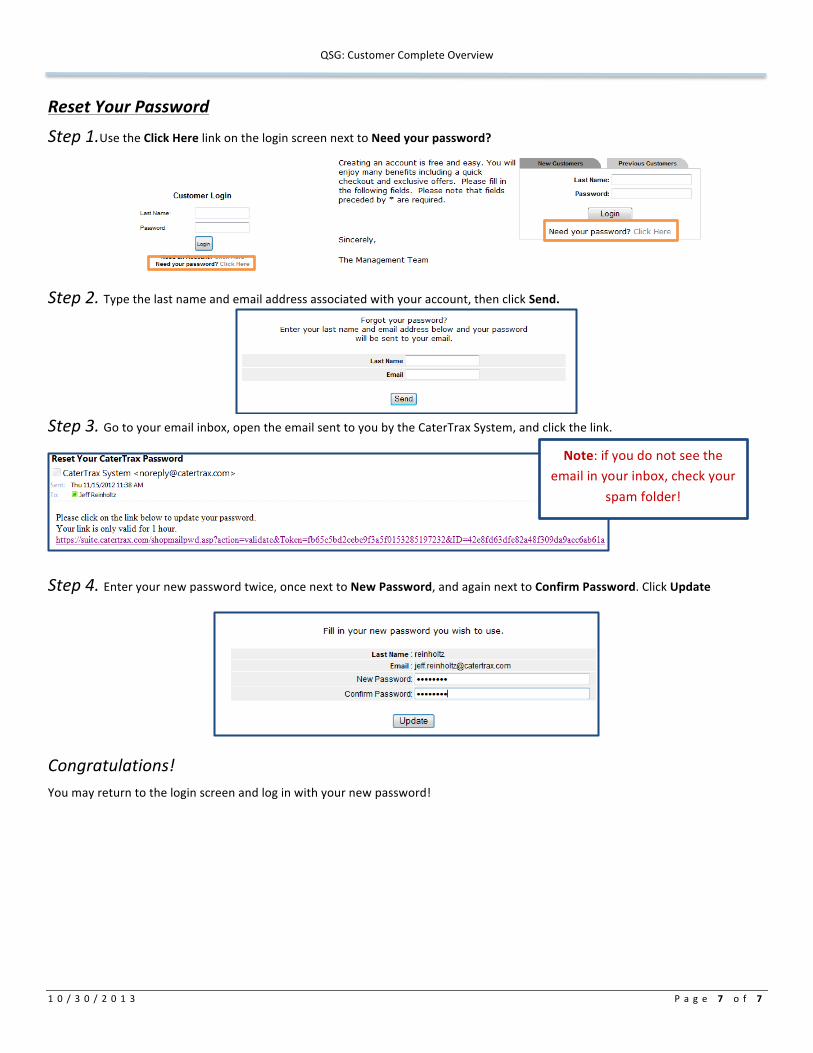
Reset Your Password
Step 1.Use the Click Here link on the login screen next to Need your password?
Step 2. Type the last name and email address associated with your account, then click Send.
Step 3. Go to your email inbox, open the email sent to you by the CaterTrax System, and click the link.
Step 4. Enter your new password twice, once next to New Password, and again next to Confirm Password. Click Update
Congratulations! You may return to the login screen and log in with your new password!
Note: if you do not see the email in your inbox, check your
spam folder!