Embed Size (px)
DESCRIPTION
Processing Point - uAttend - Product ManualCB1000 CB2000 BN1500 BN2500
Citation preview

P R O F E S S I O N A L S E R I E S
Table of ConTenTs 1.0 IntroductIon 2
2.0 SettIng up Your uAttend Account 2 2.1 Creating an Account 2 2.2 Adding Departments and Employees 4 2.2.1 Adding Departments 4 2.2.2 Adding Employees 4
3.0 SettIng up And uSIng the cB1000 6 3.1 Mounting Your CB1000 6 3.2 Linking the CB1000 to Your uAttend Account 7 3.3 Overview of the CB1000 8 3.3.1 Using the CB1000 Keypad 8 3.3.2 Using the CB1000 Menus 8
4.0 SettIng up And uSIng the cB2000 10 4.1 Mounting Your CB2000 10 4.2 Linking the CB2000 to Your uAttend Account 11 4.2.1 Connecting via WIFI Router 12 4.2.2 Connecting via LAN Cable 13 4.3 Overview of the CB2000 13 4.3.1 Using the CB2000 Keypad 13 4.3.2 Using the CB2000 Menus 14
5.0 SettIng up And uSIng the Bn1500 15 5.1 Mounting Your BN1500 15 5.2 Linking the BN1500 to Your uAttend Account 16 5.3 Registering Fingerprint Templates 17 5.3.1 Transferring Fingerprint Templates to Other Timeclocks 19 5.4 Overview of the BN1500 19 5.4.1 Using the BN1500 Keypad 20 5.4.2 Using the BN1500 Menus 20
6.0 SettIng up And uSIng the Bn2500 22 6.1 Mounting Your BN2500 22 6.2 Linking the BN2500 to Your uAttend Account 23 6.2.1 Connecting via WIFI Router 24 6.2.2 Connecting via LAN Cable 25 6.3 Registering Fingerprint Templates 25 6.3.1 Transferring Fingerprint Templates to Other Timeclocks 27 6.4 Overview of the BN2500 27 6.4.1 Using the BN2500 Keypad 28 6.4.2 Using the BN2500 Menus 28
7.0 trouBleShootIng 30
8.0 templAte ASSIgnment Sheet 32
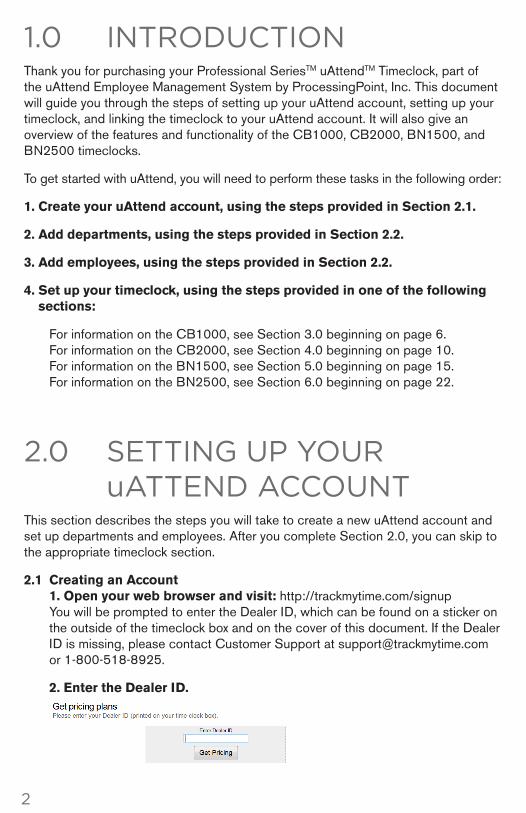
1.0 InTroduCTIonThank you for purchasing your Professional SeriesTM uAttendTM Timeclock, part of the uAttend Employee Management System by ProcessingPoint, Inc. This document will guide you through the steps of setting up your uAttend account, setting up your timeclock, and linking the timeclock to your uAttend account. It will also give an overview of the features and functionality of the CB1000, CB2000, BN1500, and BN2500 timeclocks.
To get started with uAttend, you will need to perform these tasks in the following order:
1. create your uAttend account, using the steps provided in Section 2.1.
2. Add departments, using the steps provided in Section 2.2.
3. Add employees, using the steps provided in Section 2.2.
4. Set up your timeclock, using the steps provided in one of the following sections:
For information on the CB1000, see Section 3.0 beginning on page 6. For information on the CB2000, see Section 4.0 beginning on page 10. For information on the BN1500, see Section 5.0 beginning on page 15. For information on the BN2500, see Section 6.0 beginning on page 22.
2.0 seTTIng up Your uaTTend aCCounTThis section describes the steps you will take to create a new uAttend account and set up departments and employees. After you complete Section 2.0, you can skip to the appropriate timeclock section.
2.1 creating an Account 1. open your web browser and visit: http://trackmytime.com/signup You will be prompted to enter the Dealer ID, which can be found on a sticker on the outside of the timeclock box and on the cover of this document. If the Dealer ID is missing, please contact Customer Support at [email protected] or 1-800-518-8925.
2. enter the dealer Id.
2
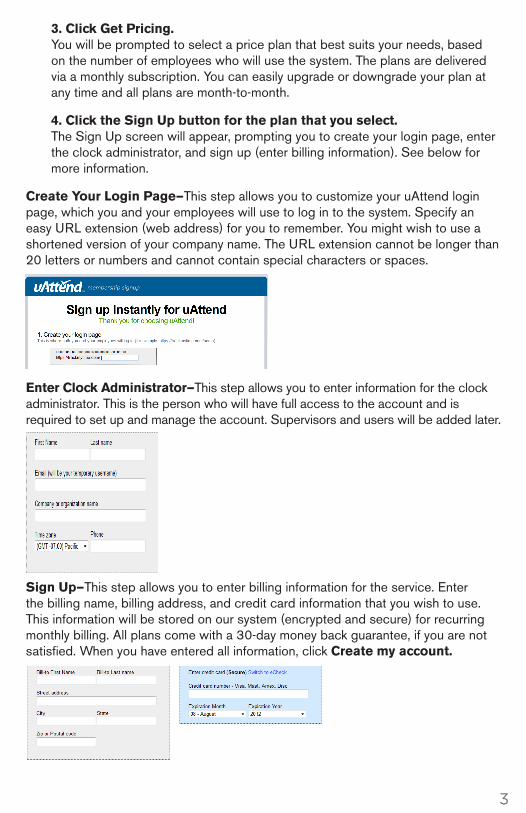
3. click get pricing. You will be prompted to select a price plan that best suits your needs, based on the number of employees who will use the system. The plans are delivered via a monthly subscription. You can easily upgrade or downgrade your plan at any time and all plans are month-to-month.
4. click the Sign up button for the plan that you select. The Sign Up screen will appear, prompting you to create your login page, enter the clock administrator, and sign up (enter billing information). See below for more information.
create Your login page—This step allows you to customize your uAttend login page, which you and your employees will use to log in to the system. Specify an easy URL extension (web address) for you to remember. You might wish to use a shortened version of your company name. The URL extension cannot be longer than 20 letters or numbers and cannot contain special characters or spaces.
enter clock Administrator—This step allows you to enter information for the clock administrator. This is the person who will have full access to the account and is required to set up and manage the account. Supervisors and users will be added later.
Sign up—This step allows you to enter billing information for the service. Enter the billing name, billing address, and credit card information that you wish to use. This information will be stored on our system (encrypted and secure) for recurring monthly billing. All plans come with a 30-day money back guarantee, if you are not satisfied. When you have entered all information, click create my account.
3
Once you have created your account, you will have access to the uAttend Online Help. The link appears as a ? icon and is found in the upper-right corner of the uAttend screen.
2.2 Adding departments and employees After you have created your uAttend account, you will need to set up at least one department and one employee. There is no limit to the number of departments you can set up. However, the number of employees is limited based on the plan you selected. You can upgrade your plan to include more employees by selecting my Account from the drop-down menu in the upper-right corner of the uAttend screen. 2.2.1 Adding departments Follow these steps to add a department to your uAttend account:
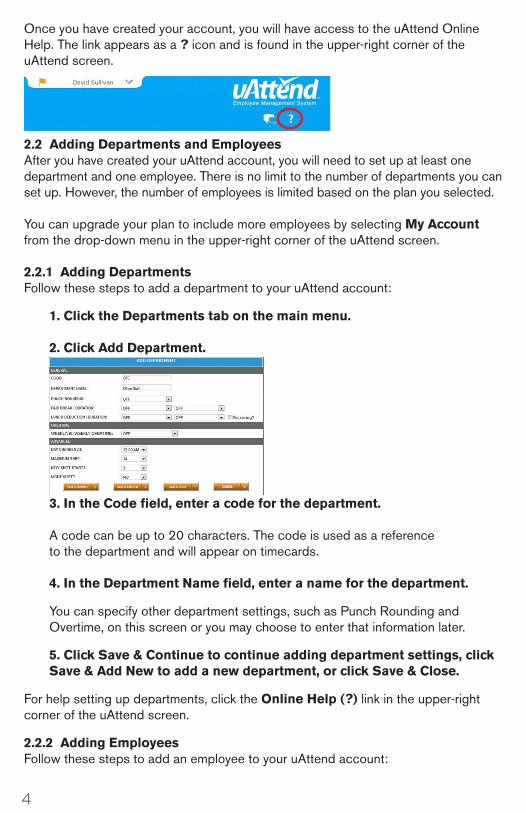
1. click the departments tab on the main menu. 2. click Add department.
3. In the code field, enter a code for the department. A code can be up to 20 characters. The code is used as a reference to the department and will appear on timecards. 4. In the department name field, enter a name for the department.
You can specify other department settings, such as Punch Rounding and Overtime, on this screen or you may choose to enter that information later.
5. click Save & continue to continue adding department settings, click Save & Add new to add a new department, or click Save & close.
For help setting up departments, click the online help (?) link in the upper-right corner of the uAttend screen.
2.2.2 Adding employees Follow these steps to add an employee to your uAttend account:
4
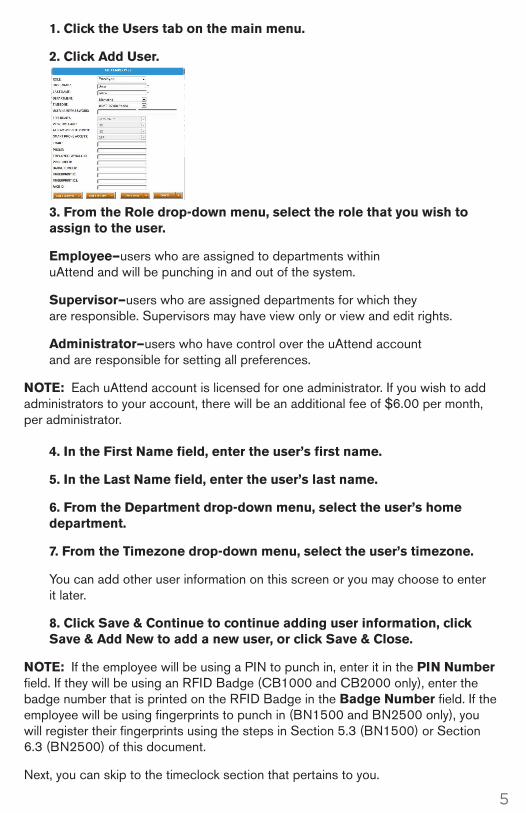
1. click the users tab on the main menu.
2. click Add user.
3. From the role drop-down menu, select the role that you wish to assign to the user.
employee—users who are assigned to departments within uAttend and will be punching in and out of the system.
Supervisor—users who are assigned departments for which they are responsible. Supervisors may have view only or view and edit rights.
Administrator—users who have control over the uAttend account and are responsible for setting all preferences.
note: Each uAttend account is licensed for one administrator. If you wish to add administrators to your account, there will be an additional fee of $6.00 per month, per administrator. 4. In the First name field, enter the user’s first name.
5. In the last name field, enter the user’s last name.
6. From the department drop-down menu, select the user’s home department.
7. From the timezone drop-down menu, select the user’s timezone.
You can add other user information on this screen or you may choose to enter it later.
8. click Save & continue to continue adding user information, click Save & Add new to add a new user, or click Save & close.
note: If the employee will be using a PIN to punch in, enter it in the pIn number field. If they will be using an RFID Badge (CB1000 and CB2000 only), enter the badge number that is printed on the RFID Badge in the Badge number field. If the employee will be using fingerprints to punch in (BN1500 and BN2500 only), you will register their fingerprints using the steps in Section 5.3 (BN1500) or Section 6.3 (BN2500) of this document.
Next, you can skip to the timeclock section that pertains to you.
5
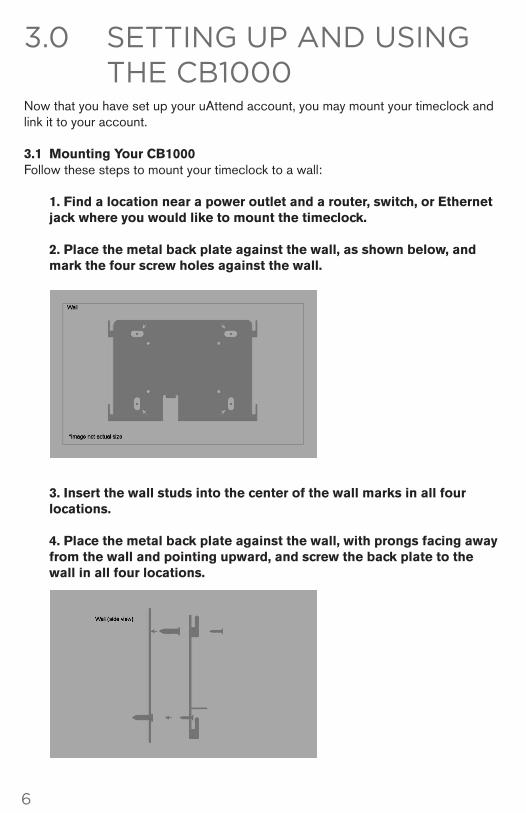
3.0 seTTIng up and usIng The Cb1000Now that you have set up your uAttend account, you may mount your timeclock and link it to your account. 3.1 mounting Your cB1000 Follow these steps to mount your timeclock to a wall: 1. Find a location near a power outlet and a router, switch, or ethernet jack where you would like to mount the timeclock. 2. place the metal back plate against the wall, as shown below, and mark the four screw holes against the wall.
3. Insert the wall studs into the center of the wall marks in all four locations. 4. place the metal back plate against the wall, with prongs facing away from the wall and pointing upward, and screw the back plate to the wall in all four locations.
6

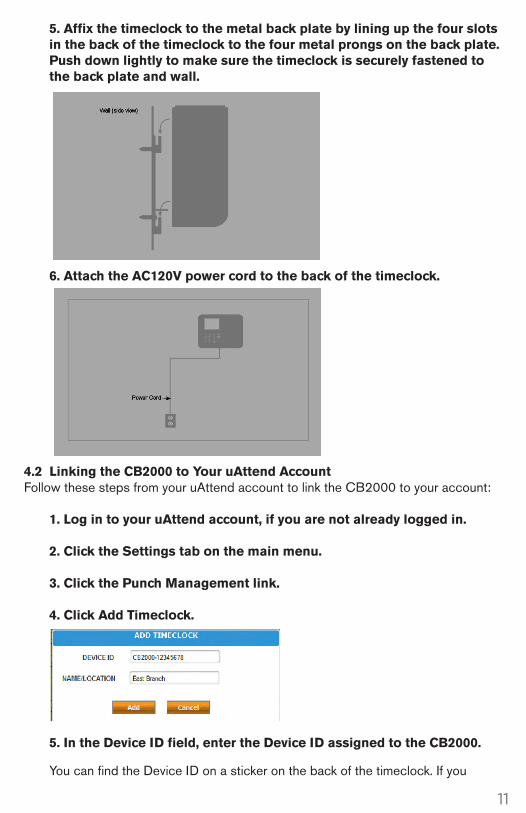
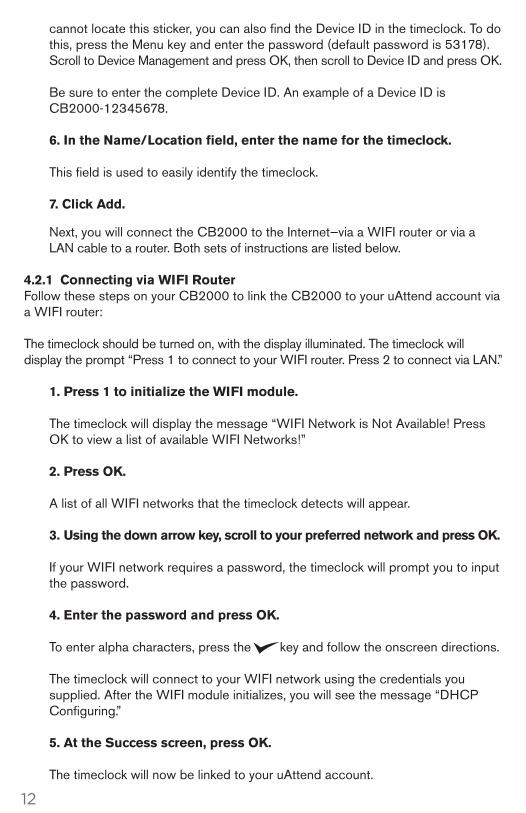
5. Affix the timeclock to the metal back plate by lining up the four slots in the back of the timeclock to the four metal prongs on the back plate. push down lightly to make sure the timeclock is securely fastened to the back plate and wall. 6. Attach the Ac120V power cord to the back of the timeclock.
3.2 linking the cB1000 to Your uAttend Account Follow these steps to link the CB1000 to your uAttend account:
1. Attach an ethernet cable between the timeclock and your router, then plug the timeclock into a power outlet. The timeclock should be turned on, with the display illuminated. 2. log in to your uAttend account, if you are not already logged in. 3. click the Settings tab on the main menu.. 4. click the punch management link. 5. click Add timeclock.
6. In the device Id field, enter the device Id assigned to the cB1000. You can find the Device ID on a sticker on the back of the timeclock. If you cannot locate this sticker, you can also find the Device ID in the timeclock. To do this, press the Menu key and enter the password (default password is 53178). Scroll to Device Management and press OK, then scroll to Device ID and press OK.
Be sure to enter the complete Device ID. An example of a Device ID is CB1000-12345678.
7
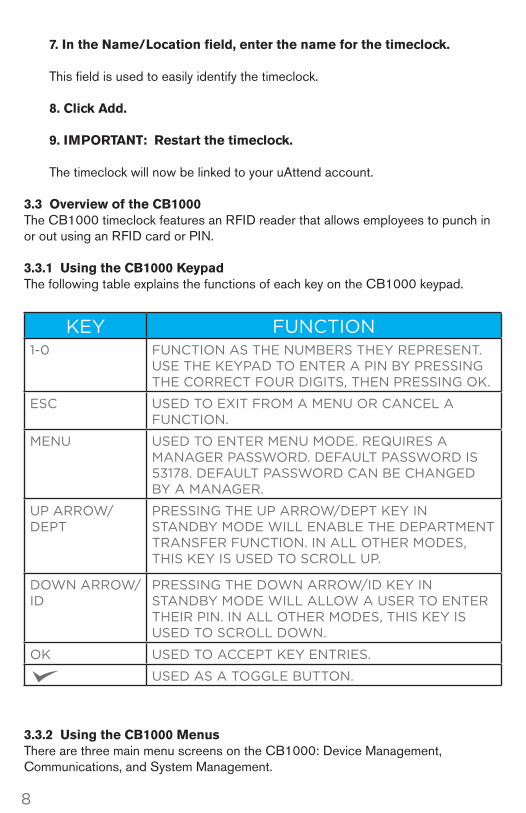
7. In the name/location field, enter the name for the timeclock. This field is used to easily identify the timeclock. 8. click Add. 9. ImportAnt: restart the timeclock. The timeclock will now be linked to your uAttend account. 3.3 overview of the cB1000 The CB1000 timeclock features an RFID reader that allows employees to punch in or out using an RFID card or PIN. 3.3.1 using the cB1000 Keypad The following table explains the functions of each key on the CB1000 keypad.
3.3.2 using the cB1000 menus There are three main menu screens on the CB1000: Device Management, Communications, and System Management.
KEY FUNCTION1-0 funCTIon as The numbers TheY represenT.
use The keYpad To enTer a pIn bY pressIng The CorreCT four dIgITs, Then pressIng ok.
esC used To exIT from a menu or CanCel a funCTIon.
menu used To enTer menu mode. requIres a manager password. defaulT password Is 53178. defaulT password Can be Changed bY a manager.
up arrow/depT
pressIng The up arrow/depT keY In sTandbY mode wIll enable The deparTmenT Transfer funCTIon. In all oTher modes, ThIs keY Is used To sCroll up.
down arrow/Id
pressIng The down arrow/Id keY In sTandbY mode wIll allow a user To enTer TheIr pIn. In all oTher modes, ThIs keY Is used To sCroll down.
ok used To aCCepT keY enTrIes.
used as a Toggle buTTon.
8
9
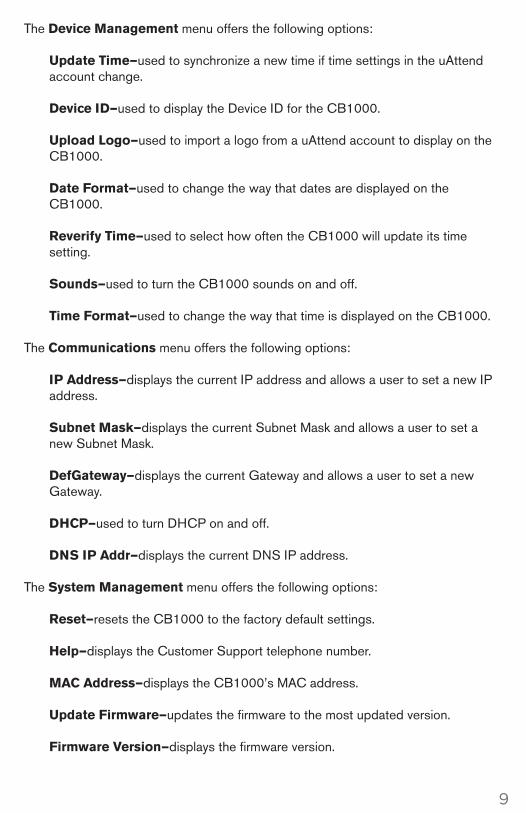
The device management menu offers the following options: update time—used to synchronize a new time if time settings in the uAttend account change. device Id—used to display the Device ID for the CB1000. upload logo—used to import a logo from a uAttend account to display on the CB1000. date Format—used to change the way that dates are displayed on the CB1000. reverify time—used to select how often the CB1000 will update its time setting. Sounds—used to turn the CB1000 sounds on and off. time Format—used to change the way that time is displayed on the CB1000. The communications menu offers the following options: Ip Address—displays the current IP address and allows a user to set a new IP address. Subnet mask—displays the current Subnet Mask and allows a user to set a new Subnet Mask. defgateway—displays the current Gateway and allows a user to set a new Gateway. dhcp—used to turn DHCP on and off. dnS Ip Addr—displays the current DNS IP address. The System management menu offers the following options: reset—resets the CB1000 to the factory default settings. help—displays the Customer Support telephone number. mAc Address—displays the CB1000’s MAC address. update Firmware—updates the firmware to the most updated version. Firmware Version—displays the firmware version.
10
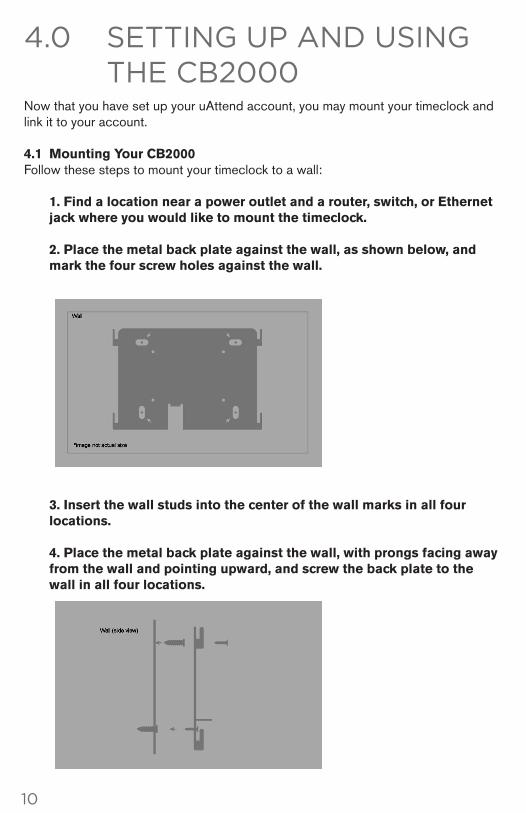
4.0 seTTIng up and usIng The Cb2000Now that you have set up your uAttend account, you may mount your timeclock and link it to your account. 4.1 mounting Your cB2000 Follow these steps to mount your timeclock to a wall: 1. Find a location near a power outlet and a router, switch, or ethernet jack where you would like to mount the timeclock. 2. place the metal back plate against the wall, as shown below, and mark the four screw holes against the wall.
3. Insert the wall studs into the center of the wall marks in all four locations. 4. place the metal back plate against the wall, with prongs facing away from the wall and pointing upward, and screw the back plate to the wall in all four locations.
11
5. Affix the timeclock to the metal back plate by lining up the four slots in the back of the timeclock to the four metal prongs on the back plate. push down lightly to make sure the timeclock is securely fastened to the back plate and wall.
6. Attach the Ac120V power cord to the back of the timeclock.
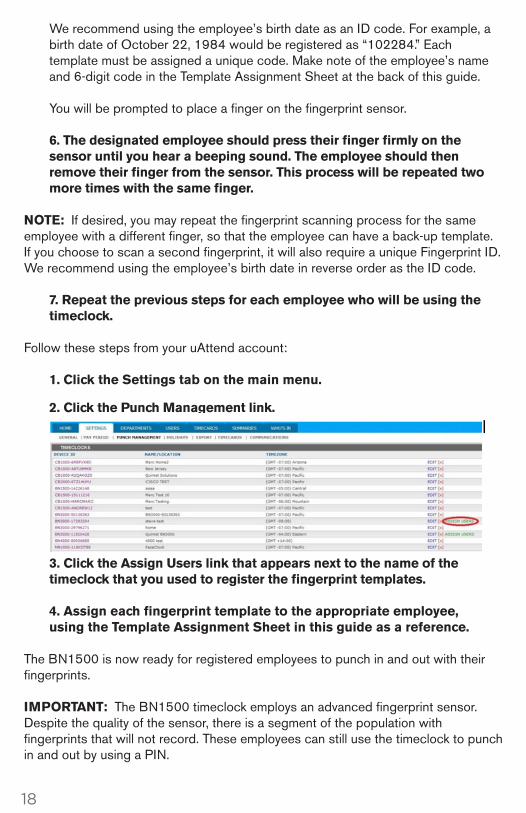
4.2 linking the cB2000 to Your uAttend Account Follow these steps from your uAttend account to link the CB2000 to your account: 1. log in to your uAttend account, if you are not already logged in. 2. click the Settings tab on the main menu. 3. click the punch management link. 4. click Add timeclock.
5. In the device Id field, enter the device Id assigned to the cB2000.
You can find the Device ID on a sticker on the back of the timeclock. If you
12
cannot locate this sticker, you can also find the Device ID in the timeclock. To do this, press the Menu key and enter the password (default password is 53178). Scroll to Device Management and press OK, then scroll to Device ID and press OK. Be sure to enter the complete Device ID. An example of a Device ID is CB2000-12345678. 6. In the name/location field, enter the name for the timeclock. This field is used to easily identify the timeclock. 7. click Add.
Next, you will connect the CB2000 to the Internet—via a WIFI router or via a LAN cable to a router. Both sets of instructions are listed below. 4.2.1 connecting via WIFI router Follow these steps on your CB2000 to link the CB2000 to your uAttend account via a WIFI router: The timeclock should be turned on, with the display illuminated. The timeclock will display the prompt “Press 1 to connect to your WIFI router. Press 2 to connect via LAN.” 1. press 1 to initialize the WIFI module. The timeclock will display the message “WIFI Network is Not Available! Press OK to view a list of available WIFI Networks!” 2. press oK. A list of all WIFI networks that the timeclock detects will appear. 3. using the down arrow key, scroll to your preferred network and press oK. If your WIFI network requires a password, the timeclock will prompt you to input the password. 4. enter the password and press oK. To enter alpha characters, press the key and follow the onscreen directions. The timeclock will connect to your WIFI network using the credentials you supplied. After the WIFI module initializes, you will see the message “DHCP Configuring.” 5. At the Success screen, press oK. The timeclock will now be linked to your uAttend account.

13
4.2.2 connecting via lAn cable Follow these steps on your CB2000 to link the CB2000 to your uAttend account via a LAN cable to a router: The timeclock should be turned on, with the display illuminated. The timeclock will display the prompt “Press 1 to connect to your WIFI router. Press 2 to connect via LAN.” 1. press 2 to connect via lAn. 2. the timeclock will display the message “dhcp configuring.” 3. After successfully connecting to your network, the timeclock will display the “System ready” message in the upper-left corner of the main screen. The timeclock will now be linked to your uAttend account. 4.3 overview of the cB2000 The CB2000 timeclock features an RFID reader that allows employees to punch in or out using an RFID card or PIN. 4.3.1 using the cB2000 Keypad The following table explains the functions of each key on the CB2000 keypad.
KEY FUNCTION1-0 funCTIon as The numbers TheY represenT.
use The keYpad To enTer a pIn bY pressIng The CorreCT four dIgITs, Then pressIng ok.
esC used To exIT from a menu or CanCel a funCTIon.
menu used To enTer menu mode. requIres a manager password. defaulT password Is 53178. defaulT password Can be Changed bY a manager.
up arrow/depT pressIng The up arrow/depT keY In sTandbY mode wIll enable The deparTmenT Transfer funCTIon. In all oTher modes, ThIs keY Is used To sCroll up.
down arrow/Id
pressIng The down arrow/Id keY In sTandbY mode wIll allow a user To enTer TheIr pIn. In all oTher modes, ThIs keY Is used To sCroll down.
ok used To aCCepT keY enTrIes.
used To swITCh beTween alpha and numerIC durIng wIfI password enTrY and Is oTherwIse used as a Toggle buTTon.

14
4.3.2 using the cB2000 menus There are three main menu screens on the CB2000: Device Management, Communications, and System Management. The device management menu offers the following options: update time—used to synchronize a new time if time settings in the uAttend account change. device Id—used to display the Device ID for the CB2000. upload logo—used to import a logo from a uAttend account to display on the CB2000. date Format—used to change the way that dates are displayed on the CB2000. reverify time—used to select how often the CB2000 will update its time setting. Sounds—used to turn the CB2000 sounds on and off. time Format—used to change the way that time is displayed on the CB2000. change mgr password—used to change the default manager password. The communications menu offers the following options: Set Ip—allows a user to set a static IP address in the CB2000. Turn off DHCP before setting a static IP. dhcp—used to turn DHCP on and off. network Settings—displays the CB2000 network settings. delete WIFI Settings—used to clear out the WIFI settings in the CB2000. View WIFI Settings—displays the network to which the CB2000 is connected. communicating Interface—allows users to select LAN or WIFI interface. The System management menu offers the following options: reset—resets the CB2000 to the factory default settings. help—displays the Customer Support telephone number. mAc Address—displays the CB2000’s MAC address. update Firmware—updates the firmware to the most updated version. Firmware Version—displays the firmware version.

15
5.0 seTTIng up and usIng The bn1500Now that you have set up your uAttend account, you may mount your timeclock and link it to your account. 5.1 mounting Your Bn1500 Follow these steps to mount your timeclock to a wall: 1. Find a location near a power outlet and a router, switch, or ethernet jack where you would like to mount the timeclock. 2. place the metal back plate against the wall, as shown below, and mark the four screw holes against the wall.
3. Insert the wall studs into the center of the wall marks in all four locations. 4. place the metal back plate against the wall, with prongs facing away from the wall and pointing upward, and screw the back plate to the wall in all four locations.

16
5. Affix the timeclock to the metal back plate by lining up the four slots in the back of the timeclock to the four metal prongs on the back plate. push down lightly to make sure the timeclock is securely fastened to the back plate and wall.
6. Attach the Ac120V power cord to the back of the timeclock.
5.2 linking the Bn1500 to Your uAttend Account Follow these steps to link the BN1500 to your uAttend account: 1. Attach an ethernet cable between the timeclock and your router, then plug the timeclock into a power outlet. The timeclock should be turned on, with the display illuminated. 2. log in to your uAttend account, if you are not already logged in. 3. click the Settings tab on the main menu. 4. click the punch management link.

17
5. click Add timeclock.
6. In the device Id field, enter the device Id assigned to the Bn1500. You can find the Device ID on a sticker on the back of the timeclock. If you cannot locate this sticker, you can also find the Device ID in the timeclock. To do this, press the Menu key and enter the password (default password is 53178). Scroll to Device Management and press OK, then scroll to Device ID and press OK. Be sure to enter the complete Device ID. An example of a Device ID is BN1500-12345678. 7. In the name/location field, enter the name for the timeclock. This field is used to easily identify the timeclock. 8. click Add. 9. ImportAnt: restart the timeclock. The timeclock will now be linked to your uAttend account. 5.3 registering Fingerprint templates If you are using the BN1500, you will register users’ fingerprints for punching in and out. Registering a fingerprint template requires interaction with both the BN1500 and your uAttend account. Follow these steps on your BN1500: 1. press the menu key. 2. enter the default password (53178) if it has not been changed, then press oK. 3. From the timeclock menu, select the first option, user management. 4. Select Add user. The BN1500 will prompt you to enter a 6-digit numeric code for this template. 5. enter an Id code for the fingerprint template and press oK.
18
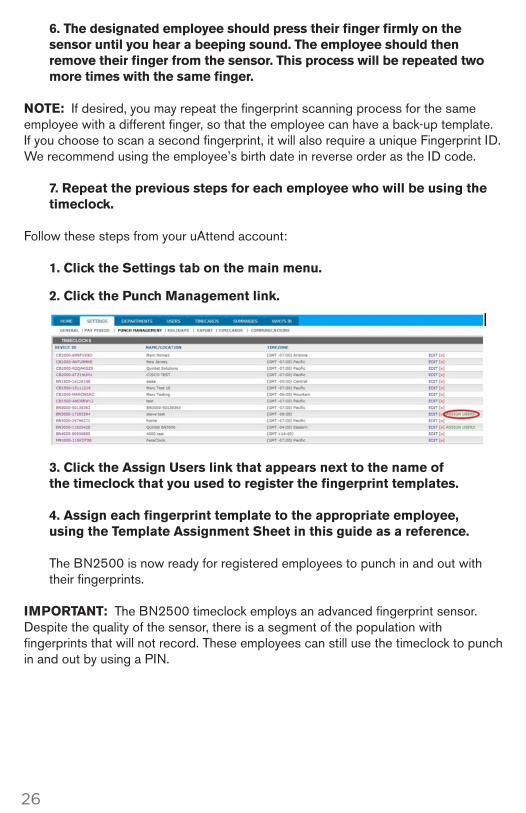
We recommend using the employee’s birth date as an ID code. For example, a birth date of October 22, 1984 would be registered as “102284.” Each template must be assigned a unique code. Make note of the employee’s name and 6-digit code in the Template Assignment Sheet at the back of this guide. You will be prompted to place a finger on the fingerprint sensor. 6. the designated employee should press their finger firmly on the sensor until you hear a beeping sound. the employee should then remove their finger from the sensor. this process will be repeated two more times with the same finger. note: If desired, you may repeat the fingerprint scanning process for the same employee with a different finger, so that the employee can have a back-up template. If you choose to scan a second fingerprint, it will also require a unique Fingerprint ID. We recommend using the employee’s birth date in reverse order as the ID code. 7. repeat the previous steps for each employee who will be using the timeclock. Follow these steps from your uAttend account: 1. click the Settings tab on the main menu.
2. click the punch management link.
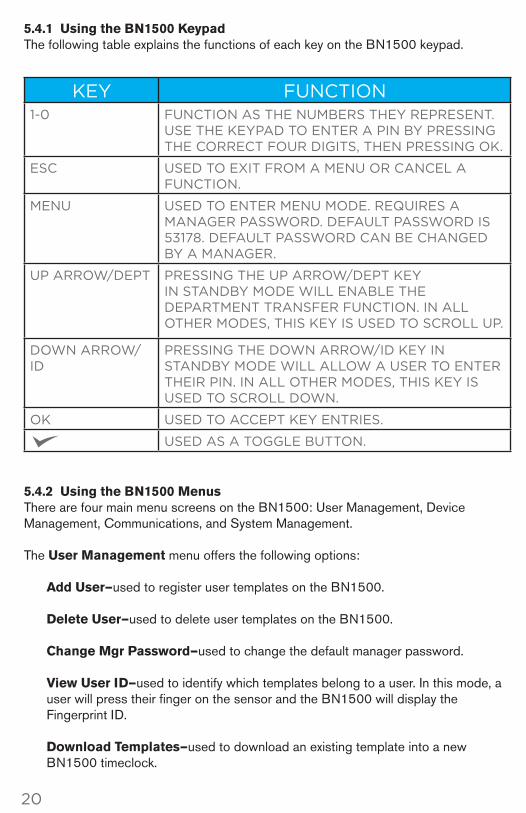
3. click the Assign users link that appears next to the name of the timeclock that you used to register the fingerprint templates. 4. Assign each fingerprint template to the appropriate employee, using the template Assignment Sheet in this guide as a reference. The BN1500 is now ready for registered employees to punch in and out with their fingerprints. ImportAnt: The BN1500 timeclock employs an advanced fingerprint sensor. Despite the quality of the sensor, there is a segment of the population with fingerprints that will not record. These employees can still use the timeclock to punch in and out by using a PIN.

19
5.3.1 transferring Fingerprint templates to other timeclocks Transferring a fingerprint template to additional timeclocks requires interaction with both the BN1500 and your uAttend account. Follow these steps from your uAttend account: 1. click the users tab on the main menu. 2. click manage Fingerprint templates. 3. check all of the fingerprint templates that you wish to transfer to an additional timeclock. 4. use the drop-down menu to select the timeclock(s) to which you wish to transfer the templates. 5. click Submit. Follow these steps on each timeclock that you selected to receive the templates: 1. press the menu key. 2. enter the default password (53178) if it has not been changed, then press oK. The User Management icon will be selected. 3. press oK. 4. Scroll to select download templates, using the down arrow key. 5. press oK. 6. Wait for the templates to download to the timeclock. 7. At the Success screen, press oK.
5.4 overview of the Bn1500 The BN1500 timeclock is a biometric time-recording device that allows employees to punch in or out using a fingerprint or PIN. This timeclock can store 2,000 fingerprint templates.
20
5.4.1 using the Bn1500 Keypad The following table explains the functions of each key on the BN1500 keypad.
5.4.2 using the Bn1500 menus There are four main menu screens on the BN1500: User Management, Device Management, Communications, and System Management. The user management menu offers the following options: Add user—used to register user templates on the BN1500. delete user—used to delete user templates on the BN1500. change mgr password—used to change the default manager password. View user Id—used to identify which templates belong to a user. In this mode, a user will press their finger on the sensor and the BN1500 will display the Fingerprint ID. download templates—used to download an existing template into a new BN1500 timeclock.
KEY FUNCTION1-0 funCTIon as The numbers TheY represenT.
use The keYpad To enTer a pIn bY pressIng The CorreCT four dIgITs, Then pressIng ok.
esC used To exIT from a menu or CanCel a funCTIon.
menu used To enTer menu mode. requIres a manager password. defaulT password Is 53178. defaulT password Can be Changed bY a manager.
up arrow/depT pressIng The up arrow/depT keY In sTandbY mode wIll enable The deparTmenT Transfer funCTIon. In all oTher modes, ThIs keY Is used To sCroll up.
down arrow/Id
pressIng The down arrow/Id keY In sTandbY mode wIll allow a user To enTer TheIr pIn. In all oTher modes, ThIs keY Is used To sCroll down.
ok used To aCCepT keY enTrIes.
used as a Toggle buTTon.
21
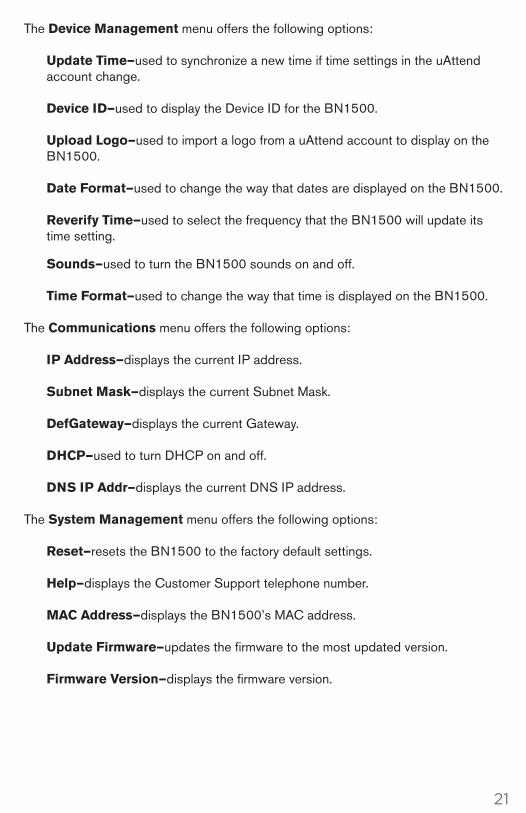
The device management menu offers the following options: update time—used to synchronize a new time if time settings in the uAttend account change. device Id—used to display the Device ID for the BN1500. upload logo—used to import a logo from a uAttend account to display on the BN1500. date Format—used to change the way that dates are displayed on the BN1500. reverify time—used to select the frequency that the BN1500 will update its time setting.
Sounds—used to turn the BN1500 sounds on and off. time Format—used to change the way that time is displayed on the BN1500. The communications menu offers the following options: Ip Address—displays the current IP address. Subnet mask—displays the current Subnet Mask. defgateway—displays the current Gateway. dhcp—used to turn DHCP on and off. dnS Ip Addr—displays the current DNS IP address. The System management menu offers the following options: reset—resets the BN1500 to the factory default settings. help—displays the Customer Support telephone number. mAc Address—displays the BN1500’s MAC address. update Firmware—updates the firmware to the most updated version. Firmware Version—displays the firmware version.
22
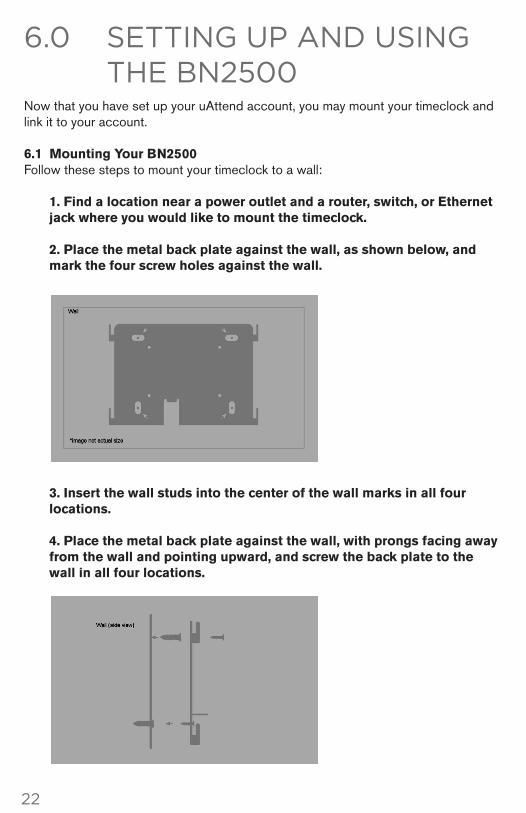
6.0 seTTIng up and usIng The bn2500Now that you have set up your uAttend account, you may mount your timeclock and link it to your account. 6.1 mounting Your Bn2500 Follow these steps to mount your timeclock to a wall: 1. Find a location near a power outlet and a router, switch, or ethernet jack where you would like to mount the timeclock. 2. place the metal back plate against the wall, as shown below, and mark the four screw holes against the wall.
3. Insert the wall studs into the center of the wall marks in all four locations. 4. place the metal back plate against the wall, with prongs facing away from the wall and pointing upward, and screw the back plate to the wall in all four locations.
23
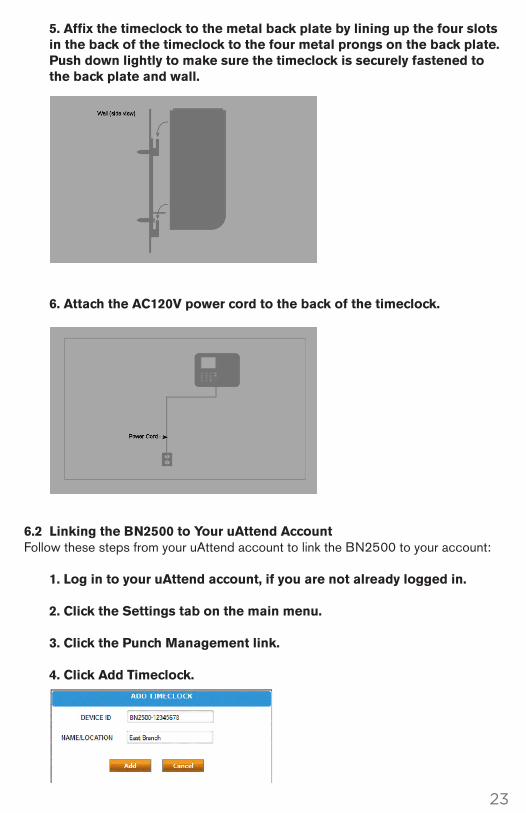
5. Affix the timeclock to the metal back plate by lining up the four slots in the back of the timeclock to the four metal prongs on the back plate. push down lightly to make sure the timeclock is securely fastened to the back plate and wall.
6. Attach the Ac120V power cord to the back of the timeclock.
6.2 linking the Bn2500 to Your uAttend Account Follow these steps from your uAttend account to link the BN2500 to your account: 1. log in to your uAttend account, if you are not already logged in. 2. click the Settings tab on the main menu. 3. click the punch management link. 4. click Add timeclock.
24
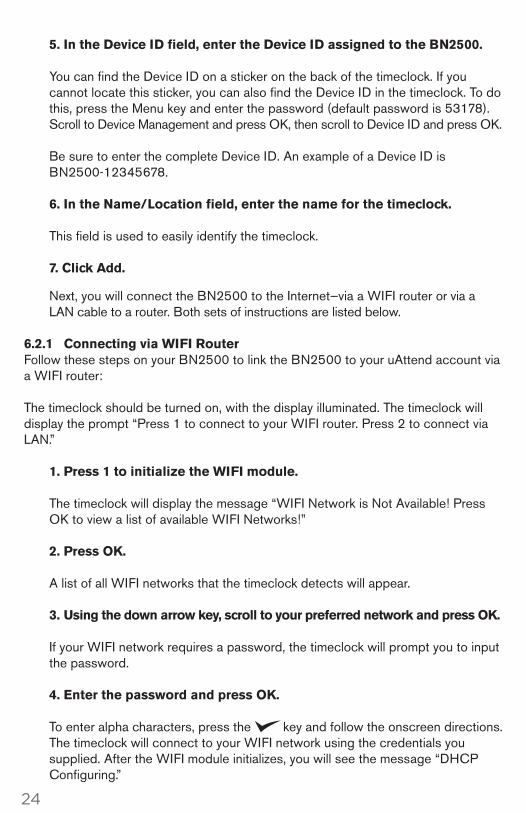
5. In the device Id field, enter the device Id assigned to the Bn2500. You can find the Device ID on a sticker on the back of the timeclock. If you cannot locate this sticker, you can also find the Device ID in the timeclock. To do this, press the Menu key and enter the password (default password is 53178). Scroll to Device Management and press OK, then scroll to Device ID and press OK. Be sure to enter the complete Device ID. An example of a Device ID is BN2500-12345678. 6. In the name/location field, enter the name for the timeclock. This field is used to easily identify the timeclock. 7. click Add.
Next, you will connect the BN2500 to the Internet—via a WIFI router or via a LAN cable to a router. Both sets of instructions are listed below. 6.2.1 connecting via WIFI router Follow these steps on your BN2500 to link the BN2500 to your uAttend account via a WIFI router: The timeclock should be turned on, with the display illuminated. The timeclock will display the prompt “Press 1 to connect to your WIFI router. Press 2 to connect via LAN.” 1. press 1 to initialize the WIFI module. The timeclock will display the message “WIFI Network is Not Available! Press OK to view a list of available WIFI Networks!” 2. press oK. A list of all WIFI networks that the timeclock detects will appear. 3. using the down arrow key, scroll to your preferred network and press oK. If your WIFI network requires a password, the timeclock will prompt you to input the password. 4. enter the password and press oK. To enter alpha characters, press the key and follow the onscreen directions. The timeclock will connect to your WIFI network using the credentials you supplied. After the WIFI module initializes, you will see the message “DHCP Configuring.”

25
5. At the Success screen, press oK. The timeclock will now be linked to your uAttend account. 6.2.2 connecting via lAn cable Follow these steps on your BN2500 to link the BN2500 to your uAttend account via a LAN cable to a router: The timeclock should be turned on, with the display illuminated. The timeclock will display the prompt “Press 1 to connect to your WIFI router. Press 2 to connect via LAN.” 1. press 2 to connect via lAn. 2. the timeclock will display the message “dhcp configuring.” 3. After successfully connecting to your network, the timeclock will display the “System ready” message in the upper-left corner of the main screen. The timeclock will now be linked to your uAttend account. 6.3 registering Fingerprint templates If you are using the BN2500, you will register users’ fingerprints for punching in and out. Registering a fingerprint template requires interaction with both the BN2500 and your uAttend account. Follow these steps on your BN2500: 1. press the menu key. 2. enter the default password (53178) if it has not been changed, then press oK. 3. From the timeclock menu, select the first option, user management. 4. Select Add user. The BN2500 will prompt you to enter a 6-digit numeric code for this template. 5. enter an Id code for the fingerprint template and press oK. We recommend using the employee’s birth date as an ID code. For example, a birth date of October 22, 1984 would be registered as “102284.” Each template must be assigned a unique code. Make note of the employee’s name and 6-digit code in the Template Assignment Sheet at the back of this guide. You will be prompted to place a finger on the fingerprint sensor.
26
6. the designated employee should press their finger firmly on the sensor until you hear a beeping sound. the employee should then remove their finger from the sensor. this process will be repeated two more times with the same finger. note: If desired, you may repeat the fingerprint scanning process for the same employee with a different finger, so that the employee can have a back-up template. If you choose to scan a second fingerprint, it will also require a unique Fingerprint ID. We recommend using the employee’s birth date in reverse order as the ID code. 7. repeat the previous steps for each employee who will be using the timeclock. Follow these steps from your uAttend account: 1. click the Settings tab on the main menu.
2. click the punch management link.
3. click the Assign users link that appears next to the name of the timeclock that you used to register the fingerprint templates. 4. Assign each fingerprint template to the appropriate employee, using the template Assignment Sheet in this guide as a reference. The BN2500 is now ready for registered employees to punch in and out with their fingerprints. ImportAnt: The BN2500 timeclock employs an advanced fingerprint sensor. Despite the quality of the sensor, there is a segment of the population with fingerprints that will not record. These employees can still use the timeclock to punch in and out by using a PIN.
27
6.3.1 transferring Fingerprint templates to other timeclocks Transferring a fingerprint template to additional timeclocks requires interaction with both the BN2500 and your uAttend account. Follow these steps from your uAttend account: 1. click the users tab on the main menu. 2. click manage Fingerprint templates. 3. check all of the fingerprint templates that you wish to transfer to an additional timeclock. 4. use the drop-down menu to select the timeclock(s) to which you wish to transfer the templates. 5. click Submit. Follow these steps on each timeclock that you selected to receive the templates: 1. press the menu key. 2. enter the default password (53178) if it has not been changed, then press oK. The User Management icon will be selected. 3. press oK. 4. Scroll to select download templates, using the down arrow key. 5. press oK. 6. Wait for the templates to download to the timeclock. 7. At the Success screen, press oK.
6.4 overview of the Bn2500 The BN2500 timeclock is a biometric time-recording device that allows employees to punch in or out using a fingerprint or PIN. This timeclock can store 2,000 fingerprint templates.
28
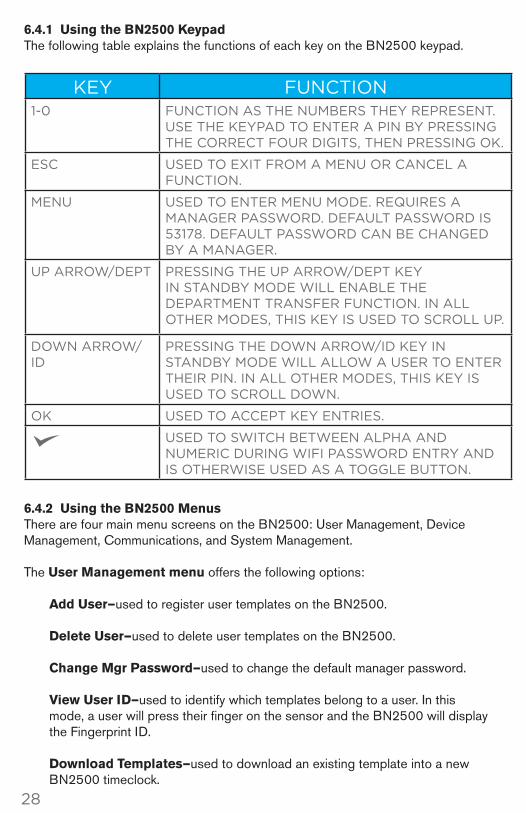
6.4.1 using the Bn2500 Keypad The following table explains the functions of each key on the BN2500 keypad.
6.4.2 using the Bn2500 menus There are four main menu screens on the BN2500: User Management, Device Management, Communications, and System Management. The user management menu offers the following options: Add user—used to register user templates on the BN2500. delete user—used to delete user templates on the BN2500. change mgr password—used to change the default manager password. View user Id—used to identify which templates belong to a user. In this mode, a user will press their finger on the sensor and the BN2500 will display the Fingerprint ID. download templates—used to download an existing template into a new BN2500 timeclock.
KEY FUNCTION1-0 funCTIon as The numbers TheY represenT.
use The keYpad To enTer a pIn bY pressIng The CorreCT four dIgITs, Then pressIng ok.
esC used To exIT from a menu or CanCel a funCTIon.
menu used To enTer menu mode. requIres a manager password. defaulT password Is 53178. defaulT password Can be Changed bY a manager.
up arrow/depT pressIng The up arrow/depT keY In sTandbY mode wIll enable The deparTmenT Transfer funCTIon. In all oTher modes, ThIs keY Is used To sCroll up.
down arrow/Id
pressIng The down arrow/Id keY In sTandbY mode wIll allow a user To enTer TheIr pIn. In all oTher modes, ThIs keY Is used To sCroll down.
ok used To aCCepT keY enTrIes.
used To swITCh beTween alpha and numerIC durIng wIfI password enTrY and Is oTherwIse used as a Toggle buTTon.
29
The device management menu offers the following options: update time—used to synchronize a new time if time settings in the uAttend account change. device Id—used to display the Device ID for the BN2500. upload logo—used to import a logo from a uAttend account to display on the BN2500. date Format—used to change the way that dates are displayed on the BN2500. reverify time—used to select the frequency that the BN2500 will update its time setting. Sounds—used to turn the BN2500 sounds on and off. time Format—used to change the way that time is displayed on the BN2500. The communications menu offers the following options: Set Ip—allows a user to set a static IP address in the BN2500. Turn off DHCP before setting a static IP. dhcp—used to turn DHCP on and off. network Settings—displays the BN2500 network settings. delete WIFI Settings—used to clear out the WIFI settings in the BN2500. View WIFI Settings—displays the network to which the BN2500 is connected. communicating Interface—allows users to select LAN or WIFI interface. The System management menu offers the following options: reset—resets the BN2500 to the factory default settings. help—displays the Customer Support telephone number. mAc Address—displays the BN2500’s MAC address. update Firmware—updates the firmware to the most updated version. Firmware Version—displays the firmware version.

30
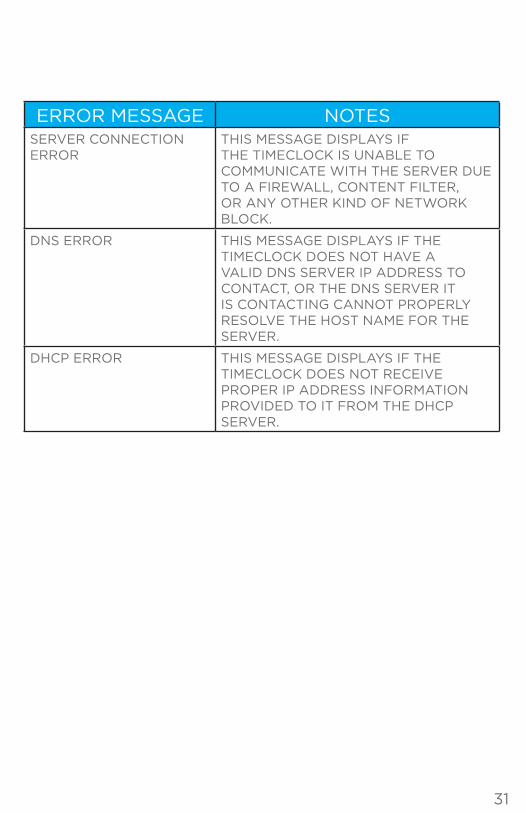
7.0 TroubleshooTIngSee the following table for help with error messages you might encounter with the CB1000, CB2000, BN1500, or BN2500 timeclocks.
ERROR MESSAGE NOTESdeVICe Id error ThIs message dIsplaYs when The
TImeCloCk has noT been lInked To a uaTTend aCCounT.
neT noT found ThIs message dIsplaYs If The TImeCloCk Is noT CurrenTlY plugged InTo anY neTworkIng deVICe, or The neTworkIng deVICe IT Is plugged InTo Is Turned off or Is noT funCTIonIng CorreCTlY. CheCk To make sure ThaT: • Your network allows DHCP ConneCTIons. • tHe network is not beHinD a fIrewall ThaT bloCks CommunICaTIon on porT 80.
sorrY, dealer Id noT found
TraCkmYTIme.Com wIll reporT ThIs error If The dealer Id You enTered Is noT ValId. please ConTaCT Your dealer represenTaTIVe for assIsTanCe.
unsuCCessful logIn when You aTTempT To log In To TraCkmYTIme.Com, The logIn form refreshes. ThIs IndICaTes ThaT The username/password CombInaTIon ThaT You enTered was noT CorreCT. If You haVe forgoTTen Your username and/or password, ClICk on The Email usErnamE/password lInk aT The Top of The page.
sorrY, user noT found ThIs message dIsplaYs If a user aTTempTs To punCh In, buT TheIr fIngerprInT Id has noT been assIgned To TheIr user profIle.
sorrY, user noT VerIfIed
ThIs message dIsplaYs If a user aTTempTs To punCh In, buT TheIr fIngerprInT TemplaTe has noT been regIsTered.
31
ERROR MESSAGE NOTESserVer ConneCTIon error
ThIs message dIsplaYs If The TImeCloCk Is unable To CommunICaTe wITh The serVer due To a fIrewall, ConTenT fIlTer, or anY oTher kInd of neTwork bloCk.
dns error ThIs message dIsplaYs If The TImeCloCk does noT haVe a ValId dns serVer Ip address To ConTaCT, or The dns serVer IT Is ConTaCTIng CannoT properlY resolVe The hosT name for The serVer.
dhCp error ThIs message dIsplaYs If The TImeCloCk does noT reCeIVe proper Ip address InformaTIon proVIded To IT from The dhCp serVer.
32
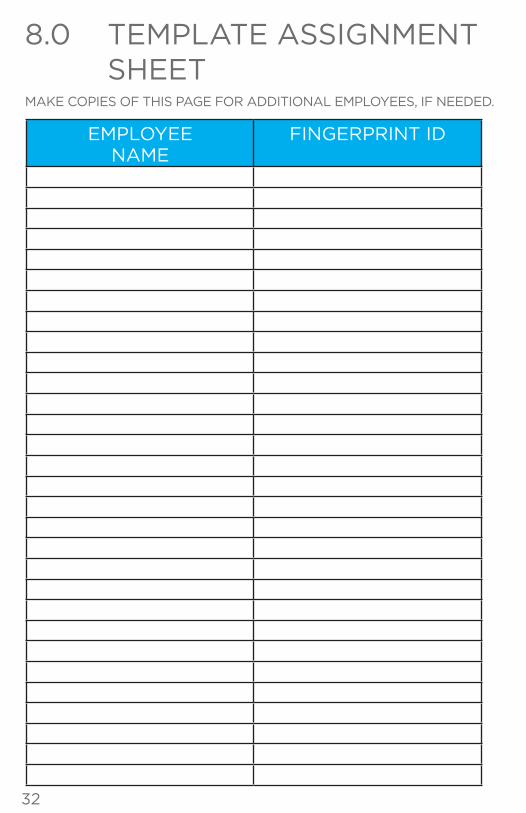
8.0 TemplaTe assIgnmenT sheeTmake CopIes of ThIs page for addITIonal emploYees, If needed.
emploYeename
fIngerprInT Id
uaTTend deVICe lImITed warranTYThis Warranty covers all uAttend™ Devices and any Devices which may now or in the future be connected to your uAttend Account. A. Warranty and Warranty Periods. ProcessingPoint, Inc. (“PPoint”) warrants only to the original Purchaser that the Device will be free from defects in material and workmanship for the time during which (i) the original Purchaser subscribes to the uAttend System, and (ii) until such time the Device has been replaced (the “Warranty Period”). B. PPoint’s Obligation Under Warranty. PPoint’s sole obligation under the above warranty shall be to repair or replace Devices and parts during the Warranty Period. PPoint does not assume responsibility for delays in replacement or repair of products or parts. PPoint may, at its sole discretion, replace Devices with refurbished Devices. This warranty gives end users specific legal rights, and particular end users may also have other rights which may vary from jurisdiction to jurisdiction. C. DISCLAIMER OF ALL OTHER WARRANTIES. NO OTHER WARRANTIES, EXPRESSED OR IMPLIED, ARE GIVEN, AND PPOINT EXPRESSLY DISCLAIMS ALL OTHER WARRANTIES, INCLUDING AND WITHOUT LIMITATION, THE IMPLIED WARRANTIES OF MERCHANTABILITY AND FITNESS FOR A PARTICULAR PURPOSE. Some jurisdictions do not allow limitations on how long an implied warranty lasts, so the above limitation may not apply to particular end users. D. Limitations. No salesperson, representative, or agent of PPoint is authorized to make any guaranty, warranty, or representation that contradicts the terms contained in this Limited Warranty. Any waiver, alteration, addition, or modification to the warranties contained herein must be in writing and signed by authorized representatives of PPoint to be valid, binding, and enforceable. PPoint does not assume responsibility for any specific application to which any products or parts are applied including, but not limited to, compatibility with other equipment. All statements, technical information, or recommendations relating to the products or parts are based upon tests believed to be reliable, but do not constitute a guaranty or warranty. PPOINT SHALL NOT UNDER ANY CIRCUMSTANCES WHATSOEVER BE LIABLE TO ANY PARTY FOR LOSS OF PROFITS, DIMINUTION OF GOOD WILL, OR ANY OTHER SPECIAL, CONSEQUENTIAL, OR INCIDENTAL DAMAGES WHATSOEVER WITH RESPECT TO ANY CLAIM IN CONNECTION WITH PPOINT PRODUCTS AND/OR PARTS. Some jurisdictions do not allow the exclusion or limitation of incidental or consequential damages, so the above limitation or exclusion may not apply to particular end users. E. What May Void the Warranty. This Limited Warranty shall be null and void in the following circumstances: 1. Modification or repair by the end user or any non-authorized PPoint service provider; or 2. Improper use or installation, or damage by accident or neglect, by the end user or any third party, or intentional damage by the end user or any third party; or 3. Failure of the end user or any third party to exercise caution to protect from electrostatic discharge damage and adverse temperature, or physical abuse; or 4. Failure by the end user to follow the Return Appointment Process set forth below. F. Return Appointment Process. As a condition precedent to the above Limited Warranty, the end user must: 1. Obtain a return material authorization (RMA) from PPoint, which will include an RMA number that must be prominently displayed on the outside of the shipping container. Returns without an RMA number may be rejected by PPoint and immediately returned to end user, freight collect. 2. Ship the items being returned to PPoint, freight prepaid, together with a written description of the claimed defect. 3. Pack the items being returned in the original packing carton or equivalent. Damage in transit is end user’s responsibility and may be cause to void the warranty claim. G. Transportation Costs. PPoint will pay surface freight to return products covered by this Limited Warranty. However, if PPoint determines in the exercise of its reasonable but sole discretion that the product or part returned for warranty service is not defective, or does not otherwise qualify for warranty service, the end user shall be liable for all costs of handling and transportation.
33

2796 Loker Ave., Suite 111, Carlsbad, CA 92010
(800) 518-8925 Toll Free • (877) 730-3578 Fax • www.processingpoint .com