Embed Size (px)
Citation preview
990223-510198-(02)
UserÕs Manual
© 1998 All rights reserved.
CD Color Printer II
510198 Fargo/CD Color PrtrII 2/26/99 12:36 PM Page i
Notices: The information in this document is subject to change without notice. NO WARRANTY OF ANY KIND IS MADE WITH REGARD TO THIS MATERIAL, INCLUDING, BUTNOT LIMITED TO, THE IMPLIED WARRANTIES OF MERCHANTABILITY AND FITNESS FOR APARTICULAR PURPOSE. No liability is assumed for errors contained herein or for incidental damagesin connection with the furnishing, performance, or use of this material. This document containsproprietary information which is protected by copyright. All rights are reserved. No part of thisdocument may be photocopied, reproduced, or translated into another language without the priorwritten consent.
Trademark Acknowledgments: IBM is a registered trademark of International BusinessMachines Corporation. Windows is a trademark of Microsoft Corporation. Apple and Macintosh areregistered trademarks and QuickDraw and AppleTalk are trademarks of Apple Computer, Inc. Allother trademarks are the property of their respective owners. Candela is a registeredtrademark of Candela Ltd. © 1995 Candela¨ Color Management Systems.
Printing HistoryEdition 2.2, #990223,© Copyright 1998, All rights reserved.
FCC Compliance Statement: This device complies with part 15 of the FCC rules. Operationis subject to the following two conditions: (1) this device may not cause harmful interference, and (2)this device must accept any interference received, including interference that may cause undesiredoperation.
For Users in the United States: This equipment has been tested and found to comply withthe limits for a Class B digital device, pursuant to Part 15 of the FCC Rules. These limits are designedto provide reasonable protection against harmful interference in a residential installation. Thisequipment generates, uses, and can radiate radio frequency energy and, if not installed and used inaccordance with the instructions, may cause harmful interference to radio communications. However,there is no guarantee that interference will not occur in a particular installation. If this equipment doescause harmful interference to radio or television reception, which can be determined by turning theequipment off and on, the user is encouraged to try to correct the interference by one or more of thefollowing measures:¥ Re-orient or relocate the receiving antenna.¥ Increase the separation between the equipment and receiver.¥ Connect the equipment into an outlet on a circuit different from that to which the receiver is
connected.¥ Consult the dealer or an experienced radio/TV technician for help.Use of a shielded cable is required to comply with the Class B limits of Part 15 of the FCC Rules. Youare cautioned that any changes or modifications not expressly approved in this manual could voidyour authority to operate and/or obtain warranty service for this equipment.
For Users in Canada: This digital apparatus does not exceed the Class B limits for radio noisefor digital apparatus set out on the Radio Interference Regulations of the Canadian Department ofCommunications. Le present appareil numerique nÕemet pas de bruits radioelectriques depassant leslimites applicables aux appareils numeriques de la class B prescrites dans le Reglement sur lebrouillage radioelectrique edicte par le ministere des Communications du Canada.
For Users in Taiwan:
CAUTION!
TO PREVENT FIRE OR SHOCK HAZARD, DO NOT EXPOSE THE UNIT TO RAIN OR MOISTURE.TO REDUCE THE RISK OF ELECTRIC SHOCK, DO NOT REMOVE EXTERIOR PANELS. NO USER-SERVICEABLE PARTS INSIDE. REFER SERVICING TO QUALIFIED SERVICE PERSONNEL. OPERATETHE UNIT ONLY ON 100-120 VAC, 50/60 HZ. FOR PRINTERS THAT HAVE BEEN SHIPPEDOUTSIDE OF THE UNITED STATES AND CANADA, OPERATE THE UNIT ONLY ON 220-250 VAC, 50/60 HZ. USE PRINTER ONLY WITH THE POWER SUPPLY LABELED FOR USE WITHTHE CD COLOR PRINTER.
ii
510198 Fargo/CD Color PrtrII 2/26/99 12:36 PM Page ii

Table of Contents
Section 1: Getting StartedA. Choosing a Good Location...............................................................................1 B. Unpacking and Inspection ...............................................................................1C. Identifying the Parts..........................................................................................2D. Applying Power.................................................................................................3
Section 2: Ink Cartridges and Printable CD’s A. About Ink Cartridges and Printable CDÕs .....................................................4B. Installing an Ink Cartridge ..............................................................................4C. Loading Blank CD Media.................................................................................6D. Printing a Self Test.............................................................................................8E. Replacing or Switching Ink Cartridges..........................................................9
Section 3: Using the CD Color Printer with WindowsA. Connecting the Printer to Your Computer ..................................................12B. Installing the Printer Driver...........................................................................13C. Installing the 32-Bit Spooler for Windows 95/98 .......................................15D. Setting Up the Printer Driver ........................................................................17E. Printing a CD ...................................................................................................25
Section 4: Using the CD Color Printer with MacintoshA. Connecting the Printer to Your Computer ..................................................27B. Installing the Printer Driver...........................................................................28C. The Chooser......................................................................................................29D. Setting Up the Printer Driver ........................................................................30E. Printing a CD ...................................................................................................35
Section 5: Using the Print Backgrounder for MacintoshA. Installing the Backgrounder...........................................................................37B. Printing with the Backgrounder....................................................................37C. The Backgrounder Status Window ...............................................................38D. Backgrounder Menus......................................................................................39E. Problems During a Background Print ..........................................................41
Section 6: Interpreting the Printer Indicator Lights...............................................42Section 7: Maintaining the Printer
A. Cleaning the Ink Cartridge Nozzles .............................................................43B. Cleaning the CD Tray and Printer Casing...................................................43C. Clearing a CD Media Jam ..............................................................................43D. Technical Support ............................................................................................44
Section 8: Technical Specifications ...........................................................................45
Appendix A: Interfacing InformationA. Introduction......................................................................................................46B. Centronics-Type Parallel Interface ................................................................46C. Mini 8-Pin Serial Interface..............................................................................47D. 6-Pin Minicircular Auxiliary Interface..........................................................48
Index ................................................................................................................................49
iii
510198 Fargo/CD Color PrtrII 2/26/99 12:36 PM Page iii

510198 Fargo/CD Color PrtrII 2/26/99 12:36 PM Page iv
Getting Started 1
Section 1: Getting Started
THANK YOU…
...for choosing the CD Color Printer II. This printer is theperfect way for you to label all of your custom CDÕs quickly,easily, and with a touch of class. The CD Color Printer lets youprint razor-sharp text, vibrant spot colors, and even stunningphoto-realistic photographs directly onto the surface ofprintable CDÕs. Operation is simple, quality is high, andprinted images are durable and highly smudge-resistant.
To begin using the printer, please refer to the remainder of thismanual. This UserÕs Manual is your complete step-by-stepguide to quickly and easily setting up and printing with yournew CD Color Printer!
A. CHOOSING A GOOD LOCATION¥ Place the printer in a location with adequate air circulation
to prevent internal heat build up. ¥ Do not place the printer near heat sources such as radiators
or air ducts or in a place subject to direct sun-light,excessive dust, mechanical vibration or shock.
¥ Allow for adequate clearance in front of the printer toaccommodate the length of the unit with its CD Tray open.
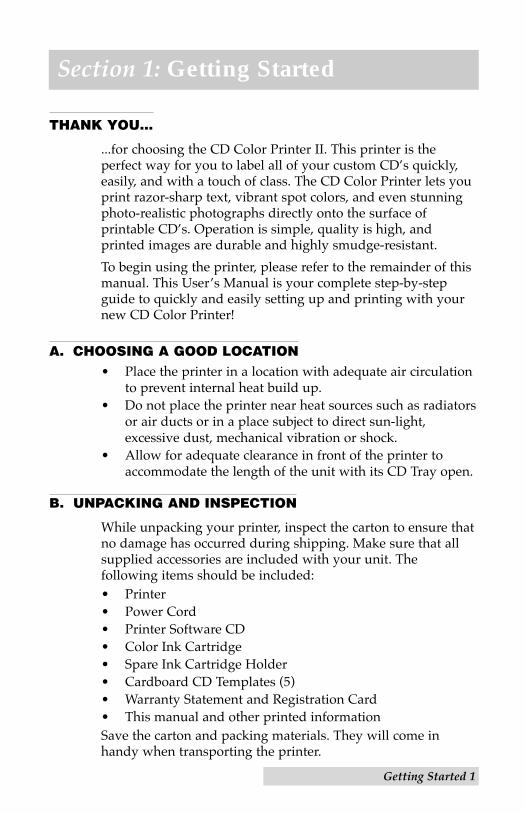
B. UNPACKING AND INSPECTION
While unpacking your printer, inspect the carton to ensure thatno damage has occurred during shipping. Make sure that allsupplied accessories are included with your unit. Thefollowing items should be included:¥ Printer¥ Power Cord¥ Printer Software CD¥ Color Ink Cartridge¥ Spare Ink Cartridge Holder¥ Cardboard CD Templates (5)¥ Warranty Statement and Registration Card¥ This manual and other printed informationSave the carton and packing materials. They will come inhandy when transporting the printer.
510198 Fargo/CD Color PrtrII 2/26/99 12:36 PM Page 1

2 Getting Started
C. IDENTIFYING THE PARTS
This illustration shows the extended CD Tray and all of thecontrol buttons and LED indicator lights found on the printer.
The Power Button turns the printerÕs power ON and OFF.This button also serves to cancel the current print job if a printerror occurs and to reset the printer for the next print job.
The CD Tray Button opens or closes the CD Tray forloading and ejecting CDÕs.
The Ink Cartridge Button positions the Cartridge Carrier foreasy ink cartridge replacement.
The Power Light indicates that power is ON. The BusyLight indicates that the printer is printing, processing, or is insome way busy. Both of these lights can also indicate severalother printer conditions. For complete information on theselights, please refer to Section 6.
Front Cover
Power Button
Power Light
Busy Light
CD Tray Button
Ink Cartridge Button
CD Tray
510198 Fargo/CD Color PrtrII 2/26/99 12:36 PM Page 2
Getting Started 3
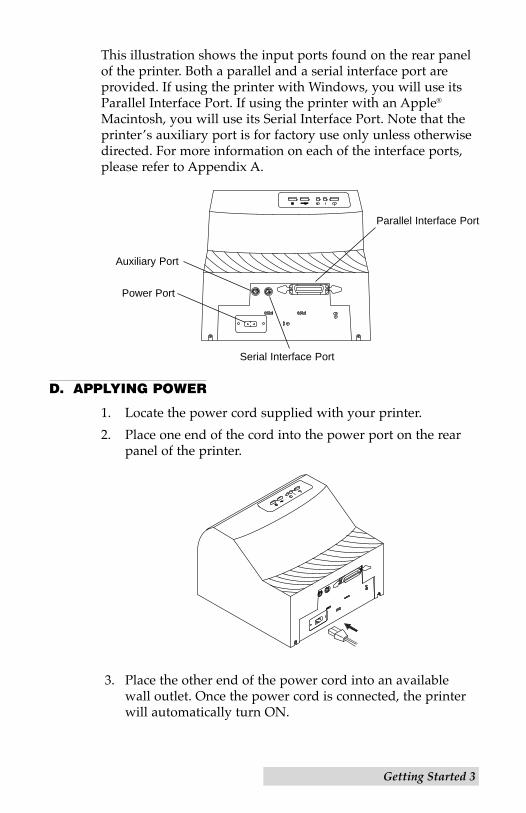
This illustration shows the input ports found on the rear panelof the printer. Both a parallel and a serial interface port areprovided. If using the printer with Windows, you will use itsParallel Interface Port. If using the printer with an Apple¨
Macintosh, you will use its Serial Interface Port. Note that theprinterÕs auxiliary port is for factory use only unless otherwisedirected. For more information on each of the interface ports,please refer to Appendix A.
D. APPLYING POWER
1. Locate the power cord supplied with your printer.
2. Place one end of the cord into the power port on the rearpanel of the printer.
3. Place the other end of the power cord into an availablewall outlet. Once the power cord is connected, the printerwill automatically turn ON.
Power Port
Auxiliary Port
Serial Interface Port
Parallel Interface Port
510198 Fargo/CD Color PrtrII 2/26/99 12:36 PM Page 3
4 Ink Cartridges and Printable CDÕs
Section 2: Ink Cartridges andPrintable CD’s
A. ABOUT INK CARTRIDGES AND PRINTABLE CD’S
For full-color printing, a 3-color ink cartridge is available. Thiscartridge contains the three process-color inks of yellow,magenta, and cyan, which combine to produce up to 16.7million printable colors. A monochrome ink cartridge is alsoavailable for fast, inexpensive black and white printing.
With either of these ink cartridges, you can print directly ontovirtually any brand of printable-surface CD media. Sincedifferent brands of CDÕs have different printable coatings,however, you may need to adjust the printer driver settings toaccommodate your specific brand of CD media. Refer toSection 3 or 4 for further printer driver information.
Due to the wide variety of printable-surface CD media, youmay find that certain brands of CDÕs provide higher printquality than others. For maximum print quality, use CD mediaauthorized by the printer manufacturer. Contact your local CDColor Printer reseller or contact the printer manufacturerdirectly for selection and pricing on all printer supplies andaccessories.
B. INSTALLING AN INK CARTRIDGE
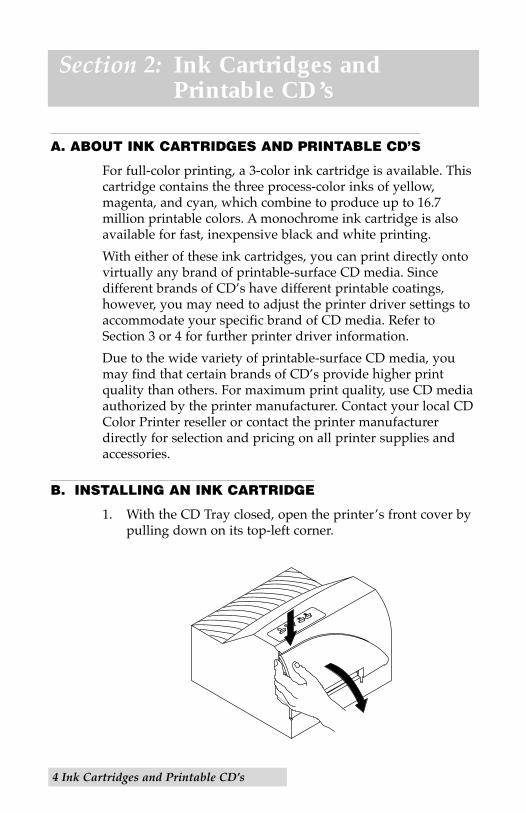
1. With the CD Tray closed, open the printerÕs front cover bypulling down on its top-left corner.
510198 Fargo/CD Color PrtrII 2/26/99 12:36 PM Page 4
Ink Cartridges and Printable CDÕs 5
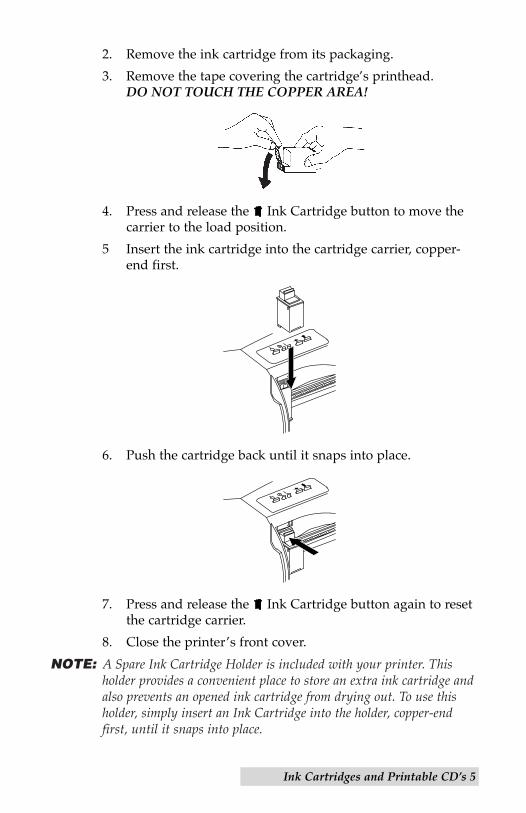
2. Remove the ink cartridge from its packaging.
3. Remove the tape covering the cartridgeÕs printhead. DO NOT TOUCH THE COPPER AREA!
4. Press and release the Ink Cartridge button to move thecarrier to the load position.
5 Insert the ink cartridge into the cartridge carrier, copper-end first.
6. Push the cartridge back until it snaps into place.
7. Press and release the Ink Cartridge button again to resetthe cartridge carrier.
8. Close the printerÕs front cover.
NOTE: A Spare Ink Cartridge Holder is included with your printer. Thisholder provides a convenient place to store an extra ink cartridge andalso prevents an opened ink cartridge from drying out. To use thisholder, simply insert an Ink Cartridge into the holder, copper-endfirst, until it snaps into place.
510198 Fargo/CD Color PrtrII 2/26/99 12:36 PM Page 5
6 Ink Cartridges and Printable CDÕs
C. LOADING BLANK CD MEDIA
The CD Color Printer is capable of printing onto a variety ofCD related media including printable CDÕs, cardboard CDtemplates, and jewel case booklets and inserts. Each of theseitems is loaded one at a time, before the start of each print job.
Loading a Blank CD
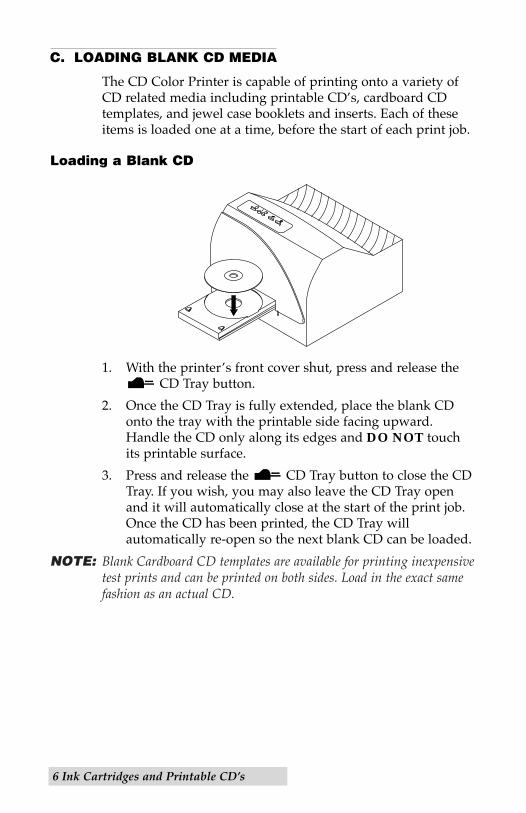
1. With the printerÕs front cover shut, press and release theCD Tray button.
2. Once the CD Tray is fully extended, place the blank CDonto the tray with the printable side facing upward.Handle the CD only along its edges and DO NOT touchits printable surface.
3. Press and release the CD Tray button to close the CDTray. If you wish, you may also leave the CD Tray openand it will automatically close at the start of the print job.Once the CD has been printed, the CD Tray willautomatically re-open so the next blank CD can be loaded.
NOTE: Blank Cardboard CD templates are available for printing inexpensivetest prints and can be printed on both sides. Load in the exact samefashion as an actual CD.
510198 Fargo/CD Color PrtrII 2/26/99 12:36 PM Page 6
Ink Cartridges and Printable CDÕs 7
Loading a Blank Jewel Case Booklet or Insert
Blank CD jewel case booklets and inserts are available forcreating custom jewel case labels. The jewel case booklet iswhat slips into the top lid of the jewel case. The jewel caseinsert is what is enclosed along the spine and back of the jewelcase. To load either, refer to the following:
1. With the printerÕs front cover shut, press and release theCD Tray button.
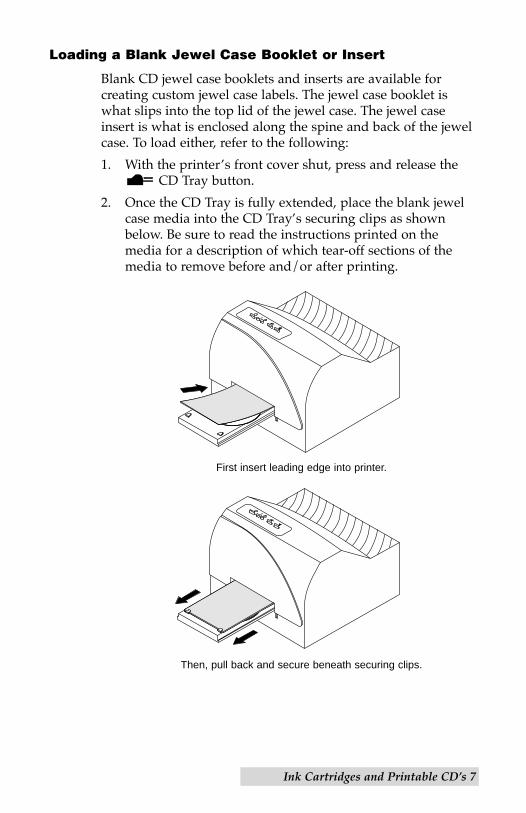
2. Once the CD Tray is fully extended, place the blank jewelcase media into the CD TrayÕs securing clips as shownbelow. Be sure to read the instructions printed on themedia for a description of which tear-off sections of themedia to remove before and/or after printing.
First insert leading edge into printer.
Then, pull back and secure beneath securing clips.
510198 Fargo/CD Color PrtrII 2/26/99 12:36 PM Page 7
8 Ink Cartridges and Printable CDÕs
3. Press and release the CD Tray button to close the CDTray. If you wish, you may also leave the CD Tray openand it will automatically close at the start of the print job.Once printing is complete, the CD Tray will automaticallyre-open.
In order for the printer to print properly, CD media must beinstalled. If you accidentally attempt to print without installingany media, the CD Tray will open and the printer will pauseuntil media is loaded and the CD Tray is closed. When closingthe CD Tray, do not manually push on the front of the tray toclose it. Instead, always press the CD Tray button to openor close the CD Tray.
IMPORTANT! After you have loaded the CD media, you must also selectthe appropriate Media option from within the printer driversetup window. Please refer to Section 3 or 4 for moreinformation on selecting printer driver settings.
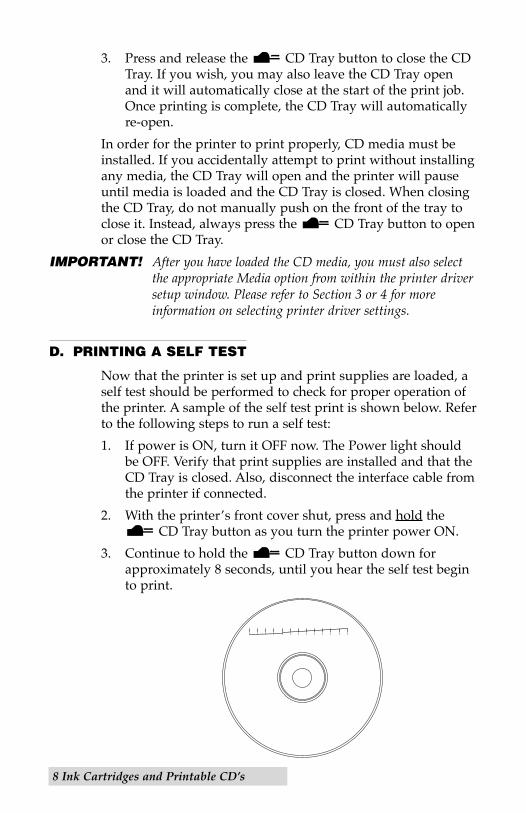
D. PRINTING A SELF TEST
Now that the printer is set up and print supplies are loaded, aself test should be performed to check for proper operation ofthe printer. A sample of the self test print is shown below. Referto the following steps to run a self test:
1. If power is ON, turn it OFF now. The Power light shouldbe OFF. Verify that print supplies are installed and that theCD Tray is closed. Also, disconnect the interface cable fromthe printer if connected.
2. With the printerÕs front cover shut, press and hold theCD Tray button as you turn the printer power ON.
3. Continue to hold the CD Tray button down forapproximately 8 seconds, until you hear the self test beginto print.
510198 Fargo/CD Color PrtrII 2/26/99 12:36 PM Page 8
Ink Cartridges and Printable CDÕs 9
E. REPLACING OR SWITCHING INK CARTRIDGES
Once you begin using your CD Color Printer on a regularbasis, you will eventually need to replace an empty inkcartridge or switch between color and monochrome cartridges.To do this from a Macintosh, Windows 3.1x, or Windows NT,use the same steps described in Part B of this section. To dothis from Windows 95/98, please refer to the following steps:
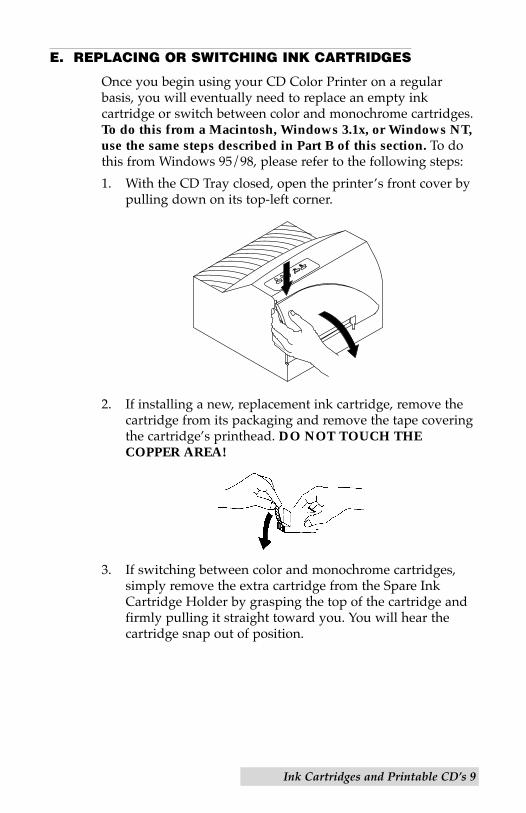
1. With the CD Tray closed, open the printerÕs front cover bypulling down on its top-left corner.
2. If installing a new, replacement ink cartridge, remove thecartridge from its packaging and remove the tape coveringthe cartridgeÕs printhead. DO NOT TOUCH THECOPPER AREA!
3. If switching between color and monochrome cartridges,simply remove the extra cartridge from the Spare InkCartridge Holder by grasping the top of the cartridge andfirmly pulling it straight toward you. You will hear thecartridge snap out of position.
510198 Fargo/CD Color PrtrII 2/26/99 12:36 PM Page 9
10 Ink Cartridges and Printable CDÕs
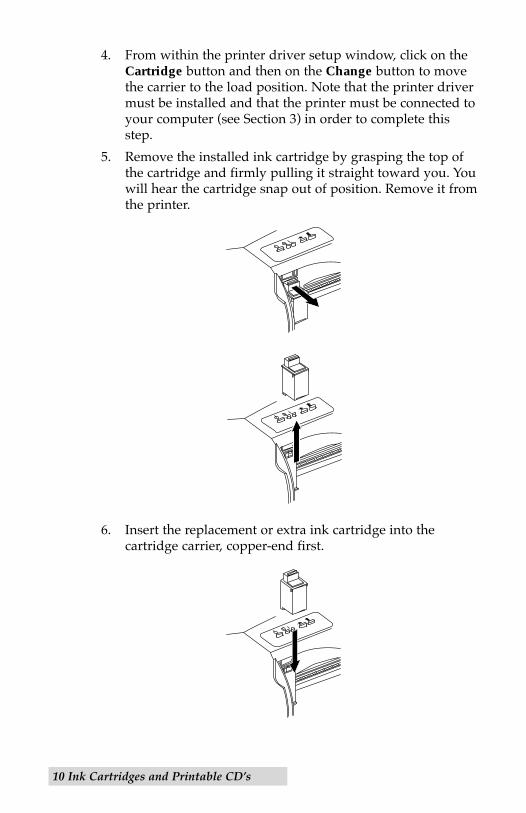
4. From within the printer driver setup window, click on theCartridge button and then on the Change button to movethe carrier to the load position. Note that the printer drivermust be installed and that the printer must be connected toyour computer (see Section 3) in order to complete thisstep.
5. Remove the installed ink cartridge by grasping the top ofthe cartridge and firmly pulling it straight toward you. Youwill hear the cartridge snap out of position. Remove it fromthe printer.
6. Insert the replacement or extra ink cartridge into thecartridge carrier, copper-end first.
510198 Fargo/CD Color PrtrII 2/26/99 12:36 PM Page 10
Ink Cartridges and Printable CDÕs 11
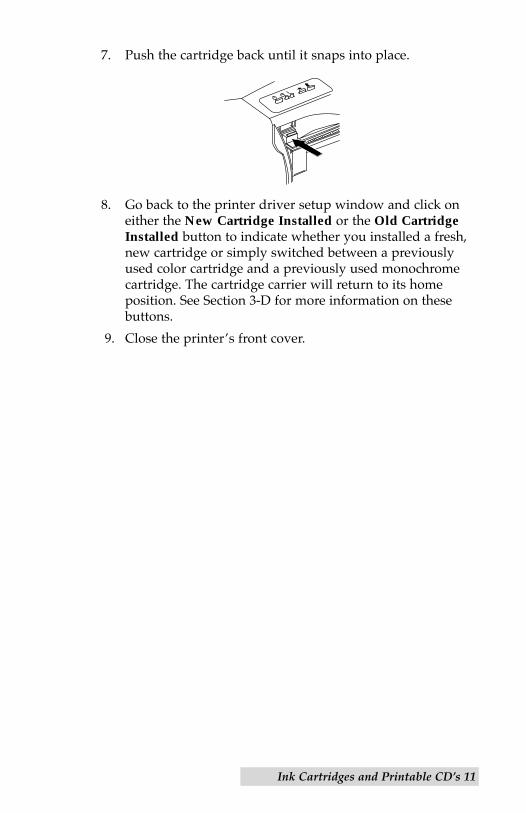
7. Push the cartridge back until it snaps into place.
8. Go back to the printer driver setup window and click oneither the New Cartridge Installed or the Old CartridgeInstalled button to indicate whether you installed a fresh,new cartridge or simply switched between a previouslyused color cartridge and a previously used monochromecartridge. The cartridge carrier will return to its homeposition. See Section 3-D for more information on thesebuttons.
9. Close the printerÕs front cover.
510198 Fargo/CD Color PrtrII 2/26/99 12:36 PM Page 11
12 Using the CD Color Printer with Windows
Section 3: Using the CD Color Printer with Windows
A. CONNECTING THE PRINTER TO YOUR COMPUTER
The CD Color Printer is designed to be used with nearly anyIBM-PC¨ or compatible running Windows 3.1x, Windows NT,or Windows 95/98. For best performance, a minimum of a486/66 computer with 8MB of RAM or higher is recommended.
The printer is equipped with a standard 8-bit Centronics-typeparallel port. This port is the means through which it receivesdata from your computer. To connect the printer to yourcomputer, simply obtain a shielded, bi-directional parallelcable, and refer to the following steps:
NOTE: For faster printing, your computerÕs parallel port mode should be setto ECP. If you experience problems with this setting or if yourcomputerÕs parallel port is not ECP compatible, set your computerÕsparallel port to the standard ÒPrinter PortÓ setting. Refer to yourcomputerÕs system documentation for instructions on checking and/orchanging the parallel port mode.
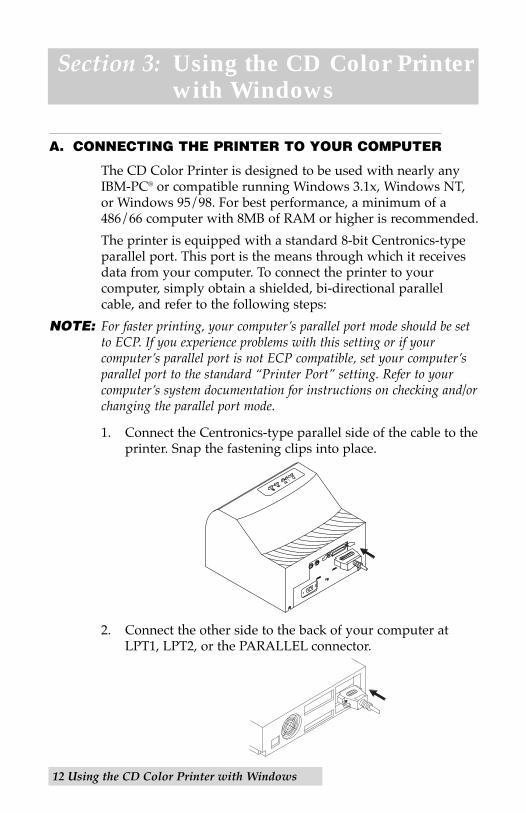
1. Connect the Centronics-type parallel side of the cable to theprinter. Snap the fastening clips into place.
2. Connect the other side to the back of your computer atLPT1, LPT2, or the PARALLEL connector.
510198 Fargo/CD Color PrtrII 2/26/99 12:36 PM Page 12
Using the CD Color Printer with Windows 13
The printer must have its Power light illuminated to receivedata. If the light is not on, press the Power button.
B. INSTALLING THE PRINTER DRIVER
The CD Color Printer can be used with virtually any Windowsapplication program. This is accomplished by installing inWindows what is called a Òprinter driver.Ó The printer driver issimply software which gives the printer all the informationneeded for printing. Use the following steps to install the printerdriver.
NOTE: This section of the OperatorÕs Manual assumes that you are alreadyfamiliar with Windows and know how it operates. If you are not yetfamiliar with Windows, consult the appropriate Microsoftdocumentation to become familiar with the basics of Windows beforeproceeding.
Windows 95/98 or Windows NT
To install the printer driver into Windows 95/98 or Windows NT,refer to the following:
1. Insert the included CD into your computerÕs CD-ROM drive.
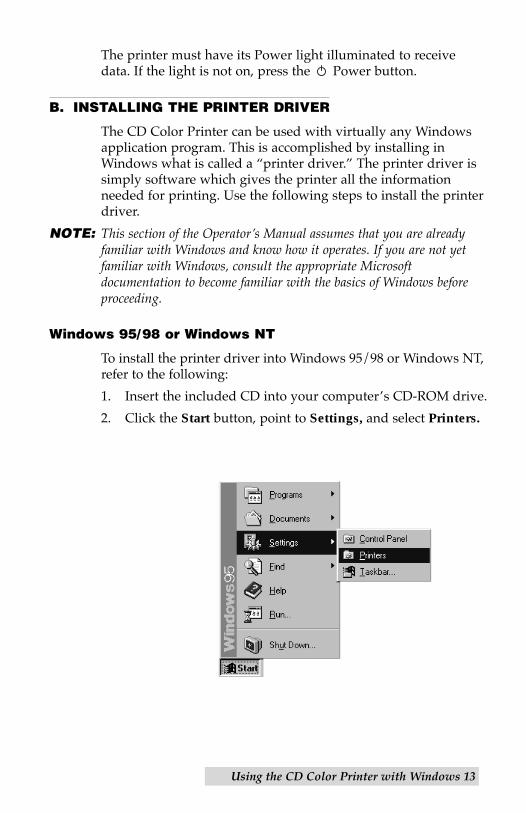
2. Click the Start button, point to Settings, and select Printers.
510198 Fargo/CD Color PrtrII 2/26/99 12:36 PM Page 13
14 Using the CD Color Printer with Windows
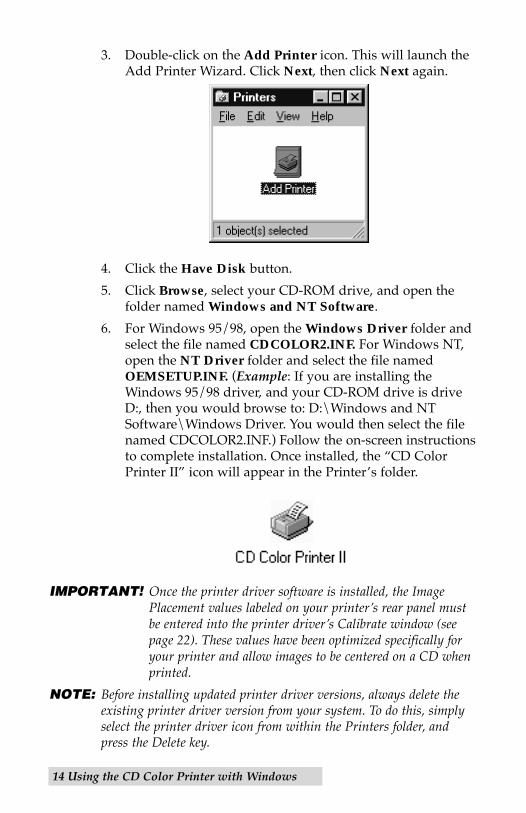
3. Double-click on the Add Printer icon. This will launch theAdd Printer Wizard. Click Next, then click Next again.
4. Click the Have Disk button.
5. Click Browse, select your CD-ROM drive, and open thefolder named Windows and NT Software.
6. For Windows 95/98, open the Windows Driver folder andselect the file named CDCOLOR2.INF. For Windows NT,open the NT Driver folder and select the file namedOEMSETUP.INF. (Example: If you are installing theWindows 95/98 driver, and your CD-ROM drive is driveD:, then you would browse to: D:\Windows and NTSoftware\Windows Driver. You would then select the filenamed CDCOLOR2.INF.) Follow the on-screen instructionsto complete installation. Once installed, the ÒCD ColorPrinter IIÓ icon will appear in the PrinterÕs folder.
IMPORTANT! Once the printer driver software is installed, the ImagePlacement values labeled on your printerÕs rear panel mustbe entered into the printer driverÕs Calibrate window (seepage 22). These values have been optimized specifically foryour printer and allow images to be centered on a CD whenprinted.
NOTE: Before installing updated printer driver versions, always delete theexisting printer driver version from your system. To do this, simplyselect the printer driver icon from within the Printers folder, andpress the Delete key.
510198 Fargo/CD Color PrtrII 2/26/99 12:36 PM Page 14
Using the CD Color Printer with Windows 15
C. INSTALLING THE 32-BIT PRINT SPOOLER FORWINDOWS 95/98
Your CD Color Printer ships with a print utility program calledthe 32-Bit Print Spooler. This print spooler is for use only withWindows 95 or Windows 98. Once installed, the print spooleris able to process your print jobs and send them to the printerat consistently faster speeds than if sending print jobs throughthe Windows system print spooler. This is especially true ifprinting from a somewhat slower computer. As a result, it ishighly recomended that you use the 32-Bit Print Spooler whenprinting from Windows 95 or Windows 98.
The 32-Bit Print Spooler is located on the included PrinterSoftware CD and installs just like any other standard Windowsapplication program. To install the 32-Bit Print Spooler, refer tothe following:
1. Insert the included CD into your computerÕs CD-ROMdrive.
2. Close down all other software applications.
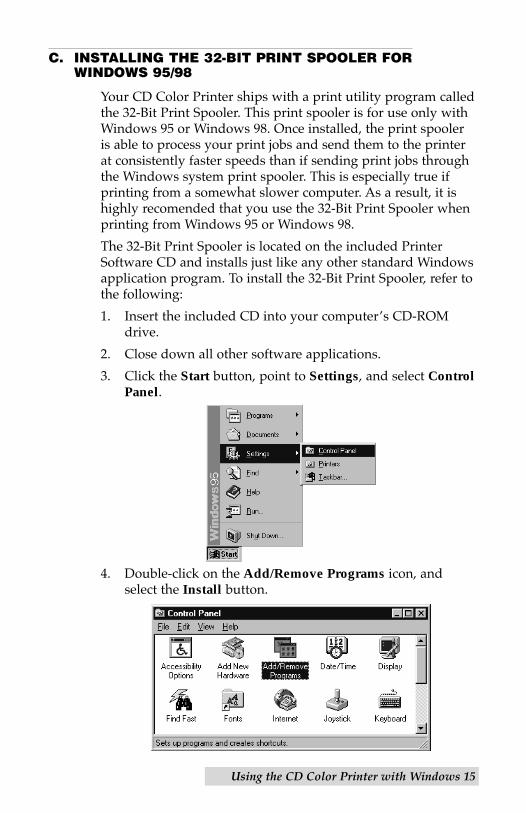
3. Click the Start button, point to Settings, and select ControlPanel.
4. Double-click on the Add/Remove Programs icon, andselect the Install button.
510198 Fargo/CD Color PrtrII 2/26/99 12:36 PM Page 15
16 Using the CD Color Printer with Windows
5. Click Next, then click on the Browse button.
6. Select your CD-ROM drive, open the folder namedWindows and NT Software, then open the folder named32 Bit Print Spooler.
7. Double-click on the Setup.exe file, then select the Finishbutton to complete installation. When installed, the 32-BitPrint Spooler icon will appear in the Programs group of theStart menu.
NOTE: Before installing updated 32-Bit Print Spooler versions, alwaysuninstall the existing print spooler version from your system. To dothis, simply select 32-Bit Print Spooler from the list of programs inthe Add/Remove Programs Properties window and click on theAdd/Remove button.
To print with the 32-Bit Print Spooler, you must select the Fast32-bit Spooler option from within the printer driver setupwindow as described in Part D of this section. When thisoption is selected, the print spooler will automatically openand close with the start and finish of each print job.
NOTE: You can also manually open the 32-Bit Print Spooler simply byselecting its icon from the Programs group of the Start menu.
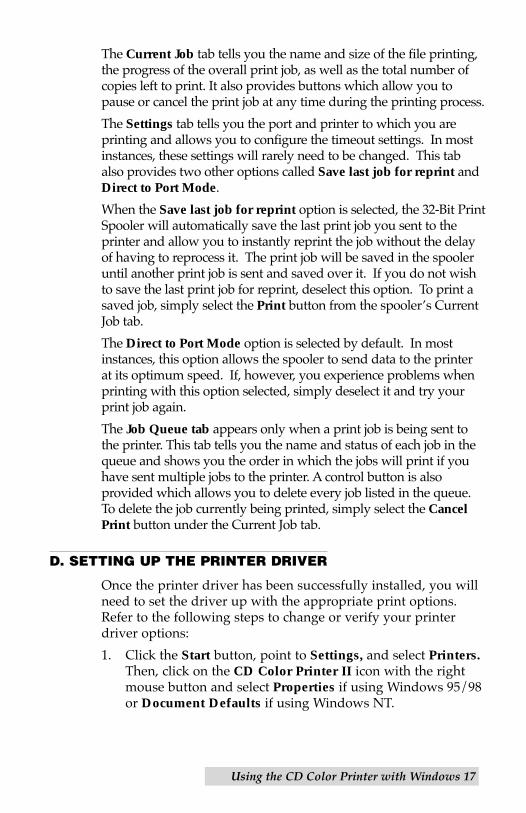
When the 32-Bit Print Spooler is running, its icon will appear in theWindows 95/98 Task Bar. During a print job, it is sometimeshelpful to click on this icon to bring the 32-Bit Print Spooler statuswindow to the foreground of your application. This windowprovides a number of details about the print jobs being sent to theprinter.
510198 Fargo/CD Color PrtrII 2/26/99 12:36 PM Page 16
Using the CD Color Printer with Windows 17
The Current Job tab tells you the name and size of the file printing,the progress of the overall print job, as well as the total number ofcopies left to print. It also provides buttons which allow you topause or cancel the print job at any time during the printing process.
The Settings tab tells you the port and printer to which you areprinting and allows you to configure the timeout settings. In mostinstances, these settings will rarely need to be changed. This tabalso provides two other options called Save last job for reprint andDirect to Port Mode.
When the Save last job for reprint option is selected, the 32-Bit PrintSpooler will automatically save the last print job you sent to theprinter and allow you to instantly reprint the job without the delayof having to reprocess it. The print job will be saved in the spooleruntil another print job is sent and saved over it. If you do not wishto save the last print job for reprint, deselect this option. To print asaved job, simply select the Print button from the spoolerÕs CurrentJob tab.
The Direct to Port Mode option is selected by default. In mostinstances, this option allows the spooler to send data to the printerat its optimum speed. If, however, you experience problems whenprinting with this option selected, simply deselect it and try yourprint job again.
The Job Queue tab appears only when a print job is being sent tothe printer. This tab tells you the name and status of each job in thequeue and shows you the order in which the jobs will print if youhave sent multiple jobs to the printer. A control button is alsoprovided which allows you to delete every job listed in the queue.To delete the job currently being printed, simply select the CancelPrint button under the Current Job tab.
D. SETTING UP THE PRINTER DRIVER
Once the printer driver has been successfully installed, you willneed to set the driver up with the appropriate print options.Refer to the following steps to change or verify your printerdriver options:
1. Click the Start button, point to Settings, and select Printers.Then, click on the CD Color Printer II icon with the rightmouse button and select Properties if using Windows 95/98or Document Defaults if using Windows NT.
510198 Fargo/CD Color PrtrII 2/26/99 12:36 PM Page 17
18 Using the CD Color Printer with Windows
2. In Windows 95/98, click on the Details tab of theProperties window and select the Setup button. InWindows NT, click on the Advanced tab of the DocumentSettings window.
NOTE: Most applications allow you to change these same printer driveroptions from their ÒPrintÓ and/or ÒPrinter SetupÓ screens. Thismeans that you donÕt have to go back to the main printer setupwindow each time you want to change a setting or option in theprinter driver. These applications will usually give you the samechoices and options, but in a slightly altered format.
3. In Windows 95/98, the CD Color Printer setup screenappears. In Windows NT, the CD Color Printer DocumentSettings appear. Although each printer driver displays theprint options in a slightly different format, the basicoptions are the same. Refer to the remainder of this sectionfor a description of each printer driver option.
MediaClick on the Media down arrow. A list of media selectionsappears. Select the CD option if printing onto printable CDÕs.Select Booklet if printing onto a jewel case booklet. SelectInsert if printing onto a jewel case insert. When sizing yourimages for printing, keep in mind that each type of CD mediahas the following maximum printable areas: CD 4.56Ó round (116mm), Booklet 4.63Ó x 4.67Ó (117.7 x 118.5mm),and Insert 4.57Ó x 5.9Ó (116 x 150mm). For a complete descriptionof each type of print media and to see how each is installed, referto Section 2.
Ink Cartridge
Select either Color or Monochrome according to the type ofink cartridge you have installed.
Print Quality
Select the appropriate print quality option for your image.Keep in mind that Draft provides the lowest quality but fastestprint, and that Photo 600 x 300 provides the highest quality butslowest print. You may wish to experiment with these optionsto see which one is best for your particular CD label.
510198 Fargo/CD Color PrtrII 2/26/99 12:36 PM Page 18
Using the CD Color Printer with Windows 19
Dither Mode
Select this option to choose the appropriate dither mode foryour image. Select Optimize for photos if printing a designprimarily composed of photographic images. Select Optimizefor graphics if mainly printing text, lines, and graphics.
Color Matching
Click on the Color Matching down arrow and choose the colormatching option thatÕs right for you. Select None if you aremore interested in print speed rather than print color, if yourimage is created in a CMYK color model, if you have alreadycolor corrected your image for printing, or if you are usingsome other third party color matching software.
Select Algebraic if you would like the printer driver to makevery simple color balance adjustments based on an RGB colormodel. This option gives you more natural looking imageswithout actually utilizing any specific color matching software.
Select PrimaColor to enable color matching profiles writtenspecifically for the CD Color Printer. The PrimaColor byCandela Color Management System automatically adjusts thecolor of your image according to preconfigured printer profilesand default system profiles. This results in a very precise colormatch compliant with ICC standards.
Ink Saturation
This option controls the ink saturation of the printed image.When printing onto the printer manufacturerÕs TuffCoat CDmedia, this option should be left at its default setting of 100%.When printing onto other brands of printable CD media, youmay need to adjust this control in order to optimize the inksaturation for the printable surface of your specific CD media.Click and drag on the slideÕs box, or click on the left and rightarrows to change the ink saturation setting. Moving the slideÕsbox to the left reduces the overall ink saturation, while movingit to the right increases it.
Rotate 180
Select this option to rotate your printed image 180¡. Althoughthis option is not relevant when printing onto a CD, it doesprovide greater flexibility when printing onto a jewel casebooklet or insert.
510198 Fargo/CD Color PrtrII 2/26/99 12:36 PM Page 19
20 Using the CD Color Printer with Windows
Manual Load
Select this option when you are printing multiple copies of asingle design or if using an auto-loader. If you do not selectthis option when printing multiple copies, the printer has noway of knowing whether or not you have loaded a blank CDand will print each of the selected number of copies onto thesame CD. When this option is selected, you must press the
CD Tray button after each new CD blank is loaded. Thiswill close the CD Tray and let the printer know that a fresh CDis installed and ready to be printed.
Write Direct to Port
Select this option to provide faster print processing if printingfrom Windows 3.1x. When selected, this option allows theprinter driver to bypass the Windows 3.1x print manager andto send all print data directly to the printer. This optiondevotes all of your system resources to the current print job,thereby increasing overall print speed. When the print job isfinished, your system resources will again be devoted to thenormal function of your on-screen applications.
Depending upon the brand of your computer, you may or maynot wish to select this option when printing. For mostcomputers, selecting this option will enhance the rasterizingand printing process. In this case, the Write Direct to Portoption should be selected. For some computers, however, thisoption may not be supported by the particular brand of PC andshould not be selected.
Fast 32-bit Spooler
Select this option for consistently faster print processing underWindows 95/98. This option is only selectable if operatingunder Windows 95/98 and if the included 32-Bit Print Spoolersoftware has been installed. When selected, this option allowsthe printer driver to send all print jobs to the 32-Bit PrintSpooler rather than to the Windows system print spooler. SeePart C of this section for complete details on the 32-Bit PrintSpooler. This option and the 32-Bit Print Spooler software willnot function in Windows 3.1x or Windows NT.
510198 Fargo/CD Color PrtrII 2/26/99 12:36 PM Page 20
Using the CD Color Printer with Windows 21
Orientation
Select either Portrait or Landscape according to the orientationof your jewel case booklet/insert design. An icon illustratingeach orientation helps your remember the difference betweenthe two. This option does not apply when printing onto a CD.
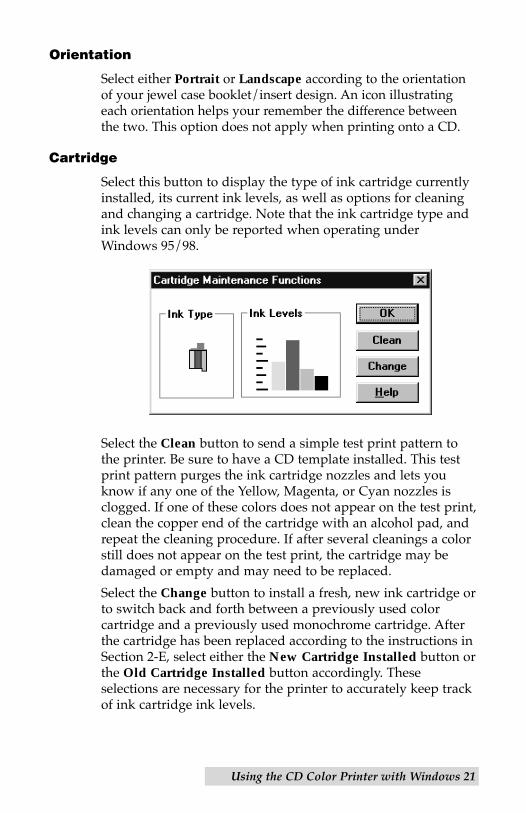
Cartridge
Select this button to display the type of ink cartridge currentlyinstalled, its current ink levels, as well as options for cleaningand changing a cartridge. Note that the ink cartridge type andink levels can only be reported when operating underWindows 95/98.
Select the Clean button to send a simple test print pattern tothe printer. Be sure to have a CD template installed. This testprint pattern purges the ink cartridge nozzles and lets youknow if any one of the Yellow, Magenta, or Cyan nozzles isclogged. If one of these colors does not appear on the test print,clean the copper end of the cartridge with an alcohol pad, andrepeat the cleaning procedure. If after several cleanings a colorstill does not appear on the test print, the cartridge may bedamaged or empty and may need to be replaced.
Select the Change button to install a fresh, new ink cartridge orto switch back and forth between a previously used colorcartridge and a previously used monochrome cartridge. Afterthe cartridge has been replaced according to the instructions inSection 2-E, select either the New Cartridge Installed button orthe Old Cartridge Installed button accordingly. Theseselections are necessary for the printer to accurately keep trackof ink cartridge ink levels.
510198 Fargo/CD Color PrtrII 2/26/99 12:36 PM Page 21
22 Using the CD Color Printer with Windows
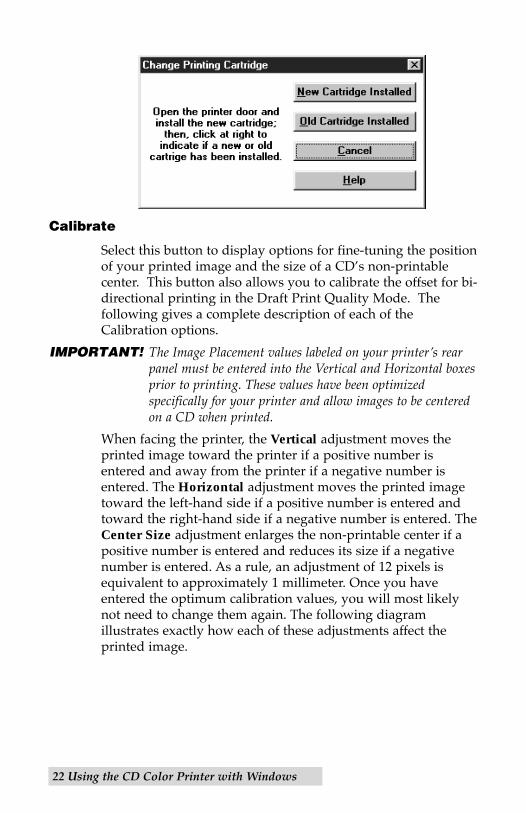
Calibrate
Select this button to display options for fine-tuning the positionof your printed image and the size of a CDÕs non-printablecenter. This button also allows you to calibrate the offset for bi-directional printing in the Draft Print Quality Mode. Thefollowing gives a complete description of each of theCalibration options.
IMPORTANT! The Image Placement values labeled on your printerÕs rearpanel must be entered into the Vertical and Horizontal boxesprior to printing. These values have been optimizedspecifically for your printer and allow images to be centeredon a CD when printed.
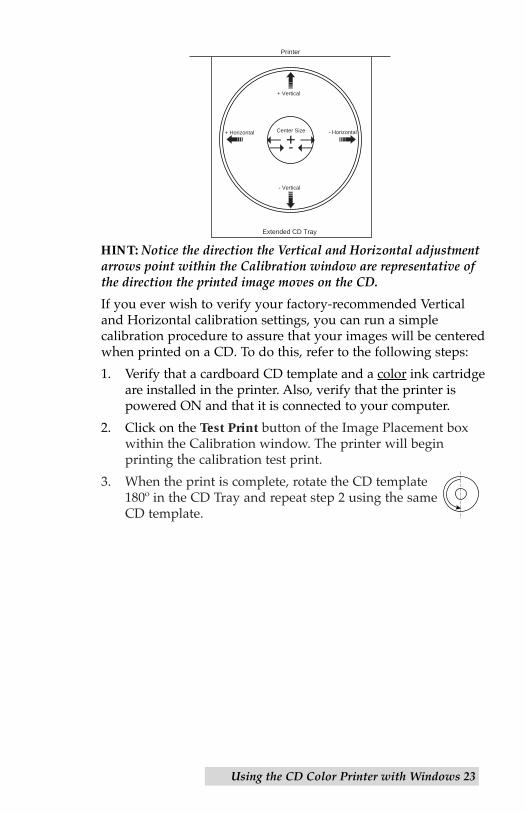
When facing the printer, the Vertical adjustment moves theprinted image toward the printer if a positive number isentered and away from the printer if a negative number isentered. The Horizontal adjustment moves the printed imagetoward the left-hand side if a positive number is entered andtoward the right-hand side if a negative number is entered. TheCenter Size adjustment enlarges the non-printable center if apositive number is entered and reduces its size if a negativenumber is entered. As a rule, an adjustment of 12 pixels isequivalent to approximately 1 millimeter. Once you haveentered the optimum calibration values, you will most likelynot need to change them again. The following diagramillustrates exactly how each of these adjustments affect theprinted image.
510198 Fargo/CD Color PrtrII 2/26/99 12:36 PM Page 22
Using the CD Color Printer with Windows 23
HINT: Notice the direction the Vertical and Horizontal adjustmentarrows point within the Calibration window are representative ofthe direction the printed image moves on the CD.
If you ever wish to verify your factory-recommended Verticaland Horizontal calibration settings, you can run a simplecalibration procedure to assure that your images will be centeredwhen printed on a CD. To do this, refer to the following steps:
1. Verify that a cardboard CD template and a color ink cartridgeare installed in the printer. Also, verify that the printer ispowered ON and that it is connected to your computer.
2. Click on the Test Print button of the Image Placement boxwithin the Calibration window. The printer will beginprinting the calibration test print.
3. When the print is complete, rotate the CD template180¼ in the CD Tray and repeat step 2 using the sameCD template.
- Horizontal+ Horizontal Center Size
Extended CD Tray
Printer
- Vertical
+ Vertical
510198 Fargo/CD Color PrtrII 2/26/99 12:36 PM Page 23
24 Using the CD Color Printer with Windows
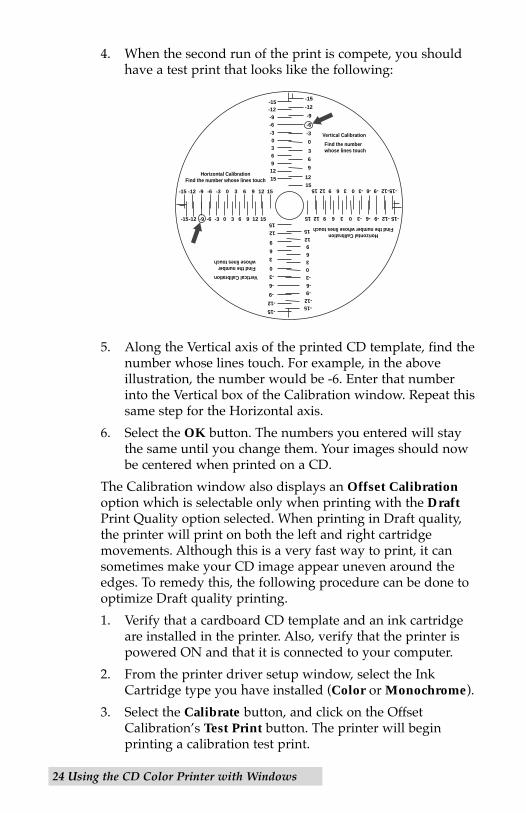
4. When the second run of the print is compete, you shouldhave a test print that looks like the following:
5. Along the Vertical axis of the printed CD template, find thenumber whose lines touch. For example, in the aboveillustration, the number would be -6. Enter that numberinto the Vertical box of the Calibration window. Repeat thissame step for the Horizontal axis.
6. Select the OK button. The numbers you entered will staythe same until you change them. Your images should nowbe centered when printed on a CD.
The Calibration window also displays an Offset Calibrationoption which is selectable only when printing with the DraftPrint Quality option selected. When printing in Draft quality,the printer will print on both the left and right cartridgemovements. Although this is a very fast way to print, it cansometimes make your CD image appear uneven around theedges. To remedy this, the following procedure can be done tooptimize Draft quality printing.
1. Verify that a cardboard CD template and an ink cartridgeare installed in the printer. Also, verify that the printer ispowered ON and that it is connected to your computer.
2. From the printer driver setup window, select the InkCartridge type you have installed (Color or Monochrome).
3. Select the Calibrate button, and click on the OffsetCalibrationÕs Test Print button. The printer will beginprinting a calibration test print.
-15-12 -9 -6 -3 0 3 6 9 12 15
-15 -12 -9 -6 -3 0 3 6 9 12 15
-15-12-9-6
-3036912
15Horizontal Calibration
Find the number whose lines touch
-15
-12
-9
-6
-3
0
3
6
9
12
15
Vertical Calibration
Find the numberwhose lines touch
Vertical Calibration
Find the numberwhose lines touch
Horizontal CalibrationFind the number whose lines touch
-15-12-9-6
-3036912
15
-15
-12
-9
-6
-3
0
3
6
9
12
15
-15-12-9-6-303691215
-15-12-9-6-303691215
510198 Fargo/CD Color PrtrII 2/26/99 12:36 PM Page 24
Using the CD Color Printer with Windows 25
4. After printing is completed, find the line that is thestraightest, and enter the number next to this line in theOffset box.
5. Select the OK button. The number you entered will stay thesame until you change it. Printing should now be optimizedfor Draft quality. Note that it is recommended you repeatthis procedure every time a new or different ink cartridge isinserted whenever you are printing in Draft quality.
After your selections have been made, close out of the printersetup window. You are now ready to go to an applicationprogram and print. All printer driver selections will stay thesame until you change them.
E. PRINTING A CD
Now that you have hooked up the printer, loaded the printsupplies, and installed the printer driver, you are ready to printyou first CD label. Follow these steps to print your first image:
1. Go to your favorite graphics application program. Or, installand open the Windows CD creation software included withyour printer.
2. Open or create the image file you wish to print. If using aprogram other than the included Windows CD creationsoftware, you will need to create a custom page or canvassize in your program according to the type of label youintend to create. The following tips will help you do this:
¥ If creating a label for a CD, set your page size to 4.56Ó x4.56Ó (116 x 116mm). Although your image will appearsquare on screen, the printer driver will automaticallycrop your image to the round shape of a CD forprinting. The driver will also automatically crop out thecenter 1.6Ó (41mm) of your image to accommodate aCDÕs non-printable center hub. If you would like tobetter visualize where the round outside edge and theround non-printable center of a CD will fall in relation toyour image, simply draw one circle with a 4.56Ó(116mm) diameter and another with a 1.6Ó (41mm) diameter. Then, center both circles withinyour active page or canvas area. These circles will serveas a guide while designing your image. Be sure to deletethese circles before printing.
510198 Fargo/CD Color PrtrII 2/26/99 12:36 PM Page 25
¥ If creating a label for a jewel case Booklet, set yourpage size to 4.63Ó x 4.67Ó (117.7 x 118.5mm).
¥ If creating a label for a jewel case Insert, set your pagesize to 4.57Ó x 5.9Ó (116 x 150mm).
3. Once you have created your image and are ready to print,select Print Setup (or the equivalent) from the programÕsFile menu to verify that the printer driver settings arecorrect for your image. Be sure the proper Media and InkCartridge options are selected according to the suppliesyou have installed in the printer. Once the driver is set,select Print from the programÕs File menu.
4. The printer driver will then begin to process the image.Depending upon the size of the image and the processingspeed of your computer, processing time can take fromseveral seconds to a few minutes.
5. Once processing is complete, the printer will begin to print.Print time will vary depending on whether you areprinting with a color or monochrome cartridge and onwhich Print Quality setting you selected. When printing iscomplete, the CD Tray will automatically open and remainfully extended until the next print job is received.
26 Using the CD Color Printer with Windows
510198 Fargo/CD Color PrtrII 2/26/99 12:36 PM Page 26
Using the CD Color Printer with Macintosh 27
Section 4: Using the CD Color Printerwith Macintosh
A. CONNECTING THE PRINTER TO YOUR COMPUTER
The CD Color Printer is designed to be used with any AppleMacintosh supporting Color QuickDrawª and running systemsoftware 7.0 or higher. For best performance, a Macintosh witha 68040 processor and 8MB of RAM (or higher) or aPowerPCª with 8MB of RAM (or higher) is recommended.The printer driver is accelerated for use with a PowerPC.
The printer is equipped with a high-speed serial port. This portis the means through which the printer receives data from yourcomputer. This port is not AppleTalkª compatible. To connectthe printer to your computer, simply obtain a standard serialcable with an 8 pin mini-DIN connection on each end, andrefer to the following steps:
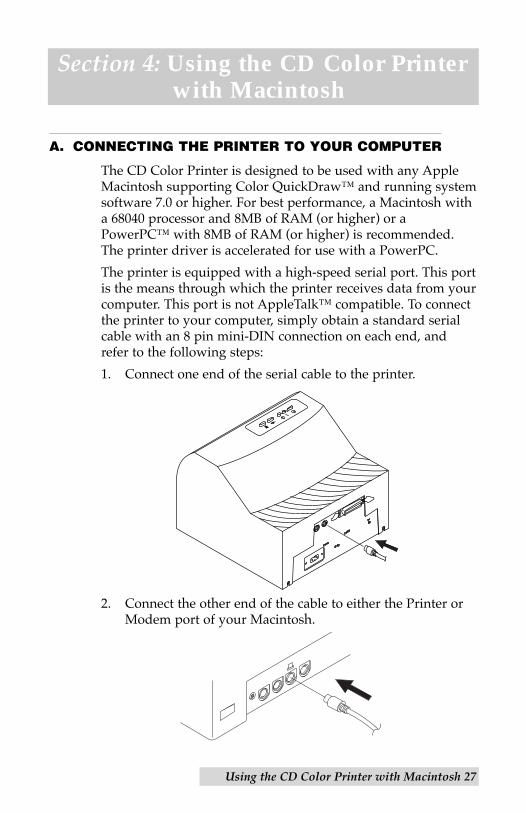
1. Connect one end of the serial cable to the printer.
2. Connect the other end of the cable to either the Printer orModem port of your Macintosh.
510198 Fargo/CD Color PrtrII 2/26/99 12:36 PM Page 27
28 Using the CD Color Printer with Macintosh
The printer must have its Power light illuminated to receivedata. If the light is not on, press the Power button.
B. INSTALLING THE PRINTER DRIVER
The CD Color Printer can be used with virtually any Macintoshapplication program. This is accomplished by installing what iscalled a Òprinter driver.Ó The printer driver is simply softwarewhich gives the printer all the information needed for printing.Use the following steps to install the printer driver.
NOTE: This section of the OperatorÕs Manual assumes that you are alreadyfamiliar with a Macintosh Operating System (OS) and know how itoperates. If you are not yet familiar with a Macintosh OS, consult theappropriate documentation to become familiar with the basics beforeproceeding.
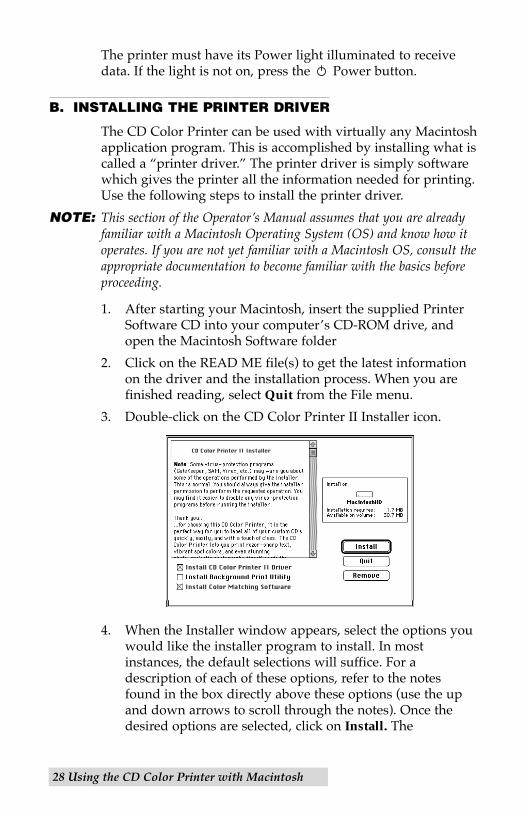
1. After starting your Macintosh, insert the supplied PrinterSoftware CD into your computerÕs CD-ROM drive, andopen the Macintosh Software folder
2. Click on the READ ME file(s) to get the latest informationon the driver and the installation process. When you arefinished reading, select Quit from the File menu.
3. Double-click on the CD Color Printer II Installer icon.
4. When the Installer window appears, select the options youwould like the installer program to install. In mostinstances, the default selections will suffice. For adescription of each of these options, refer to the notesfound in the box directly above these options (use the upand down arrows to scroll through the notes). Once thedesired options are selected, click on Install. The
CD Color Printer II Installer
Install CD Color Printer II Driver
Install Color Matching Software
510198 Fargo/CD Color PrtrII 2/26/99 12:36 PM Page 28
Using the CD Color Printer with Macintosh 29
appropriate files will automatically install onto yourcomputer. An alert box will then display indicating thatinstallation is complete.
5. Click on OK to exit the installer. Driver installation is nowcomplete.
C. THE CHOOSER
The Chooser is a Desk Accessory in the Apple menu. Before youcan use the printer, you need to select the CD Color Printer IIdriver using the Chooser. This instructs your Macintosh to sendprint jobs to the CD Color Printer II instead of to some otherprinter you may already have connected to your system. Referto the following steps to select the CD Color Printer II driver:
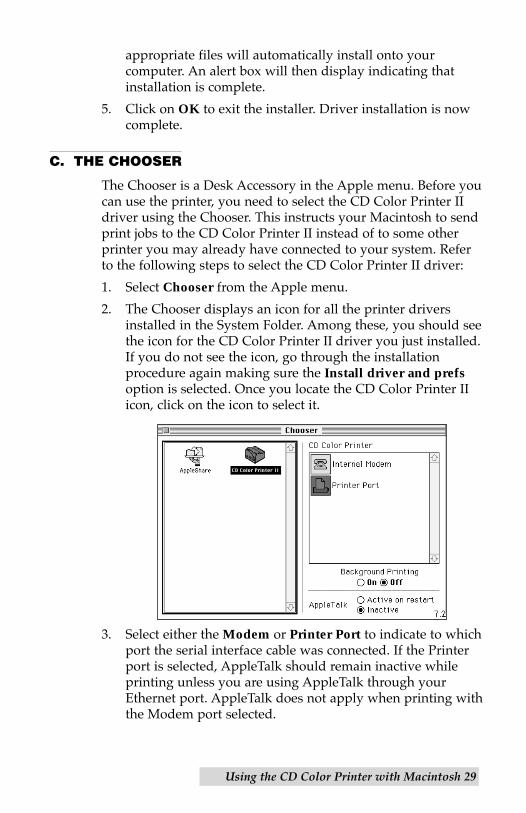
1. Select Chooser from the Apple menu.
2. The Chooser displays an icon for all the printer driversinstalled in the System Folder. Among these, you should seethe icon for the CD Color Printer II driver you just installed.If you do not see the icon, go through the installationprocedure again making sure the Install driver and prefsoption is selected. Once you locate the CD Color Printer IIicon, click on the icon to select it.
3. Select either the Modem or Printer Port to indicate to whichport the serial interface cable was connected. If the Printerport is selected, AppleTalk should remain inactive whileprinting unless you are using AppleTalk through yourEthernet port. AppleTalk does not apply when printing withthe Modem port selected.
CD Color Printer II
510198 Fargo/CD Color PrtrII 2/26/99 12:36 PM Page 29
30 Using the CD Color Printer with Macintosh
4. Select either On or Off to enable or disable the printerÕsBackground Printing function. When enabled, this functionallows you to work in the foreground of your applicationprogram while printing in the background. Please refer toSection 5 for more information on background printing.
The next time you open the Chooser, the selected driver will nolonger be highlighted. The Chooser remembers, however,which driver is the current one but does not display it whenopened.
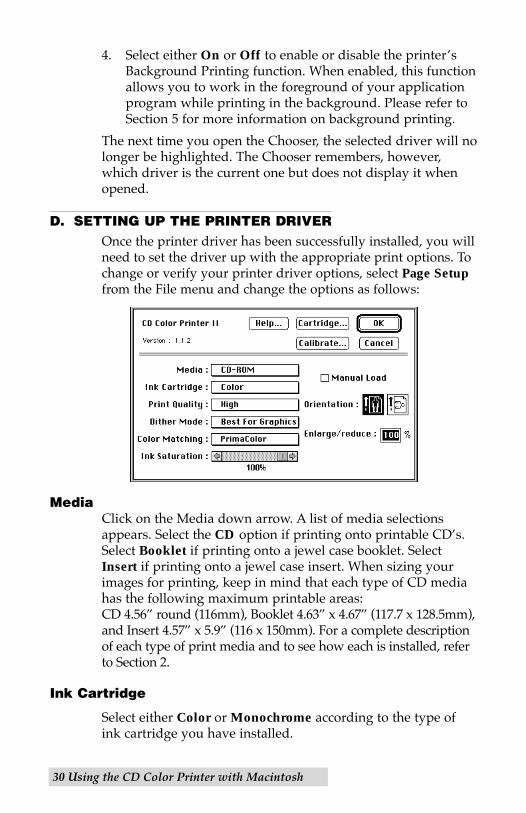
D. SETTING UP THE PRINTER DRIVEROnce the printer driver has been successfully installed, you willneed to set the driver up with the appropriate print options. Tochange or verify your printer driver options, select Page Setupfrom the File menu and change the options as follows:
MediaClick on the Media down arrow. A list of media selectionsappears. Select the CD option if printing onto printable CDÕs.Select Booklet if printing onto a jewel case booklet. SelectInsert if printing onto a jewel case insert. When sizing yourimages for printing, keep in mind that each type of CD mediahas the following maximum printable areas: CD 4.56Ó round (116mm), Booklet 4.63Ó x 4.67Ó (117.7 x 128.5mm),and Insert 4.57Ó x 5.9Ó (116 x 150mm). For a complete descriptionof each type of print media and to see how each is installed, referto Section 2.
Ink Cartridge
Select either Color or Monochrome according to the type ofink cartridge you have installed.
CD Color Printer II
PrimaColor
High
510198 Fargo/CD Color PrtrII 2/26/99 12:36 PM Page 30
Using the CD Color Printer with Macintosh 31
Print Quality
Select the appropriate print quality option for your image. Keepin mind that Draft provides the lowest quality but fastest print,and that Photo provides the highest quality but slowest print.You may wish to experiment with these options to see which oneis best for your particular CD label.
Dither Mode
Select this option to choose the appropriate dither mode foryour image. Select Best For Photos if printing a designprimarily composed of photographic images. Select Best ForGraphics if mainly printing text, lines, and graphics.
Color Matching
Click on the Color Matching box and choose the color matchingoption thatÕs right for you. Select None if you are moreinterested in print speed rather than print color, if you havealready color corrected your image for printing, or if you areusing some other third party color matching software.
Select Algebraic if you would like the printer driver to makevery simple color balance adjustments. This option gives youmore natural looking images without actually utilizing anyspecific color matching software.
Select PrimaColor to enable color matching profiles writtenspecifically for the CD Color Printer. The PrimaColor byCandela Color Management System automatically adjusts thecolor of your image according to preconfigured printer profilesand default system profiles. This results in a very precise colormatch compliant with ICC standards.
Select ColorSync to perform a ColorSyncª match on the imageto be printed. This option enables ColorSync to color correctyour image according to preset printer profiles and the selectedsystem profile. A default system profile is installed into theColorSync Preferences folder. For best results, however, it isrecommended that you use the specific profile for your monitor.To select this profile, select Control Panels from the Applemenu, and double-click on ColorSync System Profile. Then,click on the Set Profile… button, and select the specific profilefor your monitor. If you cannot find your monitorÕs profile,select the default system profile called Default CD Monitor.Click on the Select button. The profile is now selected.
510198 Fargo/CD Color PrtrII 2/26/99 12:36 PM Page 31
32 Using the CD Color Printer with Macintosh
Ink Saturation
This option controls the ink saturation of the printed image.When printing onto the printer manufacturerÕs TuffCoat CDmedia, this option should be left at its default setting of 100%.When printing onto other brands of printable CD media, youmay need to adjust this control in order to optimize the inksaturation for the printable surface of your specific CD media.Click and drag on the slideÕs box, or click on the left and rightarrows to change the ink saturation setting. Moving the slideÕsbox to the left reduces the overall ink saturation, while movingit to the right increases it.
Manual Load
Select this option when you are printing multiple copies of asingle design or if using an auto-loader. If you do not selectthis option when printing multiple copies, the printer has noway of knowing whether or not you have loaded a blank CDand will print each of the selected number of copies onto thesame CD. When this option is selected, you must press the
CD Tray button after each new CD blank is loaded. Thiswill close the CD Tray and let the printer know that a fresh CDis installed and ready to be printed.
Orientation
Select either Portrait or Landscape according to the orientationof your jewel case booklet/insert design. An icon illustratingeach orientation helps your remember the difference betweenthe two. This option does not apply when printing onto a CD.
Enlarge/reduce
This option alters the size of the printed image between theintegers of 25% and 400%. A setting of 100% indicates thedocument will be printed at actual size. Please note thatsignificantly enlarging or reducing the image may cause theimage to appear pixelated or ÒjaggyÓ when printed.
510198 Fargo/CD Color PrtrII 2/26/99 12:36 PM Page 32
Using the CD Color Printer with Macintosh 33
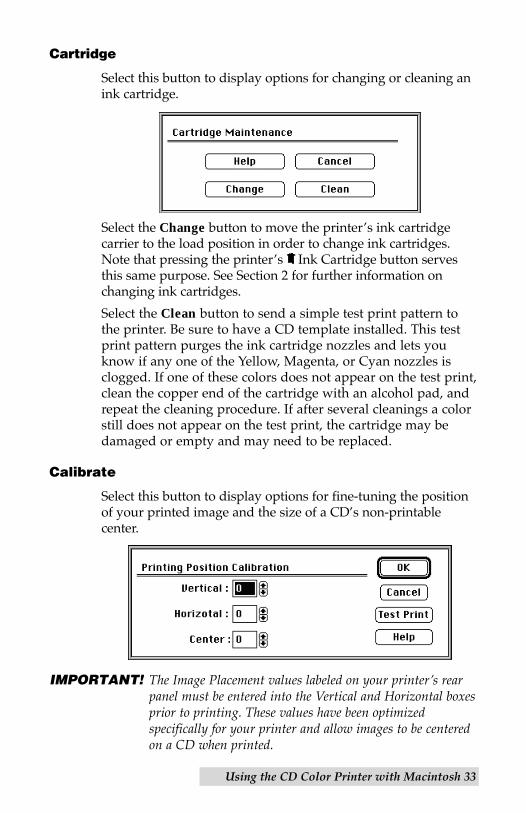
Cartridge
Select this button to display options for changing or cleaning anink cartridge.
Select the Change button to move the printerÕs ink cartridgecarrier to the load position in order to change ink cartridges.Note that pressing the printerÕs Ink Cartridge button servesthis same purpose. See Section 2 for further information onchanging ink cartridges.
Select the Clean button to send a simple test print pattern tothe printer. Be sure to have a CD template installed. This testprint pattern purges the ink cartridge nozzles and lets youknow if any one of the Yellow, Magenta, or Cyan nozzles isclogged. If one of these colors does not appear on the test print,clean the copper end of the cartridge with an alcohol pad, andrepeat the cleaning procedure. If after several cleanings a colorstill does not appear on the test print, the cartridge may bedamaged or empty and may need to be replaced.
Calibrate
Select this button to display options for fine-tuning the positionof your printed image and the size of a CDÕs non-printablecenter.
IMPORTANT! The Image Placement values labeled on your printerÕs rearpanel must be entered into the Vertical and Horizontal boxesprior to printing. These values have been optimizedspecifically for your printer and allow images to be centeredon a CD when printed.
510198 Fargo/CD Color PrtrII 2/26/99 12:36 PM Page 33
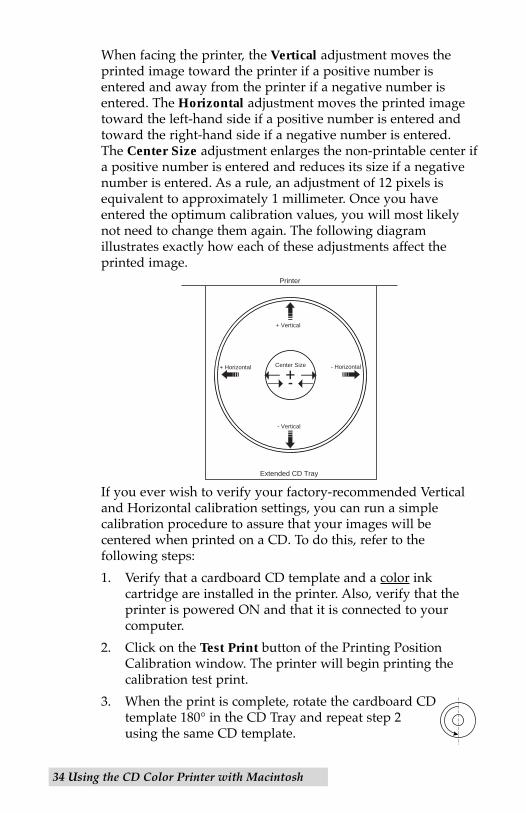
When facing the printer, the Vertical adjustment moves theprinted image toward the printer if a positive number isentered and away from the printer if a negative number isentered. The Horizontal adjustment moves the printed imagetoward the left-hand side if a positive number is entered andtoward the right-hand side if a negative number is entered. The Center Size adjustment enlarges the non-printable center ifa positive number is entered and reduces its size if a negativenumber is entered. As a rule, an adjustment of 12 pixels isequivalent to approximately 1 millimeter. Once you haveentered the optimum calibration values, you will most likelynot need to change them again. The following diagramillustrates exactly how each of these adjustments affect theprinted image.
If you ever wish to verify your factory-recommended Verticaland Horizontal calibration settings, you can run a simplecalibration procedure to assure that your images will becentered when printed on a CD. To do this, refer to thefollowing steps:
1. Verify that a cardboard CD template and a color inkcartridge are installed in the printer. Also, verify that theprinter is powered ON and that it is connected to yourcomputer.
2. Click on the Test Print button of the Printing PositionCalibration window. The printer will begin printing thecalibration test print.
3. When the print is complete, rotate the cardboard CDtemplate 180¡ in the CD Tray and repeat step 2using the same CD template.
34 Using the CD Color Printer with Macintosh
- Horizontal+ Horizontal Center Size
Extended CD Tray
Printer
- Vertical
+ Vertical
510198 Fargo/CD Color PrtrII 2/26/99 12:36 PM Page 34
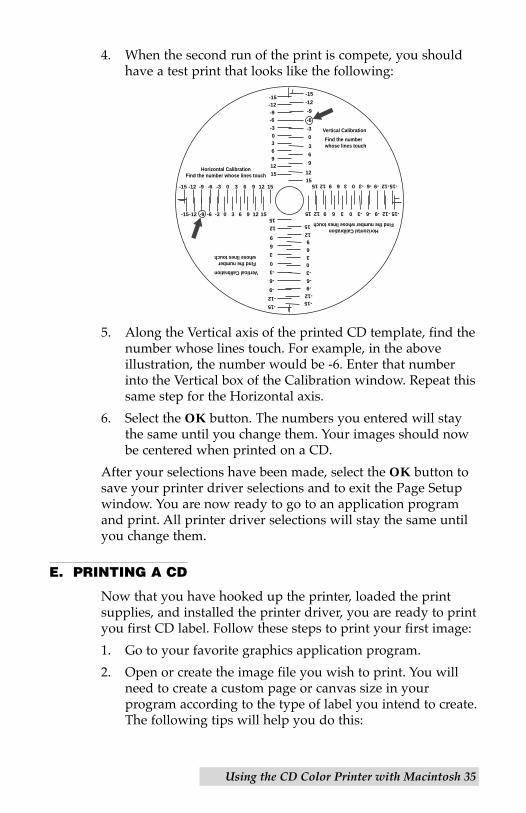
4. When the second run of the print is compete, you shouldhave a test print that looks like the following:
5. Along the Vertical axis of the printed CD template, find thenumber whose lines touch. For example, in the aboveillustration, the number would be -6. Enter that numberinto the Vertical box of the Calibration window. Repeat thissame step for the Horizontal axis.
6. Select the OK button. The numbers you entered will staythe same until you change them. Your images should nowbe centered when printed on a CD.
After your selections have been made, select the OK button tosave your printer driver selections and to exit the Page Setupwindow. You are now ready to go to an application programand print. All printer driver selections will stay the same untilyou change them.
E. PRINTING A CD
Now that you have hooked up the printer, loaded the printsupplies, and installed the printer driver, you are ready to printyou first CD label. Follow these steps to print your first image:
1. Go to your favorite graphics application program.
2. Open or create the image file you wish to print. You willneed to create a custom page or canvas size in yourprogram according to the type of label you intend to create.The following tips will help you do this:
Using the CD Color Printer with Macintosh 35
-15-12 -9 -6 -3 0 3 6 9 12 15
-15 -12 -9 -6 -3 0 3 6 9 12 15
-15-12-9-6
-3036912
15Horizontal Calibration
Find the number whose lines touch
-15
-12
-9
-6
-3
0
3
6
9
12
15
Vertical Calibration
Find the numberwhose lines touch
Vertical Calibration
Find the numberwhose lines touch
Horizontal CalibrationFind the number whose lines touch
-15-12-9-6
-3036912
15
-15
-12
-9
-6
-3
0
3
6
9
12
15
-15-12-9-6-303691215
-15-12-9-6-303691215
510198 Fargo/CD Color PrtrII 2/26/99 12:36 PM Page 35
¥ If creating a label for a CD, set your page size to 4.56Óx 4.56Ó (116 x 116mm). Although your image willappear square on screen, the printer driver willautomatically crop your image to the round shape of aCD for printing. The driver will also automaticallycrop out the center 1.6Ó (41mm) of your image toaccommodate a CDÕs non-printable center hub. If youwould like to better visualize where the round outsideedge and the round non-printable center of a CD willfall in relation to your image, simply draw one circlewith a 4.56Ó (116mm) diameter and another with a 1.6Ó(41mm) diameter. Then, center both circles within youractive page or canvas area. These circles will serve as aguide while designing your image. Be sure to deletethese circles before printing.
¥ If creating a label for a jewel case Booklet, set yourpage size to 4.63Ó x 4.67Ó (117.7 x 118.5mm).
¥ If creating a label for a jewel case Insert, set your pagesize to 4.57Ó x 5.9Ó (116 x 150mm).
3. Once you have created your image and are ready to print,select Page Setup (or the equivalent) from the programÕsFile menu to verify that the printer driver settings arecorrect for your image. Be sure the proper Media and InkCartridge options are selected according to the suppliesyou have installed in the printer. Once the driver is set,select Print from the programÕs File menu.
4. The printer driver will then begin to process the image.Depending upon the size of the image and the processingspeed of your computer, processing time can take fromseveral seconds to a few minutes.
5. Once processing is complete, the printer will begin to print.Print time will vary depending on whether you areprinting with a color or monochrome cartridge and onwhich Print Quality setting you selected. When printing iscomplete, the CD Tray will automatically open and remainfully extended until the next print job is received.
36 Using the CD Color Printer with Macintosh
510198 Fargo/CD Color PrtrII 2/26/99 12:36 PM Page 36
Using the Print Backgrounder for Macintosh 37
Section 5: Using the Print Backgrounderfor Macintosh
The printer driver for Macintosh provides a background printutility called the Print Backgrounder. This print utility is turnedon or off through the Chooser. When the Backgrounder isturned on, it allows you to conveniently continue working inthe foreground of your application while printing in thebackground. When Backgrounder is turned off, all print jobsare processed immediately in the foreground of yourapplication. The Backgrounder offers many helpful featureswhich are described further in this section.
A. INSTALLING THE BACKGROUNDER
The Backgrounder is installed by selecting the InstallBackground Print Utility option from within the printerdriverÕs installer program. This option is NOT selected bydefault, so if you did not select the Backgrounder option wheninstalling the printer driver, it is most likely not installed. Toinstall the Backgrounder, simply go through the printer driverinstallation procedure described in Section 4-B making surethat the Install Background Print Utility option is selected.The Backgrounder installs into the Extensions folder of yourstartup drive. Once installed, Backgrounder will automaticallyopen and close with the start and finish of each print job. Tomanually open Backgrounder, double-click on the PrintBackgrounder icon within the Extensions folder.
B. PRINTING WITH THE BACKGROUNDER
With the Backgrounder turned on in the Chooser, select Printfrom the File menu to print your image. A message appearstelling you the image is being spooled to disk for Background/Later processing. Once the message disappears, backgroundprocessing has begun so your application is free to be used forother work.
The print job is processed automatically by the Backgrounder.Other documents can be printed and, in turn, will be processedby Backgrounder. While Backgrounder is running, you can quitthe current application and start another without disturbing
510198 Fargo/CD Color PrtrII 2/26/99 12:36 PM Page 37
38 Using the Print Backgrounder for Macintosh
your print jobs. Backgrounder processes all print jobs in theorder in which they were sent to the printer.
C. THE BACKGROUNDER STATUS WINDOW
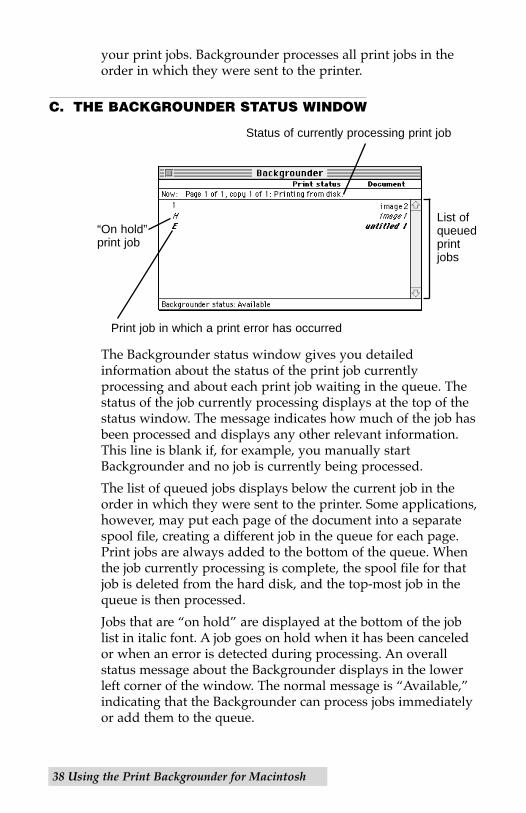
The Backgrounder status window gives you detailedinformation about the status of the print job currentlyprocessing and about each print job waiting in the queue. Thestatus of the job currently processing displays at the top of thestatus window. The message indicates how much of the job hasbeen processed and displays any other relevant information.This line is blank if, for example, you manually startBackgrounder and no job is currently being processed.
The list of queued jobs displays below the current job in theorder in which they were sent to the printer. Some applications,however, may put each page of the document into a separatespool file, creating a different job in the queue for each page.Print jobs are always added to the bottom of the queue. Whenthe job currently processing is complete, the spool file for thatjob is deleted from the hard disk, and the top-most job in thequeue is then processed.
Jobs that are Òon holdÓ are displayed at the bottom of the joblist in italic font. A job goes on hold when it has been canceledor when an error is detected during processing. An overallstatus message about the Backgrounder displays in the lowerleft corner of the window. The normal message is ÒAvailable,Óindicating that the Backgrounder can process jobs immediatelyor add them to the queue.
Status of currently processing print job
Print job in which a print error has occurred
List ofqueuedprintjobs
“On hold”print job
510198 Fargo/CD Color PrtrII 2/26/99 12:36 PM Page 38
Using the Print Backgrounder for Macintosh 39
D. BACKGROUNDER MENUS
File menu
Open Status Window and Close Status Window: Opens andcloses the Backgrounder status window. The Backgroundercontinues to work if the status window is closed.
Log Files: The Backgrounder has the ability to create andmaintain a sequential history file, or Log file, of Backgrounderprint jobs. This Log file can be enabled and manipulated withthe following commands of the File menu:
New Log File: Selects a new file in which to maintain yourongoing Backgrounder printing log.
Save Copy of Log as: Saves the current Log file to a newfile name or location of your specification.
Start Recording Log: Begins logging print history. Beforethe Log file is started, you are asked to specify a Log file inwhich to save your processed print job entries. Whenlogging begins, this option dims.
Stop Recording Log: Stops logging print history. Thisoption dims once print logging stops.
Get Info: Provides additional information about the currentlyselected print job. Click on the processing job or any job in thequeue, before selecting Get Info. Double-clicking on a job inthe status window is a shortcut for Get Info.
Quit: Exits the Backgrounder. Note that you cannot quit whilea job is being processed (see Stop Processing on the followingpage). All jobs in the queue are retained and processed whenBackgrounder is next started.
NOTE: The spool files are stored in the ÒSpool Folder,Ó inside the ÒSystemFolder.Ó If these files are deleted, the corresponding print jobs will belost, and must be printed again.
Admin menu
Stop Processing: Stops the Backgrounder from processing anyjobs, although it will still receive them and add them to thequeue. A dialog box is displayed if Stop Processing is selectedwhile Backgrounder is processing a job, asking when the jobshould be put on hold. The Backgrounder status box in the
510198 Fargo/CD Color PrtrII 2/26/99 12:36 PM Page 39
40 Using the Print Backgrounder for Macintosh
lower left-hand corner of the window indicates thatBackgrounder has stopped.
You cannot quit from Backgrounder while it is processing a job.Stop Processing must first be selected to cancel the processingjob and stop Backgrounder. When Backgrounder stops, themenu changes to Continue Processing. When this option isselected, the server starts processing the top job in the queue.
Preferences: Presents a dialog box containing options for fine-tuning the Backgrounder. Background printing prioritydetermines how much time your Mac spends processing theimage, and how much time it spends in the foregroundapplication (interpreting mouse clicks, key presses, etc.). Whenthe priority is set to High, Backgrounder processes the imagefaster, but the foreground application may become lessresponsive. With the priority set to Low, Backgrounder takeslonger to process the image, yet the responsiveness of the otherapplications is improved.
Jobs menu
All commands in the Jobs menu act on the currently selected job.
Hold: Prevents an individual job from being processed. Jobsthat are Òon holdÓ are displayed in italic font at the bottom ofthe queue. Placing a job on hold is useful if you wish to createa print job at present, yet save its processing until later.
If Hold is selected on the job currently processing, the job iscanceled before it is placed on hold. Canceling the current jobcan take some time, since the printer software may beperforming a lengthy task that cannot be interrupted.
Remove Hold: Moves the job from the hold section of the listand places it at the bottom of the waiting queue.
Delete: Permanently removes the selected print job. Thecorresponding spool file is deleted from the Spool Folder. Usethis command only when you are sure that you do not wish toprocess the job. Note that the job currently processing cannotbe deleted (this happens automatically when it is printedsuccessfully).
Move Job Up and Move Job Down: Adjusts the position of theselected job in the queue, allowing you to prioritize jobs. Thequeue is processed in top-to-bottom order.
510198 Fargo/CD Color PrtrII 2/26/99 12:36 PM Page 40
Using the Print Backgrounder for Macintosh 41
E. PROBLEMS DURING A BACKGROUND PRINT
Errors that are detected during a background print must bereported. The Backgrounder, however, cannot simply present adialog box as soon as the error occurs, since the dialog couldobscure work that is being done in the foreground. Errordialogs appear immediately, however, if the Backgrounder is inthe foreground when the error is detected.
If operating in the background, Backgrounder stops processinguntil it is brought to the front. When Backgrounder detects anerror, it beeps and visually indicates an error condition. Thiserror condition is signaled by alternately flashing between theApplication menu and the Backgrounder icon. A smalldiamond symbol is also displayed next to the Backgroundericon within the Application menu.
Complete and save any work in the foreground applicationbefore bringing the Backgrounder to the front. OnceBackgrounder is in the foreground, the error dialog displaysand processing continues or is canceled. Some errors forceBackgrounder to stop processing all jobs.
510198 Fargo/CD Color PrtrII 2/26/99 12:36 PM Page 41
42 Interpreting the PrinterÕs Indicator Lights
Section 6: Interpreting the Printer’sIndicator Lights
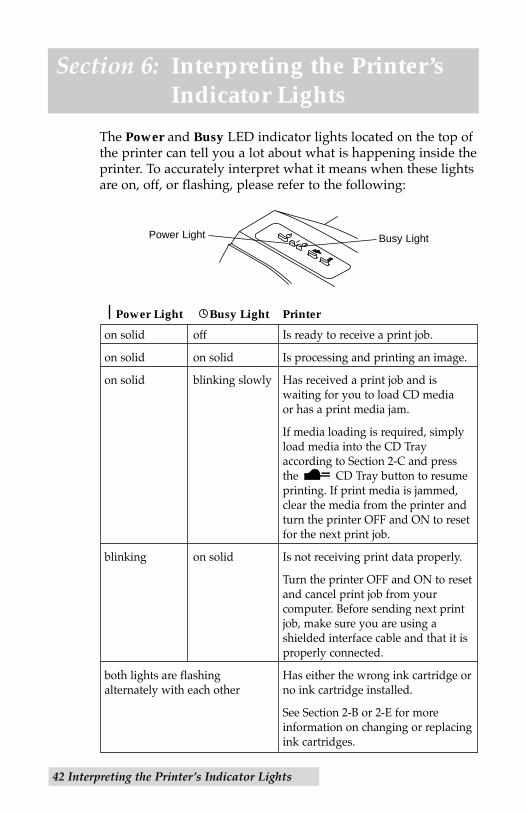
The Power and Busy LED indicator lights located on the top ofthe printer can tell you a lot about what is happening inside theprinter. To accurately interpret what it means when these lightsare on, off, or flashing, please refer to the following:
Power Light Busy Light Printer
on solid off Is ready to receive a print job.
on solid on solid Is processing and printing an image.
on solid blinking slowly Has received a print job and is waiting for you to load CD media or has a print media jam.
If media loading is required, simply load media into the CD Tray according to Section 2-C and press the CD Tray button to resume printing. If print media is jammed, clear the media from the printer and turn the printer OFF and ON to reset for the next print job.
blinking on solid Is not receiving print data properly.
Turn the printer OFF and ON to reset and cancel print job from your computer. Before sending next print job, make sure you are using a shielded interface cable and that it is properly connected.
both lights are flashing Has either the wrong ink cartridge oralternately with each other no ink cartridge installed.
See Section 2-B or 2-E for more information on changing or replacing ink cartridges.
Power Light Busy Light
510198 Fargo/CD Color PrtrII 2/26/99 12:36 PM Page 42
Maintaining the Printer 43
Section 7: Maintaining the Printer
The CD Color Printer is designed to require very littlemaintenance. Nevertheless, there are a few procedures you canperform on a regular basis or as needed to ensure yourprinterÕs best performance.
A. CLEANING THE INK CARTRIDGE NOZZLES
It may be necessary to clean the ink cartridge nozzles if theprinter does not seem to be laying down ink evenly or if yoususpect an ink cartridge nozzle has become slightly dried outor clogged. Refer to the cleaning procedure explained withinthe Cartridge button description of Section 3-D or 4-D to cleanthe cartridge nozzles.
B. CLEANING THE CD TRAY AND PRINTER CASING
If ink gets on the printerÕs CD Tray, it may stain if left on thetray too long. To avoid this, simply wipe off any ink from theCD Tray as soon as you notice it. Use a lint-free cloth slightlymoistened with isopropyl alcohol to wipe off the CD Tray. Ifnecessary, use these same items to wipe off the outside casingof the printer. Always disconnect your printer’s power cordbefore cleaning. Do not allow alcohol to drip inside theprinter. Resume printer operation only after the printer iscompletely dry.
C. CLEARING A CD MEDIA JAM
If CD Media becomes jammed inside the printer, first press theCD Tray button to try and eject the media. If this does
not work, turn the printer power OFF and gently try to clear orremove the CD media manually.
510198 Fargo/CD Color PrtrII 2/26/99 12:36 PM Page 43
44 Maintaining the Printer
D. TECHNICAL SUPPORT
If you have difficulty operating your CD Color Printer, theprocedures in this manual should, in most cases, solve theproblem. If you still have difficulty, contact the technicalsupport number listed on the insert in this manual. Technicalsupport representatives are available Monday through Friday,7:30 AM to 5:30 PM Central Standard Time.
510198 Fargo/CD Color PrtrII 2/26/99 12:36 PM Page 44
Technical Specifications 45
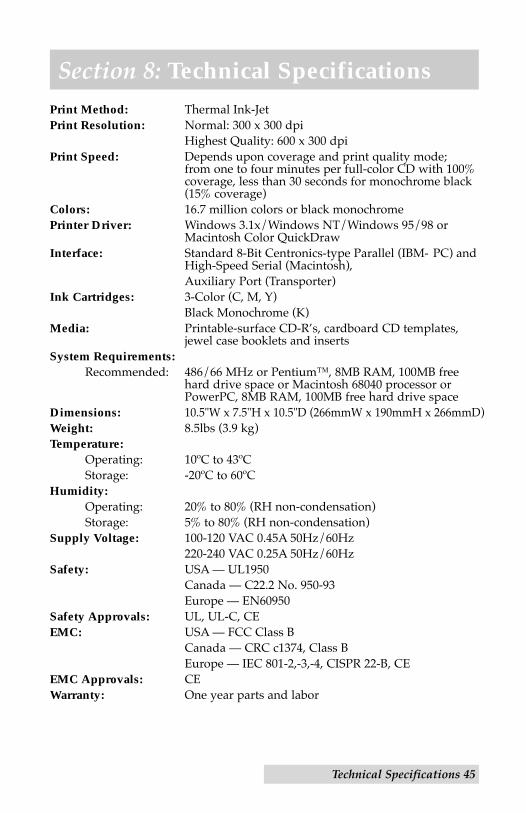
Section 8: Technical SpecificationsPrint Method: Thermal Ink-JetPrint Resolution: Normal: 300 x 300 dpi
Highest Quality: 600 x 300 dpiPrint Speed: Depends upon coverage and print quality mode;
from one to four minutes per full-color CD with 100%coverage, less than 30 seconds for monochrome black(15% coverage)
Colors: 16.7 million colors or black monochromePrinter Driver: Windows 3.1x/Windows NT/Windows 95/98 or
Macintosh Color QuickDrawInterface: Standard 8-Bit Centronics-type Parallel (IBM- PC) and
High-Speed Serial (Macintosh),Auxiliary Port (Transporter)
Ink Cartridges: 3-Color (C, M, Y)Black Monochrome (K)
Media: Printable-surface CD-RÕs, cardboard CD templates, jewel case booklets and inserts
System Requirements:Recommended: 486/66 MHz or Pentiumª, 8MB RAM, 100MB free
hard drive space or Macintosh 68040 processor or PowerPC, 8MB RAM, 100MB free hard drive space
Dimensions: 10.5"W x 7.5"H x 10.5"D (266mmW x 190mmH x 266mmD)Weight: 8.5lbs (3.9 kg)Temperature:
Operating: 10¼C to 43¼CStorage: -20¼C to 60¼C
Humidity:Operating: 20% to 80% (RH non-condensation)Storage: 5% to 80% (RH non-condensation)
Supply Voltage: 100-120 VAC 0.45A 50Hz/60Hz220-240 VAC 0.25A 50Hz/60Hz
Safety: USA Ñ UL1950Canada Ñ C22.2 No. 950-93Europe Ñ EN60950
Safety Approvals: UL, UL-C, CEEMC: USA Ñ FCC Class B
Canada Ñ CRC c1374, Class BEurope Ñ IEC 801-2,-3,-4, CISPR 22-B, CE
EMC Approvals: CEWarranty: One year parts and labor
510198 Fargo/CD Color PrtrII 2/26/99 12:36 PM Page 45
46 Interfacing Information
14
25 13
PIN 136 18
PIN 119
WIRE DIAGRAMDB36P DB25P
1 12 23 34 45 56 67 78 89 910 1011 1112 1213 1314 1432 1531 1636 17
THROUGH 3019 THROUGH 25SHELL SHELL
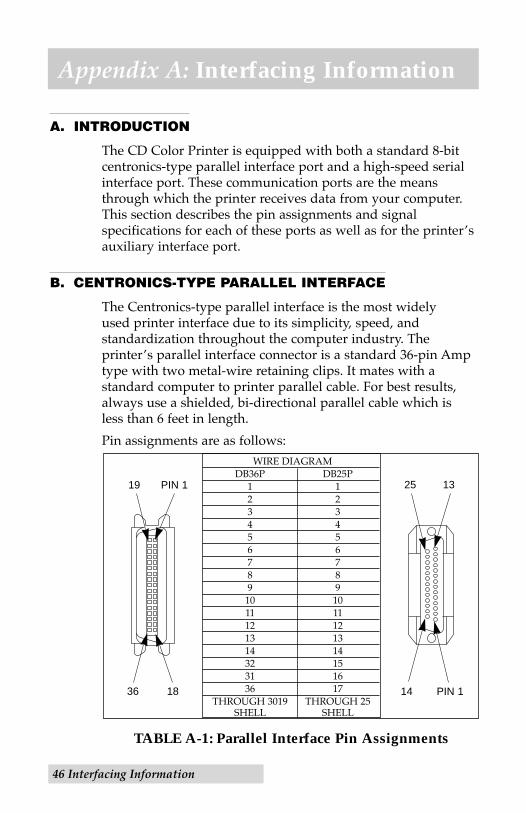
TABLE A-1: Parallel Interface Pin Assignments
Appendix A: Interfacing Information
A. INTRODUCTION
The CD Color Printer is equipped with both a standard 8-bitcentronics-type parallel interface port and a high-speed serialinterface port. These communication ports are the meansthrough which the printer receives data from your computer.This section describes the pin assignments and signalspecifications for each of these ports as well as for the printerÕsauxiliary interface port.
B. CENTRONICS-TYPE PARALLEL INTERFACE
The Centronics-type parallel interface is the most widely used printer interface due to its simplicity, speed, andstandardization throughout the computer industry. TheprinterÕs parallel interface connector is a standard 36-pin Amptype with two metal-wire retaining clips. It mates with astandard computer to printer parallel cable. For best results,always use a shielded, bi-directional parallel cable which isless than 6 feet in length.
Pin assignments are as follows:
510198 Fargo/CD Color PrtrII 2/26/99 12:36 PM Page 46
Interfacing Information 47
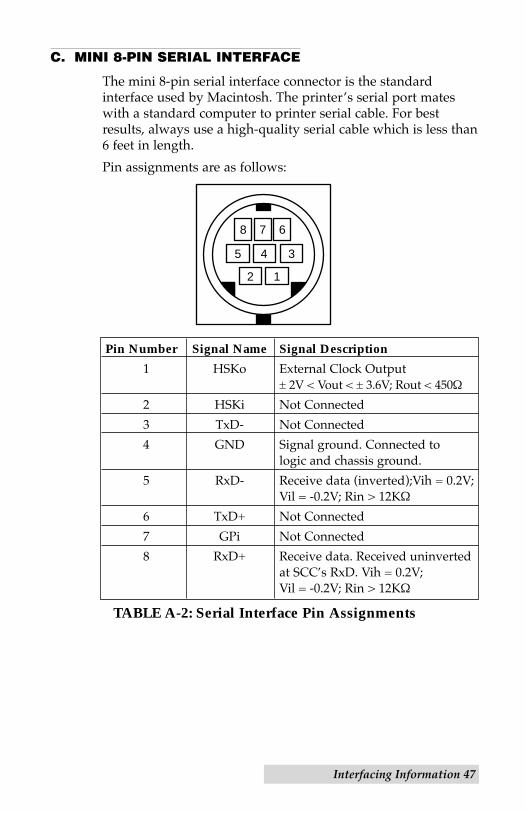
C. MINI 8-PIN SERIAL INTERFACE
The mini 8-pin serial interface connector is the standardinterface used by Macintosh. The printerÕs serial port mateswith a standard computer to printer serial cable. For bestresults, always use a high-quality serial cable which is less than6 feet in length.
Pin assignments are as follows:
Pin Number Signal Name Signal Description
1 HSKo External Clock Output± 2V < Vout < ± 3.6V; Rout < 450½
2 HSKi Not Connected
3 TxD- Not Connected
4 GND Signal ground. Connected to logic and chassis ground.
5 RxD- Receive data (inverted);Vih = 0.2V;Vil = -0.2V; Rin > 12K½
6 TxD+ Not Connected
7 GPi Not Connected
8 RxD+ Receive data. Received uninvertedat SCCÕs RxD. Vih = 0.2V; Vil = -0.2V; Rin > 12K½
TABLE A-2: Serial Interface Pin Assignments
8 7 6
5 4 3
2 1
510198 Fargo/CD Color PrtrII 2/26/99 12:36 PM Page 47
48 Interfacing Information
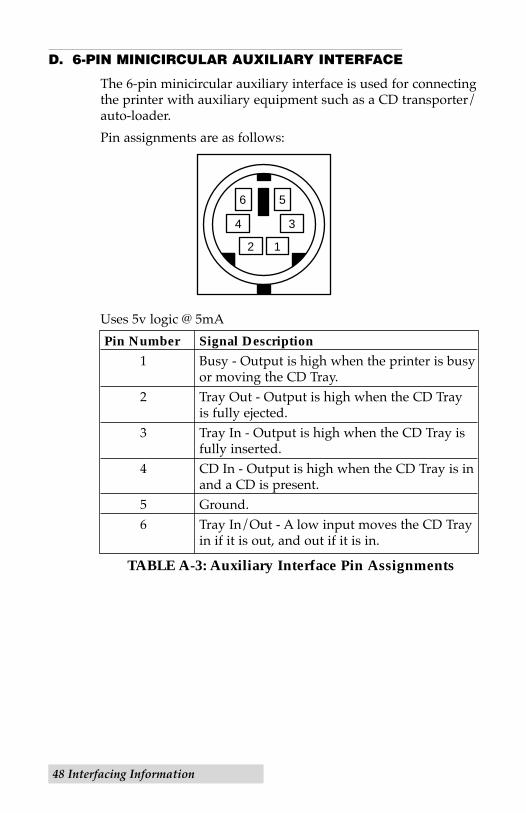
D. 6-PIN MINICIRCULAR AUXILIARY INTERFACE
The 6-pin minicircular auxiliary interface is used for connectingthe printer with auxiliary equipment such as a CD transporter/auto-loader.
Pin assignments are as follows:
Uses 5v logic @ 5mA
Pin Number Signal Description
1 Busy - Output is high when the printer is busyor moving the CD Tray.
2 Tray Out - Output is high when the CD Trayis fully ejected.
3 Tray In - Output is high when the CD Tray isfully inserted.
4 CD In - Output is high when the CD Tray is inand a CD is present.
5 Ground.6 Tray In/Out - A low input moves the CD Tray
in if it is out, and out if it is in.
TABLE A-3: Auxiliary Interface Pin Assignments
56
4 3
2 1
510198 Fargo/CD Color PrtrII 2/26/99 12:36 PM Page 48
Index 49
Index
Algebraic .....................................................................................19, 31Auxiliary Port ...............................................................................3, 48Backgrounder ...................................................................................37Booklet.................................................................................................7Busy Light.....................................................................................2, 42Calibrate ......................................................................................22, 33Cartridge......................................................................................21, 33CD’s ..................................................................................................4, 6CD Tray................................................................................................2CD Tray Button ..................................................................................2Chooser..............................................................................................29Color Matching ..........................................................................19, 31Dither Mode ...............................................................................19, 31Ink Cartridges ........................................................................4, 18, 30Ink Cartridge Button.........................................................................2Ink Saturation ............................................................................19, 32 Insert ....................................................................................................7Interface Port ..........................................................................3, 46, 47Jewel Case Booklet............................................................................7Jewel Case Insert ...............................................................................7Manual Load ..............................................................................20, 32Media ...........................................................................................18, 30Orientation..................................................................................21, 32Parallel Port ............................................................................3, 12, 46Print Quality...............................................................................18, 31Printable CD’s ....................................................................................4Printer Driver .............................................................................13, 28Power Button......................................................................................2Power Light ..................................................................................2, 42Rotate 180 ..........................................................................................19Self Test ...............................................................................................8Serial Port ...............................................................................3, 27, 47Technical Support............................................................................4432-Bit Print Spooler...................................................................15, 20Write Direct to Port .........................................................................20
510198 Fargo/CD Color PrtrII 2/26/99 12:36 PM Page 49

510198 Fargo/CD Color PrtrII 2/26/99 12:36 PM Page 50

510198 Fargo/CD Color PrtrII 2/26/99 12:36 PM Page 51

Printed in the United States of AmericaP/N 510198
510198 Fargo/CD Color PrtrII 2/26/99 12:36 PM Page 52