Embed Size (px)
Citation preview

CERTIFIED APPLICATION COUNSELOR DESIGNATED ORGANIZATION
CDO Organizational Maintenance Web Form User Guide May 15, 2020

CDO Organizational Maintenance Web Form User Guide i
CDO Organizational Maintenance Web Form User Guide
Table of Contents
Table of Contents
1. Introduction ............................................................................................................................ 1
1.1. Helpful Resources & Tips Getting Started ...................................................................... 1
2. Welcome Page ...................................................................................................................... 2
2.1. Create Access Code ....................................................................................................... 3
2.2. I Have an Access Code .................................................................................................. 5
2.3. Forgot Access Code ....................................................................................................... 6
3. CDO Summary Page ............................................................................................................. 9
3.1. Agreement PDF Table .................................................................................................. 10
3.1.1. Add Agreement ..................................................................................................... 10
3.1.2. Print PDF Agreement ............................................................................................ 10
3.1.3. Attestation and Agreement Upload ....................................................................... 11
3.2. Organization Headquarters Information Section .......................................................... 13
3.3. Service Locations Table ............................................................................................... 15
3.4. Additional Organization Details Section ....................................................................... 18
3.5. Contact Information Table ............................................................................................ 20
3.6. Replace Agreement ...................................................................................................... 26
4. Confirmation Page ............................................................................................................... 29
5. Active CDO CAC Roster ...................................................................................................... 30
5.1. Preparing for the CAC Roster ....................................................................................... 31
5.2. Adding a CAC Roster ................................................................................................... 31
5.2.1. Manual Process ..................................................................................................... 33
5.2.2. CAC Roster Template ........................................................................................... 35
5.3. Downloading Your Current CAC Roster ....................................................................... 42
5.4. Decertifying CACs ........................................................................................................ 44
5.5. Editing a CAC’s Information ......................................................................................... 46
6. Active CDO Renewal ........................................................................................................... 48
7. Next Steps ........................................................................................................................... 49
7.1. Certifying CAC Staff and Maintaining CAC Roster ....................................................... 49
7.2. Keeping Your CDO Information Current ....................................................................... 49
7.3. Renewing Your CMS-CDO Agreement ........................................................................ 50

CDO Organizational Maintenance Web Form User Guide ii
Table of Contents
7.4. Withdrawing from the CDO Program ............................................................................ 50
CDO Organizational Maintenance Web Form User Guide

CDO Organizational Maintenance Web Form User Guide iii
Table of Figures
Figure 1: Welcome to the Organizational Maintenance Web Form Page ........................... 2
Figure 2: Create Access Code Button ...................................................................................... 3
Figure 3: Create Access Code Page Fields ............................................................................. 4
Figure 4: Access Code Confirmation Page Continue Button ................................................ 4
Figure 5: Welcome Page Login Button ..................................................................................... 5
Figure 6: Welcome Page Forgot Access Code Link ............................................................... 6
Figure 7: Forgot Access Code Page Send PIN Button .......................................................... 6
Figure 8: Welcome Page Forgot Access Code Link ............................................................... 7
Figure 9: Forgot Access Code Window .................................................................................... 7
Figure 10: Reset Access Code Window ................................................................................... 8
Figure 11: Access Code Reset Confirmation Message ......................................................... 8
Figure 12: CMS-CDO Agreement Prompt ................................................................................ 9
Figure 13: Agreement PDF Table Add Link ........................................................................... 10
Figure 14: Attestation and Agreement Upload ...................................................................... 10
Figure 15: Attestation and Agreement Upload Page Choose File Button ......................... 11
Figure 16: Upload Attachment Button ..................................................................................... 11
Figure 17: Attestation and Agreement Upload Page View Link .......................................... 12
Figure 18: Save and Return Button ......................................................................................... 12
Figure 19: CDO Summary Page Submit Button .................................................................... 12
Figure 20: Edit Organization Headquarters Information Page Edit Link ........................... 13
Figure 21: Edit Organization Headquarters Information Save & Return Button .............. 14
Figure 22: Edit Service Locations Button ............................................................................... 15
Figure 23: Edit Service Locations Page State List ................................................................ 15
Figure 24: Edit Service Locations Page Available Counties List ....................................... 16
Figure 25: Edit Service Locations Page Selected Counties List ....................................... 16
Figure 26: Edit Service Locations Page Update Table Button ............................................ 17
Figure 27: Edit Service Locations Page Save and Return Button ...................................... 17
Figure 28: Additional Organization Information Edit Button ................................................ 18
CDO Organizational Maintenance Web Form User Guide

CDO Organizational Maintenance Web Form User Guide iv
Table of Figures
Figure 29: Edit Additional Organization Details Page Save & Return Button .................. 19
Figure 30: Contact Information Edit Link ................................................................................ 21
Figure 31: Edit Contact Information Save & Return Button ................................................. 22
Figure 32: Replace Contact Information Link ........................................................................ 22
Figure 33: Replace Contact Information Save & Return Button ......................................... 23
Figure 34: Add Secondary Contact Link ................................................................................. 23
Figure 35: Secondary Contact Information Save & Return Button .................................... 24
Figure 36: Secondary Contact Delete Link ............................................................................ 24
Figure 37: Ok Button on Pop-Up Window .............................................................................. 25
Figure 38: Contact Information Display without Secondary Contact Information ............ 25
Figure 39: Agreement PDF Table Replace Link ................................................................... 26
Figure 40: Warning Message for Agreement Replace Link ................................................ 26
Figure 41: Print PDF Agreement Button ................................................................................. 27
Figure 42: Attestation and Agreement Upload Page Cancel Button .................................. 28
Figure 43: CDO Summary Page Exit Button ......................................................................... 28
Figure 44: Confirmation Page PDF Button ............................................................................ 29
Figure 45: Confirmation Page Exit Button .............................................................................. 29
Figure 46: Add CAC Roster Button ......................................................................................... 32
Figure 47: CAC Roster Upload Page ...................................................................................... 32
Figure 48: CAC Roster Template No Button ......................................................................... 33
Figure 49: CAC Roster Summary Table Save and Return Button ..................................... 33
Figure 50: CAC Roster Submit Button .................................................................................... 34
Figure 51: Confirmation Page PDF and Exit Buttons ........................................................... 35
Figure 52: CAC Roster Template Link .................................................................................... 36
Figure 53: Enable Editing Button ............................................................................................. 36
Figure 54: Enable Content Button ........................................................................................... 36
Figure 55: CAC Roster Template Instructions Tab ............................................................... 36
CDO Organizational Maintenance Web Form User Guide

CDO Organizational Maintenance Web Form User Guide v
Table of Figures
Figure 56: CAC Roster Template CAC Roster Tab .............................................................. 37
Figure 57: CAC Information Fields .......................................................................................... 37
Figure 58: Add Certified Application Counselor Button ........................................................ 37
Figure 59: Create CAC Roster CSV File Button ................................................................... 37
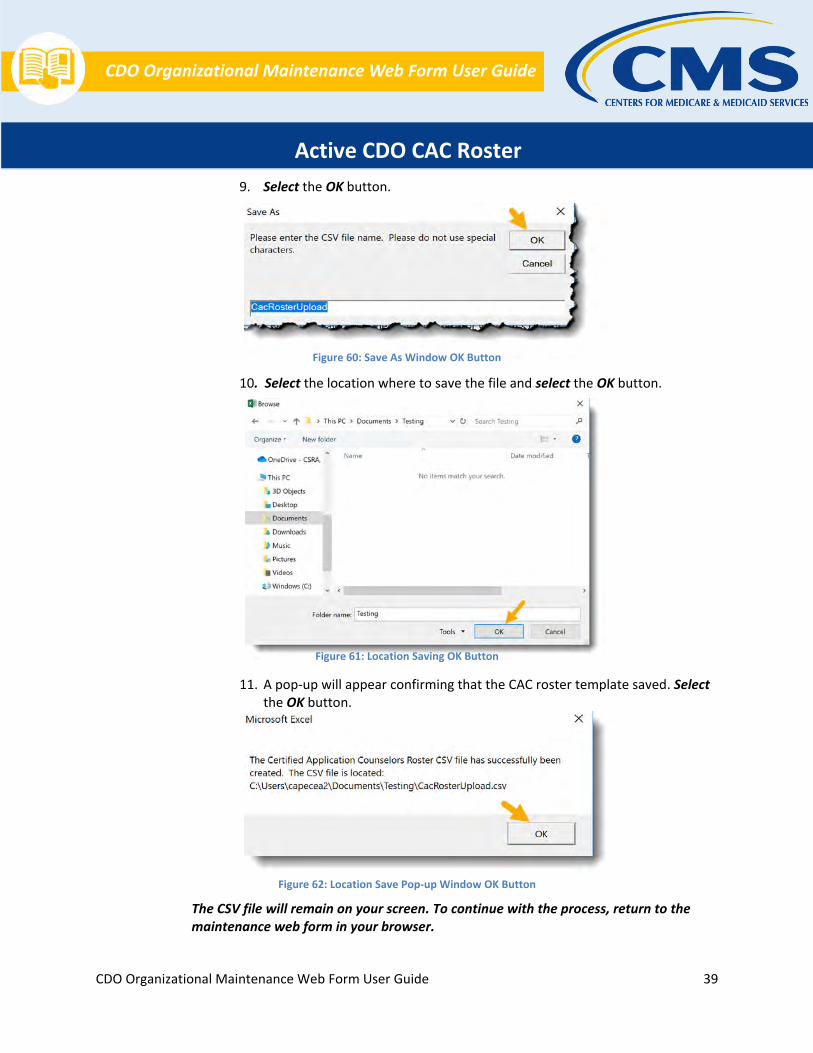
Figure 60: Save As Window OK Button .................................................................................. 38
Figure 61: Location Saving OK Button ................................................................................... 38
Figure 62: Location Save Pop-up Window OK Button ......................................................... 38
Figure 63: CAC Roster Template Yes Button ........................................................................ 39
Figure 64: CAC Roster Template Upload Attachment Button ............................................ 39
Figure 65: CAC Roster Save and Return Button .................................................................. 40
Figure 66: Add CAC Roster Submit Button ............................................................................ 40
Figure 67: Confirmation Page PDF Button ............................................................................ 41
Figure 68: CAC Download My Current CAC Roster Button ................................................ 42
Figure 69: CAC Roster CSV File Tab ..................................................................................... 42
Figure 70: CAC Roster Excel ........................................................................ .................. 43
Figure 71: File Location Save Button ...................................................................................... 43
Figure 72: Decertify Link ........................................................................................................... 44
Figure 73: Decertify Pop-up Window OK Button ................................................................... 44
Figure 74: CAC Roster Table ................................................................................................... 45
Figure 75: Exit Button ................................................................................................................ 45
Figure 76: CAC Edit Link .......................................................................................................... 46
Figure 77: CAC Contact Edit Fields and Save & Return Button ......................................... 46
Figure 78: Submit Button .......................................................................................................... 47
Figure 79: Expiration Date on the CDO Summary Page of the Maintenance Web Form....................................................................................................................................................... 48
CDO Organizational Maintenance Web Form User Guide

CDO Organizational Maintenance Web Form User Guide 1
Introduction
1. Introduction
The CDO Organizational Maintenance Web Form, referred to as the maintenance web form, is the platform that certified application counselor designated organizations (CDOs) use to maintain information about their organization with the Centers for Medicare and Medicaid Services (CMS).
You will use the maintenance web form to:
Submit, renew, or edit CMS-CDO agreements.
o New Applicants complete the initial application process by uploading a signed CMS-CDOagreement after submitting your initial application using the CDO Application web form andreceiving a preliminary approval.
o Existing CDOs complete a renewal application every two years by reviewing existingorganization information and uploading a renewal agreement.
Maintain administrative data on CDO headquarter location, service locations, designatedcontacts information, etc.
Submit and maintain a roster of certified application counselors (CACs).
Monitor CAC annual certification data from the Marketplace Learning Management System(MLMS).
New applicants can access the maintenance web form only after receiving a preliminary approval email from CMS, upon approval of the CDO application you submitted through the CDO Application web form. Moving forward, you can access the maintenance web form to keep your information up to date with CMS.
Note: Your unique contacts (Organization Senior Official, CAC Project Director, or Secondary Contact, if
applicable) must use the email address entered on the CDO application when creating an access code
or logging in to the maintenance web form.
CDO Organizational Maintenance Web Form User Guide

CDO Organizational Maintenance Web Form User Guide 2
Introduction
1.1. Helpful Resources & Tips Getting Started Before you get started, reference this user guide to understand what information you need to complete the maintenance web form.
You can access additional training materials, FAQs, and videos that describe how to complete the maintenance web form and the CAC roster on the CDO Program web page. Thisincludes:
CDO Learning Series – CDO Data Management – discusses resources available to youas a CDO and how to maintain information with CMS during the two (2)-yearagreement period.
CAC Roster Job Aid – provides step-by-step instructions about adding and updating aCAC roster.
CDO Organizational Maintenance Web Form Demonstration videos – Overview andAccess Code – provides an overview of the maintenance web form and a step-by-step demonstration of how to setup an access code and how to submit a CMS-CDOagreement the first time using the maintenance web form.
CDO Organizational Maintenance Web Form FAQs – provides frequently askedquestions about the maintenance web form and CAC application process includingthe CAC roster.
For a video that discusses the CDO application process, visit the CDO Learning Series – CDO
Application video.
For a video that discusses the process for renewing your CDO agreement with CMS, visit the CDO Learning Series – CDO Renewal video.
For a video that discusses the process for CDOs to add, update, and decertify CACs for the CAC roster, visit the CDO Learning Series – CAC Roster video.
For step-by-step instructions about adding and updating a CAC roster, review the CAC Roster
Job Aid.
CDO Organizational Maintenance Web Form User Guide

CDO Organizational Maintenance Web Form User Guide 3
Welcome Page
2. Welcome Page
After approving your application, CMS will send you an email with a link to the maintenance web form. Select the link to access the Welcome Page to the Organizational Maintenance Web Form.
Figure 1: Welcome to the Organizational Maintenance Web Form Page
Upon your initial login, you must enter or create an access code to proceed with the maintenance web form; you will follow different paths in the maintenance web form if you need to create an access code, you have an access code, or you forgot your access code. Table 1 provides guidance about how to proceed to the appropriate section of this user guide with instructions for each section.
Table 1: Welcome Page Options
If Then
You need to create an access code Refer to Section 2.1.
You have an access code Refer to Section 2.2.
You forgot your access code Refer to Section 2.3.
CDO Organizational Maintenance Web Form User Guide

CDO Organizational Maintenance Web Form User Guide 4
Welcome Page
2.1. Create Access Code If this is the first time accessing the maintenance web form and you do not have an access code, you will need to create one. To create an access code:
1. Select the Create Access Code button on the welcome page of the maintenance webform.
Figure 2: Create Access Code Button
2. Enter the email address for the Organization Senior Official, CAC Project Director, orSecondary Contact (if applicable) exactly as it appears on your CDO application.
3. Create and enter an access code that meets the requirements.4. Confirm the access code by entering it again.
CDO Organizational Maintenance Web Form User Guide

CDO Organizational Maintenance Web Form User Guide 5
Welcome Page
5. Select two security questions and enter the corresponding responses to each.6. Select the Continue button to proceed.
Figure 3: Create Access Code Button
7. The maintenance web form will take you to the Access Code Confirmation page. Onthe Access Code Confirmation page, select the Continue button. The maintenanceweb form will return you to the login page.
Refer to Table 1 to proceed through the login process.
Figure 4: Access Code Confirmation Page Continue Button
CDO Organizational Maintenance Web Form User Guide

CDO Organizational Maintenance Web Form User Guide 6
Welcome Page
2.2. I Have an Access Code If you already have an access code, proceed to I have an access code on the welcome page.
1. Enter your Login ID (i.e., your email address on record).2. Enter your access code.3. Select the Login button.
Figure 5: Welcome Page Login Button
CDO Organizational Maintenance Web Form User Guide

CDO Organizational Maintenance Web Form User Guide 7
Welcome Page
2.3. Forgot Access Code If you forgot your access code, select the Forgot Access Code link on the welcome page.
On the Forgot Access Code page:
1. Enter your email address on record.2. Select the Send PIN button. The maintenance web form will send a PIN to the email
address on record. The PIN expires in 24 hours.
Add [email protected] to your trusted emails to ensure you receive all CMS notifications and check your spam/junk folders.
Figure 6: Welcome Page Forgot Access Code Link
Figure 7: Forgot Access Code Page Send PIN Button
CDO Organizational Maintenance Web Form User Guide

CDO Organizational Maintenance Web Form User Guide 8
Welcome Page
Once you receive a six-digit PIN:
1. Return to the maintenance web form.2. Select the Forgot Access Code link on the welcome page.
3. On the Forgot Access Code page, enter the email address and PIN.4. Select the Continue button. The maintenance web form will take you to the Reset
Access Code page.
Figure 8: Welcome Page Forgot Access Code Link
Figure 9: Forgot Access Code Window
CDO Organizational Maintenance Web Form User Guide

CDO Organizational Maintenance Web Form User Guide 9
Welcome Page
On the Reset Access Code page:
1. Create and enter a new access code.2. Confirm your new access code by entering it again.3. Select the security questions and enter the corresponding responses to each.4. Select the Continue button to proceed.
Figure 10: Reset Access Code Window
5. On the Access Code Reset Confirmation page, select the Continue button. Themaintenance web form will return you to the login page.
Figure 11: Access Code Reset Confirmation Message
Refer to Table 1 to proceed through the login process.
CDO Organizational Maintenance Web Form User Guide

CDO Organizational Maintenance Web Form User Guide 10
CDO Summary Page
3. CDO Summary Page
The CDO Summary Page allows you to review and/or edit your organization’s information, update the CAC Rosters and upload your signed agreement.
CMS encourages CDOs to review and update all of your organizations information (addresses, contacts, services area, etc.) before uploading the agreement.
The maintenance web form will prompt you to review your information before uploading a new CMS-CDO agreement.
Figure 12: CMS-CDO Agreement Prompt
CMS needs a new CMS-CDO agreement signed by the Organization Senior Official if:
CMS recently approved your CDO application and does not have a signed agreement on file foryour organization.
You made changes to your organization’s information that affects your agreement. Thesechanges include organization name, Organization Senior Official’s name and title, service locationstates, and organization address.
Your CMS-CDO agreement expired.
Each section on the CDO Summary page represents a section of the CDO application web form. Table 2 provides guidance about how to proceed to the appropriate section of this user guide with instructions for each section.
CDO Organizational Maintenance Web Form User Guide

CDO Organizational Maintenance Web Form User Guide 11
CDO Summary Page Table 2: CDO Summary Page Sections
If Then
You want to generate a new copy of the agreement Refer to Section 3.1.
You want to review and/or edit your organization’s headquarters information
Refer to Section 3.2.
You want to review and/or edit your organization’s service locations Refer to Section 3.3.
You want to review and/or edit your organization’s additional details Refer to Section 3.4.
You want to edit or replace the contact information for one or more of your organization’s contacts
Refer to Section 3.5.
You want to view and/or replace your CMS-CDO signed agreement Refer to Section 3.6.
3.1. Agreement PDF Table The Agreement PDF table includes links that allow you to add, view, or replace your CMS-CDO signed agreement as needed. If you are on this page for the first time, you will have only one link to add your agreement.
3.1.1. Add Agreement
Select the Add link to upload your signed CMS-CDO agreement.
Figure 13: Agreement PDF Table Add Link
3.1.2. Print PDF Agreement
To download a copy of your pre-populated CMS-CDO agreement, select the Print PDF Agreement button.
Figure 14: Attestation and Agreement Upload
Refer to Section 3.6 to replace your newly generated agreement.
CDO Organizational Maintenance Web Form User Guide

CDO Organizational Maintenance Web Form User Guide 12
CDO Summary Page
3.1.3. Attestation and Agreement Upload
The Attestation and Agreement Upload page allows you to upload your signed CMS-CDO agreement.
To upload your signed CMS-CDO agreement:
1. Select the Choose File button under the Upload a File section. The maintenanceweb form displays a pop- up window.
2. In the pop-up window, navigate to the place where you saved the PDF version ofyour signed CMS-CDO agreement on your computer, select the file, and select theOK button. The maintenance web form will return you to the Attestation andAgreement Upload page.
3. Select the Upload Attachment button.
Figure 16: Upload Attachment Button
Figure 15: Attestation and Agreement Upload Page Choose File Button
CDO Organizational Maintenance Web Form User Guide

CDO Organizational Maintenance Web Form User Guide 13
CDO Summary Page
4. In the Attachment Summary table, select the View link to open your file. If theagreement did not upload, the maintenance web form will display a warningmessage.
Figure 17: Attestation and Agreement Upload Page View Link
5. Select the Save and Return button to return to the CDO Summary page.
Figure 18: Save and Return Button
6. On the CDO Summary page, select the Submit button to submit your CMS-CDOagreement.
Refer to Section 4 for Confirmation page instructions.
Figure 19: CDO Summary Page Submit Button
CDO Organizational Maintenance Web Form User Guide

CDO Organizational Maintenance Web Form User Guide 14
CDO Summary Page
3.2. Organization Headquarters Information Section The Organization Headquarters Information section allows you to review and/or edit your organization’s headquarters information.
1. In the Organization Headquarters Information section of the CDO Summary page,select the Edit link to edit your organization headquarters information. Themaintenance web form will take you to the Edit Organization HeadquartersInformation page.
Figure 20: Edit Organization Headquarters Information Page Edit Link
2. On the Edit Organization Headquarters Information page, update your informationas needed in the following fields:
Name
Federal Employee Identification Number (FEIN) (if applicable)
Phone Number
Email Address
Website URL (if applicable)
Street Address
City
State
Zip Code
CDO Organizational Maintenance Web Form User Guide

CDO Organizational Maintenance Web Form User Guide 15
CDO Summary Page 3. Select the Save and Return button to save your updates. The maintenance web form
will return you to the CDO Summary page.
Figure 21: Edit Organization Headquarters Information Save & Return Button
Refer to Table 2 and continue editing your organization’s information.
CDO Organizational Maintenance Web Form User Guide

CDO Organizational Maintenance Web Form User Guide 16
CDO Summary Page
3.3. Service Locations Table The Service Locations table allows you to review and/or edit the states and counties in which your organization provides enrollment assistance.
1. In the Service Locations table of the CDO Summary page, select the Edit link to edityour service locations. The maintenance web form navigates to the Edit ServiceLocations page.
Figure 22: Edit Service Locations Button
2. On the Edit Service Locations page, select the state in which your organization willprovide enrollment assistance services from the drop-down menu. The AvailableCounties list will populate with the counties for the state chosen.
Figure 23: Edit Service Locations Page State List
3. Select the county or counties in which your organization will provide enrollmentassistance services.
CDO Organizational Maintenance Web Form User Guide

CDO Organizational Maintenance Web Form User Guide 17
CDO Summary Page 4. Move the applicable counties to the Selected Counties list by using the arrows above
the Available Counties. You may filter the list of counties by entering the countyname in the Filter field.
Figure 24: Edit Service Locations Page Available and Selected Counties List
5. To remove a county or state, select the state and move the list of counties from theSelected Counties column to the Available Counties column.
Figure 25: Edit Service Locations Page Available and Selected Counties List
6. Select the Update Table button. The Service Locations table will include all servicelocations for the organization that you selected.
CDO Organizational Maintenance Web Form User Guide

CDO Organizational Maintenance Web Form User Guide 18
CDO Summary Page
Figure 26: Edit Service Locations Page Update Table Button
7. Repeat steps 2 to 6 for each state in which your organization will provide enrollmentassistance services.
8. Select the Save and Return button to save your updates. The maintenance web formwill return you to the CDO Summary page.
Figure 27: Edit Service Locations Page Save and Return Button
CDO Organizational Maintenance Web Form User Guide

CDO Organizational Maintenance Web Form User Guide 19
CDO Summary Page
Refer to Table 2 to continue editing your organization’s information.
3.4. Additional Organization Details Section The Additional Organization Details section allows you to review and/or edit information about the type of work your organization performs.
1. In the Additional Organization Details section of the CDO Summary page, select theEdit link to edit your additional organization information. The maintenance web formnavigates to the Edit Additional Organization Details page.
Figure 28: Additional Organization Information Edit Button
2. On the Edit Additional Organization Details page, update your information asneeded in the following fields:
Primary Organization Type
Organization Specialty
Enrollment Assistance type
CDO Organizational Maintenance Web Form User Guide

CDO Organizational Maintenance Web Form User Guide 20
CDO Summary Page
3. Select the Save and Return button to save your updates. The maintenance web formwill return you to the CDO Summary page.
Figure 29: Edit Additional Organization Details Page Save & Return Button
Refer to Table 2 to continue editing your organization’s information.
CDO Organizational Maintenance Web Form User Guide

CDO Organizational Maintenance Web Form User Guide 21
CDO Summary Page
3.5. Contact Information Table The Contact Information table allows you to review and/or edit information for your organization’s contacts. Each organization is required to have an Organization Senior Official and a CDO Project Director. You may designate a third contact, referred to as the secondary contact, but is not required. Table 3 provides guidance about how to add or edit a contact and how to delete an optional secondary contact.
Table 3: Contact Information Options
If Then
You want to edit a contact. (e.g., an existing contact’s last name changed or their email address or phone number changed)
1. Select the Edit link beneath the title of the contact (refer to Figure 30).The maintenance web form will take you to the Edit ContactInformation page. The role you selected appears and all of the fieldsprepopulate with the Organization Contact Information on record.
2. Update your information as needed in the following fields:
First Name
Last Name
Email Address Job Title Phone Number
Phone Extension (if applicable)3. Select the Save and Return button to save your updates (refer to Figure
31). The maintenance web form will return you to the CDO Summarypage.
You want to replace a contact. (e.g., an existing contact left the organization and someone else is taking their place)
1. Select the Replace link beneath the title of the contact (refer toFigure 32). The maintenance web form will take you to the ReplaceContact Information page and the role you selected appears.
2. Update your information as needed in the following fields:
First Name Last Name Email Address
Job Title
Phone Number
Phone Extension (if applicable)3. Select the Save and Return button to save your updates (refer to Figure
33). The maintenance web form will return you to the CDO Summarypage.
CDO Organizational Maintenance Web Form User Guide

CDO Organizational Maintenance Web Form User Guide 22
CDO Summary Page
If Then
Once approved, you want to add a Secondary Contact
1. Select the Add Secondary Contact (refer to Figure 34).2. Enter the Secondary Contact information as needed in the
following fields: First Name
Last Name
Email Address
Job Title Phone Number Phone Extension (if applicable)
3. Select the Save and Return button to save your updates (refer toFigure 35). The maintenance web form will return you to the CDOSummary page.
You want to delete a secondary contact
1. Select the Delete link beneath the title of the contact (refer to Figure36).
2. Select OK in the pop-up window (refer to Figure 37).3. The CDO Summary page will re-fresh and will no longer list anything in
the secondary contact information section (refer to Figure 38).
Figure 30: Contact Information Edit Link
CDO Organizational Maintenance Web Form User Guide

CDO Organizational Maintenance Web Form User Guide 23
CDO Summary Page
Figure 31: Edit Contact Information Save & Return Button
Figure 32: Replace Contact Information Link
CDO Organizational Maintenance Web Form User Guide

CDO Organizational Maintenance Web Form User Guide 24
CDO Summary Page
Figure 33: Replace Contact Information Save & Return Button
Figure 34: Add Secondary Contact Link
CDO Organizational Maintenance Web Form User Guide

CDO Organizational Maintenance Web Form User Guide 25
CDO Summary Page
Figure 35: Secondary Contact Information Save & Return Button
Figure 36: Secondary Contact Delete Link
CDO Organizational Maintenance Web Form User Guide

CDO Organizational Maintenance Web Form User Guide 26
CDO Summary Page
Figure 37: OK Button on Pop-Up Window
Figure 38: Contact Information Display without Secondary Contact Information
CDO Organizational Maintenance Web Form User Guide

CDO Organizational Maintenance Web Form User Guide 27
CDO Summary Page
3.6. Replace Agreement If you made changes to your organization’s information during your session, the Replace link will appear in the Agreement PDF table on the CDO Summary page and the maintenance web form will prompt you to generate an up-to-date signed CMS-CDO agreement.
To generate your up-to-date signed CMS-CDO agreement:
1. Select the Replace link in the Agreement PDF table.
Figure 39: Agreement PDF Table Replace Link
2. A pop-up will appear asking if you need to make any changes to your informationbefore you proceed to uploading an agreement. Note: while an agreement is underreview, your record will lock and you will not be able to make any changes until youreceive a determination from CMS. Select the OK button to proceed to upload youragreement. Select the Cancel button to stay on the CDO Summary page and changeyour information or add your CAC roster as needed.
Figure 40: Warning Message for Agreement Replace Link
CDO Organizational Maintenance Web Form User Guide

CDO Organizational Maintenance Web Form User Guide 28
CDO Summary Page
3. Select the Print PDF Agreement button. The maintenance web form opens a newwindow in your internet browser that displays your updated CMS-CDO agreement.
Figure 41: Print PDF Agreement Button
4. Return to the maintenance web form window in your internet browser.
You have two options for when to upload your signed agreement. You can (1) keep the maintenance web form open, obtain your Organization Senior Official’s signature, and return to the maintenance web form within 60 minutes or (2) you can exit the maintenance web form, obtain your Organization Senior Official’s signature, and log back into the maintenance web form later.
Refer to Table 4 for instructions for each option.
Table 4: Options for Uploading Up-to-Date Agreement
If Then
You want to remain in the maintenance web form to upload your up-to-date agreement.
1. Outside of the maintenance web form, obtain yourOrganization Senior Official’s signature on the updatedCMS-CDO agreement. Your session will expire in 60minutes so make sure you return to the maintenanceweb form within this time. If your session expires, followthe instructions in the next row of this table.
2. Refer to Section 3.1.3 of this guide for instructions foruploading your up-to-date CMS-CDO signedagreement on the Attestation and Agreement Uploadpage of the maintenance web form.
You want to return to the maintenance web form to upload your up-to-date agreement
1. On the Attestation and Upload page, select the Cancelbutton (refer to Figure 42).
2. On the CDO Summary page, select the Exit button(refer to Figure 43).
3. Outside of the maintenance web form, obtain yourOrganization Senior Official’s signature on the updatedCMS-CDO agreement.
4. Return to the maintenance web form and refer toSection 3.1.3 of this guide for instructions foruploading your up- to-date CMS-CDO signedagreement on the Attestation and Agreement Uploadpage of the maintenance web form.
CDO Organizational Maintenance Web Form User Guide

CDO Organizational Maintenance Web Form User Guide 29
CDO Summary Page
Figure 42: Attestation and Agreement Upload Page Cancel Button
Figure 43: CDO Summary Page Exit Button
CDO Organizational Maintenance Web Form User Guide

CDO Organizational Maintenance Web Form User Guide 30
Confirmation Page
4. Confirmation Page
The Confirmation page provides a summary of your session and allows you to print and save a PDF confirmation containing the information you submitted. CMS recommends that you print and save this confirmation for your records. You will only be able to access this confirmation at the end of your session. The confirmation does not save and you cannot return to save and print it later.
1. Select the PDF button to generate a PDF confirmation.
2. Select the Exit button to exit the maintenance web form.
Figure 45: Confirmation Page Exit Button
Figure 44: Confirmation Page PDF Button
CDO Organizational Maintenance Web Form User Guide

CDO Organizational Maintenance Web Form User Guide 31
Active CDO CAC Roster
5. Active CDO CAC Roster
For plan year 2021 and beyond, CMS requires that CDOs now add a roster of their active CACs using new functionality on the maintenance web form.
This added functionality is a required component to your CDO record with CMS during your two (2)-year agreement period. This new feature will not automatically assign CAC IDs for you; your CAC Project Director is still responsible for assigning CAC IDs and documenting them on the maintenance web form.
You can access additional training materials, FAQs, and videos that describe how to complete the maintenance web form and the CAC roster on the CDO Program web page. This includes:
CDO Learning Series – CAC Roster – discusses the process for CDOs to add, update, anddecertify CACs for the CAC roster.
CAC Roster Job Aid – provides step-by-step instructions about adding and updating a CACroster.
To access a web page that provides information for active CDOs including information about the CDO renewal requirement, the CAC roster, and how to maintain CDO information during the agreement period, visit the Information for active CDOs web page.
As an active CDO, you must assign unique IDs to each of your CACs and track their completion of the annual assister certification training. The ability to document your CAC information is available using the maintenance web form.
This functionality allows CDOs to:
Document your CACs’ full names, email addresses, and CAC IDs.
Monitor your CACs’ annual assister certification training completion dates from the MLMS.
Maintain your roster of CACs during their two (2)-year agreement period.
Any of your organization’s unique contacts can access the maintenance web form and complete these actions.
CDO Organizational Maintenance Web Form User Guide

CDO Organizational Maintenance Web Form User Guide 32
Active CDO CAC Roster
5.1. Preparing for the CAC Roster To prepare to upload your CAC roster:
1. Make sure your unique contacts can access the maintenance web form.2. Ensure every CAC has a unique ID. For guidance on assigning CAC ID, visit How
to Assign Unique CAC IDs.3. Gather all of the necessary CAC data and have it readily available to complete
all of the information for the roster:
First Name
Last Name
Email Address
Current CAC ID — e.g., USCDOZ0012345, a maximum of 13 characters in length
Previous CAC ID — if applicable
5.2. Adding a CAC Roster CDOs have two options when adding your roster of CACs:
1. Manually using the maintenance web form to submit information on your CACsone-by-one (you can manually add up to 5 CACs with this method).
2. Using a CMS provided template to collect information for many CACs at onceand upload it to the maintenance web form.
You can access additional training materials, FAQs, and videos that describe how to complete the maintenance web form and the CAC roster on the CDO Program web page. Thisincludes:
CDO Learning Series – CAC Roster – discusses the process for CDOs to add, update,and decertify CACs for the CAC roster.
CDO Organizational Maintenance Web Form Demonstration Videos – CAC Roster –provides a step-by-step demonstration of how to add and update a CAC roster usingthe maintenance web form.
CAC Roster Job Aid – provides step-by-step instructions about adding and updating aCAC roster.
On the CDO Summary page, scroll down to the CACs section. The first time you access this section, your CAC roster table will be empty. Once you add and submit your roster, you will be able to view and edit your CACs directly from this table on the CDO Summary page.
CDO Organizational Maintenance Web Form User Guide

CDO Organizational Maintenance Web Form User Guide 33
Active CDO CAC Roster
To add your roster of CACs:
1. Select the Add CAC Roster button.
2. On the CAC Roster Upload page, review the Instructions.
Figure 46: Add CAC Roster Button
Figure 47: CAC Roster Upload Page
CDO Organizational Maintenance Web Form User Guide

CDO Organizational Maintenance Web Form User Guide 34
Active CDO CAC Roster
5.2.1. Manual Process
To begin the manual upload process:
1. Select the No button. Once you select the No button on the CAC RosterUpload page, the CAC Roster Manual Upload section will appear.
Figure 48: CAC Roster Template No Button
2. Enter the information indicated by a red asterisk.
First Name
Last Name
Email Address
Current CAC ID
Previous CAC ID — enter a previous CAC ID only if applicable. Thisis an optional field.
3. Select the Save button if only adding one CAC and the Save and New buttonif adding multiple CACs.
4. The CAC Roster Summary table will appear displaying the information youjust entered. Review the information carefully, and select the Save andReturn button.
Figure 49: CAC Roster Summary Table Save and Return Button
CDO Organizational Maintenance Web Form User Guide

CDO Organizational Maintenance Web Form User Guide 35
Active CDO CAC Roster
5. The CDO Summary page will appear. Your CAC Roster table will now displaythe CAC(s) you added. To submit your roster, select the Submit button.
Figure 50: CAC Roster Submit Button
6. The Confirmation page will appear. You can select the PDF button to print acopy of your information
CDO Organizational Maintenance Web Form User Guide

CDO Organizational Maintenance Web Form User Guide 36
Active CDO CAC Roster
7. Select the Exit button to exit the maintenance web form
Figure 51: Confirmation Page PDF and Exit Buttons
5.2.2. CAC Roster Template
The purpose of the CAC Roster template is to provide CDOs a streamlined way to import and maintain your CAC information. The template is available for CDOs to collect CAC information and generate a CSV file for upload to the maintenance web form. Best Practices for using the template:
• For a step-by-step demonstration of how to add and update a CACroster using the maintenance web form, access the CDO OrganizationalMaintenance Web Form Demonstration Videos – CAC Roster video onthe CDO Program web page.
• For step-by-step instructions about adding and updating a CAC roster,review the CAC Roster Job Aid on the maintenance web form.
• Follow all of the instructions on the initial Instructions Tab and the CACRoster tab.
• Make sure to select the Enable Content button in the yellow ribbon atthe top of the template before attempting to add CACs on thetemplate.
• Enter all required CAC data before moving to the next field; thetemplate will not allow you to move forward if it detects missing orincorrect data.
• Sometimes copying and pasting data into the template adds phantomspaces that will generate error messages.
CDO Organizational Maintenance Web Form User Guide

CDO Organizational Maintenance Web Form User Guide 37
Active CDO CAC Roster
o Consider checking the cell for extra spaces before or after the entereddata.
o Consider entering the data into the cell manually as opposed to copyingand pasting the data into the cell.
1. Select the CAC Roster Template link. The CAC Roster template will open onthe instructions page. Review the instructions before you continue.
2. Select the Enable Editing button.
3. Select the Enable Content button.
4. Review the information on the Instructions tab.
Figure 55: CAC Roster Template Instructions Tab
Figure 54: Enable Content Button
Figure 53: Enable Editing Button
Figure 52: CAC Roster Template Link
CDO Organizational Maintenance Web Form User Guide

CDO Organizational Maintenance Web Form User Guide 38
Active CDO CAC Roster
5. Select the CAC Roster tab.
6. Start on row 11 and enter the information indicated by a red asterisk. The
Previous CAC ID is only if applicable and is optional.
Figure 57: CAC Information Fields
7. Select the Add Certified Application Counselor button to add your next CAC
Figure 58: Add Certified Application Counselor Button
8. When you are finished adding your CACs, select the Create CAC Roster CSVFile button
Figure 56: CAC Roster Template CAC Roster Tab
Figure 59: Create CAC Roster CSV File Button
CDO Organizational Maintenance Web Form User Guide
CDO Organizational Maintenance Web Form User Guide 39
Active CDO CAC Roster
9. Select the OK button.
10. Select the location where to save the file and select the OK button.
11. A pop-up will appear confirming that the CAC roster template saved. Selectthe OK button.
Figure 62: Location Save Pop-up Window OK Button
The CSV file will remain on your screen. To continue with the process, return to the maintenance web form in your browser.
Figure 61: Location Saving OK Button
Figure 60: Save As Window OK Button
CDO Organizational Maintenance Web Form User Guide

CDO Organizational Maintenance Web Form User Guide 40
Active CDO CAC Roster
On the CAC Roster Upload page:
1. Select the Yes button indicating that you want to upload your rostertemplate.
2. In the CAC Roster Template Upload section, select the Choose Filebutton.
3. Navigate to the location of your template and select that file.4. Back on the maintenance web form, select the Upload Attachment
button.
Figure 63: CAC Roster Template Yes Button
Figure 64: CAC Roster Template Upload Attachment Button
CDO Organizational Maintenance Web Form User Guide

CDO Organizational Maintenance Web Form User Guide 41
Active CDO CAC Roster
5. Your attachment summary will appear along with the CAC RosterSummary table select the Save and Return button.
6. The CDO Summary page will appear and your CAC Roster table will nowdisplay the CAC you added – to submit your roster, select the Submit button
Figure 66: Add CAC Roster Submit Button
7. The Confirmation page will appear – select the PDF button to print a copy ofyour information.
Figure 65: CAC Roster Save and Return Button
CDO Organizational Maintenance Web Form User Guide

CDO Organizational Maintenance Web Form User Guide 42
Active CDO CAC Roster
8. Select the Exit button to return to the maintenance web form welcomepage.
Figure 67: Confirmation Page PDF Button
CDO Organizational Maintenance Web Form User Guide

CDO Organizational Maintenance Web Form User Guide 43
Active CDO CAC Roster
5.3. Downloading Your Current CAC Roster You can download an Excel file of your current CAC roster after you add your CAC(s). This is an optional step, but CMS recommends that you keep a copy of your CAC roster for your records.
Do not use the copy that you download for your records to make future updates. Make any updates to your roster through the maintenance web form using the manual process or by uploading a new CSV file.
To download a copy of your CAC roster:
1. Log in to the maintenance web form.2. Scroll to the Certified Application Counselors (CACs) section of the CDO
Summary page.3. Select the Download My Current CAC Roster button.
4. Select your file in the lower left corner tab of your screen.
Figure 69: CAC Roster CSV File Tab
Figure 68: CAC Download My Current CAC Roster Button
CDO Organizational Maintenance Web Form User Guide

CDO Organizational Maintenance Web Form User Guide 44
Active CDO CAC Roster
Figure 70: CAC Roster Excel File
5. Save your file to a location of your choice.
Figure 71: File Location Save Button
6. Once you download your CAC roster, return to the maintenance web form inyour browser to continue.
CDO Organizational Maintenance Web Form User Guide

CDO Organizational Maintenance Web Form User Guide 45
Active CDO CAC Roster
5.4. Decertifying CACs During your two (2)-year agreement period as a CDO with CMS, you may have CACs who leave the organization.
When a CAC leaves your organization, or remains with your organization but no longer assists consumers as a CAC for that plan year, you should decertify this person on the maintenance web form. Decertifying a CAC means, this person can no longer assist consumers as a certified CAC with your organization.
You can use the maintenance web form to document these changes by decertifying the CACs who leave your organization.
1. On the CDO Summary page, in the CAC section, identify the individual youwant to decertify.
2. Select the Decertify link.
Figure 72: Decertify Link
3. The system will confirm that you want to decertify the individual – select theOK button
Figure 73: Decertify Pop-up Window OK Button
CDO Organizational Maintenance Web Form User Guide

CDO Organizational Maintenance Web Form User Guide 46
Active CDO CAC Roster
4. The system will update the CAC roster table on the CDO Summary page to listthe decertification date and move the contact to the bottom of the table.
Figure 74: CAC Roster Table
5. Confirm the information is correct, make additional changes if needed, andselect the Exit button to leave the maintenance web form.
Figure 75: Exit Button
CDO Organizational Maintenance Web Form User Guide

CDO Organizational Maintenance Web Form User Guide 47
Active CDO CAC Roster
5.5. Editing a CAC’s Information During your two (2)-year agreement period, a CAC’s information may change. For example, someone’s last name may change or your organization may change names requiring new email addresses.
To edit a CAC’s contact information:
1. Navigate to the CAC section on the CDO Summary page and select the Editlink.
2. On the CAC Contact Edit page, you can edit the individual’s last name or emailaddress. Once you make your changes, select the Save and Return button.
Figure 77: CAC Contact Edit Fields and Save & Return Button
Figure 76: CAC Edit Link
CDO Organizational Maintenance Web Form User Guide

CDO Organizational Maintenance Web Form User Guide 48
Active CDO CAC Roster
3. On the CDO Summary Page, your edits will appear in the CAC table – select theSubmit button. The Confirmation Page will appear where you can download acopy of your submission and exit the maintenance web form.
Figure 78: Submit Button
CDO Organizational Maintenance Web Form User Guide

CDO Organizational Maintenance Web Form User Guide 49
Active CDO Renewal
6. Active CDO Renewal
CMS certifies CDOs on a two (2)-year basis. To renew your CDO agreement, your unique contacts (Organization Senior Official, CAC Project Director, and Secondary Contact, if applicable) should access the maintenance web form to update your organization’s information and submit a new signed and dated CMS-CDO agreement.
Your unique contacts will be able to renew starting thirty (30) calendar days prior to your organization’s expiration date. Your unique contacts can renew any time during that thirty (30)-day window, but must renew the CMS-CDO agreement by your organization’s expiration date.
If you do not know your expiration date, you can email us at [email protected]. You can also view your expiration date in the Agreement PDF table on the CDO Summary page of the maintenance web form.
Figure 79: Expiration Date on the CDO Summary Page of the Maintenance Web Form
You can access additional training materials, FAQs, and videos that describe how to complete renewing your CDO agreement on the CDO Program web page. This includes:
CDO Organizational Maintenance Web Form FAQs – contains frequently asked questionsabout the maintenance web form and CAC application process.
CDO Learning Series – CDO Renewal video – discusses the process for renewing your CDOagreement with CMS.
CDO Organizational Maintenance Web Form Demonstration Videos – CDO Renewal video –contains a step-by-step demonstration of renewing an organization's CDO agreement usingthe maintenance web form.
To review and update your organization’s information, refer to Section 3.
To replace your existing CMS-CDO agreement with new signed and dated agreement, refer to Section 3.6.
CDO Organizational Maintenance Web Form User Guide

CDO Organizational Maintenance Web Form User Guide 50
Next Steps
7. Next Steps
If CMS approves your CMS-CDO agreement, you will receive a Welcome Packet email that includes your CDO ID, counter signature page with your effective date, and important guidance for operating as a CDO.
During your two (2)-year agreement period, your organization needs to:
Certify your CAC staff and maintain your CAC Roster per Section II, paragraphs 1 through 4(Obligations and Conditions) of the CMS-CDO agreement.
Keep your CDO information current per Section II, paragraphs 5 and 6 (Obligations andConditions) of the CMS-CDO agreement.
7.1. Certifying CAC Staff and Maintaining CAC RosterPer Section II, paragraphs 1 through 4 (Obligations and Conditions) of the CMS-CDO agreement,as authorized by 45 CFR 155.225, to certify your CACs, your organization must:
Issue each CAC a unique ID
Ensure their completion of the annual training
Provide them with a CDO-CAC model agreement
Your organization’s contacts can then access the maintenance web form to upload and maintain your organization’s CAC roster.
7.2. Keeping Your CDO Information Current Per Section II, paragraphs 5 and 6 (Obligations and Conditions) of the CMS-CDO agreement, to keep your CDO information current, your organization must update your CDO record if any of these changes occur:
Organization name and/or address
List of contacts
Service locations
Enrollment assistance type (open enrollment only or year-round)
Specialty areas
Your organization’s contacts can then access the maintenance web form to make these updates.
If you update your organization name, Organization Senior Official contact information, add or remove a service location state, or edit your address, the maintenance web form will prompt you to upload a new signed and dated CMS-CDO agreement.
CDO Organizational Maintenance Web Form User Guide

CDO Organizational Maintenance Web Form User Guide 51
Next Steps
7.3. Renewing Your CMS-CDO Agreement Per Section IV.1 (Effective Date; Term and Renewal) of the CMS CDO agreement, at the end of each two (2)-year CDO term, organizations must renew participation in the CDO Program byupdating their organization information and returning a new signed and dated CMS-CDO agreement using the maintenance web form before your expiration date.
You can find your expiration date on the CDO Summary page of the maintenance web form or you can email [email protected].
If you do not renew your CDO agreement with CMS before your expiration date, you will become inactive. If you become inactive, your organization will need to re-apply to the CDOProgram since your CDO ID will no longer be valid. Per Section V.3 (Consequences of Termination or Nonrenewal) of the CMS-CDO agreement, you must also inform your CACs to stop providing enrollment assistance once your organization becomes inactive.
7.4. Withdrawing from the CDO Program Per Section V (Termination) of the CMS-CDO agreement, as authorized by 45 CFR 155.225, if you are an approved CDO and want to withdraw:
1. Send a formal written request to CMS at [email protected]. Thewritten request should include your CDO ID and the date when your CMS-CDOagreement should terminate.
2. Notify your organization’s staff and volunteers that, as of the effective date oftermination of its agreement with CMS, they cannot provide enrollment andapplication assistance to consumers. Ensure that neither your organization noryour staff or volunteers hold themselves out to the public as a designatedorganization or as a CAC, respectively, after the effective date of termination.
3. Appropriately secure and retain for six (6) years consumer consent documents.Your organization’s duty to protect and maintain the privacy and security ofpersonally identifiable information (PII) survives its withdrawal from the CDOProgram. Please refer to your organization’s agreement with CMS, includingthe appendices to the agreement, for guidance on the requirements for recordkeeping of PII and personal health information (PHI).
4. Submit a request to remove your organization’s listing(s) from Find Local
Help.
CDO Organizational Maintenance Web Form User Guide


![CS42448 108 dB, 192 kHz 6-In, 8-Out CODEC · 6 DS648F4 CS42448 1. PIN DESCRIPTIONS Pin Name # Pin Description AD0/CS 1 Address Bit [0]/ Chip Select (Input) - Chip address bit in I²C](https://img.pdfslide.net/doc/110x75/5d62375c88c993e75e8bd078/cs42448-108-db-192-khz-6-in-8-out-6-ds648f4-cs42448-1-pin-descriptions-pin.jpg)


![CS42888 108 dB, 192 kHz 4-In, 8-Out CODEC · 6 DS717F4 CS42888 1. PIN DESCRIPTIONS Pin Name # Pin Description AD0/CS 1 Address Bit [0]/ Chip Select (Input) - Chip address bit in I²C](https://img.pdfslide.net/doc/110x75/5f61f7985b3ec410ef2825fe/cs42888-108-db-192-khz-4-in-8-out-codec-6-ds717f4-cs42888-1-pin-descriptions.jpg)