Embed Size (px)
Citation preview

User instructions
CDPE 6320CDPE 6320 X
DISHWASHER
EN


Congratulations!
Thank you for choosing a Candyappliance; quality dishwashers whichguarantee high performance andreliability.Candy manufacture a vast rangeof domestic appliances: washingmachines, washer/dryers, cookers,microwave ovens, ovens and hobs,refrigerators and freezers.Ask your dealer for the catalogue withthe complete range of Candy products.Please read this booklet carefully asit provides important informationregarding the safe installation, use,and maintenance of the machine,together with some useful advice onhow to achieve the best results fromyour dishwasher.For future reference please keep thisinstruction booklet in a safe place.
GUARANTEE
This appliance is supplied with aguarantee certificate which allows freeuse of Technical Assistance Service.Please retain your purchase receipt.This should be kept in a safe place andpreserved to the engineer if a servicecall is required.
3
4
CONTENTS
Safety adviceSetting up, installationWater softener unitLoading the saltAdjusting the upper basketLoading the dishesLoading the detergentTypes of detergentLoading the rinse aidCleaning the filtersSome practical hintsRoutine cleaning and maintenanceDescription of the control panelTechnical dataProgramme selection and special functionsProgramme guideIdentifying minor faults
pag. 5 pag. 6pag. 10pag. 11pag. 12pag. 13pag. 16pag. 17pag. 18pag. 19pag. 20pag. 21pag. 22pag. 22pag. 23pag. 26pag. 28
Please read the instructions in this booklet carefully because they contain importantinformation on how to install, use and maintain your dishwasher safely as well ascontaining useful tips on how to make the most of it.
Keep this booklet safe for future reference.
Fig. A
3 2
1
4
5
5
SAFETY INSTRUCTIONS
There are certain basic safety ruleswhich are valid for any domesticappliance.
Installation
■ Make sure that the plug fitted to themachine is compatible with the powersupply socket. If it is not, get a suitablyqualified person to fit the correct type,and to make sure that the cables to themains socket are able to cope with thepower rating of the appliance.
■ Ensure that the dishwasher does notcrush power cables.
■ Do not use this appliance with adaptors,power boards or extension cords.
■ Should it be necessary to replace thesupply cord, call the After Sales ServiceCentre.
Safety
■ Never touch the appliance when yourhands or feet are wet or damp.
■ Do not use when your feet are bare.
■ Do not remove the plug from the mainssupply socket by pulling the mains cableor the machine itself.
■ Do not leave the appliance exposed tothe elements (rain, sun etc).
■ This appliance is not intended for use bypersons (including children) with reducedphysical, sensory or mental capabilities,or lack of experience and knowledge,unless they have been given supervisionor instruction concerning use of theappliance by a person responsible fortheir safety.
Children should be supervised to ensurethat they do not play with the appliance.
■ Water left in the machine or on thedishes at the end of the wash programmeshould not be swallowed.
■ The door should not be left in the openposition since this could present a potentialhazard ( es. tripping ).
■ Leaning or sitting on the open door ofthe dishwasher could cause it to tip over.
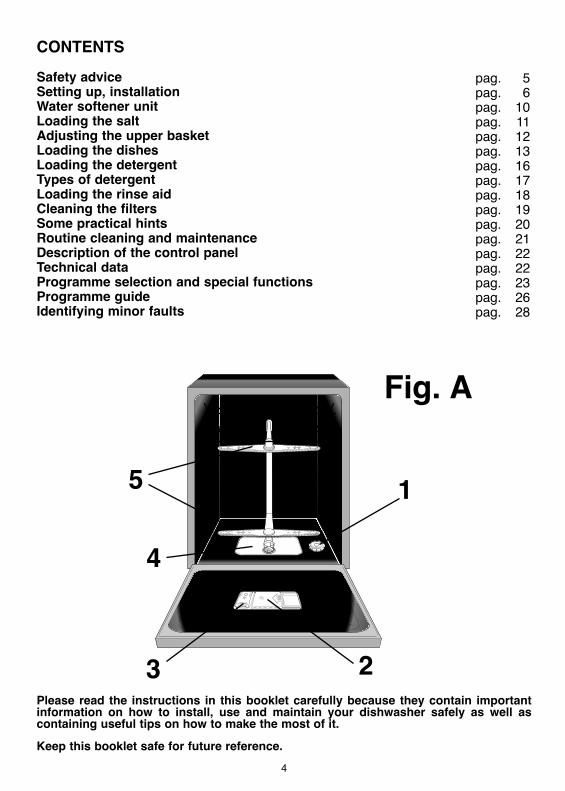
WARNING !Knives and other utensils with sharppoints must be loaded in the basketwith their points down or placed in ahorizontal position.
Daily use
■ This appliances is intended to be used inhousehold and similar applications suchas: - staff kitchen areas in shops, offices
and other working environments;- farm houses; - by clients in hotels, motels and other
residential type environments; - bed and breakfast type environments.
A different use of this appliance fromhousehold environment or from typicalhousekeeping functions, as commercialuse by expert or trained users, is excludedeven in the above applications.
If the appliance is used in a mannerinconsistent with this it may reduce thelife of the appliance and may void themanufacturer’s warranty.
Any damage to the appliance or otherdamage or loss arising through use that isnot consistent with domestic or householduse (even if located in a domestic orhousehold environment) shall not beaccepted by the manufacturer to the fullestextent permitted by law.
■ The dishwasher is designed for normalkitchen utensils.Objects that have been contamined bypetrol, paint, traces of steel or iron,corrosive chemicals, acids or alkalismust not be washed in the dishwasher.
■ If there is a water softening device installedin the home there is no need to addsalt to the water softener fitted in thedishwasher.

6
INSTALLATION(Technical notes)
■ After unpacking, adjust the height of thedishwasher. For the dishwasher to workcorrectly it must be level. Adjust the feetso that the machine does not tilt by morethan 2 degrees.
■ If it you need to move the machine afterremoving the packaging, do not try to liftit by the bottom of the door. Follow theinstructions in the figure below. Open thedoor slightly and lift the machine byholding on the top.
IMPORTANTWhen the appliance is located on acarpet floor, attention must be paid toensure that there is no obstruction tothe bottom vents.
Make sure that the plug on theappliance remains accessible afterinstallation.
Electrical connection
This appliance complies with internationalsafety standards, and is fitted with a 3 pinplug with earth connection to ensurecomplete earthing of the product.
Before connecting the appliance to themains supply it is important to ensure:
1. that the supply socket is properlyearthed;
2. that your electricity supply is capable ofmeeting the consumption requirementslisted on the rating plate of yourappliance.
WARNING!Ensure that your product is properlyearthed.
In the absence of adequate earthingyou will notice that when touchingthe metal parts of your appliance anelectrical dispersion can be felt, dueto the presence of a radio interferencesuppressor.
Manufacturer declines all responsibilityfor any damage due to non-earthing ofthe machine.
Appliance complies withEuropean Directives 73/23/EECand 89/336/EEC, replaced by2006/95/EC and 2004/108/EC, andsubsequent amendments.
■ Cutlery is washed best if it is placed inthe basket with the handles downwards.
■ If the appliance breaks down or stopsworking properly, switch it off, turn off thewater supply and do not tamper with it.Repair work should only be carried outby an approved service agent and onlygenuine spare parts should be fitted. Anyfailure to follow the above advice mayhave serious consequences for the safetyof the appliance.
Disposal
■ The dishwasher has been made frommaterials which can be recycled so that itcan be disposed of in an environmentallyfriendly way.
■ If you wish to dispose of an old dishwasherbe careful to remove the door toeliminate the risk of children becomingtrapped inside it.

7
Water connection
IMPORTANTThe appliance must be connected tothe water mains using new hose-sets.The old hose-sets should not be reused.
■ The inlet and drain hoses can be directedto left or right.
IMPORTANTThe dishwasher can be connected toeither cold or hot water, as long as itis no hotter than 60 °C.
■ Water pressure must be between80 kPa and 800 kPa. If the pressure isbelow the minimum consult our servicedepartment for advice.
■ The inlet hose must be connected to atap so that the water supply can be cutoff when the machine is not in use(fig. 1 B).
■ The dishwasher is fitted with 3/4" threadedconnector (fig. 2).
■ Connect inlet hose “A” to water tap “B”with a 3/4" attachment making sure thatit has been properly tightened.
■ If it is necessary, the inlet pipe can belengthened up to 2,5 m. The extensionpipe is available from the After SalesService Centre.
■ If limescale deposits or sand are presentin the water, it is advisable to obtain theappropriate filter, art. 9226085, from theAfter Sales Service Centre (fig. 3). Thefilter “D” must be inserted between the tap“B” and the inlet hose “A”, rememberingto fit the washer “C”.
■ If the dishwasher is connected to newpipes or to pipes which have not been inuse for a long time run water through fora few minutes before connecting theinlet hose. In this way no deposits ofsand or rust will clog up the water inflowfilter.
1
2
3

8
Connecting the outlet hose
■ The outlet hose should disharge into astandpipe, making sure that there are nokinks (fig. 4).
■ The standpipe must be at least 40 cmabove floor level and it must have aninternal diameter of at least 4 cm.
■ It is advisable to fit an anti-odour air trap(fig. 4X).
■ If necessary the outlet hose can beextended up to 2,5 m, provided that it iskept at a maximum height of 85 cmabove floor level. The extension pipe isavailable from the After Sales ServiceCentre.
■ The hose can be hooked over the side ofthe sink, but it must not be immersed inwater, in order to prevent water frombeing syphoned back to the machinewhen this is in operation (fig. 4Y).
■ When installing the appliance under aworktop the hose pipe clamp must beattached to the wall in the highest possibleposition under the worktop (fig. 4Z).
■ Check that there are no kinks in the inletand outlet hoses.
4
9
7
598556/573
5
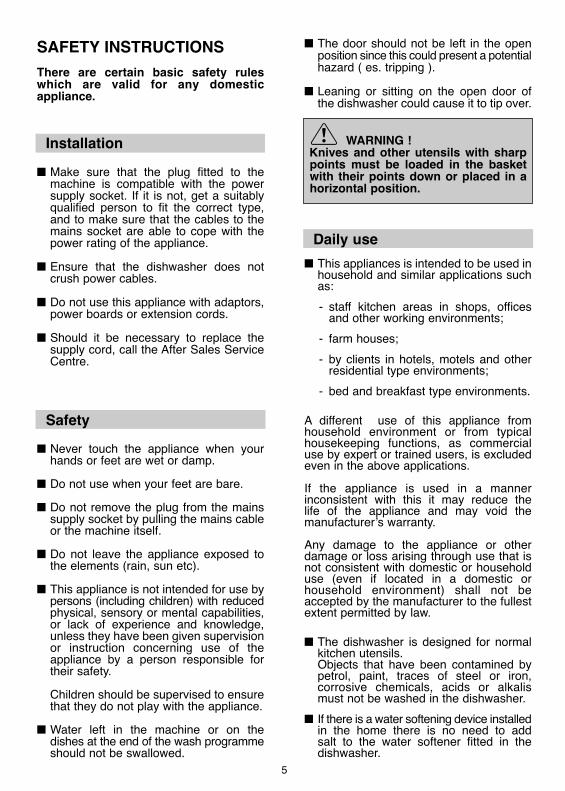
INSTALLATION IN FITTEDKITCHENS
Fitting between existing cabinets
■ The height of the dishwasher, 85 cm, hasbeen designed in order to allow themachine to be fitted between existingcabinets of the same height in modernfitted kitchens (fig. 5). The feet can be adjusted so that correctheight is reached.
Opening the door
Put your hand into the recess and pull. If the machine comes open while it is working,an electrical safety device automaticallyswitches everything off.
IMPORTANTFor the machine to work properly,the door should not be opened whileit is in operation.
Closing the door
Place the baskets in the machine. Make sure that both the spray arms arefree to rotate and are not obstructed bycutlery, crockery or pans. Close the door,pressing on it to make sure it is firmly shut.
Underneath existing work top
(when fitting beneath a work top)
■ In most modern fitted kitchens there isonly one single work top under whichcabinets and electrical appliances arefitted. In this case remove the work topof the dishwasher by unscrewing thescrews under the rear edge of the top(fig. 6a).
IMPORTANTAfter removing the work top, thescrews MUST BE screwed againunder the rear edge of the top(fig. 6b).
■ The height will then be reduced to 82 cm,as scheduled by the InternationalRegulations (ISO) and the dishwasherwill fit perfectly under the kitchenworking top (fig. 7).
6 a
ba
b

10
* The water softener unit is set in thefactory at level 3, as this is suitable forthe majority of users.
According to the degree of hardness ofyour water, regulate the softener unit in thefollowing way:
IMPORTANTThe dishwasher must ALWAYS beoff before start of this procedure.
1. Hold down the "PROGRAMMESELECTION" button and at the sametime switch on the dishwasher bypressing the "ON/OFF" button (a briefaudible signal will sound).
2. Keep the "PROGRAMME SELECTION"button pressed for at least 5 seconds,UNTIL an audible signal sounds. Some"PROGRAMME SELECTION" indicatorlights will come on to indicate thecurrent water softener setting level.
3. Press the same button again to selectthe required water softener level: eachtime the button is pressed, one indicatorlight will come on (the water softenerlevel is indicated by the number of lightson). For level 5, 4 lights will flash, forlevel 0 all lights will be off.
4. Turn off the dishwasher by pressing the"ON/OFF" button to confirm the newsetting.
WARNING!If any problem occurs, turn thedishwasher off by pressing the"ON/OFF" button and start theprocedure again from the beginning(STEP 1).
WATER SOFTENER UNIT
Depending on the source of the supply,water contains varying amounts of limestoneand minerals which are deposited on thedishes leaving whitish stains and marks.The higher the level of these mineralspresent in the water, the harder the water is.The dishwasher is fitted with a watersoftener unit which, through the use ofspecial regenerating salt, suppliessoftened water for washing the dishes. The degree of hardness of your water canbe obtained from your water supplycompany.
Regulating the water softener
The softener unit can treat water with ahardness of up to 90°fH (French grading)or 50°dH (German grading) through 6different settings.
The table below lists different degrees ofwater hardness with the correspondingsetting for the softener unit.
Level
ºfH
(F
ren
ch
g
rad
ing
)
ºdH
(Germ
an
gra
din
g)
NO
YES
YES
YES
YES
YES
No indicatorlights
Indicator light1
Indicator lights1,2
Indicator lights1,2,3
Indicator lights1,2,3,4
Indicator lights1,2,3,4flashing
Water hardness
Wate
r so
ften
er
sett
ing
Use o
f re
gen
era
tin
gsalt
0
1
2
*3
4
5
0-5
6-15
16-30
31-45
46-60
61-90
0-3
4-9
10-16
17-25
26-33
34-50
“ON/OFF” button “PROGRAMME SELECTION” button
“PROGRAMME SELECTION” indicator lights

LOADING THE SALT
■ On the bottom of the machine there is acontainer for the salt for regeneratingthe softener.
■ It is important to use only a salt that isspecifically designed for dishwasher.Other types of salt contain small quantitiesof insoluble particles which over a longperiod of time may affect and deterioratethe softener performance.
■ To add salt, unscrew the cap of the con-tainer on the bottom and then refill thecontainer.
■ During this operation a little water willoverflow; but keep adding salt until thecontainer is full. When the container isfull, clean the thread of salt residue andretighten the tap.
■ After loading the salt, it is recommendedrunning a complete washing cycle,or COLD RINSE programme. The saltdispenser has a capacity of between 1.5and 1.8 kg and, for efficient use of theappliance, it should be refilled from timeto time according to the regulation of thewater softener unit.
11
IMPORTANT(Only for first start up)When the appliance is used for thefirst time, after completely filling thesalt container, it is necessary to addwater until the container overflows.
Salt loading indicator
This model is provided with an indicator lighton the control panel which will light upwhen it is necessary to reload the saltcontainer.
IMPORTANT The appearance of white stains ondishes is generally an importantsign that the salt container needsfilling.

12
ADJUSTMENT OF THEUPPER BASKET
If 29 cm to 32,5 cm plates are normallyused, load them onto the lower basket afterthe upper basket has been placed in itsupper position and proceed as detailedbelow:
1. Turn the front stops “A” outwards;
2. Take out the basket and remount it in theupper position;
3. Replace the blocks “A” in their originalposition.
Dishes that are bigger than 20 cm indiameter can no longer be loaded onto theupper basket and the mobile supportscannot be used when the basket is in theupper position.
A
A

13
LOADING DISHES
Using the upper basket
■ The upper basket is provided withmobile racks hooked to the sides of thebasket, which can be regulated into 4positions.
■ In the lowered position (A-A1) the racksmay be used for such items as: tea andcoffee cups, kitchen knives and ladles.Also glasses with stems may be safelyhung on the ends of the racks.
■ In the upright position (B-B1) the racksallow you to load dinner plates and soupplates. Plates should be loadedvertically with the underside of the platetowards the back of the dishwasher witha space between each plate to allowwater to pass freely.
■ It is advisable to load large plates(approx. 26 or more cm) slightly tiltedtowards the rear to facilitate introductionof the basket into the machine.
■ Salad bowls and plastic bowls may alsobe loaded on the upper basket. It isadvisable to block these in place so thatthe jets of water do not make themoverturn.
■ The upper basket has been designed tooffer maximum flexibility in use and canbe loaded with up to 24 plates on tworows, up to 30 glasses on five rows or amixed load.
B B1
A A1
A standard daily load is represented infigs. 1, 2 and 3.
Upper basket (fig. 1)A = soup platesB = dinner platesC = dessert platesD = saucersE = cupsF = glasses
Upper basket (fig. 2)A = soup platesB = dinner platesC = dessert platesD = saucersE = cupsF = glasses G = single section cutlery basket
A
B
C
D
E
F
A
B
C
D
E
1
2
FG
F

14
Upper basket (fig. 3) A = glassesB = saucersC = cupsD = small bowlE = medium bowlF = large bowlG = serving spoons
Using the lower basket
■ Saucepans, oven dishes, tureens, saladbowls, lids, serving dishes, dinnerplates, soup plates and ladles can beloaded on the lower basket.
■ Place the cutlery in the plastic cutleryholder with the handles pointingupwards.
■ Place the cutlery holder on the lowerbasket (fig. 4 and 5), making sure thatthe cutlery does not get in the way of therotating arms.
IMPORTANTThe lower basket has a safety-stopdevice, for its safe extraction, alsoespecially useful with a full load.For loading salt, cleaning filter and forordinary maintenance, the completeextraction of the basket is necessary.
Please load the dishwasher sensibly toensure the best wash results.
A standard daily load is represented infigs. 4 and 5.
Lower basket (fig. 4)A = medium-sized saucepanB = large saucepan C = frying panD = lidsE = tureens, serving dishesF = cutleryG = oven dishes
Lower basket (fig. 5)A = soup platesB = dinner platesC = dessert platesD = serving dishE = cutlery
A
AF
C
CB
ED
G
G
3
C
A
A
E B
A
C
A
B5
D
4
DF A G
E
B C

15
Cutlery basket (fig. 6)
The cutlery basket is made with twodetachable parts which will enable variousloading options.
The two parts can be detached by slidingthe left section away from the right section.
The top of cutlery basket can be removed,for enable various loading options.
6

LOADING THE DETERGENT
The detergent
IMPORTANTIt is essential to use a detergentthat is specifically designed fordishwashers either in powder, liquidor tablet form.
Unsuitable detergents (like those forwashing up by hand) do not contain theproper ingredients for use in a dishwasher,and stop the dishwasher from workingcorrectly.
Filling the detergent container
The detergent container is inside the door(fig. A “2”). If the lid of the container isclosed, press the button (A) to open. At the end of every wash cycle the lid isalways open and ready for the next timethe dishwasher is used.
WARNING!When loading the lower basket, pleaseensure that the plates or others do notobstruct the detergent dispenser.
The amount of detergent to be used variesaccording to how dirty the dishes are andon the type of dishes to be washed.We advise using 20÷30 g of detergent in thewash section of detergent compartment (B).
16
After pouring the detergent into the container,close the lid, firstly pushing (1) and thenpressing on it (2) until you hear the click.
Since not all detergents are the same theinstructions on the boxes of detergent canvary. We should just like to remind usersthat too little detergent does not clean thedishes properly whilst too much detergentwill not produce better results and is also awaste.
IMPORTANTDo not use an excessive amount ofdetergent and help limit damage tothe environment at the same time.
A
B
17
TYPES OF DETERGENT
Detergent tablets
Detergent tablets of different manufacturersdissolve at different speeds, for thisreason, during short programmes, somedetergent tablets may be not fully effective,because they are not completely dissolved.If these products are used, is recommendedto choose longer programmes to guaranteethe complete use of the detergent.
IMPORTANTTo get satisfactory washing results,the tablets MUST be placed in thewash section of the detergentcontainer and NOT directly in the tub.
Concentrated detergents
The concentrated detergents, with reducedalkalinity and with natural enzymes, inconjunction with 50°C wash programmes,have a smaller impact on the environmentand they protect the dishes and thedishwasher. The 50°C wash programmespurposely exploit the dirt-dissolving propertiesof the enzymes, allowing therefore, with theuse of the concentrated detergents, to achievethe same results of the 65°C programmes butat a lower temperature.
Combined detergents
The detergents that also contain the rinseaid must be placed in the wash section ofthe detergent container. The rinse aidcontainer must be empty (if it is not empty,set the rinse aid regulator to lowest positionbefore using combined detergents).
"ALL in 1" combined detergents
If you are planning to use “ALL in 1” (“3 in 1 “/“4 in 1”/ “5 in 1”, etc.) combined detergents i.e.those with built in salt and/or rinse agent,we would advise the following:
■ read carefully and follow the manufacturer’sinstructions given on the packaging;
■ the effectiveness of detergents containingthe built in water softener/salt dependson the hardness of your water supply.Check that the hardness of your watersupply is within the effective range givenon the detergent packaging.
If when using this type of product, youdon't get satisfactory washing results,please contact the detergentmanufacturer.
In certain circumstances use of combineddetergents can cause:
■ limescale deposits on dishes or in thedishwasher;
■ a reduction in washing and dryingperformance.
IMPORTANTAny problems which arise as a directresult of the use of these productsare not covered by our warranty.
Please note that using the "ALL in 1"combined detergents, the rinse aid andsalt indicator lights (only used onselected models) are superfluous, so youmust ignore the lights.
If washing and/or drying problems occur,we recommend you return to use traditionalseparate products (salt, detergent andrinse agent). This will ensure that the watersoftener in the dishwasher operatescorrectly.
In this case, we recommends that you:
■ refill both the salt and rinse aid container;
■ run one normal washing cycle without aload.
Please note that on return to the use ofconventional salt, a number of cycles willbe required before the system becomesfully efficient again.
WARNING!Some dishwasher detergents arestrongly alkaline. They can be extre-mely dangerous if swallowed. Avoidcontact with the skin and eyes andkeep children away from the dishwa-sher when the door is open. Checkthat the detergent receptacle is emptyafter completion of the wash cycle.
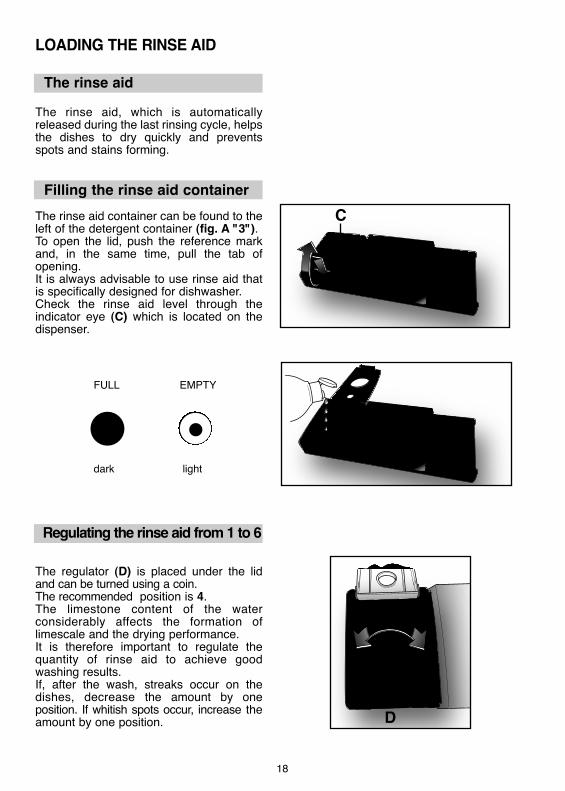
LOADING THE RINSE AID
The rinse aid
The rinse aid, which is automaticallyreleased during the last rinsing cycle, helpsthe dishes to dry quickly and preventsspots and stains forming.
Filling the rinse aid container
The rinse aid container can be found to theleft of the detergent container (fig. A "3").To open the lid, push the reference markand, in the same time, pull the tab ofopening.It is always advisable to use rinse aid thatis specifically designed for dishwasher.Check the rinse aid level through theindicator eye (C) which is located on thedispenser.
Regulating the rinse aid from 1 to 6
The regulator (D) is placed under the lidand can be turned using a coin. The recommended position is 4.The limestone content of the waterconsiderably affects the formation oflimescale and the drying performance.It is therefore important to regulate thequantity of rinse aid to achieve goodwashing results.If, after the wash, streaks occur on thedishes, decrease the amount by oneposition. If whitish spots occur, increase theamount by one position.
18
FULL EMPTY
dark light
C
D

19
1
2
3
CLEANING THE FILTERS
The filter system (fig.A “4”) consists of:
a central container that traps the largerparticles;
a flat gauze that continuously filters thewash water;
a micro filter, located beneath the gauze,that traps the tiniest particles ensuring aperfect rinse.
■ To achieve excellent results every time,the filters should be checked andcleaned after each wash.
■ To remove the filter unit, simply turn thehandle anticlockwise (fig. 1).
■ For ease of cleaning, the central containeris removable (fig. 2).
■ Remove the gauze filter (fig.3) andwash the whole unit under a jet ofwater. If necessary a small brush canbe used.
■ With the Self-cleaning Micro filter,maintenance is reduced and the filterunit need only be checked every twoweeks. Nevertheless, after each wash itis advisable to check that the centralcontainer and the gauze filter are notclogged.
WARNING!After cleaning the filters, make surethat they are correctly reassembledand that the gauze filter is properlypositioned at the bottom of thedishwasher.
Make sure that the filter is screwedback, clockwise, into the gauze, aspoor seating of the filter unit couldhave an adverse effect on theefficiency of the appliance.
IMPORTANTNever use the dishwasher withoutthe filters.

20
PRATICAL HINTS
How to get really good washresults
■ Before placing the dishes in thedishwasher, remove any remainingfood (bones, shells, pieces of meat orvegetables, coffee grounds, skin of fruit,cigarette ash, tooth picks etc. to avoidblocking the filters, water outlet andwashing arm nozzles.
■ Try not to rinse the dishes beforeloading them into the dishwasher.
■ If saucepans and oven dishes areencrusted with the remains of burnt orroast food, it is advisable to leave themto soak before washing.
■ Place the dishes face downwards.
■ Try to place the dishes in such a waythat they are not touching one another.If they are loaded properly you will getbetter results.
■ After loading the dishes check that thewashing arms can rotate freely.
■ Pans and other dishes that haveparticularly stubborn food particles orremnants of burnt food should be left tosoak in water with dishwasherdetergent.
■ To wash silver properly:
a) rinse the silver immediately afteruse, especially if it has been used formayonnaise, eggs, fish etc.;
b) do not sprinkle detergent onto it;
c) keep it separate from other metals.
How to make savings
■ If you want the dishwasher to give acomplete wash, place the dishes in thedishwasher at the end of each meal andif necessary turn on the COLD RINSEcycle to soften the food remains andremove bigger particles of food from thenew load of dishes. When the dishwasher is full start thecomplete wash cycle programme.
■ If the dishes are not very dirty or if thebaskets are not very full select anECONOMY programme, following theinstructions in the program list.
What not to wash
■ It should be remembered that not alldishes are suitable for washing in adishwasher.We advise against usingthe dishwasher to wash items inthermoplastic, cutlery with wooden orplastic handles, saucepans withwooden handles, items in aluminium,crystal, leaded glass unless otherwisestated.
■ Certain decorations may fade. It istherefore a good idea before loading thewhole batch to wash just one of theitems first so as to be sure that otherslike it will not fade.
■ It is a good idea not to put silver cutlerywith non-stainless steel handles intothe dishwasher as there could be achemical reaction between them.
IMPORTANTWhen buying new crockery orcutlery always make sure that they aresuitable for washing in a dishwasher.
Useful hints
■ In order to avoid any dripping from thetop rack, remove the lower rack first.
■ If the dishes are to be left in themachine for some time, leave the doorajar, to let some air circulate and toimprove the drying performance.

21
WHEN CYCLE IS FINISHED
After every wash it is essential to turn offwater supply and to switch off the machineby pressing the On/Off button to the offposition.
If the machine is not going to be used forsome time, it is advisable to follow theserules:
1. do an empty wash with detergent in orderto clean the machine of any deposits;
2. pull out the electric plug;
3. turn off the water tap;
4. fill the rinse aid container;
5. Ieave the door ajar;
6. keep the inside of the machine clean;
7. If the machine is left in places where thetemperature is below 0°C any water leftinside the pipes may freeze. Wait untilthe temperature rises above zero andthen wait for about 24 hours beforestarting up the dishwasher.
CLEANING AND MAINTENANCE
■ To clean the dishwasher outside, do notuse solvents (degreasing action) neitherabrasives, but only a cloth soaked withwater.
■ The dishwasher does not require specialmaintenance, because the tank isself-cleaning.
■ Regularly wipe the door gasket with adamp cloth to remove any food remainsor rinse aid.
■ It is advisable to remove limestonedeposits or dirt periodically, by doing anempty wash; pour a glass of vinegar onthe bottom of the tank and select thelight wash.
■ If, in spite of the routine cleaning of thefilters, you notice that the dishes or pansare not properly washed or rinsed, checkthat all the spray heads on the rotorarms (fig. A “5”) are clear.
If they are blocked, clean them in thefollowing way:
1. to remove the upper rotor arm, turn ituntil it lines up with the stop markedby the arrow (fig. 1). Push it upwards(fig. 1b) and, keeping it pushed in,unscrew it in a clockwise direction(to reassemble it repeat the sameoperation, but turn it anticlockwise).The lower rotor arm can be removedsimply by pulling it upwards (fig. 2);
2. wash the rotor arms under a jet of waterto clear any blockage in the sprayheads;
3. when you have finished, refit the rotorarms in the same position, rememberingto re-align the arrow and screw intoposition.
■ Both the door lining and the tank liningare in stainless steel; however, shouldspots caused by oxidation occur, this isprobably due to a high level of iron saltspresents in the water.
■ The spots can be removed with a mildabrasive agent; never use chlorinebased materials, steel wool, etc.
1
2
1b
22
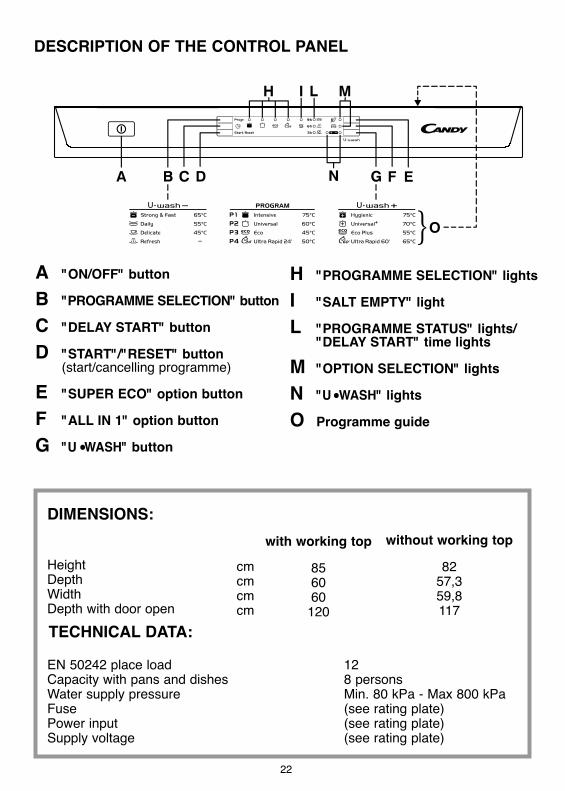
EN 50242 place loadCapacity with pans and dishesWater supply pressure FusePower inputSupply voltage
128 personsMin. 80 kPa - Max 800 kPa(see rating plate)(see rating plate)(see rating plate)
DESCRIPTION OF THE CONTROL PANEL
TECHNICAL DATA:
DIMENSIONS:
HeightDepth Width Depth with door open
cmcmcmcm
with working top
856060120
without working top
8257,359,8117
A "ON/OFF" button
B "PROGRAMME SELECTION" button
C "DELAY START" button
D "START"/"RESET" button (start/cancelling programme)
E "SUPER ECO" option button
F "ALL IN 1" option button
G "U WASH" button
H "PROGRAMME SELECTION" lights
I "SALT EMPTY" light
L "PROGRAMME STATUS" lights/"DELAY START" time lights
M "OPTION SELECTION" lights
N "U WASH" lights
O Programme guide
•
•
23
PROGRAMME SELECTION AND SPECIAL FUNCTIONS(Use in conjunction with programme guide)
"U WASH" button
This button allows you to modify the washintensity, according to how dirty your dishesare, by modifying the wash time andtemperature.Press the button to increase the intensity ofwash cycle ( indicator light) or to reducethe intensity of wash, this also allows you todecrease the wash length time ( indicatorlight).The combination of the button with the 4main wash programmes enables to have 8additional wash cycles (achieving a total of12 programmes of washing).
IMPORTANTWhen the dishwasher is switched on,the setting last used will be indicated.
Programme settings
■ Open the door and place the dirty dishesinside the appliance.
■ Press the "ON/OFF" button . All the programme indicator lights willflash.
■ Choose a programme by pressing the"PROGRAMME SELECTION" button.
■ If you wish, press the "U WASH" button.
■ If you wish to select an option, press thecorresponding button (the indicator lightwill turn on).
The option buttons can be selected ordeselected WITHIN one minute of theprogramme commencing.
■ Press the "START" button (the selectedprogramme indicator light will stopflashing and remain on.
■ When the door is shut, after an audible
signal has sounded, the programme willstart automatically.WITHIN one minute of the programmecommencing, another programmecan be selected, simply by pressingthe "PROGRAMME SELECTION"button (it is also possible to changethe "U WASH" button setting ).
Programme interruption
Opening the door when a programme isrunning is not recommended especiallyduring the main wash and final hot rinsephases. However, if the door is openedwhile a programme is running (for example,to add dishes) the machine stopsautomatically. Close the door, withoutpressing any buttons. The cycle will startfrom where it left off.
IMPORTANT A running program can be interruptedwithout opening the door bypressing the "ON/OFF" button. Inthis case, simply press the "ON/OFF"button again to restart the cycle fromwhere it left off.
WARNING!If you open the door during thedrying cycle, an audible audio signaladvises you that the drying cycle hasnot yet finished.
Changing a running programme
Proceed as follows to change or cancel arunning program:■ Hold the "RESET" button down for at
least 5 seconds. The programme indicator lights will turnon and off individually and sequentiallyand some audible signals will sound.
■ The running programme will be cancelledand all the programme indicator lights willflash.
■ At this point a new programme can be set.
WARNING!Before starting a new programme,you should check that there is stilldetergent in the dispenser. If necessary, top up the dispenser.
•
•
•
24
Programme operations
When a programme is running the relevantindicator light will remain on and the 3“PROGRAMME STATUS” indicator lights("WASH" , "DRY" , and "END" )will light singularly and in sequence toindicate the current phase.
If there is any break in the power supplywhile the dishwasher is operating, aspecial memory stores the selectedprogramme and, when the power isrestored, it continues where it left off.
Programme end
A 5 second alarm will sound (if not muted)3 times at 30 second intervals to signal thatthe programme has ended. The programme end indicator light will turnon, while all the others indicator lights willturn off. Dishes can now be removed and thedishwasher turned off by pressing the"ON/OFF" button or dishes can be loadedfor new cycle.
Option buttons
"SUPER ECO" button
This button provides an energy and timesaving of 25% on average (according tothe select cycle) reducing the wash watertemperature and the drying time during thefinal rinse.This programme is recommended for lightsoil washes, and for slightly wet dishes thatare not fully dry, & improved drying results.We advise you to leave the door of theDishwasher half-open at the end of thecycle, to allow for a natural circulation of airinside the dishwasher.
"ALL IN 1" button
This option optimises the use of "ALL in 1"("3 in 1"/"4 in 1"/"5 in 1", ecc.) combineddetergents.By pressing this button, the selectedwashing programme is modified to get bestperformance from combined detergents(furthermore, the salt aid shortage light isde-activated).
WARNING!Once selected, this option keepsbeing on (light on) also for nextwashing cycles and it can be de-activate(light off) only by pressing the buttononce again.
IMPORTANTThis option is recommended whenusing the ULTRA RAPID 24' program,the duration of which will beextended for about 15 minutes,allowing the detergent tablets toachieve a better performance.
"DELAY START" button
The dishwasher start time can be set withthis button, delaying the start by 3, 6 or 9hours.
Proceed as follows to set a delayed start:
■ Press the "DELAY START" button (eachtime the button is pressed the startwill be delayed by 3, 6 or 9 hoursrespectively and the corresponding timeindicator light will illuminate).
■ To start the countdown, press the"START" button (the selected programmeindicator light will come on, while the settime indicator light will start to flash).
If a 9 hour delay is set, countdown will bedisplayed by the 6h indicator light after 3hours and the 3h indicator light after 6hours.At the end of the last 3 hours (at the endof countdown) the 3h indicator light willstop flashing and remain on to indicate thewashing phase and the programme willstart automatically.If countdown has not ended, wherebythe programme has not yet started, it ispossible to change or cancel the delayedstart and select another programme or toselect/deselect the option button, proceedingas follows:■ Hold the "RESET" button down for at
least 5 seconds. The programme indicator lights will turnon and off individually and sequentiallyand some audible signals will sound.
■ The delayed start and the selectedprogramme will be cancelled. The programme indicator lights will flash.
■ Press the "DELAY START" button toset another delayed start time (thecorresponding indicator light will turn on).
■ A new programme can be set after adelayed time has been changed orcancelled or an option button can beselected or deselected.
25
Alarm mute for the PROGRAMMEEND
The alarm for the programme end may bemuted as follows:
IMPORTANTThe dishwasher must ALWAYS be offbefore start of this procedure.
1. Hold down the "PROGRAMMESELECTION" button and at the sametime switch on the dishwasher bypressing the "ON/OFF" button (a briefaudible signal will sound).
2. Keep the "PROGRAMME SELECTION"button pressed for at least 15 seconds(during this time, 2 audible signals willsound).
3. Release the button when the secondaudible signal sounds (3 "PROGRAMMESELECTION" indicator lights will comeon).
4. Press the same button again: the 3indicator lights (which indicate that thealarm is activated) will start flashing (toindicate that the alarm is off).
5. Turn off the dishwasher by pressing the"ON/OFF" button to confirm the newsetting.
To turn the alarm on again, follow the sameprocedure.
Memorization of the last programme used
The last programme used can be memorizedby following the below:
IMPORTANTThe dishwasher must ALWAYS be offbefore start of this procedure.
1. Hold down the "PROGRAMMESELECTION" button and at the sametime switch on the dishwasher bypressing the "ON/OFF" button (a briefaudible signal will sound).
2. Keep the "PROGRAMME SELECTION"button pressed for at least 30 seconds(during this time, 3 audible signals willsound).
3. Release the button when the THIRDaudible signal sounds (all the indicatorlights will flash).
4. Press the same button again: theflashing indicator light (memorization off)will stop flashing and remain on(memorization on).
5. Turn off the dishwasher by pressing the"ON/OFF" button to confirm the newsetting.
To disable the memorization, follow thesame procedure.
Fault signals
If malfunctions or faults occur when aprogramme is running the indicator lightthat corresponds to the selected cyclewill flash rapidly and the alarm sounds.In this event, turn the dishwasher off bypressing the "ON/OFF" button. After checking to make sure the waterinlet hose tap is open, that the drainhose is not bent and that the siphon orfilters are not clogged, set the selectedprogramme again. If the anomaly persists, contact CustomerService Department.
IMPORTANTThis dishwasher is equipped with ananti-overflow safety device which willautomatically discharge any excesswater should a problem occur.
WARNING!To ensure the correct operation ofthe anti-overflow safety device, werecommend that the dishwasher isnot moved or tilted during operation.If however it is necessary to tilt ormove the dishwasher, please ensurethat the washing cycle is completeand that there is no remaining waterinside the dishwasher.
26
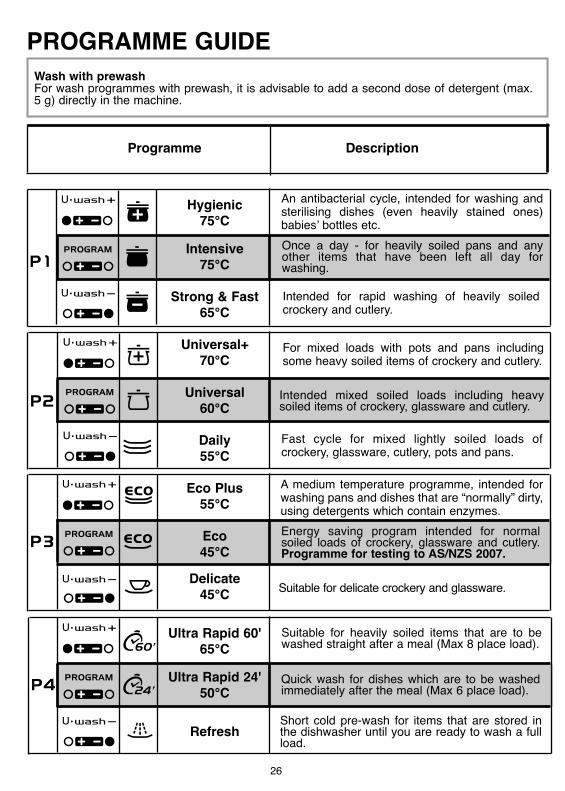
Hygienic
75°C
Intensive
75°C
Strong & Fast
65°C
Universal+
70°C
Universal
60°C
Daily
55°C
Eco Plus
55°C
Eco
45°C
Delicate
45°C
Ultra Rapid 60'
65°C
Ultra Rapid 24'
50°C
Refresh
Wash with prewashFor wash programmes with prewash, it is advisable to add a second dose of detergent (max.5 g) directly in the machine.
Once a day - for heavily soiled pans and anyother items that have been left all day forwashing.
Suitable for heavily soiled items that are to bewashed straight after a meal (Max 8 place load).
Short cold pre-wash for items that are stored inthe dishwasher until you are ready to wash a fullload.
An antibacterial cycle, intended for washing andsterilising dishes (even heavily stained ones)babies’ bottles etc.
A medium temperature programme, intended forwashing pans and dishes that are “normally” dirty,using detergents which contain enzymes.
Programme Description
PROGRAMME GUIDE
Intended mixed soiled loads including heavysoiled items of crockery, glassware and cutlery.
Intended for rapid washing of heavily soiledcrockery and cutlery.
For mixed loads with pots and pans includingsome heavy soiled items of crockery and cutlery.
Fast cycle for mixed lightly soiled loads ofcrockery, glassware, cutlery, pots and pans.
Quick wash for dishes which are to be washedimmediately after the meal (Max 6 place load).
Suitable for delicate crockery and glassware.
Energy saving program intended for normalsoiled loads of crockery, glassware and cutlery.Programme for testing to AS/NZS 2007.
27
140•• •• 75°C••• •• ••• •• •
135
85
75°C
65°C
•• ••••• •••• ••
•• •••• •••• ••
•• •• ••• •••
125
120
80
190
170
85
60
24
5
55°C
45°C
45°C
65°C
50°C
70°C
60°C
55°C
YES
YES
YES
YES
YES
YES
YES
YES
YES
YES
YES
YES
YES
YES
YES
YES
YES
YES
YES
YES
YES
YES
YES
YES
YES
YES
YES
YES
YES
YES
YES
N/A
N/A
YES
YES
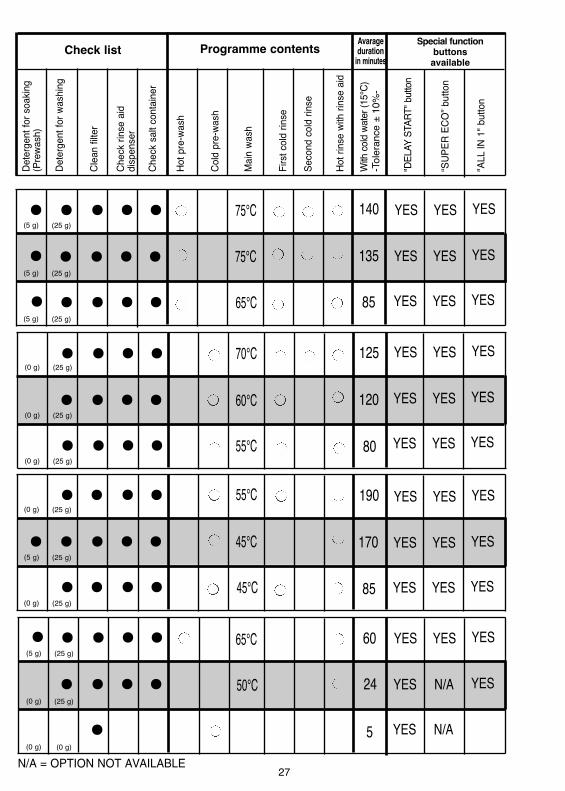
Check list Avarageduration
in minutes
Special functionbuttons
available
Dete
rgen
t for
soa
king
(Pre
wash
)
Dete
rgen
t for
was
hing
Clea
n filt
er
Chec
k rin
se a
id
disp
ense
r
Chec
k sa
lt co
ntai
ner
Hot p
re-w
ash
Cold
pre
-was
h
Mai
n wa
sh
Firs
t col
d rin
se
Seco
nd c
old
rinse
Hot r
inse
with
rins
e ai
d
With
cold
wate
r (15
°C)
-Tol
eran
ce ±
10%
-
"DEL
AYST
ART"
but
ton
“SUP
ER E
CO” b
utto
n
"ALL
IN 1
" but
ton
Programme contents
(5 g) (25 g)
(5 g) (25 g)
(5 g) (25 g)
(0 g) (25 g)
(0 g) (25 g)
(0 g) (25 g)
(0 g) (25 g)
(5 g) (25 g)
(0 g) (25 g)
(5 g) (25 g)
(0 g) (25 g)
(0 g) (0 g)
N/A = OPTION NOT AVAILABLE

IDENTIFYING MINOR FAULTS
Should the dishwasher fail to operate, before contacting the Service Centre, make
the following checks:
28
FAULT CAUSE REMEDY
1 - Machine completely dead
2 - Machine does not draw water
3 - Machine does not discharge water
4 - Machine discharges water continuously
5 - Spray arms are not heardto rotate
6 - On electronic applianceswithout a display: one ormore LED flashing quickly.
Plug is not connected to wallsocketO/I button has not been pressed
Door is open
No electricity
See causes for no. 1
Water tap is turned off
Programme selector is not atcorrect position
The inlet hose is bent
The inlet hose filter is not correctly connected
Filter is dirty
Outlet hose is kinked
The outlet hose extension isnot correctly connected
The outlet connection on thewall is pointing downwards notupwardsPosition of outlet hose is toolowExcessive amount of detergent
Item prevents arms from rotatingPlate and cup filter very dirty
Water inlet tap turned off
Connect electric plug
Press button
Close door
Check the fuse in the plug and the electricity supply
Check
Turn water tap on
Turn programme selector tocorrect position
Eliminate the bends in the hose
Clean the filter at the end of thehose
Clean filter
Straighten outlet hose
Follow the instructions for connecting the outlet hosecarefullyCall a qualified technician
Lift outlet hose to at least 40 cmabove floor levelReduce amount of detergent Use suitable detergentCheckClean plate and cup filter
Switch off the appliance.Turn on the tap.Re-set the cycle.
29
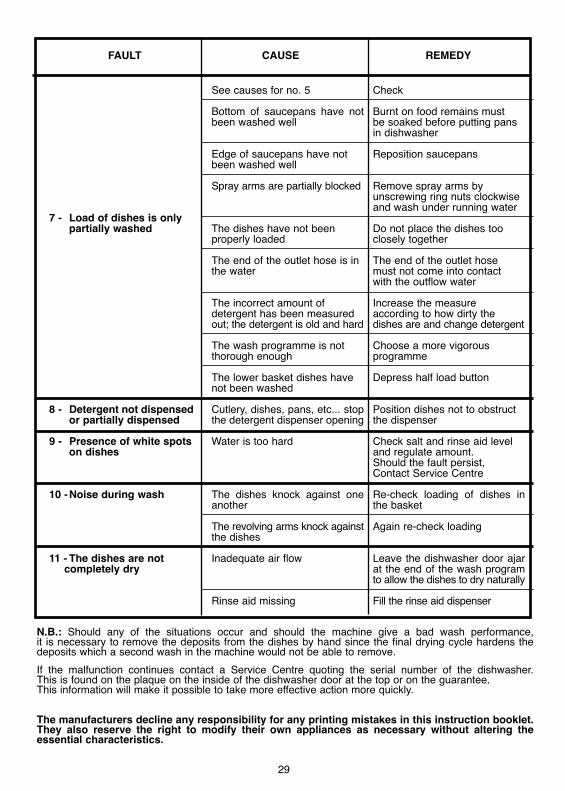
N.B.: Should any of the situations occur and should the machine give a bad wash performance,it is necessary to remove the deposits from the dishes by hand since the final drying cycle hardens thedeposits which a second wash in the machine would not be able to remove.If the malfunction continues contact a Service Centre quoting the serial number of the dishwasher.This is found on the plaque on the inside of the dishwasher door at the top or on the guarantee. This information will make it possible to take more effective action more quickly.
The manufacturers decline any responsibility for any printing mistakes in this instruction booklet.They also reserve the right to modify their own appliances as necessary without altering theessential characteristics.
FAULT CAUSE REMEDY
7 - Load of dishes is only partially washed
8 - Detergent not dispensedor partially dispensed
9 - Presence of white spots on dishes
10 -Noise during wash
11 - The dishes are not completely dry
See causes for no. 5
Bottom of saucepans have notbeen washed well
Edge of saucepans have not been washed well
Spray arms are partially blocked
The dishes have not been properly loaded
The end of the outlet hose is inthe water
The incorrect amount of detergent has been measuredout; the detergent is old and hard
The wash programme is not thorough enough
The lower basket dishes havenot been washed
Cutlery, dishes, pans, etc... stopthe detergent dispenser opening
Water is too hard
The dishes knock against oneanother
The revolving arms knock againstthe dishes
Inadequate air flow
Rinse aid missing
Check
Burnt on food remains must be soaked before putting pansin dishwasher
Reposition saucepans
Remove spray arms byunscrewing ring nuts clockwiseand wash under running water
Do not place the dishes too closely together
The end of the outlet hose must not come into contact with the outflow water
Increase the measure according to how dirty thedishes are and change detergent
Choose a more vigorous programme
Depress half load button
Position dishes not to obstructthe dispenser
Check salt and rinse aid leveland regulate amount. Should the fault persist, Contact Service Centre
Re-check loading of dishes inthe basket
Again re-check loading
Leave the dishwasher door ajarat the end of the wash programto allow the dishes to dry naturally
Fill the rinse aid dispenser


The manufacturer declines all responsibility in the event of any printing mistakes in thisbooklet. The manufacturer also reserves the right to make appropriate modifications toits products without changing the essential characteristics.
12.1
2 - 4
1901
037
EN
This appliance is marked according to the European directive 2002/96/EC on Waste Electrical and ElectronicEquipment (WEEE).By ensuring this product is disposed of correctly, you will help prevent potential negative consequences for theenvironment and human health, which could otherwise be caused by inappropriate waste handling of thisproduct.The symbol on the product indicates that this product may not be treated as household waste. Instead it shallbe handed over to the applicable collection point for the recycling of electrical and electronic equipmentDisposal must be carried out in accordance with local environmental regulations for waste disposal.For more detailed information about treatment, recovery and recycling of this product, please contact your localcity office, your household waste disposal service or the shop where you purchased the product.