Embed Size (px)
Citation preview
Central Recordkeeping Agency, NSDL e-Governance Infrastructure Limited
Standard Operating Procedures
For
MIS Upload by POP/POP-SP
Version-1.10
1
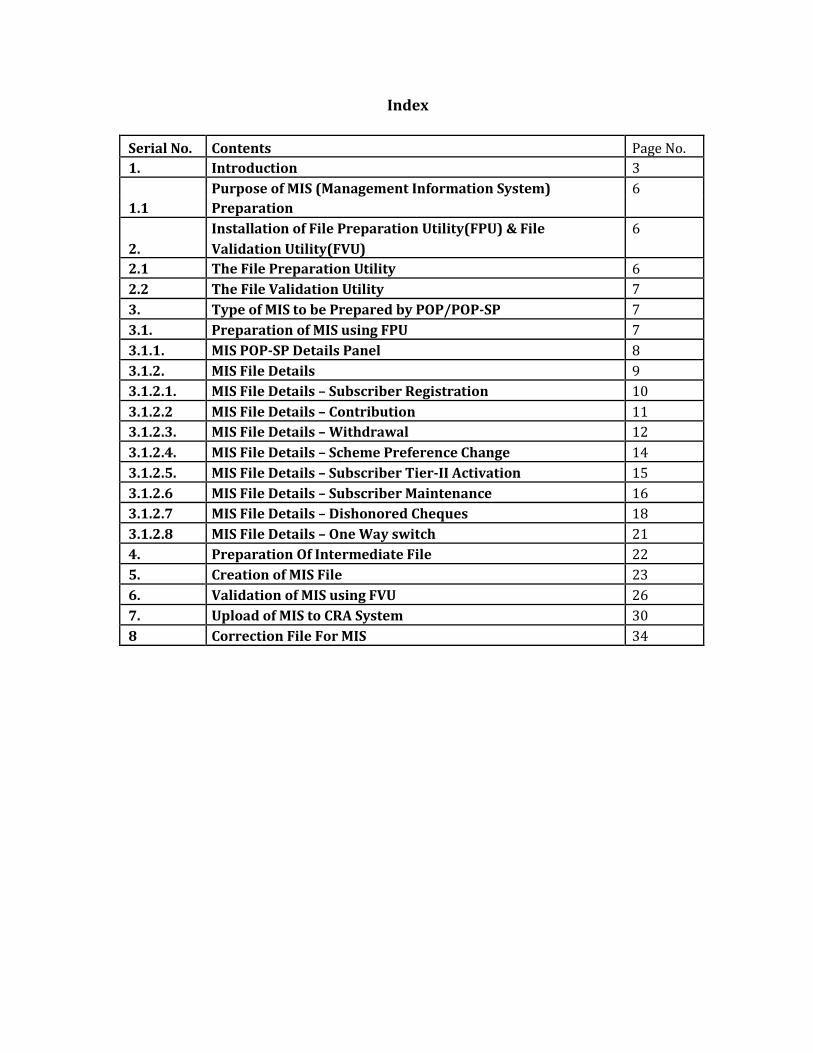
Index
Serial No. Contents Page No. 1. Introduction 3
Purpose of MIS (Management Information System) 6 1.1 Preparation
Installation of File Preparation Utility(FPU) & File 6
2. Validation Utility(FVU)
2.1 The File Preparation Utility 6
2.2 The File Validation Utility 7
3. Type of MIS to be Prepared by POP/POP-SP 7
3.1. Preparation of MIS using FPU 7
3.1.1. MIS POP-SP Details Panel 8
3.1.2. MIS File Details 9
3.1.2.1. MIS File Details – Subscriber Registration 10
3.1.2.2 MIS File Details – Contribution 11
3.1.2.3. MIS File Details – Withdrawal 12
3.1.2.4. MIS File Details – Scheme Preference Change 14
3.1.2.5. MIS File Details – Subscriber Tier-II Activation 15
3.1.2.6 MIS File Details – Subscriber Maintenance 16
3.1.2.7 MIS File Details – Dishonored Cheques 18
3.1.2.8 MIS File Details – One Way switch 21
4. Preparation Of Intermediate File 22
5. Creation of MIS File 23
6. Validation of MIS using FVU 26
7. Upload of MIS to CRA System 30
8 Correction File For MIS 34

1. Introduction
The Government of India (GOI) has introduced a new Defined Contribution Pension System known as the National Pension System (NPS) replacing the existing system of Defined Benefit Pension System vide Government of India, Ministry of Finance, and Department of Economic Affairs Notification, dated 22nd December 2003. The NPS came into operation with effect from 1st January 2004 and was made applicable to all new employees to Central Government service, except to Armed Forces, joining Government service on or after 1st January 2004. The employees of Central Autonomous organizations, State Governments/Union Territories (UTs) and the Autonomous organizations of the respective State Government/UT are also eligible to join the NPS.
The GOI has established Pension Fund Regulatory and Development Authority (PFRDA) on 10th October 2003 for developing and regulating the pension funds under the NPS. PFRDA has appointed NSDL e-Governance Infrastructure Limited (NSDL) as the Central Recordkeeping Agency (CRA) to maintain the records of contribution and its deployment in various pension fund schemes for the Subscribers. NSDL has setup a CRA system for this purpose. CRA is a first of its kind venture in India which will carry out the functions of Record Keeping, Administration and Customer Service for all Subscribers under NPS. The records of the contributions of each Subscriber will be kept in an account known as the Permanent Retirement Account which shall be identified by a Permanent Retirement Account Number (PRAN). CRA shall issue a PRAN to each Subscriber on his/her successful registration and maintain database of each Permanent Retirement Account along with recording of transactions relating to each PRAN.
PFRDA has already put in place the institutional framework and infrastructure required for administering NPS for government employees. Various entities such as CRA, Pension Fund Managers (PFM), Trustee Bank (TB), Custodian and NPS Trust have been appointed for this purpose.
The GOI has now decided to roll out the NPS for all citizens from 1st May, 2009. Hence, various facilities (like opening Permanent Retirement Account, contributing to NPS etc) will be required to be provided to all the citizens (known as ‘Subscribers’ in the NPS architecture) at various locations across India. These processes shall be carried out through the entities known as Points of Presence (POPs) appointed by the PFRDA. POPs’ shall provide the services under NPS through their network of branches called POP Service Providers (POP-SP).
Government of India has rolled out 'Tier II‘ investment account under NPS. This is a facility for the existing PRA holders (also to the prospective subscribers who intend to subscribe for NPS) to undertake investments over and above the investment in the normal pension account i.e. Tier I. Tier-II account has been introduced mainly to have a flexibility to withdraw savings in case of

requirement. The subscribers are free to withdraw the savings from this account whenever he/she wishes. This facility is available to any Indian Citizen including all the Central/State Government subscribers (mandatorily covered under NPS). PoP will act as subscriber interface for activation of Tier-I & Tier-II accounts for all citizens of India including all Government employees.
This document describes the standard operating procedure to be followed by the POPs, POP-SPs’ in the CRA architecture for preparing and uploading different MIS to CRA system. Acronyms and Abbreviations:
Acronym Description
CRA Central Recordkeeping Agency
CRA-FC CRA Facilitation Centre
CSF Contribution Submission Form
FPU File Preparation Utility
FRC Fund Receipt Confirmation File uploaded by TB
FVU File Validation Utility
NEFT National Electronic Funds Transfer (NEFT) system
NPS National Pension System
NSDL National Securities Depository Limited
PFM Pension Fund Manager
PFRDA Pension Fund Regulatory & Development Authority
POP Points of Presence
POP-SP POP Service Provider
PRA Permanent Retirement Account
PRAN Permanent Retirement Account Number
PRN Provisional Receipt Number
RTGS Real Time Gross Settlement
SCF Subscriber Contribution File
Important terms used in this document:
Correction File A revised file which is uploaded to replace the original file due to some
corrections in the data. Correction file can be uploaded only if the
original file has been accepted by CRA and a transaction id has been generated.
CRA-FC CRA-FC is Facilitation Centre appointed by CRA to facilitate Nodal
Offices to submit applications for allotment of PRAN and application
for change in signature and photograph of the subscriber.

File Reference File Reference Number (FRN) is generated on upload of SCF. This
Number (FRN) number can be used by POP/POP-SP for future reference to know the
status of the file.
FPU A utility provided by CRA to facilitate the digitisation and
consolidation of the pension contribution details of the Subscribers.
FVU A utility provided by CRA that will verify whether the Subscriber
Contribution File prepared is as per the file format of CRA.
Matching & Booking Matching is the process wherein the Subscriber Contribution File
uploaded by POP/POP-SP will be matched with the Fund Receipt
Confirmation file uploaded by Trustee Bank.
Original File Any new SCF prepared by POP/POP-SP for upload to CRA
POP PFRDA has appointed entities known as Points of Presence (POPs) to
extend customer interface for non-government Subscribers/individual
citizens of India who wish to open Permanent Retirement Account
(PRA) with CRA for the purpose of subscribing to the NPS
POP-SP POPs shall provide the services under NPS through their network of
branches called POP Service Providers (POP-SP)
PRAN 12 digits unique Permanent Retirement Account Number allotted by
CRA to each Subscriber registered in CRA system.
Scheme Scheme setup is scheme preference opted by Subscriber for investing
Setup/Scheme his monthly pension contribution.
Preference
Settlement It is the process run by CRA during a predefined time wherein, the
Contribution; Switch and Withdrawal requests received on behalf of all
Subscribers will be processed and Subscriber-wise, Scheme-wise units
will be generated/ redeemed as per the request type.
Subscriber The citizen of India who has opened Permanent Retirement Accounts
(PRA) with CRA for the purpose of subscribing to the NPS.
Subscriber The details about NPS contributions of the Subscriber uploaded by the
Contribution File POP/POP-SP to CRA system
(SCF)
T The term ‘T’ means the day on which transaction is executed.
T+1, T+2, etc. Number of Days after the Transaction day T (as described above). E.g.
If transaction takes place on 02.09.2014 then T=02.09.2014, T+1 =
03.09.2014 and T+2 = 04.09.2014).
Transaction id Unique ID generated by the CRA system on successful acceptance of
SCF by CRA.
User The term ‘User’ wherever referred to in the document indicates both a
POP and POP-SP.

1.1. Purpose of MIS (Management Information System) Preparation: The different functions under NPS such as acceptance of Subscriber registration applications for allotment of PRAN, contribution acceptance and upload, subscriber maintenance, etc will be carried through POP and their POP-SPs. POP-SPs will generate 17 digit ‘Receipt Number‘ as acknowledgement for accepting any requests viz. Upload of Subscriber Contribution, Subscriber Registration, Scheme Preference Change, Switch, Subscriber Details Modification, Reset/ Re-issue of I-PIN and T-PIN for Subscriber, Reprint of PRAN Card, Shifting of subscriber etc. from subscribers. These details of receipt number need to be uploaded into the CRA system for the purpose of tracking the services of POP-SPs. Additionally POP-SPs would also need to upload details of the cheques accepted for the purpose of contribution but which, at a later stage got dishonored. The MIS to be uploaded shall contain the details such as type of request, 17 digits Receipt Number issued by POP-SP to the subscriber, PRAN, etc. MIS to be uploaded by the POP/POP-SPs based on the model of operation adopted by the POP i.e, centralized /decentralized/quasi centralized.
2. Procedure for Installing File Preparation Utility (FPU) & File Validation Utility (FVU):
2.1. The File Preparation Utility (FPU):
To facilitate the preparation of MIS, CRA has developed a utility called File Preparation Utility (FPU). It is a utility which shall generate the desired output in conformity with the file formats as prescribed by CRA. It is a standalone JAVA based utility which can be easily installed on any machine. The minimum software and hardware required for installing the FPU pertaining to MIS shall be the same as required for upload of Subscriber Contribution File (SCF). Hence, POP-SP may refer to the Standard Operating Procedures (SOPs) on “Contribution Upload” available at www.npscra.nsdl.co.in for the same. POP-SP can freely download the FPU from CRA website www.npscra.nsdl.co.in. However, it is not mandatory for POP-SP to use the FPU provided by CRA. POP-SP can use the file formats required for the preparation of MIS provided by CRA and get the desired output from its back office. The file formats for preparation of MIS, are available at the CRA website www.npscra.nsdl.co.in.

2.2. File Validation Utility (FVU): FVU is a standalone Java based utility developed by the CRA to ensure that MIS file prepared and validated by POP-SP is in conformity with the file formats as prescribed by CRA. POP-SP can freely download the FVU from CRA website www.npscra.nsdl.co.in. The minimum software and hardware required for installing the FVU pertaining to MIS shall be the same as required for upload of Subscriber Contribution File (SCF). Hence, POP-SP may refer to the Standard Operating Procedures (SOPs) on “Contribution Upload” available at www.npscra.nsdl.co.in for the same. It is mandatory for POP-SP to validate the MIS file through the latest version of the FVU provided by CRA before uploading the same to CRA system.
3. Type of MIS to be prepared by POP/POP-SP: POP/POP-SP shall prepare various types of MIS as mentioned below and upload the same to the CRA system. For each type of request mentioned below, the POP/POP-SP shall prepare and upload separate MIS file.
Subscriber Registration Subscriber Tier – II Activation Contribution Withdrawal Scheme Preference Change Subscriber Details Modification I-PIN/T-PIN Request Shifting of Subscriber from one POP-SP to another PRAN Card Reprinting Dishonored Cheques One Way Switch
3.0. Preparation of MIS using FPU: The FPU provided by CRA can be used only by the POPs who have opted for MIS file upload by POP-SPs.
After the successful installation of the FPU, POP-SP shall undertake the activity of preparing the MIS File. POP-SP should ensure that the latest version of FPU is being used.

FPU shall display the following two panels to the POP-SP user:
MIS POP-SP Details: In this panel, the user shall enter details such as POP-SP
Registration Number (allotted by CRA), POP-SP name, Request File Type (Original/Correction), Request Type (MIS for Contribution, Subscriber Registration, Reset of I-Pin/T-Pin etc.)
MIS File Details: In this panel, the user shall enter the details pertaining to particular request type as mentioned above. The details to be entered in this panel shall vary according to the request type selected by the POP-SP.
3.1.1. MIS POP-SP Details Panel:
This panel will open by default when the POP-SP executes/double clicks on FPU icon. The FPU will have an extension “.JAR”. This panel will be a common one irrespective of the request type (Subscriber Registration, Contribution etc). The details of this panel will be displayed as shown in Figure 1 below.
Figure 1

POP/POP-SP user shall enter the following details in this panel:- 1) POP-SP Reg. No.: User should enter the POP-SP Reg. No. allotted by CRA on
successful registration in CRA system. 2) POP-SP Name: This is an optional field. User may enter the name of
POP/POP-SP in this field. 3) Request File Type (Original / Correction): If the user is preparing a new
file for upload to CRA system; user shall select the request type as „Original‟. If user wants to upload a correction file for a file which has already been uploaded to CRA, the user shall upload the correction file by selecting the request type as “correction” and mention the batch ID of the original file in the correction file.
4) Original Batch ID: In case the request type is original, the “Original Batch ID” field shall remain disabled. If the request type is “Correction”, the user shall have to provide the batch ID of the original file in the correction file which is being prepared. If batch ID is not provided, user will not be able to create the correction file. (The batch ID is a 20 digit number which is generated by FPU after successful creation of MIS File.)
5) Request File Type: User should select the type of request such as Subscriber Registration, Subscriber Tier-II Activation, Scheme Preference Change/Switch Withdrawal, I-PIN/T-PIN request, etc. for which MIS to be prepared from drop down list provided.
6) MIS Details: This field shall display the total number of Subscriber records. This field shall be automatically populated based on the data entered by the user in the ‘MIS file details‘ panel.
7) The fields which are marked with sign (*) in the MIS POP-SP details panel are mandatory fields.
3.1.2. MIS File Details: The fields displayed in the ‘MIS file Details’ panel of the FPU will vary depending upon the request type selected by the user under ‘MIS POP-SP Details’ panel. Under this panel the user shall enter the details pertaining to different requests for validation through FVU. The details that are required to be entered in the ‘MIS File details’ panel for different requests explained below.
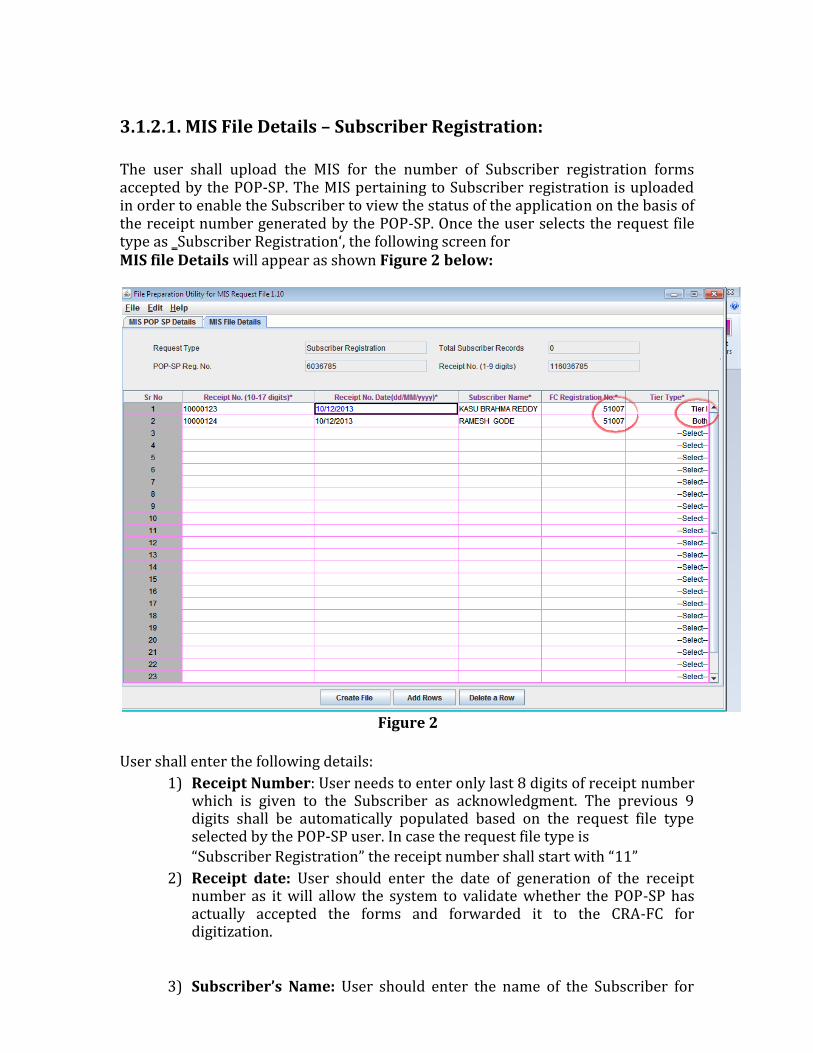
3.1.2.1. MIS File Details – Subscriber Registration: The user shall upload the MIS for the number of Subscriber registration forms accepted by the POP-SP. The MIS pertaining to Subscriber registration is uploaded in order to enable the Subscriber to view the status of the application on the basis of the receipt number generated by the POP-SP. Once the user selects the request file type as ‗Subscriber Registration‘, the following screen for MIS file Details will appear as shown Figure 2 below:
Figure 2
User shall enter the following details:
1) Receipt Number: User needs to enter only last 8 digits of receipt number which is given to the Subscriber as acknowledgment. The previous 9 digits shall be automatically populated based on the request file type selected by the POP-SP user. In case the request file type is “Subscriber Registration” the receipt number shall start with “11”
2) Receipt date: User should enter the date of generation of the receipt number as it will allow the system to validate whether the POP-SP has actually accepted the forms and forwarded it to the CRA-FC for digitization.
3) Subscriber’s Name: User should enter the name of the Subscriber for

whom registration application is accepted by POP-SP. 4) FC Registration Number: POP-SP has to mention the CRA-FC
registration number in the MIS i.e, the registration number of the CRA-FC to whom the forms will be submitted for processing.
5) Tier Type: User shall select the account type either Tier-I or Tier-II as mentioned in the subscriber form.
3.1.2.2. MIS File Details – Contribution:
The POP-SP shall upload the MIS for the accepted contributions made by the Subscribers. This has to be done in order to track the number of contributions received and the ones which are actually uploaded. Once the POP-SP user selects the request type as ‘Contribution‘, the screen for MIS File Details will appear as shown Figure 3 below:
Figure 3

User shall enter the following details:
1) Receipt Number: POP-SP shall enter only last 8 digits of receipt number
which is given to the Subscriber as acknowledgment. The previous 9 digits shall be automatically populated based on the request file type selected by the POP-SP user. In case the request file type is “Contribution” the receipt number shall start with “12”.
2) Receipt date: User should enter the date of generation of the receipt number.
3) PRAN number: User shall enter the PRAN number for which contributions are accepted and receipt number is generated.
4) Mode of Payment: POP-SP User shall specify the mode of payment i.e. whether Subscriber has remitted the contributions by way of Cash or by Cheque.
5) Contribution Amount: User shall specify the contribution amount as remitted by the Subscriber.
6) Net Contribution: POP-SP shall deduct their charges from contribution amount and specify only net amount.
7) Tier Type: User shall select the account type either Tier-I or Tier-II as specify by the subscriber in the NCIS form.
3.1.2.3. MIS File Details – Withdrawal: The POP-SP shall upload the MIS for the withdrawal made by the subscribers. This has to be done in order to track the amount which has withdrawn from Tier-II account. POP/POP-SP shall receive withdrawal request from subscriber to withdraw from his/her Tier-II account, in that case user has to select the request type as ―Withdrawal, and the following screen for MIS file Details will appear as shown Figure 4 below:

Figure 4
User shall enter the following details:
1) Receipt Number: POP-SP shall enter only last 8 digits of receipt number
which is given to the Subscriber as acknowledgment. The previous 9 digits shall be automatically populated based on the request file type selected by the POP-SP user. In case the request file type is “Withdrawal” the receipt number shall start with “14”.
2) Receipt date: User should enter the date of generation of the receipt number.
3) PRAN Number: User shall enter the PRAN number of subscriber for which withdrawal has to be done from his/her account
4) Tier Type: User shall select the account type as Tier-II.

3.1.2.4. MIS File Details – Scheme Preference Change: The POP-SP shall upload the MIS for the scheme preference change request made by the subscribers. POP/POP-SP shall receive “Scheme Preference Change” request from subscriber to change the scheme details. In that case user has to select the request type as “Scheme Preference Change”, the following screen for MIS file Details will appear as shown Figure 5 below:
Figure 5
User shall enter the following details:
1) Receipt Number: POP-SP shall enter only last 8 digits of receipt number
which is given to the Subscriber as acknowledgment. The previous 9 digits shall be automatically populated based on the request file type selected by the POP-SP user. In case the request file type is “Scheme Preference Change” the receipt number shall start with “15”.
2) Receipt date: User should enter the date of generation of the receipt number.
3) PRAN Number: User shall enter the PRAN number of subscriber for which
scheme has to be change from his/her account 4) Tier Type: User shall select the account type as Tier—I & II.
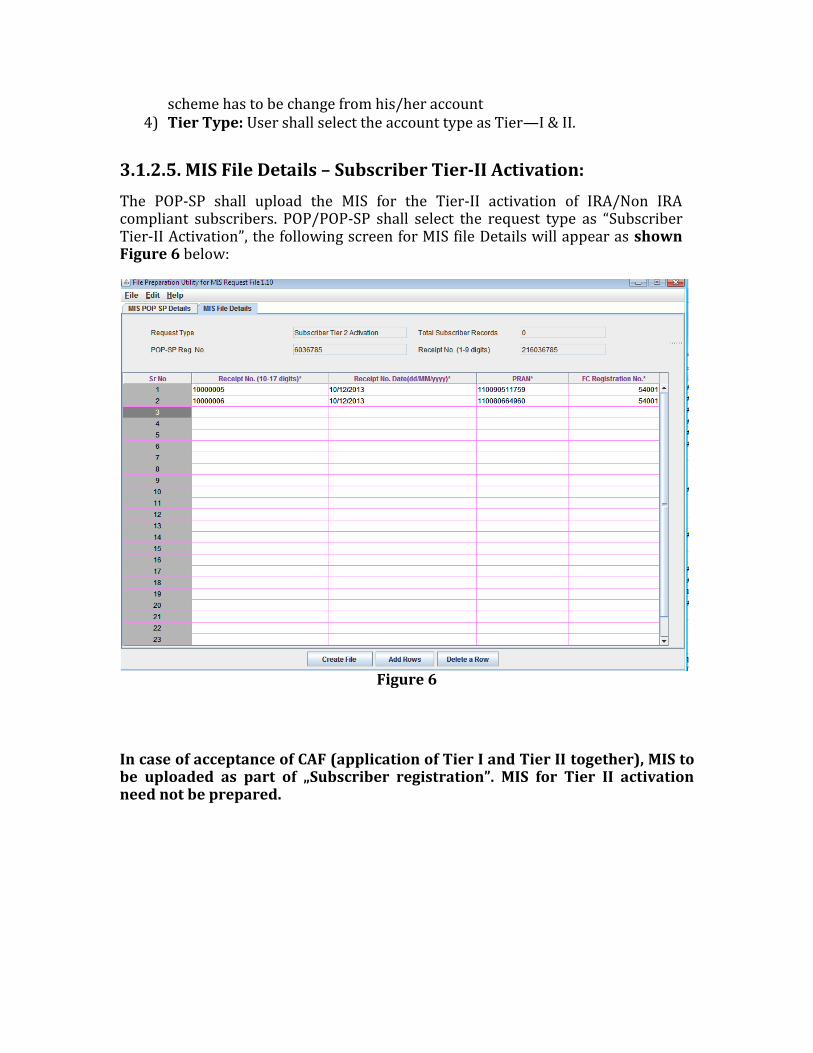
3.1.2.5. MIS File Details – Subscriber Tier-II Activation: The POP-SP shall upload the MIS for the Tier-II activation of IRA/Non IRA compliant subscribers. POP/POP-SP shall select the request type as “Subscriber Tier-II Activation”, the following screen for MIS file Details will appear as shown Figure 6 below:
Figure 6
In case of acceptance of CAF (application of Tier I and Tier II together), MIS to be uploaded as part of „Subscriber registration”. MIS for Tier II activation need not be prepared.

User shall enter the following details: 1) Receipt Number: POP-SP shall enter only last 8 digits of receipt number
which is given to the Subscriber as acknowledgment. The previous 9 digits shall be automatically populated based on the request file type selected by the POP-SP user. In case the request file type is “Subscriber Tier-II Activation” the receipt number shall start with “21”.
2) Receipt date: User should enter the date of generation of the receipt number.
3) PRAN Number: User shall enter the PRAN for which Tier –II activation request has been received and accepted.
4) FC Registration Number: POP/POP-SP has to send physical form after activation of Tier-II account to the nearest CRA –FC within 15 days and shall mention the CRA-FC registration number in the MIS. i.e., the CRA-FC to whom the physical forms will be submitted for storage.
3.1.2.6. MIS File Details – Subscriber Maintenance: Once the POP-SP selects any of the request type out of the below mentioned requests as part of Subscriber maintenance, the screen for ‘MIS File Details’ will appear as shown below in Figure 7.
Subscriber details Modification I-PIN, T-PIN Request Shifting of Subscriber PRAN Card Reprinting

Figure 7
User shall enter the following details:
1) Receipt Number: POP-SP shall enter only last 8 digits of receipt number which is given to the Subscriber as acknowledgment. The previous 9 digits shall be automatically populated based on the request file type selected by the POP-SP user. The receipt number generated shall start with the following:
a. Withdrawal – 14 b. Scheme Preference Change/Switch – 15 c. Subscriber Modification – 17 d. I-Pin/T-Pin – 18 e. Subscriber Shifting – 19 f. PRAN card reprint – 20
2) Receipt date: User should enter the date of generation of the receipt number.
3) PRAN: User shall enter the PRAN of the Subscriber for which the
concerned request is accepted by POP-SP.

3.1.2.7. MIS File Details – Dishonored Cheques:
POP-SP shall prepare MIS of all the dishonored cheques and shall give the reason for dishonor of the same. This shall be uploaded by the POP-SP user so that when the Subscriber enters the receipt number to view the status of the contribution made, the reason for non-investment of funds shall be displayed. Once the POP-SP user selects the request type as ‘Dishonored Cheques‘, the screen for ‘MIS File Details‘ will appear as shown below in Figure 8
Figure 8
User shall enter the following details: 1) Receipt Number: POP-SP shall enter only last 8 digits of receipt number
which is given to the Subscriber as acknowledgment. The previous 9 digits shall be automatically populated based on the request file type selected by the POP-SP user. In case the request file type is “Dishonored Cheques” the number shall start with “12”.
2) Receipt date: User shall enter the date of generation of the receipt number.
3) Dishonored Cheque Reason: User shall select the reason for dishonor of cheque i.e. Cheque bounced or Cheque Rejected from the dropdown

provided. This is a mandatory field. 4) Remark: User shall specify in the remark column the reason for
dishonored of cheque i.e. insufficient fund, signature mismatch, etc. Remarks are mandatory in case the dishonor of cheque is due to cheque rejection.
At the time of entering the data, FPU will perform format and structure level validations of the data which is entered by the POP-SP user. In cases where data is not as per the file formats specified by CRA, FPU will display an error message to the user. An example of such error message is shown as below Figure 9 where receipt number is incorrect:
Figure 9
POP-SP can enter the request details manually, copy the data from an excel sheet or take an export form its current back office. To paste data from an excel sheet, POP-SP can use “Paste from Excel” option. This can be done either by going to the Edit Menu and using the “Paste from excel” option or by right clicking the mouse in the cell in which the data needs to be pasted. The contents will be displayed as shown below Figure 10:
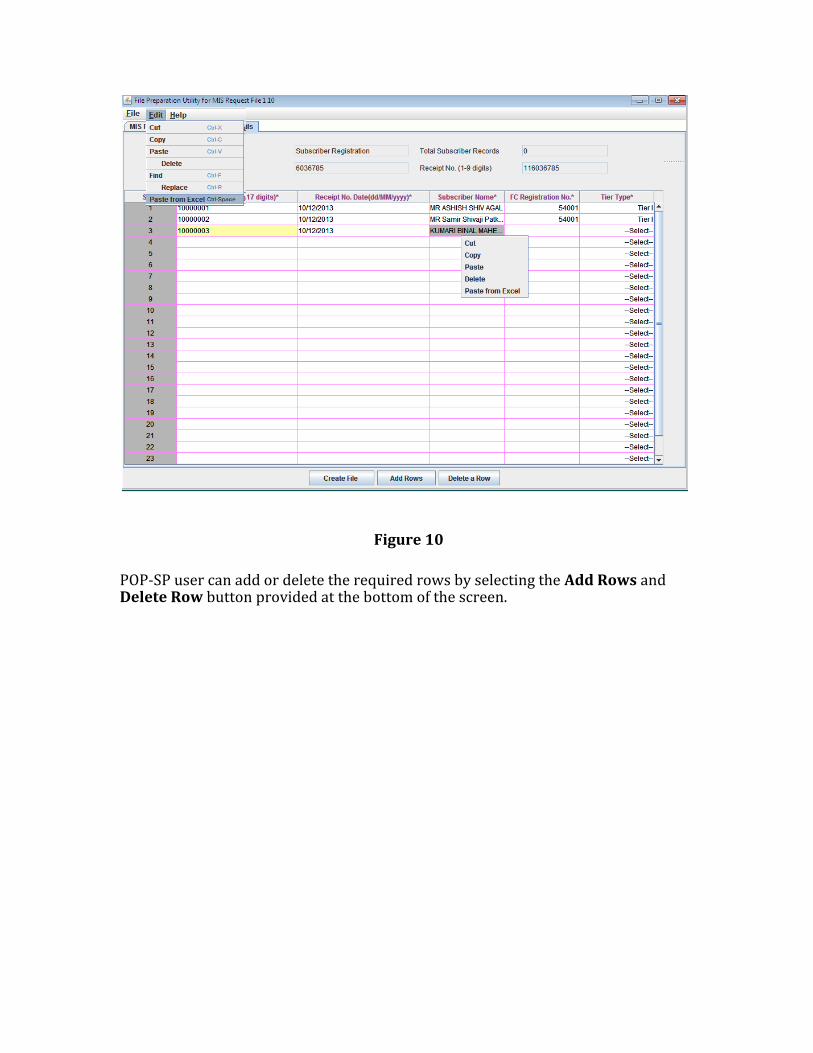
Figure 10
POP-SP user can add or delete the required rows by selecting the Add Rows and Delete Row button provided at the bottom of the screen.

3.1.2.8. MIS File Details – One Way Switch The POP-SP shall upload the MIS for the One Way switch request made by the subscribers. POP/POP-SP shall receive “One way switch” request from subscriber In that case user has to select the request type as “One Way switch”, the following screen for MIS file Details will appear as shown Figure 11 below:
Figure 11 User shall enter the following details:
1) Receipt Number: POP-SP shall enter only last 8 digits of receipt number
which is given to the Subscriber as acknowledgment. The previous 9 digits shall be automatically populated based on the request file type selected by the POP-SP user. In case the request file type is “One way switch” the receipt number shall start with “22”.
2) Receipt date: User should enter the date of generation of the receipt number.
3) PRAN Number: User shall enter the PRAN number of subscriber for which withdrawal has to be done from his/her account
4) Tier Type: User shall select the account type as Tier-II.

4. Preparation of Intermediate File: 1) In FPU, user will have the option to save the data at any point in time while
digitizing the details. User can save the partially entered details by clicking on the Save option in File menu as shown below Figure 12.
Figure 12
2) After clicking on the Save option, the FPU will prompt the user to save the file on
the machine. User will have to assign a name to the file which should not be more than 8 characters. User will have to also enter the required location in which MIS file to be saved.
3) After entering the name and the location of the file, user will have to click on the ‘Save’ option on the screen. A confirmation message will be displayed as shown in below Figure 13, which will also mention the path where the file is saved. An Intermediate file will always be saved with an ‘.fpu‘ extension. However, POP-SP user can not validate this intermediate file having ‘.fpu‘ extension in FVU or upload to CRA system.

Figure 13
4) The user can reopen the intermediate file with the same version of the FPU that
was used at the time of creation. To open the intermediate file, user has to select the “Open” option in the File menu.
5) For the record purposes, it is advisable for the user to create a working directory containing the year-wise, month-wise, date-wise folders for MIS files prepared.
5. Creation of MIS File:
1) After entering the necessary details in the FPU, the user shall create the MIS file by clicking on the ‘Create File’ button. Once the user clicks on the ‘Create File’ option a screen as shown in below Figure 14 will be displayed to the user, User shall select required path and give desired file name having maximum 8 characters. (File name should not contain any special characters such as- , “, \ etc. e.g. Mar: 14, Mar\14 and should not exceed 8 characters.)

Figure 14
2) FPU will create two types of file; one file having extension ‘.txt‘ and another will
be an intermediate file having extension ‘.fpu‘. FPU will also generate a unique 20 digit Batch ID to identify each file. This Batch ID will be displayed to the user in the final confirmation message shown after successful generation of the file as shown below Figure 15.

Figure 15
(In case POP-SP user wants to prepare a correction file for replacing the original file uploaded to CRA, user shall mention this batch ID while preparing a correction file.)
3) While creating a file, FPU will validate the following: FPU will check whether user has provided all the mandatory details
and data type of all the fields is correct. FPU will check whether the POP-SP Reg. No, PRAN, Receipt Number
and Date are structurally correct. FPU will check whether for each receipt number, there is only one
record within a file. FPU will reject the file if duplicate records with the same receipt number. In case the POP-SP has entered a receipt number that was part of an earlier file, the MIS file uploaded shall be rejected by the CRA system.
FPU will validate whether contribution amount is greater than zero and it is not negative amount. FVU will also check that date of the receipt number is not a future date.
4) If the FPU encounters any error in the data entered by the user, such as, incorrect POP-SP registration number, null contribution amount, it will display an error message to the user. In all such cases, FPU will not

generate any output file. The User will be required to rectify the errors and create a valid file again.
6. Validation of MIS file Using FVU: After the completion of preparation of MIS file using FPU or own back office, POP-SP shall validate the file with the help of the File Validation Utility (FVU). It is mandatory for the POP-SP to validate the MIS file using the FVU provided by CRA. Only the file which is successfully validated through the FVU can be uploaded to CRA system. CRA system will reject the file if the same has not been validated using the latest version of FVU or not validated using the FVU at all before upload to CRA system.
To validate the MIS File through FVU, the user shall double click on the FVU icon at the path where FVU is installed. Once the user double clicks on the ‘FVU.JAR‘, the FVU will be displayed as shown in the below Figure 16.
Figure 16
The FVU contains the following two fields explained below: 1. Input File Name with Path
1) POP-SP user shall input the name of the file (with the .txt extension) to be validated using the FVU using the browse option shown above.
2) The Input file should be the file, successfully generated by FPU or by POP-SP own back office.
3) The file to be passed through FVU should be in “.txt” format only. 2. Error/Upload & Control Sheet Report File Path
1) User will have to specify the path where the desired output file (error file/
upload file & control sheet) should be stored on the machine. It is advisable to use the same path as the input file path. For error file or upload file, User shall only specify the path and should not specify any file name. FVU will provide the name for output file by default.

2) User can enter the path or can select the same by clicking the ‘Browse‘ button
on the extreme right of the ‘Error/Upload & Control Sheet Report File Path’.
3) It is mandatory for the User to fill both ‘Input File Name with Path‘ and ‘Error/Upload & Control Sheet Report File Path‘. ‘Validate‘ button will remain disabled till the time both fields are not entered.
4) After selecting the input and output folder, User should click on the ‘Validate’ button to validate the MIS File. If the file is successfully validated, FVU will display a message as shown below and shall also generate the upload file with the extension ‘.fvu‘. FVU will also generate a control sheet (an HTML report) in the path specified in the ‘Error/Upload File Path‘ as shown below Figure 17.
Figure 17
5) While validating the MIS file, FVU will perform the following validations
mentioned below:
FVU will check whether input file is text file having ‘.txt‘ extension
and name is not more than 8 characters. FVU will check whether user has provided all the mandatory
details and format of all the details is correct. FVU will check whether the POP-SP Reg. No, PRAN and Receipt
Number are structurally correct. FVU will check whether for each receipt number, there is only one
record within a file. FVU will reject the file if duplicate records with the same receipt number.
FVU will validate whether contribution amount is greater than zero and that it is not a negative amount.
FVU will also check that date of receipt is not a future date.
6) On successful validation, FVU will generate an output file with extension ‘.fvu‘ at location specified in the field ‘Error/Upload & Control Sheet Report File Path’. Along with output file, FVU will also generate an

“.html” file showing control totals (no. of records, etc.) as shown below Figure 18.
Figure 18
7) At the time of file validation, if any of the validations fail, then the file will be
rejected and an error message will be shown as per below Figure 19.
Figure 19
In case of validation failure, FVU will also generate an error file (“.html” file) at location specified in the field ‘Error/Upload & Control Sheet Report File Path’

Error file will show the errors/list of errors associated with that particular file as shown in below Figure 20.
Figure 20

7. Upload of MIS file to CRA System: After validating the MIS file through FVU, POP-SP shall upload the output file having ‘.fvu‘ extension to CRA system. The brief process of uploading of MIS files to CRA system is as under:
POP-SP shall access the CRA system using DSC for uploading the validated MIS files.
POP-SP shall upload the file using the DSC (Digital Signature Certificate) based user IDs allotted by the CRA at the time of POP-SP registration.
POP-SP shall navigate to the “File Upload” menu and select “MIS File” option as shown in below Figure 21.
Figure 21
The CRA system shall display a upload screen similar to that of the Subscriber contribution file (SCF) upload. POP-SP shall attach the MIS file and upload it to the system.
CRA system will generate a unique file reference number (FRN) for successfully uploaded files.
CRA system will perform structural and database level validations on the uploaded files and accordingly update the status of the file.
POP-SP can check the status of the uploaded file using the FRN, Batch ID or the date range of upload by selecting “MIS File Status View” option under the File Upload option as shown in below Figure 22:

Figure 22
If the validations are successful, the status of the file in CRA system will be
‗Accepted‘ as shown in below Figure 23:

Figure 23
CRA system will reject the file in case of validation failure. CRA will update the status of the file in CRA system as ‘Rejected‘ and generate error file giving the reasons for rejection. POP-SP can download this error report for reference. CRA system will send intimation by email for rejected files to concerned POP-SP.
The processes pertaining to MIS file preparation, upload, checking the status of the file etc. as enumerated above will be the same as required for Subscriber Contribution upload by POP/POP-SP. Hence, POP-SP may refer Standard Operating Procedure (SOP) on “Contribution Upload” available at our website www.npscra.nsdl.co.in which provides the detailed procedure to be followed by POP-SP regarding the above.

Validations at by CRA for uploaded MIS files
CRA will carry out the following validations. In case of any validation failure, CRA system will reject the entire file and POP-SP will have to rectify the errors and upload a new file.
1) CRA system will perform all the validation as performed by FPU and FVU as
enumerated above. 2) CRA system will not accept the file if it is prepared and validated through
any older version of FPU/FVU. Files should be prepared and validated through latest version.
3) CRA system will check whether file is tampered after validation. 4) CRA will reject the duplicate files (having same batch ID) 5) CRA system will check whether POP-SP registration number and uploading
POP-SP entity is same. 6) CRA system will check whether the POP-SP registration number and PRAN
are valid in system.

8. Correction File for MIS
CRA system provides POP-SP a facility to upload a correction file for any previously uploaded MIS file which has been accepted by CRA system. However, user should take note of following points related to correction file:
POP-SP user can upload a correction file when user wants to make
any changes in original file due to incorrect data. User will have to prepare and upload the entire file even if a single
record in original file contains any error. The user should note that a correction file can be uploaded only for
original file which is already uploaded and accepted by CRA. User shall select the type of request file as “Correction” and shall provide the batch ID of the original file which is already uploaded and accepted by CRA as shown in below Figure.

If the original file is rejected by CRA system, the user will have to upload a
new file and not a correction file. CRA system will perform all the validations as required for regular file.
However, CRA system will perform following additional validations for correction file.
CRA system shall check whether correction file contains batch ID of original file. .
On successful validation of file, CRA system shall accept the correction file uploaded by the POP-SP and the status of original file for which correction file is uploaded shall be ‘Cancelled‘.
In case of validation failure, CRA system will reject the correction file and generate error report for which POP-SP can download for reference.
******************************