Embed Size (px)
Citation preview

CHAP LINQ USER GUIDE - OCTOBER 2015 0
2015
CHAP IT Department
Community Health Accreditation Partner 1275 K Street NW Suite 800 Washington DC 2005
Version 1.1
CHAP LinQ User Guide
© COMMUNITY HEALTH ACCREDITATION PARTNER, INC. VERSION 1.1
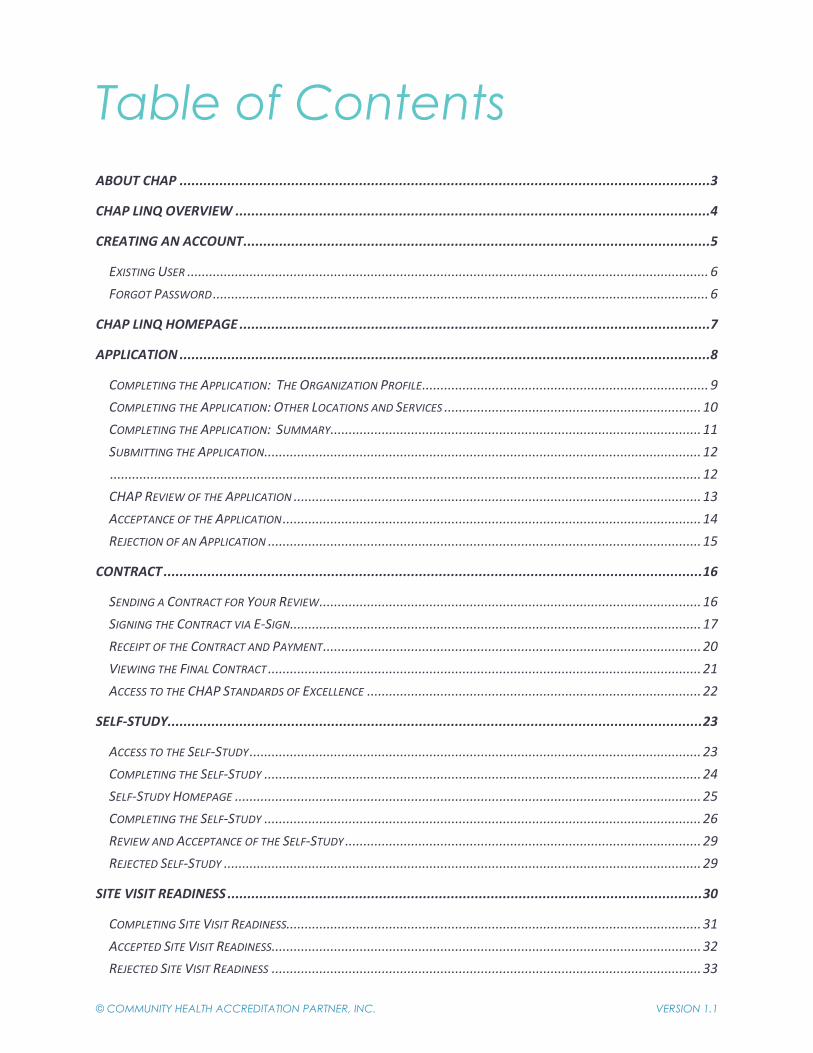
Table of Contents
ABOUT CHAP .....................................................................................................................................3
CHAP LINQ OVERVIEW .......................................................................................................................4
CREATING AN ACCOUNT .....................................................................................................................5
EXISTING USER .............................................................................................................................................. 6
FORGOT PASSWORD ....................................................................................................................................... 6
CHAP LINQ HOMEPAGE ......................................................................................................................7
APPLICATION .....................................................................................................................................8
COMPLETING THE APPLICATION: THE ORGANIZATION PROFILE .............................................................................. 9
COMPLETING THE APPLICATION: OTHER LOCATIONS AND SERVICES ...................................................................... 10
COMPLETING THE APPLICATION: SUMMARY ..................................................................................................... 11
SUBMITTING THE APPLICATION ....................................................................................................................... 12
................................................................................................................................................................. 12
CHAP REVIEW OF THE APPLICATION ............................................................................................................... 13
ACCEPTANCE OF THE APPLICATION .................................................................................................................. 14
REJECTION OF AN APPLICATION ...................................................................................................................... 15
CONTRACT ....................................................................................................................................... 16
SENDING A CONTRACT FOR YOUR REVIEW ........................................................................................................ 16
SIGNING THE CONTRACT VIA E-SIGN................................................................................................................ 17
RECEIPT OF THE CONTRACT AND PAYMENT ....................................................................................................... 20
VIEWING THE FINAL CONTRACT ...................................................................................................................... 21
ACCESS TO THE CHAP STANDARDS OF EXCELLENCE ........................................................................................... 22
SELF-STUDY...................................................................................................................................... 23
ACCESS TO THE SELF-STUDY ........................................................................................................................... 23
COMPLETING THE SELF-STUDY ....................................................................................................................... 24
SELF-STUDY HOMEPAGE ............................................................................................................................... 25
COMPLETING THE SELF-STUDY ....................................................................................................................... 26
REVIEW AND ACCEPTANCE OF THE SELF-STUDY ................................................................................................. 29
REJECTED SELF-STUDY .................................................................................................................................. 29
SITE VISIT READINESS ....................................................................................................................... 30
COMPLETING SITE VISIT READINESS................................................................................................................. 31
ACCEPTED SITE VISIT READINESS ..................................................................................................................... 32
REJECTED SITE VISIT READINESS ..................................................................................................................... 33

© COMMUNITY HEALTH ACCREDITATION PARTNER, INC. VERSION 1.1
SITE VISIT ......................................................................................................................................... 34
SITE VISIT ................................................................................................................................................... 34
PLAN OF CORRECTION ................................................................................................................................... 35
PLAN OF CORRECTION HOME PAGE ................................................................................................................. 36
COMPLETING THE PLAN OF CORRECTION .......................................................................................................... 37
ACCEPTED PLAN OF CORRECTION .................................................................................................................... 41
REJECTED PLAN OF CORRECTION ..................................................................................................................... 42
BOARD OF REVIEW........................................................................................................................... 44
ACCREDITATION ............................................................................................................................... 45
OTHER ACTIONS ............................................................................................................................... 46
ADD A SITE OR SERVICE ................................................................................................................................. 46
EDIT CUSTOMER INFORMATION ...................................................................................................................... 47
VIEW APPLICATION SUMMARY ....................................................................................................................... 48
VIEW CONTRACT DOCUMENT ........................................................................................................................ 49
VIEW SELF-STUDIES ...................................................................................................................................... 50
VIEW SITE VISITS.......................................................................................................................................... 51
VIEW PLANS OF CORRECTION ......................................................................................................................... 53
VIEW ACCREDITED LOCATIONS ....................................................................................................................... 54
VIEW ALL LOCATIONS ................................................................................................................................... 56
VIEW DOCUMENTS ....................................................................................................................................... 57
VIEW JOURNALS .......................................................................................................................................... 58
VIEW SITE VISIT READINESS ........................................................................................................................... 59
VIEW FINDINGS ........................................................................................................................................... 60
COMPLETE BLACKOUT DATES ......................................................................................................................... 62
ICON LEGEND ................................................................................................................................... 63

© COMMUNITY HEALTH ACCREDITATION PARNERT INC.
VERSION 1.1 3
About CHAP
The Community Health Accreditation Partner (CHAP) is an independent, nonprofit accrediting body for home and community-based health care organizations. We are people who care on a mission to lead and a journey to serve.
Created in 1965 as a joint venture between the American Public Health Association and the National League for Nursing, CHAP was the first accrediting body for home and community-based health care organizations in the United States.
CHAP accredits a variety of home and community-based health care organizations that make high quality care a programmatic and business priority. We bring deep insights, best practices and thought leadership to the organizations we serve, supporting the care and services they provide. Don‘t just take our word for it; CHAP is a nationally approved accrediting organization that makes recommendations to the Centers for Medicare and Medicaid Services (CMS) on whether a provider should be granted “deemed status”.
We know more about home and community-based health care accreditation than anyone in the industry. It is not part of what we do; it is all we do.
© COMMUNITY HEALTH ACCREDITATION PARNERT INC.
VERSION 1.1 4
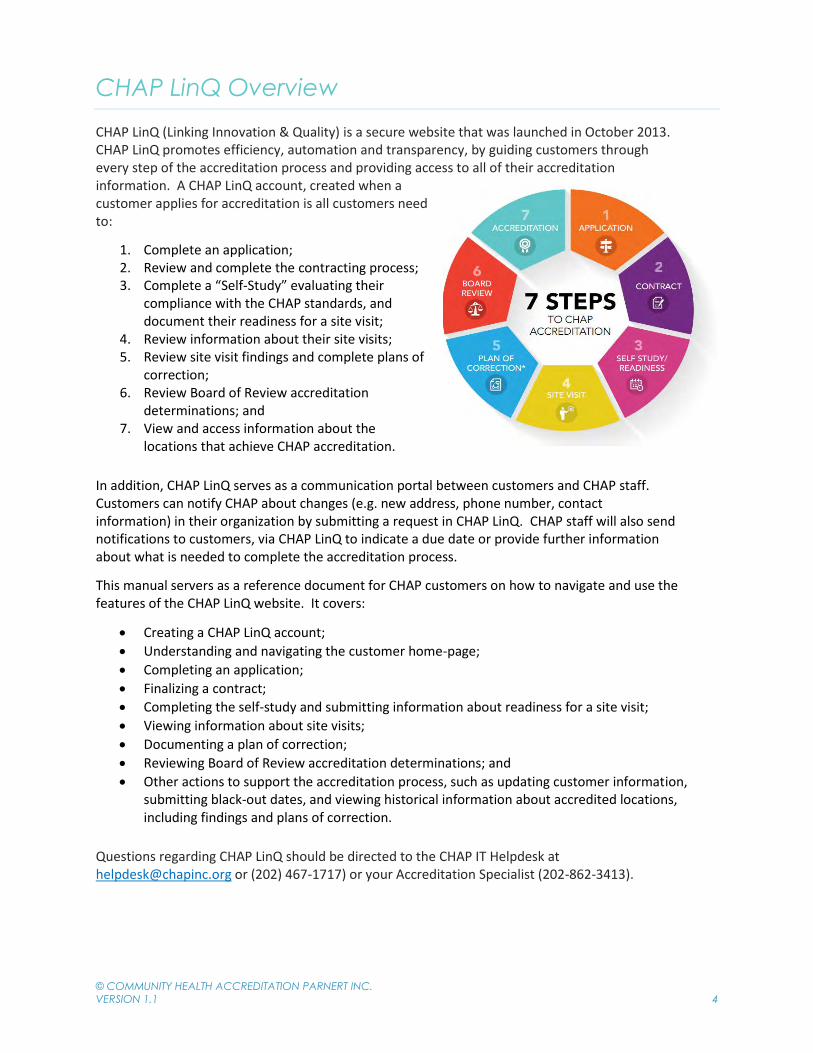
CHAP LinQ Overview
CHAP LinQ (Linking Innovation & Quality) is a secure website that was launched in October 2013. CHAP LinQ promotes efficiency, automation and transparency, by guiding customers through every step of the accreditation process and providing access to all of their accreditation information. A CHAP LinQ account, created when a customer applies for accreditation is all customers need to:
1. Complete an application; 2. Review and complete the contracting process; 3. Complete a “Self-Study” evaluating their
compliance with the CHAP standards, and document their readiness for a site visit;
4. Review information about their site visits; 5. Review site visit findings and complete plans of
correction; 6. Review Board of Review accreditation
determinations; and 7. View and access information about the
locations that achieve CHAP accreditation.
In addition, CHAP LinQ serves as a communication portal between customers and CHAP staff. Customers can notify CHAP about changes (e.g. new address, phone number, contact information) in their organization by submitting a request in CHAP LinQ. CHAP staff will also send notifications to customers, via CHAP LinQ to indicate a due date or provide further information about what is needed to complete the accreditation process.
This manual servers as a reference document for CHAP customers on how to navigate and use the features of the CHAP LinQ website. It covers:
Creating a CHAP LinQ account;
Understanding and navigating the customer home-page;
Completing an application;
Finalizing a contract;
Completing the self-study and submitting information about readiness for a site visit;
Viewing information about site visits;
Documenting a plan of correction;
Reviewing Board of Review accreditation determinations; and
Other actions to support the accreditation process, such as updating customer information, submitting black-out dates, and viewing historical information about accredited locations, including findings and plans of correction.
Questions regarding CHAP LinQ should be directed to the CHAP IT Helpdesk at [email protected] or (202) 467-1717) or your Accreditation Specialist (202-862-3413).

© COMMUNITY HEALTH ACCREDITATION PARNERT INC.
VERSION 1.1 5
Creating an Account
To begin your CHAP accreditation and create a new account, go to https://chaplinq.org/
Select the Apply button.
You will be directed to a welcome screen requesting your general account information and information about your main location. After completing the fields, select the Create My Account button.
An activation link will be sent to the e-mail provided. Once you receive the e-mail, select the activation link. The link will direct you to your CHAP application.
If you had a CARES account, or an existing CHAP LinQ account, do not create a new CHAP LinQ Account. Your CHAP LinQ user name and password will be the same used to log in to your CARES account. If you need help identifying your User Name, contact your Accreditation Specialist.
Note Your username is the e-mail address entered when you created your LinQ account. Your password is the password you entered when you created your LinQ account.

© COMMUNITY HEALTH ACCREDITATION PARNERT INC.
VERSION 1.1 6
Existing User
To log in to your account, go to https://chaplinq.org/
Your username is the e-mail address entered when you created your LinQ account. Your password is the password that was entered when you created your LinQ account.
Forgot Password
If you forgot your password, select the Forgot Password link.
Enter your user name and select the Request Password button. An e-mail will be sent to the e-mail address associated with the user name. Check your spam folder if you do not receive the e-mail in your inbox folder. If you do not receive an e-mail, contact our helpdesk team or your Accreditation Specialist.
© COMMUNITY HEALTH ACCREDITATION PARNERT INC.
VERSION 1.1 7
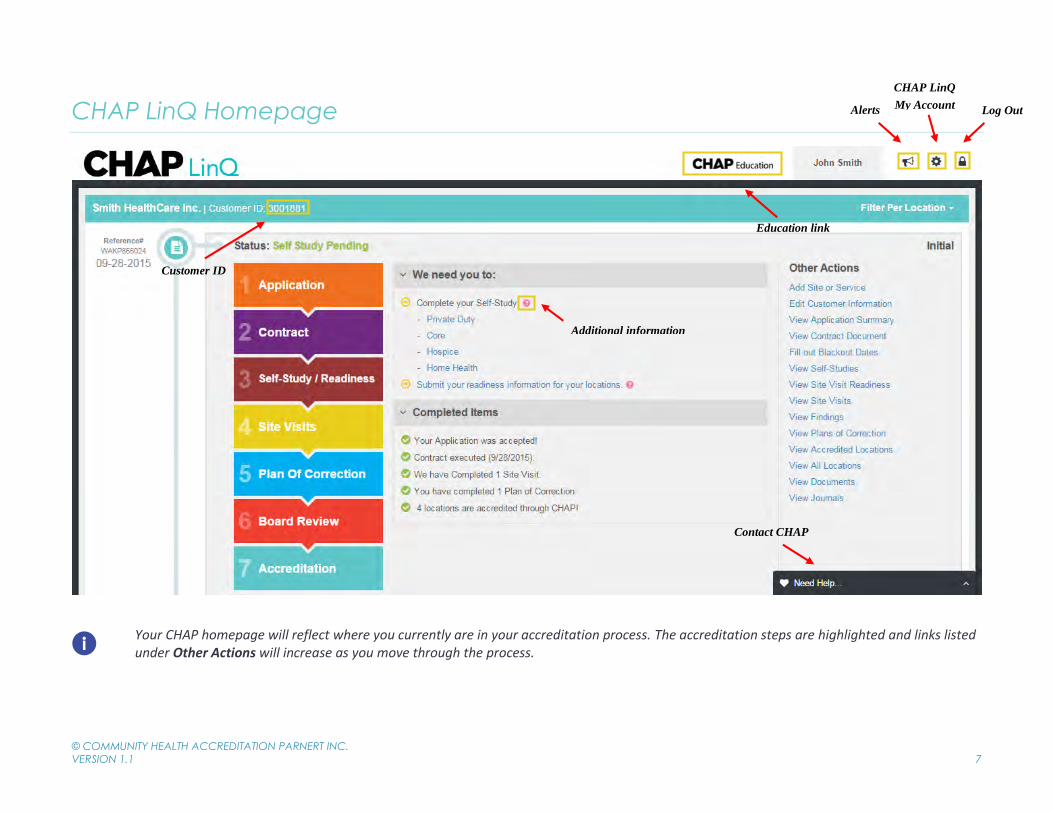
CHAP LinQ Homepage
Your CHAP homepage will reflect where you currently are in your accreditation process. The accreditation steps are highlighted and links listed under Other Actions will increase as you move through the process.
Contact CHAP
Customer ID
Alerts Log Out
CHAP LinQ
My Account
Education link
Additional information

© COMMUNITY HEALTH ACCREDITATION PARNERT INC.
VERSION 1.1 8
Application
The first step in the CHAP accreditation process is completing your application. When you create a CHAP LinQ account, an activation link will be sent to the e-mail provided. Once you receive the e-mail, select the activation link. The link will direct you to your CHAP application.
Before completing your application make sure you have the following documents, applicable business license (as required by state), Employer ID Number (EIN) and National Provider Number (NPI).
If you do not finish completing your application, the next time you log in to your CHAP LinQ account, the following screen will display. Select the Complete and submit your Initial application link under the “We need you to:” section. The link will direct you to your CHAP application.
Note Select to obtain
additional information.

© COMMUNITY HEALTH ACCREDITATION PARNERT INC.
VERSION 1.1 9
Completing the Application: The Organization Profile
Under the Organization Profile, you will provide information about the main location of your business. You may or may not provide services from your main location. The Organization Profile is comprised of four sections (1) Information about the Main Location (2) Type of Organization (3) Address and (4) Contact(s). You must complete all required fields under these sections. Required fields are noted by an asterisk (*) beside the field name.
You must select the Save button after completing each section to save your work. Do not include site or branch address information under the Address section. You will be prompted to add that information during Other Locations and Services. Do not complete the “Contact Type” areas under the Contact section when entering contact information for sites.
You will need to designate a Signing Contact who will be responsible for signing the contract with CHAP. Ensure this contact has the authority within your organization to agree to the terms and sign the consent and disclosure form.

© COMMUNITY HEALTH ACCREDITATION PARNERT INC.
VERSION 1.1 10
Completing the Application: Other Locations and Services
Under Other Locations and Services, you will provide information about all of the locations that provide the types of services provided, and branch information, if applicable, associated with each location.
If a popup window does not display, select the Launch Wizard button located on the right side of the screen. When you add a site, the dropdown list located under the contact tab will display contact names that were added during the Organization Profile. If the contact you are looking for does not appear in the dropdown list select Other, input the contact information and select the Save button. Go back to the dropdown list, select your added contact and select the Save button.
© COMMUNITY HEALTH ACCREDITATION PARNERT INC.
VERSION 1.1 11
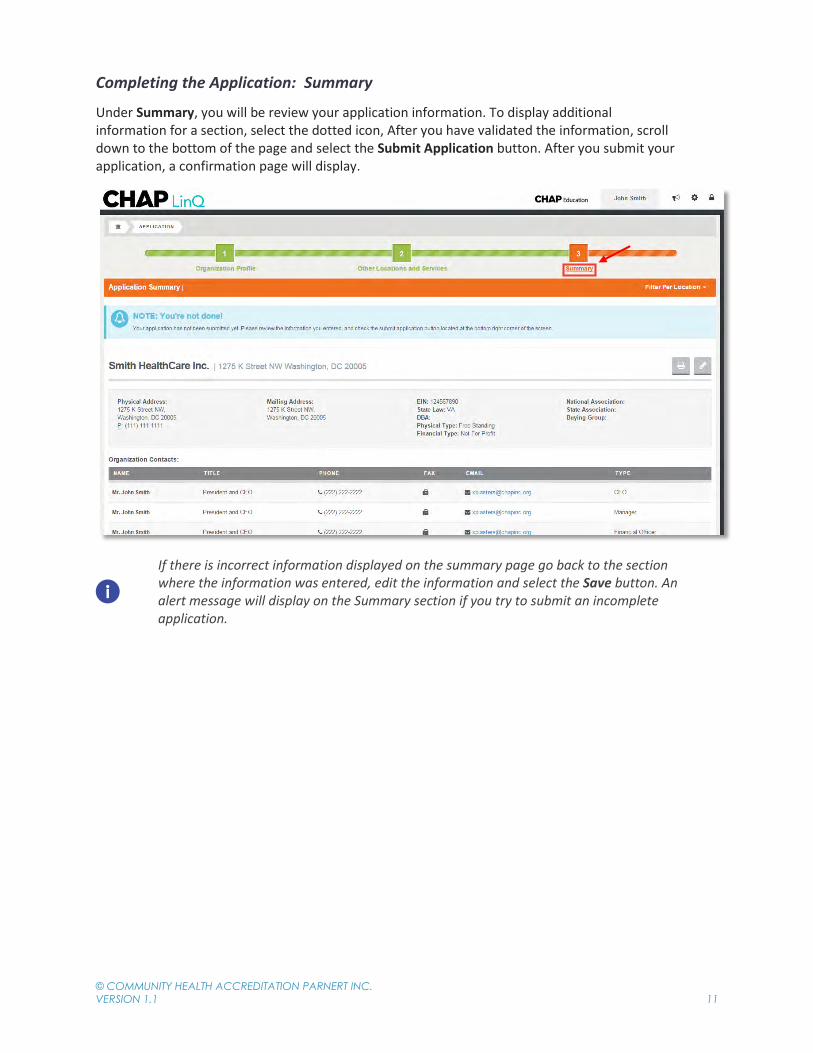
Completing the Application: Summary
Under Summary, you will be review your application information. To display additional information for a section, select the dotted icon, After you have validated the information, scroll down to the bottom of the page and select the Submit Application button. After you submit your application, a confirmation page will display.
If there is incorrect information displayed on the summary page go back to the section where the information was entered, edit the information and select the Save button. An alert message will display on the Summary section if you try to submit an incomplete application.

© COMMUNITY HEALTH ACCREDITATION PARNERT INC.
VERSION 1.1 12
Submitting the Application
After the application is submitted, the status on the CHAP homepage displays as, “Application Submitted”.

© COMMUNITY HEALTH ACCREDITATION PARNERT INC.
VERSION 1.1 13
CHAP Review of the Application
Once an application is submitted, your Accreditation Specialist will review it for accuracy and completeness. During the “Application Review” status, you will need to pay a non-refundable application fee before your application is accepted. Select the Pay Now button to pay securely by credit card. In addition, you will be required to return a completed signature sheet with an applicable license. The signature sheet will be sent via e-mail.
Check your spam folder if you do not receive the e-mail with the signature sheet in your inbox folder. If you do not receive an e-mail within one business day, contact your Accreditation Specialist.

© COMMUNITY HEALTH ACCREDITATION PARNERT INC.
VERSION 1.1 14
Acceptance of the Application
After your application is accepted, the status will transition to “Contract Pending”. During this status, CHAP will work on determining your accreditation fees and site visit days based on information provided in the application. In addition, they will work on providing a three-year Accreditation Services Agreement (ASA) for your organization.
After your application is accepted, you can view a copy of the document by selecting the View Application Summary link under Other Actions.

© COMMUNITY HEALTH ACCREDITATION PARNERT INC.
VERSION 1.1 15
Rejection of an Application
At times, CHAP will need to reject your application due to ensure we have the most accurate information to develop a contract. If your application is rejected, select the Review Application button. After you select the button you will be directed to the Summary section of you application. A rejection reason will appear on the top-left corner of the page. After you have reviewed and addressed the rejection reason, resubmit your application by selecting the Submit Application button located at the bottom of the Summary section in your application.

© COMMUNITY HEALTH ACCREDITATION PARNERT INC.
VERSION 1.1 16
Contract
Sending a Contract for Your Review
After CHAP drafts your contract, an e-mail will be sent to the individual listed as the Signing Contact on the application. The e-mail will contain a link to sign the contract via an e- signature, or E-Sign.
The Signing Contact should check their spam folder if they do not receive the e-mail in their folder. If you do not receive an e-mail within one business day, contact your Accreditation Specialist.

© COMMUNITY HEALTH ACCREDITATION PARNERT INC.
VERSION 1.1 17
Signing the Contract via E-Sign
The Signing Contact will receive the following e-mail:
After the Signing Contact selects the link, they will be directed to a secure page where they will be required to answer an authentication question.
The Signing Contact must correctly answer the authentication question before proceeding to the contract.
© COMMUNITY HEALTH ACCREDITATION PARNERT INC.
VERSION 1.1 18
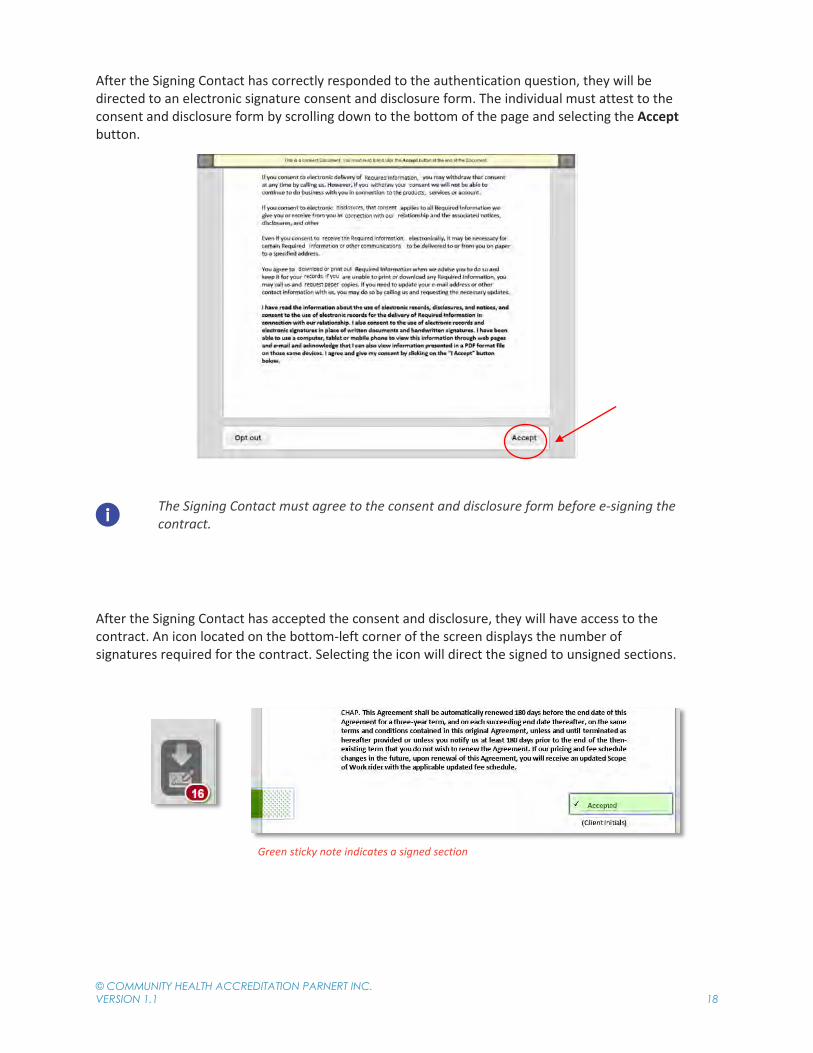
After the Signing Contact has correctly responded to the authentication question, they will be directed to an electronic signature consent and disclosure form. The individual must attest to the consent and disclosure form by scrolling down to the bottom of the page and selecting the Accept button.
The Signing Contact must agree to the consent and disclosure form before e-signing the contract.
After the Signing Contact has accepted the consent and disclosure, they will have access to the contract. An icon located on the bottom-left corner of the screen displays the number of signatures required for the contract. Selecting the icon will direct the signed to unsigned sections.
Green sticky note indicates a signed section

© COMMUNITY HEALTH ACCREDITATION PARNERT INC.
VERSION 1.1 19
After all signature sections are completed, a confirmation popup message will appear. The Signing Contact must select OK to confirm the signatures on the document. CHAP will sign the document after the organization has submitted accreditation payment.

© COMMUNITY HEALTH ACCREDITATION PARNERT INC.
VERSION 1.1 20
Receipt of the Contract and Payment
After your signed contract is received, along with any payments specified in the contract, CHAP will do a final review and execute the contract. You can pay any applicable accreditation fees using the ”Pay Now” button in CHAP LinQ that will appear on your home page after we receive the contract. You also have the option of sending a check with your contract for any applicable fees due.
Accreditation fees must be paid before CHAP can process a contract. Your accreditation fee amount is found on your contract, under Exhibit B, Amount Due to Execute this Contract.

© COMMUNITY HEALTH ACCREDITATION PARNERT INC.
VERSION 1.1 21
Viewing the Final Contract
After CHAP has signed the contract, the Signing Contact will receive an e-mail. The email will have a link to access the finalized contract.
To view the final contract, you will once again need to answer the authentication question. Once the question is complete, you can download a copy of your contract. To download the contract, select the arrow located on the top-right corner of the screen and then select the Download icon.
Step 1
Step 2

© COMMUNITY HEALTH ACCREDITATION PARNERT INC.
VERSION 1.1 22
Access to the CHAP Standards of Excellence
After your contract is executed, CHAP will begin to prepare your Self-Study. At this point, you will also have access to the CHAP Standards of Excellence in PDF format. To access the standards, select the View Documents link under Other Actions and select the Standards folder.

© COMMUNITY HEALTH ACCREDITATION PARNERT INC.
VERSION 1.1 23
Self-Study
Access to the Self-Study
Immediately after your contract is executed, CHAP begins to prepare your self-study for each service line listed in your contract. The self-study is a comprehensive internal evaluation of your business and services aimed at helping your prepare for a site visit. While we are preparing your self-study, you can submit information pertaining to your readiness for a site visit (e.g., CMS Forms, admission information). For information on how to complete readiness, reference the Site Visit Readiness section in this guide.
In addition, you can view a copy of your contract by selecting the View Contract Document link under Other Actions.

© COMMUNITY HEALTH ACCREDITATION PARNERT INC.
VERSION 1.1 24
Completing the Self-Study
You will need to complete a self-study for all services being accredited by CHAP. You will also need to complete a self-study for the CHAP CORE Standards of Excellence. Your services are listed under the “We need you to” section. You can access your self-study by selecting the service link(s) under, “Complete your Self-Study”.
The Self-Study home page provides an easy way for you to manage your completion of this task. You can view the instructions, the due date, navigate to all the questions, print out a copy for your records, and submit the self-study when it is completed.

© COMMUNITY HEALTH ACCREDITATION PARNERT INC.
VERSION 1.1 25
Self-Study Homepage
Self
Stud
y
Hom
epag
e
CHAP Home Page
Due Date

© COMMUNITY HEALTH ACCREDITATION PARNERT INC.
VERSION 1.1 26
Completing the Self-Study
You can access your self-study by selecting the service link(s) under, “Complete your Self-Study”.
Renewing organization will have their self-study pre-populated with information submitted during their last self-study. The organization must review the previous responses and provide new attachments for questions that have an Attachment Required link.
After you select the link, you will be directed to the self-study homepage. You need to complete all the questions under the sections located on the left sidebar menu. Your responses will automatically save as you advance through your self-study. Questions found under the Background section will require a text or checkbox response.
For all self-studies, except for CORE, verify that the information under the Operating Sites sub-section, located under Background section is correct. If the information is incorrect, contact your Accreditation Specialist.

© COMMUNITY HEALTH ACCREDITATION PARNERT INC.
VERSION 1.1 27
Questions found under the remaining sections will require a Yes, No or N/A. In addition, you will be required to upload an attachment for questions that have an Attachment Required link beside them. You will also have the option to add comments to questions. To add comments, select the Add Comment link.
You will be required to provide additional information when you respond with No or N/A response.
After you complete all the questions, go to the self-study homepage by selecting the home icon located on the top left corner of the page.

© COMMUNITY HEALTH ACCREDITATION PARNERT INC.
VERSION 1.1 28
Select the Submit Self Study button. A self-study submitted message will display on the top-right corner of the page. To print your self-study, select the print icon located on the top-left corner of the page.
If you are unable to submit your self-study, make sure the progress bar is at 100%. If the progress bar is not at 100%, select the Next Unanswered Question button. The Next Unanswered Question button will direct you to the incomplete question.
After you complete the self-study, go back to your CHAP homepage. You can go back to your homepage by selecting the building icon. Complete any remaining self-studies under, “Complete your Self-Study”. When a self-study is submitted, CHAP will review and approve it to ensure you are ready for a site visit.

© COMMUNITY HEALTH ACCREDITATION PARNERT INC.
VERSION 1.1 29
Review and Acceptance of the Self-Study
When all the self-studies are accepted, the following message will display, “Your Self-Study is completed” under the Completed Items section. To view completed self-studies, select the View Self-Studies link under Other Actions.
Rejected Self-Study
If your self-study is rejected, select the service link under We need you to section. After you select the link, you will be directed to the self-study homepage for that service. A rejection reason will appear on the top of the page. After you have reviewed and addressed the rejection reason, resubmit your self-study by selecting the Submit Self-Study button located on the self-study homepage.
© COMMUNITY HEALTH ACCREDITATION PARNERT INC.
VERSION 1.1 30
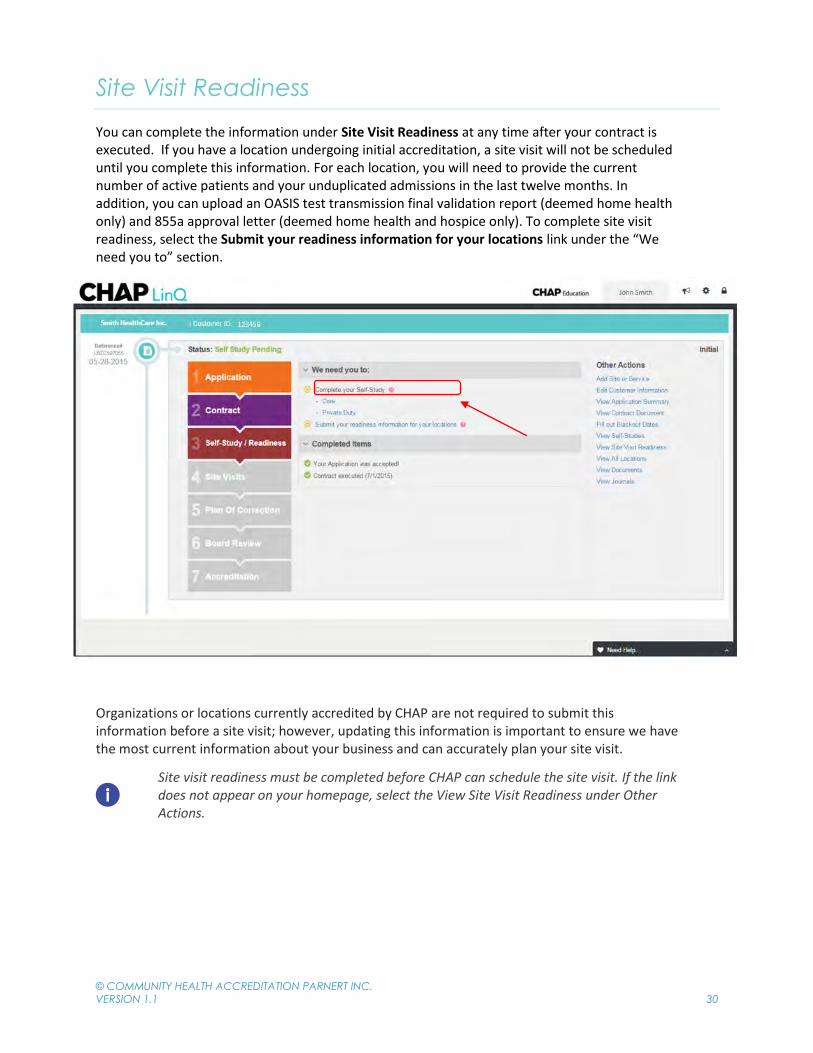
Site Visit Readiness
You can complete the information under Site Visit Readiness at any time after your contract is executed. If you have a location undergoing initial accreditation, a site visit will not be scheduled until you complete this information. For each location, you will need to provide the current number of active patients and your unduplicated admissions in the last twelve months. In addition, you can upload an OASIS test transmission final validation report (deemed home health only) and 855a approval letter (deemed home health and hospice only). To complete site visit readiness, select the Submit your readiness information for your locations link under the “We need you to” section.
Organizations or locations currently accredited by CHAP are not required to submit this information before a site visit; however, updating this information is important to ensure we have the most current information about your business and can accurately plan your site visit.
Site visit readiness must be completed before CHAP can schedule the site visit. If the link does not appear on your homepage, select the View Site Visit Readiness under Other Actions.

© COMMUNITY HEALTH ACCREDITATION PARNERT INC.
VERSION 1.1 31
Completing Site Visit Readiness
When you select the Submit your readiness information for your locations link you will be directed to your site visit readiness page. The page will list all your locations on the left side of the page. Begin by selecting a location. You need to complete readiness information for all locations that are in “Pending” status (i.e. locations that have a yellow arrow). After you select the location, complete all the required fields that appear on the left side of the page. After you complete the fields, select the Submit button.
Blackout dates are no longer completed during site visit readiness. To submit blackout dates, select the Fill out Blackout Dates under Other Actions.
After readiness is submitted for a location, a blue circle will display beside the location. Complete site visit readiness information for all remaining services lines including Core.
© COMMUNITY HEALTH ACCREDITATION PARNERT INC.
VERSION 1.1 32
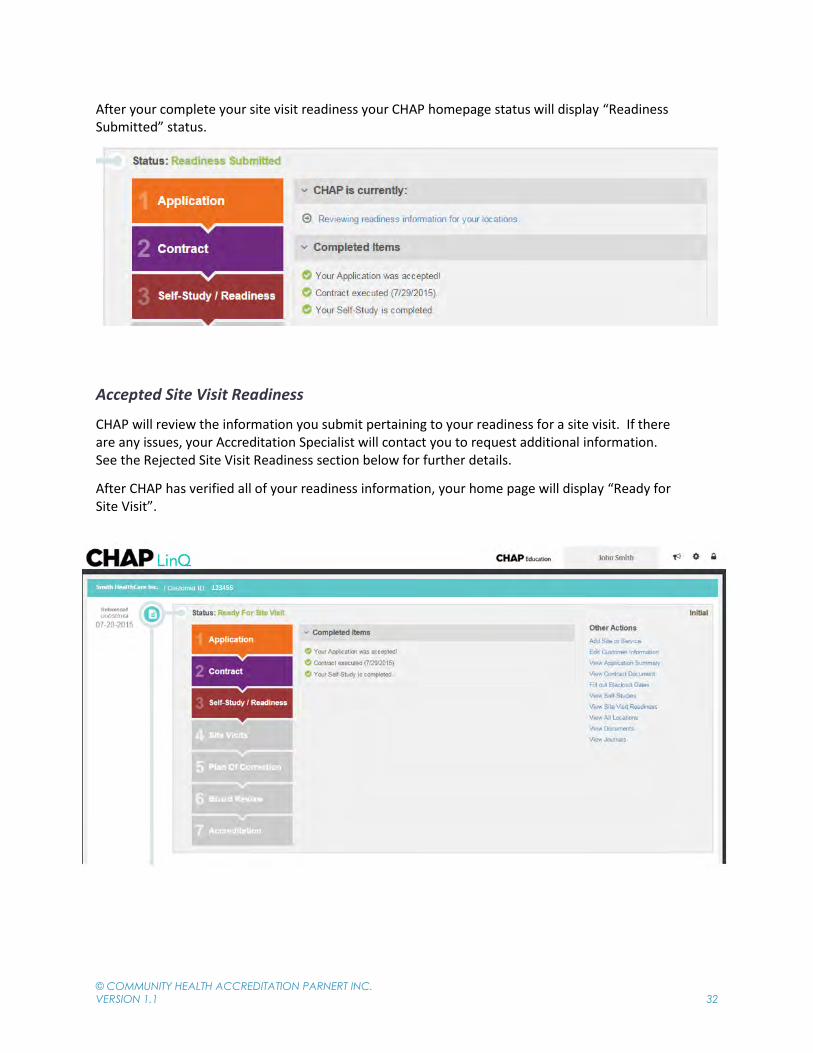
After your complete your site visit readiness your CHAP homepage status will display “Readiness Submitted” status.
Accepted Site Visit Readiness
CHAP will review the information you submit pertaining to your readiness for a site visit. If there are any issues, your Accreditation Specialist will contact you to request additional information. See the Rejected Site Visit Readiness section below for further details.
After CHAP has verified all of your readiness information, your home page will display “Ready for Site Visit”.

© COMMUNITY HEALTH ACCREDITATION PARNERT INC.
VERSION 1.1 33
Rejected Site Visit Readiness
If your readiness information is rejected, it means CHAP needs additional information before we can schedule your site visit. Select the Submit your readiness information for your locations link. After you select the button, you will be directed to the site visit readiness page.
A red “X” will display beside the location(s) that have had readiness rejected. When you select on the location, a rejection reason will appear on the right side of the page. After you have reviewed and addressed the rejection reason, resubmit readiness for that location by selecting the Submit button. When you select submit, a blue circle will display beside the location.

© COMMUNITY HEALTH ACCREDITATION PARNERT INC.
VERSION 1.1 34
Site Visit
Site Visit
After site visit readiness is accepted, your organization will transition to a Ready for Site Visit status. CHAP will schedule your site visit as soon as possible based on the information provided during the self-study and any blackout dates you have provided.
During a site visit, CHAP evaluates your organization’s evidence of compliance with the CHAP Standards of Excellence. Once your site visit begins, you will see your site visit listed on your CHAP LinQ home page.
CHAP can perform a site visit once an organization has completed their self-study and met all the applicable readiness requirements.
© COMMUNITY HEALTH ACCREDITATION PARNERT INC.
VERSION 1.1 35
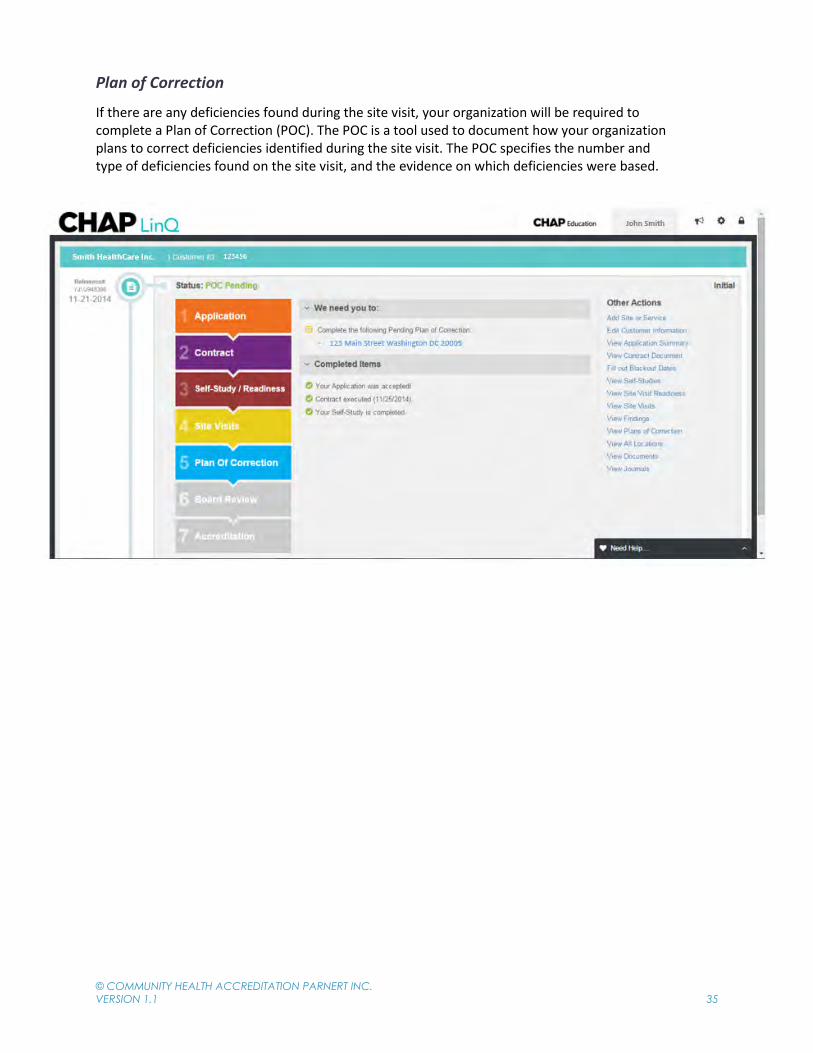
Plan of Correction
If there are any deficiencies found during the site visit, your organization will be required to complete a Plan of Correction (POC). The POC is a tool used to document how your organization plans to correct deficiencies identified during the site visit. The POC specifies the number and type of deficiencies found on the site visit, and the evidence on which deficiencies were based.

© COMMUNITY HEALTH ACCREDITATION PARNERT INC.
VERSION 1.1 36
Plan of Correction Home Page
Add POC Notes
View POC Instructions
POC Questions
Findings
Summary
CHAP Home Page
Submit
Findings

© COMMUNITY HEALTH ACCREDITATION PARNERT INC.
VERSION 1.1 37
Completing the Plan of Correction
To complete your POC, select the address link under, “Complete the following Pending Plan of Correction”.
The POC is due within 10 calendar days of notification from the CHAP Director of Accreditation. The organization will be notified through an e-mail sent to the site manager.
After you select the link, you will be directed to the POC page. A popup window will display a POC overview message and list the number of findings identified during the site visit.

© COMMUNITY HEALTH ACCREDITATION PARNERT INC.
VERSION 1.1 38
The list of findings will display on the left side of the screen. When you select a finding, information about the finding (i.e., Standard Text) and evidence (i.e., Finding Narrative) on which the finding was cited will display in the middle of the screen. Each finding will display a list of POC questions for you to complete. You will need to complete the POC questions for each finding.
Your responses will automatically save when you complete a POC question. A will display besides the finding when all the POC questions for that finding have been completed.
A tip will appear for each question when you input a response in the textbox. To close the tip, select anywhere on the page.
© COMMUNITY HEALTH ACCREDITATION PARNERT INC.
VERSION 1.1 39
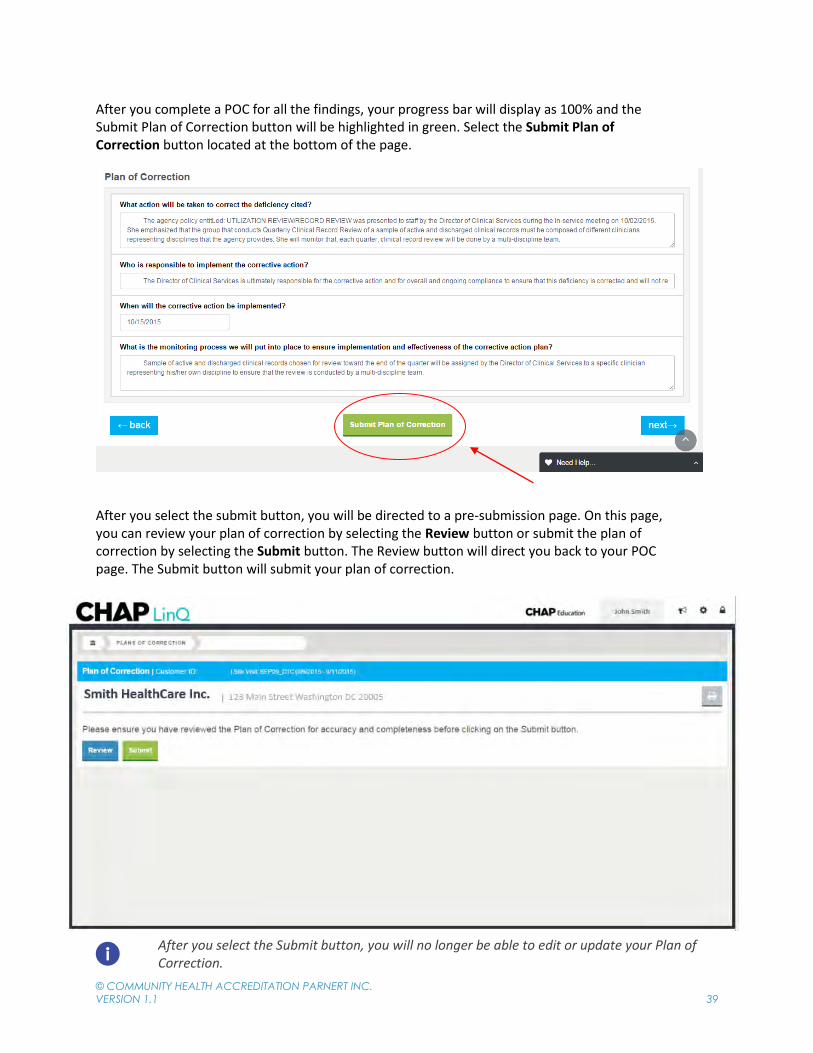
After you complete a POC for all the findings, your progress bar will display as 100% and the Submit Plan of Correction button will be highlighted in green. Select the Submit Plan of Correction button located at the bottom of the page.
After you select the submit button, you will be directed to a pre-submission page. On this page, you can review your plan of correction by selecting the Review button or submit the plan of correction by selecting the Submit button. The Review button will direct you back to your POC page. The Submit button will submit your plan of correction.
After you select the Submit button, you will no longer be able to edit or update your Plan of Correction.

© COMMUNITY HEALTH ACCREDITATION PARNERT INC.
VERSION 1.1 40
After you select the Submit button on the pre-submission page, a popup window will display a POC confirmation message. Select the print button located on the top-right corner of the screen to print your POC. To go back to your CHAP home page, select the building icon located on the top-left corner of the screen.
Complete any remaining plan of corrections under, “Complete the following Pending Plan of Correction”. When a plan of correction is submitted, it will appear under the “CHAP is currently” section. Once a POC is in this section, your CHAP Director of Accreditation will review your submitted POC.

© COMMUNITY HEALTH ACCREDITATION PARNERT INC.
VERSION 1.1 41
Accepted Plan of Correction
Once your plan of correction is submitted, a CHAP Director of Accreditation will review it for completeness and to ensure all requirements have been met. When your plan of correction has been accepted the status on your CHAP home page will read, “POC Accepted”. In addition, you can select the View Plans of Correction link under Other Actions. An accepted POC will appear under the “Completed Plans of Correction” section.

© COMMUNITY HEALTH ACCREDITATION PARNERT INC.
VERSION 1.1 42
Rejected Plan of Correction
You plan of correction may be rejected if it is incomplete or fails to adequately address the deficiency cited. If your plan of correction is rejected, select the address link located under the “We need you to” section.
After you select the link, you will be directed to the POC page. A POC that has been rejected will display an X besides the finding. A rejection reason will appear on the top of the plan of correction question.

© COMMUNITY HEALTH ACCREDITATION PARNERT INC.
VERSION 1.1 43
After you review and address all the rejection reasons, resubmit your plan of correction by selecting the Submit Plan of Correction button located at the bottom of the page. When you select the button you will get directed to a pre-submission page. The page will display a list of findings that were rejected. To review the rejected findings, select the Review button. The Review button will direct you back to your POC page to do a final review. To submit your POC, select the Submit button. After you submit your POC, a submission popup window will display.
The organization must submit the revised POC within 5 calendar days of notification. The organization will be notified through an e-mail sent to the site manager.

© COMMUNITY HEALTH ACCREDITATION PARNERT INC.
VERSION 1.1 44
Board of Review
Once the Plan of Correction (POC) is accepted, the Board of Review (BOR) will review the submitted POC for an accreditation determination. Under “CHAP is currently” section, the following message will display: Reviewing the following locations for final accreditation determination.
All of your organization’s identifying information is removed when the CHAP Board of Review completes their review of the site visit.

© COMMUNITY HEALTH ACCREDITATION PARNERT INC.
VERSION 1.1 45
Accreditation
After the Board of Review has rendered a determination for a location, the following message will appear under “Completed Items” section, # locations are accredited through CHAP! The Board of Review can make one of the following accreditation determinations:
To view your accreditation determination select the View Accredited Locations link under Other Actions.

© COMMUNITY HEALTH ACCREDITATION PARNERT INC.
VERSION 1.1 46
Other Actions
Add a Site or Service
To add a site or service select the Add a Site or Service link located on the right side of the screen.
When you select the link, a popup window will display detailed information about a site and service. If you select the Yes, I need to add a site or service button you will be directed to the application page. On the application page, select the Other Locations and Services link. Select the Add Site button to add a site or the Add Service button to add a service. After you complete the required fields, select the Summary link, review your application and select the Submit Application button located at the bottom of the page.
When you request to add a site or service, it will be processed as an addendum application. Do not request to add a site or service if your organization will need to complete a renewal application within the next three months. You will be able to update and add any site or service information when you complete your renewal application.

© COMMUNITY HEALTH ACCREDITATION PARNERT INC.
VERSION 1.1 47
Edit Customer Information
To edit your customer information for any location or service, select the Edit Customer Information link.
When you select the link, a popup window will display a textbox for you to enter updated information (e.g. address, phone, e-mail address, contact). In addition, you must select the location and service line you would like the information updated. After you complete the form, select the Submit button. If you are a deemed organization, you must attach a copy of your 855a approval letter for an address update.
If you are communicating a change of ownership, contact your Accreditation Specialist.

© COMMUNITY HEALTH ACCREDITATION PARNERT INC.
VERSION 1.1 48
View Application Summary
The View Application Summary link will allow you to select the application you wish to view. After you select the application, you will be directed to the application summary page.
If you only have one application, you will automatically be directed to your application summary.

© COMMUNITY HEALTH ACCREDITATION PARNERT INC.
VERSION 1.1 49
View Contract Document
Selecting the View Contract Document link will allow you to view current and past contract. After you select the contract, a PDF copy of your contract will download.
If you only have one contract, a copy of your contract will automatically download. If there is no digital copy of your contract then you will be directed to a page that states the following, “There is no digital copy of this contact available for download”.
© COMMUNITY HEALTH ACCREDITATION PARNERT INC.
VERSION 1.1 50
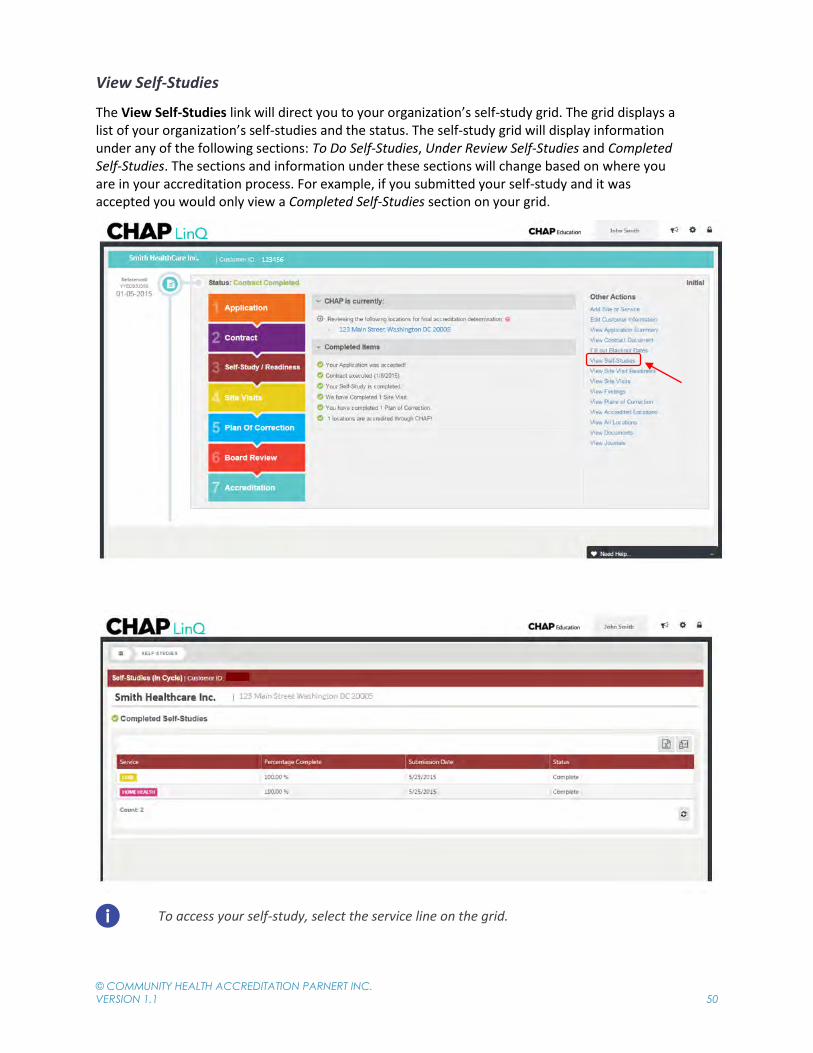
View Self-Studies
The View Self-Studies link will direct you to your organization’s self-study grid. The grid displays a list of your organization’s self-studies and the status. The self-study grid will display information under any of the following sections: To Do Self-Studies, Under Review Self-Studies and Completed Self-Studies. The sections and information under these sections will change based on where you are in your accreditation process. For example, if you submitted your self-study and it was accepted you would only view a Completed Self-Studies section on your grid.
To access your self-study, select the service line on the grid.

© COMMUNITY HEALTH ACCREDITATION PARNERT INC.
VERSION 1.1 51
View Site Visits
The View Site Visits link will direct you to your organization’s site visit grid.
The grid displays a list of locations that have had a CHAP site visit, including the type of visit.

© COMMUNITY HEALTH ACCREDITATION PARNERT INC.
VERSION 1.1 52
When you select on a location on the site visit grid, you will be directed to a page that lists general information about the location and a list of finding(s) identified during the site visit. If you select on a finding, you will be directed to the plan of correction associated with that finding.

© COMMUNITY HEALTH ACCREDITATION PARNERT INC.
VERSION 1.1 53
View Plans of Correction
The View Plans of Correction link will direct you to your organization’s plan of correction (POC) grid. The grid displays a list of your organization’s plan of correction(s) and the status. The POC grid will display information under any of the following sections: To Do Plans of Correction, Under Review Plans of Correction and Completed Plans of Correction. The sections and information under these sections will change based on where you are in your accreditation process. For example, if you submitted your plan of correction and it was accepted you would only view a Completed Plans of Correction section on your grid.
You can access your plan of correction by selecting the location on the grid.

© COMMUNITY HEALTH ACCREDITATION PARNERT INC.
VERSION 1.1 54
View Accredited Locations
The View Accredited Locations link will direct you to your organization’s accreditation grid.
The grid displays a list of locations that had a determination rendered by the Board of Review. The grid displays the accreditation determination and accreditation dates.
If a location is awaiting an accreditation determination, it will appear under, Under Review Services section.

© COMMUNITY HEALTH ACCREDITATION PARNERT INC.
VERSION 1.1 55
To search for a specific location, select on the search box and type information for the location you wish to view. You can search by state abbreviation (i.e., CA, FL), NPI, CCN and location name.
To view deemed dates, select the column chooser icon and drag the “Deemed Start Date” and “Deemed End Date” to the area titled, “Drag a column header here to group by that column”.

© COMMUNITY HEALTH ACCREDITATION PARNERT INC.
VERSION 1.1 56
View All Locations
The View All Locations link will direct you to your organization’s location grid. The grid display a list of the CHAP Accreditation status for all your locations. Similar to the View Accredited locations list, you can search for a specific location on the page using CCN, NPI, location name, or state. The View All Locations page shows you all locations that are either currently, or were previously accredited by CHAP, as well as information on any branches or subunits.

© COMMUNITY HEALTH ACCREDITATION PARNERT INC.
VERSION 1.1 57
View Documents
The View Documents link will direct you to your documents page. The documents page displays all documents related to your CHAP accreditation. Documents are organized into the following folders: Site Visit, Contract, Self-Study, Site Visit Readiness, Standards and Media. To view a document, select on a folder and then select the document you wish to view.
Document folders appear as you reach each part of the process. For example, the Contract document folder will not appear until your contract is executed.
© COMMUNITY HEALTH ACCREDITATION PARNERT INC.
VERSION 1.1 58
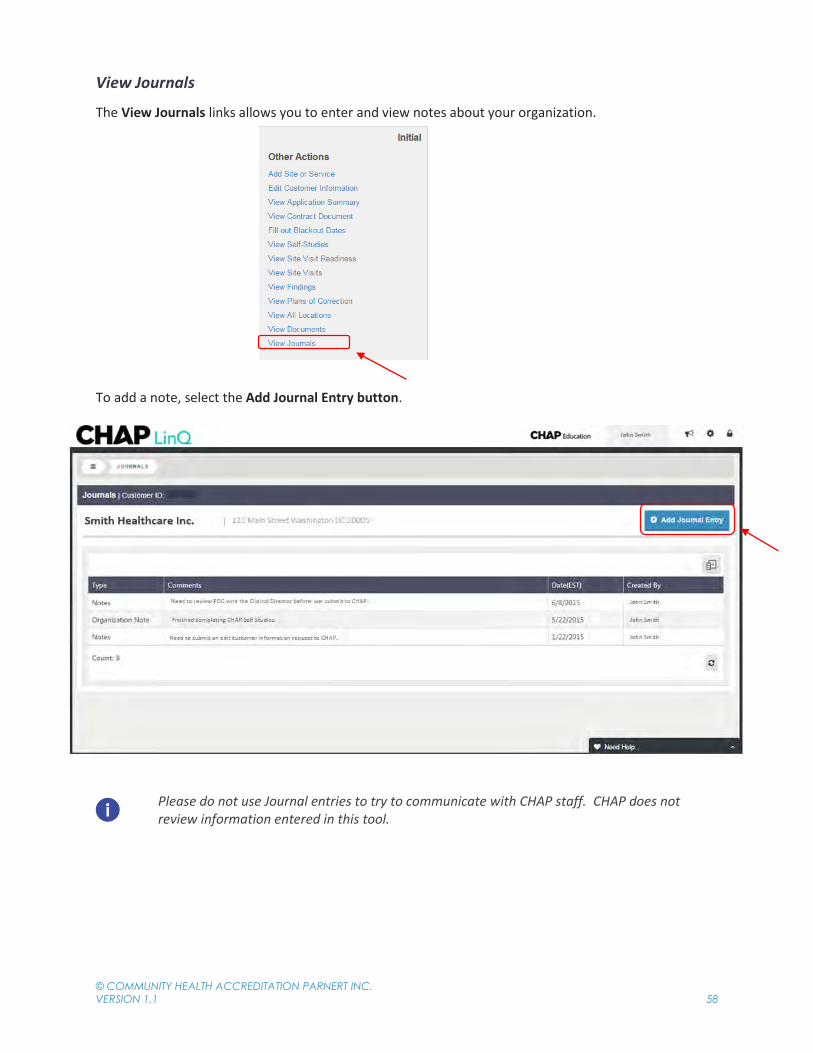
View Journals
The View Journals links allows you to enter and view notes about your organization.
To add a note, select the Add Journal Entry button.
Please do not use Journal entries to try to communicate with CHAP staff. CHAP does not review information entered in this tool.
© COMMUNITY HEALTH ACCREDITATION PARNERT INC.
VERSION 1.1 59
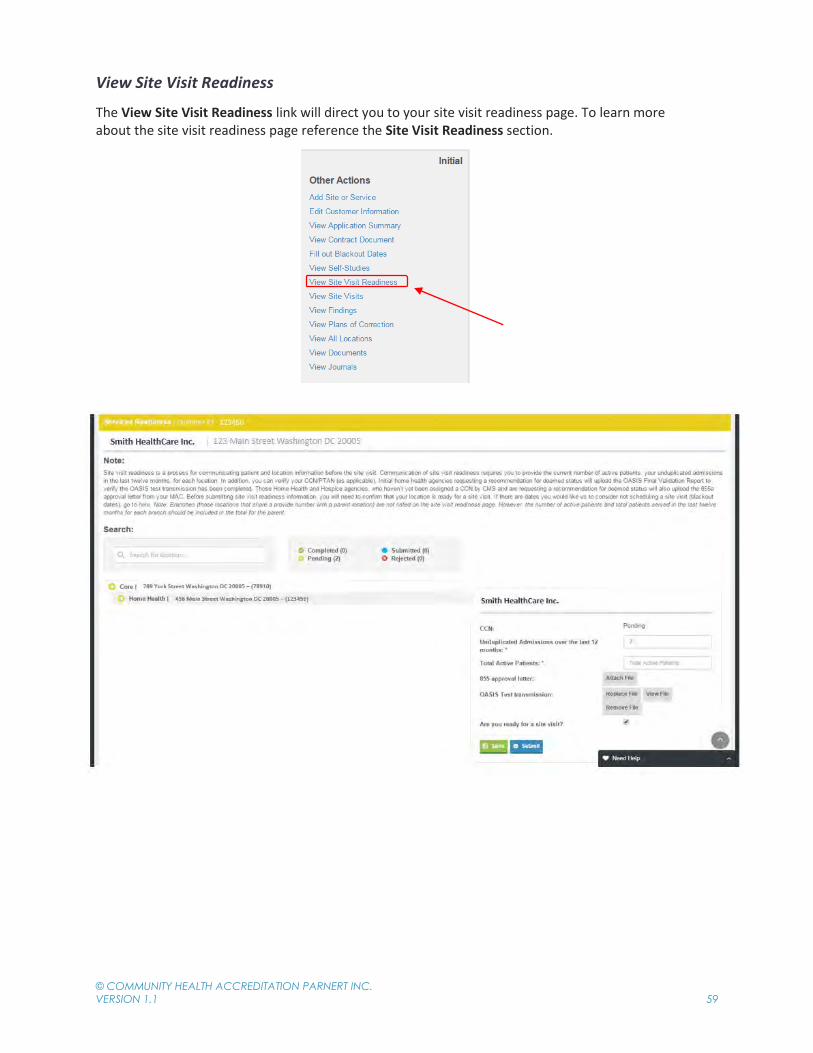
View Site Visit Readiness
The View Site Visit Readiness link will direct you to your site visit readiness page. To learn more about the site visit readiness page reference the Site Visit Readiness section.

© COMMUNITY HEALTH ACCREDITATION PARNERT INC.
VERSION 1.1 60
View Findings
The View Findings link will direct you to a grid of all current and past findings identified during site visits. You can use the grid to sort findings by citation number, location, service, etc. You may find it useful to use the grid to identify patterns or trends. For example, how many times have issues related to infection control been identified during site visits. Selecting a finding will direct you to the plan of correction associated with that finding.

© COMMUNITY HEALTH ACCREDITATION PARNERT INC.
VERSION 1.1 61
To search for findings for a specific location, select on the search box and type information for the location you wish to view. You can search by state abbreviation (i.e., NY, FL), location address and location name.
To view and additional fields to the findings grid, select the column chooser icon and drag the field you wish to view to the area titled, “Drag a column header here to group by that column”.
© COMMUNITY HEALTH ACCREDITATION PARNERT INC.
VERSION 1.1 62
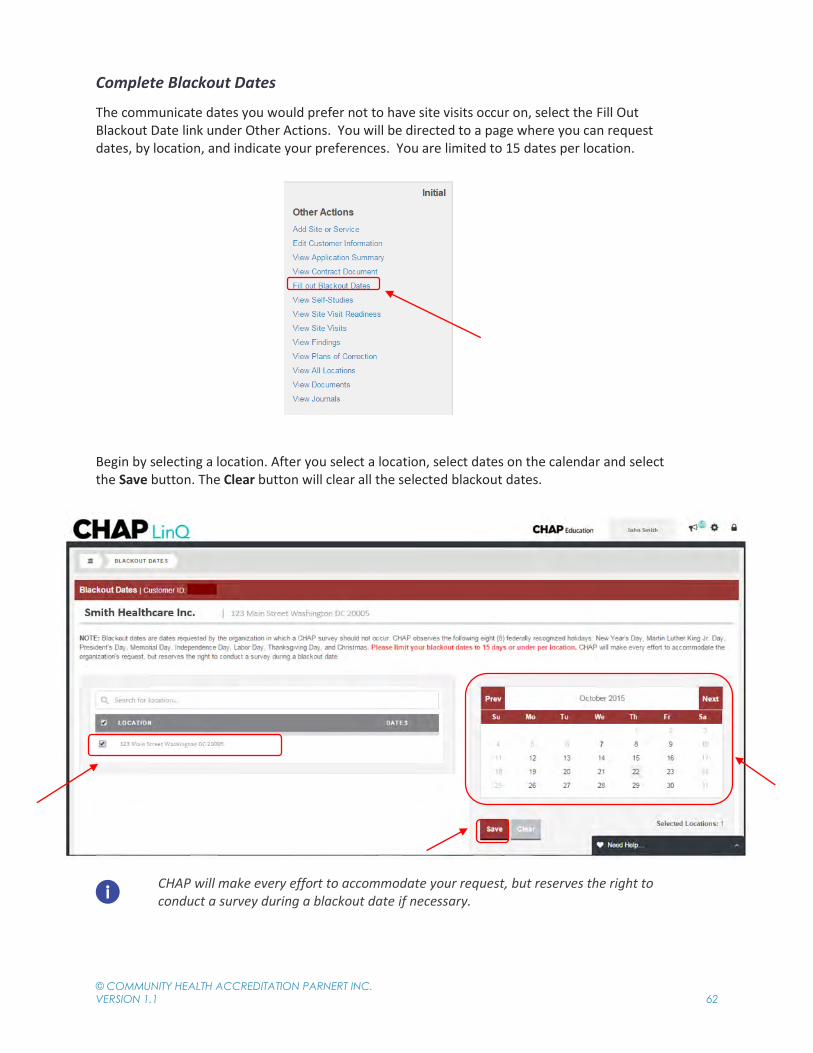
Complete Blackout Dates
The communicate dates you would prefer not to have site visits occur on, select the Fill Out Blackout Date link under Other Actions. You will be directed to a page where you can request dates, by location, and indicate your preferences. You are limited to 15 dates per location.
Begin by selecting a location. After you select a location, select dates on the calendar and select the Save button. The Clear button will clear all the selected blackout dates.
CHAP will make every effort to accommodate your request, but reserves the right to conduct a survey during a blackout date if necessary.
© COMMUNITY HEALTH ACCREDITATION PARNERT INC.
VERSION 1.1 63
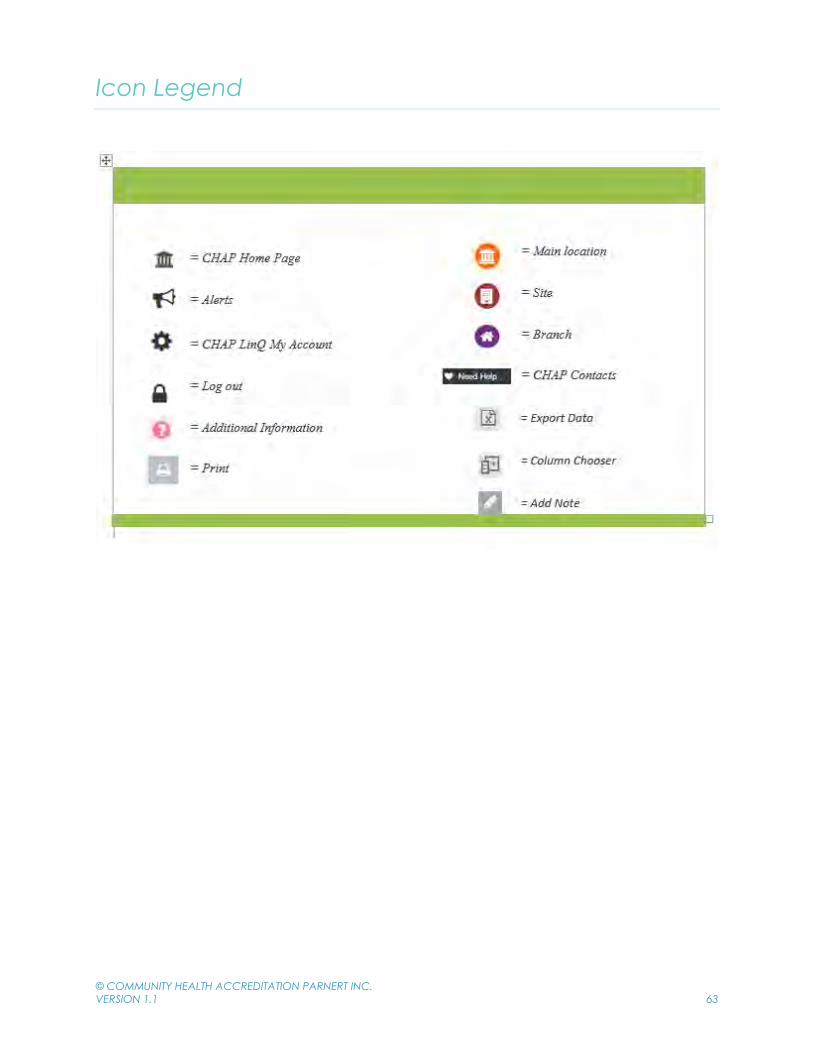
Icon Legend