Embed Size (px)
Citation preview

Chapter 1: Hospital Setup
1
CHAPTER 1: HOSPITAL SETUP In this chapter you will learn how to:
“Verify Hospital Information” on page 1 “Enter Demographics and Default Hospital Information” on page 1 “Set Values for Invoicing” on page 3 “Set Values for Statements” on page 8 “Set Values for Documents” on page 10 “Set Values for Reminders” on page 12 “Set Appointment and Boarding Values” on page 16 “Specify Miscellaneous Hospital Values” on page 21 “Specify System Information” on page 23 “Set Advanced Hospital Options” on page 29
Verify Hospital Information When you begin using AVImark, you will first need to access Hospital Setup and verify the Hospital Information is correct. The Hospital Information area is encrypted and will not allow you to make changes without help from Technical Support. Call the Support department for assistance at 877-838-9273. It is from Hospital Setup that you will specify certain default information such as tax rates, discount values, and so on. Information about your hospital is entered into a series of “folders”, each with its own Folder Tab at the top of the AVImark Hospital Setup display.
• On the Client Information Display (CID), open the Work with menu and click Hospital Setup to display the Hospital Setup window.
For clinics setting up Users & Security or those that have already set up security, it is highly recommended that hospital values be defined under the Advanced Options area. By using the Advanced options, hospital values can be defined for each user or site.

Chapter 1: Hospital Setup
2
Enter Demographics and Default Hospital Information In addition to verifying the correctness of the Hospital Information, it is from the Demographics window where you will specify each of the “Default Values” that will be entered automatically when a new client is added to your files. DEA no. AVImark provides controlled substance reports to meet the requirements for Alabama, California, Kentucky, Michigan, New York and Oklahoma. The hospital’s DEA number will need to be entered for the use within these reports.
• Type the correct DEA number for the hospital. Slogan AVImark allows you to enter a Slogan to be printed at the top of all Invoices.
• If appropriate, type a Hospital Slogan to be printed on Invoices. Logo AVImark allows you to link a Logo to be printed on Invoices. This must be either a bmp, jpeg, or tif file and must be stored in the \PHOTOS folder of the server computer.
• If appropriate, type the Logo name without the extension. When printing the invoice the quality must be set to Picture in order for the logo to be included on the invoice. Logo Margins The Logo margins allow you to specify appropriate margins to position the logo on the invoice in inches (use decimal values such as 2.25 for 2 1/4 inches). This will place the logo to a area on the invoice so as to not interfere with the printing of the patient’s picture if applicable.
• If appropriate, enter the Left and Top margin for placement of the Logo. • If appropriate, click Border if you wish to place a Border around the Logo.
Web site You may specify your clinic’s web site in this field giving you the capability to merge into MS Word or Open Office documents. This information will merge by using the merge word <web-address> on your documents.
• If appropriate, type the Hospital’s web site address. Default City, State and Zip code This is the name of the city, state and zip code you wish to be entered each time you add a new client to your records. This would typically be the information where most of your clients reside.
• Type the City name. • Use the TAB key to move to the State field and type the 2-letter abbreviation for the State. • Use the TAB key to move to the Zip field and type the Zip Code.
Default Area Code This is the Area Code you wish to be automatically assigned to new clients.
• Type the Area Code. Default Company Number This will be the default Company number which will be assigned to newly added clients. AVImark automatically sets this value to 01. It is recommended that you leave this value set to 01 for your regular client records.

Chapter 1: Hospital Setup
3
Default Client title This will be the title you wish to be entered automatically for new clients.
• Type the Client title. Auto-assign Client and Patient folder numbers When selected, these options cause AVImark to automatically assign newly added clients/patients a folder number. These folder numbers are assigned in a simple “one-up” fashion, starting with 1. You may however, choose to start your folder numbers at any number you wish.
• If appropriate, select Client folder no. and/or Patient folder no. • If appropriate, use the Starting at box, type or select the folder number you wish to start
from. Zip code lookup length (U.S. and Canadian usage) This field defaults to 5 characters, which is the normal length for U.S. clinics, but because of the length and character assignment being different in Canada this field can adapt to 3 characters allowing the Canadian clinics full use of the feature. (There are utility programs available to help change your Zip Code System Table to the new length. Please call technical support at 1-877-838-9273 for assistance in running Zipto Three and DelDup.)
To learn more about: Search the Help for: Hospital Demographics
Hospital Demographics; Demographics
Set Values for Invoicing
Under this tab the values for pricing, discounting, taxing and other monetary issues for your clinic will be determined. The window is divided into an upper and lower section; the lower section having three sub-tabs specifying Formatting, Discounting and Fees.
• On the Hospital Setup window, click the Invoicing tab to display the Invoicing Values set up folder.
Tax Values In these fields you will set the state (GST) and local (PST) tax rates along with your tax registration number for your area. If, however, you live in an area where more than one set of rates apply, you will need to become familiar with “Error! Reference source not found., Tax Table”. If you have set up a Tax Table and linked the various tax areas with appropriate Zip Codes, clients will be taxed accordingly. If you sell taxable items to a client whose Zip Code is either not in the Zip Code table or does not have a Tax Area linked to it, the client will be charged whatever tax rates you have assigned here.
• Specify the correct tax rates using decimal values. Next invoice no. This is a count forward feature that allows you to enter a beginning invoice number at will.
• If appropriate, enter a Next invoice number. Auto-payment You are able to specify how you want AVImark to prompt you for payments on posted charges, either “(none)”, for the “Invoice amount”, or for the “Balance due”.
• Use the Auto-payment drop-down list and select how you wish to be prompted for payments.

Chapter 1: Hospital Setup
4
Open change-maker if payment amount Payments taken that are greater than the Invoice total for a client that has an outstanding balance does not have to be applied to the entire balance. If the option “> Invoice total” is selected and a client makes a payment that is greater than the invoice total, but less than the outstanding balance, the Change-maker window will be prompted, allowing change to be returned to the client, rather than applying the change to the outstanding balance.
The “> Balance due” option will allow AVImark to perform as it has previously. The Change-maker window will not be prompted when a payment is made that is greater than the invoice total but less than the outstanding balance. The change would be automatically applied to the outstanding balance. The “(never)” option will prevent the Change-maker window from being prompted even when the client has no outstanding balance and a payment is made that is greater than the invoice total.
• Use the Open change-maker if payment amount drop-down list and select how you wish to use the Change-maker.
Returned check fee This is the amount you would like to charge the client when a check is returned. The fee is automatically added to the clients balance when you return a check in the accounting window of the client.
• Specify the amount to be applied for returned checks. For example: (20.00). Default type Using the “Default type” menu, you may specify the type of payment you wish AVImark to default to; Check, Cash or None. If “None” is chosen as the default, AVImark requires you to manually select the payment type before the payment can be entered. This is intended to improve accuracy of entering different payment types.
• Use the Default type drop-down list and select the default payment type. Sub-tab, Formatting
Invoice title You may specify an alternate title for your invoices using up to 13 characters. For example: (RECEIPT). If no title is entered, the word INVOICE will be printed.
• If appropriate, type an alternate Invoice title. Print summary AVImark gives you the ability to print invoice totals in a ‘Vertical’ or ‘Horizontal’ manner.
• Use the Print summary drop-down list and select the manner you wish to print invoices. Print charges AVImark gives you a few options when printing charges on the invoice. You may; “Group by provider” (which will organize line items by doctor), “Group by category” (which will organize and total by category name), print “Chronologically”, or, print “As Shown” (how charges are displayed in Medical History). When “Group by category” is selected, the “Category summary only” option will become active by appearing in red. With this option checked, the printed invoice will show charges by category only. No line items will be listed.
• Use the Print charges drop-down list and select how you wish to print charges on the invoice.
Options From this area of the Formatting sub-folder, AVImark allows you to choose what information you would like displayed on the invoice. You may select as many options that you wish.
• Select the Options you wish to have printed on the invoice.

Chapter 1: Hospital Setup
5
To learn more about: Search the Help for: Invoice Options and their function
Invoicing Tab
Closing notation In this field, AVImark allows you to enter notes that you want to periodically appear at the bottom of the client’s invoice. A different Closing Notation may be specified for each Company within AVImark.
• If appropriate, type a Closing notation. Sub-tab, Discounting
Non-discounted prices This option allows you to have AVImark print the regular (non-discounted) prices for discounted services and/or items on the client invoice. In this case, you will also want to make sure to check the next box, “Print total discount” so that the amount of the discount is printed on the invoice summary line below the list of charges.
• If appropriate, select Non-discounted prices. Print total discount This option allows you to have the total of all discounts printed on the invoice.
• If appropriate, and if Non-discounted prices is checked, select Print total discount. Line item discounts With this option checked, AVImark will list retail, discount amount and net price as column headings in the line item section of the invoice. When using this option, ensure the “Non-discounted prices” box is not checked.
• If appropriate, select Line item discount. Cash discount % This field allows you to specify a percentage that you allow a discount for cash (or check) payments. If, once the payment has been entered in the payment window, you wish to change the payment type; AVImark will recalculate the amount due. If the payment (and appropriate cash discount amount) is already recorded on the invoice, you will need to delete these before you change the payment type.
• If appropriate, enter a Cash discount percentage using a whole number. Discount rates When you want to specify discounts for certain classes of clients on certain treatments and/or inventory items, you will do so on this display. AVImark allows you to give clients a class number for the sole purpose of determining what discount rate the client is to receive. For example, you would gather a homogenous group of clients together (e.g. senior citizens) and give that group a specific class number. By default, AVImark assigns a class number of 1 to all clients. There is no limit to the number of client classes you can create. In addition to clients having a class number, all treatments and inventory items can have a class number. Unlimited class numbers can also be created for treatments and items. AVImark calculates discounts to clients based on how you define which classes of clients are to receive what discount percentage for each treatment and/or inventory class. Inventory and Treatments may also be discounted on a cost plus basis for any given client class.

Chapter 1: Hospital Setup
6
• In the Discount rates section, right-click and from the shortcut menu click New to display the
New Discount Rate window. • Use the Client Class drop-down list and select a Client Group. These are the groups that are
set up in System Tables.
• To create a new Client Class from this window, click the Paper button next to the Client Class field.
• From the New Client Discount Class Entry window, enter a numbered Code and a Discount Class name.
• Click OK and select that Client Group from the Client Class drop-down list. This will add the New Client Class to System Tables as well.
• Use the Discount Class drop-down list and select the class of treatments and/or items which are to be discounted for the selected Client Class. Treatments and inventory must be assigned these client discount groups from within your Treatment and Inventory list.
• To create a new Discount Class from this window, click the Paper button next to the Discount Class field.
• From the New Discount Class Entry window, enter a numbered Code and a Discount Class name.
• Click OK and select that Discount Class from the Discount Class drop-down list. This will add the New Discount Class to System Tables as well.
• In the Rate box, type or select the correct discount percentage. • If appropriate, select the Cost Plus and click OK.
You may use a Negative discount percentage value to effectively surcharge certain classes of clients.
Chapter 1: Hospital Setup
7
Cost Plus Discounts The “Cost Plus” field allows you to tell AVImark whether or not you would like a certain client class to be charged your cost for a certain Treatment and/or Inventory class or cost PLUS a specified percentage. If the “Cost Plus” option is checked and a zero has been specified in the “Rate” field, AVImark will charge the client the Markup Cost of the item and the Cost of the treatment. With the “Cost Plus” option checked and a percentage specified in the “Rate” field, AVImark will charge the client the Markup Cost of the item, the Cost of treatment PLUS the specified percentage.
• In the Discount Rates section, select the correct Client Class. • Right-click and from the shortcut menu click Change to display the Change Discount Rate
window. • To charge the client Cost only, type or select 0 in the Rate box and select Cost Plus. • To charge the client Cost Plus, type or select the correct percentage in the Rate box and
select Cost Plus.
To learn more about: Search the Help for: Tax Values
Discount Rates
Tax Values; Invoicing Tab Discount Rates; Discounting sub-tab
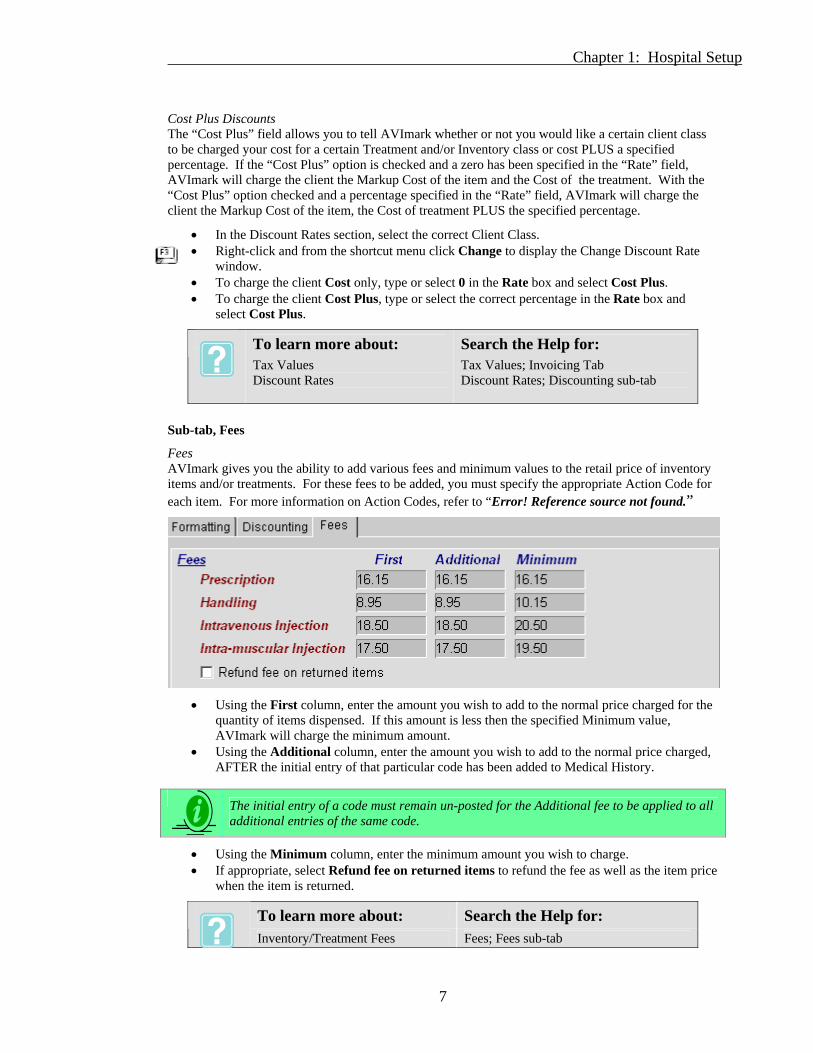
Sub-tab, Fees
Fees AVImark gives you the ability to add various fees and minimum values to the retail price of inventory items and/or treatments. For these fees to be added, you must specify the appropriate Action Code for each item. For more information on Action Codes, refer to “Error! Reference source not found.”
• Using the First column, enter the amount you wish to add to the normal price charged for the
quantity of items dispensed. If this amount is less then the specified Minimum value, AVImark will charge the minimum amount.
• Using the Additional column, enter the amount you wish to add to the normal price charged, AFTER the initial entry of that particular code has been added to Medical History.
• Using the Minimum column, enter the minimum amount you wish to charge. • If appropriate, select Refund fee on returned items to refund the fee as well as the item price
when the item is returned.
To learn more about: Search the Help for:
Inventory/Treatment Fees Fees; Fees sub-tab
The initial entry of a code must remain un-posted for the Additional fee to be applied to all additional entries of the same code.

Chapter 1: Hospital Setup
8
Set Values for Statements From this tab, AVImark lets you set the values for printing of your detailed statements at the end of any period (usually once a month).
• On the Hospital Setup window, click the Statements tab to display the Statements Values set up folder.
Service charge This field allows you to specify the service charge you wish to charge for overdue accounts. This amount will need to be entered as a decimal. For example: 0.015 equals 1½%.
• Enter the amount you wish to charge for overdue accounts. Minimum This is the amount you wish AVImark to charge should the Service Charge be less than the minimum value specified.
• If appropriate, enter a Minimum Service Charge. Days overdue This field allows you to specify the number of days after which an account will have service charges applied. AVImark only charges interest on the number of days greater than what is specified here.
• Enter the number of days after which an account will have service charges applied.
Handling fee AVImark allows you to add a fee to every client that owes you money whenever you print monthly statements, with the following exceptions: If a client has a Client Code “W” (Waive Charge) or the “I” code (Inactive Client), they will not be charged either the service charge or the handling fee. By

Chapter 1: Hospital Setup
9
“Client Code”, we are referring to the “Code” field in the Client area of the Client Information Display. For more information on "Client Codes", refer to “Error! Reference source not found.”.
• Enter the amount of the Handling fee you wish to apply to every account that is being billed. Messages AVImark will print an appropriate message on a client’s statement depending on how many days the client has an outstanding balance; either current, over 30, over 60, or over 90 days. You may type any message you feel appropriate for these situations.
• If appropriate, type statement messages for the different situations. Options This area of the Statements folder allows you to select what information you would like displayed on the statement. You may select as many options that you wish. The following is a list of the available options and their meaning:
• Select the Options you wish to have displayed on the client’s statement. Interest notice This notice may be any message you would like to be printed at the bottom of the client invoice any time the client charges their balance. In addition, AVImark will print this message at the bottom of all statements. Print patient summary This option allows you to print a patient by patient summary of charges on each statement. Print account aging AVImark gives you the ability to print an aged account summary at the bottom of each statement showing what portion of the client’s balance is current, over 30 days past due, over 60 and so on. Show folder number This option allows you to print the client’s folder number on the statements instead of the client’s account number. Don’t apply late fee if payment received If you have received a payment of any amount from the client within the number of days specified in the “Days overdue” field, AVImark will not charge a service charge.
• If appropriate, select Don’t apply late fee if payment received. Envelope This option allows you to adjust the statement format to fit the envelope format you choose.
• If appropriate, use the Envelope drop-down list and select the correct envelope type. Billing document In this field, you may type the name of a Microsoft Word document that you would like AVImark to print along with any unpaid invoice. This document will only print if the client’s balance exceeds the amount entered in the “Print only if balance at least” field. There is a default setting of 1.00 but you may change this amount if necessary.
• If appropriate, type the name of the Microsoft Word document you wish to print. • Enter a dollar amount in the Print only if balance at least field.
Closing notation In this field AVImark allows you to enter notes you want to appear at the bottom of the client’s monthly statement. A separate Closing Notation may be entered for each Company within AVImark.
• If appropriate, type a Closing notation.

Chapter 1: Hospital Setup
10
To learn more about: Search the Help for: Statements Tab Setup
Statements Tab
Set Values for Documents
The Documents folder allows you to specify the size and quantity of various documents and labels that AVImark will print for you. You will also use this screen to tell AVImark the name of the MS Word document you want to use for your Rabies certificate.
• On the Hospital Setup window, click the Documents tab to display the Documents Values set up folder.
Drug Labels These fields allow you to specify the true size of the height, width, font size, and the left/top margins (in inches) for the prescription labels you will be using.
• Using the Height, Width, Left margin, Top margin and Font size fields, enter the correct size of your Drug labels.
Sequence number This field allows you to enter a beginning label sequence number (or prescription number) to be printed on all prescription labels. AVImark will automatically sequence from the number entered.

Chapter 1: Hospital Setup
11
• If appropriate, enter a beginning Sequence number. Include The Include area allows you to specify what information will be displayed on the prescription label. The option “Doctor’s license” is specific for New Jersey clinics and when selected, cannot be used in conjunction with the DEA #. Just below the option check boxes, you also have the option to include on the label any brief note that will be printed at the bottom of the label. For example: “For veterinary use only”, or “Keep out of reach of children”.
• Select the Include options you wish to have displayed on the prescription labels. • If appropriate, type a brief note to have displayed at the bottom of the label.
Copies to print This area allows you to specify the number of copies of the daily deposit slip, client invoice, rabies certificate, and patient charts to be printed at the time the invoice is printed. Also, you may specify the number of drug labels you want printed at a time.
• Enter the number of copies you wish to have printed for each of the items. Photographs These fields allow you to specify the margins and dimensions of printed photos. These dimensions only apply when printing images from the AVImark Image Editor window.
• Using the Left margin, Top margin, Width, and Height fields enter the dimensions for printed photos from the AVImark Image Editor.
Patient Labels These fields allow you to specify the height, top and left margins, and the font size settings for your patient labels. You may also choose to include basic client or patient information. When using labels that are one inch in height and you wish to include client information, check the option ‘New Page after Client Info’. This will allow an automatic page break after the client information is printed and force the patient information onto a second label.
• Using the Height, Font, Top and Left margin fields enter the correct size of your Patient labels.
Mailing labels These fields allow you to specify the height, top and left margins settings for your mailing labels.
• Using the Height, Top and Left margin fields enter the correct size of your Mailing labels. Referral letter This field gives you the ability to specify a Microsoft Word Document that you would like printed for each referring client included on the AVImark Referral report. These documents would be letters you want to send to referring clients (not clients who have been referred) thanking them for referring new clients to you. Understand that the AVImark Referral Report only includes new clients that have been added to your system AND that have received an invoice during the period of time reported. Therefore, AVImark clients who have referred these new customers to you would be the clients receiving the thank-you letters. In order for these documents to be addressed to the referring client and be worded appropriately regarding the referred client, you will need to be familiar with the AVImark merge words relating to referral correspondence. These special words are listed in “Error! Reference source not found.”.
• Type the name of the Microsoft Word Document that you wish to have printed for each referring client included on the Referral Report.
• Select Print? To have the document printed when printing the Referral Report. Check-in

Chapter 1: Hospital Setup
12
AVImark gives you the ability to specify a Microsoft Word document that will be printed when you check-in a patient from either the Boarding Calendar or the CID. You may specify multiple documents by choosing from a list of client education documents or documents which you have created. This is accomplished by entering the document names into this field separated by commas. When a patient is checked-in you will be prompted by a screen to select a document to print. This feature will default to the first document that is listed in this field.
• Type the name of the Microsoft Word Document(s) that you wish to have printed when you check-in a patient.
Rabies certificate If this field is left blank (default), AVImark will print the rabies certificate form that is included with the AVImark program. You may however, customize your own Rabies certificate using Microsoft Word and entering the name of the document in this field. This document must be saved in the My Documents folder on the server computer.
• Type the name of the Microsoft Word Document you wish to use for the Rabies certificate, or leave this field blank to print the default certificate.
Chart length AVImark gives you the ability to specify the length of the Patient chart by number of Days, Months, or Visits.
• Enter a whole number in the first field and then use the drop-down list and select Days, Months, or Visits.
To learn more about: Search the Help for: Drug/Patient Labels
Labels; Prescription Labels; Documents Tab
Set Values for Reminders
The Reminder folder allows you to specify the values in which to print your Reminders. In addition, if you choose to send Reminders through a source other then AVImark, you will need to specify that information from this folder. Should you need any assistance with setting up your reminder specifications, contact AVImark Technical Support at 877-838-9273.

Chapter 1: Hospital Setup
13
Reminder intervals It is from this area that you will tell AVImark the interval in which you wish to print/send Reminders. The “Reminder cycle ___ days” field will be the default setting for the number of days between sending of the first Reminder. For example: If you print Reminders on a monthly basis, you will want to enter either 30 or 31 in this field to represent a typical month. If you send Reminders twice a month, you would want to enter 15 and so on. Next, if you send out second and even third Reminders, you will need to specify the interval days between Reminders in the fields, “Wait ____ days, then send second”, and “Wait ____ days, then send third”. The way this works when sending second and third Reminders is AVImark looks at the date you sent your first Reminder. It then looks back from that date the number of days you specified for your second, and then it looks forward the number of days specified in the “Reminder cycle ___ days”. For your third Reminders, AVImark looks at the beginning date for the second Reminder interval and then looks back the number of days you specified for your third. Then it looks forward the number of days specified in the “Reminder cycle ___ days”. For a better perspective, let’s say on July 1st, you mail reminders to your clients. The “Reminder cycle ___days” is 15 days, the “Wait ____days, then send second” is 30 days and the “Wait ____ days, then send third” is 30 days. The first reminders will go to clients that have patients due from July 1st to July 15th. Second reminders will go to clients with patients due from June 1st to June 15th (back 30 days from July 1st, then forward 15 days). Third reminders will be sent to clients with patients due for treatments from May 1st to May 15th (back 30 days from the starting date of the Second Notices then forward 15 days). Remind for overdue treatments AVImark gives you the option to include past due treatments on your Reminder cards (or letters) along with the treatments that are due during a given reminder cycle. The past due treatments will only print on the card if the patient was to receive a card anyway for a treatment that is due during the cycle.
• If appropriate, select Remind for overdue treatments. Print dates as mm/yy This option allows you to have just the month and year of the due treatment printed on the card. Unchecked the date will be displayed as month, day and year.
• If appropriate, select Print dates as mm/yy.

Chapter 1: Hospital Setup
14
Restrict to patients w/o appointments This option allows you to prevent reminders from being printed for those clients who currently have an appointment on the AVImark Appointment Calendar. When using this option the appointment must fall within the time frame of the printing of reminders and will apply to First Reminders only.
• If appropriate, select Restrict to patient’s w/o appointments. Reminders per page If you are using the page formats used with laser printers that allow either three or four cards per page, AVImark allows you to specify how many reminders to print per page. If you choose “One”, AVImark will print either one-up tractor-feed cards or an MS Word document set up as a full size letter.
• Use the Reminders per page drop-down list and select the number of reminders to print per page.
E-Mail options The AVImark e-mail reminder function allows you to send e-mail messages to those clients who have a valid e-mail address and own animals that are either due or past due for remindable services. You will probably do this in two steps by printing reminder documents for those clients who don’t have an e-mail address and then sending e-mail messages to the rest. However, you may not want to depend entirely upon the success of e-mail reminders, especially for clients who have not responded to their first message. In this case, by using these options you may force AVImark to send reminders to due and/or overdue patients, and even to those clients who have e-mail addresses. AVImark checks these boxes as a default setting but you may uncheck them if appropriate.
• If appropriate, uncheck the e-mail option(s) that you wish. Reminder magazine options AVImark gives you the ability to export your Reminder information to Healthy Pet®, Paw Print®, Pet Quarterly®, US NetCom®, Jabez Communications® or AVImark Online Reminders. Prior to using this feature you will need to obtain a hospital identification number from the organization you will be working with. Unless specifically directed by the Healthy Pet®, Paw Print®, Pet Quarterly®, US NetCom®, Jabez® Organizations or AVImark Online Reminders do not put anything in the Clinic ID field.
• Use the Reminder magazine options drop-down list and select the correct organization. • If you wish to use your ISP for sending reminder information to one of the reminder
organizations select Send via internet. • If a firewall is installed, select Passive connection.
Edit and print reminders with Microsoft Word® AVImark gives you the ability to use Microsoft Word® documents as your Reminders. In addition, when printing one reminder card for a client who has more than one animal due for treatments during a given reminder cycle, you may specify the name of that document in the “Multi-patient document” field. Using this feature, you will need to select the one per page option. Should you choose to print multiple reminder post cards per page (either three or four), you must first indicate how many reminders per page you want to print. Then you will need to set up your post card document using Microsoft Word Table support, in a manner similar to that used in the sample reminder documents THREE.DOC and FOUR.DOC, found on the AVImark bulletin board.
• If appropriate, select Microsoft Word. • If you wish to print consolidated Reminder, type the document name in the Multi-patient
Document field. Edit and print Reminders with AVImark When using AVImark to edit and print Reminders, AVImark gives you the ability to create Reminder text for your first, second, third and consolidated reminders. In addition, AVImark allows you to have

Chapter 1: Hospital Setup
15
up to 10 alternate reminder texts. This feature allows you to choose alternate messages when printing reminders for a prior period or for a particular treatment.
• If appropriate, select AVImark. • Select First Reminder text to display the First Reminder text window.
• Type the Reminder text you wish to have printed on the first reminder card. After each line of
text, press ENTER. For example: <company> <co-address> <co-city>, <co-st> <co-zip> <co-phone> Dear Mr./Mrs. <last-name>, This is an important reminder letting you know that <animal> is due for the following treatments. Please call <co-phone> for an appointment.
<treatments>
<first-name> <last-name>
<address>
<city>, <st> <zip>
• Click Done when finished. • If appropriate, repeat the procedure for the second and third Reminder cards. • To use one Reminder card for multiple patients, select Consolidated reminder. • Type the Reminder text you wish to have printed on the consolidated reminder card.
<company> <co-address> <co-city>, <co-st> <co-zip>

Chapter 1: Hospital Setup
16
<co-phone> Dear Mr./Mrs. <last-name>, This is an important reminder letting you know that your pets are due for the following treatments. Please call <co-phone> to schedule an appointment.
<list> <first-name> <last-name> <address> <city>, <st> <zip>
• Click Done when finished. • To create an Alternate Reminder notice, select either first, second, or third Reminder text
to display the Reminder text window. • Click Next. The appropriate Reminder text window - No. 2 should be displayed at the top of
the window. • Type the text you wish to have printed on the Alternate Reminder card and click Done.
Font size and Left margin When printing Reminders through AVImark you may specify the font size and a left margin.
• Specify the Font size you wish to use to print Reminders. • Specify the Left margin. For example; (.75 for ¾ inch).
To learn more about: Search the Help for: Reminder Intervals
Reminder Magazine Options
Reminders Tab
Set Appointment and Boarding Values
The Appointments Folder will be used to set the parameters governing your Appointment calendar format and Boarding schedule. Calendar start and stop times In these fields you will specify the time you wish to begin and stop seeing patients each day. AVImark accepts both 24-hour military time and standard 12-hour clock designations. For 12-hour format, use a lower case “a” or “p” to designate morning or afternoon times. For example: (8:00a).
• Specify the Start time. • Specify the Stop time.
Increment This field allows you to specify the Appointment Schedule increment between appointments.
• Specify the Increment between appointments in minutes. Default room You may specify the room in which you would like all new appointments to be scheduled.
• If appropriate, use the Default room drop-down list and select a Default room. Sub-tab, View

Chapter 1: Hospital Setup
17
The Calendar View is the default view you would like the Appointment Calendar to be in when it is opened. Selecting “Daily, Consolidated” will place a specific day’s appointments for all doctors in all rooms in a “stacked” manner on the Appointment Calendar. A more selective view of specific doctors and/or rooms can be accessed by using the drop-down menus on the Appointment Calendar. Selecting “Daily, by Doctor” will show the appointments for a specific day, with separate columns for each doctor in your hospital. Selecting “Daily, by Room” will show a day’s schedule for all rooms in the hospital, with separate columns for each room in your hospital. In this case, if an appointment was not scheduled for a specific facility, it will be displayed in a column called “Not Assigned”. Selecting “Weekly, by Room” will show a week’s schedule for all rooms in the hospital. Appointments appear as colored icons according to the colors assigned to each doctor. Using this view, there is a Quick Edit feature that will display a small Active Appointment window showing the details of any selected appointment.
• Select the View option you wish to have displayed when opening the Appointment Calendar.
Sub-tab, Options
Print expanded schedule With this box checked, all times slots will be shown on the appointment schedule, regardless of whether any appointments have been made for any of the times. If this box is not checked, only the actual appointments will print on the schedule.
• If appropriate, select Print expanded schedule.

Chapter 1: Hospital Setup
18
Post notes to Medical History
With this box checked, any appointment notes that were attached to an appointment will be entered into the Medical History of the patient when the patient is checked into the hospital. The notes will be entered using a code of “Appt$” as a Type N transaction. If the box is not checked, notes will be posted to the Subjective Tab of the Medical Condition Window.
• If appropriate, select Post notes to medical History. Always show ghosts
With this box checked, the Appointment Calendar will display all appointments that have been removed and marked as having been kept, cancelled or as no-shows. Deleted appointments will not be shown.
• If appropriate, select Always show ghosts. Notify When Client Has Had
Clients that are frequently marked as a No Show, Late, Rescheduled , and/or Canceling appointments can be flagged to display an alert when they are scheduling new appointments. You must specify one or more of the situations and how many times those instances can occur before the client is flagged with a warning. Once the specified number of occurrences has been reached, the next time a new appointment is created for that client, a warning with the number of instances this client has had will be displayed, as well as a confirmation asking if you would like to proceed with the appointment. Clicking “Yes” will allow the appointment to be created. Clicking “No” will prohibit the new appointment from being created.
• If appropriate, select the desired situations. • Using the UP and DOWN ARROWS, specify the number of times the situation must occur
prior to flagging the client with a warning. Sub-tab, Colors
Colors may be selected for different parts and functions of the calendar. Colors for each of your staff are assigned in Users and Security. For more information on changing the default colors, refer to “Error! Reference source not found.”.
Chapter 1: Hospital Setup
19
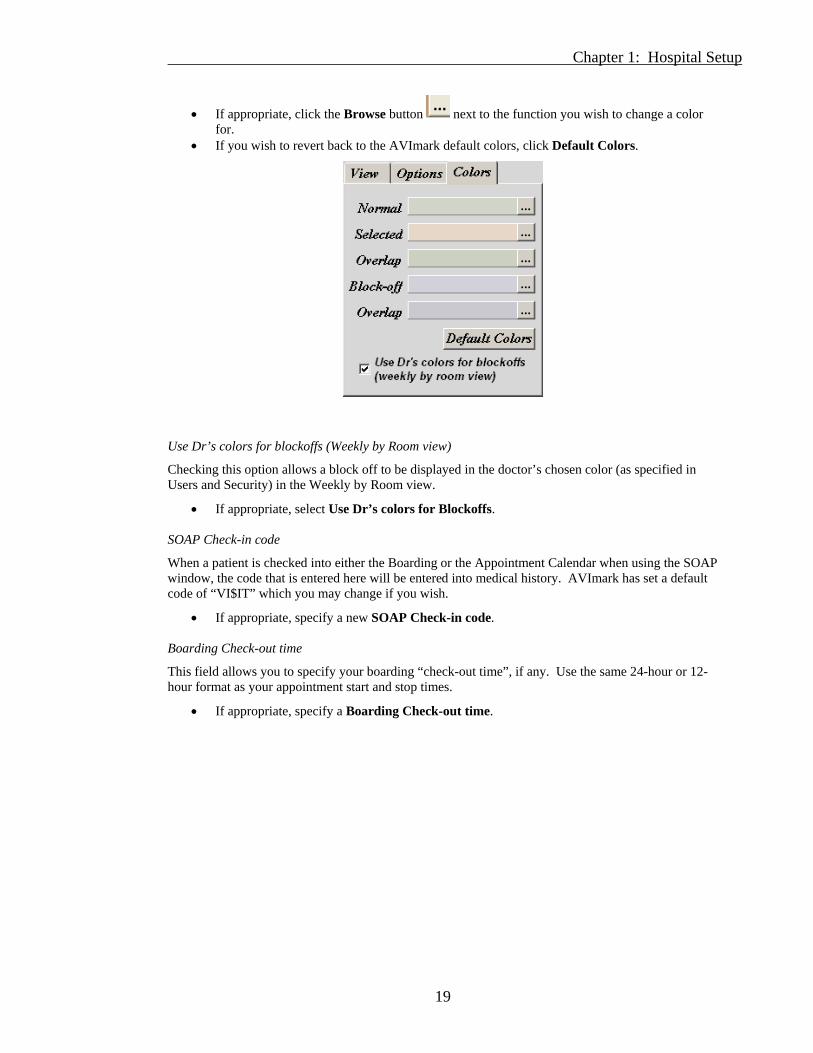
• If appropriate, click the Browse button next to the function you wish to change a color for.
• If you wish to revert back to the AVImark default colors, click Default Colors.
Use Dr’s colors for blockoffs (Weekly by Room view)
Checking this option allows a block off to be displayed in the doctor’s chosen color (as specified in Users and Security) in the Weekly by Room view.
• If appropriate, select Use Dr’s colors for Blockoffs. SOAP Check-in code
When a patient is checked into either the Boarding or the Appointment Calendar when using the SOAP window, the code that is entered here will be entered into medical history. AVImark has set a default code of “VI$IT” which you may change if you wish.
• If appropriate, specify a new SOAP Check-in code. Boarding Check-out time
This field allows you to specify your boarding “check-out time”, if any. Use the same 24-hour or 12-hour format as your appointment start and stop times.
• If appropriate, specify a Boarding Check-out time.
Chapter 1: Hospital Setup
20
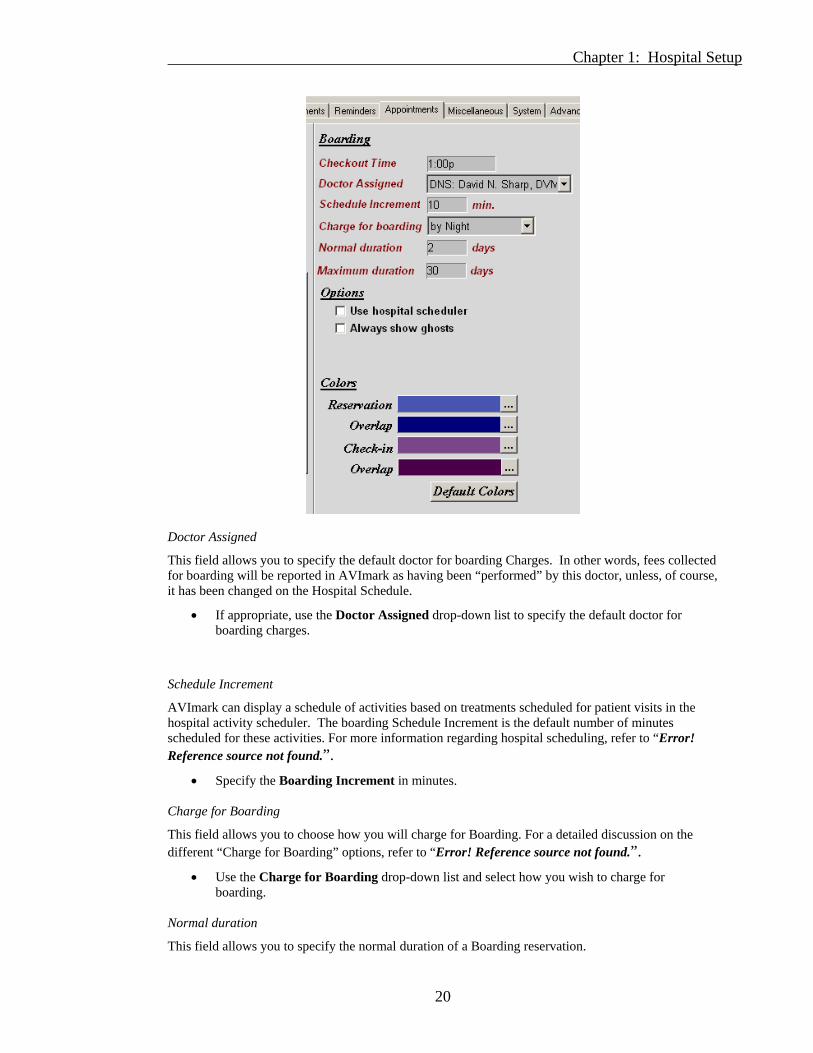
Doctor Assigned
This field allows you to specify the default doctor for boarding Charges. In other words, fees collected for boarding will be reported in AVImark as having been “performed” by this doctor, unless, of course, it has been changed on the Hospital Schedule.
• If appropriate, use the Doctor Assigned drop-down list to specify the default doctor for boarding charges.
Schedule Increment
AVImark can display a schedule of activities based on treatments scheduled for patient visits in the hospital activity scheduler. The boarding Schedule Increment is the default number of minutes scheduled for these activities. For more information regarding hospital scheduling, refer to “Error! Reference source not found.”.
• Specify the Boarding Increment in minutes. Charge for Boarding
This field allows you to choose how you will charge for Boarding. For a detailed discussion on the different “Charge for Boarding” options, refer to “Error! Reference source not found.”.
• Use the Charge for Boarding drop-down list and select how you wish to charge for boarding.
Normal duration
This field allows you to specify the normal duration of a Boarding reservation.

Chapter 1: Hospital Setup
21
• Specify the Normal duration of a Boarding reservation. Maximum duration
This field allows you to specify the maximum duration of a Boarding reservation. By setting this value low, for example 30 days, AVImark is able to display the calendar more quickly.
• Specify the Maximum duration of a Boarding reservation. Always show ghosts
With this box checked, the Boarding Calendar will display all appointments that have been removed and marked as having been kept, cancelled or as no-shows. Deleted appointments will not be shown.
• If appropriate, select Always show ghosts. Colors
Colors may be selected for different parts and functions of the calendar.
• If appropriate, click the Browse button next to the function you wish to change a color for.
• If you wish to revert back to the AVImark default colors, click Default Colors.
Specify Miscellaneous Hospital Values This folder is used to specify various values that determine the way AVImark works.
Default species This field allows you to specify a default species when checking in new patients.

Chapter 1: Hospital Setup
22
• If appropriate, use the Default species drop-down list and select a Default species. Default doctor AVImark will assign this doctor as the Preferred Doctor for all new clients. When you treat a patient belonging to a client that has a preferred doctor, AVImark will automatically assign that doctor for treatments being added into the Medical History area. If you do not want AVImark to assign Preferred Doctors for new clients, you will need to select “None assigned”. If the Auto-assign doctor by client option is NOT checked, AVImark will retain the same selected doctor as you enter Medical History, even from client to client. In this case, AVImark will ignore the preferred doctor.
• If appropriate, use the Default doctor drop-down list and select a Default doctor. OTC Doctor This option allows you to select a doctor you want to be assigned to clients for over the counter sales.
• If appropriate, use the OTC Doctor drop-down list and select an OTC Doctor.
Rabies assignment This field allows you to specify the species you would like AVImark to automatically increment the rabies tag number for each time you add a rabies vaccination in the Medical History Area of the patient.
• Using the Rabies assignment drop-down list, select the correct species, or select Always for all species.
Rabies prompt This field allows you to specify which species you would like AVImark to automatically prompt you to enter a tag number for when a rabies vaccination treatment is added to the Medical History of the patient.
• Using the Rabies prompt drop-down list, select the correct species, or select Always for all species.
Rabies certificates This field allows you to specify which species you would like AVImark to automatically print a rabies certificate for when a rabies vaccination is included on the invoice.
• Using the Rabies certificates drop-down list, select the correct species, or select Always for all species.
Prompt before printing This option allows you to have AVImark prompt you before printing Rabies Certificates. By selecting this option, you are able to change printing options, such as Print Preview, number of copies, or the printer itself. This is done from the Print Document window, which will appear when printing the invoice.
• If applicable, select Prompt before printing. Start/Stop auditing at
You may want to set up a “client” account in AVImark specifically for over-the-counter sales. In fact, things will work more quickly if you set up one of these OTC clients for each month of the year. You will not need a patient added for these OTC clients, just the client area itself.

Chapter 1: Hospital Setup
23
When using the Audit Trail feature of AVImark, these fields allow you to specify the start and stop auditing times. For more information on the AVImark Audit Trail feature, refer to “Error! Reference source not found.”.
• If appropriate, type a Start and Stop auditing at time. For example, (Start 12:00a, Stop 11:59p).
Audit on weekends This option allows you to continue auditing on weekends when using the AVImark Audit Trail feature.
• If appropriate, select Audit on weekends. Last used on date This field is used to indicate the date that your inventory statistics were last updated. AVImark will automatically enter the date when you select “Yes” to update your inventory statistics at the beginning of each month. Chart memo The Chart memo area may be used to type a default memo or text to be included at the bottom of each patient chart below the Medical History section. This memo will be in addition to the “Enter chart notes” option on the Patient Chart window.
• If applicable, type a default Chart memo. Other options From this area of the Miscellaneous folder, AVImark allows you to specify different actions, warnings and prompts to be displayed when certain functions are performed. You may select as many options that you wish. The following is a list of the available options and their meaning:
• If appropriate, select the Other options you wish.
To learn more about: Search the Help for: “Other Options” and their function
Miscellaneous Tab
Show alerts This option allows you to tell AVImark when you want the alert messages to be displayed.
• Using the Show alerts drop-down list select the alerts display option.
Specify System Information The System folder consists of a series of sub-folders and fields where you may specify information about how your computer system/network is configured. Sub-folder, System

Chapter 1: Hospital Setup
24
AVImark version
AVImark automatically detects what version you are using. Do not change this version number unless instructed by an AVImark support technician. Title
By default the title “AVImark” is placed in this field. The AVImark application name will be shown on the Windows Task Bar while AVImark is running. If you wish, you may change this title.
• If appropriate, type a Title. Use Window’s colors
This option allows you to use the Windows Display Properties Appearance colors that have been selected for Active and Inactive windows, Message boxes, Window text background, and so on.
• If appropriate, select Use Window’s colors. Military time format
With this option selected, all aspects of the software dealing with time will be converted to Military time format.
• If appropriate, select Military time format.
Detailed error messages
With this option selected, AVImark will display a screen whenever you receive an error message that contains specific information concerning the steps taken prior to receiving the error.
• If appropriate, select Detailed error messages. Windows date format
This option allows you to have the dates that appear in AVImark and on AVImark reports follow the date format specified in the Regional settings of your Control Panel within the Short date format field.
• If appropriate, select Windows date format. Directories
AVImark requires you to designate the folders in which certain files are stored. As AVImark performs its various functions, it needs to access these files and therefore needs to know the location “path” of these files. When specifying the folder path names, do NOT include the local drive letter since they do not reside on each local workstation. For example: \MY DOCUMENTS, \FORMS, \TEXT, and \PHOTOS for each of these folders. The following is a list of the different folders in which certain files are stored:

Chapter 1: Hospital Setup
25
Documents
AVImark allows you to organize your documents into subdirectories of the “Documents directory”. For example, you could now have a directory structure for your documents such as:
Letters - (C:\My Documents\Letters) Certificates - (C:\My Documents\Certificates) Personal - (C:\My Documents\Personal) Take-home documents - (C:\My Documents\Take-Home documents) Treatments - (C:\My Documents\Take-home documents\Treatments) Diagnoses - (C:\My Documents\Take-home documents\Diagnoses) Forms - (C:\My Documents\Forms) AVImark will automatically attempt to locate documents that are attached to Treatments, Items, and Diagnoses, as well as any manually entered document name for which a directory has not been selected. Forms
AVImark uses the Forms function of Microsoft Word. With this feature you may attach an MS Word form document to any treatment. If you specify \FORMS, this would mean your MS Word form files are stored in the “FORMS” folder on the C-Drive of your server computer.
ID
When using the AVImark Sidekick feature along with Microsoft Word Forms, you may specify a Starting Form ID. This value is used as an auto-incrementing sequence number so as to give each form a unique name. Each Sidekick workstation should use its own unique “Starting form ID” value. Photographs
This field allows you to specify a path to store your photographs into a single directory. For example: \PHOTOS. In sub-directories
You may specify your photographs be stored either into a single directory (as is currently the case) or into sub-directories by using the drop-down list to select a sub-directory. For more information on storing patient photos, refer to “Error! Reference source not found.”. Journal files
AVImark uses the Journal feature in conjunction with the Animal Care Training’s VETED Tablet. The VETED Tablet extensively uses Microsoft Journal files for Client Education documents and consent forms.

Chapter 1: Hospital Setup
26
Text files
AVImark has the ability to import Text files into the different Notes windows throughout AVImark.
These files must be in the Text File format (*.txt). If you would like to keep your Text files separate from your other Word documents, you may specify the path to the Text files in this field. Spreadsheets Use this field to specify the destination path where AVImark will locate and store MS Excel spreadsheets. When attaching an XLS file to a Medical History entry AVImark will open to the directory specified here. Backup to This field shows the specified destination path when backing up your data. Regardless of what computer is being used for backing up purposes AVImark will default to the destination specified in the “Backup to field”. QuickBooks® When using QuickBooks in conjunction with AVImark, this field is where you will specify the folder in which AVImark will place the file that is created when exporting financial information to Quick Books. For more information on exporting to QuickBooks, refer to “Error! Reference source not found.”. Applications
AVImark has the ability to launch other application programs directly from the Client Information Display through the Applications Menu. For example: MS Excel, MS Word, QuickBooks, a website and so on. You must specify the name and path for each of these applications, if applicable, and you may enter up to ten different applications.
• Type the Name of the program in the Menu item area. For example: (NOTEPAD).
• Type the Path of where the program resides in the Program path area. For example: (C:\WINDOWS\NOTEPAD.EXE).
Sub-folder, E-Mail
Server name
This is the name of your Internet Service Provider’s (ISP) Outgoing mail (SMTP) server. If you are not certain what this name is, you may refer to it in Microsoft Outlook, Tools, Accounts, Mail, Properties, Servers, Outgoing mail (STMP).
• Type the Server name of your ISP Outgoing mail server. Reply E-Mail address
This field specifies the default E-Mail address for incoming mail if there is no user specific e-mail address selected. If you need to refer to it, it may be found in Microsoft Outlook, Tools, Accounts, Mail, Properties, Servers, Ingoing mail Server, Account name.
• Type the Reply E-Mail address for incoming mail.

Chapter 1: Hospital Setup
27
Authentication
This field is provided for those clinics whose mail provider requires authentication. There is a User ID field and an E-Mail Password within this section. The User ID and password can be obtained from your E-Mail Service Provider.
• Enter the User ID and E-Mail password provided by your E-Mail Service Provider. Sub-folder, Modem
Modem on
For AVImark to work properly, you must specify which serial port your modem (if you have one) is connected.
• Use the Modem on drop-down list to select which port your modem is using. Sub-folder, Cash Drawer
If you are or will be using a cash drawer with the AVImark program you will need to enter the specifications for the cash drawer you are using. All of the specifications can be found in the paper work the cash drawer came with. If you are having trouble finding the information you can test the communication by "pinging" the computer using a DOS command to check the communication between the computer and the cash drawer. If you need further assistance, AVImark Technical Support can walk you through this process. As a shortcut, AVImark allows you to press Ctrl+F11 from the CID to open the cash drawer.
Cash drawer on
AVImark will support most of the serial-attached cash drawers. That is, AVImark will open most computer-driven cash drawers that are attached to the computer via the system COM1 or COM2 serial ports.
• If appropriate, use the Cash drawer on drop-down list and select the correct serial port. Baud Rate
• Use the Baud Rate drop-down list and select the correct Baud Rate. Cash string
The field is used to specify the characters that your cash drawer needs to receive to open.
• Type the cash drawer’s Cash string specifications. Data Bits
• Use the Data Bits drop-down list and select the correct Data Bits. Parity

Chapter 1: Hospital Setup
28
• Use the Parity drop-down list and select the correct Parity. Stop Bits
• Use the Stop Bits drop-down list and select the correct Stop Bits. Open On Credit
• Use Open On Credit to open the cash drawer when accepting an MPS credit card payment. Use TCP/IP
This option is used if you are using this naming code when connecting to the cash drawer.
• If appropriate, select Use TCP/IP. Sub-folder, Instrument
The use of multiple lab instruments on the same computer is available through the use of this sub-folder. For more information on the different lab instruments and their settings, refer to “Error! Reference source not found.”.
• With the correct lab instrument highlighted, select the correct settings for that instrument. • Continue with the same procedure for each instrument you will be using.
Sub-folder, Documents
Office Suite Integration
AVImark gives you the ability to select which word processing program you will be using from each computer.
• Select either Microsoft Word or Star Office/Open Office. • Use the File name extension drop-down list and select the correct File name extension.
When selecting Microsoft Word, select DOC from the drop-down list. If using Star Office/Open Office, you may select any of the three file extensions.
Graphing
Chapter 1: Hospital Setup
29
AVImark gives you the ability to graph and print analysis either through AVImark or Excel.
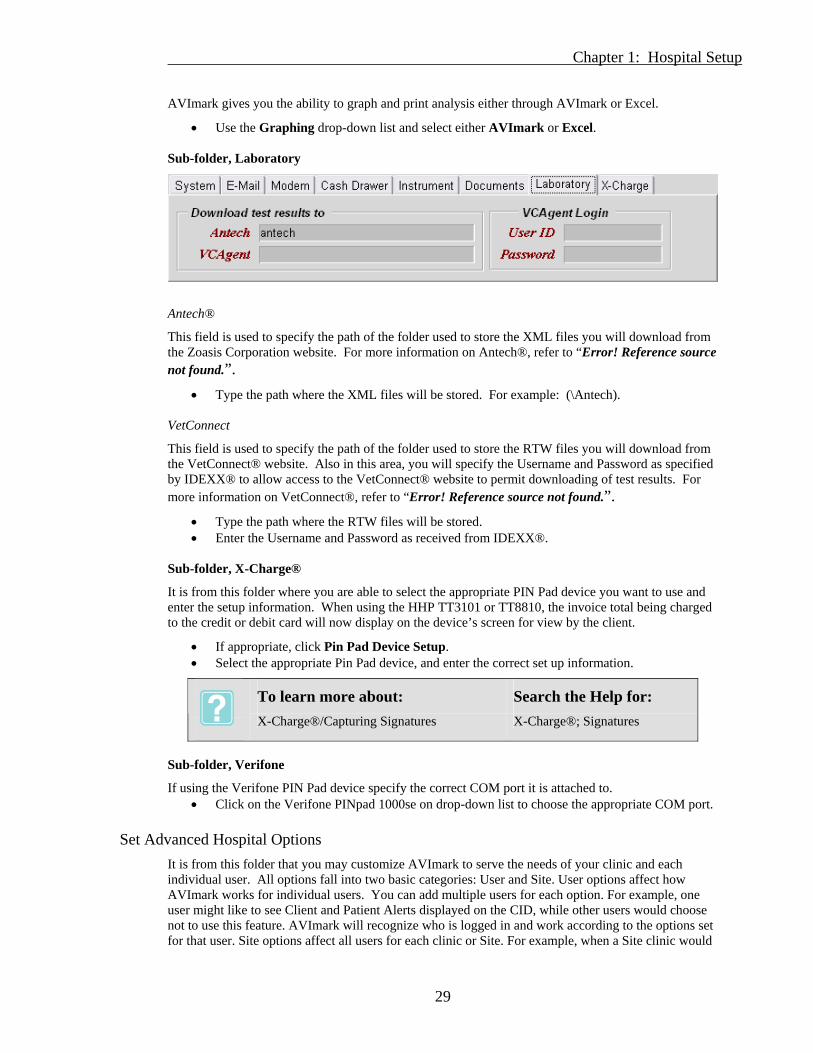
• Use the Graphing drop-down list and select either AVImark or Excel. Sub-folder, Laboratory
Antech®
This field is used to specify the path of the folder used to store the XML files you will download from the Zoasis Corporation website. For more information on Antech®, refer to “Error! Reference source not found.”.
• Type the path where the XML files will be stored. For example: (\Antech). VetConnect
This field is used to specify the path of the folder used to store the RTW files you will download from the VetConnect® website. Also in this area, you will specify the Username and Password as specified by IDEXX® to allow access to the VetConnect® website to permit downloading of test results. For more information on VetConnect®, refer to “Error! Reference source not found.”.
• Type the path where the RTW files will be stored. • Enter the Username and Password as received from IDEXX®.
Sub-folder, X-Charge®
It is from this folder where you are able to select the appropriate PIN Pad device you want to use and enter the setup information. When using the HHP TT3101 or TT8810, the invoice total being charged to the credit or debit card will now display on the device’s screen for view by the client.
• If appropriate, click Pin Pad Device Setup. • Select the appropriate Pin Pad device, and enter the correct set up information.
To learn more about: Search the Help for:
X-Charge®/Capturing Signatures X-Charge®; Signatures
Sub-folder, Verifone
If using the Verifone PIN Pad device specify the correct COM port it is attached to. • Click on the Verifone PINpad 1000se on drop-down list to choose the appropriate COM port.
Set Advanced Hospital Options
It is from this folder that you may customize AVImark to serve the needs of your clinic and each individual user. All options fall into two basic categories: User and Site. User options affect how AVImark works for individual users. You can add multiple users for each option. For example, one user might like to see Client and Patient Alerts displayed on the CID, while other users would choose not to use this feature. AVImark will recognize who is logged in and work according to the options set for that user. Site options affect all users for each clinic or Site. For example, when a Site clinic would

Chapter 1: Hospital Setup
30
like to charge a different amount for a Prescription fee (other than what the home clinic is charging) they will have the ability to set their own fee accordingly.
• From the Advanced folder, click Advanced Options to display the Options Maintenance window.
Set options for users
• Click the button next to the Option Category name to expand the category. • Select the Option you wish to set a default value for. • To set a Value for all users, click Change in the Default Value area to display the Change
Option Value window. • In the Value field, set the appropriate Default Value. • To set a Default Value for an individual user(s), right-click in the ID/User area to display the
shortcut menu. Click New to display the New User Option Value window.
• Using the User drop-down list, select the correct User name. • In the Value field, enter the appropriate Value for the selected user and click OK.
Set options for Site
• Click the button next to the Option Category name to expand the category. • Select the Option you wish to set a default value for. • To set a Value for all Sites, click Change in the Default Value area to display the Change
Option Value window. • In the Value field, set the appropriate Default Value.
In the Search field you can type in part or the entire description of the option you are looking for. The options matching the entry will be displayed in a “narrowed down” list.
Chapter 1: Hospital Setup
31
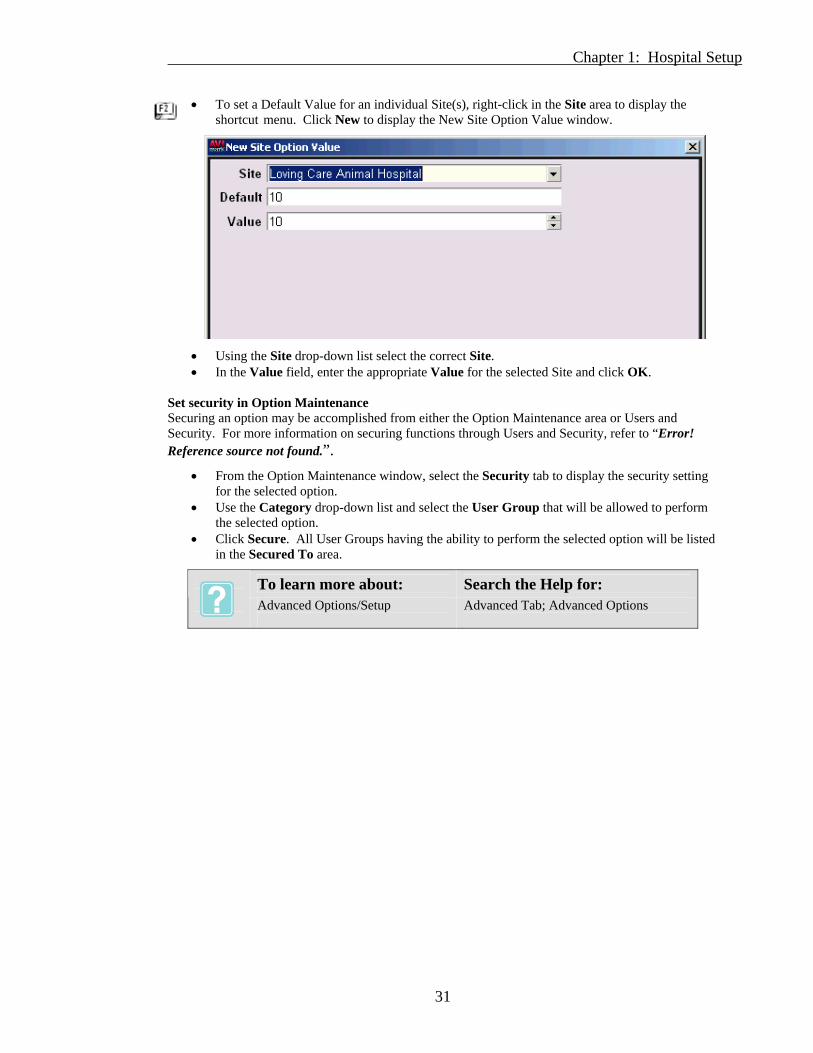
• To set a Default Value for an individual Site(s), right-click in the Site area to display the shortcut menu. Click New to display the New Site Option Value window.
• Using the Site drop-down list select the correct Site. • In the Value field, enter the appropriate Value for the selected Site and click OK.
Set security in Option Maintenance Securing an option may be accomplished from either the Option Maintenance area or Users and Security. For more information on securing functions through Users and Security, refer to “Error! Reference source not found.”.
• From the Option Maintenance window, select the Security tab to display the security setting for the selected option.
• Use the Category drop-down list and select the User Group that will be allowed to perform the selected option.
• Click Secure. All User Groups having the ability to perform the selected option will be listed in the Secured To area.
To learn more about: Search the Help for: Advanced Options/Setup
Advanced Tab; Advanced Options

Chapter 1: Hospital Setup
32