Embed Size (px)
Citation preview

ptg21174253
1
C H A P T E R 1
Overview of Windows PowerShell 5.0
After completing this chapter, you will be able to
■ Understand the basic use and capabilities of Windows PowerShell.
■ Install Windows PowerShell.
■ Use basic command-line utilities inside Windows PowerShell.
■ Use Windows PowerShell help.
■ Run basic Windows PowerShell cmdlets.
■ Get help on basic Windows PowerShell cmdlets.
The release of Windows PowerShell 5.0 continues to offer real power to the Windows network administrator. Combining the power of a full-fledged scripting language with access to command-line utilities, Windows Management Instrumentation (WMI), and even Microsoft Visual Basic Script-ing Edition (VBScript), Windows PowerShell provides real power and ease. The implementation of hundreds of cmdlets and advanced functions provides a rich ecosystem that makes sophisticated changes as simple as a single line of easy-to-read code. As part of the Microsoft Common Engineering Criteria, Windows PowerShell is the management solution for the Windows platform.
Understanding Windows PowerShell
Perhaps the biggest obstacle for a Windows network administrator in migrating to Windows PowerShell 5.0 is understanding what Windows PowerShell actually is. In some respects, it is a replacement for the venerable CMD (command) shell. In fact, on Windows Server–based computers running Server Core, it is possible to replace the CMD shell with Windows PowerShell so that when the server starts up, it uses Windows PowerShell as the interface.
From the Library of Todd Schultz
ptg21174253
2 Windows PowerShell Step by Step, Third Edition
As shown here, after Windows PowerShell launches, you can use cd to change the working direc-tory, and then use dir to produce a directory listing in exactly the same way you would perform these tasks from the CMD shell.
PS C:\Windows\System32> cd\ PS C:\> dir Directory: C:\ Mode LastWriteTime Length Name ---- ------------- ------ ---- d----- 7/10/2015 7:07 PM FSO d----- 7/9/2015 5:24 AM PerfLogs d-r--- 7/9/2015 6:59 AM Program Files d-r--- 7/10/2015 7:27 PM Program Files (x86) d-r--- 7/10/2015 7:18 PM Users d----- 7/10/2015 6:00 PM Windows PS C:\>
You can also combine traditional CMD interpreter commands with other utilities, such as fsutil. This is shown here.
PS C:\> md c:\test Directory: C:\ Mode LastWriteTime Length Name ---- ------------- ------ ---- d----- 7/11/2015 11:14 AM test PS C:\> fsutil file createnew c:\test\myfile.txt 1000 File c:\test\myfile.txt is created PS C:\> cd c:\test PS C:\test> dir Directory: C:\test Mode LastWriteTime Length Name ---- ------------- ------ ---- -a---- 7/11/2015 11:14 AM 1000 myfile.txt PS C:\test>
From the Library of Todd Schultz

ptg21174253
CHAPTER 1 Overview of Windows PowerShell 5.0 3
The preceding two examples show Windows PowerShell being used in an interactive manner. Interactivity is one of the primary features of Windows PowerShell, and you can begin to use Windows PowerShell interactively by opening a Windows PowerShell prompt and entering commands. You can enter the commands one at a time, or you can group them together like a batch file. I will discuss this later because you will need more information to understand it.
Using cmdletsIn addition to using Windows console applications and built-in commands, you can also use the cmdlets (pronounced commandlets) that are built into Windows PowerShell. Cmdlets can be created by anyone. The Windows PowerShell team creates the core cmdlets, but many other teams at Microsoft were involved in creating the hundreds of cmdlets that were included with Windows 10. They are like executable programs, but they take advantage of the facilities built into Windows PowerShell, and therefore are easy to write. They are not scripts, which are uncompiled code, because they are built using the services of a special Microsoft .NET Framework namespace. Windows PowerShell 5.0 comes with about 1,300 cmdlets on Windows 10, and as additional features and roles are added, so are additional cmdlets. These cmdlets are designed to assist the network administrator or consultant to take advantage of the power of Windows PowerShell without having to learn a scripting language. One of the strengths of Windows PowerShell is that cmdlets use a standard naming convention that follows a verb-noun pattern, such as Get-Help, Get-EventLog, or Get-Process. The cmdlets that use the get verb display information about the item on the right side of the dash. The cmdlets that use the set verb modify or set information about the item on the right side of the dash. An example of a cmdlet that uses the set verb is Set-Service, which can be used to change the start mode of a service. All cmdlets use one of the standard verbs. To find all of the standard verbs, you can use the Get-Verb cmdlet. In Windows PowerShell 5.0, there are nearly 100 approved verbs.
Installing Windows PowerShellWindows PowerShell 5.0 comes with Windows 10 Client. You can download the Windows Management Framework 5.0 package, which contains updated versions of Windows Remote Management (WinRM), WMI, and Windows PowerShell 5.0, from the Microsoft Download Center. Because Windows 10 comes with Windows PowerShell 5.0, there is no Windows Management Framework 5.0 package available for download—it is not needed. In order to install Windows Management Framework 5.0 on Windows 7, Windows 8.1, Windows Server 2008 R2, Windows Server 2012, and Windows Server 2012 R2, they all must be running the .NET Framework 4.5.
Deploying Windows PowerShell to down-level operating systemsAfter Windows PowerShell is downloaded from http://www.microsoft.com/downloads, you can deploy it to your enterprise by using any of the standard methods.
From the Library of Todd Schultz
ptg21174253
4 Windows PowerShell Step by Step, Third Edition
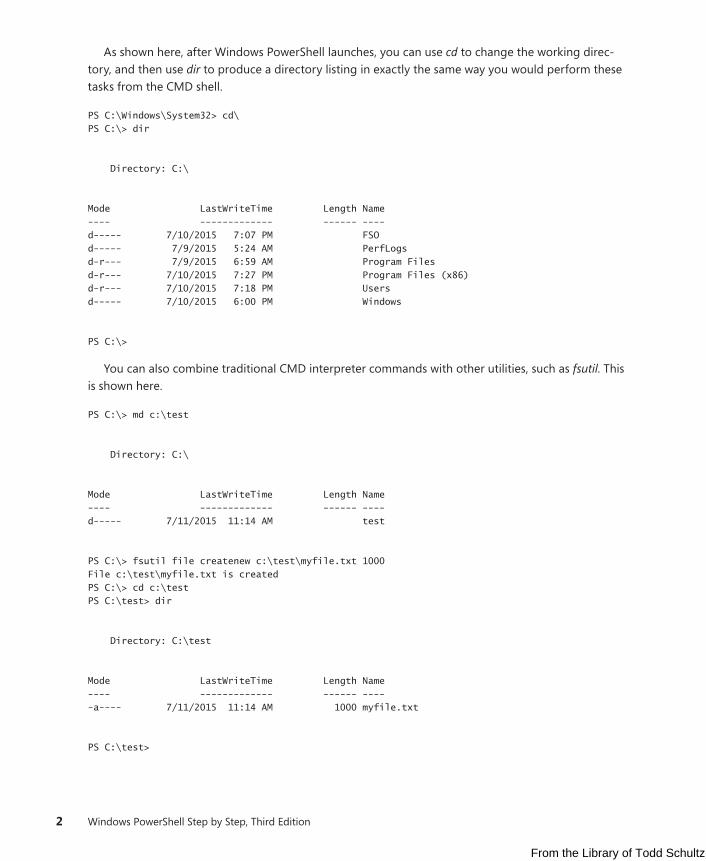
Here are few of the methods that you can use to accomplish Windows PowerShell deployment:
■ Create a Microsoft Systems Center Configuration Manager package and advertise it to the appropriate organizational unit (OU) or collection.
■ Create a Group Policy Object (GPO) in Active Directory Domain Services (AD DS) and link it to the appropriate OU.
■ Approve the update in Software Update Services (SUS), when available.
■ Add the Windows Management Framework 5.0 packages to a central file share or webpage for self-service.
If you are not deploying to an entire enterprise, perhaps the easiest way to install Windows PowerShell is to download the package and step through the wizard.
Note To use a command-line utility in Windows PowerShell, launch Windows PowerShell by choosing Start | Run | PowerShell. At the Windows PowerShell prompt, enter in the com-mand to run.
Using command-line utilities
As mentioned earlier, command-line utilities can be used directly within Windows PowerShell. The ad-vantages of using command-line utilities in Windows PowerShell, as opposed to simply running them in the CMD interpreter, are the Windows PowerShell pipelining and formatting features. Additionally, if you have batch files or CMD files that already use existing command-line utilities, you can easily modify them to run within the Windows PowerShell environment. The following procedure illustrates adding ipconfig commands to a text file.
Running ipconfig commands
1. Start Windows PowerShell by choosing Start | Run | PowerShell. The Windows PowerShell prompt opens by default at the root of your user folder—for example, C:\Users\Ed.
2. Enter the command ipconfig /all. This is shown here.
PS C:\> ipconfig /all
3. Pipeline the result of ipconfig /all to a text file. This is illustrated here.
PS C:\> ipconfig /all >ipconfig.txt
4. Open Notepad to view the contents of the text file, as follows.
PS C:\> notepad ipconfig.txt
From the Library of Todd Schultz
ptg21174253
CHAPTER 1 Overview of Windows PowerShell 5.0 5
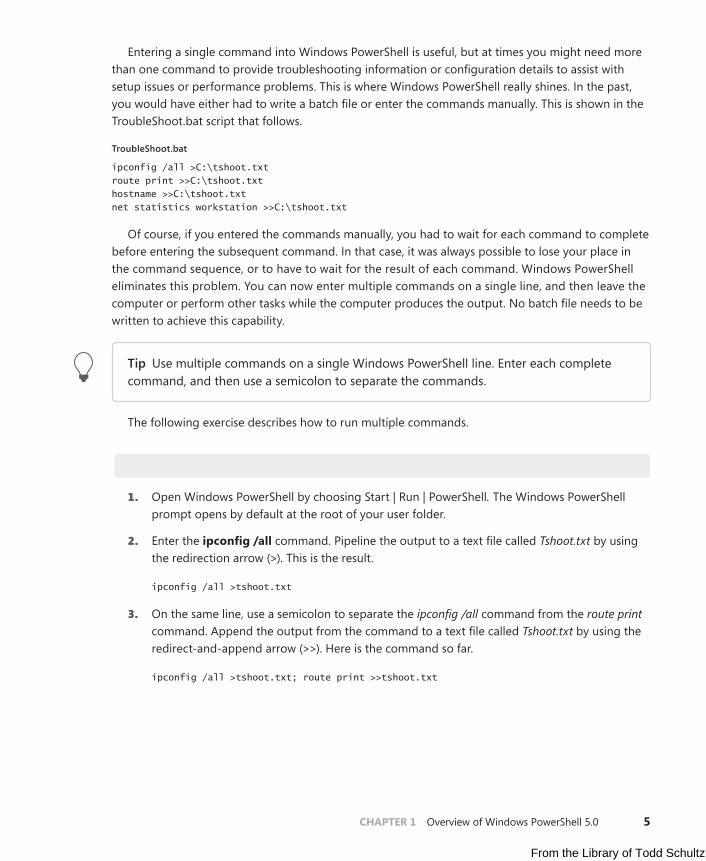
Entering a single command into Windows PowerShell is useful, but at times you might need more than one command to provide troubleshooting information or configuration details to assist with setup issues or performance problems. This is where Windows PowerShell really shines. In the past, you would have either had to write a batch file or enter the commands manually. This is shown in the TroubleShoot.bat script that follows.
TroubleShoot.bat
ipconfig /all >C:\tshoot.txt route print >>C:\tshoot.txt hostname >>C:\tshoot.txt net statistics workstation >>C:\tshoot.txt
Of course, if you entered the commands manually, you had to wait for each command to complete before entering the subsequent command. In that case, it was always possible to lose your place in the command sequence, or to have to wait for the result of each command. Windows PowerShell eliminates this problem. You can now enter multiple commands on a single line, and then leave the computer or perform other tasks while the computer produces the output. No batch file needs to be written to achieve this capability.
Tip Use multiple commands on a single Windows PowerShell line. Enter each complete command, and then use a semicolon to separate the commands.
The following exercise describes how to run multiple commands.
Running multiple commands
1. Open Windows PowerShell by choosing Start | Run | PowerShell. The Windows PowerShell prompt opens by default at the root of your user folder.
2. Enter the ipconfig /all command. Pipeline the output to a text file called Tshoot.txt by using the redirection arrow (>). This is the result.
ipconfig /all >tshoot.txt
3. On the same line, use a semicolon to separate the ipconfig /all command from the route print command. Append the output from the command to a text file called Tshoot.txt by using the redirect-and-append arrow (>>). Here is the command so far.
ipconfig /all >tshoot.txt; route print >>tshoot.txt
From the Library of Todd Schultz

ptg21174253
6 Windows PowerShell Step by Step, Third Edition
4. On the same line, use a semicolon to separate the route print command from the hostname command. Append the output from the command to a text file called Tshoot.txt by using the redirect-and-append arrow. The command up to this point is shown here.
ipconfig /all >tshoot.txt; route print >>tshoot.txt; hostname >>tshoot .txt
5. On the same line, use a semicolon to separate the hostname command from the net statistics workstation command. Append the output from the command to a text file called Tshoot.txt by using the redirect-and-append arrow. The completed command looks like the following.
ipconfig /all >tshoot.txt; route print >>tshoot.txt; hostname >>tshoot .txt; net statistics workstation >>tshoot.txt
Security issues with Windows PowerShell
As with any tool as versatile as Windows PowerShell, there are bound to be some security concerns. Security, however, was one of the design goals in the development of Windows PowerShell.
When you launch Windows PowerShell, it opens in the root of your user folder; this ensures that you are in a directory where you will have permission to perform certain actions and activities. This is far safer than opening at the root of the drive, or even opening in system root.
The running of scripts is disabled by default and can be easily managed through Group Policy. It can also be managed on a per-user or per-session basis.
Controlling execution of Windows PowerShell cmdletsHave you ever opened a CMD interpreter prompt, entered a command, and pressed Enter so that you could find out what it does? What if that command happened to be Format C:\? Are you sure you want to format your C drive? This section covers some parameters that can be supplied to cmdlets that allow you to control the way they execute. Although not all cmdlets support these parameters, most of those included with Windows PowerShell do. The three switch parameters you can use to control execution are -WhatIf, -Confirm, and suspend. Suspend is not really a switch parameter that is supplied to a cmdlet, but rather is an action you can take at a confirmation prompt, and is therefore another method of controlling execution.
Note To use -WhatIf at a Windows PowerShell prompt, enter the cmdlet. Type the -WhatIf switch parameter after the cmdlet. This only works for cmdlets that change system state. Therefore, there is no -WhatIf parameter for cmdlets like Get-Process that only display information.
From the Library of Todd Schultz

ptg21174253
CHAPTER 1 Overview of Windows PowerShell 5.0 7
Windows PowerShell cmdlets that change system state (such as Set-Service) support a prototype mode that you can enter by using the -WhatIf switch parameter. The developer decides to implement -WhatIf when developing the cmdlet; however, the Windows PowerShell team recommends that developers implement -WhatIf. The use of the -WhatIf switch parameter is shown in the following procedure.
Using -WhatIf to prototype a command
1. Open Windows PowerShell by choosing Start | Run | PowerShell. The Windows PowerShell prompt opens by default at the root of your user folder.
2. Start an instance of Notepad.exe. Do this by entering notepad and pressing the Enter key. This is shown here.
notepad
3. Identify the Notepad process you just started by using the Get-Process cmdlet. Type enough of the process name to identify it, and then use a wildcard asterisk (*) to avoid typing the entire name of the process, as follows.
Get-Process note*
4. Examine the output from the Get-Process cmdlet, and identify the process ID. The output on my machine is shown here. Note that, in all likelihood, the process ID used by your instance of Notepad.exe will be different from the one on my machine.
Handles NPM(K) PM(K) WS(K) VM(M) CPU(s) Id ProcessName ------- ------ ----- ----- ----- ------ -- ----------- 114 8 1544 8712 ...54 0.00 3756 notepad
5. Use -WhatIf to find out what would happen if you used Stop-Process to stop the process ID you obtained in step 4. This process ID is found under the Id column in your output. Use the -Id parameter to identify the Notepad.exe process. The command is as follows.
Stop-Process -id 3756 -whatif
6. Examine the output from the command. It tells you that the command will stop the Notepad process with the process ID that you used in your command.
What if: Performing the operation "Stop-Process" on target "notepad (3756)".
Confirming actionsAs described in the previous section, you can use -WhatIf to prototype a cmdlet in Windows Power Shell. This is useful for finding out what a cmdlet would do; however, if you want to be prompted before the execution of the cmdlet, you can use the -Confirm parameter.
From the Library of Todd Schultz
ptg21174253
8 Windows PowerShell Step by Step, Third Edition
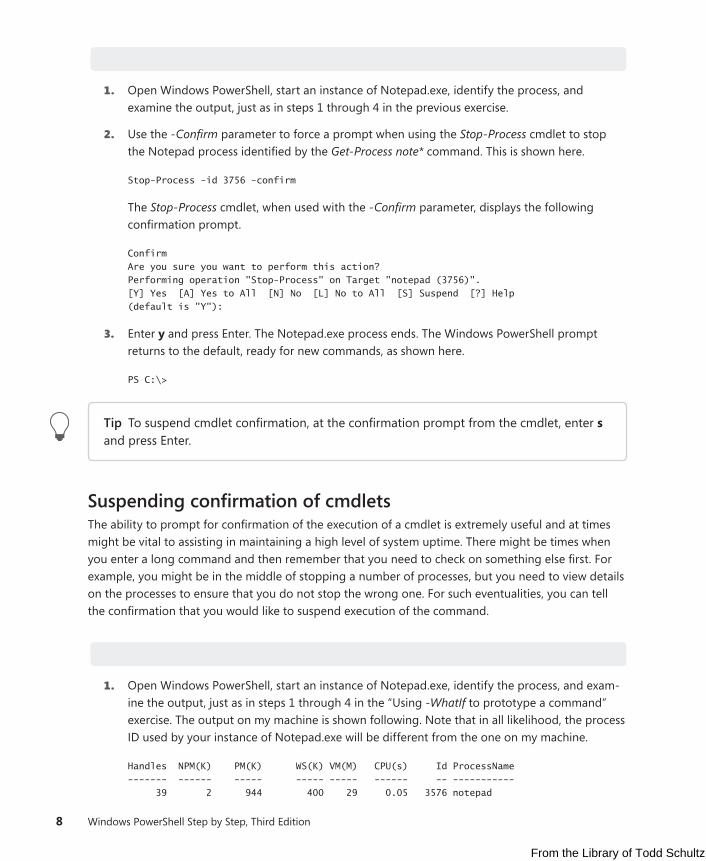
Confirming the execution of cmdlets
1. Open Windows PowerShell, start an instance of Notepad.exe, identify the process, and examine the output, just as in steps 1 through 4 in the previous exercise.
2. Use the -Confirm parameter to force a prompt when using the Stop-Process cmdlet to stop the Notepad process identified by the Get-Process note* command. This is shown here.
Stop-Process -id 3756 -confirm
The Stop-Process cmdlet, when used with the -Confirm parameter, displays the following confirmation prompt.
Confirm Are you sure you want to perform this action? Performing operation "Stop-Process" on Target "notepad (3756)". [Y] Yes [A] Yes to All [N] No [L] No to All [S] Suspend [?] Help (default is "Y"):
3. Enter y and press Enter. The Notepad.exe process ends. The Windows PowerShell prompt returns to the default, ready for new commands, as shown here.
PS C:\>
Tip To suspend cmdlet confirmation, at the confirmation prompt from the cmdlet, enter s and press Enter.
Suspending confirmation of cmdletsThe ability to prompt for confirmation of the execution of a cmdlet is extremely useful and at times might be vital to assisting in maintaining a high level of system uptime. There might be times when you enter a long command and then remember that you need to check on something else first. For example, you might be in the middle of stopping a number of processes, but you need to view details on the processes to ensure that you do not stop the wrong one. For such eventualities, you can tell the confirmation that you would like to suspend execution of the command.
Suspending execution of a cmdlet
1. Open Windows PowerShell, start an instance of Notepad.exe, identify the process, and exam-ine the output, just as in steps 1 through 4 in the “Using -WhatIf to prototype a command” exercise. The output on my machine is shown following. Note that in all likelihood, the process ID used by your instance of Notepad.exe will be different from the one on my machine.
Handles NPM(K) PM(K) WS(K) VM(M) CPU(s) Id ProcessName ------- ------ ----- ----- ----- ------ -- ----------- 39 2 944 400 29 0.05 3576 notepad
From the Library of Todd Schultz

ptg21174253
CHAPTER 1 Overview of Windows PowerShell 5.0 9
2. Use the -Confirm parameter to force a prompt when using the Stop-Process cmdlet to stop the Notepad process identified by the Get-Process note* command. This is illustrated here.
Stop-Process -id 3576 -confirm
The Stop-Process cmdlet, when used with the -Confirm parameter, displays the following confirmation prompt.
Confirm Are you sure you want to perform this action? Performing operation "Stop-Process" on Target "notepad (3576)". [Y] Yes [A] Yes to All [N] No [L] No to All [S] Suspend [?] Help (default is "Y"):
3. To suspend execution of the Stop-Process cmdlet, enter s. and then a double-arrow prompt appears, as follows.
PS C:\>>
4. Use the Get-Process cmdlet to obtain a list of all the running processes that begin with the letter n. The syntax is as follows.
Get-Process n*
On my machine, two processes appear, the Notepad process I launched earlier and another process. This is shown here.
Handles NPM(K) PM(K) WS(K) VM(M) CPU(s) Id ProcessName ------- ------ ----- ----- ----- ------ -- ----------- 269 168 4076 2332 ...98 0.19 1632 NisSrv 114 8 1536 8732 ...54 0.02 3576 notepad
5. Return to the previous confirmation prompt by entering exit.
Again, the confirmation prompt appears as follows.
Confirm Are you sure you want to perform this action? Performing operation "Stop-Process" on Target "notepad (3576)". [Y] Yes [A] Yes to All [N] No [L] No to All [S] Suspend [?] Help (default is "Y"):
6. Enter y and press Enter to stop the Notepad process. There is no further confirmation. The prompt now displays the default Windows PowerShell prompt, as shown here.
PS C:\>
From the Library of Todd Schultz
ptg21174253
10 Windows PowerShell Step by Step, Third Edition
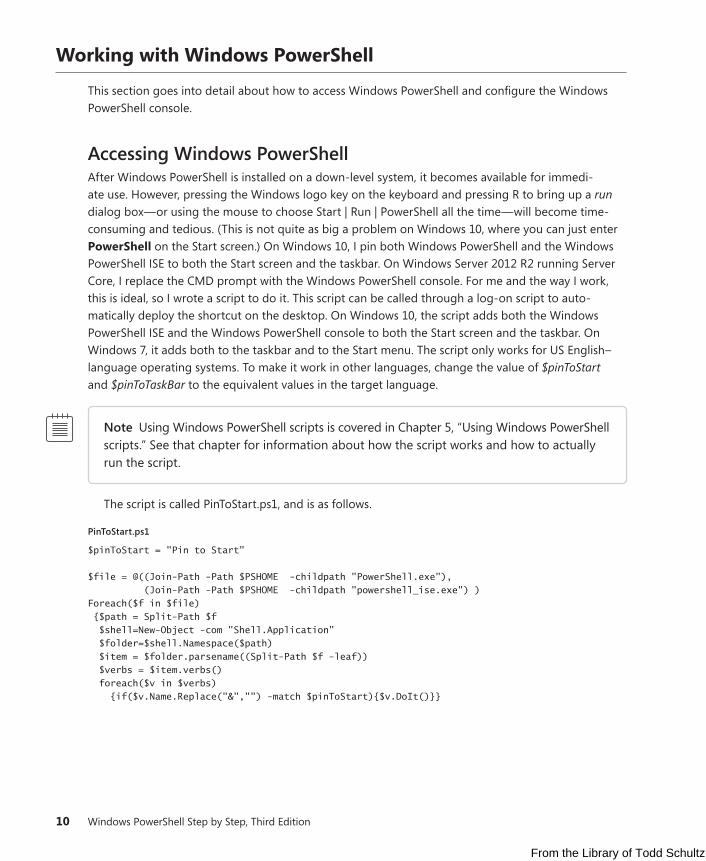
Working with Windows PowerShell
This section goes into detail about how to access Windows PowerShell and configure the Windows PowerShell console.
Accessing Windows PowerShellAfter Windows PowerShell is installed on a down-level system, it becomes available for immedi-ate use. However, pressing the Windows logo key on the keyboard and pressing R to bring up a run dialog box—or using the mouse to choose Start | Run | PowerShell all the time—will become time-consuming and tedious. (This is not quite as big a problem on Windows 10, where you can just enter PowerShell on the Start screen.) On Windows 10, I pin both Windows PowerShell and the Windows PowerShell ISE to both the Start screen and the taskbar. On Windows Server 2012 R2 running Server Core, I replace the CMD prompt with the Windows PowerShell console. For me and the way I work, this is ideal, so I wrote a script to do it. This script can be called through a log-on script to auto-matically deploy the shortcut on the desktop. On Windows 10, the script adds both the Windows PowerShell ISE and the Windows PowerShell console to both the Start screen and the taskbar. On Windows 7, it adds both to the taskbar and to the Start menu. The script only works for US English–language operating systems. To make it work in other languages, change the value of $pinToStart and $pinToTaskBar to the equivalent values in the target language.
Note Using Windows PowerShell scripts is covered in Chapter 5, “Using Windows PowerShell scripts.” See that chapter for information about how the script works and how to actually run the script.
The script is called PinToStart.ps1, and is as follows.
PinToStart.ps1
$pinToStart = "Pin to Start" $file = @((Join-Path -Path $PSHOME -childpath "PowerShell.exe"), (Join-Path -Path $PSHOME -childpath "powershell_ise.exe") ) Foreach($f in $file) {$path = Split-Path $f $shell=New-Object -com "Shell.Application" $folder=$shell.Namespace($path) $item = $folder.parsename((Split-Path $f -leaf)) $verbs = $item.verbs() foreach($v in $verbs) {if($v.Name.Replace("&","") -match $pinToStart){$v.DoIt()}}
From the Library of Todd Schultz

ptg21174253
CHAPTER 1 Overview of Windows PowerShell 5.0 11
Configuring the Windows PowerShell consoleMany items can be configured for Windows PowerShell. These items can be stored in a PSConsole file. To export the console configuration file, use the Export-Console cmdlet, as shown here.
PS C:\> Export-Console myconsole
The PSConsole file is saved in the current directory by default and has an extension of .psc1. The PSConsole file is saved in XML format. A generic console file is shown here.
<?xml version="1.0" encoding="utf-8"?> <PSConsoleFile ConsoleSchemaVersion="1.0"> <PSVersion>5.0.10224.0</PSVersion> <PSSnapIns /> </PSConsoleFile>
Controlling Windows PowerShell launch options
1. Launch Windows PowerShell without the banner by using the -NoLogo argument. This is shown here.
PowerShell -nologo
2. Launch a specific version of Windows PowerShell by using the -Version argument. This is shown here.
PowerShell -version 3
3. Launch Windows PowerShell using a specific configuration file by specifying the -PSConsoleFile argument, as follows.
PowerShell -psconsolefile myconsole.psc1
4. Launch Windows PowerShell, execute a specific command, and then exit by using the -Command argument. The command itself must be prefixed by an ampersand (&) and enclosed in braces. This is shown here.
Powershell -command "& {Get-Process}"
Supplying options for cmdlets
One of the useful features of Windows PowerShell is the standardization of the syntax in working with cmdlets. This vastly simplifies the learning of Windows PowerShell and language constructs. Table 1-1 lists the common parameters. Keep in mind that some cmdlets cannot implement some of these parameters. However, if these parameters are used, they will be interpreted in the same manner for all cmdlets, because the Windows PowerShell engine itself interprets the parameters.
From the Library of Todd Schultz

ptg21174253
12 Windows PowerShell Step by Step, Third Edition
TABLE 1-1 Common parameters
Parameter Meaning
-WhatIf Tells the cmdlet to not execute, but to tell you what would happen if the cmdlet were to run.
-Confirm Tells the cmdlet to prompt before executing the command.
-Verbose Instructs the cmdlet to provide a higher level of detail than a cmdlet not using the verbose parameter.
-Debug Instructs the cmdlet to provide debugging information.
-ErrorAction Instructs the cmdlet to perform a certain action when an error occurs. Allowed actions are Continue, Ignore, Inquire, SilentlyContinue, Stop, and Suspend.
-ErrorVariable Instructs the cmdlet to use a specific variable to hold error information. This is in addition to the standard $Error variable.
-OutVariable Instructs the cmdlet to use a specific variable to hold the output information.
-OutBuffer Instructs the cmdlet to hold a certain number of objects before calling the next cmdlet in the pipeline.
Note To get help on any cmdlet, use the Get-Help <cmdletname> cmdlet. For example, use Get-Help Get-Process to obtain help with using the Get-Process cmdlet.
Working with the help options
One of the first commands to run when you are opening Windows PowerShell for the first time is the Update-Help cmdlet. This is because Windows PowerShell does not include help files with the product, as of Windows PowerShell version 3. This does not mean that no help presents itself—it does mean that help beyond simple syntax display requires an additional download.
A default installation of Windows PowerShell 5.0 contains numerous modules that vary from installation to installation, depending upon the operating system features and roles selected. In fact, Windows PowerShell 5.0 installed on Windows 7 workstations contains far fewer modules and cmdlets than are available on a similar Windows 10 workstation. This does not mean that all is chaos, however, because the essential Windows PowerShell cmdlets—the core cmdlets—remain unchanged from installation to installation. The difference between installations is because additional features and roles often install additional Windows PowerShell modules and cmdlets.
The modular nature of Windows PowerShell requires additional consideration when you are updating help. Simply running Update-Help does not update all of the modules loaded on a particu-lar system. In fact, some modules might not support updatable help at all—these generate an error when you attempt to update help. The easiest way to ensure that you update all possible help is to use both the -Module parameter and the -Force switch parameter. The command to update help for all installed modules (those that support updatable help) is shown here.
Update-Help -Module * -Force
From the Library of Todd Schultz

ptg21174253
CHAPTER 1 Overview of Windows PowerShell 5.0 13
The result of running the Update-Help cmdlet on a typical Windows 10 client system is shown in Figure 1-1.
FIGURE 1-1 Errors appear when you attempt to update help files that do not support updatable help.
One way to update help and not receive a screen full of error messages is to run the Update-Help cmdlet and suppress the errors altogether. This technique is shown here.
Update-Help -Module * -Force -ea 0
The problem with this approach is that you can never be certain that you have actually received updated help for everything you wanted to update. A better approach is to hide the errors during the update process, but also to display errors after the update completes. The advantage to this approach is the ability to display cleaner errors. The UpdateHelpTrackErrors.ps1 script illustrates this technique. The first thing the UpdateHelpTrackErrors.ps1 script does is empty the error stack by calling the clear method. Next, it calls the Update-Help module with both the -Module parameter and the -Force switch parameter. In addition, it uses the -ErrorAction parameter (ea is an alias for this parameter) with a value of 0 (zero). A 0 value means that errors will not be displayed when the command runs. The script concludes by using a For loop to walk through the errors and by displaying the error exceptions. The complete UpdateHelpTrackErrors.ps1 script is shown here.
UpdateHelpTrackErrors.ps1
$error.Clear() Update-Help -Module * -Force -ea 0 For ($i = 0 ; $i -lt $error.Count ; $i ++) { "`nerror $i" ; $error[$i].exception }
From the Library of Todd Schultz

ptg21174253
14 Windows PowerShell Step by Step, Third Edition
Note For information about writing Windows PowerShell scripts and about using the For loop, see Chapter 5.
When the UpdateHelpTrackErrors script runs, a progress bar is shown, indicating the progress as the updatable help files update. When the script is finished, any errors appear in order. The script and associated errors are shown in Figure 1-2.
FIGURE 1-2 Cleaner error output from updatable help is generated by the UpdateHelpTrackErrors script.
You can also determine which modules receive updated help by running the Update-Help cmdlet with the -Verbose switch parameter. Unfortunately, when you do this, the output scrolls by so fast that it is hard to see what has actually updated. To solve this problem, redirect the verbose output to a text file. In the command that follows, all modules attempt to update help. The verbose messages redirect to a text file named updatedhelp.txt in a folder named fso off the root.
Update-Help -module * -force -verbose 4>>c:\fso\updatedhelp.txt
Windows PowerShell has a high level of discoverability; that is, to learn how to use Windows PowerShell, you can simply use Windows PowerShell. Online help serves an important role in assisting in this discoverability. The help system in Windows PowerShell can be entered by several methods.
From the Library of Todd Schultz
ptg21174253
CHAPTER 1 Overview of Windows PowerShell 5.0 15
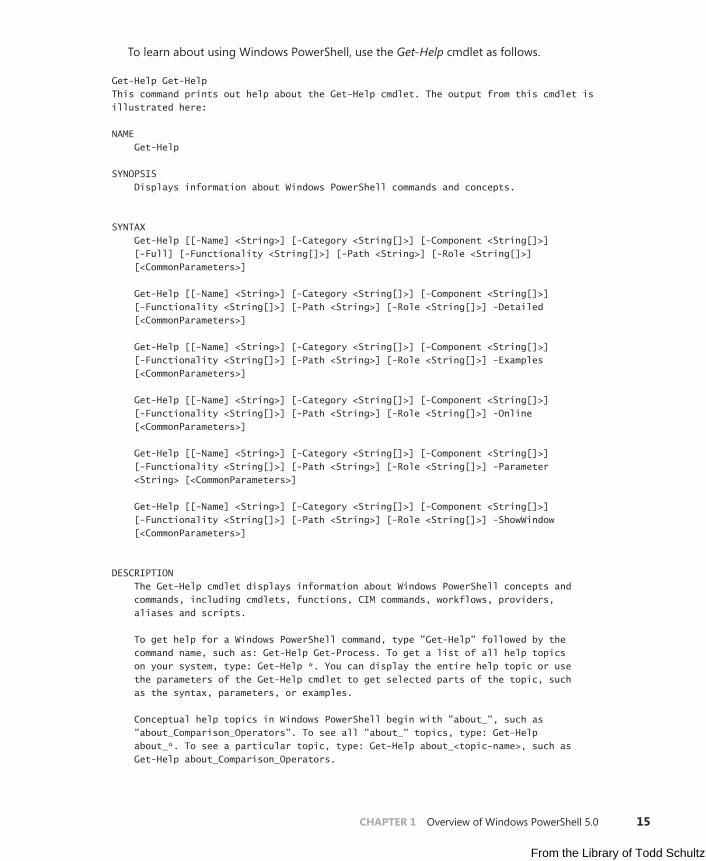
To learn about using Windows PowerShell, use the Get-Help cmdlet as follows.
Get-Help Get-Help This command prints out help about the Get-Help cmdlet. The output from this cmdlet is illustrated here: NAME Get-Help SYNOPSIS Displays information about Windows PowerShell commands and concepts. SYNTAX Get-Help [[-Name] <String>] [-Category <String[]>] [-Component <String[]>] [-Full] [-Functionality <String[]>] [-Path <String>] [-Role <String[]>] [<CommonParameters>] Get-Help [[-Name] <String>] [-Category <String[]>] [-Component <String[]>] [-Functionality <String[]>] [-Path <String>] [-Role <String[]>] -Detailed [<CommonParameters>] Get-Help [[-Name] <String>] [-Category <String[]>] [-Component <String[]>] [-Functionality <String[]>] [-Path <String>] [-Role <String[]>] -Examples [<CommonParameters>] Get-Help [[-Name] <String>] [-Category <String[]>] [-Component <String[]>] [-Functionality <String[]>] [-Path <String>] [-Role <String[]>] -Online [<CommonParameters>] Get-Help [[-Name] <String>] [-Category <String[]>] [-Component <String[]>] [-Functionality <String[]>] [-Path <String>] [-Role <String[]>] -Parameter <String> [<CommonParameters>] Get-Help [[-Name] <String>] [-Category <String[]>] [-Component <String[]>] [-Functionality <String[]>] [-Path <String>] [-Role <String[]>] -ShowWindow [<CommonParameters>] DESCRIPTION The Get-Help cmdlet displays information about Windows PowerShell concepts and commands, including cmdlets, functions, CIM commands, workflows, providers, aliases and scripts. To get help for a Windows PowerShell command, type "Get-Help" followed by the command name, such as: Get-Help Get-Process. To get a list of all help topics on your system, type: Get-Help *. You can display the entire help topic or use the parameters of the Get-Help cmdlet to get selected parts of the topic, such as the syntax, parameters, or examples. Conceptual help topics in Windows PowerShell begin with "about_", such as "about_Comparison_Operators". To see all "about_" topics, type: Get-Help about_*. To see a particular topic, type: Get-Help about_<topic-name>, such as Get-Help about_Comparison_Operators.
From the Library of Todd Schultz
ptg21174253
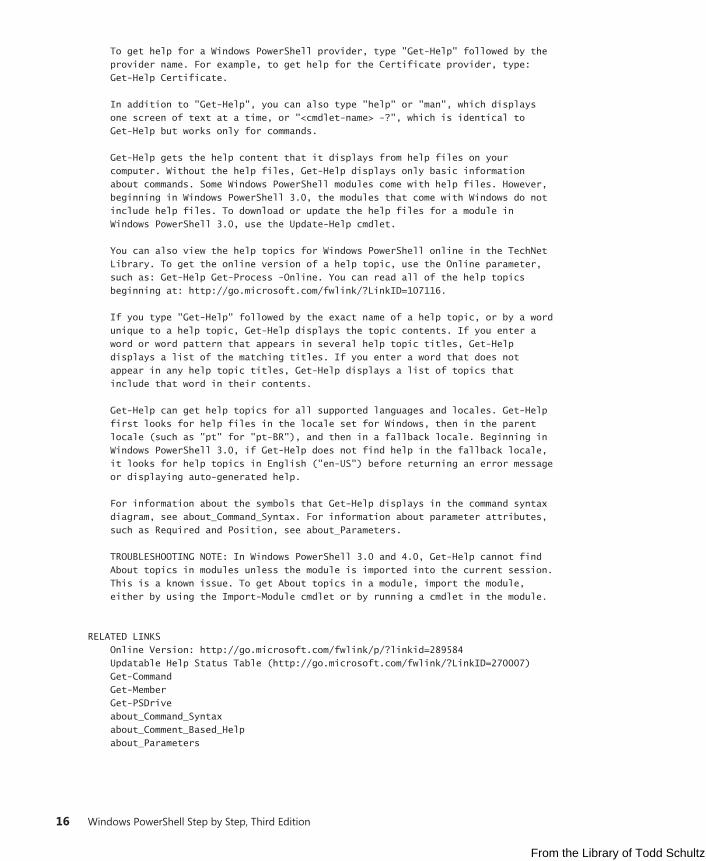
16 Windows PowerShell Step by Step, Third Edition
To get help for a Windows PowerShell provider, type "Get-Help" followed by the provider name. For example, to get help for the Certificate provider, type: Get-Help Certificate. In addition to "Get-Help", you can also type "help" or "man", which displays one screen of text at a time, or "<cmdlet-name> -?", which is identical to Get-Help but works only for commands. Get-Help gets the help content that it displays from help files on your computer. Without the help files, Get-Help displays only basic information about commands. Some Windows PowerShell modules come with help files. However, beginning in Windows PowerShell 3.0, the modules that come with Windows do not include help files. To download or update the help files for a module in Windows PowerShell 3.0, use the Update-Help cmdlet. You can also view the help topics for Windows PowerShell online in the TechNet Library. To get the online version of a help topic, use the Online parameter, such as: Get-Help Get-Process -Online. You can read all of the help topics beginning at: http://go.microsoft.com/fwlink/?LinkID=107116. If you type "Get-Help" followed by the exact name of a help topic, or by a word unique to a help topic, Get-Help displays the topic contents. If you enter a word or word pattern that appears in several help topic titles, Get-Help displays a list of the matching titles. If you enter a word that does not appear in any help topic titles, Get-Help displays a list of topics that include that word in their contents. Get-Help can get help topics for all supported languages and locales. Get-Help first looks for help files in the locale set for Windows, then in the parent locale (such as "pt" for "pt-BR"), and then in a fallback locale. Beginning in Windows PowerShell 3.0, if Get-Help does not find help in the fallback locale, it looks for help topics in English ("en-US") before returning an error message or displaying auto-generated help. For information about the symbols that Get-Help displays in the command syntax diagram, see about_Command_Syntax. For information about parameter attributes, such as Required and Position, see about_Parameters. TROUBLESHOOTING NOTE: In Windows PowerShell 3.0 and 4.0, Get-Help cannot find About topics in modules unless the module is imported into the current session. This is a known issue. To get About topics in a module, import the module, either by using the Import-Module cmdlet or by running a cmdlet in the module. RELATED LINKS Online Version: http://go.microsoft.com/fwlink/p/?linkid=289584 Updatable Help Status Table (http://go.microsoft.com/fwlink/?LinkID=270007) Get-Command Get-Member Get-PSDrive about_Command_Syntax about_Comment_Based_Help about_Parameters
From the Library of Todd Schultz

ptg21174253
CHAPTER 1 Overview of Windows PowerShell 5.0 17
REMARKS To see the examples, type: "get-help Get-Help -examples". For more information, type: "get-help Get-Help -detailed". For technical information, type: "get-help Get-Help -full". For online help, type: "get-help Get-Help -online"
The good thing about help with Windows PowerShell is that it not only displays help about cmdlets, which you would expect, but it also has three levels of display: normal, detailed, and full. Additionally, you can obtain help about concepts in Windows PowerShell. This last feature is equivalent to having an online instruction manual. To retrieve a listing of all the conceptual help articles, use the Get-Help about* command, as follows.
Get-Help about*
Suppose you do not remember the exact name of the cmdlet you want to use, but you remember it was a get cmdlet. You can use a wildcard, such as an asterisk (*), to obtain the name of the cmdlet. This is shown here.
Get-Help get*
This technique of using a wildcard operator can be extended further. If you remember that the cmdlet was a get cmdlet, and that it started with the letter p, you can use the following syntax to retrieve the cmdlet you’re looking for.
Get-Help get-p*
Suppose, however, that you know the exact name of the cmdlet, but you cannot exactly remember the syntax. For this scenario, you can use the -Examples switch parameter. For example, for the Get-PSDrive cmdlet, you would use Get-Help with the -Examples switch parameter, as follows.
Get-Help Get-PSDrive -examples
To view help displayed one page at a time, you can use the Help function. The Help function passes your input to the Get-Help cmdlet, and pipelines the resulting information to the more.com utility. This causes output to display one page at a time in the Windows PowerShell console. This is useful if you want to avoid scrolling up and down to view the help output.
Note Keep in mind that in the Windows PowerShell ISE, the pager does not work, and therefore you will find no difference in output between Get-Help and Help. In the ISE, both Get-Help and Help behave the same way. However, it is likely that if you are using the Windows PowerShell ISE, you will use Show-Command for your help instead of relying on Get-Help.
This formatted output is shown in Figure 1-3.
From the Library of Todd Schultz

ptg21174253
18 Windows PowerShell Step by Step, Third Edition
FIGURE 1-3 Use Help to display information one page at a time.
Getting tired of typing Get-Help all the time? After all, it is eight characters long. The solution is to create an alias to the Get-Help cmdlet. An alias is a shortcut keystroke combination that will launch a program or cmdlet when entered. In the “Creating an alias for the Get-Help cmdlet” procedure, you will assign the Get-Help cmdlet to the G+H key combination.
Note When creating an alias for a cmdlet, confirm that it does not already have an alias by using Get-Alias. Use New-Alias to assign the cmdlet to a unique keystroke combination.
Creating an alias for the Get-Help cmdlet
1. Open Windows PowerShell by choosing Start | Run | PowerShell. The Windows PowerShell prompt opens by default at the root of your user folder.
2. Retrieve an alphabetic listing of all currently defined aliases, and inspect the list for one assigned to either the Get-Help cmdlet or the keystroke combination G+H. The command to do this is as follows.
Get-Alias | sort
From the Library of Todd Schultz

ptg21174253
CHAPTER 1 Overview of Windows PowerShell 5.0 19
3. After you have determined that there is no alias for the Get-Help cmdlet and that none is assigned to the G+H keystroke combination, review the syntax for the New-Alias cmdlet. Use the -Full switch parameter to the Get-Help cmdlet. This is shown here.
Get-Help New-Alias -full
4. Use the New-Alias cmdlet to assign the G+H keystroke combination to the Get-Help cmdlet. To do this, use the following command.
New-Alias gh Get-Help
Exploring commands: Step-by-step exercises
In the following exercises, you’ll explore the use of command-line utilities in Windows PowerShell. You will find that it is as easy to use command-line utilities in Windows PowerShell as in the CMD inter-preter; however, by using such commands in Windows PowerShell, you gain access to new levels of functionality.
Using command-line utilities
1. Open Windows PowerShell by choosing Start | Run | PowerShell. The Windows PowerShell prompt opens by default at the root of your user folder.
2. Change to the root of C:\ by entering cd c:\ inside the Windows PowerShell prompt.
cd c:\
3. Obtain a listing of all the files in the root of C:\ by using the dir command.
dir
4. Create a directory off the root of C:\ by using the md command.
md mytest
5. Obtain a listing of all files and folders off the root that begin with the letter m.
dir m*
6. Change the working directory to the Windows PowerShell working directory. You can do this by using the Set-Location command, as follows.
Set-Location $pshome
From the Library of Todd Schultz
ptg21174253
20 Windows PowerShell Step by Step, Third Edition
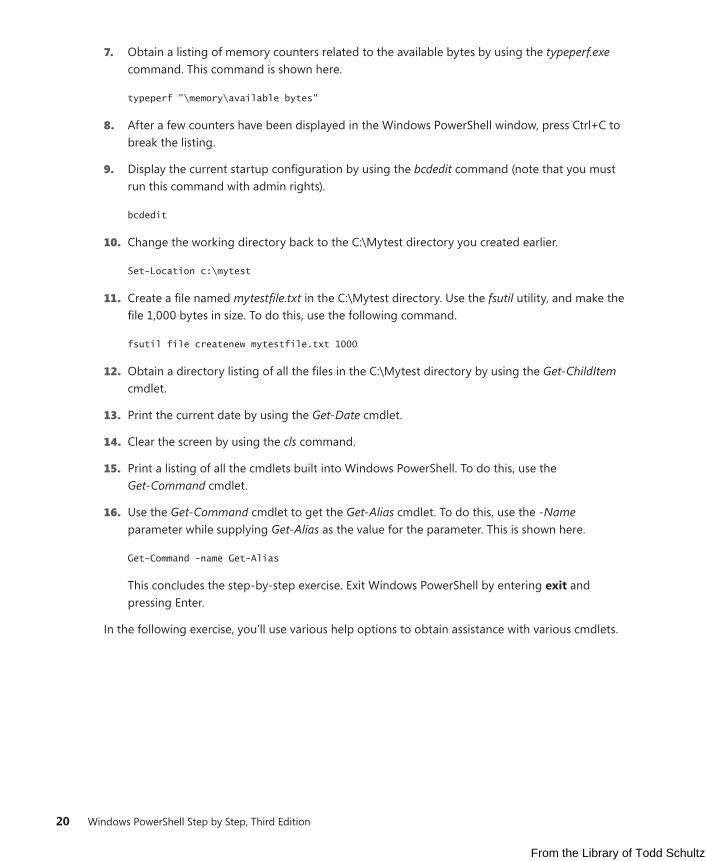
7. Obtain a listing of memory counters related to the available bytes by using the typeperf.exe command. This command is shown here.
typeperf "\memory\available bytes"
8. After a few counters have been displayed in the Windows PowerShell window, press Ctrl+C to break the listing.
9. Display the current startup configuration by using the bcdedit command (note that you must run this command with admin rights).
bcdedit
10. Change the working directory back to the C:\Mytest directory you created earlier.
Set-Location c:\mytest
11. Create a file named mytestfile.txt in the C:\Mytest directory. Use the fsutil utility, and make the file 1,000 bytes in size. To do this, use the following command.
fsutil file createnew mytestfile.txt 1000
12. Obtain a directory listing of all the files in the C:\Mytest directory by using the Get-ChildItem cmdlet.
13. Print the current date by using the Get-Date cmdlet.
14. Clear the screen by using the cls command.
15. Print a listing of all the cmdlets built into Windows PowerShell. To do this, use the Get-Command cmdlet.
16. Use the Get-Command cmdlet to get the Get-Alias cmdlet. To do this, use the -Name parameter while supplying Get-Alias as the value for the parameter. This is shown here.
Get-Command -name Get-Alias
This concludes the step-by-step exercise. Exit Windows PowerShell by entering exit and pressing Enter.
In the following exercise, you’ll use various help options to obtain assistance with various cmdlets.
From the Library of Todd Schultz
ptg21174253
CHAPTER 1 Overview of Windows PowerShell 5.0 21
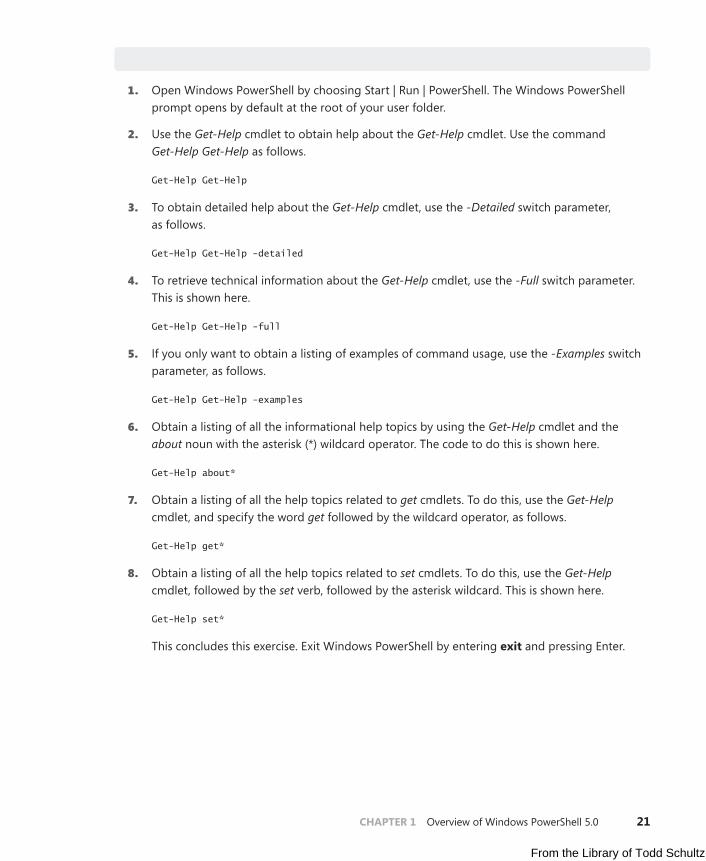
Obtaining help
1. Open Windows PowerShell by choosing Start | Run | PowerShell. The Windows PowerShell prompt opens by default at the root of your user folder.
2. Use the Get-Help cmdlet to obtain help about the Get-Help cmdlet. Use the command Get-Help Get-Help as follows.
Get-Help Get-Help
3. To obtain detailed help about the Get-Help cmdlet, use the -Detailed switch parameter, as follows.
Get-Help Get-Help -detailed
4. To retrieve technical information about the Get-Help cmdlet, use the -Full switch parameter. This is shown here.
Get-Help Get-Help -full
5. If you only want to obtain a listing of examples of command usage, use the -Examples switch parameter, as follows.
Get-Help Get-Help -examples
6. Obtain a listing of all the informational help topics by using the Get-Help cmdlet and the about noun with the asterisk (*) wildcard operator. The code to do this is shown here.
Get-Help about*
7. Obtain a listing of all the help topics related to get cmdlets. To do this, use the Get-Help cmdlet, and specify the word get followed by the wildcard operator, as follows.
Get-Help get*
8. Obtain a listing of all the help topics related to set cmdlets. To do this, use the Get-Help cmdlet, followed by the set verb, followed by the asterisk wildcard. This is shown here.
Get-Help set*
This concludes this exercise. Exit Windows PowerShell by entering exit and pressing Enter.
From the Library of Todd Schultz

ptg21174253
22 Windows PowerShell Step by Step, Third Edition
Chapter 1 quick reference
To Do this
Use an external command-line utility Enter the name of the command-line utility while inside Windows PowerShell.
Use multiple external command-line utilities sequentially
Separate each command-line utility with a semicolon on a single Windows PowerShell line.
Obtain a list of running processes Use the Get-Process cmdlet.
Stop a process Use the Stop-Process cmdlet and specify either the name or the process ID parameter.
Model the effect of a cmdlet before actually performing the requested action
Use the -WhatIf switch parameter.
Instruct Windows PowerShell to start up, run a cmdlet, and then exit
Use the PowerShell command while prefixing the cmdlet with & and enclosing the name of the cmdlet in braces.
Prompt for confirmation before stopping a process
Use the Stop-Process cmdlet while specifying the -Confirm parameter.
From the Library of Todd Schultz