Embed Size (px)
Citation preview
To build anything, large or small, using the right tools makes ahuge improvement in the quality of the finished product. The
right tools will also speed up the process of building, minimizewasted materials, and reduce operator fatigue and stress. Soundspretty important to have the right tools, doesn’t it? You’re right!This chapter shows you which, out of the zillions of tools, are theones to use for building electronic circuits.
Basic Tools for BuildingCircuits
You’ll be pleasantly surprised to find that you don’t need a giant set of fancy tools todo excellent work! In fact, you may have most of them already and a couple of addi-tional acquisitions are all that’s needed.
Mechanically speaking, you’ll need squeezers, cutters, turners, pokers, holders, andhole makers. That’s pretty simple, isn’t it? Of course, there is an incredible variety ofavailable tools. I’ll list the basic items you really need, ways to upgrade them, andsome optional tools that are handy but not necessities. Then you go shopping!
Buy the best tools you can afford — always! Then take care of them — always! Withcare, tools will last a literal lifetime. The author’s toolbox has perfectly functionaland often-used tools that are 40 years old or more. Avoid bargain-bucket and no-name tools. An all-in-one tool is handy at times, but is no match for a single-purposetool. Buy from a store with a no-questions-asked return policy that stands behindtheir tools.
The selection of tools listed in this section has been made with electronics in mind,not robot assembly, plumbing installation, or home wiring. Tools for those jobs areoften inappropriate for the smaller scale of electronics. Conversely, electronic toolsare often overmatched for beefier work. There is no one-size-fits-all tool selection!
Chapter 1
The ToolboxTasks Performed inThis Chapter
� Basic tools for electronic construction
� The solderlessbreadboard
� Keeping a notebook
� Software tools and utilities
05_173428 ch01.qxp 1/18/08 8:40 PM Page 7
COPYRIG
HTED M
ATERIAL
8 Part I: Working Basics for Electronic-ers
The Klein Company has specialized in tools for electrical and electronic work fordecades. They have an excellent selection of tools designed for every possible use at the electronics workbench. Their online catalog (www.kleintools.com/ToolCatalog/index.html) is a great reference. Klein is my favorite, but there aremany other fine tool companies. Ace Hardware has a comprehensive introduction tomany common types of tools on their Web site at www.acehardware.com. ClickProjects➪Solutions➪Learning Guides to access the directory of informative pages.
Safety and visibilityBefore you head off to the hardware store with a big list, be sure that right at the topyou include some basic safety equipment — goggles (or safety glasses), workspaceventilation (for soldering smoke or solvent fumes), and first aid. Electronics maysound tame, but the first time you snip a wire and hear the sharp end “ping” off yoursafety glasses or take them off and find a small solder “splat” right in front of youreye, you’ll be glad you had them on!
It sounds trite, but you really do need to be able to see what you’re doing! There aretwo paths to seeing your electronics clearly; lighting and magnification. Your work-space simply has to be brightly lit, preferably from more than one angle to minimizeshadows. Inexpensive swing-arm laps with floodlight bulbs are good choicesbecause they can be moved to put light where you need it.
Head-mounted magnifiers are inexpensive and lightweight. The Carson MV-23 dual-power magnifier (www.carsonoptical.com/Magnifiers/Hands%20Free) iswidely available and provides both x2 and x3 magnification. Swing-arm magnifiers,such as the Alvin ML100 (www.alvinco.com), can be positioned in front of yourface and provide additional illumination, too. Magnifiers are often found at craft andsewing stores for considerably less cost than at office or technical-supply stores.
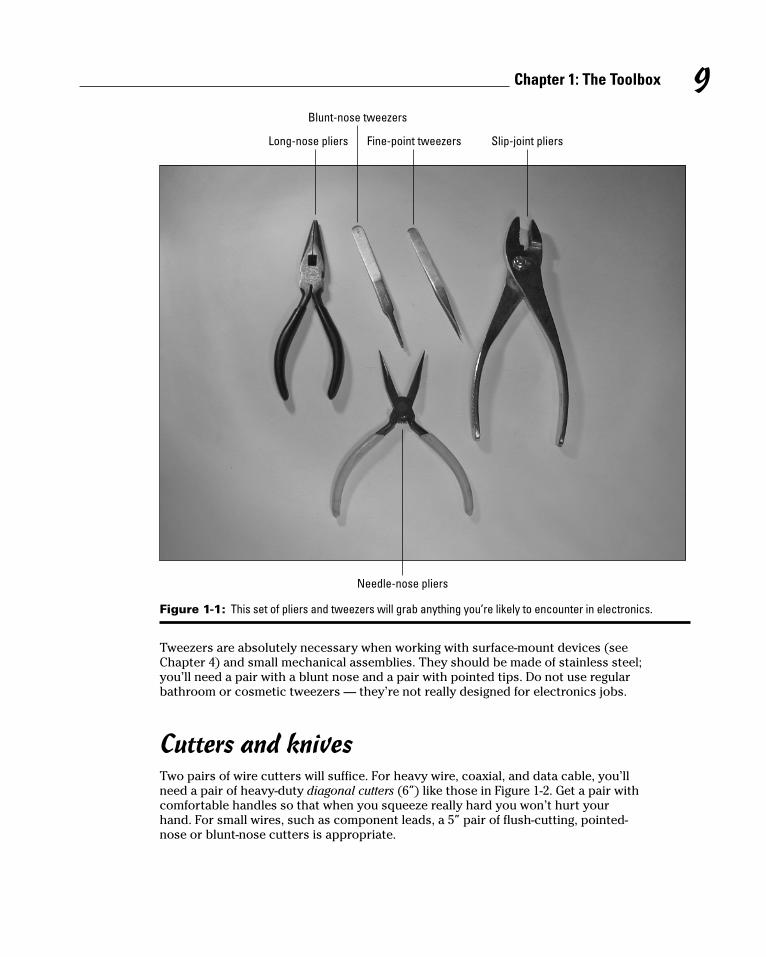
Pliers and tweezersIn the “squeezer” category are pliers and tweezers. The largest electronic thing youare likely to have to grab with pliers is a half-inch nut; the smallest will be tiny setscrews. Pliers and tweezers that fit things in that range are good to have in yourtoolkit. Figure 1-1 shows a few examples of the pliers and tweezers that I use a lot.
The most common type of pliers are slip-joint pliers (8”) which have jaws that can beadjusted to grip large or small things. A small pair of locking pliers (6”) (optional) —also known as Vise-Grips™, come in very handy when working with connectors andcan be used as an impromptu clamp or vise.
Needle-nose pliers (a generic term that covers many different styles of pliers) withserrated jaws are a necessity. You’ll need a heavy pair of combination long-nosepliers (8”–9”, with or without a side cutter) for bending and holding. Smaller needle-nose pliers (5”–6”) will be used for positioning and holding delicate components.Additional pliers with extra-fine jaws (or bent-nose pliers) are nice to have in thetoolbox, but not required.
05_173428 ch01.qxp 1/18/08 8:40 PM Page 8
9Chapter 1: The Toolbox
Figure 1-1: This set of pliers and tweezers will grab anything you’re likely to encounter in electronics.
Tweezers are absolutely necessary when working with surface-mount devices (seeChapter 4) and small mechanical assemblies. They should be made of stainless steel;you’ll need a pair with a blunt nose and a pair with pointed tips. Do not use regularbathroom or cosmetic tweezers — they’re not really designed for electronics jobs.
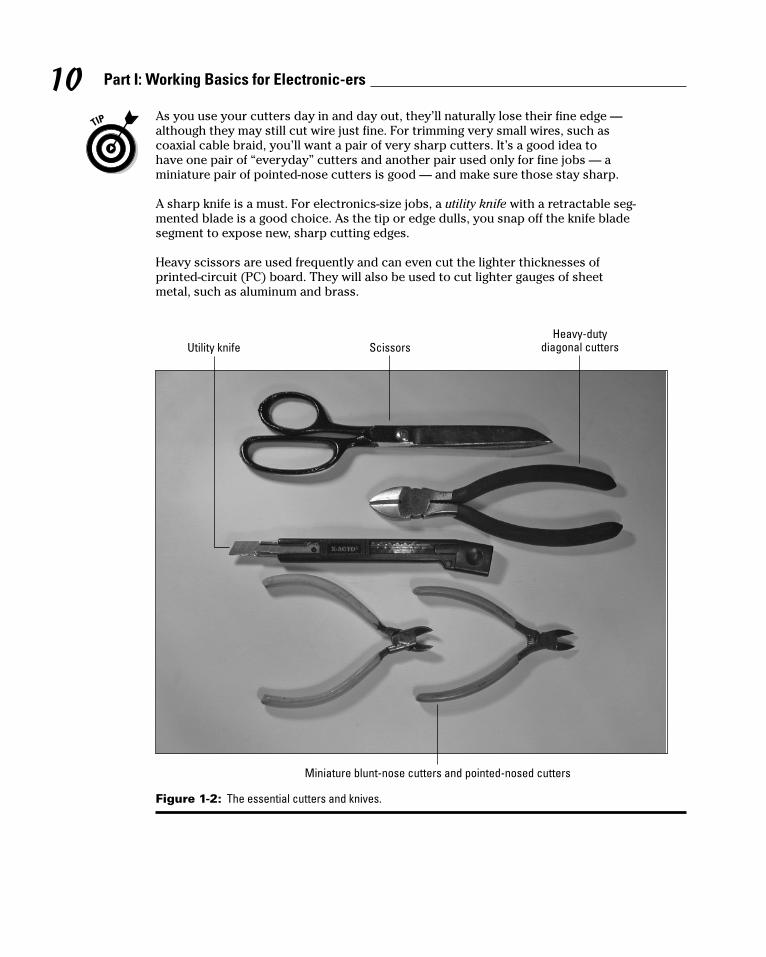
Cutters and knivesTwo pairs of wire cutters will suffice. For heavy wire, coaxial, and data cable, you’llneed a pair of heavy-duty diagonal cutters (6”) like those in Figure 1-2. Get a pair withcomfortable handles so that when you squeeze really hard you won’t hurt yourhand. For small wires, such as component leads, a 5” pair of flush-cutting, pointed-nose or blunt-nose cutters is appropriate.
Long-nose pliers
Needle-nose pliers
Fine-point tweezers
Blunt-nose tweezers
Slip-joint pliers
05_173428 ch01.qxp 1/18/08 8:40 PM Page 9
10 Part I: Working Basics for Electronic-ers
As you use your cutters day in and day out, they’ll naturally lose their fine edge —although they may still cut wire just fine. For trimming very small wires, such ascoaxial cable braid, you’ll want a pair of very sharp cutters. It’s a good idea to have one pair of “everyday” cutters and another pair used only for fine jobs — aminiature pair of pointed-nose cutters is good — and make sure those stay sharp.
A sharp knife is a must. For electronics-size jobs, a utility knife with a retractable seg-mented blade is a good choice. As the tip or edge dulls, you snap off the knife bladesegment to expose new, sharp cutting edges.
Heavy scissors are used frequently and can even cut the lighter thicknesses ofprinted-circuit (PC) board. They will also be used to cut lighter gauges of sheetmetal, such as aluminum and brass.
Figure 1-2: The essential cutters and knives.
ScissorsUtility knife
Miniature blunt-nose cutters and pointed-nosed cutters
Heavy-dutydiagonal cutters
05_173428 ch01.qxp 1/18/08 8:40 PM Page 10
11Chapter 1: The Toolbox
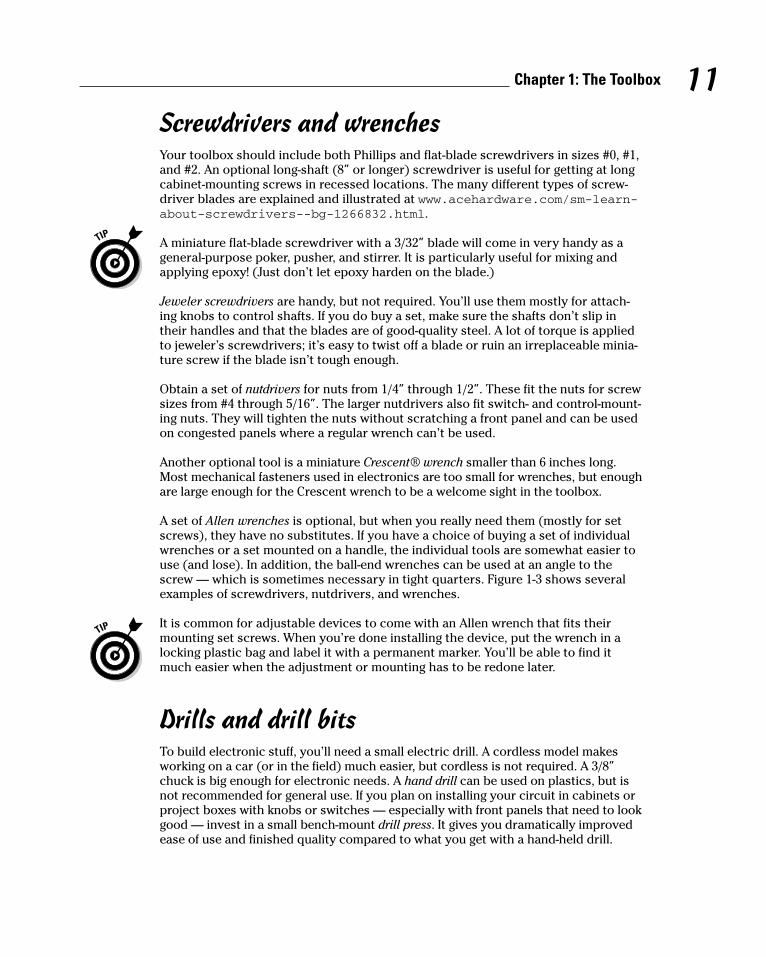
Screwdrivers and wrenchesYour toolbox should include both Phillips and flat-blade screwdrivers in sizes #0, #1,and #2. An optional long-shaft (8” or longer) screwdriver is useful for getting at longcabinet-mounting screws in recessed locations. The many different types of screw-driver blades are explained and illustrated at www.acehardware.com/sm-learn-about-screwdrivers--bg-1266832.html.
A miniature flat-blade screwdriver with a 3/32” blade will come in very handy as ageneral-purpose poker, pusher, and stirrer. It is particularly useful for mixing andapplying epoxy! (Just don’t let epoxy harden on the blade.)
Jeweler screwdrivers are handy, but not required. You’ll use them mostly for attach-ing knobs to control shafts. If you do buy a set, make sure the shafts don’t slip intheir handles and that the blades are of good-quality steel. A lot of torque is appliedto jeweler’s screwdrivers; it’s easy to twist off a blade or ruin an irreplaceable minia-ture screw if the blade isn’t tough enough.
Obtain a set of nutdrivers for nuts from 1/4” through 1/2”. These fit the nuts for screwsizes from #4 through 5/16”. The larger nutdrivers also fit switch- and control-mount-ing nuts. They will tighten the nuts without scratching a front panel and can be usedon congested panels where a regular wrench can’t be used.
Another optional tool is a miniature Crescent® wrench smaller than 6 inches long.Most mechanical fasteners used in electronics are too small for wrenches, but enoughare large enough for the Crescent wrench to be a welcome sight in the toolbox.
A set of Allen wrenches is optional, but when you really need them (mostly for setscrews), they have no substitutes. If you have a choice of buying a set of individualwrenches or a set mounted on a handle, the individual tools are somewhat easier touse (and lose). In addition, the ball-end wrenches can be used at an angle to thescrew — which is sometimes necessary in tight quarters. Figure 1-3 shows severalexamples of screwdrivers, nutdrivers, and wrenches.
It is common for adjustable devices to come with an Allen wrench that fits theirmounting set screws. When you’re done installing the device, put the wrench in alocking plastic bag and label it with a permanent marker. You’ll be able to find itmuch easier when the adjustment or mounting has to be redone later.
Drills and drill bits To build electronic stuff, you’ll need a small electric drill. A cordless model makesworking on a car (or in the field) much easier, but cordless is not required. A 3/8”chuck is big enough for electronic needs. A hand drill can be used on plastics, but isnot recommended for general use. If you plan on installing your circuit in cabinets orproject boxes with knobs or switches — especially with front panels that need to lookgood — invest in a small bench-mount drill press. It gives you dramatically improvedease of use and finished quality compared to what you get with a hand-held drill.
05_173428 ch01.qxp 1/18/08 8:40 PM Page 11
12 Part I: Working Basics for Electronic-ers
Figure 1-3: An assortment of screwdrivers is complemented by a set of nutdrivers. The miniature Crescentwrench and Allen wrenches round out the collection.
For delicate jobs, enlarging small holes, or just cleaning out a pre-drilled hole, areplacement drill chuck can make a fine hand-held holder for a drill bit. Themachined metal chuck fits well in the hand and works like a handle for the bit; itssize allows reasonable control of the bit.
You’ll need an assortment of drill bits from 1/16” to 3/8”. It’s not necessary to havedozens of sizes and standard twist bits will suffice. A complete discussion of drill bit types and applications is available on the Ace Hardware Web site (www.acehardware.com). Add an optional countersink bit to your collection of drilling toolsto smooth the edges of holes.
While drilling small panels and enclosures, you should use a vise. For temporary andportable use, purchase a small machinist’s vise or a small bench vise that clamps tothe work surface. Trying to hold the material being drilled by hand often results indamage to your enclosure or panel — and if the material is seized by the drill bit, youcan be injured. Examples of both can be viewed at www.lexic.us/definition-of/machinist’s_vise.
NutdriversMiniature
screwdrivers
Crescent wrench
Standardscrewdrivers
Set of Allen wrenches
05_173428 ch01.qxp 1/18/08 8:41 PM Page 12
13Chapter 1: The Toolbox
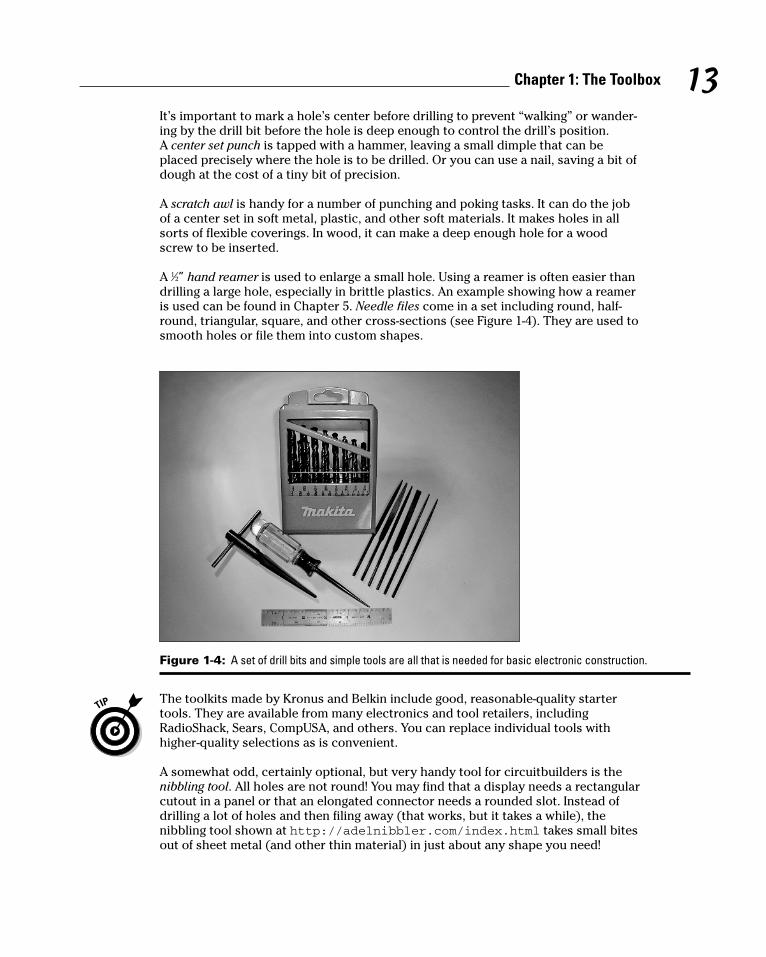
It’s important to mark a hole’s center before drilling to prevent “walking” or wander-ing by the drill bit before the hole is deep enough to control the drill’s position. A center set punch is tapped with a hammer, leaving a small dimple that can beplaced precisely where the hole is to be drilled. Or you can use a nail, saving a bit ofdough at the cost of a tiny bit of precision.
A scratch awl is handy for a number of punching and poking tasks. It can do the jobof a center set in soft metal, plastic, and other soft materials. It makes holes in allsorts of flexible coverings. In wood, it can make a deep enough hole for a woodscrew to be inserted.
A 1⁄2” hand reamer is used to enlarge a small hole. Using a reamer is often easier thandrilling a large hole, especially in brittle plastics. An example showing how a reameris used can be found in Chapter 5. Needle files come in a set including round, half-round, triangular, square, and other cross-sections (see Figure 1-4). They are used tosmooth holes or file them into custom shapes.
Figure 1-4: A set of drill bits and simple tools are all that is needed for basic electronic construction.
The toolkits made by Kronus and Belkin include good, reasonable-quality startertools. They are available from many electronics and tool retailers, includingRadioShack, Sears, CompUSA, and others. You can replace individual tools withhigher-quality selections as is convenient.
A somewhat odd, certainly optional, but very handy tool for circuitbuilders is thenibbling tool. All holes are not round! You may find that a display needs a rectangularcutout in a panel or that an elongated connector needs a rounded slot. Instead ofdrilling a lot of holes and then filing away (that works, but it takes a while), the nibbling tool shown at http://adelnibbler.com/index.html takes small bitesout of sheet metal (and other thin material) in just about any shape you need!
05_173428 ch01.qxp 1/18/08 8:41 PM Page 13
14 Part I: Working Basics for Electronic-ers
Special electronic toolsAs you put your circuitbuilding projects together, you’ll find that you need a few spe-cialized tools. You’ll need some kind of wire stripper to remove insulation. A numberof tools include wire-stripping capability, but they don’t work as well (or as conve-niently) as a tool made specifically for that purpose. The stripper should have indi-vidual positions for different sizes of wire, such as the Kronus 64-2980 available fromRadioShack (www.radioshack.com). An automatic stripper (Kronus 64-2981)doesn’t require pulling on the wire and is bulkier than the plier-like stripper — but itis fun to watch as it works!
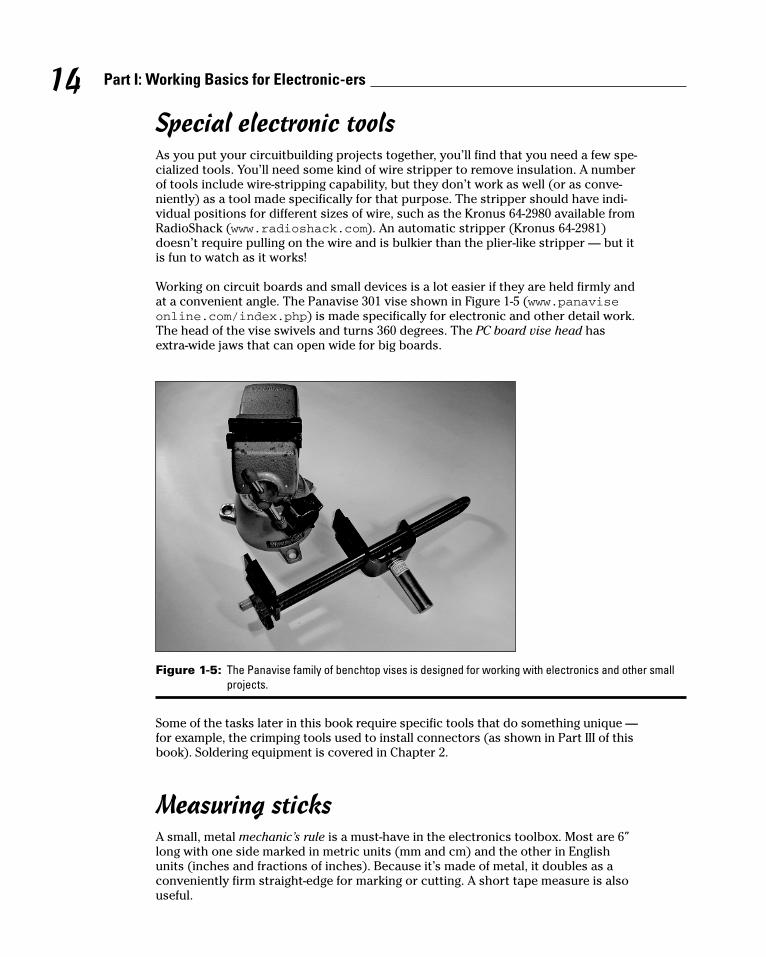
Working on circuit boards and small devices is a lot easier if they are held firmly andat a convenient angle. The Panavise 301 vise shown in Figure 1-5 (www.panaviseonline.com/index.php) is made specifically for electronic and other detail work.The head of the vise swivels and turns 360 degrees. The PC board vise head hasextra-wide jaws that can open wide for big boards.
Figure 1-5: The Panavise family of benchtop vises is designed for working with electronics and other smallprojects.
Some of the tasks later in this book require specific tools that do something unique —for example, the crimping tools used to install connectors (as shown in Part III of thisbook). Soldering equipment is covered in Chapter 2.
Measuring sticksA small, metal mechanic’s rule is a must-have in the electronics toolbox. Most are 6”long with one side marked in metric units (mm and cm) and the other in Englishunits (inches and fractions of inches). Because it’s made of metal, it doubles as aconveniently firm straight-edge for marking or cutting. A short tape measure is alsouseful.
05_173428 ch01.qxp 1/18/08 8:41 PM Page 14
15Chapter 1: The Toolbox
A permanent ruler is an option if your workspace allows. Use a yardstick to makepermanent markings directly on the work surface. If you have a broken or cut tapemeasure, tack a length of the tape to the work surface. Being able to measure a cableor wire or other material without having to get out a new tool saves a lot of time!
Optionally, you may want to pick up a set of calipers to measure inside and outsidewidths and diameters, thicknesses, and even depths. Excellent quality calipers areavailable for a few dollars if you learn to read a vernier scale as instructed atwww.marylandmetrics.com/tech/calipuse.pdf.
The Solderless BreadboardOne of the keys to learning about electronics is convenience. That is, learning andexperimenting and testing should be as easy as possible. One way to make it easy isto use tools and techniques that reduce expense and bother. An excellent example ofsuch a tool is the solderless breadboard. Using a breadboard is one of the basic start-ing points for the design of many types of circuits and projects. Also known as a plugboard or prototyping board, this miniature workbench allows you to whip up acircuit or try a new design in just minutes!
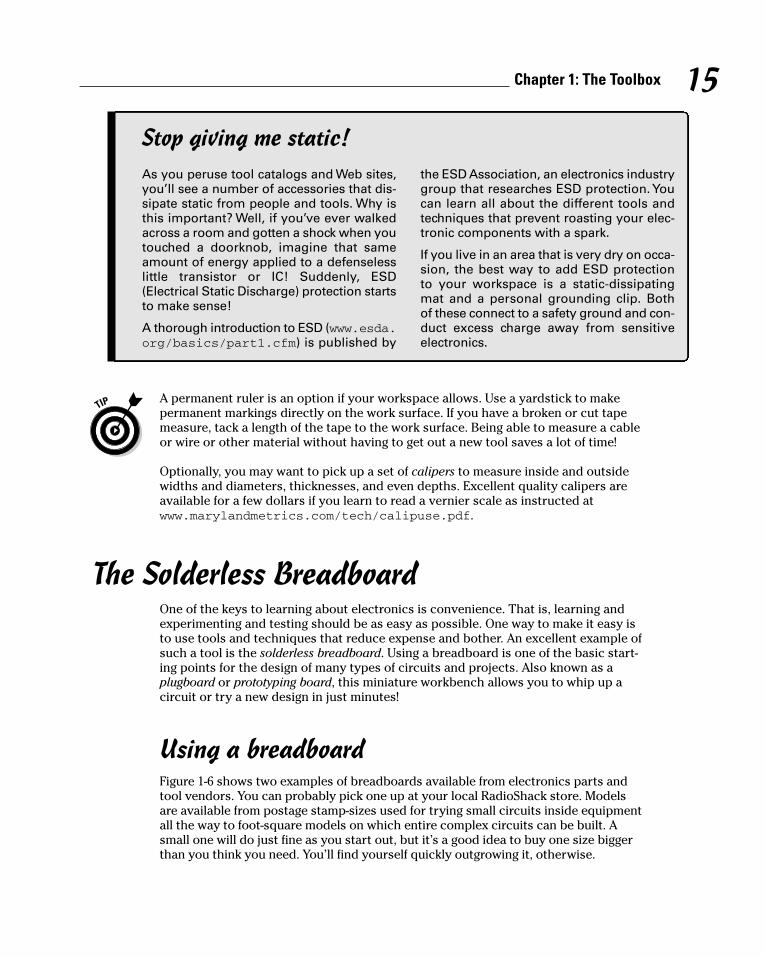
Using a breadboardFigure 1-6 shows two examples of breadboards available from electronics parts andtool vendors. You can probably pick one up at your local RadioShack store. Modelsare available from postage stamp-sizes used for trying small circuits inside equipmentall the way to foot-square models on which entire complex circuits can be built. Asmall one will do just fine as you start out, but it’s a good idea to buy one size biggerthan you think you need. You’ll find yourself quickly outgrowing it, otherwise.
Stop giving me static!As you peruse tool catalogs and Web sites,you’ll see a number of accessories that dis-sipate static from people and tools. Why isthis important? Well, if you’ve ever walkedacross a room and gotten a shock when youtouched a doorknob, imagine that sameamount of energy applied to a defenselesslittle transistor or IC! Suddenly, ESD(Electrical Static Discharge) protection startsto make sense!
A thorough introduction to ESD (www.esda.org/basics/part1.cfm) is published by
the ESD Association, an electronics industrygroup that researches ESD protection. Youcan learn all about the different tools andtechniques that prevent roasting your elec-tronic components with a spark.
If you live in an area that is very dry on occa-sion, the best way to add ESD protection to your workspace is a static-dissipating mat and a personal grounding clip. Both of these connect to a safety ground and con-duct excess charge away from sensitiveelectronics.
05_173428 ch01.qxp 1/18/08 8:41 PM Page 15
16 Part I: Working Basics for Electronic-ers
Figure 1-6: Two examples of solderless breadboards available from electronic retailers.
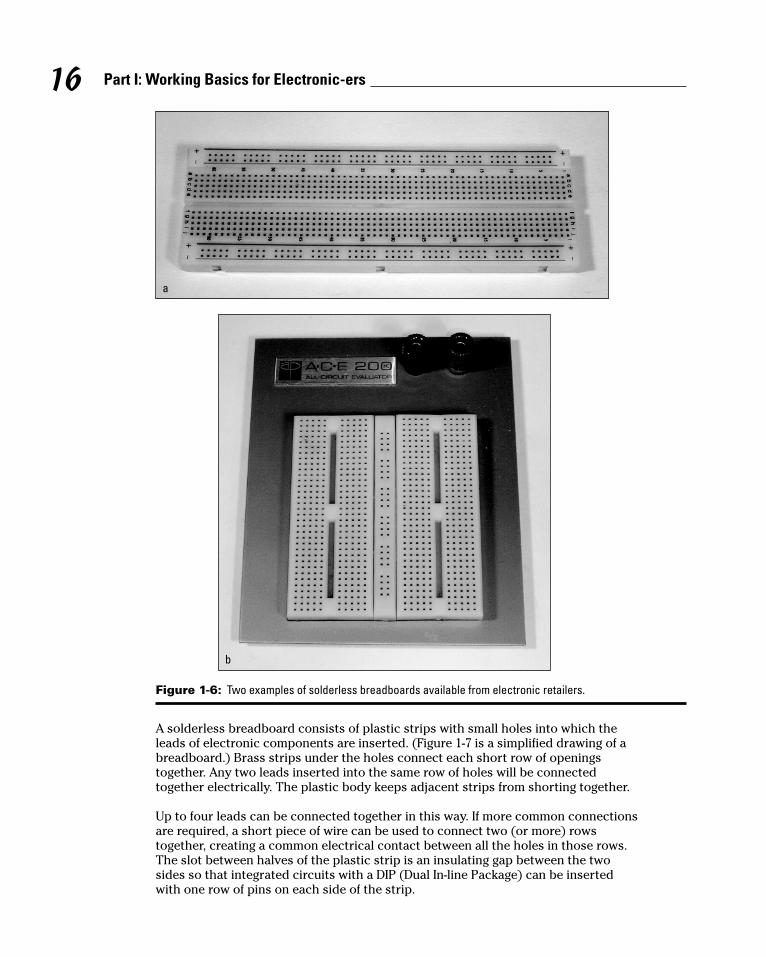
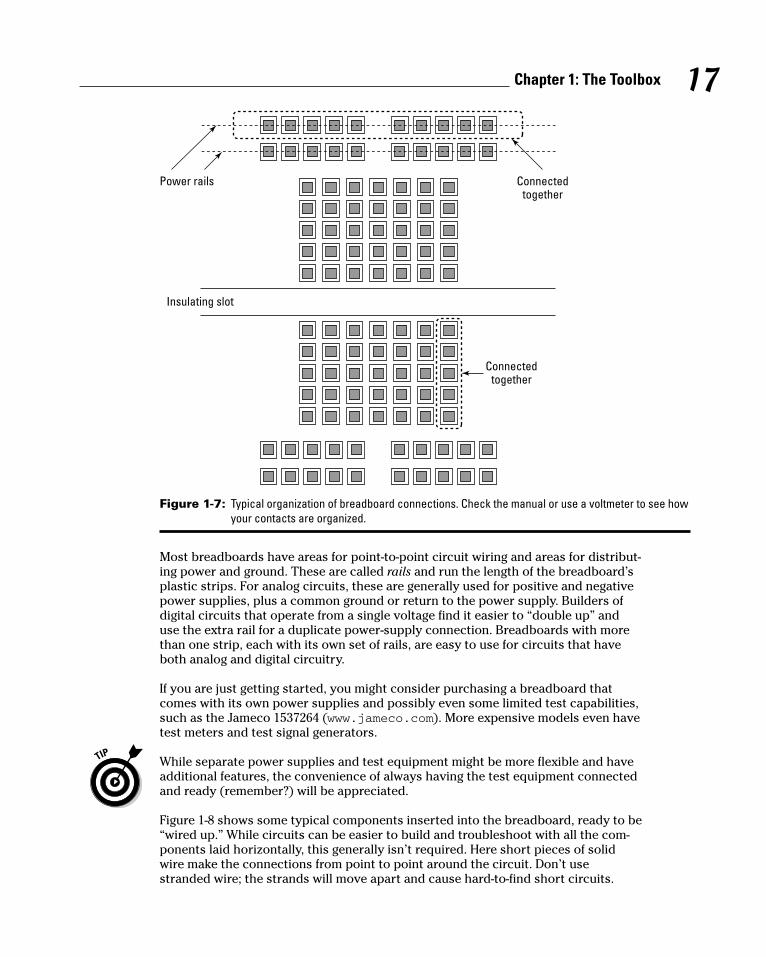
A solderless breadboard consists of plastic strips with small holes into which theleads of electronic components are inserted. (Figure 1-7 is a simplified drawing of abreadboard.) Brass strips under the holes connect each short row of openingstogether. Any two leads inserted into the same row of holes will be connectedtogether electrically. The plastic body keeps adjacent strips from shorting together.
Up to four leads can be connected together in this way. If more common connectionsare required, a short piece of wire can be used to connect two (or more) rowstogether, creating a common electrical contact between all the holes in those rows.The slot between halves of the plastic strip is an insulating gap between the twosides so that integrated circuits with a DIP (Dual In-line Package) can be insertedwith one row of pins on each side of the strip.
a
b
05_173428 ch01.qxp 1/18/08 8:41 PM Page 16
17Chapter 1: The Toolbox
Figure 1-7: Typical organization of breadboard connections. Check the manual or use a voltmeter to see howyour contacts are organized.
Most breadboards have areas for point-to-point circuit wiring and areas for distribut-ing power and ground. These are called rails and run the length of the breadboard’splastic strips. For analog circuits, these are generally used for positive and negativepower supplies, plus a common ground or return to the power supply. Builders ofdigital circuits that operate from a single voltage find it easier to “double up” anduse the extra rail for a duplicate power-supply connection. Breadboards with morethan one strip, each with its own set of rails, are easy to use for circuits that haveboth analog and digital circuitry.
If you are just getting started, you might consider purchasing a breadboard thatcomes with its own power supplies and possibly even some limited test capabilities,such as the Jameco 1537264 (www.jameco.com). More expensive models even havetest meters and test signal generators.
While separate power supplies and test equipment might be more flexible and haveadditional features, the convenience of always having the test equipment connectedand ready (remember?) will be appreciated.
Figure 1-8 shows some typical components inserted into the breadboard, ready to be“wired up.” While circuits can be easier to build and troubleshoot with all the com-ponents laid horizontally, this generally isn’t required. Here short pieces of solidwire make the connections from point to point around the circuit. Don’t usestranded wire; the strands will move apart and cause hard-to-find short circuits.
Insulating slot
Power rails Connectedtogether
Connectedtogether
05_173428 ch01.qxp 1/18/08 8:41 PM Page 17
18 Part I: Working Basics for Electronic-ers
Figure 1-8: Component leads are inserted into the breadboard holes. Strips of contacts under the holes allowother components to be connected at the same point.
Breadboard materialsIn keeping with the theme of convenience, breadboards hardly need any specialmaterials to use! You’ll need some test equipment to power and measure your cir-cuits, certainly, but aside from the components themselves, little is needed. Here is alist of things you’ll need:
� Insulated jumpers (20- to 24-gauge solid, insulated wire in various colors):It doesn’t have to be tinned (coated with solder); bare copper is fine. A goodsource of suitable wire is scrap lengths of 4-conductor telephone wiringcable using for wiring the wall jacks (not the flat cable used to connectphones and wall sockets).
Components
Lead inserted in hole
Power rails
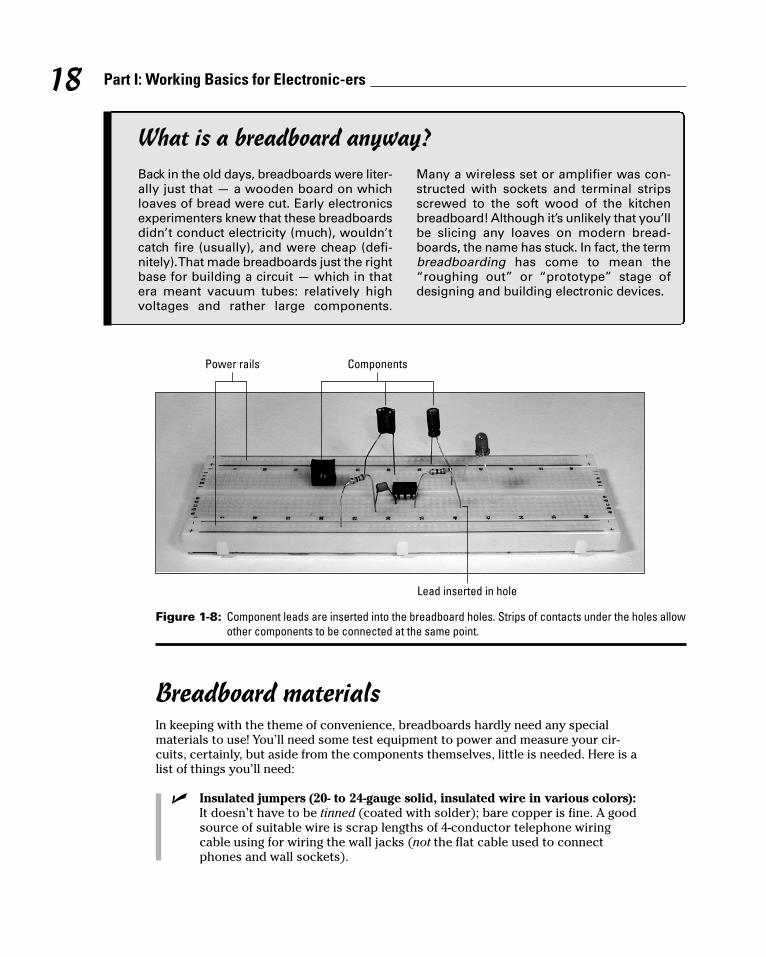
What is a breadboard anyway?Back in the old days, breadboards were liter-ally just that — a wooden board on whichloaves of bread were cut. Early electronicsexperimenters knew that these breadboardsdidn’t conduct electricity (much), wouldn’tcatch fire (usually), and were cheap (defi-nitely). That made breadboards just the rightbase for building a circuit — which in thatera meant vacuum tubes: relatively highvoltages and rather large components.
Many a wireless set or amplifier was con-structed with sockets and terminal stripsscrewed to the soft wood of the kitchenbreadboard! Although it’s unlikely that you’llbe slicing any loaves on modern bread-boards, the name has stuck. In fact, the termbreadboarding has come to mean the“roughing out” or “prototype” stage ofdesigning and building electronic devices.
05_173428 ch01.qxp 1/18/08 8:41 PM Page 18
19Chapter 1: The Toolbox
� Bare jumpers (20- to 24-gauge solid bare wire): This is used to connectadjacent rows of contacts, to create connection points for external equip-ment, or make leads for items that don’t have suitable leads for insertioninto the breadboard sockets. Save the clipped-off pieces of component leadsto create a bountiful supply!
� Leaded components: It’s very difficult, if not impossible, to use surface-mount technology (SMT) components with a breadboard. Make the taskeasier by purchasing and stocking only leaded components.
That’s it! No special tools other than needle-nose pliers and a small pair of wire cut-ters are needed. You may also want to augment your eyesight by purchasing a pairof head-mounted magnifier glasses from a local craft store for a few dollars.
Limitations of breadboardsThe breadboard sounds like a perfect way to build circuits, doesn’t it? There arelimits, however — and you should keep them in mind.
Current and voltage limitsThe small contacts in a breadboard mean that they can only handle so much currentbefore they are damaged by heating. Check the manufacturer’s specification on howmuch current is safe. Higher currents can also melt the plastic strips. High voltage isoften a problem, too, since the plastic insulation is only so thick. Arcing can alsodamage a breadboard. Whether from excessive voltage or current, damaged bread-board contacts can’t be used reliably — and can’t be repaired. A good rule of thumbis to limit breadboards to circuits that use a maximum of 100 mA and 50 V. If yourcircuit uses higher currents and voltages, it’s a good idea to change your buildingmethods or construct a separate circuit that only makes low-current connections tothe breadboard circuit.
Frequency limitThe convenience of having lots of contacts and connections made of small wires hasa drawback in poor performance for high-frequency signals. At high frequencies, thewires start to look like small inductors, upsetting circuit performance. Further, themany rows of closely spaced contacts act like small capacitors. Both the inductorsand capacitors affect circuit performance in unpredictable ways. It’s also harder tocreate a good, solid ground connection for a circuit of any complexity that’s built ona breadboard. Another good general rule is to limit your circuit’s highest frequenciesto about 500 kHz. For digital circuits, the clock-speed limit is 1 MHz. Above those fre-quencies, your circuit won’t be behaving the same way it will in a final version builtwith better techniques.
Contact wear-out If you are a frequent builder, you’ll probably start wearing out the breadboard’s con-tacts. For example, some of the contacts will loosen, weakening their grip on a leador wire. This is hard to detect — and can lead to intermittent problems that are diffi-cult to assess and fix. If a contact has been overheated or has an oversized wirestuffed into it, its grip on smaller wires is relaxed. The connection points at one endof a power rail are particularly prone to this problem. Since you can’t repair thosecontacts, it’s best to mark which ones are bad and not use them again.
05_173428 ch01.qxp 1/18/08 8:41 PM Page 19
20 Part I: Working Basics for Electronic-ers
Your NotebookThe most important tool isn’t one that lives in your toolbox, it’s the one betweenyour ears! The sharpening and lubricating for this tool comes from a notebook.Almost any old notebook will do — even one with cartoon characters on the cover.While a notebook filled with graph paper is the best, regular old lined or blank paperis fine. The important thing is to have a handy place to write down information asyou work on projects.
Your notebook can be a record for design ideas, construction and installation notes,test results, project ideas — anything that you think goes in the notebook should goin the notebook. Believe me, you’ll be a believer when you can go back into a years-old notebook and quickly find just the right circuit or look up the color code of acontrol cable you installed way back when!
Make a habit of opening the notebook before you even start work!
Software ToolsCan software be a tool for building electronics? Sure it can! If you can draw it onpaper or calculate it, there is a software tool to help with the job. The only thing soft-ware can’t do (yet) is fire up the iron and melt solder on that PC board. That’s stillyour job, but by using the appropriate software, what you build will be finishedfaster and work more like what you expected.
There are far too many programs to try or even list, so only a few are mentioned here.More software is available all the time. If you do an Internet search for “free electronicdesign software” you’ll be directed to Web sites such as the University of Nebraska’sElectrical Engineering Shop page (eeshop.unl.edu/cad.html) or TechnologySystems (www.tech-systems-labs.com/freesoftware.htm). They list many,many programs for you to try. Experiment and choose the ones you like!
Schematic and PC board layoutThe actual term for the software with which you draw schematics is schematic cap-ture. Software you can use to lay out your own circuit boards is PCB layout. The fol-lowing packages listed here include both functions. While professional packages cancost thousands of dollars, there are some capable packages available for free or atvery low cost. Free versions are usually limited in how many pins (meaning IC pins)can be used — and the designs may not be used for commercial purposes. For abeginner in circuitbuilding, these versions are just fine! Here are a few:
� Easy PC (www.numberone.com)
� Dip Trace (www.diptrace.com)
� Eagle (www.cadsoft.de; click Freeware)
� Designworks Lite (www.capilano.com/dwlite.html)
05_173428 ch01.qxp 1/18/08 8:41 PM Page 20
21Chapter 1: The Toolbox
There are also low-cost PC board fabricators that provide schematic-capture andlayout software (Express PCB, www.expresspcb.com) but they are usually propri-etary packages that don’t let you interface to other fabrication services. Nevertheless,this might not be a problem if such a package suits your purposes.
If you are familiar with PowerPoint software and only want to draw schematics thatlook good without any advanced features, a free package of schematic symbols devel-oped by the author is available from the American Radio Relay League’s TechnicalInformation Service at www.arrl.org/tis/info/HTML/Hands-On-Radio.
Electronic simulatorsThe power of the PC is really put to work in electronic circuit simulators that can pre-dict how your circuit will work. With a simulator, it is possible to do almost all yourdevelopmental work at the computer — and only turn on the soldering iron for thefinal version. To be sure, there are many subtle factors in circuit design that a com-puter doesn’t know about or can’t handle well, but these are well beyond what abeginning circuitbuilder worries about.
Simulators are powerful programs; they have a steep learning curve when you getbeyond simple simulations. Nevertheless, there’s no time like the present to trythem out! These two packages are evaluation versions of professional-level circuitsimulators:
� Micro Cap (www.spectrum-soft.com/index.shtm)
� Intusoft ICAP (www.intusoft.com)
The Linear Technology software, LTSPICE, is a capable version of the public-domaincircuit-simulator program, SPICE. It’s completely free from www.linear.com/designtools/software/index.jsp and also includes a switching power-supplydesign package.
Mechanical drawing softwareIt’s also important to be able to make accurate drawings of panel layouts and othermechanical parts that are part of your project. Software that does mechanical draw-ings is called CAD for Computer-Aided Drafting. There are many inexpensive or freesoftware packages (enter “cad drawing freeware” into an Internet search engine) forthe downloading. Here are some general purpose drawing packages to try:
� Vector Engineer (www.vectorengineer.com)
� CadSted (www.cadstd.com)
There are also software packages for specialized drawing applications:
� Scale (http://stiftsbogtrykkeriet.dk/~mcs/Scale.html) is a Webapplication to design meter scales and control dials. You enter the data foryour scale and it sends you a graphic file you can edit or print.
05_173428 ch01.qxp 1/18/08 8:41 PM Page 21
22 Part I: Working Basics for Electronic-ers
� Dial and Panel (http://hfradio.org/wb8rcr) are simple programs tomake dial scales and design front panels.
� Gpaper (http://pharm.kuleuven.be/pharbio/gpaper.htm) drawsany kind of graph paper you can think of!
Utilities and calculatorsLiterally thousands of utility software packages are available on the Internet. If youneed one for a specific purpose, just type the purpose plus “design utility” into anInternet search engine — for example, “555 timer design utility” or “555 timer designcalculator” — and dozens of programs and Web sites pop up. Caveat emptor (or, inthis case, browser), of course; you don’t know the pedigree of these programs.There is also a nice listing of electronic calculator programs at 101science.com/Radio.htm#Calculators.
As you collect the URLs for online calculators, set up a folder in your browser’sFavorites list specifically for calculators. That way they’ll always be easy to find.
You don’t have to download every calculator individually as there are some verynice packaged sets. Here are two of my favorites, both free:
� Hamcalc (www.cq-amateur-radio.com/HamCalcem.html) has dozensof routines for all sorts of electronic design tasks.
� Convert (http://joshmadison.com/software/convert) is a terrificlittle utility that I leave on my PC desktop for whenever I have to convert avalue between units of measure — say, barrels to pecks. Seriously, this isone of those tools that occasionally saves a whole lot of time.
05_173428 ch01.qxp 1/18/08 8:41 PM Page 22