Embed Size (px)
Citation preview
HowTo8 (8) / How to Do Everything with Photoshop 7/ McCanna / 219554-1 / Chapter 2blind folio 19
Chapter 2 Creating aLayered Image
G:\OMH\HowTo\554-1\ch02.vpTuesday, May 07, 2002 8:48:26 AM
Color profile: DisabledComposite Default screen
How to…
■ Create a new file
■ Create a new layer
■ Work with layers
■ Explore blending modes
■ Lock transparency of a layer
■ Create linked layers
■ Merge layers
■ Save a file
The key to discovering the power of Photoshop is working with layers. Whenyou work with layers, you can enjoy the freedom to experiment without fear ofdamaging the image you are working on. Layers can be duplicated, deleted, or movedwithout affecting other parts of your image. You can easily change the transparency,color, or position of any layer, unleashing a world of creative possibilities for yourwork in Photoshop. In this chapter, you will create a layered image, move andadjust the layers, and save the finished image.
Learning LayersThe best way to understand layers is to think of each layer as an image on a sheetof glass. Then think of all the sheets of glass stacked together. You can move orerase a layer, or change its transparency, without changing any of the layers aboveor below it.
To open the Layers palette, if it isn’t already open, choose Window | Layers.Until you open an existing file or create a new file, no layers will be displayed inthe Layers palette.
The Layers PaletteYou will use the Layers palette to organize, delete, and modify layers in yourimage. In order to experiment with layers, you will want to open a file by selectingFile | New.
20 How to Do Everything with Photoshop 7
HowTo8 (8) / How to Do Everything with Photoshop 7/ McCanna / 219554-1 / Chapter 2
G:\OMH\HowTo\554-1\ch02.vpTuesday, May 07, 2002 8:48:26 AM
Color profile: DisabledComposite Default screen
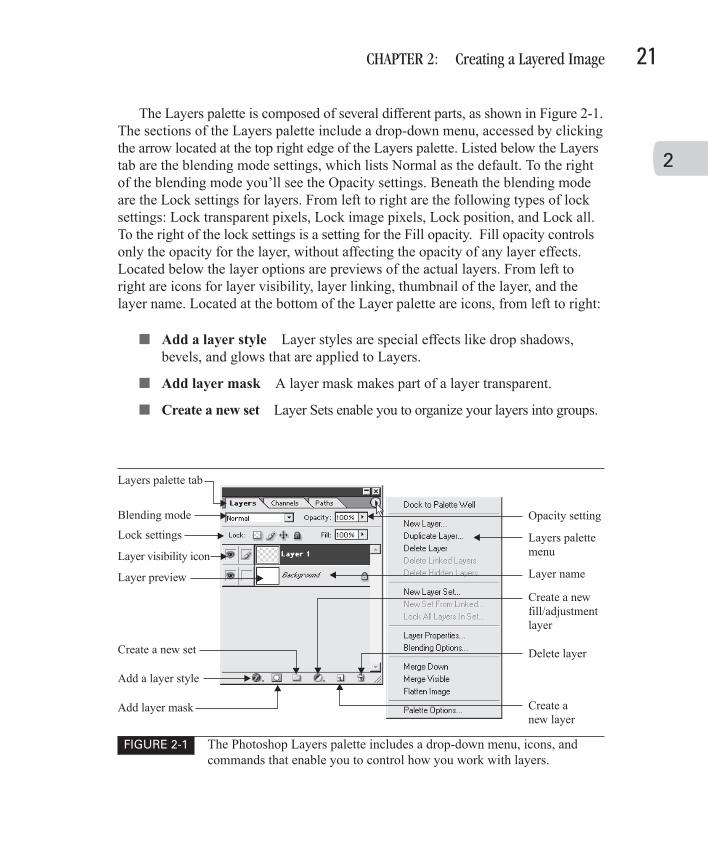
The Layers palette is composed of several different parts, as shown in Figure 2-1.The sections of the Layers palette include a drop-down menu, accessed by clickingthe arrow located at the top right edge of the Layers palette. Listed below the Layerstab are the blending mode settings, which lists Normal as the default. To the rightof the blending mode you’ll see the Opacity settings. Beneath the blending modeare the Lock settings for layers. From left to right are the following types of locksettings: Lock transparent pixels, Lock image pixels, Lock position, and Lock all.To the right of the lock settings is a setting for the Fill opacity. Fill opacity controlsonly the opacity for the layer, without affecting the opacity of any layer effects.Located below the layer options are previews of the actual layers. From left toright are icons for layer visibility, layer linking, thumbnail of the layer, and thelayer name. Located at the bottom of the Layer palette are icons, from left to right:
■ Add a layer style Layer styles are special effects like drop shadows,bevels, and glows that are applied to Layers.
■ Add layer mask A layer mask makes part of a layer transparent.
■ Create a new set Layer Sets enable you to organize your layers into groups.
CHAPTER 2: Creating a Layered Image 21
HowTo8 (8) / How to Do Everything with Photoshop 7/ McCanna / 219554-1 / Chapter 2
2
FIGURE 2-1 The Photoshop Layers palette includes a drop-down menu, icons, andcommands that enable you to control how you work with layers.
Create a newfill/adjustmentlayer
Layers palette tab
Delete layer
Layers palettemenu
Opacity settingLock settings
Layer visibility icon
Blending mode
Layer preview
Create a new set
Create anew layer
Layer name
Add a layer style
Add layer mask
G:\OMH\HowTo\554-1\ch02.vpTuesday, May 07, 2002 8:48:26 AM
Color profile: DisabledComposite Default screen
■ Create a new fill or adjustment layer Adjustment layers are effectsthat are applied to a layer to change attributes like contrast, hue, and colorbalance.
■ Create a new layer Add a new, empty layer to your file.
■ Delete layer Delete a selected layer from your file.
Changing the Layer PreviewYou can customize the size of the previews that are displayed in the Layers palette.Photoshop refers to these previews as thumbnails. If you have a small screen, youmay want to stay with the smallest thumbnail size, which is the default. However,if you have a larger screen, it can be helpful to see larger thumbnails of each layeras you work.
The top of the image window also gives you valuable information. Next tothe image name, you’ll see the zoom amount, color mode, and name of thelayer you are currently working on.
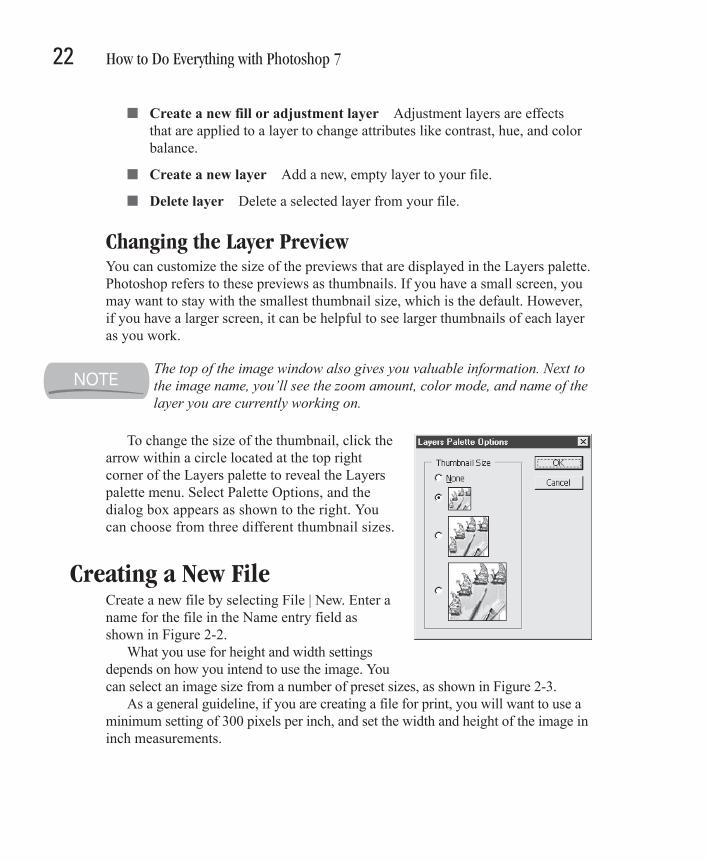
To change the size of the thumbnail, click thearrow within a circle located at the top rightcorner of the Layers palette to reveal the Layerspalette menu. Select Palette Options, and thedialog box appears as shown to the right. Youcan choose from three different thumbnail sizes.
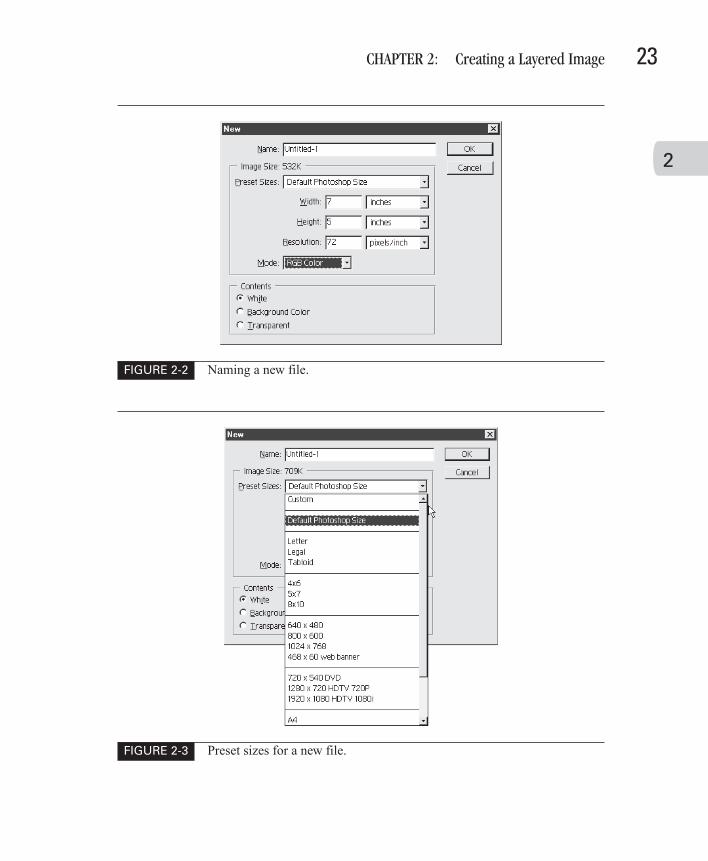
Creating a New FileCreate a new file by selecting File | New. Enter aname for the file in the Name entry field asshown in Figure 2-2.
What you use for height and width settingsdepends on how you intend to use the image. Youcan select an image size from a number of preset sizes, as shown in Figure 2-3.
As a general guideline, if you are creating a file for print, you will want to use aminimum setting of 300 pixels per inch, and set the width and height of the image ininch measurements.
22 How to Do Everything with Photoshop 7
HowTo8 (8) / How to Do Everything with Photoshop 7/ McCanna / 219554-1 / Chapter 2
G:\OMH\HowTo\554-1\ch02.vpTuesday, May 07, 2002 8:48:26 AM
Color profile: DisabledComposite Default screen
CHAPTER 2: Creating a Layered Image 23
HowTo8 (8) / How to Do Everything with Photoshop 7/ McCanna / 219554-1 / Chapter 2
2
FIGURE 2-2 Naming a new file.
FIGURE 2-3 Preset sizes for a new file.
G:\OMH\HowTo\554-1\ch02.vpTuesday, May 07, 2002 8:48:27 AM
Color profile: DisabledComposite Default screen
If you are creating an image for the Web, you’ll want to create images that areno larger than a web browser’s area, less the size for the title bar and browserwindow edges. For a monitor set to 640 × 480 pixels—the minimum size monitordisplay that web designers target—the size of the viewing area is actually 590 pixelswide by 325 pixels high. The number of pixels per inch for web images is not asimportant as it is for print images, so leave the default setting of 72 pixels per inch.Set the Mode to RGB color.
The Image Mode setting determines what type of color you’ll be working with.In most cases, you will want to use the default setting of RGB color. Image sizeand resolution will be discussed in more depth in Chapter 5.
You can also select whether you want the background of the image filled withwhite, your currently selected background color, or if you want the background tobe transparent.
You’ll notice that once you create this new file, the Layers palette displays asingle layer named Background.
Creating a New LayerBecause the Background layer is locked, you will generally want to start out bycreating or adding new layers. There are several ways to add layers to an image.
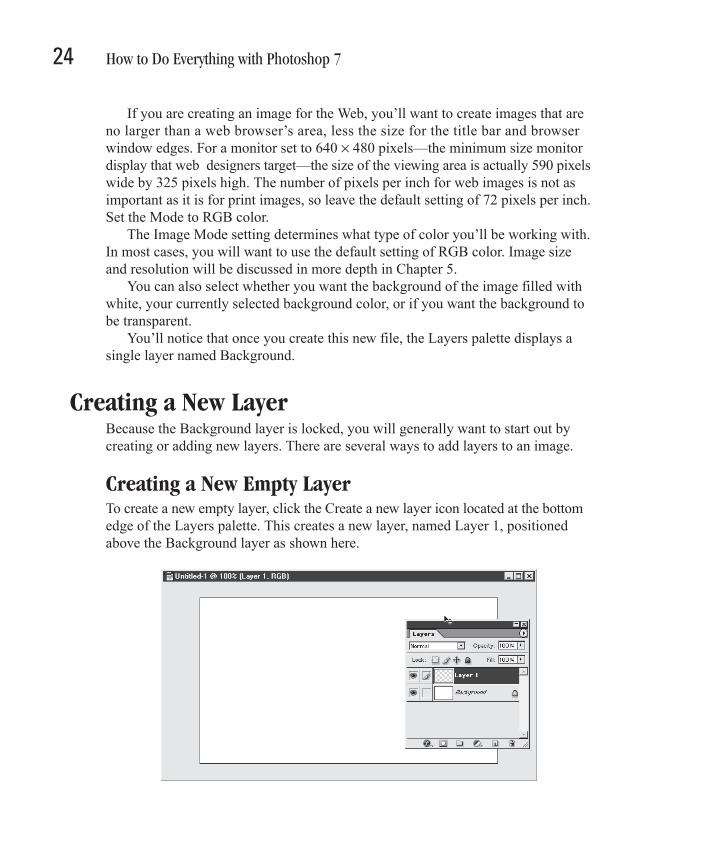
Creating a New Empty LayerTo create a new empty layer, click the Create a new layer icon located at the bottomedge of the Layers palette. This creates a new layer, named Layer 1, positionedabove the Background layer as shown here.
Ill 2-4
24 How to Do Everything with Photoshop 7
HowTo8 (8) / How to Do Everything with Photoshop 7/ McCanna / 219554-1 / Chapter 2
G:\OMH\HowTo\554-1\ch02.vpTuesday, May 07, 2002 8:48:27 AM
Color profile: DisabledComposite Default screen
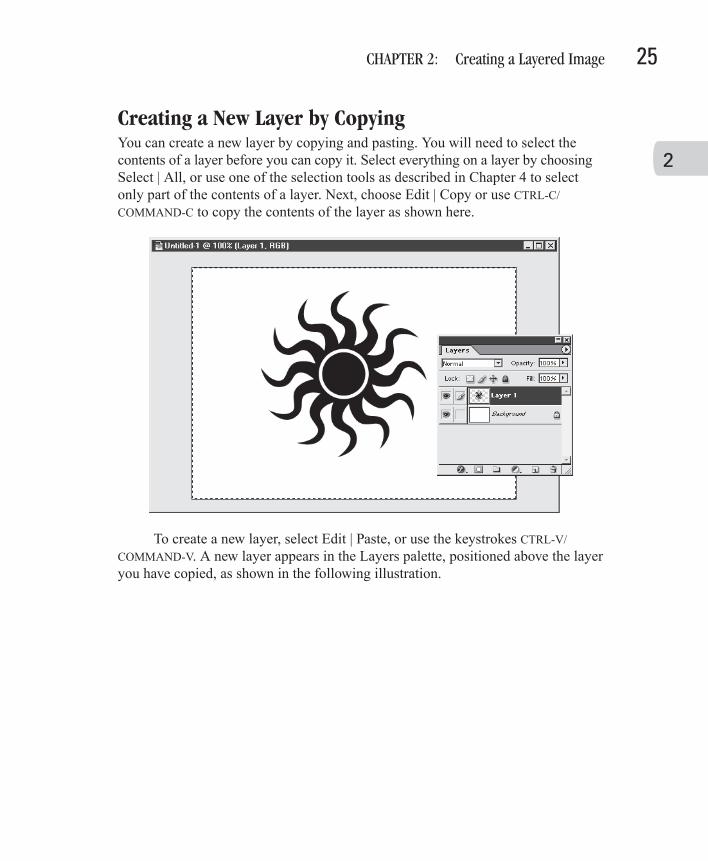
Creating a New Layer by CopyingYou can create a new layer by copying and pasting. You will need to select thecontents of a layer before you can copy it. Select everything on a layer by choosingSelect | All, or use one of the selection tools as described in Chapter 4 to selectonly part of the contents of a layer. Next, choose Edit | Copy or use CTRL-C/COMMAND-C to copy the contents of the layer as shown here.
Ill 2-5
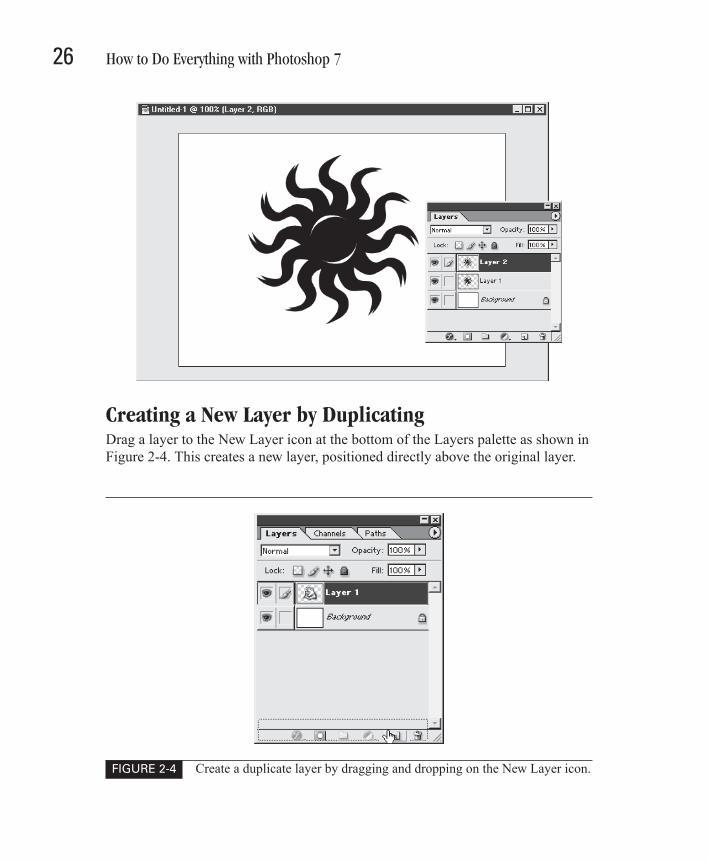
To create a new layer, select Edit | Paste, or use the keystrokes CTRL-V/COMMAND-V. A new layer appears in the Layers palette, positioned above the layeryou have copied, as shown in the following illustration.
CHAPTER 2: Creating a Layered Image 25
HowTo8 (8) / How to Do Everything with Photoshop 7/ McCanna / 219554-1 / Chapter 2
2
G:\OMH\HowTo\554-1\ch02.vpTuesday, May 07, 2002 8:48:27 AM
Color profile: DisabledComposite Default screen
Ill 2-6
Creating a New Layer by DuplicatingDrag a layer to the New Layer icon at the bottom of the Layers palette as shown inFigure 2-4. This creates a new layer, positioned directly above the original layer.
26 How to Do Everything with Photoshop 7
HowTo8 (8) / How to Do Everything with Photoshop 7/ McCanna / 219554-1 / Chapter 2
FIGURE 2-4 Create a duplicate layer by dragging and dropping on the New Layer icon.
G:\OMH\HowTo\554-1\ch02.vpTuesday, May 07, 2002 8:48:27 AM
Color profile: DisabledComposite Default screen
The new layer has the same name as the original layer followed by the word Copy.Since it is positioned exactly above the original layer, you’ll see only one copy inthe image window, but you’ll see both copies in the Layers palette thumbnails.
Working with LayersOnce you know how to create layers you’re ready to move onto layer basics:naming, filling, and moving layers.
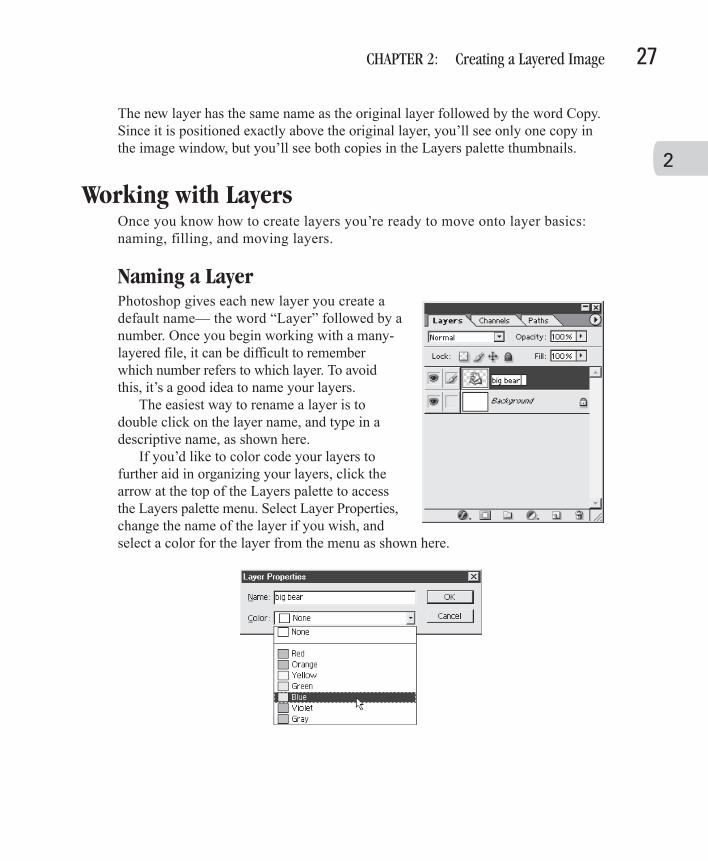
Naming a LayerPhotoshop gives each new layer you create adefault name— the word “Layer” followed by anumber. Once you begin working with a many-layered file, it can be difficult to rememberwhich number refers to which layer. To avoidthis, it’s a good idea to name your layers.
The easiest way to rename a layer is todouble click on the layer name, and type in adescriptive name, as shown here.
If you’d like to color code your layers tofurther aid in organizing your layers, click thearrow at the top of the Layers palette to accessthe Layers palette menu. Select Layer Properties,change the name of the layer if you wish, andselect a color for the layer from the menu as shown here.
Ill 2-8
CHAPTER 2: Creating a Layered Image 27
HowTo8 (8) / How to Do Everything with Photoshop 7/ McCanna / 219554-1 / Chapter 2
2
G:\OMH\HowTo\554-1\ch02.vpTuesday, May 07, 2002 8:48:28 AM
Color profile: DisabledComposite Default screen
You can also rename a layer by using right-click/CTRL-click on the name of alayer in the Layers palette, and selecting Layer Properties from the context-sensitivemenu that appears.
Filling a LayerYou can fill the entire layer with a solid color, or you can fill part of a layer. By fillingpart of a layer, you will be able to see layers that are behind the partially filled layer.
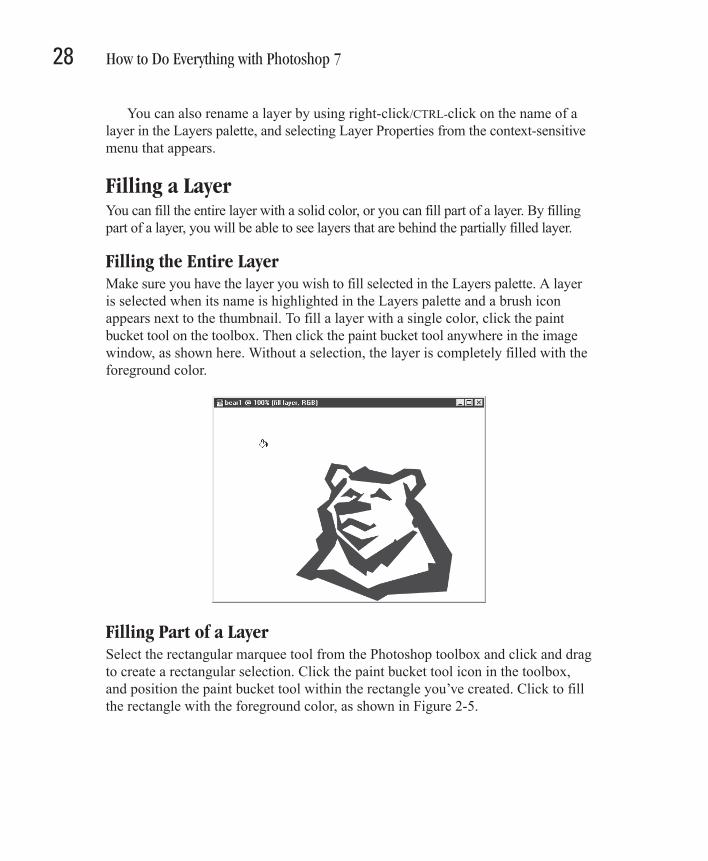
Filling the Entire LayerMake sure you have the layer you wish to fill selected in the Layers palette. A layeris selected when its name is highlighted in the Layers palette and a brush iconappears next to the thumbnail. To fill a layer with a single color, click the paintbucket tool on the toolbox. Then click the paint bucket tool anywhere in the imagewindow, as shown here. Without a selection, the layer is completely filled with theforeground color.
Ill 2-9
Filling Part of a LayerSelect the rectangular marquee tool from the Photoshop toolbox and click and dragto create a rectangular selection. Click the paint bucket tool icon in the toolbox,and position the paint bucket tool within the rectangle you’ve created. Click to fillthe rectangle with the foreground color, as shown in Figure 2-5.
28 How to Do Everything with Photoshop 7
HowTo8 (8) / How to Do Everything with Photoshop 7/ McCanna / 219554-1 / Chapter 2
G:\OMH\HowTo\554-1\ch02.vpTuesday, May 07, 2002 8:48:28 AM
Color profile: DisabledComposite Default screen
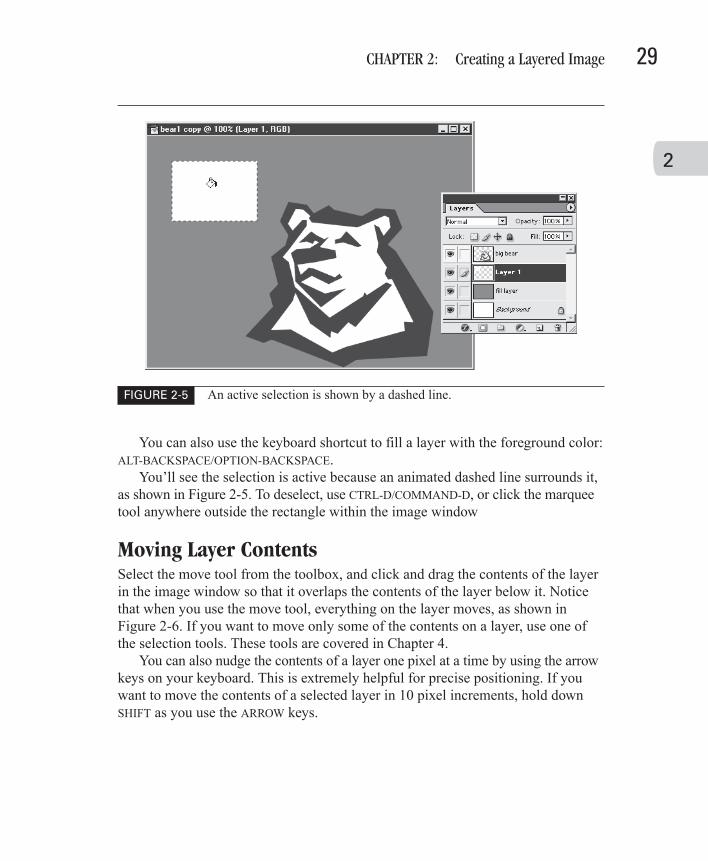
You can also use the keyboard shortcut to fill a layer with the foreground color:ALT-BACKSPACE/OPTION-BACKSPACE.
You’ll see the selection is active because an animated dashed line surrounds it,as shown in Figure 2-5. To deselect, use CTRL-D/COMMAND-D, or click the marqueetool anywhere outside the rectangle within the image window
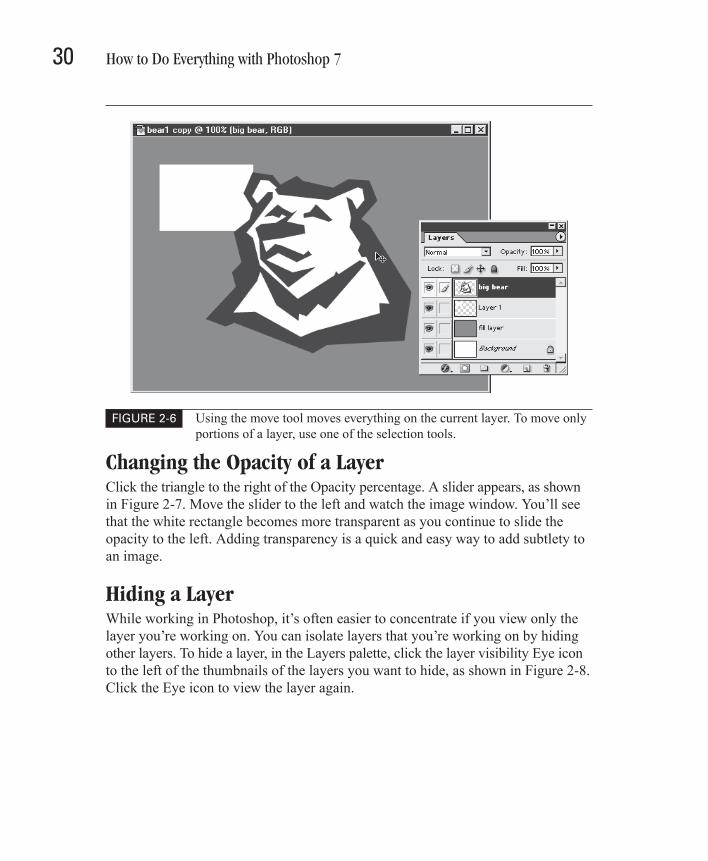
Moving Layer ContentsSelect the move tool from the toolbox, and click and drag the contents of the layerin the image window so that it overlaps the contents of the layer below it. Noticethat when you use the move tool, everything on the layer moves, as shown inFigure 2-6. If you want to move only some of the contents on a layer, use one ofthe selection tools. These tools are covered in Chapter 4.
You can also nudge the contents of a layer one pixel at a time by using the arrowkeys on your keyboard. This is extremely helpful for precise positioning. If youwant to move the contents of a selected layer in 10 pixel increments, hold downSHIFT as you use the ARROW keys.
CHAPTER 2: Creating a Layered Image 29
HowTo8 (8) / How to Do Everything with Photoshop 7/ McCanna / 219554-1 / Chapter 2
2
FIGURE 2-5 An active selection is shown by a dashed line.
G:\OMH\HowTo\554-1\ch02.vpTuesday, May 07, 2002 8:48:28 AM
Color profile: DisabledComposite Default screen
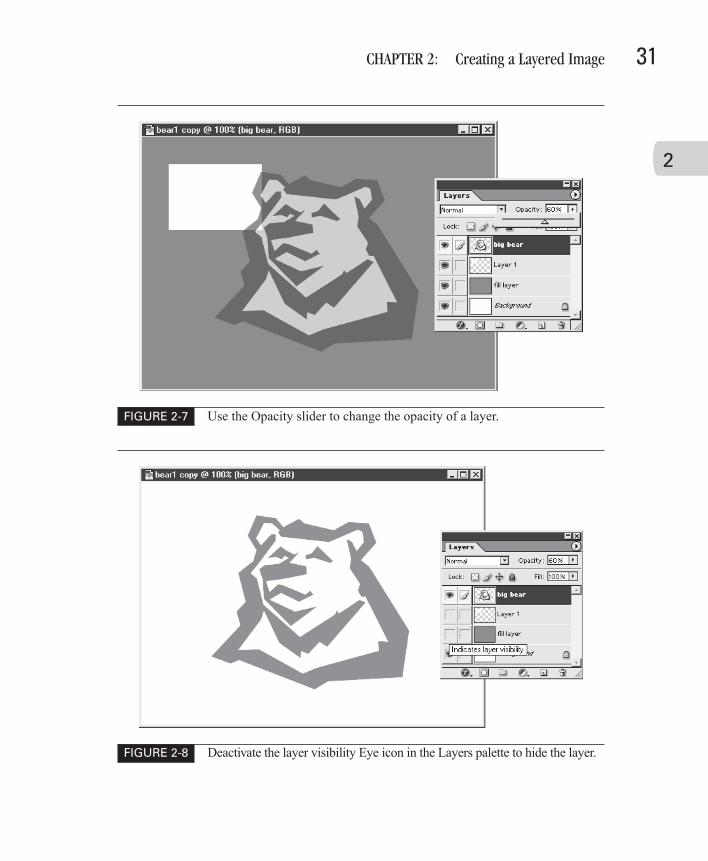
Changing the Opacity of a LayerClick the triangle to the right of the Opacity percentage. A slider appears, as shownin Figure 2-7. Move the slider to the left and watch the image window. You’ll seethat the white rectangle becomes more transparent as you continue to slide theopacity to the left. Adding transparency is a quick and easy way to add subtlety toan image.
Hiding a LayerWhile working in Photoshop, it’s often easier to concentrate if you view only thelayer you’re working on. You can isolate layers that you’re working on by hidingother layers. To hide a layer, in the Layers palette, click the layer visibility Eye iconto the left of the thumbnails of the layers you want to hide, as shown in Figure 2-8.Click the Eye icon to view the layer again.
30 How to Do Everything with Photoshop 7
HowTo8 (8) / How to Do Everything with Photoshop 7/ McCanna / 219554-1 / Chapter 2
FIGURE 2-6 Using the move tool moves everything on the current layer. To move onlyportions of a layer, use one of the selection tools.
G:\OMH\HowTo\554-1\ch02.vpTuesday, May 07, 2002 8:48:28 AM
Color profile: DisabledComposite Default screen
CHAPTER 2: Creating a Layered Image 31
HowTo8 (8) / How to Do Everything with Photoshop 7/ McCanna / 219554-1 / Chapter 2
2
FIGURE 2-7 Use the Opacity slider to change the opacity of a layer.
FIGURE 2-8 Deactivate the layer visibility Eye icon in the Layers palette to hide the layer.
G:\OMH\HowTo\554-1\ch02.vpTuesday, May 07, 2002 8:48:29 AM
Color profile: DisabledComposite Default screen
Deleting a LayerTo delete a layer, drag the layer to the Trashcan icon at the bottom of the Layerspalette. To undo this, or any operation in Photoshop, press CTRL-Z/COMMAND-Z.
You cannot delete a layer if you have selected the Lock All checkbox forthat layer.
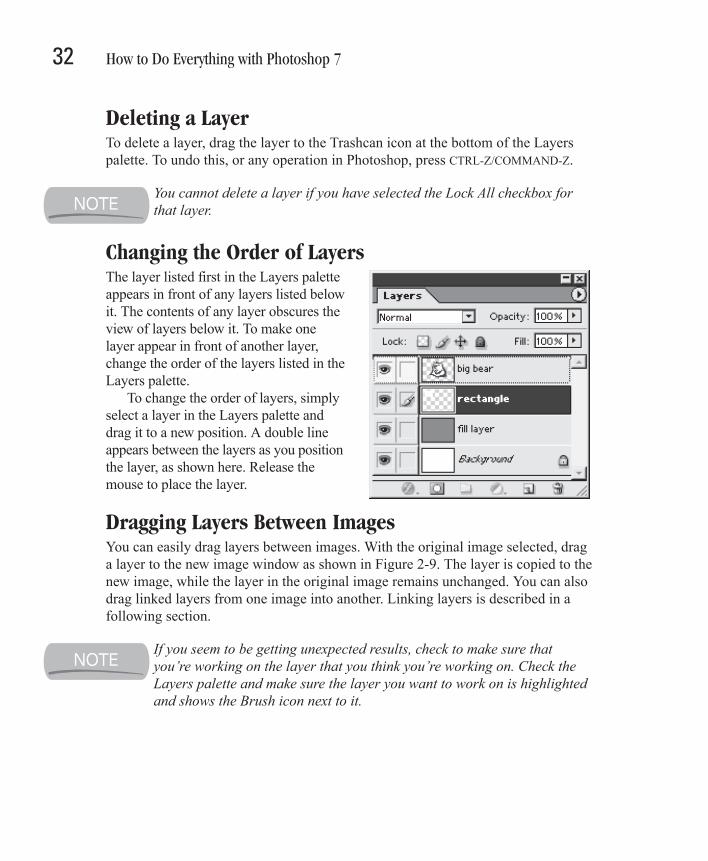
Changing the Order of LayersThe layer listed first in the Layers paletteappears in front of any layers listed belowit. The contents of any layer obscures theview of layers below it. To make onelayer appear in front of another layer,change the order of the layers listed in theLayers palette.
To change the order of layers, simplyselect a layer in the Layers palette anddrag it to a new position. A double lineappears between the layers as you positionthe layer, as shown here. Release themouse to place the layer.
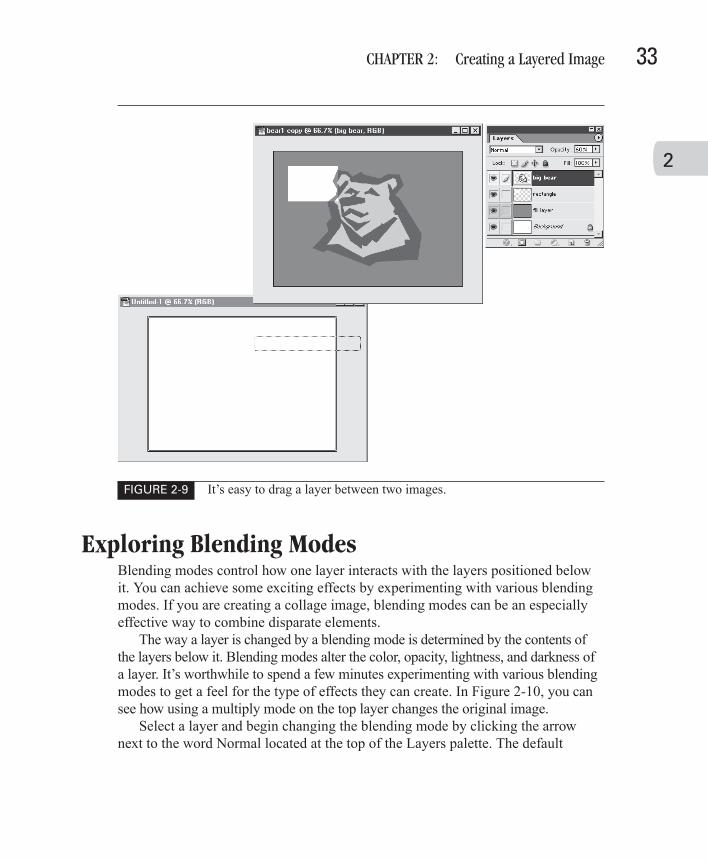
Dragging Layers Between ImagesYou can easily drag layers between images. With the original image selected, draga layer to the new image window as shown in Figure 2-9. The layer is copied to thenew image, while the layer in the original image remains unchanged. You can alsodrag linked layers from one image into another. Linking layers is described in afollowing section.
If you seem to be getting unexpected results, check to make sure thatyou’re working on the layer that you think you’re working on. Check theLayers palette and make sure the layer you want to work on is highlightedand shows the Brush icon next to it.
32 How to Do Everything with Photoshop 7
HowTo8 (8) / How to Do Everything with Photoshop 7/ McCanna / 219554-1 / Chapter 2
G:\OMH\HowTo\554-1\ch02.vpTuesday, May 07, 2002 8:48:29 AM
Color profile: DisabledComposite Default screen
Exploring Blending ModesBlending modes control how one layer interacts with the layers positioned belowit. You can achieve some exciting effects by experimenting with various blendingmodes. If you are creating a collage image, blending modes can be an especiallyeffective way to combine disparate elements.
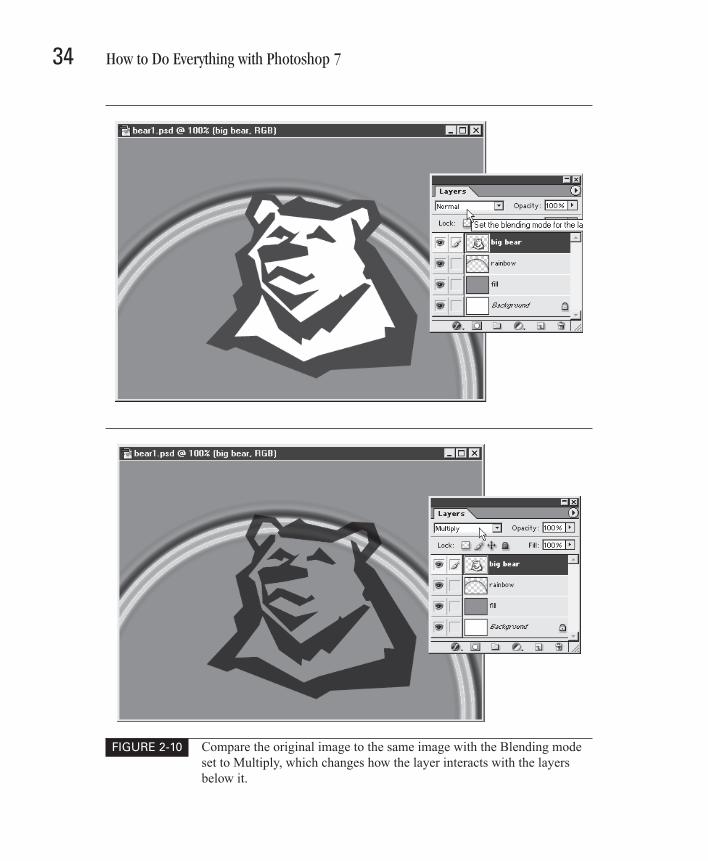
The way a layer is changed by a blending mode is determined by the contents ofthe layers below it. Blending modes alter the color, opacity, lightness, and darkness ofa layer. It’s worthwhile to spend a few minutes experimenting with various blendingmodes to get a feel for the type of effects they can create. In Figure 2-10, you cansee how using a multiply mode on the top layer changes the original image.
Select a layer and begin changing the blending mode by clicking the arrownext to the word Normal located at the top of the Layers palette. The default
CHAPTER 2: Creating a Layered Image 33
HowTo8 (8) / How to Do Everything with Photoshop 7/ McCanna / 219554-1 / Chapter 2
2
FIGURE 2-9 It’s easy to drag a layer between two images.
G:\OMH\HowTo\554-1\ch02.vpTuesday, May 07, 2002 8:48:29 AM
Color profile: DisabledComposite Default screen
34 How to Do Everything with Photoshop 7
HowTo8 (8) / How to Do Everything with Photoshop 7/ McCanna / 219554-1 / Chapter 2
FIGURE 2-10 Compare the original image to the same image with the Blending modeset to Multiply, which changes how the layer interacts with the layersbelow it.
G:\OMH\HowTo\554-1\ch02.vpTuesday, May 07, 2002 8:48:30 AM
Color profile: DisabledComposite Default screen
blending mode for all layers is Normal. As you change modes, you’ll notice avariety of effects that can be achieved.
Since each layer has its own blending mode, the possibilities are endless forachieving both subtle and striking effects. When you combine blending modeswith Opacity changes, the possibilities are infinite.
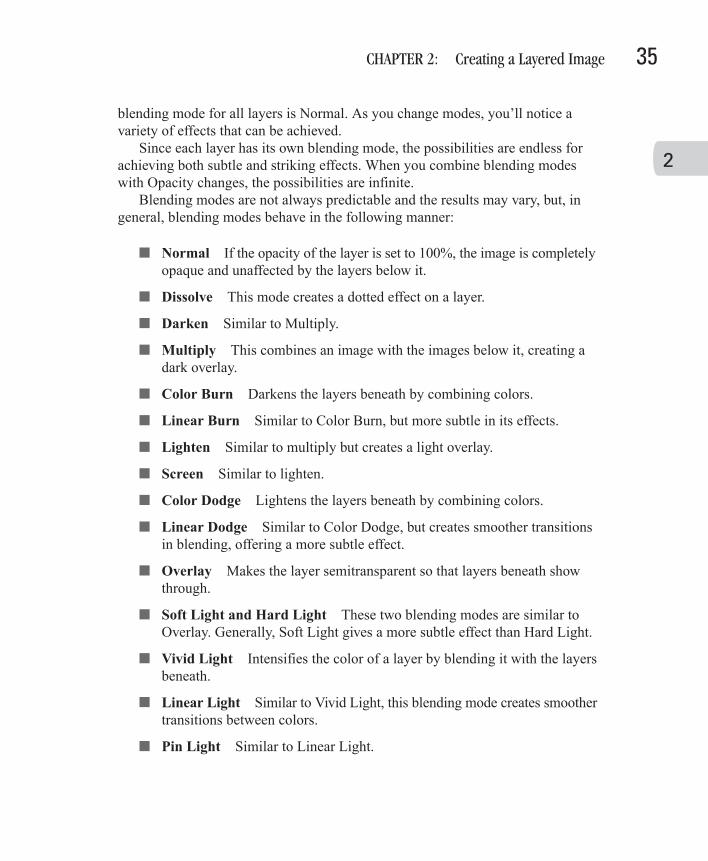
Blending modes are not always predictable and the results may vary, but, ingeneral, blending modes behave in the following manner:
■ Normal If the opacity of the layer is set to 100%, the image is completelyopaque and unaffected by the layers below it.
■ Dissolve This mode creates a dotted effect on a layer.
■ Darken Similar to Multiply.
■ Multiply This combines an image with the images below it, creating adark overlay.
■ Color Burn Darkens the layers beneath by combining colors.
■ Linear Burn Similar to Color Burn, but more subtle in its effects.
■ Lighten Similar to multiply but creates a light overlay.
■ Screen Similar to lighten.
■ Color Dodge Lightens the layers beneath by combining colors.
■ Linear Dodge Similar to Color Dodge, but creates smoother transitionsin blending, offering a more subtle effect.
■ Overlay Makes the layer semitransparent so that layers beneath showthrough.
■ Soft Light and Hard Light These two blending modes are similar toOverlay. Generally, Soft Light gives a more subtle effect than Hard Light.
■ Vivid Light Intensifies the color of a layer by blending it with the layersbeneath.
■ Linear Light Similar to Vivid Light, this blending mode creates smoothertransitions between colors.
■ Pin Light Similar to Linear Light.
CHAPTER 2: Creating a Layered Image 35
HowTo8 (8) / How to Do Everything with Photoshop 7/ McCanna / 219554-1 / Chapter 2
2
G:\OMH\HowTo\554-1\ch02.vpTuesday, May 07, 2002 8:48:30 AM
Color profile: DisabledComposite Default screen

■ Difference Affects the colors of the layers and generally darkens imagesas a result.
■ Exclusion Similar to Difference, but a subtler change to the layer.
■ Hue Mixes the colors of the layer with those of the layers below it.
■ Saturation This mode changes the intensity of colors in the layers below.
■ Color Creates a color overlay, tinting the layers below.
■ Luminosity Changes the relative lightness and darkness of the layers below.
Locking the Transparency of a LayerOnce you have created a layer and you’re happy with it, you may want to lock the layerto prevent further changes. On the Layers palette, there are four Lock icons thatserve to keep you from changing a layer in different ways. The functions of theseoptions are, from left to right, as shown in Figure 2-11.
36 How to Do Everything with Photoshop 7
HowTo8 (8) / How to Do Everything with Photoshop 7/ McCanna / 219554-1 / Chapter 2
FIGURE 2-11 Use these icons on the Layers palette to lock layers you don’t want tochange.
Lock transparentpixels
Lock image pixels
Lock position
Lock all
G:\OMH\HowTo\554-1\ch02.vpTuesday, May 07, 2002 8:48:30 AM
Color profile: DisabledComposite Default screen
■ Lock transparent pixels This option protects the transparency of a layerfrom being changed. You can paint or fill within any area that is already nottransparent, but you cannot paint outside the locked transparent area, andyou cannot erase within the non-transparent area.
■ Lock image pixels This option prevents you from painting or filling onthe layer, although you can move and transform the layer.
■ Lock position This option prevents you from moving the layer, but youcan still erase, paint, and fill the layer.
■ Lock all This option locks all of the attributes described above.
The Background layer is always locked. You can unlock the Backgroundlayer by renaming it. You can hide the Background layer by clicking theeye icon for the Background layer in the Layers palette. You can delete theBackground layer.
Changing the Color of a Layer by Locking PixelsIf you wish to change the color of something on a layer, click the first icon at thetop of the palette, named Lock transparent pixels. A small Lock icon appears to theright of the name for the layer.
Click the foreground color swatch on the toolbox and select a different colorthan the color you’ve been working with. Use the paint bucket tool and clickanywhere within the image to fill the layer as shown in Figure 2-12. Because you’velocked the transparency of the pixels, only the area that was previously filled isnow filled with the new color.
The keyboard shortcut for toggling on and off the Lock transparent pixelsfunction is the FORWARD SLASH key (/) on the keyboard, located on the same key asthe question mark. The forward slash key toggles on and off the last lock functionthat you used.
Creating Linked LayersIf you need to reposition or resize more than one layer at a time, you can link thelayers. You can link layers so that you can move, transform, align, merge, or createclipping groups from multiple layers at the same time.
CHAPTER 2: Creating a Layered Image 37
HowTo8 (8) / How to Do Everything with Photoshop 7/ McCanna / 219554-1 / Chapter 2
2
G:\OMH\HowTo\554-1\ch02.vpTuesday, May 07, 2002 8:48:30 AM
Color profile: DisabledComposite Default screen
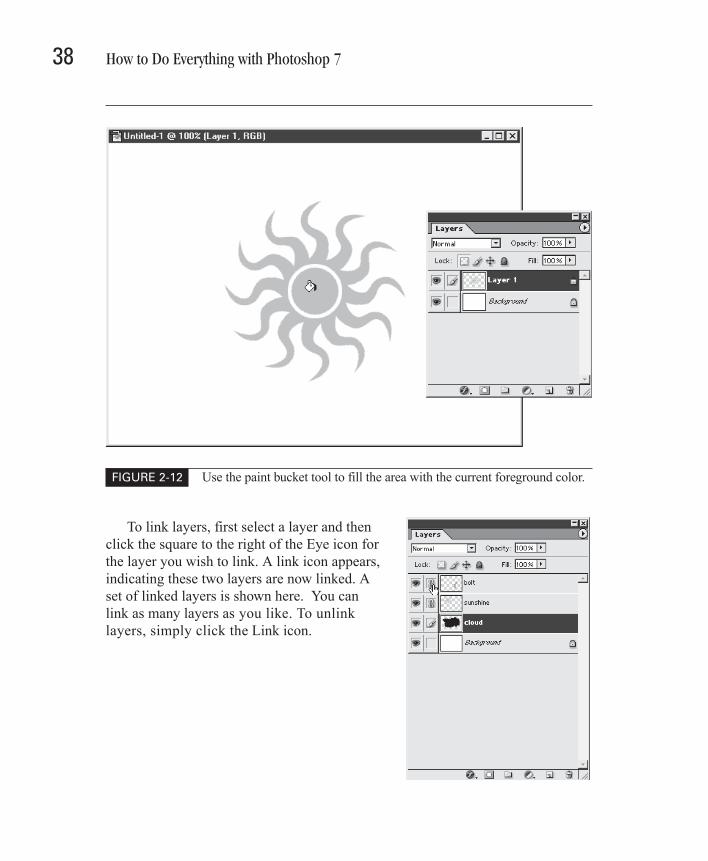
To link layers, first select a layer and thenclick the square to the right of the Eye icon forthe layer you wish to link. A link icon appears,indicating these two layers are now linked. Aset of linked layers is shown here. You canlink as many layers as you like. To unlinklayers, simply click the Link icon.
38 How to Do Everything with Photoshop 7
HowTo8 (8) / How to Do Everything with Photoshop 7/ McCanna / 219554-1 / Chapter 2
FIGURE 2-12 Use the paint bucket tool to fill the area with the current foreground color.
G:\OMH\HowTo\554-1\ch02.vpTuesday, May 07, 2002 8:48:30 AM
Color profile: DisabledComposite Default screen
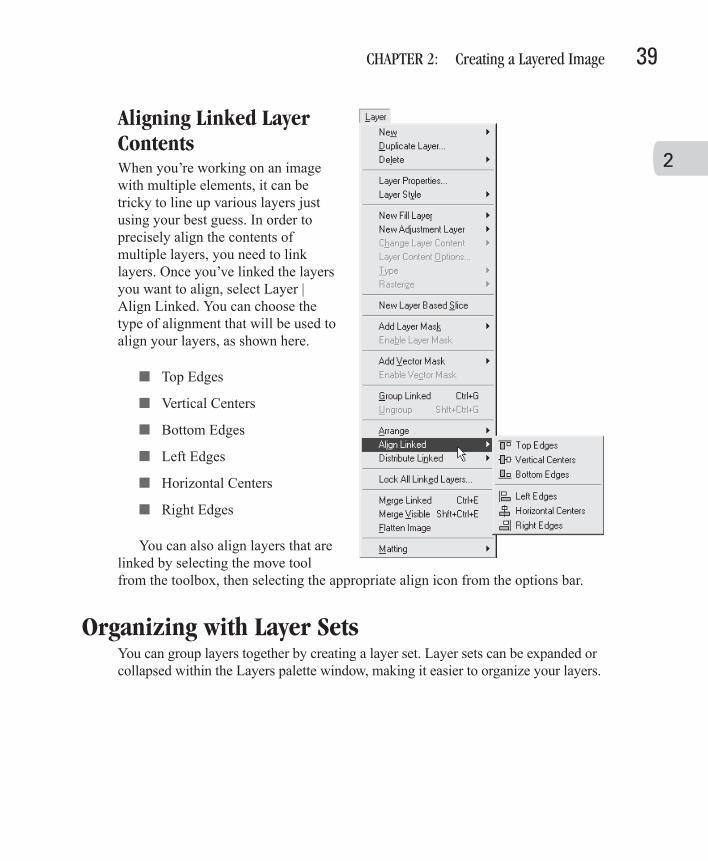
Aligning Linked LayerContentsWhen you’re working on an imagewith multiple elements, it can betricky to line up various layers justusing your best guess. In order toprecisely align the contents ofmultiple layers, you need to linklayers. Once you’ve linked the layersyou want to align, select Layer |Align Linked. You can choose thetype of alignment that will be used toalign your layers, as shown here.
■ Top Edges
■ Vertical Centers
■ Bottom Edges
■ Left Edges
■ Horizontal Centers
■ Right Edges
You can also align layers that arelinked by selecting the move toolfrom the toolbox, then selecting the appropriate align icon from the options bar.
Organizing with Layer SetsYou can group layers together by creating a layer set. Layer sets can be expanded orcollapsed within the Layers palette window, making it easier to organize your layers.
CHAPTER 2: Creating a Layered Image 39
HowTo8 (8) / How to Do Everything with Photoshop 7/ McCanna / 219554-1 / Chapter 2
2
G:\OMH\HowTo\554-1\ch02.vpTuesday, May 07, 2002 8:48:31 AM
Color profile: DisabledComposite Default screen
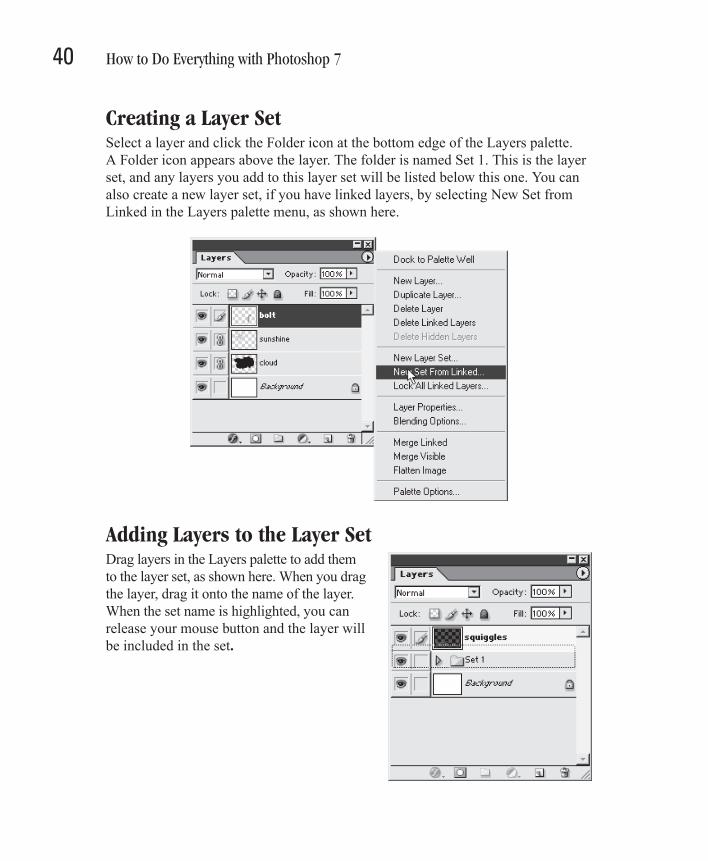
Creating a Layer SetSelect a layer and click the Folder icon at the bottom edge of the Layers palette.A Folder icon appears above the layer. The folder is named Set 1. This is the layerset, and any layers you add to this layer set will be listed below this one. You canalso create a new layer set, if you have linked layers, by selecting New Set fromLinked in the Layers palette menu, as shown here.
Ill 2-15
Adding Layers to the Layer SetDrag layers in the Layers palette to add themto the layer set, as shown here. When you dragthe layer, drag it onto the name of the layer.When the set name is highlighted, you canrelease your mouse button and the layer willbe included in the set.
40 How to Do Everything with Photoshop 7
HowTo8 (8) / How to Do Everything with Photoshop 7/ McCanna / 219554-1 / Chapter 2
G:\OMH\HowTo\554-1\ch02.vpTuesday, May 07, 2002 8:48:31 AM
Color profile: DisabledComposite Default screen
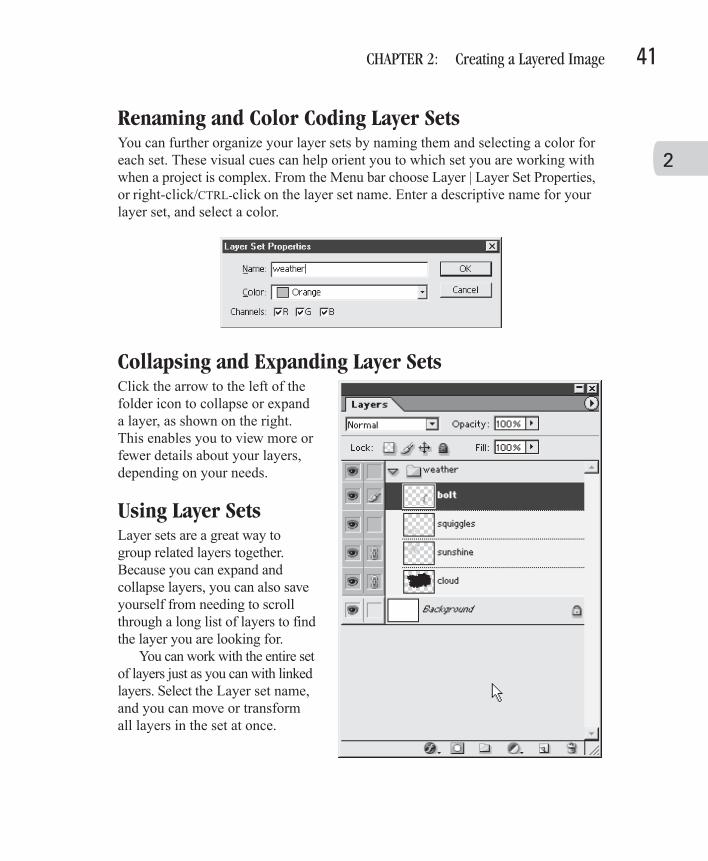
Renaming and Color Coding Layer SetsYou can further organize your layer sets by naming them and selecting a color foreach set. These visual cues can help orient you to which set you are working withwhen a project is complex. From the Menu bar choose Layer | Layer Set Properties,or right-click/CTRL-click on the layer set name. Enter a descriptive name for yourlayer set, and select a color.
Ill 2-17
Collapsing and Expanding Layer SetsClick the arrow to the left of thefolder icon to collapse or expanda layer, as shown on the right.This enables you to view more orfewer details about your layers,depending on your needs.
Using Layer SetsLayer sets are a great way togroup related layers together.Because you can expand andcollapse layers, you can also saveyourself from needing to scrollthrough a long list of layers to findthe layer you are looking for.
You can work with the entire setof layers just as you can with linkedlayers. Select the Layer set name,and you can move or transformall layers in the set at once.
CHAPTER 2: Creating a Layered Image 41
HowTo8 (8) / How to Do Everything with Photoshop 7/ McCanna / 219554-1 / Chapter 2
2
G:\OMH\HowTo\554-1\ch02.vpTuesday, May 07, 2002 8:48:31 AM
Color profile: DisabledComposite Default screen
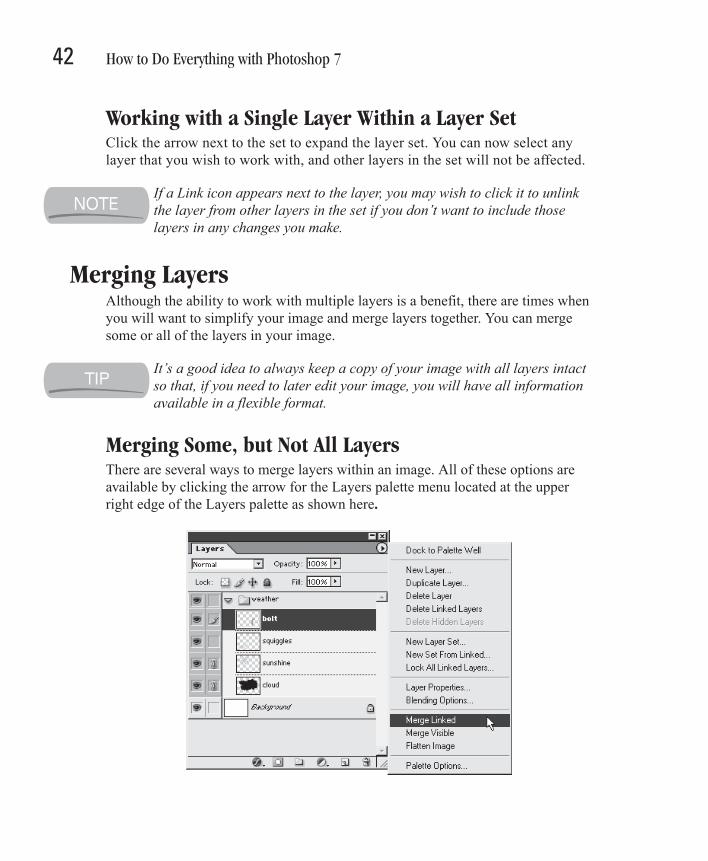
Working with a Single Layer Within a Layer SetClick the arrow next to the set to expand the layer set. You can now select anylayer that you wish to work with, and other layers in the set will not be affected.
If a Link icon appears next to the layer, you may wish to click it to unlinkthe layer from other layers in the set if you don’t want to include thoselayers in any changes you make.
Merging LayersAlthough the ability to work with multiple layers is a benefit, there are times whenyou will want to simplify your image and merge layers together. You can mergesome or all of the layers in your image.
It’s a good idea to always keep a copy of your image with all layers intactso that, if you need to later edit your image, you will have all informationavailable in a flexible format.
Merging Some, but Not All LayersThere are several ways to merge layers within an image. All of these options areavailable by clicking the arrow for the Layers palette menu located at the upperright edge of the Layers palette as shown here.
Ill 2-19
42 How to Do Everything with Photoshop 7
HowTo8 (8) / How to Do Everything with Photoshop 7/ McCanna / 219554-1 / Chapter 2
G:\OMH\HowTo\554-1\ch02.vpTuesday, May 07, 2002 8:48:31 AM
Color profile: DisabledComposite Default screen
Select the top-most layer you want to merge and, from the Layers palette menuon the Layers palette, choose Merge Down. This merges two layers together. Notethat you can’t merge hidden layers. You can also merge a single layer with the layerbeneath it by using CTRL-E/COMMAND-E.
Another method is to hide the layers you don’t want to merge by clickingthe eye icon next to those layers. Then, from the Layers palette menu, selectMerge Visible.
If you have linked layers, you can merge them together by selecting MergeLinked from the Layers palette menu.
Type layers need to be rasterized before they can be merged. See Chapter 7for more information on type layers.
Merging All LayersThe most common reason to merge all layers within an image is to enable youto save to a file format that requires a file with a single layer. In Photoshop thisis called flattening a file. To flatten a file, select Flatten Image from the Layerspalette menu.
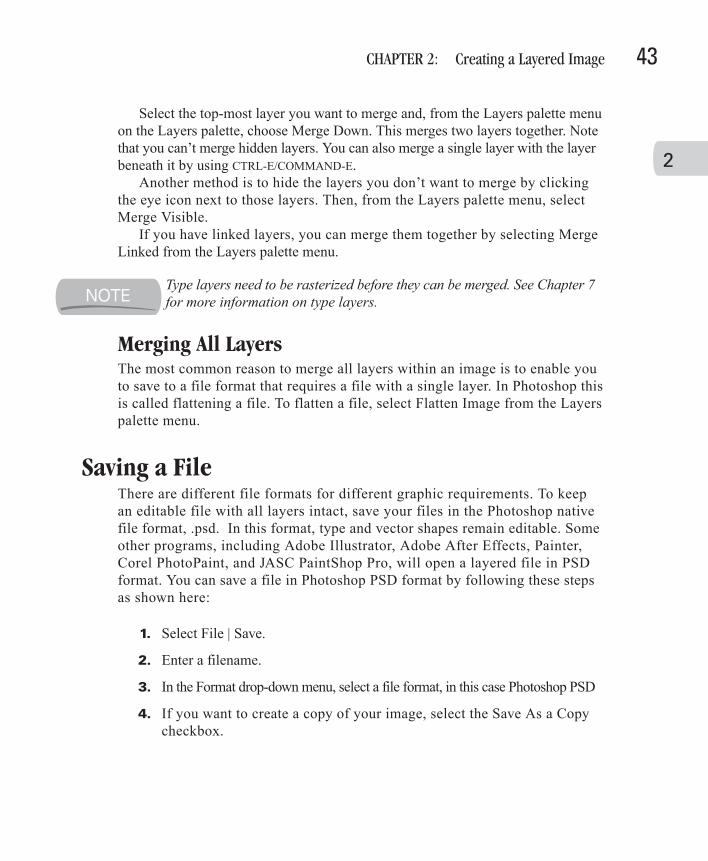
Saving a FileThere are different file formats for different graphic requirements. To keepan editable file with all layers intact, save your files in the Photoshop nativefile format, .psd. In this format, type and vector shapes remain editable. Someother programs, including Adobe Illustrator, Adobe After Effects, Painter,Corel PhotoPaint, and JASC PaintShop Pro, will open a layered file in PSDformat. You can save a file in Photoshop PSD format by following these stepsas shown here:
1. Select File | Save.
2. Enter a filename.
3. In the Format drop-down menu, select a file format, in this case Photoshop PSD
4. If you want to create a copy of your image, select the Save As a Copycheckbox.
CHAPTER 2: Creating a Layered Image 43
HowTo8 (8) / How to Do Everything with Photoshop 7/ McCanna / 219554-1 / Chapter 2
2
G:\OMH\HowTo\554-1\ch02.vpTuesday, May 07, 2002 8:48:31 AM
Color profile: DisabledComposite Default screen
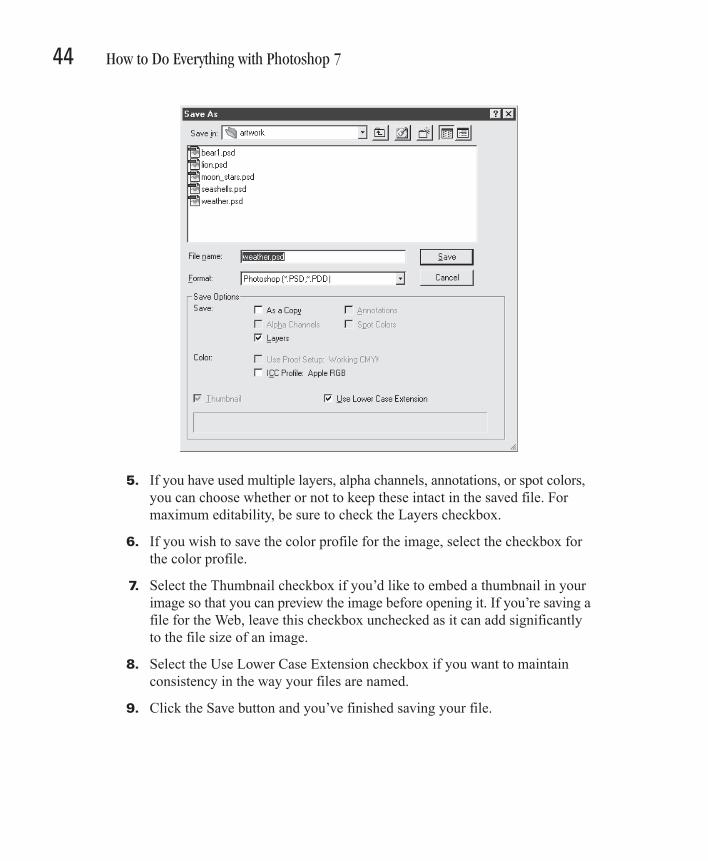
5. If you have used multiple layers, alpha channels, annotations, or spot colors,you can choose whether or not to keep these intact in the saved file. Formaximum editability, be sure to check the Layers checkbox.
6. If you wish to save the color profile for the image, select the checkbox forthe color profile.
7. Select the Thumbnail checkbox if you’d like to embed a thumbnail in yourimage so that you can preview the image before opening it. If you’re saving afile for the Web, leave this checkbox unchecked as it can add significantlyto the file size of an image.
8. Select the Use Lower Case Extension checkbox if you want to maintainconsistency in the way your files are named.
9. Click the Save button and you’ve finished saving your file.
44 How to Do Everything with Photoshop 7
HowTo8 (8) / How to Do Everything with Photoshop 7/ McCanna / 219554-1 / Chapter 2
G:\OMH\HowTo\554-1\ch02.vpTuesday, May 07, 2002 8:48:32 AM
Color profile: DisabledComposite Default screen
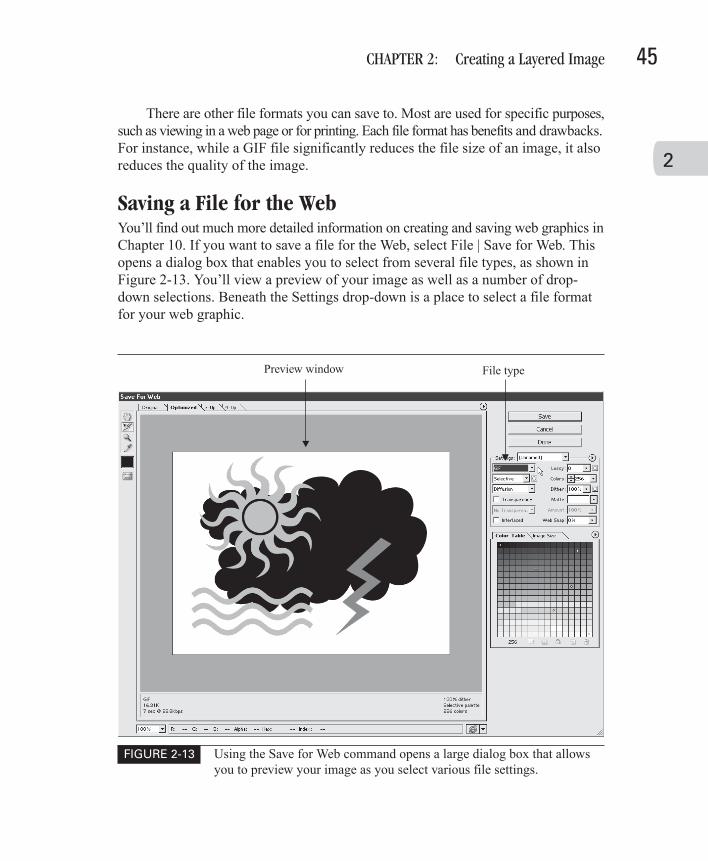
There are other file formats you can save to. Most are used for specific purposes,such as viewing in a web page or for printing. Each file format has benefits and drawbacks.For instance, while a GIF file significantly reduces the file size of an image, it alsoreduces the quality of the image.
Saving a File for the WebYou’ll find out much more detailed information on creating and saving web graphics inChapter 10. If you want to save a file for the Web, select File | Save for Web. Thisopens a dialog box that enables you to select from several file types, as shown inFigure 2-13. You’ll view a preview of your image as well as a number of drop-down selections. Beneath the Settings drop-down is a place to select a file formatfor your web graphic.
CHAPTER 2: Creating a Layered Image 45
HowTo8 (8) / How to Do Everything with Photoshop 7/ McCanna / 219554-1 / Chapter 2
2
FIGURE 2-13 Using the Save for Web command opens a large dialog box that allowsyou to preview your image as you select various file settings.
Preview window File type
G:\OMH\HowTo\554-1\ch02.vpTuesday, May 07, 2002 8:48:32 AM
Color profile: DisabledComposite Default screen

1. GIF files are limited to 256 colors or fewer and can contain transparencyinformation. Select GIF if you need transparency in an image or have asimple image with few colors.
2. JPG files yield the best results for images with many colors, such asphotographs.
3. PNG files can contain both full color information and transparency; however,older web browsers do not support them.
Once you’ve made your file type selection, click OK on the upper right edge ofthe preview pane.
Saving a File for PrintIf you are saving a file for print, save in a format that your page-layout or illustrationprogram can best use. Select EPS or TIF for most print purposes. To save a file toEPS or TIF format, first flatten the file as described in the preceding section.
Saving an EPS FileThere are several options to choose from when you save an EPS file. EPS stands forEncapsulated PostScript, and is commonly used for artwork that will be printed.
1. Select File | Save As.
2. Enter a filename.
3. Choose EPS DCS 1.0 from the File Format drop-down menu.
4. Click Save.
5. A second dialog boxappears, titled DCS 1.0Format, as shown here.For Preview, select TIF,(8 bits/pixel). The TIFformat is the best formatfor sharing EPS filesbetween Mac andWindows. Using the 8 bitssetting yields the bestquality preview for theEPS file.
46 How to Do Everything with Photoshop 7
HowTo8 (8) / How to Do Everything with Photoshop 7/ McCanna / 219554-1 / Chapter 2
G:\OMH\HowTo\554-1\ch02.vpTuesday, May 07, 2002 8:48:32 AM
Color profile: DisabledComposite Default screen
6. Chose an encoding method. For greatest flexibility, and for sharing filesbetween Mac and Windows platforms, choose ASCII.
7. For low-resolution images, click the Image Interpolation checkbox for thebest quality output.
8. Click OK.
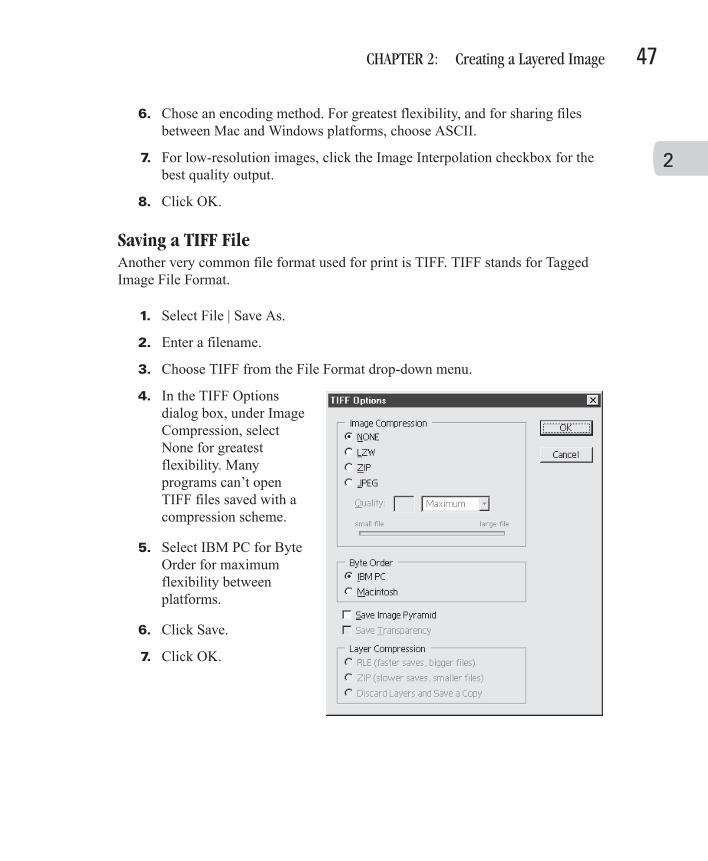
Saving a TIFF FileAnother very common file format used for print is TIFF. TIFF stands for TaggedImage File Format.
1. Select File | Save As.
2. Enter a filename.
3. Choose TIFF from the File Format drop-down menu.
4. In the TIFF Optionsdialog box, under ImageCompression, selectNone for greatestflexibility. Manyprograms can’t openTIFF files saved with acompression scheme.
5. Select IBM PC for ByteOrder for maximumflexibility betweenplatforms.
6. Click Save.
7. Click OK.
CHAPTER 2: Creating a Layered Image 47
HowTo8 (8) / How to Do Everything with Photoshop 7/ McCanna / 219554-1 / Chapter 2
2
G:\OMH\HowTo\554-1\ch02.vpTuesday, May 07, 2002 8:48:33 AM
Color profile: DisabledComposite Default screen

HowTo8 (8) / How to Do Everything with Photoshop 7/ McCanna / 219554-1 / Chapter 2Blind Folio 2:48
G:\OMH\HowTo\554-1\ch02.vpTuesday, May 07, 2002 8:48:33 AM
Color profile: DisabledComposite Default screen