Embed Size (px)
Citation preview
CHAPTER 3 – CHILD AND FAMILY INFORMATION
TABLE OF CONTENTS
PART I
Section A: Adding a New Child 1
Section B: Viewing a Child’s Record
6
Searching For a Specific Child or Group of Children Advanced Lookup
Section C: Child Record
13
Child Record Header
Section C1: Child Record – Main Tab 14
Section C2: Child Record – Relationships Tab 15
Section C3: Child Record – Services Tab 16 Summary of Current Service Profile Editing/Updating the Service Profile Services Section - Care Services Section – Meals Services Section - Transportation Subsidy/Scholarship Section Adding a Subsidy to a Child’s Record
Cost/Payment Section
Section C4: Child Record – Financial Tab 29 Adding a Transaction to a Child’s Record Voiding a Payment Drop In Processing Printing an Invoice or Transaction List

CHAPTER 3 – CHILD AND FAMILY INFORMATION
ChildWare Manual 8/06/2012 Chapter 3 – Child & Family Data Page 1
1. Click “Children”.
2. Click “Add Child”. You will be taken to a new screen.
Section A: Adding a New Child

CHAPTER 3 – CHILD AND FAMILY INFORMATION
ChildWare Manual 8/06/2012 Chapter 3 – Child & Family Data Page 2
Section A: Adding a New Child
3. Enter the child’s basic information. The system will automatically calculate the child’s age based on her date of birth.
4. If the child is from a family that is new to your center, check “New Family” and enter basic information for the child’s primary contact(s) (you will be able to add more
details later). Then proceed to Step 8.

CHAPTER 3 – CHILD AND FAMILY INFORMATION
ChildWare Manual 8/06/2012 Chapter 3 – Child & Family Data Page 3
Section A: Adding a New Child
5. If the child is from a family with a previous relationship to your center, select “Existing Family” and choose the appropriate contacts and relationships
from the drop-down lists.
6. Any children associated with selected contacts will appear in the “Siblings” area. Select the appropriate relationship from the drop-down list to the right of the name.
7. Expected enrollment days, site, family size and annual income will default to the sibling’s service information, as it may reflect the new child’s information. You can override these
selections if they do not match.

CHAPTER 3 – CHILD AND FAMILY INFORMATION
ChildWare Manual 8/06/2012 Chapter 3 – Child & Family Data Page 4
Section A: Adding a New Child
9. Regardless of enrollment status (waiting list, future enrollment, etc.) you can designate the child’s expected or current schedule at the center. More details will be available after you’ve filled in this initial form such as time in and out
each day.
8. Add any referral data your center collects. The only required field is Referral Date. You can track: Referral Date (the date the child’s parents/
guardians first contacted your center – it can be the same as the Enrollment Date)
Referral Source (in case you want to track how people find out about your center)
Reason for Requesting Child Care (what brought this prospective child to your center?)
First Staff Contact (the first staff person that spoke to the parent/guardian – this can be useful for later follow-up)
Dates that the parents/guardians: o Toured the facility o Completed an Application Form o Paid an Application Fee (if you charge
a fee)
10. If you work for a multi-site agency you can choose to select the expected site, or leave it blank and
manage an agency-level waiting list.
CHAPTER 3 – CHILD AND FAMILY INFORMATION
ChildWare Manual 8/06/2012 Chapter 3 – Child & Family Data Page 5
Section A: Adding a New Child
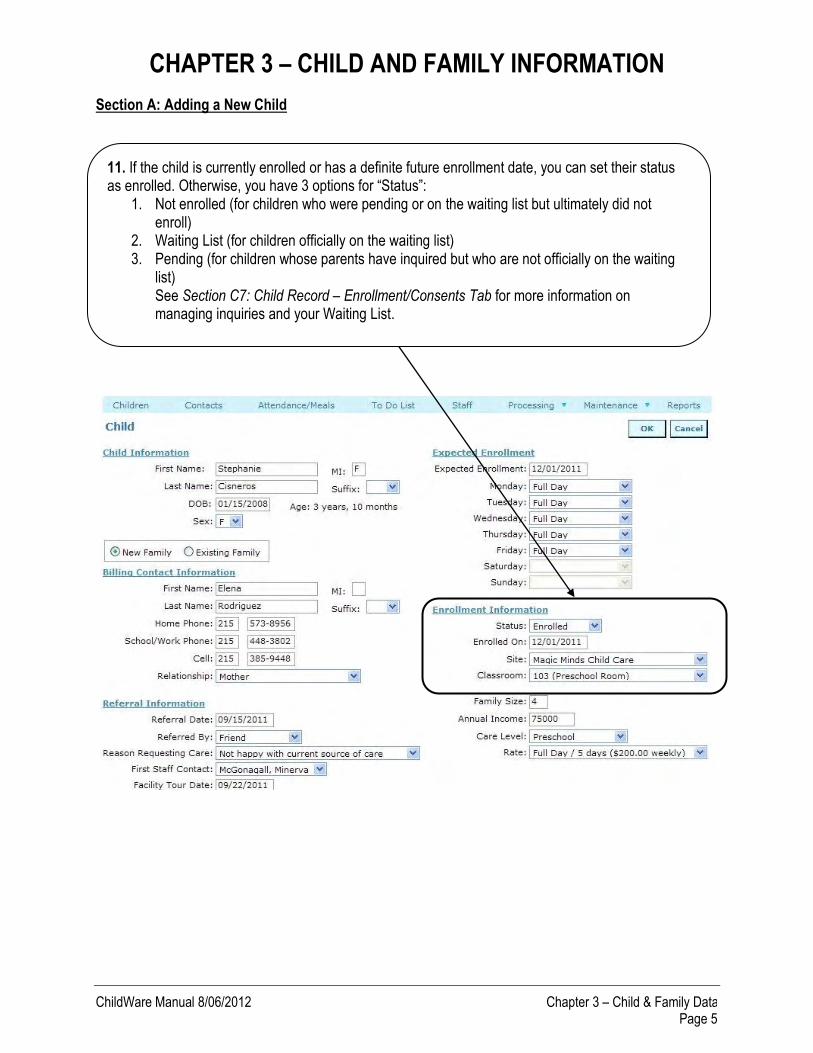
11. If the child is currently enrolled or has a definite future enrollment date, you can set their status as enrolled. Otherwise, you have 3 options for “Status”:
1. Not enrolled (for children who were pending or on the waiting list but ultimately did not enroll)
2. Waiting List (for children officially on the waiting list) 3. Pending (for children whose parents have inquired but who are not officially on the waiting
list) See Section C7: Child Record – Enrollment/Consents Tab for more information on managing inquiries and your Waiting List.

CHAPTER 3 – CHILD AND FAMILY INFORMATION
ChildWare Manual 8/06/2012 Chapter 3 – Child & Family Data Page 6
Section A: Adding a New Child
12. If the child is enrolled, the remaining fields in the Enrollment Information section must be filled out with the exception of “Classroom” which is optional. “Family Size” and “Annual Income” are optional, unless your center’s tuition rates are sliding scale. If you participate in the food program, these fields are useful also for calculating the child’s meal subsidy status.
13. Don’t forget to click “OK” to save your work. You will be taken to the child’s record where you can add or edit information. See Section C for information on the child record.
CHAPTER 3 – CHILD AND FAMILY INFORMATION
ChildWare Manual 8/06/2012 Chapter 3 – Child & Family Data Page 7
Section B: Viewing a Child’s Record
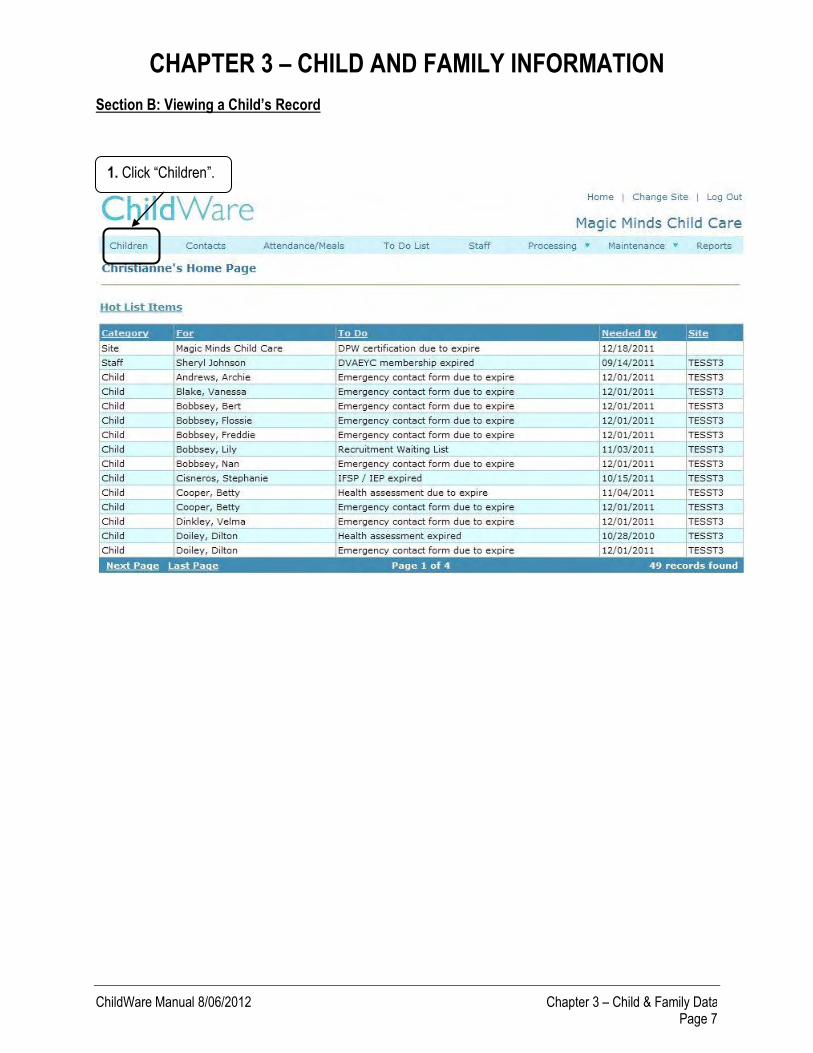
1. Click “Children”.

CHAPTER 3 – CHILD AND FAMILY INFORMATION
ChildWare Manual 8/06/2012 Chapter 3 – Child & Family Data Page 8
Section B: Viewing a Child’s Record
2. The system will display a list of active (currently enrolled) children sorted alphabetically by last name. Click “Select” beside the name of
the child whose record you want to view or edit.
Click “Print List” to view or print the list you see on the screen. You can print the list before or
after filtering (see next page).
You can also sort the list by clicking on the column headers.

CHAPTER 3 – CHILD AND FAMILY INFORMATION
ChildWare Manual 8/06/2012 Chapter 3 – Child & Family Data Page 9
Section B: Viewing a Child’s Record
Searching For a Specific Child or Group of Children View Options (most useful for finding a particular group of children):
Active: Displays a list of children currently enrolled in your agency. All Children: Displays a list of all children you have ever added to the database; includes all
enrollment statuses (enrolled, discharged, waiting list, etc.). Future Enrollments: Displays a list of children with future enrollment dates. Active (date range): Displays a list of children that were active (enrolled) during a particular time
frame. You can specify the date range you want. Did Not Enroll: Displays a list of children who were previously pending or on the waiting list and
whose caregivers decided not to enroll them. Discharged: Displays a list of children who have been discharged. Discharge Reason: Displays a list of children who were discharged for a specific reason (e.g. see
only children who left because they lost their subsidy funding). Pending: Displays a list of children whose caregivers have inquired about registration but who are
not officially on the Waiting List (children added without enrollment date and not specifically tagged as on the waiting list will appear).
Waiting List: Displays a list of children on the official Waiting List. Allergies/Food Restriction: Displays a list of children with specific allergies or restrictions (e.g. you
can view a list of all children with peanut allergies). Care Level: Displays a list of children at a specific care level.
The system displays a list of active children by default but you can use the “View or Search By” drop-down box to either filter the list of active children or to find children not currently active. This makes it easier to find the child you want, or to view the records of a specific group of children.
CHAPTER 3 – CHILD AND FAMILY INFORMATION
ChildWare Manual 8/06/2012 Chapter 3 – Child & Family Data Page 10
Section B: Viewing a Child’s Record Searching For a Specific Child or Group of Children (cont.) View Options (cont.)
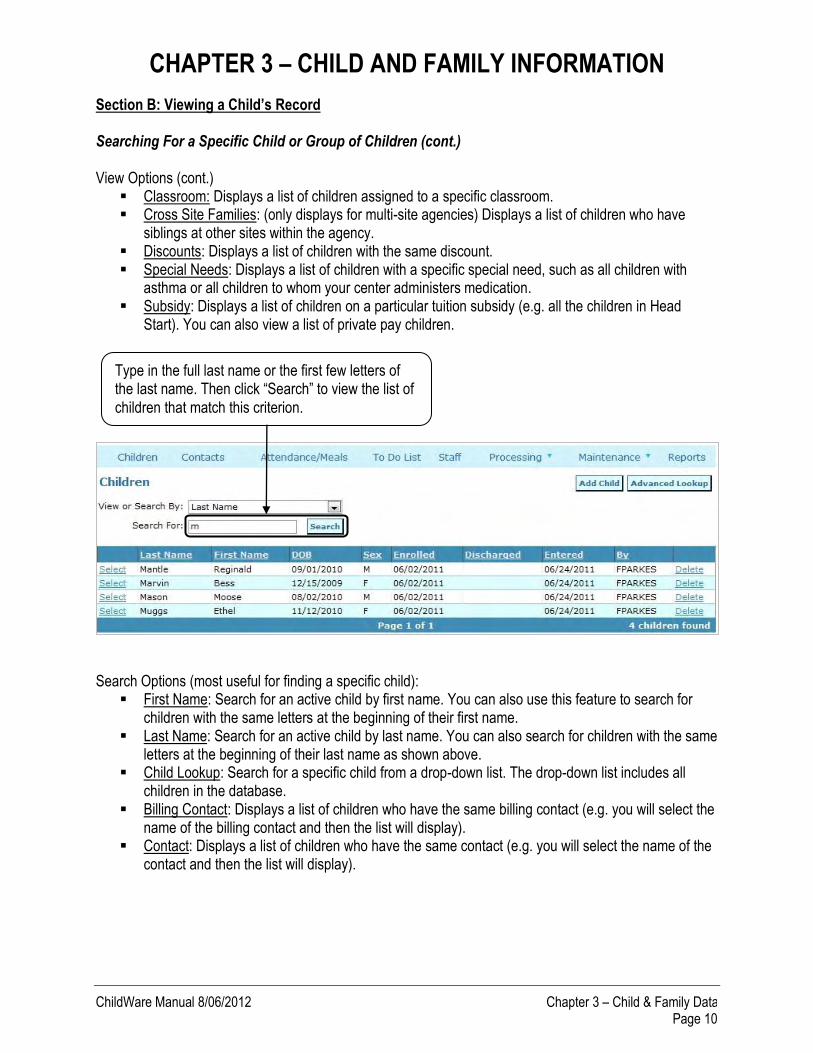
Classroom: Displays a list of children assigned to a specific classroom. Cross Site Families: (only displays for multi-site agencies) Displays a list of children who have
siblings at other sites within the agency. Discounts: Displays a list of children with the same discount. Special Needs: Displays a list of children with a specific special need, such as all children with
asthma or all children to whom your center administers medication. Subsidy: Displays a list of children on a particular tuition subsidy (e.g. all the children in Head
Start). You can also view a list of private pay children.
Search Options (most useful for finding a specific child):
First Name: Search for an active child by first name. You can also use this feature to search for children with the same letters at the beginning of their first name.
Last Name: Search for an active child by last name. You can also search for children with the same letters at the beginning of their last name as shown above.
Child Lookup: Search for a specific child from a drop-down list. The drop-down list includes all children in the database.
Billing Contact: Displays a list of children who have the same billing contact (e.g. you will select the name of the billing contact and then the list will display).
Contact: Displays a list of children who have the same contact (e.g. you will select the name of the contact and then the list will display).
Type in the full last name or the first few letters of the last name. Then click “Search” to view the list of children that match this criterion.

CHAPTER 3 – CHILD AND FAMILY INFORMATION
ChildWare Manual 8/06/2012 Chapter 3 – Child & Family Data Page 11
Section B: Viewing a Child’s Record Advanced Lookup The Advanced Lookup Feature enables you to select a group of records using multiple criteria. In the example below, the list is filtered by current enrollment status and subsidy participation for two different types of subsidy.
1. Select the criteria for the group of records you are trying to identify. In this example the user wants to identify all children with CCIS and Pre-K Counts funding that is currently enrolled: Subsidy 1: Select CCIS Subsidy 2: Select Pre-K Counts Current Status: Select Enrolled
2. When you have selected all applicable criteria click “Search” to view the grouping
of records.
3. If you would like print this list of children, click “Print List.”

CHAPTER 3 – CHILD AND FAMILY INFORMATION
ChildWare Manual 8/06/2012 Chapter 3 – Child & Family Data Page 12
Section B: Viewing a Child’s Record Advanced Lookup (cont.)
In this example, the user wants to identify all children that withdrew over this past summer and reenrolled for the school year. Current Status: Select Enrolled Discharged Between: 06/15/2011 and 9/1/2011 Discharge Reason: Temporarily Inactive
After selecting all applicable criteria click “Search” to view the grouping of
records.

CHAPTER 3 – CHILD AND FAMILY INFORMATION
ChildWare Manual 8/06/2012 Chapter 3 – Child & Family Data Page 13
Section C: Child Record Every child entered in your system has an associated record. It is recommended that you do not delete records. Any errors in the child’s record can be corrected. Children who have left your center can be discharged and children who were potentially going to enroll, but did not, can be set to “Did not Enroll”. See Section C7: Child Record – Enrollment/Consents Tab for more information. Child Record Header The Child Record has a horizontal display across the top that includes classroom information and a summary of financial balances.
The remainder of the child’s information is accessed through a series of tabs. These are described individually in the following pages.
Child Due: Amount owed for services rendered to that child. If there is a credit on the child’s account, the amount is displayed in parentheses. In this example, $245 is owed for this child. Family Due: Amount owed for services rendered to that child and his or her siblings. If there is a credit on the family’s account, the amount is displayed in parentheses. In this example, the family owes $250, which indicates that his siblings owe an additional $5.
Deposit Required: Indicates how much has been charged against the child’s account for the purpose of a refundable or escrow deposit. If your center does not collect refundable deposits, you will not need to use this field. Deposit on File: Indicates how much money the center has collected for a refundable or escrow deposit for that child. If your center does not collect refundable deposits, you will not need to use this field. See Section C4: Child Record – Financial Tab for more information about deposits.
Each record includes the child’s name and her classroom assignment in parenthesis. See Section C3: Child Record – Services Tab for how to add or update a classroom assignment.

CHAPTER 3 – CHILD AND FAMILY INFORMATION
ChildWare Manual 8/06/2012 Chapter 3 – Child & Family Data Page 14
Section C1: Child Record – Main Tab The Main Tab displays basic information about the child. Explanations of fields that might be unfamiliar to you are listed below. Most fields are optional – use the ones that are relevant to your center.
The Ethnicity field can be used to track Hispanic/Non-Hispanic status, as used for census data. You can also record the child’s two primary Languages. This can be useful to help track students for whom English is a second language. Location of birth can also be recorded.
For students in your after-school program you can track the name of their school, their grade and their District-issued Student ID #. This information can be used if you offer school pickup service. Section C: Child Record – Services Tab reviews how to add transportation services to the child’s record.
The Contact/ Guardian Summary shows details of the child’s two primary contacts. You cannot edit their information on this screen. The next section will review adding and updating contact records.

CHAPTER 3 – CHILD AND FAMILY INFORMATION
ChildWare Manual 8/06/2012 Chapter 3 – Child & Family Data Page 15
Section C2: Child Record – Relationships Tab The Relationships Tab displays a listing of children (siblings) and adults (contacts) related to the child along with some basic information about them. In addition to providing information, this tab is the gateway to several functions which are described below. See Section D: Contacts and Section E: Siblings for more information on relationships in ChildWare.
Open an adult contact’s record to view, edit or add information.
Delete an adult contact from the child’s record (this does not delete the adult’s record; it just removes the database connection between the adult and the child). This function can be used to correct mistakes.
Add an adult contact to the child’s record.
Specify a primary and secondary billing contact for the child. See “Add Contact” for details about Billing Contacts.
Add a sibling contact to the child’s record.
Open a sibling’s record to view, edit or add information.
Delete a sibling contact from the child’s record (this does not delete the sibling’s record; it just removes the database connection between the sibling and the child). This function can be used to correct mistakes.

CHAPTER 3 – CHILD AND FAMILY INFORMATION
ChildWare Manual 8/06/2012 Chapter 3 – Child & Family Data Page 16
Section C3: Child Record – Services Tab The Services Tab stores all information related to service delivery at your center. This includes information such as the child’s care level, schedule, subsidy and copay amount, payment plans, etc. Collectively, this information is referred to as the Service Profile. The active service profile is a snapshot of the current services the child receives. When this information changes, (e.g. child moves up a care level or starts receiving subsidy for care) an updated profile must be created. The information in service profiles is used throughout ChildWare. Parent payment plans are used generate parent billing. The child’s expected schedule and meals is used to create attendance and meal rosters (See Chapter 5: Attendance and Meal Tracking). Many reports can be filtered using service profile information such as current classroom or care level.
All Service Profiles linked to the current enrollment are listed here. To view the detail, click “Select” next to the profile you want to see.

CHAPTER 3 – CHILD AND FAMILY INFORMATION
ChildWare Manual 8/06/2012 Chapter 3 – Child & Family Data Page 17
Section C3: Child Record – Services Tab Summary of Current Service Profile By default, the system will display a summary of the child’s current service profile on the services tab. You cannot edit the information on this screen. Each time the service profile is updated, the system will create a snapshot of the previous plan so that you will have a record of all previous service profile. The system will only create a history record if the profile was used for a billing cycle.
The Cost Summary includes how much it costs to provide services to this child. Even though this child receives subsidy from CCIS, the private pay rate is listed.
The Payment Summary shows who is paying for care and other services, what discounts are applied, and what the final parent payment schedule will be for billing.
A summary of Subsidy and Scholarship information is listed on this page to easily identify children with other funding sources.

CHAPTER 3 – CHILD AND FAMILY INFORMATION
ChildWare Manual 8/06/2012 Chapter 3 – Child & Family Data Page 18
Section C3: Child Record – Services Tab Editing/Updating the Service Profile To change or update a child’s service profile (if, for example, the child’s care level changes), click “Add/Change Current Service Profile”. The system will prompt you to input a start date for the new service profile. The date can be either in the past or future. However, the system will only allow you to input past dates for which billing has not yet been run.
To view a Service Profile, click “Select” beside the profile you want to view. Service profiles are listed in chronological order from newest to oldest. The current profile is usually at the top unless you have established a future profile.
To update a child’s service profile, click “Add/Change Current Service Profile”. You will have to add a Service Profile for all newly enrolled children.
CHAPTER 3 – CHILD AND FAMILY INFORMATION
ChildWare Manual 8/06/2012 Chapter 3 – Child & Family Data Page 19
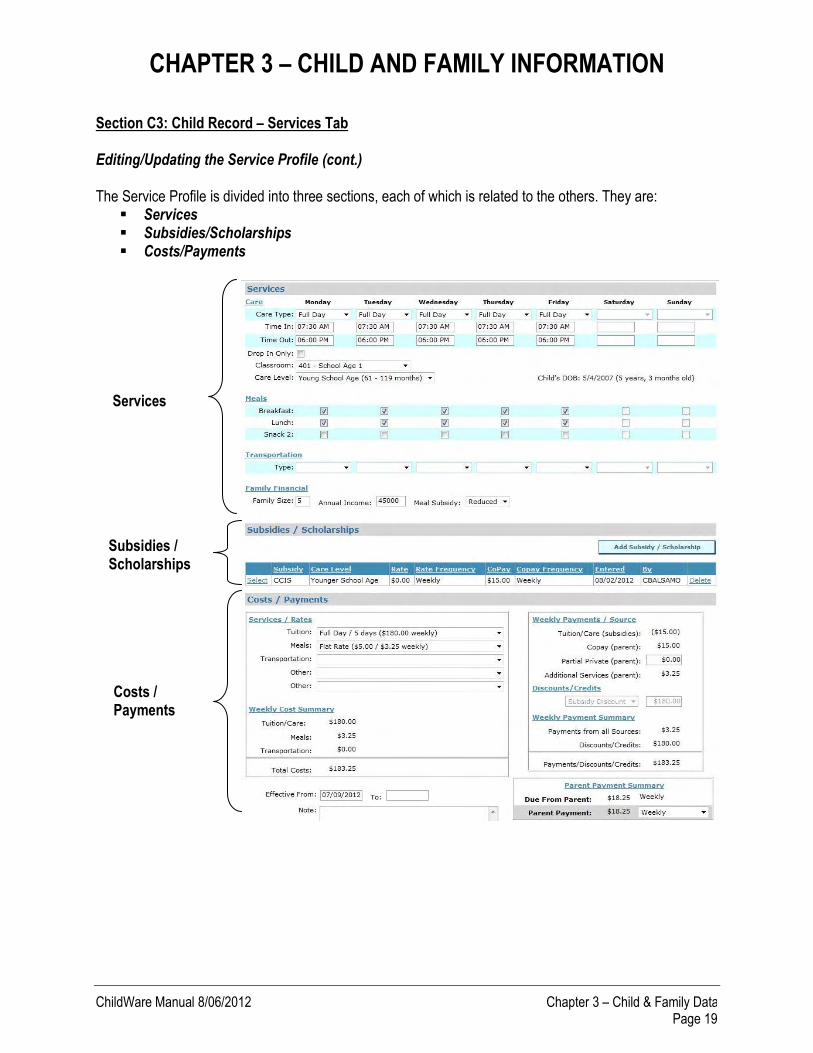
Section C3: Child Record – Services Tab Editing/Updating the Service Profile (cont.) The Service Profile is divided into three sections, each of which is related to the others. They are:
Services Subsidies/Scholarships Costs/Payments
Services
Subsidies / Scholarships
Costs / Payments

CHAPTER 3 – CHILD AND FAMILY INFORMATION
ChildWare Manual 8/06/2012 Chapter 3 – Child & Family Data Page 20
Section C3: Child Record – Services Tab Service Section – Care See Chapter 2: Agency & Site Data for details on setting up care types, default time in/out, meal options, and transportation options. The selections will be specific to your center.
1. For each day the child will be at your center, select a Care Type. The care type is the type of day the child is scheduled to receive.
2. For each day, you can also specify Time In/Time Out. These fields will be populated automatically when you select a care type, but you can edit these fields if necessary. This information can be used to plan staff/child ratios.
3. If the child does not have a set schedule and the parents pay per visit, you can tag them as Drop In Only. Check this box to remove the child from billing cycles. They will be included on attendance rosters, but will not have preloaded expected attendance. See Section C4: Child Record – Financial Tab for how to use the Drop-In Processing feature.

CHAPTER 3 – CHILD AND FAMILY INFORMATION
ChildWare Manual 8/06/2012 Chapter 3 – Child & Family Data Page 21
Section C3: Child Record – Services Tab Service Section – Care
3. Select the appropriate Care Level and Classroom assignment for the child.
The system automatically calculates and displays the child’s age based on their date of birth, in order to make it easier for you to determine the appropriate care level.

CHAPTER 3 – CHILD AND FAMILY INFORMATION
ChildWare Manual 8/06/2012 Chapter 3 – Child & Family Data Page 22
Section C3: Child Record – Services Tab Service Section – Meals
4. Select the Meals the child will receive at your center each day. This information is used to create a meal report for your center.
The child’s Meal Subsidy Status is calculated automatically based on family size and family income. If your center typically charges for meals, the system will not charge a child if their food subsidy status is “Free”. It will also charge a reduced price for children with “Reduced Price” status. See the Costs/Payments section for additional details. You can override the status calculated by the system. A notice will appear next to the field that says “Mismatch!”

CHAPTER 3 – CHILD AND FAMILY INFORMATION
ChildWare Manual 8/06/2012 Chapter 3 – Child & Family Data Page 23
Section C3: Child Record – Services Tab Service Section – Transportation
5. If your center offers Transportation for school-age students, select the transportation type they will be using each day.

CHAPTER 3 – CHILD AND FAMILY INFORMATION
ChildWare Manual 8/06/2012 Chapter 3 – Child & Family Data Page 24
Section C3: Child Record – Services Tab Subsidies/Scholarships Section This section displays information about any subsidies or scholarships that help fund the cost of a child’s care. A summary version of the child’s subsidy information is displayed on the Service Profile’s main screen, as shown below. The list of subsidies available displays based on the location of the child care agency. Adding a Subsidy to a Child’s Record
1. Click “Add Subsidy/Scholarship”.
2. Select the appropriate subsidy or scholarship type from the drop-down list. Then select the subsidy care level, and the default subsidy reimbursement rate. If the child’s attendance varies from day to day you can specify the correct rates for each day in the next step.
Reminder: If you wish to view or edit a current subsidy on a child’s profile, click Select.
3. Click “OK”.
CHAPTER 3 – CHILD AND FAMILY INFORMATION
ChildWare Manual 8/06/2012 Chapter 3 – Child & Family Data Page 25
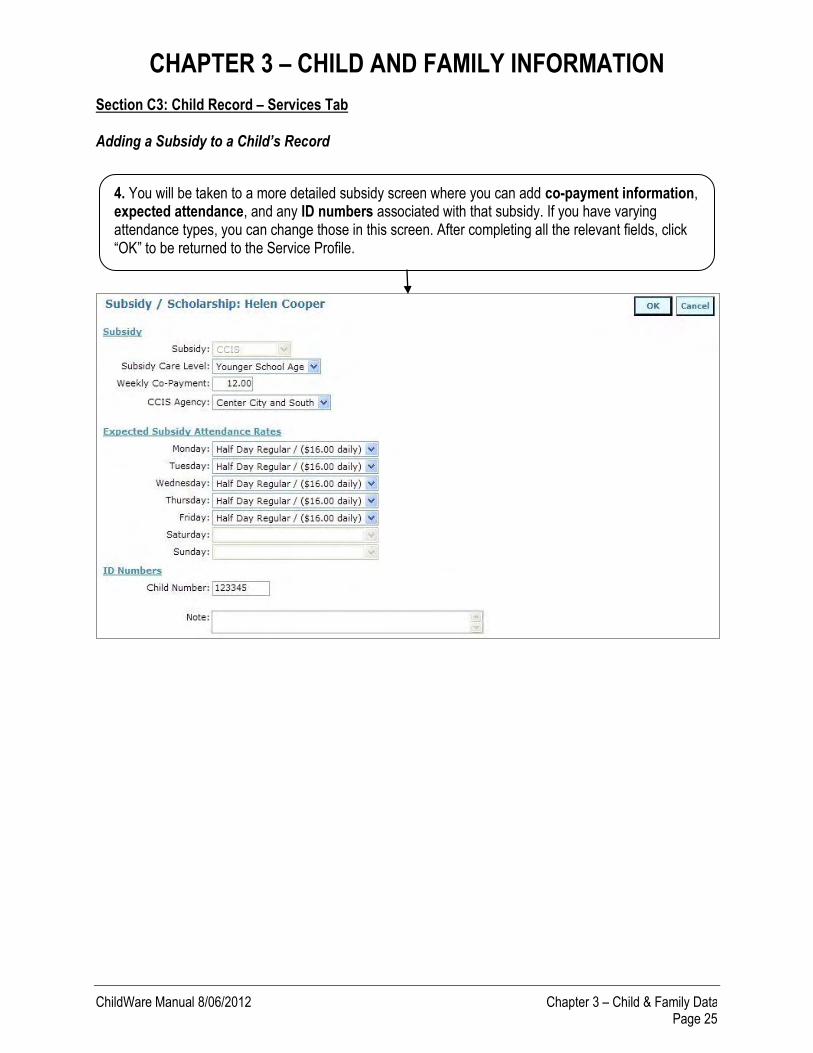
Section C3: Child Record – Services Tab Adding a Subsidy to a Child’s Record
4. You will be taken to a more detailed subsidy screen where you can add co-payment information, expected attendance, and any ID numbers associated with that subsidy. If you have varying attendance types, you can change those in this screen. After completing all the relevant fields, click “OK” to be returned to the Service Profile.

CHAPTER 3 – CHILD AND FAMILY INFORMATION
ChildWare Manual 8/06/2012 Chapter 3 – Child & Family Data Page 26
Section C3: Child Record – Services Tab Adding a Subsidy to a Child’s Record (cont.)
You can add more than one subsidy to a child’s record as seen below.
If you are updating the service profile and the child is no longer on one or both of the subsidies, you can remove it by clicking “Delete.” Deleting is only an option when you update a profile that has not yet been used for billing. n.
Depending on the subsidy selected, you may have different fields available to enter data. In this example, Center Based Contract subsidy also has effective dates for the contract and several different types of ID numbers than the example subsidy on the previous page.
CHAPTER 3 – CHILD AND FAMILY INFORMATION
ChildWare Manual 8/06/2012 Chapter 3 – Child & Family Data Page 27
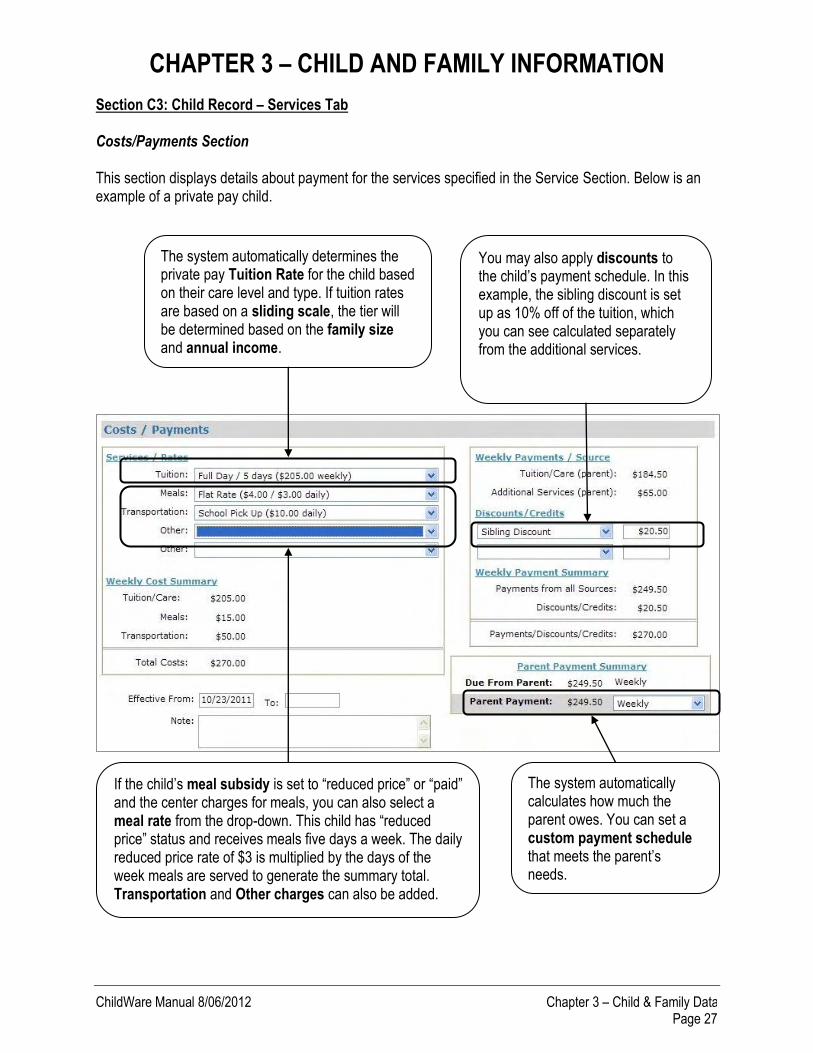
Section C3: Child Record – Services Tab Costs/Payments Section This section displays details about payment for the services specified in the Service Section. Below is an example of a private pay child.
The system automatically calculates how much the parent owes. You can set a custom payment schedule that meets the parent’s needs.
If the child’s meal subsidy is set to “reduced price” or “paid” and the center charges for meals, you can also select a meal rate from the drop-down. This child has “reduced price” status and receives meals five days a week. The daily reduced price rate of $3 is multiplied by the days of the week meals are served to generate the summary total. Transportation and Other charges can also be added.
The system automatically determines the private pay Tuition Rate for the child based on their care level and type. If tuition rates are based on a sliding scale, the tier will be determined based on the family size and annual income.
You may also apply discounts to the child’s payment schedule. In this example, the sibling discount is set up as 10% off of the tuition, which you can see calculated separately from the additional services.

CHAPTER 3 – CHILD AND FAMILY INFORMATION
ChildWare Manual 8/06/2012 Chapter 3 – Child & Family Data Page 28
Section C3: Child Record – Services Tab Costs/Payments Section Here is an example of a student who receives subsidized funding. Subsidy and/or scholarship setup was discussed in the last section.
If the subsidy program doesn’t cover the full cost of care, your center may choose to charge an Additional Co-payment. The system will calculate this amount for you automatically. Conversely, if your center does not charge an additional co-payment, the system will automatically calculate a Subsidy Discount. This will help you keep track of revenue differences by child and subsidy program. If you offer before and after care, you can utilize the “Additional Co-pay” field to add these charges on top of the subsidy co-payment. If you place an amount in the Additional Copay field, the child can be searched under the subsidy AND under the category “Partial Private.”
Although this child is receiving subsidized funding, the system automatically determines the private pay tuition rate for the child based on their care level and type. This allows you to compare revenue from private pay children vs. subsidized children.
CHAPTER 3 – CHILD AND FAMILY INFORMATION
ChildWare Manual 8/06/2012 Chapter 3 – Child & Family Data Page 29
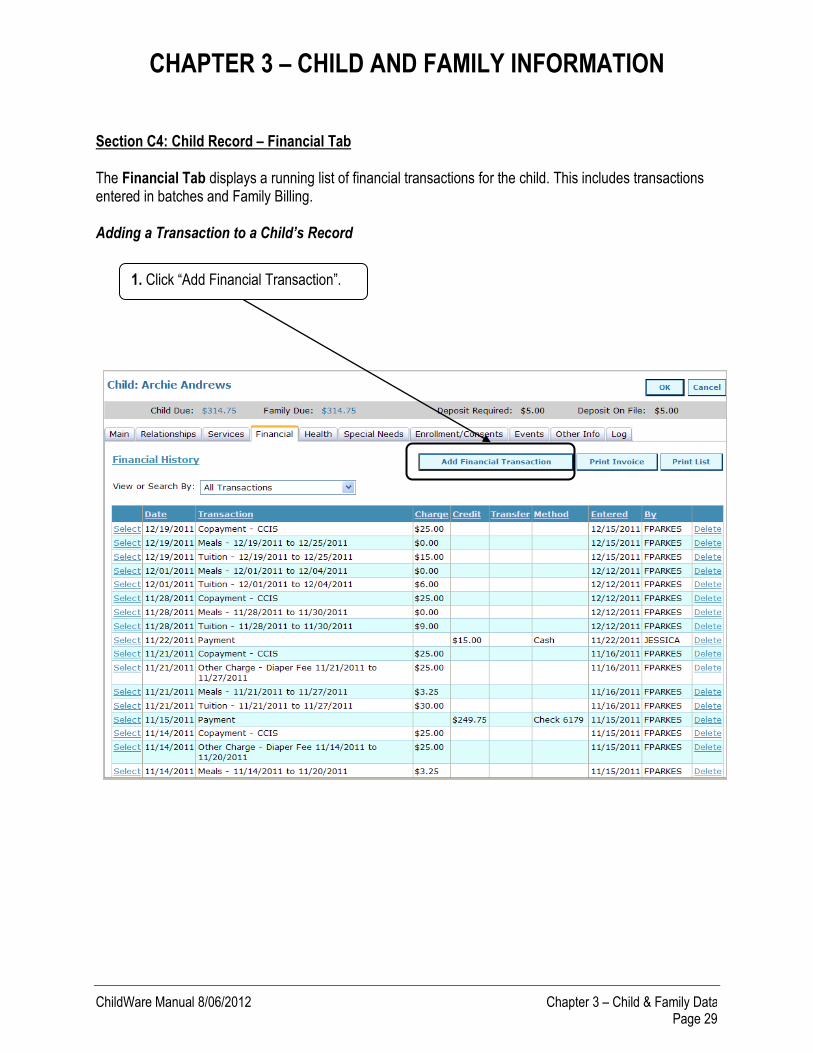
Section C4: Child Record – Financial Tab The Financial Tab displays a running list of financial transactions for the child. This includes transactions entered in batches and Family Billing. Adding a Transaction to a Child’s Record
1. Click “Add Financial Transaction”.

CHAPTER 3 – CHILD AND FAMILY INFORMATION
ChildWare Manual 8/06/2012 Chapter 3 – Child & Family Data Page 30
Section C4: Child Record – Financial Tab Adding a Transaction to a Child’s Record
2. To add a payment or credit, select the appropriate check box. To add a charge, proceed to Step 6.
3. Select the appropriate payment or credit type from the drop-down list. In order to ensure the accuracy of your financial records, you must record deposit payments separately from regular payments.
4. Enter all other information about the transaction and click “OK” to save and return to the Financial Tab.

CHAPTER 3 – CHILD AND FAMILY INFORMATION
ChildWare Manual 8/06/2012 Chapter 3 – Child & Family Data Page 31
Section C4: Child Record – Financial Tab Adding a Transaction to a Child’s Record
5. To add a charge, select the appropriate check box.
6. Select the appropriate charge type from the drop-down list.
7. Fill out the remaining fields. An amount and date are required.
8. Don’t forget to click “OK” to save the transaction. You will be taken back to the Financial Tab. .
Add an adult contact to the child’s record. See “Add Contact” for details.
Specify a primary and secondary billing contact for the child. See “Add Contact” for details about Billing Contacts.
Open a sibling or adult contact’s record to view, edit or add information.

CHAPTER 3 – CHILD AND FAMILY INFORMATION
ChildWare Manual 8/06/2012 Chapter 3 – Child & Family Data Page 32
Section C4: Child Record – Financial Tab Voiding a Payment You may need to void a payment if the check bounces or you added an entry in error, but do not want to remove the record of the data entry.
1. Select the payment you want to void.
2. Select the reason you are voiding the transaction. You can also add a note that will appear on the child’s invoice.
3. Click “Ok” to save and return to the financial tab.
CHAPTER 3 – CHILD AND FAMILY INFORMATION
ChildWare Manual 8/06/2012 Chapter 3 – Child & Family Data Page 33
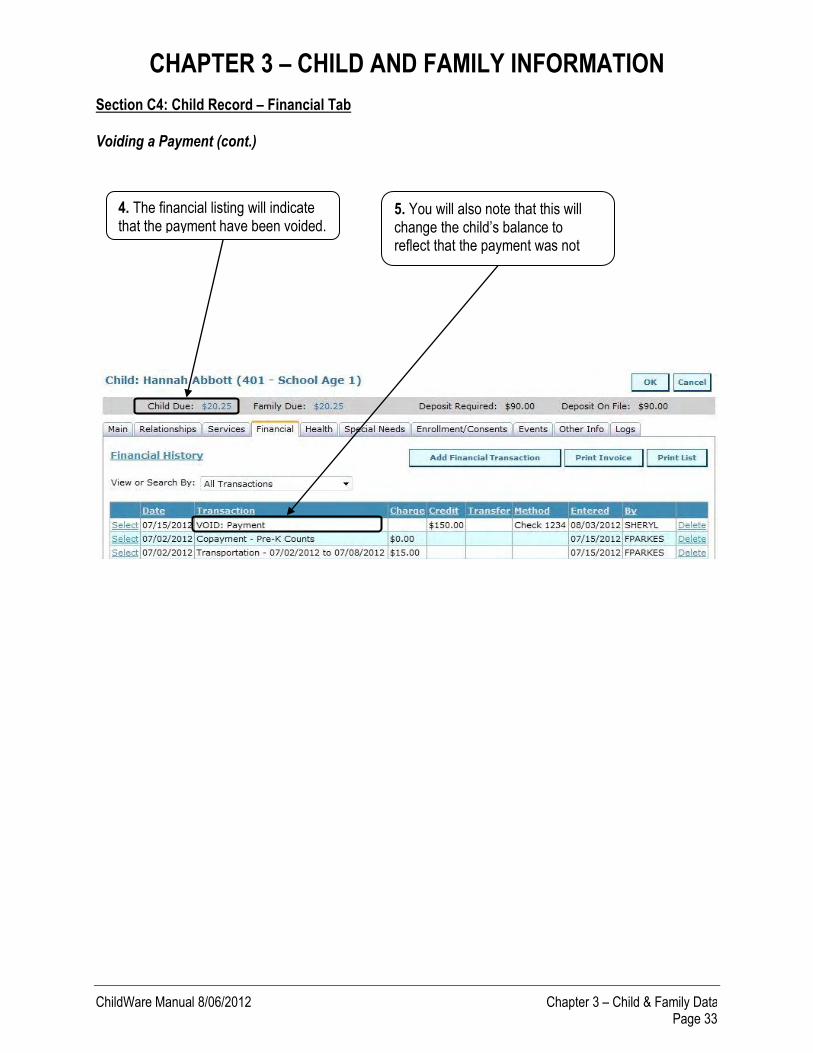
Section C4: Child Record – Financial Tab Voiding a Payment (cont.)
4. The financial listing will indicate that the payment have been voided.
5. You will also note that this will change the child’s balance to reflect that the payment was not valid.

CHAPTER 3 – CHILD AND FAMILY INFORMATION
ChildWare Manual 8/06/2012 Chapter 3 – Child & Family Data Page 34
Section C4: Child Record – Financial Tab Drop In Processing Section C3: Child Record – Services reviewed how to mark a child as Drop In Only. This is a child who does not have a set schedule, and whose parent pays per day rather than being billed on a regular basis. This feature allows you to add a child’s daily fee and attendance in one step.
When you add the Transaction Type Unscheduled Attendance, the system will automatically add the attendance for that child on the date of the charge.
3. Select Transaction Type Unscheduled Attendance. Then select the date and amount of the daily tuition fee.
2. To add a charge, select the appropriate check box.
4. Click “Ok” to save and return to the financial tab.
1. Click “Add Financial Transaction”.

CHAPTER 3 – CHILD AND FAMILY INFORMATION
ChildWare Manual 8/06/2012 Chapter 3 – Child & Family Data Page 35
Section C4: Child Record – Financial Tab Drop In Processing (cont.)
5. When you add the Transaction Type Unscheduled Attendance, the system will automatically add the attendance for that child on the date of the charge. (See Chapter 5: Attendance and Meals Processing for a full tutorial)

CHAPTER 3 – CHILD AND FAMILY INFORMATION
ChildWare Manual 8/06/2012 Chapter 3 – Child & Family Data Page 36
Section C4: Child Record – Financial Tab Printing an Invoice or a Transaction List
To print an invoice using a specific date range, follow the instructions below.
You can print an invoice or a transaction report directly from the child’s record by clicking on “Print Invoice” or “Print List”. The invoice will default to reporting transactions within one week of today’s date. The transaction report will default to reporting on all transactions.
You can also print the invoice or list of transactions by using these filters.
1. Select Date Range.
2. Fill in the date range that you wish to view/print then click “Search”. A list of transactions will appear below that match your selected criteria.
3. Click “Print Invoice”.