Embed Size (px)
Citation preview

CHAPTER 3How to Make a Cowl Panel or Just a Part
of It for a 1933 Ford
Here you can see a fi nished product that normally I let the students make in every Step 1 Class. It’s a very good project. You use the bead roller a lot and also the shrinker/stretcher tool
Another picture of the cowl panel

45
1. LAY OUT. This was a big problem for me many years ago in my metal shaping career. How do I start to make a panel? To try and cut out a panel that’s close to what you think will be enough doesn’t work. It’s either too small or too big to work
with; too much material to work with.
So what I learned over the years is that if I start a project and make a paper/cardboard template for the part on a panel that’s flat or almost flat (in this case we make the template so it fits inside the bead on all four edges), then I know where the beads starts and that’s all I want now. You can hold the paper easiest with some magnets and mark the edge with a pen or some-thing that gives you a mark from the edge. Cut out the paper smooth and put it back on the panel, so you can see if it fits well. The better you make the templates, the better your piece will be when you’re
done; it will be an exact copy.
2. Take the paper and put it over a sheet of 19G and clamp it with magnets.
3. Measure on the panel how much extra you need from the bead and out. Let’s say this is 3 1/2”.
4. Take a divider and adjust that so it’s 3 1/2” between the points. Hold one of the points to the edge of the pa-per and draw a line with the divider so it gives you a
scribe on the sheet.
46
5. When you scribe the panel in the curve, be sure that you hold the divider parallel to the edge. It’s easy to
scribe it so it’s not parallel anymore.
6. Do the same thing on all four edges so that you will know the size of the cowl panel. This technique can be
used on any panel you would like to do.
7. Now it’s time to cut out the sheet. Here I am using a Makita electric shear. It works really well. Try a shear be-fore you buy one. Each is different and if the overlap on the shears is too much, it’s really hard to cut into a curve;
something to remember:
8. Look to the front of the shear so you can see the shears where they cut. It makes it so much easier for you to cut after on line and you don’t
need to grind the edge so much afterwards.
7 con;t.
Makita JS1600 - ShearPowerful motor for continuous use in 16 gauge mild steel and 18 gauge stainless steel Built-in
thickness gauge for convenienceLever switch for comfort and easy use
Easy replaceable blades with a total of 8 cutting edges each
Lightweight for easy one-handed operationAll ball and needle bearings for long life
Double insulated
9. Put the paper back on and hold it with the magnets. Mark it all the way around with a
scribe.

47
10. Make a little mark with the scribe (11mm / 7/16”) inside the scribe you just did (just a little mark in the end
and in the beginning).
11. Also mark the paper with a pen and make a line 11mm / 7/16” inside the edge (see picture).
12. Then take a 90° angle that you bent in a break (size is about 32 mm / 1 1/4”) (bent in the middle). Go to the shrinker/stretcher and stretch it so it fits the curve/line on
the paper. Be sure
13. This is how it should look when you are done.
14. Here you have both sides; the front and back parts of the cowl panel.
12 con’t.
that it fits very well because later on you are go-ing to use this template as a guide in the bead roller and every thing that’s wrong here on this edge will copy over to the bead because the dies in the bead roller follow the guide (90° template). It really helps if you look along the length edge when you make these so you can see every little
“kink”.

48
15. Put the template on one side of the sheet and adjust so it’s parallel to the 11mm / 7/16” inside the scribe done in picture 10. It can be a little tricky to have it so it’s parallel, but, adjust it up or down and in and out until it’s parallel. Clamp it with two vise grips or the new “Lock
Jaws” that are self adjusting. They are really good.
16. To hold the template in the middle, I recommend us-ing a spot welder and make one spot weld in the middle some where. That really helps the template so it’s not moving and by doing only one spot weld, when you are done, you can take the clamps away and just turn it and it will break the spot weld loose. If you use more spot welds, which you can do, you will need to “drill them
off” and that’s extra work ............
17. So now it’s time to go to the bead roller and put in some new dies. This time you will be using a pair of dies that are specially made for a ‘33-‘34 Ford. Re-member to adjust the shaft so you have the gap (19G) between the dies in and out. Up and down you will be adjusting later when you run the cowl panel. You will
be using these dies on the rear quarter panel too.
18. Put the sheet between the dies and start on the straight part of the cowl panel. It’s easier to do that and go into the curve on the cowl panel. Turn down the upper die so the dies touch and then turn it down one more turn. When you do that, it’s very impor-tant that you are holding the sheet “level” and keep the sheet “level” all the way when you run it in the bead roller. If you don’t, you are going to have a mark from the edge of the top die and also the bead will be away from the template so the whole bead is going to be on the wrong spot. If that happens you can go to the LAZZE Wheel and flatten the bead out between the two flat wheels and start over again
in the bead roller.
Adjust the speed first so it’s comfortable for you. Start the machine so the sheet goes to the right and stand so you feel comfortable and also so you are standing on the side where you can see the sheet going into the dies. You can stop if you need to, but, I recommend starting the machine and letting it go.
You will have a better flow.
Keep the dies so they are parallel to the template. If you force too much toward the template, you can actually move the template and that’s not good
........

49
19. Continue the entire way down and as you can see here, the dies are parallel to the template and that’s what you are
searching for.
20. It can be a little hard down in the curve, however, if you feel like it, stop and go again. Here you can see three spot welds. The templates have been used more than one time. Here only one spot
weld is being used.
21. Continue doing this about 4-5 times. Between each run you can turn down the upper shaft about 1/2 of a turn each time. The last time you can turn down the sides so they touch each other lightly and then start the machine and let the machine flex
the rest.
22. Now you are done with one side and you can take it to the table and remove the template and vise grips.

50
23. Turn the template back and forth and the spot weld will break loose. Now you are done with one side.
24. Here you can see a little mark from the spot weld that can be fixed with a hammer and a dolly on the sand
bag.
25. Put the template on the other side of the sheet and adjust it so it’s parallel to the 11mm / 7/16” inside the
scribe you did in picture 10.
Clamp it with two vise grips or the new “Lock Jaws” that are self adjusting. They are really good. Spot weld the
template as well
26. Repeat the same thing on this side but remember to start from the other side. Now you are going the other direction. Start on the straight part as you did on the
other side.
27. You might need to move your hands when you get to the curve so that you are standing comfortably. When you have done 4-5 runs and are all the way down with the bead, remove the template and #
1 and #2 of the beads are done.

51
28. Take the sheet over to the table again and lay the cardboard paper over the sheet on the outside and adjust it so it fits the top. Now you can measure on the bottom
and it should be 52mm / 2 1/16”.
29. Turn the sheet upside down and make a scribe on 52mm / 2 1/16” all the way.
30. Go back to the bead roller again using the same dies this time, but, it’s upside down and because it’s an outer radius, you can use the template on the machine. Adjust the guide so you have 52mm / 2 1/16” from the guide out to the first edge on the bottom die be-cause that’s where you are going to
start the bead.
31. Put the sheet between the dies and as you can see here you can’t go all the way out on both ends because the bead that you did as # 1 and # 2 are in the way and you will need to start a little bit in with the bead. Stand on the side that feeds the sheet into the dies and check the touch-ing points of the template as that’s a little before the center of the shaft, then the sheet will automatically try to go into the
sheet.
32. Here you can see more exactly where the touching point is.

52
33. As you can see here I am holding the sheet level but only for the first 3” of the sheet (outside the dies). Don’t hold it down more because then you are going to have a mark from the lower die edge. Don’t fight with the machine. The only thing you need to do is to feed the ma-chine with the sheet so it’s touching the template a little before the center of the shaft so the dies will go in on the sheet.
34. Here you can see how it looks if it’s done right. As you can see here you have a little more to do on both ends to finish
the bead.
Many years ago a hammer and the dolly were used to continue the bead, but, in one class you would find out that you
could use the bead roller instead.
35. Leave the template and the bottom die. Change only the upper die to a ra-dius of 6mm (a little less than 1/4”) and adjust the shaft so it fits the radius on the lower die and so you have the space for
the sheet between the dies.
36. Again, stand on the side that’s going into the ma-chine and pull the sheet a little toward you with your right hand; not too much, only enough so the sheet stays to the
template on the side that’s going into the machine.

53
37. Here you can see the result of the first side and it looks great so do the opposite on the other side. Remember to move yourself over to the other side and also
move the foot pedal.
38. Now it’s time to make # 4 bead on the cowl panel. You are going to bend an edge that’s an outer radius up to almost 90°. As you can see, the bead on the back and the front is not the same width. It’s narrow in the front. The difference is almost 8mm / 5/6”. To make this, we need to cut the edge a little in the front and fade it out to nothing
in the back.
39. We take a caliper and measure 8mm / 5/6” in the front and make a little scribe there.
40. Put the cardboard paper over the sheet again and hold it so it’s on the scribe
8mm / 5/6” in the front and fade it out to nothing in the back and scribe it after the edge of the paper. (To hold
the paper, use a vise grip or magnets)
41. Use the Makita shear and cut that little part off of the edge. Even if the shear has new blades, there will be a little “bend” on the edge and I recommend you
take care of that before you bend the edge.
54
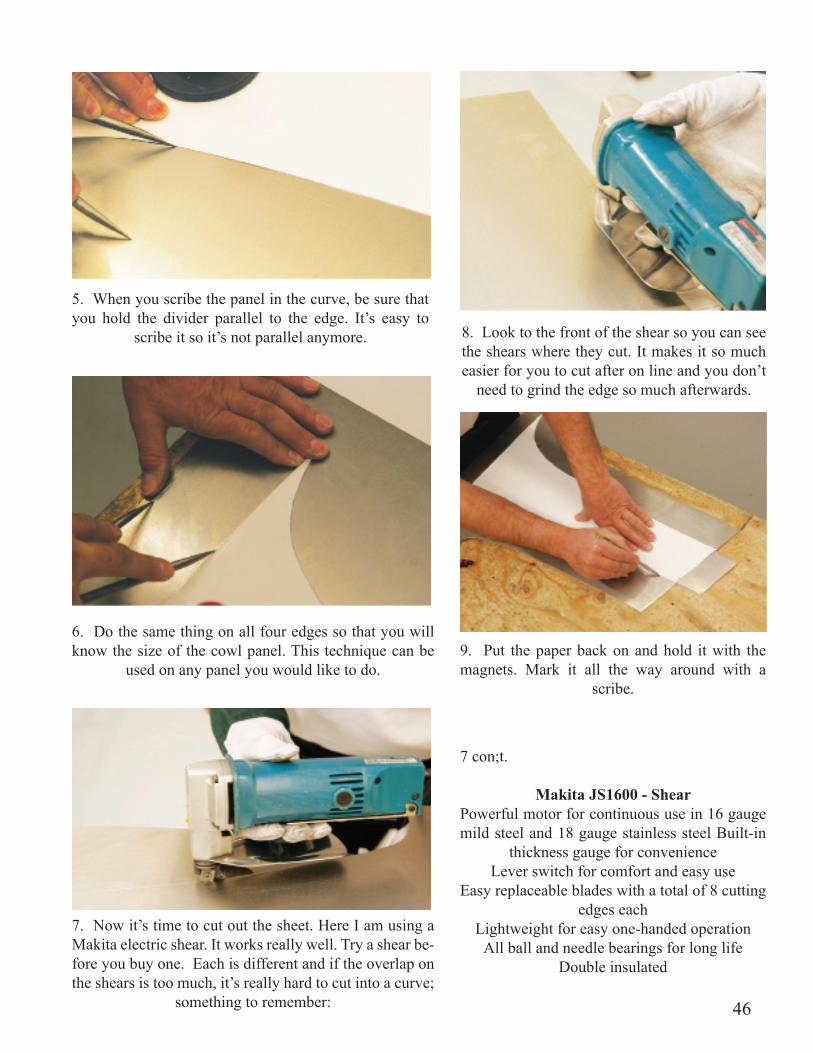
42. You do that in the LAZZE wheel us-ing the flat wheel on the bottom and using that little shim to lift one side up on the
bottom wheel.
43. Now take the sheet and with a low pressure wheel the edge one time over the edge so it will be flat again.
44. Before you can bend the edge, you must measure so you know where you are going to bend the edge. Inside
the bead the measurement should be 31mm / 4 1/4”.
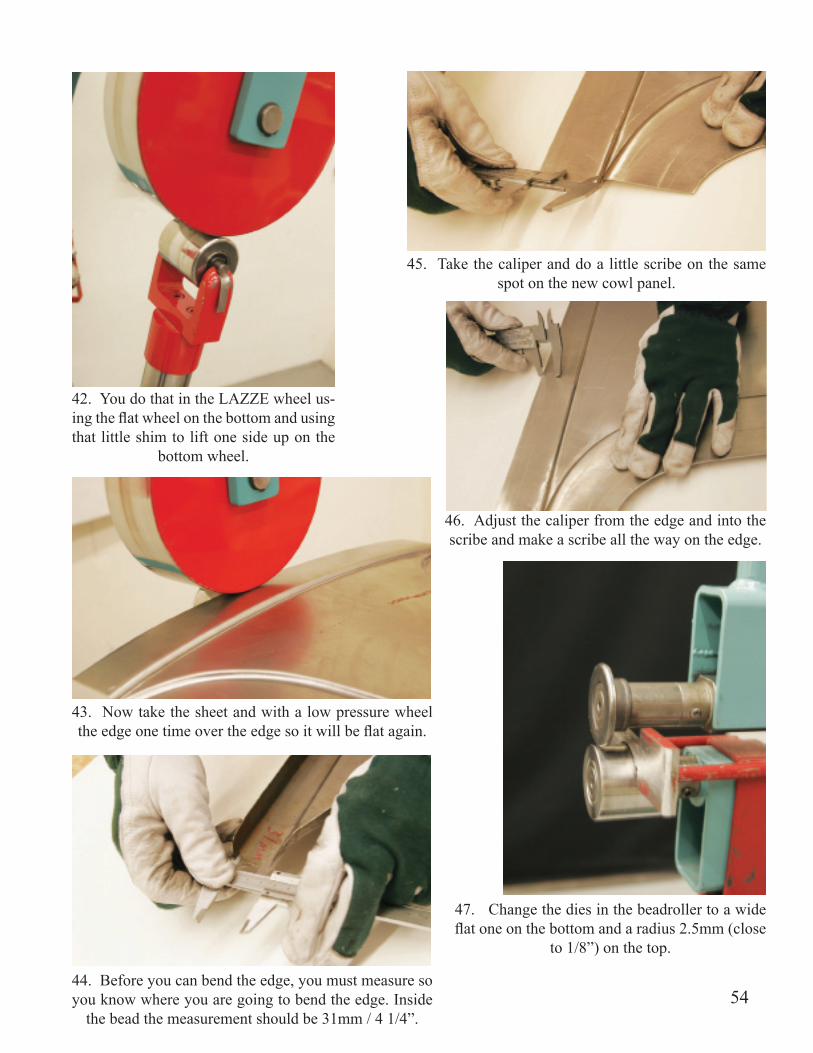
45. Take the caliper and do a little scribe on the same spot on the new cowl panel.
46. Adjust the caliper from the edge and into the scribe and make a scribe all the way on the edge.
47. Change the dies in the beadroller to a wide flat one on the bottom and a radius 2.5mm (close
to 1/8”) on the top.
55
49. Then you adjust the guide out to the edge of the cowl panel and lock the template a little harder so it doesn’t
move.
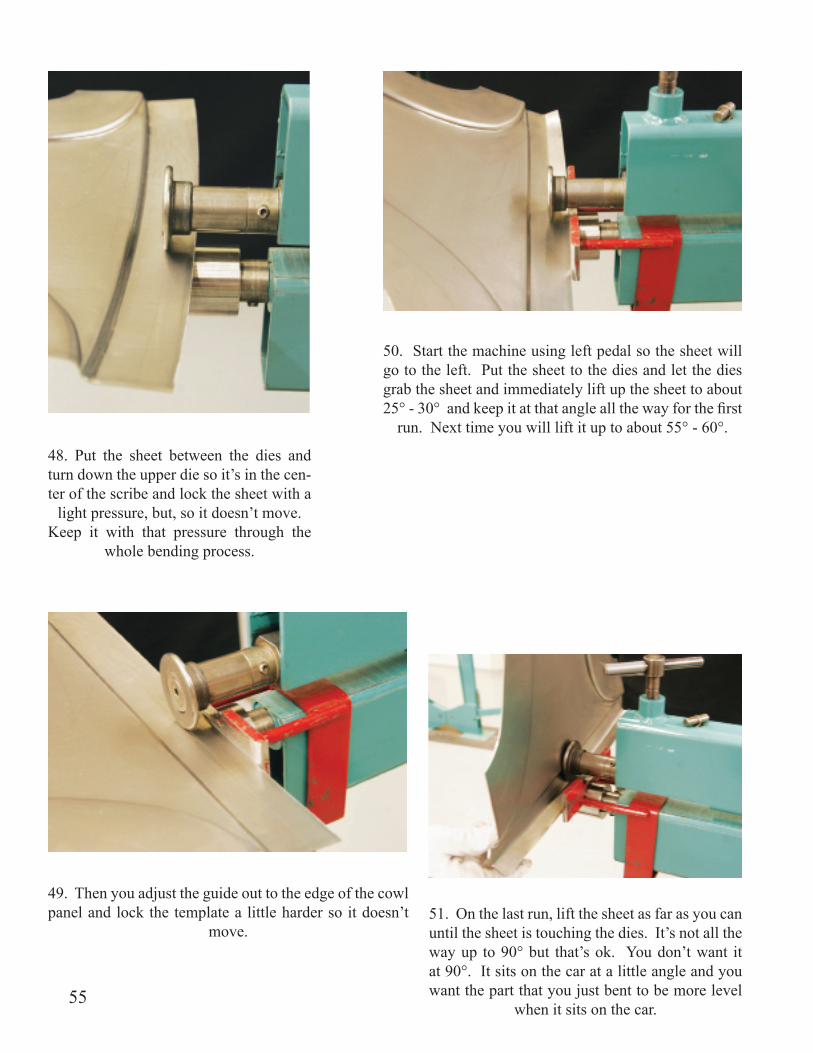
48. Put the sheet between the dies and turn down the upper die so it’s in the cen-ter of the scribe and lock the sheet with a
light pressure, but, so it doesn’t move.Keep it with that pressure through the
whole bending process.
50. Start the machine using left pedal so the sheet will go to the left. Put the sheet to the dies and let the dies grab the sheet and immediately lift up the sheet to about 25° - 30° and keep it at that angle all the way for the first
run. Next time you will lift it up to about 55° - 60°.
51. On the last run, lift the sheet as far as you can until the sheet is touching the dies. It’s not all the way up to 90° but that’s ok. You don’t want it at 90°. It sits on the car at a little angle and you want the part that you just bent to be more level
when it sits on the car.

56
52. As you can see here, after bending the edge, it’s in a curve, but, the wrong curve. It was an outer curve before it was bent which means that it’s still an outer curve after bending. So, to make this edge a nice curve the other way so that it matches the curve on the frame, you need to shrink the edge lightly all the way until
you have a smooth curve/radius.
53. You can use the deeper shrinker pic-tured or you can use the smaller version of the shrinker/stretcher tool. Both work
great for a small edge like this.
54. Here you can see that you have achieved the curve/radius you want. It’s
a little hard to see in this picture.
55. Here you can see the cowl panel half way done.

57
56. To adjust these two small dents from the spot weld, use a flat dolly on the leather bag filled with sand. Put the dolly on the sandbag and the cowl panel over the dolly so the spot weld is on the dolly. Take a hammer that has a little “convex” face on it and easily tap down the marks from the spot weld. Be careful because if you hit the sheet to hard, you are going to stretch the metal and it can be difficult to get rid of that extra material. Do
both spot welds in this manner.
57. Now it’s time for bead # 5 you measured on the car (or another piece you have). Here you take a divider and adjust it so that it fits in the bead that you did as # 1 or
#2. (See picture)
At the other end of the divider you adjust so it fits in the center of the bead and lock the adjustment on the
divider.
58. Now go over to the cowl panel you are work-ing on and make a scribe with the divider. Re-member that you are holding the divider at the same angle all the way. If you straighten it up, you are going to change the distance from the bead out to the scribe and when you put the bead
on there it will look terrible.
59. Take a Sharpie marker pen and fill in the scribe with it. It helps if you keep your finger in the earlier bead so you have support when you fol-
low the scribe.

60. Here you change the dies to a radius 9mm, and, of course, you adjust the dies so they are in the center of each other. Start the machine and hold the Sharpie pen in the middle of the top die making a mark there as the machine runs one turn.
61. Put the sheet between the dies. I recommend starting this operation on the straight part of this bead and adjusting the sheet so the top die with the black line is in the center of the black line on the sheet. Crank the
top die down so it’s touching the sheet. Afterwards you can crank it down one more turn for the first run.
Stay on the side that goes into the machine so you can see both black lines. Start the machine and follow the two lines. Remember that the line goes in a little curve all the way, but, if you line up the two lines all the time, it will not be any problem. If you lost the track in the first run, you can take it to the LAZZE wheel and
flatten the bead out again with the flattest lower wheel and start over again.58
62. In this picture you can see how much space you have between the dies. Note that the dies should not go all the way to the bottom. You need to look at a car and may-be measure how deep that is so you can make yours the
same depth.
63. Here you can see how the panel should look after the last bead.

59
64. To adjust the end of the bead, go to the deep shrinker and shrink both ends of the bead. It helps if you mark the end in a little round with a Sharpie pen. It’s easier to have a line to follow when you shrink and it’s going to
make a nice end of the bead.
65. You can do a lot in the shrinker, but, the last adjustments will need to be done with the hammer and the dolly on the
sandbag.
66. It’s time to change the dies in the bead roller again. For the next bead you will be using radius 5mm dies. Adjust them so they are in the center of each
other.
67. To make this bead, you need to do it from the backside. This means you need to flip the sheet upside down and run this bead in the groove from the other bead you just did. Take it step by step so you don’t go too deep. This bead should not go all the way to the bottom. You need to measure on a car to see how
deep this should be and make yours the same.
The same here. Start on the straight part of the bead and go into the curve.

60
68. Run it one time and check how deep the bead is. You probably need to run it one more time and crank the top die down
a little more.
69. Both these beads took so much material which made the edge too long and it needs to be shrunk a little all the way with a light pressure. WARNING! Don’t shrink too hard or you are going to move the
bead in and destroy it.
70. It’s better to shrink more times at a low pressure so you have control.
71. Here you can see what the cowl panel looks like after the last bead. Pretty good
from a flat sheet ........................

61
72. Now it’s time for the next to last bead. You need to measure on the sample panel again (could be a car too). Measure on the backside (see picture). Take the divider and adjust it as you see in this picture. Lock the divider.
73. Transfer that measurement over to the new cowl pan-el and draw a line with the divider about 13” down and
stop. I’m going to explain why.
74. As you can see here, the edge is tapered; it’s not par-allel all the way down. So you have made a template for that edge as it looks before you bend it. You can see this
in the picture.
75. Lay the template over the panel and adjust it so it’s parallel to the scribe and adjust it down until it comes together with the other bead. See where I’m holding my left hand. Clamp the template with 2 small vise grips or Lock Jaws (self adjustable) and make a scribe on the left side (see picture). When you bend the edge, you
will follow this scribe.
76. Scribe it all the way up even if there is a scribe there already after the divider.
77. In this picture you can see that a scribe has been made even on the other side of the tem-plate. However, here you are going to use the scribe and cut the sheet after the scribe. There is
a little too much extra material here.

62
78. Lay the panel down on a table and clamp it down with one vise grip or a Lock Jaw clamp (self adjustable) so it doesn’t move when you cut. It’s so much easier to follow a line then. As you can see in this picture, the cut has been started from the left side of the panel because when you do this, the sheet that is being cut drops down and will not be in the way when you are cutting. If you cut from the other side, the piece will go up to the ma-chine and it can be hard to move the machine forward. A
Makita JS 1600 electrical shear is being used.
79. Stand so you see where the shear cuts the sheet so you can follow the scribe/line. The better the cut is, the better the edge will be when you bend the edge in the bead roller. To check the edge after the cut, look long ways after the edge and if you have something on the edge that doesn’t look good, go to a belt grinder and ad-just the edge until the edge has a smooth curve. Every-thing that’s wrong on the edge is going to be transferred over to the edge you are bending. You will be able to see
more easily this way. Nothing is hidden.
80. It’s time to change the dies in the bead roller again. Three dies are being used on the bottom; first a little bigger diameter as a guide, and two short flat ones on the outside of that. On the top you will be using a sharp die because you want
a pretty sharp 90° bend.
Put the sheet between the dies so the edge of the sheet is lying against the bigger diameter die on the bottom. Then adjust the upper shaft/die so it’s in the center of the scribe you have on the
sheet and look at the upper shaft adjustment.
81. Turn down the upper shaft so the dies are touching each other with a light pressure. Let the machine flex the rest when you let the sheet go into the dies. As you can see here, I’m stand-ing so I can see the scribe and also see where the touching point is to the bigger diameter die on the bottom. It’s very important that you see what you’re doing. Always stay on the side where the
sheet goes into the machine.
Start the machine and hold the sheet so the dies can grab the sheet and let the sheet go into the machine. After about 1/8”, lift up the left side of the panel to about 30° and keep it at that angle
all the way for the first run.

63
82. Continue all the way and be careful when you get to the curve. It can be a little hard to follow the guide (big-ger diameter die) because of the sharp curve, but, do the
best you can.
83. After the first run, you must do some-thing to the edge. Why? It was an inner curve and an inner curve is always short-er than an outer curve and when you bend an inner curve, it’s still too short and the panel is going to take a really funny shape. So, what you need to do after the first 30° run, is stretch the edge in the curve, not
on the straight area.
It’s better to stretch more steps at a low pressure so you can keep the edge
smooth.
84. Next time in the bead roller you bend it up to about 60°.
85. Stretch the curve a little more and you’ll see that the panel stays in the right shape as it looks like on the car. Go back to the bead roller now and bend the edge
up to 90° or as close as you can.

64
86. It will be necessary to go over to the sandbag and use the hammer and the
dolly to adjust the edge so it’s smooth.
87. Now you can probably do some small adjustments on the edge with the shrinker/stretcher all the way. Look long ways and you’ll see the curve much better. Adjust it so it’s smooth. You can also make a tem-plate from an original panel that goes on the outside and adjust your edge so it has
the same shape.
88. Now you are to the last bead on the panel before you are done. It’s the top bead on the panel and the same as
the belt line on the car.
89. Change the dies in the bead roller to these two. They are specially made for a
’33 – ‘34 Ford belt line.

65
90. As you can see here, a scribe has been made from side to side that is very close, but, you can also use the cardboard paper that was done in the beginning of this chapter as a template to create the scribe. Adjust the sheet so the scribe is on the side of the bead (die) and turn down the top die so the sheet is locked a little be-tween the dies. Now adjust the guide out so it is touching the edge of the sheet and lock the guide a little harder so
it doesn’t move.
91. You can see better from this view what I mean.
92. Run the machine from one side to the other and stop. You can’t go all the way out because of the earlier bead that you did. Turn down the top die 1/2 to 3/4 of a turn more and run the machine again. Now you are close to half way down on the bead and if you look close to the guide, you can see that you have a gap to the guide. The reason this happened is that the bead takes material from the edge of the sheet to create the bead. That’s why
it’s getting short.
What I recommend here is to adjust the guide out about 1/16” and turn down the top dies a half turn more and run the ma-chine again. Maybe you need to do it one more time so you are sure you are all the
way down with the bead.
93. Here you can see the bead after it is done in the bead roller and, as you can see, the bead is not sharp all the
way because it couldn’t go further.

66
94. You could probably change the dies in the bead roller and fix it there, but, normally in my classes, I take a dolly and go over to the sandbag and adjust the bead there. I’ve flipped the cowl panel upside down and am using the edge of the dolly and hammering the flat part on the side of
the bead first.
95. Then I flipped the hammer around and used the other side of it to make the bead a little more
round from the inside.
96. Here you can see the finished product made from flat sheet in about 3 to 5 hours; no welding and very little
hammer and dolly work.
NOTE: The panel you see here is a little short on the side that goes to the hood. That’s because of an earlier model bead roller that didn’t have enough depth and the template for this project hadn’t been changed. Today we have a deeper shrinker/stretcher and you can make the
whole panel in one piece with no problem.”