Embed Size (px)
Citation preview

1
Chapter 32
Principles of Hand Therapy Jennifer Durham, M.Ed., OTR/L, CHT
Introduction
The following are general hand therapy guidelines for tendon and fracture rehabilitation.
Flexor Tendons
♦ Therapy for Zones I-III Flexor Tendons Post Op: In the operating room, the patient's hand is fitted with a dorsal blocking splint (DBS) or cast that holds the wrist in 20-30 degrees extension, MCP's at 80-90 degrees flexion and full IPJ extension. A molded palmar bar proximal to the distal palmar crease helps to keep the hand firmly in place. If the patient is considered cooperative, the exercise program may begin in the 1st 3 days postoperatively. The patient is instructed in an exercise of:
♦ 10 passive full finger flexion movements using the opposite hand—the doctor/therapist/nurse will likely need to help
♦ Next, have the patient do: 5 active finger extensions to the limit of the splint
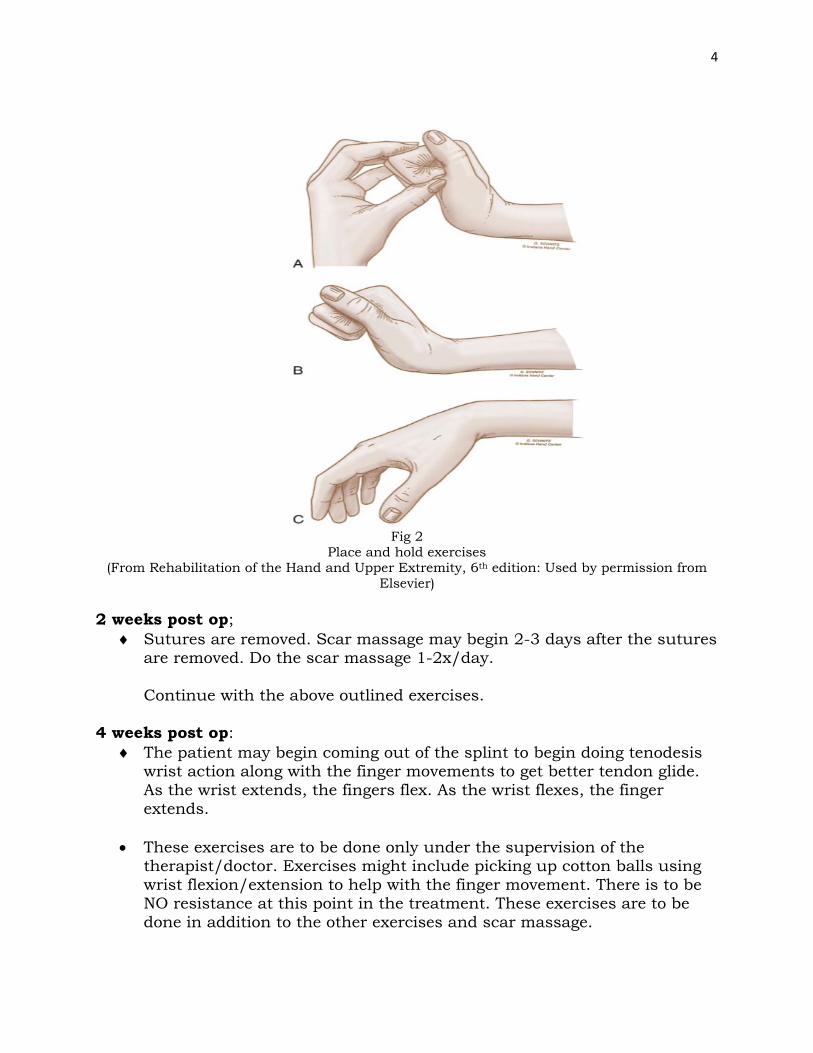
5 active assisted (place/hold) flexion—again the doctor or therapist will need help the patient with these The therapist or doctor helps the patient with passive flexion—placing the fingers in a flexed position into the palm. Then the patient gently holds fingers flexed. Then the patient is allowed to actively extend the finger/fingers. Editor’s Note: Early in the postoperative period when there is considerable swelling and pain, the patient will have difficulty even with passive flexion. The therapist or doctor must spend time with the patient and family to help them with these exercises. Again, the therapist or doctor passively flexes the fingers and also teaches the family and patient how to do this. At no time during the first week should the patient actively flex the fingers. Only when the fingers are passively flexed should the patient attempt to gently hold the fingers in flexion with slight

2
and gentle squeezing—contraction-- as the finger touches the palm. Do the exercises slowly, gently and without force. See Fig 2. Since these exercises should be done every hour the patient is awake, the patient and family must be carefully taught how to do these.
Fig 1
Duran Technique: controlled passive motion for first week: The fingers are passively flexed and active extension allowed
No active flexion is allowed (just gentle squeezing after passive flexion)—need close supervision first week
(From Journal of Hand Therapy 2003, page 202: Used by permission from Elsevier)
♦ It is very important to control edema in the hand during this phase of the recovery. Elevation of the hand and these gentle active exercises
mentioned above is the best way to control the edema. If a compressive wrap is used, it should be removed from the fingers during the exercises.
♦ If it is possible, the patient should be seen daily by the therapist/doctor to supervise the patient doing these exercises and monitor edema. When not doing the exercises, a light compressive dressing (gauze and crepe or Ace bandage) should be in place to minimize edema.

3
♦ To be sure the fingers do not develop finger contractures while in the splint, foam wedge extension blocks can be inserted between the proximal phalanx and the splint to hold the finger joints in extension.
♦ Ideally full active flexion should be possible by the 7th post-operative day. Editor’s Note: If tendon repair described in Chapter 24 and this therapy protocol are closely followed and:
• the patient has been performing passive flexion and place and hold exercises as discussed above and shown in Fig 2 below every hour while awake and
• the hand has been kept elevated the entire time and • edema has subsided
Then the patient should be able to perform gentle active flexion by the 7th postop day. Precautions:
• if the patient and family have not understood this protocol and have not performed passive flexion and place and hold exercises all day long
• if there is still considerable edema • if the patient is not compliant
Then one must delay active flexion for a few more days and until edema has subsided and there is full passive flexion of fingers. If the patient must return home, continue passive flexion and place and hold exercises until the patient can return for followup—weekly if possible. Do not allow the patient to go home and start active flexion on their own. If you do not feel that the patient will be compliant with the active phase of this protocol, it may be necessary to do only passive motion until 3 ½ weeks postop. At that time, if passive ROM is good, you would begin gentle Active ROM of the fingers. If this protocol is closely followed, then patients will regain active flexion early and not end up with a stiff hand as is often the case now. See note at end of this chapter.
♦ The splint is worn at all times except to clean the hand.
4
Fig 2
Place and hold exercises (From Rehabilitation of the Hand and Upper Extremity, 6th edition: Used by permission from
Elsevier) 2 weeks post op;
♦ Sutures are removed. Scar massage may begin 2-3 days after the sutures are removed. Do the scar massage 1-2x/day.
Continue with the above outlined exercises. 4 weeks post op:
♦ The patient may begin coming out of the splint to begin doing tenodesis wrist action along with the finger movements to get better tendon glide. As the wrist extends, the fingers flex. As the wrist flexes, the finger extends.
• These exercises are to be done only under the supervision of the
therapist/doctor. Exercises might include picking up cotton balls using wrist flexion/extension to help with the finger movement. There is to be NO resistance at this point in the treatment. These exercises are to be done in addition to the other exercises and scar massage.
5
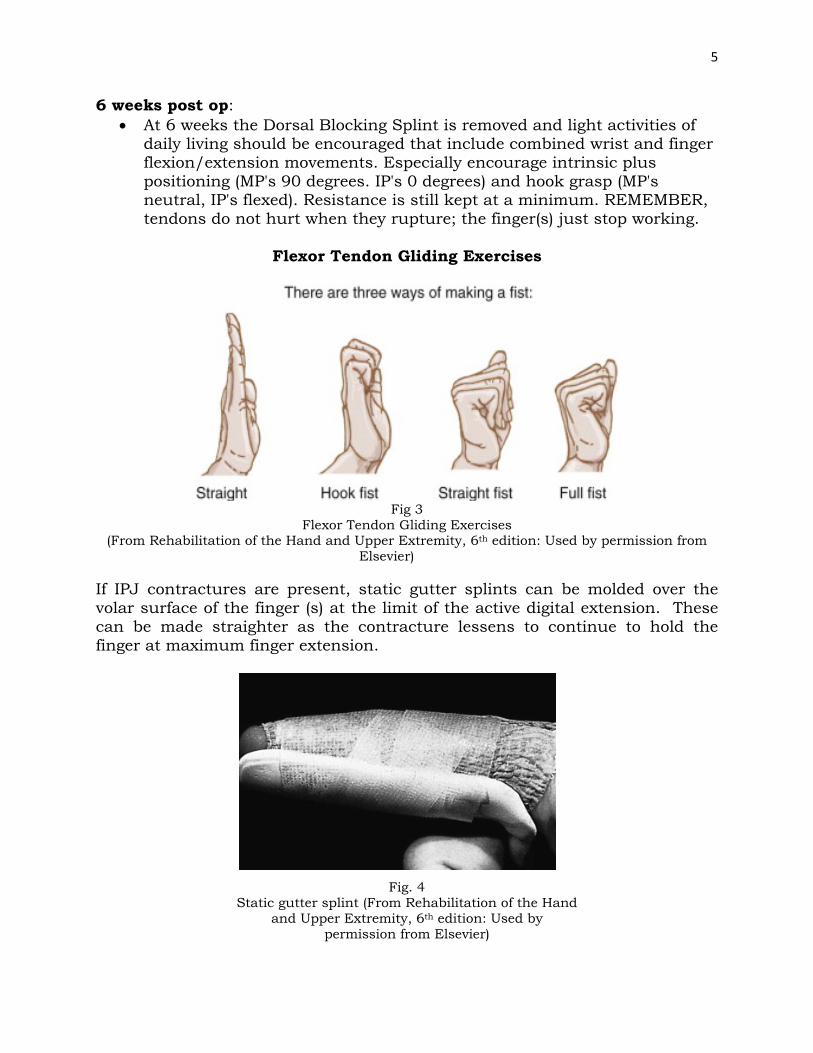
6 weeks post op: • At 6 weeks the Dorsal Blocking Splint is removed and light activities of
daily living should be encouraged that include combined wrist and finger flexion/extension movements. Especially encourage intrinsic plus positioning (MP's 90 degrees. IP's 0 degrees) and hook grasp (MP's neutral, IP's flexed). Resistance is still kept at a minimum. REMEMBER, tendons do not hurt when they rupture; the finger(s) just stop working.
Flexor Tendon Gliding Exercises
Fig 3
Flexor Tendon Gliding Exercises (From Rehabilitation of the Hand and Upper Extremity, 6th edition: Used by permission from
Elsevier) If IPJ contractures are present, static gutter splints can be molded over the volar surface of the finger (s) at the limit of the active digital extension. These can be made straighter as the contracture lessens to continue to hold the finger at maximum finger extension.
Fig. 4
Static gutter splint (From Rehabilitation of the Hand and Upper Extremity, 6th edition: Used by
permission from Elsevier)

6
8-12weeks post op Light resistive exercises can be included and activities of daily living increased to include some light resisted lifting. More resistance can be added to the program at 10 weeks. Regular duties can be resumed at 12 weeks.
Flexor Tendon Repairs Zones IV and V
Post Op: The hand is placed in a Dorsal Blocking Splint (DBS) as with the Zone I-III repairs. In the restraints of the splint, passive composite flexion/extension is done to the digits. 25 repetitions are done 3-4 times each day. 2 weeks post op: 48 hours after suture removal, begin with scar massage. Continue with composite Passive ROM exercises within the DBS. 3 Weeks Postoperative: Active ROM exercises are begin are started within the restraints of the splint. (No resistive exercises). Exercises might include grasping/releasing different shaped objects without lifting them. At 4 weeks post op gentle blocking exercises may be started to the PIP and DIP joints to encourage more movement at these joints. (Blocking exercises: block PIPJ over the proximal phalanx and encourage flexion of middle phalanx and block DIPJ over middle phalanx and encourage flexion of distal phalanx. 4.5 weeks post op: The dorsal block splint may be removed for exercises only. Unrestricted AROM exercises are performed to the wrist and digits. Pay particular attention to motion at the PIP and DIP joints, blocking to maximize motion. 6 weeks post op: Discontinue the DBS. If it is a thermoplastic material the splint can be remolded to make a full extension resting splint to get full composite extension of the wrist and digits if the hand shows shortening in the long finger flexors or wrist. Unrestricted active and PROM exercises are done. Begin passive extension of the wrist and digits. Emphasize tendon gliding (See pictures). Begin strengthening but avoid any heavy lifting or tight gripping. 10-12 weeks post op: The patient may return to unrestricted use of the hand in all activities.

7
Extensor Tendon Therapy As with flexor tendons, edema must be managed in order to prevent too much resistance on the tendons. Elevation, movement of the uninvolved joints, and compressive wrap will help to control this. The digits can be wrapped individually as long as any extra volume of fluids present. Edema could be present for as much as 8-12 weeks post operatively. Patient education is critical so that they can be complaint with the splint schedule and therapy program. Give complete explanations of anatomy, wound healing, and precautions. The strength of the repair is dependent on the number of sutures, size of the tendon, type of repair, and suture material used. It is very helpful to know all of this before beginning any type of therapy. Here is a quick overview of what to do for extensor tendons by level: (Zone 1) Mallet Deformity Conservative Management Splint the DIPJ at o-+15 degrees for 6 weeks continuously. Begin AROM at 6 weeks 4 times a day for 5 minutes each session. If an extension lag develops, decrease number of exercise sessions. At 8 weeks wear the splint only at night. At 9 weeks discontinue splint completely.
Fig 5
Mallet splint (From Rehabilitation of the Hand and Upper Extremity, 6th edition: Used by permission from
Elsevier)
Conservative Management Splint the DIPJ at o-+15 degrees for 6 weeks continuously.

8
Begin AROM at 6 weeks 4 times a day for 5 minutes each session. If an extension lag develops, decrease number of exercise sessions. At 8 weeks wear the splint only at night. At 9 weeks discontinue splint completely. Zones II, III, IV (central slip, lateral bands, triangular ligament)
Fig 6
(From Rehabilitation of the Hand and Upper Extremity, 6th edition: Used by permission from Elsevier)
Post operatively, put the finger in a gutter splint to hold the PIP and DIP joints at 0 degrees extension. Wear the splint at all times. At 4 weeks, begin AROM to the finger 6-8 times per day Wear the gutter splint at all times except when exercising. At 6 weeks, begin PROM if the extension lag is less than 10 degrees. Gradually begin to decrease wearing time for the splint. At 8 weeks, begin gentle strengthening. (Gripping, pinching) At 9 weeks, discontinue wearing the splint. If the injury is limited to the central slip, splinting can be done to only the PIPJ, leaving the DIPJ free to move Zones V & VI Immobilize the wrist in 20 degrees extension and the MP's at 0 degrees extension. The PIP and DIP joints are left free but splinted in extension at night (See Fig 7 and 8) At 4 weeks post op begin active exercises to the wrist and fingers. Continue wearing the splint between exercise sessions. At 6 weeks begin PROM to the wrist and digits. At 7 weeks begin weaning out of the splint. Begin strengthening.

9
Fig 7 Fig 8 Daytime Nighttime
(From Rehabilitation of the Hand and Upper Extremity, 6th edition: Used by permission from Elsevier)
Zones VII & VIII Immobilize the wrist in 30 degrees extension and the MP's at 0 degrees. At 4 weeks post op begin AROM to the wrist and digits for brief sessions several times a day. At 6 weeks begin PROM to the wrist and digits. At 7 weeks begin weaning out of the splint. Begin progressive strengthening.
Guidelines for Fracture Therapy
Working with patients who live a great distance away and who have limited understanding of therapy is a challenge. Therapy goals must be aimed at setting realistic goals that are meaningful for the patient in their daily life. If the patient can be made to understand the big picture of what is reasonable to accomplish in therapy and the steps necessary to get there, outcomes will be much more favorable. Working with fractures, the sooner the injured area can be moved the better the movement will ultimately be. However, until the fracture is stable, therapy will be forced to be limited to areas proximal and/or distal to the injury. The fracture itself needs to be immobilized for 3-4 weeks until enough healing has occurred to allow it to withstand the stressors of movement. Ideally, therapy

10
should begin within a few days of the injury or surgery. Motion is limited or controlled and protected, with functional reactivation as the goal. The degree of protection is progressively decreased, and the types of physiologic loads and functional outcomes are increased over the next few weeks until full functional recovery has occurred, usually about 3 months after injury/surgery. Each fracture is unique. The rehabilitation plan must be designed for each patient's needs, priorities, and daily functional demands. The more tissues that are involved surrounding the fracture, the more complex the rehabilitation will be and the greater the need to start therapy early to try to prevent secondary complications associated with immobilization. Even with simple closed hand fractures, it is important to remember that all hand fractures are multi-tissue traumatic injuries and include soft tissue trauma, even if not obvious from examination of the extremity. Phases of rehabilitation: Phase 1: Fragile fractures - 3-5 days after injury/surgery Rest, Ice, Compression, and Elevation (RICE) Instruct the patient to elevate and rest the hand. Apply a compressive dressing to minimize edema. Phase 2: Limited Stability - 3 days to 3 weeks after injury/ surgery Introduce light functional use while wearing a protective support. (this type of support will usually mean immobilizing the joint proximal and distal to the fracture) light functional tasks should be pain-free such as assisting with dressing, grasping/releasing different sized light weight objects, etc. Phase 3: Clinical Stability - 3-4 weeks after injury/surgery Introduce unrestricted, full ACTIVE range of motion. No passive motion and no resistive exercises. The brace can be modified to include only circumferential support of the fracture during functional activities. Activities must be pain-free with the fracture brace. It may be necessary to gradually reduce the fracture brace rather than cut it down all at once. Phase 4: 6 weeks after injury/surgery Begin light strengthening exercises and moderate functional activities outside the functional brace. Activities may include active and passive range of motion. The fracture brace should be used for heavier strengthening or functional activities. Phase 5: 9 weeks after injury/surgery The fracture should be strong enough to with stand moderate levels of occupational and recreational activities. Heavier therapeutic exercises without any protective support are ok. However, a support is indicated for any higher-risk, high impact activities until at least 3 months after the fracture.

11
Phase 6: 12 weeks after injury/Surgery Unless there are complicating factors, normal activities are resumed with no need for a functional support. Within each of these phases progression must be done pain-free. Range of motion starts with a limited arc of motion and increases as the patient tolerates. Passive ROM and isolated joint motion is added only as the patient is able tolerate it. How and when to progress motion following a hand fracture depends on the stability of the fracture and how well the patient is able to progress with their motion. There are no specific timelines or rules for progression, other than achieving pain-free motion without compromising the fracture. Your decision to progress the patient functionally will need to be determined based on each case. These guidelines will help you make your decision, with the help of the surgeon, as to how fast to progress the patient. For Extra-Articular Hand Fractures, typically the joint proximal and distal to the fracture should be included in the splint/cast. Abbreviations: P1—Proximal phalanx, P2—Middle phalanx, P-3 Distal phalanx P1: Proximal phalanx P2: Middle phalanx P3: Distal phalanx MPJ: Metacarpal phalangeal joint PIPJ: Proximal interphalangeal joint DIPJ: Distal interphalangeal joint For intra-articular fractures, the following chart on the next page is a good guideline to follow:
12
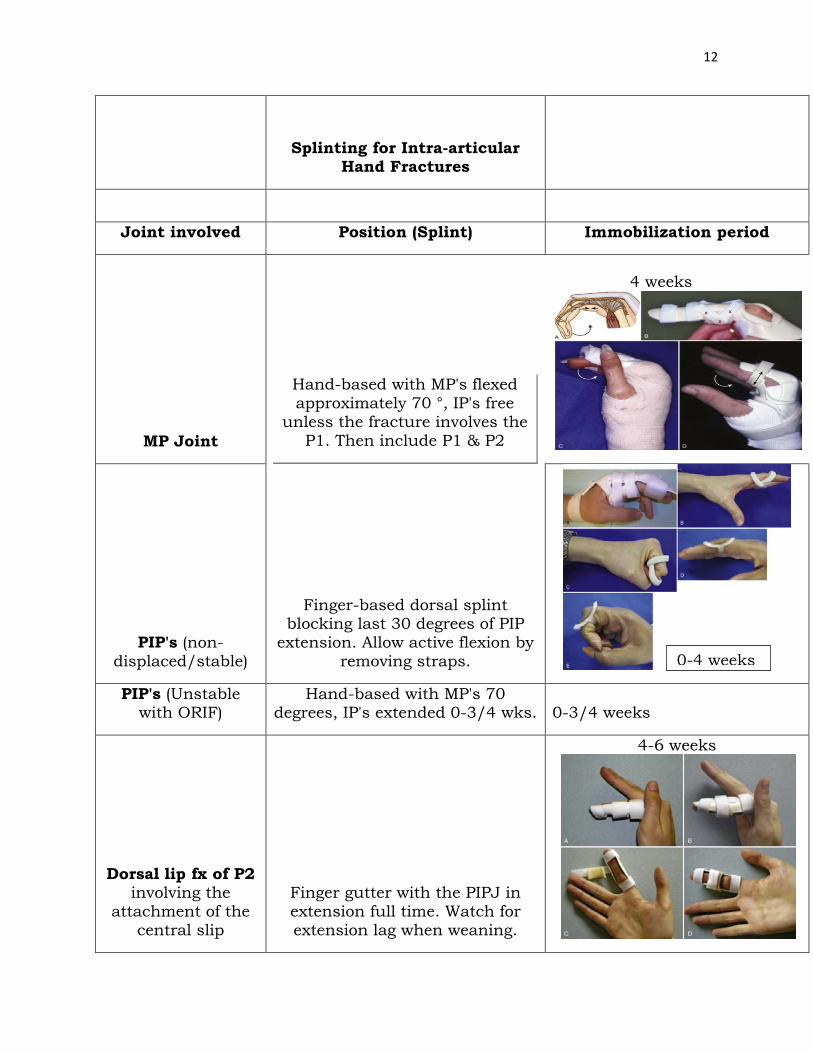
Splinting for Intra-articular
Hand Fractures
Joint involved Position (Splint) Immobilization period
MP Joint
Hand-based with MP's flexed approximately 70 °, IP's free
unless the fracture involves the P1. Then include P1 & P2
4 weeks
PIP's (non-displaced/stable)
Finger-based dorsal splint blocking last 30 degrees of PIP
extension. Allow active flexion by removing straps.
PIP's (Unstable with ORIF)
Hand-based with MP's 70 degrees, IP's extended 0-3/4 wks.
0-3/4 weeks
Dorsal lip fx of P2 involving the
attachment of the central slip
Finger gutter with the PIPJ in extension full time. Watch for extension lag when weaning.
4-6 weeks
0-4 weeks

13
Combined fracture/dislocation Finger or hand-based protector 4 weeks
DIP (Mallet) DIP in full extension. PIPJ free 6-8 weeks
Editor’s note:
The most important part of this chapter is the Flexor Tendon Protocol. Stiff hands are often the final result of flexor tendon injuries in Africa and around the world. If flexor tendon surgery is carried out as described in Chapter 24 and the protocol above is closely followed, then you should get better results. It is recognized patients who do not understand the protocol and those that are non-compliant may rupture their repair. It is important that these patients are identified before allowing early active flexion. The editor realizes this could be a majority of your patients in some parts of the world and your final results will be less than ideal.