Embed Size (px)
Citation preview
Fiscal Software User’s Guide, BSA February 2013
5-1
Chapter 5 – General Ledger
This Section Includes:
5.1 Accounting Periods
5.2 Ledgers
5.3 Open and Closed Periods
5.3.1 Processing a Period Close or Opening a Period
5.4 Creating Journals
5.4.1 General Journals
5.4.2 Time Study Journals
5.4.3 Attachments and Reversals of Journal
5.4.4 Downloading and Printing Journal
5.4.4.1 Downloading a Journal
5.4.4.2 Printing a Journal
5.5 Editing Journals
5.5.1 Edit a Single Journal
5.5.2 Edit Multiple Journals
5.6 Deleting a Journal
5.7 Posting Journals
5.7.1 Post a Single Journal
5.7.2 Posting Multiple Journals
5.7.3 Subsidiary Journals
5.8 Unposting a Journal
5.9 Coping an Existing Journal
5.9.1 Copy a Journal While Viewing
5.9.2 Recurring Journal Entry
5.9.3 Reversing Journal Entry
5.9.4 Correcting a Journal to another Period
5.9.4.1 Summary of Journal Copy Options
Fiscal Software User’s Guide, BSA February 2013
5-2
5.1 Accounting Periods The local council BSA accounting periods follow the calendar year from January to December (1-12). PeopleSoft uses
additional periods to handle other than normal operational transactions.
Period 0 Beginning Balances (created by the previous year end close process)
Period 1 January Transactions
Period 2 February Transactions
Period 3 March Transactions
Period 4 April Transactions
Period 5 May Transactions
Period 6 June Transactions
Period 7 July Transactions
Period 8 August Transactions
Period 9 September Transactions
Period 10 October Transactions
Period 11 November Transactions
Period 12 December Transactions
Year End Period:
Period 999 Year End Close Transactions
Adjustments to Prior Year:
NOTE: After a year is closed you should make “Council Adjustments - CA” or “Audit Adjustments - AA” to period
12.
5.2 Ledgers PeopleSoft ® has several different ledgers to record data. The principle ledger is the “ACTUALS” ledger where fiscal
transactions are stored. Ledgers include:
• ACTUALS Ledger – Stores all financial data from all journal sources and supports financial reporting totals
and queries. Values for assets, liabilities and net assets roll forward from year to year.
• BUDGET Ledger – Stores budget entries and supports financial reporting totals and queries. Values DO NOT
roll forward from year to year.
• SUBSIDIARY LEDGERS – detailed data stored in another module or software. Transactions from these
ledgers are moved into the ACTUALS Ledger. They include:
o Accounts Payable - Voucher (Invoice) and Payments
o Asset Management – Asset additions, changes and depreciation
o Cash Receipts – Manual Receipts, Trading Post and Fundraising Cash Receipts
o Membership - Journals created by membership transmittals
o Payroll – Payroll and related tax transactions
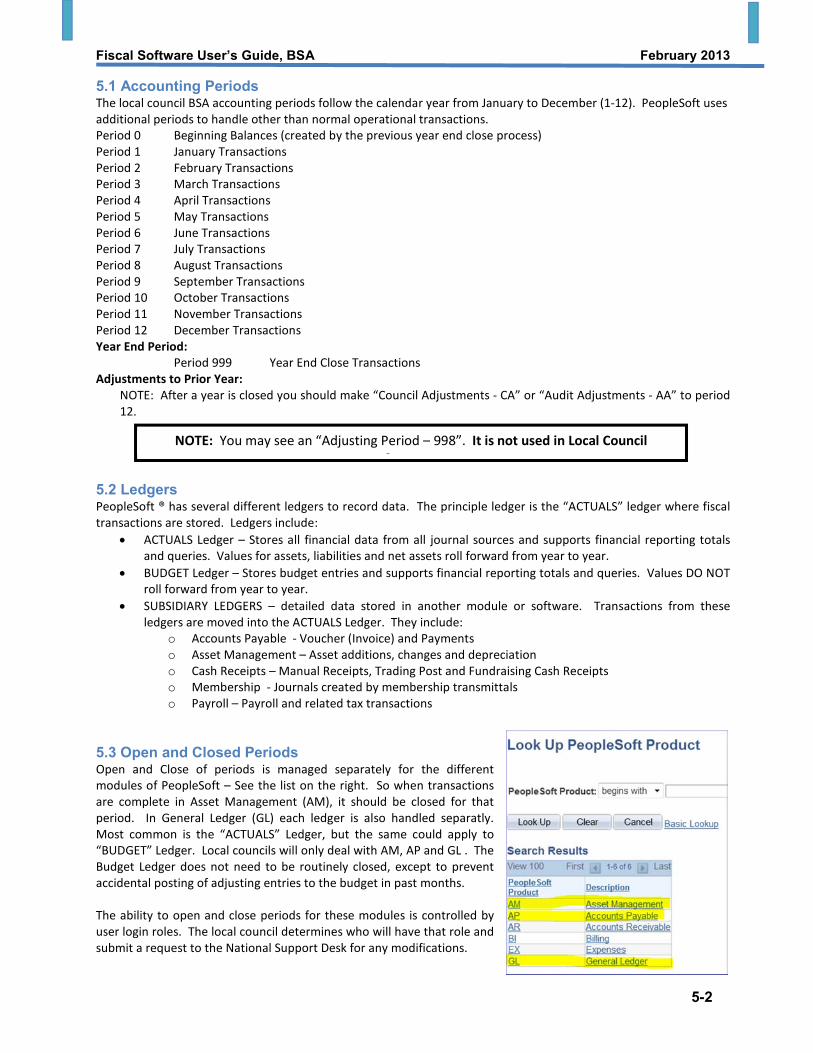
5.3 Open and Closed Periods Open and Close of periods is managed separately for the different
modules of PeopleSoft – See the list on the right. So when transactions
are complete in Asset Management (AM), it should be closed for that
period. In General Ledger (GL) each ledger is also handled separatly.
Most common is the “ACTUALS” Ledger, but the same could apply to
“BUDGET” Ledger. Local councils will only deal with AM, AP and GL . The
Budget Ledger does not need to be routinely closed, except to prevent
accidental posting of adjusting entries to the budget in past months.
The ability to open and close periods for these modules is controlled by
user login roles. The local council determines who will have that role and
submit a request to the National Support Desk for any modifications.
NOTE: You may see an “Adjusting Period – 998”. It is not used in Local Council
Systems.

Fiscal Software User’s Guide, BSA February 2013
5-3
NOTE: PeopleSoft does not stop you from closing the month with transactions not yet posted
The query named LC_TRANACTIONS_NOT_PROCESSED will give a listing of any journals that need
to be posted, changed or deleted prior to closing the period.
.
5.3.1 Processing a Period Close or Opening a Period Periods are open and closed by the movement of two dates that establish a range, Open and Close. If those
dates are set to be open from Period 1 through Period 1, then transactions can only be made to January
transactions. If the range is Period 1 through Period 2, then transactions can be made to both months. This
feature allows the council to transact business and post journals to February while January is still open. Then
when the Open date is set as Period 2, transactions can no longer be posted to January unless it is reopened.
Navigate your menu system using the “bread-crumb” trail shown below:
Select the PeopleSoft Product to close, your Business Unit and the Ledger (ACTUALS or BUDGET) then press
search. The following screen opens up. In the example below, if you wish to close January 2012, simple change
the “From Period” from a 1 to 2. If you wish to open up March 2012, change the “To Period” to 3. Then click
“Save”. Repeat the process for other products such as AP and AM and for GL Budget Ledger if desired.
NOTE: At year end, you may also need to change the “From Year” and/or “To Year” as needed.
If adjustments are to be made to a closed month, the month can be opened long enough to post the transaction
and then closed again.
Fiscal Software User’s Guide, BSA February 2013
5-4
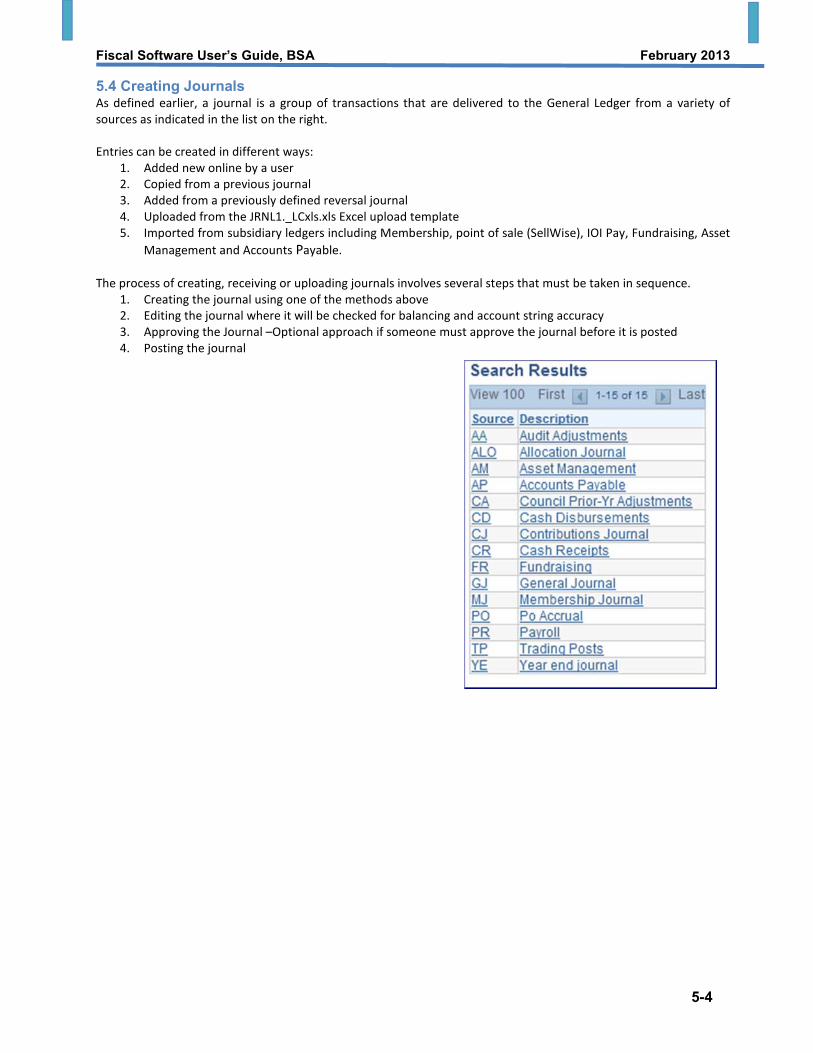
5.4 Creating Journals As defined earlier, a journal is a group of transactions that are delivered to the General Ledger from a variety of
sources as indicated in the list on the right.
Entries can be created in different ways:
1. Added new online by a user
2. Copied from a previous journal
3. Added from a previously defined reversal journal
4. Uploaded from the JRNL1._LCxls.xls Excel upload template
5. Imported from subsidiary ledgers including Membership, point of sale (SellWise), IOI Pay, Fundraising, Asset
Management and Accounts Payable.
The process of creating, receiving or uploading journals involves several steps that must be taken in sequence.
1. Creating the journal using one of the methods above
2. Editing the journal where it will be checked for balancing and account string accuracy
3. Approving the Journal –Optional approach if someone must approve the journal before it is posted
4. Posting the journal

Fiscal Software User’s Guide, BSA February 2013
5-5
5.4.1 General Journals Based on the security roles of the user, a journal can be entered, edited and posted from the same screen,
or posted at a later time, or even by a different user. To create a General Journal the user will:
Steps Navigation & Detail / UPK LCFIN05.061 1. Add Journal Entry General Ledger> Journals>Journal
Entry>Create/Update Journal Entries
2. Add new value Add New Value Tab
3. Select Business Unit from Drop Down
Menu> Choose date of journal entry
Click the Add button
4. The Header Tab opens add “Description” of
journal entry. Defaults should
be>Transaction Code=General> Non-
adjusting entry>
Header Tab>
OPTIONS: Attach Documentation
Create Automatic Reversal
Click the Save button>
5. Defaults to Edit Journal.>
Enter Business Unit>Account number> Fund>
Class> Project Code> Debit or Credit
amount
Click on Lines Tab>Click on + sign to add additional
lines to complete entry.> Click Save>On Process
button select Edit-PreCheck>
6. Check journal status; if status is N (New)
the entry is ready to be edited against
balance and account rules.
Click on the Process button>Select Post Journal.
1. Navigate to “Create/Update Journal Entries”
2. Click on the “Add a New Value” tab
3. Make sure your Business Unit is entered.
4. “Next” will assign the next journal number in order OR you may define your own including alpha
characters
5. Make sure the Journal Date is in the period you want the transaction to post.
6. Click “Add”
Then proceed to the following screen.
Fiscal Software User’s Guide, BSA February 2013
5-6
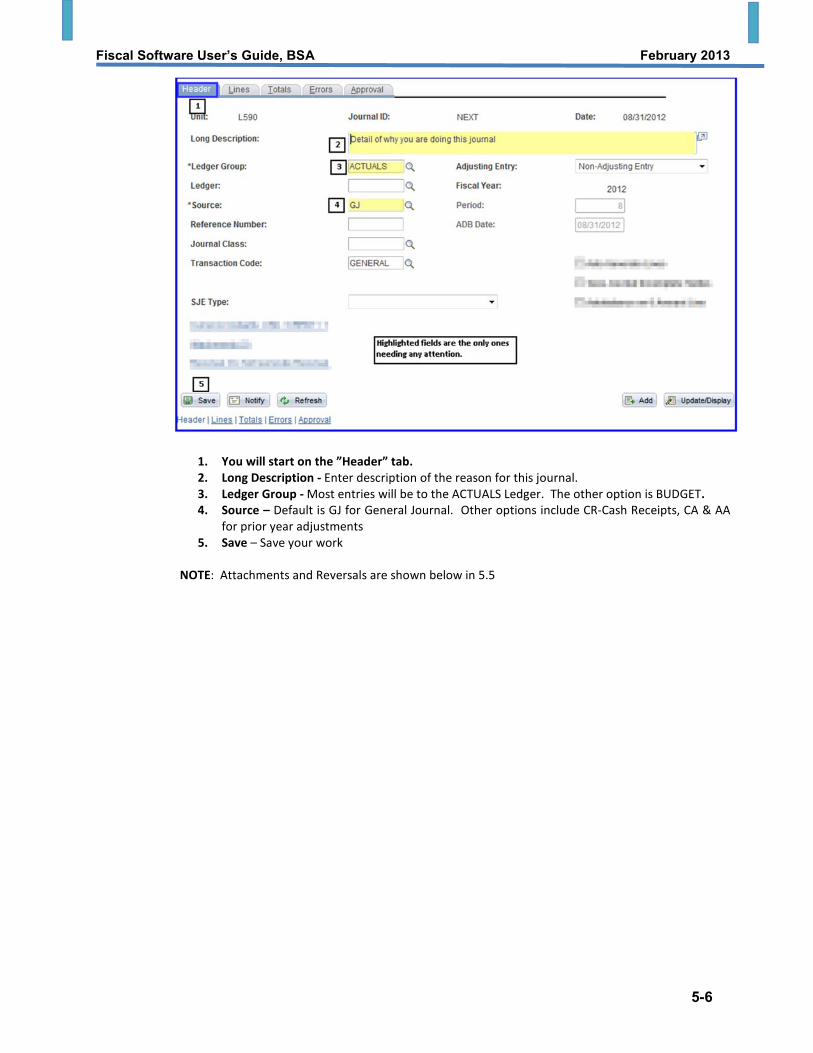
1. You will start on the ”Header” tab.
2. Long Description - Enter description of the reason for this journal.
3. Ledger Group - Most entries will be to the ACTUALS Ledger. The other option is BUDGET.
4. Source – Default is GJ for General Journal. Other options include CR-Cash Receipts, CA & AA
for prior year adjustments
5. Save – Save your work
NOTE: Attachments and Reversals are shown below in 5.5

Fiscal Software User’s Guide, BSA February 2013
5-7
NEXT: Click on the “Lines” tab at the top of the screen.
1. Account elements are entered in the fields on line 1. Note: If your fields are not in this
order, you can change that order. Use the link “Customize” in the blue ribbon names “Lines”.
Enter values in “Fund”, “Account”, “Project” and “Class” by clicking on the magnifying glass to
search or by beginning to type the values. As you type, possible values will appear for
selection. See samples above.
2. Using the “+” button you can add one or multiple lines as needed. If you know the number
of lines set the “Lines to Add” number to the lines to be added and click the “+” button.
3. Use the “-“button to remove unwanted lines. First click the “Select” box for each line you
wish to remove and then click the “-“button.
4. This icon is the “Calculate Amounts” button. Click to refresh the debit and credit totals at
item 5 below.
5. Total Debits and Credits for the journal are shown here. Click on the “Calculate Amounts”
icon to refresh the totals.
6. Journal Status. N = Not Edited; V=Valid ready to post; E=Errors occur posting not allowed.
7. Save your work.
Fiscal Software User’s Guide, BSA February 2013
5-8
5.4.2 Time Study Journals The process used to allocate general expenses to program, management or fundraising for functional
expense reporting involves a time study. Out of the time study will come a percentage of staff time
spent on Program, Management and Fundraising. Those expenses recorded with a 99 class are then
allocated based on this time study result. There are two statements that report functional expense
information, Statement of Activities and Changes in Net Assets and the Statement of Functional
Expense.
To run these reports correctly, the percentage numbers for time study must be entered into the GL
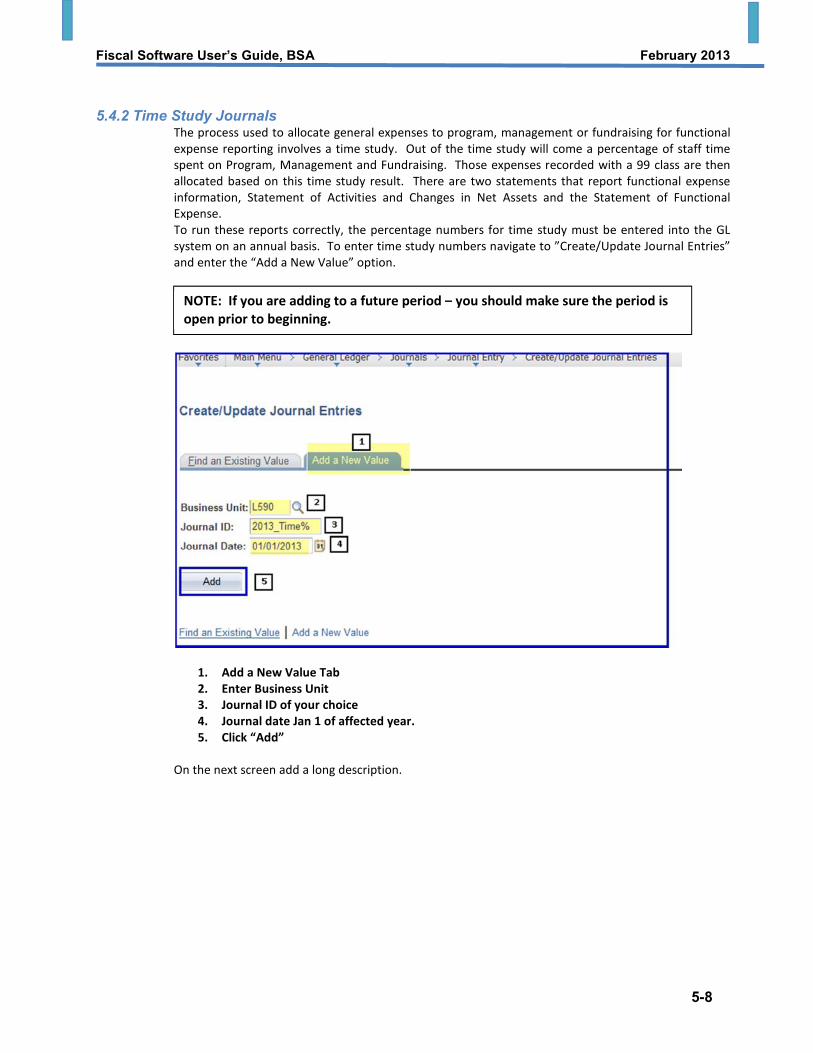
system on an annual basis. To enter time study numbers navigate to ”Create/Update Journal Entries”
and enter the “Add a New Value” option.
1. Add a New Value Tab
2. Enter Business Unit
3. Journal ID of your choice
4. Journal date Jan 1 of affected year.
5. Click “Add”
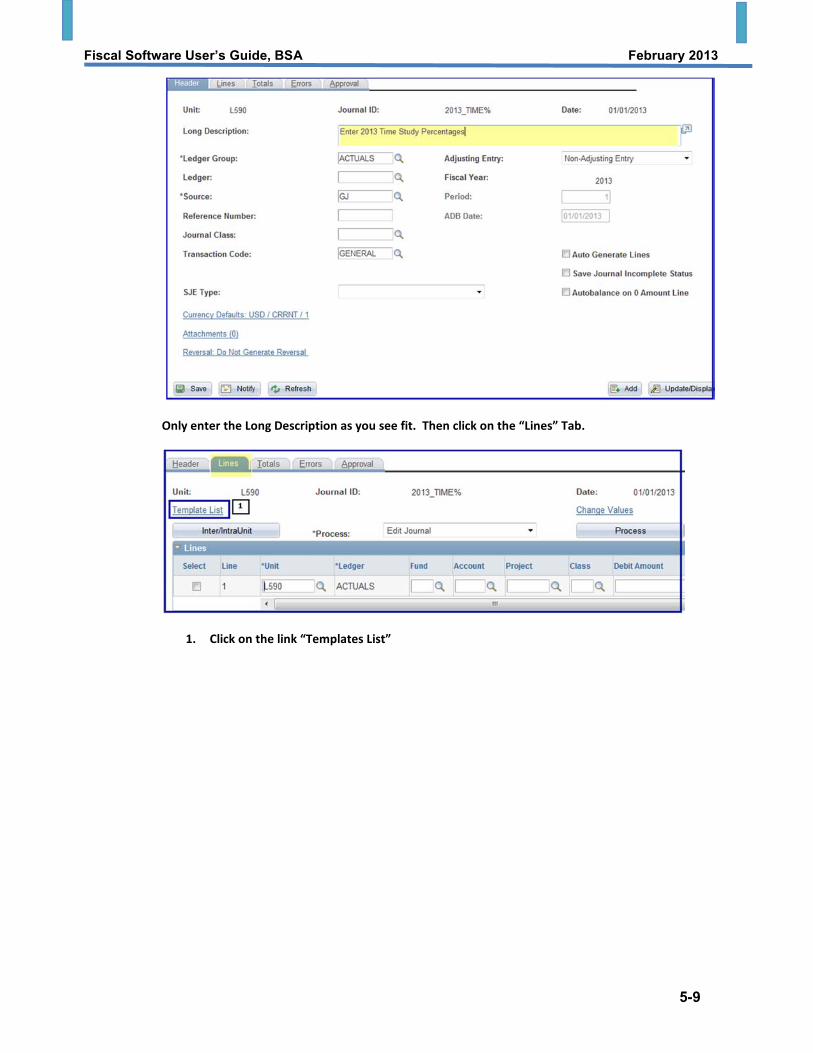
On the next screen add a long description.
NOTE: If you are adding to a future period – you should make sure the period is
open prior to beginning.
Fiscal Software User’s Guide, BSA February 2013
5-9
Only enter the Long Description as you see fit. Then click on the “Lines” Tab.
1. Click on the link “Templates List”
Fiscal Software User’s Guide, BSA February 2013
5-10
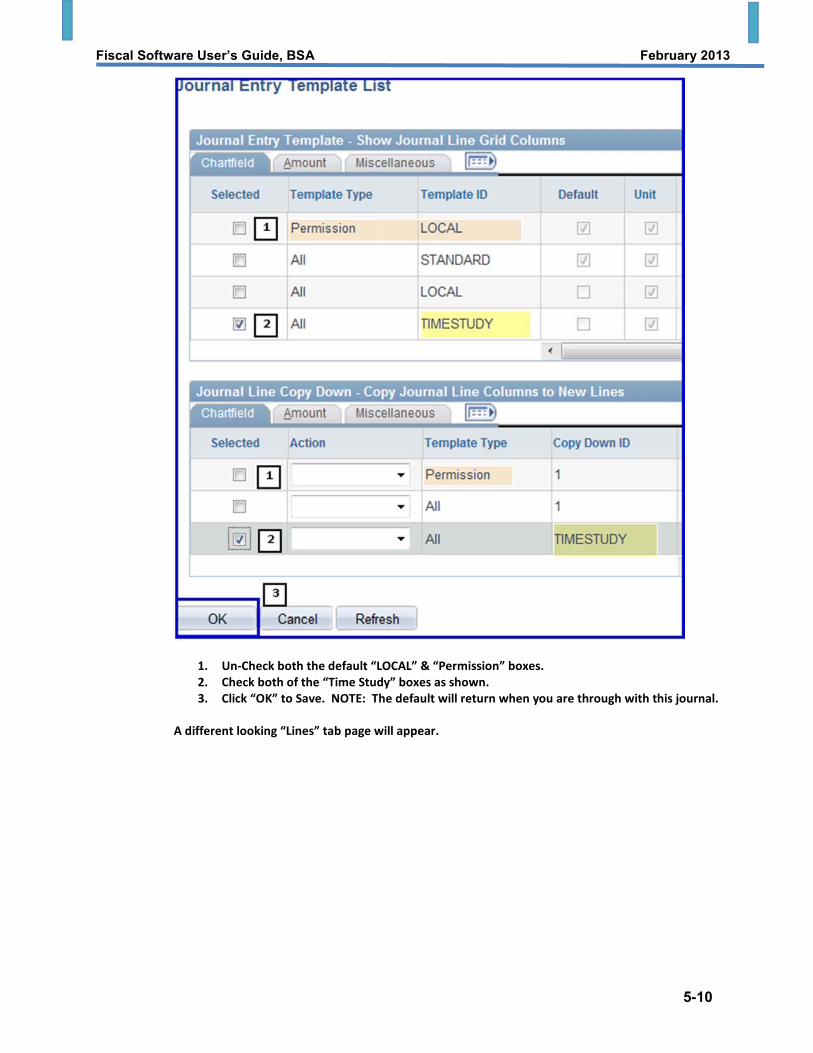
1. Un-Check both the default “LOCAL” & “Permission” boxes.
2. Check both of the “Time Study” boxes as shown.
3. Click “OK” to Save. NOTE: The default will return when you are through with this journal.
A different looking “Lines” tab page will appear.
Fiscal Software User’s Guide, BSA February 2013
5-11
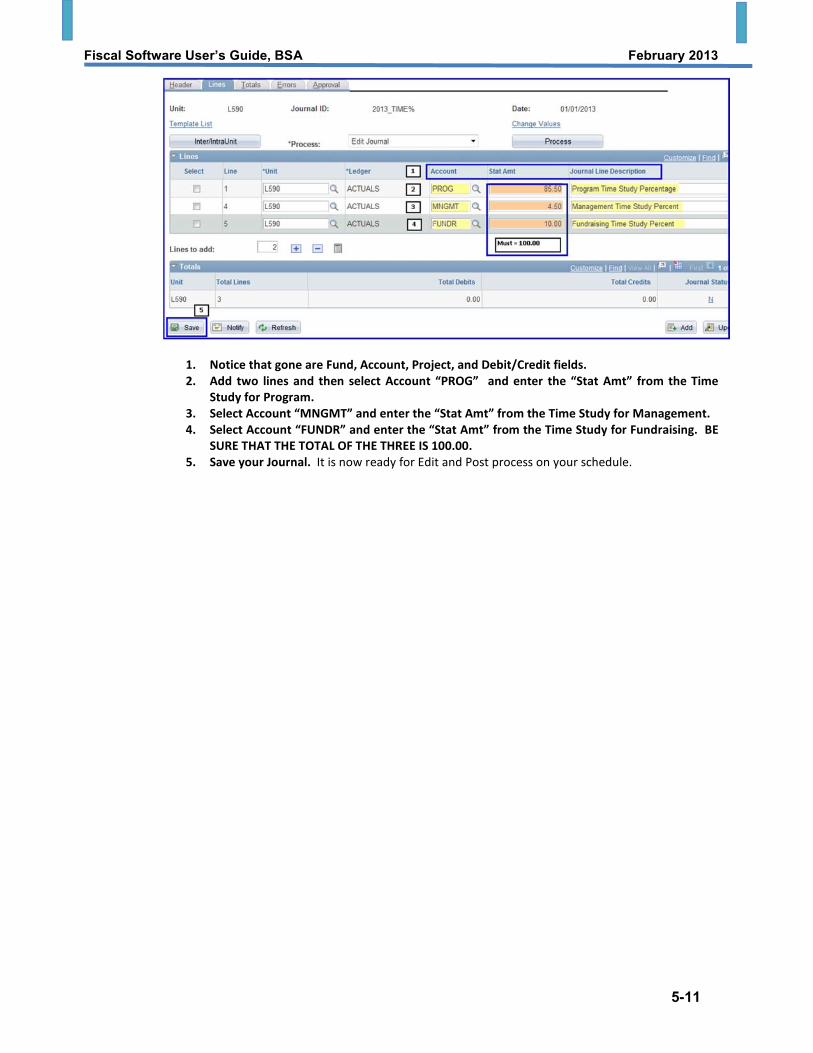
1. Notice that gone are Fund, Account, Project, and Debit/Credit fields.
2. Add two lines and then select Account “PROG” and enter the “Stat Amt” from the Time
Study for Program.
3. Select Account “MNGMT” and enter the “Stat Amt” from the Time Study for Management.
4. Select Account “FUNDR” and enter the “Stat Amt” from the Time Study for Fundraising. BE
SURE THAT THE TOTAL OF THE THREE IS 100.00.
5. Save your Journal. It is now ready for Edit and Post process on your schedule.
Fiscal Software User’s Guide, BSA February 2013
5-12
5.4.3 Attachments and Reversals of a Journal There is capability in PeopleSoft Financials 9.1 to attach scanned documents in support of transactions.
This process allows the reduction of paper storage in support of the fiscal transactions. The council
should adopt a policy about document storage that includes how scanned transaction support records
will be stored. Hint: Some documents will also require storage of the original paper such as loan
records, vehicle titles and so forth. Documents should be scanned into a Portable Document Format
(PDF) which is supported by most scanners. This format is universal and easily opened. The bottom
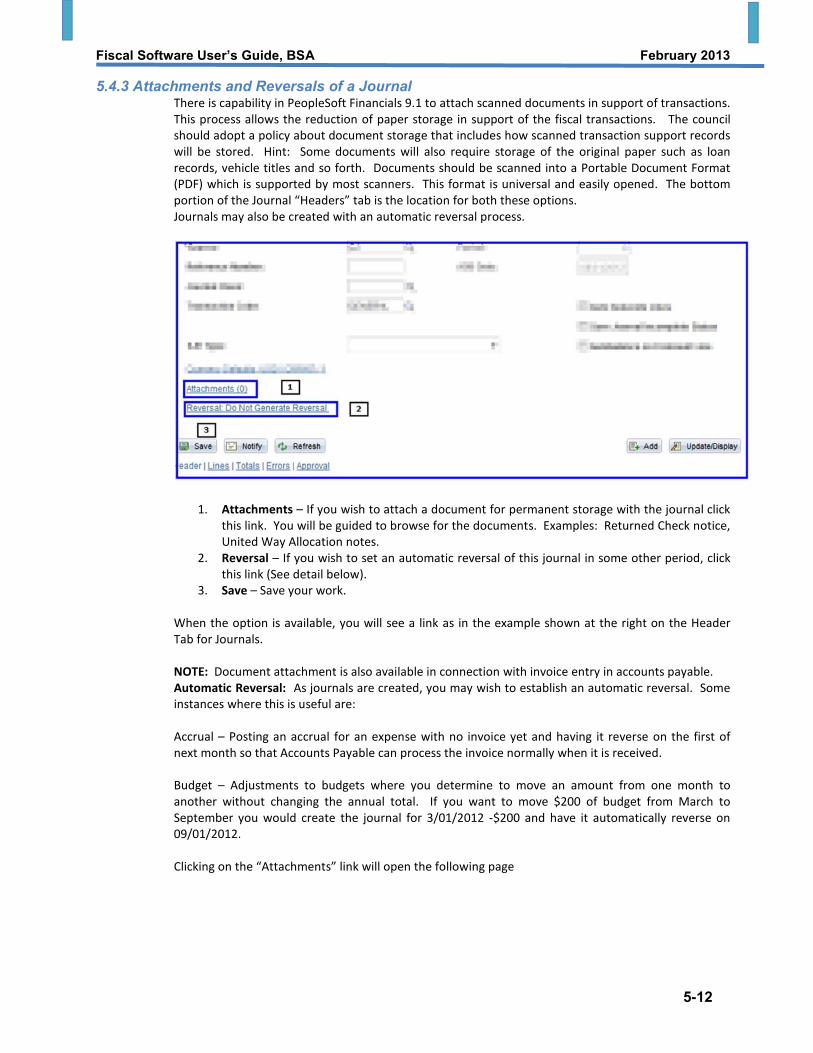
portion of the Journal “Headers” tab is the location for both these options.
Journals may also be created with an automatic reversal process.
1. Attachments – If you wish to attach a document for permanent storage with the journal click
this link. You will be guided to browse for the documents. Examples: Returned Check notice,
United Way Allocation notes.
2. Reversal – If you wish to set an automatic reversal of this journal in some other period, click
this link (See detail below).
3. Save – Save your work.
When the option is available, you will see a link as in the example shown at the right on the Header
Tab for Journals.
NOTE: Document attachment is also available in connection with invoice entry in accounts payable.
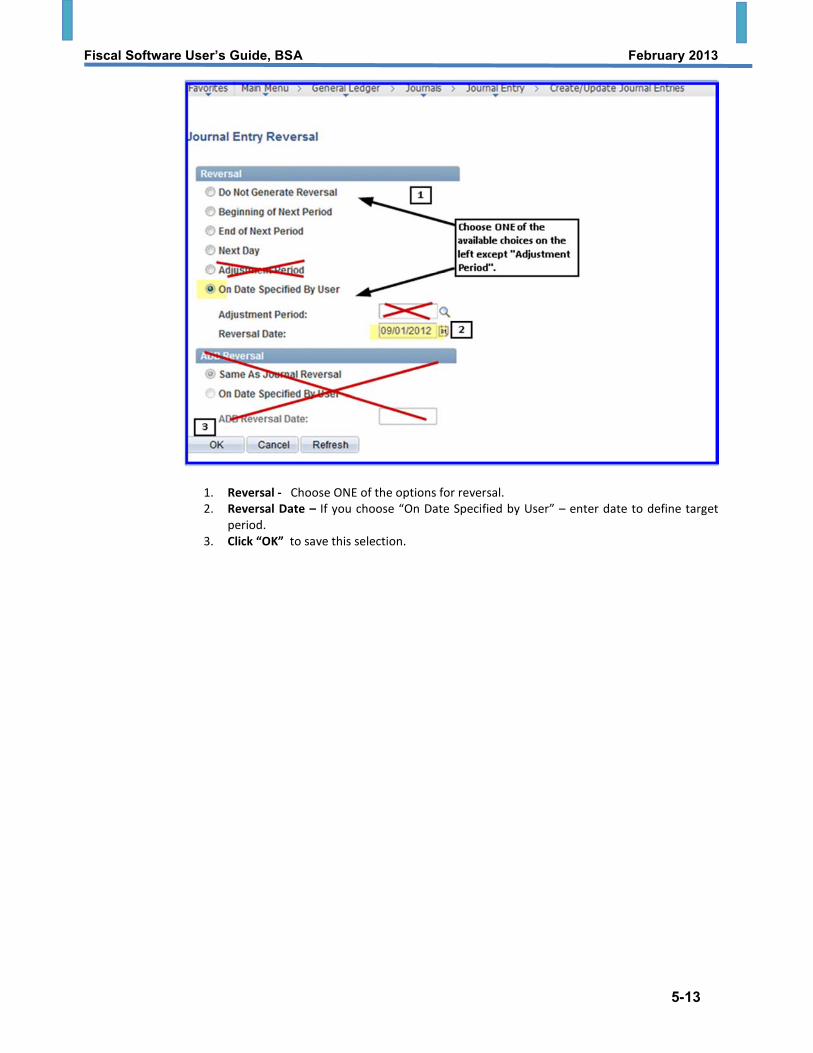
Automatic Reversal: As journals are created, you may wish to establish an automatic reversal. Some
instances where this is useful are:
Accrual – Posting an accrual for an expense with no invoice yet and having it reverse on the first of
next month so that Accounts Payable can process the invoice normally when it is received.
Budget – Adjustments to budgets where you determine to move an amount from one month to
another without changing the annual total. If you want to move $200 of budget from March to
September you would create the journal for 3/01/2012 -$200 and have it automatically reverse on
09/01/2012.
Clicking on the “Attachments” link will open the following page
Fiscal Software User’s Guide, BSA February 2013
5-13
1. Reversal - Choose ONE of the options for reversal.
2. Reversal Date – If you choose “On Date Specified by User” – enter date to define target
period.
3. Click “OK” to save this selection.
Fiscal Software User’s Guide, BSA February 2013
5-14
5.4.4 Downloading and Printing Journals Journal information may be printed or downloaded during the creation of a journal or at any time
after posting. Journal detail is stored automatically in the system by the Edit and Post processes.
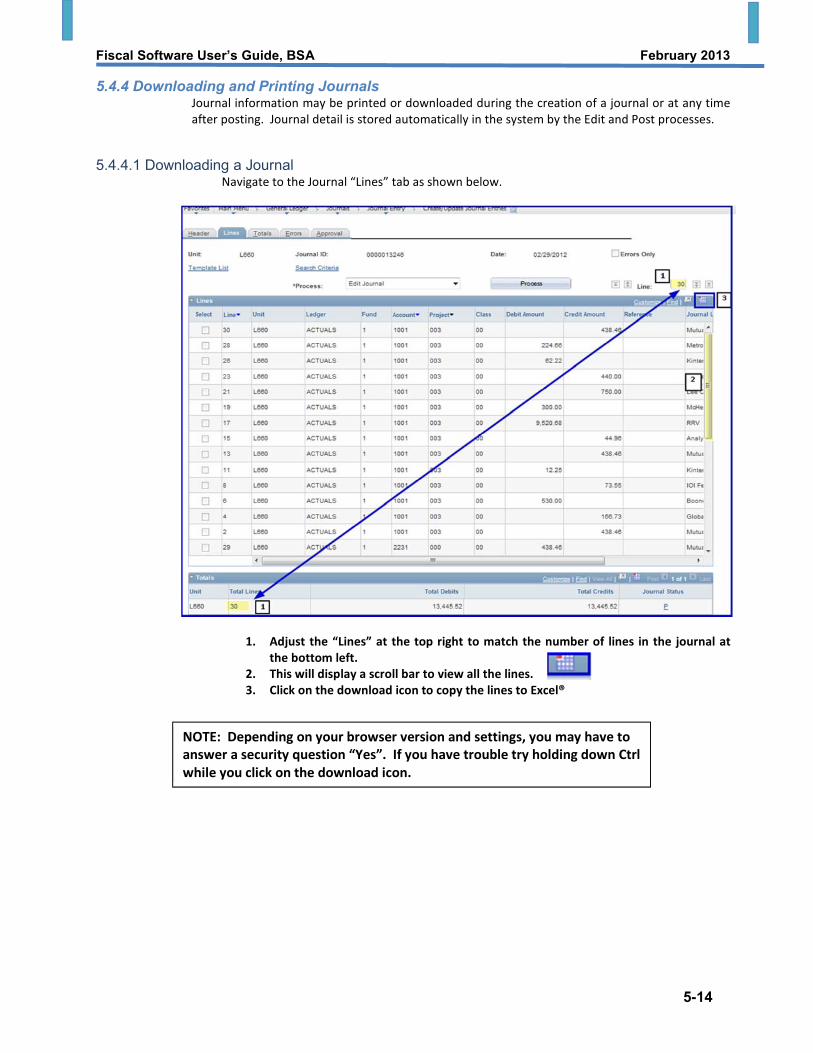
5.4.4.1 Downloading a Journal Navigate to the Journal “Lines” tab as shown below.
1. Adjust the “Lines” at the top right to match the number of lines in the journal at
the bottom left.
2. This will display a scroll bar to view all the lines.
3. Click on the download icon to copy the lines to Excel®
NOTE: Depending on your browser version and settings, you may have to
answer a security question “Yes”. If you have trouble try holding down Ctrl
while you click on the download icon.

Fiscal Software User’s Guide, BSA February 2013
5-15
The result should look like the sample above. The top row was added manually after the download to
Excel® to identify the journal and date.
5.4.4.2 Printing a Journal There is a formal printing of a journal that can be done from the “Lines” tab of the journal as shown
below:
1. Click on the dropdown button in the “Process” field.
2. Select “Print Journal (Chrystal)” from the list.
3. Click on the “Process” Button – After a little time to process, the journal will appear on your
“Report Manager” and can be printed or saved as a PDF.
Fiscal Software User’s Guide, BSA February 2013
5-16
5.5 Editing Journals After journals are created as noted above, they will follow a path that leads from entry to final posting. There are
two methods of editing journals, Single Journal Edit, or Multiple Journal Edit. Care should be taken in the
multiple methods to avoid editing journals that are not completed.
5.5.1 Edit a Single Journals After finding and opening the journal select the “Lines” tab. On the “Lines” tab, the current status of the
journal will be shown in the lower right hand portion of the screen. Status options: N = Not Edited
V = Valid for Posting
E = Errors exist – will not post
P = Posted
U = Unposted
A newly created journal has a status of “N” meaning “New” or not ready. Journals must go through the edit
process to evaluate that it is balanced and that all the account strings selected are valid. To Edit a Journal:
Steps Navigation 1. Edit a Journal Entry – Find
the Journal
Navigate to: General Ledger> Journals>Journal Entry>Create/Update Journal Entries
Click on “Find An Existing Value” tab.
Click the Clear Button at the bottom
Enter your Business Unit
Fill in any other detail to narrow the search such as Journal ID, Date,
and Source etc. as needed. The more detail the smaller the list of
journals to be found.
Click on the desired Journal
5. Launch the Edit Process Click on Lines Tab
“Edit” should be defaulted in the “Process” field (if not select “Edit”)
Click the “Process” Button
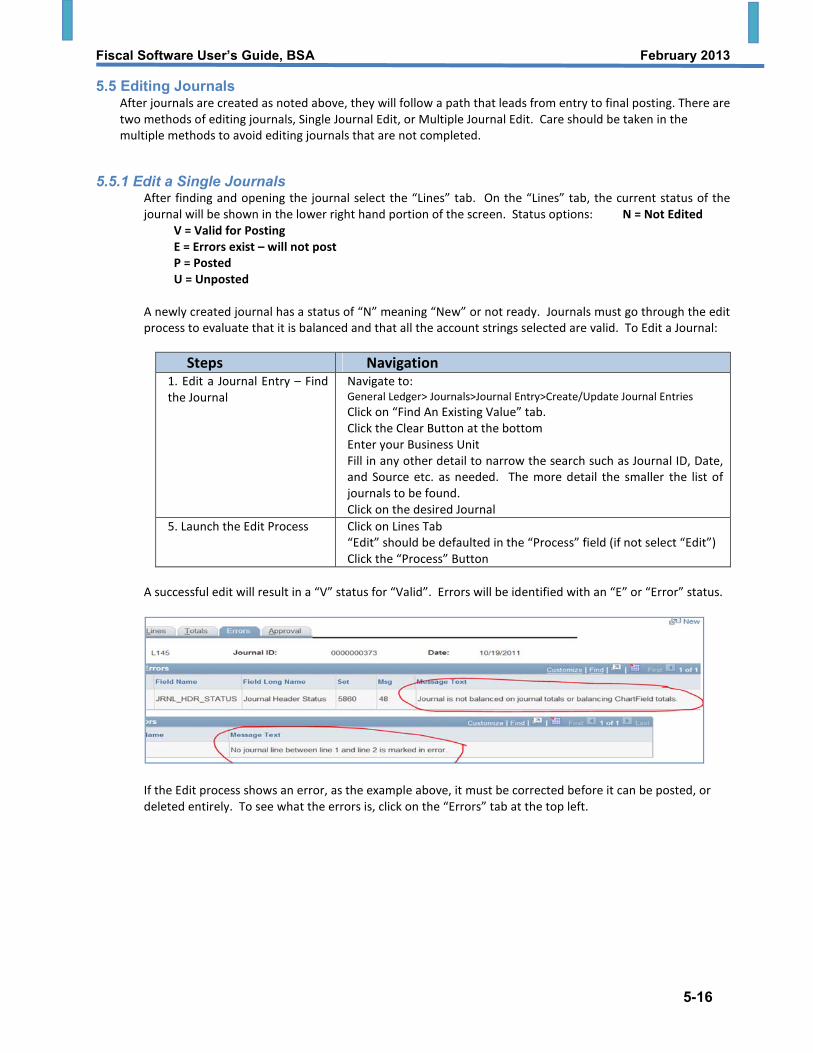
A successful edit will result in a “V” status for “Valid”. Errors will be identified with an “E” or “Error” status.
If the Edit process shows an error, as the example above, it must be corrected before it can be posted, or
deleted entirely. To see what the errors is, click on the “Errors” tab at the top left.
Fiscal Software User’s Guide, BSA February 2013
5-17
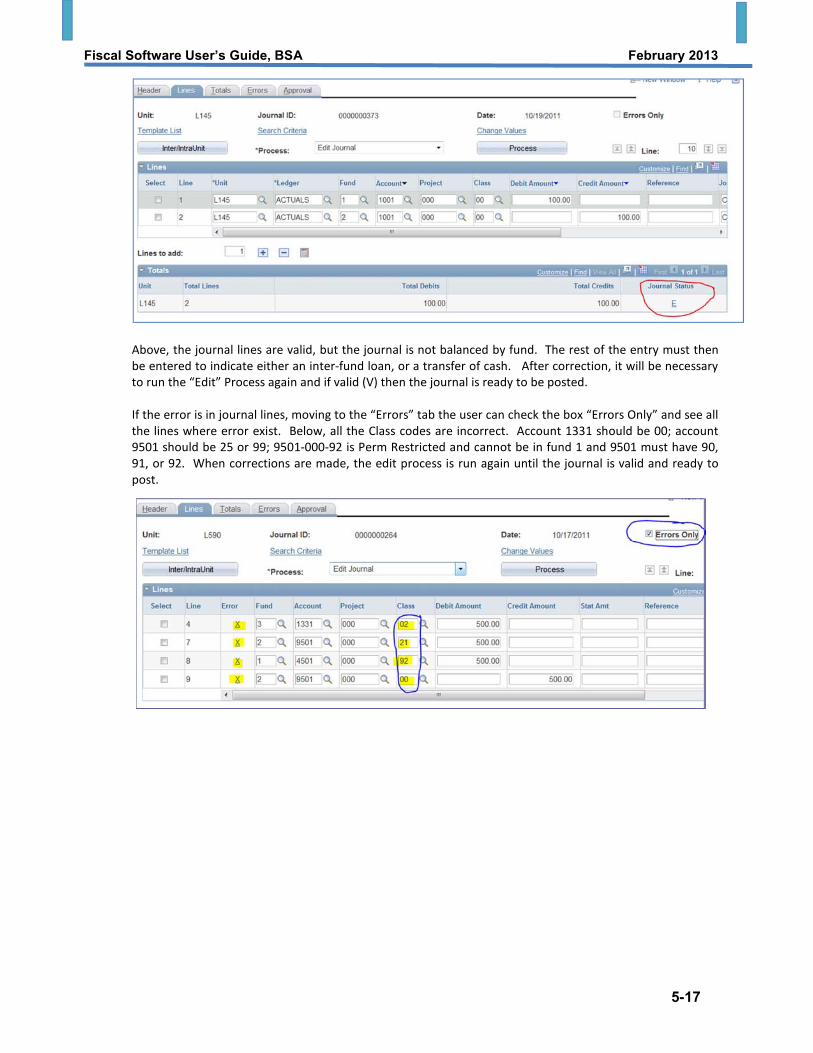
Above, the journal lines are valid, but the journal is not balanced by fund. The rest of the entry must then
be entered to indicate either an inter-fund loan, or a transfer of cash. After correction, it will be necessary
to run the “Edit” Process again and if valid (V) then the journal is ready to be posted.
If the error is in journal lines, moving to the “Errors” tab the user can check the box “Errors Only” and see all
the lines where error exist. Below, all the Class codes are incorrect. Account 1331 should be 00; account
9501 should be 25 or 99; 9501-000-92 is Perm Restricted and cannot be in fund 1 and 9501 must have 90,
91, or 92. When corrections are made, the edit process is run again until the journal is valid and ready to
post.
Fiscal Software User’s Guide, BSA February 2013
5-18
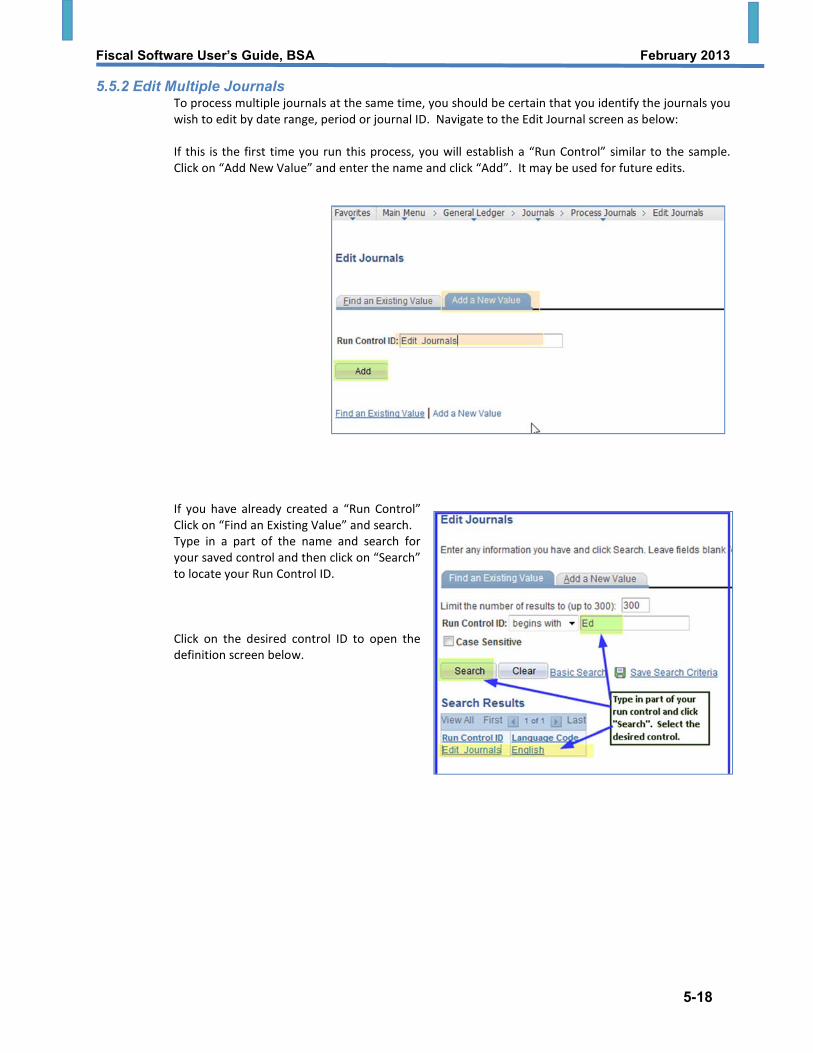
5.5.2 Edit Multiple Journals To process multiple journals at the same time, you should be certain that you identify the journals you
wish to edit by date range, period or journal ID. Navigate to the Edit Journal screen as below:
If this is the first time you run this process, you will establish a “Run Control” similar to the sample.
Click on “Add New Value” and enter the name and click “Add”. It may be used for future edits.
If you have already created a “Run Control”
Click on “Find an Existing Value” and search.
Type in a part of the name and search for
your saved control and then click on “Search”
to locate your Run Control ID.
Click on the desired control ID to open the
definition screen below.
Fiscal Software User’s Guide, BSA February 2013
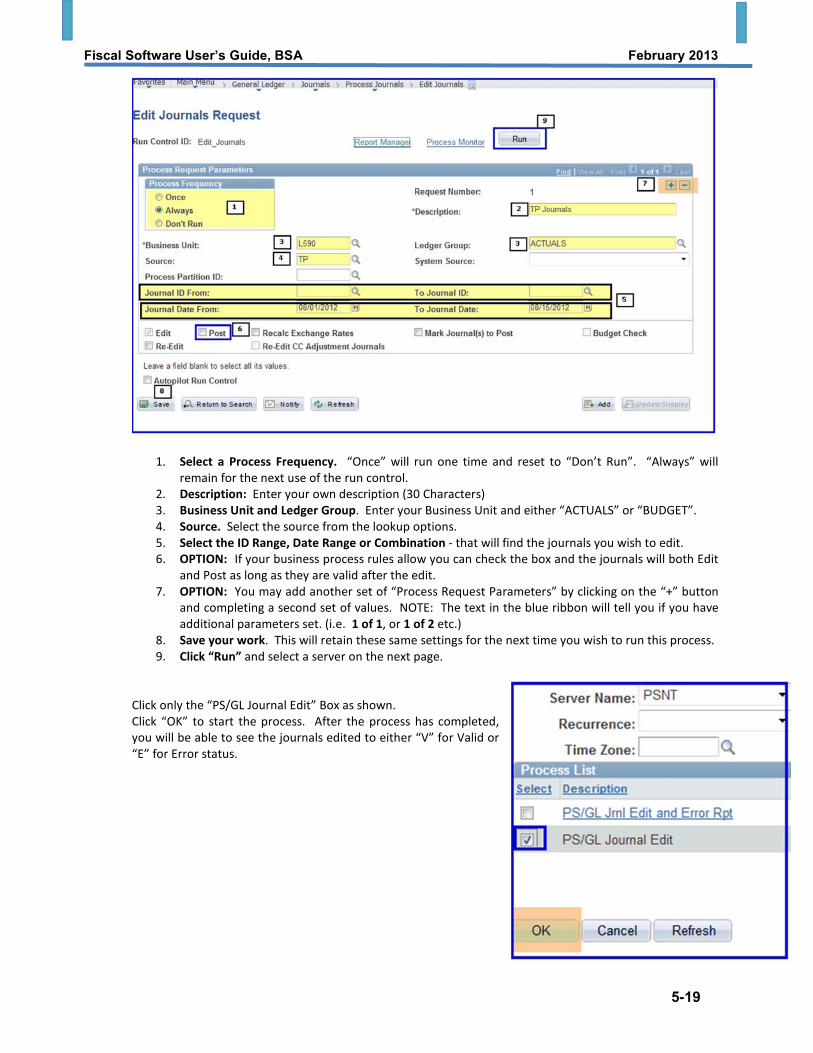
5-19
1. Select a Process Frequency. “Once” will run one time and reset to “Don’t Run”. “Always” will
remain for the next use of the run control.
2. Description: Enter your own description (30 Characters)
3. Business Unit and Ledger Group. Enter your Business Unit and either “ACTUALS” or “BUDGET”.
4. Source. Select the source from the lookup options.
5. Select the ID Range, Date Range or Combination - that will find the journals you wish to edit.
6. OPTION: If your business process rules allow you can check the box and the journals will both Edit
and Post as long as they are valid after the edit.
7. OPTION: You may add another set of “Process Request Parameters” by clicking on the “+” button
and completing a second set of values. NOTE: The text in the blue ribbon will tell you if you have
additional parameters set. (i.e. 1 of 1, or 1 of 2 etc.)
8. Save your work. This will retain these same settings for the next time you wish to run this process.
9. Click “Run” and select a server on the next page.
Click only the “PS/GL Journal Edit” Box as shown.
Click “OK” to start the process. After the process has completed,
you will be able to see the journals edited to either “V” for Valid or
“E” for Error status.

Fiscal Software User’s Guide, BSA February 2013
5-20
5.6 Deleting a Journal Before a journal is posted, it can be deleted as long as the user has permission to delete journals. All such
deletions are recorded in a system log for reference or audit. To delete the journal, simply search for the
journal, go to the “Lines” tab, click on the “Process “ drop-down button, top center, and select “Delete”, then
press the “Process” action button. Notice that there are several actions that can be taken with an “un-posted”
journal as seen below.
5.7 Posting Journals All journals must have a V = Valid Status before they can be posted. There are two different ways to post
journals. If you are working in the journal, you can run the Edit and Post processes from within the “Lines” tab
of the journal itself as on the right. Some journals are posted automatically by the system assuming that there
are no errors found in the automatic edit process.
5.7.1 Post a Single Journal To post a journal individually, click on the process drop-down in the “Lines” tab of the journal and select
“Post Journal”. Then click “Process”. The wheel in the upper right corner of the screen will run for 10-30
seconds and the system should report “Journal Saved”. The Status should now read “P” for posted.

Fiscal Software User’s Guide, BSA February 2013
5-21
5.7.2 Posting Multiple Journals The posting of multiple journals can be very useful but also need to be precise so as to avoid posting a journal that is
not yet ready.
Navigate to the Post Journals page as below. If it is the first time, click on “Add a New Value”, add a unique
name and click on “Add”. This may then be used for subsequent Posts.
If you have previously saved a Run Control you may click on the “Find An Existing Value” tab and search for your
saved ID.
You will then have the following page to complete your task.
Fiscal Software User’s Guide, BSA February 2013
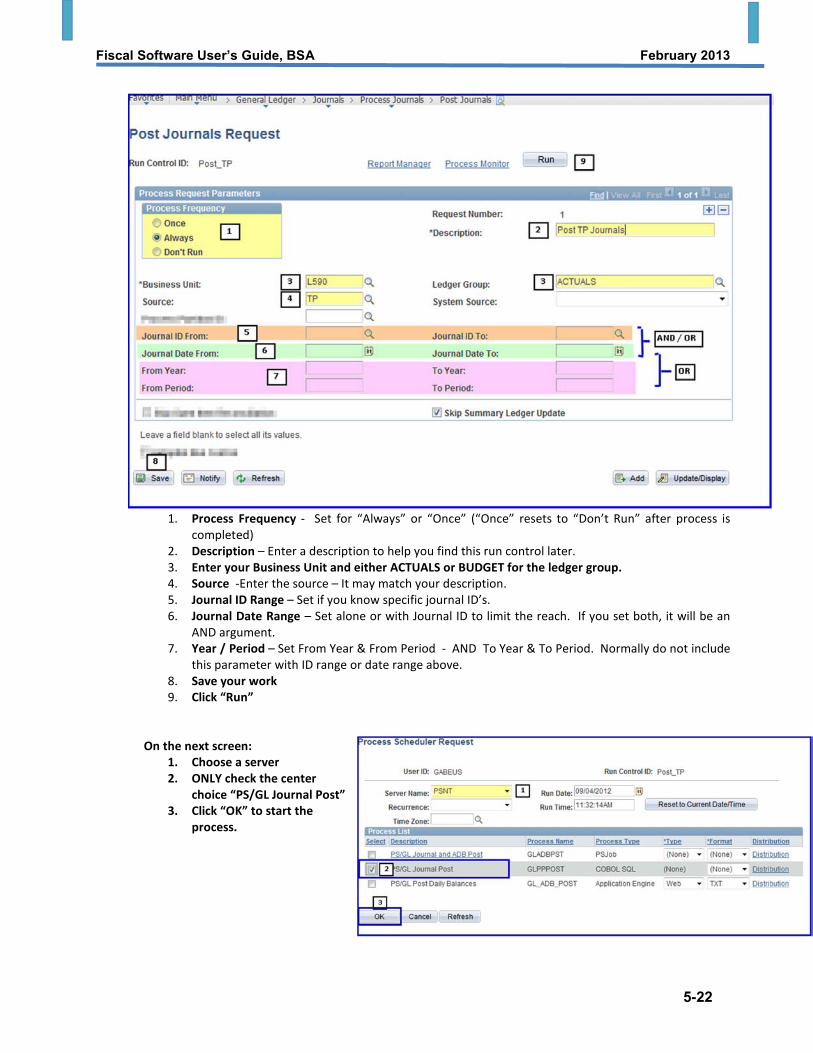
5-22
1. Process Frequency - Set for “Always” or “Once” (“Once” resets to “Don’t Run” after process is
completed)
2. Description – Enter a description to help you find this run control later.
3. Enter your Business Unit and either ACTUALS or BUDGET for the ledger group.
4. Source -Enter the source – It may match your description.
5. Journal ID Range – Set if you know specific journal ID’s.
6. Journal Date Range – Set alone or with Journal ID to limit the reach. If you set both, it will be an
AND argument.
7. Year / Period – Set From Year & From Period - AND To Year & To Period. Normally do not include
this parameter with ID range or date range above.
8. Save your work
9. Click “Run”
On the next screen:
1. Choose a server
2. ONLY check the center
choice “PS/GL Journal Post”
3. Click “OK” to start the
process.

Fiscal Software User’s Guide, BSA February 2013
5-23
5.7.3 Subsidiary Journals Subsidiary ledgers will produce journals that will enter the general ledger for posting to the Actuals Ledger.
o A nightly process in the software will gather journals from the following sources and import them, edit
for correctness of account strings and balancing and post them automatically. If any of these processes
find an error, that journal will not post and will need to be corrected, edited and posted manually.
� AM – Asset Management – Asset depreciation and other adjustments
� AP – Accounts Payable – Invoice entry and corrections
� AP – Payments – Checks, ACH and corrections
� CJ – Contributions Journal – Pledge information from PAS Software
� FR – Fundraising Payments – Coming from PAS (Optional)
� MJ – Membership – Registration entries form PAS
� PR – Payroll – transactions from IOI Pay processing
o A nightly process in the software will gather journals from the following sources and import them, edit
for correctness of account strings and balancing but NOT Post them. This allows the user to check for
accuracy and make needed corrections prior to posting.
� TP – Trading Post – Entries coming from SellWise uploads (including optional fundraising
payments entered into SellWise)
5.8 Unposting a Journal With help from the National Support Desk, it is possible to unpost a journal that has been posted. The record of
the journal will remain searchable and will have a status of U=Unposted. This if recommended only if a reversal
is not desired.
5.9 Copying an Existing Journal Copying a journal is useful to correct a previous error and for recurring entries. There are two ways to copy a
journal. If the journal is viewed on the screen, it can be done right there. The other method requires knowing
the journal ID.
Typical reasons to copy a journal are:
• Recurring Journal Entry
• Correcting a Journal – Backing it out.
• Moving a journal to a different period
5.9.1 Copy a Journal While Viewing The most commonly used is the
individual method from the
position of viewing an un-posted
or posted journal. To
accomplish this, 1- select “Copy
Journal” from the drop-down list
as shown and 2- . Click the
“Process” Button.

Fiscal Software User’s Guide, BSA February 2013
5-24
5.9.2 Recurring Journal Entry At the next screen, you should fill in the fields as below. In this example a simple copy from an old journal
to a new period.
1. Journal ID – Can default to “Next” and be system generated or you may enter unique ID.
2. Journal Date – Make certain you place the new journal in the proper month.
3. Click OK - This will create a new journal with the same accounts and values as the first. It can be
modified as needed, edited and posted as normal.
5.9.3 Reversing Journal Entry At the next screen, you should fill in the fields as below. This is the reversal of a journal because of an error
or other reason. Usually the new date should be same as the old..
1. Journal ID - Recommend using an “R” followed by the numbers in the old journal with one less
zero.
2. Journal Date - For a correction you would normally use the same date as the original.
3. Check the Box ‘Reverse Signs” to do a complete reversal. It may be edited as needed.
4. Click “OK” to Create.
Fiscal Software User’s Guide, BSA February 2013
5-25
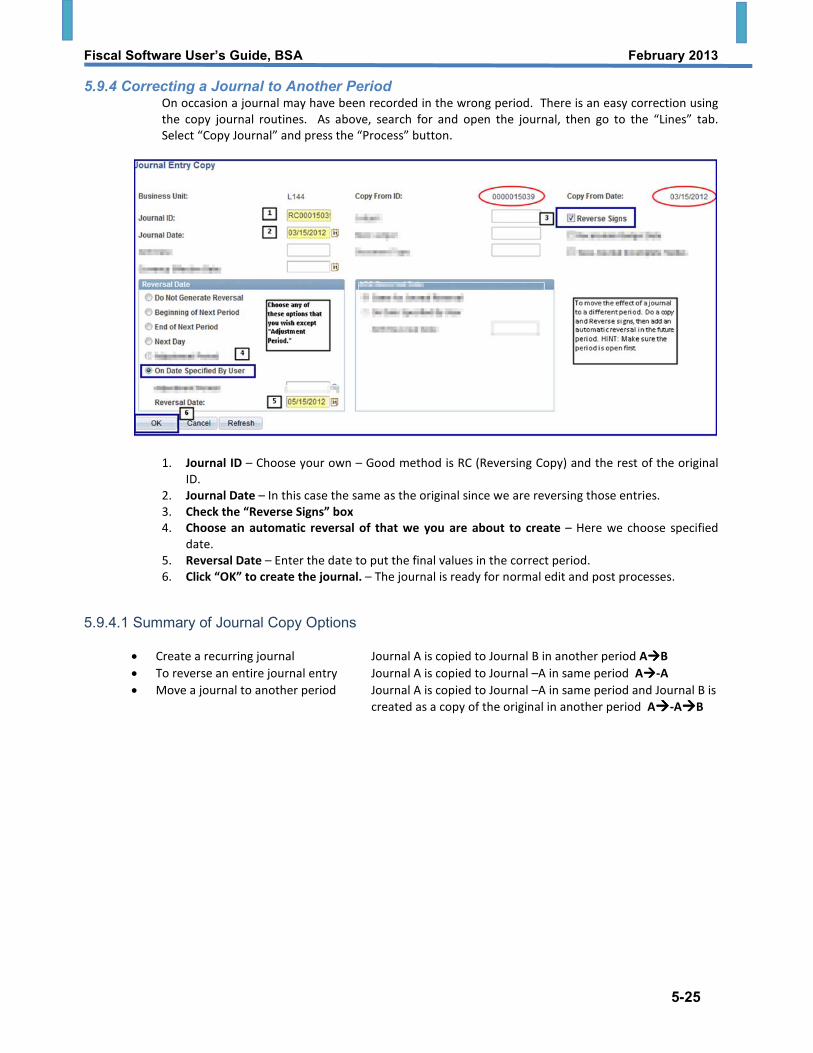
5.9.4 Correcting a Journal to Another Period On occasion a journal may have been recorded in the wrong period. There is an easy correction using
the copy journal routines. As above, search for and open the journal, then go to the “Lines” tab.
Select “Copy Journal” and press the “Process” button.
1. Journal ID – Choose your own – Good method is RC (Reversing Copy) and the rest of the original
ID.
2. Journal Date – In this case the same as the original since we are reversing those entries.
3. Check the “Reverse Signs” box
4. Choose an automatic reversal of that we you are about to create – Here we choose specified
date.
5. Reversal Date – Enter the date to put the final values in the correct period.
6. Click “OK” to create the journal. – The journal is ready for normal edit and post processes.
5.9.4.1 Summary of Journal Copy Options
• Create a recurring journal Journal A is copied to Journal B in another period A����B
• To reverse an entire journal entry Journal A is copied to Journal –A in same period A����-A
• Move a journal to another period Journal A is copied to Journal –A in same period and Journal B is
created as a copy of the original in another period A����-A����B