Embed Size (px)
Citation preview
Cameras:
By default, your scene already has one camera and that is usually all you need, but onoccasion you may wish to add more cameras. You add more cameras by hitting “Shift-A”, like creating all other objects discussed up until now. To change which camera isactive, you need to select that camera and press “Ctrl” and number pad “0”. Thischanges the active camera.
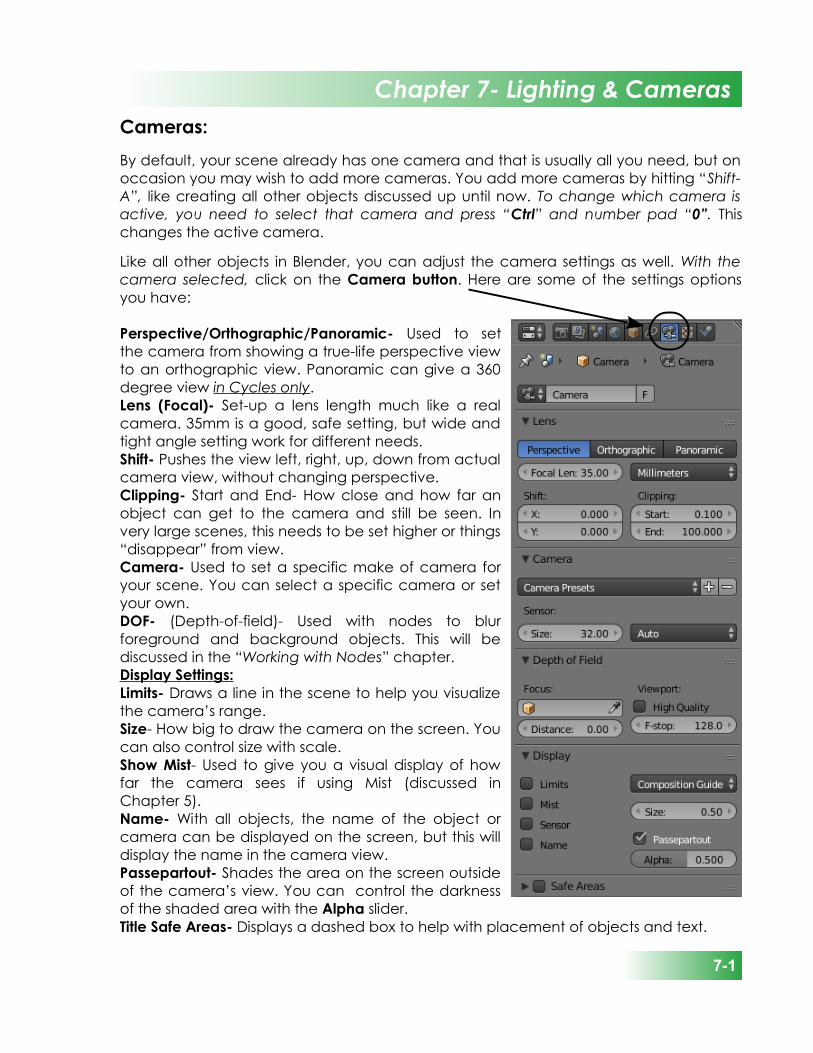
Like all other objects in Blender, you can adjust the camera settings as well. With thecamera selected, click on the Camera button. Here are some of the settings optionsyou have:
Perspective/Orthographic/Panoramic- Used to setthe camera from showing a true-life perspective viewto an orthographic view. Panoramic can give a 360degree view in Cycles only. Lens (Focal)- Set-up a lens length much like a realcamera. 35mm is a good, safe setting, but wide andtight angle setting work for different needs.Shift- Pushes the view left, right, up, down from actualcamera view, without changing perspective.Clipping- Start and End- How close and how far anobject can get to the camera and still be seen. Invery large scenes, this needs to be set higher or things“disappear” from view.Camera- Used to set a specific make of camera foryour scene. You can select a specific camera or setyour own. DOF- (Depth-of-field)- Used with nodes to blurforeground and background objects. This will bediscussed in the “Working with Nodes” chapter.Display Settings:Limits- Draws a line in the scene to help you visualizethe camera’s range.Size- How big to draw the camera on the screen. Youcan also control size with scale.Show Mist- Used to give you a visual display of howfar the camera sees if using Mist (discussed inChapter 5).Name- With all objects, the name of the object orcamera can be displayed on the screen, but this willdisplay the name in the camera view.Passepartout- Shades the area on the screen outsideof the camera’s view. You can control the darknessof the shaded area with the Alpha slider.Title Safe Areas- Displays a dashed box to help with placement of objects and text.
Chapter 7- Lighting & Cameras
7-1
Chapter 1- The Blender Interface
Using Nodes for Camera Effects:Up to this point, we have only used nodes for Cycles materials, but node can be usedwith the internal renderer for camera effects as well.
Depth-of-Field- Internal Renderer:A great node feature is creating Depth-of-Field effects. Just like a camera shot using alow F-stop setting that creates blur behind and in front of what the camera is focusedon, we can create in Blender. This process if for the Internal Render Engine.
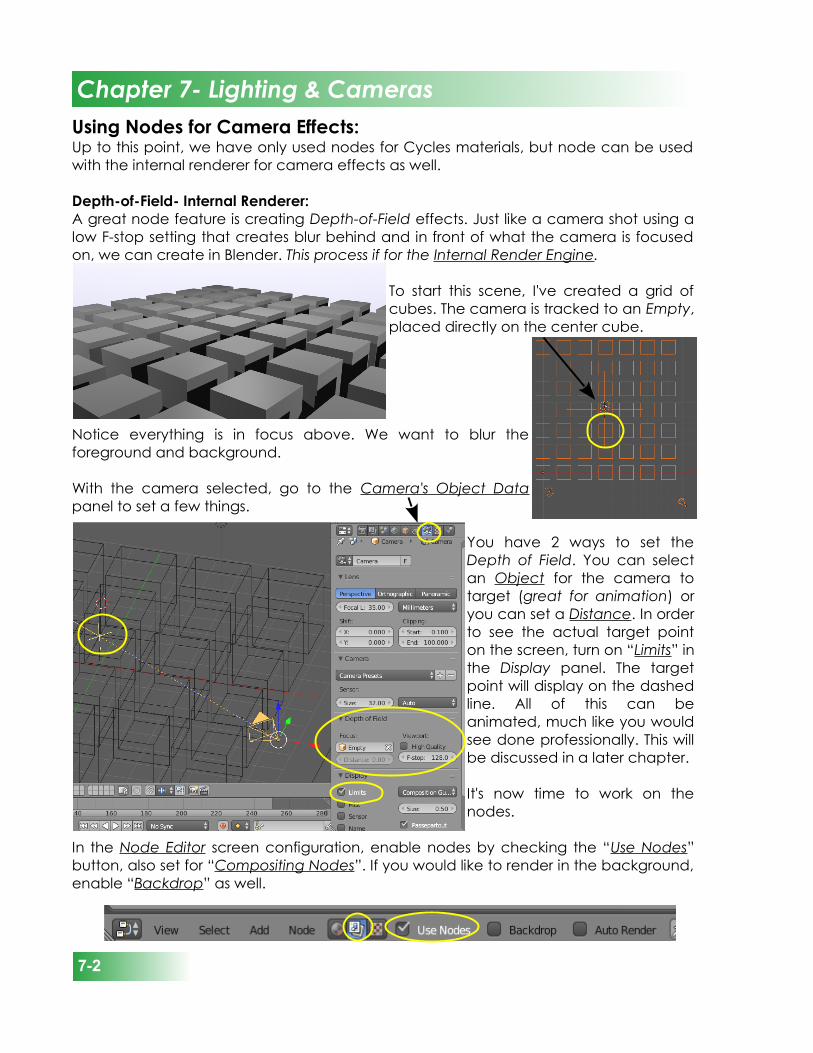
To start this scene, I've created a grid ofcubes. The camera is tracked to an Empty,placed directly on the center cube.
Notice everything is in focus above. We want to blur theforeground and background.
With the camera selected, go to the Camera's Object Datapanel to set a few things.
You have 2 ways to set theDepth of Field. You can selectan Object for the camera totarget (great for animation) oryou can set a Distance. In orderto see the actual target pointon the screen, turn on “Limits” inthe Display panel. The targetpoint will display on the dashedline. All of this can beanimated, much like you wouldsee done professionally. This willbe discussed in a later chapter.
It's now time to work on thenodes.
In the Node Editor screen configuration, enable nodes by checking the “Use Nodes”button, also set for “Compositing Nodes”. If you would like to render in the background,enable “Backdrop” as well.
Chapter 7- Lighting & Cameras
7-2

Delete the line connecting the Render Layers and Composite panels. We are nowgoing to add 2 nodes. Add a “Map Value” node from the Vector node set and a“Defocus” node from the Filter node set. If you would like to render in the backdrop,add a “Viewer” node from the Output node set.
Set the nodes up as displayed below and match settings:
The “Map Value” panel is used to adjust the pixels related to distance from cameraand connects to the “Z” on the Render Layer panel and Defocus panel. The imageOut/Ins connect as shown. Adjust the F-stop to a low number. Like a camera, a lowfStop means little is in focus beyond the target. A larger number will give a larger focusrange. Max Blur sets the amount of blurring while a high Samples setting will give you abetter quality image. Experimenting with these settings will give you different results.
Chapter 7- Lighting & Cameras
7-3
Motorcycle with focus at headlamp
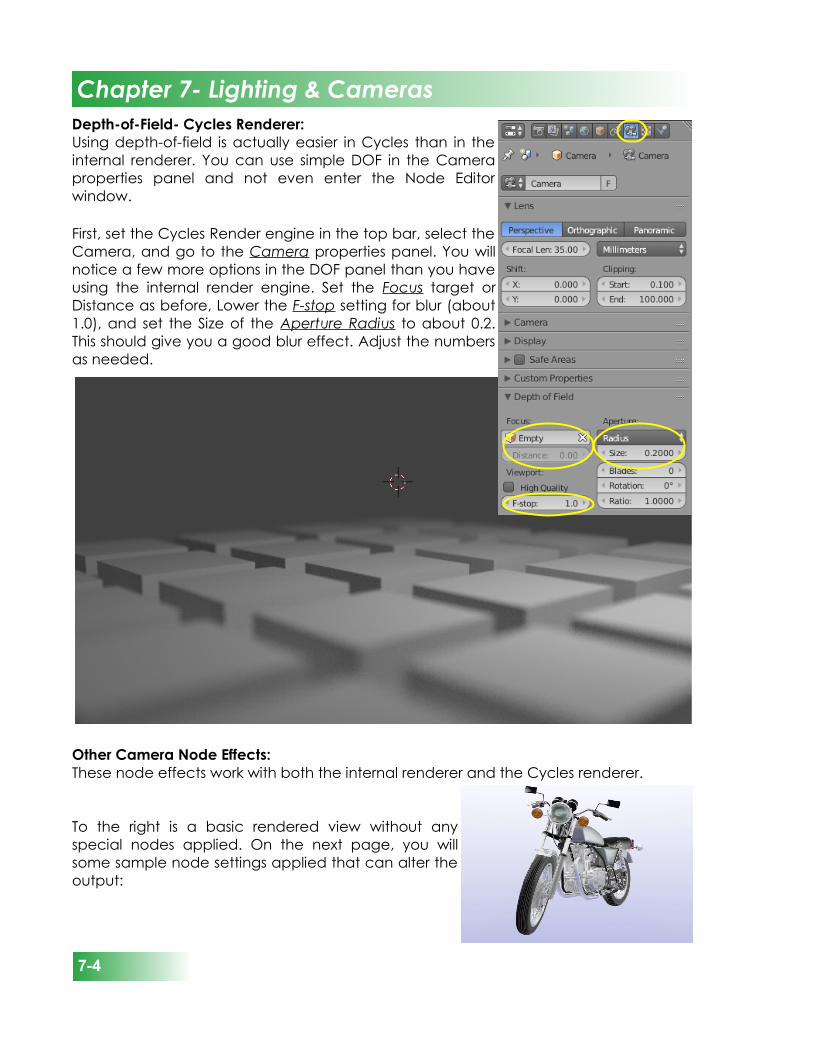
Chapter 1- The Blender InterfaceDepth-of-Field- Cycles Renderer:Using depth-of-field is actually easier in Cycles than in theinternal renderer. You can use simple DOF in the Cameraproperties panel and not even enter the Node Editorwindow.
First, set the Cycles Render engine in the top bar, select theCamera, and go to the Camera properties panel. You willnotice a few more options in the DOF panel than you haveusing the internal render engine. Set the Focus target orDistance as before, Lower the F-stop setting for blur (about1.0), and set the Size of the Aperture Radius to about 0.2.This should give you a good blur effect. Adjust the numbersas needed.
Other Camera Node Effects:These node effects work with both the internal renderer and the Cycles renderer.
To the right is a basic rendered view without anyspecial nodes applied. On the next page, you willsome sample node settings applied that can alter theoutput:
Chapter 7- Lighting & Cameras
7-4
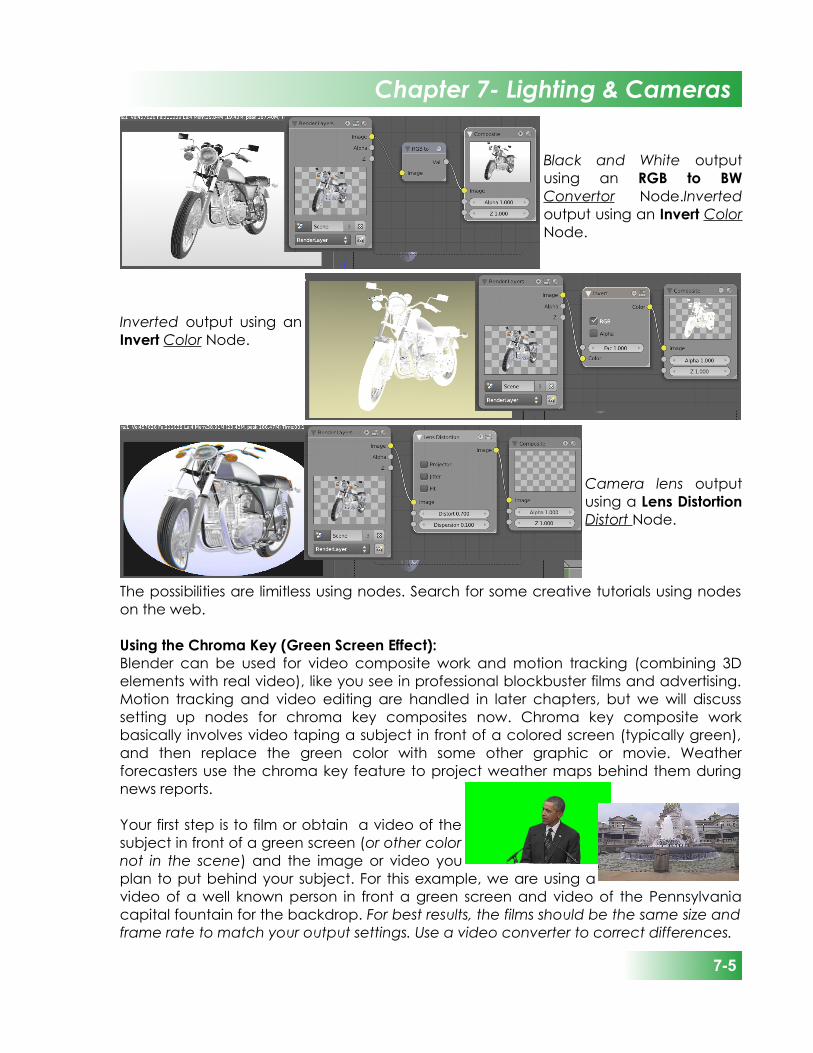
Black and White outputusing an RGB to BWConvertor Node.Invertedoutput using an Invert ColorNode.
Inverted output using anInvert Color Node.
Camera lens outputusing a Lens DistortionDistort Node.
The possibilities are limitless using nodes. Search for some creative tutorials using nodeson the web.
Using the Chroma Key (Green Screen Effect):Blender can be used for video composite work and motion tracking (combining 3Delements with real video), like you see in professional blockbuster films and advertising.Motion tracking and video editing are handled in later chapters, but we will discusssetting up nodes for chroma key composites now. Chroma key composite workbasically involves video taping a subject in front of a colored screen (typically green),and then replace the green color with some other graphic or movie. Weatherforecasters use the chroma key feature to project weather maps behind them duringnews reports.
Your first step is to film or obtain a video of thesubject in front of a green screen (or other colornot in the scene) and the image or video youplan to put behind your subject. For this example, we are using avideo of a well known person in front a green screen and video of the Pennsylvaniacapital fountain for the backdrop. For best results, the films should be the same size andframe rate to match your output settings. Use a video converter to correct differences.
Chapter 7- Lighting & Cameras
7-5
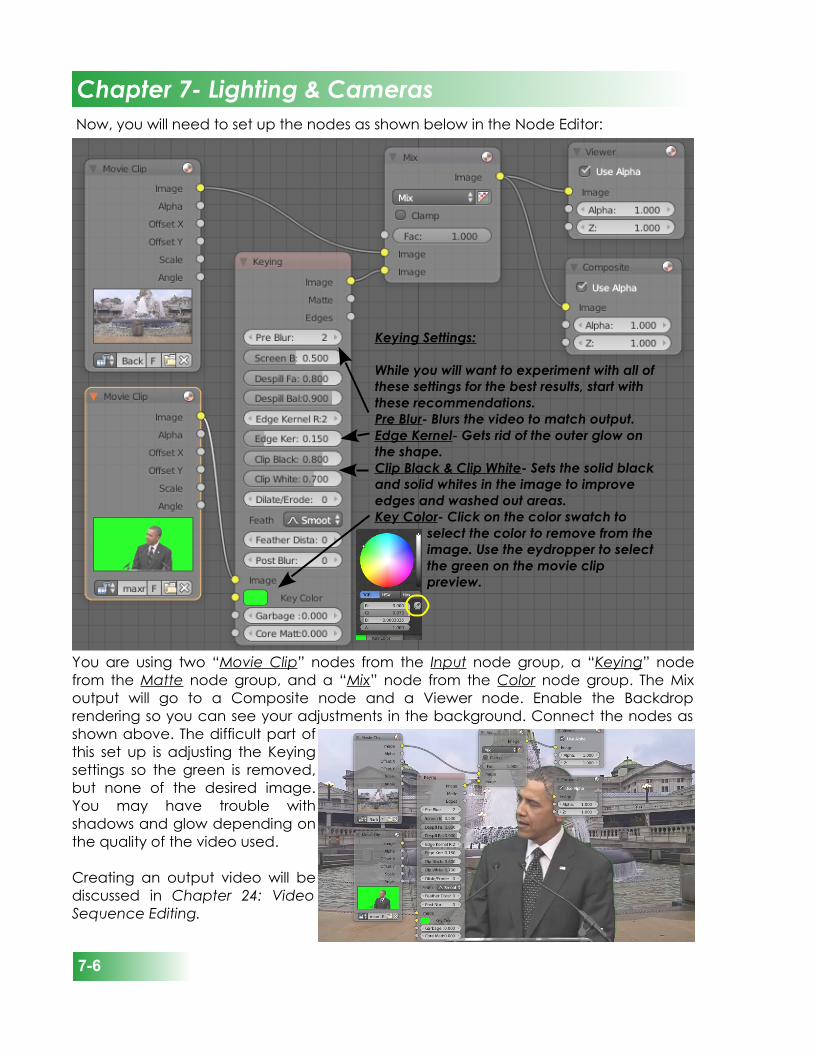
Chapter 1- The Blender Interface Now, you will need to set up the nodes as shown below in the Node Editor:
You are using two “Movie Clip” nodes from the Input node group, a “Keying” nodefrom the Matte node group, and a “Mix” node from the Color node group. The Mixoutput will go to a Composite node and a Viewer node. Enable the Backdroprendering so you can see your adjustments in the background. Connect the nodes asshown above. The difficult part ofthis set up is adjusting the Keyingsettings so the green is removed,but none of the desired image.You may have trouble withshadows and glow depending onthe quality of the video used.
Creating an output video will bediscussed in Chapter 24: VideoSequence Editing.
Chapter 7- Lighting & Cameras
7-6
Keying Settings:
While you will want to experiment with all of these settings for the best results, start with these recommendations.Pre Blur- Blurs the video to match output.Edge Kernel- Gets rid of the outer glow on the shape.Clip Black & Clip White- Sets the solid black and solid whites in the image to improve edges and washed out areas.Key Color- Click on the color swatch to select the color to remove from the image. Use the eydropper to select the green on the movie clip preview.
Lighting Types and Settings
When you create a scene in Blender, you start with a few basic elements that willinclude a camera, but may or may not include a light. Remember that what thecamera sees is what will render out as a picture or movie depending on what you tellthe program you want as a final output. To get a simple rendered view, press the “F12”key. If the picture is black, you do not have a lamp or the lamp settings or placement isincorrect. To exit the render window, press the “Esc” key.
In most cases, you will need more than one lamp in order to properly illuminate yourscene. Most scenes usually require 3-4 lamps. Be careful not to use too many lamps! Thedifferent types of lamps available for you to use are as follows:
Point- Basic Blender Lamp- shines all directions.Sun- Provides even angle of light, regardless of placement from objects.Spot- Shines a direct angle of light.Hemi- A wider light, much like area lights.Area- Provides large area lighting (like a classroom). Can be scaled.
In traditional Blender rendering, only spotlights are able to cast shadows. However, withRay-tracing (discussed in a later chapter) all lamps can cast shadows.
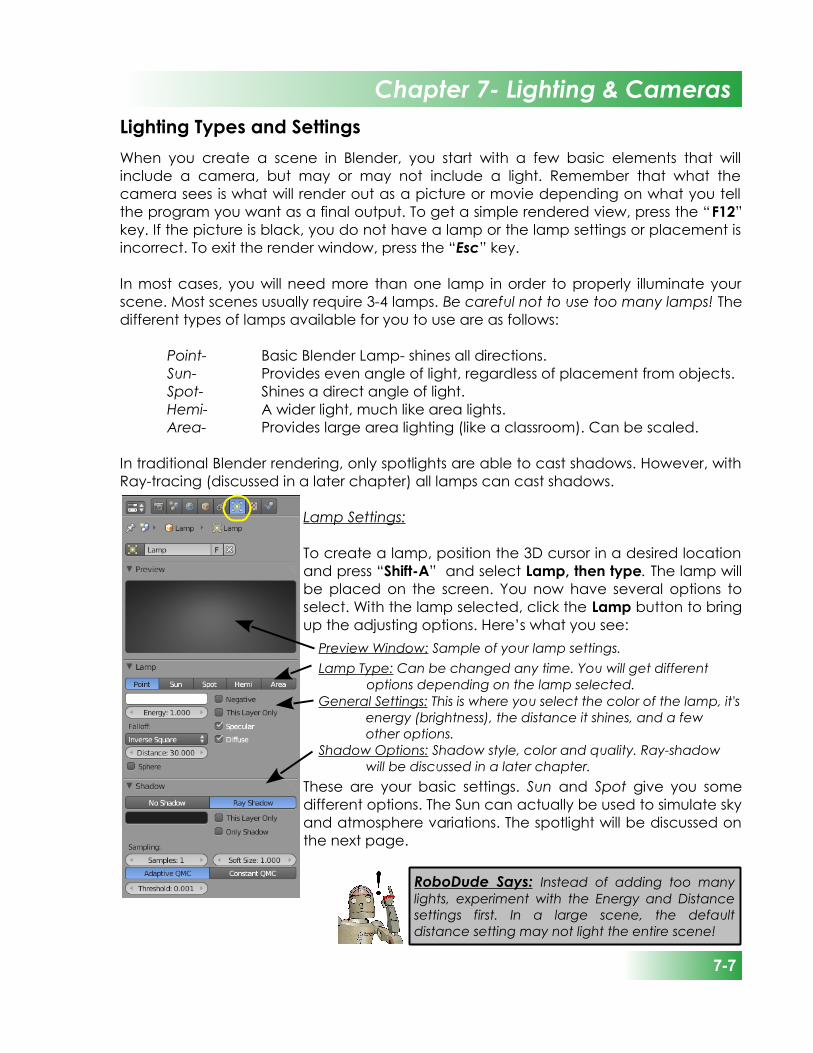
Lamp Settings:
To create a lamp, position the 3D cursor in a desired locationand press “Shift-A” and select Lamp, then type. The lamp willbe placed on the screen. You now have several options toselect. With the lamp selected, click the Lamp button to bringup the adjusting options. Here’s what you see:
These are your basic settings. Sun and Spot give you somedifferent options. The Sun can actually be used to simulate skyand atmosphere variations. The spotlight will be discussed onthe next page.
Chapter 7- Lighting & Cameras
7-7
Preview Window: Sample of your lamp settings.
Lamp Type: Can be changed any time. You will get different options depending on the lamp selected.
General Settings: This is where you select the color of the lamp, it's energy (brightness), the distance it shines, and a few other options.
Shadow Options: Shadow style, color and quality. Ray-shadow will be discussed in a later chapter.
RoboDude Says: Instead of adding too many lights, experiment with the Energy and Distance settings first. In a large scene, the default distance setting may not light the entire scene!

Chapter 1- The Blender InterfaceSpotlight Settings:
Spotlights are unique in that you can simulate afoggy scene with them and cast shadows in thetraditional Blender program. Ray-tracing(discussed in a later chapter) can cast shadowsfor all lamp types, but because of the morecomplex rendering calculations that need to beperformed, renders much slower. If you watchprofessionally made animations on T.V., you willsee that ray-tracing with reflections is not alwaysused because of the rendering time. It is onlyused when needed. You can do the same thing.Again, we will focus on using the Buffer Shadowsettings. Ray-trace shadows will be discussedlater. Here are your spotlight settings:
Different lights can be used to get different effects. Asmentioned before, try not to add too many lights to your scene.It is better to keep it down to 3-4 and play with their locationsand setting, rather than flood the scene in light. Think of it interms of real lighting situations.
Chapter 7- Lighting & Cameras
7-8
Shadow Type: Buffer is the old style and fastest.
Shadow Color: Adjusts the color of the shadow.
Buffer Type: By holding your mouse over these buttons, it will tell you the benefit of each style (i.e. Deep supports transparency and better filtering, but slower).
Filter and Sample: These settings can be used to refine your results, but could add to your render times.
Clip Start and End: Gives a range for calculating shadows. Represented by a line down through lamp. Keep this line as short as possible to give the best shadowing. New to this release is the Autoclip options to set these for you.
Spot Shape: Set the Angle Size, Blend (edge softness), and Shape (round or square). You can also give it a haze with the Halo settings and intensity.
RoboDude Asks: Why can't I see my shadows or why do they look bad? If you have shadows, but look bad, try a larger Clip Start number to shorten up the area of calculation or adjust the Sample Buffers Size and Samples. If you don't see any shadows at all, you might need to go to the Render buttons and turn on Shadows under Shading.
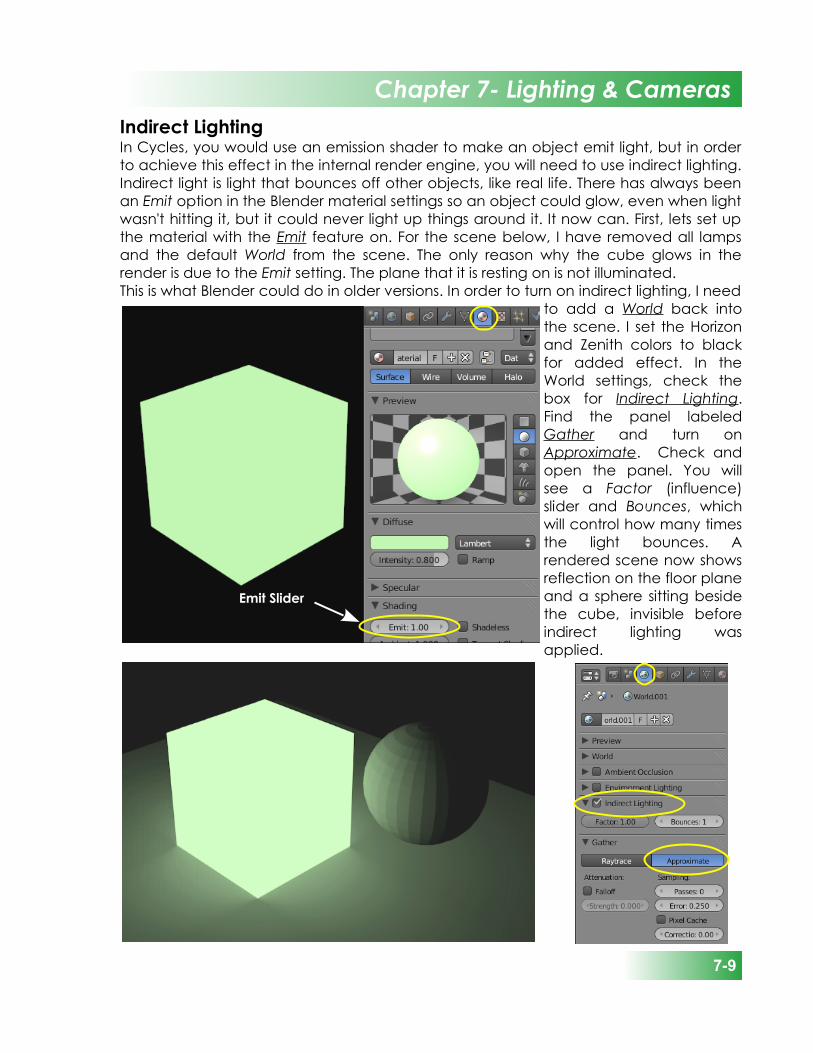
Indirect LightingIn Cycles, you would use an emission shader to make an object emit light, but in orderto achieve this effect in the internal render engine, you will need to use indirect lighting.Indirect light is light that bounces off other objects, like real life. There has always beenan Emit option in the Blender material settings so an object could glow, even when lightwasn't hitting it, but it could never light up things around it. It now can. First, lets set upthe material with the Emit feature on. For the scene below, I have removed all lampsand the default World from the scene. The only reason why the cube glows in therender is due to the Emit setting. The plane that it is resting on is not illuminated. This is what Blender could do in older versions. In order to turn on indirect lighting, I need
to add a World back intothe scene. I set the Horizonand Zenith colors to blackfor added effect. In theWorld settings, check thebox for Indirect Lighting.Find the panel labeledGather and turn onApproximate. Check andopen the panel. You willsee a Factor (influence)slider and Bounces, whichwill control how many timesthe light bounces. Arendered scene now showsreflection on the floor planeand a sphere sitting besidethe cube, invisible beforeindirect lighting wasapplied.
Emit Slider
Chapter 7- Lighting & Cameras
7-9